> ## Documentation Index
> Fetch the complete documentation index at: https://documentation.onesignal.com/llms.txt
> Use this file to discover all available pages before exploring further.
# 使用 Custom Events 进行个性化
> 使用 Custom Event 属性通过 Liquid 语法个性化 Journey 消息。了解事件如何存储、访问以及在推送、邮件和短信模板中渲染。
[Custom Events](./custom-events) 允许你使用事件属性(产品名称、价格、URL、数组等)来个性化 Journey 消息。
事件属性仅在以下情况下才可在模板中使用:
* 触发 Journey 入口,或
* 匹配 Journey 内的 **Wait Until** 条件
可以使用 [Liquid 语法](./using-liquid-syntax)访问已存储的事件属性。
***
## Custom Event 个性化的工作原理
按照以下步骤将事件属性添加到你的 Journey 消息中:
示例 [Custom Events](./custom-events) 负载:
```json JSON theme={null}
{
"name": "purchase",
"properties": {
"item": "Blue Sweater",
"price": "29.99",
"order status": "pending",
"details": [
{
"manufacturer": "Company A",
"model": "1234567890"
},
{
"manufacturer": "Company B",
"model": "9876543210"
}
]
},
"external_id": "user_12345",
"timestamp": "2025-10-21T19:09:32.263Z",
}
```
使用 [Liquid 语法](./using-liquid-syntax)访问事件属性。
### 常用 Liquid 访问模式
| 你想获取的内容 | Liquid | 输出 |
| --------- | --------------------------------------------------------------------- | ------------------------------ |
| 事件名称 | `{{ journey.first_event.name }}` | `purchase` |
| 属性 | `{{ journey.first_event.properties.item }}` | `Blue Sweater` |
| 嵌套属性 | `{{ journey.first_event.properties.details.first.manufacturer }}` | `Company A` |
| 包含特殊字符的属性 | `{{ journey.last_event.properties["order status"] }}` | `pending` |
| 时间戳 | `{{ journey.last_event.timestamp \| date: "%B %d, %Y at %I:%M %p" }}` | `October 21, 2025 at 07:09 PM` |
#### 嵌套 Liquid 访问模式
你还可以使用点表示法和括号表示法访问嵌套属性:
```liquid Liquid theme={null}
{{ journey.first_event.properties.details.first.manufacturer }} = Company A
{{ journey.first_event.properties.details.last.manufacturer }} = Company B
{{ journey.first_event.properties.details[0].manufacturer }} = Company A
{{ journey.first_event.properties.details[1].manufacturer }} = Company B
```
无效的 Liquid 或缺失的属性会渲染为空字符串。消息仍会发送。使用 [default 过滤器](./using-liquid-syntax#default)设置备用值。
设置 Journey,将 Custom Event 用作入口规则和/或 Wait Until 条件。
* 请参阅 [Journeys 设置](./journeys-settings)了解入口规则。
* 请参阅 [Journeys 操作](./journeys-actions)了解 Wait Until 条件。
添加包含模板的消息节点。
### 事件属性存储规则
* 你可以通过组合入口规则和 Wait Until 步骤在 Journey 中使用多个事件。
* 最大值:**每个用户每个 Journey 实例最多存储 100 个事件属性**(最旧的会被丢弃)。
* 事件属性按**每个用户、每个 Journey 实例**存储。
* 入口之前发送的事件不可访问。
* 当用户退出 Journey 时,事件属性会被清除。
存储在一个 Journey 中的事件无法在另一个 Journey 中访问。
***
## Custom Event Liquid 参考
使用这些对象访问 Journey 中存储的事件。
此 Journey 实例中存储的第一个事件。
* 如果使用 **Custom Event 入口规则**,则这是触发 Journey 入口的事件。
* 如果未使用 Custom Event 入口规则,则这是通过匹配 Wait Until 条件存储的第一个事件。
```liquid Liquid theme={null}
Thanks for purchasing {{ journey.first_event.properties.item | default: "your item" }}!
```
此 Journey 实例中最近存储的事件。
* 如果只存储了一个事件,`first_event` 和 `last_event` 返回相同的内容。
```liquid Liquid theme={null}
Your most recent purchase was {{ journey.last_event.properties.item | default: "made" }}!
```
具有特定名称的最近存储的事件。
* 将 `EVENT_NAME` 替换为你的事件名称(例如 `purchase`)。
* 如果同一事件名称被多次使用,则返回最近的实例。
```liquid Liquid theme={null}
{% assign event = journey.event.purchase %}
```
如果你的事件名称包含空格或特殊字符,请使用[括号表示法](https://shopify.dev/docs/api/liquid/basics#referencing-handles)。
**示例事件:** `"name": "order status"`
```liquid Liquid theme={null}
{% assign event = journey.event["order status"] %}
```
此 Journey 实例中所有存储的事件,按存储顺序排列。
* 使用 [for 循环](./using-liquid-syntax#for-loops)遍历它们。
```liquid Liquid theme={null}
{% for event in journey.all_events %}
• {{ event.properties.item | default: "Item" }} — ${{ event.properties.price | default: "0.00" }}
{% endfor %}
```
* `journey.first_event` 是 `journey.all_events[0]` 的简写。
* `journey.last_event` 是数组中最近事件的简写。
***
## 示例:使用 Custom Events 的弃购车模板
此示例展示如何使用 Custom Events 个性化弃购车消息。它基于[弃购车教程](./abandoned-cart)构建。
**示例 Custom Event 集:**
```json JSON theme={null}
{
"events": [
{
"name": "cart_abandoned",
"properties": {
"cart_url": "https://yourdomain.com/username/cart",
"cart": [
{
"product_name": "24 Pack of Acorns",
"product_image": "https://i.imgur.com/ssPCfbC.png",
"product_price": "$12.99",
"product_quantity": "1"
},
{
"product_name": "Fancy Sweater",
"product_image": "https://i.imgur.com/8QWTfV4.png",
"product_price": "$9.99",
"product_quantity": "1"
}
]
},
"external_id": "ID_OF_THE_USER"
}
]
}
```
### 邮件模板
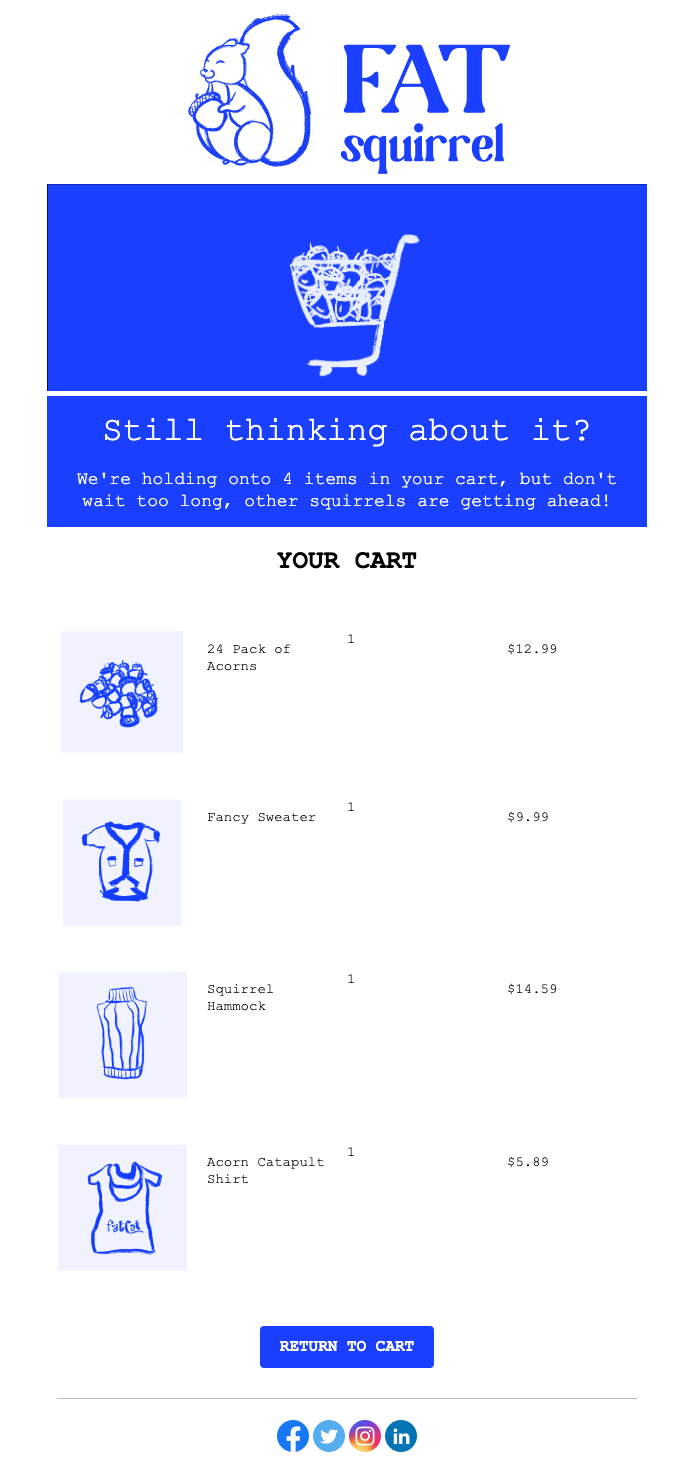
此示例展示如何构建一个邮件模板,显示:
* 购物车商品数量
* 使用 for 循环显示每个产品的图片、名称、数量和价格
* 一个链接到客户唯一购物车 URL 的按钮
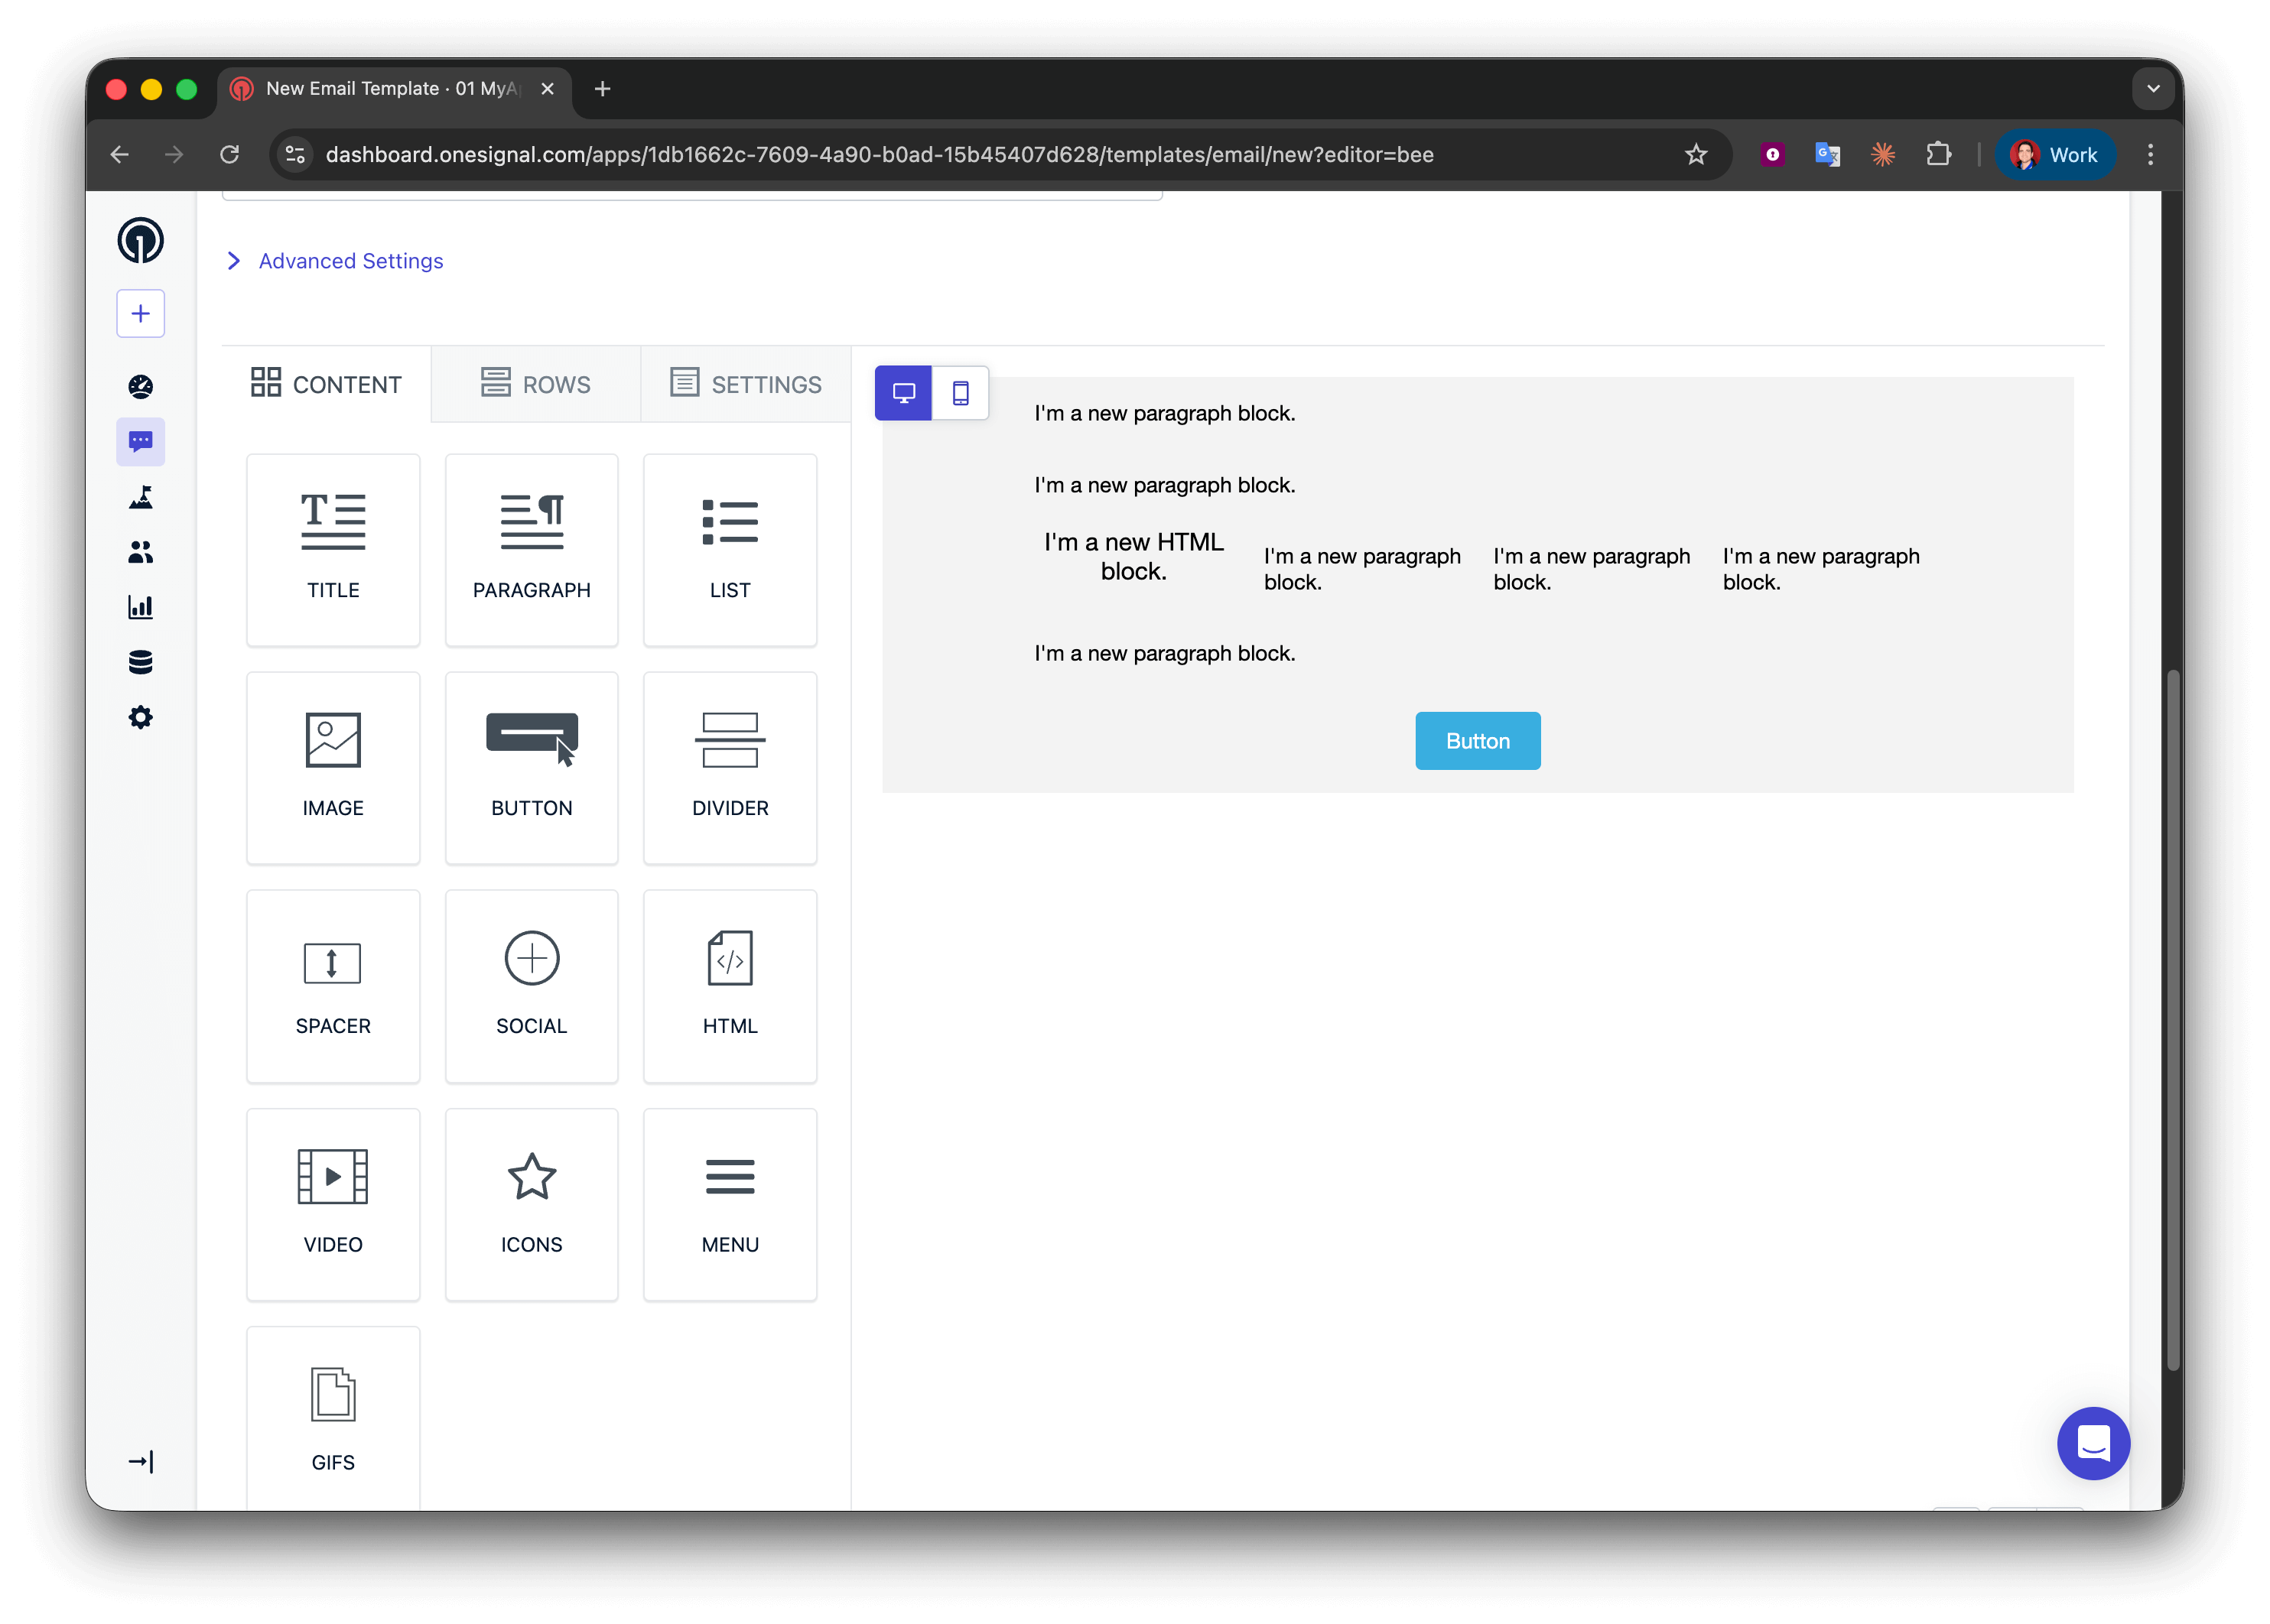
 导航到 **Messages > Templates > New Email Template** 并打开拖放编辑器。
创建五行:
* 第 1、2 和 4 行:一列,包含一个**段落**块
* 第 3 行:四列,包含 **HTML | 段落 | 段落 | 段落**
* 第 5 行:一列,包含一个**按钮**块
导航到 **Messages > Templates > New Email Template** 并打开拖放编辑器。
创建五行:
* 第 1、2 和 4 行:一列,包含一个**段落**块
* 第 3 行:四列,包含 **HTML | 段落 | 段落 | 段落**
* 第 5 行:一列,包含一个**按钮**块
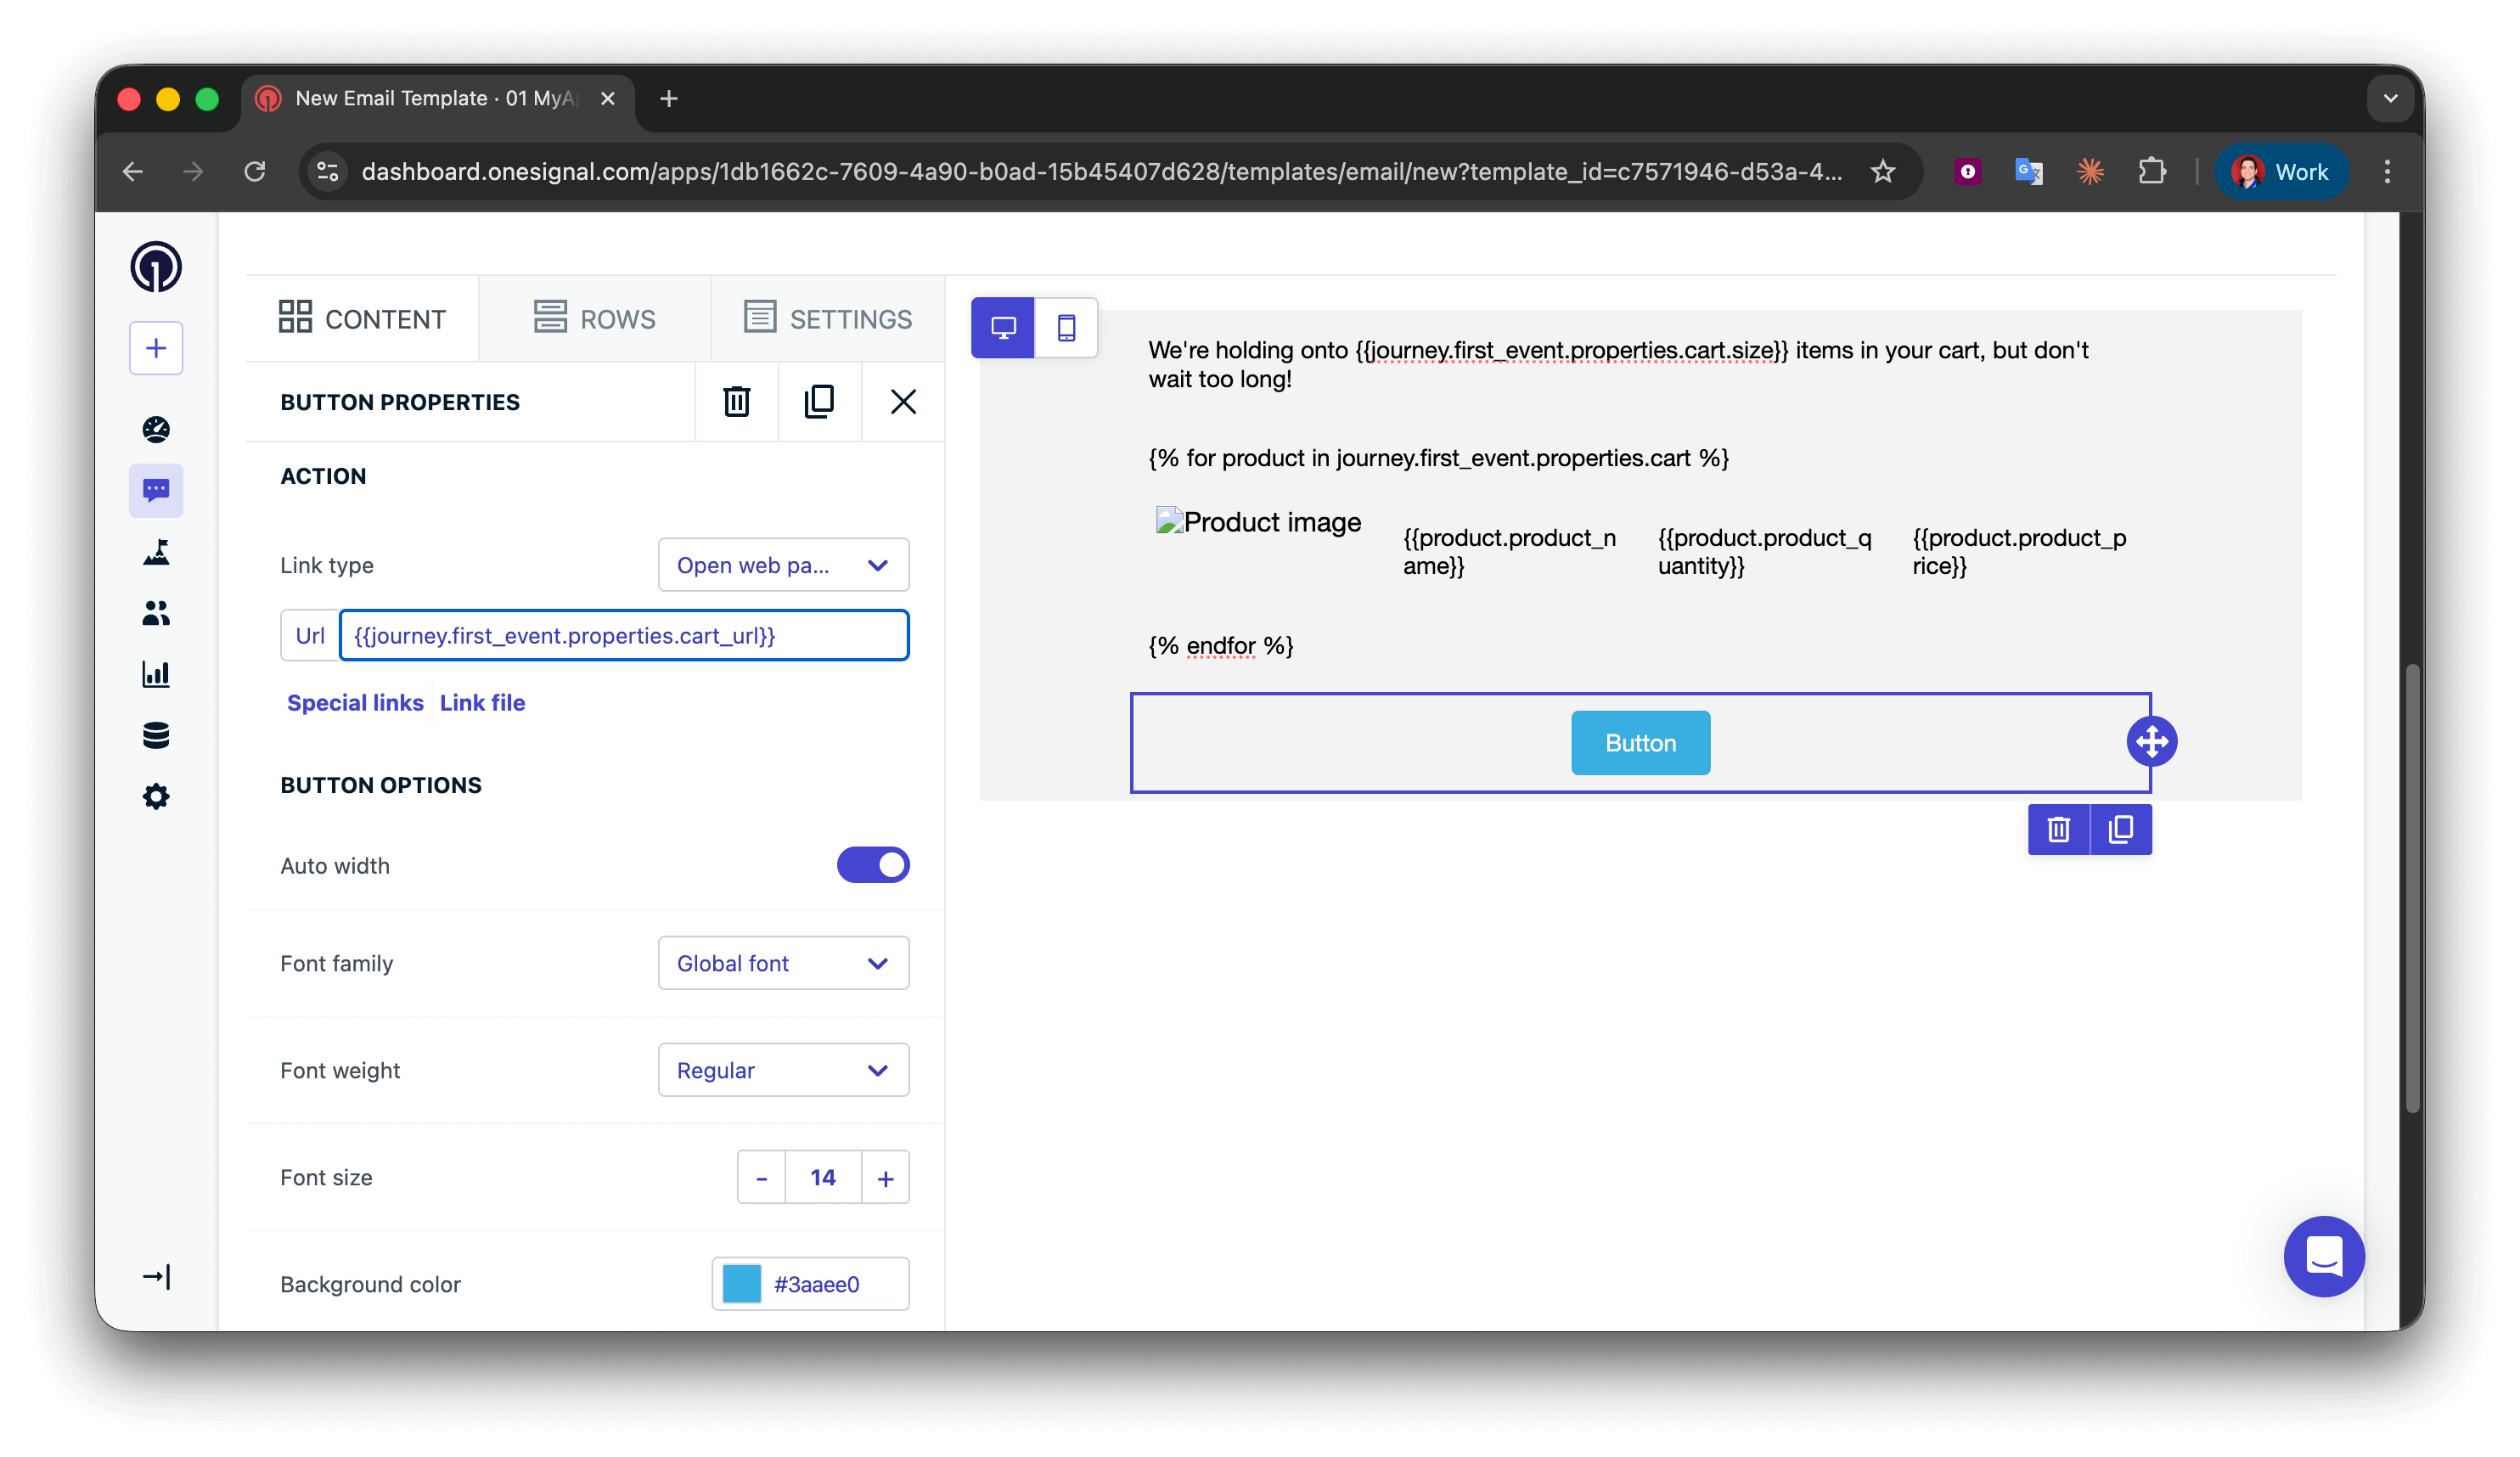
 在第 1 行中添加:
```liquid Liquid theme={null}
We're holding onto {{journey.first_event.properties.cart.size}} items in your cart, but don't wait too long!
```
为了更好的语法,你可以使用条件语句来区分"1 item"和"2 items",但对于弃购车邮件,使用复数形式通常是可以接受的。
```liquid Liquid theme={null}
{% assign cart = message.custom_data.cart %}
{% assign item_count = cart.size | plus: 0 %}
{% if item_count == 1 %}
We're holding onto {{item_count}} item in your cart, but don't wait too long, other squirrels are getting ahead!
{% endif %}
{% if item_count > 1 %}
We're holding onto {{item_count}} items in your cart, but don't wait too long, other squirrels are getting ahead!
{% endif %}
```
使用 [for 循环](./using-liquid-syntax#for-loops)为每个购物车商品重复产品显示行。
在第 2 行(循环开始)中添加:
```liquid Liquid theme={null}
{% for product in journey.first_event.properties.cart %}
```
**作用说明:**
* 开始一个遍历 `cart` 数组中每个对象的循环
* 创建一个临时变量 `product` 表示当前商品
* `{% for %}` 和 `{% endfor %}` 之间的所有内容会为每个购物车商品重复一次
* 你可以将 `product` 命名为任何名称(例如 `item`、`cartItem`)——只需保持一致即可
For 循环放置位置:确保 `{% for %}` 语法位于其独立的文本块行中。不要将其放在包含其他内容的多列行中,因为这可能会在某些邮件客户端中导致渲染问题。
这个 4 列行显示图片、名称、数量和价格。因为它在循环内部,所以会为每个购物车商品重复。
在第 3 行(产品详情)中配置:
**第 1 列 - HTML 块**(产品图片):
```html theme={null}
在第 1 行中添加:
```liquid Liquid theme={null}
We're holding onto {{journey.first_event.properties.cart.size}} items in your cart, but don't wait too long!
```
为了更好的语法,你可以使用条件语句来区分"1 item"和"2 items",但对于弃购车邮件,使用复数形式通常是可以接受的。
```liquid Liquid theme={null}
{% assign cart = message.custom_data.cart %}
{% assign item_count = cart.size | plus: 0 %}
{% if item_count == 1 %}
We're holding onto {{item_count}} item in your cart, but don't wait too long, other squirrels are getting ahead!
{% endif %}
{% if item_count > 1 %}
We're holding onto {{item_count}} items in your cart, but don't wait too long, other squirrels are getting ahead!
{% endif %}
```
使用 [for 循环](./using-liquid-syntax#for-loops)为每个购物车商品重复产品显示行。
在第 2 行(循环开始)中添加:
```liquid Liquid theme={null}
{% for product in journey.first_event.properties.cart %}
```
**作用说明:**
* 开始一个遍历 `cart` 数组中每个对象的循环
* 创建一个临时变量 `product` 表示当前商品
* `{% for %}` 和 `{% endfor %}` 之间的所有内容会为每个购物车商品重复一次
* 你可以将 `product` 命名为任何名称(例如 `item`、`cartItem`)——只需保持一致即可
For 循环放置位置:确保 `{% for %}` 语法位于其独立的文本块行中。不要将其放在包含其他内容的多列行中,因为这可能会在某些邮件客户端中导致渲染问题。
这个 4 列行显示图片、名称、数量和价格。因为它在循环内部,所以会为每个购物车商品重复。
在第 3 行(产品详情)中配置:
**第 1 列 - HTML 块**(产品图片):
```html theme={null}
 ```
**第 2-4 列 - 文本块**(产品名称、数量、价格):
* 第 2 列:`{{product.product_name}}`
* 第 3 列:`{{product.product_quantity}}`
* 第 4 列:`{{product.product_price}}`
**循环工作原理:**
* 第一次迭代时,`product` = 购物车数组中的第一个对象
* `{{product.product_image}}` 获取第一个商品的图片
* 第二次迭代时,`product` = 第二个对象
* 行会自动为所有购物车商品重复
\*\*字段名称匹配:\*\*像 `product_image` 这样的键必须与你的事件负载完全匹配(区分大小写)。不匹配会渲染为空字符串。
关闭循环以标记重复结束的位置。
在第 4 行(循环结束)中添加:
```liquid Liquid theme={null}
{% endfor %}
```
每个 `{% for %}` 必须有匹配的 `{% endfor %}`。缺少它会导致邮件渲染出错。
在第 5 行的**按钮**块中,将操作 URL 设置为:
```liquid Liquid theme={null}
{{journey.first_event.properties.cart_url}}
```
```
**第 2-4 列 - 文本块**(产品名称、数量、价格):
* 第 2 列:`{{product.product_name}}`
* 第 3 列:`{{product.product_quantity}}`
* 第 4 列:`{{product.product_price}}`
**循环工作原理:**
* 第一次迭代时,`product` = 购物车数组中的第一个对象
* `{{product.product_image}}` 获取第一个商品的图片
* 第二次迭代时,`product` = 第二个对象
* 行会自动为所有购物车商品重复
\*\*字段名称匹配:\*\*像 `product_image` 这样的键必须与你的事件负载完全匹配(区分大小写)。不匹配会渲染为空字符串。
关闭循环以标记重复结束的位置。
在第 4 行(循环结束)中添加:
```liquid Liquid theme={null}
{% endfor %}
```
每个 `{% for %}` 必须有匹配的 `{% endfor %}`。缺少它会导致邮件渲染出错。
在第 5 行的**按钮**块中,将操作 URL 设置为:
```liquid Liquid theme={null}
{{journey.first_event.properties.cart_url}}
```
 * 将模板添加到空白 Journey,并将入口规则设置为 Custom Event。
* 启用 Journey 并通过 Custom Event API 将自己加入其中。
* 验证数据是否正确显示。
成功!现在你可以为模板应用自己的样式。请参阅[使用拖放设计邮件](./design-emails-with-drag-and-drop)。
### 推送模板
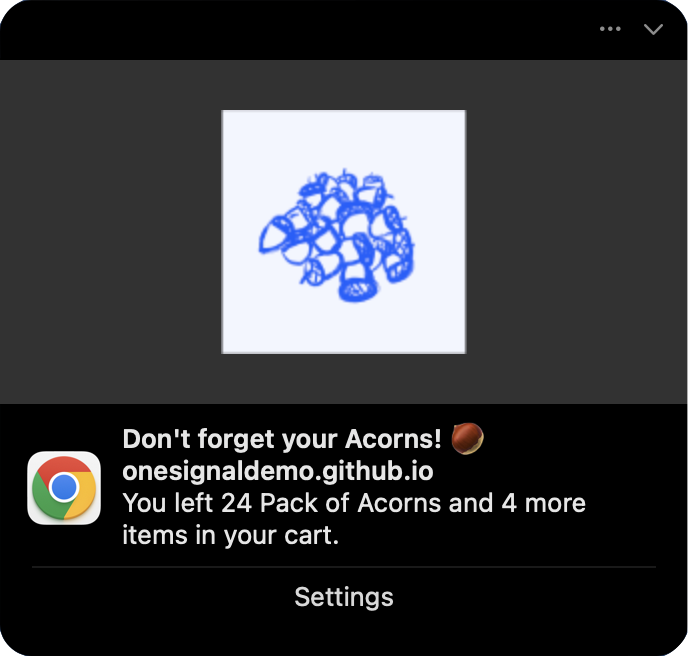
推送通知空间有限,因此只显示一个商品并提及总数量。
**消息字段:**
使用[条件语句](./using-liquid-syntax#if-elsif-else)显示商品和数量,并确保语法正确。
```liquid Liquid theme={null}
{% assign cart = journey.first_event.properties.cart %}
{% assign item_count = cart.size | plus: 0 %}
{% if item_count == 1 %}
You left {{cart.first.product_name}} in your cart.
{% endif %}
{% if item_count == 2 %}
You left {{cart.first.product_name}} and {{item_count | minus: 1}} more item in your cart.
{% endif %}
{% if item_count > 2 %}
You left {{cart.first.product_name}} and {{item_count | minus: 1}} more items in your cart.
{% endif %}
```
**图片字段:**
```liquid Liquid theme={null}
{{journey.first_event.properties.cart.first.product_image | default: "https://i.imgur.com/ssPCfbC.png"}}
```
**启动 URL 字段:**
```liquid Liquid theme={null}
{{journey.first_event.properties.cart_url | default: "https://yourdomain.com/cart"}}
```
将推送通知添加到测试 Journey 并通过另一个 Custom Event API 调用将自己加入其中,向自己发送测试推送通知。你应该会看到类似以下内容的通知:
* 将模板添加到空白 Journey,并将入口规则设置为 Custom Event。
* 启用 Journey 并通过 Custom Event API 将自己加入其中。
* 验证数据是否正确显示。
成功!现在你可以为模板应用自己的样式。请参阅[使用拖放设计邮件](./design-emails-with-drag-and-drop)。
### 推送模板
推送通知空间有限,因此只显示一个商品并提及总数量。
**消息字段:**
使用[条件语句](./using-liquid-syntax#if-elsif-else)显示商品和数量,并确保语法正确。
```liquid Liquid theme={null}
{% assign cart = journey.first_event.properties.cart %}
{% assign item_count = cart.size | plus: 0 %}
{% if item_count == 1 %}
You left {{cart.first.product_name}} in your cart.
{% endif %}
{% if item_count == 2 %}
You left {{cart.first.product_name}} and {{item_count | minus: 1}} more item in your cart.
{% endif %}
{% if item_count > 2 %}
You left {{cart.first.product_name}} and {{item_count | minus: 1}} more items in your cart.
{% endif %}
```
**图片字段:**
```liquid Liquid theme={null}
{{journey.first_event.properties.cart.first.product_image | default: "https://i.imgur.com/ssPCfbC.png"}}
```
**启动 URL 字段:**
```liquid Liquid theme={null}
{{journey.first_event.properties.cart_url | default: "https://yourdomain.com/cart"}}
```
将推送通知添加到测试 Journey 并通过另一个 Custom Event API 调用将自己加入其中,向自己发送测试推送通知。你应该会看到类似以下内容的通知:
 成功!你现在可以创建更多模板并在[弃购车 Journey](./abandoned-cart) 中使用它们。
***
## 故障排除和最佳实践
**常见错误:**
| 错误 | 失败原因 | 正确语法 |
| ------------------------------------------- | ---------------- | ---------------------------------------------- |
| `{{ journey.first_event.item }}` | 缺少 `.properties` | `{{ journey.first_event.properties.item }}` |
| `{{ journey.event.purchase.item }}` | 缺少 `.properties` | `{{ journey.event.purchase.properties.item }}` |
| `{{ journey.first_event.properties.Item }}` | 大小写错误(应为 `item`) | `{{ journey.first_event.properties.item }}` |
| `{{ event.properties.item }}` | 缺少 `journey.` 前缀 | `{{ journey.first_event.properties.item }}` |
**最佳实践:**
* 在上线之前始终测试模板
* 对可选属性使用 [default 过滤器](./using-liquid-syntax#default)
* 验证事件结构与模板预期匹配
***
## 相关页面
OneSignal 中所有个性化选项的概览,包括何时使用 Custom Events 与其他方法。
通过 SDK 或 API 实现和发送 Custom Events 的完整指南。
了解如何使用触发器、条件和操作构建自动化消息工作流。
配置事件触发的入口规则和 Journey 行为。
使用 Wait Until 节点在 Journey 推进过程中存储额外事件。
完整的 Liquid 参考,包括过滤器、条件语句、循环和字符串操作。
创建和管理可在 Journeys 中使用的可复用消息模板。
需要帮助?
与我们的支持团队聊天或发送邮件至 `support@onesignal.com`
请包含以下信息:
* 您遇到的问题详情以及复现步骤(如有)
* 您的 OneSignal 应用 ID
* 外部 ID 或订阅 ID(如适用)
* 您在 OneSignal 控制台中测试的消息 URL(如适用)
* 任何相关的[日志或错误信息](/docs/cn/capturing-a-debug-log)
我们很乐意为您提供帮助!
***
成功!你现在可以创建更多模板并在[弃购车 Journey](./abandoned-cart) 中使用它们。
***
## 故障排除和最佳实践
**常见错误:**
| 错误 | 失败原因 | 正确语法 |
| ------------------------------------------- | ---------------- | ---------------------------------------------- |
| `{{ journey.first_event.item }}` | 缺少 `.properties` | `{{ journey.first_event.properties.item }}` |
| `{{ journey.event.purchase.item }}` | 缺少 `.properties` | `{{ journey.event.purchase.properties.item }}` |
| `{{ journey.first_event.properties.Item }}` | 大小写错误(应为 `item`) | `{{ journey.first_event.properties.item }}` |
| `{{ event.properties.item }}` | 缺少 `journey.` 前缀 | `{{ journey.first_event.properties.item }}` |
**最佳实践:**
* 在上线之前始终测试模板
* 对可选属性使用 [default 过滤器](./using-liquid-syntax#default)
* 验证事件结构与模板预期匹配
***
## 相关页面
OneSignal 中所有个性化选项的概览,包括何时使用 Custom Events 与其他方法。
通过 SDK 或 API 实现和发送 Custom Events 的完整指南。
了解如何使用触发器、条件和操作构建自动化消息工作流。
配置事件触发的入口规则和 Journey 行为。
使用 Wait Until 节点在 Journey 推进过程中存储额外事件。
完整的 Liquid 参考,包括过滤器、条件语句、循环和字符串操作。
创建和管理可在 Journeys 中使用的可复用消息模板。
需要帮助?
与我们的支持团队聊天或发送邮件至 `support@onesignal.com`
请包含以下信息:
* 您遇到的问题详情以及复现步骤(如有)
* 您的 OneSignal 应用 ID
* 外部 ID 或订阅 ID(如适用)
* 您在 OneSignal 控制台中测试的消息 URL(如适用)
* 任何相关的[日志或错误信息](/docs/cn/capturing-a-debug-log)
我们很乐意为您提供帮助!
***