> ## Documentation Index
> Fetch the complete documentation index at: https://documentation.onesignal.com/llms.txt
> Use this file to discover all available pages before exploring further.
# Android Firebase credentials
> Configure Firebase Cloud Messaging (FCM) Service Account credentials in OneSignal to enable Android push notifications for apps on the Google Play Store.
To send push notifications to users who download your Android app from the Google Play Store, you must create and upload a Firebase Cloud Messaging (FCM) Service Account private key to OneSignal.
These instructions do not apply to:
* **Web Push.** Android devices can subscribe to your website or PWA without an FCM Service Account. See [Web push setup](./web-push-setup).
* **Huawei apps** distributed via the Huawei App Gallery. See [Huawei Authorization](./authorize-onesignal-to-send-huawei-push).
***
## Requirements
* An Android app distributed via the Google Play Store
* A [OneSignal account](https://onesignal.com)
* A [Firebase account (free)](https://firebase.google.com)
* A Firebase Service Account private key with the `cloudmessaging.messages.create` and `firebase.projects.get` permissions
* If you do not have one, follow the steps below to [create a Firebase Service Account private key](#create-a-firebase-service-account-private-key)
* If you already have a private key, [check existing permissions](#how-do-i-check-my-service-account-permissions)
***
## Create a Firebase Service Account private key
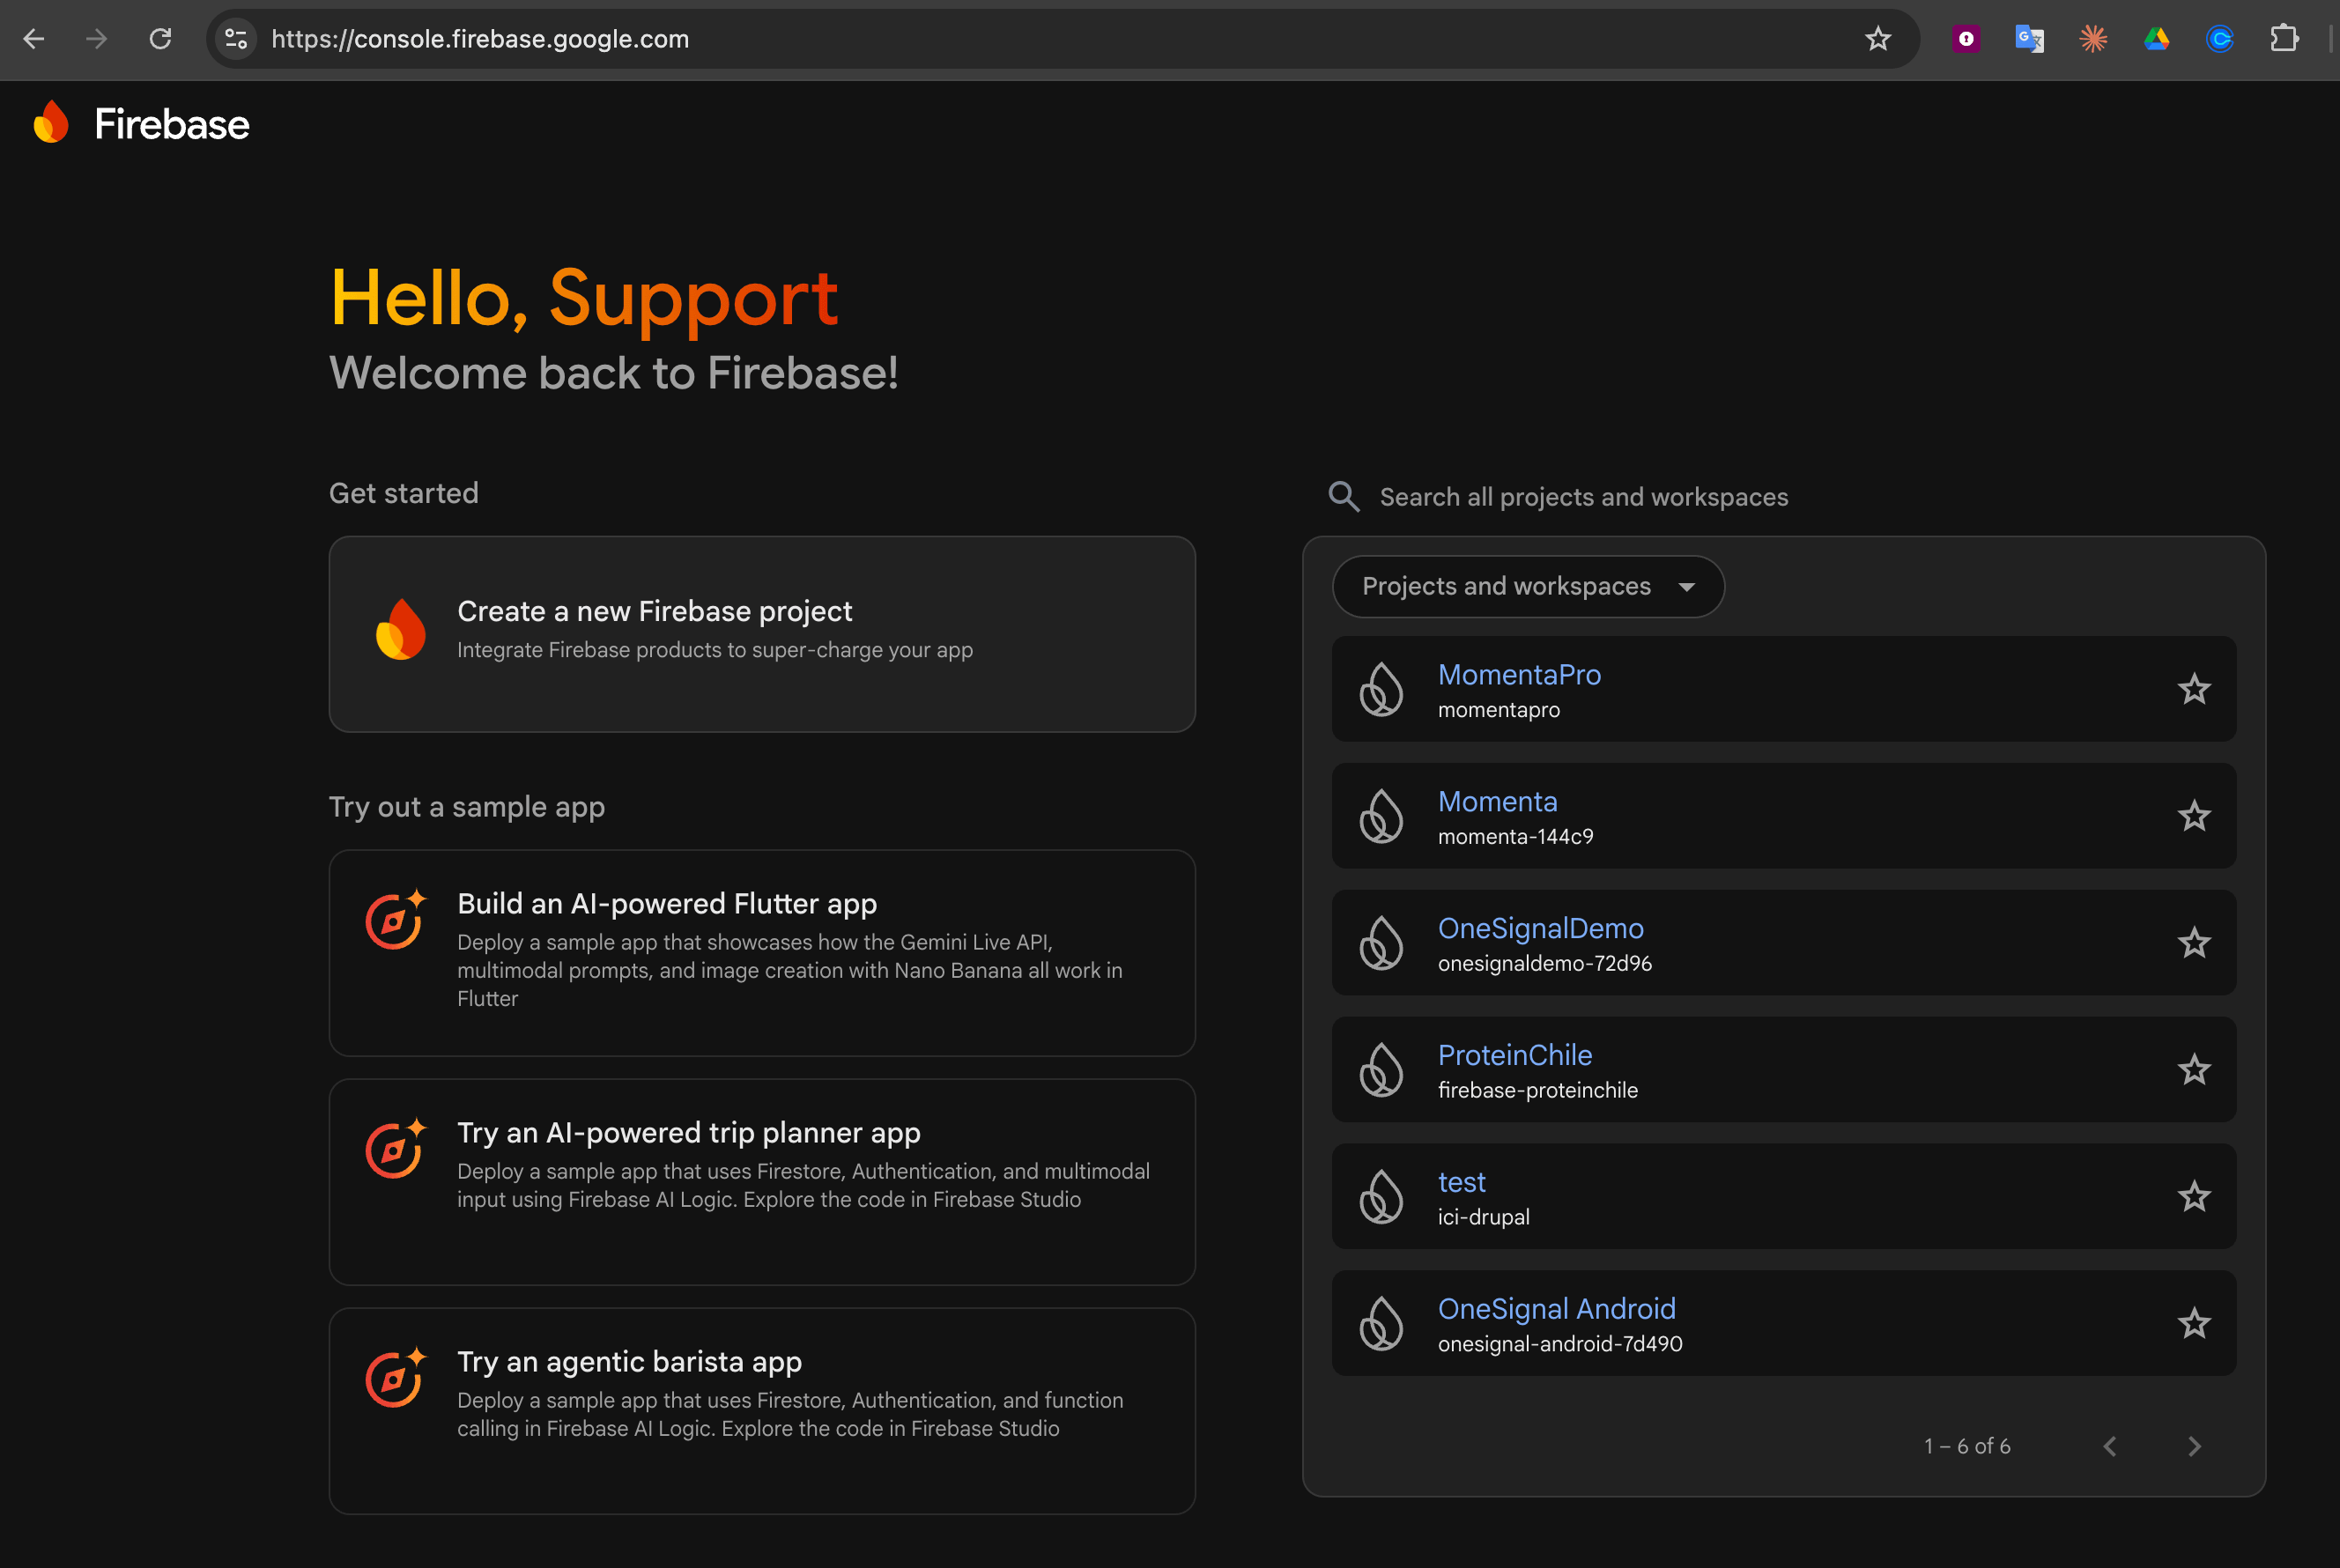
Go to your [Firebase console](https://console.firebase.google.com/) and either create or select a project.
 In **Project settings**, select the **Cloud Messaging** tab.
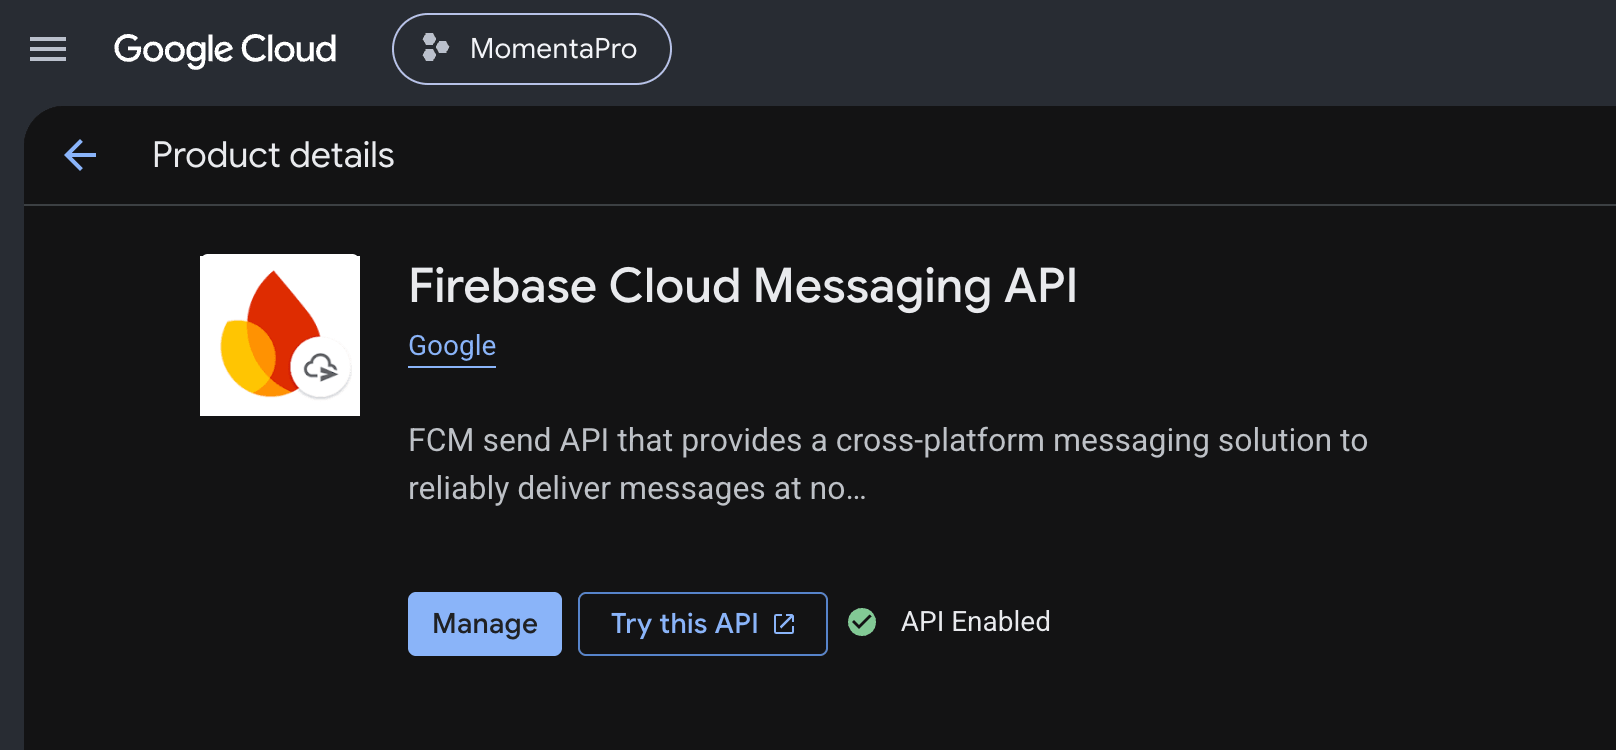
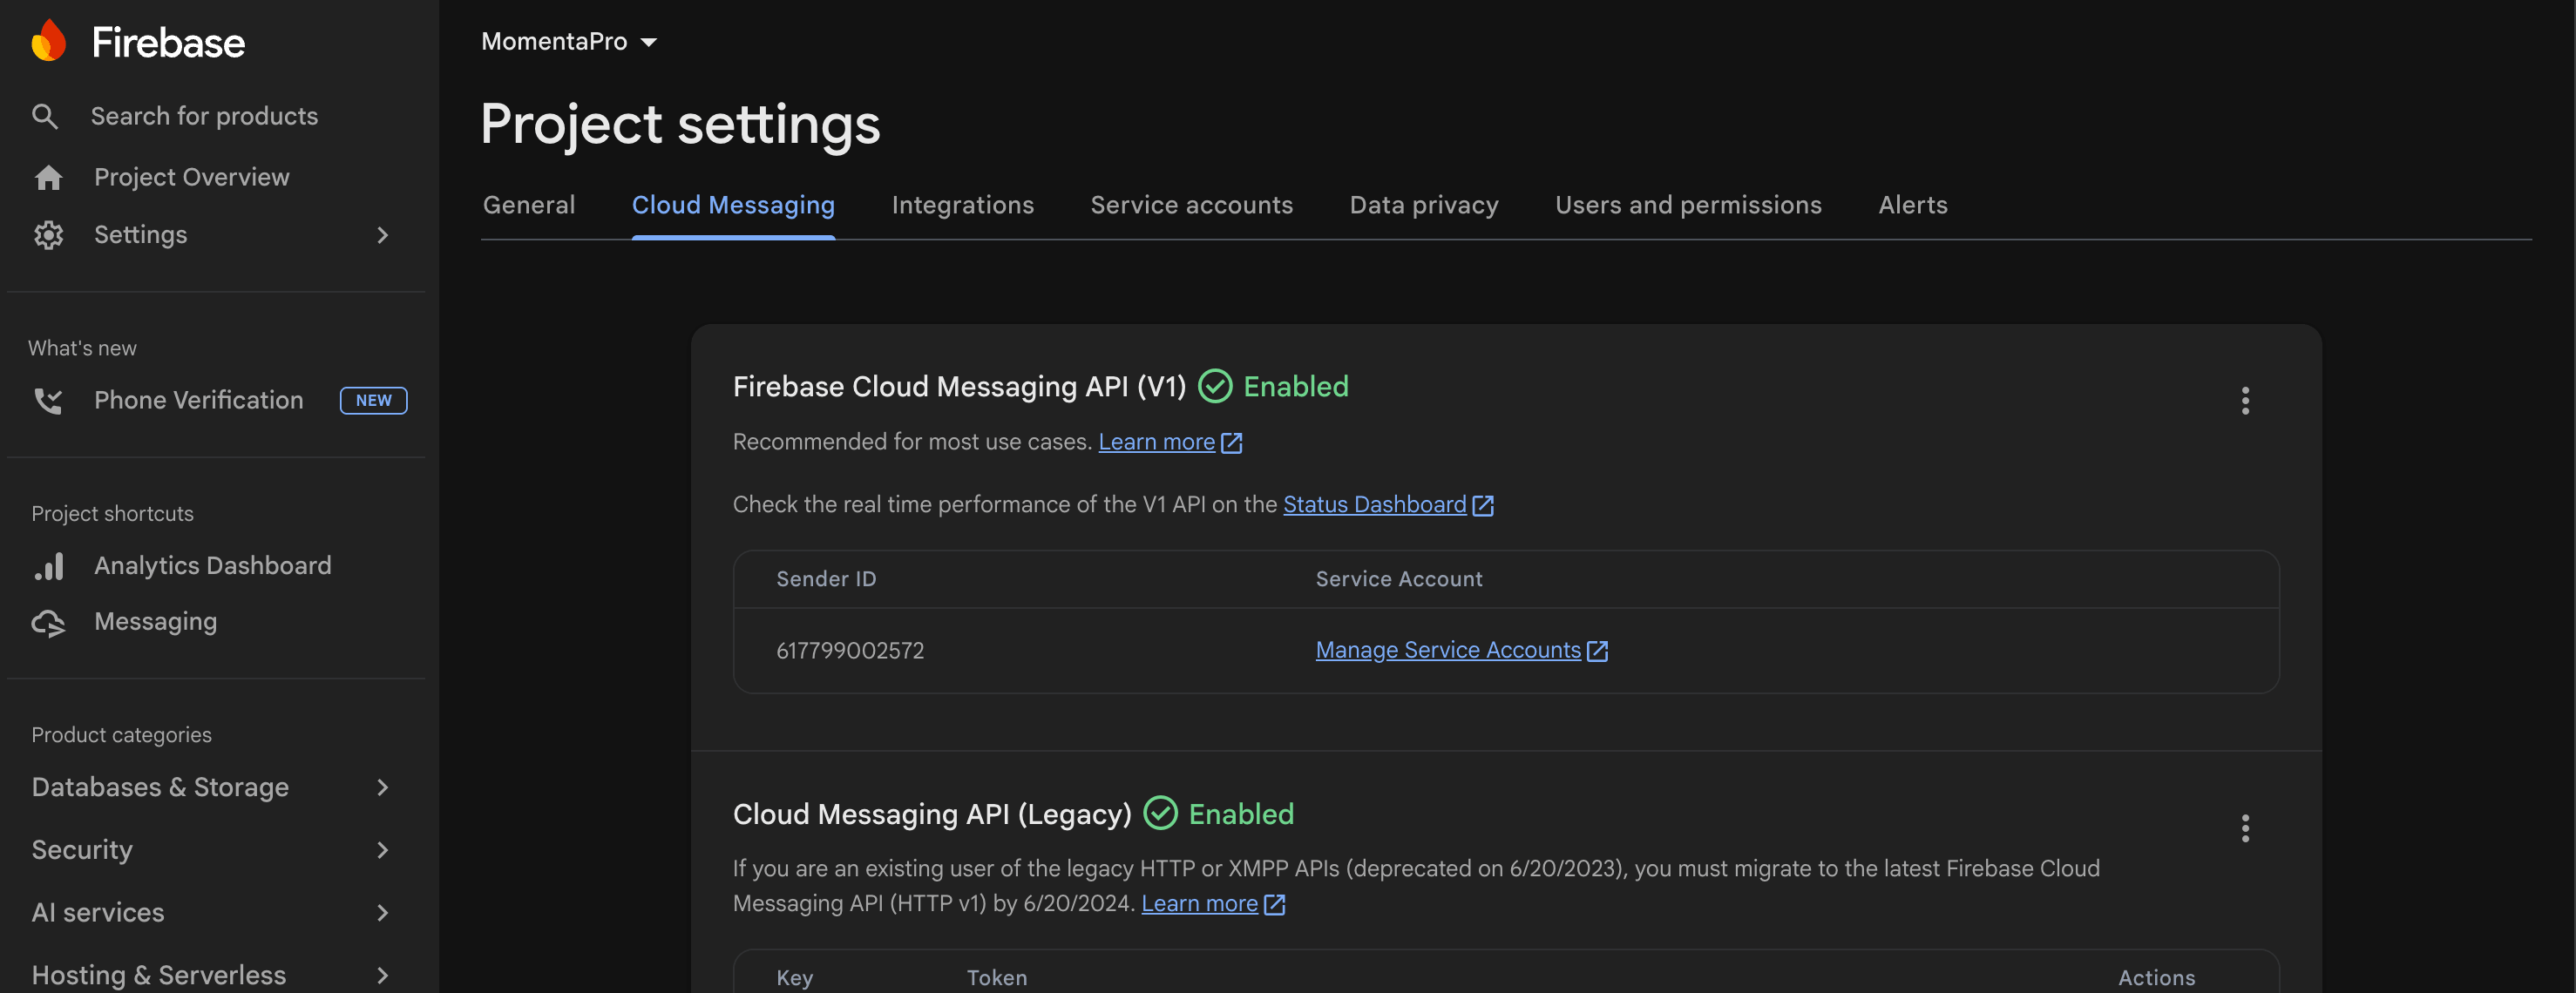 Check the **Firebase Cloud Messaging API (V1)** status:
* If it shows **Enabled** (green checkmark), continue to the next step.
* If it shows **Disabled**, click the **3-dot menu > Manage API in Google Cloud Console**. In the Google Cloud Console, click **Enable** and wait for the green checkmark to appear with "API Enabled".
Check the **Firebase Cloud Messaging API (V1)** status:
* If it shows **Enabled** (green checkmark), continue to the next step.
* If it shows **Disabled**, click the **3-dot menu > Manage API in Google Cloud Console**. In the Google Cloud Console, click **Enable** and wait for the green checkmark to appear with "API Enabled".
 This is a good time to check if your Firebase Service Account has the required permissions:
* `cloudmessaging.messages.create`
* `firebase.projects.get`
Newly created Firebase projects usually have these permissions on the default Service Account. Check before continuing if you are unsure or working with an older project. See [How do I check my Service Account permissions?](#how-do-i-check-my-service-account-permissions) for details.
Back in **Project settings**, select the **Service accounts** tab and click **Generate new private key**.
This is a good time to check if your Firebase Service Account has the required permissions:
* `cloudmessaging.messages.create`
* `firebase.projects.get`
Newly created Firebase projects usually have these permissions on the default Service Account. Check before continuing if you are unsure or working with an older project. See [How do I check my Service Account permissions?](#how-do-i-check-my-service-account-permissions) for details.
Back in **Project settings**, select the **Service accounts** tab and click **Generate new private key**.
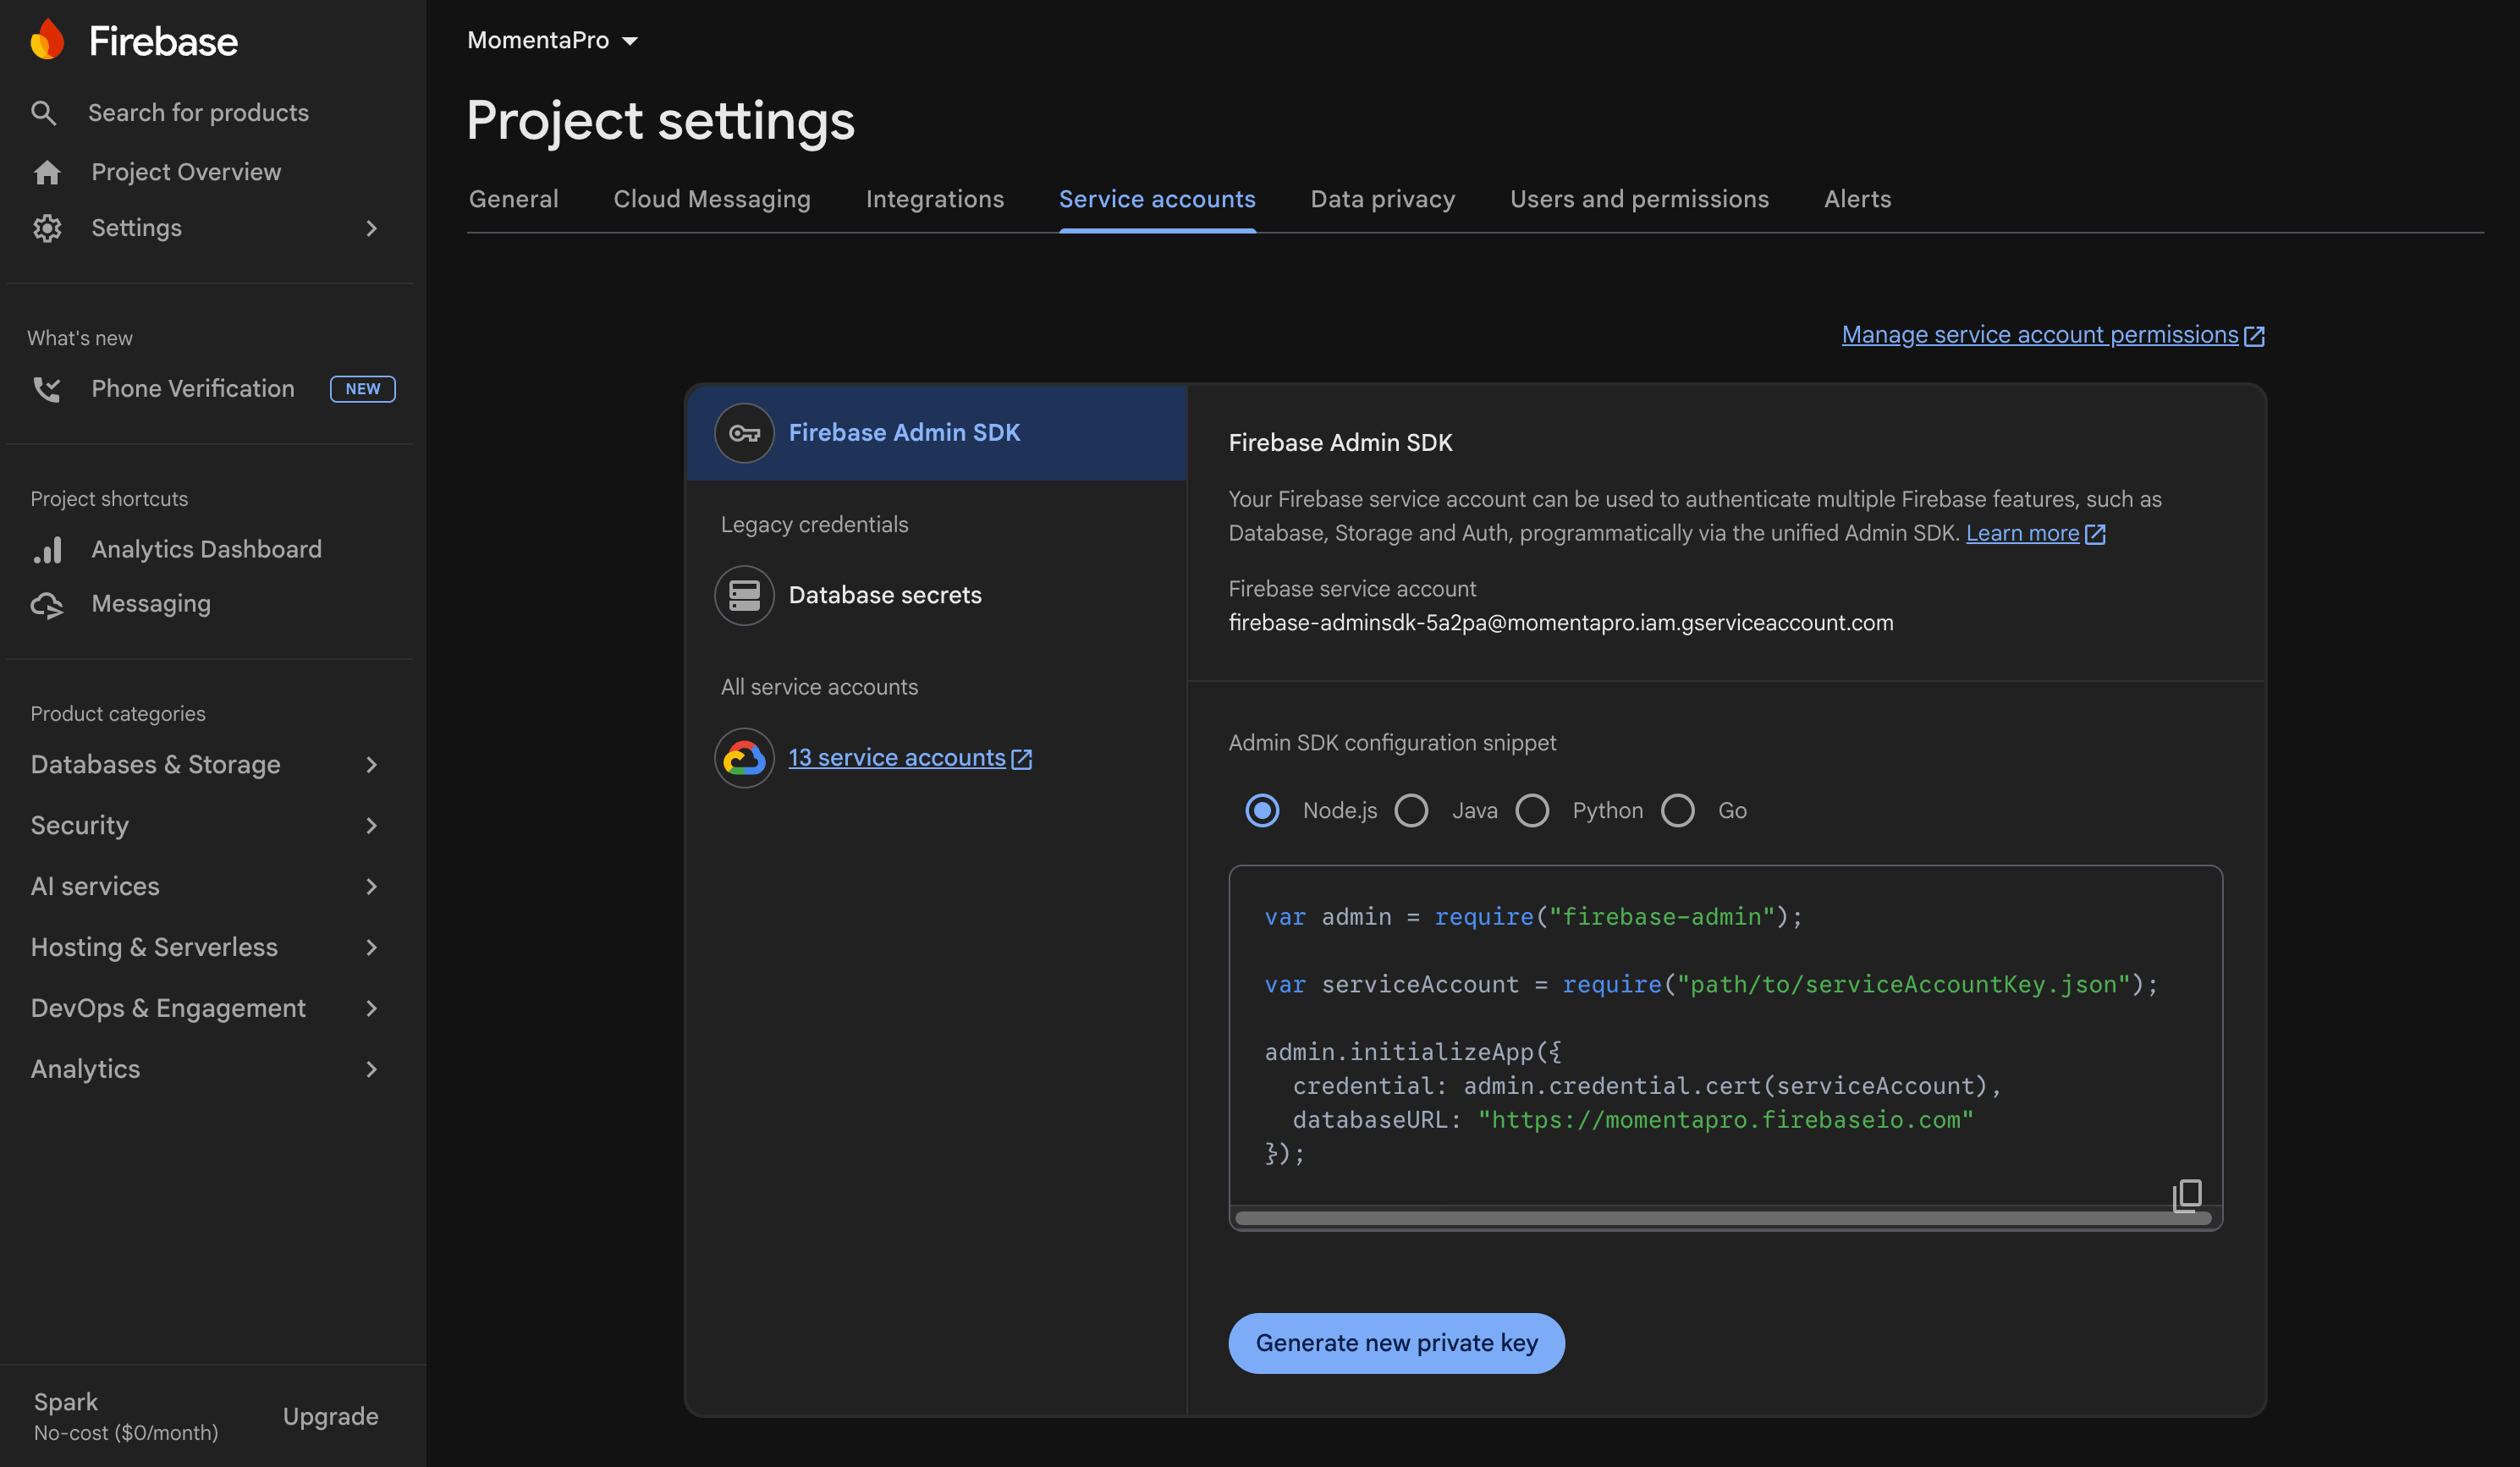 Confirm by clicking **Generate key** in the popup.
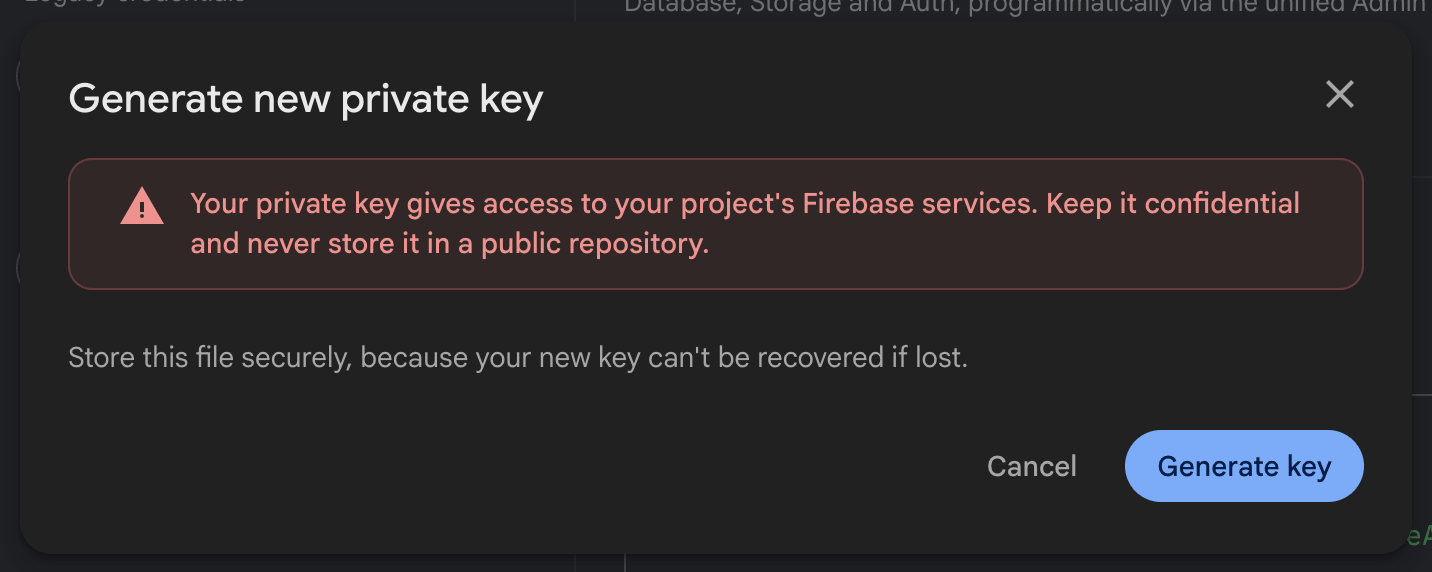 The downloaded private key contains sensitive credentials. Do not share it or check it into version control.
Save the `.json` file in a secure location. You will need it in the next section.
***
## Upload the Service Account private key to OneSignal
In your OneSignal dashboard:
Go to **Settings > Push & In-App > Platforms > Google Android (FCM)**.
Click **Activate** (first-time setup) or **Settings** (if Android is already configured).
The downloaded private key contains sensitive credentials. Do not share it or check it into version control.
Save the `.json` file in a secure location. You will need it in the next section.
***
## Upload the Service Account private key to OneSignal
In your OneSignal dashboard:
Go to **Settings > Push & In-App > Platforms > Google Android (FCM)**.
Click **Activate** (first-time setup) or **Settings** (if Android is already configured).
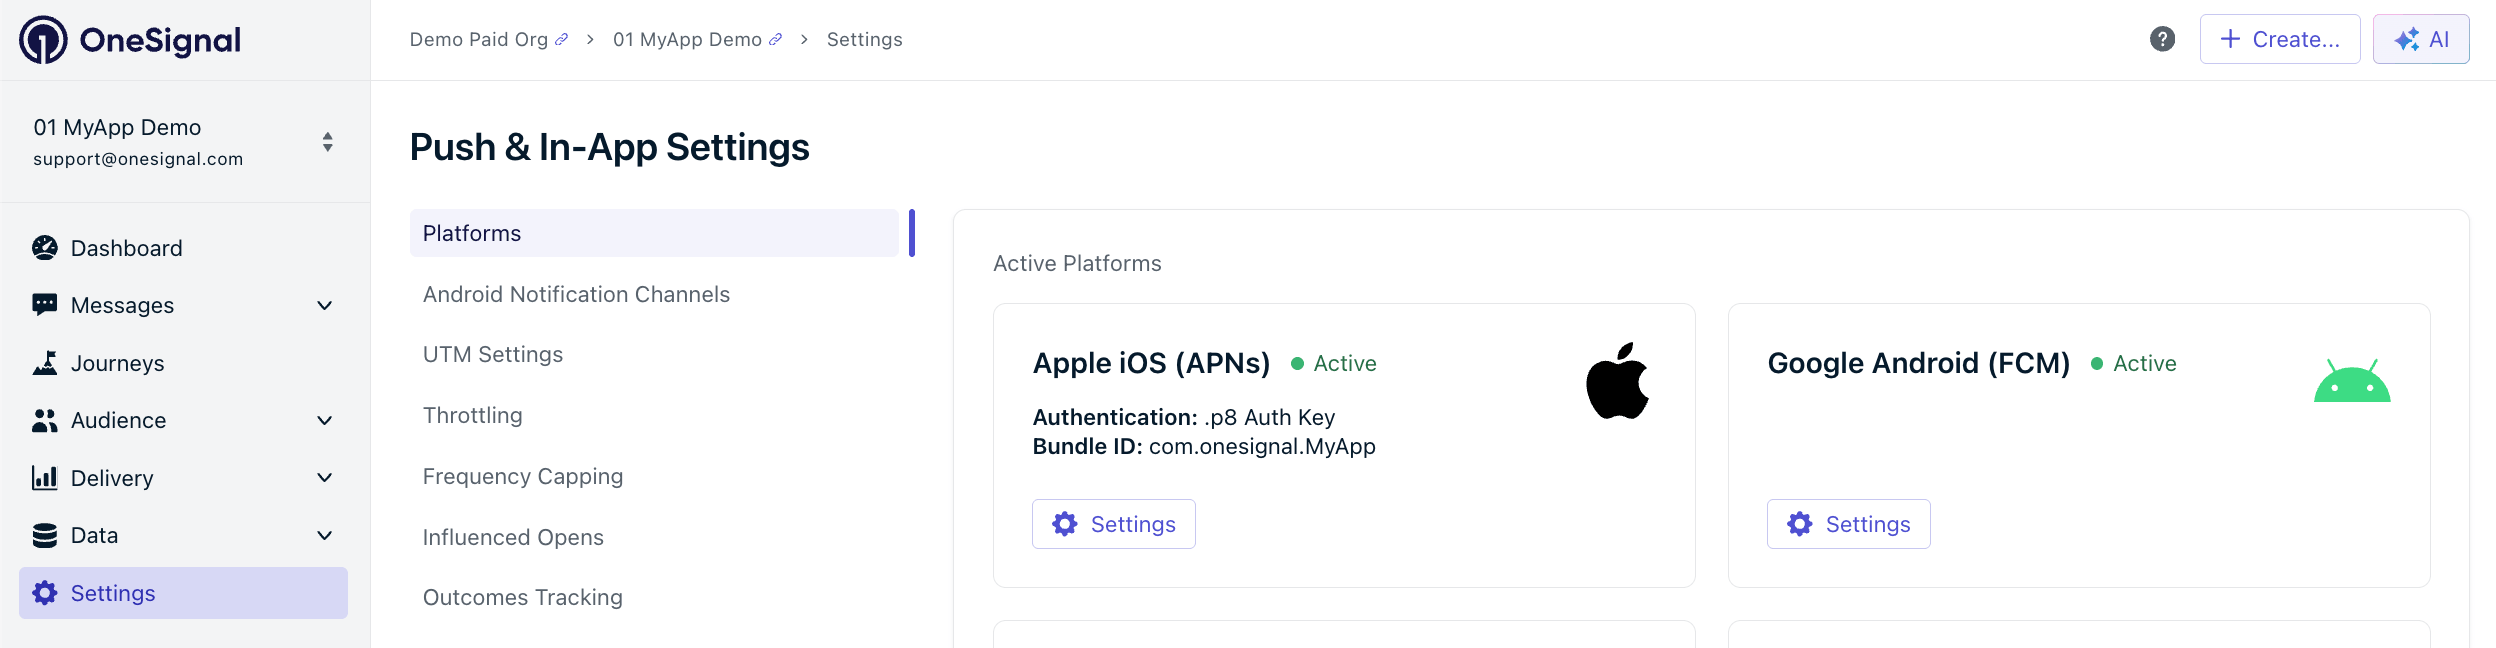 Click **Select file** and choose the `.json` private key you saved in the previous section.
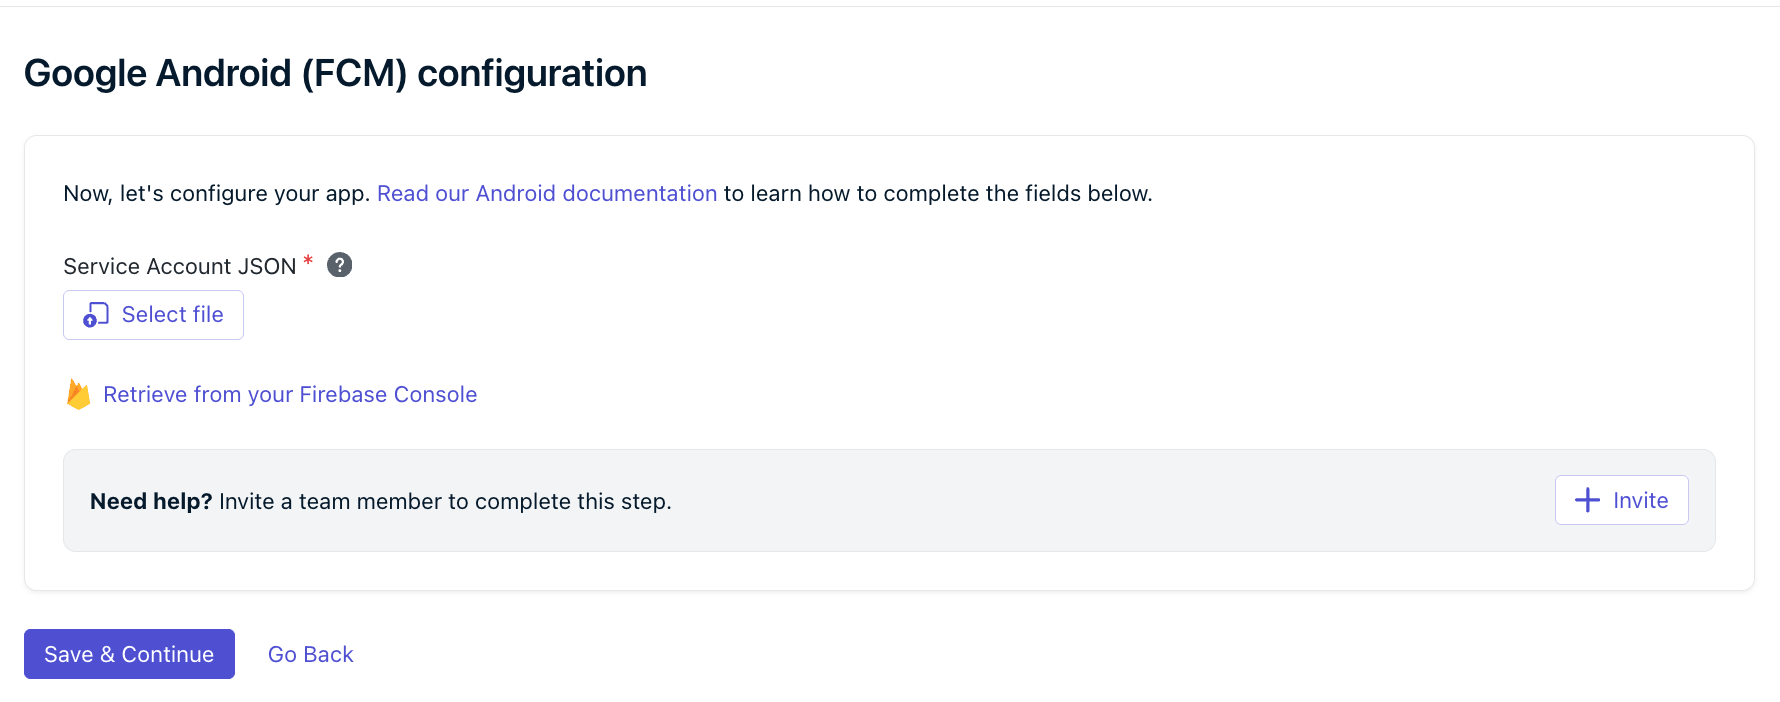 Click **Save & Continue**. OneSignal validates the private key and moves you to the next step in the setup flow, where you select your SDK.
If the dashboard shows **Invalid request** or other errors, your Service Account is likely missing one or more required roles. See [How do I check my Service Account permissions?](#how-do-i-check-my-service-account-permissions).
Your OneSignal app is now connected to Firebase Cloud Messaging (V1). Next, follow [Mobile SDK setup](./mobile-sdk-setup) for the SDK you are using to install and initialize OneSignal in your app.
***
## FAQ
### How do I check my Service Account permissions?
Service Account permissions are managed in the **Google Cloud Console**, not the Firebase Console. The Service Account whose private key you upload to OneSignal must have both:
* `cloudmessaging.messages.create` — granted by **Firebase Cloud Messaging API Admin** (`roles/firebasecloudmessaging.admin`).
* `firebase.projects.get` — granted by **Firebase Viewer** (`roles/firebase.viewer`).
Broader roles like **Firebase Admin** (`roles/firebase.admin`), **Editor**, or **Owner** include both permissions and also satisfy the requirement. For OneSignal-only Service Accounts, prefer the narrow pair above to limit the impact if the private key is ever exposed.
If the OneSignal dashboard shows **Invalid request** after you upload your Service Account private key, missing roles are the most common cause.
Sign in to the [Google Cloud Console](https://console.cloud.google.com/), select the project tied to your Firebase app, and go to **IAM & Admin > IAM**.
Match the principal email to the `client_email` field in your uploaded private key.
Click the pencil (edit) icon, then click **Add another role** to add either role if it is not already assigned.
Click **Save**. IAM changes may take a minute to apply.
### Why am I seeing "This configuration is for a different Firebase Project"?
This error occurs when the uploaded private key belongs to a different Firebase project (a different Sender ID).
**Solution**: Use the original Firebase project's private key. If unavailable, contact `support@onesignal.com` with your App ID. Switching projects resets push tokens. Your users must reopen the app to get push again.
### Can I change my Sender ID?
Yes, but it will impact your existing users.
Device tokens are tied to the original Sender ID. Changing it will invalidate existing tokens.
Users will stop receiving push notifications until they reopen the app and generate new tokens.
If you need help, contact `support@onesignal.com` with your App ID.
### Why don't I see a Sender ID in OneSignal?
If your Firebase server key looks like `AIz...`, you're likely using an outdated Google Cloud Messaging (GCM) setup. Create a new Firebase project and upload a Service Account private key.
### Do I need to update my code when switching to FCM V1?
No app or SDK changes are required. This is a dashboard-only update.
### What is the deadline for switching to FCM V1?
Google legacy FCM APIs are now fully deprecated. If you are still using the legacy APIs, **you should migrate to FCM V1 immediately**.
### How can I check which apps are still using the Legacy API?
Call the [View an app](/reference/view-an-app) API for each app and check the `fcm_v1_service_account_json` field in the response:
* **Present and non-empty**: the app is on FCM V1.
* **Missing or empty**: the app is not configured for FCM V1. If the app sends Android push, it is still on the Legacy API and must be migrated.
To list your apps and their App IDs first, use the [View apps](/reference/view-apps) API.
### What is Firebase Cloud Messaging, and why does OneSignal need a Service Account private key?
**Firebase Cloud Messaging (FCM)** is Google's service for delivering push notifications to Android devices. A **Service Account** is a Google identity that OneSignal uses to authenticate to your Firebase project, and its **private key** is a JSON file that proves the identity. Uploading the private key authorizes OneSignal to send pushes through Firebase on your behalf. For more details, see [Google's Service Account documentation](https://cloud.google.com/iam/docs/service-account-overview).
***
## Related pages
Install and initialize the OneSignal SDK in your Android app.
Platform-specific setup steps for Android, iOS, and other mobile platforms.
Authorize OneSignal to send push to Huawei apps distributed via Huawei App Gallery.
Configure push notifications for websites.
Click **Save & Continue**. OneSignal validates the private key and moves you to the next step in the setup flow, where you select your SDK.
If the dashboard shows **Invalid request** or other errors, your Service Account is likely missing one or more required roles. See [How do I check my Service Account permissions?](#how-do-i-check-my-service-account-permissions).
Your OneSignal app is now connected to Firebase Cloud Messaging (V1). Next, follow [Mobile SDK setup](./mobile-sdk-setup) for the SDK you are using to install and initialize OneSignal in your app.
***
## FAQ
### How do I check my Service Account permissions?
Service Account permissions are managed in the **Google Cloud Console**, not the Firebase Console. The Service Account whose private key you upload to OneSignal must have both:
* `cloudmessaging.messages.create` — granted by **Firebase Cloud Messaging API Admin** (`roles/firebasecloudmessaging.admin`).
* `firebase.projects.get` — granted by **Firebase Viewer** (`roles/firebase.viewer`).
Broader roles like **Firebase Admin** (`roles/firebase.admin`), **Editor**, or **Owner** include both permissions and also satisfy the requirement. For OneSignal-only Service Accounts, prefer the narrow pair above to limit the impact if the private key is ever exposed.
If the OneSignal dashboard shows **Invalid request** after you upload your Service Account private key, missing roles are the most common cause.
Sign in to the [Google Cloud Console](https://console.cloud.google.com/), select the project tied to your Firebase app, and go to **IAM & Admin > IAM**.
Match the principal email to the `client_email` field in your uploaded private key.
Click the pencil (edit) icon, then click **Add another role** to add either role if it is not already assigned.
Click **Save**. IAM changes may take a minute to apply.
### Why am I seeing "This configuration is for a different Firebase Project"?
This error occurs when the uploaded private key belongs to a different Firebase project (a different Sender ID).
**Solution**: Use the original Firebase project's private key. If unavailable, contact `support@onesignal.com` with your App ID. Switching projects resets push tokens. Your users must reopen the app to get push again.
### Can I change my Sender ID?
Yes, but it will impact your existing users.
Device tokens are tied to the original Sender ID. Changing it will invalidate existing tokens.
Users will stop receiving push notifications until they reopen the app and generate new tokens.
If you need help, contact `support@onesignal.com` with your App ID.
### Why don't I see a Sender ID in OneSignal?
If your Firebase server key looks like `AIz...`, you're likely using an outdated Google Cloud Messaging (GCM) setup. Create a new Firebase project and upload a Service Account private key.
### Do I need to update my code when switching to FCM V1?
No app or SDK changes are required. This is a dashboard-only update.
### What is the deadline for switching to FCM V1?
Google legacy FCM APIs are now fully deprecated. If you are still using the legacy APIs, **you should migrate to FCM V1 immediately**.
### How can I check which apps are still using the Legacy API?
Call the [View an app](/reference/view-an-app) API for each app and check the `fcm_v1_service_account_json` field in the response:
* **Present and non-empty**: the app is on FCM V1.
* **Missing or empty**: the app is not configured for FCM V1. If the app sends Android push, it is still on the Legacy API and must be migrated.
To list your apps and their App IDs first, use the [View apps](/reference/view-apps) API.
### What is Firebase Cloud Messaging, and why does OneSignal need a Service Account private key?
**Firebase Cloud Messaging (FCM)** is Google's service for delivering push notifications to Android devices. A **Service Account** is a Google identity that OneSignal uses to authenticate to your Firebase project, and its **private key** is a JSON file that proves the identity. Uploading the private key authorizes OneSignal to send pushes through Firebase on your behalf. For more details, see [Google's Service Account documentation](https://cloud.google.com/iam/docs/service-account-overview).
***
## Related pages
Install and initialize the OneSignal SDK in your Android app.
Platform-specific setup steps for Android, iOS, and other mobile platforms.
Authorize OneSignal to send push to Huawei apps distributed via Huawei App Gallery.
Configure push notifications for websites.