> ## Documentation Index
> Fetch the complete documentation index at: https://documentation.onesignal.com/llms.txt
> Use this file to discover all available pages before exploring further.
# Target outdated app versions to encourage app updates
> Use in-app messages to detect outdated app versions and prompt users to update, with platform-specific segments for iOS and Android.
Use in-app messages to notify users on older app versions that an update is available and prompt them to install it. This tutorial walks through creating platform-specific segments and messages for iOS and Android.
## Requirements
* OneSignal SDK v5 or later
## Setup
**Example scenario**: The latest version of our app is `1.0.1`. We want to target users on version `1.0.0` and older with an in-app message prompting them to update.
### 1. Get your latest app version
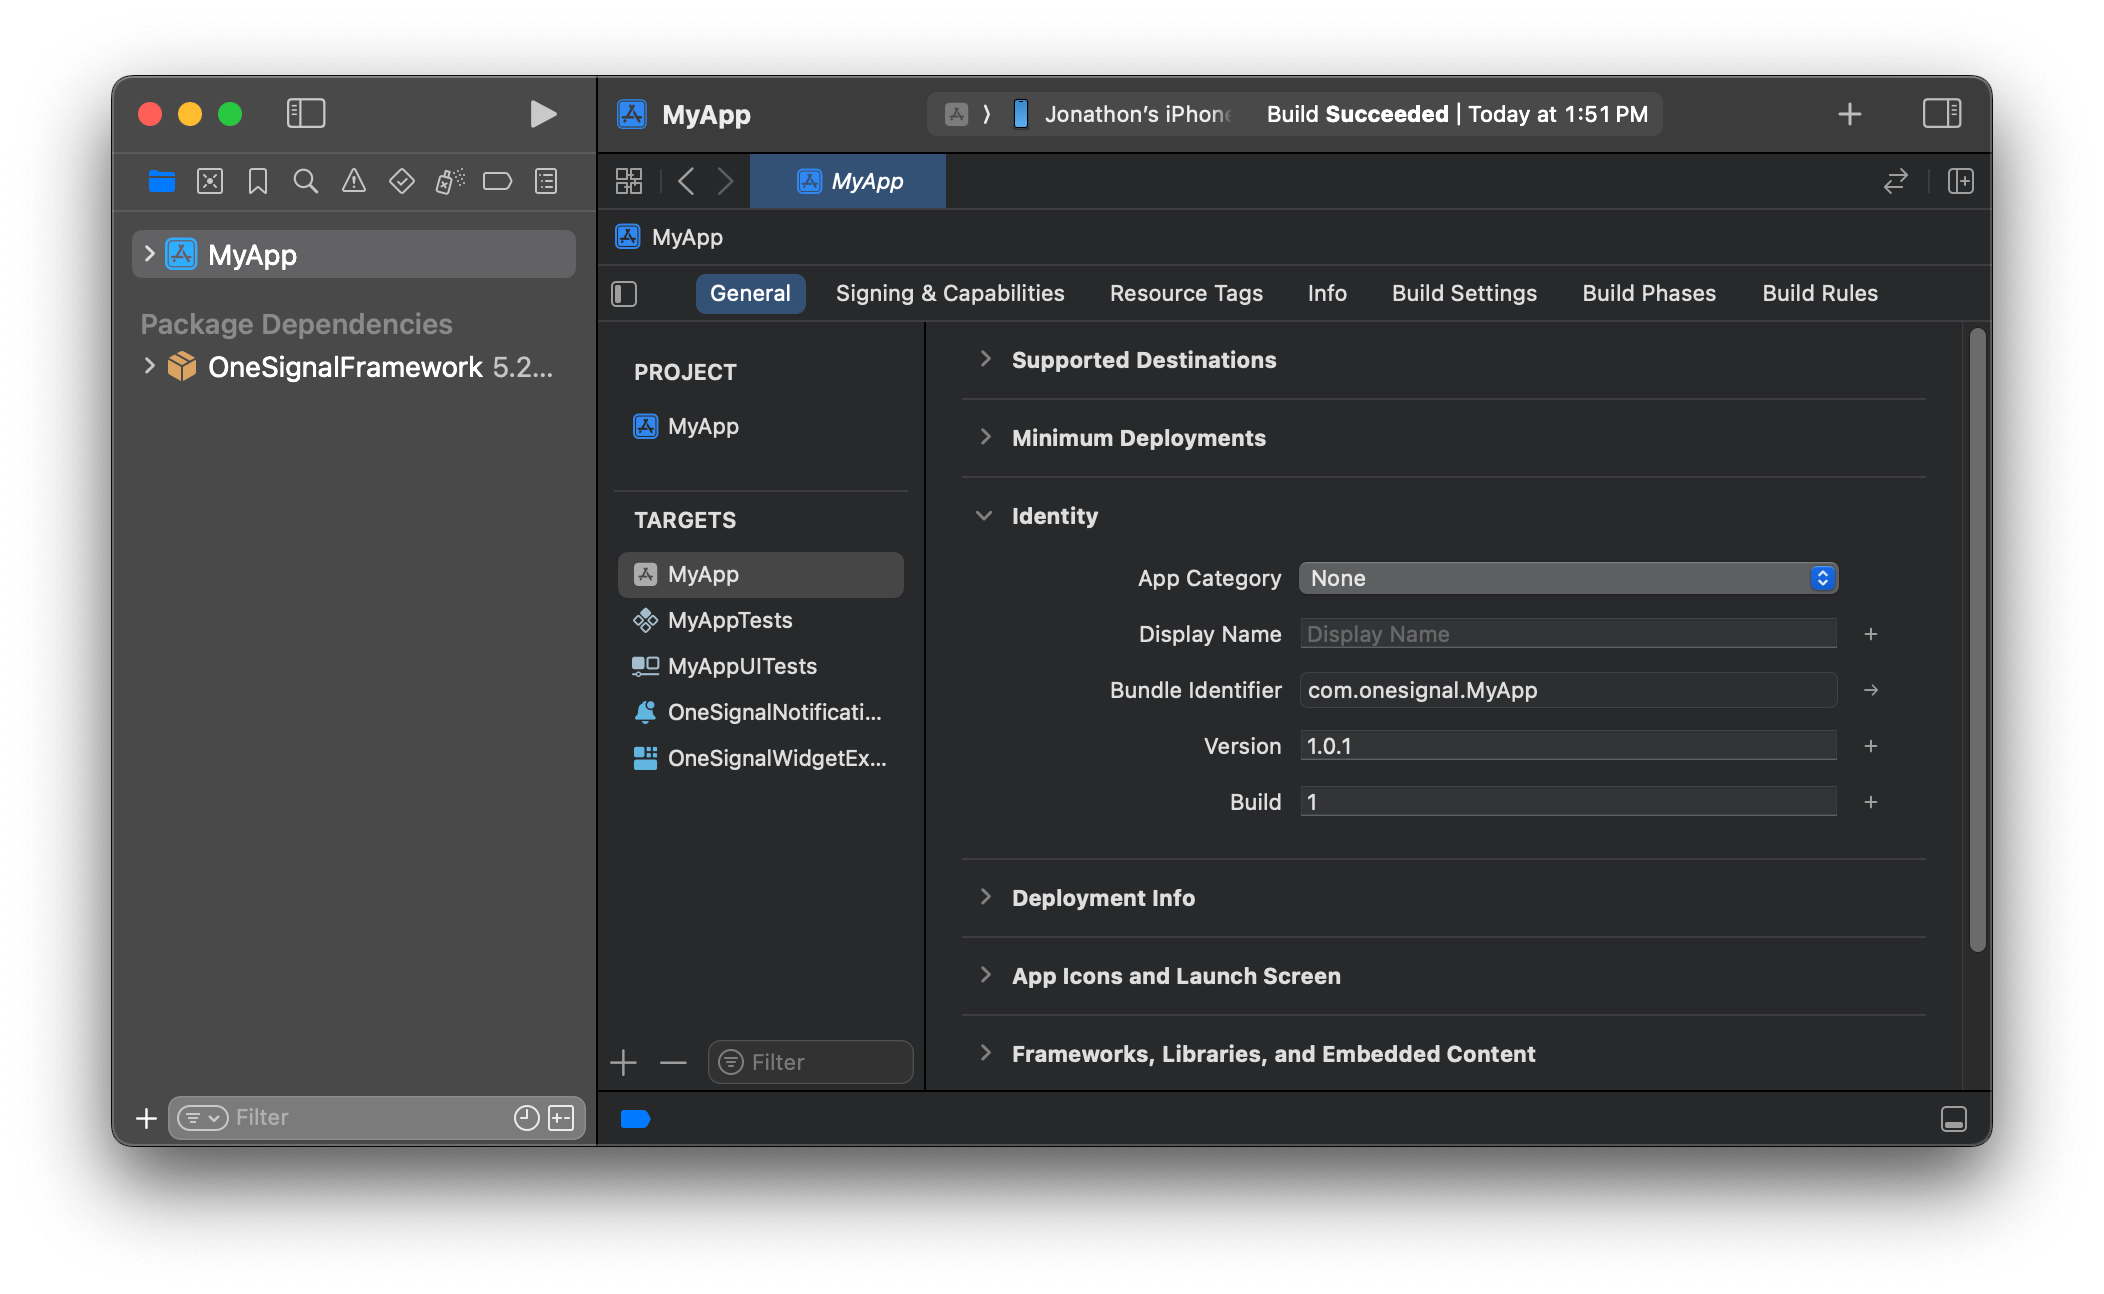
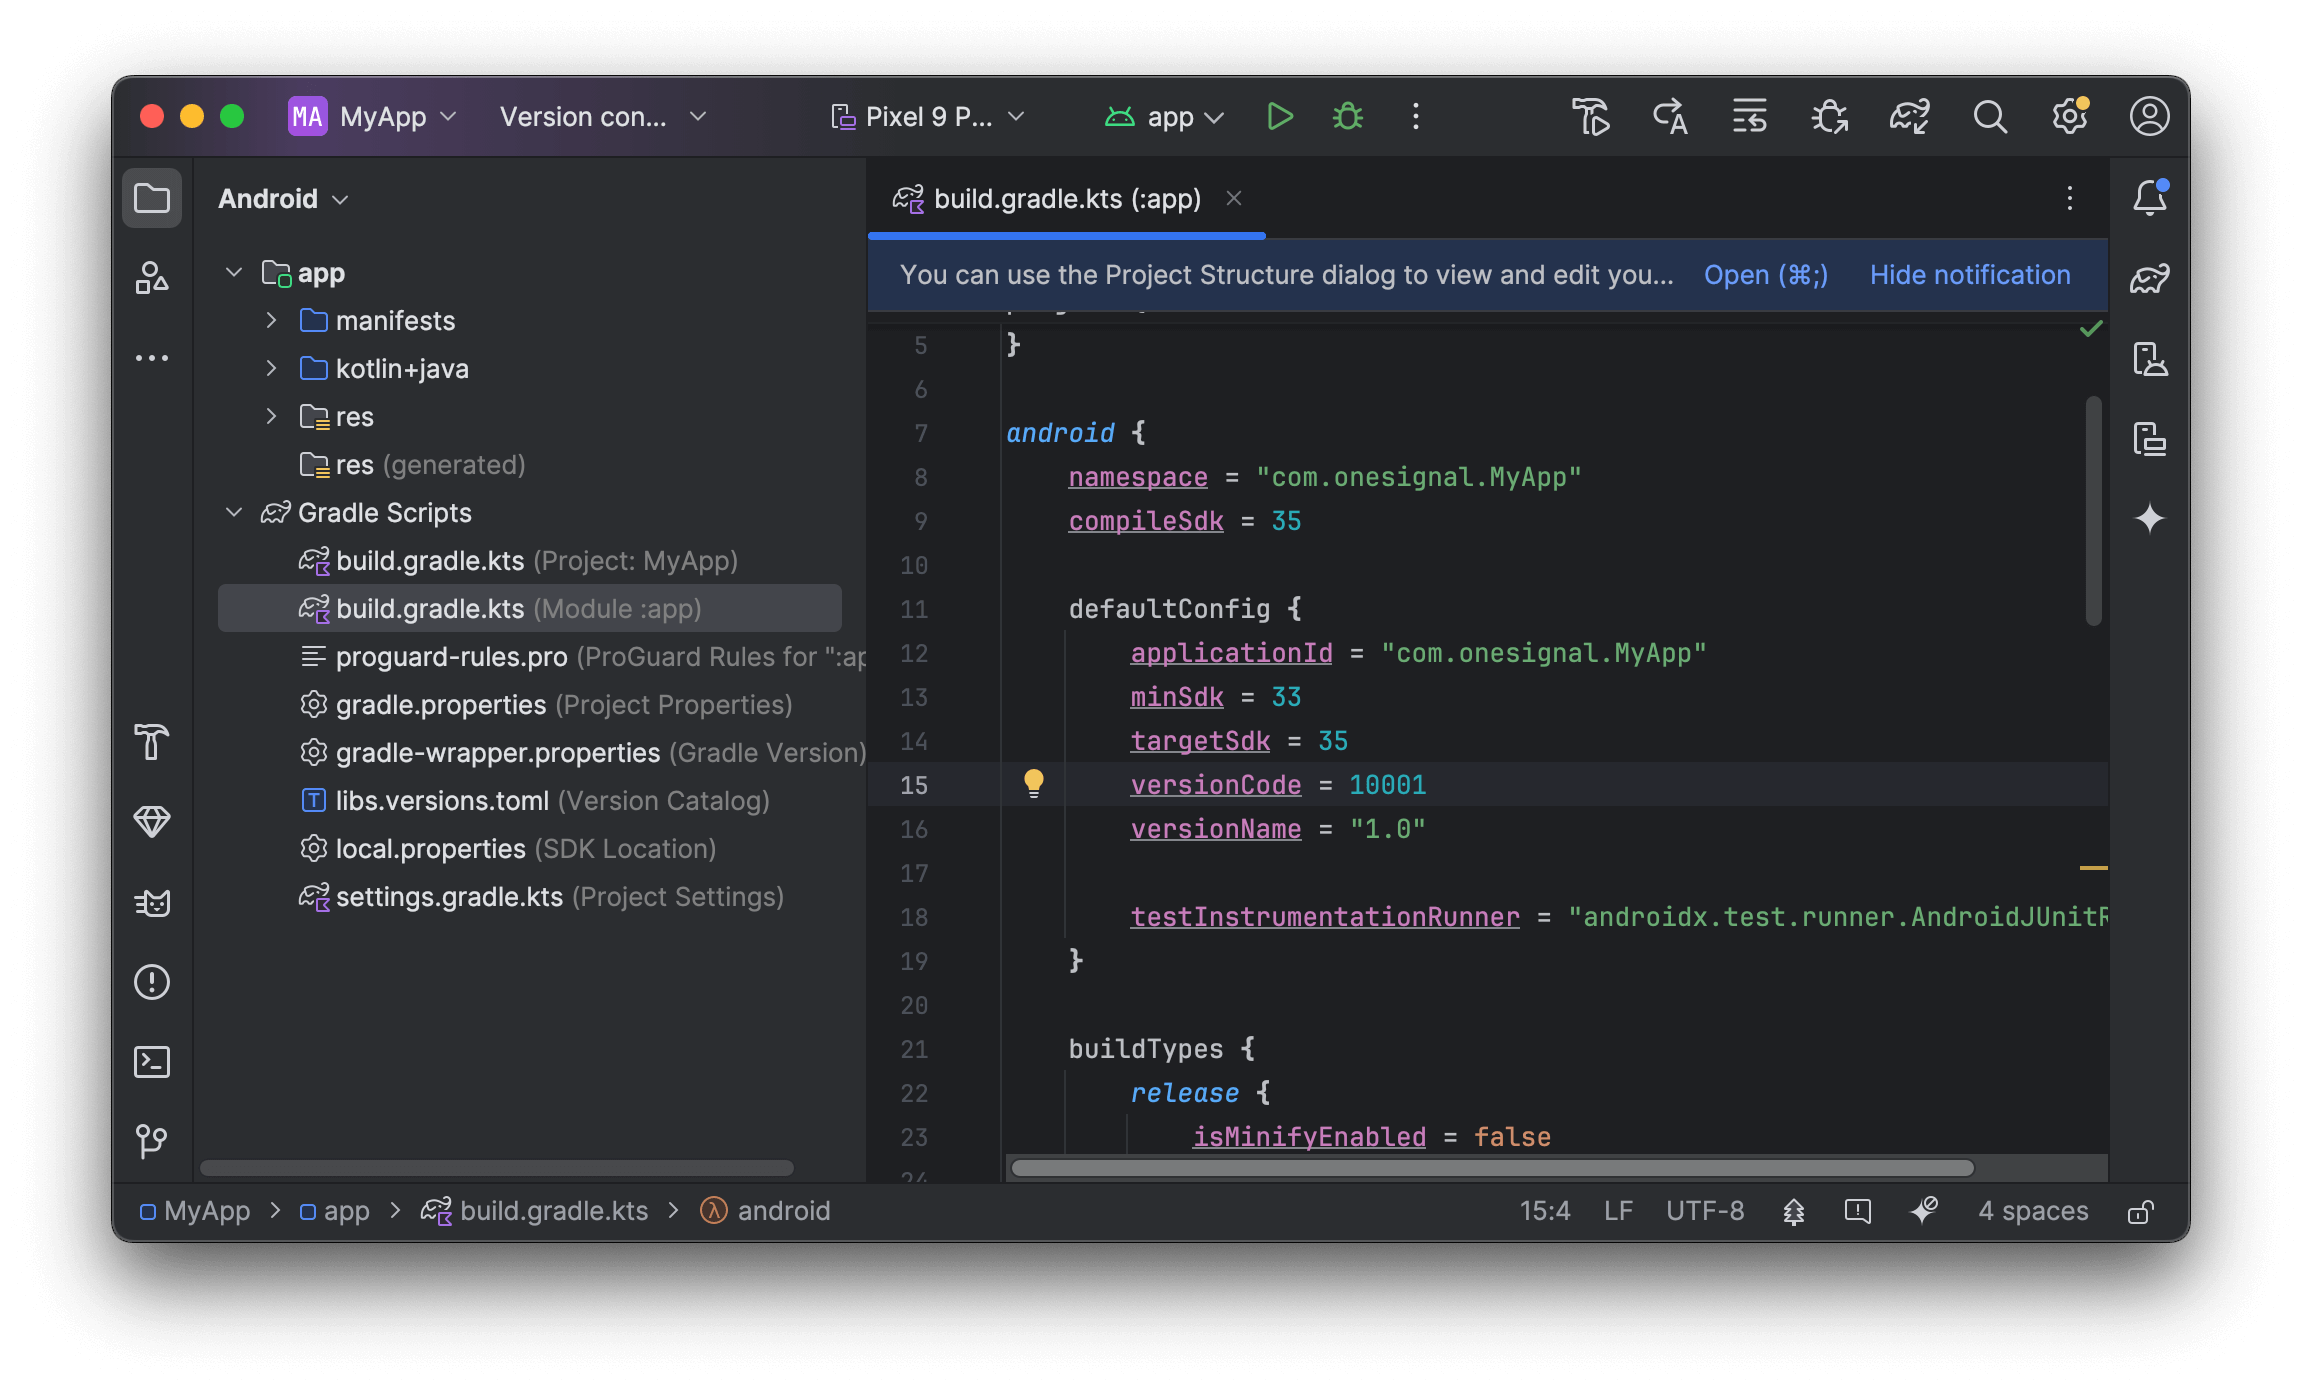
OneSignal detects `App Version` based on the following:
**iOS**: The `Version` found in Xcode **your main app Target > General > Identity**
 **Android**: The `versionCode` found in your app `build.gradle` file
 If you don't have access to Xcode and/or Android Studio, ask your developer for these values.
iOS and Android use different version formats, and the store links differ by platform. Create separate segments and in-app messages for each.
### 2. Set up the segments
You will need to create two segments, one for iOS and one for Android.
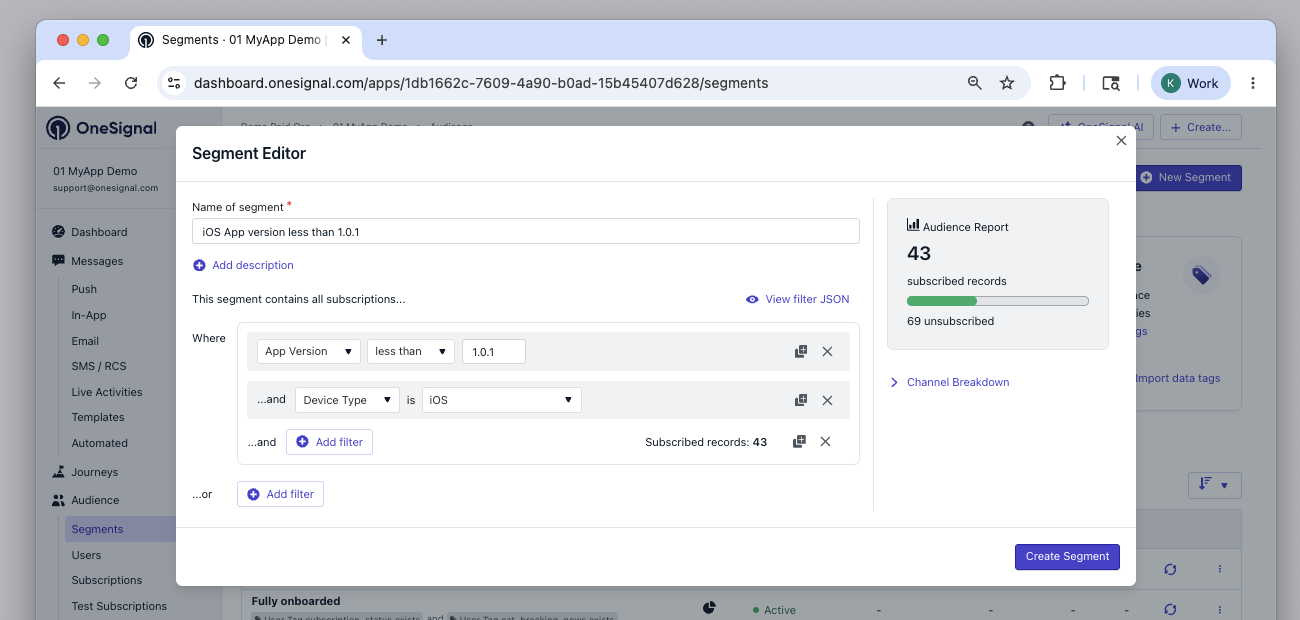
**iOS**:
* Segment Name: `iOS App version less than 1.0.1`
* Filters: `App Version` is `less than` `1.0.1` AND `Device Type` is `iOS`.
If you don't have access to Xcode and/or Android Studio, ask your developer for these values.
iOS and Android use different version formats, and the store links differ by platform. Create separate segments and in-app messages for each.
### 2. Set up the segments
You will need to create two segments, one for iOS and one for Android.
**iOS**:
* Segment Name: `iOS App version less than 1.0.1`
* Filters: `App Version` is `less than` `1.0.1` AND `Device Type` is `iOS`.
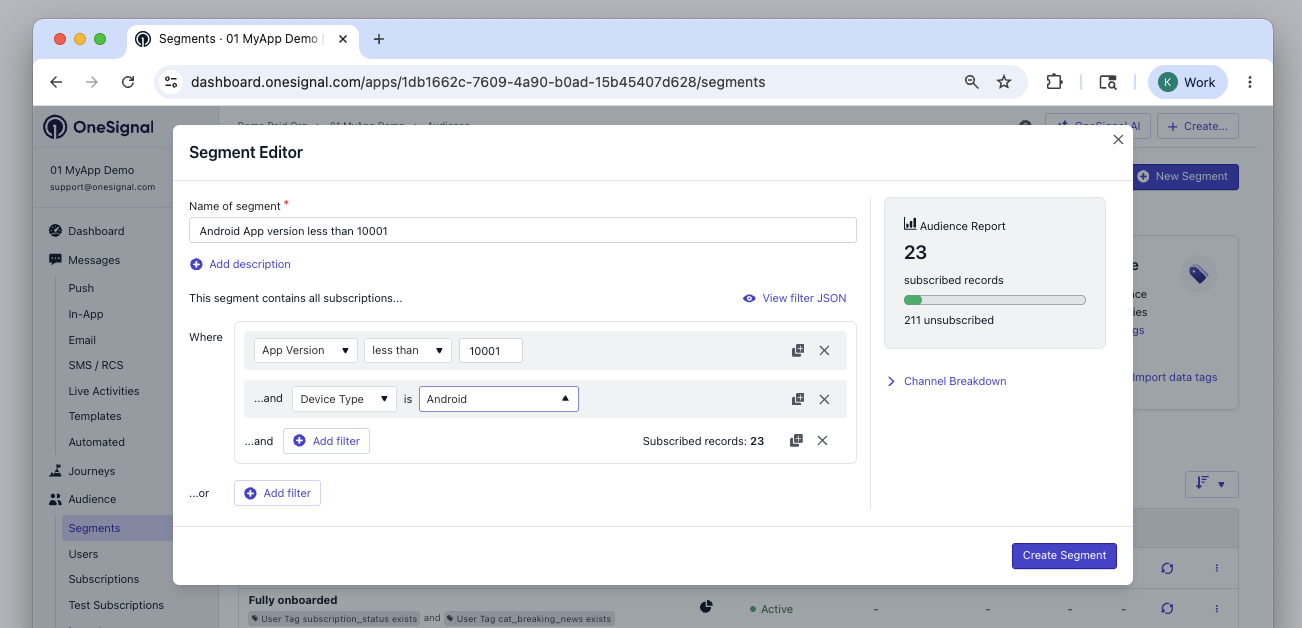
 **Android**:
* Segment Name: `Android App version less than 10001`
* Filters: `App Version` is `less than` `10001` AND `Device Type` is `Android`.
**Android**:
* Segment Name: `Android App version less than 10001`
* Filters: `App Version` is `less than` `10001` AND `Device Type` is `Android`.
 ### 3. Set up the in-app messages
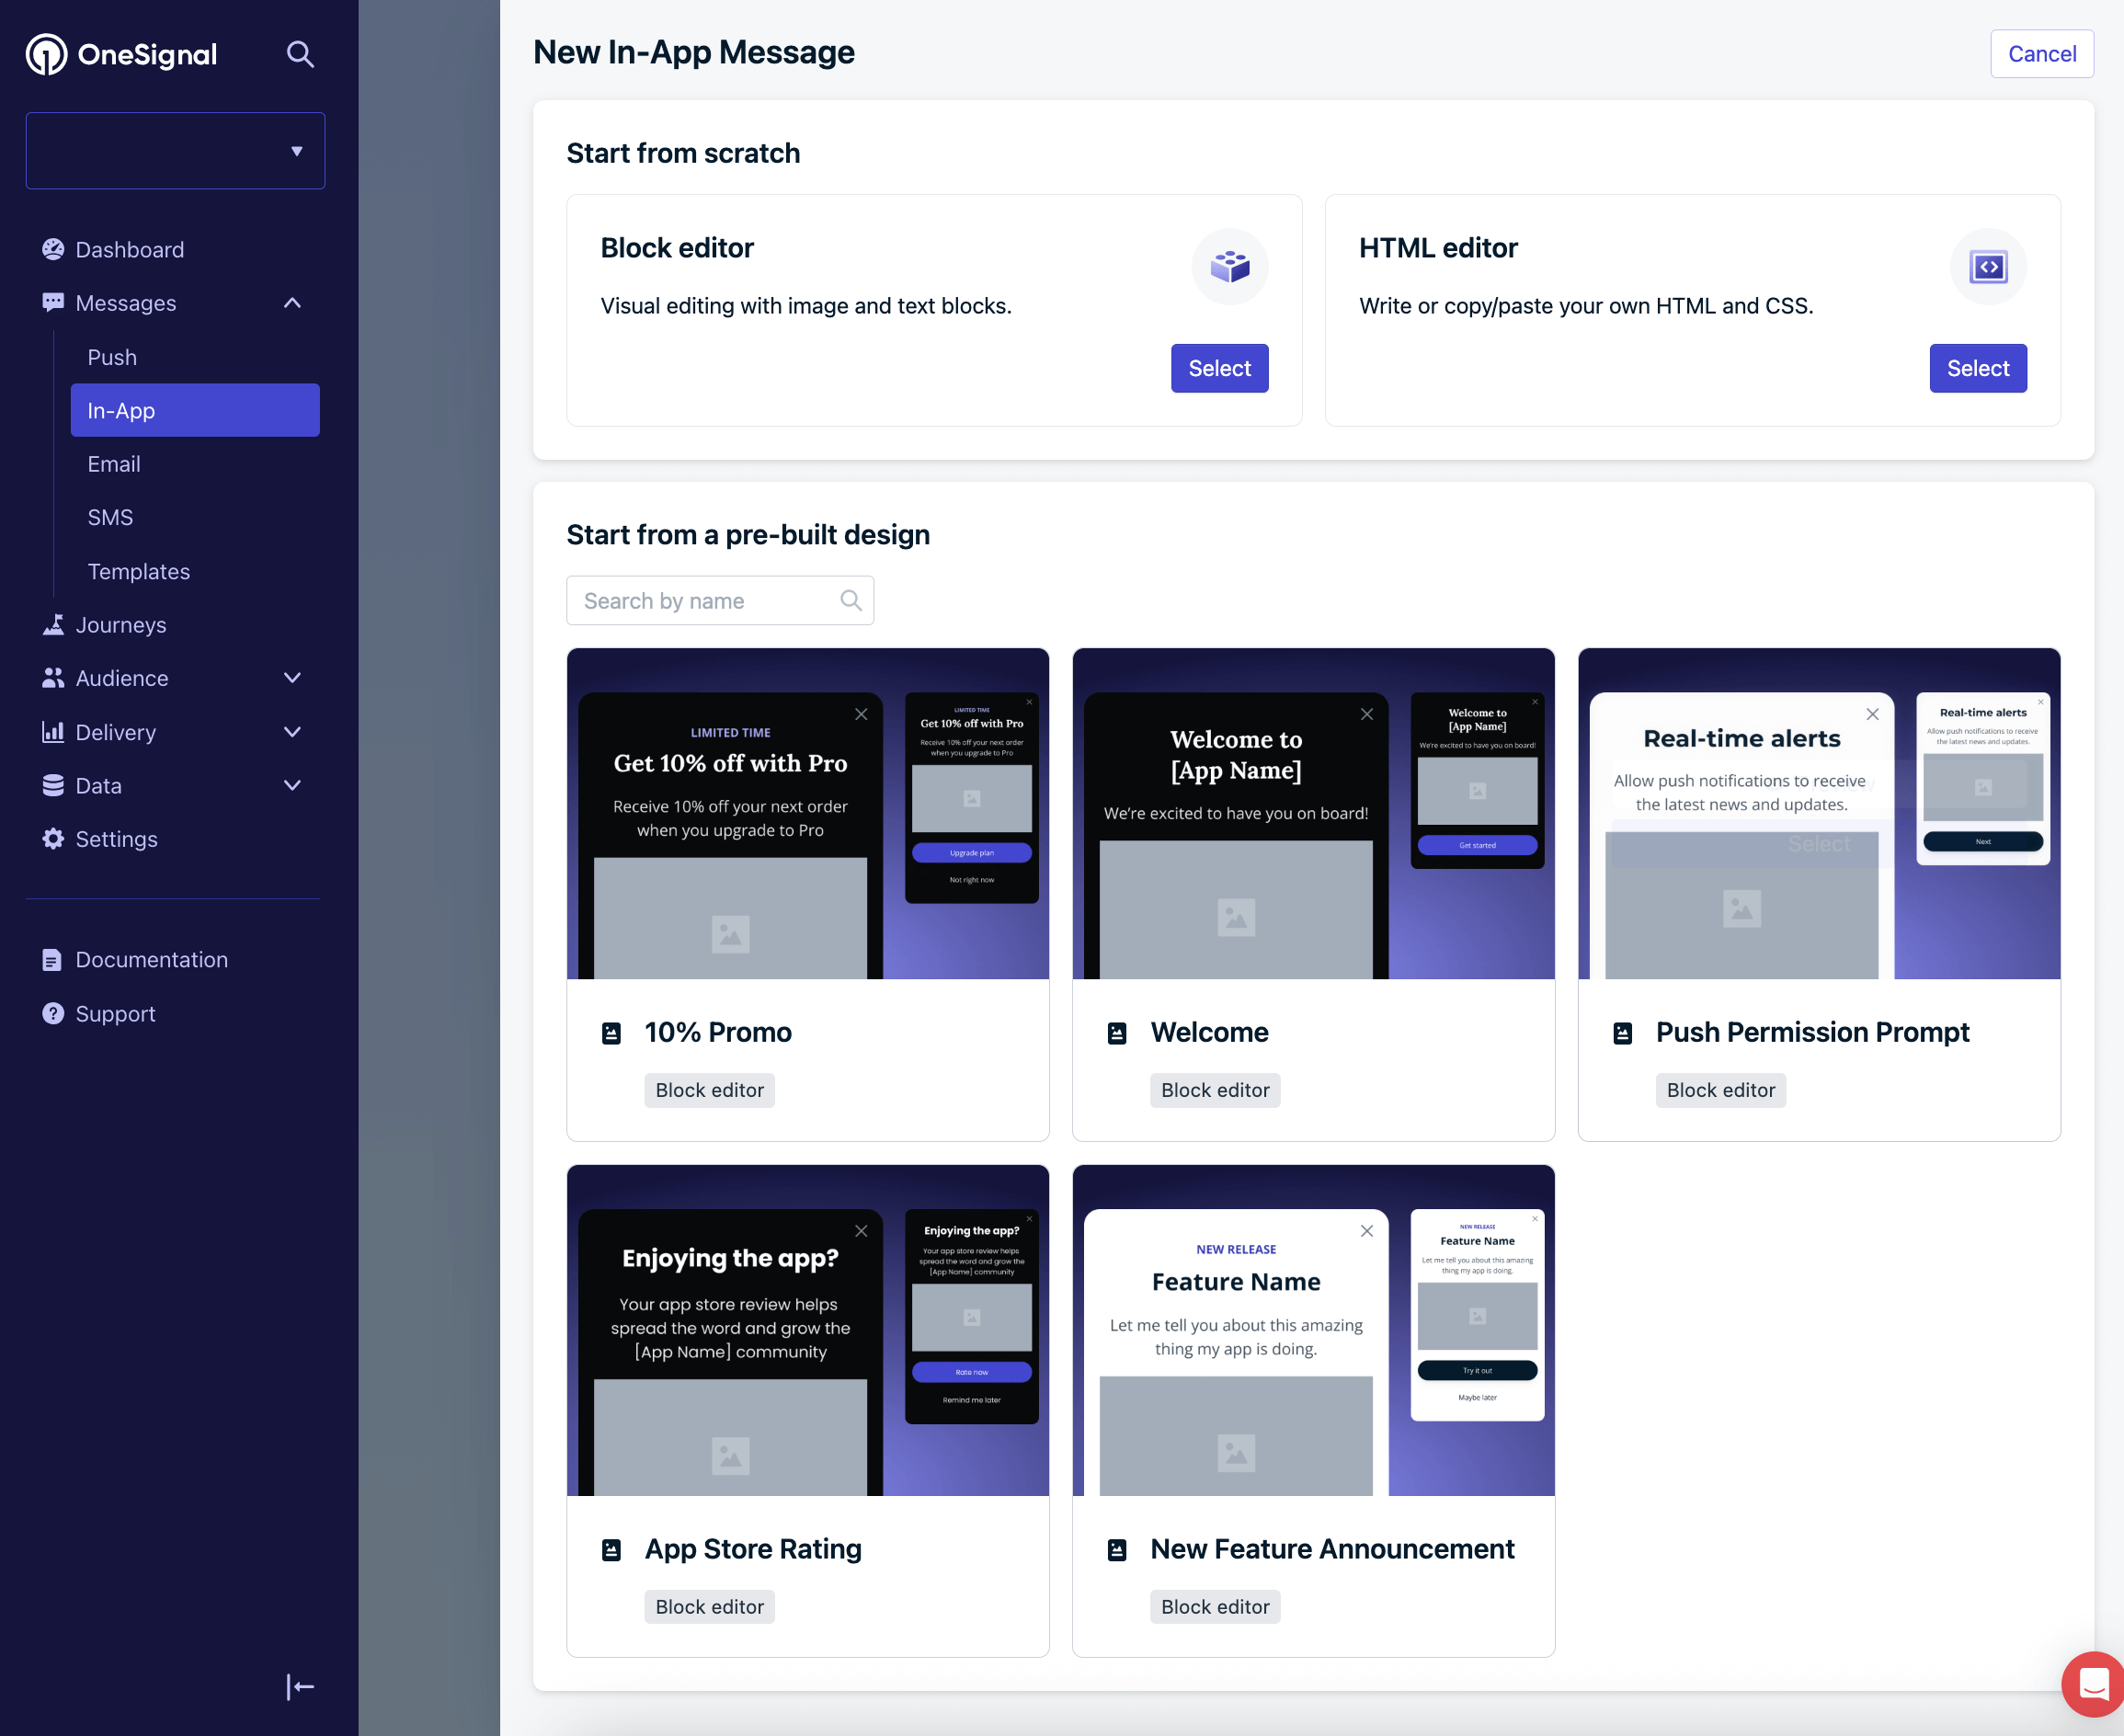
Navigate to **Messages > In-App > New Message > New In-App**.
Start from the pre-built design **New Feature Announcement** or create your own from scratch.
### 3. Set up the in-app messages
Navigate to **Messages > In-App > New Message > New In-App**.
Start from the pre-built design **New Feature Announcement** or create your own from scratch.
 Name the message something to reflect this is for iOS users.
#### Add your audience
Select the particular segment **iOS App version less than 1.0.1**.
#### Update the message
Update the message content as needed. To navigate the user to your app store listing, add a [URL click action](./iam-click-actions#url) to a button or other element.
Name the message something to reflect this is for iOS users.
#### Add your audience
Select the particular segment **iOS App version less than 1.0.1**.
#### Update the message
Update the message content as needed. To navigate the user to your app store listing, add a [URL click action](./iam-click-actions#url) to a button or other element.
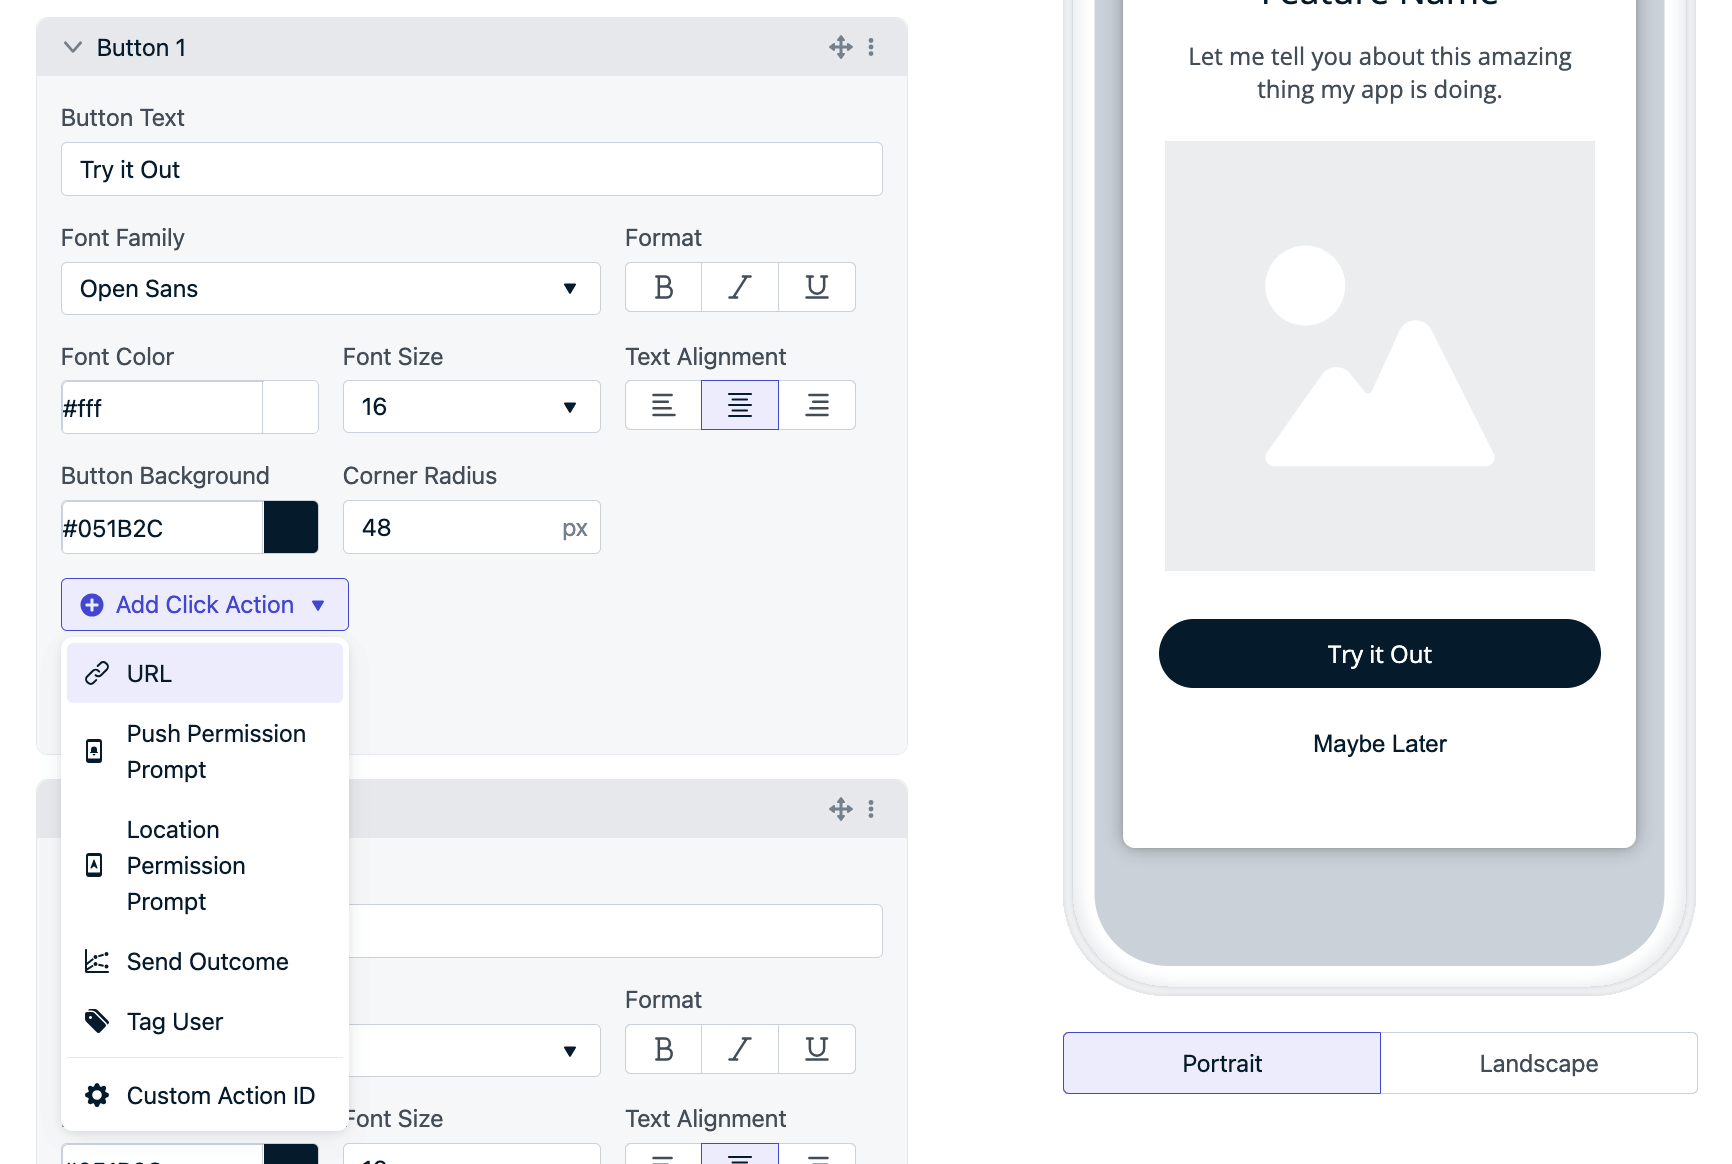 Enter the store link as the URL:
* **iOS**: `https://apps.apple.com/app/idYOUR_APP_STORE_ID` — see [Requesting App Store Reviews](https://developer.apple.com/documentation/storekit/requesting_app_store_reviews)
* **Android**: `https://play.google.com/store/apps/details?id=YOUR_PACKAGE_NAME` — see [Linking to Google Play](https://developer.android.com/distribute/marketing-tools/linking-to-google-play.html)
### 4. Triggers
We recommend using the **On app open** trigger to ensure the message is shown when the user opens the app.
### 5. Schedule and frequency
If you scheduled the app update to be some time in the future, you can schedule the message to start showing at that time.
Depending on how aggressive you want to be with your update prompts, you can set the "How often do you want to show this message?" frequency to:
* **Every time trigger conditions are satisfied** - which means every time they open the app in this example.
* **Multiple times** - set the total number of times to show the message and what delay in between. For example, 100 times with a gap of 3 days in between. Will show the message every 3 days for up to 100 times.
### 6. Save as draft and duplicate for Android
Click the **Save as Draft** button to save the message.
In the **In-App Messages** page, click **Options > Duplicate** next to the message you just saved.
Update the following for your Android users:
* The IAM name to reflect this is for Android users
* Set the Segment to **Android App version less than 10001**
* Update the URL to the Android store link
* Add any additional changes to the message to make it unique for Android users
Click **Save as Draft** to save the message.
***
## Testing
Before publishing your messages, we suggest testing them with the following steps:
* Find your test device and set it as a [test user](./test-users).
* Make sure the test device is on the lower version of your app.
* Open the in-app message you want to test.
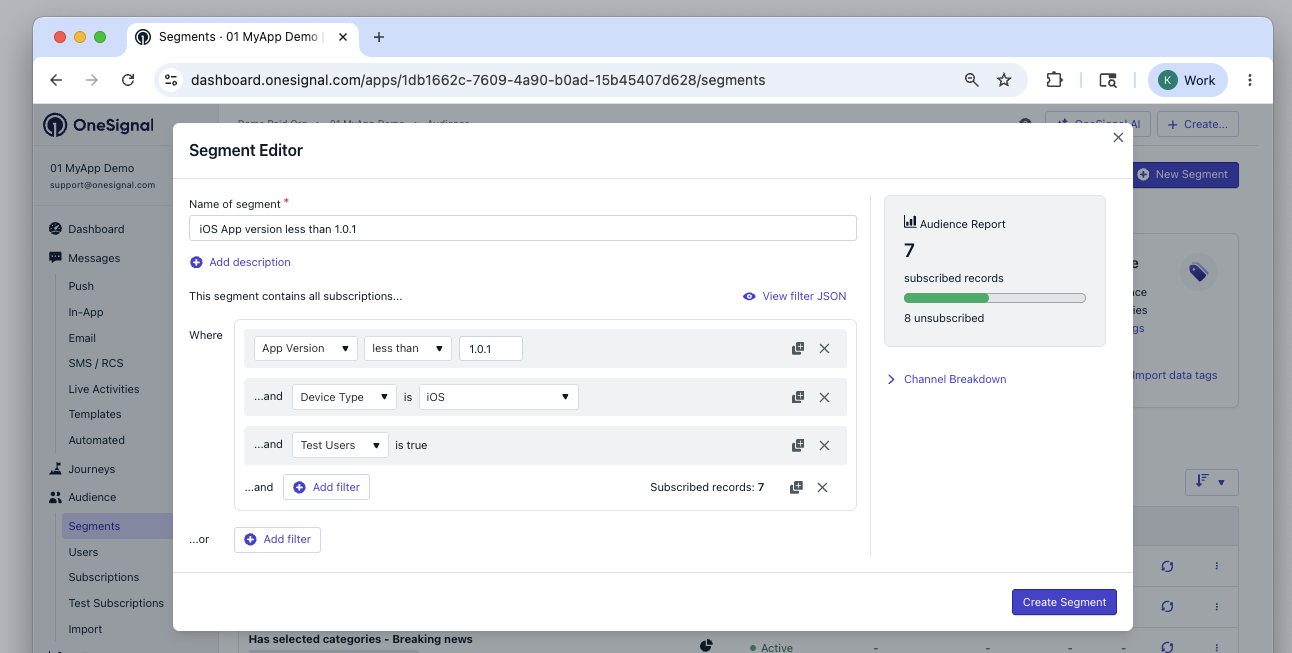
* Click the Segment and add an **And** filter for **Test Users**.
* This will ensure the message only shows for your test devices
* For example, if your test device is on iOS, the segment will look like this:
Enter the store link as the URL:
* **iOS**: `https://apps.apple.com/app/idYOUR_APP_STORE_ID` — see [Requesting App Store Reviews](https://developer.apple.com/documentation/storekit/requesting_app_store_reviews)
* **Android**: `https://play.google.com/store/apps/details?id=YOUR_PACKAGE_NAME` — see [Linking to Google Play](https://developer.android.com/distribute/marketing-tools/linking-to-google-play.html)
### 4. Triggers
We recommend using the **On app open** trigger to ensure the message is shown when the user opens the app.
### 5. Schedule and frequency
If you scheduled the app update to be some time in the future, you can schedule the message to start showing at that time.
Depending on how aggressive you want to be with your update prompts, you can set the "How often do you want to show this message?" frequency to:
* **Every time trigger conditions are satisfied** - which means every time they open the app in this example.
* **Multiple times** - set the total number of times to show the message and what delay in between. For example, 100 times with a gap of 3 days in between. Will show the message every 3 days for up to 100 times.
### 6. Save as draft and duplicate for Android
Click the **Save as Draft** button to save the message.
In the **In-App Messages** page, click **Options > Duplicate** next to the message you just saved.
Update the following for your Android users:
* The IAM name to reflect this is for Android users
* Set the Segment to **Android App version less than 10001**
* Update the URL to the Android store link
* Add any additional changes to the message to make it unique for Android users
Click **Save as Draft** to save the message.
***
## Testing
Before publishing your messages, we suggest testing them with the following steps:
* Find your test device and set it as a [test user](./test-users).
* Make sure the test device is on the lower version of your app.
* Open the in-app message you want to test.
* Click the Segment and add an **And** filter for **Test Users**.
* This will ensure the message only shows for your test devices
* For example, if your test device is on iOS, the segment will look like this:
 * Click **Update Segment** to save the changes.
* Click **Update Message** to update the in-app message.
* Click **Options > Resume** next to the message to set it live.
* Close the app on the test device.
* Wait 1 minute.
* Open the app on your test device.
* You should see the message if:
* The device is a test user
* The device is on the lower version of your app.
* The segment is set to **Test Users**.
***
## Go live checklist
When you are ready to go live:
* Update the Segments to remove the `Test Users` filter.
* Check the Schedule to make sure it is set to the correct date and time.
* Click **Update Message** to update the in-app message.
You're done! Any users that open your app on an older version will get notified of your App Update.
Return to the in-app message after some time to check progress. You can also get in-app message analytics with [Event Streams](./event-streams) or 3rd party [Integrations](./integrations).
***
## FAQ
### Does OneSignal detect app version automatically?
Yes. The OneSignal SDK reports the app version to OneSignal automatically. On iOS this is the `Version` field in Xcode, and on Android it is the `versionCode` in your `build.gradle` file.
### Why do I need separate messages for iOS and Android?
iOS and Android use different version formats (e.g., `1.0.1` vs `10001`), and the store links for each platform are different. Separate segments and messages ensure the correct version filter and store link are used for each platform.
### Can I use this with Journeys instead of in-app triggers?
Yes. You can create a Journey that targets the same version-based segments and sends an in-app message as a step. This gives you additional control over timing and follow-up actions.
***
Need help?
Chat with our Support team or email `support@onesignal.com`
Please include:
* Details of the issue you're experiencing and steps to reproduce if available
* Your OneSignal App ID
* The External ID or Subscription ID if applicable
* The URL to the message you tested in the OneSignal Dashboard if applicable
* Any relevant [logs or error messages](/docs/en/capturing-a-debug-log)
We're happy to help!
Configure URL, permission prompt, tag, outcome, and custom click actions on in-app message elements.
Create segments based on user properties, behavior, and device attributes.
* Click **Update Segment** to save the changes.
* Click **Update Message** to update the in-app message.
* Click **Options > Resume** next to the message to set it live.
* Close the app on the test device.
* Wait 1 minute.
* Open the app on your test device.
* You should see the message if:
* The device is a test user
* The device is on the lower version of your app.
* The segment is set to **Test Users**.
***
## Go live checklist
When you are ready to go live:
* Update the Segments to remove the `Test Users` filter.
* Check the Schedule to make sure it is set to the correct date and time.
* Click **Update Message** to update the in-app message.
You're done! Any users that open your app on an older version will get notified of your App Update.
Return to the in-app message after some time to check progress. You can also get in-app message analytics with [Event Streams](./event-streams) or 3rd party [Integrations](./integrations).
***
## FAQ
### Does OneSignal detect app version automatically?
Yes. The OneSignal SDK reports the app version to OneSignal automatically. On iOS this is the `Version` field in Xcode, and on Android it is the `versionCode` in your `build.gradle` file.
### Why do I need separate messages for iOS and Android?
iOS and Android use different version formats (e.g., `1.0.1` vs `10001`), and the store links for each platform are different. Separate segments and messages ensure the correct version filter and store link are used for each platform.
### Can I use this with Journeys instead of in-app triggers?
Yes. You can create a Journey that targets the same version-based segments and sends an in-app message as a step. This gives you additional control over timing and follow-up actions.
***
Need help?
Chat with our Support team or email `support@onesignal.com`
Please include:
* Details of the issue you're experiencing and steps to reproduce if available
* Your OneSignal App ID
* The External ID or Subscription ID if applicable
* The URL to the message you tested in the OneSignal Dashboard if applicable
* Any relevant [logs or error messages](/docs/en/capturing-a-debug-log)
We're happy to help!
Configure URL, permission prompt, tag, outcome, and custom click actions on in-app message elements.
Create segments based on user properties, behavior, and device attributes.