> ## Documentation Index
> Fetch the complete documentation index at: https://documentation.onesignal.com/llms.txt
> Use this file to discover all available pages before exploring further.

# Data feeds

> Pull real-time data from your APIs into OneSignal email messages at send time using Data Feeds, with Liquid syntax for personalization.

Data Feeds let you pull **real-time data from your APIs directly into messages** at send time. This allows you to deliver highly personalized content without pre-loading data into OneSignal.

Use Data Feeds when your data changes frequently, such as:

* A user’s current rewards balance
* Latest order status
* Personalized product recommendations

Other personalization methods (like [Tags](./add-user-data-tags) or [Dynamic Content](./dynamic-content)) work well for static data. **Data Feeds are best for live, fast-changing values**.

<Note>
  Data Feeds are currently available **only for email messages sent through Journeys**.
  Need another channel? [Fill out this short survey](https://survey.survicate.com/954895d3e7ed1348/?p=anonymous).
</Note>

***

## How Data Feeds work

1. **Create a Data Feed** – Configure how OneSignal connects to your API.
2. **Attach the Data Feed** to a message template.
3. **Insert response fields** in your message using [Liquid syntax](./using-liquid-syntax).
4. **At send time**, OneSignal makes an API call for each recipient, parses the response, and injects the data into your message.

### Example: Display reward points

Suppose you want to show each customer their rewards balance:

```liquid theme={null}
Hi {{ first_name }},

You have {{ data_feed.rewards.points }} points!
Your membership status is {{ data_feed.rewards.status_level }}.

Keep shopping to earn more points!
```

When Sarah receives this email, the Liquid variables are replaced with her actual points balance and membership status. The following sections walk through setting up this example step by step.

## Creating and using a Data Feed

### 1. Set up your Data Feed configuration

Navigate to **Data > Data Feeds** in the sidebar to see the list of existing Data Feeds and create a new one.

Each Data Feed must have:

* **Name**: A descriptive name like "Customer Rewards API" to help you distinguish feeds. Unique names are recommended but not required.
* **Alias**: A short identifier like `rewards` used in Liquid syntax (e.g., `{{ data_feed.rewards.points }}`). Must be unique, lowercase, alphanumeric, with no spaces or special characters.
* **Method**: The HTTP method OneSignal uses to contact your API. Usually `GET`, but `POST` is also supported.
* **URL**: Your API endpoint. Supports Liquid syntax so OneSignal can fetch user-specific data.

For example, your rewards endpoint might accept the user's `external_id` (stored in OneSignal) as a URL parameter:

```liquid theme={null}
https://acme.com/customers/user_id={{ external_id }}/rewards
```

* **Headers**: Key-value pairs required by your API (e.g., authentication tokens). Supports Liquid syntax.
* **Body**: Optional JSON request body. Supports Liquid syntax, the same as [Journey webhooks](./journeys-webhook#personalization).

For example, your API might require the user's ID in the request body instead of the URL:

```json theme={null}
{
	"customer_id": "{{ subscription.external_id }}"
}
```

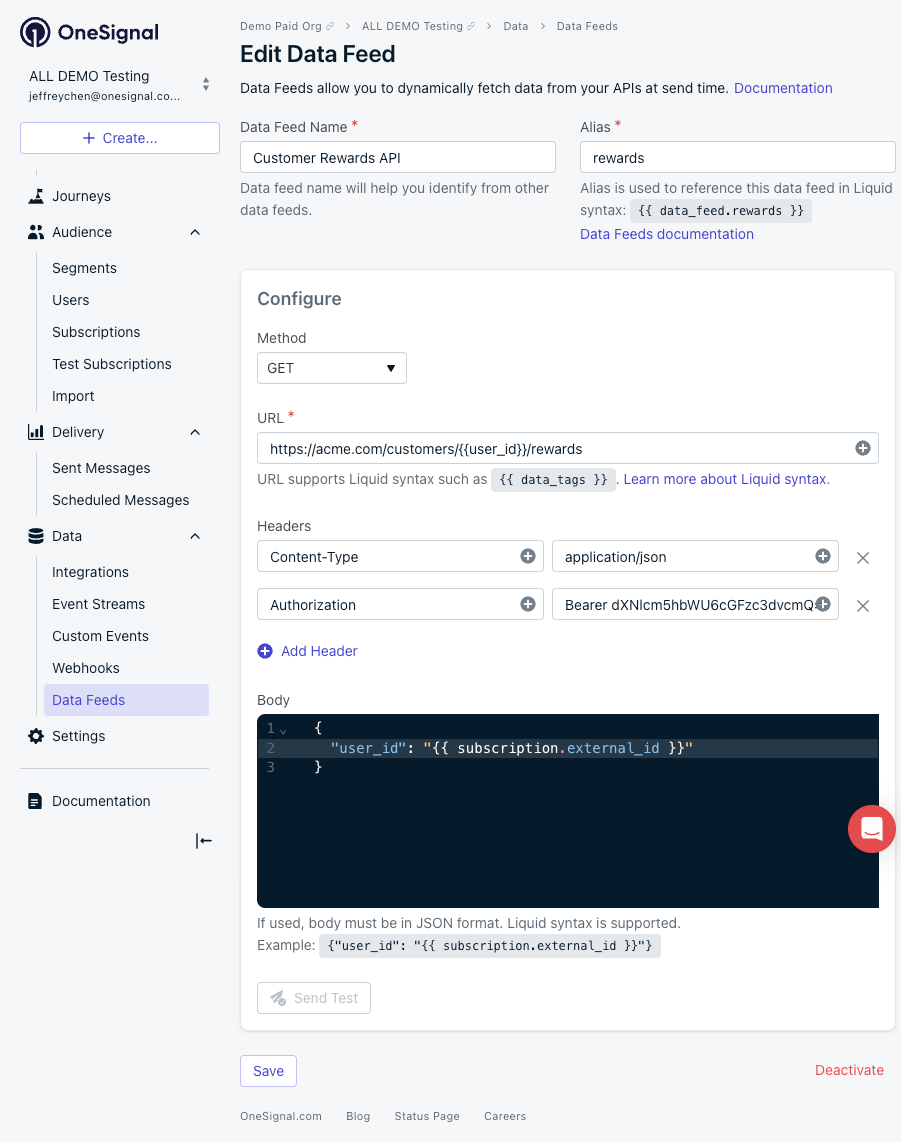
A complete Data Feed configuration looks like this:

<Frame caption="Data Feed configuration example">
  <img src="https://mintcdn.com/onesignal/pJu1B0q7HE_EbGFK/images/dashboard/data-feed-configuration-example.png?fit=max&auto=format&n=pJu1B0q7HE_EbGFK&q=85&s=d000fa94b02ee58c15b089fa7f9ad834" alt="Data Feed configuration showing name, alias, method, URL, and headers" width="901" height="1142" data-path="images/dashboard/data-feed-configuration-example.png" />
</Frame>

<Tip>
  Test your feed before using it in production. Data Feed tests run against your [Test Users](./test-users), so verify that those subscriptions have attributes that return a real result from your API.
</Tip>

Finally, **Activate** your new Data Feed so it’s ready for use.

### 2. Attach the Data Feed to your message template

Attach your Data Feed to your message template so that OneSignal knows to use it.

1. Navigate to **Messages > Templates**
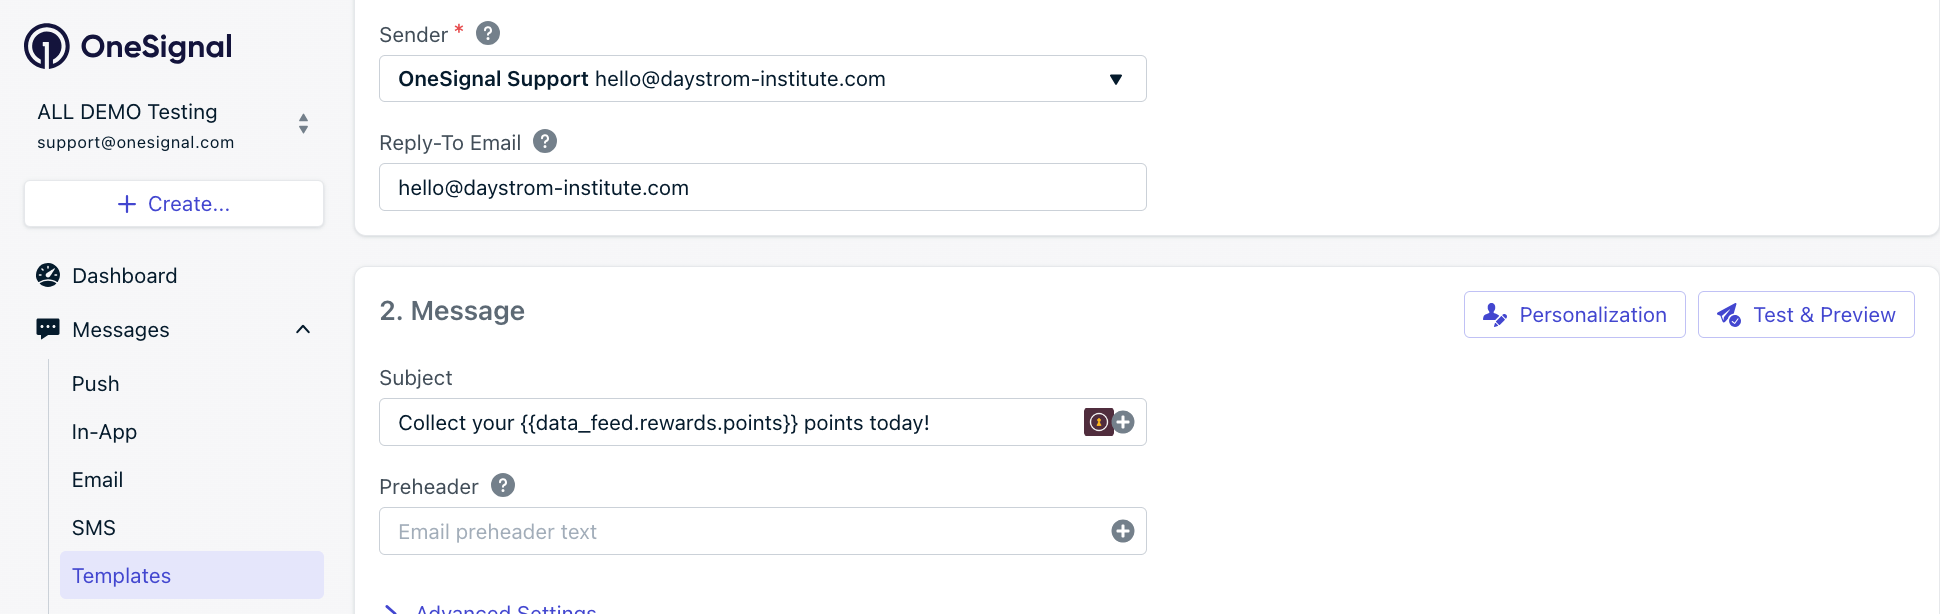
2. In the Message section, select the **Personalization** button

<Frame caption="Personalization button options">
  <img src="https://mintcdn.com/onesignal/ciRrThfP6xMpI7GY/images/dashboard/data-feeds-personalization-button.png?fit=max&auto=format&n=ciRrThfP6xMpI7GY&q=85&s=a2b46a9c67cc0ce86c469c407d2afbac" alt="Personalization button in the message template editor" width="1940" height="614" data-path="images/dashboard/data-feeds-personalization-button.png" />
</Frame>

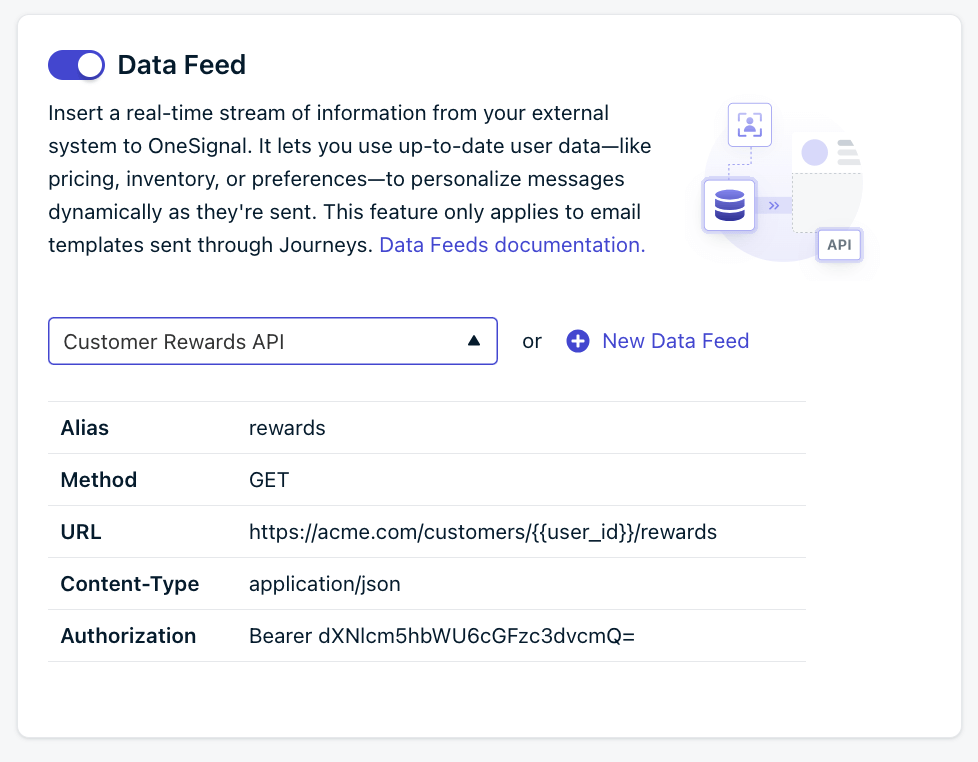
3. Toggle on **Data Feeds** and select your feed

<Frame caption="Data Feeds section in the message composer">
  <img src="https://mintcdn.com/onesignal/ciRrThfP6xMpI7GY/images/dashboard/data-feeds-option.png?fit=max&auto=format&n=ciRrThfP6xMpI7GY&q=85&s=ca51e5f38a54b8550b3256ad76843947" alt="Data Feeds toggle and feed selector in the message composer" width="978" height="762" data-path="images/dashboard/data-feeds-option.png" />
</Frame>

4. Save your template

### 3. Use the data in your message

Use Liquid syntax to insert response data anywhere in your message. Continuing the rewards example, the API response for Sarah (whose `external_id` is `a1-b2c3`) might look like this:

```json theme={null}
{
	"external_id": "a1-b2c3",
	"points": 193,
	"status_level": "Gold"
}
```

To insert the number of points and the status level, use dot notation to reference the Data Feed alias and response fields:

```liquid theme={null}
You have {{ data_feed.rewards.points }} points!
Your membership status is {{ data_feed.rewards.status_level }}.
```

This tells OneSignal:

* Use a Data Feed
* Use the `rewards` Data Feed
  * Recall: the `rewards` feed knows to call the API with the `external_id` of the recipient
* From the response, insert the value of the `points` item (193) and the `status_level` item (Gold)

***

## Requirements and limits

Your API needs to:

* **Accept single-step authentication** with auth tokens in headers
* **Respond quickly.** Under 250ms recommended (this directly affects send speed)
* **Return JSON.** Other formats are not supported at this time.
  * If you need a different format, [share your use case](https://survey.survicate.com/954895d3e7ed1348/?p=anonymous).
* **Handle your send volume.** A low rate limit on your API slows message delivery.
* **Return reasonably-sized payloads.** Keep responses under 50 KB for best performance.

Current limits:

* **One Data Feed per template.** Fetch everything you need in a single API response.
* **One API call per Data Feed per message.**
* **Journeys only.** Not yet available for other sending methods.
* **No chaining calls.** The payload from one Data Feed cannot be used to call another.

<Info>
  Need multiple Data Feeds per template or support for other channels? [Share your use case](https://survey.survicate.com/954895d3e7ed1348/?p=anonymous) to help prioritize these features.
</Info>

***

## Setting up your API

Before creating a Data Feed, ensure your API can handle these requirements:

### Authentication

Your API should accept authentication via headers:

```
Authorization: Bearer YOUR_TOKEN
```

or

```
X-API-Key: YOUR_KEY
```

#### Disallowed headers

The following headers are restricted and cannot be set:

* `content-length`
* `referer`
* `metadata-flavor`
* `x-google-metadata-request`
* `host`
* `x-onesignal*`

### JSON request body

If you need to include a body in the request, your API should accept JSON. This may mean your headers need to include `Content-Type: application/json`.

### JSON response

Your API should return a JSON object. Typically this means your headers will include `Accept: application/json`.

### Personalization parameters

You'll typically pass user identifiers in the URL like this:

```liquid theme={null}
https://api.example.com/users/{{ external_id }}/data
https://api.example.com/rewards?email={{ email | url_encode }}
```

And/or in the body:

```json theme={null}
{
	"customer_id": "{{ external_id }}",
	"email": "{{ subscription.email }}"
}
```

Make sure this data will exist in OneSignal (usually as Tags, but other options are available such as [custom event properties](#examples-and-advanced-use-cases)).

### Rate limits

Consider your API's rate limits. Sending to 10,000 users means 10,000 API calls in rapid succession. Ensure your API can handle this volume.

### Error handling

If your API returns an error or doesn't have data for a user, the message won't be sent to that recipient. Make sure your API returns data for all expected users.

***

## Getting started checklist

Before implementing Data Feeds, answer these questions:

* What data do I want to show in my message? Working backwards from a simple outline with the items to be populated from your API identified will help you organize your thinking.
* Is this data available via a single API endpoint?
* How will I authenticate API requests?
* What identifier or other data item will I use to fetch personalized data?
* Is that identifier already stored in OneSignal? If not, how will it be populated?
* Can my API handle the volume of requests I'll generate?
* What happens if my API doesn't have data for a user?

***

## Examples and advanced use cases

Data Feeds can be used with Liquid syntax or in combination with other features in creative ways to produce more complex personalization.

<AccordionGroup>
  <Accordion title="Iterating with loops: abandoned cart">
    Let's say you have a Data Feed cart that returns an array of items in the user's cart, plus the cart total dollar amount:

    ```json theme={null}
    {
      "items": [
        {
          "name": "Blue Running Shoes",
          "price": 84.00,
          "image_url": "https://acme.com/blue-running-shoes.png"
        },
        {
          "name": "Protein Bar",
          "price": 5.99,
          "image_url": "https://acme.com/protein-bar.png"
        }
      ],
      "total": 89.99
    }
    ```

    If you want to show each item in the cart, plus the cart total, you can use a for loop in Liquid:

    ```html theme={null}
    <ul>
      {% for item in data_feed.cart.items %}
        <li>
          <strong>{{ item.name }}</strong><br>
          ${{ item.price }}<br>
          <img src="{{ item.image_url }}" alt="{{ item.name }}">
        </li>
      {% endfor %}
    </ul>

    <p>Cart total: ${{ data_feed.cart.total }}</p>

    ```

    This will result in:

    ```text theme={null}
    - Blue Running Shoes
    - $84.00
    - <running shoes image>
    - Protein Bar
    - $5.99
    - <protein bar image>
    Cart total: $89.99
    ```

    <Note>
      If you're using the email block editor, when inserting this sort of complex Liquid syntax, particularly if you need to include images or links, for best results use the custom HTML block element.
    </Note>

    <Tip>
      Want to see how to trigger this abandoned cart email using custom events? Check out the **Custom events properties** section below for the complete workflow.
    </Tip>
  </Accordion>

  <Accordion title="Custom events properties">
    Continuing the previous abandoned cart example, how might we know how to fetch that particular cart in the first place?

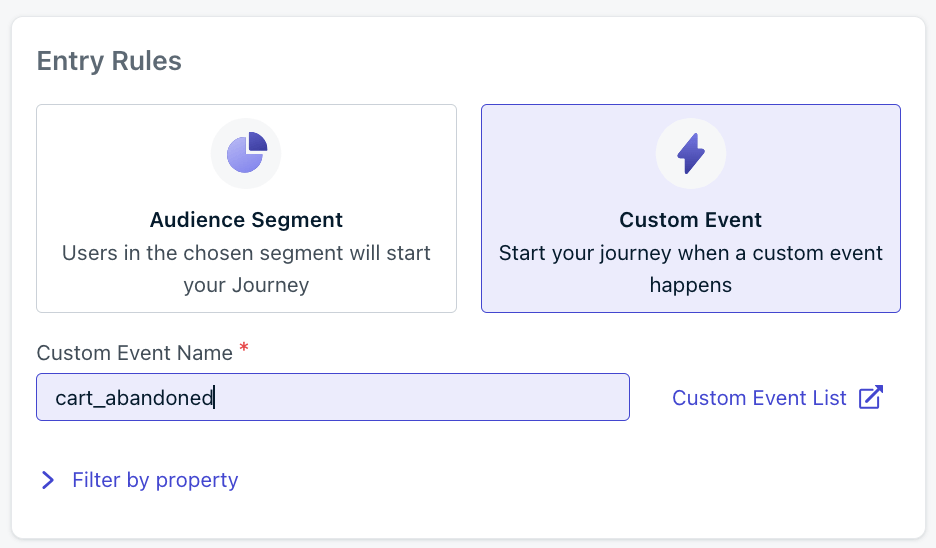
    One method might be to create a Journey triggered by a `cart_abandoned` [custom event](./custom-events), where the properties includes a cart\_id. In this example that event is being sent to OneSignal via API:

    ```bash theme={null}
    curl --request POST \
      --url https://api.onesignal.com/apps/{app_id}/custom_events \
      --header 'Accept: application/json' \
      --data '{
      "events": [
        {
          "name": "cart_abandoned",
          "external_id": "user_12345",
          "properties": {
            "cart_id": 98765
          }
        }
      ]
    }'
    ```

    <Frame caption="Custom event for Journey entry">
      <img src="https://mintcdn.com/onesignal/ciRrThfP6xMpI7GY/images/dashboard/data-feed-custom-event-journey-entry.png?fit=max&auto=format&n=ciRrThfP6xMpI7GY&q=85&s=6bb357d09ef9a2830ee6e9a19109afc1" alt="Journey entry node triggered by a custom event" width="936" height="548" data-path="images/dashboard/data-feed-custom-event-journey-entry.png" />
    </Frame>

    The user `user_12345` enters the journey when this event is fired, then reaches a node sending an email. That email template is set up with the `cart` Data Feed, where the URL is set to retrieve the contents of a particular cart like so:

    ```liquid theme={null}
    https://acme.com/carts/{{ journey.event.cart_abandoned.data.cart_id }}
    ```

    Thus, when this particular event is ingested and triggers the Journey:

    1. The `cart_id` value of `98765` will be stored to the Journey
    2. When the email step is reached, the `cart` Data Feed will reference that `cart_id` value and use it to call the cart API
    3. The returned JSON properties will be parsed and inserted into the email as in the previous example above

    <Tip>
      Want to see how to conditionally display Data Feed content based on order status? Check out the **Conditional display: order status** section below to learn more.
    </Tip>
  </Accordion>

  <Accordion title="Conditional display: order status">
    Let's say you want to include the status of a customer's order, but only include a tracking number link if the order has been shipped. You can use an `if` statement to do so:

    ```liquid theme={null}
    Your order is {{data_feed.order.status}}!

    {% if data_feed.order.tracking_number != empty %}
    Track it here: {{data_feed.order.tracking_url}}
    {% endif %}
    ```

    Here, the tracking link will only be displayed if the `tracking_number` exists.
  </Accordion>

  <Accordion title="Automation without personalization">
    Data Feeds can be used to automatically insert up-to-date information into your messages without necessarily needing to be personalized per recipient.

    For example, perhaps you insert a banner image at the top of your emails and change it monthly to keep up with holidays and other monthly events. Rather than remembering to upload a new image to OneSignal and changing all your templates each month, you might set up a Data Feed that fetches the current banner image URL from your CMS or other asset-management location.

    You would set up a `banner` Data Feed that points to an endpoint **without** any variables in the URL like so:

    ```liquid theme={null}
    https://acme.com/assets/email-banner
    ```

    Which returns a response with the current banner URL:

    ```json theme={null}
    {
    	"banner_url": "https://acme.com/assets/email-banner/2025july.png"
    }
    ```

    You'd set your email template to use `{{ data_feed.banner.banner_url }}` as the image source URL, automating this process going forward.
  </Accordion>

  <Accordion title="Personalized coupon codes">
    This example covers how to send personalized, single-use coupon codes in emails using a Data Feed that fetches a unique value from your API for each recipient.

    ### Goal

    Send an email such as:

    > Hi George,
    >
    > Complete your booking in the next 2 hours and save 10% with your personal code: XYZ123ABC

    Each user receives a unique coupon code, generated live via an external API call when the email is sent, valid for the given time window, and scoped to that user.

    ### Prerequisites

    * [Email channel configured](./email-setup) in OneSignal (your app has email capability enabled)
    * An external API that accepts a user identifier (for example, [`external_id`](./users#external-id)) and campaign identifier, and returns JSON with the coupon code, discount, and expiration
    * A unique identifier (such as `external_id`) for each user that your API can use to generate coupons
    * A [segment](./segmentation) or trigger (for example, "abandoned search in last 24h") used to send the email through a OneSignal Journey

    ### Step 1: Create the Data Feed

    <Steps>
      <Step title="Navigate to Data Feeds">
        In your OneSignal dashboard, select **Data > Data Feeds** from the navigation bar, then click **New Data Feed**.
      </Step>

      <Step title="Configure the Data Feed">
        Configure the following fields:

        * **Data Feed Name**: `coupon_code_generator`
        * **Alias**: `coupon`
        * **Method**: `GET`
        * **URL**: `https://api.example.com/generate-coupon?userId={{ external_id }}&campaign=AbandonedBooking10`
        * **Headers**:
          ```json theme={null}
          {
            "Authorization": "Bearer YOUR_API_TOKEN"
          }
          ```
      </Step>

      <Step title="Reference the API response">
        When the API returns JSON like this:

        ```json theme={null}
        {
          "code": "AB10-5F3K-HT9L",
          "discount_percent": "10%",
          "expires_in_hours": 2
        }
        ```

        You can reference its values in your email template as:

        * `{{ data_feed.coupon.code }}`
        * `{{ data_feed.coupon.discount_percent }}`
        * `{{ data_feed.coupon.expires_in_hours }}`
      </Step>

      <Step title="Test and activate the Data Feed">
        Click **Send Test** to verify your configuration, then click **Activate** to make the Data Feed available for use in templates.
      </Step>
    </Steps>

    ### Step 2: Create the email template

    1. In OneSignal, go to **Messages > Email > New Template**
    2. Use the Data Feed alias and fields within your message body. For example:

    ```html theme={null}
    <h2>Hi {{ first_name }},</h2>
    <p>
    Complete your booking in the next {{ data_feed.coupon.expires_in_hours }} hours and save
    {{ data_feed.coupon.discount_percent }} with your personal code:
    <strong>{{ data_feed.coupon.code }}</strong>
    </p>

    <p><a href="https://example.com/checkout?coupon={{ data_feed.coupon.code }}">Use Code Now →</a></p>
    ```

    <Note>
      * Use Liquid syntax in the form `{{ data_feed.<alias>.<field> }}`
      * Make sure the Data Feed is attached to the template
      * If using the drag-and-drop editor with custom Liquid logic, use an HTML block
    </Note>

    ### Step 3: Attach the Data Feed and trigger the email

    1. In the template composer, under **Personalization > Data Feeds**, toggle the feed on and select `coupon_code_generator`
    2. This ensures OneSignal makes the API call at send time for each recipient, populates the data, and injects it into the email
    3. Set up a Journey to automate the message:
       * **Entry condition**: Segment such as "abandoned search in last 24 hours"
       * **[Wait until](./custom-events#wait-until-event)**: Create a `booking_completed` custom event. Configure the wait to exit the Journey if this event fires, or continue after 1 hour. If they complete a booking, they exit without receiving the email; otherwise, they continue to receive the coupon.
       * **Send email**: Use the personalized coupon email template
       * Ensure the Journey uses the email channel and that recipients are subscribed to email

    ### Step 4: Manage coupon redemption and tracking

    Your backend should:

    1. Record each generated code along with `userId`, `code`, `campaign`, `expiration_time`, and a `redeemed` flag
    2. Validate and mark codes as redeemed upon checkout
    3. Log the redemption data (user, campaign, and time) for ROI analysis

    ### Complete workflow example

    | Step | Event                                    | Action                                                                                       |
    | ---- | ---------------------------------------- | -------------------------------------------------------------------------------------------- |
    | 1    | User triggers "abandoned search" segment | User enters Journey via segment                                                              |
    | 2    | Journey triggers email send              | OneSignal attaches Data Feed, calls your API with the user's `external_id` and campaign name |
    | 3    | API returns JSON                         | OneSignal populates data feed coupon fields and sends email                                  |
    | 4    | User receives email                      | Example: "Hi George! Save 10% with your personal code: AB10-5F3K-HT9L"                       |
    | 5    | User redeems code                        | Backend validates and logs redemption                                                        |

    ### Testing

    * Test with a user who has a known `external_id`
    * Call your API manually to confirm correct JSON responses
    * Use **Preview** in the OneSignal template editor to verify that data feed coupon fields populate
    * Check API logs for latency and errors
    * If a Data Feed call fails, OneSignal will skip sending the message to that recipient
  </Accordion>

  <Accordion title="Google Sheets: no-code data feed">
    If you want to send dynamic content in your emails but don't have a backend database or API, Google Sheets combined with Google Apps Script is a simple alternative. This guide walks you through setting up a Google Sheet as a live JSON endpoint that OneSignal can pull from at send time.

    <Note>
      This approach works well for any manually curated content that updates on a regular cadence — weekly newsletters, product roundups, editorial digests, event listings, and more.
    </Note>

    ### How it works

    1. You maintain a Google Sheet with your content (one row per item)
    2. A small Apps Script converts the sheet into a JSON endpoint
    3. OneSignal fetches that JSON at send time via a Data Feed
    4. Liquid tags in your email template populate with the sheet data

    ### Step 1: Set up your Google Sheet

    Create a new Google Sheet with your content. Use the first row as column headers — these become your Liquid variable names.

    **Example structure:**

    | title     | image        | price   | link         | category   |
    | --------- | ------------ | ------- | ------------ | ---------- |
    | Product A | https\://... | \$24.00 | https\://... | Category 1 |
    | Product B | https\://... | \$68.00 | https\://... | Category 2 |

    <Note>
      Keep column headers lowercase with no spaces — this makes them easier to reference in Liquid tags.
    </Note>

    ### Step 2: Add the Apps Script

    In your Google Sheet, go to **Extensions > Apps Script** and paste the following code:

    ```javascript theme={null}
    function doGet() {
      const sheet = SpreadsheetApp.getActiveSpreadsheet().getActiveSheet();
      const data = sheet.getDataRange().getValues();
      const headers = data[0];
      const rows = data.slice(1);

      const result = {};

      rows.forEach((row, index) => {
        const slot = index + 1;
        headers.forEach((header, i) => {
          result[`item_${slot}_${header}`] = row[i];
        });
      });

      return ContentService.createTextOutput(JSON.stringify(result))
        .setMimeType(ContentService.MimeType.JSON);
    }
    ```

    This script reads your sheet and transforms it into a flat JSON object. Each row becomes a numbered item slot:

    ```json theme={null}
    {
      "item_1_title": "Product A",
      "item_1_price": "$24.00",
      "item_2_title": "Product B",
      "item_2_price": "$68.00"
    }
    ```

    ### Step 3: Deploy the script as a web app

    <Steps>
      <Step title="Open the Deploy menu">
        Click **Deploy > New deployment**.
      </Step>

      <Step title="Configure the deployment">
        Select type: **Web app**. Set **Execute as**: Me. Set **Who has access**: Anyone.
      </Step>

      <Step title="Deploy and copy the URL">
        Click **Deploy** and copy the web app URL. This is the URL you'll use in OneSignal.
      </Step>
    </Steps>

    <Warning>
      Any time you update the script, you must create a **new version** under Manage Deployments for changes to take effect on the live URL. Saving the script alone is not enough.
    </Warning>

    ### Step 4: Create a Data Feed in OneSignal

    <Steps>
      <Step title="Navigate to Data Feeds">
        In your OneSignal dashboard, go to **Data > Data Feeds** and click **New Data Feed**.
      </Step>

      <Step title="Configure the feed">
        Set a descriptive **Name** (e.g. `Weekly Content`) and an **Alias** you'll reference in Liquid tags (e.g. `weekly_content`). Set the **URL** to your Apps Script web app URL.
      </Step>

      <Step title="Activate">
        Save and activate the Data Feed so it's available for use in templates.
      </Step>
    </Steps>

    ### Step 5: Use Liquid tags in your email template

    Reference your sheet data in any email template using the following syntax:

    ```liquid theme={null}
    {{ data_feed.weekly_content.item_1_title }}
    {{ data_feed.weekly_content.item_1_price }}
    {{ data_feed.weekly_content.item_1_image }}
    {{ data_feed.weekly_content.item_2_title }}
    ```

    The pattern is always:

    ```liquid theme={null}
    {{ data_feed.{alias}.item_{row number}_{column header} }}
    ```

    ### Step 6: Attach the Data Feed to your message

    When creating a new email message or template, attach the Data Feed under **Personalization > Data Feeds** before sending. OneSignal fetches the latest data from your sheet at send time.

    ### Updating content

    To update your email content for the next send, open your Google Sheet and update the rows. No script changes or redeployment needed — the URL always serves the current sheet data.

    ### Tips

    * **Add or remove rows freely.** Just make sure your Liquid tags in the template match the number of rows in your sheet.
    * **Column headers are your variable names.** Renaming a column means updating the Liquid tags in your template to match.
    * **Test your endpoint first.** Paste your Apps Script URL directly in a browser to verify the JSON output before connecting it to OneSignal.
    * **Format numbers as text.** If you include currency or other formatted values, set those cells to Plain Text in Google Sheets to prevent formatting from being stripped.
    * **The script is reusable.** The same Apps Script works for any sheet structure — no modifications needed.
  </Accordion>
</AccordionGroup>

***

## FAQ

### My Data Feed values are not appearing in the message. What should I check?

Verify these in order:

1. The Data Feed is **attached** to the template (under **Personalization > Data Feeds**).
2. Your Liquid syntax matches the JSON response structure exactly — `{{ data_feed.<alias>.<field> }}`.
3. The API endpoint returns valid JSON when called manually with the same identifiers.
4. The recipient has the required identifier (e.g., `external_id`) stored in OneSignal.

### Why are messages sending slowly?

Data Feed API calls run at send time for every recipient. If your API responds slowly or cannot handle concurrent requests, message delivery slows proportionally. Aim for under 250 ms response time and ensure your infrastructure can handle your send volume.

### Why are some recipients not getting messages?

If the Data Feed API call fails for a recipient — due to a 404, timeout, or missing data — OneSignal skips that recipient entirely. Check the error log in your Data Feed configuration and your own API logs for failures. Verify those users have the required identifiers in OneSignal.

### Can I use more than one Data Feed in a template?

Not currently. Each template supports one Data Feed. Fetch all the data you need in a single API response. If you need multiple feeds, [share your use case](https://survey.survicate.com/954895d3e7ed1348/?p=anonymous).

### Are Data Feeds available for push notifications or SMS?

No. Data Feeds are currently available only for email messages sent through Journeys. Support for additional channels is planned — [share your use case](https://survey.survicate.com/954895d3e7ed1348/?p=anonymous) to help prioritize.

### What happens if my API is down when the message sends?

OneSignal skips any recipient whose Data Feed call fails. The message is not sent to that recipient, and no fallback value is inserted. Monitor your API uptime and error rates during scheduled sends.

## Related pages

<Columns cols={2}>
  <Card title="Liquid syntax" icon="code" href="./using-liquid-syntax">
    Full reference for Liquid templating in OneSignal messages.
  </Card>

  <Card title="Journeys" icon="route" href="./journeys-overview">
    Build automated messaging workflows that trigger Data Feed emails.
  </Card>

  <Card title="Custom events" icon="bolt" href="./custom-events">
    Trigger Journeys and pass event properties for Data Feed URLs.
  </Card>

  <Card title="Message personalization" icon="user-pen" href="./message-personalization">
    Overview of all personalization methods — tags, Liquid, dynamic content, and Data Feeds.
  </Card>
</Columns>