> ## Documentation Index
> Fetch the complete documentation index at: https://documentation.onesignal.com/llms.txt
> Use this file to discover all available pages before exploring further.
# Onboard users with banner in-app messages
> Guide users with contextual top and bottom banner in-app messages that don't block your app UI.
Banner In-App Messages (IAMs) let you guide users without blocking your app UI. You display short, contextual messages at the top or bottom of the screen while users continue interacting with your app.
You typically use banner IAMs when users need extra context at a specific moment, such as the first time they reach a screen or start a key workflow.
In-App Messages display only when their trigger conditions are met. You control exactly when a banner appears by setting triggers from your app.
***
## When to use banner IAMs
Use banner IAMs for onboarding when you want to:
* Explain a screen as the user reaches it
* Guide users through multi-step flows
* Highlight actions users should take next
* Keep onboarding visible but non-intrusive
If you need a structured, multi-screen walkthrough, use a card or carousel IAM instead.
***
## Example onboarding flow
When a user opens your site or app for the first time, a top banner welcomes them and prompts exploration. When the user taps a product to view details, a bottom banner guides them on what to do next. Each banner appears only when the user reaches the relevant screen.
This approach ensures users see guidance only when it is relevant.
### Visual example: E-commerce onboarding
Here's how banner IAMs guide users through an e-commerce app. This example uses **two separate IAMs**, each with a **3-second auto-dismiss**. When the first banner dismisses, the trigger for the second banner activates, creating a smooth sequential flow:
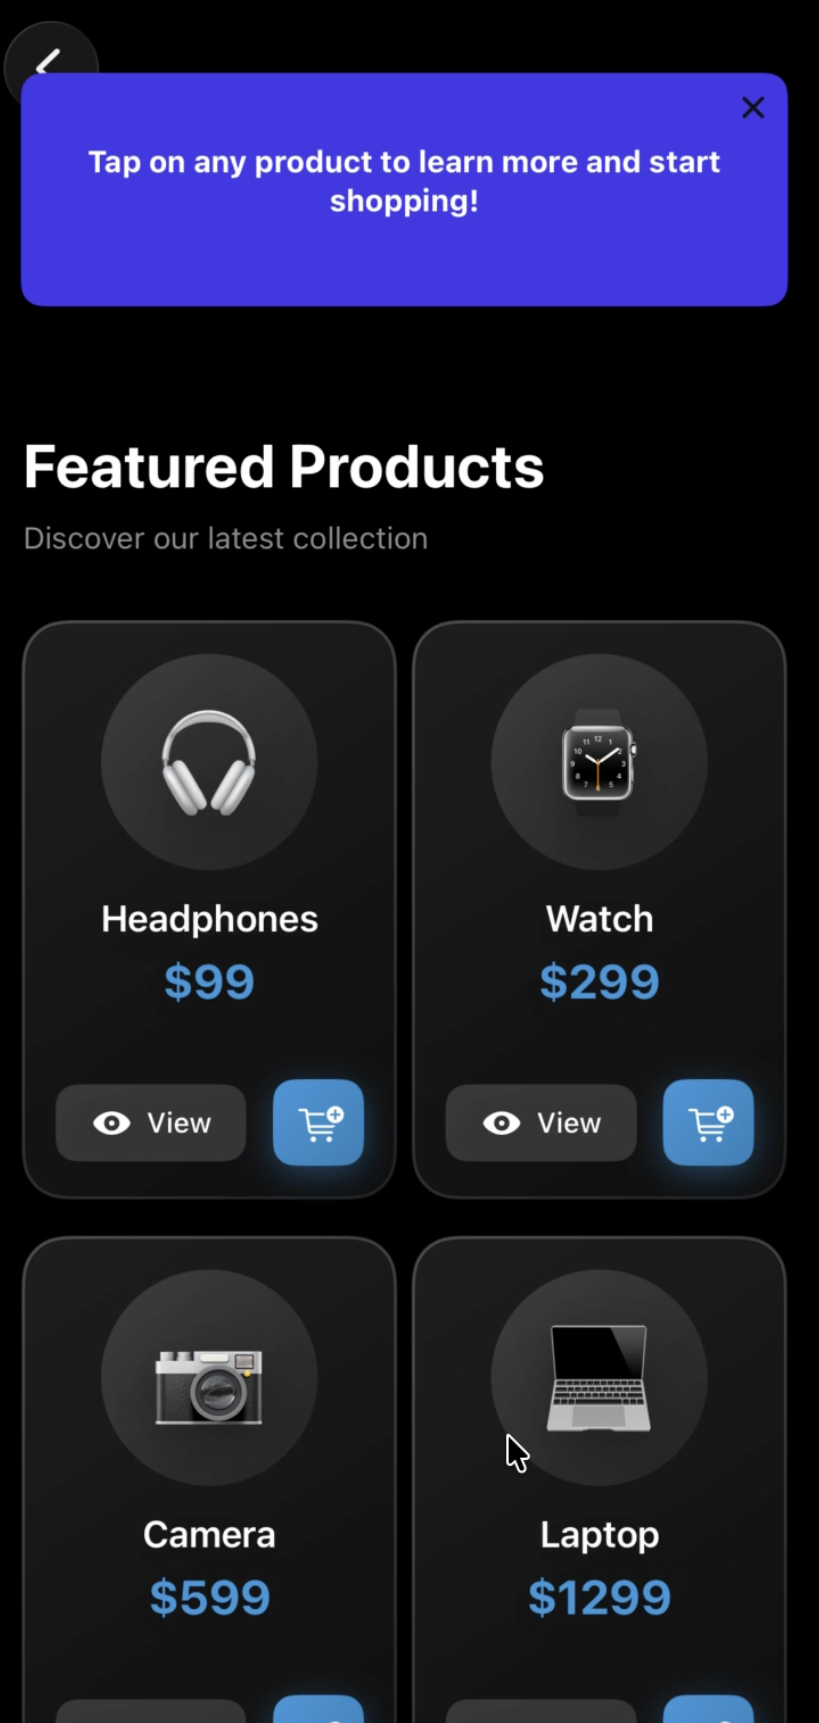 When users first open the app, a bottom banner prompts them to explore products.
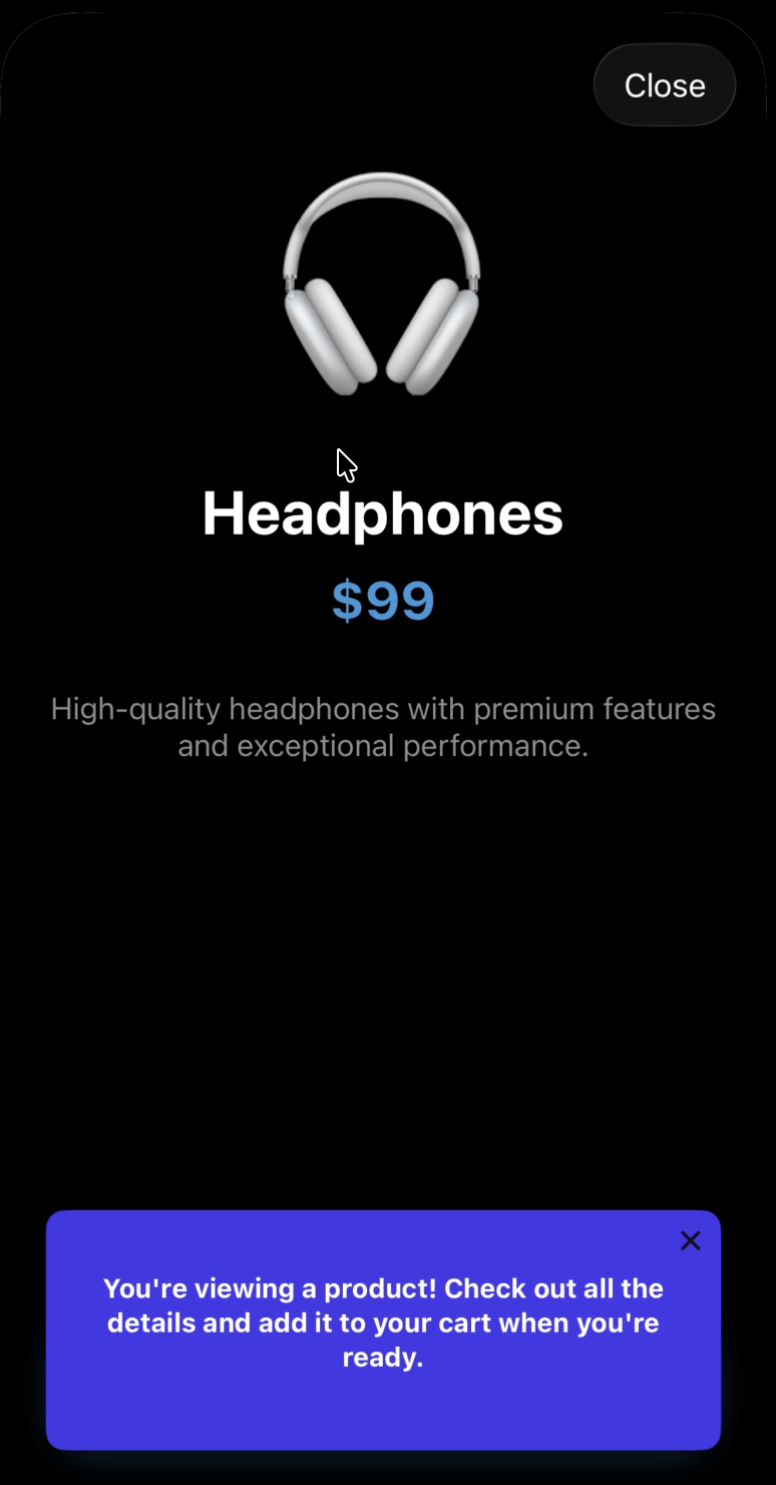 When a user taps on a product, a banner provides guidance for the product detail view.
***
## Prerequisites
Before you begin, make sure you have:
* An active OneSignal app
* OneSignal SDK installed in your app
* The ability to trigger events or call methods from your app code
* [User consent](./mobile-sdk-reference#privacy) granted for the OneSignal SDK (required for In-App Messaging)
***
## Create a banner in-app message
In the OneSignal dashboard, go to **Messages → In-App Messages** and select **New In-App Message**.
Under **Message Type**, choose **Top** or **Bottom**.
Include a short heading that explains the purpose of the screen, optional supporting text if needed, and an optional button to guide the next action.
Add one or more **[In-App Message triggers](./iam-triggers)** that define when the banner should appear. Optionally add conditions or limits to control how often the message displays.
Choose between auto-dismiss (banner disappears after 3-10 seconds) or user-dismissible (banner remains until the user taps close).
Save and activate your banner In-App Message.
Use top banners for high-visibility guidance and bottom banners for subtle prompts that align with primary actions. For onboarding, use auto-dismiss to keep the flow moving without requiring user action.
Avoid long explanations. Banner IAMs are not designed for detailed onboarding or tutorials.
***
## Trigger the banner from your app
You trigger the banner IAM when the user reaches a specific screen or completes an action using In-App Message triggers. Triggers are key–value pairs that you set from your app code. When the trigger conditions match the IAM's display rules, the banner displays.
```javascript JavaScript theme={null}
// Trigger when the user views the dashboard
OneSignal.addTrigger('dashboard_viewed', 'true');
```
```swift iOS theme={null}
// Trigger when the user views the dashboard
OneSignal.addTrigger("dashboard_viewed", value: "true")
```
```kotlin Android theme={null}
// Trigger when the user views the dashboard
OneSignal.addTrigger("dashboard_viewed", "true")
```
Triggers persist for the session unless you remove or update them. Make sure each trigger represents a clear, intentional onboarding moment.
### Remove triggers when no longer needed
To prevent banners from reappearing unintentionally, remove triggers when they're no longer needed:
```javascript JavaScript theme={null}
// Remove trigger after the user completes onboarding
OneSignal.removeTrigger('dashboard_viewed');
```
```swift iOS theme={null}
// Remove trigger after the user completes onboarding
OneSignal.removeTrigger("dashboard_viewed")
```
```kotlin Android theme={null}
// Remove trigger after the user completes onboarding
OneSignal.removeTrigger("dashboard_viewed")
```
***
## Chain banner messages (optional)
You can guide users through a flow by creating **multiple IAMs**, each with its own trigger. Set each banner to **auto-dismiss after 3 seconds** so the next banner can appear. Remove the previous trigger before adding the next one to prevent overlapping banners.
For smooth sequential onboarding, create one IAM per step, set each to auto-dismiss after 3 seconds, and chain them by removing the previous trigger when adding the next one.
### Example: E-commerce onboarding flow
1. Page loads → Trigger `iam_welcome` → Banner: "🎉 Welcome! Explore our products"
2. User taps product → Trigger `iam_product_view` → Banner: "👀 Tap ❤️ to save favorites"
3. User adds to cart → Trigger `iam_add_to_cart` → Banner: "✅ Great choice! View cart anytime"
4. User views cart → Trigger `iam_cart_view` → Banner: "🛒 Review your items here"
5. User checks out → Trigger `iam_checkout` → Banner: "🎊 Thanks for your order!"
```javascript JavaScript theme={null}
// Move from step 1 to step 2
OneSignal.removeTrigger('iam_welcome');
OneSignal.addTrigger('iam_product_view', 'true');
```
```swift iOS theme={null}
// Move from step 1 to step 2
OneSignal.removeTrigger("iam_welcome")
OneSignal.addTrigger("iam_product_view", value: "true")
```
```kotlin Android theme={null}
// Move from step 1 to step 2
OneSignal.removeTrigger("iam_welcome")
OneSignal.addTrigger("iam_product_view", "true")
```
This creates progressive onboarding without overwhelming the user.
***
## Verify the setup
The banner appears only when the trigger fires and does not block the app UI.
If the banner does not appear:
* Confirm the trigger key and value match exactly (case-sensitive)
* Verify the IAM is Active in the dashboard
* Check Frequency Limits - the IAM may be rate-limited
* Ensure user meets Targeting Rules (if any)
* Check console logs for OneSignal trigger events
* Verify In-App Messaging consent has been granted (if required)
***
## Next steps
* Announce new features using banner In-App Messages
* Create a full onboarding experience with card or carousel IAMs
* Segment users to show different onboarding messages based on experience level
* [A/B test](./journeys-actions#abn-tests-multivariate-testing) different banner messages to optimize engagement
When a user taps on a product, a banner provides guidance for the product detail view.
***
## Prerequisites
Before you begin, make sure you have:
* An active OneSignal app
* OneSignal SDK installed in your app
* The ability to trigger events or call methods from your app code
* [User consent](./mobile-sdk-reference#privacy) granted for the OneSignal SDK (required for In-App Messaging)
***
## Create a banner in-app message
In the OneSignal dashboard, go to **Messages → In-App Messages** and select **New In-App Message**.
Under **Message Type**, choose **Top** or **Bottom**.
Include a short heading that explains the purpose of the screen, optional supporting text if needed, and an optional button to guide the next action.
Add one or more **[In-App Message triggers](./iam-triggers)** that define when the banner should appear. Optionally add conditions or limits to control how often the message displays.
Choose between auto-dismiss (banner disappears after 3-10 seconds) or user-dismissible (banner remains until the user taps close).
Save and activate your banner In-App Message.
Use top banners for high-visibility guidance and bottom banners for subtle prompts that align with primary actions. For onboarding, use auto-dismiss to keep the flow moving without requiring user action.
Avoid long explanations. Banner IAMs are not designed for detailed onboarding or tutorials.
***
## Trigger the banner from your app
You trigger the banner IAM when the user reaches a specific screen or completes an action using In-App Message triggers. Triggers are key–value pairs that you set from your app code. When the trigger conditions match the IAM's display rules, the banner displays.
```javascript JavaScript theme={null}
// Trigger when the user views the dashboard
OneSignal.addTrigger('dashboard_viewed', 'true');
```
```swift iOS theme={null}
// Trigger when the user views the dashboard
OneSignal.addTrigger("dashboard_viewed", value: "true")
```
```kotlin Android theme={null}
// Trigger when the user views the dashboard
OneSignal.addTrigger("dashboard_viewed", "true")
```
Triggers persist for the session unless you remove or update them. Make sure each trigger represents a clear, intentional onboarding moment.
### Remove triggers when no longer needed
To prevent banners from reappearing unintentionally, remove triggers when they're no longer needed:
```javascript JavaScript theme={null}
// Remove trigger after the user completes onboarding
OneSignal.removeTrigger('dashboard_viewed');
```
```swift iOS theme={null}
// Remove trigger after the user completes onboarding
OneSignal.removeTrigger("dashboard_viewed")
```
```kotlin Android theme={null}
// Remove trigger after the user completes onboarding
OneSignal.removeTrigger("dashboard_viewed")
```
***
## Chain banner messages (optional)
You can guide users through a flow by creating **multiple IAMs**, each with its own trigger. Set each banner to **auto-dismiss after 3 seconds** so the next banner can appear. Remove the previous trigger before adding the next one to prevent overlapping banners.
For smooth sequential onboarding, create one IAM per step, set each to auto-dismiss after 3 seconds, and chain them by removing the previous trigger when adding the next one.
### Example: E-commerce onboarding flow
1. Page loads → Trigger `iam_welcome` → Banner: "🎉 Welcome! Explore our products"
2. User taps product → Trigger `iam_product_view` → Banner: "👀 Tap ❤️ to save favorites"
3. User adds to cart → Trigger `iam_add_to_cart` → Banner: "✅ Great choice! View cart anytime"
4. User views cart → Trigger `iam_cart_view` → Banner: "🛒 Review your items here"
5. User checks out → Trigger `iam_checkout` → Banner: "🎊 Thanks for your order!"
```javascript JavaScript theme={null}
// Move from step 1 to step 2
OneSignal.removeTrigger('iam_welcome');
OneSignal.addTrigger('iam_product_view', 'true');
```
```swift iOS theme={null}
// Move from step 1 to step 2
OneSignal.removeTrigger("iam_welcome")
OneSignal.addTrigger("iam_product_view", value: "true")
```
```kotlin Android theme={null}
// Move from step 1 to step 2
OneSignal.removeTrigger("iam_welcome")
OneSignal.addTrigger("iam_product_view", "true")
```
This creates progressive onboarding without overwhelming the user.
***
## Verify the setup
The banner appears only when the trigger fires and does not block the app UI.
If the banner does not appear:
* Confirm the trigger key and value match exactly (case-sensitive)
* Verify the IAM is Active in the dashboard
* Check Frequency Limits - the IAM may be rate-limited
* Ensure user meets Targeting Rules (if any)
* Check console logs for OneSignal trigger events
* Verify In-App Messaging consent has been granted (if required)
***
## Next steps
* Announce new features using banner In-App Messages
* Create a full onboarding experience with card or carousel IAMs
* Segment users to show different onboarding messages based on experience level
* [A/B test](./journeys-actions#abn-tests-multivariate-testing) different banner messages to optimize engagement