> ## Documentation Index
> Fetch the complete documentation index at: https://documentation.onesignal.com/llms.txt
> Use this file to discover all available pages before exploring further.
# Huawei SDK setup
> OneSignal Huawei SDK Setup Guide for Android Studio.
## Overview
This guide explains how to integrate OneSignal push notifications into a Huawei app distributed on the Huawei AppGallery.
These instructions are for native apps written in Java or Kotlin. For other supported SDKs see:
***
## Requirements
* [Android Studio](https://developer.android.com/studio)
* A Huawei device with "Huawei App Gallery" installed
* Configured OneSignal App and Platform
***
### Configure your OneSignal app and platform
Configure your OneSignal app with the platforms you support — Apple (APNs), Google (FCM), Huawei (HMS), and/or Amazon (ADM).
If your organization already has a OneSignal account, [ask to be invited](/docs/en/manage-team-members) to the Organization. Otherwise, [sign up for a free account](https://onesignal.com) to get started.
Create a new app by clicking **New App/Website**, or add a platform to an existing app in **Settings > Push & In-App**. Select the platform(s) you want to configure and click **Next: Configure Your Platform**.
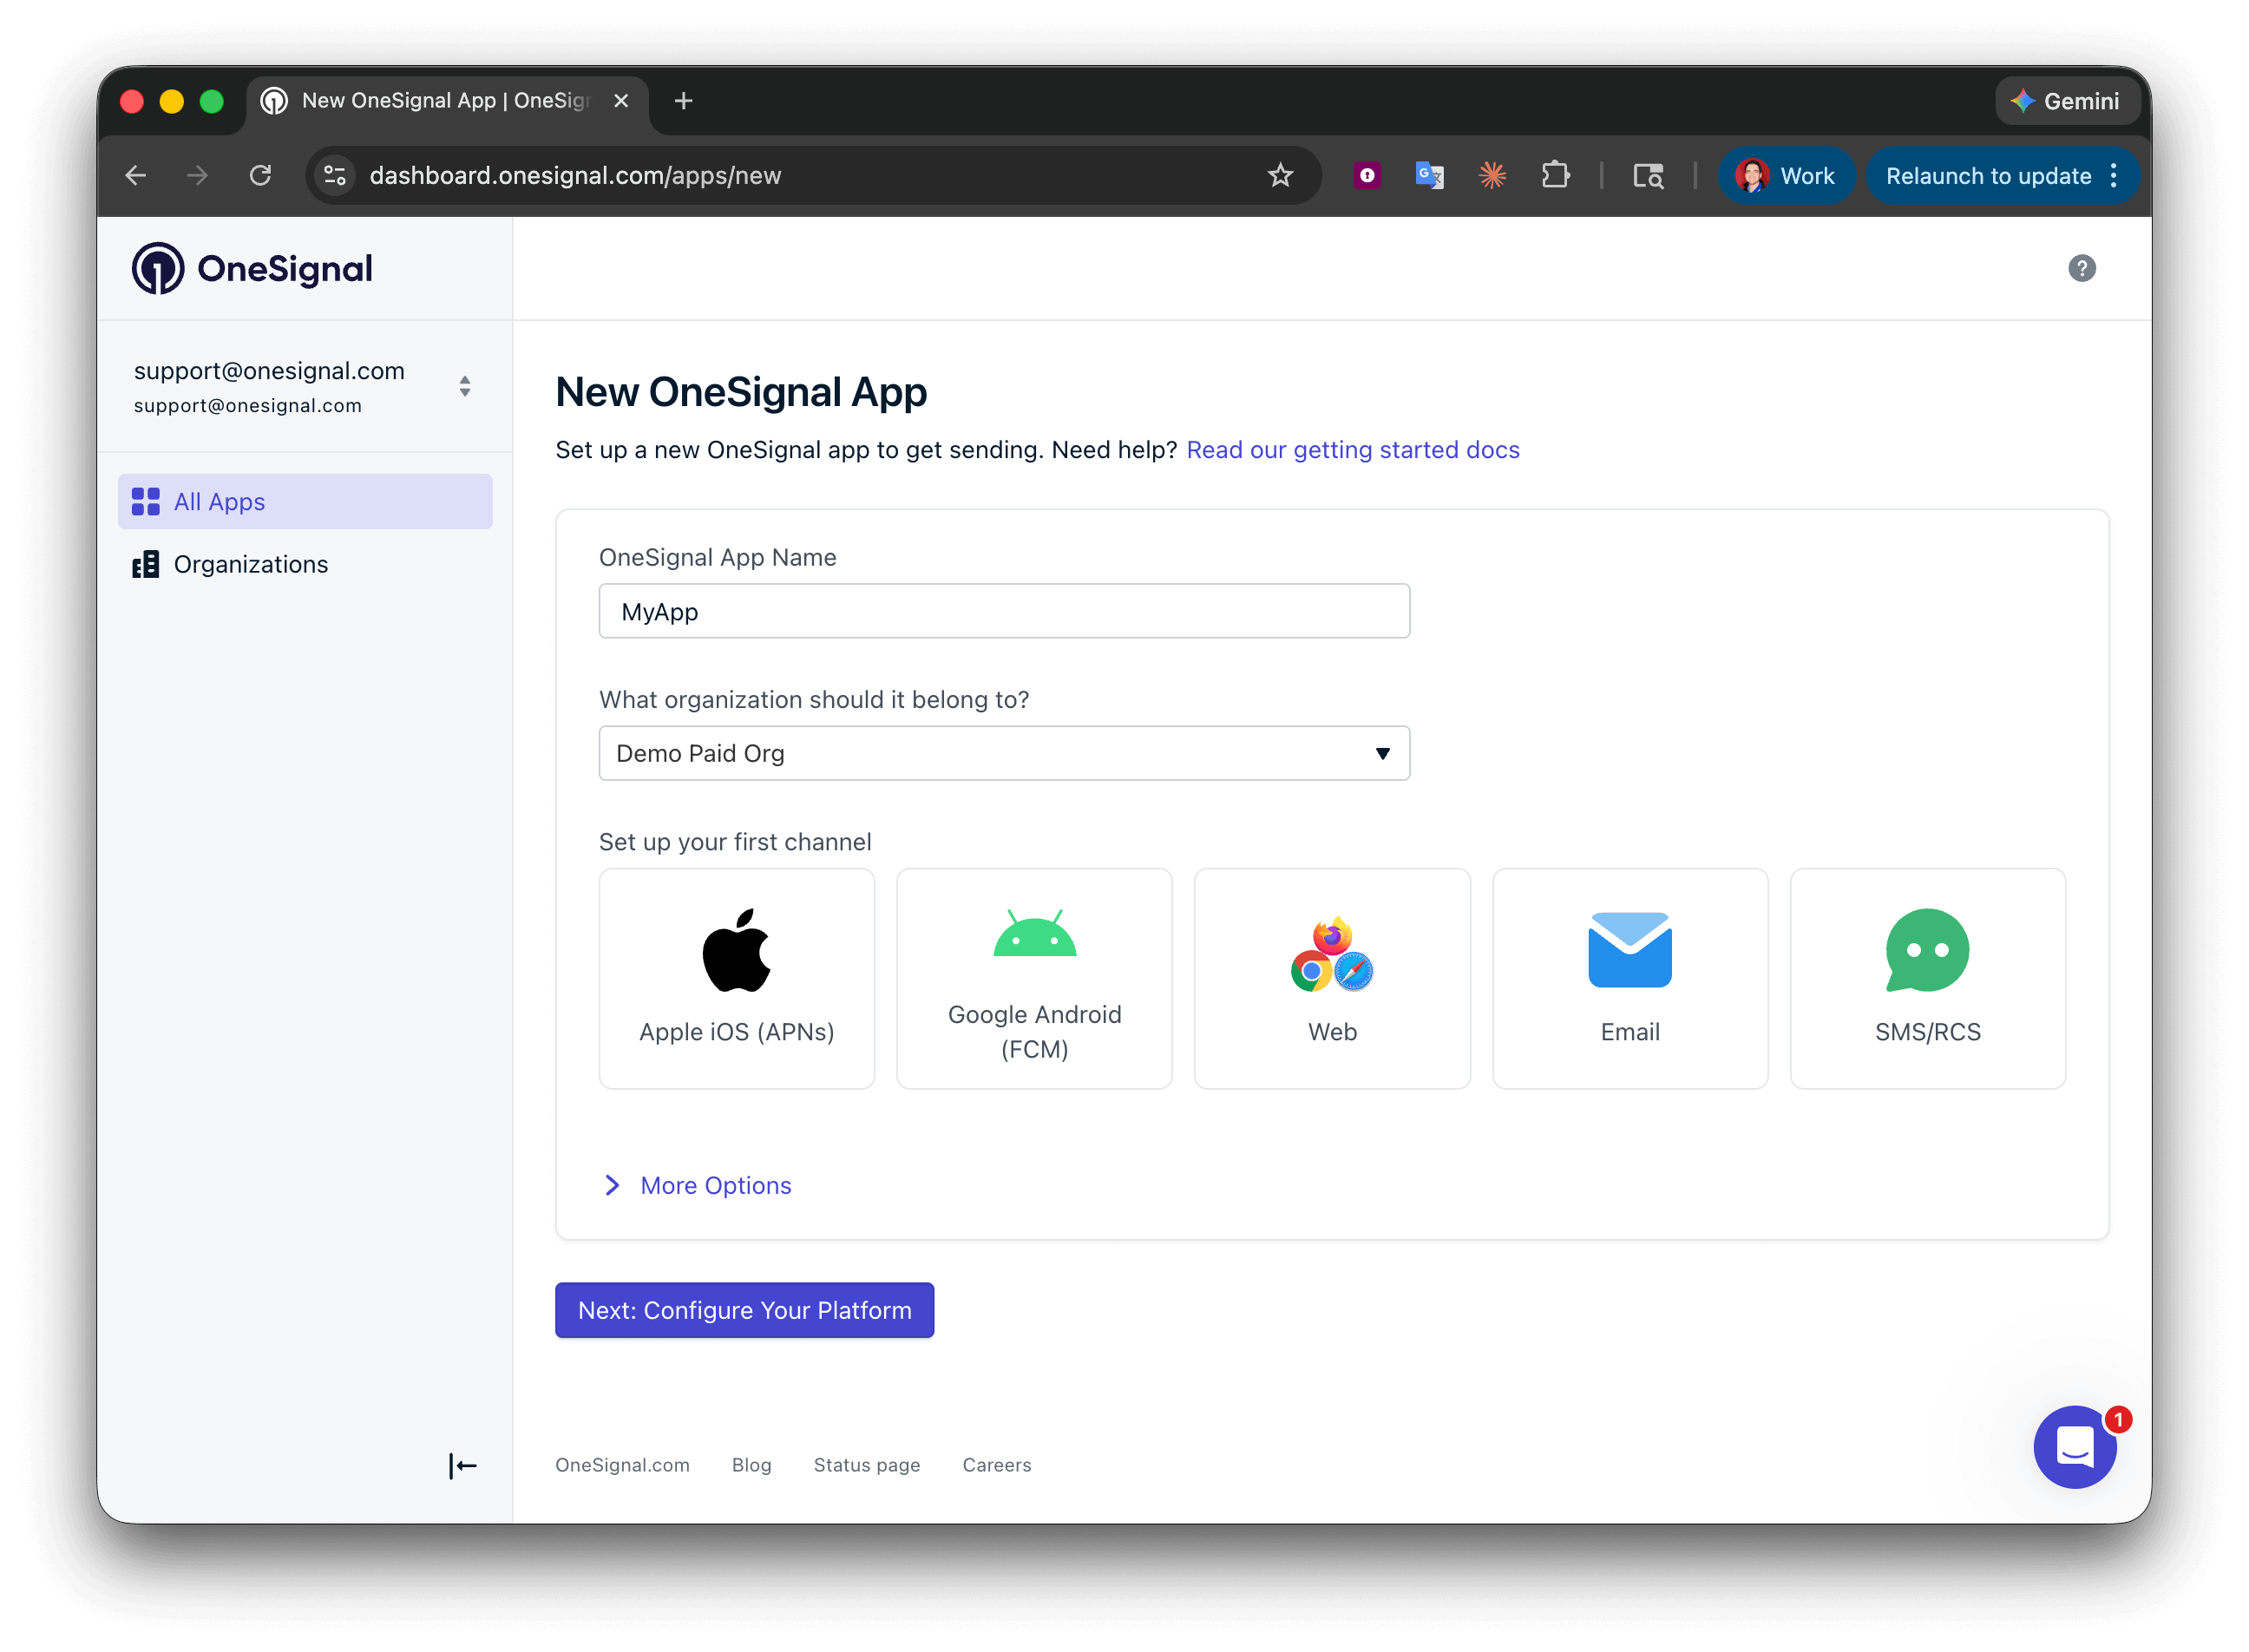 Enter the credentials for your platform:
* **Android**: [Set up Firebase credentials](/docs/en/android-firebase-credentials)
* **iOS**: [p8 token (recommended)](/docs/en/ios-p8-token-based-connection-to-apns) or [p12 certificate](/docs/en/ios-p12-generate-certificates)
* **Amazon**: [Generate API key](/docs/en/generate-an-amazon-api-key)
* **Huawei**: [Authorize OneSignal](/docs/en/authorize-onesignal-to-send-huawei-push)
Click **Save & Continue** after entering your credentials.
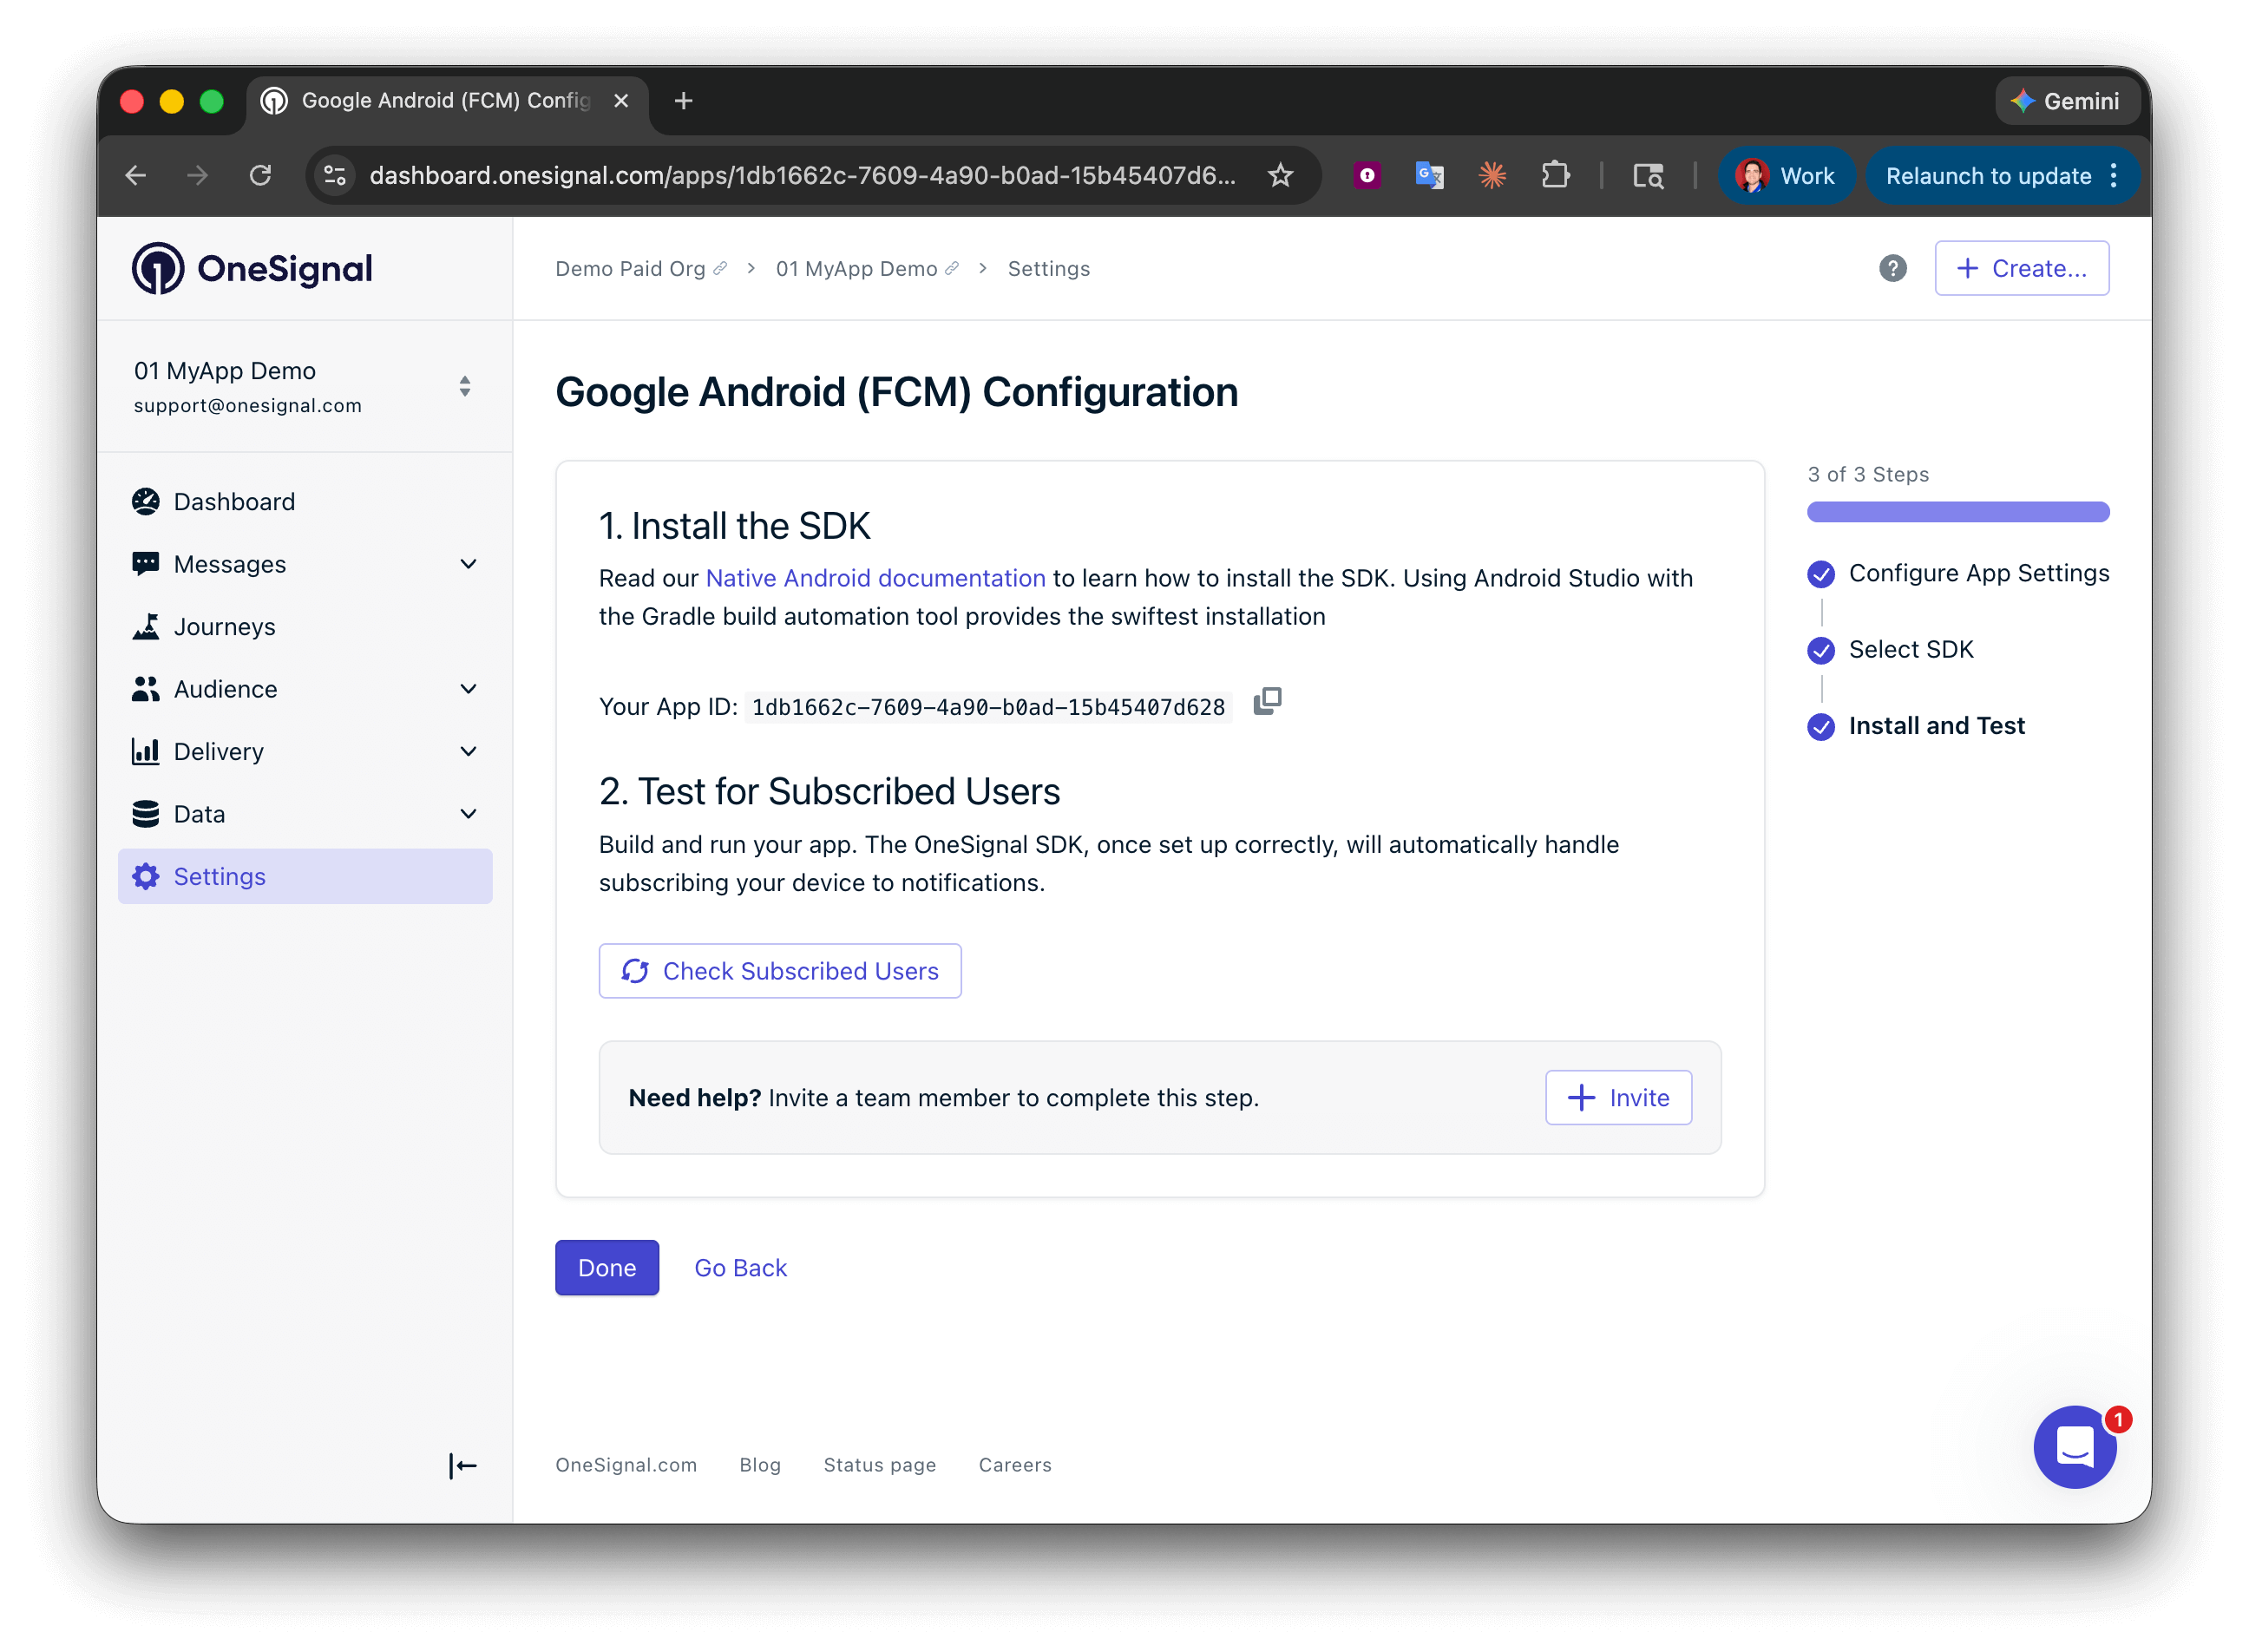
Your **App ID** is displayed on the final screen. Copy and save it — you need it when initializing the SDK. Select your SDK platform, then follow the setup guide.
Enter the credentials for your platform:
* **Android**: [Set up Firebase credentials](/docs/en/android-firebase-credentials)
* **iOS**: [p8 token (recommended)](/docs/en/ios-p8-token-based-connection-to-apns) or [p12 certificate](/docs/en/ios-p12-generate-certificates)
* **Amazon**: [Generate API key](/docs/en/generate-an-amazon-api-key)
* **Huawei**: [Authorize OneSignal](/docs/en/authorize-onesignal-to-send-huawei-push)
Click **Save & Continue** after entering your credentials.
Your **App ID** is displayed on the final screen. Copy and save it — you need it when initializing the SDK. Select your SDK platform, then follow the setup guide.
 ***
## Setup
### 1. Setup the OneSignal SDK
Follow the OneSignal Android SDK setup guide to implement our SDK into your app.
Note that Firebase/Google setup is not required for app builds released to the Huawei AppGallery.
### 2. Huawei configuration (agconnect-services.json)
You can skip this step if you already have a Huawei `agconnect-services.json` in your Android Studio Project from setting up a different Huawei service.
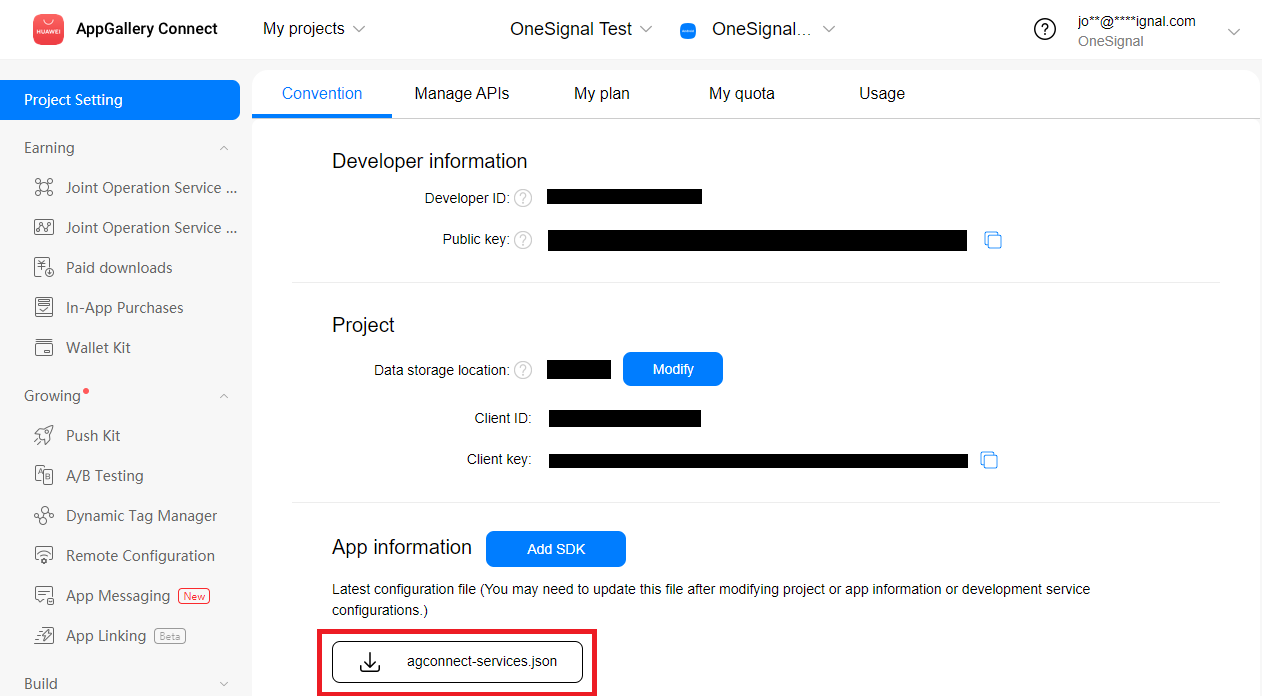
From the [AppGallery Connect Project List](https://developer.huawei.com/consumer/en/service/josp/agc/index.html#/myProject) select your app.
Click on the "agconnect-services.json" button to download this file.
***
## Setup
### 1. Setup the OneSignal SDK
Follow the OneSignal Android SDK setup guide to implement our SDK into your app.
Note that Firebase/Google setup is not required for app builds released to the Huawei AppGallery.
### 2. Huawei configuration (agconnect-services.json)
You can skip this step if you already have a Huawei `agconnect-services.json` in your Android Studio Project from setting up a different Huawei service.
From the [AppGallery Connect Project List](https://developer.huawei.com/consumer/en/service/josp/agc/index.html#/myProject) select your app.
Click on the "agconnect-services.json" button to download this file.
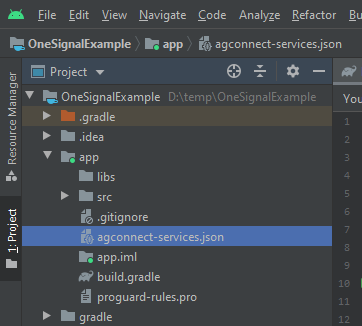
 Place this file in your app directory in Android Studio.
 ### 3. Generating a signing certificate fingerprint
You can skip this step if you already have added your SHA-256 certificate fingerprint to Huawei's dashboard for a different Huawei service.
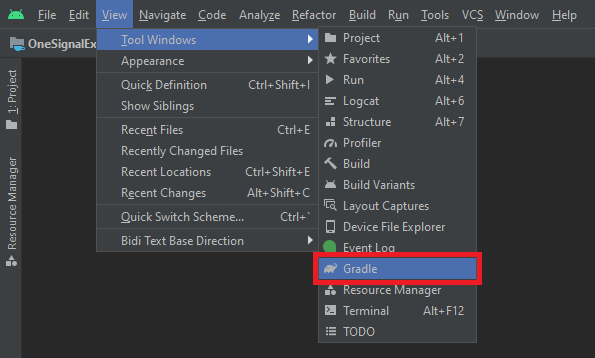
From your Android Studio go to **View > Tool Windows > Gradle**.
### 3. Generating a signing certificate fingerprint
You can skip this step if you already have added your SHA-256 certificate fingerprint to Huawei's dashboard for a different Huawei service.
From your Android Studio go to **View > Tool Windows > Gradle**.
 From here select **app > Tasks > android > signingReport**.
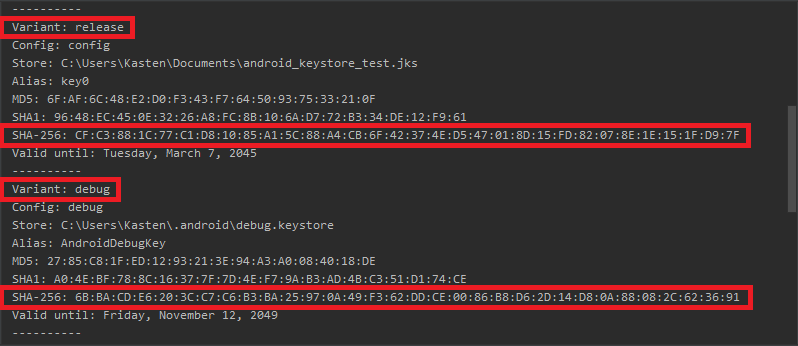
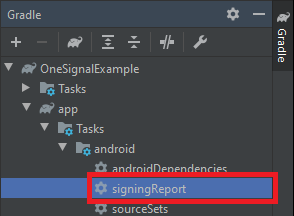 Copy your `SHA-256` for your `release` variant.
* Optional but recommended for quicker testing is the `SHA-256` for your `debug` variant too.
* You may have other custom variants in your project, if you need push support for them copy these as well.
Copy your `SHA-256` for your `release` variant.
* Optional but recommended for quicker testing is the `SHA-256` for your `debug` variant too.
* You may have other custom variants in your project, if you need push support for them copy these as well.
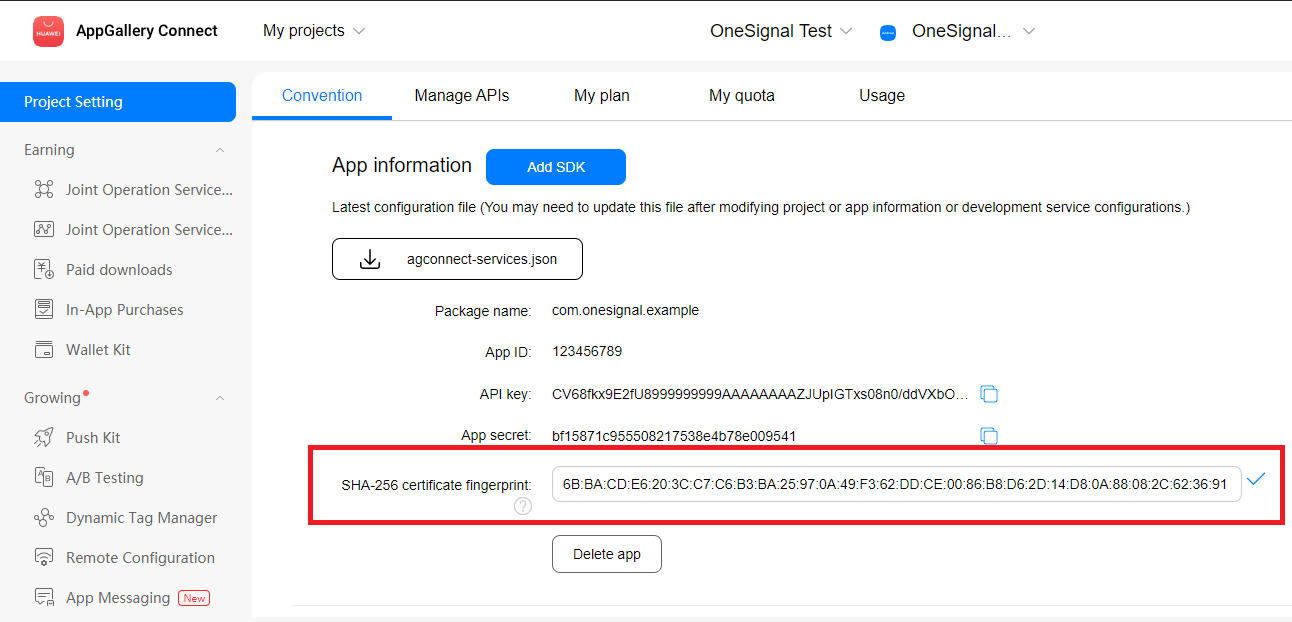
 From the [AppGallery Connect Project List](https://developer.huawei.com/consumer/en/service/josp/agc/index.html#/myProject) select your app.
Scroll to the bottom to find the "SHA-256 certificate fingerprint" field were you should enter your keys.
From the [AppGallery Connect Project List](https://developer.huawei.com/consumer/en/service/josp/agc/index.html#/myProject) select your app.
Scroll to the bottom to find the "SHA-256 certificate fingerprint" field were you should enter your keys.
 ### 4. Add Huawei gradle plugin and dependencies
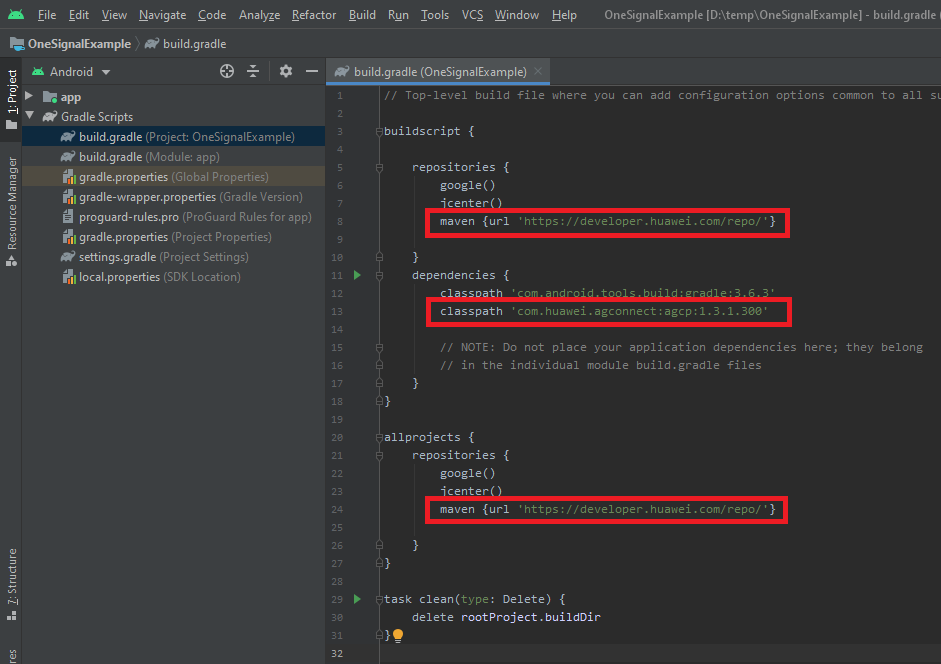
Open your root `build.gradle` (Project: ) in Android Studio and add ` maven {url 'https://developer.huawei.com/repo/'}` under `buildscript { repositories }` and `allprojects { repositories }`
Open your `settings.gradle.kts` file and add `maven {url 'https://developer.huawei.com/repo/'}` under `pluginManagement { repositories }` and `dependencyResolutionManagement { repositories }`
Under `buildscript { dependencies }` add `classpath 'com.huawei.agconnect:agcp:1.9.1.301'`
You should have in total 3 new lines in your root `build.gradle`, highlighted below.
### 4. Add Huawei gradle plugin and dependencies
Open your root `build.gradle` (Project: ) in Android Studio and add ` maven {url 'https://developer.huawei.com/repo/'}` under `buildscript { repositories }` and `allprojects { repositories }`
Open your `settings.gradle.kts` file and add `maven {url 'https://developer.huawei.com/repo/'}` under `pluginManagement { repositories }` and `dependencyResolutionManagement { repositories }`
Under `buildscript { dependencies }` add `classpath 'com.huawei.agconnect:agcp:1.9.1.301'`
You should have in total 3 new lines in your root `build.gradle`, highlighted below.
 Open your `app/build.gradle` file and add `implementation 'com.huawei.hms:push:6.3.0.304'` under the `dependencies` section.
Also to the `app/build.gradle` file add `apply plugin: 'com.huawei.agconnect'` to the very bottom of the file.
You should have in total 2 new lines in your `app/build.gradle`, highlighted below.
Make sure to press "Sync Now" on the banner that pops up after saving!
Open your `app/build.gradle` file and add `implementation 'com.huawei.hms:push:6.3.0.304'` under the `dependencies` section.
Also to the `app/build.gradle` file add `apply plugin: 'com.huawei.agconnect'` to the very bottom of the file.
You should have in total 2 new lines in your `app/build.gradle`, highlighted below.
Make sure to press "Sync Now" on the banner that pops up after saving!
 ***
## Additional configuration steps
### Compatibility with other HMS push libraries or your own `HmsMessageService` class
Required if:
* You have another HMS push SDK/Library in your app in-addition to OneSignal
* You have your own `HmsMessageService`
Create a class that extends from `HmsMessageService`, if you don't have one already and add the following methods.
If you already had a class that extends `HmsMessageService` please add the two
new `OneSignalHmsEventBridge` lines instead of creating another class.
```java Java theme={null}
public class YourHmsMessageService extends HmsMessageService {
public void onNewToken(String token) {
// ...
// Forward event on to OneSignal SDK
OneSignalHmsEventBridge.onNewToken(this, token);
}
@Override
public void onMessageReceived(RemoteMessage message) {
// ...
// Forward event on to OneSignal SDK
OneSignalHmsEventBridge.onMessageReceived(this, message);
}
}
```
This is to forward `onNewToken` and `onMessageReceived` to OneSignal via the `OneSignalHmsEventBridge`.
If you didn't have a class that extended `HmsMessageService` before make sure to add it to your `AndroidManifest.xml` under the `` tag.
```xml AndroidManifest.xml theme={null}
...
...
```
### Omit Google libraries for Huawei AppGallery builds (optional)
If your app will only be available on the Huawei AppGallery and you want to omit any Google related dependencies that OneSignal includes you can use `exclude` with `implementation` in your `app/build.gradle`.
```groovy app/build.gradle theme={null}
implementation('com.onesignal:OneSignal:[5.4.0, 5.99.99]') {
exclude group: 'com.google.android.gms'
exclude group: 'com.google.firebase'
}
```
If your app will be for both the Google Play Store and Huawei AppGallery and you want to be selective on which libraries you will include to make your APK smaller you can add dependencies based on buildTypes or variants. Example:
```groovy app/build.gradle theme={null}
android {
// ...
buildTypes {
debug {
}
release {
}
// **** Add your custom hauwei buildType here
huawei {
}
}
}
dependencies {
// \*\*\*\* Use the full OneSignal dependencies for Google Play Store builds
debugImplementation 'com.onesignal:OneSignal:[5.0.0, 5.99.99]'
releaseImplementation 'com.onesignal:OneSignal:[5.0.0, 5.99.99]'
// **** Only include hms:push for your Huawei AppGallery builds.
huaweiImplementation 'com.huawei.hms:push:6.3.0.304'
// Omit Google / Firebase libraries for Huawei builds.
huaweiImplementation('com.onesignal:OneSignal:[5.0.0, 5.99.99]') {
exclude group: 'com.google.android.gms'
exclude group: 'com.google.firebase'
}
}
```
### Prefer HMS over FCM (optional)
***If you have [omitted Google Libraries](./huawei-sdk-setup#omit-google-libraries-for-huawei-appgallery-builds-optional) for Huawei AppGallery build above, this step doesn't apply.***
By default OneSignal prefers using FCM over HMS if both are included in your app. If you like to change this to prefer HMS instead you can add the following to your `AndroidManifest.xml`:
```xml xml theme={null}
...
...
```
***
## Huawei troubleshooting
While testing, make sure to keep the [OneSignal setLogLevel method](./mobile-sdk-reference#setloglevel) set to VERBOSE.
Check the logs to see any errors being thrown and [Huawei Common Error Codes](https://developer.huawei.com/consumer/en/doc/development/HMS-2-References/hmssdk_huaweipush_api_reference_errorcode).
You may need to create a debug or release keystore signature (choose the correct app build path, `debug` or `release`) so that a `6003` error is avoided when registering for Huawei `pushToken` with the OneSignal SDK. See ["Configure a Signature" section](https://developer.huawei.com/consumer/en/doc/HMS-Guides/Preparations#h2-1584707362385)
`"notification_types":-25` means OneSignal timed out waiting for a response from Huawei's HMS to get a push token. This is most likely due to another 3rd-party HMS push SDK or your own HmsMessageService getting this event instead of OneSignal.
Please review [step on how to check this and forward the event if this is the case](#compatibility-with-other-hms-push-libraries-or-your-own-hmsmessageservice-class).
This means there is a class HMS is missing from the app that is needed for push. Just having `com.huawei.hms:push` in the `build.gradle` will cause this specific error not to happen any more. However, if you have some aggressive Proguard or R8 settings, this might cause issues. We recommend turn off `minifyEnabled` temporary if you have it to see if that is the root of the issue.
Also, you shouldn't mix and match major release versions of other HMS libraries. Start with either 4 or 5. Make sure not to have a mixture from 3 to 5 which is going to create other errors
```
E/OneSignal: HMS ApiException getting Huawei push token!
com.huawei.hms.common.ApiException: -5: Core error
```
Check your Proguard or R8 rules to make sure they are setup properly. Possibly disable it temporarily to see if it is related. If it fixes the issue after disabling Proguard or R8 then you can follow this guide and turn it back on See ["Configure a Signature" section](https://developer.huawei.com/consumer/en/doc/HMS-Guides/Preparations#h2-1584707362385)
## Testing the OneSignal SDK integration
This guide helps you verify that your OneSignal SDK integration is working correctly by testing push notifications, subscription registration, and in-app messaging.
If you are testing with an Android emulator, it should start with a cold boot.
1. Go to **Device Manager** in Android Studio.
2. Select your emulator device and click **Edit**.
3. Go to **Additional Settings** or **More**.
4. Set the **Boot option** to **Cold Boot**.
5. Save changes and restart the emulator.
### Check mobile subscriptions
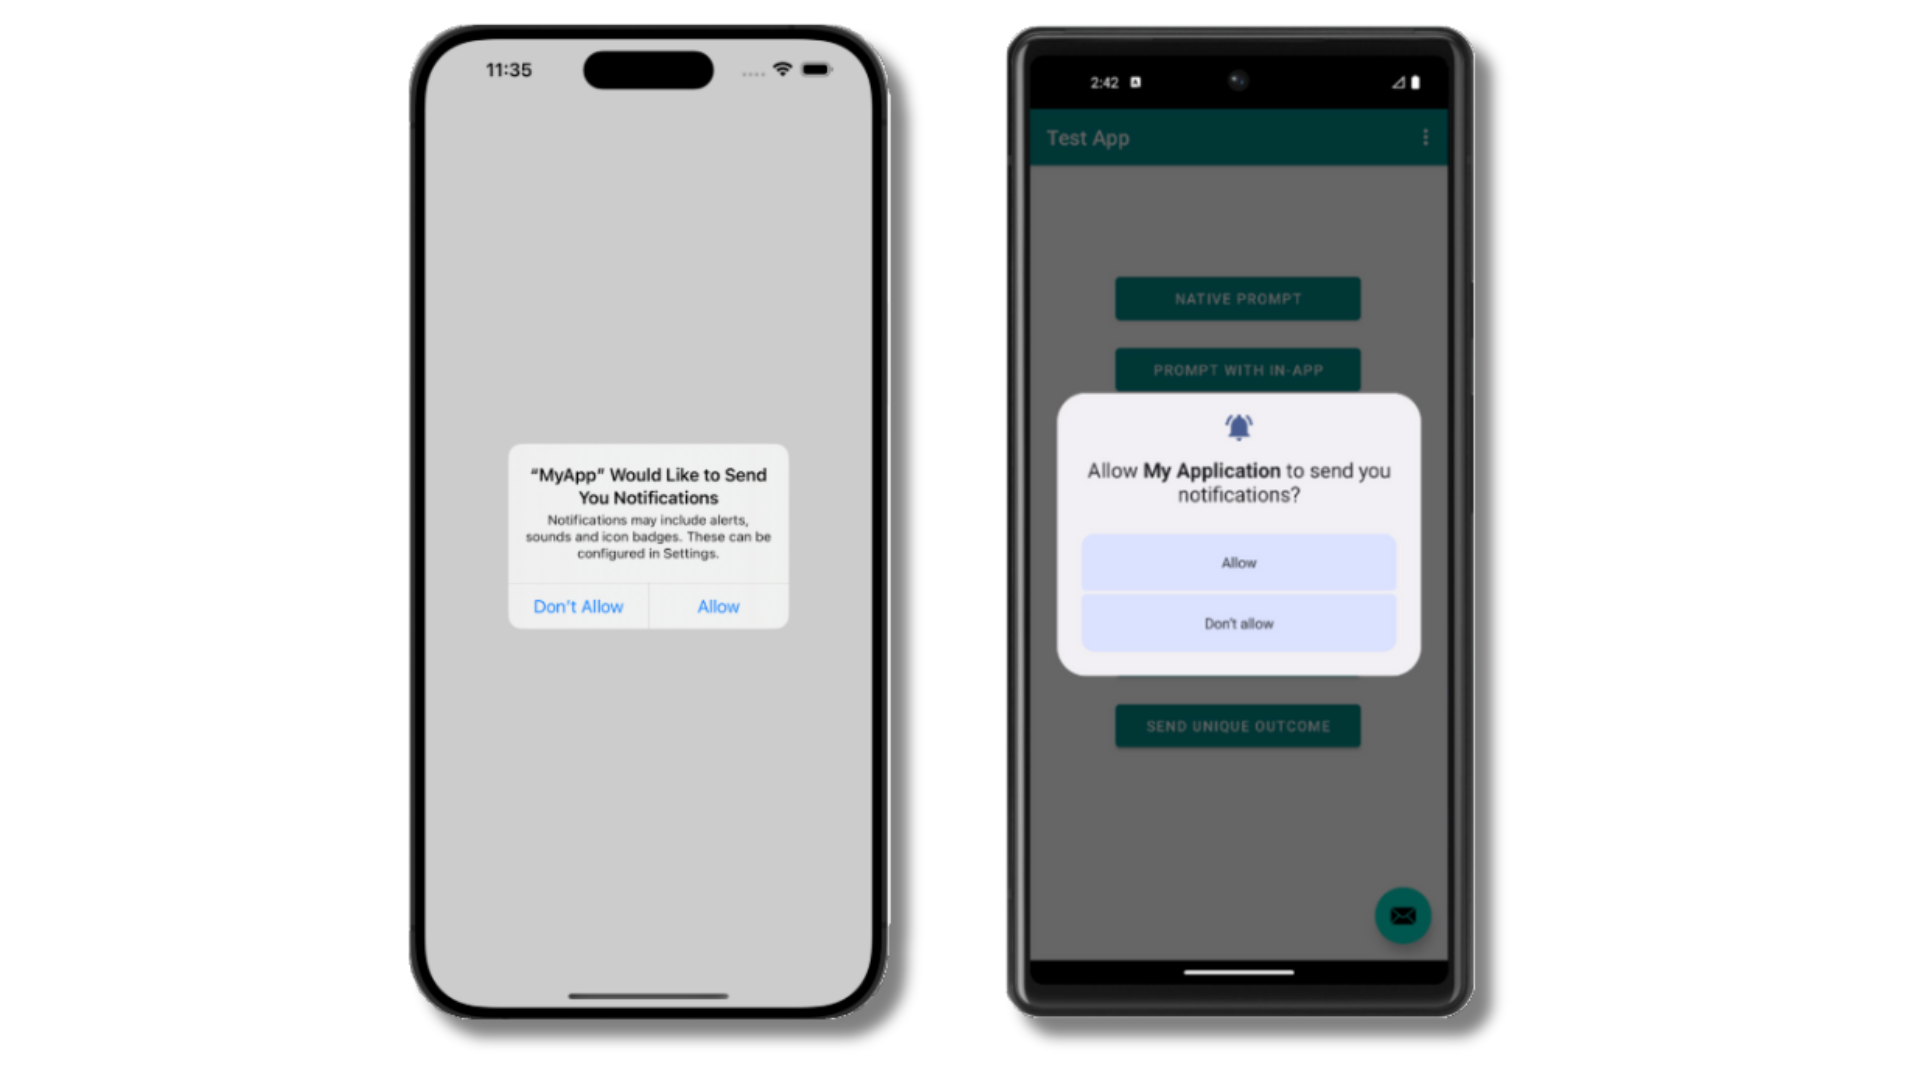
The native push permission prompt should appear automatically if you added the `requestPermission` method during initialization.
***
## Additional configuration steps
### Compatibility with other HMS push libraries or your own `HmsMessageService` class
Required if:
* You have another HMS push SDK/Library in your app in-addition to OneSignal
* You have your own `HmsMessageService`
Create a class that extends from `HmsMessageService`, if you don't have one already and add the following methods.
If you already had a class that extends `HmsMessageService` please add the two
new `OneSignalHmsEventBridge` lines instead of creating another class.
```java Java theme={null}
public class YourHmsMessageService extends HmsMessageService {
public void onNewToken(String token) {
// ...
// Forward event on to OneSignal SDK
OneSignalHmsEventBridge.onNewToken(this, token);
}
@Override
public void onMessageReceived(RemoteMessage message) {
// ...
// Forward event on to OneSignal SDK
OneSignalHmsEventBridge.onMessageReceived(this, message);
}
}
```
This is to forward `onNewToken` and `onMessageReceived` to OneSignal via the `OneSignalHmsEventBridge`.
If you didn't have a class that extended `HmsMessageService` before make sure to add it to your `AndroidManifest.xml` under the `` tag.
```xml AndroidManifest.xml theme={null}
...
...
```
### Omit Google libraries for Huawei AppGallery builds (optional)
If your app will only be available on the Huawei AppGallery and you want to omit any Google related dependencies that OneSignal includes you can use `exclude` with `implementation` in your `app/build.gradle`.
```groovy app/build.gradle theme={null}
implementation('com.onesignal:OneSignal:[5.4.0, 5.99.99]') {
exclude group: 'com.google.android.gms'
exclude group: 'com.google.firebase'
}
```
If your app will be for both the Google Play Store and Huawei AppGallery and you want to be selective on which libraries you will include to make your APK smaller you can add dependencies based on buildTypes or variants. Example:
```groovy app/build.gradle theme={null}
android {
// ...
buildTypes {
debug {
}
release {
}
// **** Add your custom hauwei buildType here
huawei {
}
}
}
dependencies {
// \*\*\*\* Use the full OneSignal dependencies for Google Play Store builds
debugImplementation 'com.onesignal:OneSignal:[5.0.0, 5.99.99]'
releaseImplementation 'com.onesignal:OneSignal:[5.0.0, 5.99.99]'
// **** Only include hms:push for your Huawei AppGallery builds.
huaweiImplementation 'com.huawei.hms:push:6.3.0.304'
// Omit Google / Firebase libraries for Huawei builds.
huaweiImplementation('com.onesignal:OneSignal:[5.0.0, 5.99.99]') {
exclude group: 'com.google.android.gms'
exclude group: 'com.google.firebase'
}
}
```
### Prefer HMS over FCM (optional)
***If you have [omitted Google Libraries](./huawei-sdk-setup#omit-google-libraries-for-huawei-appgallery-builds-optional) for Huawei AppGallery build above, this step doesn't apply.***
By default OneSignal prefers using FCM over HMS if both are included in your app. If you like to change this to prefer HMS instead you can add the following to your `AndroidManifest.xml`:
```xml xml theme={null}
...
...
```
***
## Huawei troubleshooting
While testing, make sure to keep the [OneSignal setLogLevel method](./mobile-sdk-reference#setloglevel) set to VERBOSE.
Check the logs to see any errors being thrown and [Huawei Common Error Codes](https://developer.huawei.com/consumer/en/doc/development/HMS-2-References/hmssdk_huaweipush_api_reference_errorcode).
You may need to create a debug or release keystore signature (choose the correct app build path, `debug` or `release`) so that a `6003` error is avoided when registering for Huawei `pushToken` with the OneSignal SDK. See ["Configure a Signature" section](https://developer.huawei.com/consumer/en/doc/HMS-Guides/Preparations#h2-1584707362385)
`"notification_types":-25` means OneSignal timed out waiting for a response from Huawei's HMS to get a push token. This is most likely due to another 3rd-party HMS push SDK or your own HmsMessageService getting this event instead of OneSignal.
Please review [step on how to check this and forward the event if this is the case](#compatibility-with-other-hms-push-libraries-or-your-own-hmsmessageservice-class).
This means there is a class HMS is missing from the app that is needed for push. Just having `com.huawei.hms:push` in the `build.gradle` will cause this specific error not to happen any more. However, if you have some aggressive Proguard or R8 settings, this might cause issues. We recommend turn off `minifyEnabled` temporary if you have it to see if that is the root of the issue.
Also, you shouldn't mix and match major release versions of other HMS libraries. Start with either 4 or 5. Make sure not to have a mixture from 3 to 5 which is going to create other errors
```
E/OneSignal: HMS ApiException getting Huawei push token!
com.huawei.hms.common.ApiException: -5: Core error
```
Check your Proguard or R8 rules to make sure they are setup properly. Possibly disable it temporarily to see if it is related. If it fixes the issue after disabling Proguard or R8 then you can follow this guide and turn it back on See ["Configure a Signature" section](https://developer.huawei.com/consumer/en/doc/HMS-Guides/Preparations#h2-1584707362385)
## Testing the OneSignal SDK integration
This guide helps you verify that your OneSignal SDK integration is working correctly by testing push notifications, subscription registration, and in-app messaging.
If you are testing with an Android emulator, it should start with a cold boot.
1. Go to **Device Manager** in Android Studio.
2. Select your emulator device and click **Edit**.
3. Go to **Additional Settings** or **More**.
4. Set the **Boot option** to **Cold Boot**.
5. Save changes and restart the emulator.
### Check mobile subscriptions
The native push permission prompt should appear automatically if you added the `requestPermission` method during initialization.
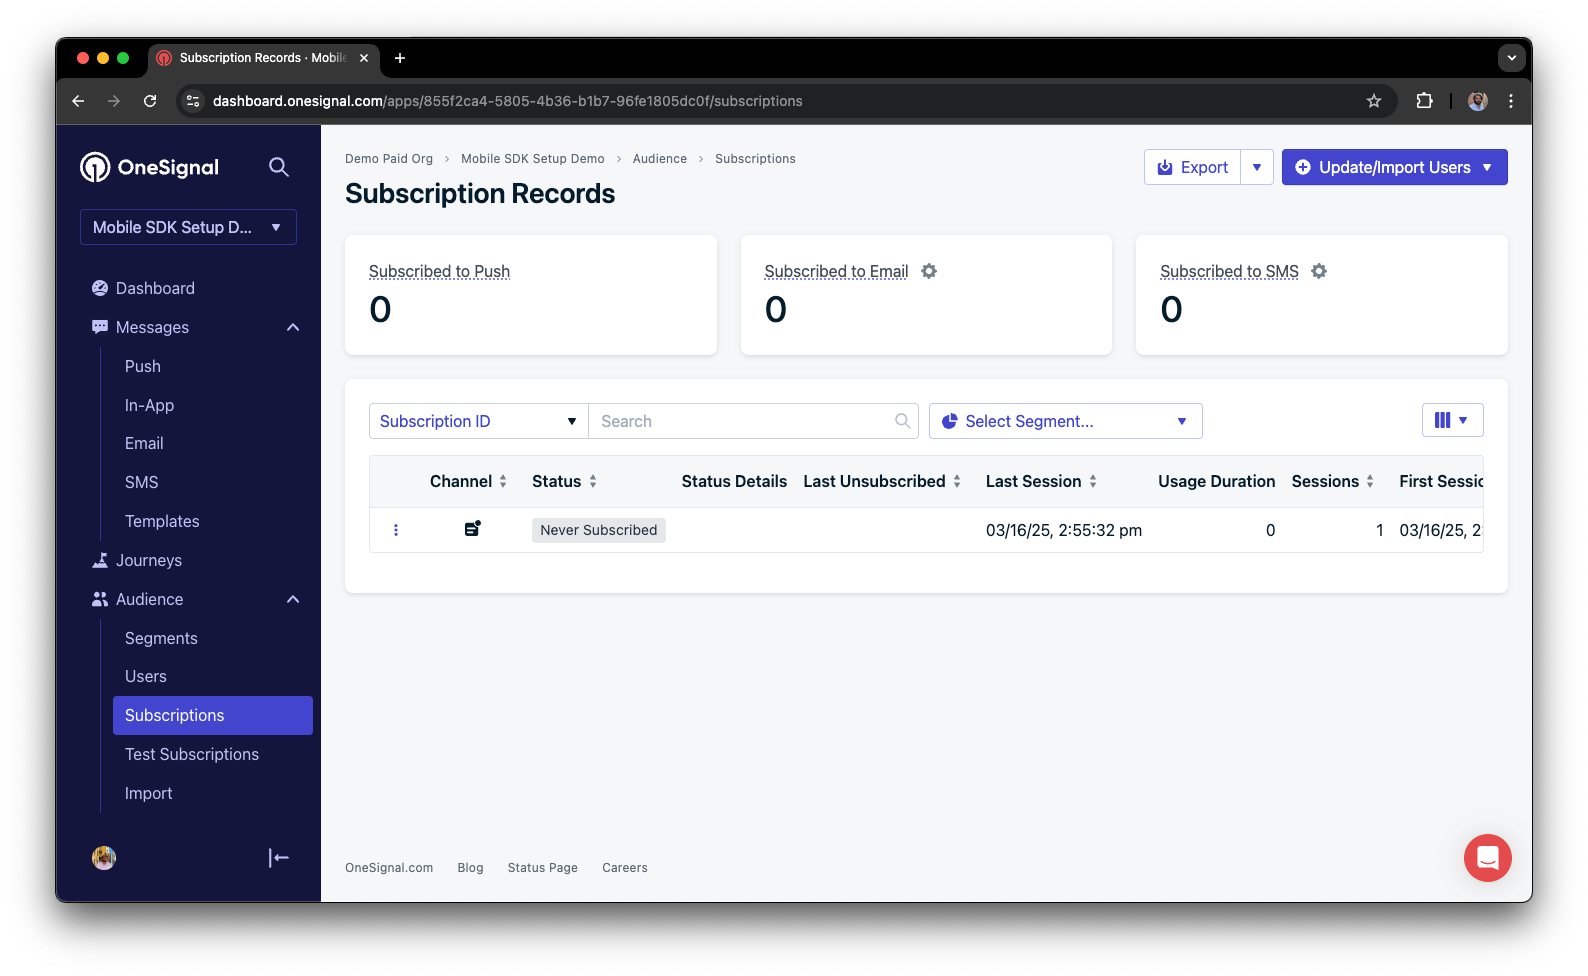
 Before accepting the prompt, check the OneSignal dashboard:
* Go to **Audience > Subscriptions**.
* You should see a new entry with the status "Never Subscribed".
Before accepting the prompt, check the OneSignal dashboard:
* Go to **Audience > Subscriptions**.
* You should see a new entry with the status "Never Subscribed".
 The subscription's status should now show **Subscribed**.
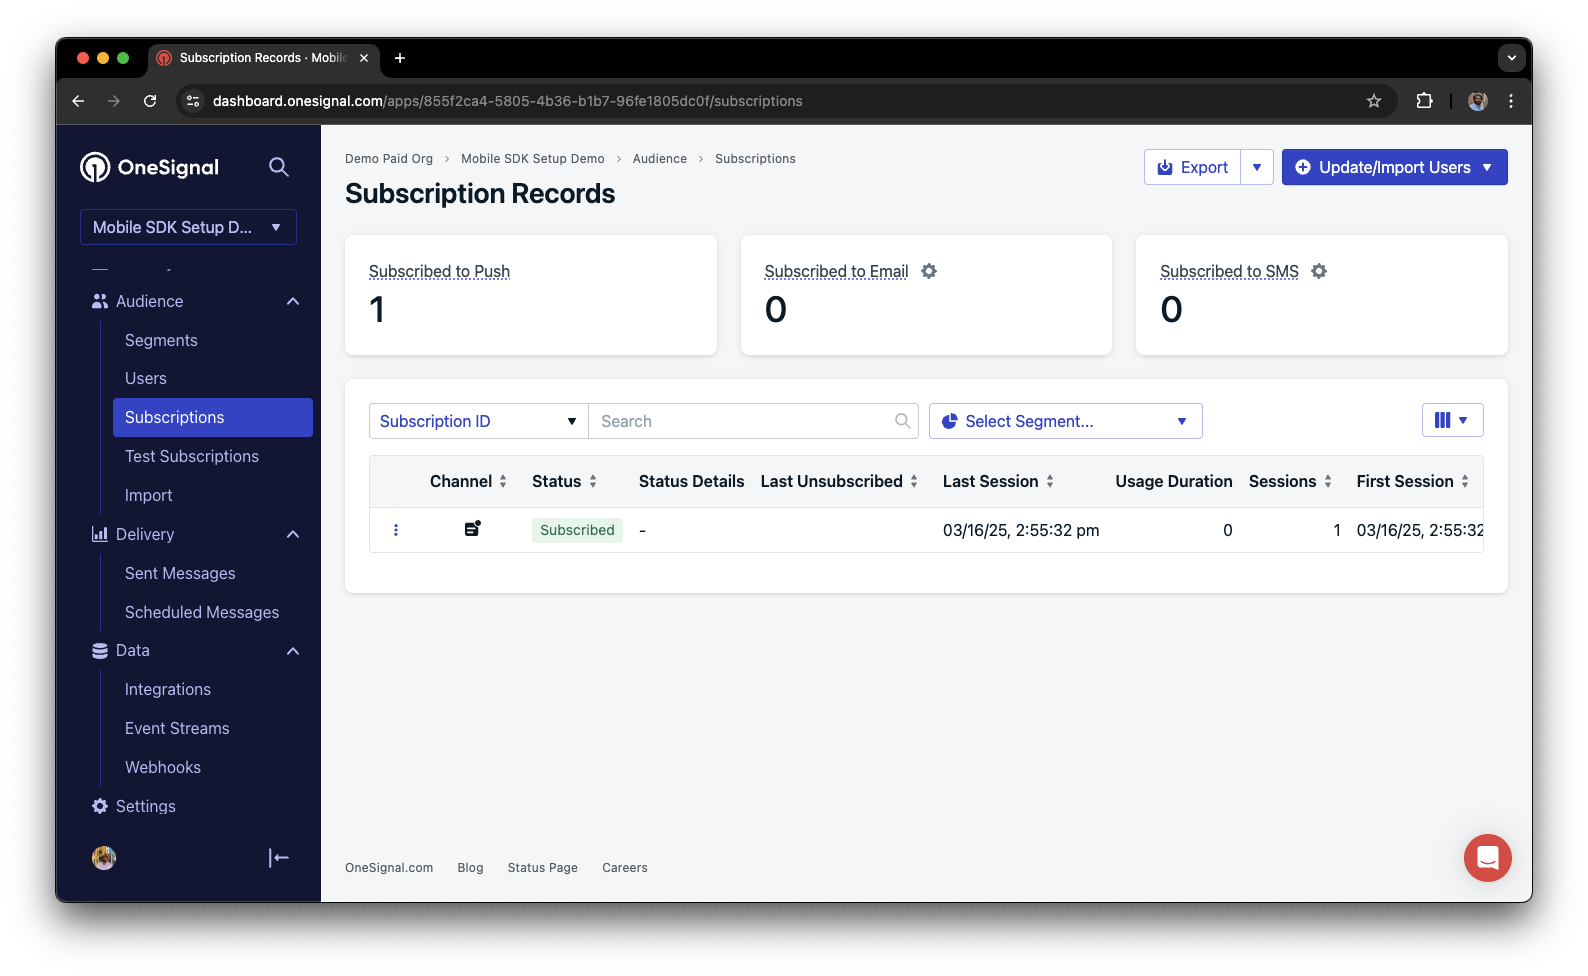 You have successfully created a [mobile subscription](/docs/en/subscriptions).
Mobile subscriptions are created when users first open your app on a device or if they uninstall and reinstall your app on the same device.
### Set up test users
test users are helpful for testing a push notification before sending a message.
In the dashboard, next to the subscription, click the **Options (three dots)** button and select **Add to Test Users**.
You have successfully created a [mobile subscription](/docs/en/subscriptions).
Mobile subscriptions are created when users first open your app on a device or if they uninstall and reinstall your app on the same device.
### Set up test users
test users are helpful for testing a push notification before sending a message.
In the dashboard, next to the subscription, click the **Options (three dots)** button and select **Add to Test Users**.
 Name the subscription so you can easily identify your device later in the **test users tab**.
Go to **Audience > Segments > New Segment**.
Name the segment `Test Users` (the name is important because it will be used later).
Name the subscription so you can easily identify your device later in the **test users tab**.
Go to **Audience > Segments > New Segment**.
Name the segment `Test Users` (the name is important because it will be used later).
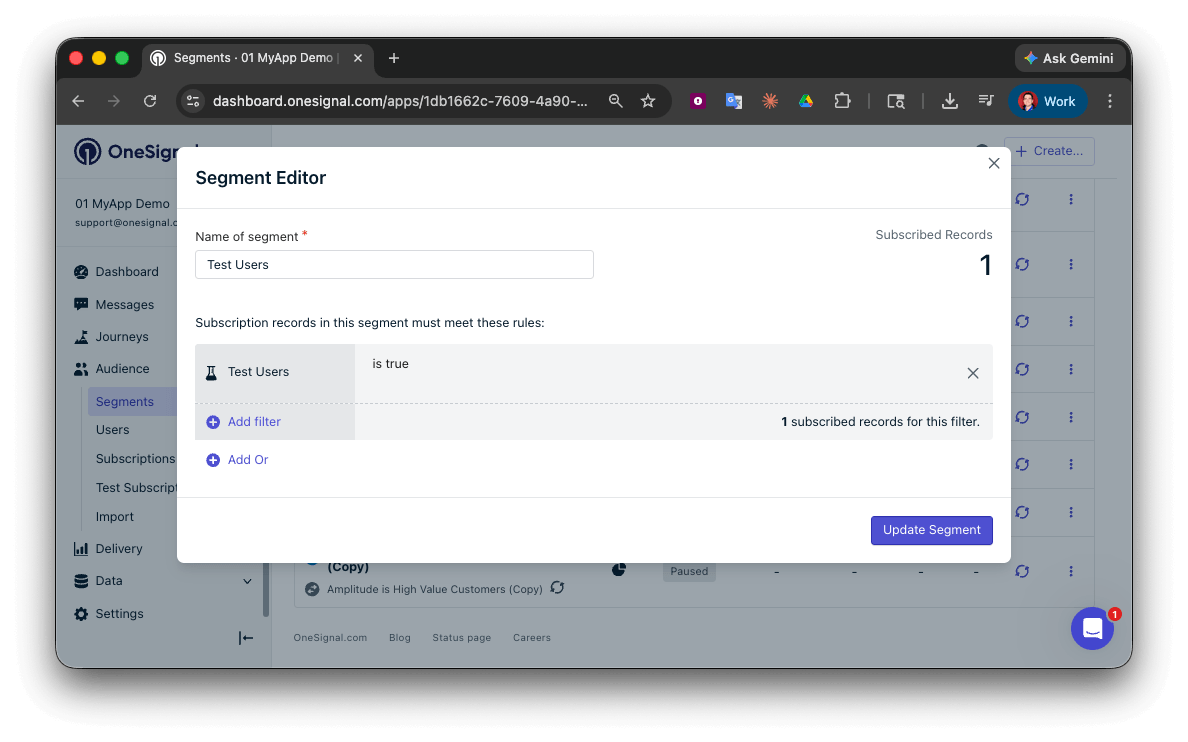 You have successfully created a segment of test users.
We can now test sending messages to this individual device and groups of test users.
### Send test push via API
In your OneSignal dashboard, go to **Settings > [Keys & IDs](/docs/en/keys-and-ids)**.
Replace `YOUR_APP_API_KEY` and `YOUR_APP_ID` in the code below with your actual keys. This code uses the `Test Users` segment we created earlier.
```curl theme={null}
curl -X \
POST --url 'https://api.onesignal.com/notifications' \
--header 'content-type: application/json; charset=utf-8' \
--header 'authorization: Key YOUR_APP_API_KEY' \
--data \
'{
"app_id": "YOUR_APP_ID",
"target_channel": "push",
"name": "Testing basic setup",
"headings": {
"en": "👋"
},
"contents": {
"en": "Hello world!"
},
"included_segments": [
"Test Users"
],
"ios_attachments": {
"onesignal_logo": "https://avatars.githubusercontent.com/u/11823027?s=200&v=4"
},
"big_picture": "https://avatars.githubusercontent.com/u/11823027?s=200&v=4"
}'
```
Run the code in your terminal.
If all setup steps were completed successfully, the test users should receive a notification with an image included:
You have successfully created a segment of test users.
We can now test sending messages to this individual device and groups of test users.
### Send test push via API
In your OneSignal dashboard, go to **Settings > [Keys & IDs](/docs/en/keys-and-ids)**.
Replace `YOUR_APP_API_KEY` and `YOUR_APP_ID` in the code below with your actual keys. This code uses the `Test Users` segment we created earlier.
```curl theme={null}
curl -X \
POST --url 'https://api.onesignal.com/notifications' \
--header 'content-type: application/json; charset=utf-8' \
--header 'authorization: Key YOUR_APP_API_KEY' \
--data \
'{
"app_id": "YOUR_APP_ID",
"target_channel": "push",
"name": "Testing basic setup",
"headings": {
"en": "👋"
},
"contents": {
"en": "Hello world!"
},
"included_segments": [
"Test Users"
],
"ios_attachments": {
"onesignal_logo": "https://avatars.githubusercontent.com/u/11823027?s=200&v=4"
},
"big_picture": "https://avatars.githubusercontent.com/u/11823027?s=200&v=4"
}'
```
Run the code in your terminal.
If all setup steps were completed successfully, the test users should receive a notification with an image included:
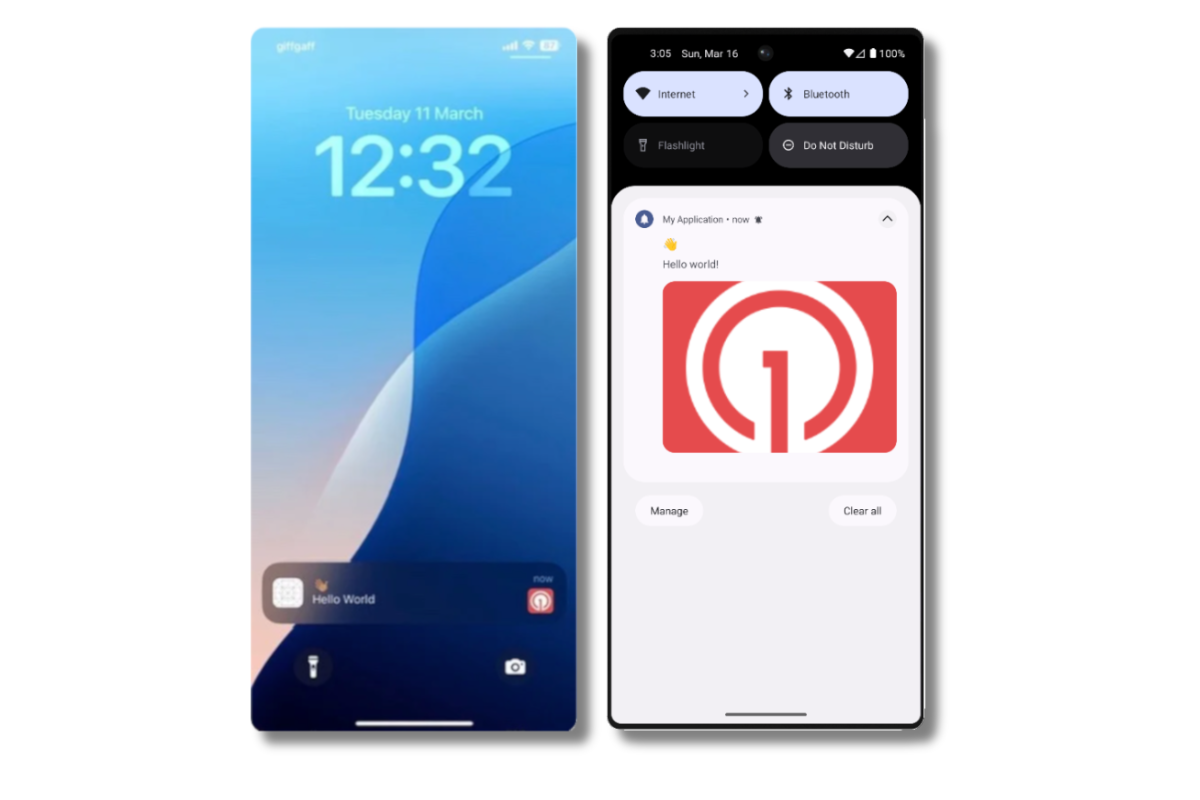 Images will appear small in the collapsed notification view. Expand the notification to see the full image.
In your dashboard, go to **Delivery > Sent Messages**, then click the message to view stats.
You should see the **confirmed** stat, meaning the device received the push.
You have successfully sent a notification via our API to a segment.
* No image received? Your [Notification Service Extension](#ios-setup) might be missing.
* No confirmed receipt? Review the troubleshooting guide [here](/docs/en/confirmed-delivery#troubleshooting-confirmed-delivery).
* Having issues? Copy-paste the api request and a log from start to finish of app launch into a `.txt` file. Then share both with `support@onesignal.com`.
### Send an in-app message
[In-app messages](/docs/en/in-app-messages-setup) let you communicate with users while they are using your app.
This is because users must meet the in-app audience criteria *before* a new session starts. In OneSignal, a new session starts when the user opens your app after it has been in the background or closed for at least 30 seconds. For more details, see our guide on [how in-app messages are displayed](/docs/en/in-app-messages-setup#how-are-iams-displayed%3F).
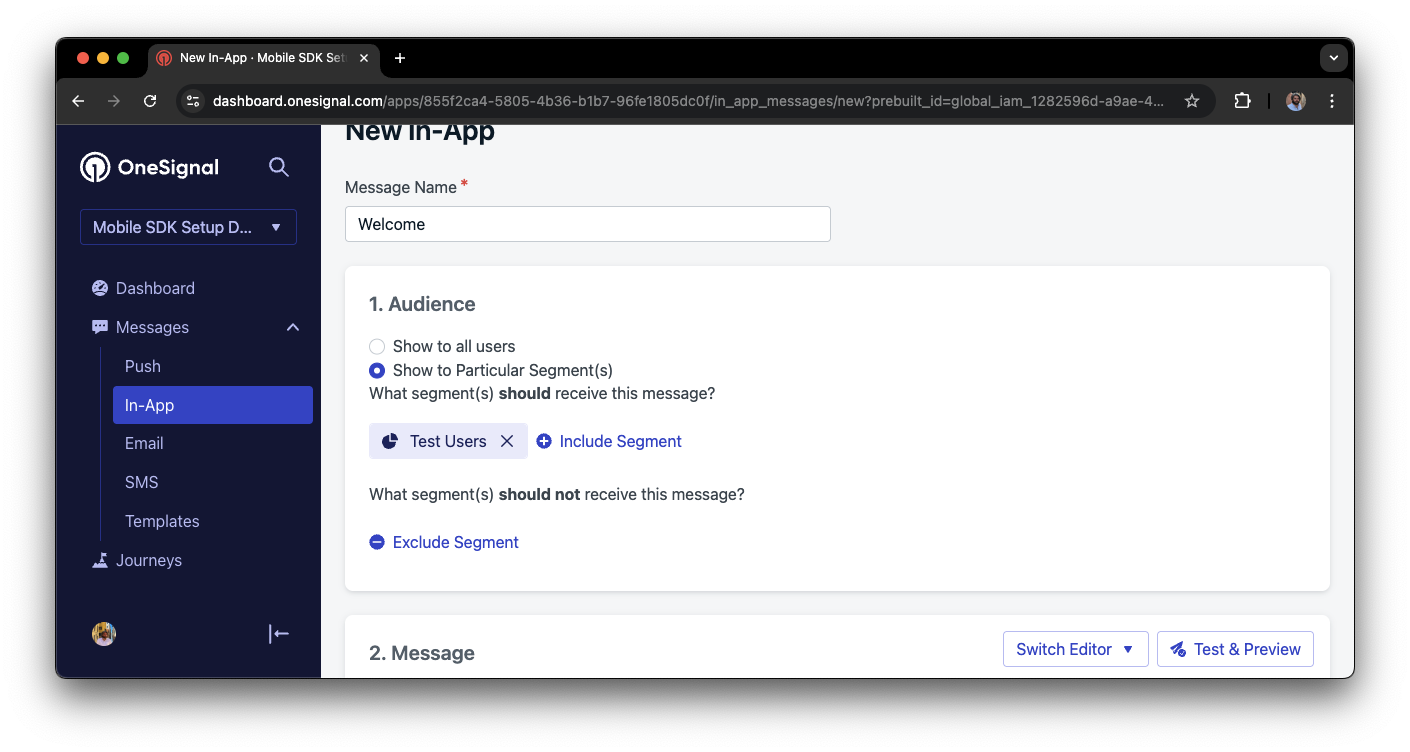
* In your OneSignal dashboard, navigate to **Messages > In-App > New In-App**.
* Find and select the **Welcome** message.
* Set your Audience as the **Test Users** segment we used previously.
Images will appear small in the collapsed notification view. Expand the notification to see the full image.
In your dashboard, go to **Delivery > Sent Messages**, then click the message to view stats.
You should see the **confirmed** stat, meaning the device received the push.
You have successfully sent a notification via our API to a segment.
* No image received? Your [Notification Service Extension](#ios-setup) might be missing.
* No confirmed receipt? Review the troubleshooting guide [here](/docs/en/confirmed-delivery#troubleshooting-confirmed-delivery).
* Having issues? Copy-paste the api request and a log from start to finish of app launch into a `.txt` file. Then share both with `support@onesignal.com`.
### Send an in-app message
[In-app messages](/docs/en/in-app-messages-setup) let you communicate with users while they are using your app.
This is because users must meet the in-app audience criteria *before* a new session starts. In OneSignal, a new session starts when the user opens your app after it has been in the background or closed for at least 30 seconds. For more details, see our guide on [how in-app messages are displayed](/docs/en/in-app-messages-setup#how-are-iams-displayed%3F).
* In your OneSignal dashboard, navigate to **Messages > In-App > New In-App**.
* Find and select the **Welcome** message.
* Set your Audience as the **Test Users** segment we used previously.
 Under **Schedule > How often do you want to show this message?** select **Every time trigger conditions are satisfied**.
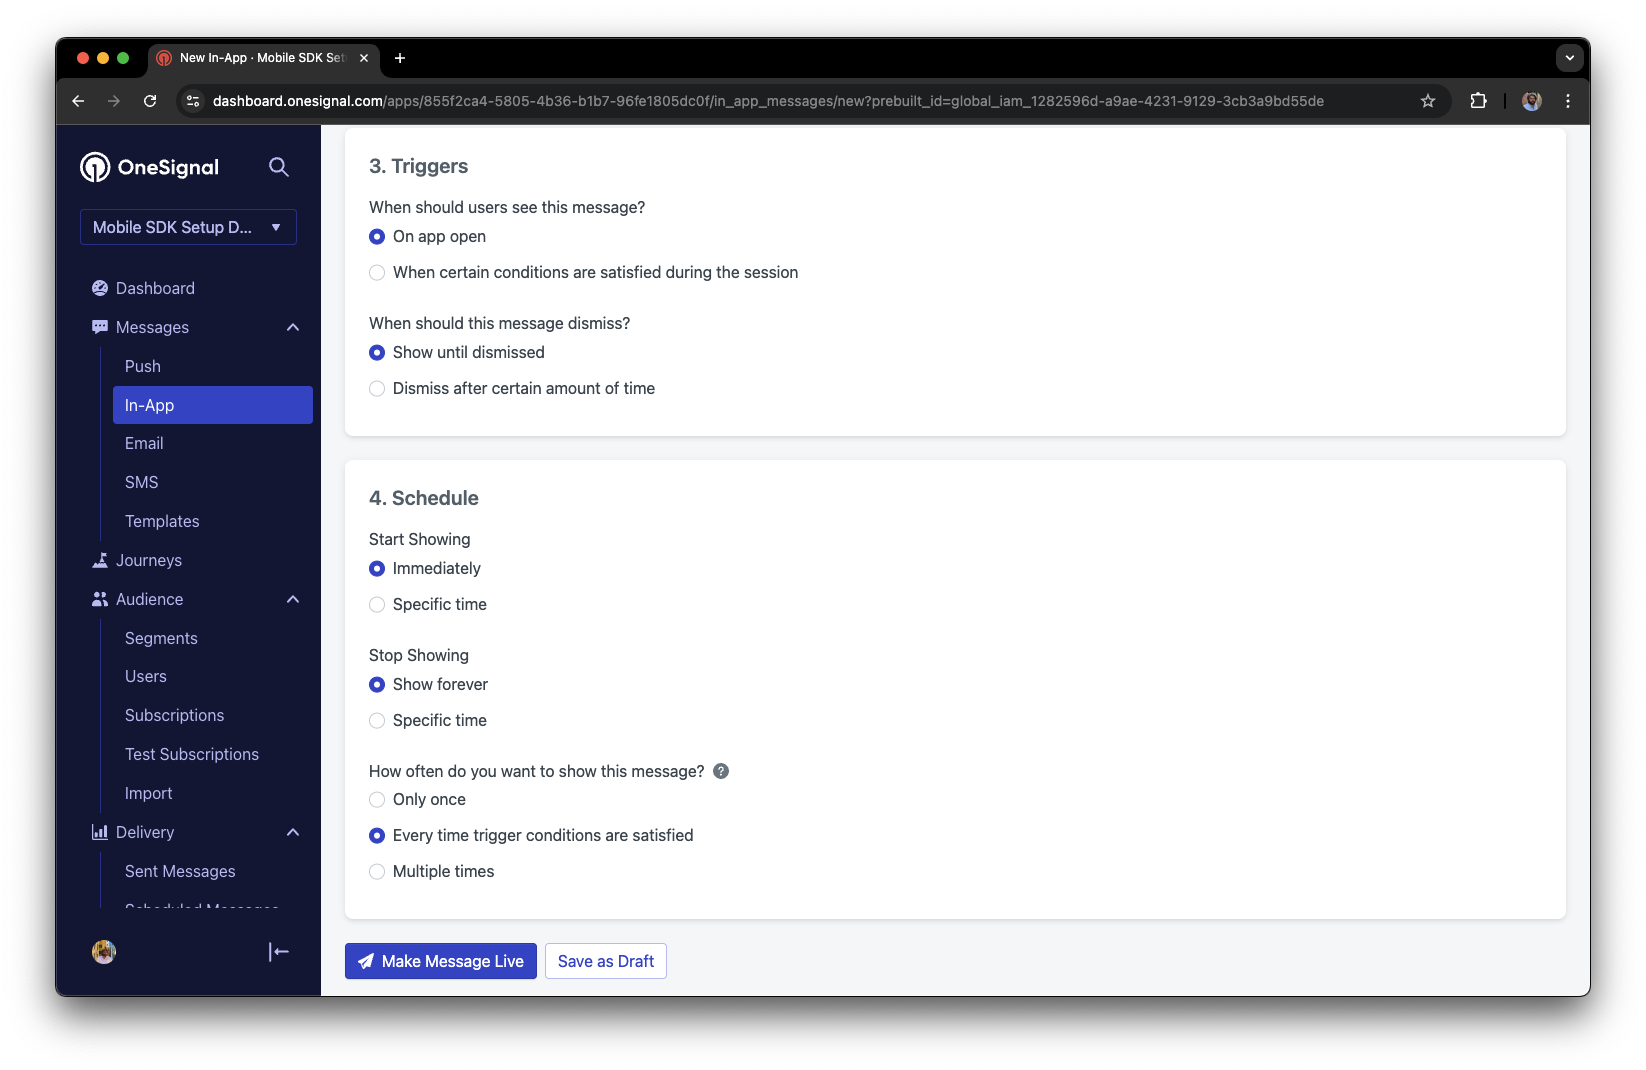 Click **Make Message Live** so it is available to your Test Users each time they open the app.
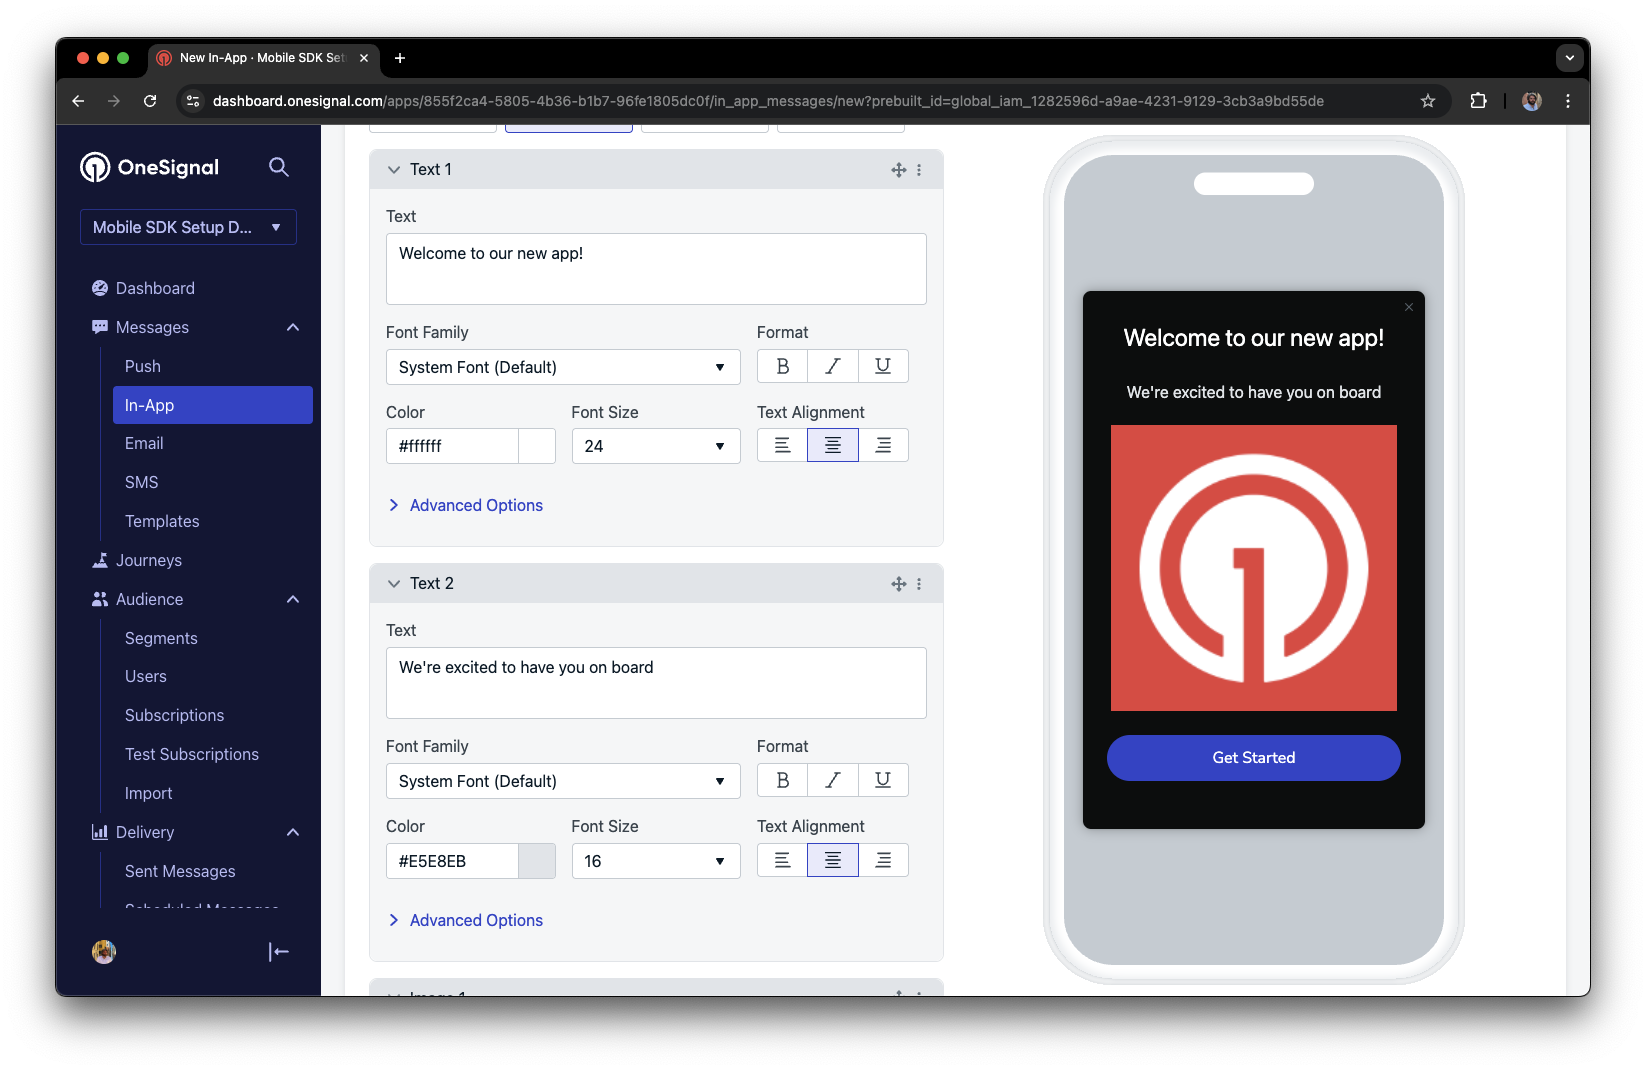
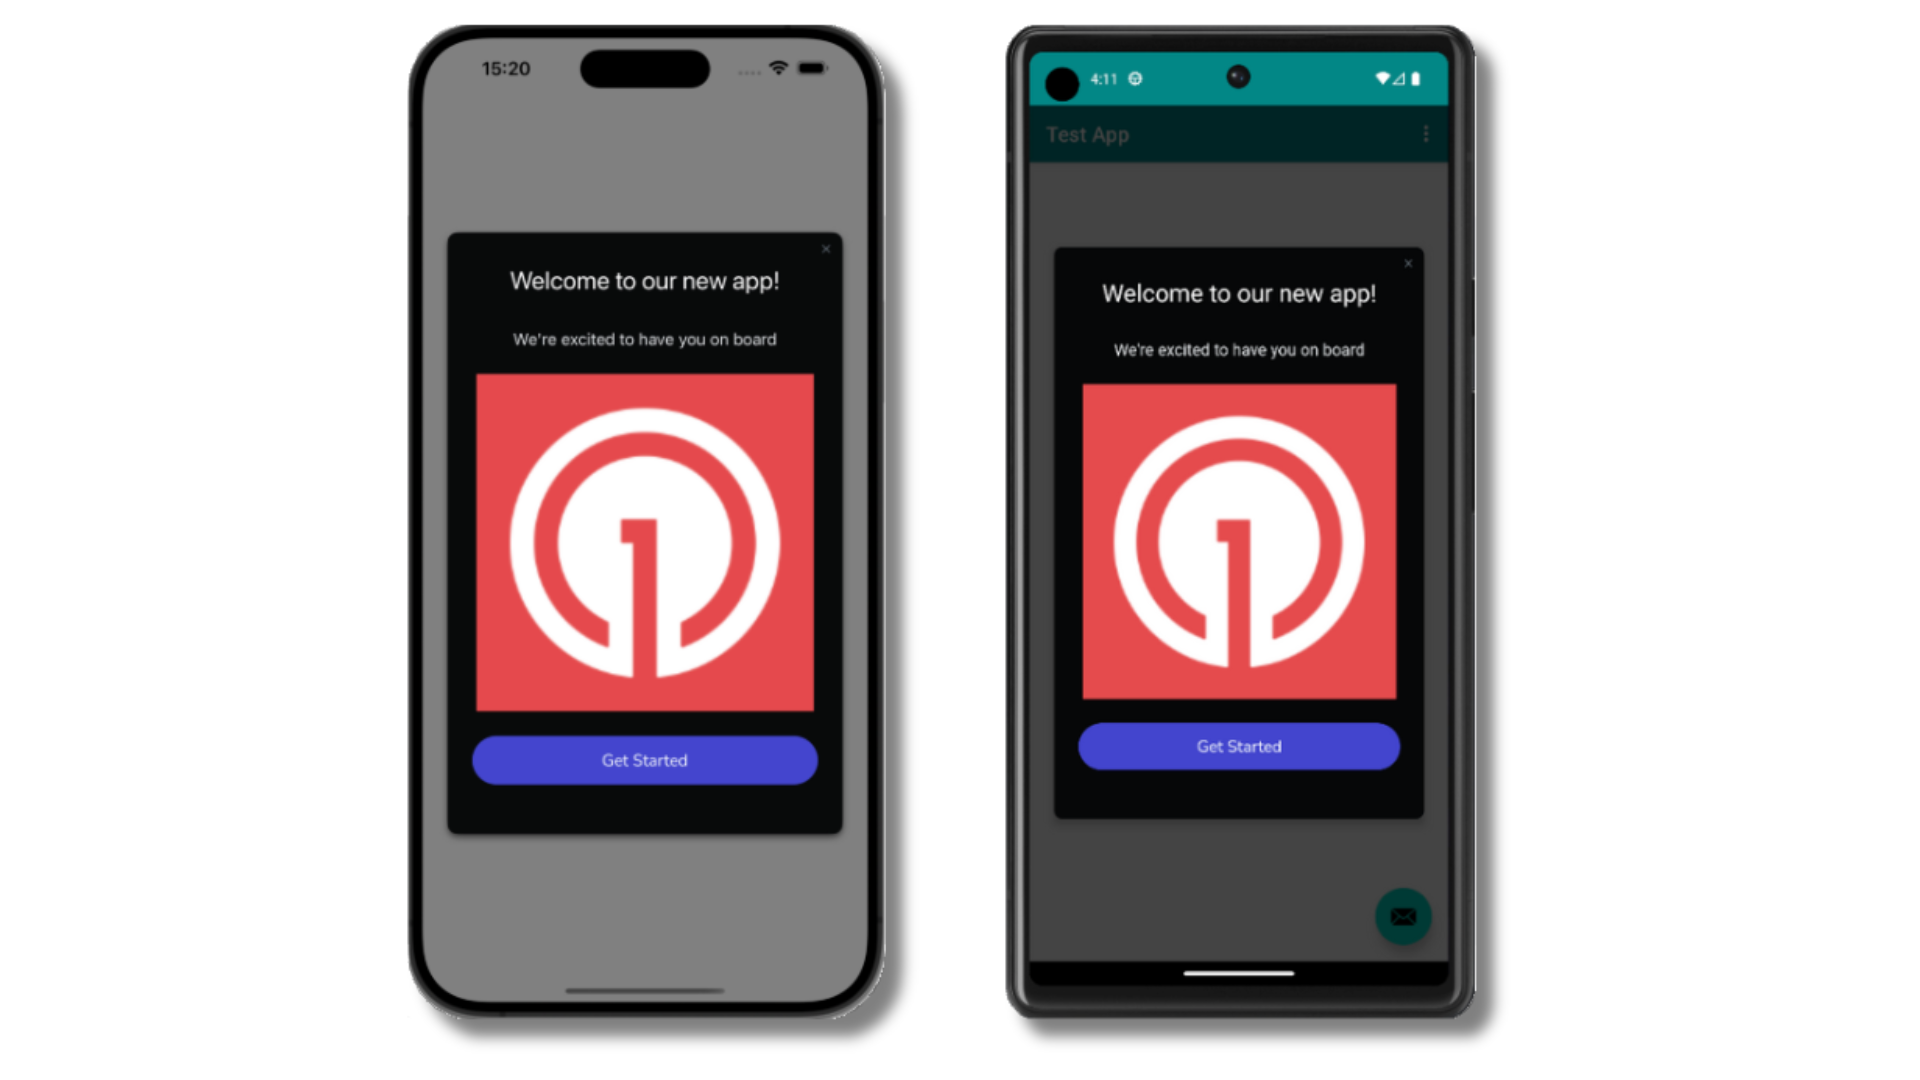
After the in-app message is live, open your app. You should see it display:
Click **Make Message Live** so it is available to your Test Users each time they open the app.
After the in-app message is live, open your app. You should see it display:
 Not seeing the message?
* Start a new session
* You must close or background the app for at least 30 seconds before reopening. This ensures a new session is started.
* For more, see [how in-app messages are displayed](/docs/en/in-app-messages-setup#how-are-iams-displayed%3F).
* Still in the `Test Users` segment?
* If you reinstalled or switched devices, re-add the device to [Test Users](#set-up-test-users) and confirm it's part of the Test Users segment.
* Having issues?
* Follow [Getting a Debug Log](/docs/en/capturing-a-debug-log) while reproducing the steps above. This will generate additional logging that you can share with `support@onesignal.com` and we will help investigate what's going on.
You have successfully setup the OneSignal SDK and learned important concepts like:
* Gathering [Subscriptions](/docs/en/subscriptions), setting [Test Users](/docs/en/find-set-test-subscriptions), and creating [Segments](/docs/en/segmentation).
* Sending [Push](/docs/en/push) with images and [Confirmed receipt](/docs/en/confirmed-delivery) using Segments and our [Create message](/reference/create-message) API.
* Sending [In-app messages](/docs/en/in-app-messages-setup).
Continue with this guide to identify users in your app and setup additional features.
***
## User identification
Previously, we demonstrated how to create mobile [Subscriptions](/docs/en/subscriptions). Now we'll expand to identifying [Users](/docs/en/users) across all their subscriptions (including push, email, and SMS) using the OneSignal SDK. We'll cover External IDs, tags, multi-channel subscriptions, privacy, and event tracking to help you unify and engage users across platforms.
### Assign External ID
Use an External ID to identify users consistently across devices, email addresses, and phone numbers using your backend's user identifier. This ensures your messaging stays unified across channels and 3rd party systems (especially important for [Integrations](/docs/en/integrations)).
Set the External ID with our SDK's [`login` method](/docs/en/mobile-sdk-reference#login-external-id) each time they are identified by your app.
OneSignal generates unique read-only IDs for subscriptions (Subscription ID) and users (OneSignal ID).
As users download your app on different devices, subscribe to your website, and/or provide you email addresses and phone numbers outside of your app, new subscriptions will be created.
Setting the External ID via our SDK is highly recommended to identify users across all their subscriptions, regardless of how they are created.
### Add Tags
[Tags](/docs/en/add-user-data-tags) are key-value pairs of string data you can use to store user properties (like `username`, `role`, or preferences) and events (like `purchase_date`, `game_level`, or user interactions). Tags power advanced [Message Personalization](/docs/en/message-personalization) and [Segmentation](/docs/en/segmentation) allowing for more advanced use cases.
Set tags with our SDK [`addTag` and `addTags` methods](/docs/en/mobile-sdk-reference#data-tags) as events occur in your app.
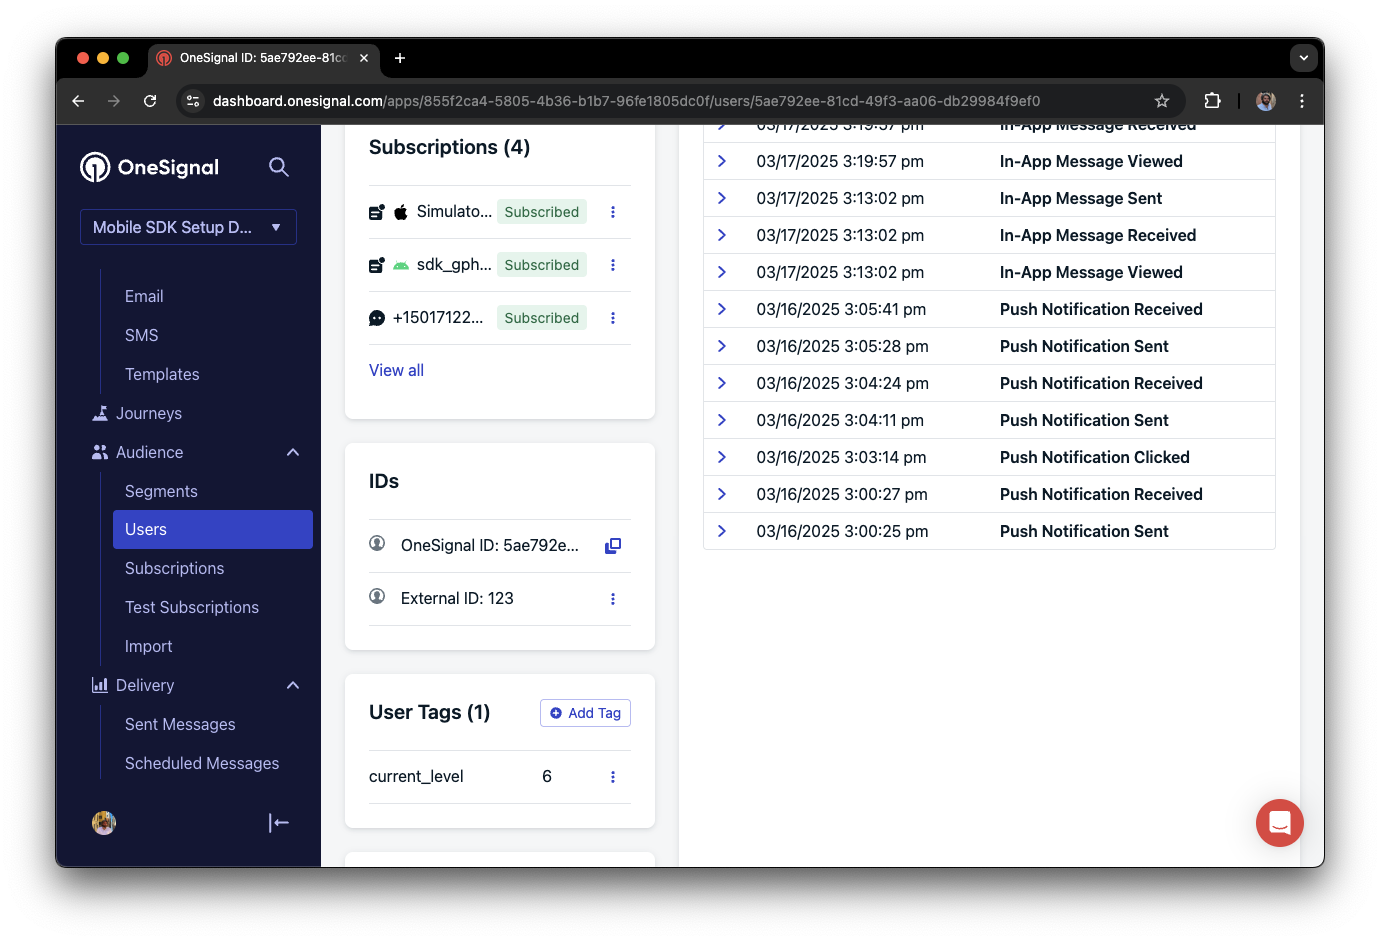
In this example, the user reached level 6 identifiable by the tag called `current_level` set to a value of `6`.
Not seeing the message?
* Start a new session
* You must close or background the app for at least 30 seconds before reopening. This ensures a new session is started.
* For more, see [how in-app messages are displayed](/docs/en/in-app-messages-setup#how-are-iams-displayed%3F).
* Still in the `Test Users` segment?
* If you reinstalled or switched devices, re-add the device to [Test Users](#set-up-test-users) and confirm it's part of the Test Users segment.
* Having issues?
* Follow [Getting a Debug Log](/docs/en/capturing-a-debug-log) while reproducing the steps above. This will generate additional logging that you can share with `support@onesignal.com` and we will help investigate what's going on.
You have successfully setup the OneSignal SDK and learned important concepts like:
* Gathering [Subscriptions](/docs/en/subscriptions), setting [Test Users](/docs/en/find-set-test-subscriptions), and creating [Segments](/docs/en/segmentation).
* Sending [Push](/docs/en/push) with images and [Confirmed receipt](/docs/en/confirmed-delivery) using Segments and our [Create message](/reference/create-message) API.
* Sending [In-app messages](/docs/en/in-app-messages-setup).
Continue with this guide to identify users in your app and setup additional features.
***
## User identification
Previously, we demonstrated how to create mobile [Subscriptions](/docs/en/subscriptions). Now we'll expand to identifying [Users](/docs/en/users) across all their subscriptions (including push, email, and SMS) using the OneSignal SDK. We'll cover External IDs, tags, multi-channel subscriptions, privacy, and event tracking to help you unify and engage users across platforms.
### Assign External ID
Use an External ID to identify users consistently across devices, email addresses, and phone numbers using your backend's user identifier. This ensures your messaging stays unified across channels and 3rd party systems (especially important for [Integrations](/docs/en/integrations)).
Set the External ID with our SDK's [`login` method](/docs/en/mobile-sdk-reference#login-external-id) each time they are identified by your app.
OneSignal generates unique read-only IDs for subscriptions (Subscription ID) and users (OneSignal ID).
As users download your app on different devices, subscribe to your website, and/or provide you email addresses and phone numbers outside of your app, new subscriptions will be created.
Setting the External ID via our SDK is highly recommended to identify users across all their subscriptions, regardless of how they are created.
### Add Tags
[Tags](/docs/en/add-user-data-tags) are key-value pairs of string data you can use to store user properties (like `username`, `role`, or preferences) and events (like `purchase_date`, `game_level`, or user interactions). Tags power advanced [Message Personalization](/docs/en/message-personalization) and [Segmentation](/docs/en/segmentation) allowing for more advanced use cases.
Set tags with our SDK [`addTag` and `addTags` methods](/docs/en/mobile-sdk-reference#data-tags) as events occur in your app.
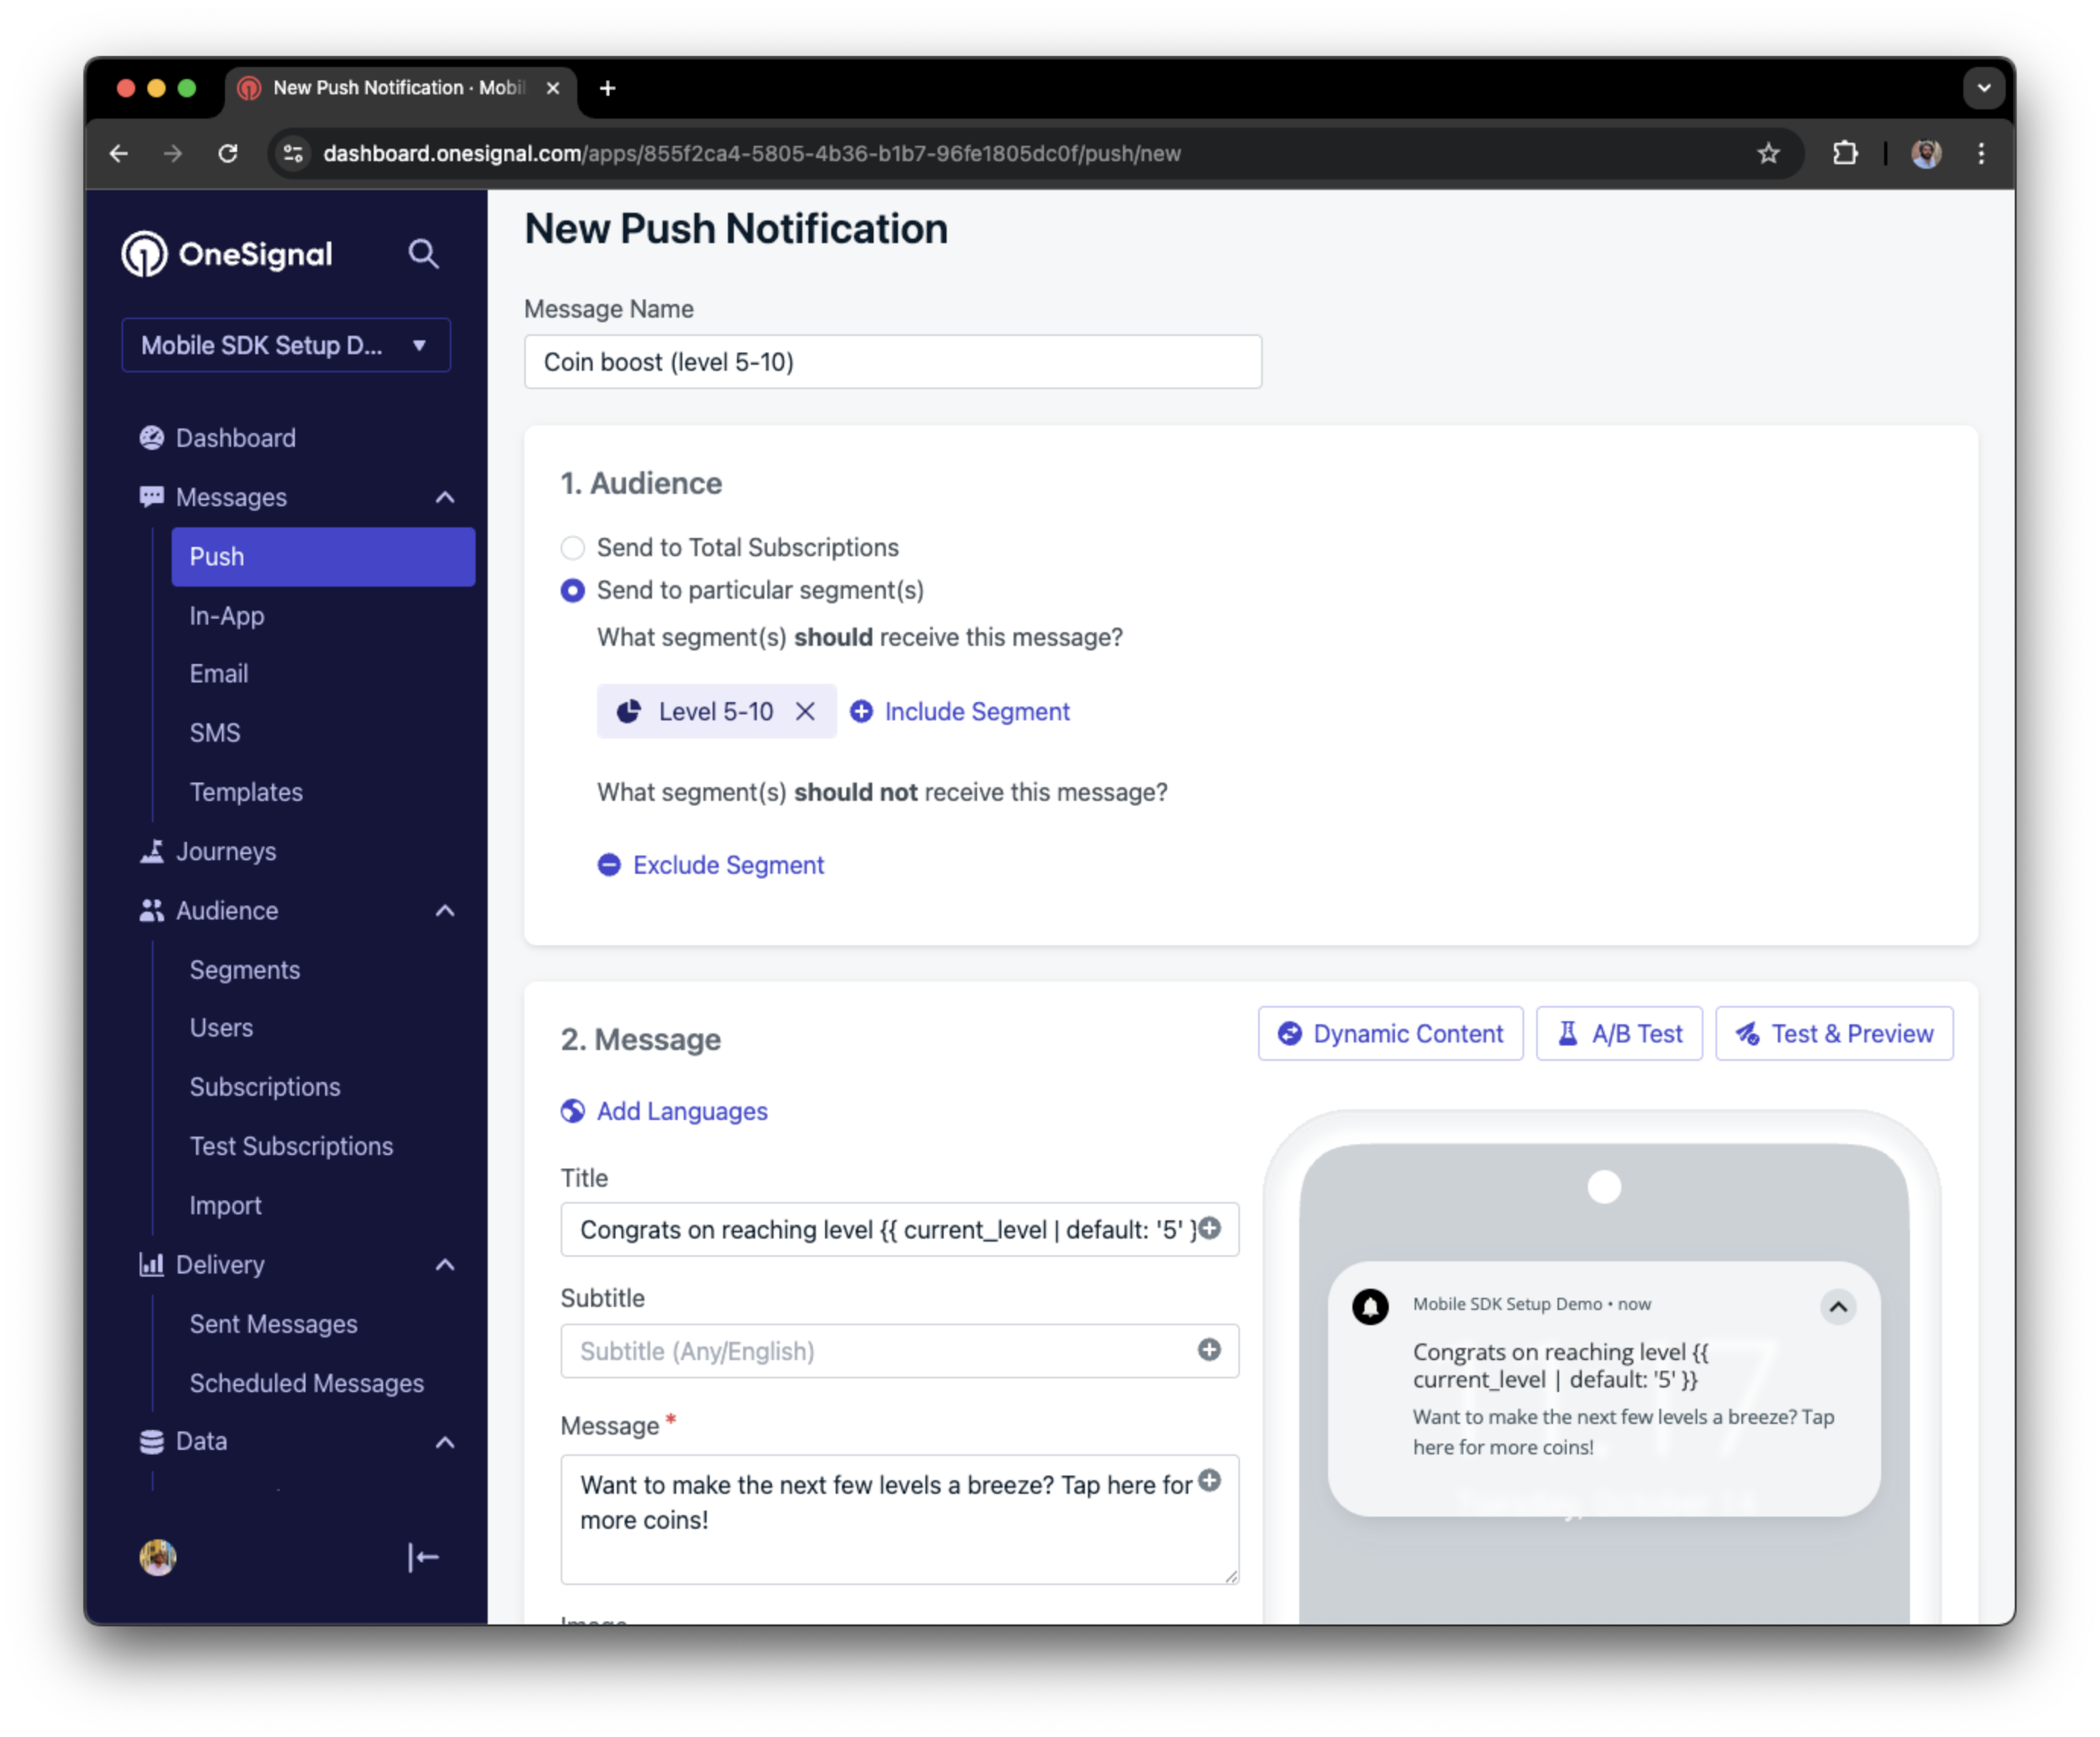
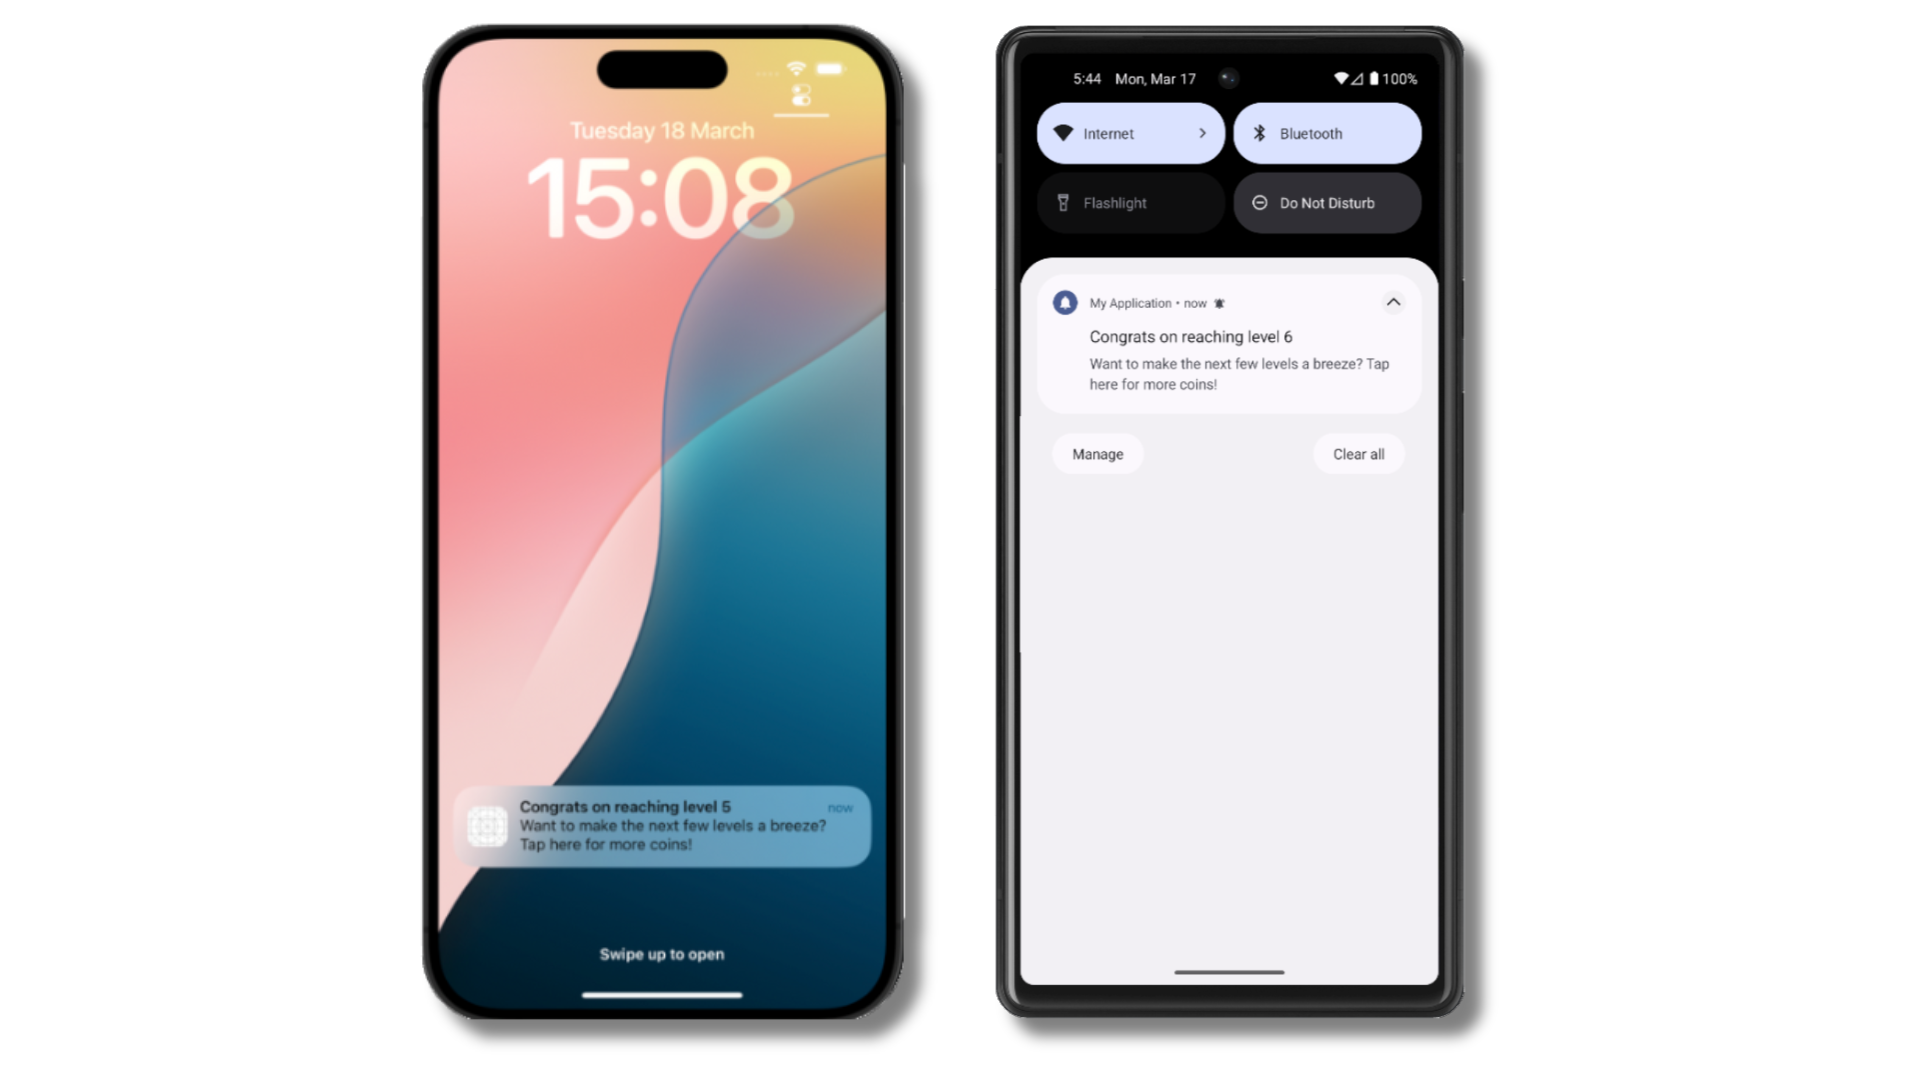
In this example, the user reached level 6 identifiable by the tag called `current_level` set to a value of `6`.
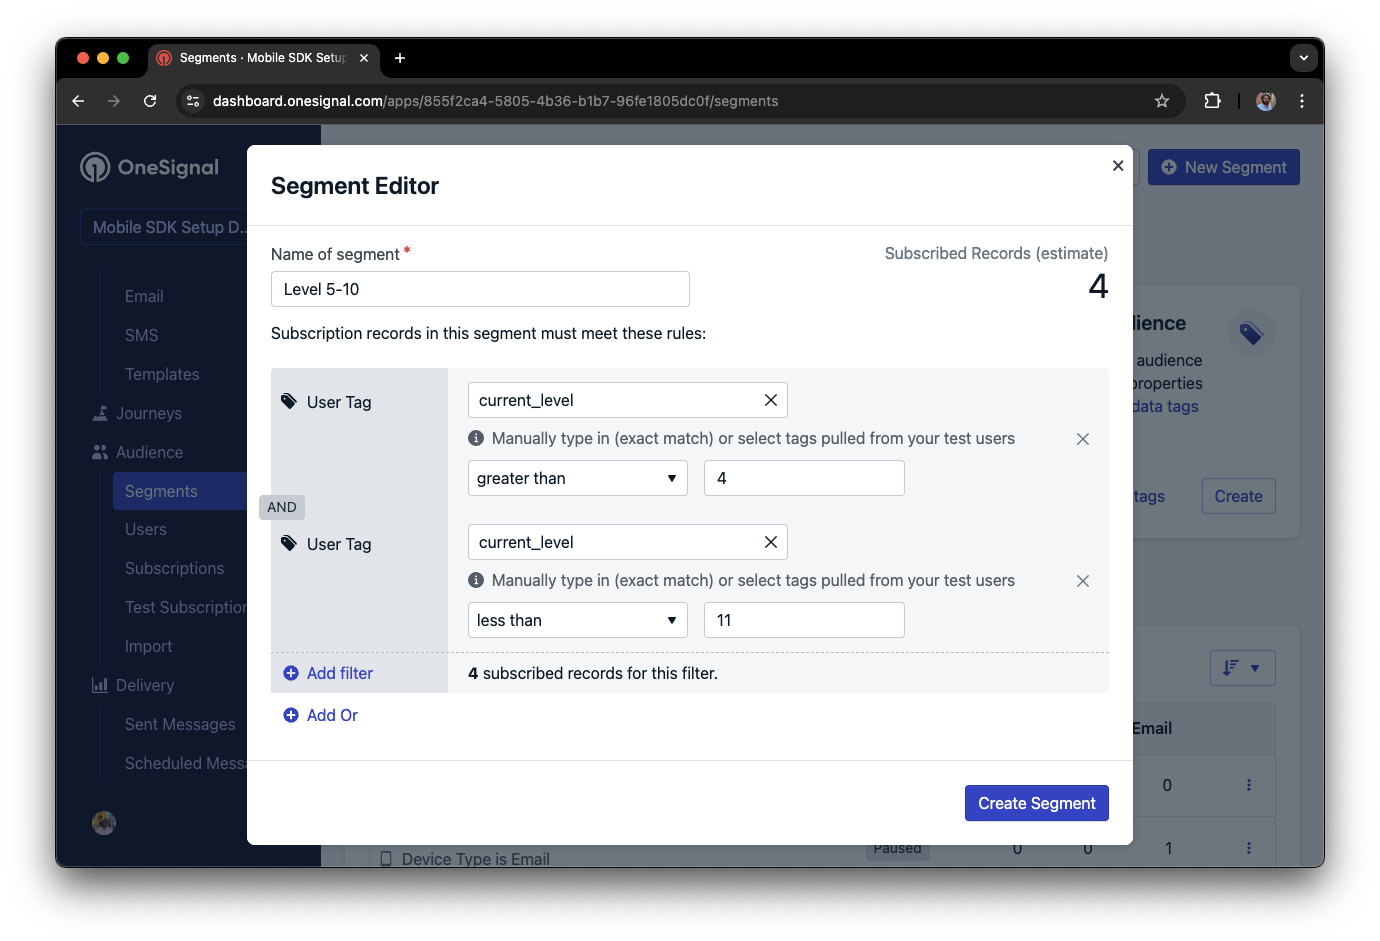
 We can create a segment of users that have a level of between 5 and 10, and use that to send targeted and personalized messages:
 ### Add email and/or SMS subscriptions
Earlier we saw how our SDK creates mobile subscriptions to send push and in-app messages. You can also reach users through emails and SMS channels by creating the corresponding subscriptions.
* Use the [`addEmail` method](/docs/en/mobile-sdk-reference#addemail-%2C-removeemail) to create email subscriptions.
* Use the [`addSms` method](/docs/en/mobile-sdk-reference#addsms-%2C-removesms) to create SMS subscriptions.
If the email address and/or phone number already exist in the OneSignal app, the SDK will add it to the existing user, it will not create duplicates.
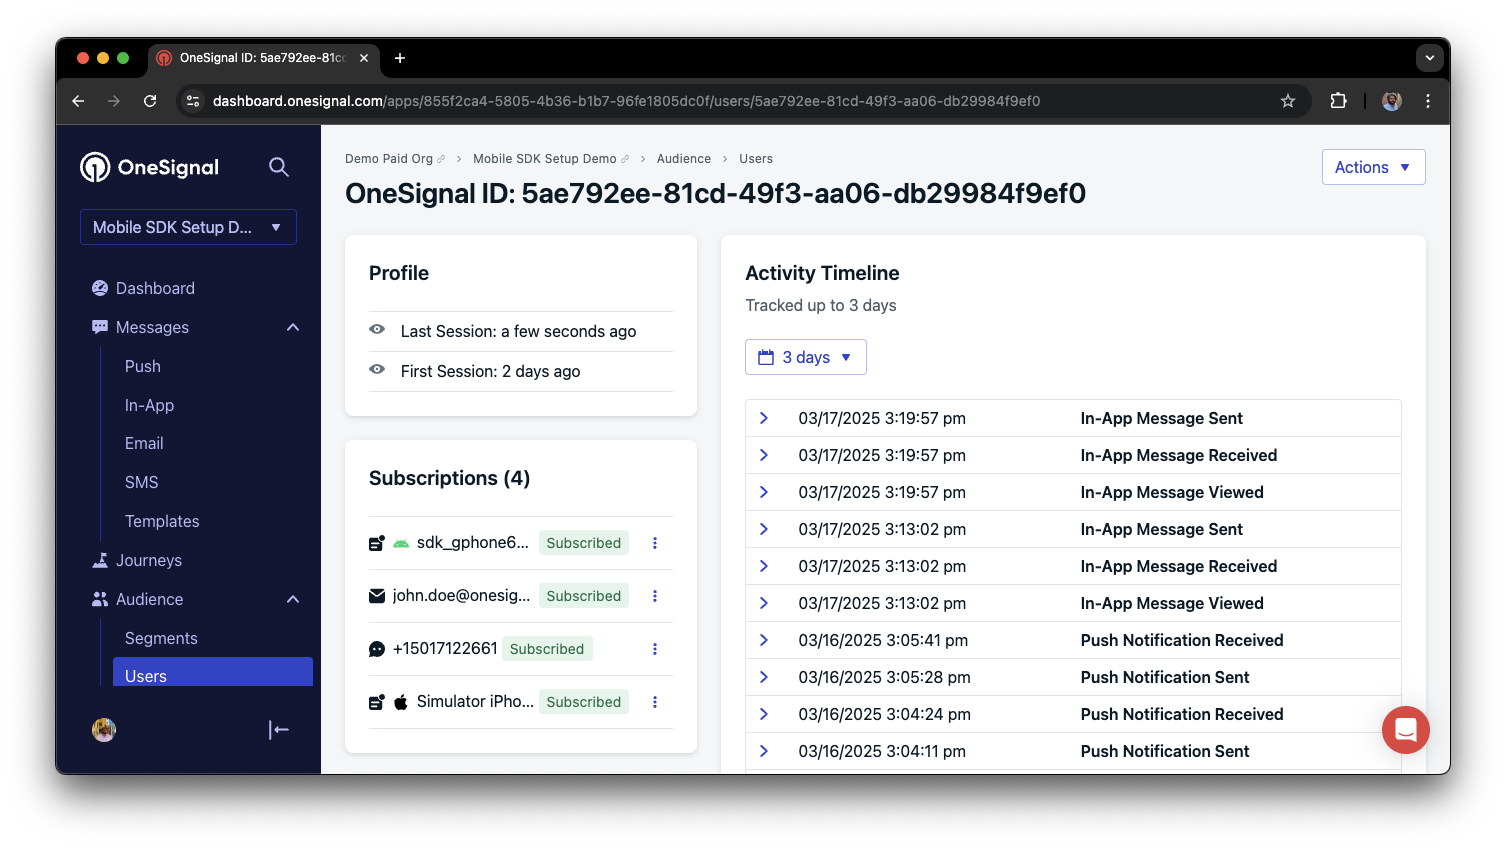
You can view unified users via **Audience > Users** in the dashboard or with the [View user API](/reference/view-user).
### Add email and/or SMS subscriptions
Earlier we saw how our SDK creates mobile subscriptions to send push and in-app messages. You can also reach users through emails and SMS channels by creating the corresponding subscriptions.
* Use the [`addEmail` method](/docs/en/mobile-sdk-reference#addemail-%2C-removeemail) to create email subscriptions.
* Use the [`addSms` method](/docs/en/mobile-sdk-reference#addsms-%2C-removesms) to create SMS subscriptions.
If the email address and/or phone number already exist in the OneSignal app, the SDK will add it to the existing user, it will not create duplicates.
You can view unified users via **Audience > Users** in the dashboard or with the [View user API](/reference/view-user).
 Best practices for multi-channel communication
* Obtain explicit consent before adding email or SMS subscriptions.
* Explain the benefits of each communication channel to users.
* Provide channel preferences so users can select which channels they prefer.
***
### Privacy & user consent
To control when OneSignal collects user data, use the SDK's consent gating methods:
* [`setConsentRequired(true)`](/docs/en/mobile-sdk-reference#setconsentrequired): Prevents data collection until consent is given.
* [`setConsentGiven(true)`](/docs/en/mobile-sdk-reference#setconsentgiven): Enables data collection once consent is granted.
See our Privacy & security docs for more on:
* [Data collected by the SDK](/docs/en/data-collected-by-the-onesignal-sdk)
* [Handling personal data](/docs/en/handling-personal-data)
***
## Prompt for push permissions
Instead of calling `requestPermission()` immediately on app open, take a more strategic approach. Use an in-app message to explain the value of push notifications before requesting permission.
For best practices and implementation details, see our [Prompt for push permissions](/docs/en/prompt-for-push-permissions) guide.
***
## Listen to push, user, and in-app events
Use SDK listeners to react to user actions and state changes.
The SDK provides several event listeners for you to hook into. See our [SDK reference guide](/docs/en/mobile-sdk-reference) for more details.
### Push notification events
* [`addClickListener()`](/docs/en/mobile-sdk-reference#addclicklistener-push): Detect when a notification is tapped. Helpful for [Deep Linking](/docs/en/deep-linking).
* [`addForegroundLifecycleListener()`](/docs/en/mobile-sdk-reference#addforegroundlifecyclelistener-push): Control how notifications behave in foreground.
For full customization, see [Mobile Service Extensions](/docs/en/service-extensions).
### User state changes
* [`addObserver()` for user state](/docs/en/mobile-sdk-reference#addobserver-user-state): Detect when the External ID is set.
* [`addPermissionObserver()`](/docs/en/mobile-sdk-reference#addpermissionobserver-push): Track the user's specific interaction with the native push permission prompt.
* [`addObserver()` for push subscription](/docs/en/mobile-sdk-reference#addobserver-push-subscription-changes): Track when the push subscription status changes.
### In-app message events
* [`addClickListener()`](/docs/en/mobile-sdk-reference#addclicklistener-in-app): Handle in-app click actions. Ideal for deep linking or tracking events.
* [`addLifecycleListener()`](/docs/en/mobile-sdk-reference#addclicklistener-in-app): Track full lifecycle of in-app messages (shown, clicked, dismissed, etc.).
***
## Advanced setup & capabilities
Explore more capabilities to enhance your integration:
* [🔁 Migrating to OneSignal from another service](/docs/en/migrating-to-onesignal)
* [🌍 Location tracking](/docs/en/mobile-sdk-reference#location)
* [🔗 Deep Linking](/docs/en/deep-linking)
* [🔌 Integrations](/docs/en/integrations)
* [🧩 Mobile Service Extensions](/docs/en/service-extensions)
* [🛎️ Action buttons](/docs/en/action-buttons)
* [🌐 Multi-language messaging](/docs/en/multi-language-messaging)
* [🛡️ Identity Verification](/docs/en/identity-verification)
* [📊 Custom Outcomes](/docs/en/custom-outcomes)
* [📲 Live Activities](/docs/en/live-activities)
### Mobile SDK setup & reference
Make sure you've enabled all key features by reviewing the [Mobile push setup](/docs/en/mobile-push-setup) guide.
For full details on available methods and configuration options, visit the [Mobile SDK reference](/docs/en/mobile-sdk-reference).
Congratulations! You've successfully completed the Mobile SDK setup guide.
***
Need help?
Chat with our Support team or email `support@onesignal.com`
Please include:
* Details of the issue you're experiencing and steps to reproduce if available
* Your OneSignal App ID
* The External ID or Subscription ID if applicable
* The URL to the message you tested in the OneSignal Dashboard if applicable
* Any relevant [logs or error messages](/docs/en/capturing-a-debug-log)
We're happy to help!
***
Best practices for multi-channel communication
* Obtain explicit consent before adding email or SMS subscriptions.
* Explain the benefits of each communication channel to users.
* Provide channel preferences so users can select which channels they prefer.
***
### Privacy & user consent
To control when OneSignal collects user data, use the SDK's consent gating methods:
* [`setConsentRequired(true)`](/docs/en/mobile-sdk-reference#setconsentrequired): Prevents data collection until consent is given.
* [`setConsentGiven(true)`](/docs/en/mobile-sdk-reference#setconsentgiven): Enables data collection once consent is granted.
See our Privacy & security docs for more on:
* [Data collected by the SDK](/docs/en/data-collected-by-the-onesignal-sdk)
* [Handling personal data](/docs/en/handling-personal-data)
***
## Prompt for push permissions
Instead of calling `requestPermission()` immediately on app open, take a more strategic approach. Use an in-app message to explain the value of push notifications before requesting permission.
For best practices and implementation details, see our [Prompt for push permissions](/docs/en/prompt-for-push-permissions) guide.
***
## Listen to push, user, and in-app events
Use SDK listeners to react to user actions and state changes.
The SDK provides several event listeners for you to hook into. See our [SDK reference guide](/docs/en/mobile-sdk-reference) for more details.
### Push notification events
* [`addClickListener()`](/docs/en/mobile-sdk-reference#addclicklistener-push): Detect when a notification is tapped. Helpful for [Deep Linking](/docs/en/deep-linking).
* [`addForegroundLifecycleListener()`](/docs/en/mobile-sdk-reference#addforegroundlifecyclelistener-push): Control how notifications behave in foreground.
For full customization, see [Mobile Service Extensions](/docs/en/service-extensions).
### User state changes
* [`addObserver()` for user state](/docs/en/mobile-sdk-reference#addobserver-user-state): Detect when the External ID is set.
* [`addPermissionObserver()`](/docs/en/mobile-sdk-reference#addpermissionobserver-push): Track the user's specific interaction with the native push permission prompt.
* [`addObserver()` for push subscription](/docs/en/mobile-sdk-reference#addobserver-push-subscription-changes): Track when the push subscription status changes.
### In-app message events
* [`addClickListener()`](/docs/en/mobile-sdk-reference#addclicklistener-in-app): Handle in-app click actions. Ideal for deep linking or tracking events.
* [`addLifecycleListener()`](/docs/en/mobile-sdk-reference#addclicklistener-in-app): Track full lifecycle of in-app messages (shown, clicked, dismissed, etc.).
***
## Advanced setup & capabilities
Explore more capabilities to enhance your integration:
* [🔁 Migrating to OneSignal from another service](/docs/en/migrating-to-onesignal)
* [🌍 Location tracking](/docs/en/mobile-sdk-reference#location)
* [🔗 Deep Linking](/docs/en/deep-linking)
* [🔌 Integrations](/docs/en/integrations)
* [🧩 Mobile Service Extensions](/docs/en/service-extensions)
* [🛎️ Action buttons](/docs/en/action-buttons)
* [🌐 Multi-language messaging](/docs/en/multi-language-messaging)
* [🛡️ Identity Verification](/docs/en/identity-verification)
* [📊 Custom Outcomes](/docs/en/custom-outcomes)
* [📲 Live Activities](/docs/en/live-activities)
### Mobile SDK setup & reference
Make sure you've enabled all key features by reviewing the [Mobile push setup](/docs/en/mobile-push-setup) guide.
For full details on available methods and configuration options, visit the [Mobile SDK reference](/docs/en/mobile-sdk-reference).
Congratulations! You've successfully completed the Mobile SDK setup guide.
***
Need help?
Chat with our Support team or email `support@onesignal.com`
Please include:
* Details of the issue you're experiencing and steps to reproduce if available
* Your OneSignal App ID
* The External ID or Subscription ID if applicable
* The URL to the message you tested in the OneSignal Dashboard if applicable
* Any relevant [logs or error messages](/docs/en/capturing-a-debug-log)
We're happy to help!
***