> ## Documentation Index
> Fetch the complete documentation index at: https://documentation.onesignal.com/llms.txt
> Use this file to discover all available pages before exploring further.
# iOS p8 token-based connection to APNs
> Set up a .p8 authentication key to connect your iOS or macOS app to Apple Push Notification service (APNs) through OneSignal.
Sending push notifications to iOS apps requires an authenticated connection to Apple Push Notification service (APNs). You can authenticate using a **token-based (.p8 key)** or a **[certificate-based (.p12 file)](./ios-p12-generate-certificates)** method — only one is necessary.
This guide covers the **token-based .p8 key**, the recommended approach.
***
## Requirements
Make sure you have the following before starting:
* An iOS mobile app.
* A [**Paid Apple Developer Account**](https://developer.apple.com/) with [**Admin** access](https://appstoreconnect.apple.com/access/users).
* A [**OneSignal Account**](https://onesignal.com).
* A Mac with Xcode 14+.
* An Xcode project with **Push Notification capability enabled**.
***
## Set up APNs authentication
### Generate your .p8 key in Apple Developer Account
For Apple's full instructions, see [Create a private key to access a service](https://developer.apple.com/help/account/keys/create-a-private-key/).
1. Log into your [Apple Developer Account](https://developer.apple.com/).
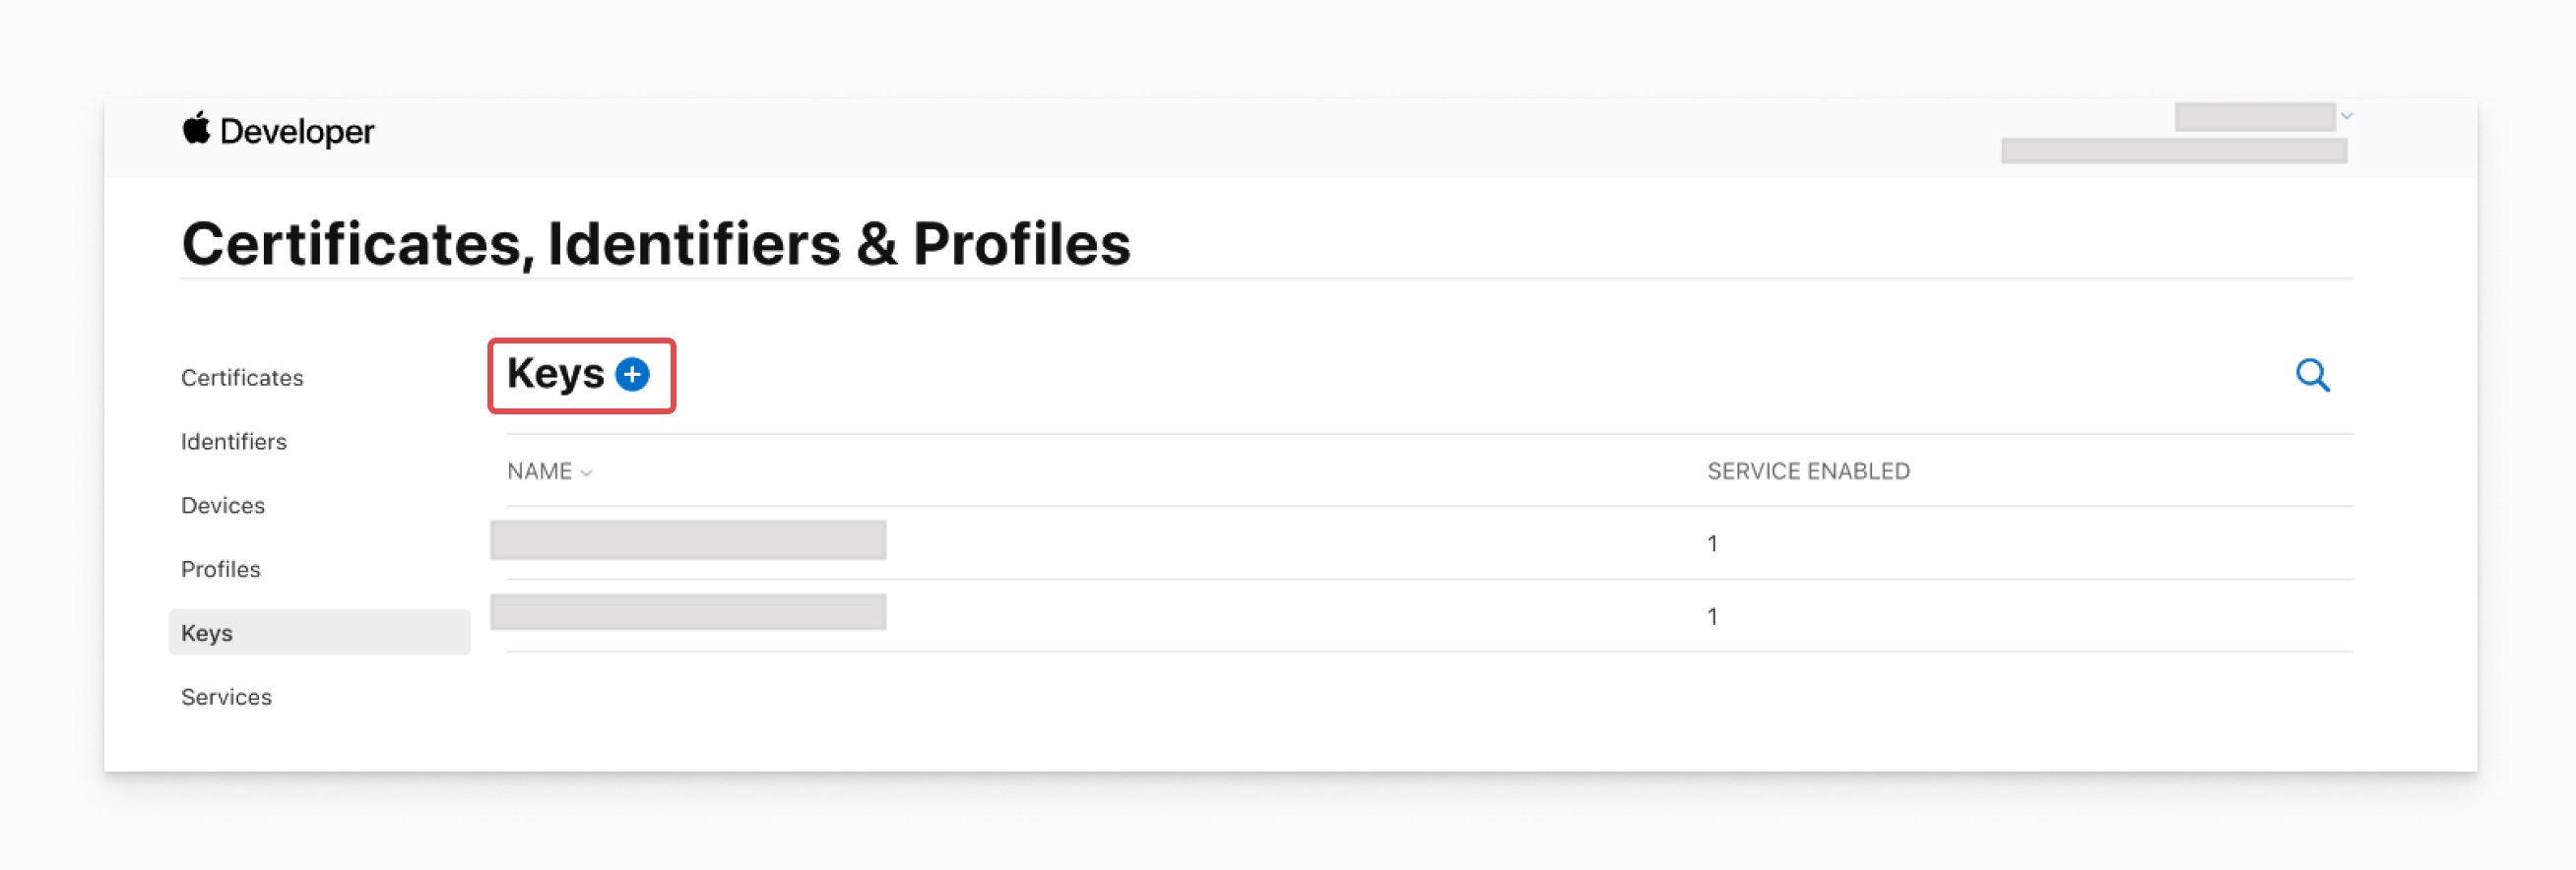
2. Go to **Certificates, Identifiers & Profiles > [Keys](https://developer.apple.com/account/resources/authkeys)**.
3. Click the **blue plus (+)** icon.
* If you don’t see it, contact your Admin for access.
 4. Select **Apple Push Notifications service (APNs)**.
5. When configuring the key, ensure that **Sandbox & Production** is selected:
4. Select **Apple Push Notifications service (APNs)**.
5. When configuring the key, ensure that **Sandbox & Production** is selected:
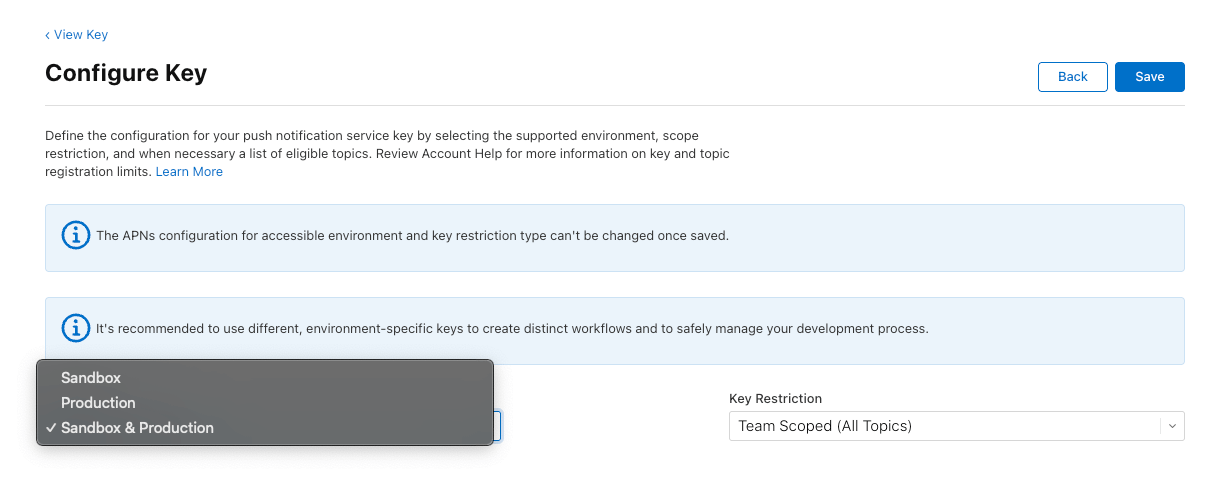 6. Enter a name for the key and click **Continue**, then **Register**.
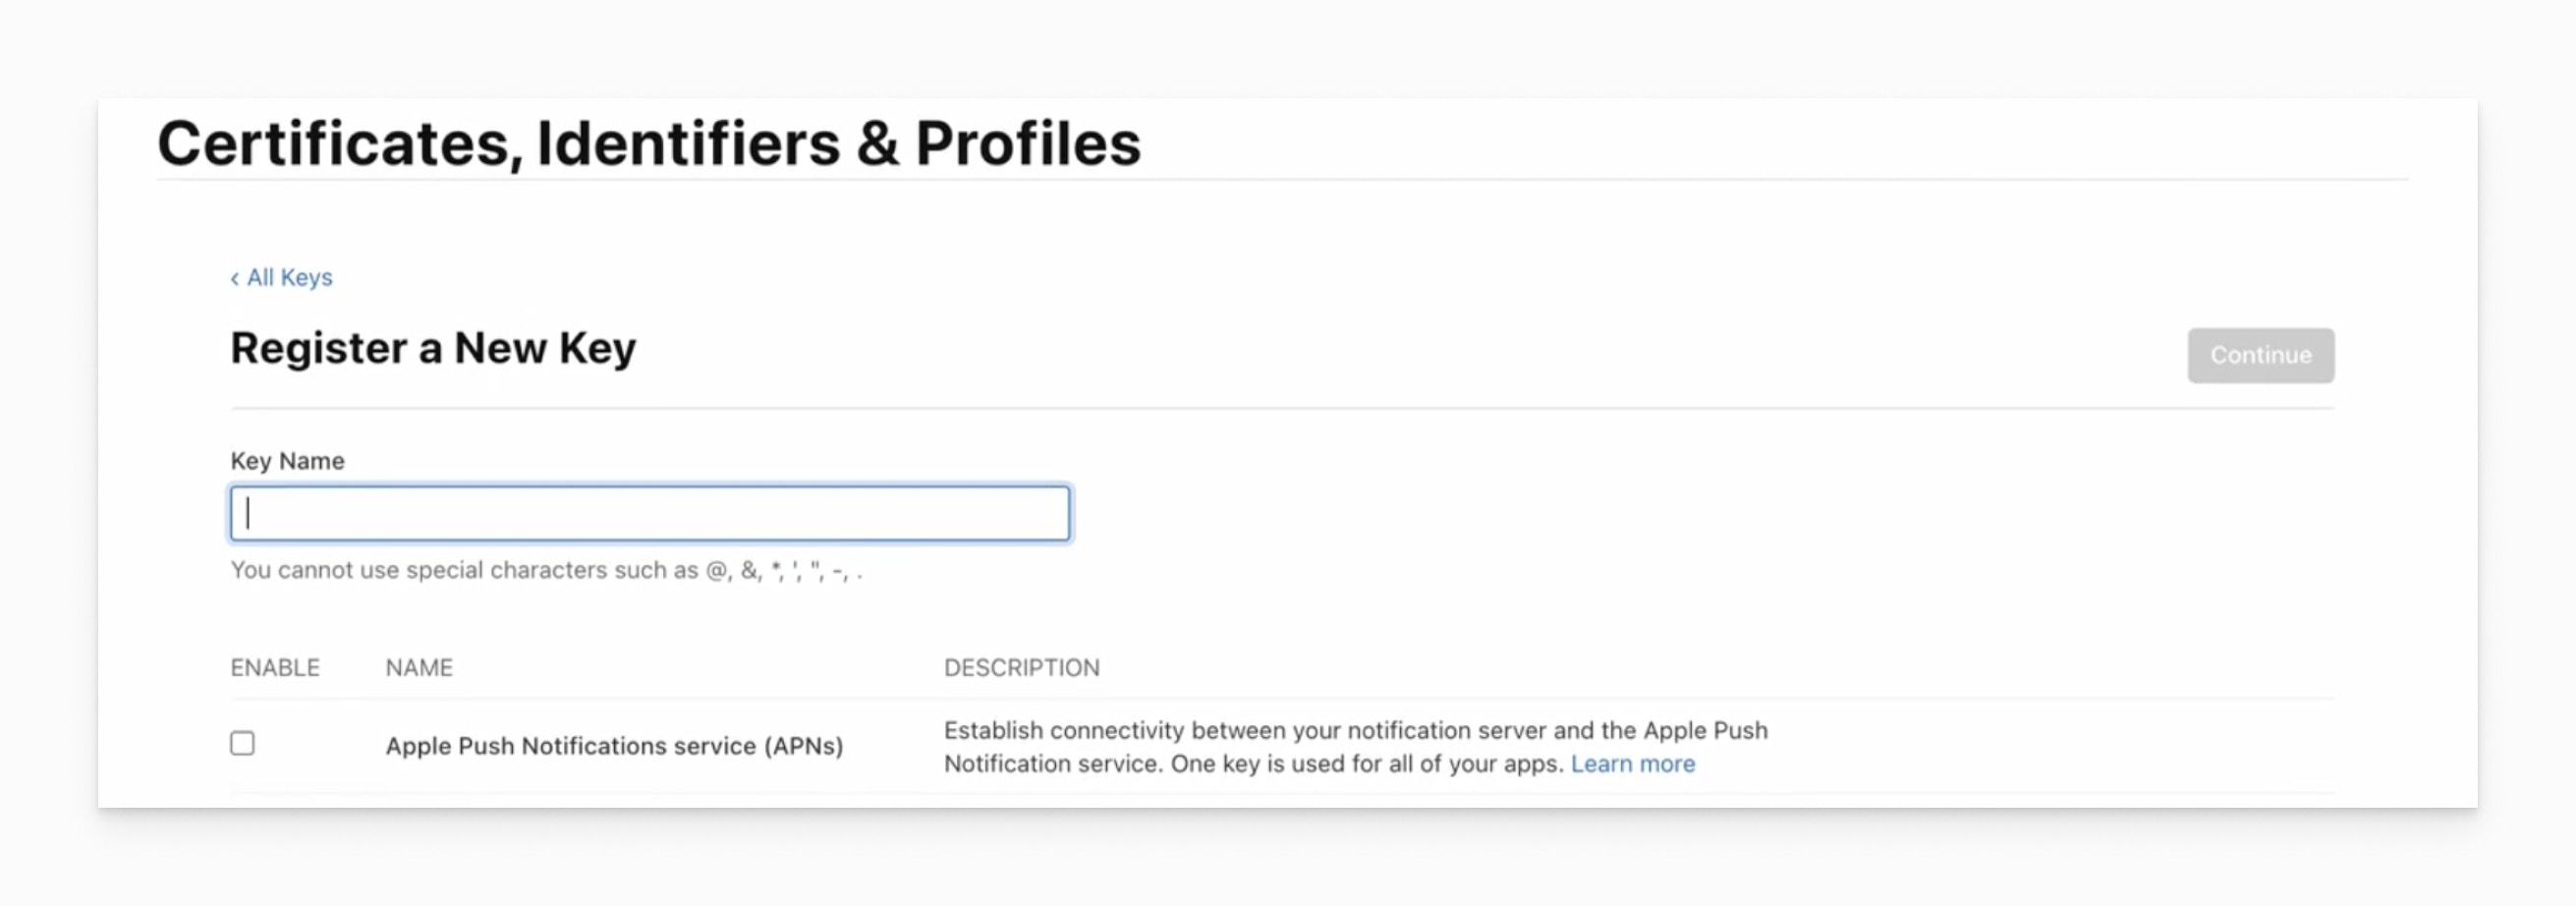 7. **Download your .p8 key** and store it securely. You won’t be able to download it again.
***
### Upload the .p8 key to OneSignal
1. Navigate to **Settings > Push & In-App > Apple iOS (APNs) Settings** in your OneSignal dashboard.
7. **Download your .p8 key** and store it securely. You won’t be able to download it again.
***
### Upload the .p8 key to OneSignal
1. Navigate to **Settings > Push & In-App > Apple iOS (APNs) Settings** in your OneSignal dashboard.
 2. Choose **.p8 Auth Key (Recommended)** as the authentication method.
 Provide the following:
* **`.p8 File`** – The private key file you downloaded from your Apple Developer account.
* **`Key ID`** – A 10-character alphanumeric string (e.g., `ABC123DEFG`) found next to your key name in the [Keys section](https://developer.apple.com/account/resources/authkeys) of your Apple Developer account. Make sure it matches the downloaded .p8 file.
* **`Team ID`** – A 10-character alphanumeric string (e.g., `9A1B2C3D4E`) shown next to your team name in the top-right corner of your [Apple Developer account](https://developer.apple.com/account/). This is **not** the same as the Key ID.
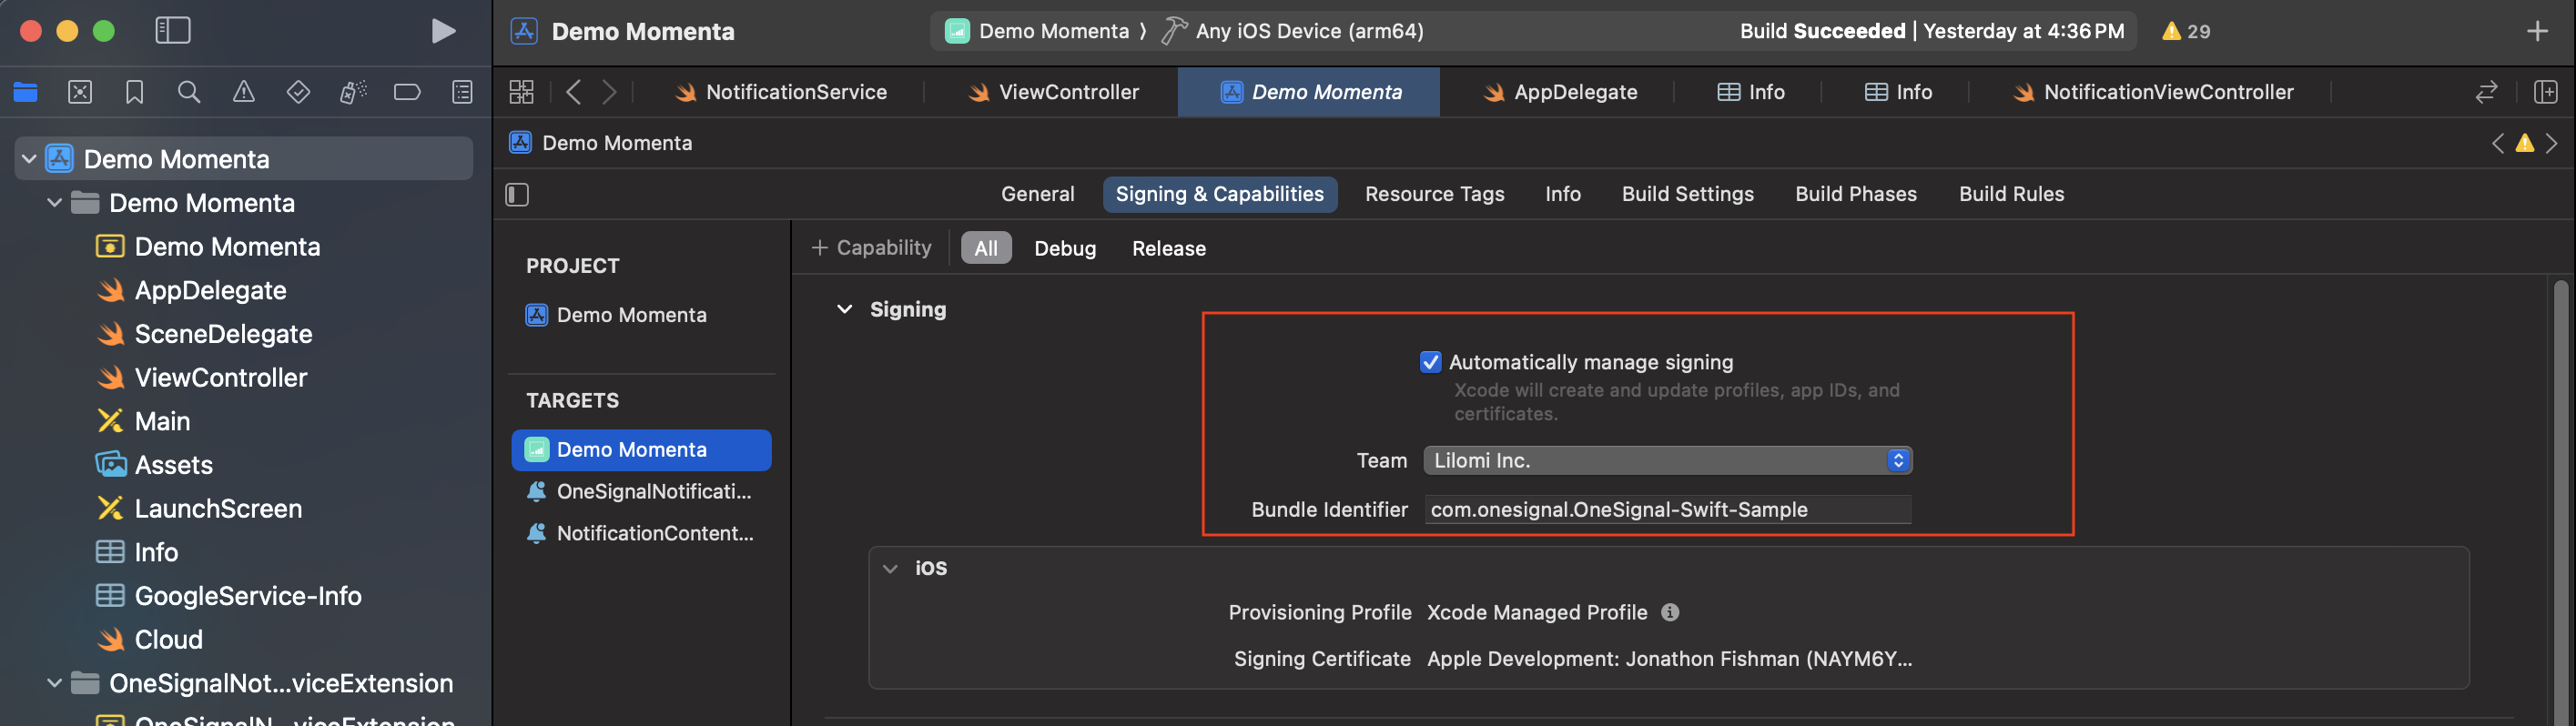
* **`App Bundle ID`** – A reverse-domain string (e.g., `com.example.app`) found in:
* The [Identifiers section](https://developer.apple.com/account/resources/identifiers/list) of your Apple Developer account, or
* **Xcode > Main App Target > Signing & Capabilities**
**Key ID** and **Team ID** are both 10-character strings found in your Apple Developer account but in different locations. Double-check you haven't swapped them — this is the most common misconfiguration.
Provide the following:
* **`.p8 File`** – The private key file you downloaded from your Apple Developer account.
* **`Key ID`** – A 10-character alphanumeric string (e.g., `ABC123DEFG`) found next to your key name in the [Keys section](https://developer.apple.com/account/resources/authkeys) of your Apple Developer account. Make sure it matches the downloaded .p8 file.
* **`Team ID`** – A 10-character alphanumeric string (e.g., `9A1B2C3D4E`) shown next to your team name in the top-right corner of your [Apple Developer account](https://developer.apple.com/account/). This is **not** the same as the Key ID.
* **`App Bundle ID`** – A reverse-domain string (e.g., `com.example.app`) found in:
* The [Identifiers section](https://developer.apple.com/account/resources/identifiers/list) of your Apple Developer account, or
* **Xcode > Main App Target > Signing & Capabilities**
**Key ID** and **Team ID** are both 10-character strings found in your Apple Developer account but in different locations. Double-check you haven't swapped them — this is the most common misconfiguration.
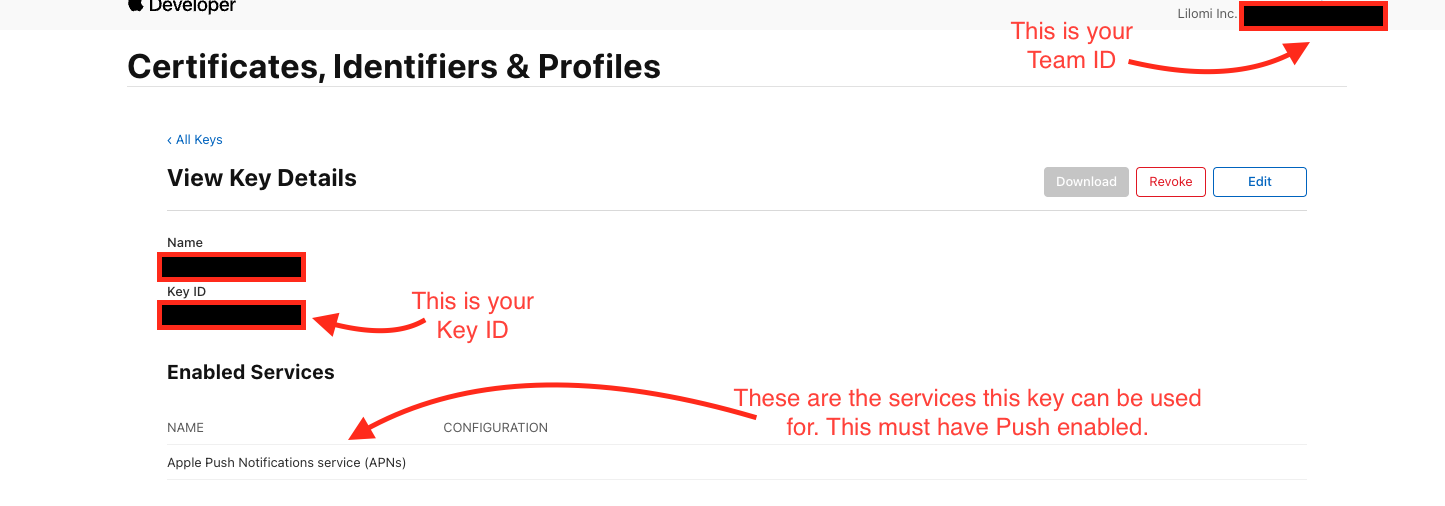
 Click **Save & Continue** when done.
You’ve successfully set up **APNs authentication using a .p8 key** in OneSignal.
Your iOS app is now ready to send and receive push notifications! 🎉
***
## .p8 troubleshooting
* Open the `.p8` file in a text editor.
* It should look like this:
```text theme={null}
-----BEGIN PRIVATE KEY-----
64 character line
64 character line
64 character line
8 character line
-----END PRIVATE KEY-----
```
* `.p8` keys come from the **Keys** section of your Apple Developer account.
* `.p12` certificates are from the **Certificates** section. These are not compatible with .p8 authentication.
* Go to your [Apple Developer > Keys section](https://developer.apple.com/account/resources/authkeys).
* The Key ID is the 10-character string shown next to your key name (e.g., `ABC123DEFG`).
* Match the Key ID you entered in OneSignal with the one listed for the downloaded `.p8` key.
* **Do not confuse this with your Team ID** — both are 10-character strings but found in different places.
* Your **Team ID** is the 10-character string shown next to your team name in the top-right corner of your [Apple Developer account](https://developer.apple.com/account/).
* Make sure it is copied exactly and matches the account where the key was generated.
* **Do not confuse this with your Key ID** — the Team ID identifies your developer account, not a specific key.
* When viewing your key in Apple Developer, the **Apple Push Notifications service (APNs)** capability should be listed.
* If not, revoke the key and create a new one.
* Newly created keys may take **10–15 minutes** to propagate before Apple allows external authentication.
* If you get validation errors immediately after creation, wait and try again.
### Need help?
* Revoke the current `.p8` key and create a new one from scratch.
* Double-check you’re using a **valid Bundle ID** from the same account the key was created under.
* Reach out to `support@onesignal.com` with a screenshot of your Apple Developer Key configuration and the Key ID, Team ID, and Bundle ID.
***
## Next steps
Install the OneSignal SDK, initialize it in your app, and send a test notification.
Choose your platform and follow the full SDK integration guide for Android, iOS, or cross-platform frameworks.
***
## FAQ
### What's the difference between .p8 and .p12?
A **.p8 key** is a token-based authentication key that does not expire and works across all apps under your Apple Developer account. A **.p12 certificate** is app-specific and expires after one year, requiring annual renewal. OneSignal recommends .p8 for its simplicity and lower maintenance. See the [.p12 certificate guide](./ios-p12-generate-certificates) for the alternative method.
### Does my .p8 key expire?
No. Unlike .p12 certificates, .p8 keys do not expire. Once created, a .p8 key remains valid until you revoke it in your Apple Developer account.
### Can I use one .p8 key for multiple apps?
Yes. A single .p8 key works for all apps under the same Apple Developer account. You can upload the same .p8 file to multiple OneSignal apps — each app only needs its own unique Bundle ID.
### Do I need a provisioning profile, and how do I create one?
Yes, Apple requires different types of profiles for development, testing (Ad Hoc), and distribution to the App Store.
In Xcode, select **Automatically manage signing** to create one automatically.
Click **Save & Continue** when done.
You’ve successfully set up **APNs authentication using a .p8 key** in OneSignal.
Your iOS app is now ready to send and receive push notifications! 🎉
***
## .p8 troubleshooting
* Open the `.p8` file in a text editor.
* It should look like this:
```text theme={null}
-----BEGIN PRIVATE KEY-----
64 character line
64 character line
64 character line
8 character line
-----END PRIVATE KEY-----
```
* `.p8` keys come from the **Keys** section of your Apple Developer account.
* `.p12` certificates are from the **Certificates** section. These are not compatible with .p8 authentication.
* Go to your [Apple Developer > Keys section](https://developer.apple.com/account/resources/authkeys).
* The Key ID is the 10-character string shown next to your key name (e.g., `ABC123DEFG`).
* Match the Key ID you entered in OneSignal with the one listed for the downloaded `.p8` key.
* **Do not confuse this with your Team ID** — both are 10-character strings but found in different places.
* Your **Team ID** is the 10-character string shown next to your team name in the top-right corner of your [Apple Developer account](https://developer.apple.com/account/).
* Make sure it is copied exactly and matches the account where the key was generated.
* **Do not confuse this with your Key ID** — the Team ID identifies your developer account, not a specific key.
* When viewing your key in Apple Developer, the **Apple Push Notifications service (APNs)** capability should be listed.
* If not, revoke the key and create a new one.
* Newly created keys may take **10–15 minutes** to propagate before Apple allows external authentication.
* If you get validation errors immediately after creation, wait and try again.
### Need help?
* Revoke the current `.p8` key and create a new one from scratch.
* Double-check you’re using a **valid Bundle ID** from the same account the key was created under.
* Reach out to `support@onesignal.com` with a screenshot of your Apple Developer Key configuration and the Key ID, Team ID, and Bundle ID.
***
## Next steps
Install the OneSignal SDK, initialize it in your app, and send a test notification.
Choose your platform and follow the full SDK integration guide for Android, iOS, or cross-platform frameworks.
***
## FAQ
### What's the difference between .p8 and .p12?
A **.p8 key** is a token-based authentication key that does not expire and works across all apps under your Apple Developer account. A **.p12 certificate** is app-specific and expires after one year, requiring annual renewal. OneSignal recommends .p8 for its simplicity and lower maintenance. See the [.p12 certificate guide](./ios-p12-generate-certificates) for the alternative method.
### Does my .p8 key expire?
No. Unlike .p12 certificates, .p8 keys do not expire. Once created, a .p8 key remains valid until you revoke it in your Apple Developer account.
### Can I use one .p8 key for multiple apps?
Yes. A single .p8 key works for all apps under the same Apple Developer account. You can upload the same .p8 file to multiple OneSignal apps — each app only needs its own unique Bundle ID.
### Do I need a provisioning profile, and how do I create one?
Yes, Apple requires different types of profiles for development, testing (Ad Hoc), and distribution to the App Store.
In Xcode, select **Automatically manage signing** to create one automatically.
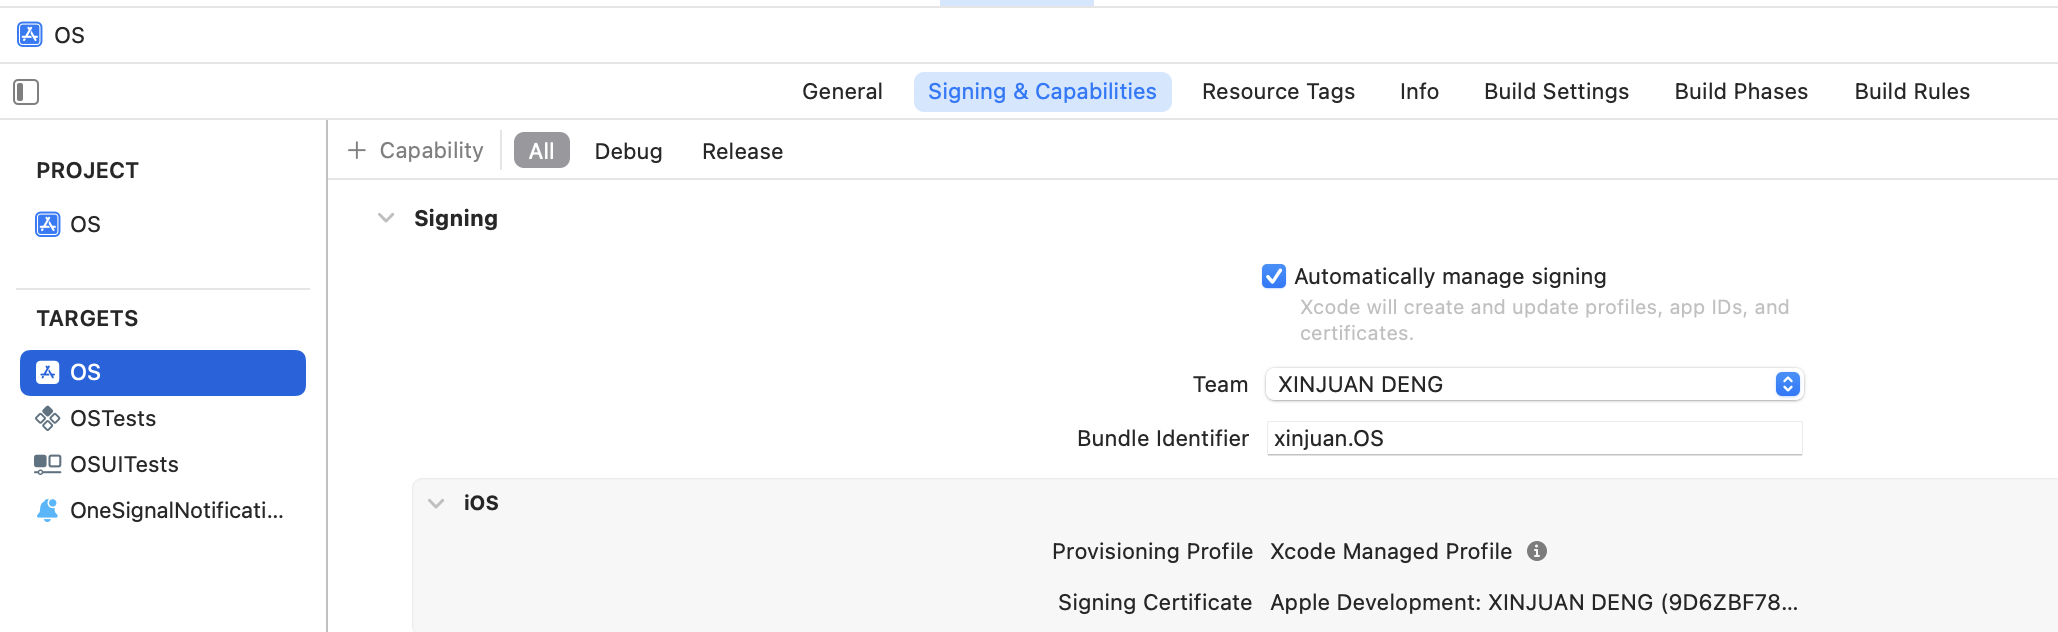 Otherwise, see [Apple's docs on provisioning profiles](https://developer.apple.com/help/account/provisioning-profiles/provisioning-profile-updates) for details.
***
Otherwise, see [Apple's docs on provisioning profiles](https://developer.apple.com/help/account/provisioning-profiles/provisioning-profile-updates) for details.
***