> ## Documentation Index
> Fetch the complete documentation index at: https://documentation.onesignal.com/llms.txt
> Use this file to discover all available pages before exploring further.
# iOS SDK setup
> Add push notifications and in-app messages to your iOS app using OneSignal's iOS SDK.
export const SdkReleasesIframe = ({sdkFilter = undefined, viewMode = undefined, height, ...frameProps}) => {
const baseUrl = 'https://onesignal.github.io/sdk-releases';
const buildUrl = (theme, sdkFilter, viewMode) => {
const url = new URL(baseUrl);
const params = new URLSearchParams();
if (theme) {
params.set('theme', theme);
}
if (sdkFilter) {
params.set('sdk', sdkFilter);
}
if (viewMode) {
params.set('viewMode', viewMode);
}
if (params.toString()) {
url.search = params.toString();
}
return url.toString();
};
const detectTheme = () => {
if (document.documentElement.classList.contains('dark')) {
return 'dark';
}
return 'light';
};
const [theme, setTheme] = useState('light');
const [iframeSrc, setIframeSrc] = useState(() => {
const initialTheme = detectTheme();
return buildUrl(initialTheme, sdkFilter, viewMode);
});
useEffect(() => {
const currentTheme = detectTheme();
setTheme(currentTheme);
setIframeSrc(buildUrl(currentTheme, sdkFilter, viewMode));
const mediaQuery = window.matchMedia('(prefers-color-scheme: dark)');
const handleThemeChange = () => {
const newTheme = detectTheme();
setTheme(newTheme);
setIframeSrc(buildUrl(newTheme, sdkFilter, viewMode));
};
if (mediaQuery.addEventListener) {
mediaQuery.addEventListener('change', handleThemeChange);
} else {
mediaQuery.addListener(handleThemeChange);
}
window.addEventListener('storage', handleThemeChange);
const observer = new MutationObserver(handleThemeChange);
observer.observe(document.documentElement, {
attributes: true,
attributeFilter: ['class', 'data-theme']
});
return () => {
if (mediaQuery.removeEventListener) {
mediaQuery.removeEventListener('change', handleThemeChange);
} else {
mediaQuery.removeListener(handleThemeChange);
}
window.removeEventListener('storage', handleThemeChange);
observer.disconnect();
};
}, [sdkFilter, viewMode]);
const getIframeHeight = () => {
if (viewMode === 'table') {
return '450';
}
if (viewMode === 'mini') {
return '170';
}
return '800';
};
const iframeHeight = height || getIframeHeight();
return
;
};
This guide walks you through adding OneSignal to your iOS app using Xcode. You'll install our SDK, setup push and in-app messages, and send test messages to confirm everything is working.
If this is your first time using OneSignal, follow the steps in order. If you're experienced, feel free to jump to the sections you need.
**Using an AI coding assistant?**
For AI-driven installation, use this prompt:
```
Integrate the OneSignal iOS SDK into this codebase.
Follow the instructions at:
https://raw.githubusercontent.com/OneSignal/sdk-ai-prompts/main/docs/ios/ai-prompt.md
```
## Step 0. Configure APNs in OneSignal (required to deliver push)
You can install and initialize the OneSignal iOS SDK without completing this step. However, **push notifications will not deliver** until APNs credentials are configured in your OneSignal app.
If your company already has a OneSignal account, [ask to be invited as an admin role](./manage-team-members) to configure the app. Otherwise, [sign up for a free account](https://onesignal.com) to get started.
These steps connect your OneSignal app to Apple Push Notification service (APNs). You only need to do this once per app.
1. Login to [https://onesignal.com](https://onesignal.com) and create or select your App.
2. Navigate to **Settings > Push & In-App**.
3. Select **Apple iOS (APNs)** and **Continue** through the setup wizard.
4. Input your [p8 Auth Key (Recommended)](./ios-p8-token-based-connection-to-apns) or [p12 Certificate](./ios-p12-generate-certificates) details.
5. Continue through the setup wizard to get your App ID. This will be used to initialize the SDK.
For full setup instructions, see our [Mobile push setup](./mobile-push-setup) guide.
***
## Setup contract & requirements
This section summarizes the tools, versions, and assumptions used throughout the guide.
* **SDK version:** `5.4.0+` (latest: check [releases](https://github.com/OneSignal/OneSignal-XCFramework/releases))
* **AI setup instructions:** `https://raw.githubusercontent.com/OneSignal/sdk-ai-prompts/main/docs/ios/ai-prompt.md`
* **SDK repo:** `https://github.com/OneSignal/OneSignal-XCFramework`
* **Xcode:** 16.0+
* **iOS:** 12.0+ minimum, 16.2+ recommended
* **Simulator:** iOS 16.2+ required for push testing
* **App target packages:** `OneSignalFramework` (required), `OneSignalInAppMessages` (recommended), `OneSignalLocation` (optional)
* **Notification Service Extension (NSE) target name:** `OneSignalNotificationServiceExtension`
* **Notification Service Extension (NSE) target package:** `OneSignalExtension`
* **App Group format:** `group.YOUR_MAIN_APP_BUNDLE_ID.onesignal`
* **App ID format:** 36-character UUID (example: `12345678-1234-1234-1234-123456789012`) — find at OneSignal Dashboard > Settings > Keys & IDs
* **Initialize:** `OneSignal.initialize("YOUR_APP_ID", withLaunchOptions: launchOptions)`
* **Requires NSE + App Group:** images, confirmed receipt, badges
* **confirmed receipt:** Requires an eligible plan (not available on free plans)
* **Recommended:** Assign External ID via `OneSignal.login("user_id")` to unify users across devices
***
## iOS setup steps
By the end of the steps below, you will have:
* The OneSignal SDK installed and initialized in your iOS app
* Push notification permissions prompting correctly on a real device
* A test push and in-app message successfully delivered
If you skipped **Step 0 (Configuring APNs in OneSignal)**, you can still complete the Xcode setup below. Complete Step 0 before you test or send push notifications.
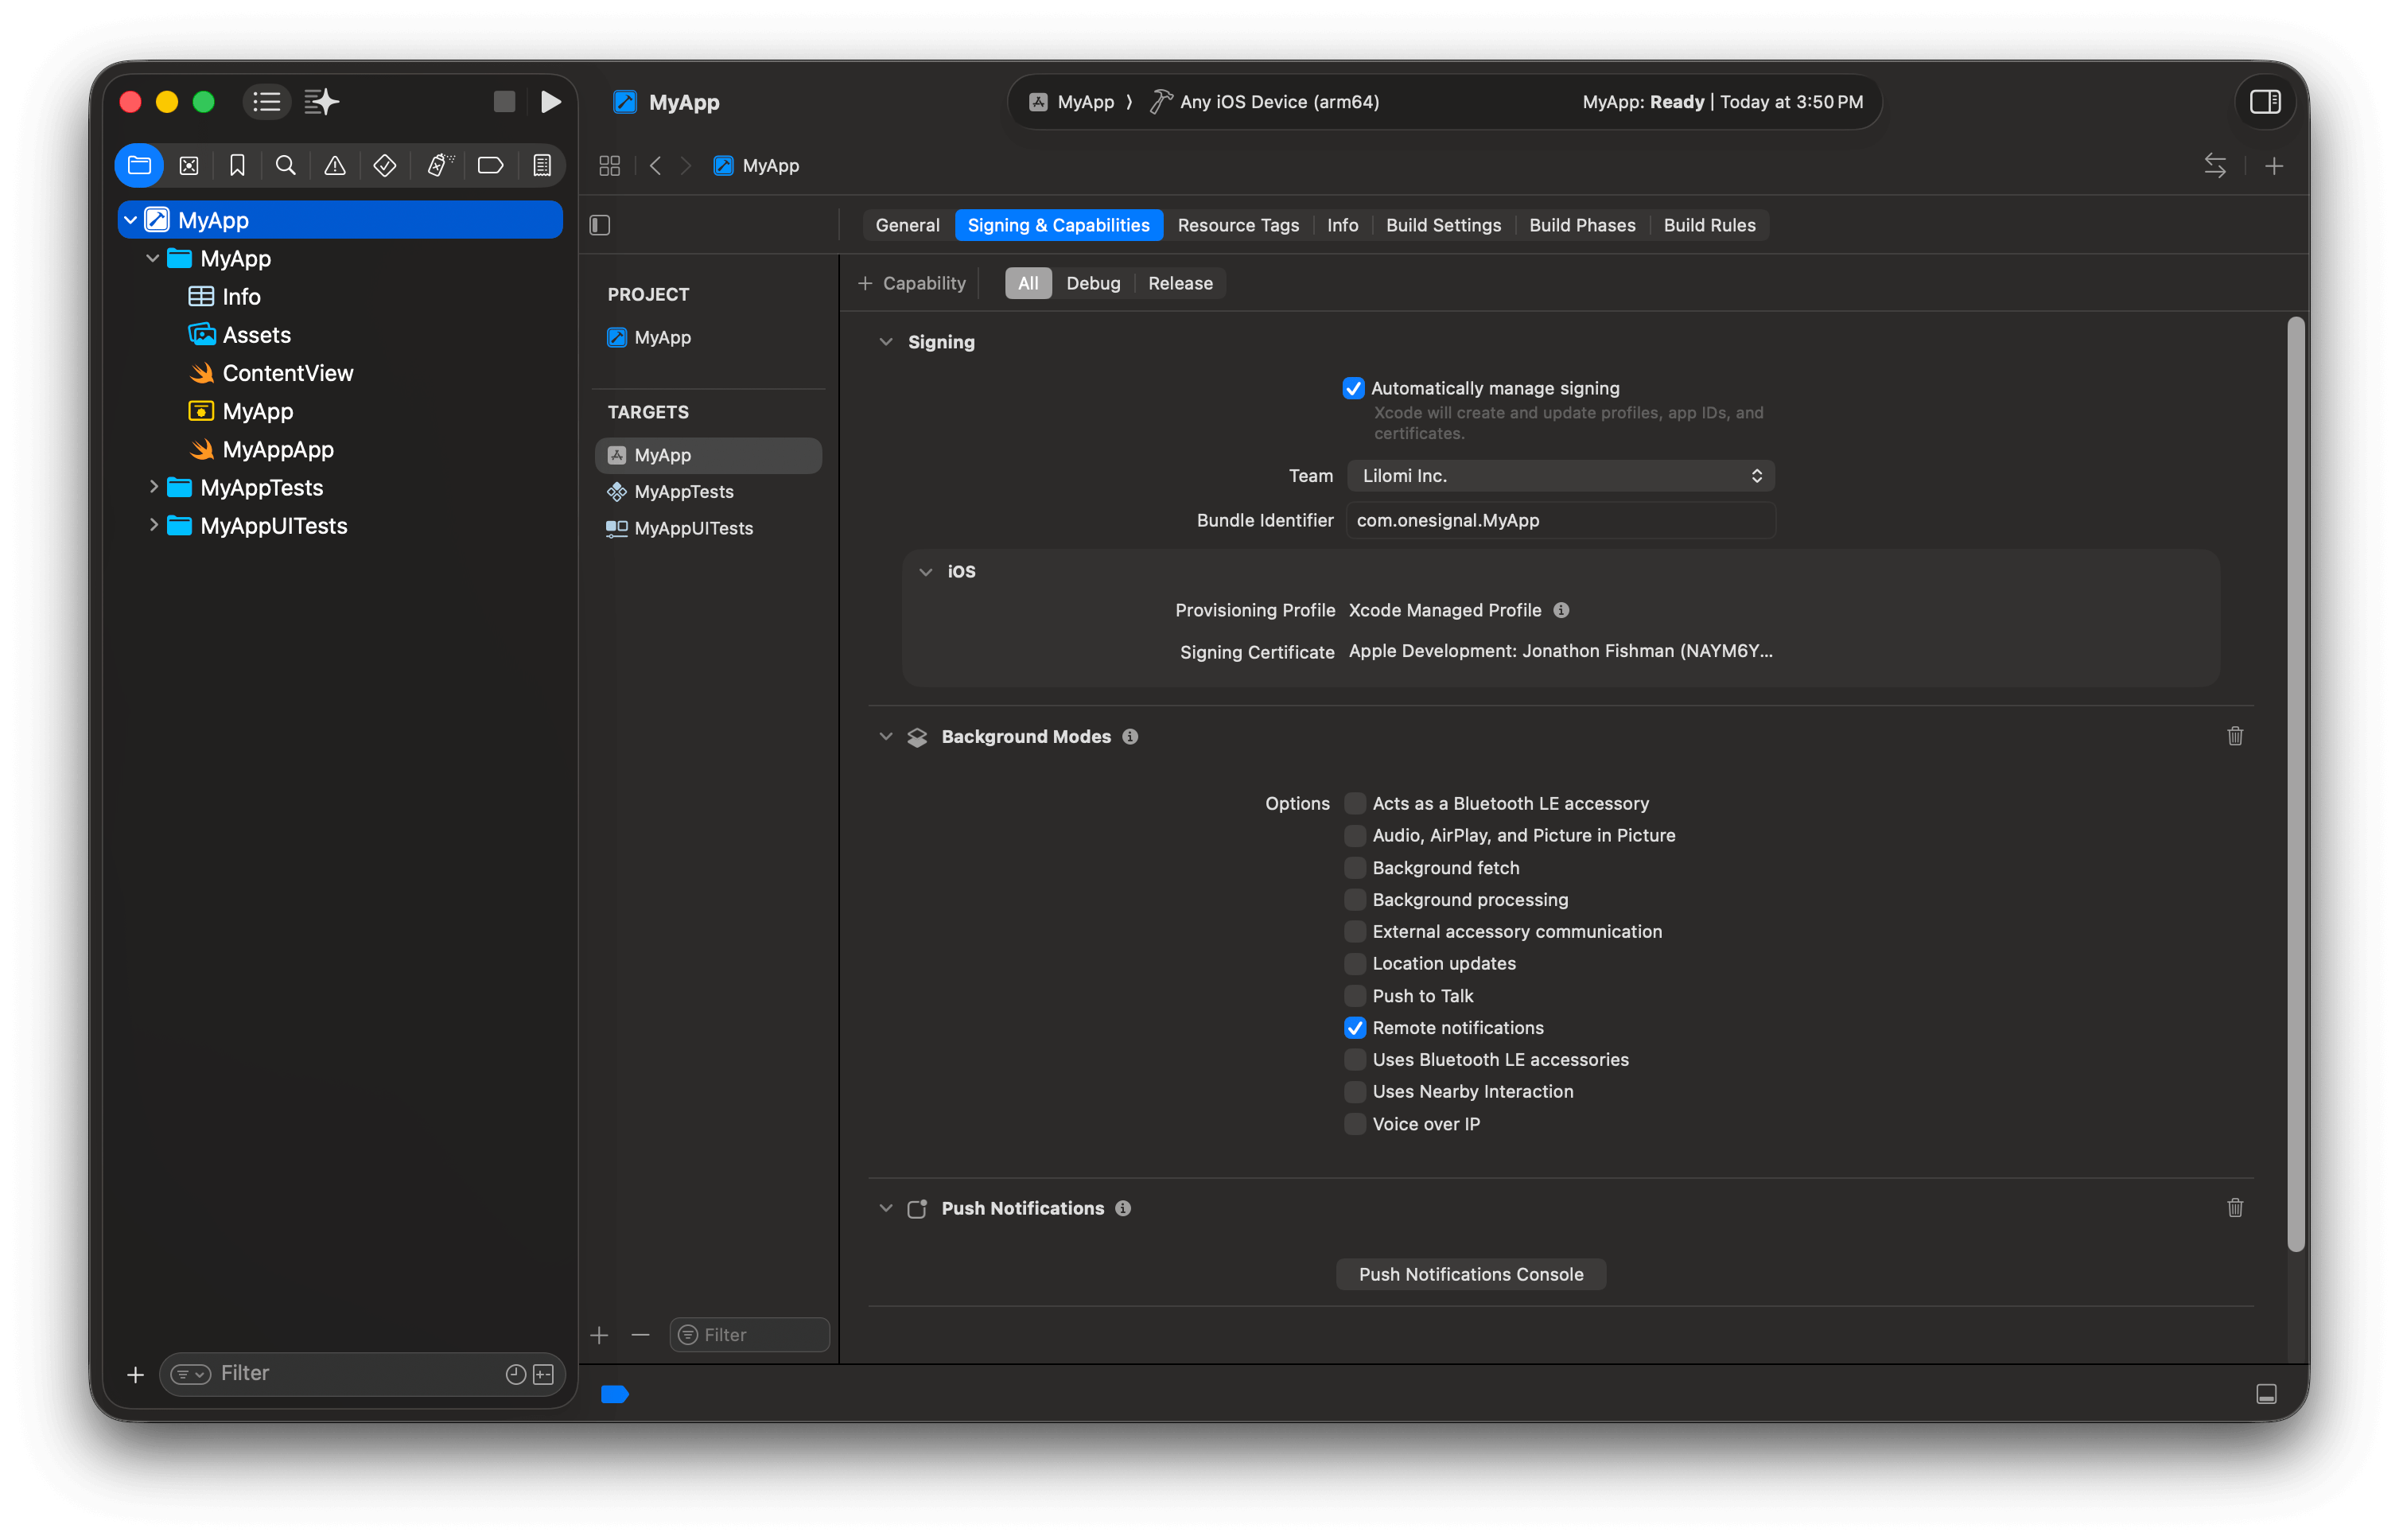
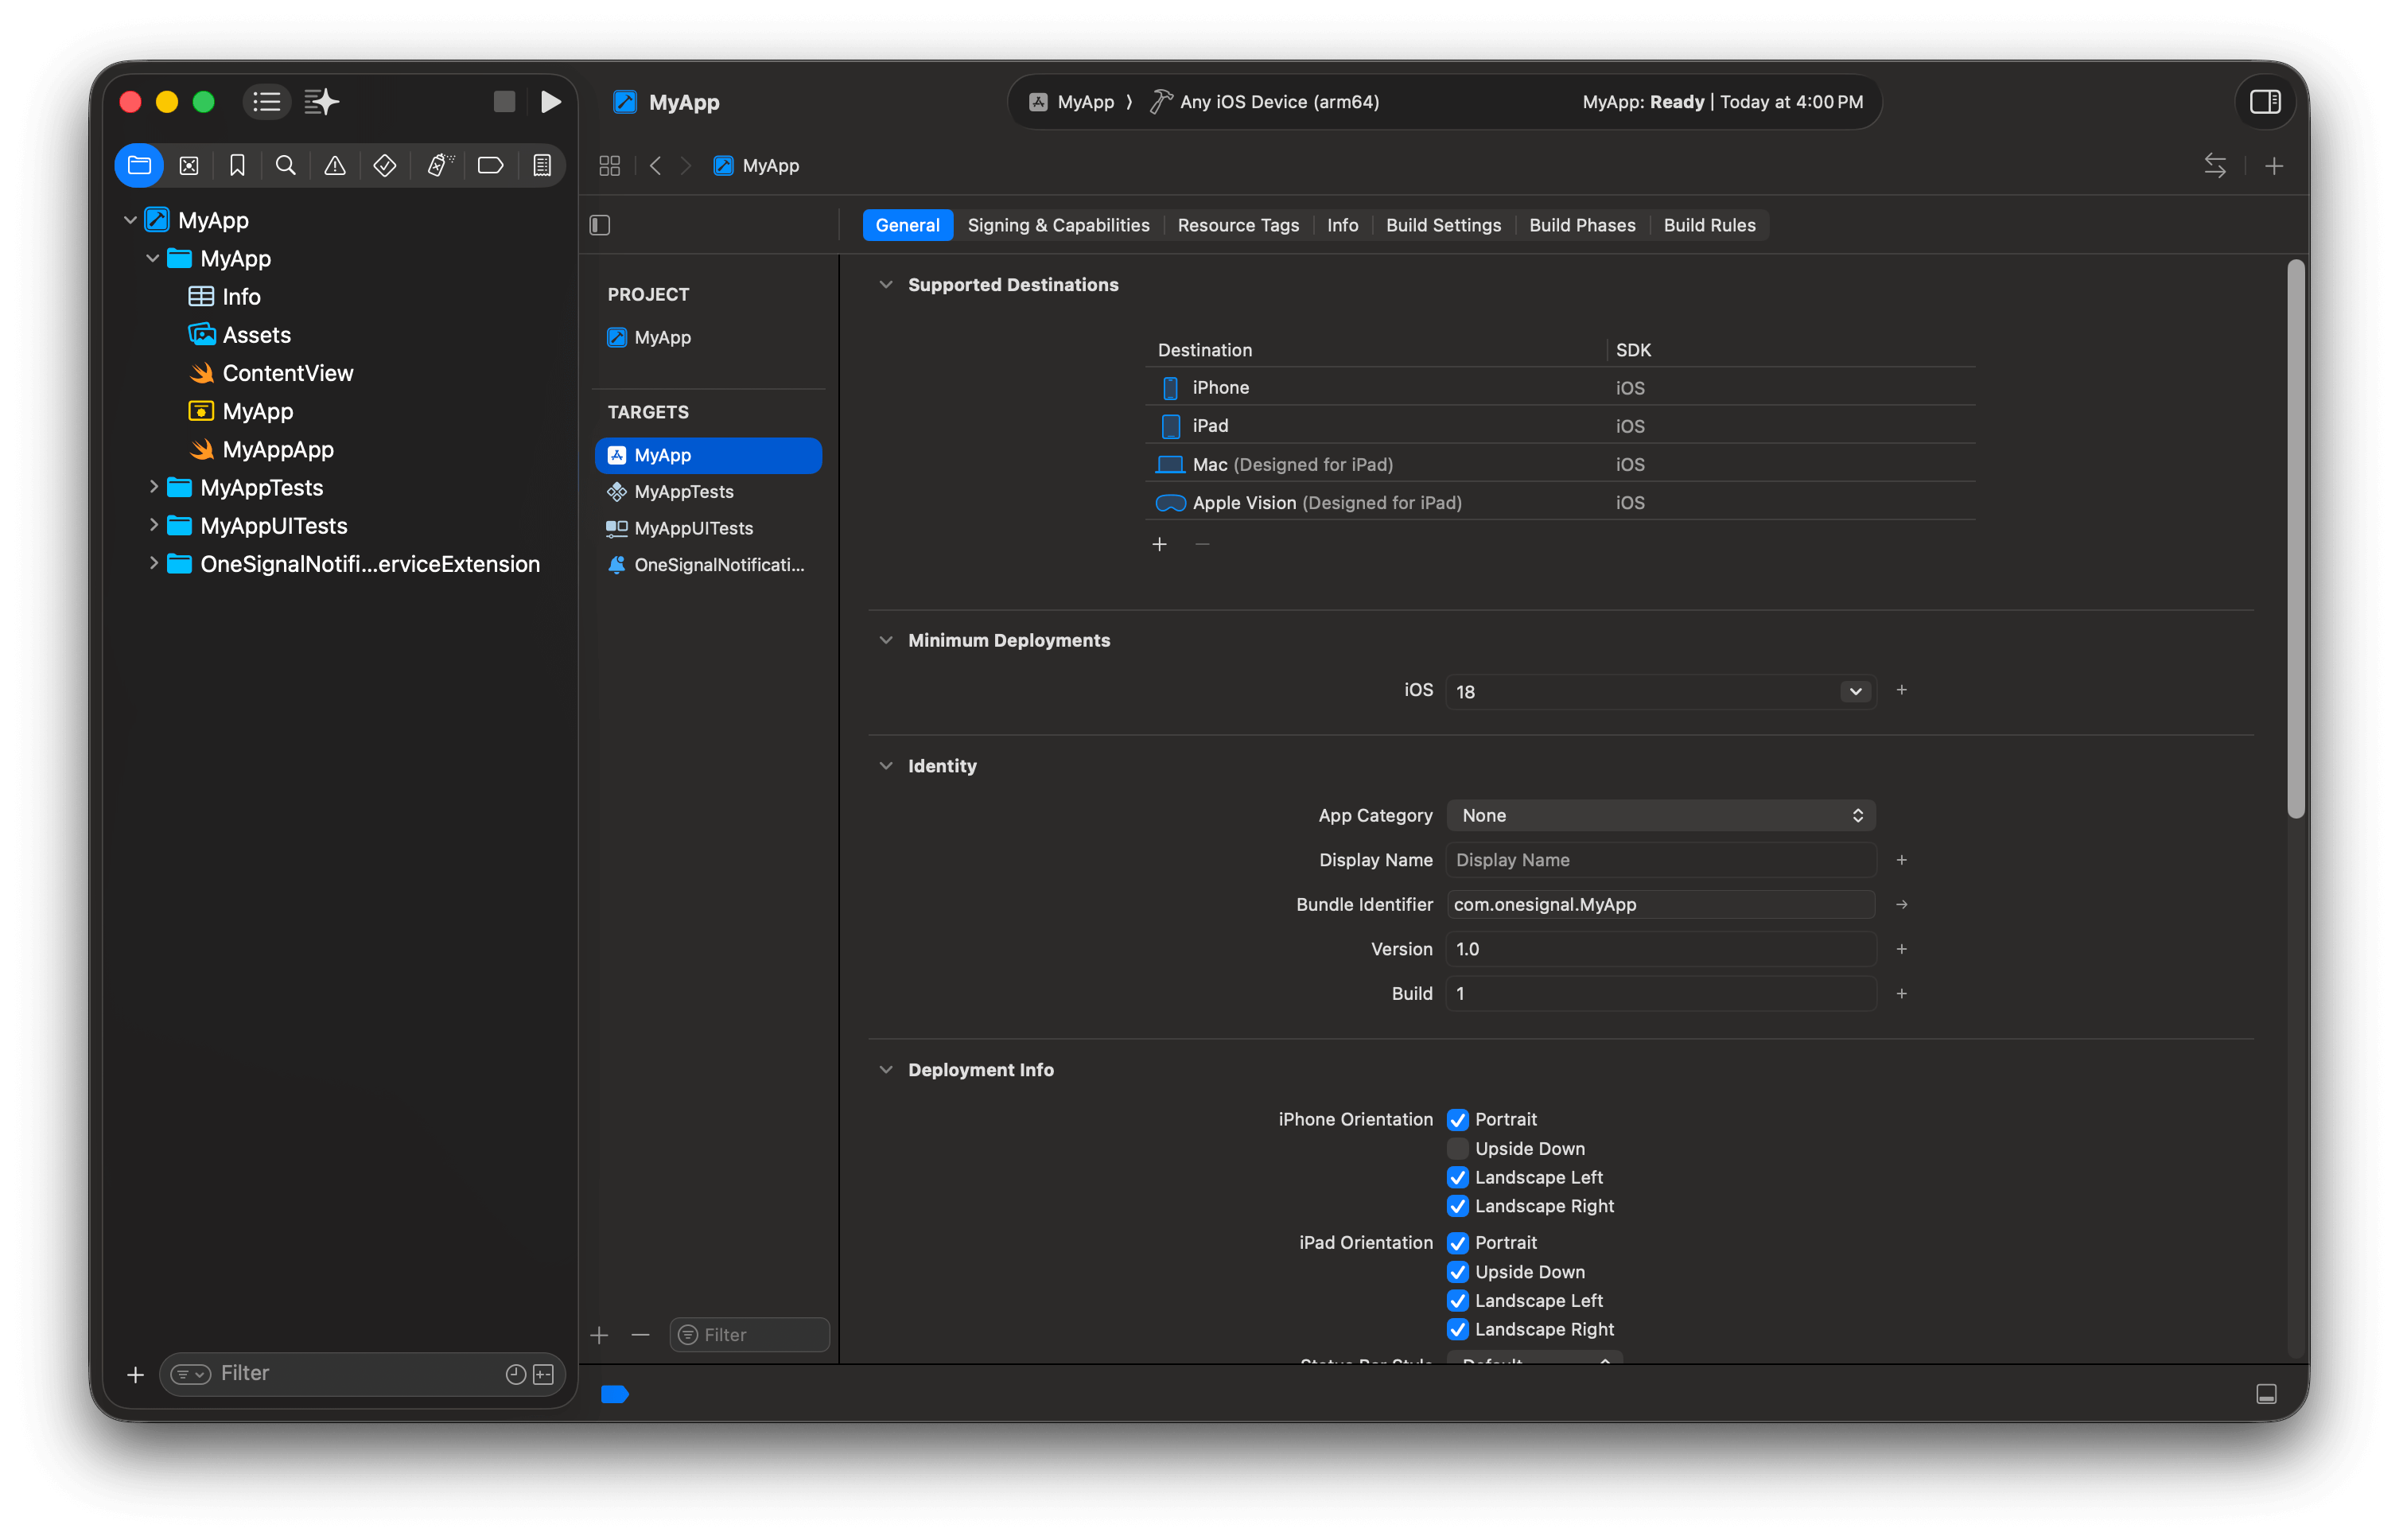
### Step 1. Enable Push Notifications and Background Modes
1. Open your `.xcodeproj` in Xcode (or `.xcworkspace` if using CocoaPods)
2. Select **app target** > **Signing & Capabilities**
3. Click **+ Capability** > add **Push Notifications**
4. Click **+ Capability** > add **Background Modes**
5. Enable **Remote notifications** checkbox
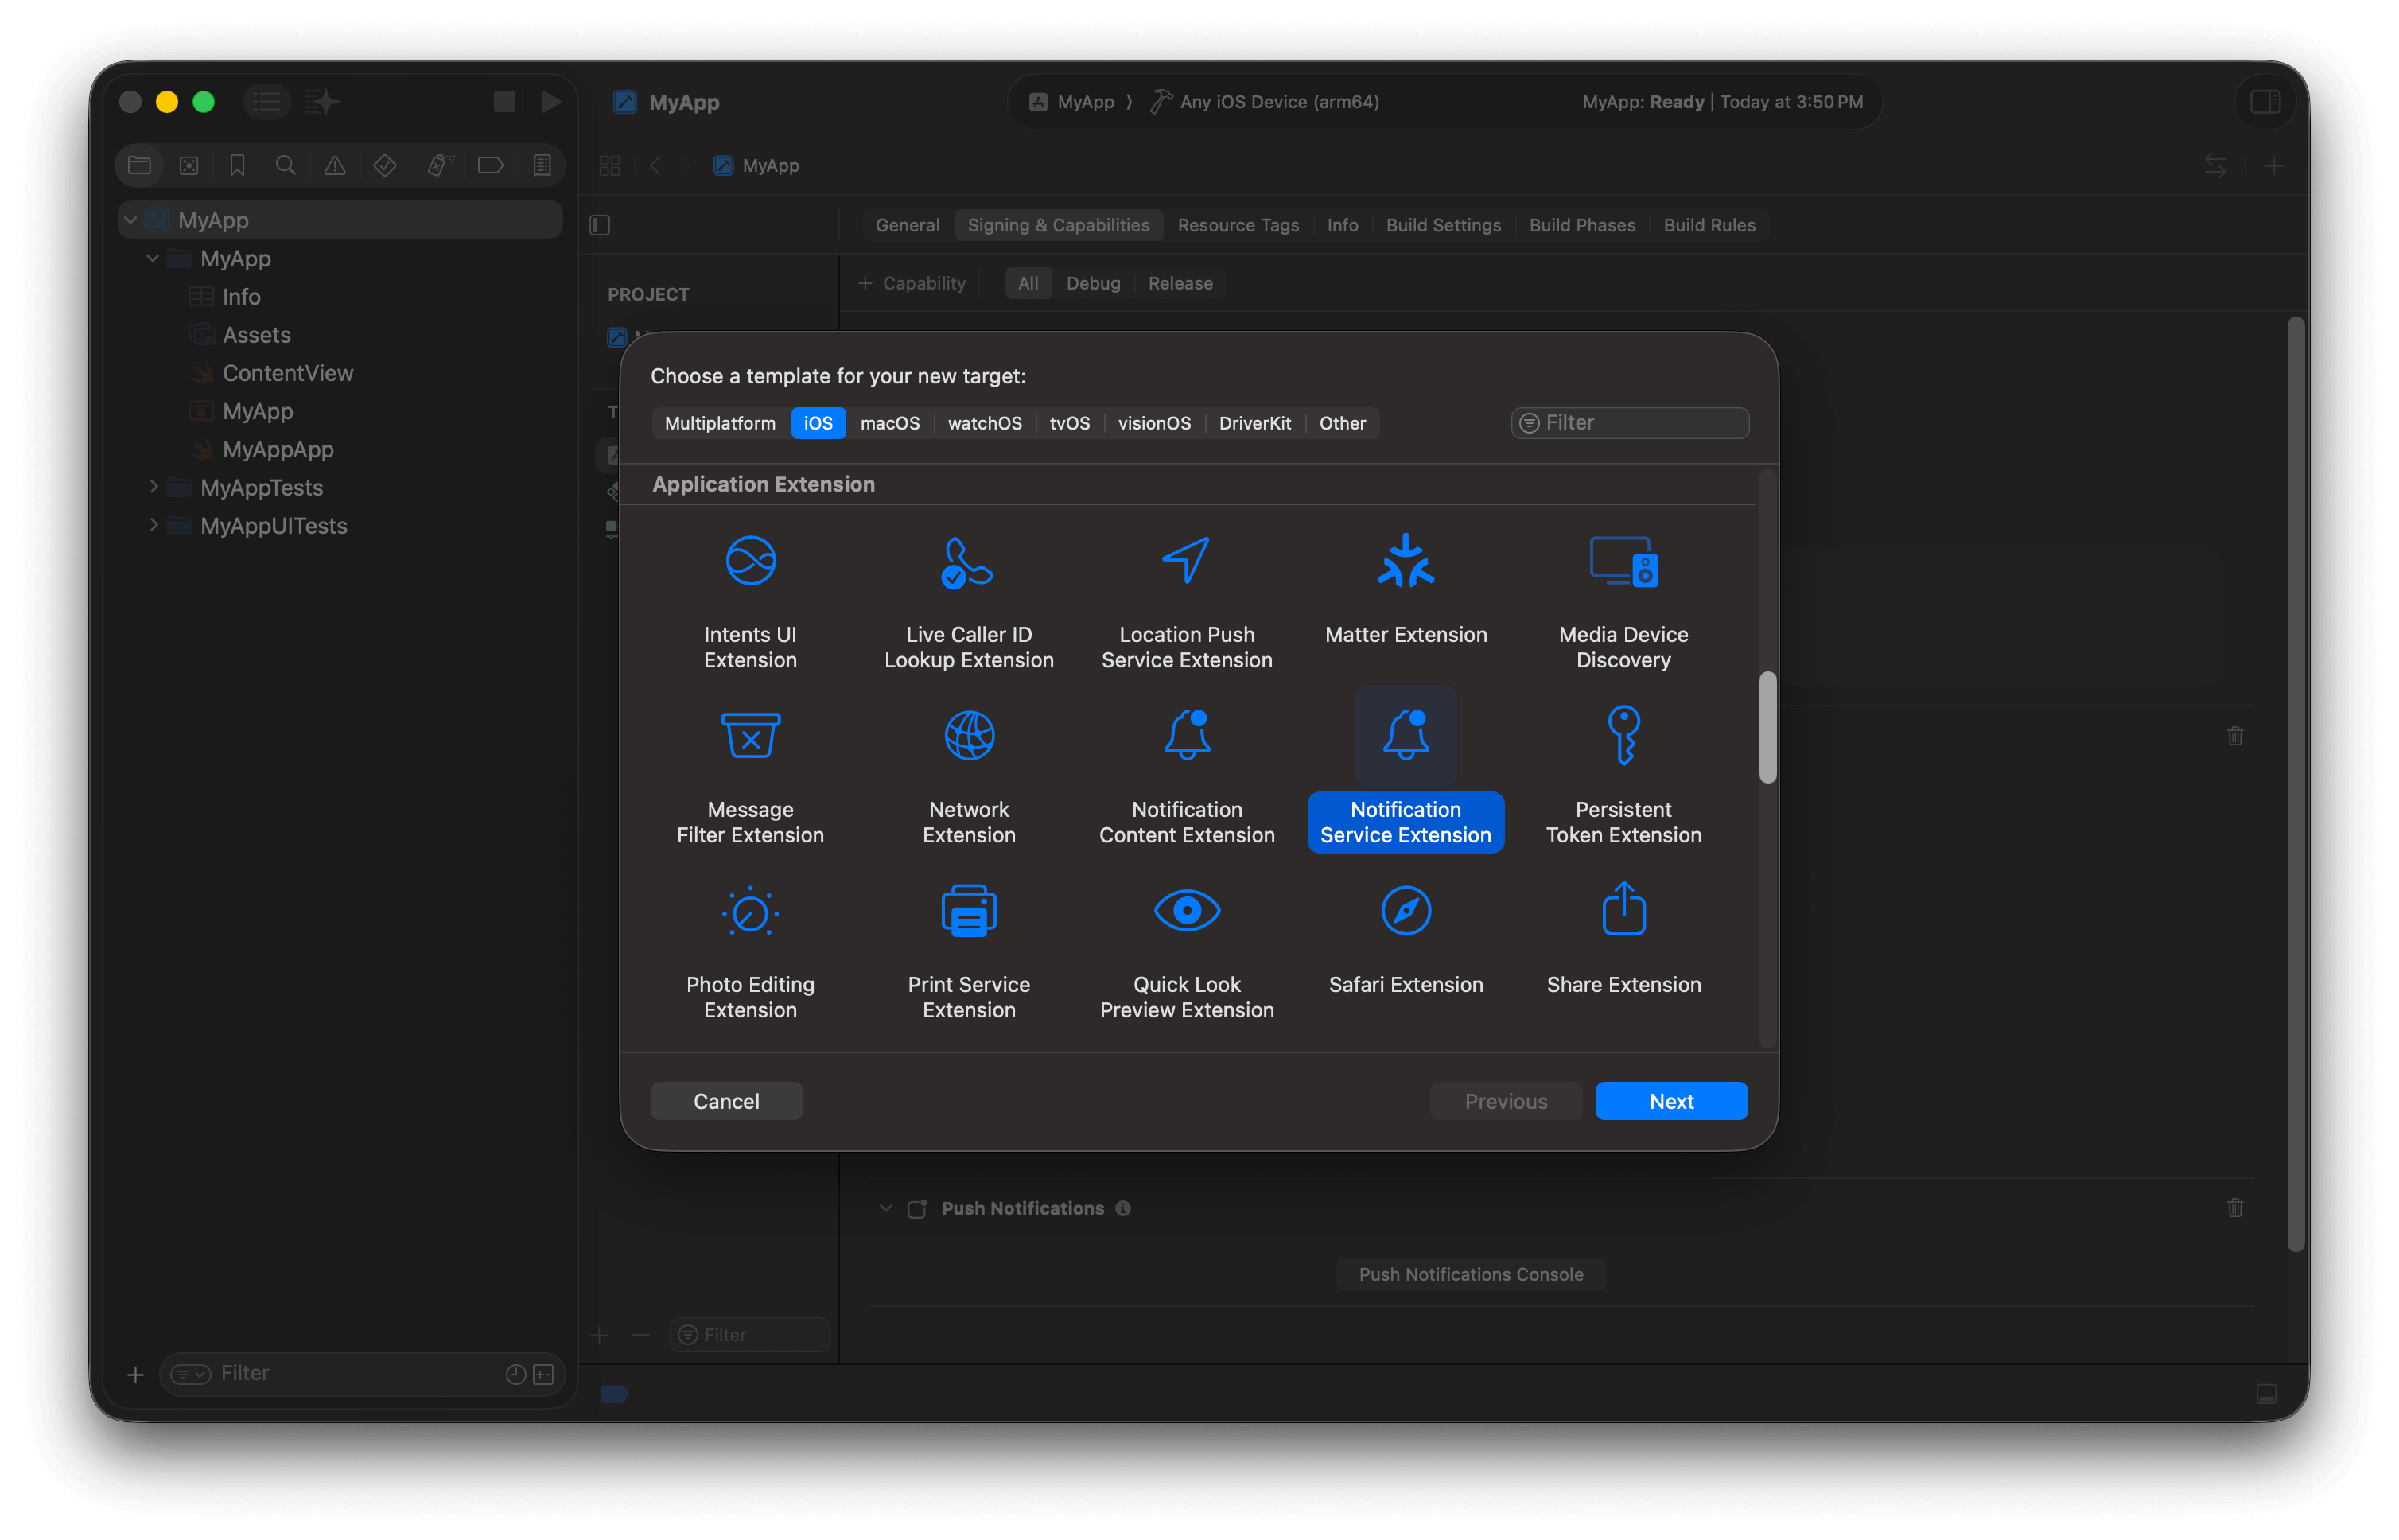
 ### Step 2. Add a Notification Service Extension (NSE)
The NSE enables rich notifications (images) and confirmed receipt analytics.
**Create the target:**
1. **File > New > Target...**
2. Select **Notification Service Extension** > **Next**
3. Product name: `OneSignalNotificationServiceExtension`
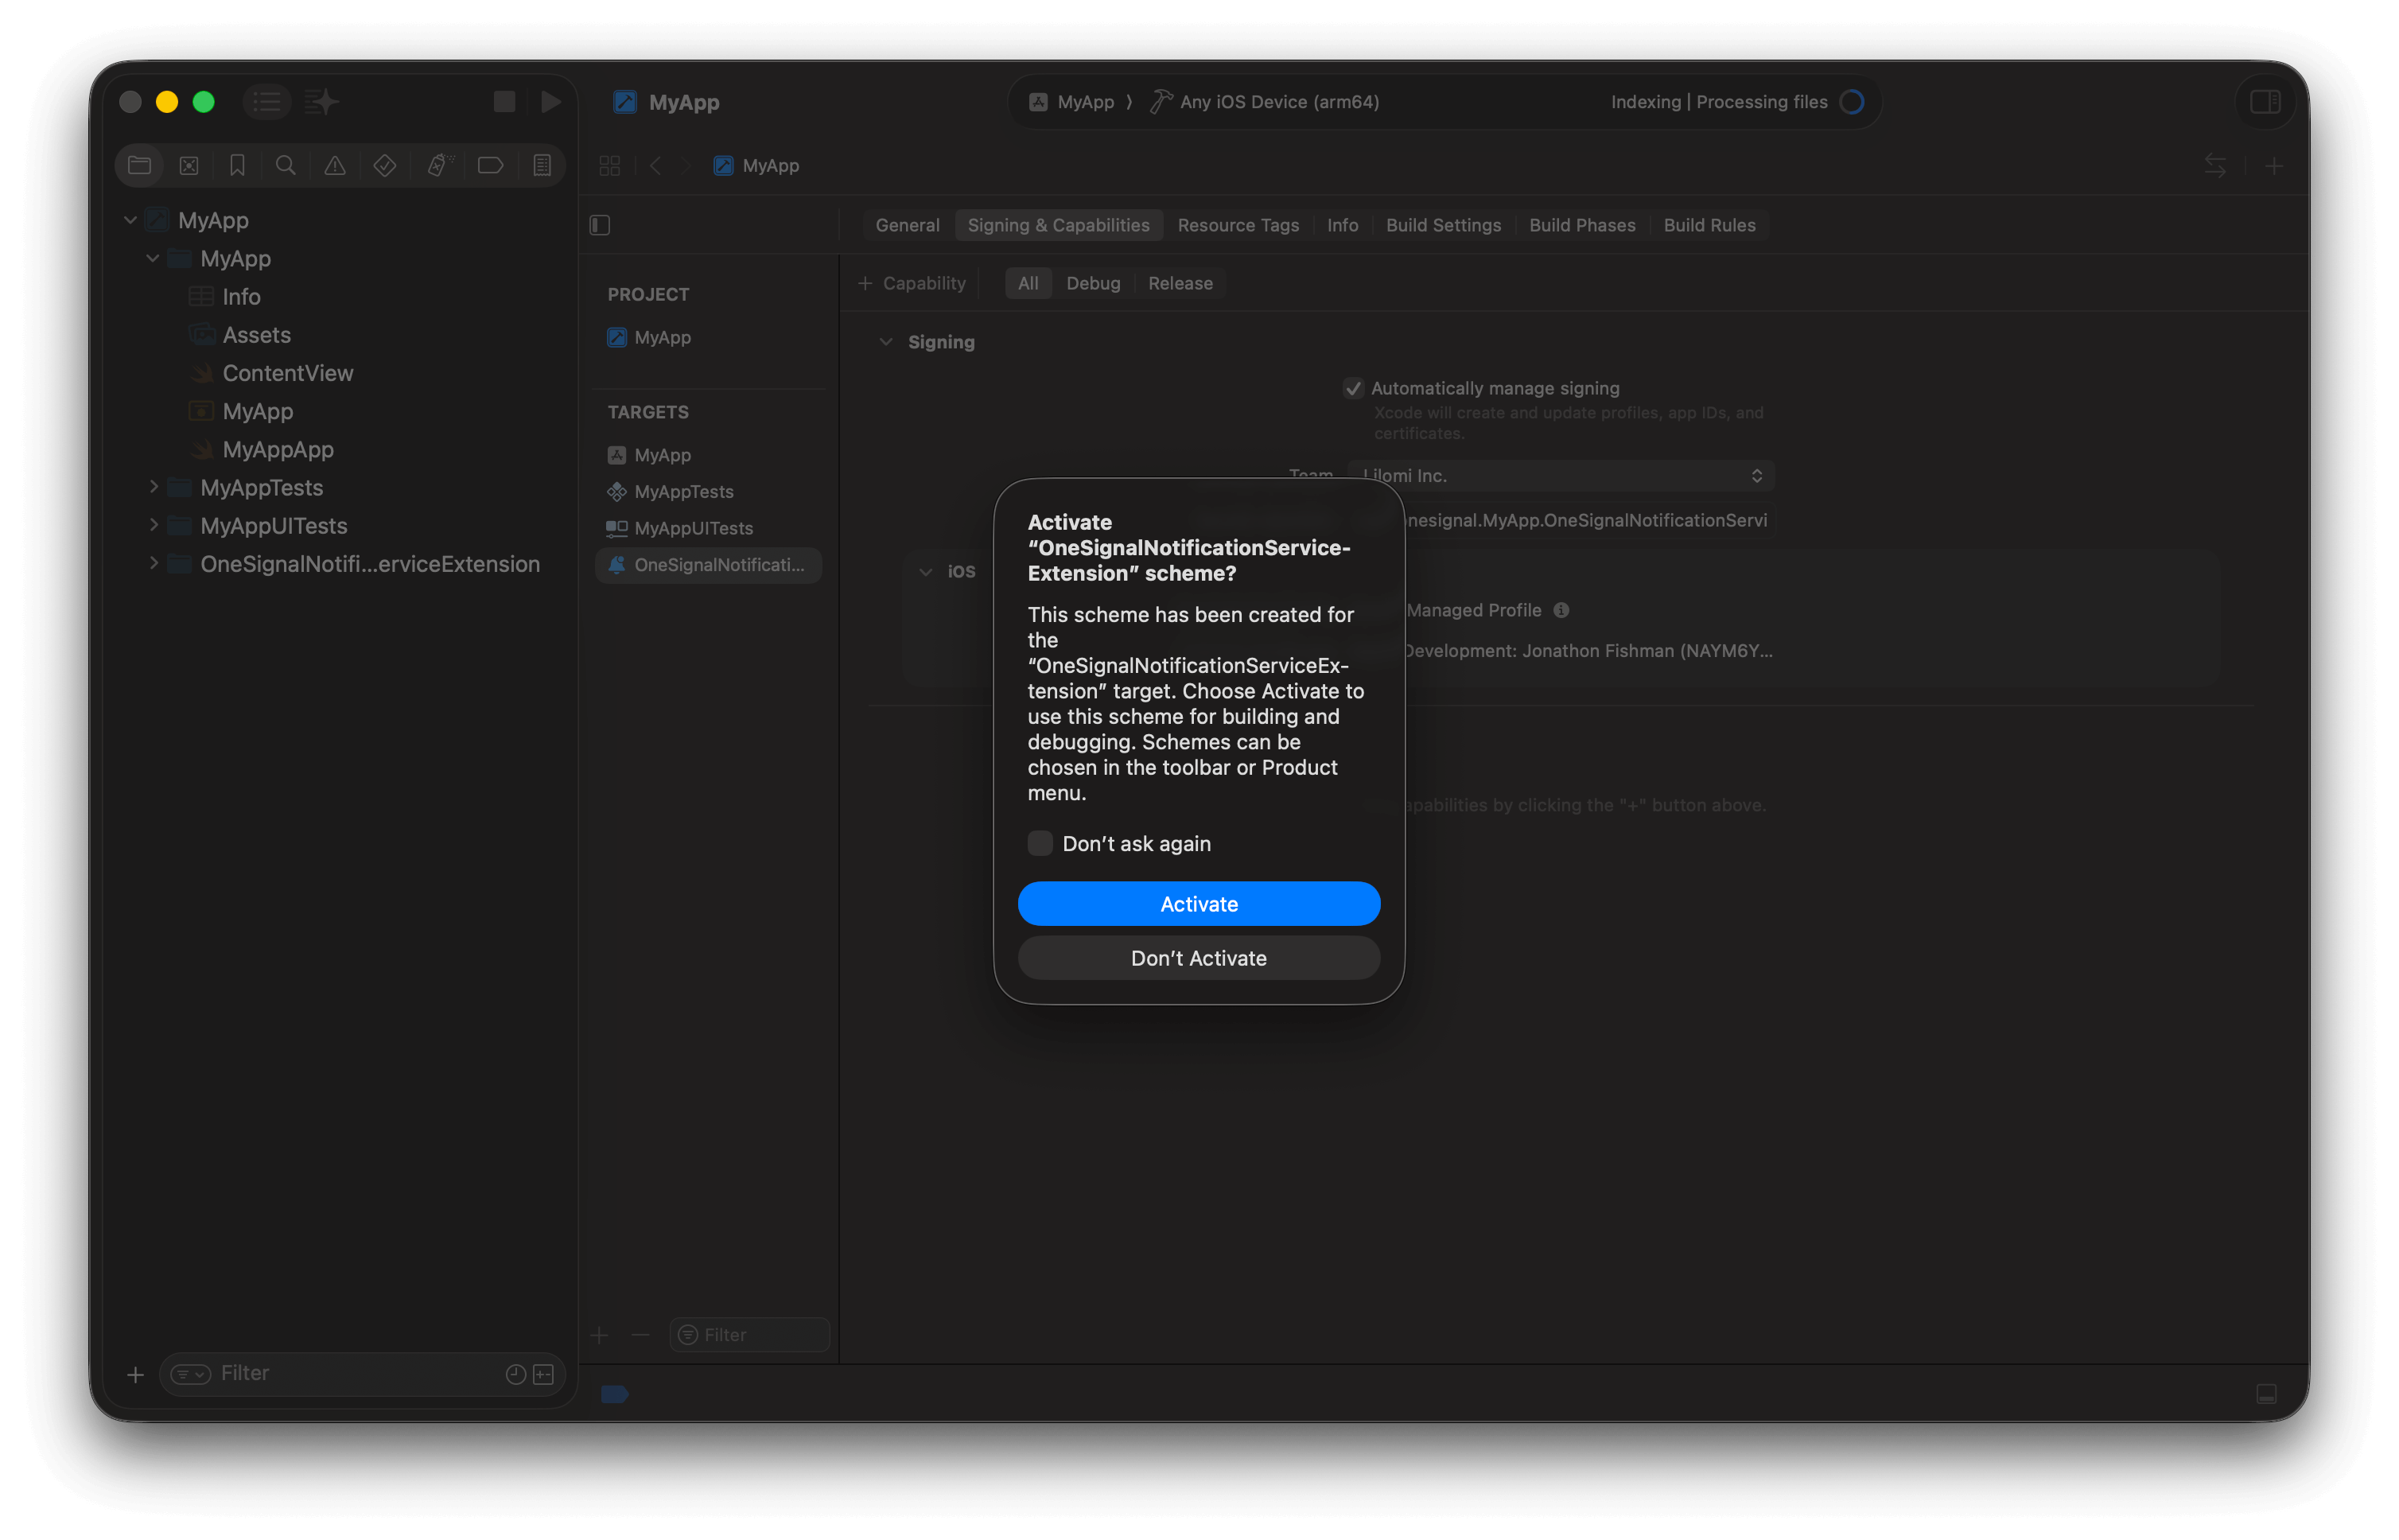
4. Click **Finish** > click **Don't Activate** when prompted
### Step 2. Add a Notification Service Extension (NSE)
The NSE enables rich notifications (images) and confirmed receipt analytics.
**Create the target:**
1. **File > New > Target...**
2. Select **Notification Service Extension** > **Next**
3. Product name: `OneSignalNotificationServiceExtension`
4. Click **Finish** > click **Don't Activate** when prompted
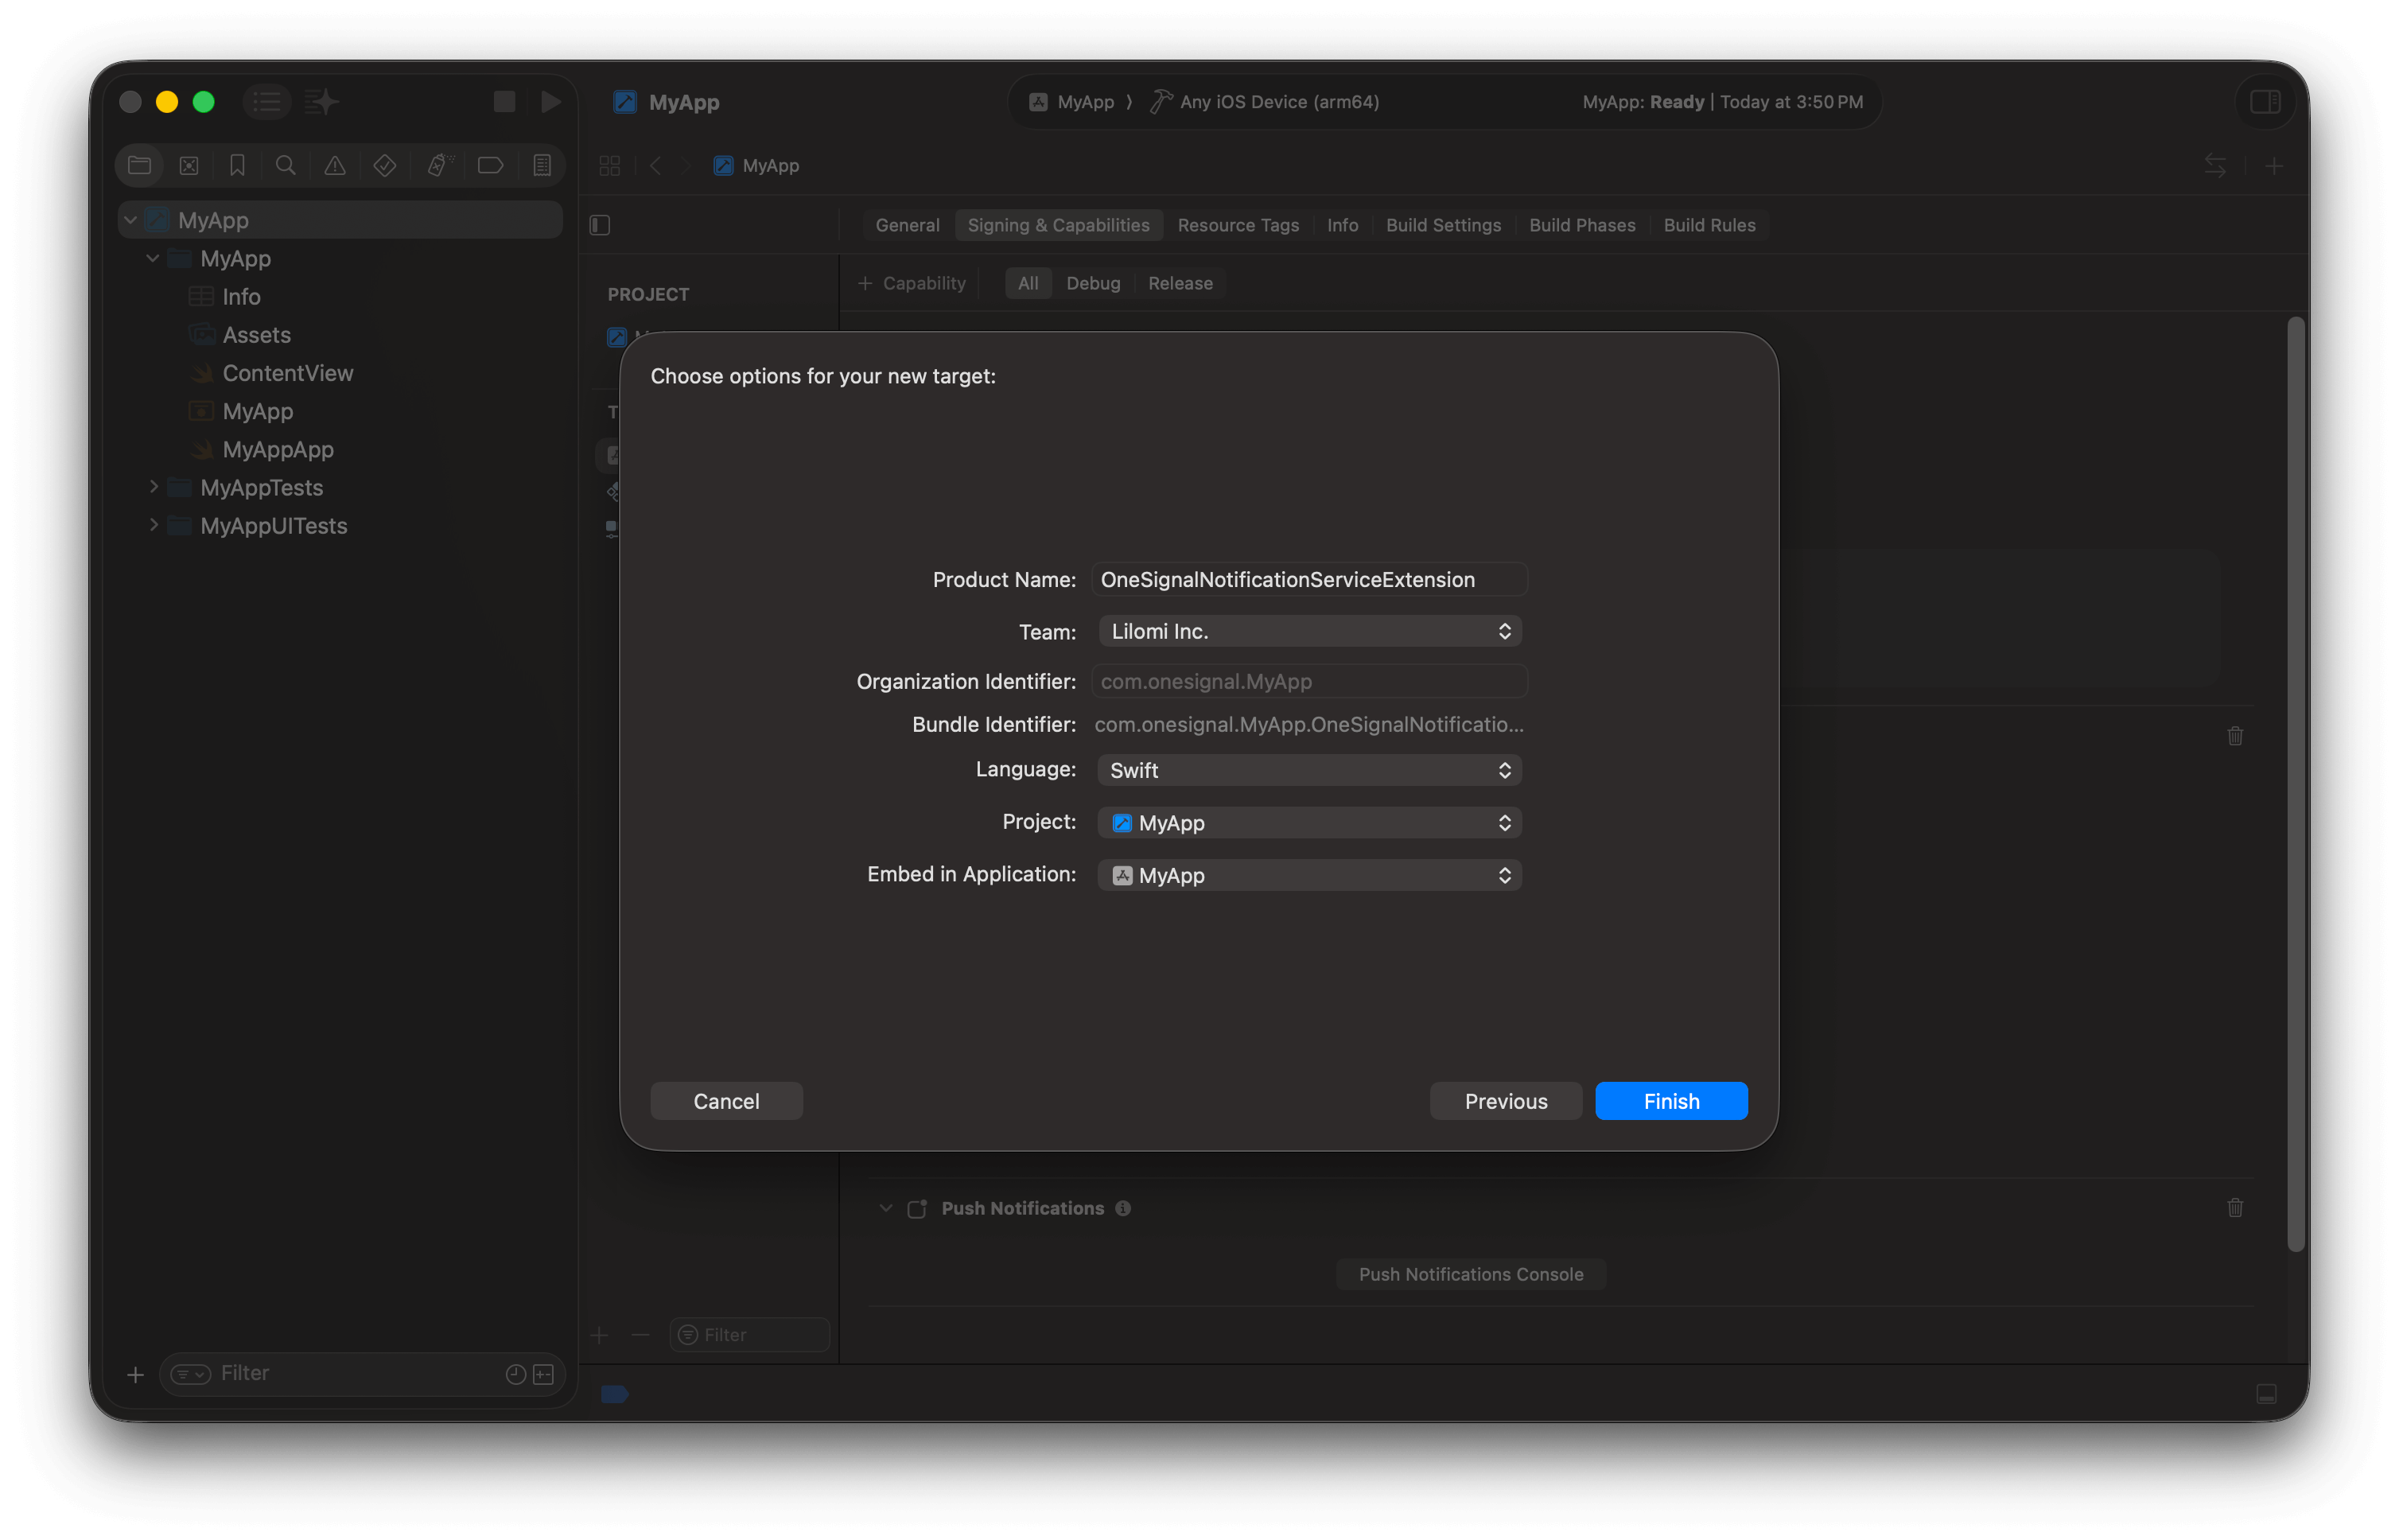
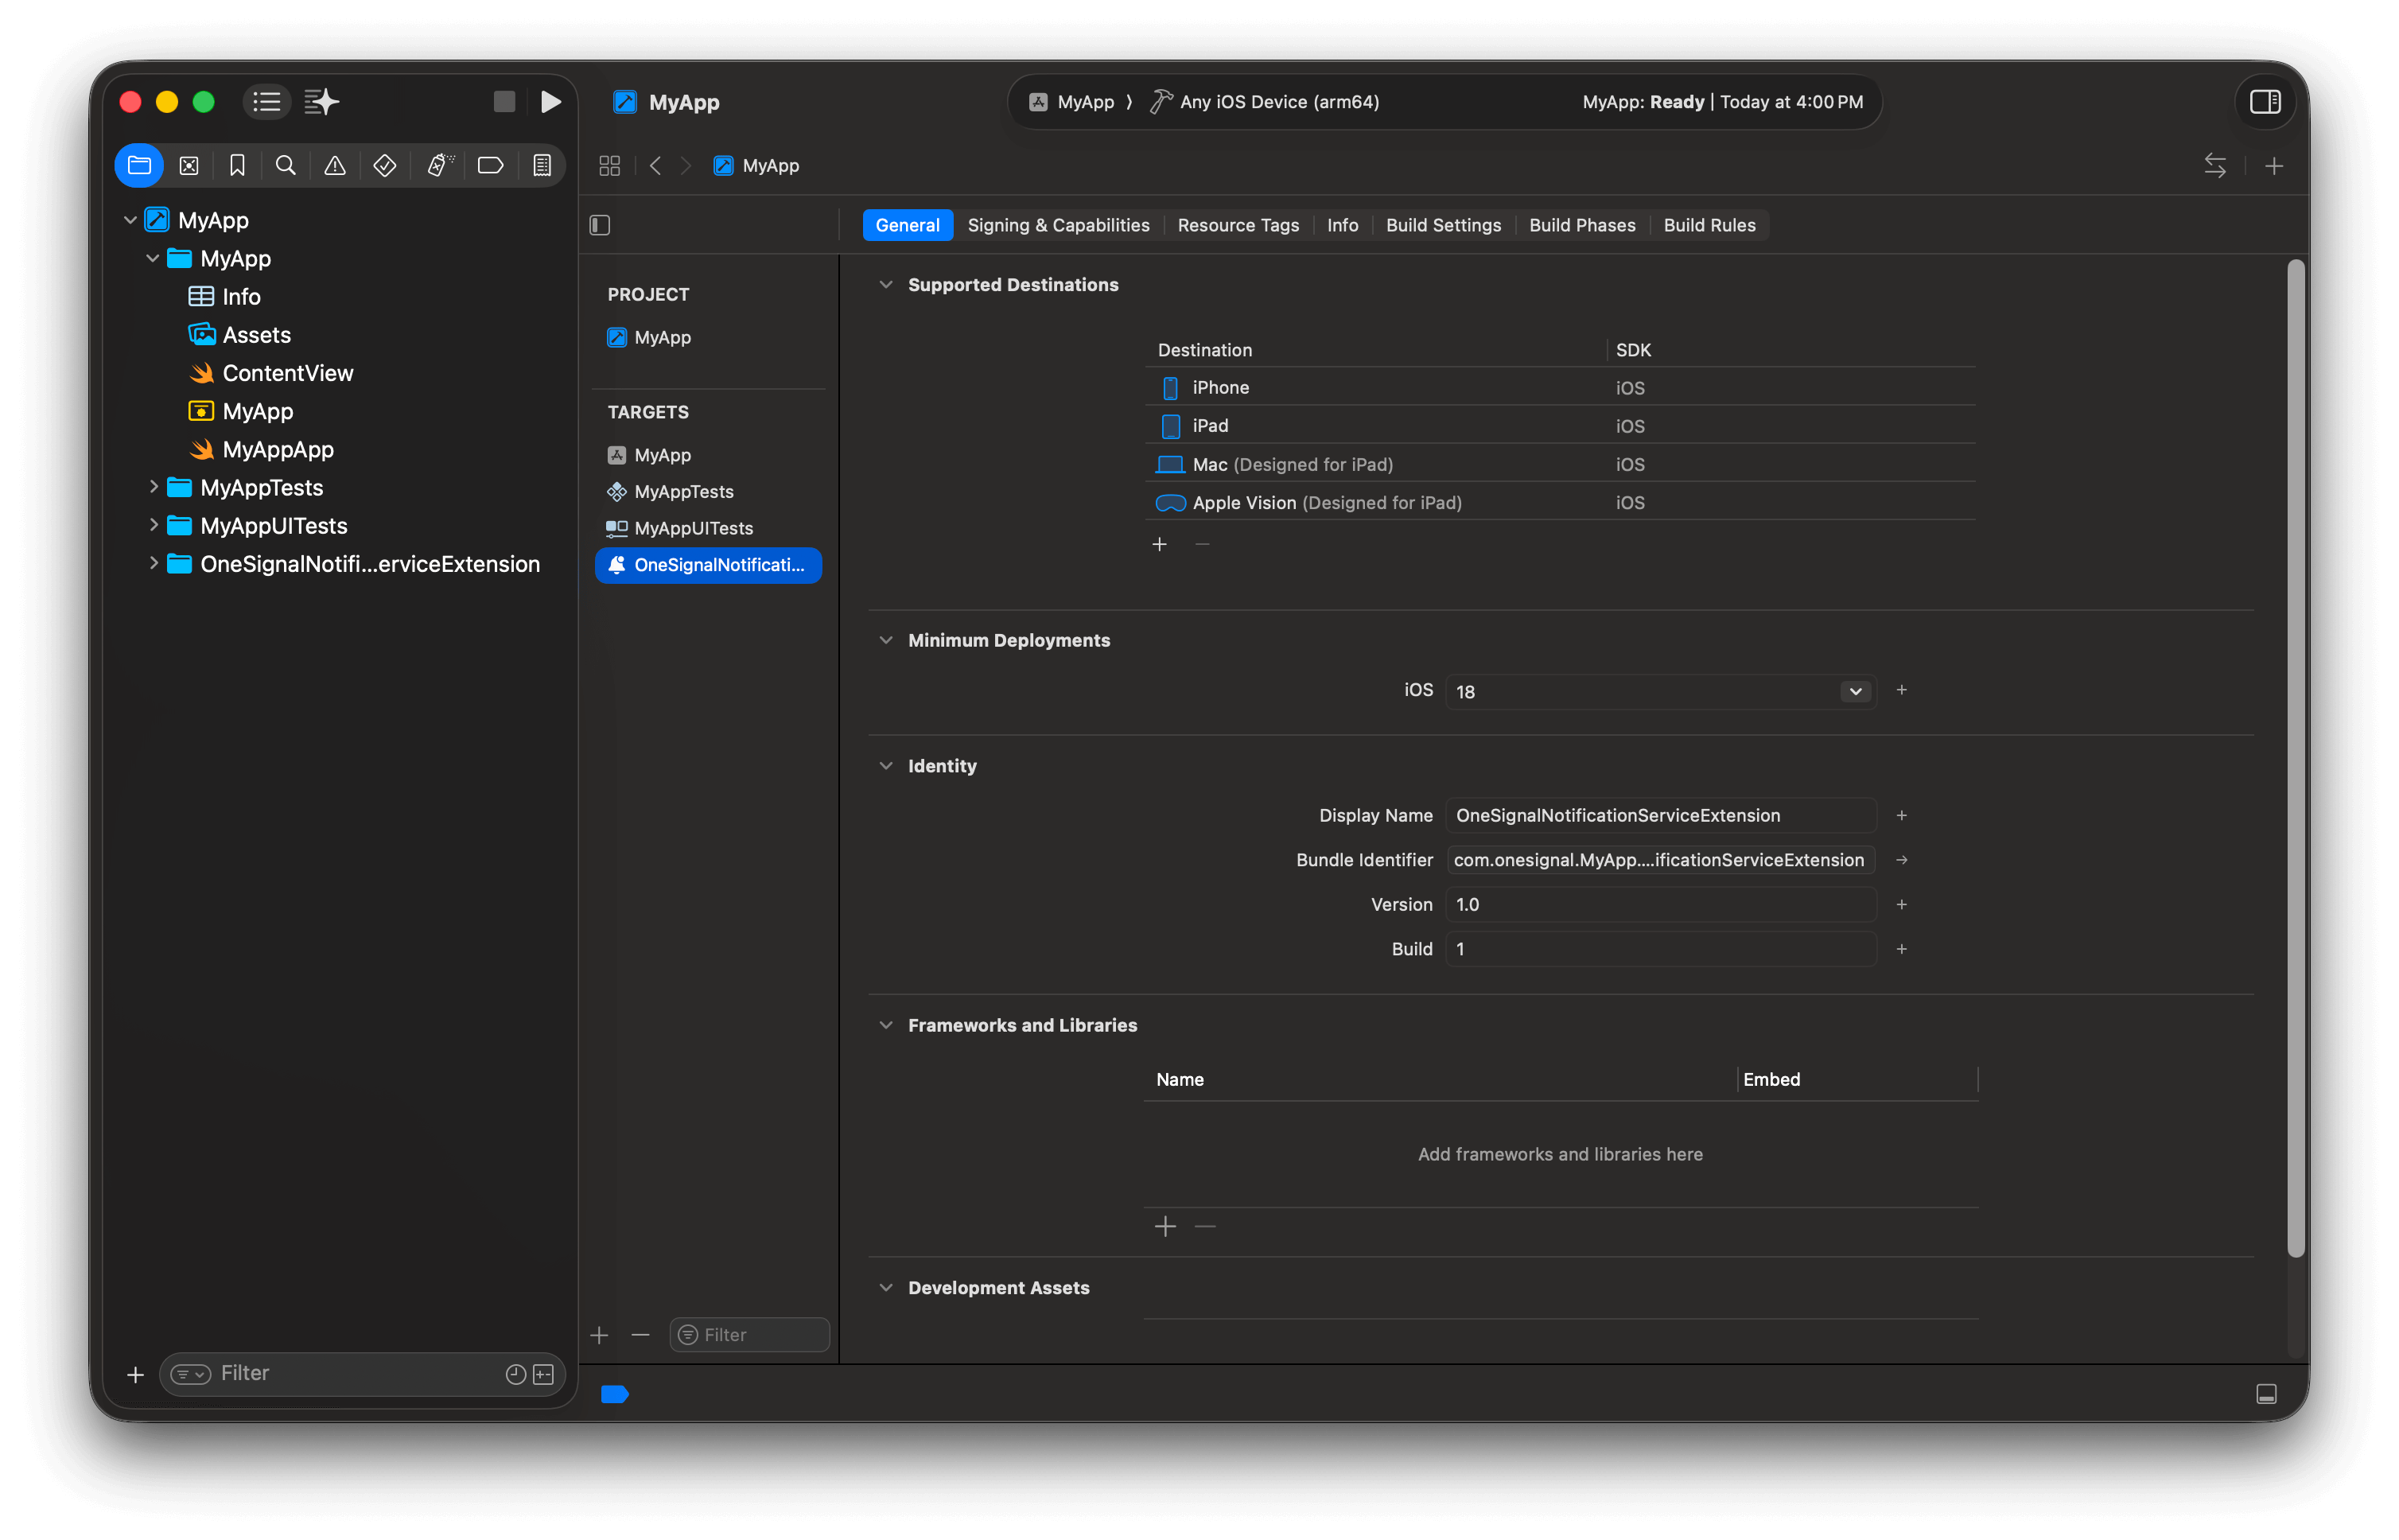
 **Configure the target:**
1. Select **OneSignalNotificationServiceExtension** target > **General**
2. Set **Minimum Deployments** to match your app target
**Configure the target:**
1. Select **OneSignalNotificationServiceExtension** target > **General**
2. Set **Minimum Deployments** to match your app target
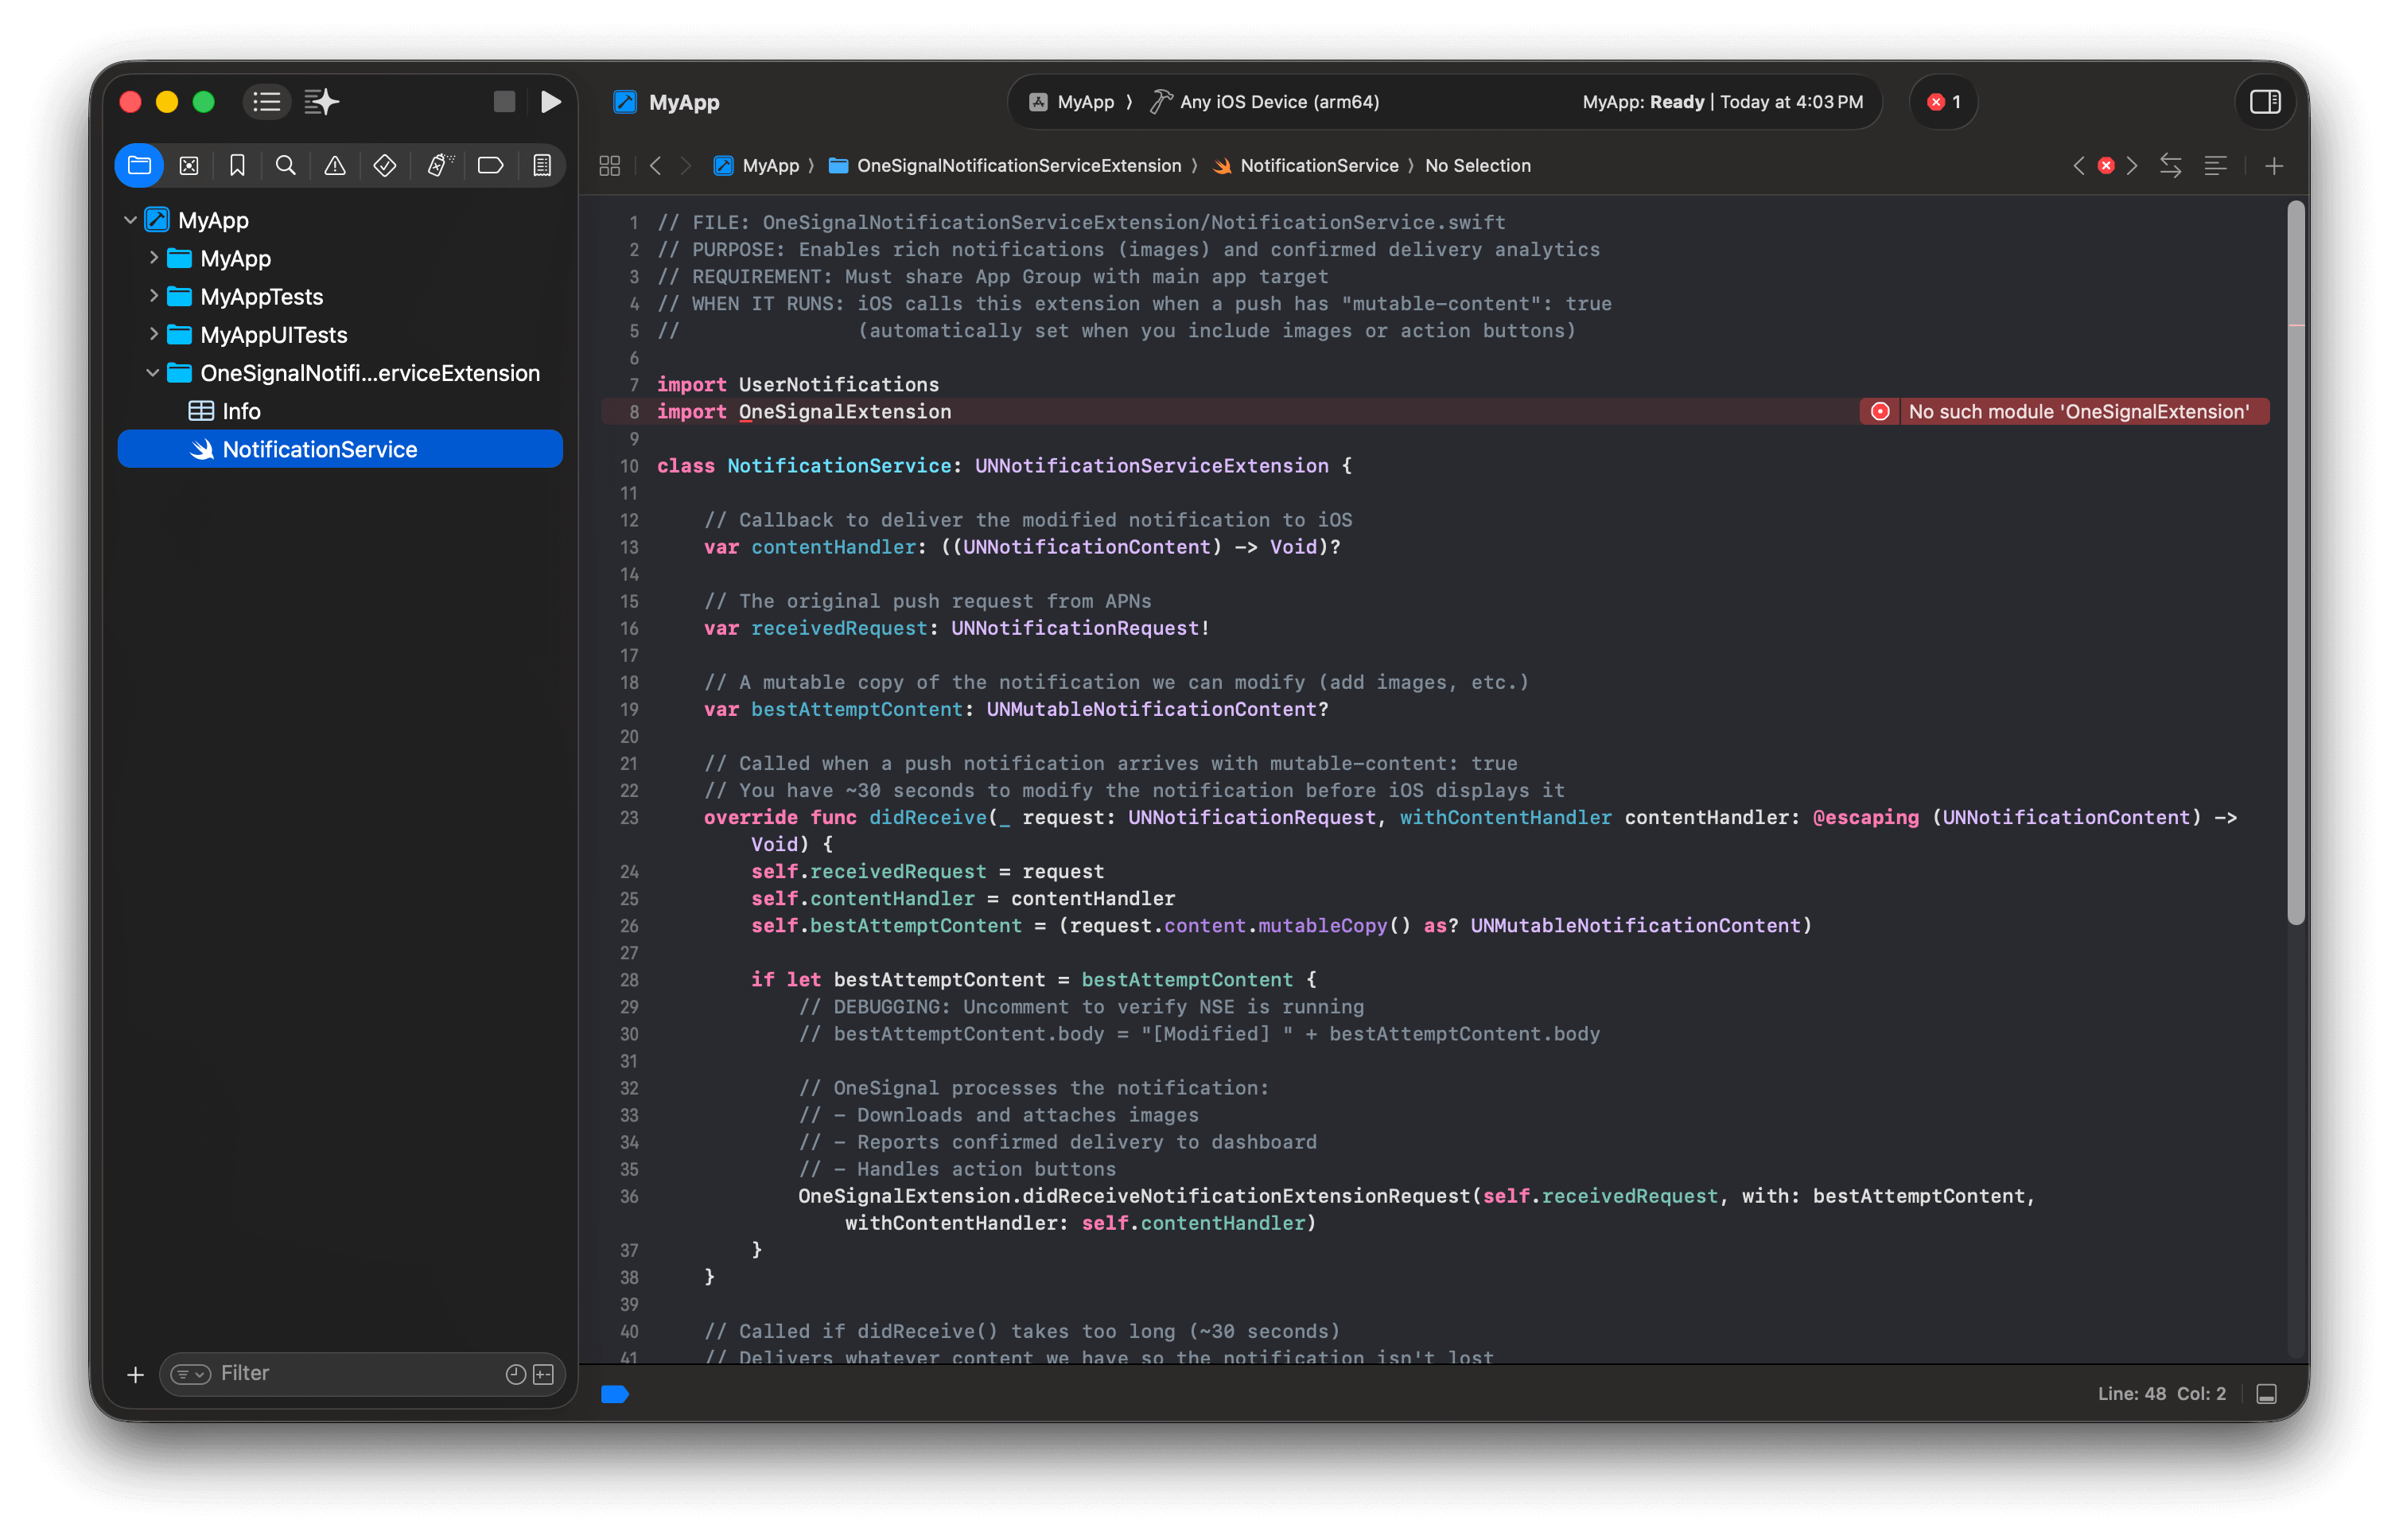
 **Update NSE code:**
1. Navigate to **OneSignalNotificationServiceExtension/NotificationService.swift**
2. Replace the contents with the code below:
```swift Swift theme={null}
// FILE: OneSignalNotificationServiceExtension/NotificationService.swift
// PURPOSE: Enables rich notifications (images) and confirmed receipt analytics
// REQUIREMENT: This extension must share an App Group with the main app target (configured in next steps)
// WHEN IT RUNS: iOS calls this extension when a push has "mutable-content": true
// (automatically set when you include images or action buttons)
import UserNotifications
import OneSignalExtension
class NotificationService: UNNotificationServiceExtension {
// Callback to deliver the modified notification to iOS
var contentHandler: ((UNNotificationContent) -> Void)?
// The original push request from APNs
var receivedRequest: UNNotificationRequest!
// A mutable copy of the notification we can modify (add images, etc.)
var bestAttemptContent: UNMutableNotificationContent?
// Called when a push notification arrives with mutable-content: true
// You have ~30 seconds to modify the notification before iOS displays it
override func didReceive(_ request: UNNotificationRequest, withContentHandler contentHandler: @escaping (UNNotificationContent) -> Void) {
self.receivedRequest = request
self.contentHandler = contentHandler
self.bestAttemptContent = (request.content.mutableCopy() as? UNMutableNotificationContent)
if let bestAttemptContent = bestAttemptContent {
// DEBUGGING: Uncomment to verify NSE is running
// bestAttemptContent.body = "[Modified] " + bestAttemptContent.body
// OneSignal processes the notification:
// - Downloads and attaches images
// - Reports confirmed receipt to dashboard
// - Handles action buttons
OneSignalExtension.didReceiveNotificationExtensionRequest(self.receivedRequest, with: bestAttemptContent, withContentHandler: self.contentHandler)
}
}
// Called if didReceive() takes too long (~30 seconds)
// Delivers whatever content we have so the notification isn't lost
override func serviceExtensionTimeWillExpire() {
if let contentHandler = contentHandler, let bestAttemptContent = bestAttemptContent {
OneSignalExtension.serviceExtensionTimeWillExpireRequest(self.receivedRequest, with: self.bestAttemptContent)
contentHandler(bestAttemptContent)
}
}
}
```
```objc Objective-C theme={null}
// FILE: OneSignalNotificationServiceExtension/NotificationService.m
// PURPOSE: Enables rich notifications (images) and confirmed receipt analytics
// REQUIREMENT: This extension must share an App Group with the main app target (configured in next steps)
// WHEN IT RUNS: iOS calls this extension when a push has "mutable-content": true
// (automatically set when you include images or action buttons)
#import
#import "NotificationService.h"
@interface NotificationService ()
@property (nonatomic, strong) void (^contentHandler)(UNNotificationContent *contentToDeliver); // Callback to deliver modified notification
@property (nonatomic, strong) UNNotificationRequest *receivedRequest; // Original push request from APNs
@property (nonatomic, strong) UNMutableNotificationContent *bestAttemptContent; // Mutable copy we can modify
@end
@implementation NotificationService
// Called when a push arrives with mutable-content: true
// You have ~30 seconds to modify the notification before iOS displays it
- (void)didReceiveNotificationRequest:(UNNotificationRequest *)request
withContentHandler:(void (^)(UNNotificationContent * _Nonnull))contentHandler {
self.receivedRequest = request;
self.contentHandler = contentHandler;
self.bestAttemptContent = [request.content mutableCopy];
// DEBUGGING: Uncomment to verify NSE is running
// NSLog(@"Running NotificationServiceExtension");
// self.bestAttemptContent.body = [@"[Modified] " stringByAppendingString:self.bestAttemptContent.body];
// OneSignal downloads images, reports confirmed receipt, handles action buttons
[OneSignalExtension didReceiveNotificationExtensionRequest:self.receivedRequest
withMutableNotificationContent:self.bestAttemptContent
withContentHandler:self.contentHandler];
}
// Called if didReceiveNotificationRequest() takes too long (~30 seconds)
// Delivers whatever content we have so the notification isn't lost
- (void)serviceExtensionTimeWillExpire {
[OneSignalExtension serviceExtensionTimeWillExpireRequest:self.receivedRequest
withMutableNotificationContent:self.bestAttemptContent];
self.contentHandler(self.bestAttemptContent);
}
@end
```
Don't panic! Build errors will resolve after installing the SDK.
**Update NSE code:**
1. Navigate to **OneSignalNotificationServiceExtension/NotificationService.swift**
2. Replace the contents with the code below:
```swift Swift theme={null}
// FILE: OneSignalNotificationServiceExtension/NotificationService.swift
// PURPOSE: Enables rich notifications (images) and confirmed receipt analytics
// REQUIREMENT: This extension must share an App Group with the main app target (configured in next steps)
// WHEN IT RUNS: iOS calls this extension when a push has "mutable-content": true
// (automatically set when you include images or action buttons)
import UserNotifications
import OneSignalExtension
class NotificationService: UNNotificationServiceExtension {
// Callback to deliver the modified notification to iOS
var contentHandler: ((UNNotificationContent) -> Void)?
// The original push request from APNs
var receivedRequest: UNNotificationRequest!
// A mutable copy of the notification we can modify (add images, etc.)
var bestAttemptContent: UNMutableNotificationContent?
// Called when a push notification arrives with mutable-content: true
// You have ~30 seconds to modify the notification before iOS displays it
override func didReceive(_ request: UNNotificationRequest, withContentHandler contentHandler: @escaping (UNNotificationContent) -> Void) {
self.receivedRequest = request
self.contentHandler = contentHandler
self.bestAttemptContent = (request.content.mutableCopy() as? UNMutableNotificationContent)
if let bestAttemptContent = bestAttemptContent {
// DEBUGGING: Uncomment to verify NSE is running
// bestAttemptContent.body = "[Modified] " + bestAttemptContent.body
// OneSignal processes the notification:
// - Downloads and attaches images
// - Reports confirmed receipt to dashboard
// - Handles action buttons
OneSignalExtension.didReceiveNotificationExtensionRequest(self.receivedRequest, with: bestAttemptContent, withContentHandler: self.contentHandler)
}
}
// Called if didReceive() takes too long (~30 seconds)
// Delivers whatever content we have so the notification isn't lost
override func serviceExtensionTimeWillExpire() {
if let contentHandler = contentHandler, let bestAttemptContent = bestAttemptContent {
OneSignalExtension.serviceExtensionTimeWillExpireRequest(self.receivedRequest, with: self.bestAttemptContent)
contentHandler(bestAttemptContent)
}
}
}
```
```objc Objective-C theme={null}
// FILE: OneSignalNotificationServiceExtension/NotificationService.m
// PURPOSE: Enables rich notifications (images) and confirmed receipt analytics
// REQUIREMENT: This extension must share an App Group with the main app target (configured in next steps)
// WHEN IT RUNS: iOS calls this extension when a push has "mutable-content": true
// (automatically set when you include images or action buttons)
#import
#import "NotificationService.h"
@interface NotificationService ()
@property (nonatomic, strong) void (^contentHandler)(UNNotificationContent *contentToDeliver); // Callback to deliver modified notification
@property (nonatomic, strong) UNNotificationRequest *receivedRequest; // Original push request from APNs
@property (nonatomic, strong) UNMutableNotificationContent *bestAttemptContent; // Mutable copy we can modify
@end
@implementation NotificationService
// Called when a push arrives with mutable-content: true
// You have ~30 seconds to modify the notification before iOS displays it
- (void)didReceiveNotificationRequest:(UNNotificationRequest *)request
withContentHandler:(void (^)(UNNotificationContent * _Nonnull))contentHandler {
self.receivedRequest = request;
self.contentHandler = contentHandler;
self.bestAttemptContent = [request.content mutableCopy];
// DEBUGGING: Uncomment to verify NSE is running
// NSLog(@"Running NotificationServiceExtension");
// self.bestAttemptContent.body = [@"[Modified] " stringByAppendingString:self.bestAttemptContent.body];
// OneSignal downloads images, reports confirmed receipt, handles action buttons
[OneSignalExtension didReceiveNotificationExtensionRequest:self.receivedRequest
withMutableNotificationContent:self.bestAttemptContent
withContentHandler:self.contentHandler];
}
// Called if didReceiveNotificationRequest() takes too long (~30 seconds)
// Delivers whatever content we have so the notification isn't lost
- (void)serviceExtensionTimeWillExpire {
[OneSignalExtension serviceExtensionTimeWillExpireRequest:self.receivedRequest
withMutableNotificationContent:self.bestAttemptContent];
self.contentHandler(self.bestAttemptContent);
}
@end
```
Don't panic! Build errors will resolve after installing the SDK.
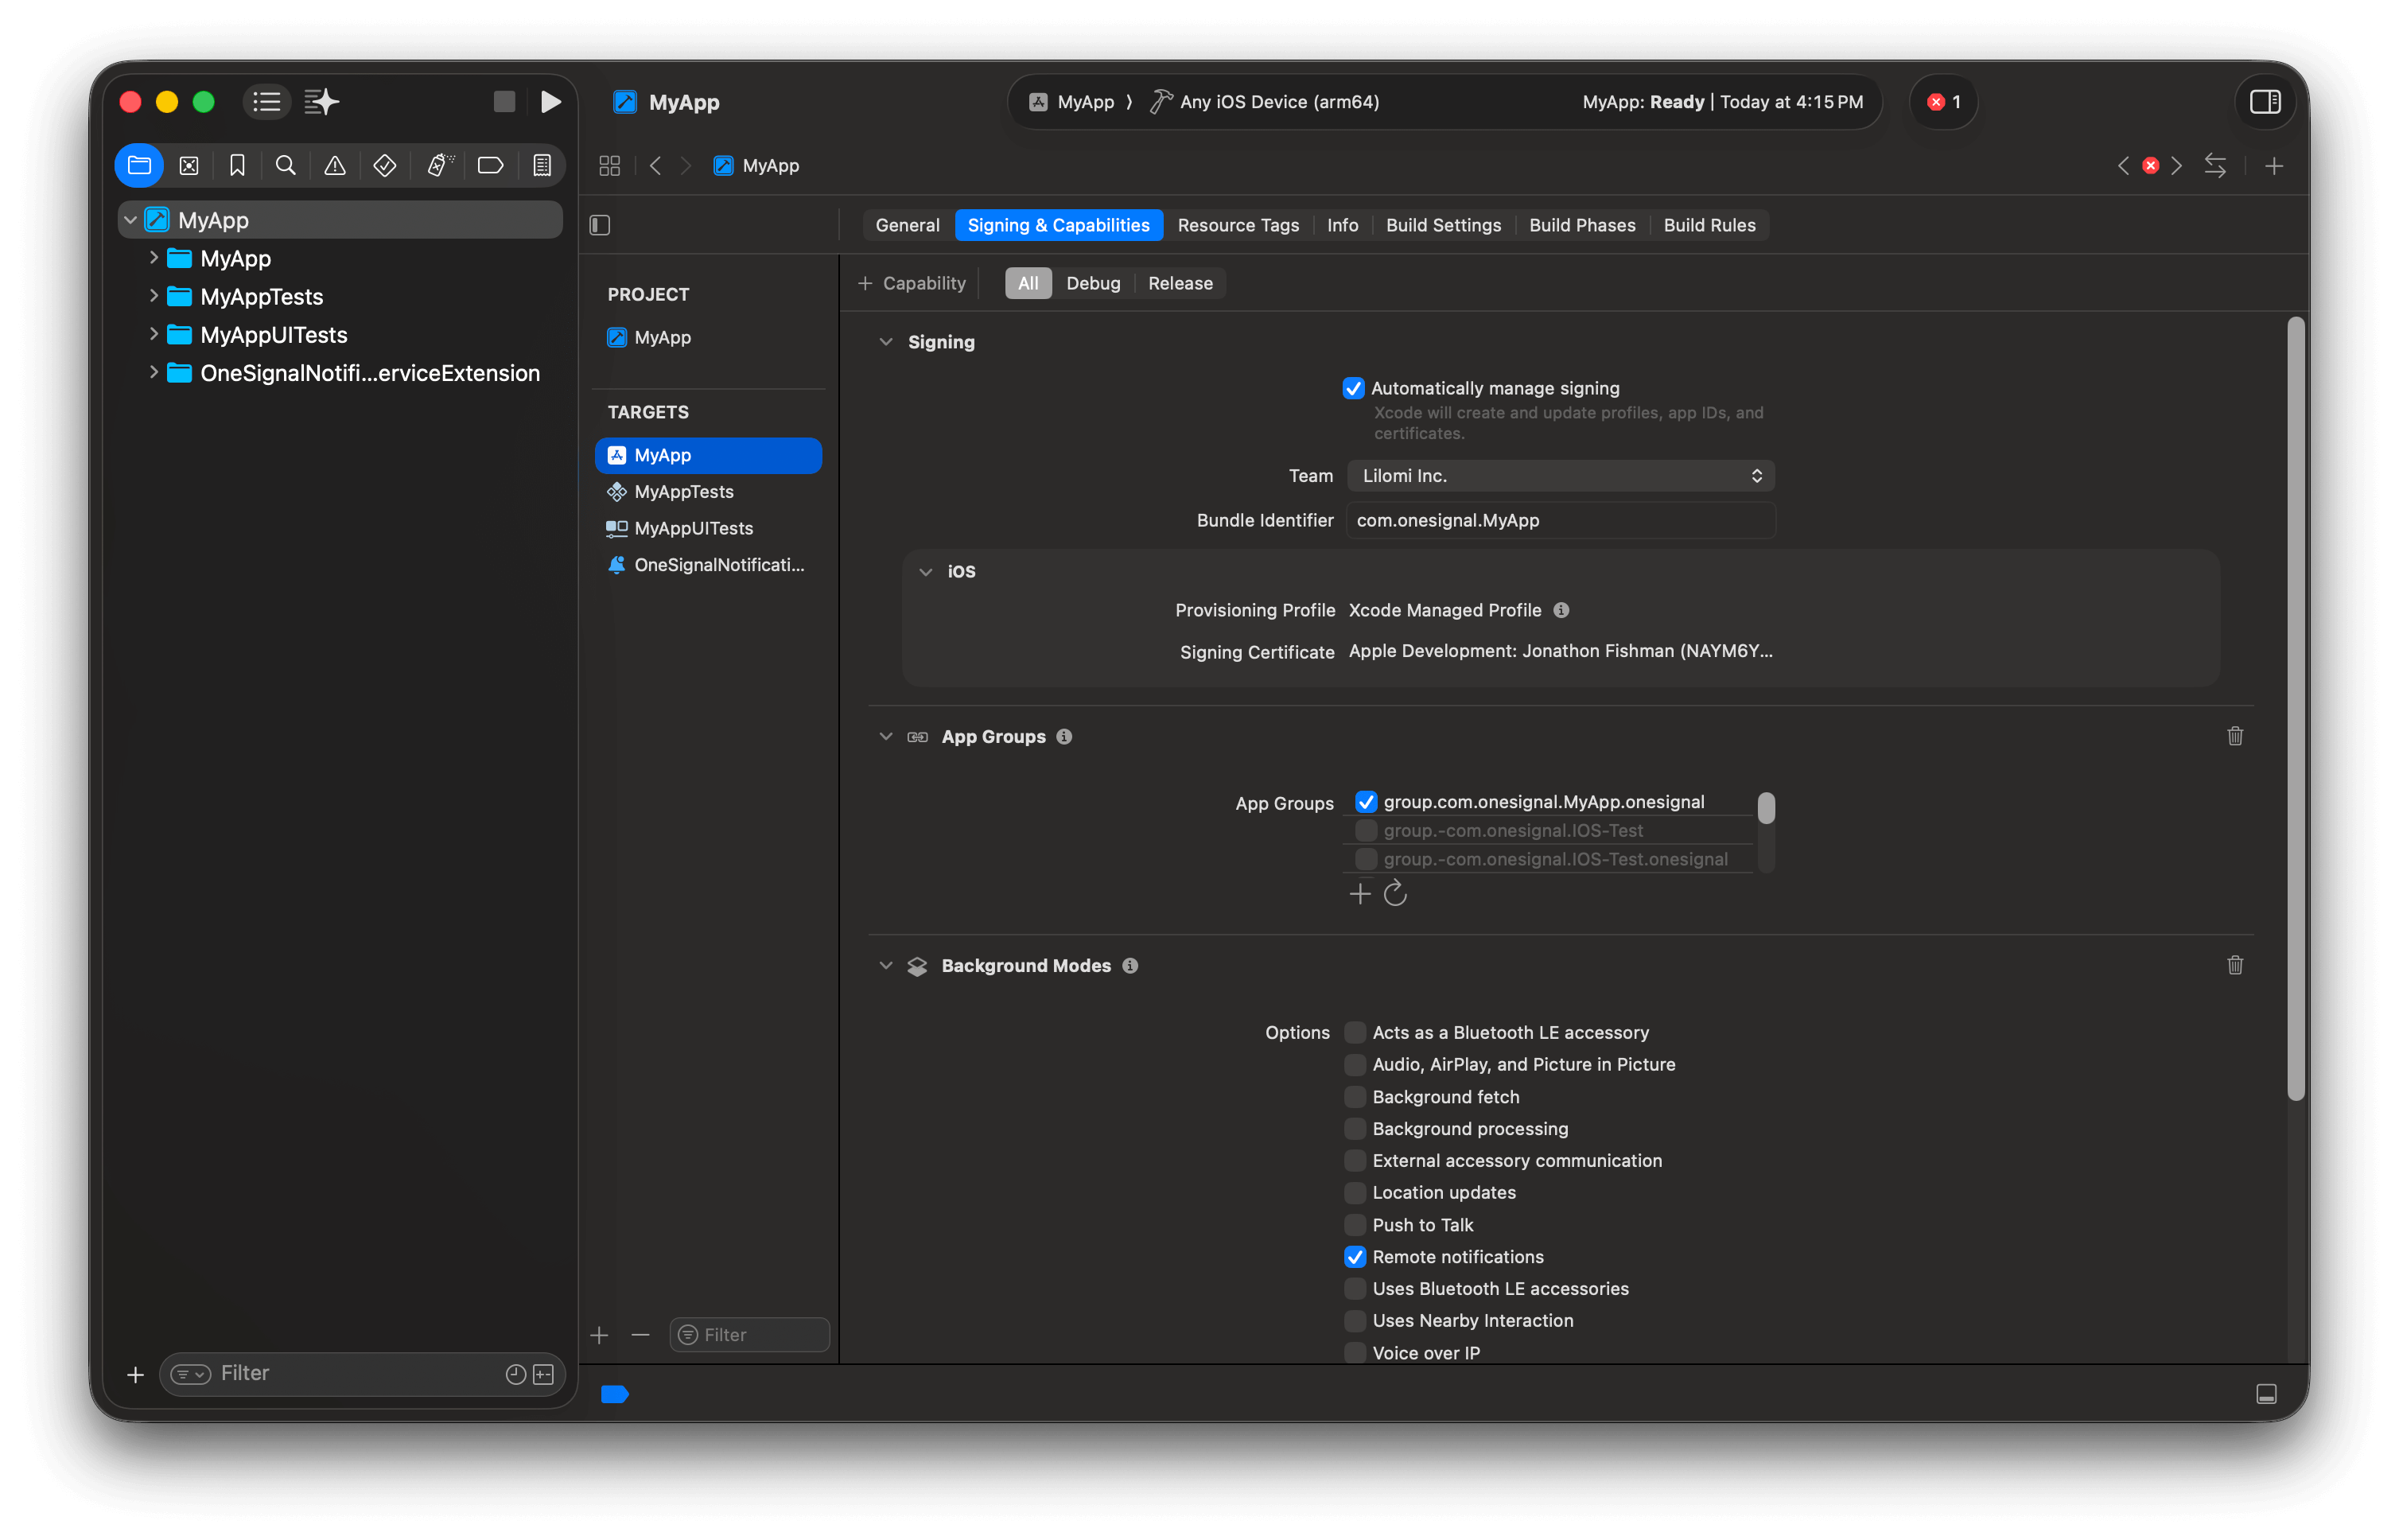
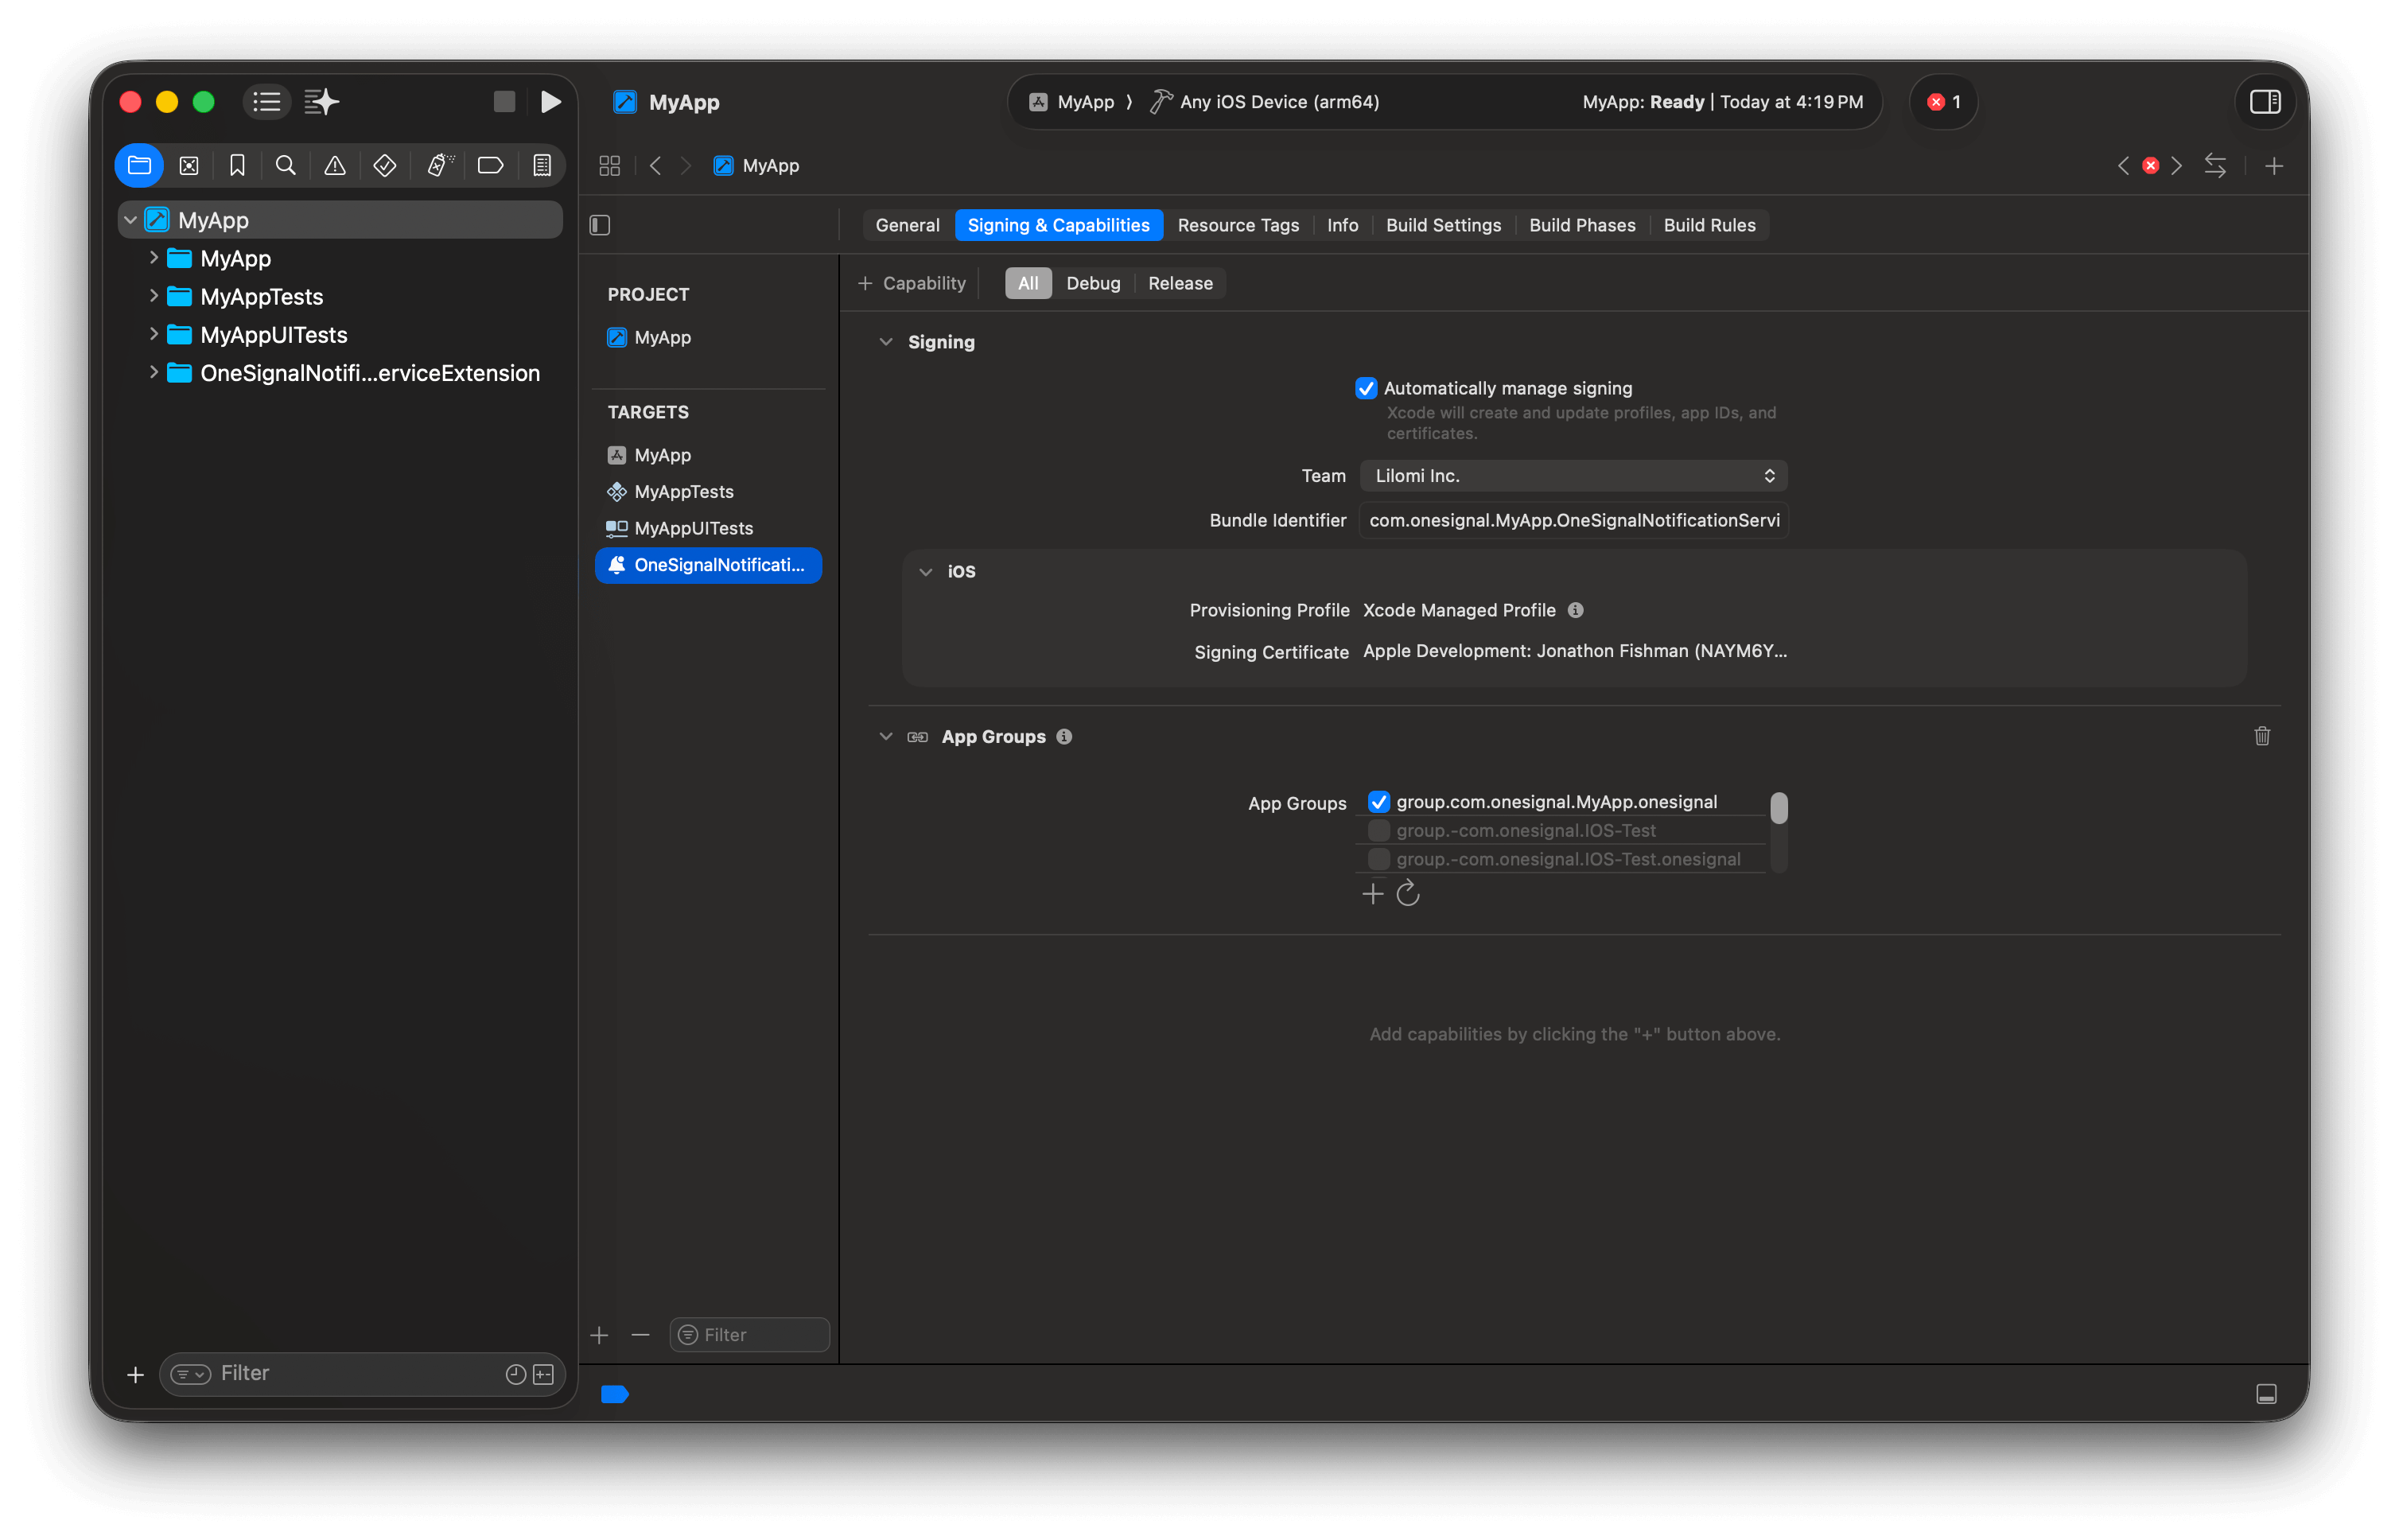
 ### Step 3. Create an App Group
App Groups enable data sharing between your app and the NSE. Required for [Confirmed receipt](./confirmed-delivery), badges, and images.
**Add the App Group to your main app target:**
1. Select your **main app target** > **Signing & Capabilities**
2. Click **+ Capability** > add **App Groups**
3. Click **+** and enter: `group.YOUR_MAIN_APP_BUNDLE_ID.onesignal` - Replace `YOUR_MAIN_APP_BUNDLE_ID` with your **main app target's** Bundle Identifier (found at **app target > General > Identity**).
**Add the same App Group to the NSE target:**
4. Select **OneSignalNotificationServiceExtension** target > **Signing & Capabilities**
5. Click **+ Capability** > add **App Groups**
6. Select the **same** App Group ID you created above: `group.YOUR_MAIN_APP_BUNDLE_ID.onesignal`
Use your **main app target's** Bundle Identifier — not the NSE's.
* **Correct:** `group.com.example.myapp.onesignal`
* **Wrong:** `group.com.example.myapp.OneSignalNotificationServiceExtension.onesignal`
Both targets must have the **exact same** App Group. If they don't match, confirmed receipt, badges, and images will not work. See [Troubleshooting confirmed receipt](./confirmed-delivery#ios) for a full verification checklist.
### Step 3. Create an App Group
App Groups enable data sharing between your app and the NSE. Required for [Confirmed receipt](./confirmed-delivery), badges, and images.
**Add the App Group to your main app target:**
1. Select your **main app target** > **Signing & Capabilities**
2. Click **+ Capability** > add **App Groups**
3. Click **+** and enter: `group.YOUR_MAIN_APP_BUNDLE_ID.onesignal` - Replace `YOUR_MAIN_APP_BUNDLE_ID` with your **main app target's** Bundle Identifier (found at **app target > General > Identity**).
**Add the same App Group to the NSE target:**
4. Select **OneSignalNotificationServiceExtension** target > **Signing & Capabilities**
5. Click **+ Capability** > add **App Groups**
6. Select the **same** App Group ID you created above: `group.YOUR_MAIN_APP_BUNDLE_ID.onesignal`
Use your **main app target's** Bundle Identifier — not the NSE's.
* **Correct:** `group.com.example.myapp.onesignal`
* **Wrong:** `group.com.example.myapp.OneSignalNotificationServiceExtension.onesignal`
Both targets must have the **exact same** App Group. If they don't match, confirmed receipt, badges, and images will not work. See [Troubleshooting confirmed receipt](./confirmed-delivery#ios) for a full verification checklist.
 If you need OneSignal to use an existing App Group instead of creating a new one, add this key to the `Info.plist` of **BOTH** your main app target and NSE target. Replace `group.your-existing-group-id` with your existing App Group ID.
```xml theme={null}
OneSignal_app_groups_key
group.your-existing-group-id
```
Without this key in both `Info.plist` files, the SDK defaults to looking for `group.YOUR_MAIN_APP_BUNDLE_ID.onesignal` and will not find your custom App Group.
If you need OneSignal to use an existing App Group instead of creating a new one, add this key to the `Info.plist` of **BOTH** your main app target and NSE target. Replace `group.your-existing-group-id` with your existing App Group ID.
```xml theme={null}
OneSignal_app_groups_key
group.your-existing-group-id
```
Without this key in both `Info.plist` files, the SDK defaults to looking for `group.YOUR_MAIN_APP_BUNDLE_ID.onesignal` and will not find your custom App Group.
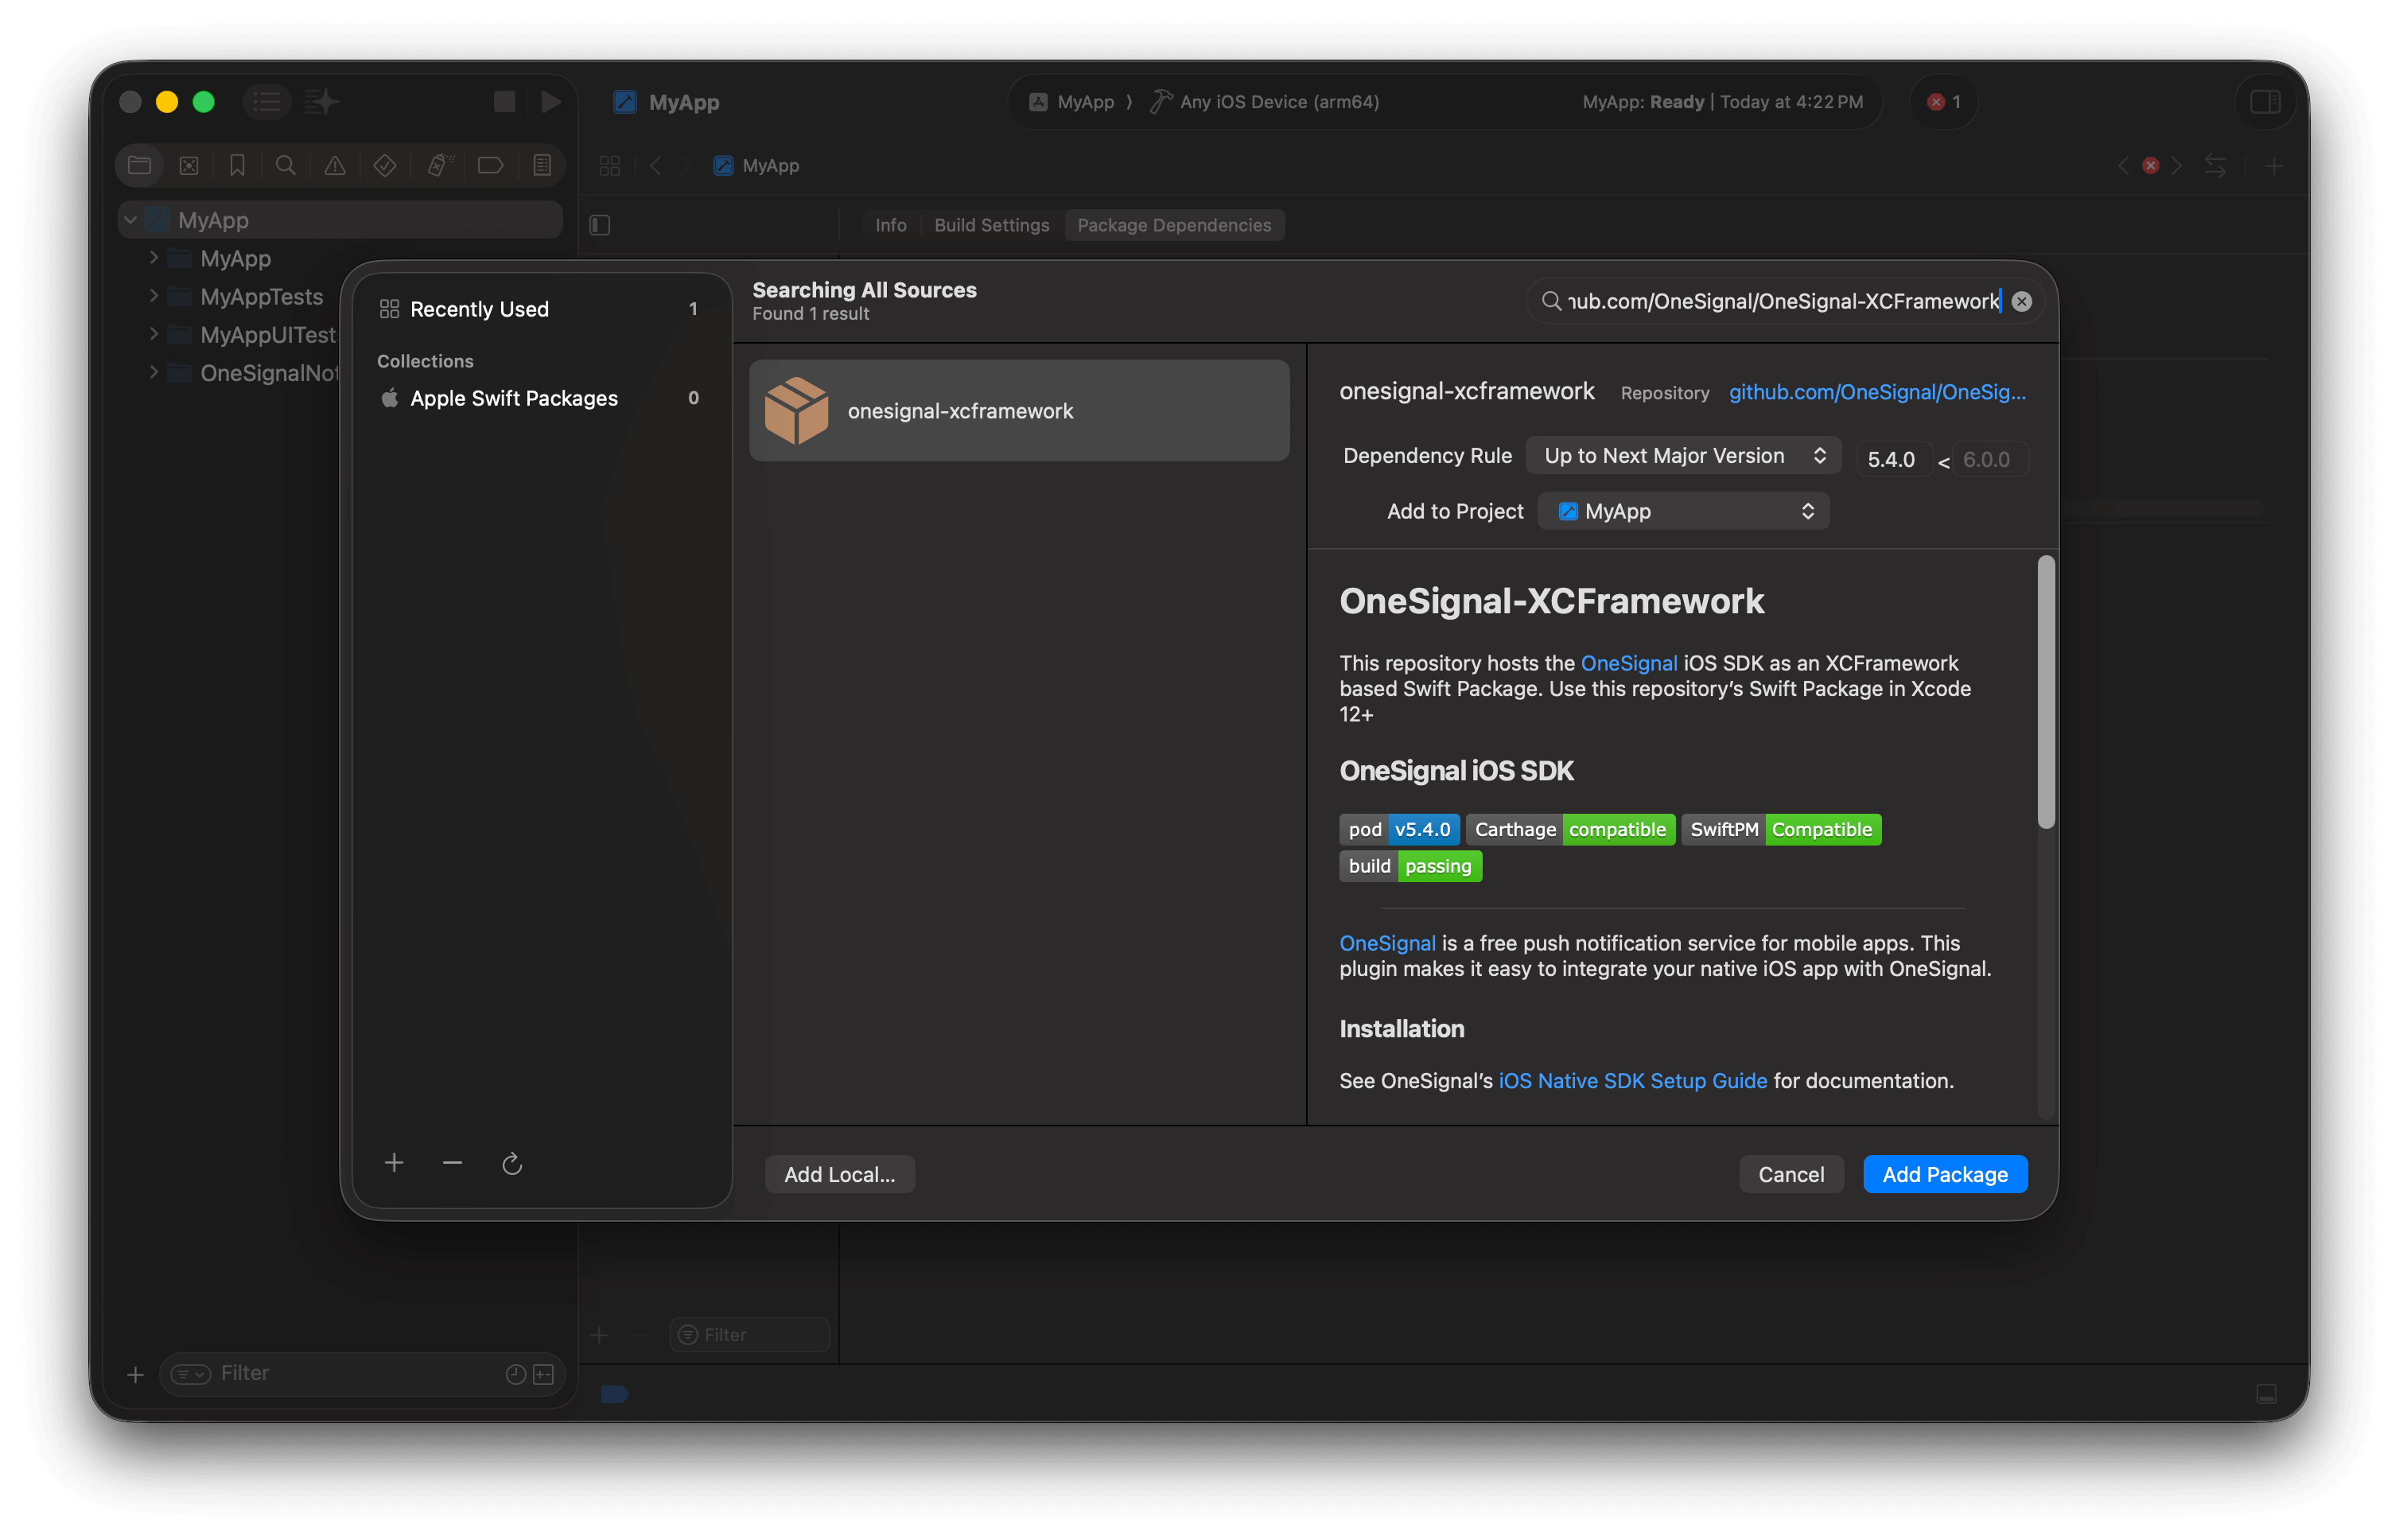
 ### Step 4. Install the OneSignal SDK
**Swift Package Manager (recommended):**
1. Select **Your project file > Package Dependencies > +**
2. Enter: `https://github.com/OneSignal/OneSignal-XCFramework`
3. Click **Add Package**
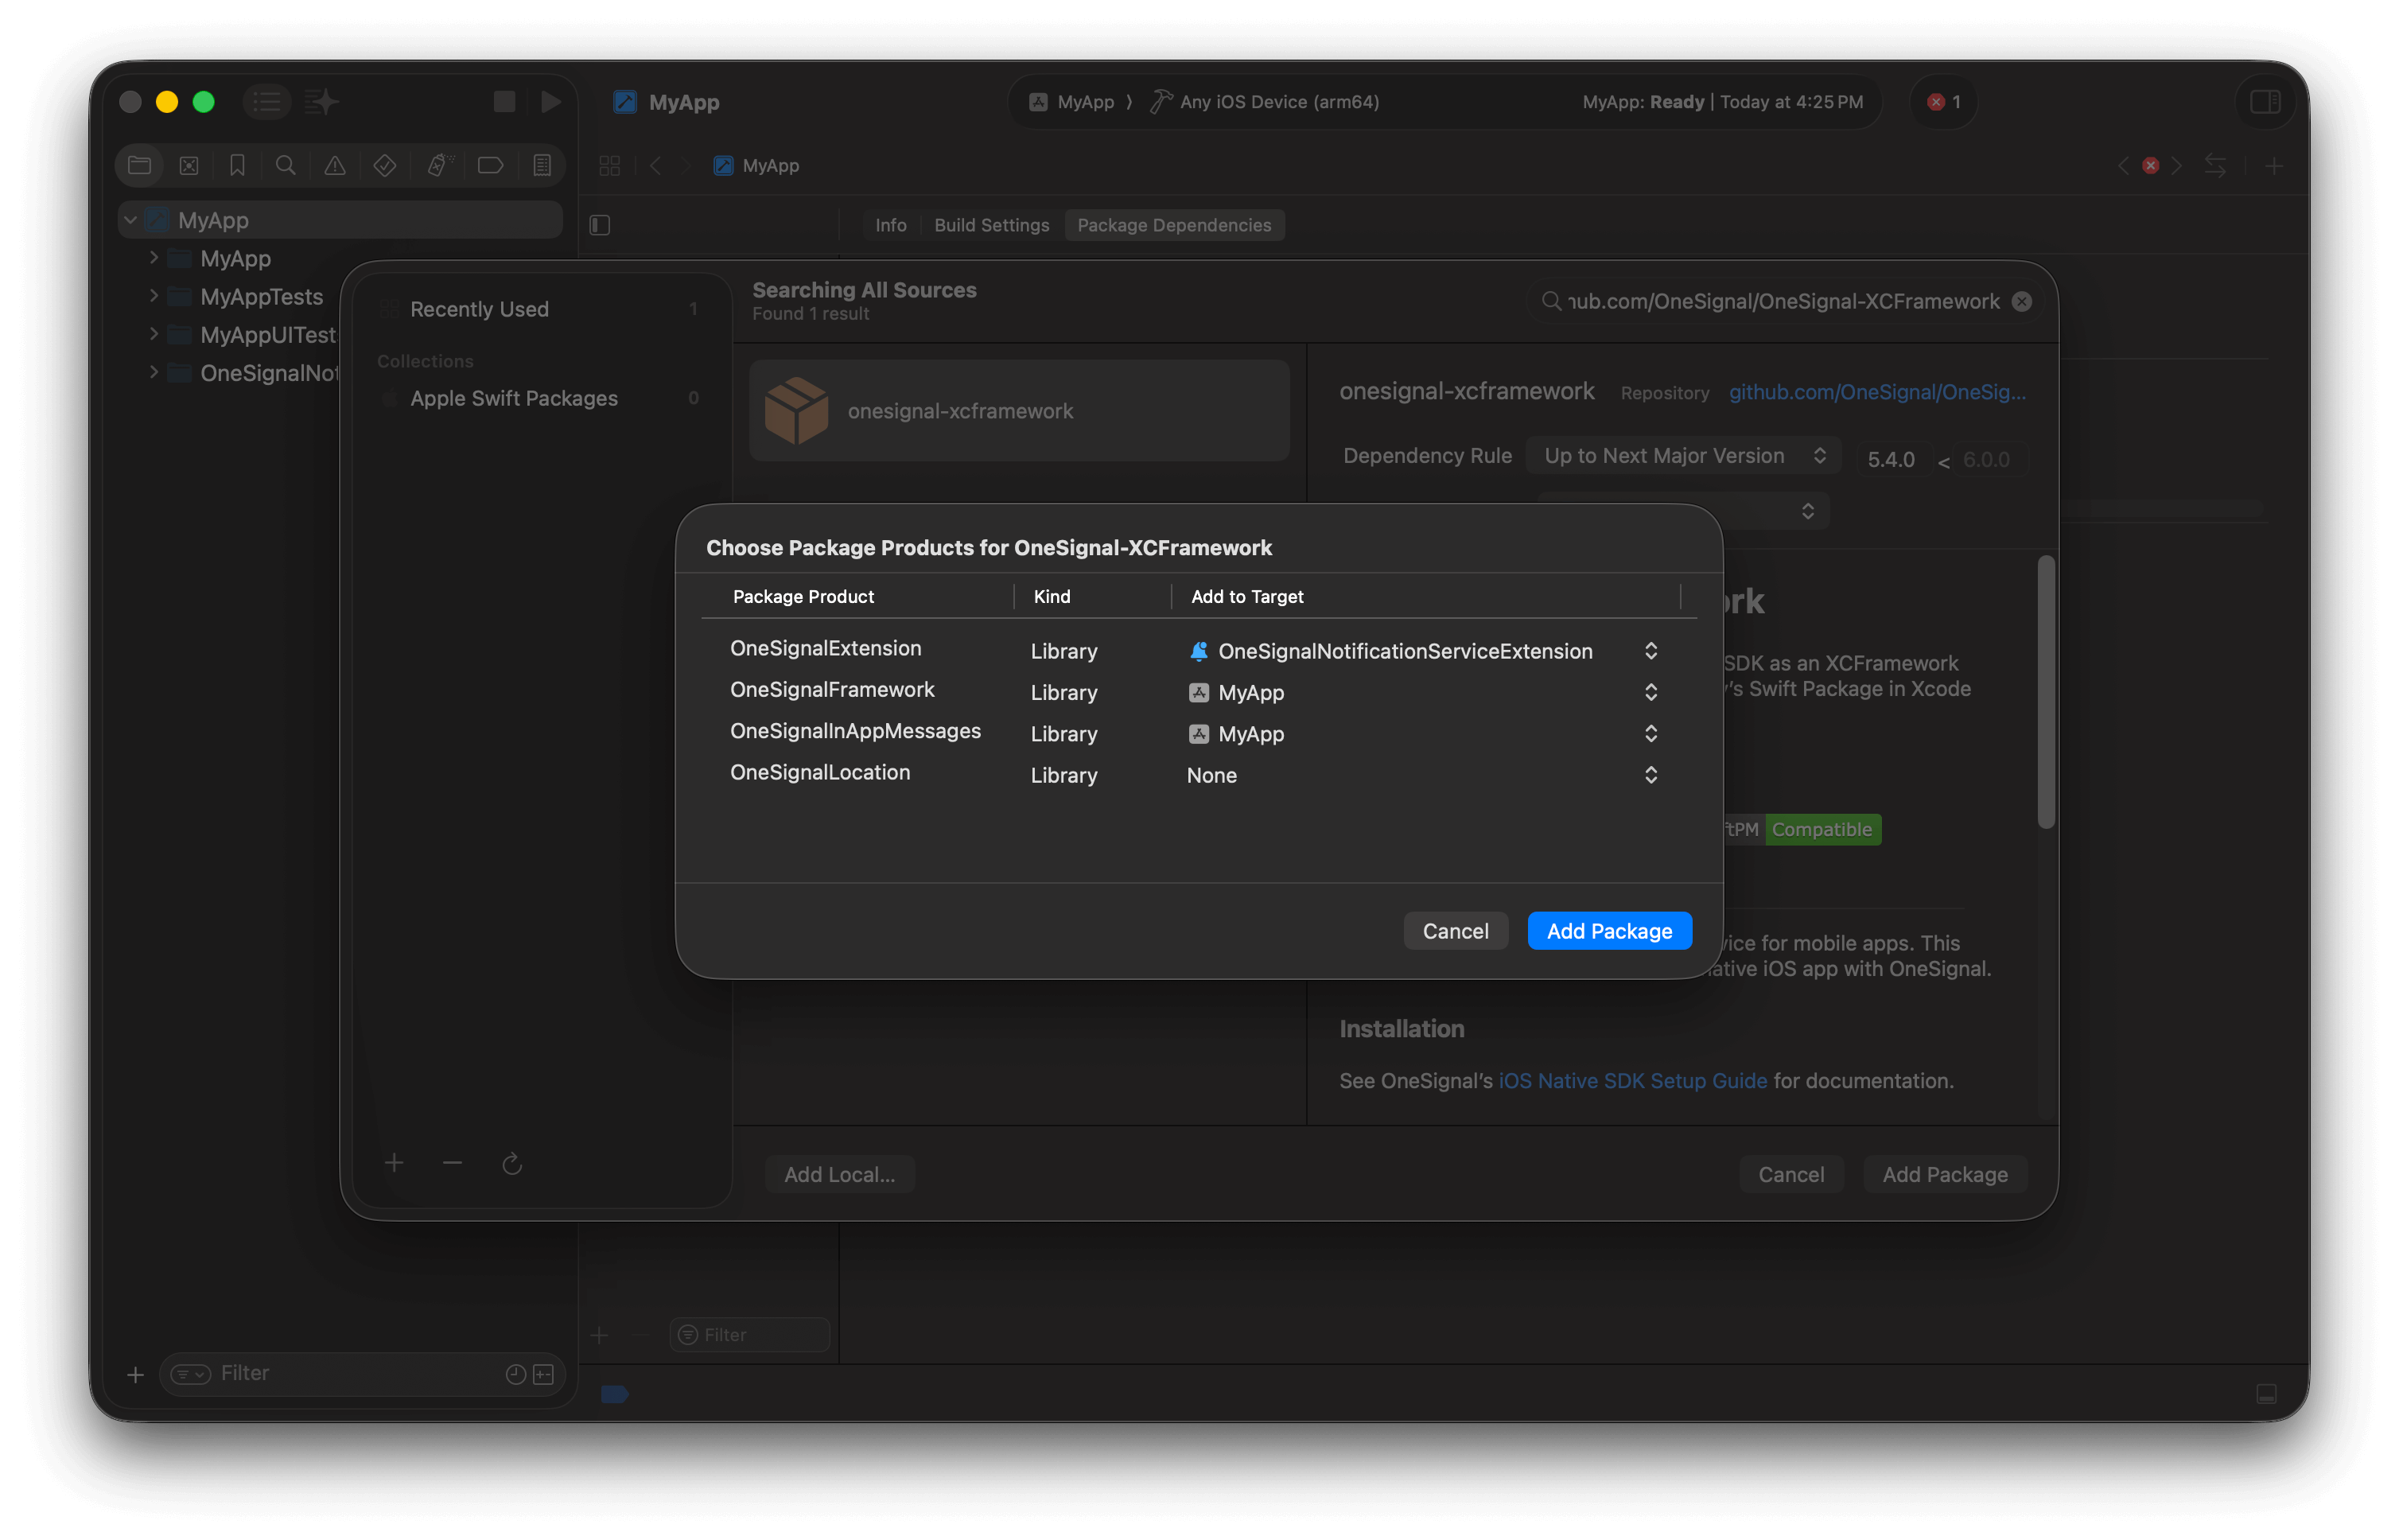
4. Assign packages:
| Package | Target | Required |
| ------------------------ | :-----------------------------------: | :---------: |
| `OneSignalExtension` | OneSignalNotificationServiceExtension | ✅ |
| `OneSignalFramework` | App | ✅ |
| `OneSignalInAppMessages` | App | Recommended |
| `OneSignalLocation` | App | Optional |
### Step 4. Install the OneSignal SDK
**Swift Package Manager (recommended):**
1. Select **Your project file > Package Dependencies > +**
2. Enter: `https://github.com/OneSignal/OneSignal-XCFramework`
3. Click **Add Package**
4. Assign packages:
| Package | Target | Required |
| ------------------------ | :-----------------------------------: | :---------: |
| `OneSignalExtension` | OneSignalNotificationServiceExtension | ✅ |
| `OneSignalFramework` | App | ✅ |
| `OneSignalInAppMessages` | App | Recommended |
| `OneSignalLocation` | App | Optional |
 **Most common install mistake (SPM): products added to the wrong target**
Double-check product-to-target mapping:
* **App target** must include: `OneSignalFramework` (and optionally `OneSignalInAppMessages`, `OneSignalLocation`)
* **OneSignalNotificationServiceExtension target** must include: `OneSignalExtension`
If you see `No such module 'OneSignalFramework'`, it usually means the **app target** is missing `OneSignalFramework`.
If you see `No such module 'OneSignalExtension'`, it usually means the **NSE target** is missing `OneSignalExtension`.
**Where to verify in Xcode:** select the target → **Build Phases** → confirm the correct OneSignal products appear under “Link Binary With Libraries”.
Requires CocoaPods 1.16.2+. Add to `Podfile`:
```ruby Podfile theme={null}
# If platform is uncommented, set to the same value as your minimum deployments target in Xcode
# platform :ios, '15.0'
target 'YourAppName' do
pod 'OneSignal/OneSignal', '>= 5.2.9', '< 6.0'
pod 'OneSignal/OneSignalInAppMessages', '>= 5.2.9', '< 6.0'
pod 'OneSignal/OneSignalLocation', '>= 5.2.9', '< 6.0' # Optional
end
target 'OneSignalNotificationServiceExtension' do
pod 'OneSignal/OneSignal', '>= 5.2.9', '< 6.0'
end
```
Run `pod repo update && pod install`, then open `.xcworkspace` (not `.xcodeproj`).
**Common error:** ArgumentError - \[Xcodeproj] Unable to find compatibility version string for object version `70`.
CocoaPods relies on the `xcodeproj` Ruby gem to read your Xcode project files. As of now, the latest `xcodeproj` release does not recognize object version 70, which was introduced by Xcode 16. So when CocoaPods tries to open your `.xcodeproj` file, it crashes with this error.
1. Close Xcode.
2. Navigate to your project's `ios/.xcodeproj/project.pbxproj` file.
3. Change this line: `objectVersion = 70;`
4. Replace it with: `objectVersion = 55;`
5. Save, close, and rerun `cd ios && pod install && cd ..`
Verify that the build succeeds without "No such module" errors.
### Step 5. Initialize OneSignal
Add the following initialization code to your app's main file.
Replace `YOUR_APP_ID` with your actual OneSignal App ID from the Dashboard > Settings > [Keys & IDs](./keys-and-ids).
**SwiftUI:**
Open your main app file (typically `YourAppNameApp.swift`) and add:
```swift Swift theme={null}
// FILE: {AppName}App.swift
// PURPOSE: Initialize OneSignal when your app launches
import SwiftUI
import OneSignalFramework
@main
struct YourAppNameApp: App {
// SwiftUI apps don't have an AppDelegate by default
// This adapter lets us use UIApplicationDelegate methods like didFinishLaunchingWithOptions
@UIApplicationDelegateAdaptor(AppDelegate.self) var appDelegate
var body: some Scene {
WindowGroup {
ContentView()
}
}
}
class AppDelegate: NSObject, UIApplicationDelegate {
// Called once when the app finishes launching
// This is the earliest point to initialize SDKs
func application(_ application: UIApplication,
didFinishLaunchingWithOptions launchOptions: [UIApplication.LaunchOptionsKey: Any]? = nil) -> Bool {
// Enable verbose logging to debug issues (remove in production)
OneSignal.Debug.setLogLevel(.LL_VERBOSE)
// Replace with your 36-character App ID from Dashboard > Settings > Keys & IDs
OneSignal.initialize("YOUR_APP_ID", withLaunchOptions: launchOptions)
// Prompt user for push notification permission
// In production, consider using an in-app message instead for better opt-in rates
// fallbackToSettings: if previously denied, opens iOS Settings to re-enable
OneSignal.Notifications.requestPermission({ accepted in
print("User accepted notifications: \(accepted)")
}, fallbackToSettings: false)
return true
}
}
```
```swift Swift theme={null}
// FILE: AppDelegate.swift
// PURPOSE: Initialize OneSignal when your app launches
import UIKit
import OneSignalFramework
@UIApplicationMain
class AppDelegate: UIResponder, UIApplicationDelegate {
// Called once when the app finishes launching
// This is the earliest point to initialize SDKs
func application(_ application: UIApplication,
didFinishLaunchingWithOptions launchOptions: [UIApplication.LaunchOptionsKey: Any]?) -> Bool {
// Enable verbose logging to debug issues (remove in production)
OneSignal.Debug.setLogLevel(.LL_VERBOSE)
// Replace with your 36-character App ID from Dashboard > Settings > Keys & IDs
OneSignal.initialize("YOUR_APP_ID", withLaunchOptions: launchOptions)
// Prompt user for push notification permission
// In production, consider using an in-app message instead for better opt-in rates
// fallbackToSettings: if previously denied, opens iOS Settings to re-enable
OneSignal.Notifications.requestPermission({ accepted in
print("User accepted notifications: \(accepted)")
}, fallbackToSettings: false)
return true
}
}
```
```objc Objective-C theme={null}
// FILE: AppDelegate.m
// PURPOSE: Initialize OneSignal when your app launches
#import
@implementation AppDelegate
// Called once when the app finishes launching
// This is the earliest point to initialize SDKs
- (BOOL)application:(UIApplication *)application
didFinishLaunchingWithOptions:(NSDictionary *)launchOptions {
// Enable verbose logging to debug issues (remove in production)
[OneSignal.Debug setLogLevel:ONE_S_LL_VERBOSE];
// Replace with your 36-character App ID from Dashboard > Settings > Keys & IDs
[OneSignal initialize:@"YOUR_APP_ID" withLaunchOptions:launchOptions];
// Prompt user for push notification permission
// In production, consider using an in-app message instead for better opt-in rates
// fallbackToSettings: if previously denied, opens iOS Settings to re-enable
[OneSignal.Notifications requestPermission:^(BOOL accepted) {
NSLog(@"User accepted notifications: %d", accepted);
} fallbackToSettings:false];
return YES;
}
@end
```
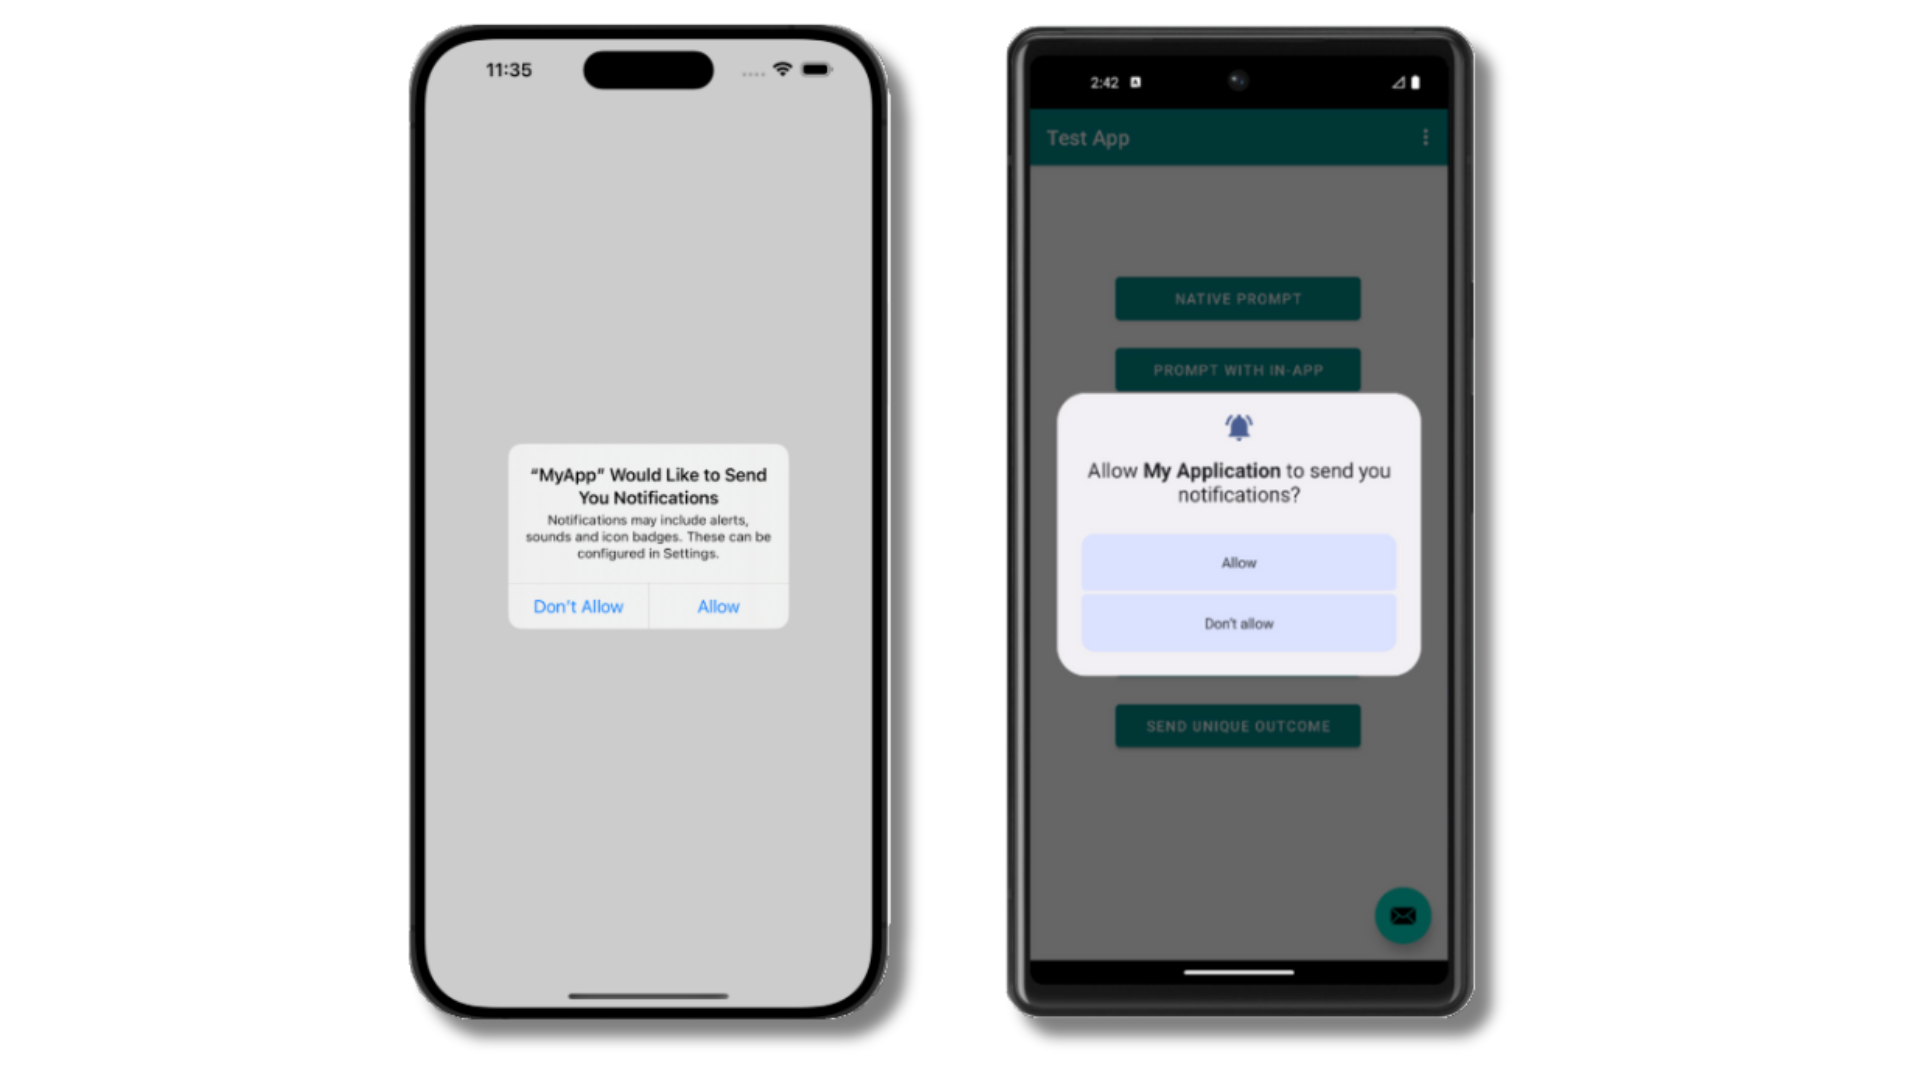
Verify the app builds, runs, and shows the push permission prompt.
### Step 6. Test the integration
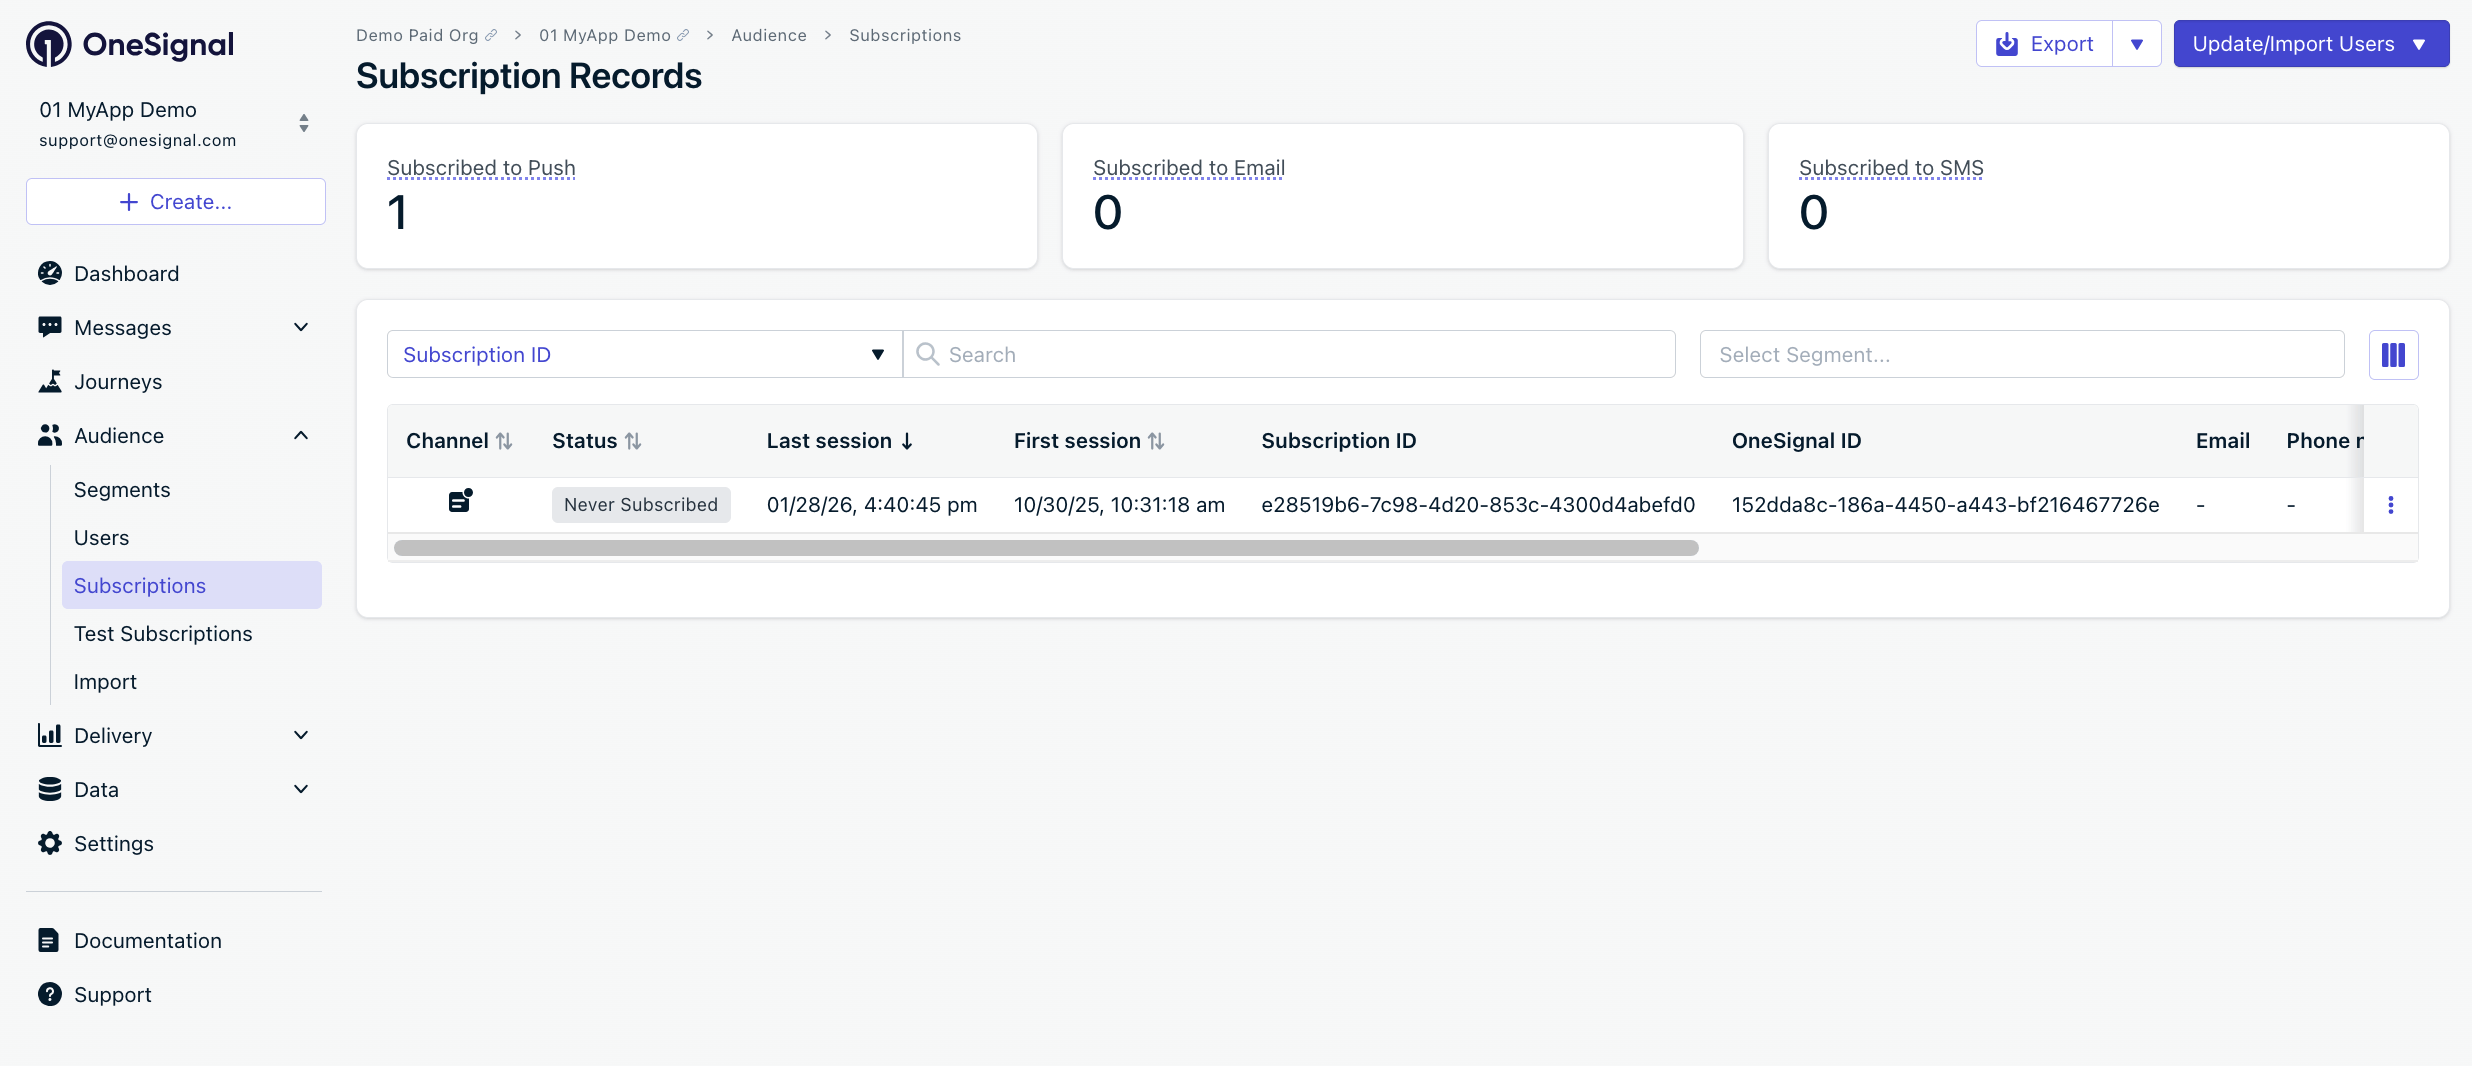
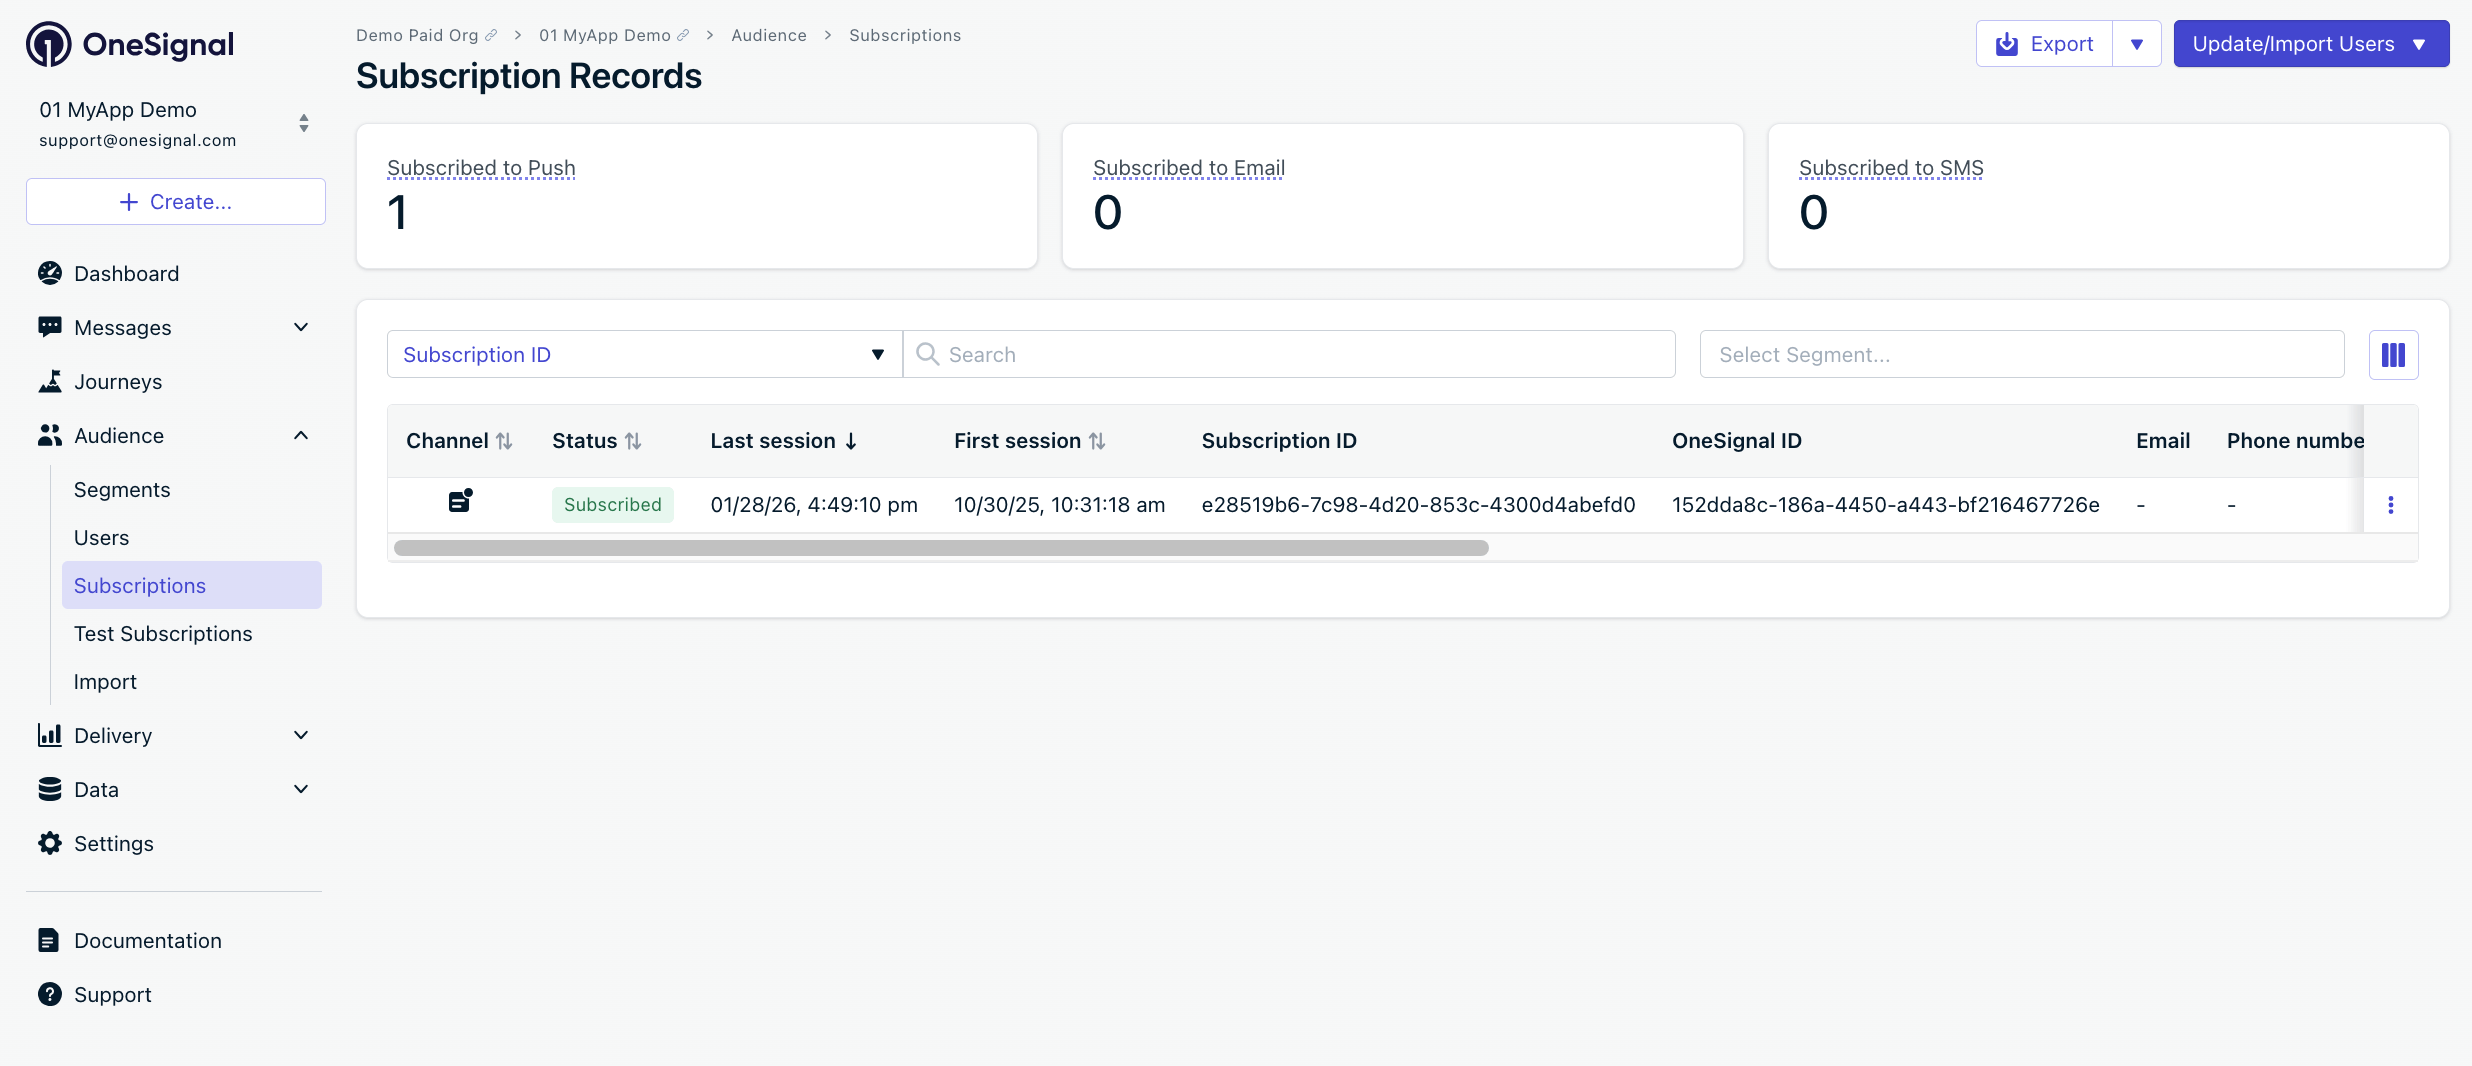
**Verify Subscription creation:**
1. Launch app on device
2. Check Dashboard > **Audience > Subscriptions** — status shows "Never Subscribed"
3. Accept the permission prompt
4. Refresh dashboard — status changes to "Subscribed"
**Most common install mistake (SPM): products added to the wrong target**
Double-check product-to-target mapping:
* **App target** must include: `OneSignalFramework` (and optionally `OneSignalInAppMessages`, `OneSignalLocation`)
* **OneSignalNotificationServiceExtension target** must include: `OneSignalExtension`
If you see `No such module 'OneSignalFramework'`, it usually means the **app target** is missing `OneSignalFramework`.
If you see `No such module 'OneSignalExtension'`, it usually means the **NSE target** is missing `OneSignalExtension`.
**Where to verify in Xcode:** select the target → **Build Phases** → confirm the correct OneSignal products appear under “Link Binary With Libraries”.
Requires CocoaPods 1.16.2+. Add to `Podfile`:
```ruby Podfile theme={null}
# If platform is uncommented, set to the same value as your minimum deployments target in Xcode
# platform :ios, '15.0'
target 'YourAppName' do
pod 'OneSignal/OneSignal', '>= 5.2.9', '< 6.0'
pod 'OneSignal/OneSignalInAppMessages', '>= 5.2.9', '< 6.0'
pod 'OneSignal/OneSignalLocation', '>= 5.2.9', '< 6.0' # Optional
end
target 'OneSignalNotificationServiceExtension' do
pod 'OneSignal/OneSignal', '>= 5.2.9', '< 6.0'
end
```
Run `pod repo update && pod install`, then open `.xcworkspace` (not `.xcodeproj`).
**Common error:** ArgumentError - \[Xcodeproj] Unable to find compatibility version string for object version `70`.
CocoaPods relies on the `xcodeproj` Ruby gem to read your Xcode project files. As of now, the latest `xcodeproj` release does not recognize object version 70, which was introduced by Xcode 16. So when CocoaPods tries to open your `.xcodeproj` file, it crashes with this error.
1. Close Xcode.
2. Navigate to your project's `ios/.xcodeproj/project.pbxproj` file.
3. Change this line: `objectVersion = 70;`
4. Replace it with: `objectVersion = 55;`
5. Save, close, and rerun `cd ios && pod install && cd ..`
Verify that the build succeeds without "No such module" errors.
### Step 5. Initialize OneSignal
Add the following initialization code to your app's main file.
Replace `YOUR_APP_ID` with your actual OneSignal App ID from the Dashboard > Settings > [Keys & IDs](./keys-and-ids).
**SwiftUI:**
Open your main app file (typically `YourAppNameApp.swift`) and add:
```swift Swift theme={null}
// FILE: {AppName}App.swift
// PURPOSE: Initialize OneSignal when your app launches
import SwiftUI
import OneSignalFramework
@main
struct YourAppNameApp: App {
// SwiftUI apps don't have an AppDelegate by default
// This adapter lets us use UIApplicationDelegate methods like didFinishLaunchingWithOptions
@UIApplicationDelegateAdaptor(AppDelegate.self) var appDelegate
var body: some Scene {
WindowGroup {
ContentView()
}
}
}
class AppDelegate: NSObject, UIApplicationDelegate {
// Called once when the app finishes launching
// This is the earliest point to initialize SDKs
func application(_ application: UIApplication,
didFinishLaunchingWithOptions launchOptions: [UIApplication.LaunchOptionsKey: Any]? = nil) -> Bool {
// Enable verbose logging to debug issues (remove in production)
OneSignal.Debug.setLogLevel(.LL_VERBOSE)
// Replace with your 36-character App ID from Dashboard > Settings > Keys & IDs
OneSignal.initialize("YOUR_APP_ID", withLaunchOptions: launchOptions)
// Prompt user for push notification permission
// In production, consider using an in-app message instead for better opt-in rates
// fallbackToSettings: if previously denied, opens iOS Settings to re-enable
OneSignal.Notifications.requestPermission({ accepted in
print("User accepted notifications: \(accepted)")
}, fallbackToSettings: false)
return true
}
}
```
```swift Swift theme={null}
// FILE: AppDelegate.swift
// PURPOSE: Initialize OneSignal when your app launches
import UIKit
import OneSignalFramework
@UIApplicationMain
class AppDelegate: UIResponder, UIApplicationDelegate {
// Called once when the app finishes launching
// This is the earliest point to initialize SDKs
func application(_ application: UIApplication,
didFinishLaunchingWithOptions launchOptions: [UIApplication.LaunchOptionsKey: Any]?) -> Bool {
// Enable verbose logging to debug issues (remove in production)
OneSignal.Debug.setLogLevel(.LL_VERBOSE)
// Replace with your 36-character App ID from Dashboard > Settings > Keys & IDs
OneSignal.initialize("YOUR_APP_ID", withLaunchOptions: launchOptions)
// Prompt user for push notification permission
// In production, consider using an in-app message instead for better opt-in rates
// fallbackToSettings: if previously denied, opens iOS Settings to re-enable
OneSignal.Notifications.requestPermission({ accepted in
print("User accepted notifications: \(accepted)")
}, fallbackToSettings: false)
return true
}
}
```
```objc Objective-C theme={null}
// FILE: AppDelegate.m
// PURPOSE: Initialize OneSignal when your app launches
#import
@implementation AppDelegate
// Called once when the app finishes launching
// This is the earliest point to initialize SDKs
- (BOOL)application:(UIApplication *)application
didFinishLaunchingWithOptions:(NSDictionary *)launchOptions {
// Enable verbose logging to debug issues (remove in production)
[OneSignal.Debug setLogLevel:ONE_S_LL_VERBOSE];
// Replace with your 36-character App ID from Dashboard > Settings > Keys & IDs
[OneSignal initialize:@"YOUR_APP_ID" withLaunchOptions:launchOptions];
// Prompt user for push notification permission
// In production, consider using an in-app message instead for better opt-in rates
// fallbackToSettings: if previously denied, opens iOS Settings to re-enable
[OneSignal.Notifications requestPermission:^(BOOL accepted) {
NSLog(@"User accepted notifications: %d", accepted);
} fallbackToSettings:false];
return YES;
}
@end
```
Verify the app builds, runs, and shows the push permission prompt.
### Step 6. Test the integration
**Verify Subscription creation:**
1. Launch app on device
2. Check Dashboard > **Audience > Subscriptions** — status shows "Never Subscribed"
3. Accept the permission prompt
4. Refresh dashboard — status changes to "Subscribed"
 You have successfully created a [mobile Subscription](./subscriptions).
Mobile subscriptions are created when users first open your app on a device or if they uninstall and reinstall your app on the same device.
#### Create test user and segment
1. Click **⋮** next to the Subscription > **Add to Test Users** > name it
2. Go to **Audience > Segments > New Segment**
3. Name: `Test Users`, add filter **Test Users** > **Create Segment**
You have successfully created a [mobile Subscription](./subscriptions).
Mobile subscriptions are created when users first open your app on a device or if they uninstall and reinstall your app on the same device.
#### Create test user and segment
1. Click **⋮** next to the Subscription > **Add to Test Users** > name it
2. Go to **Audience > Segments > New Segment**
3. Name: `Test Users`, add filter **Test Users** > **Create Segment**

 You have successfully created a segment of test users.
We can now test sending messages to this individual device and groups of test users.
#### Send test push via API
1. Navigate to **Settings > [Keys & IDs](./keys-and-ids)**.
2. In the provided code, replace `YOUR_APP_API_KEY` and `YOUR_APP_ID` in the code below with your actual keys. This code uses the `Test Users` segment we created earlier.
```bash theme={null}
curl -X POST 'https://api.onesignal.com/notifications' \
-H 'Content-Type: application/json; charset=utf-8' \
-H 'Authorization: Key YOUR_APP_API_KEY' \
-d '{
"app_id": "YOUR_APP_ID",
"target_channel": "push",
"name": "Testing basic setup",
"headings": { "en": "👋" },
"contents": {"en": "Hello world!"},
"included_segments": ["Test Users"],
"ios_attachments": {"onesignal_logo": "https://avatars.githubusercontent.com/u/11823027?s=200&v=4"}
}'
```
You have successfully created a segment of test users.
We can now test sending messages to this individual device and groups of test users.
#### Send test push via API
1. Navigate to **Settings > [Keys & IDs](./keys-and-ids)**.
2. In the provided code, replace `YOUR_APP_API_KEY` and `YOUR_APP_ID` in the code below with your actual keys. This code uses the `Test Users` segment we created earlier.
```bash theme={null}
curl -X POST 'https://api.onesignal.com/notifications' \
-H 'Content-Type: application/json; charset=utf-8' \
-H 'Authorization: Key YOUR_APP_API_KEY' \
-d '{
"app_id": "YOUR_APP_ID",
"target_channel": "push",
"name": "Testing basic setup",
"headings": { "en": "👋" },
"contents": {"en": "Hello world!"},
"included_segments": ["Test Users"],
"ios_attachments": {"onesignal_logo": "https://avatars.githubusercontent.com/u/11823027?s=200&v=4"}
}'
```
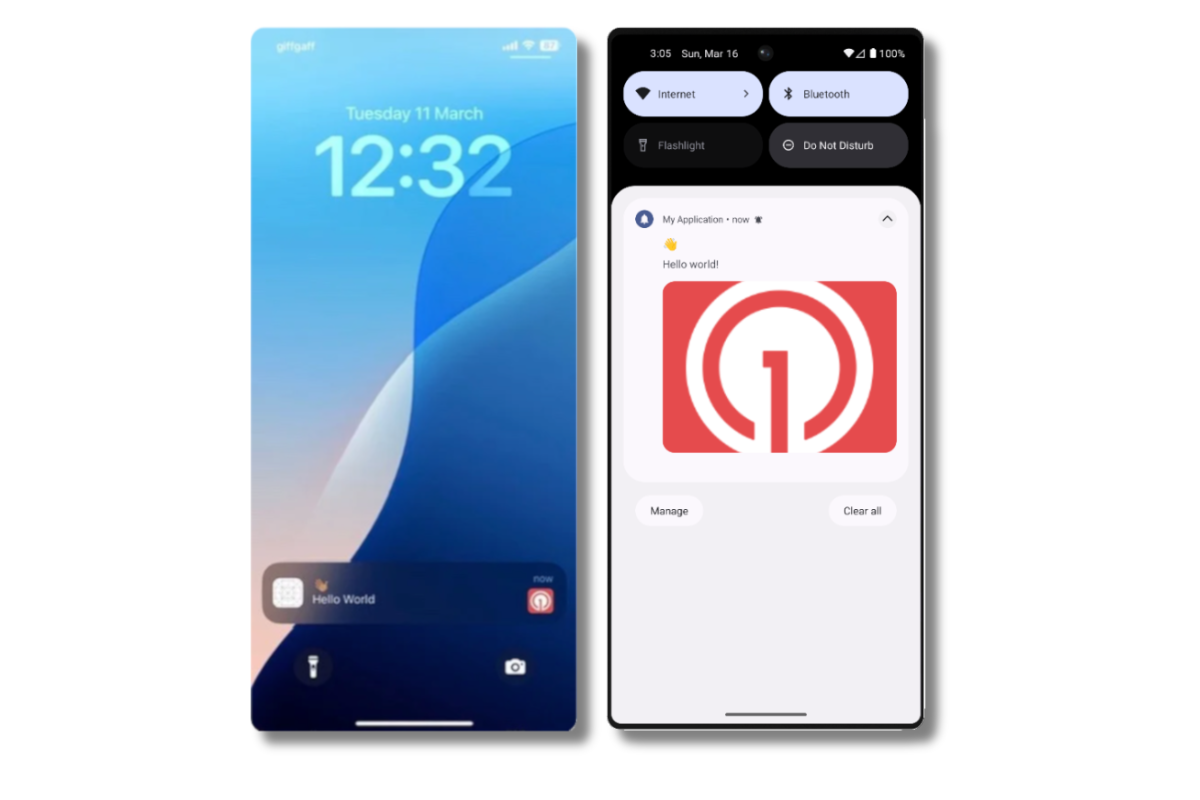
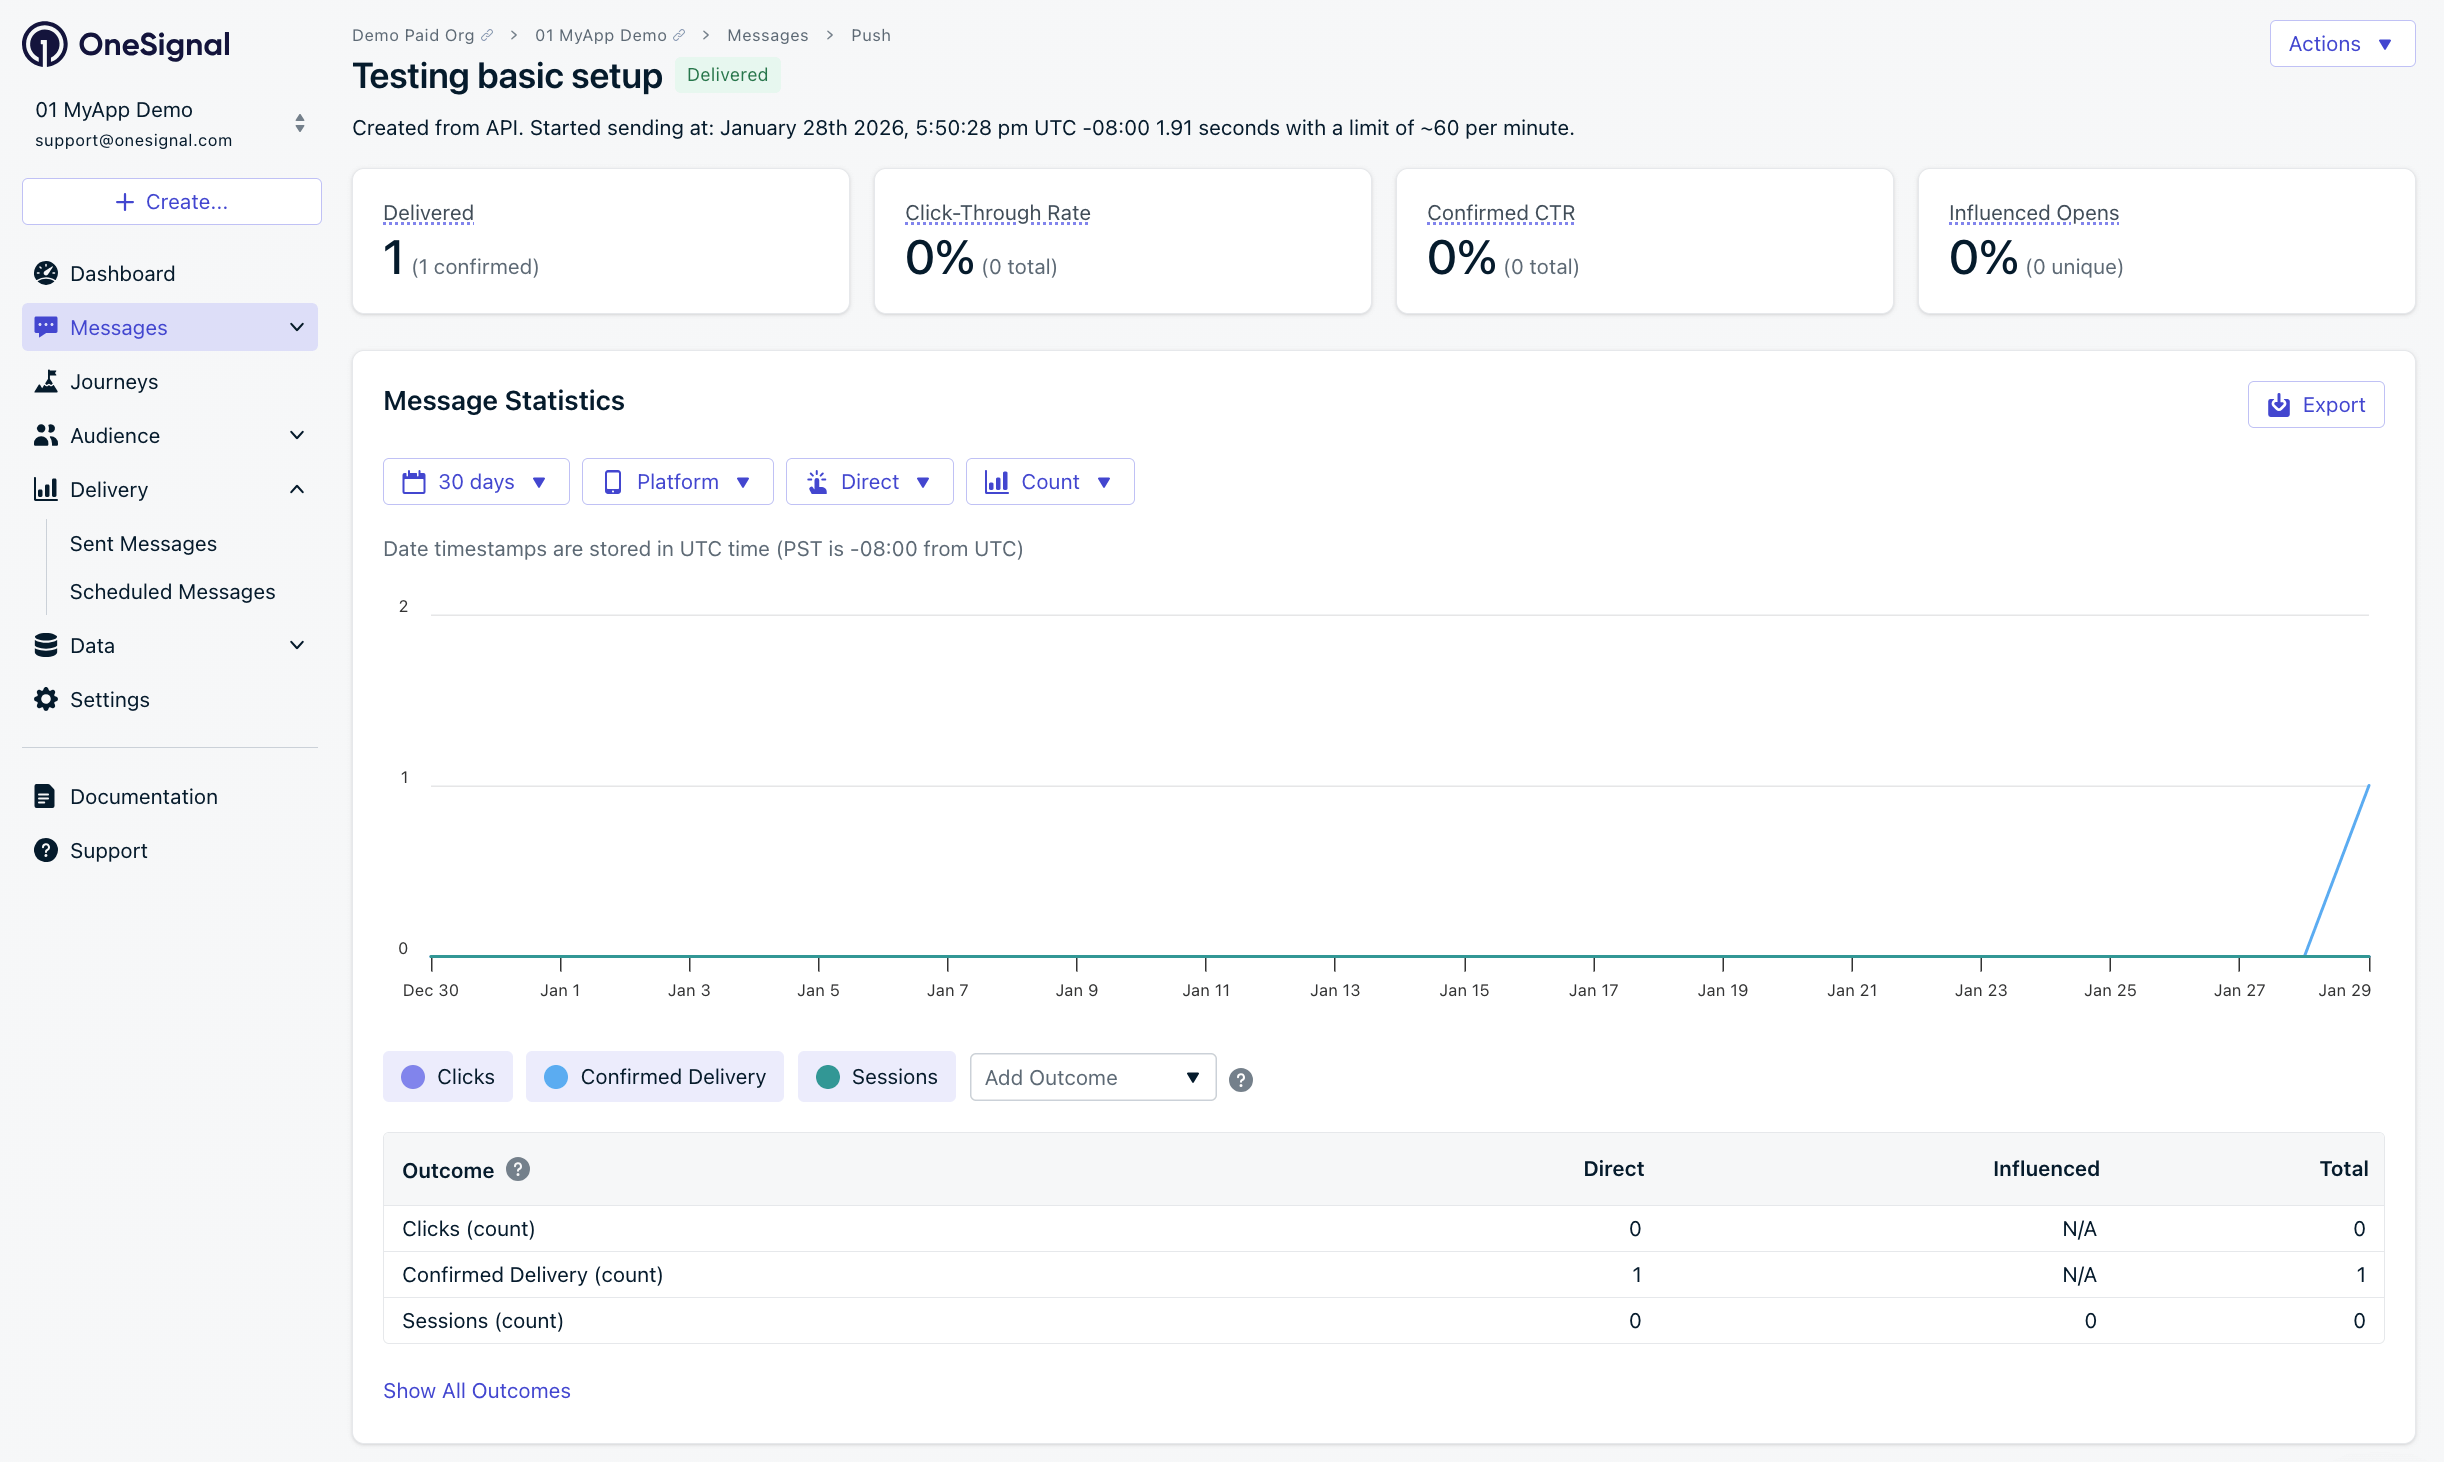 Verify the test device received a notification with:
* An image.
* Dashboard > **Delivery > Sent Messages** shows "Confirmed" status (unavailable on free plans).
* No image received? Your Notification Service Extension might be missing or incomplete setup.
* No confirmed receipt? Review the troubleshooting guide [here](./confirmed-delivery#troubleshooting-confirmed-delivery).
* Having issues? Copy-paste the api request and a log from start to finish of app launch into a `.txt` file. Then share both with `support@onesignal.com`.
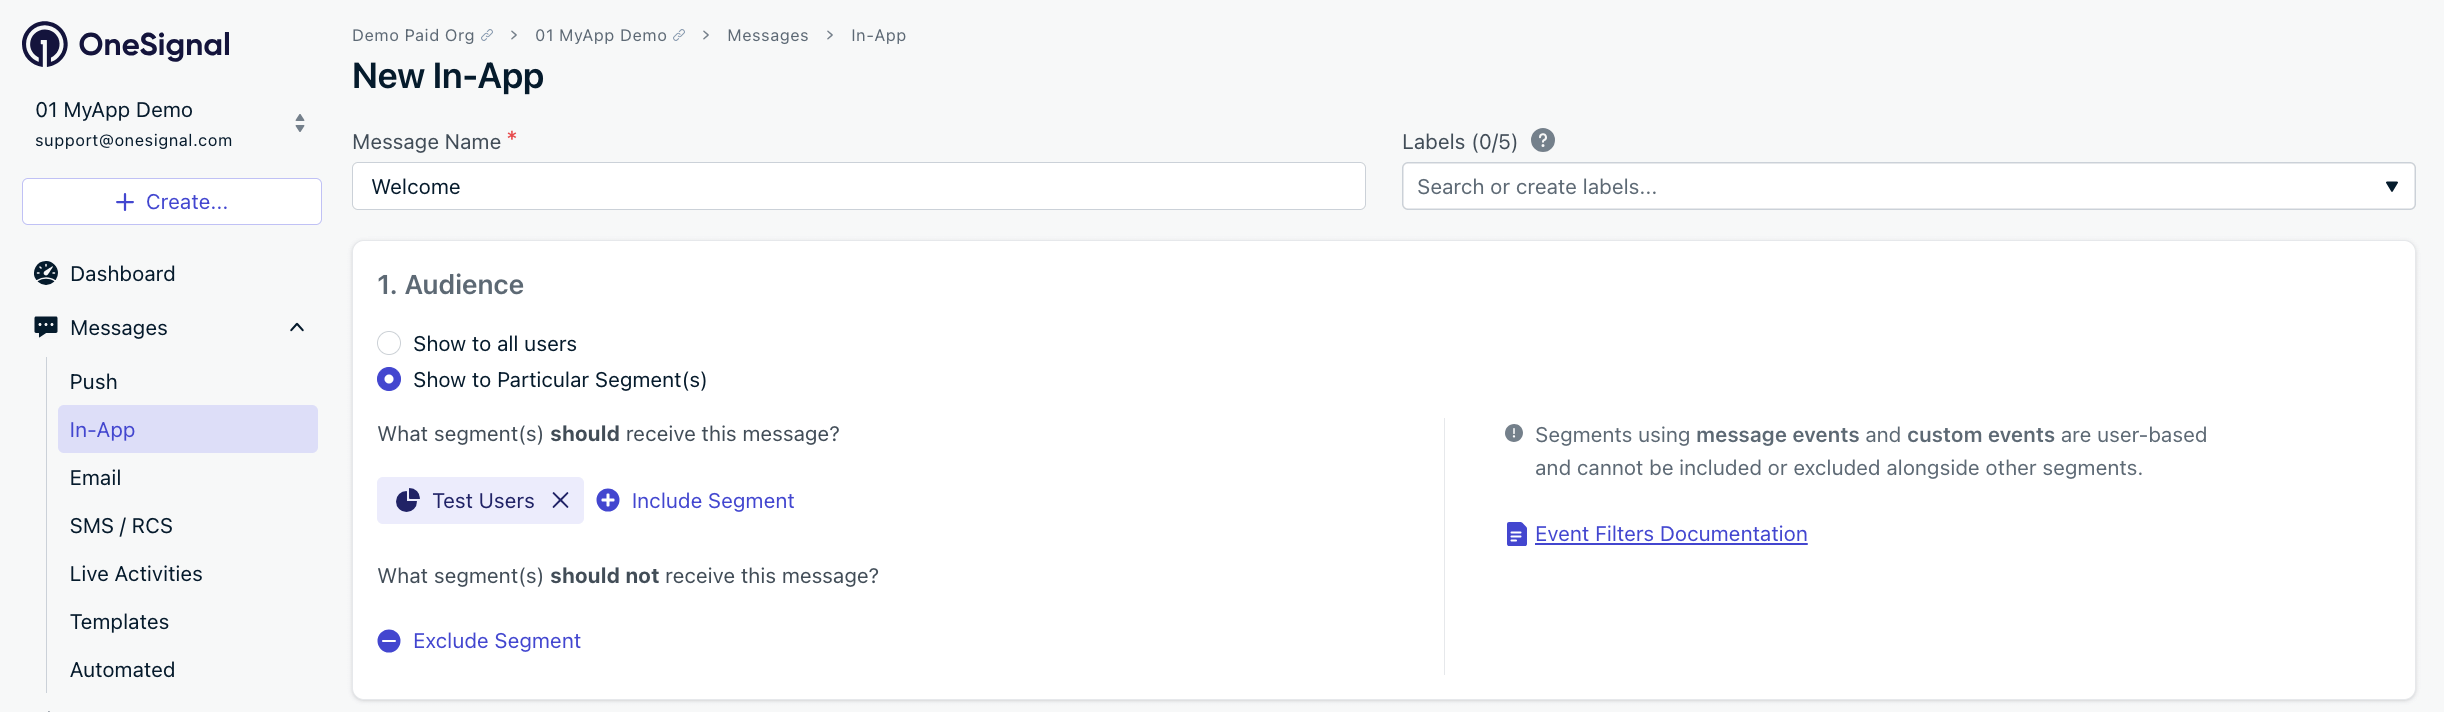
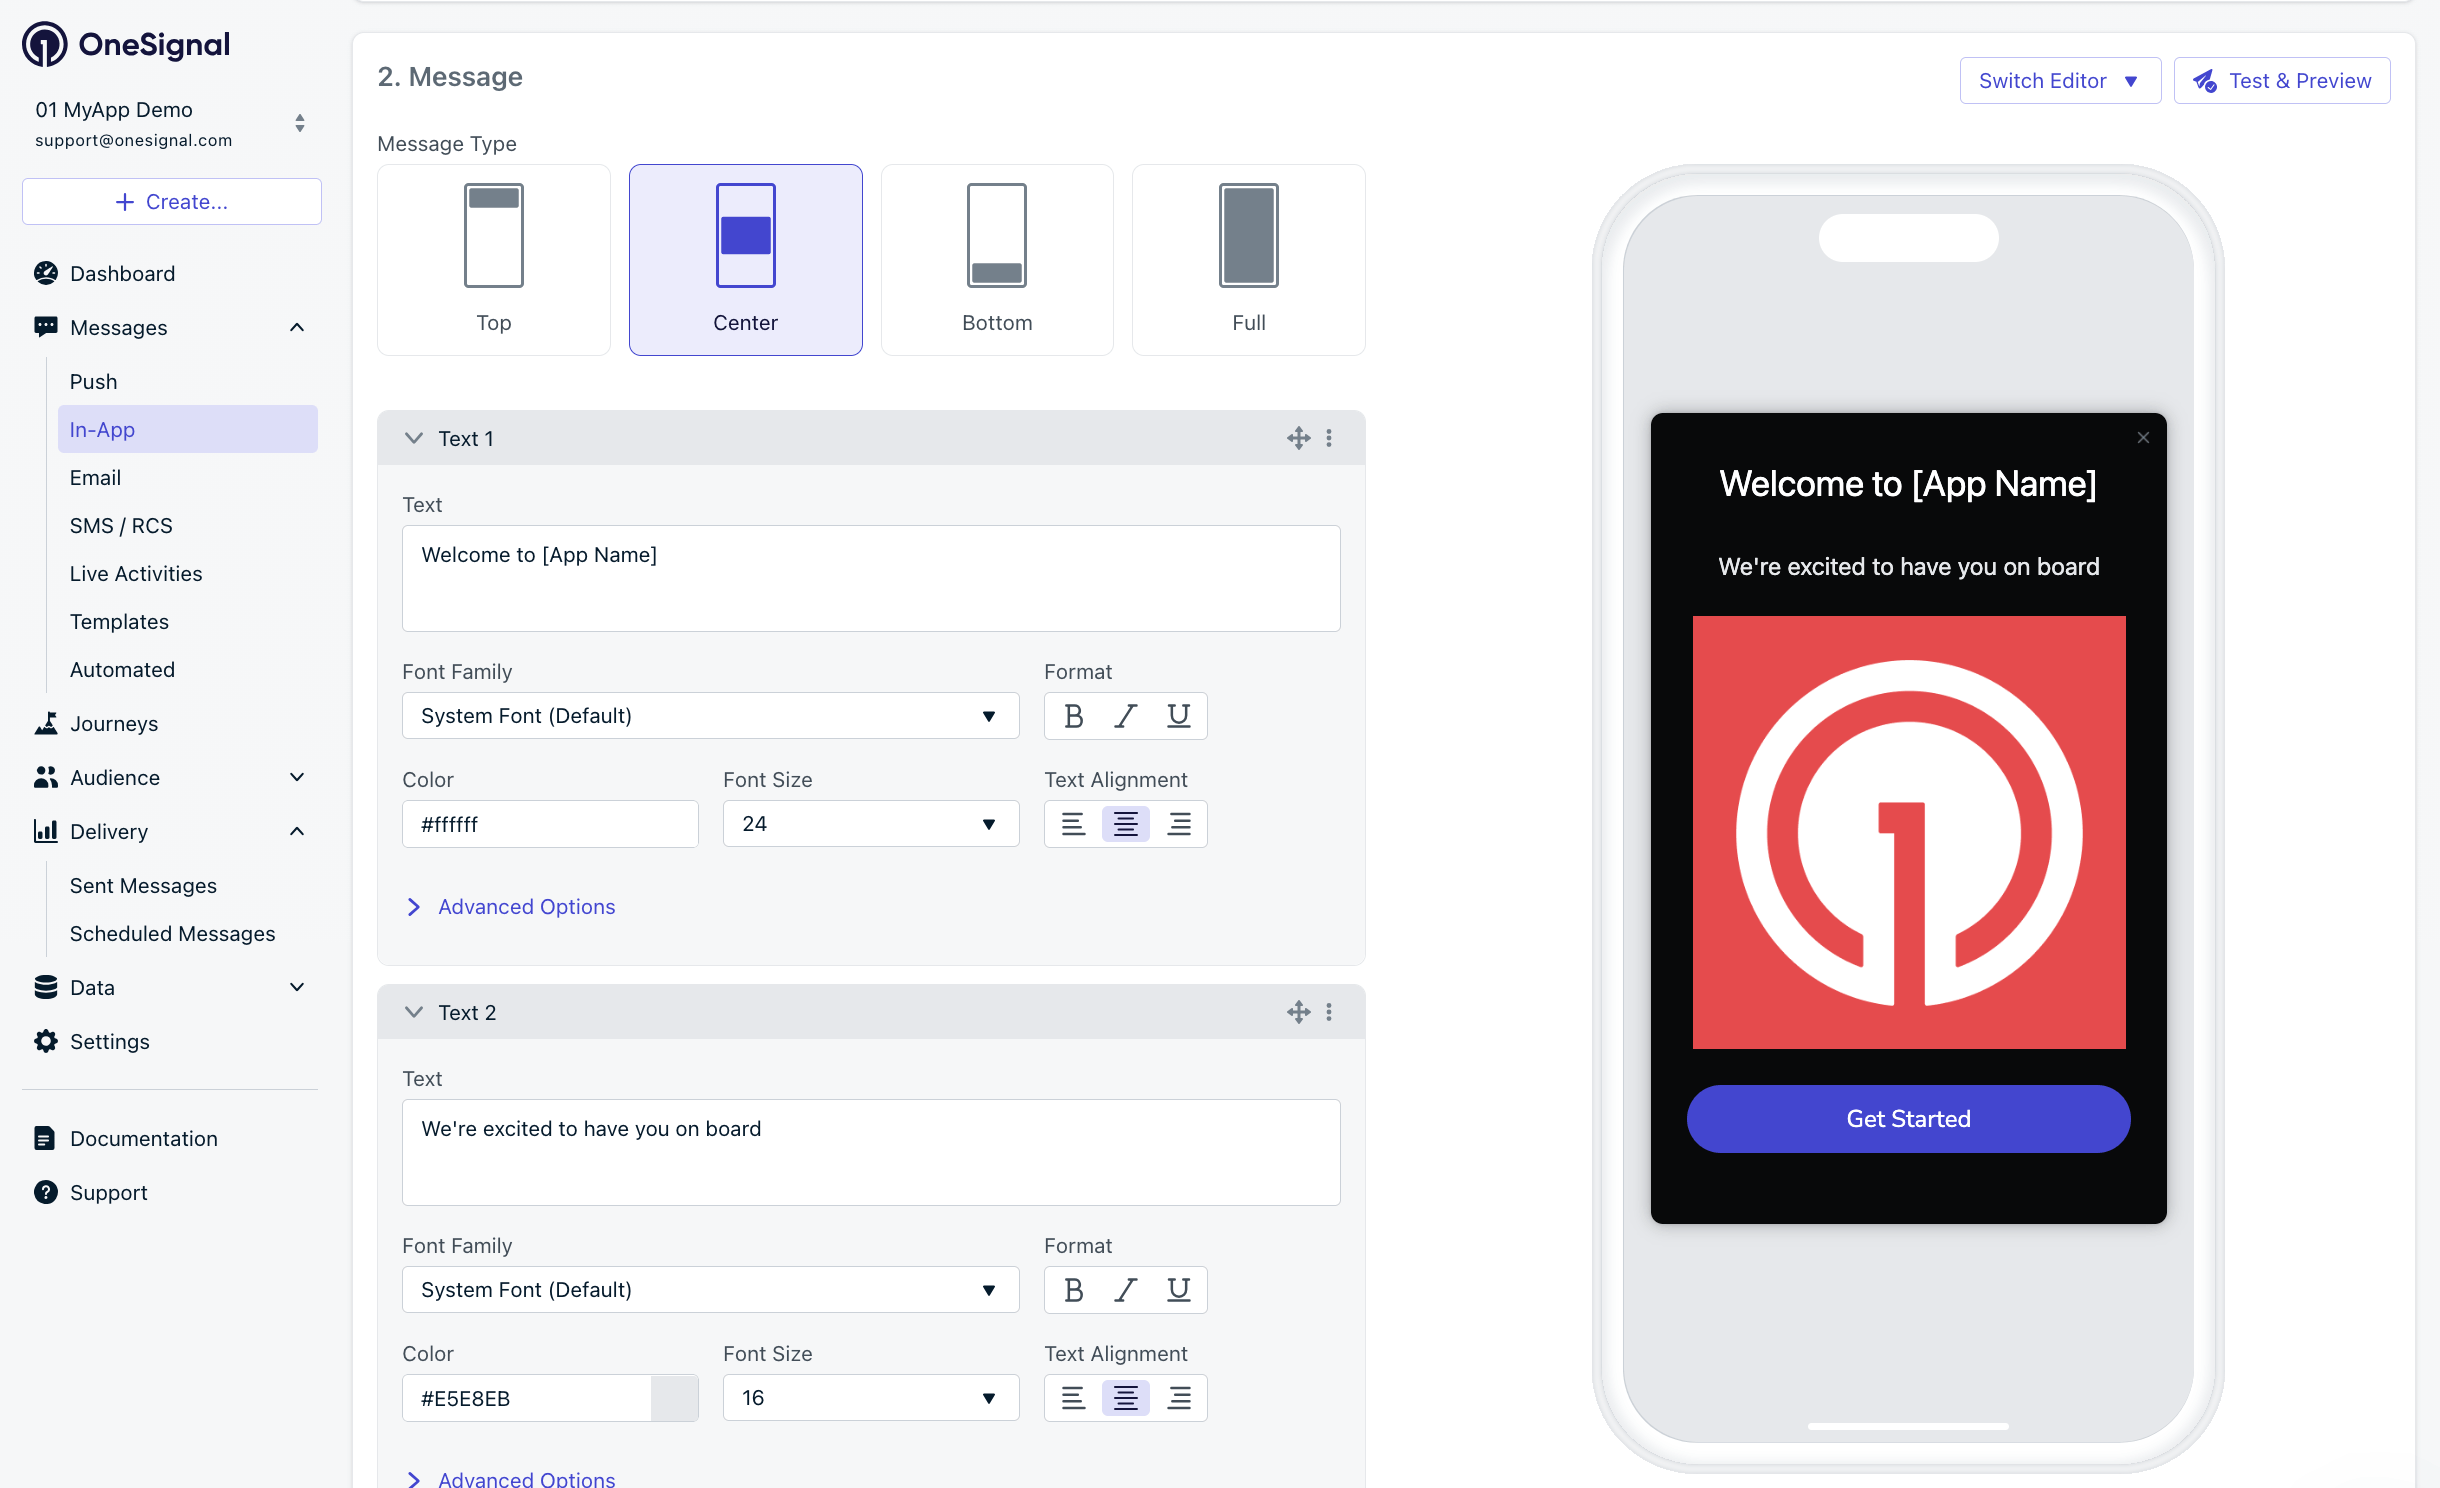
#### Test in-app messages
1. Close app for 30+ seconds
2. Dashboard > **Messages > In-App > New In-App** > select **Welcome** template
3. Audience: **Test Users** segment
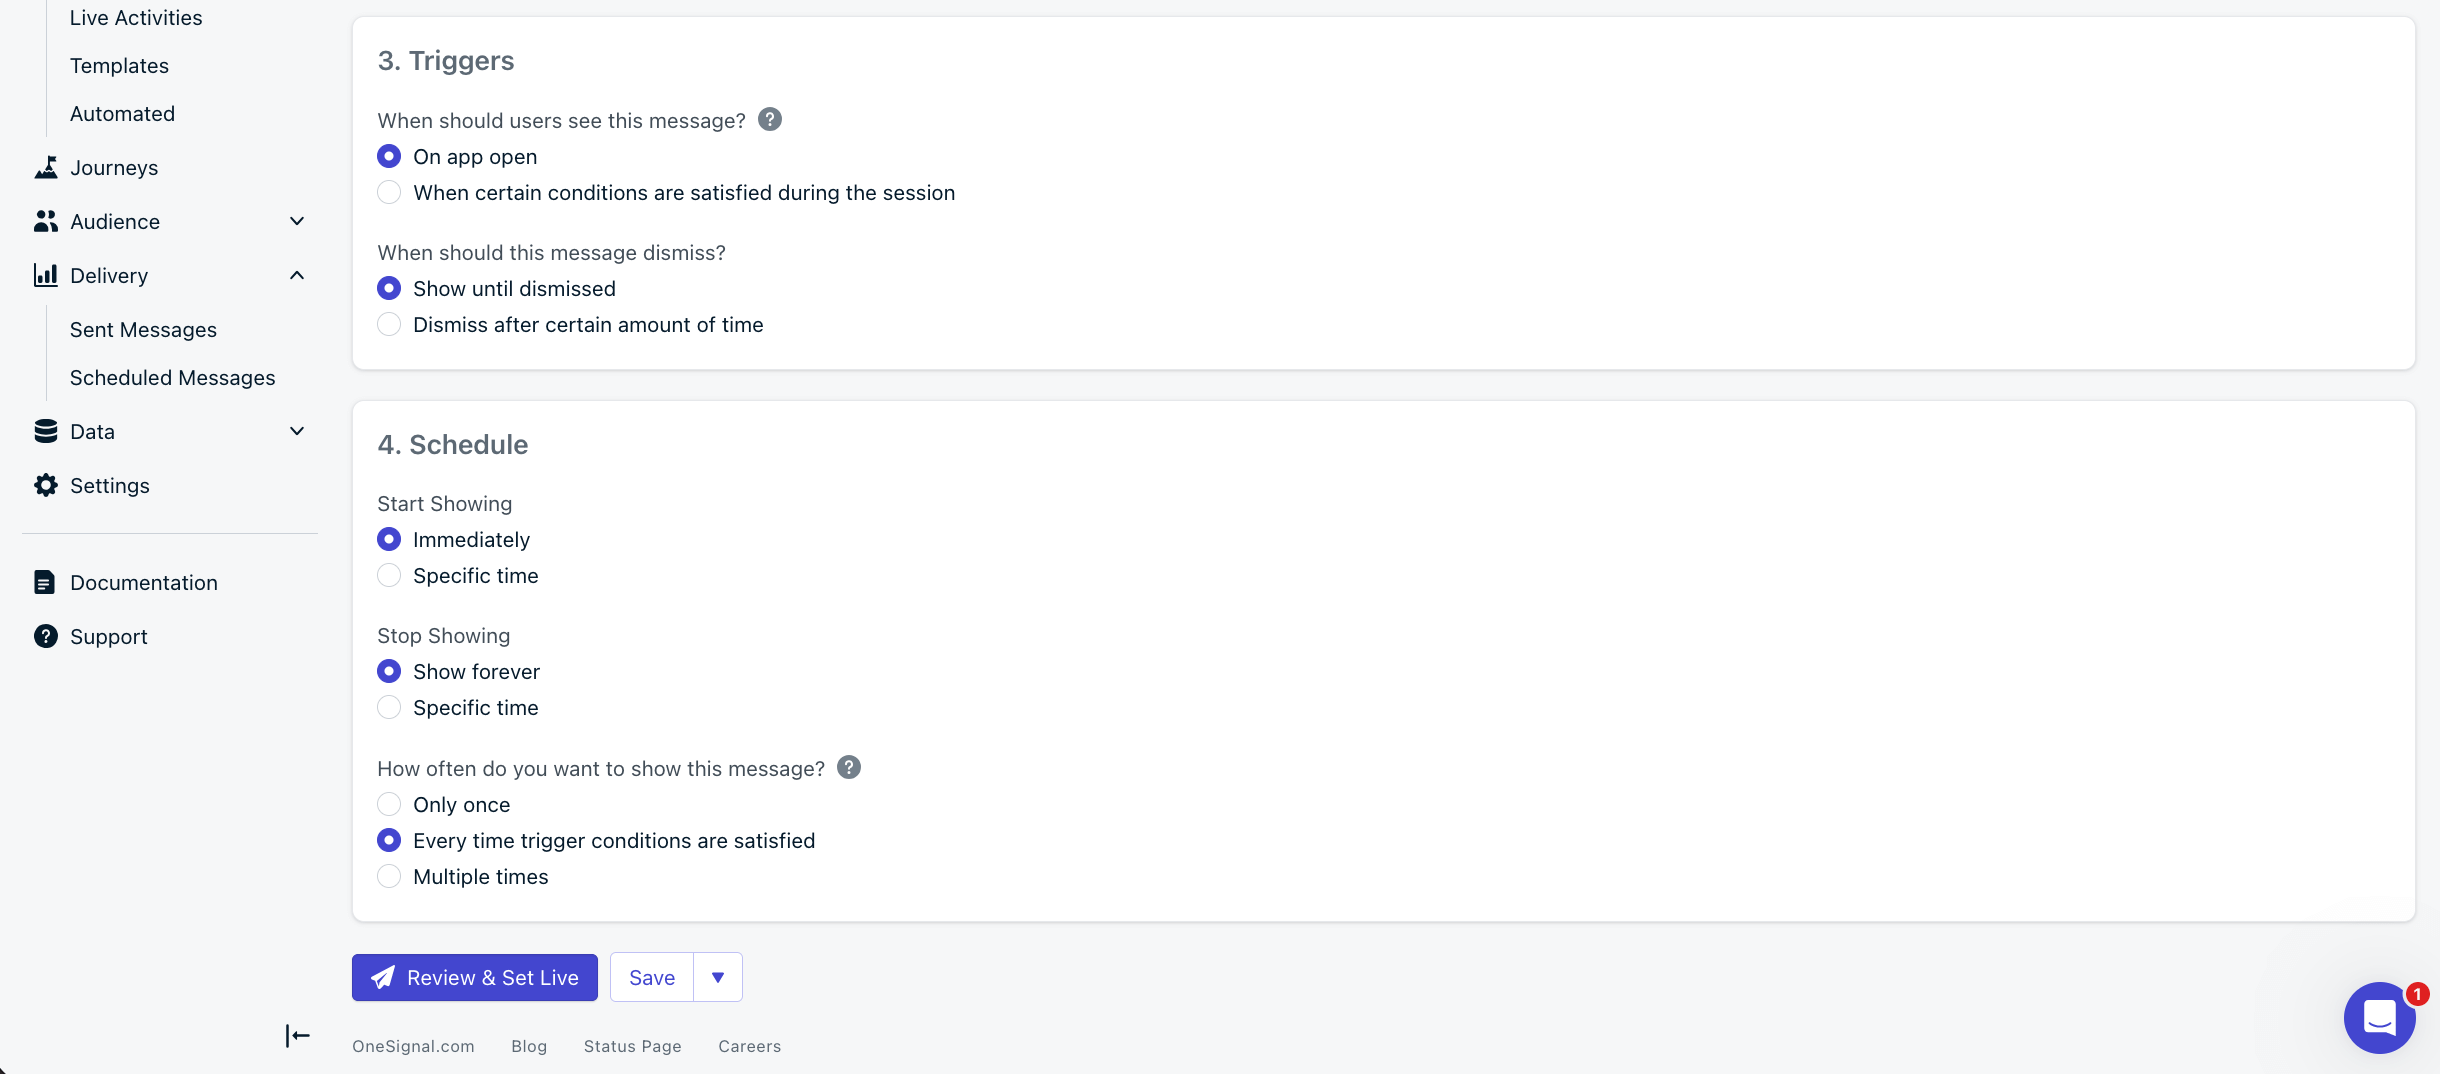
4. Trigger: **On app open**
5. Schedule: **Every time trigger conditions are satisfied**
6. Click **Make Message Live**
7. Open app
Verify the test device received a notification with:
* An image.
* Dashboard > **Delivery > Sent Messages** shows "Confirmed" status (unavailable on free plans).
* No image received? Your Notification Service Extension might be missing or incomplete setup.
* No confirmed receipt? Review the troubleshooting guide [here](./confirmed-delivery#troubleshooting-confirmed-delivery).
* Having issues? Copy-paste the api request and a log from start to finish of app launch into a `.txt` file. Then share both with `support@onesignal.com`.
#### Test in-app messages
1. Close app for 30+ seconds
2. Dashboard > **Messages > In-App > New In-App** > select **Welcome** template
3. Audience: **Test Users** segment
4. Trigger: **On app open**
5. Schedule: **Every time trigger conditions are satisfied**
6. Click **Make Message Live**
7. Open app
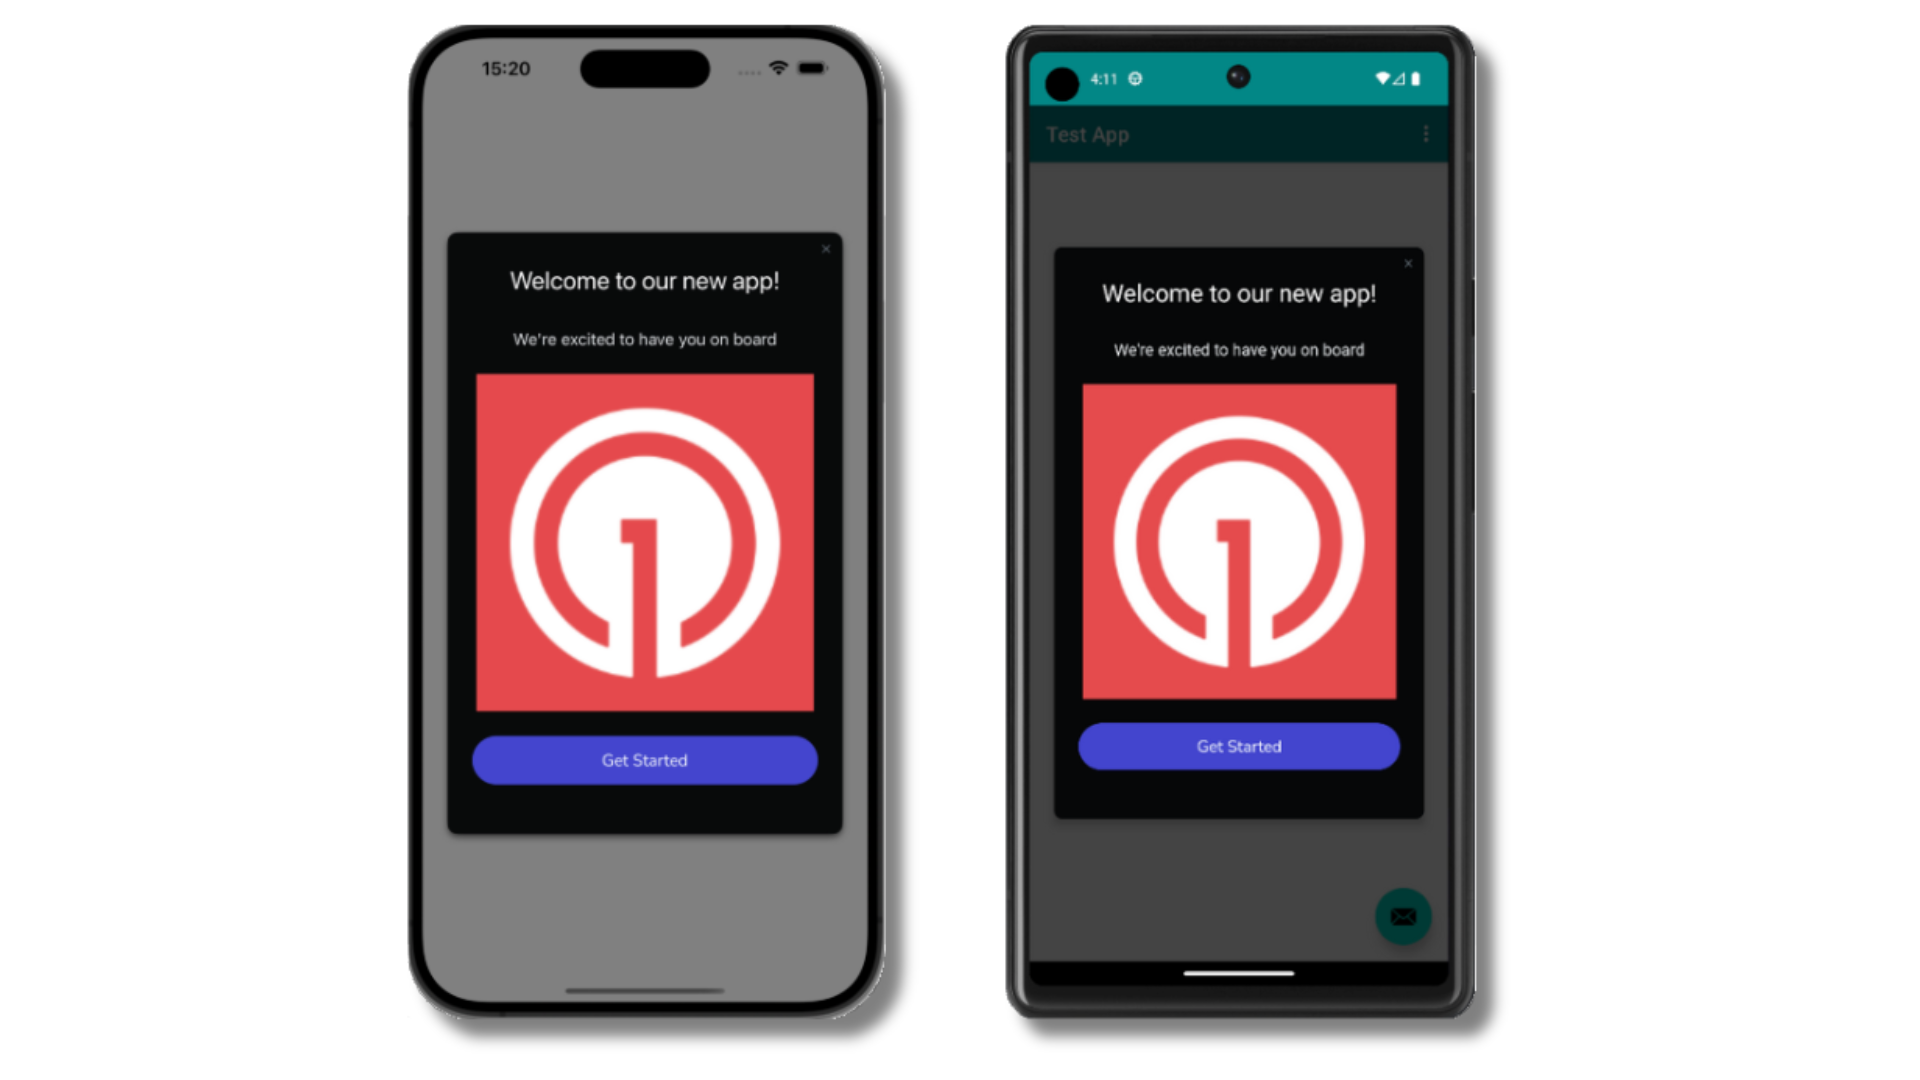 Verify the test device received an in-app message. See the [In-app messages setup](./in-app-messages-setup) guide for more details.
Not seeing the message?
* Start a new session
* You must close or background the app for at least 30 seconds before reopening. This ensures a new session is started.
* For more, see [how in-app messages are displayed](./in-app-messages-setup#how-are-iams-displayed%3F).
* Still in the `Test Users` segment?
* If you reinstalled or switched devices, re-add the device to [Test Users](./test-users) and confirm it's part of the Test Users segment.
* Having issues?
* Follow [Getting a Debug Log](./capturing-a-debug-log) while reproducing the steps above. This will generate additional logging that you can share with `support@onesignal.com` and we will help investigate what's going on.
You have successfully set up the OneSignal SDK and learned important concepts like:
* Gathering [Subscriptions](./subscriptions), setting [Test Users](./test-users), and creating [Segments](./segmentation).
* Sending [Push](./push) with images and [Confirmed receipt](./confirmed-delivery) using Segments and our [Create message](/reference/create-message) API.
* Sending [In-app messages](./in-app-messages-setup).
Continue with this guide to identify users in your app and setup additional features.
### Common Errors & Fixes
| Error / Symptom | Cause | Fix |
| ------------------------------------- | ----------------------------------------------------------------- | -------------------------------------------------------------------------------------------------------- |
| `No such module 'OneSignalFramework'` | Package not added to app target | Add `OneSignalFramework` via File > Add Package Dependencies. Clean and build the project. |
| `No such module 'OneSignalExtension'` | Package not added to NSE | Add `OneSignalExtension` to `OneSignalNotificationServiceExtension` target. Clean and build the project. |
| Push received but no image | NSE not running | Verify NSE deployment target matches app; confirm code is updated |
| No confirmed receipt stat | App Group mismatch | App Group ID must be identical in both targets |
| Badges not updating | App Group missing | Add App Groups capability to both targets |
| In-app not showing | Session not started or missing `OneSignalInAppMessages` framework | Check the framework is added, then close app 30+ seconds before reopening |
| Can't diagnose issue | Not enough log info | Add `OneSignal.Debug.setLogLevel(.LL_VERBOSE)` before initialize, then reproduce the issue to get a log |
***
## User management
Previously, we demonstrated how to create mobile [Subscriptions](./subscriptions). Now we'll expand to identifying [Users](./users) across all their Subscriptions (including push, email, and SMS) using the OneSignal SDK.
### Assign External ID (recommended)
Use an External ID to identify users consistently across devices, email addresses, and phone numbers using your backend's user identifier. This ensures your messaging stays unified across channels and 3rd party systems. See our [Mobile SDK reference](./mobile-sdk-reference) for more details and Objective-C code examples.
```swift Swift theme={null}
// Call when user logs in or is identified, safe to call multiple times
// Typically used in a login completion handler, or on app launch if already authenticated
func onUserAuthenticated(userId: String) {
OneSignal.login(userId)
}
// If you want to remove the External ID from the Subscription, setting it to an anonymous user
func onUserLoggedOut() {
OneSignal.logout()
}
```
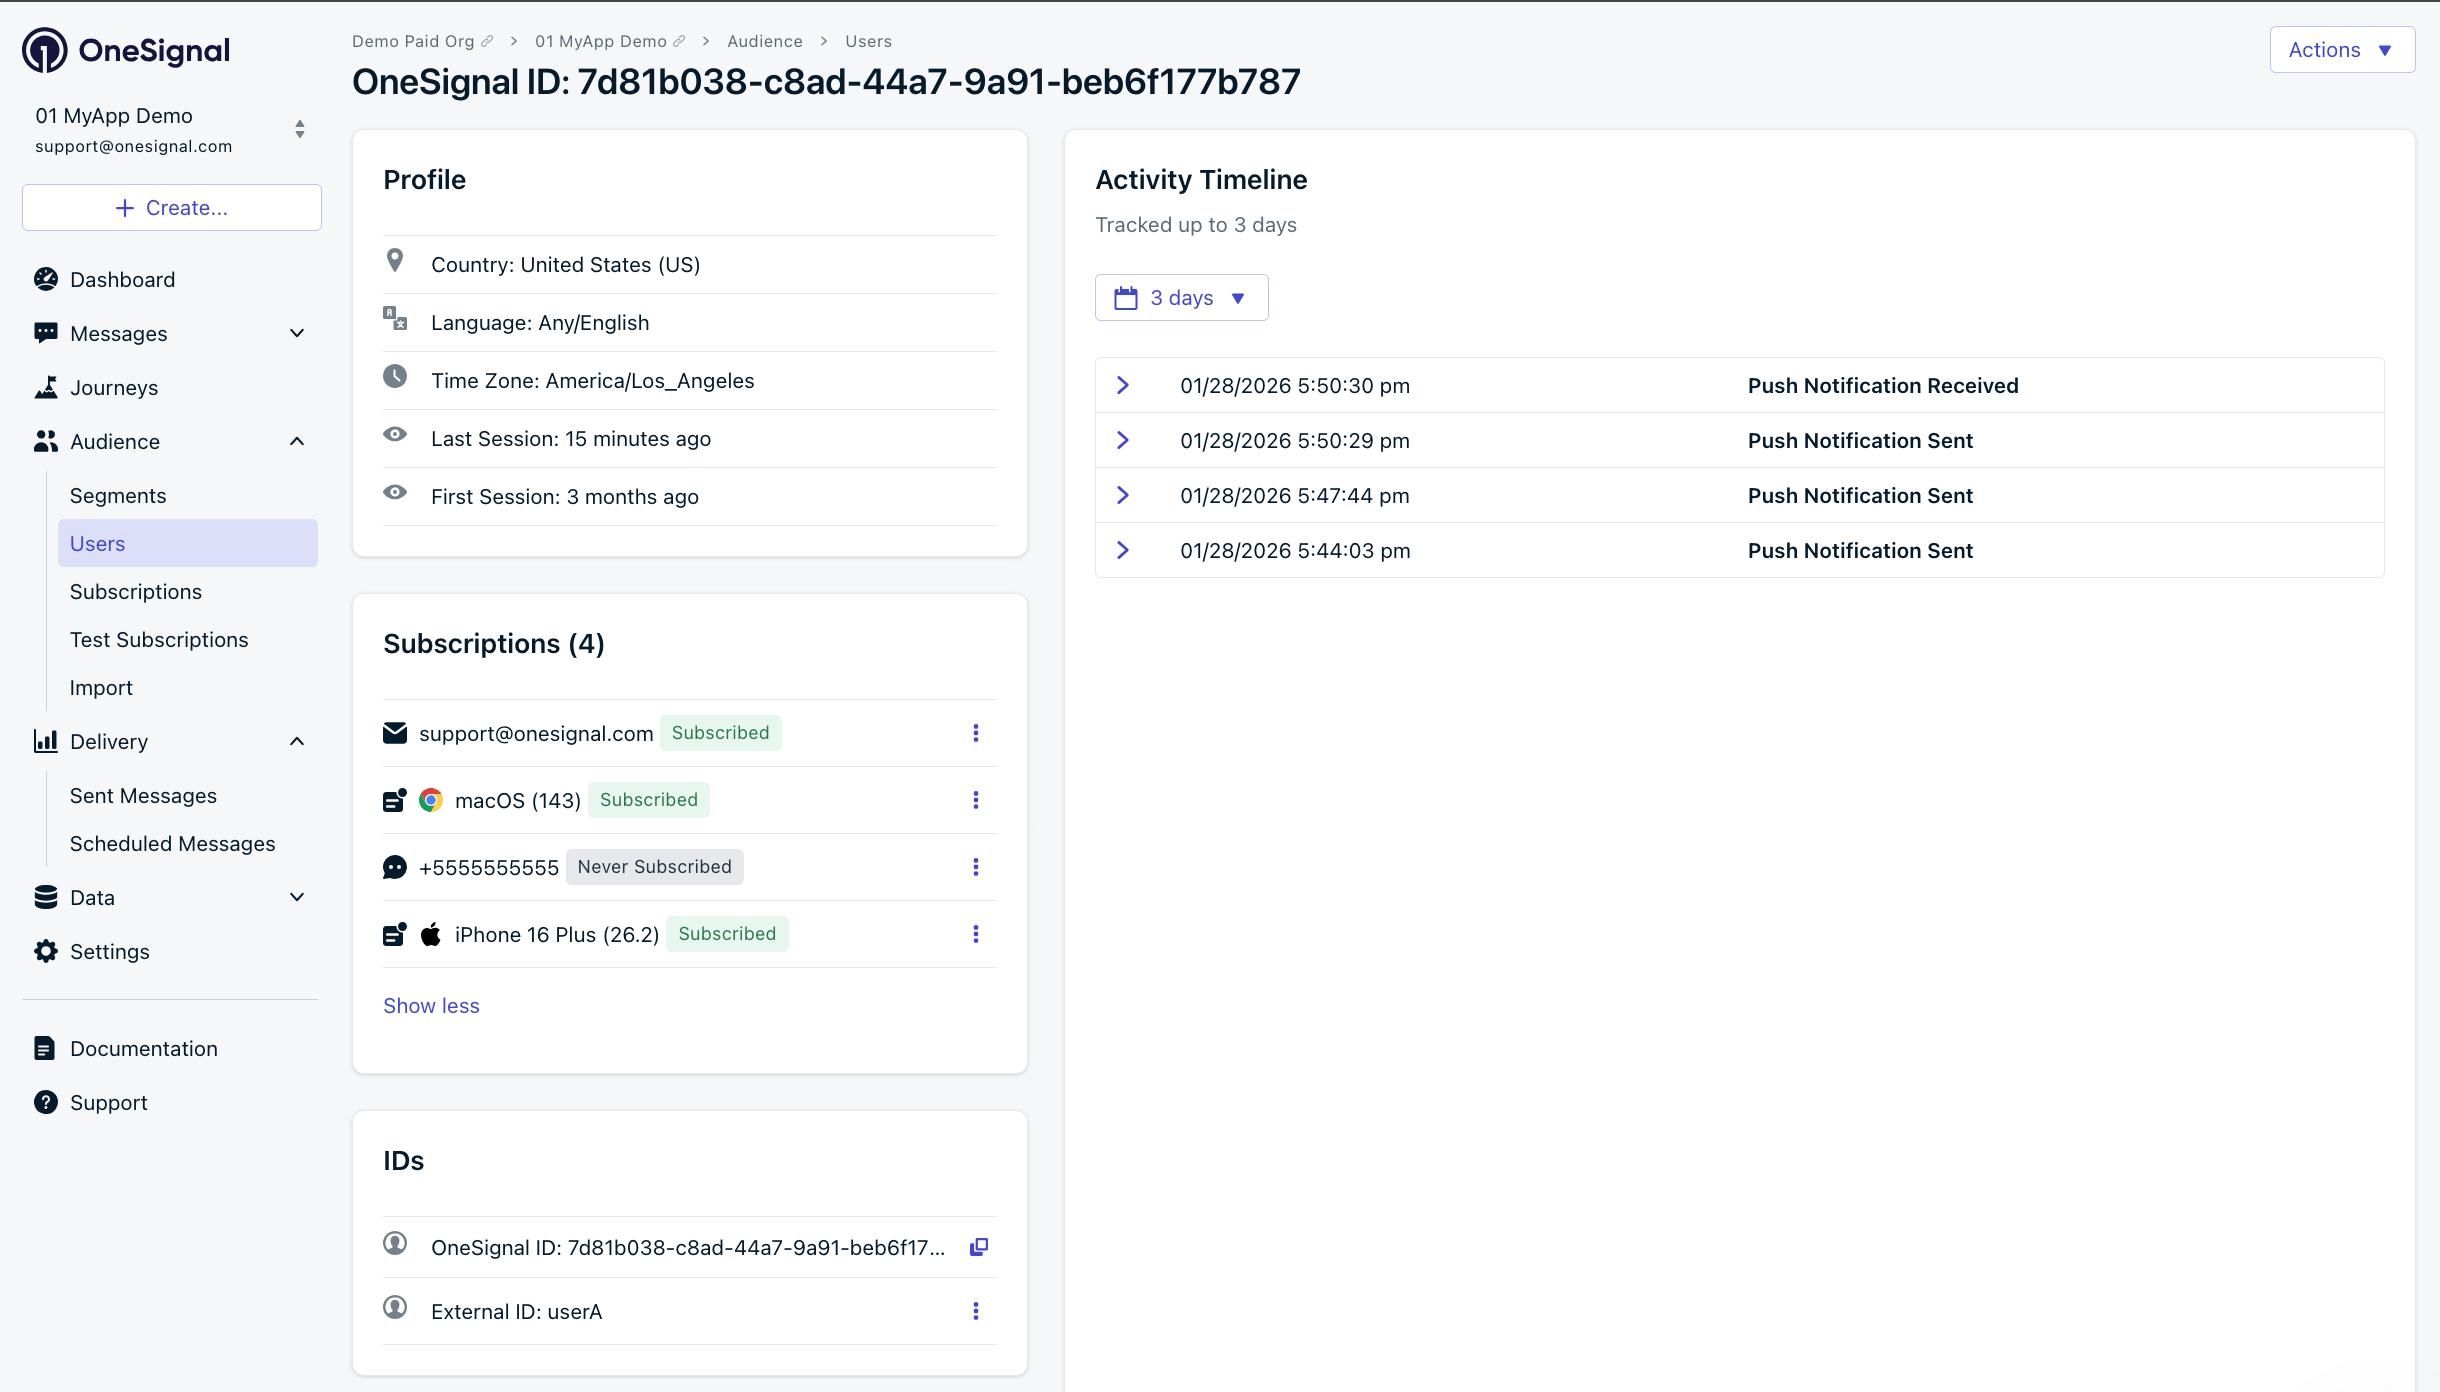
OneSignal generates unique read-only IDs for Subscriptions (Subscription ID) and Users (OneSignal ID).
Setting the External ID via our SDK is highly recommended to identify users across all their subscriptions, regardless of how they are created.
Learn more about the [`login` method](./mobile-sdk-reference#login-external-id) in the SDK reference guide.
### Add Tags & Custom Events
Tags and Custom Events are both ways to add data to your users. Tags are `key-value` strings and are generally associated with user properties (like `username`, `role`, or `status`) while Custom Events have a JSON format and are usually associated with actions (like `new_purchase`, `abandoned_cart`, and associated properties). Both can be used to power advanced [Message Personalization](./message-personalization) and Journeys. See our [Mobile SDK reference](./mobile-sdk-reference) for more details and Objective-C code examples.
```swift Swift theme={null}
// Add a tag when the user's name is set
OneSignal.User.addTag(key: "username", value: "john_doe")
// Create a custom event when user abandoned a cart
let myProperties = [
"product_id": "123456",
"product_name": "Product Name",
"product_price": 100,
"product_quantity": 1
]
OneSignal.User.trackEvent(name: "abandoned_cart", properties: myProperties as [String: Any])
```
More details on how to use Tags and Custom Events in the [Tags](./add-user-data-tags) and [Custom Events](./custom-events) guides.
### Add email and/or SMS subscriptions
You can reach users through email and SMS channels in addition to push notifications. If the email address and/or phone number already exist in the OneSignal app, the SDK will add it to the existing user — it will not create duplicates. See our [Mobile SDK reference](./mobile-sdk-reference) for more details and Objective-C code examples.
```swift Swift theme={null}
// Add email subscription
// Call when user provides their email (e.g., account creation, settings update) after calling OneSignal.login("user_id")
OneSignal.User.addEmail("user@example.com")
// Add SMS subscription
// Use E.164 format: + country code + number
// Call when user provides their phone number (e.g., account creation, settings update) after calling OneSignal.login("user_id")
OneSignal.User.addSms("+15551234567")
```
Verify the test device received an in-app message. See the [In-app messages setup](./in-app-messages-setup) guide for more details.
Not seeing the message?
* Start a new session
* You must close or background the app for at least 30 seconds before reopening. This ensures a new session is started.
* For more, see [how in-app messages are displayed](./in-app-messages-setup#how-are-iams-displayed%3F).
* Still in the `Test Users` segment?
* If you reinstalled or switched devices, re-add the device to [Test Users](./test-users) and confirm it's part of the Test Users segment.
* Having issues?
* Follow [Getting a Debug Log](./capturing-a-debug-log) while reproducing the steps above. This will generate additional logging that you can share with `support@onesignal.com` and we will help investigate what's going on.
You have successfully set up the OneSignal SDK and learned important concepts like:
* Gathering [Subscriptions](./subscriptions), setting [Test Users](./test-users), and creating [Segments](./segmentation).
* Sending [Push](./push) with images and [Confirmed receipt](./confirmed-delivery) using Segments and our [Create message](/reference/create-message) API.
* Sending [In-app messages](./in-app-messages-setup).
Continue with this guide to identify users in your app and setup additional features.
### Common Errors & Fixes
| Error / Symptom | Cause | Fix |
| ------------------------------------- | ----------------------------------------------------------------- | -------------------------------------------------------------------------------------------------------- |
| `No such module 'OneSignalFramework'` | Package not added to app target | Add `OneSignalFramework` via File > Add Package Dependencies. Clean and build the project. |
| `No such module 'OneSignalExtension'` | Package not added to NSE | Add `OneSignalExtension` to `OneSignalNotificationServiceExtension` target. Clean and build the project. |
| Push received but no image | NSE not running | Verify NSE deployment target matches app; confirm code is updated |
| No confirmed receipt stat | App Group mismatch | App Group ID must be identical in both targets |
| Badges not updating | App Group missing | Add App Groups capability to both targets |
| In-app not showing | Session not started or missing `OneSignalInAppMessages` framework | Check the framework is added, then close app 30+ seconds before reopening |
| Can't diagnose issue | Not enough log info | Add `OneSignal.Debug.setLogLevel(.LL_VERBOSE)` before initialize, then reproduce the issue to get a log |
***
## User management
Previously, we demonstrated how to create mobile [Subscriptions](./subscriptions). Now we'll expand to identifying [Users](./users) across all their Subscriptions (including push, email, and SMS) using the OneSignal SDK.
### Assign External ID (recommended)
Use an External ID to identify users consistently across devices, email addresses, and phone numbers using your backend's user identifier. This ensures your messaging stays unified across channels and 3rd party systems. See our [Mobile SDK reference](./mobile-sdk-reference) for more details and Objective-C code examples.
```swift Swift theme={null}
// Call when user logs in or is identified, safe to call multiple times
// Typically used in a login completion handler, or on app launch if already authenticated
func onUserAuthenticated(userId: String) {
OneSignal.login(userId)
}
// If you want to remove the External ID from the Subscription, setting it to an anonymous user
func onUserLoggedOut() {
OneSignal.logout()
}
```
OneSignal generates unique read-only IDs for Subscriptions (Subscription ID) and Users (OneSignal ID).
Setting the External ID via our SDK is highly recommended to identify users across all their subscriptions, regardless of how they are created.
Learn more about the [`login` method](./mobile-sdk-reference#login-external-id) in the SDK reference guide.
### Add Tags & Custom Events
Tags and Custom Events are both ways to add data to your users. Tags are `key-value` strings and are generally associated with user properties (like `username`, `role`, or `status`) while Custom Events have a JSON format and are usually associated with actions (like `new_purchase`, `abandoned_cart`, and associated properties). Both can be used to power advanced [Message Personalization](./message-personalization) and Journeys. See our [Mobile SDK reference](./mobile-sdk-reference) for more details and Objective-C code examples.
```swift Swift theme={null}
// Add a tag when the user's name is set
OneSignal.User.addTag(key: "username", value: "john_doe")
// Create a custom event when user abandoned a cart
let myProperties = [
"product_id": "123456",
"product_name": "Product Name",
"product_price": 100,
"product_quantity": 1
]
OneSignal.User.trackEvent(name: "abandoned_cart", properties: myProperties as [String: Any])
```
More details on how to use Tags and Custom Events in the [Tags](./add-user-data-tags) and [Custom Events](./custom-events) guides.
### Add email and/or SMS subscriptions
You can reach users through email and SMS channels in addition to push notifications. If the email address and/or phone number already exist in the OneSignal app, the SDK will add it to the existing user — it will not create duplicates. See our [Mobile SDK reference](./mobile-sdk-reference) for more details and Objective-C code examples.
```swift Swift theme={null}
// Add email subscription
// Call when user provides their email (e.g., account creation, settings update) after calling OneSignal.login("user_id")
OneSignal.User.addEmail("user@example.com")
// Add SMS subscription
// Use E.164 format: + country code + number
// Call when user provides their phone number (e.g., account creation, settings update) after calling OneSignal.login("user_id")
OneSignal.User.addSms("+15551234567")
```
 Best practices for multi-channel communication
* Obtain explicit consent before adding email or SMS subscriptions.
* Explain the benefits of each communication channel to users.
* Provide channel preferences so users can select which channels they prefer.
***
### Privacy & user consent
To control when OneSignal collects user data, use the SDK's consent gating methods. See our [Mobile SDK reference](./mobile-sdk-reference) for more details and Objective-C code examples.
```swift Swift theme={null}
// In AppDelegate, BEFORE OneSignal.initialize()
// Use this if your app requires GDPR or other privacy consent before data collection
OneSignal.setConsentRequired(true)
// Later, after user grants consent (e.g., taps "I Agree" on your consent screen)
OneSignal.setConsentGiven(true)
```
See our Privacy & security docs for more on:
* [Data collected by the SDK](./data-collected-by-the-onesignal-sdk)
* [Handling personal data](./handling-personal-data)
***
## Prompt for push permissions
Instead of calling `requestPermission()` immediately on app open, take a more strategic approach. Use an in-app message to explain the value of push notifications before requesting permission.
For best practices and implementation details, see our [Prompt for push permissions](./prompt-for-push-permissions) guide.
***
## Listen to push, user, and in-app events
Use SDK listeners to react to user actions and state changes. Add these in your AppDelegate after `OneSignal.initialize()`.
### Push notification events
Example shows how to use the push click listener. Other push notification events like the foreground lifecycle listener to control how notifications behave in foreground are available in the [Mobile SDK Reference](./mobile-sdk-reference#push-notification-events).
```swift Swift theme={null}
// The OSNotificationClickListener is used to detect push click events
class AppDelegate: NSObject, UIApplicationDelegate, OSNotificationClickListener {
// Add the required onClick method for OSNotificationClickListener
func onClick(event: OSNotificationClickEvent) {
print("Notification clicked: \(event.jsonRepresentation())")
let notification = event.notification
// Access notification data
let title = notification.title ?? ""
let additionalData = notification.additionalData // Custom key-value pairs you sent
// Example: Deep link based on custom data
if let screenName = additionalData?["screen"] as? String {
// Navigate to the specified screen
}
}
// Reference the listeners in your AppDelegate
func application(_ application: UIApplication, didFinishLaunchingWithOptions launchOptions: [UIApplication.LaunchOptionsKey : Any]? = nil) -> Bool {
// For the OSNotificationClickListener
OneSignal.Notifications.addClickListener(self)
return true
}
}
```
### User state changes
Example shows how to use push subscription observer. Other user state events like the user state observer and notification permission observer are available in the [Mobile SDK Reference](./mobile-sdk-reference).
```swift Swift theme={null}
// The OSPushSubscriptionObserver is used to detect push subscription changes (token changes, opt-out, etc.)
class AppDelegate: NSObject, UIApplicationDelegate, OSNotificationPermissionObserver, OSPushSubscriptionObserver {
// Add the onPushSubscriptionChanged method for OSPushSubscriptionObserver
func onPushSubscriptionChanged(state: OSPushSubscriptionChangedState) {
print("Push subscription changed: \(state.jsonRepresentation())")
print(state.current.optedIn)
print(state.current.token)
// This is a good spot to update your UI or analytics
}
// Reference the observer in your AppDelegate
func application(_ application: UIApplication, didFinishLaunchingWithOptions launchOptions: [UIApplication.LaunchOptionsKey : Any]? = nil) -> Bool {
// For the OSPushSubscriptionObserver
OneSignal.User.pushSubscription.addObserver(self)
return true
}
}
```
### In-app message events
Additional in-app message methods are available in the [Mobile SDK Reference](./mobile-sdk-reference).
```swift Swift theme={null}
// The OSInAppMessageClickListener is used to detect in-app message button clicks
class AppDelegate: NSObject, UIApplicationDelegate, OSInAppMessageClickListener {
// Add the onClick method for OSInAppMessageClickListener
func onClick(event: OSInAppMessageClickEvent) {
let result: OSInAppMessageClickResult = event.result
print("In-app message clicked: \(result.jsonRepresentation())")
let actionId = result.actionId
print("Action ID: \(actionId ?? "no actionId")")
// Example: Deep link based on the actionId
if let screenName = actionId {
// Navigate to the specified screen
}
}
// Reference the listeners in your AppDelegate
func application(_ application: UIApplication, didFinishLaunchingWithOptions launchOptions: [UIApplication.LaunchOptionsKey : Any]? = nil) -> Bool {
// For the OSInAppMessageClickListener
OneSignal.InAppMessages.addClickListener(self)
return true
}
}
```
***
## Disable method swizzling (optional)
By default, the OneSignal SDK uses method swizzling to automatically handle push notification delegate methods. If your app needs to disable swizzling (for example, to avoid conflicts with other SDKs or to maintain full control over notification delegate methods), you can opt out via `Info.plist`.
When swizzling is disabled, you must manually forward notification delegate methods to the OneSignal SDK. All other SDK features (listeners, observers, in-app messages, outcomes, etc.) continue to work normally.
### Step 1. Add the Info.plist flag
Add the following to your app's `Info.plist`:
```xml theme={null}
OneSignal_disable_swizzling
```
When the SDK detects this flag, it skips all method swizzling at startup and logs a warning reminding you to implement manual forwarding.
### Step 2. Set the UNUserNotificationCenter delegate
Set your `AppDelegate` as the `UNUserNotificationCenter` delegate **before** calling `OneSignal.initialize`. Without this, foreground notification display and notification tap handling will not work.
```swift Swift theme={null}
// In application(_:didFinishLaunchingWithOptions:), BEFORE OneSignal.initialize()
UNUserNotificationCenter.current().delegate = self
```
```objc Objective-C theme={null}
// In application:didFinishLaunchingWithOptions:, BEFORE [OneSignal initialize:]
[UNUserNotificationCenter currentNotificationCenter].delegate = self;
```
### Step 3. Forward notification delegate methods
Implement the following methods in your `AppDelegate`. All methods call through `OneSignal.Notifications`.
**Token registration:**
```swift Swift theme={null}
func application(_ application: UIApplication,
didRegisterForRemoteNotificationsWithDeviceToken deviceToken: Data) {
OneSignal.Notifications.didRegisterForRemoteNotifications(deviceToken: deviceToken)
}
func application(_ application: UIApplication,
didFailToRegisterForRemoteNotificationsWithError error: Error) {
OneSignal.Notifications.didFailToRegisterForRemoteNotifications(error: error as NSError)
}
```
```objc Objective-C theme={null}
- (void)application:(UIApplication *)application
didRegisterForRemoteNotificationsWithDeviceToken:(NSData *)deviceToken {
[OneSignal.Notifications didRegisterForRemoteNotificationsWithDeviceToken:deviceToken];
}
- (void)application:(UIApplication *)application
didFailToRegisterForRemoteNotificationsWithError:(NSError *)error {
[OneSignal.Notifications didFailToRegisterForRemoteNotificationsWithError:error];
}
```
**Background / silent notifications:**
```swift Swift theme={null}
func application(_ application: UIApplication,
didReceiveRemoteNotification userInfo: [AnyHashable: Any],
fetchCompletionHandler completionHandler: @escaping (UIBackgroundFetchResult) -> Void) {
OneSignal.Notifications.didReceiveRemoteNotification(userInfo: userInfo,
completionHandler: completionHandler)
}
```
```objc Objective-C theme={null}
- (void)application:(UIApplication *)application
didReceiveRemoteNotification:(NSDictionary *)userInfo
fetchCompletionHandler:(void (^)(UIBackgroundFetchResult))completionHandler {
[OneSignal.Notifications didReceiveRemoteNotification:userInfo
completionHandler:completionHandler];
}
```
**Foreground notification display:**
The SDK calls your completion block with an `OSNotification` object. If non-nil, the SDK wants the notification displayed — pass your preferred presentation options. If nil (e.g., an IAM preview), pass no presentation options.
```swift Swift theme={null}
func userNotificationCenter(_ center: UNUserNotificationCenter,
willPresent notification: UNNotification,
withCompletionHandler completionHandler: @escaping (UNNotificationPresentationOptions) -> Void) {
OneSignal.Notifications.willPresentNotification(
payload: notification.request.content.userInfo
) { notif in
if notif != nil {
if #available(iOS 14.0, *) {
completionHandler([.banner, .list, .sound])
} else {
completionHandler([.alert, .sound])
}
} else {
completionHandler([])
}
}
}
```
```objc Objective-C theme={null}
- (void)userNotificationCenter:(UNUserNotificationCenter *)center
willPresentNotification:(UNNotification *)notification
withCompletionHandler:(void (^)(UNNotificationPresentationOptions))completionHandler {
[OneSignal.Notifications
willPresentNotificationWithPayload:notification.request.content.userInfo
completion:^(OSNotification *notif) {
if (notif) {
if (@available(iOS 14.0, *)) {
completionHandler(UNNotificationPresentationOptionBanner |
UNNotificationPresentationOptionList |
UNNotificationPresentationOptionSound);
} else {
completionHandler(UNNotificationPresentationOptionAlert |
UNNotificationPresentationOptionSound);
}
} else {
completionHandler(UNNotificationPresentationOptionNone);
}
}];
}
```
The `onWillDisplayNotification` lifecycle listener and `preventDefault` / `display` APIs continue to work with manual forwarding. The SDK invokes your listeners from within `willPresentNotification`.
**Notification tap / action:**
```swift Swift theme={null}
func userNotificationCenter(_ center: UNUserNotificationCenter,
didReceive response: UNNotificationResponse,
withCompletionHandler completionHandler: @escaping () -> Void) {
OneSignal.Notifications.didReceiveNotificationResponse(response)
completionHandler()
}
```
```objc Objective-C theme={null}
- (void)userNotificationCenter:(UNUserNotificationCenter *)center
didReceiveNotificationResponse:(UNNotificationResponse *)response
withCompletionHandler:(void (^)(void))completionHandler {
[OneSignal.Notifications didReceiveNotificationResponse:response];
completionHandler();
}
```
### Optional: Set badge count
When swizzling is disabled, the SDK cannot intercept badge changes. Use this method to set the badge count and keep OneSignal's internal badge cache in sync:
```swift Swift theme={null}
OneSignal.Notifications.setBadgeCount(5)
```
```objc Objective-C theme={null}
[OneSignal.Notifications setBadgeCount:5];
```
### SwiftUI apps
SwiftUI apps don't have an `AppDelegate` by default. Use `@UIApplicationDelegateAdaptor` to add one, then implement all the forwarding methods shown above:
```swift Swift theme={null}
@main
struct YourApp: App {
@UIApplicationDelegateAdaptor(AppDelegate.self) var appDelegate
var body: some Scene {
WindowGroup {
ContentView()
}
}
}
class AppDelegate: NSObject, UIApplicationDelegate, UNUserNotificationCenterDelegate {
func application(_ application: UIApplication,
didFinishLaunchingWithOptions launchOptions: [UIApplication.LaunchOptionsKey: Any]? = nil) -> Bool {
UNUserNotificationCenter.current().delegate = self
OneSignal.initialize("YOUR_APP_ID", withLaunchOptions: launchOptions)
return true
}
// Implement all the forwarding methods shown above
}
```
### API reference
| Swift | Objective-C | Purpose |
| ----------------------------------------------------------- | --------------------------------------------------- | --------------------------------------- |
| `didRegisterForRemoteNotifications(deviceToken:)` | `didRegisterForRemoteNotificationsWithDeviceToken:` | Forward APNs device token |
| `didFailToRegisterForRemoteNotifications(error:)` | `didFailToRegisterForRemoteNotificationsWithError:` | Forward APNs registration failure |
| `didReceiveRemoteNotification(userInfo:completionHandler:)` | `didReceiveRemoteNotification:completionHandler:` | Forward background/silent notifications |
| `willPresentNotification(payload:completion:)` | `willPresentNotificationWithPayload:completion:` | Forward foreground notification |
| `didReceiveNotificationResponse(_:)` | `didReceiveNotificationResponse:` | Forward notification tap/action |
| `setBadgeCount(_:)` | `setBadgeCount:` | Set badge count and sync cache |
***
## Advanced setup & capabilities
* [Deep Linking](./deep-linking) — Navigate users to specific screens from notifications
* [Action Buttons](./action-buttons) — Add interactive buttons to notifications
* [Live Activities](./live-activities) — iOS Live Activities support
* [Service Extensions](./service-extensions) — Advanced notification customization
* [Identity Verification](./identity-verification) — Secure user identification
* [Location Tracking](./mobile-sdk-reference#location) — Location-based targeting
* [Integrations](./integrations) — Connect with analytics and data platforms
* [Multi-language Messaging](./multi-language-messaging) — Localized notifications
For full SDK method documentation, visit the [Mobile SDK Reference](./mobile-sdk-reference).
***
Need help?
Chat with our Support team or email `support@onesignal.com`
Please include:
* Details of the issue you're experiencing and steps to reproduce if available
* Your OneSignal App ID
* The External ID or Subscription ID if applicable
* The URL to the message you tested in the OneSignal Dashboard if applicable
* Any relevant [logs or error messages](/docs/en/capturing-a-debug-log)
We're happy to help!
Best practices for multi-channel communication
* Obtain explicit consent before adding email or SMS subscriptions.
* Explain the benefits of each communication channel to users.
* Provide channel preferences so users can select which channels they prefer.
***
### Privacy & user consent
To control when OneSignal collects user data, use the SDK's consent gating methods. See our [Mobile SDK reference](./mobile-sdk-reference) for more details and Objective-C code examples.
```swift Swift theme={null}
// In AppDelegate, BEFORE OneSignal.initialize()
// Use this if your app requires GDPR or other privacy consent before data collection
OneSignal.setConsentRequired(true)
// Later, after user grants consent (e.g., taps "I Agree" on your consent screen)
OneSignal.setConsentGiven(true)
```
See our Privacy & security docs for more on:
* [Data collected by the SDK](./data-collected-by-the-onesignal-sdk)
* [Handling personal data](./handling-personal-data)
***
## Prompt for push permissions
Instead of calling `requestPermission()` immediately on app open, take a more strategic approach. Use an in-app message to explain the value of push notifications before requesting permission.
For best practices and implementation details, see our [Prompt for push permissions](./prompt-for-push-permissions) guide.
***
## Listen to push, user, and in-app events
Use SDK listeners to react to user actions and state changes. Add these in your AppDelegate after `OneSignal.initialize()`.
### Push notification events
Example shows how to use the push click listener. Other push notification events like the foreground lifecycle listener to control how notifications behave in foreground are available in the [Mobile SDK Reference](./mobile-sdk-reference#push-notification-events).
```swift Swift theme={null}
// The OSNotificationClickListener is used to detect push click events
class AppDelegate: NSObject, UIApplicationDelegate, OSNotificationClickListener {
// Add the required onClick method for OSNotificationClickListener
func onClick(event: OSNotificationClickEvent) {
print("Notification clicked: \(event.jsonRepresentation())")
let notification = event.notification
// Access notification data
let title = notification.title ?? ""
let additionalData = notification.additionalData // Custom key-value pairs you sent
// Example: Deep link based on custom data
if let screenName = additionalData?["screen"] as? String {
// Navigate to the specified screen
}
}
// Reference the listeners in your AppDelegate
func application(_ application: UIApplication, didFinishLaunchingWithOptions launchOptions: [UIApplication.LaunchOptionsKey : Any]? = nil) -> Bool {
// For the OSNotificationClickListener
OneSignal.Notifications.addClickListener(self)
return true
}
}
```
### User state changes
Example shows how to use push subscription observer. Other user state events like the user state observer and notification permission observer are available in the [Mobile SDK Reference](./mobile-sdk-reference).
```swift Swift theme={null}
// The OSPushSubscriptionObserver is used to detect push subscription changes (token changes, opt-out, etc.)
class AppDelegate: NSObject, UIApplicationDelegate, OSNotificationPermissionObserver, OSPushSubscriptionObserver {
// Add the onPushSubscriptionChanged method for OSPushSubscriptionObserver
func onPushSubscriptionChanged(state: OSPushSubscriptionChangedState) {
print("Push subscription changed: \(state.jsonRepresentation())")
print(state.current.optedIn)
print(state.current.token)
// This is a good spot to update your UI or analytics
}
// Reference the observer in your AppDelegate
func application(_ application: UIApplication, didFinishLaunchingWithOptions launchOptions: [UIApplication.LaunchOptionsKey : Any]? = nil) -> Bool {
// For the OSPushSubscriptionObserver
OneSignal.User.pushSubscription.addObserver(self)
return true
}
}
```
### In-app message events
Additional in-app message methods are available in the [Mobile SDK Reference](./mobile-sdk-reference).
```swift Swift theme={null}
// The OSInAppMessageClickListener is used to detect in-app message button clicks
class AppDelegate: NSObject, UIApplicationDelegate, OSInAppMessageClickListener {
// Add the onClick method for OSInAppMessageClickListener
func onClick(event: OSInAppMessageClickEvent) {
let result: OSInAppMessageClickResult = event.result
print("In-app message clicked: \(result.jsonRepresentation())")
let actionId = result.actionId
print("Action ID: \(actionId ?? "no actionId")")
// Example: Deep link based on the actionId
if let screenName = actionId {
// Navigate to the specified screen
}
}
// Reference the listeners in your AppDelegate
func application(_ application: UIApplication, didFinishLaunchingWithOptions launchOptions: [UIApplication.LaunchOptionsKey : Any]? = nil) -> Bool {
// For the OSInAppMessageClickListener
OneSignal.InAppMessages.addClickListener(self)
return true
}
}
```
***
## Disable method swizzling (optional)
By default, the OneSignal SDK uses method swizzling to automatically handle push notification delegate methods. If your app needs to disable swizzling (for example, to avoid conflicts with other SDKs or to maintain full control over notification delegate methods), you can opt out via `Info.plist`.
When swizzling is disabled, you must manually forward notification delegate methods to the OneSignal SDK. All other SDK features (listeners, observers, in-app messages, outcomes, etc.) continue to work normally.
### Step 1. Add the Info.plist flag
Add the following to your app's `Info.plist`:
```xml theme={null}
OneSignal_disable_swizzling
```
When the SDK detects this flag, it skips all method swizzling at startup and logs a warning reminding you to implement manual forwarding.
### Step 2. Set the UNUserNotificationCenter delegate
Set your `AppDelegate` as the `UNUserNotificationCenter` delegate **before** calling `OneSignal.initialize`. Without this, foreground notification display and notification tap handling will not work.
```swift Swift theme={null}
// In application(_:didFinishLaunchingWithOptions:), BEFORE OneSignal.initialize()
UNUserNotificationCenter.current().delegate = self
```
```objc Objective-C theme={null}
// In application:didFinishLaunchingWithOptions:, BEFORE [OneSignal initialize:]
[UNUserNotificationCenter currentNotificationCenter].delegate = self;
```
### Step 3. Forward notification delegate methods
Implement the following methods in your `AppDelegate`. All methods call through `OneSignal.Notifications`.
**Token registration:**
```swift Swift theme={null}
func application(_ application: UIApplication,
didRegisterForRemoteNotificationsWithDeviceToken deviceToken: Data) {
OneSignal.Notifications.didRegisterForRemoteNotifications(deviceToken: deviceToken)
}
func application(_ application: UIApplication,
didFailToRegisterForRemoteNotificationsWithError error: Error) {
OneSignal.Notifications.didFailToRegisterForRemoteNotifications(error: error as NSError)
}
```
```objc Objective-C theme={null}
- (void)application:(UIApplication *)application
didRegisterForRemoteNotificationsWithDeviceToken:(NSData *)deviceToken {
[OneSignal.Notifications didRegisterForRemoteNotificationsWithDeviceToken:deviceToken];
}
- (void)application:(UIApplication *)application
didFailToRegisterForRemoteNotificationsWithError:(NSError *)error {
[OneSignal.Notifications didFailToRegisterForRemoteNotificationsWithError:error];
}
```
**Background / silent notifications:**
```swift Swift theme={null}
func application(_ application: UIApplication,
didReceiveRemoteNotification userInfo: [AnyHashable: Any],
fetchCompletionHandler completionHandler: @escaping (UIBackgroundFetchResult) -> Void) {
OneSignal.Notifications.didReceiveRemoteNotification(userInfo: userInfo,
completionHandler: completionHandler)
}
```
```objc Objective-C theme={null}
- (void)application:(UIApplication *)application
didReceiveRemoteNotification:(NSDictionary *)userInfo
fetchCompletionHandler:(void (^)(UIBackgroundFetchResult))completionHandler {
[OneSignal.Notifications didReceiveRemoteNotification:userInfo
completionHandler:completionHandler];
}
```
**Foreground notification display:**
The SDK calls your completion block with an `OSNotification` object. If non-nil, the SDK wants the notification displayed — pass your preferred presentation options. If nil (e.g., an IAM preview), pass no presentation options.
```swift Swift theme={null}
func userNotificationCenter(_ center: UNUserNotificationCenter,
willPresent notification: UNNotification,
withCompletionHandler completionHandler: @escaping (UNNotificationPresentationOptions) -> Void) {
OneSignal.Notifications.willPresentNotification(
payload: notification.request.content.userInfo
) { notif in
if notif != nil {
if #available(iOS 14.0, *) {
completionHandler([.banner, .list, .sound])
} else {
completionHandler([.alert, .sound])
}
} else {
completionHandler([])
}
}
}
```
```objc Objective-C theme={null}
- (void)userNotificationCenter:(UNUserNotificationCenter *)center
willPresentNotification:(UNNotification *)notification
withCompletionHandler:(void (^)(UNNotificationPresentationOptions))completionHandler {
[OneSignal.Notifications
willPresentNotificationWithPayload:notification.request.content.userInfo
completion:^(OSNotification *notif) {
if (notif) {
if (@available(iOS 14.0, *)) {
completionHandler(UNNotificationPresentationOptionBanner |
UNNotificationPresentationOptionList |
UNNotificationPresentationOptionSound);
} else {
completionHandler(UNNotificationPresentationOptionAlert |
UNNotificationPresentationOptionSound);
}
} else {
completionHandler(UNNotificationPresentationOptionNone);
}
}];
}
```
The `onWillDisplayNotification` lifecycle listener and `preventDefault` / `display` APIs continue to work with manual forwarding. The SDK invokes your listeners from within `willPresentNotification`.
**Notification tap / action:**
```swift Swift theme={null}
func userNotificationCenter(_ center: UNUserNotificationCenter,
didReceive response: UNNotificationResponse,
withCompletionHandler completionHandler: @escaping () -> Void) {
OneSignal.Notifications.didReceiveNotificationResponse(response)
completionHandler()
}
```
```objc Objective-C theme={null}
- (void)userNotificationCenter:(UNUserNotificationCenter *)center
didReceiveNotificationResponse:(UNNotificationResponse *)response
withCompletionHandler:(void (^)(void))completionHandler {
[OneSignal.Notifications didReceiveNotificationResponse:response];
completionHandler();
}
```
### Optional: Set badge count
When swizzling is disabled, the SDK cannot intercept badge changes. Use this method to set the badge count and keep OneSignal's internal badge cache in sync:
```swift Swift theme={null}
OneSignal.Notifications.setBadgeCount(5)
```
```objc Objective-C theme={null}
[OneSignal.Notifications setBadgeCount:5];
```
### SwiftUI apps
SwiftUI apps don't have an `AppDelegate` by default. Use `@UIApplicationDelegateAdaptor` to add one, then implement all the forwarding methods shown above:
```swift Swift theme={null}
@main
struct YourApp: App {
@UIApplicationDelegateAdaptor(AppDelegate.self) var appDelegate
var body: some Scene {
WindowGroup {
ContentView()
}
}
}
class AppDelegate: NSObject, UIApplicationDelegate, UNUserNotificationCenterDelegate {
func application(_ application: UIApplication,
didFinishLaunchingWithOptions launchOptions: [UIApplication.LaunchOptionsKey: Any]? = nil) -> Bool {
UNUserNotificationCenter.current().delegate = self
OneSignal.initialize("YOUR_APP_ID", withLaunchOptions: launchOptions)
return true
}
// Implement all the forwarding methods shown above
}
```
### API reference
| Swift | Objective-C | Purpose |
| ----------------------------------------------------------- | --------------------------------------------------- | --------------------------------------- |
| `didRegisterForRemoteNotifications(deviceToken:)` | `didRegisterForRemoteNotificationsWithDeviceToken:` | Forward APNs device token |
| `didFailToRegisterForRemoteNotifications(error:)` | `didFailToRegisterForRemoteNotificationsWithError:` | Forward APNs registration failure |
| `didReceiveRemoteNotification(userInfo:completionHandler:)` | `didReceiveRemoteNotification:completionHandler:` | Forward background/silent notifications |
| `willPresentNotification(payload:completion:)` | `willPresentNotificationWithPayload:completion:` | Forward foreground notification |
| `didReceiveNotificationResponse(_:)` | `didReceiveNotificationResponse:` | Forward notification tap/action |
| `setBadgeCount(_:)` | `setBadgeCount:` | Set badge count and sync cache |
***
## Advanced setup & capabilities
* [Deep Linking](./deep-linking) — Navigate users to specific screens from notifications
* [Action Buttons](./action-buttons) — Add interactive buttons to notifications
* [Live Activities](./live-activities) — iOS Live Activities support
* [Service Extensions](./service-extensions) — Advanced notification customization
* [Identity Verification](./identity-verification) — Secure user identification
* [Location Tracking](./mobile-sdk-reference#location) — Location-based targeting
* [Integrations](./integrations) — Connect with analytics and data platforms
* [Multi-language Messaging](./multi-language-messaging) — Localized notifications
For full SDK method documentation, visit the [Mobile SDK Reference](./mobile-sdk-reference).
***
Need help?
Chat with our Support team or email `support@onesignal.com`
Please include:
* Details of the issue you're experiencing and steps to reproduce if available
* Your OneSignal App ID
* The External ID or Subscription ID if applicable
* The URL to the message you tested in the OneSignal Dashboard if applicable
* Any relevant [logs or error messages](/docs/en/capturing-a-debug-log)
We're happy to help!