> ## Documentation Index
> Fetch the complete documentation index at: https://documentation.onesignal.com/llms.txt
> Use this file to discover all available pages before exploring further.
# Journey actions
> Define wait periods, branch journeys based on user behavior, and tag users using journey steps.
Use **Journey actions** to control how and when users move through your Journey, personalize experiences, and test outcomes.
## Wait
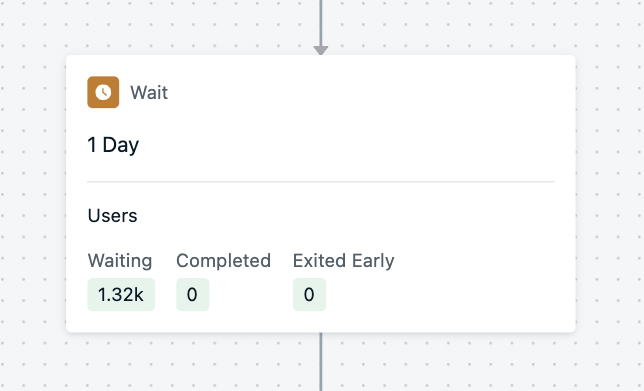
Delay the user's Journey progression by a specific amount of time—minutes, hours, days, or weeks.
Use it to:
* Space out messages and steps
* Allow time for users to engage with a message before branching
 ***
## Wait Until
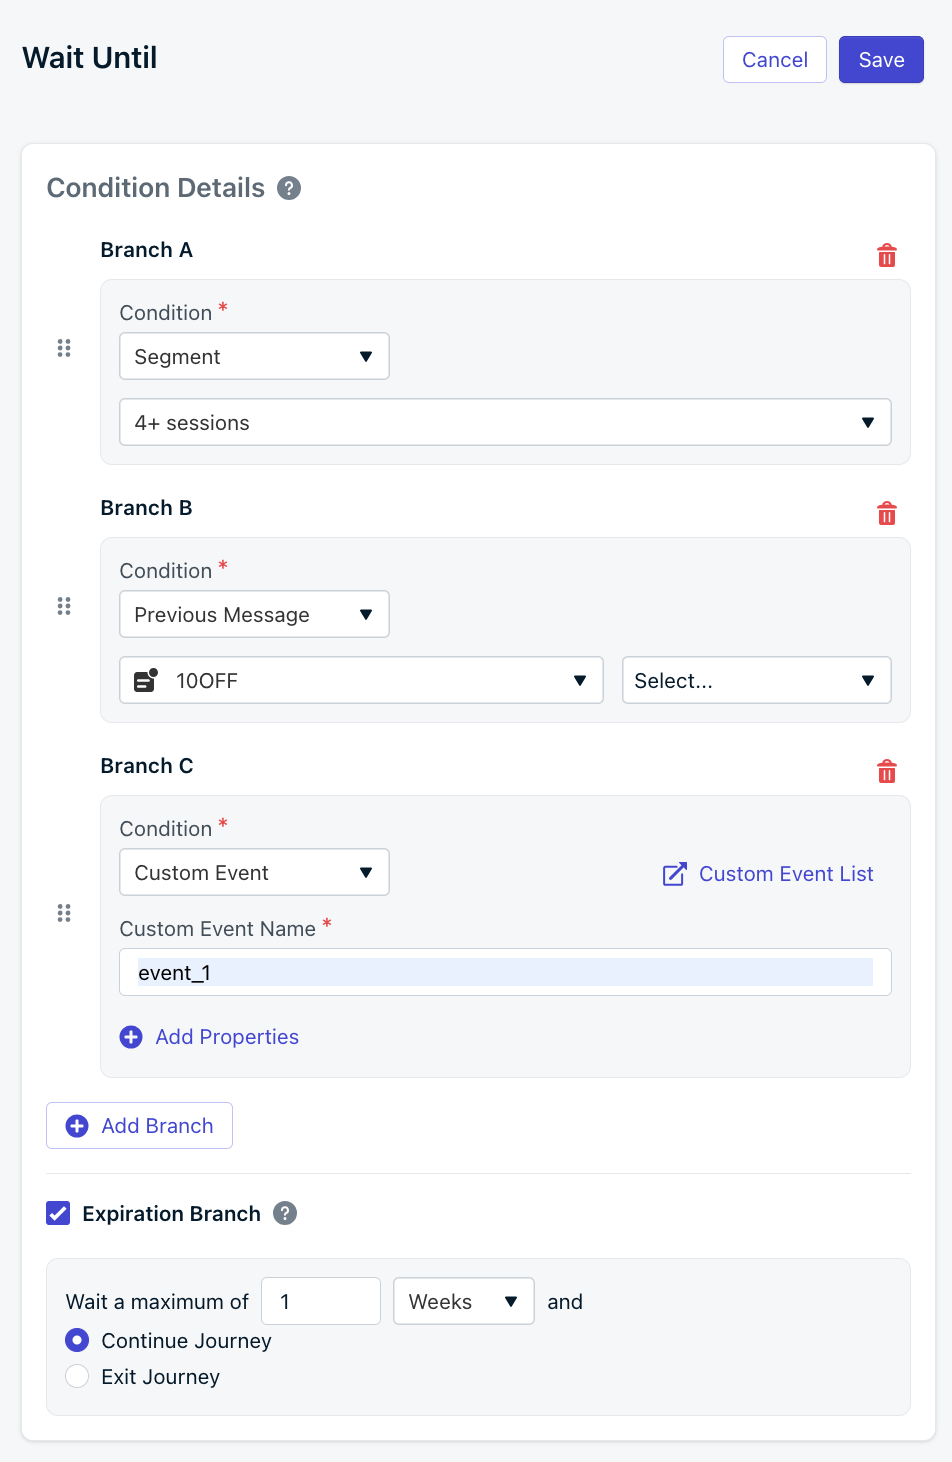
Hold a user at this step until they meet specific conditions:
* Entering a segment
* Triggering a message event (e.g., specific message delivered, opened, or clicked)
* **Only one message event per wait until step** is supported at this time.
* Triggering a custom event (e.g., onboarding complete, purchase made)
You can **add multiple conditions** and branch users based on the *first condition they meet*. If those conditions are not met in a certain amount of time, you can set an **expiration branch** to continue users through the Journey or exit them completely.
If a user already qualifies for a condition when they reach this step, they'll move down that branch straight away without waiting. Conditions are evaluated in order (top to bottom / A–Z).
Using the Custom Events entry rule you can also add [Event Matching](#event-matching) to control which instance of the user to progress through the Journey if you enter them multiple times.
***
## Wait Until
Hold a user at this step until they meet specific conditions:
* Entering a segment
* Triggering a message event (e.g., specific message delivered, opened, or clicked)
* **Only one message event per wait until step** is supported at this time.
* Triggering a custom event (e.g., onboarding complete, purchase made)
You can **add multiple conditions** and branch users based on the *first condition they meet*. If those conditions are not met in a certain amount of time, you can set an **expiration branch** to continue users through the Journey or exit them completely.
If a user already qualifies for a condition when they reach this step, they'll move down that branch straight away without waiting. Conditions are evaluated in order (top to bottom / A–Z).
Using the Custom Events entry rule you can also add [Event Matching](#event-matching) to control which instance of the user to progress through the Journey if you enter them multiple times.
 When a custom event matches a condition, that event is stored on behalf of the user and may be [referenced in Liquid syntax](./custom-events#liquid-syntax-for-custom-events) when sending Journey messages.
### Event Matching
Using the Custom Events entry rule, you can have users enter a Journey multiple times. With the Wait Until step's **Event Matching** setting, you can control which instance of the user to progress through the Journey.
Requirements:
* Set the Journey Entry Rules to use a custom event.
* Include an event property when entering users into the Journey.
For example, you have a "Survey Reminder" Journey. You have multiple surveys which means users can enter the Journey multiple times (once for each survey). You want to send a reminder message if they did not complete the survey or remove them if they did.
You can use the **Event Matching** setting to control which instance of the user to progress through the Journey.
**Example**:
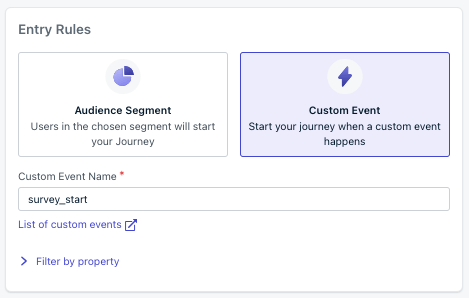
Set the Journey Entry Rules to use a custom event. **Example**: `survey_start`
When a custom event matches a condition, that event is stored on behalf of the user and may be [referenced in Liquid syntax](./custom-events#liquid-syntax-for-custom-events) when sending Journey messages.
### Event Matching
Using the Custom Events entry rule, you can have users enter a Journey multiple times. With the Wait Until step's **Event Matching** setting, you can control which instance of the user to progress through the Journey.
Requirements:
* Set the Journey Entry Rules to use a custom event.
* Include an event property when entering users into the Journey.
For example, you have a "Survey Reminder" Journey. You have multiple surveys which means users can enter the Journey multiple times (once for each survey). You want to send a reminder message if they did not complete the survey or remove them if they did.
You can use the **Event Matching** setting to control which instance of the user to progress through the Journey.
**Example**:
Set the Journey Entry Rules to use a custom event. **Example**: `survey_start`
 Users will enter the Journey via the [Custom Event API](/reference/create-custom-events).
The custom event will have the `name` set to `survey_start` and a `payload` property `survey_id` with a value of the survey they are taking (e.g., `survey_1`).
```json Entrance Trigger Event Example theme={null}
{
"events": [
{
"external_id": "UserA",
"name": "survey_start",
"properties": {
"survey_id": "survey_1"
}
}
]
}
```
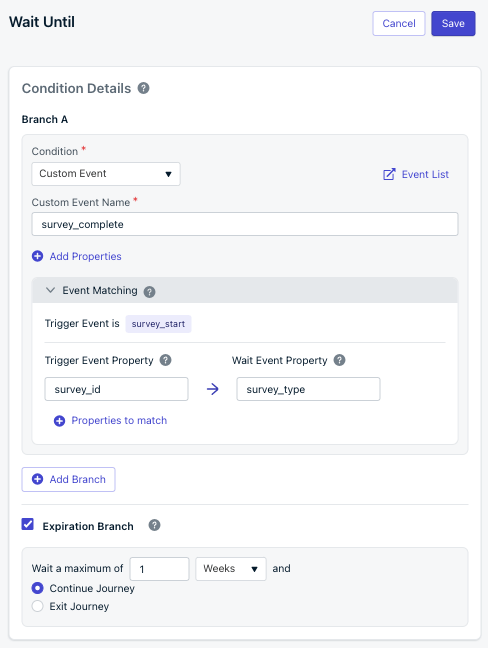
Set the Wait Until condition to use a custom event. **Example**: `survey_complete`
Set the **Event Matching** option to specify which instance of the user to progress through the Wait Until step by matching the:
* **Trigger Event Property**: set in the Journey entrance trigger event (e.g., `survey_id`)
* **Wait Event Property**: set in the Wait Until event (e.g., `survey_type`)
```json Wait Until Event Example theme={null}
{
"events": [
{
"external_id": "UserA",
"name": "survey_complete",
"properties": {
"survey_type": "survey_1"
}
}
]
}
```
When the value of `survey_id` matches the value of `survey_type`, that instance of the user will progress through the Journey.
You can use the same properties (e.g., `survey_id`) in both the **Trigger Event Property** and the **Wait Event Property**. The example uses different properties (e.g., `survey_id` and `survey_type`) to demonstrate the concept.
Properties are case-sensitive! `survey_1` does not equal `Survey_1`.
**Expiration branch**:
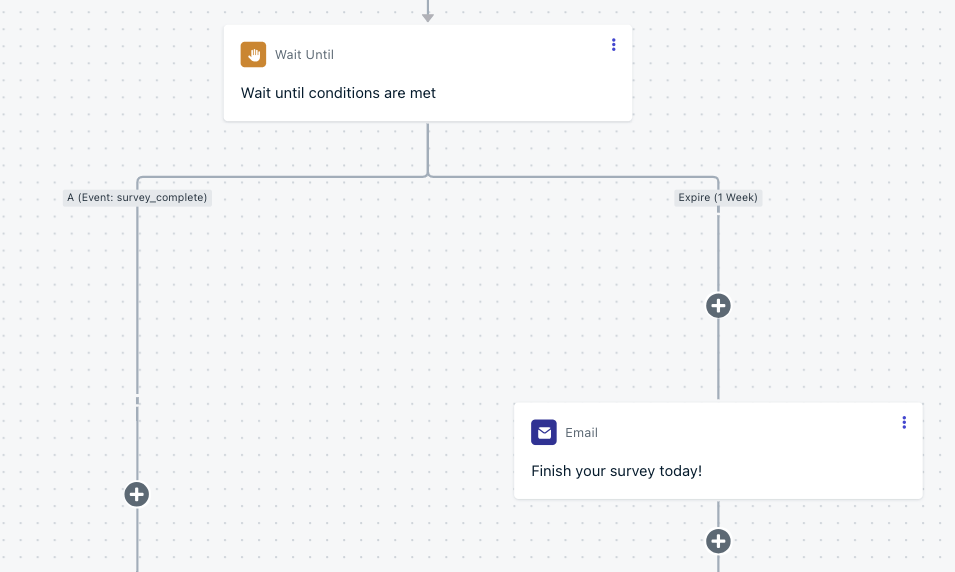
If the Wait Until event does not occur within the expiration time, the user will progress through the Journey. This example gives the user 1 week to complete the survey.
Users will enter the Journey via the [Custom Event API](/reference/create-custom-events).
The custom event will have the `name` set to `survey_start` and a `payload` property `survey_id` with a value of the survey they are taking (e.g., `survey_1`).
```json Entrance Trigger Event Example theme={null}
{
"events": [
{
"external_id": "UserA",
"name": "survey_start",
"properties": {
"survey_id": "survey_1"
}
}
]
}
```
Set the Wait Until condition to use a custom event. **Example**: `survey_complete`
Set the **Event Matching** option to specify which instance of the user to progress through the Wait Until step by matching the:
* **Trigger Event Property**: set in the Journey entrance trigger event (e.g., `survey_id`)
* **Wait Event Property**: set in the Wait Until event (e.g., `survey_type`)
```json Wait Until Event Example theme={null}
{
"events": [
{
"external_id": "UserA",
"name": "survey_complete",
"properties": {
"survey_type": "survey_1"
}
}
]
}
```
When the value of `survey_id` matches the value of `survey_type`, that instance of the user will progress through the Journey.
You can use the same properties (e.g., `survey_id`) in both the **Trigger Event Property** and the **Wait Event Property**. The example uses different properties (e.g., `survey_id` and `survey_type`) to demonstrate the concept.
Properties are case-sensitive! `survey_1` does not equal `Survey_1`.
**Expiration branch**:
If the Wait Until event does not occur within the expiration time, the user will progress through the Journey. This example gives the user 1 week to complete the survey.
 To complete the example, add a message step within the Expiration branch to send the reminder.
 After following the steps above, you can test it:
* Replace the `external_id` in the [Custom Event API](/reference/create-custom-events) with your external ID
* Trigger the `survey_start` event with a `survey_id` of `survey_1`
* You will see your user enter the Journey and flow into the Wait Until step
Events are not immediate but very quick! You may need to wait a few minutes before the event is processed.
Check the Custom Events list to see if the event was processed.
* Trigger another `survey_start` event with a `survey_id` of `survey_2`
* You will see 2 users enter the Journey and Wait Until step
* Trigger the `survey_complete` event with a `survey_type` of `survey_1`
* You will see your user progress through the Journey
* Trigger another `survey_complete` event with a `survey_type` of `survey_2`
* You will see both instances of your user progress through the Journey and exit
You completed the Journey custom event example with Event Matching!
***
## Time Window
Restrict when users can move to the next step in the Journey based on **specific days and times**.
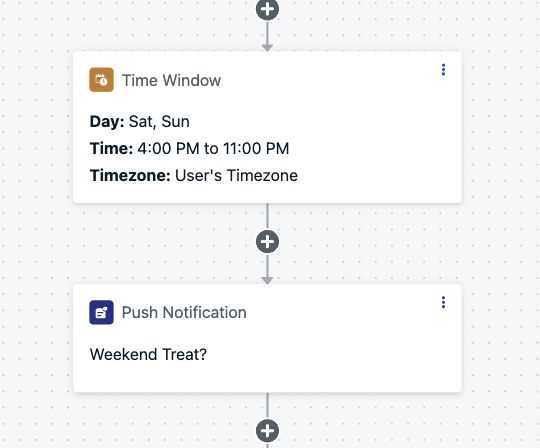
**Example**: Only allow users to receive a message on weekends in the evening.
After following the steps above, you can test it:
* Replace the `external_id` in the [Custom Event API](/reference/create-custom-events) with your external ID
* Trigger the `survey_start` event with a `survey_id` of `survey_1`
* You will see your user enter the Journey and flow into the Wait Until step
Events are not immediate but very quick! You may need to wait a few minutes before the event is processed.
Check the Custom Events list to see if the event was processed.
* Trigger another `survey_start` event with a `survey_id` of `survey_2`
* You will see 2 users enter the Journey and Wait Until step
* Trigger the `survey_complete` event with a `survey_type` of `survey_1`
* You will see your user progress through the Journey
* Trigger another `survey_complete` event with a `survey_type` of `survey_2`
* You will see both instances of your user progress through the Journey and exit
You completed the Journey custom event example with Event Matching!
***
## Time Window
Restrict when users can move to the next step in the Journey based on **specific days and times**.
**Example**: Only allow users to receive a message on weekends in the evening.
 ### How time window behavior works
When a user enters this node, OneSignal checks whether the current time falls inside the allowed window:
* If the window is **currently open**, the user continues immediately with no delay.
* If the window is in the **future** (or has already closed for the day), OneSignal delays the user until the next available window. To prevent traffic spikes at the moment a window opens, each user's release time is randomized between the **window start** and **window start + 15 minutes**.
The time window can use the **user's time zone** when time zone data is available. If a user does not have time zone data, the app's default time zone is used.
**Example**:
If your time window is Tuesdays from 1:00 PM to 6:00 PM and a user hits the node on Monday, they continue Tuesday at a random time between 1:00 PM and 1:15 PM. If the user instead hits the node on Tuesday at 3:00 PM, they continue immediately.
### Using time windows for recurring sends
Combine a time window node with [re-entry rules](./journeys-settings#re-entry-rules) to send recurring messages on a schedule (daily, weekly, etc.). Place the time window as the **first step** in the Journey so users wait for the right day and time before receiving the message.
When choosing a re-entry duration, set it **longer than the time window duration** but shorter than the send interval. This prevents double-sends within the same window while ensuring users re-enter early enough to catch the next window.
**Example — daily send:**
* Time window: every day, 10 AM – 6 PM (8-hour window)
* Re-entry: 12 hours (longer than the 8-hour window, shorter than 24 hours)
* Result: users re-enter \~12 hours after exiting, always arrive before the next day's window closes, and receive one message per day
See [Recurring journeys for specific days](./journeys-examples#recurring-journeys-for-specific-days) and [Can I schedule a message to send every day?](./journeys-examples#can-i-schedule-a-message-to-send-every-day) for full examples.
***
## Yes/No branch
Branch users based on **segment membership** or **message behavior**.
### Segment membership
Create branches based on what segment a user is in.
**Example**:
If users are tagged by plan type:
* “Free” branch = promote upgrade
* “Paid” branch = highlight premium features
### Message behavior
Branch based on interaction with previous messages in the Journey:
* **Push**: Clicked, Delivered
* **Email**: Clicked, Opened, Delivered
**Note**: Safari does not support [confirmed receipts](./confirmed-delivery).
***
## Split Branch
Randomly distribute users across different paths to test messaging, channels, or Journey flows.
### How time window behavior works
When a user enters this node, OneSignal checks whether the current time falls inside the allowed window:
* If the window is **currently open**, the user continues immediately with no delay.
* If the window is in the **future** (or has already closed for the day), OneSignal delays the user until the next available window. To prevent traffic spikes at the moment a window opens, each user's release time is randomized between the **window start** and **window start + 15 minutes**.
The time window can use the **user's time zone** when time zone data is available. If a user does not have time zone data, the app's default time zone is used.
**Example**:
If your time window is Tuesdays from 1:00 PM to 6:00 PM and a user hits the node on Monday, they continue Tuesday at a random time between 1:00 PM and 1:15 PM. If the user instead hits the node on Tuesday at 3:00 PM, they continue immediately.
### Using time windows for recurring sends
Combine a time window node with [re-entry rules](./journeys-settings#re-entry-rules) to send recurring messages on a schedule (daily, weekly, etc.). Place the time window as the **first step** in the Journey so users wait for the right day and time before receiving the message.
When choosing a re-entry duration, set it **longer than the time window duration** but shorter than the send interval. This prevents double-sends within the same window while ensuring users re-enter early enough to catch the next window.
**Example — daily send:**
* Time window: every day, 10 AM – 6 PM (8-hour window)
* Re-entry: 12 hours (longer than the 8-hour window, shorter than 24 hours)
* Result: users re-enter \~12 hours after exiting, always arrive before the next day's window closes, and receive one message per day
See [Recurring journeys for specific days](./journeys-examples#recurring-journeys-for-specific-days) and [Can I schedule a message to send every day?](./journeys-examples#can-i-schedule-a-message-to-send-every-day) for full examples.
***
## Yes/No branch
Branch users based on **segment membership** or **message behavior**.
### Segment membership
Create branches based on what segment a user is in.
**Example**:
If users are tagged by plan type:
* “Free” branch = promote upgrade
* “Paid” branch = highlight premium features
### Message behavior
Branch based on interaction with previous messages in the Journey:
* **Push**: Clicked, Delivered
* **Email**: Clicked, Opened, Delivered
**Note**: Safari does not support [confirmed receipts](./confirmed-delivery).
***
## Split Branch
Randomly distribute users across different paths to test messaging, channels, or Journey flows.
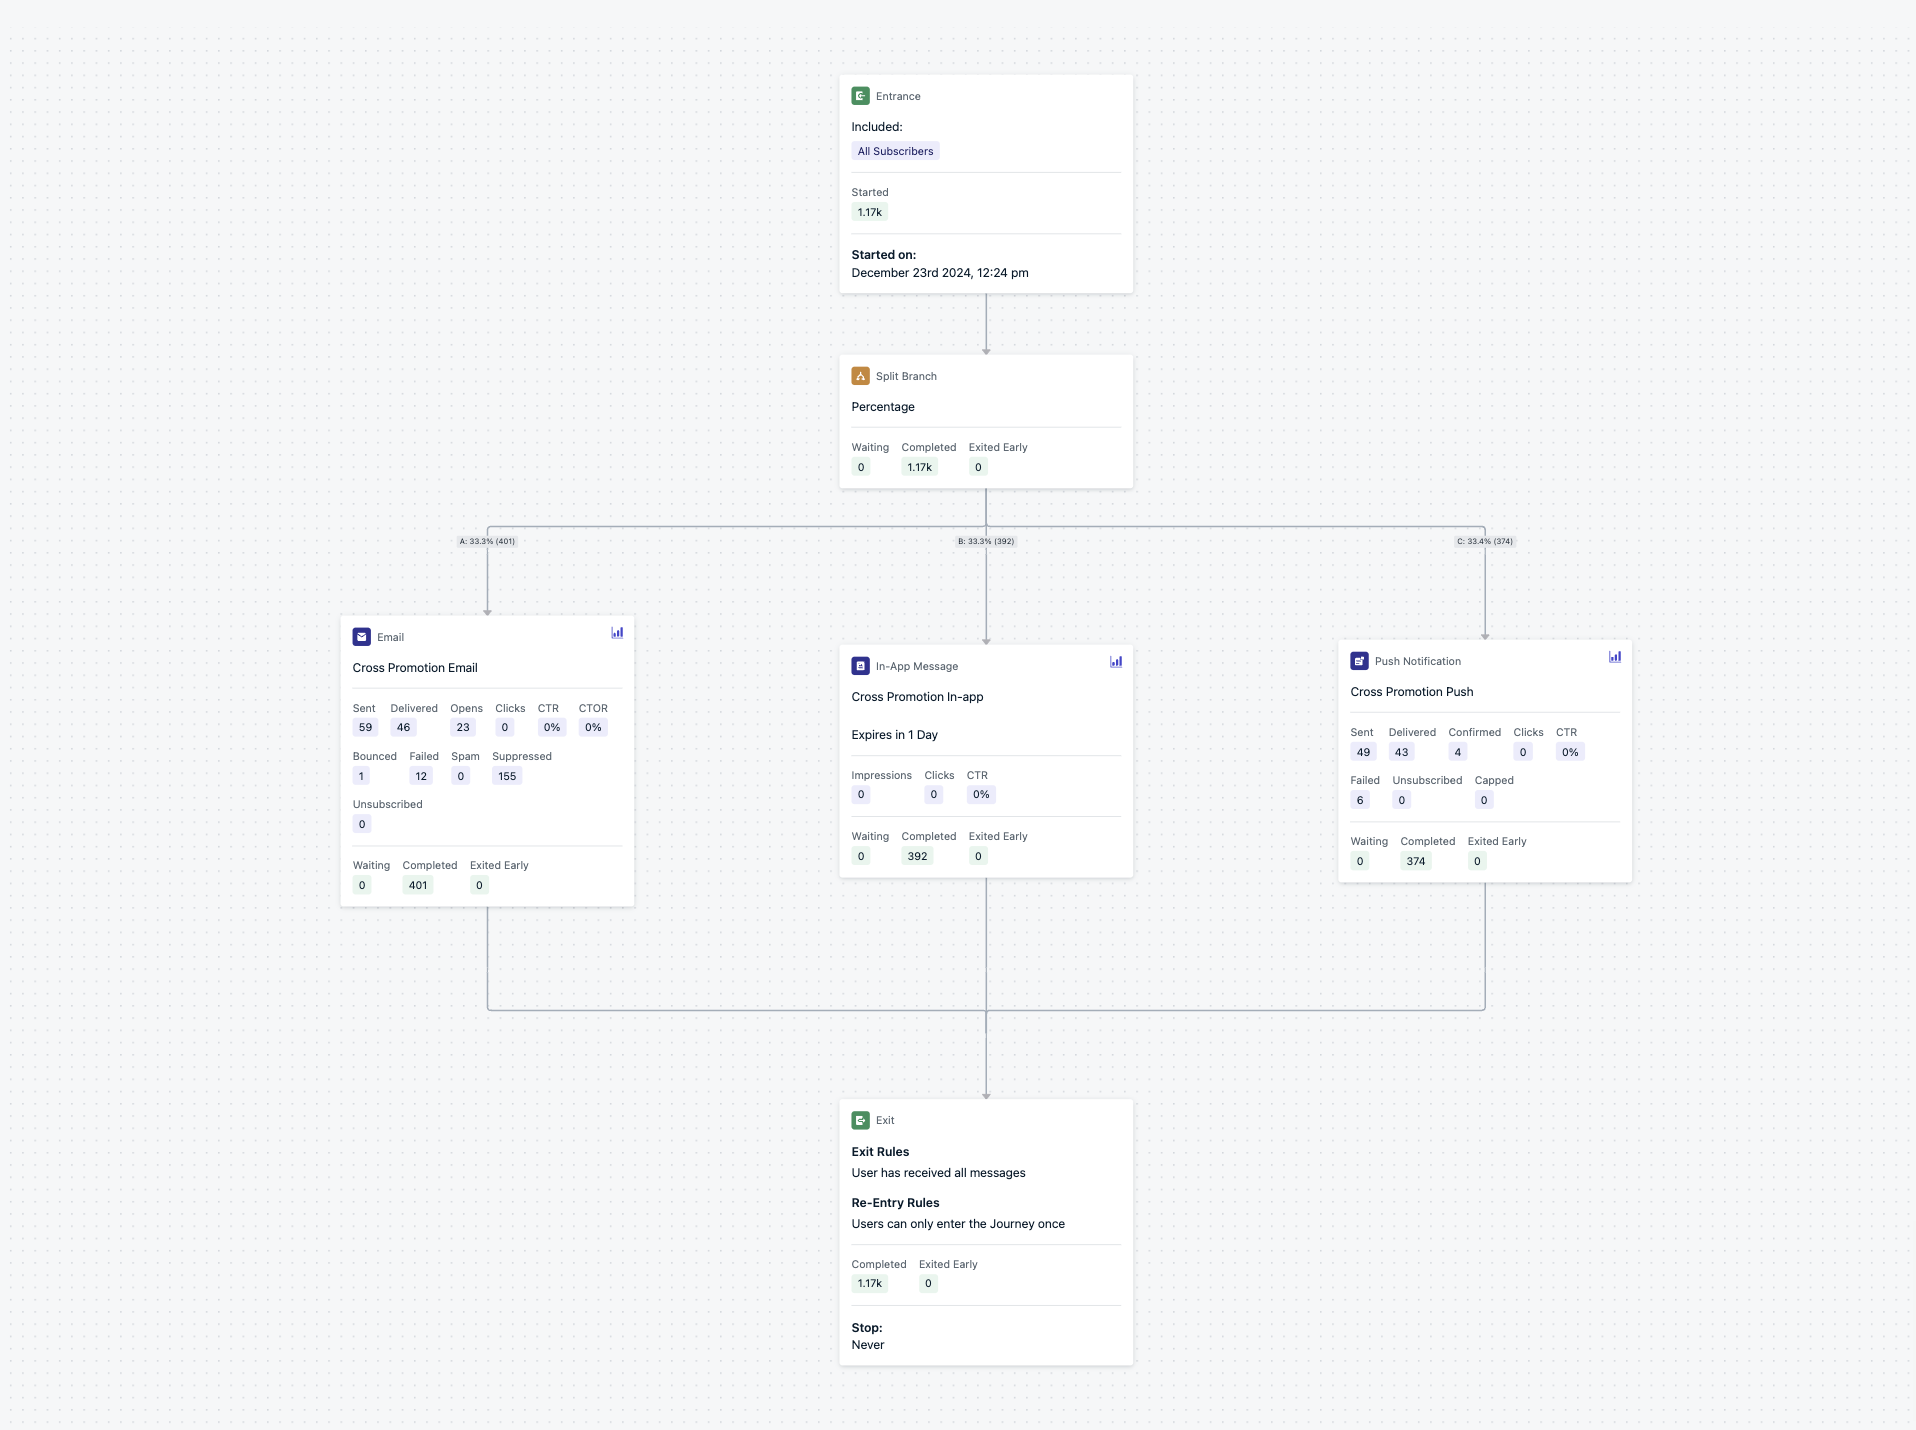 Once a Journey is live, you **cannot edit** a Split Branch. To change the number of branches, create a new Journey.
### How it works
* Up to 20 branches
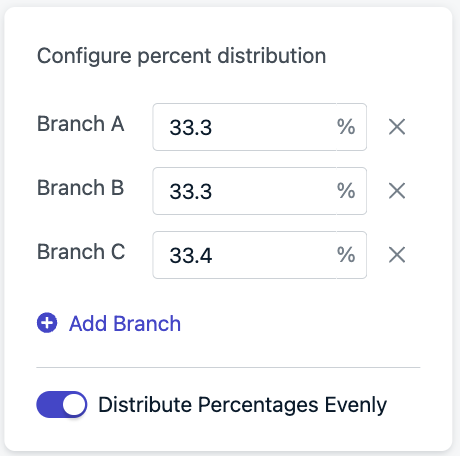
* Set equal or custom percentage splits
* Percentages round to whole numbers (e.g., 3-way split becomes 34/33/33)
* Distribution may vary slightly with small sample sizes
Once a Journey is live, you **cannot edit** a Split Branch. To change the number of branches, create a new Journey.
### How it works
* Up to 20 branches
* Set equal or custom percentage splits
* Percentages round to whole numbers (e.g., 3-way split becomes 34/33/33)
* Distribution may vary slightly with small sample sizes
 By default, users are re-randomized each time they re-enter a Journey.
To keep them on the same branch, turn off **Randomize on re-entry**.
Use the **Tag User** action to track which branch a user followed.
### A/B/N Tests
Use nested Split Branches to test more than two variants simultaneously.
**Example**:
To split users equally across 3 variants:
1. First branch: 33% vs 67%
2. Under the 67% branch, add another 50/50 Split Branch
This gives \~33% on each path.
### Control Groups
Test the impact of messaging by leaving one branch empty (no message nodes). This lets you compare against users who receive no message at all.
### Choosing a Winner
Once a winning variant is identified, update the branch to send **100%** of traffic down that path (and 0% down the losing branch).
To continue measuring impact over time, consider keeping a small **holdout group**—a percentage of users who don't receive the winning message.
***
## Tag User
Use this action to apply or remove tags during a Journey.
**Common use cases**:
* Track Journey progress (e.g., `journeyStep: welcome`)
* Power in-app messages by tagging users at key moments
* Exclude users from other Journeys using active tags
By default, users are re-randomized each time they re-enter a Journey.
To keep them on the same branch, turn off **Randomize on re-entry**.
Use the **Tag User** action to track which branch a user followed.
### A/B/N Tests
Use nested Split Branches to test more than two variants simultaneously.
**Example**:
To split users equally across 3 variants:
1. First branch: 33% vs 67%
2. Under the 67% branch, add another 50/50 Split Branch
This gives \~33% on each path.
### Control Groups
Test the impact of messaging by leaving one branch empty (no message nodes). This lets you compare against users who receive no message at all.
### Choosing a Winner
Once a winning variant is identified, update the branch to send **100%** of traffic down that path (and 0% down the losing branch).
To continue measuring impact over time, consider keeping a small **holdout group**—a percentage of users who don't receive the winning message.
***
## Tag User
Use this action to apply or remove tags during a Journey.
**Common use cases**:
* Track Journey progress (e.g., `journeyStep: welcome`)
* Power in-app messages by tagging users at key moments
* Exclude users from other Journeys using active tags
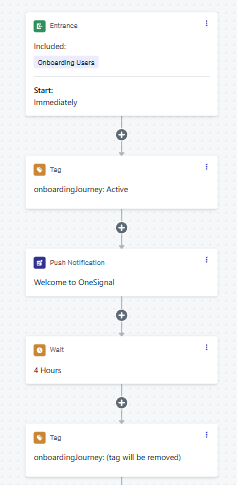 ### Example: onboarding flow control
1. First step: Add a tag (e.g., `onboardingJourney: active`)
2. Use this tag to create a segment for exclusion from other Journeys
3. Last step: Remove the tag by setting the value to blank
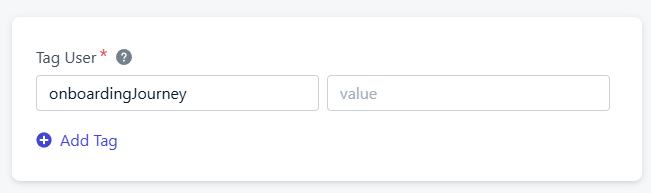
### Example: onboarding flow control
1. First step: Add a tag (e.g., `onboardingJourney: active`)
2. Use this tag to create a segment for exclusion from other Journeys
3. Last step: Remove the tag by setting the value to blank
 ***
### Best practice: Using tags with webhooks or personalization
When you add or remove tags in a Journey, it can take a short time before those changes are ready to use in the next step. To make sure everything works smoothly:
* **For Webhooks**: Add a short wait after setting a tag before sending data with a webhook.
* **For Personalization**: Add a short wait after setting or removing a tag before using it in an email to personalize content.
We recommend adding a **15-minute Wait node** between the Tag action and the next step. This ensures the tag is fully ready, so your webhook or email always includes the correct data.
***
## FAQ
### Can I branch a Journey based on which push action button was clicked?
Not with the built-in Yes/No branch alone — the message behavior conditions only detect "Clicked" or "Delivered," not which specific button was clicked. To branch by button, listen for the click event in your SDK, read the Action ID, and send a [Custom Event](./custom-events). Then use a [Wait Until](#wait-until) step to branch based on which custom event fires first.
See [Branch a Journey by action button clicked](./journeys-examples#branch-a-journey-by-action-button-clicked) for a full walkthrough with code examples.
### Do I need to write code to use Custom Events in a Journey?
Yes. Custom Events are sent to OneSignal from your app or website using the [SDK](./mobile-sdk-reference#custom-events), or from your backend using the [REST API](/reference/create-custom-events). There is no dashboard-only way to fire Custom Events. Once events are flowing into OneSignal, you can use them in Journeys and Segments through the dashboard without additional code.
***
***
### Best practice: Using tags with webhooks or personalization
When you add or remove tags in a Journey, it can take a short time before those changes are ready to use in the next step. To make sure everything works smoothly:
* **For Webhooks**: Add a short wait after setting a tag before sending data with a webhook.
* **For Personalization**: Add a short wait after setting or removing a tag before using it in an email to personalize content.
We recommend adding a **15-minute Wait node** between the Tag action and the next step. This ensures the tag is fully ready, so your webhook or email always includes the correct data.
***
## FAQ
### Can I branch a Journey based on which push action button was clicked?
Not with the built-in Yes/No branch alone — the message behavior conditions only detect "Clicked" or "Delivered," not which specific button was clicked. To branch by button, listen for the click event in your SDK, read the Action ID, and send a [Custom Event](./custom-events). Then use a [Wait Until](#wait-until) step to branch based on which custom event fires first.
See [Branch a Journey by action button clicked](./journeys-examples#branch-a-journey-by-action-button-clicked) for a full walkthrough with code examples.
### Do I need to write code to use Custom Events in a Journey?
Yes. Custom Events are sent to OneSignal from your app or website using the [SDK](./mobile-sdk-reference#custom-events), or from your backend using the [REST API](/reference/create-custom-events). There is no dashboard-only way to fire Custom Events. Once events are flowing into OneSignal, you can use them in Journeys and Segments through the dashboard without additional code.
***