> ## Documentation Index
> Fetch the complete documentation index at: https://documentation.onesignal.com/llms.txt
> Use this file to discover all available pages before exploring further.
# Personalize with Custom Events
> Use Custom Event properties to personalize Journey messages with Liquid syntax. Learn how events are stored, accessed, and rendered in push, email, and SMS templates.
[Custom Events](./custom-events) let you personalize Journey messages using event properties (product names, prices, URLs, arrays, etc.).
Event properties become available in templates only if the event:
* Triggers Journey entry, or
* Matches a **Wait Until** condition inside the Journey
Stored event properties can be accessed using [Liquid syntax](./using-liquid-syntax).
***
## How Custom Event personalization works
Add event properties to your Journey messages following these steps:
Example [Custom Events](./custom-events) payload:
```json JSON theme={null}
{
"name": "purchase",
"properties": {
"item": "Blue Sweater",
"price": "29.99",
"order status": "pending",
"details": [
{
"manufacturer": "Company A",
"model": "1234567890"
},
{
"manufacturer": "Company B",
"model": "9876543210"
}
]
},
"external_id": "user_12345",
"timestamp": "2025-10-21T19:09:32.263Z",
}
```
Use [Liquid syntax](./using-liquid-syntax) to access event properties.
### Common Liquid access patterns
| What you want | Liquid | Output |
| -------------------------------- | --------------------------------------------------------------------- | ------------------------------ |
| Event name | `{{ journey.first_event.name }}` | `purchase` |
| Property | `{{ journey.first_event.properties.item }}` | `Blue Sweater` |
| Nested properties | `{{ journey.first_event.properties.details.first.manufacturer }}` | `Company A` |
| Property with special characters | `{{ journey.last_event.properties["order status"] }}` | `pending` |
| Timestamp | `{{ journey.last_event.timestamp \| date: "%B %d, %Y at %I:%M %p" }}` | `October 21, 2025 at 07:09 PM` |
#### Nested Liquid access patterns
You can also access nested properties using dot and bracket notation:
```liquid Liquid theme={null}
{{ journey.first_event.properties.details.first.manufacturer }} = Company A
{{ journey.first_event.properties.details.last.manufacturer }} = Company B
{{ journey.first_event.properties.details[0].manufacturer }} = Company A
{{ journey.first_event.properties.details[1].manufacturer }} = Company B
```
Invalid Liquid or missing properties render as empty strings. Messages still send. Use [default filters](./using-liquid-syntax#default) to set a fallback.
Setup the Journey to use the Custom Event as the entry rule and/or Wait Until condition.
* See [Journeys settings](./journeys-settings) for Entry rules.
* See [Journeys actions](./journeys-actions) for Wait Until conditions.
Add message nodes with the templates.
### Event property storage rules
* You can use multiple events in your Journey by combining entry rules and Wait Until steps.
* Maximum: **100 stored event properties per user per Journey instance** (oldest dropped).
* Event properties are stored **per user, per Journey instance**.
* Events sent before entry are not accessible.
* Event properties are cleared when the user exits the Journey.
Events stored in one Journey cannot be accessed in another Journey.
***
## Custom Event Liquid reference
Use these objects to access stored events inside the Journey.
The first stored event for this Journey instance.
* If using a **Custom Event Entry Rule**, than this is the event that caused Journey entry.
* If not using a Custom Event Entry Rule, then this is the first event stored by matching a Wait Until condition.
```liquid Liquid theme={null}
Thanks for purchasing {{ journey.first_event.properties.item | default: "your item" }}!
```
The most recent stored event for this Journey instance.
* If only one event is stored, `first_event` and `last_event` return the same thing.
```liquid Liquid theme={null}
Your most recent purchase was {{ journey.last_event.properties.item | default: "made" }}!
```
The most recent stored event with a specific name.
* Replace `EVENT_NAME` with your event name (e.g., `purchase`).
* If the same event name is used multiple times, this returns the most recent instance.
```liquid Liquid theme={null}
{% assign event = journey.event.purchase %}
```
If your event name includes spaces or special characters, use [bracket notation](https://shopify.dev/docs/api/liquid/basics#referencing-handles).
**Example Event:** `"name": "order status"`
```liquid Liquid theme={null}
{% assign event = journey.event["order status"] %}
```
All stored events for this Journey instance, in the order they were stored.
* Use [for loops](./using-liquid-syntax#for-loops) to iterate over them.
```liquid Liquid theme={null}
{% for event in journey.all_events %}
• {{ event.properties.item | default: "Item" }} — ${{ event.properties.price | default: "0.00" }}
{% endfor %}
```
* `journey.first_event` is shorthand for `journey.all_events[0]`.
* `journey.last_event` is shorthand for the most recent event in the array.
***
## Example: Abandoned cart templates using Custom Events
This example shows how to personalize abandoned cart messages using Custom Events. It builds on the [Abandoned Cart tutorial](./abandoned-cart).
**Example Custom Event set:**
```json JSON theme={null}
{
"events": [
{
"name": "cart_abandoned",
"properties": {
"cart_url": "https://yourdomain.com/username/cart",
"cart": [
{
"product_name": "24 Pack of Acorns",
"product_image": "https://i.imgur.com/ssPCfbC.png",
"product_price": "$12.99",
"product_quantity": "1"
},
{
"product_name": "Fancy Sweater",
"product_image": "https://i.imgur.com/8QWTfV4.png",
"product_price": "$9.99",
"product_quantity": "1"
}
]
},
"external_id": "ID_OF_THE_USER"
}
]
}
```
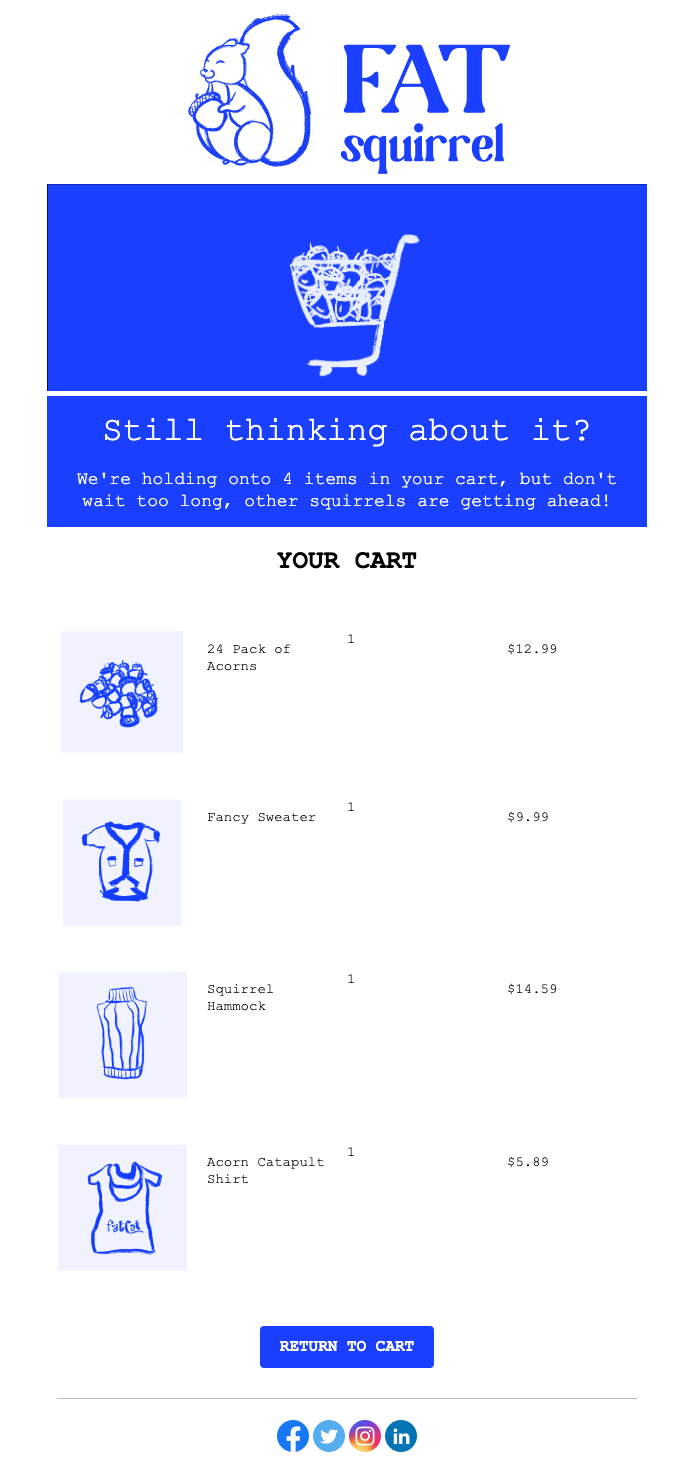
### Email template
This example shows how to build an email template that displays:
* The cart item count
* Each product with image, name, quantity, and price using a for-loop
* A button that links to the customer's unique cart URL
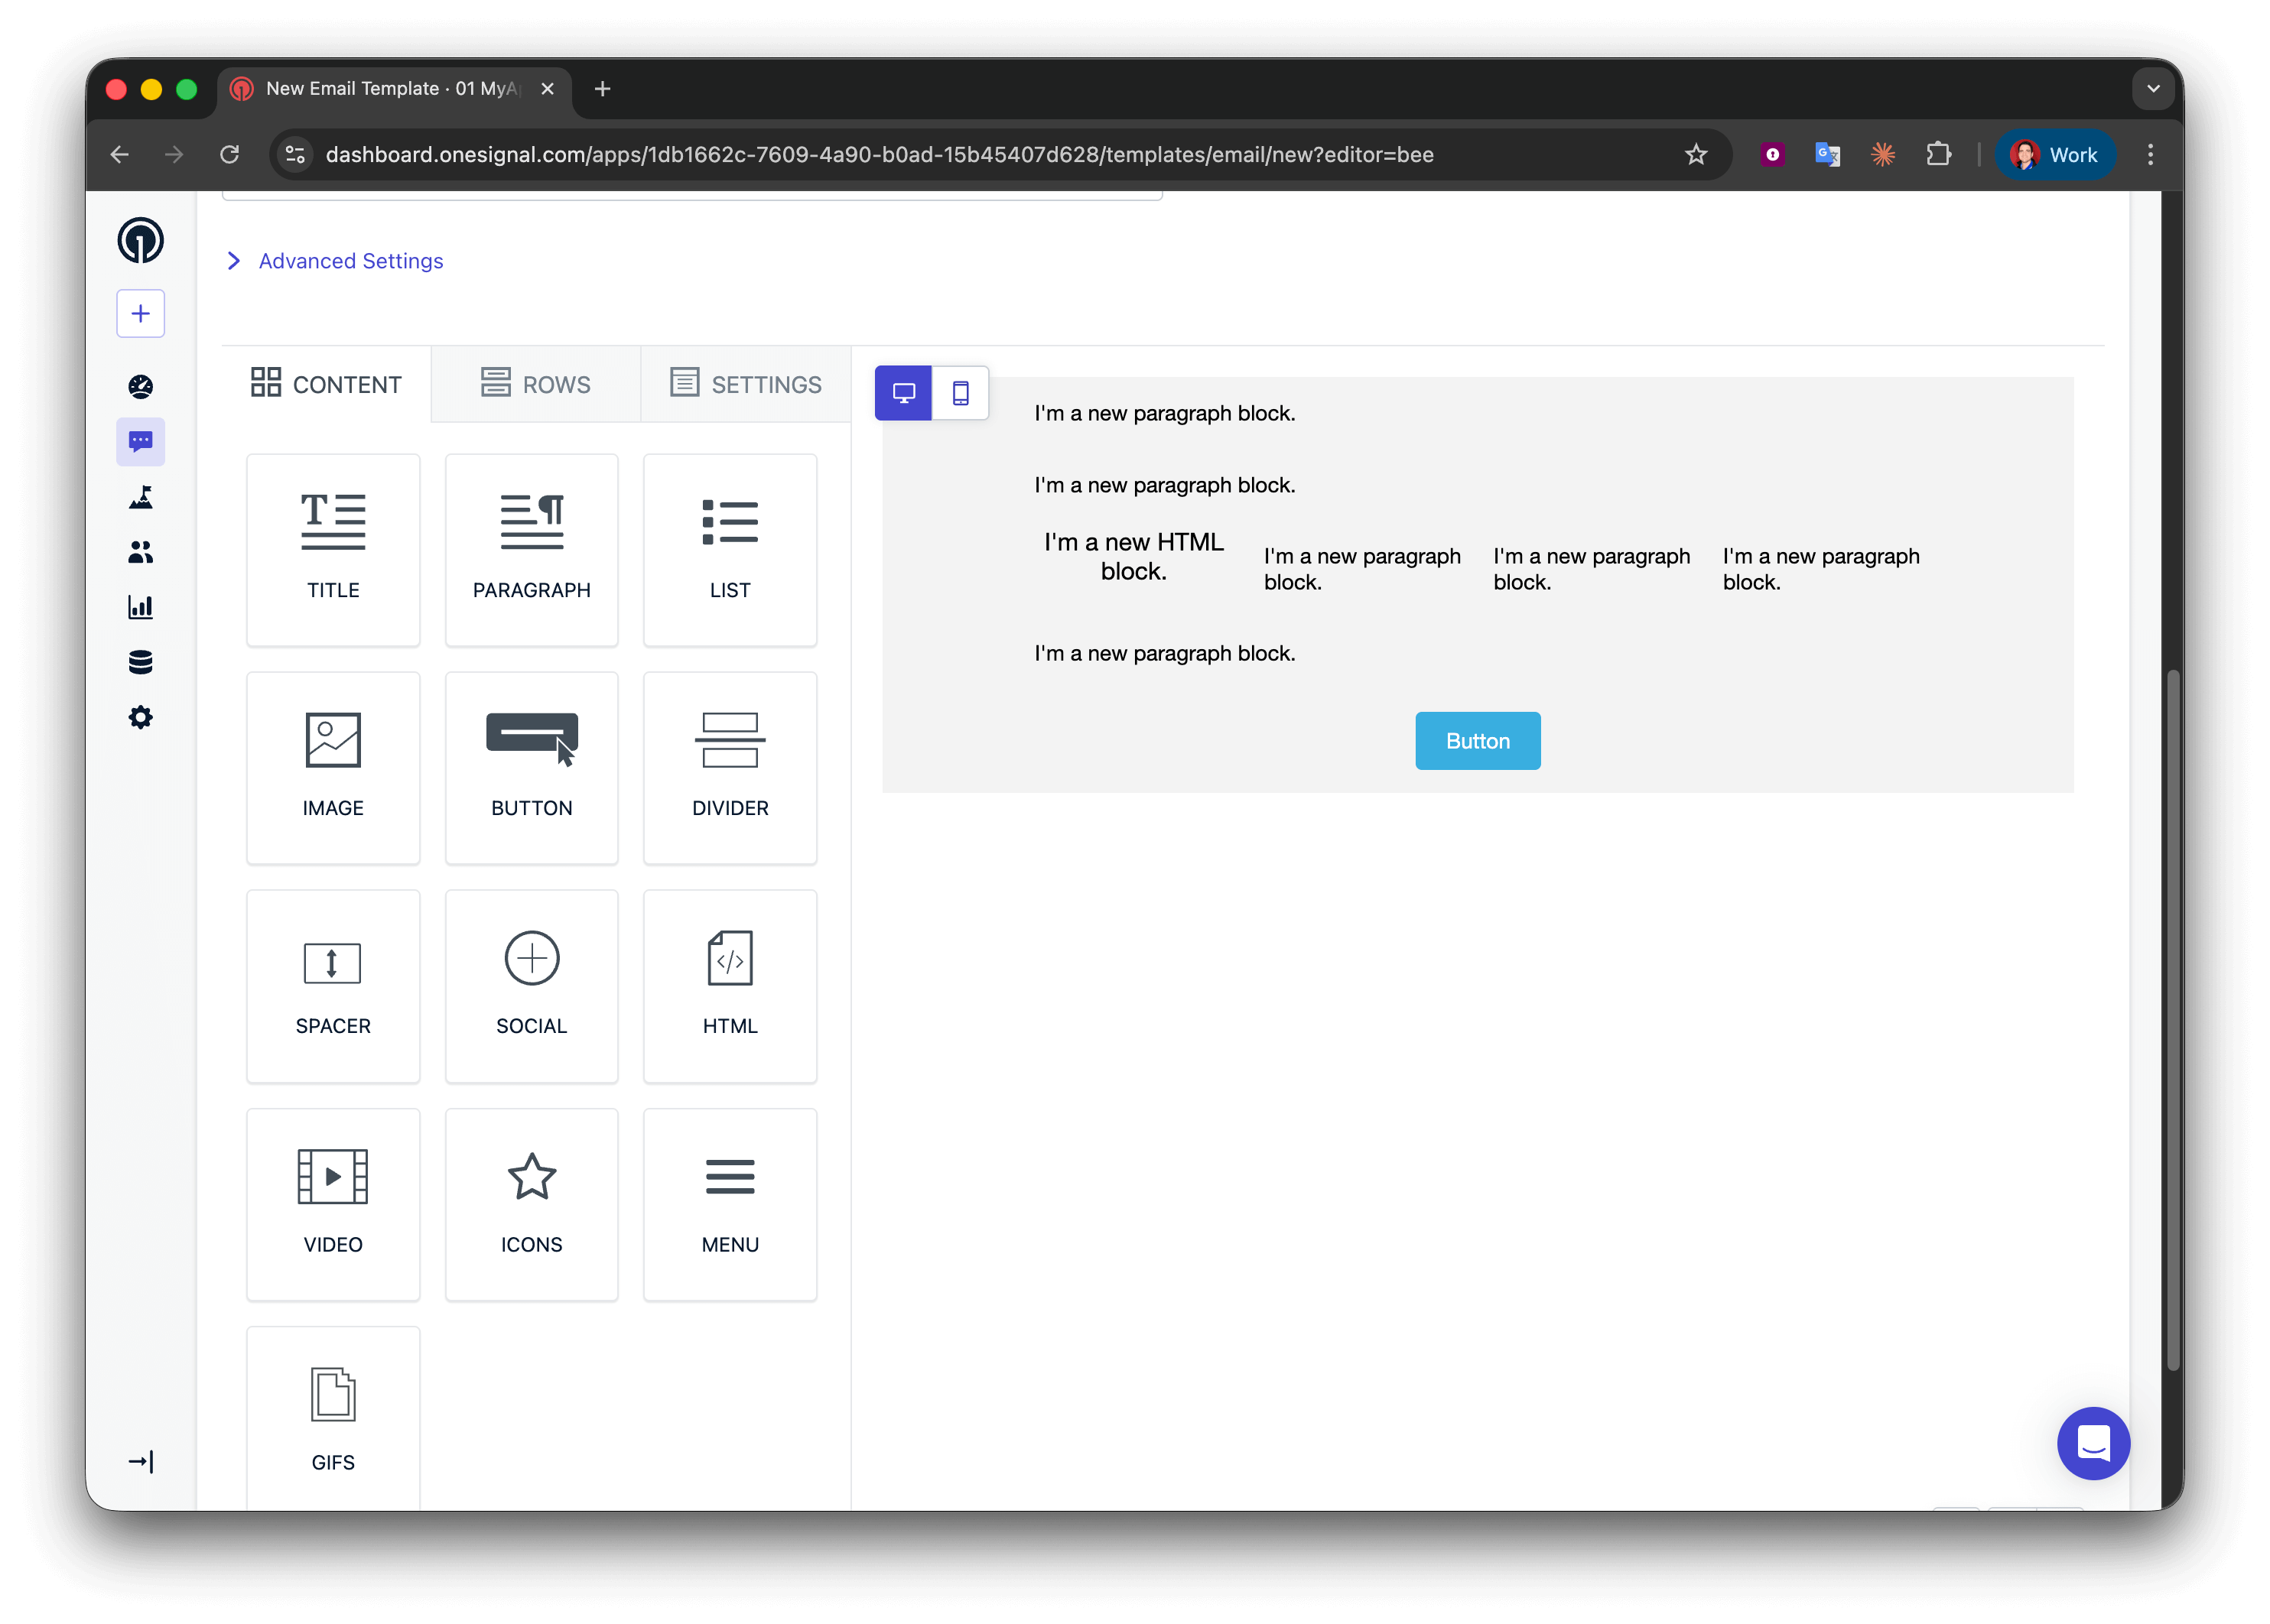
 Navigate to **Messages > Templates > New Email Template** and open the Drag & Drop Editor.
Create five rows:
* Rows 1, 2, and 4: one column with a **Paragraph** block
* Row 3: four columns with **HTML | Paragraph | Paragraph | Paragraph**
* Row 5: one column with a **Button** block
Navigate to **Messages > Templates > New Email Template** and open the Drag & Drop Editor.
Create five rows:
* Rows 1, 2, and 4: one column with a **Paragraph** block
* Row 3: four columns with **HTML | Paragraph | Paragraph | Paragraph**
* Row 5: one column with a **Button** block
 In row 1, add:
```liquid Liquid theme={null}
We're holding onto {{journey.first_event.properties.cart.size}} items in your cart, but don't wait too long!
```
For better grammar, you could use a conditional to say "1 item" vs "2 items", but for abandoned cart emails, plural is usually acceptable.
```liquid Liquid theme={null}
{% assign cart = message.custom_data.cart %}
{% assign item_count = cart.size | plus: 0 %}
{% if item_count == 1 %}
We're holding onto {{item_count}} item in your cart, but don't wait too long, other squirrels are getting ahead!
{% endif %}
{% if item_count > 1 %}
We're holding onto {{item_count}} items in your cart, but don't wait too long, other squirrels are getting ahead!
{% endif %}
```
Use a [for-loop](./using-liquid-syntax#for-loops) to repeat the product display row for each cart item.
In row 2 (loop start), add:
```liquid Liquid theme={null}
{% for product in journey.first_event.properties.cart %}
```
**What this does:**
* Begins a loop that iterates over each object in the `cart` array
* Creates a temporary variable `product` representing the current item
* Everything between `{% for %}` and `{% endfor %}` repeats once per cart item
* You can name `product` anything (e.g., `item`, `cartItem`)—just stay consistent
For-loop placement: Make sure the `{% for %}` syntax is in its own Text block row. Don't put it inside a multi-column row with other content, as this can break email rendering in some clients.
This 4-column row shows image, name, quantity, and price. Because it's inside the loop, it repeats for every cart item.
In row 3 (product details), configure:
**Column 1 - HTML block** (product image):
```html theme={null}
In row 1, add:
```liquid Liquid theme={null}
We're holding onto {{journey.first_event.properties.cart.size}} items in your cart, but don't wait too long!
```
For better grammar, you could use a conditional to say "1 item" vs "2 items", but for abandoned cart emails, plural is usually acceptable.
```liquid Liquid theme={null}
{% assign cart = message.custom_data.cart %}
{% assign item_count = cart.size | plus: 0 %}
{% if item_count == 1 %}
We're holding onto {{item_count}} item in your cart, but don't wait too long, other squirrels are getting ahead!
{% endif %}
{% if item_count > 1 %}
We're holding onto {{item_count}} items in your cart, but don't wait too long, other squirrels are getting ahead!
{% endif %}
```
Use a [for-loop](./using-liquid-syntax#for-loops) to repeat the product display row for each cart item.
In row 2 (loop start), add:
```liquid Liquid theme={null}
{% for product in journey.first_event.properties.cart %}
```
**What this does:**
* Begins a loop that iterates over each object in the `cart` array
* Creates a temporary variable `product` representing the current item
* Everything between `{% for %}` and `{% endfor %}` repeats once per cart item
* You can name `product` anything (e.g., `item`, `cartItem`)—just stay consistent
For-loop placement: Make sure the `{% for %}` syntax is in its own Text block row. Don't put it inside a multi-column row with other content, as this can break email rendering in some clients.
This 4-column row shows image, name, quantity, and price. Because it's inside the loop, it repeats for every cart item.
In row 3 (product details), configure:
**Column 1 - HTML block** (product image):
```html theme={null}
 ```
**Columns 2–4 - Text blocks** (product name, quantity, price):
* Column 2: `{{product.product_name}}`
* Column 3: `{{product.product_quantity}}`
* Column 4: `{{product.product_price}}`
**How the loop works:**
* On first iteration, `product` = first object in cart array
* `{{product.product_image}}` gets the first item's image
* On second iteration, `product` = second object
* Row repeats automatically for all cart items
**Field name matching:** Keys like `product_image` must exactly match your event payload (case-sensitive). Mismatches render as empty strings.
Close the loop to mark where repetition stops.
In row 4 (loop end), add:
```liquid Liquid theme={null}
{% endfor %}
```
Every `{% for %}` must have a matching `{% endfor %}`. Missing this will break email rendering.
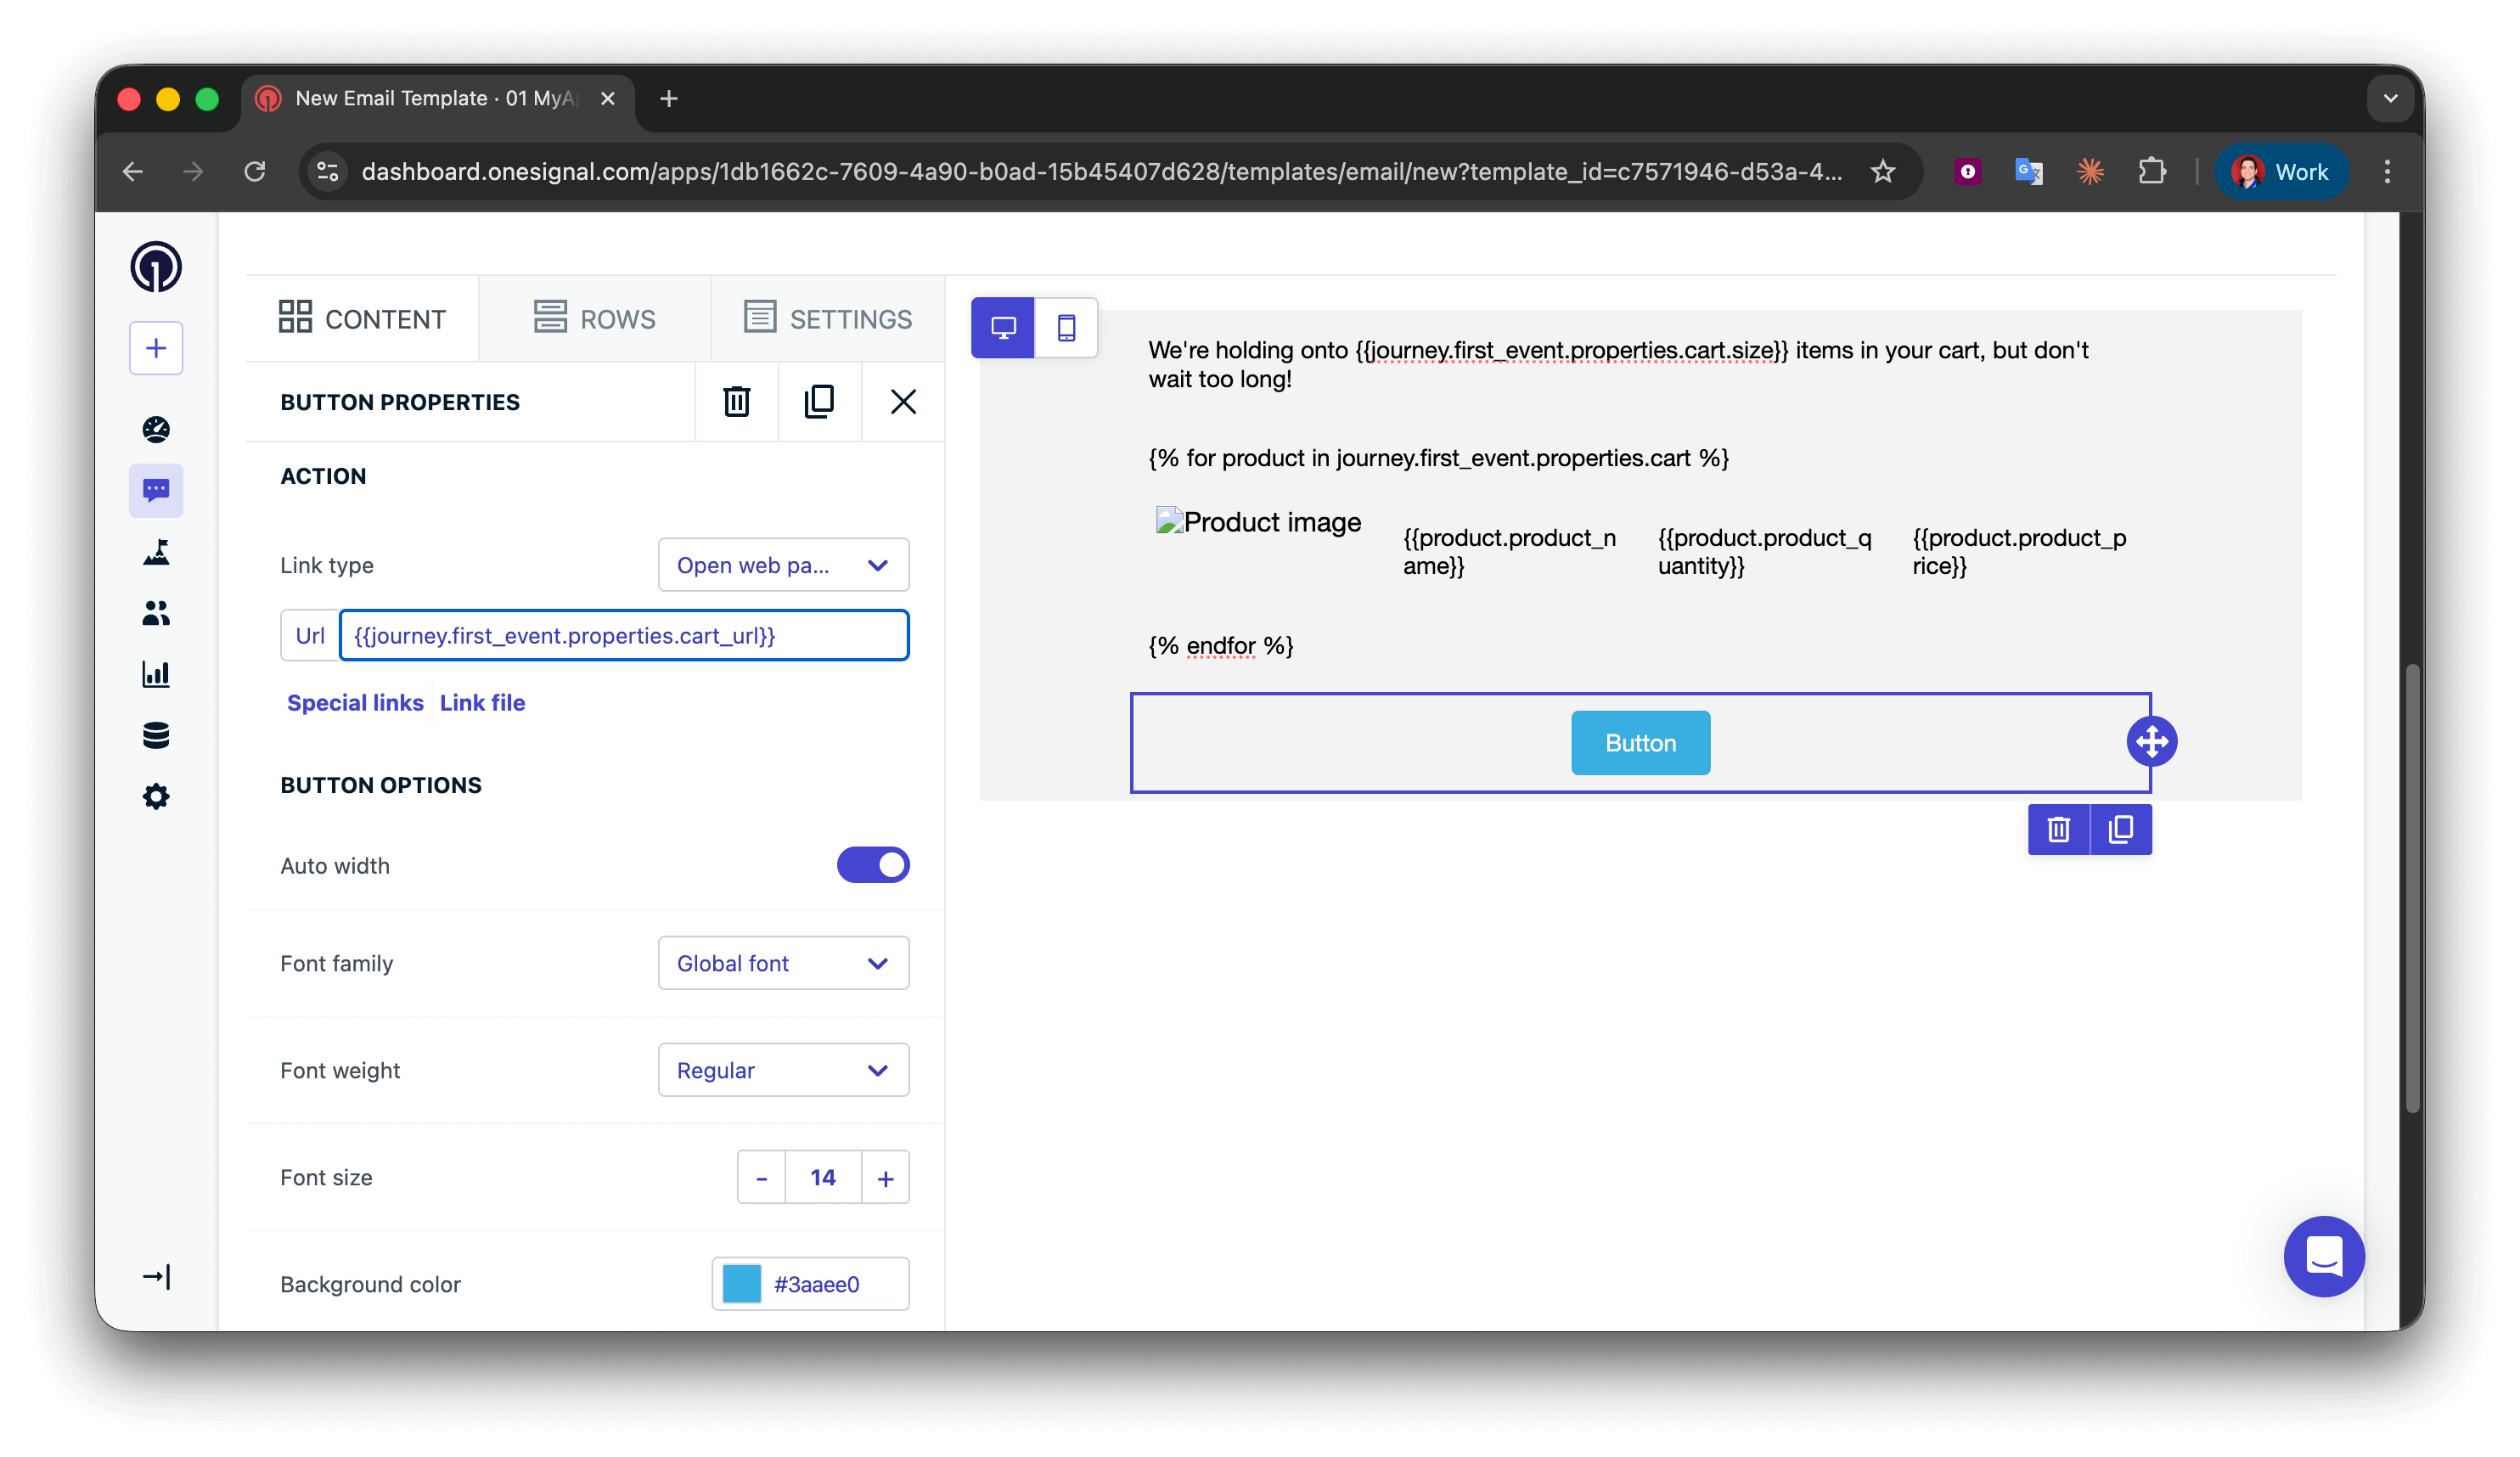
In the row 5 **Button** block, set the Action URL to:
```liquid Liquid theme={null}
{{journey.first_event.properties.cart_url}}
```
```
**Columns 2–4 - Text blocks** (product name, quantity, price):
* Column 2: `{{product.product_name}}`
* Column 3: `{{product.product_quantity}}`
* Column 4: `{{product.product_price}}`
**How the loop works:**
* On first iteration, `product` = first object in cart array
* `{{product.product_image}}` gets the first item's image
* On second iteration, `product` = second object
* Row repeats automatically for all cart items
**Field name matching:** Keys like `product_image` must exactly match your event payload (case-sensitive). Mismatches render as empty strings.
Close the loop to mark where repetition stops.
In row 4 (loop end), add:
```liquid Liquid theme={null}
{% endfor %}
```
Every `{% for %}` must have a matching `{% endfor %}`. Missing this will break email rendering.
In the row 5 **Button** block, set the Action URL to:
```liquid Liquid theme={null}
{{journey.first_event.properties.cart_url}}
```
 * Add the template to a blank Journey and set the entry rule to a Custom Event.
* Enabling the Journey and entering yourself into it via the Custom Event API.
* Verify the data displays correctly.
Success! Now you can apply your own styling to the template. See [Design emails with drag-and-drop](./design-emails-with-drag-and-drop).
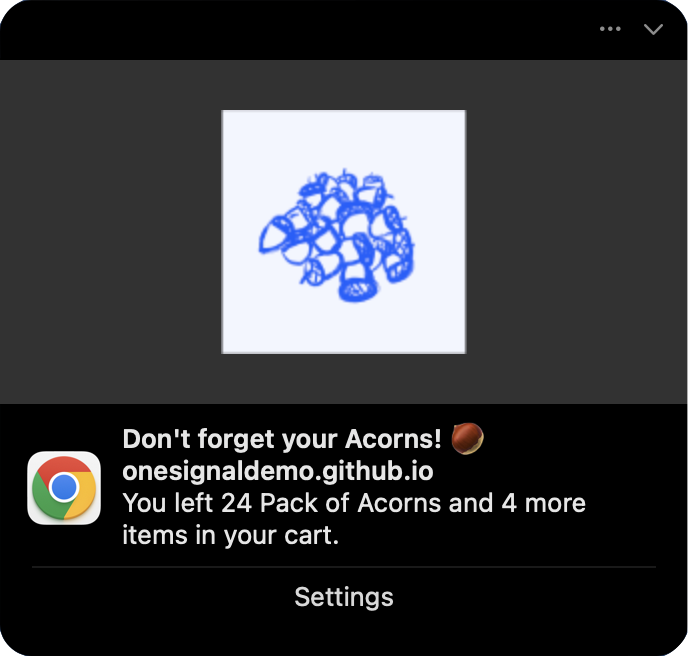
### Push template
Push notifications have limited space, so display one item and mention the total count.
**Message field:**
Display item and count with correct grammar using [conditional statements](./using-liquid-syntax#if-elsif-else).
```liquid Liquid theme={null}
{% assign cart = journey.first_event.properties.cart %}
{% assign item_count = cart.size | plus: 0 %}
{% if item_count == 1 %}
You left {{cart.first.product_name}} in your cart.
{% endif %}
{% if item_count == 2 %}
You left {{cart.first.product_name}} and {{item_count | minus: 1}} more item in your cart.
{% endif %}
{% if item_count > 2 %}
You left {{cart.first.product_name}} and {{item_count | minus: 1}} more items in your cart.
{% endif %}
```
**Image field:**
```liquid Liquid theme={null}
{{journey.first_event.properties.cart.first.product_image | default: "https://i.imgur.com/ssPCfbC.png"}}
```
**Launch URL field:**
```liquid Liquid theme={null}
{{journey.first_event.properties.cart_url | default: "https://yourdomain.com/cart"}}
```
Send yourself a test push notification by adding it to the test Journey and entering yourself into it via another Custom Event API call. You should see a notification similar to this appear:
* Add the template to a blank Journey and set the entry rule to a Custom Event.
* Enabling the Journey and entering yourself into it via the Custom Event API.
* Verify the data displays correctly.
Success! Now you can apply your own styling to the template. See [Design emails with drag-and-drop](./design-emails-with-drag-and-drop).
### Push template
Push notifications have limited space, so display one item and mention the total count.
**Message field:**
Display item and count with correct grammar using [conditional statements](./using-liquid-syntax#if-elsif-else).
```liquid Liquid theme={null}
{% assign cart = journey.first_event.properties.cart %}
{% assign item_count = cart.size | plus: 0 %}
{% if item_count == 1 %}
You left {{cart.first.product_name}} in your cart.
{% endif %}
{% if item_count == 2 %}
You left {{cart.first.product_name}} and {{item_count | minus: 1}} more item in your cart.
{% endif %}
{% if item_count > 2 %}
You left {{cart.first.product_name}} and {{item_count | minus: 1}} more items in your cart.
{% endif %}
```
**Image field:**
```liquid Liquid theme={null}
{{journey.first_event.properties.cart.first.product_image | default: "https://i.imgur.com/ssPCfbC.png"}}
```
**Launch URL field:**
```liquid Liquid theme={null}
{{journey.first_event.properties.cart_url | default: "https://yourdomain.com/cart"}}
```
Send yourself a test push notification by adding it to the test Journey and entering yourself into it via another Custom Event API call. You should see a notification similar to this appear:
 Success! You can now create more templates and use them in the [Abandoned Cart Journey](./abandoned-cart).
***
## Troubleshooting & best practices
**Common mistakes:**
| Mistake | Why it fails | Correct syntax |
| ------------------------------------------- | ----------------------------- | ---------------------------------------------- |
| `{{ journey.first_event.item }}` | Missing `.properties` | `{{ journey.first_event.properties.item }}` |
| `{{ journey.event.purchase.item }}` | Missing `.properties` | `{{ journey.event.purchase.properties.item }}` |
| `{{ journey.first_event.properties.Item }}` | Wrong case (should be `item`) | `{{ journey.first_event.properties.item }}` |
| `{{ event.properties.item }}` | Missing `journey.` prefix | `{{ journey.first_event.properties.item }}` |
**Best practices:**
* Always test templates before going live
* Use [default filters](./using-liquid-syntax#default) for optional properties
* Validate event schema matches template expectations
***
## Related pages
Overview of all personalization options in OneSignal, including when to use Custom Events vs other methods.
Complete guide to implementing and sending Custom Events via SDK or API.
Learn how to build automated messaging workflows with triggers, conditions, and actions.
Configure event-triggered entry rules and Journey behavior.
Use Wait Until nodes to store additional events during Journey progression.
Complete Liquid reference with filters, conditionals, loops, and string manipulation.
Create and manage reusable message templates for use in Journeys.
Need help?
Chat with our Support team or email `support@onesignal.com`
Please include:
* Details of the issue you're experiencing and steps to reproduce if available
* Your OneSignal App ID
* The External ID or Subscription ID if applicable
* The URL to the message you tested in the OneSignal Dashboard if applicable
* Any relevant [logs or error messages](/docs/en/capturing-a-debug-log)
We're happy to help!
***
Success! You can now create more templates and use them in the [Abandoned Cart Journey](./abandoned-cart).
***
## Troubleshooting & best practices
**Common mistakes:**
| Mistake | Why it fails | Correct syntax |
| ------------------------------------------- | ----------------------------- | ---------------------------------------------- |
| `{{ journey.first_event.item }}` | Missing `.properties` | `{{ journey.first_event.properties.item }}` |
| `{{ journey.event.purchase.item }}` | Missing `.properties` | `{{ journey.event.purchase.properties.item }}` |
| `{{ journey.first_event.properties.Item }}` | Wrong case (should be `item`) | `{{ journey.first_event.properties.item }}` |
| `{{ event.properties.item }}` | Missing `journey.` prefix | `{{ journey.first_event.properties.item }}` |
**Best practices:**
* Always test templates before going live
* Use [default filters](./using-liquid-syntax#default) for optional properties
* Validate event schema matches template expectations
***
## Related pages
Overview of all personalization options in OneSignal, including when to use Custom Events vs other methods.
Complete guide to implementing and sending Custom Events via SDK or API.
Learn how to build automated messaging workflows with triggers, conditions, and actions.
Configure event-triggered entry rules and Journey behavior.
Use Wait Until nodes to store additional events during Journey progression.
Complete Liquid reference with filters, conditionals, loops, and string manipulation.
Create and manage reusable message templates for use in Journeys.
Need help?
Chat with our Support team or email `support@onesignal.com`
Please include:
* Details of the issue you're experiencing and steps to reproduce if available
* Your OneSignal App ID
* The External ID or Subscription ID if applicable
* The URL to the message you tested in the OneSignal Dashboard if applicable
* Any relevant [logs or error messages](/docs/en/capturing-a-debug-log)
We're happy to help!
***