> ## Documentation Index
> Fetch the complete documentation index at: https://documentation.onesignal.com/llms.txt
> Use this file to discover all available pages before exploring further.
# Personalize with properties
> Personalize OneSignal messages using predefined properties and custom Tags. Access user, subscription, journey, message, template, and app-level data with Liquid syntax across email, push, SMS, and webhooks.
Use properties (such as Tags and identifiers like External ID) to personalize messages and delivery payloads with [Liquid syntax](./using-liquid-syntax).
OneSignal renders Liquid placeholders **at send time**, using data already stored on the user, subscription, Journey, message, template, app, or organization. You can use this data to personalize messages, [Journey webhooks](./journeys-webhook), and [Event Streams](./event-streams).
***
## When to use property personalization
Use property personalization to render content at send time using data that already exists in OneSignal—most commonly Tags, External ID, and subscription fields like email or phone number.
This is the right approach when:
* The data is already stored in OneSignal
* You want Liquid placeholders replaced automatically when the message sends
* You don't need to fetch or compute fresh data at delivery time
If the value must be fetched or computed at send time (for example, live pricing or inventory), use [Data Feeds](./data-feeds) or our [API with `custom_data`](./personalization-api-custom-data).
If the value comes from the event that caused a user to enter or progress through a Journey, use [Custom Event personalization](./personalization-custom-event).
### Channel support
Each channel supports specific property types and fields.
Supports [User & Subscription properties](#user-&-subscription-properties) in:
* Subject, Reply-to, and Pre-header
* Message body
* HTML attributes (for example: ` `)
* Button actions (URLs, mailto, etc.)
Supports [User & Subscription properties](#user-&-subscription-properties) in:
* Title (`headings`), Subtitle, Body (`contents`)
* Image URL
* Launch URL: `https://example.com/{{last_category_viewed}}`
The `data` (additional data) field does not support Liquid syntax.
Supports [User & Subscription properties](#user-&-subscription-properties) in:
* Message body (`contents`)
Only support Tag substitution. Properties, Custom Events, and other data sources are not available at this time.
* Tags must be set before the user starts a new app session.
* Tag substitution may not appear when using test-send flows.
**Block editor:** Text, Button, and Image blocks\
**HTML editor:** Text elements and attributes (`src`, `href`, `action`, `data`)
Supports [User & Subscription properties](#user-&-subscription-properties) in:
* `event_updates`
* `contents`
* `headings`
***
## How property personalization works
OneSignal replaces Liquid placeholders with the corresponding property values for the user and subscription being messaged.
```liquid Liquid theme={null}
Hi {{ first_name | default: "friend" }}!
Congrats on reaching level {{ level | default: "1" }}!
```
If a user has tags `first_name: Jon` and `level: 5`, they see:
```liquid Text theme={null}
Hi Jon!
Congrats on reaching level 5!
```
If a user has no tags set, they see the default values instead.
***
## Property Liquid reference
Use this section to look up the exact object and field names available in Liquid.
### User & Subscription properties
Use `user` for user-level data. Use `subscription` when you need channel-specific values like email address or phone number.
The [Tags](./add-user-data-tags) of the User. You can reference the tags in several ways:
* Use the `key` directly or place the key after `tags`
* Example tags set: `first_name: Jon, level: 5`
```liquid Liquid theme={null}
Your first name is {{ first_name }}.
Your first name is {{ user.tags.first_name }}.
Your level is {{ level }}.
Your level is {{ user.tags.level }}.
```
* Iterate over tags with for-loop syntax. This example outputs key:value pairs separated by commas.
```liquid Liquid theme={null}
{% for tag in user.tags %}
{{ tag[0] }}: {{ tag[1] }}
{% unless forloop.last %},
{% endunless %}{% endfor %}
```
The language code of the user.
```liquid Liquid theme={null}
Current language set: {{ user.language }}
```
The country code of the user.
```liquid Liquid theme={null}
Current country set: {{ user.country }}
```
The [External ID](./users#external-id) of the User.
```liquid Liquid theme={null}
Your user ID is {{ user.external_id }}.
Your user ID is {{ subscription.external_id }}.
```
The [OneSignal ID](./users) of the User.
```liquid Liquid theme={null}
Your OneSignal user ID is {{ user.onesignal_id }}.
```
The email address of the email Subscription being messaged.
```liquid Liquid theme={null}
Thanks for subscribing with email {{ subscription.email }}.
```
The phone number of the SMS Subscription being messaged.
```liquid Liquid theme={null}
Thanks for subscribing with phone number {{ subscription.phone_number }}.
```
The [Subscriptions](./subscriptions) of the User.
* Iterate over subscriptions with for-loop syntax.
* This example outputs each subscription's token and ID separated by commas.
```json JSON theme={null}
{
"subscriptions": "{% for subscription in user.subscriptions %}{% if subscription.subscription_token %}{{ subscription.subscription_token }}: {{ subscription.id }}{% unless forloop.last %}, {% endunless %}{% endif %}{% endfor %}"
}
```
The token used with the [Unsubscribe email with token API](/reference/unsubscribe-with-token).
```liquid Liquid theme={null}
Unsubscribe: https://your-domain.com/unsubscribe?token={{ subscription.unsubscribe_token }}
```
### Journey properties
The `journey` object lets you reference the Journey name or access [Custom Event Personalization](./personalization-custom-event) for the Journey.
The name of the Journey.
```json JSON theme={null}
{
"journey_name": "{{ journey.name }}"
}
```
### Message properties
The `message` object provides access to the message ID, name, and template ID that can be helpful for [Event Streams](./event-streams) along with access to [custom\_data](./personalization-api-custom-data) for personalizing messages sent from your backend.
The ID of the message set by OneSignal.
```json JSON theme={null}
{
"message_id": "{{ message.id }}"
}
```
The name of the message set by you, the sender.
```json JSON theme={null}
{
"message_name": "{{ message.name }}"
}
```
The ID of the template set by OneSignal.
```json JSON theme={null}
{
"template_id": "{{ message.template_id }}"
}
```
### Template properties
The `template` object provides access to the template ID and name about the [Template](./templates) used to send the message. This can be helpful for [Event Streams](./event-streams).
The ID of the template set by OneSignal.
```json JSON theme={null}
{
"template_id": "{{ template.id }}"
}
```
The name of the template set by you, the sender.
```json JSON theme={null}
{
"template_name": "{{ template.name }}"
}
```
***
### App and organization properties
The `app` and `org` objects provide details about the [App and Organization](./apps-organizations) that sent the message. This can be helpful for [Event Streams](./event-streams).
The ID of the app set by OneSignal.
```json JSON theme={null}
{
"app_id": "{{ app.id }}"
}
```
The name of the app set by you, the owner of the app.
```json JSON theme={null}
{
"app_name": "{{ app.name }}"
}
```
The ID of the Organization set by OneSignal.
```json JSON theme={null}
{
"org_id": "{{ org.id }}"
}
```
The name of the Organization set by you, the owner of the Organization.
```json JSON theme={null}
{
"org_name": "{{ org.name }}"
}
```
***
## Example: Abandoned cart templates using tags
This example shows how to personalize abandoned cart messages using Tags. It builds on the [Abandoned Cart tutorial](./abandoned-cart).
**Example tags set:**
```json JSON theme={null}
{
"cart_updated": "unix_timestamp_seconds",
"product_image": "https://i.imgur.com/ssPCfbC.png",
"product_name": "24 Pack of Acorns",
"product_quantity": "1",
"product_price": "$12.99",
"cart_items_count": "4",
"cart_url": "https://yourdomain.com/cart"
}
```
### Email template
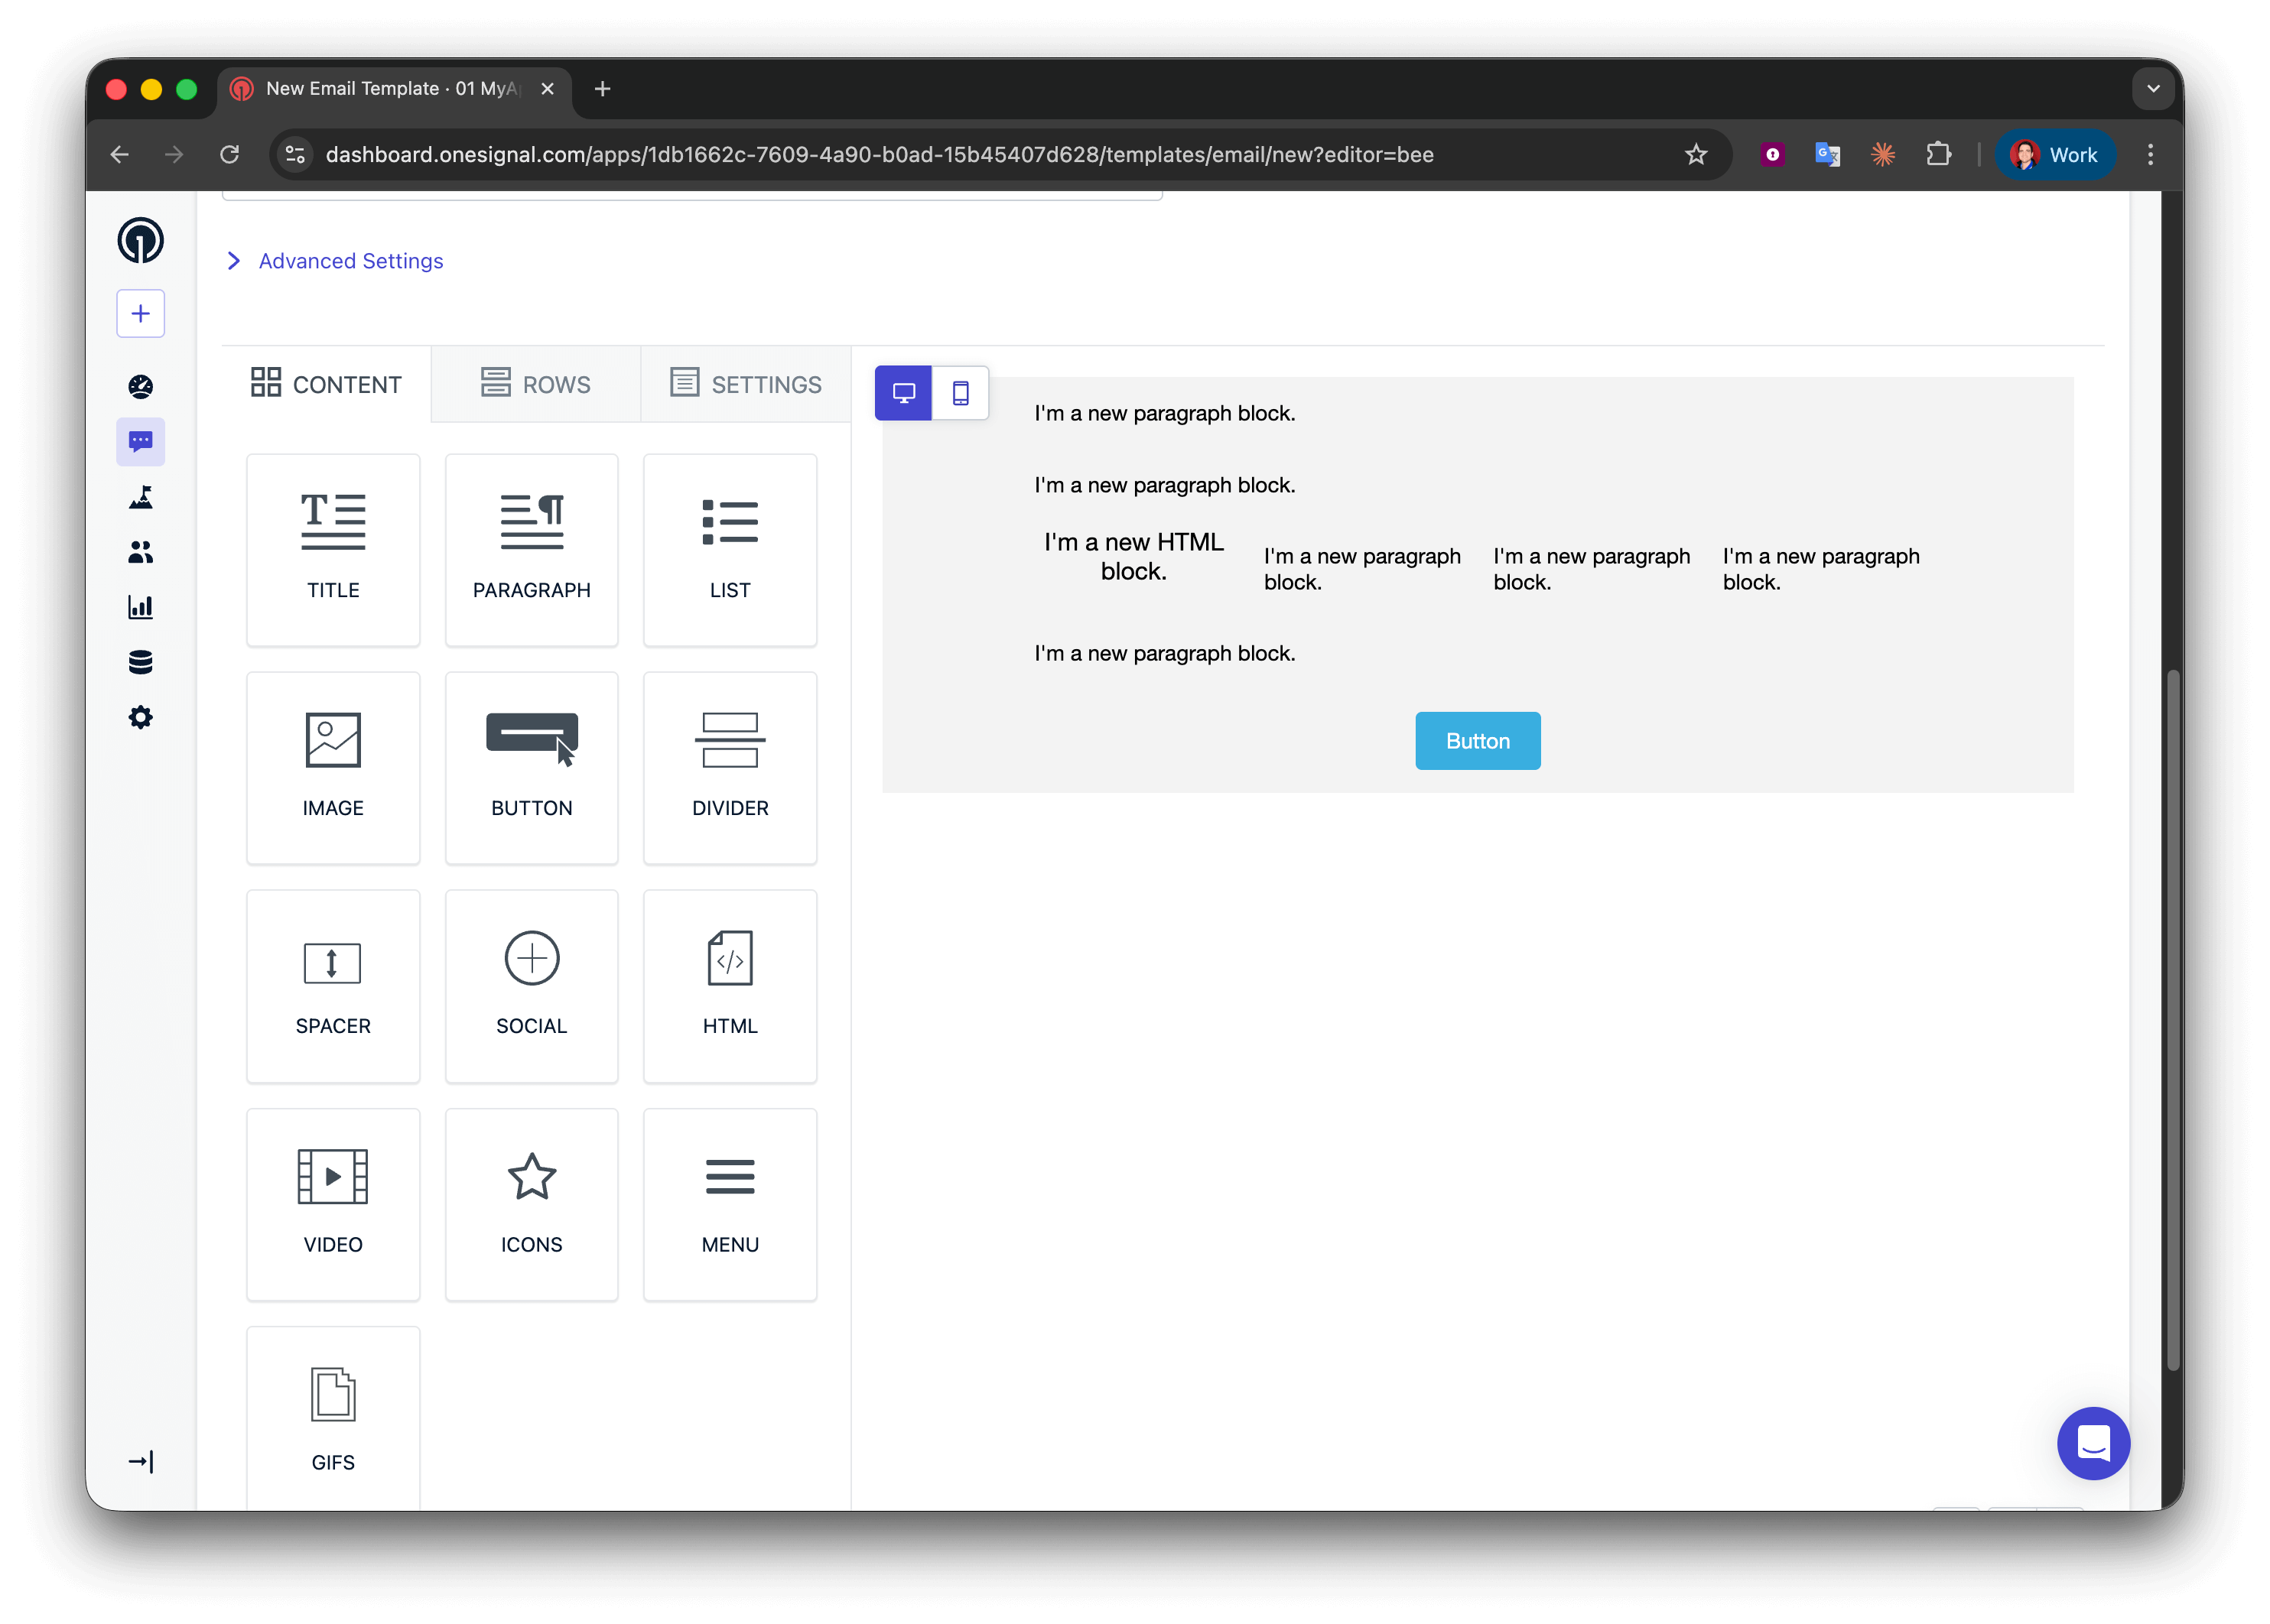
Navigate to **Messages > Templates > New Email Template** and open the Drag & Drop Editor.
Create five rows:
* Rows 1, 2, and 4: one column with a **Paragraph** block
* Row 3: four columns with **HTML | Paragraph | Paragraph | Paragraph**
* Row 5: one column with a **Button** block
`)
* Button actions (URLs, mailto, etc.)
Supports [User & Subscription properties](#user-&-subscription-properties) in:
* Title (`headings`), Subtitle, Body (`contents`)
* Image URL
* Launch URL: `https://example.com/{{last_category_viewed}}`
The `data` (additional data) field does not support Liquid syntax.
Supports [User & Subscription properties](#user-&-subscription-properties) in:
* Message body (`contents`)
Only support Tag substitution. Properties, Custom Events, and other data sources are not available at this time.
* Tags must be set before the user starts a new app session.
* Tag substitution may not appear when using test-send flows.
**Block editor:** Text, Button, and Image blocks\
**HTML editor:** Text elements and attributes (`src`, `href`, `action`, `data`)
Supports [User & Subscription properties](#user-&-subscription-properties) in:
* `event_updates`
* `contents`
* `headings`
***
## How property personalization works
OneSignal replaces Liquid placeholders with the corresponding property values for the user and subscription being messaged.
```liquid Liquid theme={null}
Hi {{ first_name | default: "friend" }}!
Congrats on reaching level {{ level | default: "1" }}!
```
If a user has tags `first_name: Jon` and `level: 5`, they see:
```liquid Text theme={null}
Hi Jon!
Congrats on reaching level 5!
```
If a user has no tags set, they see the default values instead.
***
## Property Liquid reference
Use this section to look up the exact object and field names available in Liquid.
### User & Subscription properties
Use `user` for user-level data. Use `subscription` when you need channel-specific values like email address or phone number.
The [Tags](./add-user-data-tags) of the User. You can reference the tags in several ways:
* Use the `key` directly or place the key after `tags`
* Example tags set: `first_name: Jon, level: 5`
```liquid Liquid theme={null}
Your first name is {{ first_name }}.
Your first name is {{ user.tags.first_name }}.
Your level is {{ level }}.
Your level is {{ user.tags.level }}.
```
* Iterate over tags with for-loop syntax. This example outputs key:value pairs separated by commas.
```liquid Liquid theme={null}
{% for tag in user.tags %}
{{ tag[0] }}: {{ tag[1] }}
{% unless forloop.last %},
{% endunless %}{% endfor %}
```
The language code of the user.
```liquid Liquid theme={null}
Current language set: {{ user.language }}
```
The country code of the user.
```liquid Liquid theme={null}
Current country set: {{ user.country }}
```
The [External ID](./users#external-id) of the User.
```liquid Liquid theme={null}
Your user ID is {{ user.external_id }}.
Your user ID is {{ subscription.external_id }}.
```
The [OneSignal ID](./users) of the User.
```liquid Liquid theme={null}
Your OneSignal user ID is {{ user.onesignal_id }}.
```
The email address of the email Subscription being messaged.
```liquid Liquid theme={null}
Thanks for subscribing with email {{ subscription.email }}.
```
The phone number of the SMS Subscription being messaged.
```liquid Liquid theme={null}
Thanks for subscribing with phone number {{ subscription.phone_number }}.
```
The [Subscriptions](./subscriptions) of the User.
* Iterate over subscriptions with for-loop syntax.
* This example outputs each subscription's token and ID separated by commas.
```json JSON theme={null}
{
"subscriptions": "{% for subscription in user.subscriptions %}{% if subscription.subscription_token %}{{ subscription.subscription_token }}: {{ subscription.id }}{% unless forloop.last %}, {% endunless %}{% endif %}{% endfor %}"
}
```
The token used with the [Unsubscribe email with token API](/reference/unsubscribe-with-token).
```liquid Liquid theme={null}
Unsubscribe: https://your-domain.com/unsubscribe?token={{ subscription.unsubscribe_token }}
```
### Journey properties
The `journey` object lets you reference the Journey name or access [Custom Event Personalization](./personalization-custom-event) for the Journey.
The name of the Journey.
```json JSON theme={null}
{
"journey_name": "{{ journey.name }}"
}
```
### Message properties
The `message` object provides access to the message ID, name, and template ID that can be helpful for [Event Streams](./event-streams) along with access to [custom\_data](./personalization-api-custom-data) for personalizing messages sent from your backend.
The ID of the message set by OneSignal.
```json JSON theme={null}
{
"message_id": "{{ message.id }}"
}
```
The name of the message set by you, the sender.
```json JSON theme={null}
{
"message_name": "{{ message.name }}"
}
```
The ID of the template set by OneSignal.
```json JSON theme={null}
{
"template_id": "{{ message.template_id }}"
}
```
### Template properties
The `template` object provides access to the template ID and name about the [Template](./templates) used to send the message. This can be helpful for [Event Streams](./event-streams).
The ID of the template set by OneSignal.
```json JSON theme={null}
{
"template_id": "{{ template.id }}"
}
```
The name of the template set by you, the sender.
```json JSON theme={null}
{
"template_name": "{{ template.name }}"
}
```
***
### App and organization properties
The `app` and `org` objects provide details about the [App and Organization](./apps-organizations) that sent the message. This can be helpful for [Event Streams](./event-streams).
The ID of the app set by OneSignal.
```json JSON theme={null}
{
"app_id": "{{ app.id }}"
}
```
The name of the app set by you, the owner of the app.
```json JSON theme={null}
{
"app_name": "{{ app.name }}"
}
```
The ID of the Organization set by OneSignal.
```json JSON theme={null}
{
"org_id": "{{ org.id }}"
}
```
The name of the Organization set by you, the owner of the Organization.
```json JSON theme={null}
{
"org_name": "{{ org.name }}"
}
```
***
## Example: Abandoned cart templates using tags
This example shows how to personalize abandoned cart messages using Tags. It builds on the [Abandoned Cart tutorial](./abandoned-cart).
**Example tags set:**
```json JSON theme={null}
{
"cart_updated": "unix_timestamp_seconds",
"product_image": "https://i.imgur.com/ssPCfbC.png",
"product_name": "24 Pack of Acorns",
"product_quantity": "1",
"product_price": "$12.99",
"cart_items_count": "4",
"cart_url": "https://yourdomain.com/cart"
}
```
### Email template
Navigate to **Messages > Templates > New Email Template** and open the Drag & Drop Editor.
Create five rows:
* Rows 1, 2, and 4: one column with a **Paragraph** block
* Row 3: four columns with **HTML | Paragraph | Paragraph | Paragraph**
* Row 5: one column with a **Button** block
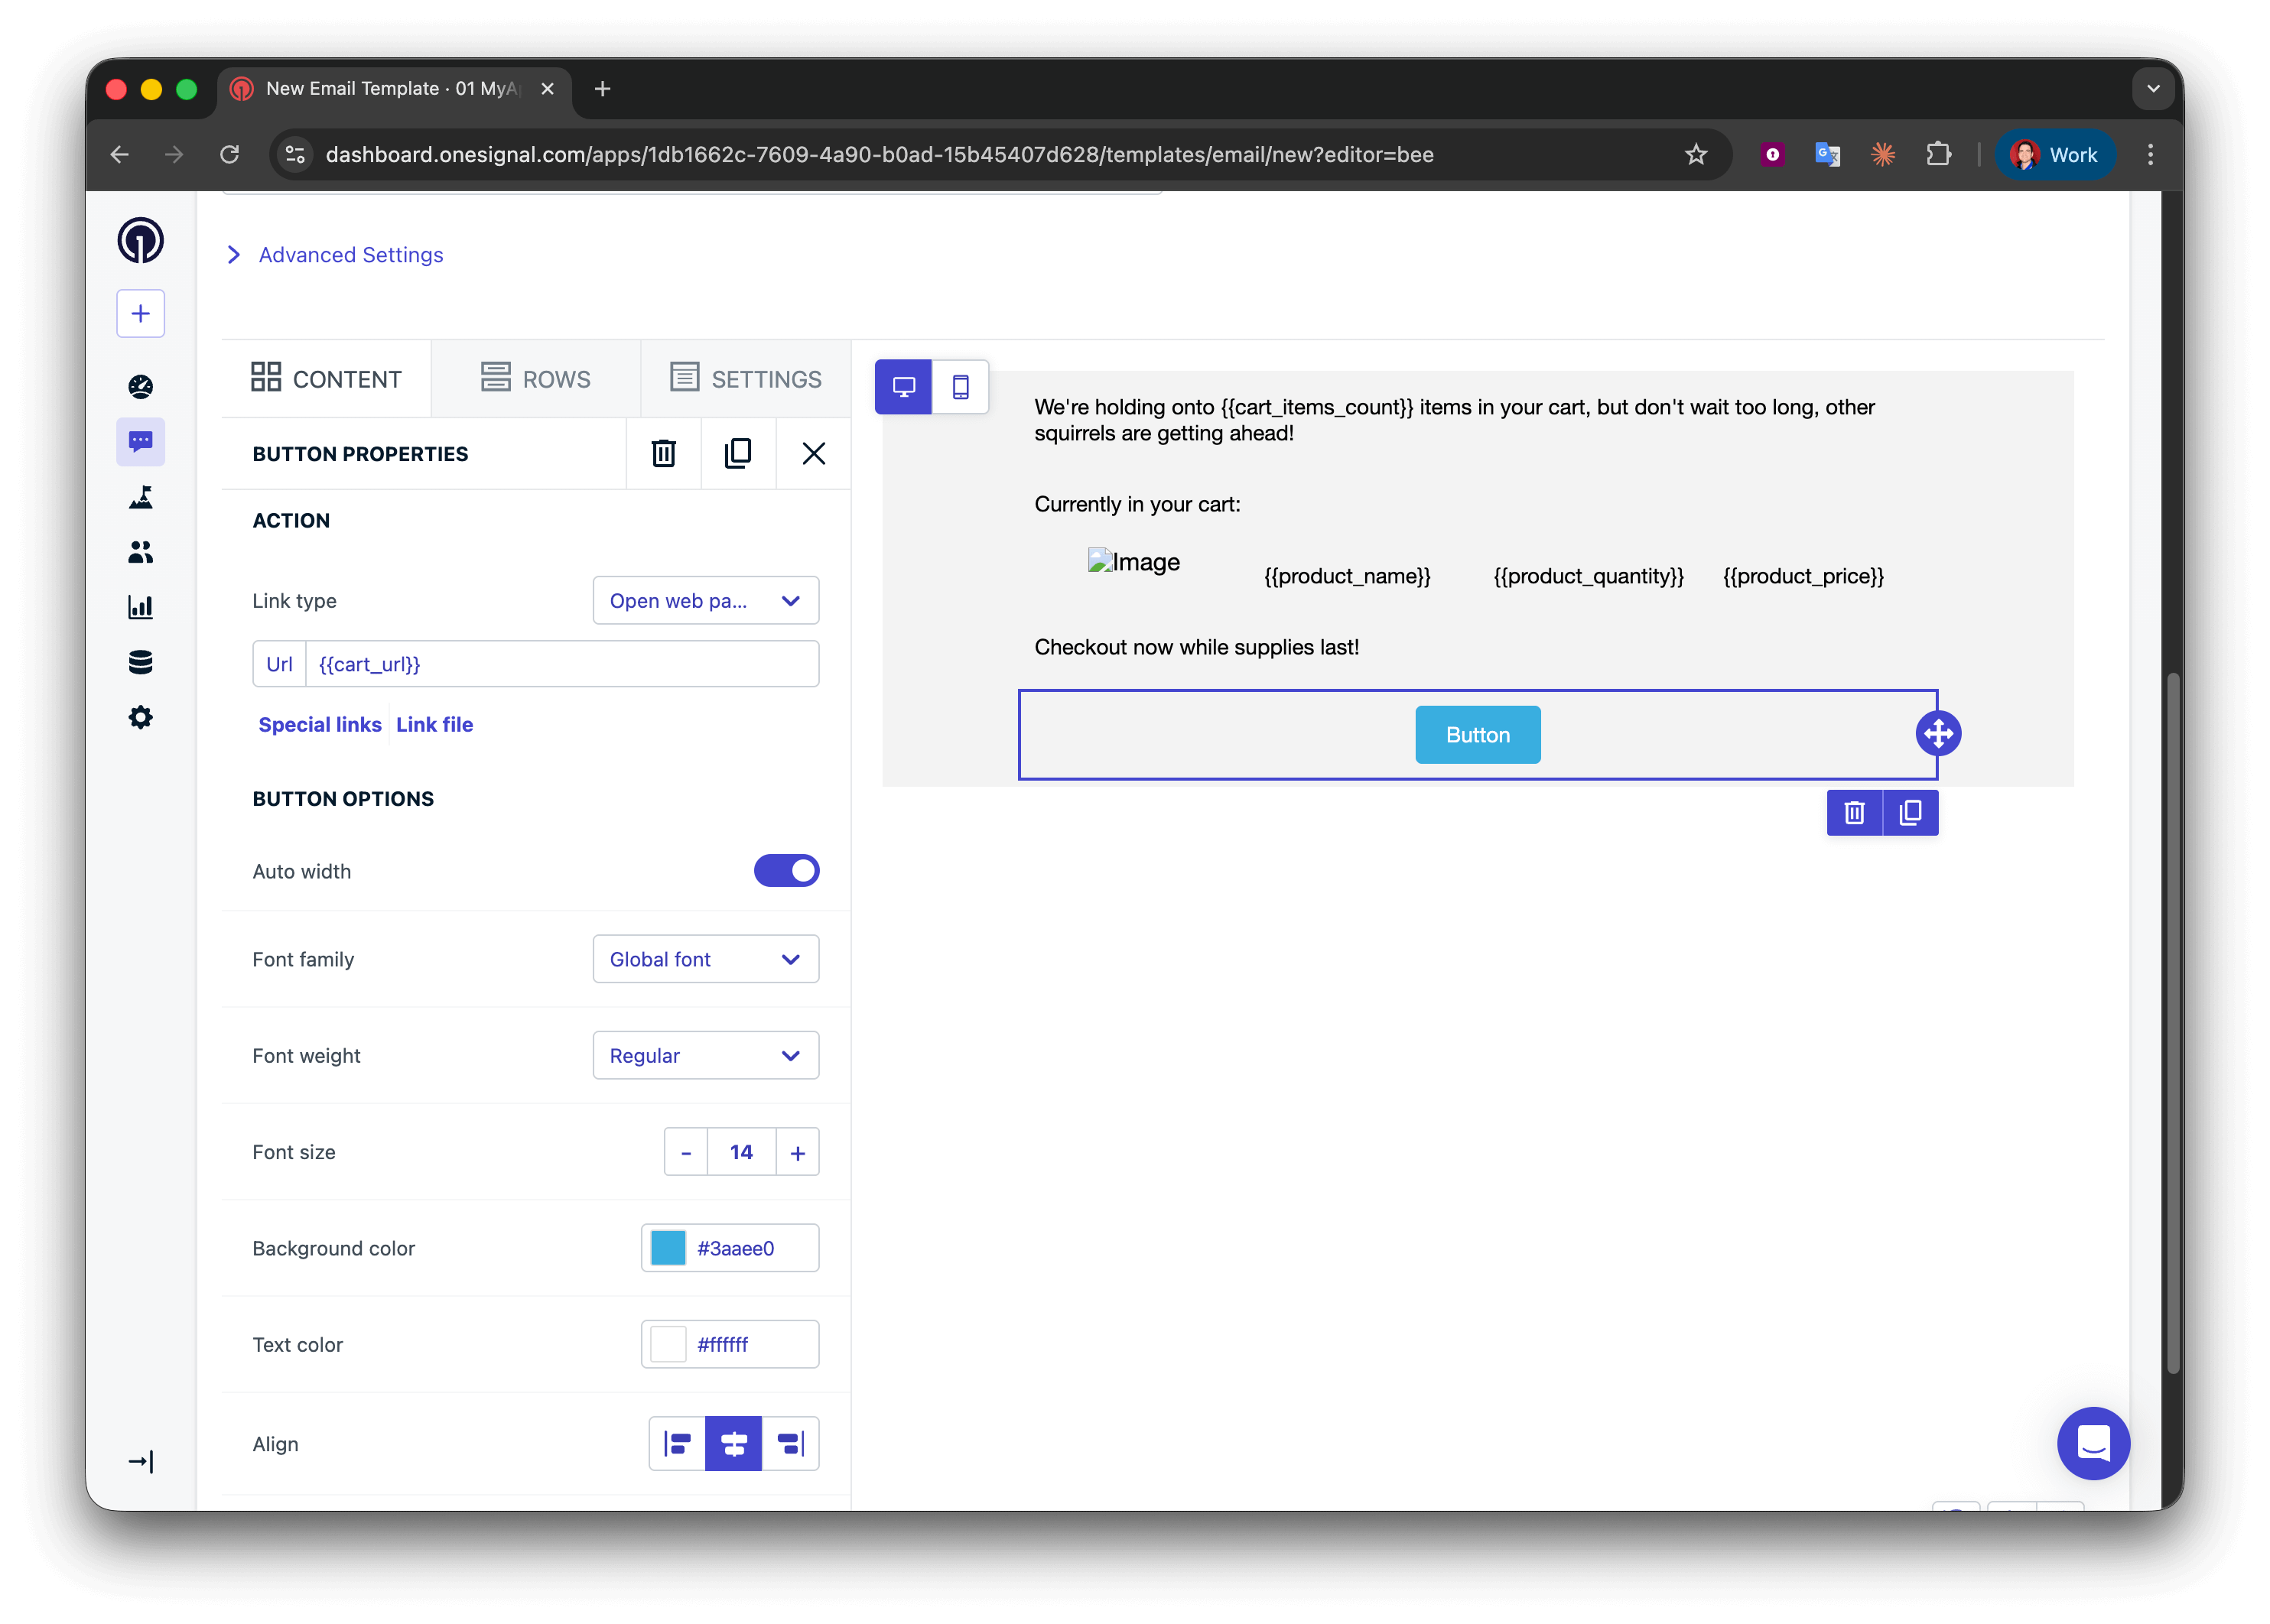
 In row 1, add:
```liquid Liquid theme={null}
We're holding onto {{cart_items_count}} items in your cart, but don't wait too long, other squirrels are getting ahead!
```
In row 2, add a description of what the user is looking at:
```liquid Text theme={null}
Currently in your cart:
```
In row 4, add another CTA:
```liquid Text theme={null}
Checkout now while supplies last!
```
In row 3, configure the four columns:
**Column 1 (HTML block):**
```html HTML theme={null}
In row 1, add:
```liquid Liquid theme={null}
We're holding onto {{cart_items_count}} items in your cart, but don't wait too long, other squirrels are getting ahead!
```
In row 2, add a description of what the user is looking at:
```liquid Text theme={null}
Currently in your cart:
```
In row 4, add another CTA:
```liquid Text theme={null}
Checkout now while supplies last!
```
In row 3, configure the four columns:
**Column 1 (HTML block):**
```html HTML theme={null}
 ```
**Columns 2–4 (Text blocks):**
* Column 2: `{{product_name}}`
* Column 3: `{{product_quantity}}`
* Column 4: `{{product_price}}`
In the row 5 **Button** block, set the Action URL to:
```liquid theme={null}
{{cart_url}}
```
```
**Columns 2–4 (Text blocks):**
* Column 2: `{{product_name}}`
* Column 3: `{{product_quantity}}`
* Column 4: `{{product_price}}`
In the row 5 **Button** block, set the Action URL to:
```liquid theme={null}
{{cart_url}}
```
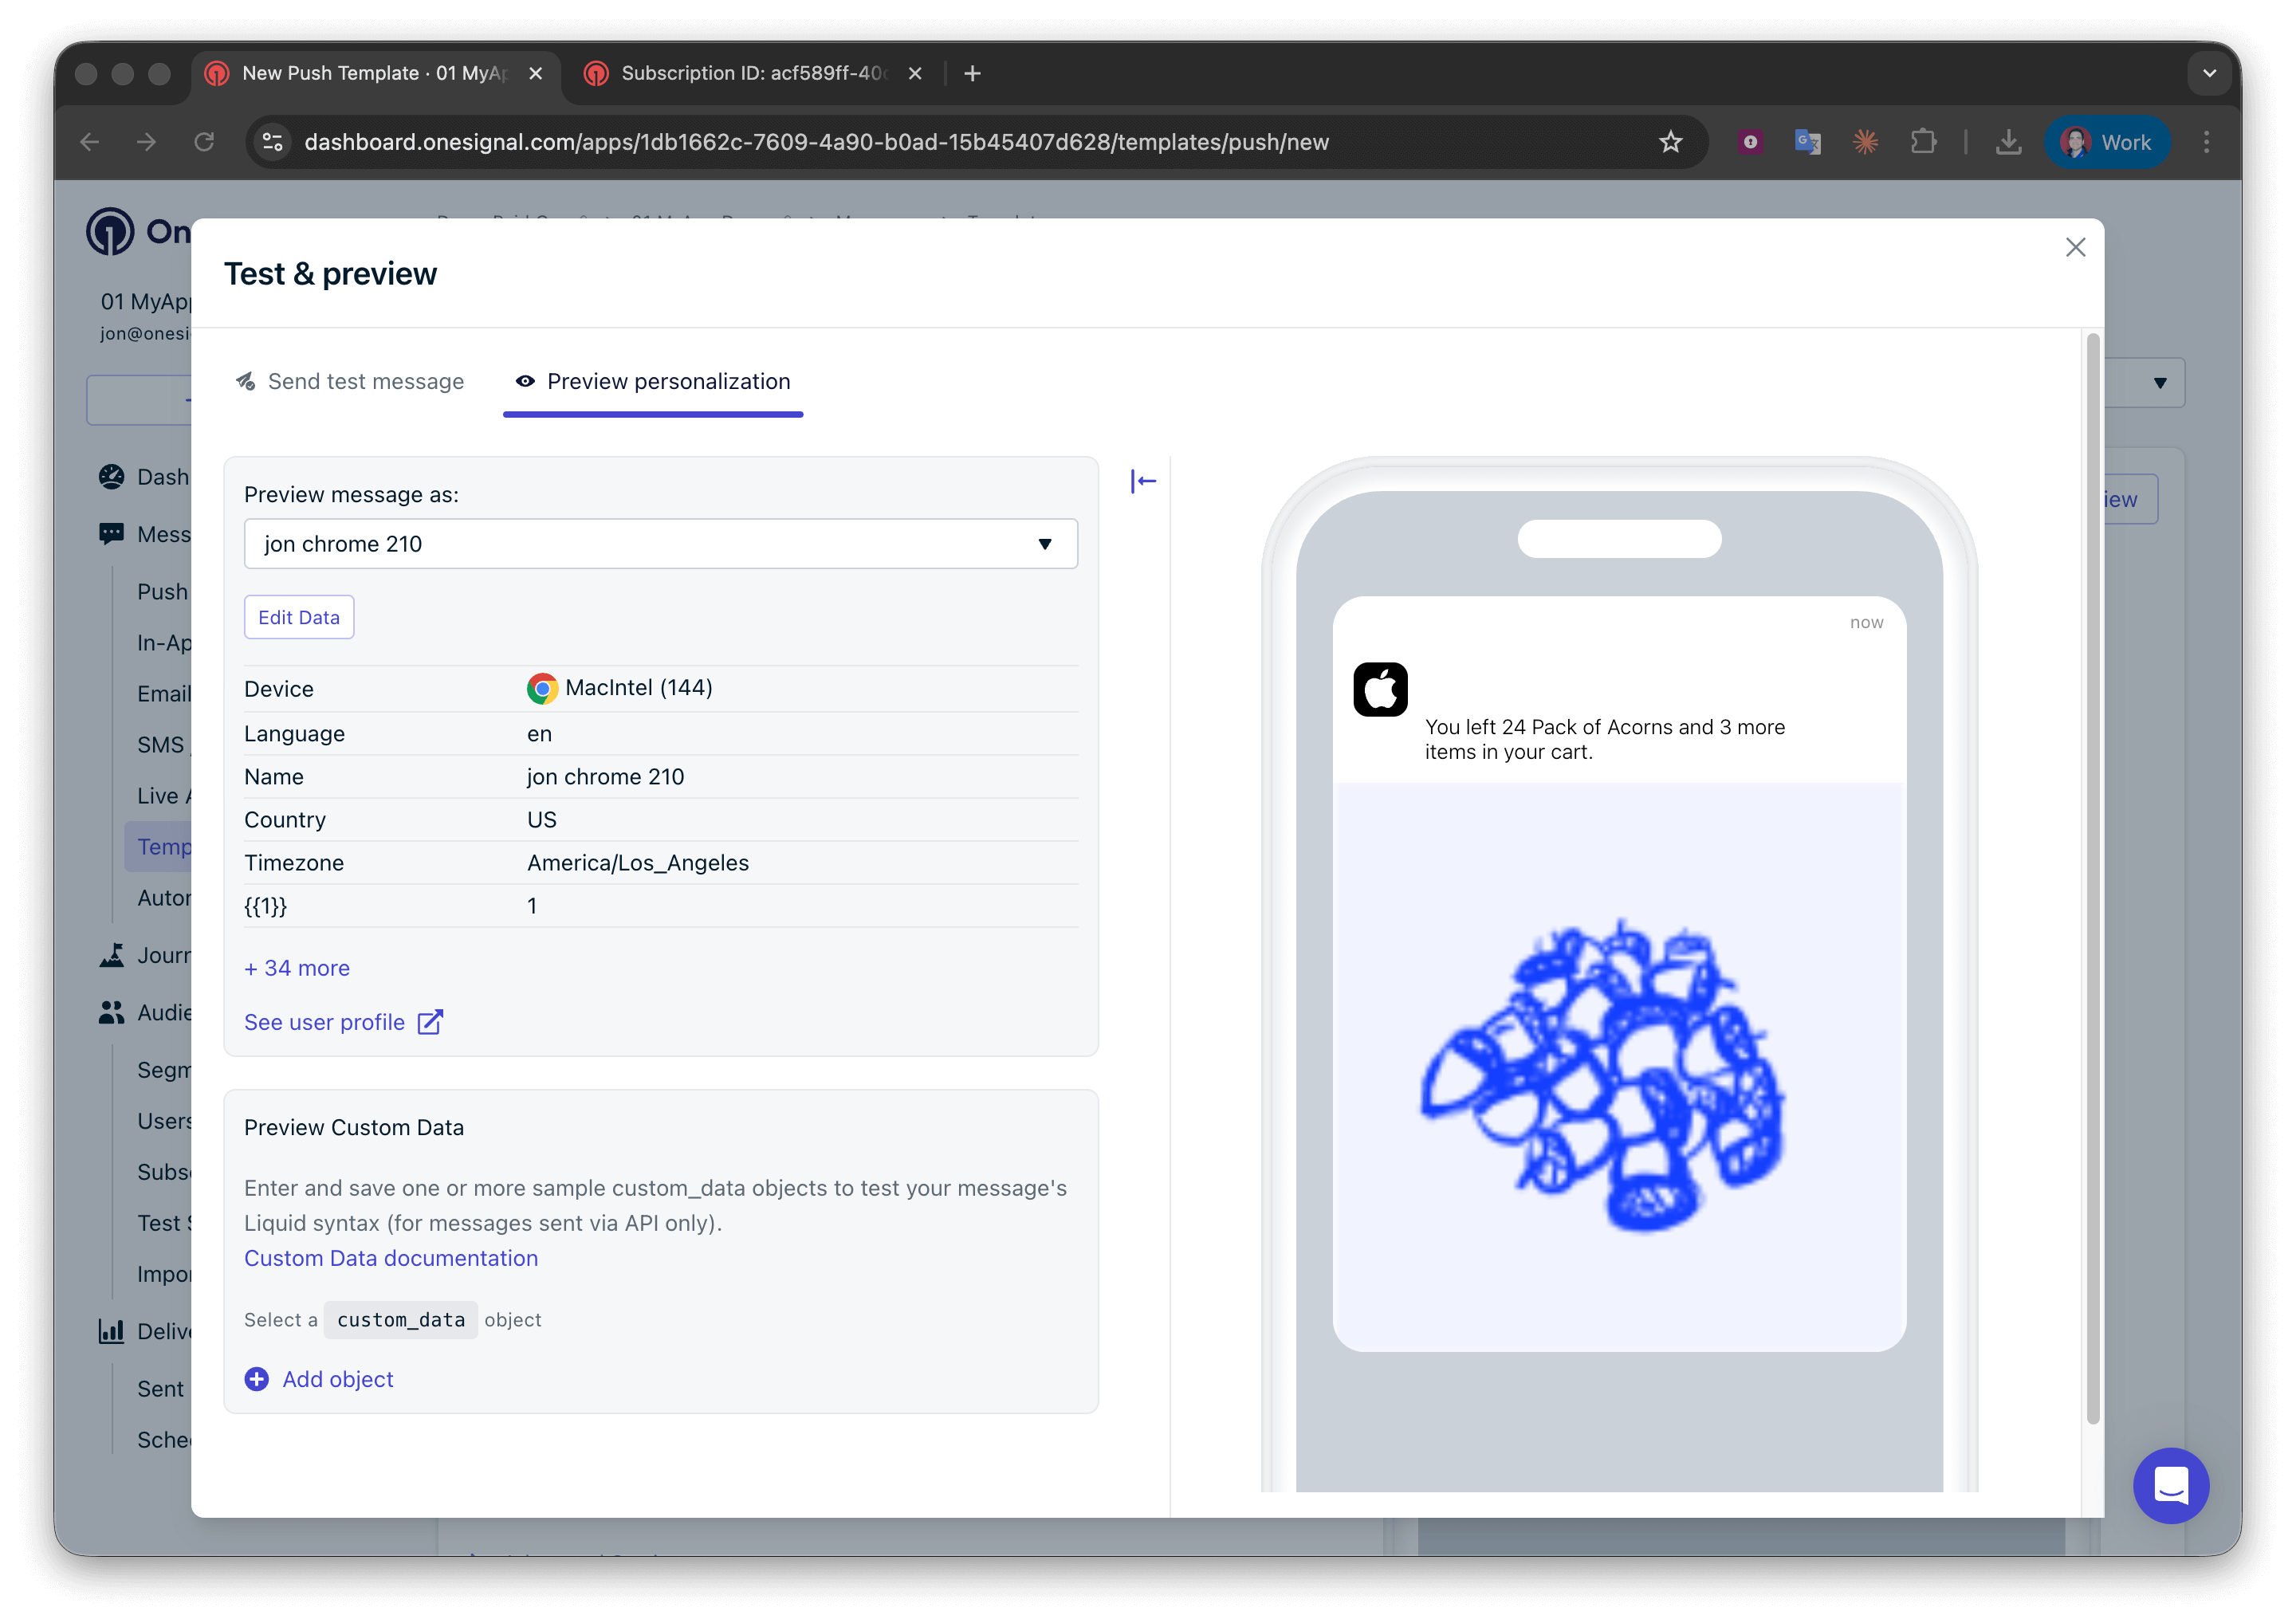
 Send a test email to yourself using the **Test & preview** button.
* Make sure the tags are set on your email Subscription.
Send a test email to yourself using the **Test & preview** button.
* Make sure the tags are set on your email Subscription.
 Success! Now you can apply your own styling to the template. See [Design emails with drag-and-drop](./design-emails-with-drag-and-drop).
### Push template
Push notifications have limited space, so display one item and mention the total count.
**Message field:**
Display item and count with correct grammar using [conditional statements](./using-liquid-syntax#if-elsif-else).
```liquid Liquid theme={null}
{% assign item_count = cart_items_count | plus: 0 %}
{% if item_count == 1 %}
You left {{product_name}} in your cart.
{% endif %}
{% if item_count == 2 %}
You left {{product_name}} and {{item_count | minus: 1}} more item in your cart.
{% endif %}
{% if item_count > 2 %}
You left {{product_name}} and {{item_count | minus: 1}} more items in your cart.
{% endif %}
```
**Image field:**
```liquid Liquid theme={null}
{{product_image | default: "https://i.imgur.com/ssPCfbC.png"}}
```
**Launch URL field:**
```liquid Liquid theme={null}
{{cart_url | default: "https://yourdomain.com/cart"}}
```
Success! Now you can apply your own styling to the template. See [Design emails with drag-and-drop](./design-emails-with-drag-and-drop).
### Push template
Push notifications have limited space, so display one item and mention the total count.
**Message field:**
Display item and count with correct grammar using [conditional statements](./using-liquid-syntax#if-elsif-else).
```liquid Liquid theme={null}
{% assign item_count = cart_items_count | plus: 0 %}
{% if item_count == 1 %}
You left {{product_name}} in your cart.
{% endif %}
{% if item_count == 2 %}
You left {{product_name}} and {{item_count | minus: 1}} more item in your cart.
{% endif %}
{% if item_count > 2 %}
You left {{product_name}} and {{item_count | minus: 1}} more items in your cart.
{% endif %}
```
**Image field:**
```liquid Liquid theme={null}
{{product_image | default: "https://i.imgur.com/ssPCfbC.png"}}
```
**Launch URL field:**
```liquid Liquid theme={null}
{{cart_url | default: "https://yourdomain.com/cart"}}
```
 Success! You can now create more templates and use them in the [Abandoned Cart Journey](./abandoned-cart).
***
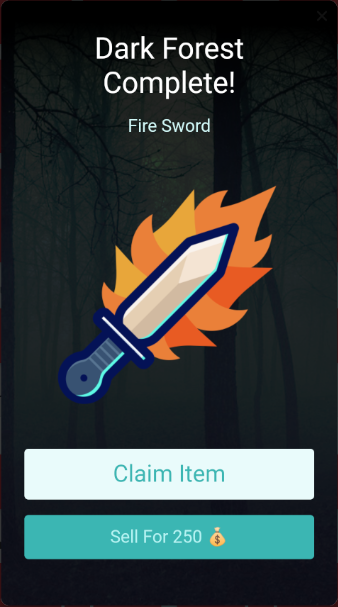
## Example: Personalize an in-app message with tags
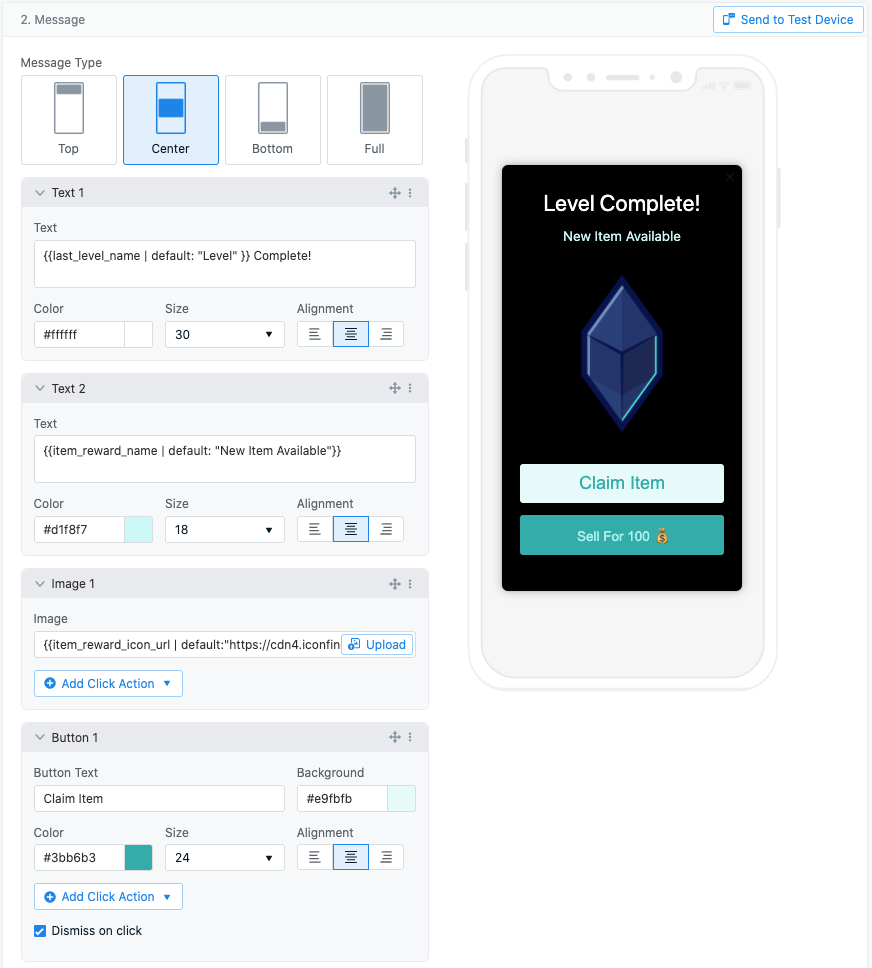
This example shows a reward in-app message personalized with Tags. The IAM substitutes Tag values into multiple block types.
In the configured message:
* **Text block** — displays the completed level and the reward for that level
* **Image block** — displays the image for that reward, with a default image as fallback
* **Button 2 text** — displays the reward value, with a default of `100`
* **Background image** — set from a Tag value
Success! You can now create more templates and use them in the [Abandoned Cart Journey](./abandoned-cart).
***
## Example: Personalize an in-app message with tags
This example shows a reward in-app message personalized with Tags. The IAM substitutes Tag values into multiple block types.
In the configured message:
* **Text block** — displays the completed level and the reward for that level
* **Image block** — displays the image for that reward, with a default image as fallback
* **Button 2 text** — displays the reward value, with a default of `100`
* **Background image** — set from a Tag value
 The message renders at session start using the user's current Tag values:
 See the **In-app messages** tab in [Channel support](#channel-support) above for the supported blocks, attributes, and timing rules. Two reminders worth restating from there:
* **Tags must be set before the user starts a new app session.** Tags updated mid-session don't render in IAMs shown in that session.
* **Tag substitution doesn't render in "Send Test Message" test-sends.** Trigger the message from a real session to verify substitution.
* [Property substitution](./using-liquid-syntax#property-include) is not supported in in-app messages.
***
## Related pages
Overview of all personalization options in OneSignal, including when to use Custom Events vs other methods.
Learn how to set tags on users via SDK, API, or CSV import.
Complete Liquid reference with filters, conditionals, loops, and string manipulation.
Create and manage reusable message templates for use in Journeys.
Build an abandoned cart Journey using Tags and Properties.
Need help?
Chat with our Support team or email `support@onesignal.com`
Please include:
* Details of the issue you're experiencing and steps to reproduce if available
* Your OneSignal App ID
* The External ID or Subscription ID if applicable
* The URL to the message you tested in the OneSignal Dashboard if applicable
* Any relevant [logs or error messages](/docs/en/capturing-a-debug-log)
We're happy to help!
***
See the **In-app messages** tab in [Channel support](#channel-support) above for the supported blocks, attributes, and timing rules. Two reminders worth restating from there:
* **Tags must be set before the user starts a new app session.** Tags updated mid-session don't render in IAMs shown in that session.
* **Tag substitution doesn't render in "Send Test Message" test-sends.** Trigger the message from a real session to verify substitution.
* [Property substitution](./using-liquid-syntax#property-include) is not supported in in-app messages.
***
## Related pages
Overview of all personalization options in OneSignal, including when to use Custom Events vs other methods.
Learn how to set tags on users via SDK, API, or CSV import.
Complete Liquid reference with filters, conditionals, loops, and string manipulation.
Create and manage reusable message templates for use in Journeys.
Build an abandoned cart Journey using Tags and Properties.
Need help?
Chat with our Support team or email `support@onesignal.com`
Please include:
* Details of the issue you're experiencing and steps to reproduce if available
* Your OneSignal App ID
* The External ID or Subscription ID if applicable
* The URL to the message you tested in the OneSignal Dashboard if applicable
* Any relevant [logs or error messages](/docs/en/capturing-a-debug-log)
We're happy to help!
***