> ## Documentation Index
> Fetch the complete documentation index at: https://documentation.onesignal.com/llms.txt
> Use this file to discover all available pages before exploring further.
# iOS SDKのセットアップ
> OneSignalを使用してiOSアプリにプッシュ通知とアプリ内メッセージを追加する方法。
export const SdkReleasesIframe = ({sdkFilter = undefined, viewMode = undefined, height, ...frameProps}) => {
const baseUrl = 'https://onesignal.github.io/sdk-releases';
const buildUrl = (theme, sdkFilter, viewMode) => {
const url = new URL(baseUrl);
const params = new URLSearchParams();
if (theme) {
params.set('theme', theme);
}
if (sdkFilter) {
params.set('sdk', sdkFilter);
}
if (viewMode) {
params.set('viewMode', viewMode);
}
if (params.toString()) {
url.search = params.toString();
}
return url.toString();
};
const detectTheme = () => {
if (document.documentElement.classList.contains('dark')) {
return 'dark';
}
return 'light';
};
const [theme, setTheme] = useState('light');
const [iframeSrc, setIframeSrc] = useState(() => {
const initialTheme = detectTheme();
return buildUrl(initialTheme, sdkFilter, viewMode);
});
useEffect(() => {
const currentTheme = detectTheme();
setTheme(currentTheme);
setIframeSrc(buildUrl(currentTheme, sdkFilter, viewMode));
const mediaQuery = window.matchMedia('(prefers-color-scheme: dark)');
const handleThemeChange = () => {
const newTheme = detectTheme();
setTheme(newTheme);
setIframeSrc(buildUrl(newTheme, sdkFilter, viewMode));
};
if (mediaQuery.addEventListener) {
mediaQuery.addEventListener('change', handleThemeChange);
} else {
mediaQuery.addListener(handleThemeChange);
}
window.addEventListener('storage', handleThemeChange);
const observer = new MutationObserver(handleThemeChange);
observer.observe(document.documentElement, {
attributes: true,
attributeFilter: ['class', 'data-theme']
});
return () => {
if (mediaQuery.removeEventListener) {
mediaQuery.removeEventListener('change', handleThemeChange);
} else {
mediaQuery.removeListener(handleThemeChange);
}
window.removeEventListener('storage', handleThemeChange);
observer.disconnect();
};
}, [sdkFilter, viewMode]);
const getIframeHeight = () => {
if (viewMode === 'table') {
return '450';
}
if (viewMode === 'mini') {
return '170';
}
return '800';
};
const iframeHeight = height || getIframeHeight();
return
;
};
## 概要
iOSプッシュ通知は、iOSアプリでの持続的なユーザーエンゲージメントとリテンションを促進するために不可欠です。これにより、リアルタイムの更新、リマインダー、パーソナライズされたメッセージをユーザーに直接配信でき、アプリの全体的なユーザーエクスペリエンスと定着性が向上します。OneSignalのSDKをアプリと統合することで、Apple Push Notification Service(APNS)を活用して、iOSデバイス全体で通知がシームレスに配信されるようにすることができます。このガイドでは、SDKをiOSアプリに統合する手順を説明します。
***
## 要件
* Xcode 14以降を搭載したmacOS(セットアップ手順ではXcode 16.2を使用)
* iOS 12以降、iPadOS 12以降、またはiOS 16.2以降を実行するXcodeシミュレーターを搭載したデバイス
* 設定されたOneSignalアプリとプラットフォーム
### OneSignalアプリとプラットフォームを設定
サポートするプラットフォーム(Apple(APNs)、Google(FCM)、Huawei(HMS)、Amazon(ADM))でOneSignalアプリを設定します。
組織がすでにOneSignalアカウントを持っている場合は、組織への[招待をリクエスト](/docs/ja/manage-team-members)してください。それ以外の場合は、[無料アカウントにサインアップ](https://onesignal.com)して開始してください。
**New App/Website** をクリックして新しいアプリを作成するか、**Settings > Push & In-App** で既存のアプリにプラットフォームを追加します。設定するプラットフォームを選択し、**Next: Configure Your Platform** をクリックします。
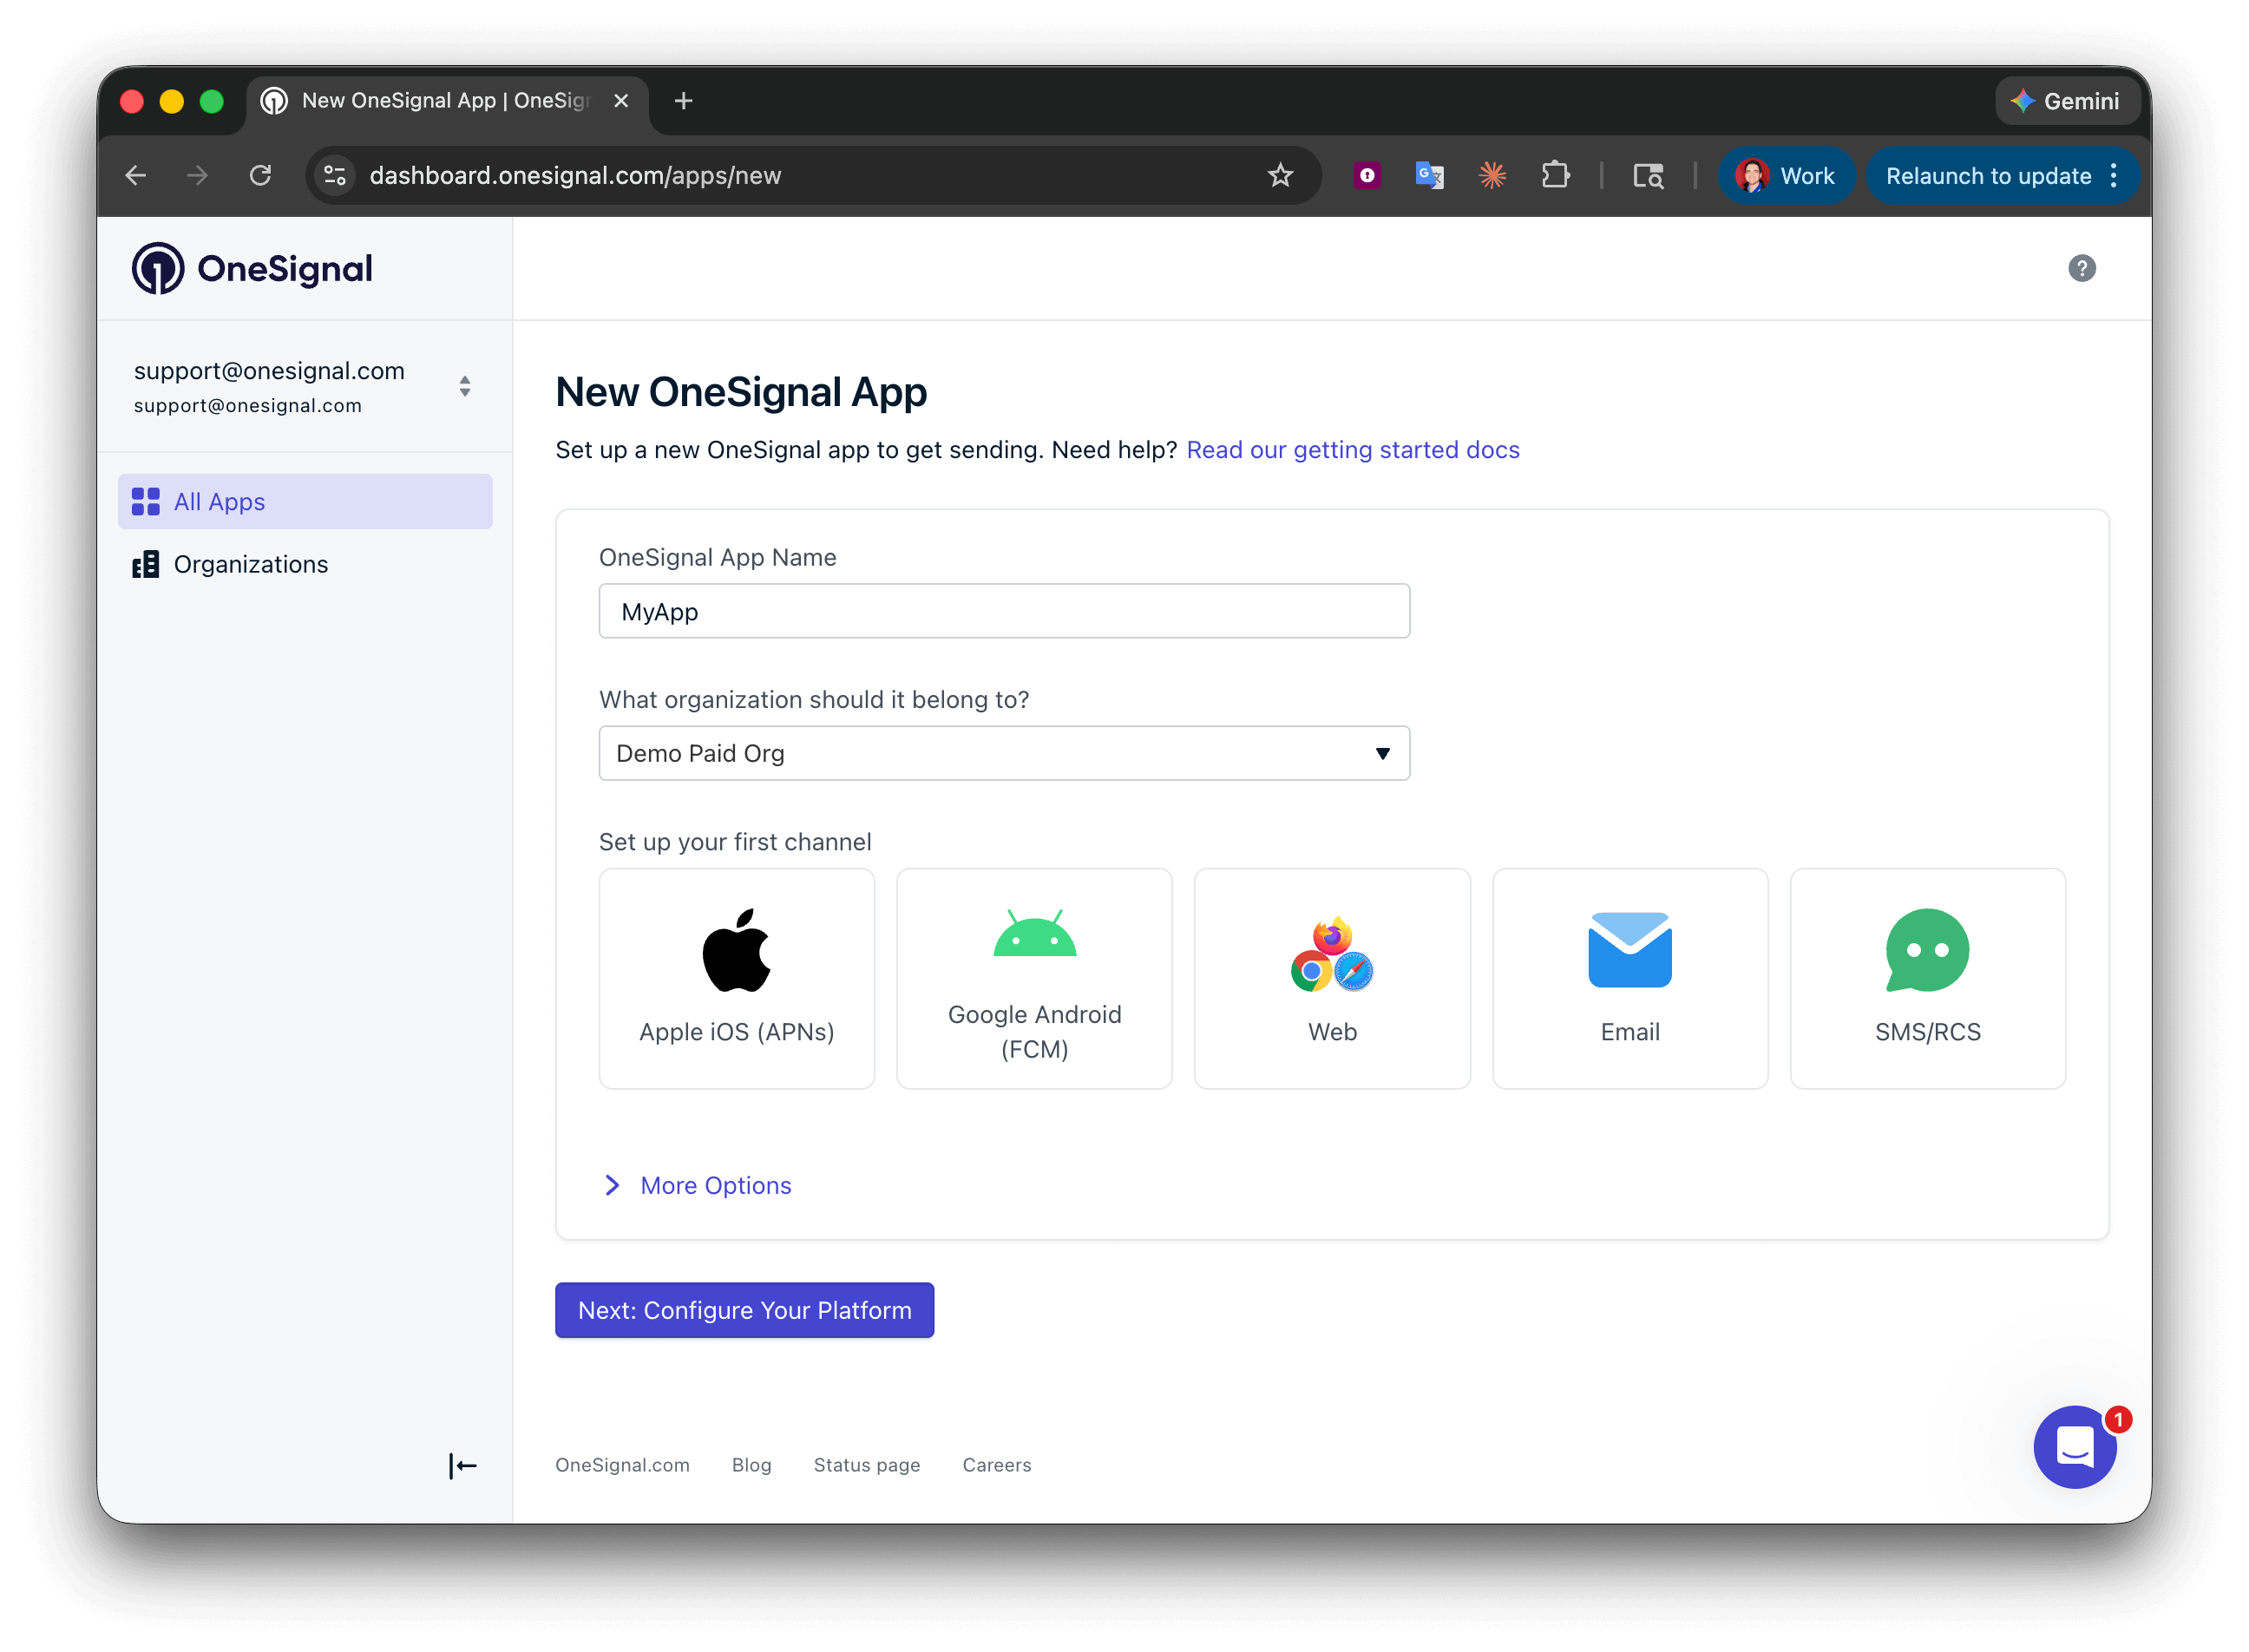 プラットフォームの認証情報を入力します:
* **Android**:[Firebase認証情報をセットアップ](/docs/ja/android-firebase-credentials)
* **iOS**:[p8トークン(推奨)](/docs/ja/ios-p8-token-based-connection-to-apns)または[p12証明書](/docs/ja/ios-p12-generate-certificates)
* **Amazon**:[APIキーを生成](/docs/ja/generate-an-amazon-api-key)
* **Huawei**:[OneSignalを承認](/docs/ja/authorize-onesignal-to-send-huawei-push)
認証情報を入力した後、**Save & Continue** をクリックします。
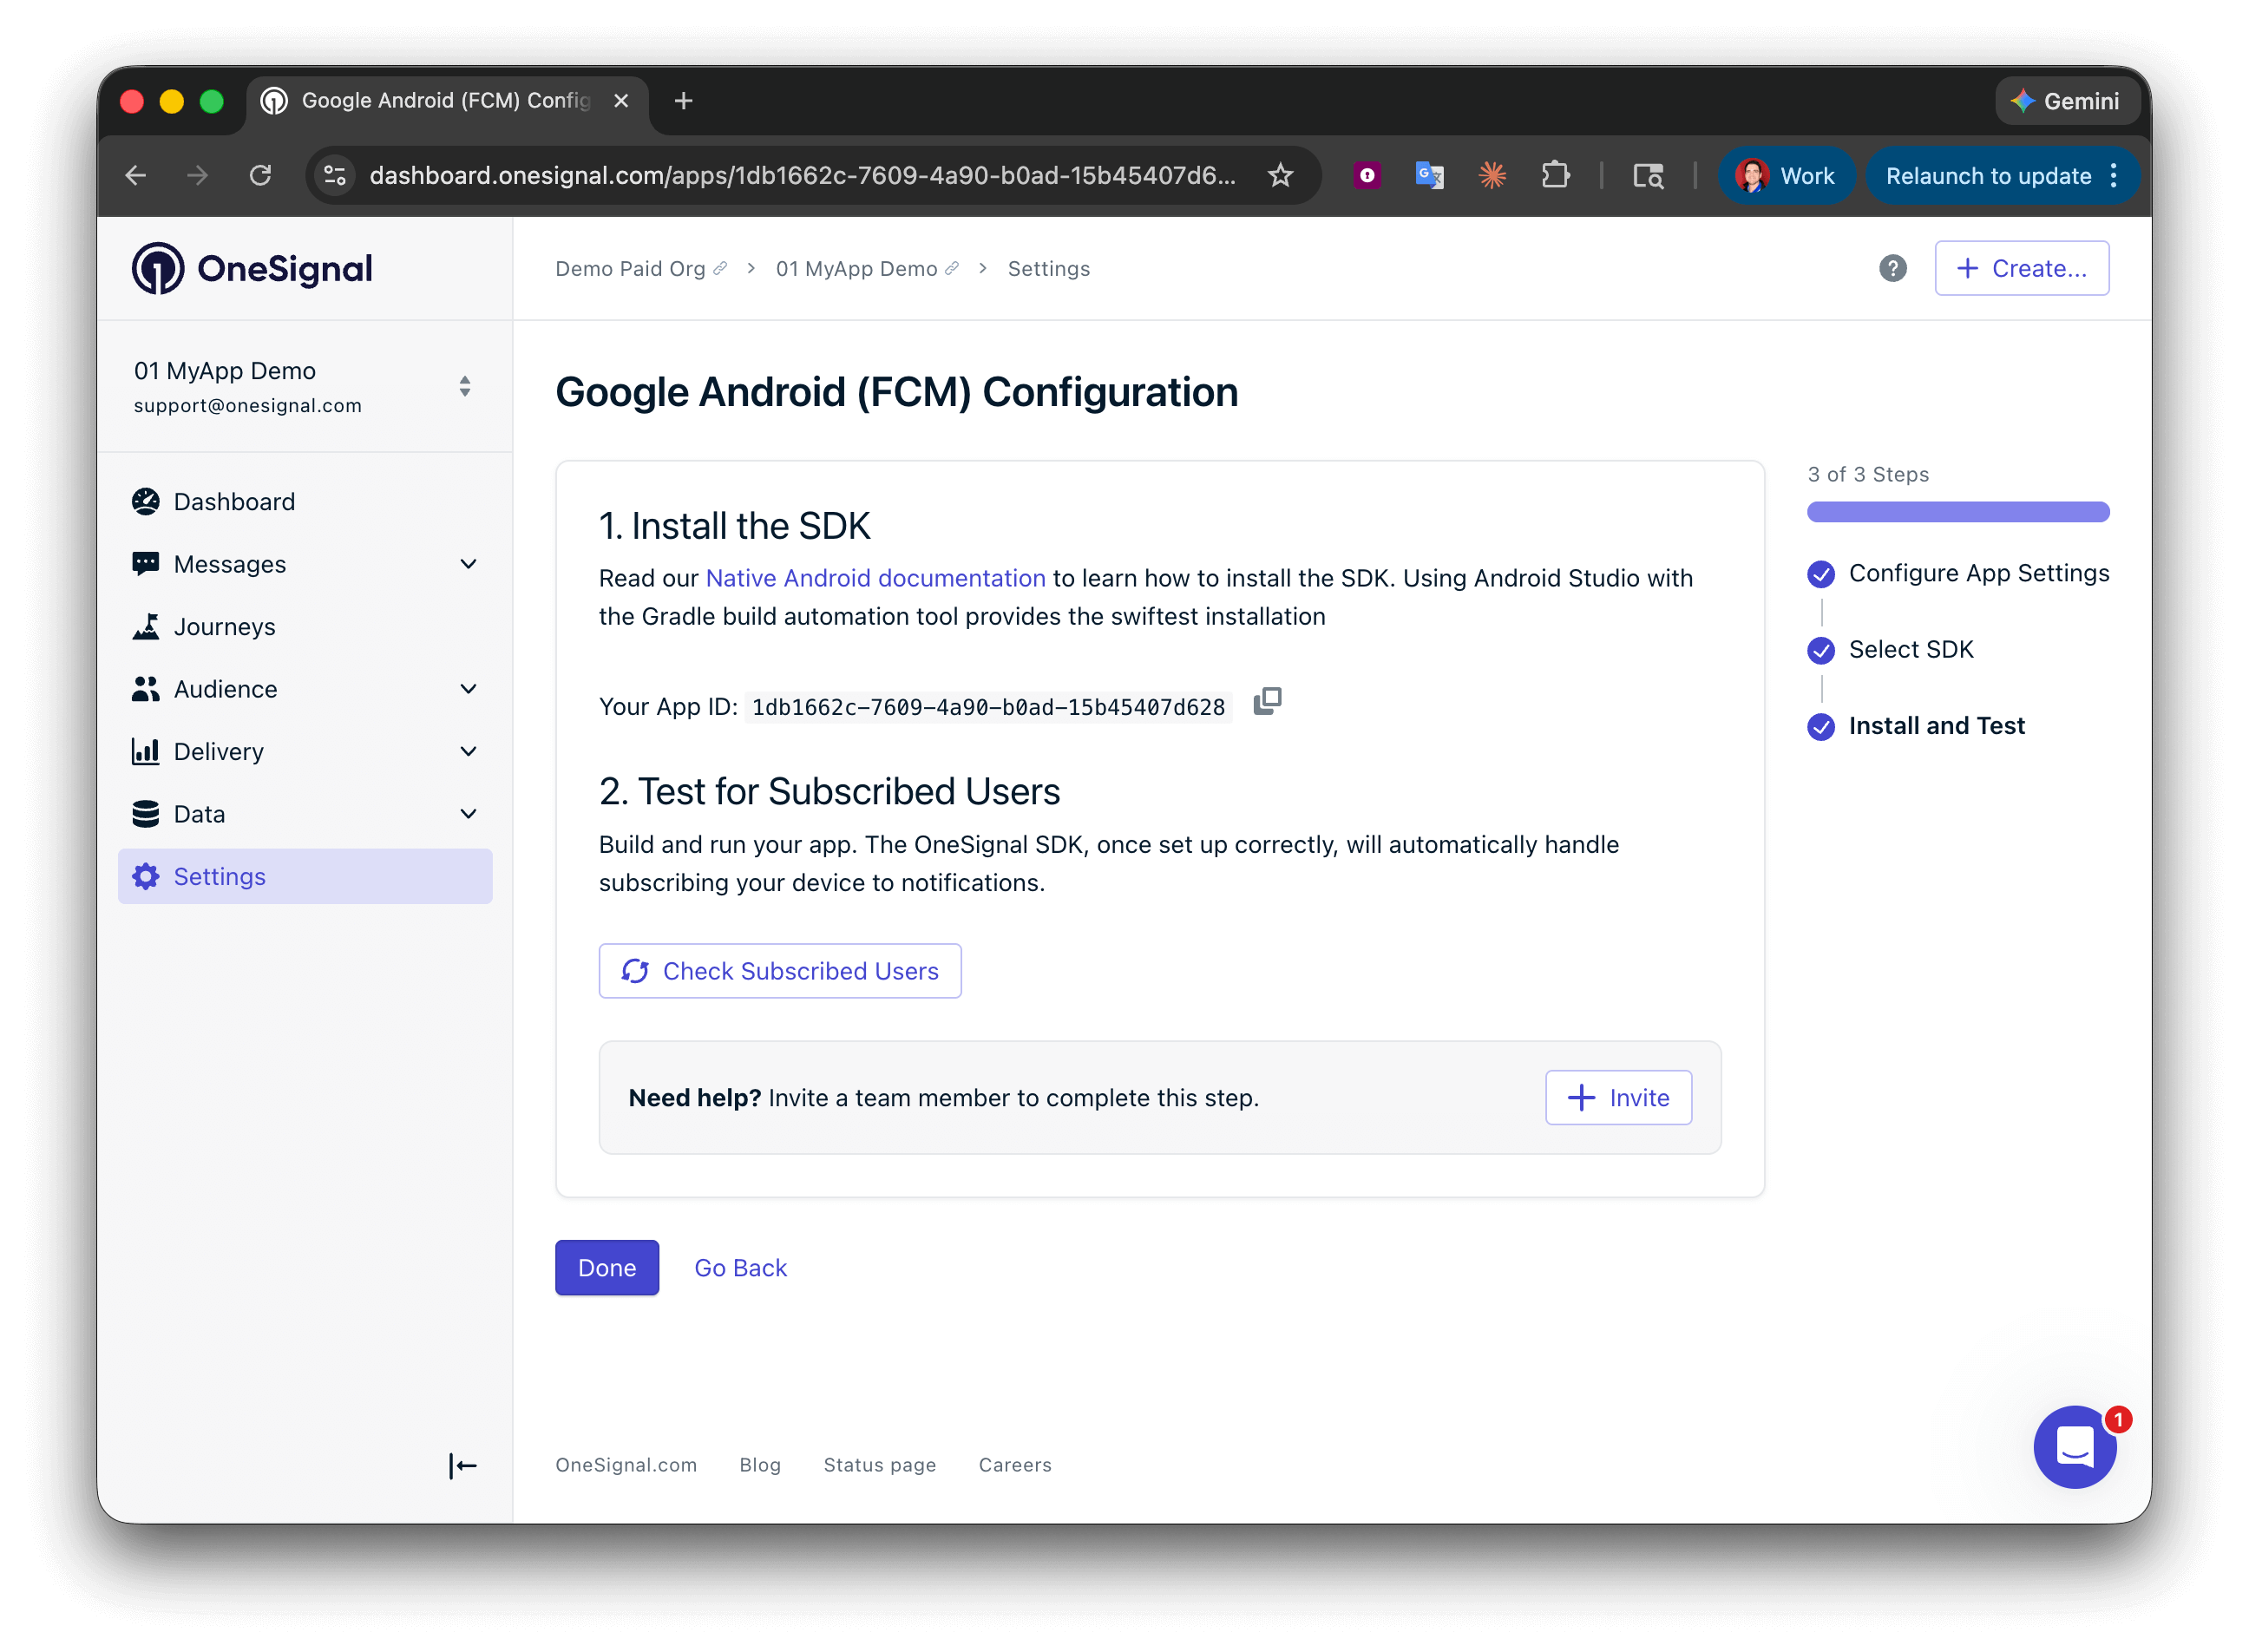
**App ID** は最終画面に表示されます。コピーして保存してください — SDKを初期化するときに必要です。SDKプラットフォームを選択し、セットアップガイドに従います。
プラットフォームの認証情報を入力します:
* **Android**:[Firebase認証情報をセットアップ](/docs/ja/android-firebase-credentials)
* **iOS**:[p8トークン(推奨)](/docs/ja/ios-p8-token-based-connection-to-apns)または[p12証明書](/docs/ja/ios-p12-generate-certificates)
* **Amazon**:[APIキーを生成](/docs/ja/generate-an-amazon-api-key)
* **Huawei**:[OneSignalを承認](/docs/ja/authorize-onesignal-to-send-huawei-push)
認証情報を入力した後、**Save & Continue** をクリックします。
**App ID** は最終画面に表示されます。コピーして保存してください — SDKを初期化するときに必要です。SDKプラットフォームを選択し、セットアップガイドに従います。
 ***
## iOSのセットアップ
次の手順に従って、[バッジ](./badges)、[確認済み配信](./confirmed-delivery)、および画像のサポートを含むプッシュ通知をiOSアプリに追加します。
### 1. アプリターゲットにプッシュ通知機能を追加
[プッシュ通知機能](https://developer.apple.com/documentation/UserNotifications/registering-your-app-with-apns#Enable-the-push-notifications-capability)により、アプリはプッシュトークンを登録して通知を受信できます。
1. Xcodeでアプリの`.xcworkspace`ファイルを開きます。
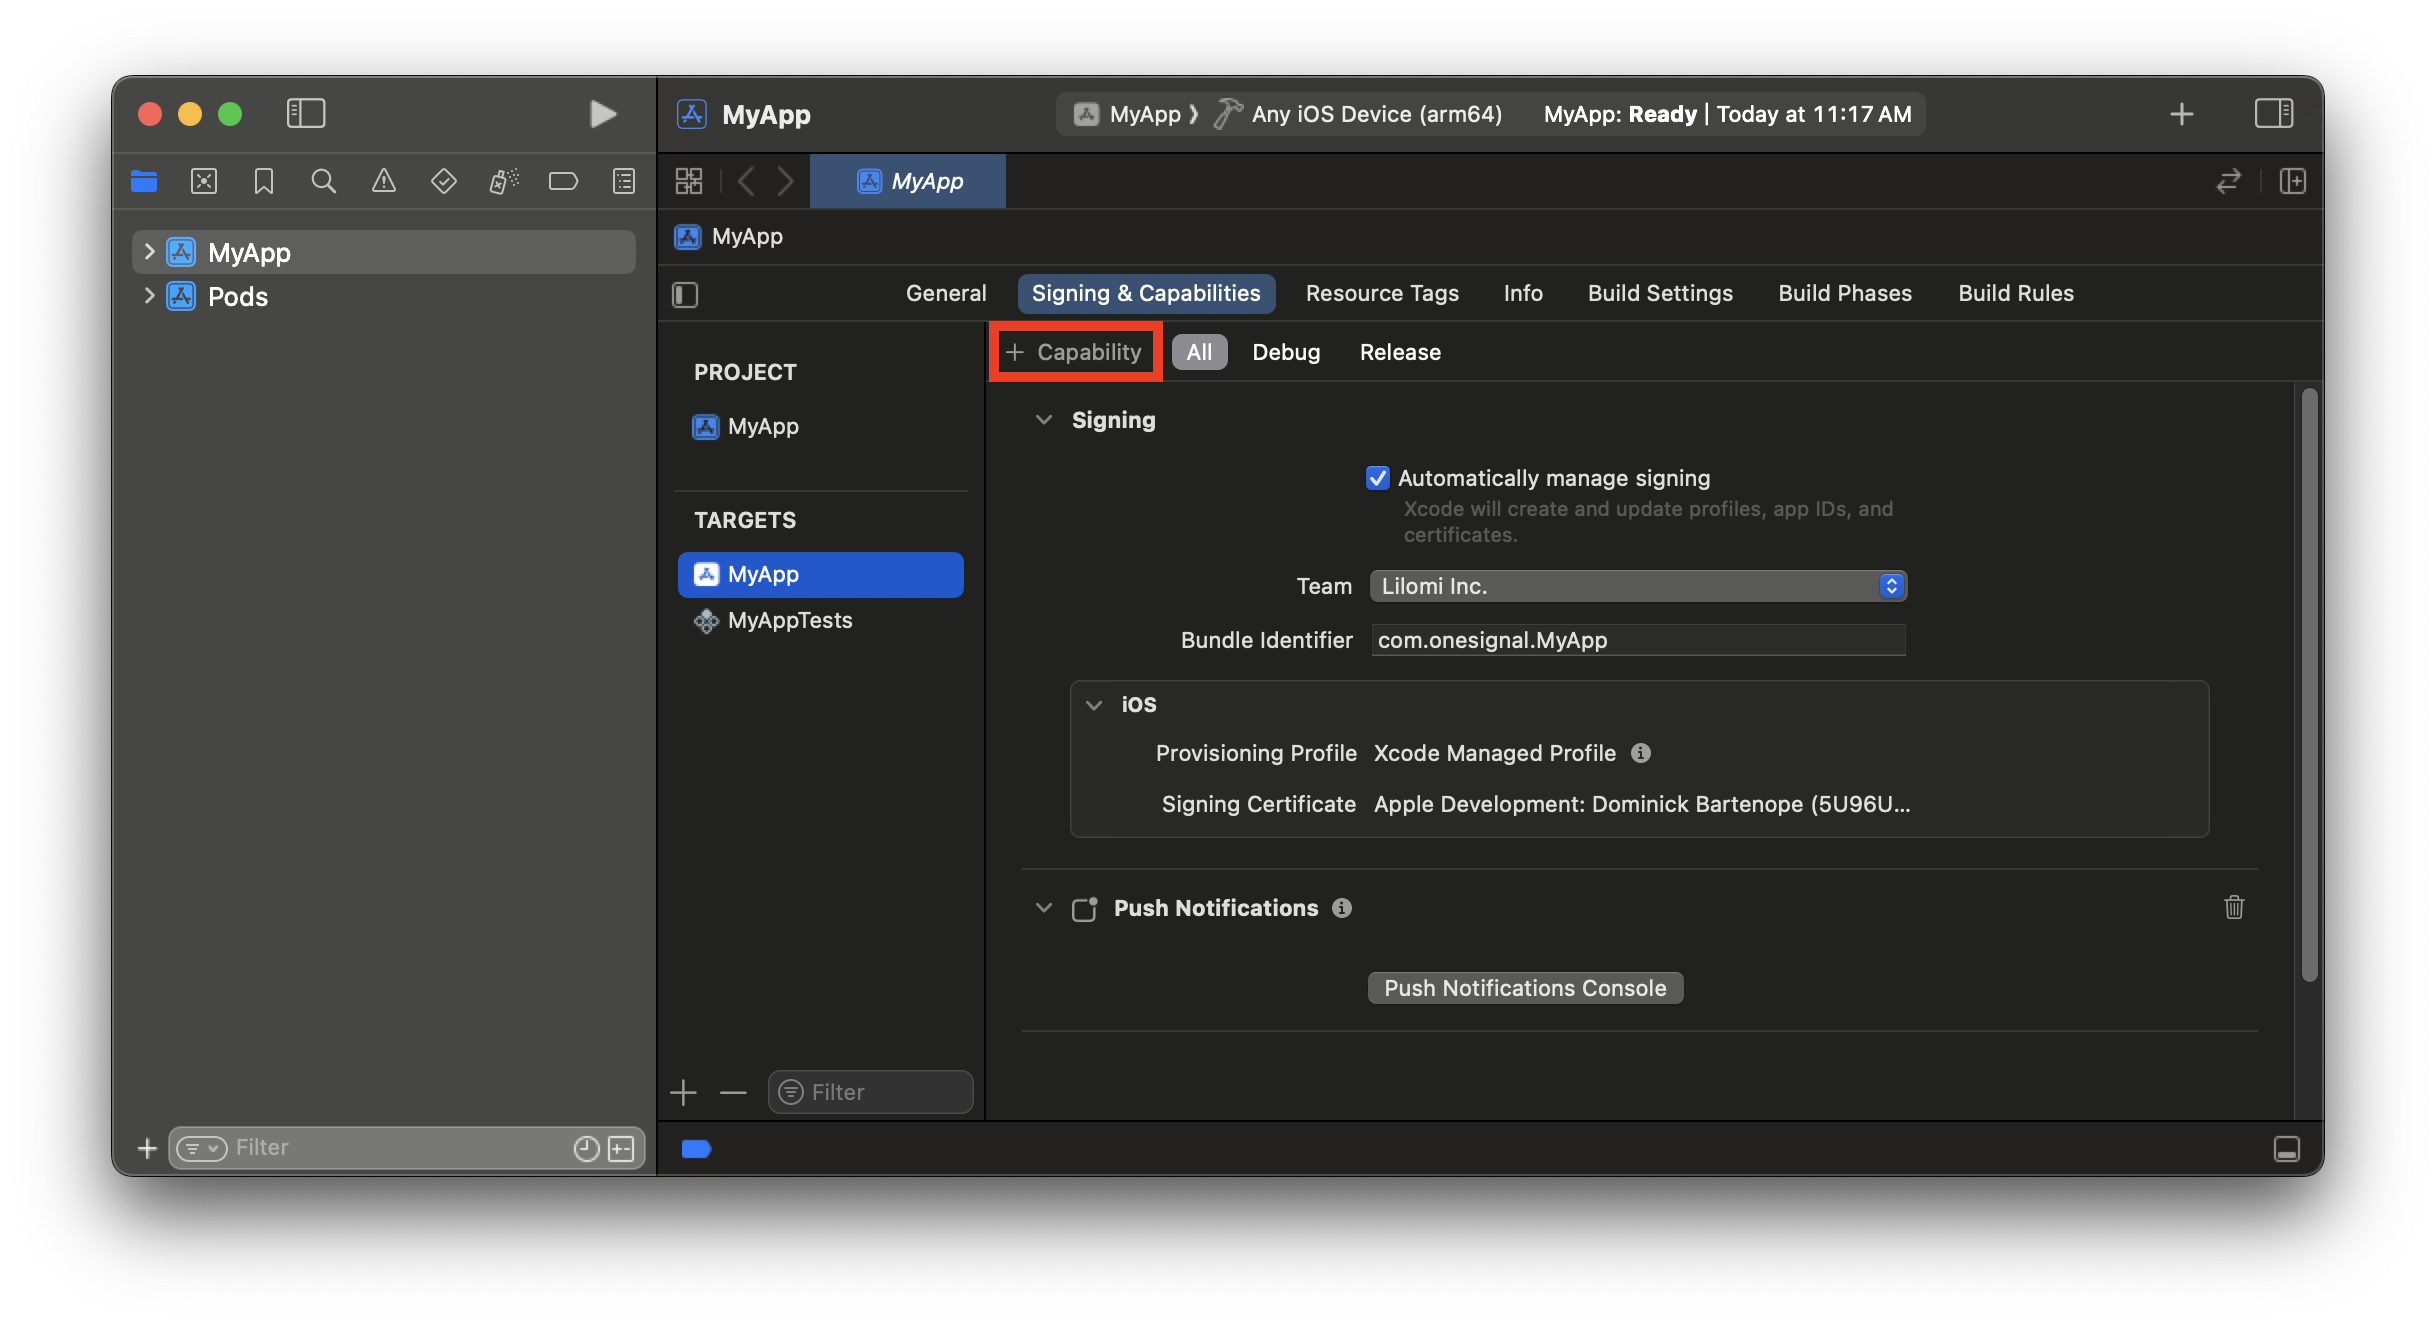
2. **アプリターゲット > 署名 & 機能**を選択します
3. **+ 機能**をクリックして、**プッシュ通知**機能を追加します
***
## iOSのセットアップ
次の手順に従って、[バッジ](./badges)、[確認済み配信](./confirmed-delivery)、および画像のサポートを含むプッシュ通知をiOSアプリに追加します。
### 1. アプリターゲットにプッシュ通知機能を追加
[プッシュ通知機能](https://developer.apple.com/documentation/UserNotifications/registering-your-app-with-apns#Enable-the-push-notifications-capability)により、アプリはプッシュトークンを登録して通知を受信できます。
1. Xcodeでアプリの`.xcworkspace`ファイルを開きます。
2. **アプリターゲット > 署名 & 機能**を選択します
3. **+ 機能**をクリックして、**プッシュ通知**機能を追加します
 ### 2. アプリターゲットにバックグラウンドモード機能を追加
これにより、プッシュ通知が到着したときにアプリがバックグラウンドでウェイクできます。
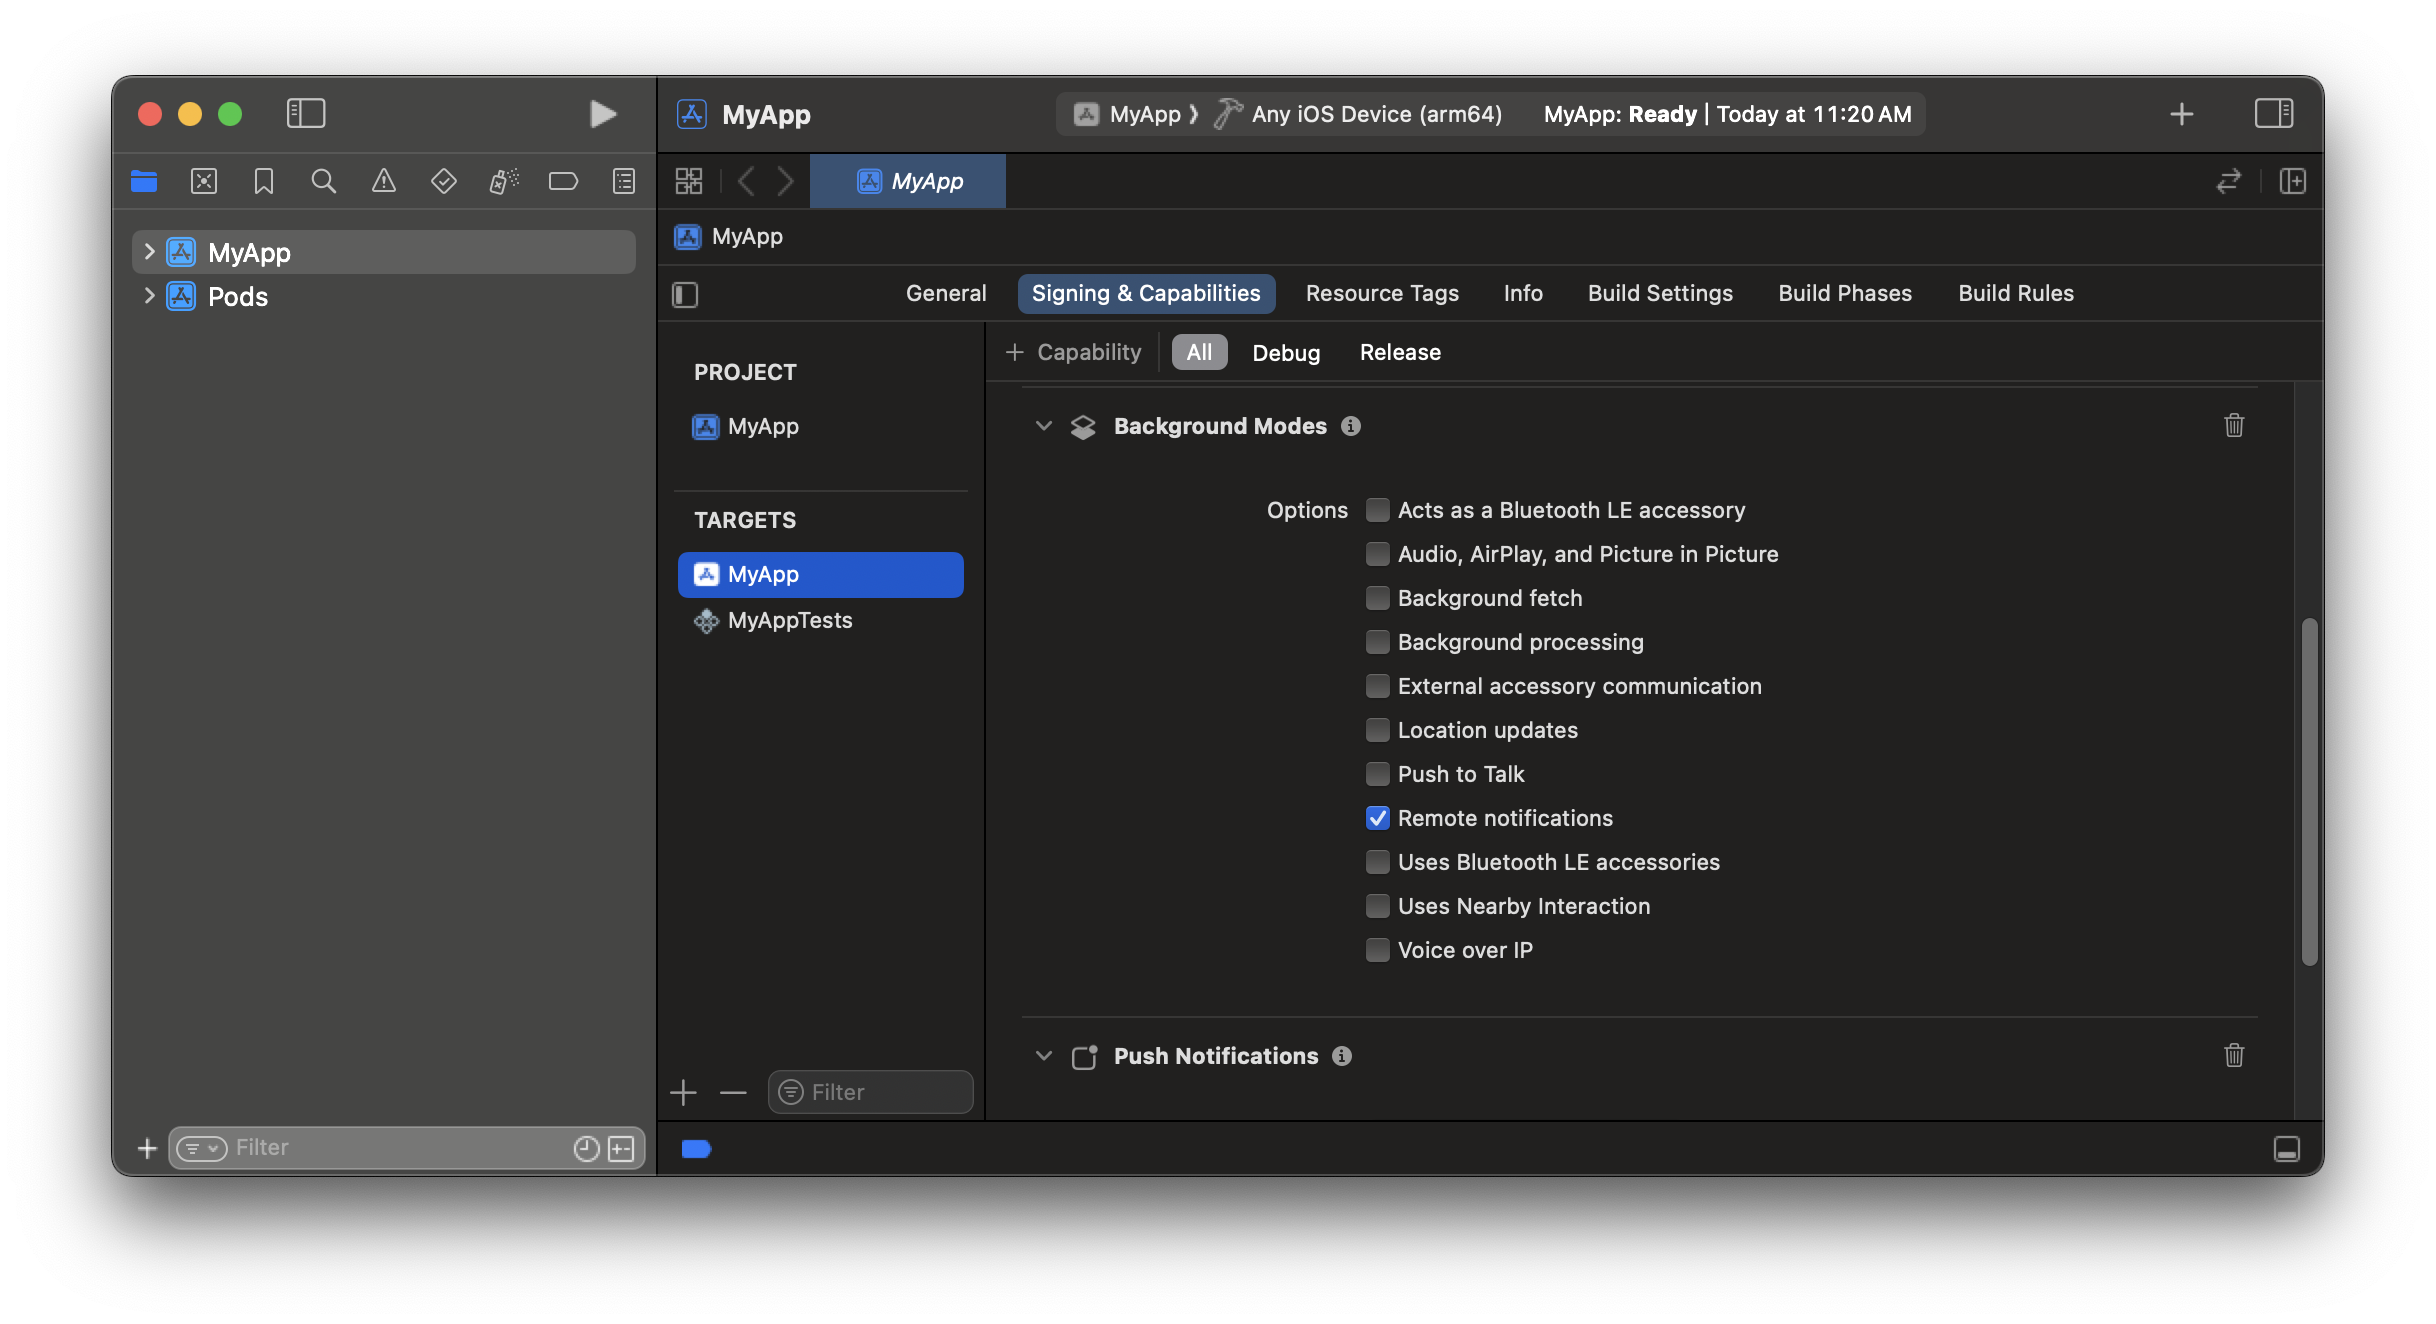
1. [バックグラウンドモード](https://developer.apple.com/documentation/usernotifications/pushing-background-updates-to-your-app)機能を追加します
2. **リモート通知**を有効にします
### 2. アプリターゲットにバックグラウンドモード機能を追加
これにより、プッシュ通知が到着したときにアプリがバックグラウンドでウェイクできます。
1. [バックグラウンドモード](https://developer.apple.com/documentation/usernotifications/pushing-background-updates-to-your-app)機能を追加します
2. **リモート通知**を有効にします
 ### 3. アプリターゲットをアプリグループに追加
[アプリグループ](https://developer.apple.com/documentation/xcode/configuring-app-groups/#Create-App-Groups-for-all-other-platforms)を使用すると、アプリとNotification Service Extension間でデータを共有できます。確認済み配信とバッジに必要です。
1. **アプリグループ**機能を追加します
2. アプリグループ機能で\*\*+\*\*をクリックします
3. 次の形式で新しいコンテナIDを追加します:`group.your_bundle_id.onesignal`
* **group.**と**.onesignal**のプレフィックスとサフィックスを保持します。\*\*`your_bundle_id`\*\*をアプリのバンドル識別子に置き換えます。
* たとえば、バンドル識別子が`com.onesignal.MyApp`の場合、コンテナ名は`group.com.onesignal.MyApp.onesignal`になります。
### 3. アプリターゲットをアプリグループに追加
[アプリグループ](https://developer.apple.com/documentation/xcode/configuring-app-groups/#Create-App-Groups-for-all-other-platforms)を使用すると、アプリとNotification Service Extension間でデータを共有できます。確認済み配信とバッジに必要です。
1. **アプリグループ**機能を追加します
2. アプリグループ機能で\*\*+\*\*をクリックします
3. 次の形式で新しいコンテナIDを追加します:`group.your_bundle_id.onesignal`
* **group.**と**.onesignal**のプレフィックスとサフィックスを保持します。\*\*`your_bundle_id`\*\*をアプリのバンドル識別子に置き換えます。
* たとえば、バンドル識別子が`com.onesignal.MyApp`の場合、コンテナ名は`group.com.onesignal.MyApp.onesignal`になります。
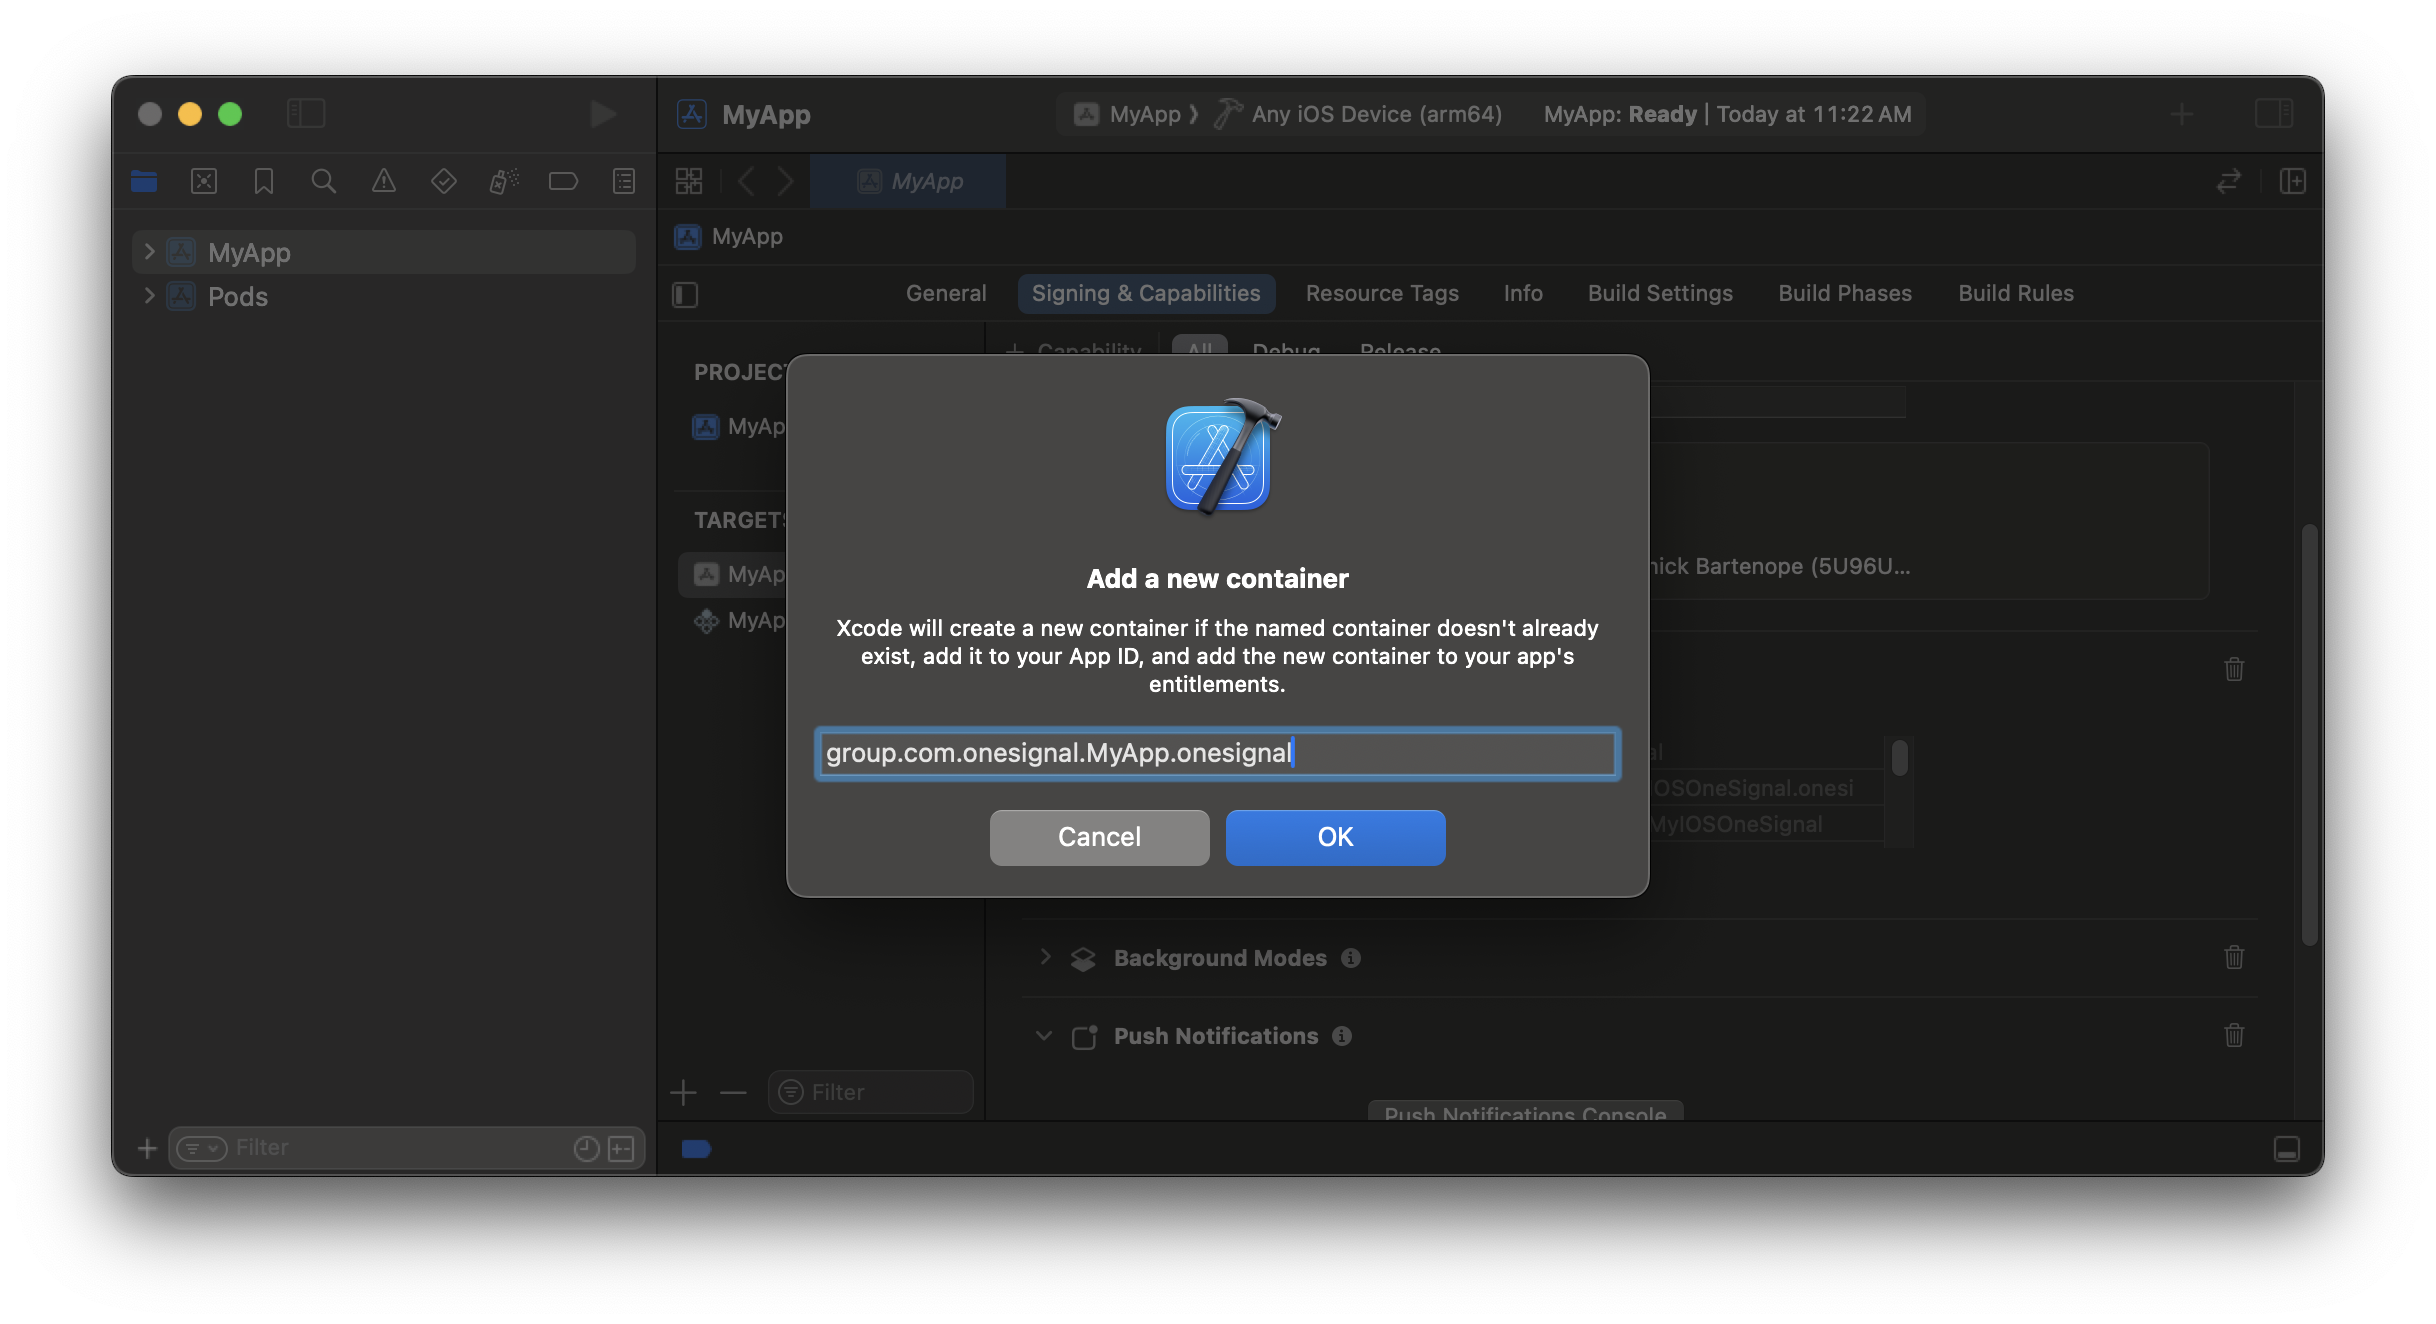 アプリグループ名は、すべてのターゲットでバンドルIDのスペルと大文字小文字が正確に一致する必要があります。
1. **アプリターゲット**と**OneSignalNotificationServiceExtensionターゲット**の`Info.plist`を開きます
2. 両方のターゲットの`Info.plist`に新しいプロパティを追加します:
* **キー:** `OneSignal_app_groups_key`
* **値:** 既存のアプリグループ名(例:`group.your-custom-group-id`)
```xml XML theme={null}
OneSignal_app_groups_key
group.your-custom-group-id
```
アプリグループ名は、すべてのターゲットでバンドルIDのスペルと大文字小文字が正確に一致する必要があります。
1. **アプリターゲット**と**OneSignalNotificationServiceExtensionターゲット**の`Info.plist`を開きます
2. 両方のターゲットの`Info.plist`に新しいプロパティを追加します:
* **キー:** `OneSignal_app_groups_key`
* **値:** 既存のアプリグループ名(例:`group.your-custom-group-id`)
```xml XML theme={null}
OneSignal_app_groups_key
group.your-custom-group-id
```
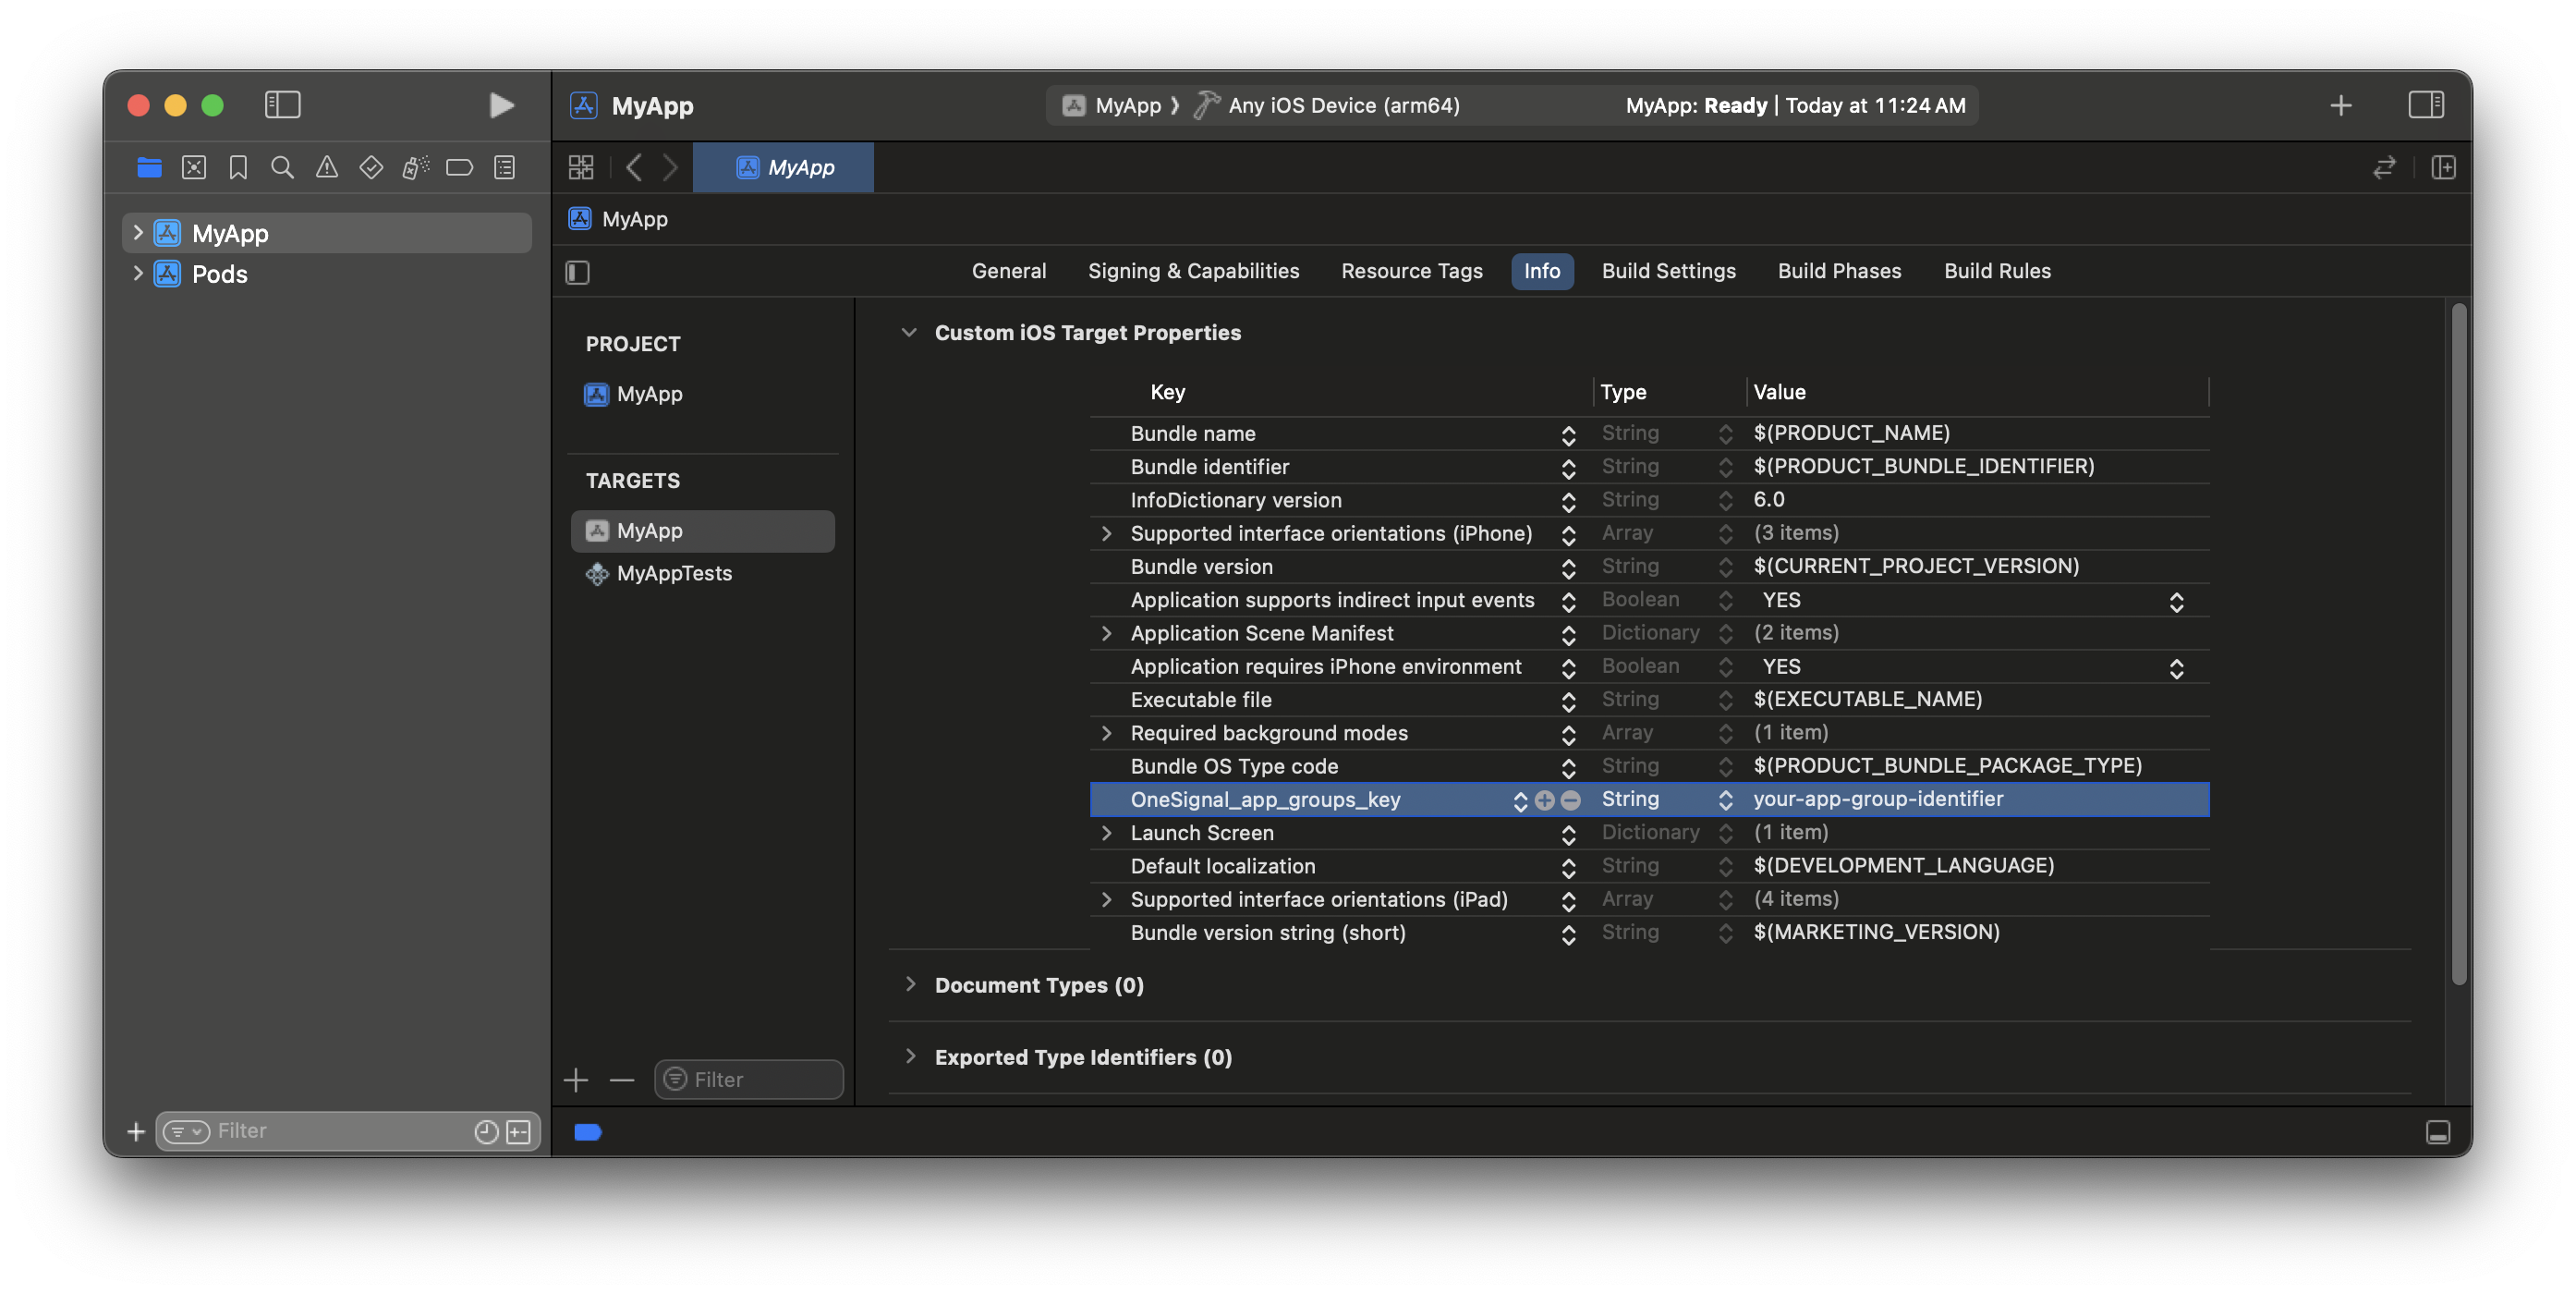 アプリターゲット**と**OneSignalNotificationServiceExtensionターゲットの`Info.plist`**の両方**で`OneSignal_app_groups_key`を更新してください!
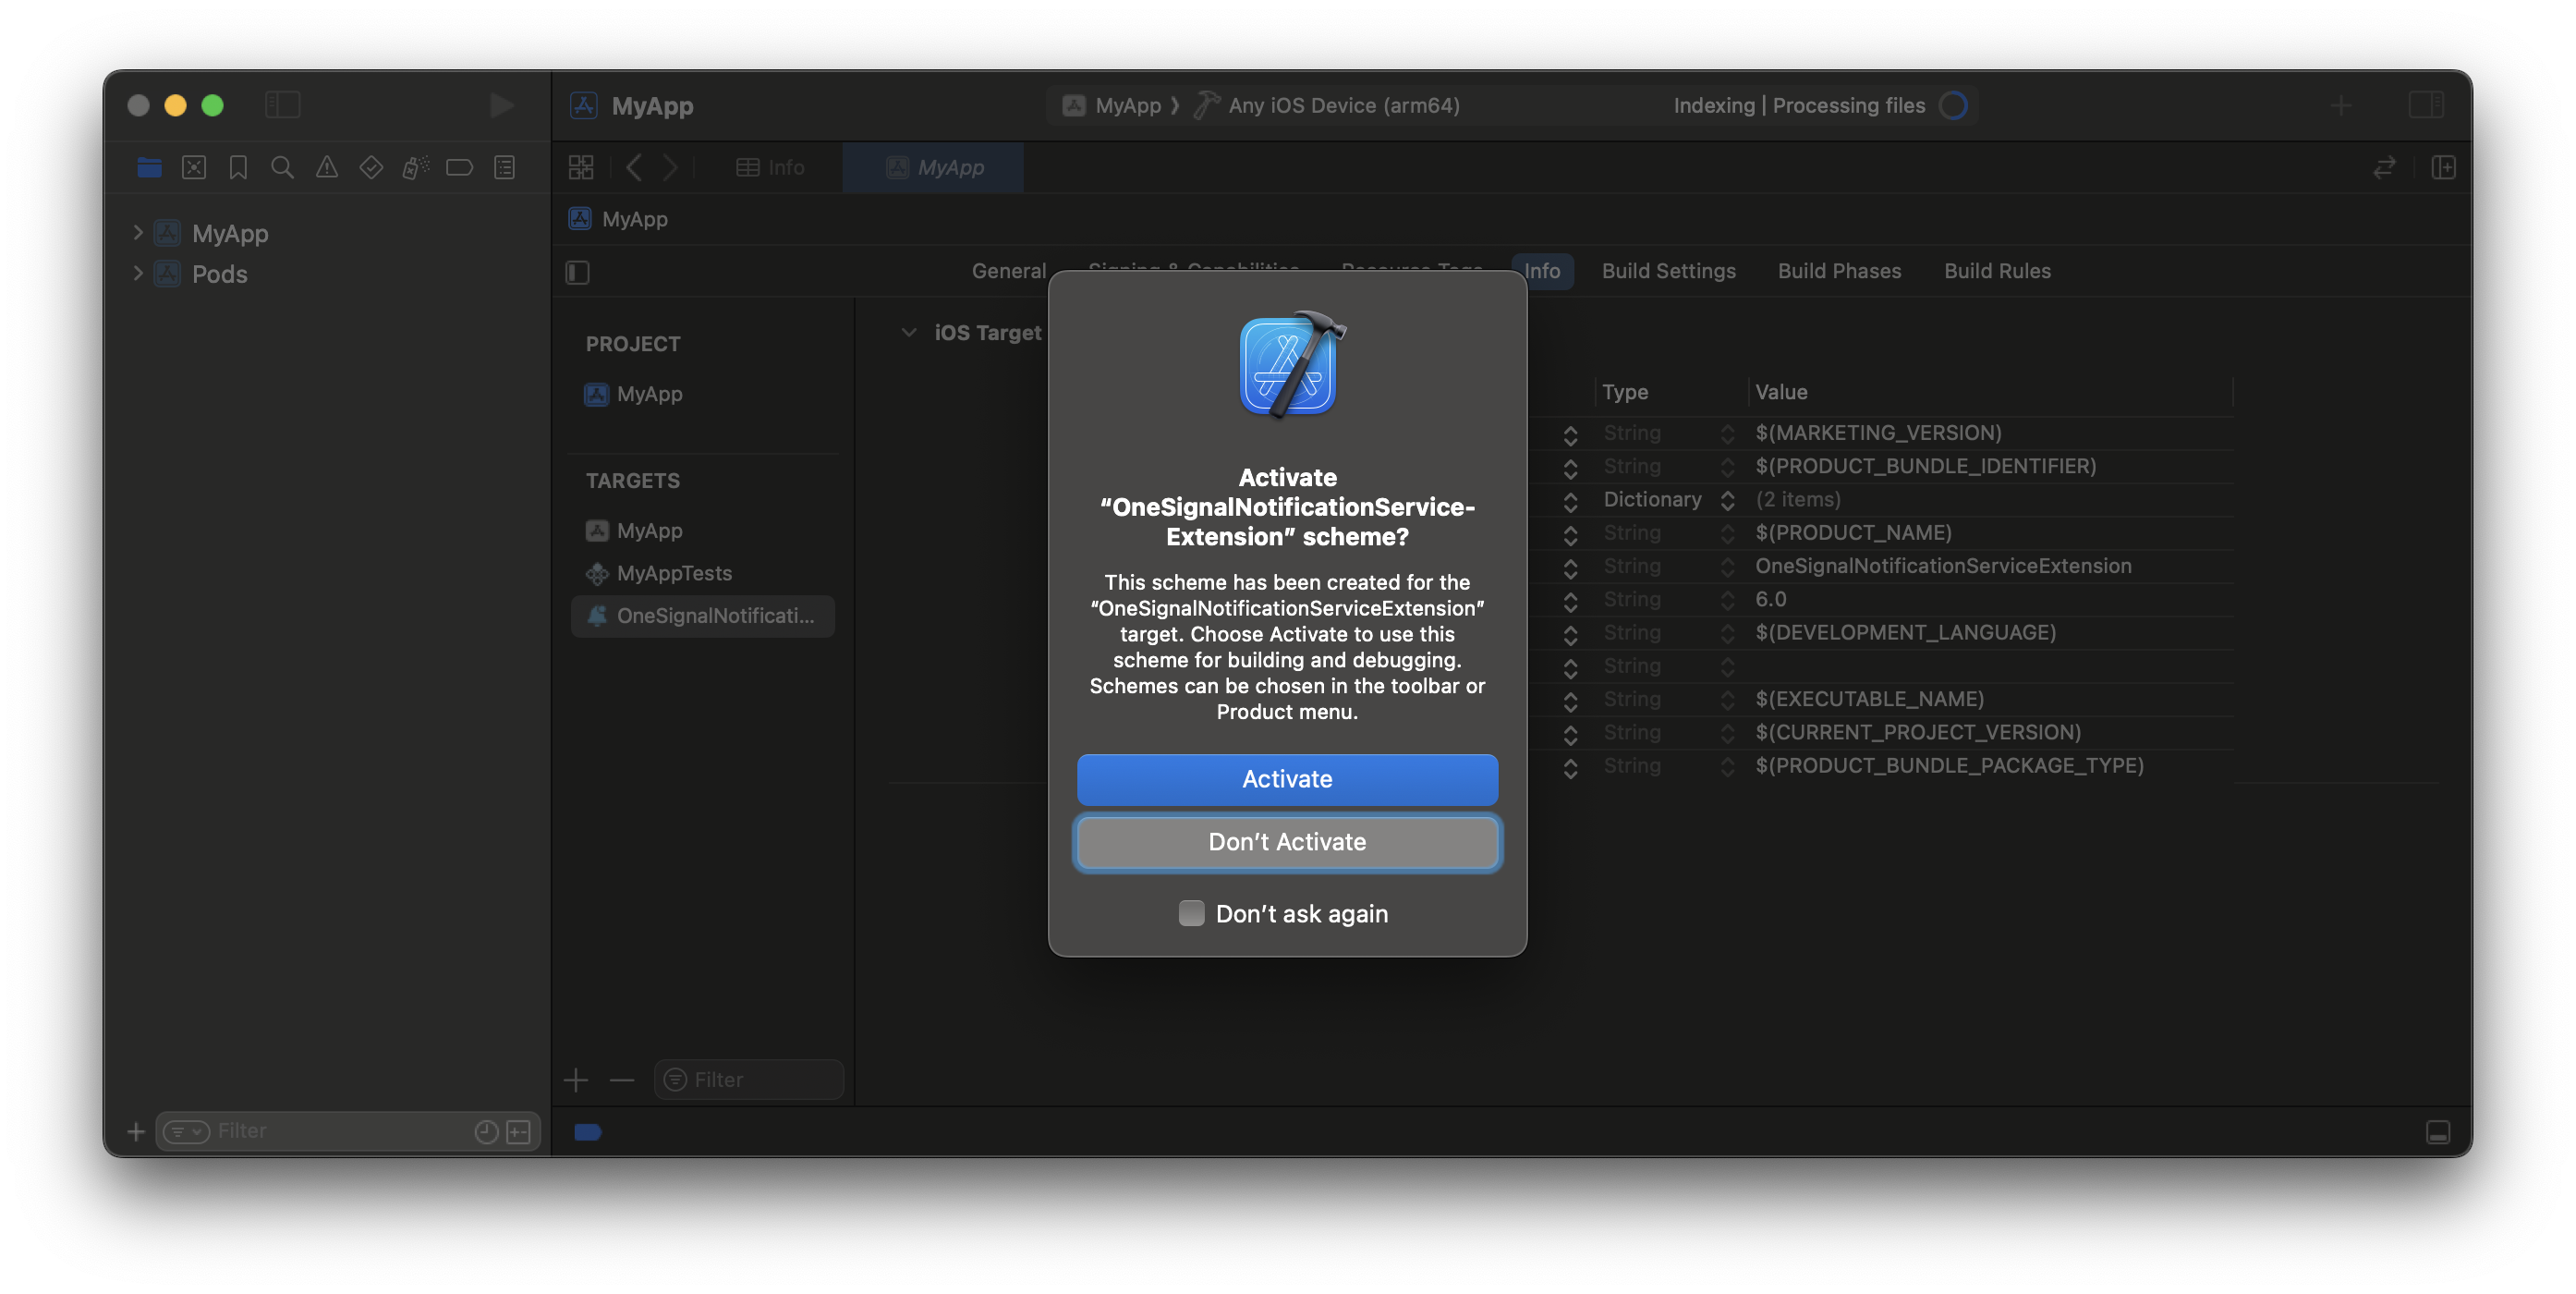
### 4. Notification Service Extensionを追加
[Notification Service Extension(NSE)](https://developer.apple.com/documentation/usernotifications/modifying-content-in-newly-delivered-notifications)は、リッチ通知と確認済み配信分析を有効にします。
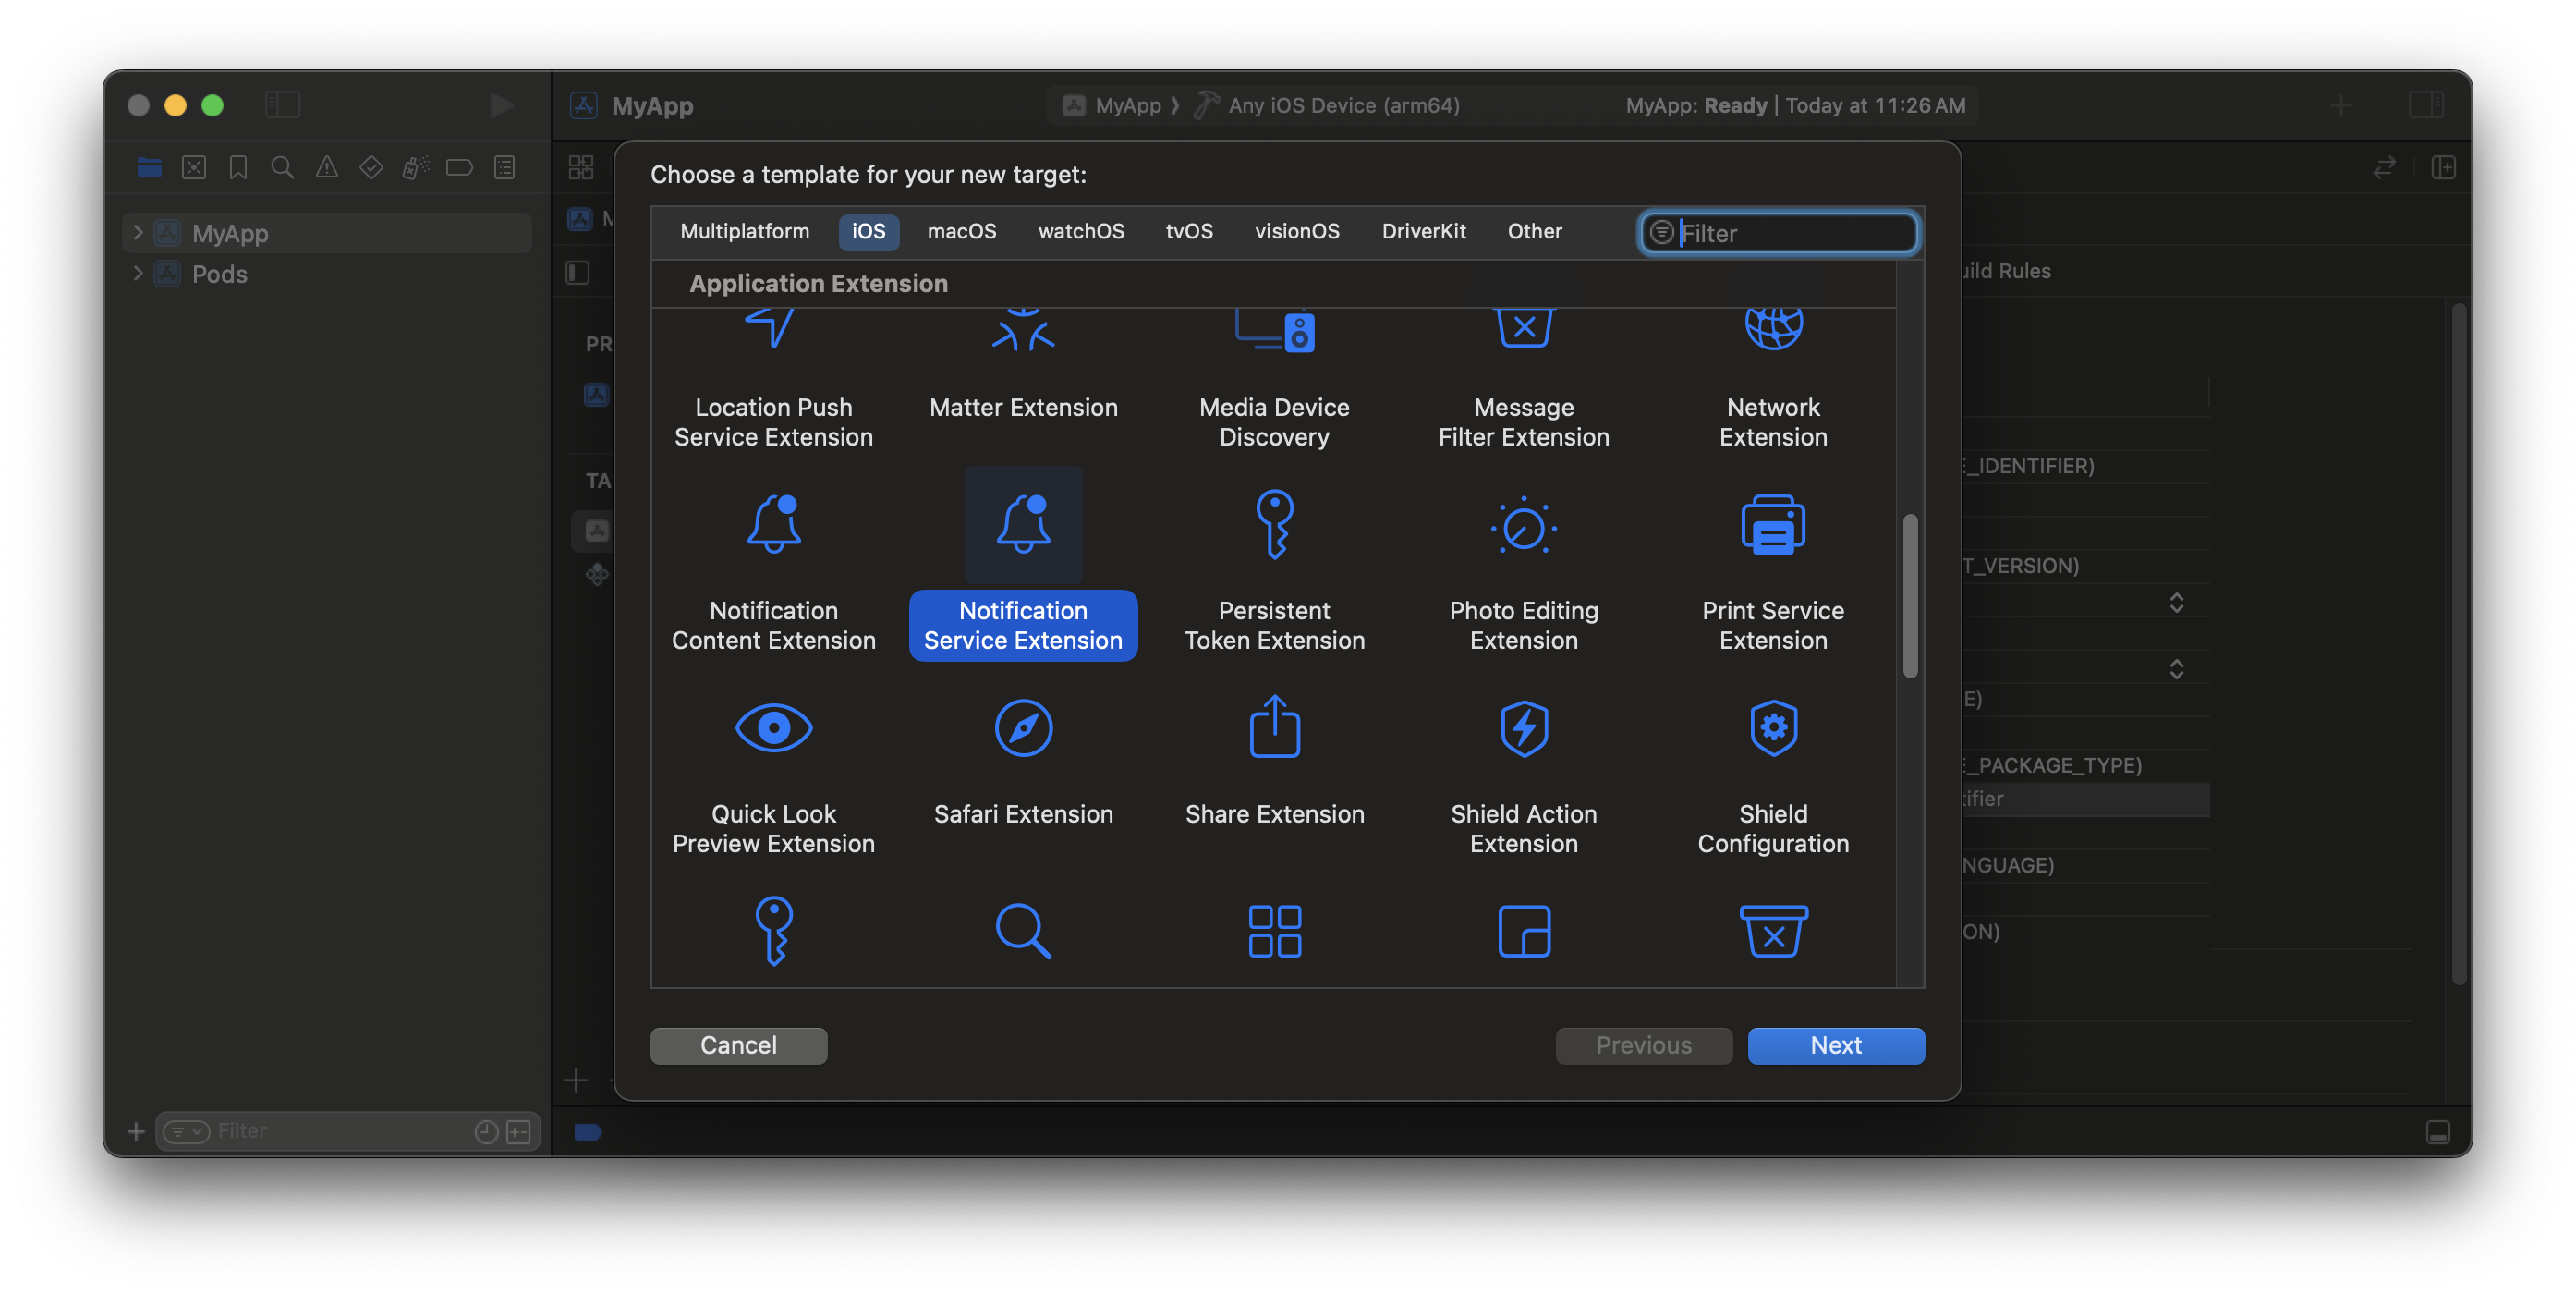
1. Xcodeで:**ファイル > 新規 > ターゲット...**
2. **Notification Service Extension**を選択してから、**次へ**をクリックします。
3. 製品名を`OneSignalNotificationServiceExtension`に設定し、**完了**を押します。
4. スキームのアクティブ化プロンプトで**アクティブ化しない**を押します。
アプリターゲット**と**OneSignalNotificationServiceExtensionターゲットの`Info.plist`**の両方**で`OneSignal_app_groups_key`を更新してください!
### 4. Notification Service Extensionを追加
[Notification Service Extension(NSE)](https://developer.apple.com/documentation/usernotifications/modifying-content-in-newly-delivered-notifications)は、リッチ通知と確認済み配信分析を有効にします。
1. Xcodeで:**ファイル > 新規 > ターゲット...**
2. **Notification Service Extension**を選択してから、**次へ**をクリックします。
3. 製品名を`OneSignalNotificationServiceExtension`に設定し、**完了**を押します。
4. スキームのアクティブ化プロンプトで**アクティブ化しない**を押します。
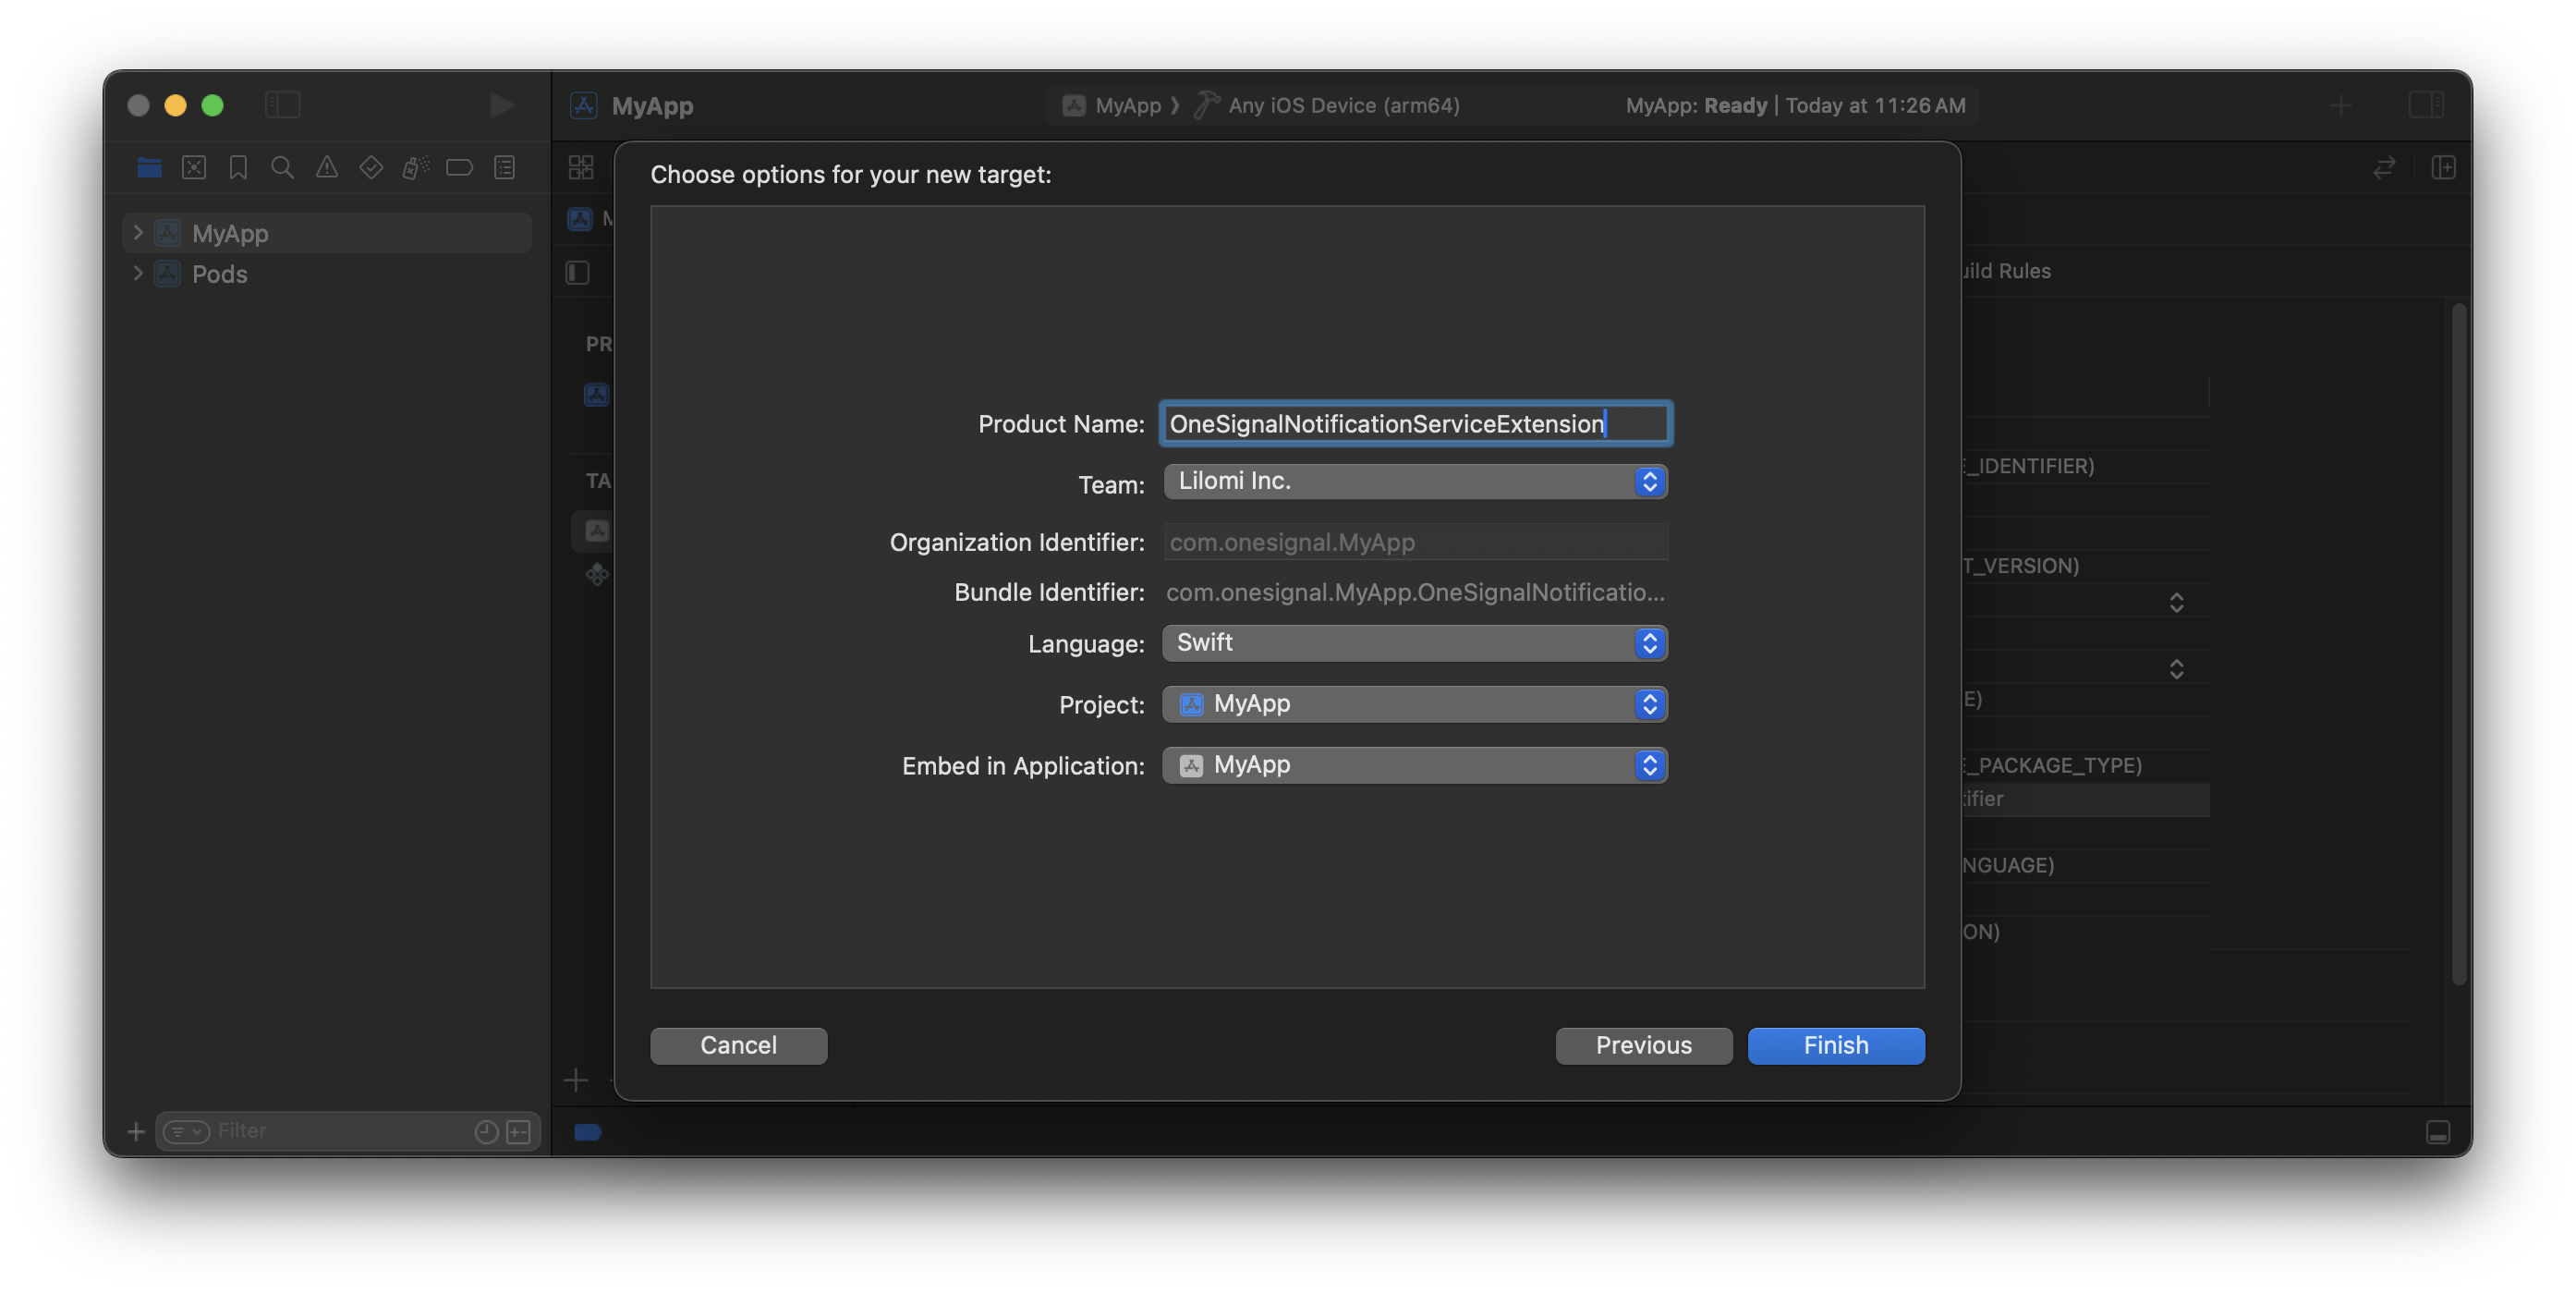
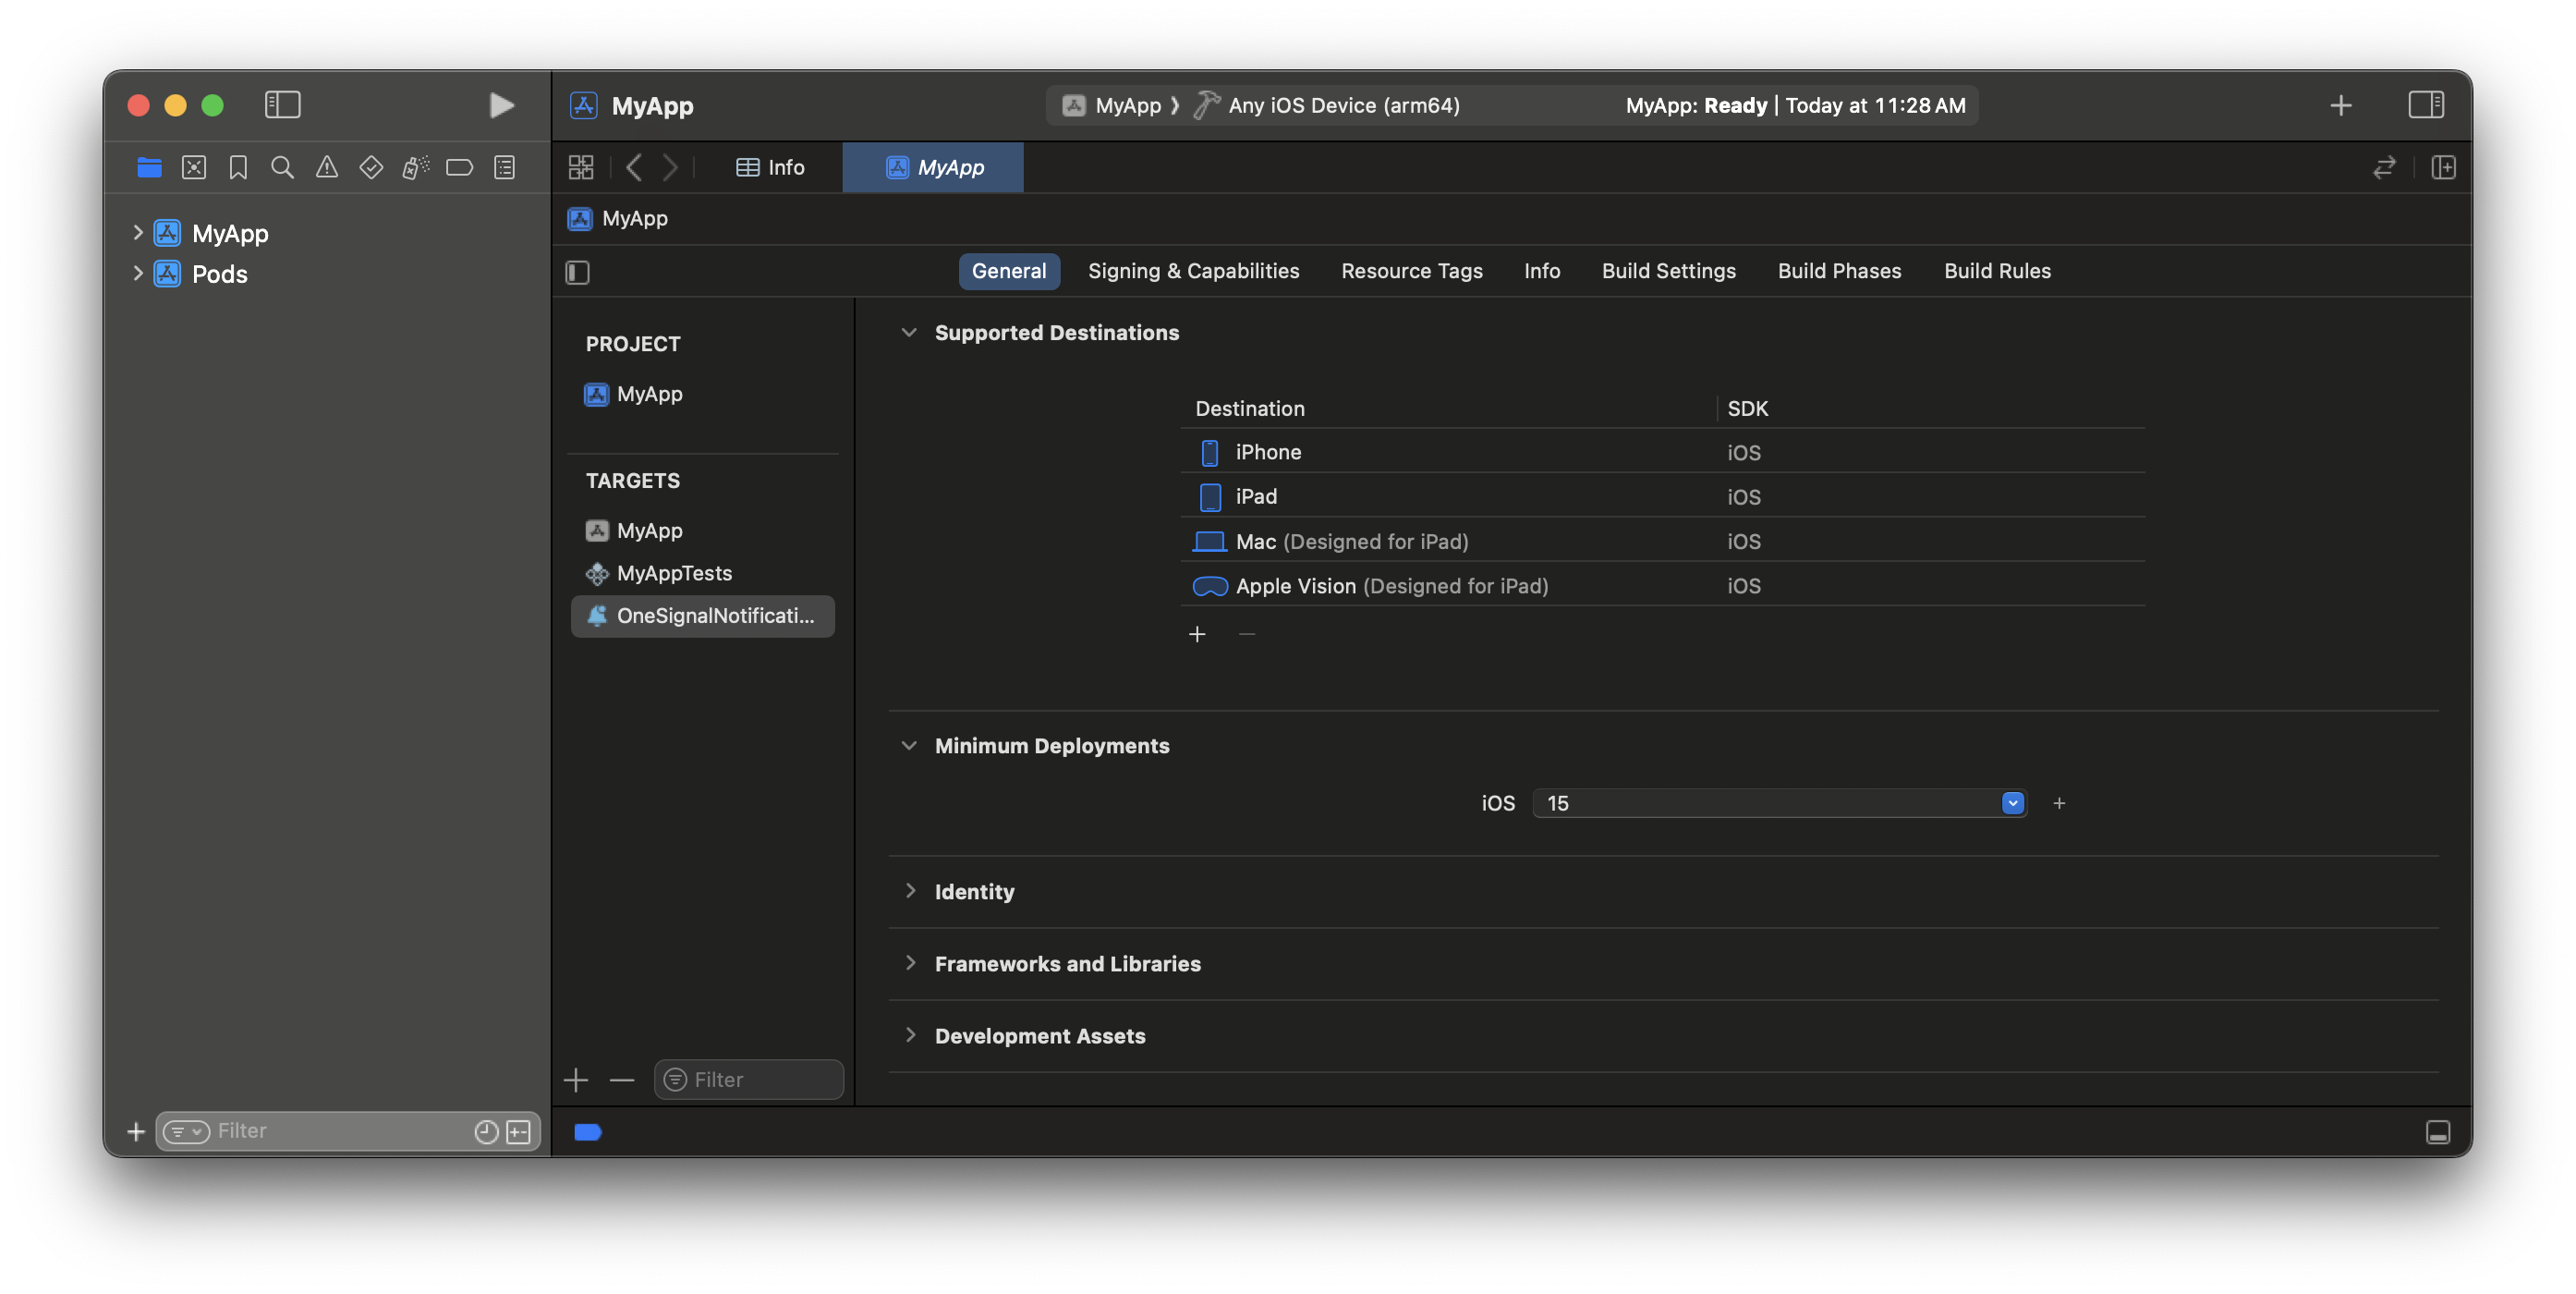
 OneSignalNotificationServiceExtensionの**最小デプロイメントターゲット**をメインアプリに一致するように設定します(iOS 15以降を推奨)。
CocoaPodsを使用している場合は、Podfileにもデプロイメントバージョンを設定してください。
OneSignalNotificationServiceExtensionの**最小デプロイメントターゲット**をメインアプリに一致するように設定します(iOS 15以降を推奨)。
CocoaPodsを使用している場合は、Podfileにもデプロイメントバージョンを設定してください。
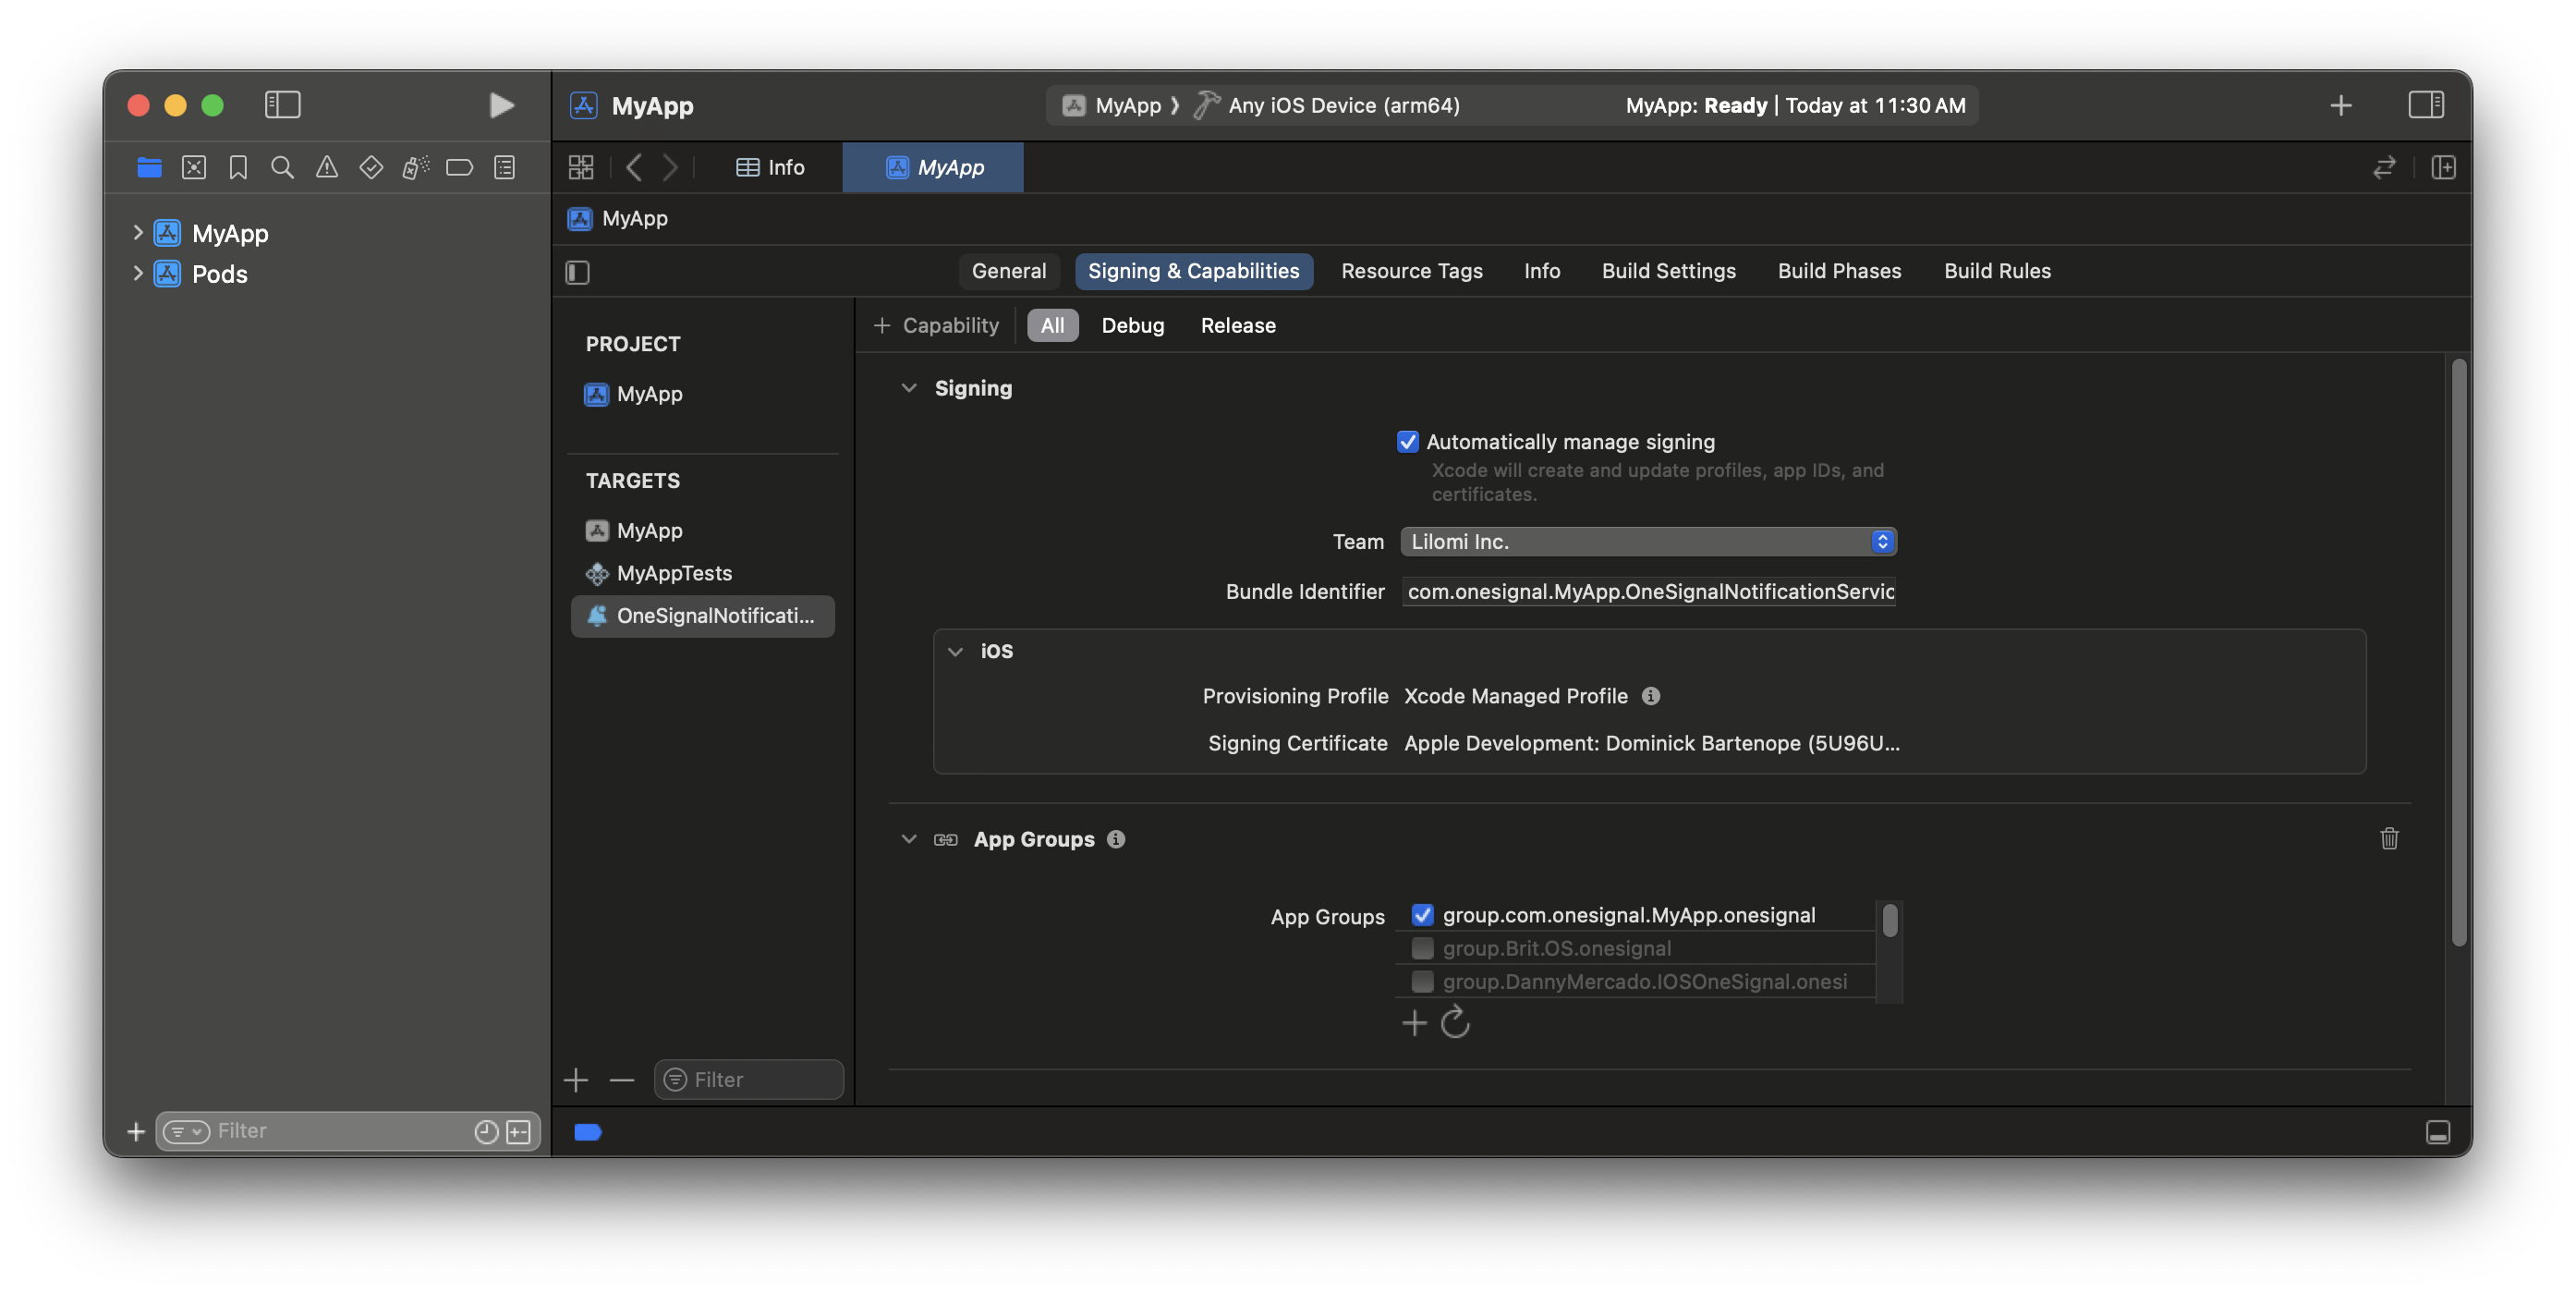
 ### 5. NSEターゲットをアプリグループに追加
ステップ3で追加したのと同じアプリグループIDを使用します。
1. **OneSignalNotificationServiceExtension > 署名 & 機能**に移動します
2. **アプリグループ**を追加します
3. まったく同じグループIDを追加します
カスタムアプリグループ名を使用していて、`group.your_bundle_id.onesignal`ではない場合は、アプリターゲットとOneSignalNotificationServiceExtensionターゲットの`Info.plist`の両方にアプリグループIDを追加してください!詳細については、[ステップ3](#3-add-app-target-to-app-group)を参照してください。
### 5. NSEターゲットをアプリグループに追加
ステップ3で追加したのと同じアプリグループIDを使用します。
1. **OneSignalNotificationServiceExtension > 署名 & 機能**に移動します
2. **アプリグループ**を追加します
3. まったく同じグループIDを追加します
カスタムアプリグループ名を使用していて、`group.your_bundle_id.onesignal`ではない場合は、アプリターゲットとOneSignalNotificationServiceExtensionターゲットの`Info.plist`の両方にアプリグループIDを追加してください!詳細については、[ステップ3](#3-add-app-target-to-app-group)を参照してください。
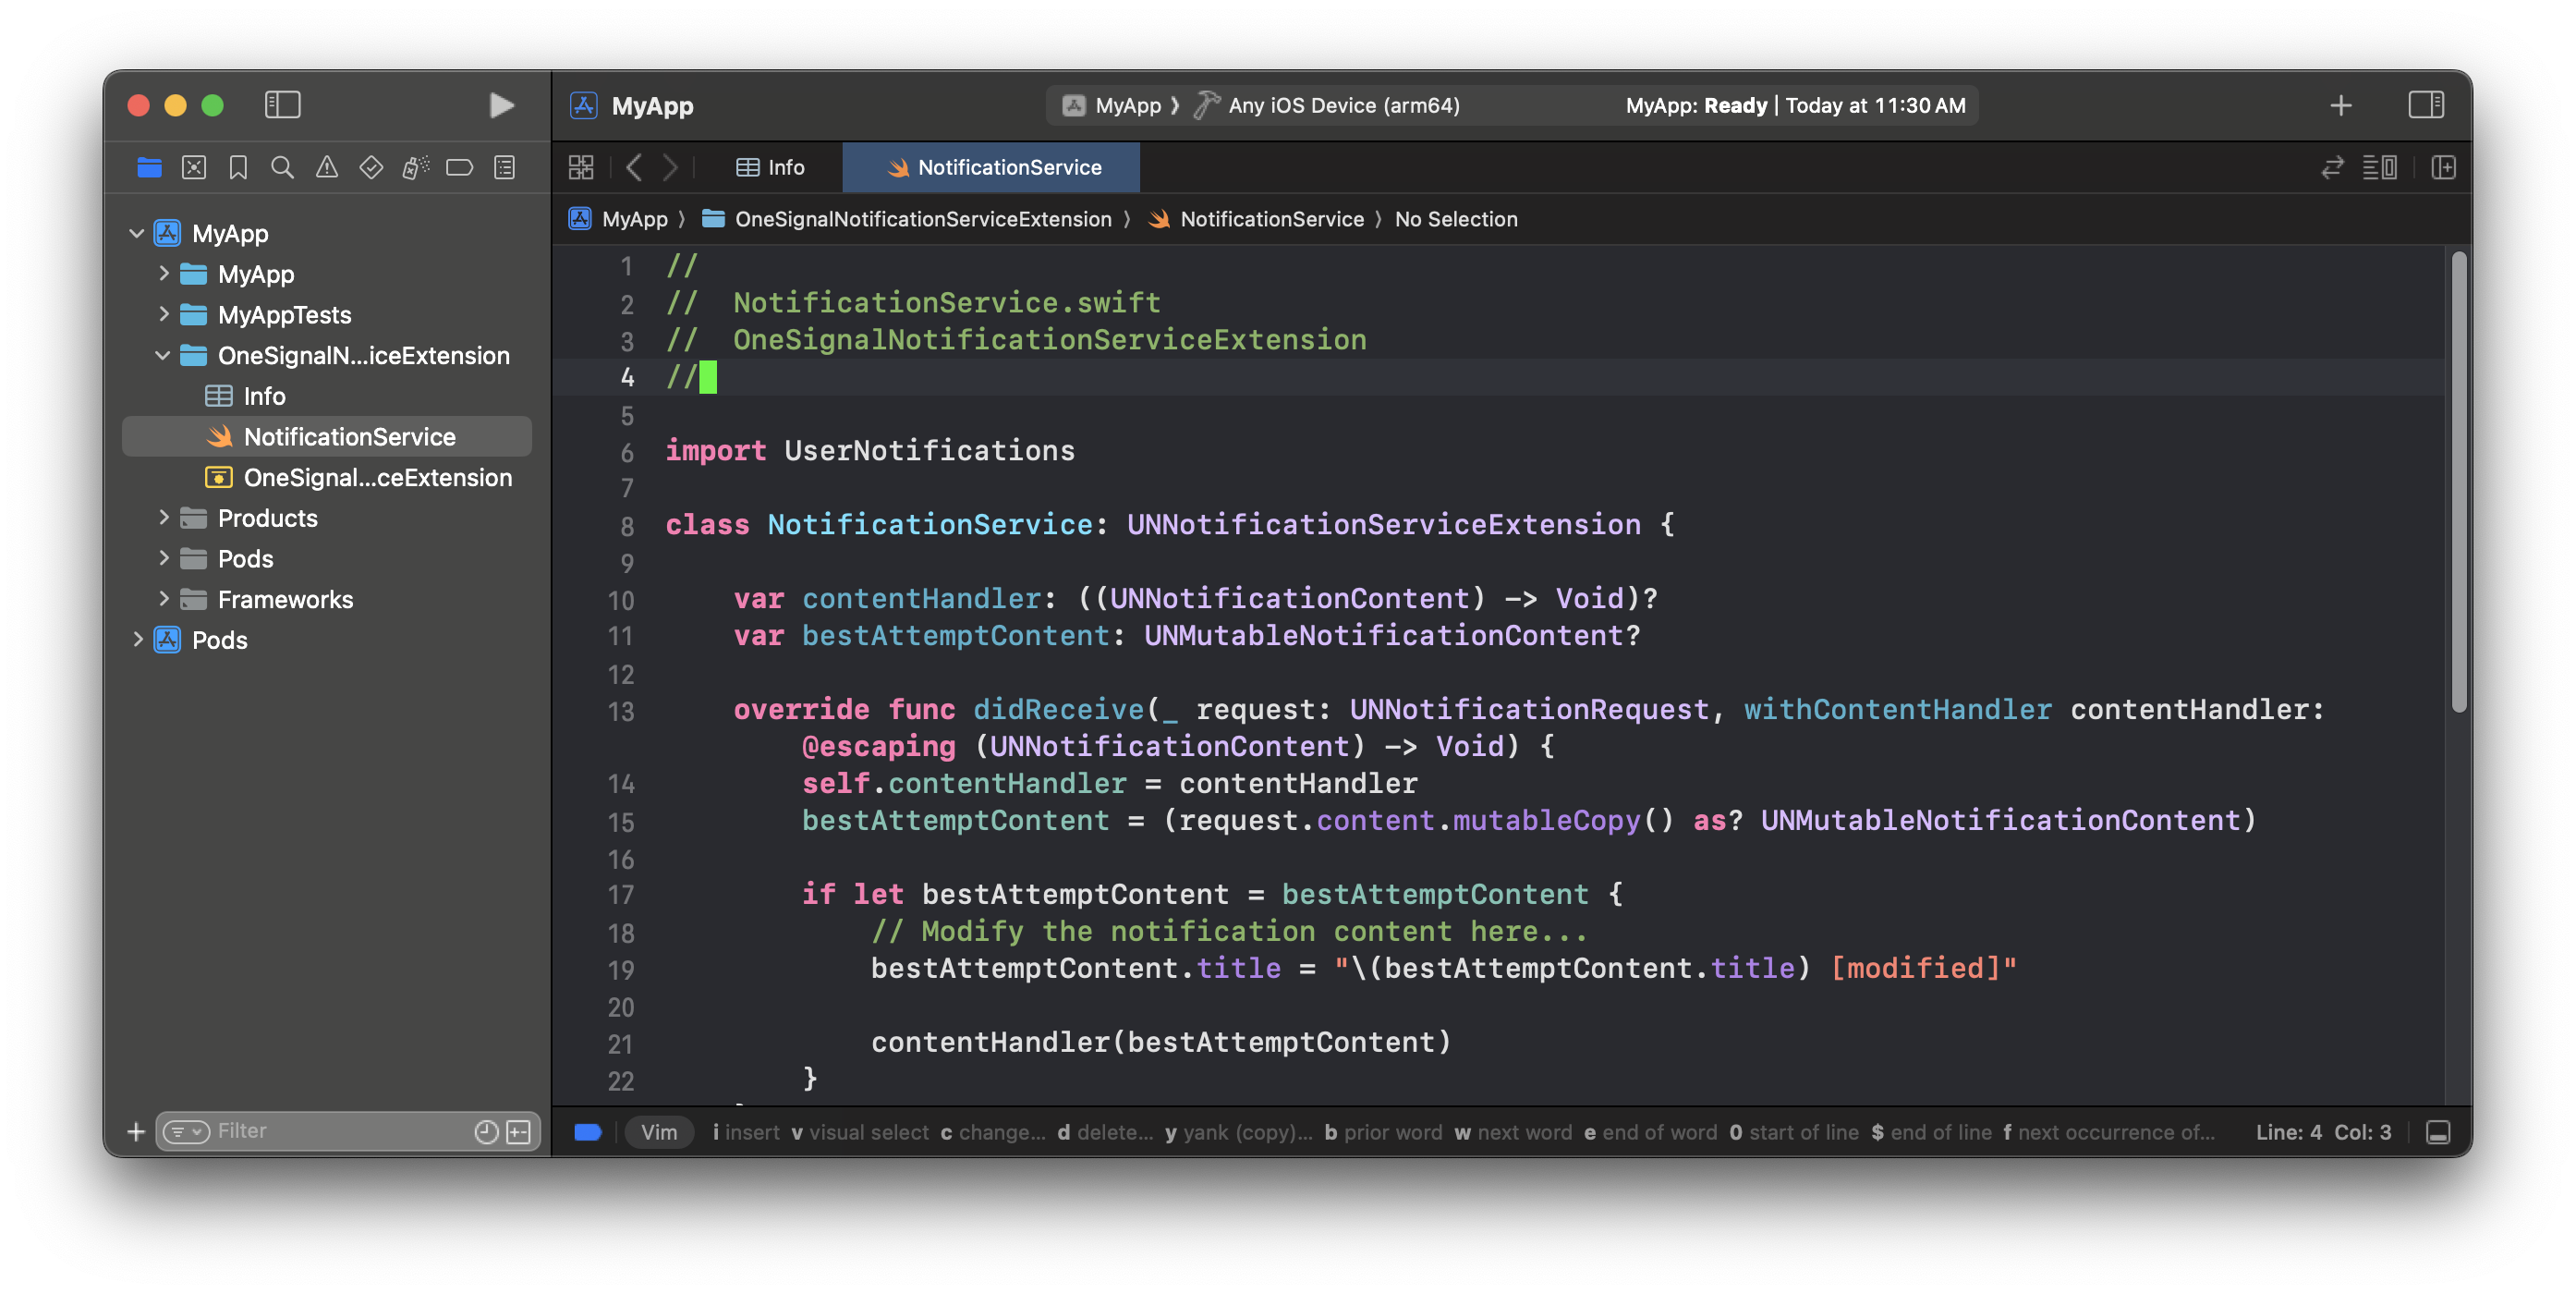
 ### 6. NSEコードを更新
1. **OneSignalNotificationServiceExtension**フォルダに移動します
2. `NotificationService.swift`または`NotificationService.m`ファイルの内容を次のものに置き換えます:
### 6. NSEコードを更新
1. **OneSignalNotificationServiceExtension**フォルダに移動します
2. `NotificationService.swift`または`NotificationService.m`ファイルの内容を次のものに置き換えます:
 ```swift Swift theme={null}
import UserNotifications
import OneSignalExtension
class NotificationService: UNNotificationServiceExtension {
var contentHandler: ((UNNotificationContent) -> Void)?
var receivedRequest: UNNotificationRequest!
var bestAttemptContent: UNMutableNotificationContent?
// Note this extension only runs when `mutable_content` is set
// Setting an attachment or action buttons automatically sets the property to true
override func didReceive(_ request: UNNotificationRequest, withContentHandler contentHandler: @escaping (UNNotificationContent) -> Void) {
self.receivedRequest = request
self.contentHandler = contentHandler
self.bestAttemptContent = (request.content.mutableCopy() as? UNMutableNotificationContent)
if let bestAttemptContent = bestAttemptContent {
// DEBUGGING: Uncomment the 2 lines below to check this extension is executing
// print("Running NotificationServiceExtension")
// bestAttemptContent.body = "[Modified] " + bestAttemptContent.body
OneSignalExtension.didReceiveNotificationExtensionRequest(self.receivedRequest, with: bestAttemptContent, withContentHandler: self.contentHandler)
}
}
override func serviceExtensionTimeWillExpire() {
// Use this as an opportunity to deliver your "best attempt" at modified content, otherwise the original push payload will be used.
if let contentHandler = contentHandler, let bestAttemptContent = bestAttemptContent {
OneSignalExtension.serviceExtensionTimeWillExpireRequest(self.receivedRequest, with: self.bestAttemptContent)
contentHandler(bestAttemptContent)
}
}
}
```
```objc Objective-C theme={null}
#import
#import "NotificationService.h"
@interface NotificationService ()
@property (nonatomic, strong) void (^contentHandler)(UNNotificationContent *contentToDeliver);
@property (nonatomic, strong) UNNotificationRequest *receivedRequest;
@property (nonatomic, strong) UNMutableNotificationContent *bestAttemptContent;
@end
@implementation NotificationService
// Note, this extension only runs when mutable-content is set
// Setting an attachment or action buttons automatically adds this
- (void)didReceiveNotificationRequest:(UNNotificationRequest *)request withContentHandler:(void (^)(UNNotificationContent * _Nonnull))contentHandler {
self.receivedRequest = request;
self.contentHandler = contentHandler;
self.bestAttemptContent = [request.content mutableCopy];
// DEBUGGING: Uncomment the 2 lines below and comment out the one above to ensure this extension is executing
// NSLog(@"Running NotificationServiceExtension");
// self.bestAttemptContent.body = [@"[Modified] " stringByAppendingString:self.bestAttemptContent.body];
[OneSignalExtension didReceiveNotificationExtensionRequest:self.receivedRequest
withMutableNotificationContent:self.bestAttemptContent
withContentHandler:self.contentHandler];
}
- (void)serviceExtensionTimeWillExpire {
// Use this as an opportunity to deliver your "best attempt" at modified content, otherwise the original push payload will be used.
[OneSignalExtension serviceExtensionTimeWillExpireRequest:self.receivedRequest withMutableNotificationContent:self.bestAttemptContent];
self.contentHandler(self.bestAttemptContent);
}
@end
```
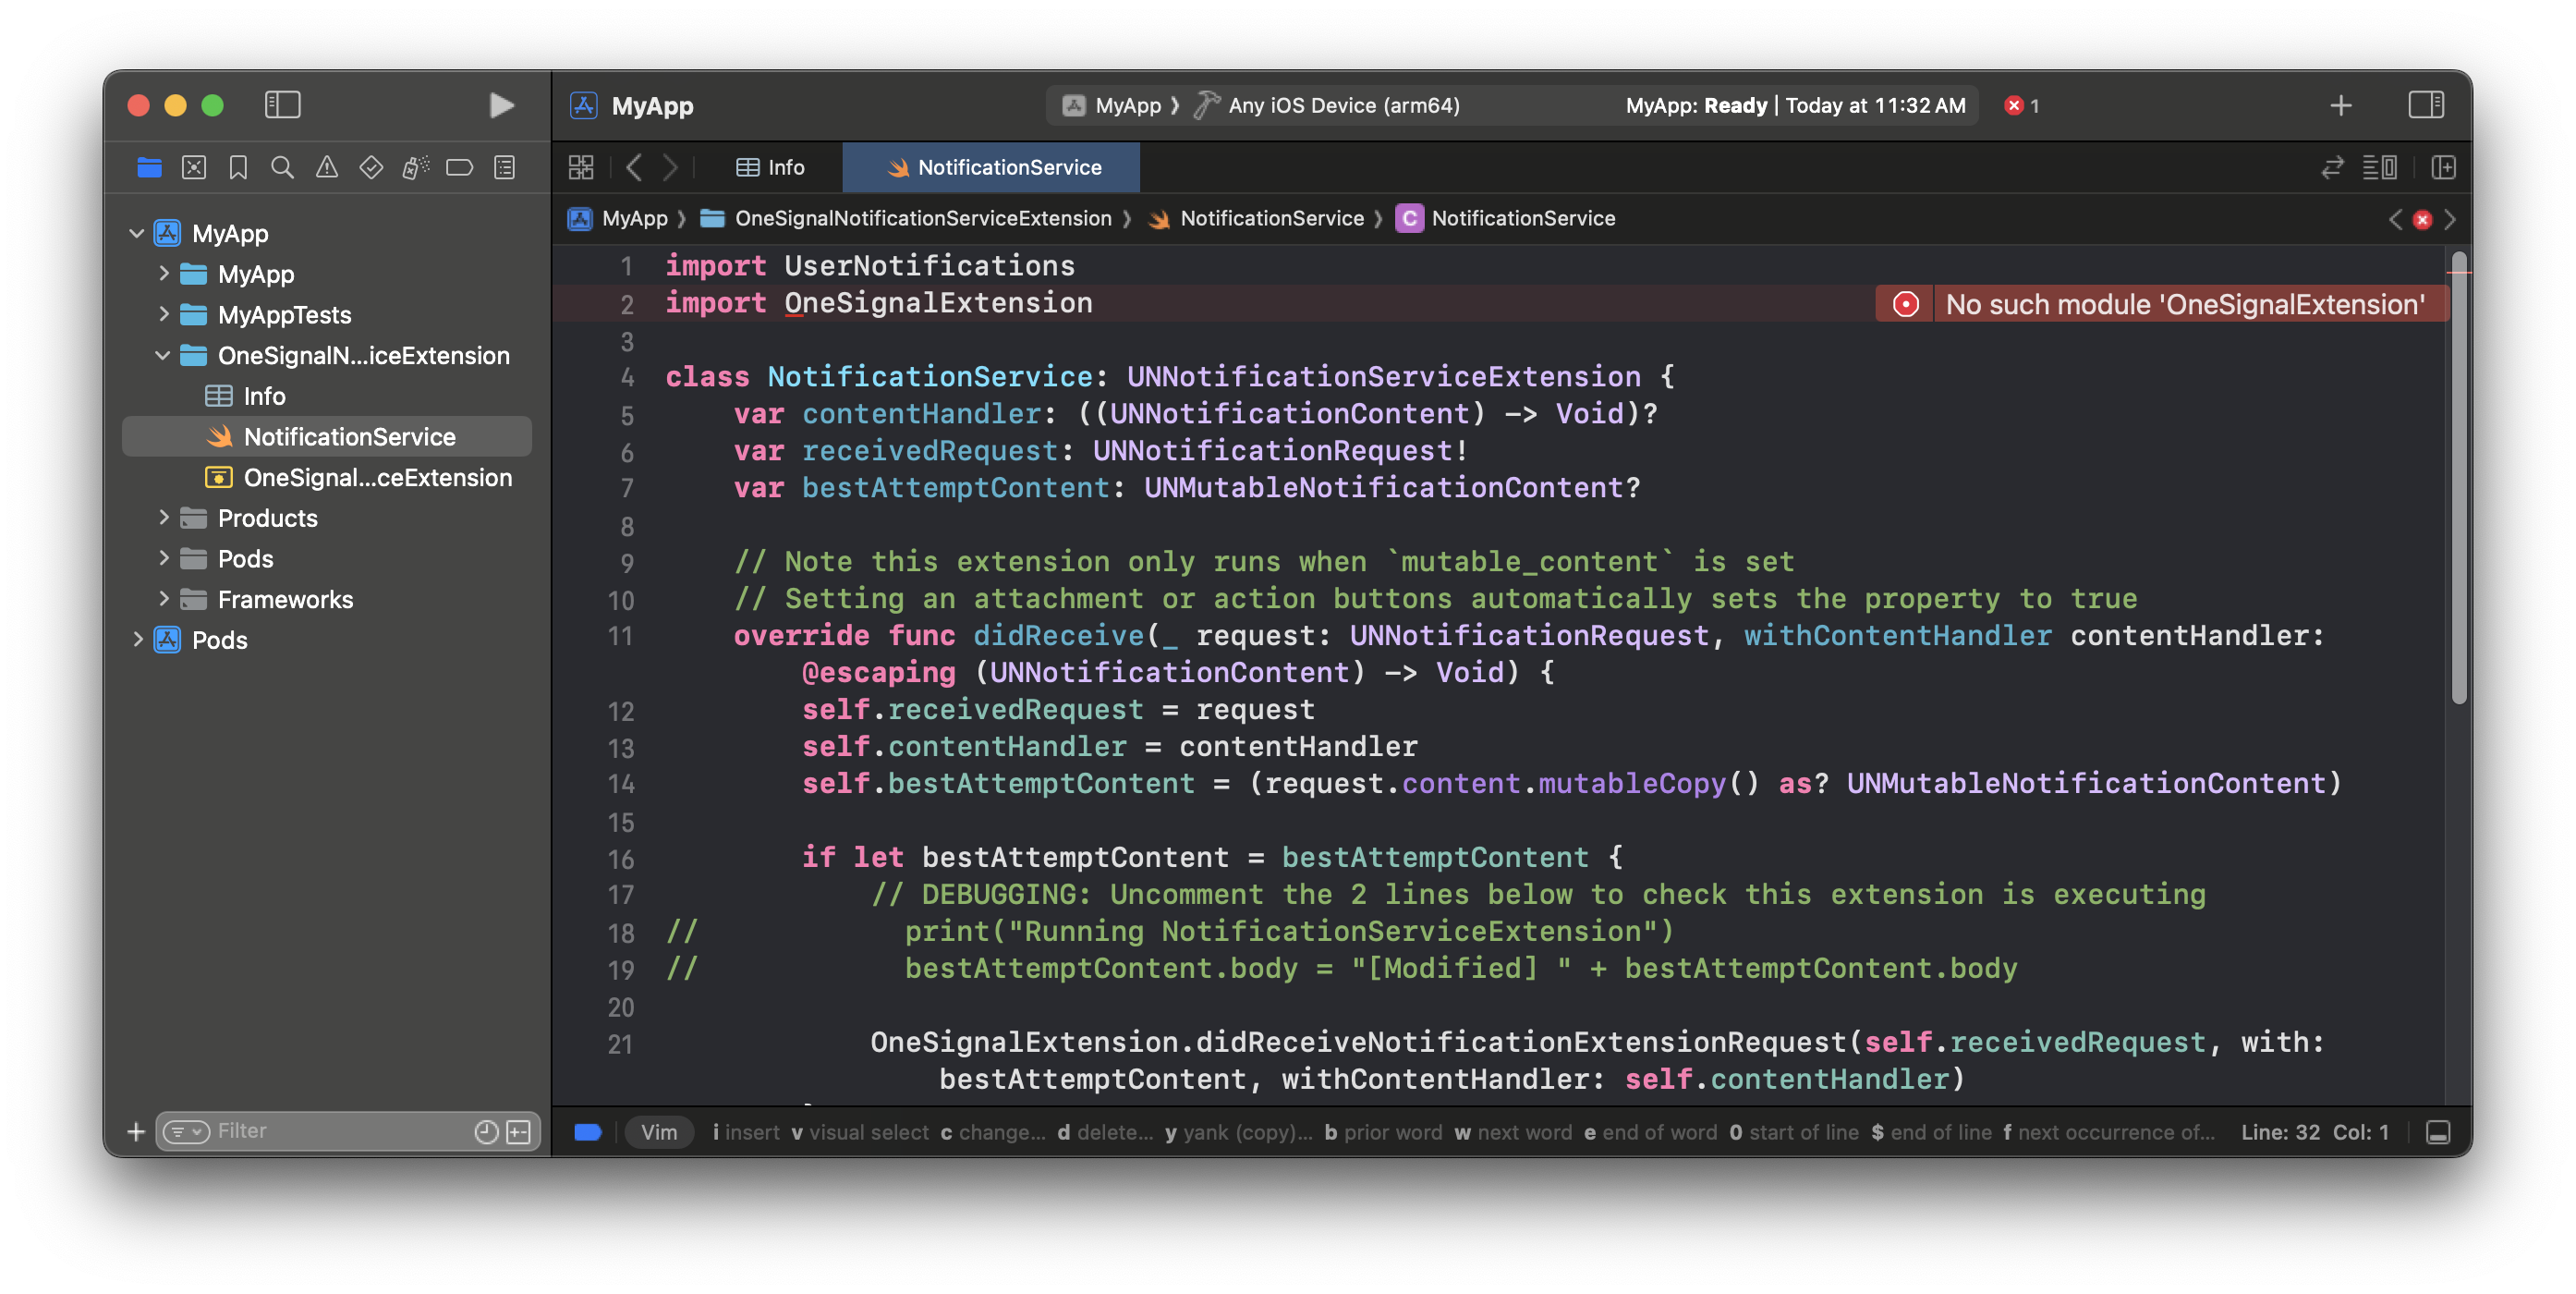
OneSignalパッケージがインストールされていないため、エラーが表示されるはずです。これは次のステップで解決されます。
```swift Swift theme={null}
import UserNotifications
import OneSignalExtension
class NotificationService: UNNotificationServiceExtension {
var contentHandler: ((UNNotificationContent) -> Void)?
var receivedRequest: UNNotificationRequest!
var bestAttemptContent: UNMutableNotificationContent?
// Note this extension only runs when `mutable_content` is set
// Setting an attachment or action buttons automatically sets the property to true
override func didReceive(_ request: UNNotificationRequest, withContentHandler contentHandler: @escaping (UNNotificationContent) -> Void) {
self.receivedRequest = request
self.contentHandler = contentHandler
self.bestAttemptContent = (request.content.mutableCopy() as? UNMutableNotificationContent)
if let bestAttemptContent = bestAttemptContent {
// DEBUGGING: Uncomment the 2 lines below to check this extension is executing
// print("Running NotificationServiceExtension")
// bestAttemptContent.body = "[Modified] " + bestAttemptContent.body
OneSignalExtension.didReceiveNotificationExtensionRequest(self.receivedRequest, with: bestAttemptContent, withContentHandler: self.contentHandler)
}
}
override func serviceExtensionTimeWillExpire() {
// Use this as an opportunity to deliver your "best attempt" at modified content, otherwise the original push payload will be used.
if let contentHandler = contentHandler, let bestAttemptContent = bestAttemptContent {
OneSignalExtension.serviceExtensionTimeWillExpireRequest(self.receivedRequest, with: self.bestAttemptContent)
contentHandler(bestAttemptContent)
}
}
}
```
```objc Objective-C theme={null}
#import
#import "NotificationService.h"
@interface NotificationService ()
@property (nonatomic, strong) void (^contentHandler)(UNNotificationContent *contentToDeliver);
@property (nonatomic, strong) UNNotificationRequest *receivedRequest;
@property (nonatomic, strong) UNMutableNotificationContent *bestAttemptContent;
@end
@implementation NotificationService
// Note, this extension only runs when mutable-content is set
// Setting an attachment or action buttons automatically adds this
- (void)didReceiveNotificationRequest:(UNNotificationRequest *)request withContentHandler:(void (^)(UNNotificationContent * _Nonnull))contentHandler {
self.receivedRequest = request;
self.contentHandler = contentHandler;
self.bestAttemptContent = [request.content mutableCopy];
// DEBUGGING: Uncomment the 2 lines below and comment out the one above to ensure this extension is executing
// NSLog(@"Running NotificationServiceExtension");
// self.bestAttemptContent.body = [@"[Modified] " stringByAppendingString:self.bestAttemptContent.body];
[OneSignalExtension didReceiveNotificationExtensionRequest:self.receivedRequest
withMutableNotificationContent:self.bestAttemptContent
withContentHandler:self.contentHandler];
}
- (void)serviceExtensionTimeWillExpire {
// Use this as an opportunity to deliver your "best attempt" at modified content, otherwise the original push payload will be used.
[OneSignalExtension serviceExtensionTimeWillExpireRequest:self.receivedRequest withMutableNotificationContent:self.bestAttemptContent];
self.contentHandler(self.bestAttemptContent);
}
@end
```
OneSignalパッケージがインストールされていないため、エラーが表示されるはずです。これは次のステップで解決されます。
 ***
## SDKのセットアップ
このセクションでは、OneSignalのコア機能の統合について説明します。このセクションが終わるまでに、アプリ内メッセージをトリガーしてプッシュ通知を受信できる、SDKとの基本的な統合が完了します。
### 1. SDKを追加
Xcode Package Dependencies Manager (Swift Package Manager)またはCocoaPodsを使用してSDKを追加します。利用可能なライブラリは4つあります。[アプリ内メッセージ](./in-app-messages-setup)または位置情報追跡が不要な場合は、これらのパッケージを省略できます。
| ライブラリ | ターゲット | 必須 |
| -------------------------- | :-----------------------------------: | :---: |
| **OneSignalExtension** | OneSignalNotificationServiceExtension | ✅ |
| **OneSignalFramework** | App | ✅ |
| **OneSignalInAppMessages** | App | 推奨 |
| **OneSignalLocation** | App | オプション |
\*\*ファイル > パッケージ依存関係を追加...\*\*に移動し、OneSignal SDKリポジトリのURLを入力します:
`https://github.com/OneSignal/OneSignal-XCFramework`
**onesignal-xcframework**パッケージを選択し、**パッケージを追加**をクリックします。
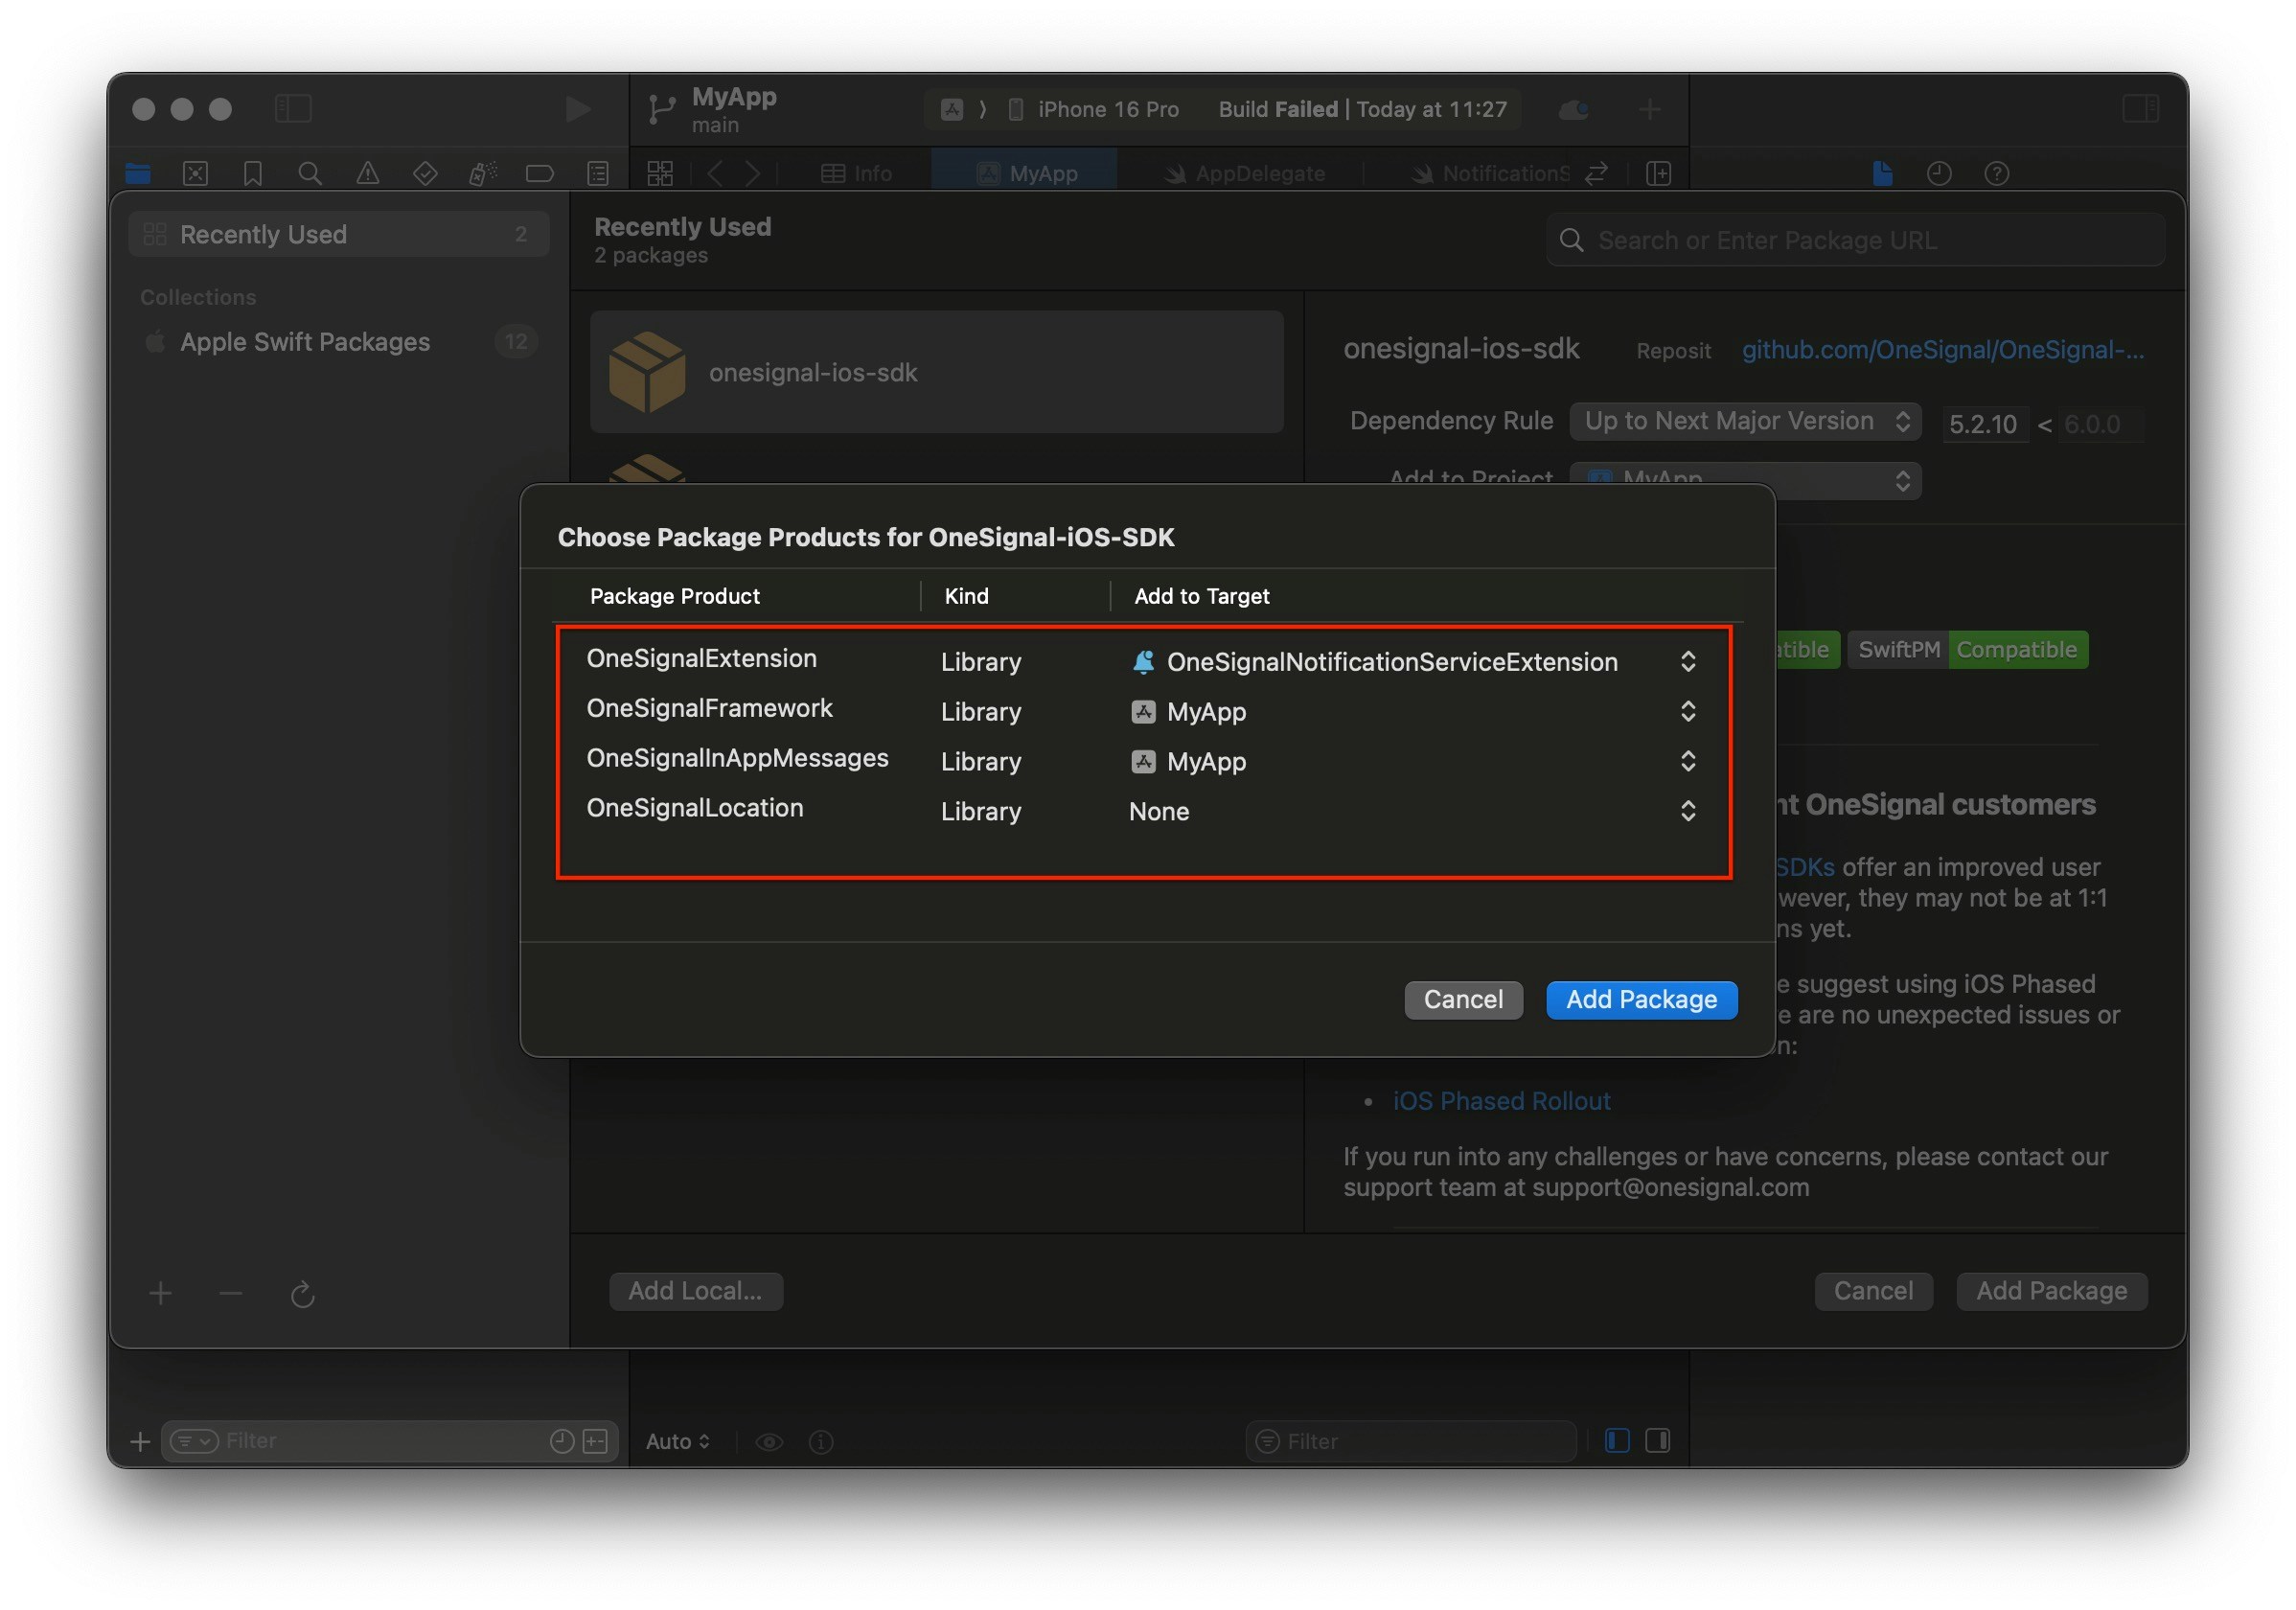
OneSignal-XCFrameworkのパッケージ製品を選択します。
* **重要**:**OneSignalExtension**をOneSignalNotificationServiceExtensionターゲットに追加します。
* **OneSignalFramework**をアプリターゲットに追加します。
* アプリ内メッセージ(推奨)または位置情報追跡を使用する予定がある場合は、それらのパッケージもアプリターゲットに追加します。
***
## SDKのセットアップ
このセクションでは、OneSignalのコア機能の統合について説明します。このセクションが終わるまでに、アプリ内メッセージをトリガーしてプッシュ通知を受信できる、SDKとの基本的な統合が完了します。
### 1. SDKを追加
Xcode Package Dependencies Manager (Swift Package Manager)またはCocoaPodsを使用してSDKを追加します。利用可能なライブラリは4つあります。[アプリ内メッセージ](./in-app-messages-setup)または位置情報追跡が不要な場合は、これらのパッケージを省略できます。
| ライブラリ | ターゲット | 必須 |
| -------------------------- | :-----------------------------------: | :---: |
| **OneSignalExtension** | OneSignalNotificationServiceExtension | ✅ |
| **OneSignalFramework** | App | ✅ |
| **OneSignalInAppMessages** | App | 推奨 |
| **OneSignalLocation** | App | オプション |
\*\*ファイル > パッケージ依存関係を追加...\*\*に移動し、OneSignal SDKリポジトリのURLを入力します:
`https://github.com/OneSignal/OneSignal-XCFramework`
**onesignal-xcframework**パッケージを選択し、**パッケージを追加**をクリックします。
OneSignal-XCFrameworkのパッケージ製品を選択します。
* **重要**:**OneSignalExtension**をOneSignalNotificationServiceExtensionターゲットに追加します。
* **OneSignalFramework**をアプリターゲットに追加します。
* アプリ内メッセージ(推奨)または位置情報追跡を使用する予定がある場合は、それらのパッケージもアプリターゲットに追加します。
 詳細については、[Appleのパッケージ依存関係の追加ドキュメント](https://developer.apple.com/documentation/xcode/adding-package-dependencies-to-your-app#Add-a-package-dependency)を参照してください。
**要件**:CocoaPods 1.16.2以降(セットアップ手順ではCocoaPods 1.16.2を使用)。
`Podfile`を開いて、次を追加します:
```ruby Podfile theme={null}
# If platform is uncommented, set to the same value as your minimum deployment target in Xcode
# platform :ios, '15.0'
target 'your_project_name' do
pod 'OneSignal/OneSignal', '>= 5.2.9', '< 6.0'
# If your app does not use In-App messages, you can remove this:
pod 'OneSignal/OneSignalInAppMessages', '>= 5.2.9', '< 6.0'
# If your app does not use CoreLocation, you can remove this:
pod 'OneSignal/OneSignalLocation', '>= 5.2.9', '< 6.0'
# Your other pods here
end
target 'OneSignalNotificationServiceExtension' do
pod 'OneSignal/OneSignal', '>= 5.2.9', '< 6.0'
end
```
依存関係をメインアプリターゲットとOneSignalNotificationServiceExtensionターゲットに追加します。`platform`のコメントが解除されている場合は、Xcodeの最小デプロイメントターゲットと同じ値であることを確認してください。
次のコマンドを実行して、OneSignal iOS SDK podをプルダウンしてプロジェクトに追加します:
`pod repo update && pod install`
インストールが完了したら、プロジェクトにちなんで名付けられた*XCWorkspace*ファイル(例:`.xcworkspace`)を開いてください
OneSignal iOS SDK podを使用する場合は、プロジェクトを開くために`.xcworkspace`ファイルを排他的に使用する必要があります。
次のエラーが発生する可能性があります。解決方法は次のとおりです。
CocoaPodsは、Xcodeプロジェクトファイルを読み取るために`xcodeproj` Ruby gemに依存しています。現在、最新の`xcodeproj`リリースは、Xcode 16で導入されたオブジェクトバージョン70を認識しません。そのため、CocoaPodsが`.xcodeproj`ファイルを開こうとすると、このエラーでクラッシュします。
1. Xcodeを閉じます。
2. プロジェクトの`ios/.xcodeproj/project.pbxproj`ファイルに移動します。
3. この行を変更します:`objectVersion = 70;`
4. 次で置き換えます:`objectVersion = 55;`
5. 保存して閉じ、`cd ios pod install cd ..`を再実行します
### 2. SDKを初期化
Xcodeインターフェースのセットアップに応じて、次のオプションに従ってOneSignalを初期化します。
SwiftUIインターフェースを使用している場合は、`App.swift`ファイルに移動し、提供されたメソッドでOneSignalを初期化します。
OneSignalダッシュボードの\*\*設定 > [キーとID](./keys-and-ids)\*\*にあるOneSignalアプリIDで`YOUR_APP_ID`を置き換えます。OneSignalアプリにアクセスできない場合は、[チームメンバー](./manage-team-members)に招待を依頼してください。
```swift Swift theme={null}
import SwiftUI
import OneSignalFramework
@main
struct YOURAPP_NAME: App {
//Connect the SwiftUI app to the UIKit app delegate
@UIApplicationDelegateAdaptor(AppDelegate.self) var appDelegate
var body: some Scene {
WindowGroup {
ContentView()
}
}
}
class AppDelegate: NSObject, UIApplicationDelegate {
func application(_ application: UIApplication, didFinishLaunchingWithOptions launchOptions: [UIApplication.LaunchOptionsKey : Any]? = nil) -> Bool {
// Enable verbose logging for debugging (remove in production)
OneSignal.Debug.setLogLevel(.LL_VERBOSE)
// Initialize with your OneSignal App ID
OneSignal.initialize("YOUR_APP_ID", withLaunchOptions: launchOptions)
// Use this method to prompt for push notifications.
// We recommend removing this method after testing and instead use In-App Messages to prompt for notification permission.
OneSignal.Notifications.requestPermission({ accepted in
print("User accepted notifications: \(accepted)")
}, fallbackToSettings: false)
return true
}
}
```
Storyboardインターフェースを使用している場合は、AppDelegateファイルに移動し、提供されたメソッドでOneSignalを初期化します。
OneSignalダッシュボードの\*\*設定 > [キーとID](./keys-and-ids)\*\*にあるOneSignalアプリIDで`YOUR_APP_ID`を置き換えます。OneSignalアプリにアクセスできない場合は、[チームメンバー](./manage-team-members)に招待を依頼してください。
```swift Swift theme={null}
//AppDelegate.swift
import UIKit
import OneSignalFramework
@UIApplicationMain
class AppDelegate: UIResponder, UIApplicationDelegate {
func application(_ application: UIApplication, didFinishLaunchingWithOptions launchOptions:
[UIApplication.LaunchOptionsKey: Any]?) -> Bool {
// Enable verbose logging for debugging (remove in production)
OneSignal.Debug.setLogLevel(.LL_VERBOSE)
// Initialize with your OneSignal App ID
OneSignal.initialize("YOUR_APP_ID", withLaunchOptions: launchOptions)
// Use this method to prompt for push notifications.
// We recommend removing this method after testing and instead use In-App Messages to prompt for notification permission.
OneSignal.Notifications.requestPermission({ accepted in
print("User accepted notifications: \(accepted)")
}, fallbackToSettings: false)
return true
}
// Remaining contents of your AppDelegate Class...
}
```
```objc Objective-C theme={null}
#import
@implementation AppDelegate
- (BOOL)application:(UIApplication *)application didFinishLaunchingWithOptions:(NSDictionary *)launchOptions {
// Enable verbose logging for debugging (remove in production)
[OneSignal.Debug setLogLevel:ONE_S_LL_VERBOSE];
// Initialize with your OneSignal App ID
[OneSignal initialize:@"YOUR_APP_ID" withLaunchOptions:launchOptions];
// Use this method to prompt for push notifications.
// We recommend removing this method after testing and instead use In-App Messages to prompt for notification permission.
[OneSignal.Notifications requestPermission:^(BOOL accepted) {
NSLog(@"User accepted notifications: %d", accepted);
} fallbackToSettings:false];
// Login your customer with externalId
// [OneSignal login:@"EXTERNAL_ID"];
return YES;
}
```
***
## メソッドスウィズリングの無効化(オプション)
デフォルトでは、OneSignal SDK はメソッドスウィズリングを使用してプッシュ通知デリゲートメソッドを自動的に処理します。アプリでスウィズリングを無効にする必要がある場合(例:他の SDK との競合を避けるため、または通知デリゲートメソッドを完全に制御するため)、`Info.plist` でオプトアウトできます。
スウィズリングが無効な場合、OneSignal SDK に通知デリゲートメソッドを手動で転送する必要があります。他のすべての SDK 機能(リスナー、オブザーバー、アプリ内メッセージ、アウトカムなど)は引き続き正常に動作します。
### ステップ 1. Info.plist フラグを追加する
アプリの `Info.plist` に以下を追加します:
```xml theme={null}
OneSignal_disable_swizzling
```
SDK がこのフラグを検出すると、起動時にすべてのメソッドスウィズリングをスキップし、手動転送を実装するよう促す警告を記録します。
### ステップ 2. UNUserNotificationCenter デリゲートを設定する
`OneSignal.initialize` を呼び出す**前に**、`AppDelegate` を `UNUserNotificationCenter` デリゲートとして設定します。これがないと、フォアグラウンド通知の表示と通知タップ処理が機能しません。
```swift Swift theme={null}
// In application(_:didFinishLaunchingWithOptions:), BEFORE OneSignal.initialize()
UNUserNotificationCenter.current().delegate = self
```
```objc Objective-C theme={null}
// In application:didFinishLaunchingWithOptions:, BEFORE [OneSignal initialize:]
[UNUserNotificationCenter currentNotificationCenter].delegate = self;
```
### ステップ 3. 通知デリゲートメソッドを転送する
`AppDelegate` に以下のメソッドを実装します。すべてのメソッドは `OneSignal.Notifications` を通じて呼び出されます。
**トークン登録:**
```swift Swift theme={null}
func application(_ application: UIApplication,
didRegisterForRemoteNotificationsWithDeviceToken deviceToken: Data) {
OneSignal.Notifications.didRegisterForRemoteNotifications(application, deviceToken: deviceToken)
}
func application(_ application: UIApplication,
didFailToRegisterForRemoteNotificationsWithError error: Error) {
OneSignal.Notifications.handleDidFailRegisterForRemoteNotification(error as NSError)
}
```
```objc Objective-C theme={null}
- (void)application:(UIApplication *)application
didRegisterForRemoteNotificationsWithDeviceToken:(NSData *)deviceToken {
[OneSignal.Notifications didRegisterForRemoteNotifications:application deviceToken:deviceToken];
}
- (void)application:(UIApplication *)application
didFailToRegisterForRemoteNotificationsWithError:(NSError *)error {
[OneSignal.Notifications handleDidFailRegisterForRemoteNotification:error];
}
```
**バックグラウンド / サイレント通知:**
```swift Swift theme={null}
func application(_ application: UIApplication,
didReceiveRemoteNotification userInfo: [AnyHashable: Any],
fetchCompletionHandler completionHandler: @escaping (UIBackgroundFetchResult) -> Void) {
OneSignal.Notifications.receiveRemoteNotification(application,
userInfo: userInfo,
completionHandler: completionHandler)
}
```
```objc Objective-C theme={null}
- (void)application:(UIApplication *)application
didReceiveRemoteNotification:(NSDictionary *)userInfo
fetchCompletionHandler:(void (^)(UIBackgroundFetchResult))completionHandler {
[OneSignal.Notifications receiveRemoteNotification:application
UserInfo:userInfo
completionHandler:completionHandler];
}
```
**フォアグラウンド通知表示:**
SDK は `OSNotification` オブジェクトでコンプリーションブロックを呼び出します。nil でない場合、SDK は通知を表示することを求めています——希望の表示オプションを渡してください。nil の場合(例:IAM プレビュー)、表示オプションを渡さないでください。
```swift Swift theme={null}
func userNotificationCenter(_ center: UNUserNotificationCenter,
willPresent notification: UNNotification,
withCompletionHandler completionHandler: @escaping (UNNotificationPresentationOptions) -> Void) {
OneSignal.Notifications.handleWillPresentNotificationInForeground(
withPayload: notification.request.content.userInfo
) { notif in
if notif != nil {
if #available(iOS 14.0, *) {
completionHandler([.banner, .list, .sound])
} else {
completionHandler([.alert, .sound])
}
} else {
completionHandler([])
}
}
}
```
```objc Objective-C theme={null}
- (void)userNotificationCenter:(UNUserNotificationCenter *)center
willPresentNotification:(UNNotification *)notification
withCompletionHandler:(void (^)(UNNotificationPresentationOptions))completionHandler {
[OneSignal.Notifications
handleWillPresentNotificationInForegroundWithPayload:notification.request.content.userInfo
withCompletion:^(OSNotification *notif) {
if (notif) {
if (@available(iOS 14.0, *)) {
completionHandler(UNNotificationPresentationOptionBanner |
UNNotificationPresentationOptionList |
UNNotificationPresentationOptionSound);
} else {
completionHandler(UNNotificationPresentationOptionAlert |
UNNotificationPresentationOptionSound);
}
} else {
completionHandler(UNNotificationPresentationOptionNone);
}
}];
}
```
`onWillDisplayNotification` ライフサイクルリスナーと `preventDefault` / `display` API は引き続き手動転送で動作します。SDK は `handleWillPresentNotificationInForegroundWithPayload` 内からリスナーを呼び出します。
**通知タップ / アクション:**
```swift Swift theme={null}
func userNotificationCenter(_ center: UNUserNotificationCenter,
didReceive response: UNNotificationResponse,
withCompletionHandler completionHandler: @escaping () -> Void) {
OneSignal.Notifications.handleNotificationResponse(response)
completionHandler()
}
```
```objc Objective-C theme={null}
- (void)userNotificationCenter:(UNUserNotificationCenter *)center
didReceiveNotificationResponse:(UNNotificationResponse *)response
withCompletionHandler:(void (^)(void))completionHandler {
[OneSignal.Notifications handleNotificationResponse:response];
completionHandler();
}
```
### オプション:バッジカウントを設定する
スウィズリングが無効な場合、SDK はバッジの変更を傍受できません。このメソッドを使用してバッジカウントを設定し、OneSignal の内部バッジキャッシュと同期します:
```swift Swift theme={null}
OneSignal.Notifications.setBadgeCount(5)
```
```objc Objective-C theme={null}
[OneSignal.Notifications setBadgeCount:5];
```
### SwiftUI アプリ
SwiftUI アプリにはデフォルトで `AppDelegate` がありません。`@UIApplicationDelegateAdaptor` を使用して追加し、上記のすべての転送メソッドを実装します:
```swift Swift theme={null}
@main
struct YourApp: App {
@UIApplicationDelegateAdaptor(AppDelegate.self) var appDelegate
var body: some Scene {
WindowGroup {
ContentView()
}
}
}
class AppDelegate: NSObject, UIApplicationDelegate, UNUserNotificationCenterDelegate {
func application(_ application: UIApplication,
didFinishLaunchingWithOptions launchOptions: [UIApplication.LaunchOptionsKey: Any]? = nil) -> Bool {
UNUserNotificationCenter.current().delegate = self
OneSignal.initialize("YOUR_APP_ID", withLaunchOptions: launchOptions)
return true
}
// Implement all the forwarding methods shown above
}
```
### API リファレンス
| メソッド | 目的 |
| ------------------------------------------------------------------------- | ------------------------------ |
| `didRegisterForRemoteNotifications(_:deviceToken:)` | APNs デバイストークンを OneSignal に転送する |
| `handleDidFailRegisterForRemoteNotification(_:)` | APNs 登録失敗を転送する |
| `receiveRemoteNotification(_:userInfo:completionHandler:)` | バックグラウンド/サイレント通知を転送する |
| `handleWillPresentNotificationInForegroundWithPayload(_:withCompletion:)` | SDK 処理のためにフォアグラウンド通知を転送する |
| `handleNotificationResponse(_:)` | 通知のタップ/アクションを SDK に転送する |
| `setBadgeCount(_:)` | バッジカウントを設定して SDK キャッシュと同期する |
***
## OneSignal SDK統合のテスト
このガイドでは、プッシュ通知、サブスクリプション登録、アプリ内メッセージをテストして、OneSignal SDK統合が正しく機能していることを確認する方法を説明します。
### モバイルサブスクリプションを確認
初期化時に`requestPermission`メソッドを追加した場合、ネイティブのプッシュ許可プロンプトが自動的に表示されます。
詳細については、[Appleのパッケージ依存関係の追加ドキュメント](https://developer.apple.com/documentation/xcode/adding-package-dependencies-to-your-app#Add-a-package-dependency)を参照してください。
**要件**:CocoaPods 1.16.2以降(セットアップ手順ではCocoaPods 1.16.2を使用)。
`Podfile`を開いて、次を追加します:
```ruby Podfile theme={null}
# If platform is uncommented, set to the same value as your minimum deployment target in Xcode
# platform :ios, '15.0'
target 'your_project_name' do
pod 'OneSignal/OneSignal', '>= 5.2.9', '< 6.0'
# If your app does not use In-App messages, you can remove this:
pod 'OneSignal/OneSignalInAppMessages', '>= 5.2.9', '< 6.0'
# If your app does not use CoreLocation, you can remove this:
pod 'OneSignal/OneSignalLocation', '>= 5.2.9', '< 6.0'
# Your other pods here
end
target 'OneSignalNotificationServiceExtension' do
pod 'OneSignal/OneSignal', '>= 5.2.9', '< 6.0'
end
```
依存関係をメインアプリターゲットとOneSignalNotificationServiceExtensionターゲットに追加します。`platform`のコメントが解除されている場合は、Xcodeの最小デプロイメントターゲットと同じ値であることを確認してください。
次のコマンドを実行して、OneSignal iOS SDK podをプルダウンしてプロジェクトに追加します:
`pod repo update && pod install`
インストールが完了したら、プロジェクトにちなんで名付けられた*XCWorkspace*ファイル(例:`.xcworkspace`)を開いてください
OneSignal iOS SDK podを使用する場合は、プロジェクトを開くために`.xcworkspace`ファイルを排他的に使用する必要があります。
次のエラーが発生する可能性があります。解決方法は次のとおりです。
CocoaPodsは、Xcodeプロジェクトファイルを読み取るために`xcodeproj` Ruby gemに依存しています。現在、最新の`xcodeproj`リリースは、Xcode 16で導入されたオブジェクトバージョン70を認識しません。そのため、CocoaPodsが`.xcodeproj`ファイルを開こうとすると、このエラーでクラッシュします。
1. Xcodeを閉じます。
2. プロジェクトの`ios/.xcodeproj/project.pbxproj`ファイルに移動します。
3. この行を変更します:`objectVersion = 70;`
4. 次で置き換えます:`objectVersion = 55;`
5. 保存して閉じ、`cd ios pod install cd ..`を再実行します
### 2. SDKを初期化
Xcodeインターフェースのセットアップに応じて、次のオプションに従ってOneSignalを初期化します。
SwiftUIインターフェースを使用している場合は、`App.swift`ファイルに移動し、提供されたメソッドでOneSignalを初期化します。
OneSignalダッシュボードの\*\*設定 > [キーとID](./keys-and-ids)\*\*にあるOneSignalアプリIDで`YOUR_APP_ID`を置き換えます。OneSignalアプリにアクセスできない場合は、[チームメンバー](./manage-team-members)に招待を依頼してください。
```swift Swift theme={null}
import SwiftUI
import OneSignalFramework
@main
struct YOURAPP_NAME: App {
//Connect the SwiftUI app to the UIKit app delegate
@UIApplicationDelegateAdaptor(AppDelegate.self) var appDelegate
var body: some Scene {
WindowGroup {
ContentView()
}
}
}
class AppDelegate: NSObject, UIApplicationDelegate {
func application(_ application: UIApplication, didFinishLaunchingWithOptions launchOptions: [UIApplication.LaunchOptionsKey : Any]? = nil) -> Bool {
// Enable verbose logging for debugging (remove in production)
OneSignal.Debug.setLogLevel(.LL_VERBOSE)
// Initialize with your OneSignal App ID
OneSignal.initialize("YOUR_APP_ID", withLaunchOptions: launchOptions)
// Use this method to prompt for push notifications.
// We recommend removing this method after testing and instead use In-App Messages to prompt for notification permission.
OneSignal.Notifications.requestPermission({ accepted in
print("User accepted notifications: \(accepted)")
}, fallbackToSettings: false)
return true
}
}
```
Storyboardインターフェースを使用している場合は、AppDelegateファイルに移動し、提供されたメソッドでOneSignalを初期化します。
OneSignalダッシュボードの\*\*設定 > [キーとID](./keys-and-ids)\*\*にあるOneSignalアプリIDで`YOUR_APP_ID`を置き換えます。OneSignalアプリにアクセスできない場合は、[チームメンバー](./manage-team-members)に招待を依頼してください。
```swift Swift theme={null}
//AppDelegate.swift
import UIKit
import OneSignalFramework
@UIApplicationMain
class AppDelegate: UIResponder, UIApplicationDelegate {
func application(_ application: UIApplication, didFinishLaunchingWithOptions launchOptions:
[UIApplication.LaunchOptionsKey: Any]?) -> Bool {
// Enable verbose logging for debugging (remove in production)
OneSignal.Debug.setLogLevel(.LL_VERBOSE)
// Initialize with your OneSignal App ID
OneSignal.initialize("YOUR_APP_ID", withLaunchOptions: launchOptions)
// Use this method to prompt for push notifications.
// We recommend removing this method after testing and instead use In-App Messages to prompt for notification permission.
OneSignal.Notifications.requestPermission({ accepted in
print("User accepted notifications: \(accepted)")
}, fallbackToSettings: false)
return true
}
// Remaining contents of your AppDelegate Class...
}
```
```objc Objective-C theme={null}
#import
@implementation AppDelegate
- (BOOL)application:(UIApplication *)application didFinishLaunchingWithOptions:(NSDictionary *)launchOptions {
// Enable verbose logging for debugging (remove in production)
[OneSignal.Debug setLogLevel:ONE_S_LL_VERBOSE];
// Initialize with your OneSignal App ID
[OneSignal initialize:@"YOUR_APP_ID" withLaunchOptions:launchOptions];
// Use this method to prompt for push notifications.
// We recommend removing this method after testing and instead use In-App Messages to prompt for notification permission.
[OneSignal.Notifications requestPermission:^(BOOL accepted) {
NSLog(@"User accepted notifications: %d", accepted);
} fallbackToSettings:false];
// Login your customer with externalId
// [OneSignal login:@"EXTERNAL_ID"];
return YES;
}
```
***
## メソッドスウィズリングの無効化(オプション)
デフォルトでは、OneSignal SDK はメソッドスウィズリングを使用してプッシュ通知デリゲートメソッドを自動的に処理します。アプリでスウィズリングを無効にする必要がある場合(例:他の SDK との競合を避けるため、または通知デリゲートメソッドを完全に制御するため)、`Info.plist` でオプトアウトできます。
スウィズリングが無効な場合、OneSignal SDK に通知デリゲートメソッドを手動で転送する必要があります。他のすべての SDK 機能(リスナー、オブザーバー、アプリ内メッセージ、アウトカムなど)は引き続き正常に動作します。
### ステップ 1. Info.plist フラグを追加する
アプリの `Info.plist` に以下を追加します:
```xml theme={null}
OneSignal_disable_swizzling
```
SDK がこのフラグを検出すると、起動時にすべてのメソッドスウィズリングをスキップし、手動転送を実装するよう促す警告を記録します。
### ステップ 2. UNUserNotificationCenter デリゲートを設定する
`OneSignal.initialize` を呼び出す**前に**、`AppDelegate` を `UNUserNotificationCenter` デリゲートとして設定します。これがないと、フォアグラウンド通知の表示と通知タップ処理が機能しません。
```swift Swift theme={null}
// In application(_:didFinishLaunchingWithOptions:), BEFORE OneSignal.initialize()
UNUserNotificationCenter.current().delegate = self
```
```objc Objective-C theme={null}
// In application:didFinishLaunchingWithOptions:, BEFORE [OneSignal initialize:]
[UNUserNotificationCenter currentNotificationCenter].delegate = self;
```
### ステップ 3. 通知デリゲートメソッドを転送する
`AppDelegate` に以下のメソッドを実装します。すべてのメソッドは `OneSignal.Notifications` を通じて呼び出されます。
**トークン登録:**
```swift Swift theme={null}
func application(_ application: UIApplication,
didRegisterForRemoteNotificationsWithDeviceToken deviceToken: Data) {
OneSignal.Notifications.didRegisterForRemoteNotifications(application, deviceToken: deviceToken)
}
func application(_ application: UIApplication,
didFailToRegisterForRemoteNotificationsWithError error: Error) {
OneSignal.Notifications.handleDidFailRegisterForRemoteNotification(error as NSError)
}
```
```objc Objective-C theme={null}
- (void)application:(UIApplication *)application
didRegisterForRemoteNotificationsWithDeviceToken:(NSData *)deviceToken {
[OneSignal.Notifications didRegisterForRemoteNotifications:application deviceToken:deviceToken];
}
- (void)application:(UIApplication *)application
didFailToRegisterForRemoteNotificationsWithError:(NSError *)error {
[OneSignal.Notifications handleDidFailRegisterForRemoteNotification:error];
}
```
**バックグラウンド / サイレント通知:**
```swift Swift theme={null}
func application(_ application: UIApplication,
didReceiveRemoteNotification userInfo: [AnyHashable: Any],
fetchCompletionHandler completionHandler: @escaping (UIBackgroundFetchResult) -> Void) {
OneSignal.Notifications.receiveRemoteNotification(application,
userInfo: userInfo,
completionHandler: completionHandler)
}
```
```objc Objective-C theme={null}
- (void)application:(UIApplication *)application
didReceiveRemoteNotification:(NSDictionary *)userInfo
fetchCompletionHandler:(void (^)(UIBackgroundFetchResult))completionHandler {
[OneSignal.Notifications receiveRemoteNotification:application
UserInfo:userInfo
completionHandler:completionHandler];
}
```
**フォアグラウンド通知表示:**
SDK は `OSNotification` オブジェクトでコンプリーションブロックを呼び出します。nil でない場合、SDK は通知を表示することを求めています——希望の表示オプションを渡してください。nil の場合(例:IAM プレビュー)、表示オプションを渡さないでください。
```swift Swift theme={null}
func userNotificationCenter(_ center: UNUserNotificationCenter,
willPresent notification: UNNotification,
withCompletionHandler completionHandler: @escaping (UNNotificationPresentationOptions) -> Void) {
OneSignal.Notifications.handleWillPresentNotificationInForeground(
withPayload: notification.request.content.userInfo
) { notif in
if notif != nil {
if #available(iOS 14.0, *) {
completionHandler([.banner, .list, .sound])
} else {
completionHandler([.alert, .sound])
}
} else {
completionHandler([])
}
}
}
```
```objc Objective-C theme={null}
- (void)userNotificationCenter:(UNUserNotificationCenter *)center
willPresentNotification:(UNNotification *)notification
withCompletionHandler:(void (^)(UNNotificationPresentationOptions))completionHandler {
[OneSignal.Notifications
handleWillPresentNotificationInForegroundWithPayload:notification.request.content.userInfo
withCompletion:^(OSNotification *notif) {
if (notif) {
if (@available(iOS 14.0, *)) {
completionHandler(UNNotificationPresentationOptionBanner |
UNNotificationPresentationOptionList |
UNNotificationPresentationOptionSound);
} else {
completionHandler(UNNotificationPresentationOptionAlert |
UNNotificationPresentationOptionSound);
}
} else {
completionHandler(UNNotificationPresentationOptionNone);
}
}];
}
```
`onWillDisplayNotification` ライフサイクルリスナーと `preventDefault` / `display` API は引き続き手動転送で動作します。SDK は `handleWillPresentNotificationInForegroundWithPayload` 内からリスナーを呼び出します。
**通知タップ / アクション:**
```swift Swift theme={null}
func userNotificationCenter(_ center: UNUserNotificationCenter,
didReceive response: UNNotificationResponse,
withCompletionHandler completionHandler: @escaping () -> Void) {
OneSignal.Notifications.handleNotificationResponse(response)
completionHandler()
}
```
```objc Objective-C theme={null}
- (void)userNotificationCenter:(UNUserNotificationCenter *)center
didReceiveNotificationResponse:(UNNotificationResponse *)response
withCompletionHandler:(void (^)(void))completionHandler {
[OneSignal.Notifications handleNotificationResponse:response];
completionHandler();
}
```
### オプション:バッジカウントを設定する
スウィズリングが無効な場合、SDK はバッジの変更を傍受できません。このメソッドを使用してバッジカウントを設定し、OneSignal の内部バッジキャッシュと同期します:
```swift Swift theme={null}
OneSignal.Notifications.setBadgeCount(5)
```
```objc Objective-C theme={null}
[OneSignal.Notifications setBadgeCount:5];
```
### SwiftUI アプリ
SwiftUI アプリにはデフォルトで `AppDelegate` がありません。`@UIApplicationDelegateAdaptor` を使用して追加し、上記のすべての転送メソッドを実装します:
```swift Swift theme={null}
@main
struct YourApp: App {
@UIApplicationDelegateAdaptor(AppDelegate.self) var appDelegate
var body: some Scene {
WindowGroup {
ContentView()
}
}
}
class AppDelegate: NSObject, UIApplicationDelegate, UNUserNotificationCenterDelegate {
func application(_ application: UIApplication,
didFinishLaunchingWithOptions launchOptions: [UIApplication.LaunchOptionsKey: Any]? = nil) -> Bool {
UNUserNotificationCenter.current().delegate = self
OneSignal.initialize("YOUR_APP_ID", withLaunchOptions: launchOptions)
return true
}
// Implement all the forwarding methods shown above
}
```
### API リファレンス
| メソッド | 目的 |
| ------------------------------------------------------------------------- | ------------------------------ |
| `didRegisterForRemoteNotifications(_:deviceToken:)` | APNs デバイストークンを OneSignal に転送する |
| `handleDidFailRegisterForRemoteNotification(_:)` | APNs 登録失敗を転送する |
| `receiveRemoteNotification(_:userInfo:completionHandler:)` | バックグラウンド/サイレント通知を転送する |
| `handleWillPresentNotificationInForegroundWithPayload(_:withCompletion:)` | SDK 処理のためにフォアグラウンド通知を転送する |
| `handleNotificationResponse(_:)` | 通知のタップ/アクションを SDK に転送する |
| `setBadgeCount(_:)` | バッジカウントを設定して SDK キャッシュと同期する |
***
## OneSignal SDK統合のテスト
このガイドでは、プッシュ通知、サブスクリプション登録、アプリ内メッセージをテストして、OneSignal SDK統合が正しく機能していることを確認する方法を説明します。
### モバイルサブスクリプションを確認
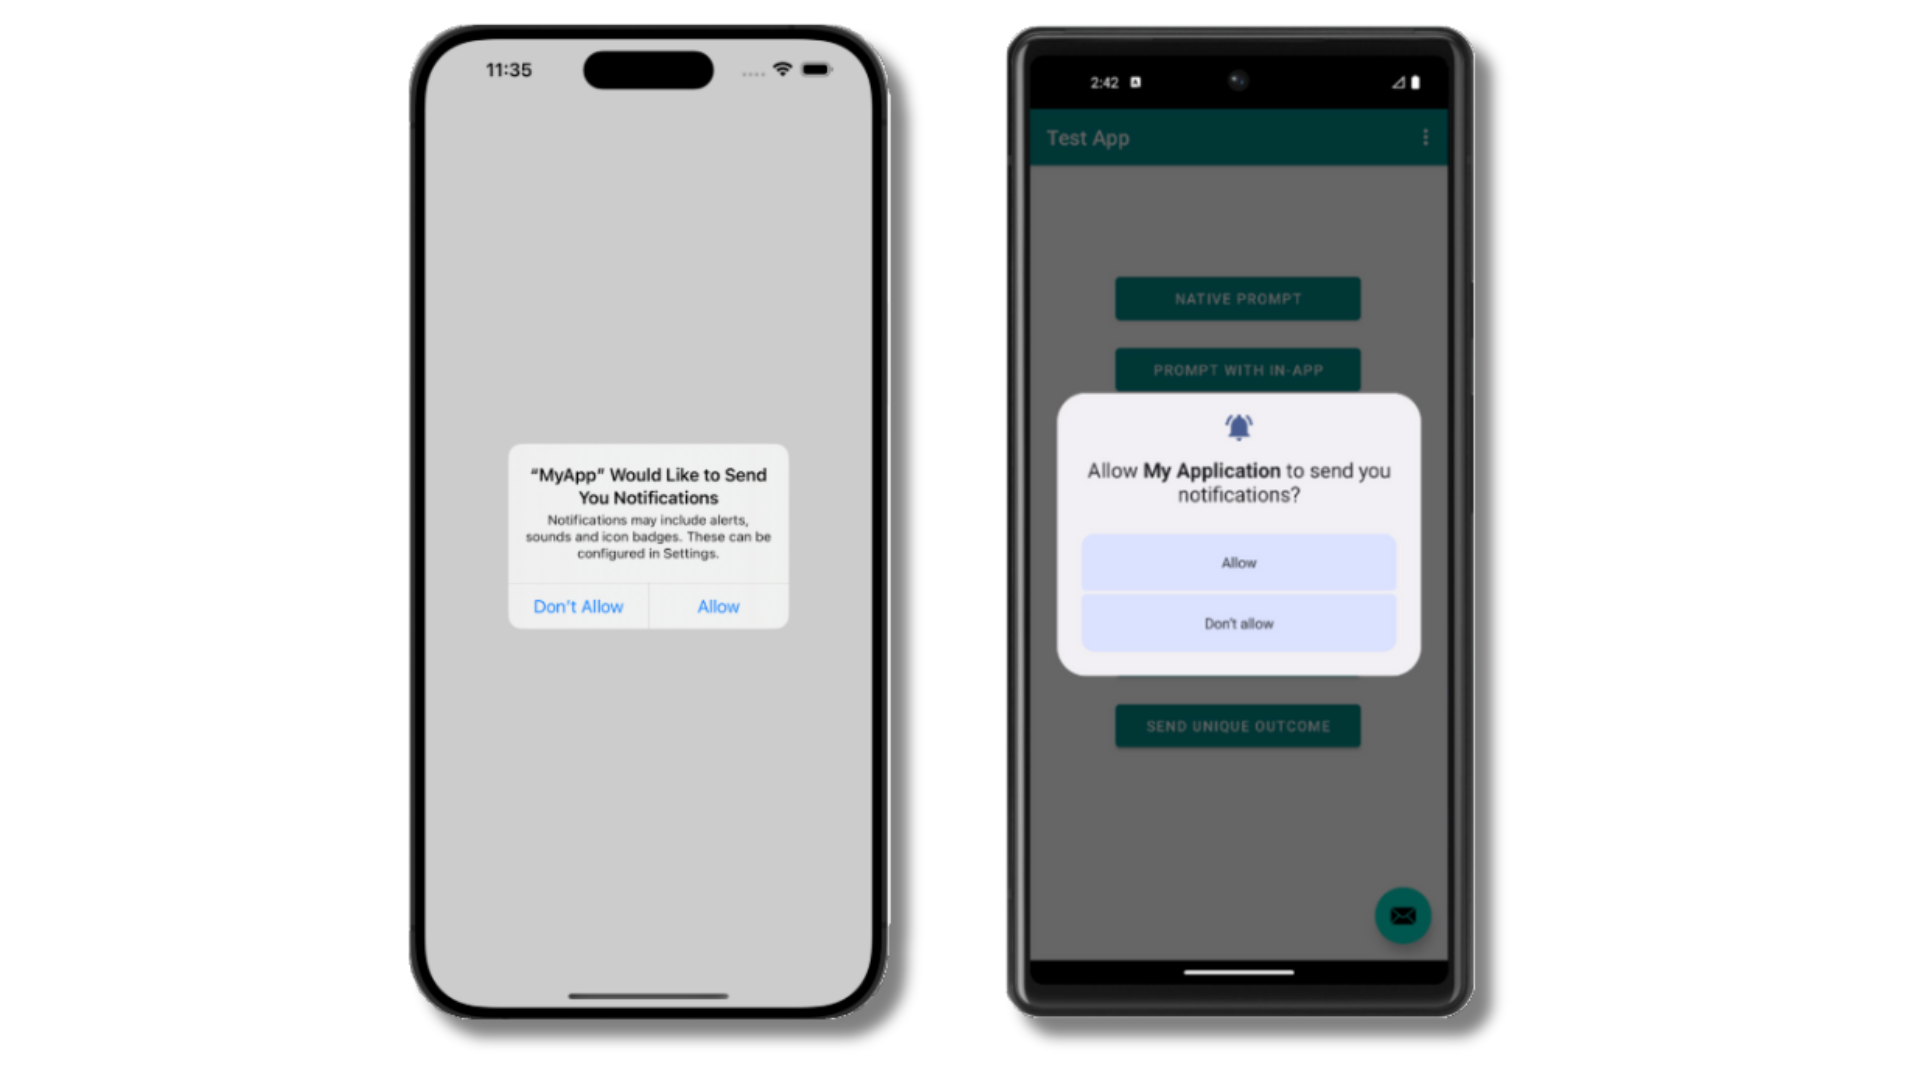
初期化時に`requestPermission`メソッドを追加した場合、ネイティブのプッシュ許可プロンプトが自動的に表示されます。
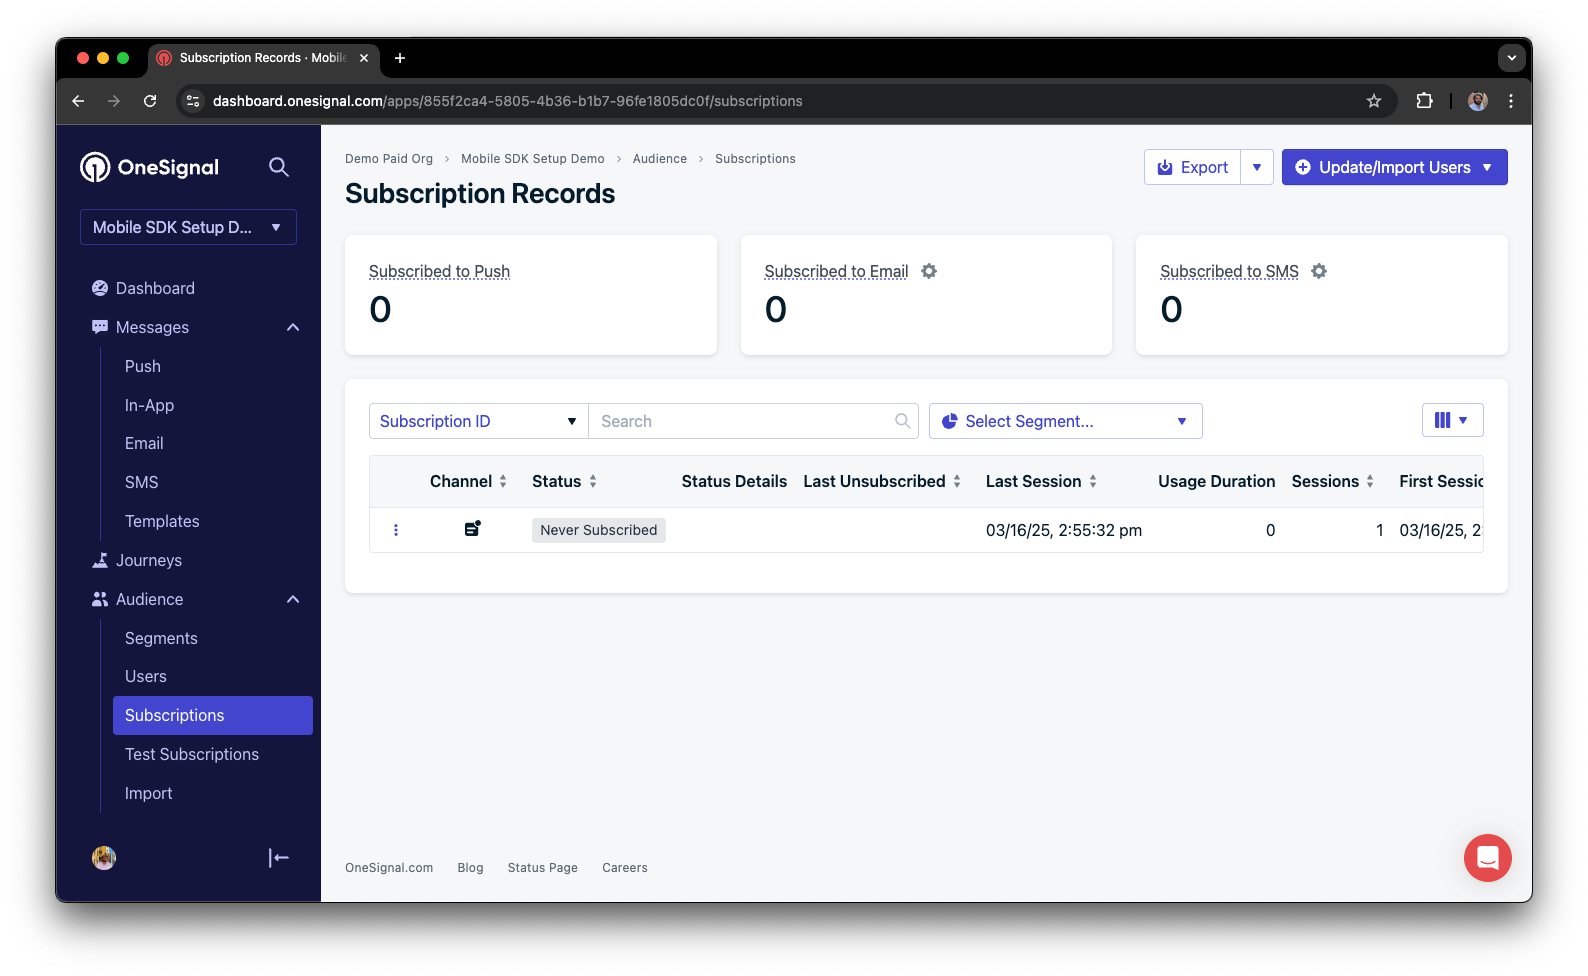
 プロンプトを受け入れる前に、OneSignalダッシュボードを確認してください:
* **Audience > Subscriptions**に移動します。
* ステータスが「Never Subscribed」の新しいエントリが表示されるはずです。
プロンプトを受け入れる前に、OneSignalダッシュボードを確認してください:
* **Audience > Subscriptions**に移動します。
* ステータスが「Never Subscribed」の新しいエントリが表示されるはずです。
 サブスクリプションのステータスが**Subscribed**と表示されるはずです。
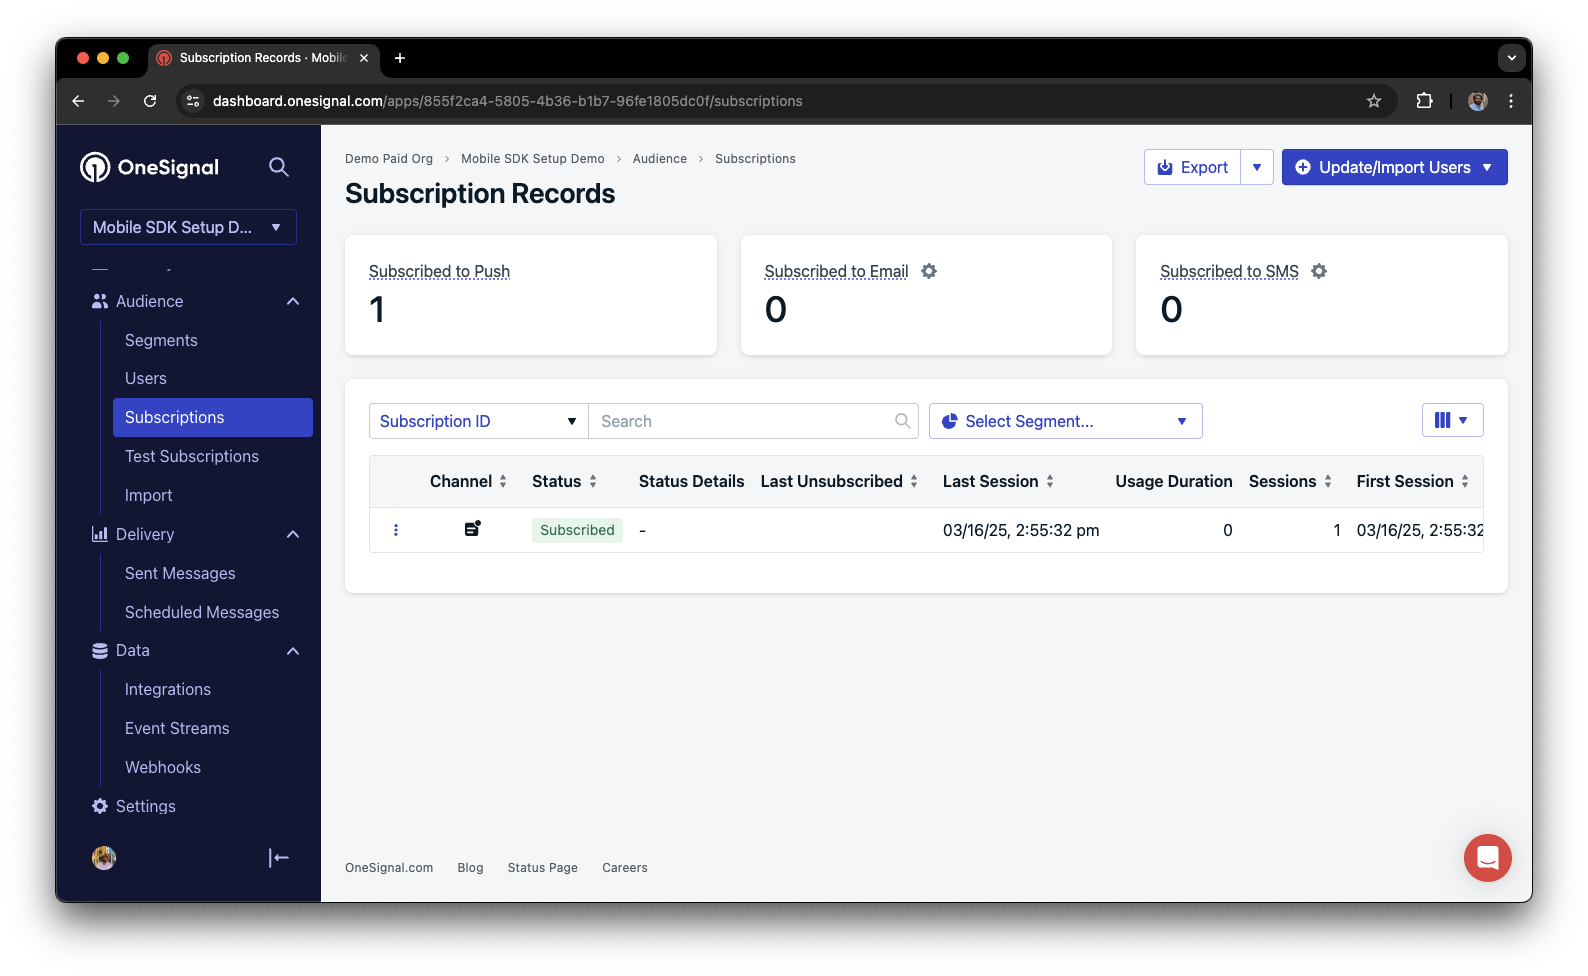 [モバイルサブスクリプション](/docs/ja/subscriptions)の作成に成功しました。
モバイルサブスクリプションは、ユーザーがデバイスで初めてアプリを開いたとき、またはユーザーが同じデバイスでアプリをアンインストールして再インストールしたときに作成されます。
### テストサブスクリプションをセットアップ
テストサブスクリプションは、メッセージを送信する前にプッシュ通知をテストするのに役立ちます。
ダッシュボードで、サブスクリプションの横にある\*\*Options(3つのドット)\*\*ボタンをクリックし、**Add to Test Users**を選択します。
[モバイルサブスクリプション](/docs/ja/subscriptions)の作成に成功しました。
モバイルサブスクリプションは、ユーザーがデバイスで初めてアプリを開いたとき、またはユーザーが同じデバイスでアプリをアンインストールして再インストールしたときに作成されます。
### テストサブスクリプションをセットアップ
テストサブスクリプションは、メッセージを送信する前にプッシュ通知をテストするのに役立ちます。
ダッシュボードで、サブスクリプションの横にある\*\*Options(3つのドット)\*\*ボタンをクリックし、**Add to Test Users**を選択します。
 **test usersタブ**で後でデバイスを簡単に識別できるように、サブスクリプションに名前を付けます。
**Audience > Segments > New Segment**に移動します。
セグメントに`Test Users`という名前を付けます(この名前は後で使用されるため重要です)。
**test usersタブ**で後でデバイスを簡単に識別できるように、サブスクリプションに名前を付けます。
**Audience > Segments > New Segment**に移動します。
セグメントに`Test Users`という名前を付けます(この名前は後で使用されるため重要です)。
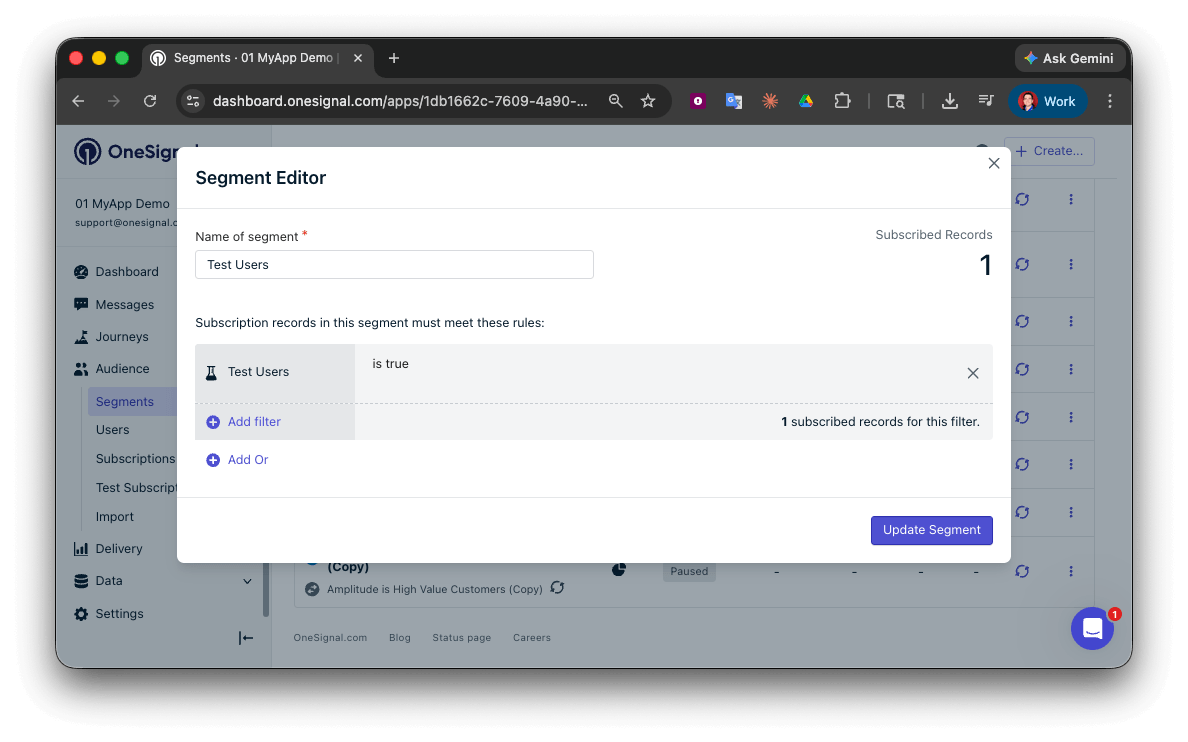 テストユーザーのセグメントの作成に成功しました。
この個別のデバイスとテストユーザーのグループにメッセージを送信するテストが可能になりました。
### API経由でテストプッシュを送信
OneSignalダッシュボードで、\*\*Settings > [Keys & IDs](/docs/ja/keys-and-ids)\*\*に移動します。
以下のコードの`YOUR_APP_API_KEY`と`YOUR_APP_ID`を実際のキーに置き換えます。このコードは、先ほど作成した`Test Users`セグメントを使用します。
```curl theme={null}
curl -X \
POST --url 'https://api.onesignal.com/notifications' \
--header 'content-type: application/json; charset=utf-8' \
--header 'authorization: Key YOUR_APP_API_KEY' \
--data \
'{
"app_id": "YOUR_APP_ID",
"target_channel": "push",
"name": "Testing basic setup",
"headings": {
"en": "👋"
},
"contents": {
"en": "Hello world!"
},
"included_segments": [
"Test Users"
],
"ios_attachments": {
"onesignal_logo": "https://avatars.githubusercontent.com/u/11823027?s=200&v=4"
},
"big_picture": "https://avatars.githubusercontent.com/u/11823027?s=200&v=4"
}'
```
ターミナルでコードを実行します。
すべてのセットアップ手順が正常に完了した場合、テストサブスクリプションは画像を含む通知を受信するはずです:
テストユーザーのセグメントの作成に成功しました。
この個別のデバイスとテストユーザーのグループにメッセージを送信するテストが可能になりました。
### API経由でテストプッシュを送信
OneSignalダッシュボードで、\*\*Settings > [Keys & IDs](/docs/ja/keys-and-ids)\*\*に移動します。
以下のコードの`YOUR_APP_API_KEY`と`YOUR_APP_ID`を実際のキーに置き換えます。このコードは、先ほど作成した`Test Users`セグメントを使用します。
```curl theme={null}
curl -X \
POST --url 'https://api.onesignal.com/notifications' \
--header 'content-type: application/json; charset=utf-8' \
--header 'authorization: Key YOUR_APP_API_KEY' \
--data \
'{
"app_id": "YOUR_APP_ID",
"target_channel": "push",
"name": "Testing basic setup",
"headings": {
"en": "👋"
},
"contents": {
"en": "Hello world!"
},
"included_segments": [
"Test Users"
],
"ios_attachments": {
"onesignal_logo": "https://avatars.githubusercontent.com/u/11823027?s=200&v=4"
},
"big_picture": "https://avatars.githubusercontent.com/u/11823027?s=200&v=4"
}'
```
ターミナルでコードを実行します。
すべてのセットアップ手順が正常に完了した場合、テストサブスクリプションは画像を含む通知を受信するはずです:
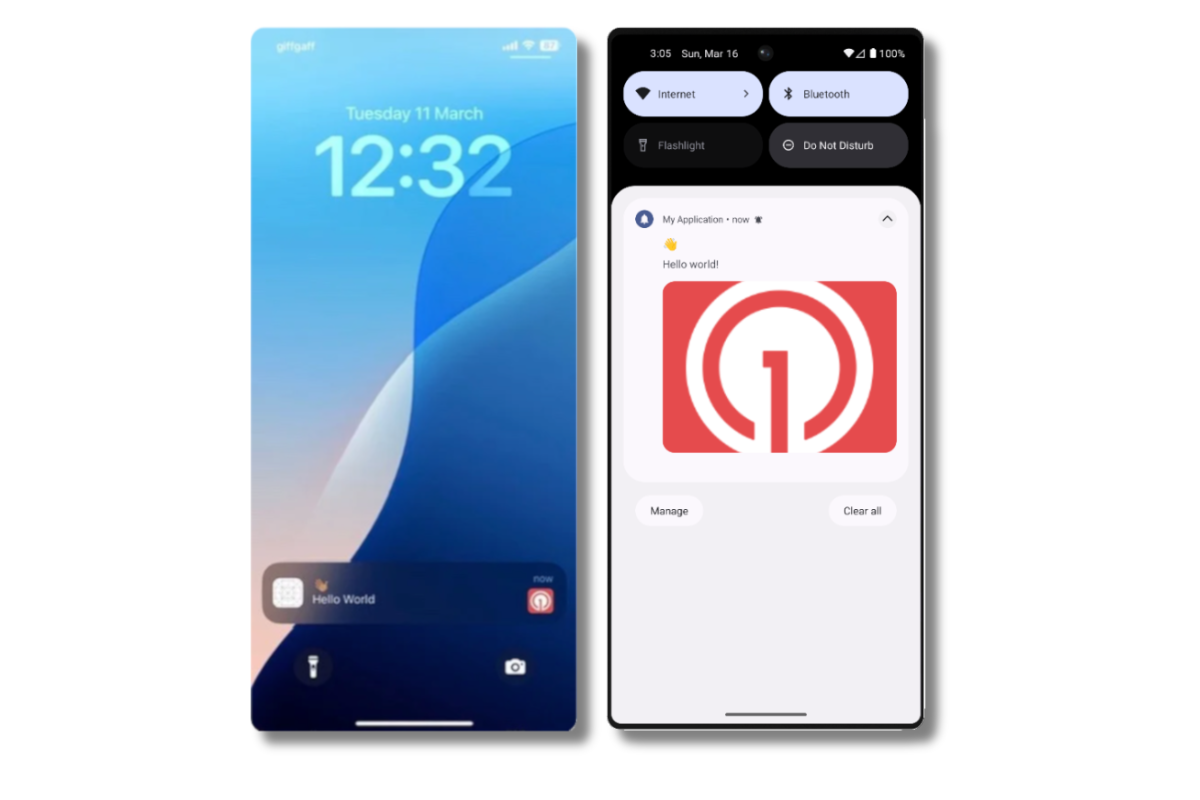 画像は折りたたまれた通知ビューでは小さく表示されます。通知を展開すると、完全な画像が表示されます。
ダッシュボードで、**Delivery > Sent Messages**に移動し、メッセージをクリックして統計を表示します。
**confirmed**統計が表示されるはずです。これは、デバイスがプッシュを受信したことを意味します。
API経由でセグメントに通知を送信することに成功しました。
* 画像が受信されない場合は、[Notification Service Extension](#ios-setup)が不足している可能性があります。
* confirmed receiptがない場合は、[こちら](/docs/ja/confirmed-delivery#troubleshooting-confirmed-delivery)のトラブルシューティングガイドを確認してください。
* 問題が発生した場合は、APIリクエストとアプリ起動の最初から最後までのログを`.txt`ファイルにコピー&ペーストしてください。その後、両方を`support@onesignal.com`と共有してください。
### アプリ内メッセージを送信
[アプリ内メッセージ](/docs/ja/in-app-messages-setup)を使用すると、ユーザーがアプリを使用している間にユーザーとコミュニケーションできます。
これは、ユーザーが新しいセッションを開始する\_前\_にアプリ内オーディエンスの基準を満たす必要があるためです。OneSignalでは、ユーザーがアプリをバックグラウンドまたは閉じた状態から少なくとも30秒後に開くと、新しいセッションが開始されます。詳細については、[アプリ内メッセージの表示方法](/docs/ja/in-app-messages-setup#how-are-iams-displayed%3F)に関するガイドを参照してください。
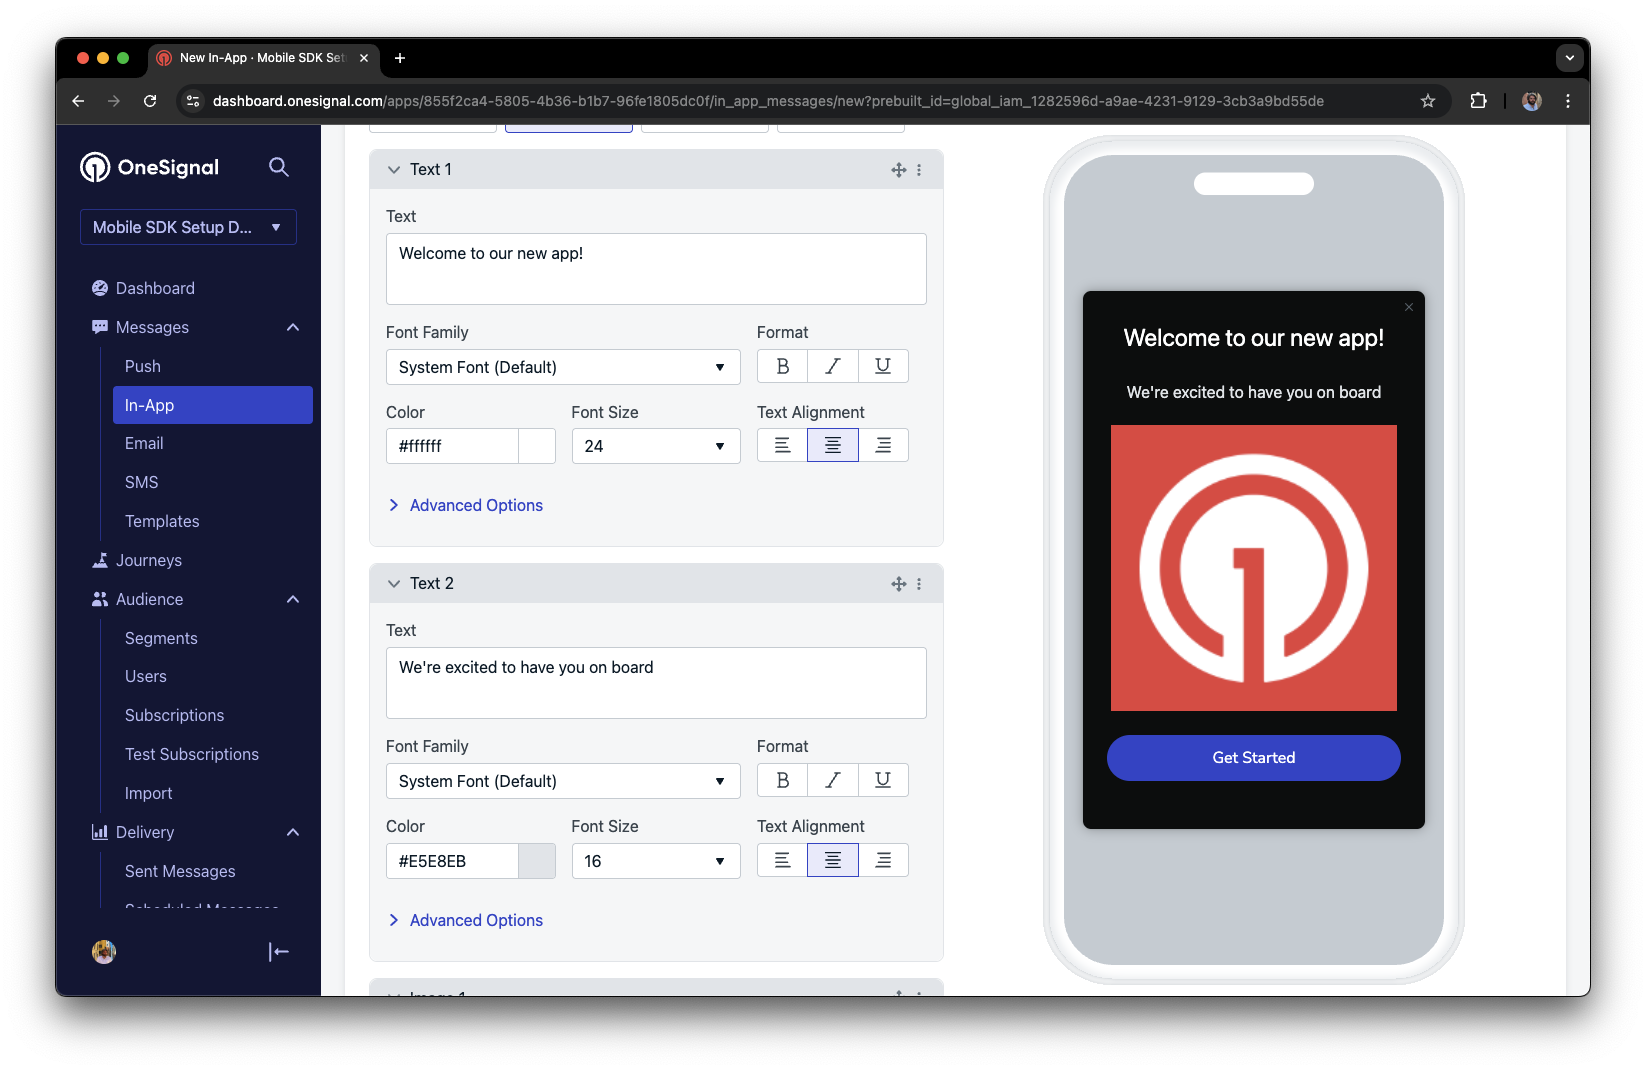
* OneSignalダッシュボードで、**Messages > In-App > New In-App**に移動します。
* **Welcome**メッセージを見つけて選択します。
* Audienceを、以前使用した**Test Users**セグメントに設定します。
画像は折りたたまれた通知ビューでは小さく表示されます。通知を展開すると、完全な画像が表示されます。
ダッシュボードで、**Delivery > Sent Messages**に移動し、メッセージをクリックして統計を表示します。
**confirmed**統計が表示されるはずです。これは、デバイスがプッシュを受信したことを意味します。
API経由でセグメントに通知を送信することに成功しました。
* 画像が受信されない場合は、[Notification Service Extension](#ios-setup)が不足している可能性があります。
* confirmed receiptがない場合は、[こちら](/docs/ja/confirmed-delivery#troubleshooting-confirmed-delivery)のトラブルシューティングガイドを確認してください。
* 問題が発生した場合は、APIリクエストとアプリ起動の最初から最後までのログを`.txt`ファイルにコピー&ペーストしてください。その後、両方を`support@onesignal.com`と共有してください。
### アプリ内メッセージを送信
[アプリ内メッセージ](/docs/ja/in-app-messages-setup)を使用すると、ユーザーがアプリを使用している間にユーザーとコミュニケーションできます。
これは、ユーザーが新しいセッションを開始する\_前\_にアプリ内オーディエンスの基準を満たす必要があるためです。OneSignalでは、ユーザーがアプリをバックグラウンドまたは閉じた状態から少なくとも30秒後に開くと、新しいセッションが開始されます。詳細については、[アプリ内メッセージの表示方法](/docs/ja/in-app-messages-setup#how-are-iams-displayed%3F)に関するガイドを参照してください。
* OneSignalダッシュボードで、**Messages > In-App > New In-App**に移動します。
* **Welcome**メッセージを見つけて選択します。
* Audienceを、以前使用した**Test Users**セグメントに設定します。
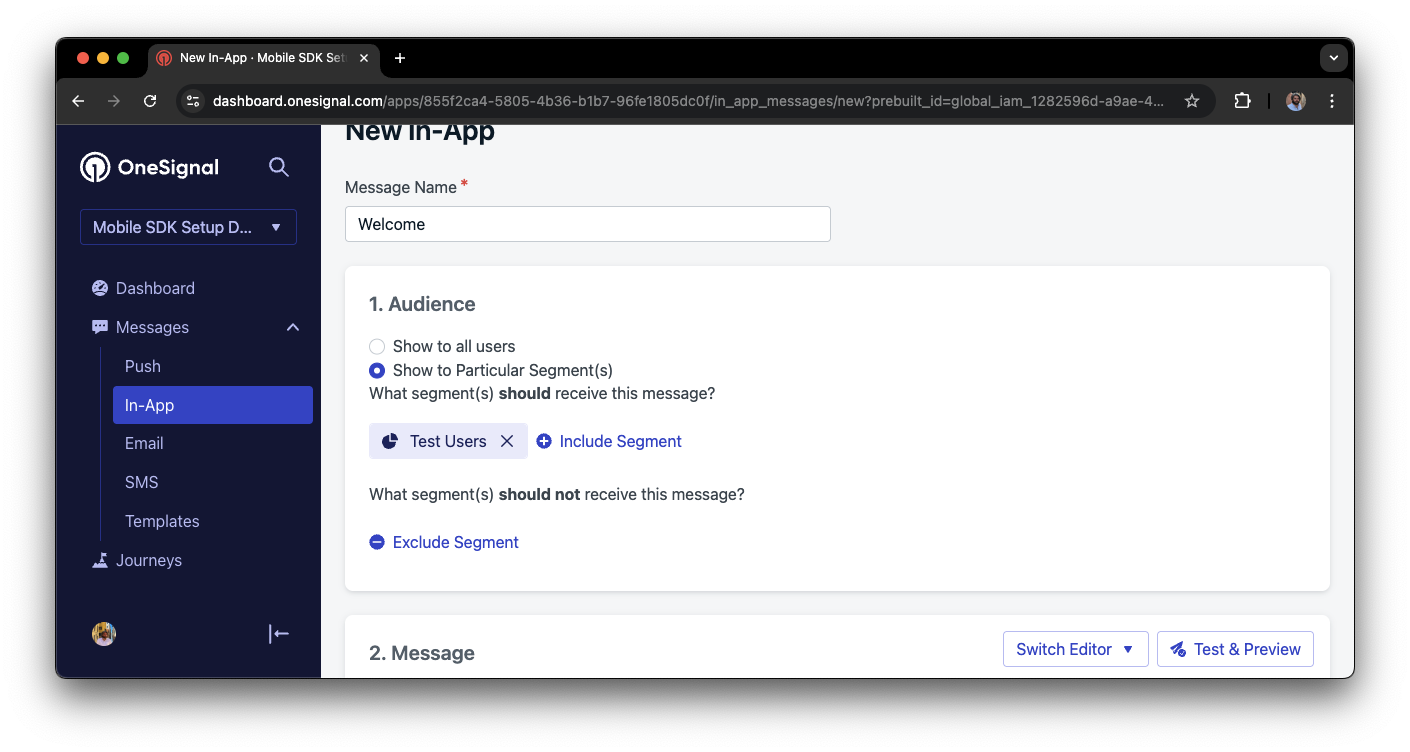
 \*\*Schedule > How often do you want to show this message?\*\*で、**Every time trigger conditions are satisfied**を選択します。
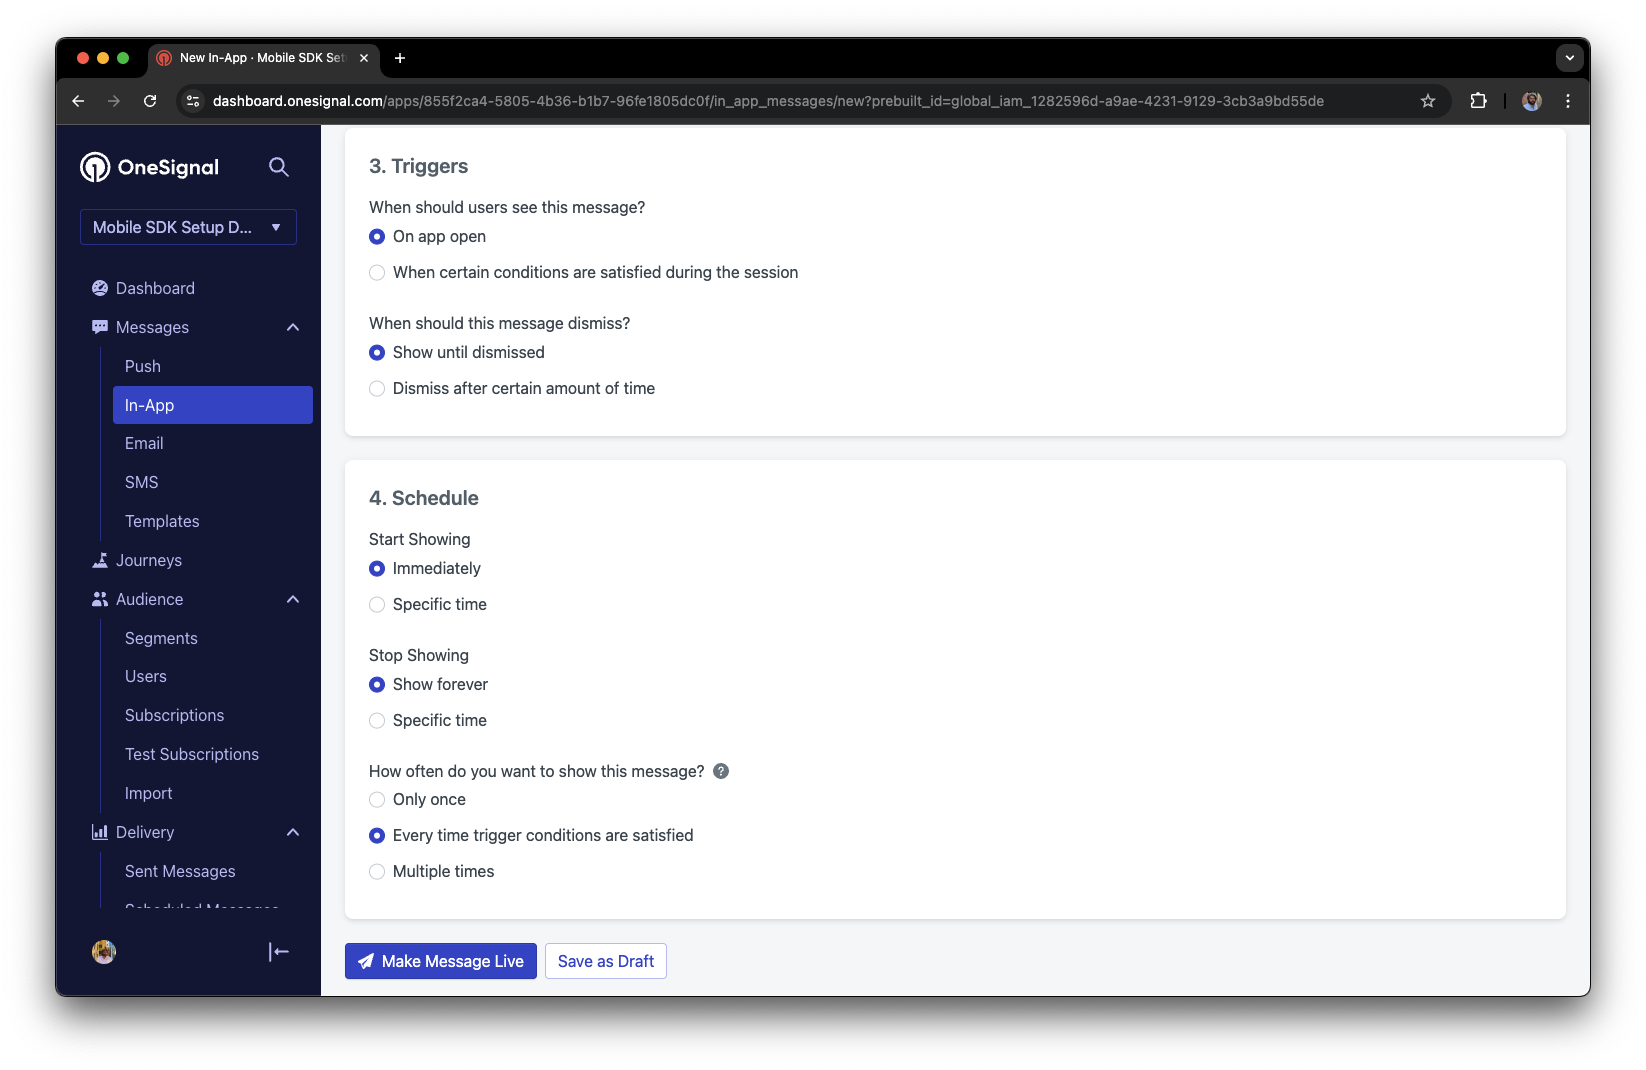 **Make Message Live**をクリックして、Test Usersがアプリを開くたびにメッセージが利用できるようにします。
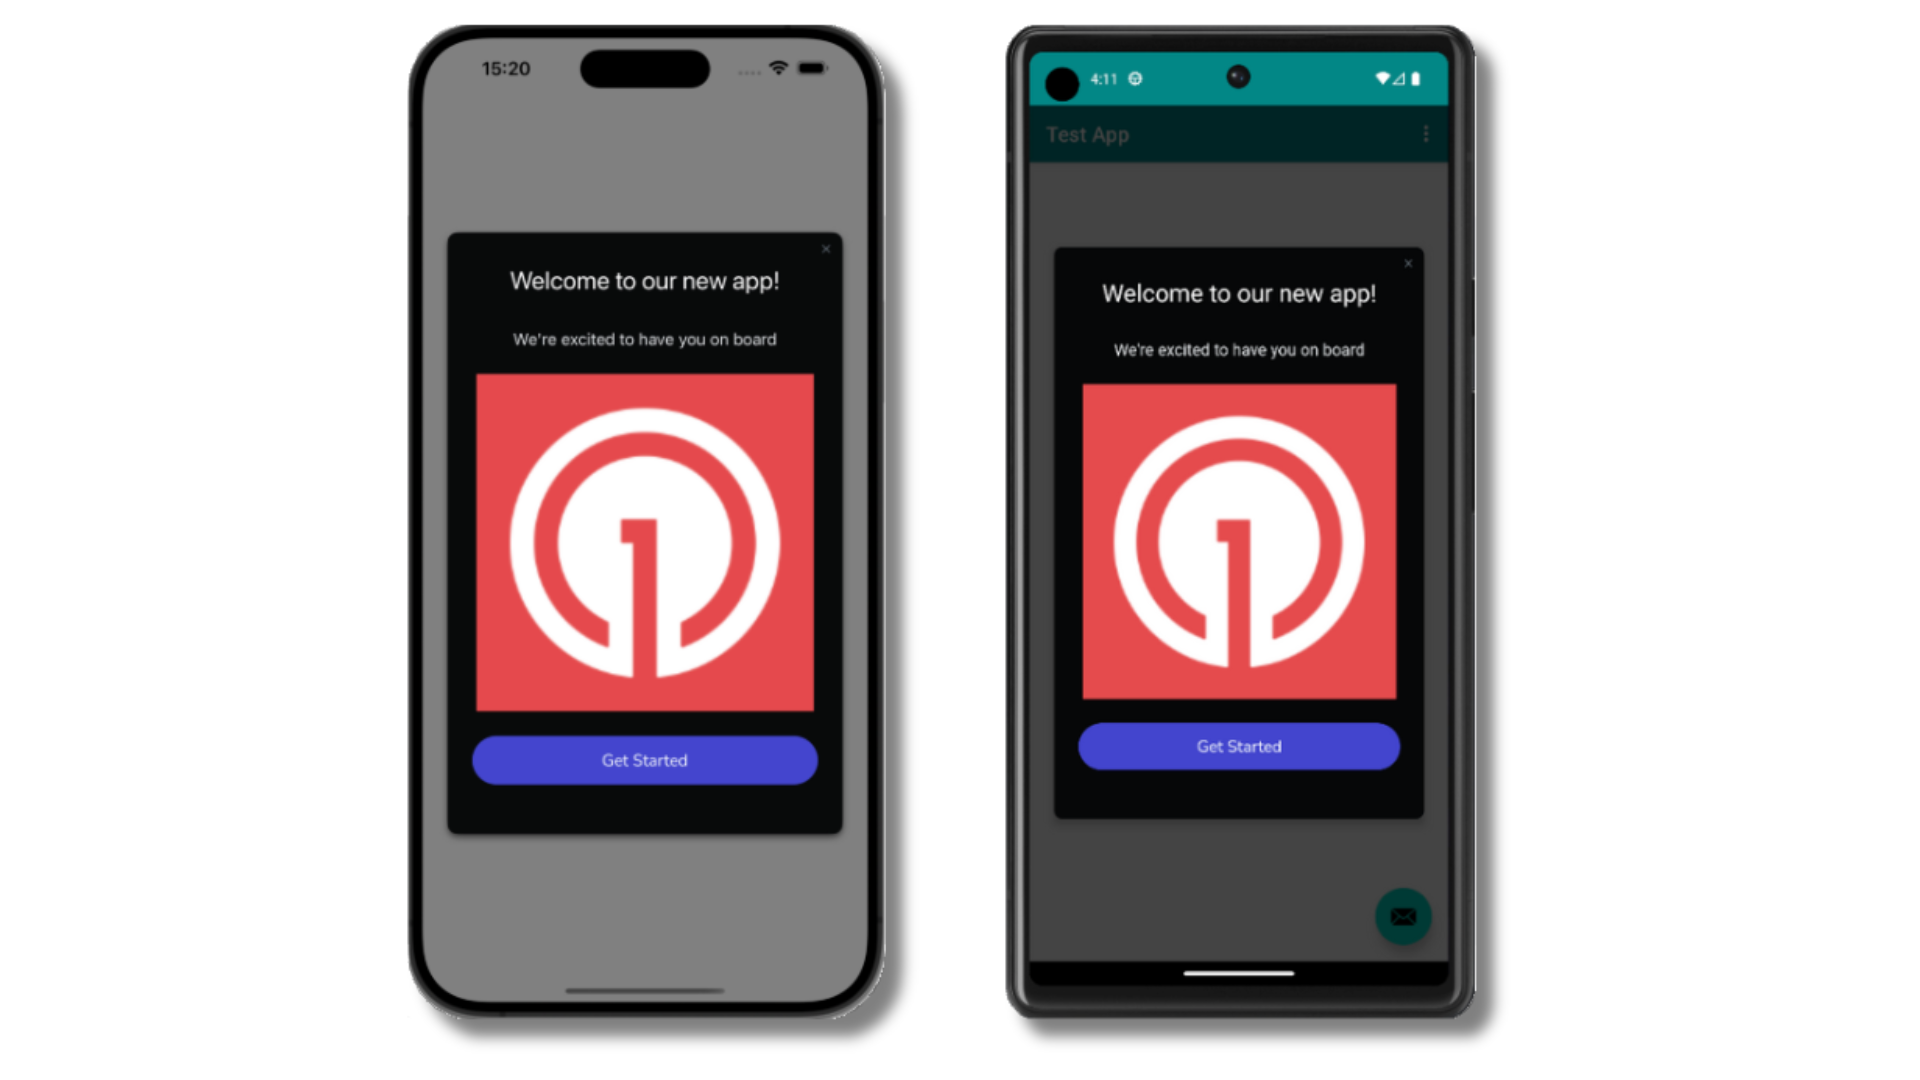
アプリ内メッセージがライブになったら、アプリを開きます。次のように表示されるはずです:
**Make Message Live**をクリックして、Test Usersがアプリを開くたびにメッセージが利用できるようにします。
アプリ内メッセージがライブになったら、アプリを開きます。次のように表示されるはずです:
 メッセージが表示されない場合:
* 新しいセッションを開始します
* 再度開く前に、少なくとも30秒間アプリを閉じるかバックグラウンドにする必要があります。これにより、新しいセッションが開始されます。
* 詳細については、[アプリ内メッセージの表示方法](/docs/ja/in-app-messages-setup#how-are-iams-displayed%3F)を参照してください。
* まだ`Test Users`セグメントに含まれていますか?
* アプリを再インストールしたりデバイスを切り替えたりした場合は、デバイスを[Test Users](#set-up-test-users)に再度追加し、Test Usersセグメントの一部であることを確認してください。
* 問題が発生していますか?
* 上記の手順を再現しながら[デバッグログの取得](/docs/ja/capturing-a-debug-log)に従ってください。これにより、`support@onesignal.com`と共有できる追加のログが生成され、何が起こっているかを調査するのに役立ちます。
OneSignal SDKのセットアップが成功し、次のような重要な概念を学びました:
* [サブスクリプション](/docs/ja/subscriptions)の収集、[テストサブスクリプション](/docs/ja/find-set-test-subscriptions)の設定、[セグメント](/docs/ja/segmentation)の作成。
* セグメントと[Create message](/reference/create-message) APIを使用した画像付き[プッシュ](/docs/ja/push)と[Confirmed receipt](/docs/ja/confirmed-delivery)の送信。
* [アプリ内メッセージ](/docs/ja/in-app-messages-setup)の送信。
このガイドを続けて、アプリでユーザーを識別し、追加機能をセットアップします。
***
## ユーザー識別
以前、モバイル[サブスクリプション](/docs/ja/subscriptions)の作成方法を説明しました。次に、OneSignal SDKを使用して、すべてのサブスクリプション(プッシュ、メール、SMSを含む)にわたる[ユーザー](/docs/ja/users)の識別に拡張します。プラットフォーム間でユーザーを統合し、エンゲージメントするために、External ID、タグ、マルチチャネルサブスクリプション、プライバシー、イベントトラッキングについて説明します。
### External IDを割り当て
External IDを使用して、バックエンドのユーザー識別子を使用して、デバイス、メールアドレス、電話番号間でユーザーを一貫して識別します。これにより、チャネルとサードパーティシステム間でメッセージングが統一されたままになります(特に[統合](/docs/ja/integrations)に重要)。
アプリによって識別されるたびに、SDKの[`login`メソッド](/docs/ja/mobile-sdk-reference#login-external-id)を使用してExternal IDを設定します。
OneSignalは、サブスクリプション(Subscription ID)とユーザー(OneSignal ID)に対して一意の読み取り専用IDを生成します。
ユーザーが異なるデバイスでアプリをダウンロードしたり、ウェブサイトにサブスクライブしたり、アプリ外でメールアドレスや電話番号を提供したりすると、新しいサブスクリプションが作成されます。
すべてのサブスクリプションにわたってユーザーを識別するために、SDK経由でExternal IDを設定することを強くお勧めします。作成方法に関係なく。
### データタグを追加
[タグ](/docs/ja/add-user-data-tags)は、ユーザープロパティ(`username`、`role`、設定など)とイベント(`purchase_date`、`game_level`、ユーザーインタラクションなど)を保存するために使用できる文字列データのキーと値のペアです。タグは、高度な[メッセージパーソナライゼーション](/docs/ja/message-personalization)と[セグメンテーション](/docs/ja/segmentation)を強化し、より高度なユースケースを可能にします。
アプリでイベントが発生したときに、SDKの[`addTag`および`addTags`メソッド](/docs/ja/mobile-sdk-reference#data-tags)を使用してタグを設定します。
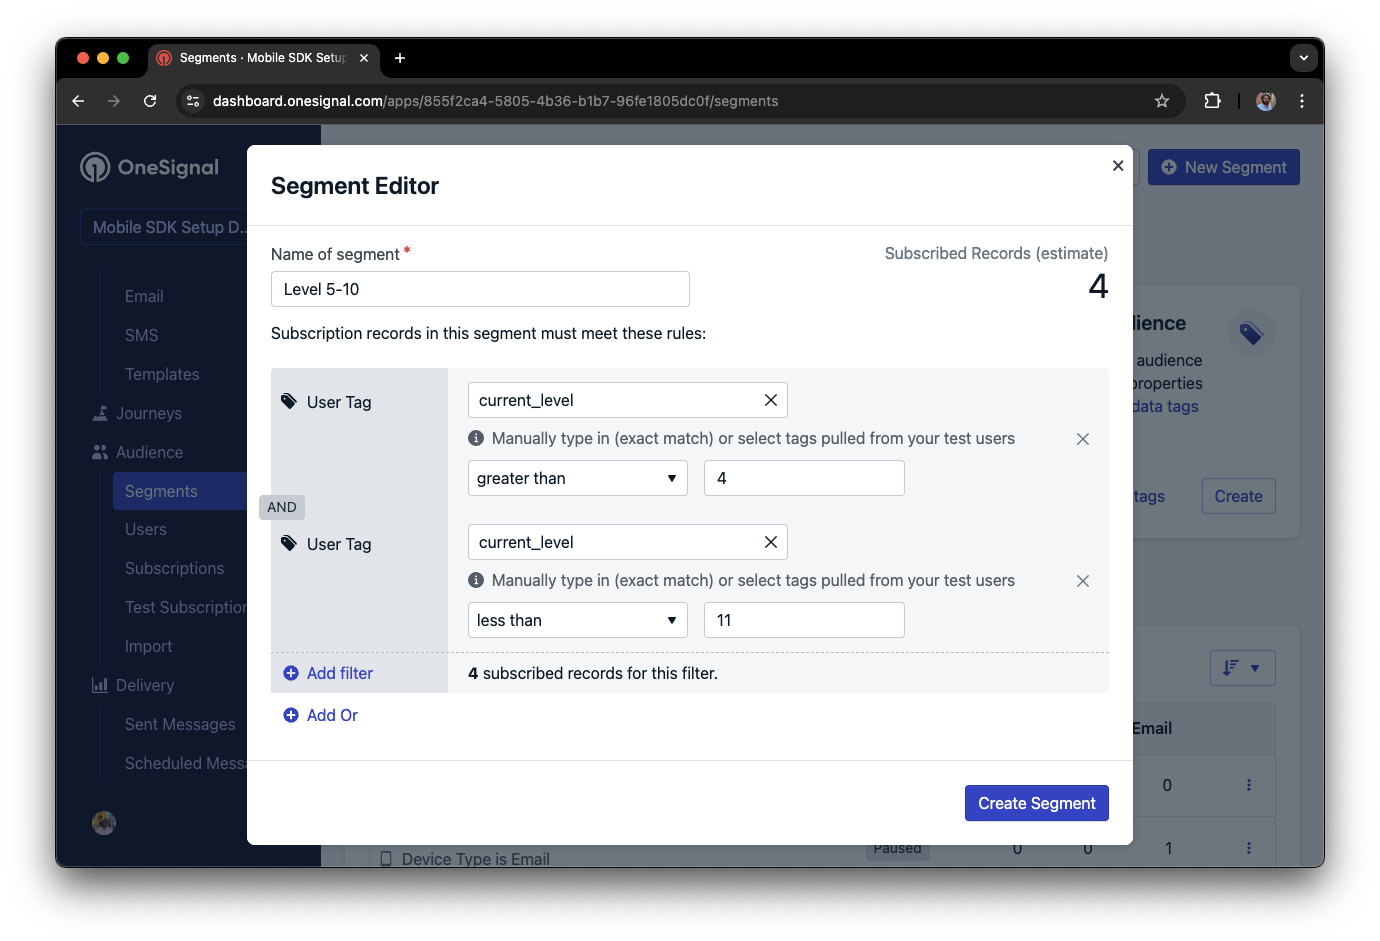
この例では、ユーザーはレベル6に到達し、`current_level`というタグで識別され、値は`6`に設定されます。
メッセージが表示されない場合:
* 新しいセッションを開始します
* 再度開く前に、少なくとも30秒間アプリを閉じるかバックグラウンドにする必要があります。これにより、新しいセッションが開始されます。
* 詳細については、[アプリ内メッセージの表示方法](/docs/ja/in-app-messages-setup#how-are-iams-displayed%3F)を参照してください。
* まだ`Test Users`セグメントに含まれていますか?
* アプリを再インストールしたりデバイスを切り替えたりした場合は、デバイスを[Test Users](#set-up-test-users)に再度追加し、Test Usersセグメントの一部であることを確認してください。
* 問題が発生していますか?
* 上記の手順を再現しながら[デバッグログの取得](/docs/ja/capturing-a-debug-log)に従ってください。これにより、`support@onesignal.com`と共有できる追加のログが生成され、何が起こっているかを調査するのに役立ちます。
OneSignal SDKのセットアップが成功し、次のような重要な概念を学びました:
* [サブスクリプション](/docs/ja/subscriptions)の収集、[テストサブスクリプション](/docs/ja/find-set-test-subscriptions)の設定、[セグメント](/docs/ja/segmentation)の作成。
* セグメントと[Create message](/reference/create-message) APIを使用した画像付き[プッシュ](/docs/ja/push)と[Confirmed receipt](/docs/ja/confirmed-delivery)の送信。
* [アプリ内メッセージ](/docs/ja/in-app-messages-setup)の送信。
このガイドを続けて、アプリでユーザーを識別し、追加機能をセットアップします。
***
## ユーザー識別
以前、モバイル[サブスクリプション](/docs/ja/subscriptions)の作成方法を説明しました。次に、OneSignal SDKを使用して、すべてのサブスクリプション(プッシュ、メール、SMSを含む)にわたる[ユーザー](/docs/ja/users)の識別に拡張します。プラットフォーム間でユーザーを統合し、エンゲージメントするために、External ID、タグ、マルチチャネルサブスクリプション、プライバシー、イベントトラッキングについて説明します。
### External IDを割り当て
External IDを使用して、バックエンドのユーザー識別子を使用して、デバイス、メールアドレス、電話番号間でユーザーを一貫して識別します。これにより、チャネルとサードパーティシステム間でメッセージングが統一されたままになります(特に[統合](/docs/ja/integrations)に重要)。
アプリによって識別されるたびに、SDKの[`login`メソッド](/docs/ja/mobile-sdk-reference#login-external-id)を使用してExternal IDを設定します。
OneSignalは、サブスクリプション(Subscription ID)とユーザー(OneSignal ID)に対して一意の読み取り専用IDを生成します。
ユーザーが異なるデバイスでアプリをダウンロードしたり、ウェブサイトにサブスクライブしたり、アプリ外でメールアドレスや電話番号を提供したりすると、新しいサブスクリプションが作成されます。
すべてのサブスクリプションにわたってユーザーを識別するために、SDK経由でExternal IDを設定することを強くお勧めします。作成方法に関係なく。
### データタグを追加
[タグ](/docs/ja/add-user-data-tags)は、ユーザープロパティ(`username`、`role`、設定など)とイベント(`purchase_date`、`game_level`、ユーザーインタラクションなど)を保存するために使用できる文字列データのキーと値のペアです。タグは、高度な[メッセージパーソナライゼーション](/docs/ja/message-personalization)と[セグメンテーション](/docs/ja/segmentation)を強化し、より高度なユースケースを可能にします。
アプリでイベントが発生したときに、SDKの[`addTag`および`addTags`メソッド](/docs/ja/mobile-sdk-reference#data-tags)を使用してタグを設定します。
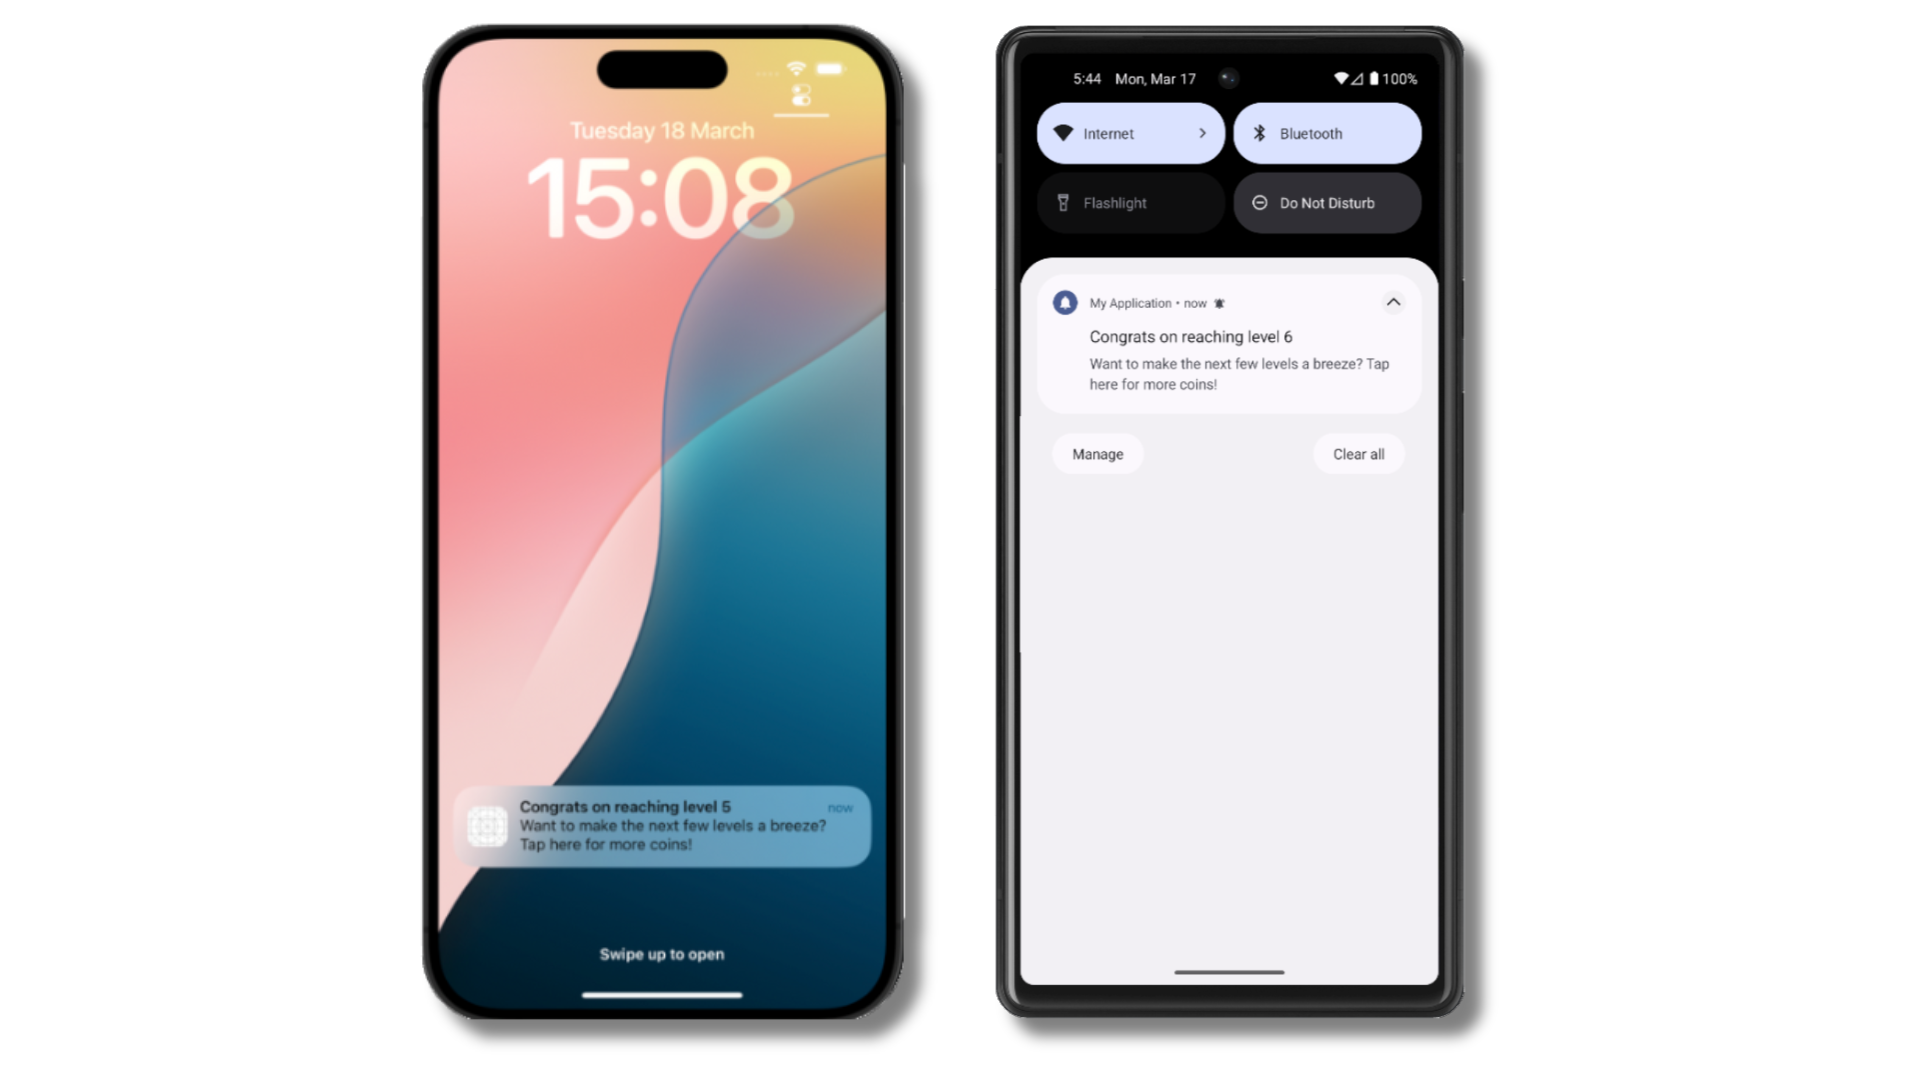
この例では、ユーザーはレベル6に到達し、`current_level`というタグで識別され、値は`6`に設定されます。
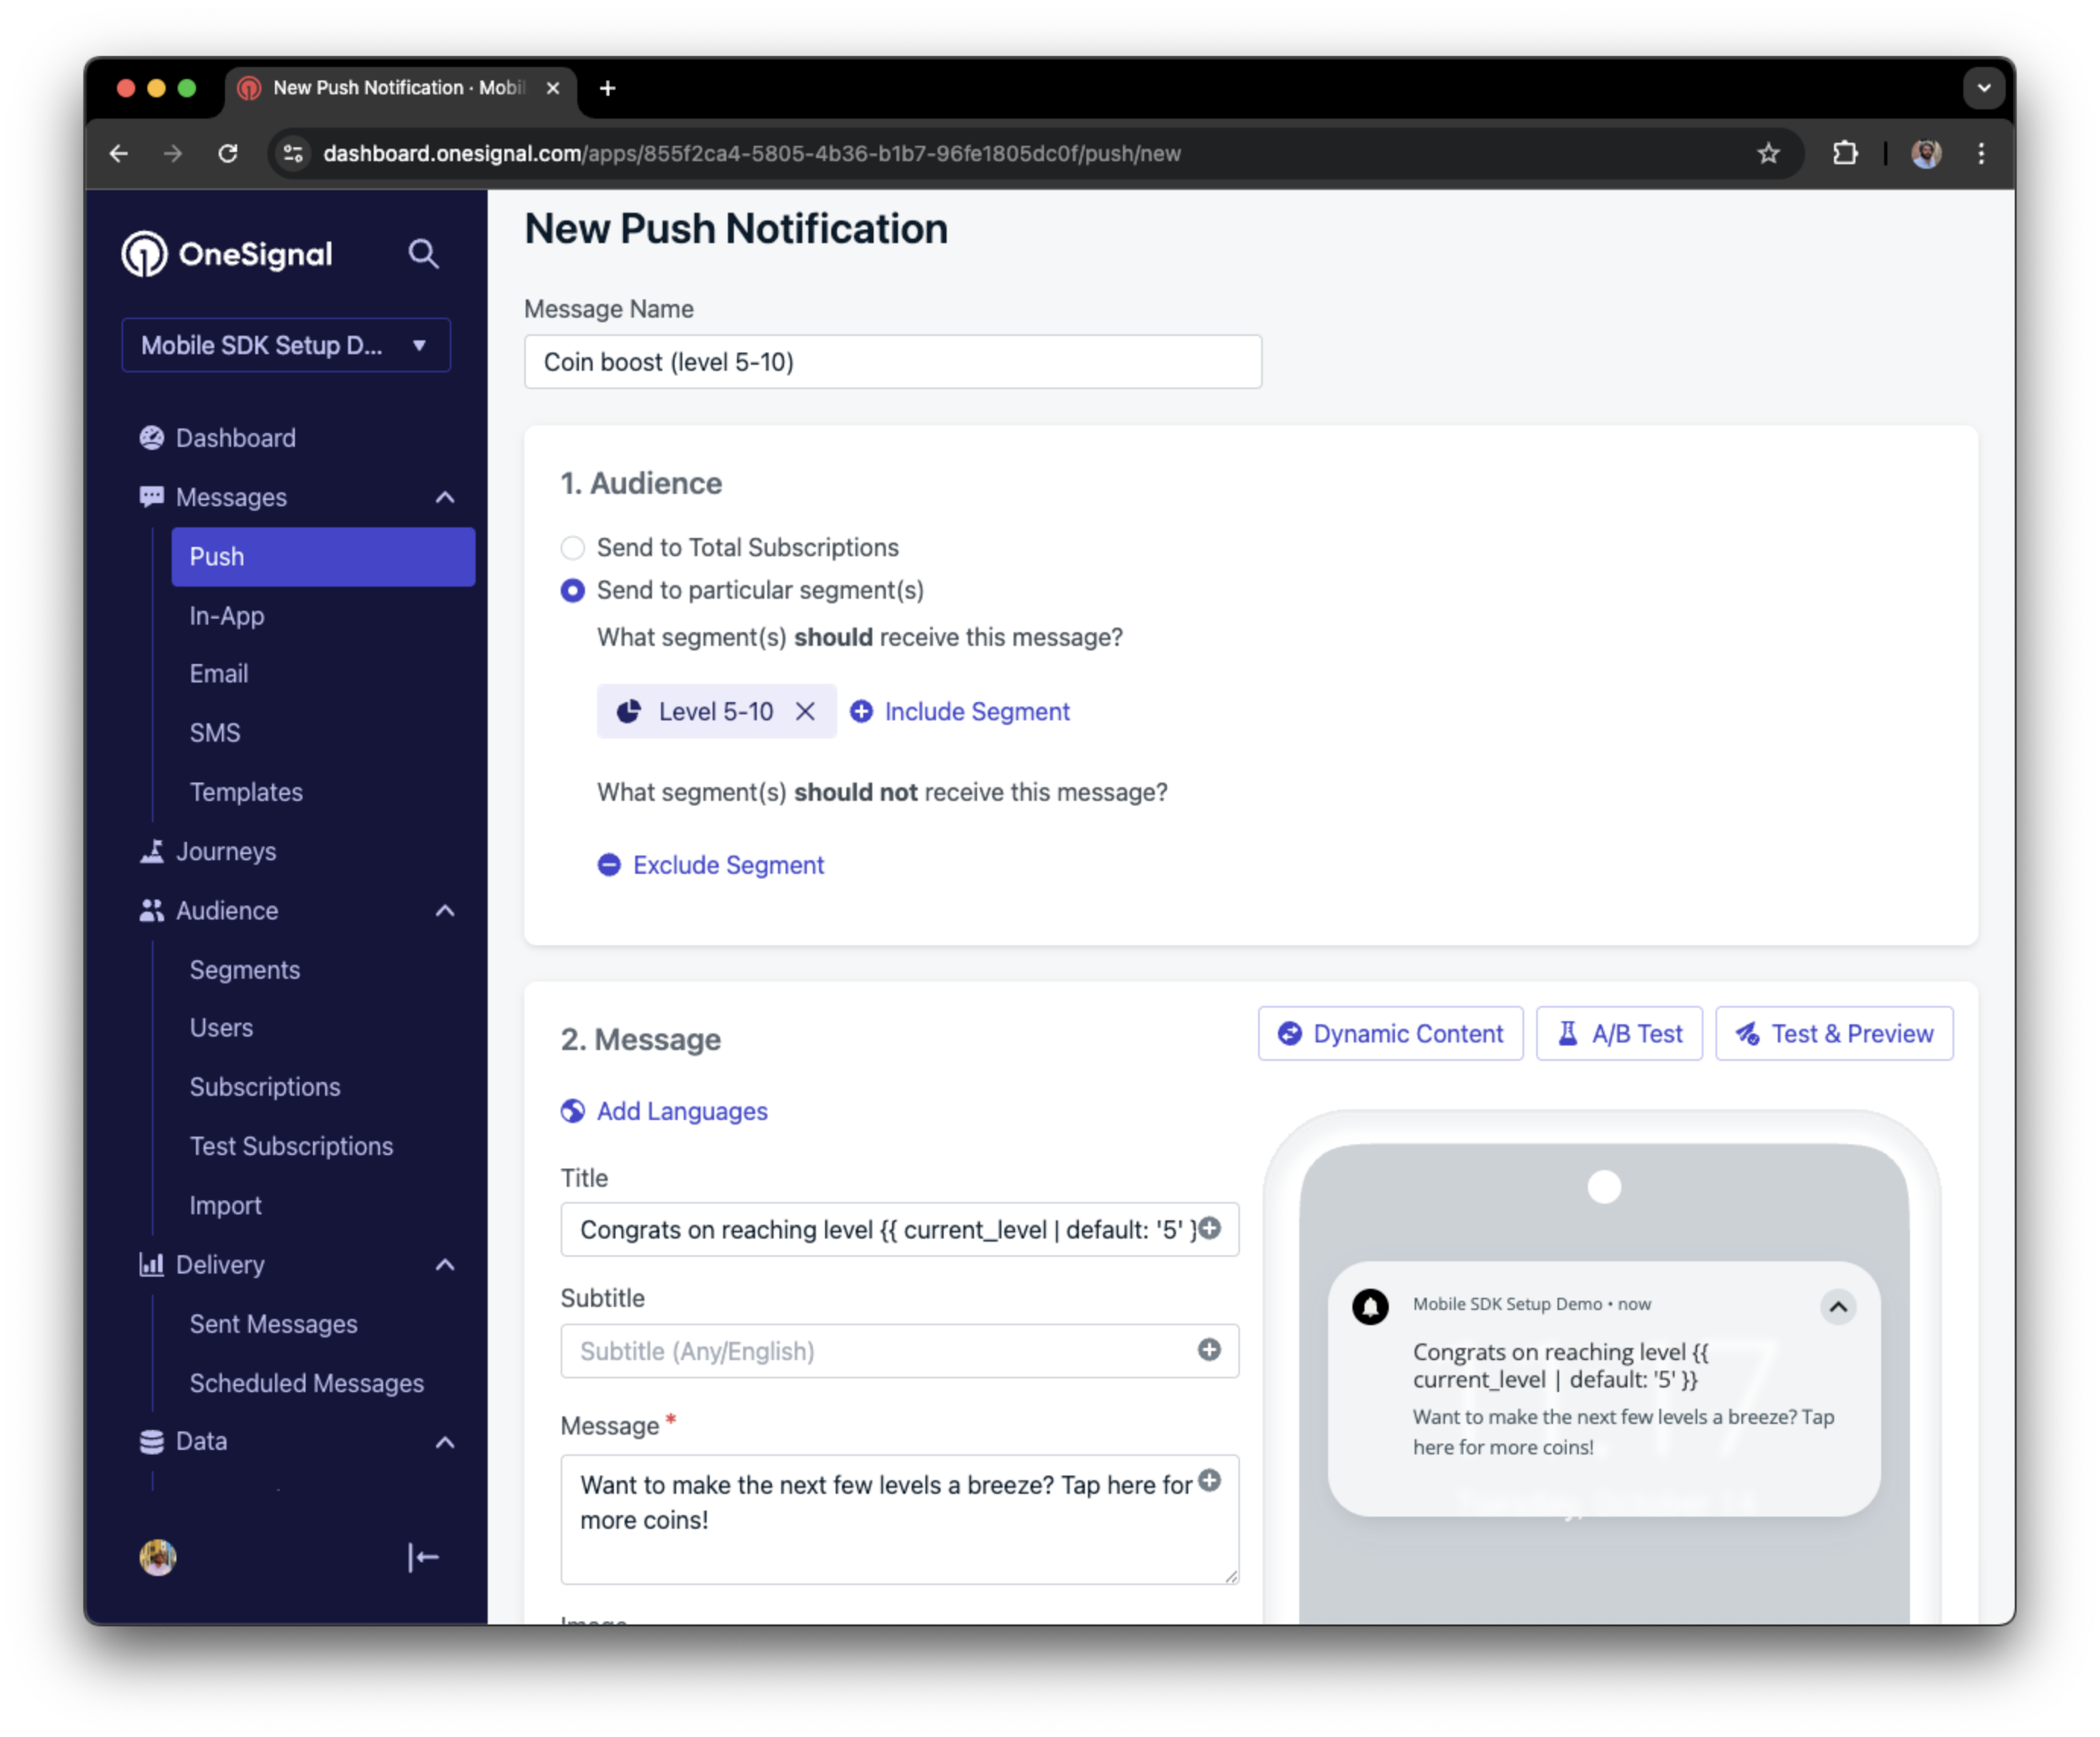
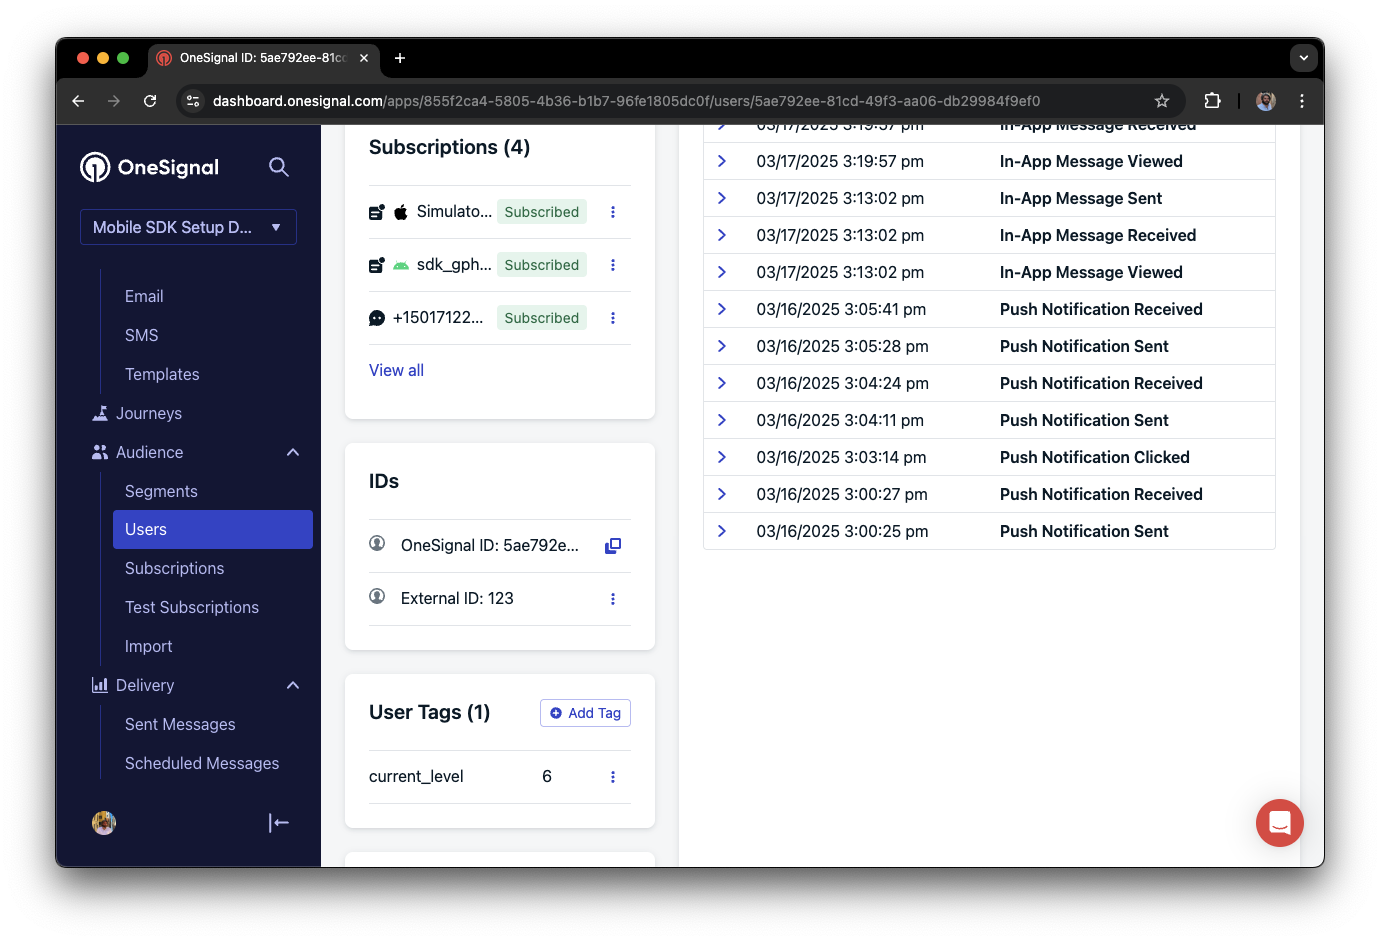 レベルが5から10の間のユーザーのセグメントを作成し、それを使用してターゲット化されたパーソナライズされたメッセージを送信できます:
 ### メールおよび/またはSMSサブスクリプションを追加
以前、SDKがプッシュとアプリ内メッセージを送信するためにモバイルサブスクリプションを作成する方法を見ました。対応するサブスクリプションを作成することで、メールとSMSチャネルを通じてユーザーにリーチすることもできます。
* [`addEmail`メソッド](/docs/ja/mobile-sdk-reference#addemail-%2C-removeemail)を使用してメールサブスクリプションを作成します。
* [`addSms`メソッド](/docs/ja/mobile-sdk-reference#addsms-%2C-removesms)を使用してSMSサブスクリプションを作成します。
メールアドレスや電話番号がOneSignalアプリに既に存在する場合、SDKはそれを既存のユーザーに追加し、重複は作成しません。
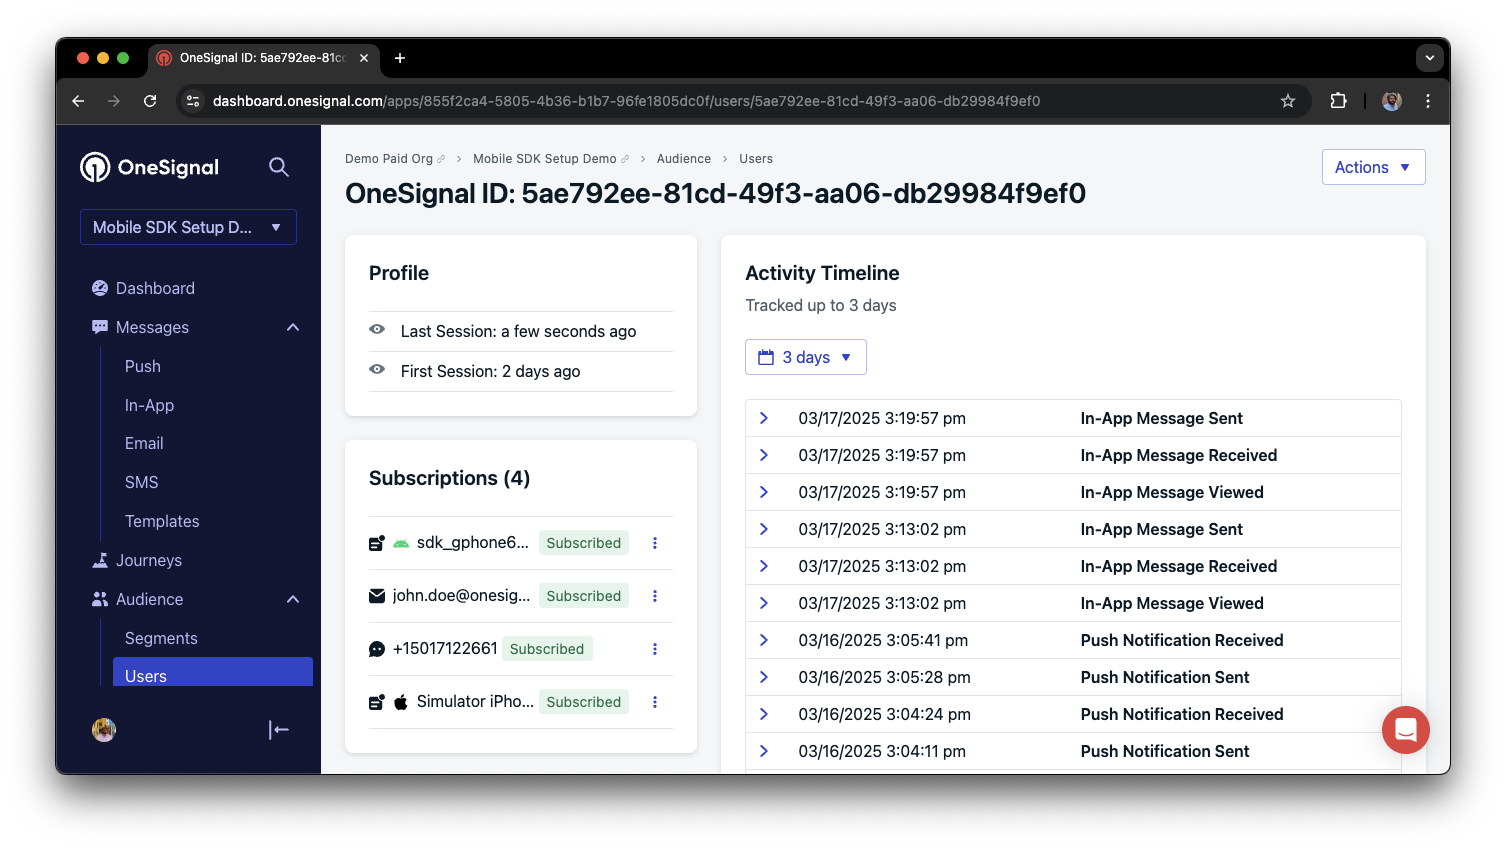
ダッシュボードの**Audience > Users**または[View user API](/reference/view-user)を使用して、統合されたユーザーを表示できます。
### メールおよび/またはSMSサブスクリプションを追加
以前、SDKがプッシュとアプリ内メッセージを送信するためにモバイルサブスクリプションを作成する方法を見ました。対応するサブスクリプションを作成することで、メールとSMSチャネルを通じてユーザーにリーチすることもできます。
* [`addEmail`メソッド](/docs/ja/mobile-sdk-reference#addemail-%2C-removeemail)を使用してメールサブスクリプションを作成します。
* [`addSms`メソッド](/docs/ja/mobile-sdk-reference#addsms-%2C-removesms)を使用してSMSサブスクリプションを作成します。
メールアドレスや電話番号がOneSignalアプリに既に存在する場合、SDKはそれを既存のユーザーに追加し、重複は作成しません。
ダッシュボードの**Audience > Users**または[View user API](/reference/view-user)を使用して、統合されたユーザーを表示できます。
 マルチチャネルコミュニケーションのベストプラクティス
* メールまたはSMSサブスクリプションを追加する前に、明示的な同意を得てください。
* 各コミュニケーションチャネルの利点をユーザーに説明してください。
* ユーザーが好むチャネルを選択できるように、チャネルの設定を提供してください。
***
### プライバシーとユーザー同意
OneSignalがユーザーデータを収集するタイミングを制御するには、SDKの同意ゲーティングメソッドを使用します:
* [`setConsentRequired(true)`](/docs/ja/mobile-sdk-reference#setconsentrequired):同意が与えられるまでデータ収集を防ぎます。
* [`setConsentGiven(true)`](/docs/ja/mobile-sdk-reference#setconsentgiven):同意が付与されるとデータ収集を有効にします。
詳細については、プライバシーとセキュリティのドキュメントを参照してください:
* [SDKによって収集されるデータ](/docs/ja/data-collected-by-the-onesignal-sdk)
* [個人データの取り扱い](/docs/ja/handling-personal-data)
***
## プッシュ許可のプロンプト
アプリを開いたときにすぐに`requestPermission()`を呼び出すのではなく、より戦略的なアプローチを取ります。許可をリクエストする前に、アプリ内メッセージを使用してプッシュ通知の価値を説明します。
ベストプラクティスと実装の詳細については、[プッシュ許可のプロンプト](/docs/ja/prompt-for-push-permissions)ガイドを参照してください。
***
## プッシュ、ユーザー、アプリ内イベントをリッスン
SDKリスナーを使用して、ユーザーのアクションと状態の変化に反応します。
SDKは、フックできるいくつかのイベントリスナーを提供します。詳細については、[SDKリファレンスガイド](/docs/ja/mobile-sdk-reference)を参照してください。
### プッシュ通知イベント
* [`addClickListener()`](/docs/ja/mobile-sdk-reference#addclicklistener-push):通知がタップされたときを検出します。[ディープリンク](/docs/ja/deep-linking)に役立ちます。
* [`addForegroundLifecycleListener()`](/docs/ja/mobile-sdk-reference#addforegroundlifecyclelistener-push):フォアグラウンドでの通知の動作を制御します。
完全なカスタマイズについては、[Mobile Service Extensions](/docs/ja/service-extensions)を参照してください。
### ユーザー状態の変更
* [ユーザー状態用の`addObserver()`](/docs/ja/mobile-sdk-reference#addobserver-user-state):External IDが設定されたときを検出します。
* [`addPermissionObserver()`](/docs/ja/mobile-sdk-reference#addpermissionobserver-push):ネイティブのプッシュ許可プロンプトとのユーザーの特定のインタラクションを追跡します。
* [プッシュサブスクリプション用の`addObserver()`](/docs/ja/mobile-sdk-reference#addobserver-push-subscription-changes):プッシュサブスクリプションのステータスが変更されたときを追跡します。
### アプリ内メッセージイベント
* [`addClickListener()`](/docs/ja/mobile-sdk-reference#addclicklistener-in-app):アプリ内クリックアクションを処理します。ディープリンクやイベントの追跡に最適です。
* [`addLifecycleListener()`](/docs/ja/mobile-sdk-reference#addclicklistener-in-app):アプリ内メッセージの完全なライフサイクル(表示、クリック、閉じるなど)を追跡します。
***
## 高度なセットアップと機能
統合を強化するための追加機能を探索します:
* [🔁 別のサービスからOneSignalへの移行](/docs/ja/migrating-to-onesignal)
* [🌍 位置情報トラッキング](/docs/ja/mobile-sdk-reference#location)
* [🔗 ディープリンク](/docs/ja/deep-linking)
* [🔌 統合](/docs/ja/integrations)
* [🧩 Mobile Service Extensions](/docs/ja/service-extensions)
* [🛎️ アクションボタン](/docs/ja/action-buttons)
* [🌐 多言語メッセージング](/docs/ja/multi-language-messaging)
* [🛡️ Identity Verification](/docs/ja/identity-verification)
* [📊 カスタムアウトカム](/docs/ja/custom-outcomes)
* [📲 Live Activities](/docs/ja/live-activities)
### Mobile SDKのセットアップとリファレンス
[モバイルプッシュセットアップ](/docs/ja/mobile-push-setup)ガイドを確認して、すべての主要機能が有効になっていることを確認してください。
利用可能なメソッドと設定オプションの詳細については、[Mobile SDKリファレンス](/docs/ja/mobile-sdk-reference)にアクセスしてください。
おめでとうございます!Mobile SDKセットアップガイドが正常に完了しました。
***
サポートが必要ですか?
サポートチームとチャットするか、`support@onesignal.com`にメールしてください
以下を含めてください:
* 発生している問題の詳細と再現手順(利用可能な場合)
* OneSignal App ID
* 該当する場合は、External IDまたはSubscription ID
* 該当する場合は、OneSignalダッシュボードでテストしたメッセージのURL
* 関連する[ログまたはエラーメッセージ](/docs/ja/capturing-a-debug-log)
お気軽にお問い合わせください!
***
マルチチャネルコミュニケーションのベストプラクティス
* メールまたはSMSサブスクリプションを追加する前に、明示的な同意を得てください。
* 各コミュニケーションチャネルの利点をユーザーに説明してください。
* ユーザーが好むチャネルを選択できるように、チャネルの設定を提供してください。
***
### プライバシーとユーザー同意
OneSignalがユーザーデータを収集するタイミングを制御するには、SDKの同意ゲーティングメソッドを使用します:
* [`setConsentRequired(true)`](/docs/ja/mobile-sdk-reference#setconsentrequired):同意が与えられるまでデータ収集を防ぎます。
* [`setConsentGiven(true)`](/docs/ja/mobile-sdk-reference#setconsentgiven):同意が付与されるとデータ収集を有効にします。
詳細については、プライバシーとセキュリティのドキュメントを参照してください:
* [SDKによって収集されるデータ](/docs/ja/data-collected-by-the-onesignal-sdk)
* [個人データの取り扱い](/docs/ja/handling-personal-data)
***
## プッシュ許可のプロンプト
アプリを開いたときにすぐに`requestPermission()`を呼び出すのではなく、より戦略的なアプローチを取ります。許可をリクエストする前に、アプリ内メッセージを使用してプッシュ通知の価値を説明します。
ベストプラクティスと実装の詳細については、[プッシュ許可のプロンプト](/docs/ja/prompt-for-push-permissions)ガイドを参照してください。
***
## プッシュ、ユーザー、アプリ内イベントをリッスン
SDKリスナーを使用して、ユーザーのアクションと状態の変化に反応します。
SDKは、フックできるいくつかのイベントリスナーを提供します。詳細については、[SDKリファレンスガイド](/docs/ja/mobile-sdk-reference)を参照してください。
### プッシュ通知イベント
* [`addClickListener()`](/docs/ja/mobile-sdk-reference#addclicklistener-push):通知がタップされたときを検出します。[ディープリンク](/docs/ja/deep-linking)に役立ちます。
* [`addForegroundLifecycleListener()`](/docs/ja/mobile-sdk-reference#addforegroundlifecyclelistener-push):フォアグラウンドでの通知の動作を制御します。
完全なカスタマイズについては、[Mobile Service Extensions](/docs/ja/service-extensions)を参照してください。
### ユーザー状態の変更
* [ユーザー状態用の`addObserver()`](/docs/ja/mobile-sdk-reference#addobserver-user-state):External IDが設定されたときを検出します。
* [`addPermissionObserver()`](/docs/ja/mobile-sdk-reference#addpermissionobserver-push):ネイティブのプッシュ許可プロンプトとのユーザーの特定のインタラクションを追跡します。
* [プッシュサブスクリプション用の`addObserver()`](/docs/ja/mobile-sdk-reference#addobserver-push-subscription-changes):プッシュサブスクリプションのステータスが変更されたときを追跡します。
### アプリ内メッセージイベント
* [`addClickListener()`](/docs/ja/mobile-sdk-reference#addclicklistener-in-app):アプリ内クリックアクションを処理します。ディープリンクやイベントの追跡に最適です。
* [`addLifecycleListener()`](/docs/ja/mobile-sdk-reference#addclicklistener-in-app):アプリ内メッセージの完全なライフサイクル(表示、クリック、閉じるなど)を追跡します。
***
## 高度なセットアップと機能
統合を強化するための追加機能を探索します:
* [🔁 別のサービスからOneSignalへの移行](/docs/ja/migrating-to-onesignal)
* [🌍 位置情報トラッキング](/docs/ja/mobile-sdk-reference#location)
* [🔗 ディープリンク](/docs/ja/deep-linking)
* [🔌 統合](/docs/ja/integrations)
* [🧩 Mobile Service Extensions](/docs/ja/service-extensions)
* [🛎️ アクションボタン](/docs/ja/action-buttons)
* [🌐 多言語メッセージング](/docs/ja/multi-language-messaging)
* [🛡️ Identity Verification](/docs/ja/identity-verification)
* [📊 カスタムアウトカム](/docs/ja/custom-outcomes)
* [📲 Live Activities](/docs/ja/live-activities)
### Mobile SDKのセットアップとリファレンス
[モバイルプッシュセットアップ](/docs/ja/mobile-push-setup)ガイドを確認して、すべての主要機能が有効になっていることを確認してください。
利用可能なメソッドと設定オプションの詳細については、[Mobile SDKリファレンス](/docs/ja/mobile-sdk-reference)にアクセスしてください。
おめでとうございます!Mobile SDKセットアップガイドが正常に完了しました。
***
サポートが必要ですか?
サポートチームとチャットするか、`support@onesignal.com`にメールしてください
以下を含めてください:
* 発生している問題の詳細と再現手順(利用可能な場合)
* OneSignal App ID
* 該当する場合は、External IDまたはSubscription ID
* 該当する場合は、OneSignalダッシュボードでテストしたメッセージのURL
* 関連する[ログまたはエラーメッセージ](/docs/ja/capturing-a-debug-log)
お気軽にお問い合わせください!
***