> ## Documentation Index
> Fetch the complete documentation index at: https://documentation.onesignal.com/llms.txt
> Use this file to discover all available pages before exploring further.
# iOS: 집중 모드 및 중단 수준
> 기기 설정 및 푸시와의 상호 작용 이해하기
집중 모드는 iOS 사용자가 업무, 수면, 개인과 같은 별도의 모드를 허용하여 알림을 받는 시기와 방법을 제어하는 데 도움이 됩니다. 각 모드는 알림 가시성 및 전달 동작을 조정합니다.
긴급 경고 또는 계정 보안과 같은 중요한 사용 사례를 지원하기 위해 Apple은 집중 모드가 활성화된 경우에도 알림이 표시되는 방법과 시기를 제어하는 **중단 수준**을 도입했습니다.
## 중단 수준
중단 수준은 알림의 긴급도 및 전달 동작을 결정합니다. 네 가지 수준이 있습니다:
표준 우선순위 알림입니다. 소리, 진동 및 화면 켜기 동작이 포함됩니다. 집중 모드를 우회하지 않습니다.
Active처럼 동작하지만 특별한 배너가 포함됩니다. Time Sensitive 알림은 집중 모드와 예약된 전달을 뚫을 수 있습니다. 긴급한 사용자 주의가 필요한 경우에만 사용하세요.
낮은 우선순위 알림입니다. 소리나 진동이 없습니다. 사용자를 방해하지 않으며 집중 모드를 뚫지 않습니다.
최고 우선순위 알림입니다. 모든 기기 제어 및 집중 모드를 우회합니다. 심각한 날씨나 건강 경고와 같은 비상 상황에 사용됩니다. 활성화하려면 Apple의 사전 승인이 필요합니다. 자세한 내용은 [Critical alerts 설정](#critical-alerts-setup)을 참조하세요.
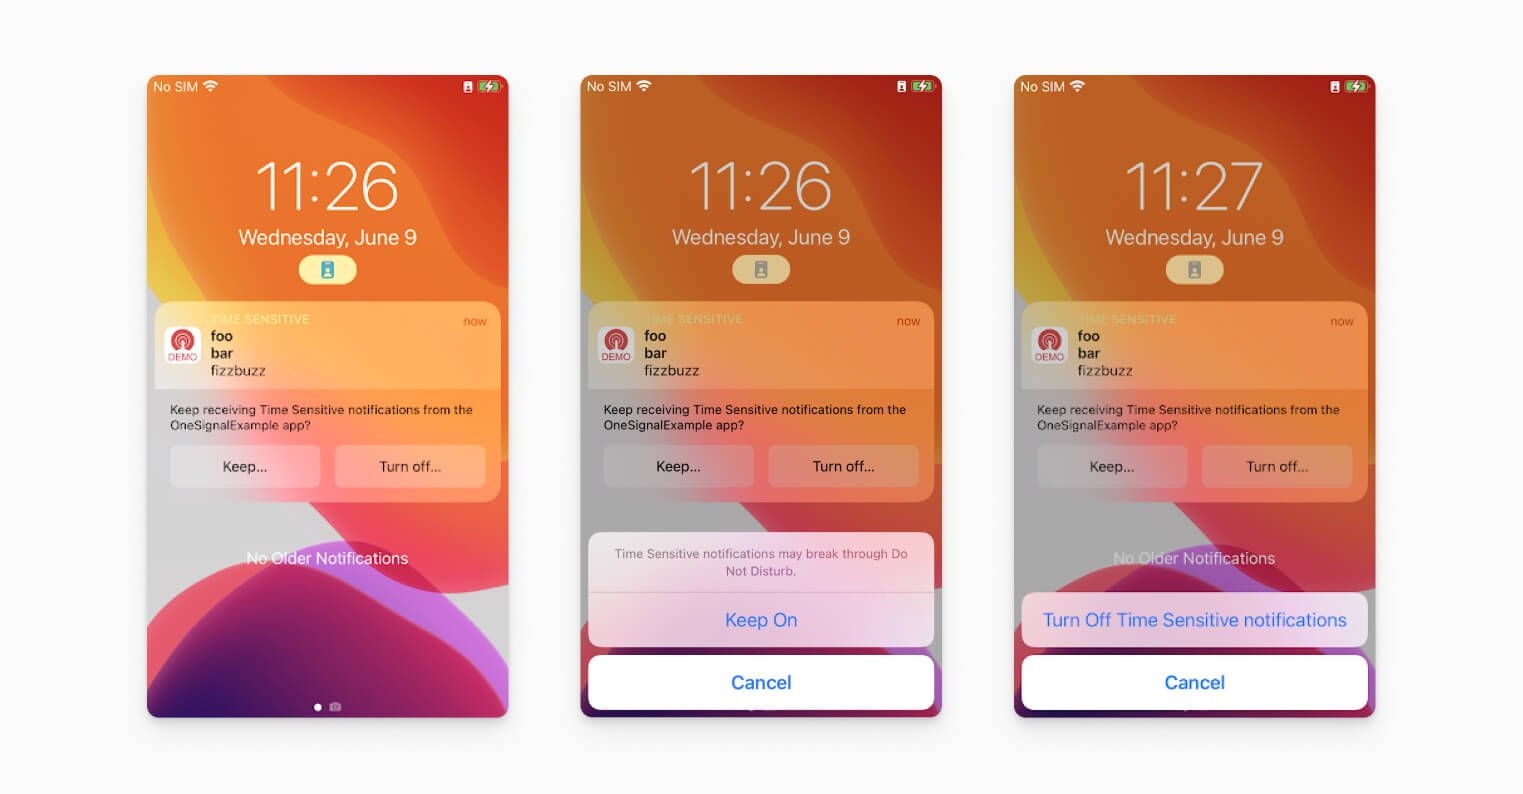 ***
## OneSignal에서 중단 수준 설정하는 방법
OneSignal 대시보드에서 푸시를 보낼 때 **Apple iOS 설정** 아래에서 **알림 중단 수준**을 찾을 수 있습니다. 기본값은 **Active**입니다.
[Create notification API](/reference/create-message)를 사용하는 경우 다음 매개변수를 사용하세요:
* `ios_interruption_level`: `"active"`, `"time-sensitive"`, `"passive"` 또는 `"critical"`로 설정
* `ios_relevance_score`: 전달 순서에 대한 중요도를 나타내는 0에서 1 사이의 선택적 숫자 값.
***
## Critical alerts 설정
**Critical Alerts:**
* 방해 금지 모드 및 무음 스위치를 무시합니다.
* 높은 우선순위 사례(예: 건강, 보안)용으로 예약되어 있습니다.
* Apple의 명시적 승인이 필요하며, 일반 푸시 알림을 활성화한 경우에도 사용자가 별도로 옵트인해야 합니다.
### critical alerts에 대한 Apple 자격 요청
1. [Apple 문서](https://developer.apple.com/documentation/bundleresources/entitlements/com.apple.developer.usernotifications.critical-alerts/)를 검토하고 **요청 양식 작성**을 클릭하세요.
2. Critical Alerts Entitlement 요청을 선택하세요.
3. 양식을 작성하고 요청을 제출하세요.
4. Apple의 검토 및 승인을 기다리세요.
### 앱에 Critical Alerts 자격 추가
Apple이 요청을 승인하면:
1. Xcode에서 `.entitlements` 파일을 엽니다(없는 경우 생성).
2. 다음을 추가합니다:
```xml theme={null}
com.apple.developer.usernotifications.critical-alerts
```
3. 프로비저닝 프로파일에 이 자격이 포함되어 있는지 확인합니다:
* 필요한 경우 Apple Developer 포털에서 프로비저닝 프로파일을 재생성합니다.
* Xcode에 다운로드하고 다시 추가합니다.
### 앱 코드에서 Critical Alert 권한 요청
Critical Alert 권한은 표준 푸시 권한과 별개이며 다음과 같이 요청해야 합니다(Swift 사용):
```swift theme={null}
import UserNotifications
UNUserNotificationCenter.current().requestAuthorization(options: [.alert, .sound, .badge, .criticalAlert]) { granted, error in
if let error = error {
print("Authorization error: \(error)")
} else {
print("Critical alert permission granted: \(granted)")
}
}
```
표준 푸시 권한을 받은 후, 이상적으로는 온보딩 플로우에서 이를 요청해야 합니다.
### Critical Alerts 테스트
1. 앱을 빌드하고 실행합니다.
2. [OneSignal에서 중단 수준 설정하는 방법](#how-to-set-interruption-level-in-onesignal)의 위 단계에 따라 테스트 푸시를 보냅니다.
***
## 관련 문서
* [iOS: 관련성 점수](./ios-relevance-score)
* [푸시 개요](./push)
***
***
## OneSignal에서 중단 수준 설정하는 방법
OneSignal 대시보드에서 푸시를 보낼 때 **Apple iOS 설정** 아래에서 **알림 중단 수준**을 찾을 수 있습니다. 기본값은 **Active**입니다.
[Create notification API](/reference/create-message)를 사용하는 경우 다음 매개변수를 사용하세요:
* `ios_interruption_level`: `"active"`, `"time-sensitive"`, `"passive"` 또는 `"critical"`로 설정
* `ios_relevance_score`: 전달 순서에 대한 중요도를 나타내는 0에서 1 사이의 선택적 숫자 값.
***
## Critical alerts 설정
**Critical Alerts:**
* 방해 금지 모드 및 무음 스위치를 무시합니다.
* 높은 우선순위 사례(예: 건강, 보안)용으로 예약되어 있습니다.
* Apple의 명시적 승인이 필요하며, 일반 푸시 알림을 활성화한 경우에도 사용자가 별도로 옵트인해야 합니다.
### critical alerts에 대한 Apple 자격 요청
1. [Apple 문서](https://developer.apple.com/documentation/bundleresources/entitlements/com.apple.developer.usernotifications.critical-alerts/)를 검토하고 **요청 양식 작성**을 클릭하세요.
2. Critical Alerts Entitlement 요청을 선택하세요.
3. 양식을 작성하고 요청을 제출하세요.
4. Apple의 검토 및 승인을 기다리세요.
### 앱에 Critical Alerts 자격 추가
Apple이 요청을 승인하면:
1. Xcode에서 `.entitlements` 파일을 엽니다(없는 경우 생성).
2. 다음을 추가합니다:
```xml theme={null}
com.apple.developer.usernotifications.critical-alerts
```
3. 프로비저닝 프로파일에 이 자격이 포함되어 있는지 확인합니다:
* 필요한 경우 Apple Developer 포털에서 프로비저닝 프로파일을 재생성합니다.
* Xcode에 다운로드하고 다시 추가합니다.
### 앱 코드에서 Critical Alert 권한 요청
Critical Alert 권한은 표준 푸시 권한과 별개이며 다음과 같이 요청해야 합니다(Swift 사용):
```swift theme={null}
import UserNotifications
UNUserNotificationCenter.current().requestAuthorization(options: [.alert, .sound, .badge, .criticalAlert]) { granted, error in
if let error = error {
print("Authorization error: \(error)")
} else {
print("Critical alert permission granted: \(granted)")
}
}
```
표준 푸시 권한을 받은 후, 이상적으로는 온보딩 플로우에서 이를 요청해야 합니다.
### Critical Alerts 테스트
1. 앱을 빌드하고 실행합니다.
2. [OneSignal에서 중단 수준 설정하는 방법](#how-to-set-interruption-level-in-onesignal)의 위 단계에 따라 테스트 푸시를 보냅니다.
***
## 관련 문서
* [iOS: 관련성 점수](./ios-relevance-score)
* [푸시 개요](./push)
***