> ## Documentation Index
> Fetch the complete documentation index at: https://documentation.onesignal.com/llms.txt
> Use this file to discover all available pages before exploring further.
# iOS: 이미지 캐러셀 푸시 알림
> Swift를 사용하여 OneSignal iOS 푸시 알림에서 이미지 캐러셀을 구현하는 방법.
iOS는 알림 콘텐츠 앱 확장의 진입점으로 [UNNotificationContentExtension](https://developer.apple.com/documentation/usernotificationsui/unnotificationcontentextension?language=objc) 프로토콜을 제공합니다. 이를 사용하여 앱 알림에 대한 맞춤형 인터페이스를 표시할 수 있습니다. 이 예제 가이드는 iOS 알림 내에서 캐러셀을 생성하는 데 이를 사용하는 방법을 설명합니다.
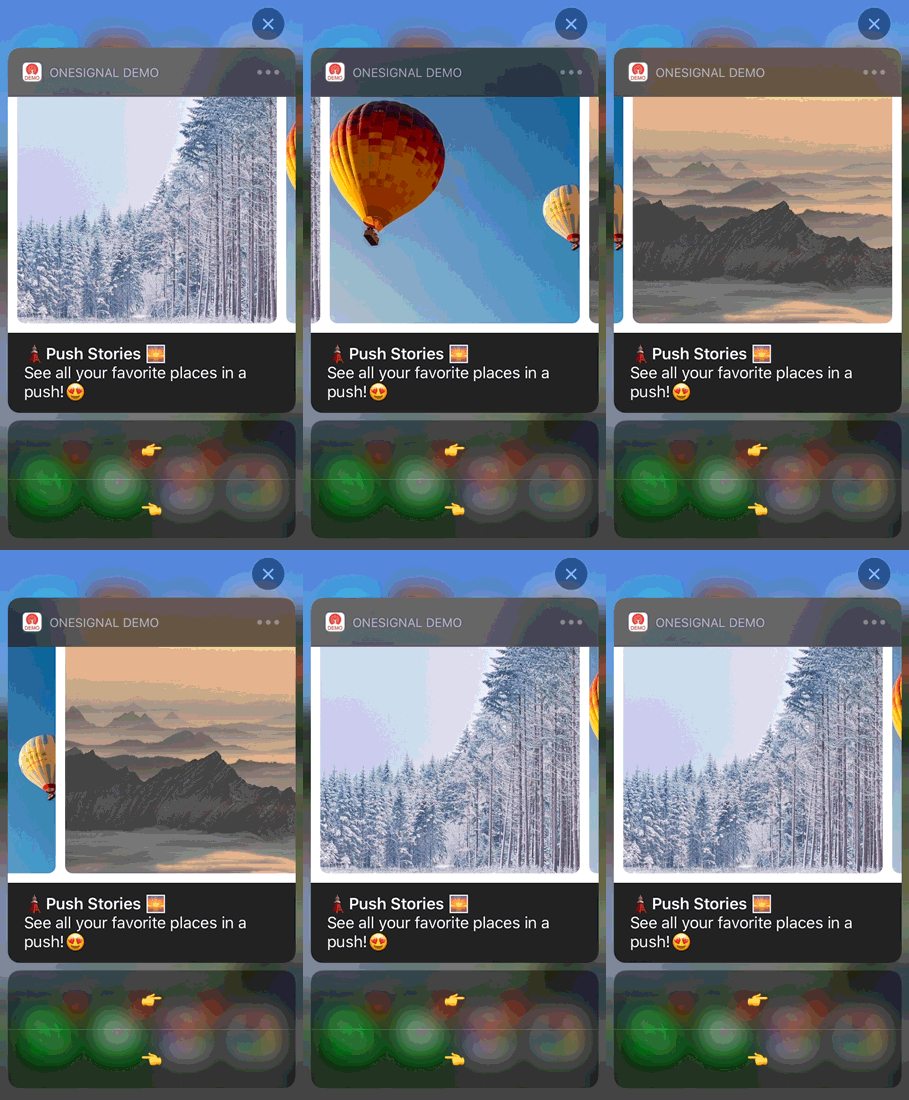 ## 1. 알림 콘텐츠 확장 추가
Xcode에서 File > New > Target...를 선택합니다.
"Notification Content Extension"을 선택합니다.
팝업 창에서 선택을 확인합니다.
디버그하려면 activate를 선택합니다.
## 2. 앱에 코드 추가
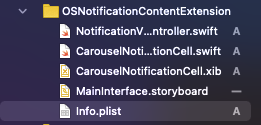
Github에서 [OSNotificationContentExtension을 다운로드](https://github.com/jfishman1/OSNotificationContentExtension)하고 Xcode 프로젝트의 `OSNotificationContentExtension`을 Github의 동일한 파일로 교체합니다.
다음 파일이 추가된 것을 볼 수 있습니다:
## 1. 알림 콘텐츠 확장 추가
Xcode에서 File > New > Target...를 선택합니다.
"Notification Content Extension"을 선택합니다.
팝업 창에서 선택을 확인합니다.
디버그하려면 activate를 선택합니다.
## 2. 앱에 코드 추가
Github에서 [OSNotificationContentExtension을 다운로드](https://github.com/jfishman1/OSNotificationContentExtension)하고 Xcode 프로젝트의 `OSNotificationContentExtension`을 Github의 동일한 파일로 교체합니다.
다음 파일이 추가된 것을 볼 수 있습니다:
 ## 3. 알림 카테고리 설정
이 예제는 AppDelegate.swift `didFinishLaunchingWithOptions` 내에서 [실행 가능한 알림 유형을 선언](https://developer.apple.com/documentation/usernotifications/declaring_your_actionable_notification_types)합니다.
```swift Swift theme={null}
func application(_ application: UIApplication, didFinishLaunchingWithOptions launchOptions: [UIApplication.LaunchOptionsKey: Any]?) -> Bool {
//START Authorize OS Notification Carousel Category
if #available(iOS 10.0, *) {
let options: UNAuthorizationOptions = [.alert]
UNUserNotificationCenter.current().requestAuthorization(options: options) { (authorized, error) in
if authorized {
let categoryIdentifier = "OSNotificationCarousel"
let carouselNext = UNNotificationAction(identifier: "OSNotificationCarousel.next", title: "👉", options: [])
let carouselPrevious = UNNotificationAction(identifier: "OSNotificationCarousel.previous", title: "👈", options: [])
let carouselCategory = UNNotificationCategory(identifier: categoryIdentifier, actions: [carouselNext, carouselPrevious], intentIdentifiers: [], options: [])
UNUserNotificationCenter.current().setNotificationCategories([carouselCategory])
}
}
}
//END Authorize OS Notification Carousel Category
return true
}
```
## 4. 푸시 알림 보내기
[푸시 메시지 보내기](./push)를 할 때 iOS 카테고리와 커스텀 데이터를 설정할 수 있습니다.
### iOS 카테고리
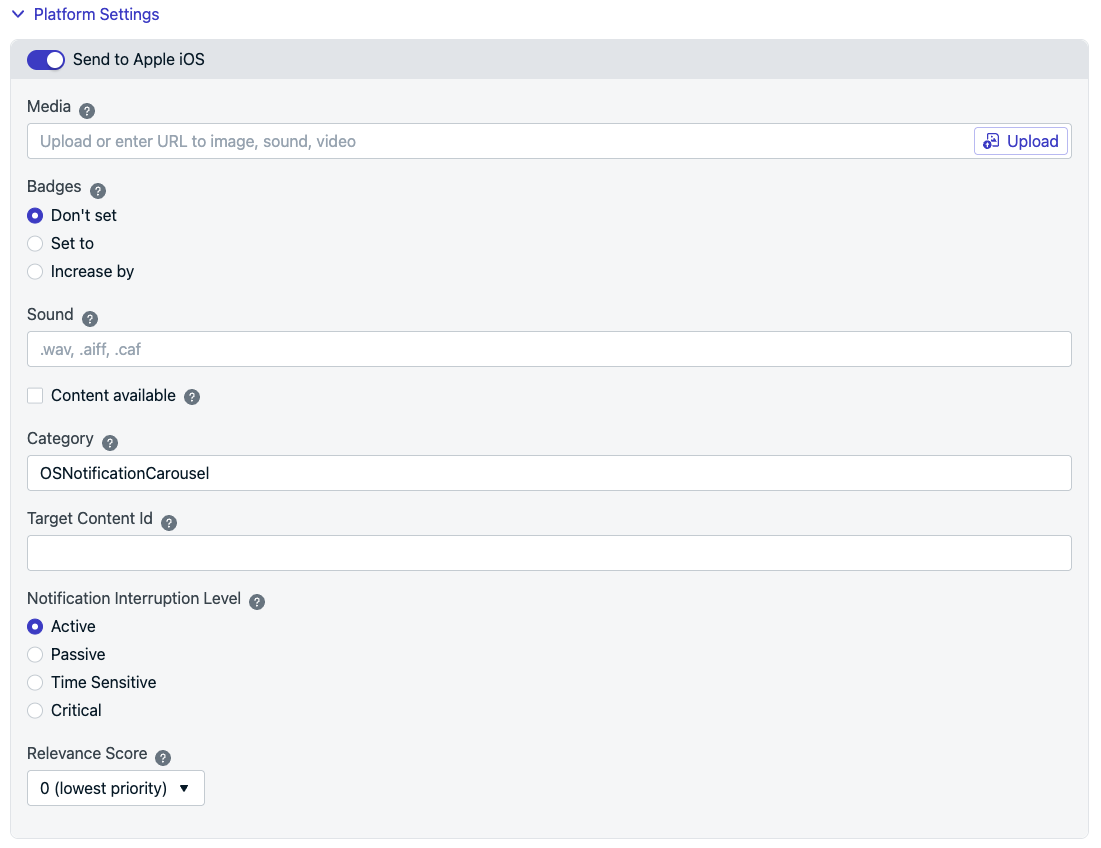
iOS 카테고리로 `OSNotificationCarousel`을 사용합니다:
"Platform Settings" > **Send to Apple iOS** > "Category"에서 설정
## 3. 알림 카테고리 설정
이 예제는 AppDelegate.swift `didFinishLaunchingWithOptions` 내에서 [실행 가능한 알림 유형을 선언](https://developer.apple.com/documentation/usernotifications/declaring_your_actionable_notification_types)합니다.
```swift Swift theme={null}
func application(_ application: UIApplication, didFinishLaunchingWithOptions launchOptions: [UIApplication.LaunchOptionsKey: Any]?) -> Bool {
//START Authorize OS Notification Carousel Category
if #available(iOS 10.0, *) {
let options: UNAuthorizationOptions = [.alert]
UNUserNotificationCenter.current().requestAuthorization(options: options) { (authorized, error) in
if authorized {
let categoryIdentifier = "OSNotificationCarousel"
let carouselNext = UNNotificationAction(identifier: "OSNotificationCarousel.next", title: "👉", options: [])
let carouselPrevious = UNNotificationAction(identifier: "OSNotificationCarousel.previous", title: "👈", options: [])
let carouselCategory = UNNotificationCategory(identifier: categoryIdentifier, actions: [carouselNext, carouselPrevious], intentIdentifiers: [], options: [])
UNUserNotificationCenter.current().setNotificationCategories([carouselCategory])
}
}
}
//END Authorize OS Notification Carousel Category
return true
}
```
## 4. 푸시 알림 보내기
[푸시 메시지 보내기](./push)를 할 때 iOS 카테고리와 커스텀 데이터를 설정할 수 있습니다.
### iOS 카테고리
iOS 카테고리로 `OSNotificationCarousel`을 사용합니다:
"Platform Settings" > **Send to Apple iOS** > "Category"에서 설정
 `ios_category` [API 매개변수](/reference/push-notification)로 설정합니다.
### 커스텀 데이터
OneSignal에는 알림당 여러 이미지를 업로드하는 옵션이 없습니다.
대신 쉼표 `,`로 구분된 이미지 URL 목록을 작성해야 합니다.
"Advanced Settings" > "Additional Data"에서 설정
"Key"에는 `images`를, "Value"에는 따옴표 없이 쉼표로 구분된 URL 목록을 설정합니다.
`ios_category` [API 매개변수](/reference/push-notification)로 설정합니다.
### 커스텀 데이터
OneSignal에는 알림당 여러 이미지를 업로드하는 옵션이 없습니다.
대신 쉼표 `,`로 구분된 이미지 URL 목록을 작성해야 합니다.
"Advanced Settings" > "Additional Data"에서 설정
"Key"에는 `images`를, "Value"에는 따옴표 없이 쉼표로 구분된 URL 목록을 설정합니다.
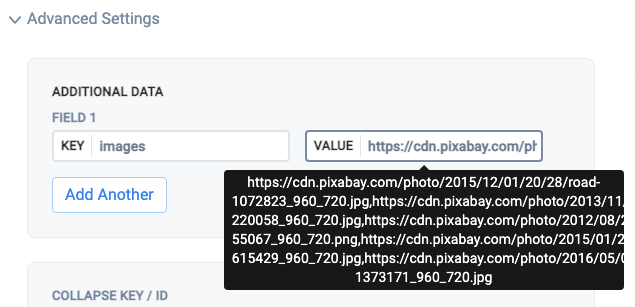 예시, 복사 붙여넣기:
```text text theme={null}
https://cdn.pixabay.com/photo/2015/12/01/20/28/road-1072823_960_720.jpg,https://cdn.pixabay.com/photo/2013/11/28/10/36/road-220058_960_720.jpg,https://cdn.pixabay.com/photo/2012/08/27/14/19/mountains-55067_960_720.png,https://cdn.pixabay.com/photo/2015/01/28/23/35/landscape-615429_960_720.jpg,https://cdn.pixabay.com/photo/2016/05/05/02/37/sunset-1373171_960_720.jpg
```
다음과 같이 `data` [API 매개변수](/reference/push-notification)를 사용합니다:
```json json theme={null}
data: {
"images" : "https://cdn.pixabay.com/photo/2015/12/01/20/28/road-1072823_960_720.jpg,https://cdn.pixabay.com/photo/2013/11/28/10/36/road-220058_960_720.jpg,https://cdn.pixabay.com/photo/2012/08/27/14/19/mountains-55067_960_720.png,https://cdn.pixabay.com/photo/2015/01/28/23/35/landscape-615429_960_720.jpg,https://cdn.pixabay.com/photo/2016/05/05/02/37/sunset-1373171_960_720.jpg"
}
```
### 푸시 보내기
푸시를 받으면 iOS 버전에 따라 길게 누르거나 왼쪽으로 스와이프하고 "View"를 클릭하여 알림을 확장해야 합니다.
### 추가 자료
* [실행 가능한 알림 유형을 선언하는 Apple 문서](https://developer.apple.com/documentation/usernotifications/declaring_your_actionable_notification_types)
* [Ahmet Keskin의 유용한 Medium 포스트](https://medium.com/nsistanbul/carousel-notification-in-ios-5a1e8239d786)
***
예시, 복사 붙여넣기:
```text text theme={null}
https://cdn.pixabay.com/photo/2015/12/01/20/28/road-1072823_960_720.jpg,https://cdn.pixabay.com/photo/2013/11/28/10/36/road-220058_960_720.jpg,https://cdn.pixabay.com/photo/2012/08/27/14/19/mountains-55067_960_720.png,https://cdn.pixabay.com/photo/2015/01/28/23/35/landscape-615429_960_720.jpg,https://cdn.pixabay.com/photo/2016/05/05/02/37/sunset-1373171_960_720.jpg
```
다음과 같이 `data` [API 매개변수](/reference/push-notification)를 사용합니다:
```json json theme={null}
data: {
"images" : "https://cdn.pixabay.com/photo/2015/12/01/20/28/road-1072823_960_720.jpg,https://cdn.pixabay.com/photo/2013/11/28/10/36/road-220058_960_720.jpg,https://cdn.pixabay.com/photo/2012/08/27/14/19/mountains-55067_960_720.png,https://cdn.pixabay.com/photo/2015/01/28/23/35/landscape-615429_960_720.jpg,https://cdn.pixabay.com/photo/2016/05/05/02/37/sunset-1373171_960_720.jpg"
}
```
### 푸시 보내기
푸시를 받으면 iOS 버전에 따라 길게 누르거나 왼쪽으로 스와이프하고 "View"를 클릭하여 알림을 확장해야 합니다.
### 추가 자료
* [실행 가능한 알림 유형을 선언하는 Apple 문서](https://developer.apple.com/documentation/usernotifications/declaring_your_actionable_notification_types)
* [Ahmet Keskin의 유용한 Medium 포스트](https://medium.com/nsistanbul/carousel-notification-in-ios-5a1e8239d786)
***