> ## Documentation Index
> Fetch the complete documentation index at: https://documentation.onesignal.com/llms.txt
> Use this file to discover all available pages before exploring further.
# iOS SDK 설정
> OneSignal로 iOS 앱에 푸시 알림 및 인앱 메시지를 추가하는 방법.
export const SdkReleasesIframe = ({sdkFilter = undefined, viewMode = undefined, height, ...frameProps}) => {
const baseUrl = 'https://onesignal.github.io/sdk-releases';
const buildUrl = (theme, sdkFilter, viewMode) => {
const url = new URL(baseUrl);
const params = new URLSearchParams();
if (theme) {
params.set('theme', theme);
}
if (sdkFilter) {
params.set('sdk', sdkFilter);
}
if (viewMode) {
params.set('viewMode', viewMode);
}
if (params.toString()) {
url.search = params.toString();
}
return url.toString();
};
const detectTheme = () => {
if (document.documentElement.classList.contains('dark')) {
return 'dark';
}
return 'light';
};
const [theme, setTheme] = useState('light');
const [iframeSrc, setIframeSrc] = useState(() => {
const initialTheme = detectTheme();
return buildUrl(initialTheme, sdkFilter, viewMode);
});
useEffect(() => {
const currentTheme = detectTheme();
setTheme(currentTheme);
setIframeSrc(buildUrl(currentTheme, sdkFilter, viewMode));
const mediaQuery = window.matchMedia('(prefers-color-scheme: dark)');
const handleThemeChange = () => {
const newTheme = detectTheme();
setTheme(newTheme);
setIframeSrc(buildUrl(newTheme, sdkFilter, viewMode));
};
if (mediaQuery.addEventListener) {
mediaQuery.addEventListener('change', handleThemeChange);
} else {
mediaQuery.addListener(handleThemeChange);
}
window.addEventListener('storage', handleThemeChange);
const observer = new MutationObserver(handleThemeChange);
observer.observe(document.documentElement, {
attributes: true,
attributeFilter: ['class', 'data-theme']
});
return () => {
if (mediaQuery.removeEventListener) {
mediaQuery.removeEventListener('change', handleThemeChange);
} else {
mediaQuery.removeListener(handleThemeChange);
}
window.removeEventListener('storage', handleThemeChange);
observer.disconnect();
};
}, [sdkFilter, viewMode]);
const getIframeHeight = () => {
if (viewMode === 'table') {
return '450';
}
if (viewMode === 'mini') {
return '170';
}
return '800';
};
const iframeHeight = height || getIframeHeight();
return
;
};
## 개요
iOS 푸시 알림은 iOS 앱에서 지속적인 사용자 참여와 유지율을 높이는 데 필수적입니다. 실시간 업데이트, 리마인더 및 개인화된 메시지를 사용자에게 직접 전달하여 앱의 전반적인 사용자 경험과 고착도를 향상시킬 수 있습니다. OneSignal의 SDK를 앱과 통합하면 Apple Push Notification Service(APNS)를 활용하여 iOS 기기 전반에 걸쳐 알림이 원활하게 전달되도록 할 수 있습니다. 이 가이드는 iOS 앱에 SDK를 통합하는 과정을 안내합니다.
***
## 요구 사항
* Xcode 14+가 설치된 macOS(설정 지침은 Xcode 16.2 사용)
* iOS 12+, iPadOS 12+ 또는 iOS 16.2+를 실행하는 Xcode 시뮬레이터가 있는 기기
* 구성된 OneSignal 앱 및 플랫폼
### 配置您的 OneSignal 应用和平台
使用您支持的平台配置您的 OneSignal 应用——Apple (APNs)、Google (FCM)、华为 (HMS) 和/或 Amazon (ADM)。
如果您的组织已有 OneSignal 账户,请[申请加入](/docs/cn/manage-team-members)组织。否则,请[注册免费账户](https://onesignal.com)以开始使用。
点击 **新应用/网站** 创建新应用,或在 **设置 > 推送和应用内** 中向现有应用添加平台。选择您要配置的平台,然后点击 **下一步:配置您的平台**。
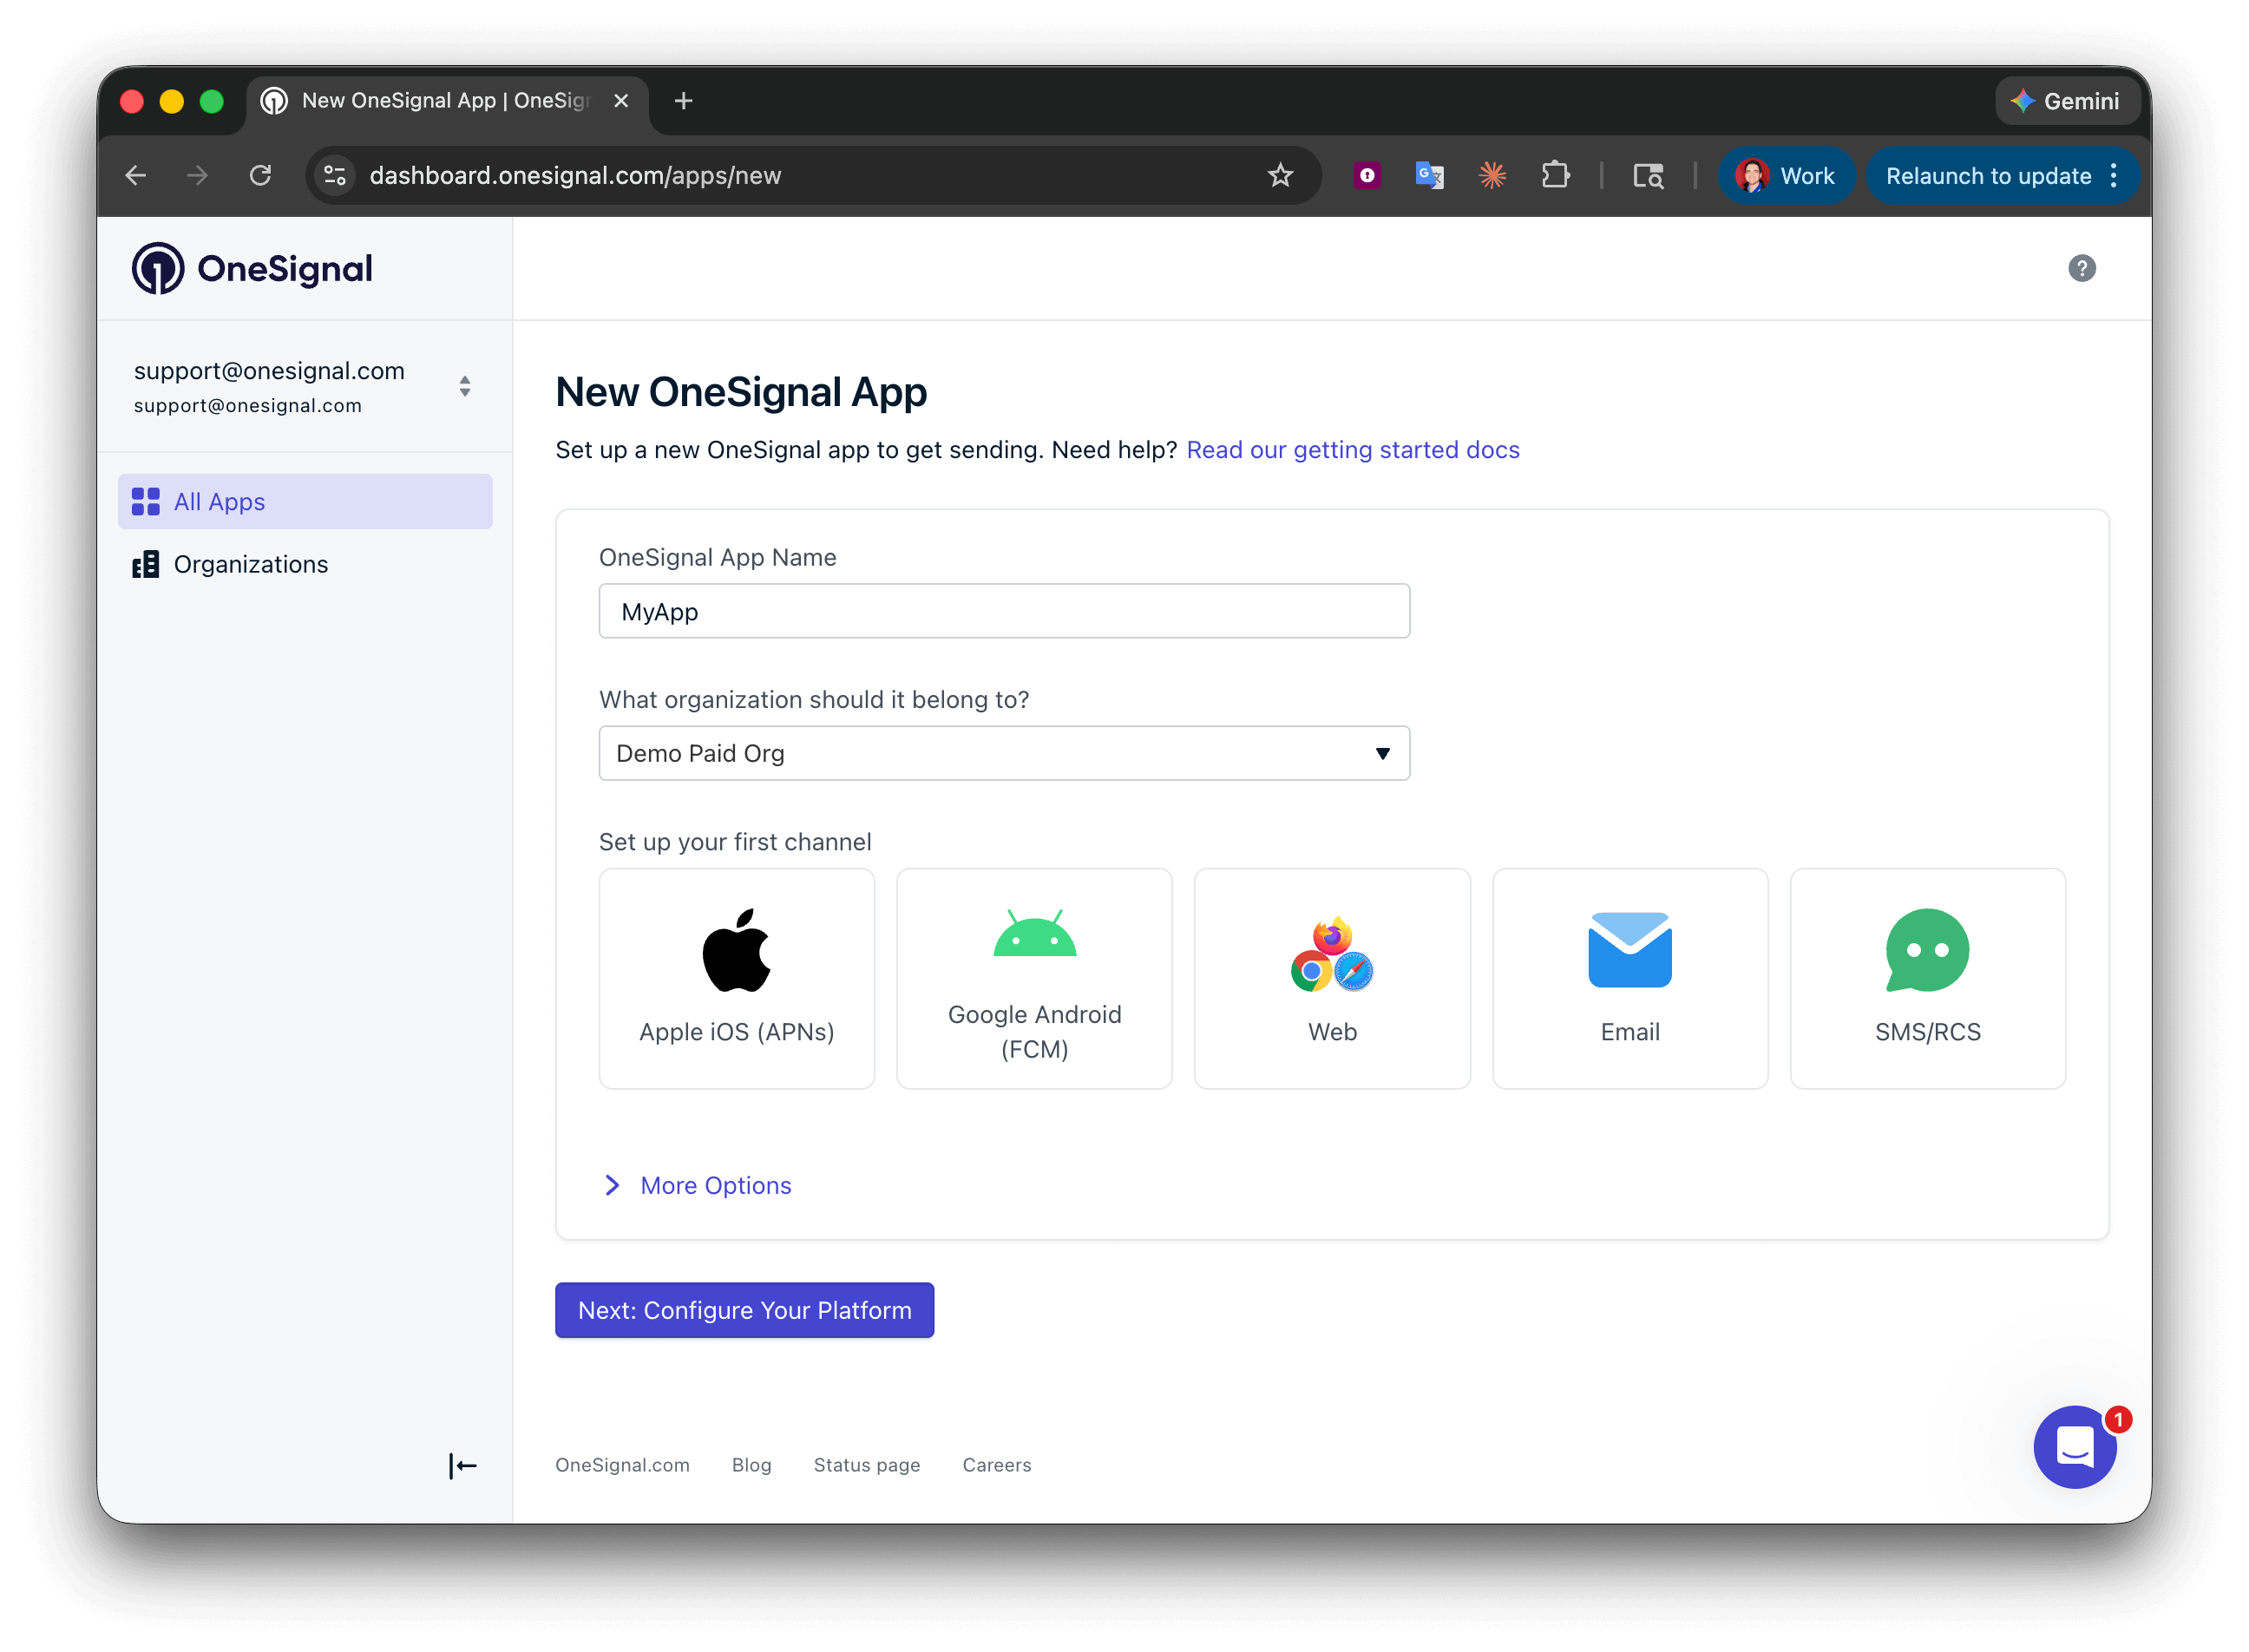 为您的平台输入凭据:
* **Android**:[设置 Firebase 凭据](/docs/cn/android-firebase-credentials)
* **iOS**:[p8 令牌(推荐)](/docs/cn/ios-p8-token-based-connection-to-apns) 或 [p12 证书](/docs/cn/ios-p12-generate-certificates)
* **Amazon**:[生成 API 密钥](/docs/cn/generate-an-amazon-api-key)
* **华为**:[授权 OneSignal](/docs/cn/authorize-onesignal-to-send-huawei-push)
输入您的凭据后点击 **保存并继续**。
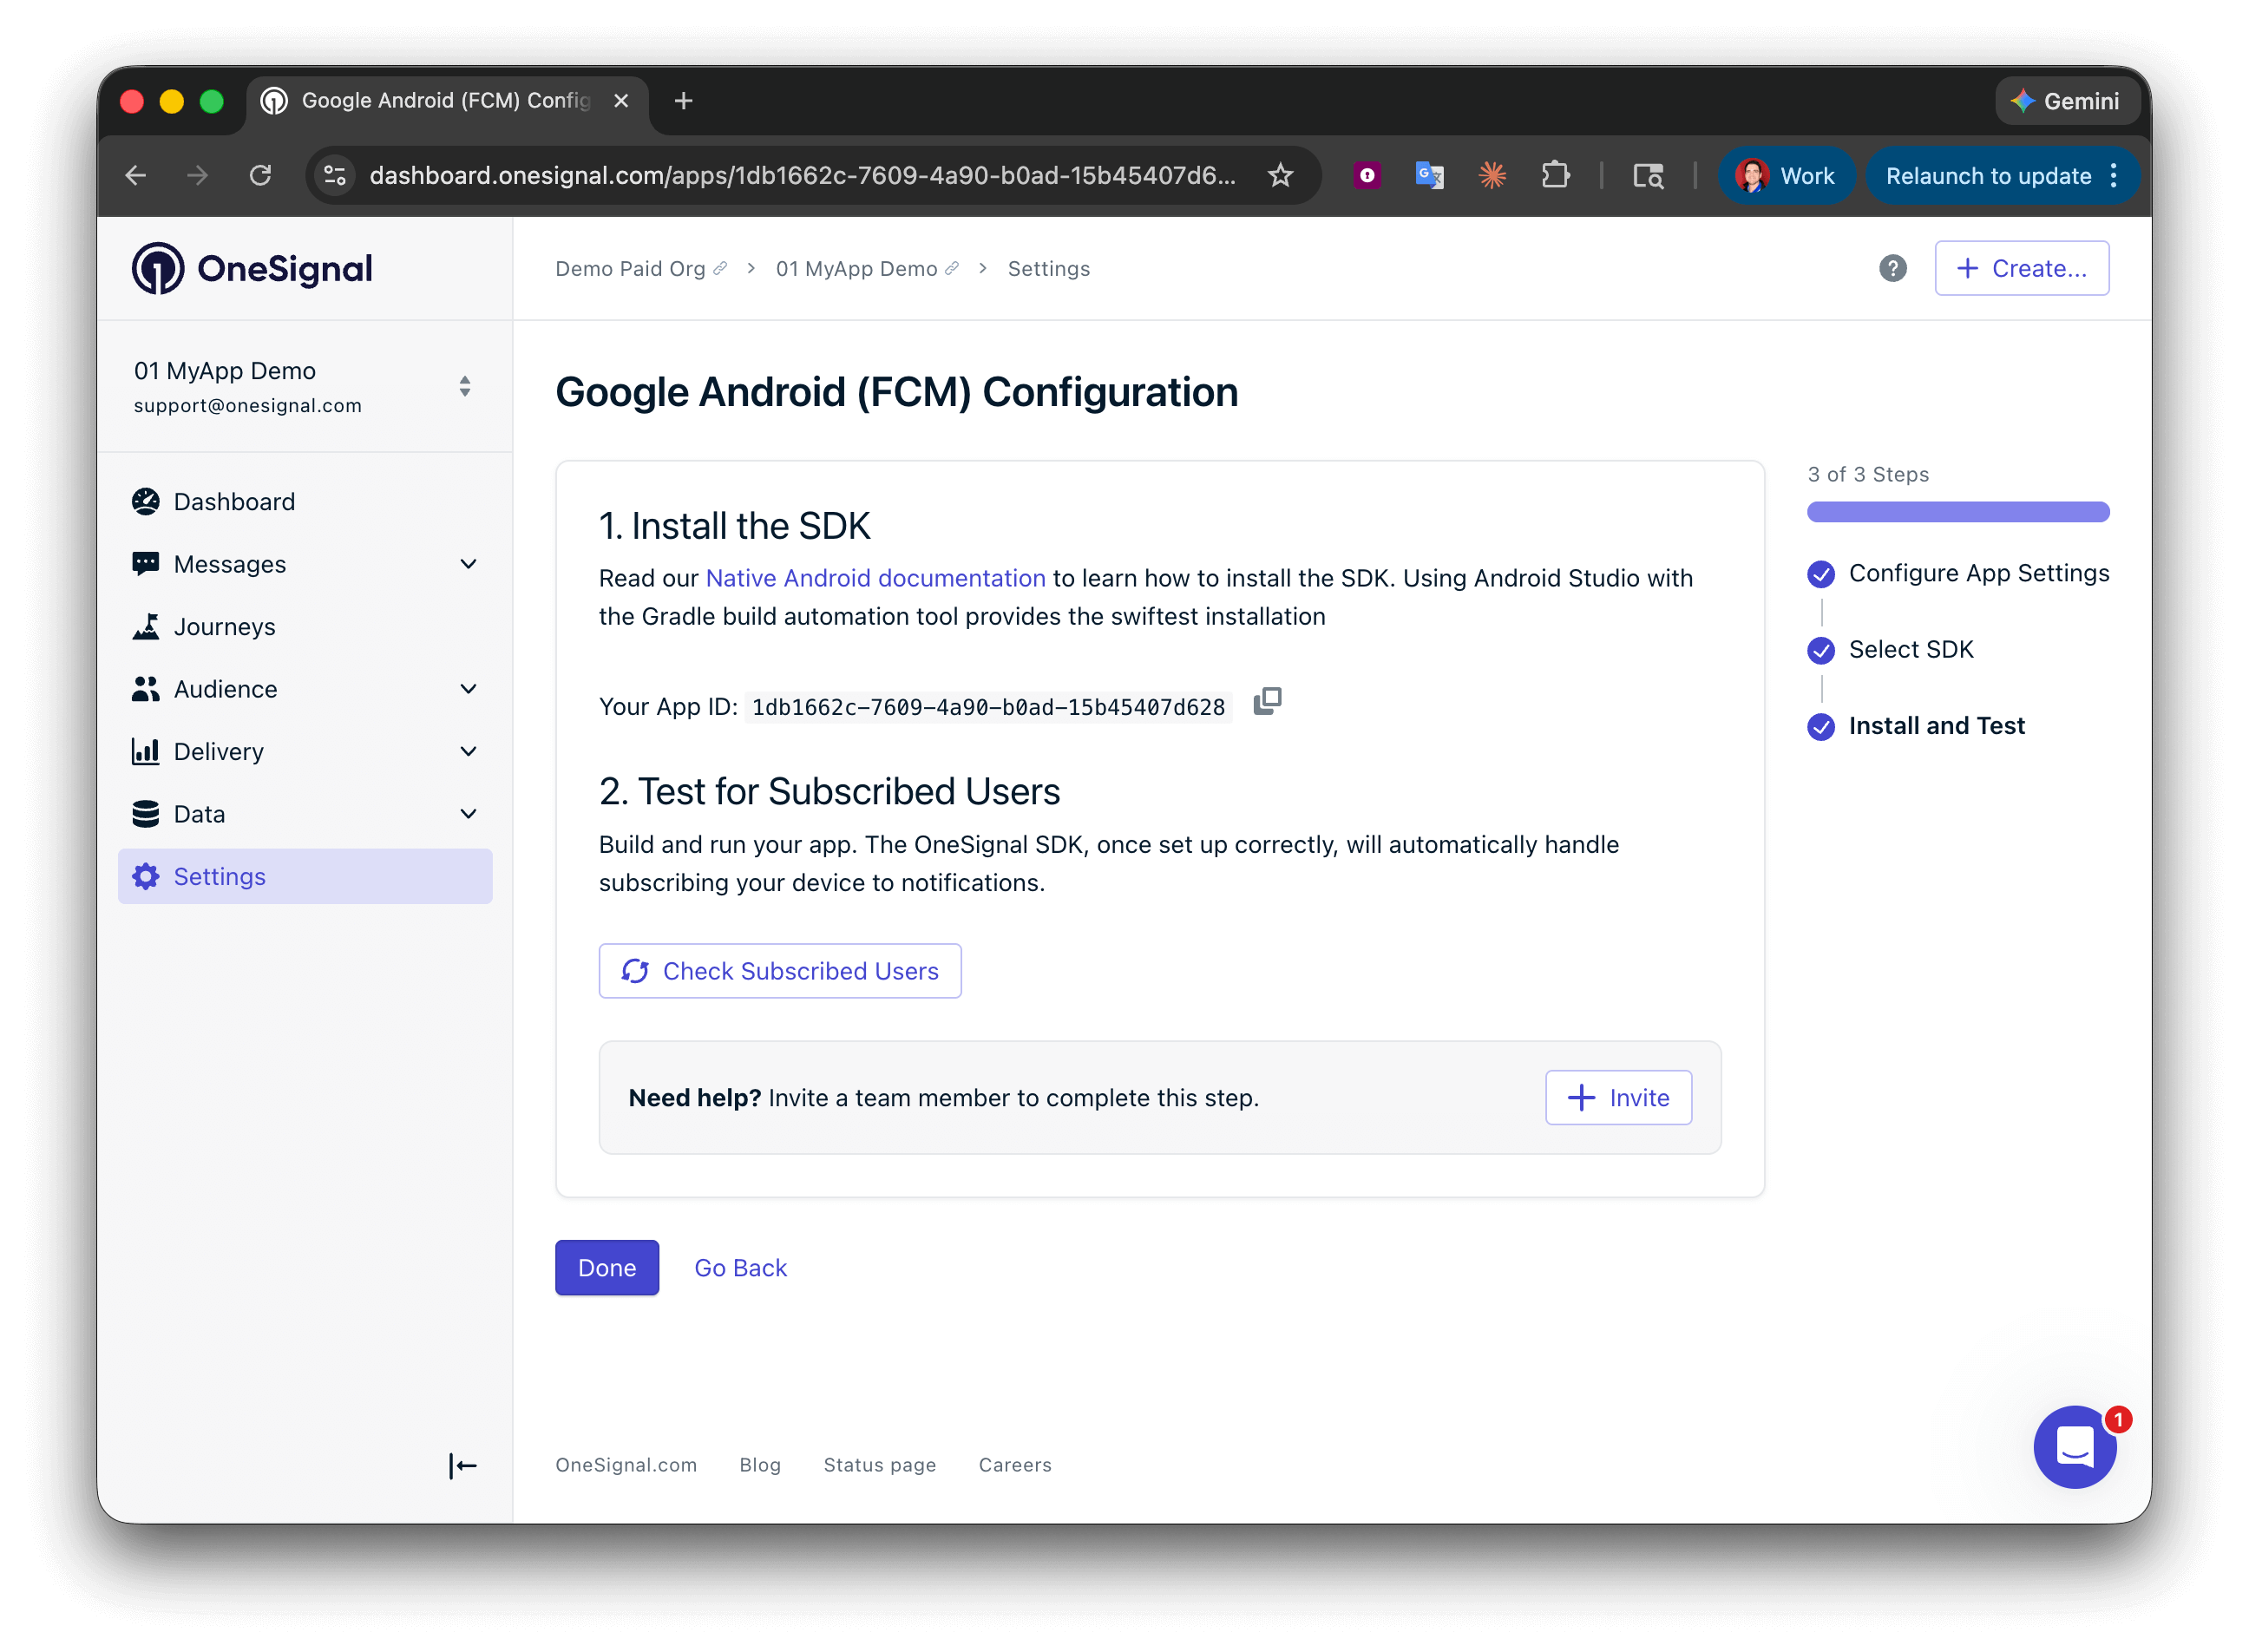
您的 **应用 ID** 显示在最终屏幕上。复制并保存它——初始化 SDK 时需要使用它。选择您的 SDK 平台,然后按照设置指南操作。
为您的平台输入凭据:
* **Android**:[设置 Firebase 凭据](/docs/cn/android-firebase-credentials)
* **iOS**:[p8 令牌(推荐)](/docs/cn/ios-p8-token-based-connection-to-apns) 或 [p12 证书](/docs/cn/ios-p12-generate-certificates)
* **Amazon**:[生成 API 密钥](/docs/cn/generate-an-amazon-api-key)
* **华为**:[授权 OneSignal](/docs/cn/authorize-onesignal-to-send-huawei-push)
输入您的凭据后点击 **保存并继续**。
您的 **应用 ID** 显示在最终屏幕上。复制并保存它——初始化 SDK 时需要使用它。选择您的 SDK 平台,然后按照设置指南操作。
 ***
## iOS 설정
[배지](./badges), [확인된 전달](./confirmed-delivery) 및 이미지 지원을 포함하여 iOS 앱에 푸시 알림을 추가하려면 다음 단계를 따르세요.
### 1. 앱 타겟에 Push Notifications 기능 추가
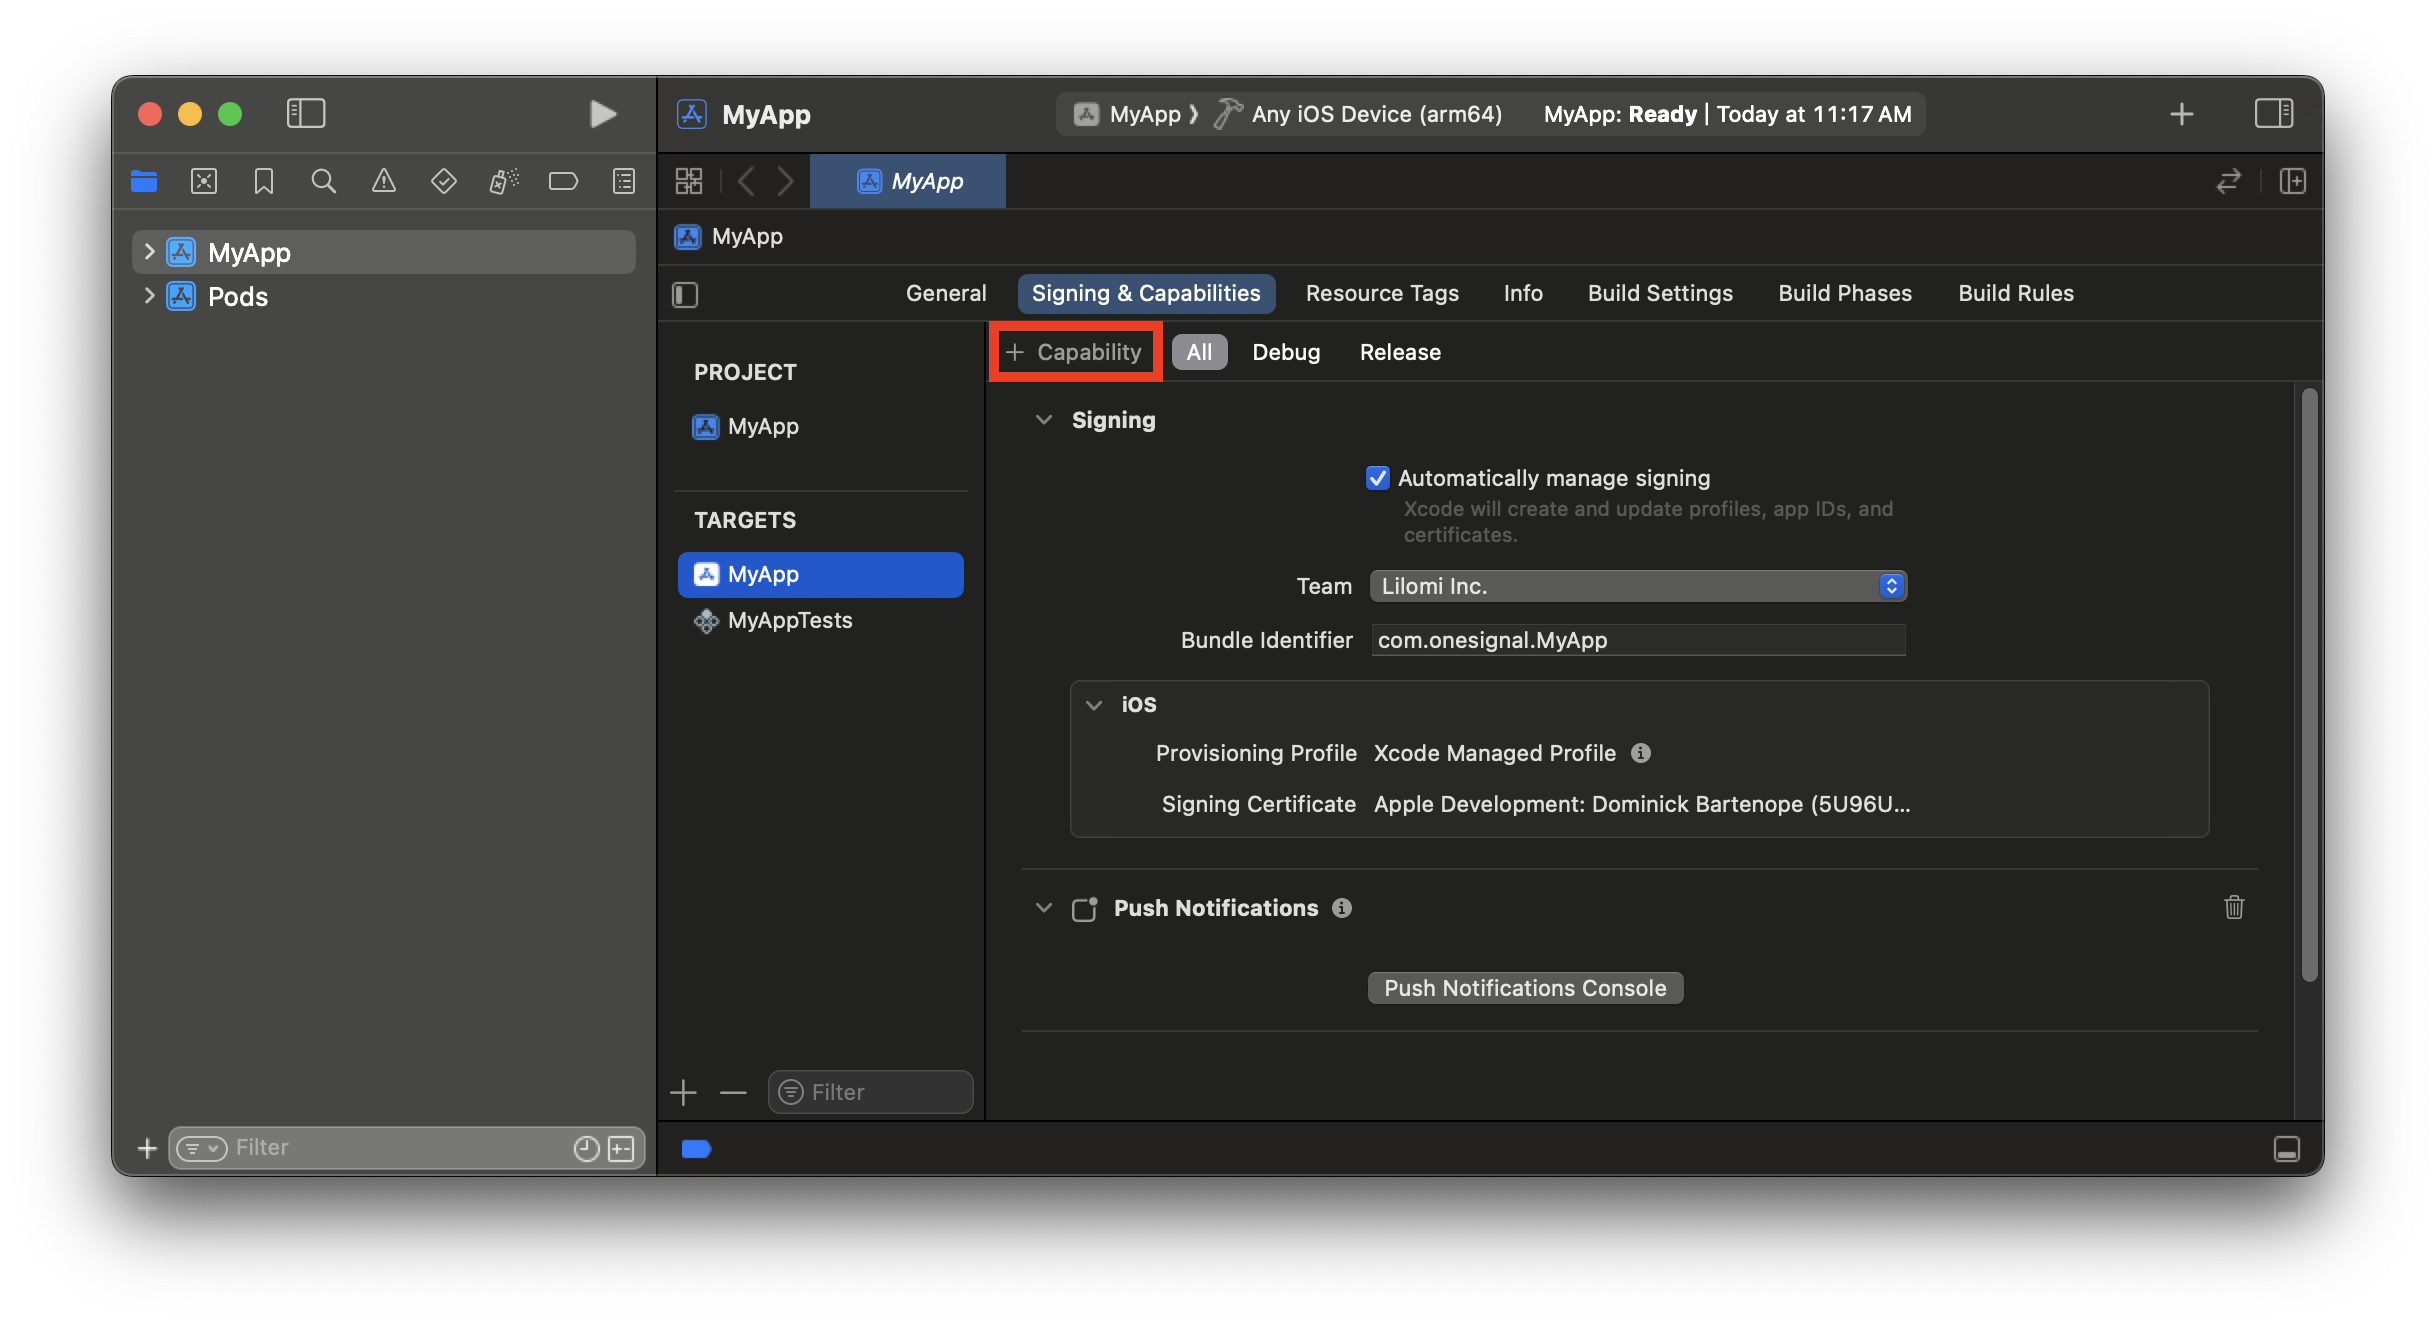
[Push Notifications 기능](https://developer.apple.com/documentation/UserNotifications/registering-your-app-with-apns#Enable-the-push-notifications-capability)을 사용하면 앱이 푸시 토큰을 등록하고 알림을 받을 수 있습니다.
1. Xcode에서 앱의 `.xcworkspace` 파일을 여세요.
2. **앱 타겟 > Signing & Capabilities**를 선택하세요
3. **+ Capability**를 클릭하고 **Push Notifications** 기능을 추가하세요
***
## iOS 설정
[배지](./badges), [확인된 전달](./confirmed-delivery) 및 이미지 지원을 포함하여 iOS 앱에 푸시 알림을 추가하려면 다음 단계를 따르세요.
### 1. 앱 타겟에 Push Notifications 기능 추가
[Push Notifications 기능](https://developer.apple.com/documentation/UserNotifications/registering-your-app-with-apns#Enable-the-push-notifications-capability)을 사용하면 앱이 푸시 토큰을 등록하고 알림을 받을 수 있습니다.
1. Xcode에서 앱의 `.xcworkspace` 파일을 여세요.
2. **앱 타겟 > Signing & Capabilities**를 선택하세요
3. **+ Capability**를 클릭하고 **Push Notifications** 기능을 추가하세요
 ### 2. 앱 타겟에 Background Modes 기능 추가
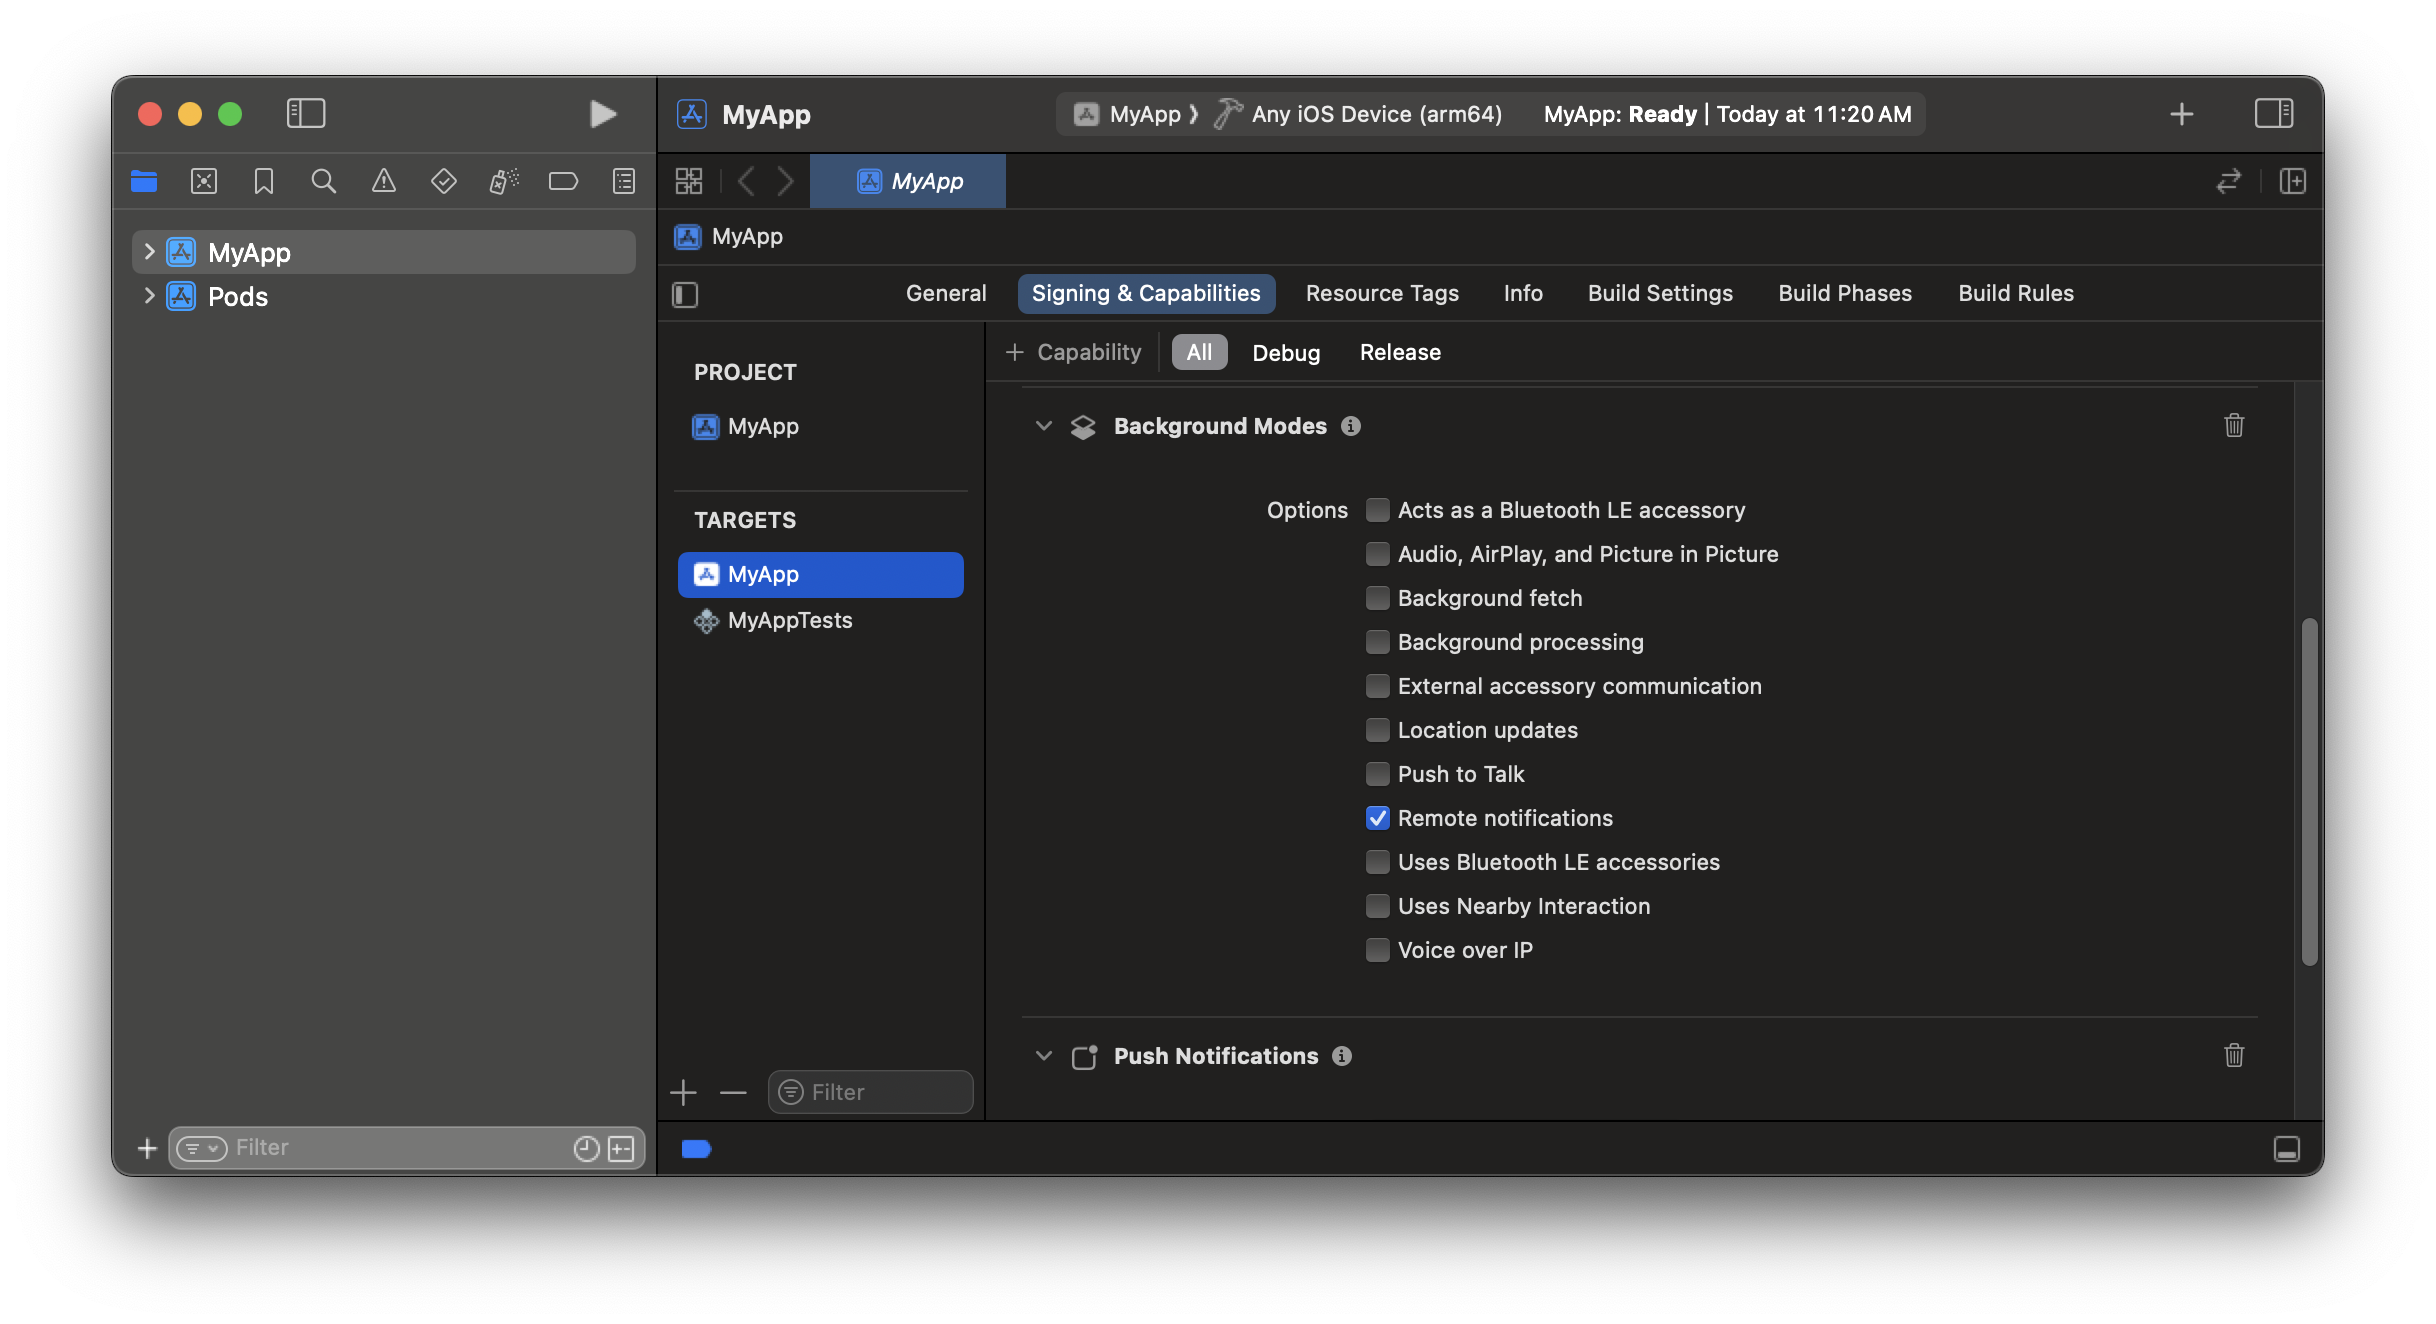
이를 통해 푸시 알림이 도착할 때 앱이 백그라운드에서 깨어날 수 있습니다.
1. [Background Modes](https://developer.apple.com/documentation/usernotifications/pushing-background-updates-to-your-app) 기능을 추가하세요
2. **Remote notifications**를 활성화하세요
### 2. 앱 타겟에 Background Modes 기능 추가
이를 통해 푸시 알림이 도착할 때 앱이 백그라운드에서 깨어날 수 있습니다.
1. [Background Modes](https://developer.apple.com/documentation/usernotifications/pushing-background-updates-to-your-app) 기능을 추가하세요
2. **Remote notifications**를 활성화하세요
 ### 3. App Group에 앱 타겟 추가
[App Groups](https://developer.apple.com/documentation/xcode/configuring-app-groups/#Create-App-Groups-for-all-other-platforms)를 사용하면 앱과 Notification Service Extension 간에 데이터를 공유할 수 있습니다. 확인된 전달 및 배지에 필요합니다.
1. **App Groups** 기능을 추가하세요
2. App Groups 기능에서 \*\*+\*\*를 클릭하세요
3. 다음 형식으로 새 컨테이너 ID를 추가하세요: `group.your_bundle_id.onesignal`
* **group.** 및 **.onesignal** 접두사와 접미사를 유지하세요. \*\*`your_bundle_id`\*\*를 앱의 번들 식별자로 바꾸세요.
* 예를 들어, 번들 식별자 `com.onesignal.MyApp`는 컨테이너 이름 `group.com.onesignal.MyApp.onesignal`을 갖습니다.
### 3. App Group에 앱 타겟 추가
[App Groups](https://developer.apple.com/documentation/xcode/configuring-app-groups/#Create-App-Groups-for-all-other-platforms)를 사용하면 앱과 Notification Service Extension 간에 데이터를 공유할 수 있습니다. 확인된 전달 및 배지에 필요합니다.
1. **App Groups** 기능을 추가하세요
2. App Groups 기능에서 \*\*+\*\*를 클릭하세요
3. 다음 형식으로 새 컨테이너 ID를 추가하세요: `group.your_bundle_id.onesignal`
* **group.** 및 **.onesignal** 접두사와 접미사를 유지하세요. \*\*`your_bundle_id`\*\*를 앱의 번들 식별자로 바꾸세요.
* 예를 들어, 번들 식별자 `com.onesignal.MyApp`는 컨테이너 이름 `group.com.onesignal.MyApp.onesignal`을 갖습니다.
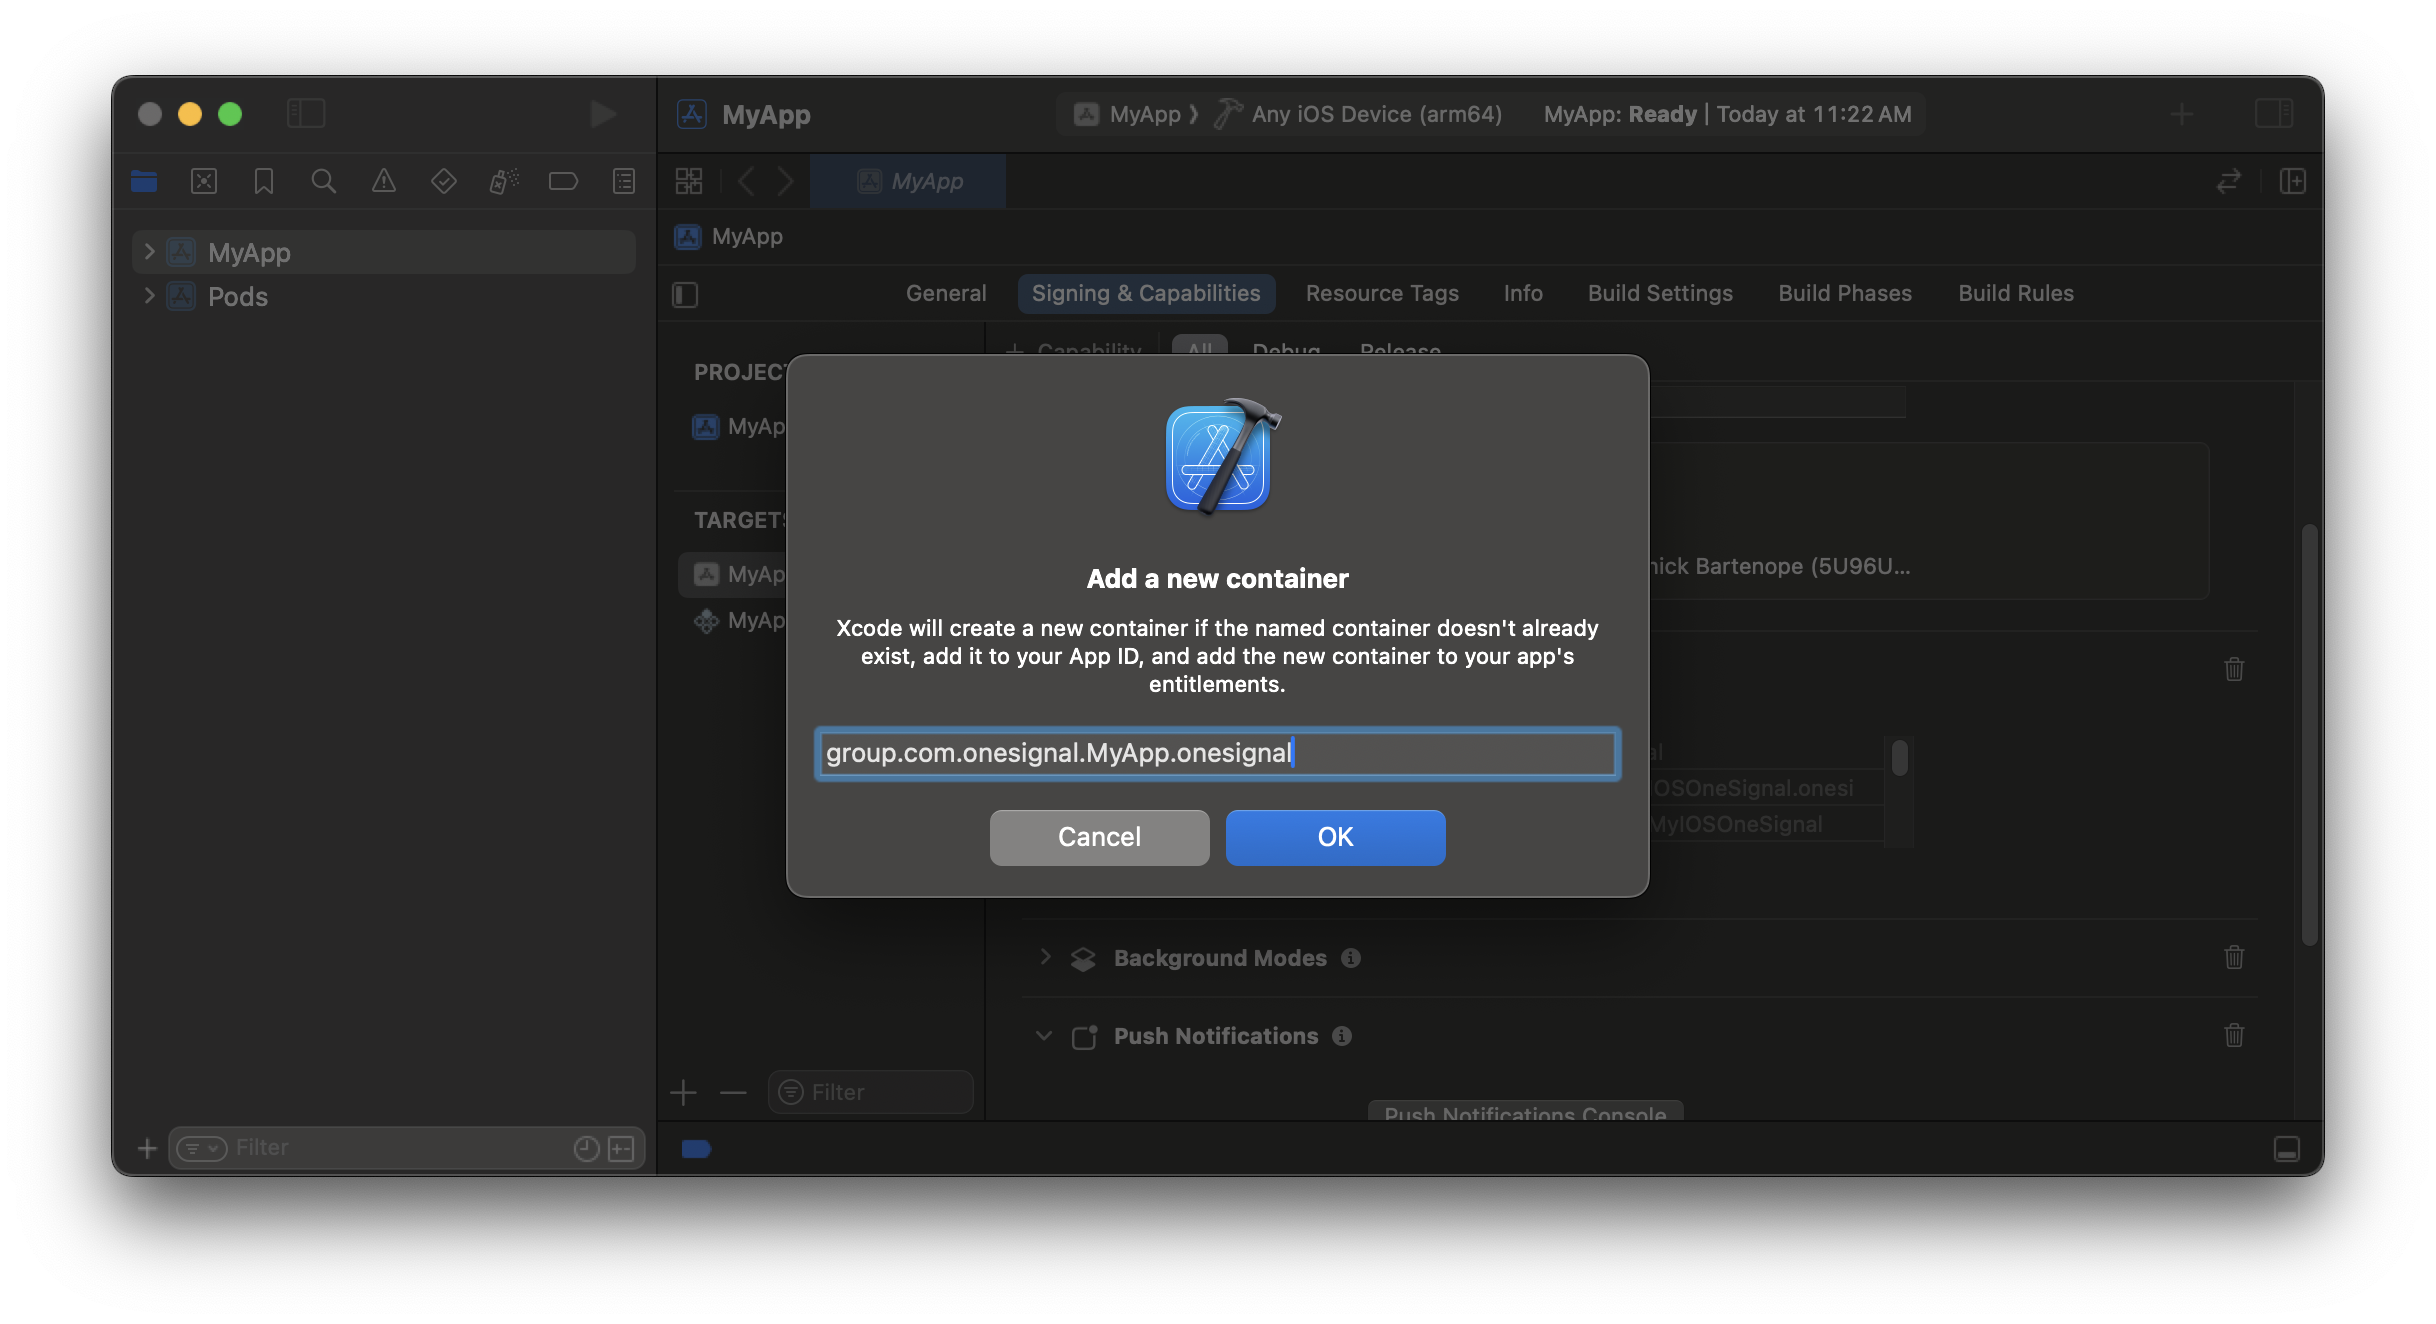 App Group 이름은 모든 타겟에서 번들 ID의 철자 및 대소문자와 정확히 일치해야 합니다.
1. **App Target** 및 **OneSignalNotificationServiceExtension Target의** `Info.plist`를 여세요
2. 두 타겟 모두에 대해 `Info.plist`에 새 속성을 추가하세요:
* **Key:** `OneSignal_app_groups_key`
* **Value:** 기존 App Group 이름 (예: `group.your-custom-group-id`)
```xml XML theme={null}
OneSignal_app_groups_key
group.your-custom-group-id
```
App Group 이름은 모든 타겟에서 번들 ID의 철자 및 대소문자와 정확히 일치해야 합니다.
1. **App Target** 및 **OneSignalNotificationServiceExtension Target의** `Info.plist`를 여세요
2. 두 타겟 모두에 대해 `Info.plist`에 새 속성을 추가하세요:
* **Key:** `OneSignal_app_groups_key`
* **Value:** 기존 App Group 이름 (예: `group.your-custom-group-id`)
```xml XML theme={null}
OneSignal_app_groups_key
group.your-custom-group-id
```
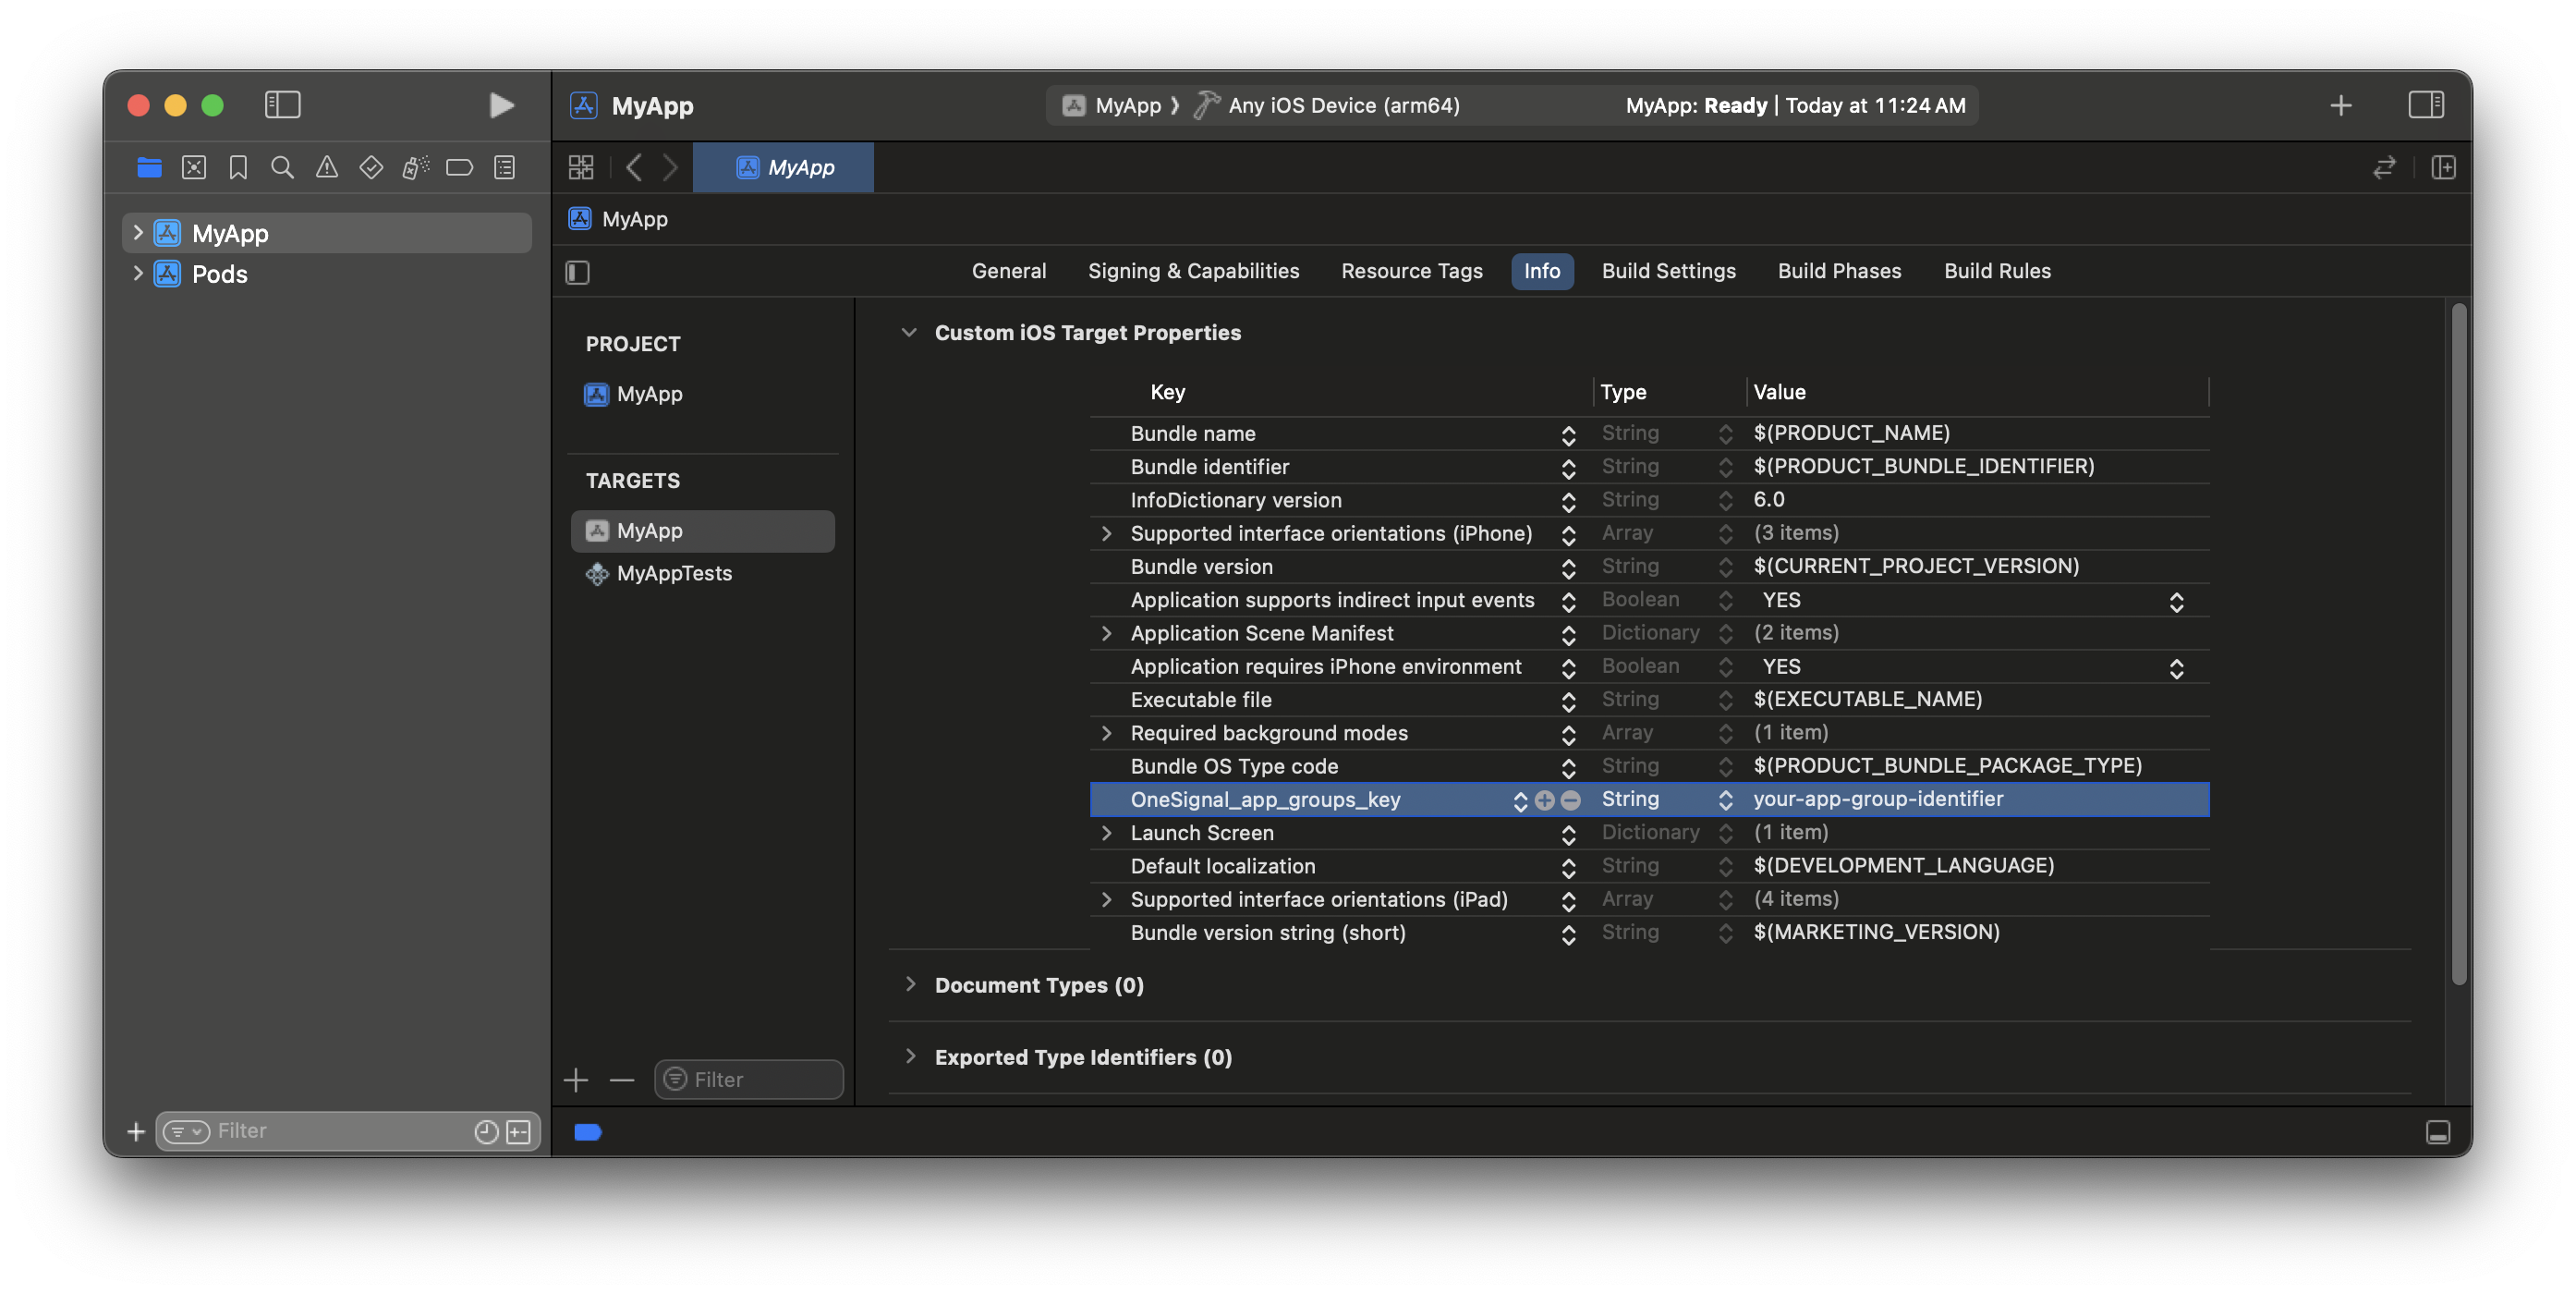 App Target **및** OneSignalNotificationServiceExtension Target의 `Info.plist` **둘 다**에서 `OneSignal_app_groups_key`를 업데이트해야 합니다!
### 4. Notification Service Extension 추가
[Notification Service Extension (NSE)](https://developer.apple.com/documentation/usernotifications/modifying-content-in-newly-delivered-notifications)은 리치 알림 및 확인된 전달 분석을 활성화합니다.
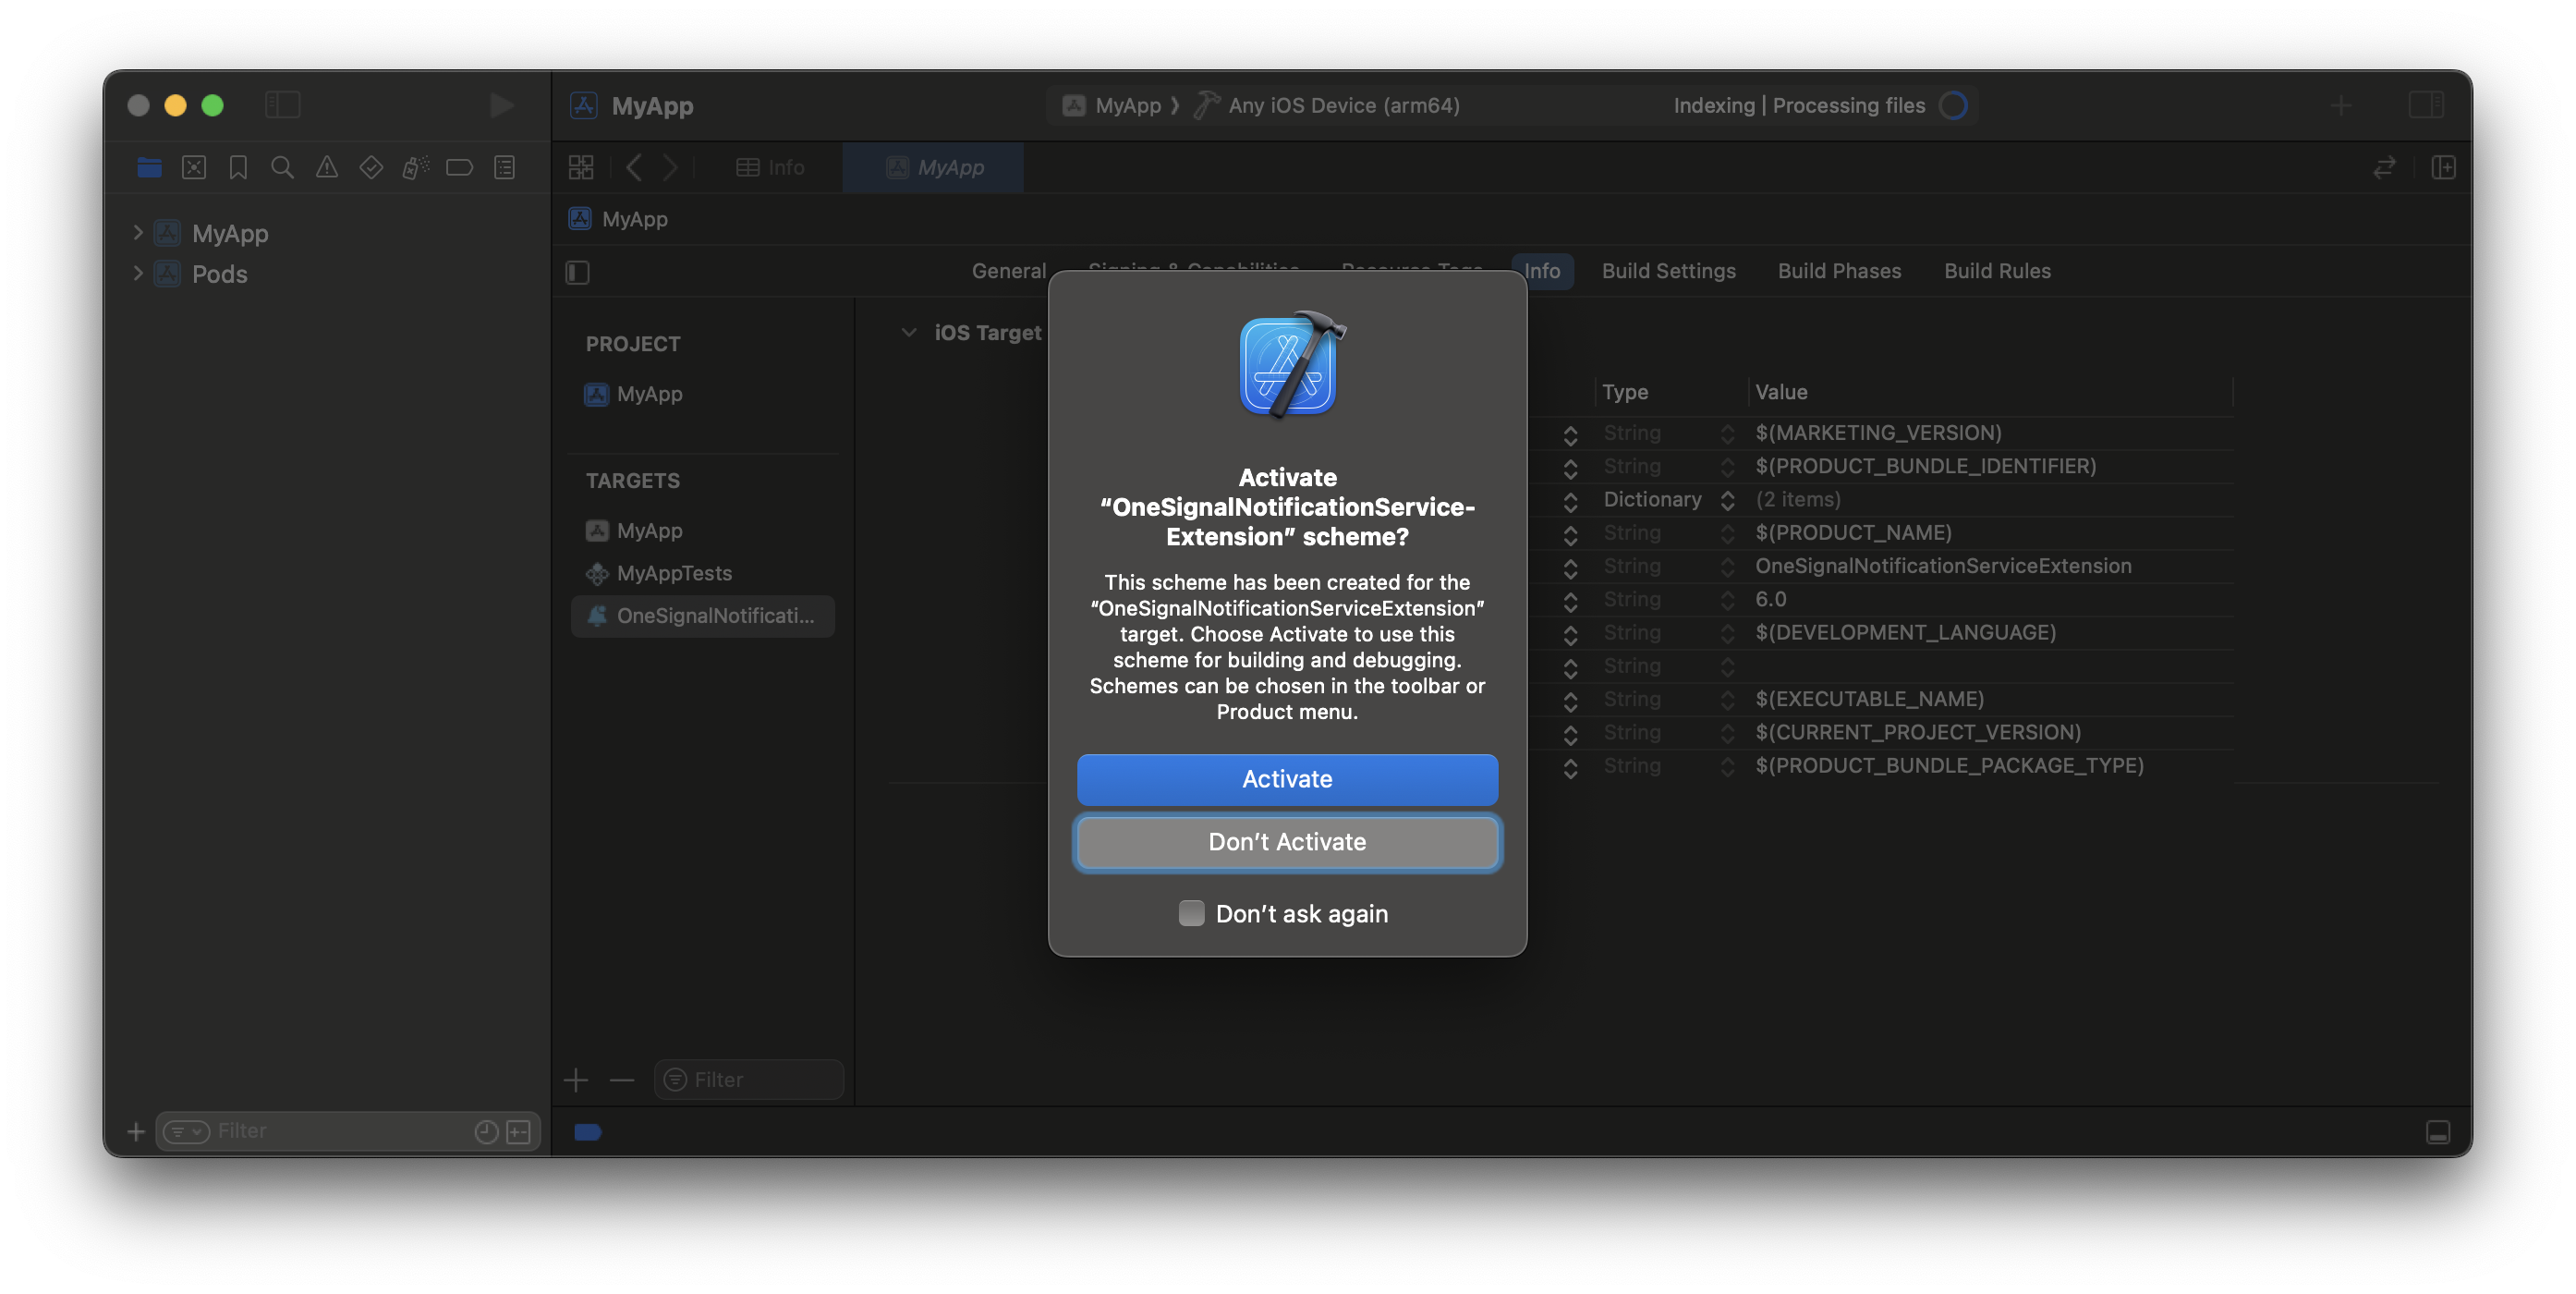
1. Xcode에서: **File > New > Target...**
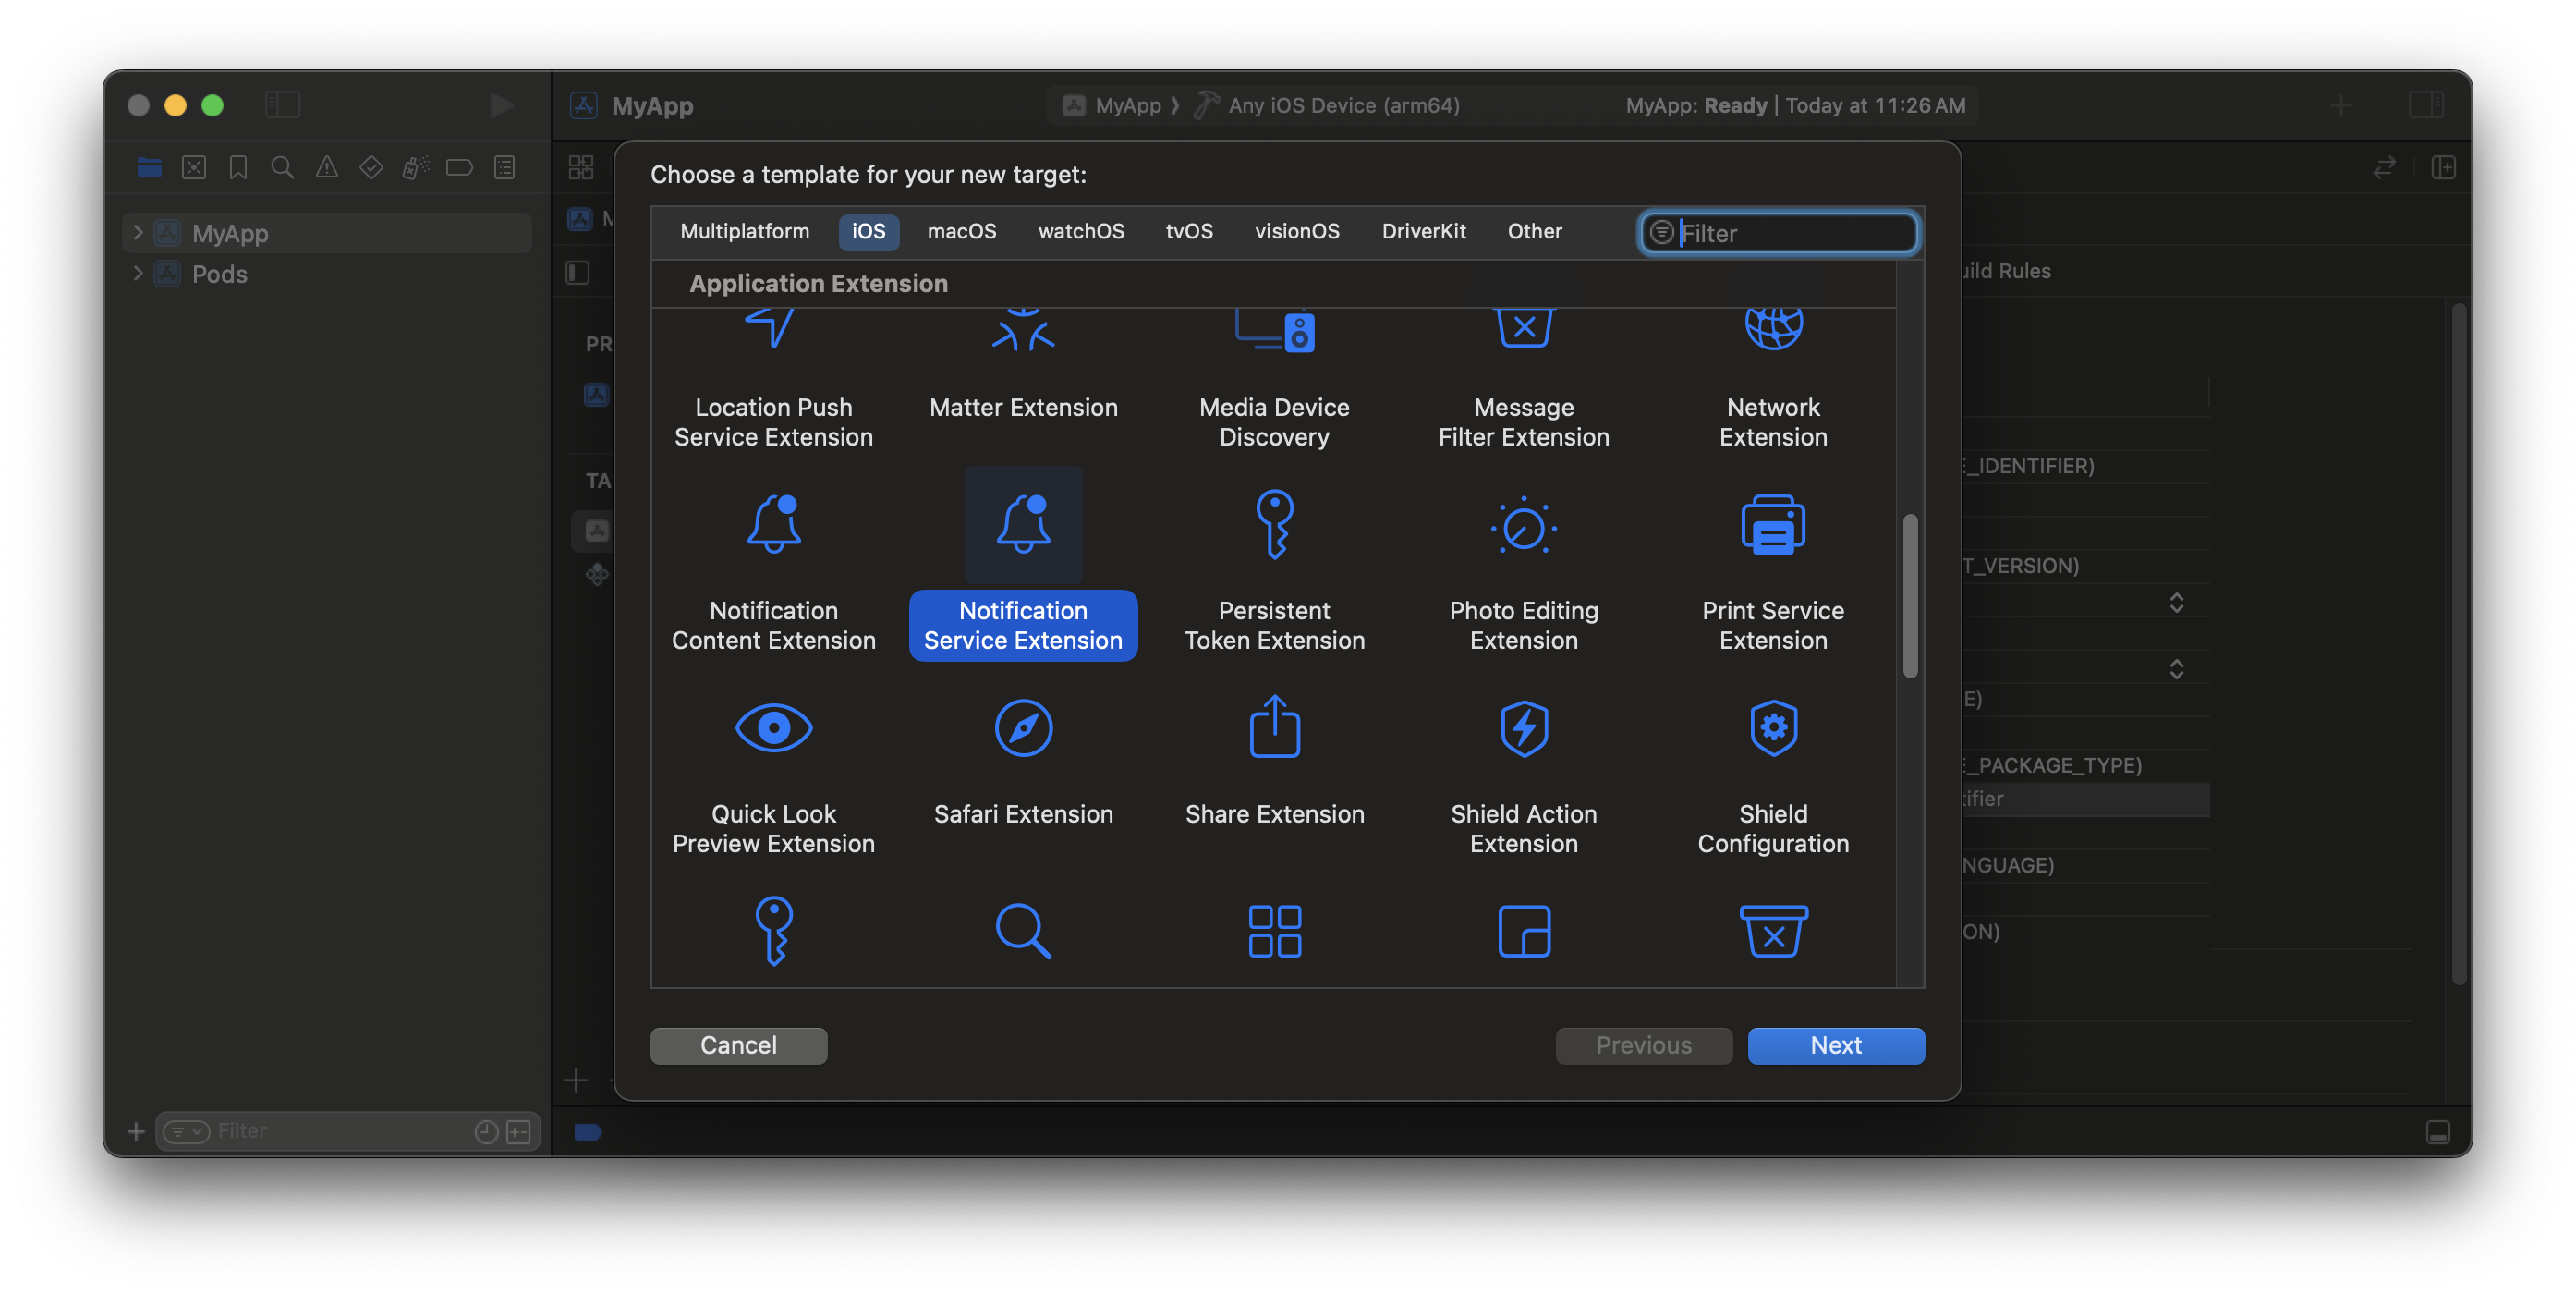
2. **Notification Service Extension**을 선택한 다음 **Next**를 클릭하세요.
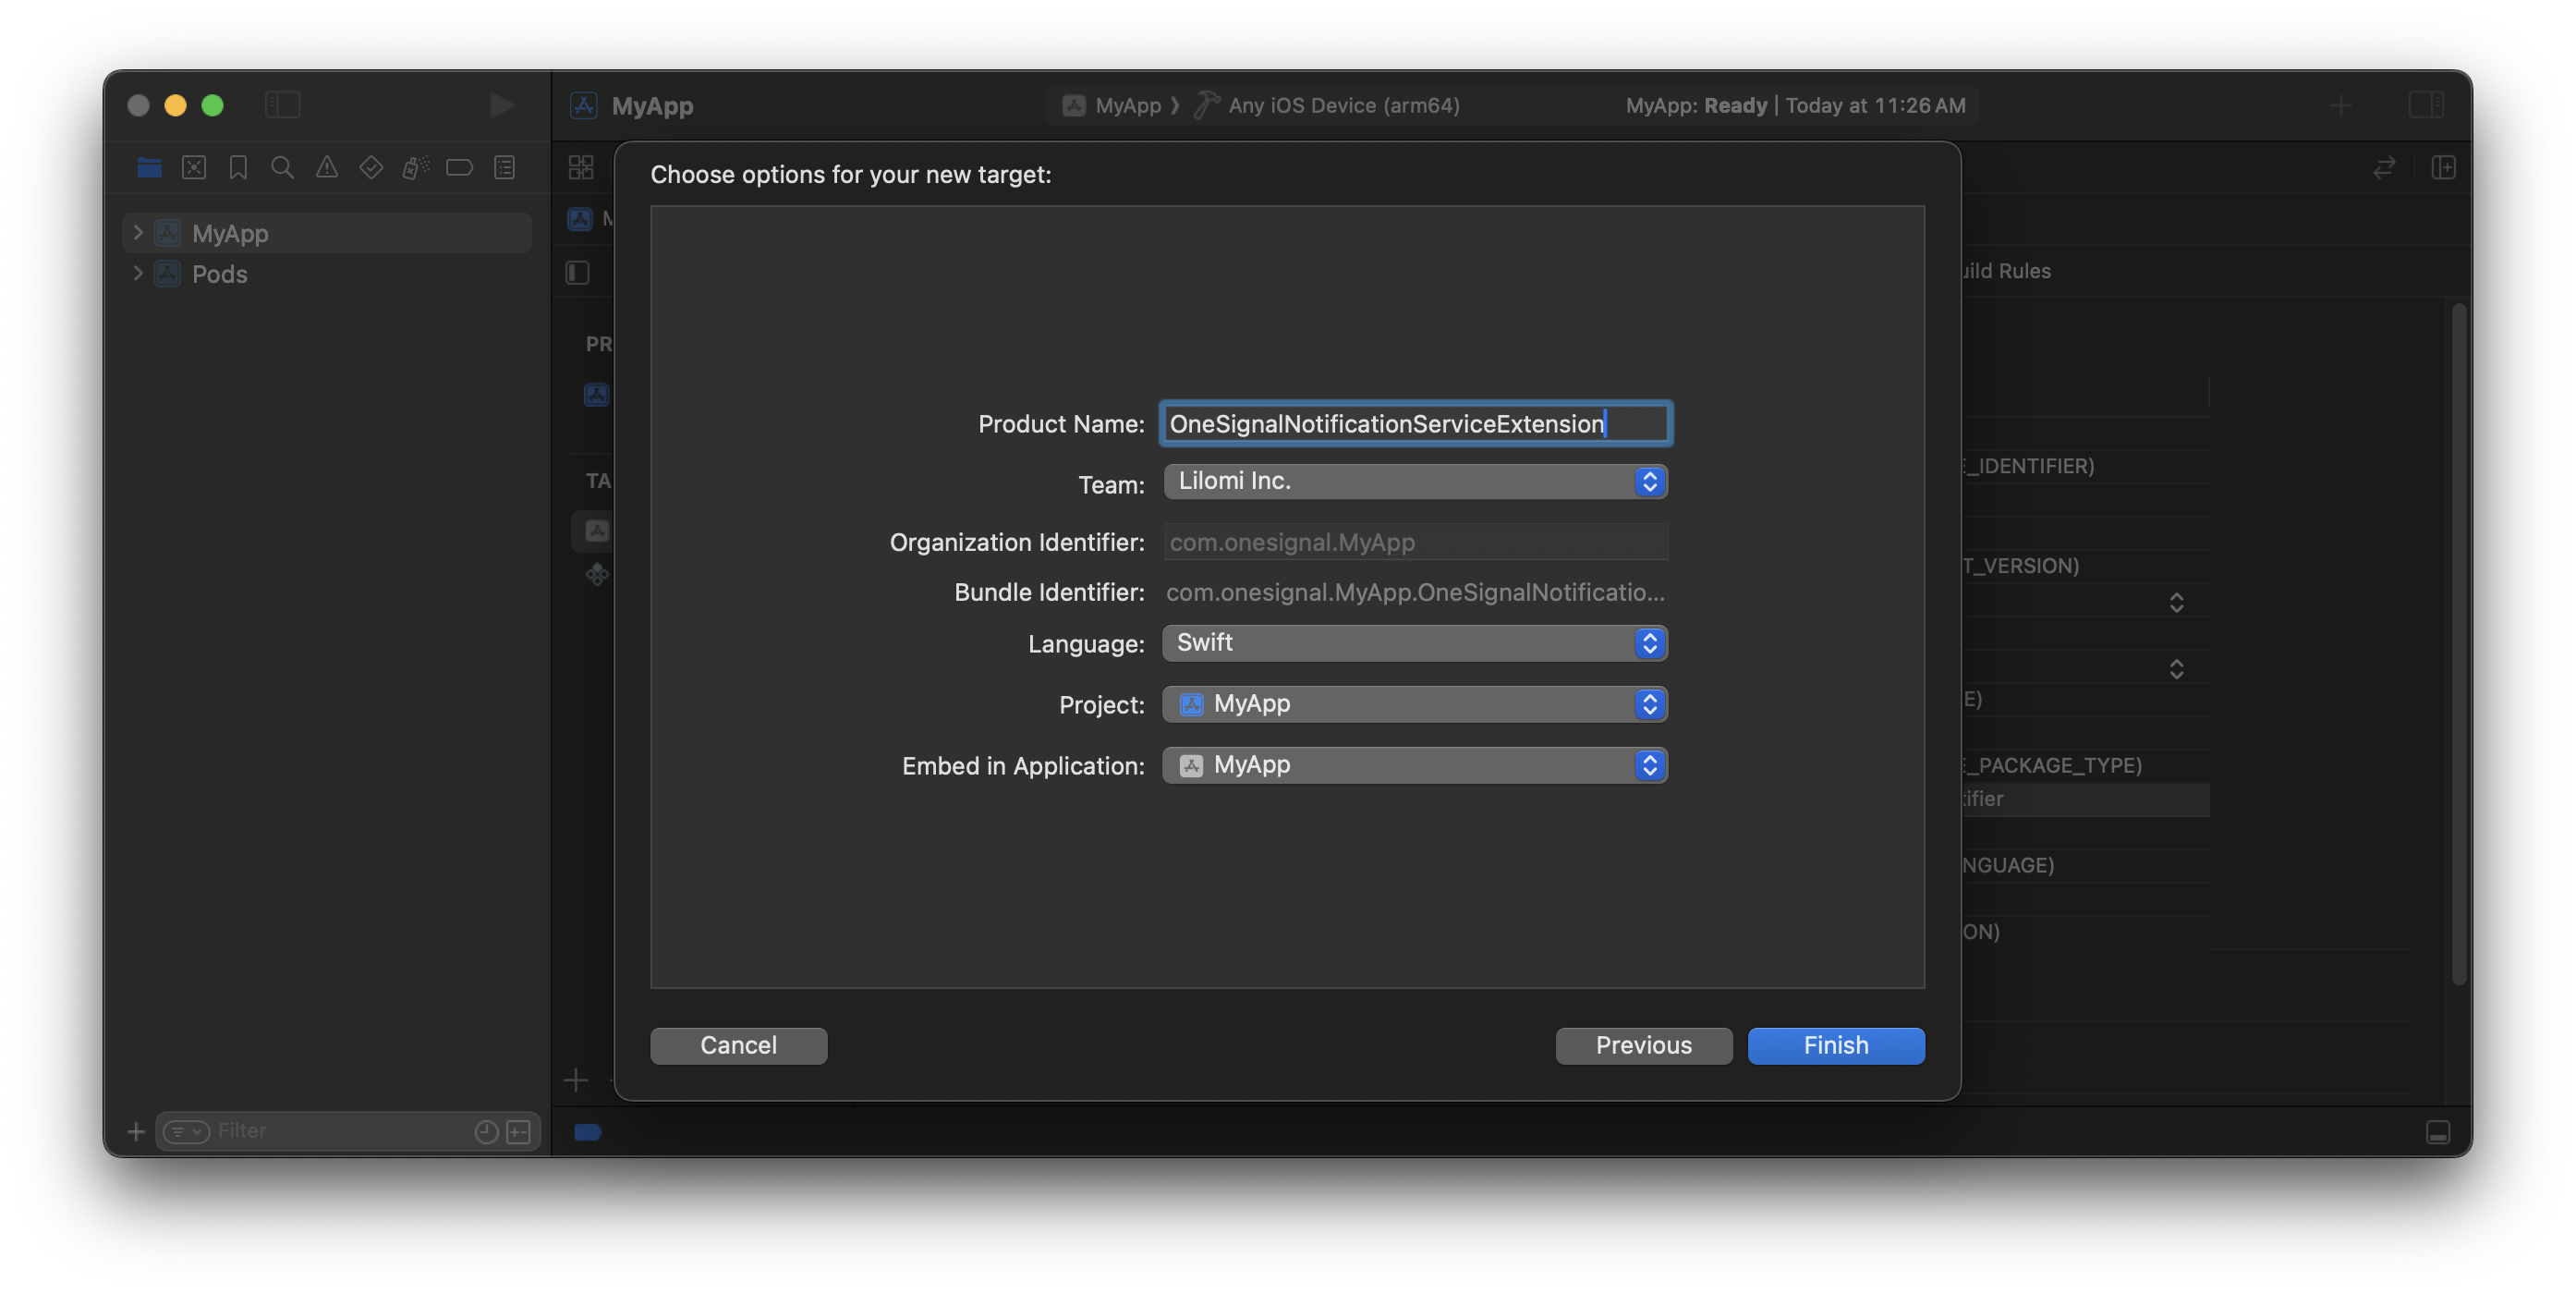
3. 제품 이름을 `OneSignalNotificationServiceExtension`으로 설정하고 **Finish**를 누르세요.
4. Activate scheme 프롬프트에서 **Don't Activate**를 누르세요.
App Target **및** OneSignalNotificationServiceExtension Target의 `Info.plist` **둘 다**에서 `OneSignal_app_groups_key`를 업데이트해야 합니다!
### 4. Notification Service Extension 추가
[Notification Service Extension (NSE)](https://developer.apple.com/documentation/usernotifications/modifying-content-in-newly-delivered-notifications)은 리치 알림 및 확인된 전달 분석을 활성화합니다.
1. Xcode에서: **File > New > Target...**
2. **Notification Service Extension**을 선택한 다음 **Next**를 클릭하세요.
3. 제품 이름을 `OneSignalNotificationServiceExtension`으로 설정하고 **Finish**를 누르세요.
4. Activate scheme 프롬프트에서 **Don't Activate**를 누르세요.
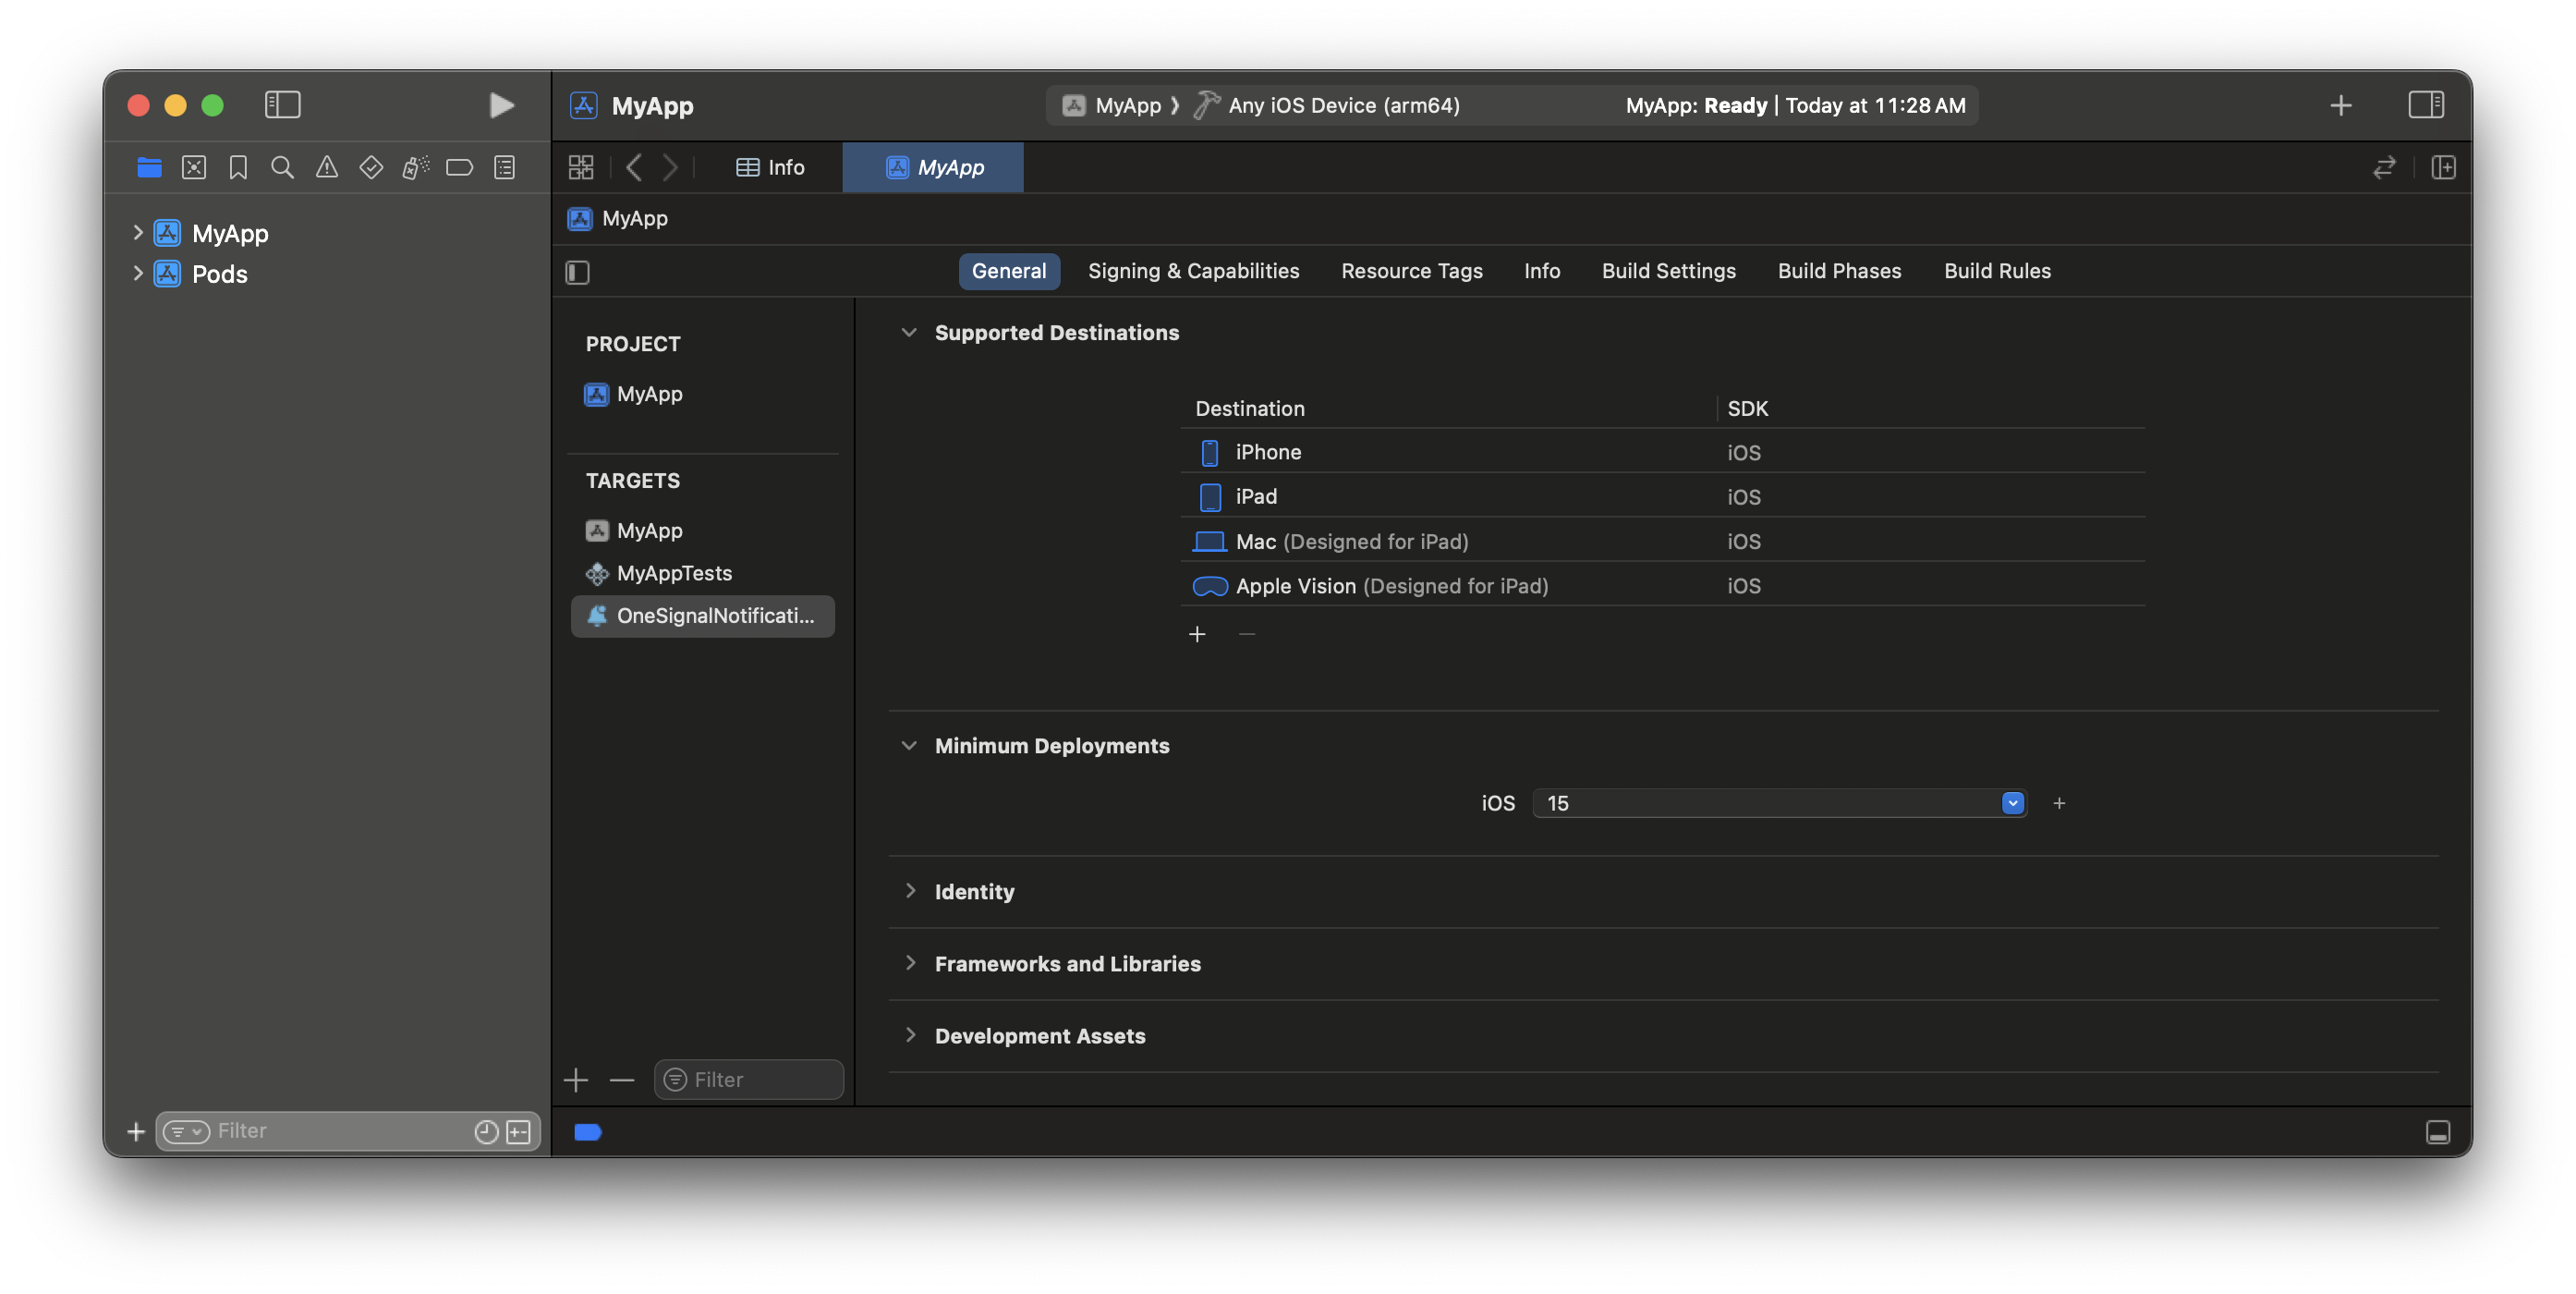
 OneSignalNotificationServiceExtension **Minimum Deployment Target**을 메인 앱과 일치하도록 설정하세요(iOS 15+ 권장).
CocoaPods를 사용하는 경우 Podfile에서도 배포 버전을 설정하세요.
OneSignalNotificationServiceExtension **Minimum Deployment Target**을 메인 앱과 일치하도록 설정하세요(iOS 15+ 권장).
CocoaPods를 사용하는 경우 Podfile에서도 배포 버전을 설정하세요.
 ### 5. NSE 타겟을 앱 그룹에 추가
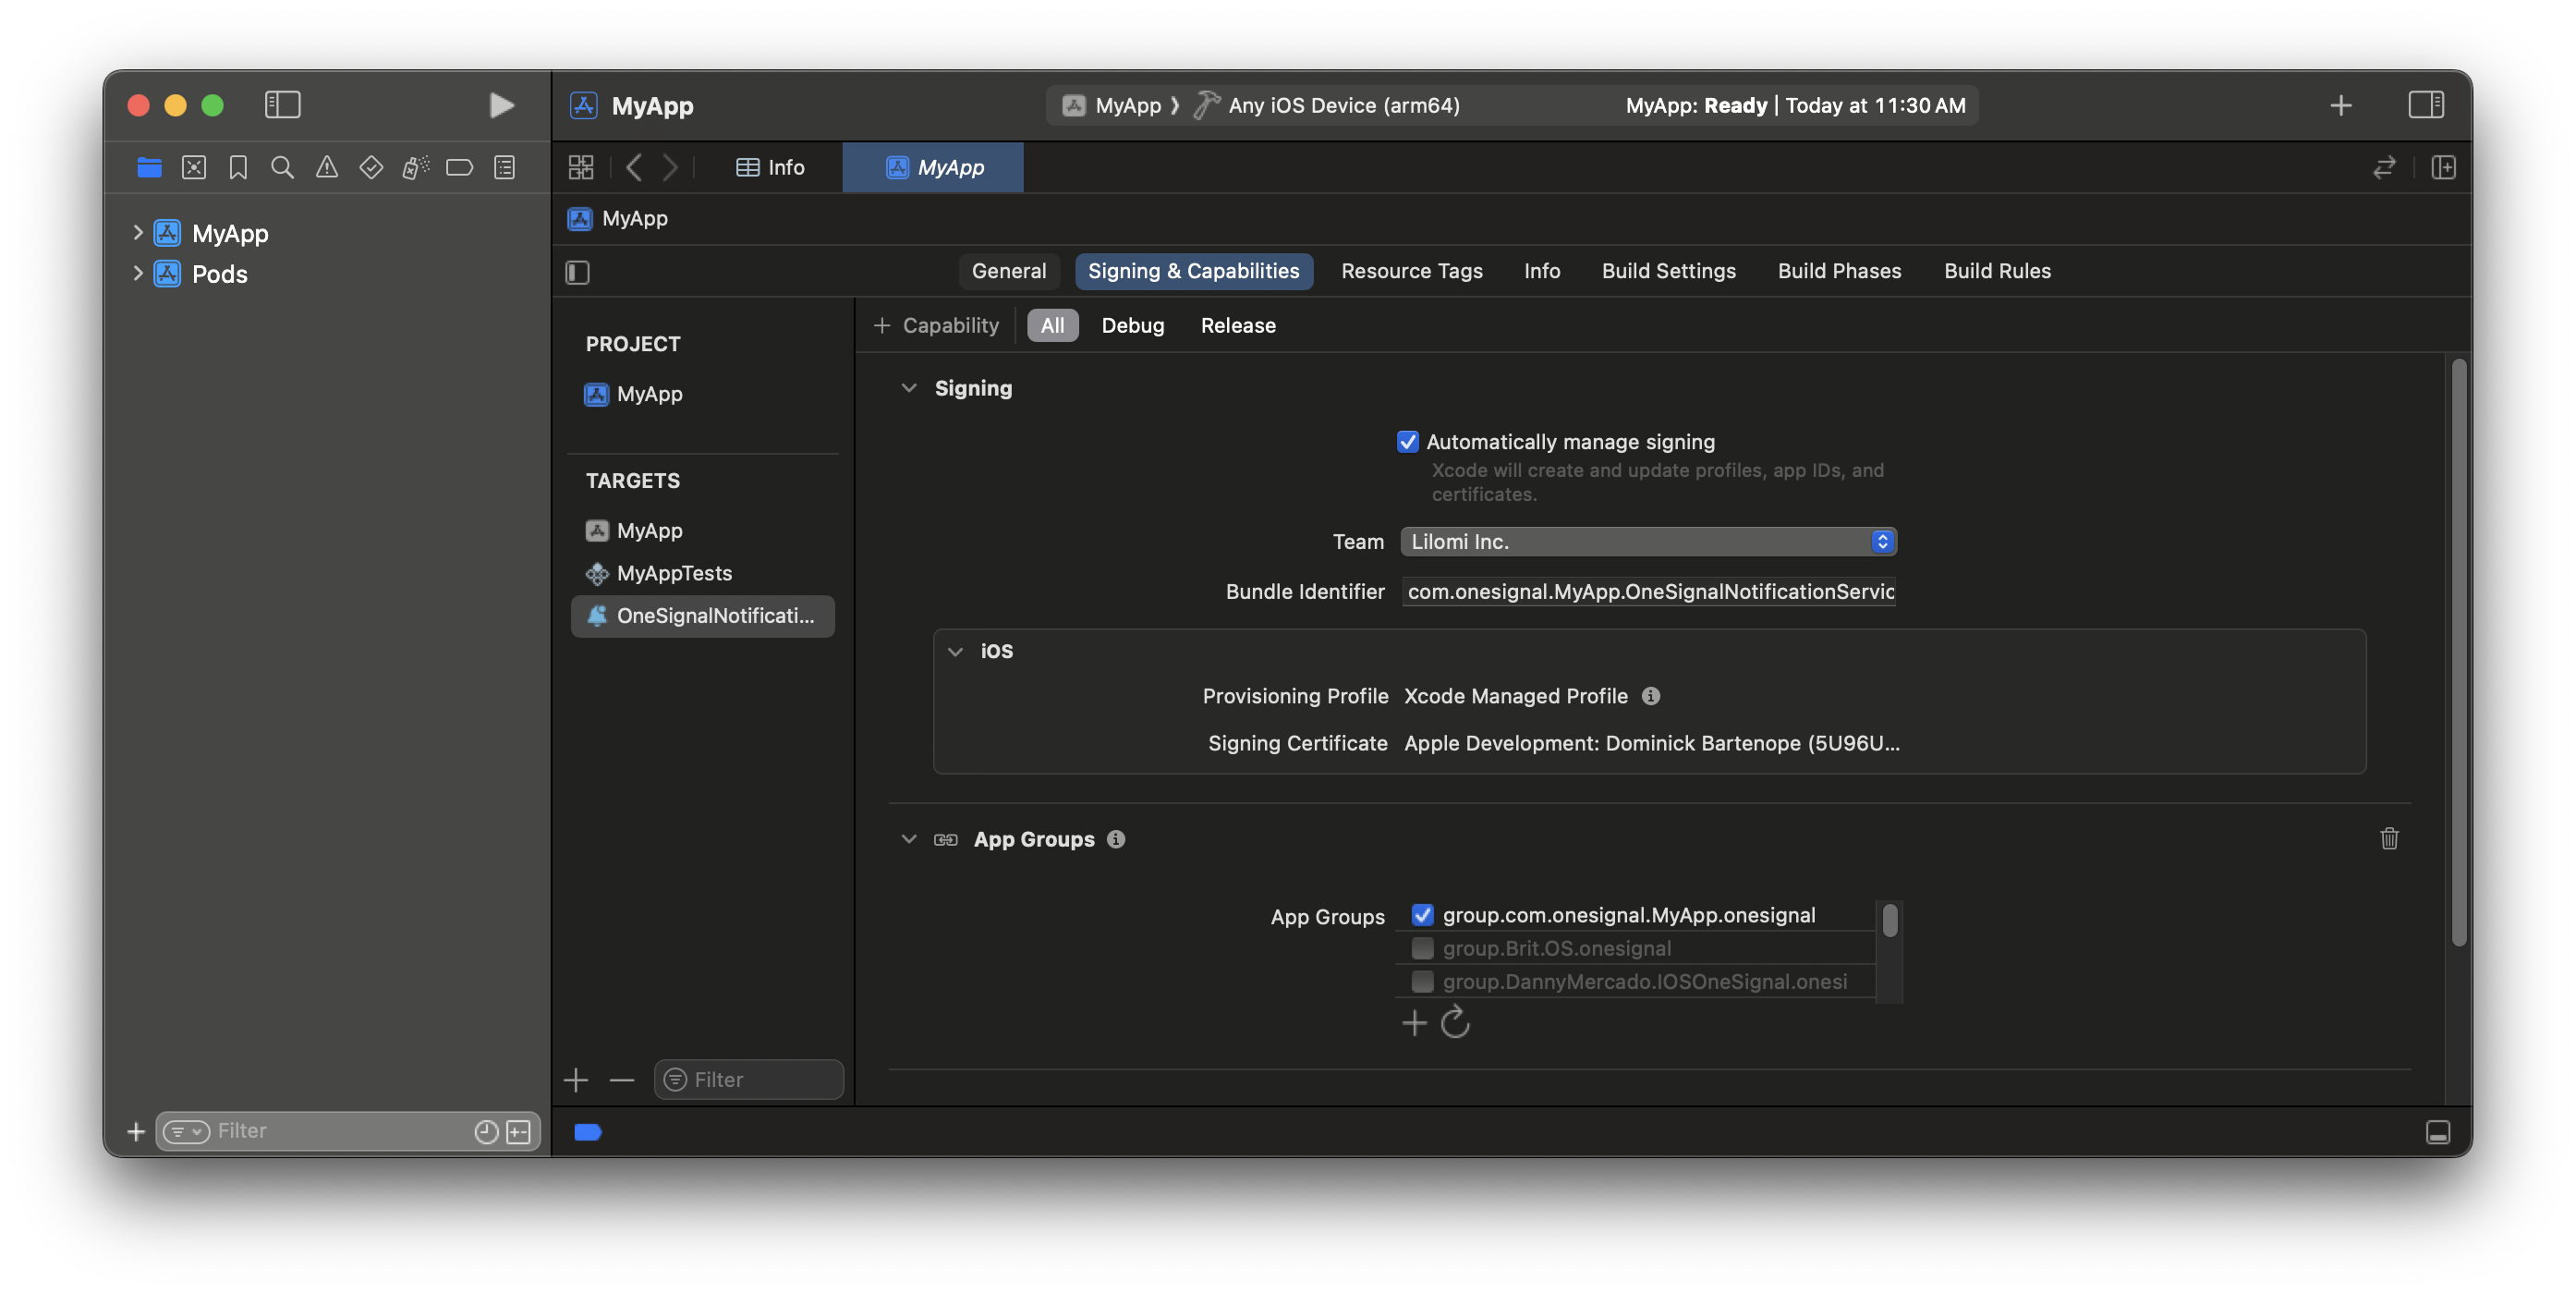
3단계에서 추가한 것과 동일한 App Group ID를 사용하세요.
1. **OneSignalNotificationServiceExtension > Signing & Capabilities**로 이동하세요
2. **App Groups**를 추가하세요
3. 정확히 동일한 그룹 ID를 추가하세요
사용자 정의 App Group 이름을 사용하고 `group.your_bundle_id.onesignal`이 아닌 경우 App Target 및 OneSignalNotificationServiceExtension Target의 `Info.plist` 둘 다에 App Group ID를 추가해야 합니다! 자세한 내용은 [3단계](#3-add-app-target-to-app-group)를 참조하세요.
### 5. NSE 타겟을 앱 그룹에 추가
3단계에서 추가한 것과 동일한 App Group ID를 사용하세요.
1. **OneSignalNotificationServiceExtension > Signing & Capabilities**로 이동하세요
2. **App Groups**를 추가하세요
3. 정확히 동일한 그룹 ID를 추가하세요
사용자 정의 App Group 이름을 사용하고 `group.your_bundle_id.onesignal`이 아닌 경우 App Target 및 OneSignalNotificationServiceExtension Target의 `Info.plist` 둘 다에 App Group ID를 추가해야 합니다! 자세한 내용은 [3단계](#3-add-app-target-to-app-group)를 참조하세요.
 ### 6. NSE 코드 업데이트
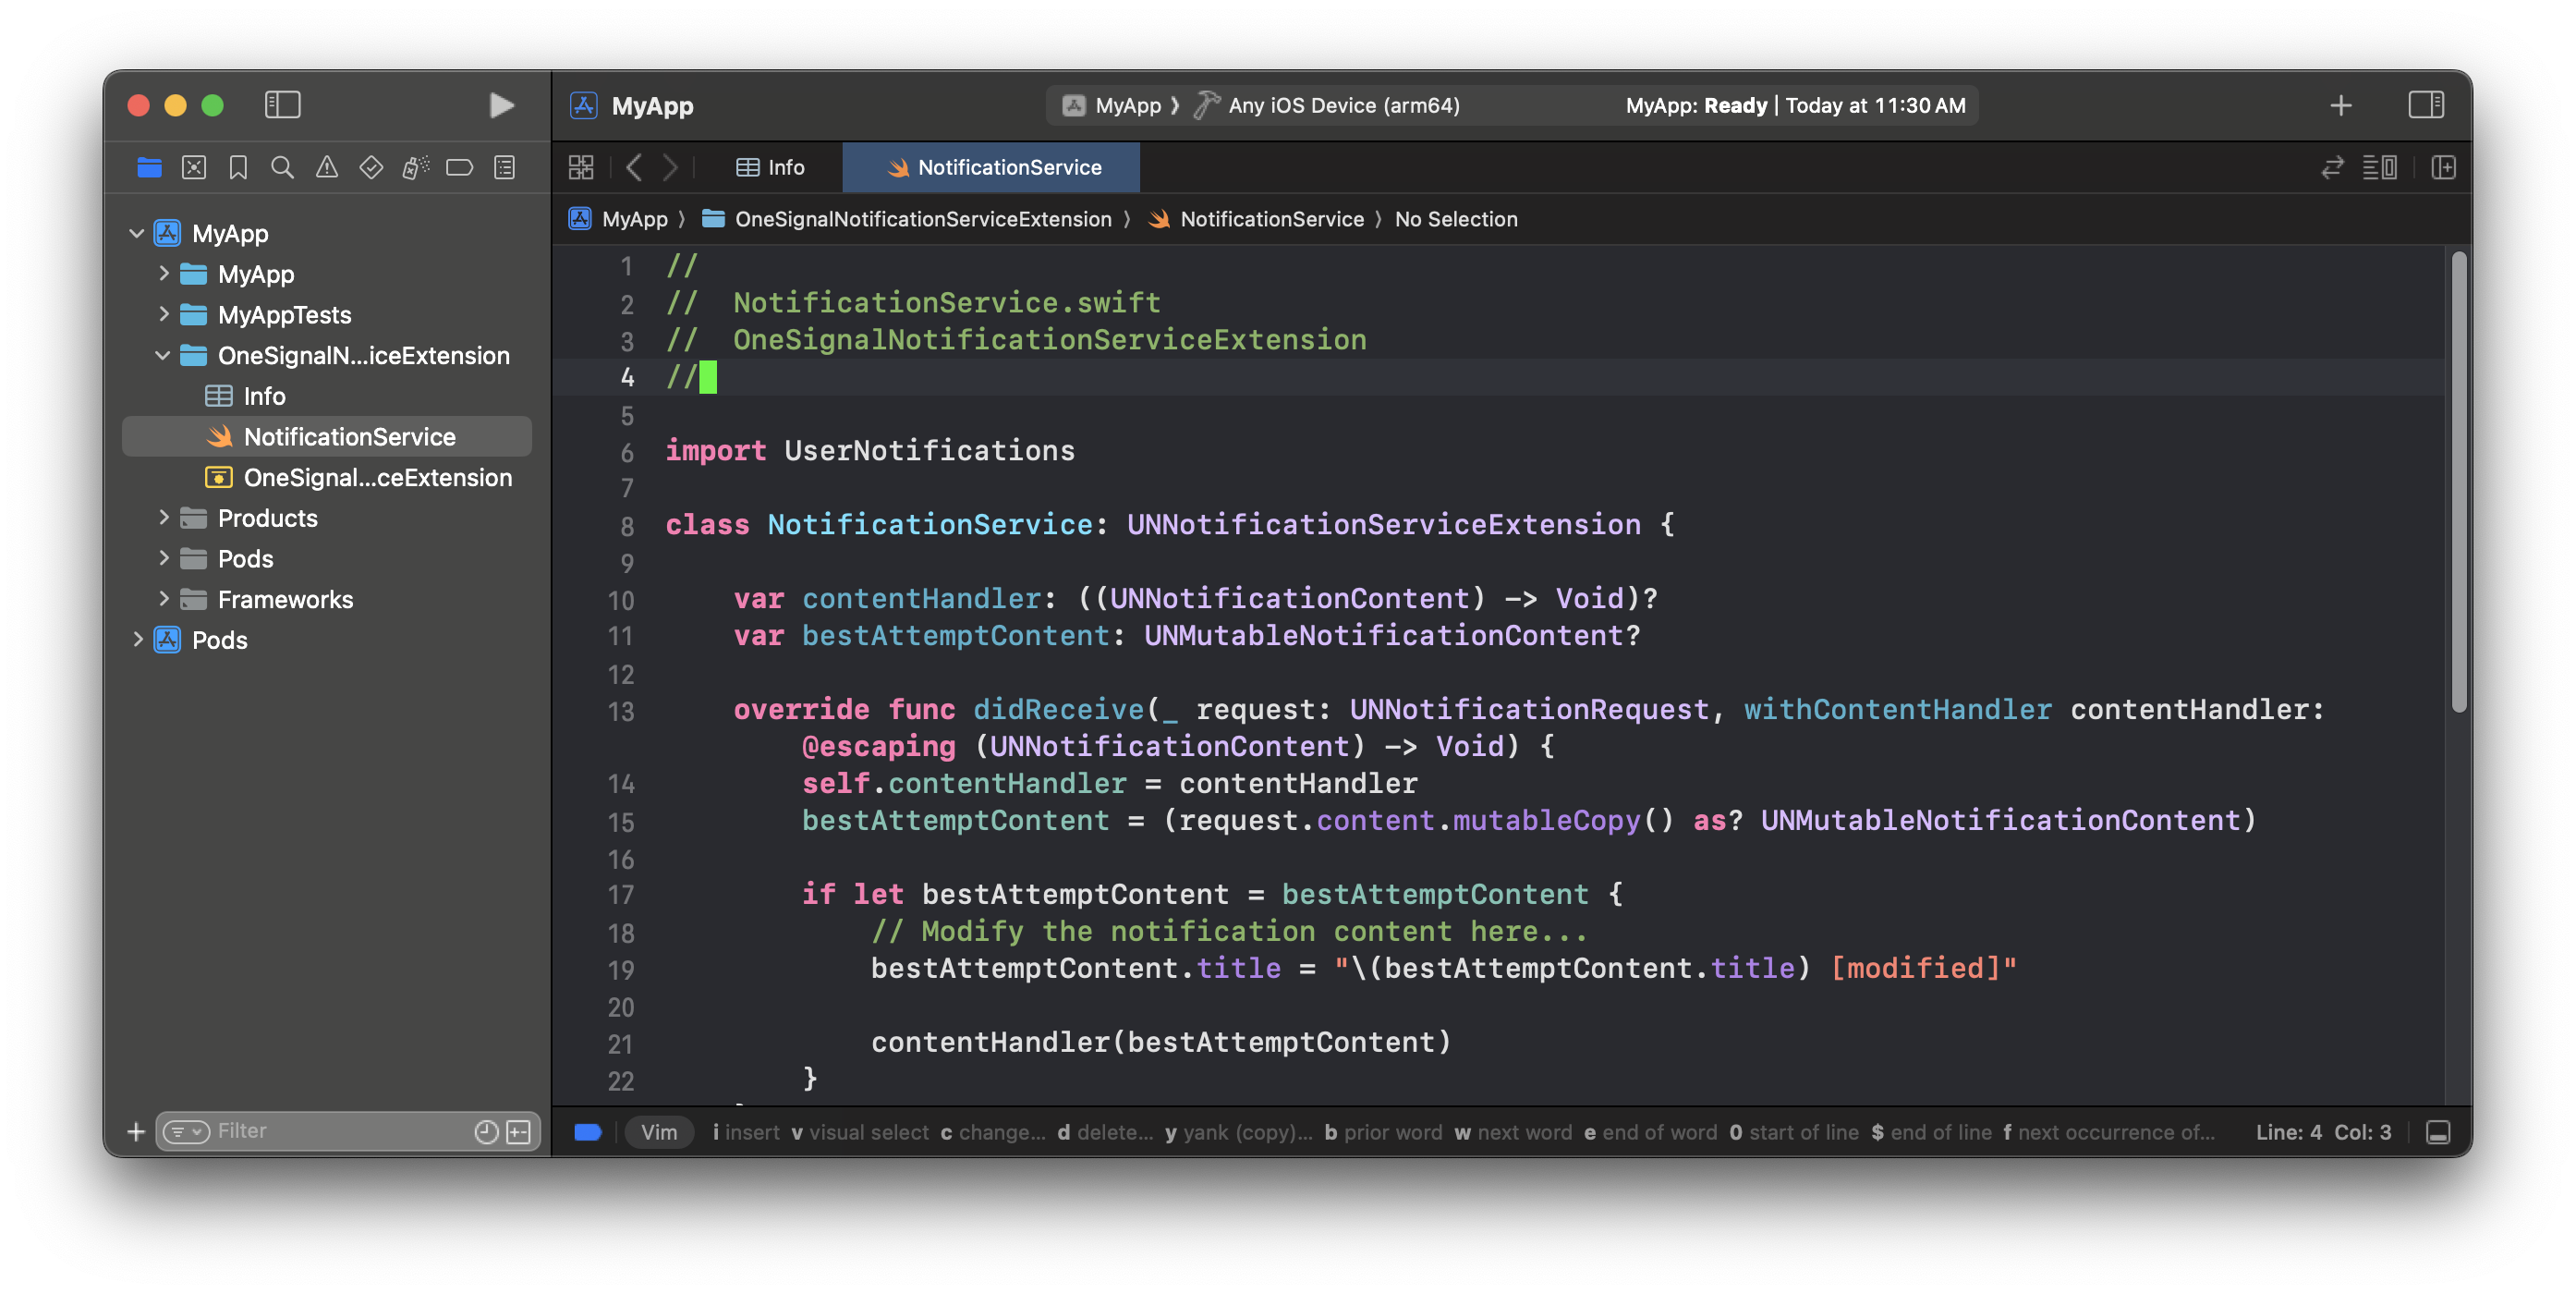
1. **OneSignalNotificationServiceExtension** 폴더로 이동하세요
2. `NotificationService.swift` 또는 `NotificationService.m` 파일의 내용을 다음으로 바꾸세요:
### 6. NSE 코드 업데이트
1. **OneSignalNotificationServiceExtension** 폴더로 이동하세요
2. `NotificationService.swift` 또는 `NotificationService.m` 파일의 내용을 다음으로 바꾸세요:
 ```swift Swift theme={null}
import UserNotifications
import OneSignalExtension
class NotificationService: UNNotificationServiceExtension {
var contentHandler: ((UNNotificationContent) -> Void)?
var receivedRequest: UNNotificationRequest!
var bestAttemptContent: UNMutableNotificationContent?
// Note this extension only runs when `mutable_content` is set
// Setting an attachment or action buttons automatically sets the property to true
override func didReceive(_ request: UNNotificationRequest, withContentHandler contentHandler: @escaping (UNNotificationContent) -> Void) {
self.receivedRequest = request
self.contentHandler = contentHandler
self.bestAttemptContent = (request.content.mutableCopy() as? UNMutableNotificationContent)
if let bestAttemptContent = bestAttemptContent {
// DEBUGGING: Uncomment the 2 lines below to check this extension is executing
// print("Running NotificationServiceExtension")
// bestAttemptContent.body = "[Modified] " + bestAttemptContent.body
OneSignalExtension.didReceiveNotificationExtensionRequest(self.receivedRequest, with: bestAttemptContent, withContentHandler: self.contentHandler)
}
}
override func serviceExtensionTimeWillExpire() {
// Use this as an opportunity to deliver your "best attempt" at modified content, otherwise the original push payload will be used.
if let contentHandler = contentHandler, let bestAttemptContent = bestAttemptContent {
OneSignalExtension.serviceExtensionTimeWillExpireRequest(self.receivedRequest, with: self.bestAttemptContent)
contentHandler(bestAttemptContent)
}
}
}
```
```objc Objective-C theme={null}
#import
#import "NotificationService.h"
@interface NotificationService ()
@property (nonatomic, strong) void (^contentHandler)(UNNotificationContent *contentToDeliver);
@property (nonatomic, strong) UNNotificationRequest *receivedRequest;
@property (nonatomic, strong) UNMutableNotificationContent *bestAttemptContent;
@end
@implementation NotificationService
// Note, this extension only runs when mutable-content is set
// Setting an attachment or action buttons automatically adds this
- (void)didReceiveNotificationRequest:(UNNotificationRequest *)request withContentHandler:(void (^)(UNNotificationContent * _Nonnull))contentHandler {
self.receivedRequest = request;
self.contentHandler = contentHandler;
self.bestAttemptContent = [request.content mutableCopy];
// DEBUGGING: Uncomment the 2 lines below and comment out the one above to ensure this extension is executing
// NSLog(@"Running NotificationServiceExtension");
// self.bestAttemptContent.body = [@"[Modified] " stringByAppendingString:self.bestAttemptContent.body];
[OneSignalExtension didReceiveNotificationExtensionRequest:self.receivedRequest
withMutableNotificationContent:self.bestAttemptContent
withContentHandler:self.contentHandler];
}
- (void)serviceExtensionTimeWillExpire {
// Use this as an opportunity to deliver your "best attempt" at modified content, otherwise the original push payload will be used.
[OneSignalExtension serviceExtensionTimeWillExpireRequest:self.receivedRequest withMutableNotificationContent:self.bestAttemptContent];
self.contentHandler(self.bestAttemptContent);
}
@end
```
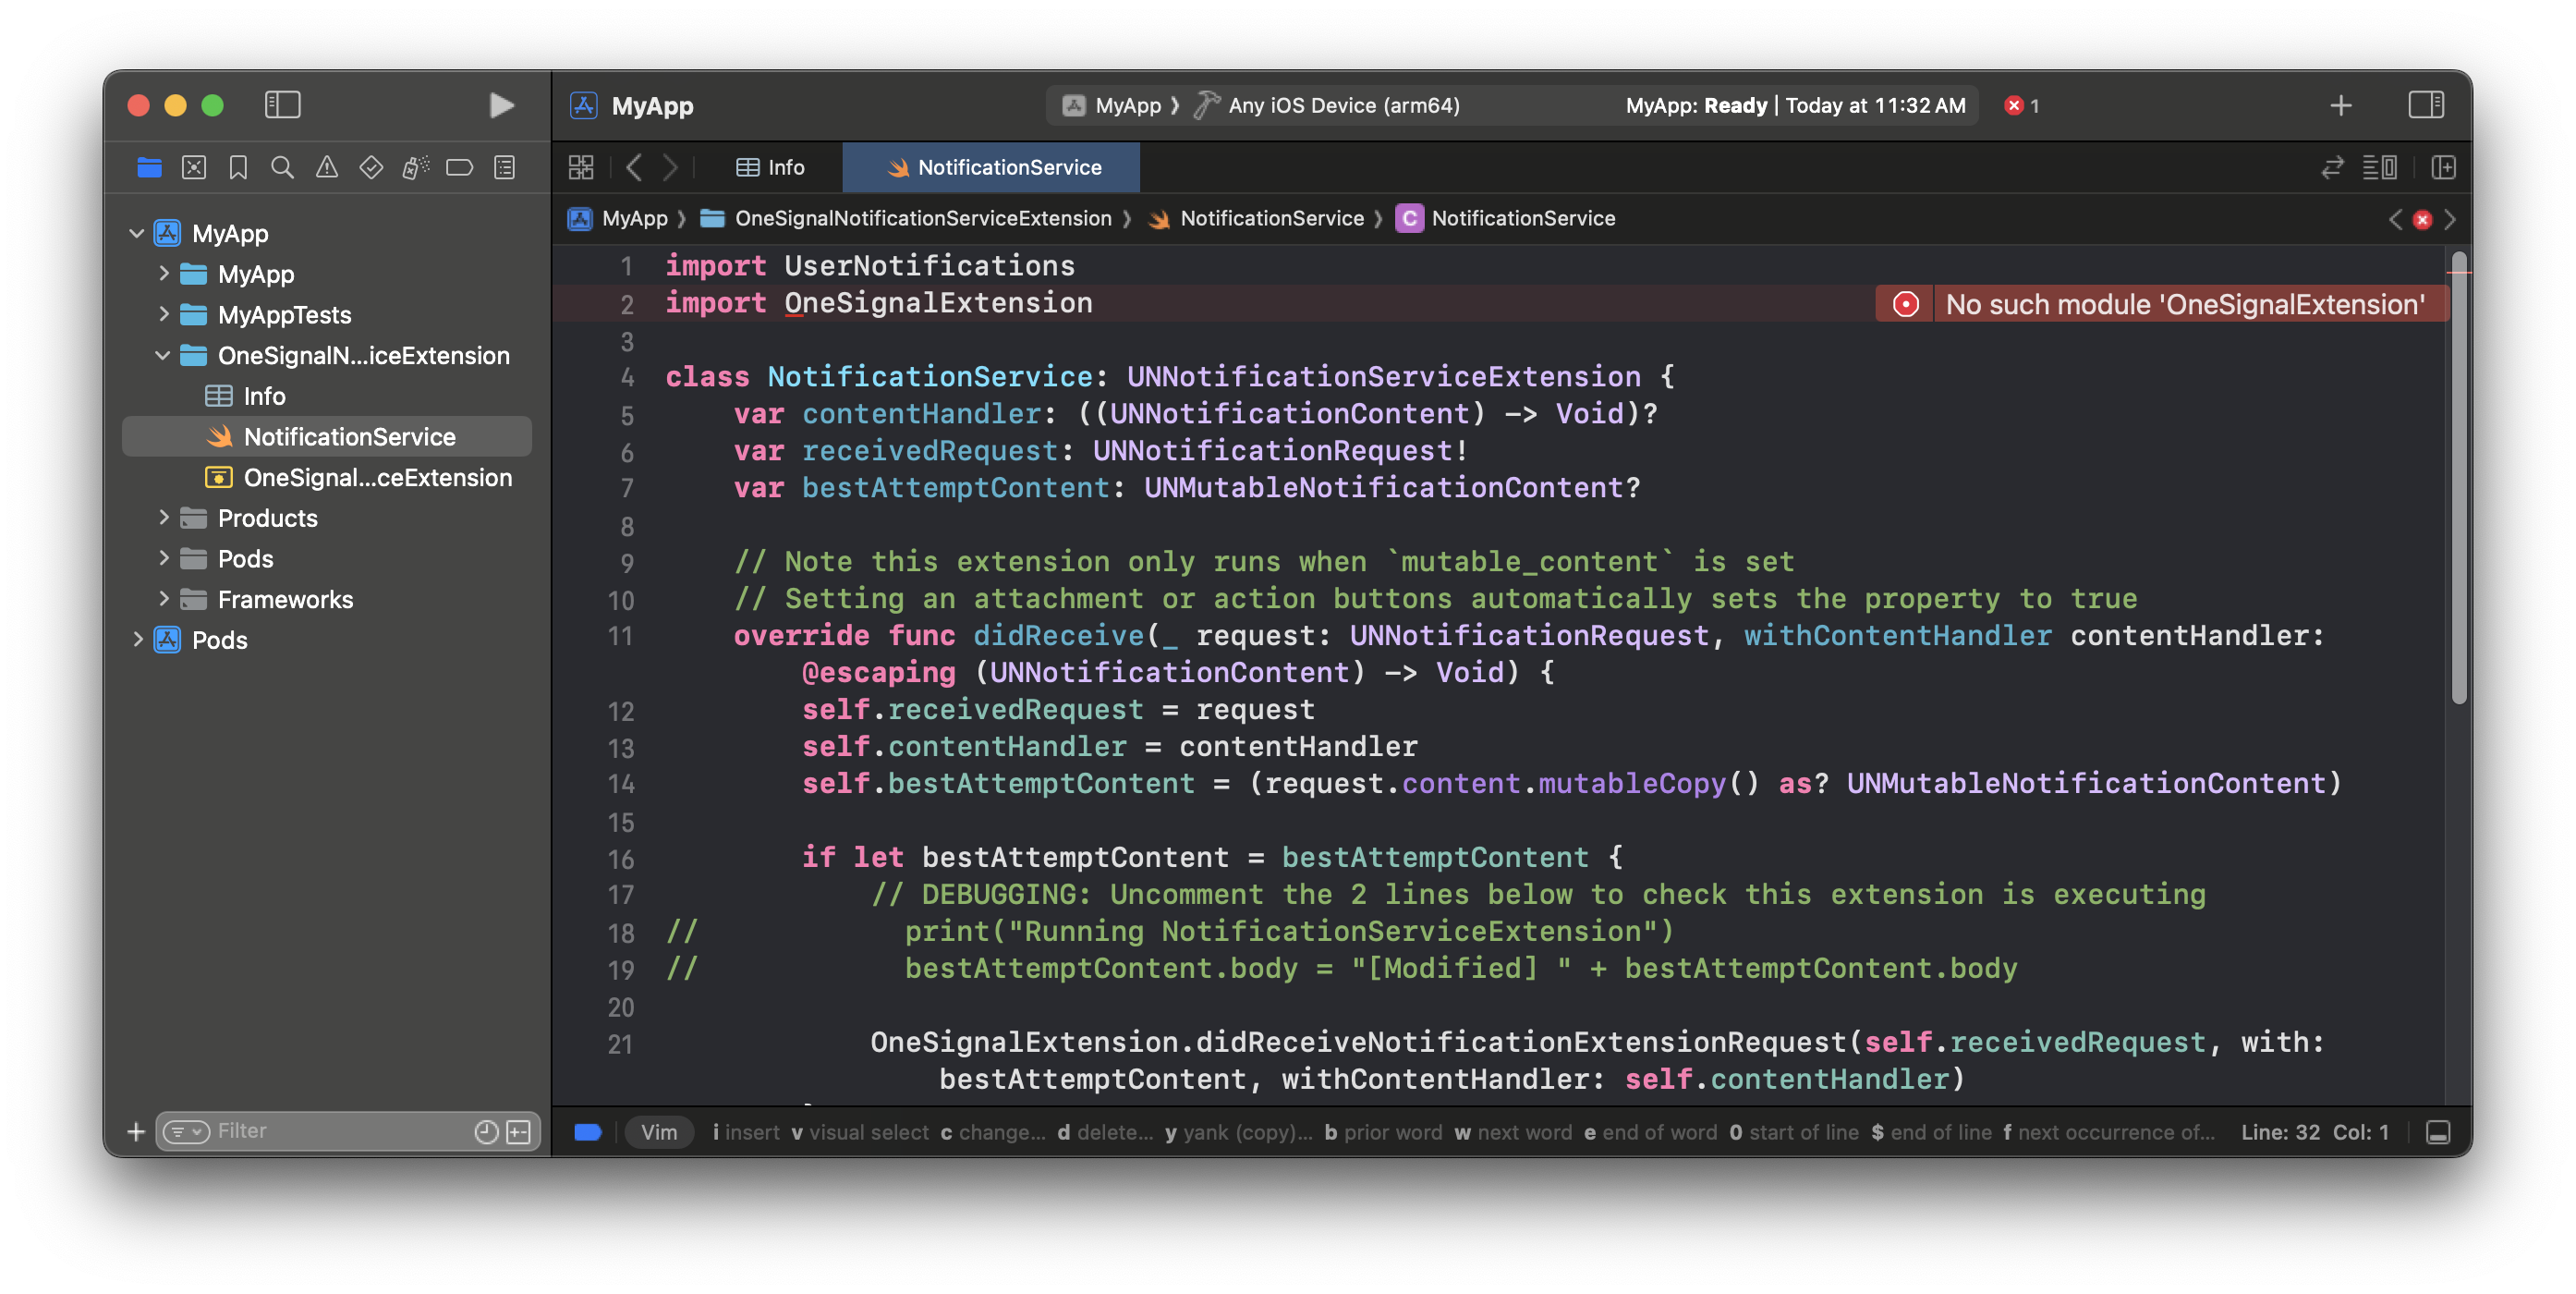
OneSignal 패키지가 설치되지 않아 오류가 표시됩니다. 이는 다음 단계에서 해결됩니다.
```swift Swift theme={null}
import UserNotifications
import OneSignalExtension
class NotificationService: UNNotificationServiceExtension {
var contentHandler: ((UNNotificationContent) -> Void)?
var receivedRequest: UNNotificationRequest!
var bestAttemptContent: UNMutableNotificationContent?
// Note this extension only runs when `mutable_content` is set
// Setting an attachment or action buttons automatically sets the property to true
override func didReceive(_ request: UNNotificationRequest, withContentHandler contentHandler: @escaping (UNNotificationContent) -> Void) {
self.receivedRequest = request
self.contentHandler = contentHandler
self.bestAttemptContent = (request.content.mutableCopy() as? UNMutableNotificationContent)
if let bestAttemptContent = bestAttemptContent {
// DEBUGGING: Uncomment the 2 lines below to check this extension is executing
// print("Running NotificationServiceExtension")
// bestAttemptContent.body = "[Modified] " + bestAttemptContent.body
OneSignalExtension.didReceiveNotificationExtensionRequest(self.receivedRequest, with: bestAttemptContent, withContentHandler: self.contentHandler)
}
}
override func serviceExtensionTimeWillExpire() {
// Use this as an opportunity to deliver your "best attempt" at modified content, otherwise the original push payload will be used.
if let contentHandler = contentHandler, let bestAttemptContent = bestAttemptContent {
OneSignalExtension.serviceExtensionTimeWillExpireRequest(self.receivedRequest, with: self.bestAttemptContent)
contentHandler(bestAttemptContent)
}
}
}
```
```objc Objective-C theme={null}
#import
#import "NotificationService.h"
@interface NotificationService ()
@property (nonatomic, strong) void (^contentHandler)(UNNotificationContent *contentToDeliver);
@property (nonatomic, strong) UNNotificationRequest *receivedRequest;
@property (nonatomic, strong) UNMutableNotificationContent *bestAttemptContent;
@end
@implementation NotificationService
// Note, this extension only runs when mutable-content is set
// Setting an attachment or action buttons automatically adds this
- (void)didReceiveNotificationRequest:(UNNotificationRequest *)request withContentHandler:(void (^)(UNNotificationContent * _Nonnull))contentHandler {
self.receivedRequest = request;
self.contentHandler = contentHandler;
self.bestAttemptContent = [request.content mutableCopy];
// DEBUGGING: Uncomment the 2 lines below and comment out the one above to ensure this extension is executing
// NSLog(@"Running NotificationServiceExtension");
// self.bestAttemptContent.body = [@"[Modified] " stringByAppendingString:self.bestAttemptContent.body];
[OneSignalExtension didReceiveNotificationExtensionRequest:self.receivedRequest
withMutableNotificationContent:self.bestAttemptContent
withContentHandler:self.contentHandler];
}
- (void)serviceExtensionTimeWillExpire {
// Use this as an opportunity to deliver your "best attempt" at modified content, otherwise the original push payload will be used.
[OneSignalExtension serviceExtensionTimeWillExpireRequest:self.receivedRequest withMutableNotificationContent:self.bestAttemptContent];
self.contentHandler(self.bestAttemptContent);
}
@end
```
OneSignal 패키지가 설치되지 않아 오류가 표시됩니다. 이는 다음 단계에서 해결됩니다.
 ***
## SDK 설정
이 섹션에서는 OneSignal의 핵심 기능을 통합하는 과정을 안내합니다. 이 섹션이 끝나면 인앱 메시지를 트리거하고 푸시 알림을 받을 수 있는 SDK와의 기본 통합이 완료됩니다.
### 1. SDK 추가
Xcode Package Dependencies Manager (Swift Package Manager) 또는 CocoaPods를 사용하여 SDK를 추가하세요. 4개의 사용 가능한 라이브러리가 있습니다. [인앱 메시지](./in-app-messages-setup) 및/또는 위치 추적을 원하지 않는 경우 이러한 패키지를 생략할 수 있습니다.
| 라이브러리 | 타겟 | 필수 여부 |
| -------------------------- | :-----------------------------------: | :---: |
| **OneSignalExtension** | OneSignalNotificationServiceExtension | ✅ |
| **OneSignalFramework** | App | ✅ |
| **OneSignalInAppMessages** | App | 권장 |
| **OneSignalLocation** | App | 선택 사항 |
\*\*File > Add Package Dependencies...\*\*로 이동하여 OneSignal SDK 저장소의 URL을 입력하세요:
`https://github.com/OneSignal/OneSignal-XCFramework`
**onesignal-xcframework** 패키지를 선택하고 **Add Package**를 클릭하세요.
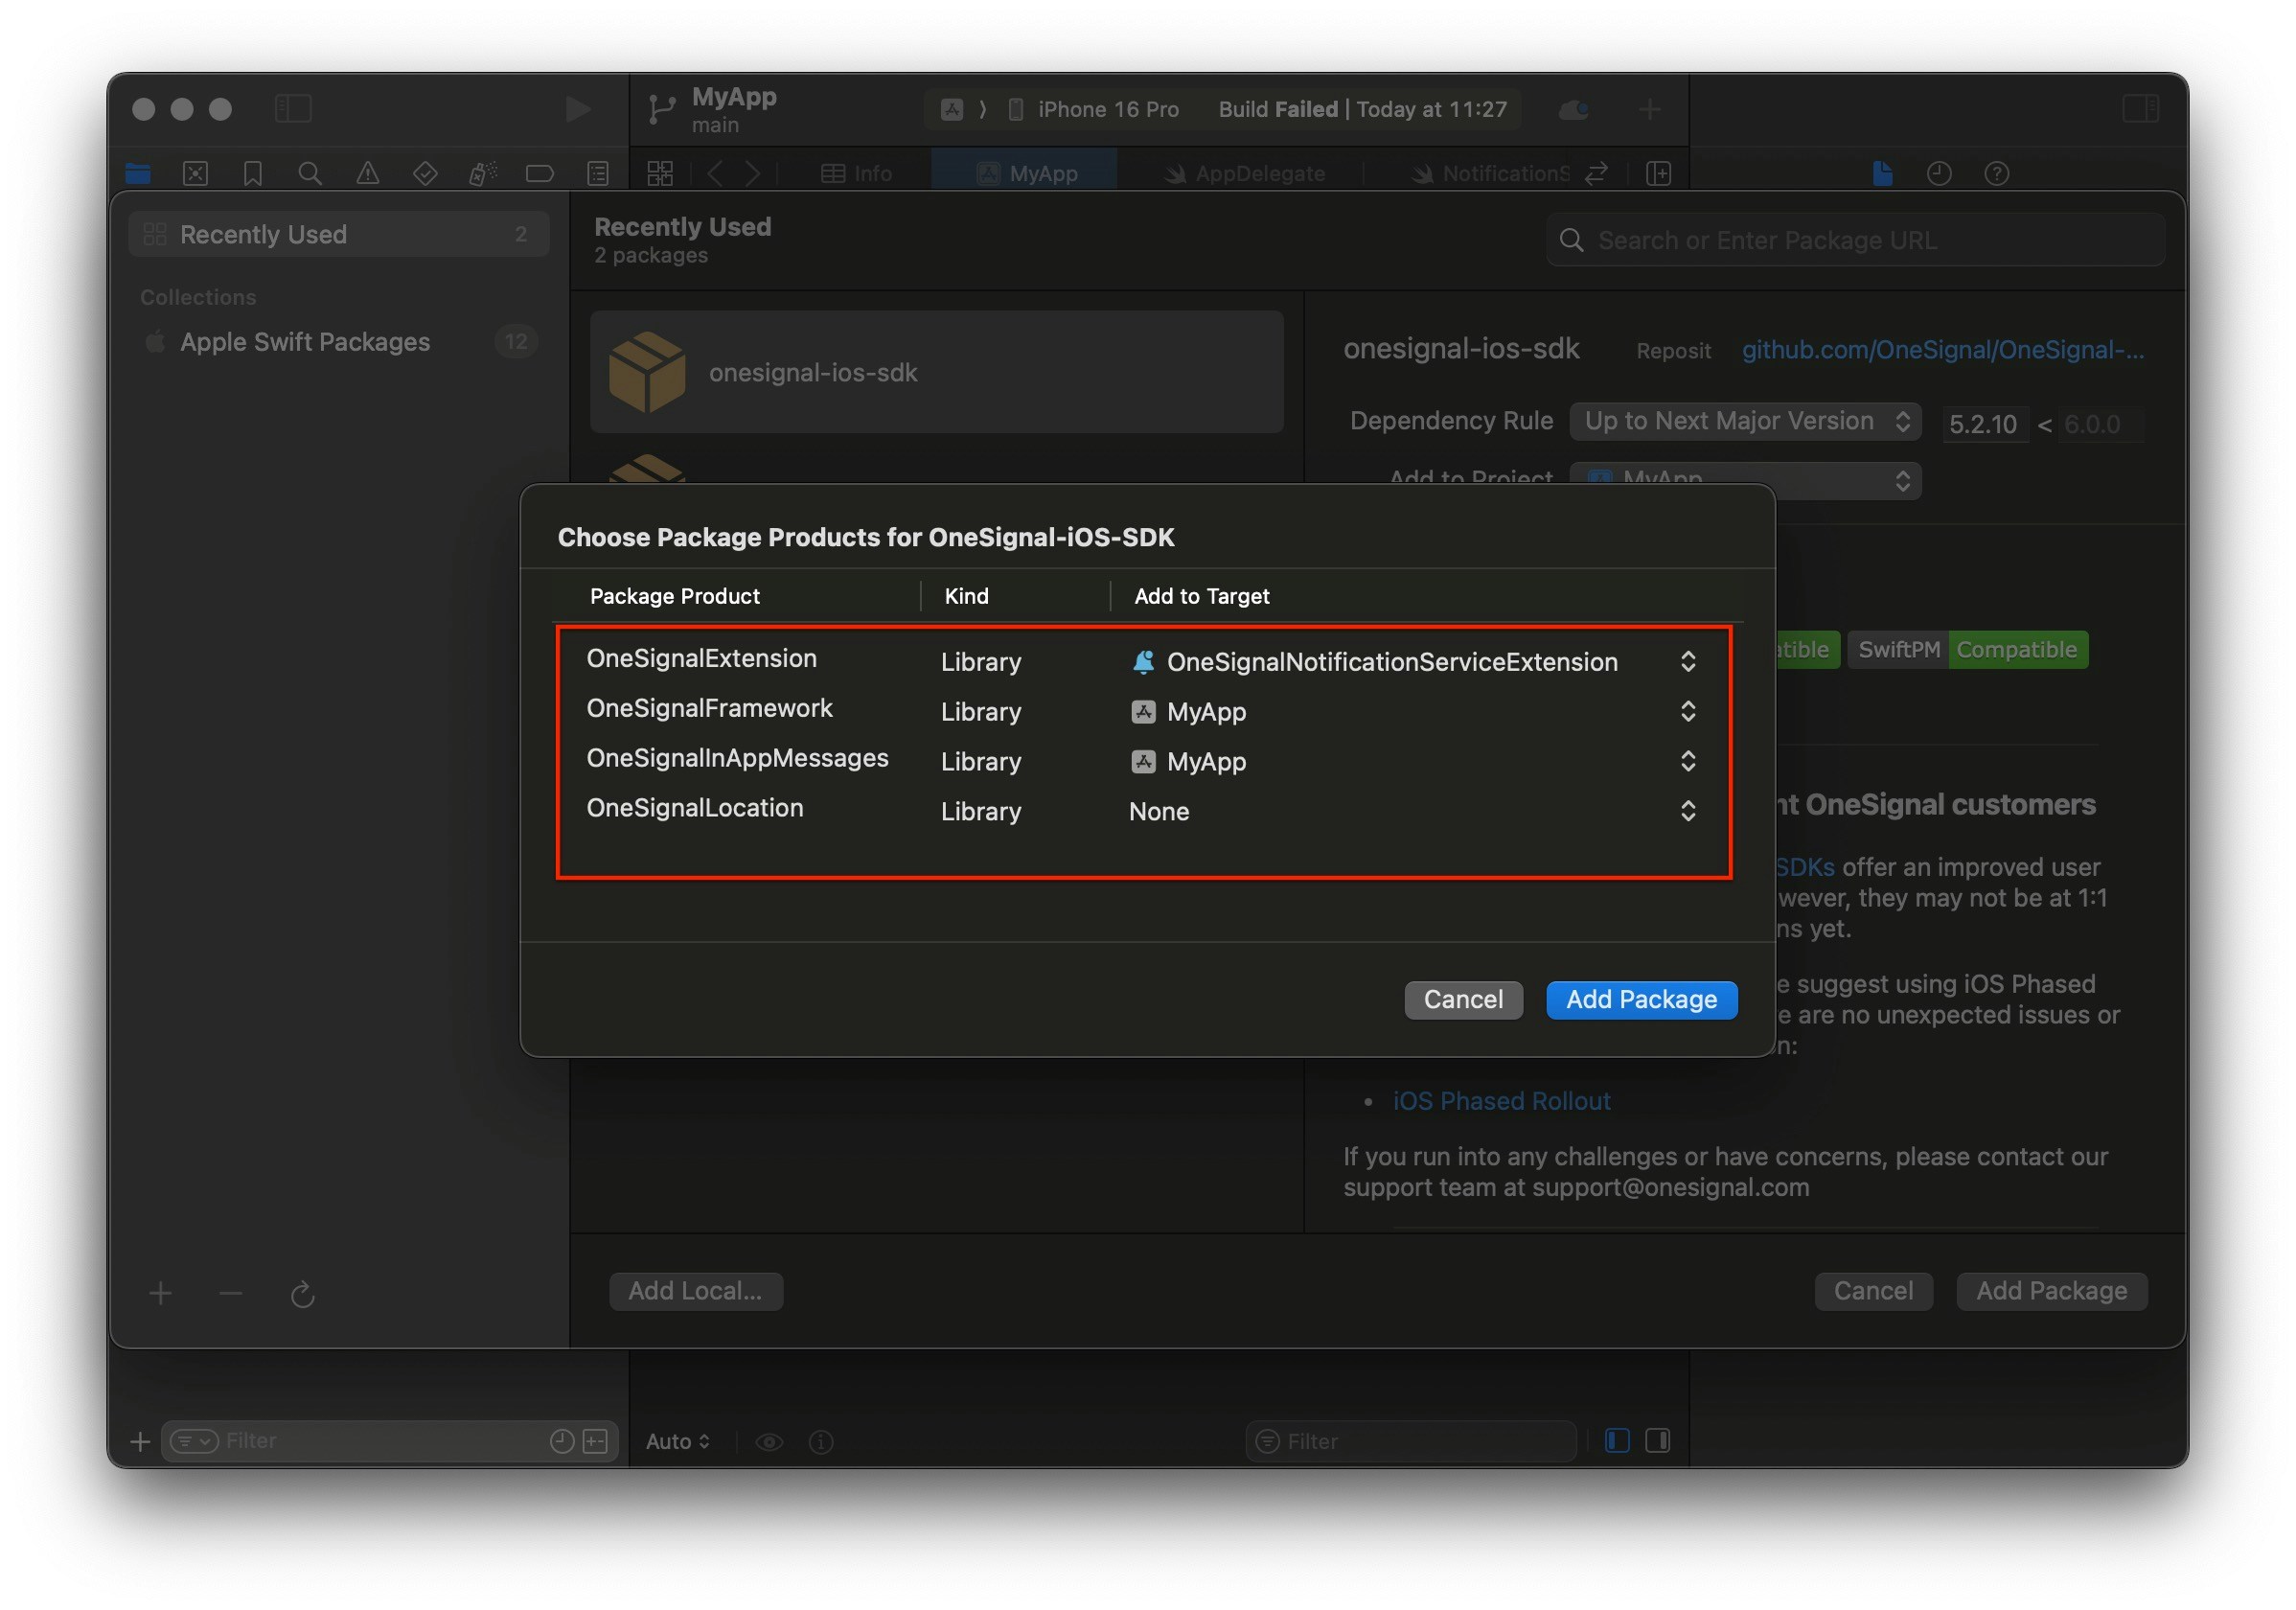
OneSignal-XCFramework에 대한 패키지 제품을 선택하세요.
* **중요**: OneSignalNotificationServiceExtension Target에 **OneSignalExtension**을 추가하세요.
* 앱 타겟에 **OneSignalFramework**를 추가하세요.
* 인앱 메시지(권장) 및/또는 위치 추적을 사용할 계획이라면 해당 패키지도 앱 타겟에 추가하세요.
***
## SDK 설정
이 섹션에서는 OneSignal의 핵심 기능을 통합하는 과정을 안내합니다. 이 섹션이 끝나면 인앱 메시지를 트리거하고 푸시 알림을 받을 수 있는 SDK와의 기본 통합이 완료됩니다.
### 1. SDK 추가
Xcode Package Dependencies Manager (Swift Package Manager) 또는 CocoaPods를 사용하여 SDK를 추가하세요. 4개의 사용 가능한 라이브러리가 있습니다. [인앱 메시지](./in-app-messages-setup) 및/또는 위치 추적을 원하지 않는 경우 이러한 패키지를 생략할 수 있습니다.
| 라이브러리 | 타겟 | 필수 여부 |
| -------------------------- | :-----------------------------------: | :---: |
| **OneSignalExtension** | OneSignalNotificationServiceExtension | ✅ |
| **OneSignalFramework** | App | ✅ |
| **OneSignalInAppMessages** | App | 권장 |
| **OneSignalLocation** | App | 선택 사항 |
\*\*File > Add Package Dependencies...\*\*로 이동하여 OneSignal SDK 저장소의 URL을 입력하세요:
`https://github.com/OneSignal/OneSignal-XCFramework`
**onesignal-xcframework** 패키지를 선택하고 **Add Package**를 클릭하세요.
OneSignal-XCFramework에 대한 패키지 제품을 선택하세요.
* **중요**: OneSignalNotificationServiceExtension Target에 **OneSignalExtension**을 추가하세요.
* 앱 타겟에 **OneSignalFramework**를 추가하세요.
* 인앱 메시지(권장) 및/또는 위치 추적을 사용할 계획이라면 해당 패키지도 앱 타겟에 추가하세요.
 자세한 내용은 [Apple의 패키지 종속성 추가 문서](https://developer.apple.com/documentation/xcode/adding-package-dependencies-to-your-app#Add-a-package-dependency)를 참조하세요.
**요구 사항**: CocoaPods 1.16.2+ (설정 지침은 CocoaPods 1.16.2 사용).
`Podfile`을 열고 다음을 추가하세요:
```ruby Podfile theme={null}
# If platform is uncommented, set to the same value as your minimum deployment target in Xcode
# platform :ios, '15.0'
target 'your_project_name' do
pod 'OneSignal/OneSignal', '>= 5.2.9', '< 6.0'
# If your app does not use In-App messages, you can remove this:
pod 'OneSignal/OneSignalInAppMessages', '>= 5.2.9', '< 6.0'
# If your app does not use CoreLocation, you can remove this:
pod 'OneSignal/OneSignalLocation', '>= 5.2.9', '< 6.0'
# Your other pods here
end
target 'OneSignalNotificationServiceExtension' do
pod 'OneSignal/OneSignal', '>= 5.2.9', '< 6.0'
end
```
종속성을 메인 앱 타겟과 OneSignalNotificationServiceExtension 타겟에 추가하세요. `platform`이 주석 처리되지 않은 경우 Xcode의 최소 배포 타겟과 동일한 값인지 확인하세요.
다음 명령을 실행하여 OneSignal iOS SDK pod를 가져와 프로젝트에 추가하세요:
`pod repo update && pod install`
설치가 완료되면 프로젝트 이름을 딴 *XCWorkspace* 파일(예: `.xcworkspace`)을 열어야 합니다.
OneSignal iOS SDK pod를 사용할 때는 프로젝트를 열기 위해 반드시 `.xcworkspace` 파일을 사용해야 합니다.
다음 오류가 발생할 수 있으며, 다음과 같이 해결할 수 있습니다.
CocoaPods는 `xcodeproj` Ruby gem에 의존하여 Xcode 프로젝트 파일을 읽습니다. 현재 최신 `xcodeproj` 릴리스는 Xcode 16에서 도입된 object version 70을 인식하지 못합니다. 따라서 CocoaPods가 `.xcodeproj` 파일을 열려고 하면 이 오류와 함께 충돌합니다.
1. Xcode를 닫으세요.
2. 프로젝트의 `ios/.xcodeproj/project.pbxproj` 파일로 이동하세요.
3. 이 줄을 변경하세요: `objectVersion = 70;`
4. 다음으로 바꾸세요: `objectVersion = 55;`
5. 저장하고 닫은 다음 `cd ios pod install cd ..`를 다시 실행하세요
### 2. SDK 초기화
Xcode 인터페이스 설정에 따라 다음 옵션을 따라 OneSignal을 초기화하세요.
SwiftUI 인터페이스를 사용하는 경우 `App.swift` 파일로 이동하여 제공된 메서드로 OneSignal을 초기화하세요.
OneSignal 대시보드 \*\*Settings > [Keys & IDs](./keys-and-ids)\*\*에서 찾은 OneSignal 앱 ID로 `YOUR_APP_ID`를 바꾸세요. OneSignal 앱에 액세스할 수 없는 경우 [팀 멤버](./manage-team-members)에게 초대를 요청하세요.
```swift Swift theme={null}
import SwiftUI
import OneSignalFramework
@main
struct YOURAPP_NAME: App {
//Connect the SwiftUI app to the UIKit app delegate
@UIApplicationDelegateAdaptor(AppDelegate.self) var appDelegate
var body: some Scene {
WindowGroup {
ContentView()
}
}
}
class AppDelegate: NSObject, UIApplicationDelegate {
func application(_ application: UIApplication, didFinishLaunchingWithOptions launchOptions: [UIApplication.LaunchOptionsKey : Any]? = nil) -> Bool {
// Enable verbose logging for debugging (remove in production)
OneSignal.Debug.setLogLevel(.LL_VERBOSE)
// Initialize with your OneSignal App ID
OneSignal.initialize("YOUR_APP_ID", withLaunchOptions: launchOptions)
// Use this method to prompt for push notifications.
// We recommend removing this method after testing and instead use In-App Messages to prompt for notification permission.
OneSignal.Notifications.requestPermission({ accepted in
print("User accepted notifications: \(accepted)")
}, fallbackToSettings: false)
return true
}
}
```
Storyboard 인터페이스를 사용하는 경우 AppDelegate 파일로 이동하여 제공된 메서드로 OneSignal을 초기화하세요.
OneSignal 대시보드 \*\*Settings > [Keys & IDs](./keys-and-ids)\*\*에서 찾은 OneSignal 앱 ID로 `YOUR_APP_ID`를 바꾸세요. OneSignal 앱에 액세스할 수 없는 경우 [팀 멤버](./manage-team-members)에게 초대를 요청하세요.
```swift Swift theme={null}
//AppDelegate.swift
import UIKit
import OneSignalFramework
@UIApplicationMain
class AppDelegate: UIResponder, UIApplicationDelegate {
func application(_ application: UIApplication, didFinishLaunchingWithOptions launchOptions:
[UIApplication.LaunchOptionsKey: Any]?) -> Bool {
// Enable verbose logging for debugging (remove in production)
OneSignal.Debug.setLogLevel(.LL_VERBOSE)
// Initialize with your OneSignal App ID
OneSignal.initialize("YOUR_APP_ID", withLaunchOptions: launchOptions)
// Use this method to prompt for push notifications.
// We recommend removing this method after testing and instead use In-App Messages to prompt for notification permission.
OneSignal.Notifications.requestPermission({ accepted in
print("User accepted notifications: \(accepted)")
}, fallbackToSettings: false)
return true
}
// Remaining contents of your AppDelegate Class...
}
```
```objc Objective-C theme={null}
#import
@implementation AppDelegate
- (BOOL)application:(UIApplication *)application didFinishLaunchingWithOptions:(NSDictionary *)launchOptions {
// Enable verbose logging for debugging (remove in production)
[OneSignal.Debug setLogLevel:ONE_S_LL_VERBOSE];
// Initialize with your OneSignal App ID
[OneSignal initialize:@"YOUR_APP_ID" withLaunchOptions:launchOptions];
// Use this method to prompt for push notifications.
// We recommend removing this method after testing and instead use In-App Messages to prompt for notification permission.
[OneSignal.Notifications requestPermission:^(BOOL accepted) {
NSLog(@"User accepted notifications: %d", accepted);
} fallbackToSettings:false];
// Login your customer with externalId
// [OneSignal login:@"EXTERNAL_ID"];
return YES;
}
```
***
## OneSignal SDK 통합 테스트
이 가이드는 푸시 알림, 구독 등록 및 인앱 메시징을 테스트하여 OneSignal SDK 통합이 올바르게 작동하는지 확인하는 데 도움이 됩니다.
### 모바일 구독 확인
초기화 중에 `requestPermission` 메서드를 추가한 경우 기본 푸시 권한 프롬프트가 자동으로 나타나야 합니다.
자세한 내용은 [Apple의 패키지 종속성 추가 문서](https://developer.apple.com/documentation/xcode/adding-package-dependencies-to-your-app#Add-a-package-dependency)를 참조하세요.
**요구 사항**: CocoaPods 1.16.2+ (설정 지침은 CocoaPods 1.16.2 사용).
`Podfile`을 열고 다음을 추가하세요:
```ruby Podfile theme={null}
# If platform is uncommented, set to the same value as your minimum deployment target in Xcode
# platform :ios, '15.0'
target 'your_project_name' do
pod 'OneSignal/OneSignal', '>= 5.2.9', '< 6.0'
# If your app does not use In-App messages, you can remove this:
pod 'OneSignal/OneSignalInAppMessages', '>= 5.2.9', '< 6.0'
# If your app does not use CoreLocation, you can remove this:
pod 'OneSignal/OneSignalLocation', '>= 5.2.9', '< 6.0'
# Your other pods here
end
target 'OneSignalNotificationServiceExtension' do
pod 'OneSignal/OneSignal', '>= 5.2.9', '< 6.0'
end
```
종속성을 메인 앱 타겟과 OneSignalNotificationServiceExtension 타겟에 추가하세요. `platform`이 주석 처리되지 않은 경우 Xcode의 최소 배포 타겟과 동일한 값인지 확인하세요.
다음 명령을 실행하여 OneSignal iOS SDK pod를 가져와 프로젝트에 추가하세요:
`pod repo update && pod install`
설치가 완료되면 프로젝트 이름을 딴 *XCWorkspace* 파일(예: `.xcworkspace`)을 열어야 합니다.
OneSignal iOS SDK pod를 사용할 때는 프로젝트를 열기 위해 반드시 `.xcworkspace` 파일을 사용해야 합니다.
다음 오류가 발생할 수 있으며, 다음과 같이 해결할 수 있습니다.
CocoaPods는 `xcodeproj` Ruby gem에 의존하여 Xcode 프로젝트 파일을 읽습니다. 현재 최신 `xcodeproj` 릴리스는 Xcode 16에서 도입된 object version 70을 인식하지 못합니다. 따라서 CocoaPods가 `.xcodeproj` 파일을 열려고 하면 이 오류와 함께 충돌합니다.
1. Xcode를 닫으세요.
2. 프로젝트의 `ios/.xcodeproj/project.pbxproj` 파일로 이동하세요.
3. 이 줄을 변경하세요: `objectVersion = 70;`
4. 다음으로 바꾸세요: `objectVersion = 55;`
5. 저장하고 닫은 다음 `cd ios pod install cd ..`를 다시 실행하세요
### 2. SDK 초기화
Xcode 인터페이스 설정에 따라 다음 옵션을 따라 OneSignal을 초기화하세요.
SwiftUI 인터페이스를 사용하는 경우 `App.swift` 파일로 이동하여 제공된 메서드로 OneSignal을 초기화하세요.
OneSignal 대시보드 \*\*Settings > [Keys & IDs](./keys-and-ids)\*\*에서 찾은 OneSignal 앱 ID로 `YOUR_APP_ID`를 바꾸세요. OneSignal 앱에 액세스할 수 없는 경우 [팀 멤버](./manage-team-members)에게 초대를 요청하세요.
```swift Swift theme={null}
import SwiftUI
import OneSignalFramework
@main
struct YOURAPP_NAME: App {
//Connect the SwiftUI app to the UIKit app delegate
@UIApplicationDelegateAdaptor(AppDelegate.self) var appDelegate
var body: some Scene {
WindowGroup {
ContentView()
}
}
}
class AppDelegate: NSObject, UIApplicationDelegate {
func application(_ application: UIApplication, didFinishLaunchingWithOptions launchOptions: [UIApplication.LaunchOptionsKey : Any]? = nil) -> Bool {
// Enable verbose logging for debugging (remove in production)
OneSignal.Debug.setLogLevel(.LL_VERBOSE)
// Initialize with your OneSignal App ID
OneSignal.initialize("YOUR_APP_ID", withLaunchOptions: launchOptions)
// Use this method to prompt for push notifications.
// We recommend removing this method after testing and instead use In-App Messages to prompt for notification permission.
OneSignal.Notifications.requestPermission({ accepted in
print("User accepted notifications: \(accepted)")
}, fallbackToSettings: false)
return true
}
}
```
Storyboard 인터페이스를 사용하는 경우 AppDelegate 파일로 이동하여 제공된 메서드로 OneSignal을 초기화하세요.
OneSignal 대시보드 \*\*Settings > [Keys & IDs](./keys-and-ids)\*\*에서 찾은 OneSignal 앱 ID로 `YOUR_APP_ID`를 바꾸세요. OneSignal 앱에 액세스할 수 없는 경우 [팀 멤버](./manage-team-members)에게 초대를 요청하세요.
```swift Swift theme={null}
//AppDelegate.swift
import UIKit
import OneSignalFramework
@UIApplicationMain
class AppDelegate: UIResponder, UIApplicationDelegate {
func application(_ application: UIApplication, didFinishLaunchingWithOptions launchOptions:
[UIApplication.LaunchOptionsKey: Any]?) -> Bool {
// Enable verbose logging for debugging (remove in production)
OneSignal.Debug.setLogLevel(.LL_VERBOSE)
// Initialize with your OneSignal App ID
OneSignal.initialize("YOUR_APP_ID", withLaunchOptions: launchOptions)
// Use this method to prompt for push notifications.
// We recommend removing this method after testing and instead use In-App Messages to prompt for notification permission.
OneSignal.Notifications.requestPermission({ accepted in
print("User accepted notifications: \(accepted)")
}, fallbackToSettings: false)
return true
}
// Remaining contents of your AppDelegate Class...
}
```
```objc Objective-C theme={null}
#import
@implementation AppDelegate
- (BOOL)application:(UIApplication *)application didFinishLaunchingWithOptions:(NSDictionary *)launchOptions {
// Enable verbose logging for debugging (remove in production)
[OneSignal.Debug setLogLevel:ONE_S_LL_VERBOSE];
// Initialize with your OneSignal App ID
[OneSignal initialize:@"YOUR_APP_ID" withLaunchOptions:launchOptions];
// Use this method to prompt for push notifications.
// We recommend removing this method after testing and instead use In-App Messages to prompt for notification permission.
[OneSignal.Notifications requestPermission:^(BOOL accepted) {
NSLog(@"User accepted notifications: %d", accepted);
} fallbackToSettings:false];
// Login your customer with externalId
// [OneSignal login:@"EXTERNAL_ID"];
return YES;
}
```
***
## OneSignal SDK 통합 테스트
이 가이드는 푸시 알림, 구독 등록 및 인앱 메시징을 테스트하여 OneSignal SDK 통합이 올바르게 작동하는지 확인하는 데 도움이 됩니다.
### 모바일 구독 확인
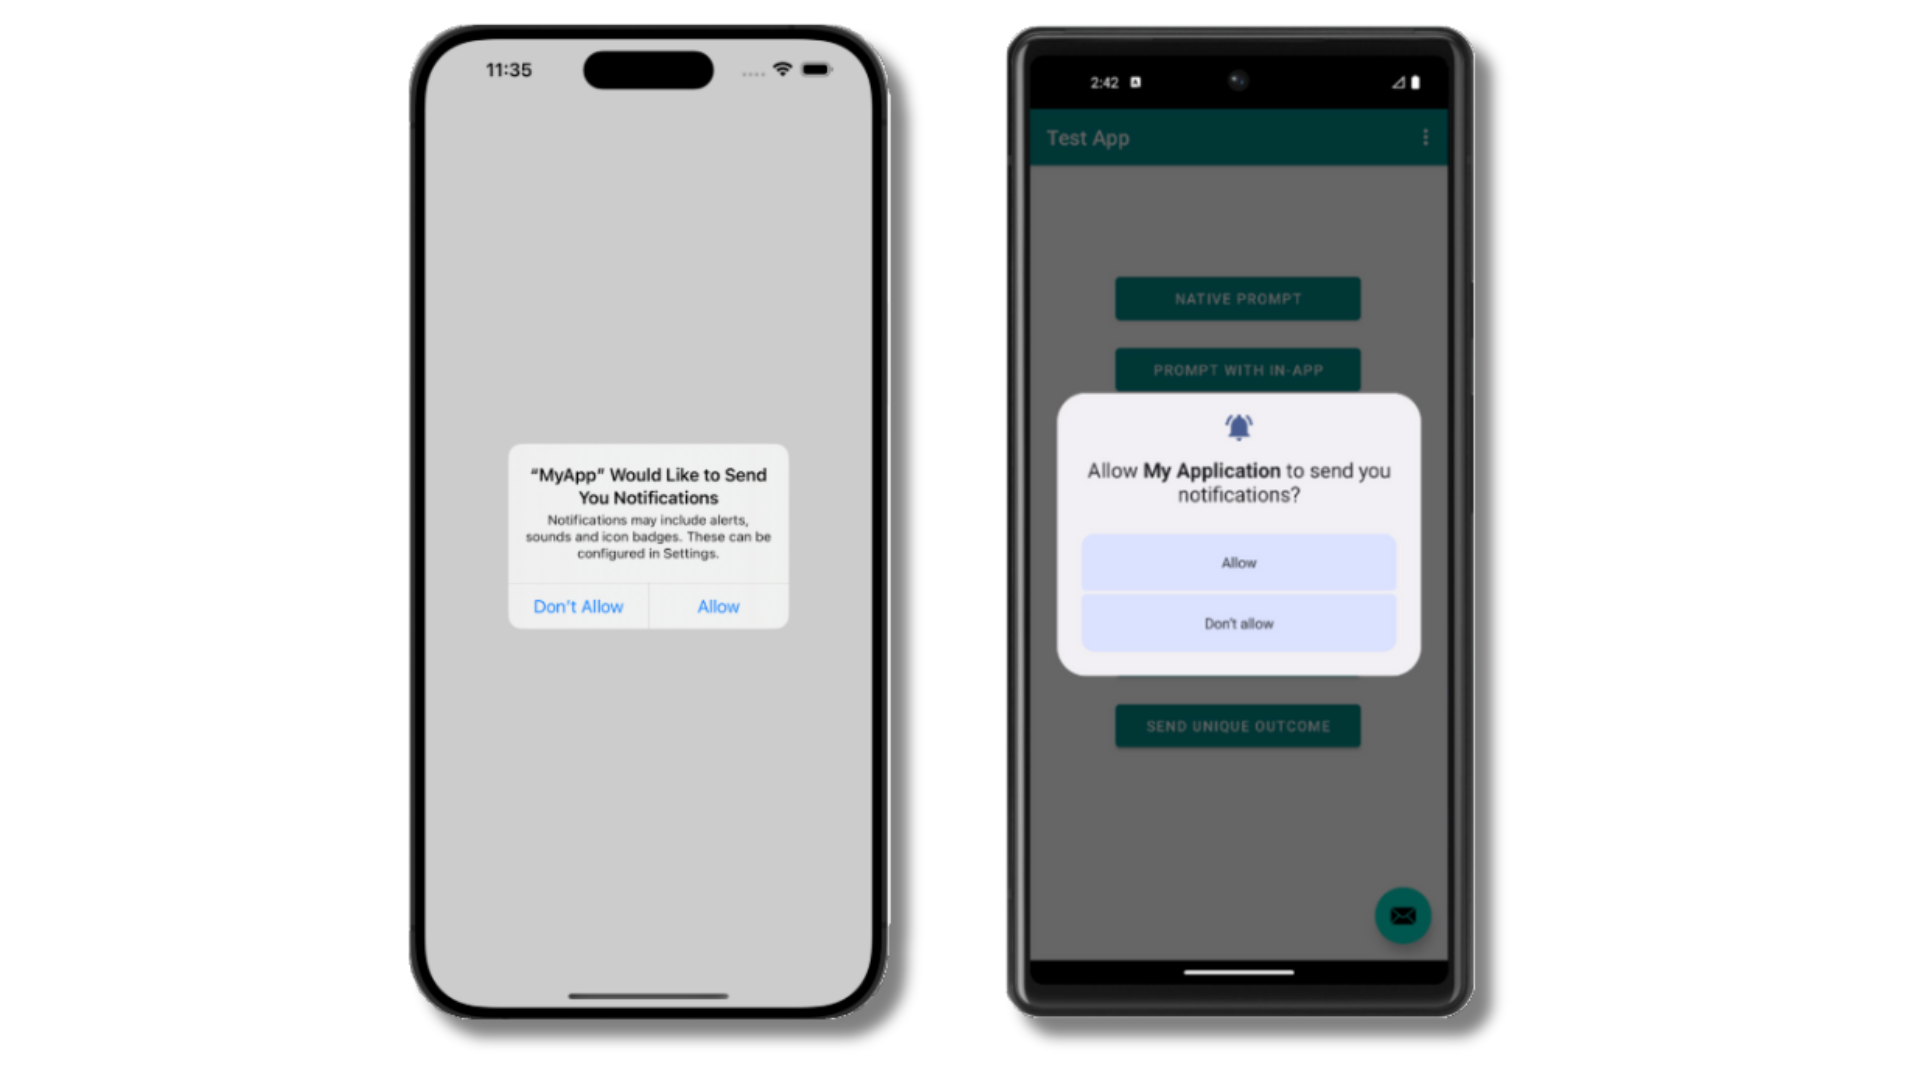
초기화 중에 `requestPermission` 메서드를 추가한 경우 기본 푸시 권한 프롬프트가 자동으로 나타나야 합니다.
 프롬프트를 수락하기 전에 OneSignal 대시보드를 확인하세요:
* **Audience > Subscriptions**로 이동하세요.
* "Never Subscribed" 상태의 새 항목이 표시되어야 합니다.
프롬프트를 수락하기 전에 OneSignal 대시보드를 확인하세요:
* **Audience > Subscriptions**로 이동하세요.
* "Never Subscribed" 상태의 새 항목이 표시되어야 합니다.
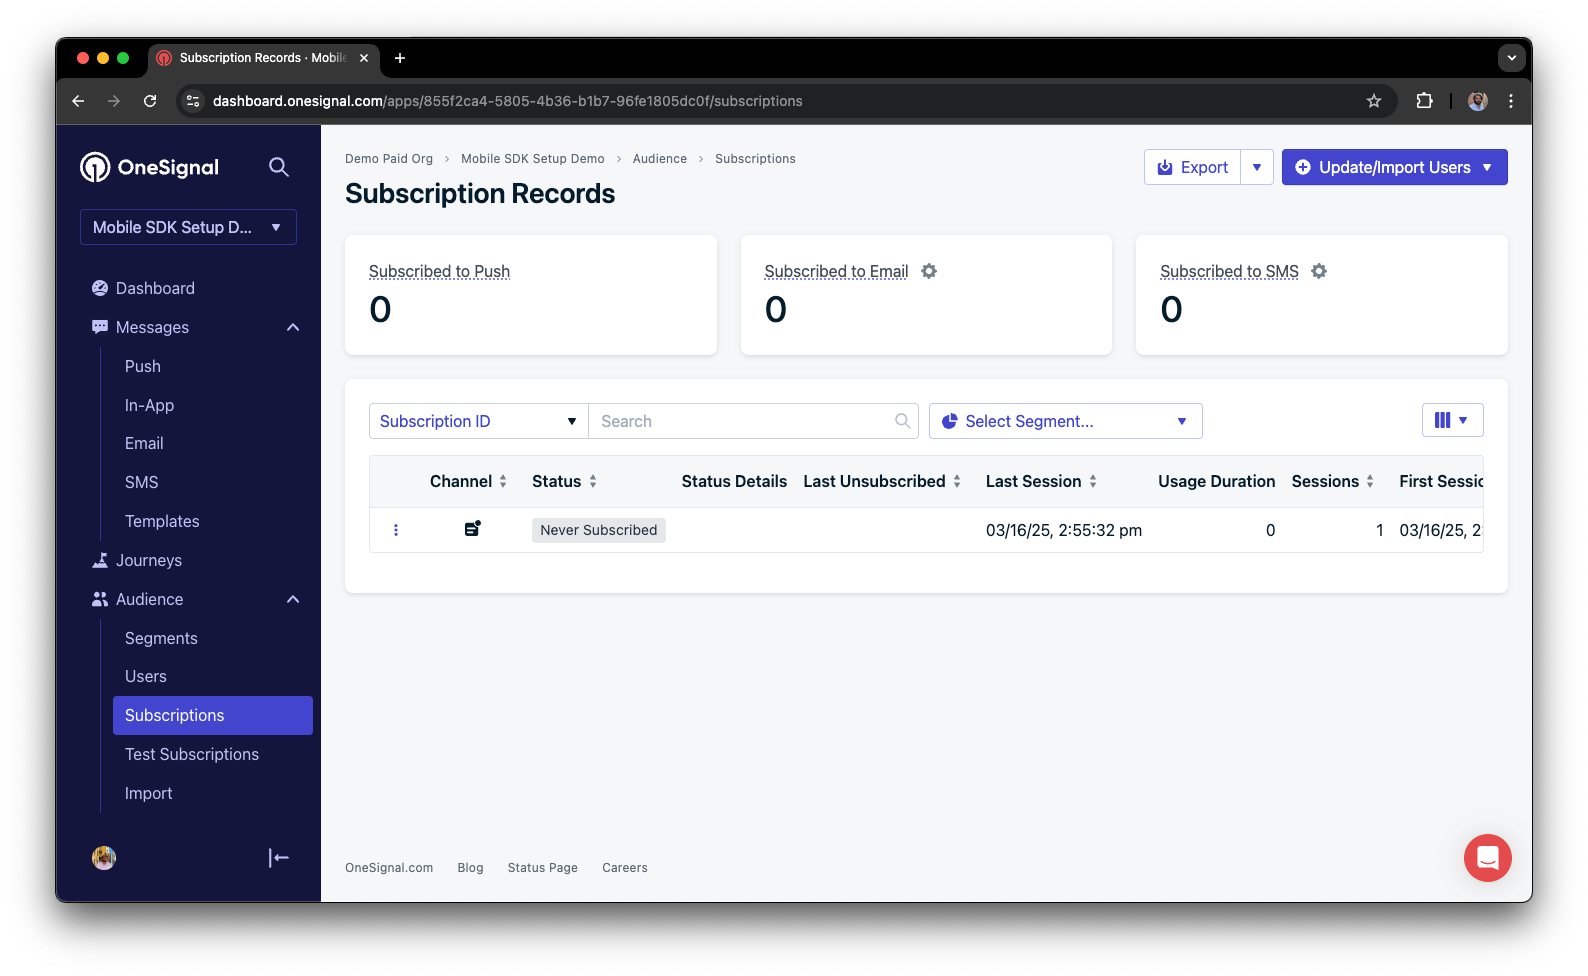 구독 상태가 이제 **Subscribed**로 표시되어야 합니다.
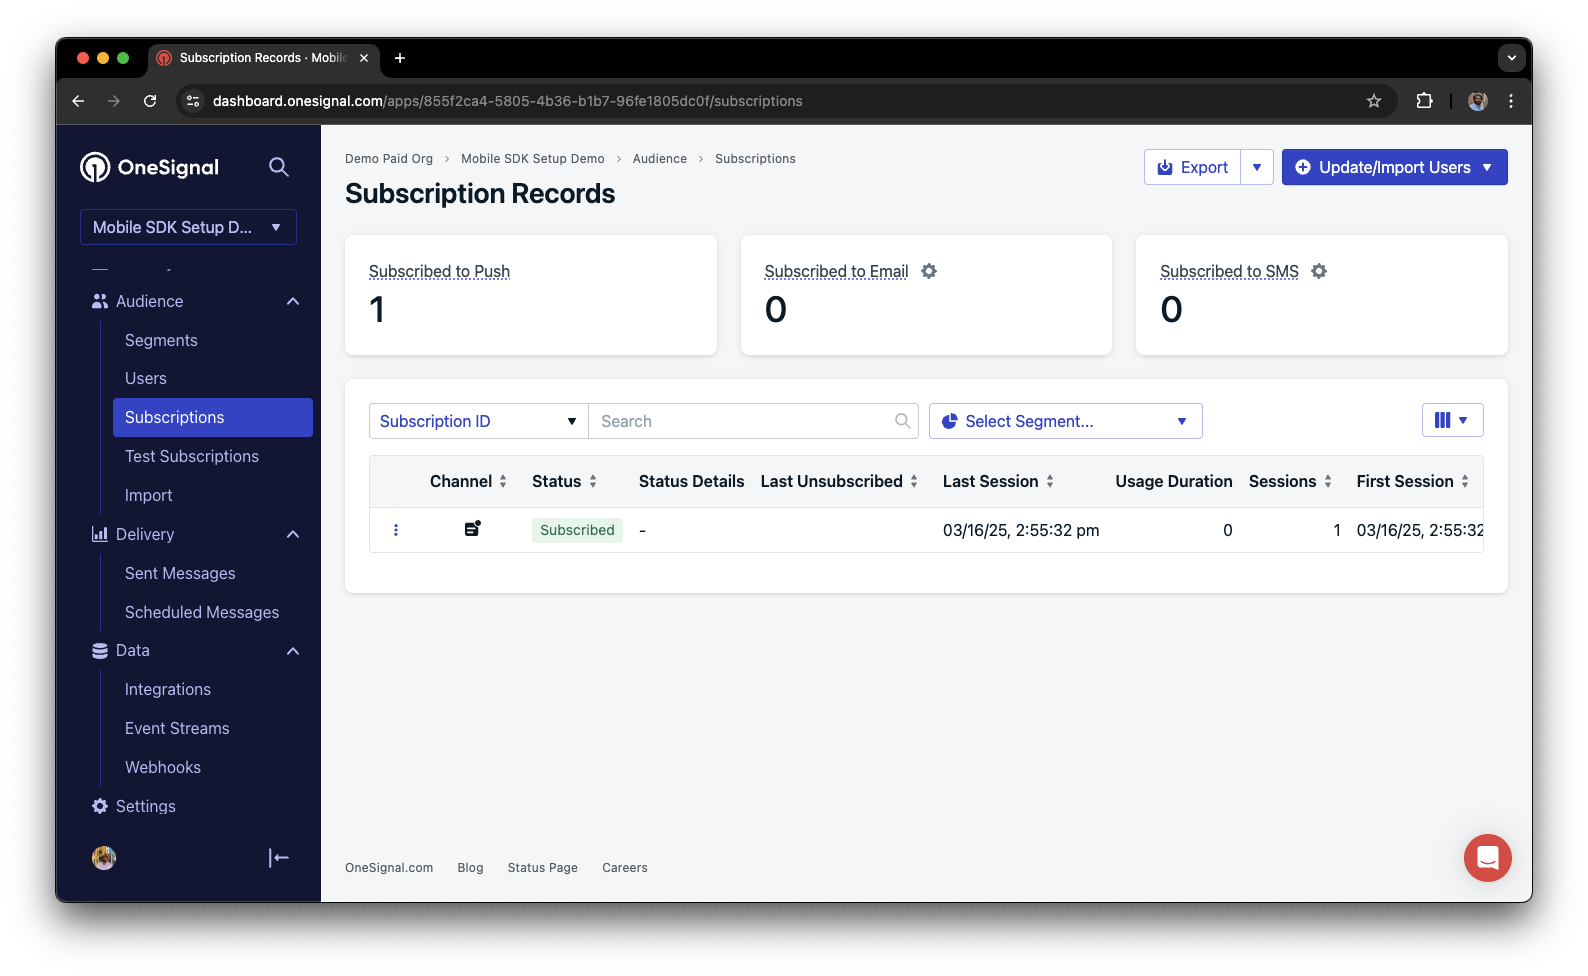 [모바일 구독](/docs/en/subscriptions)을 성공적으로 생성했습니다.
모바일 구독은 사용자가 기기에서 앱을 처음 열거나 동일한 기기에 앱을 제거했다가 다시 설치할 때 생성됩니다.
### 테스트 구독 설정
테스트 구독은 메시지를 보내기 전에 푸시 알림을 테스트하는 데 유용합니다.
대시보드에서 구독 옆에 있는 **Options (세 개의 점)** 버튼을 클릭하고 **Add to Test Users**를 선택하세요.
[모바일 구독](/docs/en/subscriptions)을 성공적으로 생성했습니다.
모바일 구독은 사용자가 기기에서 앱을 처음 열거나 동일한 기기에 앱을 제거했다가 다시 설치할 때 생성됩니다.
### 테스트 구독 설정
테스트 구독은 메시지를 보내기 전에 푸시 알림을 테스트하는 데 유용합니다.
대시보드에서 구독 옆에 있는 **Options (세 개의 점)** 버튼을 클릭하고 **Add to Test Users**를 선택하세요.
 나중에 **test users 탭**에서 기기를 쉽게 식별할 수 있도록 구독 이름을 지정하세요.
**Audience > Segments > New Segment**로 이동하세요.
세그먼트 이름을 `Test Users`로 지정하세요(나중에 사용되므로 이름이 중요함).
나중에 **test users 탭**에서 기기를 쉽게 식별할 수 있도록 구독 이름을 지정하세요.
**Audience > Segments > New Segment**로 이동하세요.
세그먼트 이름을 `Test Users`로 지정하세요(나중에 사용되므로 이름이 중요함).
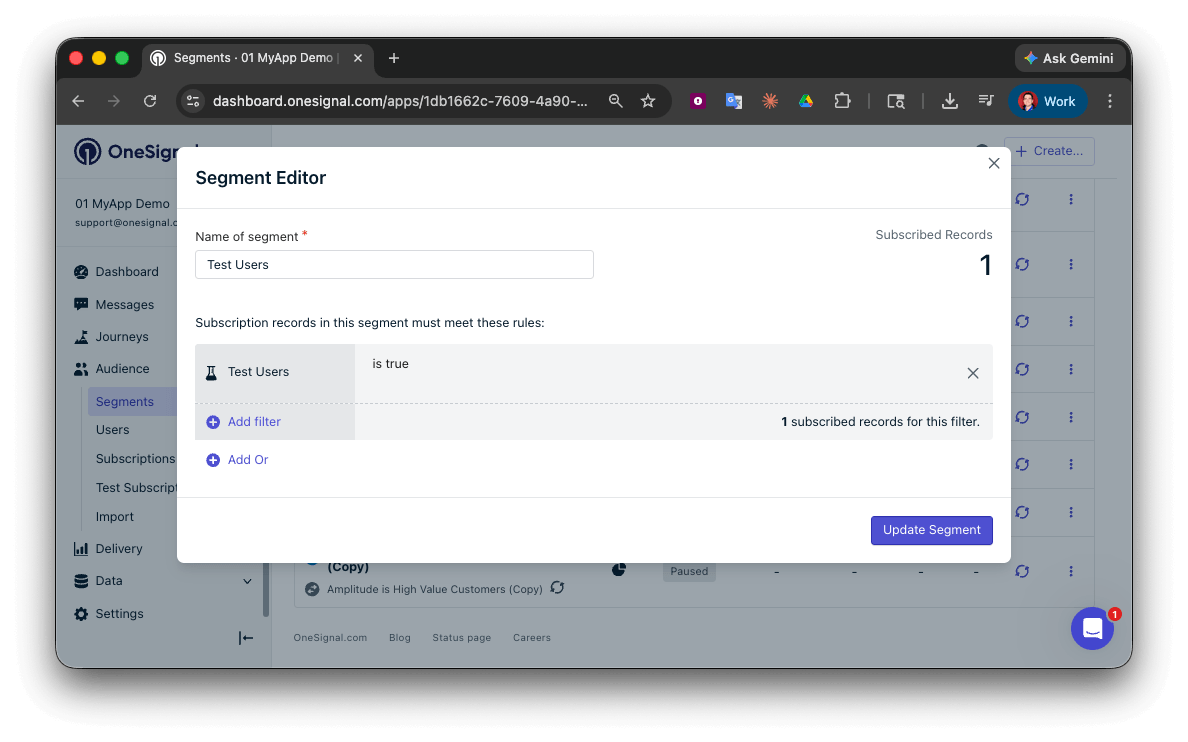 테스트 사용자 세그먼트를 성공적으로 생성했습니다.
이제 이 개별 기기 및 테스트 사용자 그룹에 메시지 전송을 테스트할 수 있습니다.
### API를 통해 테스트 푸시 전송
OneSignal 대시보드에서 \*\*Settings > [Keys & IDs](/docs/en/keys-and-ids)\*\*로 이동하세요.
아래 코드에서 `YOUR_APP_API_KEY` 및 `YOUR_APP_ID`를 실제 키로 바꾸세요. 이 코드는 이전에 생성한 `Test Users` 세그먼트를 사용합니다.
```curl theme={null}
curl -X \
POST --url 'https://api.onesignal.com/notifications' \
--header 'content-type: application/json; charset=utf-8' \
--header 'authorization: Key YOUR_APP_API_KEY' \
--data \
'{
"app_id": "YOUR_APP_ID",
"target_channel": "push",
"name": "Testing basic setup",
"headings": {
"en": "👋"
},
"contents": {
"en": "Hello world!"
},
"included_segments": [
"Test Users"
],
"ios_attachments": {
"onesignal_logo": "https://avatars.githubusercontent.com/u/11823027?s=200&v=4"
},
"big_picture": "https://avatars.githubusercontent.com/u/11823027?s=200&v=4"
}'
```
터미널에서 코드를 실행하세요.
모든 설정 단계가 성공적으로 완료되면 테스트 구독이 이미지가 포함된 알림을 받아야 합니다:
테스트 사용자 세그먼트를 성공적으로 생성했습니다.
이제 이 개별 기기 및 테스트 사용자 그룹에 메시지 전송을 테스트할 수 있습니다.
### API를 통해 테스트 푸시 전송
OneSignal 대시보드에서 \*\*Settings > [Keys & IDs](/docs/en/keys-and-ids)\*\*로 이동하세요.
아래 코드에서 `YOUR_APP_API_KEY` 및 `YOUR_APP_ID`를 실제 키로 바꾸세요. 이 코드는 이전에 생성한 `Test Users` 세그먼트를 사용합니다.
```curl theme={null}
curl -X \
POST --url 'https://api.onesignal.com/notifications' \
--header 'content-type: application/json; charset=utf-8' \
--header 'authorization: Key YOUR_APP_API_KEY' \
--data \
'{
"app_id": "YOUR_APP_ID",
"target_channel": "push",
"name": "Testing basic setup",
"headings": {
"en": "👋"
},
"contents": {
"en": "Hello world!"
},
"included_segments": [
"Test Users"
],
"ios_attachments": {
"onesignal_logo": "https://avatars.githubusercontent.com/u/11823027?s=200&v=4"
},
"big_picture": "https://avatars.githubusercontent.com/u/11823027?s=200&v=4"
}'
```
터미널에서 코드를 실행하세요.
모든 설정 단계가 성공적으로 완료되면 테스트 구독이 이미지가 포함된 알림을 받아야 합니다:
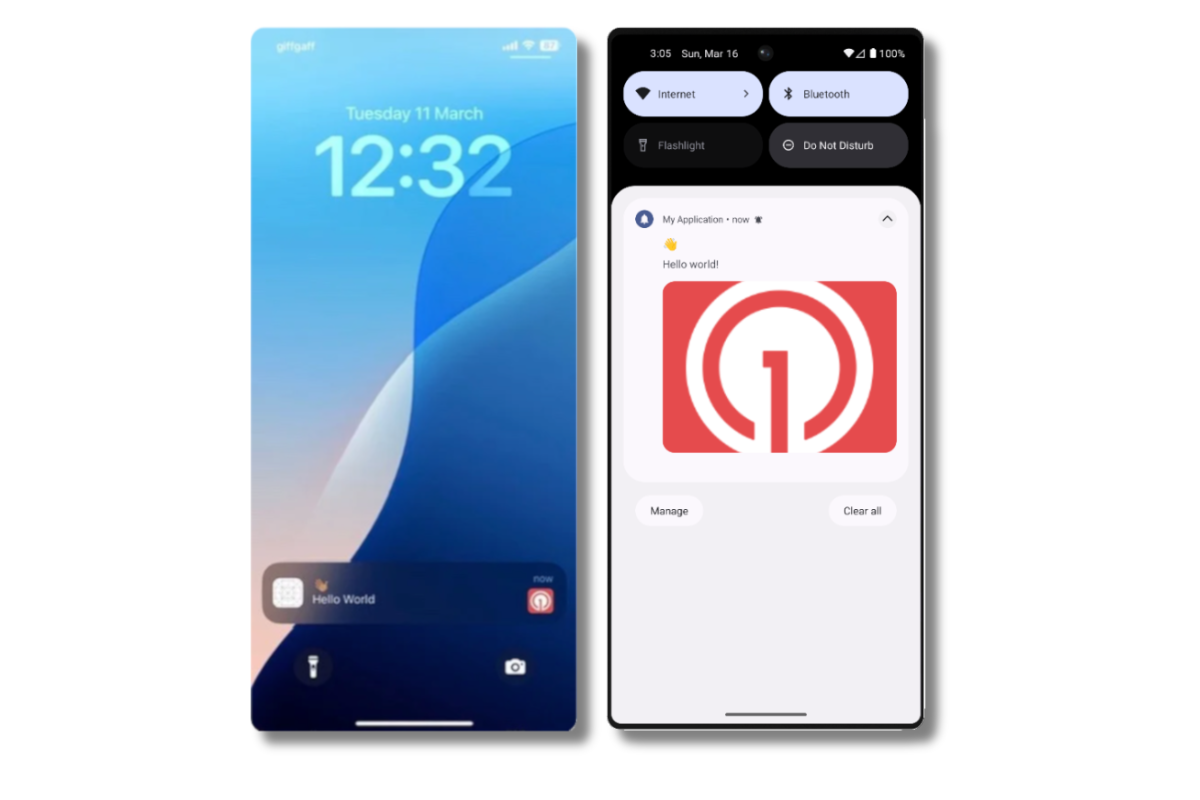 축소된 알림 보기에서는 이미지가 작게 표시됩니다. 알림을 확장하여 전체 이미지를 확인하세요.
대시보드에서 **Delivery > Sent Messages**로 이동한 다음 메시지를 클릭하여 통계를 확인하세요.
**confirmed** 통계가 표시되어야 하며, 이는 기기가 푸시를 받았음을 의미합니다.
API를 통해 세그먼트에 알림을 성공적으로 전송했습니다.
* 이미지를 받지 못했나요? [Notification Service Extension](#ios-setup)이 누락되었을 수 있습니다.
* 확인된 전달이 없나요? [여기](/docs/en/confirmed-delivery#troubleshooting-confirmed-delivery)에서 문제 해결 가이드를 검토하세요.
* 문제가 있나요? api 요청과 앱 실행 시작부터 끝까지의 로그를 `.txt` 파일에 복사하여 붙여넣으세요. 그런 다음 둘 다 `support@onesignal.com`에 공유하세요.
### 인앱 메시지 전송
[인앱 메시지](/docs/en/in-app-messages-setup)를 사용하면 사용자가 앱을 사용하는 동안 사용자와 소통할 수 있습니다.
사용자가 새 세션이 시작되기 *전에* 인앱 대상 조건을 충족해야 하기 때문입니다. OneSignal에서 새 세션은 사용자가 백그라운드에 있거나 최소 30초 동안 닫혀 있던 후 앱을 열 때 시작됩니다. 자세한 내용은 [인앱 메시지 표시 방법](/docs/en/in-app-messages-setup#how-are-iams-displayed%3F) 가이드를 참조하세요.
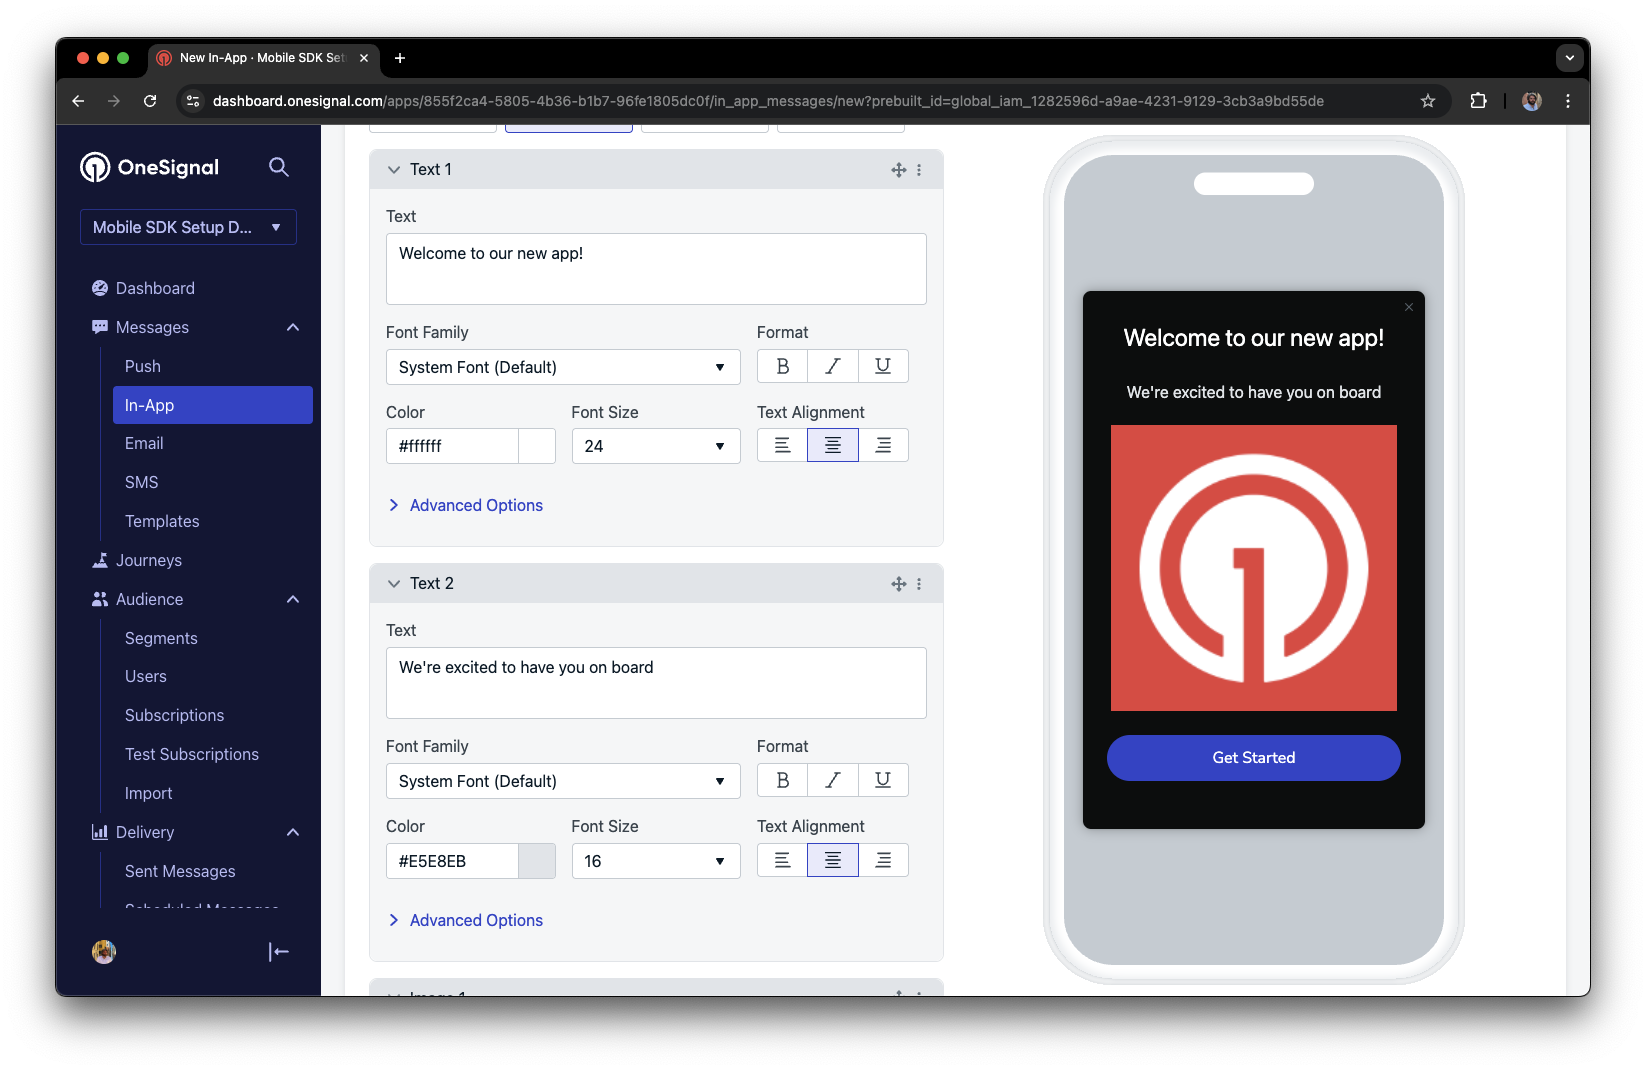
* OneSignal 대시보드에서 **Messages > In-App > New In-App**으로 이동하세요.
* **Welcome** 메시지를 찾아 선택하세요.
* 대상을 이전에 사용한 **Test Users** 세그먼트로 설정하세요.
축소된 알림 보기에서는 이미지가 작게 표시됩니다. 알림을 확장하여 전체 이미지를 확인하세요.
대시보드에서 **Delivery > Sent Messages**로 이동한 다음 메시지를 클릭하여 통계를 확인하세요.
**confirmed** 통계가 표시되어야 하며, 이는 기기가 푸시를 받았음을 의미합니다.
API를 통해 세그먼트에 알림을 성공적으로 전송했습니다.
* 이미지를 받지 못했나요? [Notification Service Extension](#ios-setup)이 누락되었을 수 있습니다.
* 확인된 전달이 없나요? [여기](/docs/en/confirmed-delivery#troubleshooting-confirmed-delivery)에서 문제 해결 가이드를 검토하세요.
* 문제가 있나요? api 요청과 앱 실행 시작부터 끝까지의 로그를 `.txt` 파일에 복사하여 붙여넣으세요. 그런 다음 둘 다 `support@onesignal.com`에 공유하세요.
### 인앱 메시지 전송
[인앱 메시지](/docs/en/in-app-messages-setup)를 사용하면 사용자가 앱을 사용하는 동안 사용자와 소통할 수 있습니다.
사용자가 새 세션이 시작되기 *전에* 인앱 대상 조건을 충족해야 하기 때문입니다. OneSignal에서 새 세션은 사용자가 백그라운드에 있거나 최소 30초 동안 닫혀 있던 후 앱을 열 때 시작됩니다. 자세한 내용은 [인앱 메시지 표시 방법](/docs/en/in-app-messages-setup#how-are-iams-displayed%3F) 가이드를 참조하세요.
* OneSignal 대시보드에서 **Messages > In-App > New In-App**으로 이동하세요.
* **Welcome** 메시지를 찾아 선택하세요.
* 대상을 이전에 사용한 **Test Users** 세그먼트로 설정하세요.
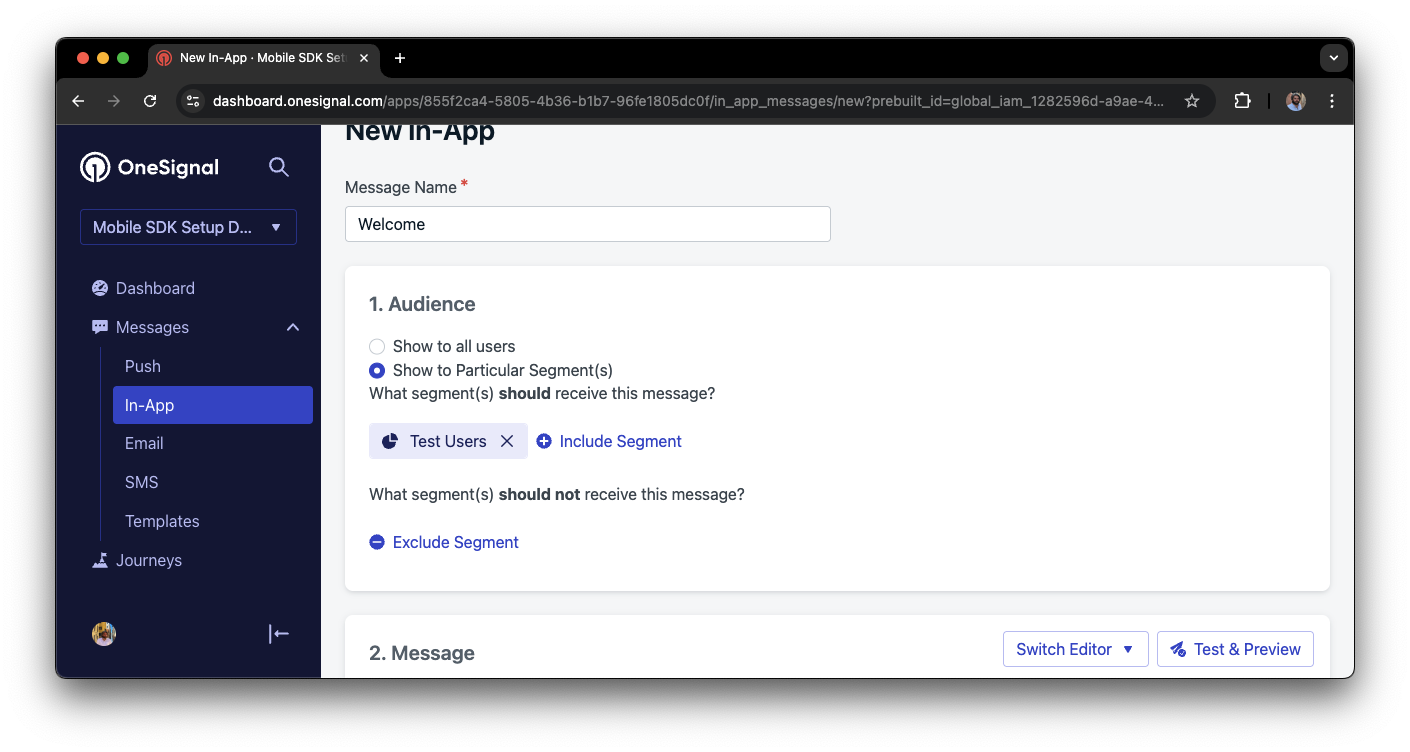
 **Schedule > How often do you want to show this message?** 아래에서 **Every time trigger conditions are satisfied**를 선택하세요.
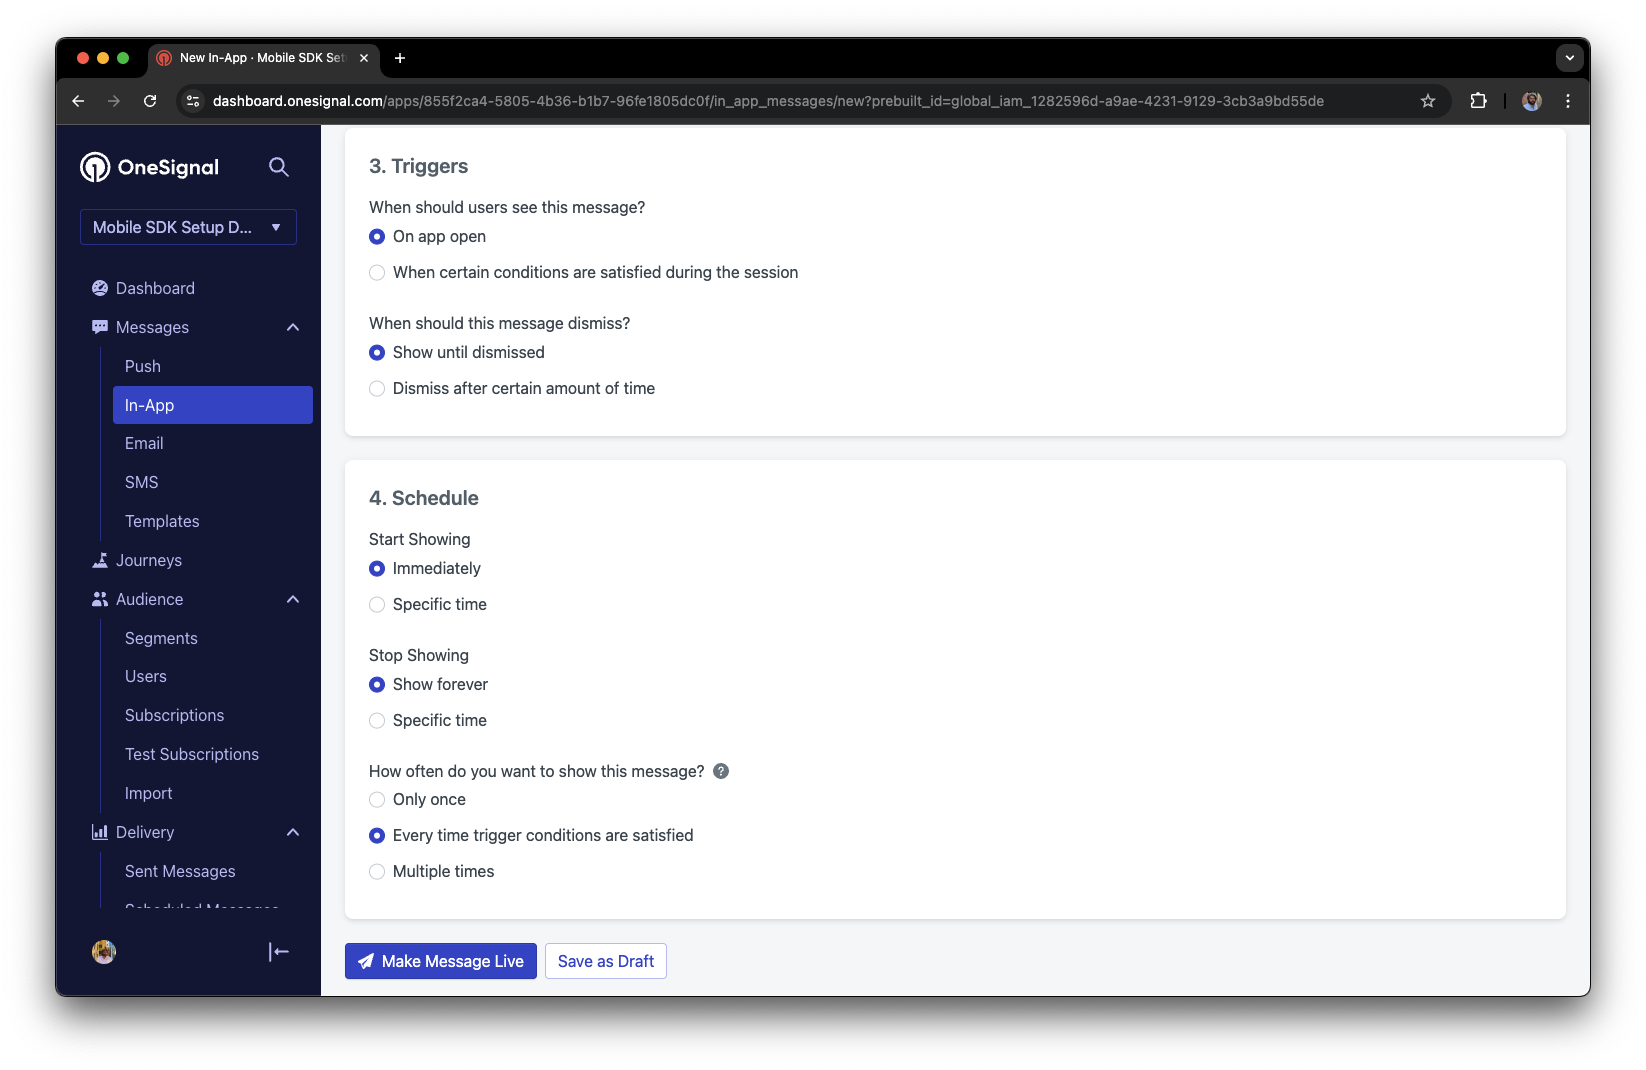 **Make Message Live**를 클릭하여 사용자가 앱을 열 때마다 테스트 사용자가 사용할 수 있도록 하세요.
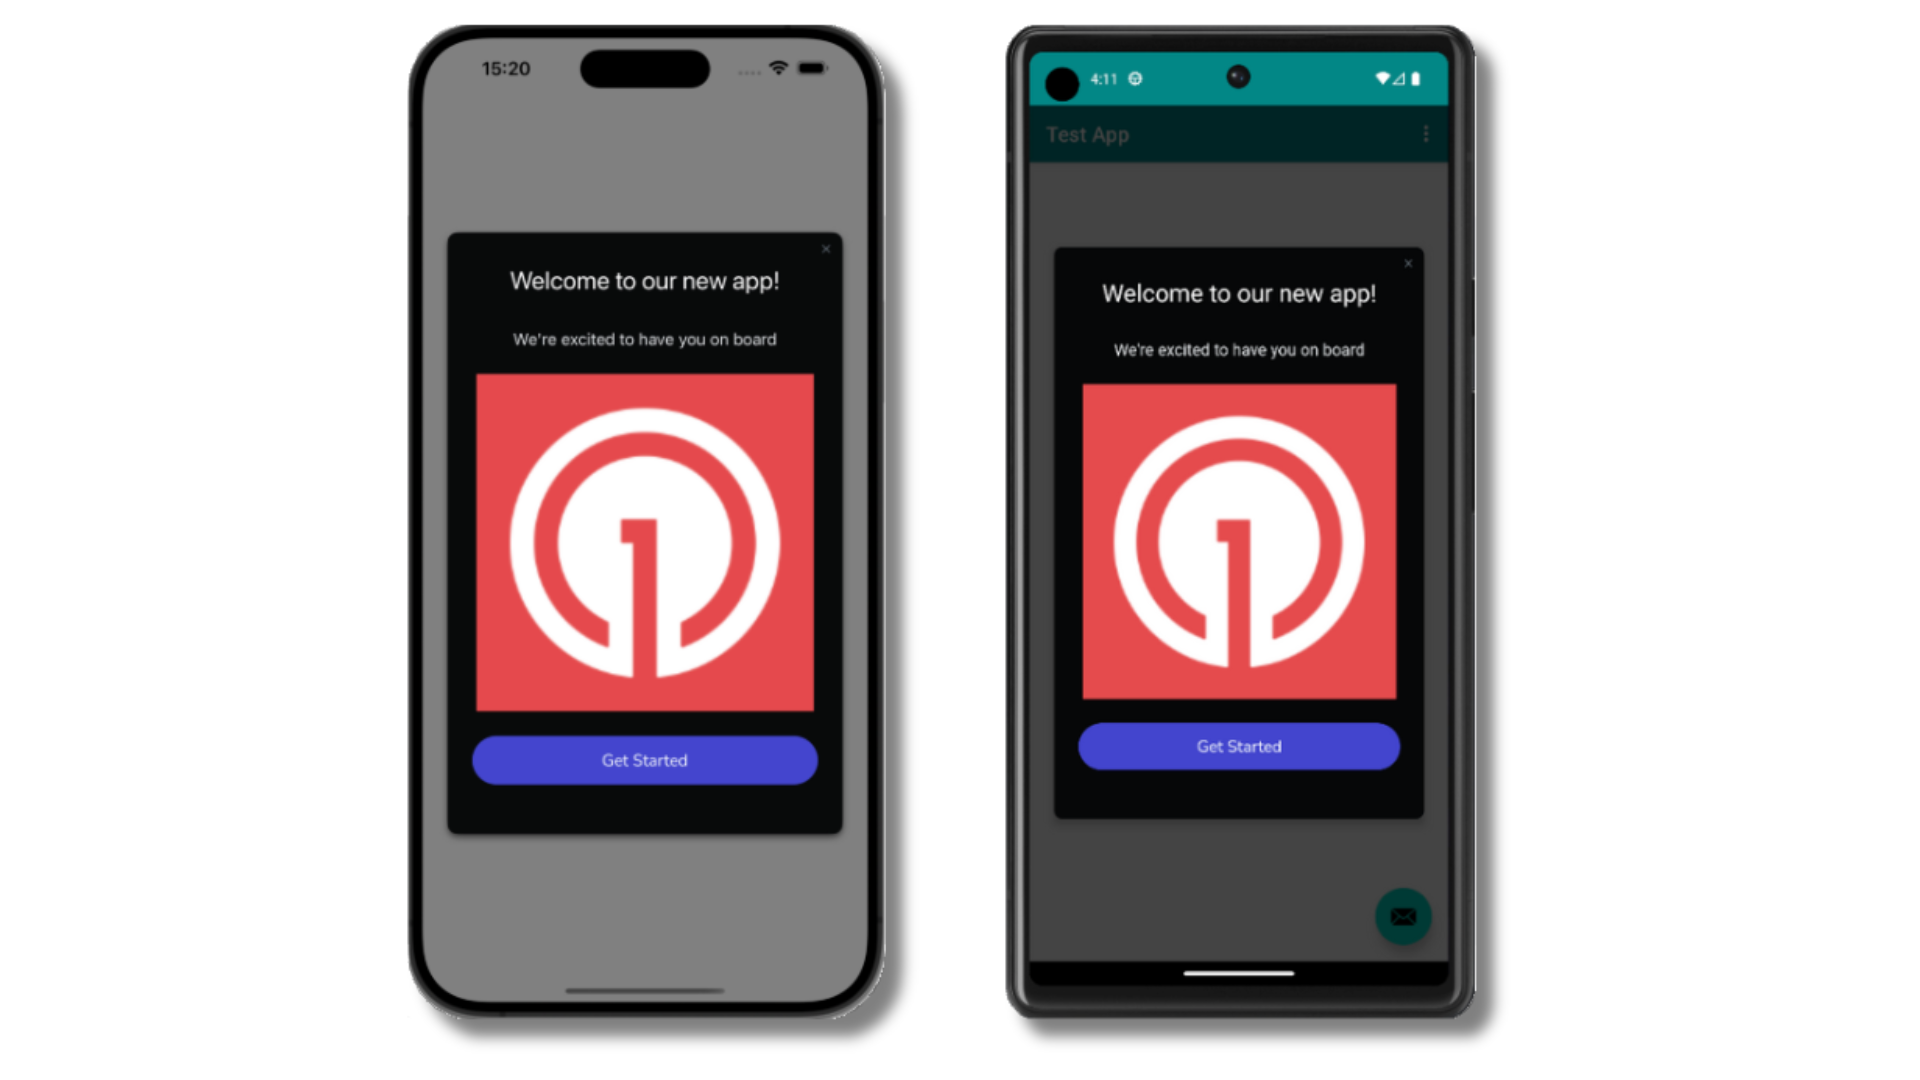
인앱 메시지가 라이브 상태가 되면 앱을 여세요. 다음과 같이 표시되어야 합니다:
**Make Message Live**를 클릭하여 사용자가 앱을 열 때마다 테스트 사용자가 사용할 수 있도록 하세요.
인앱 메시지가 라이브 상태가 되면 앱을 여세요. 다음과 같이 표시되어야 합니다:
 메시지가 표시되지 않나요?
* 새 세션 시작
* 다시 열기 전에 최소 30초 동안 앱을 닫거나 백그라운드로 전환해야 합니다. 이렇게 하면 새 세션이 시작됩니다.
* 자세한 내용은 [인앱 메시지 표시 방법](/docs/en/in-app-messages-setup#how-are-iams-displayed%3F)을 참조하세요.
* 여전히 `Test Users` 세그먼트에 있나요?
* 다시 설치하거나 기기를 전환한 경우 기기를 [Test Users](#set-up-test-users)에 다시 추가하고 Test Users 세그먼트의 일부인지 확인하세요.
* 문제가 있나요?
* 위 단계를 재현하는 동안 [디버그 로그 가져오기](/docs/en/capturing-a-debug-log)를 따르세요. 이렇게 하면 추가 로깅이 생성되며 `support@onesignal.com`과 공유하면 무슨 일이 일어나고 있는지 조사하는 데 도움을 드립니다.
OneSignal SDK를 성공적으로 설정하고 다음과 같은 중요한 개념을 배웠습니다:
* [구독](/docs/en/subscriptions) 수집, [테스트 구독](/docs/en/find-set-test-subscriptions) 설정 및 [세그먼트](/docs/en/segmentation) 생성.
* 세그먼트 및 [Create message](/reference/create-message) API를 사용하여 이미지 및 [확인된 전달](/docs/en/confirmed-delivery)과 함께 [푸시](/docs/en/push) 전송.
* [인앱 메시지](/docs/en/in-app-messages-setup) 전송.
이 가이드를 계속 진행하여 앱에서 사용자를 식별하고 추가 기능을 설정하세요.
***
## 사용자 식별
이전에는 모바일 [구독](/docs/en/subscriptions)을 생성하는 방법을 시연했습니다. 이제 OneSignal SDK를 사용하여 모든 구독(푸시, 이메일 및 SMS 포함)에서 [사용자](/docs/en/users)를 식별하는 것으로 확장하겠습니다. 플랫폼 전반에 걸쳐 사용자를 통합하고 참여시키는 데 도움이 되는 External ID, 태그, 다중 채널 구독, 개인 정보 보호 및 이벤트 추적을 다룹니다.
### External ID 할당
External ID를 사용하여 백엔드의 사용자 식별자를 사용하여 기기, 이메일 주소 및 전화번호 전반에 걸쳐 사용자를 일관되게 식별하세요. 이렇게 하면 채널 및 타사 시스템 전반에 걸쳐 메시징이 통합된 상태로 유지됩니다([통합](/docs/en/integrations)에 특히 중요).
앱에서 식별될 때마다 SDK의 [`login` 메서드](/docs/en/mobile-sdk-reference#login-external-id)로 External ID를 설정하세요.
OneSignal은 구독(Subscription ID) 및 사용자(OneSignal ID)에 대한 고유한 읽기 전용 ID를 생성합니다.
사용자가 다른 기기에 앱을 다운로드하거나, 웹사이트를 구독하거나, 앱 외부에서 이메일 주소 및 전화번호를 제공하면 새 구독이 생성됩니다.
SDK를 통해 External ID를 설정하는 것은 생성 방법에 관계없이 모든 구독에서 사용자를 식별하는 데 매우 권장됩니다.
### 데이터 태그 추가
[태그](/docs/en/add-user-data-tags)는 사용자 속성(`username`, `role` 또는 기본 설정 등) 및 이벤트(`purchase_date`, `game_level` 또는 사용자 상호 작용 등)를 저장하는 데 사용할 수 있는 문자열 데이터의 키-값 쌍입니다. 태그는 고급 [메시지 개인화](/docs/en/message-personalization) 및 [세그먼테이션](/docs/en/segmentation)을 지원하여 보다 고급 사용 사례를 가능하게 합니다.
앱에서 이벤트가 발생할 때 SDK [`addTag` 및 `addTags` 메서드](/docs/en/mobile-sdk-reference#data-tags)로 태그를 설정하세요.
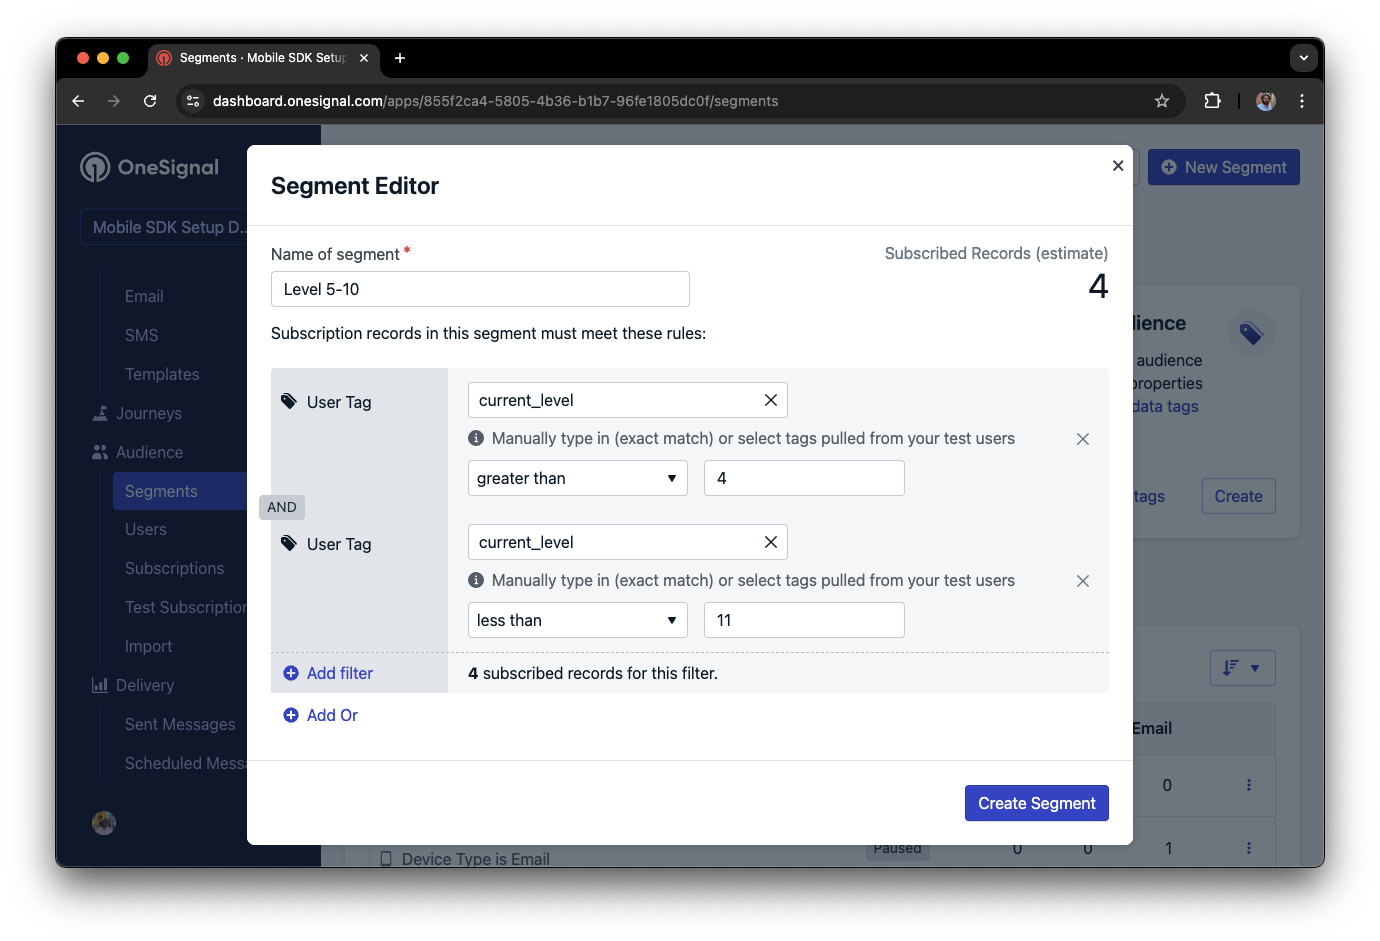
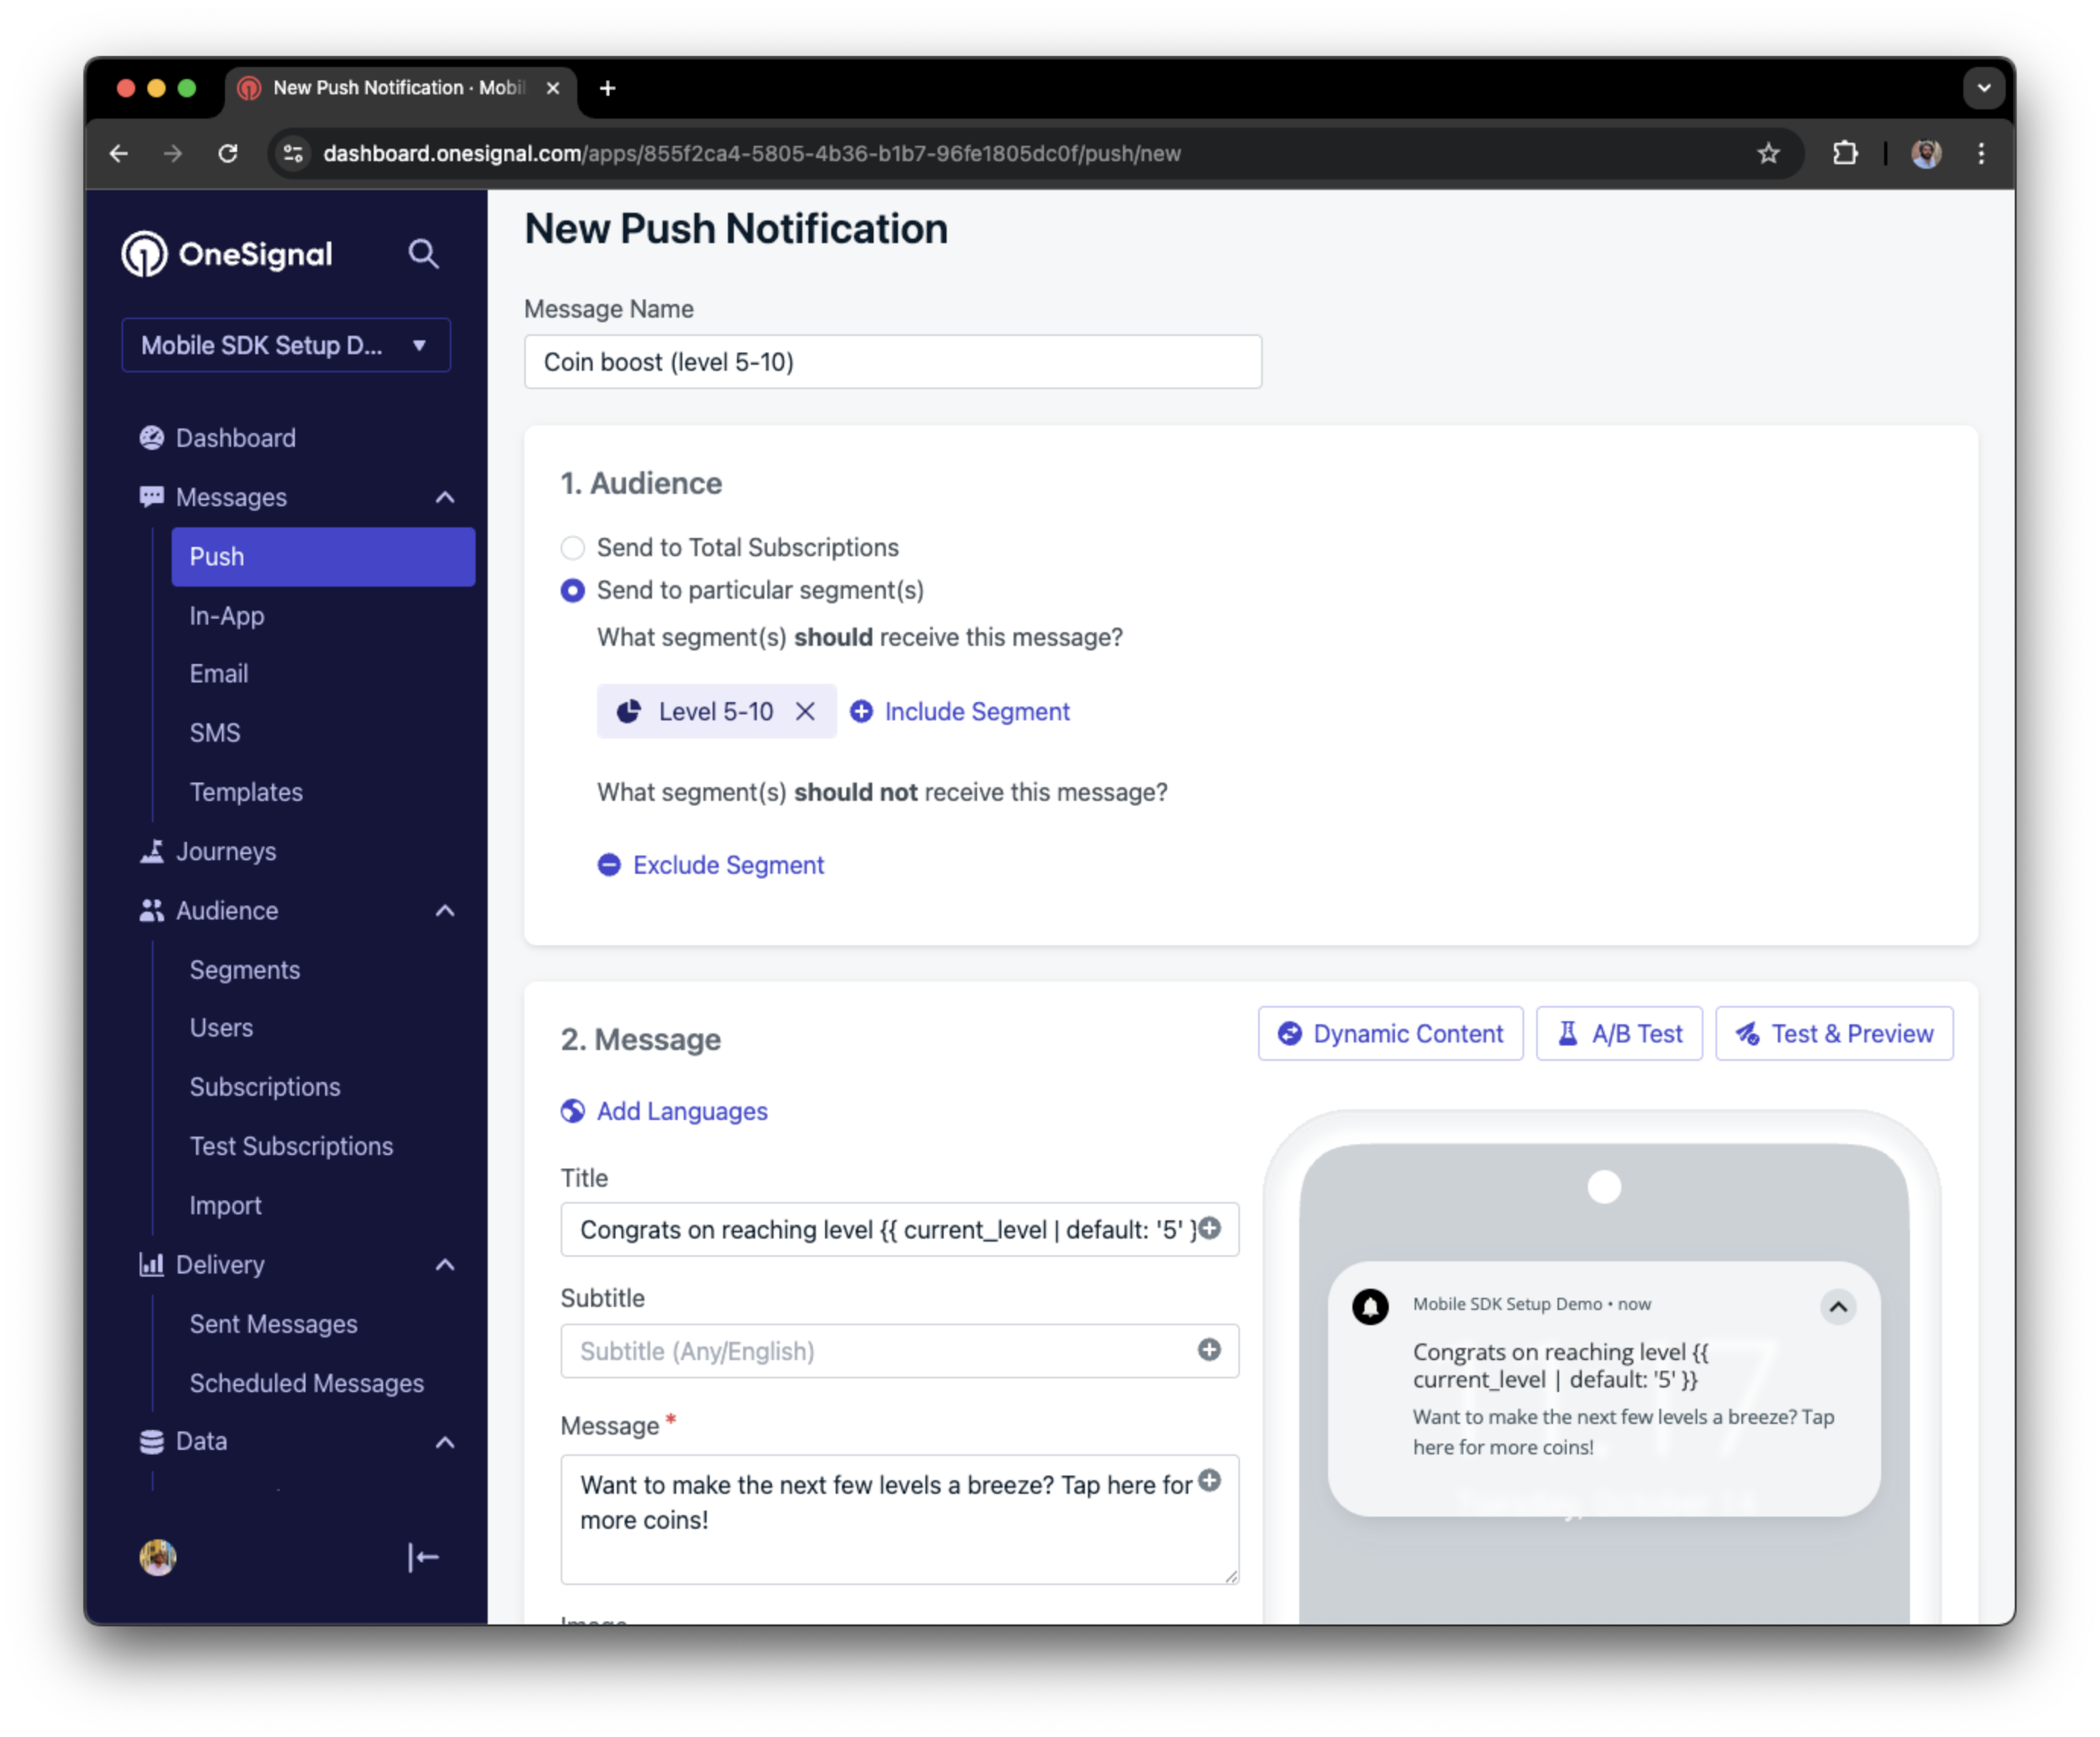
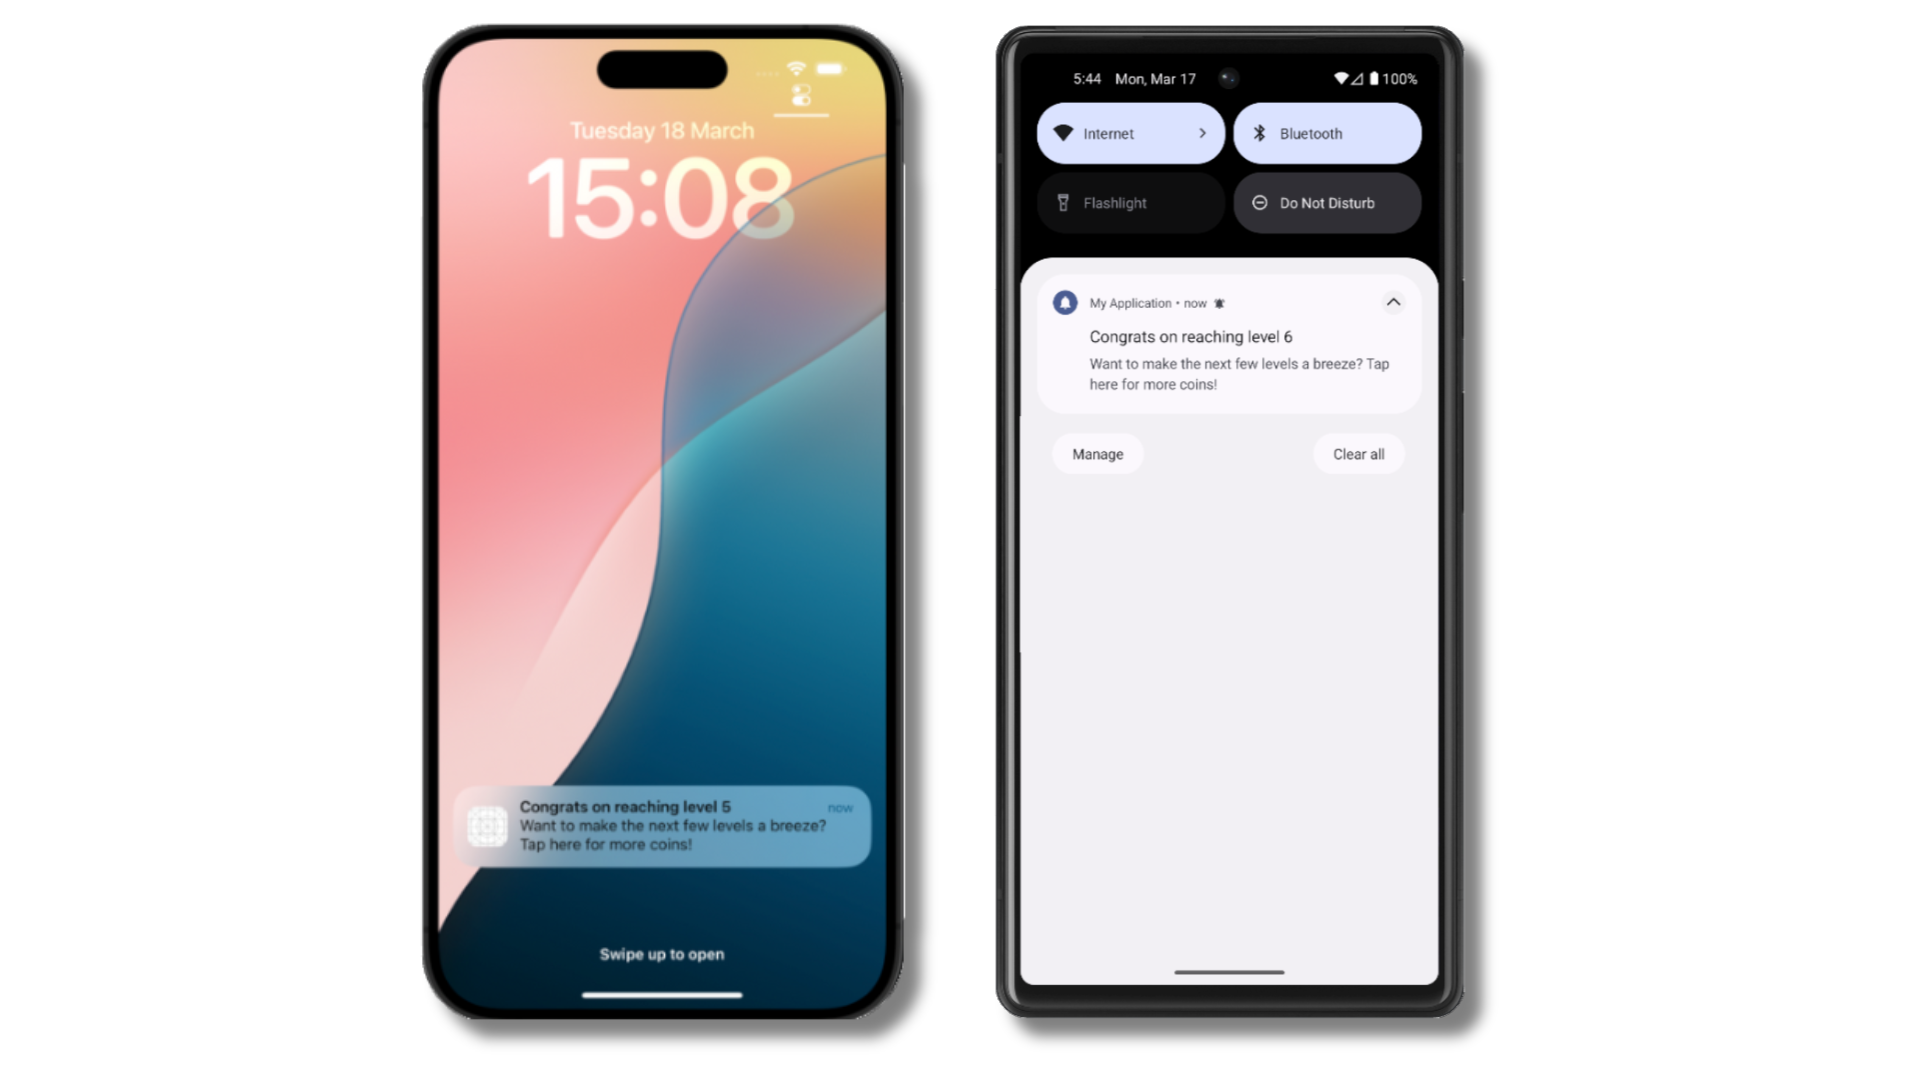
이 예시에서 사용자는 `current_level`이라는 태그가 `6`의 값으로 설정되어 식별 가능한 레벨 6에 도달했습니다.
메시지가 표시되지 않나요?
* 새 세션 시작
* 다시 열기 전에 최소 30초 동안 앱을 닫거나 백그라운드로 전환해야 합니다. 이렇게 하면 새 세션이 시작됩니다.
* 자세한 내용은 [인앱 메시지 표시 방법](/docs/en/in-app-messages-setup#how-are-iams-displayed%3F)을 참조하세요.
* 여전히 `Test Users` 세그먼트에 있나요?
* 다시 설치하거나 기기를 전환한 경우 기기를 [Test Users](#set-up-test-users)에 다시 추가하고 Test Users 세그먼트의 일부인지 확인하세요.
* 문제가 있나요?
* 위 단계를 재현하는 동안 [디버그 로그 가져오기](/docs/en/capturing-a-debug-log)를 따르세요. 이렇게 하면 추가 로깅이 생성되며 `support@onesignal.com`과 공유하면 무슨 일이 일어나고 있는지 조사하는 데 도움을 드립니다.
OneSignal SDK를 성공적으로 설정하고 다음과 같은 중요한 개념을 배웠습니다:
* [구독](/docs/en/subscriptions) 수집, [테스트 구독](/docs/en/find-set-test-subscriptions) 설정 및 [세그먼트](/docs/en/segmentation) 생성.
* 세그먼트 및 [Create message](/reference/create-message) API를 사용하여 이미지 및 [확인된 전달](/docs/en/confirmed-delivery)과 함께 [푸시](/docs/en/push) 전송.
* [인앱 메시지](/docs/en/in-app-messages-setup) 전송.
이 가이드를 계속 진행하여 앱에서 사용자를 식별하고 추가 기능을 설정하세요.
***
## 사용자 식별
이전에는 모바일 [구독](/docs/en/subscriptions)을 생성하는 방법을 시연했습니다. 이제 OneSignal SDK를 사용하여 모든 구독(푸시, 이메일 및 SMS 포함)에서 [사용자](/docs/en/users)를 식별하는 것으로 확장하겠습니다. 플랫폼 전반에 걸쳐 사용자를 통합하고 참여시키는 데 도움이 되는 External ID, 태그, 다중 채널 구독, 개인 정보 보호 및 이벤트 추적을 다룹니다.
### External ID 할당
External ID를 사용하여 백엔드의 사용자 식별자를 사용하여 기기, 이메일 주소 및 전화번호 전반에 걸쳐 사용자를 일관되게 식별하세요. 이렇게 하면 채널 및 타사 시스템 전반에 걸쳐 메시징이 통합된 상태로 유지됩니다([통합](/docs/en/integrations)에 특히 중요).
앱에서 식별될 때마다 SDK의 [`login` 메서드](/docs/en/mobile-sdk-reference#login-external-id)로 External ID를 설정하세요.
OneSignal은 구독(Subscription ID) 및 사용자(OneSignal ID)에 대한 고유한 읽기 전용 ID를 생성합니다.
사용자가 다른 기기에 앱을 다운로드하거나, 웹사이트를 구독하거나, 앱 외부에서 이메일 주소 및 전화번호를 제공하면 새 구독이 생성됩니다.
SDK를 통해 External ID를 설정하는 것은 생성 방법에 관계없이 모든 구독에서 사용자를 식별하는 데 매우 권장됩니다.
### 데이터 태그 추가
[태그](/docs/en/add-user-data-tags)는 사용자 속성(`username`, `role` 또는 기본 설정 등) 및 이벤트(`purchase_date`, `game_level` 또는 사용자 상호 작용 등)를 저장하는 데 사용할 수 있는 문자열 데이터의 키-값 쌍입니다. 태그는 고급 [메시지 개인화](/docs/en/message-personalization) 및 [세그먼테이션](/docs/en/segmentation)을 지원하여 보다 고급 사용 사례를 가능하게 합니다.
앱에서 이벤트가 발생할 때 SDK [`addTag` 및 `addTags` 메서드](/docs/en/mobile-sdk-reference#data-tags)로 태그를 설정하세요.
이 예시에서 사용자는 `current_level`이라는 태그가 `6`의 값으로 설정되어 식별 가능한 레벨 6에 도달했습니다.
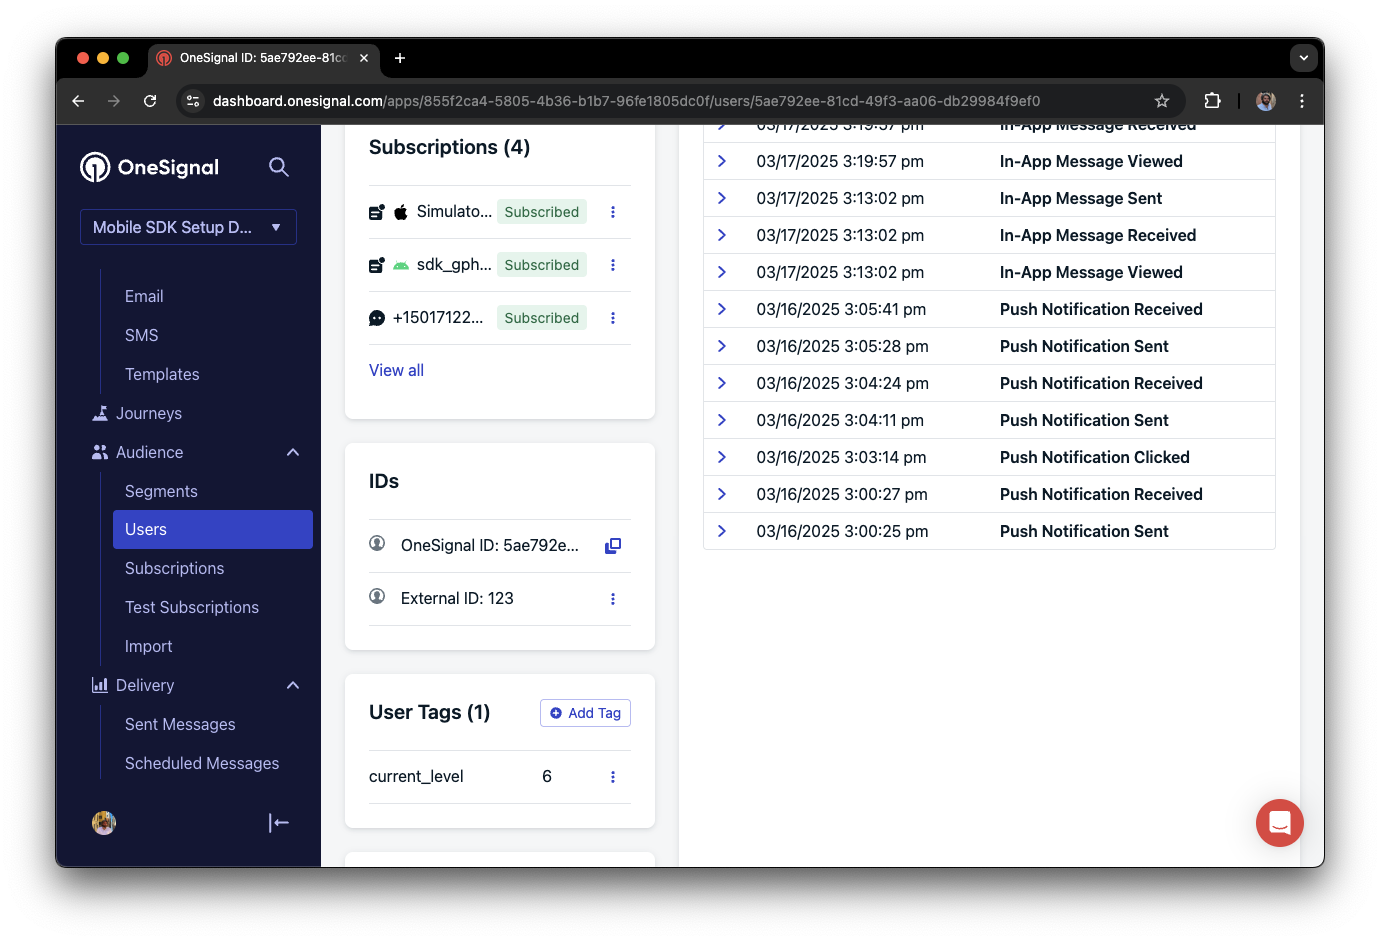 레벨이 5에서 10 사이인 사용자 세그먼트를 생성하고 이를 사용하여 타겟팅되고 개인화된 메시지를 보낼 수 있습니다:
 ### 이메일 및/또는 SMS 구독 추가
이전에 SDK가 푸시 및 인앱 메시지를 보내기 위해 모바일 구독을 생성하는 방법을 살펴보았습니다. 해당 구독을 생성하여 이메일 및 SMS 채널을 통해 사용자에게 도달할 수도 있습니다.
* [`addEmail` 메서드](/docs/en/mobile-sdk-reference#addemail-%2C-removeemail)를 사용하여 이메일 구독을 생성하세요.
* [`addSms` 메서드](/docs/en/mobile-sdk-reference#addsms-%2C-removesms)를 사용하여 SMS 구독을 생성하세요.
이메일 주소 및/또는 전화번호가 OneSignal 앱에 이미 존재하는 경우 SDK는 이를 기존 사용자에게 추가하며 중복을 생성하지 않습니다.
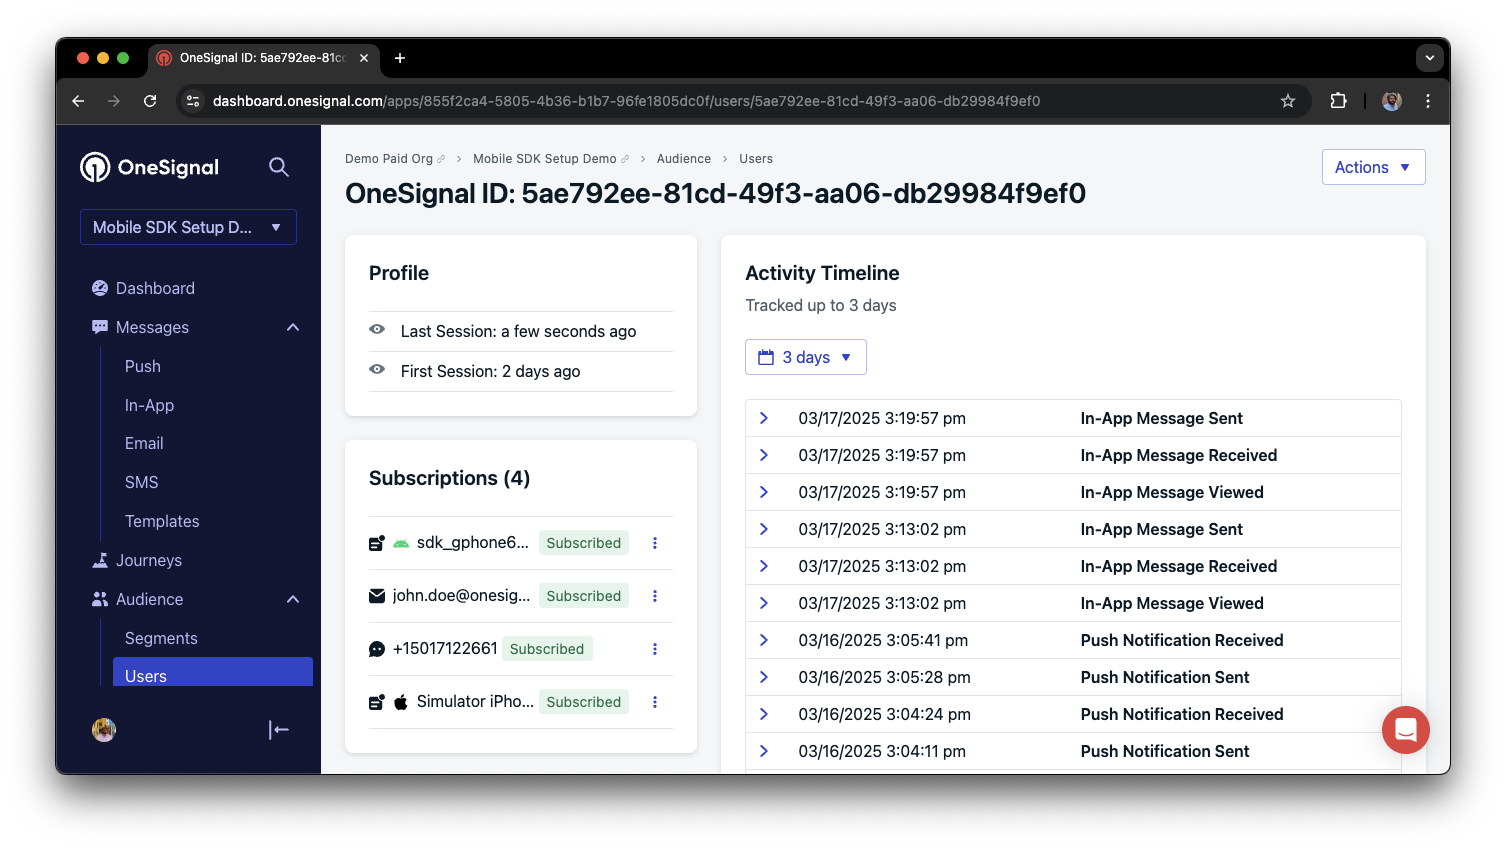
대시보드에서 **Audience > Users**를 통해 또는 [View user API](/reference/view-user)를 사용하여 통합된 사용자를 볼 수 있습니다.
### 이메일 및/또는 SMS 구독 추가
이전에 SDK가 푸시 및 인앱 메시지를 보내기 위해 모바일 구독을 생성하는 방법을 살펴보았습니다. 해당 구독을 생성하여 이메일 및 SMS 채널을 통해 사용자에게 도달할 수도 있습니다.
* [`addEmail` 메서드](/docs/en/mobile-sdk-reference#addemail-%2C-removeemail)를 사용하여 이메일 구독을 생성하세요.
* [`addSms` 메서드](/docs/en/mobile-sdk-reference#addsms-%2C-removesms)를 사용하여 SMS 구독을 생성하세요.
이메일 주소 및/또는 전화번호가 OneSignal 앱에 이미 존재하는 경우 SDK는 이를 기존 사용자에게 추가하며 중복을 생성하지 않습니다.
대시보드에서 **Audience > Users**를 통해 또는 [View user API](/reference/view-user)를 사용하여 통합된 사용자를 볼 수 있습니다.
 다중 채널 커뮤니케이션 모범 사례
* 이메일 또는 SMS 구독을 추가하기 전에 명시적인 동의를 얻으세요.
* 각 커뮤니케이션 채널의 이점을 사용자에게 설명하세요.
* 사용자가 선호하는 채널을 선택할 수 있도록 채널 기본 설정을 제공하세요.
***
### 개인정보 보호 및 사용자 동의
OneSignal이 사용자 데이터를 수집하는 시기를 제어하려면 SDK의 동의 게이팅 메서드를 사용하세요:
* [`setConsentRequired(true)`](/docs/en/mobile-sdk-reference#setconsentrequired): 동의가 제공될 때까지 데이터 수집을 방지합니다.
* [`setConsentGiven(true)`](/docs/en/mobile-sdk-reference#setconsentgiven): 동의가 부여되면 데이터 수집을 활성화합니다.
자세한 내용은 개인정보 보호 및 보안 문서를 참조하세요:
* [SDK에서 수집한 데이터](/docs/en/data-collected-by-the-onesignal-sdk)
* [개인 데이터 처리](/docs/en/handling-personal-data)
***
## 푸시 권한 프롬프트
앱을 열 때 즉시 `requestPermission()`을 호출하는 대신 보다 전략적인 접근 방식을 취하세요. 인앱 메시지를 사용하여 권한을 요청하기 전에 푸시 알림의 가치를 설명하세요.
모범 사례 및 구현 세부 정보는 [푸시 권한 프롬프트](/docs/en/prompt-for-push-permissions) 가이드를 참조하세요.
***
## 푸시, 사용자 및 인앱 이벤트 수신
SDK 리스너를 사용하여 사용자 작업 및 상태 변경에 반응하세요.
SDK는 연결할 수 있는 여러 이벤트 리스너를 제공합니다. 자세한 내용은 [SDK 참조 가이드](/docs/en/mobile-sdk-reference)를 참조하세요.
### 푸시 알림 이벤트
* [`addClickListener()`](/docs/en/mobile-sdk-reference#addclicklistener-push): 알림을 탭했을 때 감지합니다. [딥 링킹](/docs/en/deep-linking)에 유용합니다.
* [`addForegroundLifecycleListener()`](/docs/en/mobile-sdk-reference#addforegroundlifecyclelistener-push): 포그라운드에서 알림이 작동하는 방식을 제어합니다.
전체 사용자 정의는 [Mobile Service Extensions](/docs/en/service-extensions)를 참조하세요.
### 사용자 상태 변경
* [사용자 상태에 대한 `addObserver()`](/docs/en/mobile-sdk-reference#addobserver-user-state): External ID가 설정되는 시기를 감지합니다.
* [`addPermissionObserver()`](/docs/en/mobile-sdk-reference#addpermissionobserver-push): 기본 푸시 권한 프롬프트와 사용자의 특정 상호 작용을 추적합니다.
* [푸시 구독에 대한 `addObserver()`](/docs/en/mobile-sdk-reference#addobserver-push-subscription-changes): 푸시 구독 상태가 변경되는 시기를 추적합니다.
### 인앱 메시지 이벤트
* [`addClickListener()`](/docs/en/mobile-sdk-reference#addclicklistener-in-app): 인앱 클릭 작업을 처리합니다. 딥 링킹 또는 이벤트 추적에 이상적입니다.
* [`addLifecycleListener()`](/docs/en/mobile-sdk-reference#addclicklistener-in-app): 인앱 메시지의 전체 수명 주기(표시, 클릭, 닫힘 등)를 추적합니다.
***
## 메서드 스위즐링 비활성화 (선택 사항)
기본적으로 OneSignal SDK는 메서드 스위즐링을 사용하여 푸시 알림 델리게이트 메서드를 자동으로 처리합니다. 앱에서 스위즐링을 비활성화해야 하는 경우(예: 다른 SDK와의 충돌을 방지하거나 알림 델리게이트 메서드에 대한 완전한 제어를 유지하기 위해) `Info.plist`를 통해 이를 해제할 수 있습니다.
스위즐링이 비활성화된 경우 알림 델리게이트 메서드를 OneSignal SDK에 수동으로 전달해야 합니다. 다른 모든 SDK 기능(리스너, 옵저버, 인앱 메시지, 아웃컴 등)은 계속 정상적으로 작동합니다.
### 1단계. Info.plist 플래그 추가
앱의 `Info.plist`에 다음을 추가합니다:
```xml theme={null}
OneSignal_disable_swizzling
```
SDK가 이 플래그를 감지하면 시작 시 모든 메서드 스위즐링을 건너뛰고 수동 전달을 구현하도록 상기시키는 경고를 기록합니다.
### 2단계. UNUserNotificationCenter 델리게이트 설정
`OneSignal.initialize`를 호출하기 **전에** `AppDelegate`를 `UNUserNotificationCenter` 델리게이트로 설정합니다. 이 설정 없이는 포그라운드 알림 표시 및 알림 탭 처리가 작동하지 않습니다.
```swift Swift theme={null}
// In application(_:didFinishLaunchingWithOptions:), BEFORE OneSignal.initialize()
UNUserNotificationCenter.current().delegate = self
```
```objc Objective-C theme={null}
// In application:didFinishLaunchingWithOptions:, BEFORE [OneSignal initialize:]
[UNUserNotificationCenter currentNotificationCenter].delegate = self;
```
### 3단계. 알림 델리게이트 메서드 전달
`AppDelegate`에 다음 메서드를 구현합니다. 모든 메서드는 `OneSignal.Notifications`를 통해 호출됩니다.
**토큰 등록:**
```swift Swift theme={null}
func application(_ application: UIApplication,
didRegisterForRemoteNotificationsWithDeviceToken deviceToken: Data) {
OneSignal.Notifications.didRegisterForRemoteNotifications(application, deviceToken: deviceToken)
}
func application(_ application: UIApplication,
didFailToRegisterForRemoteNotificationsWithError error: Error) {
OneSignal.Notifications.handleDidFailRegisterForRemoteNotification(error as NSError)
}
```
```objc Objective-C theme={null}
- (void)application:(UIApplication *)application
didRegisterForRemoteNotificationsWithDeviceToken:(NSData *)deviceToken {
[OneSignal.Notifications didRegisterForRemoteNotifications:application deviceToken:deviceToken];
}
- (void)application:(UIApplication *)application
didFailToRegisterForRemoteNotificationsWithError:(NSError *)error {
[OneSignal.Notifications handleDidFailRegisterForRemoteNotification:error];
}
```
**백그라운드 / 무음 알림:**
```swift Swift theme={null}
func application(_ application: UIApplication,
didReceiveRemoteNotification userInfo: [AnyHashable: Any],
fetchCompletionHandler completionHandler: @escaping (UIBackgroundFetchResult) -> Void) {
OneSignal.Notifications.receiveRemoteNotification(application,
userInfo: userInfo,
completionHandler: completionHandler)
}
```
```objc Objective-C theme={null}
- (void)application:(UIApplication *)application
didReceiveRemoteNotification:(NSDictionary *)userInfo
fetchCompletionHandler:(void (^)(UIBackgroundFetchResult))completionHandler {
[OneSignal.Notifications receiveRemoteNotification:application
UserInfo:userInfo
completionHandler:completionHandler];
}
```
**포그라운드 알림 표시:**
SDK는 `OSNotification` 객체와 함께 완료 블록을 호출합니다. nil이 아닌 경우 SDK는 알림을 표시하려는 것이므로 원하는 표시 옵션을 전달합니다. nil인 경우(예: IAM 미리보기) 표시 옵션을 전달하지 않습니다.
```swift Swift theme={null}
func userNotificationCenter(_ center: UNUserNotificationCenter,
willPresent notification: UNNotification,
withCompletionHandler completionHandler: @escaping (UNNotificationPresentationOptions) -> Void) {
OneSignal.Notifications.handleWillPresentNotificationInForeground(
withPayload: notification.request.content.userInfo
) { notif in
if notif != nil {
if #available(iOS 14.0, *) {
completionHandler([.banner, .list, .sound])
} else {
completionHandler([.alert, .sound])
}
} else {
completionHandler([])
}
}
}
```
```objc Objective-C theme={null}
- (void)userNotificationCenter:(UNUserNotificationCenter *)center
willPresentNotification:(UNNotification *)notification
withCompletionHandler:(void (^)(UNNotificationPresentationOptions))completionHandler {
[OneSignal.Notifications
handleWillPresentNotificationInForegroundWithPayload:notification.request.content.userInfo
withCompletion:^(OSNotification *notif) {
if (notif) {
if (@available(iOS 14.0, *)) {
completionHandler(UNNotificationPresentationOptionBanner |
UNNotificationPresentationOptionList |
UNNotificationPresentationOptionSound);
} else {
completionHandler(UNNotificationPresentationOptionAlert |
UNNotificationPresentationOptionSound);
}
} else {
completionHandler(UNNotificationPresentationOptionNone);
}
}];
}
```
`onWillDisplayNotification` 수명 주기 리스너와 `preventDefault` / `display` API는 수동 전달에서도 계속 작동합니다. SDK는 `handleWillPresentNotificationInForegroundWithPayload` 내에서 리스너를 호출합니다.
**알림 탭 / 액션:**
```swift Swift theme={null}
func userNotificationCenter(_ center: UNUserNotificationCenter,
didReceive response: UNNotificationResponse,
withCompletionHandler completionHandler: @escaping () -> Void) {
OneSignal.Notifications.handleNotificationResponse(response)
completionHandler()
}
```
```objc Objective-C theme={null}
- (void)userNotificationCenter:(UNUserNotificationCenter *)center
didReceiveNotificationResponse:(UNNotificationResponse *)response
withCompletionHandler:(void (^)(void))completionHandler {
[OneSignal.Notifications handleNotificationResponse:response];
completionHandler();
}
```
### 선택 사항: 배지 수 설정
스위즐링이 비활성화된 경우 SDK는 배지 변경을 가로챌 수 없습니다. 이 메서드를 사용하여 배지 수를 설정하고 OneSignal의 내부 배지 캐시와 동기화합니다:
```swift Swift theme={null}
OneSignal.Notifications.setBadgeCount(5)
```
```objc Objective-C theme={null}
[OneSignal.Notifications setBadgeCount:5];
```
### SwiftUI 앱
SwiftUI 앱에는 기본적으로 `AppDelegate`가 없습니다. `@UIApplicationDelegateAdaptor`를 사용하여 추가한 후 위에 표시된 모든 전달 메서드를 구현합니다:
```swift Swift theme={null}
@main
struct YourApp: App {
@UIApplicationDelegateAdaptor(AppDelegate.self) var appDelegate
var body: some Scene {
WindowGroup {
ContentView()
}
}
}
class AppDelegate: NSObject, UIApplicationDelegate, UNUserNotificationCenterDelegate {
func application(_ application: UIApplication,
didFinishLaunchingWithOptions launchOptions: [UIApplication.LaunchOptionsKey: Any]? = nil) -> Bool {
UNUserNotificationCenter.current().delegate = self
OneSignal.initialize("YOUR_APP_ID", withLaunchOptions: launchOptions)
return true
}
// Implement all the forwarding methods shown above
}
```
### API 참조
| 메서드 | 목적 |
| ------------------------------------------------------------------------- | --------------------------- |
| `didRegisterForRemoteNotifications(_:deviceToken:)` | APNs 디바이스 토큰을 OneSignal에 전달 |
| `handleDidFailRegisterForRemoteNotification(_:)` | APNs 등록 실패를 전달 |
| `receiveRemoteNotification(_:userInfo:completionHandler:)` | 백그라운드/무음 알림을 전달 |
| `handleWillPresentNotificationInForegroundWithPayload(_:withCompletion:)` | SDK 처리를 위해 포그라운드 알림을 전달 |
| `handleNotificationResponse(_:)` | 알림 탭/액션을 SDK에 전달 |
| `setBadgeCount(_:)` | 배지 수를 설정하고 SDK 캐시와 동기화 |
***
## 고급 설정 및 기능
통합을 향상시키기 위한 더 많은 기능을 살펴보세요:
* [🔁 다른 서비스에서 OneSignal로 마이그레이션](/docs/en/migrating-to-onesignal)
* [🌍 위치 추적](/docs/en/mobile-sdk-reference#location)
* [🔗 딥 링킹](/docs/en/deep-linking)
* [🔌 통합](/docs/en/integrations)
* [🧩 Mobile Service Extensions](/docs/en/service-extensions)
* [🛎️ 액션 버튼](/docs/en/action-buttons)
* [🌐 다국어 메시징](/docs/en/multi-language-messaging)
* [🛡️ Identity Verification](/docs/en/identity-verification)
* [📊 Custom Outcomes](/docs/en/custom-outcomes)
* [📲 Live Activities](/docs/en/live-activities)
### Mobile SDK 설정 및 참조
[Mobile push 설정](/docs/en/mobile-push-setup) 가이드를 검토하여 모든 주요 기능을 활성화했는지 확인하세요.
사용 가능한 메서드 및 구성 옵션에 대한 전체 세부 정보는 [Mobile SDK 참조](/docs/en/mobile-sdk-reference)를 참조하세요.
축하합니다! Mobile SDK 설정 가이드를 성공적으로 완료했습니다.
***
需要帮助?
与我们的支持团队聊天或发送邮件至 `support@onesignal.com`
请包含以下信息:
* 您遇到的问题详情以及复现步骤(如有)
* 您的 OneSignal 应用 ID
* 外部 ID 或订阅 ID(如适用)
* 您在 OneSignal 控制台中测试的消息 URL(如适用)
* 任何相关的[日志或错误信息](/docs/cn/capturing-a-debug-log)
我们很乐意为您提供帮助!
***
다중 채널 커뮤니케이션 모범 사례
* 이메일 또는 SMS 구독을 추가하기 전에 명시적인 동의를 얻으세요.
* 각 커뮤니케이션 채널의 이점을 사용자에게 설명하세요.
* 사용자가 선호하는 채널을 선택할 수 있도록 채널 기본 설정을 제공하세요.
***
### 개인정보 보호 및 사용자 동의
OneSignal이 사용자 데이터를 수집하는 시기를 제어하려면 SDK의 동의 게이팅 메서드를 사용하세요:
* [`setConsentRequired(true)`](/docs/en/mobile-sdk-reference#setconsentrequired): 동의가 제공될 때까지 데이터 수집을 방지합니다.
* [`setConsentGiven(true)`](/docs/en/mobile-sdk-reference#setconsentgiven): 동의가 부여되면 데이터 수집을 활성화합니다.
자세한 내용은 개인정보 보호 및 보안 문서를 참조하세요:
* [SDK에서 수집한 데이터](/docs/en/data-collected-by-the-onesignal-sdk)
* [개인 데이터 처리](/docs/en/handling-personal-data)
***
## 푸시 권한 프롬프트
앱을 열 때 즉시 `requestPermission()`을 호출하는 대신 보다 전략적인 접근 방식을 취하세요. 인앱 메시지를 사용하여 권한을 요청하기 전에 푸시 알림의 가치를 설명하세요.
모범 사례 및 구현 세부 정보는 [푸시 권한 프롬프트](/docs/en/prompt-for-push-permissions) 가이드를 참조하세요.
***
## 푸시, 사용자 및 인앱 이벤트 수신
SDK 리스너를 사용하여 사용자 작업 및 상태 변경에 반응하세요.
SDK는 연결할 수 있는 여러 이벤트 리스너를 제공합니다. 자세한 내용은 [SDK 참조 가이드](/docs/en/mobile-sdk-reference)를 참조하세요.
### 푸시 알림 이벤트
* [`addClickListener()`](/docs/en/mobile-sdk-reference#addclicklistener-push): 알림을 탭했을 때 감지합니다. [딥 링킹](/docs/en/deep-linking)에 유용합니다.
* [`addForegroundLifecycleListener()`](/docs/en/mobile-sdk-reference#addforegroundlifecyclelistener-push): 포그라운드에서 알림이 작동하는 방식을 제어합니다.
전체 사용자 정의는 [Mobile Service Extensions](/docs/en/service-extensions)를 참조하세요.
### 사용자 상태 변경
* [사용자 상태에 대한 `addObserver()`](/docs/en/mobile-sdk-reference#addobserver-user-state): External ID가 설정되는 시기를 감지합니다.
* [`addPermissionObserver()`](/docs/en/mobile-sdk-reference#addpermissionobserver-push): 기본 푸시 권한 프롬프트와 사용자의 특정 상호 작용을 추적합니다.
* [푸시 구독에 대한 `addObserver()`](/docs/en/mobile-sdk-reference#addobserver-push-subscription-changes): 푸시 구독 상태가 변경되는 시기를 추적합니다.
### 인앱 메시지 이벤트
* [`addClickListener()`](/docs/en/mobile-sdk-reference#addclicklistener-in-app): 인앱 클릭 작업을 처리합니다. 딥 링킹 또는 이벤트 추적에 이상적입니다.
* [`addLifecycleListener()`](/docs/en/mobile-sdk-reference#addclicklistener-in-app): 인앱 메시지의 전체 수명 주기(표시, 클릭, 닫힘 등)를 추적합니다.
***
## 메서드 스위즐링 비활성화 (선택 사항)
기본적으로 OneSignal SDK는 메서드 스위즐링을 사용하여 푸시 알림 델리게이트 메서드를 자동으로 처리합니다. 앱에서 스위즐링을 비활성화해야 하는 경우(예: 다른 SDK와의 충돌을 방지하거나 알림 델리게이트 메서드에 대한 완전한 제어를 유지하기 위해) `Info.plist`를 통해 이를 해제할 수 있습니다.
스위즐링이 비활성화된 경우 알림 델리게이트 메서드를 OneSignal SDK에 수동으로 전달해야 합니다. 다른 모든 SDK 기능(리스너, 옵저버, 인앱 메시지, 아웃컴 등)은 계속 정상적으로 작동합니다.
### 1단계. Info.plist 플래그 추가
앱의 `Info.plist`에 다음을 추가합니다:
```xml theme={null}
OneSignal_disable_swizzling
```
SDK가 이 플래그를 감지하면 시작 시 모든 메서드 스위즐링을 건너뛰고 수동 전달을 구현하도록 상기시키는 경고를 기록합니다.
### 2단계. UNUserNotificationCenter 델리게이트 설정
`OneSignal.initialize`를 호출하기 **전에** `AppDelegate`를 `UNUserNotificationCenter` 델리게이트로 설정합니다. 이 설정 없이는 포그라운드 알림 표시 및 알림 탭 처리가 작동하지 않습니다.
```swift Swift theme={null}
// In application(_:didFinishLaunchingWithOptions:), BEFORE OneSignal.initialize()
UNUserNotificationCenter.current().delegate = self
```
```objc Objective-C theme={null}
// In application:didFinishLaunchingWithOptions:, BEFORE [OneSignal initialize:]
[UNUserNotificationCenter currentNotificationCenter].delegate = self;
```
### 3단계. 알림 델리게이트 메서드 전달
`AppDelegate`에 다음 메서드를 구현합니다. 모든 메서드는 `OneSignal.Notifications`를 통해 호출됩니다.
**토큰 등록:**
```swift Swift theme={null}
func application(_ application: UIApplication,
didRegisterForRemoteNotificationsWithDeviceToken deviceToken: Data) {
OneSignal.Notifications.didRegisterForRemoteNotifications(application, deviceToken: deviceToken)
}
func application(_ application: UIApplication,
didFailToRegisterForRemoteNotificationsWithError error: Error) {
OneSignal.Notifications.handleDidFailRegisterForRemoteNotification(error as NSError)
}
```
```objc Objective-C theme={null}
- (void)application:(UIApplication *)application
didRegisterForRemoteNotificationsWithDeviceToken:(NSData *)deviceToken {
[OneSignal.Notifications didRegisterForRemoteNotifications:application deviceToken:deviceToken];
}
- (void)application:(UIApplication *)application
didFailToRegisterForRemoteNotificationsWithError:(NSError *)error {
[OneSignal.Notifications handleDidFailRegisterForRemoteNotification:error];
}
```
**백그라운드 / 무음 알림:**
```swift Swift theme={null}
func application(_ application: UIApplication,
didReceiveRemoteNotification userInfo: [AnyHashable: Any],
fetchCompletionHandler completionHandler: @escaping (UIBackgroundFetchResult) -> Void) {
OneSignal.Notifications.receiveRemoteNotification(application,
userInfo: userInfo,
completionHandler: completionHandler)
}
```
```objc Objective-C theme={null}
- (void)application:(UIApplication *)application
didReceiveRemoteNotification:(NSDictionary *)userInfo
fetchCompletionHandler:(void (^)(UIBackgroundFetchResult))completionHandler {
[OneSignal.Notifications receiveRemoteNotification:application
UserInfo:userInfo
completionHandler:completionHandler];
}
```
**포그라운드 알림 표시:**
SDK는 `OSNotification` 객체와 함께 완료 블록을 호출합니다. nil이 아닌 경우 SDK는 알림을 표시하려는 것이므로 원하는 표시 옵션을 전달합니다. nil인 경우(예: IAM 미리보기) 표시 옵션을 전달하지 않습니다.
```swift Swift theme={null}
func userNotificationCenter(_ center: UNUserNotificationCenter,
willPresent notification: UNNotification,
withCompletionHandler completionHandler: @escaping (UNNotificationPresentationOptions) -> Void) {
OneSignal.Notifications.handleWillPresentNotificationInForeground(
withPayload: notification.request.content.userInfo
) { notif in
if notif != nil {
if #available(iOS 14.0, *) {
completionHandler([.banner, .list, .sound])
} else {
completionHandler([.alert, .sound])
}
} else {
completionHandler([])
}
}
}
```
```objc Objective-C theme={null}
- (void)userNotificationCenter:(UNUserNotificationCenter *)center
willPresentNotification:(UNNotification *)notification
withCompletionHandler:(void (^)(UNNotificationPresentationOptions))completionHandler {
[OneSignal.Notifications
handleWillPresentNotificationInForegroundWithPayload:notification.request.content.userInfo
withCompletion:^(OSNotification *notif) {
if (notif) {
if (@available(iOS 14.0, *)) {
completionHandler(UNNotificationPresentationOptionBanner |
UNNotificationPresentationOptionList |
UNNotificationPresentationOptionSound);
} else {
completionHandler(UNNotificationPresentationOptionAlert |
UNNotificationPresentationOptionSound);
}
} else {
completionHandler(UNNotificationPresentationOptionNone);
}
}];
}
```
`onWillDisplayNotification` 수명 주기 리스너와 `preventDefault` / `display` API는 수동 전달에서도 계속 작동합니다. SDK는 `handleWillPresentNotificationInForegroundWithPayload` 내에서 리스너를 호출합니다.
**알림 탭 / 액션:**
```swift Swift theme={null}
func userNotificationCenter(_ center: UNUserNotificationCenter,
didReceive response: UNNotificationResponse,
withCompletionHandler completionHandler: @escaping () -> Void) {
OneSignal.Notifications.handleNotificationResponse(response)
completionHandler()
}
```
```objc Objective-C theme={null}
- (void)userNotificationCenter:(UNUserNotificationCenter *)center
didReceiveNotificationResponse:(UNNotificationResponse *)response
withCompletionHandler:(void (^)(void))completionHandler {
[OneSignal.Notifications handleNotificationResponse:response];
completionHandler();
}
```
### 선택 사항: 배지 수 설정
스위즐링이 비활성화된 경우 SDK는 배지 변경을 가로챌 수 없습니다. 이 메서드를 사용하여 배지 수를 설정하고 OneSignal의 내부 배지 캐시와 동기화합니다:
```swift Swift theme={null}
OneSignal.Notifications.setBadgeCount(5)
```
```objc Objective-C theme={null}
[OneSignal.Notifications setBadgeCount:5];
```
### SwiftUI 앱
SwiftUI 앱에는 기본적으로 `AppDelegate`가 없습니다. `@UIApplicationDelegateAdaptor`를 사용하여 추가한 후 위에 표시된 모든 전달 메서드를 구현합니다:
```swift Swift theme={null}
@main
struct YourApp: App {
@UIApplicationDelegateAdaptor(AppDelegate.self) var appDelegate
var body: some Scene {
WindowGroup {
ContentView()
}
}
}
class AppDelegate: NSObject, UIApplicationDelegate, UNUserNotificationCenterDelegate {
func application(_ application: UIApplication,
didFinishLaunchingWithOptions launchOptions: [UIApplication.LaunchOptionsKey: Any]? = nil) -> Bool {
UNUserNotificationCenter.current().delegate = self
OneSignal.initialize("YOUR_APP_ID", withLaunchOptions: launchOptions)
return true
}
// Implement all the forwarding methods shown above
}
```
### API 참조
| 메서드 | 목적 |
| ------------------------------------------------------------------------- | --------------------------- |
| `didRegisterForRemoteNotifications(_:deviceToken:)` | APNs 디바이스 토큰을 OneSignal에 전달 |
| `handleDidFailRegisterForRemoteNotification(_:)` | APNs 등록 실패를 전달 |
| `receiveRemoteNotification(_:userInfo:completionHandler:)` | 백그라운드/무음 알림을 전달 |
| `handleWillPresentNotificationInForegroundWithPayload(_:withCompletion:)` | SDK 처리를 위해 포그라운드 알림을 전달 |
| `handleNotificationResponse(_:)` | 알림 탭/액션을 SDK에 전달 |
| `setBadgeCount(_:)` | 배지 수를 설정하고 SDK 캐시와 동기화 |
***
## 고급 설정 및 기능
통합을 향상시키기 위한 더 많은 기능을 살펴보세요:
* [🔁 다른 서비스에서 OneSignal로 마이그레이션](/docs/en/migrating-to-onesignal)
* [🌍 위치 추적](/docs/en/mobile-sdk-reference#location)
* [🔗 딥 링킹](/docs/en/deep-linking)
* [🔌 통합](/docs/en/integrations)
* [🧩 Mobile Service Extensions](/docs/en/service-extensions)
* [🛎️ 액션 버튼](/docs/en/action-buttons)
* [🌐 다국어 메시징](/docs/en/multi-language-messaging)
* [🛡️ Identity Verification](/docs/en/identity-verification)
* [📊 Custom Outcomes](/docs/en/custom-outcomes)
* [📲 Live Activities](/docs/en/live-activities)
### Mobile SDK 설정 및 참조
[Mobile push 설정](/docs/en/mobile-push-setup) 가이드를 검토하여 모든 주요 기능을 활성화했는지 확인하세요.
사용 가능한 메서드 및 구성 옵션에 대한 전체 세부 정보는 [Mobile SDK 참조](/docs/en/mobile-sdk-reference)를 참조하세요.
축하합니다! Mobile SDK 설정 가이드를 성공적으로 완료했습니다.
***
需要帮助?
与我们的支持团队聊天或发送邮件至 `support@onesignal.com`
请包含以下信息:
* 您遇到的问题详情以及复现步骤(如有)
* 您的 OneSignal 应用 ID
* 外部 ID 或订阅 ID(如适用)
* 您在 OneSignal 控制台中测试的消息 URL(如适用)
* 任何相关的[日志或错误信息](/docs/cn/capturing-a-debug-log)
我们很乐意为您提供帮助!
***