> ## Documentation Index
> Fetch the complete documentation index at: https://documentation.onesignal.com/llms.txt
> Use this file to discover all available pages before exploring further.
# API custom_data로 메시지 개인화하기
> Create Message API의 custom_data를 사용하여 동적인 메시지별 데이터를 전송합니다. Liquid 구문으로 템플릿에서 값을 참조하여 실시간 개인화를 구현합니다.
[Create Message API](/reference/create-message)에서 `custom_data` 필드를 사용하여 백엔드에서 동적 데이터를 전송하고 [Liquid 구문](./using-liquid-syntax)을 사용하여 템플릿 내에서 렌더링합니다.
`custom_data`:
* **메시지별** 데이터입니다
* **저장되지 않습니다**
* API 요청 중에만 존재합니다
* `template_id`와 함께 사용해야 합니다
템플릿에서 다음과 같이 값을 참조합니다:
```liquid Liquid theme={null}
{{ message.custom_data.key_name }}
```
`custom_data`는 임시 데이터입니다. 데이터는 사용자 프로필에 저장되지 않으며 향후 메시지에서 재사용할 수 없습니다. 영구 데이터가 필요한 경우 [메시지 개인화](./message-personalization)를 참조하세요.
***
## `custom_data` 사용 시기
다음과 같은 경우 `custom_data`를 사용합니다:
* 메시지마다 데이터가 변경되는 경우 (주문 합계, 장바구니 항목, 잔액)
* 배열이 필요한 경우 (상품 목록, 항목 목록, 추천)
* 데이터가 지속되지 않아야 하는 경우 (일회용 코드, 임시 URL)
* 백엔드에서 트리거되는 메시지를 전송하는 경우
* 하나의 API 요청으로 대량 개인화를 원하는 경우
***
## `custom_data` 개인화 작동 방식
메시지에 `custom_data`를 추가하려면 몇 가지 단계가 필요합니다:
대시보드에서 또는 [Create Template API](/reference/create-template)를 통해 Push, Email 또는 SMS [Template](./templates)을 생성합니다.
필수 접두사를 사용하여 참조를 삽입합니다:
```liquid Liquid theme={null}
Hi {{ message.custom_data.first_name }},
Order {{ message.custom_data.order_id }} is confirmed.
```
다음 항목과 함께 [Create Message API](/reference/create-message)를 호출합니다:
* `template_id` - 템플릿의 ID
* `custom_data` - 데이터 객체
* 대상 지정 (`include_player_ids`, `include_aliases`, 또는 세그먼트)
OneSignal은 전송 시점에 사용자의 데이터를 사용하여 템플릿을 렌더링합니다.
Liquid 구문이 유효하지 않거나 키가 존재하지 않는 경우, 해당 필드는 빈 문자열로 렌더링되지만 메시지는 계속 전송됩니다.
***
## 데이터 패턴
`custom_data`와 함께 사용할 수 있는 일반적인 데이터 패턴 예시입니다.
### 플랫 JSON 예시
이름, ID, URL 또는 단일 값 데이터와 같은 기본 개인화를 위해 간단한 키-값 쌍을 사용합니다.
**사용 사례:** 각 필드에 단일 값이 포함되는 트랜잭션 메시지 (청구서, 영수증, 확인서).
**템플릿:**
```liquid Liquid theme={null}
Invoice {{ message.custom_data.invoice_id }} for {{ message.custom_data.product_name }} is ready.
```
**API 요청:**
```json JSON theme={null}
{
"app_id": "YOUR_APP_ID",
"template_id": "YOUR_TEMPLATE_ID",
"include_email_tokens": ["user@example.com"],
"custom_data": {
"invoice_id": "463246732",
"product_name": "Widget"
}
}
```
**고객에게 표시되는 내용:**
```liquid Text theme={null}
Invoice 463246732 for Widget is ready.
```
***
### 배열 데이터 예시
장바구니 상품, 주문 항목 또는 추천과 같은 여러 항목을 사용하기 위해 객체 배열을 전달합니다. 배열은 직접 접근(인덱싱)과 반복(루프)을 모두 지원합니다.
**사용 사례:** 상품 목록, 리더보드, 주문 요약 또는 다중 항목 데이터를 표시하는 경우.
**인덱싱 템플릿 (첫 번째 항목 접근):**
```liquid Liquid theme={null}
Your {{message.custom_data.cart_items[0].item_name}} is waiting for you!
Image: {{message.custom_data.cart_items[0].img_url}}
```
**배열 인덱싱은 0부터 시작합니다**, 1이 아닙니다. 첫 번째 항목은 `[0]`, 두 번째는 `[1]` 등입니다. 존재하지 않는 인덱스에 접근하면 빈 값이 반환됩니다 (오류가 발생하지 않음).
**루프 템플릿 (모든 항목 접근):**
```liquid Liquid theme={null}
{% for item in message.custom_data.cart_items %}
- {{ item.item_name }} — {{ item.img_url }}
{% endfor %}
```
**API 요청:**
```json theme={null}
{
"app_id": "YOUR_APP_ID",
"template_id": "YOUR_TEMPLATE_ID",
"include_email_tokens": ["user@example.com"],
"custom_data": {
"cart_items": [
{
"item_name": "sweater",
"img_url": "https://.../sweater.png"
},
{
"item_name": "socks",
"img_url": "https://.../socks.png"
}
]
}
}
```
**고객에게 표시되는 내용:**
```liquid Text theme={null}
Your sweater is waiting for you!
Image: https://.../sweater.png
- sweater — https://.../sweater.png
- socks — https://.../socks.png
```
**유용한 배열 속성:**
* `{{message.custom_data.cart_items.size}}` — 배열의 항목 수 (이 예시에서는 `2` 반환)
* `{{message.custom_data.cart_items.first.item_name}}` — 첫 번째 항목의 이름 (`[0]`과 동일)
* `{{message.custom_data.cart_items.last.item_name}}` — 마지막 항목의 이름
***
### 대량 개인화 예시
단일 API 요청으로 여러 사용자에게 메시지를 전송하며, 각 수신자는 자신의 `external_id`를 기반으로 개인화된 콘텐츠를 확인합니다.
**작동 방식:**
1. `custom_data`를 **키가 external\_id**이고 **값이 사용자별 데이터**인 객체로 구성합니다
2. 템플릿에서 `subscription.external_id`를 사용하여 현재 수신자의 데이터를 조회합니다
3. OneSignal은 각 수신자의 특정 데이터로 수신자당 한 번 템플릿을 렌더링합니다
**템플릿:**
```liquid theme={null}
{% assign user = message.custom_data.users[subscription.external_id] %}
Hi {{ user.first_name }}, you have {{ user.points }} points. Your level is {{ user.level }}.
```
**동작 설명:**
* `subscription.external_id`에는 현재 수신자의 external\_id가 포함됩니다 (예: "user123")
* `message.custom_data.users[subscription.external_id]`는 custom\_data 객체에서 해당 사용자의 데이터를 조회합니다
* `user`는 해당 사용자 데이터의 단축 변수가 됩니다
* 각 수신자는 자신의 개인화된 콘텐츠만 볼 수 있습니다
**API 요청:**
```json theme={null}
{
"app_id": "YOUR_APP_ID",
"template_id": "YOUR_TEMPLATE_ID",
"include_aliases": {
"external_id": ["user123", "user456"]
},
"custom_data": {
"users": {
"user123": { "first_name": "John", "points": "150", "level": "Gold" },
"user456": { "first_name": "Sarah", "points": "200", "level": "Platinum" }
}
}
}
```
**각 사용자에게 표시되는 내용:**
* **John** (user123): "Hi John, you have 150 points. Your level is Gold."
* **Sarah** (user456): "Hi Sarah, you have 200 points. Your level is Platinum."
**대량 개인화 요구 사항:**
* 모든 수신자는 OneSignal에 `external_id`가 설정되어 있어야 합니다
* `include_aliases`의 각 `external_id`는 `custom_data.users`에 일치하는 키가 있어야 합니다
* 수신자의 external\_id가 `custom_data`에 없으면 해당 메시지의 필드가 비어 있게 됩니다
***
## 예시: custom\_data를 사용한 장바구니 이탈 메시지
`custom_data`를 사용하여 이메일과 푸시 모두에 대한 장바구니 이탈 메시지를 구축하는 방법입니다.
**이 접근 방식을 사용하는 경우:**
* 서버가 장바구니 이탈을 감지하는 경우 (예: 마지막 활동 후 1시간)
* 실시간 장바구니 데이터가 데이터베이스에 있는 경우
* 이미지, 이름, 가격이 포함된 여러 상품을 표시하려는 경우
* 각 사용자가 다른 항목과 수량을 가질 수 있는 경우
* 백엔드에서 메시지를 조율하려는 경우
### `custom_data` 페이로드 예시
이 예시의 [Create Message API](/reference/create-message) 요청입니다.
```json JSON theme={null}
{
"custom_data": {
"cart_url": "https://yourdomain.com/cart",
"cart": [
{
"product_name": "24 Pack of Acorns",
"product_image": "https://i.imgur.com/ssPCfbC.png",
"product_price": "$12.99",
"product_quantity": "1"
},
{
"product_name": "Fancy Sweater",
"product_image": "https://i.imgur.com/8QWTfV4.png",
"product_price": "$9.99",
"product_quantity": "1"
}
]
},
"app_id": "YOUR_APP_ID",
"template_id": "YOUR_TEMPLATE_ID",
"include_aliases": {
"external_id": ["YOUR_EXTERNAL_ID"]
}
}
```
**필드 설명:**
| 필드 | 유형 | 용도 |
| ------------------ | ------ | --------------------------- |
| `cart_url` | string | 고객의 고유 장바구니 링크 (버튼/실행 URL용) |
| `cart` | array | 상품 목록 — 카운팅, 루프 및 상세 표시 지원 |
| `product_image` | string | 상품 이미지 (배열 내 항목별) |
| `product_name` | string | 상품 이름 (항목별) |
| `product_quantity` | string | 수량 (항목별) |
| `product_price` | string | 형식이 지정된 가격 (항목별) |
필드 이름은 원하는 대로 지정할 수 있습니다. 단, 템플릿의 Liquid 구문과 일치하는지 확인하세요.
**2KB 이하로 유지하세요:** 장바구니에 항목이 많은 경우, 크기 제한을 초과하지 않도록 처음 3-5개 항목으로 제한하거나 필수 필드만 전송하는 것을 고려하세요.
### 이메일 템플릿
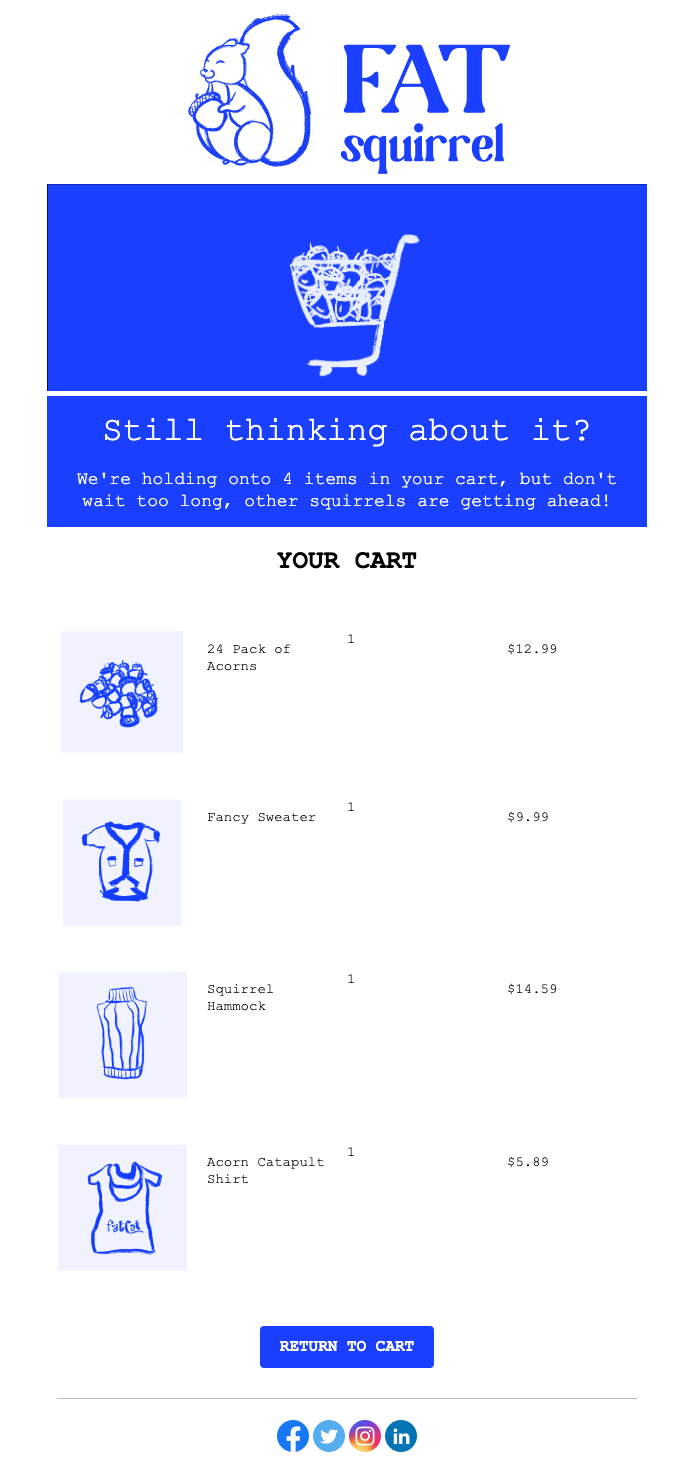
이 예시는 다음을 표시하는 이메일 템플릿을 구축하는 방법을 보여줍니다:
* 장바구니 항목 수
* for 루프를 사용하여 이미지, 이름, 수량, 가격이 포함된 각 상품
* 고객의 고유 장바구니 URL로 연결되는 버튼
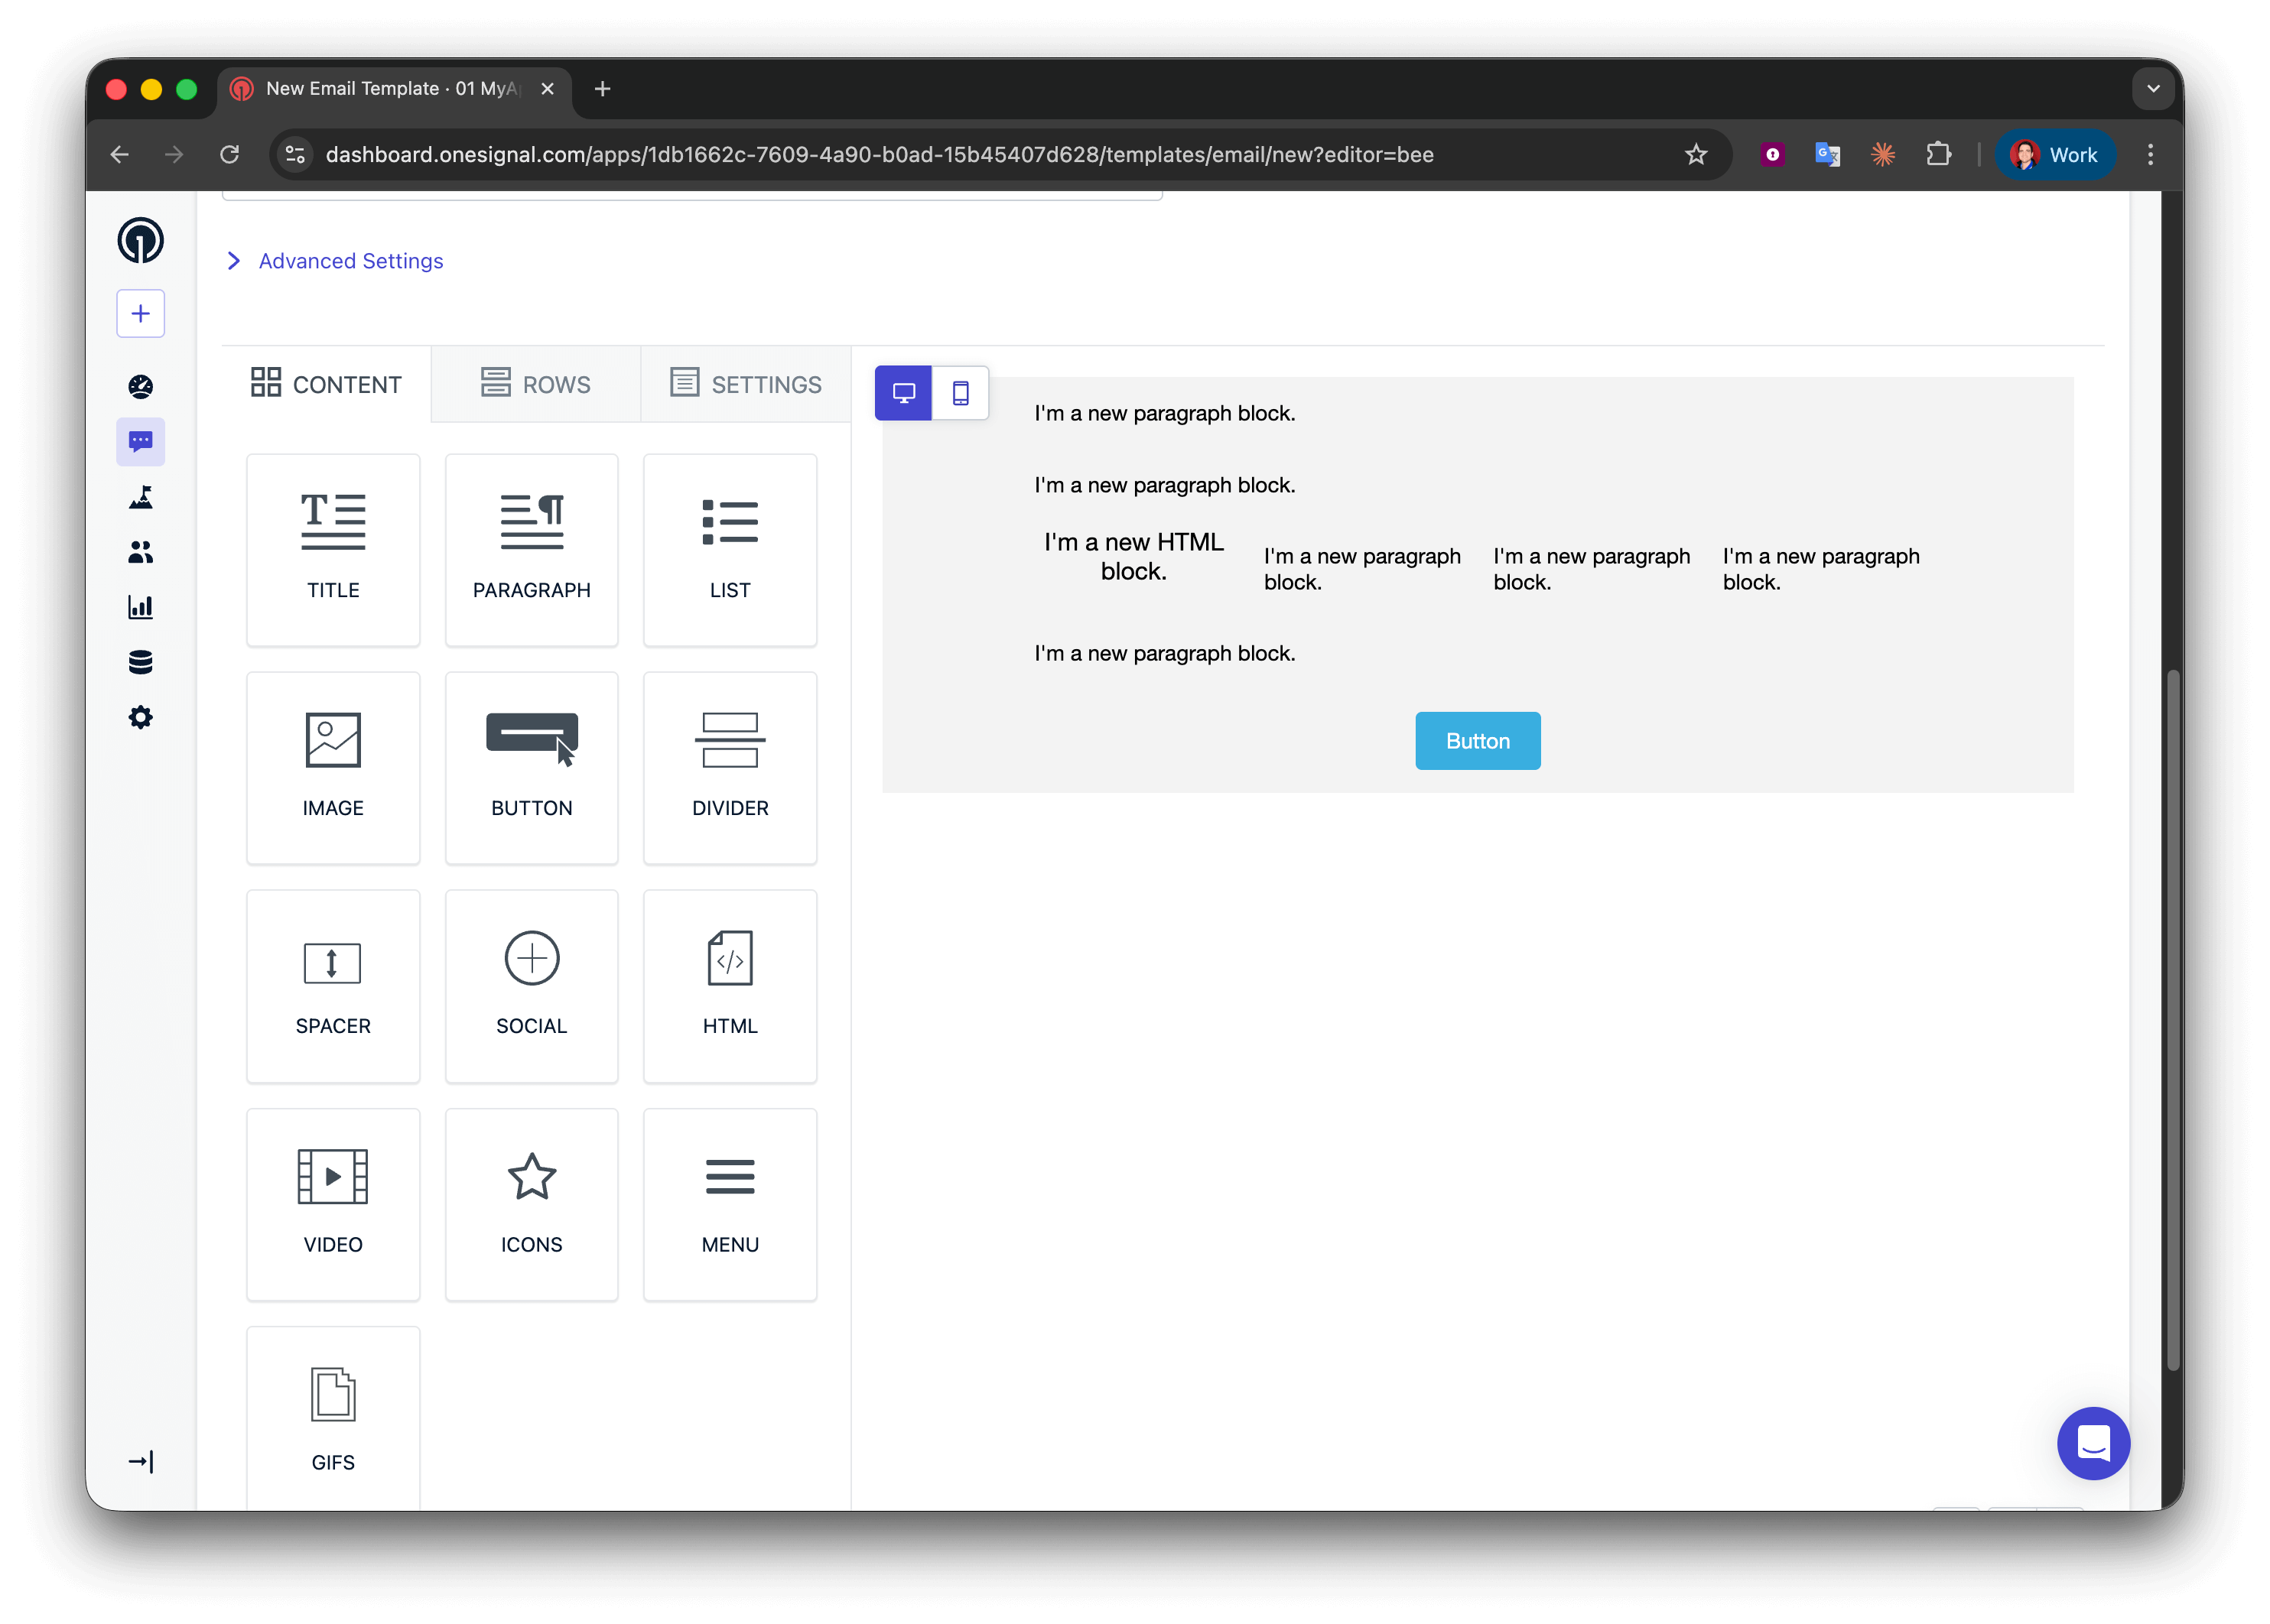
 **Messages > Templates > New Email Template**로 이동하여 드래그 앤 드롭 편집기를 엽니다.
5개의 행을 생성합니다:
* 행 1, 2, 4: **Paragraph** 블록이 있는 단일 열
* 행 3: **HTML | Paragraph | Paragraph | Paragraph**의 4열
* 행 5: **Button** 블록이 있는 단일 열
**Messages > Templates > New Email Template**로 이동하여 드래그 앤 드롭 편집기를 엽니다.
5개의 행을 생성합니다:
* 행 1, 2, 4: **Paragraph** 블록이 있는 단일 열
* 행 3: **HTML | Paragraph | Paragraph | Paragraph**의 4열
* 행 5: **Button** 블록이 있는 단일 열
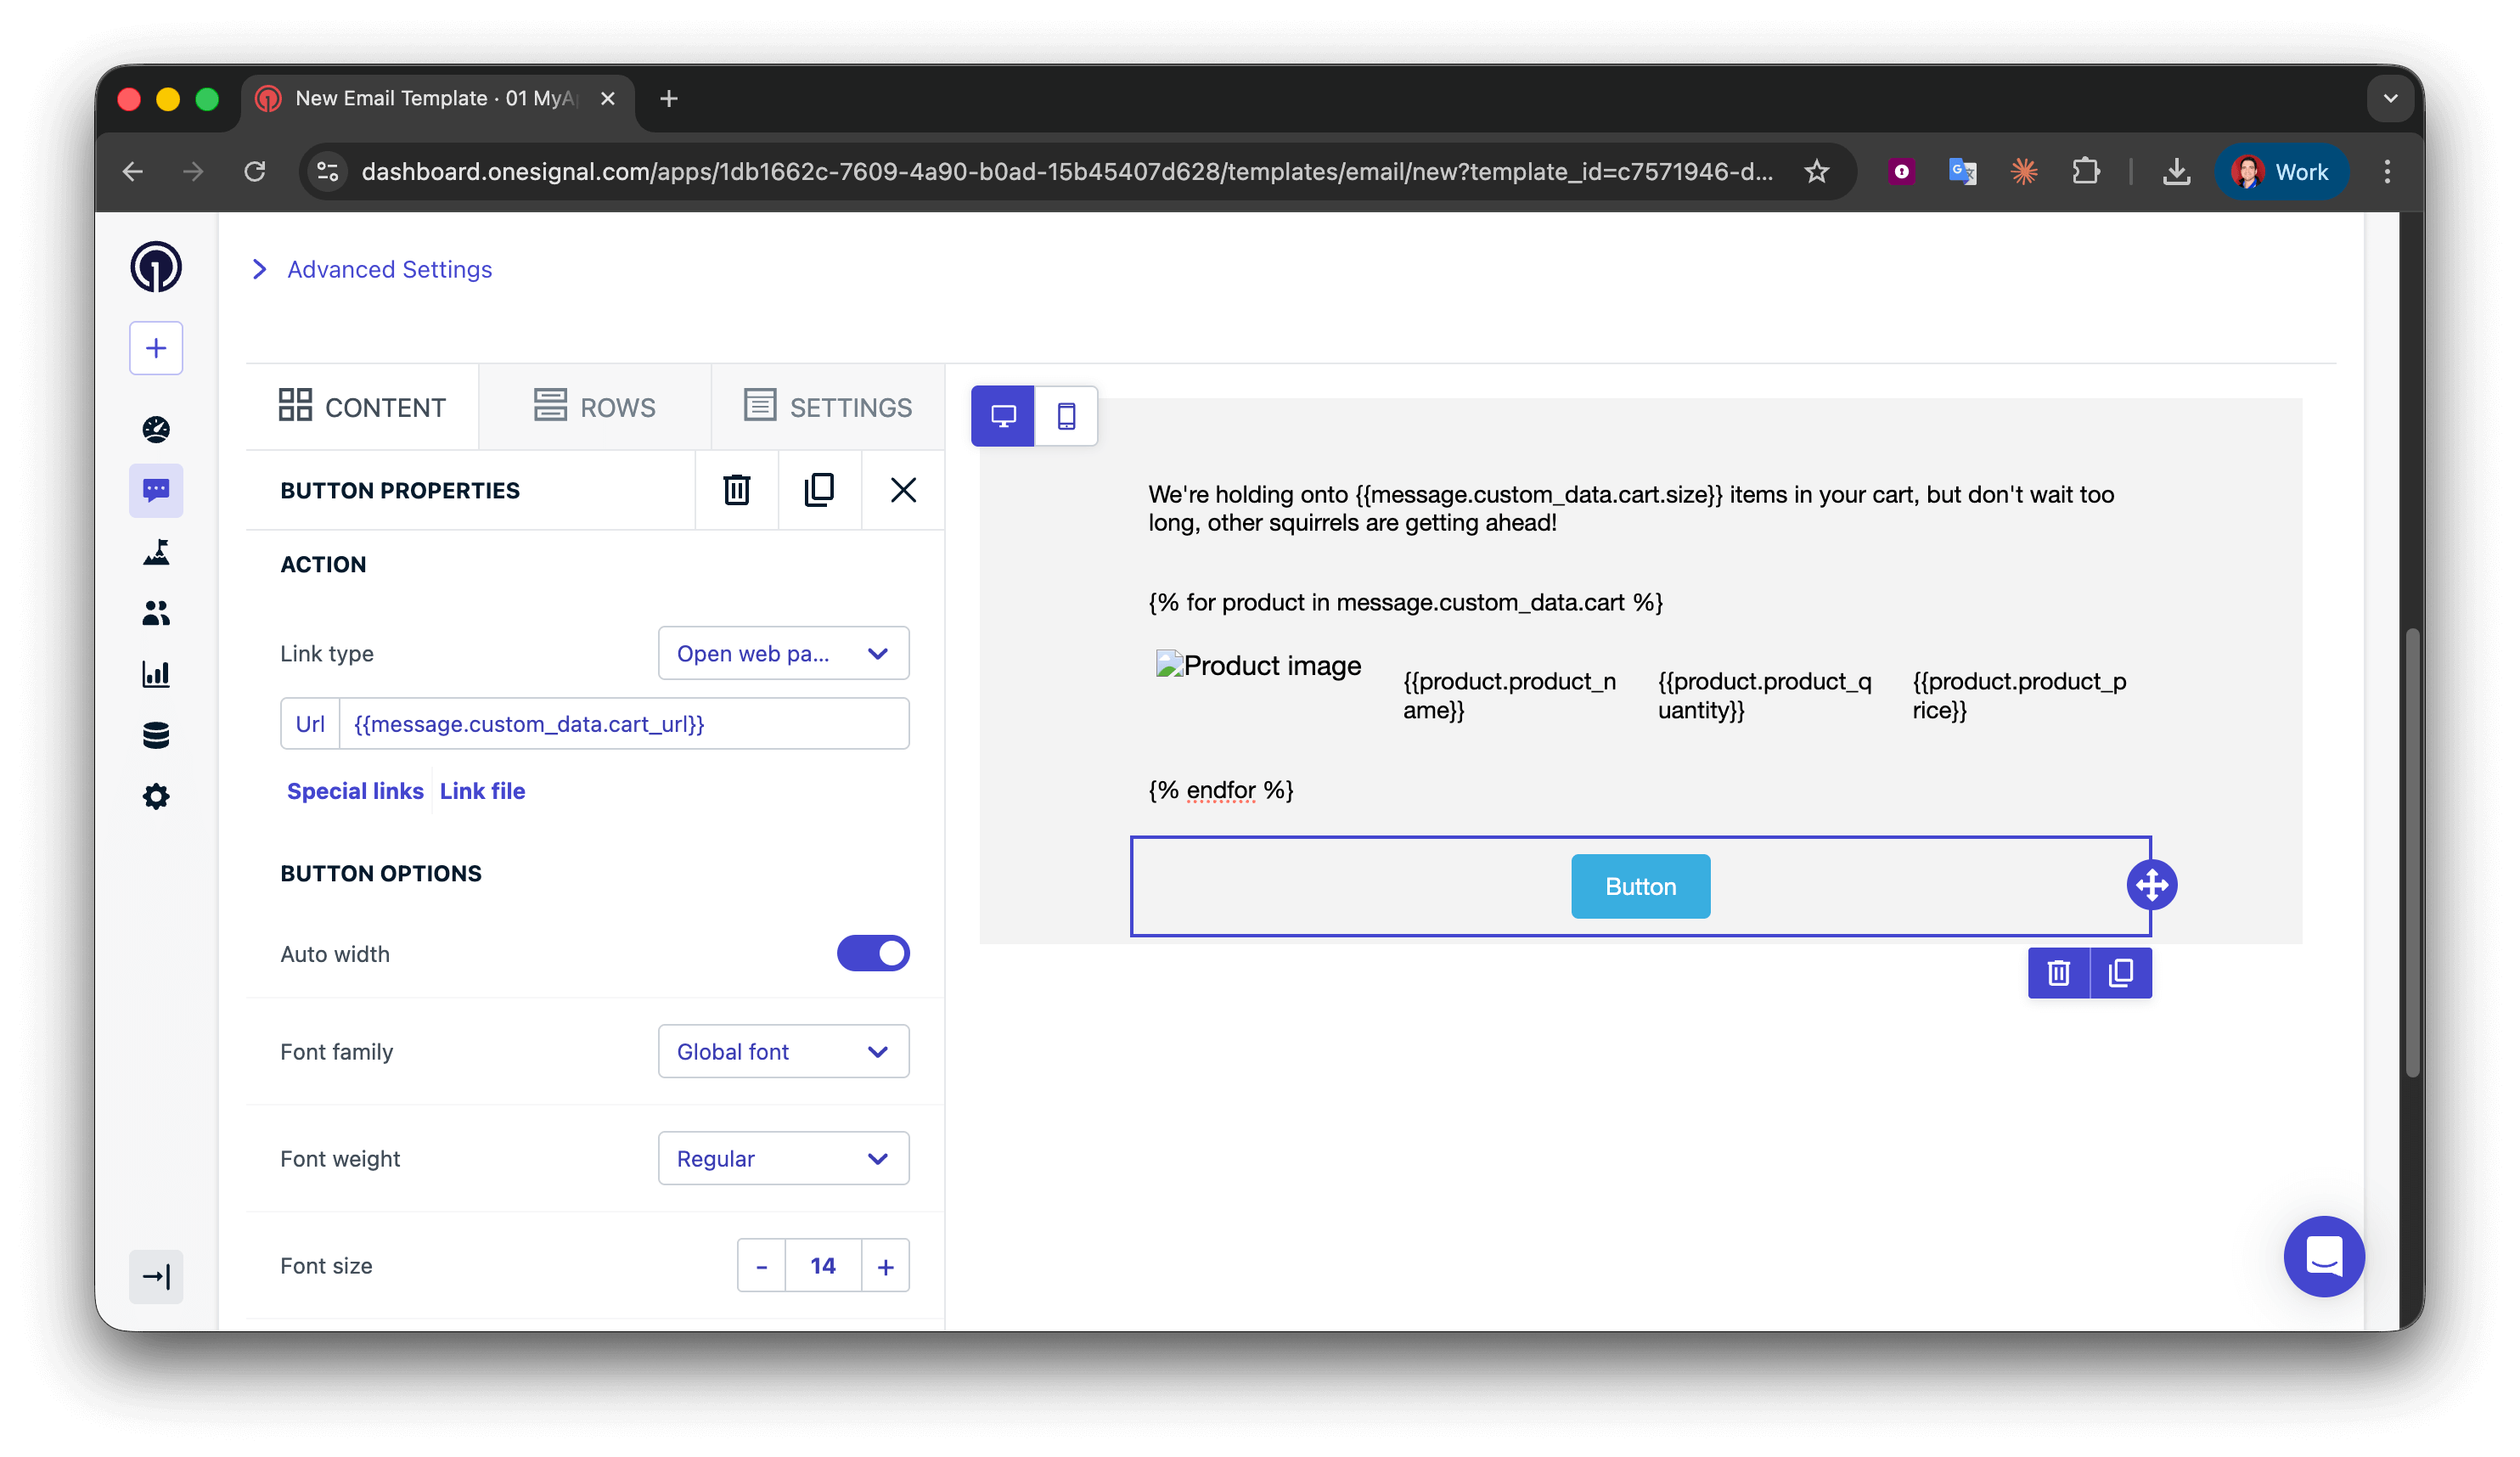
 행 1에 다음을 추가합니다:
```liquid Liquid theme={null}
We're holding onto {{message.custom_data.cart.size}} items in your cart, but don't wait too long, other squirrels are getting ahead!
```
더 나은 문법을 위해 "1 item"과 "2 items"를 구분하는 조건문을 사용할 수 있지만, 장바구니 이탈 이메일에서는 보통 복수형이 허용됩니다.
```liquid Liquid theme={null}
{% assign cart = message.custom_data.cart %}
{% assign item_count = cart.size | plus: 0 %}
{% if item_count == 1 %}
We're holding onto {{item_count}} item in your cart, but don't wait too long, other squirrels are getting ahead!
{% endif %}
{% if item_count > 1 %}
We're holding onto {{item_count}} items in your cart, but don't wait too long, other squirrels are getting ahead!
{% endif %}
```
[for 루프](./using-liquid-syntax#for-loops)를 사용하여 장바구니의 각 항목에 대해 상품 표시 행을 반복합니다.
행 2(루프 시작)의 텍스트 블록에 다음을 추가합니다:
```liquid Text theme={null}
{% for product in message.custom_data.cart %}
```
**동작 설명:**
* `cart` 배열의 각 객체를 반복하는 루프를 시작합니다
* 현재 항목을 나타내는 `product`라는 임시 변수를 생성합니다
* `{% for %}`와 `{% endfor %}` 사이의 모든 내용이 장바구니 항목당 한 번 반복됩니다
* `product` 대신 아무 이름이나 사용할 수 있습니다 (예: `item`, `cartItem`) — 일관되게만 유지하세요
For 루프 배치: `{% for %}` 구문이 자체 텍스트 블록 행에 있는지 확인하세요. 다른 콘텐츠가 있는 다중 열 행 안에 넣지 마세요. 일부 이메일 클라이언트에서 렌더링이 깨질 수 있습니다.
이 4열 행은 이미지, 이름, 수량, 가격을 표시합니다. 루프 내부에 있으므로 모든 장바구니 항목에 대해 반복됩니다.
행 3(상품 세부 정보)에서 구성합니다:
**열 1 - HTML 블록** (상품 이미지):
```html HTML theme={null}
행 1에 다음을 추가합니다:
```liquid Liquid theme={null}
We're holding onto {{message.custom_data.cart.size}} items in your cart, but don't wait too long, other squirrels are getting ahead!
```
더 나은 문법을 위해 "1 item"과 "2 items"를 구분하는 조건문을 사용할 수 있지만, 장바구니 이탈 이메일에서는 보통 복수형이 허용됩니다.
```liquid Liquid theme={null}
{% assign cart = message.custom_data.cart %}
{% assign item_count = cart.size | plus: 0 %}
{% if item_count == 1 %}
We're holding onto {{item_count}} item in your cart, but don't wait too long, other squirrels are getting ahead!
{% endif %}
{% if item_count > 1 %}
We're holding onto {{item_count}} items in your cart, but don't wait too long, other squirrels are getting ahead!
{% endif %}
```
[for 루프](./using-liquid-syntax#for-loops)를 사용하여 장바구니의 각 항목에 대해 상품 표시 행을 반복합니다.
행 2(루프 시작)의 텍스트 블록에 다음을 추가합니다:
```liquid Text theme={null}
{% for product in message.custom_data.cart %}
```
**동작 설명:**
* `cart` 배열의 각 객체를 반복하는 루프를 시작합니다
* 현재 항목을 나타내는 `product`라는 임시 변수를 생성합니다
* `{% for %}`와 `{% endfor %}` 사이의 모든 내용이 장바구니 항목당 한 번 반복됩니다
* `product` 대신 아무 이름이나 사용할 수 있습니다 (예: `item`, `cartItem`) — 일관되게만 유지하세요
For 루프 배치: `{% for %}` 구문이 자체 텍스트 블록 행에 있는지 확인하세요. 다른 콘텐츠가 있는 다중 열 행 안에 넣지 마세요. 일부 이메일 클라이언트에서 렌더링이 깨질 수 있습니다.
이 4열 행은 이미지, 이름, 수량, 가격을 표시합니다. 루프 내부에 있으므로 모든 장바구니 항목에 대해 반복됩니다.
행 3(상품 세부 정보)에서 구성합니다:
**열 1 - HTML 블록** (상품 이미지):
```html HTML theme={null}
 ```
**열 2-4 - 텍스트 블록** (상품 이름, 수량, 가격):
* 열 2: `{{product.product_name}}`
* 열 3: `{{product.product_quantity}}`
* 열 4: `{{product.product_price}}`
**루프 동작 방식:**
* 첫 번째 반복에서 `product` = 장바구니 배열의 첫 번째 객체
* `{{product.product_image}}`은 첫 번째 항목의 이미지 URL을 가져옵니다
* 두 번째 반복에서 `product` = 두 번째 객체
* 이 행은 모든 장바구니 항목에 대해 자동으로 반복됩니다
**필드 이름 매칭:** `product_image`와 같은 키는 이벤트 페이로드와 정확히 일치해야 합니다 (대소문자 구분). 불일치 시 빈 문자열로 렌더링됩니다.
반복이 멈추는 위치를 표시하기 위해 루프를 닫습니다.
행 4(루프 종료)에 다음을 추가합니다:
```liquid Liquid theme={null}
{% endfor %}
```
모든 `{% for %}`에는 대응하는 `{% endfor %}`가 있어야 합니다. 이를 누락하면 이메일 렌더링이 깨집니다.
행 5의 **Button** 블록에서 Action URL을 다음과 같이 설정합니다:
```liquid Text theme={null}
{{message.custom_data.cart_url}}
```
```
**열 2-4 - 텍스트 블록** (상품 이름, 수량, 가격):
* 열 2: `{{product.product_name}}`
* 열 3: `{{product.product_quantity}}`
* 열 4: `{{product.product_price}}`
**루프 동작 방식:**
* 첫 번째 반복에서 `product` = 장바구니 배열의 첫 번째 객체
* `{{product.product_image}}`은 첫 번째 항목의 이미지 URL을 가져옵니다
* 두 번째 반복에서 `product` = 두 번째 객체
* 이 행은 모든 장바구니 항목에 대해 자동으로 반복됩니다
**필드 이름 매칭:** `product_image`와 같은 키는 이벤트 페이로드와 정확히 일치해야 합니다 (대소문자 구분). 불일치 시 빈 문자열로 렌더링됩니다.
반복이 멈추는 위치를 표시하기 위해 루프를 닫습니다.
행 4(루프 종료)에 다음을 추가합니다:
```liquid Liquid theme={null}
{% endfor %}
```
모든 `{% for %}`에는 대응하는 `{% endfor %}`가 있어야 합니다. 이를 누락하면 이메일 렌더링이 깨집니다.
행 5의 **Button** 블록에서 Action URL을 다음과 같이 설정합니다:
```liquid Text theme={null}
{{message.custom_data.cart_url}}
```
 * [예시 `custom_data` 페이로드](#example-custom-data-payload)를 사용하여 API 요청을 설정합니다.
* 자신에게 이메일을 전송합니다.
* 데이터가 올바르게 표시되는지 확인합니다.
성공! 이제 템플릿에 자신만의 스타일을 적용할 수 있습니다. [드래그 앤 드롭으로 이메일 디자인하기](./design-emails-with-drag-and-drop)를 참조하세요.
### 푸시 템플릿
푸시 알림은 문자 수 제한과 운영체제 제한이 있으므로, 모든 항목을 표시하는 대신 첫 번째 상품을 표시하고 적절한 문법으로 총 수를 나타냅니다.
다음은 구축할 푸시 알림 예시입니다:
* [예시 `custom_data` 페이로드](#example-custom-data-payload)를 사용하여 API 요청을 설정합니다.
* 자신에게 이메일을 전송합니다.
* 데이터가 올바르게 표시되는지 확인합니다.
성공! 이제 템플릿에 자신만의 스타일을 적용할 수 있습니다. [드래그 앤 드롭으로 이메일 디자인하기](./design-emails-with-drag-and-drop)를 참조하세요.
### 푸시 템플릿
푸시 알림은 문자 수 제한과 운영체제 제한이 있으므로, 모든 항목을 표시하는 대신 첫 번째 상품을 표시하고 적절한 문법으로 총 수를 나타냅니다.
다음은 구축할 푸시 알림 예시입니다:
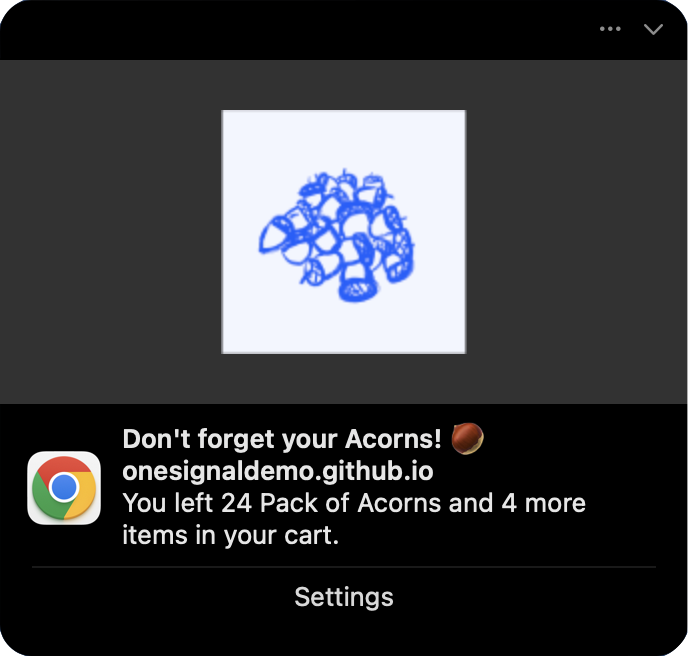 **메시지 필드:**
```liquid Liquid theme={null}
{% assign cart = message.custom_data.cart %}
{% assign item_count = cart.size | plus: 0 %}
{% if item_count == 1 %}
You left {{cart.first.product_name}} in your cart.
{% endif %}
{% if item_count == 2 %}
You left {{cart.first.product_name}} and {{item_count | minus: 1}} more item in your cart.
{% endif %}
{% if item_count > 2 %}
You left {{cart.first.product_name}} and {{item_count | minus: 1}} more items in your cart.
{% endif %}
```
자세한 정보는 [Liquid 구문 사용하기](./using-liquid-syntax#if-elsif-else)를 참조하세요.
**이미지 필드:**
```liquid Liquid theme={null}
{{message.custom_data.cart.first.product_image | default: "https://i.imgur.com/ssPCfbC.png"}}
```
자세한 정보는 [알림 이미지 및 리치 미디어](./rich-media)를 참조하세요.
**실행 URL 필드:**
```liquid Liquid theme={null}
{{cart_url | default: "https://yourdomain.com/cart"}}
```
성공! 템플릿을 저장하고 `custom_data` 속성과 함께 [Create message](/reference/create-message) API 요청에서 해당 `template_id`를 사용하여 테스트합니다.
***
## 문제 해결 및 모범 사례
* **간단하게 유지하세요**: 템플릿에서 실제로 사용할 데이터만 포함하세요
* **2KB 이하로 유지하세요**: 특히 배열을 사용할 때 페이로드 크기를 모니터링하세요
* **일관된 네이밍을 사용하세요**: 전체적으로 `snake_case` 또는 `camelCase`를 일관되게 사용하세요
* **전송 전 검증하세요**: null 값, 빈 배열 및 필수 필드를 확인하세요
**템플릿 디자인:**
* 선택적 필드에는 **항상 기본값 필터를 사용하세요**:
```liquid Liquid theme={null}
{{message.custom_data.user_name | default: "there"}}
```
* **루프 전에 배열 크기를 확인하세요**:
```liquid Liquid theme={null}
{% if message.custom_data.items.size > 0 %}
{% for item in message.custom_data.items %}
{{item.name}}
{% endfor %}
{% endif %}
```
* **엣지 케이스로 테스트하세요**: 빈 배열, 누락된 필드, 최대 항목 수
**오류 처리:**
* 검증 오류를 잡기 위해 서버 측에서 API 응답을 로깅하세요
* 메시지 전달률을 모니터링하세요 — 급격한 감소는 Liquid 오류를 나타낼 수 있습니다
* 중요한 트랜잭션 메시지에 대비하여 대체 템플릿을 준비하세요
**성능:**
* 복잡한 Liquid 로직을 사용하는 대신 백엔드에서 **복잡한 데이터를 사전 포맷하세요**
* **템플릿을 캐시하고** 여러 API 호출에서 재사용하세요
* 대량 트랜잭션 메시지를 마케팅 캠페인과 분리하는 것을 고려하세요
**원인:** Liquid 구문 오류 또는 필드 이름 불일치
**해결 방법:**
* `custom_data`와 템플릿 간의 필드 이름이 정확히 일치하는지 확인하세요 (대소문자 구분)
* 오타를 확인하세요: `{{message.custom_data.name}}`이지 `{{message.custm_data.name}}`이 아닙니다
* 누락된 필드를 잡기 위해 [기본값 필터](./using-liquid-syntax#default)를 사용하세요
* 프로덕션 전에 실제 `custom_data` 구조로 템플릿을 테스트하세요
**원인:** `custom_data`가 2KB 제한을 초과함
**해결 방법:**
* 페이로드에서 불필요한 필드를 제거하세요
* 가능한 경우 필드 이름과 값을 줄이세요
* 배열을 처음 3-5개 항목으로 제한하세요
* 큰 정적 콘텐츠(전체 HTML 등)를 대신 템플릿으로 이동하세요
***
## 관련 페이지
Tags, 사용자 속성 및 세그먼테이션을 포함한 OneSignal의 모든 개인화 옵션 개요입니다.
custom\_data, 타겟팅 옵션 및 사용 가능한 모든 필드를 포함한 메시지 전송을 위한 전체 API 레퍼런스입니다.
필터, 조건문, 루프 및 문자열 조작을 포함한 전체 Liquid 구문 레퍼런스입니다.
Push, Email, SMS 및 인앱 채널을 위한 재사용 가능한 메시지 템플릿을 생성하고 관리합니다.
도움이 필요하신가요?
지원 팀과 채팅하거나 `support@onesignal.com`으로 이메일을 보내주세요.
다음을 포함해 주세요:
* 발생한 문제의 세부 정보 및 재현 단계(가능한 경우)
* OneSignal 앱 ID
* External ID 또는 Subscription ID(해당하는 경우)
* OneSignal 대시보드에서 테스트한 메시지의 URL(해당하는 경우)
* 관련 [로그 또는 오류 메시지](/docs/ko/capturing-a-debug-log)
기꺼이 도와드리겠습니다!
***
**메시지 필드:**
```liquid Liquid theme={null}
{% assign cart = message.custom_data.cart %}
{% assign item_count = cart.size | plus: 0 %}
{% if item_count == 1 %}
You left {{cart.first.product_name}} in your cart.
{% endif %}
{% if item_count == 2 %}
You left {{cart.first.product_name}} and {{item_count | minus: 1}} more item in your cart.
{% endif %}
{% if item_count > 2 %}
You left {{cart.first.product_name}} and {{item_count | minus: 1}} more items in your cart.
{% endif %}
```
자세한 정보는 [Liquid 구문 사용하기](./using-liquid-syntax#if-elsif-else)를 참조하세요.
**이미지 필드:**
```liquid Liquid theme={null}
{{message.custom_data.cart.first.product_image | default: "https://i.imgur.com/ssPCfbC.png"}}
```
자세한 정보는 [알림 이미지 및 리치 미디어](./rich-media)를 참조하세요.
**실행 URL 필드:**
```liquid Liquid theme={null}
{{cart_url | default: "https://yourdomain.com/cart"}}
```
성공! 템플릿을 저장하고 `custom_data` 속성과 함께 [Create message](/reference/create-message) API 요청에서 해당 `template_id`를 사용하여 테스트합니다.
***
## 문제 해결 및 모범 사례
* **간단하게 유지하세요**: 템플릿에서 실제로 사용할 데이터만 포함하세요
* **2KB 이하로 유지하세요**: 특히 배열을 사용할 때 페이로드 크기를 모니터링하세요
* **일관된 네이밍을 사용하세요**: 전체적으로 `snake_case` 또는 `camelCase`를 일관되게 사용하세요
* **전송 전 검증하세요**: null 값, 빈 배열 및 필수 필드를 확인하세요
**템플릿 디자인:**
* 선택적 필드에는 **항상 기본값 필터를 사용하세요**:
```liquid Liquid theme={null}
{{message.custom_data.user_name | default: "there"}}
```
* **루프 전에 배열 크기를 확인하세요**:
```liquid Liquid theme={null}
{% if message.custom_data.items.size > 0 %}
{% for item in message.custom_data.items %}
{{item.name}}
{% endfor %}
{% endif %}
```
* **엣지 케이스로 테스트하세요**: 빈 배열, 누락된 필드, 최대 항목 수
**오류 처리:**
* 검증 오류를 잡기 위해 서버 측에서 API 응답을 로깅하세요
* 메시지 전달률을 모니터링하세요 — 급격한 감소는 Liquid 오류를 나타낼 수 있습니다
* 중요한 트랜잭션 메시지에 대비하여 대체 템플릿을 준비하세요
**성능:**
* 복잡한 Liquid 로직을 사용하는 대신 백엔드에서 **복잡한 데이터를 사전 포맷하세요**
* **템플릿을 캐시하고** 여러 API 호출에서 재사용하세요
* 대량 트랜잭션 메시지를 마케팅 캠페인과 분리하는 것을 고려하세요
**원인:** Liquid 구문 오류 또는 필드 이름 불일치
**해결 방법:**
* `custom_data`와 템플릿 간의 필드 이름이 정확히 일치하는지 확인하세요 (대소문자 구분)
* 오타를 확인하세요: `{{message.custom_data.name}}`이지 `{{message.custm_data.name}}`이 아닙니다
* 누락된 필드를 잡기 위해 [기본값 필터](./using-liquid-syntax#default)를 사용하세요
* 프로덕션 전에 실제 `custom_data` 구조로 템플릿을 테스트하세요
**원인:** `custom_data`가 2KB 제한을 초과함
**해결 방법:**
* 페이로드에서 불필요한 필드를 제거하세요
* 가능한 경우 필드 이름과 값을 줄이세요
* 배열을 처음 3-5개 항목으로 제한하세요
* 큰 정적 콘텐츠(전체 HTML 등)를 대신 템플릿으로 이동하세요
***
## 관련 페이지
Tags, 사용자 속성 및 세그먼테이션을 포함한 OneSignal의 모든 개인화 옵션 개요입니다.
custom\_data, 타겟팅 옵션 및 사용 가능한 모든 필드를 포함한 메시지 전송을 위한 전체 API 레퍼런스입니다.
필터, 조건문, 루프 및 문자열 조작을 포함한 전체 Liquid 구문 레퍼런스입니다.
Push, Email, SMS 및 인앱 채널을 위한 재사용 가능한 메시지 템플릿을 생성하고 관리합니다.
도움이 필요하신가요?
지원 팀과 채팅하거나 `support@onesignal.com`으로 이메일을 보내주세요.
다음을 포함해 주세요:
* 발생한 문제의 세부 정보 및 재현 단계(가능한 경우)
* OneSignal 앱 ID
* External ID 또는 Subscription ID(해당하는 경우)
* OneSignal 대시보드에서 테스트한 메시지의 URL(해당하는 경우)
* 관련 [로그 또는 오류 메시지](/docs/ko/capturing-a-debug-log)
기꺼이 도와드리겠습니다!
***