> ## Documentation Index
> Fetch the complete documentation index at: https://documentation.onesignal.com/llms.txt
> Use this file to discover all available pages before exploring further.
# Custom Events로 개인화하기
> Custom Event 속성을 사용하여 Liquid 구문으로 Journey 메시지를 개인화하세요. 이벤트가 저장, 접근, 렌더링되는 방식을 push, 이메일, SMS 템플릿에서 알아보세요.
[Custom Events](./custom-events)를 사용하면 이벤트 속성(제품명, 가격, URL, 배열 등)을 활용하여 Journey 메시지를 개인화할 수 있습니다.
이벤트 속성은 다음 조건을 충족하는 경우에만 템플릿에서 사용할 수 있습니다:
* Journey 진입을 트리거하는 경우, 또는
* Journey 내부의 **Wait Until** 조건과 일치하는 경우
저장된 이벤트 속성은 [Liquid 구문](./using-liquid-syntax)을 사용하여 접근할 수 있습니다.
***
## Custom Event 개인화 작동 방식
다음 단계에 따라 Journey 메시지에 이벤트 속성을 추가하세요:
[Custom Events](./custom-events) 페이로드 예시:
```json JSON theme={null}
{
"name": "purchase",
"properties": {
"item": "Blue Sweater",
"price": "29.99",
"order status": "pending",
"details": [
{
"manufacturer": "Company A",
"model": "1234567890"
},
{
"manufacturer": "Company B",
"model": "9876543210"
}
]
},
"external_id": "user_12345",
"timestamp": "2025-10-21T19:09:32.263Z",
}
```
[Liquid 구문](./using-liquid-syntax)을 사용하여 이벤트 속성에 접근합니다.
### 일반적인 Liquid 접근 패턴
| 원하는 값 | Liquid | 출력 |
| ------------- | --------------------------------------------------------------------- | ------------------------------ |
| 이벤트 이름 | `{{ journey.first_event.name }}` | `purchase` |
| 속성 | `{{ journey.first_event.properties.item }}` | `Blue Sweater` |
| 중첩 속성 | `{{ journey.first_event.properties.details.first.manufacturer }}` | `Company A` |
| 특수 문자가 포함된 속성 | `{{ journey.last_event.properties["order status"] }}` | `pending` |
| 타임스탬프 | `{{ journey.last_event.timestamp \| date: "%B %d, %Y at %I:%M %p" }}` | `October 21, 2025 at 07:09 PM` |
#### 중첩 Liquid 접근 패턴
점 표기법과 괄호 표기법을 사용하여 중첩 속성에 접근할 수도 있습니다:
```liquid Liquid theme={null}
{{ journey.first_event.properties.details.first.manufacturer }} = Company A
{{ journey.first_event.properties.details.last.manufacturer }} = Company B
{{ journey.first_event.properties.details[0].manufacturer }} = Company A
{{ journey.first_event.properties.details[1].manufacturer }} = Company B
```
잘못된 Liquid 구문이나 누락된 속성은 빈 문자열로 렌더링됩니다. 메시지는 그대로 전송됩니다. [default 필터](./using-liquid-syntax#default)를 사용하여 대체 값을 설정하세요.
Custom Event를 진입 규칙 및/또는 Wait Until 조건으로 사용하도록 Journey를 설정합니다.
* 진입 규칙은 [Journeys 설정](./journeys-settings)을 참조하세요.
* Wait Until 조건은 [Journeys 액션](./journeys-actions)을 참조하세요.
템플릿이 포함된 메시지 노드를 추가합니다.
### 이벤트 속성 저장 규칙
* 진입 규칙과 Wait Until 단계를 결합하여 Journey에서 여러 이벤트를 사용할 수 있습니다.
* 최대: **사용자당 Journey 인스턴스당 저장 가능한 이벤트 속성 100개** (가장 오래된 것부터 삭제됨).
* 이벤트 속성은 **사용자별, Journey 인스턴스별**로 저장됩니다.
* 진입 전에 전송된 이벤트는 접근할 수 없습니다.
* 사용자가 Journey를 종료하면 이벤트 속성이 삭제됩니다.
하나의 Journey에 저장된 이벤트는 다른 Journey에서 접근할 수 없습니다.
***
## Custom Event Liquid 참조
Journey 내부에서 저장된 이벤트에 접근하려면 다음 객체를 사용하세요.
이 Journey 인스턴스에 대해 처음으로 저장된 이벤트입니다.
* **Custom Event 진입 규칙**을 사용하는 경우, Journey 진입을 유발한 이벤트입니다.
* Custom Event 진입 규칙을 사용하지 않는 경우, Wait Until 조건과 일치하여 저장된 첫 번째 이벤트입니다.
```liquid Liquid theme={null}
Thanks for purchasing {{ journey.first_event.properties.item | default: "your item" }}!
```
이 Journey 인스턴스에 대해 가장 최근에 저장된 이벤트입니다.
* 이벤트가 하나만 저장된 경우, `first_event`와 `last_event`는 동일한 값을 반환합니다.
```liquid Liquid theme={null}
Your most recent purchase was {{ journey.last_event.properties.item | default: "made" }}!
```
특정 이름을 가진 가장 최근에 저장된 이벤트입니다.
* `EVENT_NAME`을 실제 이벤트 이름(예: `purchase`)으로 대체하세요.
* 동일한 이벤트 이름이 여러 번 사용된 경우, 가장 최근 인스턴스를 반환합니다.
```liquid Liquid theme={null}
{% assign event = journey.event.purchase %}
```
이벤트 이름에 공백이나 특수 문자가 포함된 경우, [괄호 표기법](https://shopify.dev/docs/api/liquid/basics#referencing-handles)을 사용하세요.
**이벤트 예시:** `"name": "order status"`
```liquid Liquid theme={null}
{% assign event = journey.event["order status"] %}
```
이 Journey 인스턴스에 대해 저장된 모든 이벤트이며, 저장된 순서대로 정렬됩니다.
* [for 루프](./using-liquid-syntax#for-loops)를 사용하여 반복 처리할 수 있습니다.
```liquid Liquid theme={null}
{% for event in journey.all_events %}
• {{ event.properties.item | default: "Item" }} — ${{ event.properties.price | default: "0.00" }}
{% endfor %}
```
* `journey.first_event`는 `journey.all_events[0]`의 축약형입니다.
* `journey.last_event`는 배열의 가장 최근 이벤트에 대한 축약형입니다.
***
## 예시: Custom Events를 사용한 장바구니 이탈 템플릿
이 예시는 Custom Events를 사용하여 장바구니 이탈 메시지를 개인화하는 방법을 보여줍니다. [장바구니 이탈 튜토리얼](./abandoned-cart)을 기반으로 합니다.
**Custom Event 세트 예시:**
```json JSON theme={null}
{
"events": [
{
"name": "cart_abandoned",
"properties": {
"cart_url": "https://yourdomain.com/username/cart",
"cart": [
{
"product_name": "24 Pack of Acorns",
"product_image": "https://i.imgur.com/ssPCfbC.png",
"product_price": "$12.99",
"product_quantity": "1"
},
{
"product_name": "Fancy Sweater",
"product_image": "https://i.imgur.com/8QWTfV4.png",
"product_price": "$9.99",
"product_quantity": "1"
}
]
},
"external_id": "ID_OF_THE_USER"
}
]
}
```
### 이메일 템플릿
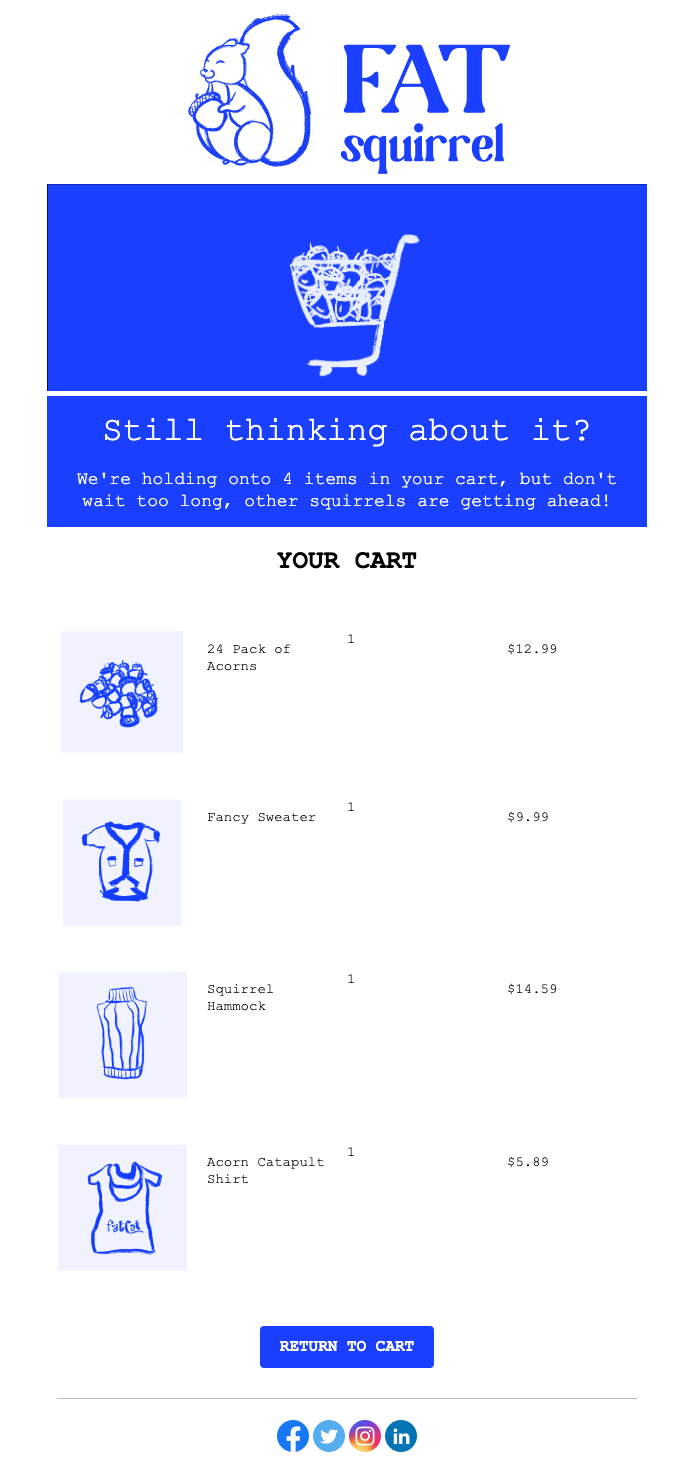
이 예시는 다음을 표시하는 이메일 템플릿을 작성하는 방법을 보여줍니다:
* 장바구니 상품 수
* for 루프를 사용하여 이미지, 이름, 수량, 가격이 포함된 각 제품
* 고객의 고유 장바구니 URL로 연결되는 버튼
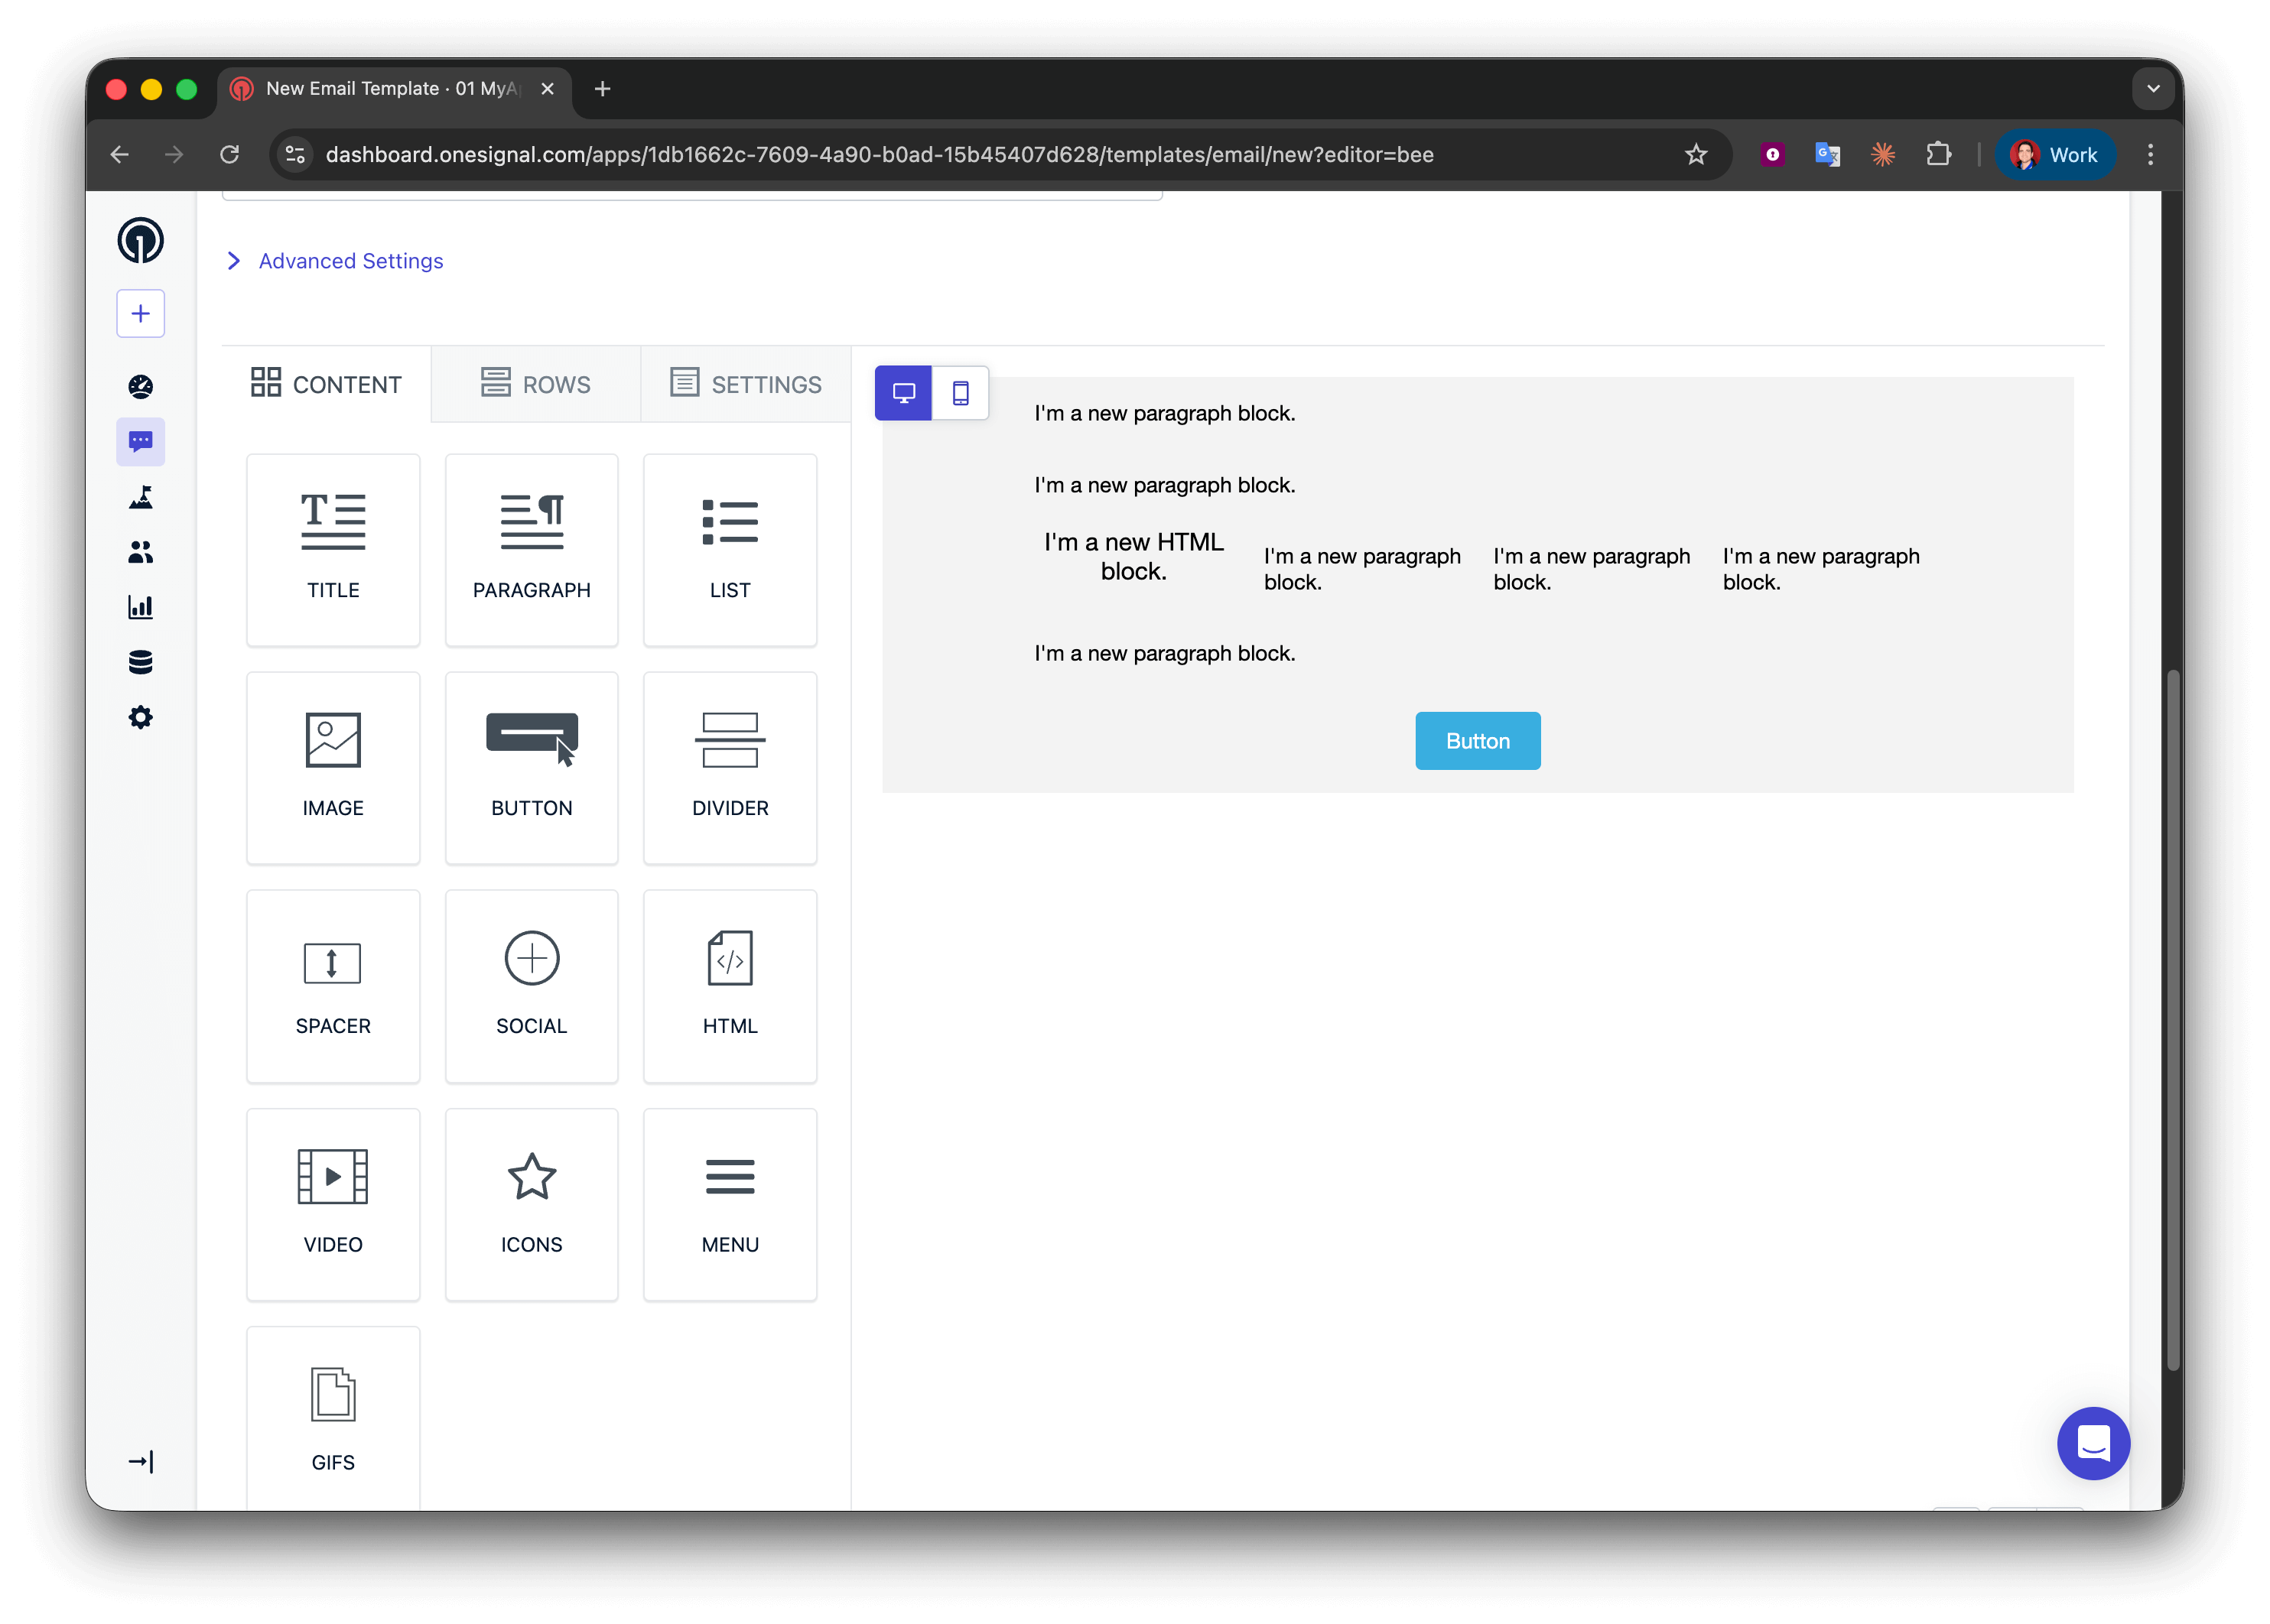
 **Messages > Templates > New Email Template**로 이동하여 드래그 앤 드롭 에디터를 엽니다.
5개의 행을 생성합니다:
* 행 1, 2, 4: **Paragraph** 블록이 포함된 1열
* 행 3: **HTML | Paragraph | Paragraph | Paragraph**가 포함된 4열
* 행 5: **Button** 블록이 포함된 1열
**Messages > Templates > New Email Template**로 이동하여 드래그 앤 드롭 에디터를 엽니다.
5개의 행을 생성합니다:
* 행 1, 2, 4: **Paragraph** 블록이 포함된 1열
* 행 3: **HTML | Paragraph | Paragraph | Paragraph**가 포함된 4열
* 행 5: **Button** 블록이 포함된 1열
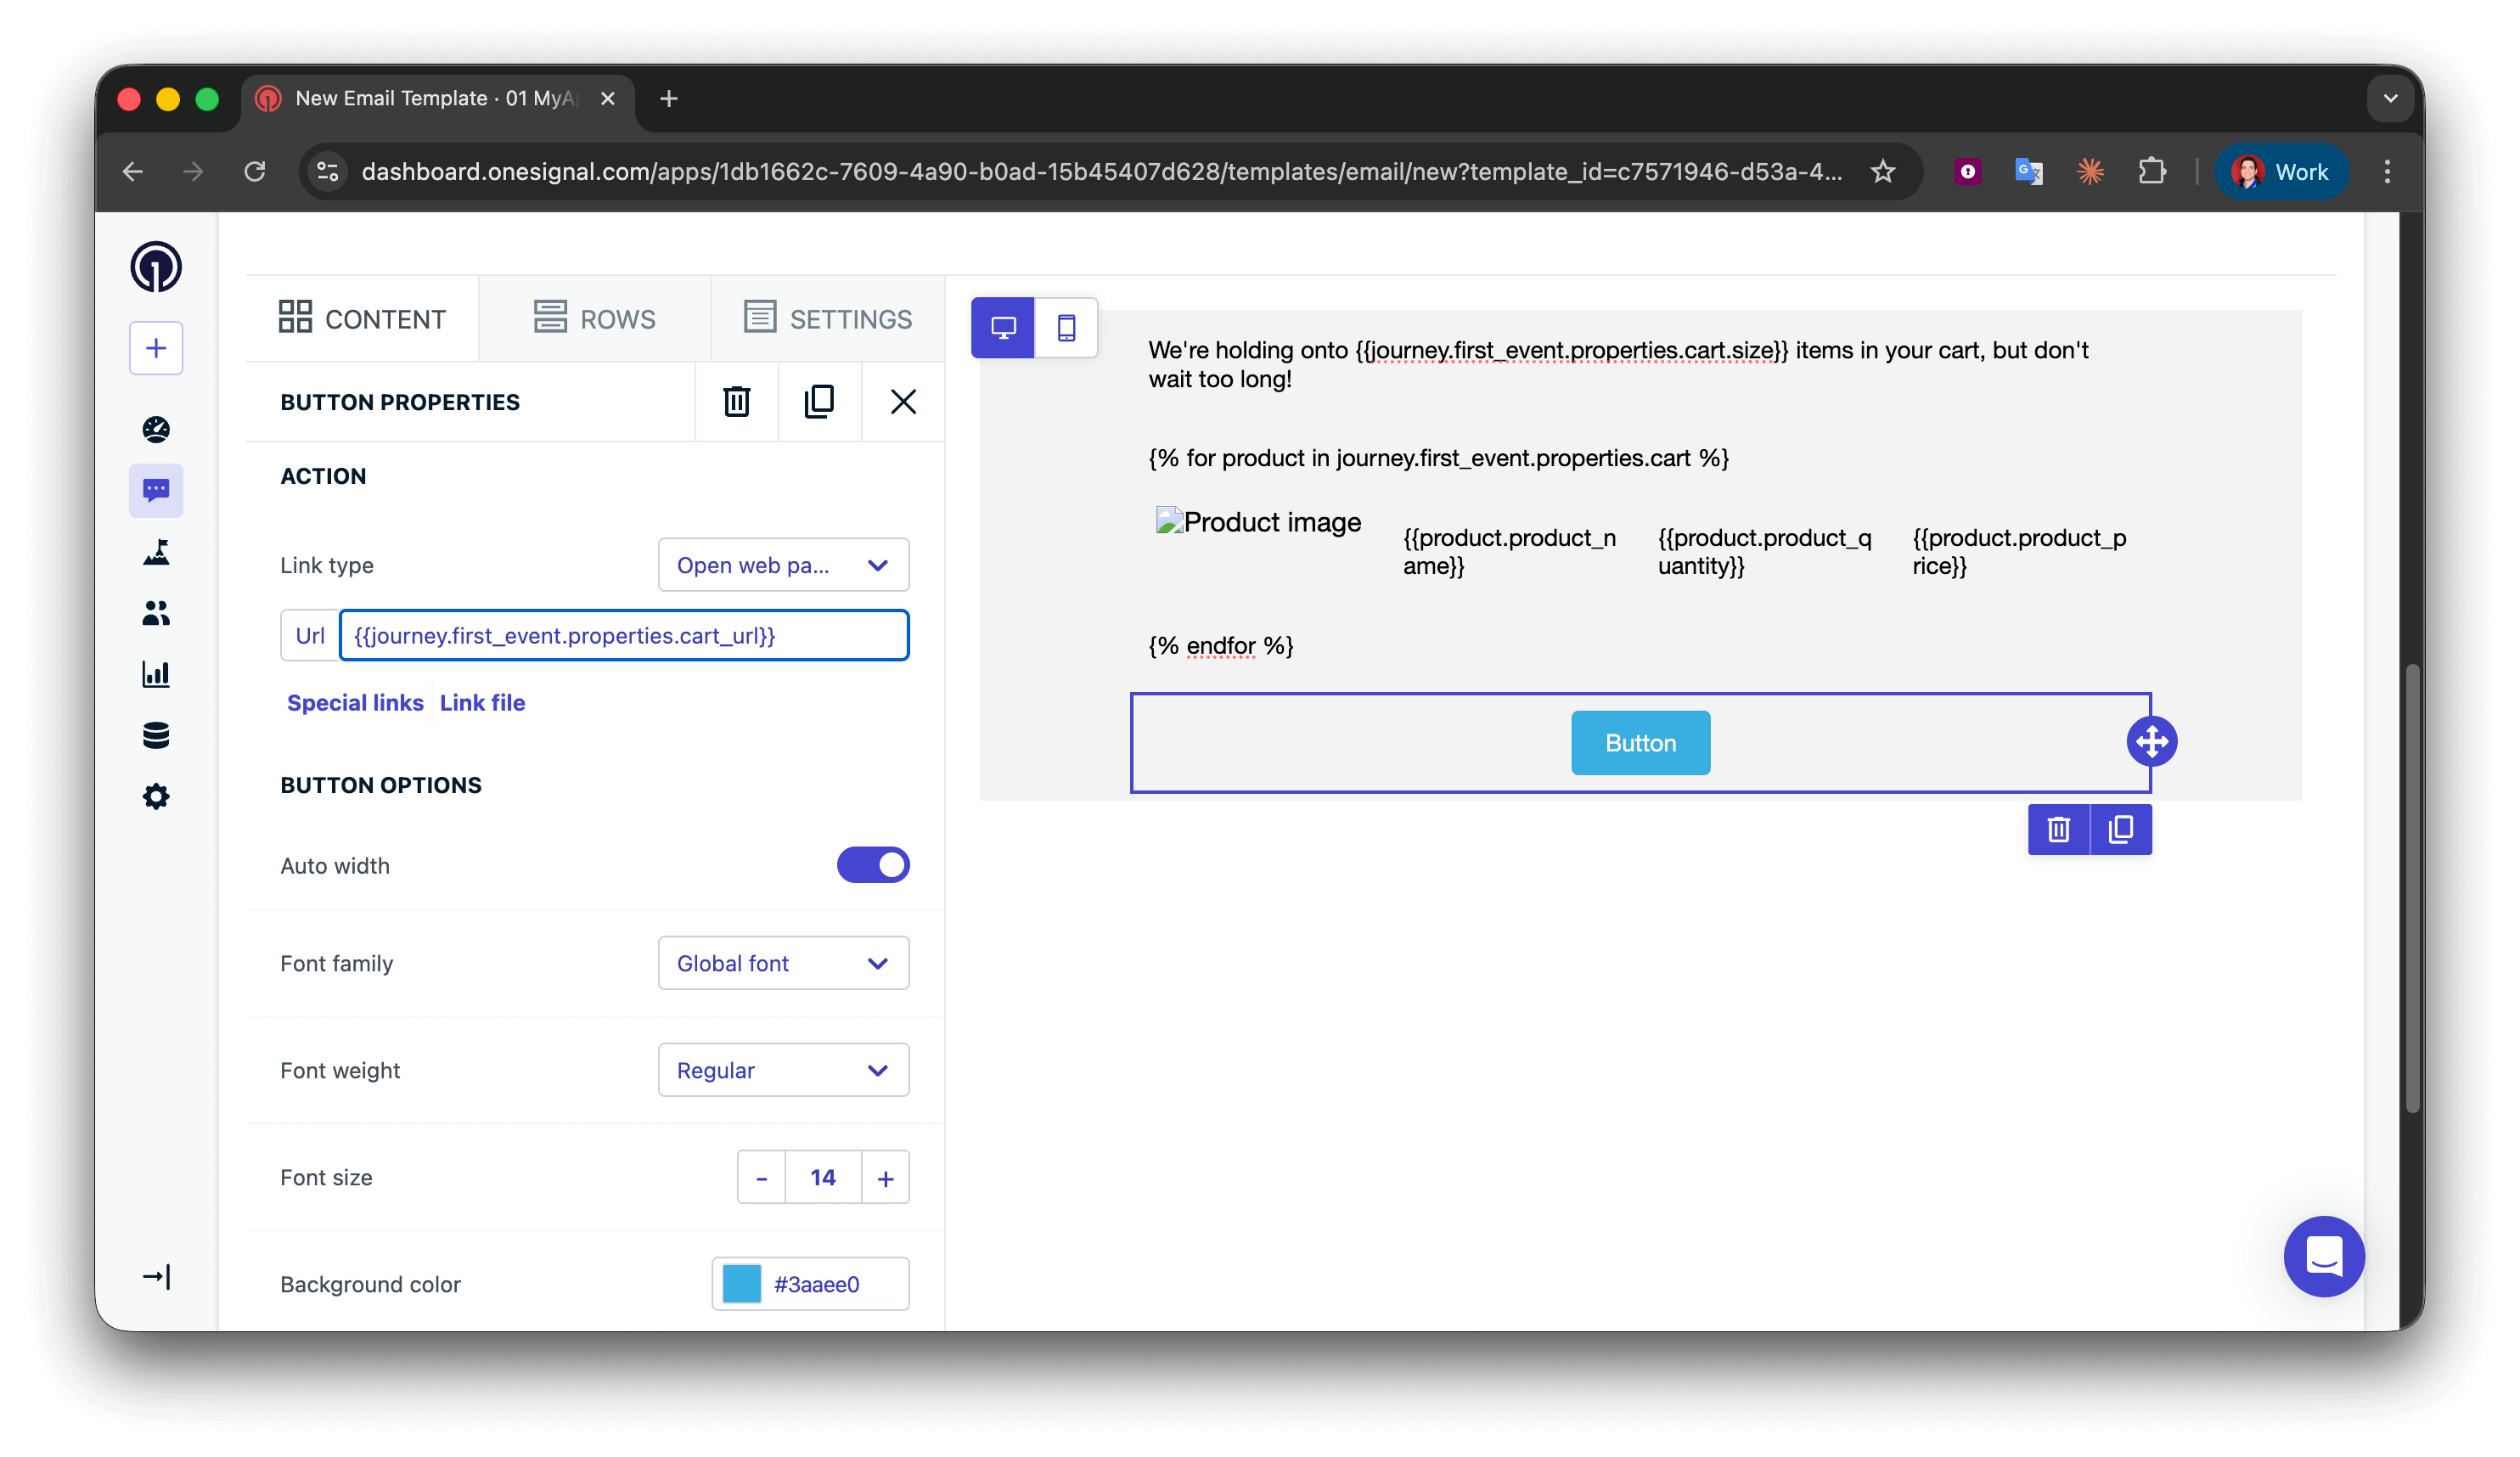
 행 1에 다음을 추가합니다:
```liquid Liquid theme={null}
We're holding onto {{journey.first_event.properties.cart.size}} items in your cart, but don't wait too long!
```
문법적으로 더 정확하게 하려면 조건문을 사용하여 "1 item"과 "2 items"를 구분할 수 있지만, 장바구니 이탈 이메일에서는 복수형을 사용해도 일반적으로 문제가 없습니다.
```liquid Liquid theme={null}
{% assign cart = message.custom_data.cart %}
{% assign item_count = cart.size | plus: 0 %}
{% if item_count == 1 %}
We're holding onto {{item_count}} item in your cart, but don't wait too long, other squirrels are getting ahead!
{% endif %}
{% if item_count > 1 %}
We're holding onto {{item_count}} items in your cart, but don't wait too long, other squirrels are getting ahead!
{% endif %}
```
[for 루프](./using-liquid-syntax#for-loops)를 사용하여 각 장바구니 항목에 대해 제품 표시 행을 반복합니다.
행 2(루프 시작)에 다음을 추가합니다:
```liquid Liquid theme={null}
{% for product in journey.first_event.properties.cart %}
```
**이 코드의 역할:**
* `cart` 배열의 각 객체를 반복하는 루프를 시작합니다
* 현재 항목을 나타내는 임시 변수 `product`를 생성합니다
* `{% for %}`와 `{% endfor %}` 사이의 모든 내용이 각 장바구니 항목마다 반복됩니다
* `product`는 원하는 이름으로 변경할 수 있습니다(예: `item`, `cartItem`). 일관성만 유지하면 됩니다
for 루프 배치: `{% for %}` 구문은 반드시 별도의 텍스트 블록 행에 배치해야 합니다. 다른 콘텐츠가 포함된 다중 열 행 안에 넣지 마세요. 일부 이메일 클라이언트에서 렌더링이 깨질 수 있습니다.
이 4열 행은 이미지, 이름, 수량, 가격을 표시합니다. 루프 내부에 있으므로 모든 장바구니 항목에 대해 반복됩니다.
행 3(제품 상세 정보)에서 다음을 구성합니다:
**열 1 - HTML 블록** (제품 이미지):
```html theme={null}
행 1에 다음을 추가합니다:
```liquid Liquid theme={null}
We're holding onto {{journey.first_event.properties.cart.size}} items in your cart, but don't wait too long!
```
문법적으로 더 정확하게 하려면 조건문을 사용하여 "1 item"과 "2 items"를 구분할 수 있지만, 장바구니 이탈 이메일에서는 복수형을 사용해도 일반적으로 문제가 없습니다.
```liquid Liquid theme={null}
{% assign cart = message.custom_data.cart %}
{% assign item_count = cart.size | plus: 0 %}
{% if item_count == 1 %}
We're holding onto {{item_count}} item in your cart, but don't wait too long, other squirrels are getting ahead!
{% endif %}
{% if item_count > 1 %}
We're holding onto {{item_count}} items in your cart, but don't wait too long, other squirrels are getting ahead!
{% endif %}
```
[for 루프](./using-liquid-syntax#for-loops)를 사용하여 각 장바구니 항목에 대해 제품 표시 행을 반복합니다.
행 2(루프 시작)에 다음을 추가합니다:
```liquid Liquid theme={null}
{% for product in journey.first_event.properties.cart %}
```
**이 코드의 역할:**
* `cart` 배열의 각 객체를 반복하는 루프를 시작합니다
* 현재 항목을 나타내는 임시 변수 `product`를 생성합니다
* `{% for %}`와 `{% endfor %}` 사이의 모든 내용이 각 장바구니 항목마다 반복됩니다
* `product`는 원하는 이름으로 변경할 수 있습니다(예: `item`, `cartItem`). 일관성만 유지하면 됩니다
for 루프 배치: `{% for %}` 구문은 반드시 별도의 텍스트 블록 행에 배치해야 합니다. 다른 콘텐츠가 포함된 다중 열 행 안에 넣지 마세요. 일부 이메일 클라이언트에서 렌더링이 깨질 수 있습니다.
이 4열 행은 이미지, 이름, 수량, 가격을 표시합니다. 루프 내부에 있으므로 모든 장바구니 항목에 대해 반복됩니다.
행 3(제품 상세 정보)에서 다음을 구성합니다:
**열 1 - HTML 블록** (제품 이미지):
```html theme={null}
 ```
**열 2-4 - 텍스트 블록** (제품명, 수량, 가격):
* 열 2: `{{product.product_name}}`
* 열 3: `{{product.product_quantity}}`
* 열 4: `{{product.product_price}}`
**루프 작동 방식:**
* 첫 번째 반복에서 `product` = cart 배열의 첫 번째 객체
* `{{product.product_image}}`는 첫 번째 항목의 이미지를 가져옵니다
* 두 번째 반복에서 `product` = 두 번째 객체
* 모든 장바구니 항목에 대해 행이 자동으로 반복됩니다
**필드 이름 일치:** `product_image`와 같은 키는 이벤트 페이로드와 정확히 일치해야 합니다(대소문자 구분). 불일치 시 빈 문자열로 렌더링됩니다.
반복이 중단되는 위치를 표시하기 위해 루프를 닫습니다.
행 4(루프 종료)에 다음을 추가합니다:
```liquid Liquid theme={null}
{% endfor %}
```
모든 `{% for %}`에는 대응하는 `{% endfor %}`가 있어야 합니다. 이를 누락하면 이메일 렌더링이 중단됩니다.
행 5의 **Button** 블록에서 Action URL을 다음으로 설정합니다:
```liquid Liquid theme={null}
{{journey.first_event.properties.cart_url}}
```
```
**열 2-4 - 텍스트 블록** (제품명, 수량, 가격):
* 열 2: `{{product.product_name}}`
* 열 3: `{{product.product_quantity}}`
* 열 4: `{{product.product_price}}`
**루프 작동 방식:**
* 첫 번째 반복에서 `product` = cart 배열의 첫 번째 객체
* `{{product.product_image}}`는 첫 번째 항목의 이미지를 가져옵니다
* 두 번째 반복에서 `product` = 두 번째 객체
* 모든 장바구니 항목에 대해 행이 자동으로 반복됩니다
**필드 이름 일치:** `product_image`와 같은 키는 이벤트 페이로드와 정확히 일치해야 합니다(대소문자 구분). 불일치 시 빈 문자열로 렌더링됩니다.
반복이 중단되는 위치를 표시하기 위해 루프를 닫습니다.
행 4(루프 종료)에 다음을 추가합니다:
```liquid Liquid theme={null}
{% endfor %}
```
모든 `{% for %}`에는 대응하는 `{% endfor %}`가 있어야 합니다. 이를 누락하면 이메일 렌더링이 중단됩니다.
행 5의 **Button** 블록에서 Action URL을 다음으로 설정합니다:
```liquid Liquid theme={null}
{{journey.first_event.properties.cart_url}}
```
 * 빈 Journey에 템플릿을 추가하고 진입 규칙을 Custom Event로 설정합니다.
* Journey를 활성화하고 Custom Event API를 통해 자신을 진입시킵니다.
* 데이터가 올바르게 표시되는지 확인합니다.
성공! 이제 템플릿에 원하는 스타일을 적용할 수 있습니다. [드래그 앤 드롭으로 이메일 디자인하기](./design-emails-with-drag-and-drop)를 참조하세요.
### Push 템플릿
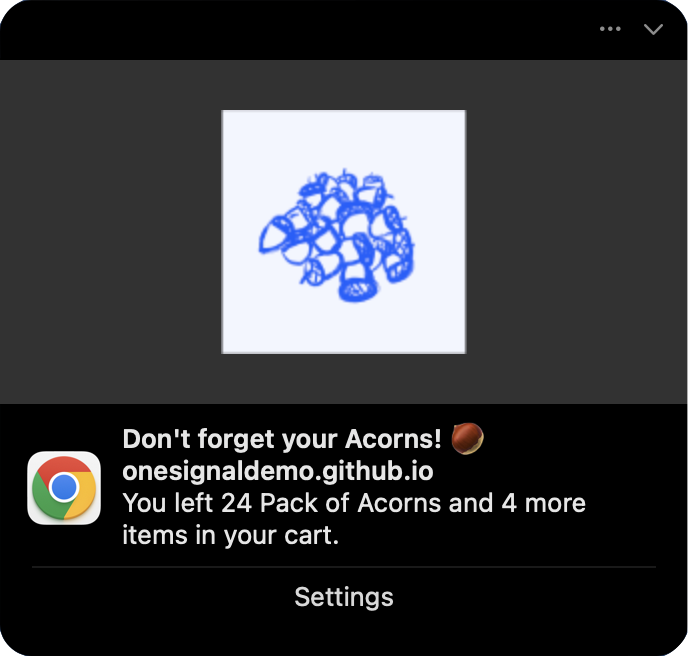
Push 알림은 공간이 제한되어 있으므로, 하나의 항목을 표시하고 전체 수량을 언급합니다.
**메시지 필드:**
[조건문](./using-liquid-syntax#if-elsif-else)을 사용하여 올바른 문법으로 항목과 수량을 표시합니다.
```liquid Liquid theme={null}
{% assign cart = journey.first_event.properties.cart %}
{% assign item_count = cart.size | plus: 0 %}
{% if item_count == 1 %}
You left {{cart.first.product_name}} in your cart.
{% endif %}
{% if item_count == 2 %}
You left {{cart.first.product_name}} and {{item_count | minus: 1}} more item in your cart.
{% endif %}
{% if item_count > 2 %}
You left {{cart.first.product_name}} and {{item_count | minus: 1}} more items in your cart.
{% endif %}
```
**이미지 필드:**
```liquid Liquid theme={null}
{{journey.first_event.properties.cart.first.product_image | default: "https://i.imgur.com/ssPCfbC.png"}}
```
**실행 URL 필드:**
```liquid Liquid theme={null}
{{journey.first_event.properties.cart_url | default: "https://yourdomain.com/cart"}}
```
테스트 Journey에 추가하고 또 다른 Custom Event API 호출을 통해 자신을 진입시켜 테스트 push 알림을 보내보세요. 다음과 유사한 알림이 나타나야 합니다:
* 빈 Journey에 템플릿을 추가하고 진입 규칙을 Custom Event로 설정합니다.
* Journey를 활성화하고 Custom Event API를 통해 자신을 진입시킵니다.
* 데이터가 올바르게 표시되는지 확인합니다.
성공! 이제 템플릿에 원하는 스타일을 적용할 수 있습니다. [드래그 앤 드롭으로 이메일 디자인하기](./design-emails-with-drag-and-drop)를 참조하세요.
### Push 템플릿
Push 알림은 공간이 제한되어 있으므로, 하나의 항목을 표시하고 전체 수량을 언급합니다.
**메시지 필드:**
[조건문](./using-liquid-syntax#if-elsif-else)을 사용하여 올바른 문법으로 항목과 수량을 표시합니다.
```liquid Liquid theme={null}
{% assign cart = journey.first_event.properties.cart %}
{% assign item_count = cart.size | plus: 0 %}
{% if item_count == 1 %}
You left {{cart.first.product_name}} in your cart.
{% endif %}
{% if item_count == 2 %}
You left {{cart.first.product_name}} and {{item_count | minus: 1}} more item in your cart.
{% endif %}
{% if item_count > 2 %}
You left {{cart.first.product_name}} and {{item_count | minus: 1}} more items in your cart.
{% endif %}
```
**이미지 필드:**
```liquid Liquid theme={null}
{{journey.first_event.properties.cart.first.product_image | default: "https://i.imgur.com/ssPCfbC.png"}}
```
**실행 URL 필드:**
```liquid Liquid theme={null}
{{journey.first_event.properties.cart_url | default: "https://yourdomain.com/cart"}}
```
테스트 Journey에 추가하고 또 다른 Custom Event API 호출을 통해 자신을 진입시켜 테스트 push 알림을 보내보세요. 다음과 유사한 알림이 나타나야 합니다:
 성공! 이제 더 많은 템플릿을 만들어 [장바구니 이탈 Journey](./abandoned-cart)에서 사용할 수 있습니다.
***
## 문제 해결 및 모범 사례
**일반적인 실수:**
| 실수 | 실패 원인 | 올바른 구문 |
| ------------------------------------------- | --------------------- | ---------------------------------------------- |
| `{{ journey.first_event.item }}` | `.properties` 누락 | `{{ journey.first_event.properties.item }}` |
| `{{ journey.event.purchase.item }}` | `.properties` 누락 | `{{ journey.event.purchase.properties.item }}` |
| `{{ journey.first_event.properties.Item }}` | 대소문자 오류 (`item`이어야 함) | `{{ journey.first_event.properties.item }}` |
| `{{ event.properties.item }}` | `journey.` 접두사 누락 | `{{ journey.first_event.properties.item }}` |
**모범 사례:**
* 항상 라이브 전에 템플릿을 테스트하세요
* 선택적 속성에는 [default 필터](./using-liquid-syntax#default)를 사용하세요
* 이벤트 스키마가 템플릿 기대값과 일치하는지 검증하세요
***
## 관련 페이지
Custom Events 대 기타 방법 사용 시기를 포함한 OneSignal의 모든 개인화 옵션 개요입니다.
SDK 또는 API를 통해 Custom Events를 구현하고 전송하는 전체 가이드입니다.
트리거, 조건, 액션을 사용하여 자동화된 메시징 워크플로우를 구축하는 방법을 알아보세요.
이벤트 트리거 진입 규칙 및 Journey 동작을 구성합니다.
Wait Until 노드를 사용하여 Journey 진행 중 추가 이벤트를 저장합니다.
필터, 조건문, 루프, 문자열 조작을 포함한 전체 Liquid 참조입니다.
Journeys에서 사용할 재사용 가능한 메시지 템플릿을 생성하고 관리합니다.
도움이 필요하신가요?
지원 팀과 채팅하거나 `support@onesignal.com`으로 이메일을 보내주세요.
다음을 포함해 주세요:
* 발생한 문제의 세부 정보 및 재현 단계(가능한 경우)
* OneSignal 앱 ID
* External ID 또는 Subscription ID(해당하는 경우)
* OneSignal 대시보드에서 테스트한 메시지의 URL(해당하는 경우)
* 관련 [로그 또는 오류 메시지](/docs/ko/capturing-a-debug-log)
기꺼이 도와드리겠습니다!
***
성공! 이제 더 많은 템플릿을 만들어 [장바구니 이탈 Journey](./abandoned-cart)에서 사용할 수 있습니다.
***
## 문제 해결 및 모범 사례
**일반적인 실수:**
| 실수 | 실패 원인 | 올바른 구문 |
| ------------------------------------------- | --------------------- | ---------------------------------------------- |
| `{{ journey.first_event.item }}` | `.properties` 누락 | `{{ journey.first_event.properties.item }}` |
| `{{ journey.event.purchase.item }}` | `.properties` 누락 | `{{ journey.event.purchase.properties.item }}` |
| `{{ journey.first_event.properties.Item }}` | 대소문자 오류 (`item`이어야 함) | `{{ journey.first_event.properties.item }}` |
| `{{ event.properties.item }}` | `journey.` 접두사 누락 | `{{ journey.first_event.properties.item }}` |
**모범 사례:**
* 항상 라이브 전에 템플릿을 테스트하세요
* 선택적 속성에는 [default 필터](./using-liquid-syntax#default)를 사용하세요
* 이벤트 스키마가 템플릿 기대값과 일치하는지 검증하세요
***
## 관련 페이지
Custom Events 대 기타 방법 사용 시기를 포함한 OneSignal의 모든 개인화 옵션 개요입니다.
SDK 또는 API를 통해 Custom Events를 구현하고 전송하는 전체 가이드입니다.
트리거, 조건, 액션을 사용하여 자동화된 메시징 워크플로우를 구축하는 방법을 알아보세요.
이벤트 트리거 진입 규칙 및 Journey 동작을 구성합니다.
Wait Until 노드를 사용하여 Journey 진행 중 추가 이벤트를 저장합니다.
필터, 조건문, 루프, 문자열 조작을 포함한 전체 Liquid 참조입니다.
Journeys에서 사용할 재사용 가능한 메시지 템플릿을 생성하고 관리합니다.
도움이 필요하신가요?
지원 팀과 채팅하거나 `support@onesignal.com`으로 이메일을 보내주세요.
다음을 포함해 주세요:
* 발생한 문제의 세부 정보 및 재현 단계(가능한 경우)
* OneSignal 앱 ID
* External ID 또는 Subscription ID(해당하는 경우)
* OneSignal 대시보드에서 테스트한 메시지의 URL(해당하는 경우)
* 관련 [로그 또는 오류 메시지](/docs/ko/capturing-a-debug-log)
기꺼이 도와드리겠습니다!
***