> ## Documentation Index
> Fetch the complete documentation index at: https://documentation.onesignal.com/llms.txt
> Use this file to discover all available pages before exploring further.
# Unity SDK 설정
> iOS, Android, Amazon 및 Huawei용 Unity 앱에 푸시 알림을 쉽게 추가하기 위해 OneSignal의 Unity SDK를 설정하는 방법을 알아보세요. 이 가이드는 Unity 설치, 플랫폼 구성 및 초기화를 다룹니다.
export const SdkReleasesIframe = ({sdkFilter = undefined, viewMode = undefined, height, ...frameProps}) => {
const baseUrl = 'https://onesignal.github.io/sdk-releases';
const buildUrl = (theme, sdkFilter, viewMode) => {
const url = new URL(baseUrl);
const params = new URLSearchParams();
if (theme) {
params.set('theme', theme);
}
if (sdkFilter) {
params.set('sdk', sdkFilter);
}
if (viewMode) {
params.set('viewMode', viewMode);
}
if (params.toString()) {
url.search = params.toString();
}
return url.toString();
};
const detectTheme = () => {
if (document.documentElement.classList.contains('dark')) {
return 'dark';
}
return 'light';
};
const [theme, setTheme] = useState('light');
const [iframeSrc, setIframeSrc] = useState(() => {
const initialTheme = detectTheme();
return buildUrl(initialTheme, sdkFilter, viewMode);
});
useEffect(() => {
const currentTheme = detectTheme();
setTheme(currentTheme);
setIframeSrc(buildUrl(currentTheme, sdkFilter, viewMode));
const mediaQuery = window.matchMedia('(prefers-color-scheme: dark)');
const handleThemeChange = () => {
const newTheme = detectTheme();
setTheme(newTheme);
setIframeSrc(buildUrl(newTheme, sdkFilter, viewMode));
};
if (mediaQuery.addEventListener) {
mediaQuery.addEventListener('change', handleThemeChange);
} else {
mediaQuery.addListener(handleThemeChange);
}
window.addEventListener('storage', handleThemeChange);
const observer = new MutationObserver(handleThemeChange);
observer.observe(document.documentElement, {
attributes: true,
attributeFilter: ['class', 'data-theme']
});
return () => {
if (mediaQuery.removeEventListener) {
mediaQuery.removeEventListener('change', handleThemeChange);
} else {
mediaQuery.removeListener(handleThemeChange);
}
window.removeEventListener('storage', handleThemeChange);
observer.disconnect();
};
}, [sdkFilter, viewMode]);
const getIframeHeight = () => {
if (viewMode === 'table') {
return '450';
}
if (viewMode === 'mini') {
return '170';
}
return '800';
};
const iframeHeight = height || getIframeHeight();
return
;
};
## 개요
## OneSignal을 사용하여 Unity 앱용 푸시 알림 설정
Unity 앱에 푸시 알림을 통합하는 것은 사용자 참여 및 유지를 높이는 강력한 방법입니다. OneSignal의 Unity SDK는 iOS(APNS), Android(FCM), Amazon(ADM) 및 Huawei 기기를 지원하여 최소한의 노력으로 실시간 메시징을 가능하게 합니다.
모바일 게임이나 대화형 앱을 구축하든 이 가이드는 OneSignal을 빠르고 안정적으로 통합하는 데 도움이 됩니다.
***
## 요구사항
* Unity 2022.3 이상
* 구성된 OneSignal 앱 및 플랫폼
**iOS 요구사항**
* Xcode 14+가 있는 macOS(설정 지침은 Xcode 16.2 사용)
* iOS 12+, iPadOS 12+ 또는 iOS 16.2+를 실행하는 Xcode 시뮬레이터가 있는 기기
**Android 요구사항**
* Google Play 스토어(서비스)가 설치된 Android 7.0+ 기기 또는 에뮬레이터
### OneSignal 앱 및 플랫폼 구성
지원하는 플랫폼(Apple (APNs), Google (FCM), Huawei (HMS), Amazon (ADM))으로 OneSignal 앱을 구성하세요.
조직에 이미 OneSignal 계정이 있는 경우 조직에 [초대를 요청](/docs/ko/manage-team-members)하세요. 그렇지 않은 경우 [무료 계정에 가입](https://onesignal.com)하여 시작하세요.
**New App/Website**를 클릭하여 새 앱을 만들거나 **설정 > 푸시 및 인앱**에서 기존 앱에 플랫폼을 추가합니다. 구성하려는 플랫폼을 선택하고 **Next: Configure Your Platform**을 클릭합니다.
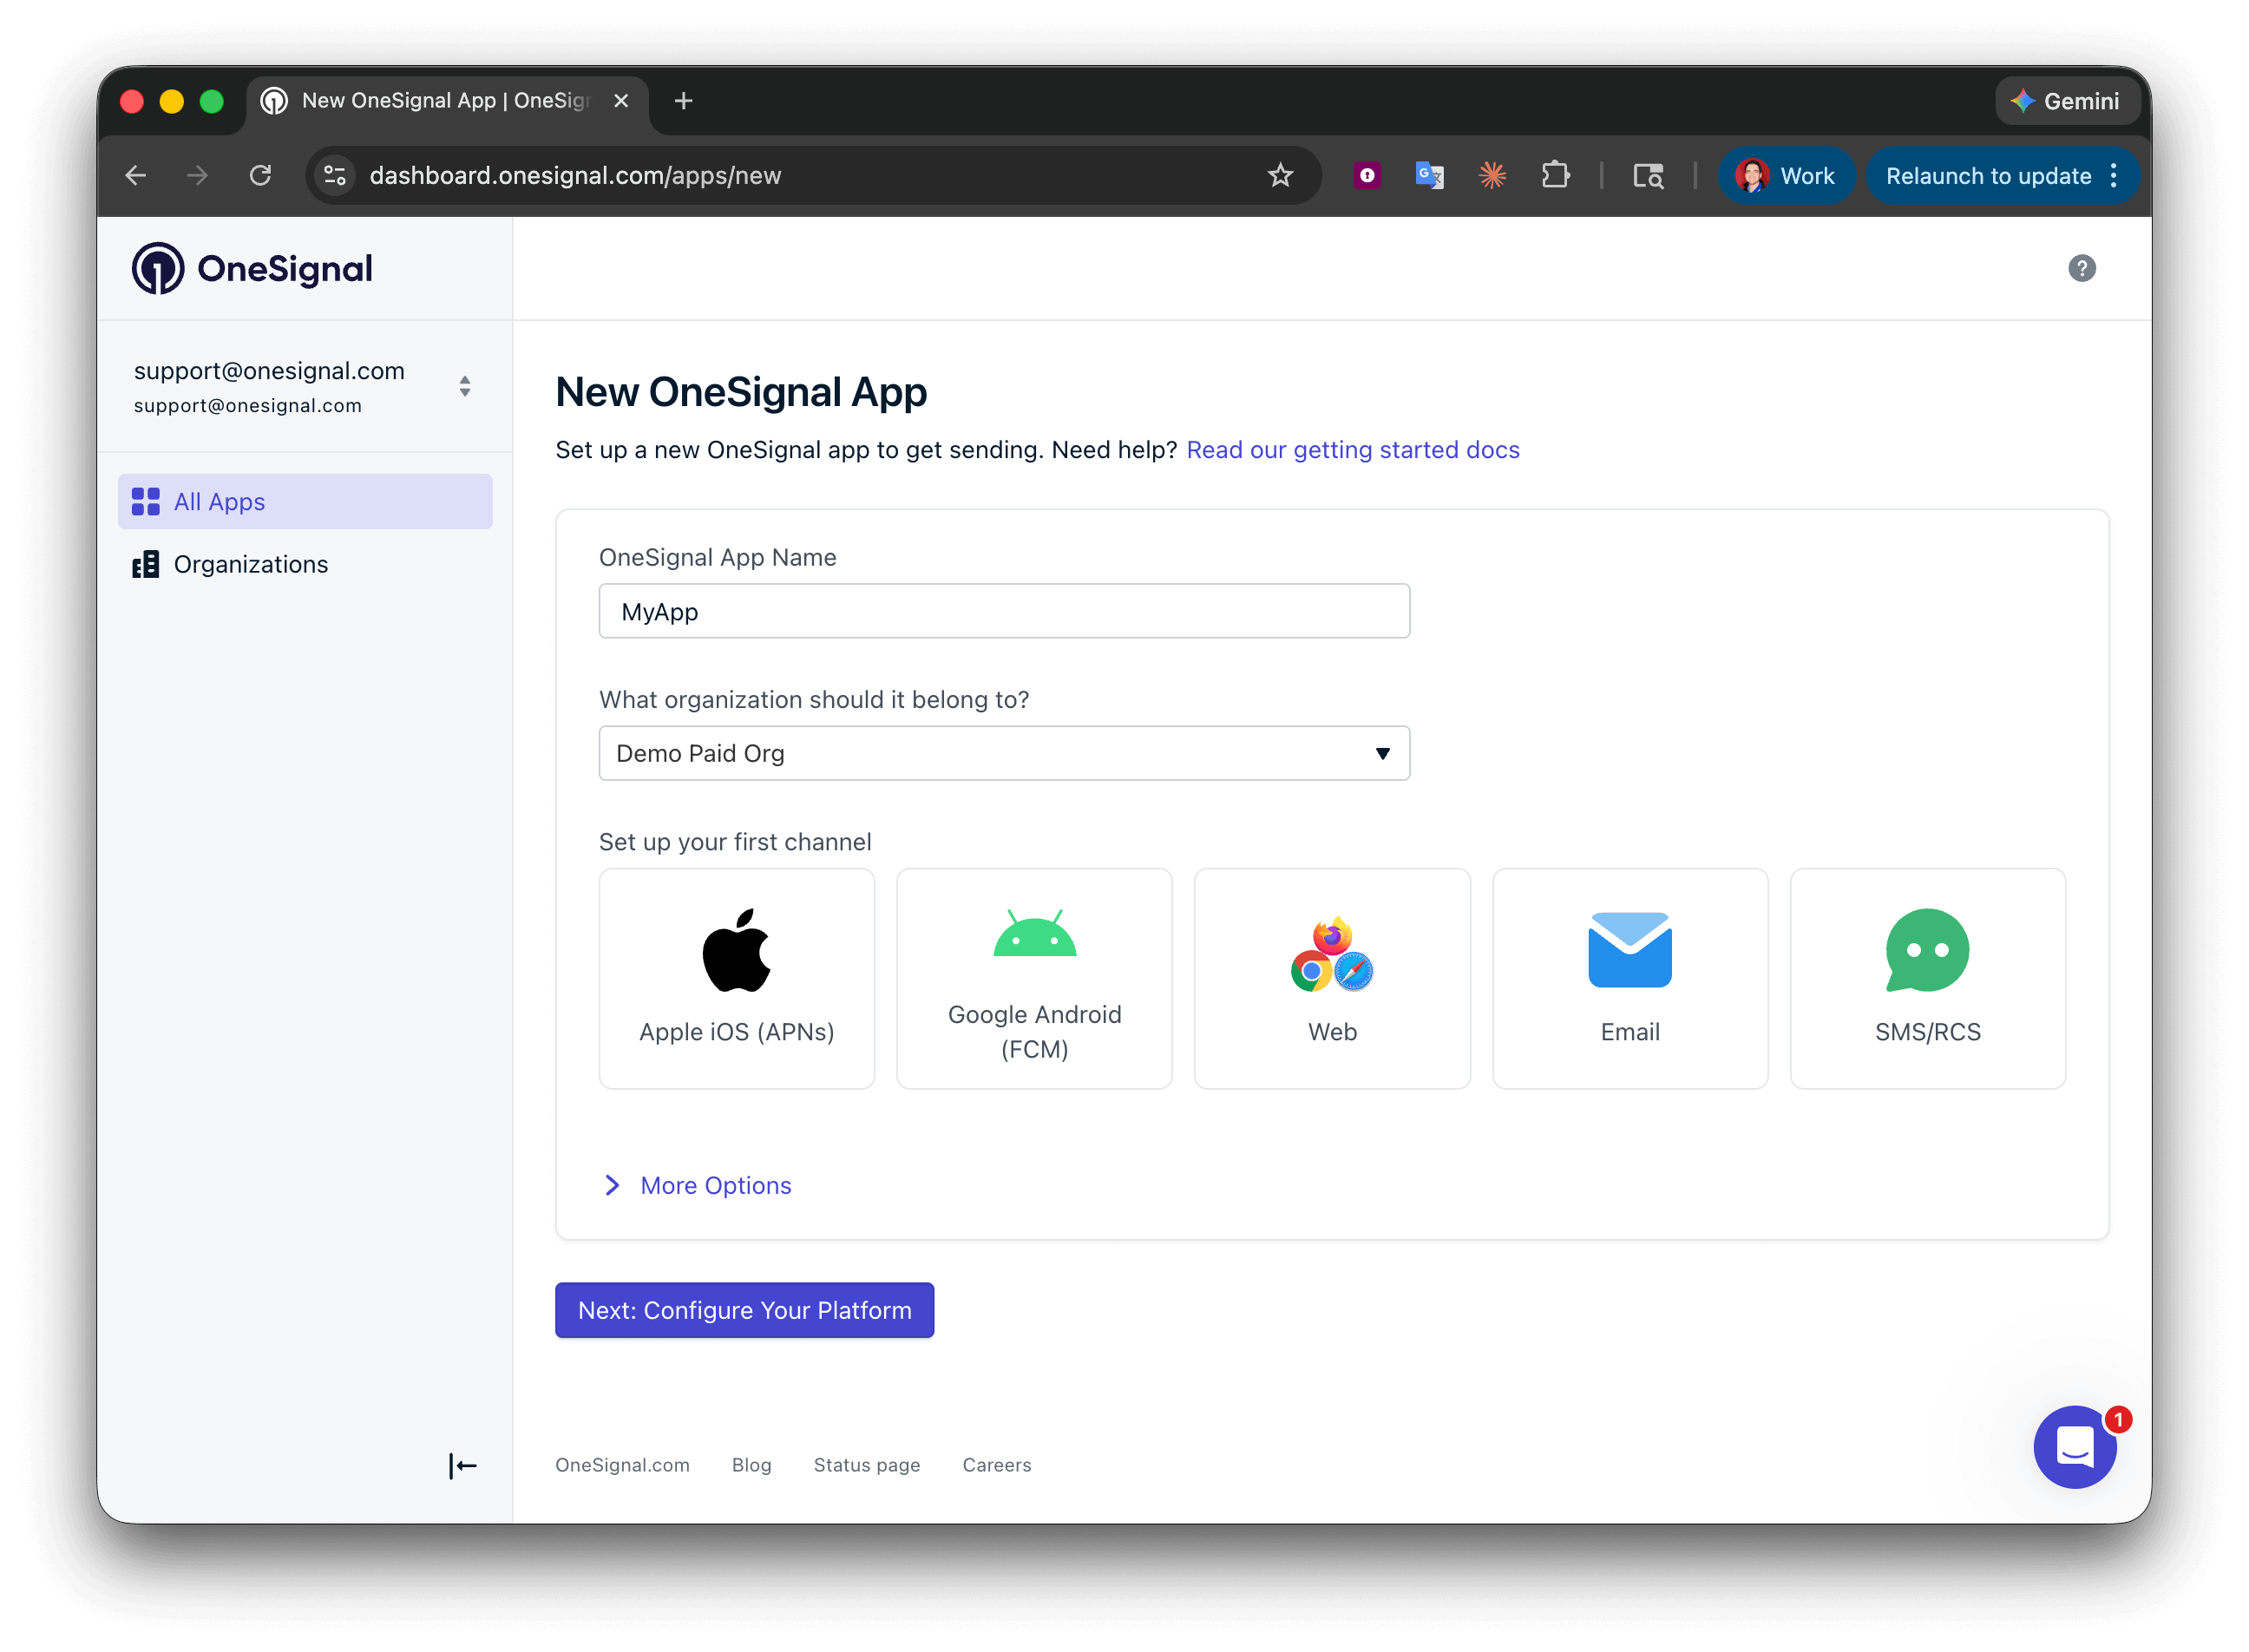 플랫폼에 대한 자격 증명을 입력합니다:
* **Android**: [Firebase 자격 증명 설정](/docs/ko/android-firebase-credentials)
* **iOS**: [p8 토큰(권장)](/docs/ko/ios-p8-token-based-connection-to-apns) 또는 [p12 인증서](/docs/ko/ios-p12-generate-certificates)
* **Amazon**: [API 키 생성](/docs/ko/generate-an-amazon-api-key)
* **Huawei**: [OneSignal 권한 부여](/docs/ko/authorize-onesignal-to-send-huawei-push)
자격 증명을 입력한 후 **Save & Continue**를 클릭합니다.
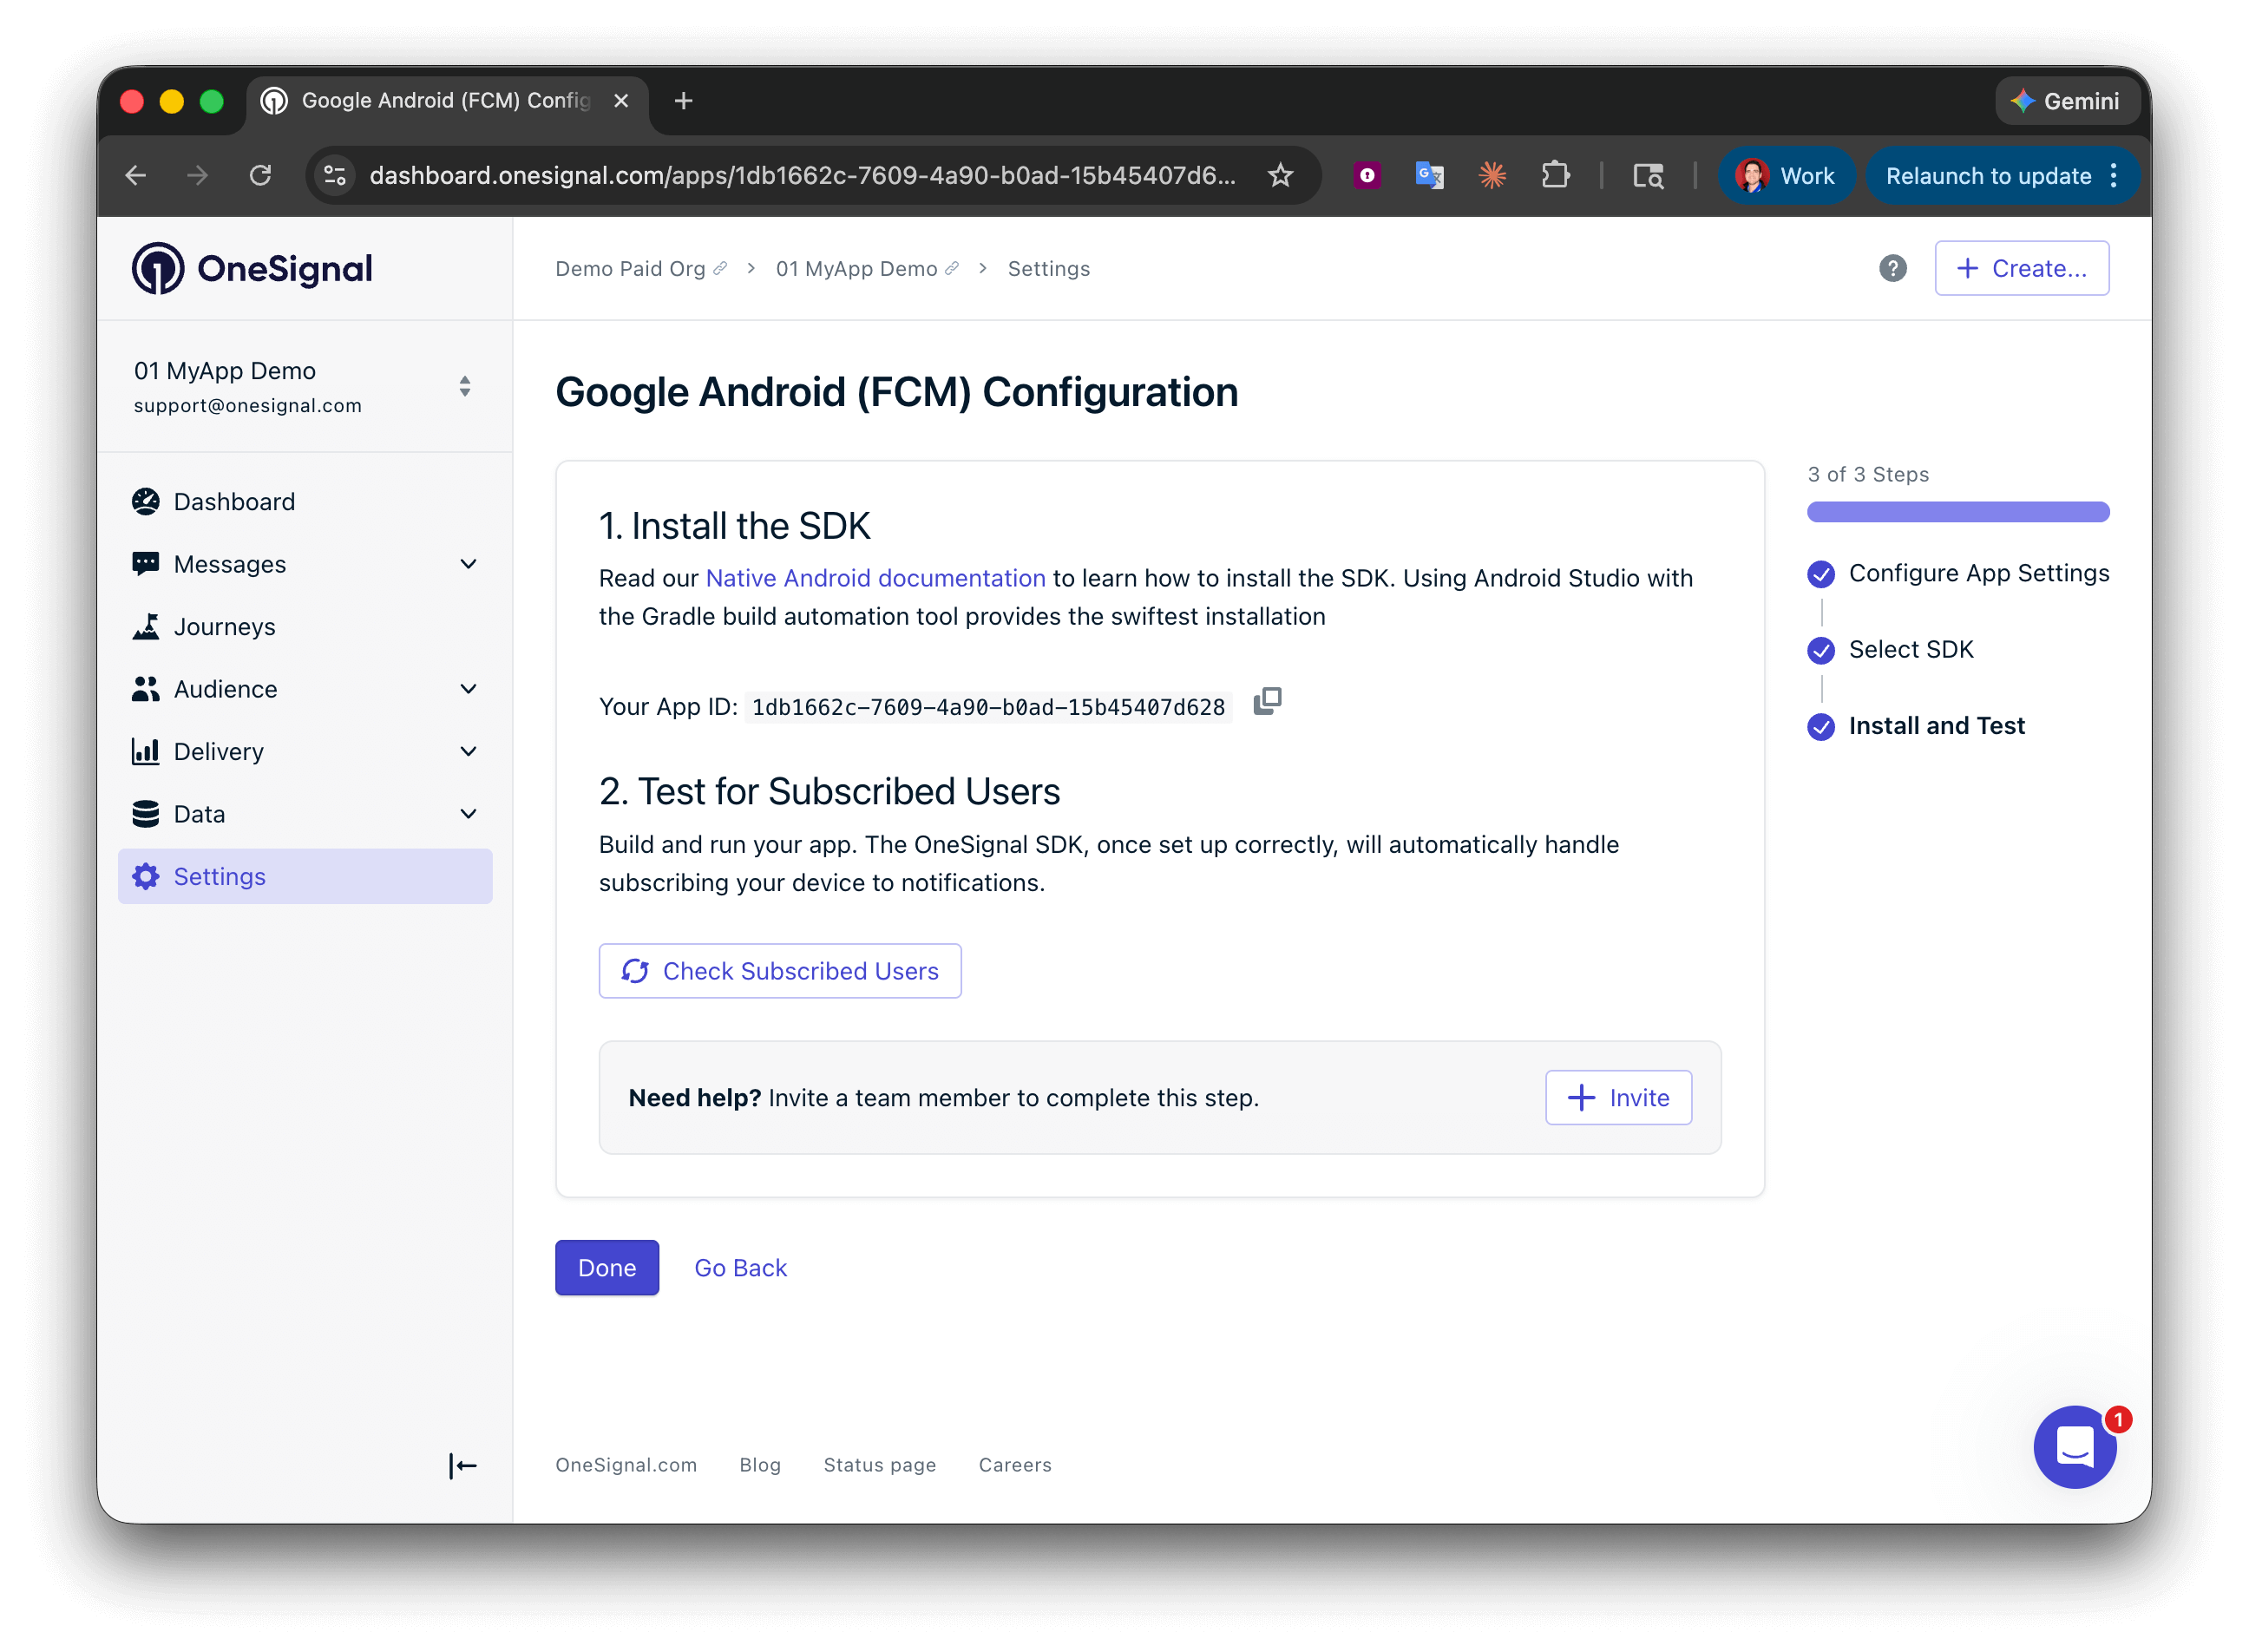
**앱 ID**가 최종 화면에 표시됩니다. 복사하고 저장하세요 — SDK를 초기화할 때 필요합니다. SDK 플랫폼을 선택한 다음 설정 가이드를 따릅니다.
플랫폼에 대한 자격 증명을 입력합니다:
* **Android**: [Firebase 자격 증명 설정](/docs/ko/android-firebase-credentials)
* **iOS**: [p8 토큰(권장)](/docs/ko/ios-p8-token-based-connection-to-apns) 또는 [p12 인증서](/docs/ko/ios-p12-generate-certificates)
* **Amazon**: [API 키 생성](/docs/ko/generate-an-amazon-api-key)
* **Huawei**: [OneSignal 권한 부여](/docs/ko/authorize-onesignal-to-send-huawei-push)
자격 증명을 입력한 후 **Save & Continue**를 클릭합니다.
**앱 ID**가 최종 화면에 표시됩니다. 복사하고 저장하세요 — SDK를 초기화할 때 필요합니다. SDK 플랫폼을 선택한 다음 설정 가이드를 따릅니다.
 ***
## 설정
### 1. OneSignal Unity SDK 추가
두 가지 설치 방법을 사용할 수 있습니다:
1. **Add to My Assets**를 통해 [계정에 SDK를 추가](https://assetstore.unity.com/packages/add-ons/services/billing/onesignal-sdk-193316)합니다.
2. **Open in Unity**를 클릭하여 Unity Editor 및 Package Manager를 시작합니다.
3. SDK를 다운로드하고 **Import**합니다.
***
## 설정
### 1. OneSignal Unity SDK 추가
두 가지 설치 방법을 사용할 수 있습니다:
1. **Add to My Assets**를 통해 [계정에 SDK를 추가](https://assetstore.unity.com/packages/add-ons/services/billing/onesignal-sdk-193316)합니다.
2. **Open in Unity**를 클릭하여 Unity Editor 및 Package Manager를 시작합니다.
3. SDK를 다운로드하고 **Import**합니다.
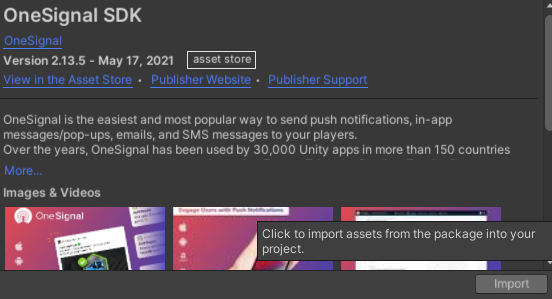 4. 모든 파일을 가져오라는 프롬프트를 수락합니다.
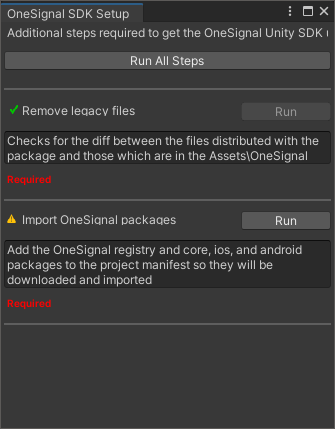
5. **Window > OneSignal SDK Setup**으로 이동하여 체크리스트, 특히 **Import OneSignal packages**를 따릅니다.
6. 가져온 후 Unity가 레지스트리를 업데이트합니다. 설정 창에 표시된 나머지 설정 단계를 완료합니다.
4. 모든 파일을 가져오라는 프롬프트를 수락합니다.
5. **Window > OneSignal SDK Setup**으로 이동하여 체크리스트, 특히 **Import OneSignal packages**를 따릅니다.
6. 가져온 후 Unity가 레지스트리를 업데이트합니다. 설정 창에 표시된 나머지 설정 단계를 완료합니다.
 1. **Edit > Project Settings > Package Manager**로 이동합니다.
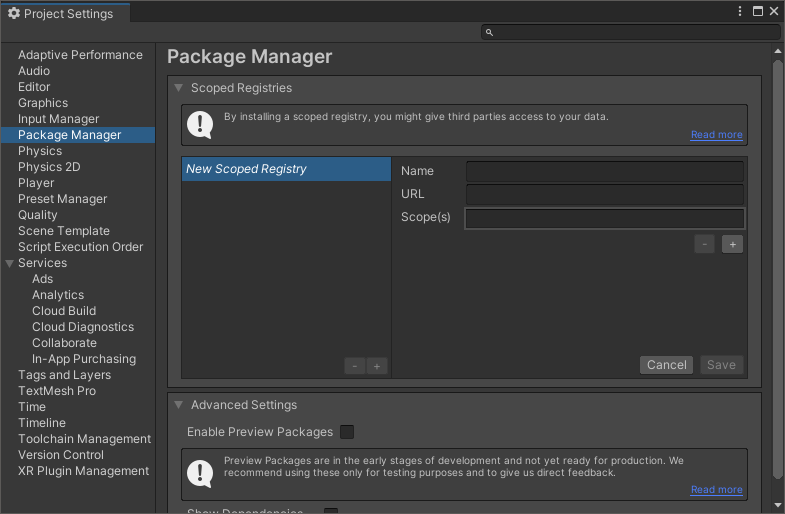 2. 범위가 지정된 레지스트리를 추가합니다:
```
Name npmjs
URL https://registry.npmjs.org
Scope(s) com.onesignal
```
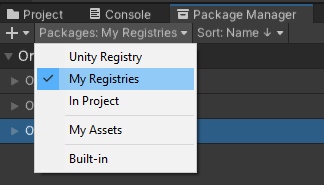
3. **Window > Package Manager**를 열고 **My Registries**로 전환합니다.
4. 원하는 OneSignal SDK 패키지를 설치합니다.
5. **Window > OneSignal SDK Setup**을 열고 최종 단계를 완료합니다.
2. 범위가 지정된 레지스트리를 추가합니다:
```
Name npmjs
URL https://registry.npmjs.org
Scope(s) com.onesignal
```
3. **Window > Package Manager**를 열고 **My Registries**로 전환합니다.
4. 원하는 OneSignal SDK 패키지를 설치합니다.
5. **Window > OneSignal SDK Setup**을 열고 최종 단계를 완료합니다.
 ### 2. 플랫폼 설정
앱이 지원하는 모든 플랫폼을 추가합니다.
#### iOS 설정
SDK가 필요한 Xcode 설정을 자동으로 구성합니다. 프로비저닝 접근 방식을 선택합니다:
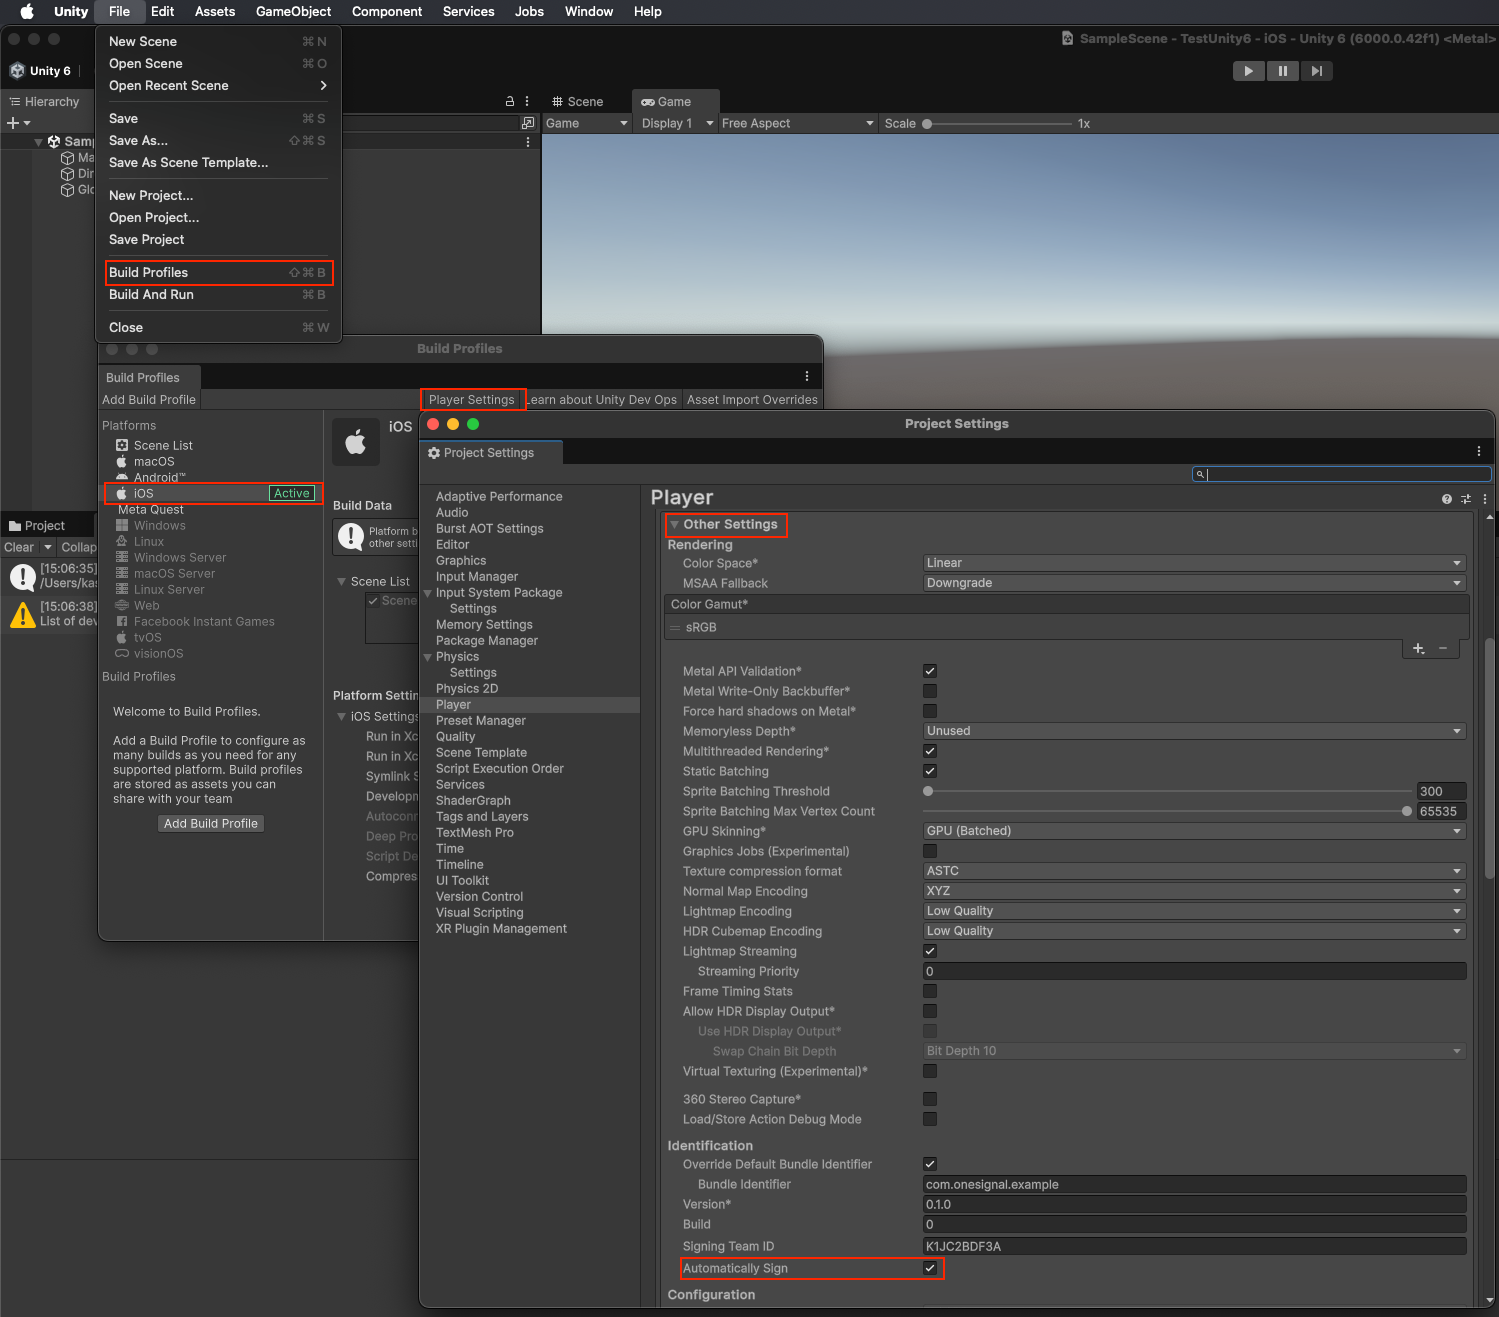
1. **File > Build Settings** > **Player Settings**로 이동합니다.
2. **Other Settings** 아래에서 **Automatically Sign**을 선택합니다.
### 2. 플랫폼 설정
앱이 지원하는 모든 플랫폼을 추가합니다.
#### iOS 설정
SDK가 필요한 Xcode 설정을 자동으로 구성합니다. 프로비저닝 접근 방식을 선택합니다:
1. **File > Build Settings** > **Player Settings**로 이동합니다.
2. **Other Settings** 아래에서 **Automatically Sign**을 선택합니다.
 Apple Developer 계정에 다음이 있는지 확인하세요:
* 앱 그룹: `group.{your_bundle_id}.onesignal`
* **Push Notifications** 및 **App Groups** 활성화됨
* 번들 ID에 대한 프로비저닝 프로필 새로 고침됨
#### Android 설정
1. **Edit > Project Settings > Player** > **Android**로 이동합니다.
2. **Publishing Settings** 아래에서 다음을 활성화합니다:
* **Custom Main Gradle Template**
* **Custom Gradle Properties Template**
3. **Assets > External Dependency Manager > Android Resolver > Force Resolve**를 실행합니다.
추가 고려사항:
* **Target API Level은 33+ 이상이어야 합니다**(v5.0.6+).
* **Minify가 활성화된 경우** **OneSignal SDK Setup**에서 **Copy Android plugin to Assets**를 실행하여 `OneSignalConfig.androidlib`를 사용합니다.
* `Assets/Plugins/Android/OneSignalConfig.androidlib/src/main/res` 내의 기본 아이콘을 자체 아이콘으로 교체합니다(소문자 파일 이름만, 밑줄 허용). 자세한 내용은 [알림 아이콘 사용자 지정](./notification-icons)을 참조하세요.
#### Amazon 설정
Amazon App Store를 통해 제공되는 Amazon 앱에만 필요합니다.
1. `Plugins/Android/AndroidManifest.xml`을 편집하거나 생성합니다.
2. 네임스페이스를 추가합니다:
```xml theme={null}
xmlns:amazon="http://schemas.amazon.com/apk/res/android"
```
3. 권한을 추가합니다:
```xml theme={null}
```
4. `` 태그에 다음을 추가합니다:
```xml theme={null}
```
5. 모든 `COM.YOUR.PACKAGE_NAME` 인스턴스를 실제 패키지 이름으로 교체합니다.
6. `api_key.txt`를 `Assets/Plugins/Android/OneSignalConfig.androidlib/src/main/assets` 아래에 배치합니다
* 이 파일을 만드는 데 도움이 필요하면 [Amazon API 키 생성 가이드](./generate-an-amazon-api-key)를 참조하세요.
#### Huawei 설정
Huawei App Gallery를 통해 제공되는 Huawei 앱에만 필요합니다.
자세한 내용은 [Huawei Unity SDK 설정](./huawei-unity-sdk-setup)을 참조하세요.
### 선택 사항: 위치 모듈 비활성화
OneSignal Unity SDK 5.3.0부터 앱에서 `OneSignal.Location`을 사용하지 않는 경우 iOS 및 Android 빌드에서 OneSignal의 네이티브 위치 모듈을 제외할 수 있습니다. 기본적으로 SDK에는 네이티브 위치 모듈이 포함되어 있어 추가 설정 없이 위치 API가 작동합니다.
Android 종속성을 해결하거나 iOS를 빌드하기 전에 플래그를 설정하세요. 제외하는 방법은 두 가지입니다.
* **에디터 토글(대화형):** Unity Editor에서 **Project Settings > OneSignal**로 이동해 **Disable Location Module**을 활성화합니다. 이 설정은 `ProjectSettings/OneSignalSettings.json`에 저장됩니다.
* **환경 변수(CLI/CI):** Unity를 실행하기 전에 셸에서 `ONESIGNAL_DISABLE_LOCATION=true`(또는 `1`)를 설정하세요. 환경 변수가 에디터 토글보다 우선합니다.
```json ProjectSettings/OneSignalSettings.json theme={null}
{
"disableLocation": true
}
```
```shell CLI theme={null}
ONESIGNAL_DISABLE_LOCATION=true /path/to/Unity \
-batchmode -quit -projectPath . -buildTarget Android
```
```yaml GitHub Actions theme={null}
env:
ONESIGNAL_DISABLE_LOCATION: true
```
위치 모듈이 비활성화되면 SDK는 세분화된 네이티브 종속성을 `Assets/OneSignal/Editor/OneSignalAndroidDependencies.xml` 및 `Assets/OneSignal/Editor/OneSignaliOSDependencies.xml`에 기록합니다. **Assets > External Dependency Manager > Android Resolver > Force Resolve**를 실행한 후 Android는 위치 아티팩트 없이 OneSignal 모듈을 `Assets/Plugins/Android/mainTemplate.gradle`에 해결합니다. iOS 빌드는 `OneSignalLocation` 없이 OneSignal pods를 사용합니다.
위치 모듈이 없는 네이티브 빌드에서 `OneSignal.Location.RequestPermission()` 및 `OneSignal.Location.IsShared` 할당은 no-op으로 동작합니다. `OneSignal.Location.IsShared`는 `false`를 반환합니다.
#### 네이티브 종속성이 캐시된 후 변경 사항 적용
기존 프로젝트에서 이 설정을 전환하는 경우 오래된 네이티브 출력을 지우고 플래그가 설정된 상태에서 종속성을 다시 해결하세요.
* `Assets/OneSignal/Editor/OneSignalAndroidDependencies.xml` 및 `Assets/OneSignal/Editor/OneSignaliOSDependencies.xml`을 삭제한 다음 프로젝트를 다시 열어 Unity가 `ProjectSettings/OneSignalSettings.json`에서 다시 생성하도록 합니다.
* **Assets > External Dependency Manager > Android Resolver > Force Resolve**를 실행해 `Assets/Plugins/Android/mainTemplate.gradle`이 위치 없는 패키지를 가져오도록 합니다.
* iOS Xcode 프로젝트를 다시 export하고 필요하면 `pod install`을 실행합니다.
* 다시 빌드하기 전에 `Build/` 및 기타 생성된 출력을 제거합니다.
CI에서는 Unity를 실행하는 것과 동일한 환경에서 `ONESIGNAL_DISABLE_LOCATION`을 export하세요. Unity `Library/`, Gradle, CocoaPods, DerivedData 캐시 키에 플래그 값을 포함해 복원된 캐시가 위치 모듈을 다시 가져오지 않도록 하세요.
### 3. SDK 초기화
애플리케이션 수명 주기 초기에 `MonoBehaviour`의 `Start()` 메서드 내부에 이 코드를 추가합니다.
OneSignal 대시보드 \*\*설정 > [키 및 ID](./keys-and-ids)\*\*에서 찾을 수 있는 OneSignal 앱 ID로 `YOUR_APP_ID`를 교체합니다.
OneSignal 앱에 액세스할 수 없는 경우 [팀 구성원](./manage-team-members)에게 초대하도록 요청하세요.
```csharp C# theme={null}
using OneSignalSDK;
void Start () {
// Enable verbose logging for debugging (remove in production)
OneSignal.Debug.LogLevel = LogLevel.Verbose;
// Initialize with your OneSignal App ID
OneSignal.Initialize("YOUR_APP_ID");
// Use this method to prompt for push notifications.
// We recommend removing this method after testing and instead use In-App Messages to prompt for notification permission.
await OneSignal.Notifications.RequestPermissionAsync(true);
}
```
***
## Testing the OneSignal SDK integration
This guide helps you verify that your OneSignal SDK integration is working correctly by testing push notifications, subscription registration, and in-app messaging.
If you are testing with an Android emulator, it should start with a cold boot.
1. Go to **Device Manager** in Android Studio.
2. Select your emulator device and click **Edit**.
3. Go to **Additional Settings** or **More**.
4. Set the **Boot option** to **Cold Boot**.
5. Save changes and restart the emulator.
### Check mobile subscriptions
The native push permission prompt should appear automatically if you added the `requestPermission` method during initialization.
Apple Developer 계정에 다음이 있는지 확인하세요:
* 앱 그룹: `group.{your_bundle_id}.onesignal`
* **Push Notifications** 및 **App Groups** 활성화됨
* 번들 ID에 대한 프로비저닝 프로필 새로 고침됨
#### Android 설정
1. **Edit > Project Settings > Player** > **Android**로 이동합니다.
2. **Publishing Settings** 아래에서 다음을 활성화합니다:
* **Custom Main Gradle Template**
* **Custom Gradle Properties Template**
3. **Assets > External Dependency Manager > Android Resolver > Force Resolve**를 실행합니다.
추가 고려사항:
* **Target API Level은 33+ 이상이어야 합니다**(v5.0.6+).
* **Minify가 활성화된 경우** **OneSignal SDK Setup**에서 **Copy Android plugin to Assets**를 실행하여 `OneSignalConfig.androidlib`를 사용합니다.
* `Assets/Plugins/Android/OneSignalConfig.androidlib/src/main/res` 내의 기본 아이콘을 자체 아이콘으로 교체합니다(소문자 파일 이름만, 밑줄 허용). 자세한 내용은 [알림 아이콘 사용자 지정](./notification-icons)을 참조하세요.
#### Amazon 설정
Amazon App Store를 통해 제공되는 Amazon 앱에만 필요합니다.
1. `Plugins/Android/AndroidManifest.xml`을 편집하거나 생성합니다.
2. 네임스페이스를 추가합니다:
```xml theme={null}
xmlns:amazon="http://schemas.amazon.com/apk/res/android"
```
3. 권한을 추가합니다:
```xml theme={null}
```
4. `` 태그에 다음을 추가합니다:
```xml theme={null}
```
5. 모든 `COM.YOUR.PACKAGE_NAME` 인스턴스를 실제 패키지 이름으로 교체합니다.
6. `api_key.txt`를 `Assets/Plugins/Android/OneSignalConfig.androidlib/src/main/assets` 아래에 배치합니다
* 이 파일을 만드는 데 도움이 필요하면 [Amazon API 키 생성 가이드](./generate-an-amazon-api-key)를 참조하세요.
#### Huawei 설정
Huawei App Gallery를 통해 제공되는 Huawei 앱에만 필요합니다.
자세한 내용은 [Huawei Unity SDK 설정](./huawei-unity-sdk-setup)을 참조하세요.
### 선택 사항: 위치 모듈 비활성화
OneSignal Unity SDK 5.3.0부터 앱에서 `OneSignal.Location`을 사용하지 않는 경우 iOS 및 Android 빌드에서 OneSignal의 네이티브 위치 모듈을 제외할 수 있습니다. 기본적으로 SDK에는 네이티브 위치 모듈이 포함되어 있어 추가 설정 없이 위치 API가 작동합니다.
Android 종속성을 해결하거나 iOS를 빌드하기 전에 플래그를 설정하세요. 제외하는 방법은 두 가지입니다.
* **에디터 토글(대화형):** Unity Editor에서 **Project Settings > OneSignal**로 이동해 **Disable Location Module**을 활성화합니다. 이 설정은 `ProjectSettings/OneSignalSettings.json`에 저장됩니다.
* **환경 변수(CLI/CI):** Unity를 실행하기 전에 셸에서 `ONESIGNAL_DISABLE_LOCATION=true`(또는 `1`)를 설정하세요. 환경 변수가 에디터 토글보다 우선합니다.
```json ProjectSettings/OneSignalSettings.json theme={null}
{
"disableLocation": true
}
```
```shell CLI theme={null}
ONESIGNAL_DISABLE_LOCATION=true /path/to/Unity \
-batchmode -quit -projectPath . -buildTarget Android
```
```yaml GitHub Actions theme={null}
env:
ONESIGNAL_DISABLE_LOCATION: true
```
위치 모듈이 비활성화되면 SDK는 세분화된 네이티브 종속성을 `Assets/OneSignal/Editor/OneSignalAndroidDependencies.xml` 및 `Assets/OneSignal/Editor/OneSignaliOSDependencies.xml`에 기록합니다. **Assets > External Dependency Manager > Android Resolver > Force Resolve**를 실행한 후 Android는 위치 아티팩트 없이 OneSignal 모듈을 `Assets/Plugins/Android/mainTemplate.gradle`에 해결합니다. iOS 빌드는 `OneSignalLocation` 없이 OneSignal pods를 사용합니다.
위치 모듈이 없는 네이티브 빌드에서 `OneSignal.Location.RequestPermission()` 및 `OneSignal.Location.IsShared` 할당은 no-op으로 동작합니다. `OneSignal.Location.IsShared`는 `false`를 반환합니다.
#### 네이티브 종속성이 캐시된 후 변경 사항 적용
기존 프로젝트에서 이 설정을 전환하는 경우 오래된 네이티브 출력을 지우고 플래그가 설정된 상태에서 종속성을 다시 해결하세요.
* `Assets/OneSignal/Editor/OneSignalAndroidDependencies.xml` 및 `Assets/OneSignal/Editor/OneSignaliOSDependencies.xml`을 삭제한 다음 프로젝트를 다시 열어 Unity가 `ProjectSettings/OneSignalSettings.json`에서 다시 생성하도록 합니다.
* **Assets > External Dependency Manager > Android Resolver > Force Resolve**를 실행해 `Assets/Plugins/Android/mainTemplate.gradle`이 위치 없는 패키지를 가져오도록 합니다.
* iOS Xcode 프로젝트를 다시 export하고 필요하면 `pod install`을 실행합니다.
* 다시 빌드하기 전에 `Build/` 및 기타 생성된 출력을 제거합니다.
CI에서는 Unity를 실행하는 것과 동일한 환경에서 `ONESIGNAL_DISABLE_LOCATION`을 export하세요. Unity `Library/`, Gradle, CocoaPods, DerivedData 캐시 키에 플래그 값을 포함해 복원된 캐시가 위치 모듈을 다시 가져오지 않도록 하세요.
### 3. SDK 초기화
애플리케이션 수명 주기 초기에 `MonoBehaviour`의 `Start()` 메서드 내부에 이 코드를 추가합니다.
OneSignal 대시보드 \*\*설정 > [키 및 ID](./keys-and-ids)\*\*에서 찾을 수 있는 OneSignal 앱 ID로 `YOUR_APP_ID`를 교체합니다.
OneSignal 앱에 액세스할 수 없는 경우 [팀 구성원](./manage-team-members)에게 초대하도록 요청하세요.
```csharp C# theme={null}
using OneSignalSDK;
void Start () {
// Enable verbose logging for debugging (remove in production)
OneSignal.Debug.LogLevel = LogLevel.Verbose;
// Initialize with your OneSignal App ID
OneSignal.Initialize("YOUR_APP_ID");
// Use this method to prompt for push notifications.
// We recommend removing this method after testing and instead use In-App Messages to prompt for notification permission.
await OneSignal.Notifications.RequestPermissionAsync(true);
}
```
***
## Testing the OneSignal SDK integration
This guide helps you verify that your OneSignal SDK integration is working correctly by testing push notifications, subscription registration, and in-app messaging.
If you are testing with an Android emulator, it should start with a cold boot.
1. Go to **Device Manager** in Android Studio.
2. Select your emulator device and click **Edit**.
3. Go to **Additional Settings** or **More**.
4. Set the **Boot option** to **Cold Boot**.
5. Save changes and restart the emulator.
### Check mobile subscriptions
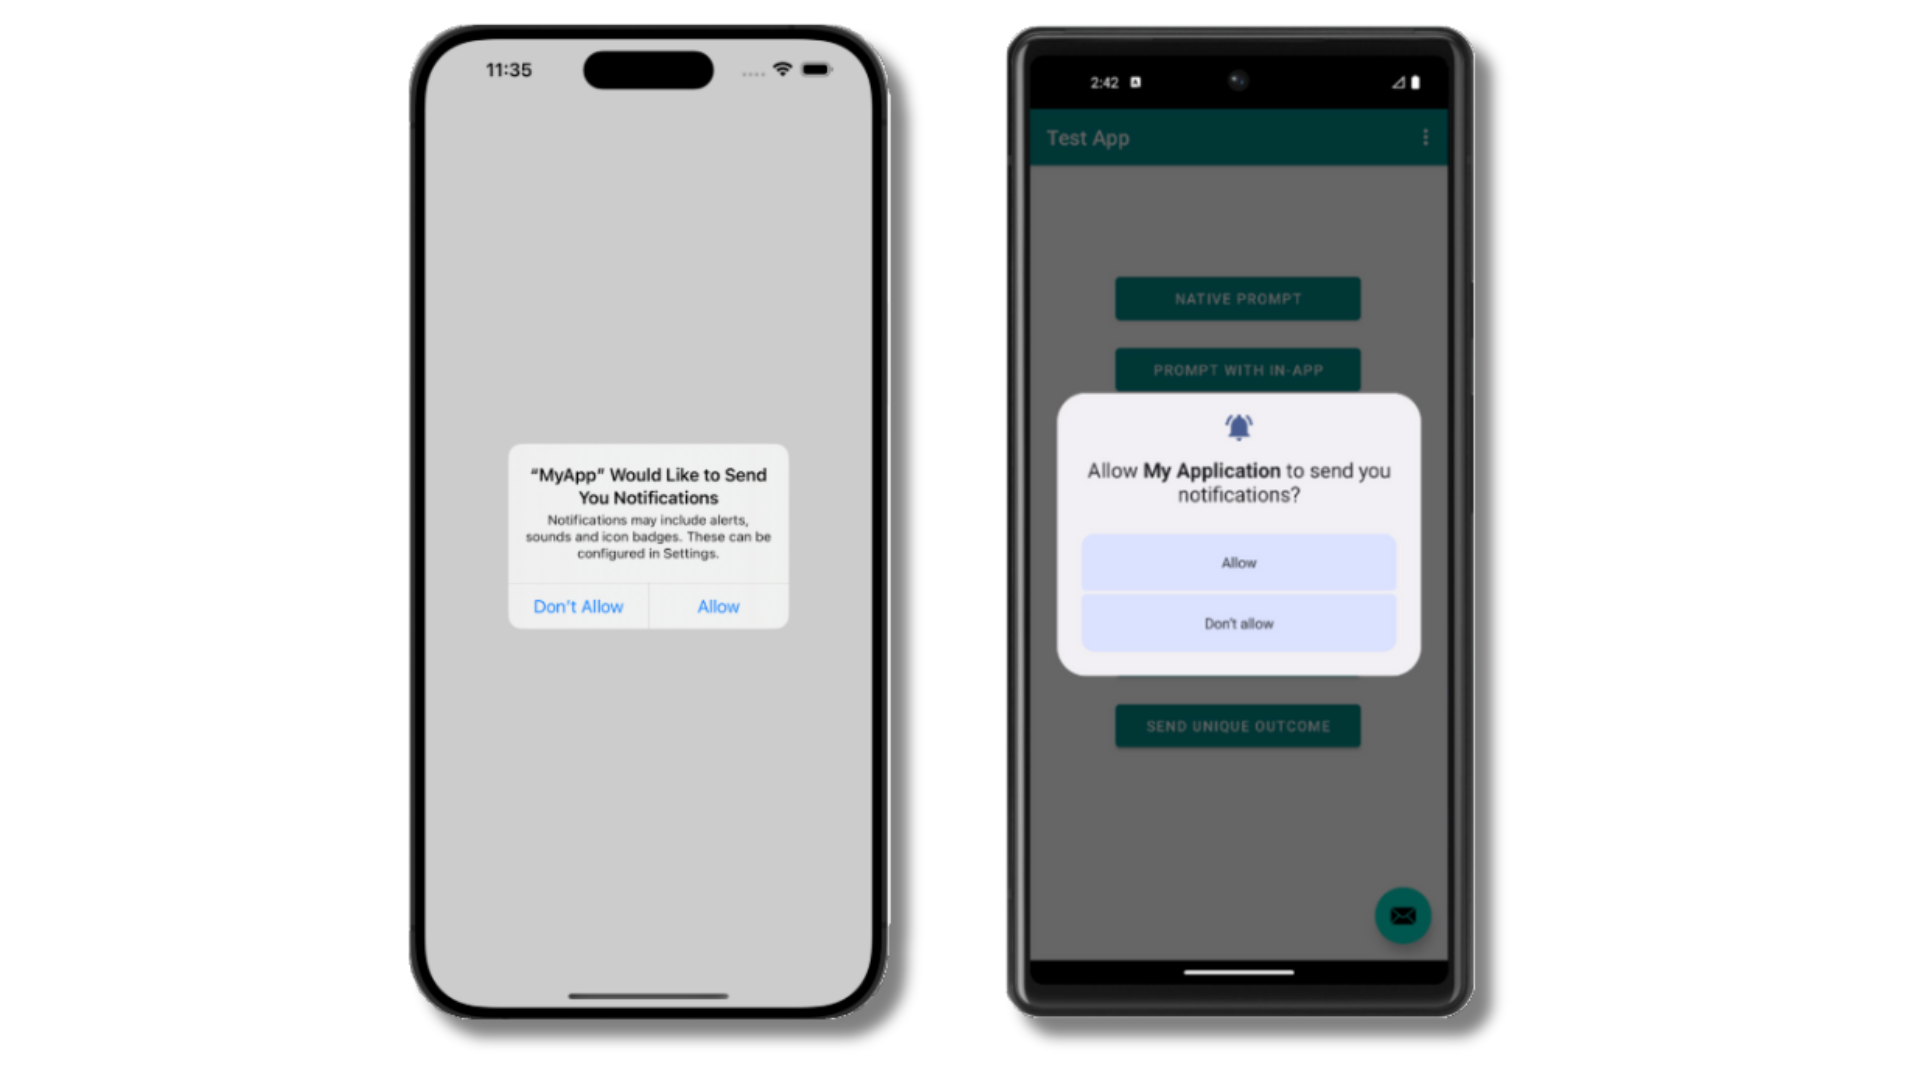
The native push permission prompt should appear automatically if you added the `requestPermission` method during initialization.
 Before accepting the prompt, check the OneSignal dashboard:
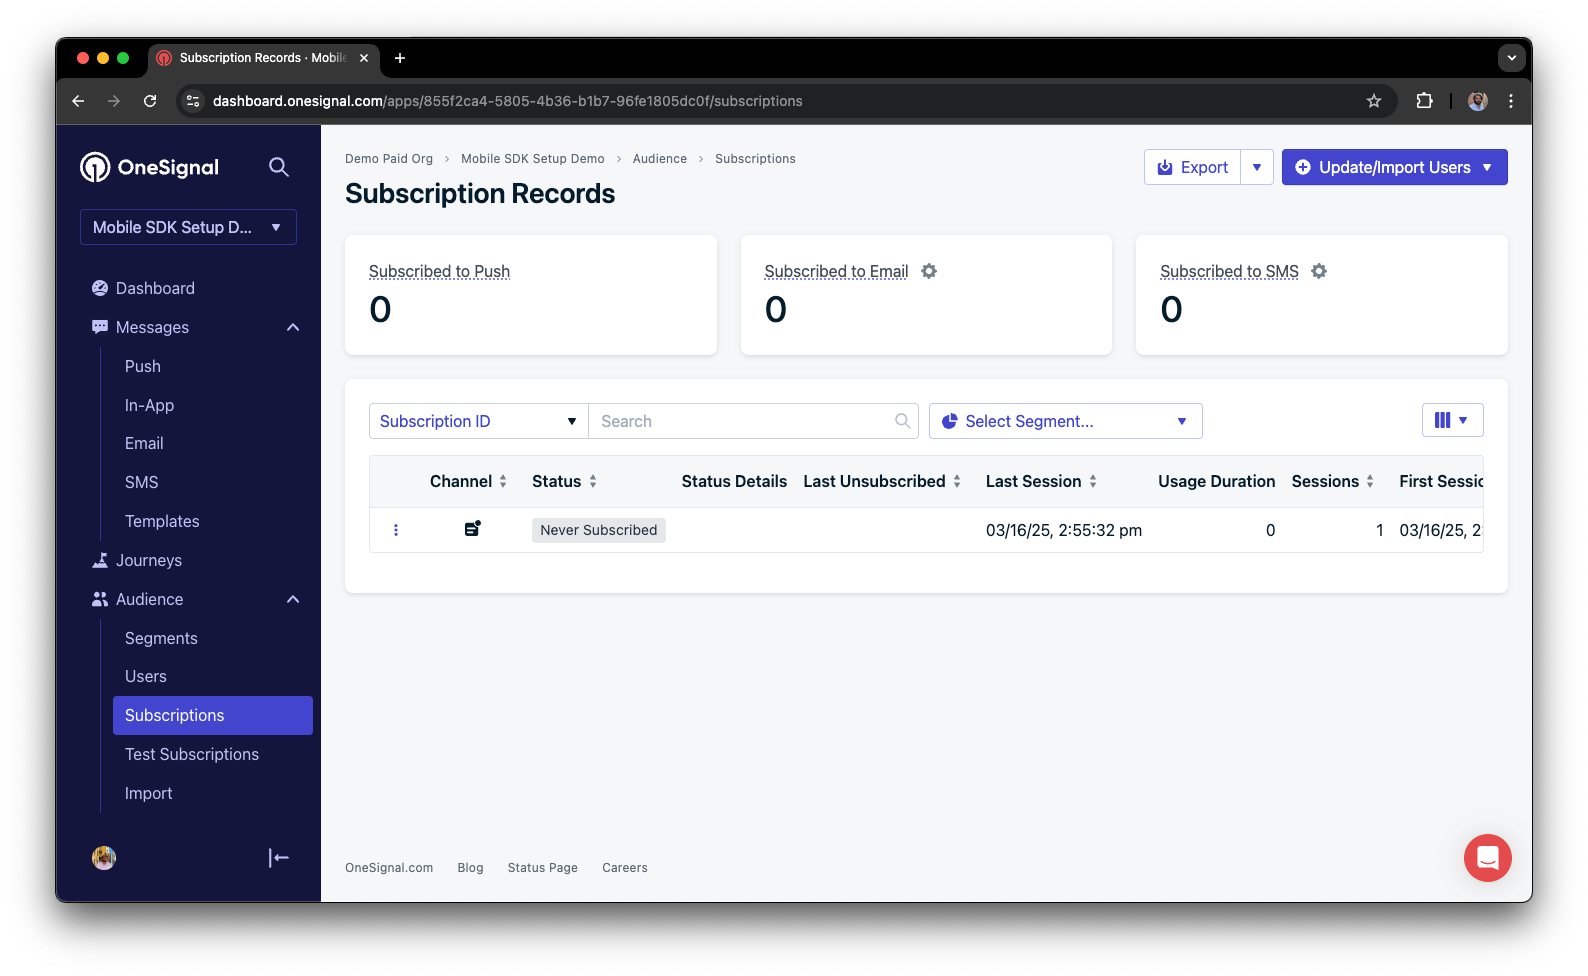
* Go to **Audience > Subscriptions**.
* You should see a new entry with the status "Never Subscribed".
Before accepting the prompt, check the OneSignal dashboard:
* Go to **Audience > Subscriptions**.
* You should see a new entry with the status "Never Subscribed".
 The subscription's status should now show **Subscribed**.
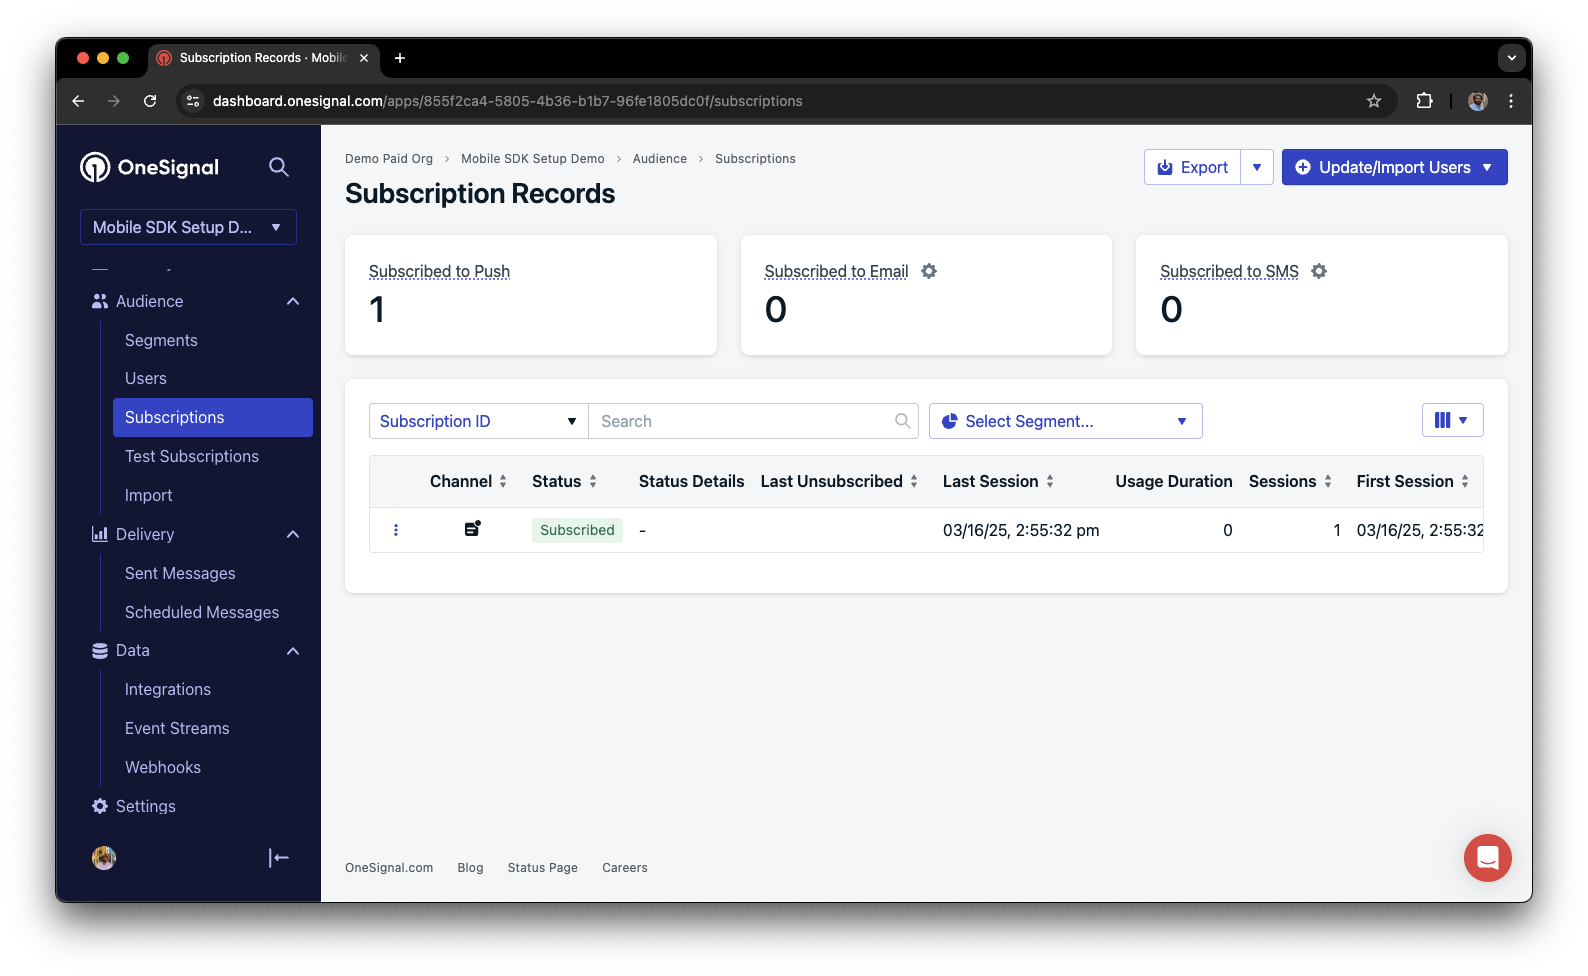 You have successfully created a [mobile subscription](/docs/en/subscriptions).
Mobile subscriptions are created when users first open your app on a device or if they uninstall and reinstall your app on the same device.
### Set up test users
test users are helpful for testing a push notification before sending a message.
In the dashboard, next to the subscription, click the **Options (three dots)** button and select **Add to Test Users**.
You have successfully created a [mobile subscription](/docs/en/subscriptions).
Mobile subscriptions are created when users first open your app on a device or if they uninstall and reinstall your app on the same device.
### Set up test users
test users are helpful for testing a push notification before sending a message.
In the dashboard, next to the subscription, click the **Options (three dots)** button and select **Add to Test Users**.
 Name the subscription so you can easily identify your device later in the **test users tab**.
Go to **Audience > Segments > New Segment**.
Name the segment `Test Users` (the name is important because it will be used later).
Name the subscription so you can easily identify your device later in the **test users tab**.
Go to **Audience > Segments > New Segment**.
Name the segment `Test Users` (the name is important because it will be used later).
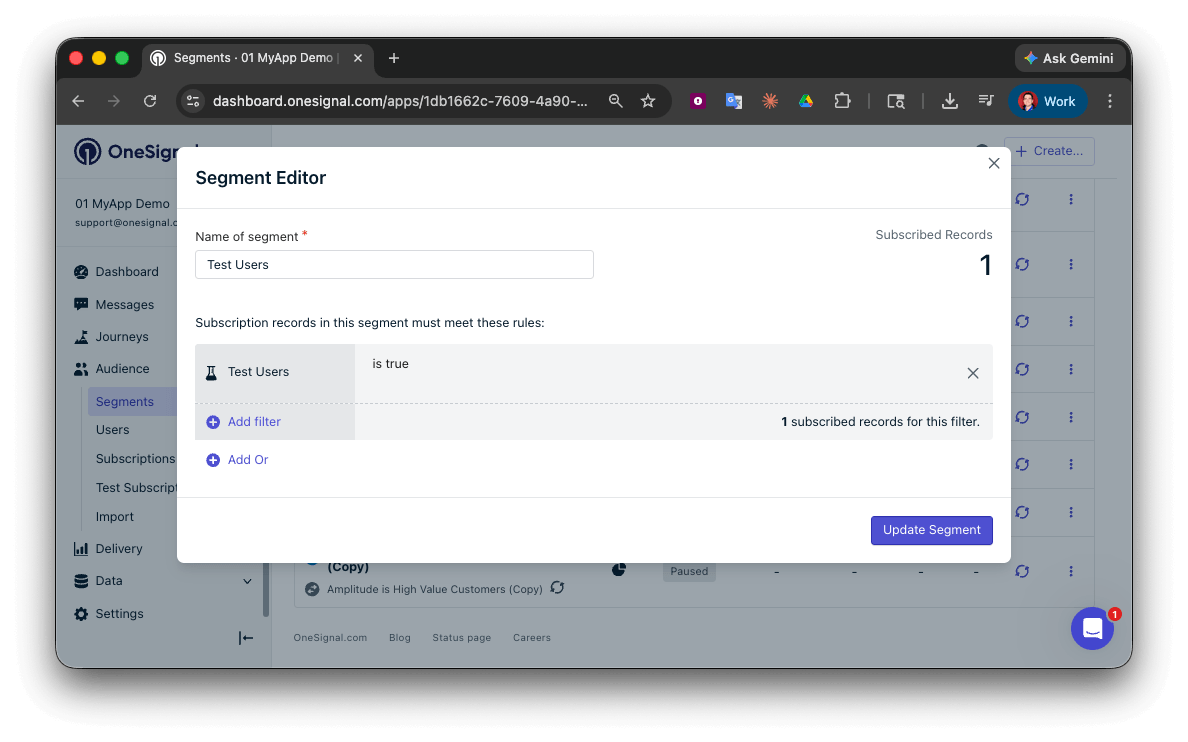 You have successfully created a segment of test users.
We can now test sending messages to this individual device and groups of test users.
### Send test push via API
In your OneSignal dashboard, go to **Settings > [Keys & IDs](/docs/en/keys-and-ids)**.
Replace `YOUR_APP_API_KEY` and `YOUR_APP_ID` in the code below with your actual keys. This code uses the `Test Users` segment we created earlier.
```curl theme={null}
curl -X \
POST --url 'https://api.onesignal.com/notifications' \
--header 'content-type: application/json; charset=utf-8' \
--header 'authorization: Key YOUR_APP_API_KEY' \
--data \
'{
"app_id": "YOUR_APP_ID",
"target_channel": "push",
"name": "Testing basic setup",
"headings": {
"en": "👋"
},
"contents": {
"en": "Hello world!"
},
"included_segments": [
"Test Users"
],
"ios_attachments": {
"onesignal_logo": "https://avatars.githubusercontent.com/u/11823027?s=200&v=4"
},
"big_picture": "https://avatars.githubusercontent.com/u/11823027?s=200&v=4"
}'
```
Run the code in your terminal.
If all setup steps were completed successfully, the test users should receive a notification with an image included:
You have successfully created a segment of test users.
We can now test sending messages to this individual device and groups of test users.
### Send test push via API
In your OneSignal dashboard, go to **Settings > [Keys & IDs](/docs/en/keys-and-ids)**.
Replace `YOUR_APP_API_KEY` and `YOUR_APP_ID` in the code below with your actual keys. This code uses the `Test Users` segment we created earlier.
```curl theme={null}
curl -X \
POST --url 'https://api.onesignal.com/notifications' \
--header 'content-type: application/json; charset=utf-8' \
--header 'authorization: Key YOUR_APP_API_KEY' \
--data \
'{
"app_id": "YOUR_APP_ID",
"target_channel": "push",
"name": "Testing basic setup",
"headings": {
"en": "👋"
},
"contents": {
"en": "Hello world!"
},
"included_segments": [
"Test Users"
],
"ios_attachments": {
"onesignal_logo": "https://avatars.githubusercontent.com/u/11823027?s=200&v=4"
},
"big_picture": "https://avatars.githubusercontent.com/u/11823027?s=200&v=4"
}'
```
Run the code in your terminal.
If all setup steps were completed successfully, the test users should receive a notification with an image included:
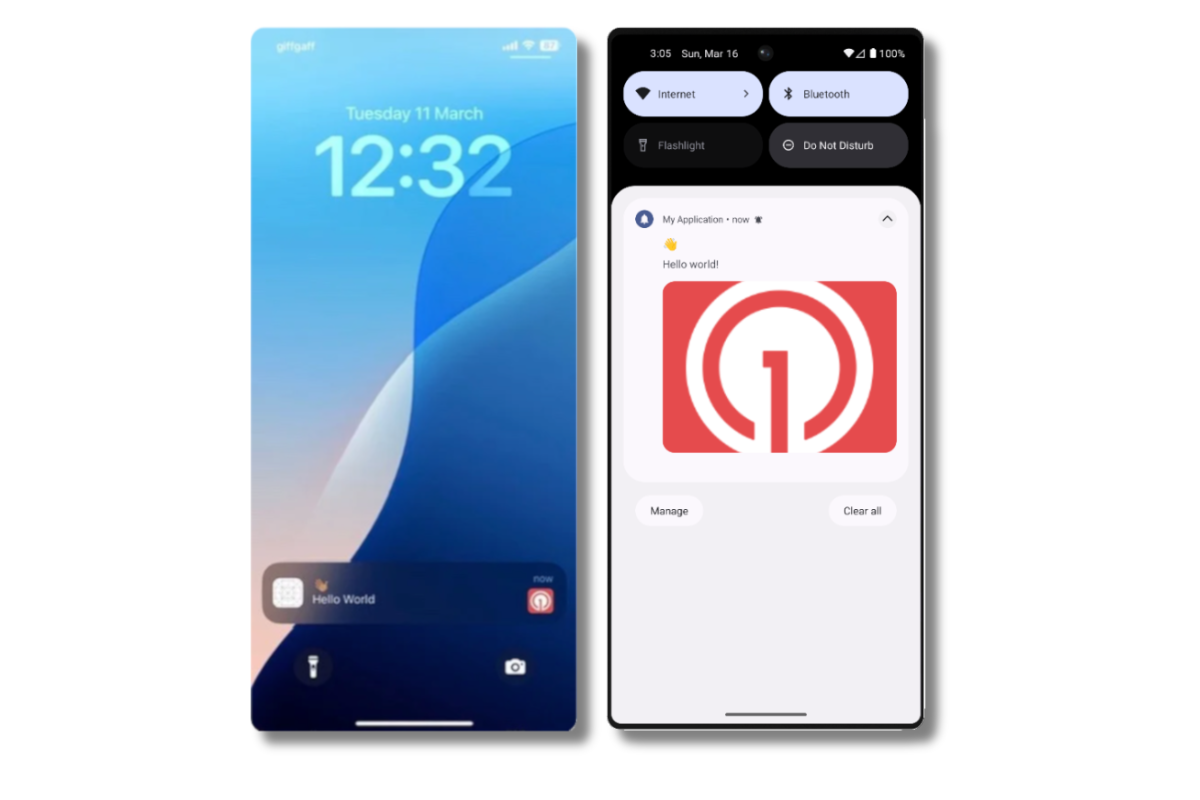 Images will appear small in the collapsed notification view. Expand the notification to see the full image.
In your dashboard, go to **Delivery > Sent Messages**, then click the message to view stats.
You should see the **confirmed** stat, meaning the device received the push.
You have successfully sent a notification via our API to a segment.
* No image received? Your [Notification Service Extension](#ios-setup) might be missing.
* No confirmed receipt? Review the troubleshooting guide [here](/docs/en/confirmed-delivery#troubleshooting-confirmed-delivery).
* Having issues? Copy-paste the api request and a log from start to finish of app launch into a `.txt` file. Then share both with `support@onesignal.com`.
### Send an in-app message
[In-app messages](/docs/en/in-app-messages-setup) let you communicate with users while they are using your app.
This is because users must meet the in-app audience criteria *before* a new session starts. In OneSignal, a new session starts when the user opens your app after it has been in the background or closed for at least 30 seconds. For more details, see our guide on [how in-app messages are displayed](/docs/en/in-app-messages-setup#how-are-iams-displayed%3F).
* In your OneSignal dashboard, navigate to **Messages > In-App > New In-App**.
* Find and select the **Welcome** message.
* Set your Audience as the **Test Users** segment we used previously.
Images will appear small in the collapsed notification view. Expand the notification to see the full image.
In your dashboard, go to **Delivery > Sent Messages**, then click the message to view stats.
You should see the **confirmed** stat, meaning the device received the push.
You have successfully sent a notification via our API to a segment.
* No image received? Your [Notification Service Extension](#ios-setup) might be missing.
* No confirmed receipt? Review the troubleshooting guide [here](/docs/en/confirmed-delivery#troubleshooting-confirmed-delivery).
* Having issues? Copy-paste the api request and a log from start to finish of app launch into a `.txt` file. Then share both with `support@onesignal.com`.
### Send an in-app message
[In-app messages](/docs/en/in-app-messages-setup) let you communicate with users while they are using your app.
This is because users must meet the in-app audience criteria *before* a new session starts. In OneSignal, a new session starts when the user opens your app after it has been in the background or closed for at least 30 seconds. For more details, see our guide on [how in-app messages are displayed](/docs/en/in-app-messages-setup#how-are-iams-displayed%3F).
* In your OneSignal dashboard, navigate to **Messages > In-App > New In-App**.
* Find and select the **Welcome** message.
* Set your Audience as the **Test Users** segment we used previously.
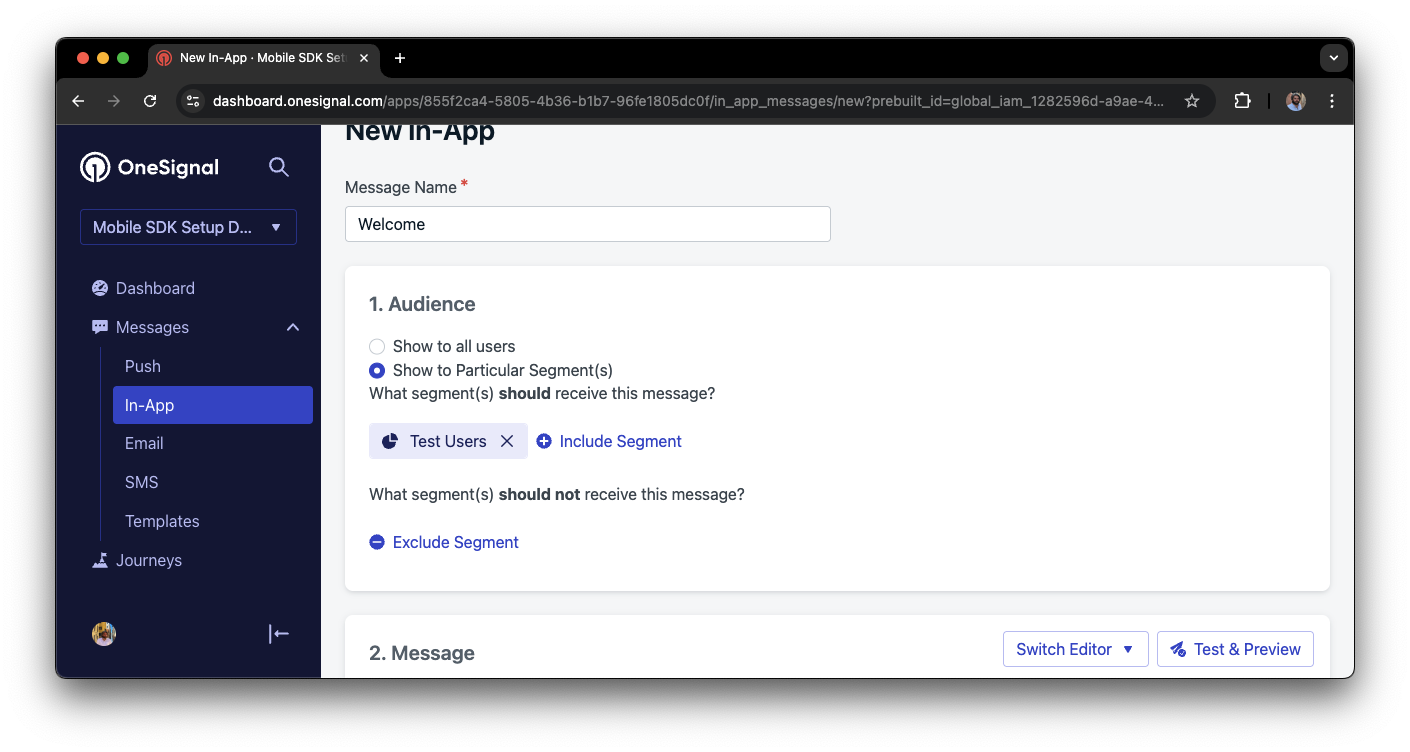
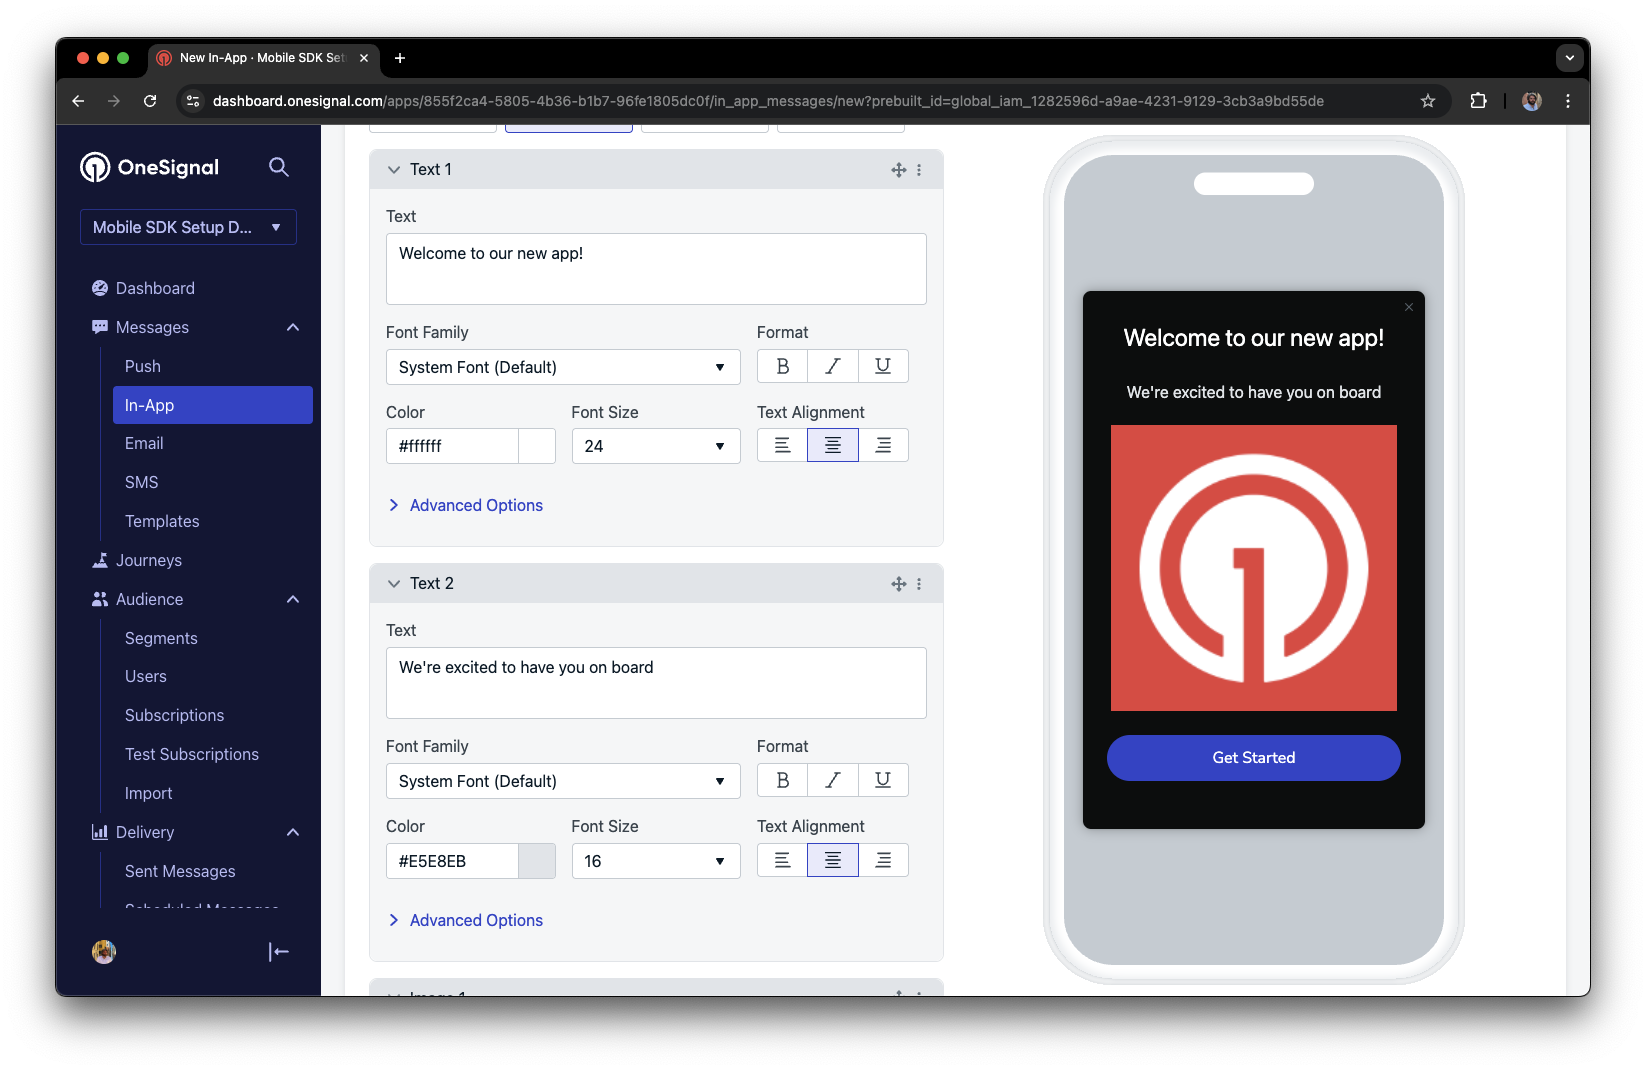 Under **Schedule > How often do you want to show this message?** select **Every time trigger conditions are satisfied**.
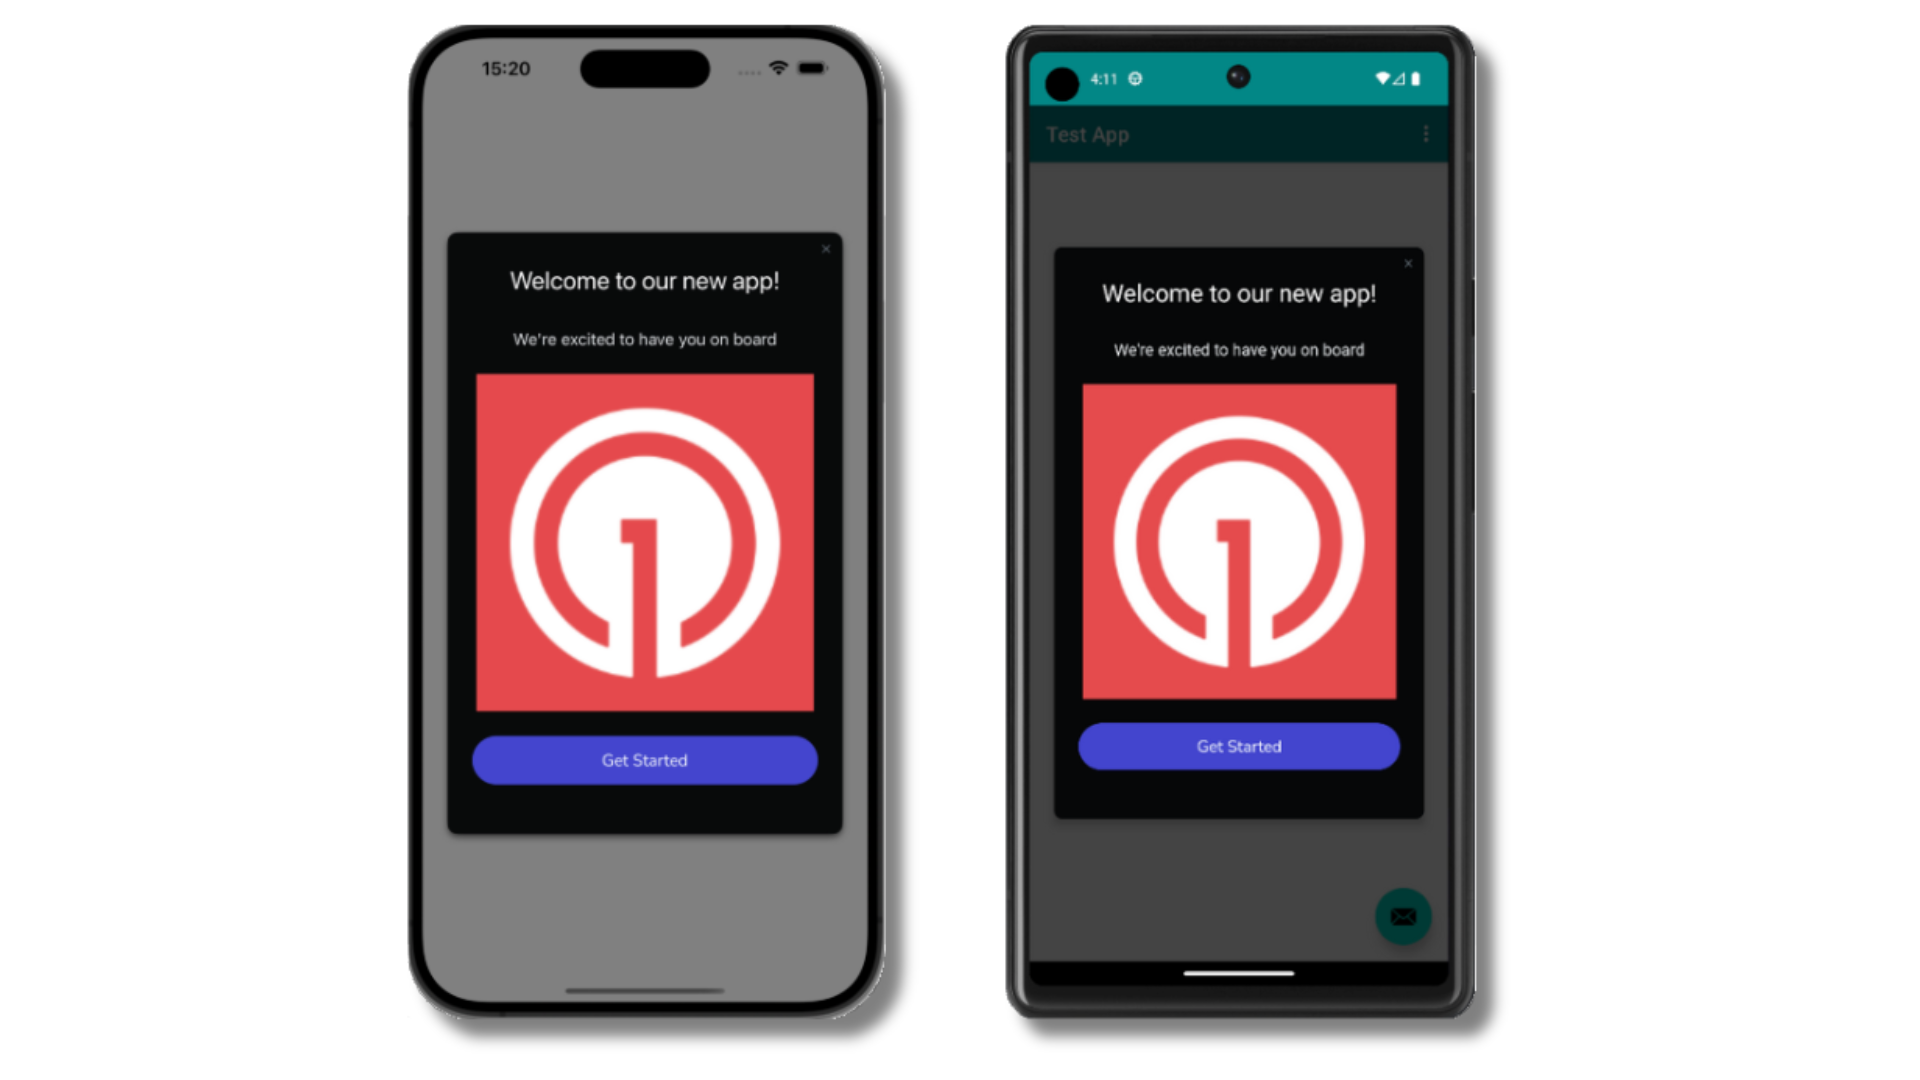
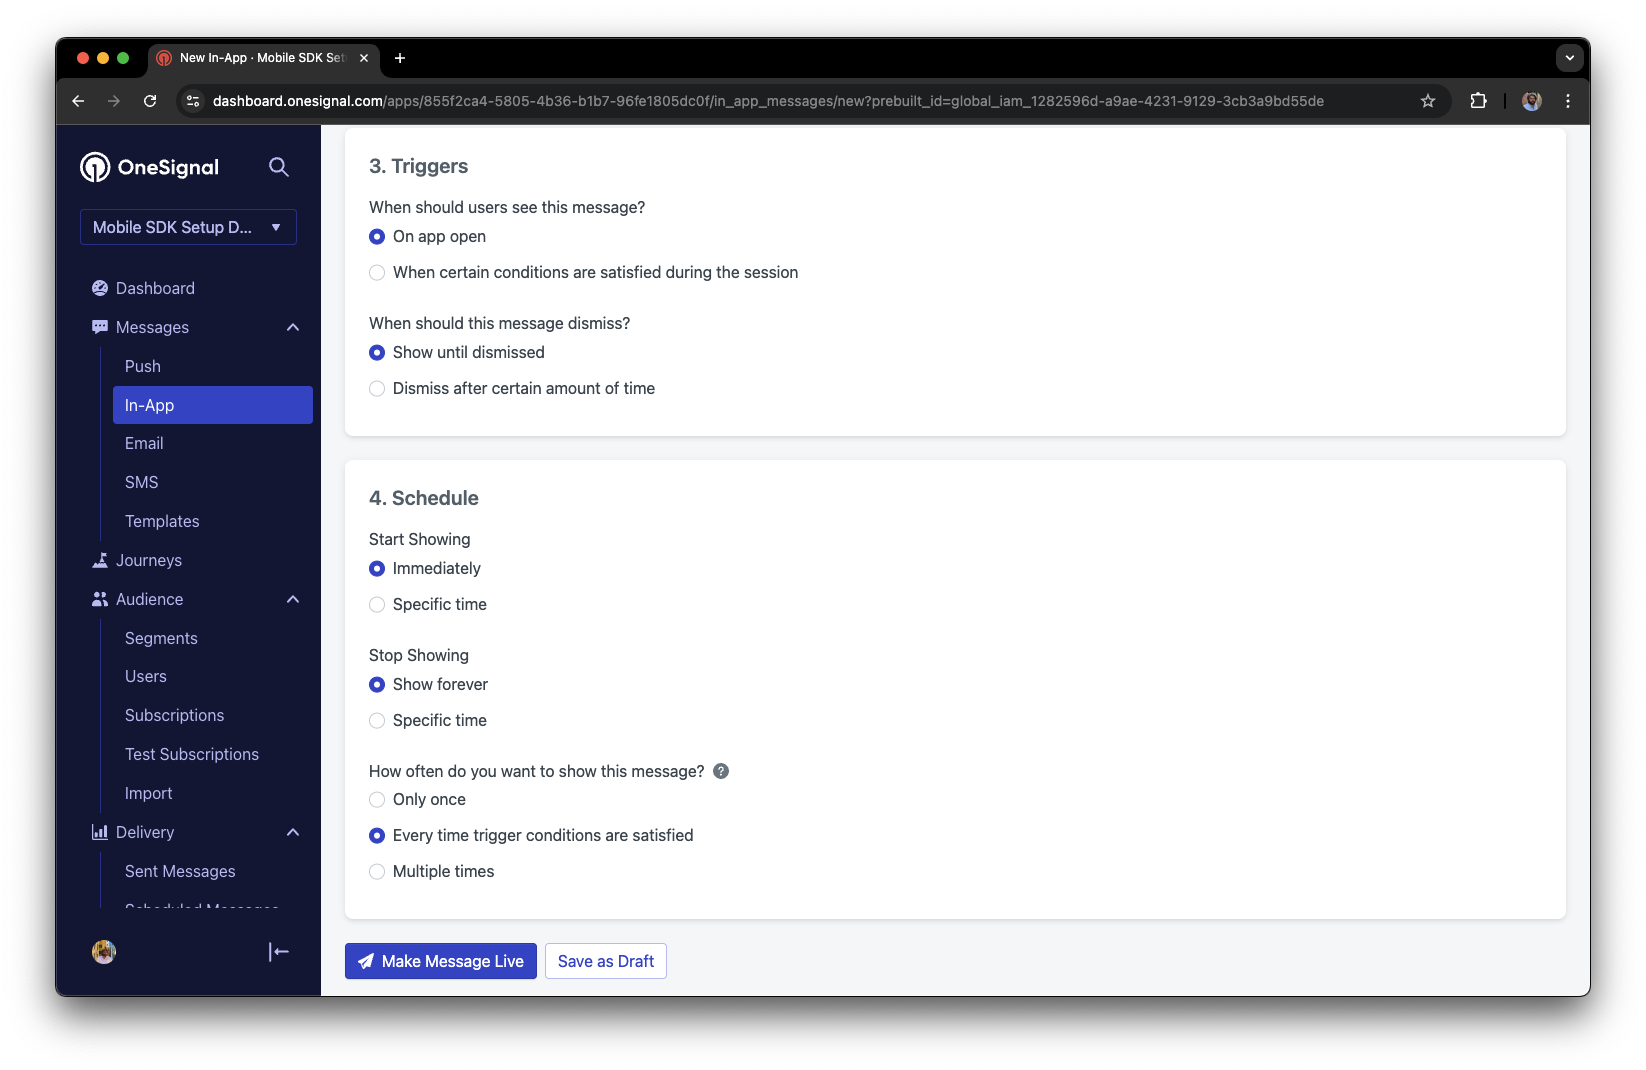 Click **Make Message Live** so it is available to your Test Users each time they open the app.
After the in-app message is live, open your app. You should see it display:
Click **Make Message Live** so it is available to your Test Users each time they open the app.
After the in-app message is live, open your app. You should see it display:
 Not seeing the message?
* Start a new session
* You must close or background the app for at least 30 seconds before reopening. This ensures a new session is started.
* For more, see [how in-app messages are displayed](/docs/en/in-app-messages-setup#how-are-iams-displayed%3F).
* Still in the `Test Users` segment?
* If you reinstalled or switched devices, re-add the device to [Test Users](#set-up-test-users) and confirm it's part of the Test Users segment.
* Having issues?
* Follow [Getting a Debug Log](/docs/en/capturing-a-debug-log) while reproducing the steps above. This will generate additional logging that you can share with `support@onesignal.com` and we will help investigate what's going on.
You have successfully setup the OneSignal SDK and learned important concepts like:
* Gathering [Subscriptions](/docs/en/subscriptions), setting [Test Users](/docs/en/find-set-test-subscriptions), and creating [Segments](/docs/en/segmentation).
* Sending [Push](/docs/en/push) with images and [Confirmed receipt](/docs/en/confirmed-delivery) using Segments and our [Create message](/reference/create-message) API.
* Sending [In-app messages](/docs/en/in-app-messages-setup).
Continue with this guide to identify users in your app and setup additional features.
***
## User identification
Previously, we demonstrated how to create mobile [Subscriptions](/docs/en/subscriptions). Now we'll expand to identifying [Users](/docs/en/users) across all their subscriptions (including push, email, and SMS) using the OneSignal SDK. We'll cover External IDs, tags, multi-channel subscriptions, privacy, and event tracking to help you unify and engage users across platforms.
### Assign External ID
Use an External ID to identify users consistently across devices, email addresses, and phone numbers using your backend's user identifier. This ensures your messaging stays unified across channels and 3rd party systems (especially important for [Integrations](/docs/en/integrations)).
Set the External ID with our SDK's [`login` method](/docs/en/mobile-sdk-reference#login-external-id) each time they are identified by your app.
OneSignal generates unique read-only IDs for subscriptions (Subscription ID) and users (OneSignal ID).
As users download your app on different devices, subscribe to your website, and/or provide you email addresses and phone numbers outside of your app, new subscriptions will be created.
Setting the External ID via our SDK is highly recommended to identify users across all their subscriptions, regardless of how they are created.
### Add Tags
[Tags](/docs/en/add-user-data-tags) are key-value pairs of string data you can use to store user properties (like `username`, `role`, or preferences) and events (like `purchase_date`, `game_level`, or user interactions). Tags power advanced [Message Personalization](/docs/en/message-personalization) and [Segmentation](/docs/en/segmentation) allowing for more advanced use cases.
Set tags with our SDK [`addTag` and `addTags` methods](/docs/en/mobile-sdk-reference#data-tags) as events occur in your app.
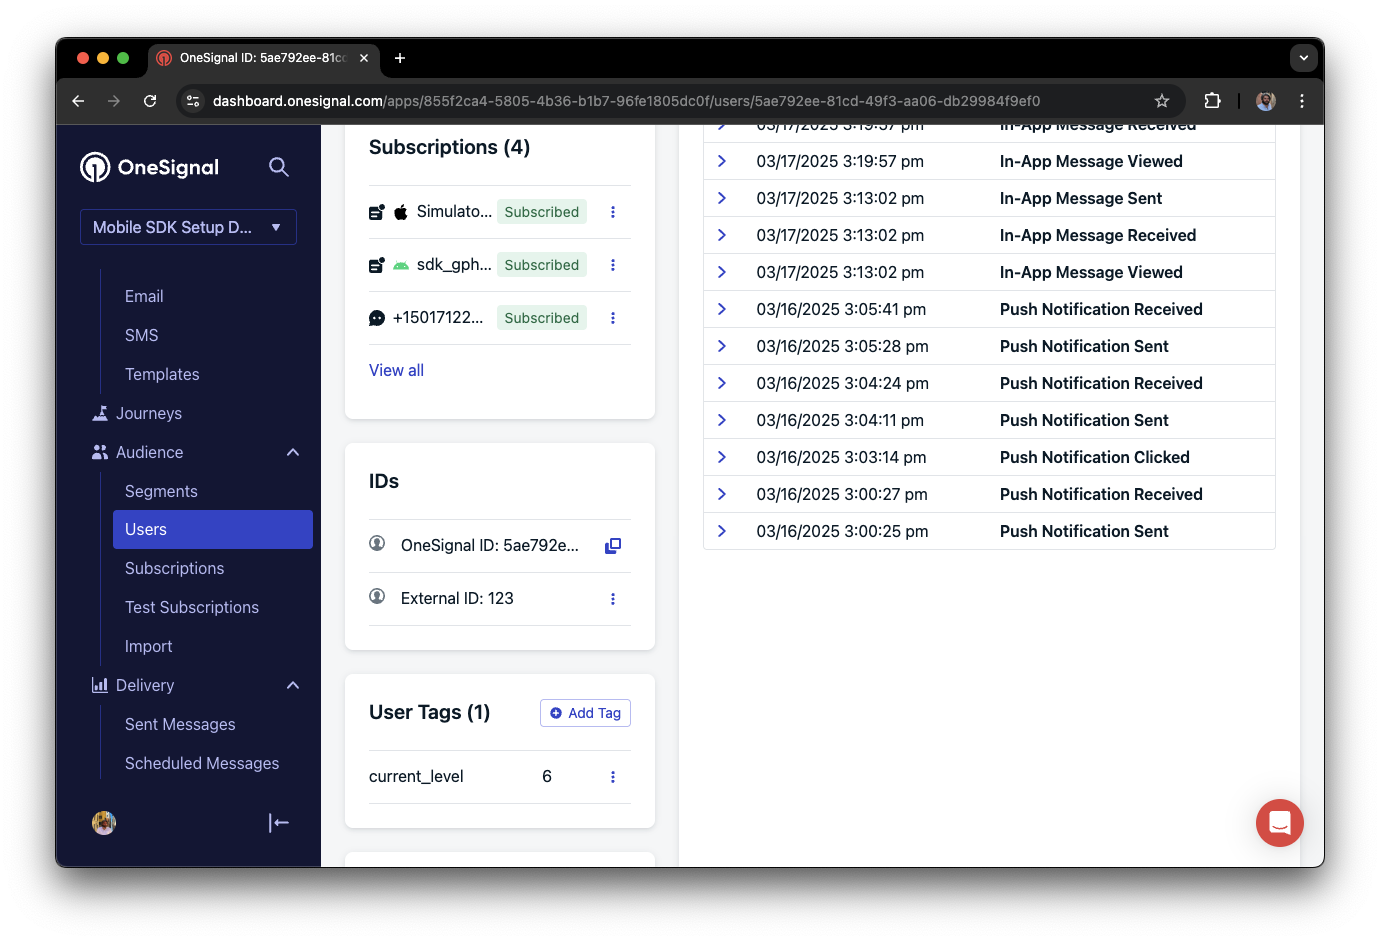
In this example, the user reached level 6 identifiable by the tag called `current_level` set to a value of `6`.
Not seeing the message?
* Start a new session
* You must close or background the app for at least 30 seconds before reopening. This ensures a new session is started.
* For more, see [how in-app messages are displayed](/docs/en/in-app-messages-setup#how-are-iams-displayed%3F).
* Still in the `Test Users` segment?
* If you reinstalled or switched devices, re-add the device to [Test Users](#set-up-test-users) and confirm it's part of the Test Users segment.
* Having issues?
* Follow [Getting a Debug Log](/docs/en/capturing-a-debug-log) while reproducing the steps above. This will generate additional logging that you can share with `support@onesignal.com` and we will help investigate what's going on.
You have successfully setup the OneSignal SDK and learned important concepts like:
* Gathering [Subscriptions](/docs/en/subscriptions), setting [Test Users](/docs/en/find-set-test-subscriptions), and creating [Segments](/docs/en/segmentation).
* Sending [Push](/docs/en/push) with images and [Confirmed receipt](/docs/en/confirmed-delivery) using Segments and our [Create message](/reference/create-message) API.
* Sending [In-app messages](/docs/en/in-app-messages-setup).
Continue with this guide to identify users in your app and setup additional features.
***
## User identification
Previously, we demonstrated how to create mobile [Subscriptions](/docs/en/subscriptions). Now we'll expand to identifying [Users](/docs/en/users) across all their subscriptions (including push, email, and SMS) using the OneSignal SDK. We'll cover External IDs, tags, multi-channel subscriptions, privacy, and event tracking to help you unify and engage users across platforms.
### Assign External ID
Use an External ID to identify users consistently across devices, email addresses, and phone numbers using your backend's user identifier. This ensures your messaging stays unified across channels and 3rd party systems (especially important for [Integrations](/docs/en/integrations)).
Set the External ID with our SDK's [`login` method](/docs/en/mobile-sdk-reference#login-external-id) each time they are identified by your app.
OneSignal generates unique read-only IDs for subscriptions (Subscription ID) and users (OneSignal ID).
As users download your app on different devices, subscribe to your website, and/or provide you email addresses and phone numbers outside of your app, new subscriptions will be created.
Setting the External ID via our SDK is highly recommended to identify users across all their subscriptions, regardless of how they are created.
### Add Tags
[Tags](/docs/en/add-user-data-tags) are key-value pairs of string data you can use to store user properties (like `username`, `role`, or preferences) and events (like `purchase_date`, `game_level`, or user interactions). Tags power advanced [Message Personalization](/docs/en/message-personalization) and [Segmentation](/docs/en/segmentation) allowing for more advanced use cases.
Set tags with our SDK [`addTag` and `addTags` methods](/docs/en/mobile-sdk-reference#data-tags) as events occur in your app.
In this example, the user reached level 6 identifiable by the tag called `current_level` set to a value of `6`.
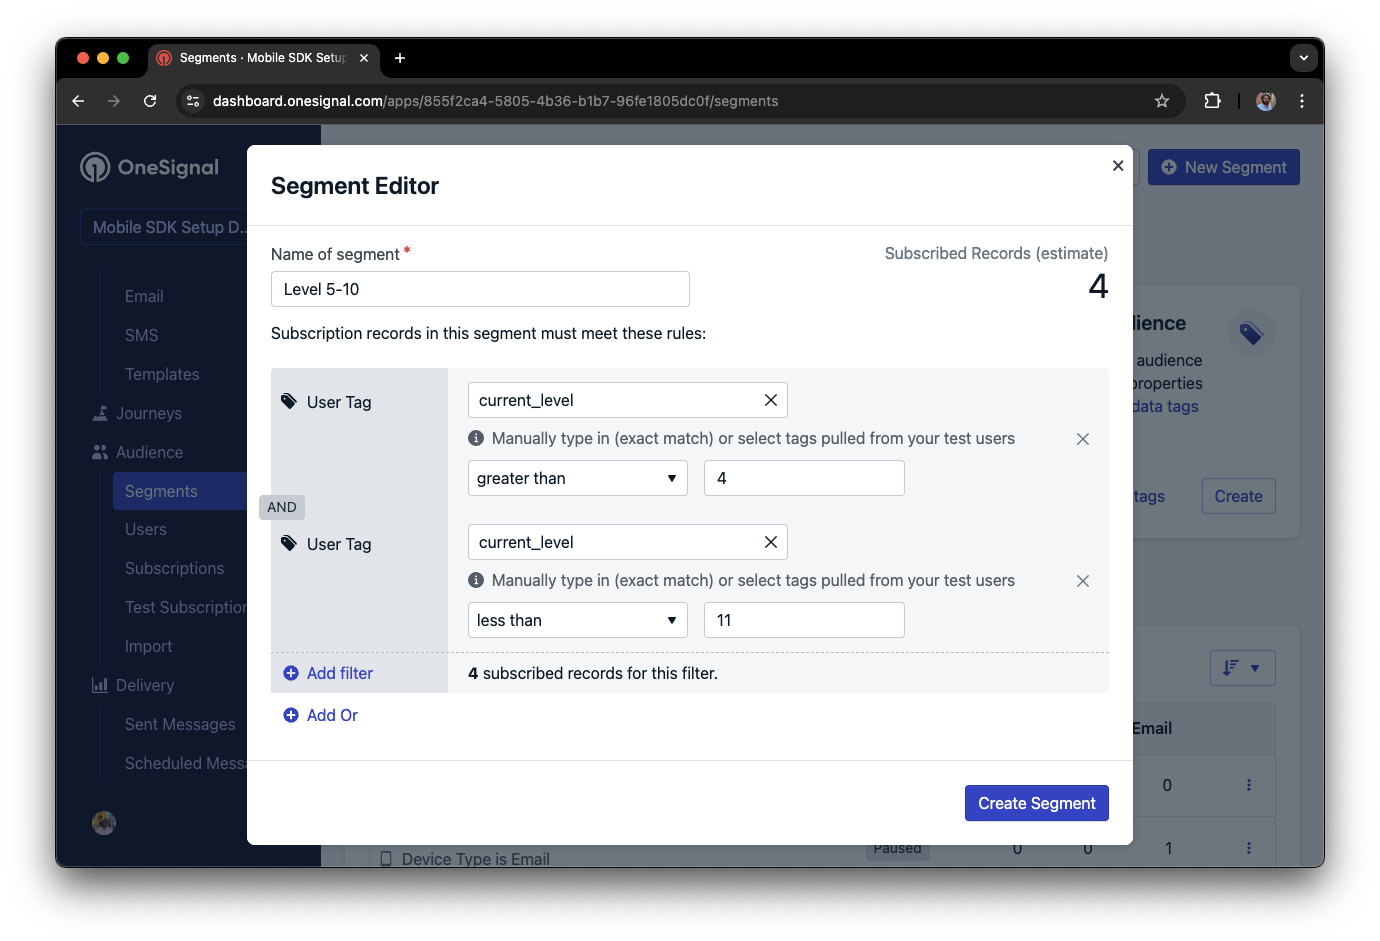
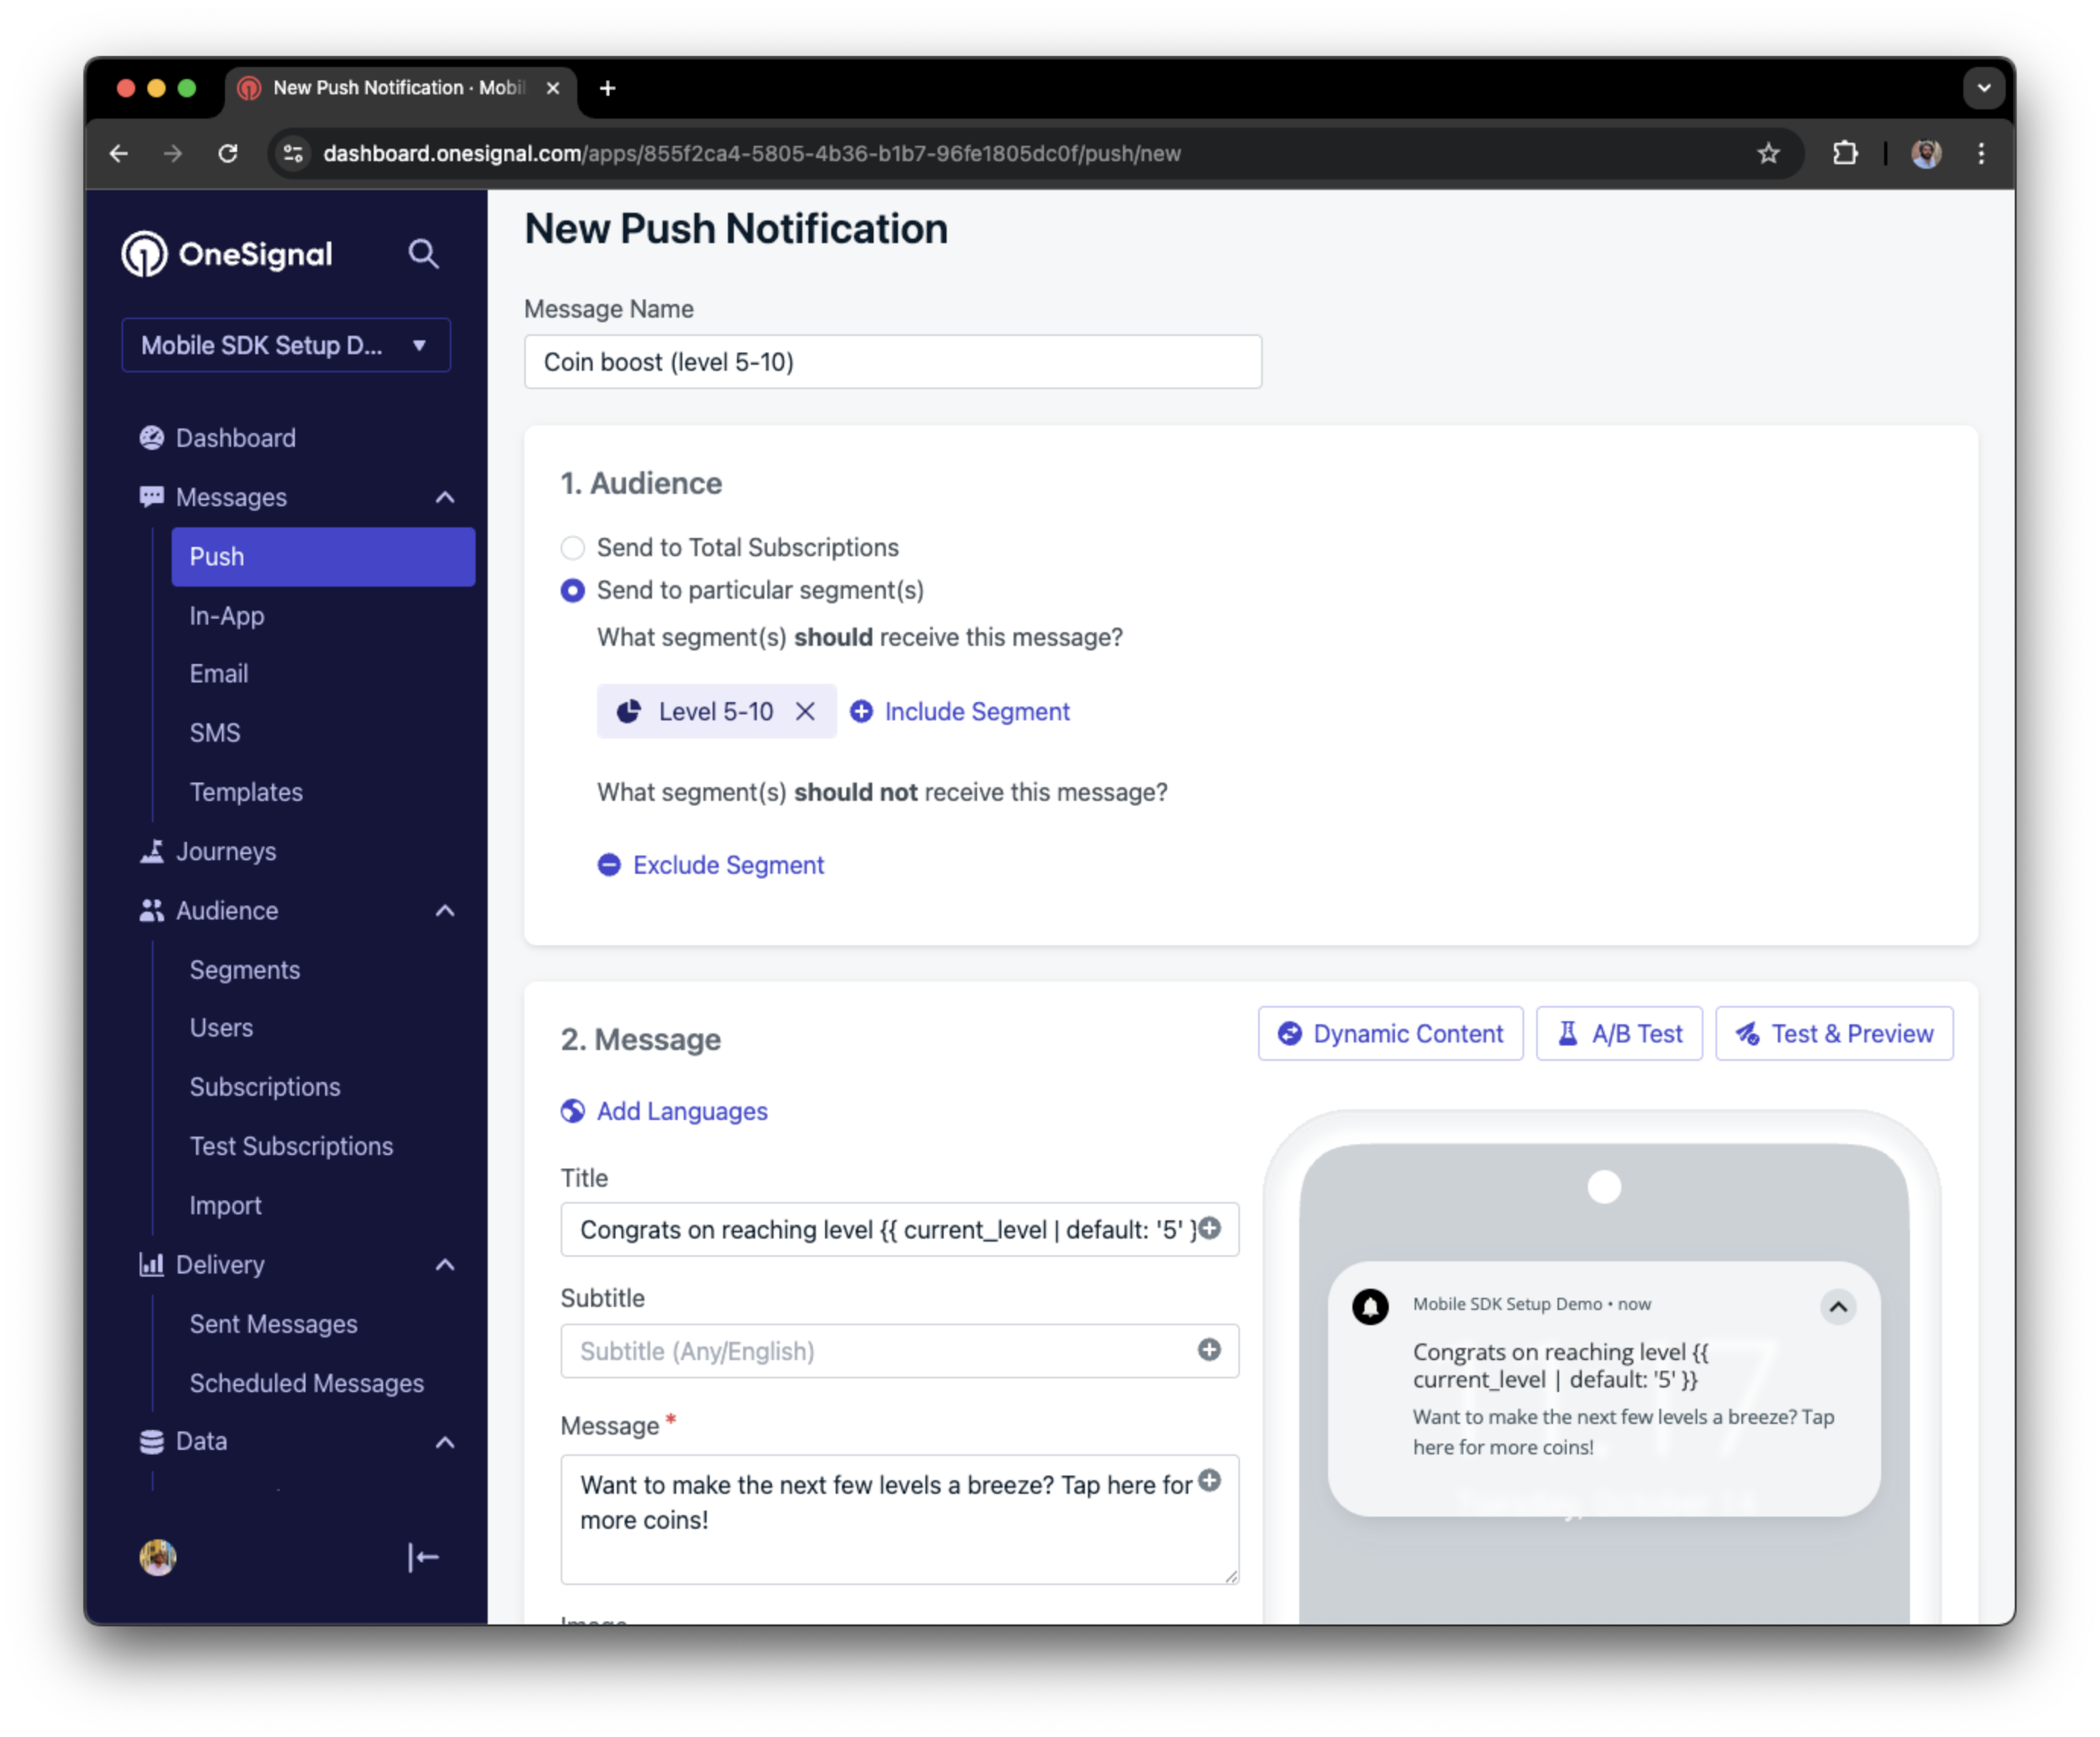
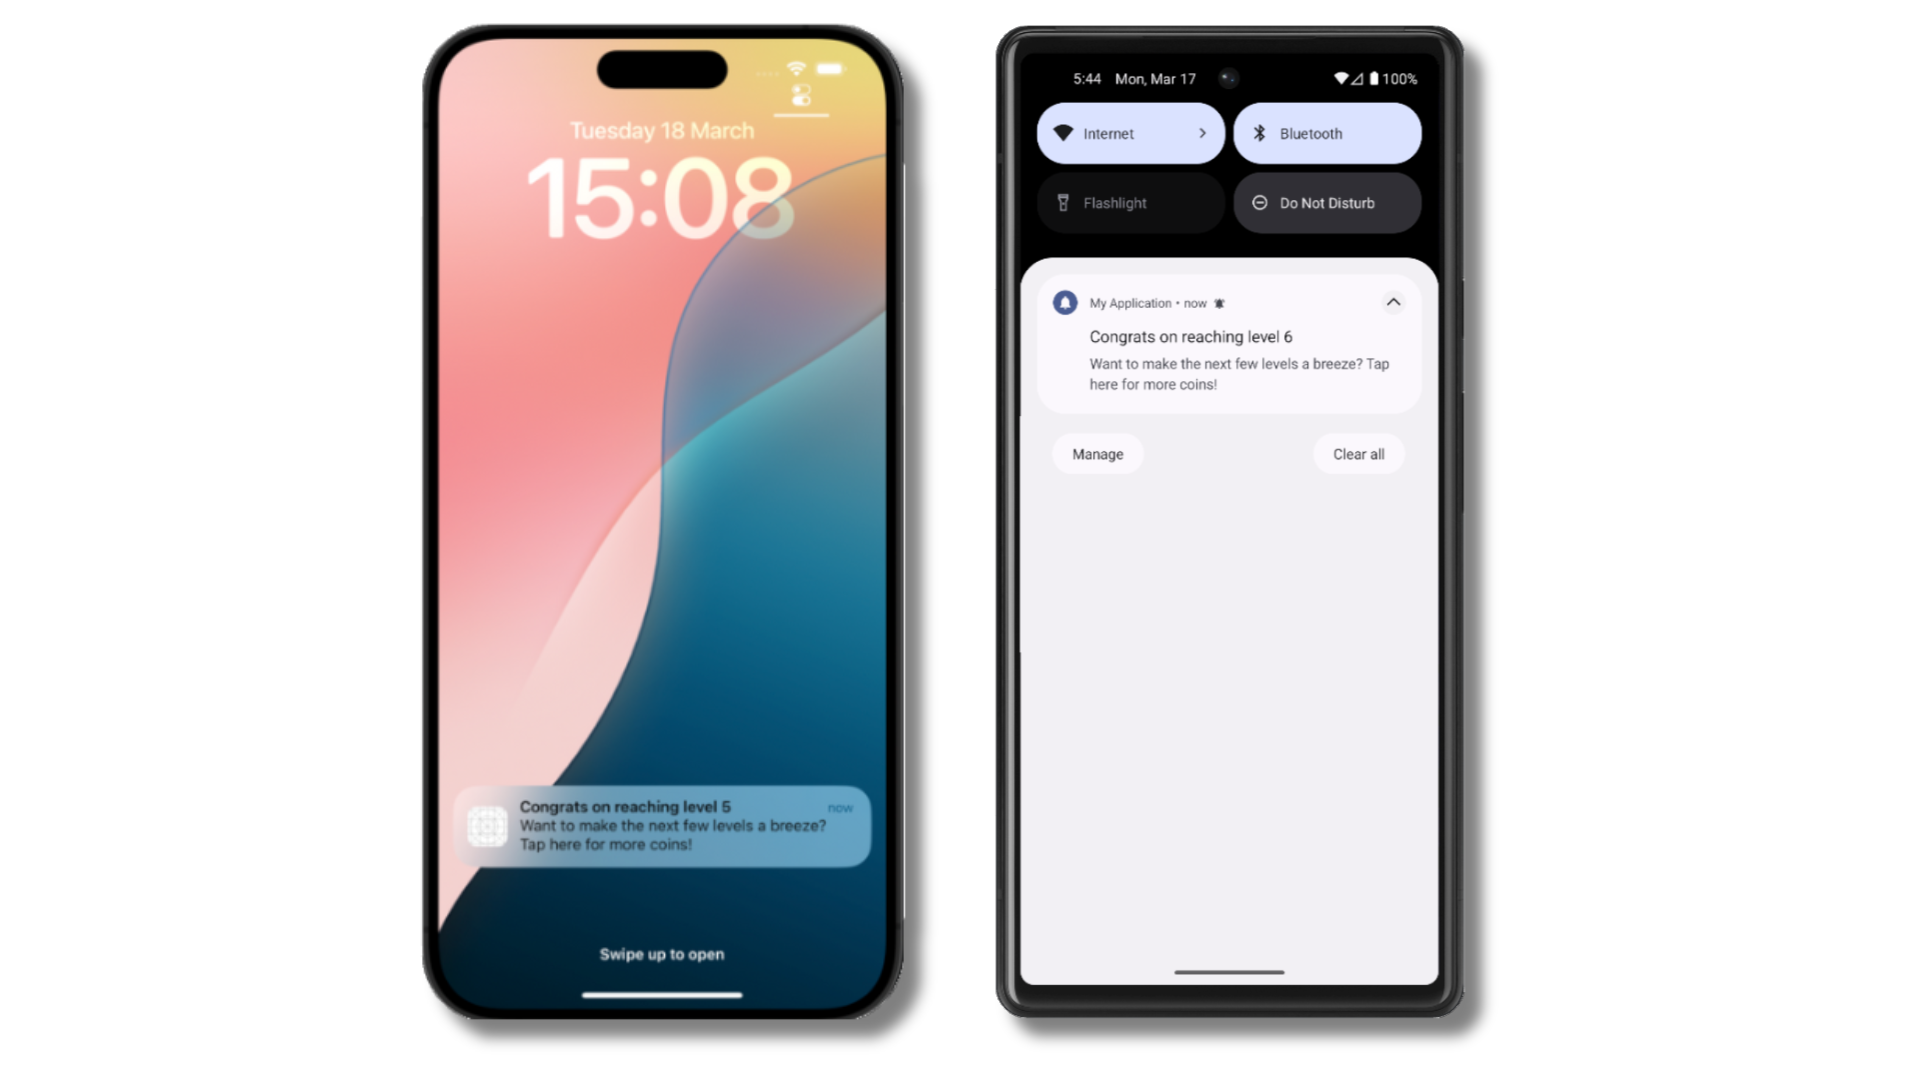
 We can create a segment of users that have a level of between 5 and 10, and use that to send targeted and personalized messages:
 ### Add email and/or SMS subscriptions
Earlier we saw how our SDK creates mobile subscriptions to send push and in-app messages. You can also reach users through emails and SMS channels by creating the corresponding subscriptions.
* Use the [`addEmail` method](/docs/en/mobile-sdk-reference#addemail-%2C-removeemail) to create email subscriptions.
* Use the [`addSms` method](/docs/en/mobile-sdk-reference#addsms-%2C-removesms) to create SMS subscriptions.
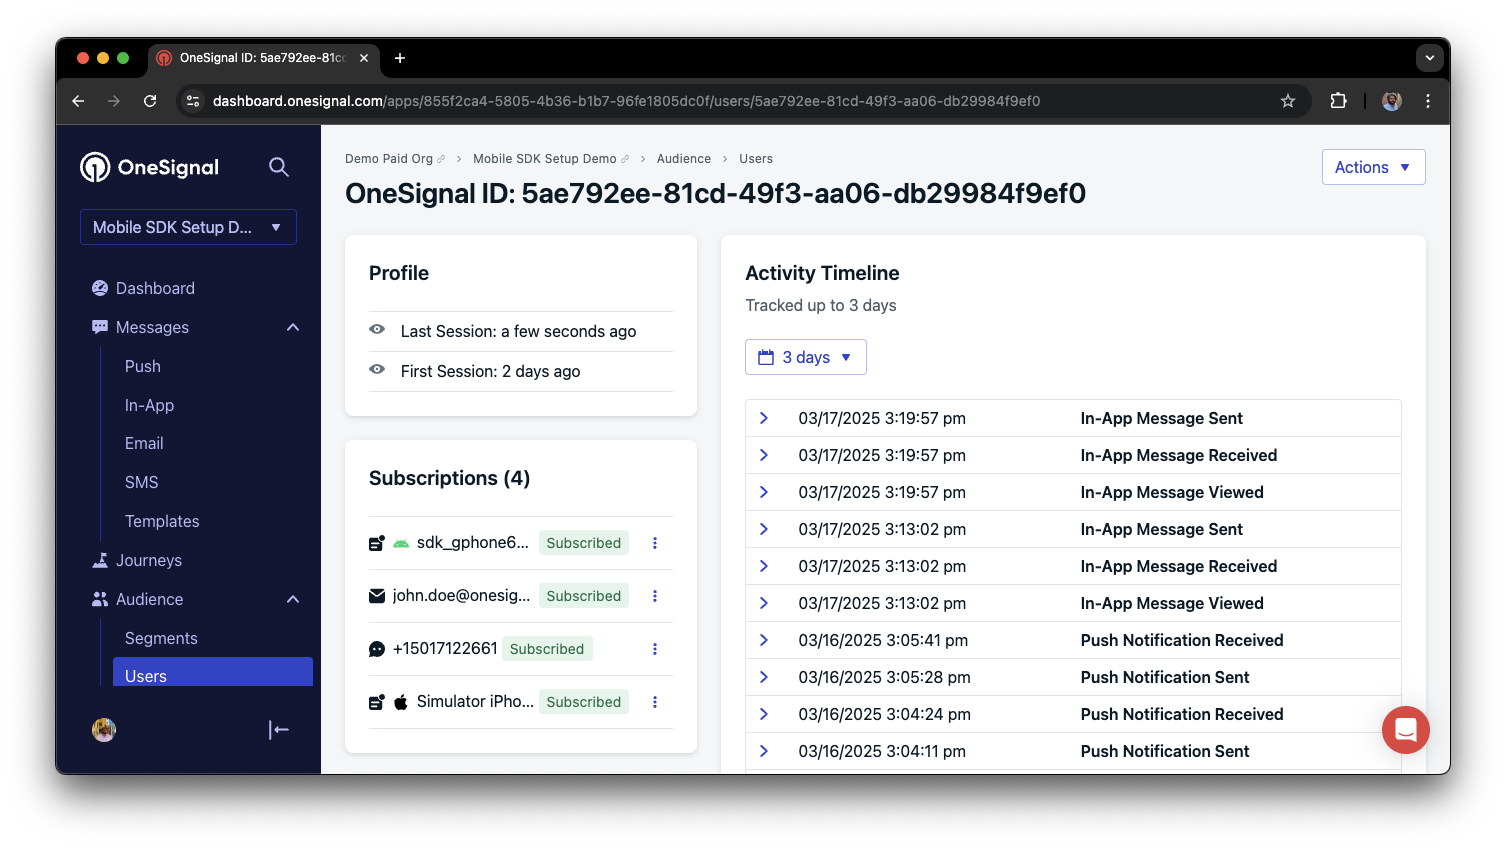
If the email address and/or phone number already exist in the OneSignal app, the SDK will add it to the existing user, it will not create duplicates.
You can view unified users via **Audience > Users** in the dashboard or with the [View user API](/reference/view-user).
### Add email and/or SMS subscriptions
Earlier we saw how our SDK creates mobile subscriptions to send push and in-app messages. You can also reach users through emails and SMS channels by creating the corresponding subscriptions.
* Use the [`addEmail` method](/docs/en/mobile-sdk-reference#addemail-%2C-removeemail) to create email subscriptions.
* Use the [`addSms` method](/docs/en/mobile-sdk-reference#addsms-%2C-removesms) to create SMS subscriptions.
If the email address and/or phone number already exist in the OneSignal app, the SDK will add it to the existing user, it will not create duplicates.
You can view unified users via **Audience > Users** in the dashboard or with the [View user API](/reference/view-user).
 Best practices for multi-channel communication
* Obtain explicit consent before adding email or SMS subscriptions.
* Explain the benefits of each communication channel to users.
* Provide channel preferences so users can select which channels they prefer.
***
### Privacy & user consent
To control when OneSignal collects user data, use the SDK's consent gating methods:
* [`setConsentRequired(true)`](/docs/en/mobile-sdk-reference#setconsentrequired): Prevents data collection until consent is given.
* [`setConsentGiven(true)`](/docs/en/mobile-sdk-reference#setconsentgiven): Enables data collection once consent is granted.
See our Privacy & security docs for more on:
* [Data collected by the SDK](/docs/en/data-collected-by-the-onesignal-sdk)
* [Handling personal data](/docs/en/handling-personal-data)
***
## Prompt for push permissions
Instead of calling `requestPermission()` immediately on app open, take a more strategic approach. Use an in-app message to explain the value of push notifications before requesting permission.
For best practices and implementation details, see our [Prompt for push permissions](/docs/en/prompt-for-push-permissions) guide.
***
## Listen to push, user, and in-app events
Use SDK listeners to react to user actions and state changes.
The SDK provides several event listeners for you to hook into. See our [SDK reference guide](/docs/en/mobile-sdk-reference) for more details.
### Push notification events
* [`addClickListener()`](/docs/en/mobile-sdk-reference#addclicklistener-push): Detect when a notification is tapped. Helpful for [Deep Linking](/docs/en/deep-linking).
* [`addForegroundLifecycleListener()`](/docs/en/mobile-sdk-reference#addforegroundlifecyclelistener-push): Control how notifications behave in foreground.
For full customization, see [Mobile Service Extensions](/docs/en/service-extensions).
### User state changes
* [`addObserver()` for user state](/docs/en/mobile-sdk-reference#addobserver-user-state): Detect when the External ID is set.
* [`addPermissionObserver()`](/docs/en/mobile-sdk-reference#addpermissionobserver-push): Track the user's specific interaction with the native push permission prompt.
* [`addObserver()` for push subscription](/docs/en/mobile-sdk-reference#addobserver-push-subscription-changes): Track when the push subscription status changes.
### In-app message events
* [`addClickListener()`](/docs/en/mobile-sdk-reference#addclicklistener-in-app): Handle in-app click actions. Ideal for deep linking or tracking events.
* [`addLifecycleListener()`](/docs/en/mobile-sdk-reference#addclicklistener-in-app): Track full lifecycle of in-app messages (shown, clicked, dismissed, etc.).
***
## Advanced setup & capabilities
Explore more capabilities to enhance your integration:
* [🔁 Migrating to OneSignal from another service](/docs/en/migrating-to-onesignal)
* [🌍 Location tracking](/docs/en/mobile-sdk-reference#location)
* [🔗 Deep Linking](/docs/en/deep-linking)
* [🔌 Integrations](/docs/en/integrations)
* [🧩 Mobile Service Extensions](/docs/en/service-extensions)
* [🛎️ Action buttons](/docs/en/action-buttons)
* [🌐 Multi-language messaging](/docs/en/multi-language-messaging)
* [🛡️ Identity Verification](/docs/en/identity-verification)
* [📊 Custom Outcomes](/docs/en/custom-outcomes)
* [📲 Live Activities](/docs/en/live-activities)
### Mobile SDK setup & reference
Make sure you've enabled all key features by reviewing the [Mobile push setup](/docs/en/mobile-push-setup) guide.
For full details on available methods and configuration options, visit the [Mobile SDK reference](/docs/en/mobile-sdk-reference).
Congratulations! You've successfully completed the Mobile SDK setup guide.
***
도움이 필요하신가요?
지원 팀과 채팅하거나 `support@onesignal.com`으로 이메일을 보내주세요.
다음을 포함해 주세요:
* 발생한 문제의 세부 정보 및 재현 단계(가능한 경우)
* OneSignal 앱 ID
* External ID 또는 Subscription ID(해당하는 경우)
* OneSignal 대시보드에서 테스트한 메시지의 URL(해당하는 경우)
* 관련 [로그 또는 오류 메시지](/docs/ko/capturing-a-debug-log)
기꺼이 도와드리겠습니다!
***
Best practices for multi-channel communication
* Obtain explicit consent before adding email or SMS subscriptions.
* Explain the benefits of each communication channel to users.
* Provide channel preferences so users can select which channels they prefer.
***
### Privacy & user consent
To control when OneSignal collects user data, use the SDK's consent gating methods:
* [`setConsentRequired(true)`](/docs/en/mobile-sdk-reference#setconsentrequired): Prevents data collection until consent is given.
* [`setConsentGiven(true)`](/docs/en/mobile-sdk-reference#setconsentgiven): Enables data collection once consent is granted.
See our Privacy & security docs for more on:
* [Data collected by the SDK](/docs/en/data-collected-by-the-onesignal-sdk)
* [Handling personal data](/docs/en/handling-personal-data)
***
## Prompt for push permissions
Instead of calling `requestPermission()` immediately on app open, take a more strategic approach. Use an in-app message to explain the value of push notifications before requesting permission.
For best practices and implementation details, see our [Prompt for push permissions](/docs/en/prompt-for-push-permissions) guide.
***
## Listen to push, user, and in-app events
Use SDK listeners to react to user actions and state changes.
The SDK provides several event listeners for you to hook into. See our [SDK reference guide](/docs/en/mobile-sdk-reference) for more details.
### Push notification events
* [`addClickListener()`](/docs/en/mobile-sdk-reference#addclicklistener-push): Detect when a notification is tapped. Helpful for [Deep Linking](/docs/en/deep-linking).
* [`addForegroundLifecycleListener()`](/docs/en/mobile-sdk-reference#addforegroundlifecyclelistener-push): Control how notifications behave in foreground.
For full customization, see [Mobile Service Extensions](/docs/en/service-extensions).
### User state changes
* [`addObserver()` for user state](/docs/en/mobile-sdk-reference#addobserver-user-state): Detect when the External ID is set.
* [`addPermissionObserver()`](/docs/en/mobile-sdk-reference#addpermissionobserver-push): Track the user's specific interaction with the native push permission prompt.
* [`addObserver()` for push subscription](/docs/en/mobile-sdk-reference#addobserver-push-subscription-changes): Track when the push subscription status changes.
### In-app message events
* [`addClickListener()`](/docs/en/mobile-sdk-reference#addclicklistener-in-app): Handle in-app click actions. Ideal for deep linking or tracking events.
* [`addLifecycleListener()`](/docs/en/mobile-sdk-reference#addclicklistener-in-app): Track full lifecycle of in-app messages (shown, clicked, dismissed, etc.).
***
## Advanced setup & capabilities
Explore more capabilities to enhance your integration:
* [🔁 Migrating to OneSignal from another service](/docs/en/migrating-to-onesignal)
* [🌍 Location tracking](/docs/en/mobile-sdk-reference#location)
* [🔗 Deep Linking](/docs/en/deep-linking)
* [🔌 Integrations](/docs/en/integrations)
* [🧩 Mobile Service Extensions](/docs/en/service-extensions)
* [🛎️ Action buttons](/docs/en/action-buttons)
* [🌐 Multi-language messaging](/docs/en/multi-language-messaging)
* [🛡️ Identity Verification](/docs/en/identity-verification)
* [📊 Custom Outcomes](/docs/en/custom-outcomes)
* [📲 Live Activities](/docs/en/live-activities)
### Mobile SDK setup & reference
Make sure you've enabled all key features by reviewing the [Mobile push setup](/docs/en/mobile-push-setup) guide.
For full details on available methods and configuration options, visit the [Mobile SDK reference](/docs/en/mobile-sdk-reference).
Congratulations! You've successfully completed the Mobile SDK setup guide.
***
도움이 필요하신가요?
지원 팀과 채팅하거나 `support@onesignal.com`으로 이메일을 보내주세요.
다음을 포함해 주세요:
* 발생한 문제의 세부 정보 및 재현 단계(가능한 경우)
* OneSignal 앱 ID
* External ID 또는 Subscription ID(해당하는 경우)
* OneSignal 대시보드에서 테스트한 메시지의 URL(해당하는 경우)
* 관련 [로그 또는 오류 메시지](/docs/ko/capturing-a-debug-log)
기꺼이 도와드리겠습니다!
***