> ## Documentation Index
> Fetch the complete documentation index at: https://documentation.onesignal.com/llms.txt
> Use this file to discover all available pages before exploring further.
# Web SDK - 사용자 지정 코드 설정
> 사용자 지정 코드 통합을 사용하여 OneSignal 웹 푸시 알림을 설정하는 완벽한 가이드입니다. Chrome, Firefox, Safari 및 기타 웹 브라우저용 JavaScript SDK, Service Worker 및 Safari 인증서를 구성하세요.
export const SdkReleasesIframe = ({sdkFilter = undefined, viewMode = undefined, height, ...frameProps}) => {
const baseUrl = 'https://onesignal.github.io/sdk-releases';
const buildUrl = (theme, sdkFilter, viewMode) => {
const url = new URL(baseUrl);
const params = new URLSearchParams();
if (theme) {
params.set('theme', theme);
}
if (sdkFilter) {
params.set('sdk', sdkFilter);
}
if (viewMode) {
params.set('viewMode', viewMode);
}
if (params.toString()) {
url.search = params.toString();
}
return url.toString();
};
const detectTheme = () => {
if (document.documentElement.classList.contains('dark')) {
return 'dark';
}
return 'light';
};
const [theme, setTheme] = useState('light');
const [iframeSrc, setIframeSrc] = useState(() => {
const initialTheme = detectTheme();
return buildUrl(initialTheme, sdkFilter, viewMode);
});
useEffect(() => {
const currentTheme = detectTheme();
setTheme(currentTheme);
setIframeSrc(buildUrl(currentTheme, sdkFilter, viewMode));
const mediaQuery = window.matchMedia('(prefers-color-scheme: dark)');
const handleThemeChange = () => {
const newTheme = detectTheme();
setTheme(newTheme);
setIframeSrc(buildUrl(newTheme, sdkFilter, viewMode));
};
if (mediaQuery.addEventListener) {
mediaQuery.addEventListener('change', handleThemeChange);
} else {
mediaQuery.addListener(handleThemeChange);
}
window.addEventListener('storage', handleThemeChange);
const observer = new MutationObserver(handleThemeChange);
observer.observe(document.documentElement, {
attributes: true,
attributeFilter: ['class', 'data-theme']
});
return () => {
if (mediaQuery.removeEventListener) {
mediaQuery.removeEventListener('change', handleThemeChange);
} else {
mediaQuery.removeListener(handleThemeChange);
}
window.removeEventListener('storage', handleThemeChange);
observer.disconnect();
};
}, [sdkFilter, viewMode]);
const getIframeHeight = () => {
if (viewMode === 'table') {
return '450';
}
if (viewMode === 'mini') {
return '170';
}
return '800';
};
const iframeHeight = height || getIframeHeight();
return
;
};
고급 구성 또는 프로그래밍 방식 제어가 필요한 경우에만 이 사용자 지정 코드 설정을 사용하세요. 대부분의 사용자에게는 다음을 권장합니다:
* [일반 웹 푸시 설정](./web-push-setup)
* [WordPress 설정](./wordpress)
* [Shopify 설정](./shopify)
JavaScript 프레임워크를 사용하는 경우 다음 전문 가이드를 따르세요:
* [Angular 설정](./angular-setup)
* [React JS 설정](./react-js-setup)
* [Vue JS 설정](./vue-js-setup)
## 요구 사항
* HTTPS 웹사이트: 웹 푸시는 HTTP 또는 시크릿/비공개 모드에서 작동하지 않습니다.
* 서버 액세스: 서비스 워커 파일을 사이트에 업로드해야 합니다.
* 단일 출처: 웹 푸시는 [동일 출처 정책](https://developer.mozilla.org/en-US/docs/Web/Security/Same-origin_policy)을 따릅니다. 여러 출처(도메인/하위 도메인)가 있는 경우 여러 OneSignal 앱이 필요합니다(출처당 하나). 이 브라우저 제한을 준수하려면:
* 구독을 위해 트래픽을 단일 출처로 리디렉션합니다.
* 출처당 하나씩 여러 OneSignal 앱을 만듭니다.
***
## OneSignal 앱 및 플랫폼 구성
OneSignal 대시보드에서:
* **Settings > Push & In-App > Web**으로 이동합니다.
* **Custom Code** 통합 유형을 선택합니다.
### 사이트 설정
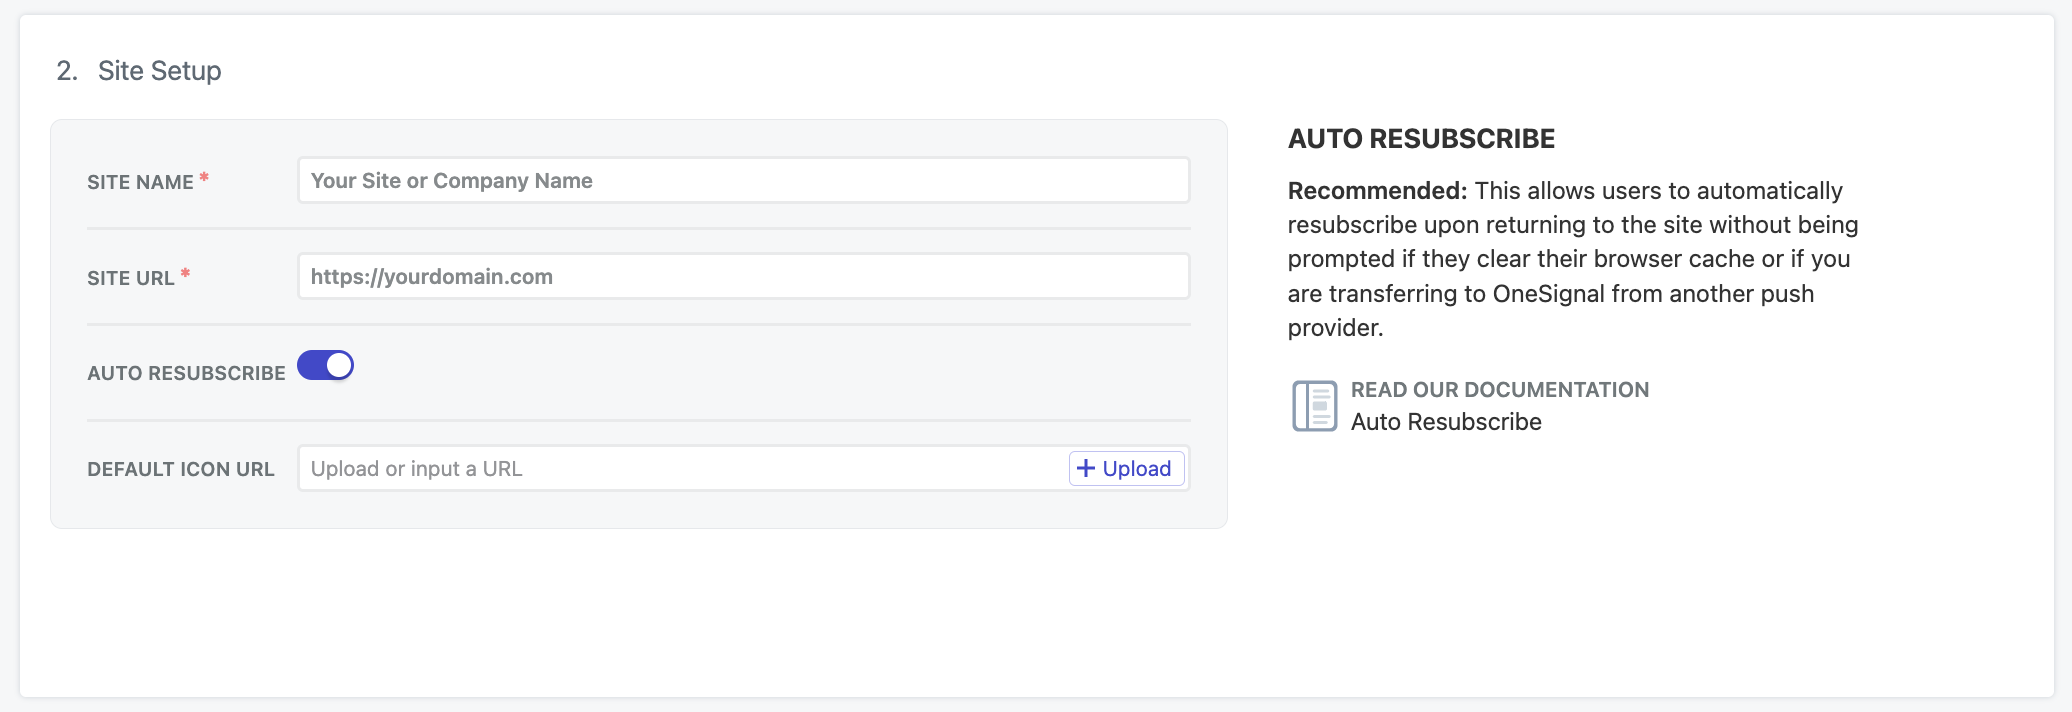
사이트 세부 정보를 추가합니다:
* **Site Name**: 사이트 이름 및 기본 알림 제목.
* **Site URL**: 사이트의 정확한 [출처](https://developer.mozilla.org/en-US/docs/Web/Security/Same-origin_policy)(예: `https://yourdomain.com`). 사이트가 그렇게 구성되지 않은 경우 `www.` 사용을 피하세요. 여러 출처가 있는 경우 [요구 사항](#requirements)을 참조하세요.
* **Auto Resubscribe**: 사용자가 브라우저 데이터를 지운 후 사이트에 돌아올 때 자동으로 재구독하려면 이것을 활성화합니다(새 권한 프롬프트 불필요).
* **Default Icon URL**: 알림 및 프롬프트에 표시되는 정사각형 `256x256px` PNG 또는 JPG 이미지를 업로드합니다. 설정하지 않으면 기본값으로 벨 아이콘이 사용됩니다.
 #### 로컬 테스트
localhost에서 테스트하려면 프로덕션 앱과 별도의 OneSignal 앱을 사용하고 `init` 옵션에 `allowLocalhostAsSecureOrigin: true`를 추가합니다.
자체 서명된 인증서로 HTTPS에서 localhost를 테스트하는 경우 `--allow-insecure-localhost`를 사용하여 Chrome에 잘못된 인증서를 무시하도록 지시해야 할 수 있습니다. Firefox와 Safari는 보안 인증서에 예외를 추가하는 기본 제공 메커니즘을 제공합니다.
```html theme={null}
```
### Safari 웹 푸시 인증서(선택 사항)
OneSignal은 무료로 Safari 인증서를 자동으로 제공합니다. 사용해야 하는 기존 Safari 웹 푸시 인증서가 있는 경우에만 이를 활성화하세요.
#### 로컬 테스트
localhost에서 테스트하려면 프로덕션 앱과 별도의 OneSignal 앱을 사용하고 `init` 옵션에 `allowLocalhostAsSecureOrigin: true`를 추가합니다.
자체 서명된 인증서로 HTTPS에서 localhost를 테스트하는 경우 `--allow-insecure-localhost`를 사용하여 Chrome에 잘못된 인증서를 무시하도록 지시해야 할 수 있습니다. Firefox와 Safari는 보안 인증서에 예외를 추가하는 기본 제공 메커니즘을 제공합니다.
```html theme={null}
```
### Safari 웹 푸시 인증서(선택 사항)
OneSignal은 무료로 Safari 인증서를 자동으로 제공합니다. 사용해야 하는 기존 Safari 웹 푸시 인증서가 있는 경우에만 이를 활성화하세요.
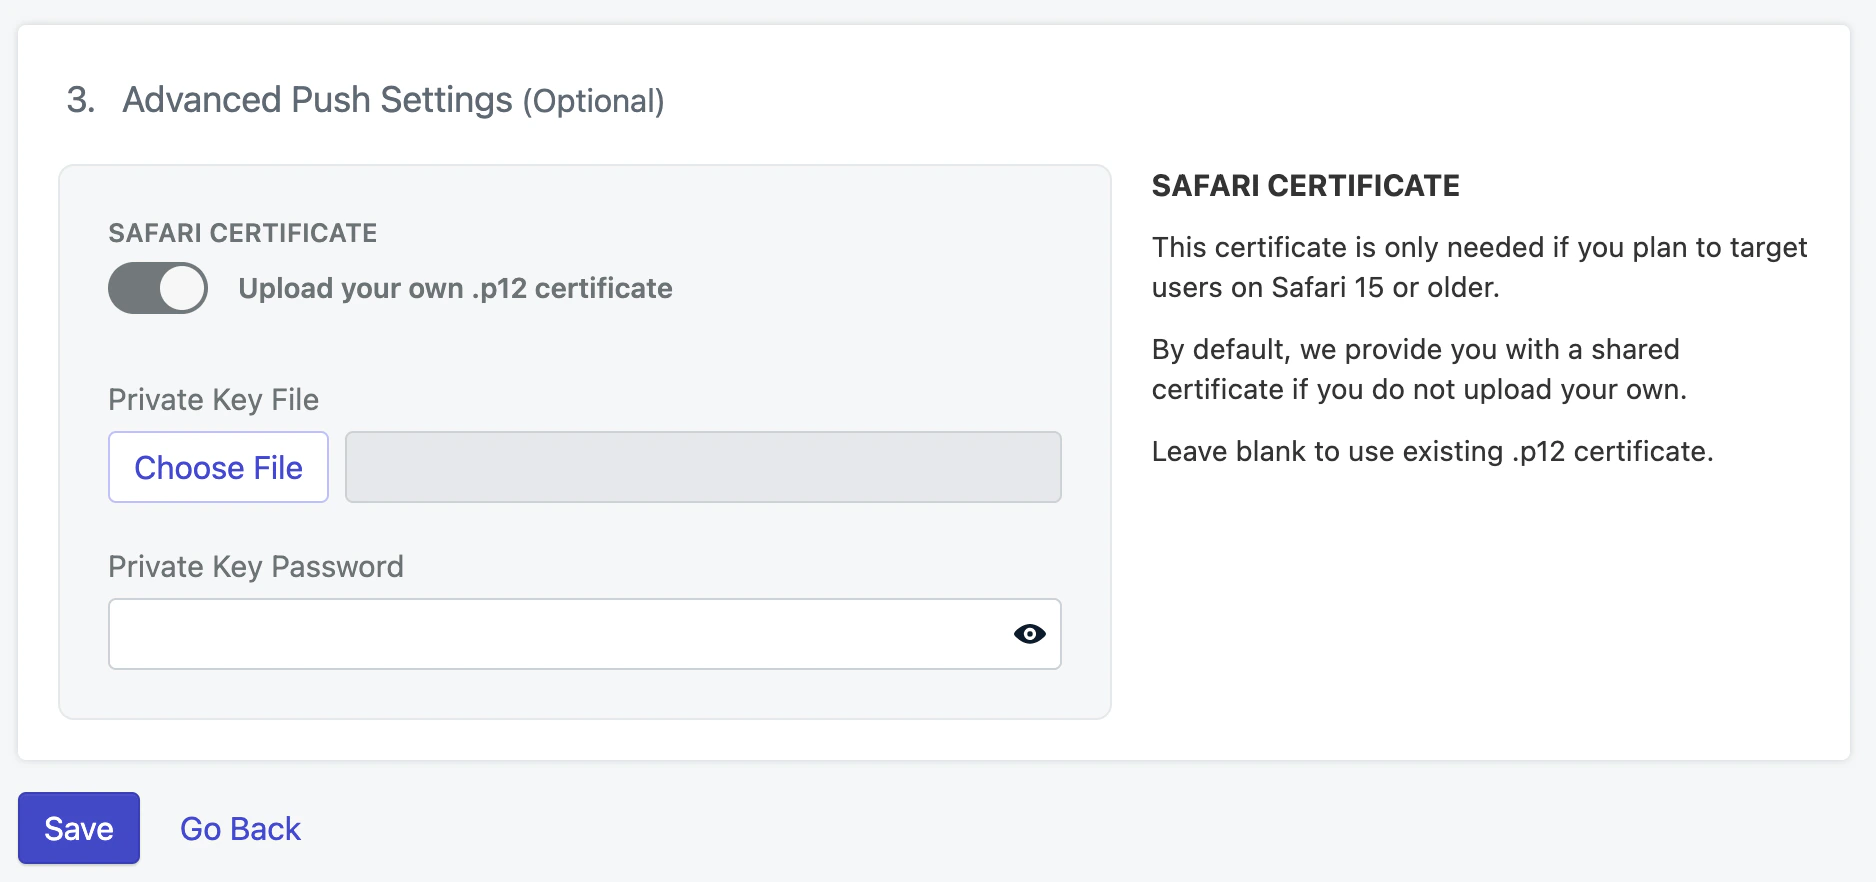 활성화된 경우 `Safari Web .p12 Push Certificate`를 업로드하고 비밀번호를 입력하세요.
**Save**를 클릭하여 계속합니다.
### 서비스 워커 파일 업로드
웹 푸시 구성의 다음 페이지에서 `OneSignalSDKWorker.js` 서비스 워커 파일이 제공됩니다.
Web SDK는 기본적으로 사이트 루트에서 이 파일을 찾습니다(예: `https://yourdomain.com/OneSignalSDKWorker.js`). 코드에서 파일 위치, 이름 및 범위를 변경할 수 있습니다.
고급 서비스 워커 구성, 사용자 지정 통합 및 다른 제공업체에서의 마이그레이션.
### 사이트에 코드 추가
이 코드를 웹사이트의 `` 섹션에 추가합니다. 다음을 교체합니다:
* `YOUR_ONESIGNAL_APP_ID`를 OneSignal 대시보드의 실제 앱 ID로
* `YOUR_SAFARI_WEB_ID`를 OneSignal 대시보드의 실제 Safari Web ID로
```html HTML theme={null}
```
### iOS 웹 푸시 지원
Apple은 iOS 16.4+를 실행하는 iPhone 및 iPad에서 웹 푸시 알림 지원을 시작했습니다. 지원되는 브라우저에서 방문하면 웹 푸시가 그냥 "작동하는" Android 기기와 달리, Apple은 `manifest.json` 파일 및 사용자가 사이트를 홈 화면에 추가하는 작업 등 몇 가지 추가 요구 사항을 추가했습니다.
필요한 `manifest.json` 파일을 추가하고 사용자가 사이트를 홈 화면에 추가하도록 안내합니다.
***
## Testing the OneSignal SDK integration
This guide helps you verify that your OneSignal SDK integration is working correctly by testing push notifications and subscription registration.
### Check web push subscriptions
* Use Chrome, Firefox, Edge, or Safari while testing.
* **Do not use Incognito or private browsing mode.** Users cannot subscribe to push notifications in these modes.
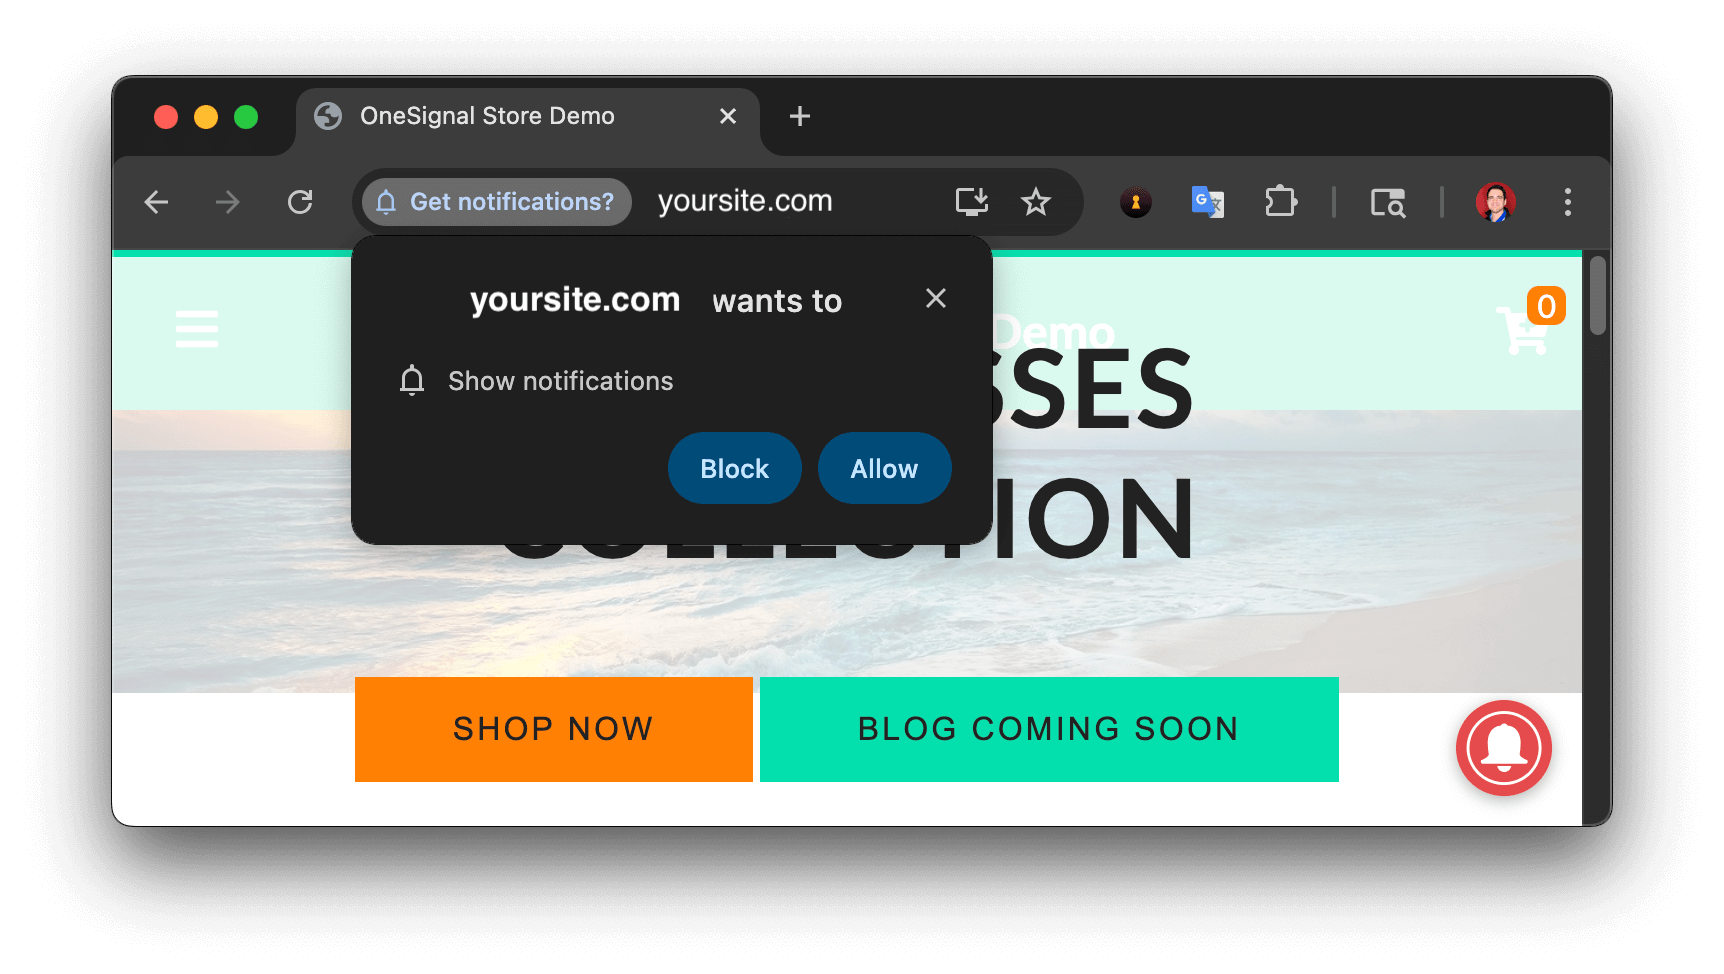
* The prompts should appear based on your [permission prompts](/docs/en/permission-requests) configuration.
* Click **Allow** on the native prompt to subscribe to push notifications.
활성화된 경우 `Safari Web .p12 Push Certificate`를 업로드하고 비밀번호를 입력하세요.
**Save**를 클릭하여 계속합니다.
### 서비스 워커 파일 업로드
웹 푸시 구성의 다음 페이지에서 `OneSignalSDKWorker.js` 서비스 워커 파일이 제공됩니다.
Web SDK는 기본적으로 사이트 루트에서 이 파일을 찾습니다(예: `https://yourdomain.com/OneSignalSDKWorker.js`). 코드에서 파일 위치, 이름 및 범위를 변경할 수 있습니다.
고급 서비스 워커 구성, 사용자 지정 통합 및 다른 제공업체에서의 마이그레이션.
### 사이트에 코드 추가
이 코드를 웹사이트의 `` 섹션에 추가합니다. 다음을 교체합니다:
* `YOUR_ONESIGNAL_APP_ID`를 OneSignal 대시보드의 실제 앱 ID로
* `YOUR_SAFARI_WEB_ID`를 OneSignal 대시보드의 실제 Safari Web ID로
```html HTML theme={null}
```
### iOS 웹 푸시 지원
Apple은 iOS 16.4+를 실행하는 iPhone 및 iPad에서 웹 푸시 알림 지원을 시작했습니다. 지원되는 브라우저에서 방문하면 웹 푸시가 그냥 "작동하는" Android 기기와 달리, Apple은 `manifest.json` 파일 및 사용자가 사이트를 홈 화면에 추가하는 작업 등 몇 가지 추가 요구 사항을 추가했습니다.
필요한 `manifest.json` 파일을 추가하고 사용자가 사이트를 홈 화면에 추가하도록 안내합니다.
***
## Testing the OneSignal SDK integration
This guide helps you verify that your OneSignal SDK integration is working correctly by testing push notifications and subscription registration.
### Check web push subscriptions
* Use Chrome, Firefox, Edge, or Safari while testing.
* **Do not use Incognito or private browsing mode.** Users cannot subscribe to push notifications in these modes.
* The prompts should appear based on your [permission prompts](/docs/en/permission-requests) configuration.
* Click **Allow** on the native prompt to subscribe to push notifications.
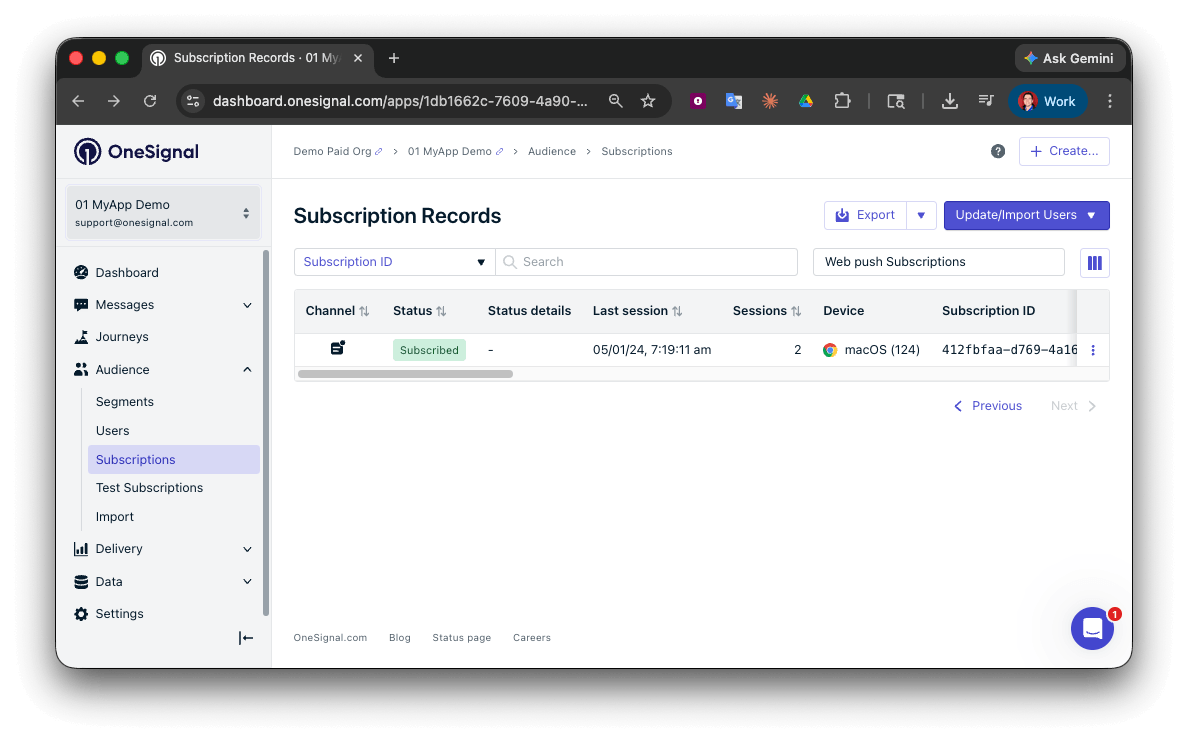
 * Go to **Audience > Subscriptions**.
* You should see a new entry with the status **Subscribed**.
* Go to **Audience > Subscriptions**.
* You should see a new entry with the status **Subscribed**.
 You have successfully created a [web push subscription](/docs/en/subscriptions).
Web push subscriptions are created when users first subscribe to push notifications on your site.
### Set up test users
test users are helpful for testing a push notification before sending a message.
In the dashboard, next to the subscription, click the **Options (three dots)** button and select **Add to Test Users**.
You have successfully created a [web push subscription](/docs/en/subscriptions).
Web push subscriptions are created when users first subscribe to push notifications on your site.
### Set up test users
test users are helpful for testing a push notification before sending a message.
In the dashboard, next to the subscription, click the **Options (three dots)** button and select **Add to Test Users**.
 Name the subscription so you can easily identify your device later in the **test users tab**.
Go to **Audience > Segments > New Segment**.
Name the segment `Test Users` (the name is important because it will be used later).
Name the subscription so you can easily identify your device later in the **test users tab**.
Go to **Audience > Segments > New Segment**.
Name the segment `Test Users` (the name is important because it will be used later).
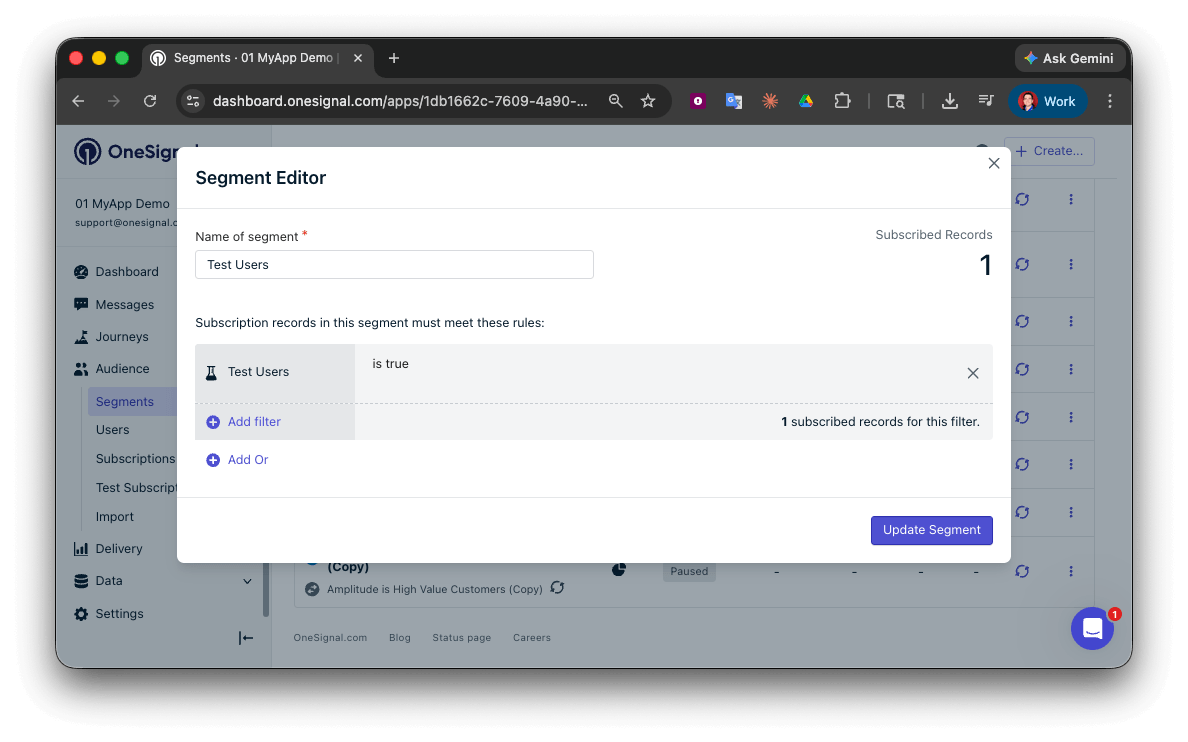 You have successfully created a segment of test users.
We can now test sending messages to this individual device and groups of test users.
### Send test push via API
In your OneSignal dashboard, go to **Settings > [Keys & IDs](/docs/en/keys-and-ids)**.
Replace `YOUR_APP_API_KEY` and `YOUR_APP_ID` in the code below with your actual keys. This code uses the `Test Users` segment we created earlier.
```curl theme={null}
curl -X \
POST --url 'https://api.onesignal.com/notifications' \
--header 'content-type: application/json; charset=utf-8' \
--header 'authorization: Key YOUR_APP_API_KEY' \
--data \
'{
"app_id": "YOUR_APP_ID",
"target_channel": "push",
"name": "Testing basic setup",
"headings": {
"en": "👋"
},
"contents": {
"en": "Hello world!"
},
"included_segments": [
"Test Users"
],
"chrome_web_image": "https://avatars.githubusercontent.com/u/11823027?s=200&v=4"
}'
```
Run the code in your terminal.
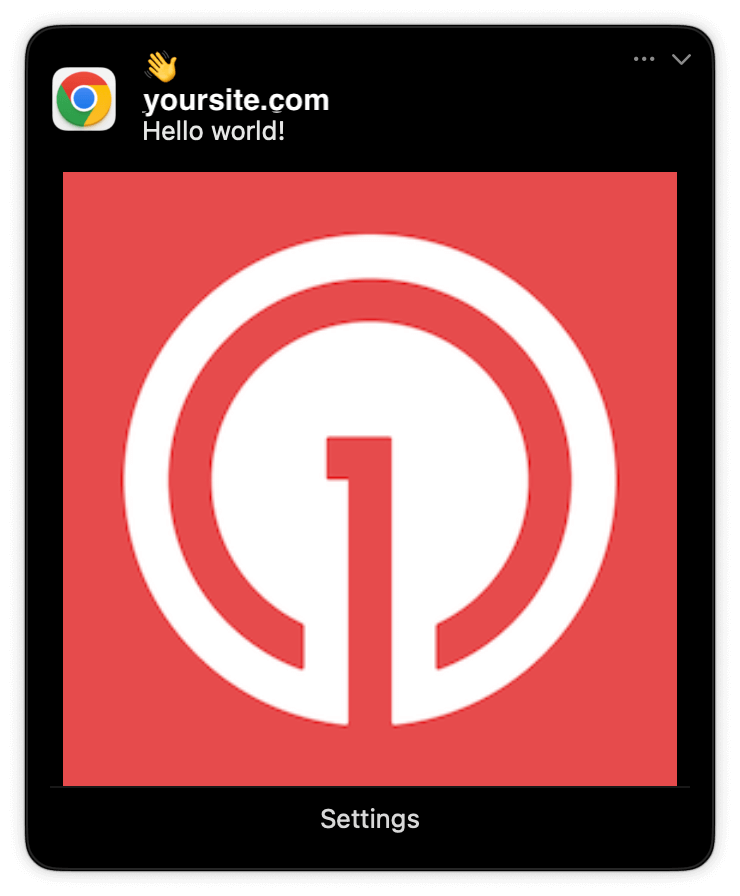
If all setup steps were completed successfully, the test users should receive a notification.
Only Chrome supports images. Images will appear small in the collapsed notification view. Expand the notification to see the full image.
You have successfully created a segment of test users.
We can now test sending messages to this individual device and groups of test users.
### Send test push via API
In your OneSignal dashboard, go to **Settings > [Keys & IDs](/docs/en/keys-and-ids)**.
Replace `YOUR_APP_API_KEY` and `YOUR_APP_ID` in the code below with your actual keys. This code uses the `Test Users` segment we created earlier.
```curl theme={null}
curl -X \
POST --url 'https://api.onesignal.com/notifications' \
--header 'content-type: application/json; charset=utf-8' \
--header 'authorization: Key YOUR_APP_API_KEY' \
--data \
'{
"app_id": "YOUR_APP_ID",
"target_channel": "push",
"name": "Testing basic setup",
"headings": {
"en": "👋"
},
"contents": {
"en": "Hello world!"
},
"included_segments": [
"Test Users"
],
"chrome_web_image": "https://avatars.githubusercontent.com/u/11823027?s=200&v=4"
}'
```
Run the code in your terminal.
If all setup steps were completed successfully, the test users should receive a notification.
Only Chrome supports images. Images will appear small in the collapsed notification view. Expand the notification to see the full image.
 In your dashboard, go to **Delivery > Sent Messages**, then click the message to view stats. You should see the **confirmed** stat, meaning the device received the push.
Safari does not support confirmed receipt.
푸시 알림의 전달, 클릭 및 전환 통계를 확인하세요.
You have successfully sent a notification via the API to a segment.
If notifications are not arriving, contact `support@onesignal.com` with the following:
* The API request and response (copy-paste into a `.txt` file)
* Your Subscription ID
* Your website URL with the OneSignal code
***
## User identification
The previous section covered creating web push [Subscriptions](/docs/en/subscriptions). This section expands to identifying [Users](/docs/en/users) across all their subscriptions (including push, email, and SMS) using the OneSignal SDK. It covers External IDs, tags, multi-channel subscriptions, privacy, and event tracking to help you unify and engage users across platforms.
### Assign External ID
Use an External ID to identify users consistently across devices, email addresses, and phone numbers using your backend's user identifier. This ensures your messaging stays unified across channels and 3rd party systems (especially important for [Integrations](/docs/en/integrations)).
Set the External ID with the SDK's [`login` method](/docs/en/web-sdk-reference#login-external-id) each time a user is identified by your app.
OneSignal generates unique read-only IDs for subscriptions (Subscription ID) and users (OneSignal ID).
As users download your app on different devices, subscribe to your website, and/or provide you email addresses and phone numbers outside of your app, new subscriptions will be created.
Setting the External ID via the SDK is highly recommended to identify users across all their subscriptions, regardless of how they are created.
### Add Tags
[Tags](/docs/en/add-user-data-tags) are key-value pairs of string data you can use to store user properties (like `username`, `role`, or preferences) and events (like `purchase_date`, `game_level`, or user interactions). Tags power advanced [Message Personalization](/docs/en/message-personalization) and [Segmentation](/docs/en/segmentation) allowing for more advanced use cases.
Set tags with the SDK's [`addTag` and `addTags` methods](/docs/en/web-sdk-reference#addtag-%2C-addtags) as events occur in your app.
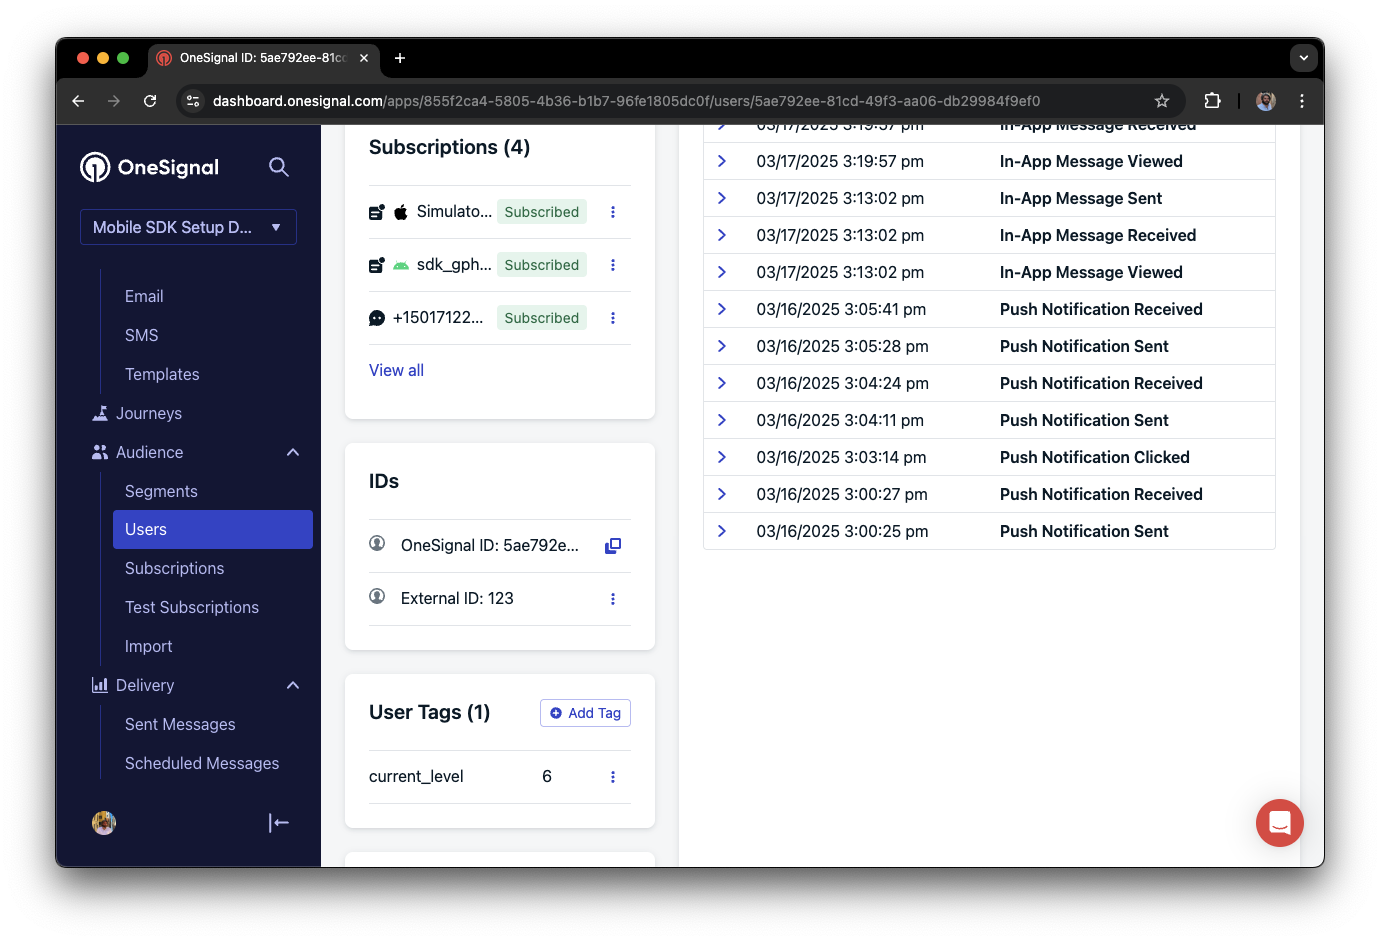
In this example, the user reached level 6 identifiable by the tag called `current_level` set to a value of `6`.
In your dashboard, go to **Delivery > Sent Messages**, then click the message to view stats. You should see the **confirmed** stat, meaning the device received the push.
Safari does not support confirmed receipt.
푸시 알림의 전달, 클릭 및 전환 통계를 확인하세요.
You have successfully sent a notification via the API to a segment.
If notifications are not arriving, contact `support@onesignal.com` with the following:
* The API request and response (copy-paste into a `.txt` file)
* Your Subscription ID
* Your website URL with the OneSignal code
***
## User identification
The previous section covered creating web push [Subscriptions](/docs/en/subscriptions). This section expands to identifying [Users](/docs/en/users) across all their subscriptions (including push, email, and SMS) using the OneSignal SDK. It covers External IDs, tags, multi-channel subscriptions, privacy, and event tracking to help you unify and engage users across platforms.
### Assign External ID
Use an External ID to identify users consistently across devices, email addresses, and phone numbers using your backend's user identifier. This ensures your messaging stays unified across channels and 3rd party systems (especially important for [Integrations](/docs/en/integrations)).
Set the External ID with the SDK's [`login` method](/docs/en/web-sdk-reference#login-external-id) each time a user is identified by your app.
OneSignal generates unique read-only IDs for subscriptions (Subscription ID) and users (OneSignal ID).
As users download your app on different devices, subscribe to your website, and/or provide you email addresses and phone numbers outside of your app, new subscriptions will be created.
Setting the External ID via the SDK is highly recommended to identify users across all their subscriptions, regardless of how they are created.
### Add Tags
[Tags](/docs/en/add-user-data-tags) are key-value pairs of string data you can use to store user properties (like `username`, `role`, or preferences) and events (like `purchase_date`, `game_level`, or user interactions). Tags power advanced [Message Personalization](/docs/en/message-personalization) and [Segmentation](/docs/en/segmentation) allowing for more advanced use cases.
Set tags with the SDK's [`addTag` and `addTags` methods](/docs/en/web-sdk-reference#addtag-%2C-addtags) as events occur in your app.
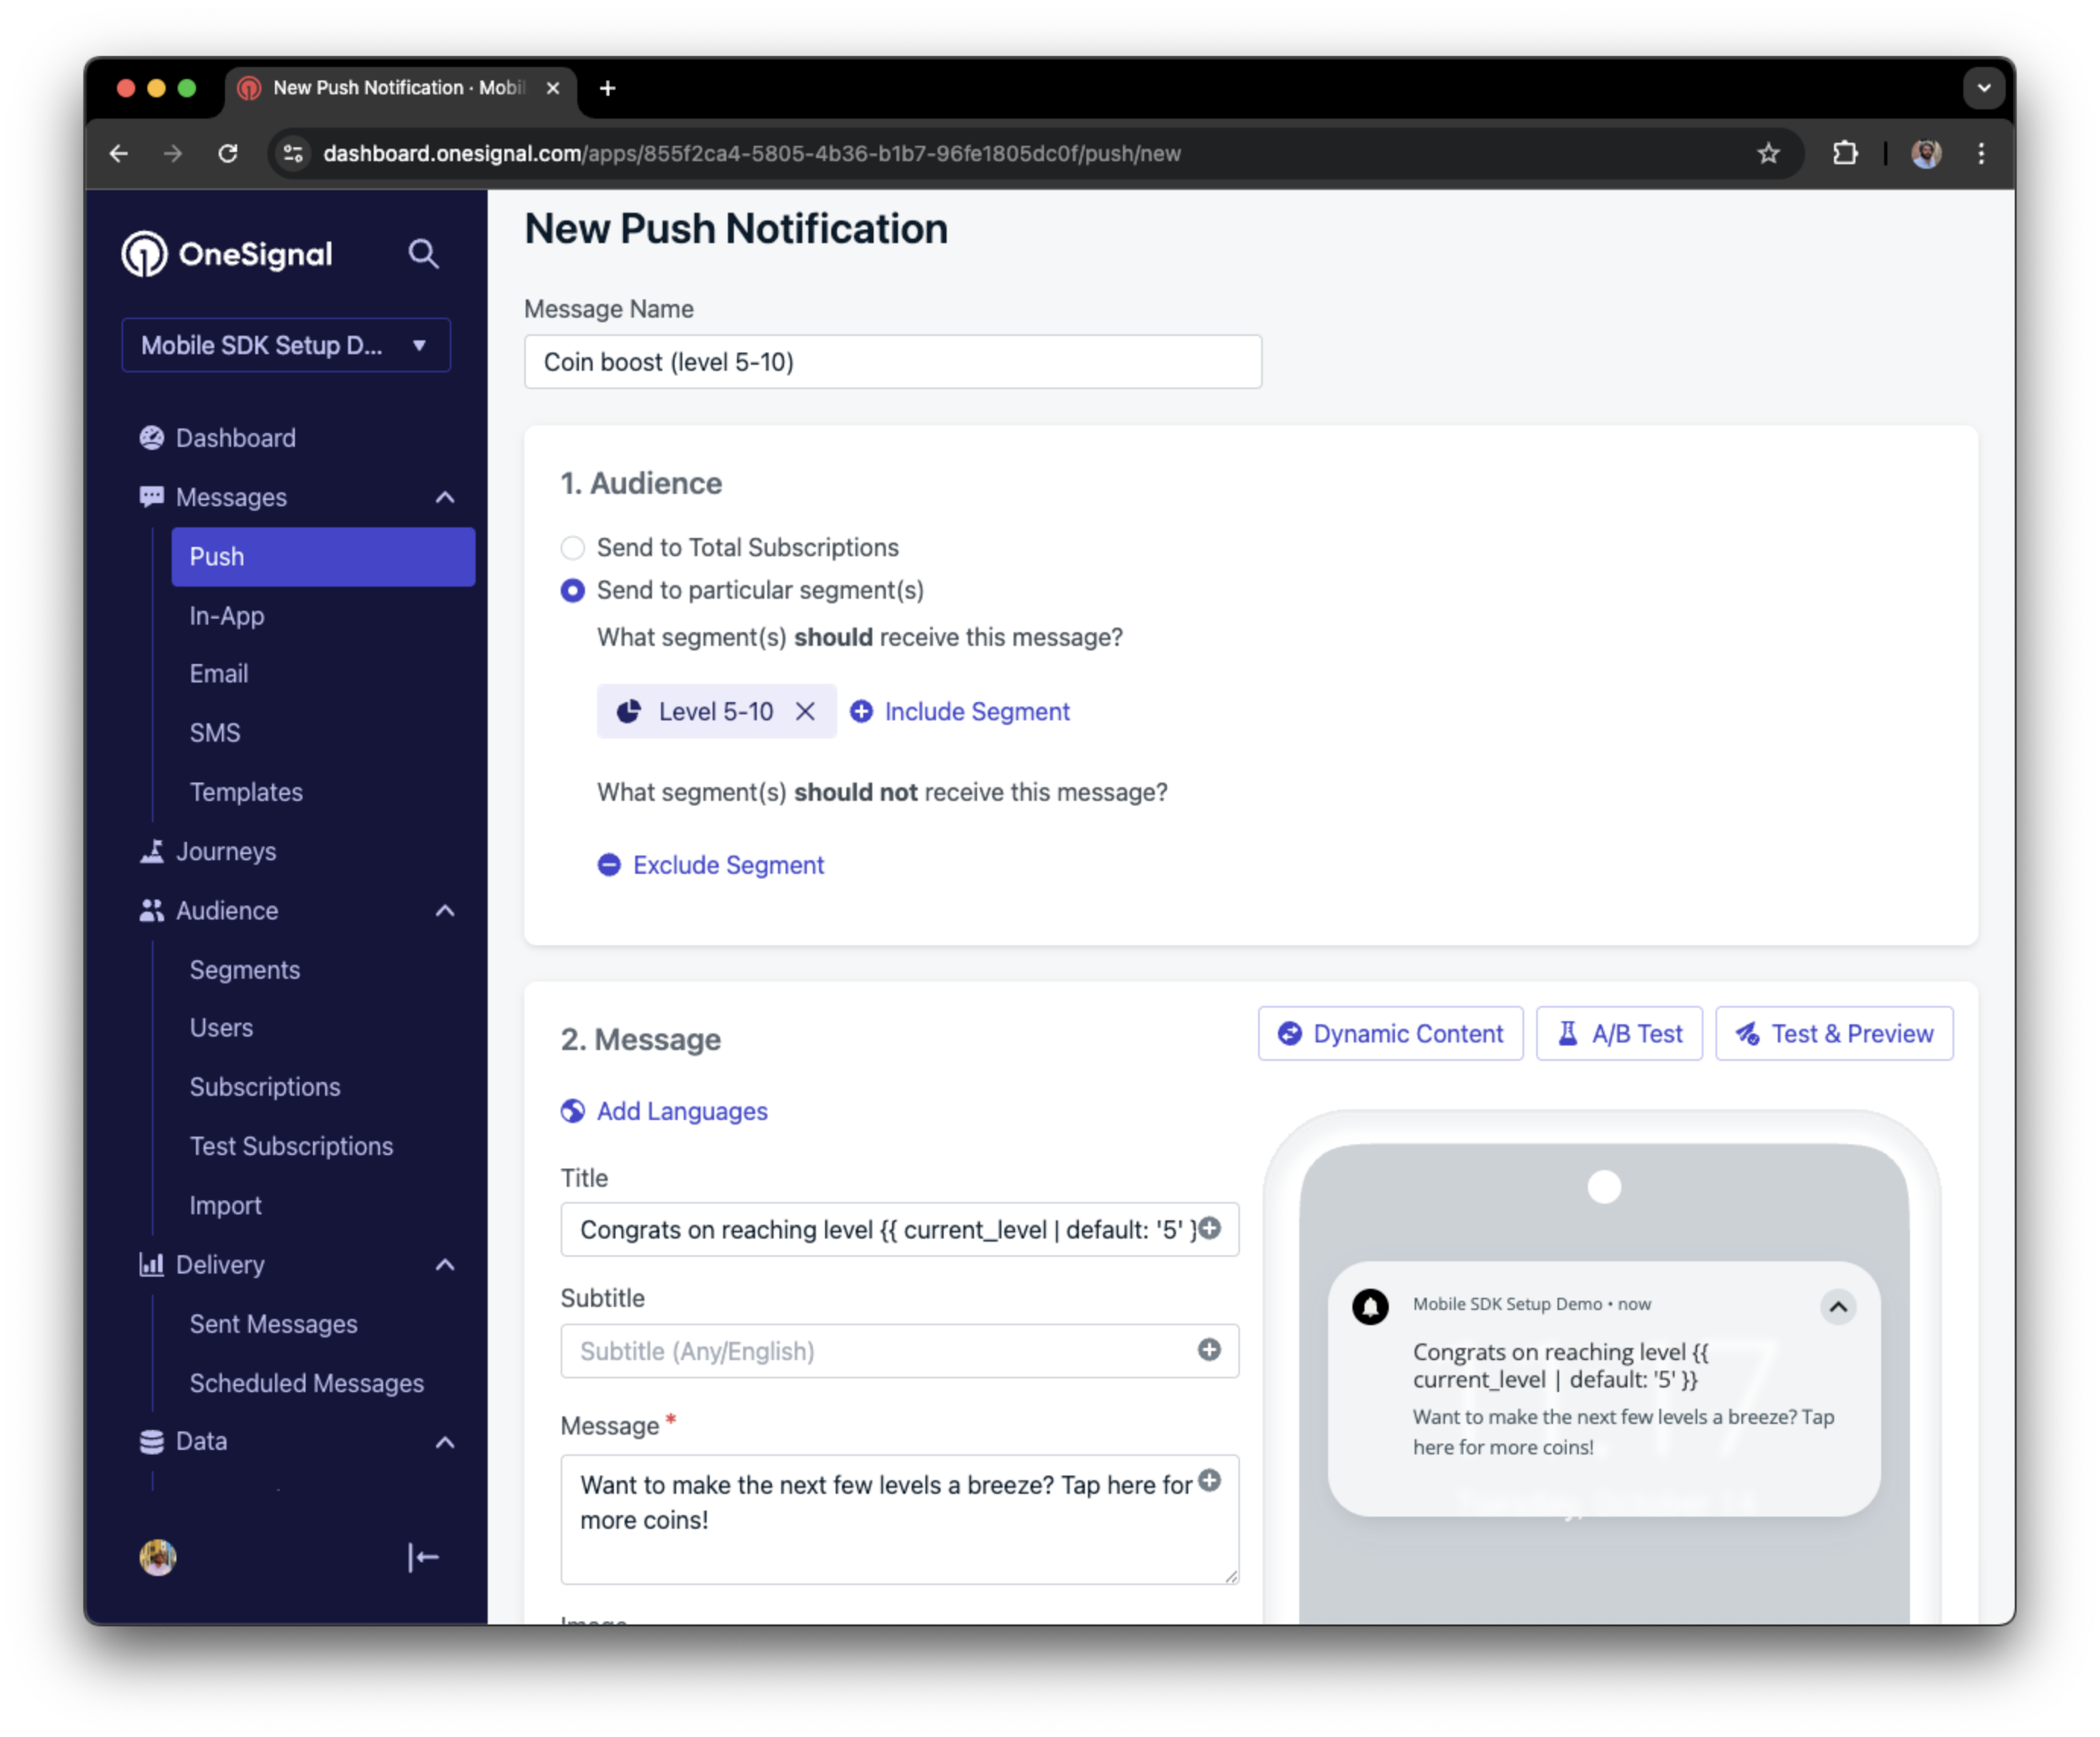
In this example, the user reached level 6 identifiable by the tag called `current_level` set to a value of `6`.
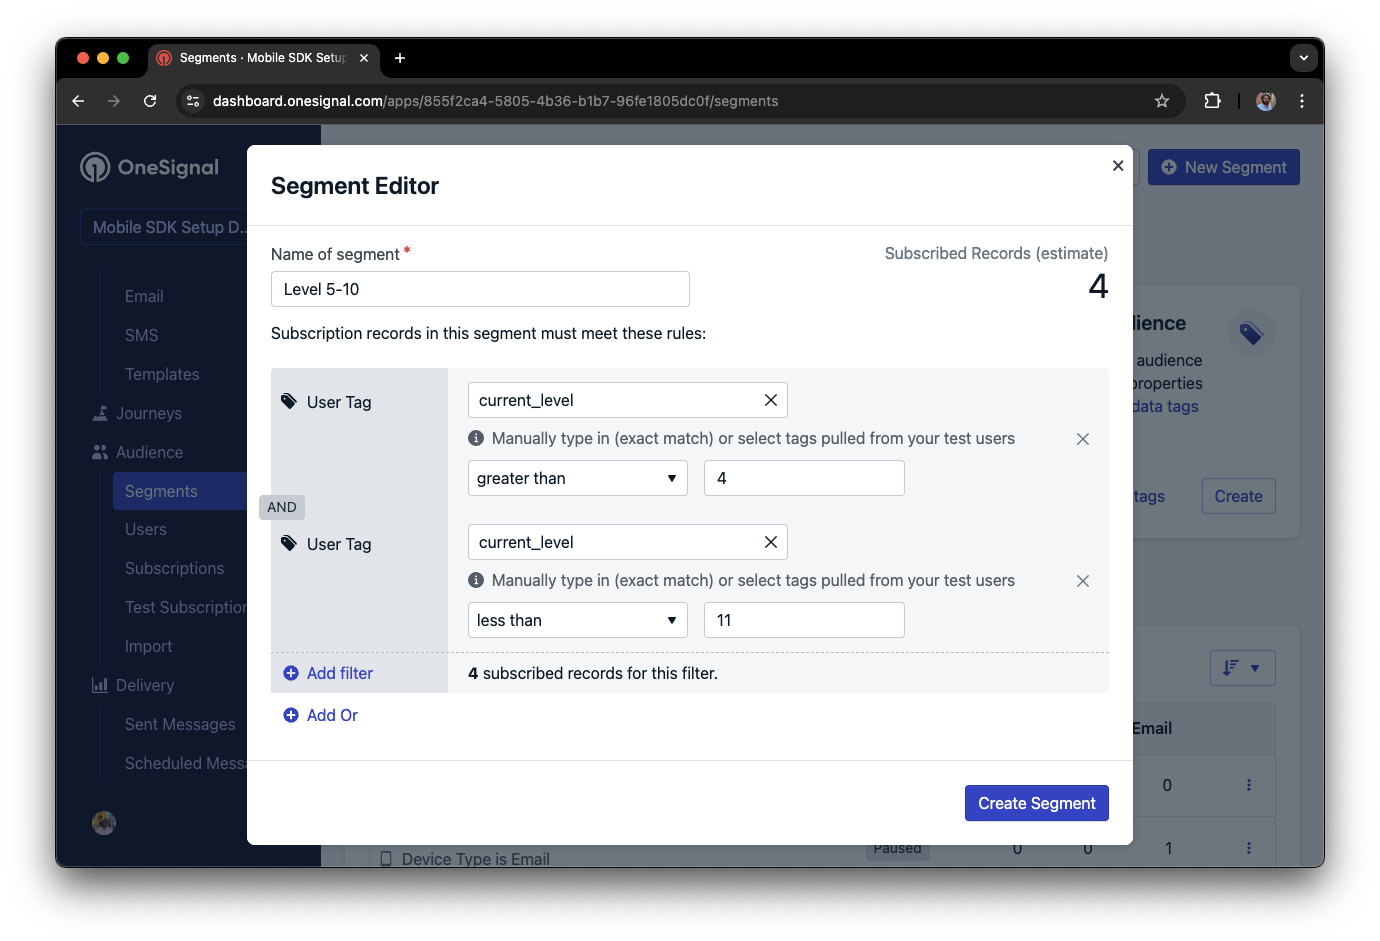
 We can create a segment of users that have a level of between 5 and 10, and use that to send targeted and personalized messages:
 ### Add email and/or SMS subscriptions
The OneSignal SDK creates web push subscriptions automatically when users opt in. You can also reach users through email and SMS channels by creating the corresponding subscriptions.
* Use the [`addEmail` method](/docs/en/web-sdk-reference#addemail-%2C-removeemail) to create email subscriptions.
* Use the [`addSms` method](/docs/en/web-sdk-reference#addsms-%2C-removesms) to create SMS subscriptions.
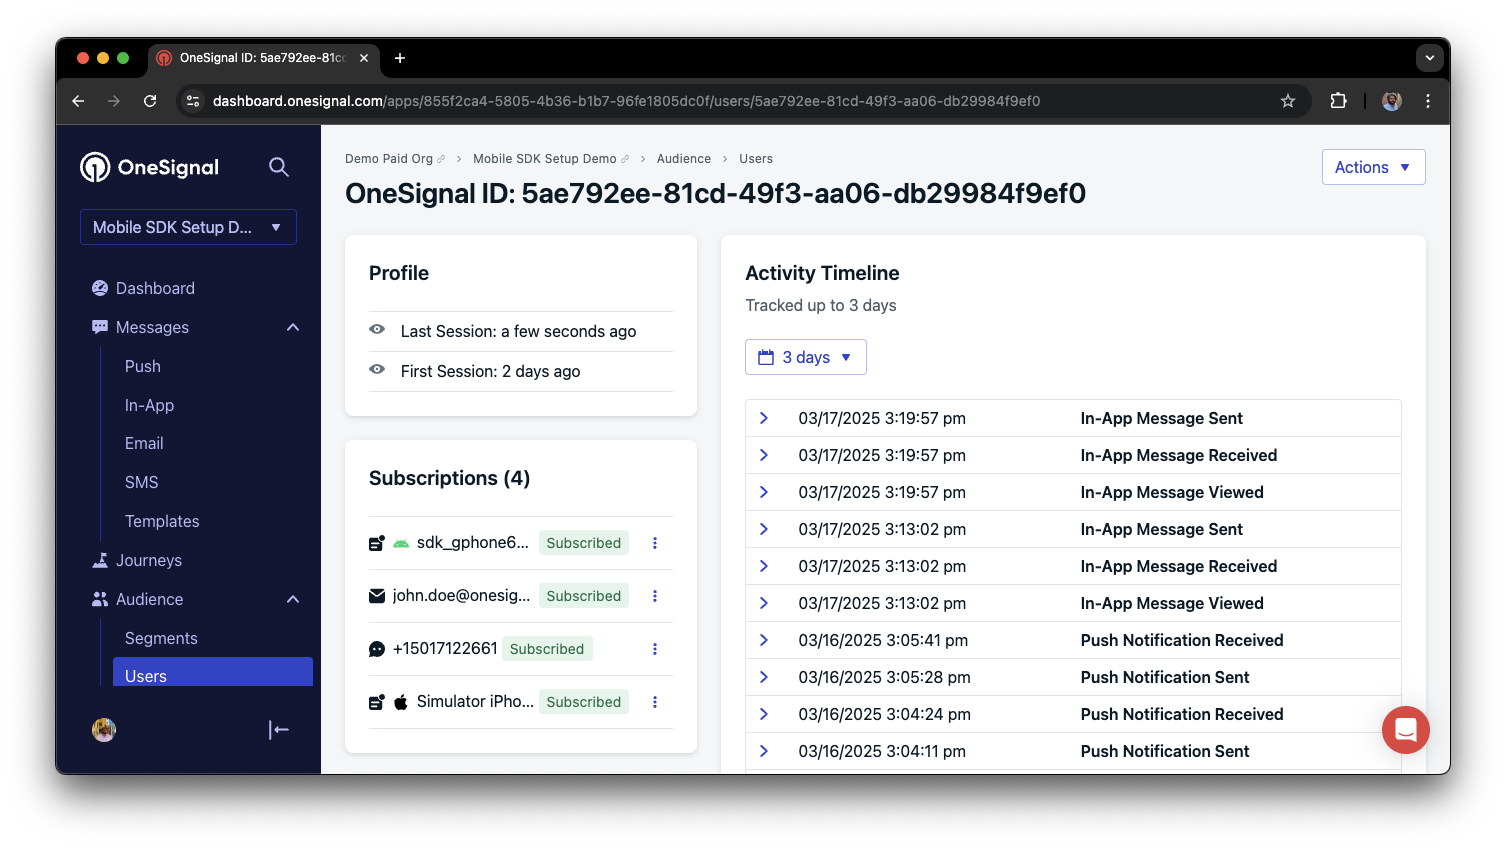
If the email address and/or phone number already exist in the OneSignal app, the SDK will add it to the existing user, it will not create duplicates.
You can view unified users via **Audience > Users** in the dashboard or with the [View user API](/reference/view-user).
### Add email and/or SMS subscriptions
The OneSignal SDK creates web push subscriptions automatically when users opt in. You can also reach users through email and SMS channels by creating the corresponding subscriptions.
* Use the [`addEmail` method](/docs/en/web-sdk-reference#addemail-%2C-removeemail) to create email subscriptions.
* Use the [`addSms` method](/docs/en/web-sdk-reference#addsms-%2C-removesms) to create SMS subscriptions.
If the email address and/or phone number already exist in the OneSignal app, the SDK will add it to the existing user, it will not create duplicates.
You can view unified users via **Audience > Users** in the dashboard or with the [View user API](/reference/view-user).
 Best practices for multi-channel communication
* Obtain explicit consent before adding email or SMS subscriptions.
* Explain the benefits of each communication channel to users.
* Provide channel preferences so users can select which channels they prefer.
***
### Privacy & user consent
To control when OneSignal collects user data, use the SDK's consent gating methods:
* [`setConsentRequired(true)`](/docs/en/web-sdk-reference#setconsentrequired): Prevents data collection until consent is given.
* [`setConsentGiven(true)`](/docs/en/web-sdk-reference#setconsentgiven): Enables data collection once consent is granted.
For more on privacy and security:
OneSignal SDK가 사용자로부터 수집하는 데이터를 확인하세요.
개인정보 보호 규정에 따라 사용자 데이터를 관리하고 보호하세요.
***
## Listen to push, user, and in-app events
Use SDK listeners to react to user actions and state changes.
The SDK provides several event listeners for you to hook into. See our [SDK reference guide](/docs/en/web-sdk-reference) for more details.
### Push notification events
* [Click event listener](/docs/en/web-sdk-reference#click): Detect when a notification is tapped.
* [Foreground lifecycle listener](/docs/en/web-sdk-reference#foregroundwilldisplay): Control how notifications behave in foreground.
### User state changes
* [User state change event listener](/docs/en/web-sdk-reference#addeventlistener-user-state): Detect when the External ID is set.
* [Permission observer](/docs/en/web-sdk-reference#permissionchange): Track the user's specific interaction with the native push permission prompt.
* [Push subscription change observer](/docs/en/web-sdk-reference#addeventlistener-push-subscription-changes): Track when the push subscription status changes.
***
## Advanced setup & capabilities
Explore more capabilities to enhance your integration:
다른 푸시 공급자에서 OneSignal로 이전하세요.
OneSignal을 서드파티 도구 및 플랫폼과 연결하세요.
푸시 알림에 인터랙티브 버튼을 추가하세요.
사용자의 선호 언어로 현지화된 메시지를 전송하세요.
서버 측 Identity Verification으로 SDK 통합을 보호하세요.
메시지와 연결된 커스텀 전환 이벤트를 추적하세요.
### Web SDK setup & reference
통합을 위한 모든 핵심 웹 푸시 기능을 활성화하세요.
사용 가능한 메서드와 구성 옵션에 대한 전체 세부 정보.
Congratulations! You've successfully completed the Web SDK setup guide.
***
***
## FAQ
### 웹 푸시 알림에 HTTPS가 필요한가요?
예. 모든 최신 브라우저는 푸시 알림 지원을 위해 HTTPS가 필요합니다. 사이트가 HTTP를 사용하는 경우 웹 푸시를 설정하기 전에 HTTPS로 마이그레이션해야 합니다.
### 단일 페이지 애플리케이션(SPA)에서 이 설정을 사용할 수 있나요?
예. Custom Code 설정은 React, Angular 또는 Vue와 같은 프레임워크로 빌드된 SPA에 권장되는 접근 방식입니다. [Angular](./angular-setup), [React](./react-js-setup), [Vue](./vue-js-setup)에 대한 프레임워크별 가이드는 [이 페이지 상단](#)을 참조하세요.
### 사용자가 브라우저 데이터를 지우면 어떻게 되나요?
사용자의 푸시 구독이 제거됩니다. **Auto Resubscribe**가 활성화된 경우 다음번에 사이트를 방문할 때 자동으로 재구독됩니다.
***
## 관련 페이지
사용자에게 구독을 요청하는 시기와 방법을 구성합니다.
OneSignal Web SDK의 전체 API 참조.
Best practices for multi-channel communication
* Obtain explicit consent before adding email or SMS subscriptions.
* Explain the benefits of each communication channel to users.
* Provide channel preferences so users can select which channels they prefer.
***
### Privacy & user consent
To control when OneSignal collects user data, use the SDK's consent gating methods:
* [`setConsentRequired(true)`](/docs/en/web-sdk-reference#setconsentrequired): Prevents data collection until consent is given.
* [`setConsentGiven(true)`](/docs/en/web-sdk-reference#setconsentgiven): Enables data collection once consent is granted.
For more on privacy and security:
OneSignal SDK가 사용자로부터 수집하는 데이터를 확인하세요.
개인정보 보호 규정에 따라 사용자 데이터를 관리하고 보호하세요.
***
## Listen to push, user, and in-app events
Use SDK listeners to react to user actions and state changes.
The SDK provides several event listeners for you to hook into. See our [SDK reference guide](/docs/en/web-sdk-reference) for more details.
### Push notification events
* [Click event listener](/docs/en/web-sdk-reference#click): Detect when a notification is tapped.
* [Foreground lifecycle listener](/docs/en/web-sdk-reference#foregroundwilldisplay): Control how notifications behave in foreground.
### User state changes
* [User state change event listener](/docs/en/web-sdk-reference#addeventlistener-user-state): Detect when the External ID is set.
* [Permission observer](/docs/en/web-sdk-reference#permissionchange): Track the user's specific interaction with the native push permission prompt.
* [Push subscription change observer](/docs/en/web-sdk-reference#addeventlistener-push-subscription-changes): Track when the push subscription status changes.
***
## Advanced setup & capabilities
Explore more capabilities to enhance your integration:
다른 푸시 공급자에서 OneSignal로 이전하세요.
OneSignal을 서드파티 도구 및 플랫폼과 연결하세요.
푸시 알림에 인터랙티브 버튼을 추가하세요.
사용자의 선호 언어로 현지화된 메시지를 전송하세요.
서버 측 Identity Verification으로 SDK 통합을 보호하세요.
메시지와 연결된 커스텀 전환 이벤트를 추적하세요.
### Web SDK setup & reference
통합을 위한 모든 핵심 웹 푸시 기능을 활성화하세요.
사용 가능한 메서드와 구성 옵션에 대한 전체 세부 정보.
Congratulations! You've successfully completed the Web SDK setup guide.
***
***
## FAQ
### 웹 푸시 알림에 HTTPS가 필요한가요?
예. 모든 최신 브라우저는 푸시 알림 지원을 위해 HTTPS가 필요합니다. 사이트가 HTTP를 사용하는 경우 웹 푸시를 설정하기 전에 HTTPS로 마이그레이션해야 합니다.
### 단일 페이지 애플리케이션(SPA)에서 이 설정을 사용할 수 있나요?
예. Custom Code 설정은 React, Angular 또는 Vue와 같은 프레임워크로 빌드된 SPA에 권장되는 접근 방식입니다. [Angular](./angular-setup), [React](./react-js-setup), [Vue](./vue-js-setup)에 대한 프레임워크별 가이드는 [이 페이지 상단](#)을 참조하세요.
### 사용자가 브라우저 데이터를 지우면 어떻게 되나요?
사용자의 푸시 구독이 제거됩니다. **Auto Resubscribe**가 활성화된 경우 다음번에 사이트를 방문할 때 자동으로 재구독됩니다.
***
## 관련 페이지
사용자에게 구독을 요청하는 시기와 방법을 구성합니다.
OneSignal Web SDK의 전체 API 참조.