> ## Documentation Index
> Fetch the complete documentation index at: https://documentation.onesignal.com/llms.txt
> Use this file to discover all available pages before exploring further.
# Configuração do SDK Flutterflow
> Instruções para adicionar o SDK OneSignal Flutter ao seu aplicativo Flutterflow para iOS e Android
export const SdkReleasesIframe = ({sdkFilter = undefined, viewMode = undefined, height, ...frameProps}) => {
const baseUrl = 'https://onesignal.github.io/sdk-releases';
const buildUrl = (theme, sdkFilter, viewMode) => {
const url = new URL(baseUrl);
const params = new URLSearchParams();
if (theme) {
params.set('theme', theme);
}
if (sdkFilter) {
params.set('sdk', sdkFilter);
}
if (viewMode) {
params.set('viewMode', viewMode);
}
if (params.toString()) {
url.search = params.toString();
}
return url.toString();
};
const detectTheme = () => {
if (document.documentElement.classList.contains('dark')) {
return 'dark';
}
return 'light';
};
const [theme, setTheme] = useState('light');
const [iframeSrc, setIframeSrc] = useState(() => {
const initialTheme = detectTheme();
return buildUrl(initialTheme, sdkFilter, viewMode);
});
useEffect(() => {
const currentTheme = detectTheme();
setTheme(currentTheme);
setIframeSrc(buildUrl(currentTheme, sdkFilter, viewMode));
const mediaQuery = window.matchMedia('(prefers-color-scheme: dark)');
const handleThemeChange = () => {
const newTheme = detectTheme();
setTheme(newTheme);
setIframeSrc(buildUrl(newTheme, sdkFilter, viewMode));
};
if (mediaQuery.addEventListener) {
mediaQuery.addEventListener('change', handleThemeChange);
} else {
mediaQuery.addListener(handleThemeChange);
}
window.addEventListener('storage', handleThemeChange);
const observer = new MutationObserver(handleThemeChange);
observer.observe(document.documentElement, {
attributes: true,
attributeFilter: ['class', 'data-theme']
});
return () => {
if (mediaQuery.removeEventListener) {
mediaQuery.removeEventListener('change', handleThemeChange);
} else {
mediaQuery.removeListener(handleThemeChange);
}
window.removeEventListener('storage', handleThemeChange);
observer.disconnect();
};
}, [sdkFilter, viewMode]);
const getIframeHeight = () => {
if (viewMode === 'table') {
return '450';
}
if (viewMode === 'mini') {
return '170';
}
return '800';
};
const iframeHeight = height || getIframeHeight();
return
;
};
Este guia é para configuração de aplicativos móveis Flutterflow. Se você tem um site Flutterflow, consulte nosso guia de [Configuração do SDK Web](./web-sdk-setup).
## Requisitos
* Plano Flutterflow: Standard ou superior
* App OneSignal e plataforma configurados
**Requisitos iOS**
* macOS com Xcode 14+ (instruções de configuração usam Xcode 16.2)
* Dispositivo com iOS 12+, iPadOS 12+, ou simulador Xcode executando iOS 16.2+
* CocoaPods 1.16.2+
**Requisitos Android**
* Dispositivo ou emulador Android 7.0+ com Google Play Store (Services) instalado
### Configure your OneSignal app and platform
Configure your OneSignal app with the platforms you support — Apple (APNs), Google (FCM), Huawei (HMS), and/or Amazon (ADM).
If your organization already has a OneSignal account, [ask to be invited](/docs/en/manage-team-members) to the Organization. Otherwise, [sign up for a free account](https://onesignal.com) to get started.
Create a new app by clicking **New App/Website**, or add a platform to an existing app in **Settings > Push & In-App**. Select the platform(s) you want to configure and click **Next: Configure Your Platform**.
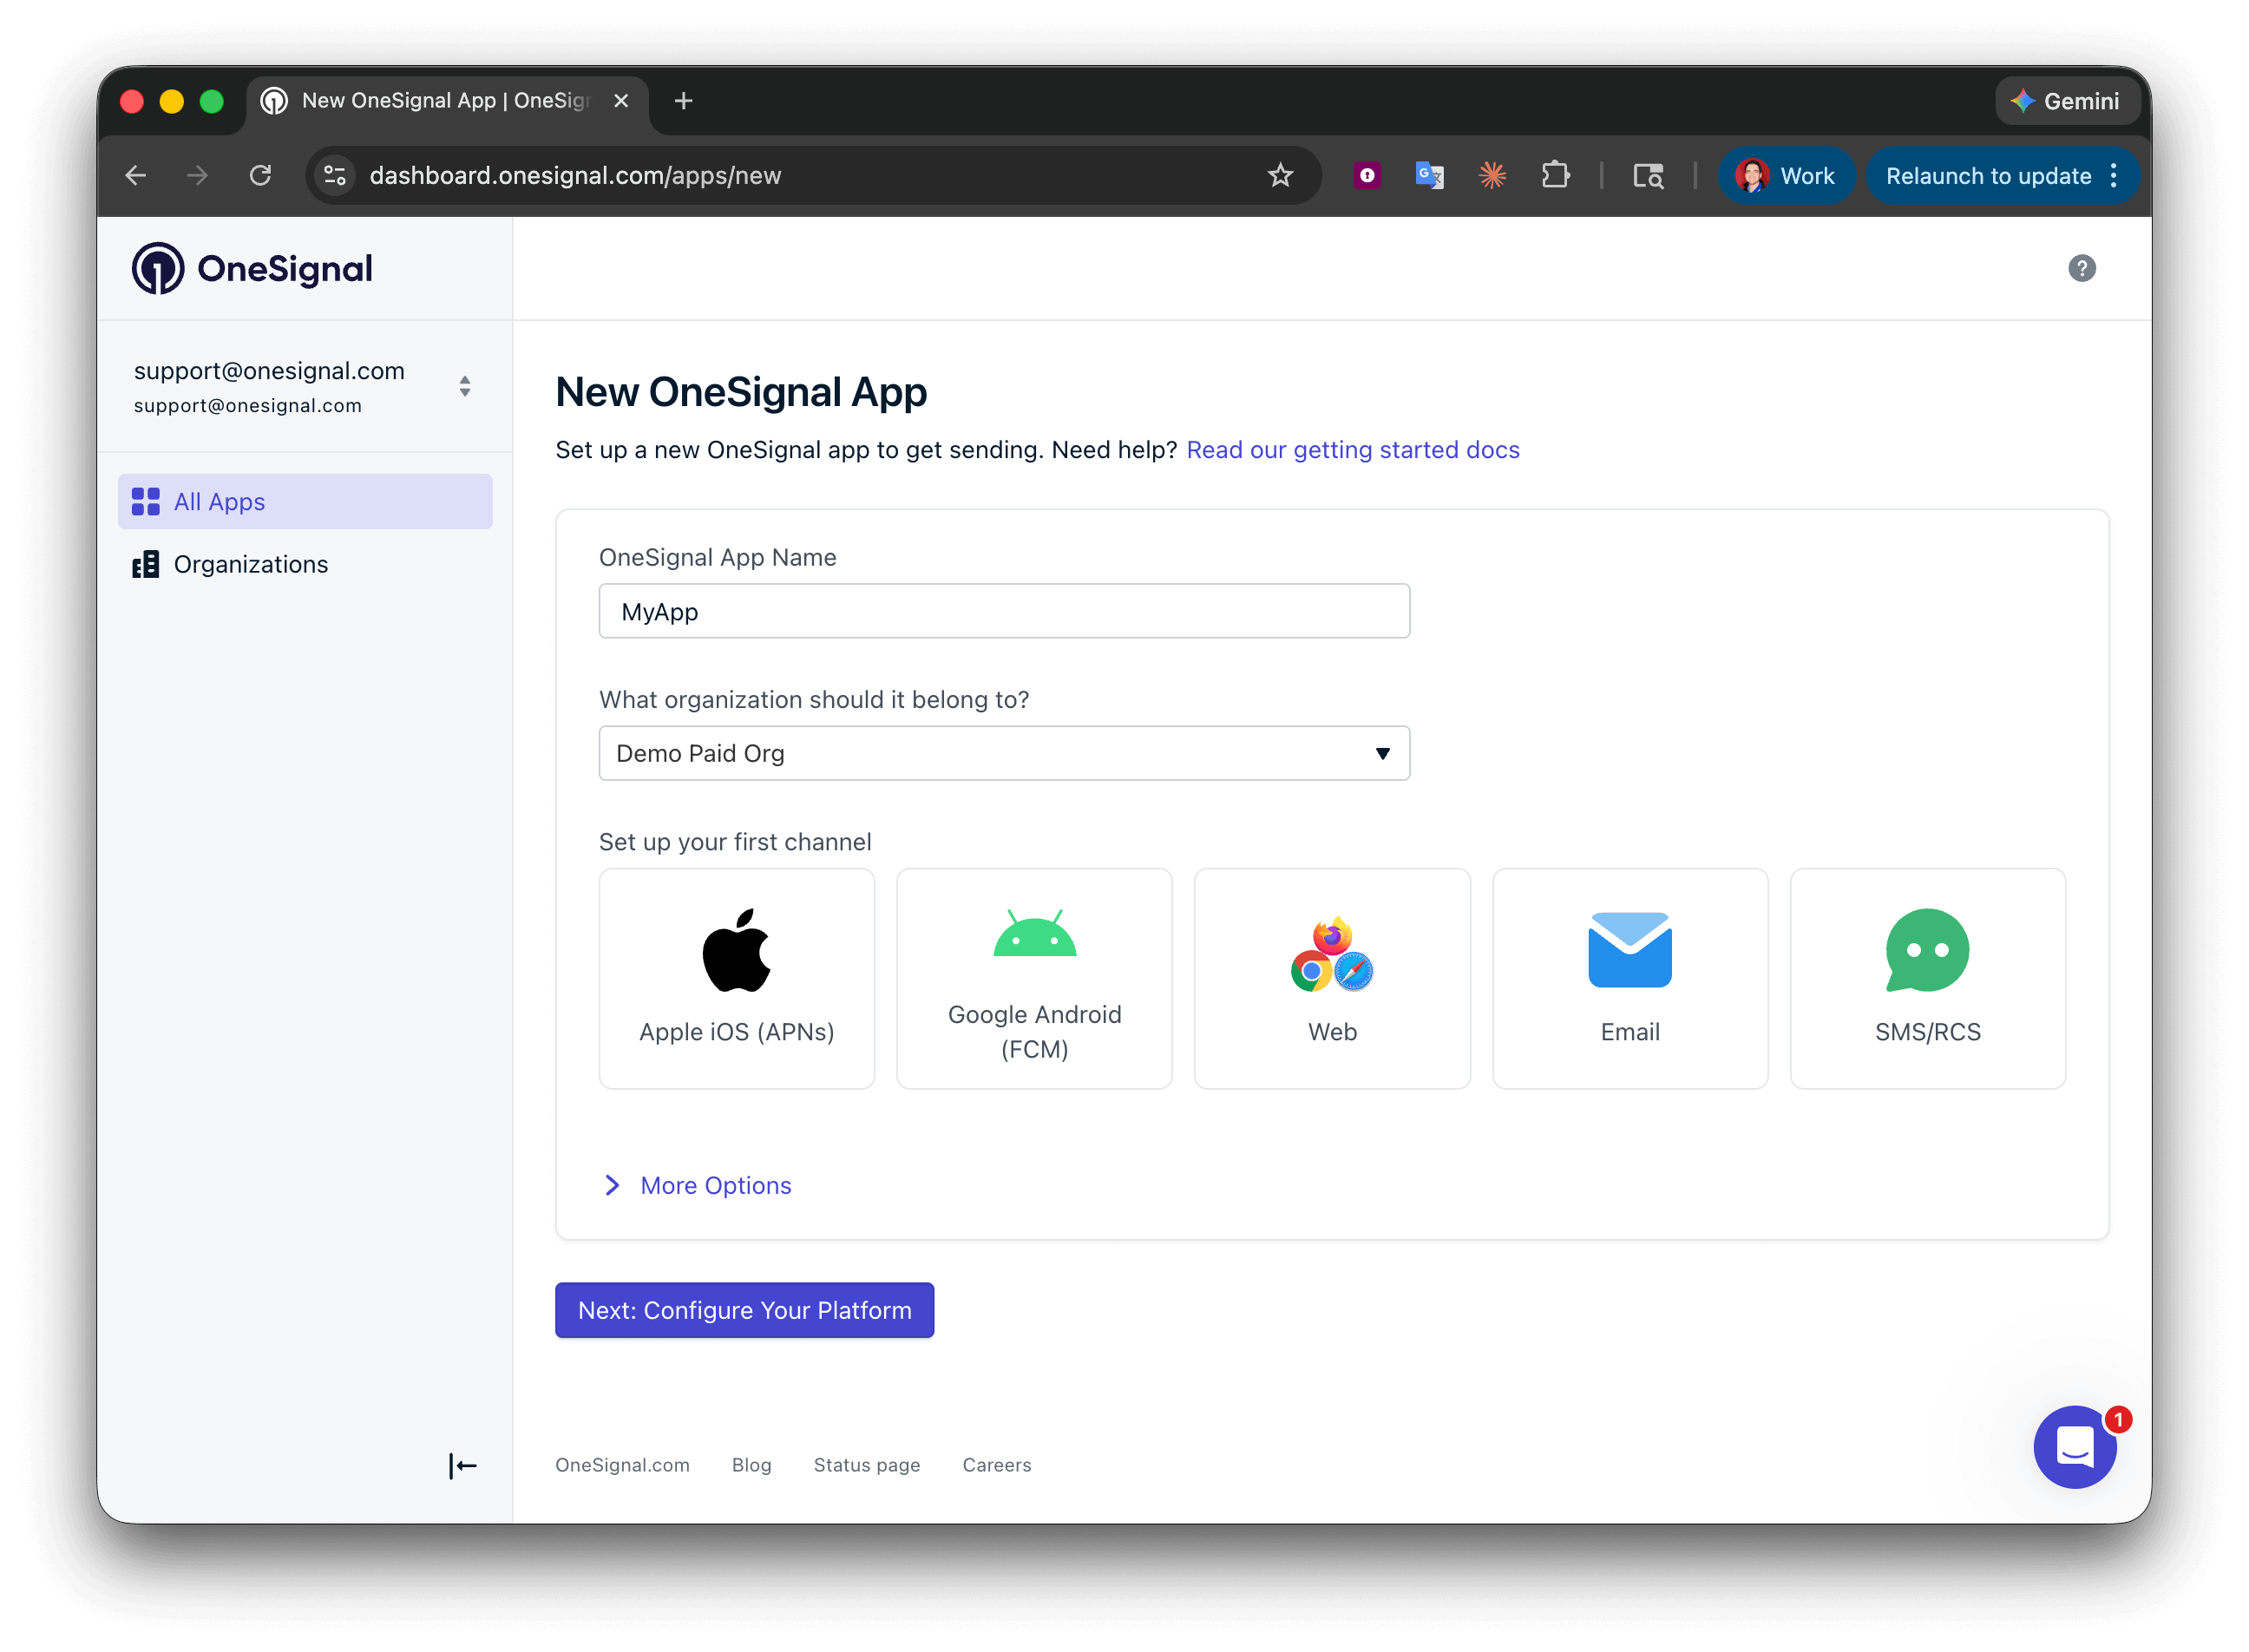 Enter the credentials for your platform:
* **Android**: [Set up Firebase credentials](/docs/en/android-firebase-credentials)
* **iOS**: [p8 token (recommended)](/docs/en/ios-p8-token-based-connection-to-apns) or [p12 certificate](/docs/en/ios-p12-generate-certificates)
* **Amazon**: [Generate API key](/docs/en/generate-an-amazon-api-key)
* **Huawei**: [Authorize OneSignal](/docs/en/authorize-onesignal-to-send-huawei-push)
Click **Save & Continue** after entering your credentials.
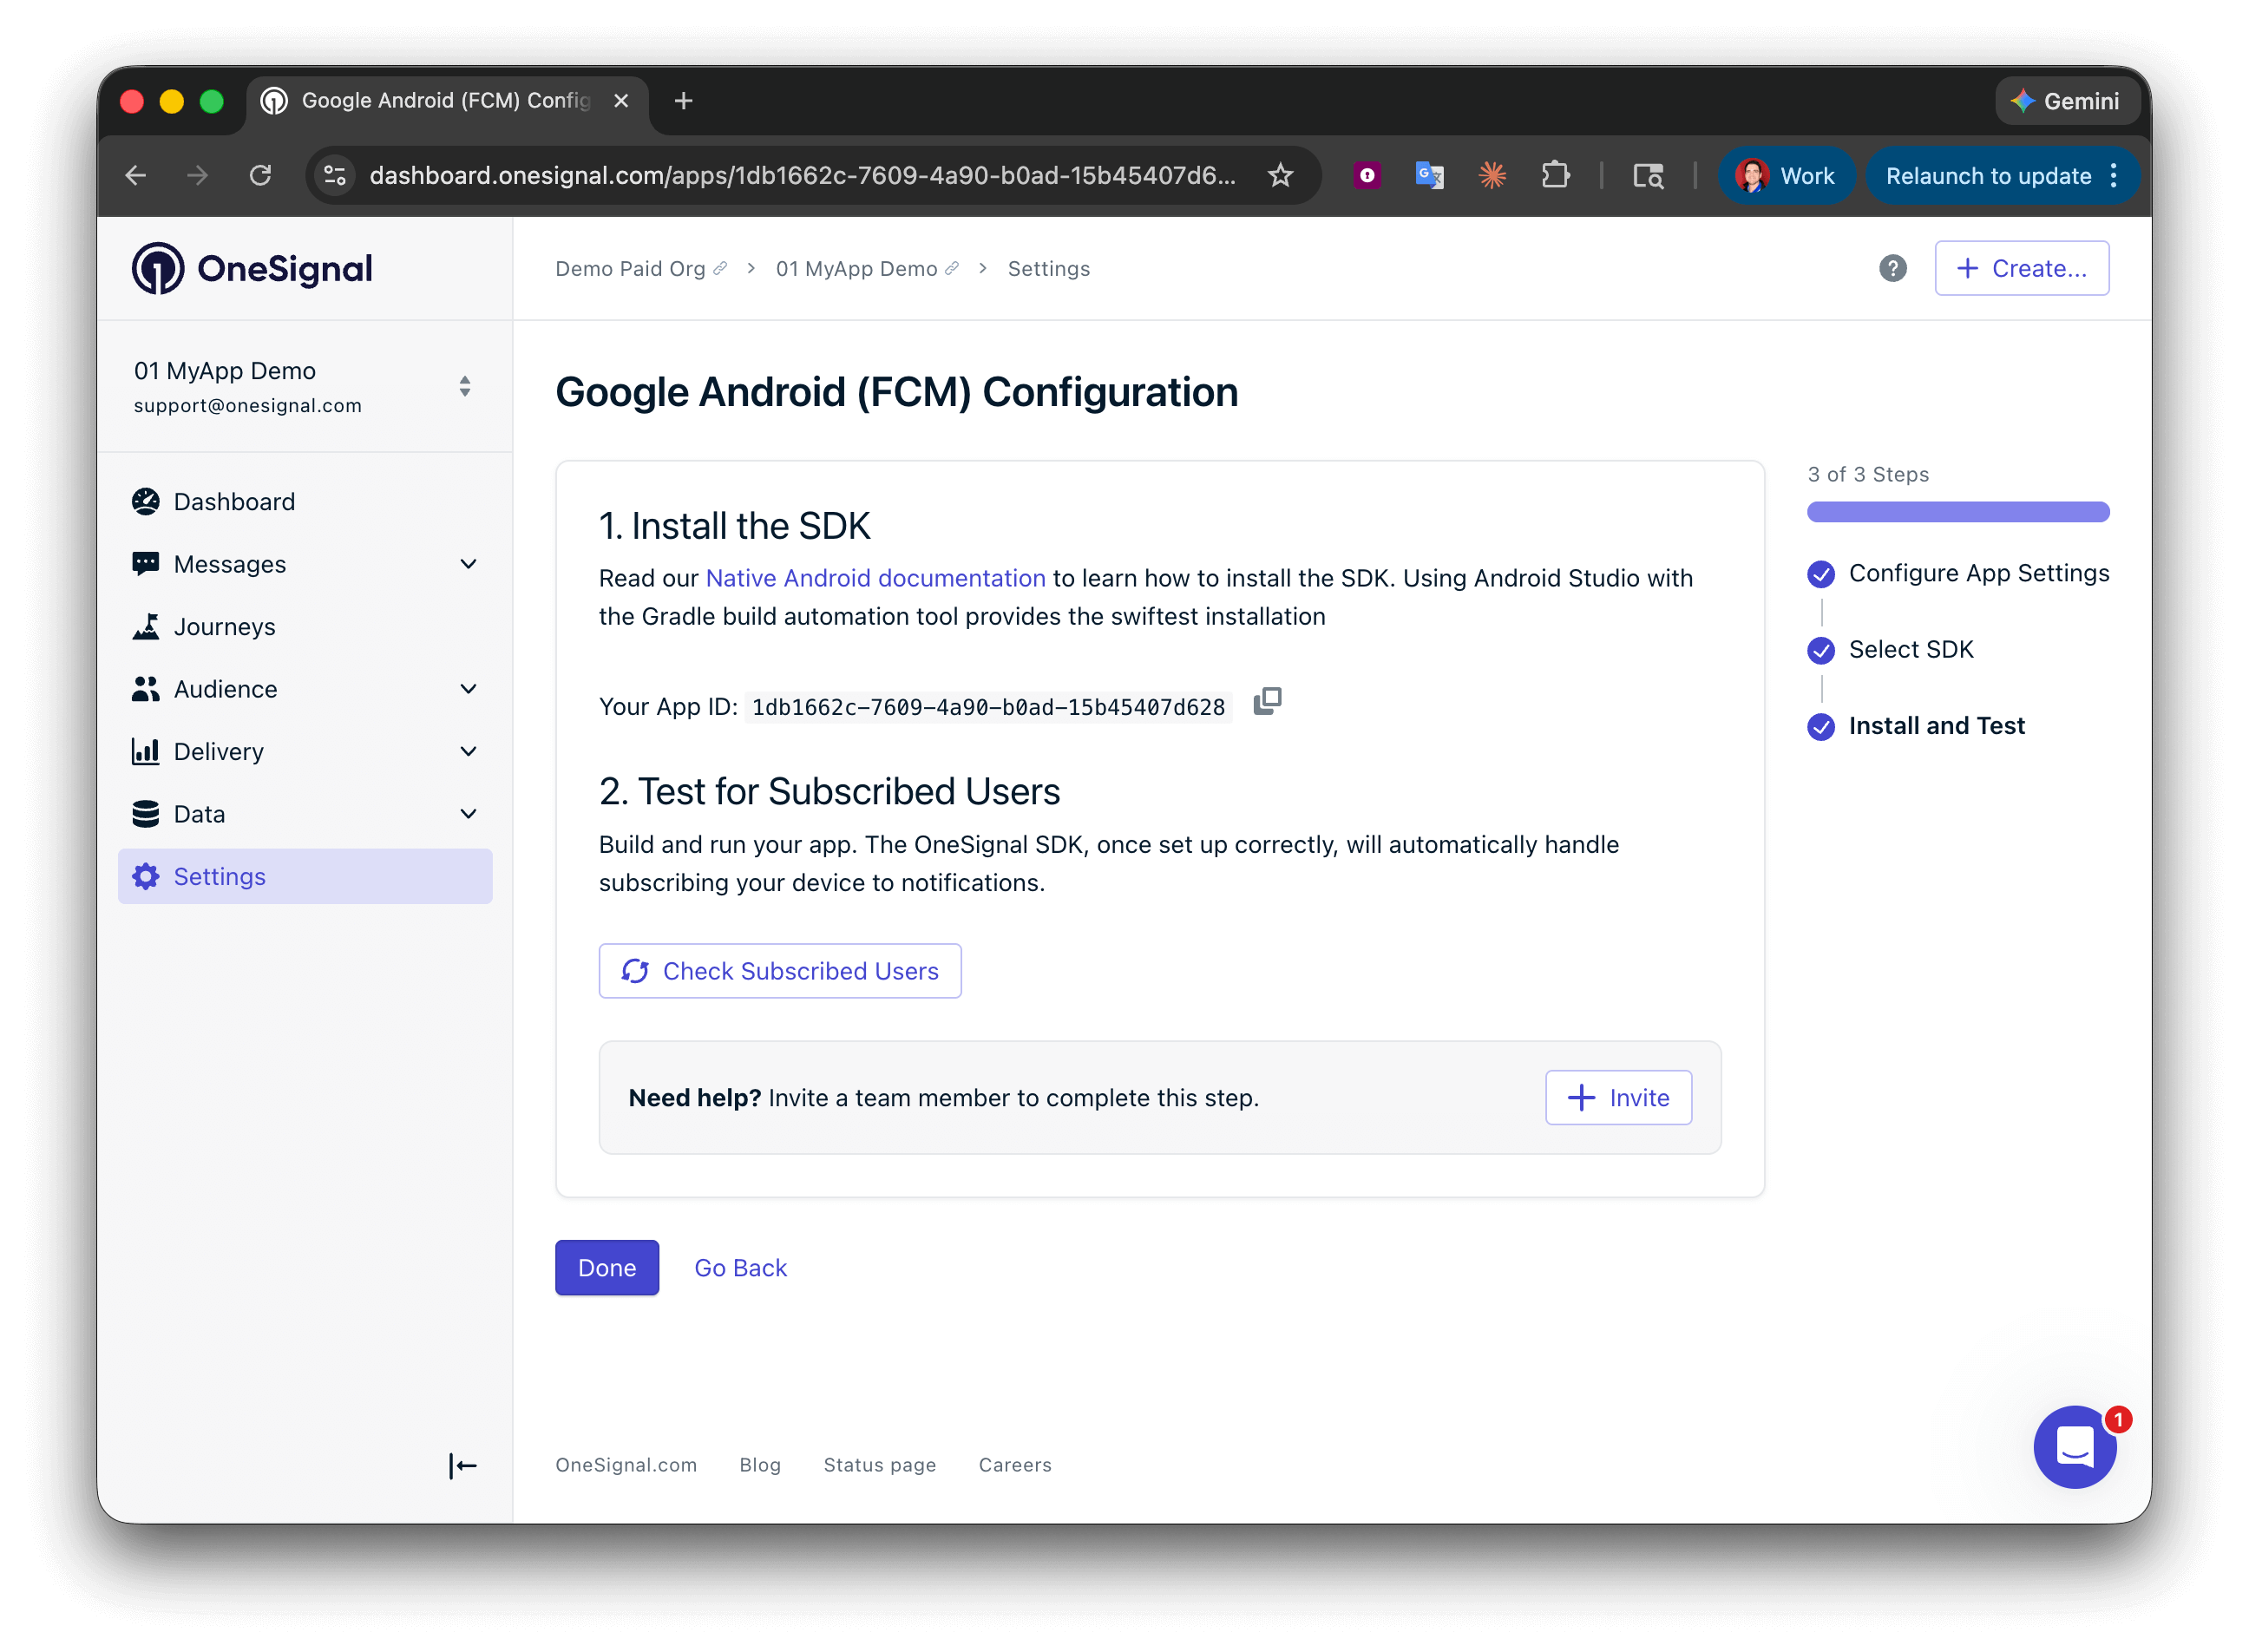
Your **App ID** is displayed on the final screen. Copy and save it — you need it when initializing the SDK. Select your SDK platform, then follow the setup guide.
Enter the credentials for your platform:
* **Android**: [Set up Firebase credentials](/docs/en/android-firebase-credentials)
* **iOS**: [p8 token (recommended)](/docs/en/ios-p8-token-based-connection-to-apns) or [p12 certificate](/docs/en/ios-p12-generate-certificates)
* **Amazon**: [Generate API key](/docs/en/generate-an-amazon-api-key)
* **Huawei**: [Authorize OneSignal](/docs/en/authorize-onesignal-to-send-huawei-push)
Click **Save & Continue** after entering your credentials.
Your **App ID** is displayed on the final screen. Copy and save it — you need it when initializing the SDK. Select your SDK platform, then follow the setup guide.
 ***
## Configuração
### 1. Criar uma nova ação personalizada
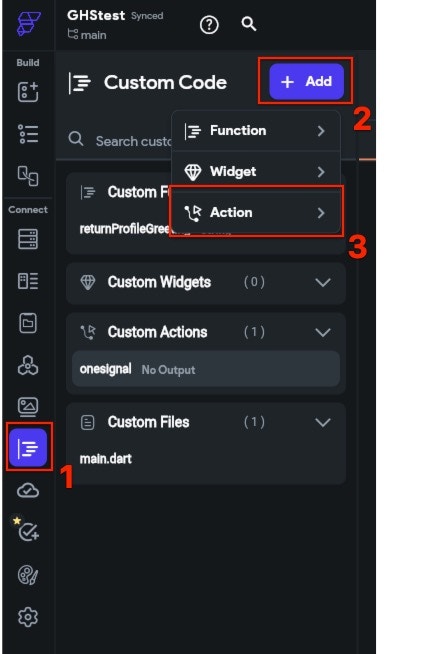
No seu projeto Flutterflow, navegue até Custom Code, depois clique no botão +Add e selecione Action.
***
## Configuração
### 1. Criar uma nova ação personalizada
No seu projeto Flutterflow, navegue até Custom Code, depois clique no botão +Add e selecione Action.
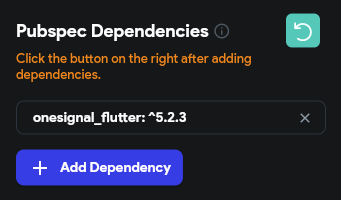
 Em Action settings na barra de ferramentas à direita, clique em Add Dependency e insira a seguinte dependência e clique em refresh para adicioná-la à ação:
```yaml dependency theme={null}
dependencies:
onesignal_flutter: ^5.1.2
```
Em Action settings na barra de ferramentas à direita, clique em Add Dependency e insira a seguinte dependência e clique em refresh para adicioná-la à ação:
```yaml dependency theme={null}
dependencies:
onesignal_flutter: ^5.1.2
```
 No Action Code, sob o código pré-carregado, adicione o seguinte, depois salve e compile sua ação.
Substitua `YOUR_APP_ID` pelo seu ID de App OneSignal encontrado no painel OneSignal **Configurações > [Chaves e IDs](./keys-and-ids)**.
Se você não tem acesso ao app OneSignal, peça aos seus [Membros da Equipe](./manage-team-members) para convidá-lo.
```javascript Flutter theme={null}
import 'package:onesignal_flutter/onesignal_flutter.dart';
Future onesignal() async {
//Remova este método para parar a Depuração do OneSignal
OneSignal.Debug.setLogLevel(OSLogLevel.verbose);
OneSignal.initialize("YOUR_APP_ID");
// A função promptForPushNotificationsWithUserResponse mostrará o prompt de notificação push iOS ou Android. Recomendamos remover o código a seguir e usar uma Mensagem In-App para solicitar permissão de notificação
OneSignal.Notifications.requestPermission(true);
}
```
Em seguida, clique no arquivo main.dart na barra de ferramentas à esquerda e clique no ícone + ao lado de Initial Actions na barra à direita e clique na ação `onesignal` que acabou de ser criada.
No Action Code, sob o código pré-carregado, adicione o seguinte, depois salve e compile sua ação.
Substitua `YOUR_APP_ID` pelo seu ID de App OneSignal encontrado no painel OneSignal **Configurações > [Chaves e IDs](./keys-and-ids)**.
Se você não tem acesso ao app OneSignal, peça aos seus [Membros da Equipe](./manage-team-members) para convidá-lo.
```javascript Flutter theme={null}
import 'package:onesignal_flutter/onesignal_flutter.dart';
Future onesignal() async {
//Remova este método para parar a Depuração do OneSignal
OneSignal.Debug.setLogLevel(OSLogLevel.verbose);
OneSignal.initialize("YOUR_APP_ID");
// A função promptForPushNotificationsWithUserResponse mostrará o prompt de notificação push iOS ou Android. Recomendamos remover o código a seguir e usar uma Mensagem In-App para solicitar permissão de notificação
OneSignal.Notifications.requestPermission(true);
}
```
Em seguida, clique no arquivo main.dart na barra de ferramentas à esquerda e clique no ícone + ao lado de Initial Actions na barra à direita e clique na ação `onesignal` que acabou de ser criada.
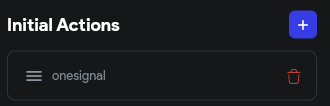 Isso adicionará a ação ao seu aplicativo e fará com que o SDK OneSignal seja inicializado quando o aplicativo for executado:
 ### 2. Exportar o projeto
Abra o Developer Menu e baixe o APK:
### 2. Exportar o projeto
Abra o Developer Menu e baixe o APK:
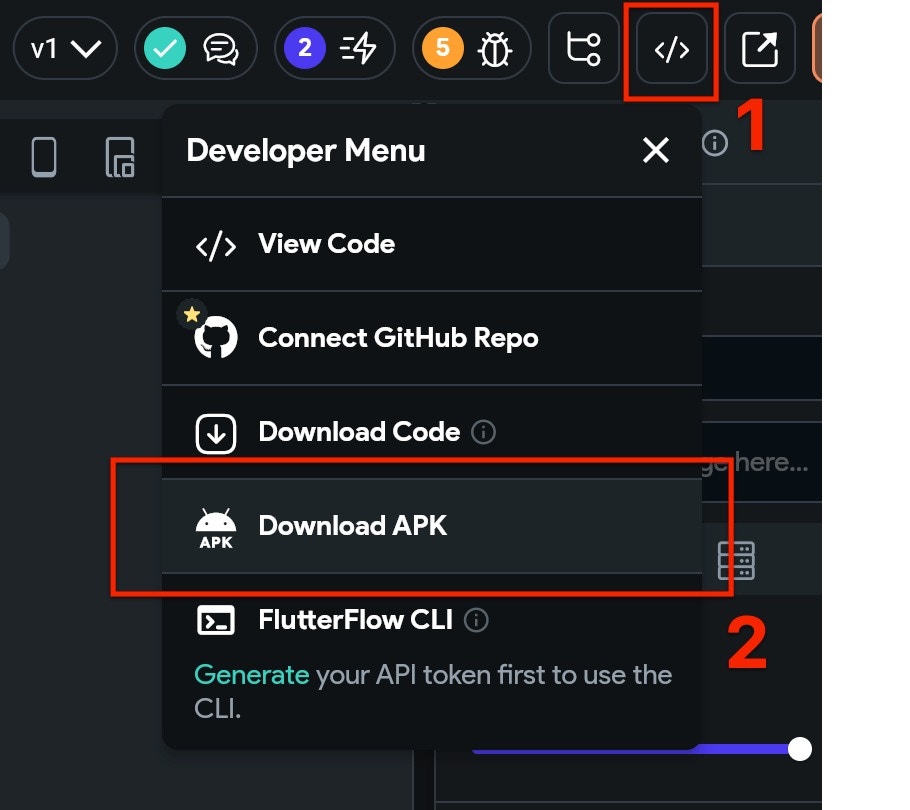 Depois que o APK for baixado, você pode testar o aplicativo arrastando o APK para um emulador Android para instalá-lo. Os recursos push devem funcionar imediatamente e você pode enviar notificações push para o dispositivo assim que fornecer permissões push por meio do prompt nativo.
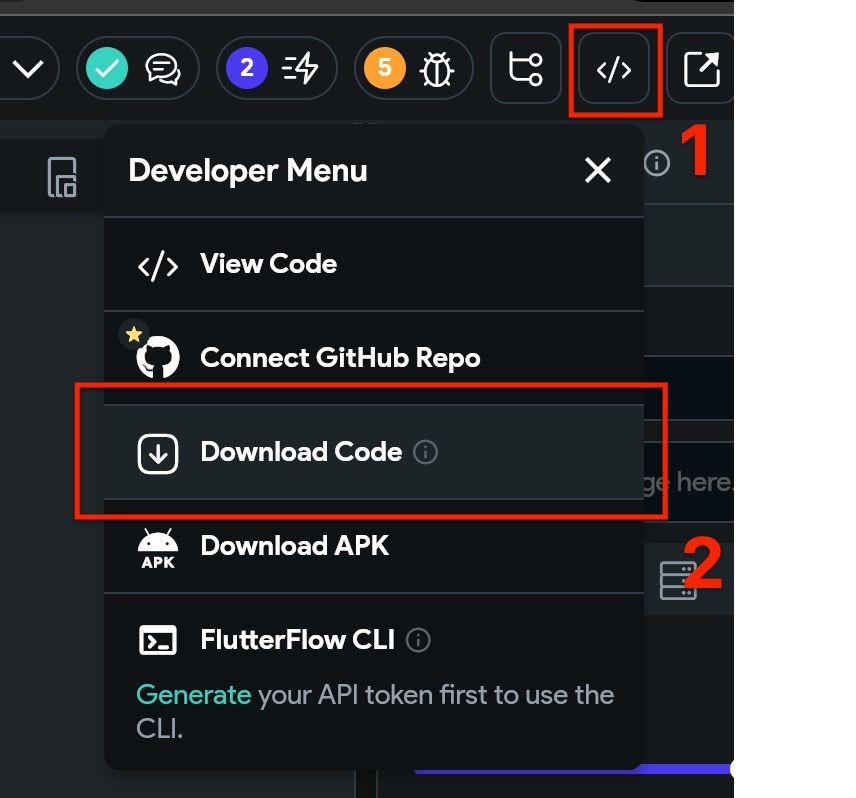
Abra o Developer Menu e baixe o código do projeto:
Depois que o APK for baixado, você pode testar o aplicativo arrastando o APK para um emulador Android para instalá-lo. Os recursos push devem funcionar imediatamente e você pode enviar notificações push para o dispositivo assim que fornecer permissões push por meio do prompt nativo.
Abra o Developer Menu e baixe o código do projeto:
 ### 3. Configuração iOS
O projeto baixado provavelmente não estará pronto para ser executado no iOS. Antes de configurar as adições específicas do OneSignal, você precisará certificar-se de que o projeto está totalmente compilado. Para fazer isso:
* Abra uma janela do Terminal, cd (mudar diretório) para a pasta `ios` do seu projeto baixado.
* No Terminal, digite `flutter build ios` e pressione enter. Aguarde a conclusão da compilação, isso pode levar algum tempo dependendo do tamanho do seu projeto.
* Ainda no Terminal, digite `pod install` e pressione enter. Aguarde a conclusão da instalação do pod.
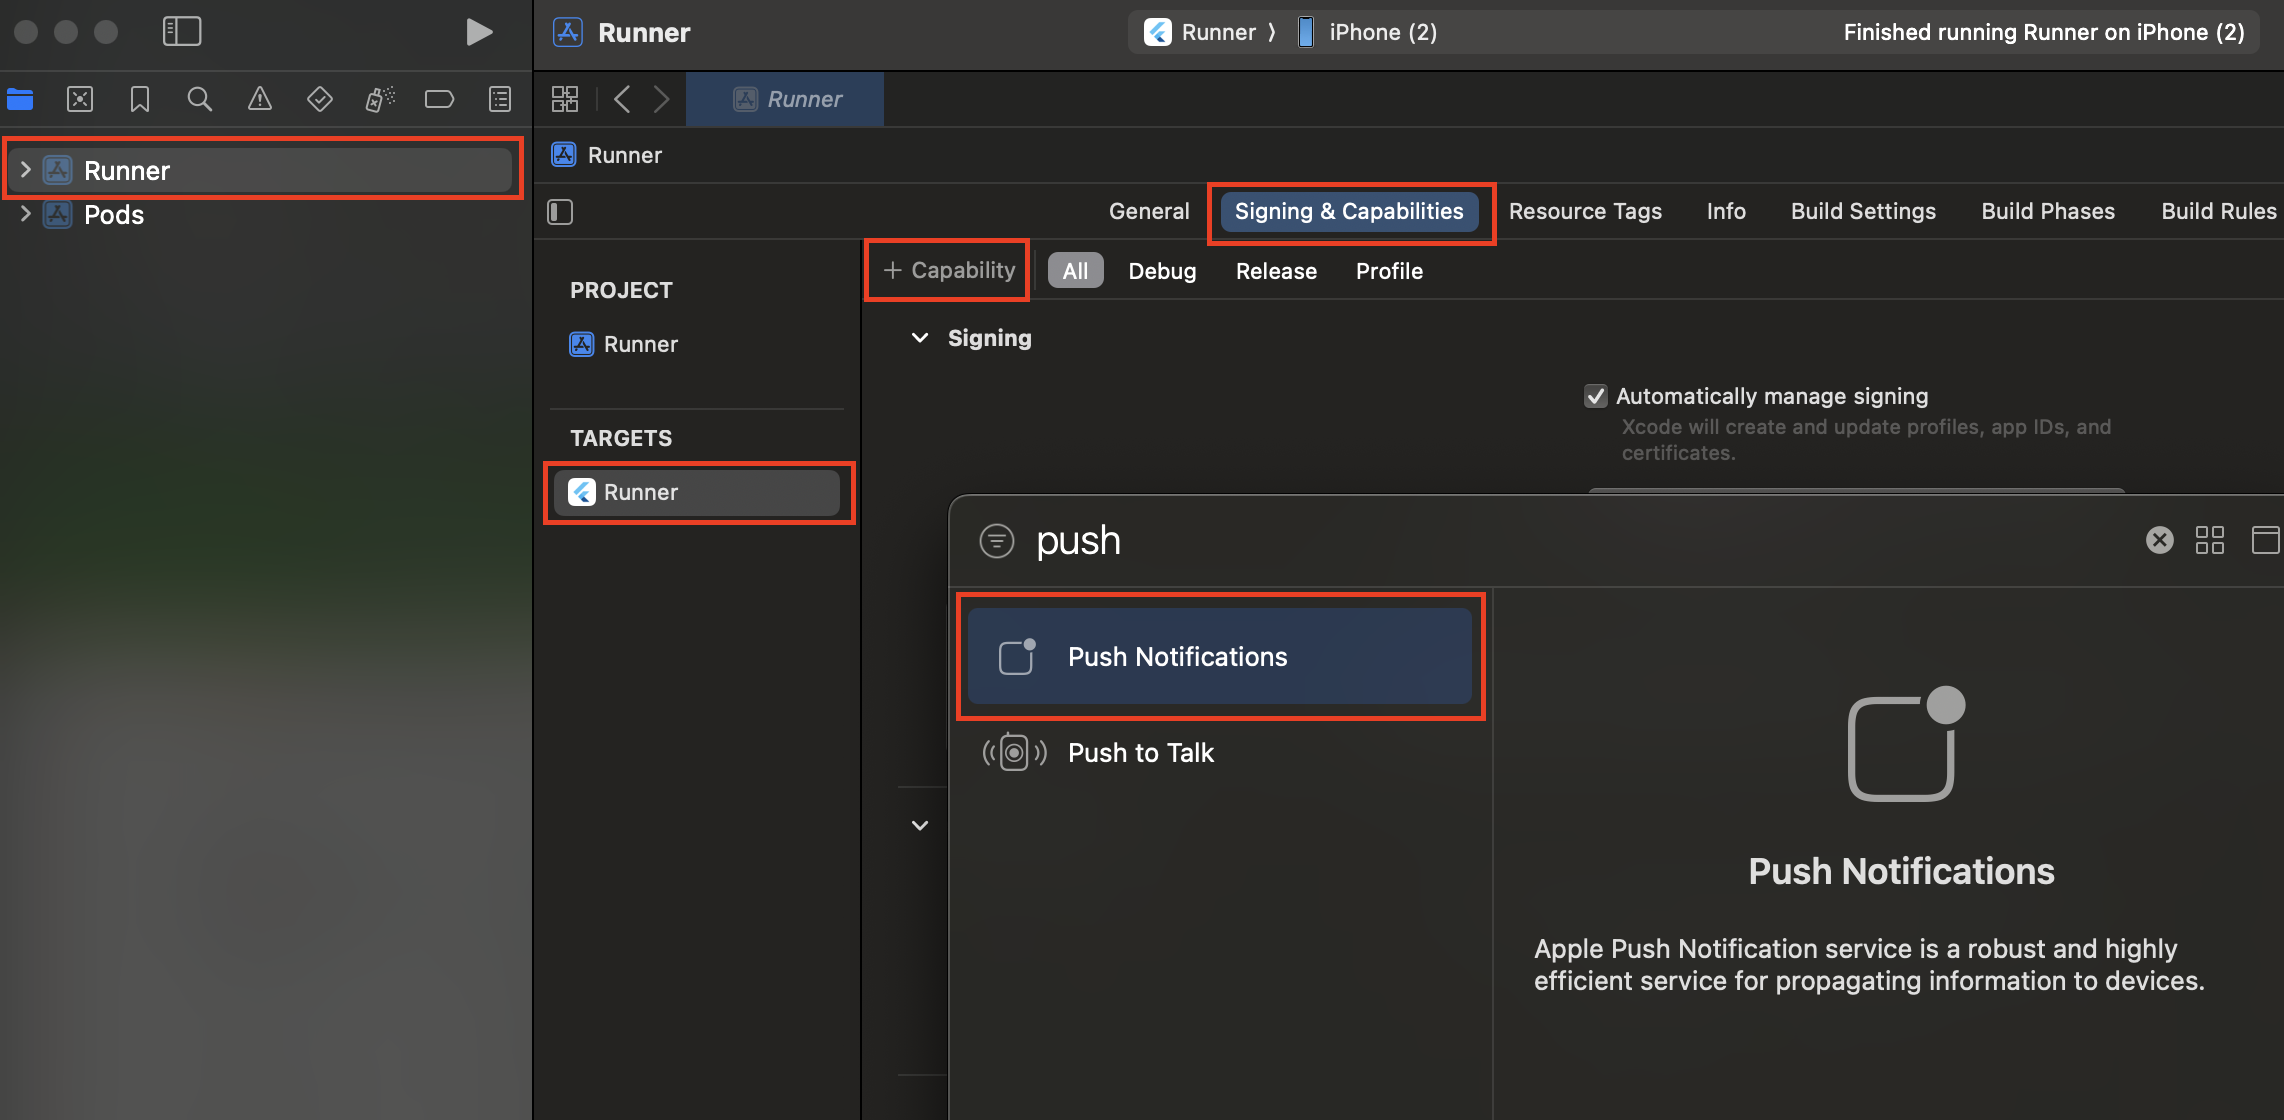
Abra o arquivo `.xcworkspace` no Xcode localizado na pasta ios do seu projeto.
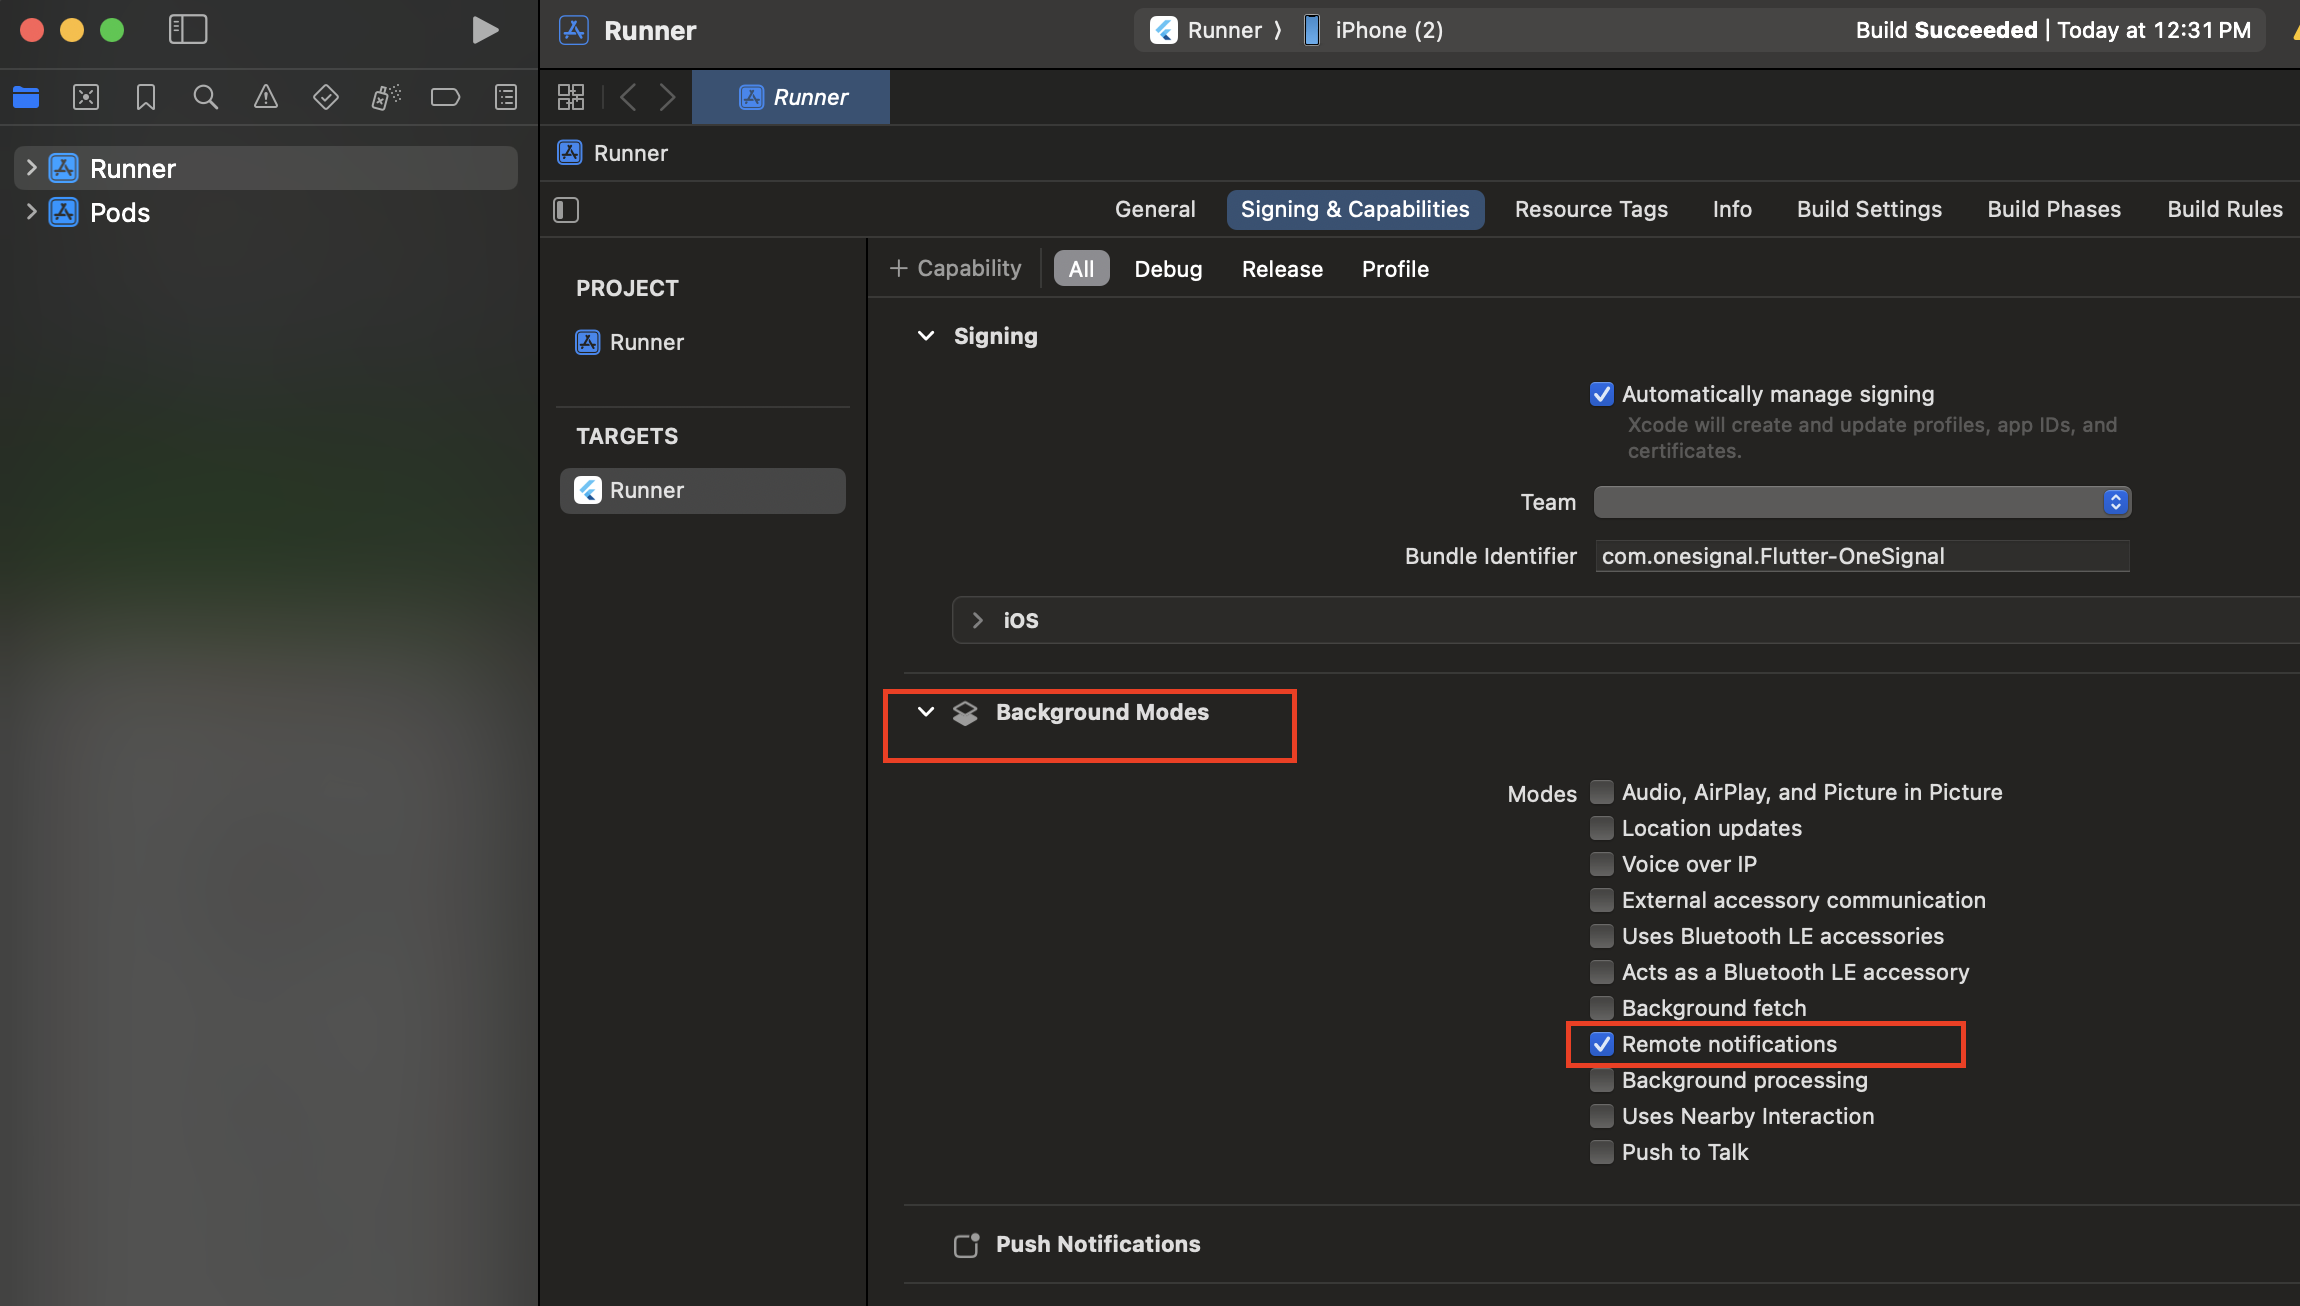
Selecione o **projeto raiz > seu app target principal > Signing & Capabilities**.
Se você não ver Push Notifications habilitado, clique em **+ Capability** e adicione **Push Notifications**. Certifique-se de inserir os detalhes corretos para seu Team e Bundle Identifier.
### 3. Configuração iOS
O projeto baixado provavelmente não estará pronto para ser executado no iOS. Antes de configurar as adições específicas do OneSignal, você precisará certificar-se de que o projeto está totalmente compilado. Para fazer isso:
* Abra uma janela do Terminal, cd (mudar diretório) para a pasta `ios` do seu projeto baixado.
* No Terminal, digite `flutter build ios` e pressione enter. Aguarde a conclusão da compilação, isso pode levar algum tempo dependendo do tamanho do seu projeto.
* Ainda no Terminal, digite `pod install` e pressione enter. Aguarde a conclusão da instalação do pod.
Abra o arquivo `.xcworkspace` no Xcode localizado na pasta ios do seu projeto.
Selecione o **projeto raiz > seu app target principal > Signing & Capabilities**.
Se você não ver Push Notifications habilitado, clique em **+ Capability** e adicione **Push Notifications**. Certifique-se de inserir os detalhes corretos para seu Team e Bundle Identifier.
 Clique em **+ Capability** novamente e adicione **Background Modes**. Em seguida, marque **Remote notifications**.
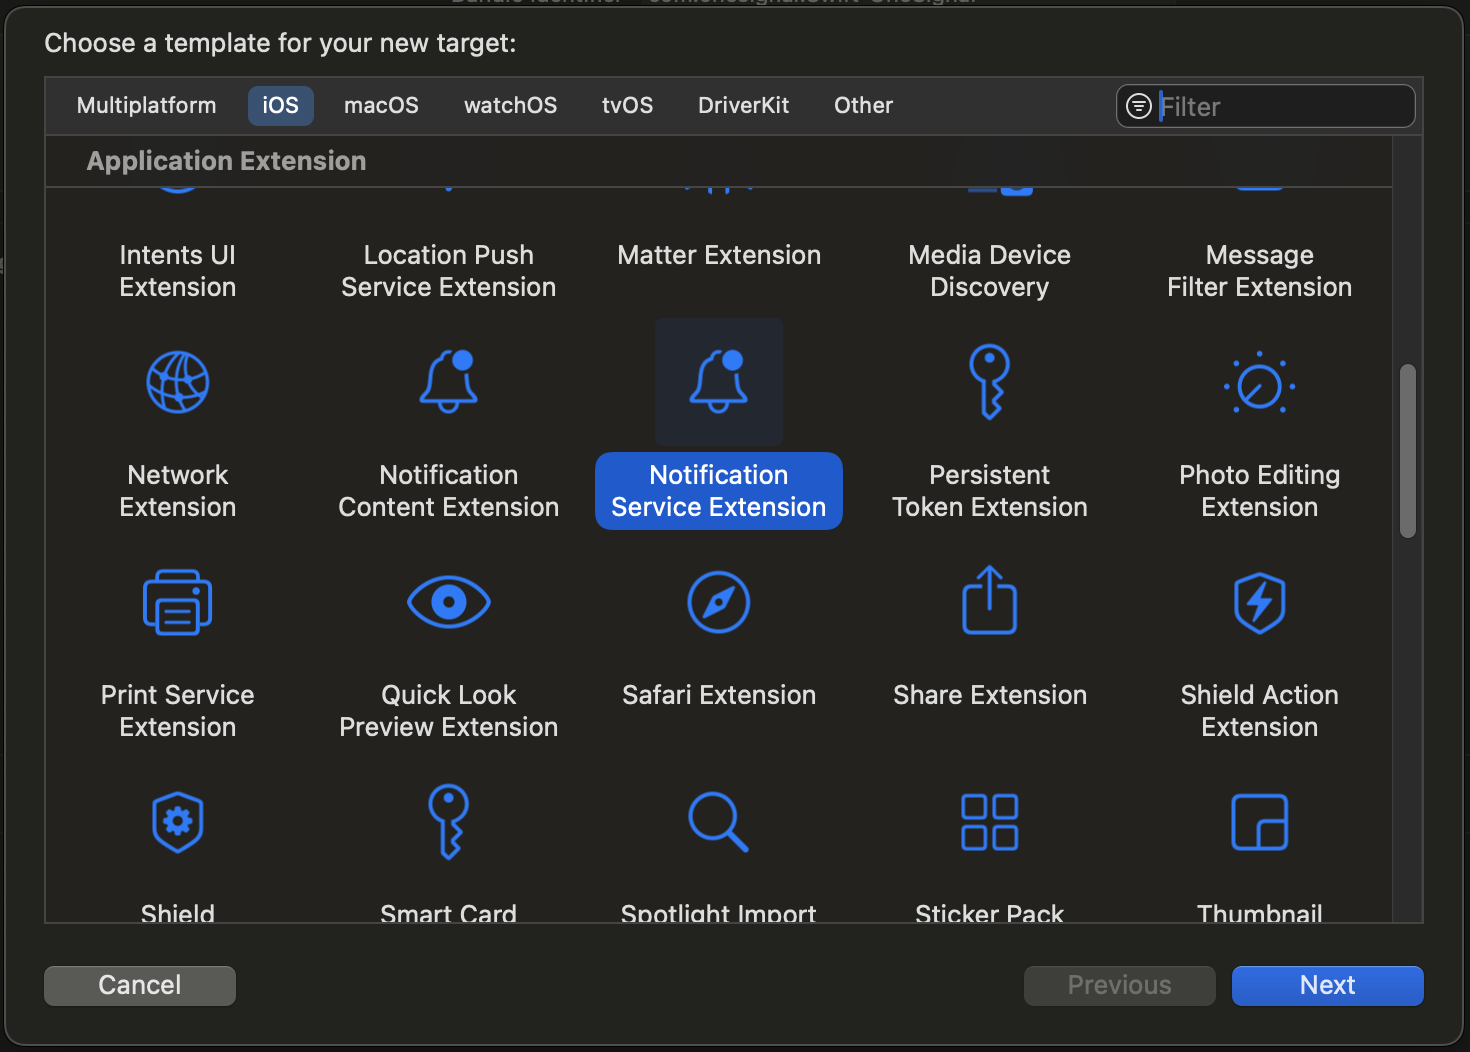
 #### Adicionar Notification Service Extension
O OneSignalNotificationServiceExtension permite que seu aplicativo iOS receba notificações ricas com imagens, botões e badges. Também é necessário para os recursos de análise de confirmed receipt do OneSignal.
No Xcode, selecione **File > New > Target...**
Selecione **Notification Service Extension** e depois **Next**.
#### Adicionar Notification Service Extension
O OneSignalNotificationServiceExtension permite que seu aplicativo iOS receba notificações ricas com imagens, botões e badges. Também é necessário para os recursos de análise de confirmed receipt do OneSignal.
No Xcode, selecione **File > New > Target...**
Selecione **Notification Service Extension** e depois **Next**.
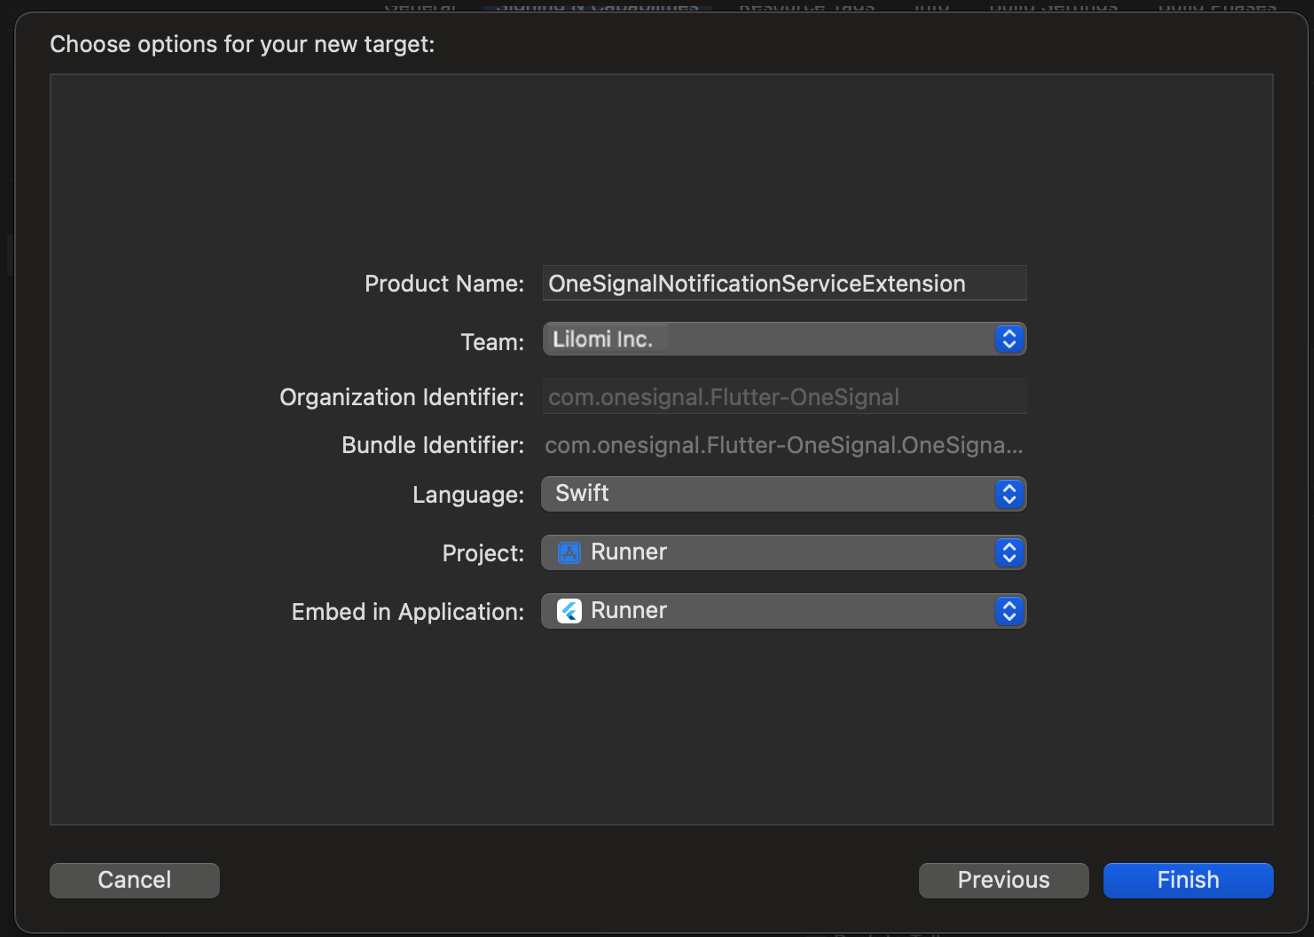
 Insira o nome do produto como `OneSignalNotificationServiceExtension` e pressione **Finish**.
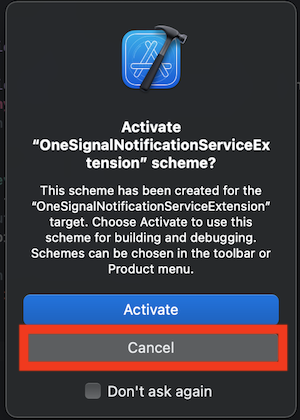
 Não ative o esquema no diálogo que é mostrado após selecionar **Finish**.
Pressione **Cancel** no prompt "Activate scheme".
Não ative o esquema no diálogo que é mostrado após selecionar **Finish**.
Pressione **Cancel** no prompt "Activate scheme".
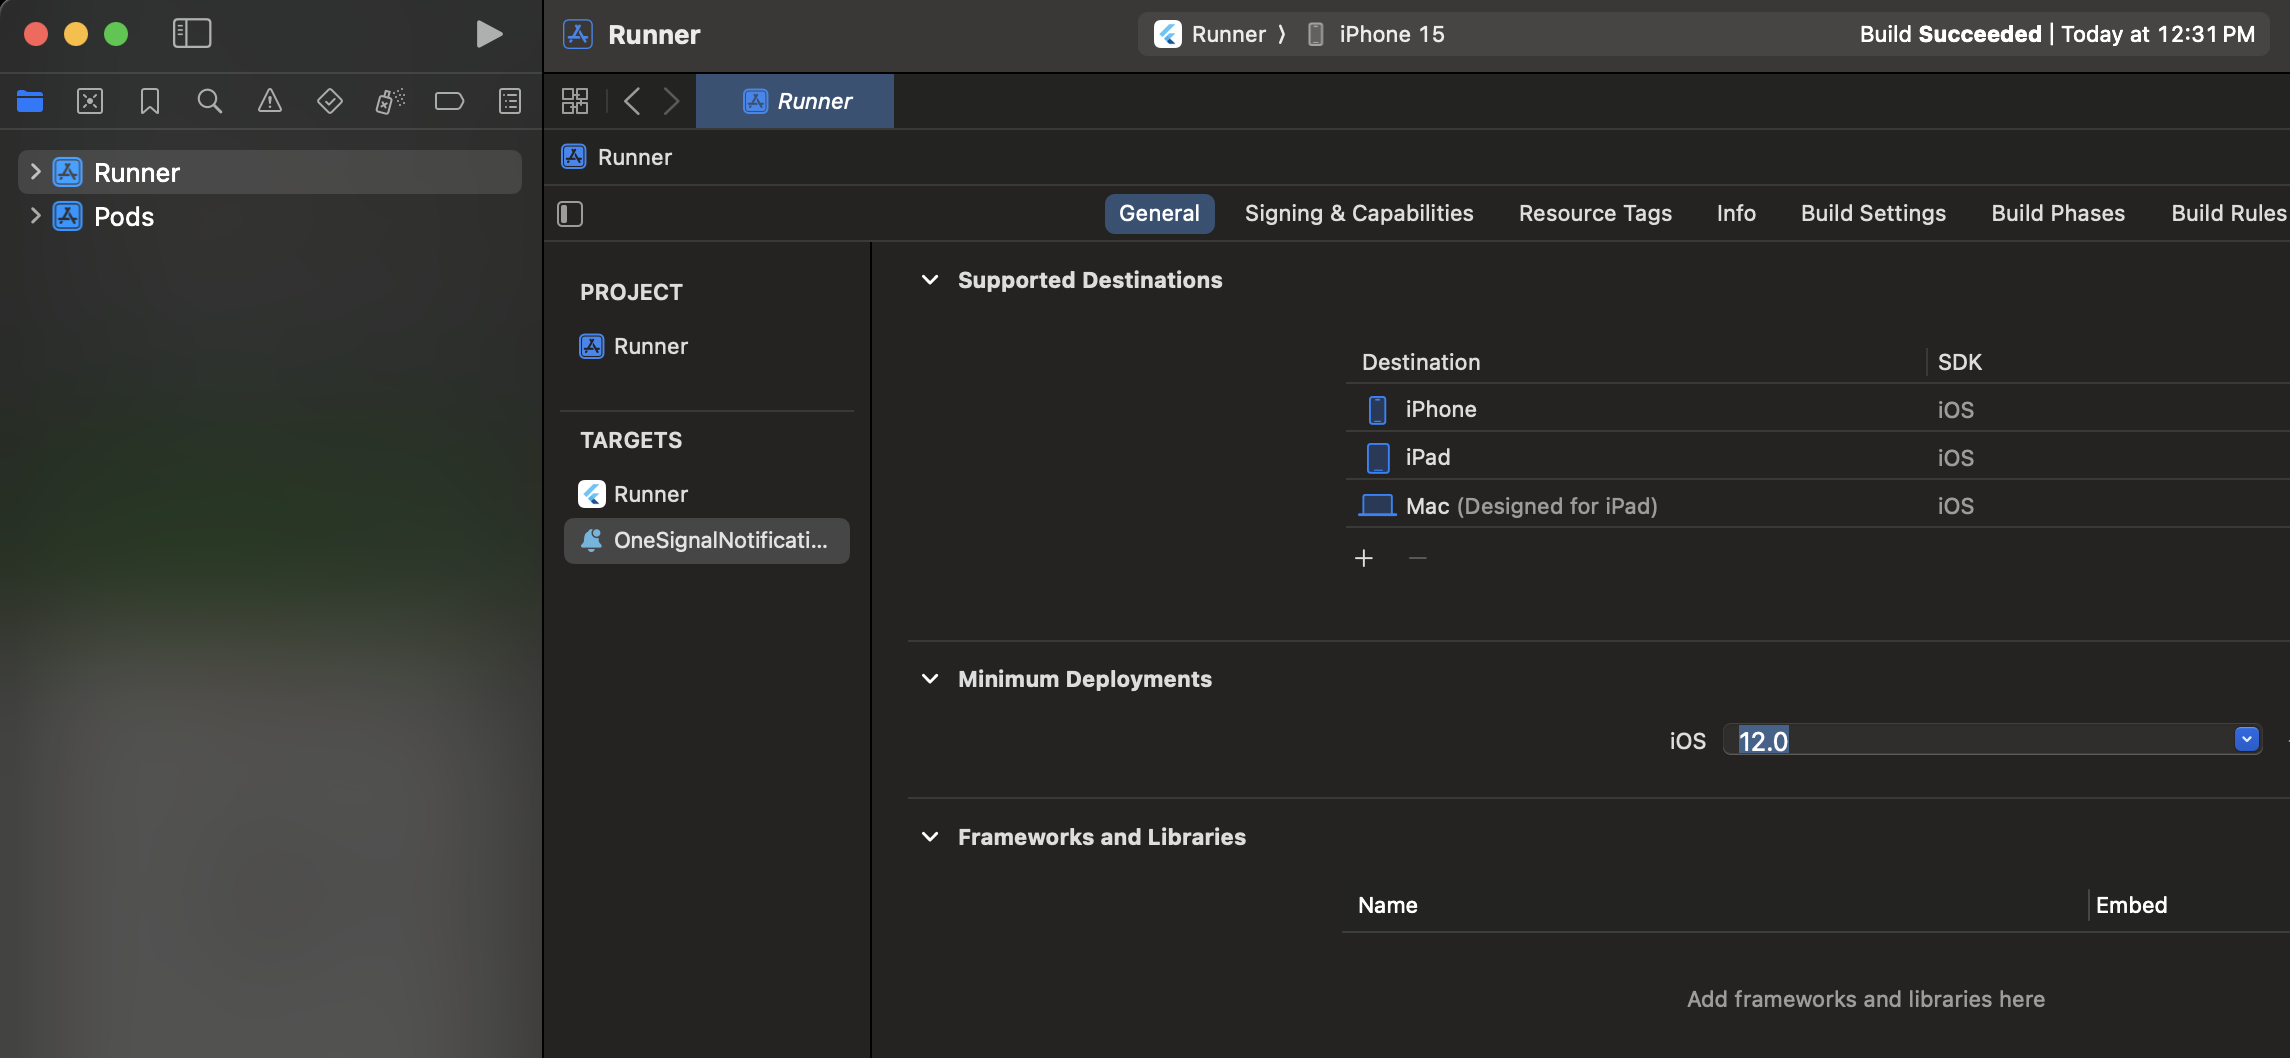
 Selecione o target **OneSignalNotificationServiceExtension** e configurações **General**.
Defina **Minimum Deployments** para ser o **mesmo valor do seu Main Application Target**. Deve ser iOS 11 ou superior.
Selecione o target **OneSignalNotificationServiceExtension** e configurações **General**.
Defina **Minimum Deployments** para ser o **mesmo valor do seu Main Application Target**. Deve ser iOS 11 ou superior.
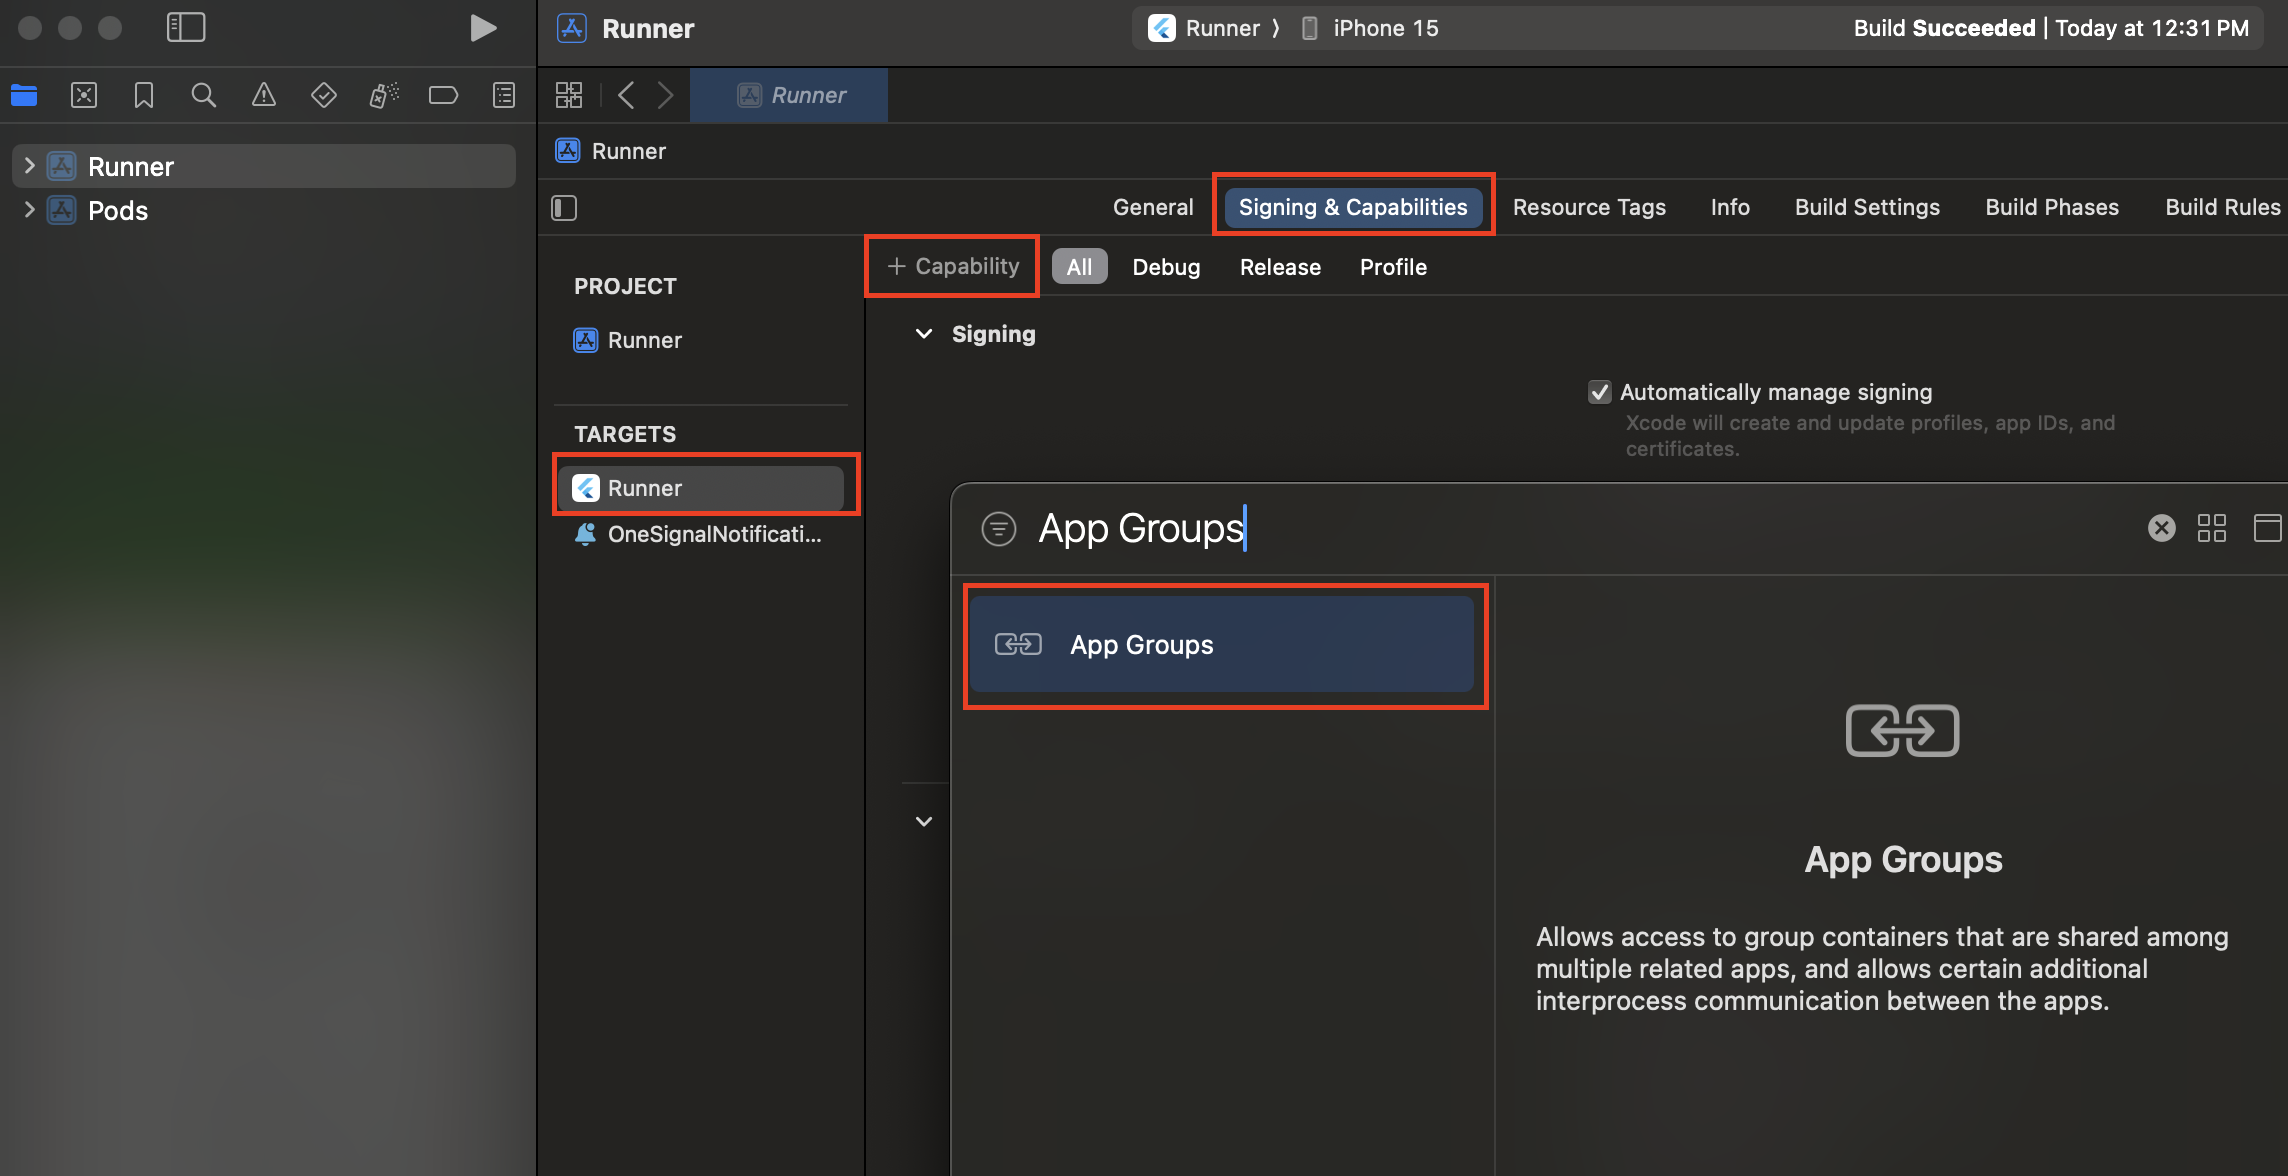
 #### Adicionar App Groups
App Groups permitem que seu aplicativo e o OneSignalNotificationServiceExtension se comuniquem quando uma notificação é recebida, mesmo que seu aplicativo não esteja ativo. Isso é necessário para badges e Confirmed Deliveries.
Selecione seu **Main App Target > Signing & Capabilities > + Capability > App Groups**.
#### Adicionar App Groups
App Groups permitem que seu aplicativo e o OneSignalNotificationServiceExtension se comuniquem quando uma notificação é recebida, mesmo que seu aplicativo não esteja ativo. Isso é necessário para badges e Confirmed Deliveries.
Selecione seu **Main App Target > Signing & Capabilities > + Capability > App Groups**.
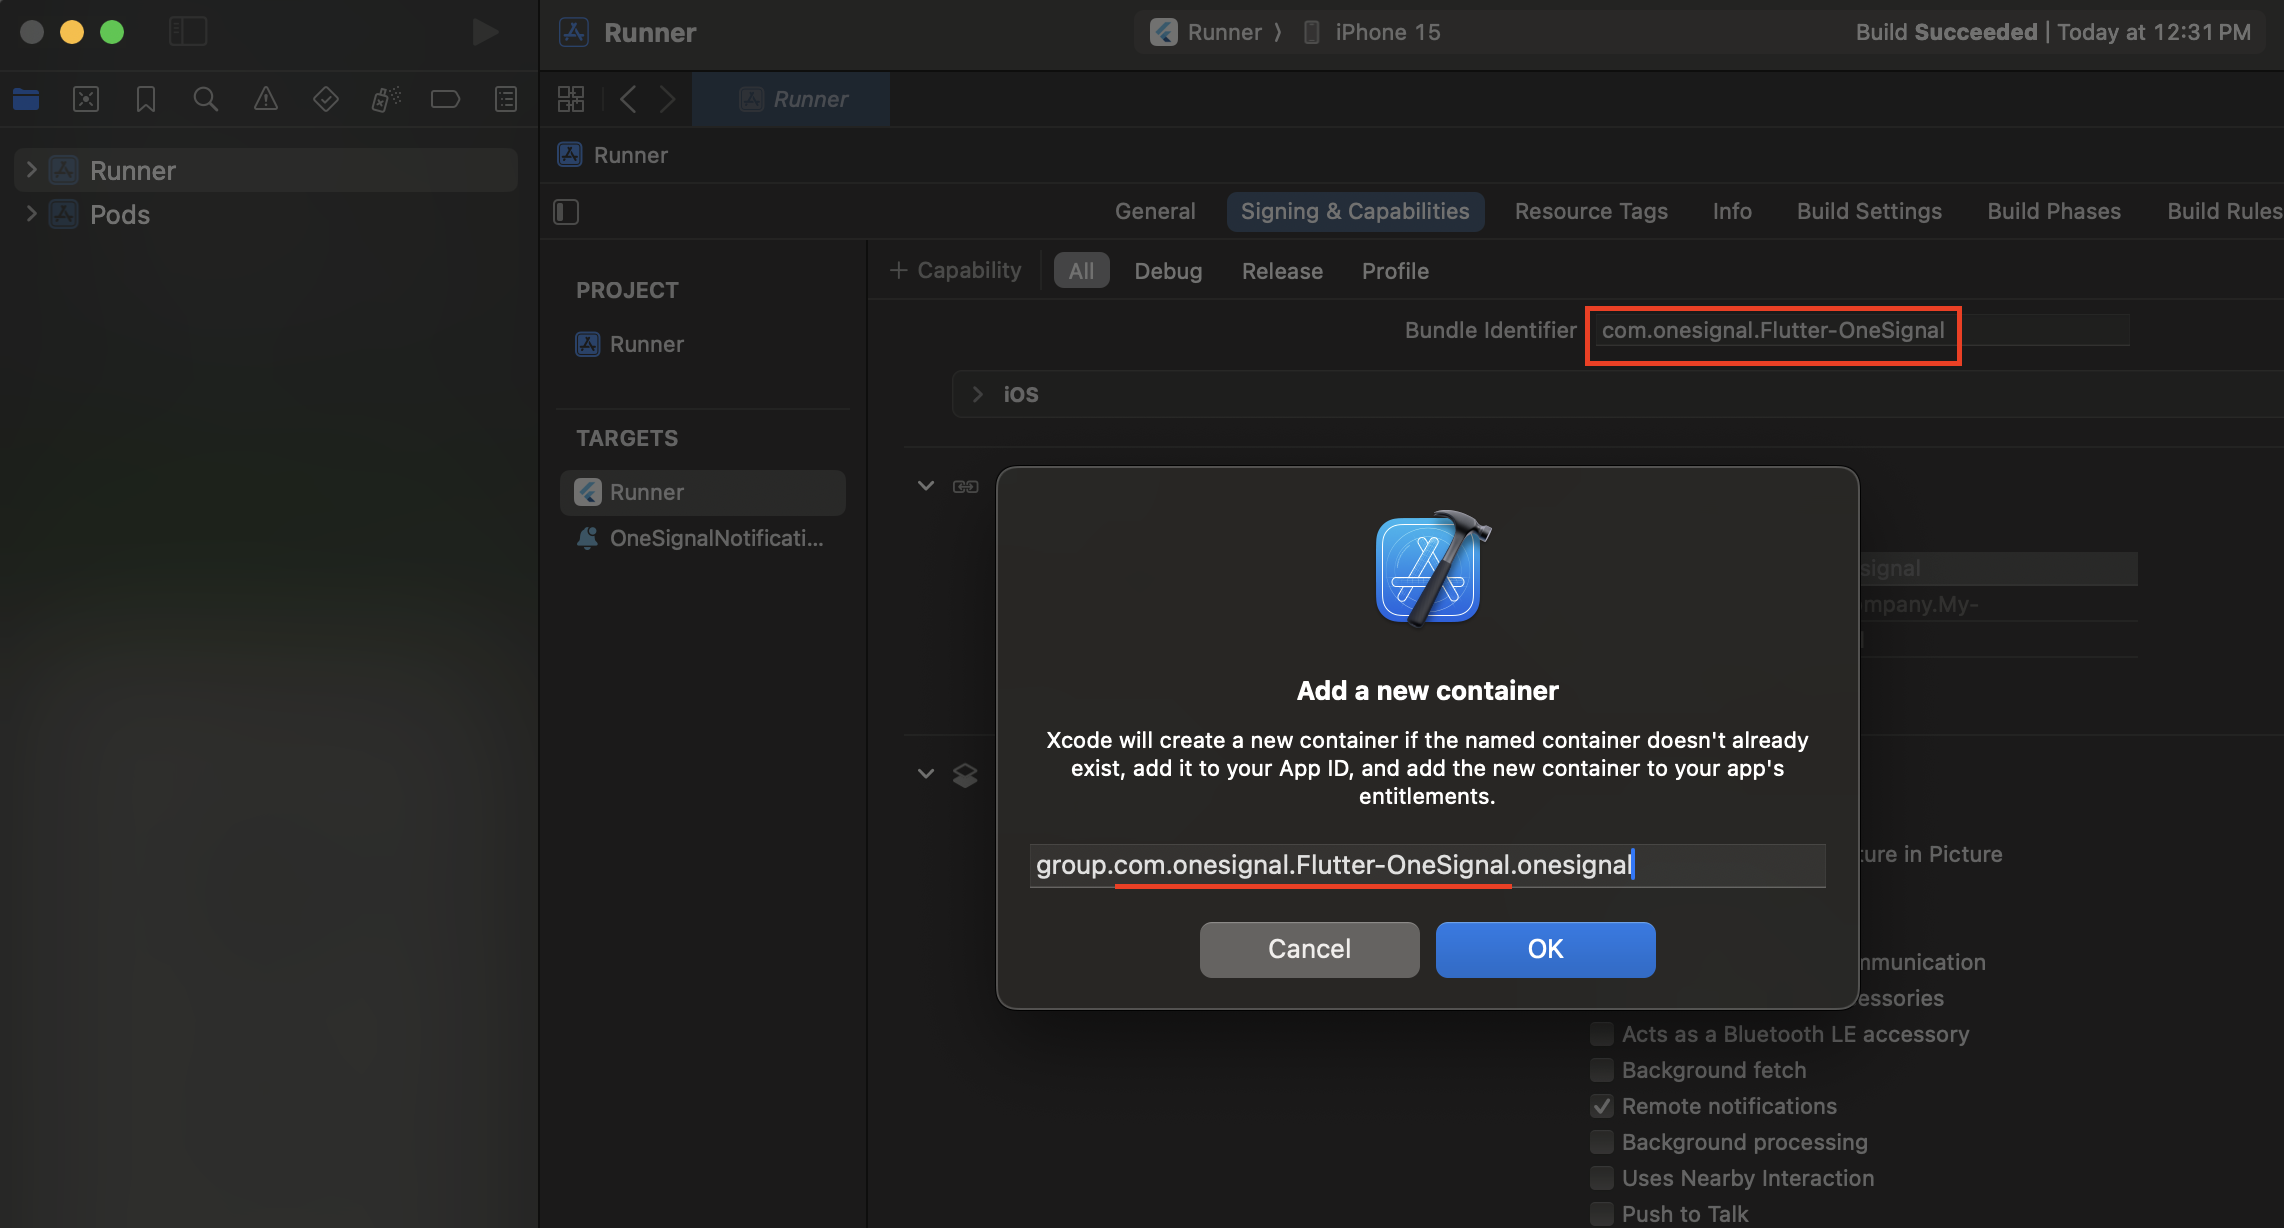
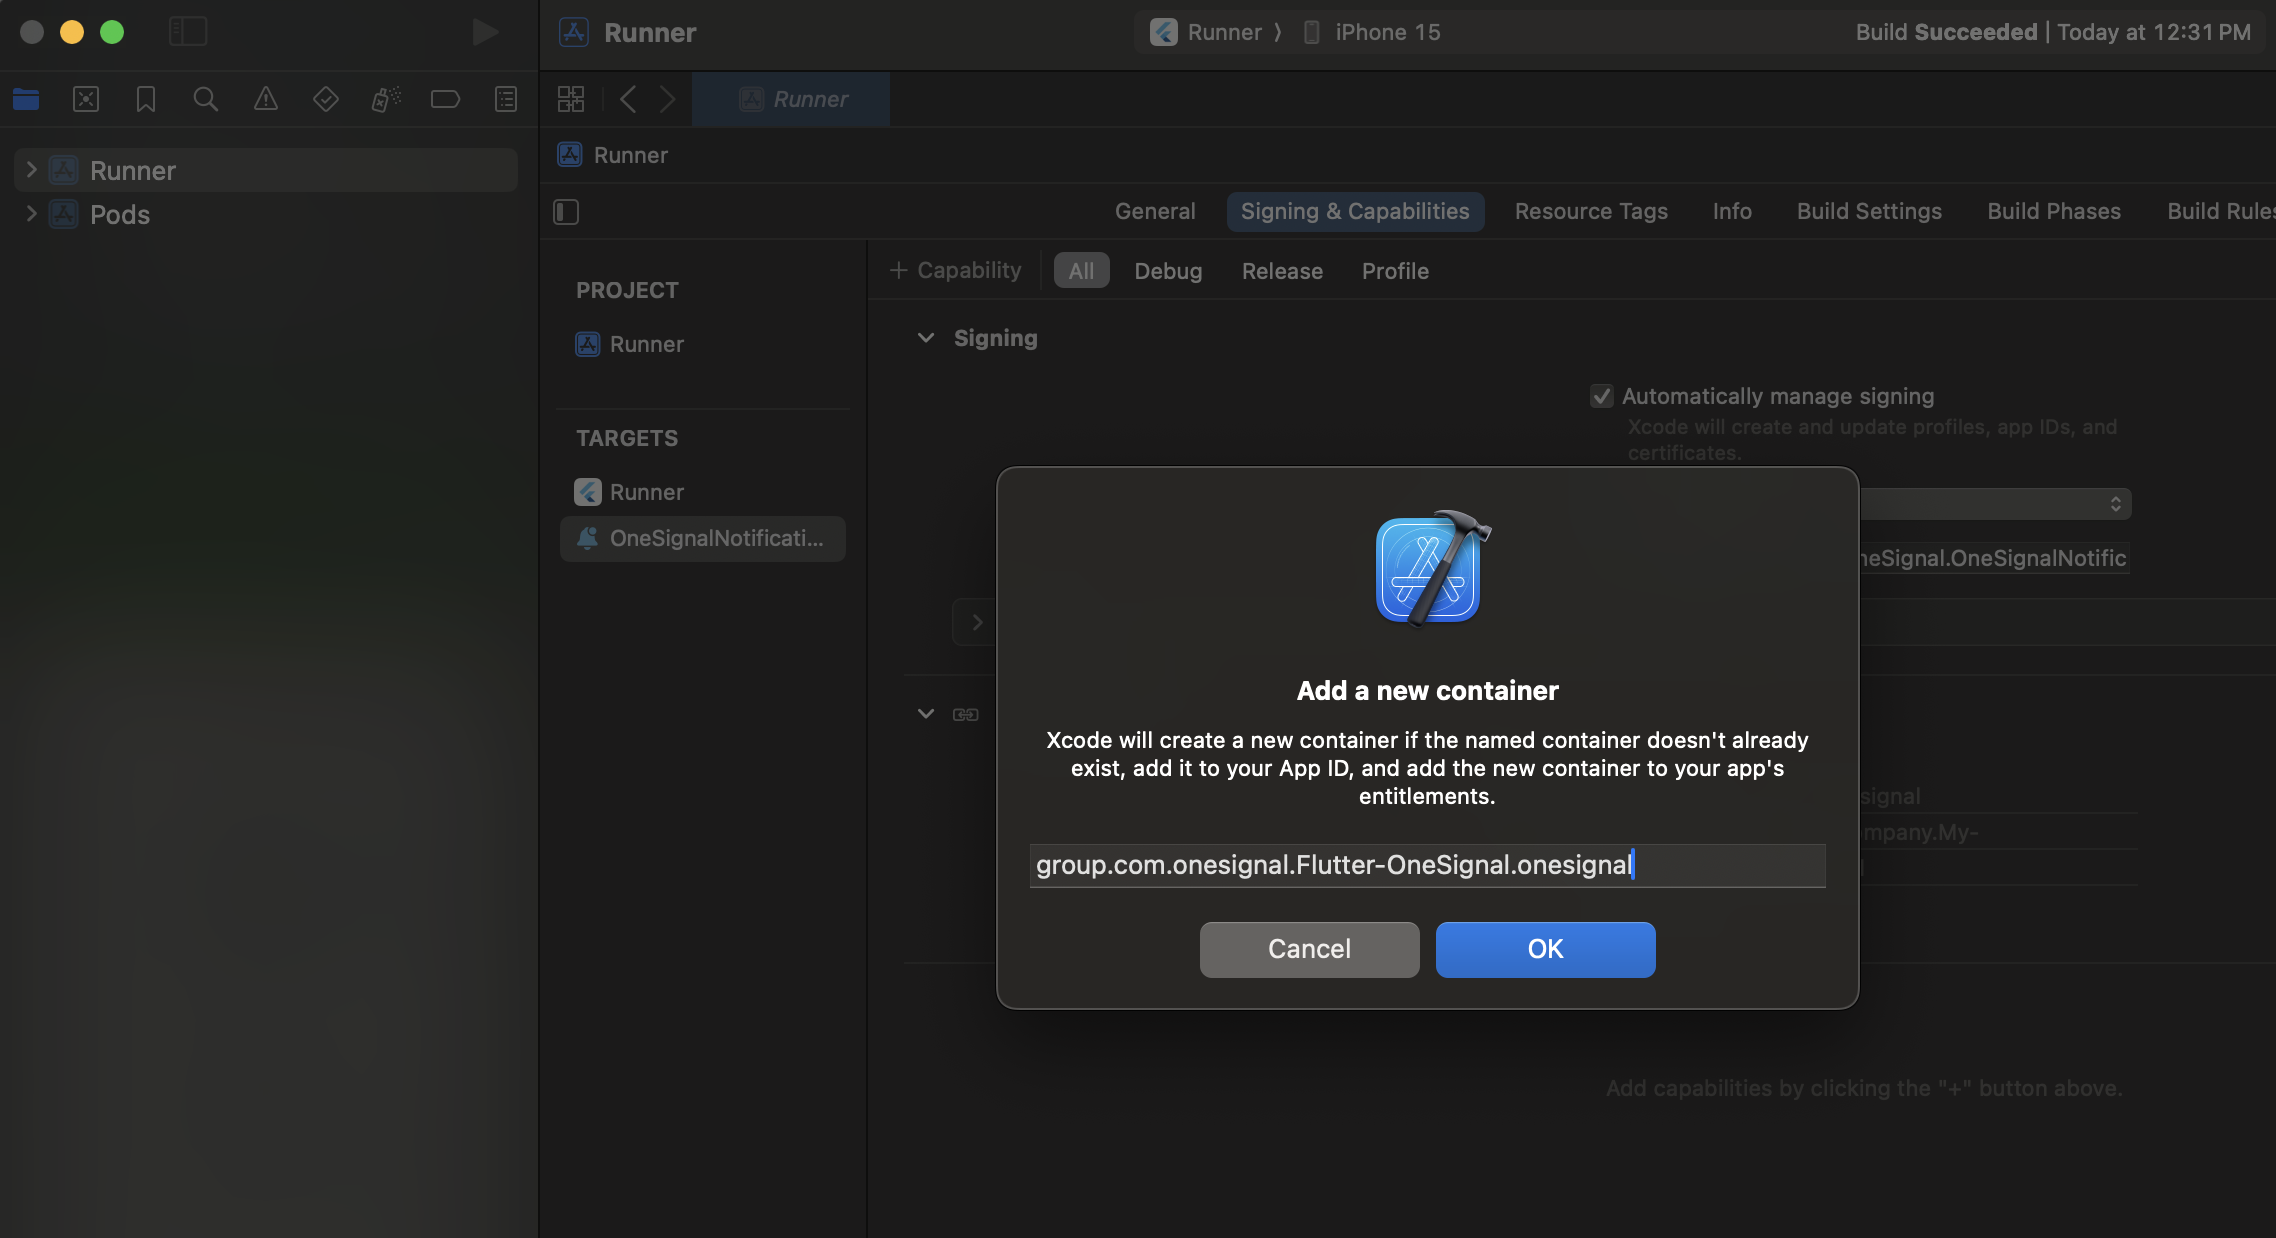
 Dentro de **App Groups**, clique no botão **+**.
Defina o container App Groups como `group.YOUR_BUNDLE_IDENTIFIER.onesignal` onde `YOUR_BUNDLE_IDENTIFIER` é o mesmo que o "Bundle Identifier" do seu Main Application.
Dentro de **App Groups**, clique no botão **+**.
Defina o container App Groups como `group.YOUR_BUNDLE_IDENTIFIER.onesignal` onde `YOUR_BUNDLE_IDENTIFIER` é o mesmo que o "Bundle Identifier" do seu Main Application.
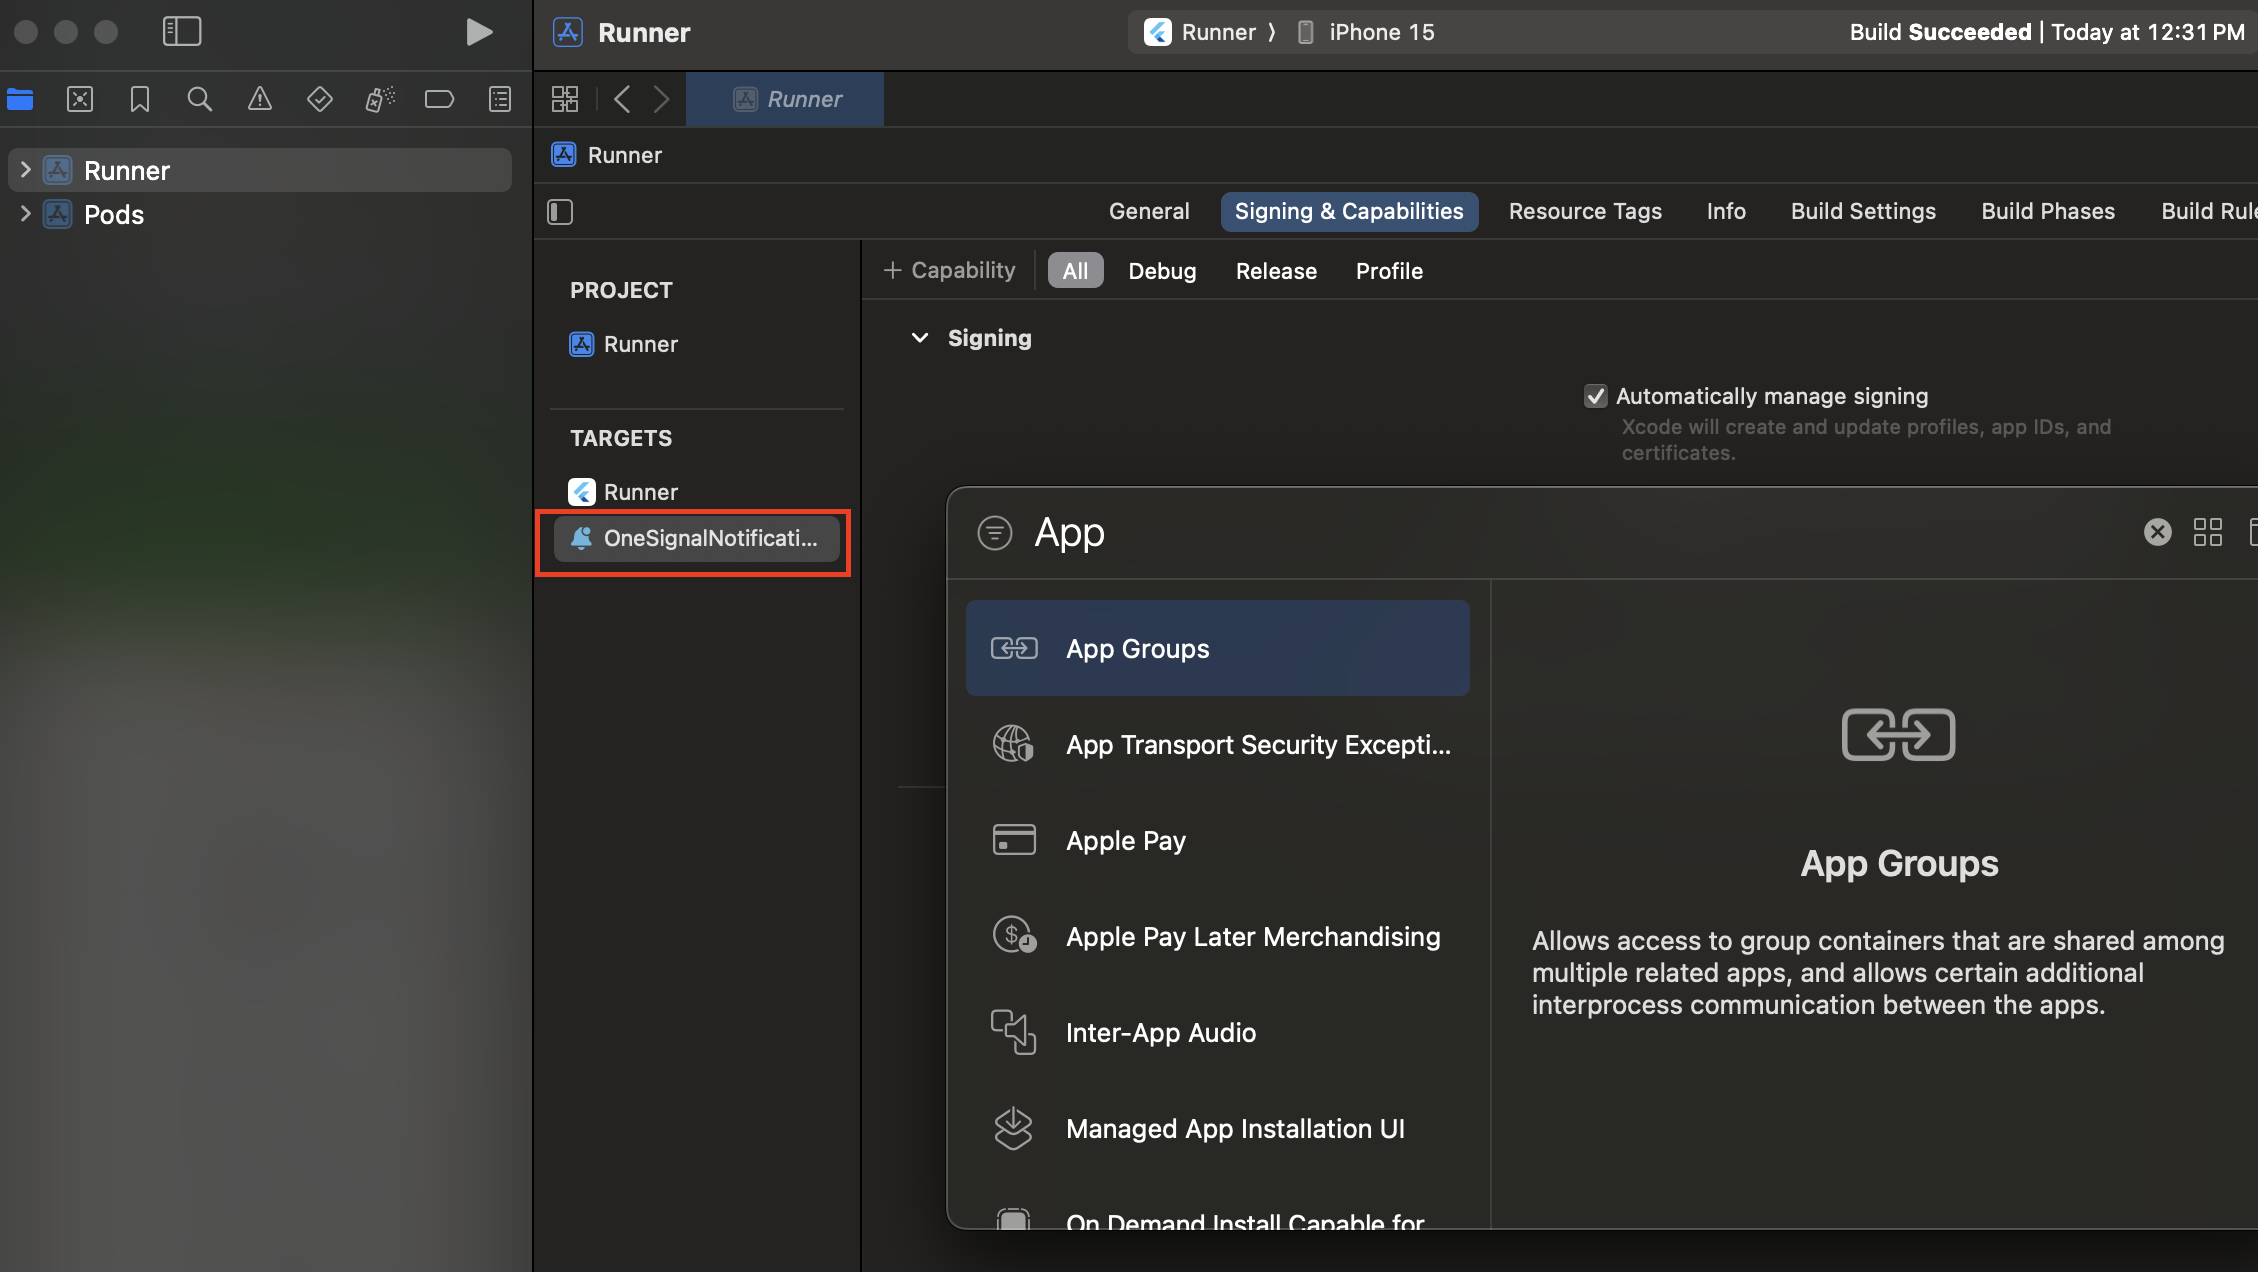
 Pressione **OK** e repita para o OneSignalNotificationServiceExtension Target.
Selecione o **OneSignalNotificationServiceExtension Target > Signing & Capabilities > + Capability > App Groups**.
Pressione **OK** e repita para o OneSignalNotificationServiceExtension Target.
Selecione o **OneSignalNotificationServiceExtension Target > Signing & Capabilities > + Capability > App Groups**.
 Dentro de **App Groups**, clique no botão **+**.
Defina o container App Groups como `group.YOUR_BUNDLE_IDENTIFIER.onesignal` onde `YOUR_BUNDLE_IDENTIFIER` é o mesmo que **o "Bundle Identifier" do seu Main Application**.
**NÃO INCLUA** `OneSignalNotificationServiceExtension`.
Dentro de **App Groups**, clique no botão **+**.
Defina o container App Groups como `group.YOUR_BUNDLE_IDENTIFIER.onesignal` onde `YOUR_BUNDLE_IDENTIFIER` é o mesmo que **o "Bundle Identifier" do seu Main Application**.
**NÃO INCLUA** `OneSignalNotificationServiceExtension`.
 Esta etapa só é necessária se você **não** quiser usar o nome padrão do app group (que é `group.{your_bundle_id}.onesignal`).
Abra seu arquivo `Info.plist` e adicione uma nova `OneSignal_app_groups_key` como tipo `String`.
Insira o nome do grupo que você marcou na última etapa como seu valor.
Certifique-se de fazer o mesmo para o `Info.plist` na pasta `OneSignalNotificationServiceExtension`.
#### Adicionar SDK OneSignal ao OneSignalNotificationServiceExtension
Atualize seu `ios/Podfile` para incluir:
```ruby Podfile theme={null}
target 'OneSignalNotificationServiceExtension' do
pod 'OneSignalXCFramework', '>= 5.0.0', '< 6.0'
end
```
```ruby Example theme={null}
target 'MyApp' do
config = use_native_modules!
use_react_native!(
:path => config[:reactNativePath],
# An absolute path to your application root.
:app_path => "#{Pod::Config.instance.installation_root}/.."
)
post_install do |installer|
# https://github.com/facebook/react-native/blob/main/packages/react-native/scripts/react_native_pods.rb#L197-L202
react_native_post_install(
installer,
config[:reactNativePath],
:mac_catalyst_enabled => false,
# :ccache_enabled => true
)
end
end
target 'OneSignalNotificationServiceExtension' do
pod 'OneSignalXCFramework', '>= 5.0.0', '< 6.0'
end
```
No topo do seu `Podfile`, certifique-se de ter `platform :ios, '11.0'`. - Ou uma versão mais recente do iOS se seu aplicativo exigir.
```Text Podfile theme={null}
# Descomente esta linha para definir uma plataforma global para seu projeto
platform :ios, '11.0'
```
Abra o terminal, faça `cd` para o diretório `ios` e execute `pod install`.
Se você vir o erro abaixo, adicione `use_frameworks!` no topo do seu podfile e tente novamente.
```
- Runner (true) and OneSignalNotificationServiceExtension (false) do not both set use_frameworks!.
```
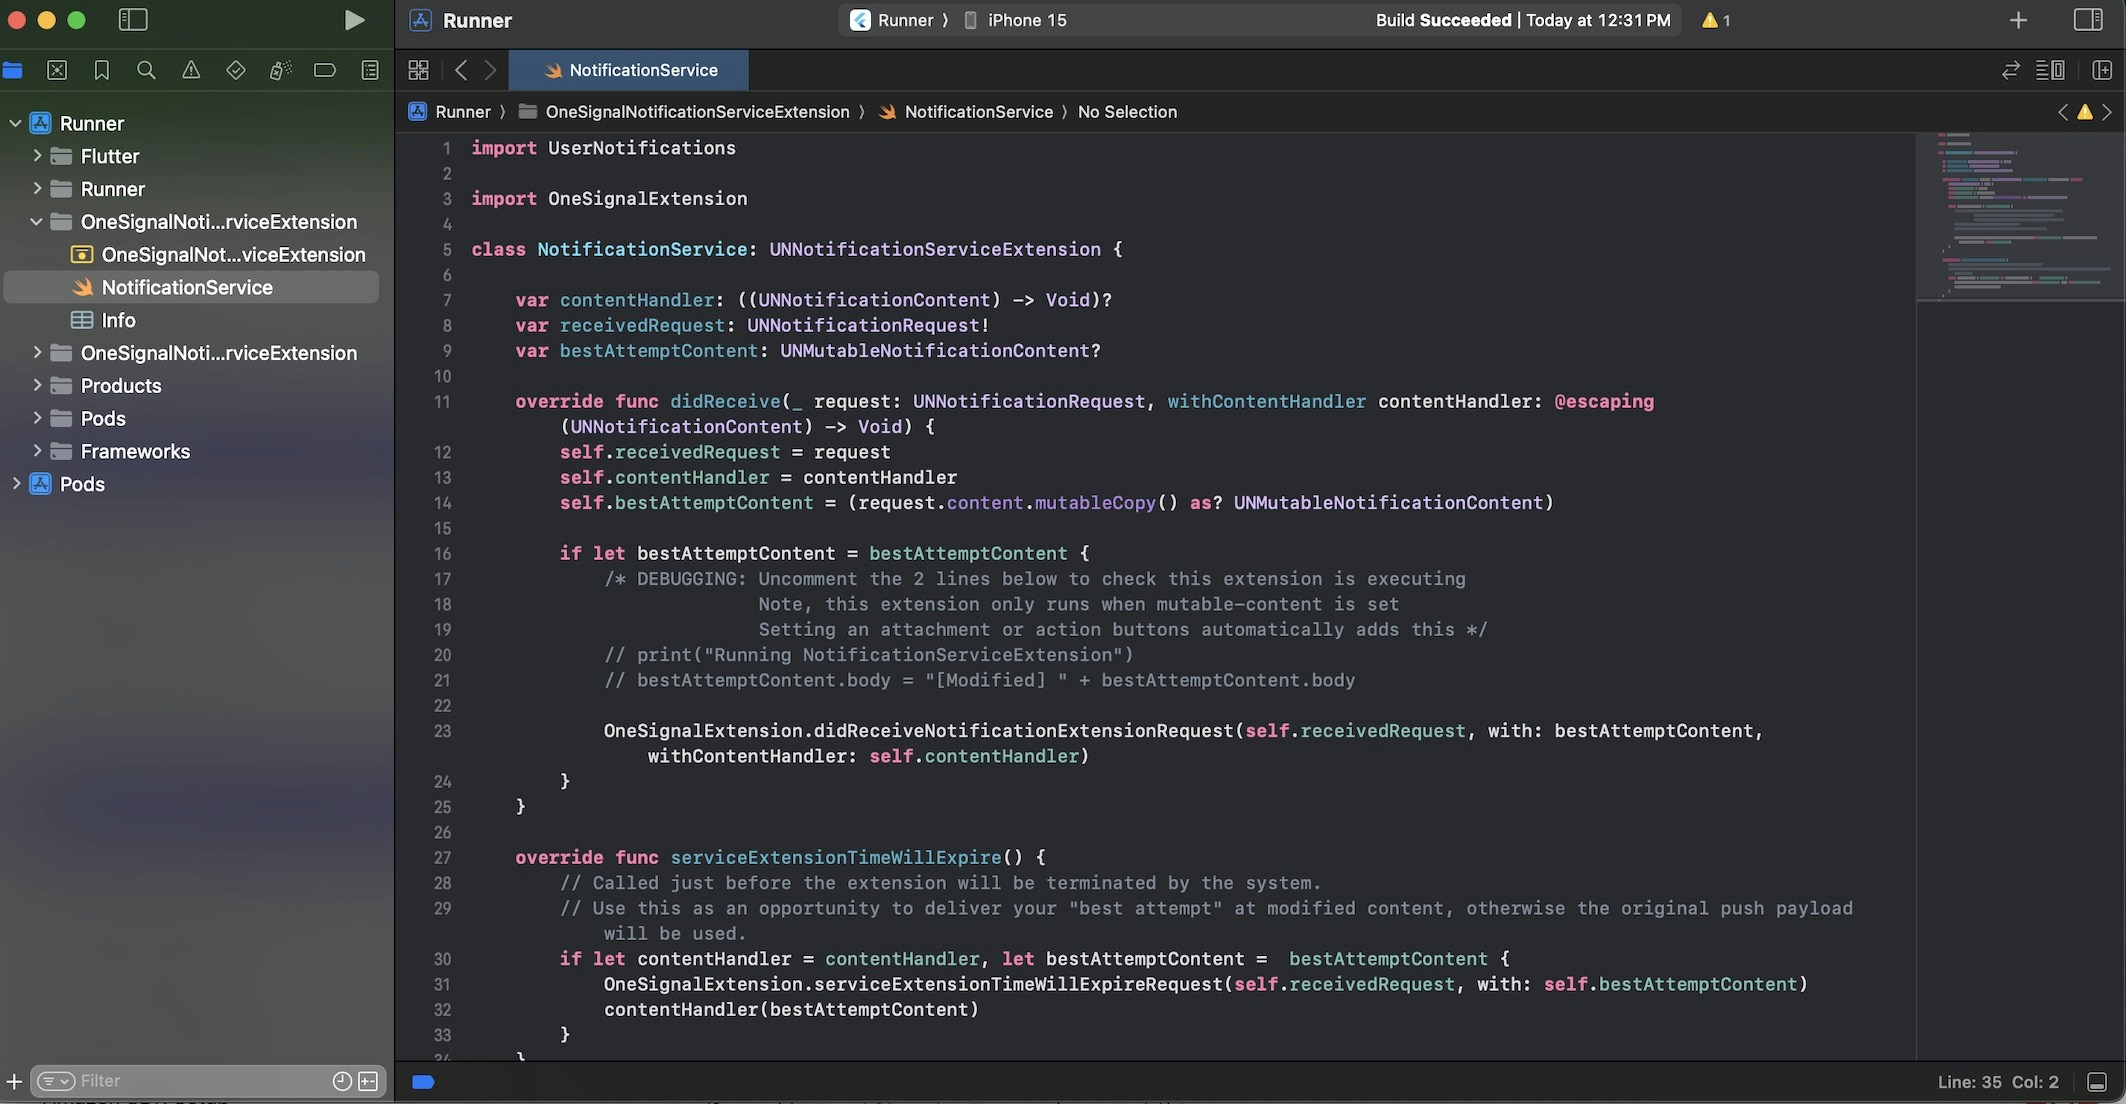
#### Código do OneSignalNotificationServiceExtension
No navegador de projetos do Xcode, selecione a **pasta OneSignalNotificationServiceExtension** e abra o arquivo `NotificationService.m` ou `NotificationService.swift`.
Substitua todo o conteúdo do arquivo pelo seguinte código.
```swift Swift theme={null}
import UserNotifications
import OneSignalExtension
class NotificationService: UNNotificationServiceExtension {
var contentHandler: ((UNNotificationContent) -> Void)?
var receivedRequest: UNNotificationRequest!
var bestAttemptContent: UNMutableNotificationContent?
override func didReceive(_ request: UNNotificationRequest, withContentHandler contentHandler: @escaping (UNNotificationContent) -> Void) {
self.receivedRequest = request
self.contentHandler = contentHandler
self.bestAttemptContent = (request.content.mutableCopy() as? UNMutableNotificationContent)
if let bestAttemptContent = bestAttemptContent {
/* DEPURAÇÃO: Descomente as 2 linhas abaixo para verificar se esta extensão está em execução
Nota: esta extensão só é executada quando mutable-content está definido
Definir um anexo ou botões de ação adiciona isso automaticamente */
// print("Running NotificationServiceExtension")
// bestAttemptContent.body = "[Modified] " + bestAttemptContent.body
OneSignalExtension.didReceiveNotificationExtensionRequest(self.receivedRequest, with: bestAttemptContent, withContentHandler: self.contentHandler)
}
}
override func serviceExtensionTimeWillExpire() {
// Chamado pouco antes de a extensão ser terminada pelo sistema.
// Use isso como uma oportunidade para entregar sua "melhor tentativa" de conteúdo modificado, caso contrário, a carga push original será usada.
if let contentHandler = contentHandler, let bestAttemptContent = bestAttemptContent {
OneSignalExtension.serviceExtensionTimeWillExpireRequest(self.receivedRequest, with: self.bestAttemptContent)
contentHandler(bestAttemptContent)
}
}
}
```
```c objective-c theme={null}
#import
#import "NotificationService.h"
@interface NotificationService ()
@property (nonatomic, strong) void (^contentHandler)(UNNotificationContent *contentToDeliver);
@property (nonatomic, strong) UNNotificationRequest *receivedRequest;
@property (nonatomic, strong) UNMutableNotificationContent *bestAttemptContent;
@end
@implementation NotificationService
- (void)didReceiveNotificationRequest:(UNNotificationRequest *)request withContentHandler:(void (^)(UNNotificationContent * _Nonnull))contentHandler {
self.receivedRequest = request;
self.contentHandler = contentHandler;
self.bestAttemptContent = [request.content mutableCopy];
/* DEPURAÇÃO: Descomente as 2 linhas abaixo e comente a acima para garantir que esta extensão está em execução
Nota: esta extensão só é executada quando mutable-content está definido
Definir um anexo ou botões de ação adiciona isso automaticamente */
// NSLog(@"Running NotificationServiceExtension");
// self.bestAttemptContent.body = [@"[Modified] " stringByAppendingString:self.bestAttemptContent.body];
[OneSignalExtension didReceiveNotificationExtensionRequest:self.receivedRequest
withMutableNotificationContent:self.bestAttemptContent
withContentHandler:self.contentHandler];
}
- (void)serviceExtensionTimeWillExpire {
// Chamado pouco antes de a extensão ser terminada pelo sistema.
// Use isso como uma oportunidade para entregar sua "melhor tentativa" de conteúdo modificado, caso contrário, a carga push original será usada.
[OneSignalExtension serviceExtensionTimeWillExpireRequest:self.receivedRequest withMutableNotificationContent:self.bestAttemptContent];
self.contentHandler(self.bestAttemptContent);
}
@end
```
Esta etapa só é necessária se você **não** quiser usar o nome padrão do app group (que é `group.{your_bundle_id}.onesignal`).
Abra seu arquivo `Info.plist` e adicione uma nova `OneSignal_app_groups_key` como tipo `String`.
Insira o nome do grupo que você marcou na última etapa como seu valor.
Certifique-se de fazer o mesmo para o `Info.plist` na pasta `OneSignalNotificationServiceExtension`.
#### Adicionar SDK OneSignal ao OneSignalNotificationServiceExtension
Atualize seu `ios/Podfile` para incluir:
```ruby Podfile theme={null}
target 'OneSignalNotificationServiceExtension' do
pod 'OneSignalXCFramework', '>= 5.0.0', '< 6.0'
end
```
```ruby Example theme={null}
target 'MyApp' do
config = use_native_modules!
use_react_native!(
:path => config[:reactNativePath],
# An absolute path to your application root.
:app_path => "#{Pod::Config.instance.installation_root}/.."
)
post_install do |installer|
# https://github.com/facebook/react-native/blob/main/packages/react-native/scripts/react_native_pods.rb#L197-L202
react_native_post_install(
installer,
config[:reactNativePath],
:mac_catalyst_enabled => false,
# :ccache_enabled => true
)
end
end
target 'OneSignalNotificationServiceExtension' do
pod 'OneSignalXCFramework', '>= 5.0.0', '< 6.0'
end
```
No topo do seu `Podfile`, certifique-se de ter `platform :ios, '11.0'`. - Ou uma versão mais recente do iOS se seu aplicativo exigir.
```Text Podfile theme={null}
# Descomente esta linha para definir uma plataforma global para seu projeto
platform :ios, '11.0'
```
Abra o terminal, faça `cd` para o diretório `ios` e execute `pod install`.
Se você vir o erro abaixo, adicione `use_frameworks!` no topo do seu podfile e tente novamente.
```
- Runner (true) and OneSignalNotificationServiceExtension (false) do not both set use_frameworks!.
```
#### Código do OneSignalNotificationServiceExtension
No navegador de projetos do Xcode, selecione a **pasta OneSignalNotificationServiceExtension** e abra o arquivo `NotificationService.m` ou `NotificationService.swift`.
Substitua todo o conteúdo do arquivo pelo seguinte código.
```swift Swift theme={null}
import UserNotifications
import OneSignalExtension
class NotificationService: UNNotificationServiceExtension {
var contentHandler: ((UNNotificationContent) -> Void)?
var receivedRequest: UNNotificationRequest!
var bestAttemptContent: UNMutableNotificationContent?
override func didReceive(_ request: UNNotificationRequest, withContentHandler contentHandler: @escaping (UNNotificationContent) -> Void) {
self.receivedRequest = request
self.contentHandler = contentHandler
self.bestAttemptContent = (request.content.mutableCopy() as? UNMutableNotificationContent)
if let bestAttemptContent = bestAttemptContent {
/* DEPURAÇÃO: Descomente as 2 linhas abaixo para verificar se esta extensão está em execução
Nota: esta extensão só é executada quando mutable-content está definido
Definir um anexo ou botões de ação adiciona isso automaticamente */
// print("Running NotificationServiceExtension")
// bestAttemptContent.body = "[Modified] " + bestAttemptContent.body
OneSignalExtension.didReceiveNotificationExtensionRequest(self.receivedRequest, with: bestAttemptContent, withContentHandler: self.contentHandler)
}
}
override func serviceExtensionTimeWillExpire() {
// Chamado pouco antes de a extensão ser terminada pelo sistema.
// Use isso como uma oportunidade para entregar sua "melhor tentativa" de conteúdo modificado, caso contrário, a carga push original será usada.
if let contentHandler = contentHandler, let bestAttemptContent = bestAttemptContent {
OneSignalExtension.serviceExtensionTimeWillExpireRequest(self.receivedRequest, with: self.bestAttemptContent)
contentHandler(bestAttemptContent)
}
}
}
```
```c objective-c theme={null}
#import
#import "NotificationService.h"
@interface NotificationService ()
@property (nonatomic, strong) void (^contentHandler)(UNNotificationContent *contentToDeliver);
@property (nonatomic, strong) UNNotificationRequest *receivedRequest;
@property (nonatomic, strong) UNMutableNotificationContent *bestAttemptContent;
@end
@implementation NotificationService
- (void)didReceiveNotificationRequest:(UNNotificationRequest *)request withContentHandler:(void (^)(UNNotificationContent * _Nonnull))contentHandler {
self.receivedRequest = request;
self.contentHandler = contentHandler;
self.bestAttemptContent = [request.content mutableCopy];
/* DEPURAÇÃO: Descomente as 2 linhas abaixo e comente a acima para garantir que esta extensão está em execução
Nota: esta extensão só é executada quando mutable-content está definido
Definir um anexo ou botões de ação adiciona isso automaticamente */
// NSLog(@"Running NotificationServiceExtension");
// self.bestAttemptContent.body = [@"[Modified] " stringByAppendingString:self.bestAttemptContent.body];
[OneSignalExtension didReceiveNotificationExtensionRequest:self.receivedRequest
withMutableNotificationContent:self.bestAttemptContent
withContentHandler:self.contentHandler];
}
- (void)serviceExtensionTimeWillExpire {
// Chamado pouco antes de a extensão ser terminada pelo sistema.
// Use isso como uma oportunidade para entregar sua "melhor tentativa" de conteúdo modificado, caso contrário, a carga push original será usada.
[OneSignalExtension serviceExtensionTimeWillExpireRequest:self.receivedRequest withMutableNotificationContent:self.bestAttemptContent];
self.contentHandler(self.bestAttemptContent);
}
@end
```
 ***
## Testing the OneSignal SDK integration
This guide helps you verify that your OneSignal SDK integration is working correctly by testing push notifications, subscription registration, and in-app messaging.
If you are testing with an Android emulator, it should start with a cold boot.
1. Go to **Device Manager** in Android Studio.
2. Select your emulator device and click **Edit**.
3. Go to **Additional Settings** or **More**.
4. Set the **Boot option** to **Cold Boot**.
5. Save changes and restart the emulator.
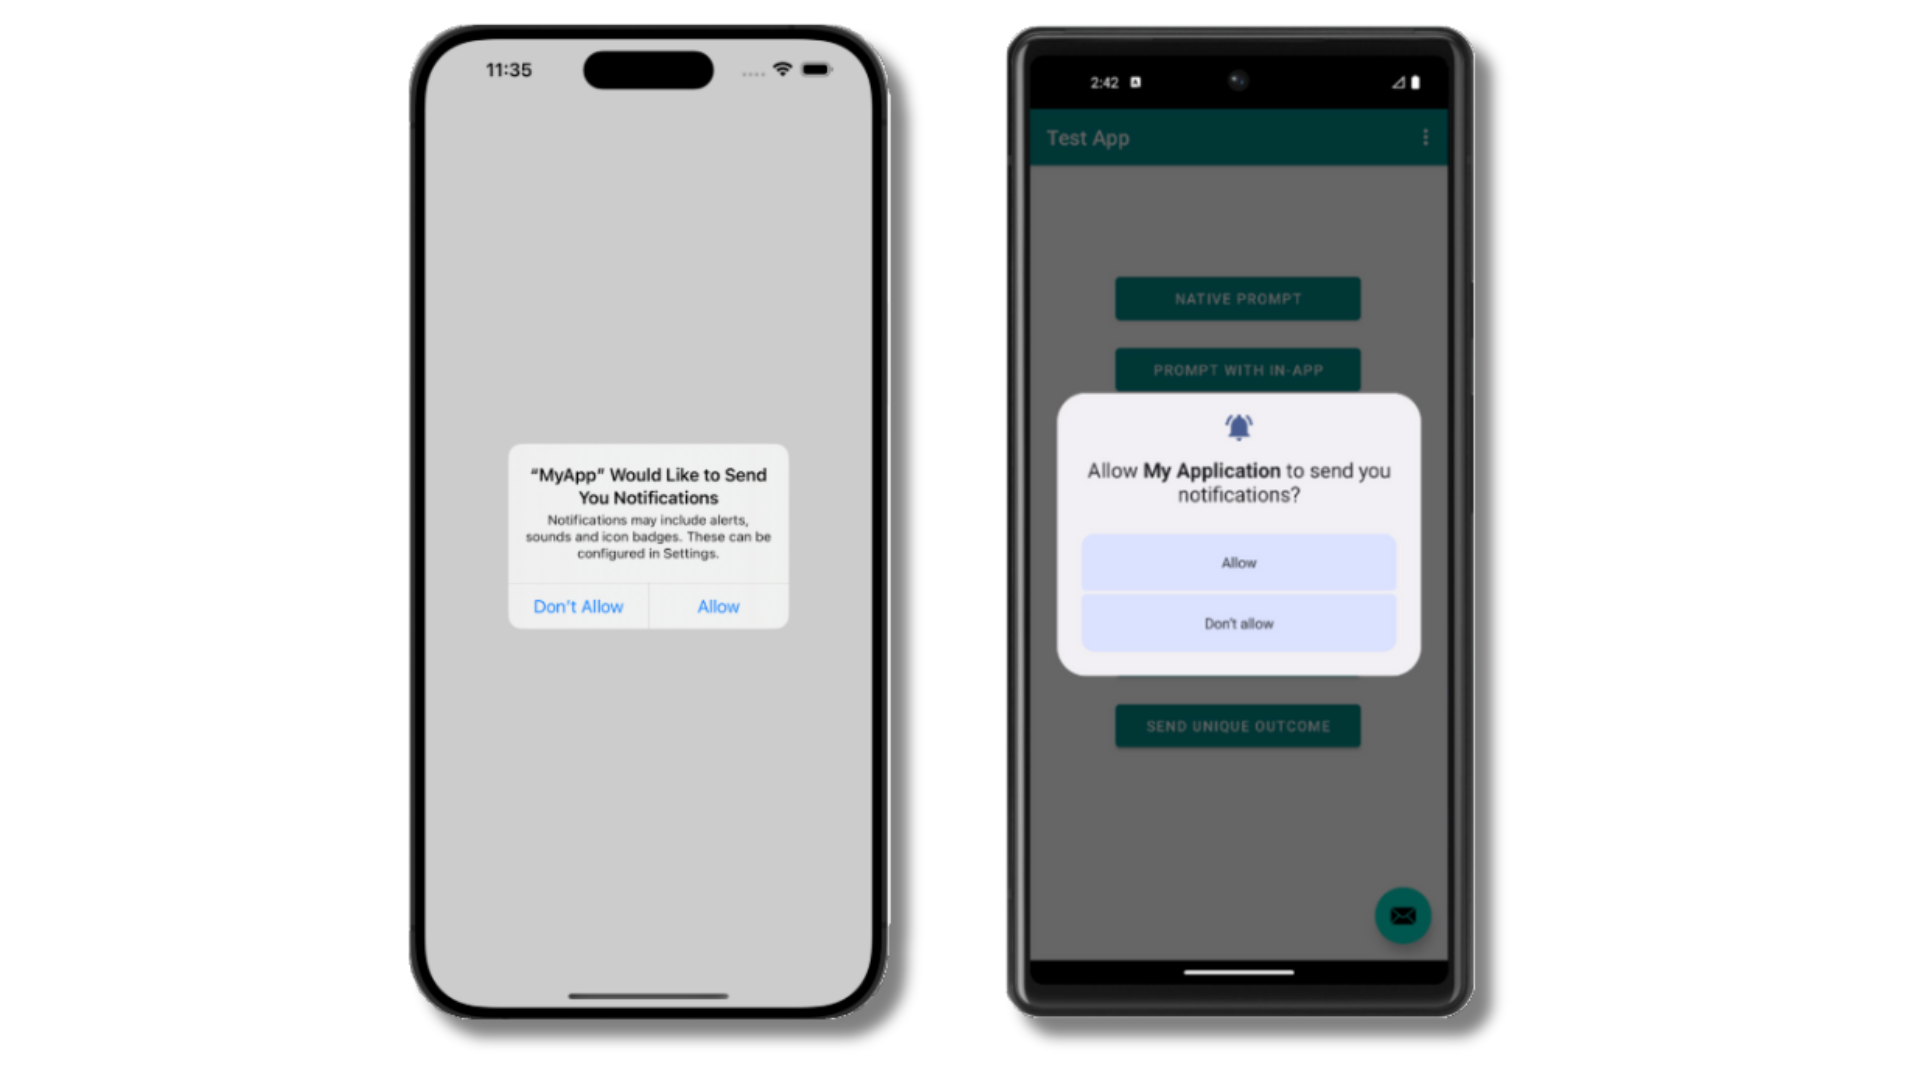
### Check mobile subscriptions
The native push permission prompt should appear automatically if you added the `requestPermission` method during initialization.
***
## Testing the OneSignal SDK integration
This guide helps you verify that your OneSignal SDK integration is working correctly by testing push notifications, subscription registration, and in-app messaging.
If you are testing with an Android emulator, it should start with a cold boot.
1. Go to **Device Manager** in Android Studio.
2. Select your emulator device and click **Edit**.
3. Go to **Additional Settings** or **More**.
4. Set the **Boot option** to **Cold Boot**.
5. Save changes and restart the emulator.
### Check mobile subscriptions
The native push permission prompt should appear automatically if you added the `requestPermission` method during initialization.
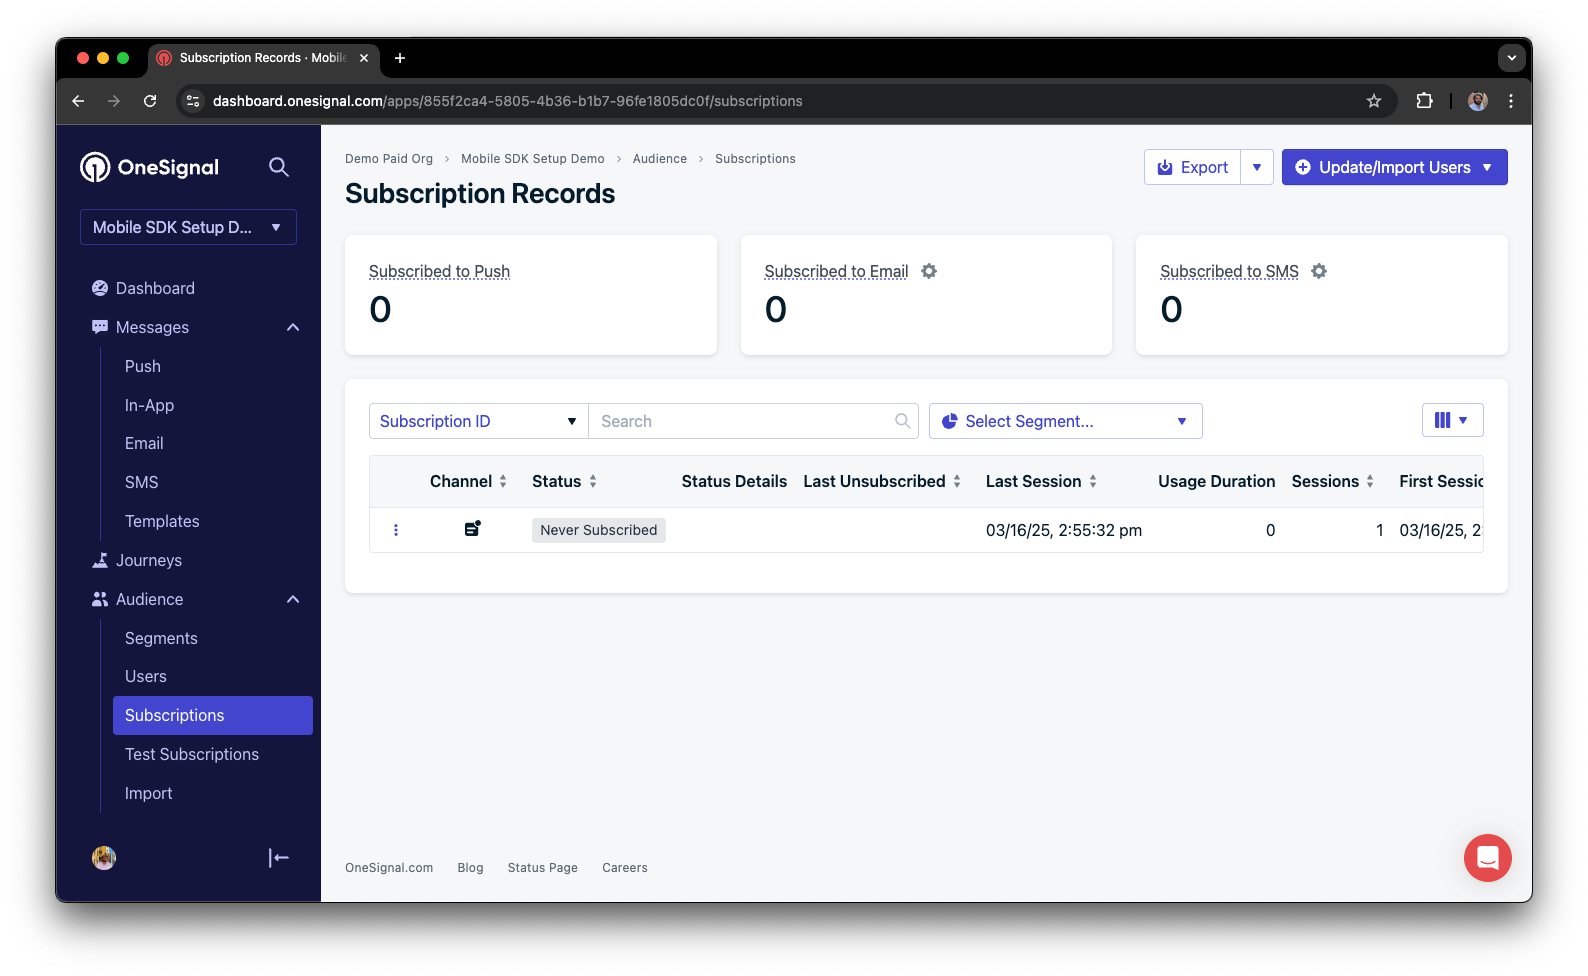
 Before accepting the prompt, check the OneSignal dashboard:
* Go to **Audience > Subscriptions**.
* You should see a new entry with the status "Never Subscribed".
Before accepting the prompt, check the OneSignal dashboard:
* Go to **Audience > Subscriptions**.
* You should see a new entry with the status "Never Subscribed".
 The subscription's status should now show **Subscribed**.
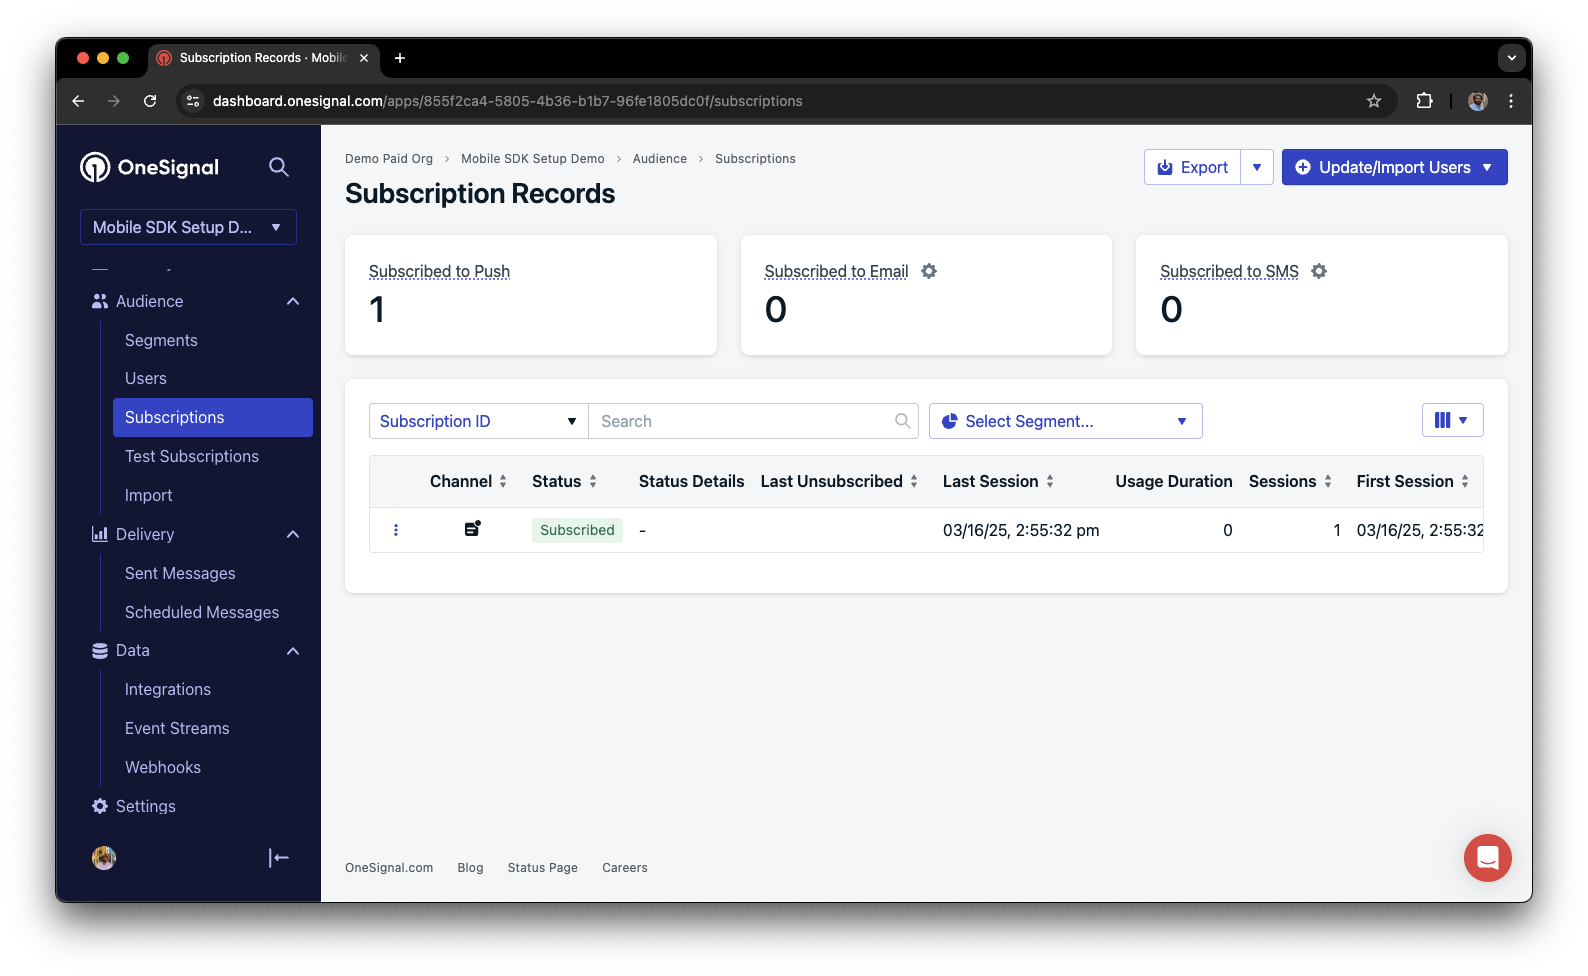 You have successfully created a [mobile subscription](/docs/en/subscriptions).
Mobile subscriptions are created when users first open your app on a device or if they uninstall and reinstall your app on the same device.
### Set up test users
test users are helpful for testing a push notification before sending a message.
In the dashboard, next to the subscription, click the **Options (three dots)** button and select **Add to Test Users**.
You have successfully created a [mobile subscription](/docs/en/subscriptions).
Mobile subscriptions are created when users first open your app on a device or if they uninstall and reinstall your app on the same device.
### Set up test users
test users are helpful for testing a push notification before sending a message.
In the dashboard, next to the subscription, click the **Options (three dots)** button and select **Add to Test Users**.
 Name the subscription so you can easily identify your device later in the **test users tab**.
Go to **Audience > Segments > New Segment**.
Name the segment `Test Users` (the name is important because it will be used later).
Name the subscription so you can easily identify your device later in the **test users tab**.
Go to **Audience > Segments > New Segment**.
Name the segment `Test Users` (the name is important because it will be used later).
 You have successfully created a segment of test users.
We can now test sending messages to this individual device and groups of test users.
### Send test push via API
In your OneSignal dashboard, go to **Settings > [Keys & IDs](/docs/en/keys-and-ids)**.
Replace `YOUR_APP_API_KEY` and `YOUR_APP_ID` in the code below with your actual keys. This code uses the `Test Users` segment we created earlier.
```curl theme={null}
curl -X \
POST --url 'https://api.onesignal.com/notifications' \
--header 'content-type: application/json; charset=utf-8' \
--header 'authorization: Key YOUR_APP_API_KEY' \
--data \
'{
"app_id": "YOUR_APP_ID",
"target_channel": "push",
"name": "Testing basic setup",
"headings": {
"en": "👋"
},
"contents": {
"en": "Hello world!"
},
"included_segments": [
"Test Users"
],
"ios_attachments": {
"onesignal_logo": "https://avatars.githubusercontent.com/u/11823027?s=200&v=4"
},
"big_picture": "https://avatars.githubusercontent.com/u/11823027?s=200&v=4"
}'
```
Run the code in your terminal.
If all setup steps were completed successfully, the test users should receive a notification with an image included:
You have successfully created a segment of test users.
We can now test sending messages to this individual device and groups of test users.
### Send test push via API
In your OneSignal dashboard, go to **Settings > [Keys & IDs](/docs/en/keys-and-ids)**.
Replace `YOUR_APP_API_KEY` and `YOUR_APP_ID` in the code below with your actual keys. This code uses the `Test Users` segment we created earlier.
```curl theme={null}
curl -X \
POST --url 'https://api.onesignal.com/notifications' \
--header 'content-type: application/json; charset=utf-8' \
--header 'authorization: Key YOUR_APP_API_KEY' \
--data \
'{
"app_id": "YOUR_APP_ID",
"target_channel": "push",
"name": "Testing basic setup",
"headings": {
"en": "👋"
},
"contents": {
"en": "Hello world!"
},
"included_segments": [
"Test Users"
],
"ios_attachments": {
"onesignal_logo": "https://avatars.githubusercontent.com/u/11823027?s=200&v=4"
},
"big_picture": "https://avatars.githubusercontent.com/u/11823027?s=200&v=4"
}'
```
Run the code in your terminal.
If all setup steps were completed successfully, the test users should receive a notification with an image included:
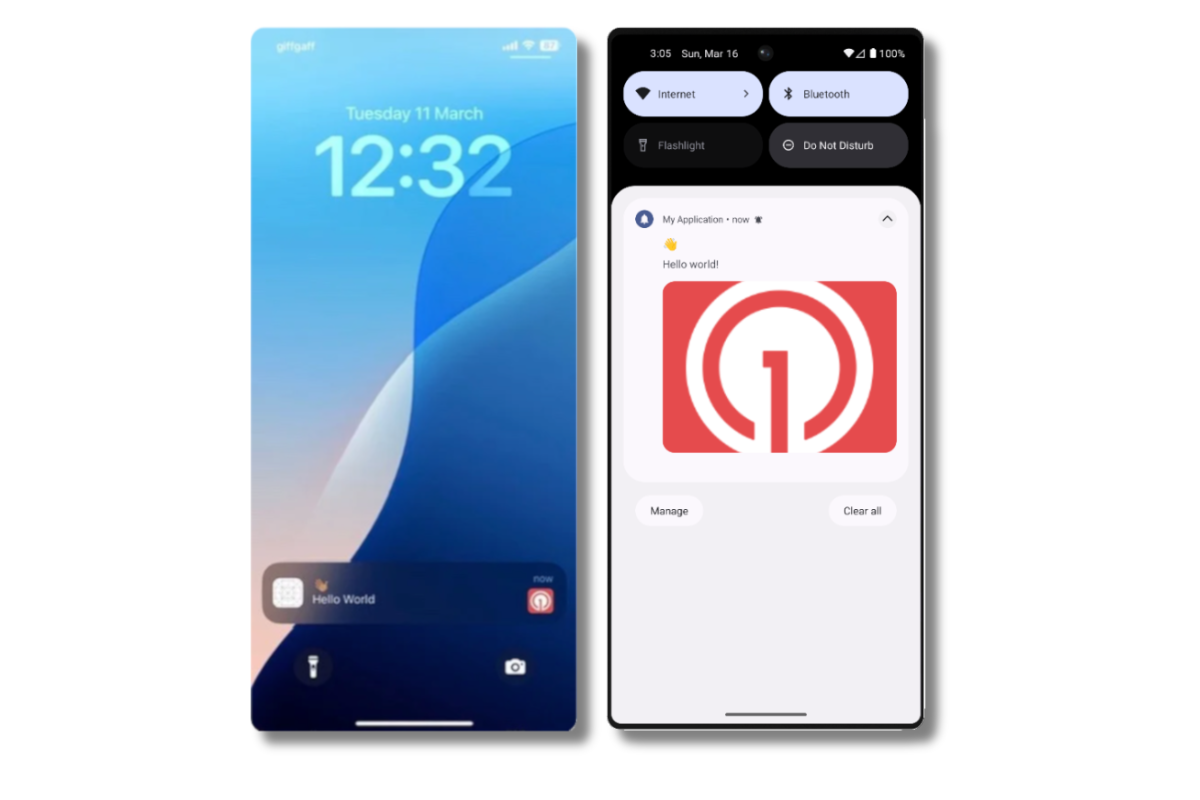 Images will appear small in the collapsed notification view. Expand the notification to see the full image.
In your dashboard, go to **Delivery > Sent Messages**, then click the message to view stats.
You should see the **confirmed** stat, meaning the device received the push.
You have successfully sent a notification via our API to a segment.
* No image received? Your [Notification Service Extension](#ios-setup) might be missing.
* No confirmed receipt? Review the troubleshooting guide [here](/docs/en/confirmed-delivery#troubleshooting-confirmed-delivery).
* Having issues? Copy-paste the api request and a log from start to finish of app launch into a `.txt` file. Then share both with `support@onesignal.com`.
### Send an in-app message
[In-app messages](/docs/en/in-app-messages-setup) let you communicate with users while they are using your app.
This is because users must meet the in-app audience criteria *before* a new session starts. In OneSignal, a new session starts when the user opens your app after it has been in the background or closed for at least 30 seconds. For more details, see our guide on [how in-app messages are displayed](/docs/en/in-app-messages-setup#how-are-iams-displayed%3F).
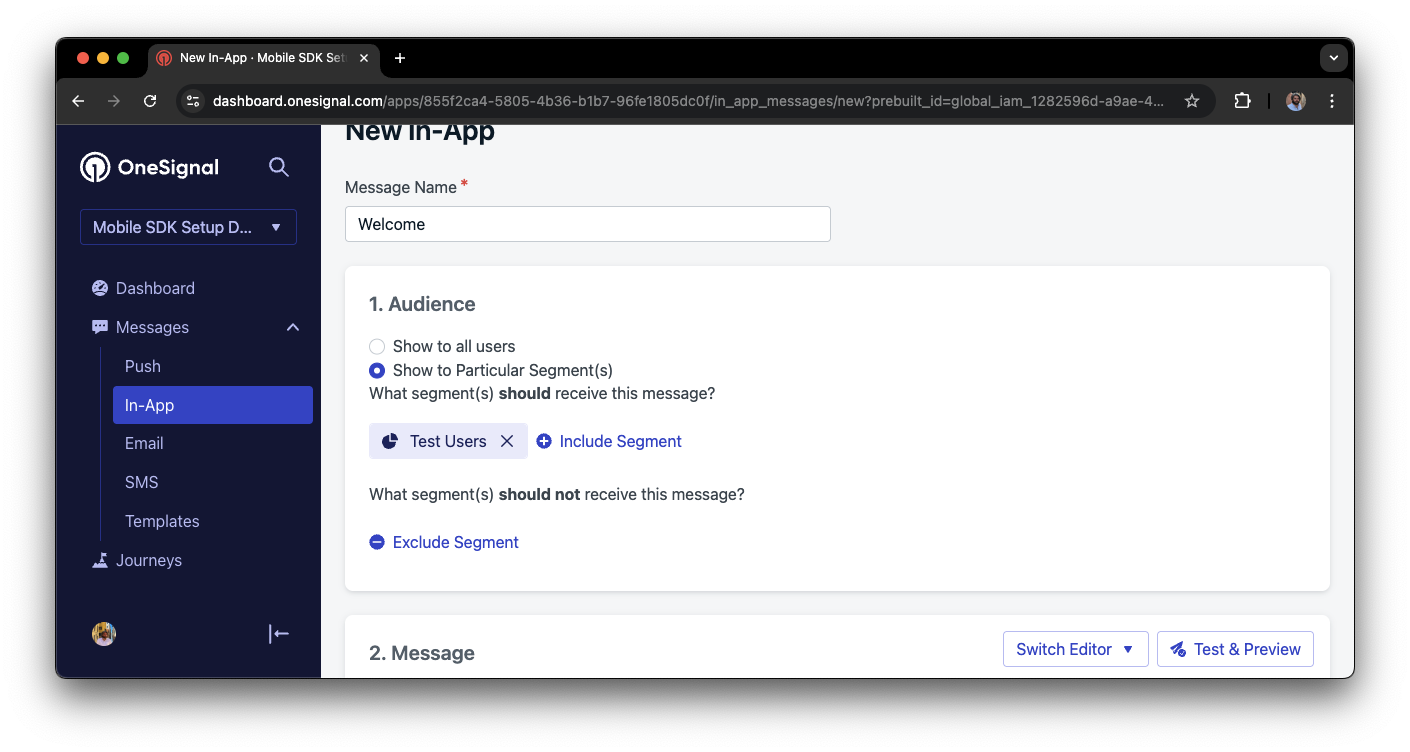
* In your OneSignal dashboard, navigate to **Messages > In-App > New In-App**.
* Find and select the **Welcome** message.
* Set your Audience as the **Test Users** segment we used previously.
Images will appear small in the collapsed notification view. Expand the notification to see the full image.
In your dashboard, go to **Delivery > Sent Messages**, then click the message to view stats.
You should see the **confirmed** stat, meaning the device received the push.
You have successfully sent a notification via our API to a segment.
* No image received? Your [Notification Service Extension](#ios-setup) might be missing.
* No confirmed receipt? Review the troubleshooting guide [here](/docs/en/confirmed-delivery#troubleshooting-confirmed-delivery).
* Having issues? Copy-paste the api request and a log from start to finish of app launch into a `.txt` file. Then share both with `support@onesignal.com`.
### Send an in-app message
[In-app messages](/docs/en/in-app-messages-setup) let you communicate with users while they are using your app.
This is because users must meet the in-app audience criteria *before* a new session starts. In OneSignal, a new session starts when the user opens your app after it has been in the background or closed for at least 30 seconds. For more details, see our guide on [how in-app messages are displayed](/docs/en/in-app-messages-setup#how-are-iams-displayed%3F).
* In your OneSignal dashboard, navigate to **Messages > In-App > New In-App**.
* Find and select the **Welcome** message.
* Set your Audience as the **Test Users** segment we used previously.
 Under **Schedule > How often do you want to show this message?** select **Every time trigger conditions are satisfied**.
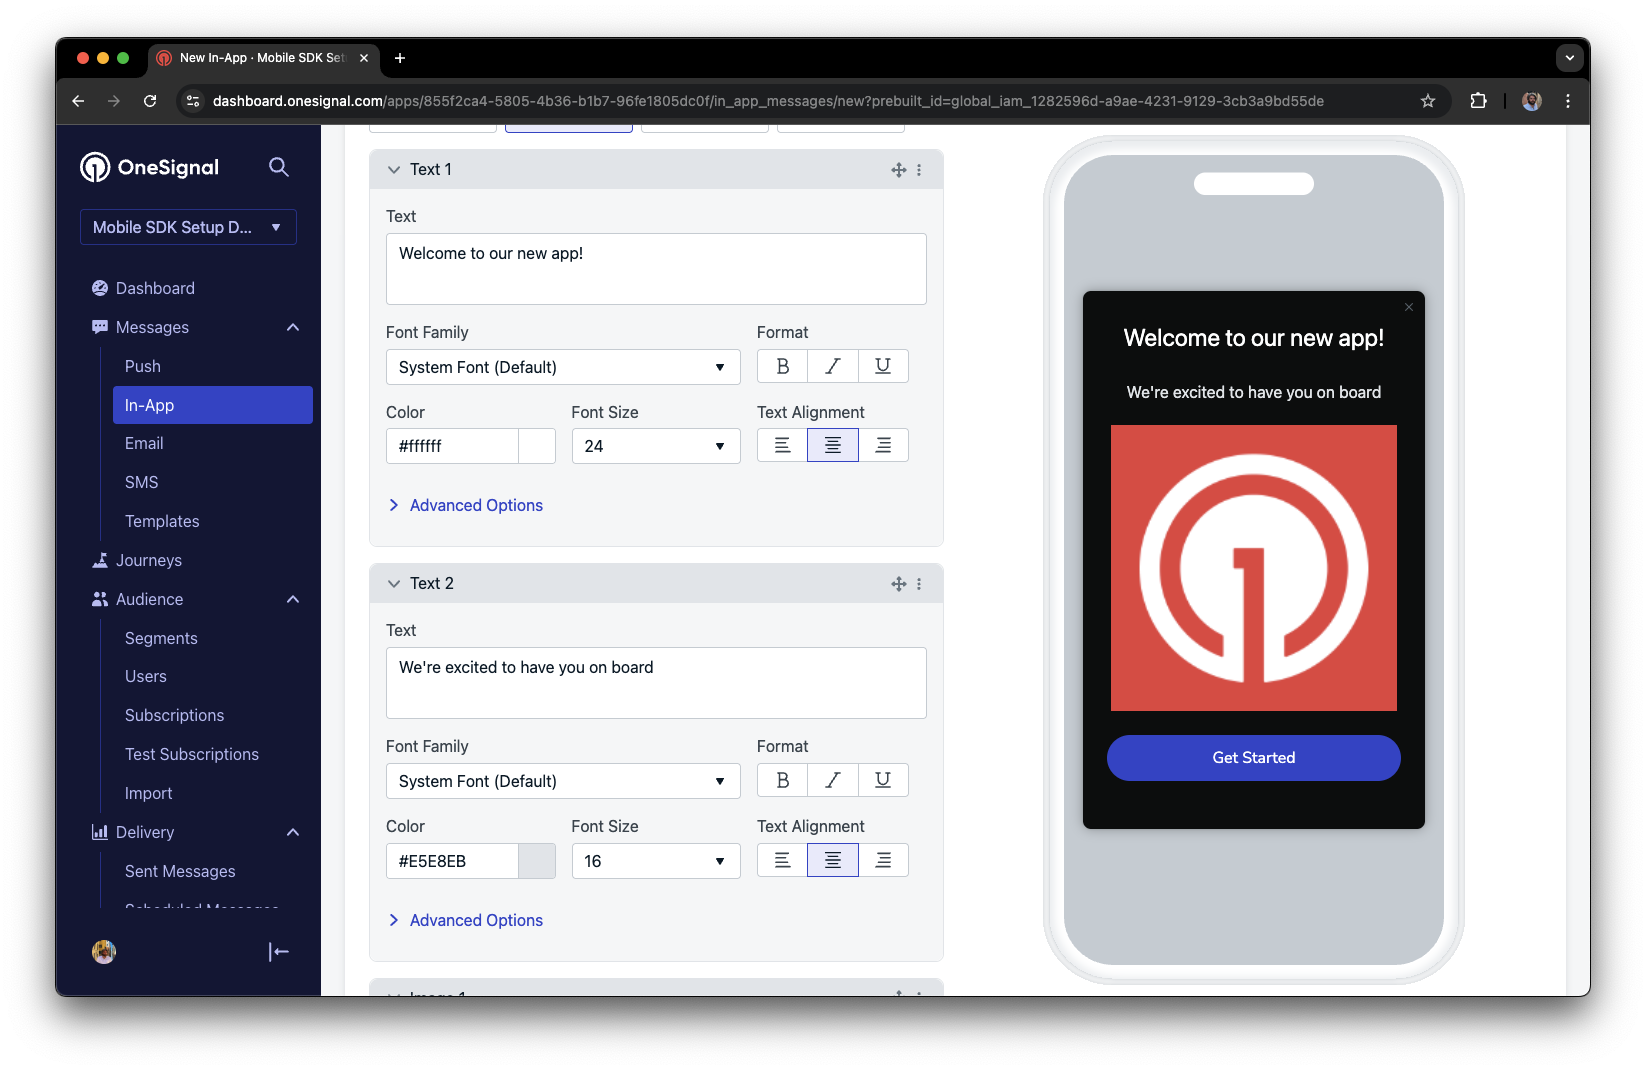
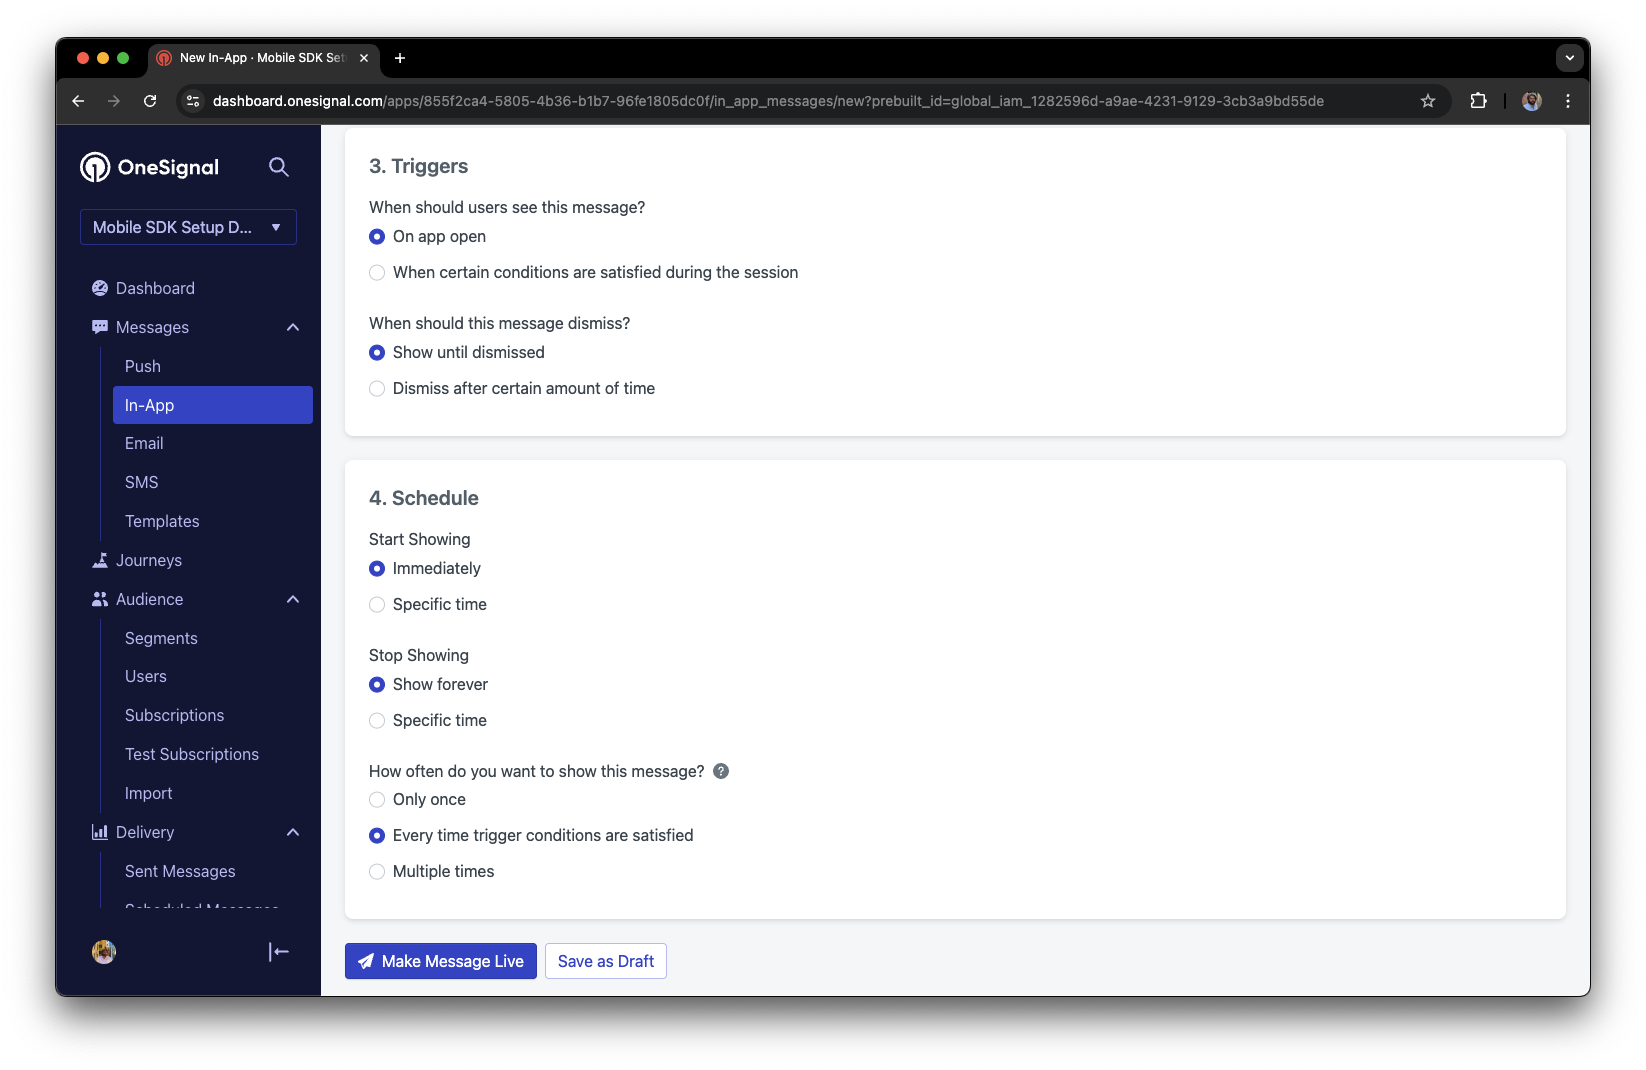 Click **Make Message Live** so it is available to your Test Users each time they open the app.
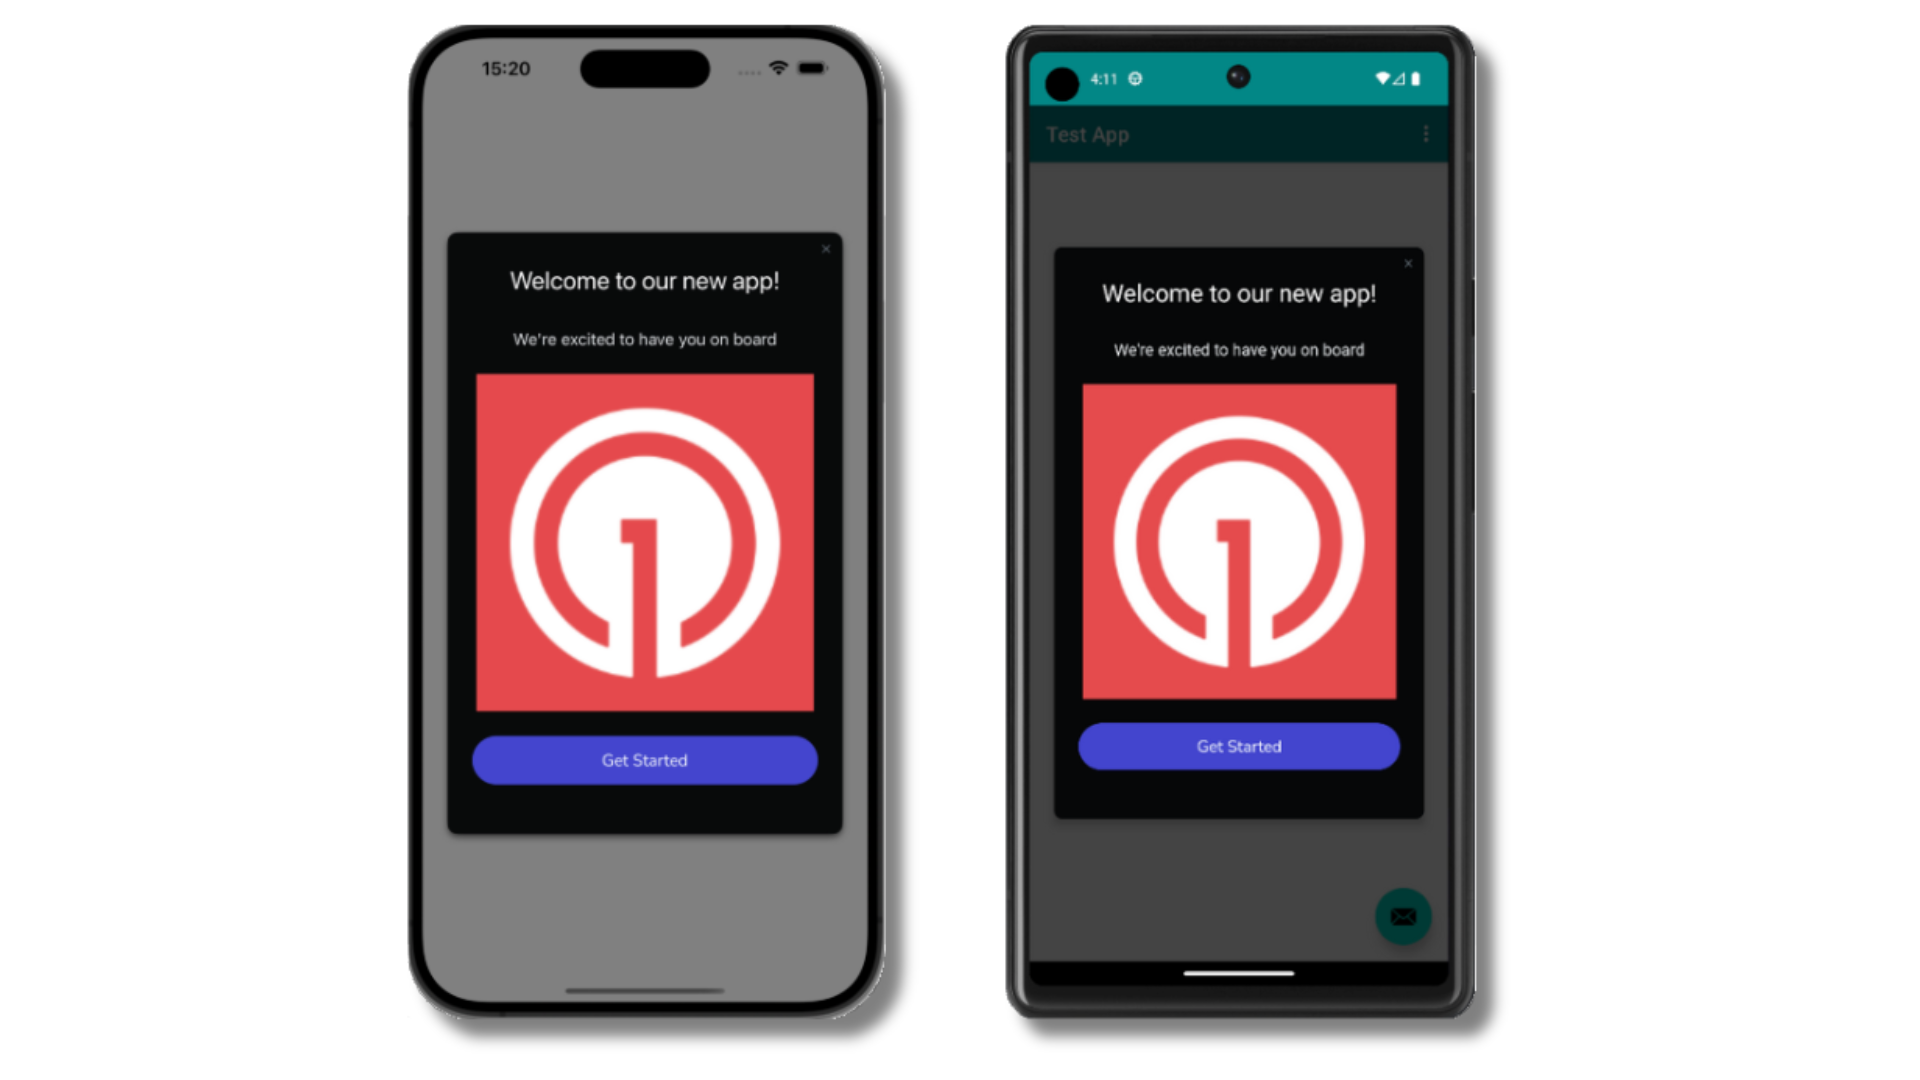
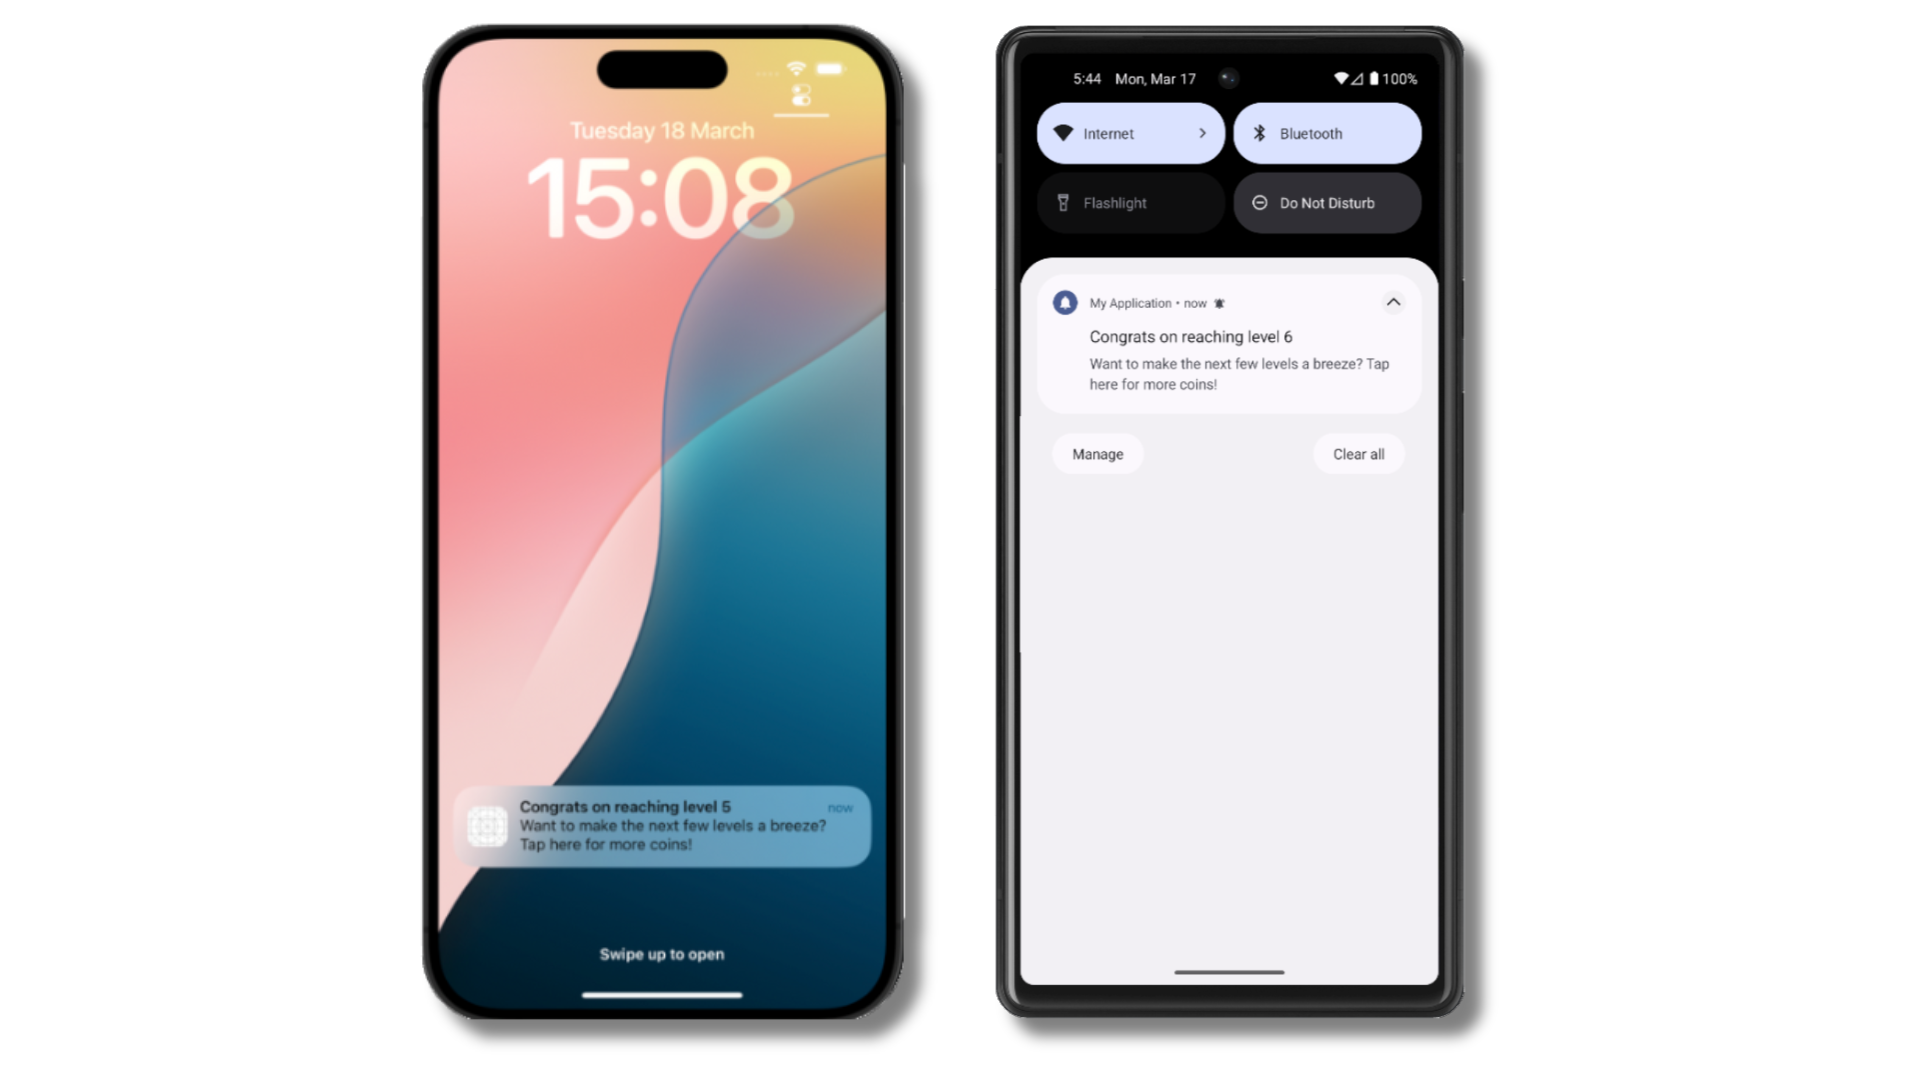
After the in-app message is live, open your app. You should see it display:
Click **Make Message Live** so it is available to your Test Users each time they open the app.
After the in-app message is live, open your app. You should see it display:
 Not seeing the message?
* Start a new session
* You must close or background the app for at least 30 seconds before reopening. This ensures a new session is started.
* For more, see [how in-app messages are displayed](/docs/en/in-app-messages-setup#how-are-iams-displayed%3F).
* Still in the `Test Users` segment?
* If you reinstalled or switched devices, re-add the device to [Test Users](#set-up-test-users) and confirm it's part of the Test Users segment.
* Having issues?
* Follow [Getting a Debug Log](/docs/en/capturing-a-debug-log) while reproducing the steps above. This will generate additional logging that you can share with `support@onesignal.com` and we will help investigate what's going on.
You have successfully setup the OneSignal SDK and learned important concepts like:
* Gathering [Subscriptions](/docs/en/subscriptions), setting [Test Users](/docs/en/find-set-test-subscriptions), and creating [Segments](/docs/en/segmentation).
* Sending [Push](/docs/en/push) with images and [Confirmed receipt](/docs/en/confirmed-delivery) using Segments and our [Create message](/reference/create-message) API.
* Sending [In-app messages](/docs/en/in-app-messages-setup).
Continue with this guide to identify users in your app and setup additional features.
***
## User identification
Previously, we demonstrated how to create mobile [Subscriptions](/docs/en/subscriptions). Now we'll expand to identifying [Users](/docs/en/users) across all their subscriptions (including push, email, and SMS) using the OneSignal SDK. We'll cover External IDs, tags, multi-channel subscriptions, privacy, and event tracking to help you unify and engage users across platforms.
### Assign External ID
Use an External ID to identify users consistently across devices, email addresses, and phone numbers using your backend's user identifier. This ensures your messaging stays unified across channels and 3rd party systems (especially important for [Integrations](/docs/en/integrations)).
Set the External ID with our SDK's [`login` method](/docs/en/mobile-sdk-reference#login-external-id) each time they are identified by your app.
OneSignal generates unique read-only IDs for subscriptions (Subscription ID) and users (OneSignal ID).
As users download your app on different devices, subscribe to your website, and/or provide you email addresses and phone numbers outside of your app, new subscriptions will be created.
Setting the External ID via our SDK is highly recommended to identify users across all their subscriptions, regardless of how they are created.
### Add Tags
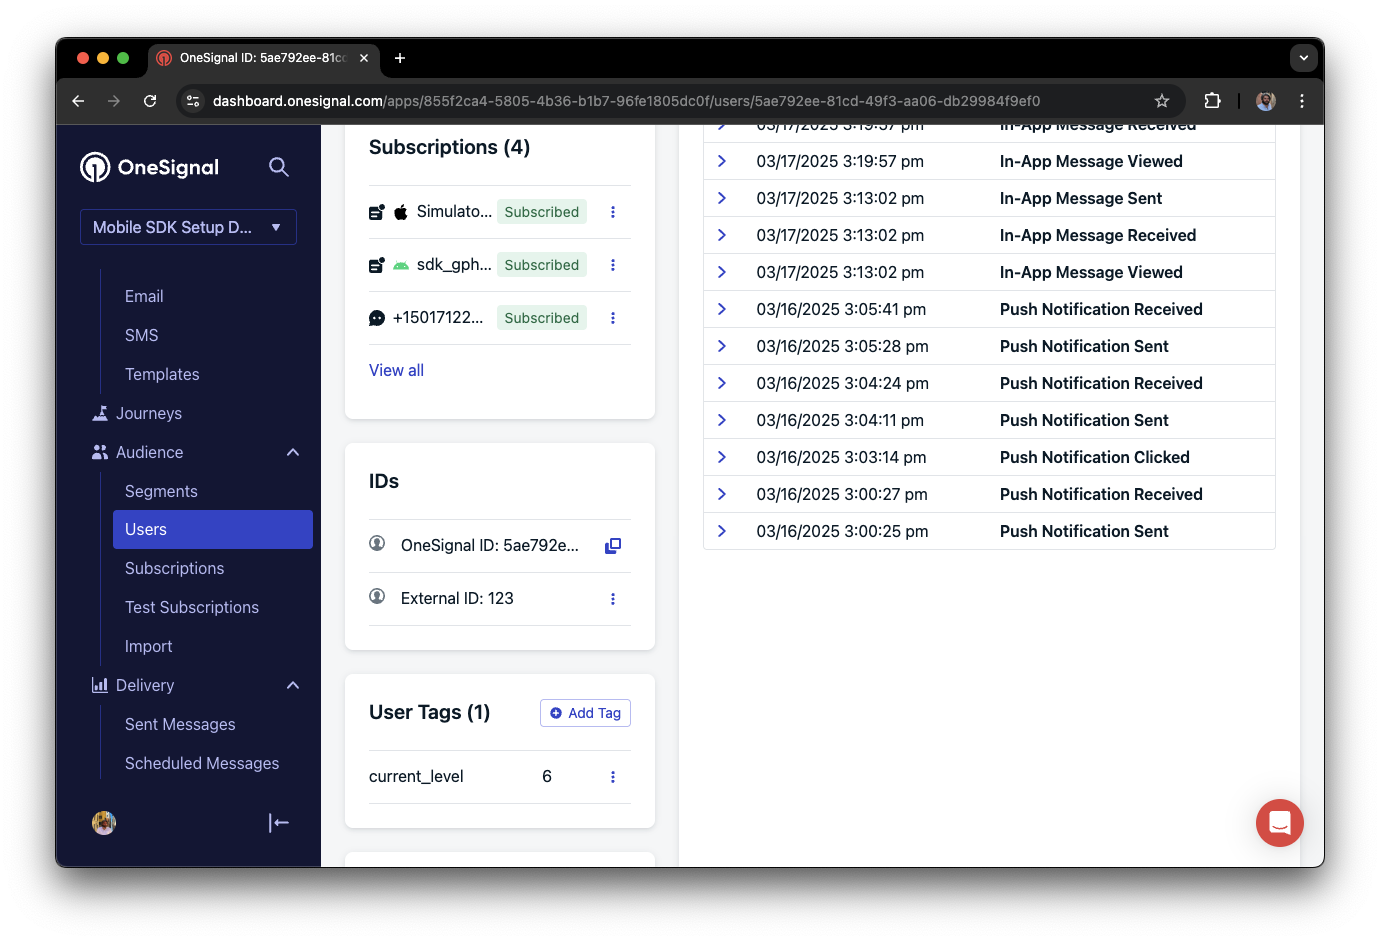
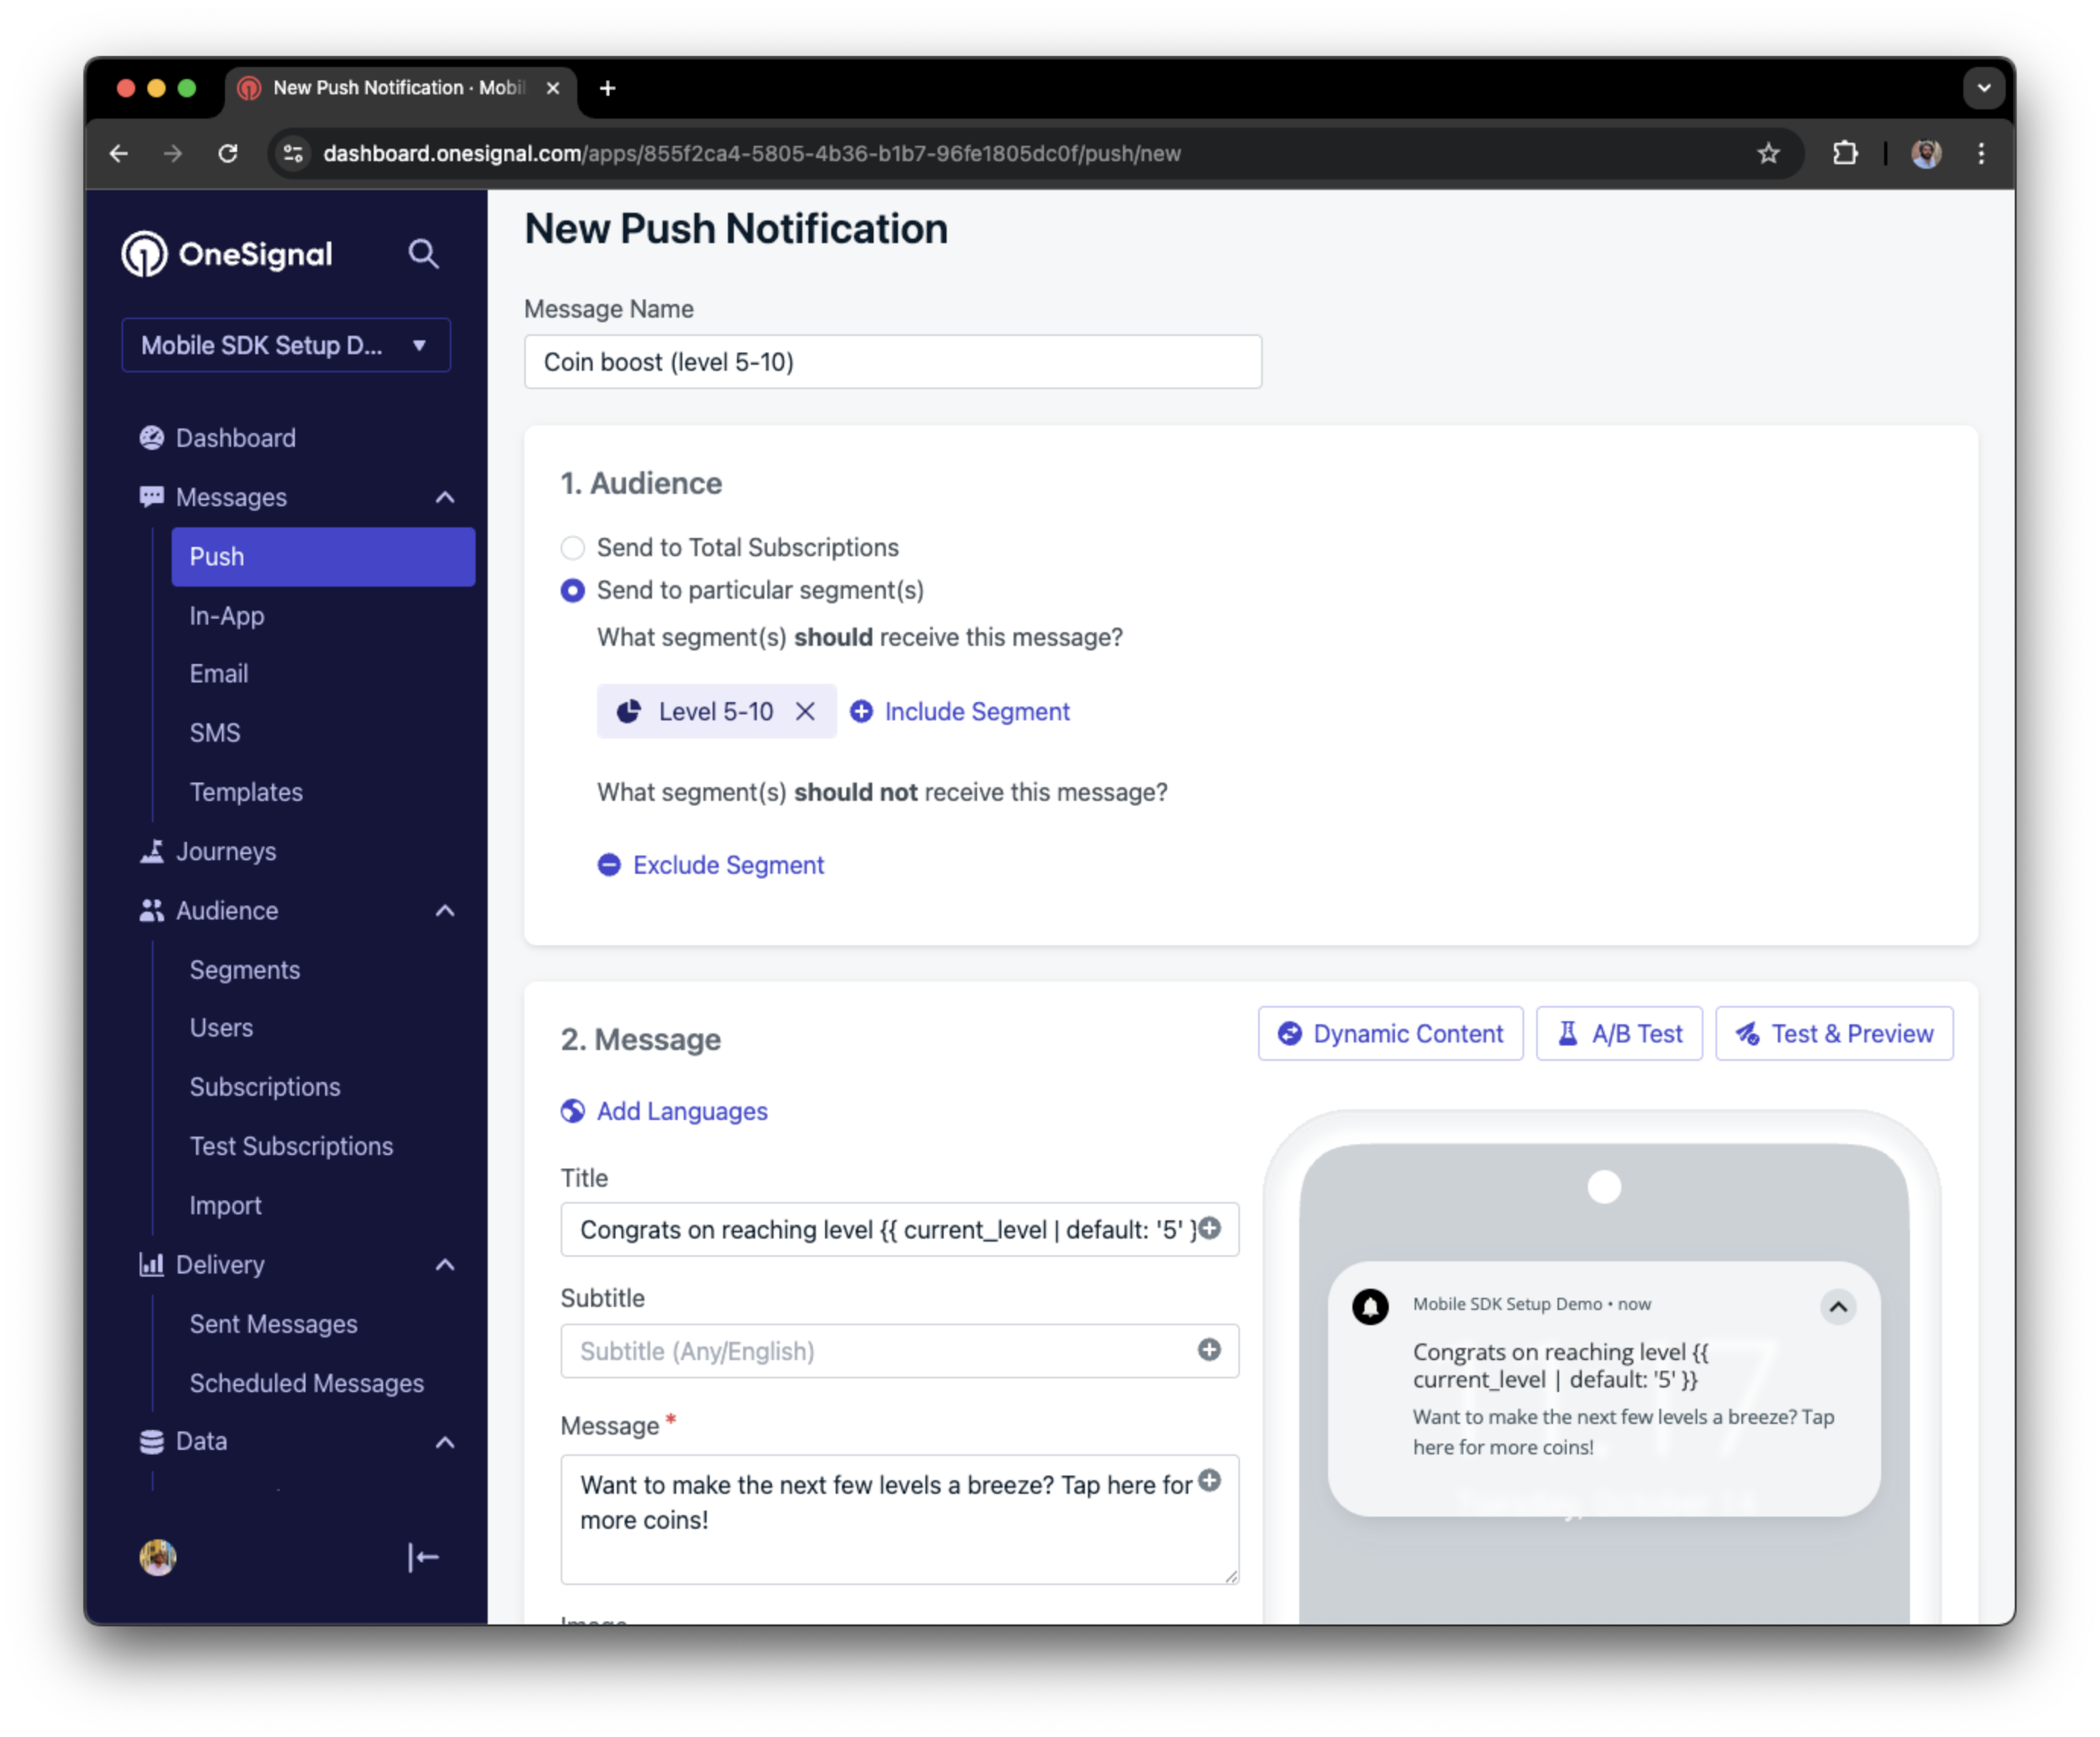
[Tags](/docs/en/add-user-data-tags) are key-value pairs of string data you can use to store user properties (like `username`, `role`, or preferences) and events (like `purchase_date`, `game_level`, or user interactions). Tags power advanced [Message Personalization](/docs/en/message-personalization) and [Segmentation](/docs/en/segmentation) allowing for more advanced use cases.
Set tags with our SDK [`addTag` and `addTags` methods](/docs/en/mobile-sdk-reference#data-tags) as events occur in your app.
In this example, the user reached level 6 identifiable by the tag called `current_level` set to a value of `6`.
Not seeing the message?
* Start a new session
* You must close or background the app for at least 30 seconds before reopening. This ensures a new session is started.
* For more, see [how in-app messages are displayed](/docs/en/in-app-messages-setup#how-are-iams-displayed%3F).
* Still in the `Test Users` segment?
* If you reinstalled or switched devices, re-add the device to [Test Users](#set-up-test-users) and confirm it's part of the Test Users segment.
* Having issues?
* Follow [Getting a Debug Log](/docs/en/capturing-a-debug-log) while reproducing the steps above. This will generate additional logging that you can share with `support@onesignal.com` and we will help investigate what's going on.
You have successfully setup the OneSignal SDK and learned important concepts like:
* Gathering [Subscriptions](/docs/en/subscriptions), setting [Test Users](/docs/en/find-set-test-subscriptions), and creating [Segments](/docs/en/segmentation).
* Sending [Push](/docs/en/push) with images and [Confirmed receipt](/docs/en/confirmed-delivery) using Segments and our [Create message](/reference/create-message) API.
* Sending [In-app messages](/docs/en/in-app-messages-setup).
Continue with this guide to identify users in your app and setup additional features.
***
## User identification
Previously, we demonstrated how to create mobile [Subscriptions](/docs/en/subscriptions). Now we'll expand to identifying [Users](/docs/en/users) across all their subscriptions (including push, email, and SMS) using the OneSignal SDK. We'll cover External IDs, tags, multi-channel subscriptions, privacy, and event tracking to help you unify and engage users across platforms.
### Assign External ID
Use an External ID to identify users consistently across devices, email addresses, and phone numbers using your backend's user identifier. This ensures your messaging stays unified across channels and 3rd party systems (especially important for [Integrations](/docs/en/integrations)).
Set the External ID with our SDK's [`login` method](/docs/en/mobile-sdk-reference#login-external-id) each time they are identified by your app.
OneSignal generates unique read-only IDs for subscriptions (Subscription ID) and users (OneSignal ID).
As users download your app on different devices, subscribe to your website, and/or provide you email addresses and phone numbers outside of your app, new subscriptions will be created.
Setting the External ID via our SDK is highly recommended to identify users across all their subscriptions, regardless of how they are created.
### Add Tags
[Tags](/docs/en/add-user-data-tags) are key-value pairs of string data you can use to store user properties (like `username`, `role`, or preferences) and events (like `purchase_date`, `game_level`, or user interactions). Tags power advanced [Message Personalization](/docs/en/message-personalization) and [Segmentation](/docs/en/segmentation) allowing for more advanced use cases.
Set tags with our SDK [`addTag` and `addTags` methods](/docs/en/mobile-sdk-reference#data-tags) as events occur in your app.
In this example, the user reached level 6 identifiable by the tag called `current_level` set to a value of `6`.
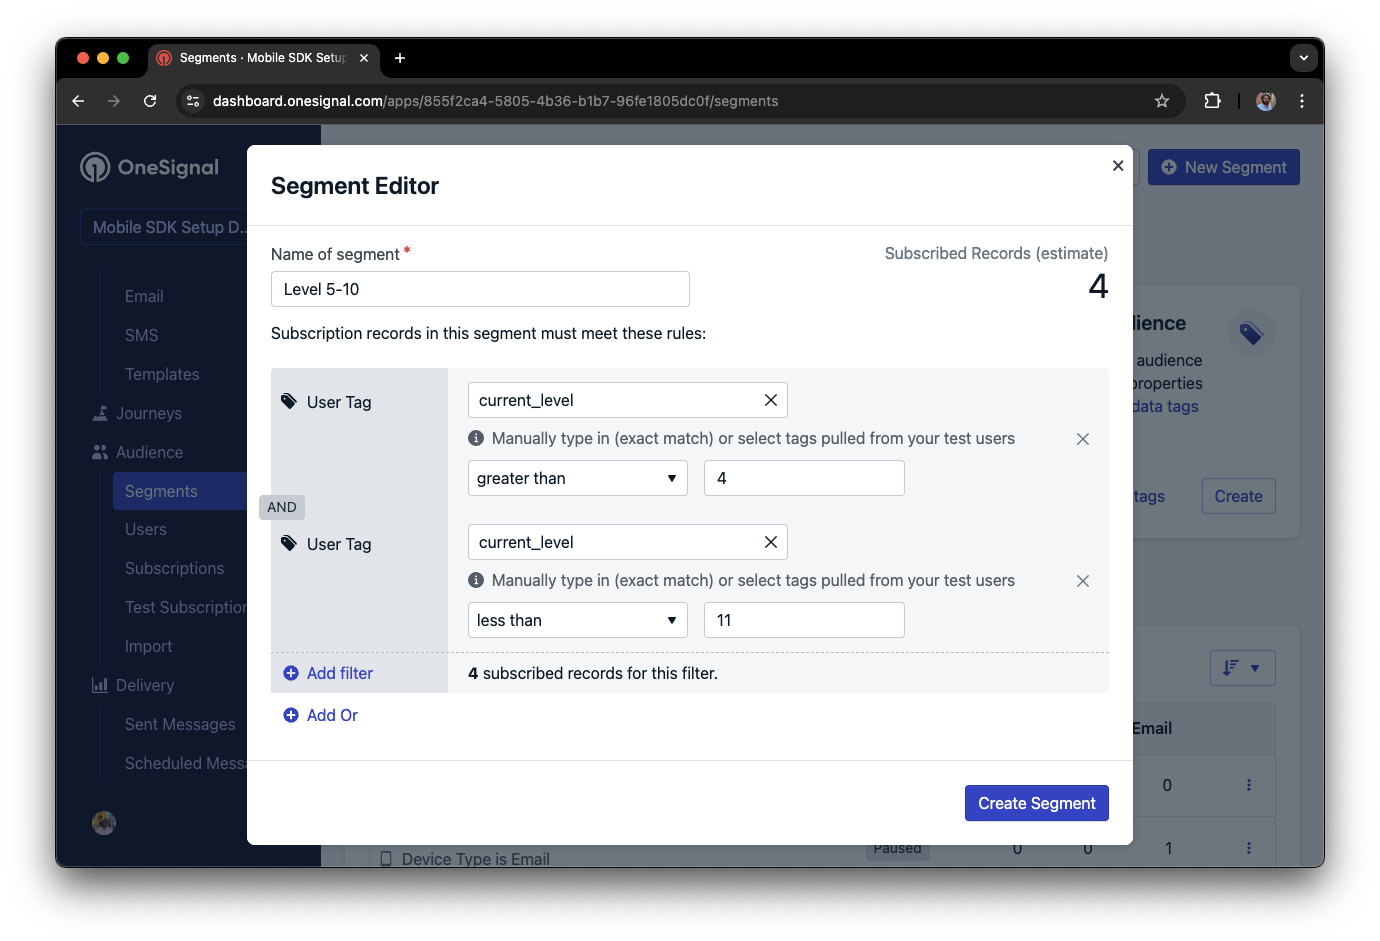
 We can create a segment of users that have a level of between 5 and 10, and use that to send targeted and personalized messages:
 ### Add email and/or SMS subscriptions
Earlier we saw how our SDK creates mobile subscriptions to send push and in-app messages. You can also reach users through emails and SMS channels by creating the corresponding subscriptions.
* Use the [`addEmail` method](/docs/en/mobile-sdk-reference#addemail-%2C-removeemail) to create email subscriptions.
* Use the [`addSms` method](/docs/en/mobile-sdk-reference#addsms-%2C-removesms) to create SMS subscriptions.
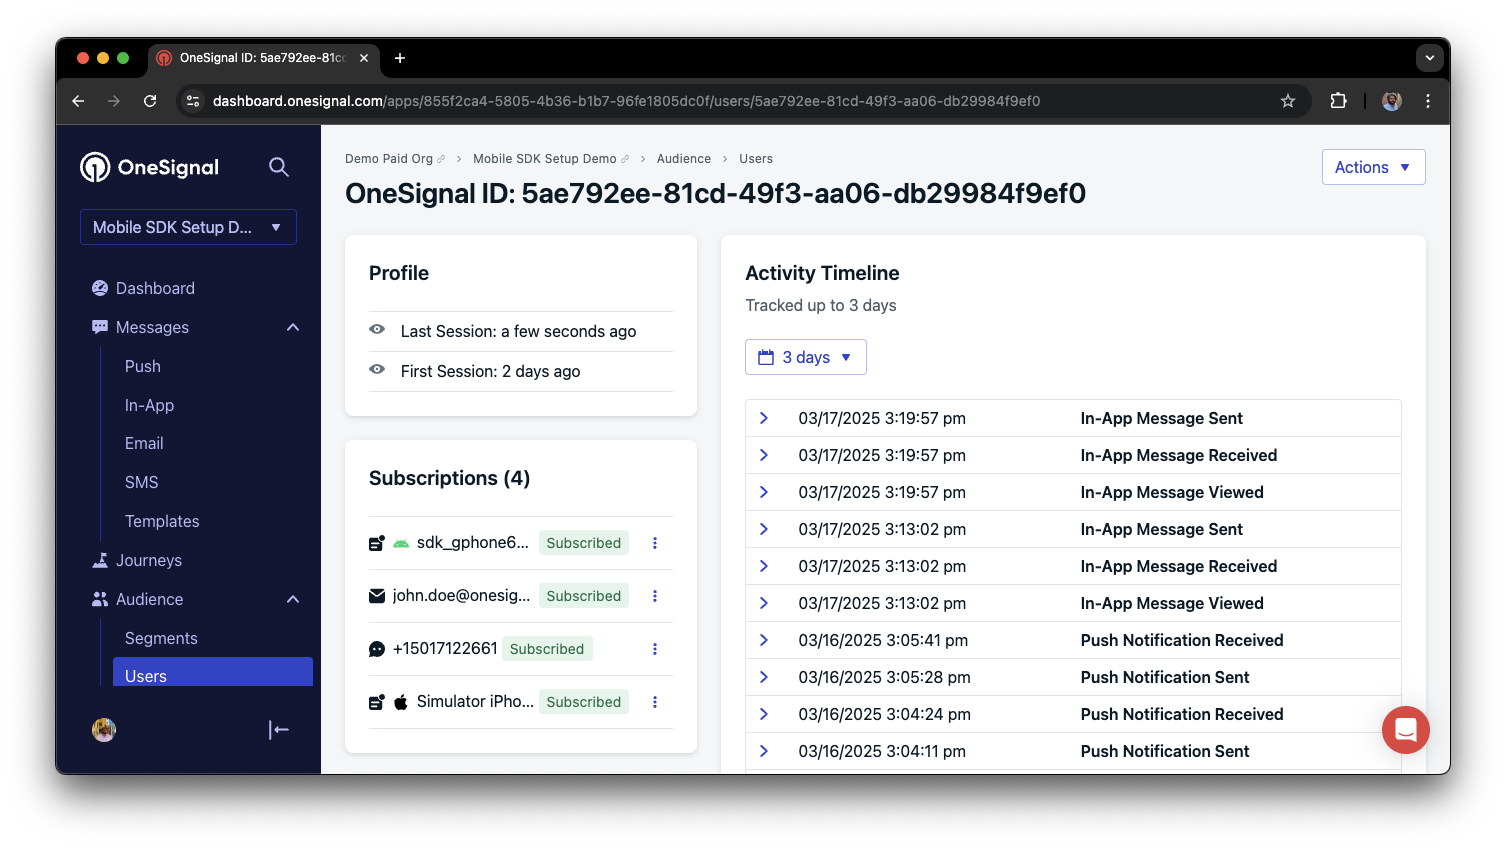
If the email address and/or phone number already exist in the OneSignal app, the SDK will add it to the existing user, it will not create duplicates.
You can view unified users via **Audience > Users** in the dashboard or with the [View user API](/reference/view-user).
### Add email and/or SMS subscriptions
Earlier we saw how our SDK creates mobile subscriptions to send push and in-app messages. You can also reach users through emails and SMS channels by creating the corresponding subscriptions.
* Use the [`addEmail` method](/docs/en/mobile-sdk-reference#addemail-%2C-removeemail) to create email subscriptions.
* Use the [`addSms` method](/docs/en/mobile-sdk-reference#addsms-%2C-removesms) to create SMS subscriptions.
If the email address and/or phone number already exist in the OneSignal app, the SDK will add it to the existing user, it will not create duplicates.
You can view unified users via **Audience > Users** in the dashboard or with the [View user API](/reference/view-user).
 Best practices for multi-channel communication
* Obtain explicit consent before adding email or SMS subscriptions.
* Explain the benefits of each communication channel to users.
* Provide channel preferences so users can select which channels they prefer.
***
### Privacy & user consent
To control when OneSignal collects user data, use the SDK's consent gating methods:
* [`setConsentRequired(true)`](/docs/en/mobile-sdk-reference#setconsentrequired): Prevents data collection until consent is given.
* [`setConsentGiven(true)`](/docs/en/mobile-sdk-reference#setconsentgiven): Enables data collection once consent is granted.
See our Privacy & security docs for more on:
* [Data collected by the SDK](/docs/en/data-collected-by-the-onesignal-sdk)
* [Handling personal data](/docs/en/handling-personal-data)
***
## Prompt for push permissions
Instead of calling `requestPermission()` immediately on app open, take a more strategic approach. Use an in-app message to explain the value of push notifications before requesting permission.
For best practices and implementation details, see our [Prompt for push permissions](/docs/en/prompt-for-push-permissions) guide.
***
## Listen to push, user, and in-app events
Use SDK listeners to react to user actions and state changes.
The SDK provides several event listeners for you to hook into. See our [SDK reference guide](/docs/en/mobile-sdk-reference) for more details.
### Push notification events
* [`addClickListener()`](/docs/en/mobile-sdk-reference#addclicklistener-push): Detect when a notification is tapped. Helpful for [Deep Linking](/docs/en/deep-linking).
* [`addForegroundLifecycleListener()`](/docs/en/mobile-sdk-reference#addforegroundlifecyclelistener-push): Control how notifications behave in foreground.
For full customization, see [Mobile Service Extensions](/docs/en/service-extensions).
### User state changes
* [`addObserver()` for user state](/docs/en/mobile-sdk-reference#addobserver-user-state): Detect when the External ID is set.
* [`addPermissionObserver()`](/docs/en/mobile-sdk-reference#addpermissionobserver-push): Track the user's specific interaction with the native push permission prompt.
* [`addObserver()` for push subscription](/docs/en/mobile-sdk-reference#addobserver-push-subscription-changes): Track when the push subscription status changes.
### In-app message events
* [`addClickListener()`](/docs/en/mobile-sdk-reference#addclicklistener-in-app): Handle in-app click actions. Ideal for deep linking or tracking events.
* [`addLifecycleListener()`](/docs/en/mobile-sdk-reference#addclicklistener-in-app): Track full lifecycle of in-app messages (shown, clicked, dismissed, etc.).
***
## Advanced setup & capabilities
Explore more capabilities to enhance your integration:
* [🔁 Migrating to OneSignal from another service](/docs/en/migrating-to-onesignal)
* [🌍 Location tracking](/docs/en/mobile-sdk-reference#location)
* [🔗 Deep Linking](/docs/en/deep-linking)
* [🔌 Integrations](/docs/en/integrations)
* [🧩 Mobile Service Extensions](/docs/en/service-extensions)
* [🛎️ Action buttons](/docs/en/action-buttons)
* [🌐 Multi-language messaging](/docs/en/multi-language-messaging)
* [🛡️ Identity Verification](/docs/en/identity-verification)
* [📊 Custom Outcomes](/docs/en/custom-outcomes)
* [📲 Live Activities](/docs/en/live-activities)
### Mobile SDK setup & reference
Make sure you've enabled all key features by reviewing the [Mobile push setup](/docs/en/mobile-push-setup) guide.
For full details on available methods and configuration options, visit the [Mobile SDK reference](/docs/en/mobile-sdk-reference).
Congratulations! You've successfully completed the Mobile SDK setup guide.
***
***
Best practices for multi-channel communication
* Obtain explicit consent before adding email or SMS subscriptions.
* Explain the benefits of each communication channel to users.
* Provide channel preferences so users can select which channels they prefer.
***
### Privacy & user consent
To control when OneSignal collects user data, use the SDK's consent gating methods:
* [`setConsentRequired(true)`](/docs/en/mobile-sdk-reference#setconsentrequired): Prevents data collection until consent is given.
* [`setConsentGiven(true)`](/docs/en/mobile-sdk-reference#setconsentgiven): Enables data collection once consent is granted.
See our Privacy & security docs for more on:
* [Data collected by the SDK](/docs/en/data-collected-by-the-onesignal-sdk)
* [Handling personal data](/docs/en/handling-personal-data)
***
## Prompt for push permissions
Instead of calling `requestPermission()` immediately on app open, take a more strategic approach. Use an in-app message to explain the value of push notifications before requesting permission.
For best practices and implementation details, see our [Prompt for push permissions](/docs/en/prompt-for-push-permissions) guide.
***
## Listen to push, user, and in-app events
Use SDK listeners to react to user actions and state changes.
The SDK provides several event listeners for you to hook into. See our [SDK reference guide](/docs/en/mobile-sdk-reference) for more details.
### Push notification events
* [`addClickListener()`](/docs/en/mobile-sdk-reference#addclicklistener-push): Detect when a notification is tapped. Helpful for [Deep Linking](/docs/en/deep-linking).
* [`addForegroundLifecycleListener()`](/docs/en/mobile-sdk-reference#addforegroundlifecyclelistener-push): Control how notifications behave in foreground.
For full customization, see [Mobile Service Extensions](/docs/en/service-extensions).
### User state changes
* [`addObserver()` for user state](/docs/en/mobile-sdk-reference#addobserver-user-state): Detect when the External ID is set.
* [`addPermissionObserver()`](/docs/en/mobile-sdk-reference#addpermissionobserver-push): Track the user's specific interaction with the native push permission prompt.
* [`addObserver()` for push subscription](/docs/en/mobile-sdk-reference#addobserver-push-subscription-changes): Track when the push subscription status changes.
### In-app message events
* [`addClickListener()`](/docs/en/mobile-sdk-reference#addclicklistener-in-app): Handle in-app click actions. Ideal for deep linking or tracking events.
* [`addLifecycleListener()`](/docs/en/mobile-sdk-reference#addclicklistener-in-app): Track full lifecycle of in-app messages (shown, clicked, dismissed, etc.).
***
## Advanced setup & capabilities
Explore more capabilities to enhance your integration:
* [🔁 Migrating to OneSignal from another service](/docs/en/migrating-to-onesignal)
* [🌍 Location tracking](/docs/en/mobile-sdk-reference#location)
* [🔗 Deep Linking](/docs/en/deep-linking)
* [🔌 Integrations](/docs/en/integrations)
* [🧩 Mobile Service Extensions](/docs/en/service-extensions)
* [🛎️ Action buttons](/docs/en/action-buttons)
* [🌐 Multi-language messaging](/docs/en/multi-language-messaging)
* [🛡️ Identity Verification](/docs/en/identity-verification)
* [📊 Custom Outcomes](/docs/en/custom-outcomes)
* [📲 Live Activities](/docs/en/live-activities)
### Mobile SDK setup & reference
Make sure you've enabled all key features by reviewing the [Mobile push setup](/docs/en/mobile-push-setup) guide.
For full details on available methods and configuration options, visit the [Mobile SDK reference](/docs/en/mobile-sdk-reference).
Congratulations! You've successfully completed the Mobile SDK setup guide.
***
***