> ## Documentation Index
> Fetch the complete documentation index at: https://documentation.onesignal.com/llms.txt
> Use this file to discover all available pages before exploring further.
# Configuração do Vue JS Web SDK
> Integre notificações Web Push do OneSignal em sua aplicação Vue.js usando o plugin onesignal-vue ou @onesignal/onesignal-vue3. Aprenda como instalar, configurar e personalizar service workers para entrega perfeita de push.
export const SdkReleasesIframe = ({sdkFilter = undefined, viewMode = undefined, height, ...frameProps}) => {
const baseUrl = 'https://onesignal.github.io/sdk-releases';
const buildUrl = (theme, sdkFilter, viewMode) => {
const url = new URL(baseUrl);
const params = new URLSearchParams();
if (theme) {
params.set('theme', theme);
}
if (sdkFilter) {
params.set('sdk', sdkFilter);
}
if (viewMode) {
params.set('viewMode', viewMode);
}
if (params.toString()) {
url.search = params.toString();
}
return url.toString();
};
const detectTheme = () => {
if (document.documentElement.classList.contains('dark')) {
return 'dark';
}
return 'light';
};
const [theme, setTheme] = useState('light');
const [iframeSrc, setIframeSrc] = useState(() => {
const initialTheme = detectTheme();
return buildUrl(initialTheme, sdkFilter, viewMode);
});
useEffect(() => {
const currentTheme = detectTheme();
setTheme(currentTheme);
setIframeSrc(buildUrl(currentTheme, sdkFilter, viewMode));
const mediaQuery = window.matchMedia('(prefers-color-scheme: dark)');
const handleThemeChange = () => {
const newTheme = detectTheme();
setTheme(newTheme);
setIframeSrc(buildUrl(newTheme, sdkFilter, viewMode));
};
if (mediaQuery.addEventListener) {
mediaQuery.addEventListener('change', handleThemeChange);
} else {
mediaQuery.addListener(handleThemeChange);
}
window.addEventListener('storage', handleThemeChange);
const observer = new MutationObserver(handleThemeChange);
observer.observe(document.documentElement, {
attributes: true,
attributeFilter: ['class', 'data-theme']
});
return () => {
if (mediaQuery.removeEventListener) {
mediaQuery.removeEventListener('change', handleThemeChange);
} else {
mediaQuery.removeListener(handleThemeChange);
}
window.removeEventListener('storage', handleThemeChange);
observer.disconnect();
};
}, [sdkFilter, viewMode]);
const getIframeHeight = () => {
if (viewMode === 'table') {
return '450';
}
if (viewMode === 'mini') {
return '170';
}
return '800';
};
const iframeHeight = height || getIframeHeight();
return
;
};
## Visão geral
Este guia explica como integrar notificações push do OneSignal em uma aplicação Vue.js. Ele cobre tanto Vue 2 quanto Vue 3 usando os plugins Vue oficiais do OneSignal, juntamente com considerações importantes de configuração incluindo configuração de service worker e suporte TypeScript.
***
## Requisitos
* App e plataforma OneSignal configurados. Veja [Configuração de Web Push](./web-push-setup) para começar.
### Compatibilidade Vue
Certifique-se de instalar uma versão de plugin compatível com seu ambiente Vue.
| Vue | Plugin OneSignal |
| --- | ------------------------------------------------------------- |
| 2 | [onesignal-vue](https://github.com/OneSignal/onesignal-vue) |
| 3 | [onesignal-vue3](https://github.com/OneSignal/onesignal-vue3) |
***
## Instalação
Instale via seu gerenciador de pacotes preferido:
```bash yarn theme={null}
yarn add onesignal-vue
# or yarn add @onesignal/onesignal-vue3
```
```bash npm theme={null}
npm install --save onesignal-vue
# or npm install --save @onesignal/onesignal-vue3
```
***
## Inicialização
Importe o serviço OneSignal e inicialize-o no seu componente raiz. A função `init` retorna uma promise que resolve quando o OneSignal é carregado.
Substitua `YOUR_APP_ID` pelo seu app ID do OneSignal encontrado em [Keys & IDs](./keys-and-ids).
```javascript Vue2 theme={null}
import Vue from 'vue'
import OneSignalVue from 'onesignal-vue'
Vue.use(OneSignalVue);
new Vue({
render: h => h(App),
beforeMount() {
this.$OneSignal.init({ appId: 'YOUR_APP_ID' });
}
}).$mount('#app')
//Example 1
await this.$OneSignal.init({ appId: 'YOUR_APP_ID' });
// do other stuff
//Example 2
this.$OneSignal.init({ appId: 'YOUR_APP_ID' }).then(() => {
// do other stuff
});
```
```javascript Vue3 theme={null}
/*
In Vue 3, you can pass in the OneSignal initialization options directly as an argument to the `use` function. You can still initialize separately if you prefer editor benefits like code completion.
*/
import { createApp } from 'vue'
import OneSignalVuePlugin from '@onesignal/onesignal-vue3'
createApp(App).use(OneSignalVuePlugin, {
appId: 'YOUR_APP_ID',
}).mount('#app');
// OR
import { createApp } from 'vue'
import OneSignalVuePlugin from '@onesignal/onesignal-vue3'
createApp(App).use(OneSignalVuePlugin).mount('#app');
// component
this.$OneSignal.init({
appId: "YOUR_APP_ID"
});
```
O plugin OneSignal expõe automaticamente uma propriedade global `$OneSignal` acessível dentro da aplicação.
### Composition API
Você também pode aproveitar a [Composition API](https://vuejs.org/guide/extras/composition-api-faq.html) do Vue via o hook `useOneSignal()` que pode ser chamado de dentro de [`setup`](https://vuejs.org/api/composition-api-setup.html#basic-usage).
### Personalizando opções de init
Você pode personalizar sua inicialização com [parâmetros `init`](./web-sdk-reference#init) adicionais.
### Configurações de Service Worker
Se você ainda não o fez, precisará [baixar o arquivo Service Worker do OneSignal](https://github.com/OneSignal/OneSignal-Website-SDK/files/11480764/OneSignalSDK-v16-ServiceWorker.zip) para adicionar ao seu site.
O arquivo `OneSignalSDKWorker.js` deve ser publicamente acessível. Você pode colocá-lo no seu diretório `public`, raiz de nível superior ou um subdiretório. No entanto, se você está colocando o arquivo em um subdiretório e/ou tem outro service worker para seu site, então certifique-se de especificar o caminho. Veja [Service Worker OneSignal](./onesignal-service-worker) para detalhes.
| Option | Description |
| -------------------- | --------------------------------------------------------------------------------------------------------------------------------------- |
| `serviceWorkerParam` | Escopo controlado pelo worker OneSignal. **Recomendação:** Use um sub-caminho personalizado (ex: `"/onesignal/"`). |
| `serviceWorkerPath` | Caminho para seu arquivo service worker OneSignal hospedado (ex: `"onesignal/OneSignalSDKWorker.js"`). Deve ser publicamente acessível. |
**Exemplo:**
```javascript theme={null}
this.$OneSignal.init({
appId: 'YOUR-ONESIGNAL-APP-ID',
serviceWorkerParam: {
scope: '/onesignal/'
},
serviceWorkerPath: 'onesignal/OneSignalSDKWorker.js'
});
```
#### Hospedando o worker
* Raiz pública (padrão): `/OneSignalSDKWorker.js`
* Pasta personalizada (recomendado): ex: `/onesignal/OneSignalSDKWorker.js` como definido no passo anterior.
#### Verificar hospedagem do service worker
Visite o caminho no seu navegador para confirmar que está acessível.
Se você usou raiz:
```
https://your-site.com/OneSignalSDKWorker.js
```
Se usando o caminho de exemplo:
```
https://your-site.com/onesignal/OneSignalSDKWorker.js
```
Deve retornar JavaScript válido.
### Notas importantes
* Evite Inicialização Duplicada em Desenvolvimento
* Ao testar em um ambiente de desenvolvimento, você pode ver o SDK OneSignal inicializar duas vezes, o que pode causar erros no console.
* Isso acontece devido a `` causando execução de efeitos duas vezes em desenvolvimento. Para resolver, remova `` do seu componente raiz durante o desenvolvimento.
Strict mode apenas afeta desenvolvimento—ele não impacta builds de produção.
***
## Testing the OneSignal SDK integration
This guide helps you verify that your OneSignal SDK integration is working correctly by testing push notifications and subscription registration.
### Check web push subscriptions
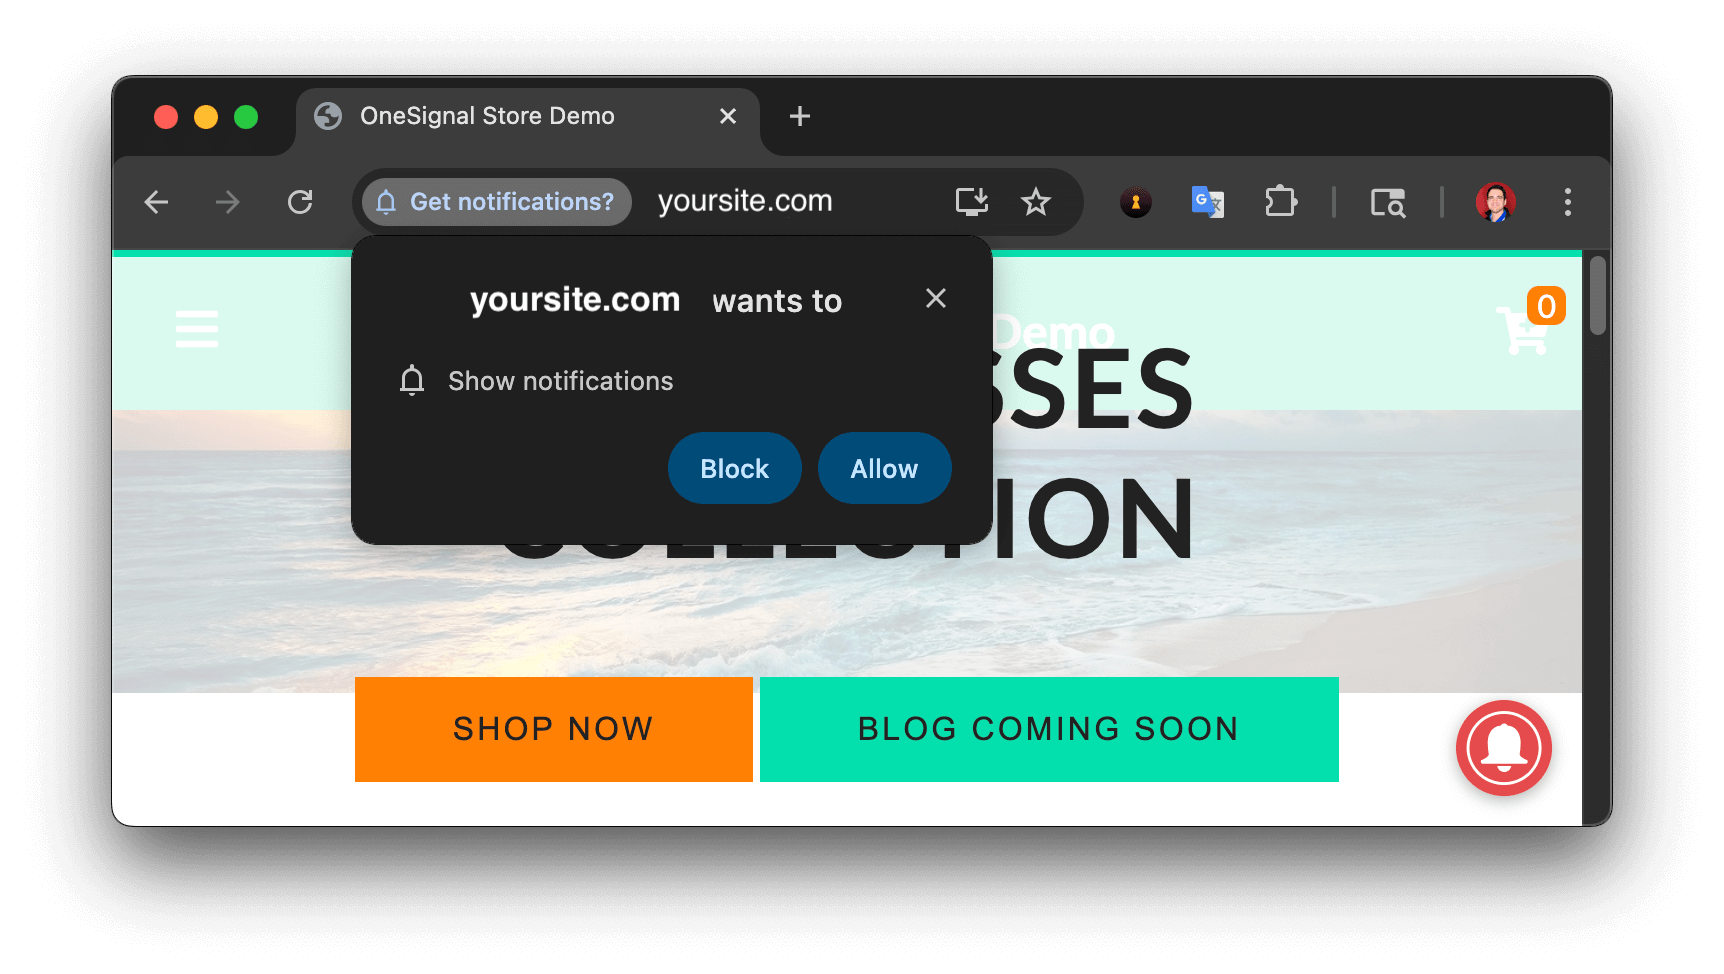
* Use Chrome, Firefox, Edge, or Safari while testing.
* **Do not use Incognito or private browsing mode.** Users cannot subscribe to push notifications in these modes.
* The prompts should appear based on your [permission prompts](/docs/en/permission-requests) configuration.
* Click **Allow** on the native prompt to subscribe to push notifications.
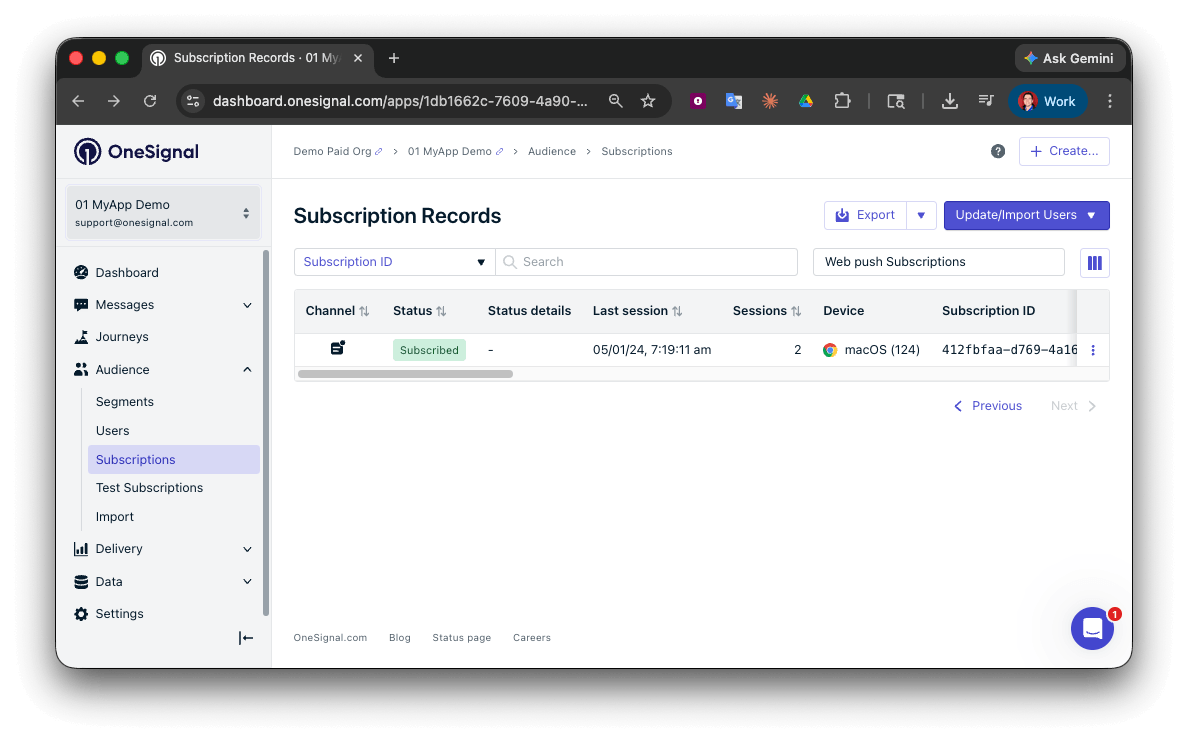
 * Go to **Audience > Subscriptions**.
* You should see a new entry with the status **Subscribed**.
* Go to **Audience > Subscriptions**.
* You should see a new entry with the status **Subscribed**.
 You have successfully created a [web push subscription](/docs/en/subscriptions).
Web push subscriptions are created when users first subscribe to push notifications on your site.
### Set up test users
test users are helpful for testing a push notification before sending a message.
In the dashboard, next to the subscription, click the **Options (three dots)** button and select **Add to Test Users**.
You have successfully created a [web push subscription](/docs/en/subscriptions).
Web push subscriptions are created when users first subscribe to push notifications on your site.
### Set up test users
test users are helpful for testing a push notification before sending a message.
In the dashboard, next to the subscription, click the **Options (three dots)** button and select **Add to Test Users**.
 Name the subscription so you can easily identify your device later in the **test users tab**.
Go to **Audience > Segments > New Segment**.
Name the segment `Test Users` (the name is important because it will be used later).
Name the subscription so you can easily identify your device later in the **test users tab**.
Go to **Audience > Segments > New Segment**.
Name the segment `Test Users` (the name is important because it will be used later).
 You have successfully created a segment of test users.
You can now test sending messages to this individual device and groups of test users.
### Send test push via API
In your OneSignal dashboard, go to **Settings > [Keys & IDs](/docs/en/keys-and-ids)**.
Replace `YOUR_APP_API_KEY` and `YOUR_APP_ID` in the code below with your actual keys. This code uses the `Test Users` segment created earlier.
```curl theme={null}
curl -X POST --url 'https://api.onesignal.com/notifications' \
--header 'content-type: application/json; charset=utf-8' \
--header 'authorization: Key YOUR_APP_API_KEY' \
--data '{
"app_id": "YOUR_APP_ID",
"target_channel": "push",
"name": "Testing basic setup",
"headings": {
"en": "👋"
},
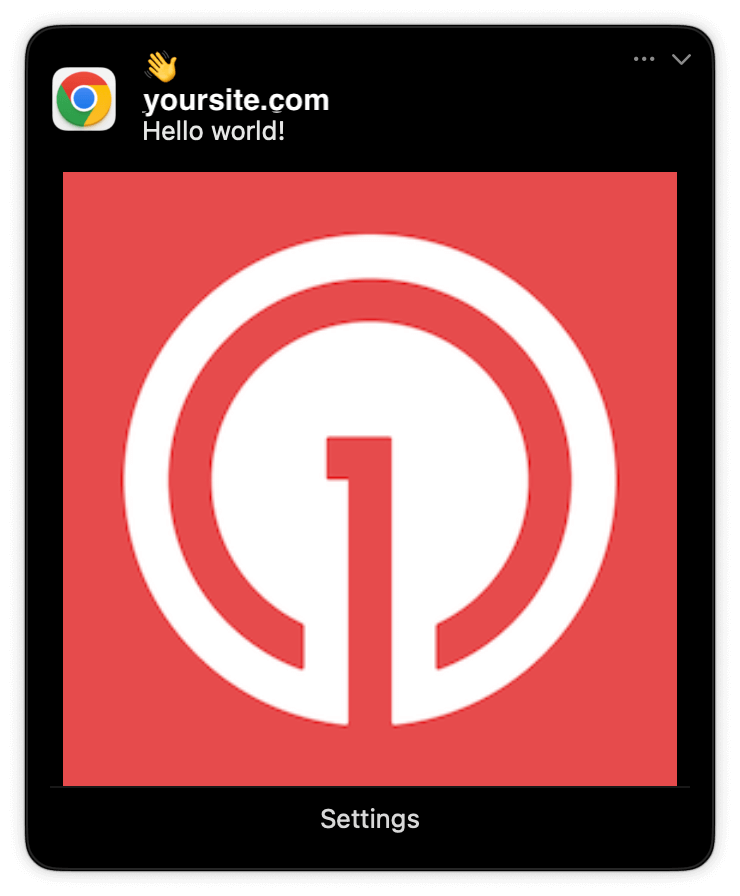
"contents": {
"en": "Hello world!"
},
"included_segments": [
"Test Users"
],
"chrome_web_image": "https://avatars.githubusercontent.com/u/11823027?s=200&v=4"
}'
```
Run the code in your terminal.
If all setup steps were completed successfully, the test users should receive a notification.
Only Chrome supports images. Images will appear small in the collapsed notification view. Expand the notification to see the full image.
You have successfully created a segment of test users.
You can now test sending messages to this individual device and groups of test users.
### Send test push via API
In your OneSignal dashboard, go to **Settings > [Keys & IDs](/docs/en/keys-and-ids)**.
Replace `YOUR_APP_API_KEY` and `YOUR_APP_ID` in the code below with your actual keys. This code uses the `Test Users` segment created earlier.
```curl theme={null}
curl -X POST --url 'https://api.onesignal.com/notifications' \
--header 'content-type: application/json; charset=utf-8' \
--header 'authorization: Key YOUR_APP_API_KEY' \
--data '{
"app_id": "YOUR_APP_ID",
"target_channel": "push",
"name": "Testing basic setup",
"headings": {
"en": "👋"
},
"contents": {
"en": "Hello world!"
},
"included_segments": [
"Test Users"
],
"chrome_web_image": "https://avatars.githubusercontent.com/u/11823027?s=200&v=4"
}'
```
Run the code in your terminal.
If all setup steps were completed successfully, the test users should receive a notification.
Only Chrome supports images. Images will appear small in the collapsed notification view. Expand the notification to see the full image.
 In your dashboard, go to **Delivery > Sent Messages**, then click the message to view stats. You should see the **confirmed** stat, meaning the device received the push.
Safari does not support confirmed receipt.
View delivery, click, and conversion stats for your push notifications.
You have successfully sent a notification via the API to a segment.
If notifications are not arriving, contact `support@onesignal.com` with the following:
* The API request and response (copy-paste into a `.txt` file)
* Your Subscription ID
* Your website URL with the OneSignal code
***
## User identification
The previous section covered creating web push [Subscriptions](/docs/en/subscriptions). This section expands to identifying [Users](/docs/en/users) across all their subscriptions (including push, email, and SMS) using the OneSignal SDK. It covers External IDs, tags, multi-channel subscriptions, privacy, and event tracking to help you unify and engage users across platforms.
### Assign External ID
Use an External ID to identify users consistently across devices, email addresses, and phone numbers using your backend's user identifier. This ensures your messaging stays unified across channels and 3rd party systems (especially important for [Integrations](/docs/en/integrations)).
Set the External ID with the SDK's [`login` method](/docs/en/web-sdk-reference#login-external-id) each time a user is identified by your app.
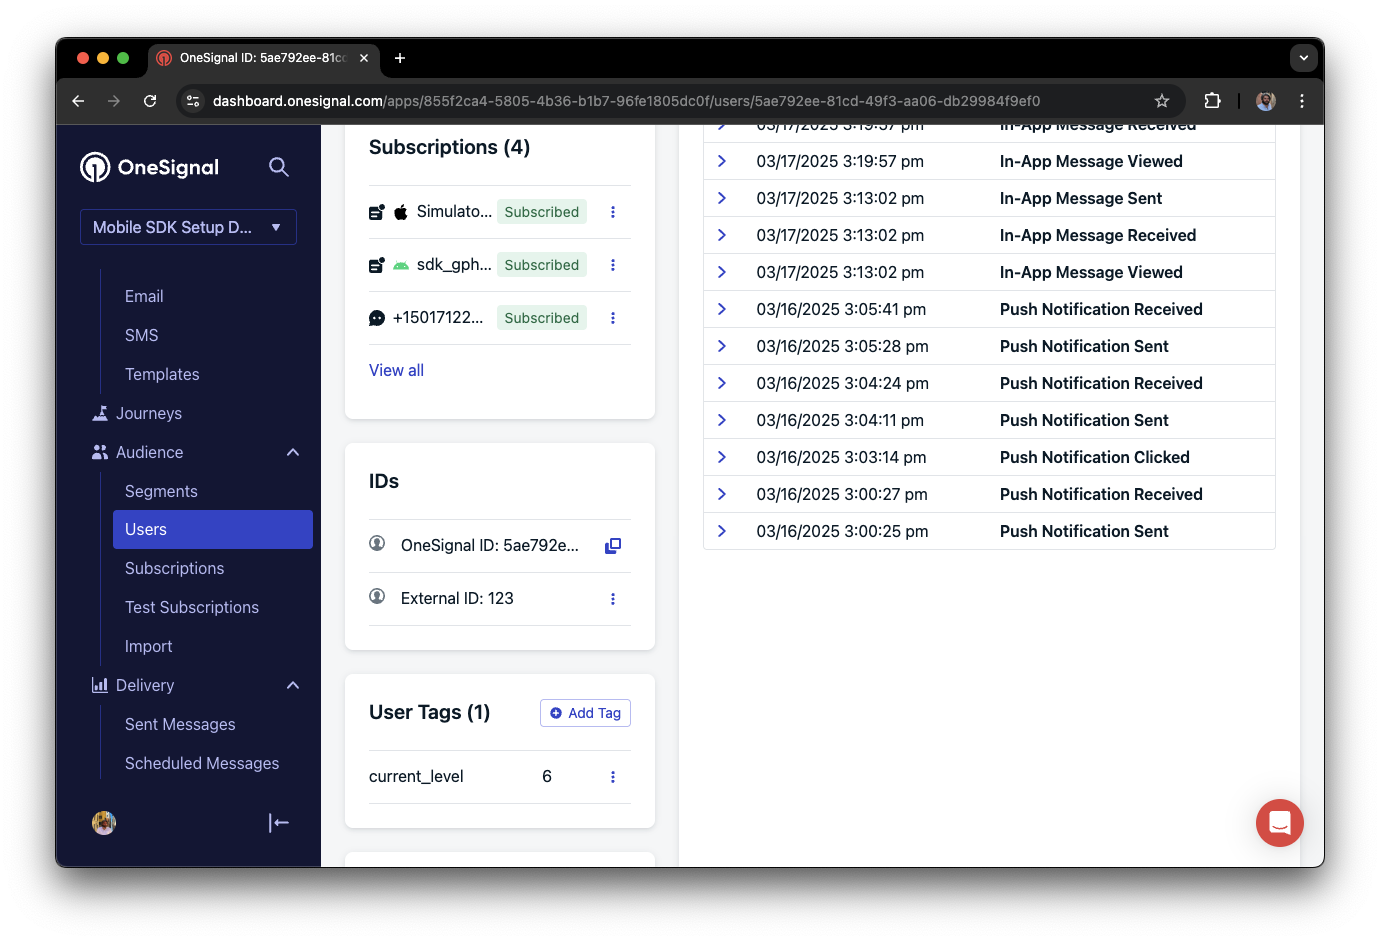
OneSignal generates unique read-only IDs for subscriptions (Subscription ID) and users (OneSignal ID).
As users download your app on different devices, subscribe to your website, and/or provide you email addresses and phone numbers outside of your app, new subscriptions will be created.
Setting the External ID via the SDK is highly recommended to identify users across all their subscriptions, regardless of how they are created.
### Add Tags
[Tags](/docs/en/add-user-data-tags) are key-value pairs of string data you can use to store user properties (like `username`, `role`, or preferences) and events (like `purchase_date`, `game_level`, or user interactions). Tags power advanced [Message Personalization](/docs/en/message-personalization) and [Segmentation](/docs/en/segmentation) allowing for more advanced use cases.
Set tags with the SDK's [`addTag` and `addTags` methods](/docs/en/web-sdk-reference#addtag-%2C-addtags) as events occur in your app.
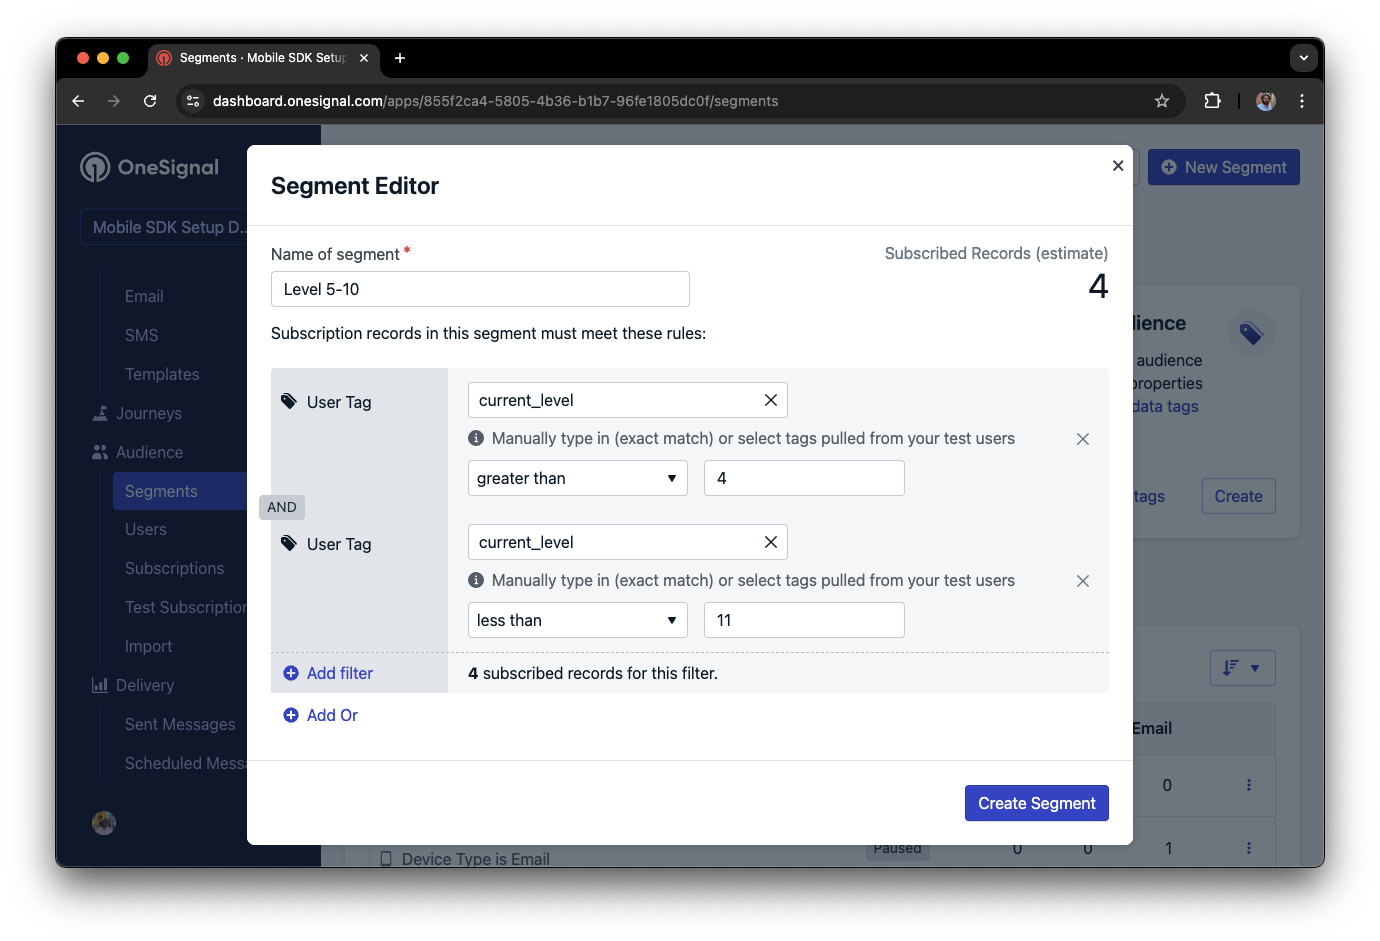
In this example, the user reached level 6 identifiable by the tag called `current_level` set to a value of `6`.
In your dashboard, go to **Delivery > Sent Messages**, then click the message to view stats. You should see the **confirmed** stat, meaning the device received the push.
Safari does not support confirmed receipt.
View delivery, click, and conversion stats for your push notifications.
You have successfully sent a notification via the API to a segment.
If notifications are not arriving, contact `support@onesignal.com` with the following:
* The API request and response (copy-paste into a `.txt` file)
* Your Subscription ID
* Your website URL with the OneSignal code
***
## User identification
The previous section covered creating web push [Subscriptions](/docs/en/subscriptions). This section expands to identifying [Users](/docs/en/users) across all their subscriptions (including push, email, and SMS) using the OneSignal SDK. It covers External IDs, tags, multi-channel subscriptions, privacy, and event tracking to help you unify and engage users across platforms.
### Assign External ID
Use an External ID to identify users consistently across devices, email addresses, and phone numbers using your backend's user identifier. This ensures your messaging stays unified across channels and 3rd party systems (especially important for [Integrations](/docs/en/integrations)).
Set the External ID with the SDK's [`login` method](/docs/en/web-sdk-reference#login-external-id) each time a user is identified by your app.
OneSignal generates unique read-only IDs for subscriptions (Subscription ID) and users (OneSignal ID).
As users download your app on different devices, subscribe to your website, and/or provide you email addresses and phone numbers outside of your app, new subscriptions will be created.
Setting the External ID via the SDK is highly recommended to identify users across all their subscriptions, regardless of how they are created.
### Add Tags
[Tags](/docs/en/add-user-data-tags) are key-value pairs of string data you can use to store user properties (like `username`, `role`, or preferences) and events (like `purchase_date`, `game_level`, or user interactions). Tags power advanced [Message Personalization](/docs/en/message-personalization) and [Segmentation](/docs/en/segmentation) allowing for more advanced use cases.
Set tags with the SDK's [`addTag` and `addTags` methods](/docs/en/web-sdk-reference#addtag-%2C-addtags) as events occur in your app.
In this example, the user reached level 6 identifiable by the tag called `current_level` set to a value of `6`.
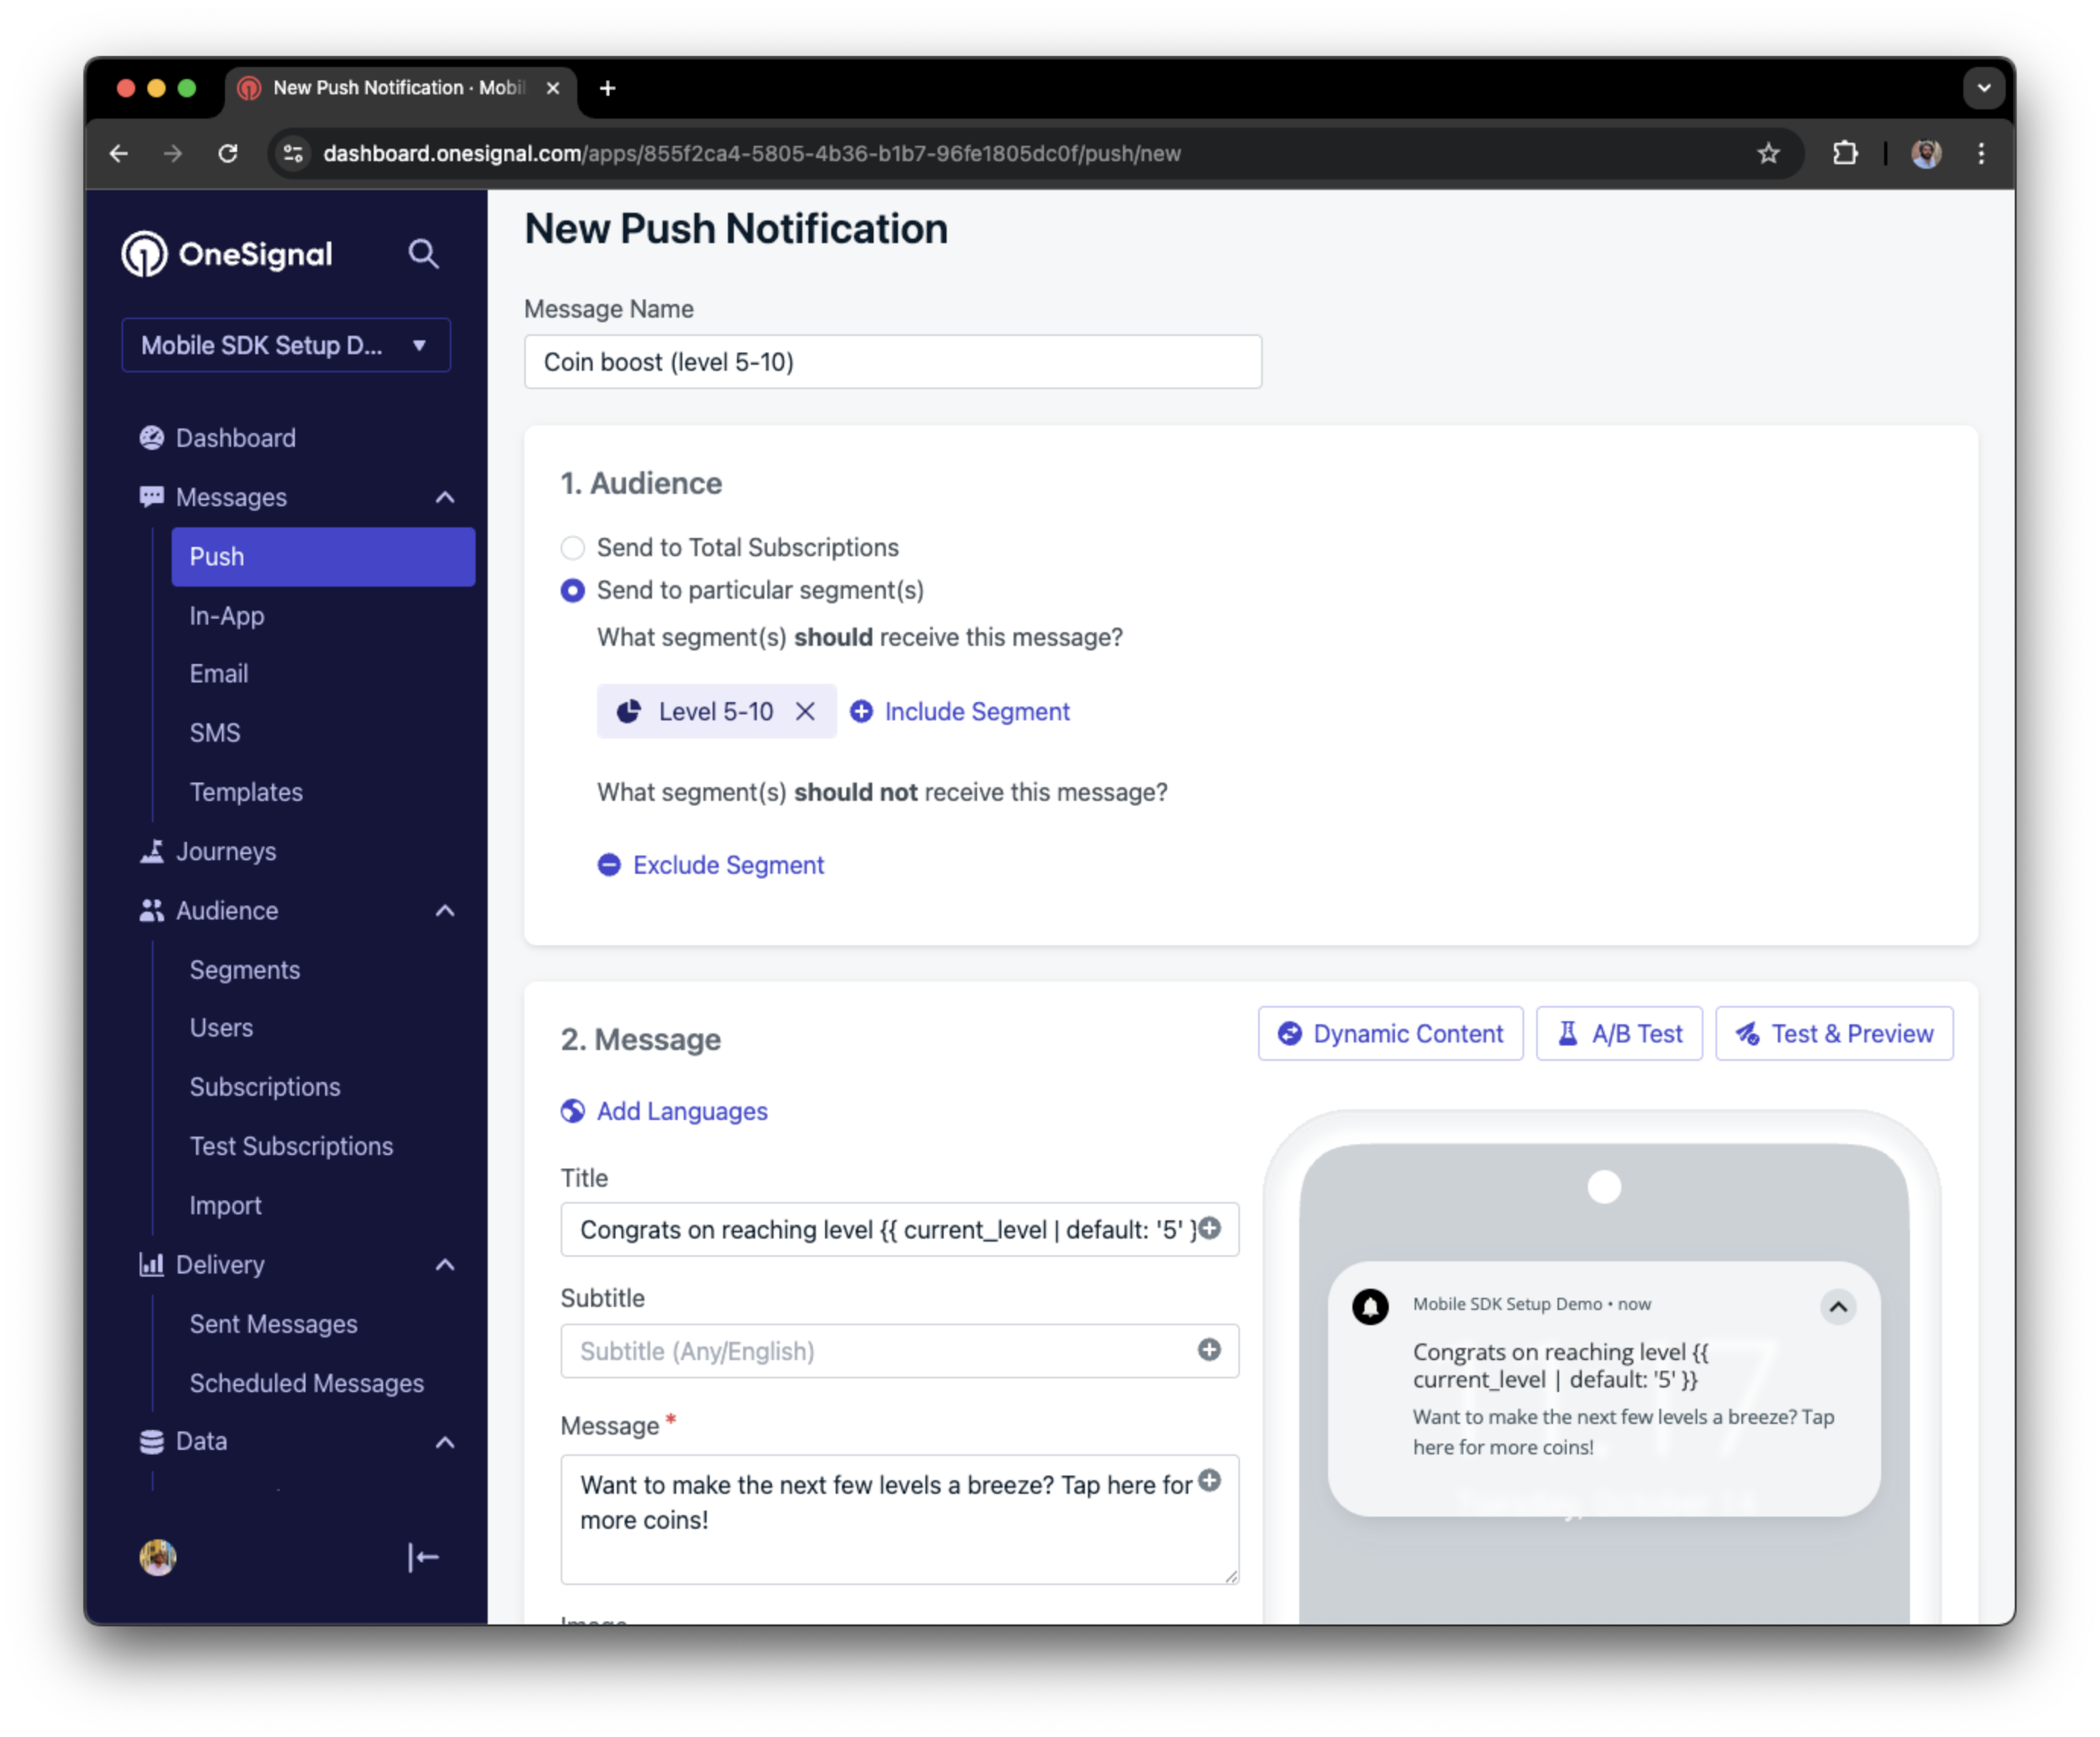
 You can create a segment of users with a level between 5 and 10, then use that segment to send targeted and personalized messages:
 ### Add email and/or SMS subscriptions
The OneSignal SDK creates web push subscriptions automatically when users opt in. You can also reach users through email and SMS channels by creating the corresponding subscriptions.
* Use the [`addEmail` method](/docs/en/web-sdk-reference#addemail-%2C-removeemail) to create email subscriptions.
* Use the [`addSms` method](/docs/en/web-sdk-reference#addsms-%2C-removesms) to create SMS subscriptions.
If the email address or phone number already exists in the OneSignal app, the SDK adds it to the existing user. It does not create duplicates.
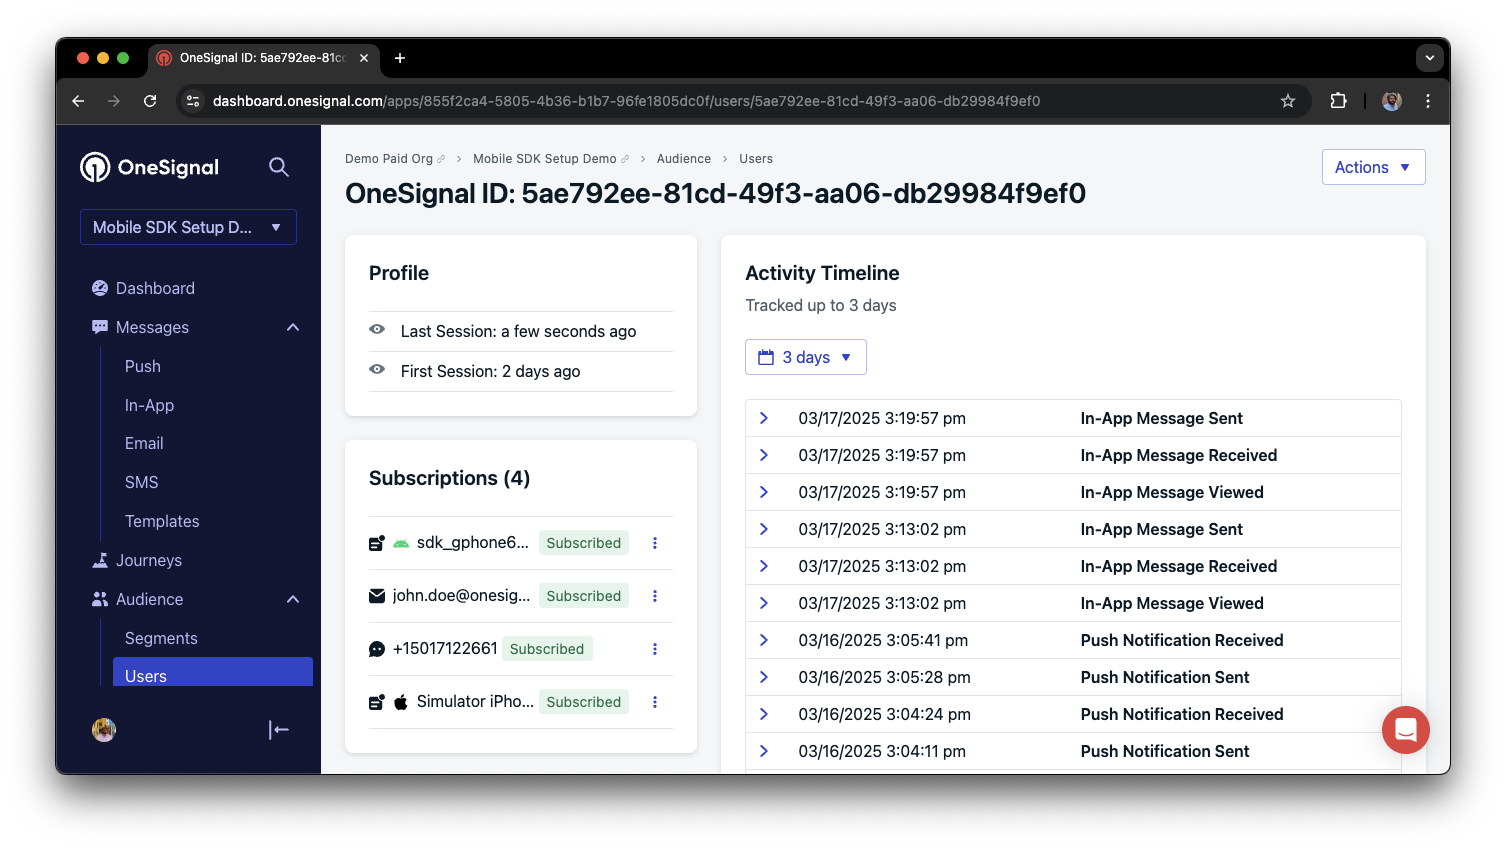
You can view unified users via **Audience > Users** in the dashboard or with the [View user API](/reference/view-user).
### Add email and/or SMS subscriptions
The OneSignal SDK creates web push subscriptions automatically when users opt in. You can also reach users through email and SMS channels by creating the corresponding subscriptions.
* Use the [`addEmail` method](/docs/en/web-sdk-reference#addemail-%2C-removeemail) to create email subscriptions.
* Use the [`addSms` method](/docs/en/web-sdk-reference#addsms-%2C-removesms) to create SMS subscriptions.
If the email address or phone number already exists in the OneSignal app, the SDK adds it to the existing user. It does not create duplicates.
You can view unified users via **Audience > Users** in the dashboard or with the [View user API](/reference/view-user).
 Best practices for multi-channel communication
* Obtain explicit consent before adding email or SMS subscriptions.
* Explain the benefits of each communication channel to users.
* Provide channel preferences so users can select which channels they prefer.
***
### Privacy & user consent
To control when OneSignal collects user data, use the SDK's consent gating methods:
* [`setConsentRequired(true)`](/docs/en/web-sdk-reference#setconsentrequired): Prevents data collection until consent is given.
* [`setConsentGiven(true)`](/docs/en/web-sdk-reference#setconsentgiven): Enables data collection once consent is granted.
For more on privacy and security:
Review what data the OneSignal SDK collects from users.
Manage and protect user data in compliance with privacy regulations.
***
## Listen to push, user, and in-app events
Use SDK listeners to react to user actions and state changes.
The SDK provides several event listeners you can hook into. See the [SDK reference guide](/docs/en/web-sdk-reference) for more details.
### Push notification events
* [Click event listener](/docs/en/web-sdk-reference#click): Detect when a notification is tapped.
* [Foreground lifecycle listener](/docs/en/web-sdk-reference#foregroundwilldisplay): Control how notifications behave in foreground.
### User state changes
* [User state change event listener](/docs/en/web-sdk-reference#addeventlistener-user-state): Detect when the External ID is set.
* [Permission observer](/docs/en/web-sdk-reference#permissionchange): Track the user's specific interaction with the native push permission prompt.
* [Push subscription change observer](/docs/en/web-sdk-reference#addeventlistener-push-subscription-changes): Track when the push subscription status changes.
***
## Advanced setup & capabilities
Explore more capabilities to enhance your integration:
Move from another push provider to OneSignal.
Connect OneSignal with third-party tools and platforms.
Add interactive buttons to push notifications.
Send localized messages to users in their preferred language.
Secure your SDK integration with server-side identity verification.
Track custom conversion events tied to your messages.
### Web SDK setup & reference
Enable all key web push features for your integration.
Full details on available methods and configuration options.
Congratulations! You've successfully completed the Web SDK setup guide.
***
Need help?
Chat with our Support team or email `support@onesignal.com`
Please include:
* Details of the issue you're experiencing and steps to reproduce if available
* Your OneSignal App ID
* The External ID or Subscription ID if applicable
* The URL to the message you tested in the OneSignal Dashboard if applicable
* Any relevant [logs or error messages](/docs/en/capturing-a-debug-log)
We're happy to help!
Best practices for multi-channel communication
* Obtain explicit consent before adding email or SMS subscriptions.
* Explain the benefits of each communication channel to users.
* Provide channel preferences so users can select which channels they prefer.
***
### Privacy & user consent
To control when OneSignal collects user data, use the SDK's consent gating methods:
* [`setConsentRequired(true)`](/docs/en/web-sdk-reference#setconsentrequired): Prevents data collection until consent is given.
* [`setConsentGiven(true)`](/docs/en/web-sdk-reference#setconsentgiven): Enables data collection once consent is granted.
For more on privacy and security:
Review what data the OneSignal SDK collects from users.
Manage and protect user data in compliance with privacy regulations.
***
## Listen to push, user, and in-app events
Use SDK listeners to react to user actions and state changes.
The SDK provides several event listeners you can hook into. See the [SDK reference guide](/docs/en/web-sdk-reference) for more details.
### Push notification events
* [Click event listener](/docs/en/web-sdk-reference#click): Detect when a notification is tapped.
* [Foreground lifecycle listener](/docs/en/web-sdk-reference#foregroundwilldisplay): Control how notifications behave in foreground.
### User state changes
* [User state change event listener](/docs/en/web-sdk-reference#addeventlistener-user-state): Detect when the External ID is set.
* [Permission observer](/docs/en/web-sdk-reference#permissionchange): Track the user's specific interaction with the native push permission prompt.
* [Push subscription change observer](/docs/en/web-sdk-reference#addeventlistener-push-subscription-changes): Track when the push subscription status changes.
***
## Advanced setup & capabilities
Explore more capabilities to enhance your integration:
Move from another push provider to OneSignal.
Connect OneSignal with third-party tools and platforms.
Add interactive buttons to push notifications.
Send localized messages to users in their preferred language.
Secure your SDK integration with server-side identity verification.
Track custom conversion events tied to your messages.
### Web SDK setup & reference
Enable all key web push features for your integration.
Full details on available methods and configuration options.
Congratulations! You've successfully completed the Web SDK setup guide.
***
Need help?
Chat with our Support team or email `support@onesignal.com`
Please include:
* Details of the issue you're experiencing and steps to reproduce if available
* Your OneSignal App ID
* The External ID or Subscription ID if applicable
* The URL to the message you tested in the OneSignal Dashboard if applicable
* Any relevant [logs or error messages](/docs/en/capturing-a-debug-log)
We're happy to help!