> ## Documentation Index
> Fetch the complete documentation index at: https://documentation.onesignal.com/llms.txt
> Use this file to discover all available pages before exploring further.
# Huawei SDK kurulumu
> Android Studio için OneSignal Huawei SDK Kurulum Kılavuzu.
## Genel Bakış
Bu kılavuz, Huawei AppGallery'de dağıtılan bir Huawei uygulamasına OneSignal push bildirimlerinin nasıl entegre edileceğini açıklar.
Bu talimatlar, Java veya Kotlin ile yazılmış yerel uygulamalar içindir. Diğer desteklenen SDK'lar için bakınız:
***
## Gereksinimler
* [Android Studio](https://developer.android.com/studio)
* "Huawei App Gallery" yüklü bir Huawei cihazı
* Yapılandırılmış OneSignal Uygulaması ve Platformu
***
### Configure your OneSignal app and platform
Configure your OneSignal app with the platforms you support — Apple (APNs), Google (FCM), Huawei (HMS), and/or Amazon (ADM).
If your organization already has a OneSignal account, [ask to be invited](/docs/en/manage-team-members) to the Organization. Otherwise, [sign up for a free account](https://onesignal.com) to get started.
Create a new app by clicking **New App/Website**, or add a platform to an existing app in **Settings > Push & In-App**. Select the platform(s) you want to configure and click **Next: Configure Your Platform**.
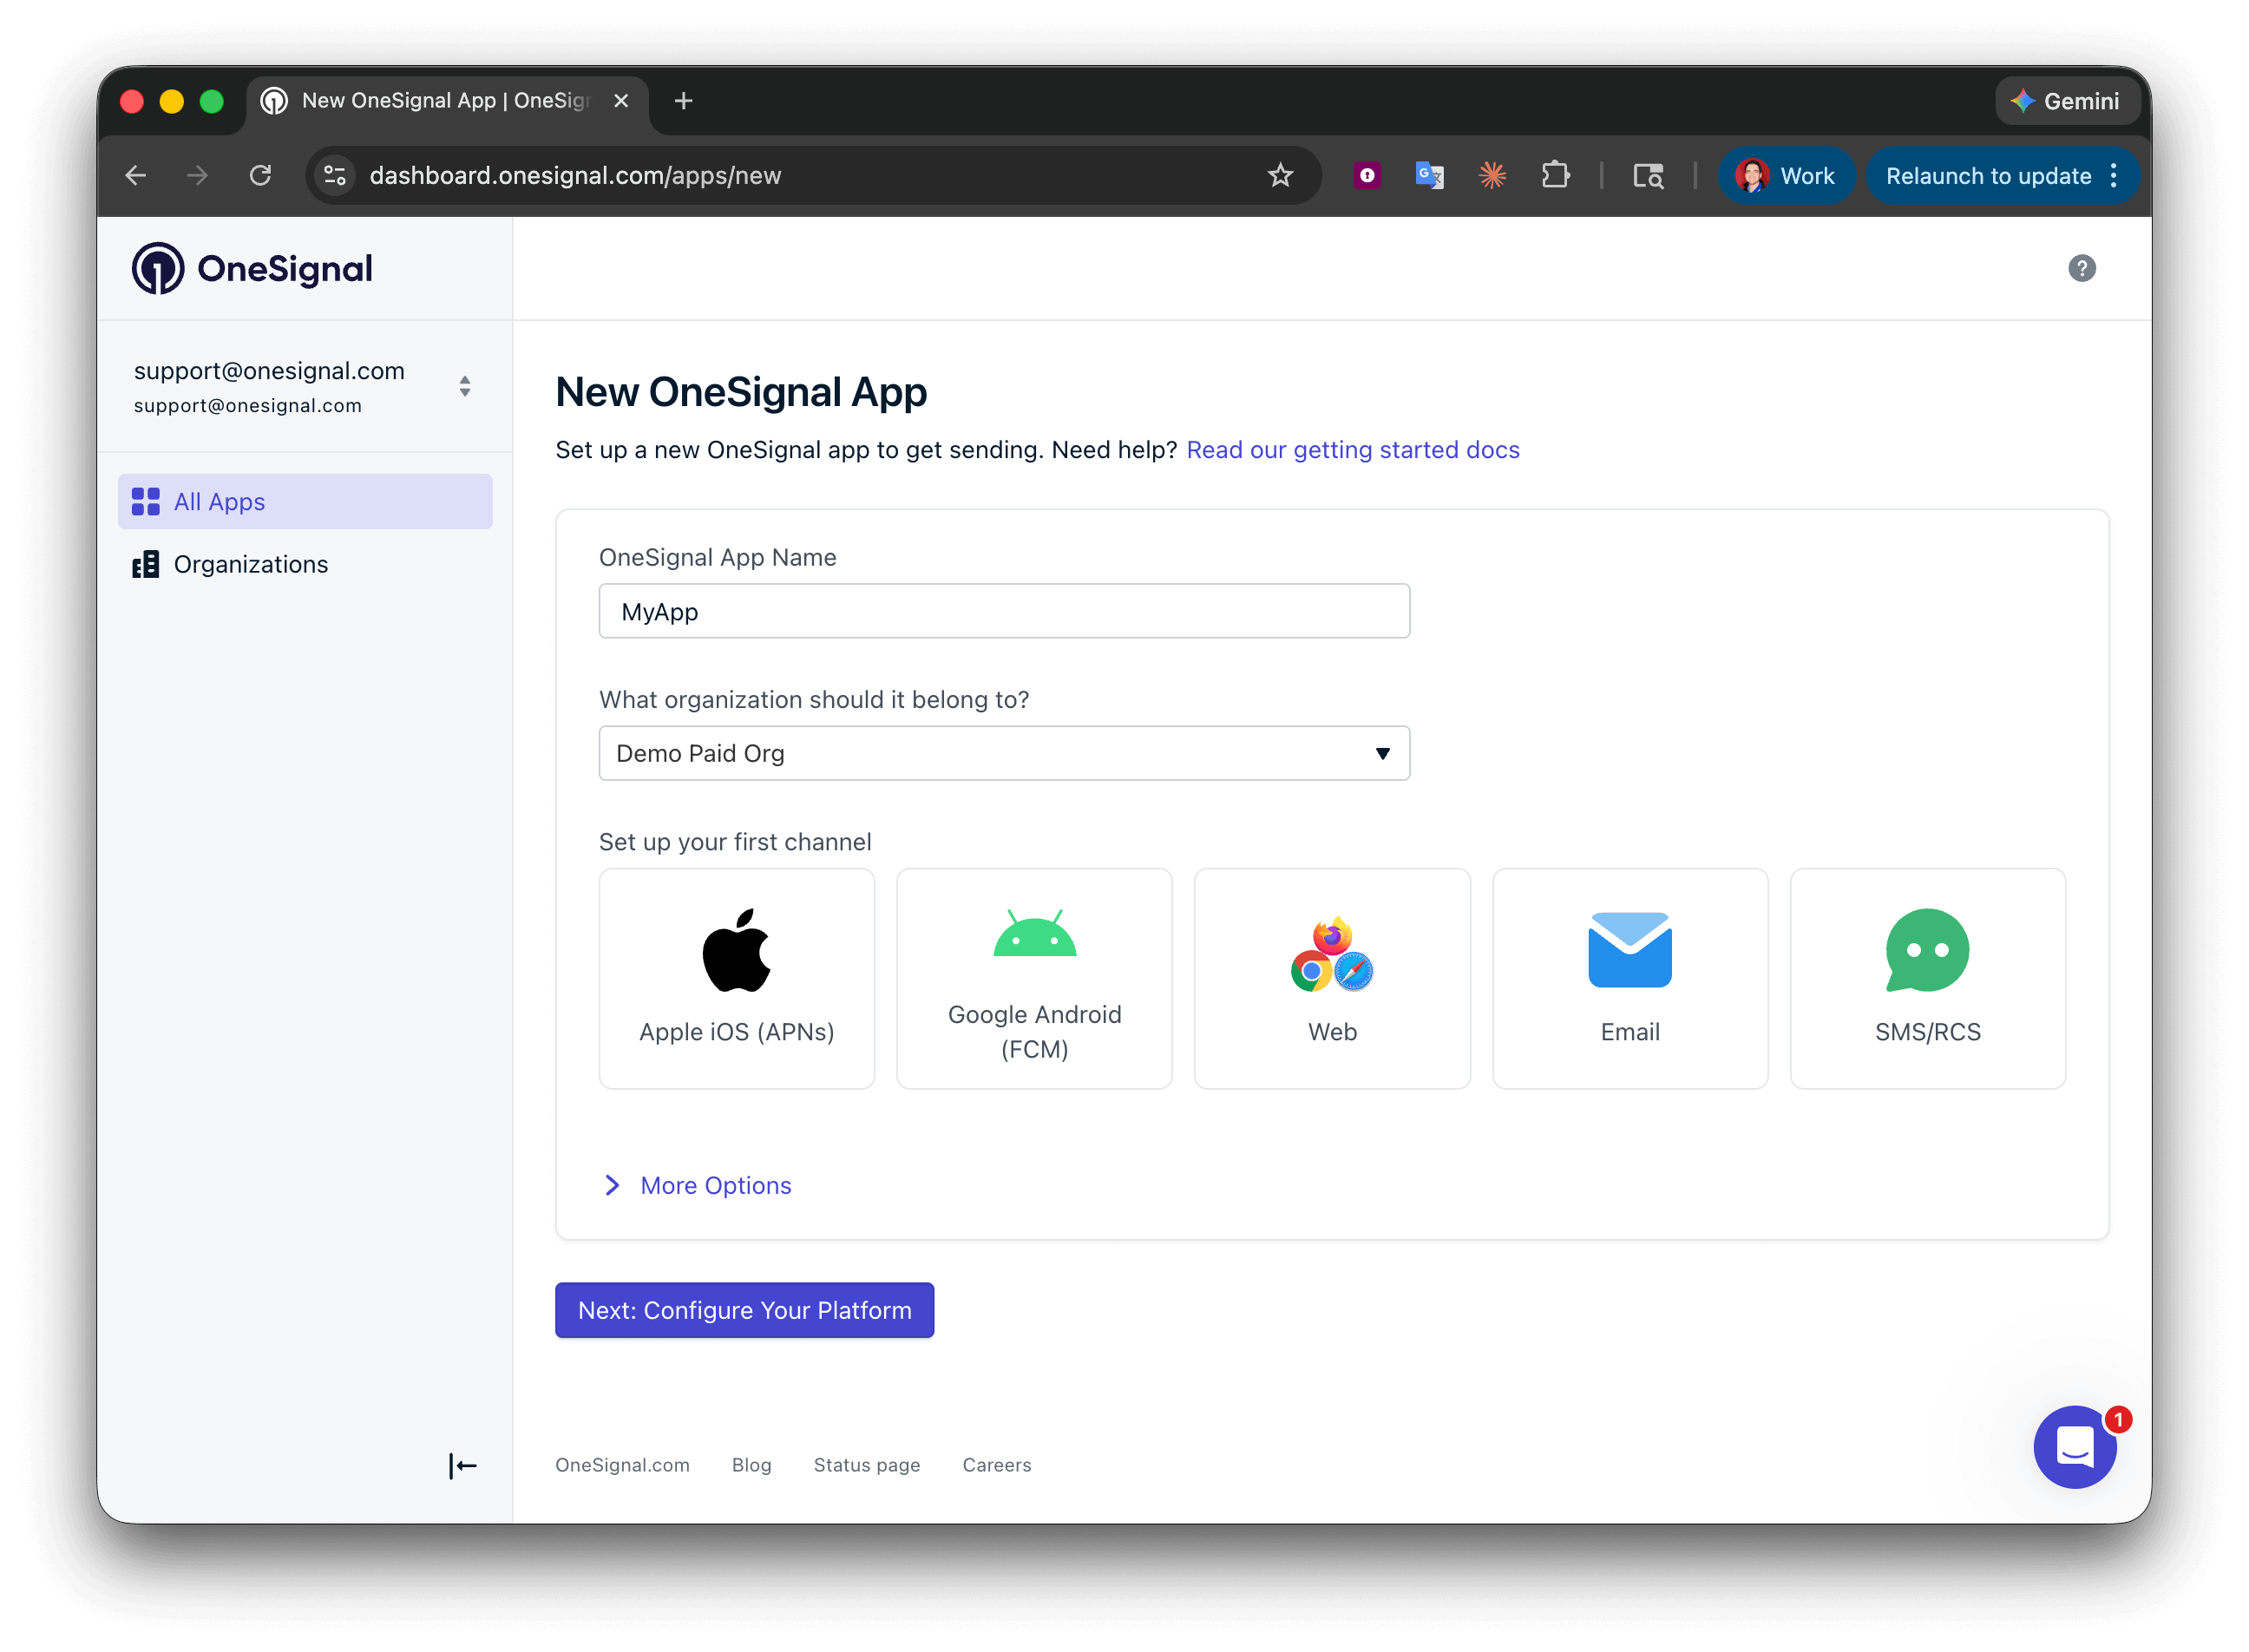 Enter the credentials for your platform:
* **Android**: [Set up Firebase credentials](/docs/en/android-firebase-credentials)
* **iOS**: [p8 token (recommended)](/docs/en/ios-p8-token-based-connection-to-apns) or [p12 certificate](/docs/en/ios-p12-generate-certificates)
* **Amazon**: [Generate API key](/docs/en/generate-an-amazon-api-key)
* **Huawei**: [Authorize OneSignal](/docs/en/authorize-onesignal-to-send-huawei-push)
Click **Save & Continue** after entering your credentials.
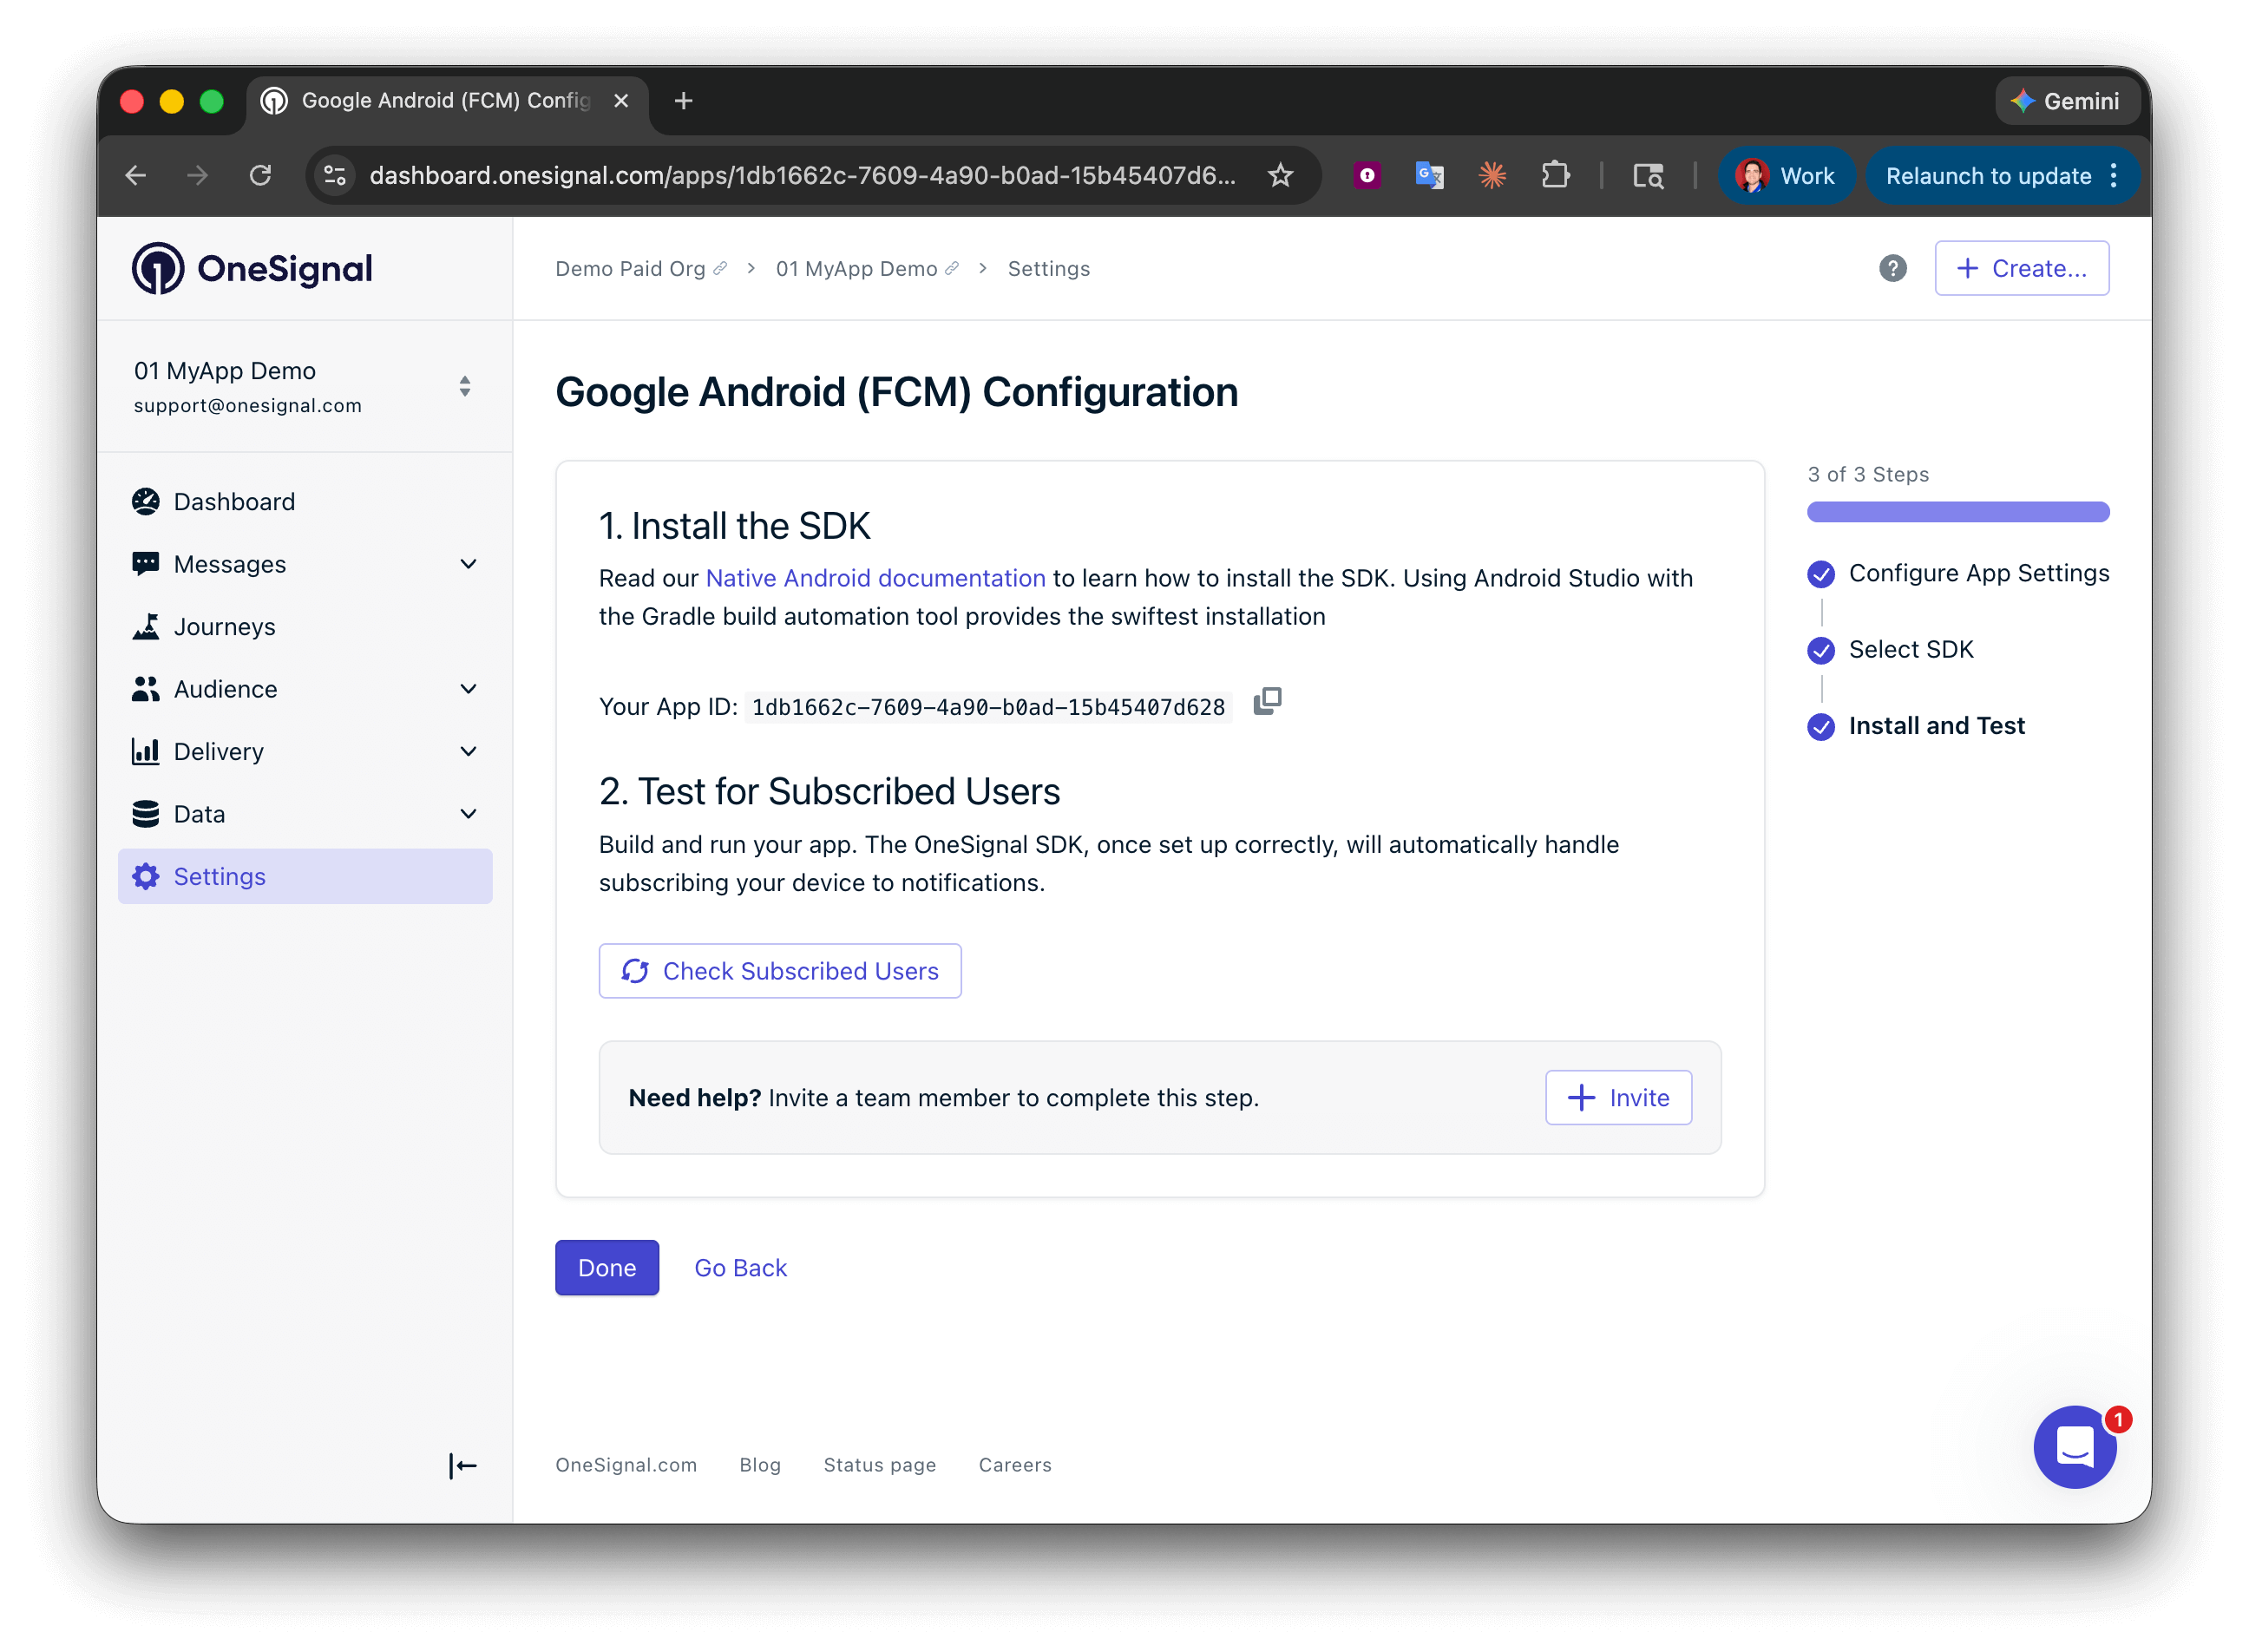
Your **App ID** is displayed on the final screen. Copy and save it — you need it when initializing the SDK. Select your SDK platform, then follow the setup guide.
Enter the credentials for your platform:
* **Android**: [Set up Firebase credentials](/docs/en/android-firebase-credentials)
* **iOS**: [p8 token (recommended)](/docs/en/ios-p8-token-based-connection-to-apns) or [p12 certificate](/docs/en/ios-p12-generate-certificates)
* **Amazon**: [Generate API key](/docs/en/generate-an-amazon-api-key)
* **Huawei**: [Authorize OneSignal](/docs/en/authorize-onesignal-to-send-huawei-push)
Click **Save & Continue** after entering your credentials.
Your **App ID** is displayed on the final screen. Copy and save it — you need it when initializing the SDK. Select your SDK platform, then follow the setup guide.
 ***
## Kurulum
### 1. OneSignal SDK'yı kurun
SDK'mızı uygulamanıza uygulamak için OneSignal Android SDK kurulum kılavuzunu izleyin.
Firebase/Google kurulumunun Huawei AppGallery'ye yayınlanan uygulama yapıları için gerekli olmadığını unutmayın.
### 2. Huawei yapılandırması (agconnect-services.json)
Farklı bir Huawei hizmetini ayarlarken Android Studio Projenizde zaten bir Huawei `agconnect-services.json` dosyası varsa bu adımı atlayabilirsiniz.
[AppGallery Connect Project List](https://developer.huawei.com/consumer/en/service/josp/agc/index.html#/myProject)'ten uygulamanızı seçin.
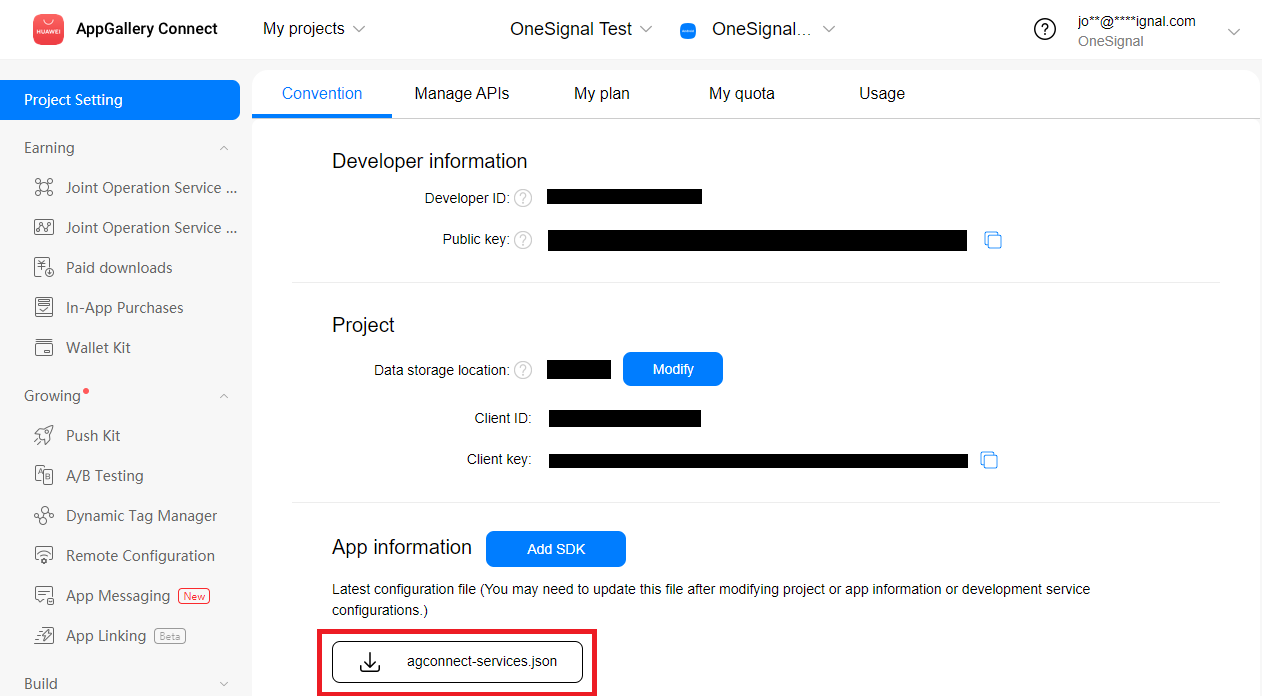
Bu dosyayı indirmek için "agconnect-services.json" düğmesine tıklayın.
***
## Kurulum
### 1. OneSignal SDK'yı kurun
SDK'mızı uygulamanıza uygulamak için OneSignal Android SDK kurulum kılavuzunu izleyin.
Firebase/Google kurulumunun Huawei AppGallery'ye yayınlanan uygulama yapıları için gerekli olmadığını unutmayın.
### 2. Huawei yapılandırması (agconnect-services.json)
Farklı bir Huawei hizmetini ayarlarken Android Studio Projenizde zaten bir Huawei `agconnect-services.json` dosyası varsa bu adımı atlayabilirsiniz.
[AppGallery Connect Project List](https://developer.huawei.com/consumer/en/service/josp/agc/index.html#/myProject)'ten uygulamanızı seçin.
Bu dosyayı indirmek için "agconnect-services.json" düğmesine tıklayın.
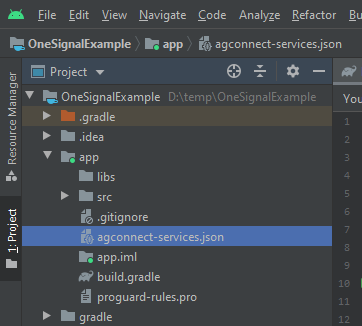
 Bu dosyayı Android Studio'daki uygulama dizininize yerleştirin.
 ### 3. İmzalama sertifikası parmak izi oluşturma
Farklı bir Huawei hizmeti için Huawei panosuna SHA-256 sertifika parmak izinizi zaten eklediyseniz bu adımı atlayabilirsiniz.
Android Studio'dan **View > Tool Windows > Gradle**'a gidin.
### 3. İmzalama sertifikası parmak izi oluşturma
Farklı bir Huawei hizmeti için Huawei panosuna SHA-256 sertifika parmak izinizi zaten eklediyseniz bu adımı atlayabilirsiniz.
Android Studio'dan **View > Tool Windows > Gradle**'a gidin.
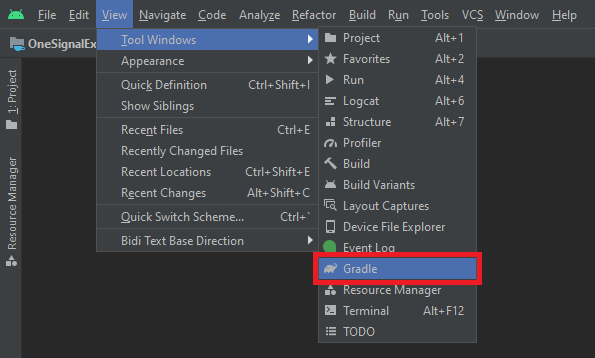 Buradan **app > Tasks > android > signingReport**'u seçin.
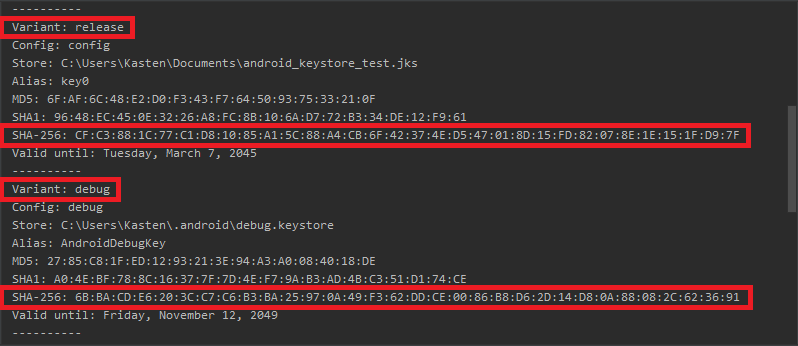
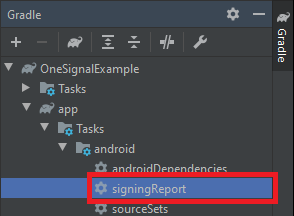 `release` varyantınız için `SHA-256`'nızı kopyalayın.
* İsteğe bağlı ancak daha hızlı test için önerilir: `debug` varyantınız için de `SHA-256`.
* Projenizde diğer özel varyantlarınız olabilir, bunlar için push desteğine ihtiyacınız varsa bunları da kopyalayın.
`release` varyantınız için `SHA-256`'nızı kopyalayın.
* İsteğe bağlı ancak daha hızlı test için önerilir: `debug` varyantınız için de `SHA-256`.
* Projenizde diğer özel varyantlarınız olabilir, bunlar için push desteğine ihtiyacınız varsa bunları da kopyalayın.
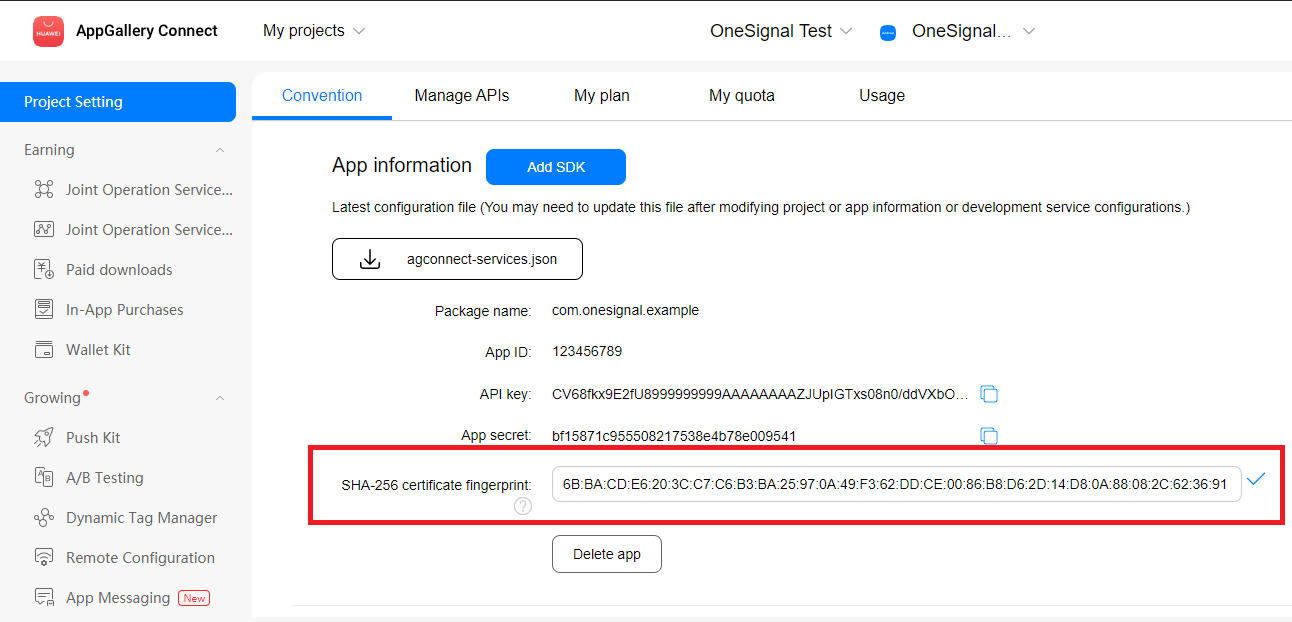
 [AppGallery Connect Project List](https://developer.huawei.com/consumer/en/service/josp/agc/index.html#/myProject)'ten uygulamanızı seçin.
Anahtarlarınızı girmeniz gereken "SHA-256 certificate fingerprint" alanını bulmak için aşağı kaydırın.
[AppGallery Connect Project List](https://developer.huawei.com/consumer/en/service/josp/agc/index.html#/myProject)'ten uygulamanızı seçin.
Anahtarlarınızı girmeniz gereken "SHA-256 certificate fingerprint" alanını bulmak için aşağı kaydırın.
 ### 4. Huawei gradle eklentisi ve bağımlılıkları ekleyin
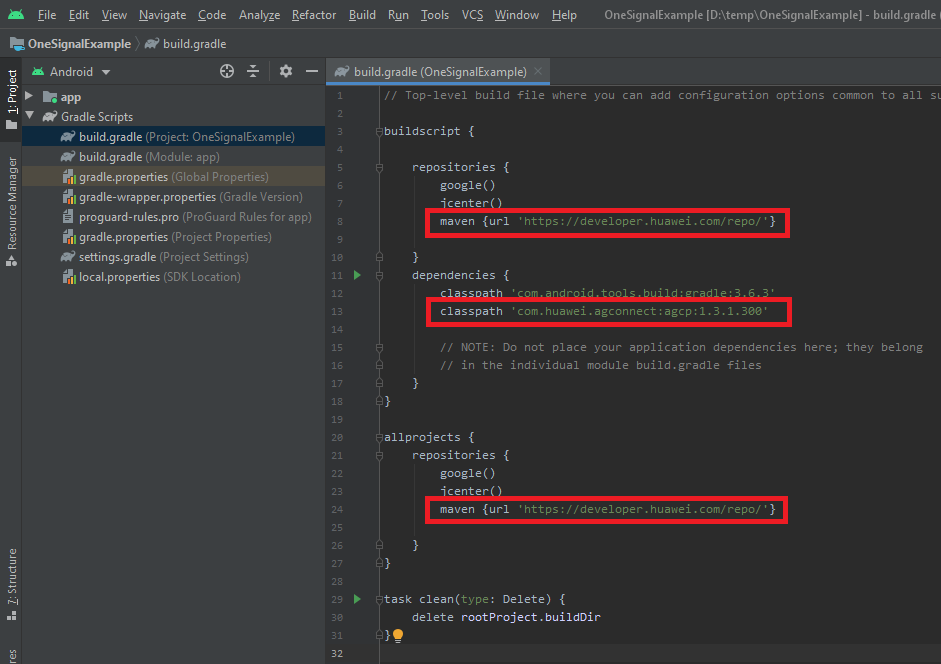
Android Studio'da kök `build.gradle` (Project: ) dosyanızı açın ve `buildscript { repositories }` ve `allprojects { repositories }` altına ` maven {url 'https://developer.huawei.com/repo/'}` ekleyin
`settings.gradle.kts` dosyanızı açın ve `pluginManagement { repositories }` ve `dependencyResolutionManagement { repositories }` altına `maven {url 'https://developer.huawei.com/repo/'}` ekleyin
`buildscript { dependencies }` altına `classpath 'com.huawei.agconnect:agcp:1.9.1.301'` ekleyin
Kök `build.gradle` dosyanızda toplamda 3 yeni satırınız olmalı, aşağıda vurgulanmıştır.
### 4. Huawei gradle eklentisi ve bağımlılıkları ekleyin
Android Studio'da kök `build.gradle` (Project: ) dosyanızı açın ve `buildscript { repositories }` ve `allprojects { repositories }` altına ` maven {url 'https://developer.huawei.com/repo/'}` ekleyin
`settings.gradle.kts` dosyanızı açın ve `pluginManagement { repositories }` ve `dependencyResolutionManagement { repositories }` altına `maven {url 'https://developer.huawei.com/repo/'}` ekleyin
`buildscript { dependencies }` altına `classpath 'com.huawei.agconnect:agcp:1.9.1.301'` ekleyin
Kök `build.gradle` dosyanızda toplamda 3 yeni satırınız olmalı, aşağıda vurgulanmıştır.
 `app/build.gradle` dosyanızı açın ve `dependencies` bölümü altına `implementation 'com.huawei.hms:push:6.3.0.304'` ekleyin.
Ayrıca `app/build.gradle` dosyasının en altına `apply plugin: 'com.huawei.agconnect'` ekleyin.
`app/build.gradle` dosyanızda toplamda 2 yeni satırınız olmalı, aşağıda vurgulanmıştır.
Kaydettikten sonra açılan banner'da "Sync Now" düğmesine basmayı unutmayın!
`app/build.gradle` dosyanızı açın ve `dependencies` bölümü altına `implementation 'com.huawei.hms:push:6.3.0.304'` ekleyin.
Ayrıca `app/build.gradle` dosyasının en altına `apply plugin: 'com.huawei.agconnect'` ekleyin.
`app/build.gradle` dosyanızda toplamda 2 yeni satırınız olmalı, aşağıda vurgulanmıştır.
Kaydettikten sonra açılan banner'da "Sync Now" düğmesine basmayı unutmayın!
 ***
## Ek yapılandırma adımları
### Diğer HMS push kütüphaneleri veya kendi `HmsMessageService` sınıfınızla uyumluluk
Şu durumlarda gereklidir:
* Uygulamanızda OneSignal'e ek olarak başka bir HMS push SDK/Kütüphanesi var
* Kendi `HmsMessageService` sınıfınız var
Henüz yoksa `HmsMessageService`'den genişleyen bir sınıf oluşturun ve aşağıdaki yöntemleri ekleyin.
Zaten `HmsMessageService`'i genişleten bir sınıfınız varsa, başka bir sınıf oluşturmak yerine iki yeni `OneSignalHmsEventBridge` satırını ekleyin.
```java Java theme={null}
public class YourHmsMessageService extends HmsMessageService {
public void onNewToken(String token) {
// ...
// Forward event on to OneSignal SDK
OneSignalHmsEventBridge.onNewToken(this, token);
}
@Override
public void onMessageReceived(RemoteMessage message) {
// ...
// Forward event on to OneSignal SDK
OneSignalHmsEventBridge.onMessageReceived(this, message);
}
}
```
Bu, `onNewToken` ve `onMessageReceived`'i `OneSignalHmsEventBridge` aracılığıyla OneSignal'e iletmek içindir.
Daha önce `HmsMessageService`'i genişleten bir sınıfınız yoksa, bunu `` etiketi altında `AndroidManifest.xml` dosyanıza eklediğinizden emin olun.
```xml AndroidManifest.xml theme={null}
...
...
```
### Huawei AppGallery yapıları için Google kütüphanelerini hariç tutun (isteğe bağlı)
Uygulamanız yalnızca Huawei AppGallery'de kullanılabilir olacaksa ve OneSignal'in içerdiği Google ile ilgili bağımlılıkları hariç tutmak istiyorsanız, `app/build.gradle` dosyanızda `implementation` ile `exclude` kullanabilirsiniz.
```groovy app/build.gradle theme={null}
implementation('com.onesignal:OneSignal:[5.4.0, 5.99.99]') {
exclude group: 'com.google.android.gms'
exclude group: 'com.google.firebase'
}
```
Uygulamanız hem Google Play Store hem de Huawei AppGallery için olacaksa ve APK'nızı daha küçük yapmak için hangi kütüphaneleri ekleyeceğiniz konusunda seçici olmak istiyorsanız, buildTypes veya varyantlara göre bağımlılıklar ekleyebilirsiniz. Örnek:
```groovy app/build.gradle theme={null}
android {
// ...
buildTypes {
debug {
}
release {
}
// **** Add your custom hauwei buildType here
huawei {
}
}
}
dependencies {
// \*\*\*\* Use the full OneSignal dependencies for Google Play Store builds
debugImplementation 'com.onesignal:OneSignal:[5.0.0, 5.99.99]'
releaseImplementation 'com.onesignal:OneSignal:[5.0.0, 5.99.99]'
// **** Only include hms:push for your Huawei AppGallery builds.
huaweiImplementation 'com.huawei.hms:push:6.3.0.304'
// Omit Google / Firebase libraries for Huawei builds.
huaweiImplementation('com.onesignal:OneSignal:[5.0.0, 5.99.99]') {
exclude group: 'com.google.android.gms'
exclude group: 'com.google.firebase'
}
}
```
### FCM yerine HMS'i tercih edin (isteğe bağlı)
***Yukarıda Huawei AppGallery yapısı için [Google Kütüphanelerini hariç tuttuysan](./huawei-sdk-setup#omit-google-libraries-for-huawei-appgallery-builds-optional), bu adım geçerli değildir.***
Varsayılan olarak OneSignal, her ikisi de uygulamanıza dahil edilmişse FCM'yi HMS'e tercih eder. Bunu HMS'i tercih edecek şekilde değiştirmek isterseniz `AndroidManifest.xml` dosyanıza aşağıdakileri ekleyebilirsiniz:
```xml xml theme={null}
...
...
```
***
## Huawei sorun giderme
Test ederken, [OneSignal setLogLevel yöntemini](./mobile-sdk-reference#setloglevel) VERBOSE olarak ayarlı tuttuğunuzdan emin olun.
Günlükleri kontrol ederek hataları ve [Huawei Common Error Codes](https://developer.huawei.com/consumer/en/doc/development/HMS-2-References/hmssdk_huaweipush_api_reference_errorcode)'u görün.
OneSignal SDK ile Huawei `pushToken` için kayıt olurken `6003` hatasından kaçınmak için bir debug veya release keystore imzası oluşturmanız gerekebilir (doğru uygulama derleme yolunu seçin, `debug` veya `release`). ["Configure a Signature" bölümüne](https://developer.huawei.com/consumer/en/doc/HMS-Guides/Preparations#h2-1584707362385) bakın
`"notification_types":-25`, OneSignal'in bir push token almak için Huawei'nin HMS'inden yanıt beklerken zaman aşımına uğradığı anlamına gelir. Bu büyük olasılıkla başka bir 3. taraf HMS push SDK'sının veya kendi HmsMessageService'inizin bu olayı OneSignal yerine almasından kaynaklanır.
Lütfen [bunu nasıl kontrol edeceğiniz ve bu durumda olayı nasıl ileteceğiniz hakkındaki adımı](#compatibility-with-other-hms-push-libraries-or-your-own-hmsmessageservice-class) inceleyin.
Bu, HMS'in push için gereken bir sınıfın uygulamada eksik olduğu anlamına gelir. `build.gradle` dosyasında sadece `com.huawei.hms:push`'a sahip olmak bu özel hatanın artık oluşmamasına neden olacaktır. Ancak, agresif Proguard veya R8 ayarlarınız varsa, bu sorunlara neden olabilir. Sorunun kaynağının bu olup olmadığını görmek için, varsa `minifyEnabled`'ı geçici olarak kapatmanızı öneririz.
Ayrıca, diğer HMS kütüphanelerinin ana sürüm sürümlerini karıştırmamalısınız. 4 veya 5 ile başlayın. 3'ten 5'e kadar bir karışıma sahip olmadığınızdan emin olun, bu da başka hatalara yol açacaktır
```
E/OneSignal: HMS ApiException getting Huawei push token!
com.huawei.hms.common.ApiException: -5: Core error
```
Proguard veya R8 kurallarınızı kontrol ederek düzgün bir şekilde ayarlandığından emin olun. İlgili olup olmadığını görmek için geçici olarak devre dışı bırakabilirsiniz. Proguard veya R8'i devre dışı bıraktıktan sonra sorunu düzeltirse, bu kılavuzu takip edebilir ve tekrar açabilirsiniz. ["Configure a Signature" bölümüne](https://developer.huawei.com/consumer/en/doc/HMS-Guides/Preparations#h2-1584707362385) bakın
## Testing the OneSignal SDK integration
This guide helps you verify that your OneSignal SDK integration is working correctly by testing push notifications, subscription registration, and in-app messaging.
If you are testing with an Android emulator, it should start with a cold boot.
1. Go to **Device Manager** in Android Studio.
2. Select your emulator device and click **Edit**.
3. Go to **Additional Settings** or **More**.
4. Set the **Boot option** to **Cold Boot**.
5. Save changes and restart the emulator.
### Check mobile subscriptions
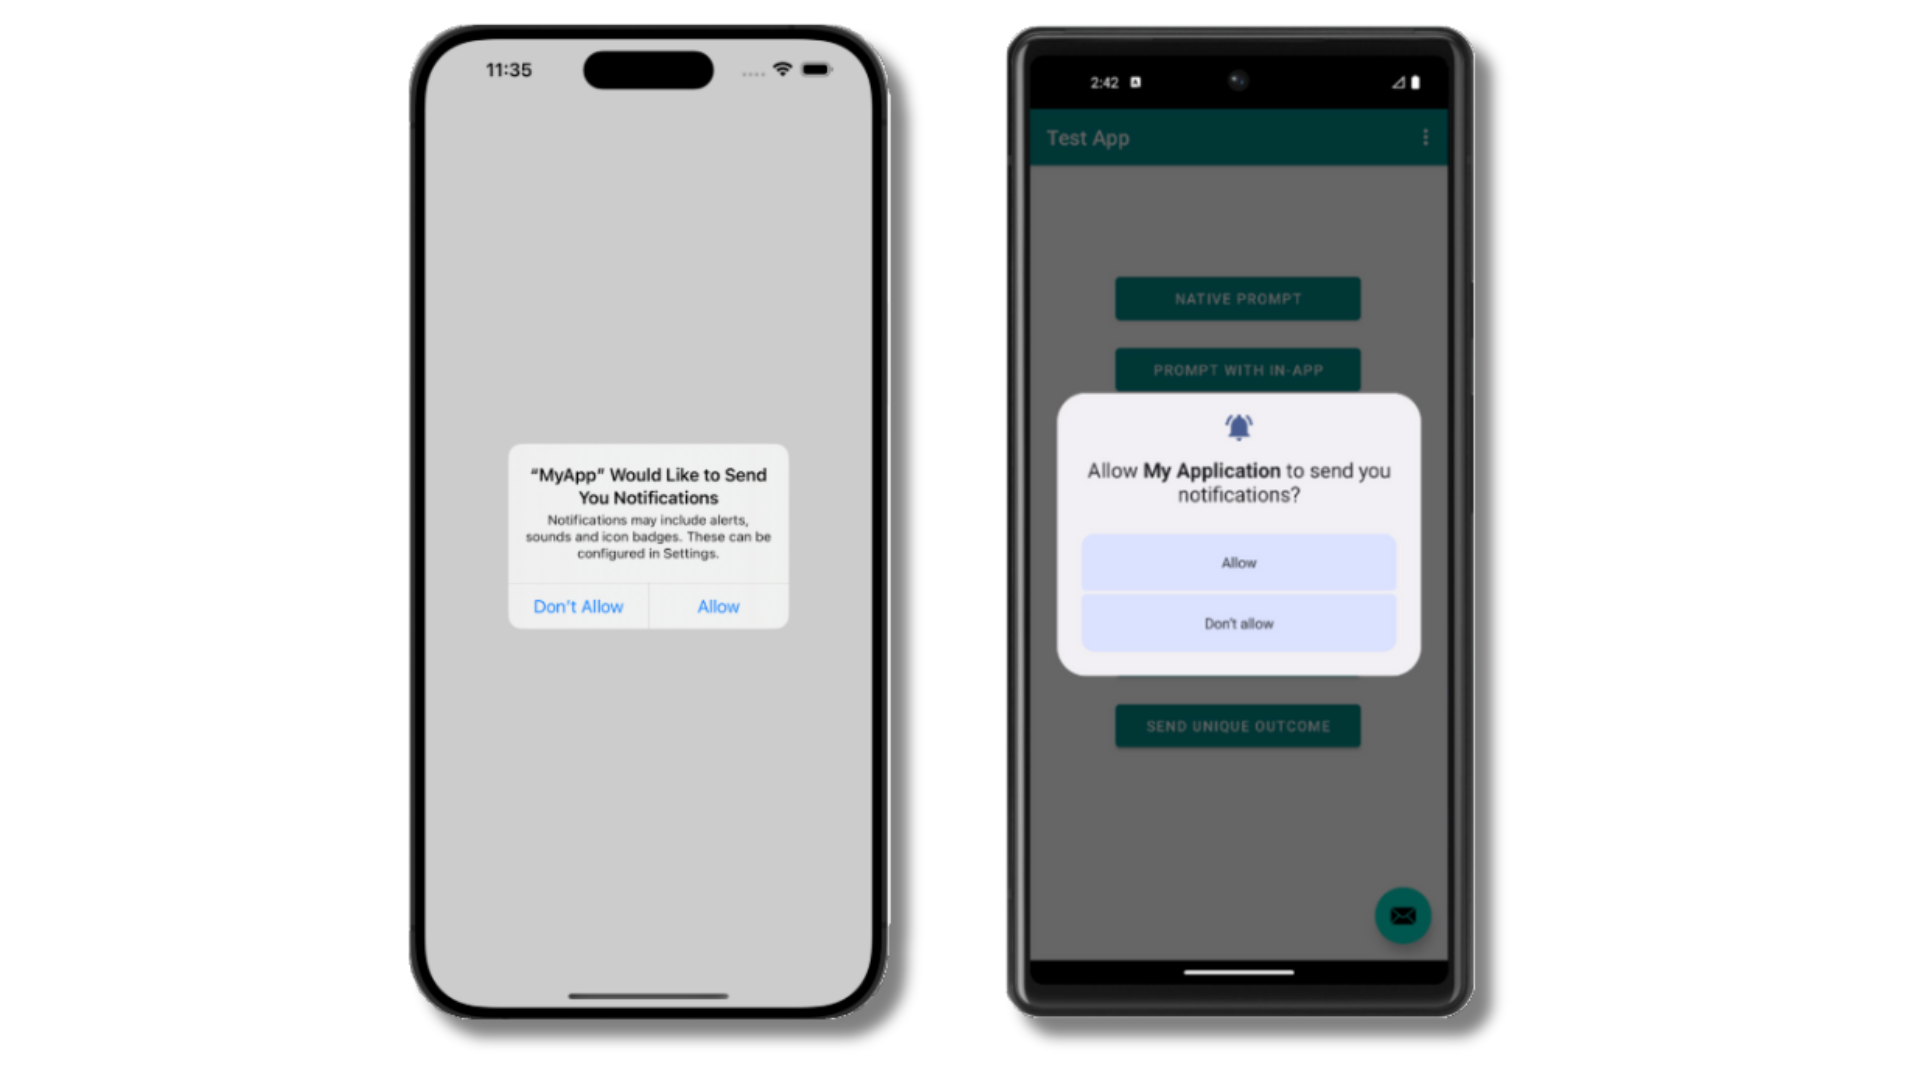
The native push permission prompt should appear automatically if you added the `requestPermission` method during initialization.
***
## Ek yapılandırma adımları
### Diğer HMS push kütüphaneleri veya kendi `HmsMessageService` sınıfınızla uyumluluk
Şu durumlarda gereklidir:
* Uygulamanızda OneSignal'e ek olarak başka bir HMS push SDK/Kütüphanesi var
* Kendi `HmsMessageService` sınıfınız var
Henüz yoksa `HmsMessageService`'den genişleyen bir sınıf oluşturun ve aşağıdaki yöntemleri ekleyin.
Zaten `HmsMessageService`'i genişleten bir sınıfınız varsa, başka bir sınıf oluşturmak yerine iki yeni `OneSignalHmsEventBridge` satırını ekleyin.
```java Java theme={null}
public class YourHmsMessageService extends HmsMessageService {
public void onNewToken(String token) {
// ...
// Forward event on to OneSignal SDK
OneSignalHmsEventBridge.onNewToken(this, token);
}
@Override
public void onMessageReceived(RemoteMessage message) {
// ...
// Forward event on to OneSignal SDK
OneSignalHmsEventBridge.onMessageReceived(this, message);
}
}
```
Bu, `onNewToken` ve `onMessageReceived`'i `OneSignalHmsEventBridge` aracılığıyla OneSignal'e iletmek içindir.
Daha önce `HmsMessageService`'i genişleten bir sınıfınız yoksa, bunu `` etiketi altında `AndroidManifest.xml` dosyanıza eklediğinizden emin olun.
```xml AndroidManifest.xml theme={null}
...
...
```
### Huawei AppGallery yapıları için Google kütüphanelerini hariç tutun (isteğe bağlı)
Uygulamanız yalnızca Huawei AppGallery'de kullanılabilir olacaksa ve OneSignal'in içerdiği Google ile ilgili bağımlılıkları hariç tutmak istiyorsanız, `app/build.gradle` dosyanızda `implementation` ile `exclude` kullanabilirsiniz.
```groovy app/build.gradle theme={null}
implementation('com.onesignal:OneSignal:[5.4.0, 5.99.99]') {
exclude group: 'com.google.android.gms'
exclude group: 'com.google.firebase'
}
```
Uygulamanız hem Google Play Store hem de Huawei AppGallery için olacaksa ve APK'nızı daha küçük yapmak için hangi kütüphaneleri ekleyeceğiniz konusunda seçici olmak istiyorsanız, buildTypes veya varyantlara göre bağımlılıklar ekleyebilirsiniz. Örnek:
```groovy app/build.gradle theme={null}
android {
// ...
buildTypes {
debug {
}
release {
}
// **** Add your custom hauwei buildType here
huawei {
}
}
}
dependencies {
// \*\*\*\* Use the full OneSignal dependencies for Google Play Store builds
debugImplementation 'com.onesignal:OneSignal:[5.0.0, 5.99.99]'
releaseImplementation 'com.onesignal:OneSignal:[5.0.0, 5.99.99]'
// **** Only include hms:push for your Huawei AppGallery builds.
huaweiImplementation 'com.huawei.hms:push:6.3.0.304'
// Omit Google / Firebase libraries for Huawei builds.
huaweiImplementation('com.onesignal:OneSignal:[5.0.0, 5.99.99]') {
exclude group: 'com.google.android.gms'
exclude group: 'com.google.firebase'
}
}
```
### FCM yerine HMS'i tercih edin (isteğe bağlı)
***Yukarıda Huawei AppGallery yapısı için [Google Kütüphanelerini hariç tuttuysan](./huawei-sdk-setup#omit-google-libraries-for-huawei-appgallery-builds-optional), bu adım geçerli değildir.***
Varsayılan olarak OneSignal, her ikisi de uygulamanıza dahil edilmişse FCM'yi HMS'e tercih eder. Bunu HMS'i tercih edecek şekilde değiştirmek isterseniz `AndroidManifest.xml` dosyanıza aşağıdakileri ekleyebilirsiniz:
```xml xml theme={null}
...
...
```
***
## Huawei sorun giderme
Test ederken, [OneSignal setLogLevel yöntemini](./mobile-sdk-reference#setloglevel) VERBOSE olarak ayarlı tuttuğunuzdan emin olun.
Günlükleri kontrol ederek hataları ve [Huawei Common Error Codes](https://developer.huawei.com/consumer/en/doc/development/HMS-2-References/hmssdk_huaweipush_api_reference_errorcode)'u görün.
OneSignal SDK ile Huawei `pushToken` için kayıt olurken `6003` hatasından kaçınmak için bir debug veya release keystore imzası oluşturmanız gerekebilir (doğru uygulama derleme yolunu seçin, `debug` veya `release`). ["Configure a Signature" bölümüne](https://developer.huawei.com/consumer/en/doc/HMS-Guides/Preparations#h2-1584707362385) bakın
`"notification_types":-25`, OneSignal'in bir push token almak için Huawei'nin HMS'inden yanıt beklerken zaman aşımına uğradığı anlamına gelir. Bu büyük olasılıkla başka bir 3. taraf HMS push SDK'sının veya kendi HmsMessageService'inizin bu olayı OneSignal yerine almasından kaynaklanır.
Lütfen [bunu nasıl kontrol edeceğiniz ve bu durumda olayı nasıl ileteceğiniz hakkındaki adımı](#compatibility-with-other-hms-push-libraries-or-your-own-hmsmessageservice-class) inceleyin.
Bu, HMS'in push için gereken bir sınıfın uygulamada eksik olduğu anlamına gelir. `build.gradle` dosyasında sadece `com.huawei.hms:push`'a sahip olmak bu özel hatanın artık oluşmamasına neden olacaktır. Ancak, agresif Proguard veya R8 ayarlarınız varsa, bu sorunlara neden olabilir. Sorunun kaynağının bu olup olmadığını görmek için, varsa `minifyEnabled`'ı geçici olarak kapatmanızı öneririz.
Ayrıca, diğer HMS kütüphanelerinin ana sürüm sürümlerini karıştırmamalısınız. 4 veya 5 ile başlayın. 3'ten 5'e kadar bir karışıma sahip olmadığınızdan emin olun, bu da başka hatalara yol açacaktır
```
E/OneSignal: HMS ApiException getting Huawei push token!
com.huawei.hms.common.ApiException: -5: Core error
```
Proguard veya R8 kurallarınızı kontrol ederek düzgün bir şekilde ayarlandığından emin olun. İlgili olup olmadığını görmek için geçici olarak devre dışı bırakabilirsiniz. Proguard veya R8'i devre dışı bıraktıktan sonra sorunu düzeltirse, bu kılavuzu takip edebilir ve tekrar açabilirsiniz. ["Configure a Signature" bölümüne](https://developer.huawei.com/consumer/en/doc/HMS-Guides/Preparations#h2-1584707362385) bakın
## Testing the OneSignal SDK integration
This guide helps you verify that your OneSignal SDK integration is working correctly by testing push notifications, subscription registration, and in-app messaging.
If you are testing with an Android emulator, it should start with a cold boot.
1. Go to **Device Manager** in Android Studio.
2. Select your emulator device and click **Edit**.
3. Go to **Additional Settings** or **More**.
4. Set the **Boot option** to **Cold Boot**.
5. Save changes and restart the emulator.
### Check mobile subscriptions
The native push permission prompt should appear automatically if you added the `requestPermission` method during initialization.
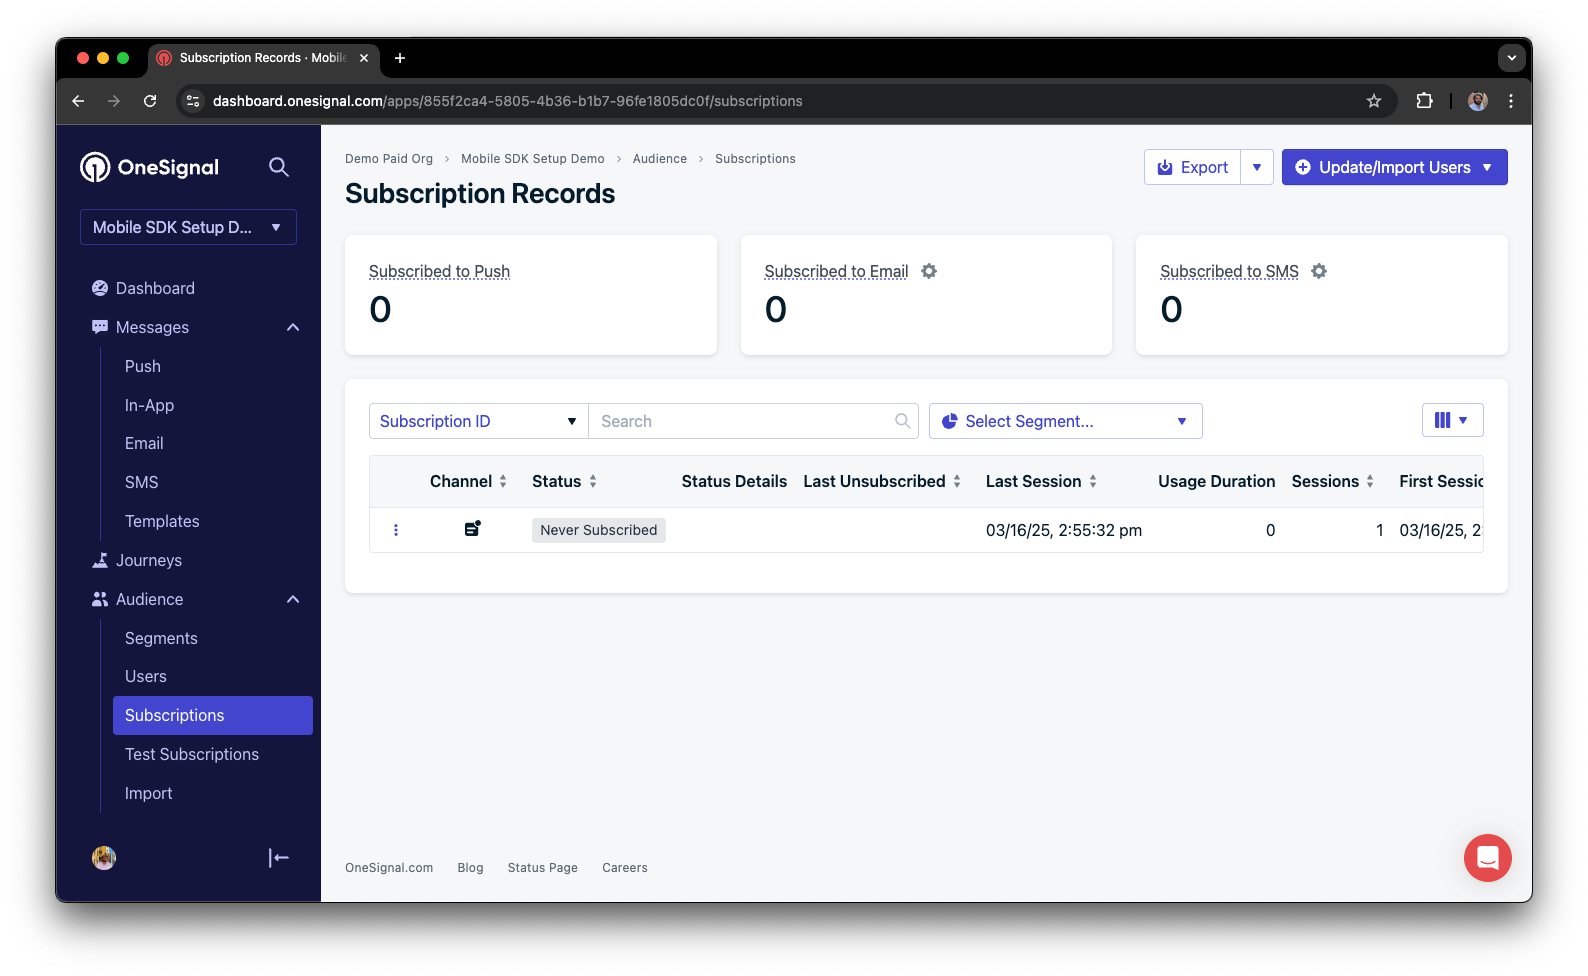
 Before accepting the prompt, check the OneSignal dashboard:
* Go to **Audience > Subscriptions**.
* You should see a new entry with the status "Never Subscribed".
Before accepting the prompt, check the OneSignal dashboard:
* Go to **Audience > Subscriptions**.
* You should see a new entry with the status "Never Subscribed".
 The subscription's status should now show **Subscribed**.
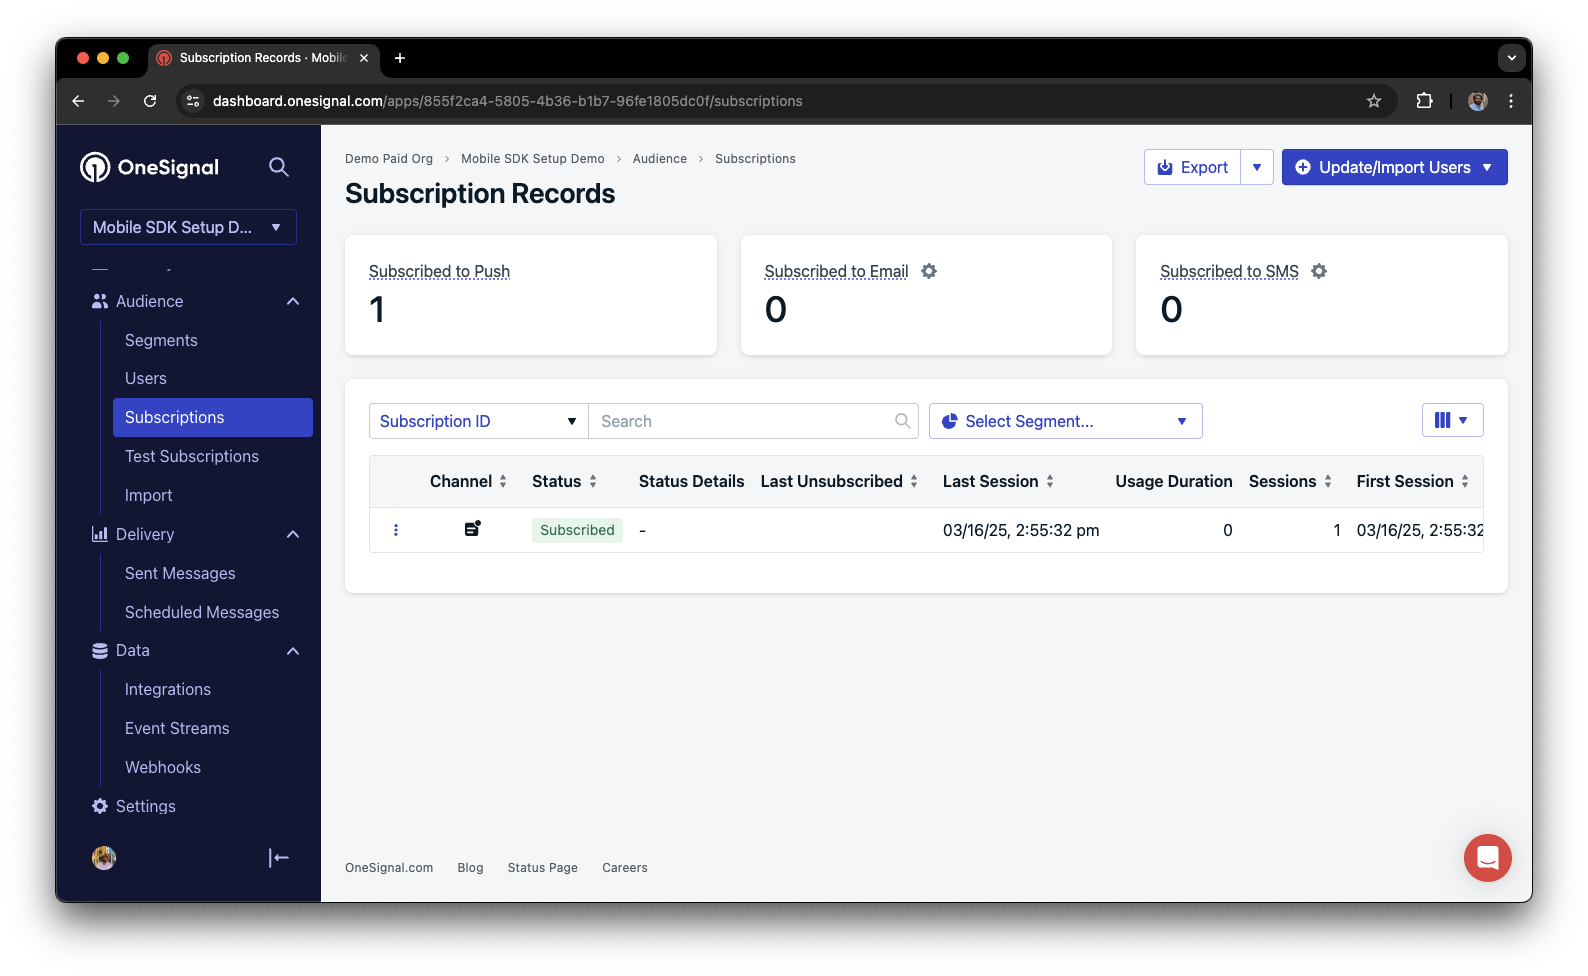 You have successfully created a [mobile subscription](/docs/en/subscriptions).
Mobile subscriptions are created when users first open your app on a device or if they uninstall and reinstall your app on the same device.
### Set up test users
test users are helpful for testing a push notification before sending a message.
In the dashboard, next to the subscription, click the **Options (three dots)** button and select **Add to Test Users**.
You have successfully created a [mobile subscription](/docs/en/subscriptions).
Mobile subscriptions are created when users first open your app on a device or if they uninstall and reinstall your app on the same device.
### Set up test users
test users are helpful for testing a push notification before sending a message.
In the dashboard, next to the subscription, click the **Options (three dots)** button and select **Add to Test Users**.
 Name the subscription so you can easily identify your device later in the **test users tab**.
Go to **Audience > Segments > New Segment**.
Name the segment `Test Users` (the name is important because it will be used later).
Name the subscription so you can easily identify your device later in the **test users tab**.
Go to **Audience > Segments > New Segment**.
Name the segment `Test Users` (the name is important because it will be used later).
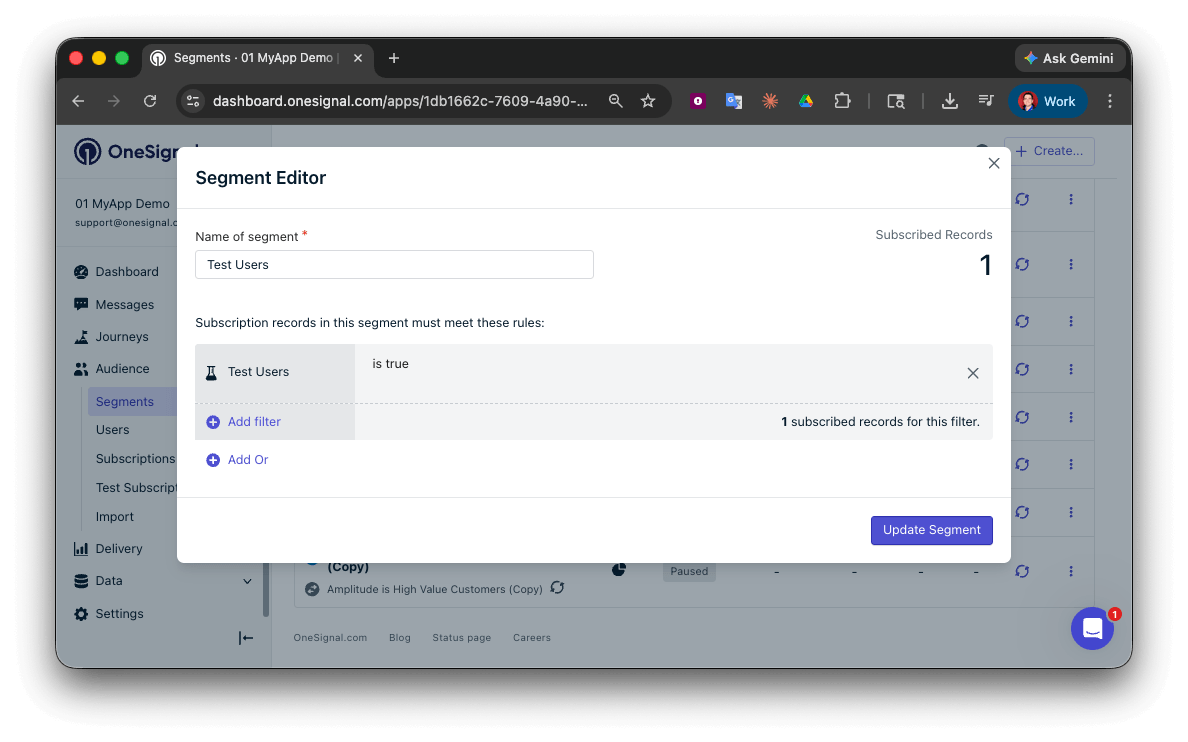 You have successfully created a segment of test users.
We can now test sending messages to this individual device and groups of test users.
### Send test push via API
In your OneSignal dashboard, go to **Settings > [Keys & IDs](/docs/en/keys-and-ids)**.
Replace `YOUR_APP_API_KEY` and `YOUR_APP_ID` in the code below with your actual keys. This code uses the `Test Users` segment we created earlier.
```curl theme={null}
curl -X \
POST --url 'https://api.onesignal.com/notifications' \
--header 'content-type: application/json; charset=utf-8' \
--header 'authorization: Key YOUR_APP_API_KEY' \
--data \
'{
"app_id": "YOUR_APP_ID",
"target_channel": "push",
"name": "Testing basic setup",
"headings": {
"en": "👋"
},
"contents": {
"en": "Hello world!"
},
"included_segments": [
"Test Users"
],
"ios_attachments": {
"onesignal_logo": "https://avatars.githubusercontent.com/u/11823027?s=200&v=4"
},
"big_picture": "https://avatars.githubusercontent.com/u/11823027?s=200&v=4"
}'
```
Run the code in your terminal.
If all setup steps were completed successfully, the test users should receive a notification with an image included:
You have successfully created a segment of test users.
We can now test sending messages to this individual device and groups of test users.
### Send test push via API
In your OneSignal dashboard, go to **Settings > [Keys & IDs](/docs/en/keys-and-ids)**.
Replace `YOUR_APP_API_KEY` and `YOUR_APP_ID` in the code below with your actual keys. This code uses the `Test Users` segment we created earlier.
```curl theme={null}
curl -X \
POST --url 'https://api.onesignal.com/notifications' \
--header 'content-type: application/json; charset=utf-8' \
--header 'authorization: Key YOUR_APP_API_KEY' \
--data \
'{
"app_id": "YOUR_APP_ID",
"target_channel": "push",
"name": "Testing basic setup",
"headings": {
"en": "👋"
},
"contents": {
"en": "Hello world!"
},
"included_segments": [
"Test Users"
],
"ios_attachments": {
"onesignal_logo": "https://avatars.githubusercontent.com/u/11823027?s=200&v=4"
},
"big_picture": "https://avatars.githubusercontent.com/u/11823027?s=200&v=4"
}'
```
Run the code in your terminal.
If all setup steps were completed successfully, the test users should receive a notification with an image included:
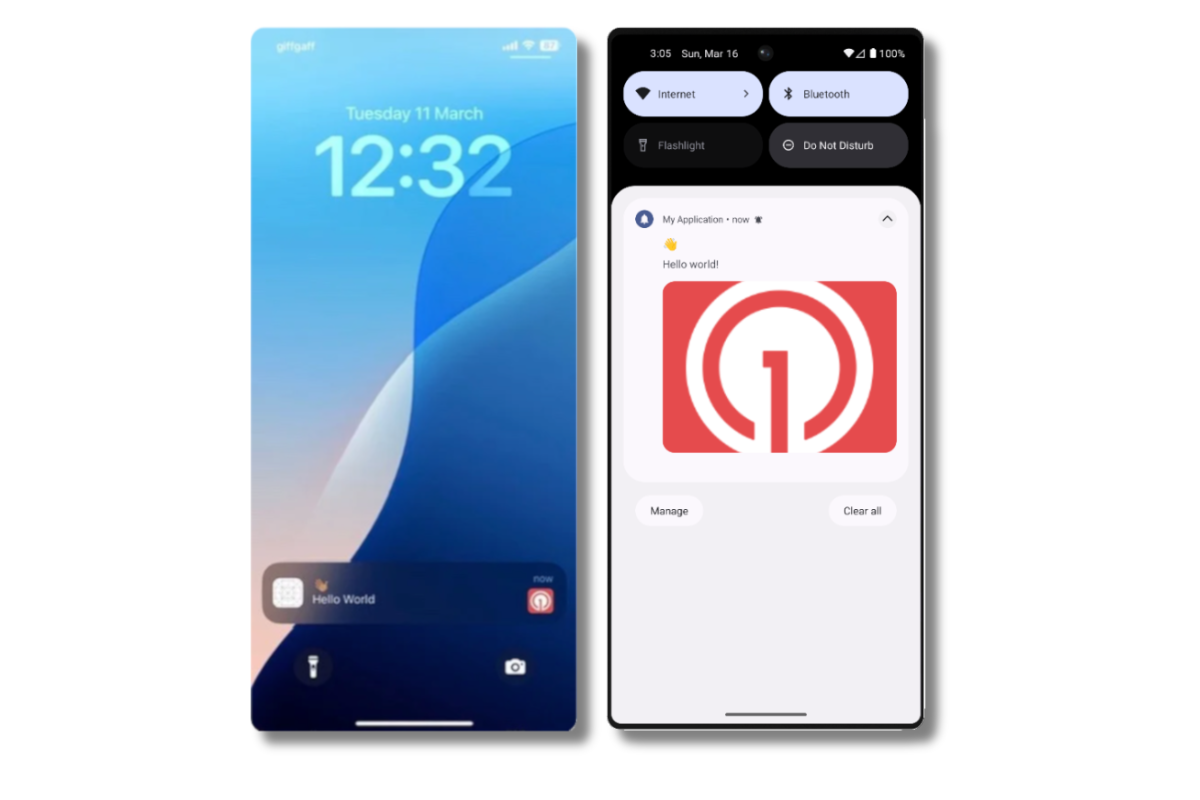 Images will appear small in the collapsed notification view. Expand the notification to see the full image.
In your dashboard, go to **Delivery > Sent Messages**, then click the message to view stats.
You should see the **confirmed** stat, meaning the device received the push.
You have successfully sent a notification via our API to a segment.
* No image received? Your [Notification Service Extension](#ios-setup) might be missing.
* No confirmed receipt? Review the troubleshooting guide [here](/docs/en/confirmed-delivery#troubleshooting-confirmed-delivery).
* Having issues? Copy-paste the api request and a log from start to finish of app launch into a `.txt` file. Then share both with `support@onesignal.com`.
### Send an in-app message
[In-app messages](/docs/en/in-app-messages-setup) let you communicate with users while they are using your app.
This is because users must meet the in-app audience criteria *before* a new session starts. In OneSignal, a new session starts when the user opens your app after it has been in the background or closed for at least 30 seconds. For more details, see our guide on [how in-app messages are displayed](/docs/en/in-app-messages-setup#how-are-iams-displayed%3F).
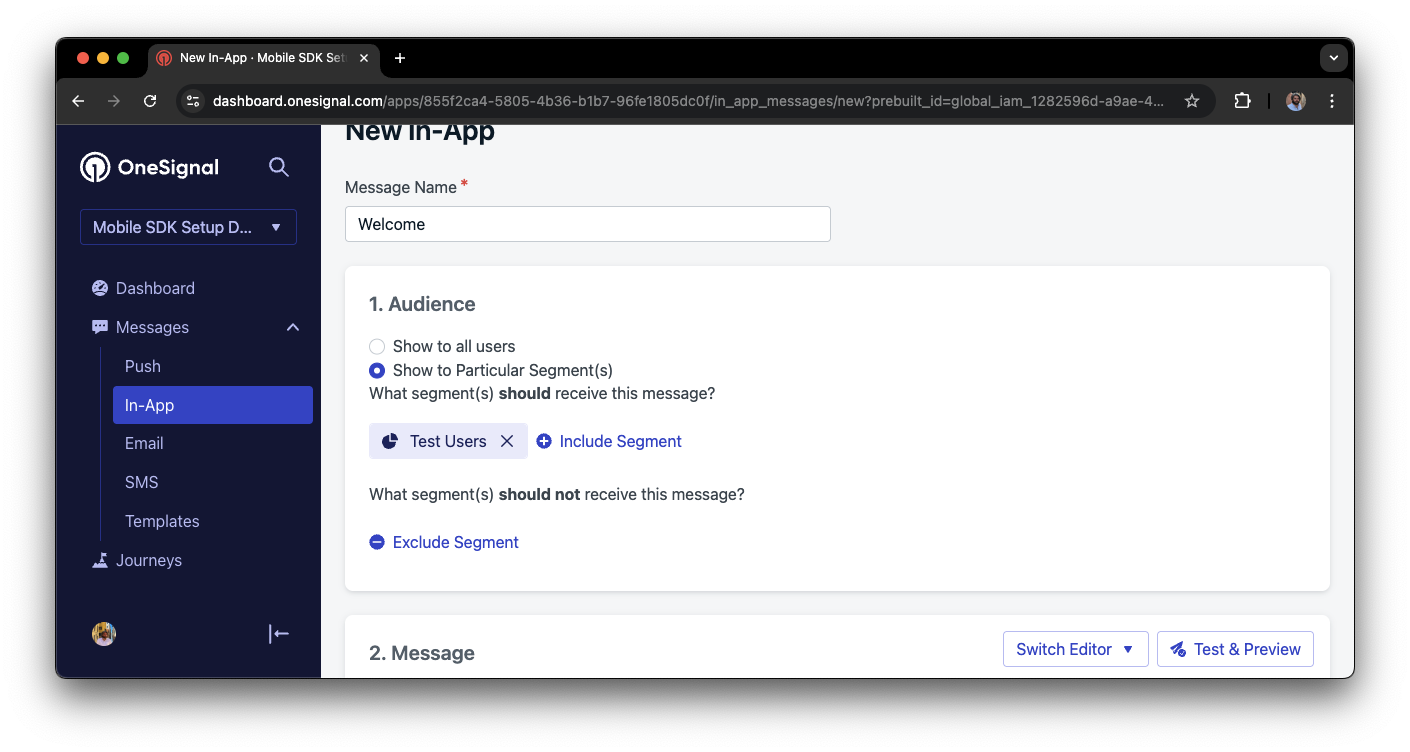
* In your OneSignal dashboard, navigate to **Messages > In-App > New In-App**.
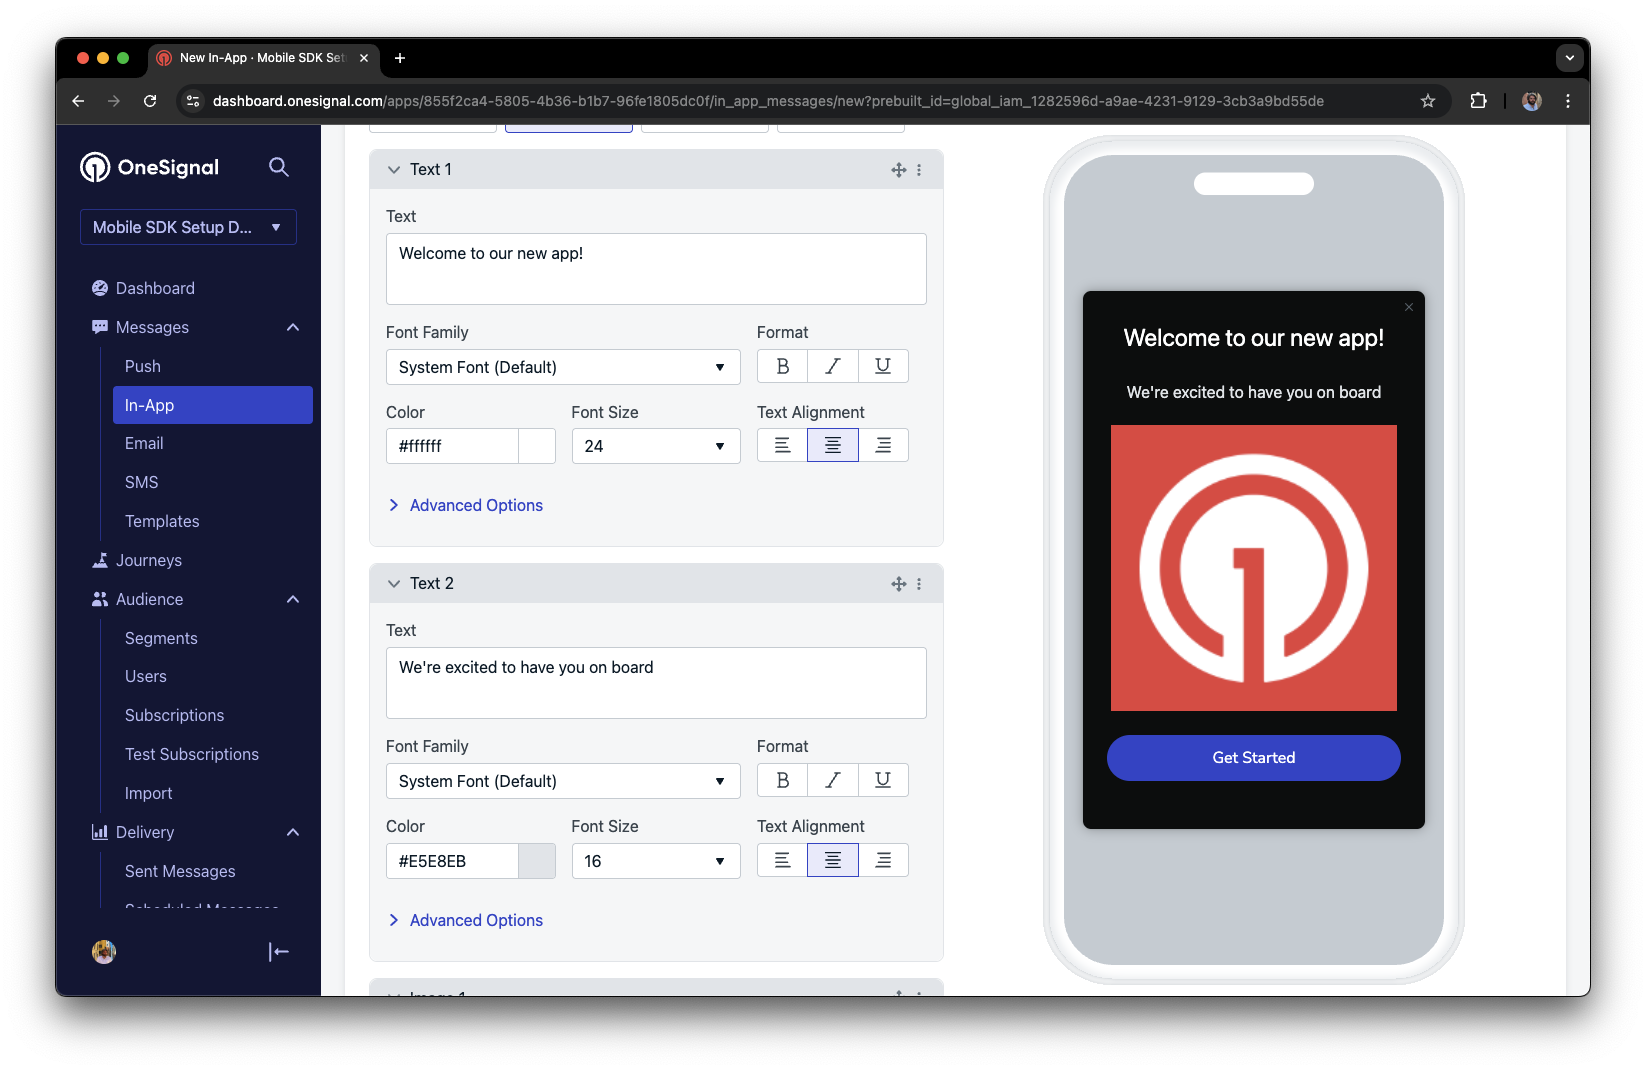
* Find and select the **Welcome** message.
* Set your Audience as the **Test Users** segment we used previously.
Images will appear small in the collapsed notification view. Expand the notification to see the full image.
In your dashboard, go to **Delivery > Sent Messages**, then click the message to view stats.
You should see the **confirmed** stat, meaning the device received the push.
You have successfully sent a notification via our API to a segment.
* No image received? Your [Notification Service Extension](#ios-setup) might be missing.
* No confirmed receipt? Review the troubleshooting guide [here](/docs/en/confirmed-delivery#troubleshooting-confirmed-delivery).
* Having issues? Copy-paste the api request and a log from start to finish of app launch into a `.txt` file. Then share both with `support@onesignal.com`.
### Send an in-app message
[In-app messages](/docs/en/in-app-messages-setup) let you communicate with users while they are using your app.
This is because users must meet the in-app audience criteria *before* a new session starts. In OneSignal, a new session starts when the user opens your app after it has been in the background or closed for at least 30 seconds. For more details, see our guide on [how in-app messages are displayed](/docs/en/in-app-messages-setup#how-are-iams-displayed%3F).
* In your OneSignal dashboard, navigate to **Messages > In-App > New In-App**.
* Find and select the **Welcome** message.
* Set your Audience as the **Test Users** segment we used previously.
 Under **Schedule > How often do you want to show this message?** select **Every time trigger conditions are satisfied**.
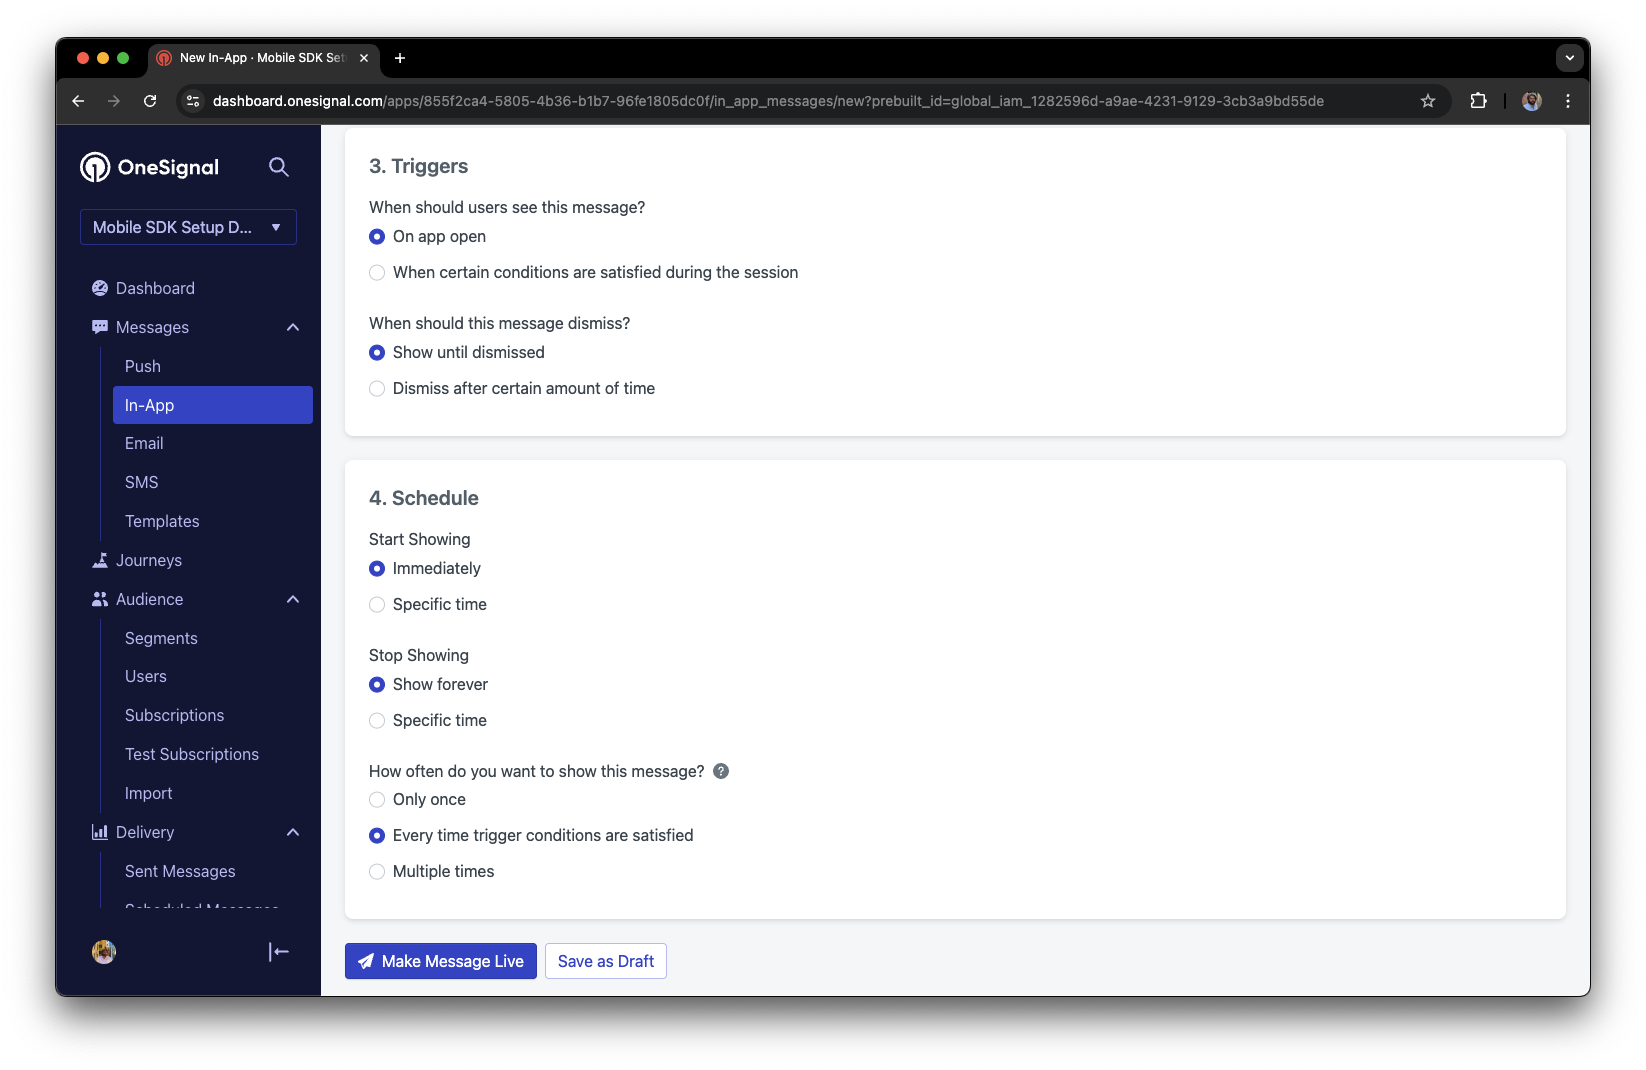 Click **Make Message Live** so it is available to your Test Users each time they open the app.
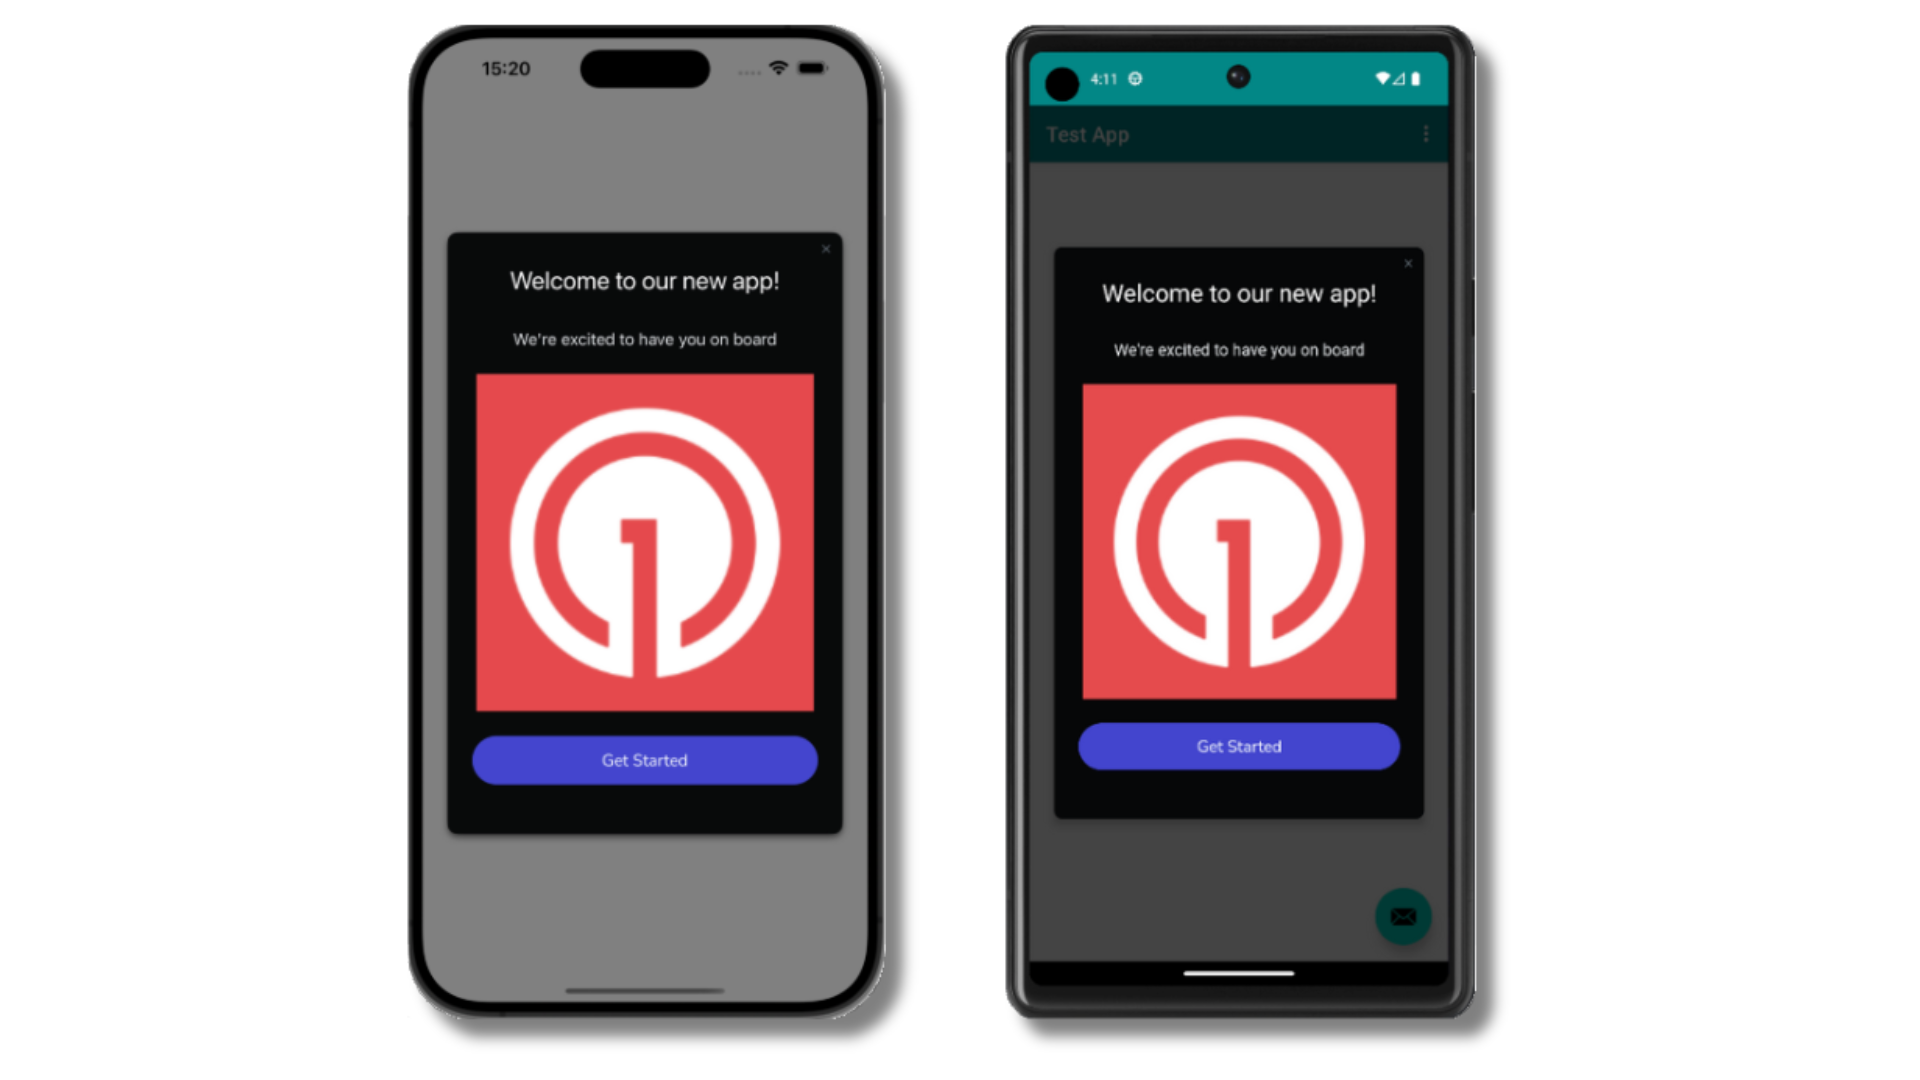
After the in-app message is live, open your app. You should see it display:
Click **Make Message Live** so it is available to your Test Users each time they open the app.
After the in-app message is live, open your app. You should see it display:
 Not seeing the message?
* Start a new session
* You must close or background the app for at least 30 seconds before reopening. This ensures a new session is started.
* For more, see [how in-app messages are displayed](/docs/en/in-app-messages-setup#how-are-iams-displayed%3F).
* Still in the `Test Users` segment?
* If you reinstalled or switched devices, re-add the device to [Test Users](#set-up-test-users) and confirm it's part of the Test Users segment.
* Having issues?
* Follow [Getting a Debug Log](/docs/en/capturing-a-debug-log) while reproducing the steps above. This will generate additional logging that you can share with `support@onesignal.com` and we will help investigate what's going on.
You have successfully setup the OneSignal SDK and learned important concepts like:
* Gathering [Subscriptions](/docs/en/subscriptions), setting [Test Users](/docs/en/find-set-test-subscriptions), and creating [Segments](/docs/en/segmentation).
* Sending [Push](/docs/en/push) with images and [Confirmed receipt](/docs/en/confirmed-delivery) using Segments and our [Create message](/reference/create-message) API.
* Sending [In-app messages](/docs/en/in-app-messages-setup).
Continue with this guide to identify users in your app and setup additional features.
***
## User identification
Previously, we demonstrated how to create mobile [Subscriptions](/docs/en/subscriptions). Now we'll expand to identifying [Users](/docs/en/users) across all their subscriptions (including push, email, and SMS) using the OneSignal SDK. We'll cover External IDs, tags, multi-channel subscriptions, privacy, and event tracking to help you unify and engage users across platforms.
### Assign External ID
Use an External ID to identify users consistently across devices, email addresses, and phone numbers using your backend's user identifier. This ensures your messaging stays unified across channels and 3rd party systems (especially important for [Integrations](/docs/en/integrations)).
Set the External ID with our SDK's [`login` method](/docs/en/mobile-sdk-reference#login-external-id) each time they are identified by your app.
OneSignal generates unique read-only IDs for subscriptions (Subscription ID) and users (OneSignal ID).
As users download your app on different devices, subscribe to your website, and/or provide you email addresses and phone numbers outside of your app, new subscriptions will be created.
Setting the External ID via our SDK is highly recommended to identify users across all their subscriptions, regardless of how they are created.
### Add Tags
[Tags](/docs/en/add-user-data-tags) are key-value pairs of string data you can use to store user properties (like `username`, `role`, or preferences) and events (like `purchase_date`, `game_level`, or user interactions). Tags power advanced [Message Personalization](/docs/en/message-personalization) and [Segmentation](/docs/en/segmentation) allowing for more advanced use cases.
Set tags with our SDK [`addTag` and `addTags` methods](/docs/en/mobile-sdk-reference#data-tags) as events occur in your app.
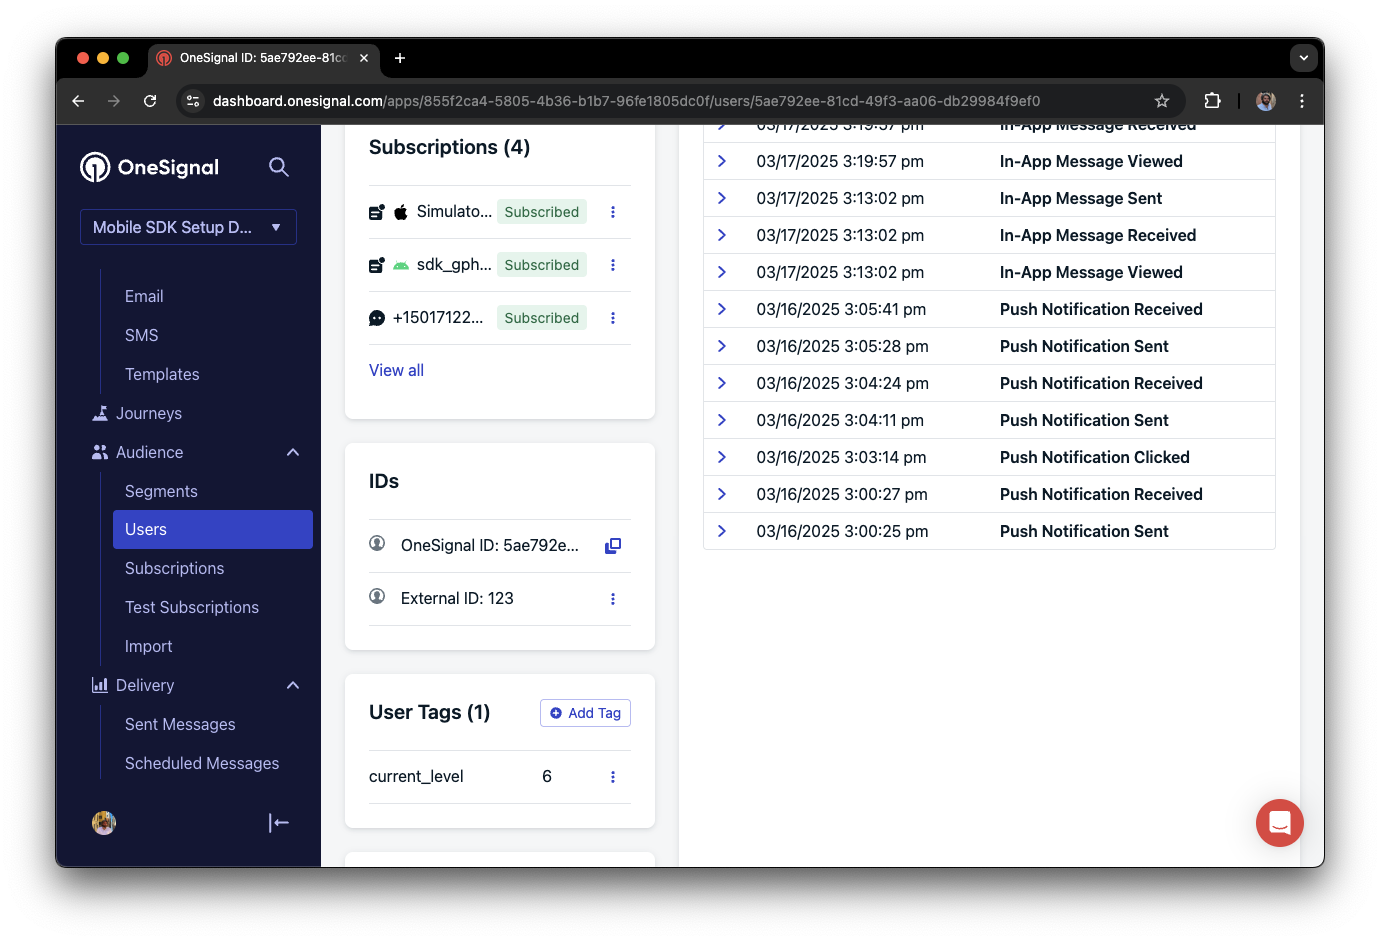
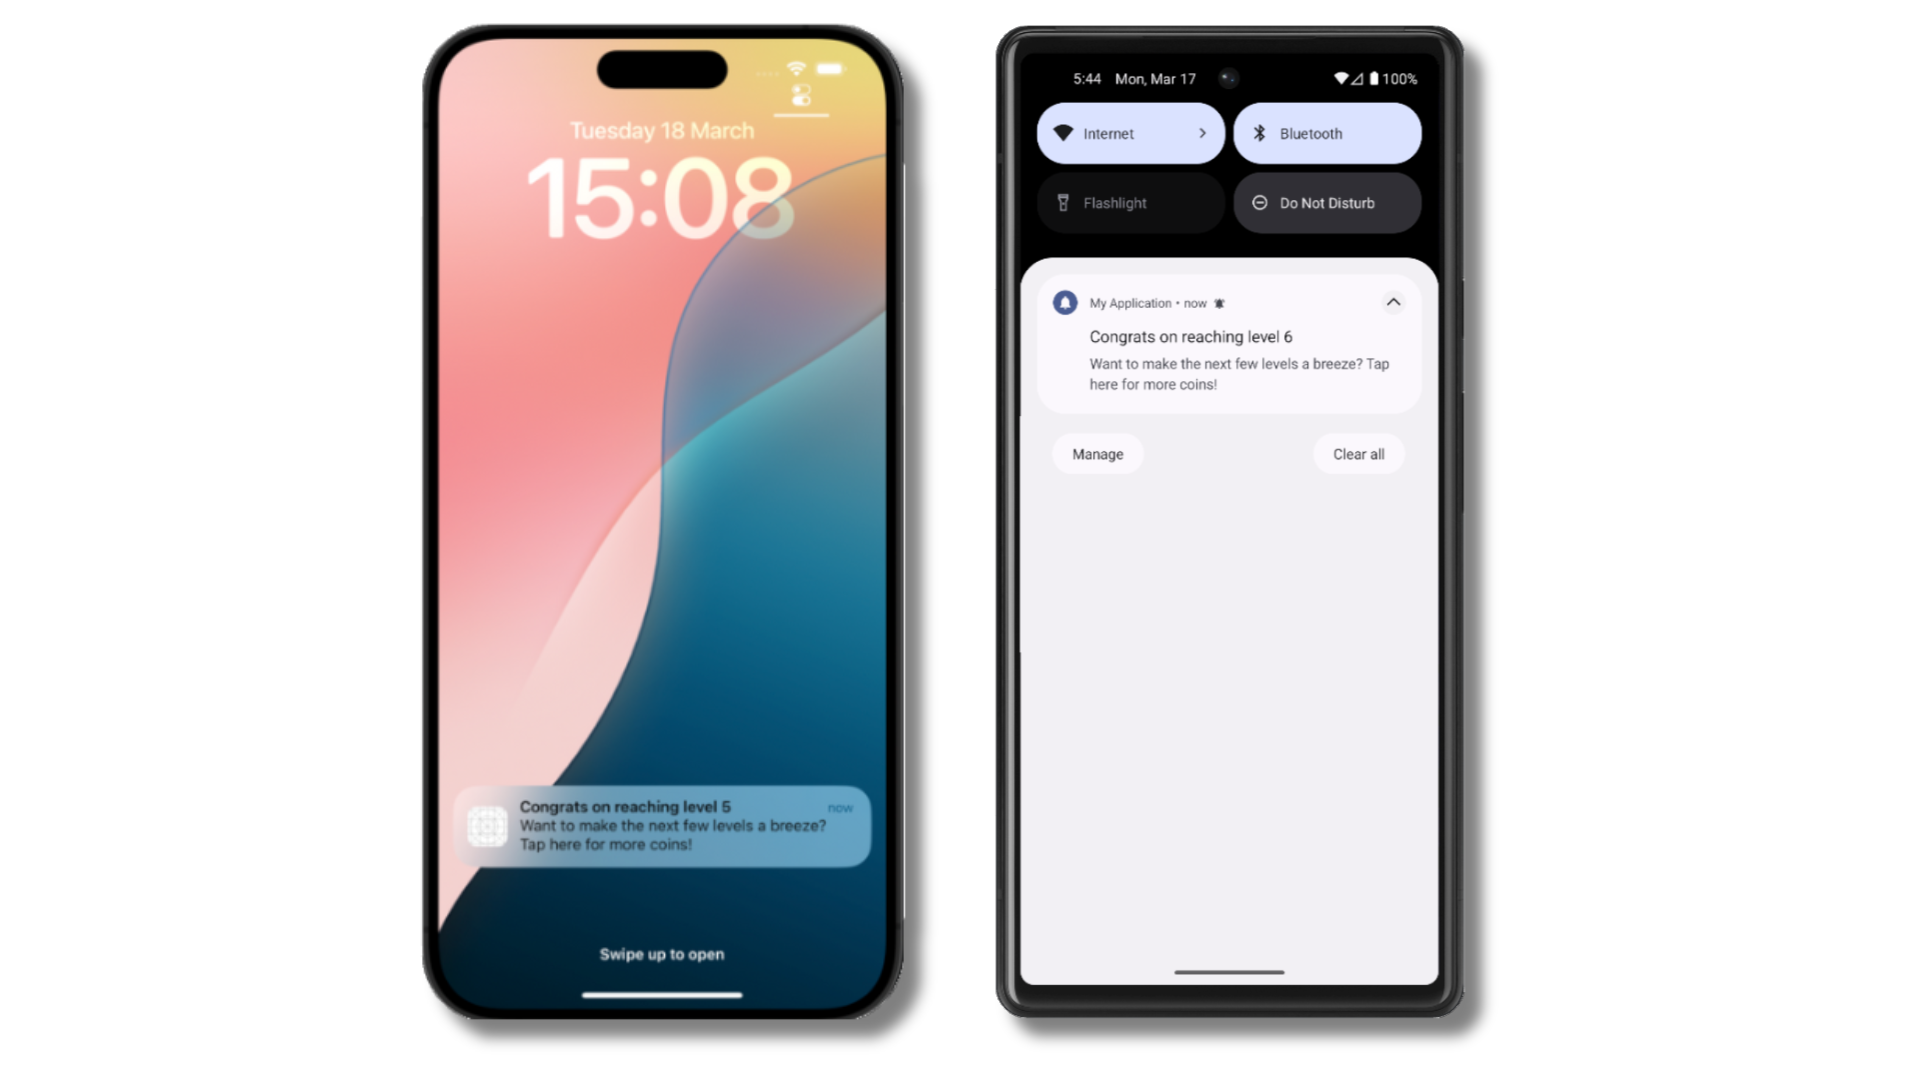
In this example, the user reached level 6 identifiable by the tag called `current_level` set to a value of `6`.
Not seeing the message?
* Start a new session
* You must close or background the app for at least 30 seconds before reopening. This ensures a new session is started.
* For more, see [how in-app messages are displayed](/docs/en/in-app-messages-setup#how-are-iams-displayed%3F).
* Still in the `Test Users` segment?
* If you reinstalled or switched devices, re-add the device to [Test Users](#set-up-test-users) and confirm it's part of the Test Users segment.
* Having issues?
* Follow [Getting a Debug Log](/docs/en/capturing-a-debug-log) while reproducing the steps above. This will generate additional logging that you can share with `support@onesignal.com` and we will help investigate what's going on.
You have successfully setup the OneSignal SDK and learned important concepts like:
* Gathering [Subscriptions](/docs/en/subscriptions), setting [Test Users](/docs/en/find-set-test-subscriptions), and creating [Segments](/docs/en/segmentation).
* Sending [Push](/docs/en/push) with images and [Confirmed receipt](/docs/en/confirmed-delivery) using Segments and our [Create message](/reference/create-message) API.
* Sending [In-app messages](/docs/en/in-app-messages-setup).
Continue with this guide to identify users in your app and setup additional features.
***
## User identification
Previously, we demonstrated how to create mobile [Subscriptions](/docs/en/subscriptions). Now we'll expand to identifying [Users](/docs/en/users) across all their subscriptions (including push, email, and SMS) using the OneSignal SDK. We'll cover External IDs, tags, multi-channel subscriptions, privacy, and event tracking to help you unify and engage users across platforms.
### Assign External ID
Use an External ID to identify users consistently across devices, email addresses, and phone numbers using your backend's user identifier. This ensures your messaging stays unified across channels and 3rd party systems (especially important for [Integrations](/docs/en/integrations)).
Set the External ID with our SDK's [`login` method](/docs/en/mobile-sdk-reference#login-external-id) each time they are identified by your app.
OneSignal generates unique read-only IDs for subscriptions (Subscription ID) and users (OneSignal ID).
As users download your app on different devices, subscribe to your website, and/or provide you email addresses and phone numbers outside of your app, new subscriptions will be created.
Setting the External ID via our SDK is highly recommended to identify users across all their subscriptions, regardless of how they are created.
### Add Tags
[Tags](/docs/en/add-user-data-tags) are key-value pairs of string data you can use to store user properties (like `username`, `role`, or preferences) and events (like `purchase_date`, `game_level`, or user interactions). Tags power advanced [Message Personalization](/docs/en/message-personalization) and [Segmentation](/docs/en/segmentation) allowing for more advanced use cases.
Set tags with our SDK [`addTag` and `addTags` methods](/docs/en/mobile-sdk-reference#data-tags) as events occur in your app.
In this example, the user reached level 6 identifiable by the tag called `current_level` set to a value of `6`.
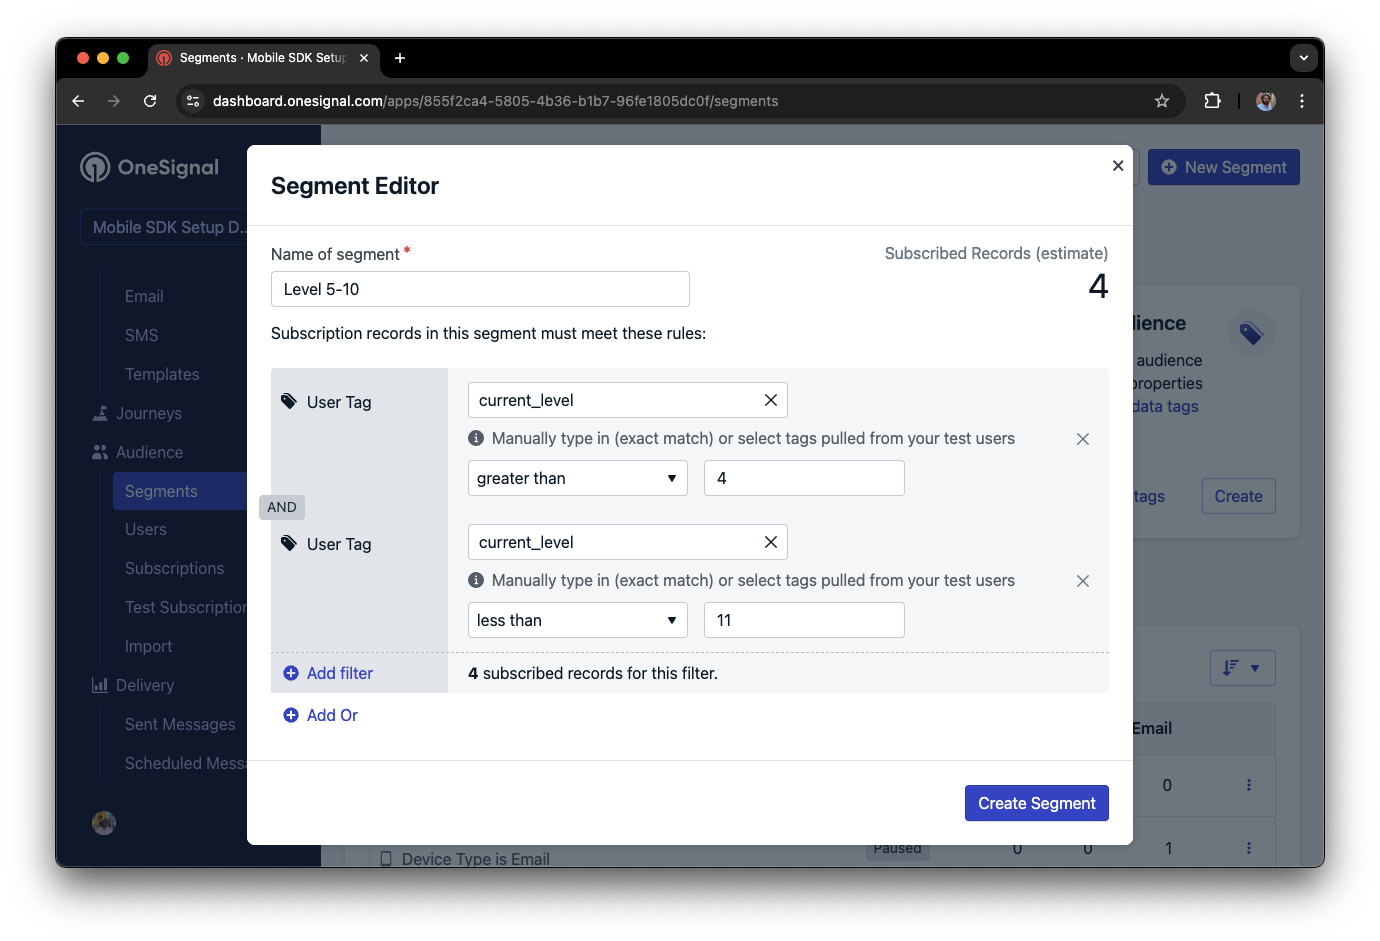
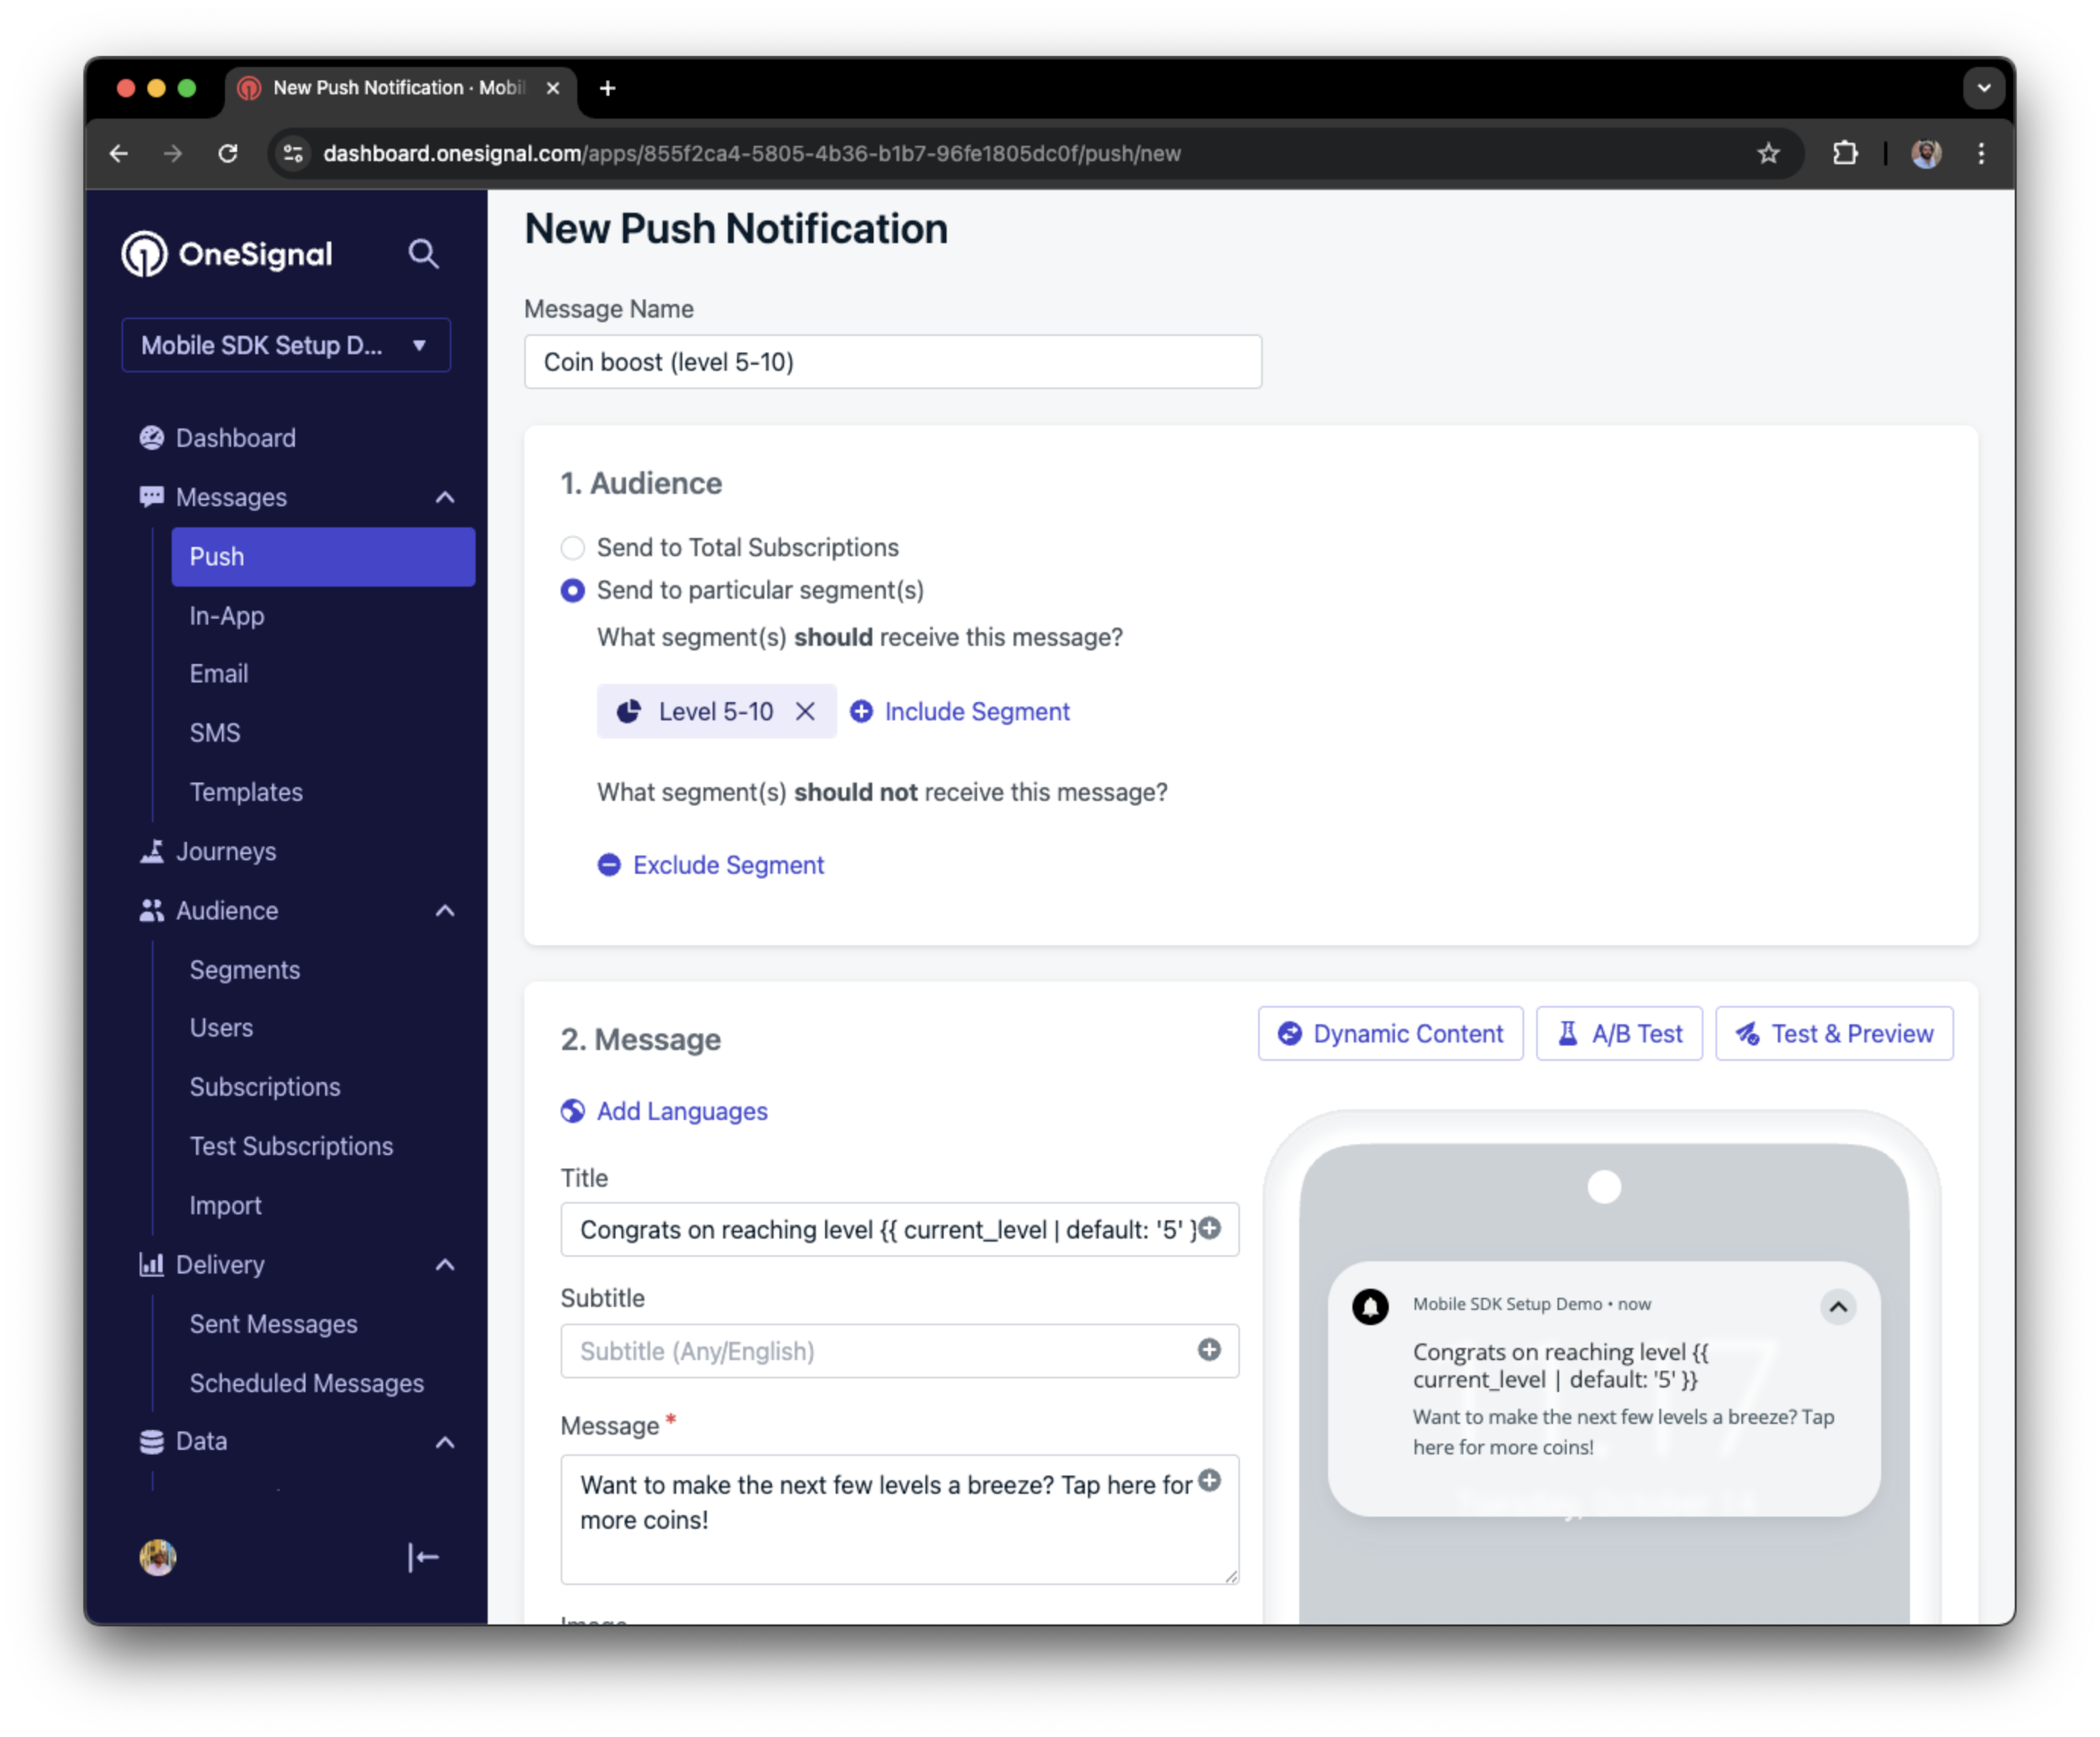
 We can create a segment of users that have a level of between 5 and 10, and use that to send targeted and personalized messages:
 ### Add email and/or SMS subscriptions
Earlier we saw how our SDK creates mobile subscriptions to send push and in-app messages. You can also reach users through emails and SMS channels by creating the corresponding subscriptions.
* Use the [`addEmail` method](/docs/en/mobile-sdk-reference#addemail-%2C-removeemail) to create email subscriptions.
* Use the [`addSms` method](/docs/en/mobile-sdk-reference#addsms-%2C-removesms) to create SMS subscriptions.
If the email address and/or phone number already exist in the OneSignal app, the SDK will add it to the existing user, it will not create duplicates.
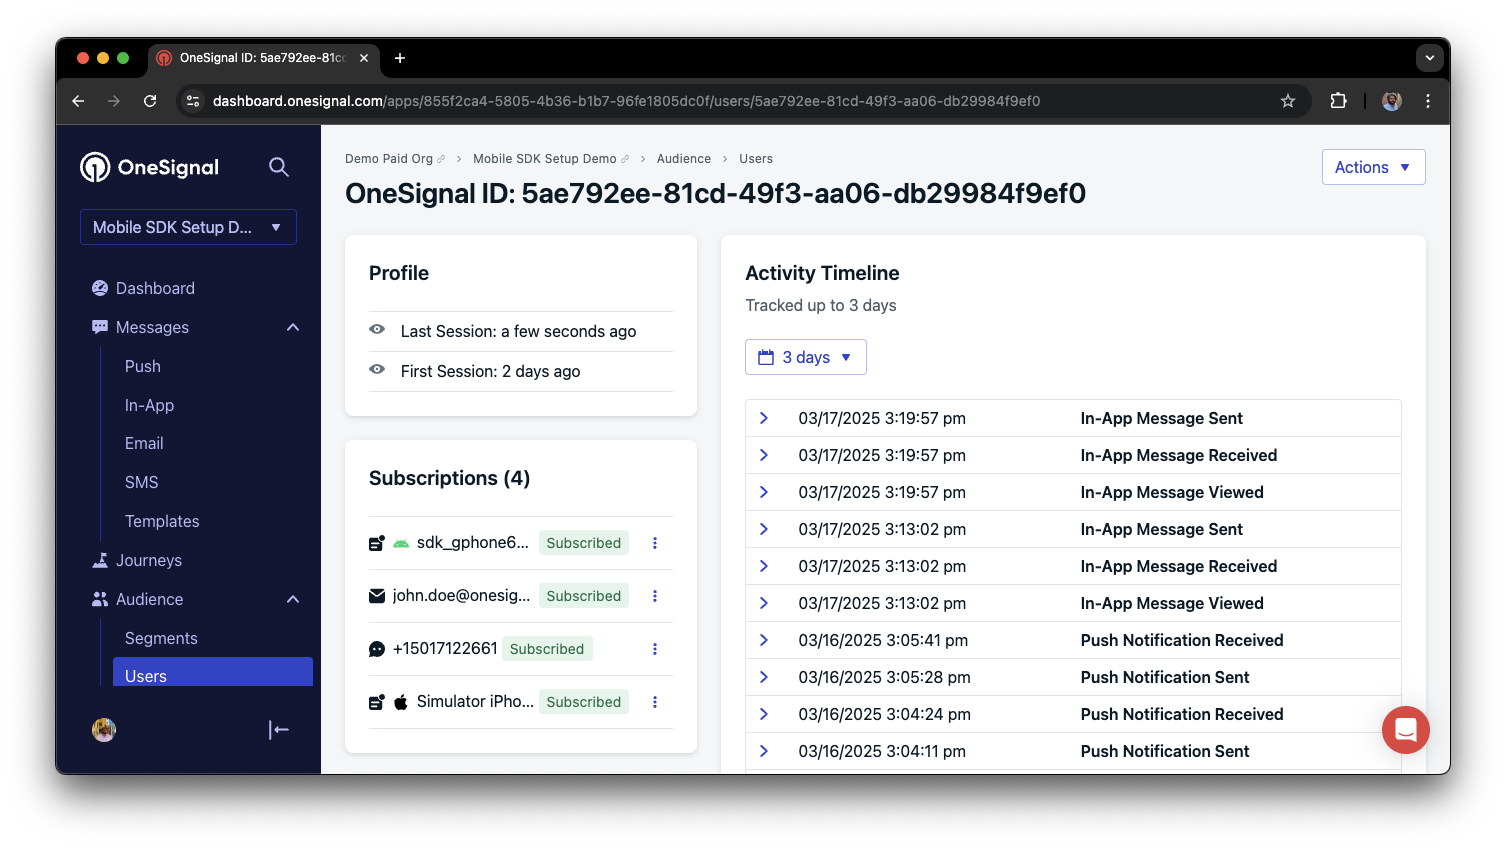
You can view unified users via **Audience > Users** in the dashboard or with the [View user API](/reference/view-user).
### Add email and/or SMS subscriptions
Earlier we saw how our SDK creates mobile subscriptions to send push and in-app messages. You can also reach users through emails and SMS channels by creating the corresponding subscriptions.
* Use the [`addEmail` method](/docs/en/mobile-sdk-reference#addemail-%2C-removeemail) to create email subscriptions.
* Use the [`addSms` method](/docs/en/mobile-sdk-reference#addsms-%2C-removesms) to create SMS subscriptions.
If the email address and/or phone number already exist in the OneSignal app, the SDK will add it to the existing user, it will not create duplicates.
You can view unified users via **Audience > Users** in the dashboard or with the [View user API](/reference/view-user).
 Best practices for multi-channel communication
* Obtain explicit consent before adding email or SMS subscriptions.
* Explain the benefits of each communication channel to users.
* Provide channel preferences so users can select which channels they prefer.
***
### Privacy & user consent
To control when OneSignal collects user data, use the SDK's consent gating methods:
* [`setConsentRequired(true)`](/docs/en/mobile-sdk-reference#setconsentrequired): Prevents data collection until consent is given.
* [`setConsentGiven(true)`](/docs/en/mobile-sdk-reference#setconsentgiven): Enables data collection once consent is granted.
See our Privacy & security docs for more on:
* [Data collected by the SDK](/docs/en/data-collected-by-the-onesignal-sdk)
* [Handling personal data](/docs/en/handling-personal-data)
***
## Prompt for push permissions
Instead of calling `requestPermission()` immediately on app open, take a more strategic approach. Use an in-app message to explain the value of push notifications before requesting permission.
For best practices and implementation details, see our [Prompt for push permissions](/docs/en/prompt-for-push-permissions) guide.
***
## Listen to push, user, and in-app events
Use SDK listeners to react to user actions and state changes.
The SDK provides several event listeners for you to hook into. See our [SDK reference guide](/docs/en/mobile-sdk-reference) for more details.
### Push notification events
* [`addClickListener()`](/docs/en/mobile-sdk-reference#addclicklistener-push): Detect when a notification is tapped. Helpful for [Deep Linking](/docs/en/deep-linking).
* [`addForegroundLifecycleListener()`](/docs/en/mobile-sdk-reference#addforegroundlifecyclelistener-push): Control how notifications behave in foreground.
For full customization, see [Mobile Service Extensions](/docs/en/service-extensions).
### User state changes
* [`addObserver()` for user state](/docs/en/mobile-sdk-reference#addobserver-user-state): Detect when the External ID is set.
* [`addPermissionObserver()`](/docs/en/mobile-sdk-reference#addpermissionobserver-push): Track the user's specific interaction with the native push permission prompt.
* [`addObserver()` for push subscription](/docs/en/mobile-sdk-reference#addobserver-push-subscription-changes): Track when the push subscription status changes.
### In-app message events
* [`addClickListener()`](/docs/en/mobile-sdk-reference#addclicklistener-in-app): Handle in-app click actions. Ideal for deep linking or tracking events.
* [`addLifecycleListener()`](/docs/en/mobile-sdk-reference#addclicklistener-in-app): Track full lifecycle of in-app messages (shown, clicked, dismissed, etc.).
***
## Advanced setup & capabilities
Explore more capabilities to enhance your integration:
* [🔁 Migrating to OneSignal from another service](/docs/en/migrating-to-onesignal)
* [🌍 Location tracking](/docs/en/mobile-sdk-reference#location)
* [🔗 Deep Linking](/docs/en/deep-linking)
* [🔌 Integrations](/docs/en/integrations)
* [🧩 Mobile Service Extensions](/docs/en/service-extensions)
* [🛎️ Action buttons](/docs/en/action-buttons)
* [🌐 Multi-language messaging](/docs/en/multi-language-messaging)
* [🛡️ Identity Verification](/docs/en/identity-verification)
* [📊 Custom Outcomes](/docs/en/custom-outcomes)
* [📲 Live Activities](/docs/en/live-activities)
### Mobile SDK setup & reference
Make sure you've enabled all key features by reviewing the [Mobile push setup](/docs/en/mobile-push-setup) guide.
For full details on available methods and configuration options, visit the [Mobile SDK reference](/docs/en/mobile-sdk-reference).
Congratulations! You've successfully completed the Mobile SDK setup guide.
***
Need help?
Chat with our Support team or email `support@onesignal.com`
Please include:
* Details of the issue you're experiencing and steps to reproduce if available
* Your OneSignal App ID
* The External ID or Subscription ID if applicable
* The URL to the message you tested in the OneSignal Dashboard if applicable
* Any relevant [logs or error messages](/docs/en/capturing-a-debug-log)
We're happy to help!
***
Best practices for multi-channel communication
* Obtain explicit consent before adding email or SMS subscriptions.
* Explain the benefits of each communication channel to users.
* Provide channel preferences so users can select which channels they prefer.
***
### Privacy & user consent
To control when OneSignal collects user data, use the SDK's consent gating methods:
* [`setConsentRequired(true)`](/docs/en/mobile-sdk-reference#setconsentrequired): Prevents data collection until consent is given.
* [`setConsentGiven(true)`](/docs/en/mobile-sdk-reference#setconsentgiven): Enables data collection once consent is granted.
See our Privacy & security docs for more on:
* [Data collected by the SDK](/docs/en/data-collected-by-the-onesignal-sdk)
* [Handling personal data](/docs/en/handling-personal-data)
***
## Prompt for push permissions
Instead of calling `requestPermission()` immediately on app open, take a more strategic approach. Use an in-app message to explain the value of push notifications before requesting permission.
For best practices and implementation details, see our [Prompt for push permissions](/docs/en/prompt-for-push-permissions) guide.
***
## Listen to push, user, and in-app events
Use SDK listeners to react to user actions and state changes.
The SDK provides several event listeners for you to hook into. See our [SDK reference guide](/docs/en/mobile-sdk-reference) for more details.
### Push notification events
* [`addClickListener()`](/docs/en/mobile-sdk-reference#addclicklistener-push): Detect when a notification is tapped. Helpful for [Deep Linking](/docs/en/deep-linking).
* [`addForegroundLifecycleListener()`](/docs/en/mobile-sdk-reference#addforegroundlifecyclelistener-push): Control how notifications behave in foreground.
For full customization, see [Mobile Service Extensions](/docs/en/service-extensions).
### User state changes
* [`addObserver()` for user state](/docs/en/mobile-sdk-reference#addobserver-user-state): Detect when the External ID is set.
* [`addPermissionObserver()`](/docs/en/mobile-sdk-reference#addpermissionobserver-push): Track the user's specific interaction with the native push permission prompt.
* [`addObserver()` for push subscription](/docs/en/mobile-sdk-reference#addobserver-push-subscription-changes): Track when the push subscription status changes.
### In-app message events
* [`addClickListener()`](/docs/en/mobile-sdk-reference#addclicklistener-in-app): Handle in-app click actions. Ideal for deep linking or tracking events.
* [`addLifecycleListener()`](/docs/en/mobile-sdk-reference#addclicklistener-in-app): Track full lifecycle of in-app messages (shown, clicked, dismissed, etc.).
***
## Advanced setup & capabilities
Explore more capabilities to enhance your integration:
* [🔁 Migrating to OneSignal from another service](/docs/en/migrating-to-onesignal)
* [🌍 Location tracking](/docs/en/mobile-sdk-reference#location)
* [🔗 Deep Linking](/docs/en/deep-linking)
* [🔌 Integrations](/docs/en/integrations)
* [🧩 Mobile Service Extensions](/docs/en/service-extensions)
* [🛎️ Action buttons](/docs/en/action-buttons)
* [🌐 Multi-language messaging](/docs/en/multi-language-messaging)
* [🛡️ Identity Verification](/docs/en/identity-verification)
* [📊 Custom Outcomes](/docs/en/custom-outcomes)
* [📲 Live Activities](/docs/en/live-activities)
### Mobile SDK setup & reference
Make sure you've enabled all key features by reviewing the [Mobile push setup](/docs/en/mobile-push-setup) guide.
For full details on available methods and configuration options, visit the [Mobile SDK reference](/docs/en/mobile-sdk-reference).
Congratulations! You've successfully completed the Mobile SDK setup guide.
***
Need help?
Chat with our Support team or email `support@onesignal.com`
Please include:
* Details of the issue you're experiencing and steps to reproduce if available
* Your OneSignal App ID
* The External ID or Subscription ID if applicable
* The URL to the message you tested in the OneSignal Dashboard if applicable
* Any relevant [logs or error messages](/docs/en/capturing-a-debug-log)
We're happy to help!
***