> ## Documentation Index
> Fetch the complete documentation index at: https://documentation.onesignal.com/llms.txt
> Use this file to discover all available pages before exploring further.
# iOS: Görsel Döngü Push Bildirimleri
> Swift kullanarak OneSignal iOS push bildirimlerinde görsel döngüsünün nasıl uygulanacağı.
iOS, bir bildirim içeriği uygulama uzantısı için giriş noktası olarak [UNNotificationContentExtension](https://developer.apple.com/documentation/usernotificationsui/unnotificationcontentextension?language=objc) protokolü sağlar. Bu, uygulamanızın bildirimleri için özel bir arayüz görüntülemek üzere kullanılabilir. Bu örnek kılavuz, bir iOS bildirimi içinde döngü oluşturmak için bunun nasıl kullanılacağını açıklar.
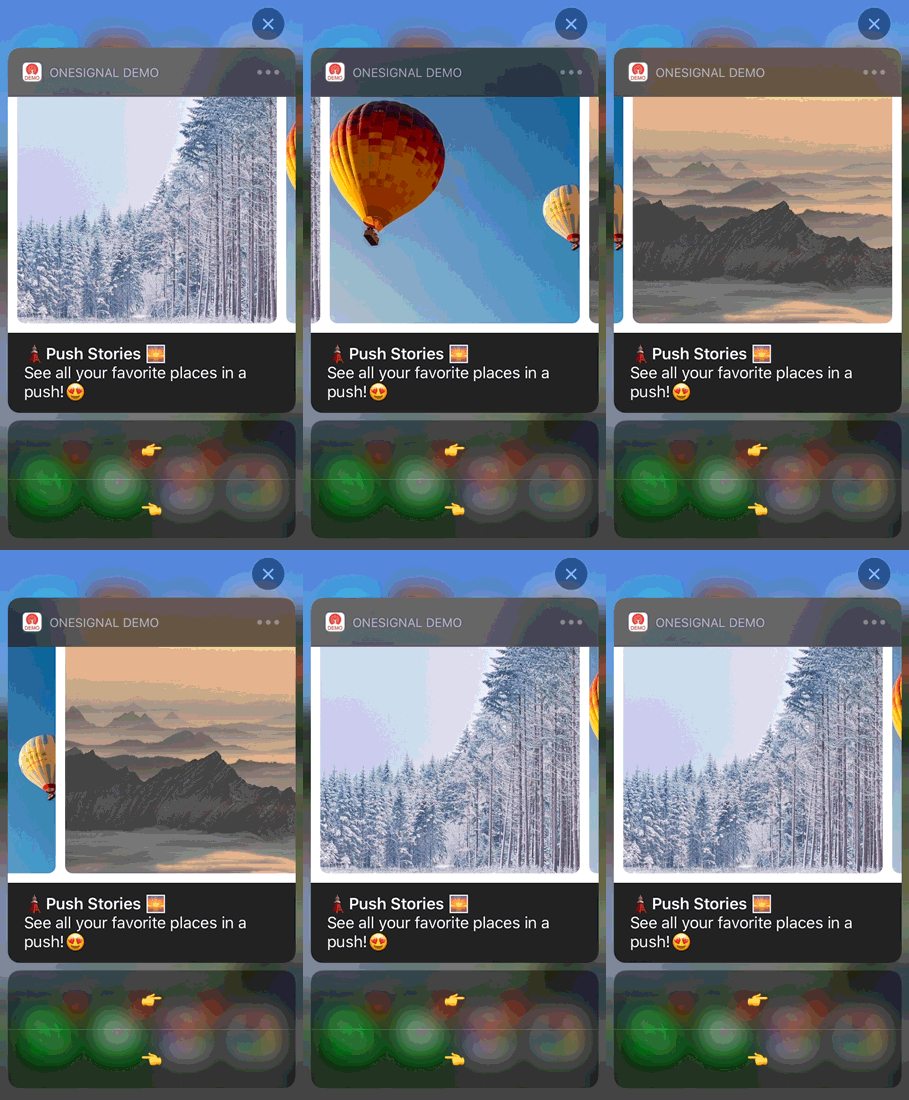 ## 1. Bildirim içeriği uzantısı ekleyin
Xcode'da, Dosya > Yeni > Hedef... seçin
"Notification Content Extension" seçin
Açılan pencerede seçimi onaylayın
Hata ayıklamak için etkinleştir'i seçin
## 2. Uygulamanıza kod ekleyin
Github'dan [OSNotificationContentExtension'ı indirin](https://github.com/jfishman1/OSNotificationContentExtension) ve Xcode Projenizd ki `OSNotificationContentExtension`'ı Github'dan aldığınız aynı dosyayla değiştirin.
Aşağıdaki dosyaların eklendiğini görmelisiniz:
## 1. Bildirim içeriği uzantısı ekleyin
Xcode'da, Dosya > Yeni > Hedef... seçin
"Notification Content Extension" seçin
Açılan pencerede seçimi onaylayın
Hata ayıklamak için etkinleştir'i seçin
## 2. Uygulamanıza kod ekleyin
Github'dan [OSNotificationContentExtension'ı indirin](https://github.com/jfishman1/OSNotificationContentExtension) ve Xcode Projenizd ki `OSNotificationContentExtension`'ı Github'dan aldığınız aynı dosyayla değiştirin.
Aşağıdaki dosyaların eklendiğini görmelisiniz:
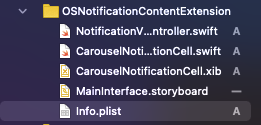 ## 3. Bildirim kategorinizi ayarlayın
Bu örnek, AppDelegate.swift `didFinishLaunchingWithOptions` içinde [İşlem Yapılabilir Bildirim Türünü Bildirir](https://developer.apple.com/documentation/usernotifications/declaring_your_actionable_notification_types).
```swift Swift theme={null}
func application(_ application: UIApplication, didFinishLaunchingWithOptions launchOptions: [UIApplication.LaunchOptionsKey: Any]?) -> Bool {
//START Authorize OS Notification Carousel Category
if #available(iOS 10.0, *) {
let options: UNAuthorizationOptions = [.alert]
UNUserNotificationCenter.current().requestAuthorization(options: options) { (authorized, error) in
if authorized {
let categoryIdentifier = "OSNotificationCarousel"
let carouselNext = UNNotificationAction(identifier: "OSNotificationCarousel.next", title: "👉", options: [])
let carouselPrevious = UNNotificationAction(identifier: "OSNotificationCarousel.previous", title: "👈", options: [])
let carouselCategory = UNNotificationCategory(identifier: categoryIdentifier, actions: [carouselNext, carouselPrevious], intentIdentifiers: [], options: [])
UNUserNotificationCenter.current().setNotificationCategories([carouselCategory])
}
}
}
//END Authorize OS Notification Carousel Category
return true
}
```
## 4. Push bildiriminizi gönderin
[Push Mesajları Gönderirken](./push) iOS Kategorisini ve özel Verileri ayarlayabilirsiniz.
### iOS kategorisi
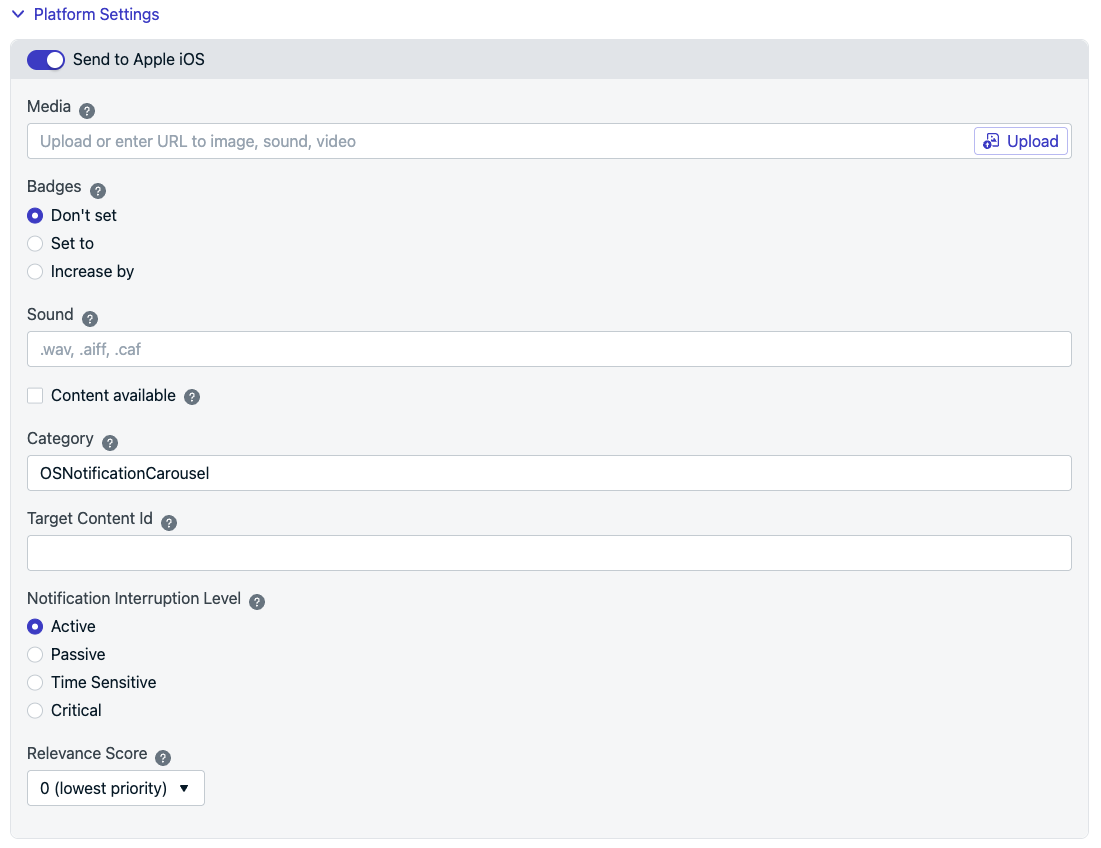
iOS Kategorisi olarak `OSNotificationCarousel` kullanın:
"Platform Ayarları" > **Apple iOS'a Gönder** > "Kategori" altında ayarlayın
## 3. Bildirim kategorinizi ayarlayın
Bu örnek, AppDelegate.swift `didFinishLaunchingWithOptions` içinde [İşlem Yapılabilir Bildirim Türünü Bildirir](https://developer.apple.com/documentation/usernotifications/declaring_your_actionable_notification_types).
```swift Swift theme={null}
func application(_ application: UIApplication, didFinishLaunchingWithOptions launchOptions: [UIApplication.LaunchOptionsKey: Any]?) -> Bool {
//START Authorize OS Notification Carousel Category
if #available(iOS 10.0, *) {
let options: UNAuthorizationOptions = [.alert]
UNUserNotificationCenter.current().requestAuthorization(options: options) { (authorized, error) in
if authorized {
let categoryIdentifier = "OSNotificationCarousel"
let carouselNext = UNNotificationAction(identifier: "OSNotificationCarousel.next", title: "👉", options: [])
let carouselPrevious = UNNotificationAction(identifier: "OSNotificationCarousel.previous", title: "👈", options: [])
let carouselCategory = UNNotificationCategory(identifier: categoryIdentifier, actions: [carouselNext, carouselPrevious], intentIdentifiers: [], options: [])
UNUserNotificationCenter.current().setNotificationCategories([carouselCategory])
}
}
}
//END Authorize OS Notification Carousel Category
return true
}
```
## 4. Push bildiriminizi gönderin
[Push Mesajları Gönderirken](./push) iOS Kategorisini ve özel Verileri ayarlayabilirsiniz.
### iOS kategorisi
iOS Kategorisi olarak `OSNotificationCarousel` kullanın:
"Platform Ayarları" > **Apple iOS'a Gönder** > "Kategori" altında ayarlayın
 `ios_category` [API Parametresi](/reference/push-notification) ile ayarlayın.
### Özel veriler
OneSignal'in bildirim başına birden fazla görsel yükleme seçeneği yoktur.
Bunun yerine Görsel URL'lerini virgülle `,` ayrılmış şekilde listelemelisiniz
"Gelişmiş Ayarlar" > "Ek Veriler" altında ayarlayın
"Anahtar" için `images` ve "Değer" için tırnak işaretleri olmadan virgülle ayrılmış URL'ler listesini ayarlayın.
`ios_category` [API Parametresi](/reference/push-notification) ile ayarlayın.
### Özel veriler
OneSignal'in bildirim başına birden fazla görsel yükleme seçeneği yoktur.
Bunun yerine Görsel URL'lerini virgülle `,` ayrılmış şekilde listelemelisiniz
"Gelişmiş Ayarlar" > "Ek Veriler" altında ayarlayın
"Anahtar" için `images` ve "Değer" için tırnak işaretleri olmadan virgülle ayrılmış URL'ler listesini ayarlayın.
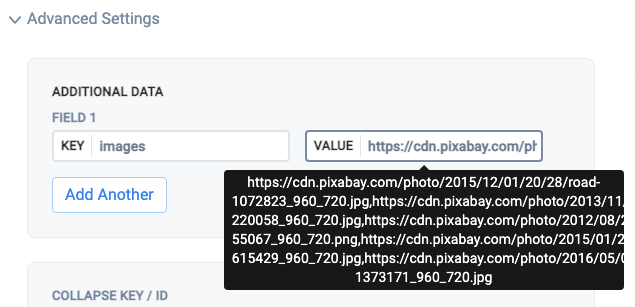 Örnek, kopyala yapıştır:
```text text theme={null}
https://cdn.pixabay.com/photo/2015/12/01/20/28/road-1072823_960_720.jpg,https://cdn.pixabay.com/photo/2013/11/28/10/36/road-220058_960_720.jpg,https://cdn.pixabay.com/photo/2012/08/27/14/19/mountains-55067_960_720.png,https://cdn.pixabay.com/photo/2015/01/28/23/35/landscape-615429_960_720.jpg,https://cdn.pixabay.com/photo/2016/05/05/02/37/sunset-1373171_960_720.jpg
```
`data` [API Parametresini](/reference/push-notification) şu şekilde kullanın:
```json json theme={null}
data: {
"images" : "https://cdn.pixabay.com/photo/2015/12/01/20/28/road-1072823_960_720.jpg,https://cdn.pixabay.com/photo/2013/11/28/10/36/road-220058_960_720.jpg,https://cdn.pixabay.com/photo/2012/08/27/14/19/mountains-55067_960_720.png,https://cdn.pixabay.com/photo/2015/01/28/23/35/landscape-615429_960_720.jpg,https://cdn.pixabay.com/photo/2016/05/05/02/37/sunset-1373171_960_720.jpg"
}
```
### Push'u gönderin
Push'u aldıktan sonra, iOS sürümüne bağlı olarak bildirimi genişletmek için uzun basmanız veya sola kaydırıp "Görüntüle"ye tıklamanız gerekecektir.
### Daha fazla okuma
* [Apple'ın İşlem Yapılabilir Bildirim Türlerinizi Bildirme Belgeleri](https://developer.apple.com/documentation/usernotifications/declaring_your_actionable_notification_types)
* [Ahmet Keskin'in Yararlı Medium Yazısı](https://medium.com/nsistanbul/carousel-notification-in-ios-5a1e8239d786)
***
Örnek, kopyala yapıştır:
```text text theme={null}
https://cdn.pixabay.com/photo/2015/12/01/20/28/road-1072823_960_720.jpg,https://cdn.pixabay.com/photo/2013/11/28/10/36/road-220058_960_720.jpg,https://cdn.pixabay.com/photo/2012/08/27/14/19/mountains-55067_960_720.png,https://cdn.pixabay.com/photo/2015/01/28/23/35/landscape-615429_960_720.jpg,https://cdn.pixabay.com/photo/2016/05/05/02/37/sunset-1373171_960_720.jpg
```
`data` [API Parametresini](/reference/push-notification) şu şekilde kullanın:
```json json theme={null}
data: {
"images" : "https://cdn.pixabay.com/photo/2015/12/01/20/28/road-1072823_960_720.jpg,https://cdn.pixabay.com/photo/2013/11/28/10/36/road-220058_960_720.jpg,https://cdn.pixabay.com/photo/2012/08/27/14/19/mountains-55067_960_720.png,https://cdn.pixabay.com/photo/2015/01/28/23/35/landscape-615429_960_720.jpg,https://cdn.pixabay.com/photo/2016/05/05/02/37/sunset-1373171_960_720.jpg"
}
```
### Push'u gönderin
Push'u aldıktan sonra, iOS sürümüne bağlı olarak bildirimi genişletmek için uzun basmanız veya sola kaydırıp "Görüntüle"ye tıklamanız gerekecektir.
### Daha fazla okuma
* [Apple'ın İşlem Yapılabilir Bildirim Türlerinizi Bildirme Belgeleri](https://developer.apple.com/documentation/usernotifications/declaring_your_actionable_notification_types)
* [Ahmet Keskin'in Yararlı Medium Yazısı](https://medium.com/nsistanbul/carousel-notification-in-ios-5a1e8239d786)
***