> ## Documentation Index
> Fetch the complete documentation index at: https://documentation.onesignal.com/llms.txt
> Use this file to discover all available pages before exploring further.
# Expo SDK kurulumu
> Expo SDK 53+ ve EAS Build kullanarak OneSignal React Native ve Expo SDK'yı iOS, Android ve Amazon gibi türev uygulamalarınıza entegre etmek için adım adım kılavuz.
export const SdkReleasesIframe = ({sdkFilter = undefined, viewMode = undefined, height, ...frameProps}) => {
const baseUrl = 'https://onesignal.github.io/sdk-releases';
const buildUrl = (theme, sdkFilter, viewMode) => {
const url = new URL(baseUrl);
const params = new URLSearchParams();
if (theme) {
params.set('theme', theme);
}
if (sdkFilter) {
params.set('sdk', sdkFilter);
}
if (viewMode) {
params.set('viewMode', viewMode);
}
if (params.toString()) {
url.search = params.toString();
}
return url.toString();
};
const detectTheme = () => {
if (document.documentElement.classList.contains('dark')) {
return 'dark';
}
return 'light';
};
const [theme, setTheme] = useState('light');
const [iframeSrc, setIframeSrc] = useState(() => {
const initialTheme = detectTheme();
return buildUrl(initialTheme, sdkFilter, viewMode);
});
useEffect(() => {
const currentTheme = detectTheme();
setTheme(currentTheme);
setIframeSrc(buildUrl(currentTheme, sdkFilter, viewMode));
const mediaQuery = window.matchMedia('(prefers-color-scheme: dark)');
const handleThemeChange = () => {
const newTheme = detectTheme();
setTheme(newTheme);
setIframeSrc(buildUrl(newTheme, sdkFilter, viewMode));
};
if (mediaQuery.addEventListener) {
mediaQuery.addEventListener('change', handleThemeChange);
} else {
mediaQuery.addListener(handleThemeChange);
}
window.addEventListener('storage', handleThemeChange);
const observer = new MutationObserver(handleThemeChange);
observer.observe(document.documentElement, {
attributes: true,
attributeFilter: ['class', 'data-theme']
});
return () => {
if (mediaQuery.removeEventListener) {
mediaQuery.removeEventListener('change', handleThemeChange);
} else {
mediaQuery.removeListener(handleThemeChange);
}
window.removeEventListener('storage', handleThemeChange);
observer.disconnect();
};
}, [sdkFilter, viewMode]);
const getIframeHeight = () => {
if (viewMode === 'table') {
return '450';
}
if (viewMode === 'mini') {
return '170';
}
return '800';
};
const iframeHeight = height || getIframeHeight();
return
;
};
## Genel bakış
Bu, OneSignal React Native ve Expo SDK'yı iOS ve Android uygulamalarınıza entegre etmek için adım adım bir kılavuzdur. Bu kılavuzun sonunda, OneSignal ile push bildirimleri ve uygulama içi mesajlar gönderebileceksiniz.
## Gereksinimler
* Yönetilen bir Expo uygulaması. Bare React Native uygulamaları için [React Native SDK kurulumu](./react-native-sdk-setup)'na bakın.
* Expo [development build](https://docs.expo.dev/develop/development-builds/introduction/)
* Expo SDK 53+ (React Native 0.79+), [Yeni Mimari](https://reactnative.dev/docs/new-architecture-intro) etkinleştirilmiş olmalı
* EAS CLI ([EAS Build dokümantasyonu](https://docs.expo.dev/build/introduction/))
* Yapılandırılmış OneSignal uygulaması ve platformu
**iOS Gereksinimleri**
* Xcode 14+ ile macOS (kurulum talimatları Xcode 16.2 kullanır)
* iOS 12+, iPadOS 12+ ile cihaz veya iOS 16.2+ çalıştıran Xcode simülatörü
* CocoaPods 1.16.2+
**Android Gereksinimleri**
* Google Play Store (Services) yüklü Android 7.0+ cihaz veya emülatör
### Configure your OneSignal app and platform
Configure your OneSignal app with the platforms you support — Apple (APNs), Google (FCM), Huawei (HMS), and/or Amazon (ADM).
If your organization already has a OneSignal account, [ask to be invited](/docs/en/manage-team-members) to the Organization. Otherwise, [sign up for a free account](https://onesignal.com) to get started.
Create a new app by clicking **New App/Website**, or add a platform to an existing app in **Settings > Push & In-App**. Select the platform(s) you want to configure and click **Next: Configure Your Platform**.
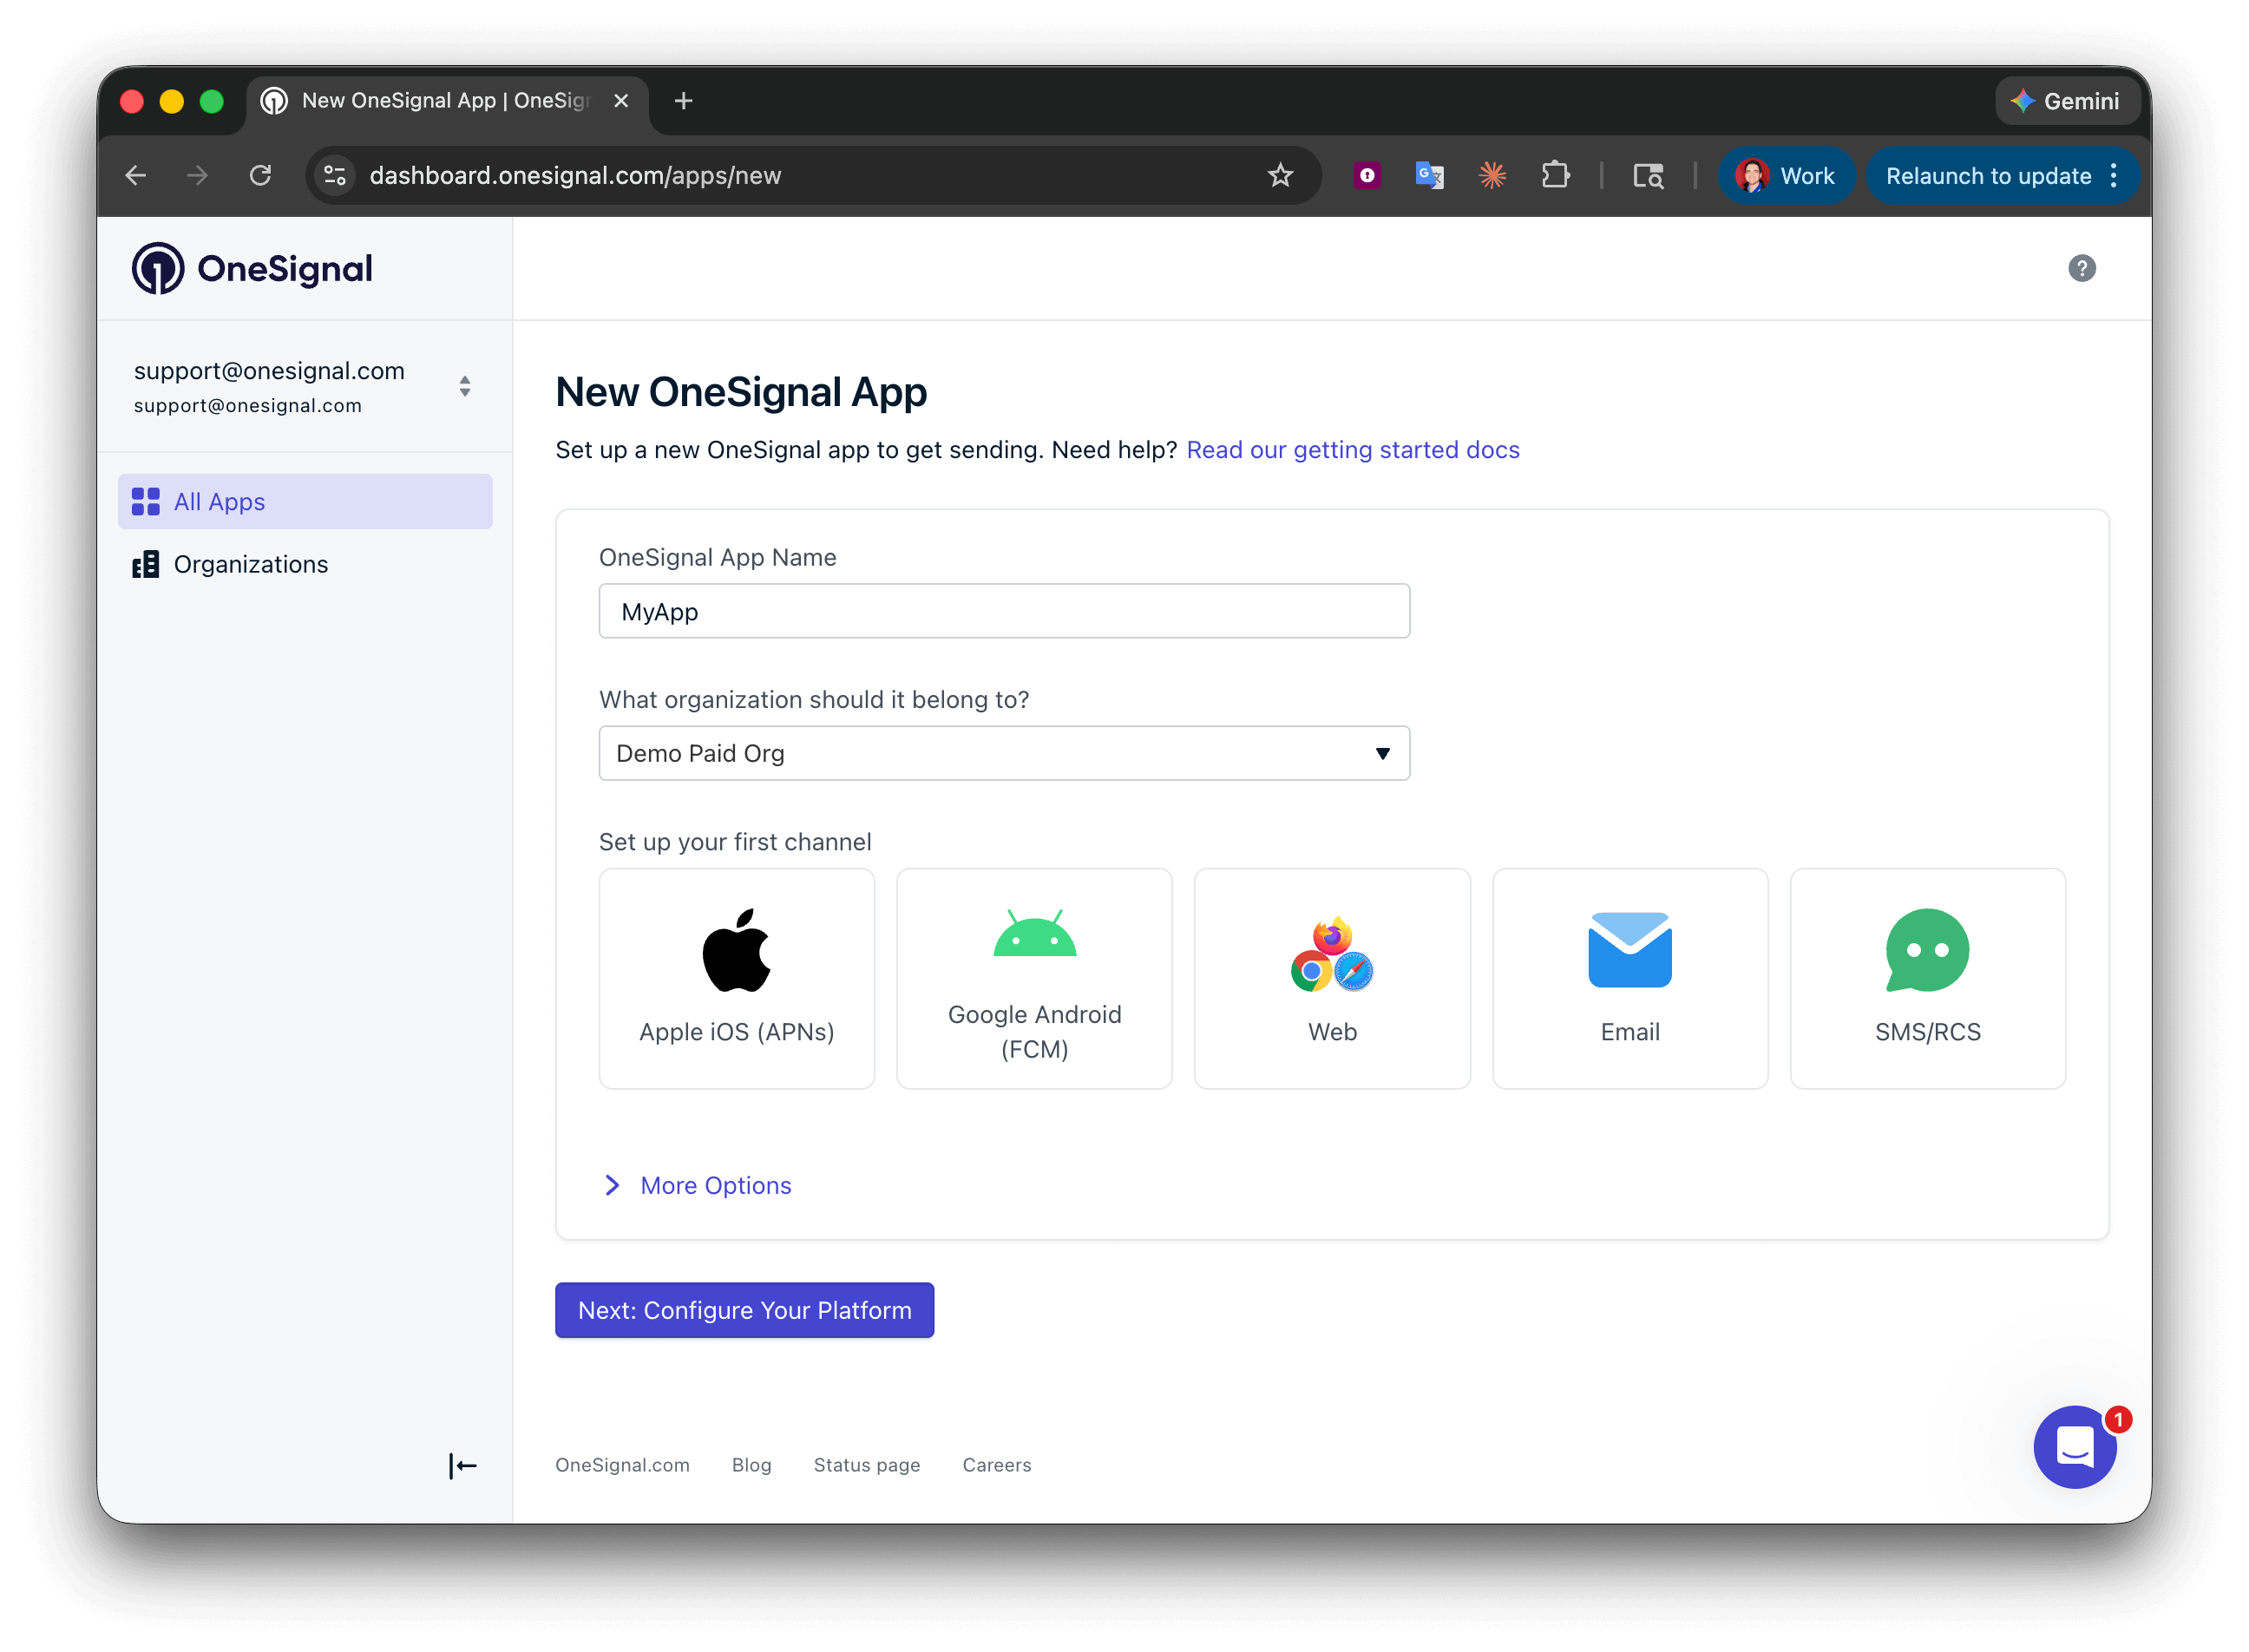 Enter the credentials for your platform:
* **Android**: [Set up Firebase credentials](/docs/en/android-firebase-credentials)
* **iOS**: [p8 token (recommended)](/docs/en/ios-p8-token-based-connection-to-apns) or [p12 certificate](/docs/en/ios-p12-generate-certificates)
* **Amazon**: [Generate API key](/docs/en/generate-an-amazon-api-key)
* **Huawei**: [Authorize OneSignal](/docs/en/authorize-onesignal-to-send-huawei-push)
Click **Save & Continue** after entering your credentials.
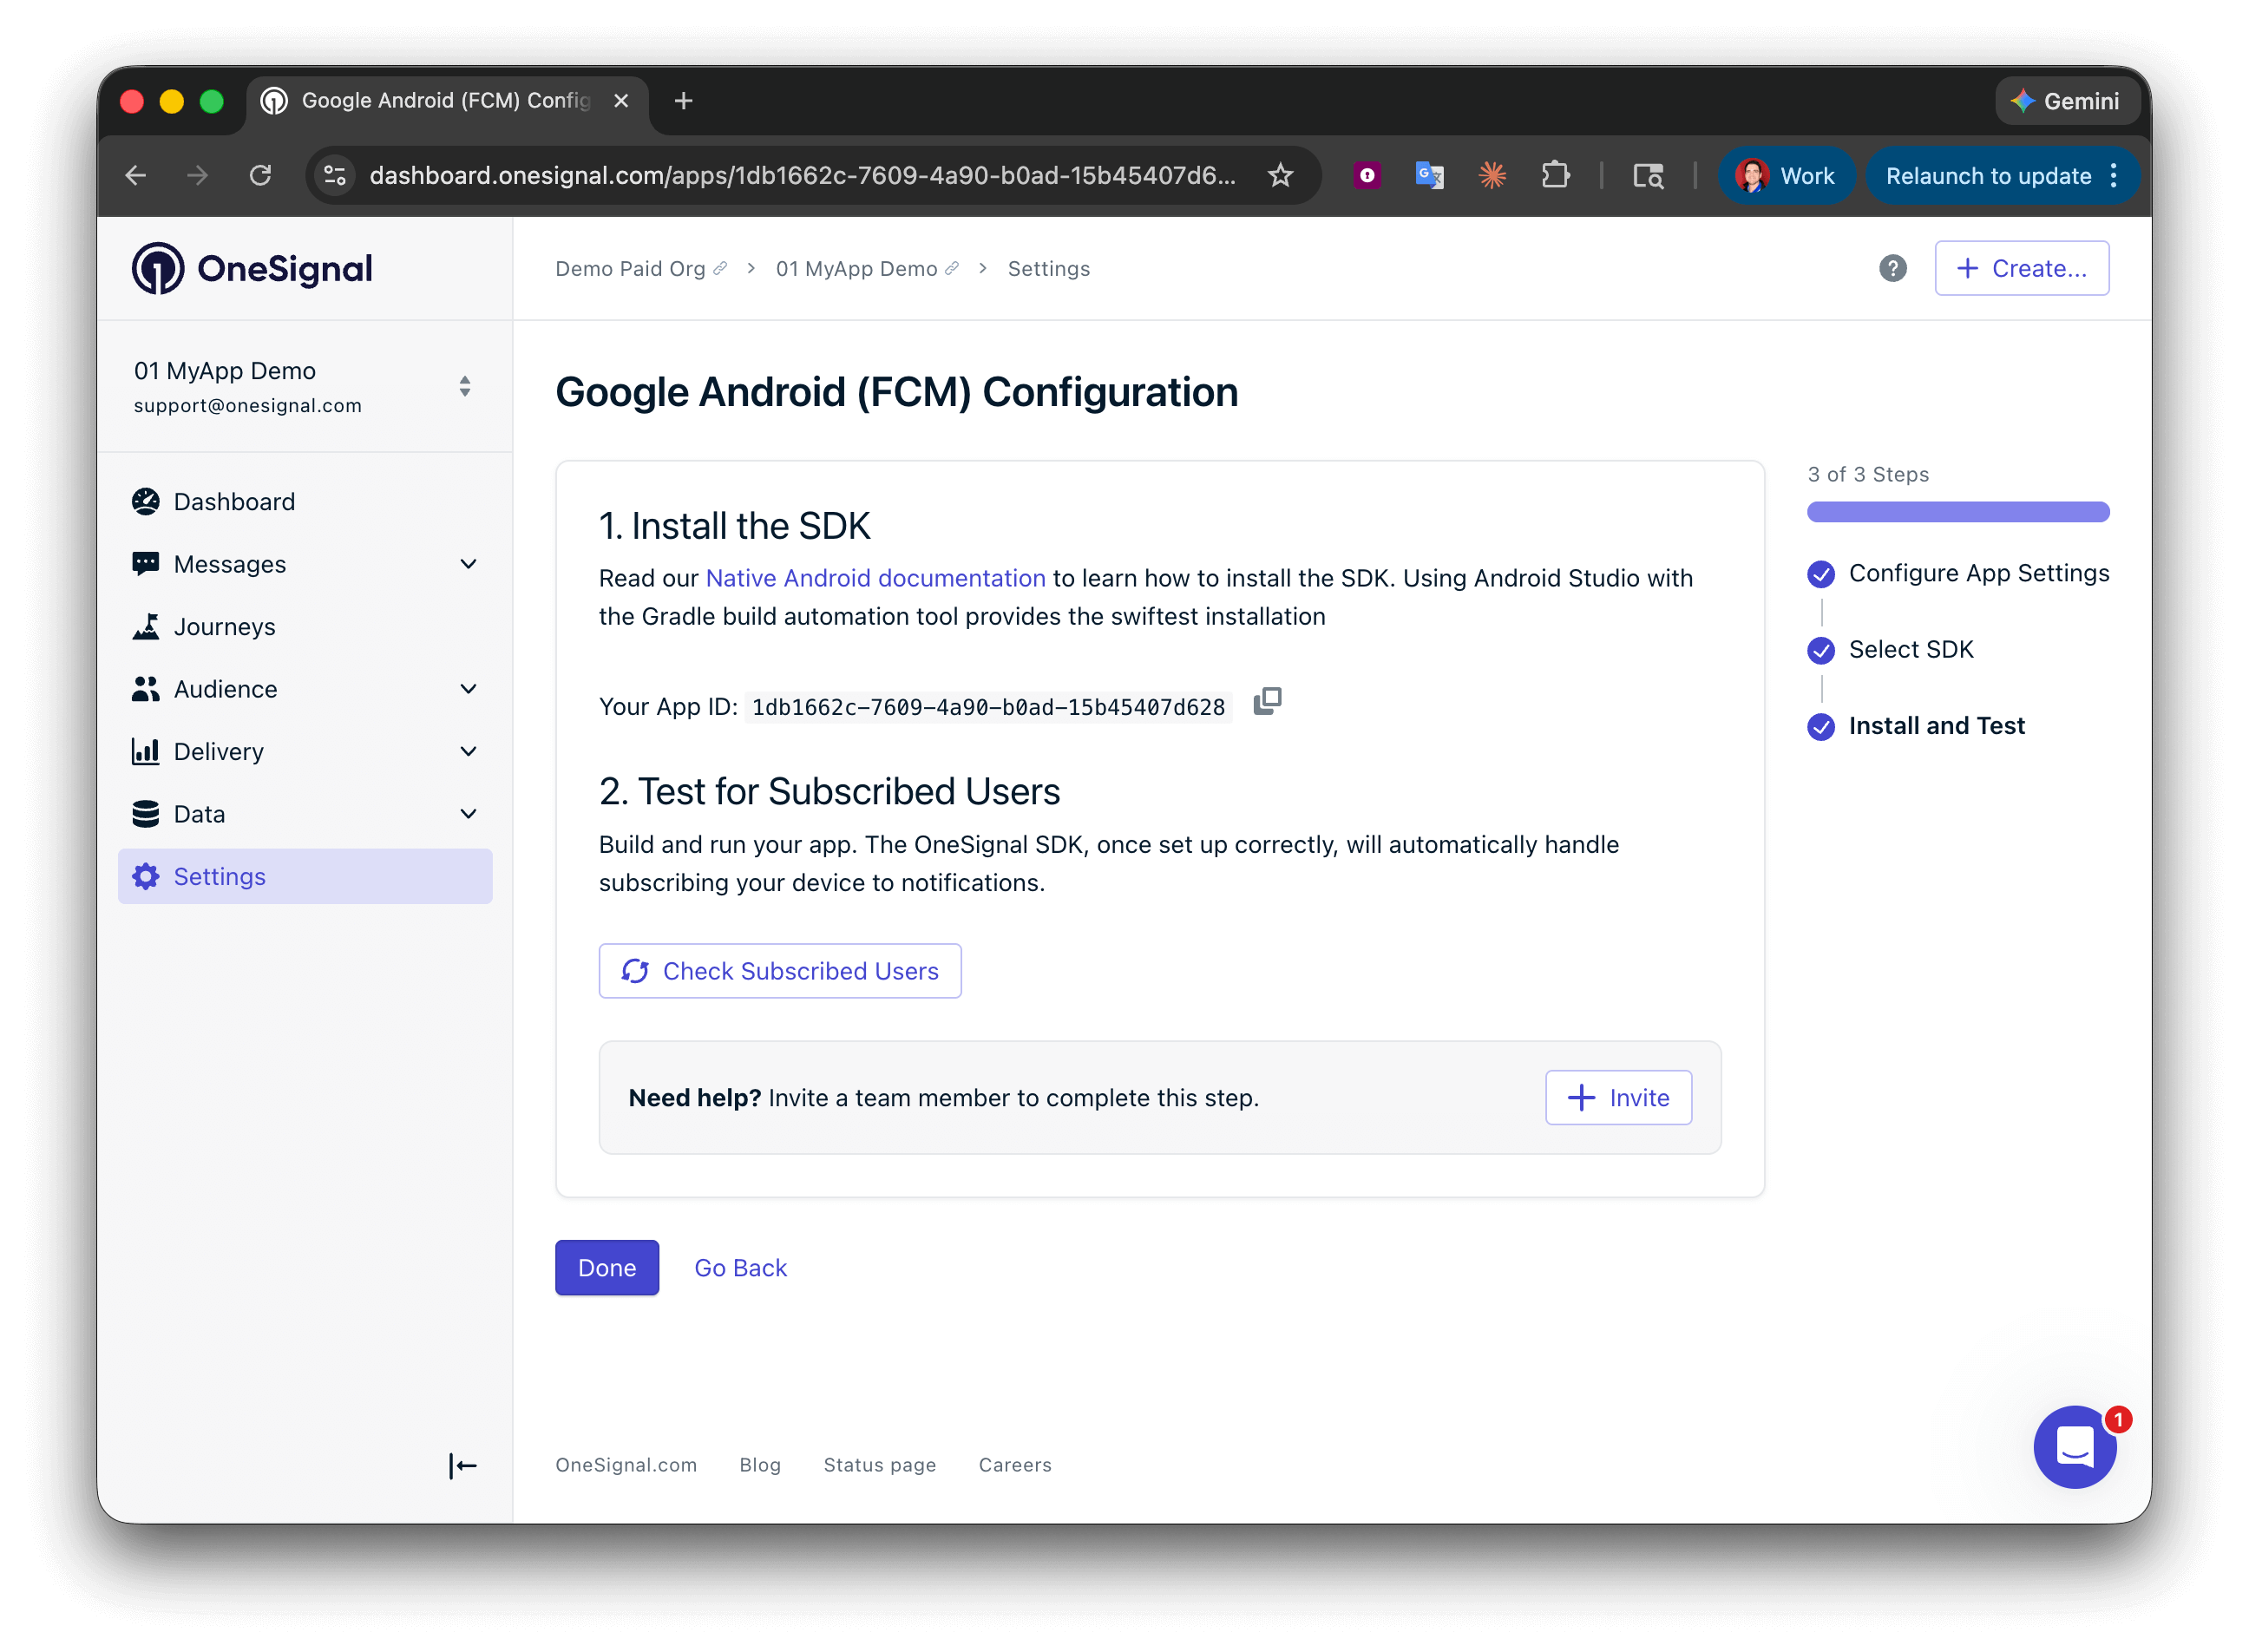
Your **App ID** is displayed on the final screen. Copy and save it — you need it when initializing the SDK. Select your SDK platform, then follow the setup guide.
Enter the credentials for your platform:
* **Android**: [Set up Firebase credentials](/docs/en/android-firebase-credentials)
* **iOS**: [p8 token (recommended)](/docs/en/ios-p8-token-based-connection-to-apns) or [p12 certificate](/docs/en/ios-p12-generate-certificates)
* **Amazon**: [Generate API key](/docs/en/generate-an-amazon-api-key)
* **Huawei**: [Authorize OneSignal](/docs/en/authorize-onesignal-to-send-huawei-push)
Click **Save & Continue** after entering your credentials.
Your **App ID** is displayed on the final screen. Copy and save it — you need it when initializing the SDK. Select your SDK platform, then follow the setup guide.
 ***
## SDK kurulumu
### 1. SDK'yı ekleyin
Expo CLI kullanarak OneSignal Expo plugin'ini yükleyin.
```shell npm theme={null}
npx expo install onesignal-expo-plugin
```
`react-native-onesignal` paketini projenize ekleyin.
```shell npm theme={null}
npm install --save react-native-onesignal
```
```shell Yarn theme={null}
yarn add react-native-onesignal
```
### 2. Plugin'i yapılandırın
`app.json` (veya `app.config.js` / `app.config.ts`) dosyanızı açın. Aşağıdaki ayarları eklemelisiniz.
**Gerekli ayarlar**
* `"bundleIdentifier"`: OneSignal uygulamanızda kullandığınız p8 veya p12 kimlik doğrulamasıyla eşleşen uygulamanızın bundle identifier'ı.
* `"infoPlist"`: `UIBackgroundModes` anahtarının `["remote-notification"]` olarak ayarlanmasını gerektirir.
* `"entitlements"`
* `aps-environment` anahtarının test için `"development"` ve Testflight ve App Store build'leri için `"production"` olarak ayarlanmasını gerektirir.
* `com.apple.security.application-groups` anahtarının `["group.${ios.bundleIdentifier}.onesignal"]` olarak ayarlanmasını gerektirir.
* `"android"`: `package` anahtarının uygulamanızın paket adına ayarlanmasını gerektirir.
* `"plugins"`: Uygulamanızın `plugins` dizisi. Plugin'ler dizisinin en üstüne `[onesignal-expo-plugin]` plugin'ini eklemeniz gereklidir. Ayrıca `mode` anahtarının test için `"development"` ve Testflight ve App Store build'leri için `"production"` olarak ayarlanmasını gerektirir.
Plugin'i `[onesignal-expo-plugin]` plugin'ler dizisinin önüne eklediğinizden emin olun. Dizideki ilk plugin olmalıdır. Bunu yapmak `OneSignal/OneSignal.h file not found` hatasını önleyecektir.
| Prop | Gerekli | Açıklama |
| :----------------------: | :--------------------: | ------------------------------------------------------------------------------------------------------------------------------------------------------------------------------------------------------------------------------------------------------------------ |
| `mode` | ✅ | [APNs environment](https://developer.apple.com/documentation/bundleresources/entitlements/aps-environment) hakkını yapılandırır. `"development"` veya `"production"` — test için `"development"`, TestFlight ve App Store build'leri için `"production"` kullanın. |
| `devTeam` | Kullanımdan kaldırıldı | **Kullanımdan kaldırıldı.** Expo yapılandırmasında [`ios.appleTeamId`](https://docs.expo.dev/versions/latest/config/app/#appleteamid) kullanın. `appleTeamId` ayarlı değilse eklenti `devTeam` değerine düşer (ör. `"91SW8A37CR"`). |
| `iPhoneDeploymentTarget` | ❌ | iOS [bildirim hizmeti uzantısı](./service-extensions) eklenirken kullanılan `IPHONEOS_DEPLOYMENT_TARGET`. Podfile'daki minimum iOS sürümüyle eşleşmelidir (ör. `"15.0"`). |
| `smallIcons` | ❌ | Android [küçük bildirim simgeleri](./notification-icons) için yerel yol dizisi (beyaz, şeffaf, 96×96px). Görseller doğru kaynak klasörlerine otomatik ölçeklenir. Örnek: `["./assets/ic_stat_onesignal_default.png"]` |
| `largeIcons` | ❌ | Android [büyük bildirim simgeleri](./notification-icons) için yerel yol dizisi (beyaz, şeffaf, 256×256px). Örnek: `["./assets/ic_onesignal_large_icon_default.png"]` |
| `smallIconAccentColor` | ❌ | Android bildirim simgesi vurgu rengi için hex değer (ör. `"#FF0000"`). |
| `iosNSEFilePath` | ❌ | Objective-C ile yazılmış özel Notification Service Extension için yerel yol. Örnek: `"./assets/NotificationService.m"` |
| `appGroupName` | ❌ | Özel iOS [App Group](./ios-sdk-setup) adı. Belirtilmezse varsayılan `"group.{ios.bundleIdentifier}.onesignal"` (ör. `"group.com.example.myapp.onesignal2"`). |
| `nseBundleIdentifier` | ❌ | NSE paket kimliği son eki. Tam kimlik `{ios.bundleIdentifier}.{nseBundleIdentifier}`. Belirtilmezse varsayılan `OneSignalNotificationServiceExtension`. |
| `disableNSE` | ❌ | `true` ise iOS NSE eklenmez. Rozetler, teslim onayı, medya ekleri ve aksiyon düğmeleri için NSE gereklidir — yalnızca temel push gerekiyorsa devre dışı bırakın. |
| `disableLocation` | ❌ | `true` ise yerel OneSignal konum modülü iOS ve Android derlemelerinden hariç tutulur. Yalnızca uygulamanız `OneSignal.Location` çağırmıyorsa kullanın. |
| `sounds` | ❌ | Özel bildirim sesleri için yerel yol dizisi (yalnızca `.wav`, ≤30 sn). iOS uygulama paketine ve Android `res/raw/` konumuna kopyalanır. Örnek: `["./assets/notification_sound.wav"]`. Bkz. [Bildirim sesleri](./notification-sounds). |
#### İsteğe bağlı: Konum modülünü devre dışı bırakın
Uygulamanız `OneSignal.Location` kullanmıyorsa OneSignal Expo plugin props içinde `disableLocation` değerini `true` olarak ayarlayın. Bu seçenek `react-native-onesignal` 5.5.1 veya üzerini gerektirir. Plugin, `react-native-onesignal` konum modülünü hariç tutsun diye yerel bağımlılık çözümlemeyi yapılandırır. iOS'ta plugin, CocoaPods çözümlemesi sırasında kullanılan Podfile ortam ayarını yazar. Android'de plugin, oluşturulan Gradle properties içine `onesignal.disableLocation=true` yazar.
```ts app.config.ts theme={null}
plugins: [
withOneSignal({
mode: 'development',
disableLocation: true,
}),
],
```
```json app.json theme={null}
"plugins": [
[
"onesignal-expo-plugin",
{
"mode": "development",
"disableLocation": true
}
]
]
```
`onesignal-expo-plugin` 2.6.0'dan itibaren, eklenti props'larında tam TypeScript desteği ve otomatik tamamlama için `withOneSignal`'i içe aktarabilirsiniz.
```ts app.config.ts theme={null}
import { ConfigContext, ExpoConfig } from '@expo/config';
import withOneSignal from 'onesignal-expo-plugin/plugin';
export default ({ config }: ConfigContext): ExpoConfig => ({
...config,
ios: {
bundleIdentifier: 'com.yourcompany.yourapp',
infoPlist: {
UIBackgroundModes: ['remote-notification'],
},
entitlements: {
'aps-environment': 'development',
},
},
android: {
package: 'com.yourcompany.yourapp',
},
plugins: [
withOneSignal({
mode: 'development',
}),
],
});
```
```json app.json theme={null}
{
"expo": {
"ios": {
"bundleIdentifier": "com.yourcompany.yourapp",
"infoPlist": {
"UIBackgroundModes": ["remote-notification"]
},
"entitlements": {
"aps-environment": "development"
}
},
"android": {
"package": "com.yourcompany.yourapp"
},
"plugins": [
[
"onesignal-expo-plugin",
{
"mode": "development"
}
]
]
}
}
```
### 3. SDK'yı başlatın
Expo yapınıza bağlı olarak (Geleneksel Uygulama girişi veya Expo Router), bu seçenekleri takip ederek OneSignal'i başlatın.
`App.tsx` veya `App.js` dosyanızda OneSignal'i sağlanan yöntemlerle başlatın.
`YOUR_APP_ID`'yi OneSignal dashboard'unuzda **Settings > [Keys & IDs](./keys-and-ids)** altında bulunan OneSignal Uygulama ID'nizle değiştirin.
OneSignal uygulamasına erişiminiz yoksa, [Ekip Üyelerinizden](./manage-team-members) sizi davet etmelerini isteyin.
```javascript App.tsx theme={null}
import React, { useEffect } from 'react';
// OneSignal paketini dahil edin
import { OneSignal, LogLevel } from 'react-native-onesignal';
export default function App() {
useEffect(() => {
// Hata ayıklama için ayrıntılı günlüğü etkinleştirin (üretimde kaldırın)
OneSignal.Debug.setLogLevel(LogLevel.Verbose);
// Dashboard > Settings > Keys & IDs adresindeki OneSignal App ID'niz ile değiştirin
OneSignal.initialize('YOUR_APP_ID');
// İlk açılışta push izni isteyin.
// Üretimde daha iyi opt-in oranı için uygulama içi mesaj kullanmayı düşünün.
OneSignal.Notifications.requestPermission(false);
// Aynı referansın ekleme ve kaldırma için kullanılabilmesi için dinleyicileri bir kez tanımlayın.
const clickListener = (event) => {
console.log('OneSignal: notification clicked:', event);
};
// v5'te ön plan bildirimleri otomatik olarak görüntülenir.
// Bastırmak için event.preventDefault(), ardından asenkron işlem sonrası
// göstermek için event.getNotification().display() çağırın.
const foregroundListener = (event) => {
console.log('OneSignal: foreground will display:', event);
};
OneSignal.Notifications.addEventListener('click', clickListener);
OneSignal.Notifications.addEventListener('foregroundWillDisplay', foregroundListener);
// Bellek sızıntılarını önlemek için bileşen unmount olduğunda dinleyicileri temizleyin.
// addEventListener'a iletilen aynı dinleyici referansı burada da iletilmelidir.
return () => {
OneSignal.Notifications.removeEventListener('click', clickListener);
OneSignal.Notifications.removeEventListener('foregroundWillDisplay', foregroundListener);
};
}, []);
}
```
`app/_layout.tsx` veya `app/_layout.js` dosyanızda OneSignal'i sağlanan yöntemlerle başlatın.
`YOUR_APP_ID`'yi OneSignal dashboard'unuzda **Settings > [Keys & IDs](./keys-and-ids)** altında bulunan OneSignal Uygulama ID'nizle değiştirin.
OneSignal uygulamasına erişiminiz yoksa, [Ekip Üyelerinizden](./manage-team-members) sizi davet etmelerini isteyin.
Aşağıdaki örnek fonksiyon adı olarak `App` kullanır — Expo Router herhangi bir varsayılan dışa aktarılmış bileşeni kabul ettiğinden, `RootLayout` olarak yeniden adlandırmak isteğe bağlıdır ancak gelenekseldir.
```javascript App.tsx theme={null}
import React, { useEffect } from 'react';
// OneSignal paketini dahil edin
import { OneSignal, LogLevel } from 'react-native-onesignal';
export default function App() {
useEffect(() => {
// Hata ayıklama için ayrıntılı günlüğü etkinleştirin (üretimde kaldırın)
OneSignal.Debug.setLogLevel(LogLevel.Verbose);
// Dashboard > Settings > Keys & IDs adresindeki OneSignal App ID'niz ile değiştirin
OneSignal.initialize('YOUR_APP_ID');
// İlk açılışta push izni isteyin.
// Üretimde daha iyi opt-in oranı için uygulama içi mesaj kullanmayı düşünün.
OneSignal.Notifications.requestPermission(false);
// Aynı referansın ekleme ve kaldırma için kullanılabilmesi için dinleyicileri bir kez tanımlayın.
const clickListener = (event) => {
console.log('OneSignal: notification clicked:', event);
};
// v5'te ön plan bildirimleri otomatik olarak görüntülenir.
// Bastırmak için event.preventDefault(), ardından asenkron işlem sonrası
// göstermek için event.getNotification().display() çağırın.
const foregroundListener = (event) => {
console.log('OneSignal: foreground will display:', event);
};
OneSignal.Notifications.addEventListener('click', clickListener);
OneSignal.Notifications.addEventListener('foregroundWillDisplay', foregroundListener);
// Bellek sızıntılarını önlemek için bileşen unmount olduğunda dinleyicileri temizleyin.
// addEventListener'a iletilen aynı dinleyici referansı burada da iletilmelidir.
return () => {
OneSignal.Notifications.removeEventListener('click', clickListener);
OneSignal.Notifications.removeEventListener('foregroundWillDisplay', foregroundListener);
};
}, []);
}
```
**`useCallback` ile yeniden kullanılabilir dinleyiciler**
Dinleyicinizin props veya state'e erişmesi gerekiyorsa, `useEffect` dışında `useCallback` ile tanımlayarak ekleme ve kaldırma için aynı referansın kullanılmasını sağlayın. `addEventListener` ve `removeEventListener`'a farklı fonksiyon referansları iletmek hiçbir etki yapmaz — dinleyici kaldırılmaz ve bileşen unmount edildikten sonra bile tetiklenebilir.
```javascript theme={null}
import React, { useCallback, useEffect } from 'react';
import { OneSignal } from 'react-native-onesignal';
export default function App() {
const clickListener = useCallback((event) => {
console.log('OneSignal: notification clicked:', event);
// bağımlılıklarınız değişebilir
}, []);
useEffect(() => {
OneSignal.Notifications.addEventListener('click', clickListener);
return () => {
OneSignal.Notifications.removeEventListener('click', clickListener);
};
}, [clickListener]);
}
```
Ek yapılandırma seçenekleri, daha karmaşık kurulum talimatları için [OneSignal Expo Plugin GitHub repo](https://github.com/OneSignal/onesignal-expo-plugin)'muzu inceleyin veya bir issue açın. SDK'larımız açık kaynaklıdır ve PR'lara açığız!
***
## Android setup
Make sure your OneSignal app is configured for the Android platform using your [Firebase credentials](/docs/en/android-firebase-credentials).
Set up your [notification icons](/docs/en/notification-icons) to match your app’s branding. If this step is skipped, a default bell icon will display for your push notifications.
**Build for Android**
At this point, you should be able to build and run your app on a physical Android device or emulator without issues.
After confirming that your Android build works:
* Continue with the [iOS setup](#ios-setup), if applicable.
* Or jump ahead to [Testing the OneSignal SDK integration](#testing-the-onesignal-sdk-integration).
***
## iOS kurulumu
OneSignal uygulamanızın [p8 Token (Önerilir)](./ios-p8-token-based-connection-to-apns) veya [p12 Sertifikası](./ios-p12-generate-certificates) kullanarak iOS platformu için yapılandırıldığından emin olun.
Bu, EAS yapılandırmanızda ayarlanan aynı kimlik bilgilerini kullanmalıdır.
### iOS için build
Artık uygulamanızı gerçek bir iOS cihazında veya iOS simülatöründe (16.2+) oluşturabilmeli ve çalıştırabilmelisiniz.
#### Yaygın iOS build hataları
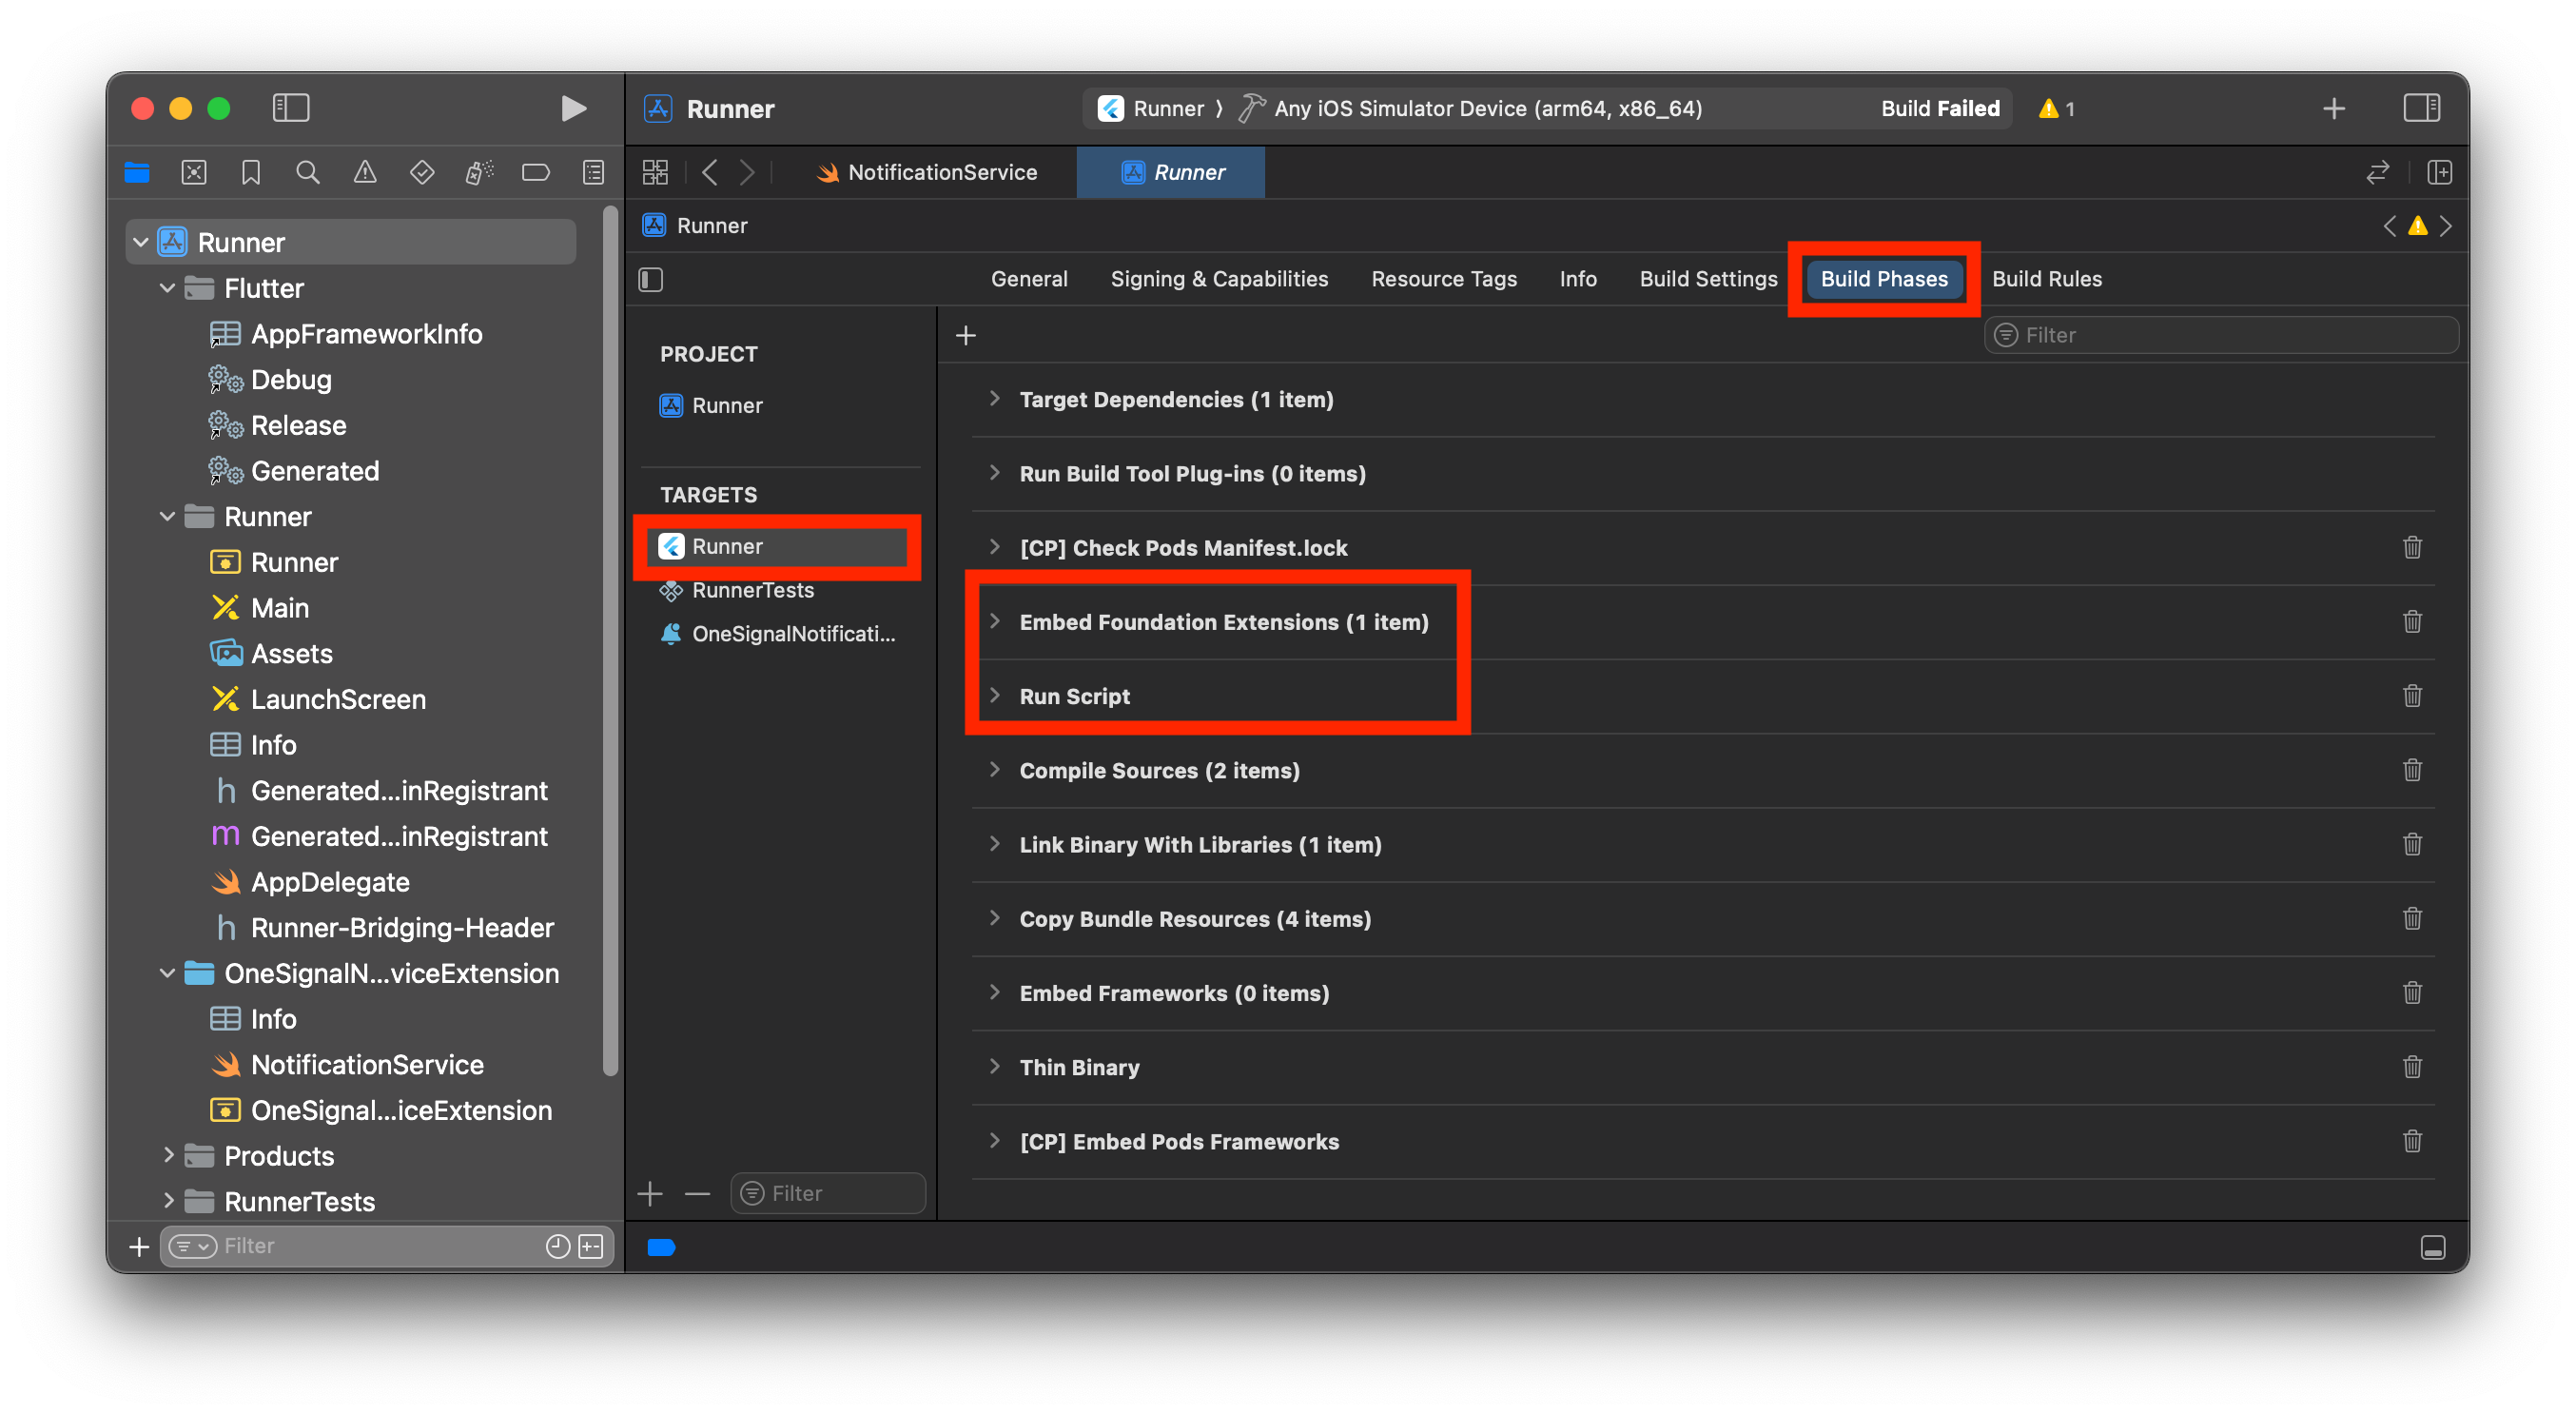
Xcode 15+ ile build yaparken bu hatayı görebilirsiniz, çünkü çapraz platform sistemlerini etkileyen varsayılan bir yapılandırma değişikliği vardır.
1. `.xcworkspace` klasörünüzü Xcode'da açın ve **your app target > Build Phases**'e gidin.
2. **"Embed Foundation Extensions"** veya **"Embed App Extensions"** adlı bir aşamanız olmalıdır.
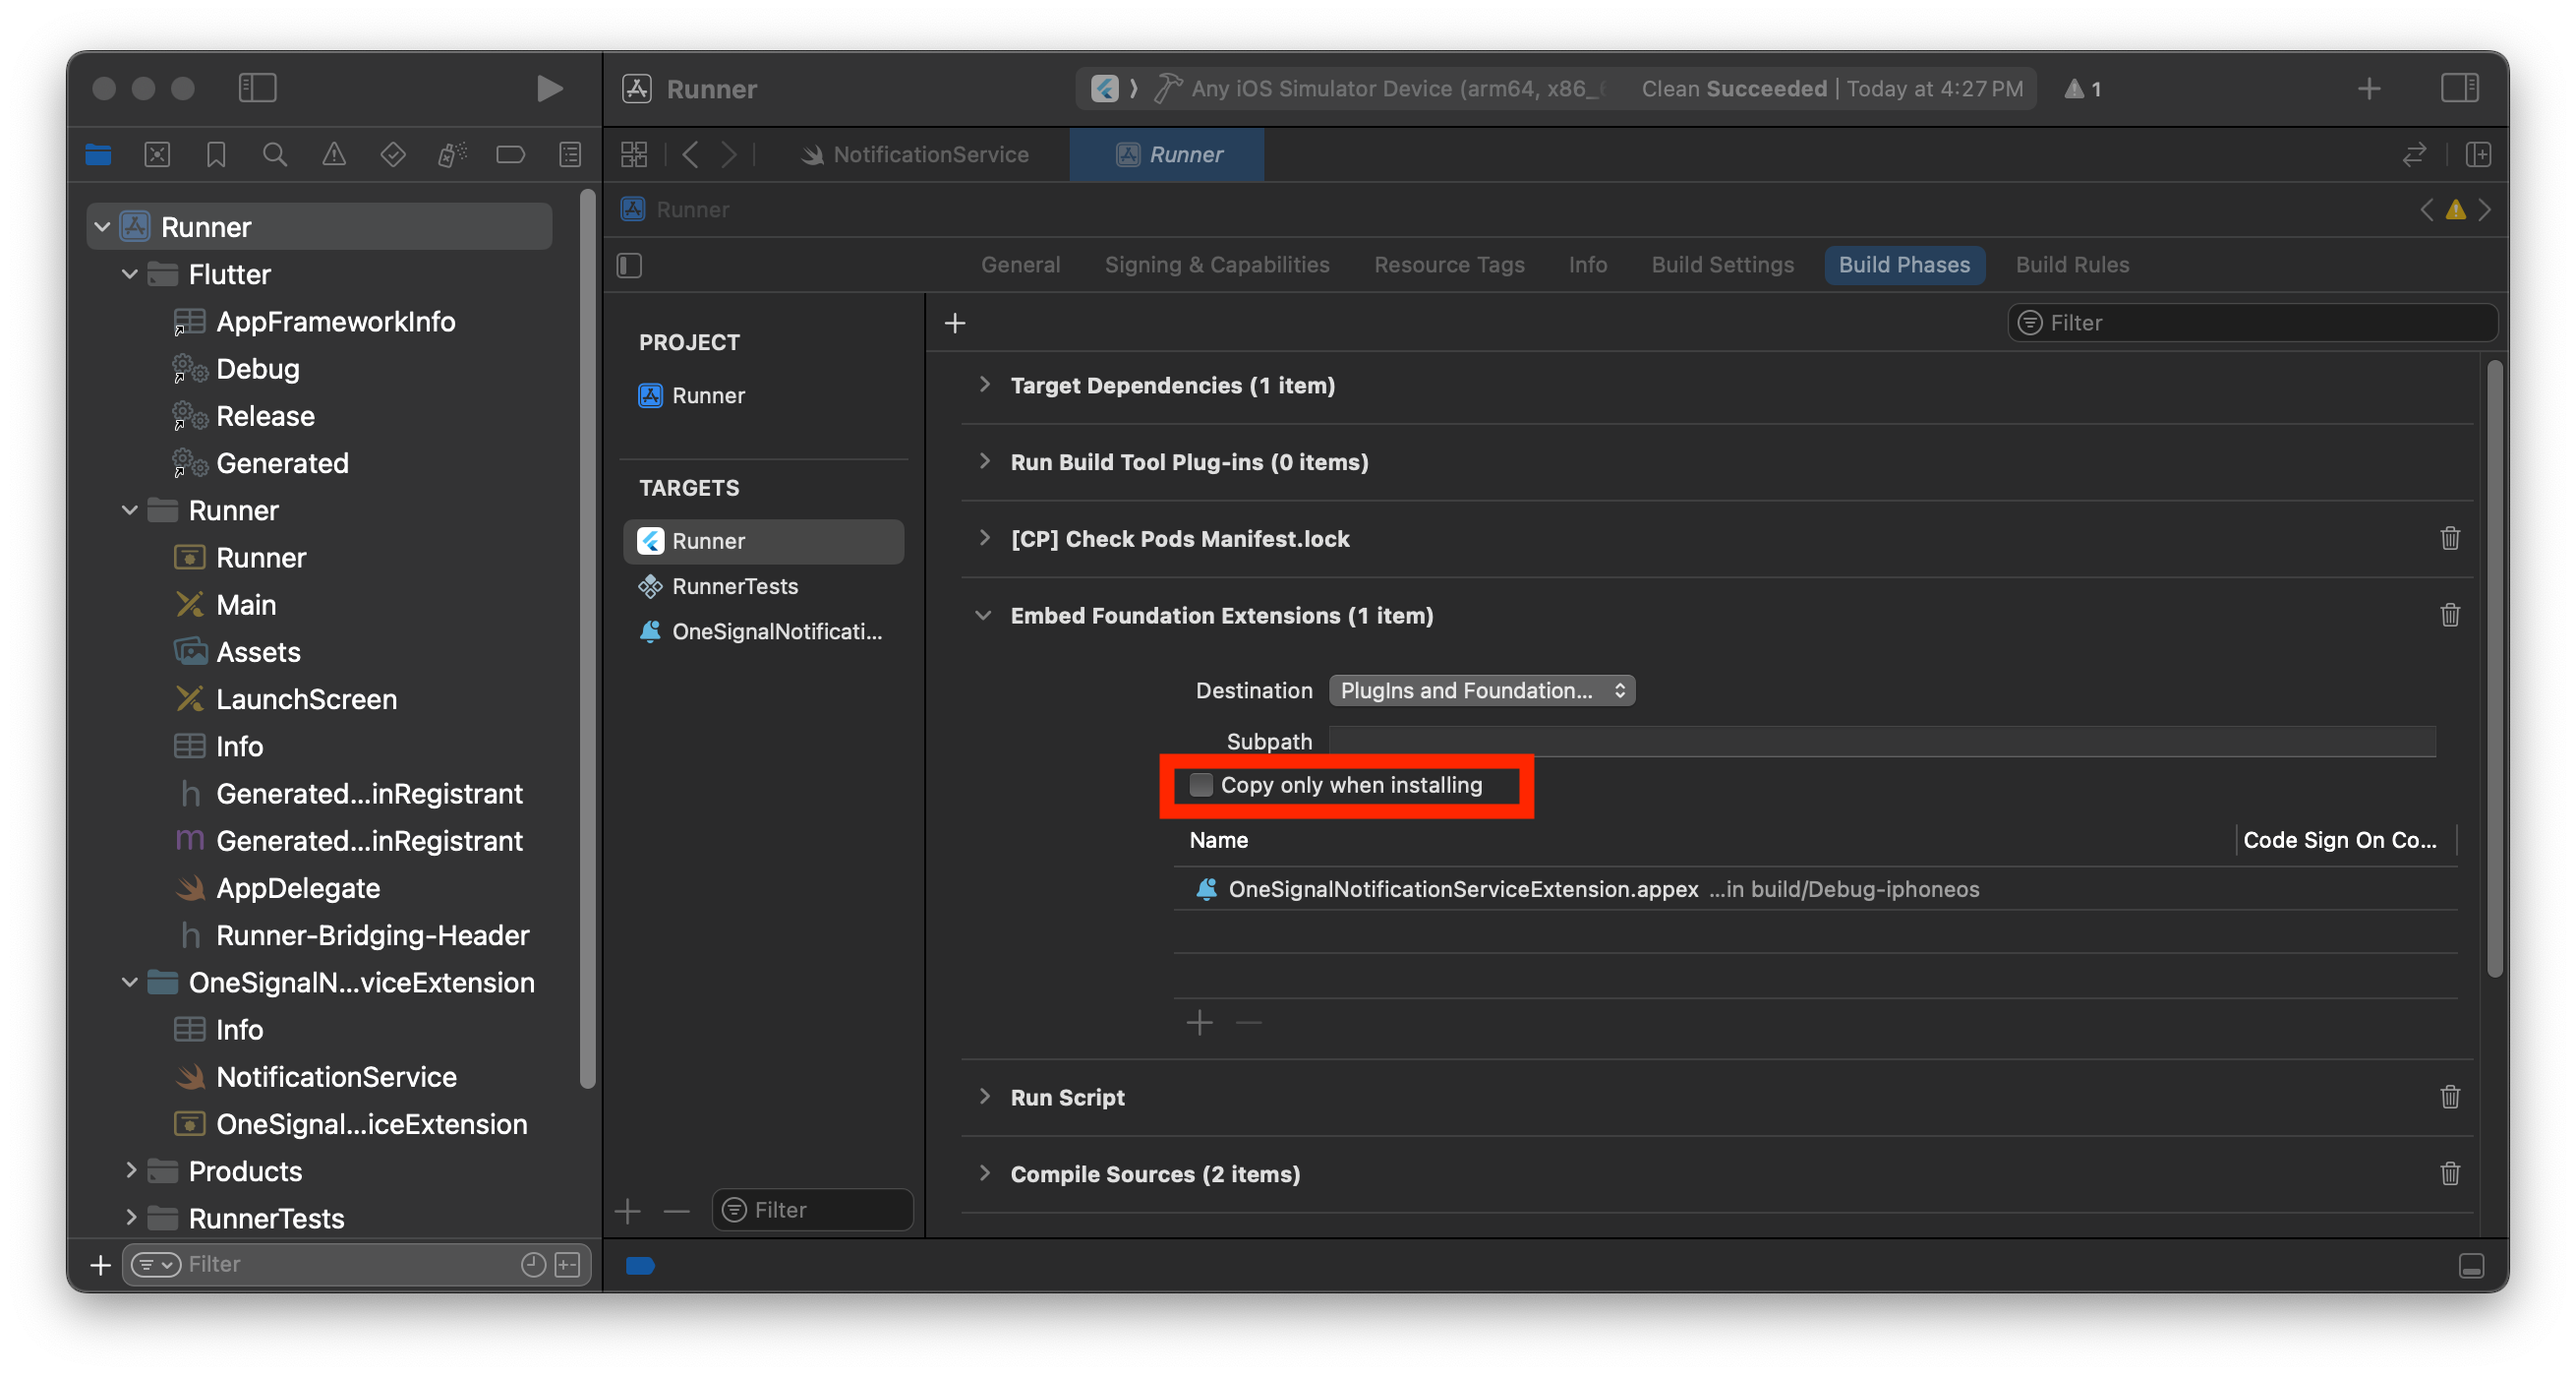
3. Bu build aşamasını **"Run Script"**'in *üzerine* sürükleyin ve taşıyın.
4. Uygulamanızı oluşturun ve çalıştırın. Hata çözülmüş olmalıdır.
***
## SDK kurulumu
### 1. SDK'yı ekleyin
Expo CLI kullanarak OneSignal Expo plugin'ini yükleyin.
```shell npm theme={null}
npx expo install onesignal-expo-plugin
```
`react-native-onesignal` paketini projenize ekleyin.
```shell npm theme={null}
npm install --save react-native-onesignal
```
```shell Yarn theme={null}
yarn add react-native-onesignal
```
### 2. Plugin'i yapılandırın
`app.json` (veya `app.config.js` / `app.config.ts`) dosyanızı açın. Aşağıdaki ayarları eklemelisiniz.
**Gerekli ayarlar**
* `"bundleIdentifier"`: OneSignal uygulamanızda kullandığınız p8 veya p12 kimlik doğrulamasıyla eşleşen uygulamanızın bundle identifier'ı.
* `"infoPlist"`: `UIBackgroundModes` anahtarının `["remote-notification"]` olarak ayarlanmasını gerektirir.
* `"entitlements"`
* `aps-environment` anahtarının test için `"development"` ve Testflight ve App Store build'leri için `"production"` olarak ayarlanmasını gerektirir.
* `com.apple.security.application-groups` anahtarının `["group.${ios.bundleIdentifier}.onesignal"]` olarak ayarlanmasını gerektirir.
* `"android"`: `package` anahtarının uygulamanızın paket adına ayarlanmasını gerektirir.
* `"plugins"`: Uygulamanızın `plugins` dizisi. Plugin'ler dizisinin en üstüne `[onesignal-expo-plugin]` plugin'ini eklemeniz gereklidir. Ayrıca `mode` anahtarının test için `"development"` ve Testflight ve App Store build'leri için `"production"` olarak ayarlanmasını gerektirir.
Plugin'i `[onesignal-expo-plugin]` plugin'ler dizisinin önüne eklediğinizden emin olun. Dizideki ilk plugin olmalıdır. Bunu yapmak `OneSignal/OneSignal.h file not found` hatasını önleyecektir.
| Prop | Gerekli | Açıklama |
| :----------------------: | :--------------------: | ------------------------------------------------------------------------------------------------------------------------------------------------------------------------------------------------------------------------------------------------------------------ |
| `mode` | ✅ | [APNs environment](https://developer.apple.com/documentation/bundleresources/entitlements/aps-environment) hakkını yapılandırır. `"development"` veya `"production"` — test için `"development"`, TestFlight ve App Store build'leri için `"production"` kullanın. |
| `devTeam` | Kullanımdan kaldırıldı | **Kullanımdan kaldırıldı.** Expo yapılandırmasında [`ios.appleTeamId`](https://docs.expo.dev/versions/latest/config/app/#appleteamid) kullanın. `appleTeamId` ayarlı değilse eklenti `devTeam` değerine düşer (ör. `"91SW8A37CR"`). |
| `iPhoneDeploymentTarget` | ❌ | iOS [bildirim hizmeti uzantısı](./service-extensions) eklenirken kullanılan `IPHONEOS_DEPLOYMENT_TARGET`. Podfile'daki minimum iOS sürümüyle eşleşmelidir (ör. `"15.0"`). |
| `smallIcons` | ❌ | Android [küçük bildirim simgeleri](./notification-icons) için yerel yol dizisi (beyaz, şeffaf, 96×96px). Görseller doğru kaynak klasörlerine otomatik ölçeklenir. Örnek: `["./assets/ic_stat_onesignal_default.png"]` |
| `largeIcons` | ❌ | Android [büyük bildirim simgeleri](./notification-icons) için yerel yol dizisi (beyaz, şeffaf, 256×256px). Örnek: `["./assets/ic_onesignal_large_icon_default.png"]` |
| `smallIconAccentColor` | ❌ | Android bildirim simgesi vurgu rengi için hex değer (ör. `"#FF0000"`). |
| `iosNSEFilePath` | ❌ | Objective-C ile yazılmış özel Notification Service Extension için yerel yol. Örnek: `"./assets/NotificationService.m"` |
| `appGroupName` | ❌ | Özel iOS [App Group](./ios-sdk-setup) adı. Belirtilmezse varsayılan `"group.{ios.bundleIdentifier}.onesignal"` (ör. `"group.com.example.myapp.onesignal2"`). |
| `nseBundleIdentifier` | ❌ | NSE paket kimliği son eki. Tam kimlik `{ios.bundleIdentifier}.{nseBundleIdentifier}`. Belirtilmezse varsayılan `OneSignalNotificationServiceExtension`. |
| `disableNSE` | ❌ | `true` ise iOS NSE eklenmez. Rozetler, teslim onayı, medya ekleri ve aksiyon düğmeleri için NSE gereklidir — yalnızca temel push gerekiyorsa devre dışı bırakın. |
| `disableLocation` | ❌ | `true` ise yerel OneSignal konum modülü iOS ve Android derlemelerinden hariç tutulur. Yalnızca uygulamanız `OneSignal.Location` çağırmıyorsa kullanın. |
| `sounds` | ❌ | Özel bildirim sesleri için yerel yol dizisi (yalnızca `.wav`, ≤30 sn). iOS uygulama paketine ve Android `res/raw/` konumuna kopyalanır. Örnek: `["./assets/notification_sound.wav"]`. Bkz. [Bildirim sesleri](./notification-sounds). |
#### İsteğe bağlı: Konum modülünü devre dışı bırakın
Uygulamanız `OneSignal.Location` kullanmıyorsa OneSignal Expo plugin props içinde `disableLocation` değerini `true` olarak ayarlayın. Bu seçenek `react-native-onesignal` 5.5.1 veya üzerini gerektirir. Plugin, `react-native-onesignal` konum modülünü hariç tutsun diye yerel bağımlılık çözümlemeyi yapılandırır. iOS'ta plugin, CocoaPods çözümlemesi sırasında kullanılan Podfile ortam ayarını yazar. Android'de plugin, oluşturulan Gradle properties içine `onesignal.disableLocation=true` yazar.
```ts app.config.ts theme={null}
plugins: [
withOneSignal({
mode: 'development',
disableLocation: true,
}),
],
```
```json app.json theme={null}
"plugins": [
[
"onesignal-expo-plugin",
{
"mode": "development",
"disableLocation": true
}
]
]
```
`onesignal-expo-plugin` 2.6.0'dan itibaren, eklenti props'larında tam TypeScript desteği ve otomatik tamamlama için `withOneSignal`'i içe aktarabilirsiniz.
```ts app.config.ts theme={null}
import { ConfigContext, ExpoConfig } from '@expo/config';
import withOneSignal from 'onesignal-expo-plugin/plugin';
export default ({ config }: ConfigContext): ExpoConfig => ({
...config,
ios: {
bundleIdentifier: 'com.yourcompany.yourapp',
infoPlist: {
UIBackgroundModes: ['remote-notification'],
},
entitlements: {
'aps-environment': 'development',
},
},
android: {
package: 'com.yourcompany.yourapp',
},
plugins: [
withOneSignal({
mode: 'development',
}),
],
});
```
```json app.json theme={null}
{
"expo": {
"ios": {
"bundleIdentifier": "com.yourcompany.yourapp",
"infoPlist": {
"UIBackgroundModes": ["remote-notification"]
},
"entitlements": {
"aps-environment": "development"
}
},
"android": {
"package": "com.yourcompany.yourapp"
},
"plugins": [
[
"onesignal-expo-plugin",
{
"mode": "development"
}
]
]
}
}
```
### 3. SDK'yı başlatın
Expo yapınıza bağlı olarak (Geleneksel Uygulama girişi veya Expo Router), bu seçenekleri takip ederek OneSignal'i başlatın.
`App.tsx` veya `App.js` dosyanızda OneSignal'i sağlanan yöntemlerle başlatın.
`YOUR_APP_ID`'yi OneSignal dashboard'unuzda **Settings > [Keys & IDs](./keys-and-ids)** altında bulunan OneSignal Uygulama ID'nizle değiştirin.
OneSignal uygulamasına erişiminiz yoksa, [Ekip Üyelerinizden](./manage-team-members) sizi davet etmelerini isteyin.
```javascript App.tsx theme={null}
import React, { useEffect } from 'react';
// OneSignal paketini dahil edin
import { OneSignal, LogLevel } from 'react-native-onesignal';
export default function App() {
useEffect(() => {
// Hata ayıklama için ayrıntılı günlüğü etkinleştirin (üretimde kaldırın)
OneSignal.Debug.setLogLevel(LogLevel.Verbose);
// Dashboard > Settings > Keys & IDs adresindeki OneSignal App ID'niz ile değiştirin
OneSignal.initialize('YOUR_APP_ID');
// İlk açılışta push izni isteyin.
// Üretimde daha iyi opt-in oranı için uygulama içi mesaj kullanmayı düşünün.
OneSignal.Notifications.requestPermission(false);
// Aynı referansın ekleme ve kaldırma için kullanılabilmesi için dinleyicileri bir kez tanımlayın.
const clickListener = (event) => {
console.log('OneSignal: notification clicked:', event);
};
// v5'te ön plan bildirimleri otomatik olarak görüntülenir.
// Bastırmak için event.preventDefault(), ardından asenkron işlem sonrası
// göstermek için event.getNotification().display() çağırın.
const foregroundListener = (event) => {
console.log('OneSignal: foreground will display:', event);
};
OneSignal.Notifications.addEventListener('click', clickListener);
OneSignal.Notifications.addEventListener('foregroundWillDisplay', foregroundListener);
// Bellek sızıntılarını önlemek için bileşen unmount olduğunda dinleyicileri temizleyin.
// addEventListener'a iletilen aynı dinleyici referansı burada da iletilmelidir.
return () => {
OneSignal.Notifications.removeEventListener('click', clickListener);
OneSignal.Notifications.removeEventListener('foregroundWillDisplay', foregroundListener);
};
}, []);
}
```
`app/_layout.tsx` veya `app/_layout.js` dosyanızda OneSignal'i sağlanan yöntemlerle başlatın.
`YOUR_APP_ID`'yi OneSignal dashboard'unuzda **Settings > [Keys & IDs](./keys-and-ids)** altında bulunan OneSignal Uygulama ID'nizle değiştirin.
OneSignal uygulamasına erişiminiz yoksa, [Ekip Üyelerinizden](./manage-team-members) sizi davet etmelerini isteyin.
Aşağıdaki örnek fonksiyon adı olarak `App` kullanır — Expo Router herhangi bir varsayılan dışa aktarılmış bileşeni kabul ettiğinden, `RootLayout` olarak yeniden adlandırmak isteğe bağlıdır ancak gelenekseldir.
```javascript App.tsx theme={null}
import React, { useEffect } from 'react';
// OneSignal paketini dahil edin
import { OneSignal, LogLevel } from 'react-native-onesignal';
export default function App() {
useEffect(() => {
// Hata ayıklama için ayrıntılı günlüğü etkinleştirin (üretimde kaldırın)
OneSignal.Debug.setLogLevel(LogLevel.Verbose);
// Dashboard > Settings > Keys & IDs adresindeki OneSignal App ID'niz ile değiştirin
OneSignal.initialize('YOUR_APP_ID');
// İlk açılışta push izni isteyin.
// Üretimde daha iyi opt-in oranı için uygulama içi mesaj kullanmayı düşünün.
OneSignal.Notifications.requestPermission(false);
// Aynı referansın ekleme ve kaldırma için kullanılabilmesi için dinleyicileri bir kez tanımlayın.
const clickListener = (event) => {
console.log('OneSignal: notification clicked:', event);
};
// v5'te ön plan bildirimleri otomatik olarak görüntülenir.
// Bastırmak için event.preventDefault(), ardından asenkron işlem sonrası
// göstermek için event.getNotification().display() çağırın.
const foregroundListener = (event) => {
console.log('OneSignal: foreground will display:', event);
};
OneSignal.Notifications.addEventListener('click', clickListener);
OneSignal.Notifications.addEventListener('foregroundWillDisplay', foregroundListener);
// Bellek sızıntılarını önlemek için bileşen unmount olduğunda dinleyicileri temizleyin.
// addEventListener'a iletilen aynı dinleyici referansı burada da iletilmelidir.
return () => {
OneSignal.Notifications.removeEventListener('click', clickListener);
OneSignal.Notifications.removeEventListener('foregroundWillDisplay', foregroundListener);
};
}, []);
}
```
**`useCallback` ile yeniden kullanılabilir dinleyiciler**
Dinleyicinizin props veya state'e erişmesi gerekiyorsa, `useEffect` dışında `useCallback` ile tanımlayarak ekleme ve kaldırma için aynı referansın kullanılmasını sağlayın. `addEventListener` ve `removeEventListener`'a farklı fonksiyon referansları iletmek hiçbir etki yapmaz — dinleyici kaldırılmaz ve bileşen unmount edildikten sonra bile tetiklenebilir.
```javascript theme={null}
import React, { useCallback, useEffect } from 'react';
import { OneSignal } from 'react-native-onesignal';
export default function App() {
const clickListener = useCallback((event) => {
console.log('OneSignal: notification clicked:', event);
// bağımlılıklarınız değişebilir
}, []);
useEffect(() => {
OneSignal.Notifications.addEventListener('click', clickListener);
return () => {
OneSignal.Notifications.removeEventListener('click', clickListener);
};
}, [clickListener]);
}
```
Ek yapılandırma seçenekleri, daha karmaşık kurulum talimatları için [OneSignal Expo Plugin GitHub repo](https://github.com/OneSignal/onesignal-expo-plugin)'muzu inceleyin veya bir issue açın. SDK'larımız açık kaynaklıdır ve PR'lara açığız!
***
## Android setup
Make sure your OneSignal app is configured for the Android platform using your [Firebase credentials](/docs/en/android-firebase-credentials).
Set up your [notification icons](/docs/en/notification-icons) to match your app’s branding. If this step is skipped, a default bell icon will display for your push notifications.
**Build for Android**
At this point, you should be able to build and run your app on a physical Android device or emulator without issues.
After confirming that your Android build works:
* Continue with the [iOS setup](#ios-setup), if applicable.
* Or jump ahead to [Testing the OneSignal SDK integration](#testing-the-onesignal-sdk-integration).
***
## iOS kurulumu
OneSignal uygulamanızın [p8 Token (Önerilir)](./ios-p8-token-based-connection-to-apns) veya [p12 Sertifikası](./ios-p12-generate-certificates) kullanarak iOS platformu için yapılandırıldığından emin olun.
Bu, EAS yapılandırmanızda ayarlanan aynı kimlik bilgilerini kullanmalıdır.
### iOS için build
Artık uygulamanızı gerçek bir iOS cihazında veya iOS simülatöründe (16.2+) oluşturabilmeli ve çalıştırabilmelisiniz.
#### Yaygın iOS build hataları
Xcode 15+ ile build yaparken bu hatayı görebilirsiniz, çünkü çapraz platform sistemlerini etkileyen varsayılan bir yapılandırma değişikliği vardır.
1. `.xcworkspace` klasörünüzü Xcode'da açın ve **your app target > Build Phases**'e gidin.
2. **"Embed Foundation Extensions"** veya **"Embed App Extensions"** adlı bir aşamanız olmalıdır.
3. Bu build aşamasını **"Run Script"**'in *üzerine* sürükleyin ve taşıyın.
4. Uygulamanızı oluşturun ve çalıştırın. Hata çözülmüş olmalıdır.
 RuntimeError - `PBXGroup` attempted to initialize an object with unknown ISA `PBXFileSystemSynchronizedRootGroup` from attributes: `{"isa"=>"...", "exceptions"=>["//", "..."], "explicitFileTypes"=>{}, "explicitFolders"=>[], "path"=>"OneSignalNotificationServiceExtension", "sourceTree"=>""}`
Çözüm:
1. Hatadaki "path" altında listelenen klasörü bulun
2. Xcode proje kenar çubuğunda, klasöre sağ tıklayın
3. **Convert to Group**'u seçin
RuntimeError - `PBXGroup` attempted to initialize an object with unknown ISA `PBXFileSystemSynchronizedRootGroup` from attributes: `{"isa"=>"...", "exceptions"=>["//", "..."], "explicitFileTypes"=>{}, "explicitFolders"=>[], "path"=>"OneSignalNotificationServiceExtension", "sourceTree"=>""}`
Çözüm:
1. Hatadaki "path" altında listelenen klasörü bulun
2. Xcode proje kenar çubuğunda, klasöre sağ tıklayın
3. **Convert to Group**'u seçin
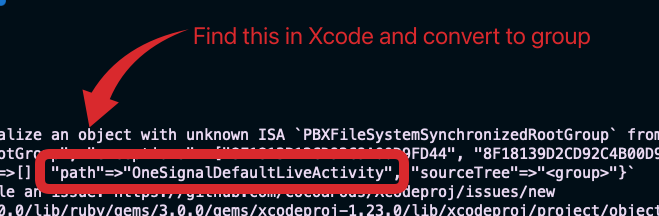
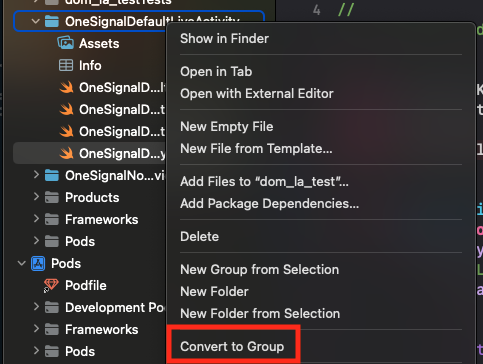 iOS build'inizin çalıştığını onayladıktan sonra, [OneSignal SDK entegrasyonunu test etme](#testing-the-onesignal-sdk-integration) ile devam edin.
***
## Testing the OneSignal SDK integration
This guide helps you verify that your OneSignal SDK integration is working correctly by testing push notifications, subscription registration, and in-app messaging.
If you are testing with an Android emulator, it should start with a cold boot.
1. Go to **Device Manager** in Android Studio.
2. Select your emulator device and click **Edit**.
3. Go to **Additional Settings** or **More**.
4. Set the **Boot option** to **Cold Boot**.
5. Save changes and restart the emulator.
### Check mobile subscriptions
The native push permission prompt should appear automatically if you added the `requestPermission` method during initialization.
iOS build'inizin çalıştığını onayladıktan sonra, [OneSignal SDK entegrasyonunu test etme](#testing-the-onesignal-sdk-integration) ile devam edin.
***
## Testing the OneSignal SDK integration
This guide helps you verify that your OneSignal SDK integration is working correctly by testing push notifications, subscription registration, and in-app messaging.
If you are testing with an Android emulator, it should start with a cold boot.
1. Go to **Device Manager** in Android Studio.
2. Select your emulator device and click **Edit**.
3. Go to **Additional Settings** or **More**.
4. Set the **Boot option** to **Cold Boot**.
5. Save changes and restart the emulator.
### Check mobile subscriptions
The native push permission prompt should appear automatically if you added the `requestPermission` method during initialization.
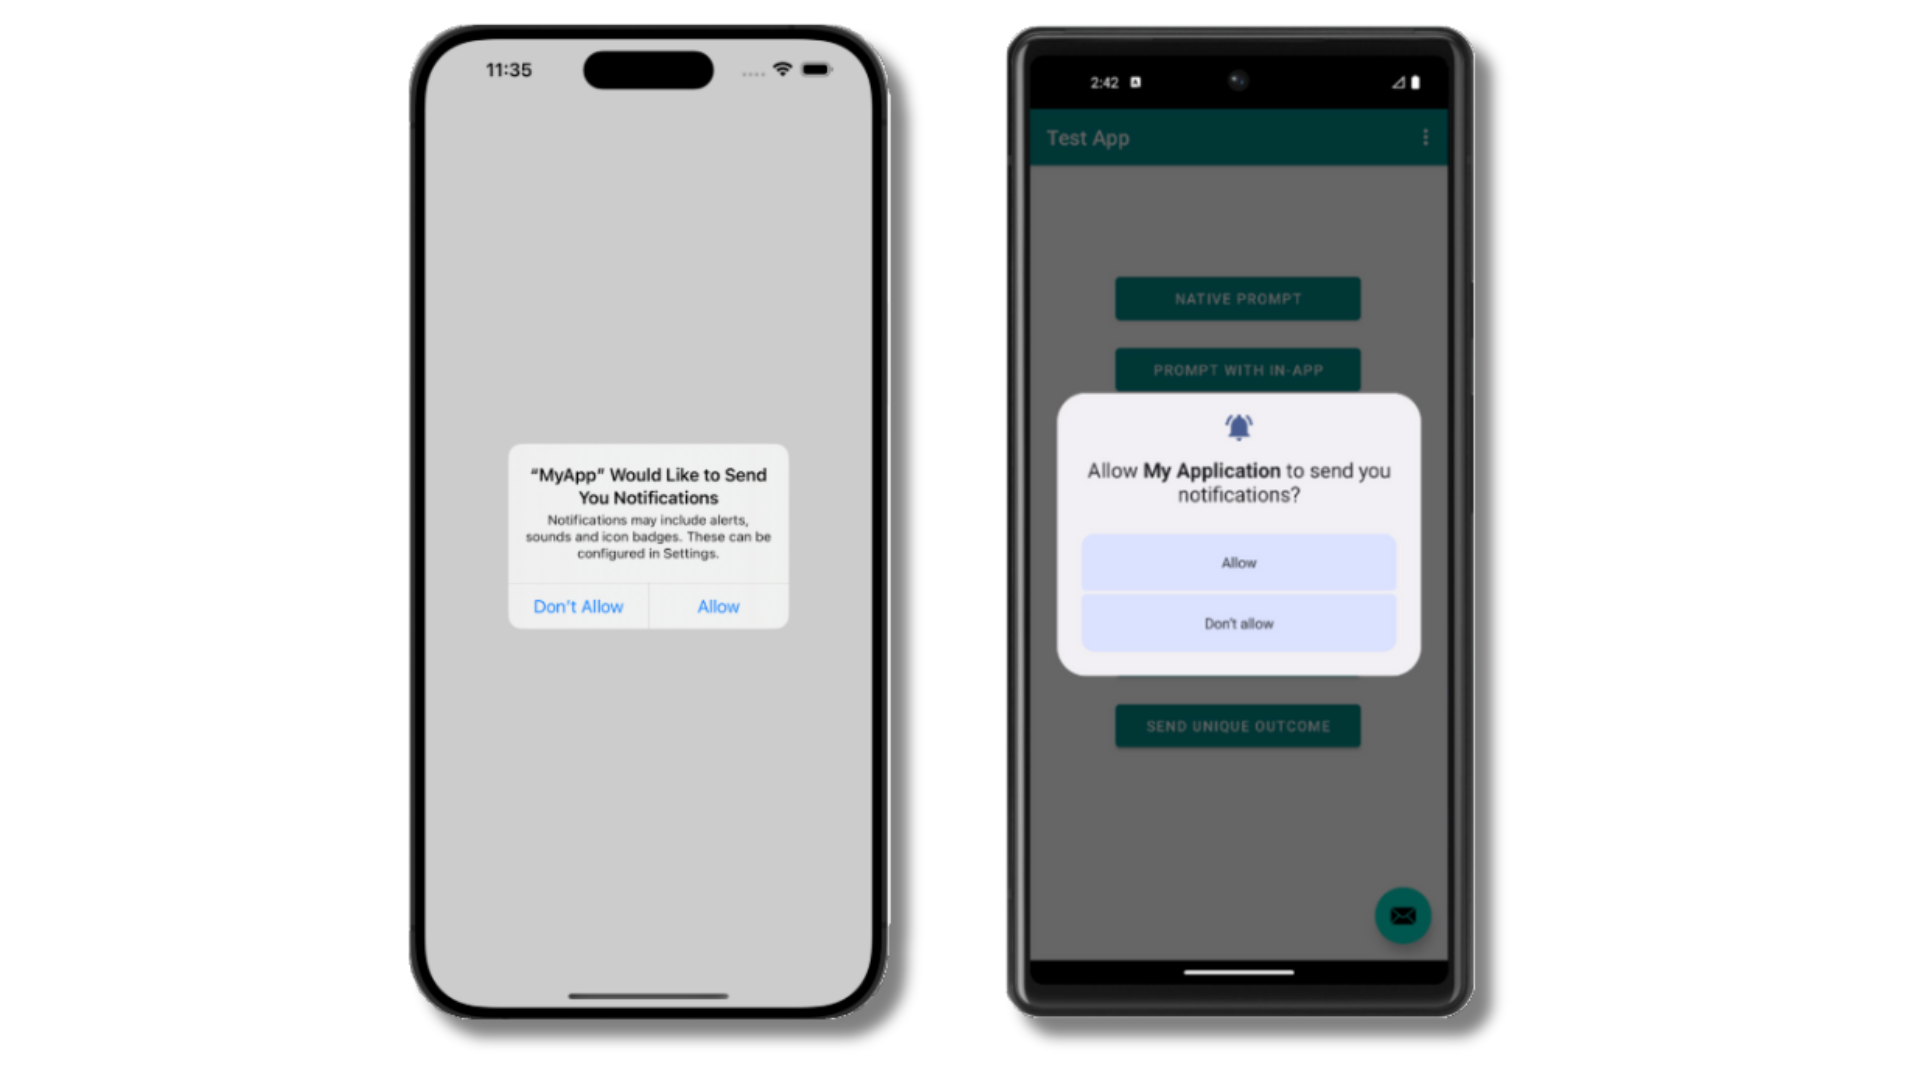 Before accepting the prompt, check the OneSignal dashboard:
* Go to **Audience > Subscriptions**.
* You should see a new entry with the status "Never Subscribed".
Before accepting the prompt, check the OneSignal dashboard:
* Go to **Audience > Subscriptions**.
* You should see a new entry with the status "Never Subscribed".
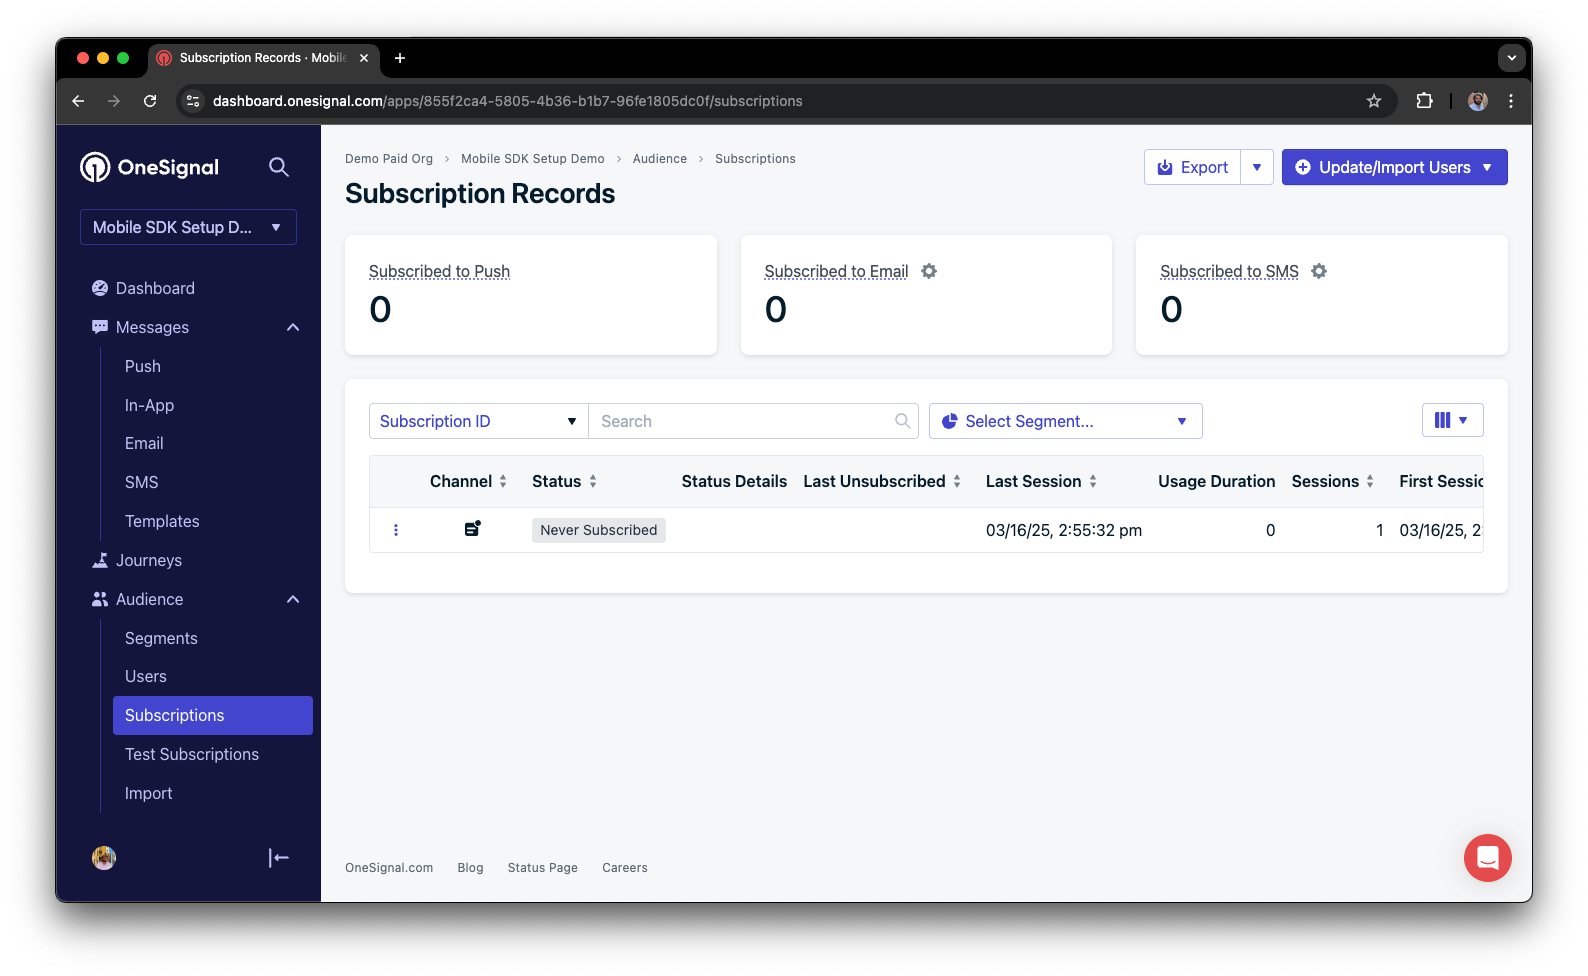 The subscription's status should now show **Subscribed**.
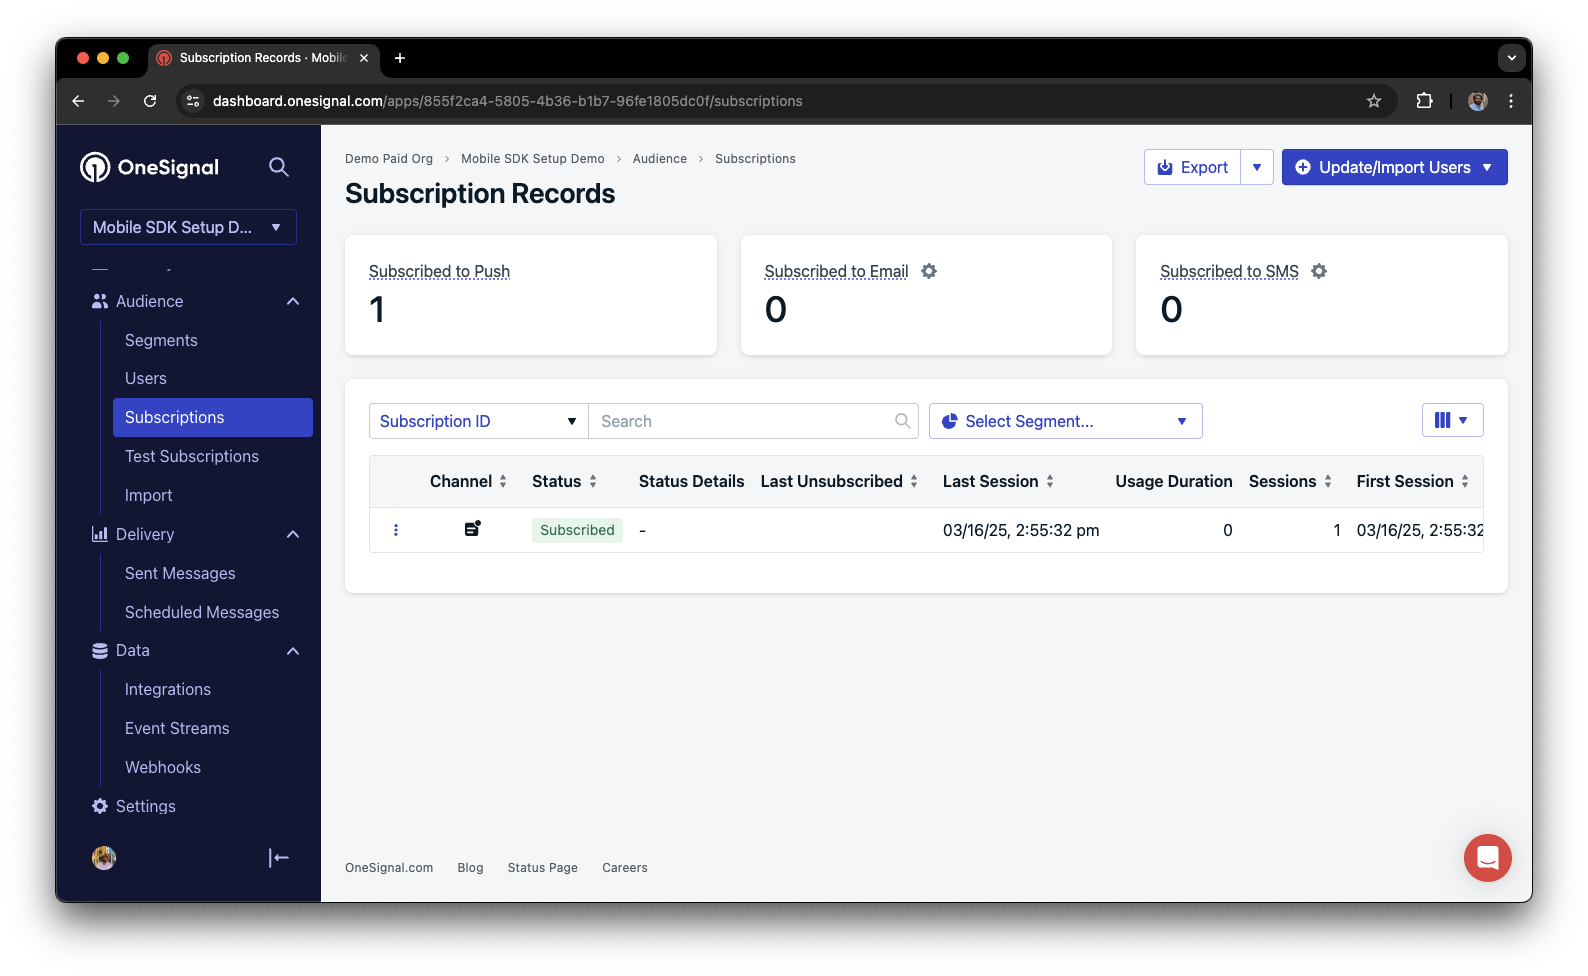 You have successfully created a [mobile subscription](/docs/en/subscriptions).
Mobile subscriptions are created when users first open your app on a device or if they uninstall and reinstall your app on the same device.
### Set up test users
test users are helpful for testing a push notification before sending a message.
In the dashboard, next to the subscription, click the **Options (three dots)** button and select **Add to Test Users**.
You have successfully created a [mobile subscription](/docs/en/subscriptions).
Mobile subscriptions are created when users first open your app on a device or if they uninstall and reinstall your app on the same device.
### Set up test users
test users are helpful for testing a push notification before sending a message.
In the dashboard, next to the subscription, click the **Options (three dots)** button and select **Add to Test Users**.
 Name the subscription so you can easily identify your device later in the **test users tab**.
Go to **Audience > Segments > New Segment**.
Name the segment `Test Users` (the name is important because it will be used later).
Name the subscription so you can easily identify your device later in the **test users tab**.
Go to **Audience > Segments > New Segment**.
Name the segment `Test Users` (the name is important because it will be used later).
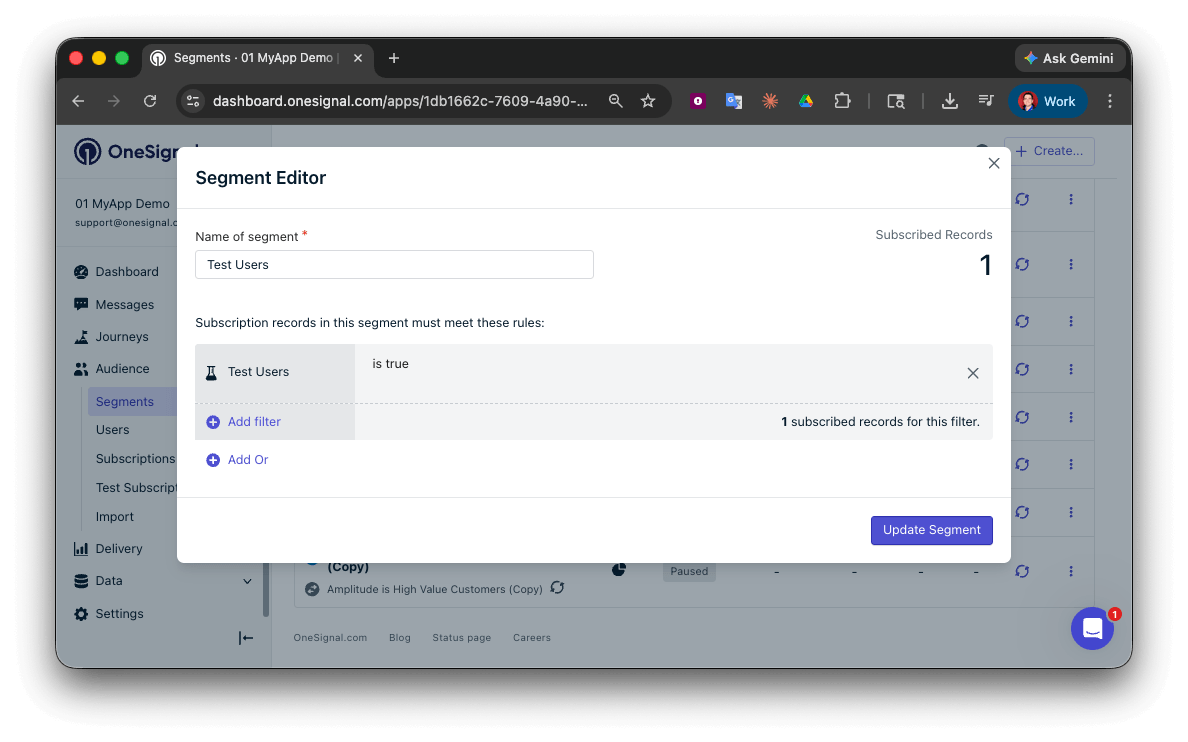 You have successfully created a segment of test users.
We can now test sending messages to this individual device and groups of test users.
### Send test push via API
In your OneSignal dashboard, go to **Settings > [Keys & IDs](/docs/en/keys-and-ids)**.
Replace `YOUR_APP_API_KEY` and `YOUR_APP_ID` in the code below with your actual keys. This code uses the `Test Users` segment we created earlier.
```curl theme={null}
curl -X \
POST --url 'https://api.onesignal.com/notifications' \
--header 'content-type: application/json; charset=utf-8' \
--header 'authorization: Key YOUR_APP_API_KEY' \
--data \
'{
"app_id": "YOUR_APP_ID",
"target_channel": "push",
"name": "Testing basic setup",
"headings": {
"en": "👋"
},
"contents": {
"en": "Hello world!"
},
"included_segments": [
"Test Users"
],
"ios_attachments": {
"onesignal_logo": "https://avatars.githubusercontent.com/u/11823027?s=200&v=4"
},
"big_picture": "https://avatars.githubusercontent.com/u/11823027?s=200&v=4"
}'
```
Run the code in your terminal.
If all setup steps were completed successfully, the test users should receive a notification with an image included:
You have successfully created a segment of test users.
We can now test sending messages to this individual device and groups of test users.
### Send test push via API
In your OneSignal dashboard, go to **Settings > [Keys & IDs](/docs/en/keys-and-ids)**.
Replace `YOUR_APP_API_KEY` and `YOUR_APP_ID` in the code below with your actual keys. This code uses the `Test Users` segment we created earlier.
```curl theme={null}
curl -X \
POST --url 'https://api.onesignal.com/notifications' \
--header 'content-type: application/json; charset=utf-8' \
--header 'authorization: Key YOUR_APP_API_KEY' \
--data \
'{
"app_id": "YOUR_APP_ID",
"target_channel": "push",
"name": "Testing basic setup",
"headings": {
"en": "👋"
},
"contents": {
"en": "Hello world!"
},
"included_segments": [
"Test Users"
],
"ios_attachments": {
"onesignal_logo": "https://avatars.githubusercontent.com/u/11823027?s=200&v=4"
},
"big_picture": "https://avatars.githubusercontent.com/u/11823027?s=200&v=4"
}'
```
Run the code in your terminal.
If all setup steps were completed successfully, the test users should receive a notification with an image included:
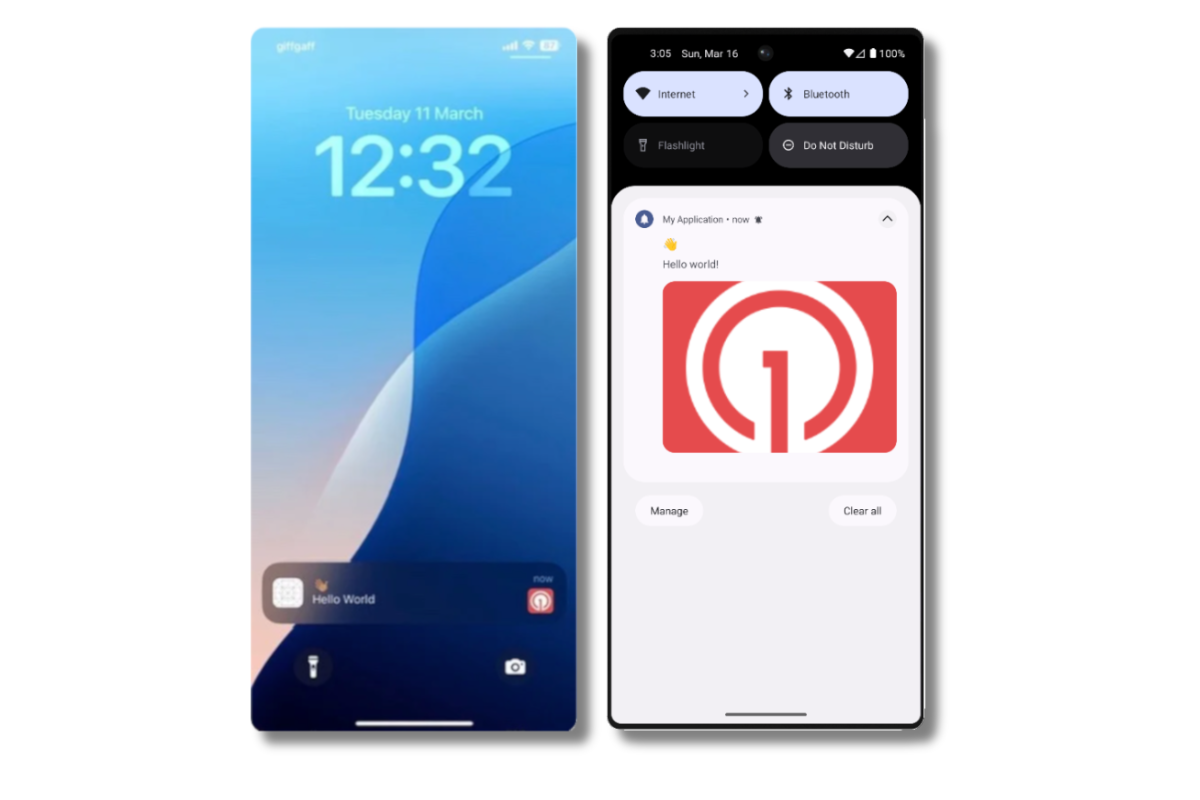 Images will appear small in the collapsed notification view. Expand the notification to see the full image.
In your dashboard, go to **Delivery > Sent Messages**, then click the message to view stats.
You should see the **confirmed** stat, meaning the device received the push.
You have successfully sent a notification via our API to a segment.
* No image received? Your [Notification Service Extension](#ios-setup) might be missing.
* No confirmed receipt? Review the troubleshooting guide [here](/docs/en/confirmed-delivery#troubleshooting-confirmed-delivery).
* Having issues? Copy-paste the api request and a log from start to finish of app launch into a `.txt` file. Then share both with `support@onesignal.com`.
### Send an in-app message
[In-app messages](/docs/en/in-app-messages-setup) let you communicate with users while they are using your app.
This is because users must meet the in-app audience criteria *before* a new session starts. In OneSignal, a new session starts when the user opens your app after it has been in the background or closed for at least 30 seconds. For more details, see our guide on [how in-app messages are displayed](/docs/en/in-app-messages-setup#how-are-iams-displayed%3F).
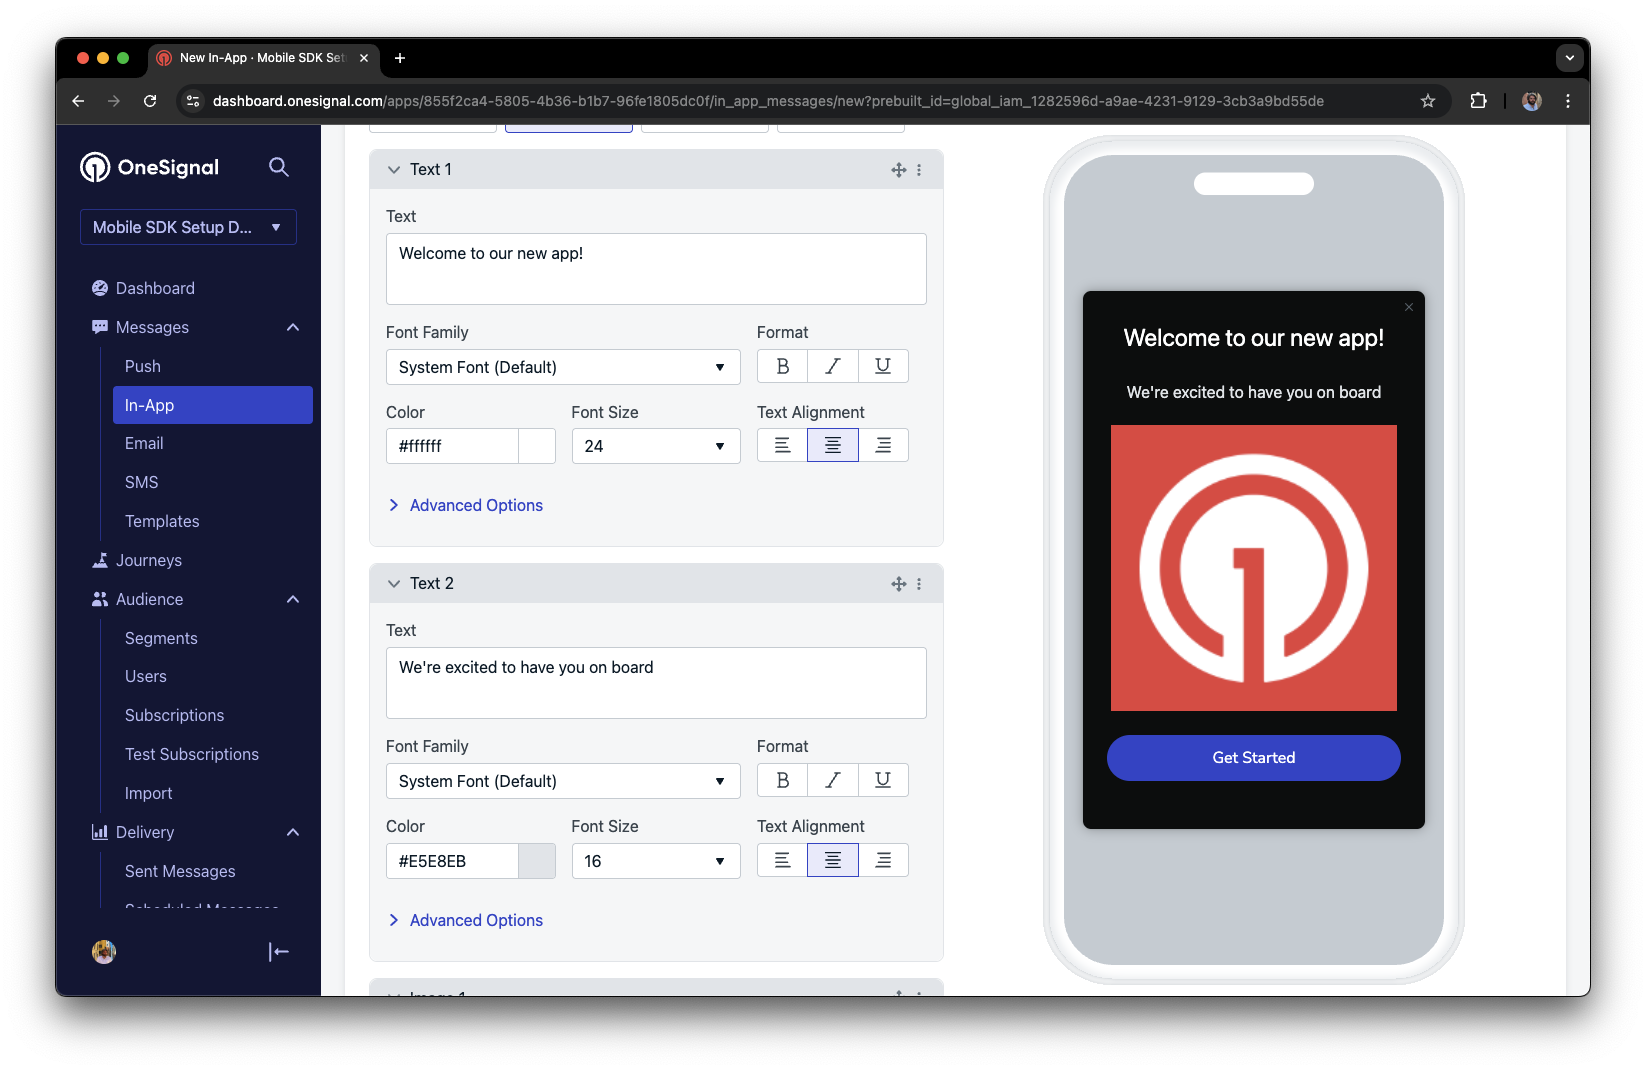
* In your OneSignal dashboard, navigate to **Messages > In-App > New In-App**.
* Find and select the **Welcome** message.
* Set your Audience as the **Test Users** segment we used previously.
Images will appear small in the collapsed notification view. Expand the notification to see the full image.
In your dashboard, go to **Delivery > Sent Messages**, then click the message to view stats.
You should see the **confirmed** stat, meaning the device received the push.
You have successfully sent a notification via our API to a segment.
* No image received? Your [Notification Service Extension](#ios-setup) might be missing.
* No confirmed receipt? Review the troubleshooting guide [here](/docs/en/confirmed-delivery#troubleshooting-confirmed-delivery).
* Having issues? Copy-paste the api request and a log from start to finish of app launch into a `.txt` file. Then share both with `support@onesignal.com`.
### Send an in-app message
[In-app messages](/docs/en/in-app-messages-setup) let you communicate with users while they are using your app.
This is because users must meet the in-app audience criteria *before* a new session starts. In OneSignal, a new session starts when the user opens your app after it has been in the background or closed for at least 30 seconds. For more details, see our guide on [how in-app messages are displayed](/docs/en/in-app-messages-setup#how-are-iams-displayed%3F).
* In your OneSignal dashboard, navigate to **Messages > In-App > New In-App**.
* Find and select the **Welcome** message.
* Set your Audience as the **Test Users** segment we used previously.
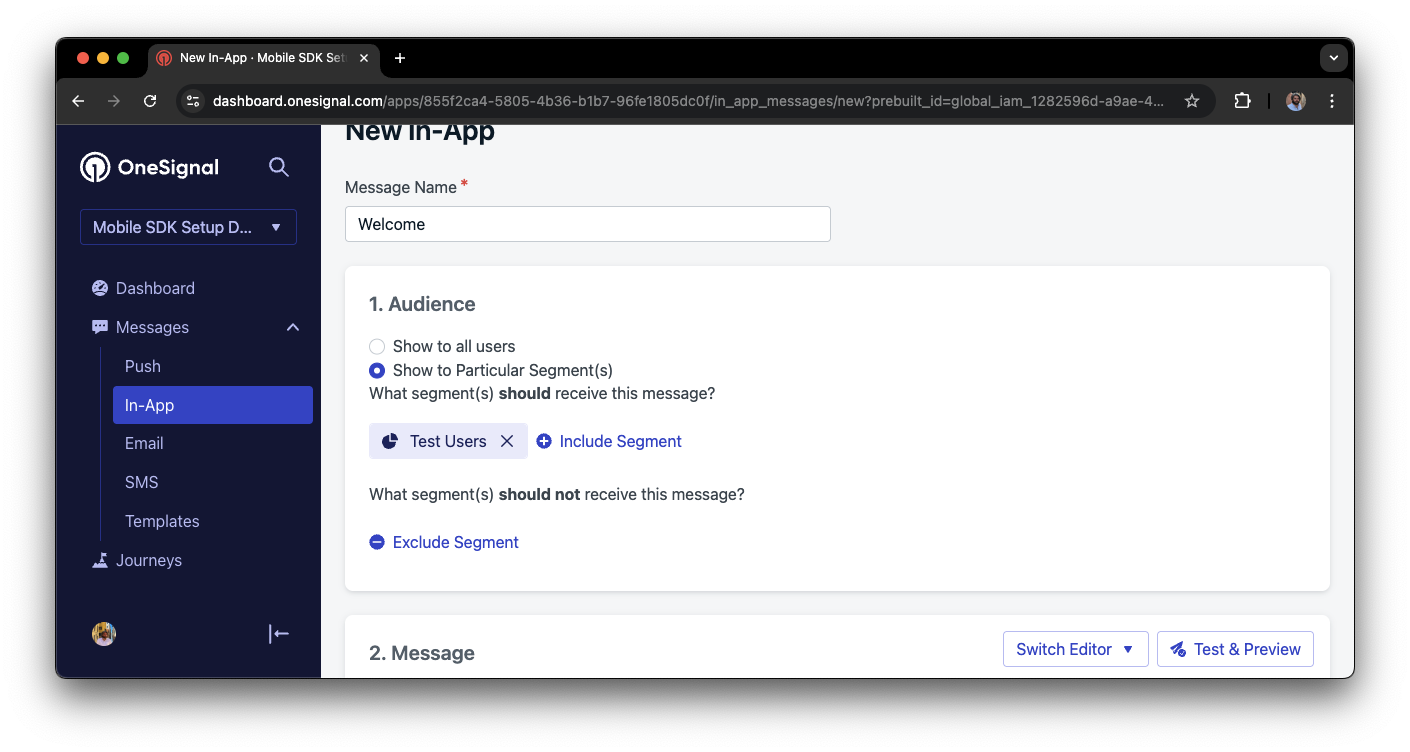
 Under **Schedule > How often do you want to show this message?** select **Every time trigger conditions are satisfied**.
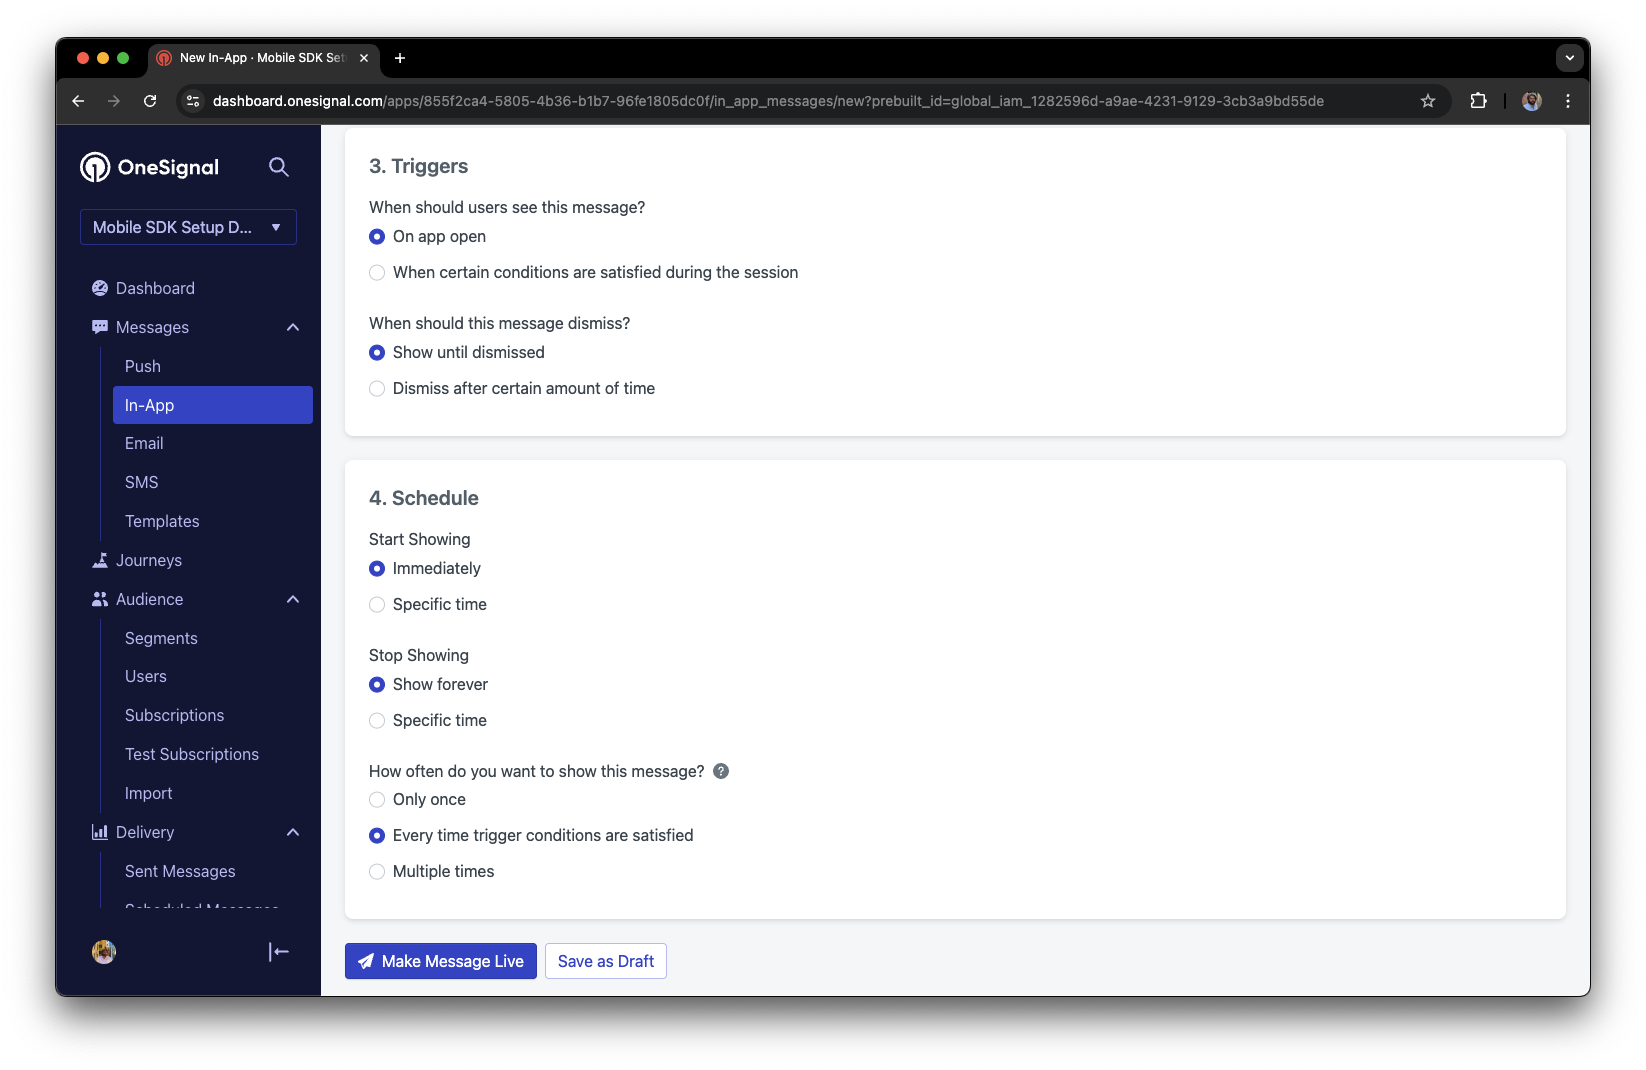 Click **Make Message Live** so it is available to your Test Users each time they open the app.
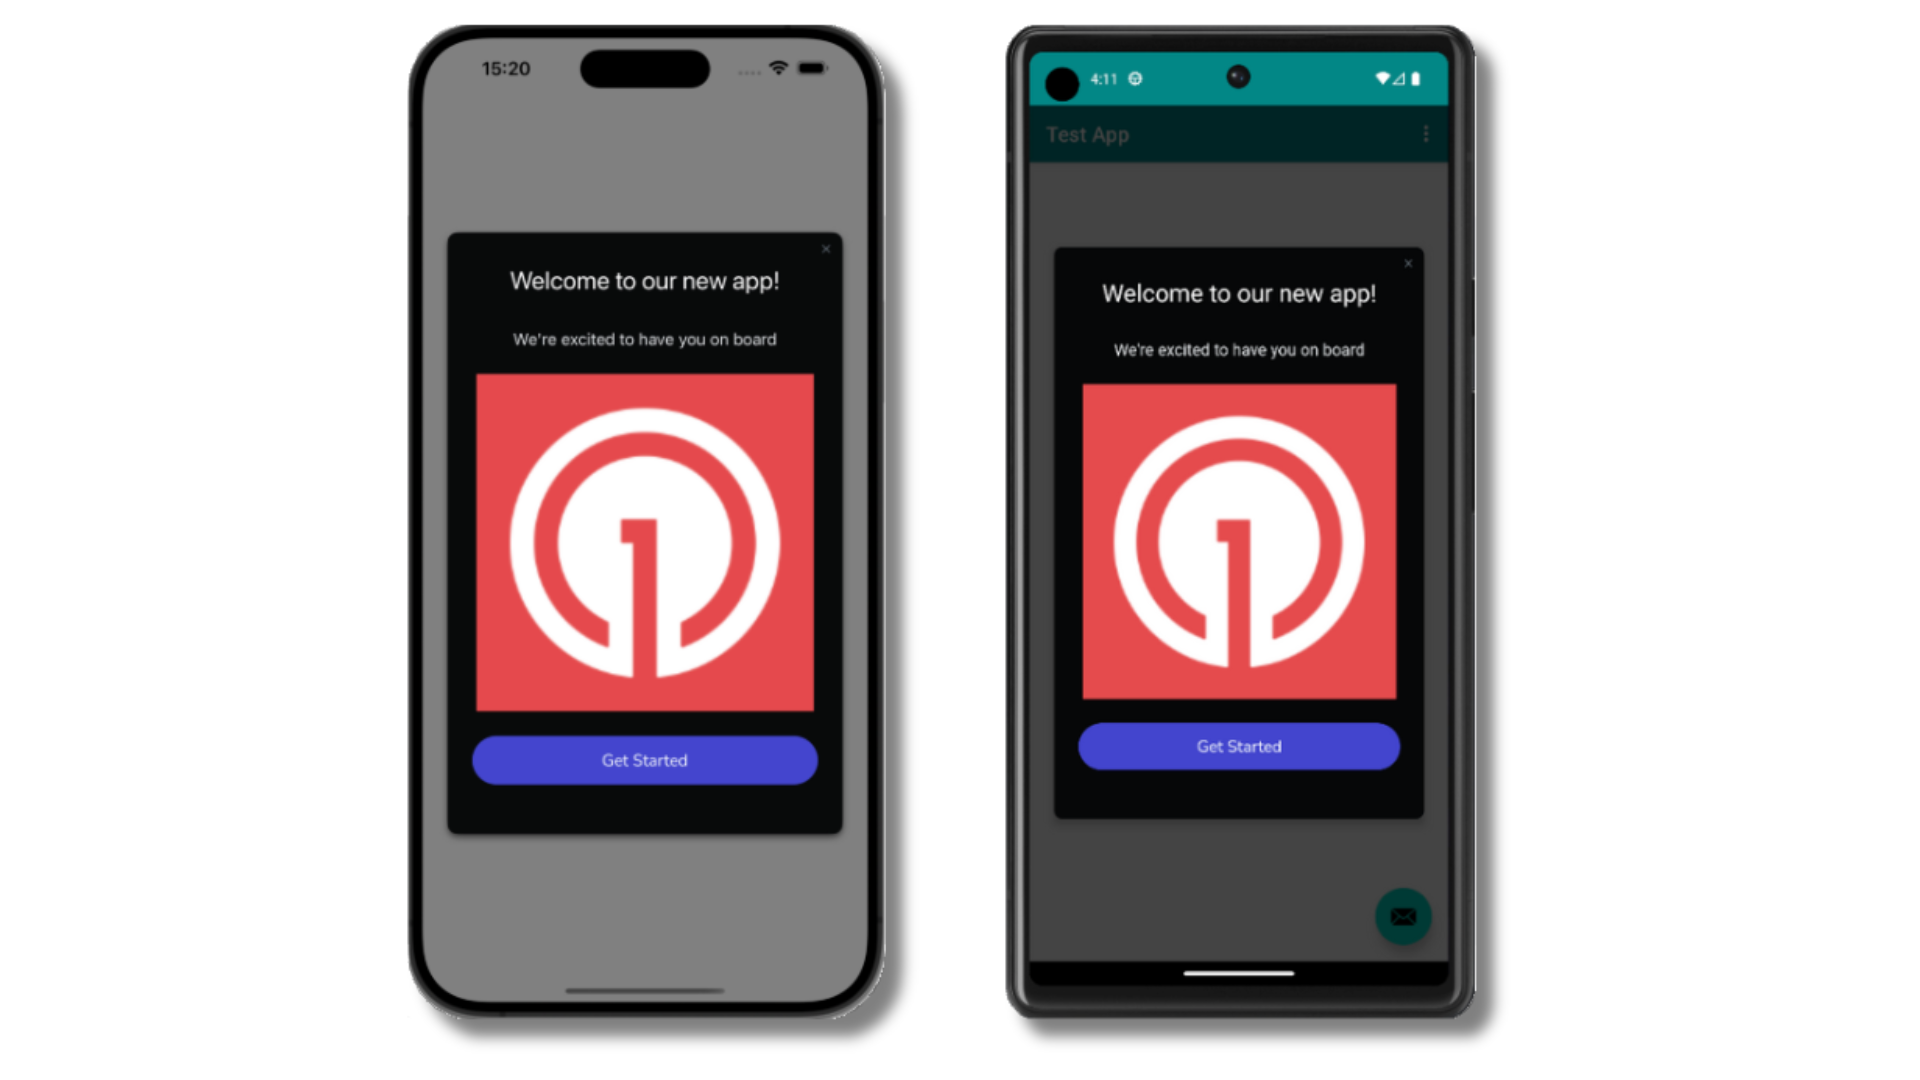
After the in-app message is live, open your app. You should see it display:
Click **Make Message Live** so it is available to your Test Users each time they open the app.
After the in-app message is live, open your app. You should see it display:
 Not seeing the message?
* Start a new session
* You must close or background the app for at least 30 seconds before reopening. This ensures a new session is started.
* For more, see [how in-app messages are displayed](/docs/en/in-app-messages-setup#how-are-iams-displayed%3F).
* Still in the `Test Users` segment?
* If you reinstalled or switched devices, re-add the device to [Test Users](#set-up-test-users) and confirm it's part of the Test Users segment.
* Having issues?
* Follow [Getting a Debug Log](/docs/en/capturing-a-debug-log) while reproducing the steps above. This will generate additional logging that you can share with `support@onesignal.com` and we will help investigate what's going on.
You have successfully setup the OneSignal SDK and learned important concepts like:
* Gathering [Subscriptions](/docs/en/subscriptions), setting [Test Users](/docs/en/find-set-test-subscriptions), and creating [Segments](/docs/en/segmentation).
* Sending [Push](/docs/en/push) with images and [Confirmed receipt](/docs/en/confirmed-delivery) using Segments and our [Create message](/reference/create-message) API.
* Sending [In-app messages](/docs/en/in-app-messages-setup).
Continue with this guide to identify users in your app and setup additional features.
***
## User identification
Previously, we demonstrated how to create mobile [Subscriptions](/docs/en/subscriptions). Now we'll expand to identifying [Users](/docs/en/users) across all their subscriptions (including push, email, and SMS) using the OneSignal SDK. We'll cover External IDs, tags, multi-channel subscriptions, privacy, and event tracking to help you unify and engage users across platforms.
### Assign External ID
Use an External ID to identify users consistently across devices, email addresses, and phone numbers using your backend's user identifier. This ensures your messaging stays unified across channels and 3rd party systems (especially important for [Integrations](/docs/en/integrations)).
Set the External ID with our SDK's [`login` method](/docs/en/mobile-sdk-reference#login-external-id) each time they are identified by your app.
OneSignal generates unique read-only IDs for subscriptions (Subscription ID) and users (OneSignal ID).
As users download your app on different devices, subscribe to your website, and/or provide you email addresses and phone numbers outside of your app, new subscriptions will be created.
Setting the External ID via our SDK is highly recommended to identify users across all their subscriptions, regardless of how they are created.
### Add Tags
[Tags](/docs/en/add-user-data-tags) are key-value pairs of string data you can use to store user properties (like `username`, `role`, or preferences) and events (like `purchase_date`, `game_level`, or user interactions). Tags power advanced [Message Personalization](/docs/en/message-personalization) and [Segmentation](/docs/en/segmentation) allowing for more advanced use cases.
Set tags with our SDK [`addTag` and `addTags` methods](/docs/en/mobile-sdk-reference#data-tags) as events occur in your app.
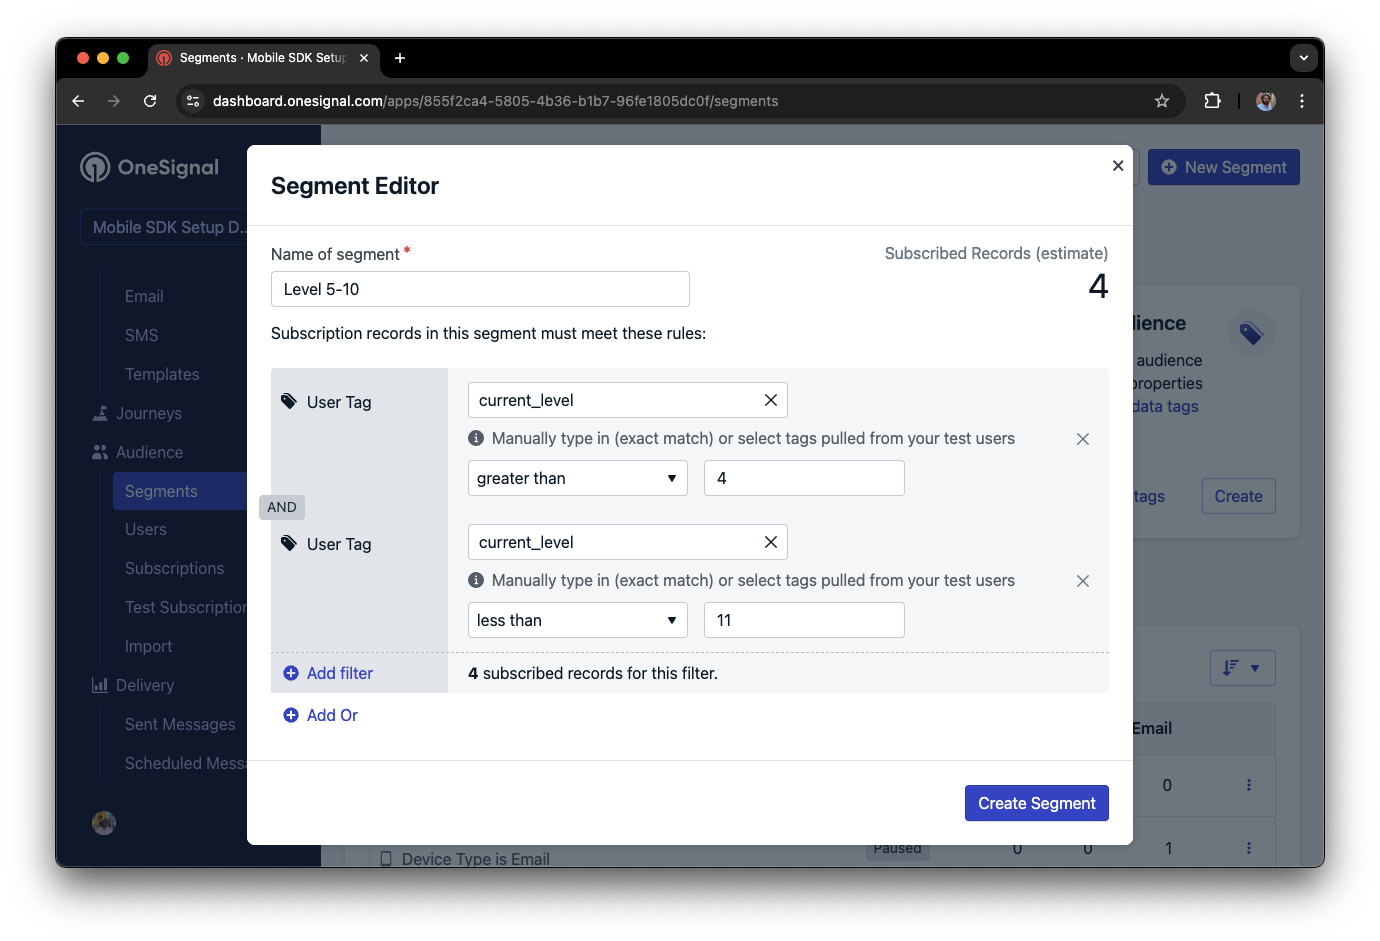
In this example, the user reached level 6 identifiable by the tag called `current_level` set to a value of `6`.
Not seeing the message?
* Start a new session
* You must close or background the app for at least 30 seconds before reopening. This ensures a new session is started.
* For more, see [how in-app messages are displayed](/docs/en/in-app-messages-setup#how-are-iams-displayed%3F).
* Still in the `Test Users` segment?
* If you reinstalled or switched devices, re-add the device to [Test Users](#set-up-test-users) and confirm it's part of the Test Users segment.
* Having issues?
* Follow [Getting a Debug Log](/docs/en/capturing-a-debug-log) while reproducing the steps above. This will generate additional logging that you can share with `support@onesignal.com` and we will help investigate what's going on.
You have successfully setup the OneSignal SDK and learned important concepts like:
* Gathering [Subscriptions](/docs/en/subscriptions), setting [Test Users](/docs/en/find-set-test-subscriptions), and creating [Segments](/docs/en/segmentation).
* Sending [Push](/docs/en/push) with images and [Confirmed receipt](/docs/en/confirmed-delivery) using Segments and our [Create message](/reference/create-message) API.
* Sending [In-app messages](/docs/en/in-app-messages-setup).
Continue with this guide to identify users in your app and setup additional features.
***
## User identification
Previously, we demonstrated how to create mobile [Subscriptions](/docs/en/subscriptions). Now we'll expand to identifying [Users](/docs/en/users) across all their subscriptions (including push, email, and SMS) using the OneSignal SDK. We'll cover External IDs, tags, multi-channel subscriptions, privacy, and event tracking to help you unify and engage users across platforms.
### Assign External ID
Use an External ID to identify users consistently across devices, email addresses, and phone numbers using your backend's user identifier. This ensures your messaging stays unified across channels and 3rd party systems (especially important for [Integrations](/docs/en/integrations)).
Set the External ID with our SDK's [`login` method](/docs/en/mobile-sdk-reference#login-external-id) each time they are identified by your app.
OneSignal generates unique read-only IDs for subscriptions (Subscription ID) and users (OneSignal ID).
As users download your app on different devices, subscribe to your website, and/or provide you email addresses and phone numbers outside of your app, new subscriptions will be created.
Setting the External ID via our SDK is highly recommended to identify users across all their subscriptions, regardless of how they are created.
### Add Tags
[Tags](/docs/en/add-user-data-tags) are key-value pairs of string data you can use to store user properties (like `username`, `role`, or preferences) and events (like `purchase_date`, `game_level`, or user interactions). Tags power advanced [Message Personalization](/docs/en/message-personalization) and [Segmentation](/docs/en/segmentation) allowing for more advanced use cases.
Set tags with our SDK [`addTag` and `addTags` methods](/docs/en/mobile-sdk-reference#data-tags) as events occur in your app.
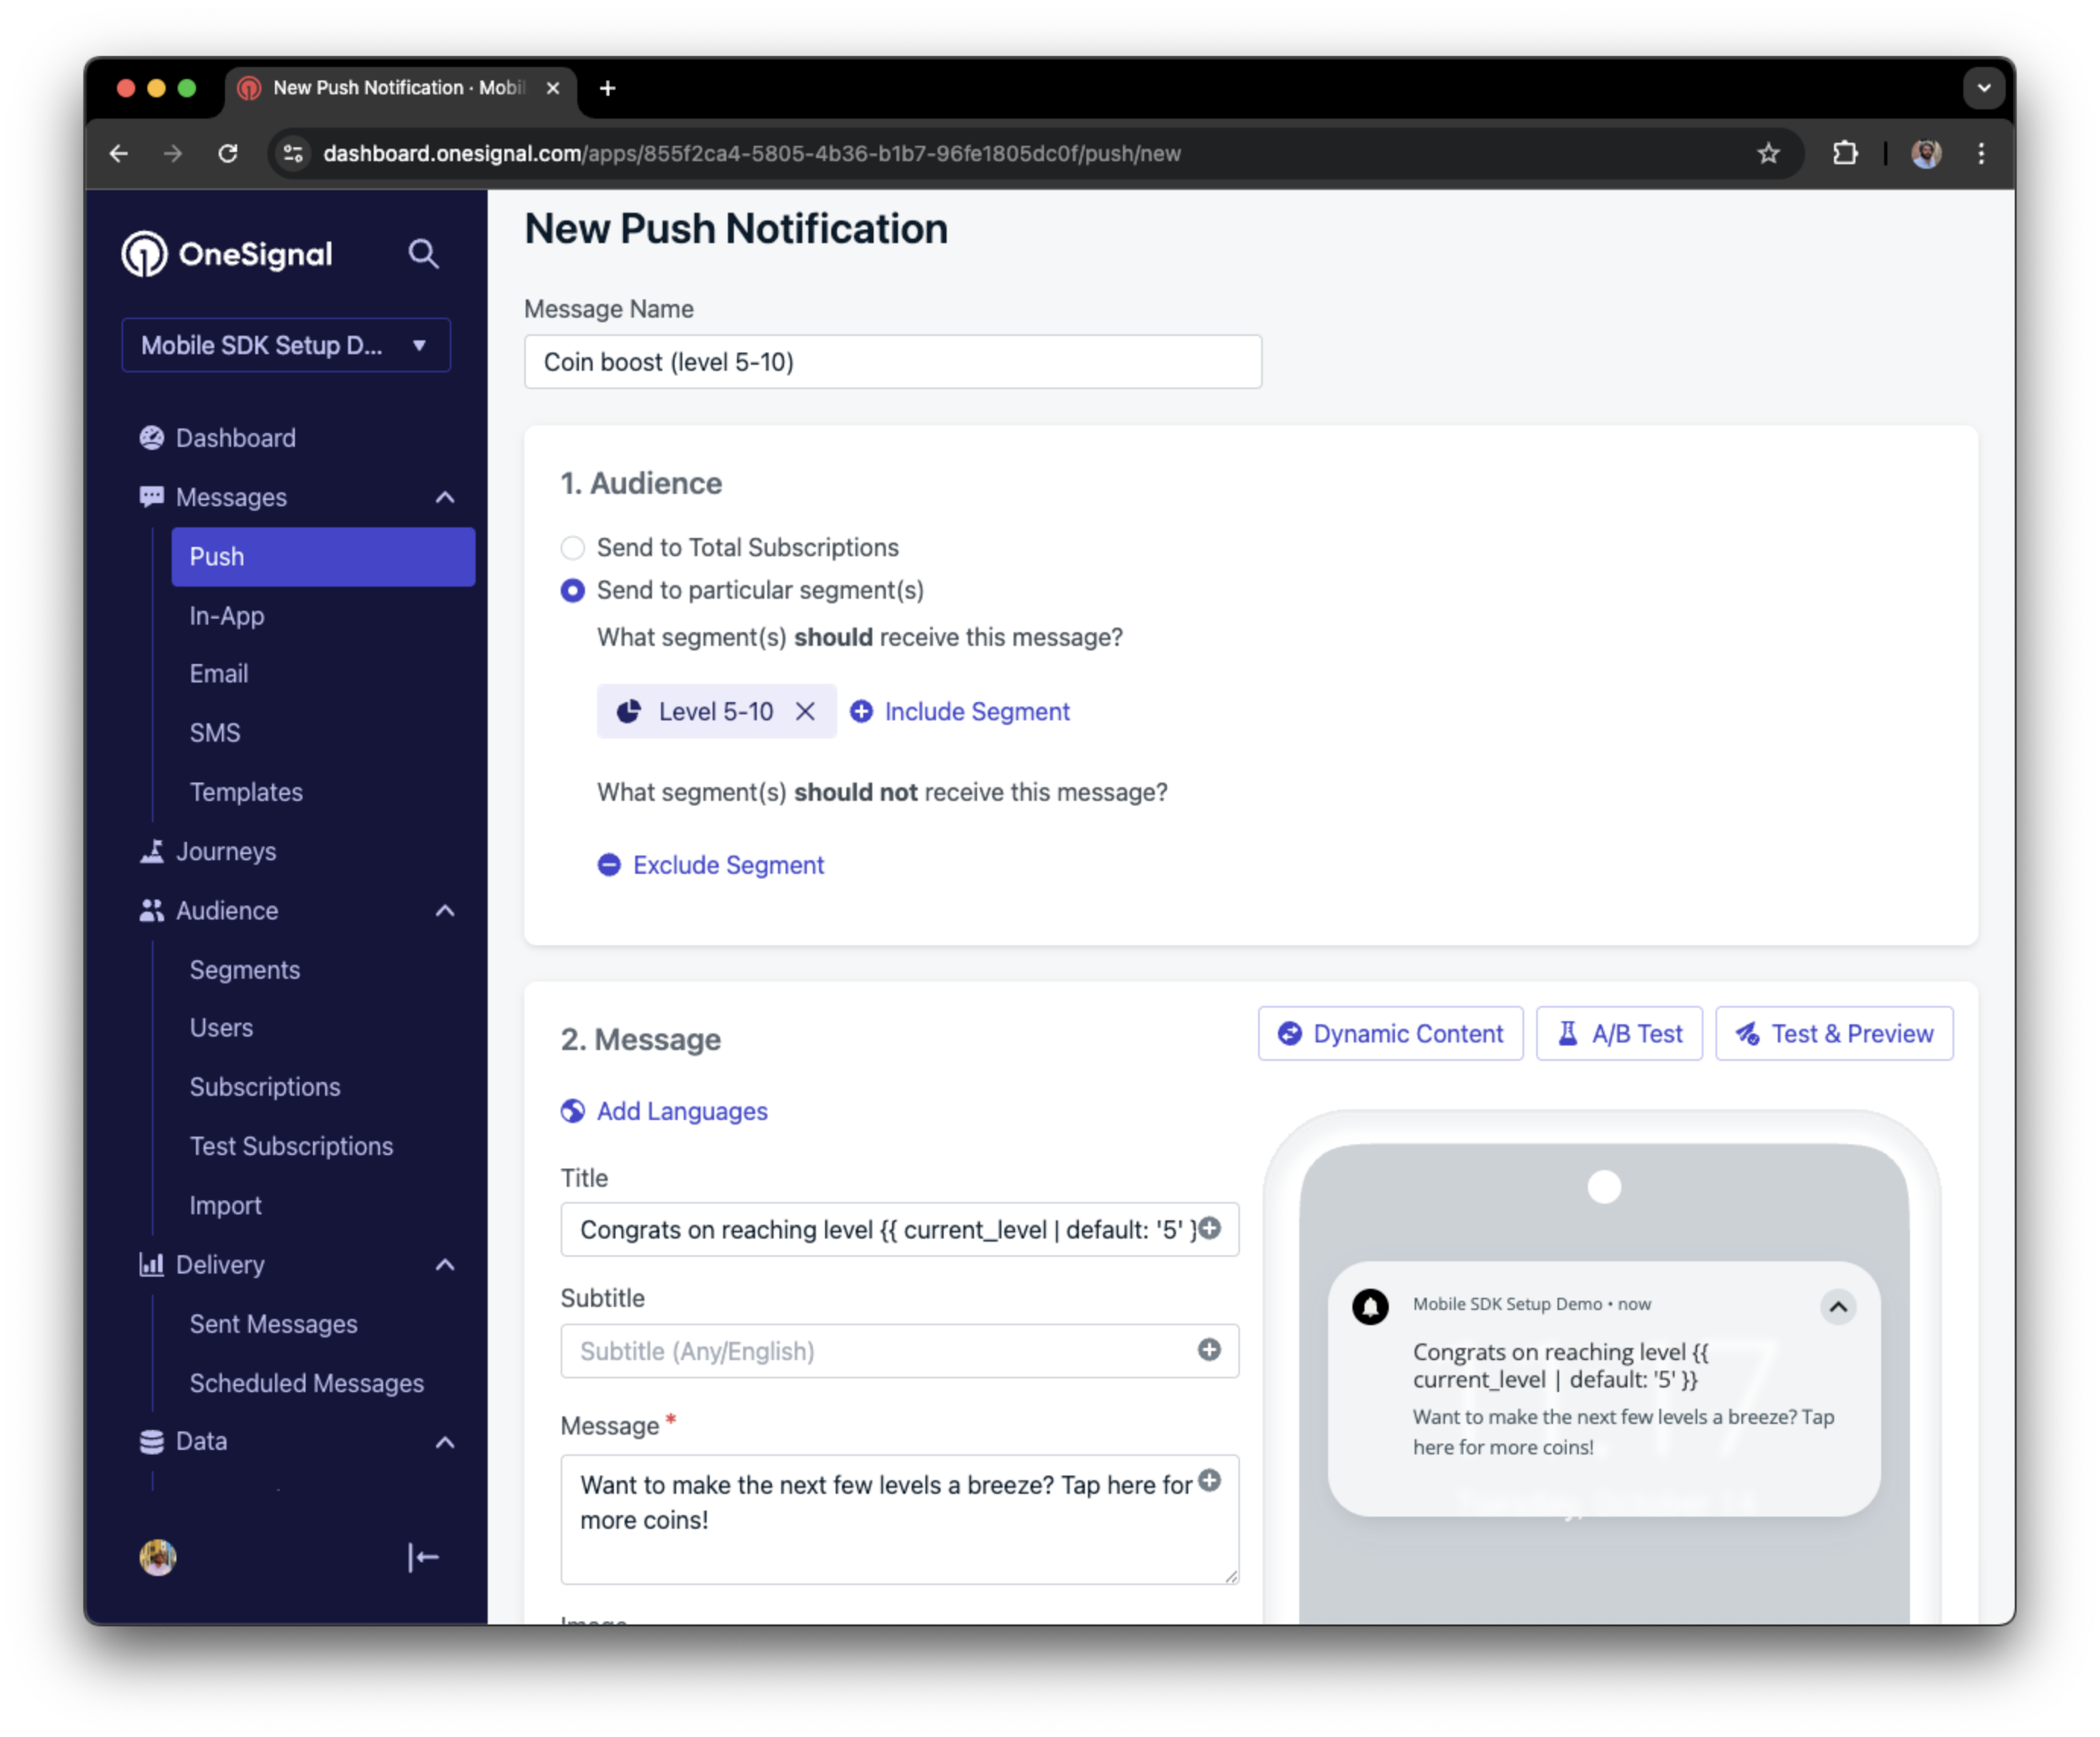
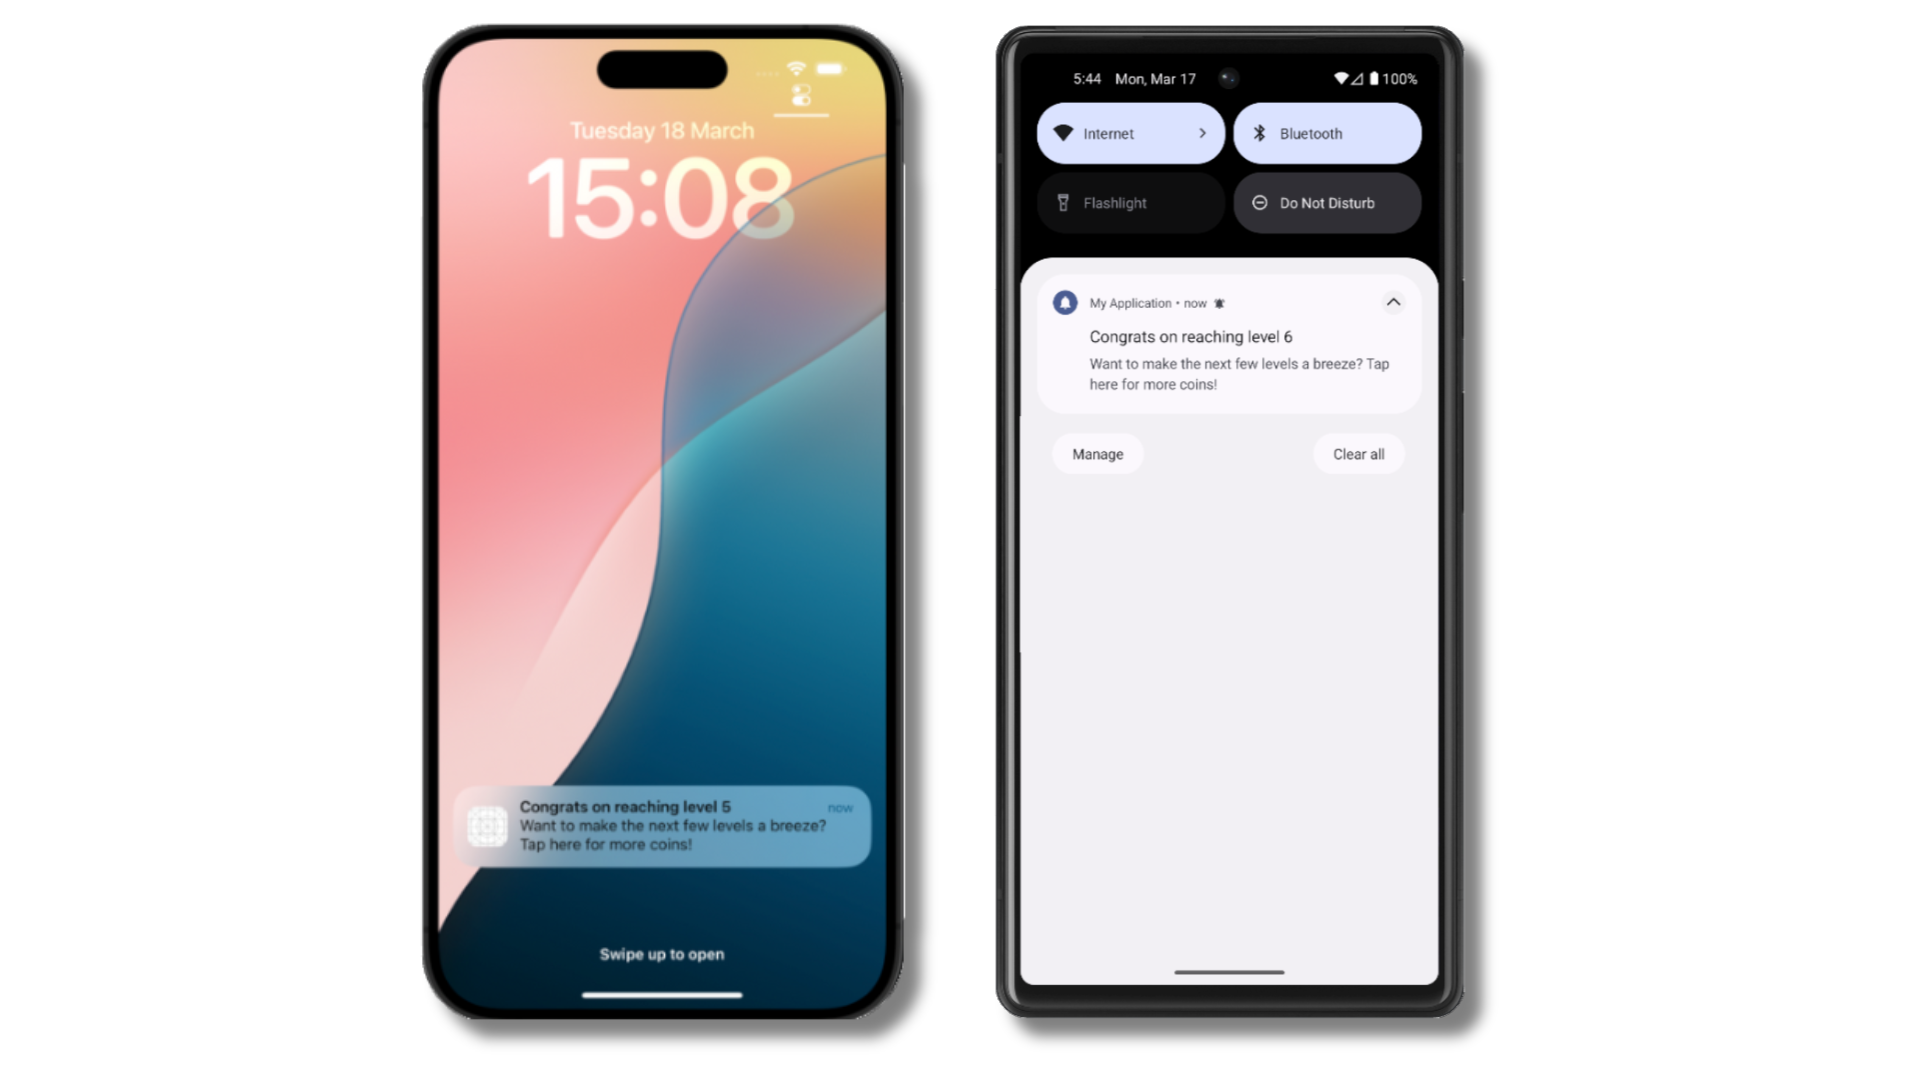
In this example, the user reached level 6 identifiable by the tag called `current_level` set to a value of `6`.
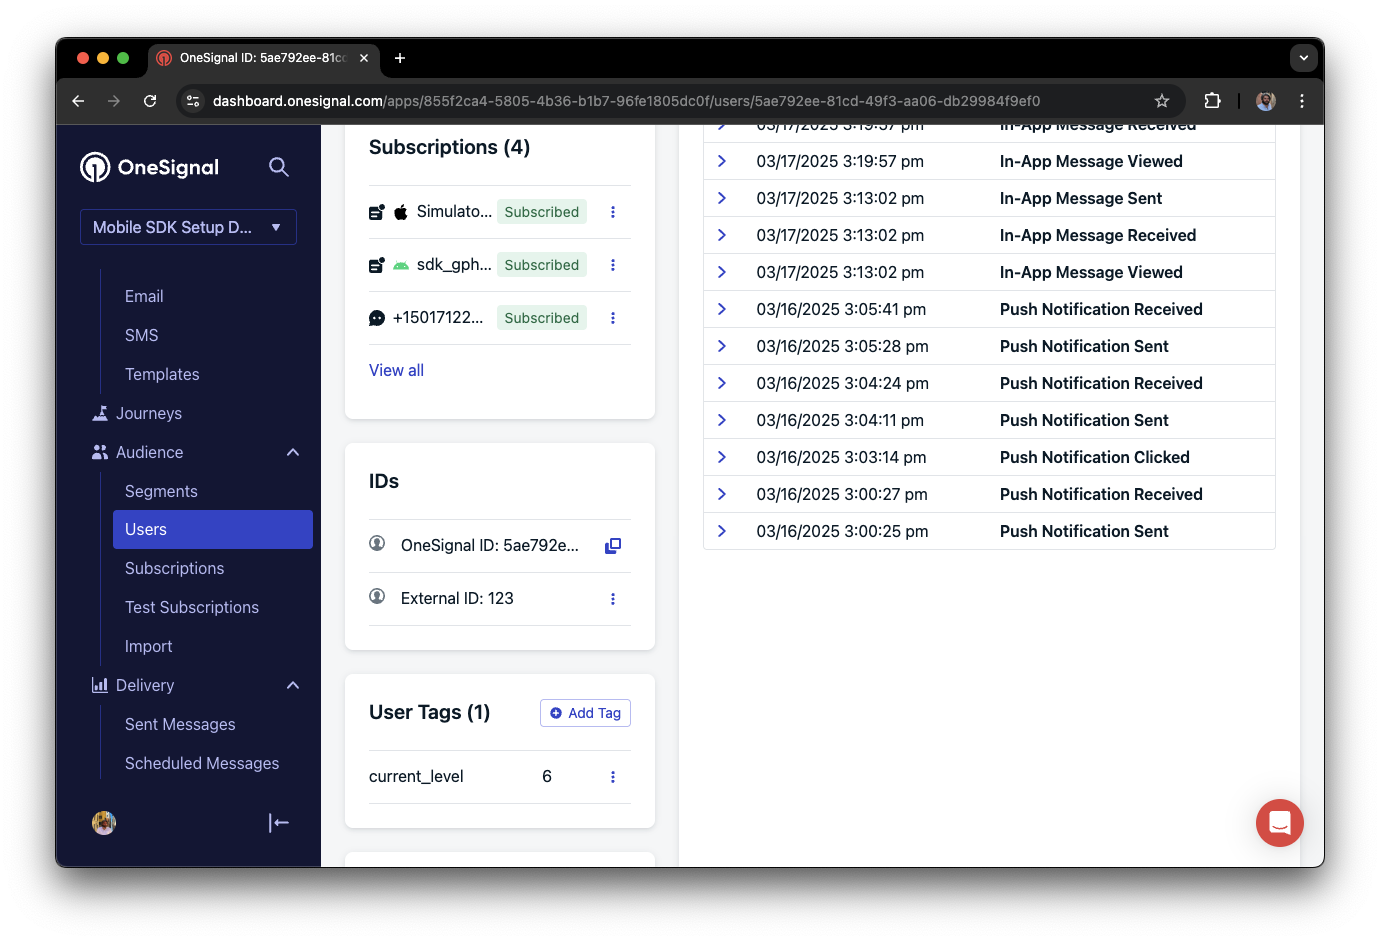 We can create a segment of users that have a level of between 5 and 10, and use that to send targeted and personalized messages:
 ### Add email and/or SMS subscriptions
Earlier we saw how our SDK creates mobile subscriptions to send push and in-app messages. You can also reach users through emails and SMS channels by creating the corresponding subscriptions.
* Use the [`addEmail` method](/docs/en/mobile-sdk-reference#addemail-%2C-removeemail) to create email subscriptions.
* Use the [`addSms` method](/docs/en/mobile-sdk-reference#addsms-%2C-removesms) to create SMS subscriptions.
If the email address and/or phone number already exist in the OneSignal app, the SDK will add it to the existing user, it will not create duplicates.
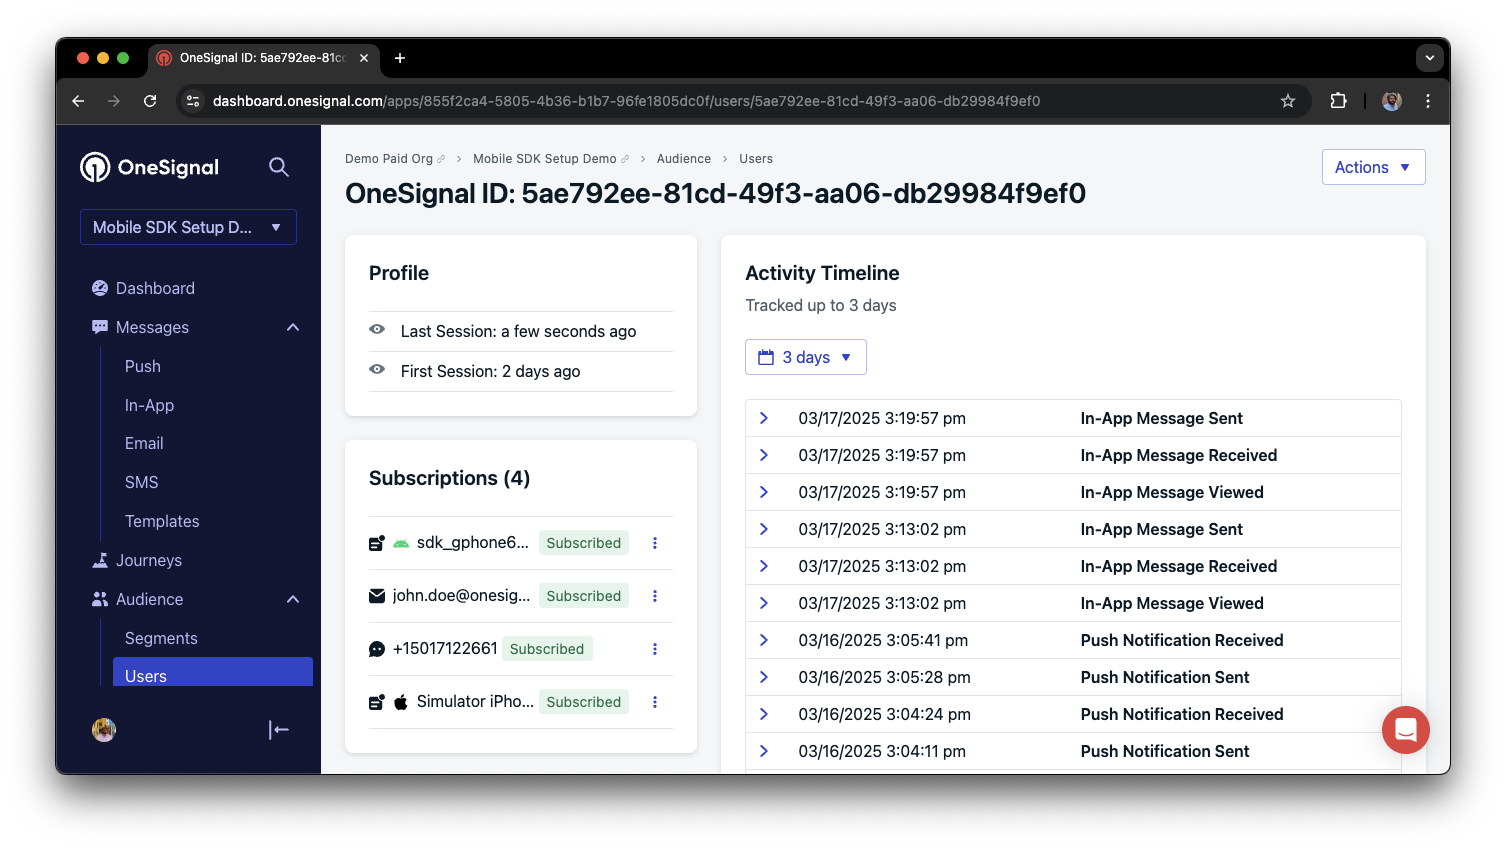
You can view unified users via **Audience > Users** in the dashboard or with the [View user API](/reference/view-user).
### Add email and/or SMS subscriptions
Earlier we saw how our SDK creates mobile subscriptions to send push and in-app messages. You can also reach users through emails and SMS channels by creating the corresponding subscriptions.
* Use the [`addEmail` method](/docs/en/mobile-sdk-reference#addemail-%2C-removeemail) to create email subscriptions.
* Use the [`addSms` method](/docs/en/mobile-sdk-reference#addsms-%2C-removesms) to create SMS subscriptions.
If the email address and/or phone number already exist in the OneSignal app, the SDK will add it to the existing user, it will not create duplicates.
You can view unified users via **Audience > Users** in the dashboard or with the [View user API](/reference/view-user).
 Best practices for multi-channel communication
* Obtain explicit consent before adding email or SMS subscriptions.
* Explain the benefits of each communication channel to users.
* Provide channel preferences so users can select which channels they prefer.
***
### Privacy & user consent
To control when OneSignal collects user data, use the SDK's consent gating methods:
* [`setConsentRequired(true)`](/docs/en/mobile-sdk-reference#setconsentrequired): Prevents data collection until consent is given.
* [`setConsentGiven(true)`](/docs/en/mobile-sdk-reference#setconsentgiven): Enables data collection once consent is granted.
See our Privacy & security docs for more on:
* [Data collected by the SDK](/docs/en/data-collected-by-the-onesignal-sdk)
* [Handling personal data](/docs/en/handling-personal-data)
***
## Prompt for push permissions
Instead of calling `requestPermission()` immediately on app open, take a more strategic approach. Use an in-app message to explain the value of push notifications before requesting permission.
For best practices and implementation details, see our [Prompt for push permissions](/docs/en/prompt-for-push-permissions) guide.
***
## Listen to push, user, and in-app events
Use SDK listeners to react to user actions and state changes.
The SDK provides several event listeners for you to hook into. See our [SDK reference guide](/docs/en/mobile-sdk-reference) for more details.
### Push notification events
* [`addClickListener()`](/docs/en/mobile-sdk-reference#addclicklistener-push): Detect when a notification is tapped. Helpful for [Deep Linking](/docs/en/deep-linking).
* [`addForegroundLifecycleListener()`](/docs/en/mobile-sdk-reference#addforegroundlifecyclelistener-push): Control how notifications behave in foreground.
For full customization, see [Mobile Service Extensions](/docs/en/service-extensions).
### User state changes
* [`addObserver()` for user state](/docs/en/mobile-sdk-reference#addobserver-user-state): Detect when the External ID is set.
* [`addPermissionObserver()`](/docs/en/mobile-sdk-reference#addpermissionobserver-push): Track the user's specific interaction with the native push permission prompt.
* [`addObserver()` for push subscription](/docs/en/mobile-sdk-reference#addobserver-push-subscription-changes): Track when the push subscription status changes.
### In-app message events
* [`addClickListener()`](/docs/en/mobile-sdk-reference#addclicklistener-in-app): Handle in-app click actions. Ideal for deep linking or tracking events.
* [`addLifecycleListener()`](/docs/en/mobile-sdk-reference#addclicklistener-in-app): Track full lifecycle of in-app messages (shown, clicked, dismissed, etc.).
***
## Advanced setup & capabilities
Explore more capabilities to enhance your integration:
* [🔁 Migrating to OneSignal from another service](/docs/en/migrating-to-onesignal)
* [🌍 Location tracking](/docs/en/mobile-sdk-reference#location)
* [🔗 Deep Linking](/docs/en/deep-linking)
* [🔌 Integrations](/docs/en/integrations)
* [🧩 Mobile Service Extensions](/docs/en/service-extensions)
* [🛎️ Action buttons](/docs/en/action-buttons)
* [🌐 Multi-language messaging](/docs/en/multi-language-messaging)
* [🛡️ Identity Verification](/docs/en/identity-verification)
* [📊 Custom Outcomes](/docs/en/custom-outcomes)
* [📲 Live Activities](/docs/en/live-activities)
### Mobile SDK setup & reference
Make sure you've enabled all key features by reviewing the [Mobile push setup](/docs/en/mobile-push-setup) guide.
For full details on available methods and configuration options, visit the [Mobile SDK reference](/docs/en/mobile-sdk-reference).
Congratulations! You've successfully completed the Mobile SDK setup guide.
***
Need help?
Chat with our Support team or email `support@onesignal.com`
Please include:
* Details of the issue you're experiencing and steps to reproduce if available
* Your OneSignal App ID
* The External ID or Subscription ID if applicable
* The URL to the message you tested in the OneSignal Dashboard if applicable
* Any relevant [logs or error messages](/docs/en/capturing-a-debug-log)
We're happy to help!
***
Best practices for multi-channel communication
* Obtain explicit consent before adding email or SMS subscriptions.
* Explain the benefits of each communication channel to users.
* Provide channel preferences so users can select which channels they prefer.
***
### Privacy & user consent
To control when OneSignal collects user data, use the SDK's consent gating methods:
* [`setConsentRequired(true)`](/docs/en/mobile-sdk-reference#setconsentrequired): Prevents data collection until consent is given.
* [`setConsentGiven(true)`](/docs/en/mobile-sdk-reference#setconsentgiven): Enables data collection once consent is granted.
See our Privacy & security docs for more on:
* [Data collected by the SDK](/docs/en/data-collected-by-the-onesignal-sdk)
* [Handling personal data](/docs/en/handling-personal-data)
***
## Prompt for push permissions
Instead of calling `requestPermission()` immediately on app open, take a more strategic approach. Use an in-app message to explain the value of push notifications before requesting permission.
For best practices and implementation details, see our [Prompt for push permissions](/docs/en/prompt-for-push-permissions) guide.
***
## Listen to push, user, and in-app events
Use SDK listeners to react to user actions and state changes.
The SDK provides several event listeners for you to hook into. See our [SDK reference guide](/docs/en/mobile-sdk-reference) for more details.
### Push notification events
* [`addClickListener()`](/docs/en/mobile-sdk-reference#addclicklistener-push): Detect when a notification is tapped. Helpful for [Deep Linking](/docs/en/deep-linking).
* [`addForegroundLifecycleListener()`](/docs/en/mobile-sdk-reference#addforegroundlifecyclelistener-push): Control how notifications behave in foreground.
For full customization, see [Mobile Service Extensions](/docs/en/service-extensions).
### User state changes
* [`addObserver()` for user state](/docs/en/mobile-sdk-reference#addobserver-user-state): Detect when the External ID is set.
* [`addPermissionObserver()`](/docs/en/mobile-sdk-reference#addpermissionobserver-push): Track the user's specific interaction with the native push permission prompt.
* [`addObserver()` for push subscription](/docs/en/mobile-sdk-reference#addobserver-push-subscription-changes): Track when the push subscription status changes.
### In-app message events
* [`addClickListener()`](/docs/en/mobile-sdk-reference#addclicklistener-in-app): Handle in-app click actions. Ideal for deep linking or tracking events.
* [`addLifecycleListener()`](/docs/en/mobile-sdk-reference#addclicklistener-in-app): Track full lifecycle of in-app messages (shown, clicked, dismissed, etc.).
***
## Advanced setup & capabilities
Explore more capabilities to enhance your integration:
* [🔁 Migrating to OneSignal from another service](/docs/en/migrating-to-onesignal)
* [🌍 Location tracking](/docs/en/mobile-sdk-reference#location)
* [🔗 Deep Linking](/docs/en/deep-linking)
* [🔌 Integrations](/docs/en/integrations)
* [🧩 Mobile Service Extensions](/docs/en/service-extensions)
* [🛎️ Action buttons](/docs/en/action-buttons)
* [🌐 Multi-language messaging](/docs/en/multi-language-messaging)
* [🛡️ Identity Verification](/docs/en/identity-verification)
* [📊 Custom Outcomes](/docs/en/custom-outcomes)
* [📲 Live Activities](/docs/en/live-activities)
### Mobile SDK setup & reference
Make sure you've enabled all key features by reviewing the [Mobile push setup](/docs/en/mobile-push-setup) guide.
For full details on available methods and configuration options, visit the [Mobile SDK reference](/docs/en/mobile-sdk-reference).
Congratulations! You've successfully completed the Mobile SDK setup guide.
***
Need help?
Chat with our Support team or email `support@onesignal.com`
Please include:
* Details of the issue you're experiencing and steps to reproduce if available
* Your OneSignal App ID
* The External ID or Subscription ID if applicable
* The URL to the message you tested in the OneSignal Dashboard if applicable
* Any relevant [logs or error messages](/docs/en/capturing-a-debug-log)
We're happy to help!
***