> ## Documentation Index
> Fetch the complete documentation index at: https://documentation.onesignal.com/llms.txt
> Use this file to discover all available pages before exploring further.
# Unity SDK kurulumu
> iOS, Android, Amazon ve Huawei için Unity uygulamalarınıza kolayca push bildirimleri eklemek için OneSignal'in Unity SDK'sını nasıl kuracağınızı öğrenin. Bu kılavuz Unity kurulumu, platform yapılandırması ve başlatmayı kapsar.
export const SdkReleasesIframe = ({sdkFilter = undefined, viewMode = undefined, height, ...frameProps}) => {
const baseUrl = 'https://onesignal.github.io/sdk-releases';
const buildUrl = (theme, sdkFilter, viewMode) => {
const url = new URL(baseUrl);
const params = new URLSearchParams();
if (theme) {
params.set('theme', theme);
}
if (sdkFilter) {
params.set('sdk', sdkFilter);
}
if (viewMode) {
params.set('viewMode', viewMode);
}
if (params.toString()) {
url.search = params.toString();
}
return url.toString();
};
const detectTheme = () => {
if (document.documentElement.classList.contains('dark')) {
return 'dark';
}
return 'light';
};
const [theme, setTheme] = useState('light');
const [iframeSrc, setIframeSrc] = useState(() => {
const initialTheme = detectTheme();
return buildUrl(initialTheme, sdkFilter, viewMode);
});
useEffect(() => {
const currentTheme = detectTheme();
setTheme(currentTheme);
setIframeSrc(buildUrl(currentTheme, sdkFilter, viewMode));
const mediaQuery = window.matchMedia('(prefers-color-scheme: dark)');
const handleThemeChange = () => {
const newTheme = detectTheme();
setTheme(newTheme);
setIframeSrc(buildUrl(newTheme, sdkFilter, viewMode));
};
if (mediaQuery.addEventListener) {
mediaQuery.addEventListener('change', handleThemeChange);
} else {
mediaQuery.addListener(handleThemeChange);
}
window.addEventListener('storage', handleThemeChange);
const observer = new MutationObserver(handleThemeChange);
observer.observe(document.documentElement, {
attributes: true,
attributeFilter: ['class', 'data-theme']
});
return () => {
if (mediaQuery.removeEventListener) {
mediaQuery.removeEventListener('change', handleThemeChange);
} else {
mediaQuery.removeListener(handleThemeChange);
}
window.removeEventListener('storage', handleThemeChange);
observer.disconnect();
};
}, [sdkFilter, viewMode]);
const getIframeHeight = () => {
if (viewMode === 'table') {
return '450';
}
if (viewMode === 'mini') {
return '170';
}
return '800';
};
const iframeHeight = height || getIframeHeight();
return
;
};
## Genel Bakış
## OneSignal kullanarak Unity uygulamanız için push bildirimleri kurma
Push bildirimlerini Unity uygulamanıza entegre etmek, kullanıcı etkileşimini ve elde tutmayı artırmanın güçlü bir yoludur. OneSignal'in Unity SDK'sı iOS (APNS), Android (FCM), Amazon (ADM) ve Huawei cihazlarını destekler, minimum çabayla gerçek zamanlı mesajlaşmayı sağlar.
Mobil oyunlar veya etkileşimli uygulamalar geliştiriyor olun, bu kılavuz OneSignal'i hızlı ve güvenilir bir şekilde entegre etmenize yardımcı olur.
***
## Gereksinimler
* Unity 2022.3 veya daha yenisi
* Yapılandırılmış OneSignal uygulaması ve platformu
**iOS Gereksinimleri**
* Xcode 14+ ile macOS (kurulum talimatları Xcode 16.2 kullanır)
* iOS 12+, iPadOS 12+ veya iOS 16.2+ çalıştıran Xcode simülatörü ile cihaz
**Android Gereksinimleri**
* Google Play Store (Hizmetleri) yüklü Android 7.0+ cihaz veya emülatör
### Configure your OneSignal app and platform
Configure your OneSignal app with the platforms you support — Apple (APNs), Google (FCM), Huawei (HMS), and/or Amazon (ADM).
If your organization already has a OneSignal account, [ask to be invited](/docs/en/manage-team-members) to the Organization. Otherwise, [sign up for a free account](https://onesignal.com) to get started.
Create a new app by clicking **New App/Website**, or add a platform to an existing app in **Settings > Push & In-App**. Select the platform(s) you want to configure and click **Next: Configure Your Platform**.
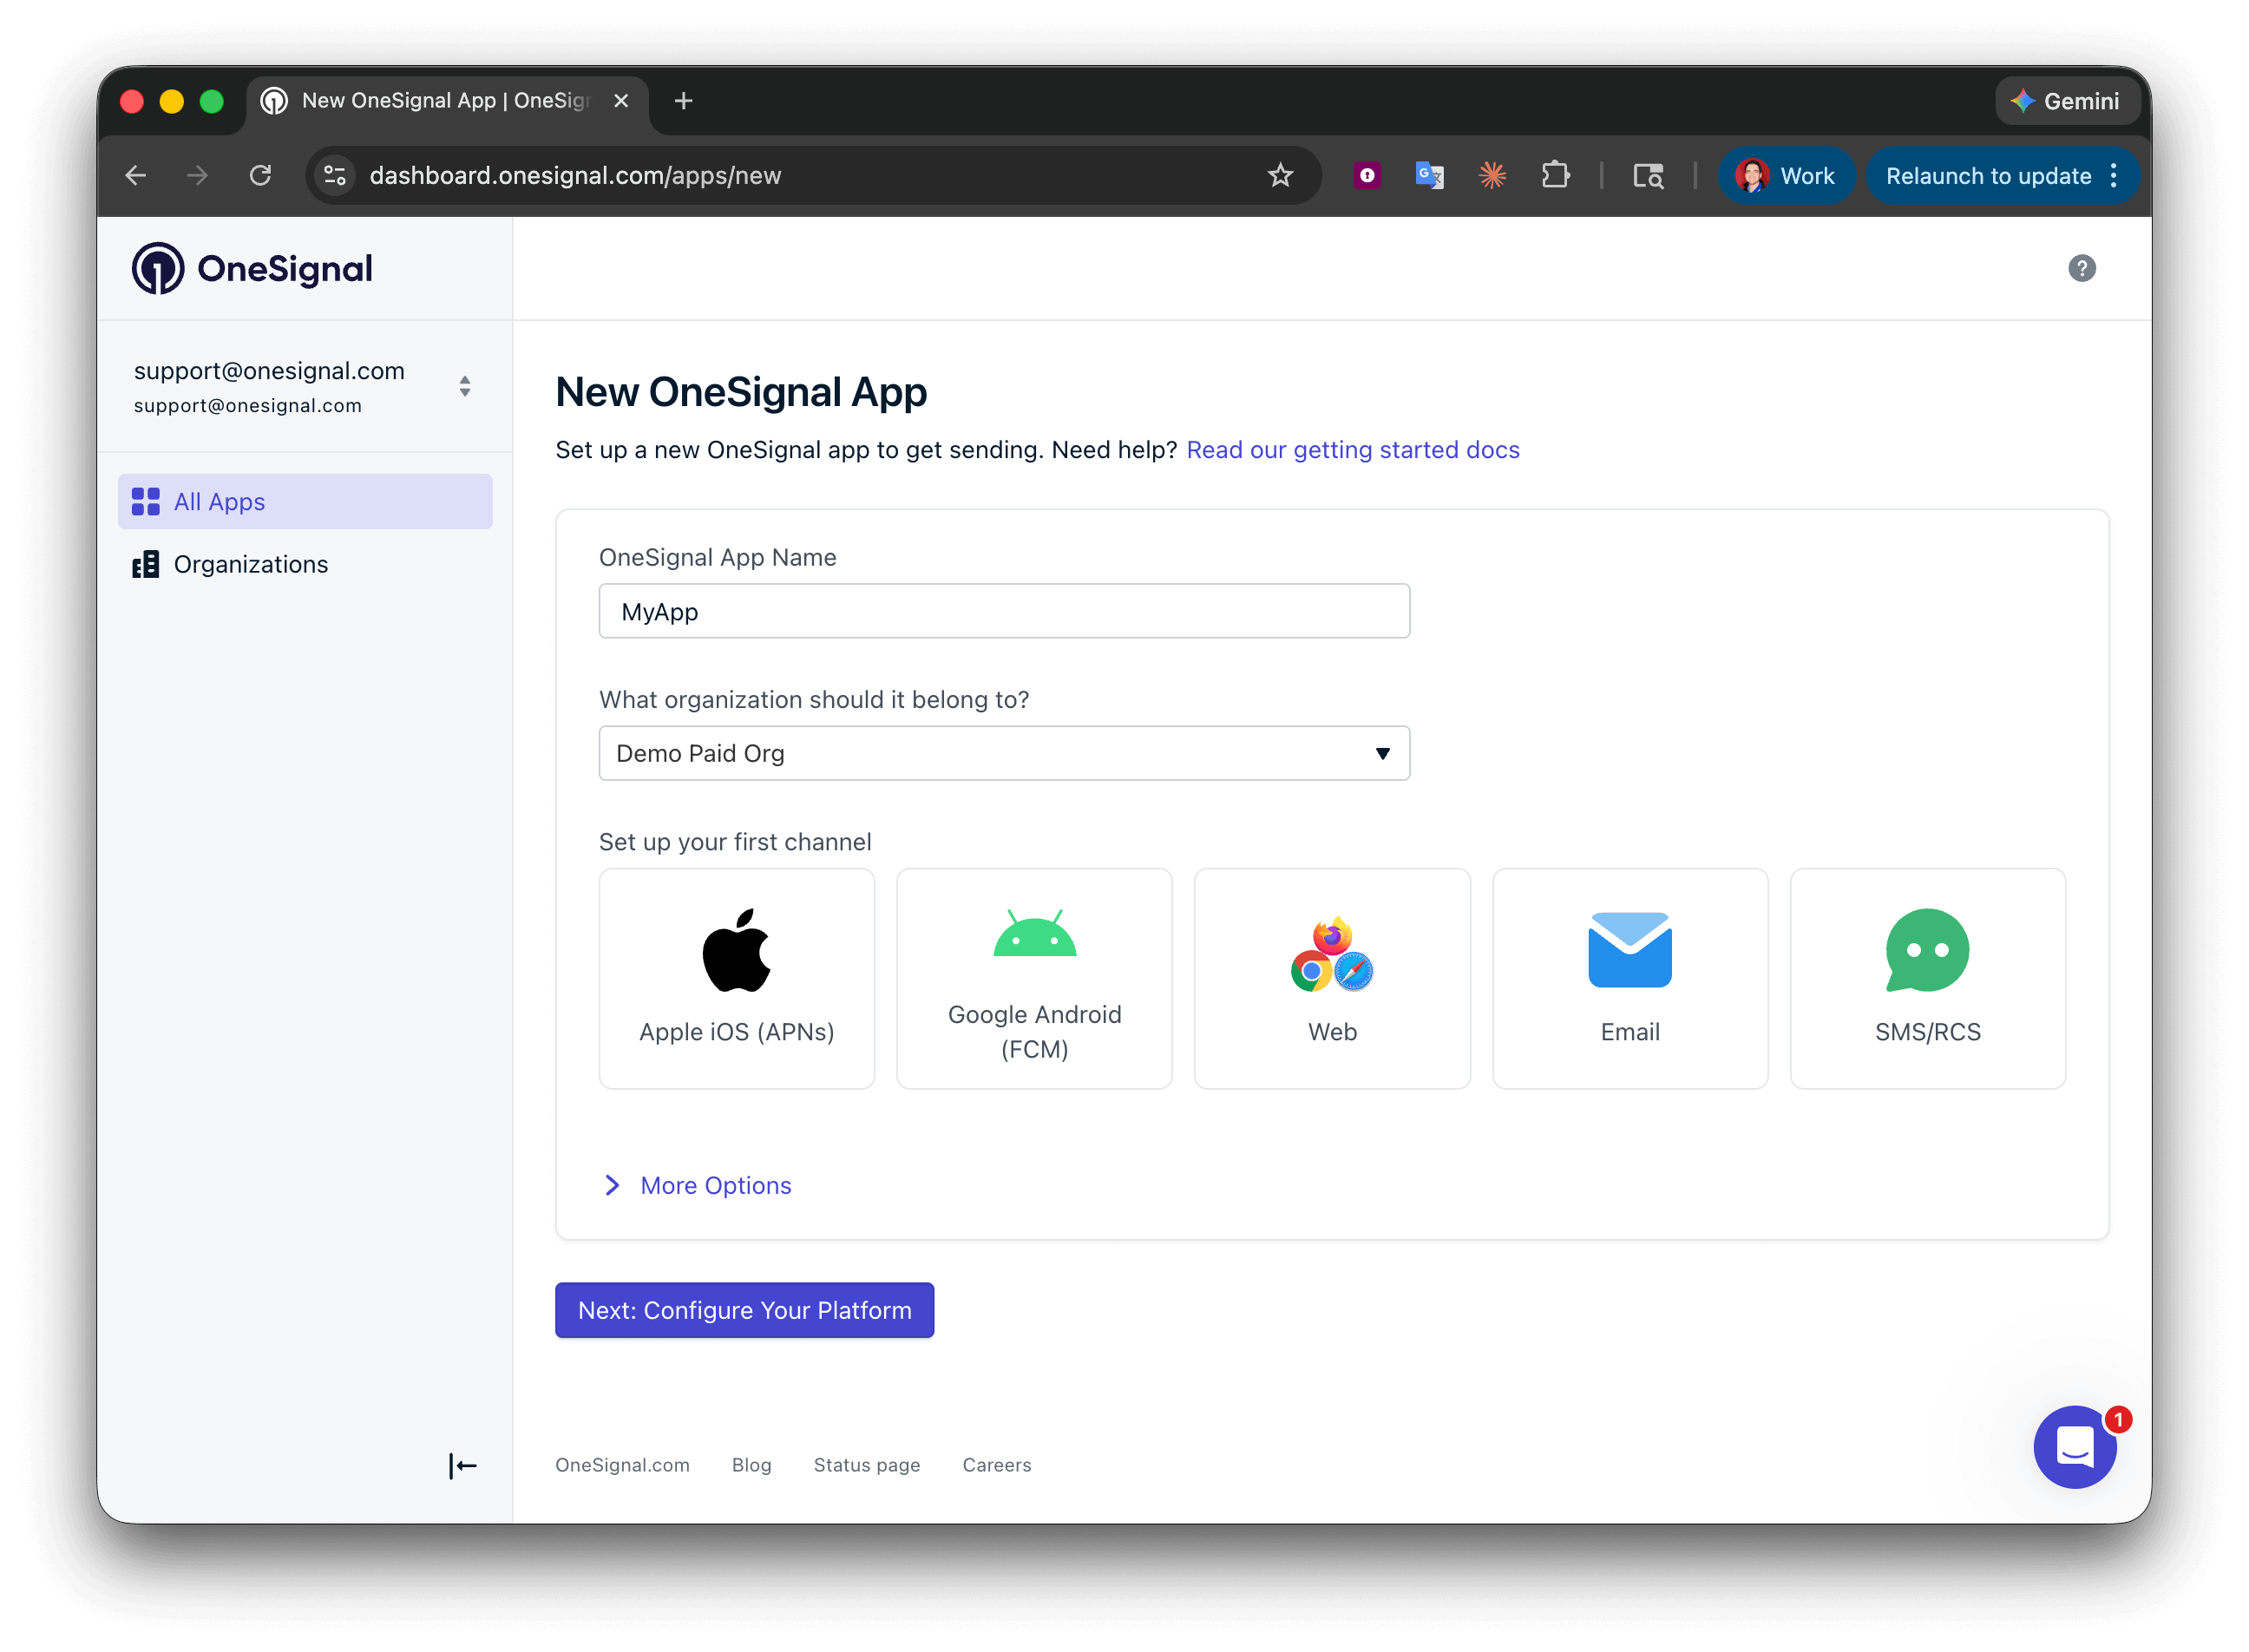 Enter the credentials for your platform:
* **Android**: [Set up Firebase credentials](/docs/en/android-firebase-credentials)
* **iOS**: [p8 token (recommended)](/docs/en/ios-p8-token-based-connection-to-apns) or [p12 certificate](/docs/en/ios-p12-generate-certificates)
* **Amazon**: [Generate API key](/docs/en/generate-an-amazon-api-key)
* **Huawei**: [Authorize OneSignal](/docs/en/authorize-onesignal-to-send-huawei-push)
Click **Save & Continue** after entering your credentials.
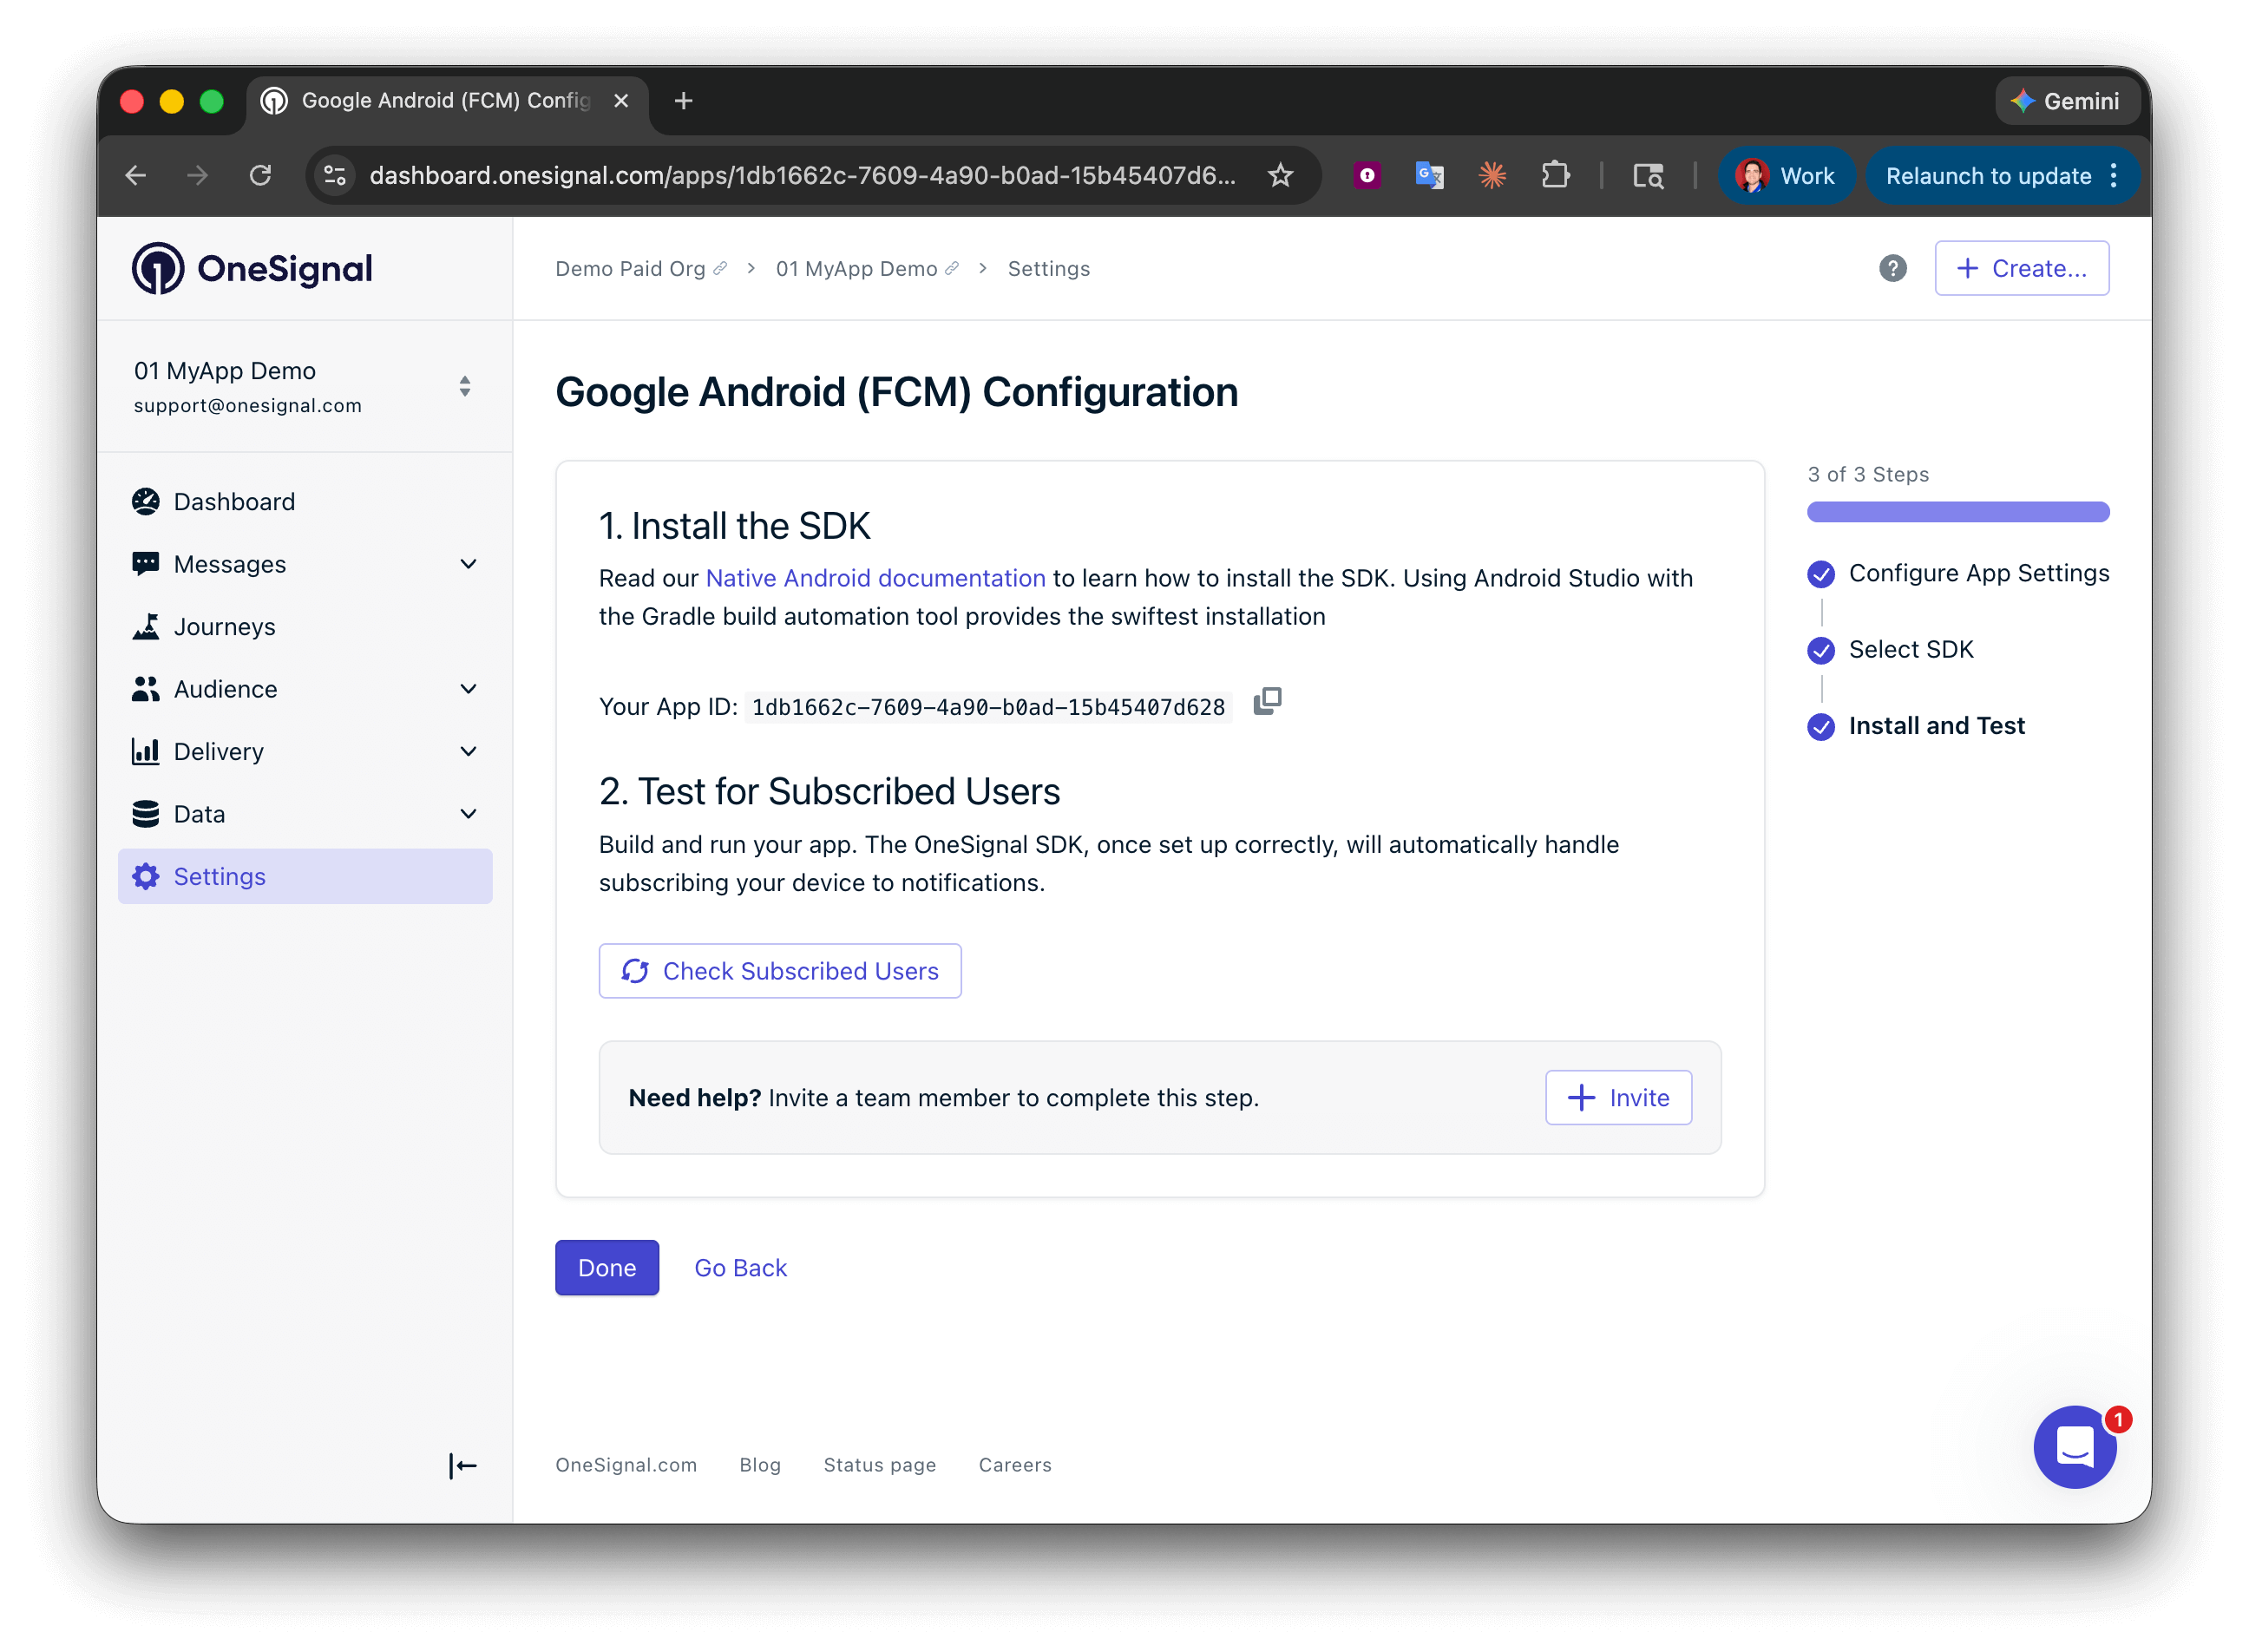
Your **App ID** is displayed on the final screen. Copy and save it — you need it when initializing the SDK. Select your SDK platform, then follow the setup guide.
Enter the credentials for your platform:
* **Android**: [Set up Firebase credentials](/docs/en/android-firebase-credentials)
* **iOS**: [p8 token (recommended)](/docs/en/ios-p8-token-based-connection-to-apns) or [p12 certificate](/docs/en/ios-p12-generate-certificates)
* **Amazon**: [Generate API key](/docs/en/generate-an-amazon-api-key)
* **Huawei**: [Authorize OneSignal](/docs/en/authorize-onesignal-to-send-huawei-push)
Click **Save & Continue** after entering your credentials.
Your **App ID** is displayed on the final screen. Copy and save it — you need it when initializing the SDK. Select your SDK platform, then follow the setup guide.
 ***
## Kurulum
### 1. OneSignal Unity SDK'sını ekleyin
İki kurulum yöntemi mevcuttur:
1. **Add to My Assets** aracılığıyla [SDK'yı hesabınıza ekleyin](https://assetstore.unity.com/packages/add-ons/services/billing/onesignal-sdk-193316).
2. Unity Editor ve Package Manager'ı başlatmak için **Open in Unity**'ye tıklayın.
3. SDK'yı indirin ve **Import** edin.
***
## Kurulum
### 1. OneSignal Unity SDK'sını ekleyin
İki kurulum yöntemi mevcuttur:
1. **Add to My Assets** aracılığıyla [SDK'yı hesabınıza ekleyin](https://assetstore.unity.com/packages/add-ons/services/billing/onesignal-sdk-193316).
2. Unity Editor ve Package Manager'ı başlatmak için **Open in Unity**'ye tıklayın.
3. SDK'yı indirin ve **Import** edin.
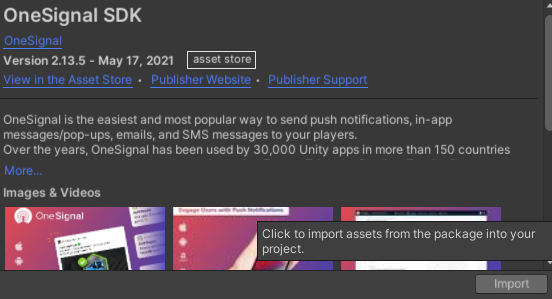 4. Tüm dosyaları içe aktarma istemini kabul edin.
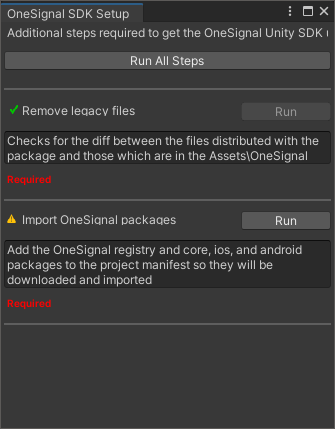
5. **Window > OneSignal SDK Setup**'a gidin ve kontrol listesini, özellikle **Import OneSignal packages**'ı izleyin.
6. İçe aktarmadan sonra, Unity kayıt defterini güncelleyecektir. Kurulum penceresinde gösterilen kalan kurulum adımlarını tamamlayın.
4. Tüm dosyaları içe aktarma istemini kabul edin.
5. **Window > OneSignal SDK Setup**'a gidin ve kontrol listesini, özellikle **Import OneSignal packages**'ı izleyin.
6. İçe aktarmadan sonra, Unity kayıt defterini güncelleyecektir. Kurulum penceresinde gösterilen kalan kurulum adımlarını tamamlayın.
 1. **Edit > Project Settings > Package Manager**'a gidin.
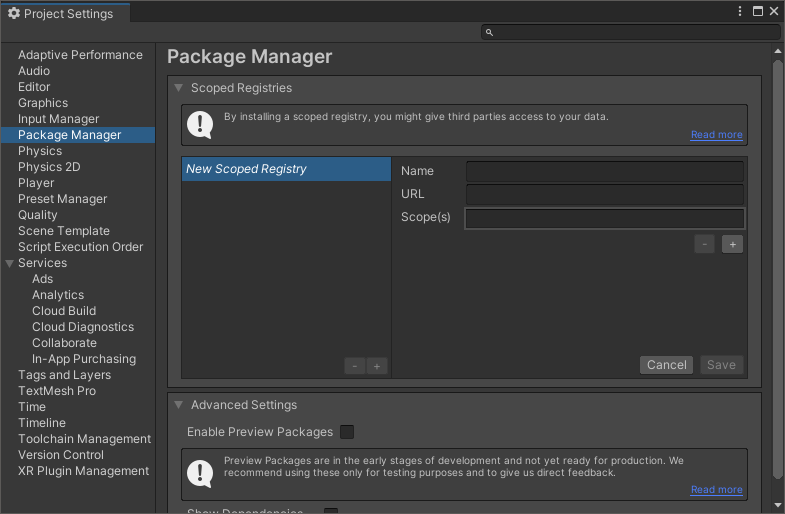 2. Kapsamlı bir kayıt defteri ekleyin:
```
Name npmjs
URL https://registry.npmjs.org
Scope(s) com.onesignal
```
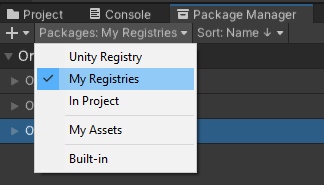
3. **Window > Package Manager**'ı açın ve **My Registries**'e geçin.
4. İstenen OneSignal SDK paketlerini yükleyin.
5. **Window > OneSignal SDK Setup**'ı açın ve son adımları tamamlayın.
2. Kapsamlı bir kayıt defteri ekleyin:
```
Name npmjs
URL https://registry.npmjs.org
Scope(s) com.onesignal
```
3. **Window > Package Manager**'ı açın ve **My Registries**'e geçin.
4. İstenen OneSignal SDK paketlerini yükleyin.
5. **Window > OneSignal SDK Setup**'ı açın ve son adımları tamamlayın.
 ### 2. Platform kurulumu
Uygulamanızın desteklediği tüm platformları ekleyin.
#### iOS kurulumu
SDK'mız gerekli Xcode ayarlarını otomatik olarak yapılandırır. Provisioning yaklaşımınızı seçin:
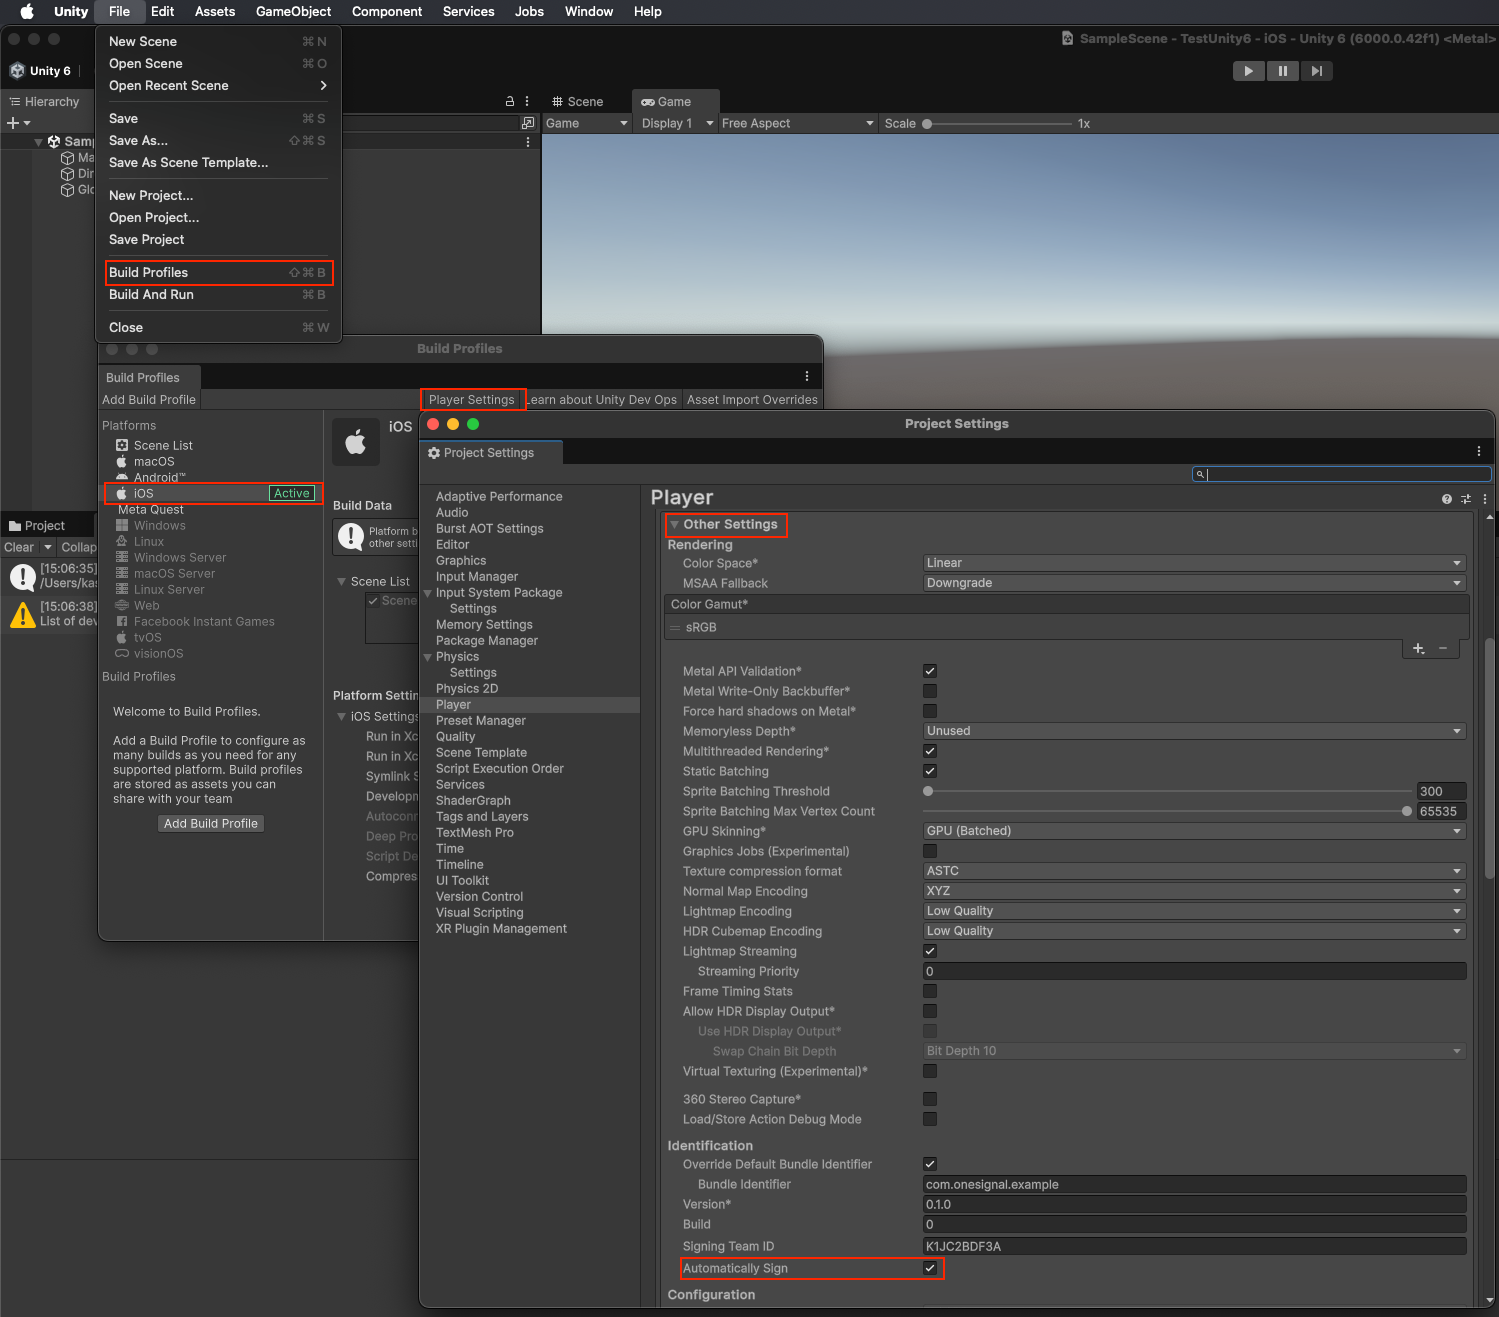
1. **File > Build Settings** > **Player Settings**'e gidin.
2. **Other Settings** altında **Automatically Sign**'ı işaretleyin.
### 2. Platform kurulumu
Uygulamanızın desteklediği tüm platformları ekleyin.
#### iOS kurulumu
SDK'mız gerekli Xcode ayarlarını otomatik olarak yapılandırır. Provisioning yaklaşımınızı seçin:
1. **File > Build Settings** > **Player Settings**'e gidin.
2. **Other Settings** altında **Automatically Sign**'ı işaretleyin.
 Apple Developer hesabınızın şunlara sahip olduğundan emin olun:
* Bir App Group: `group.{your_bundle_id}.onesignal`
* Etkinleştirilmiş **Push Notifications** ve **App Groups**
* Bundle ID'niz için yenilenmiş provisioning profilleri
#### Android kurulumu
1. **Edit > Project Settings > Player** > **Android**'e gidin.
2. **Publishing Settings** altında şunları etkinleştirin:
* **Custom Main Gradle Template**
* **Custom Gradle Properties Template**
3. **Assets > External Dependency Manager > Android Resolver > Force Resolve**'u çalıştırın.
Ek hususlar:
* **Target API Level 33+ olmalıdır** (v5.0.6+).
* **Minify etkinse**, `OneSignalConfig.androidlib` kullanmak için **OneSignal SDK Setup**'tan **Copy Android plugin to Assets**'i çalıştırın.
* `Assets/Plugins/Android/OneSignalConfig.androidlib/src/main/res` içindeki varsayılan simgeleri kendinizinkilerle değiştirin (yalnızca küçük harf dosya adları, alt çizgiye izin verilir). Daha fazla bilgi için [Bildirim Simgelerini Özelleştir](./notification-icons) bölümüne bakın.
#### Amazon kurulumu
Yalnızca Amazon App Store aracılığıyla sunulan Amazon uygulamaları için gereklidir.
1. `Plugins/Android/AndroidManifest.xml` dosyasını düzenleyin veya oluşturun.
2. Ad alanı ekleyin:
```xml theme={null}
xmlns:amazon="http://schemas.amazon.com/apk/res/android"
```
3. İzinleri ekleyin:
```xml theme={null}
```
4. `` etiketine aşağıdakileri ekleyin:
```xml theme={null}
```
5. Tüm `COM.YOUR.PACKAGE_NAME` örneklerini gerçek paket adınızla değiştirin.
6. `api_key.txt` dosyanızı `Assets/Plugins/Android/OneSignalConfig.androidlib/src/main/assets` altına yerleştirin
* Bu dosyayı oluşturma konusunda yardım için [Amazon API Anahtarı Oluşturma Kılavuzu](./generate-an-amazon-api-key) bölümüne bakın.
#### Huawei kurulumu
Yalnızca Huawei App Gallery aracılığıyla sunulan Huawei uygulamaları için gereklidir.
Daha fazla bilgi için [Huawei Unity SDK kurulumu](./huawei-unity-sdk-setup) bölümüne bakın.
### İsteğe bağlı: Konum modülünü devre dışı bırakın
OneSignal Unity SDK 5.3.0'dan itibaren, uygulamanız `OneSignal.Location` kullanmıyorsa OneSignal'ın yerel konum modülünü iOS ve Android derlemelerinden hariç tutabilirsiniz. Varsayılan olarak SDK, konum API'lerinin ek kurulum gerektirmeden çalışması için yerel konum modülünü içerir.
Android bağımlılıklarını çözmeden veya iOS derlemeden önce bayrağı ayarlayın. Hariç tutmanın iki yolu vardır:
* **Editör anahtarı (etkileşimli):** Unity Editor'da **Project Settings > OneSignal** bölümüne gidin ve **Disable Location Module** seçeneğini etkinleştirin. Ayar `ProjectSettings/OneSignalSettings.json` dosyasına kaydedilir.
* **Ortam değişkeni (CLI/CI):** Unity'yi başlatmadan önce kabukta `ONESIGNAL_DISABLE_LOCATION=true` (veya `1`) değerini dışa aktarın. Ortam değişkeni, Editör anahtarına göre önceliklidir.
```json ProjectSettings/OneSignalSettings.json theme={null}
{
"disableLocation": true
}
```
```shell CLI theme={null}
ONESIGNAL_DISABLE_LOCATION=true /path/to/Unity \
-batchmode -quit -projectPath . -buildTarget Android
```
```yaml GitHub Actions theme={null}
env:
ONESIGNAL_DISABLE_LOCATION: true
```
Konum modülü devre dışı bırakıldığında SDK, ayrıntılı yerel bağımlılıkları `Assets/OneSignal/Editor/OneSignalAndroidDependencies.xml` ve `Assets/OneSignal/Editor/OneSignaliOSDependencies.xml` dosyalarına yazar. **Assets > External Dependency Manager > Android Resolver > Force Resolve** çalıştırdıktan sonra Android, konum bileşeni olmayan OneSignal modüllerini `Assets/Plugins/Android/mainTemplate.gradle` dosyasına çözer. iOS derlemeleri `OneSignalLocation` olmadan OneSignal pod'larını kullanır.
Konum modülü olmayan yerel derlemelerde `OneSignal.Location.RequestPermission()` ve `OneSignal.Location.IsShared` ataması no-op olur. `OneSignal.Location.IsShared`, `false` döndürür.
#### Yerel bağımlılıklar önbelleğe alındıktan sonra değişikliği uygulayın
Bu ayarı mevcut bir projede değiştirirseniz, eski yerel çıktıları temizleyin ve bayrak ayarlıyken bağımlılıkları yeniden çözün:
* `Assets/OneSignal/Editor/OneSignalAndroidDependencies.xml` ve `Assets/OneSignal/Editor/OneSignaliOSDependencies.xml` dosyalarını silin, ardından Unity'nin bunları `ProjectSettings/OneSignalSettings.json` dosyasından yeniden oluşturması için projeyi yeniden açın.
* `Assets/Plugins/Android/mainTemplate.gradle` dosyasının konumsuz paketleri alması için **Assets > External Dependency Manager > Android Resolver > Force Resolve** çalıştırın.
* iOS Xcode projesini yeniden dışa aktarın ve gerekirse `pod install` çalıştırın.
* Yeniden derlemeden önce `Build/` ve diğer oluşturulan çıktıları kaldırın.
CI'da `ONESIGNAL_DISABLE_LOCATION` değerini Unity'yi başlatan ortamda dışa aktarın. Unity `Library/`, Gradle, CocoaPods ve DerivedData önbellek anahtarlarına bayrak değerini ekleyin; böylece geri yüklenen bir önbellek konum modülünü geri getirmez.
### 3. SDK'yı başlatın
Bu kodu uygulamanızın yaşam döngüsünün başlarında bir `MonoBehaviour`'ın `Start()` yönteminin içine ekleyin.
`YOUR_APP_ID` yerine OneSignal panonuzun **Settings > [Keys & IDs](./keys-and-ids)** bölümünde bulunan OneSignal App ID'nizi yazın.
OneSignal uygulamasına erişiminiz yoksa, [Ekip Üyeleri](./manage-team-members)'nden sizi davet etmelerini isteyin.
```csharp C# theme={null}
using OneSignalSDK;
void Start () {
// Enable verbose logging for debugging (remove in production)
OneSignal.Debug.LogLevel = LogLevel.Verbose;
// Initialize with your OneSignal App ID
OneSignal.Initialize("YOUR_APP_ID");
// Use this method to prompt for push notifications.
// We recommend removing this method after testing and instead use In-App Messages to prompt for notification permission.
await OneSignal.Notifications.RequestPermissionAsync(true);
}
```
***
## Testing the OneSignal SDK integration
This guide helps you verify that your OneSignal SDK integration is working correctly by testing push notifications, subscription registration, and in-app messaging.
If you are testing with an Android emulator, it should start with a cold boot.
1. Go to **Device Manager** in Android Studio.
2. Select your emulator device and click **Edit**.
3. Go to **Additional Settings** or **More**.
4. Set the **Boot option** to **Cold Boot**.
5. Save changes and restart the emulator.
### Check mobile subscriptions
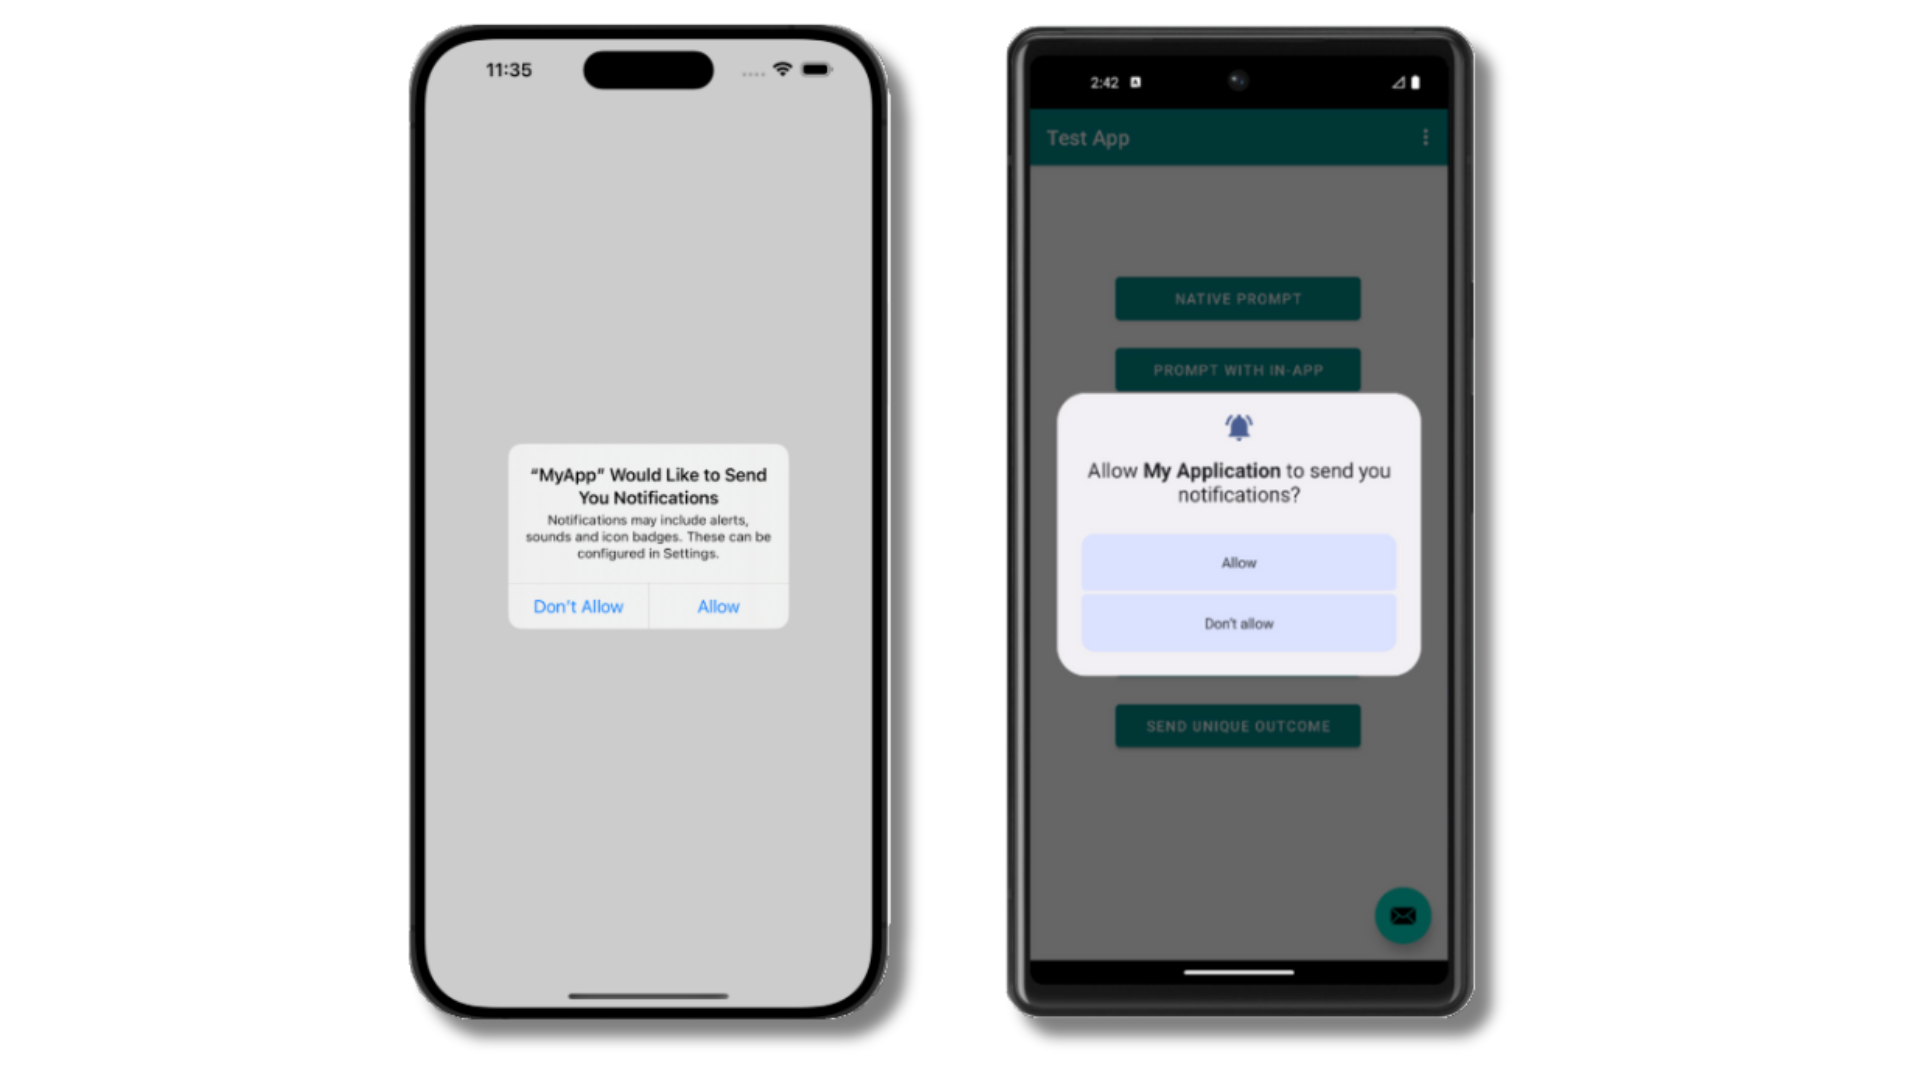
The native push permission prompt should appear automatically if you added the `requestPermission` method during initialization.
Apple Developer hesabınızın şunlara sahip olduğundan emin olun:
* Bir App Group: `group.{your_bundle_id}.onesignal`
* Etkinleştirilmiş **Push Notifications** ve **App Groups**
* Bundle ID'niz için yenilenmiş provisioning profilleri
#### Android kurulumu
1. **Edit > Project Settings > Player** > **Android**'e gidin.
2. **Publishing Settings** altında şunları etkinleştirin:
* **Custom Main Gradle Template**
* **Custom Gradle Properties Template**
3. **Assets > External Dependency Manager > Android Resolver > Force Resolve**'u çalıştırın.
Ek hususlar:
* **Target API Level 33+ olmalıdır** (v5.0.6+).
* **Minify etkinse**, `OneSignalConfig.androidlib` kullanmak için **OneSignal SDK Setup**'tan **Copy Android plugin to Assets**'i çalıştırın.
* `Assets/Plugins/Android/OneSignalConfig.androidlib/src/main/res` içindeki varsayılan simgeleri kendinizinkilerle değiştirin (yalnızca küçük harf dosya adları, alt çizgiye izin verilir). Daha fazla bilgi için [Bildirim Simgelerini Özelleştir](./notification-icons) bölümüne bakın.
#### Amazon kurulumu
Yalnızca Amazon App Store aracılığıyla sunulan Amazon uygulamaları için gereklidir.
1. `Plugins/Android/AndroidManifest.xml` dosyasını düzenleyin veya oluşturun.
2. Ad alanı ekleyin:
```xml theme={null}
xmlns:amazon="http://schemas.amazon.com/apk/res/android"
```
3. İzinleri ekleyin:
```xml theme={null}
```
4. `` etiketine aşağıdakileri ekleyin:
```xml theme={null}
```
5. Tüm `COM.YOUR.PACKAGE_NAME` örneklerini gerçek paket adınızla değiştirin.
6. `api_key.txt` dosyanızı `Assets/Plugins/Android/OneSignalConfig.androidlib/src/main/assets` altına yerleştirin
* Bu dosyayı oluşturma konusunda yardım için [Amazon API Anahtarı Oluşturma Kılavuzu](./generate-an-amazon-api-key) bölümüne bakın.
#### Huawei kurulumu
Yalnızca Huawei App Gallery aracılığıyla sunulan Huawei uygulamaları için gereklidir.
Daha fazla bilgi için [Huawei Unity SDK kurulumu](./huawei-unity-sdk-setup) bölümüne bakın.
### İsteğe bağlı: Konum modülünü devre dışı bırakın
OneSignal Unity SDK 5.3.0'dan itibaren, uygulamanız `OneSignal.Location` kullanmıyorsa OneSignal'ın yerel konum modülünü iOS ve Android derlemelerinden hariç tutabilirsiniz. Varsayılan olarak SDK, konum API'lerinin ek kurulum gerektirmeden çalışması için yerel konum modülünü içerir.
Android bağımlılıklarını çözmeden veya iOS derlemeden önce bayrağı ayarlayın. Hariç tutmanın iki yolu vardır:
* **Editör anahtarı (etkileşimli):** Unity Editor'da **Project Settings > OneSignal** bölümüne gidin ve **Disable Location Module** seçeneğini etkinleştirin. Ayar `ProjectSettings/OneSignalSettings.json` dosyasına kaydedilir.
* **Ortam değişkeni (CLI/CI):** Unity'yi başlatmadan önce kabukta `ONESIGNAL_DISABLE_LOCATION=true` (veya `1`) değerini dışa aktarın. Ortam değişkeni, Editör anahtarına göre önceliklidir.
```json ProjectSettings/OneSignalSettings.json theme={null}
{
"disableLocation": true
}
```
```shell CLI theme={null}
ONESIGNAL_DISABLE_LOCATION=true /path/to/Unity \
-batchmode -quit -projectPath . -buildTarget Android
```
```yaml GitHub Actions theme={null}
env:
ONESIGNAL_DISABLE_LOCATION: true
```
Konum modülü devre dışı bırakıldığında SDK, ayrıntılı yerel bağımlılıkları `Assets/OneSignal/Editor/OneSignalAndroidDependencies.xml` ve `Assets/OneSignal/Editor/OneSignaliOSDependencies.xml` dosyalarına yazar. **Assets > External Dependency Manager > Android Resolver > Force Resolve** çalıştırdıktan sonra Android, konum bileşeni olmayan OneSignal modüllerini `Assets/Plugins/Android/mainTemplate.gradle` dosyasına çözer. iOS derlemeleri `OneSignalLocation` olmadan OneSignal pod'larını kullanır.
Konum modülü olmayan yerel derlemelerde `OneSignal.Location.RequestPermission()` ve `OneSignal.Location.IsShared` ataması no-op olur. `OneSignal.Location.IsShared`, `false` döndürür.
#### Yerel bağımlılıklar önbelleğe alındıktan sonra değişikliği uygulayın
Bu ayarı mevcut bir projede değiştirirseniz, eski yerel çıktıları temizleyin ve bayrak ayarlıyken bağımlılıkları yeniden çözün:
* `Assets/OneSignal/Editor/OneSignalAndroidDependencies.xml` ve `Assets/OneSignal/Editor/OneSignaliOSDependencies.xml` dosyalarını silin, ardından Unity'nin bunları `ProjectSettings/OneSignalSettings.json` dosyasından yeniden oluşturması için projeyi yeniden açın.
* `Assets/Plugins/Android/mainTemplate.gradle` dosyasının konumsuz paketleri alması için **Assets > External Dependency Manager > Android Resolver > Force Resolve** çalıştırın.
* iOS Xcode projesini yeniden dışa aktarın ve gerekirse `pod install` çalıştırın.
* Yeniden derlemeden önce `Build/` ve diğer oluşturulan çıktıları kaldırın.
CI'da `ONESIGNAL_DISABLE_LOCATION` değerini Unity'yi başlatan ortamda dışa aktarın. Unity `Library/`, Gradle, CocoaPods ve DerivedData önbellek anahtarlarına bayrak değerini ekleyin; böylece geri yüklenen bir önbellek konum modülünü geri getirmez.
### 3. SDK'yı başlatın
Bu kodu uygulamanızın yaşam döngüsünün başlarında bir `MonoBehaviour`'ın `Start()` yönteminin içine ekleyin.
`YOUR_APP_ID` yerine OneSignal panonuzun **Settings > [Keys & IDs](./keys-and-ids)** bölümünde bulunan OneSignal App ID'nizi yazın.
OneSignal uygulamasına erişiminiz yoksa, [Ekip Üyeleri](./manage-team-members)'nden sizi davet etmelerini isteyin.
```csharp C# theme={null}
using OneSignalSDK;
void Start () {
// Enable verbose logging for debugging (remove in production)
OneSignal.Debug.LogLevel = LogLevel.Verbose;
// Initialize with your OneSignal App ID
OneSignal.Initialize("YOUR_APP_ID");
// Use this method to prompt for push notifications.
// We recommend removing this method after testing and instead use In-App Messages to prompt for notification permission.
await OneSignal.Notifications.RequestPermissionAsync(true);
}
```
***
## Testing the OneSignal SDK integration
This guide helps you verify that your OneSignal SDK integration is working correctly by testing push notifications, subscription registration, and in-app messaging.
If you are testing with an Android emulator, it should start with a cold boot.
1. Go to **Device Manager** in Android Studio.
2. Select your emulator device and click **Edit**.
3. Go to **Additional Settings** or **More**.
4. Set the **Boot option** to **Cold Boot**.
5. Save changes and restart the emulator.
### Check mobile subscriptions
The native push permission prompt should appear automatically if you added the `requestPermission` method during initialization.
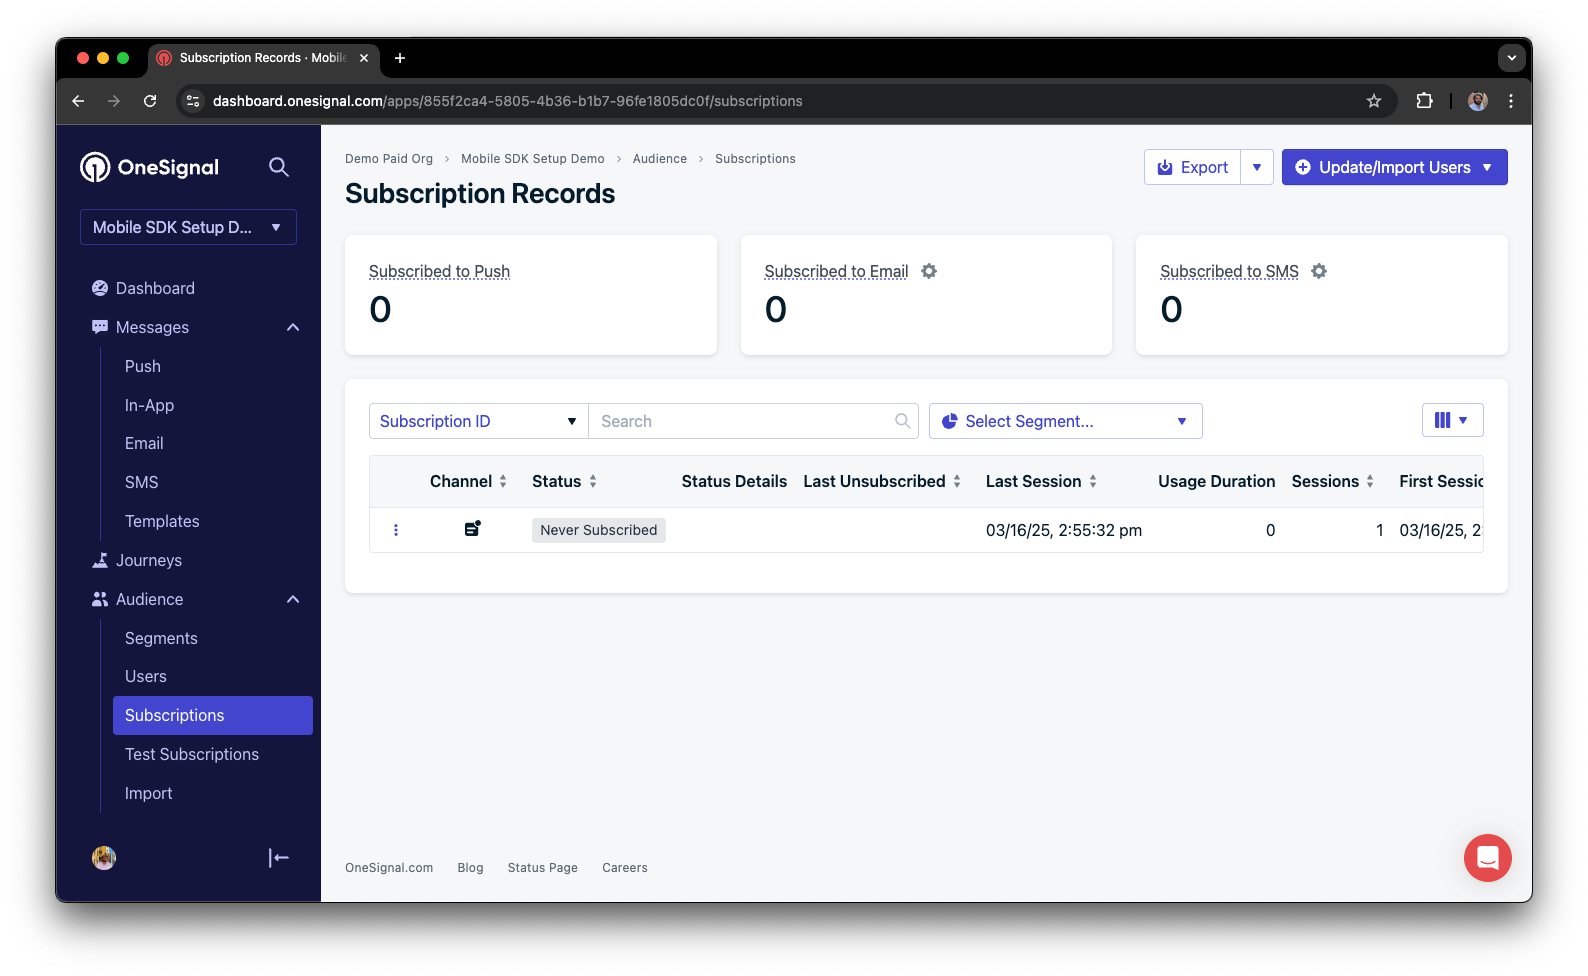
 Before accepting the prompt, check the OneSignal dashboard:
* Go to **Audience > Subscriptions**.
* You should see a new entry with the status "Never Subscribed".
Before accepting the prompt, check the OneSignal dashboard:
* Go to **Audience > Subscriptions**.
* You should see a new entry with the status "Never Subscribed".
 The subscription's status should now show **Subscribed**.
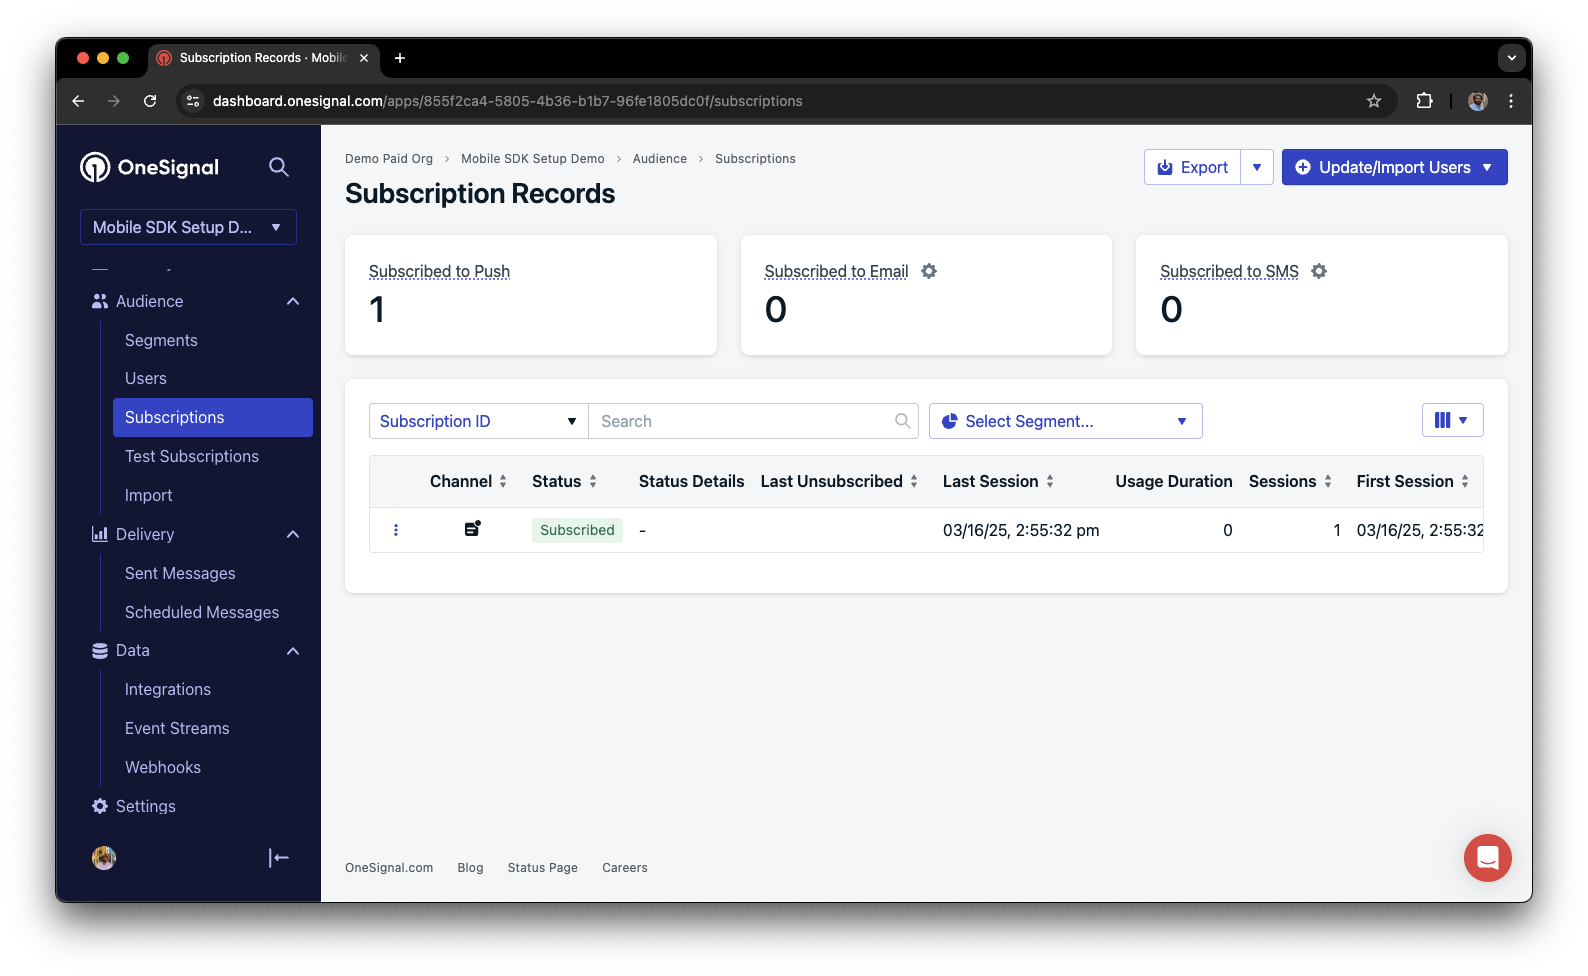 You have successfully created a [mobile subscription](/docs/en/subscriptions).
Mobile subscriptions are created when users first open your app on a device or if they uninstall and reinstall your app on the same device.
### Set up test users
test users are helpful for testing a push notification before sending a message.
In the dashboard, next to the subscription, click the **Options (three dots)** button and select **Add to Test Users**.
You have successfully created a [mobile subscription](/docs/en/subscriptions).
Mobile subscriptions are created when users first open your app on a device or if they uninstall and reinstall your app on the same device.
### Set up test users
test users are helpful for testing a push notification before sending a message.
In the dashboard, next to the subscription, click the **Options (three dots)** button and select **Add to Test Users**.
 Name the subscription so you can easily identify your device later in the **test users tab**.
Go to **Audience > Segments > New Segment**.
Name the segment `Test Users` (the name is important because it will be used later).
Name the subscription so you can easily identify your device later in the **test users tab**.
Go to **Audience > Segments > New Segment**.
Name the segment `Test Users` (the name is important because it will be used later).
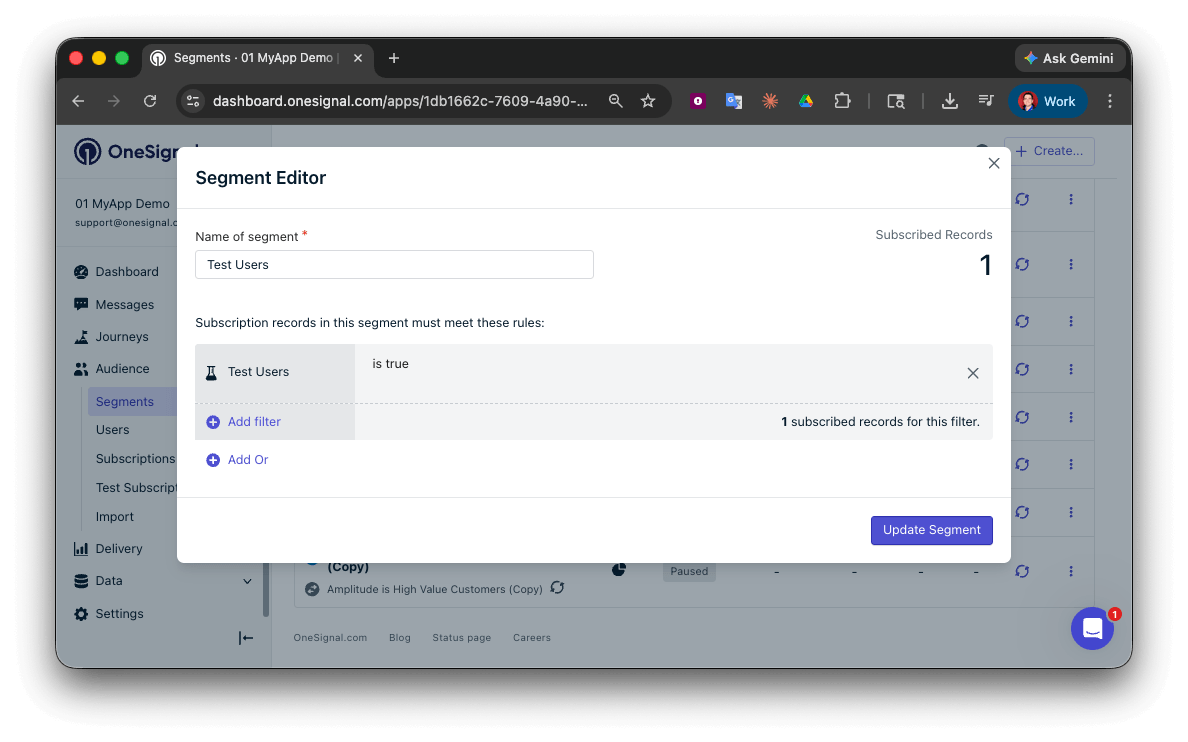 You have successfully created a segment of test users.
We can now test sending messages to this individual device and groups of test users.
### Send test push via API
In your OneSignal dashboard, go to **Settings > [Keys & IDs](/docs/en/keys-and-ids)**.
Replace `YOUR_APP_API_KEY` and `YOUR_APP_ID` in the code below with your actual keys. This code uses the `Test Users` segment we created earlier.
```curl theme={null}
curl -X \
POST --url 'https://api.onesignal.com/notifications' \
--header 'content-type: application/json; charset=utf-8' \
--header 'authorization: Key YOUR_APP_API_KEY' \
--data \
'{
"app_id": "YOUR_APP_ID",
"target_channel": "push",
"name": "Testing basic setup",
"headings": {
"en": "👋"
},
"contents": {
"en": "Hello world!"
},
"included_segments": [
"Test Users"
],
"ios_attachments": {
"onesignal_logo": "https://avatars.githubusercontent.com/u/11823027?s=200&v=4"
},
"big_picture": "https://avatars.githubusercontent.com/u/11823027?s=200&v=4"
}'
```
Run the code in your terminal.
If all setup steps were completed successfully, the test users should receive a notification with an image included:
You have successfully created a segment of test users.
We can now test sending messages to this individual device and groups of test users.
### Send test push via API
In your OneSignal dashboard, go to **Settings > [Keys & IDs](/docs/en/keys-and-ids)**.
Replace `YOUR_APP_API_KEY` and `YOUR_APP_ID` in the code below with your actual keys. This code uses the `Test Users` segment we created earlier.
```curl theme={null}
curl -X \
POST --url 'https://api.onesignal.com/notifications' \
--header 'content-type: application/json; charset=utf-8' \
--header 'authorization: Key YOUR_APP_API_KEY' \
--data \
'{
"app_id": "YOUR_APP_ID",
"target_channel": "push",
"name": "Testing basic setup",
"headings": {
"en": "👋"
},
"contents": {
"en": "Hello world!"
},
"included_segments": [
"Test Users"
],
"ios_attachments": {
"onesignal_logo": "https://avatars.githubusercontent.com/u/11823027?s=200&v=4"
},
"big_picture": "https://avatars.githubusercontent.com/u/11823027?s=200&v=4"
}'
```
Run the code in your terminal.
If all setup steps were completed successfully, the test users should receive a notification with an image included:
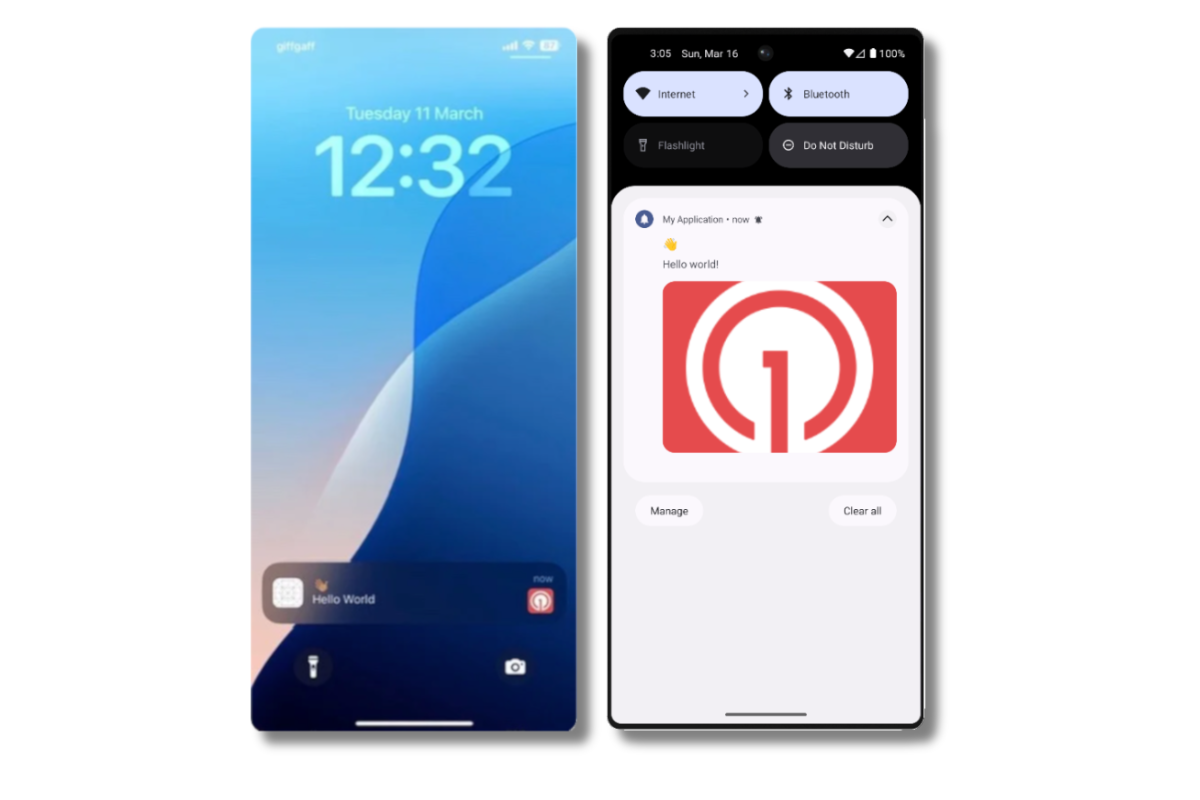 Images will appear small in the collapsed notification view. Expand the notification to see the full image.
In your dashboard, go to **Delivery > Sent Messages**, then click the message to view stats.
You should see the **confirmed** stat, meaning the device received the push.
You have successfully sent a notification via our API to a segment.
* No image received? Your [Notification Service Extension](#ios-setup) might be missing.
* No confirmed receipt? Review the troubleshooting guide [here](/docs/en/confirmed-delivery#troubleshooting-confirmed-delivery).
* Having issues? Copy-paste the api request and a log from start to finish of app launch into a `.txt` file. Then share both with `support@onesignal.com`.
### Send an in-app message
[In-app messages](/docs/en/in-app-messages-setup) let you communicate with users while they are using your app.
This is because users must meet the in-app audience criteria *before* a new session starts. In OneSignal, a new session starts when the user opens your app after it has been in the background or closed for at least 30 seconds. For more details, see our guide on [how in-app messages are displayed](/docs/en/in-app-messages-setup#how-are-iams-displayed%3F).
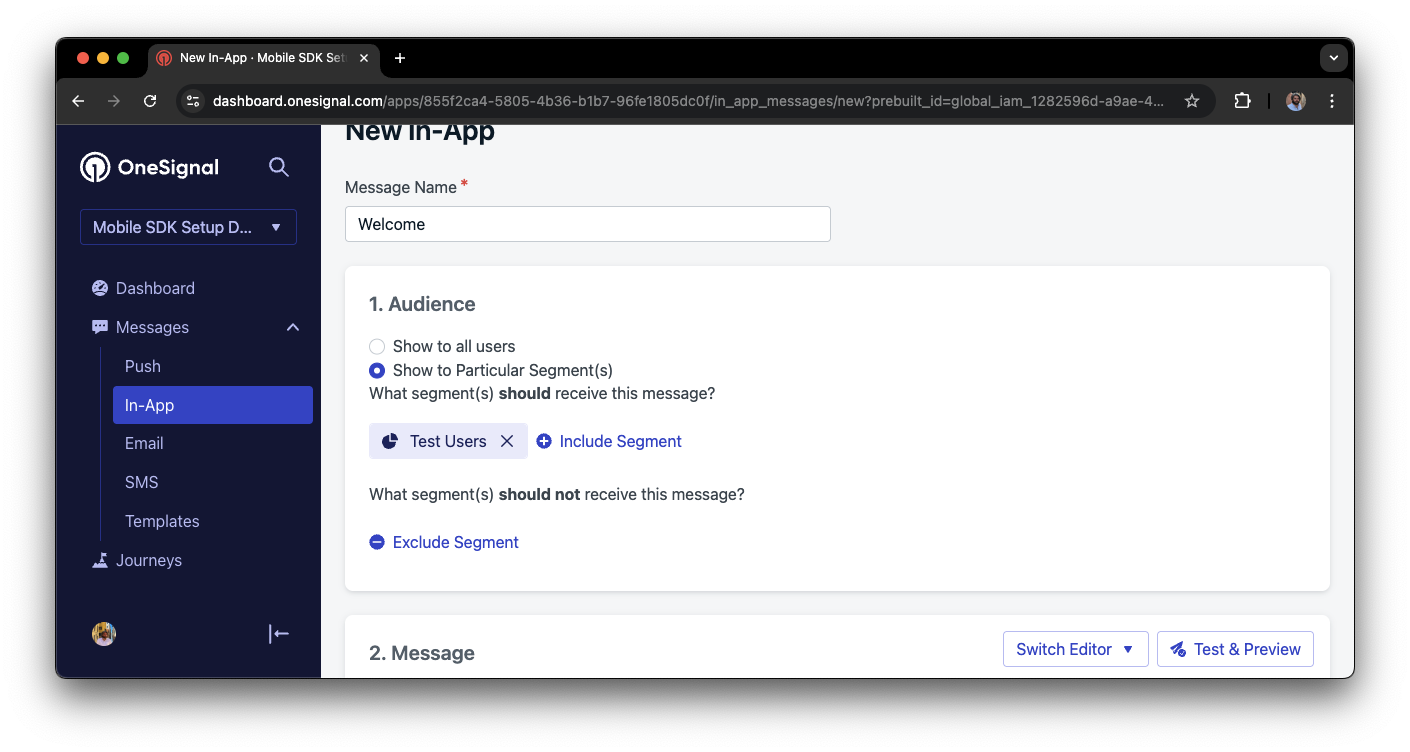
* In your OneSignal dashboard, navigate to **Messages > In-App > New In-App**.
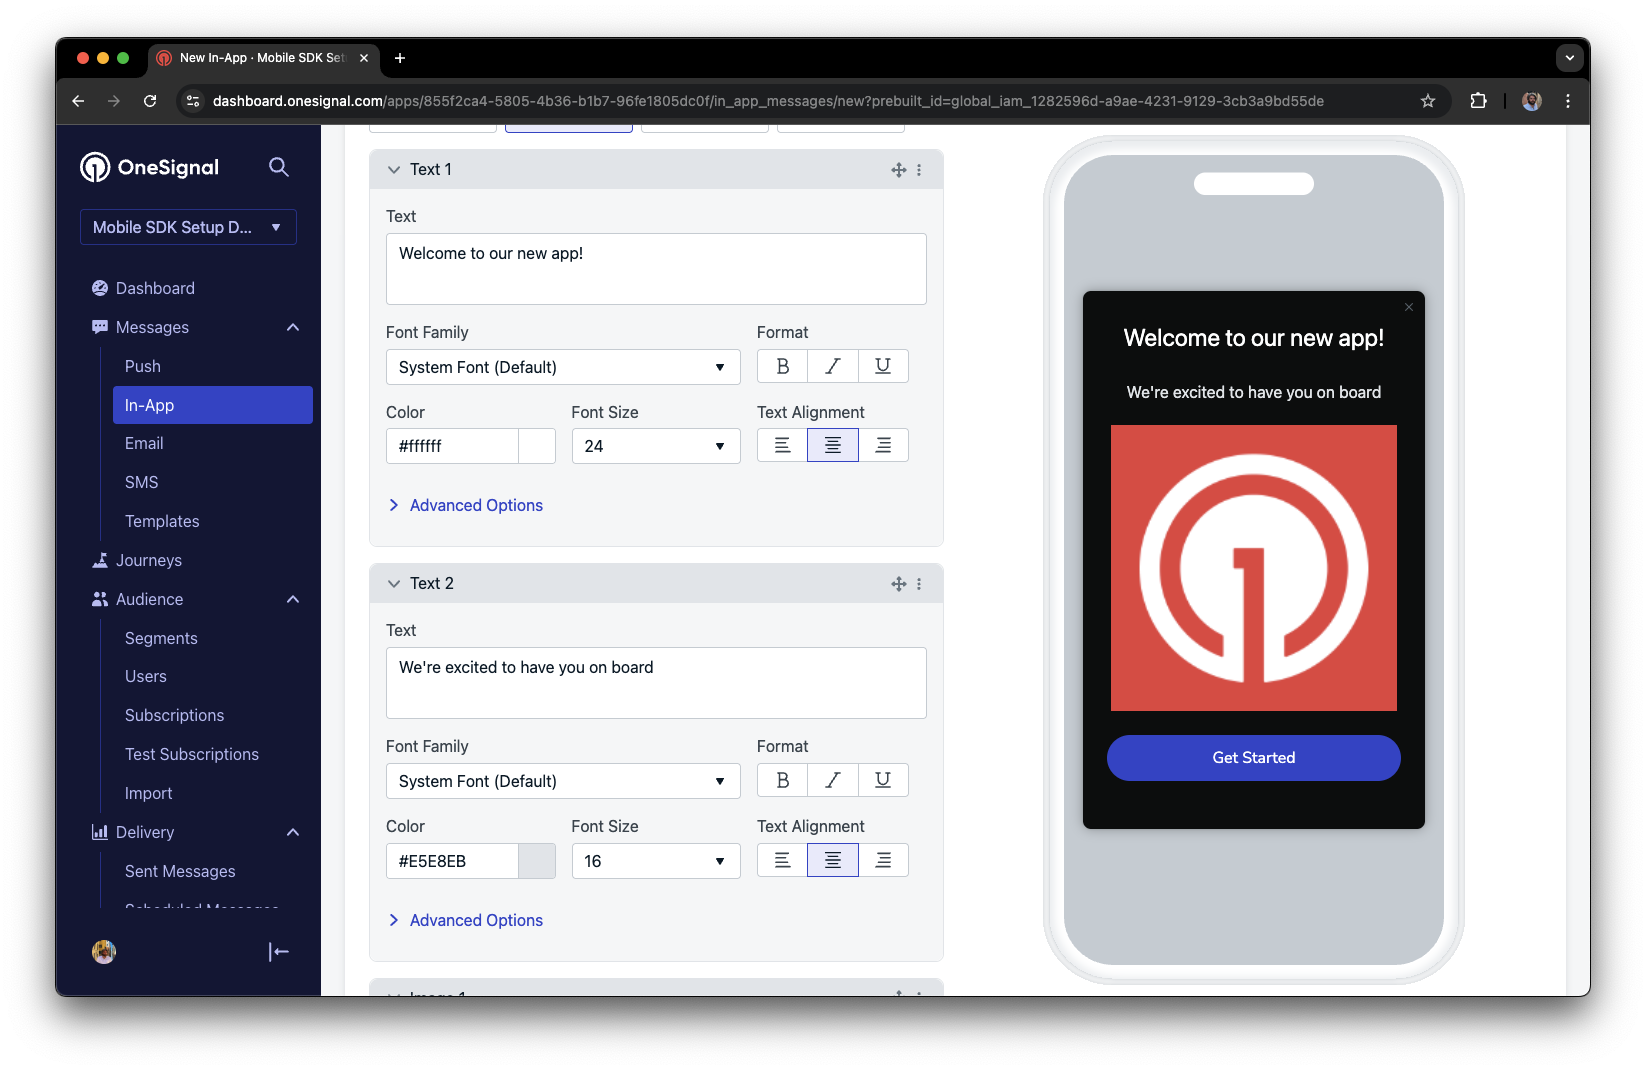
* Find and select the **Welcome** message.
* Set your Audience as the **Test Users** segment we used previously.
Images will appear small in the collapsed notification view. Expand the notification to see the full image.
In your dashboard, go to **Delivery > Sent Messages**, then click the message to view stats.
You should see the **confirmed** stat, meaning the device received the push.
You have successfully sent a notification via our API to a segment.
* No image received? Your [Notification Service Extension](#ios-setup) might be missing.
* No confirmed receipt? Review the troubleshooting guide [here](/docs/en/confirmed-delivery#troubleshooting-confirmed-delivery).
* Having issues? Copy-paste the api request and a log from start to finish of app launch into a `.txt` file. Then share both with `support@onesignal.com`.
### Send an in-app message
[In-app messages](/docs/en/in-app-messages-setup) let you communicate with users while they are using your app.
This is because users must meet the in-app audience criteria *before* a new session starts. In OneSignal, a new session starts when the user opens your app after it has been in the background or closed for at least 30 seconds. For more details, see our guide on [how in-app messages are displayed](/docs/en/in-app-messages-setup#how-are-iams-displayed%3F).
* In your OneSignal dashboard, navigate to **Messages > In-App > New In-App**.
* Find and select the **Welcome** message.
* Set your Audience as the **Test Users** segment we used previously.
 Under **Schedule > How often do you want to show this message?** select **Every time trigger conditions are satisfied**.
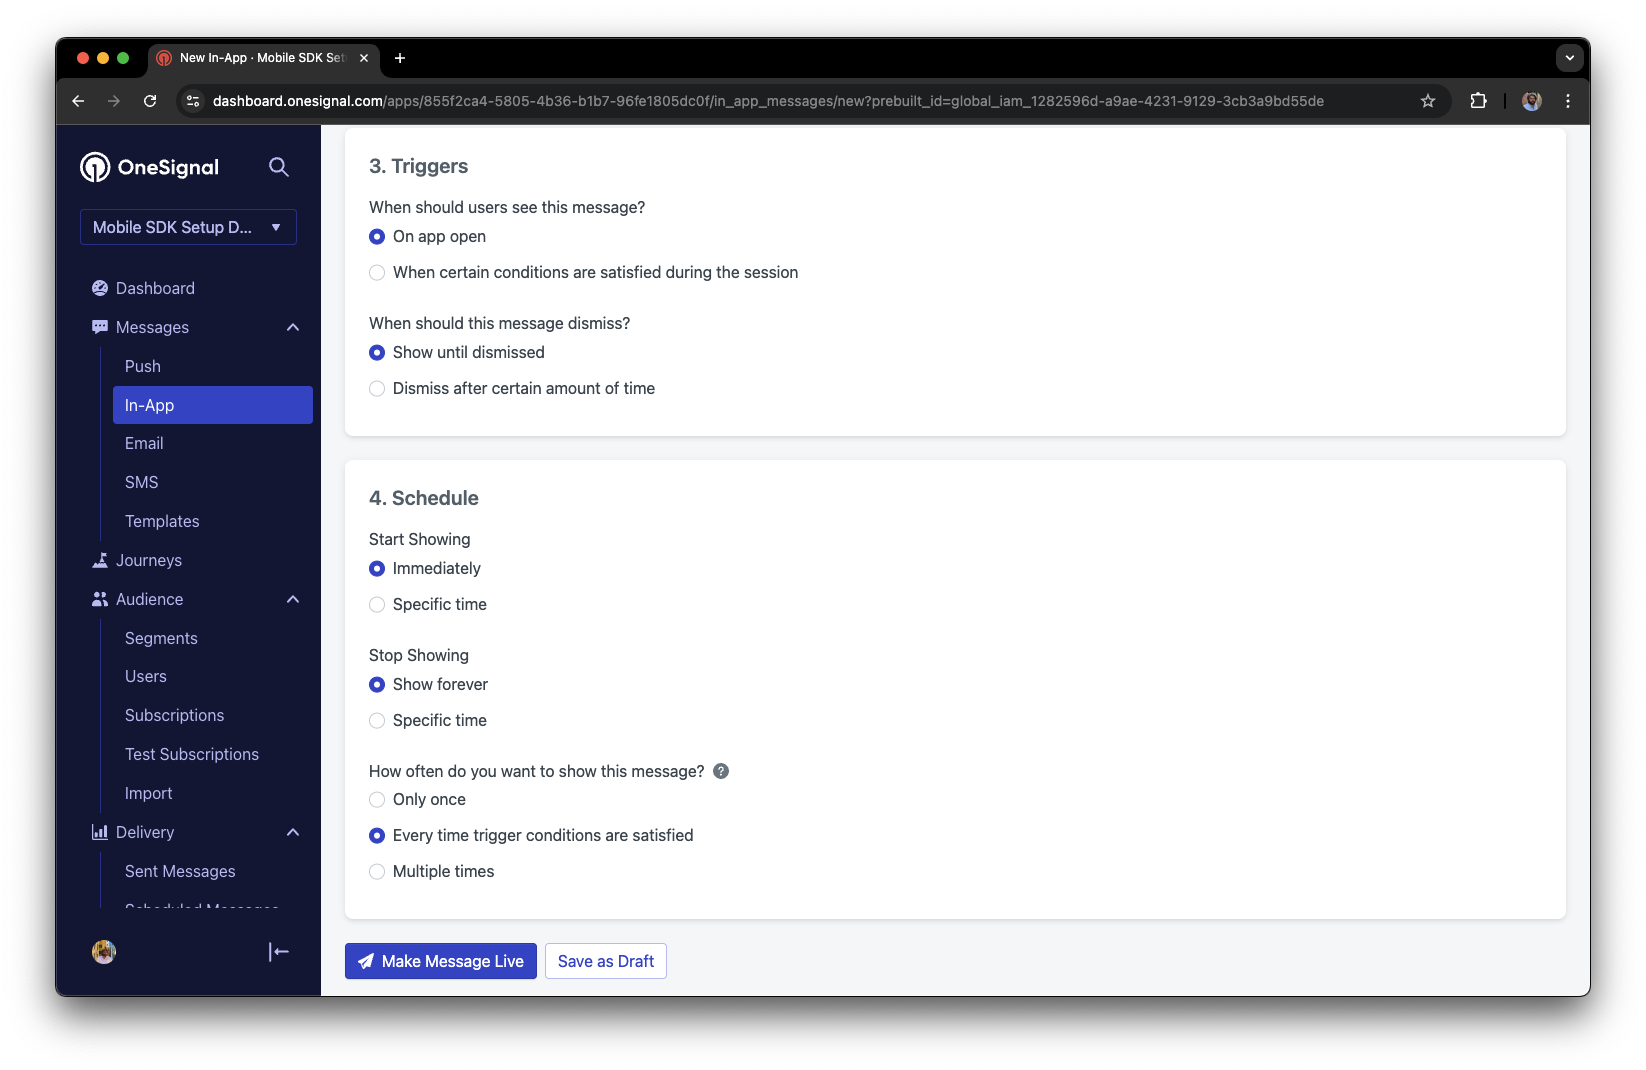 Click **Make Message Live** so it is available to your Test Users each time they open the app.
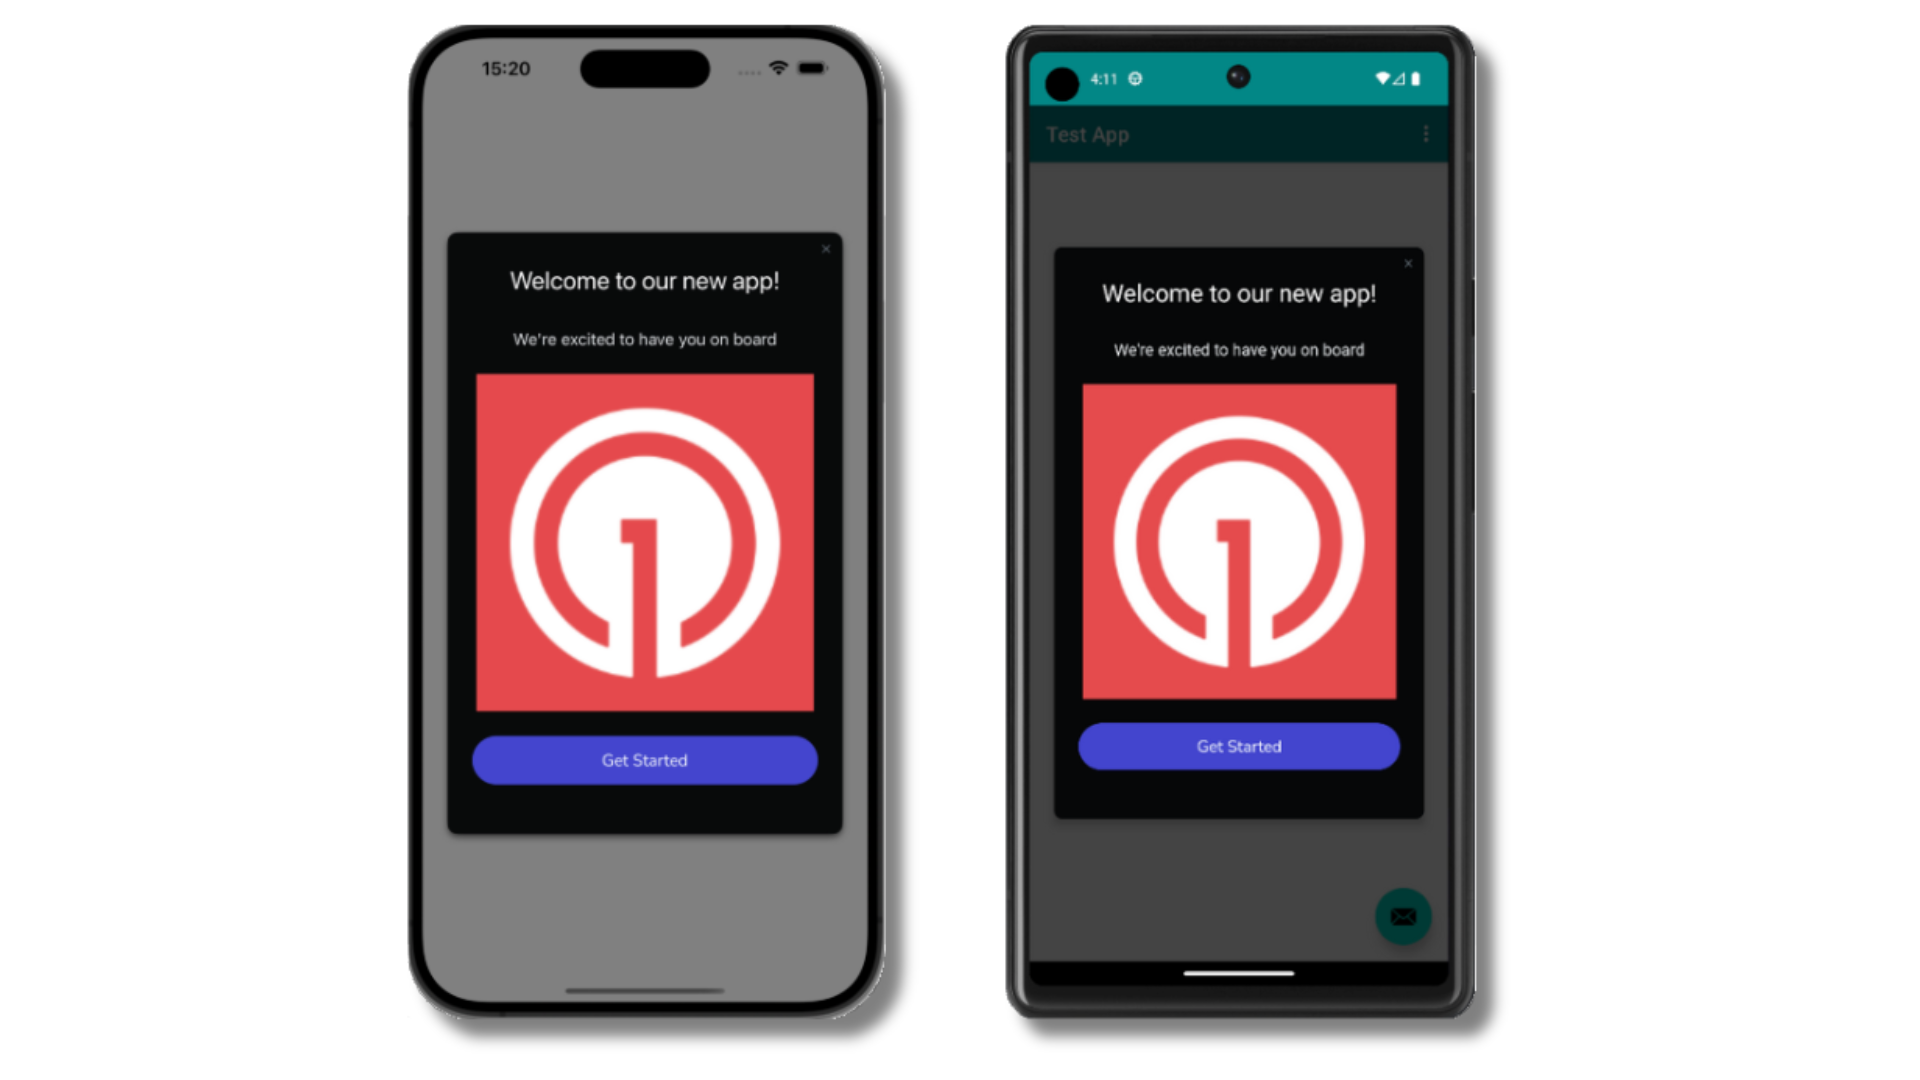
After the in-app message is live, open your app. You should see it display:
Click **Make Message Live** so it is available to your Test Users each time they open the app.
After the in-app message is live, open your app. You should see it display:
 Not seeing the message?
* Start a new session
* You must close or background the app for at least 30 seconds before reopening. This ensures a new session is started.
* For more, see [how in-app messages are displayed](/docs/en/in-app-messages-setup#how-are-iams-displayed%3F).
* Still in the `Test Users` segment?
* If you reinstalled or switched devices, re-add the device to [Test Users](#set-up-test-users) and confirm it's part of the Test Users segment.
* Having issues?
* Follow [Getting a Debug Log](/docs/en/capturing-a-debug-log) while reproducing the steps above. This will generate additional logging that you can share with `support@onesignal.com` and we will help investigate what's going on.
You have successfully setup the OneSignal SDK and learned important concepts like:
* Gathering [Subscriptions](/docs/en/subscriptions), setting [Test Users](/docs/en/find-set-test-subscriptions), and creating [Segments](/docs/en/segmentation).
* Sending [Push](/docs/en/push) with images and [Confirmed receipt](/docs/en/confirmed-delivery) using Segments and our [Create message](/reference/create-message) API.
* Sending [In-app messages](/docs/en/in-app-messages-setup).
Continue with this guide to identify users in your app and setup additional features.
***
## User identification
Previously, we demonstrated how to create mobile [Subscriptions](/docs/en/subscriptions). Now we'll expand to identifying [Users](/docs/en/users) across all their subscriptions (including push, email, and SMS) using the OneSignal SDK. We'll cover External IDs, tags, multi-channel subscriptions, privacy, and event tracking to help you unify and engage users across platforms.
### Assign External ID
Use an External ID to identify users consistently across devices, email addresses, and phone numbers using your backend's user identifier. This ensures your messaging stays unified across channels and 3rd party systems (especially important for [Integrations](/docs/en/integrations)).
Set the External ID with our SDK's [`login` method](/docs/en/mobile-sdk-reference#login-external-id) each time they are identified by your app.
OneSignal generates unique read-only IDs for subscriptions (Subscription ID) and users (OneSignal ID).
As users download your app on different devices, subscribe to your website, and/or provide you email addresses and phone numbers outside of your app, new subscriptions will be created.
Setting the External ID via our SDK is highly recommended to identify users across all their subscriptions, regardless of how they are created.
### Add Tags
[Tags](/docs/en/add-user-data-tags) are key-value pairs of string data you can use to store user properties (like `username`, `role`, or preferences) and events (like `purchase_date`, `game_level`, or user interactions). Tags power advanced [Message Personalization](/docs/en/message-personalization) and [Segmentation](/docs/en/segmentation) allowing for more advanced use cases.
Set tags with our SDK [`addTag` and `addTags` methods](/docs/en/mobile-sdk-reference#data-tags) as events occur in your app.
In this example, the user reached level 6 identifiable by the tag called `current_level` set to a value of `6`.
Not seeing the message?
* Start a new session
* You must close or background the app for at least 30 seconds before reopening. This ensures a new session is started.
* For more, see [how in-app messages are displayed](/docs/en/in-app-messages-setup#how-are-iams-displayed%3F).
* Still in the `Test Users` segment?
* If you reinstalled or switched devices, re-add the device to [Test Users](#set-up-test-users) and confirm it's part of the Test Users segment.
* Having issues?
* Follow [Getting a Debug Log](/docs/en/capturing-a-debug-log) while reproducing the steps above. This will generate additional logging that you can share with `support@onesignal.com` and we will help investigate what's going on.
You have successfully setup the OneSignal SDK and learned important concepts like:
* Gathering [Subscriptions](/docs/en/subscriptions), setting [Test Users](/docs/en/find-set-test-subscriptions), and creating [Segments](/docs/en/segmentation).
* Sending [Push](/docs/en/push) with images and [Confirmed receipt](/docs/en/confirmed-delivery) using Segments and our [Create message](/reference/create-message) API.
* Sending [In-app messages](/docs/en/in-app-messages-setup).
Continue with this guide to identify users in your app and setup additional features.
***
## User identification
Previously, we demonstrated how to create mobile [Subscriptions](/docs/en/subscriptions). Now we'll expand to identifying [Users](/docs/en/users) across all their subscriptions (including push, email, and SMS) using the OneSignal SDK. We'll cover External IDs, tags, multi-channel subscriptions, privacy, and event tracking to help you unify and engage users across platforms.
### Assign External ID
Use an External ID to identify users consistently across devices, email addresses, and phone numbers using your backend's user identifier. This ensures your messaging stays unified across channels and 3rd party systems (especially important for [Integrations](/docs/en/integrations)).
Set the External ID with our SDK's [`login` method](/docs/en/mobile-sdk-reference#login-external-id) each time they are identified by your app.
OneSignal generates unique read-only IDs for subscriptions (Subscription ID) and users (OneSignal ID).
As users download your app on different devices, subscribe to your website, and/or provide you email addresses and phone numbers outside of your app, new subscriptions will be created.
Setting the External ID via our SDK is highly recommended to identify users across all their subscriptions, regardless of how they are created.
### Add Tags
[Tags](/docs/en/add-user-data-tags) are key-value pairs of string data you can use to store user properties (like `username`, `role`, or preferences) and events (like `purchase_date`, `game_level`, or user interactions). Tags power advanced [Message Personalization](/docs/en/message-personalization) and [Segmentation](/docs/en/segmentation) allowing for more advanced use cases.
Set tags with our SDK [`addTag` and `addTags` methods](/docs/en/mobile-sdk-reference#data-tags) as events occur in your app.
In this example, the user reached level 6 identifiable by the tag called `current_level` set to a value of `6`.
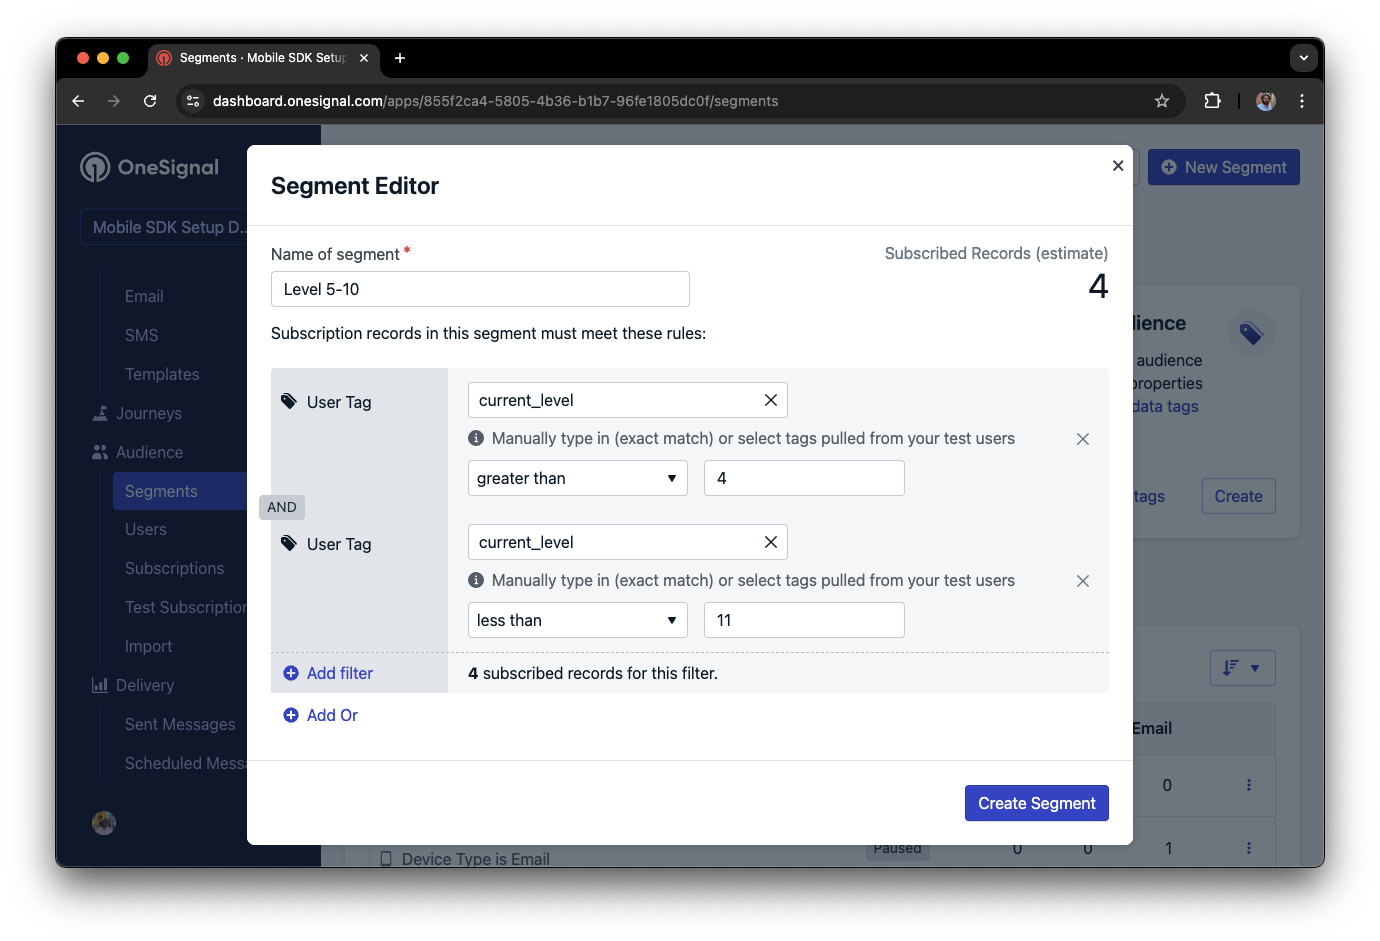
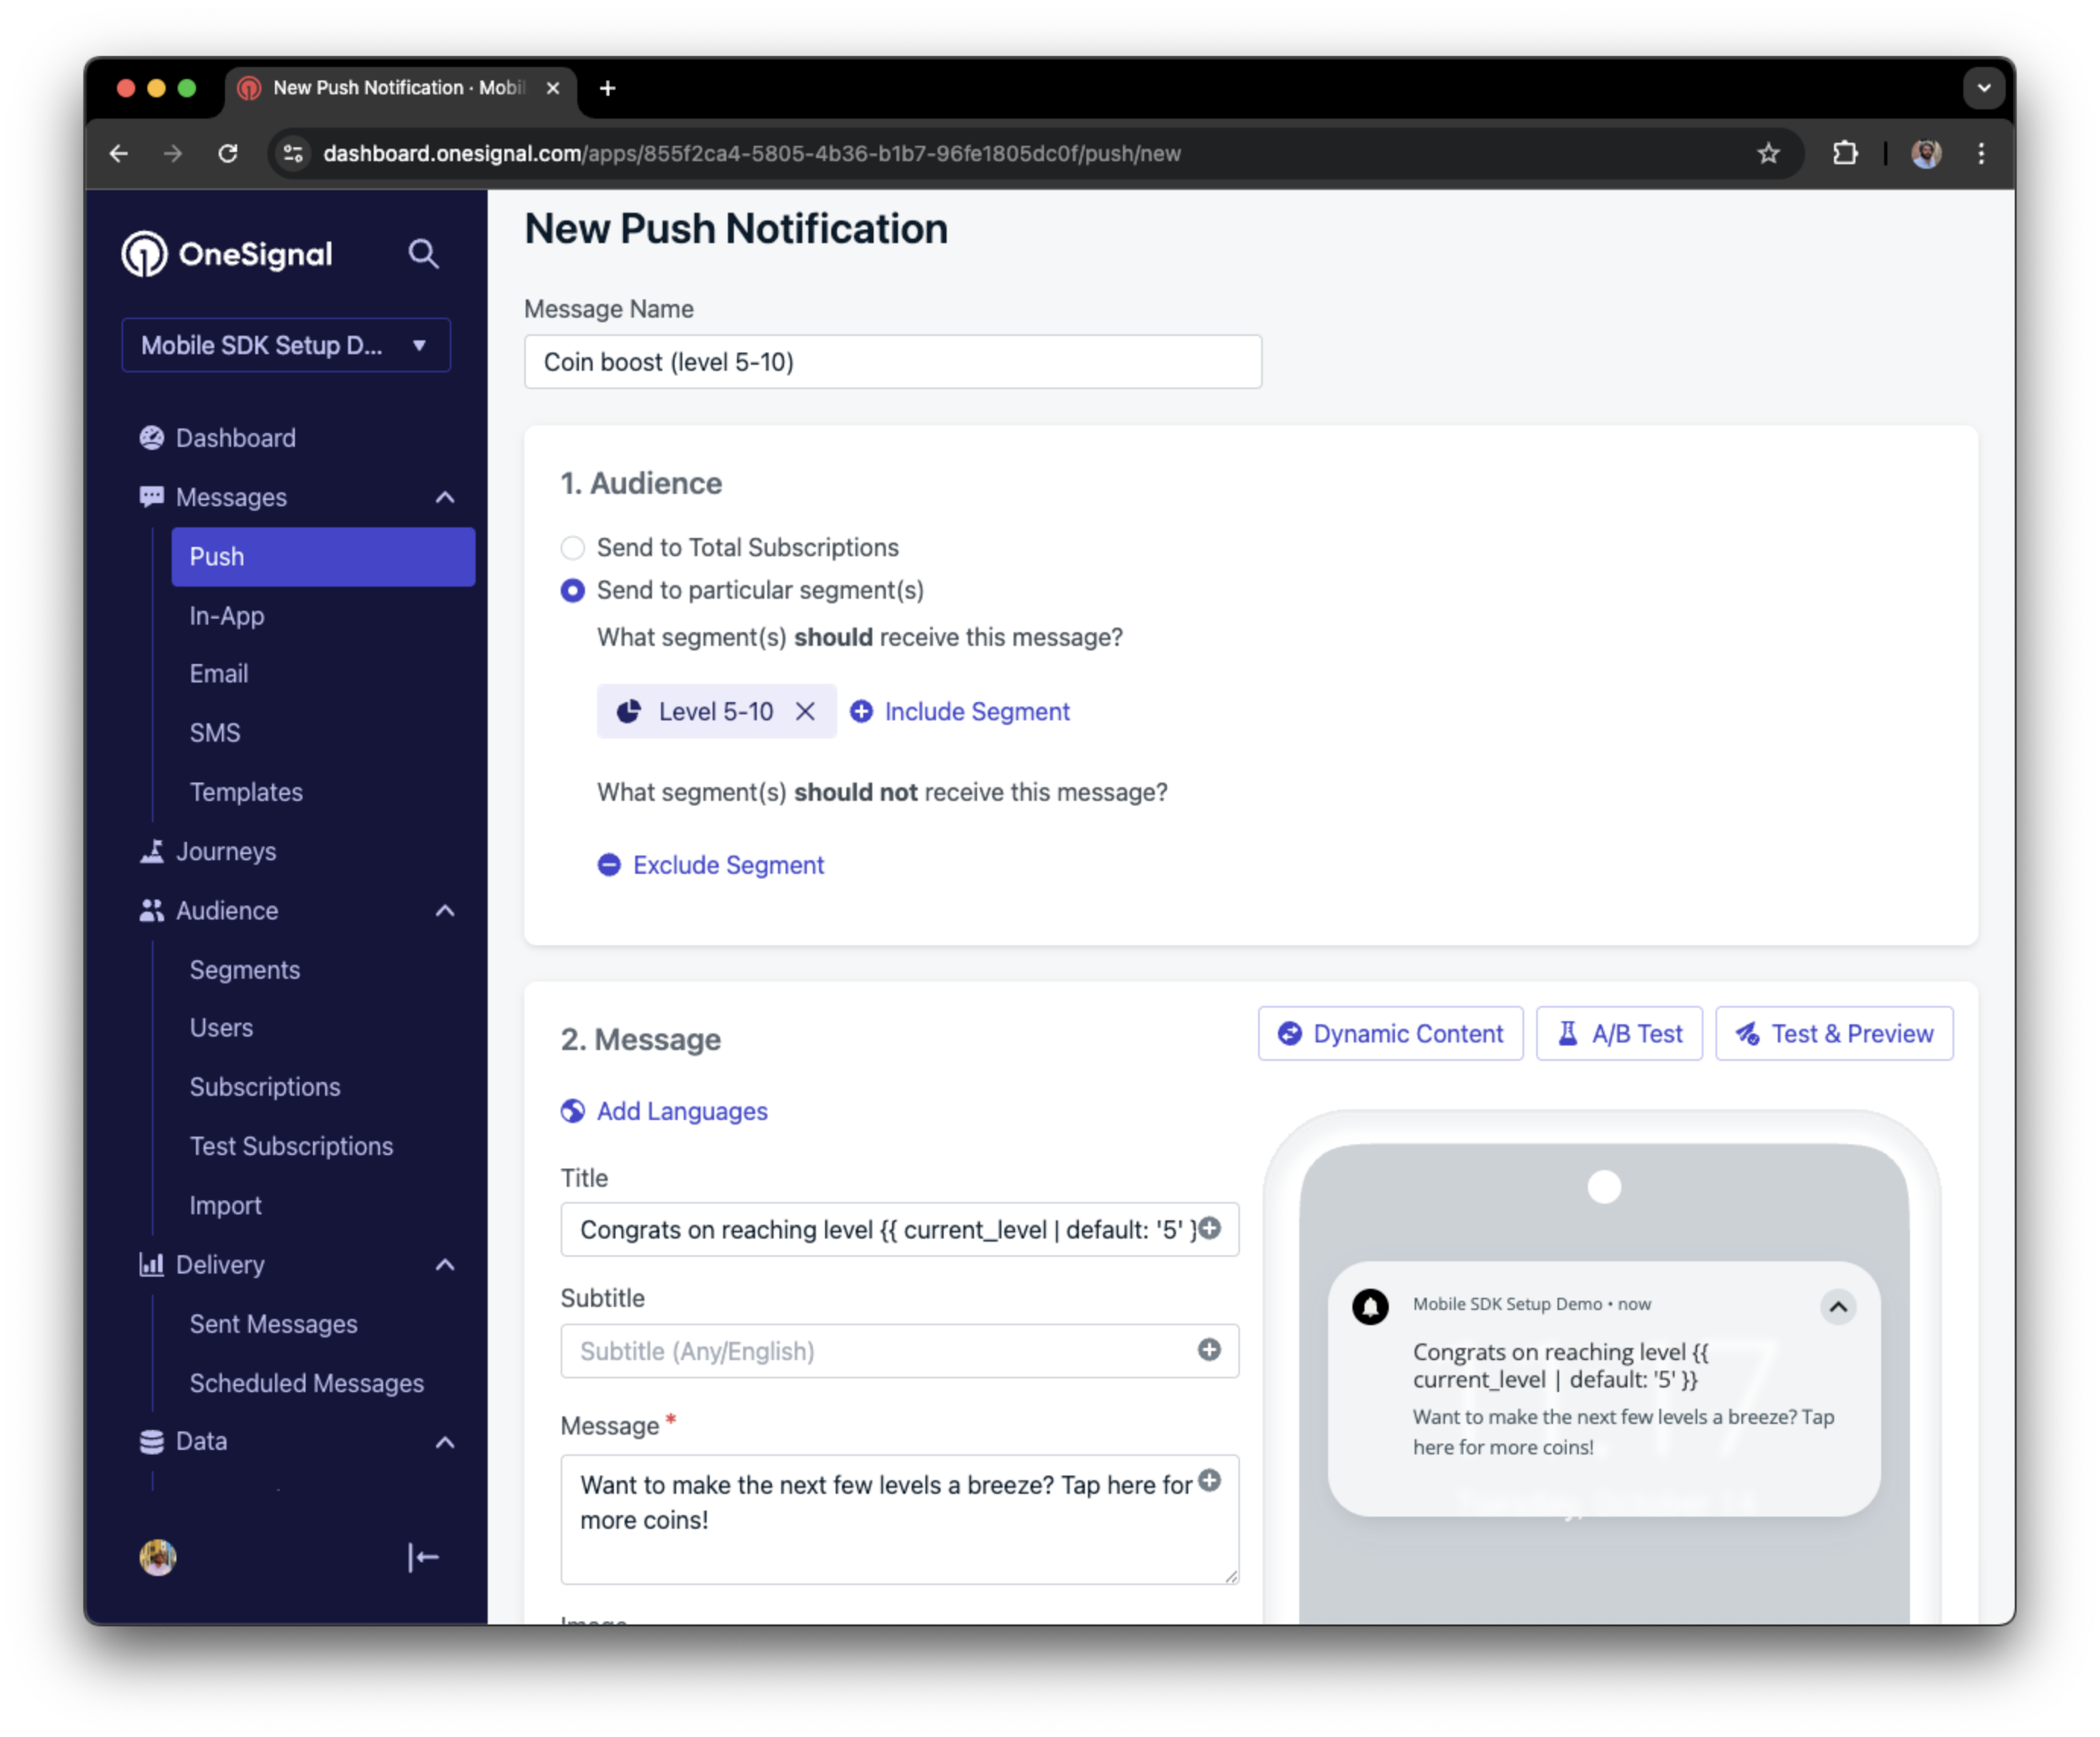
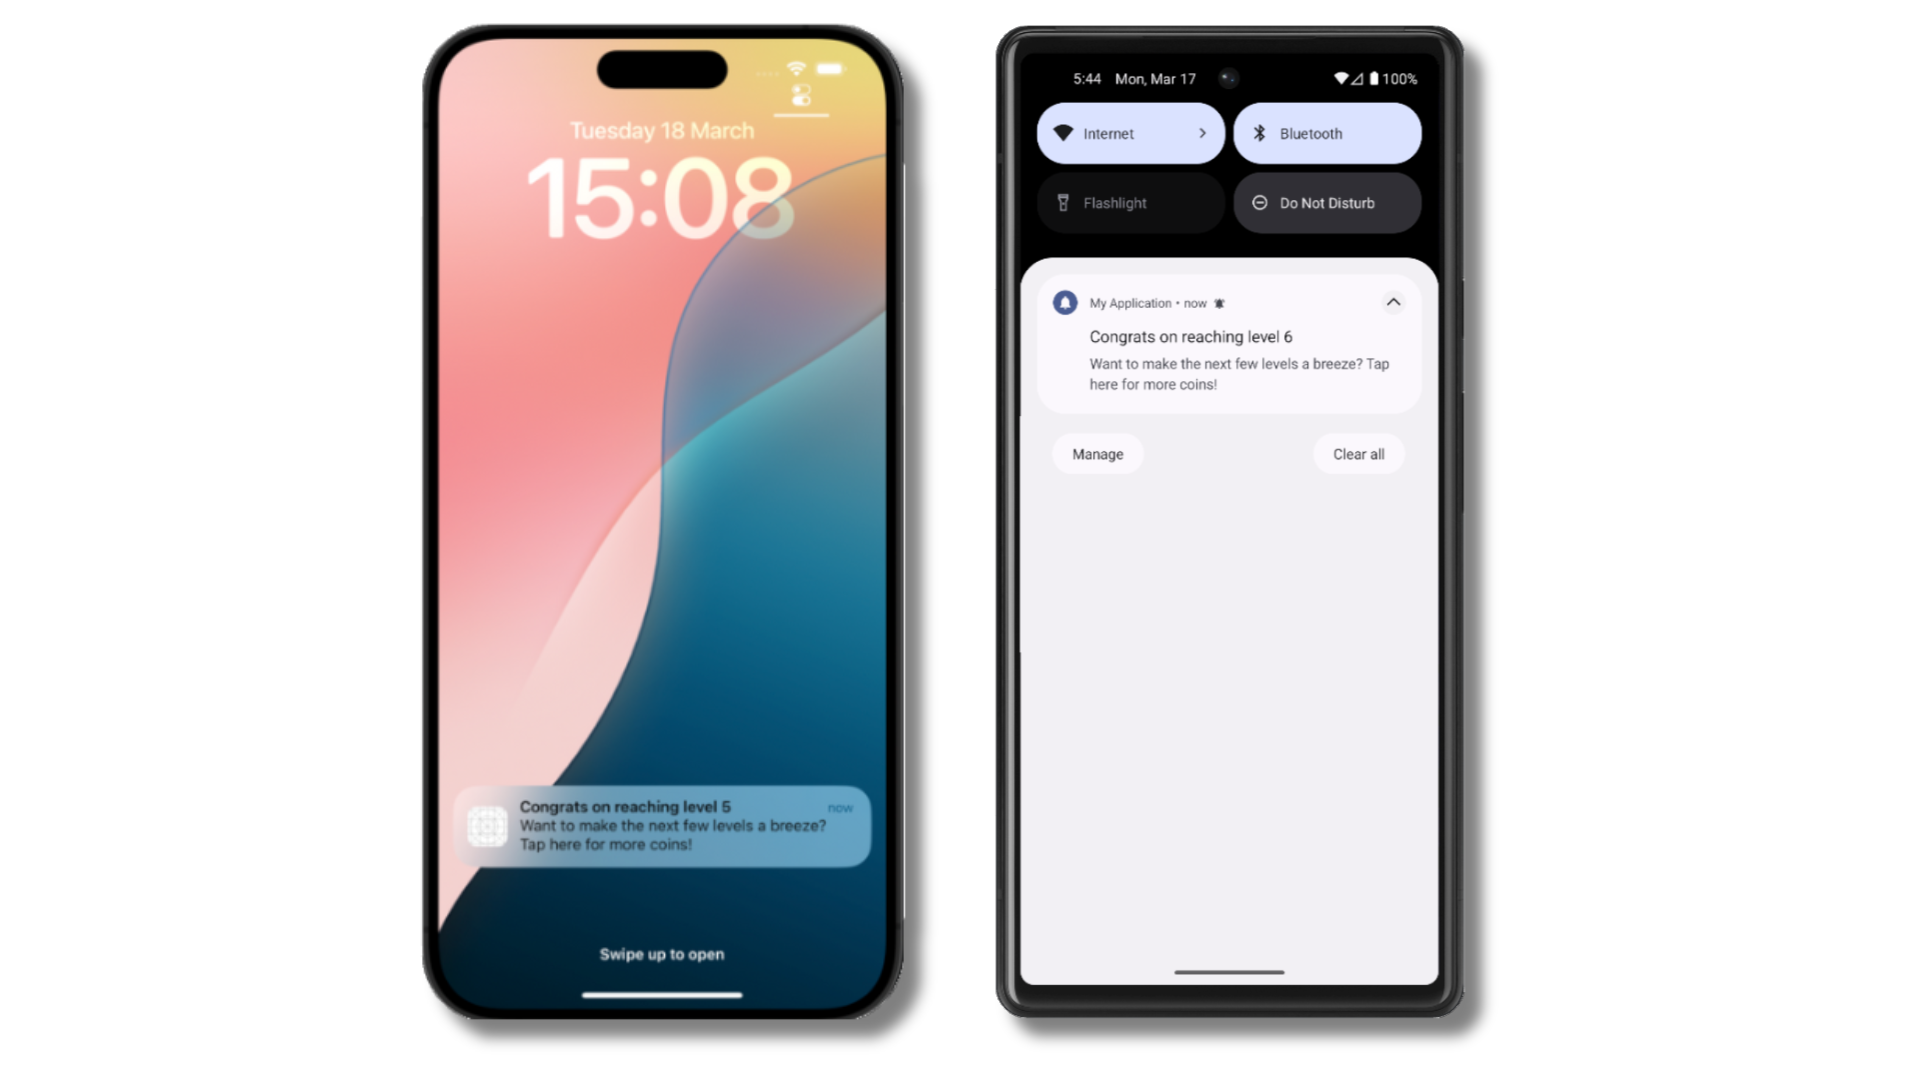
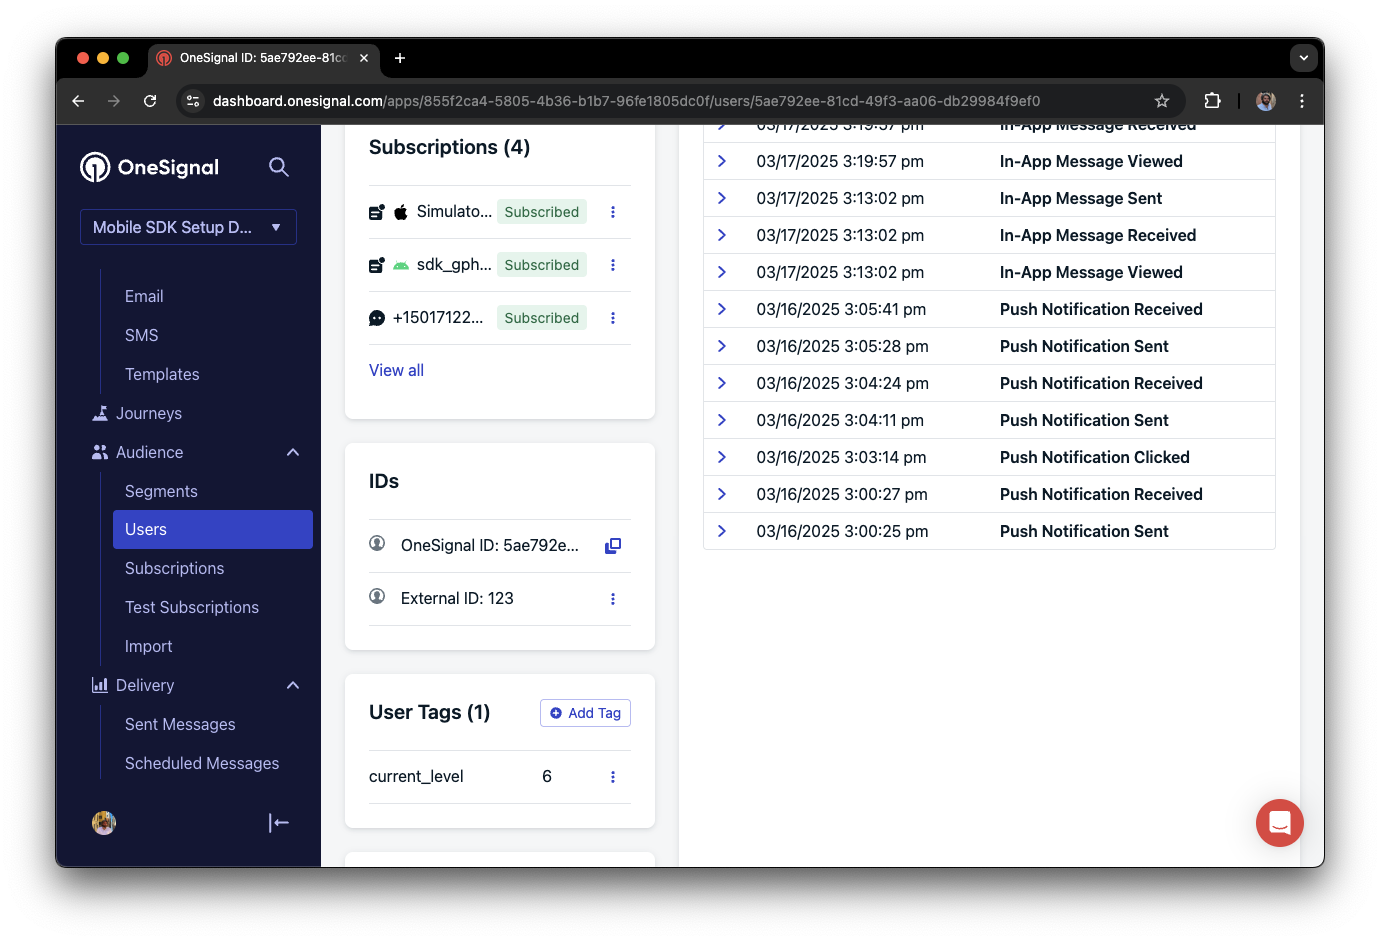 We can create a segment of users that have a level of between 5 and 10, and use that to send targeted and personalized messages:
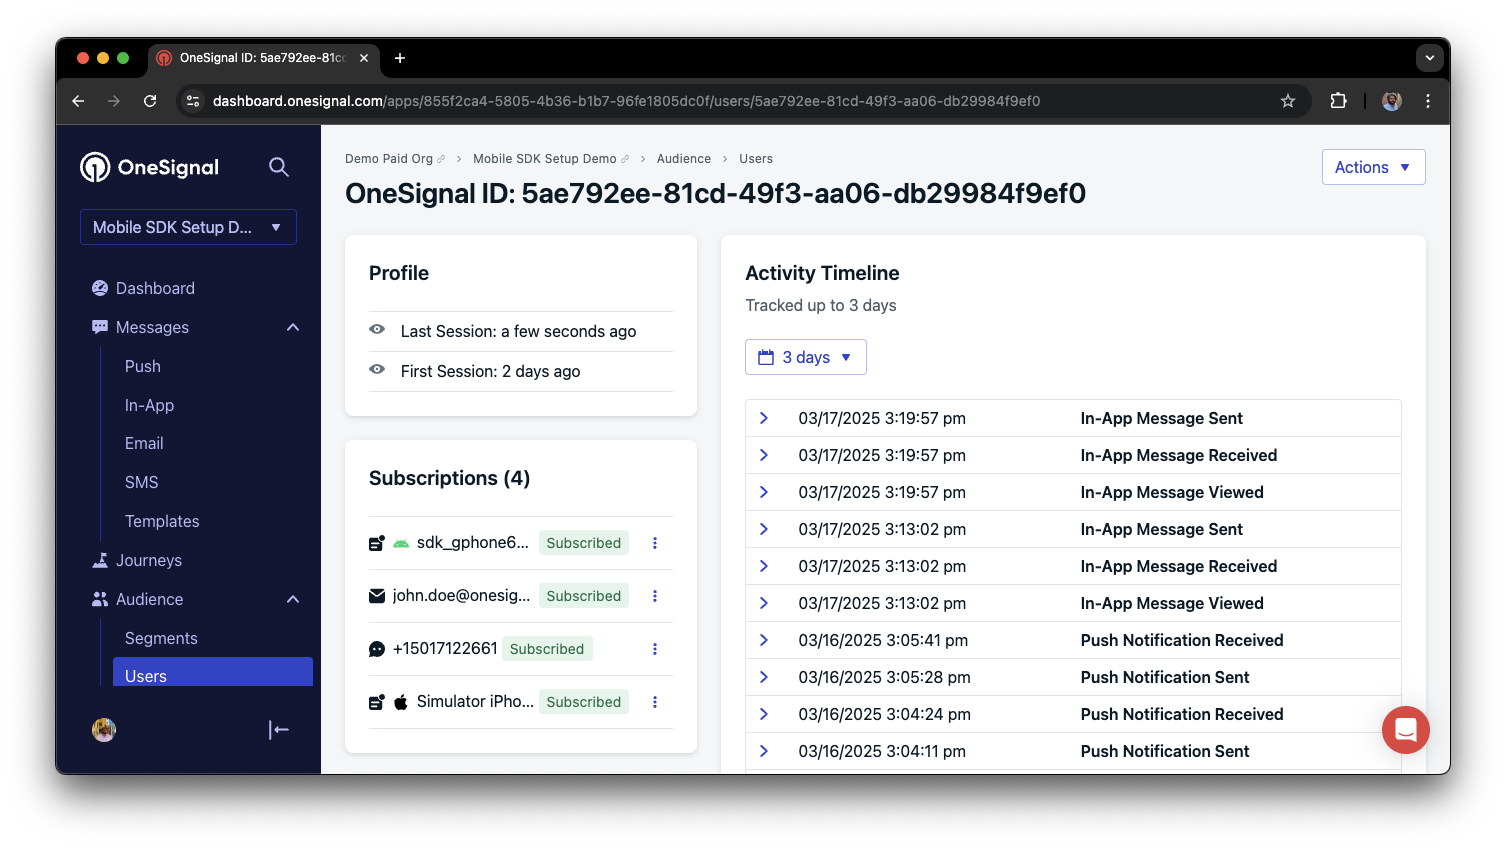
 ### Add email and/or SMS subscriptions
Earlier we saw how our SDK creates mobile subscriptions to send push and in-app messages. You can also reach users through emails and SMS channels by creating the corresponding subscriptions.
* Use the [`addEmail` method](/docs/en/mobile-sdk-reference#addemail-%2C-removeemail) to create email subscriptions.
* Use the [`addSms` method](/docs/en/mobile-sdk-reference#addsms-%2C-removesms) to create SMS subscriptions.
If the email address and/or phone number already exist in the OneSignal app, the SDK will add it to the existing user, it will not create duplicates.
You can view unified users via **Audience > Users** in the dashboard or with the [View user API](/reference/view-user).
### Add email and/or SMS subscriptions
Earlier we saw how our SDK creates mobile subscriptions to send push and in-app messages. You can also reach users through emails and SMS channels by creating the corresponding subscriptions.
* Use the [`addEmail` method](/docs/en/mobile-sdk-reference#addemail-%2C-removeemail) to create email subscriptions.
* Use the [`addSms` method](/docs/en/mobile-sdk-reference#addsms-%2C-removesms) to create SMS subscriptions.
If the email address and/or phone number already exist in the OneSignal app, the SDK will add it to the existing user, it will not create duplicates.
You can view unified users via **Audience > Users** in the dashboard or with the [View user API](/reference/view-user).
 Best practices for multi-channel communication
* Obtain explicit consent before adding email or SMS subscriptions.
* Explain the benefits of each communication channel to users.
* Provide channel preferences so users can select which channels they prefer.
***
### Privacy & user consent
To control when OneSignal collects user data, use the SDK's consent gating methods:
* [`setConsentRequired(true)`](/docs/en/mobile-sdk-reference#setconsentrequired): Prevents data collection until consent is given.
* [`setConsentGiven(true)`](/docs/en/mobile-sdk-reference#setconsentgiven): Enables data collection once consent is granted.
See our Privacy & security docs for more on:
* [Data collected by the SDK](/docs/en/data-collected-by-the-onesignal-sdk)
* [Handling personal data](/docs/en/handling-personal-data)
***
## Prompt for push permissions
Instead of calling `requestPermission()` immediately on app open, take a more strategic approach. Use an in-app message to explain the value of push notifications before requesting permission.
For best practices and implementation details, see our [Prompt for push permissions](/docs/en/prompt-for-push-permissions) guide.
***
## Listen to push, user, and in-app events
Use SDK listeners to react to user actions and state changes.
The SDK provides several event listeners for you to hook into. See our [SDK reference guide](/docs/en/mobile-sdk-reference) for more details.
### Push notification events
* [`addClickListener()`](/docs/en/mobile-sdk-reference#addclicklistener-push): Detect when a notification is tapped. Helpful for [Deep Linking](/docs/en/deep-linking).
* [`addForegroundLifecycleListener()`](/docs/en/mobile-sdk-reference#addforegroundlifecyclelistener-push): Control how notifications behave in foreground.
For full customization, see [Mobile Service Extensions](/docs/en/service-extensions).
### User state changes
* [`addObserver()` for user state](/docs/en/mobile-sdk-reference#addobserver-user-state): Detect when the External ID is set.
* [`addPermissionObserver()`](/docs/en/mobile-sdk-reference#addpermissionobserver-push): Track the user's specific interaction with the native push permission prompt.
* [`addObserver()` for push subscription](/docs/en/mobile-sdk-reference#addobserver-push-subscription-changes): Track when the push subscription status changes.
### In-app message events
* [`addClickListener()`](/docs/en/mobile-sdk-reference#addclicklistener-in-app): Handle in-app click actions. Ideal for deep linking or tracking events.
* [`addLifecycleListener()`](/docs/en/mobile-sdk-reference#addclicklistener-in-app): Track full lifecycle of in-app messages (shown, clicked, dismissed, etc.).
***
## Advanced setup & capabilities
Explore more capabilities to enhance your integration:
* [🔁 Migrating to OneSignal from another service](/docs/en/migrating-to-onesignal)
* [🌍 Location tracking](/docs/en/mobile-sdk-reference#location)
* [🔗 Deep Linking](/docs/en/deep-linking)
* [🔌 Integrations](/docs/en/integrations)
* [🧩 Mobile Service Extensions](/docs/en/service-extensions)
* [🛎️ Action buttons](/docs/en/action-buttons)
* [🌐 Multi-language messaging](/docs/en/multi-language-messaging)
* [🛡️ Identity Verification](/docs/en/identity-verification)
* [📊 Custom Outcomes](/docs/en/custom-outcomes)
* [📲 Live Activities](/docs/en/live-activities)
### Mobile SDK setup & reference
Make sure you've enabled all key features by reviewing the [Mobile push setup](/docs/en/mobile-push-setup) guide.
For full details on available methods and configuration options, visit the [Mobile SDK reference](/docs/en/mobile-sdk-reference).
Congratulations! You've successfully completed the Mobile SDK setup guide.
***
Need help?
Chat with our Support team or email `support@onesignal.com`
Please include:
* Details of the issue you're experiencing and steps to reproduce if available
* Your OneSignal App ID
* The External ID or Subscription ID if applicable
* The URL to the message you tested in the OneSignal Dashboard if applicable
* Any relevant [logs or error messages](/docs/en/capturing-a-debug-log)
We're happy to help!
***
Best practices for multi-channel communication
* Obtain explicit consent before adding email or SMS subscriptions.
* Explain the benefits of each communication channel to users.
* Provide channel preferences so users can select which channels they prefer.
***
### Privacy & user consent
To control when OneSignal collects user data, use the SDK's consent gating methods:
* [`setConsentRequired(true)`](/docs/en/mobile-sdk-reference#setconsentrequired): Prevents data collection until consent is given.
* [`setConsentGiven(true)`](/docs/en/mobile-sdk-reference#setconsentgiven): Enables data collection once consent is granted.
See our Privacy & security docs for more on:
* [Data collected by the SDK](/docs/en/data-collected-by-the-onesignal-sdk)
* [Handling personal data](/docs/en/handling-personal-data)
***
## Prompt for push permissions
Instead of calling `requestPermission()` immediately on app open, take a more strategic approach. Use an in-app message to explain the value of push notifications before requesting permission.
For best practices and implementation details, see our [Prompt for push permissions](/docs/en/prompt-for-push-permissions) guide.
***
## Listen to push, user, and in-app events
Use SDK listeners to react to user actions and state changes.
The SDK provides several event listeners for you to hook into. See our [SDK reference guide](/docs/en/mobile-sdk-reference) for more details.
### Push notification events
* [`addClickListener()`](/docs/en/mobile-sdk-reference#addclicklistener-push): Detect when a notification is tapped. Helpful for [Deep Linking](/docs/en/deep-linking).
* [`addForegroundLifecycleListener()`](/docs/en/mobile-sdk-reference#addforegroundlifecyclelistener-push): Control how notifications behave in foreground.
For full customization, see [Mobile Service Extensions](/docs/en/service-extensions).
### User state changes
* [`addObserver()` for user state](/docs/en/mobile-sdk-reference#addobserver-user-state): Detect when the External ID is set.
* [`addPermissionObserver()`](/docs/en/mobile-sdk-reference#addpermissionobserver-push): Track the user's specific interaction with the native push permission prompt.
* [`addObserver()` for push subscription](/docs/en/mobile-sdk-reference#addobserver-push-subscription-changes): Track when the push subscription status changes.
### In-app message events
* [`addClickListener()`](/docs/en/mobile-sdk-reference#addclicklistener-in-app): Handle in-app click actions. Ideal for deep linking or tracking events.
* [`addLifecycleListener()`](/docs/en/mobile-sdk-reference#addclicklistener-in-app): Track full lifecycle of in-app messages (shown, clicked, dismissed, etc.).
***
## Advanced setup & capabilities
Explore more capabilities to enhance your integration:
* [🔁 Migrating to OneSignal from another service](/docs/en/migrating-to-onesignal)
* [🌍 Location tracking](/docs/en/mobile-sdk-reference#location)
* [🔗 Deep Linking](/docs/en/deep-linking)
* [🔌 Integrations](/docs/en/integrations)
* [🧩 Mobile Service Extensions](/docs/en/service-extensions)
* [🛎️ Action buttons](/docs/en/action-buttons)
* [🌐 Multi-language messaging](/docs/en/multi-language-messaging)
* [🛡️ Identity Verification](/docs/en/identity-verification)
* [📊 Custom Outcomes](/docs/en/custom-outcomes)
* [📲 Live Activities](/docs/en/live-activities)
### Mobile SDK setup & reference
Make sure you've enabled all key features by reviewing the [Mobile push setup](/docs/en/mobile-push-setup) guide.
For full details on available methods and configuration options, visit the [Mobile SDK reference](/docs/en/mobile-sdk-reference).
Congratulations! You've successfully completed the Mobile SDK setup guide.
***
Need help?
Chat with our Support team or email `support@onesignal.com`
Please include:
* Details of the issue you're experiencing and steps to reproduce if available
* Your OneSignal App ID
* The External ID or Subscription ID if applicable
* The URL to the message you tested in the OneSignal Dashboard if applicable
* Any relevant [logs or error messages](/docs/en/capturing-a-debug-log)
We're happy to help!
***