> ## Documentation Index
> Fetch the complete documentation index at: https://documentation.onesignal.com/llms.txt
> Use this file to discover all available pages before exploring further.
# Web SDK kurulumu
> JavaScript SDK, service worker kurulumu ve kontrol paneli yapılandırmasıyla web sitenize OneSignal web push bildirimleri ekleyin.
export const SdkReleasesIframe = ({sdkFilter = undefined, viewMode = undefined, height, ...frameProps}) => {
const baseUrl = 'https://onesignal.github.io/sdk-releases';
const buildUrl = (theme, sdkFilter, viewMode) => {
const url = new URL(baseUrl);
const params = new URLSearchParams();
if (theme) {
params.set('theme', theme);
}
if (sdkFilter) {
params.set('sdk', sdkFilter);
}
if (viewMode) {
params.set('viewMode', viewMode);
}
if (params.toString()) {
url.search = params.toString();
}
return url.toString();
};
const detectTheme = () => {
if (document.documentElement.classList.contains('dark')) {
return 'dark';
}
return 'light';
};
const [theme, setTheme] = useState('light');
const [iframeSrc, setIframeSrc] = useState(() => {
const initialTheme = detectTheme();
return buildUrl(initialTheme, sdkFilter, viewMode);
});
useEffect(() => {
const currentTheme = detectTheme();
setTheme(currentTheme);
setIframeSrc(buildUrl(currentTheme, sdkFilter, viewMode));
const mediaQuery = window.matchMedia('(prefers-color-scheme: dark)');
const handleThemeChange = () => {
const newTheme = detectTheme();
setTheme(newTheme);
setIframeSrc(buildUrl(newTheme, sdkFilter, viewMode));
};
if (mediaQuery.addEventListener) {
mediaQuery.addEventListener('change', handleThemeChange);
} else {
mediaQuery.addListener(handleThemeChange);
}
window.addEventListener('storage', handleThemeChange);
const observer = new MutationObserver(handleThemeChange);
observer.observe(document.documentElement, {
attributes: true,
attributeFilter: ['class', 'data-theme']
});
return () => {
if (mediaQuery.removeEventListener) {
mediaQuery.removeEventListener('change', handleThemeChange);
} else {
mediaQuery.removeListener(handleThemeChange);
}
window.removeEventListener('storage', handleThemeChange);
observer.disconnect();
};
}, [sdkFilter, viewMode]);
const getIframeHeight = () => {
if (viewMode === 'table') {
return '450';
}
if (viewMode === 'mini') {
return '170';
}
return '800';
};
const iframeHeight = height || getIframeHeight();
return
;
};
## Genel bakış
Bu kılavuz, kontrol paneli yapılandırmasından SDK kurulumuna kadar sitenize OneSignal web push bildirimleri ekleme sürecinde size yol gösterir. OneSignal, Chrome, Firefox, Edge, Safari ve [diğer büyük tarayıcıları](./web-push-setup-faq) destekler.
***
## Gereksinimler
* HTTPS web sitesi: Web push, HTTP'de veya gizli/özel modlarda çalışmaz.
* Sunucu erişimi: Sitenize bir service worker dosyası yüklemeniz gerekecek.
* Tek origin: Web push, [Same-origin politikasını](https://developer.mozilla.org/en-US/docs/Web/Security/Same-origin_policy) takip eder. Birden fazla origin'iniz varsa (alan adları/alt alan adları), birden fazla OneSignal uygulamasına ihtiyacınız olacaktır (origin başına bir tane). Bu tarayıcı sınırlamasına uymak için şunlardan birini yapabilirsiniz:
* Abonelikler için trafiği tek bir origin'e yönlendirin.
* Birden fazla OneSignal uygulaması oluşturun—origin başına bir tane.
Ekibiniz OneSignal ile zaten bir hesap oluşturduysa, uygulamayı kurabilmeniz için [admin rolü olarak davet edilmenizi isteyin](./manage-team-members). Aksi takdirde, başlamak için [onesignal.com](https://onesignal.com)'da ücretsiz bir hesap açın!
***
## OneSignal uygulamanızı ve platformunuzu yapılandırın
OneSignal kontrol panelinde:
* **Ayarlar > Push & In-App > Web**'e gidin.
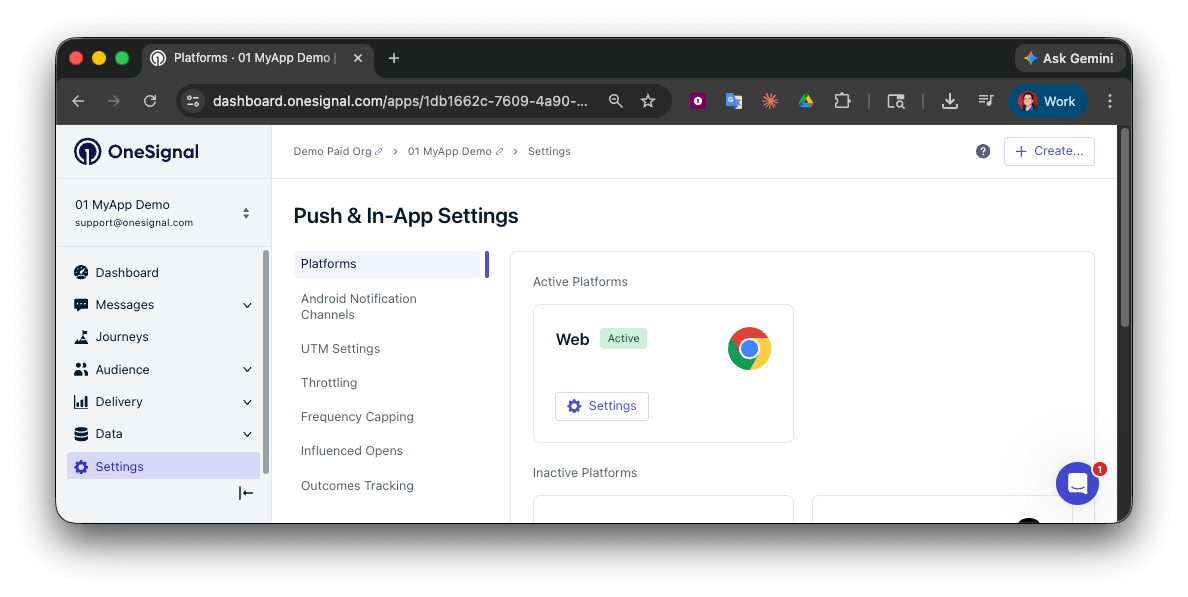 Entegrasyon türünü seçin:
Ek kodlama olmadan istemleri ve ayarları doğrudan OneSignal kontrol panelinden yönetin.
Resmi eklentimizle WordPress kullanıyorsanız gereklidir.
İstemler ve SDK yapılandırması üzerinde tam kontrol gerektiren geliştiriciler için.
### Site kurulumu
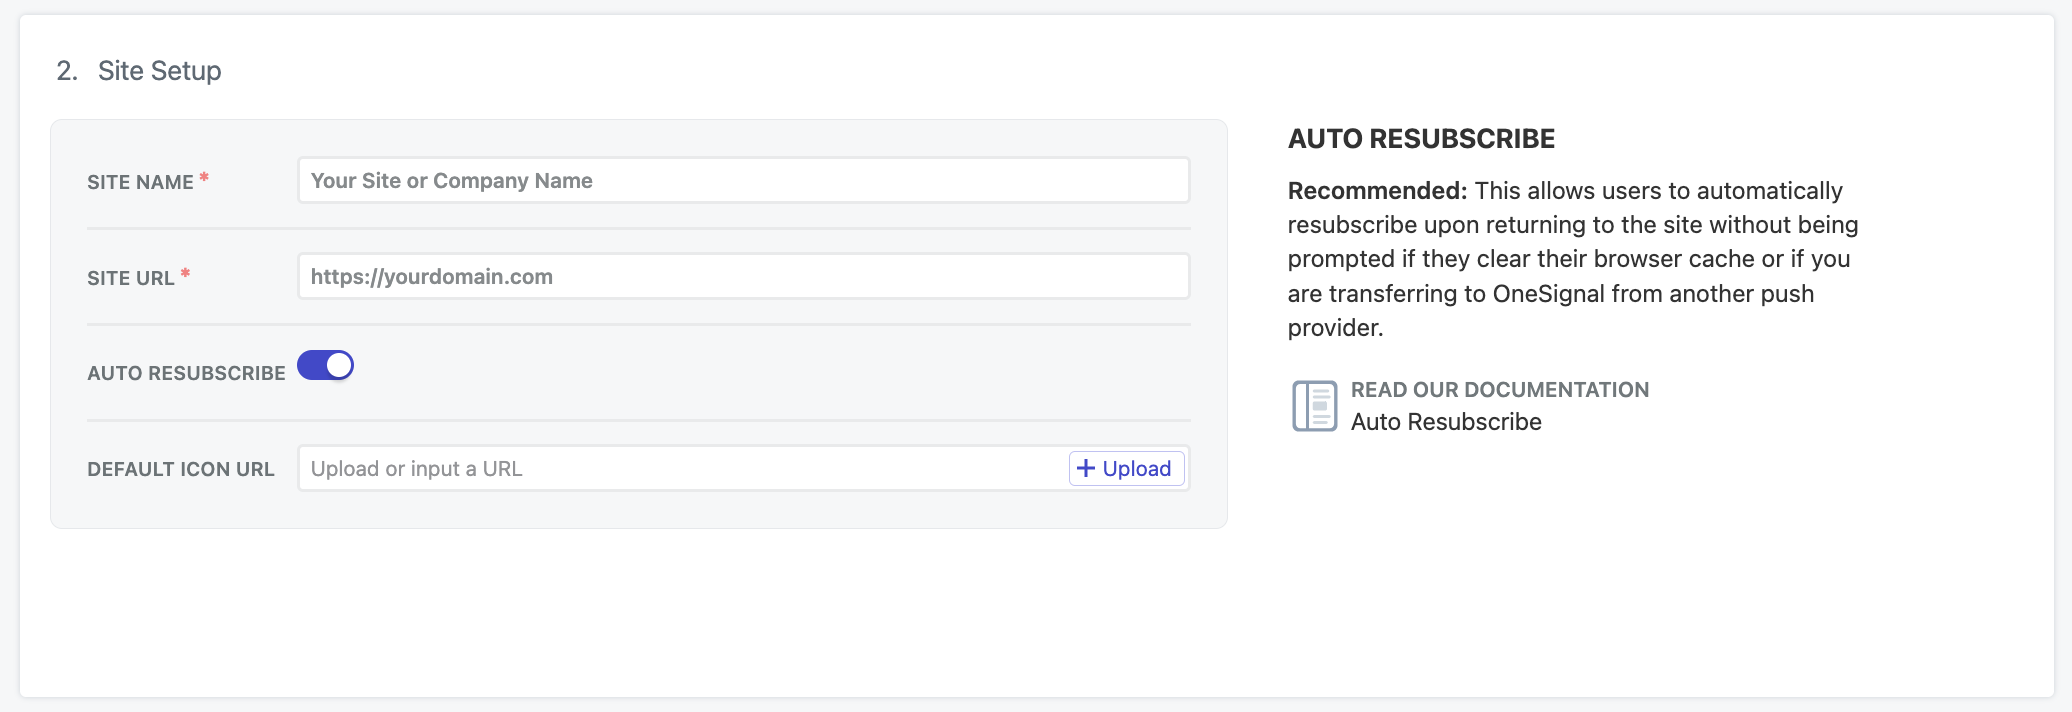
Site ayrıntılarını ekleyin:
* **Site Adı**: Sitenizin adı ve varsayılan bildirim başlığı.
* **Site URL'si**: Sitenizin URL'si. Daha fazla ayrıntı için [Site URL](#site-url)'sine bakın.
* **Otomatik Yeniden Abone Olma**: Tarayıcı verilerini temizleyen kullanıcıları sitenize döndüklerinde otomatik olarak yeniden abone etmek için bunu etkinleştirin (yeni izin istemi gerekmez)
* **Varsayılan İkon URL'si**: Bildirimlerde ve istemlerde görünen 256x256px kare PNG veya JPG resim yükleyin. Ayarlanmazsa, varsayılan ikon için bir zil kullanırız.
Entegrasyon türünü seçin:
Ek kodlama olmadan istemleri ve ayarları doğrudan OneSignal kontrol panelinden yönetin.
Resmi eklentimizle WordPress kullanıyorsanız gereklidir.
İstemler ve SDK yapılandırması üzerinde tam kontrol gerektiren geliştiriciler için.
### Site kurulumu
Site ayrıntılarını ekleyin:
* **Site Adı**: Sitenizin adı ve varsayılan bildirim başlığı.
* **Site URL'si**: Sitenizin URL'si. Daha fazla ayrıntı için [Site URL](#site-url)'sine bakın.
* **Otomatik Yeniden Abone Olma**: Tarayıcı verilerini temizleyen kullanıcıları sitenize döndüklerinde otomatik olarak yeniden abone etmek için bunu etkinleştirin (yeni izin istemi gerekmez)
* **Varsayılan İkon URL'si**: Bildirimlerde ve istemlerde görünen 256x256px kare PNG veya JPG resim yükleyin. Ayarlanmazsa, varsayılan ikon için bir zil kullanırız.
 #### Site URL
Sitenizin tam [origin](https://developer.mozilla.org/en-US/docs/Web/Security/Same-origin_policy)'ini girin, örneğin `https://yourdomain.com`. Siteniz bu şekilde yapılandırılmamışsa `www.` kullanmaktan kaçının.
Birden fazla origin'iniz varsa:
* Tek bir origin'e yönlendirin.
* Veya origin başına bir OneSignal uygulaması kurun.
#### Yerel test
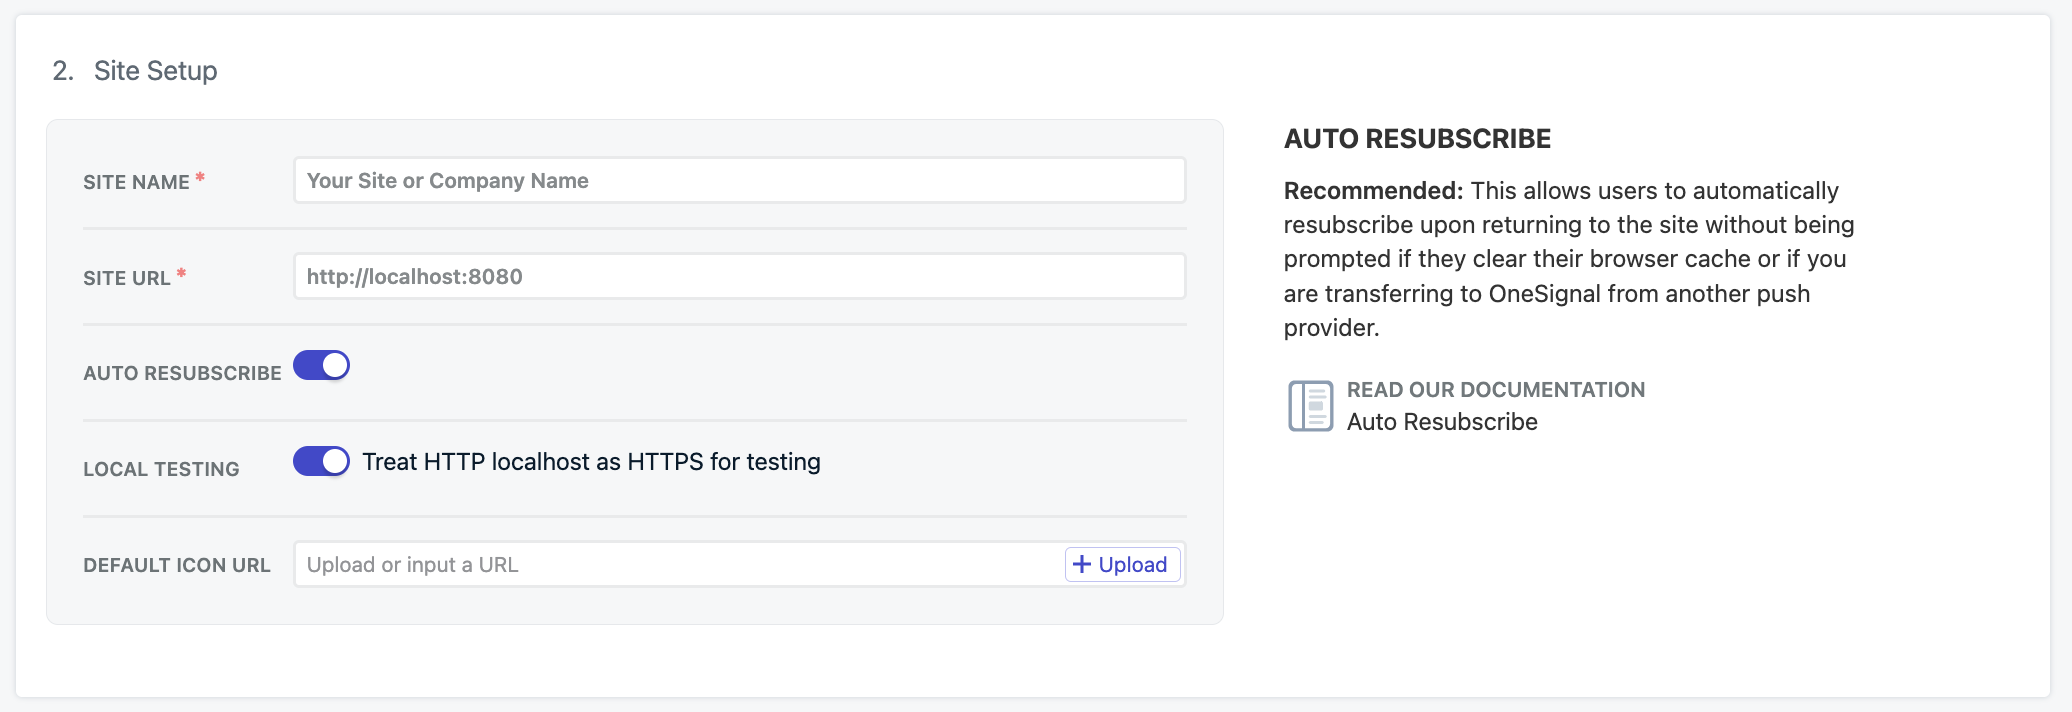
Web SDK'mız localhost ortamlarında test edilebilir. Localhost'ta test yapıyorsanız, üretim uygulamanızdan farklı bir OneSignal uygulaması kurmanızı öneririz.
**SITE URL**'yi localhost ortam URL'nizle tam olarak eşleşecek şekilde ayarlayın. Yaygın bir localhost URL'si olmalıdır, örnekler:
* `http://localhost`
* `https://localhost:3000`
* `http://127.0.0.1`
* `https://127.0.0.1:5000`
Localhost'unuz HTTP kullanıyorsa, **Test için HTTP localhost'u HTTPS olarak değerlendir**'i seçin.
Google Chrome, `http://localhost` ve `http://127.0.0.1`'i güvenli origin olarak değerlendirir, HTTP'de bile HTTPS entegrasyonlarına izin verir. Bu nedenle HTTPS localhost'ta diğer standart olmayan origin'leri test edemezsiniz.
#### Site URL
Sitenizin tam [origin](https://developer.mozilla.org/en-US/docs/Web/Security/Same-origin_policy)'ini girin, örneğin `https://yourdomain.com`. Siteniz bu şekilde yapılandırılmamışsa `www.` kullanmaktan kaçının.
Birden fazla origin'iniz varsa:
* Tek bir origin'e yönlendirin.
* Veya origin başına bir OneSignal uygulaması kurun.
#### Yerel test
Web SDK'mız localhost ortamlarında test edilebilir. Localhost'ta test yapıyorsanız, üretim uygulamanızdan farklı bir OneSignal uygulaması kurmanızı öneririz.
**SITE URL**'yi localhost ortam URL'nizle tam olarak eşleşecek şekilde ayarlayın. Yaygın bir localhost URL'si olmalıdır, örnekler:
* `http://localhost`
* `https://localhost:3000`
* `http://127.0.0.1`
* `https://127.0.0.1:5000`
Localhost'unuz HTTP kullanıyorsa, **Test için HTTP localhost'u HTTPS olarak değerlendir**'i seçin.
Google Chrome, `http://localhost` ve `http://127.0.0.1`'i güvenli origin olarak değerlendirir, HTTP'de bile HTTPS entegrasyonlarına izin verir. Bu nedenle HTTPS localhost'ta diğer standart olmayan origin'leri test edemezsiniz.
 #### OneSignal `init` seçeneklerinize `allowLocalhostAsSecureOrigin` ekleyin
OneSignal'i localhost sitenizde başlatırken, OneSignal `init` seçeneklerinize `allowLocalhostAsSecureOrigin: true,` ekleyin.
Ek olarak, self-signed sertifika ile HTTPS üzerinde localhost'u test ediyorsanız, Chrome'dan test için geçersiz sertifikaları yok saymasını istemeniz gerekebilir: ` --allow-insecure-localhost`. Firefox ve Safari, güvenlik sertifikaları için istisna eklemeye yönelik yerleşik mekanizmalar sağlar.
```html theme={null}
```
### İzin istemi
Tipik site kurulumu, siz veya ekip üyelerinizin OneSignal kontrol panelinden istediğiniz zaman izin istemleri eklemesine, kaldırmasına ve güncellemesine olanak tanır.
Tarayıcı izin iletişim kutusunun kullanıcılarınıza ne zaman ve nasıl görüneceğini yapılandırın.
### Hoş geldin bildirimi (isteğe bağlı)
Kullanıcılar push bildirimlerine abone olduklarında onlara gönderilecek bir hoş geldin bildirimi de ayarlayabilirsiniz.
### Gelişmiş ayarlar
OneSignal kontrol panelinde yapılandırılabilir ek özellikler.
#### Webhook'lar
Web SDK'mız, belirli web push olaylarını seçtiğiniz bir URL'ye `POST` etme yeteneği sağlar.
Web Push Webhook'ları, [Olay Webhook'larından](./event-streams) ayrı bir implementasyondur ve birbirinin yerine kullanılamaz.
Web push olaylarını POST istekleri aracılığıyla sunucunuza gönderin.
#### Service worker'lar
Web push yapılandırmasının sonraki sayfasında size `OneSignalSDKWorker.js` service worker dosyası sağlanacaktır.
Web SDK'mız varsayılan olarak bu dosyayı sitenizin kök dizininde arar. Service worker dosya konumunu, adını ve/veya kapsamını değiştirmek istiyorsanız, bu ayarları buradan güncelleyebilirsiniz.
* **Service worker dosyalarının yolu**, bu dosyaları koyacağınız dizinin yoludur.
* **Ana ve Güncelleyici service worker dosya adları** sadece `OneSignalSDKWorker.js` olabilir veya bu dosyayı yeniden adlandırmak istiyorsanız. `.js` dosya uzantısı kullanmalıdır.
* **Service worker kayıt kapsamı**, bu dosyanın çalışabileceği sayfalardır. Push bildirimleri için bu önemli değildir ve orijinal olarak service worker dosyasına daha fazla işlevsellik eklemek istediğiniz durumlar için tasarlanmıştır. Bunu konumunuzla aynı yol olarak ayarlamalısınız.
#### OneSignal `init` seçeneklerinize `allowLocalhostAsSecureOrigin` ekleyin
OneSignal'i localhost sitenizde başlatırken, OneSignal `init` seçeneklerinize `allowLocalhostAsSecureOrigin: true,` ekleyin.
Ek olarak, self-signed sertifika ile HTTPS üzerinde localhost'u test ediyorsanız, Chrome'dan test için geçersiz sertifikaları yok saymasını istemeniz gerekebilir: ` --allow-insecure-localhost`. Firefox ve Safari, güvenlik sertifikaları için istisna eklemeye yönelik yerleşik mekanizmalar sağlar.
```html theme={null}
```
### İzin istemi
Tipik site kurulumu, siz veya ekip üyelerinizin OneSignal kontrol panelinden istediğiniz zaman izin istemleri eklemesine, kaldırmasına ve güncellemesine olanak tanır.
Tarayıcı izin iletişim kutusunun kullanıcılarınıza ne zaman ve nasıl görüneceğini yapılandırın.
### Hoş geldin bildirimi (isteğe bağlı)
Kullanıcılar push bildirimlerine abone olduklarında onlara gönderilecek bir hoş geldin bildirimi de ayarlayabilirsiniz.
### Gelişmiş ayarlar
OneSignal kontrol panelinde yapılandırılabilir ek özellikler.
#### Webhook'lar
Web SDK'mız, belirli web push olaylarını seçtiğiniz bir URL'ye `POST` etme yeteneği sağlar.
Web Push Webhook'ları, [Olay Webhook'larından](./event-streams) ayrı bir implementasyondur ve birbirinin yerine kullanılamaz.
Web push olaylarını POST istekleri aracılığıyla sunucunuza gönderin.
#### Service worker'lar
Web push yapılandırmasının sonraki sayfasında size `OneSignalSDKWorker.js` service worker dosyası sağlanacaktır.
Web SDK'mız varsayılan olarak bu dosyayı sitenizin kök dizininde arar. Service worker dosya konumunu, adını ve/veya kapsamını değiştirmek istiyorsanız, bu ayarları buradan güncelleyebilirsiniz.
* **Service worker dosyalarının yolu**, bu dosyaları koyacağınız dizinin yoludur.
* **Ana ve Güncelleyici service worker dosya adları** sadece `OneSignalSDKWorker.js` olabilir veya bu dosyayı yeniden adlandırmak istiyorsanız. `.js` dosya uzantısı kullanmalıdır.
* **Service worker kayıt kapsamı**, bu dosyanın çalışabileceği sayfalardır. Push bildirimleri için bu önemli değildir ve orijinal olarak service worker dosyasına daha fazla işlevsellik eklemek istediğiniz durumlar için tasarlanmıştır. Bunu konumunuzla aynı yol olarak ayarlamalısınız.
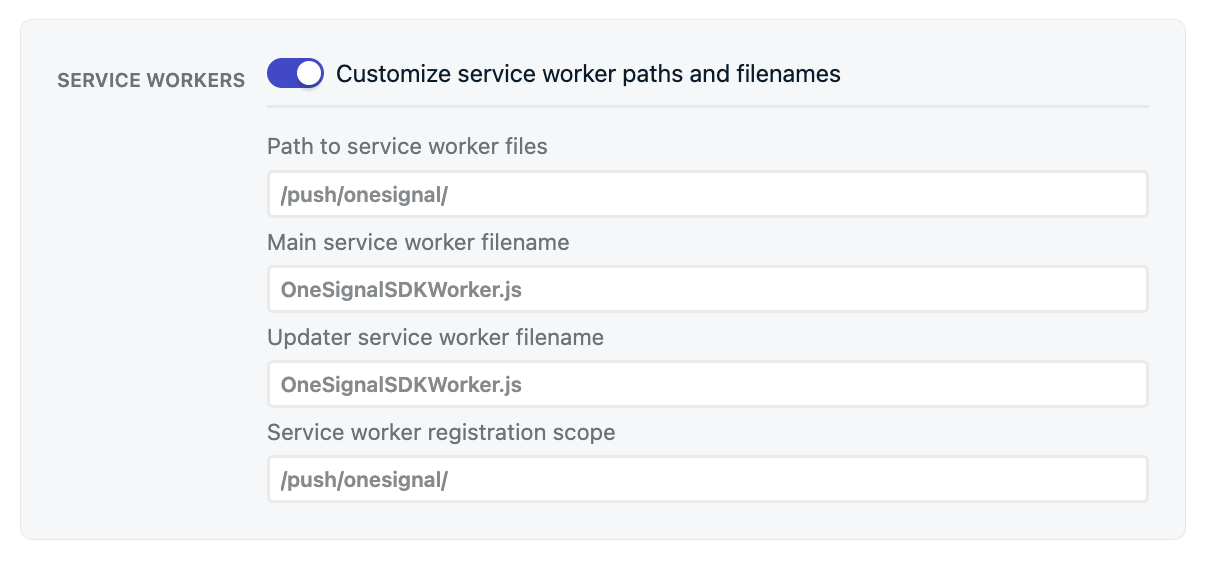 Bu örnekle, dosyanın kodunun `https://yourdomain.com/push/onesignal/OneSignalSDKWorker.js` adresinde herkese açık olarak erişilebilir olduğunu görmelisiniz
Gelişmiş service worker yapılandırması, özel entegrasyon ve diğer sağlayıcılardan geçiş.
#### Tıklama davranışı
Kullanıcıların bildirime tıkladıklarında ayarladığınız [URL](./links)'ye nasıl gideceklerini kontrol edin.
Kullanıcının siteniz hiçbir sekmede açık değilse, tarayıcı yeni bir sekme açar ve bildirim URL'sine gider. Kullanıcının siteniz zaten açıksa, davranış seçtiğiniz ayara bağlıdır:
| Ayar | Eşleşme kriteri | Eylem |
| ------------------------------- | ------------------------------------ | -------------------------------------------- |
| **Exact Navigate** (varsayılan) | Tam URL (örn. `example.com/product`) | Eşleşen sekmede bildirim URL'sine gider |
| **Origin Navigate** | Origin (örn. `example.com`) | Eşleşen sekmede bildirim URL'sine gider |
| **Exact Focus** | Tam URL | Eşleşen sekmeye odaklanır, sayfayı yenilemez |
| **Origin Focus** | Origin | Eşleşen sekmeye odaklanır, sayfayı yenilemez |
#### Kalıcılık
Varsayılan web push davranışı, Bildirim Merkezi'ne taşınmadan önce yaklaşık 5 saniye boyunca cihazda pop-up olarak görünmeleridir, burada işletim sistemi tarafından kaldırılmadan önce yaklaşık 1 hafta saklanırlar.
Bazı cihazlar ve Chrome ve Edge sürümleri, bildirimleri ekranda daha uzun süre kalıcı hale getirmenize olanak tanır. Bu, bildirimin kullanıcı onunla etkileşime girene kadar ekranda kalacağı anlamına gelir. **Bu kullanıcılarınızı rahatsız edebilir ve önerilmez.** Ayrıca, kalıcılığı etkinleştirirseniz, karakter sayısını azaltarak bildirimlerin abonelere nasıl göründüğünü etkiler ve resimlerin ve düğmelerin nasıl görüntülendiğini etkileyebilir.
Bunları değiştirdiğinizde, yalnızca güncellenmiş ayarlarla siteyi ziyaret eden aboneler için geçerli olurlar. Bu seçeneklerin değiştiğini görmüyorsanız, beklemeniz gerekecektir
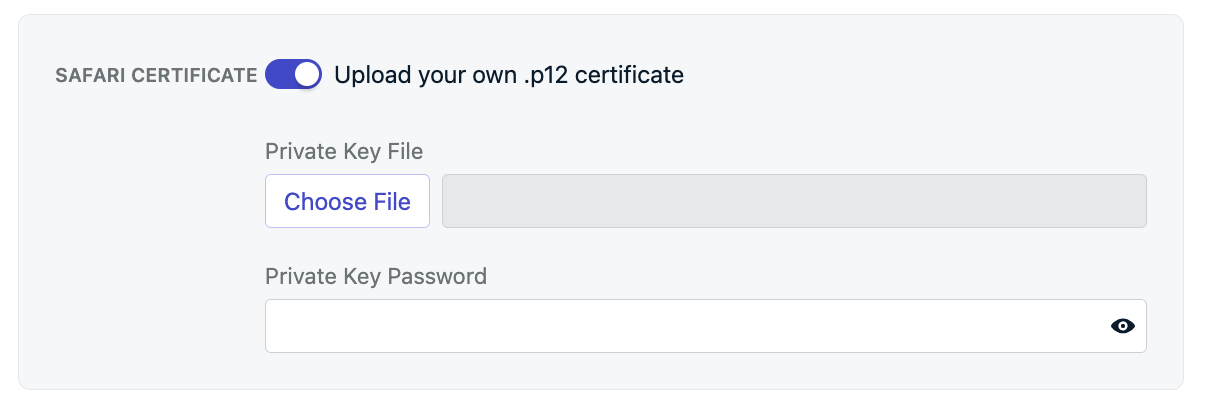
#### Safari sertifikası (İsteğe bağlı)
OneSignal, Safari tarayıcılarıyla çalışmak için gerekli sertifikaları ek ücret ödemeden otomatik olarak sağlar. Zaten kendi Safari Web Push Sertifikalarınız varsa, `Safari Web .p12 Push Certificate` ve şifrenizi yüklemek için bu seçeneği açın.
Bu örnekle, dosyanın kodunun `https://yourdomain.com/push/onesignal/OneSignalSDKWorker.js` adresinde herkese açık olarak erişilebilir olduğunu görmelisiniz
Gelişmiş service worker yapılandırması, özel entegrasyon ve diğer sağlayıcılardan geçiş.
#### Tıklama davranışı
Kullanıcıların bildirime tıkladıklarında ayarladığınız [URL](./links)'ye nasıl gideceklerini kontrol edin.
Kullanıcının siteniz hiçbir sekmede açık değilse, tarayıcı yeni bir sekme açar ve bildirim URL'sine gider. Kullanıcının siteniz zaten açıksa, davranış seçtiğiniz ayara bağlıdır:
| Ayar | Eşleşme kriteri | Eylem |
| ------------------------------- | ------------------------------------ | -------------------------------------------- |
| **Exact Navigate** (varsayılan) | Tam URL (örn. `example.com/product`) | Eşleşen sekmede bildirim URL'sine gider |
| **Origin Navigate** | Origin (örn. `example.com`) | Eşleşen sekmede bildirim URL'sine gider |
| **Exact Focus** | Tam URL | Eşleşen sekmeye odaklanır, sayfayı yenilemez |
| **Origin Focus** | Origin | Eşleşen sekmeye odaklanır, sayfayı yenilemez |
#### Kalıcılık
Varsayılan web push davranışı, Bildirim Merkezi'ne taşınmadan önce yaklaşık 5 saniye boyunca cihazda pop-up olarak görünmeleridir, burada işletim sistemi tarafından kaldırılmadan önce yaklaşık 1 hafta saklanırlar.
Bazı cihazlar ve Chrome ve Edge sürümleri, bildirimleri ekranda daha uzun süre kalıcı hale getirmenize olanak tanır. Bu, bildirimin kullanıcı onunla etkileşime girene kadar ekranda kalacağı anlamına gelir. **Bu kullanıcılarınızı rahatsız edebilir ve önerilmez.** Ayrıca, kalıcılığı etkinleştirirseniz, karakter sayısını azaltarak bildirimlerin abonelere nasıl göründüğünü etkiler ve resimlerin ve düğmelerin nasıl görüntülendiğini etkileyebilir.
Bunları değiştirdiğinizde, yalnızca güncellenmiş ayarlarla siteyi ziyaret eden aboneler için geçerli olurlar. Bu seçeneklerin değiştiğini görmüyorsanız, beklemeniz gerekecektir
#### Safari sertifikası (İsteğe bağlı)
OneSignal, Safari tarayıcılarıyla çalışmak için gerekli sertifikaları ek ücret ödemeden otomatik olarak sağlar. Zaten kendi Safari Web Push Sertifikalarınız varsa, `Safari Web .p12 Push Certificate` ve şifrenizi yüklemek için bu seçeneği açın.
 ***
## Service worker dosyasını yükle
`OneSignalSDKWorker.js` service worker dosyasını sitenize ekleyin. OneSignal kontrol panelinden veya [GitHub'dan](https://github.com/OneSignal/OneSignal-Website-SDK/files/11480764/OneSignalSDK-v16-ServiceWorker.zip) indirin.
***
## Service worker dosyasını yükle
`OneSignalSDKWorker.js` service worker dosyasını sitenize ekleyin. OneSignal kontrol panelinden veya [GitHub'dan](https://github.com/OneSignal/OneSignal-Website-SDK/files/11480764/OneSignalSDK-v16-ServiceWorker.zip) indirin.
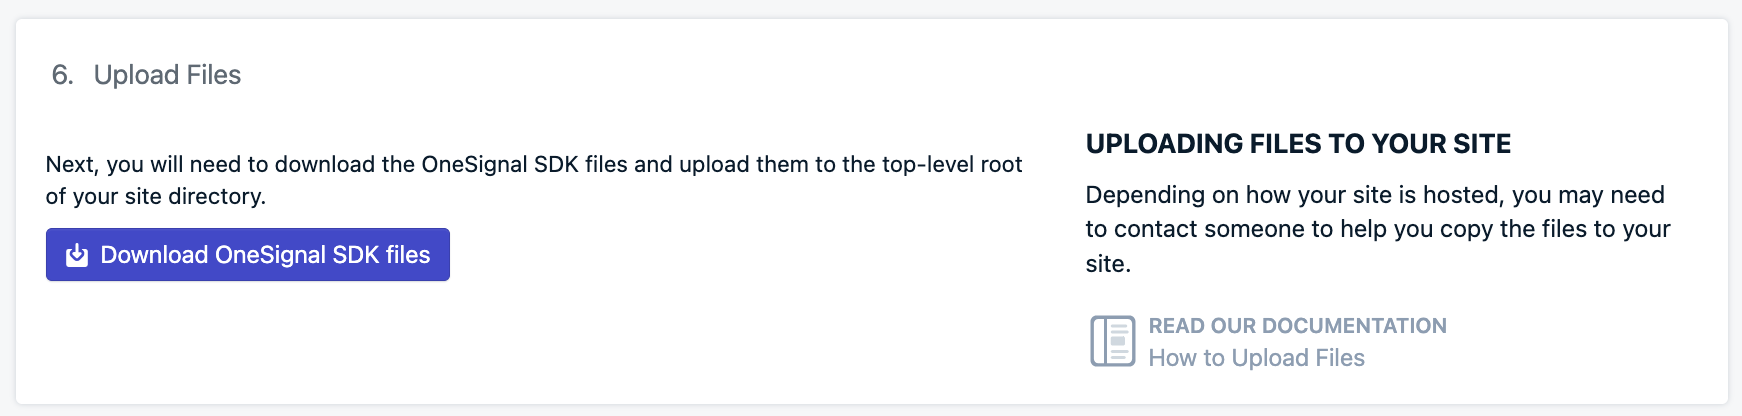 Bu dosyayı sitenizin kök dizinine veya bir alt dizine koyun. Bir alt dizine koyarsanız, [Gelişmiş ayarlar > Service worker'lar](#service-workers) bölümündeki **Service worker dosyalarının yolunu** ayarlamanız gerekecektir.
Dosya sunucunuzda olduktan sonra, çalıştığından emin olmak için aşağıdakileri kontrol edin:
Dosyanın [Gelişmiş ayarlar > Service worker'lar](#service-workers)'da ayarlanan **Service worker dosyalarının yolu** ile aynı konumda olduğundan emin olun. Bu ayarları güncellemediyseniz, dosyayı kök dizininize koymuş olmalısınız. Örneğin:
* `https://yourdomain.com/OneSignalSDKWorker.js`
* `https://yourdomain.com/some-subdirectory/OneSignalSDKWorker.js`
`OneSignalSDKWorker.js` dosyası herkese açık olarak erişilebilir olmalı ve origin'inizde mevcut olmalıdır. CDN aracılığıyla barındırılamaz veya yönlendirme ile farklı bir origin'e yerleştirilemez.
Dosyanın URL'sini ziyaret ettiğinizde, kodu görmelisiniz.
Bu bir javascript dosyasıdır ve bu şekilde sunulmalıdır. text/html content-type'ına sahip olamaz.
Gelişmiş yapılandırma ve diğer web push sağlayıcılarından geçiş.
## Sitenize kod ekleyin
Aşağıdaki JavaScript SDK kodu herhangi bir sitede çalışır. Siteniz [Angular](./angular-setup), [React JS](./react-js-setup) veya [Vue JS](./vue-js-setup) ile kurulduysa bu bağlantıları takip edin.
OneSignal'i JavaScript SDK'mızla sitenizde başlatmak için, sağlanan kodu web sitenizin `` etiketlerine kopyalayıp yapıştırın. OneSignal kontrol paneli, [uygulama ID'niz](./keys-and-ids) önceden doldurulmuş aynı kod parçacığını sağlar.
```javascript theme={null}
```
### iOS web push desteği
Apple, iOS 16.4+ çalıştıran iPhone ve iPad'lerde web push bildirimlerini desteklemeye başladı. Desteklenen bir tarayıcıda ziyaret edildiği sürece web push'un "çalıştığı" Android cihazların aksine, Apple `manifest.json` dosyası ve kullanıcıların sitenizi ana ekranlarına eklemesi gibi birkaç gereksinim daha ekledi.
Gerekli `manifest.json` dosyasını ekleyin ve kullanıcılara sitenizi ana ekranlarına eklemeleri için rehberlik edin.
***
## SSS
### Web push HTTP sitelerinde çalışır mı?
Hayır. Web push HTTPS gerektirir. Tarayıcılar bunu bir güvenlik gereksinimi olarak uygular. Tek istisna, tarayıcıların geliştirme amacıyla güvenli origin olarak değerlendirdiği `localhost` ve `127.0.0.1`'dir.
### Neden service worker dosyasına ihtiyacım var?
Service worker arka planda çalışır ve kullanıcının sitenizi açık olmadığı durumlarda bile gelen push bildirimlerini işler. Olmadan, tarayıcı bildirimleri görüntüleyemez. `OneSignalSDKWorker.js` dosyası origin'inizde herkese açık olarak erişilebilir olmalıdır.
### iOS'ta (iPhone/iPad) web push kullanabilir miyim?
Evet, iOS 16.4+ ile başlayarak. Ancak Apple bir `manifest.json` dosyası gerektirmekte ve kullanıcının önce sitenizi ana ekranına eklemesi gerekmektedir. Tam gereksinimler için [iOS web push kurulumu](./web-push-for-ios)'na bakın.
### Bildirimlerim neden görünmüyor?
Yaygın nedenler arasında yanlış yerleştirilmiş service worker dosyası, kontrol panelinde eşleşmeyen Site URL'si veya kullanıcının tarayıcı ayarlarında bildirimleri engellemiş olması yer alır. Tam sorun giderme kontrol listesi için [Bildirimler gösterilmiyor veya gecikiyor](./notifications-show-successful-but-are-not-being-shown) sayfasına bakın.
***
## Testing the OneSignal SDK integration
This guide helps you verify that your OneSignal SDK integration is working correctly by testing push notifications and subscription registration.
### Check web push subscriptions
* Use Chrome, Firefox, Edge, or Safari while testing.
* **Do not use Incognito or private browsing mode.** Users cannot subscribe to push notifications in these modes.
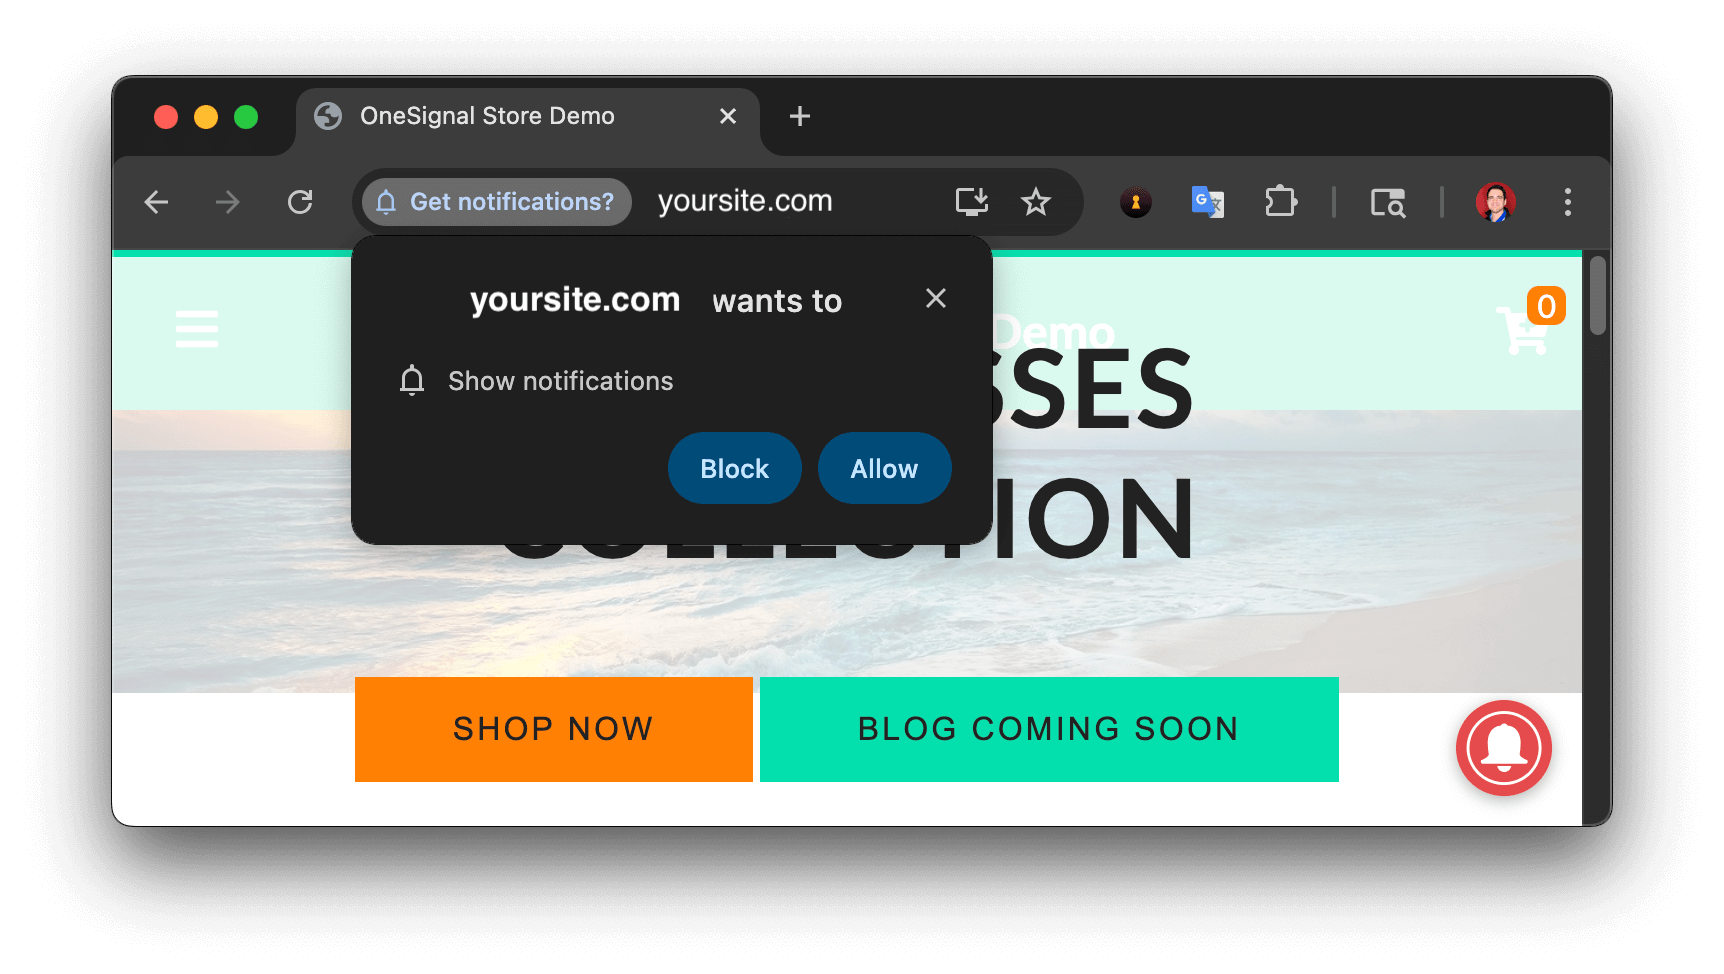
* The prompts should appear based on your [permission prompts](/docs/en/permission-requests) configuration.
* Click **Allow** on the native prompt to subscribe to push notifications.
Bu dosyayı sitenizin kök dizinine veya bir alt dizine koyun. Bir alt dizine koyarsanız, [Gelişmiş ayarlar > Service worker'lar](#service-workers) bölümündeki **Service worker dosyalarının yolunu** ayarlamanız gerekecektir.
Dosya sunucunuzda olduktan sonra, çalıştığından emin olmak için aşağıdakileri kontrol edin:
Dosyanın [Gelişmiş ayarlar > Service worker'lar](#service-workers)'da ayarlanan **Service worker dosyalarının yolu** ile aynı konumda olduğundan emin olun. Bu ayarları güncellemediyseniz, dosyayı kök dizininize koymuş olmalısınız. Örneğin:
* `https://yourdomain.com/OneSignalSDKWorker.js`
* `https://yourdomain.com/some-subdirectory/OneSignalSDKWorker.js`
`OneSignalSDKWorker.js` dosyası herkese açık olarak erişilebilir olmalı ve origin'inizde mevcut olmalıdır. CDN aracılığıyla barındırılamaz veya yönlendirme ile farklı bir origin'e yerleştirilemez.
Dosyanın URL'sini ziyaret ettiğinizde, kodu görmelisiniz.
Bu bir javascript dosyasıdır ve bu şekilde sunulmalıdır. text/html content-type'ına sahip olamaz.
Gelişmiş yapılandırma ve diğer web push sağlayıcılarından geçiş.
## Sitenize kod ekleyin
Aşağıdaki JavaScript SDK kodu herhangi bir sitede çalışır. Siteniz [Angular](./angular-setup), [React JS](./react-js-setup) veya [Vue JS](./vue-js-setup) ile kurulduysa bu bağlantıları takip edin.
OneSignal'i JavaScript SDK'mızla sitenizde başlatmak için, sağlanan kodu web sitenizin `` etiketlerine kopyalayıp yapıştırın. OneSignal kontrol paneli, [uygulama ID'niz](./keys-and-ids) önceden doldurulmuş aynı kod parçacığını sağlar.
```javascript theme={null}
```
### iOS web push desteği
Apple, iOS 16.4+ çalıştıran iPhone ve iPad'lerde web push bildirimlerini desteklemeye başladı. Desteklenen bir tarayıcıda ziyaret edildiği sürece web push'un "çalıştığı" Android cihazların aksine, Apple `manifest.json` dosyası ve kullanıcıların sitenizi ana ekranlarına eklemesi gibi birkaç gereksinim daha ekledi.
Gerekli `manifest.json` dosyasını ekleyin ve kullanıcılara sitenizi ana ekranlarına eklemeleri için rehberlik edin.
***
## SSS
### Web push HTTP sitelerinde çalışır mı?
Hayır. Web push HTTPS gerektirir. Tarayıcılar bunu bir güvenlik gereksinimi olarak uygular. Tek istisna, tarayıcıların geliştirme amacıyla güvenli origin olarak değerlendirdiği `localhost` ve `127.0.0.1`'dir.
### Neden service worker dosyasına ihtiyacım var?
Service worker arka planda çalışır ve kullanıcının sitenizi açık olmadığı durumlarda bile gelen push bildirimlerini işler. Olmadan, tarayıcı bildirimleri görüntüleyemez. `OneSignalSDKWorker.js` dosyası origin'inizde herkese açık olarak erişilebilir olmalıdır.
### iOS'ta (iPhone/iPad) web push kullanabilir miyim?
Evet, iOS 16.4+ ile başlayarak. Ancak Apple bir `manifest.json` dosyası gerektirmekte ve kullanıcının önce sitenizi ana ekranına eklemesi gerekmektedir. Tam gereksinimler için [iOS web push kurulumu](./web-push-for-ios)'na bakın.
### Bildirimlerim neden görünmüyor?
Yaygın nedenler arasında yanlış yerleştirilmiş service worker dosyası, kontrol panelinde eşleşmeyen Site URL'si veya kullanıcının tarayıcı ayarlarında bildirimleri engellemiş olması yer alır. Tam sorun giderme kontrol listesi için [Bildirimler gösterilmiyor veya gecikiyor](./notifications-show-successful-but-are-not-being-shown) sayfasına bakın.
***
## Testing the OneSignal SDK integration
This guide helps you verify that your OneSignal SDK integration is working correctly by testing push notifications and subscription registration.
### Check web push subscriptions
* Use Chrome, Firefox, Edge, or Safari while testing.
* **Do not use Incognito or private browsing mode.** Users cannot subscribe to push notifications in these modes.
* The prompts should appear based on your [permission prompts](/docs/en/permission-requests) configuration.
* Click **Allow** on the native prompt to subscribe to push notifications.
 * Go to **Audience > Subscriptions**.
* You should see a new entry with the status **Subscribed**.
* Go to **Audience > Subscriptions**.
* You should see a new entry with the status **Subscribed**.
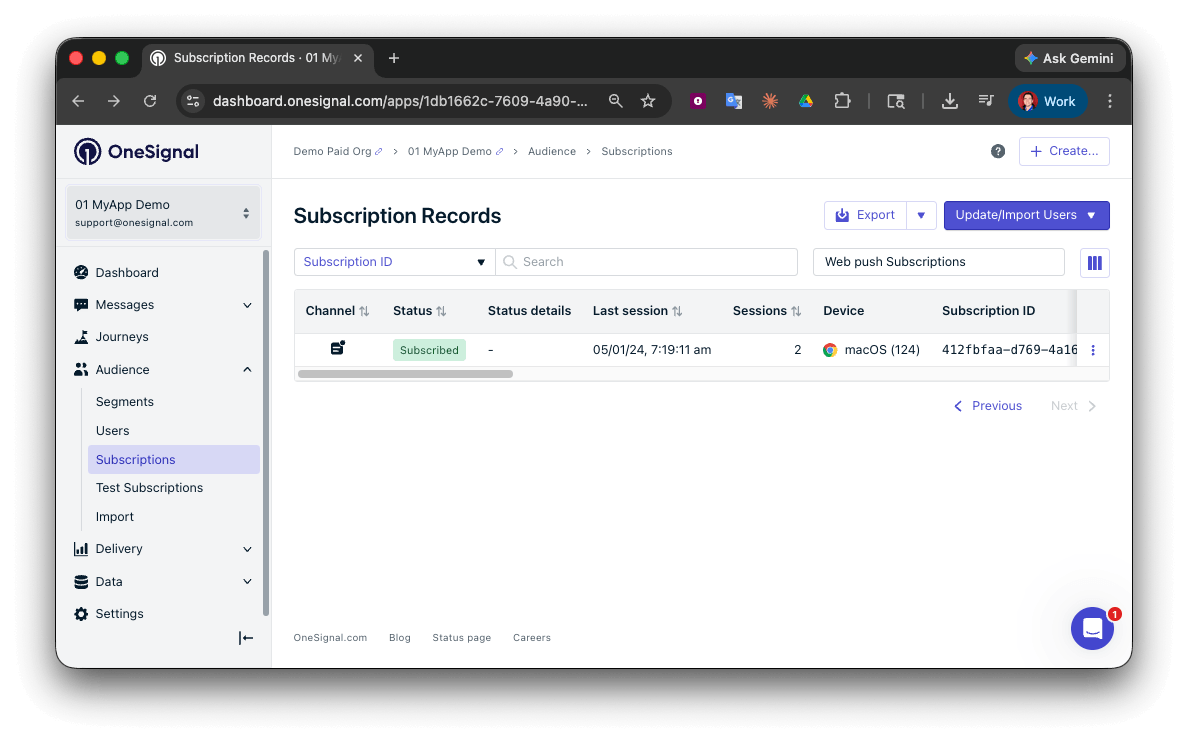 You have successfully created a [web push subscription](/docs/en/subscriptions).
Web push subscriptions are created when users first subscribe to push notifications on your site.
### Set up test users
test users are helpful for testing a push notification before sending a message.
In the dashboard, next to the subscription, click the **Options (three dots)** button and select **Add to Test Users**.
You have successfully created a [web push subscription](/docs/en/subscriptions).
Web push subscriptions are created when users first subscribe to push notifications on your site.
### Set up test users
test users are helpful for testing a push notification before sending a message.
In the dashboard, next to the subscription, click the **Options (three dots)** button and select **Add to Test Users**.
 Name the subscription so you can easily identify your device later in the **test users tab**.
Go to **Audience > Segments > New Segment**.
Name the segment `Test Users` (the name is important because it will be used later).
Name the subscription so you can easily identify your device later in the **test users tab**.
Go to **Audience > Segments > New Segment**.
Name the segment `Test Users` (the name is important because it will be used later).
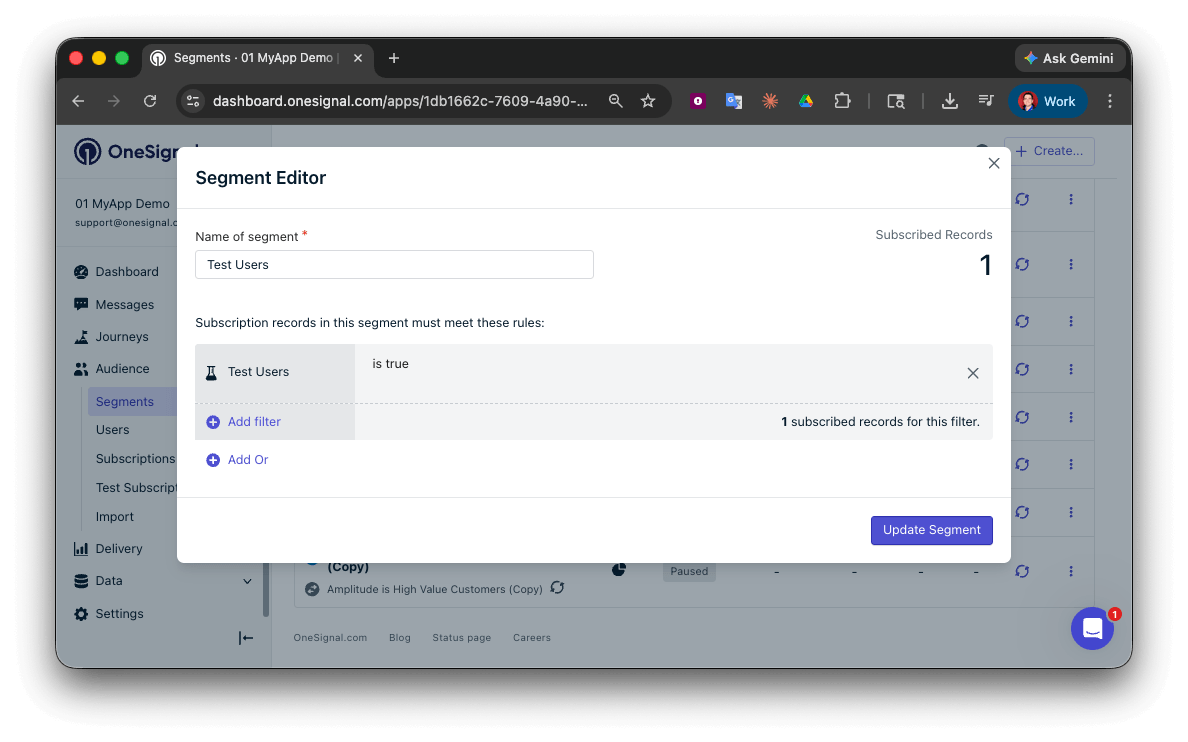 You have successfully created a segment of test users.
You can now test sending messages to this individual device and groups of test users.
### Send test push via API
In your OneSignal dashboard, go to **Settings > [Keys & IDs](/docs/en/keys-and-ids)**.
Replace `YOUR_APP_API_KEY` and `YOUR_APP_ID` in the code below with your actual keys. This code uses the `Test Users` segment created earlier.
```curl theme={null}
curl -X POST --url 'https://api.onesignal.com/notifications' \
--header 'content-type: application/json; charset=utf-8' \
--header 'authorization: Key YOUR_APP_API_KEY' \
--data '{
"app_id": "YOUR_APP_ID",
"target_channel": "push",
"name": "Testing basic setup",
"headings": {
"en": "👋"
},
"contents": {
"en": "Hello world!"
},
"included_segments": [
"Test Users"
],
"chrome_web_image": "https://avatars.githubusercontent.com/u/11823027?s=200&v=4"
}'
```
Run the code in your terminal.
If all setup steps were completed successfully, the test users should receive a notification.
Only Chrome supports images. Images will appear small in the collapsed notification view. Expand the notification to see the full image.
You have successfully created a segment of test users.
You can now test sending messages to this individual device and groups of test users.
### Send test push via API
In your OneSignal dashboard, go to **Settings > [Keys & IDs](/docs/en/keys-and-ids)**.
Replace `YOUR_APP_API_KEY` and `YOUR_APP_ID` in the code below with your actual keys. This code uses the `Test Users` segment created earlier.
```curl theme={null}
curl -X POST --url 'https://api.onesignal.com/notifications' \
--header 'content-type: application/json; charset=utf-8' \
--header 'authorization: Key YOUR_APP_API_KEY' \
--data '{
"app_id": "YOUR_APP_ID",
"target_channel": "push",
"name": "Testing basic setup",
"headings": {
"en": "👋"
},
"contents": {
"en": "Hello world!"
},
"included_segments": [
"Test Users"
],
"chrome_web_image": "https://avatars.githubusercontent.com/u/11823027?s=200&v=4"
}'
```
Run the code in your terminal.
If all setup steps were completed successfully, the test users should receive a notification.
Only Chrome supports images. Images will appear small in the collapsed notification view. Expand the notification to see the full image.
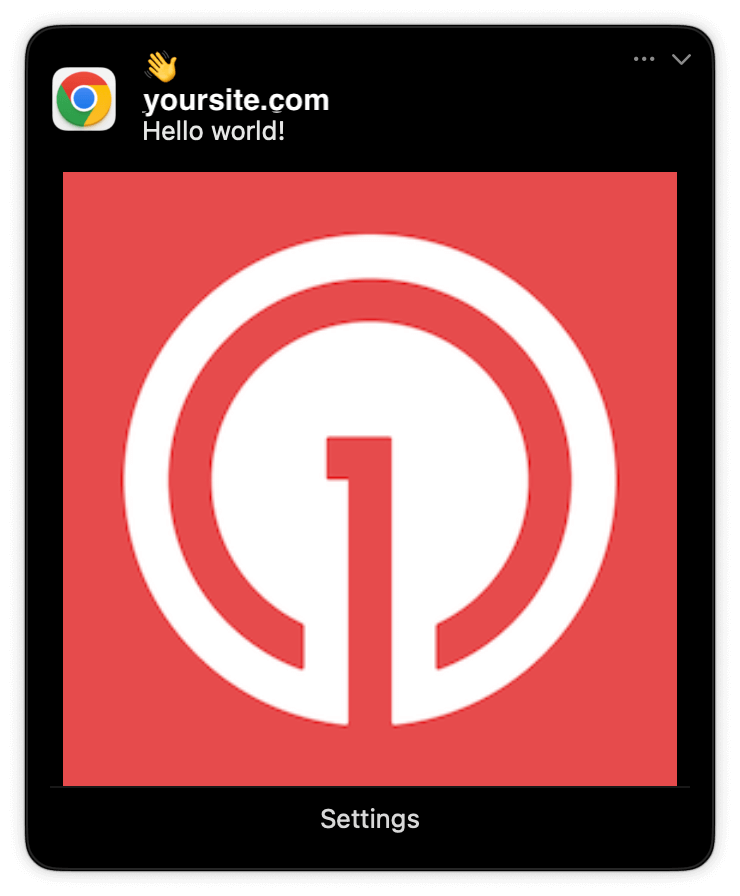 In your dashboard, go to **Delivery > Sent Messages**, then click the message to view stats. You should see the **confirmed** stat, meaning the device received the push.
Safari does not support confirmed receipt.
View delivery, click, and conversion stats for your push notifications.
You have successfully sent a notification via the API to a segment.
If notifications are not arriving, contact `support@onesignal.com` with the following:
* The API request and response (copy-paste into a `.txt` file)
* Your Subscription ID
* Your website URL with the OneSignal code
***
## User identification
The previous section covered creating web push [Subscriptions](/docs/en/subscriptions). This section expands to identifying [Users](/docs/en/users) across all their subscriptions (including push, email, and SMS) using the OneSignal SDK. It covers External IDs, tags, multi-channel subscriptions, privacy, and event tracking to help you unify and engage users across platforms.
### Assign External ID
Use an External ID to identify users consistently across devices, email addresses, and phone numbers using your backend's user identifier. This ensures your messaging stays unified across channels and 3rd party systems (especially important for [Integrations](/docs/en/integrations)).
Set the External ID with the SDK's [`login` method](/docs/en/web-sdk-reference#login-external-id) each time a user is identified by your app.
OneSignal generates unique read-only IDs for subscriptions (Subscription ID) and users (OneSignal ID).
As users download your app on different devices, subscribe to your website, and/or provide you email addresses and phone numbers outside of your app, new subscriptions will be created.
Setting the External ID via the SDK is highly recommended to identify users across all their subscriptions, regardless of how they are created.
### Add Tags
[Tags](/docs/en/add-user-data-tags) are key-value pairs of string data you can use to store user properties (like `username`, `role`, or preferences) and events (like `purchase_date`, `game_level`, or user interactions). Tags power advanced [Message Personalization](/docs/en/message-personalization) and [Segmentation](/docs/en/segmentation) allowing for more advanced use cases.
Set tags with the SDK's [`addTag` and `addTags` methods](/docs/en/web-sdk-reference#addtag-%2C-addtags) as events occur in your app.
In this example, the user reached level 6 identifiable by the tag called `current_level` set to a value of `6`.
In your dashboard, go to **Delivery > Sent Messages**, then click the message to view stats. You should see the **confirmed** stat, meaning the device received the push.
Safari does not support confirmed receipt.
View delivery, click, and conversion stats for your push notifications.
You have successfully sent a notification via the API to a segment.
If notifications are not arriving, contact `support@onesignal.com` with the following:
* The API request and response (copy-paste into a `.txt` file)
* Your Subscription ID
* Your website URL with the OneSignal code
***
## User identification
The previous section covered creating web push [Subscriptions](/docs/en/subscriptions). This section expands to identifying [Users](/docs/en/users) across all their subscriptions (including push, email, and SMS) using the OneSignal SDK. It covers External IDs, tags, multi-channel subscriptions, privacy, and event tracking to help you unify and engage users across platforms.
### Assign External ID
Use an External ID to identify users consistently across devices, email addresses, and phone numbers using your backend's user identifier. This ensures your messaging stays unified across channels and 3rd party systems (especially important for [Integrations](/docs/en/integrations)).
Set the External ID with the SDK's [`login` method](/docs/en/web-sdk-reference#login-external-id) each time a user is identified by your app.
OneSignal generates unique read-only IDs for subscriptions (Subscription ID) and users (OneSignal ID).
As users download your app on different devices, subscribe to your website, and/or provide you email addresses and phone numbers outside of your app, new subscriptions will be created.
Setting the External ID via the SDK is highly recommended to identify users across all their subscriptions, regardless of how they are created.
### Add Tags
[Tags](/docs/en/add-user-data-tags) are key-value pairs of string data you can use to store user properties (like `username`, `role`, or preferences) and events (like `purchase_date`, `game_level`, or user interactions). Tags power advanced [Message Personalization](/docs/en/message-personalization) and [Segmentation](/docs/en/segmentation) allowing for more advanced use cases.
Set tags with the SDK's [`addTag` and `addTags` methods](/docs/en/web-sdk-reference#addtag-%2C-addtags) as events occur in your app.
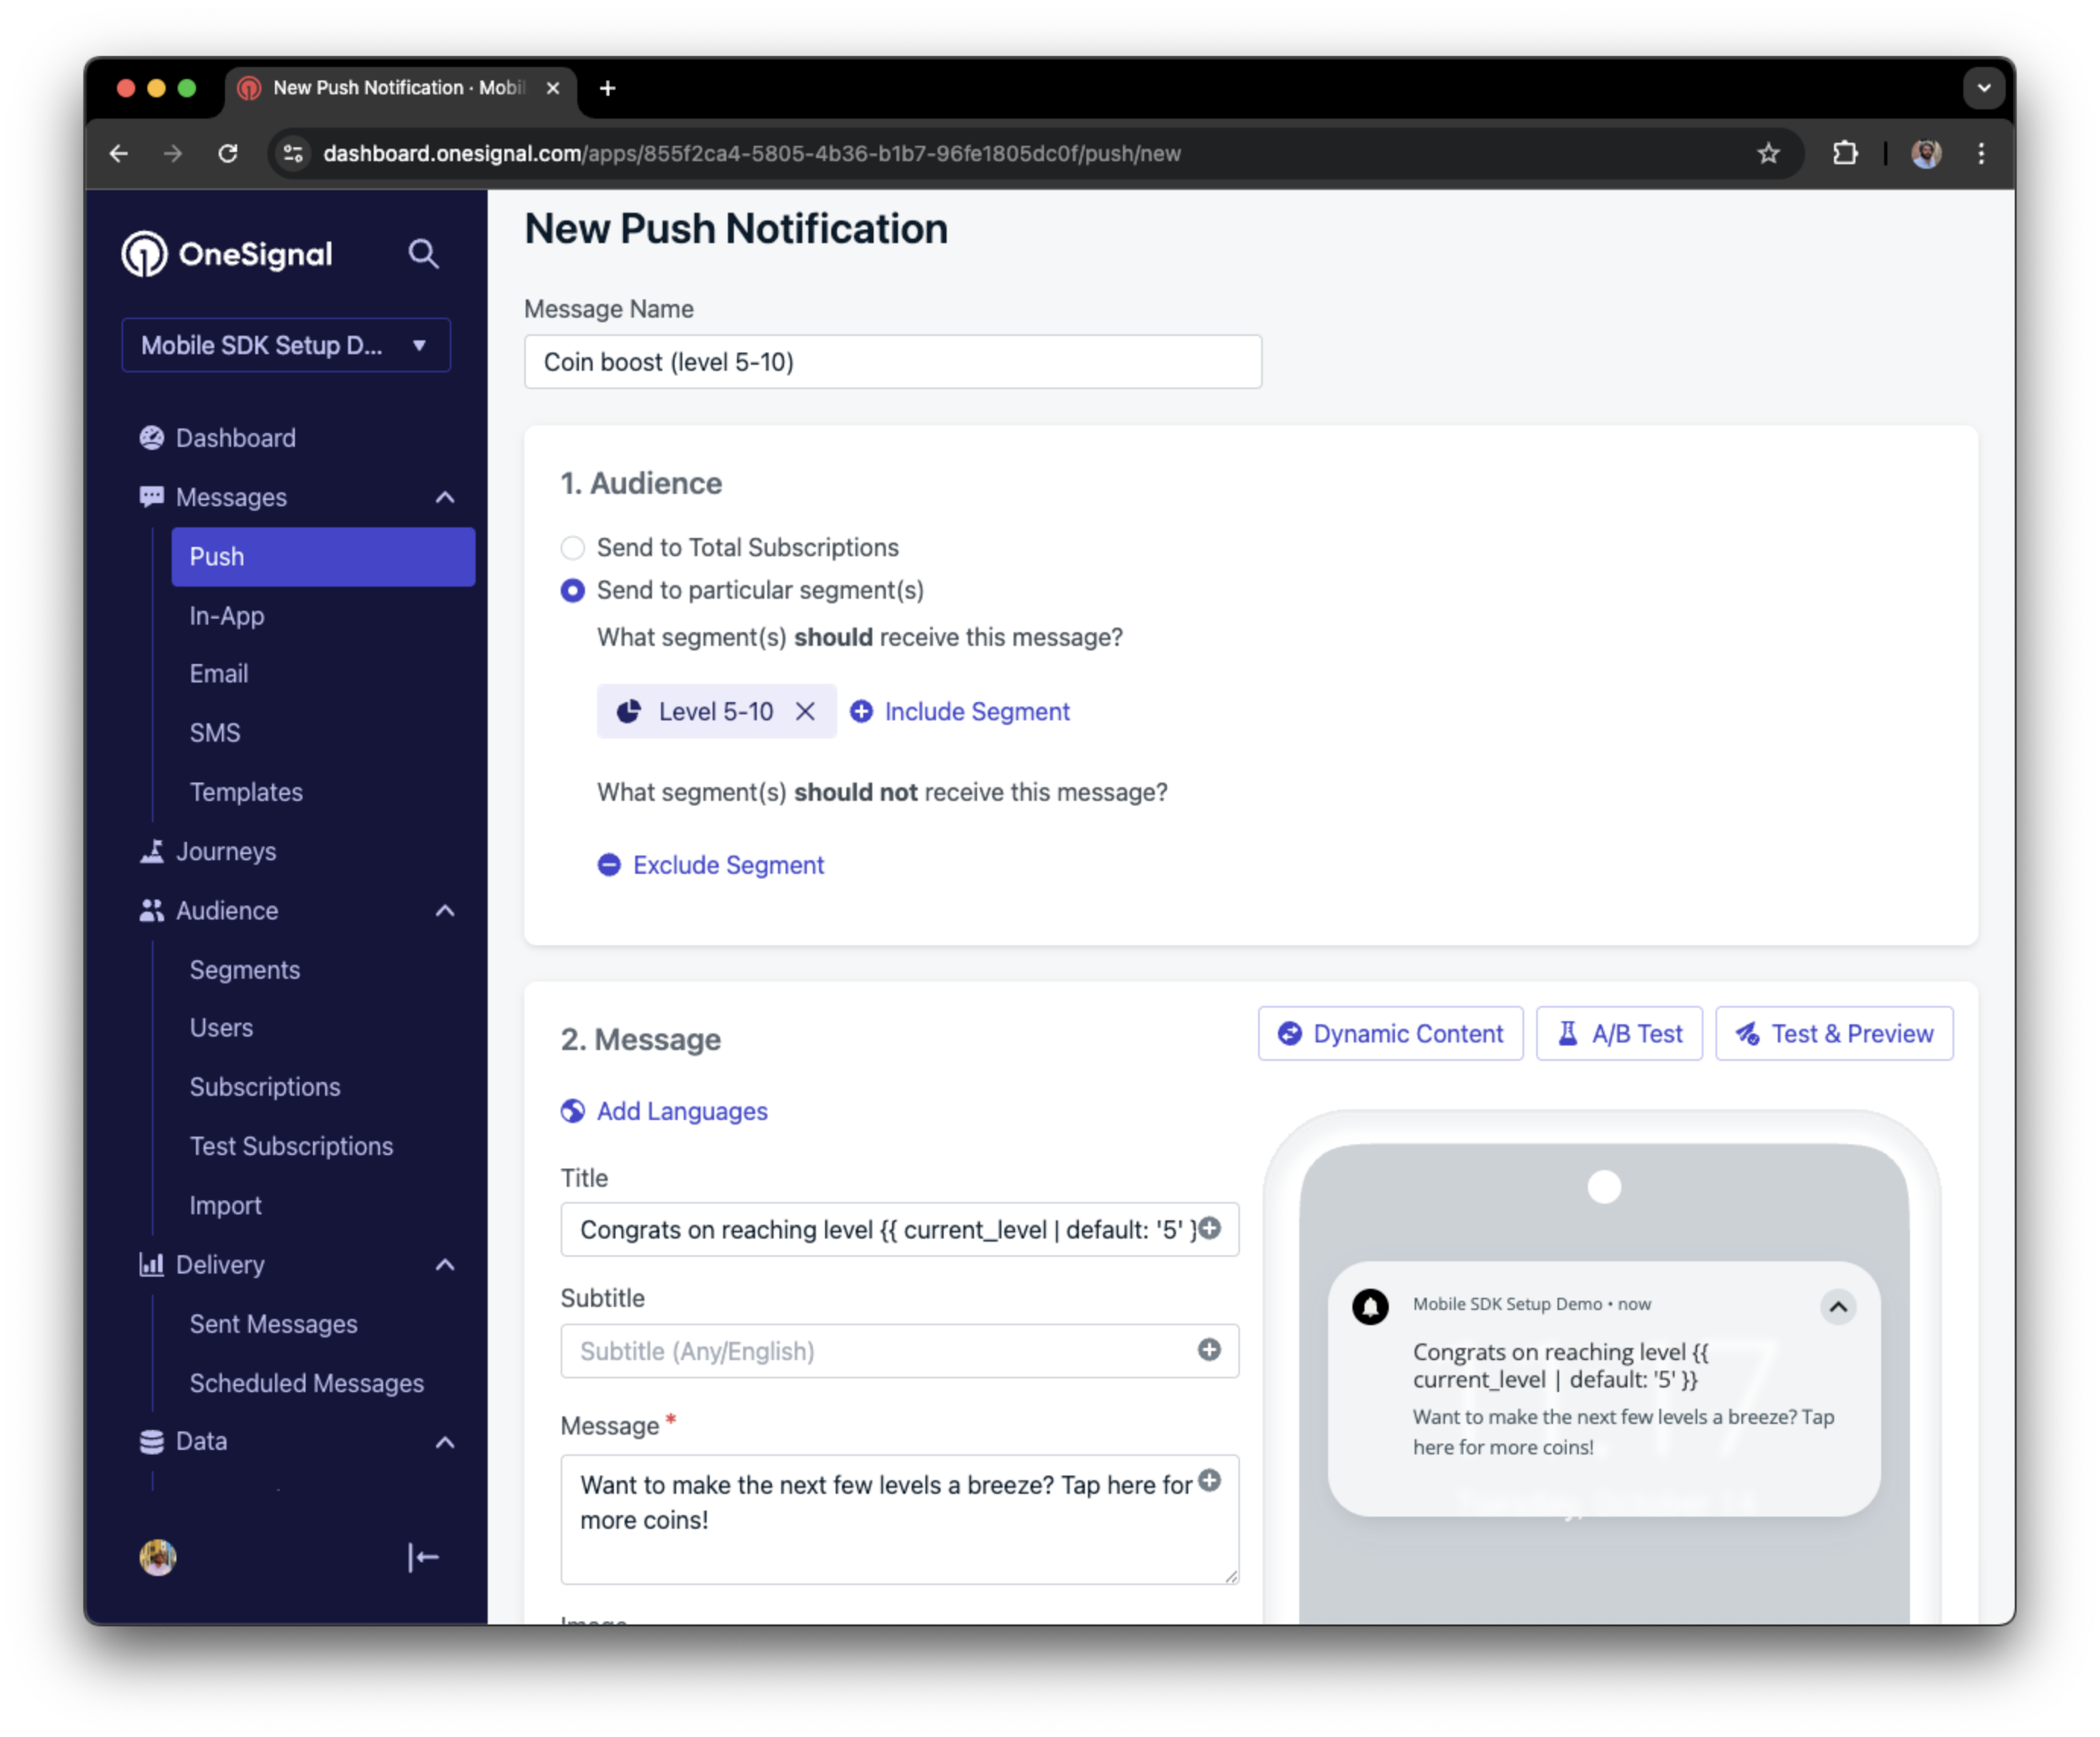
In this example, the user reached level 6 identifiable by the tag called `current_level` set to a value of `6`.
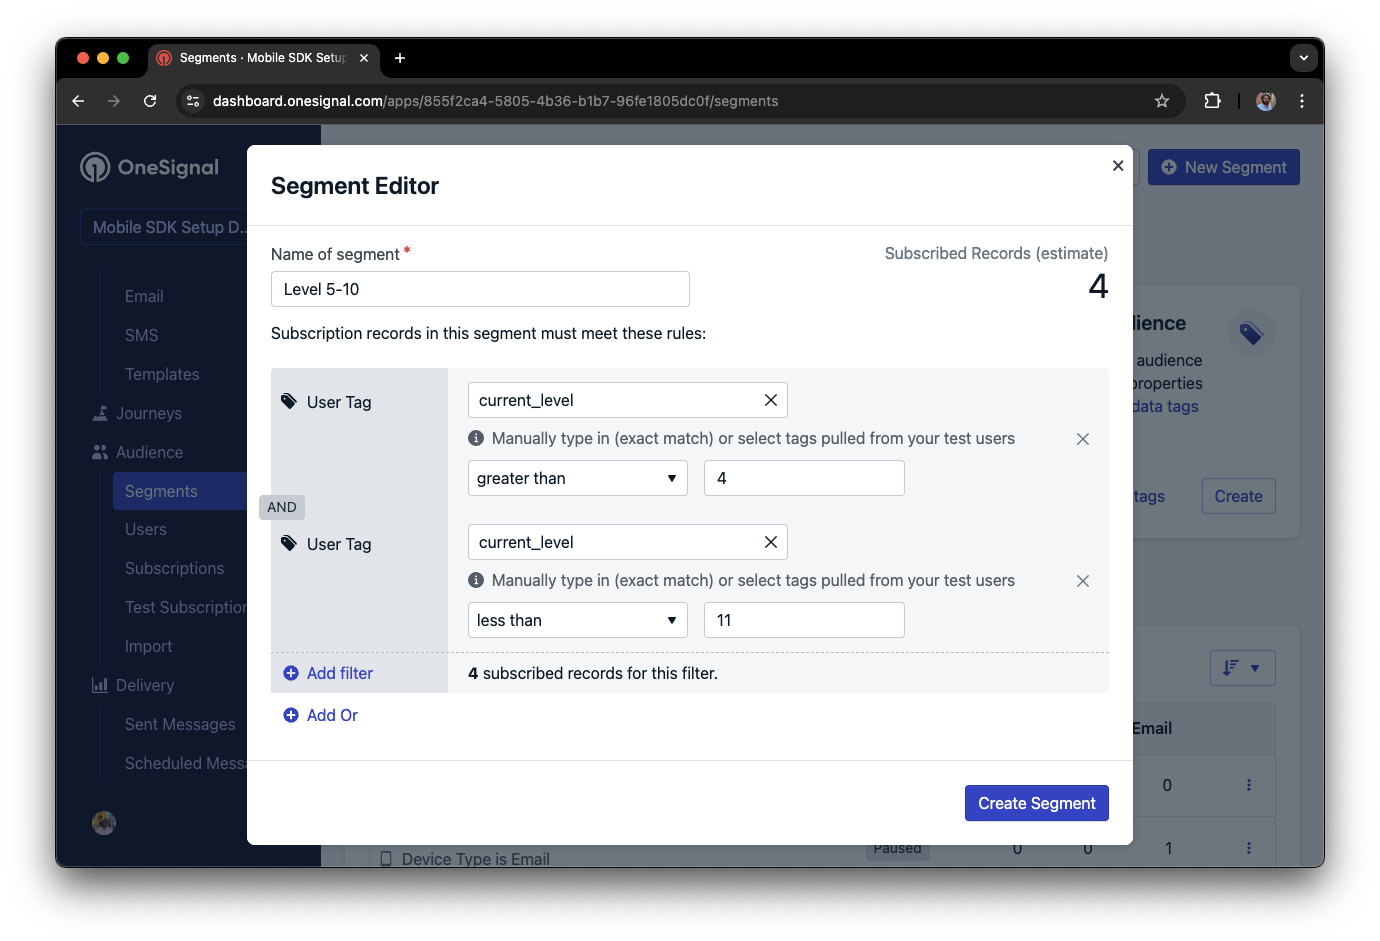
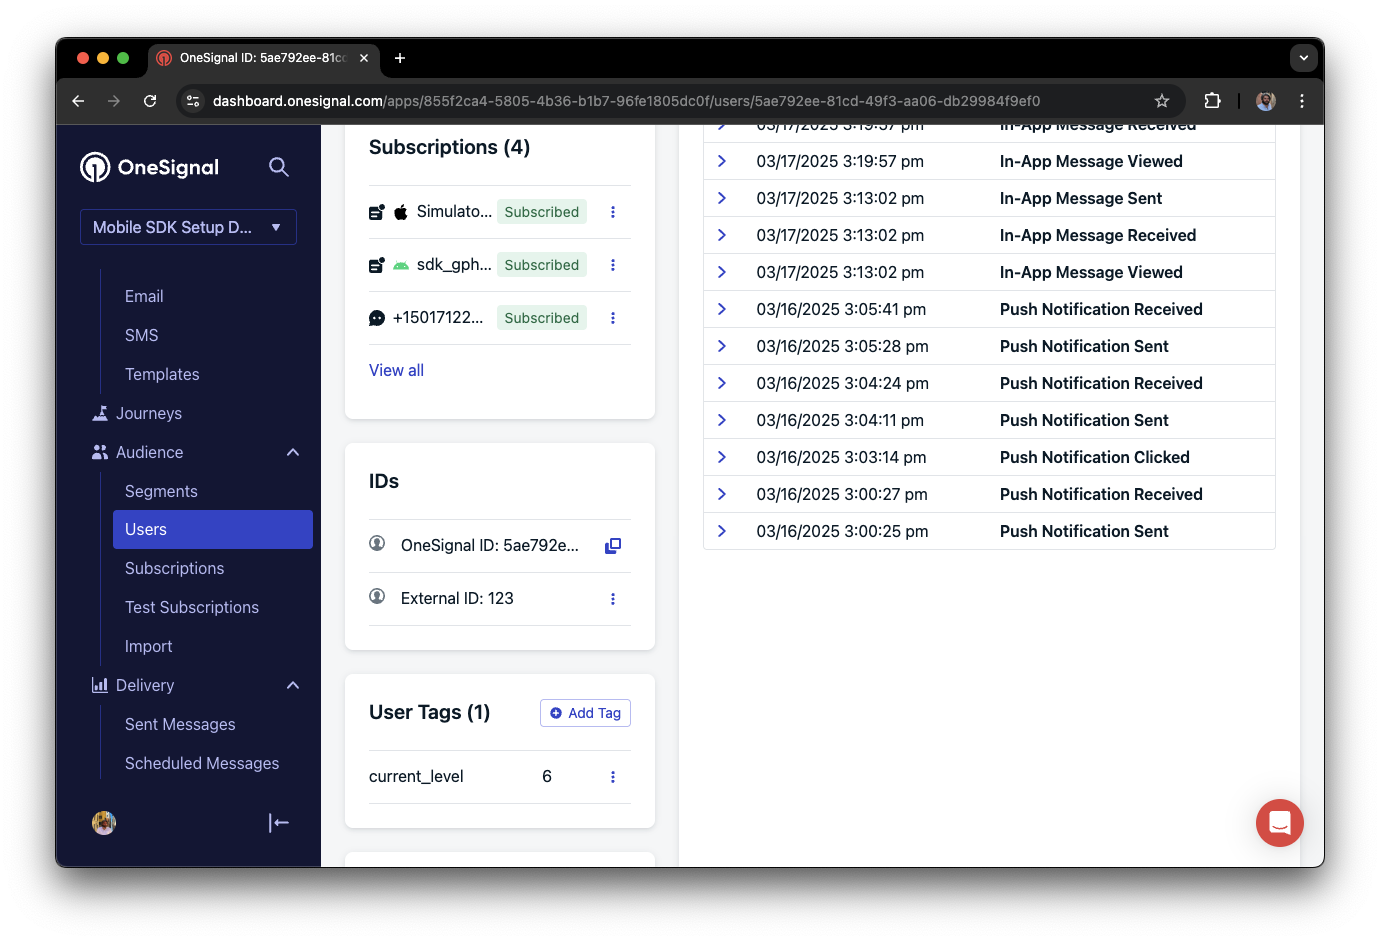 You can create a segment of users with a level between 5 and 10, then use that segment to send targeted and personalized messages:
 ### Add email and/or SMS subscriptions
The OneSignal SDK creates web push subscriptions automatically when users opt in. You can also reach users through email and SMS channels by creating the corresponding subscriptions.
* Use the [`addEmail` method](/docs/en/web-sdk-reference#addemail-%2C-removeemail) to create email subscriptions.
* Use the [`addSms` method](/docs/en/web-sdk-reference#addsms-%2C-removesms) to create SMS subscriptions.
If the email address or phone number already exists in the OneSignal app, the SDK adds it to the existing user. It does not create duplicates.
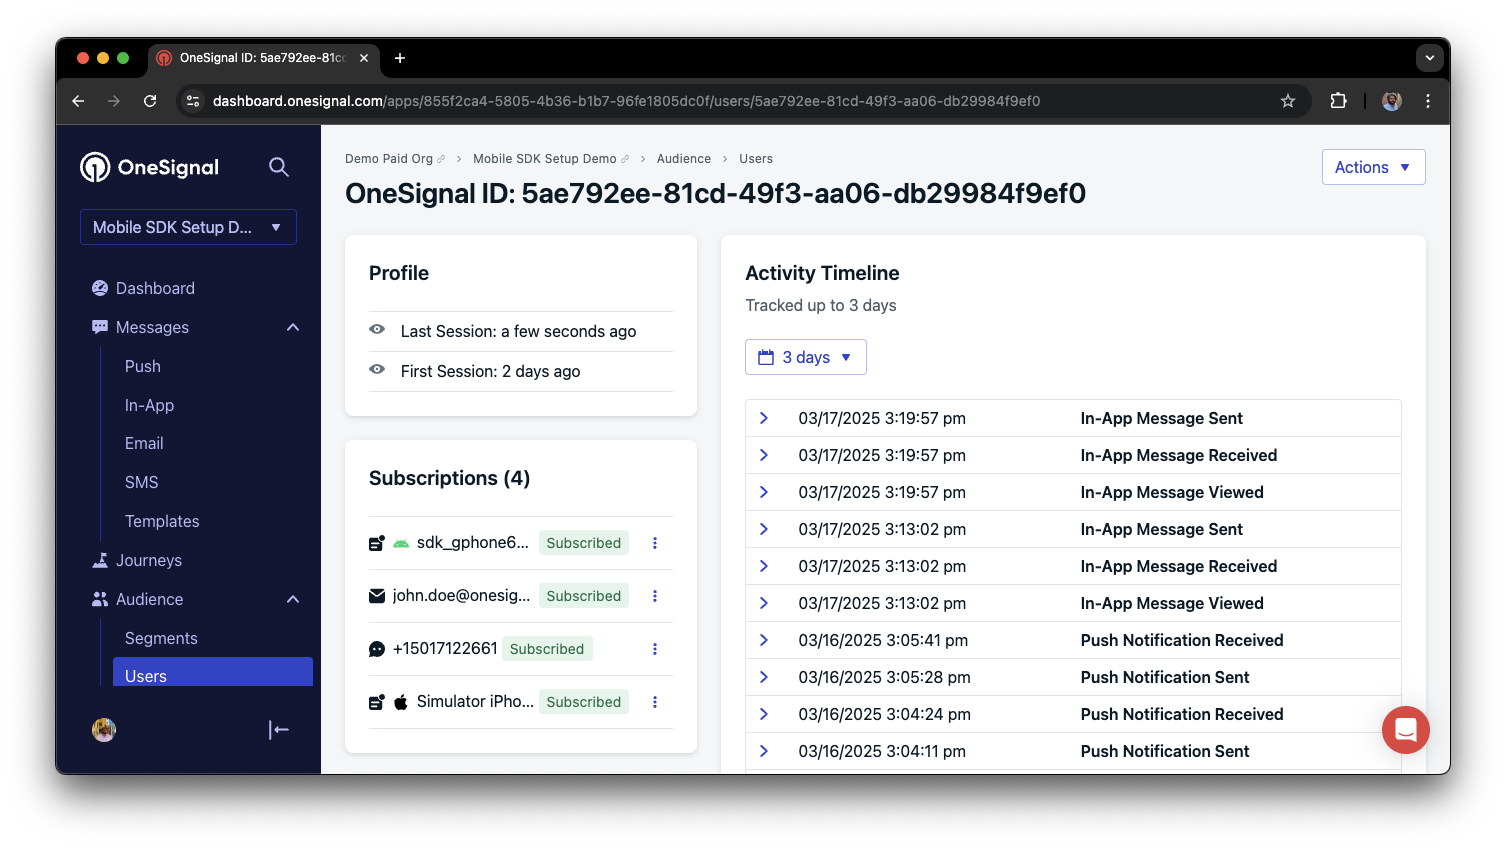
You can view unified users via **Audience > Users** in the dashboard or with the [View user API](/reference/view-user).
### Add email and/or SMS subscriptions
The OneSignal SDK creates web push subscriptions automatically when users opt in. You can also reach users through email and SMS channels by creating the corresponding subscriptions.
* Use the [`addEmail` method](/docs/en/web-sdk-reference#addemail-%2C-removeemail) to create email subscriptions.
* Use the [`addSms` method](/docs/en/web-sdk-reference#addsms-%2C-removesms) to create SMS subscriptions.
If the email address or phone number already exists in the OneSignal app, the SDK adds it to the existing user. It does not create duplicates.
You can view unified users via **Audience > Users** in the dashboard or with the [View user API](/reference/view-user).
 Best practices for multi-channel communication
* Obtain explicit consent before adding email or SMS subscriptions.
* Explain the benefits of each communication channel to users.
* Provide channel preferences so users can select which channels they prefer.
***
### Privacy & user consent
To control when OneSignal collects user data, use the SDK's consent gating methods:
* [`setConsentRequired(true)`](/docs/en/web-sdk-reference#setconsentrequired): Prevents data collection until consent is given.
* [`setConsentGiven(true)`](/docs/en/web-sdk-reference#setconsentgiven): Enables data collection once consent is granted.
For more on privacy and security:
Review what data the OneSignal SDK collects from users.
Manage and protect user data in compliance with privacy regulations.
***
## Listen to push, user, and in-app events
Use SDK listeners to react to user actions and state changes.
The SDK provides several event listeners you can hook into. See the [SDK reference guide](/docs/en/web-sdk-reference) for more details.
### Push notification events
* [Click event listener](/docs/en/web-sdk-reference#click): Detect when a notification is tapped.
* [Foreground lifecycle listener](/docs/en/web-sdk-reference#foregroundwilldisplay): Control how notifications behave in foreground.
### User state changes
* [User state change event listener](/docs/en/web-sdk-reference#addeventlistener-user-state): Detect when the External ID is set.
* [Permission observer](/docs/en/web-sdk-reference#permissionchange): Track the user's specific interaction with the native push permission prompt.
* [Push subscription change observer](/docs/en/web-sdk-reference#addeventlistener-push-subscription-changes): Track when the push subscription status changes.
***
## Advanced setup & capabilities
Explore more capabilities to enhance your integration:
Move from another push provider to OneSignal.
Connect OneSignal with third-party tools and platforms.
Add interactive buttons to push notifications.
Send localized messages to users in their preferred language.
Secure your SDK integration with server-side identity verification.
Track custom conversion events tied to your messages.
### Web SDK setup & reference
Enable all key web push features for your integration.
Full details on available methods and configuration options.
Congratulations! You've successfully completed the Web SDK setup guide.
***
***
Need help?
Chat with our Support team or email `support@onesignal.com`
Please include:
* Details of the issue you're experiencing and steps to reproduce if available
* Your OneSignal App ID
* The External ID or Subscription ID if applicable
* The URL to the message you tested in the OneSignal Dashboard if applicable
* Any relevant [logs or error messages](/docs/en/capturing-a-debug-log)
We're happy to help!
***
Best practices for multi-channel communication
* Obtain explicit consent before adding email or SMS subscriptions.
* Explain the benefits of each communication channel to users.
* Provide channel preferences so users can select which channels they prefer.
***
### Privacy & user consent
To control when OneSignal collects user data, use the SDK's consent gating methods:
* [`setConsentRequired(true)`](/docs/en/web-sdk-reference#setconsentrequired): Prevents data collection until consent is given.
* [`setConsentGiven(true)`](/docs/en/web-sdk-reference#setconsentgiven): Enables data collection once consent is granted.
For more on privacy and security:
Review what data the OneSignal SDK collects from users.
Manage and protect user data in compliance with privacy regulations.
***
## Listen to push, user, and in-app events
Use SDK listeners to react to user actions and state changes.
The SDK provides several event listeners you can hook into. See the [SDK reference guide](/docs/en/web-sdk-reference) for more details.
### Push notification events
* [Click event listener](/docs/en/web-sdk-reference#click): Detect when a notification is tapped.
* [Foreground lifecycle listener](/docs/en/web-sdk-reference#foregroundwilldisplay): Control how notifications behave in foreground.
### User state changes
* [User state change event listener](/docs/en/web-sdk-reference#addeventlistener-user-state): Detect when the External ID is set.
* [Permission observer](/docs/en/web-sdk-reference#permissionchange): Track the user's specific interaction with the native push permission prompt.
* [Push subscription change observer](/docs/en/web-sdk-reference#addeventlistener-push-subscription-changes): Track when the push subscription status changes.
***
## Advanced setup & capabilities
Explore more capabilities to enhance your integration:
Move from another push provider to OneSignal.
Connect OneSignal with third-party tools and platforms.
Add interactive buttons to push notifications.
Send localized messages to users in their preferred language.
Secure your SDK integration with server-side identity verification.
Track custom conversion events tied to your messages.
### Web SDK setup & reference
Enable all key web push features for your integration.
Full details on available methods and configuration options.
Congratulations! You've successfully completed the Web SDK setup guide.
***
***
Need help?
Chat with our Support team or email `support@onesignal.com`
Please include:
* Details of the issue you're experiencing and steps to reproduce if available
* Your OneSignal App ID
* The External ID or Subscription ID if applicable
* The URL to the message you tested in the OneSignal Dashboard if applicable
* Any relevant [logs or error messages](/docs/en/capturing-a-debug-log)
We're happy to help!
***