Naming and describing your Journey
When you click Create Journey, a modal appears (only once per new Journey) prompting you to:- Enter a Journey Name (required)
- Enter a Description (optional)
- Journey name is required.
- Name maximum length: 300 characters
- Description maximum length: 255 characters
New Journey YYYY-MM-DD) and an empty description.
The initialization modal does not appear when duplicating a Journey or creating one from a template.
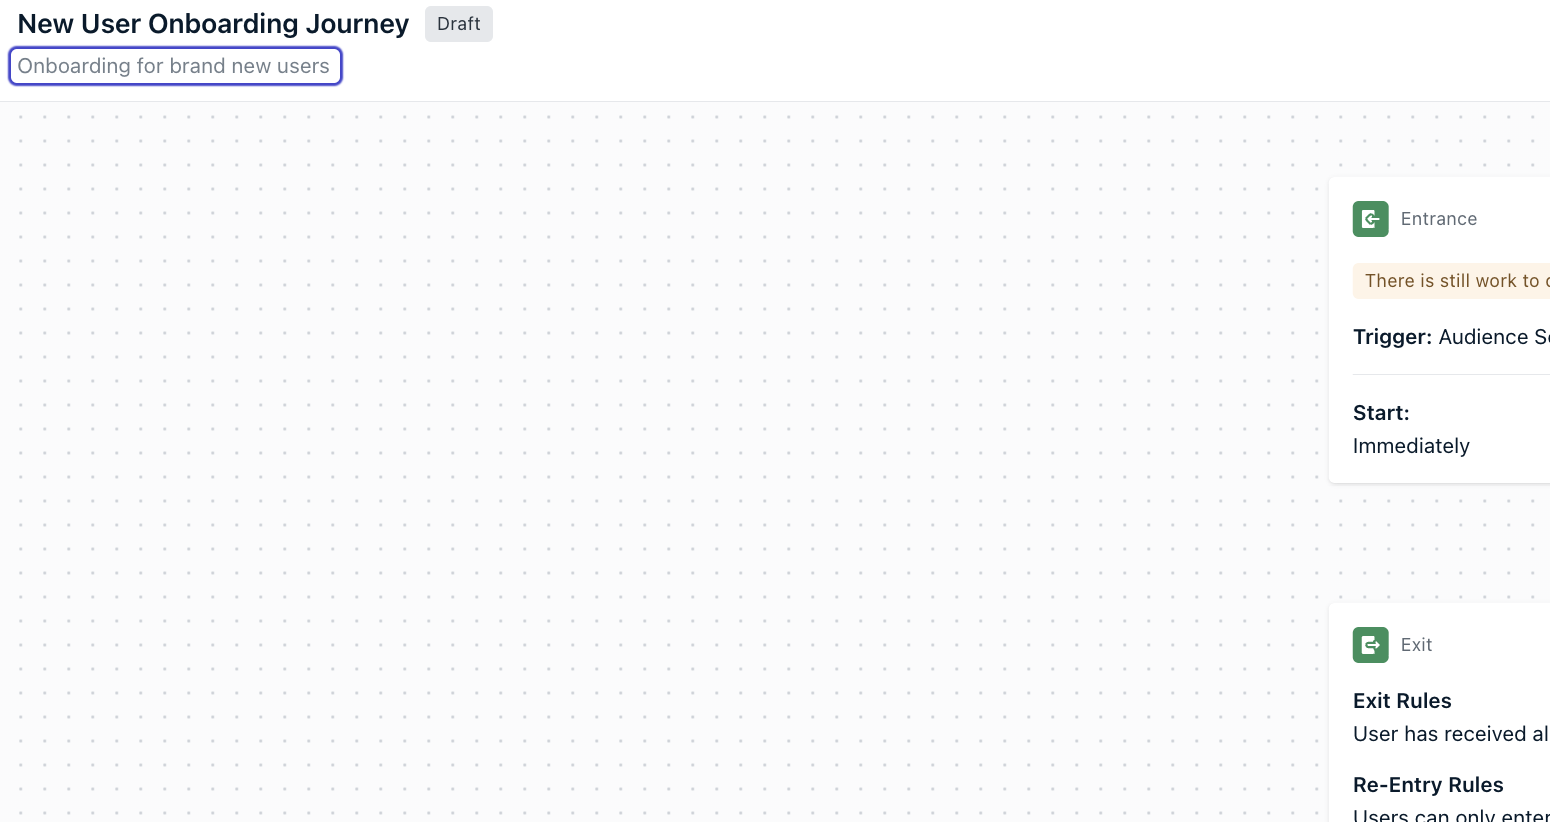
Editing name and description
After creation, the Journey Name and Description appear at the top of the page and can be edited inline. The description field supports multi-line text. Start by giving your Journey a name and description that clearly communicate its purpose to your team. Common examples include:- Abandoned Cart
- Welcome Campaign
- Inactive User Reach Out
Journey Settings
Goals (Beta)
Set success metrics for Journeys and supported message steps to measure performance over time.
Goals (Beta)
Set success metrics for Journeys and supported message steps to measure performance over time.
Beta feature: Journey and Message Goals are currently in Beta and available in early access. Functionality may change before general availability.
- Journey Goal (overall Journey performance)
- Message Goal (for individual message action steps that support goals)
Journey Goal
A Journey Goal tracks a single success metric for the entire Journey, for example whether users are entering, exiting, or completing it.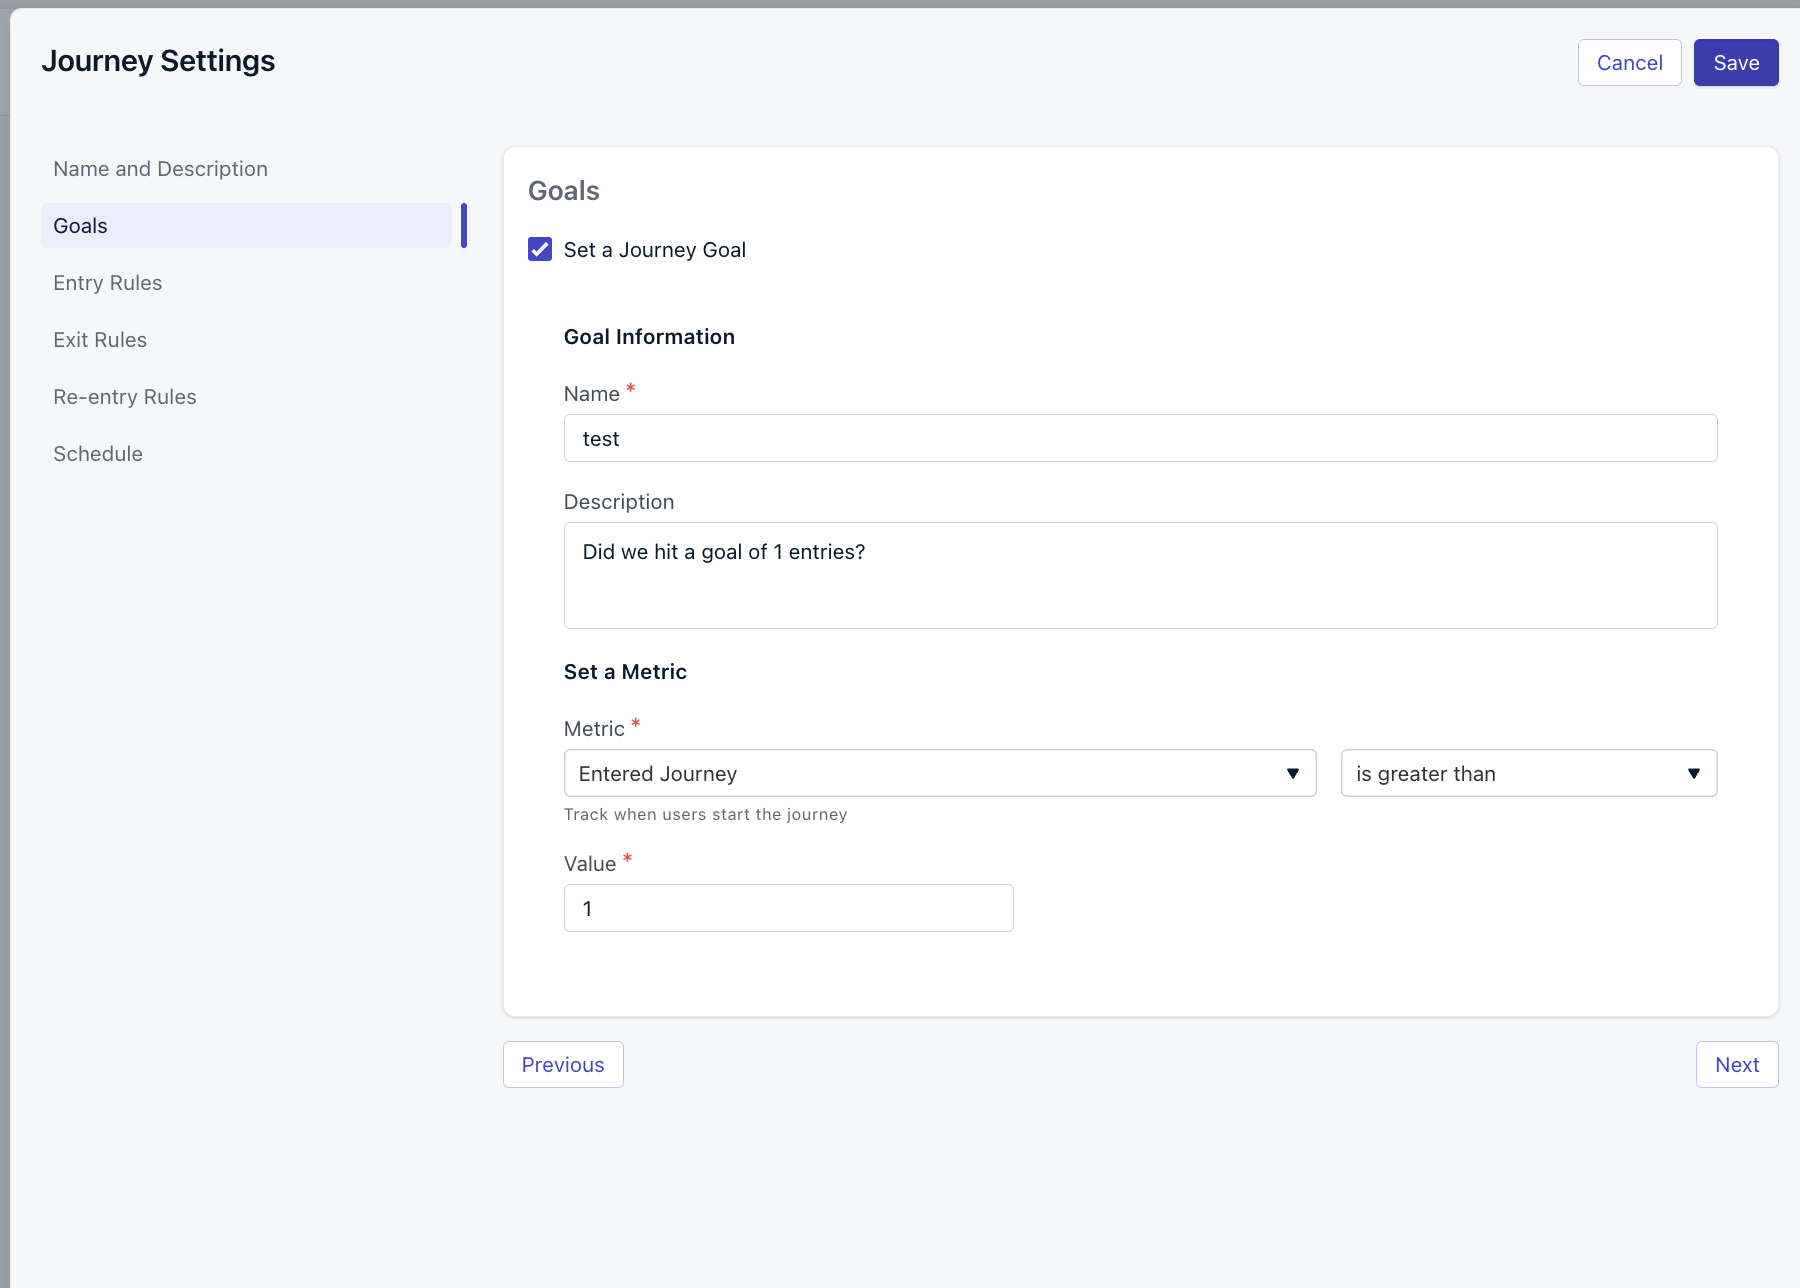
Journey Goal in Journey Settings
- Open your Journey and click Settings.
- Select Goals.
- Enable Set a Journey Goal.
- Enter a Name (required) and optional Description.
- Choose a Metric and condition, then set the Value threshold.
- Click Save.
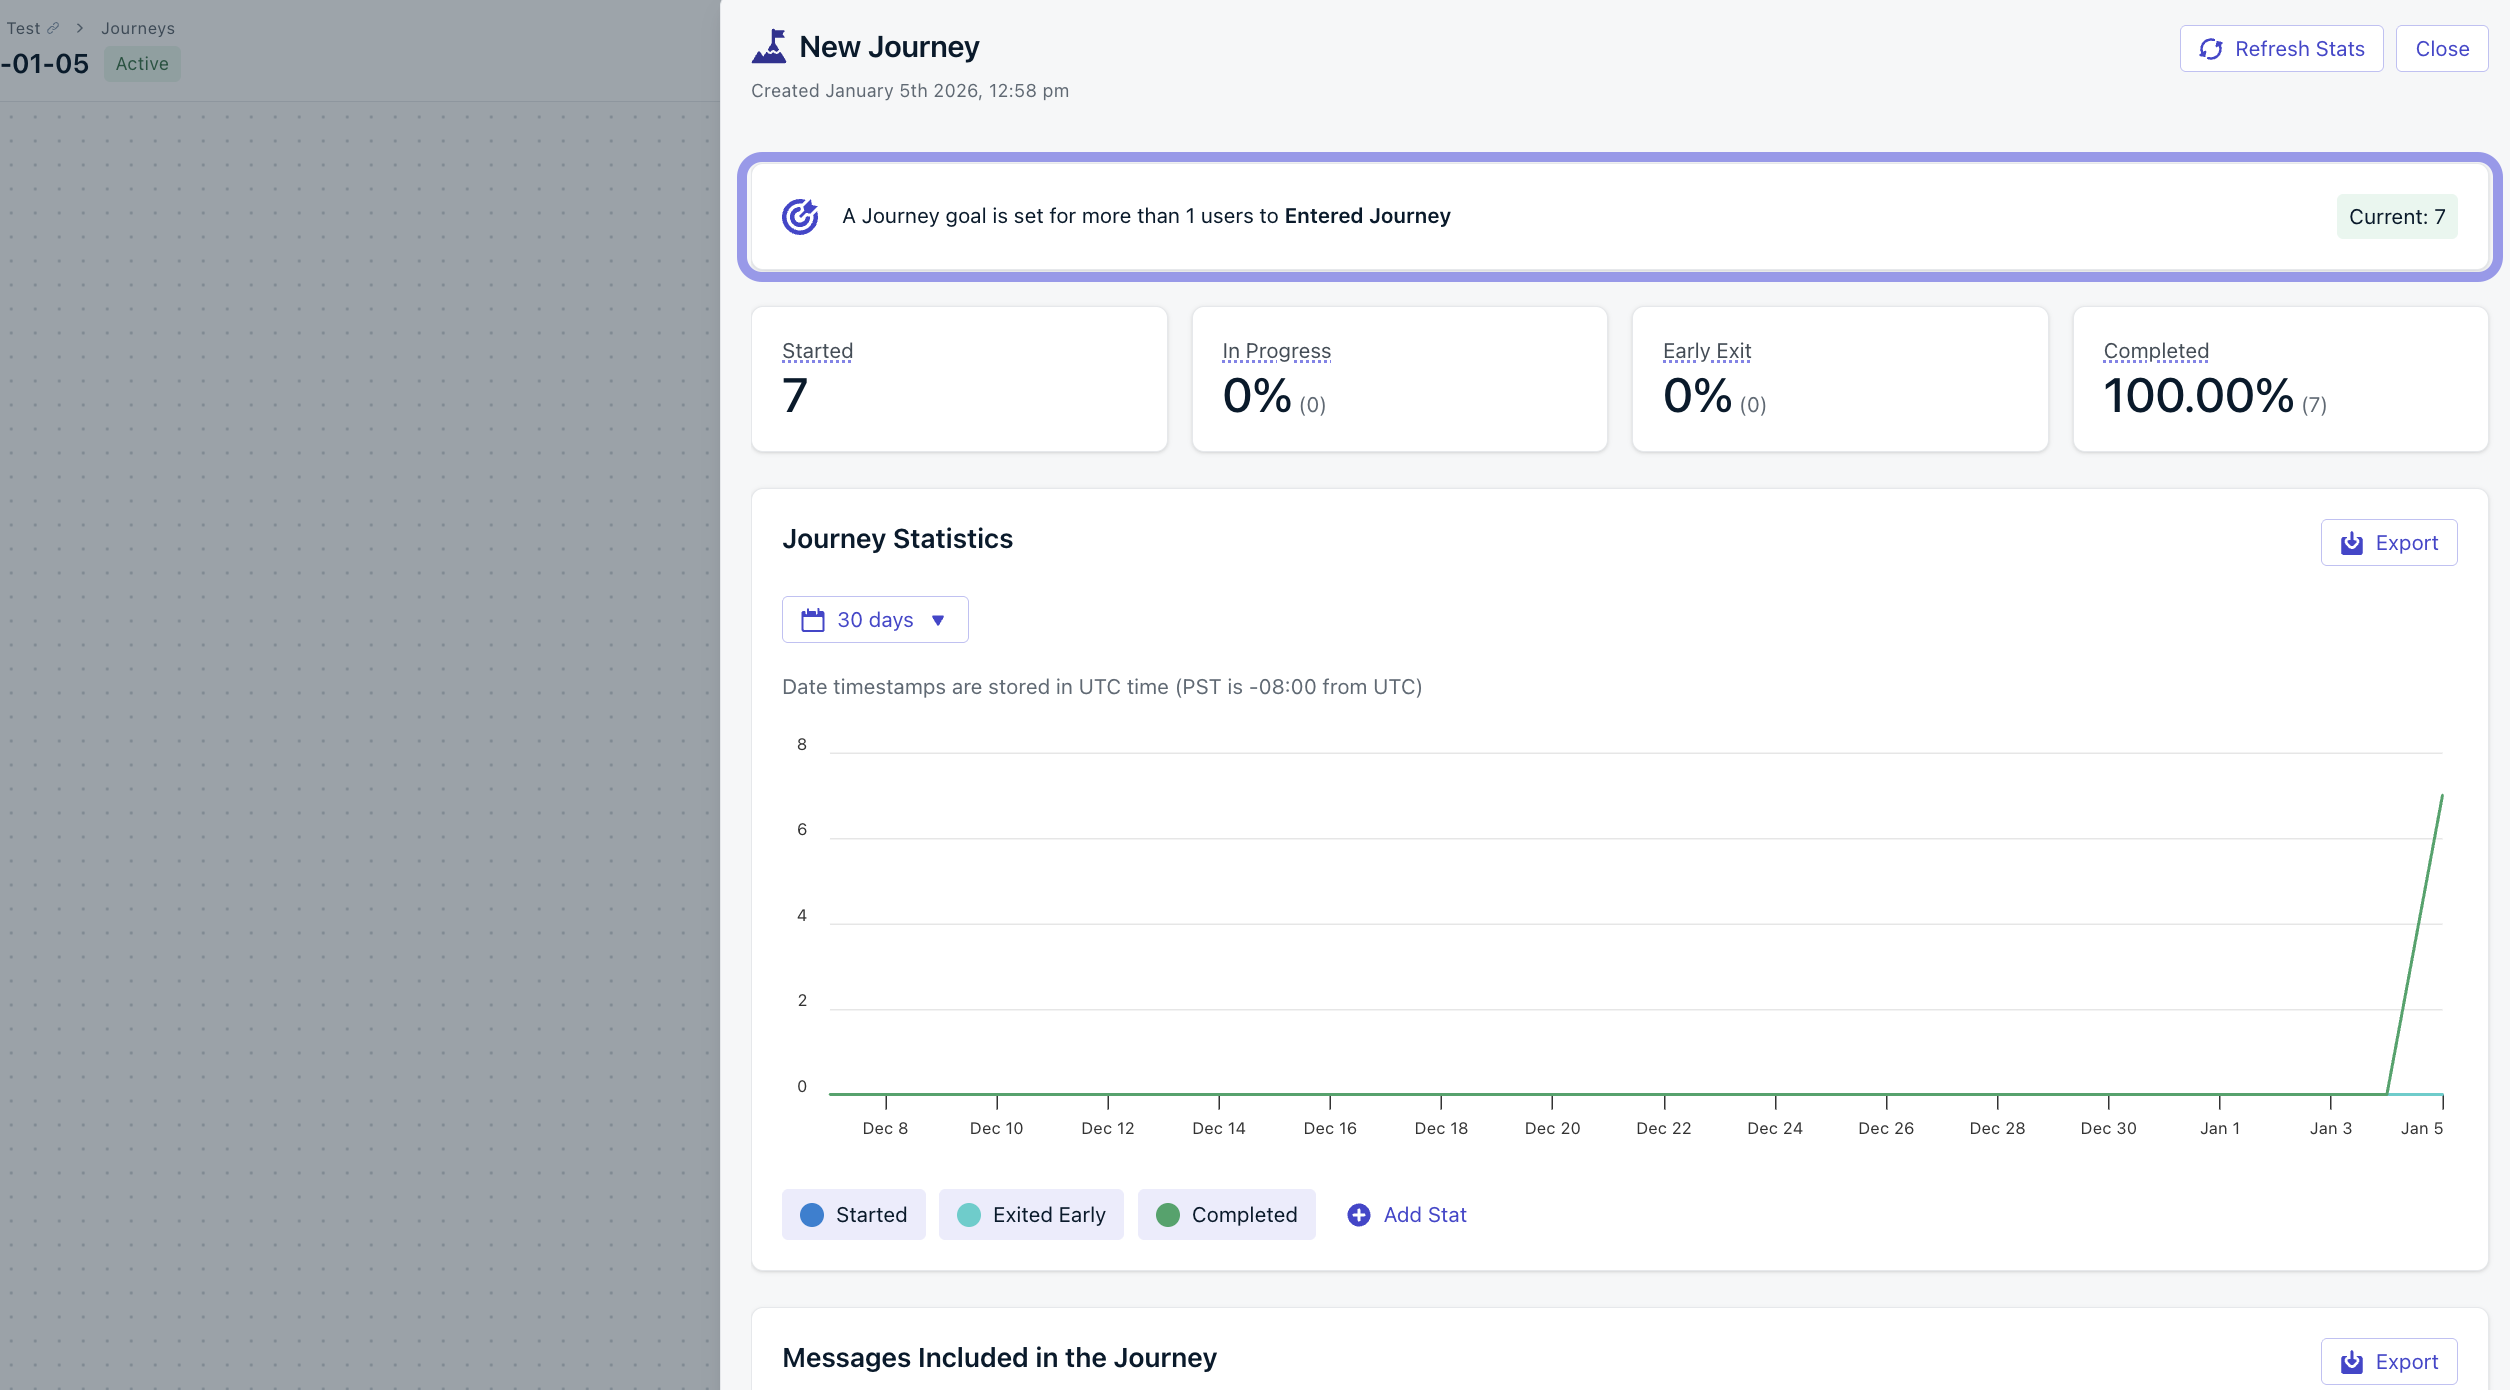
Journey Goal shown in the Journey report
Journey Goal metrics
Journey Goals support Journey-level engagement metrics such as:- Entered Journey (users who started the Journey)
- Completed (users who reached the end)
- Exited Early (users who left due to exit rules)
- “Did at least 100 users enter this Journey?”
- “Are most users completing it?”
- “Are too many users exiting early?”
Message Goals (Push + other supported message steps)
Message steps support their own Message Goal, which measures performance for that specific message. For example, a Push Notification step can track CTR, confirmations, or clicks.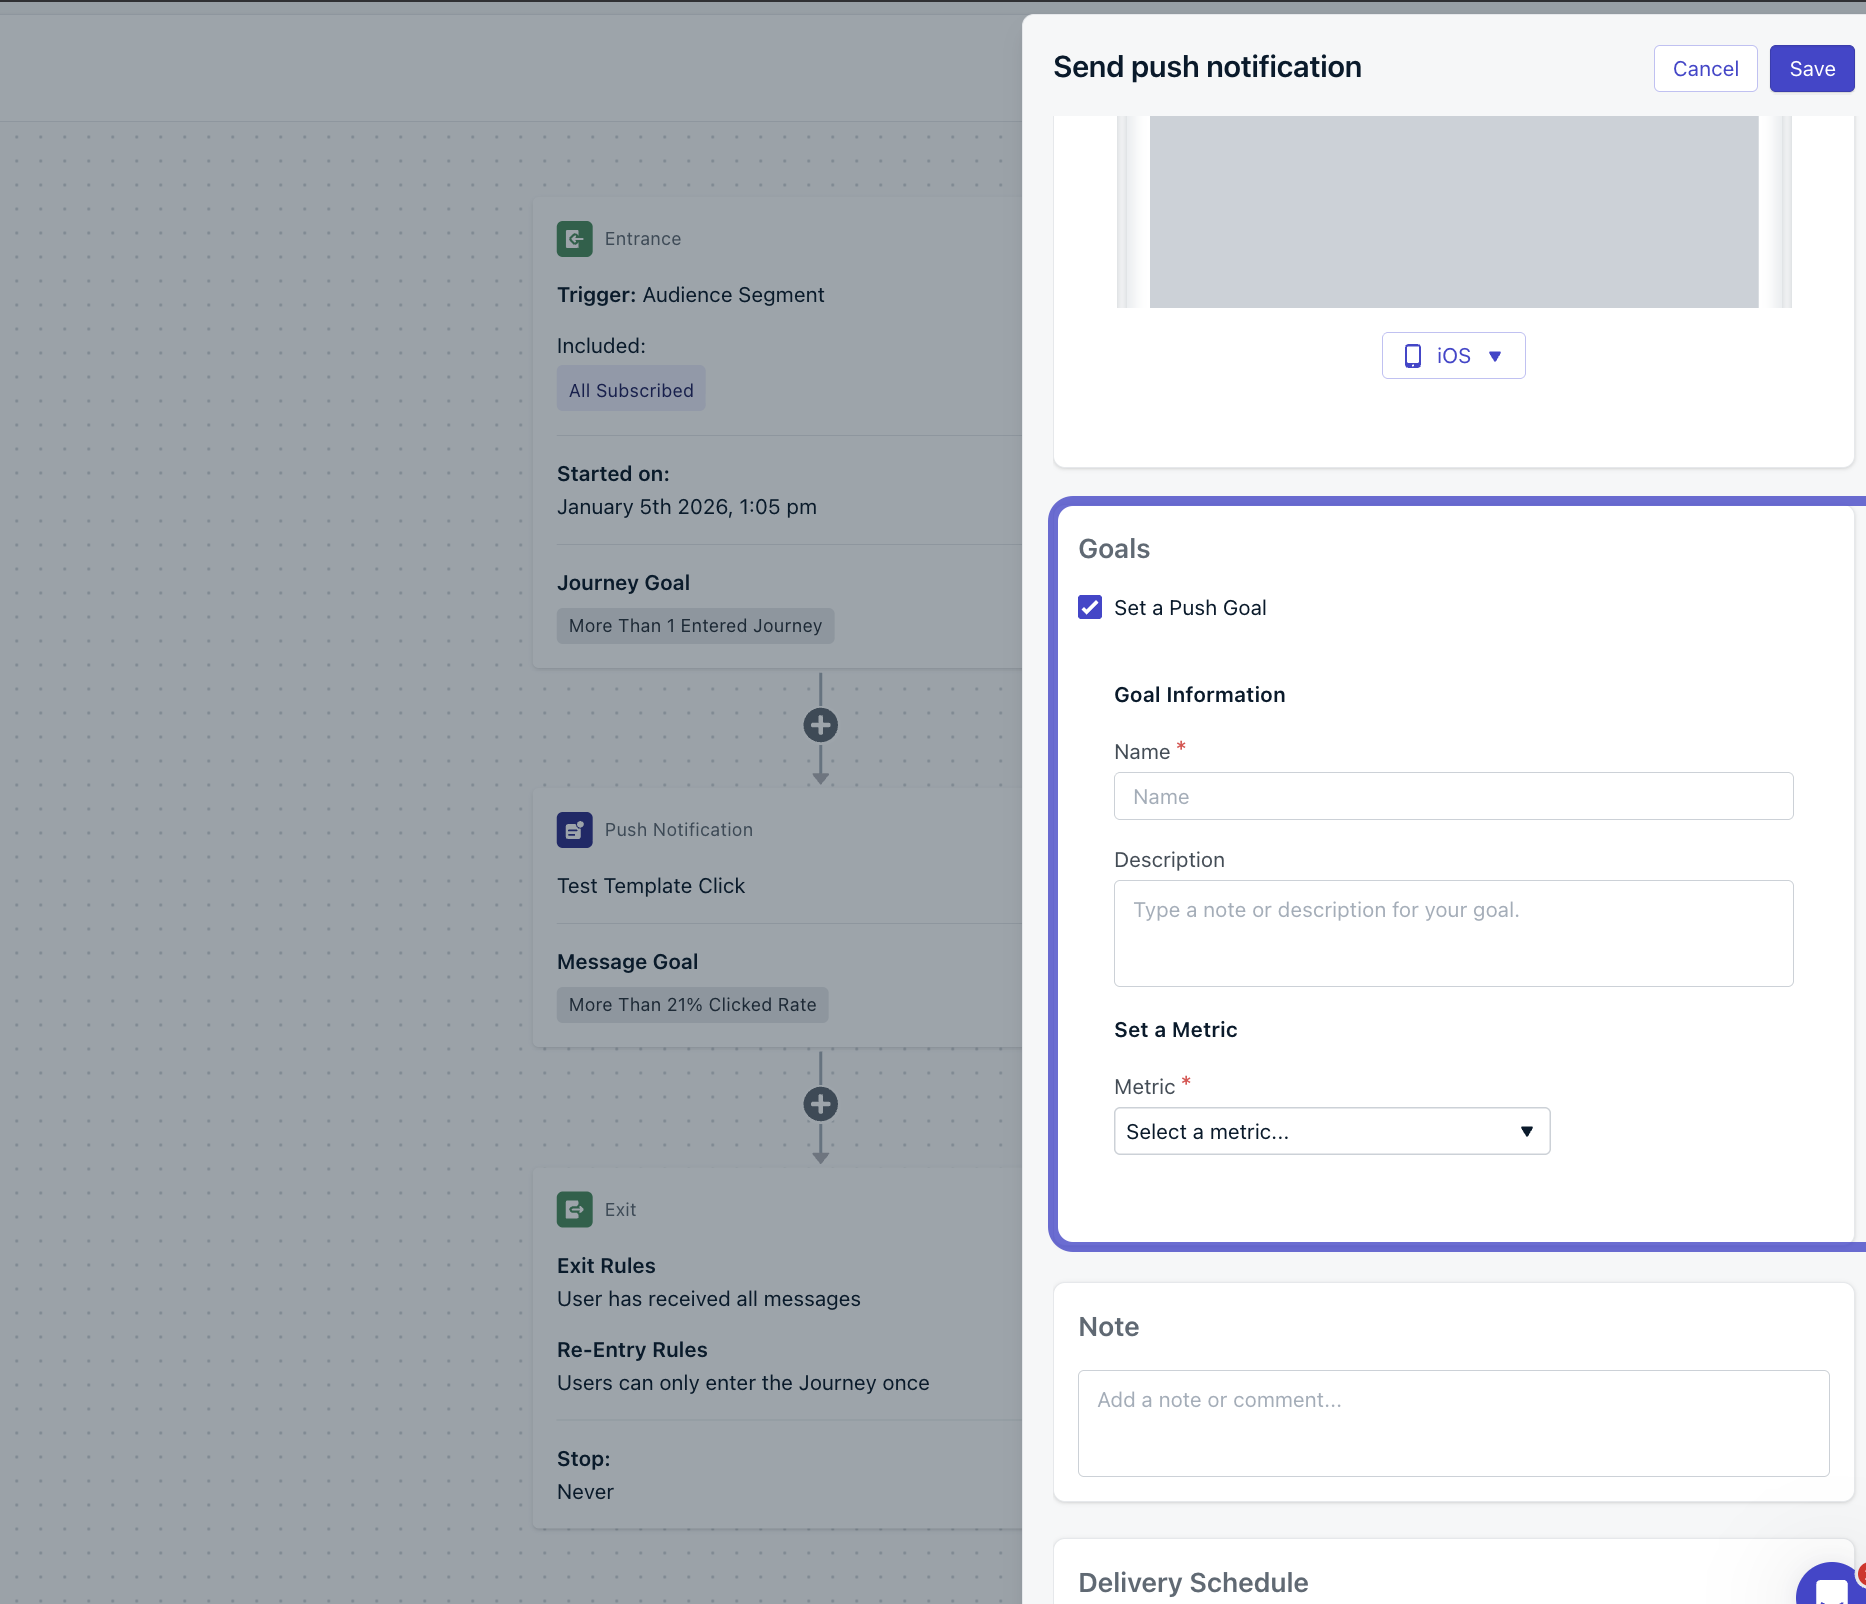
Message Goal configuration inside a Push Notification step
- Click the message action step in your Journey (for example, Push Notification).
- In the editor, enable Set a Push Goal (or equivalent goal toggle).
- Enter a Name and optional Description.
- Select a Metric, condition, and Value.
- Click Save.
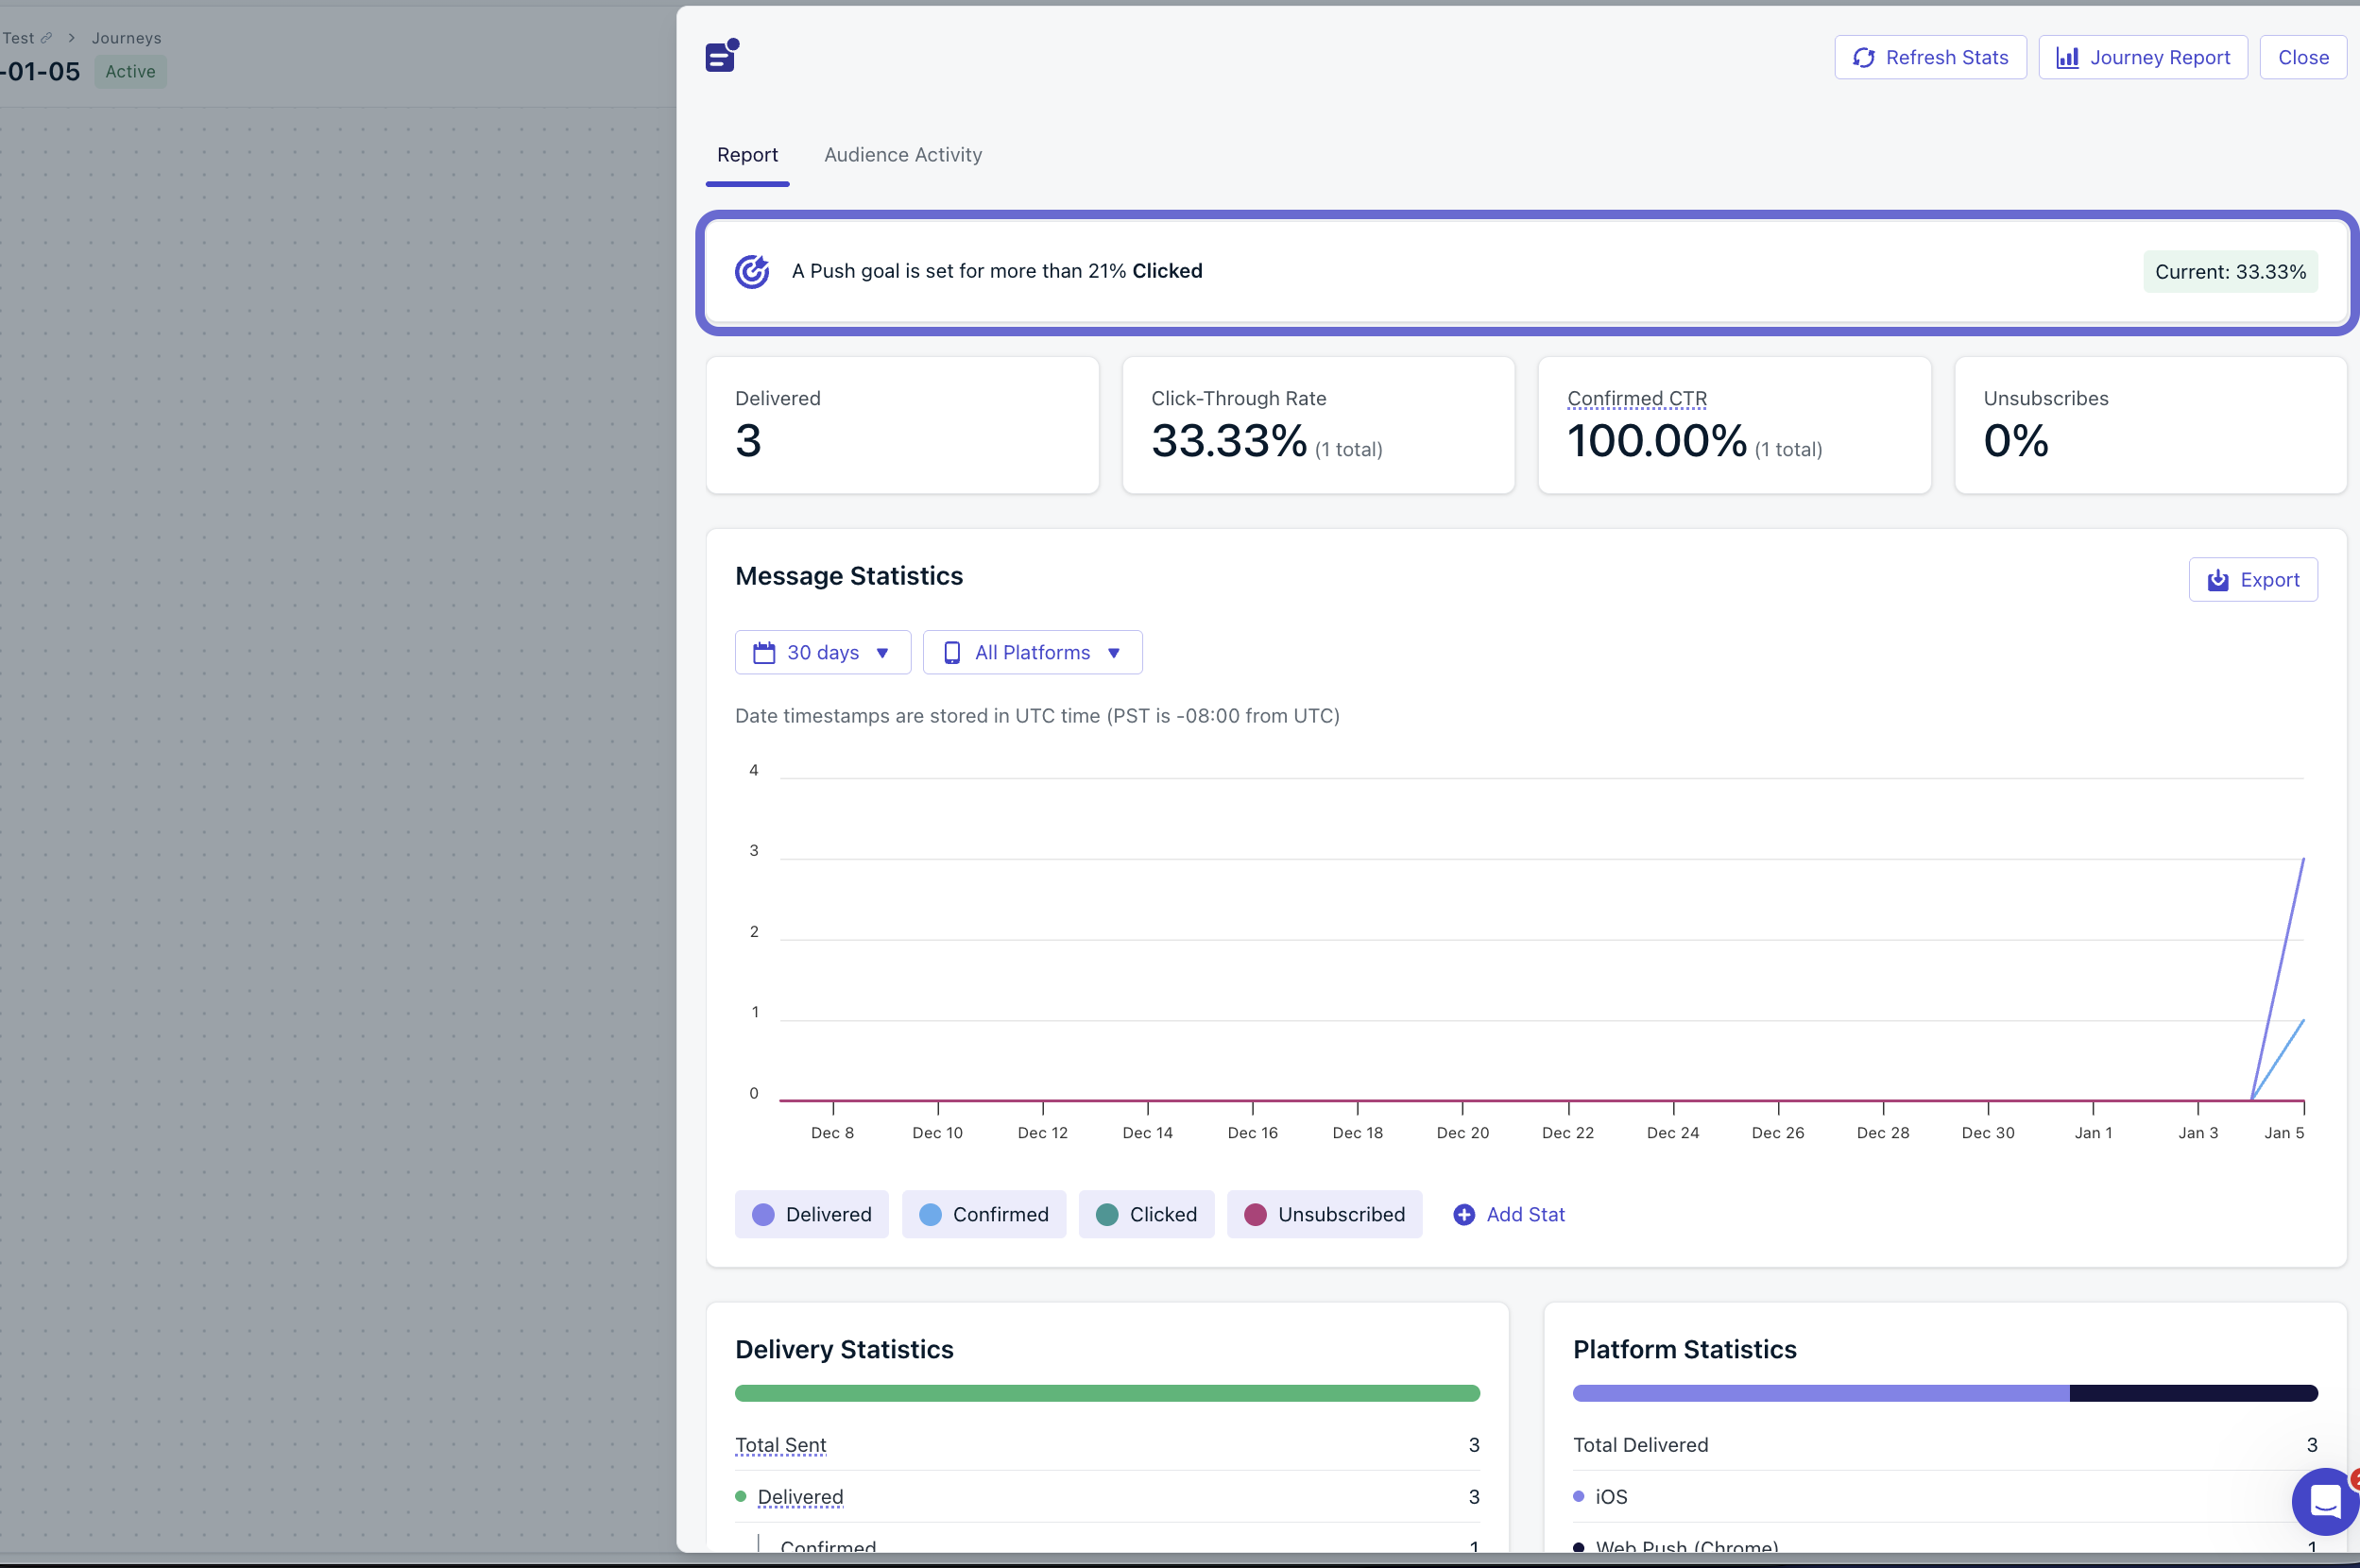
Message goal displayed in the message report
Message Goal metrics (Push)
Push goals support delivery and engagement metrics such as:- Sent
- Delivered
- Confirmed
- Clicked
- CTR
- Failed
- Unsubscribed
- Capped
- Rate (percentage-based), like CTR
- Count (total number), like clicks
Conversion metrics in Message Goals
Message Goals on Push, Email, SMS, and In-App steps can also target conversion metrics, such as purchases, sign-ups, or app sessions. The metric picker groups these under Conversions, alongside the channel’s Engagement metrics. See set a Goal against a conversion metric for the available metrics, measures, and plan requirements.Entry rules
Entry rules define how users can enter your Journey based on their segment membership or custom events. Entry rules cannot combine Segments and Custom Events. You must choose one type per Journey. You can still use Custom Events to continue users through a Journey via the Wait until step. Once a Journey is set live, you cannot switch between Segment-based and Custom Event-based entry rules. To change the entry type, stop and archive the Journey, duplicate it, then configure the new entry rules.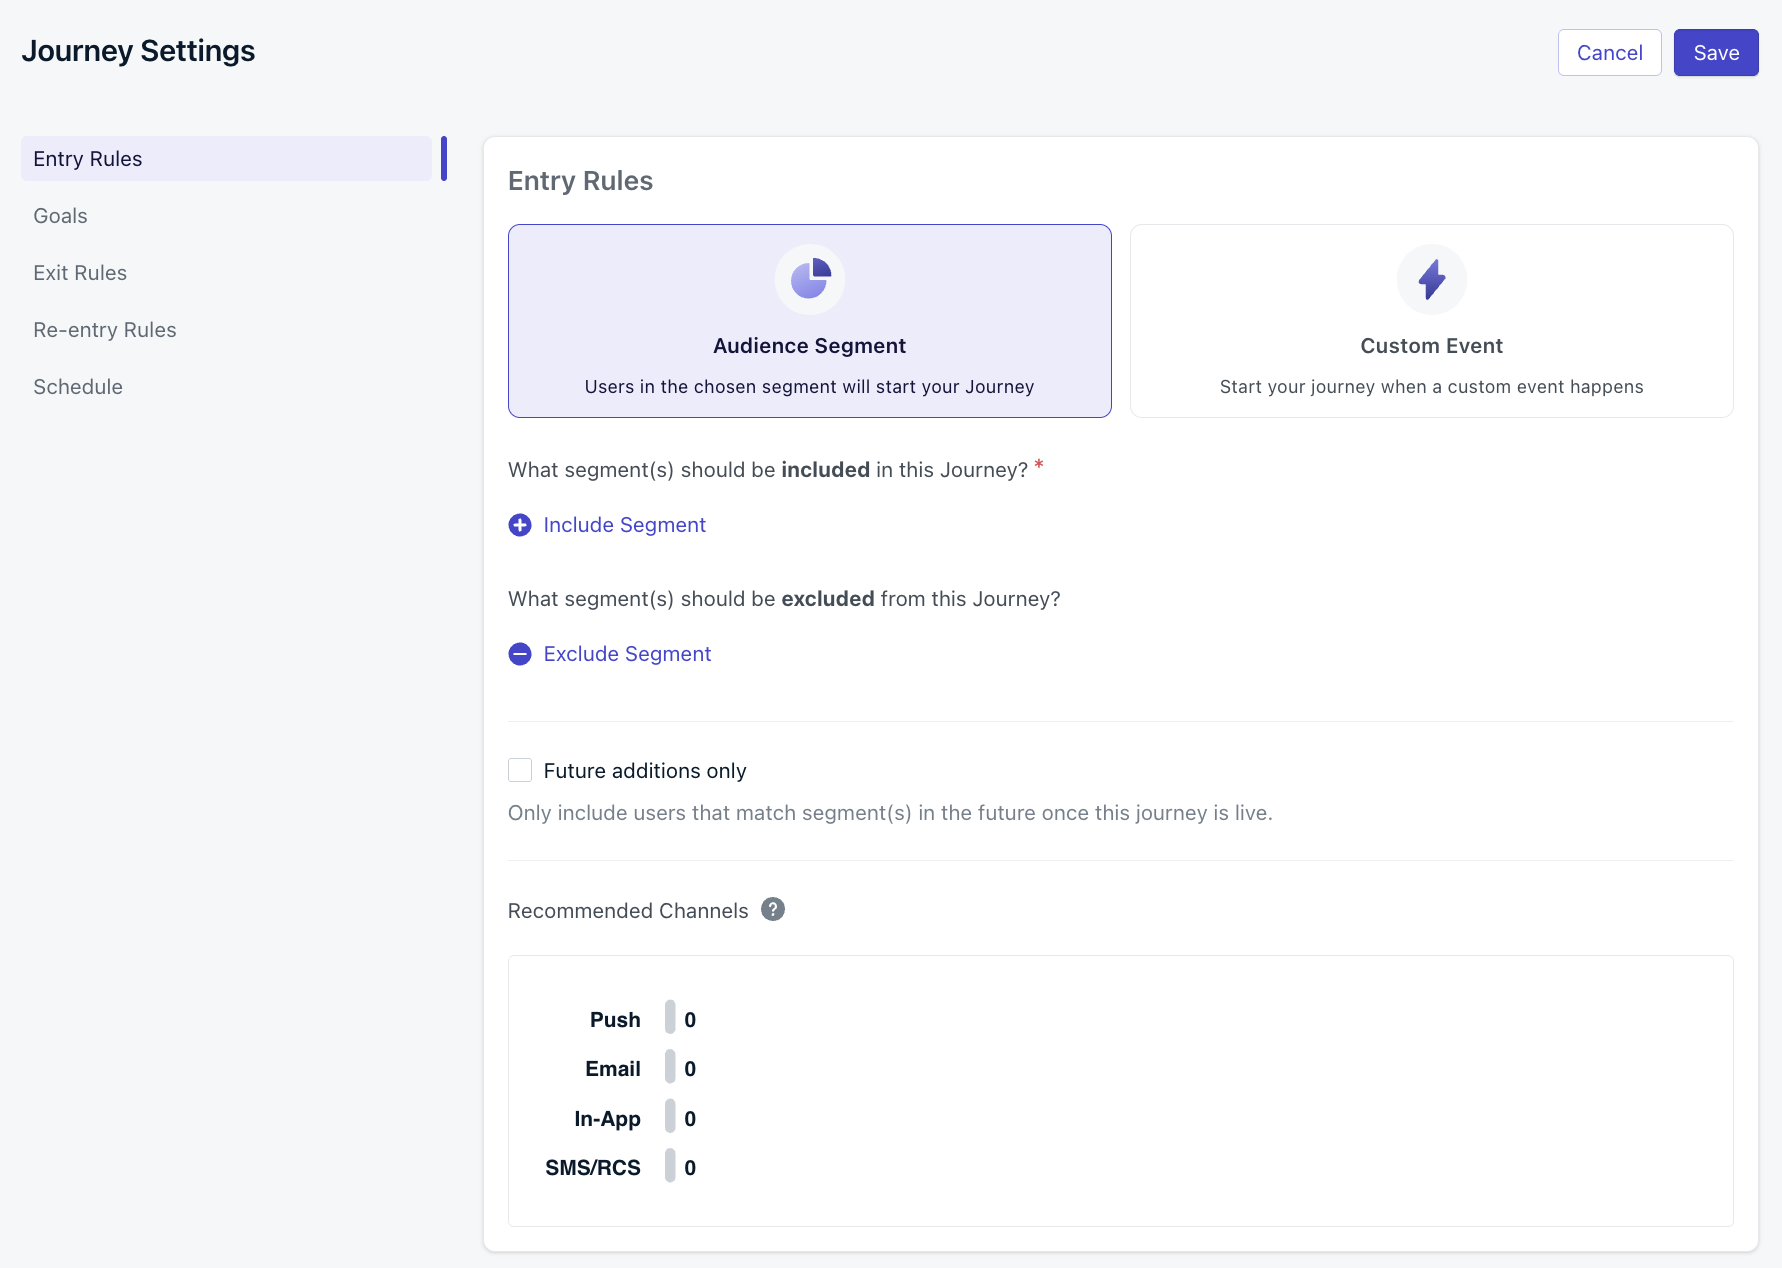
Entry rules for a Journey
Audience segment
Use Include Segment and Exclude Segment to control who qualifies for your Journey. Users who match the defined Audience will enter the journey. If re-entry rules are set, a user who matches the Audience but have exited the journey will continue to re-enter the journey each time those rules are met. In segment-driven journeys, a user can only be active in the journey once at a time. They can re-enter after exiting, as long as they meet the journey’s re-entry conditions. Segment checks are done at the Subscription level and consider all of a user’s Subscriptions. See Exit rules for what happens when a user matches both entry and exit rules. If a Journey is active, the segments used in its entry rules cannot be edited. To modify the segments, archive the Journey or remove the segment from the entry rules first.How inclusion and exclusion logic works
- ✅ If any Subscription is in an Included Segment(s) → the user enters the Journey.
- ❌ If any Subscription is in an Excluded Segment(s) → the user is blocked entirely.
Future additions only
When this option is checked, the Journey ignores all users who are already in the included or excluded segments at the time it goes live. Only users who join the segment after launch can enter. This applies permanently — even if an existing user leaves the segment and re-enters later, they are still excluded. Use this for one-time campaigns (e.g., onboarding) where current users should not receive the Journey.Custom events
Users enter the Journey when a Custom Event matches the entry rule. Each entry stores the event that triggered it, which you can reference in Liquid syntax for message personalization and use for Event Matching in action steps.- Custom Event Name: The event name to match, sent via SDK or API.
- Filter by property: Optional property conditions to further restrict which events trigger entry.
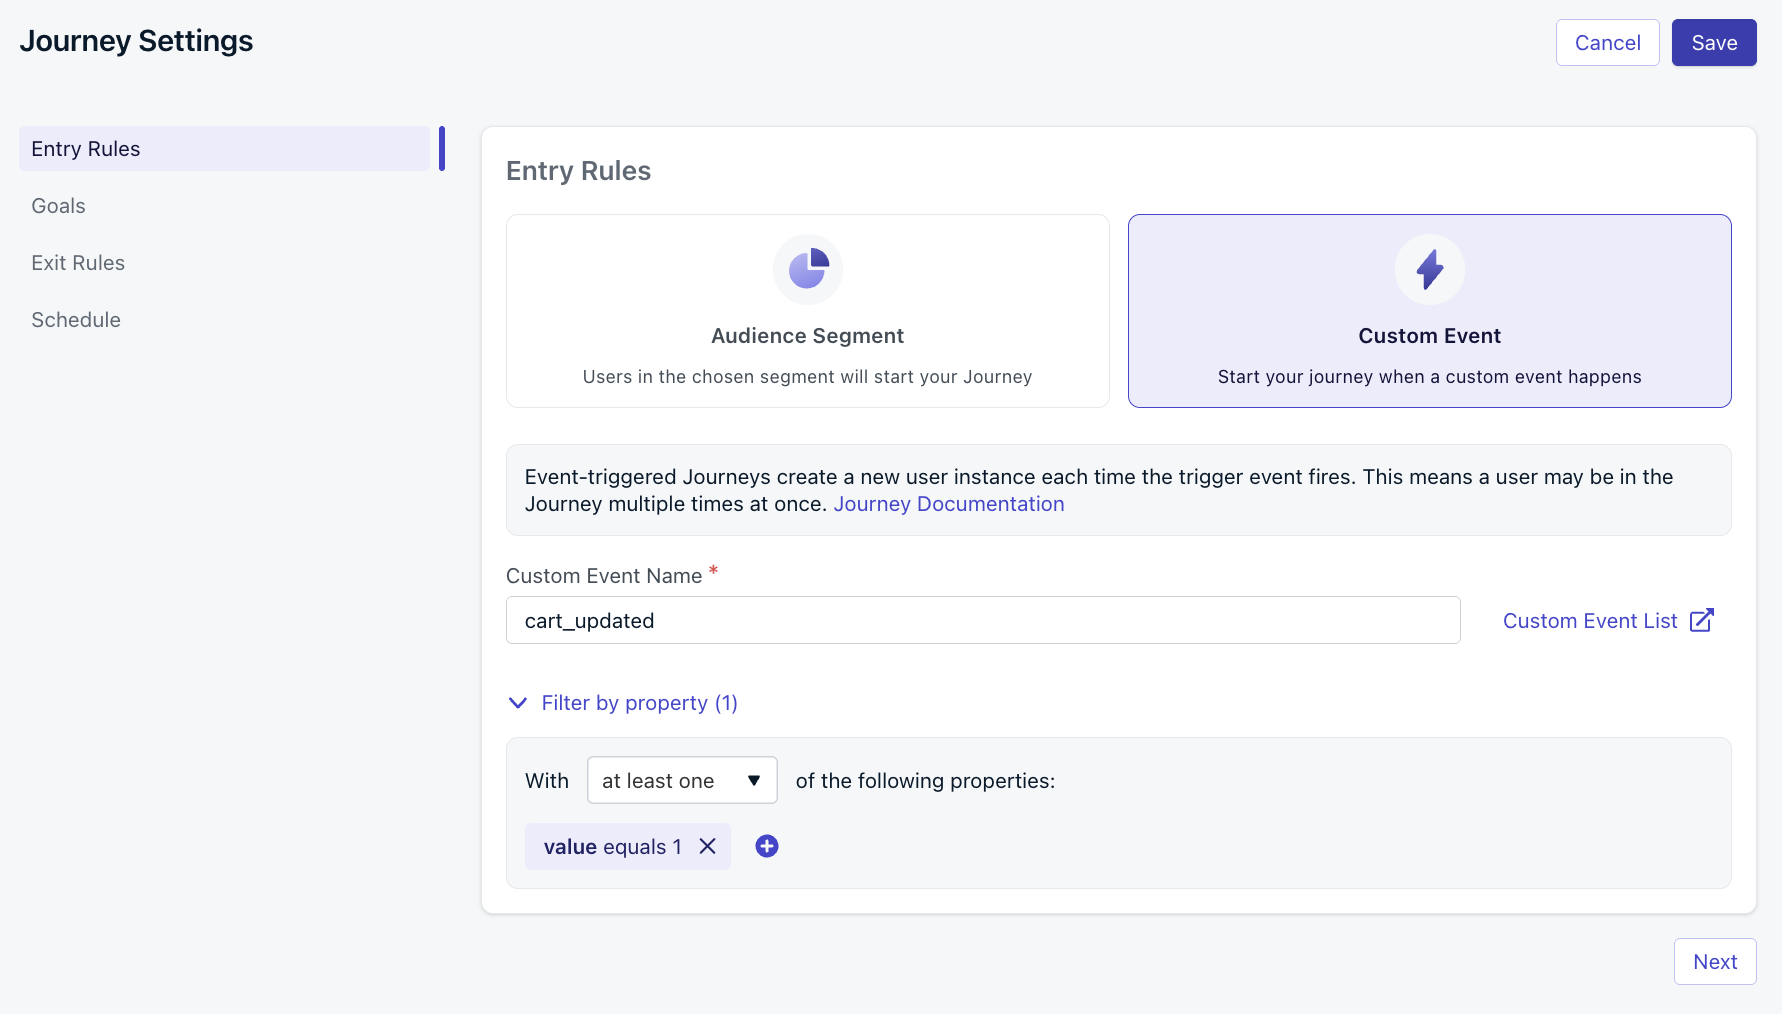
Custom event entry rule requires the sign_up event to include the property plan is trial
Exit rules
Exit rules define when users automatically leave the Journey. They may re-enter later based on your re-entry settings.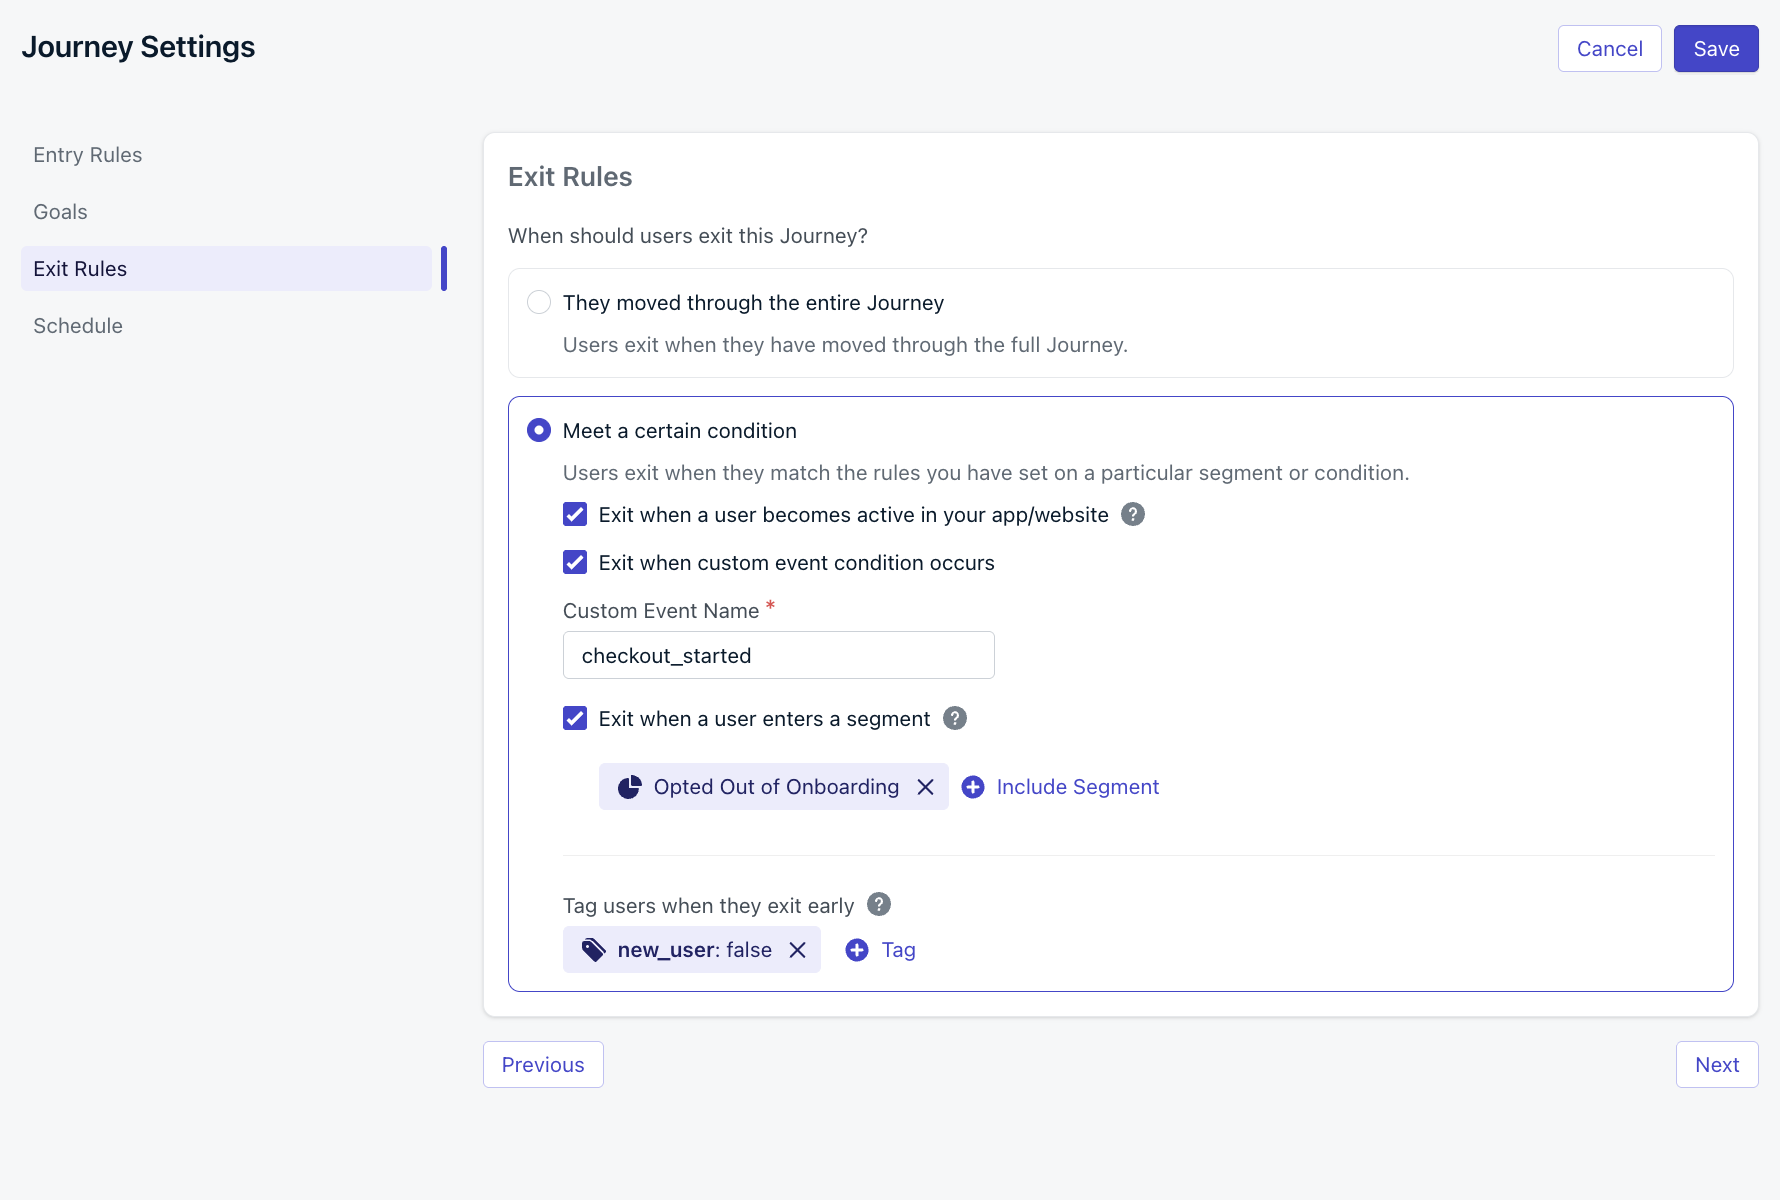
Journey exit rules
Exit when user becomes active in your app/website
As soon as the user returns to your app or website with the OneSignal SDK, their “last session” updates, making them active again and exiting them from the Journey. Useful for re-engagement or reactivation Journeys.Exit when custom event condition occurs
Send a Custom Event to exit the user from the Journey immediately. Using the same Custom Event for Entry and Exit Rules: When the Exit Rule Custom Event name matches the Entry Rule Custom Event name, each occurrence of that event exits the user from the Journey and immediately enters them again. The new entry carries the latest event properties, so message personalization always reflects the most recent data. This pattern is common for Journeys where the triggering action can repeat — like abandoned cart reminders. Each cart update restarts the wait timer and refreshes the product data used in messages.Exit when user no longer matches the audience conditions
Automatically remove users if they stop matching the original entry rule audience segments.Exit when a user enters a segment
If a user enters a selected segment at any point, they are removed from the Journey and stop receiving messages.Tag users when they exit early
Apply or remove a tag when users exit early.- Leave the value blank to remove an existing tag.
- If the app is at the tag limit, no tag will be applied.
-
Trigger another Journey:
Tag users (e.g.
exited-journey-1:true), then use that tag to define a segment for your next Journey. -
Limit concurrent Journeys:
Tag users when they enter (
in-journey:true), and remove the tag when they finish or exit. This allows you to exclude them from other Journeys using that tag.
Re-entry rules
Re-entry rules determine if and when users can enter the Journey again after exiting. The re-entry timer starts when the user exits the Journey — not when they entered. Re-entry rules apply only to Journeys with Audience Segment entry rules. Custom Event-based Journeys always allow re-entry.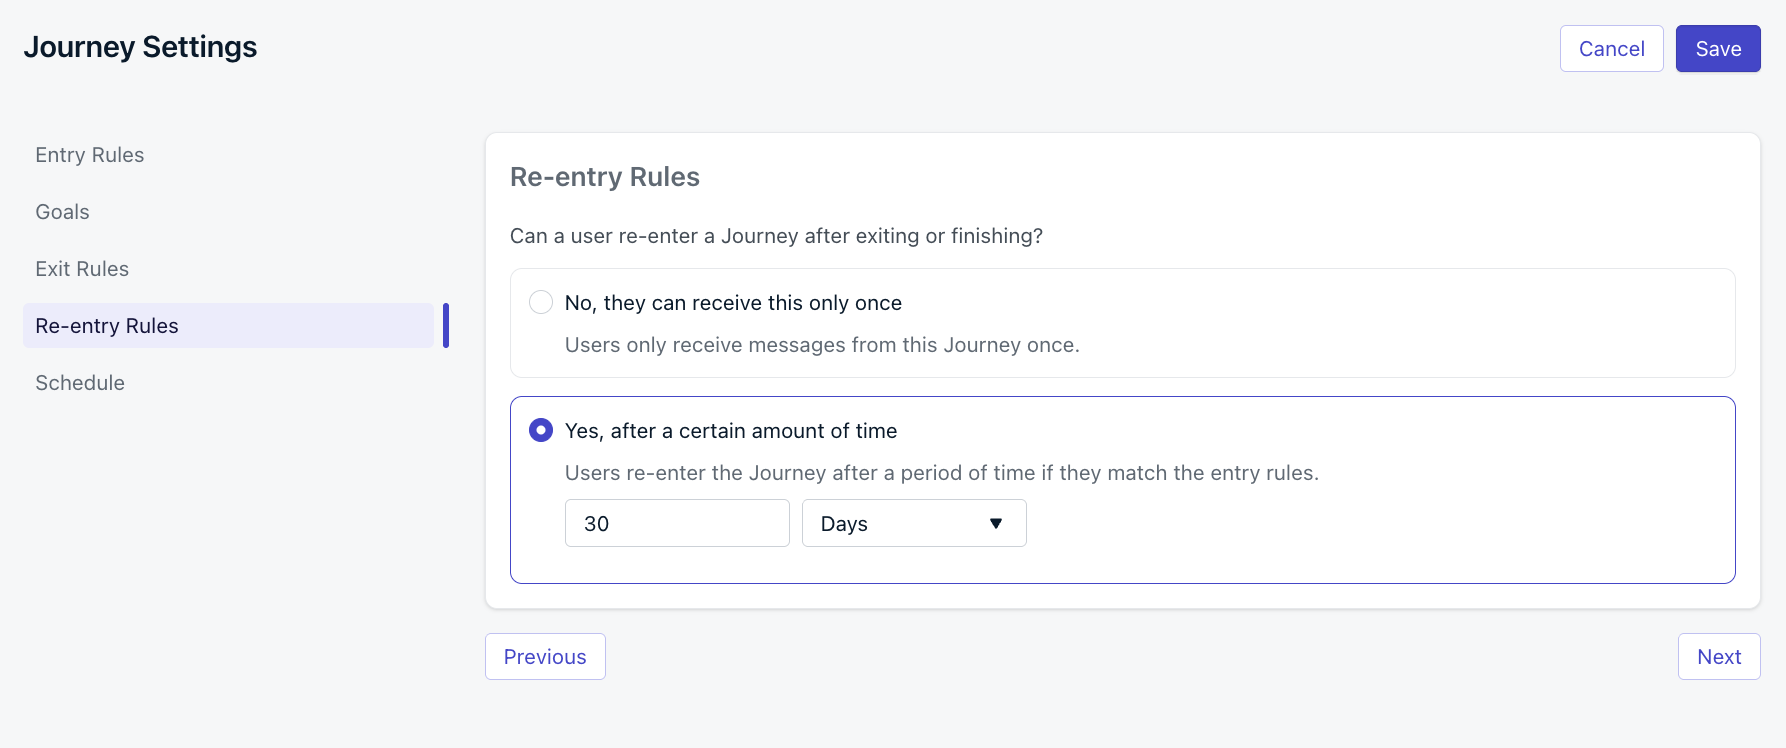
Journey re-entry rules
Schedule
Set when the Journey should start and end.- Start the Journey immediately or at some point in the future.
- The Journey will appear as Scheduled in the dashboard until the start time.
- It automatically becomes Active at the configured start time.
- Allow the Journey to run indefinitely until you stop it or set a future end time.
- If an end date is set, the Journey will be Stopped and Archived automatically once the end time is reached.
- All messages immediately stop for users currently in the Journey.
- These users will not trigger exit or early exit events.
Let current users finish the Journey
To stop new users from entering but let current ones finish:- Update the Entry Rules Audience Segment to only include an empty segment (e.g. a Test Users segment).
- Update the Exit Rules to Uncheck “Exit when a user no longer matches the audience conditions”.
FAQ
Can I change entry rules after a Journey goes live?
You cannot switch between Segment-based and Custom Event-based entry rules on a live Journey. To change the entry type, stop and archive the Journey, duplicate it, and configure new entry rules on the copy.Can I edit the segments used in a live Journey’s entry rules?
No. Segments referenced in a live Journey’s entry rules are locked. To modify them, archive the Journey or remove the segment from the entry rules first.How does “Future additions only” work?
When enabled, all users currently in the included or excluded segments at launch are permanently excluded from the Journey — even if they leave and re-enter the segment later. Only users who join the segment after launch can enter.Can a user re-enter a Journey triggered by Custom Events?
Yes. Custom Event-based Journeys always allow re-entry. Each time a matching event fires, the user enters a new instance of the Journey with that event’s properties.What happens when the exit rule uses the same Custom Event as the entry rule?
Each occurrence of that event exits the user from the Journey and immediately starts again. The new entry carries the latest event properties, so message personalization always reflects the most recent data. This pattern is common for Journeys where the triggering action repeats, like abandoned cart reminders.Related pages
Journeys overview
Introduction to Journeys and what you can build with them.
Journey actions
Add branching logic, wait steps, split paths, and delays.
Journey messages
Configure push, email, SMS, and in-app message steps.
Custom events
Send events from your app or API to trigger Journey entry and exit.