Recover lost sales with abandoned cart notifications using OneSignal by tracking cart activity, building targeted segments, and sending timely reminders with Journeys.
Abandoned carts are one of the highest-impact opportunities to recover lost revenue. Most users who abandon a cart still intend to purchase — they just need a timely reminder.This guide shows you how to build an automated abandoned cart Journey in OneSignal that:
Detects cart activity
Waits for a short period of inactivity
Sends a personalized reminder
Stops messaging immediately after purchase or cart removal
You can implement this using either:
Custom Events (recommended for most implementations)
Tags (simpler, limited to track 1 item instead of multiple)
The right choice depends on the data you want to show in the message and where that data comes from.What you will buildBy the end of this guide, you will have:
Cart activity sent to OneSignal (via Tags or Custom Events)
A clear, code-defined abandonment signal
Message templates that personalize cart data
A Journey that:
Starts when an abandonment signal is received
Waits before sending
Sends abandoned cart messages
Exits immediately when the cart is emptied or purchased
Re-enters the Journey if the user still has items in their cart within a specific time period
Analytics to measure message and revenue performance
How abandoned carts are modeledThis guide assumes you are tracking “cart updated” actions, meaning each time a user adds or removes items from their cart. This could be a single item like a subscription to your content or multiple items like a shopping cart.Once OneSignal receives a cart_updated event or tag:
The user becomes eligible to enter the Journey
A wait period gives them time to return naturally
Messages are sent only if they do not exit
The user exits immediately when the cart is emptied
When the cart state changes, send the updated cart data to OneSignal so the activity can be tracked.This guide uses the event or tag cart_updated to track cart activity and at least one property.Select the method you chose in Step 1:
Custom Events
Tags
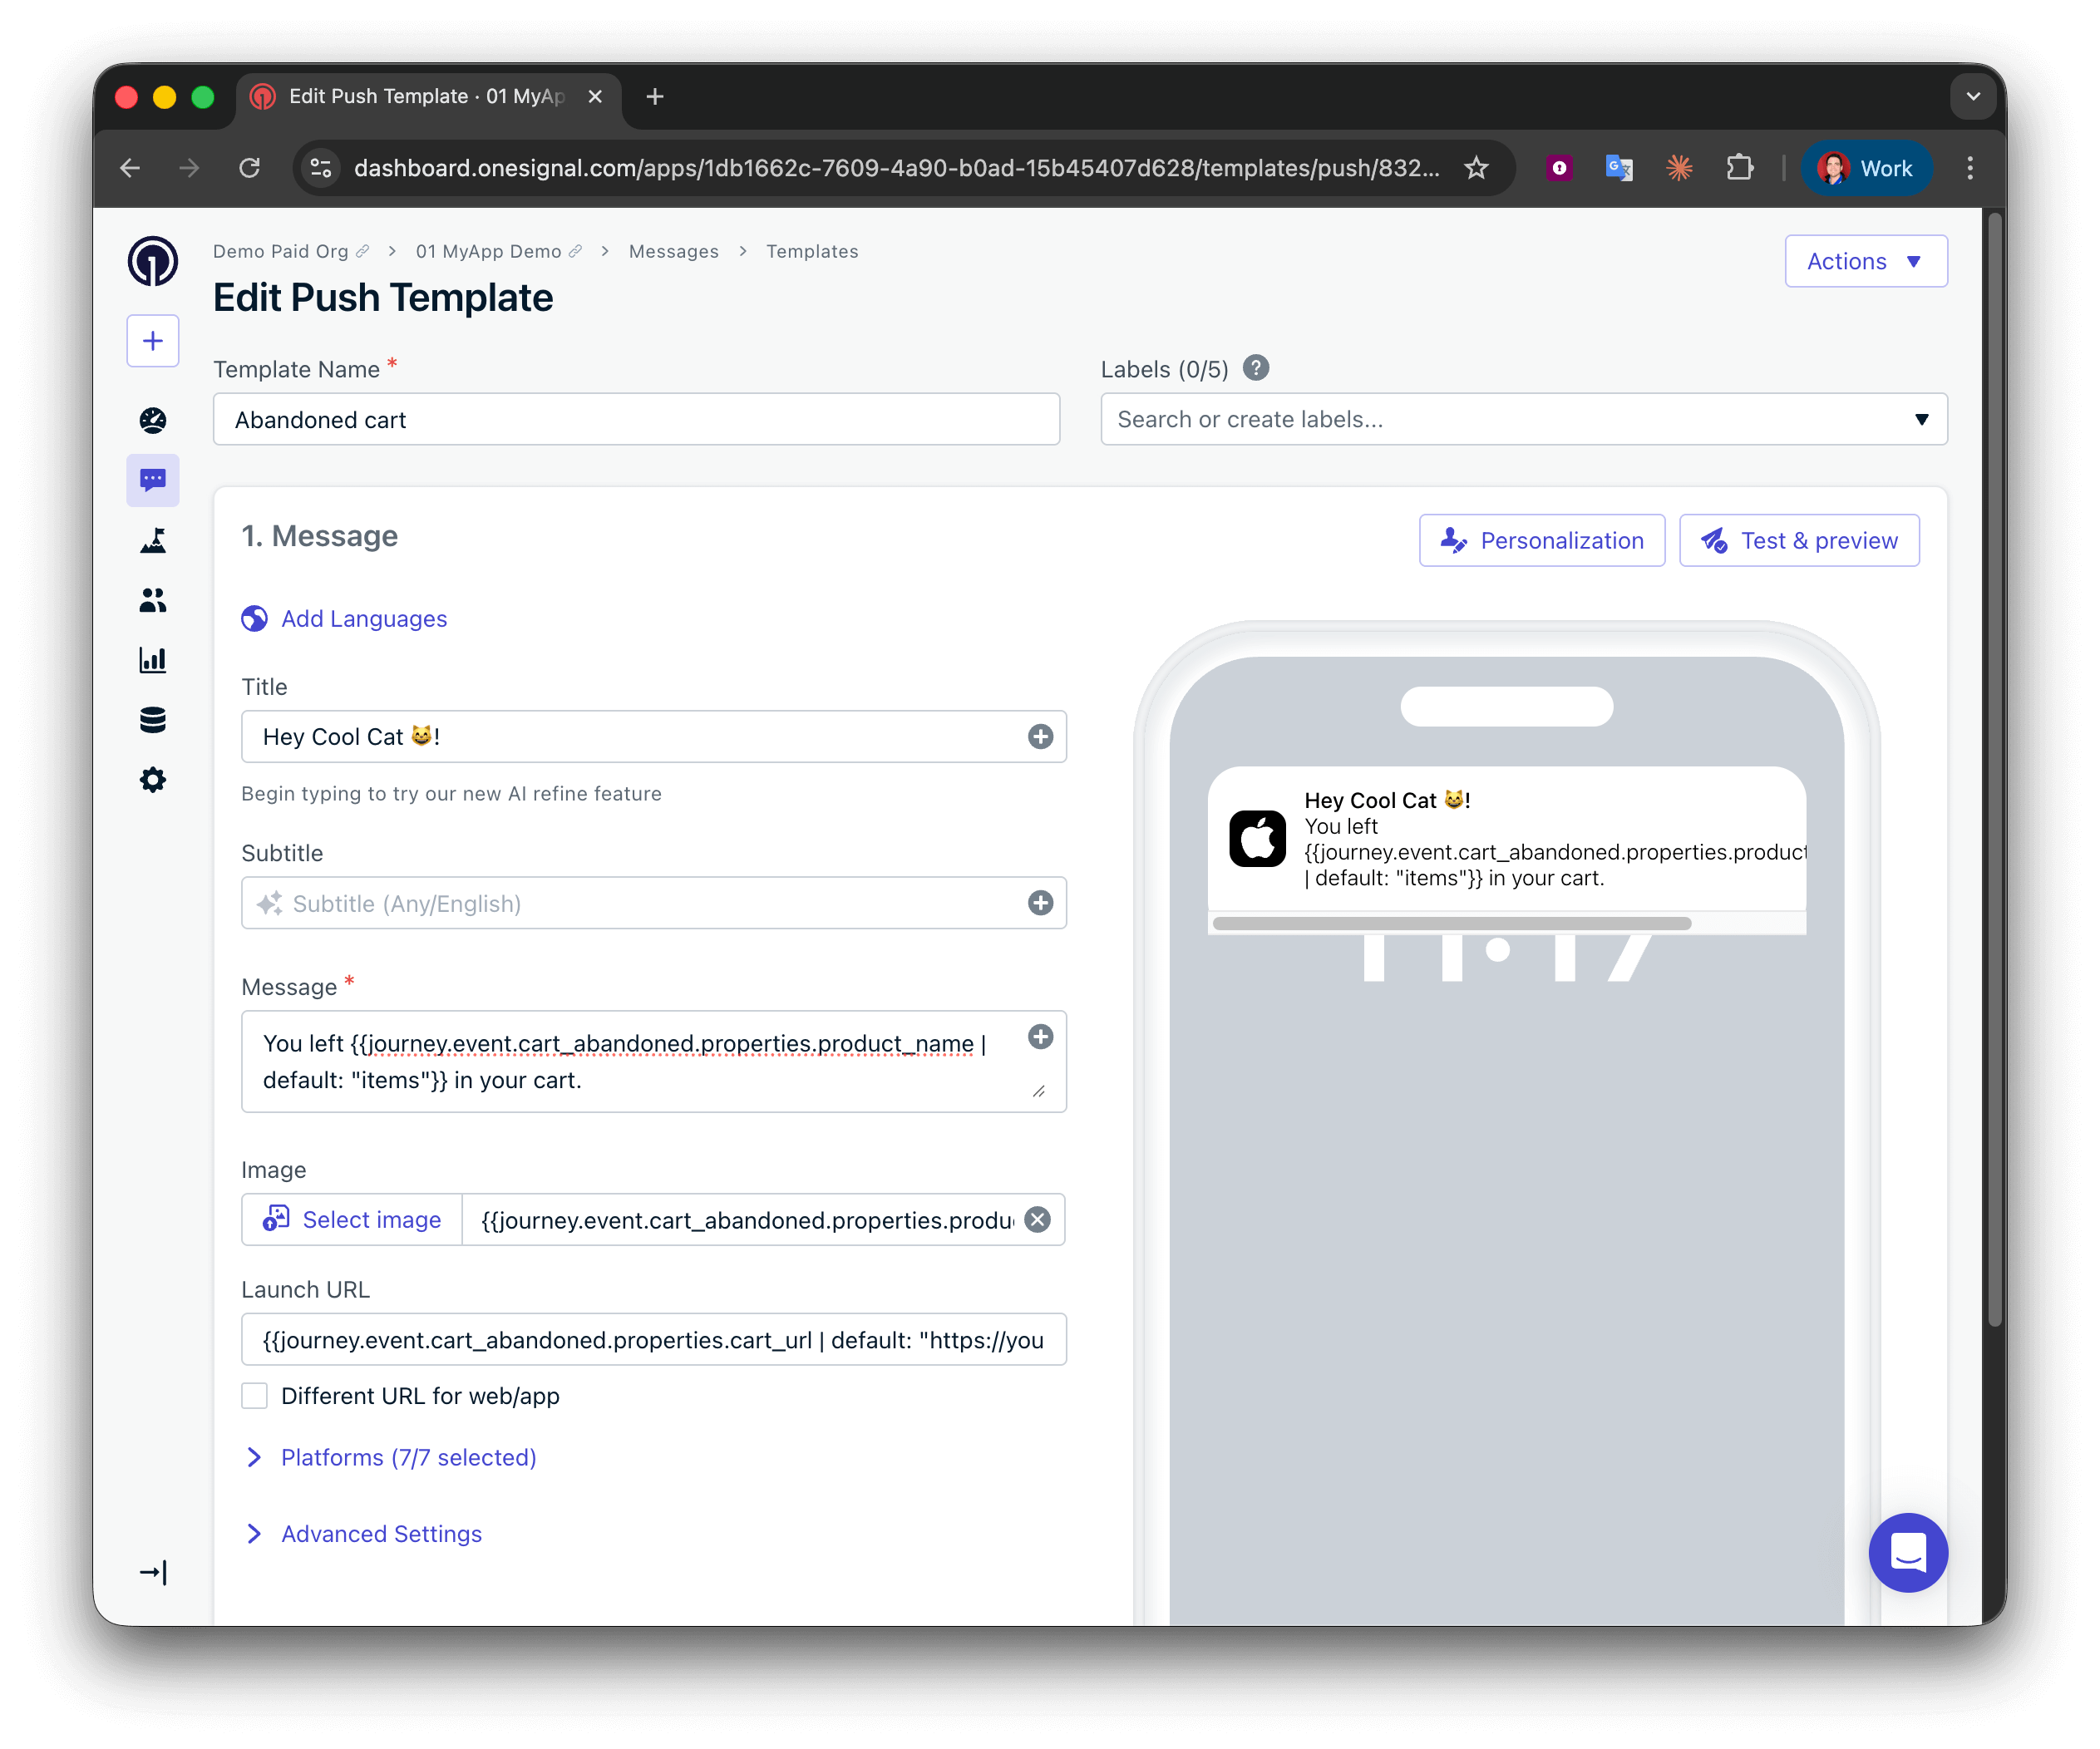
Send a cart_updated Custom Event each time the cart changes. Include product properties when items are in the cart and omit them when the cart is emptied.
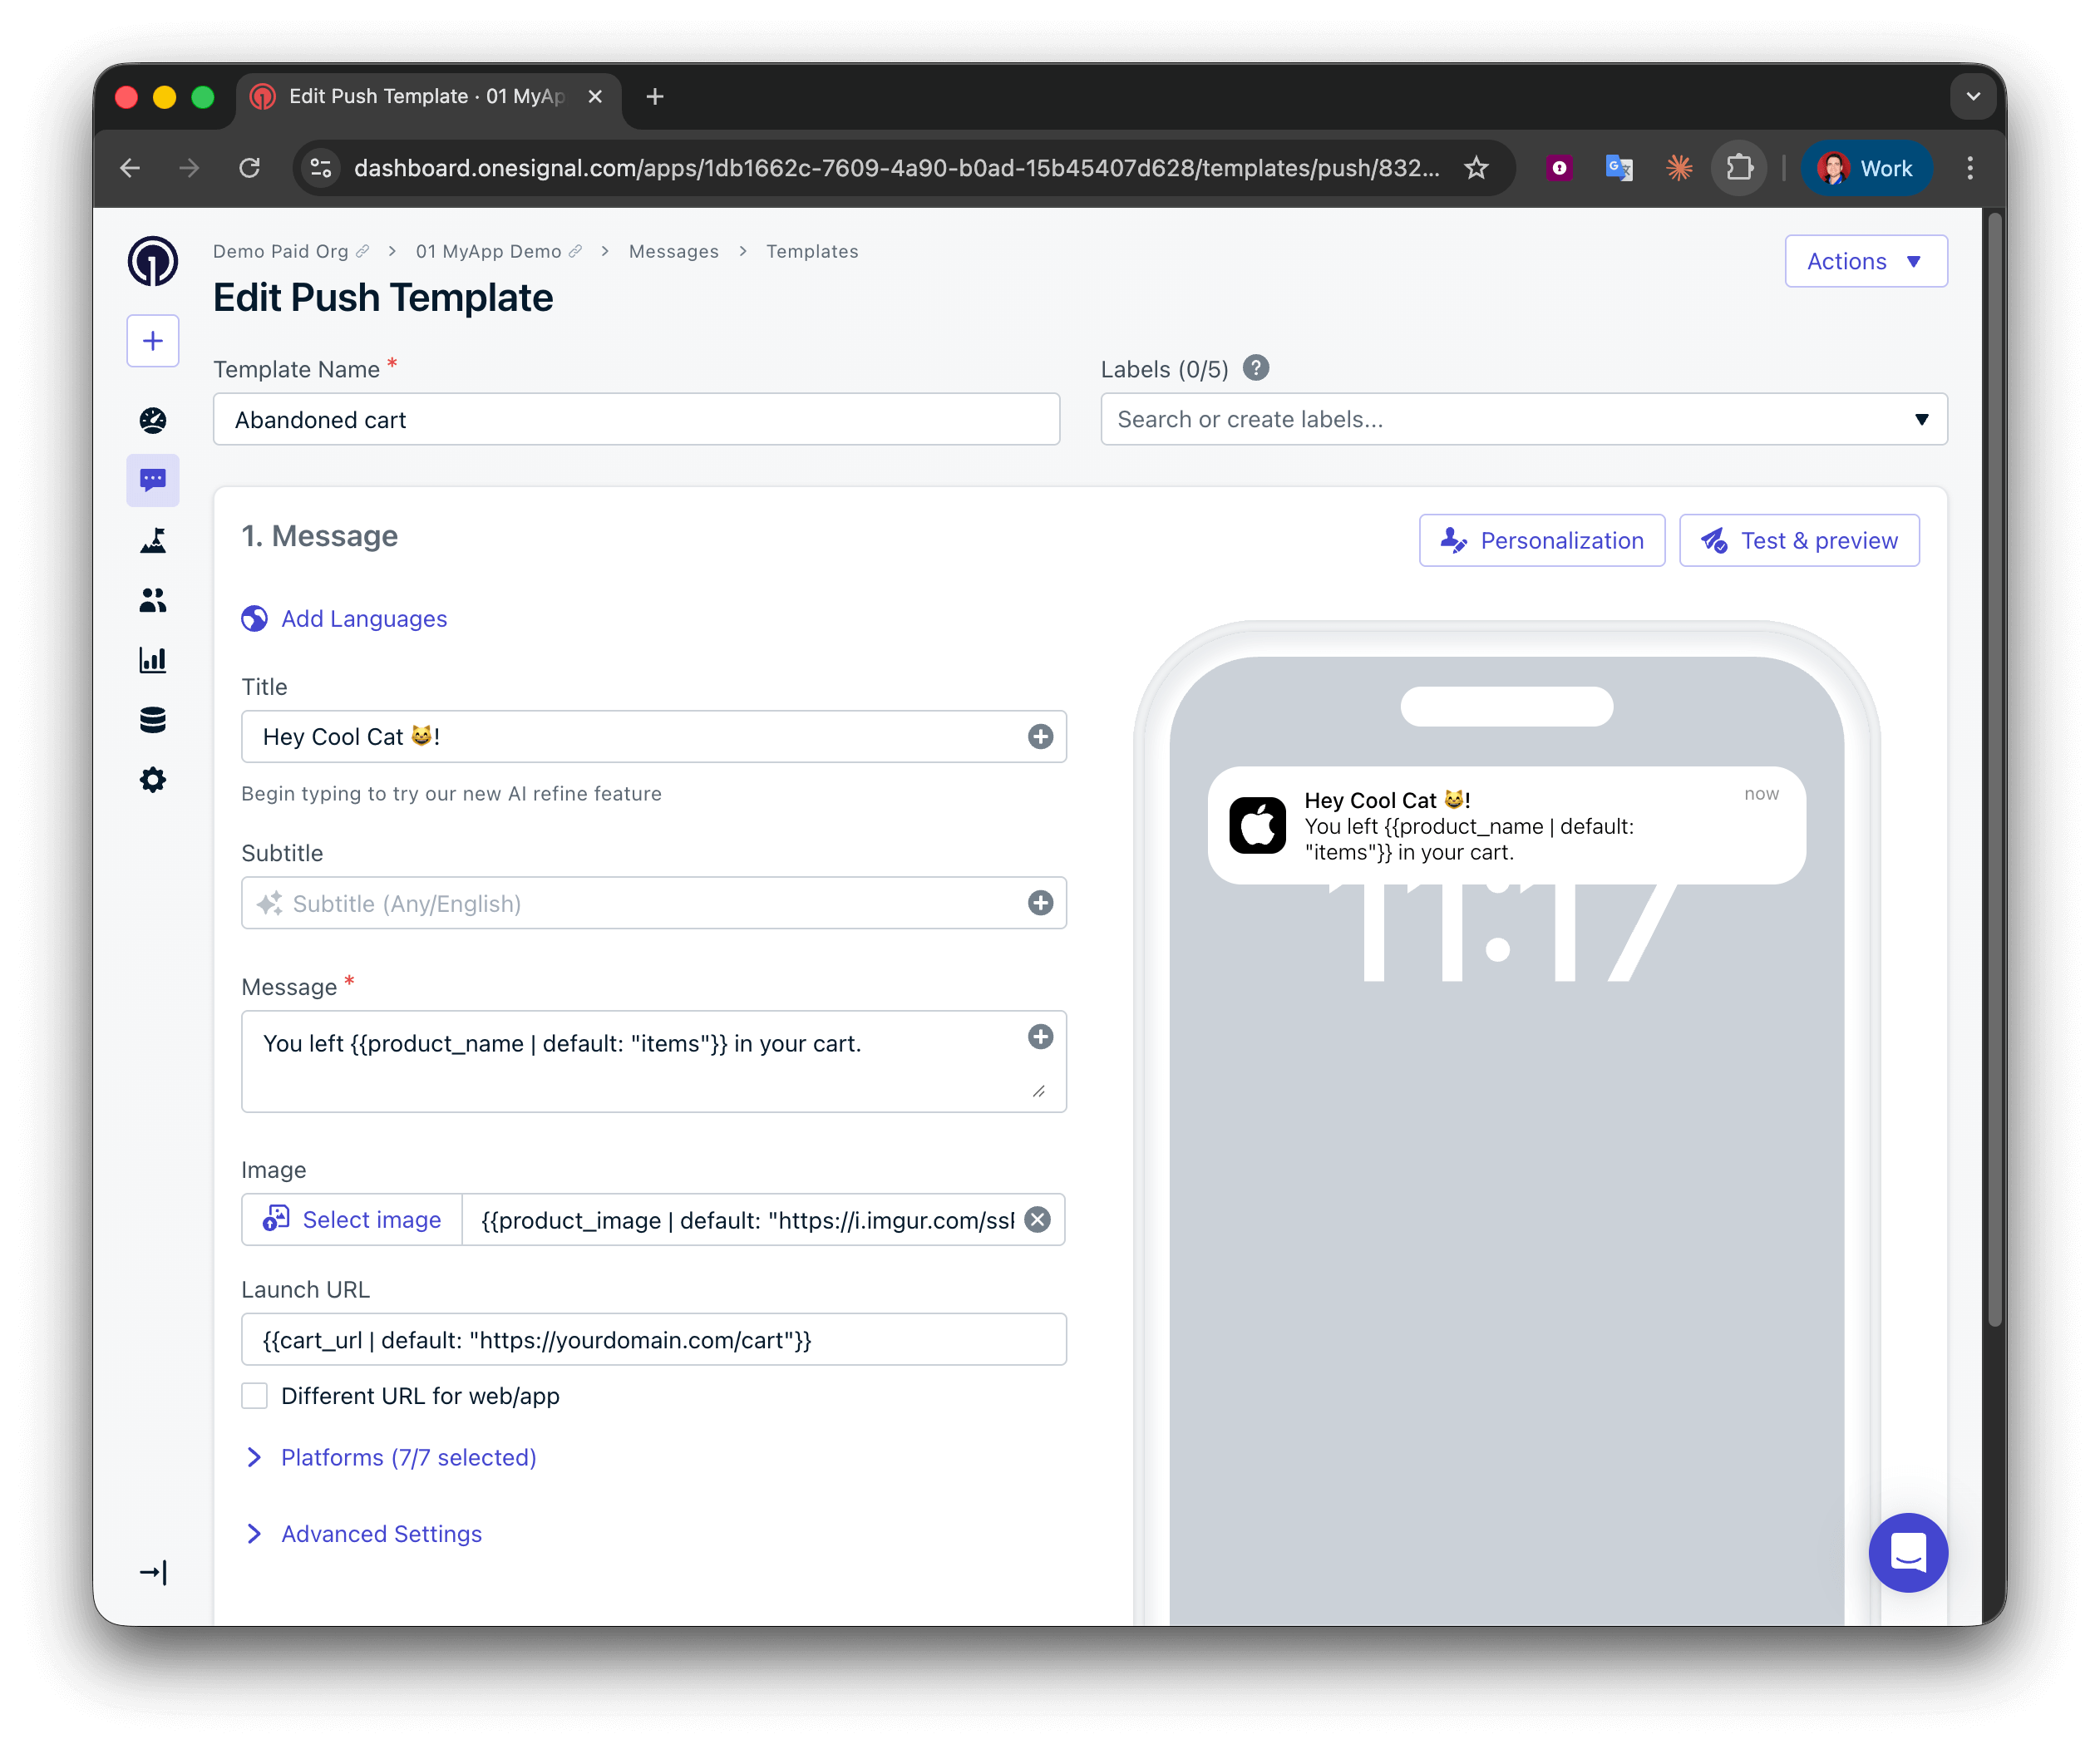
Set tags when items are in the cart and remove them when the cart is emptied.
These examples set the cart_updated tag to a Unix timestamp (in seconds) representing when the cart was last updated. You can also use a boolean value (true/false), but a timestamp provides more flexibility with Time Operators.
Cart activity is now being sent to OneSignal. Each time the cart changes, OneSignal receives the updated data needed to trigger and personalize messages.
The image will not display if product_image is not a direct, publicly accessible image URL.If your product_image is the name of an image file available online, you can reference the image using the following format:
https://yourdomain.com/images/{{journey.event.cart_updated.properties.product_image | default: "stock_image"}}.png
Abandoned cart template example with Custom Events
Reference tag properties using liquid syntax format:
Liquid
{{tag_key | default: "fallback_value"}}
Message:
Liquid
You left {{product_name | default: "items"}} in your cart.
The image will not display if product_image is not a direct, publicly accessible image URL.If your product_image is the name of an image file available online, you can reference the image using the following format:
https://yourdomain.com/images/{{product_image | default: "stock_image"}}.png
Abandoned cart template example with Tags
Need email examples, help, or more inspiration?
Personalize messages with Custom Events
Complete guide to using Custom Events in Journeys. Includes event storage, Journey configuration, abandoned cart example, best practices, and troubleshooting.
Personalize messages with Properties
Complete guide to using Properties and Tags in Journeys. Includes event storage, Journey configuration, abandoned cart example, best practices, and troubleshooting.
This step is only required if you are using Tags to track cart activity. If you are using Custom Events, you can skip this step.
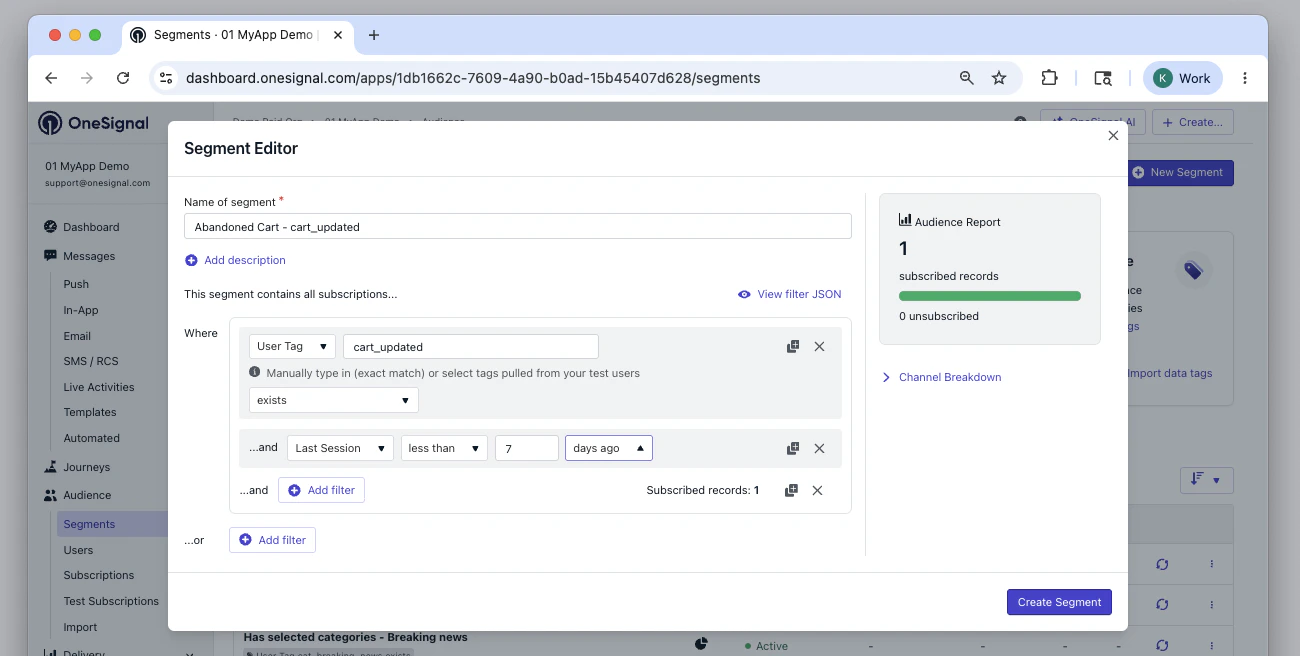
The Segment will determine who can enter the Journey. See Segments for more details.Add two filters to the Segment:
User Tag — cart_updatedexists
Last Session — less than7days ago - Adjust the time period as desired
Abandoned Cart Segment with Tag Filter where the cart_updated tag exists and the last session is less than 7 days ago
You can now track users that update their cart and have visited the app or website in the last 7 days.Users are automatically removed from the segment when either of the following conditions are met:
After 7 days have passed since they last visited the app/website
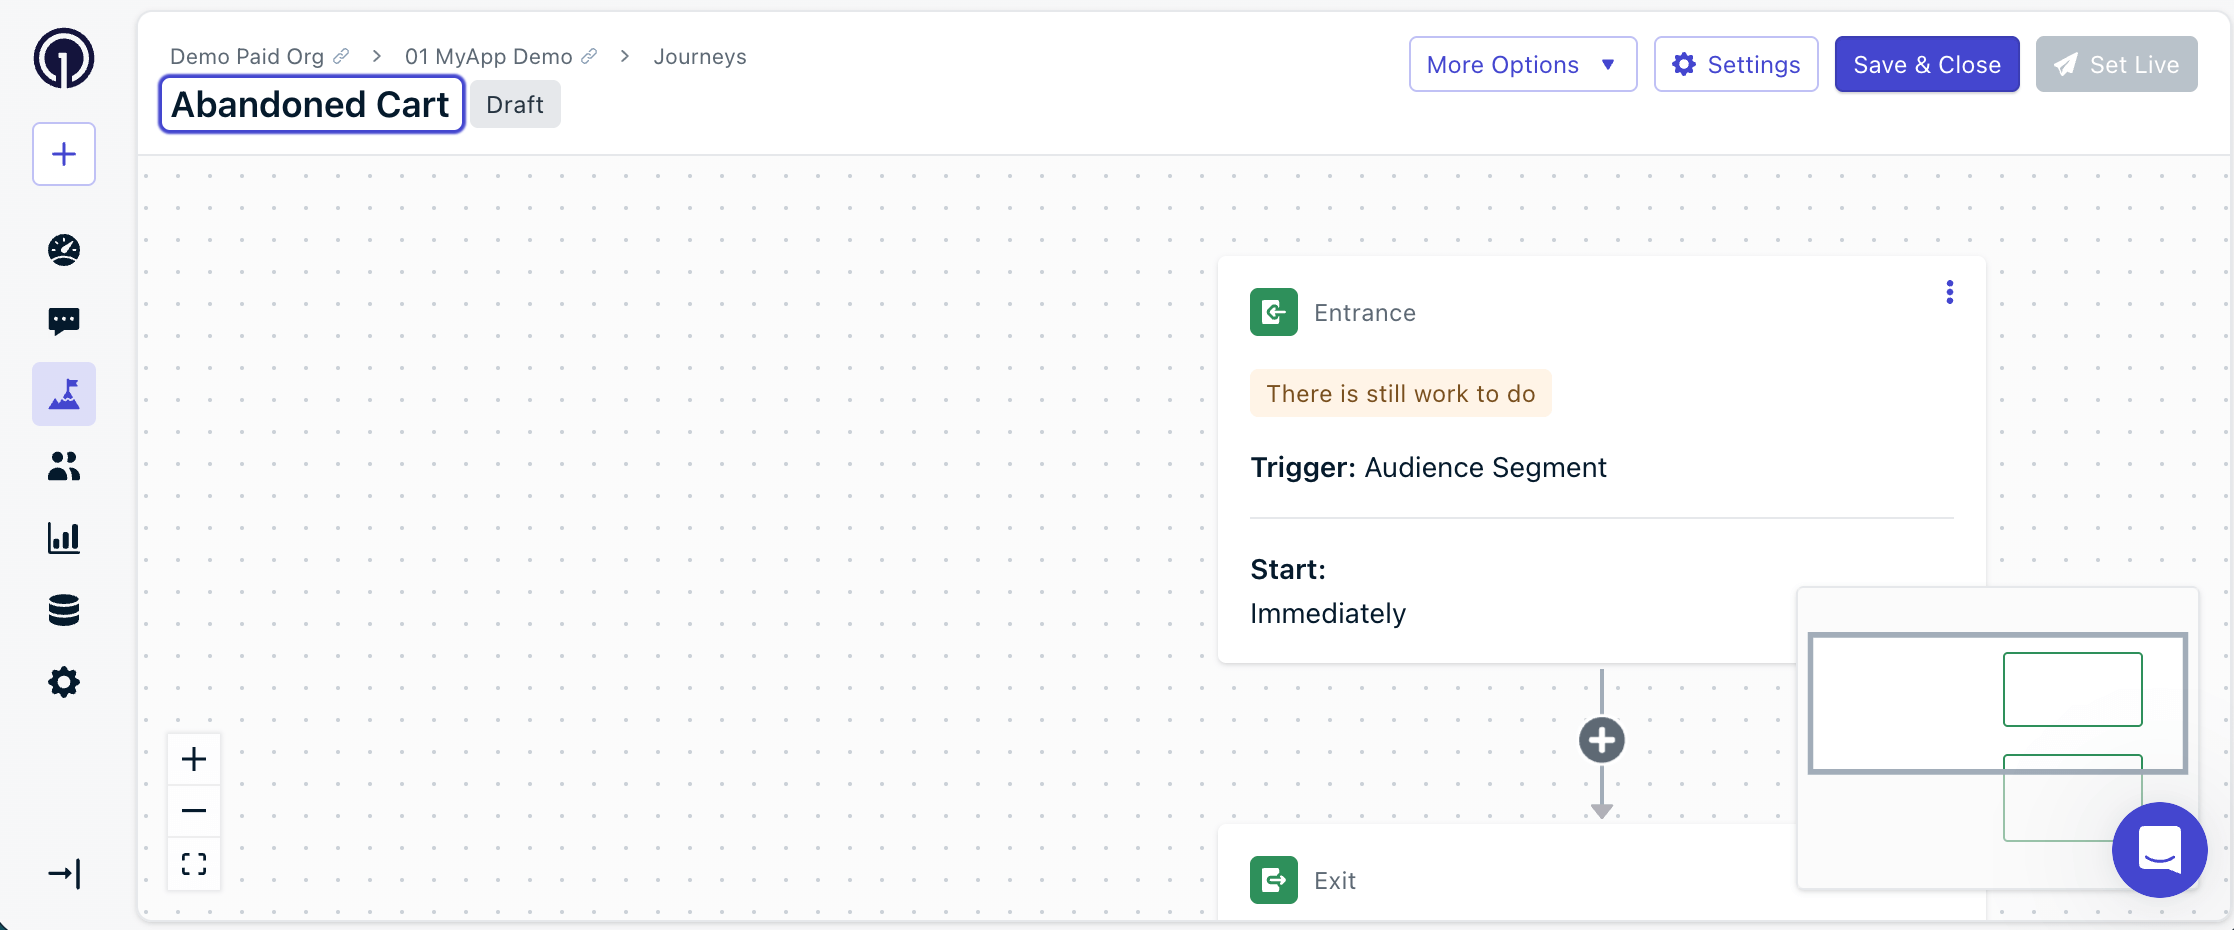
Review the Journey Settings guide for more details on Entry, Exit, and Re-entry rules.Entry Rules:
Custom Event: Entry Rules
Tag: Entry Rules
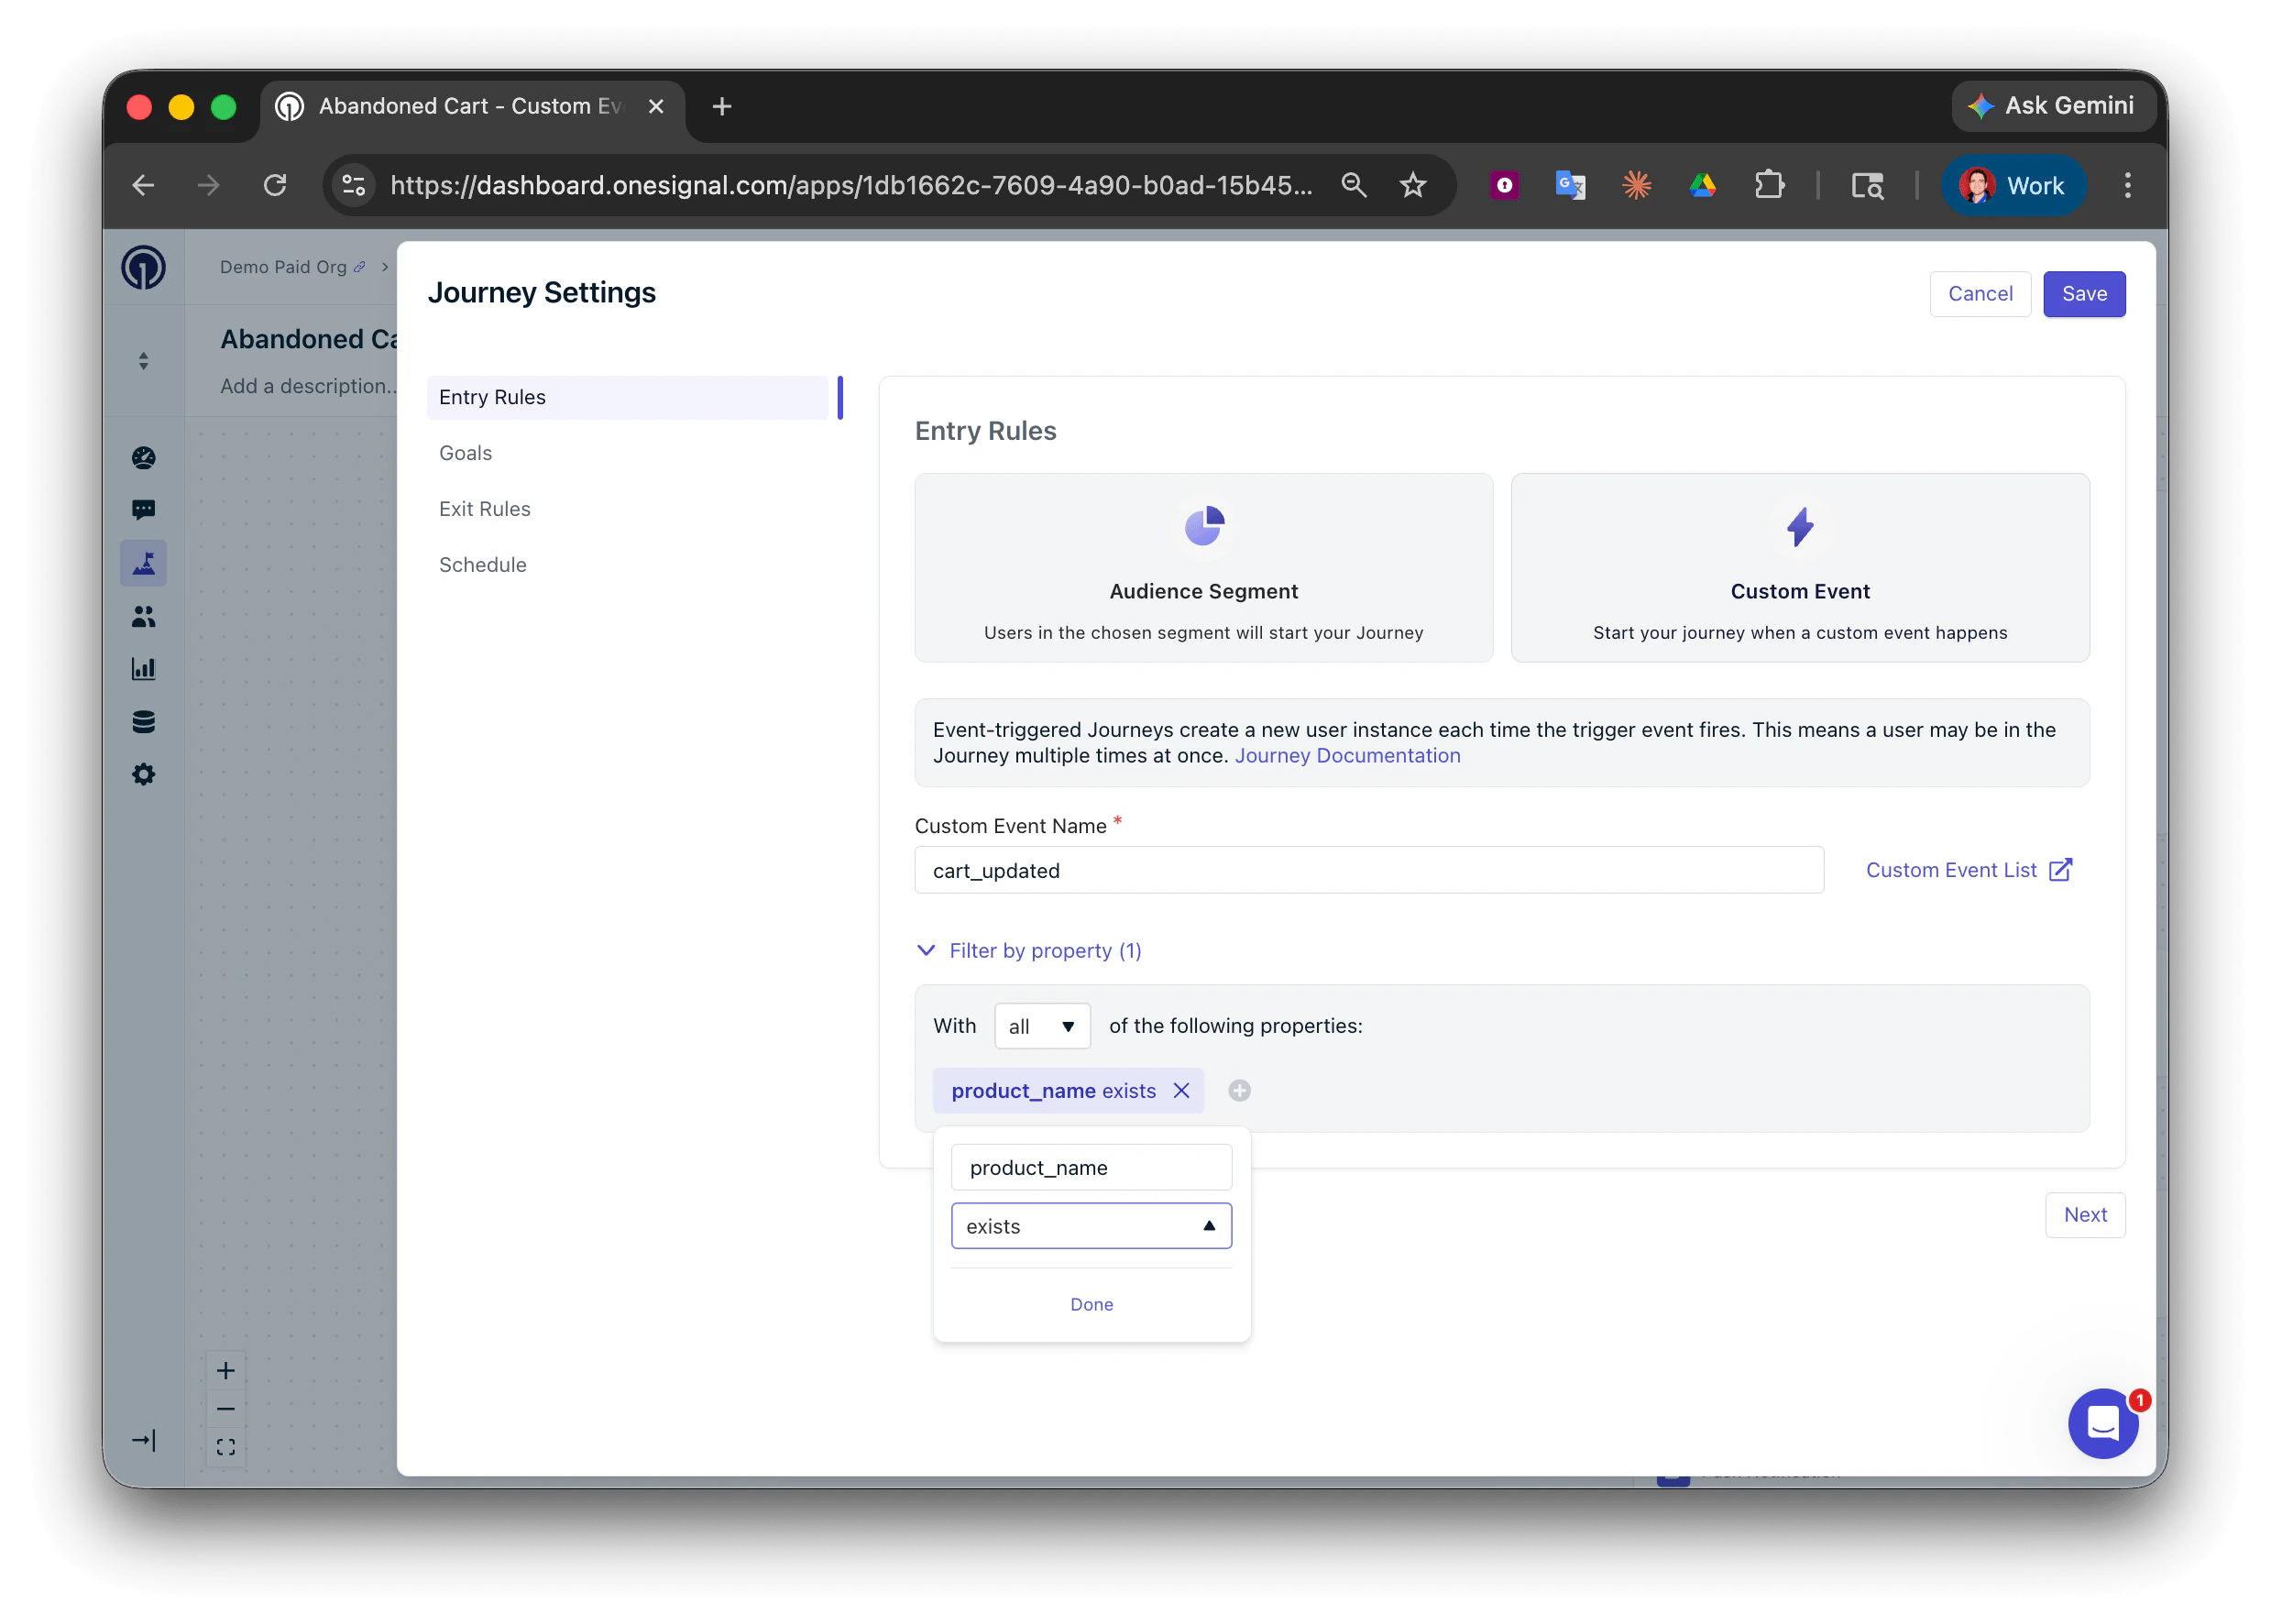
Select Custom Event
Custom Event Name: cart_updated
Filter by property: With all of the following properties: product_nameexists
Using Custom Events allows individual users to enter Journeys multiple times.Use properties to filter users so they only enter when a specific property exists.
Abandoned Cart Journey Custom Event Entry Rules
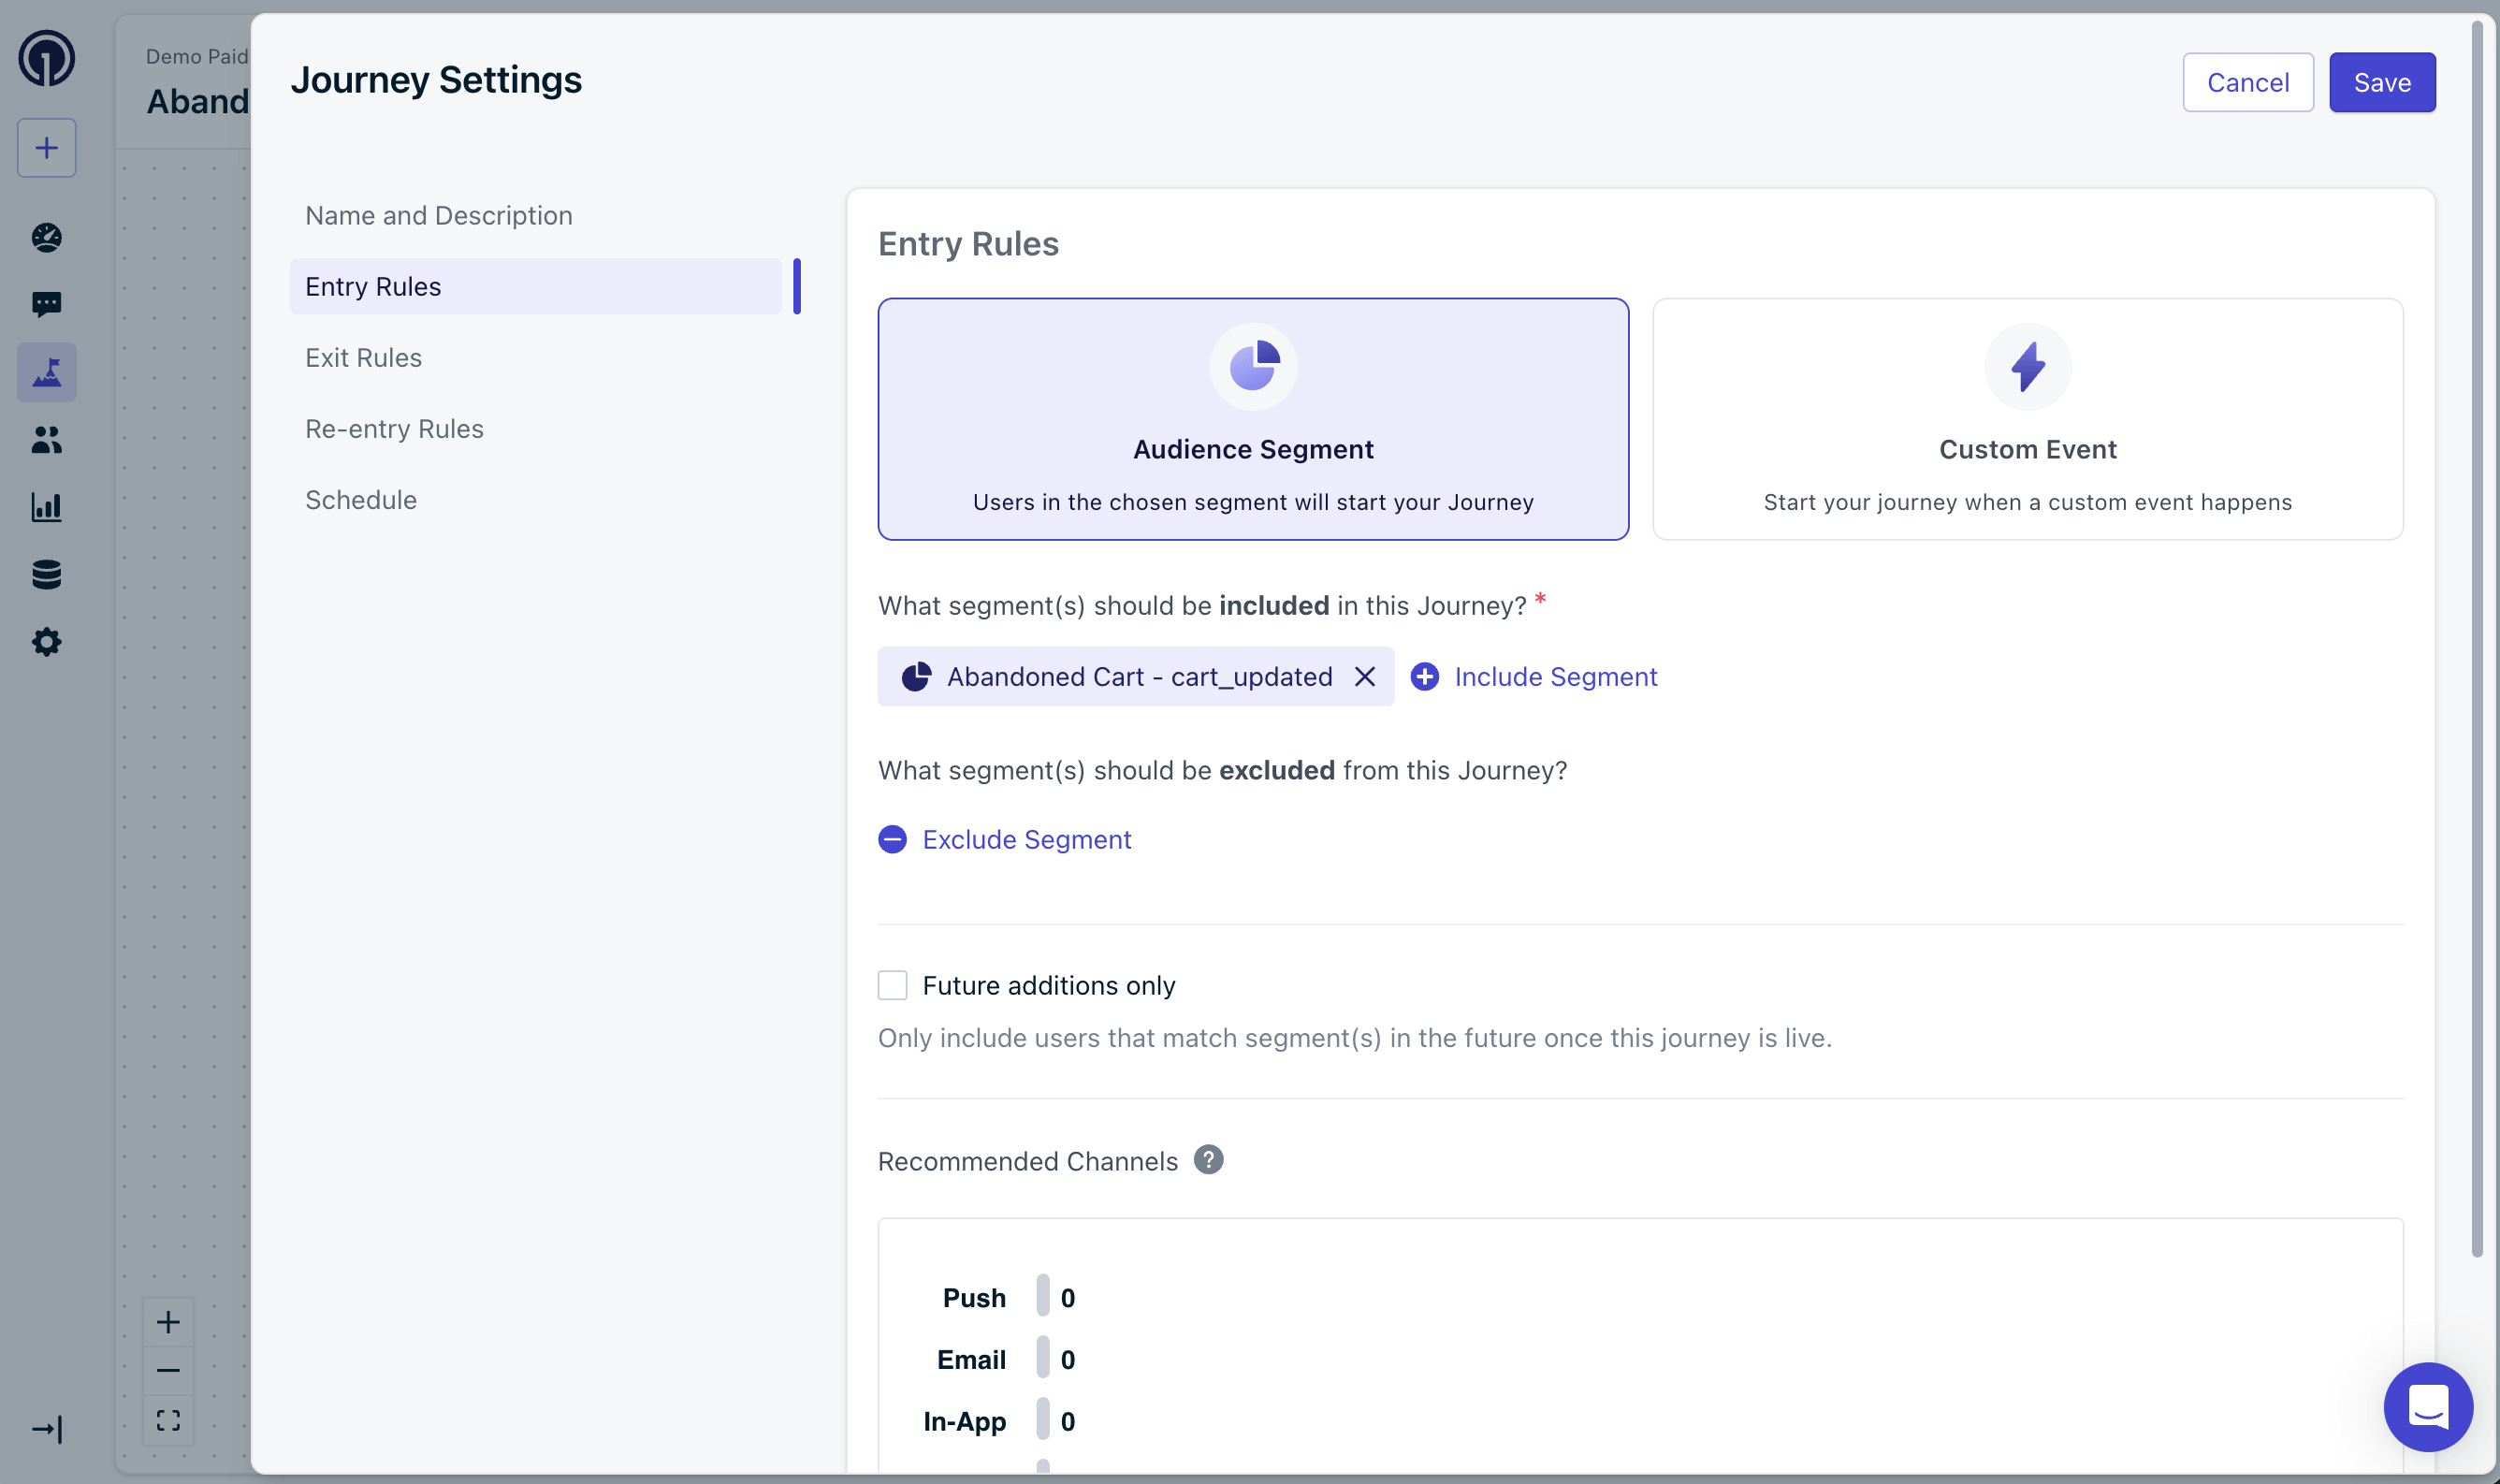
Select Audience Segment
Include Segment: Abandoned Cart - cart_updated
Abandoned Cart Journey Entry Rules
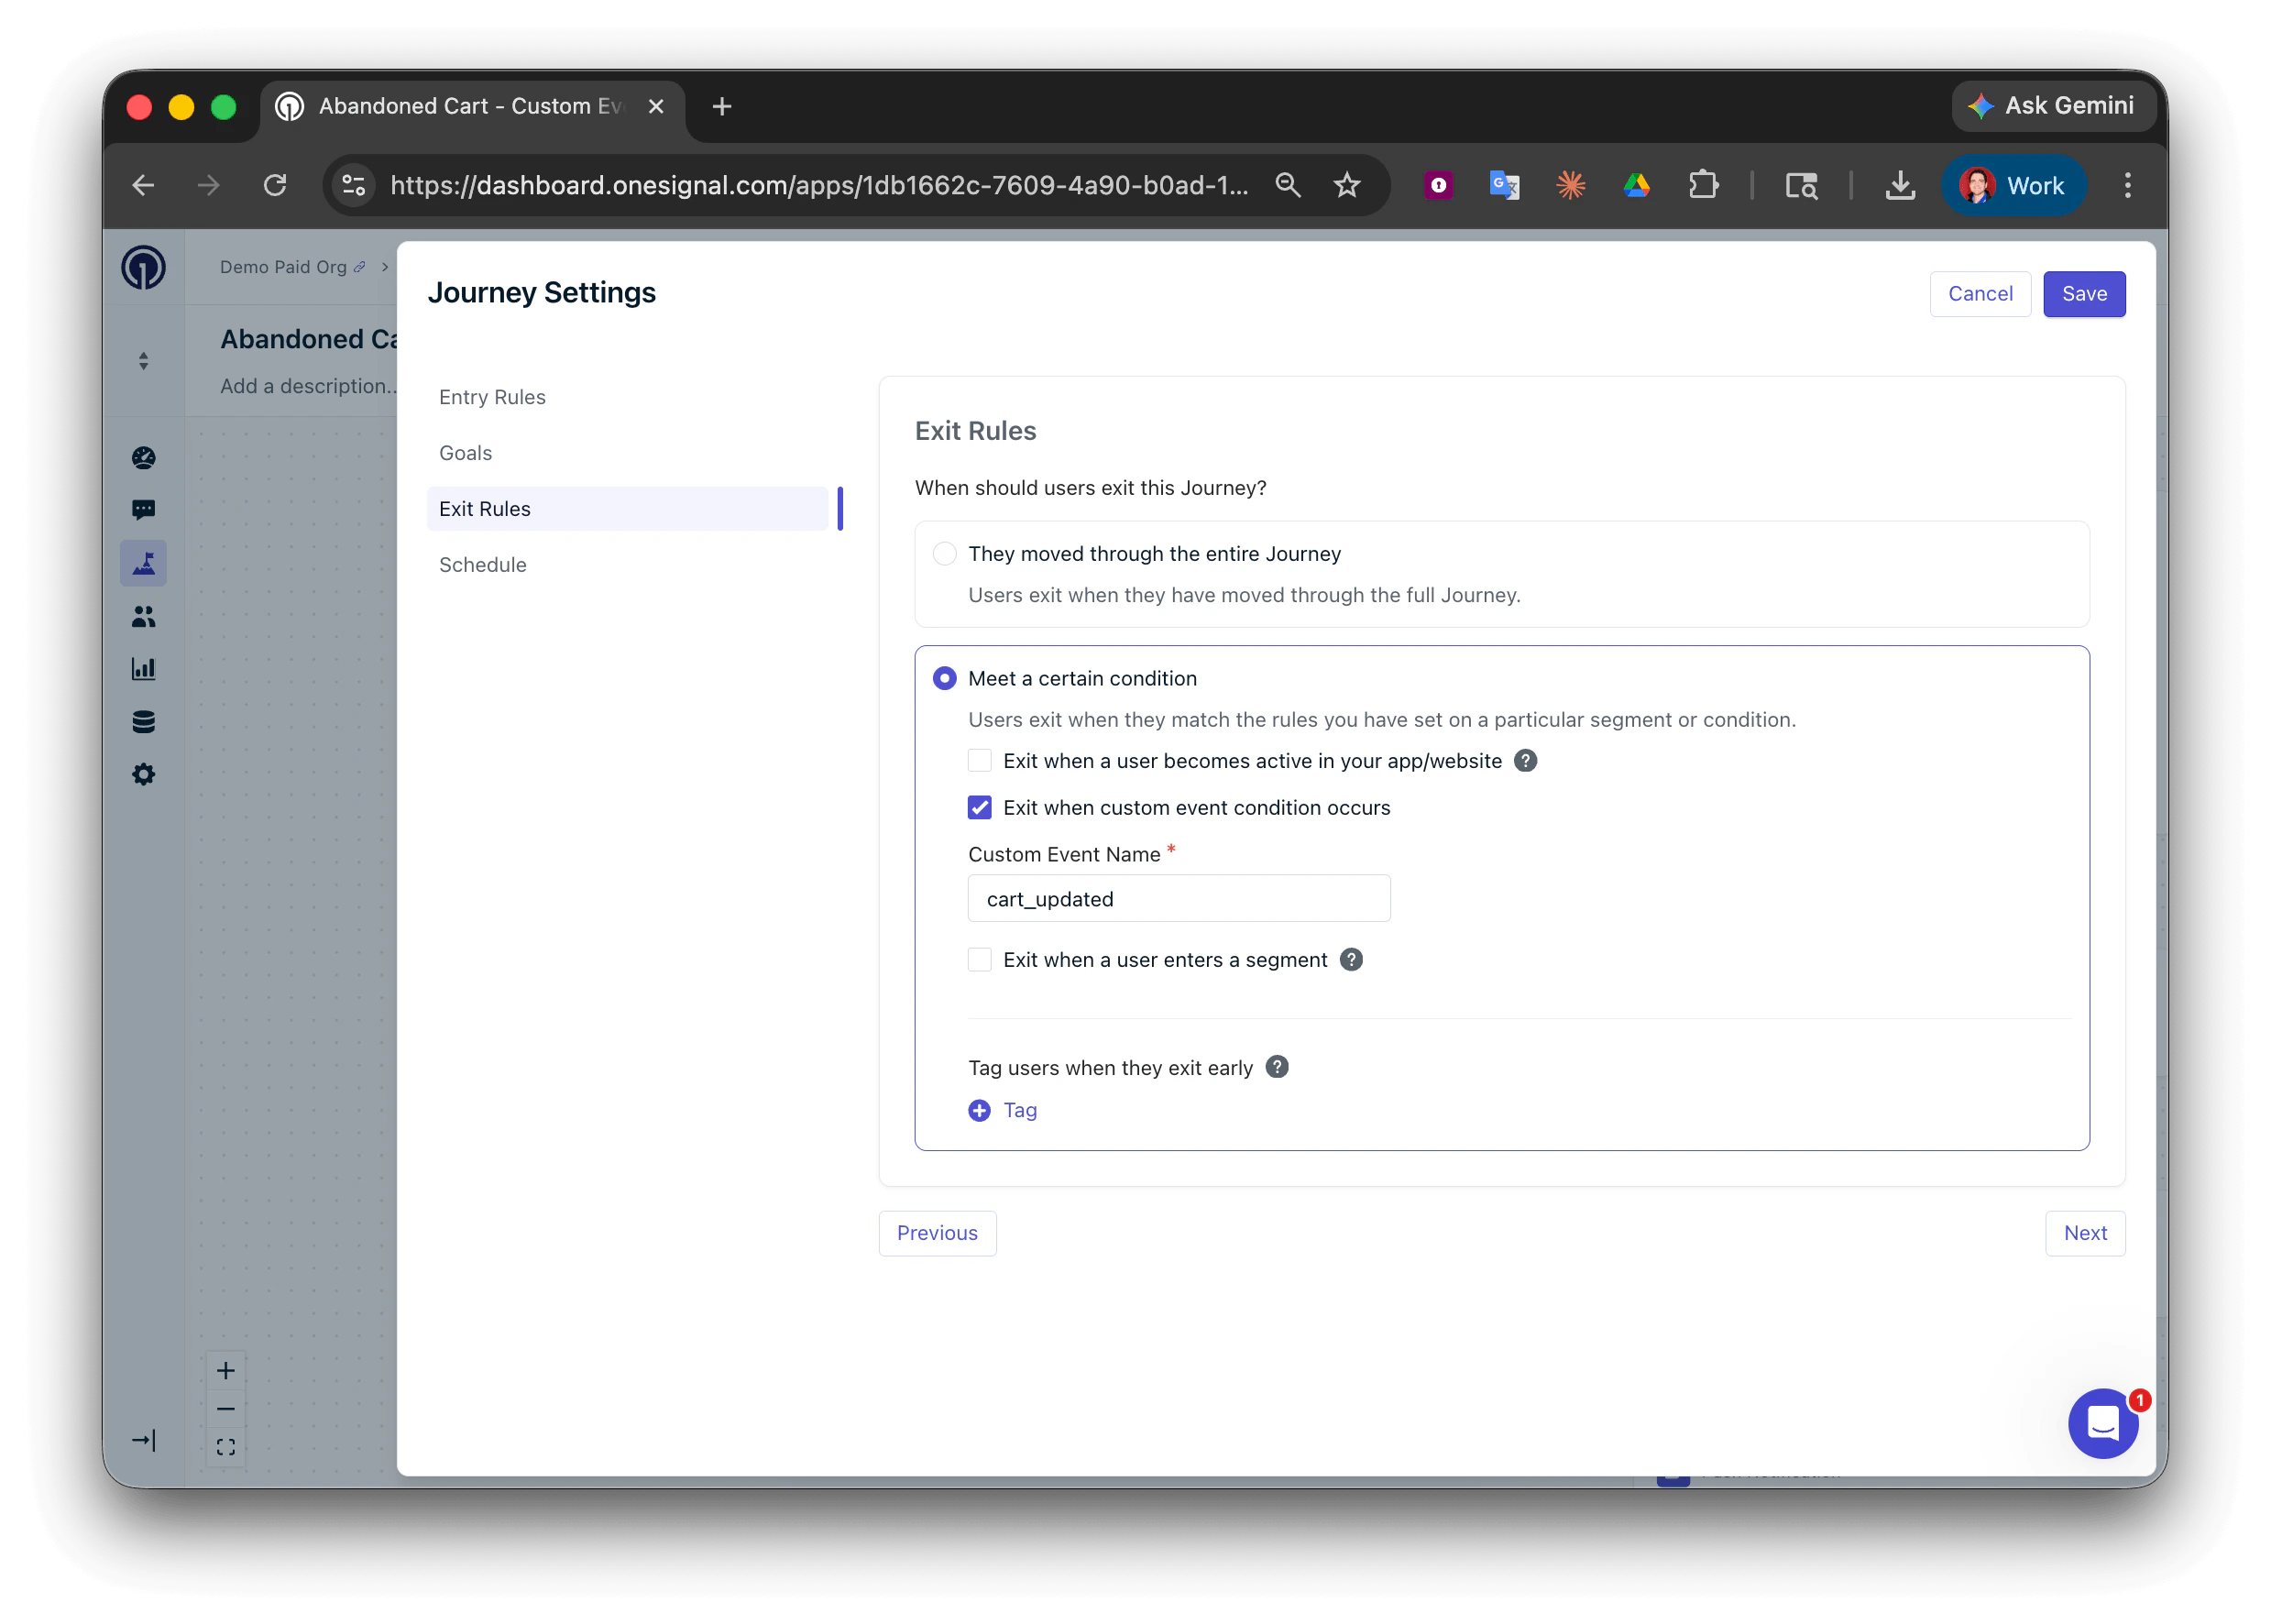
Exit Rules:
Custom Event: Exit Rules
Tag: Exit Rules
Users should exit the Journey when they empty their cart or complete the Journey.
Select Meet a certain condition
Check Exit when custom event condition occurs
Custom Event Name: cart_updated
Abandoned Cart Journey Custom Event Exit Rules
This configuration uses the same Custom Event name (cart_updated) for both entry and exit rules.This allows the user to only be in the Journey once at a time. Each time they update their cart, that instance of the user will exit and a new instance of the same user will enter the Journey. This is why it is important to use properties to filter users within the Entry Rules.
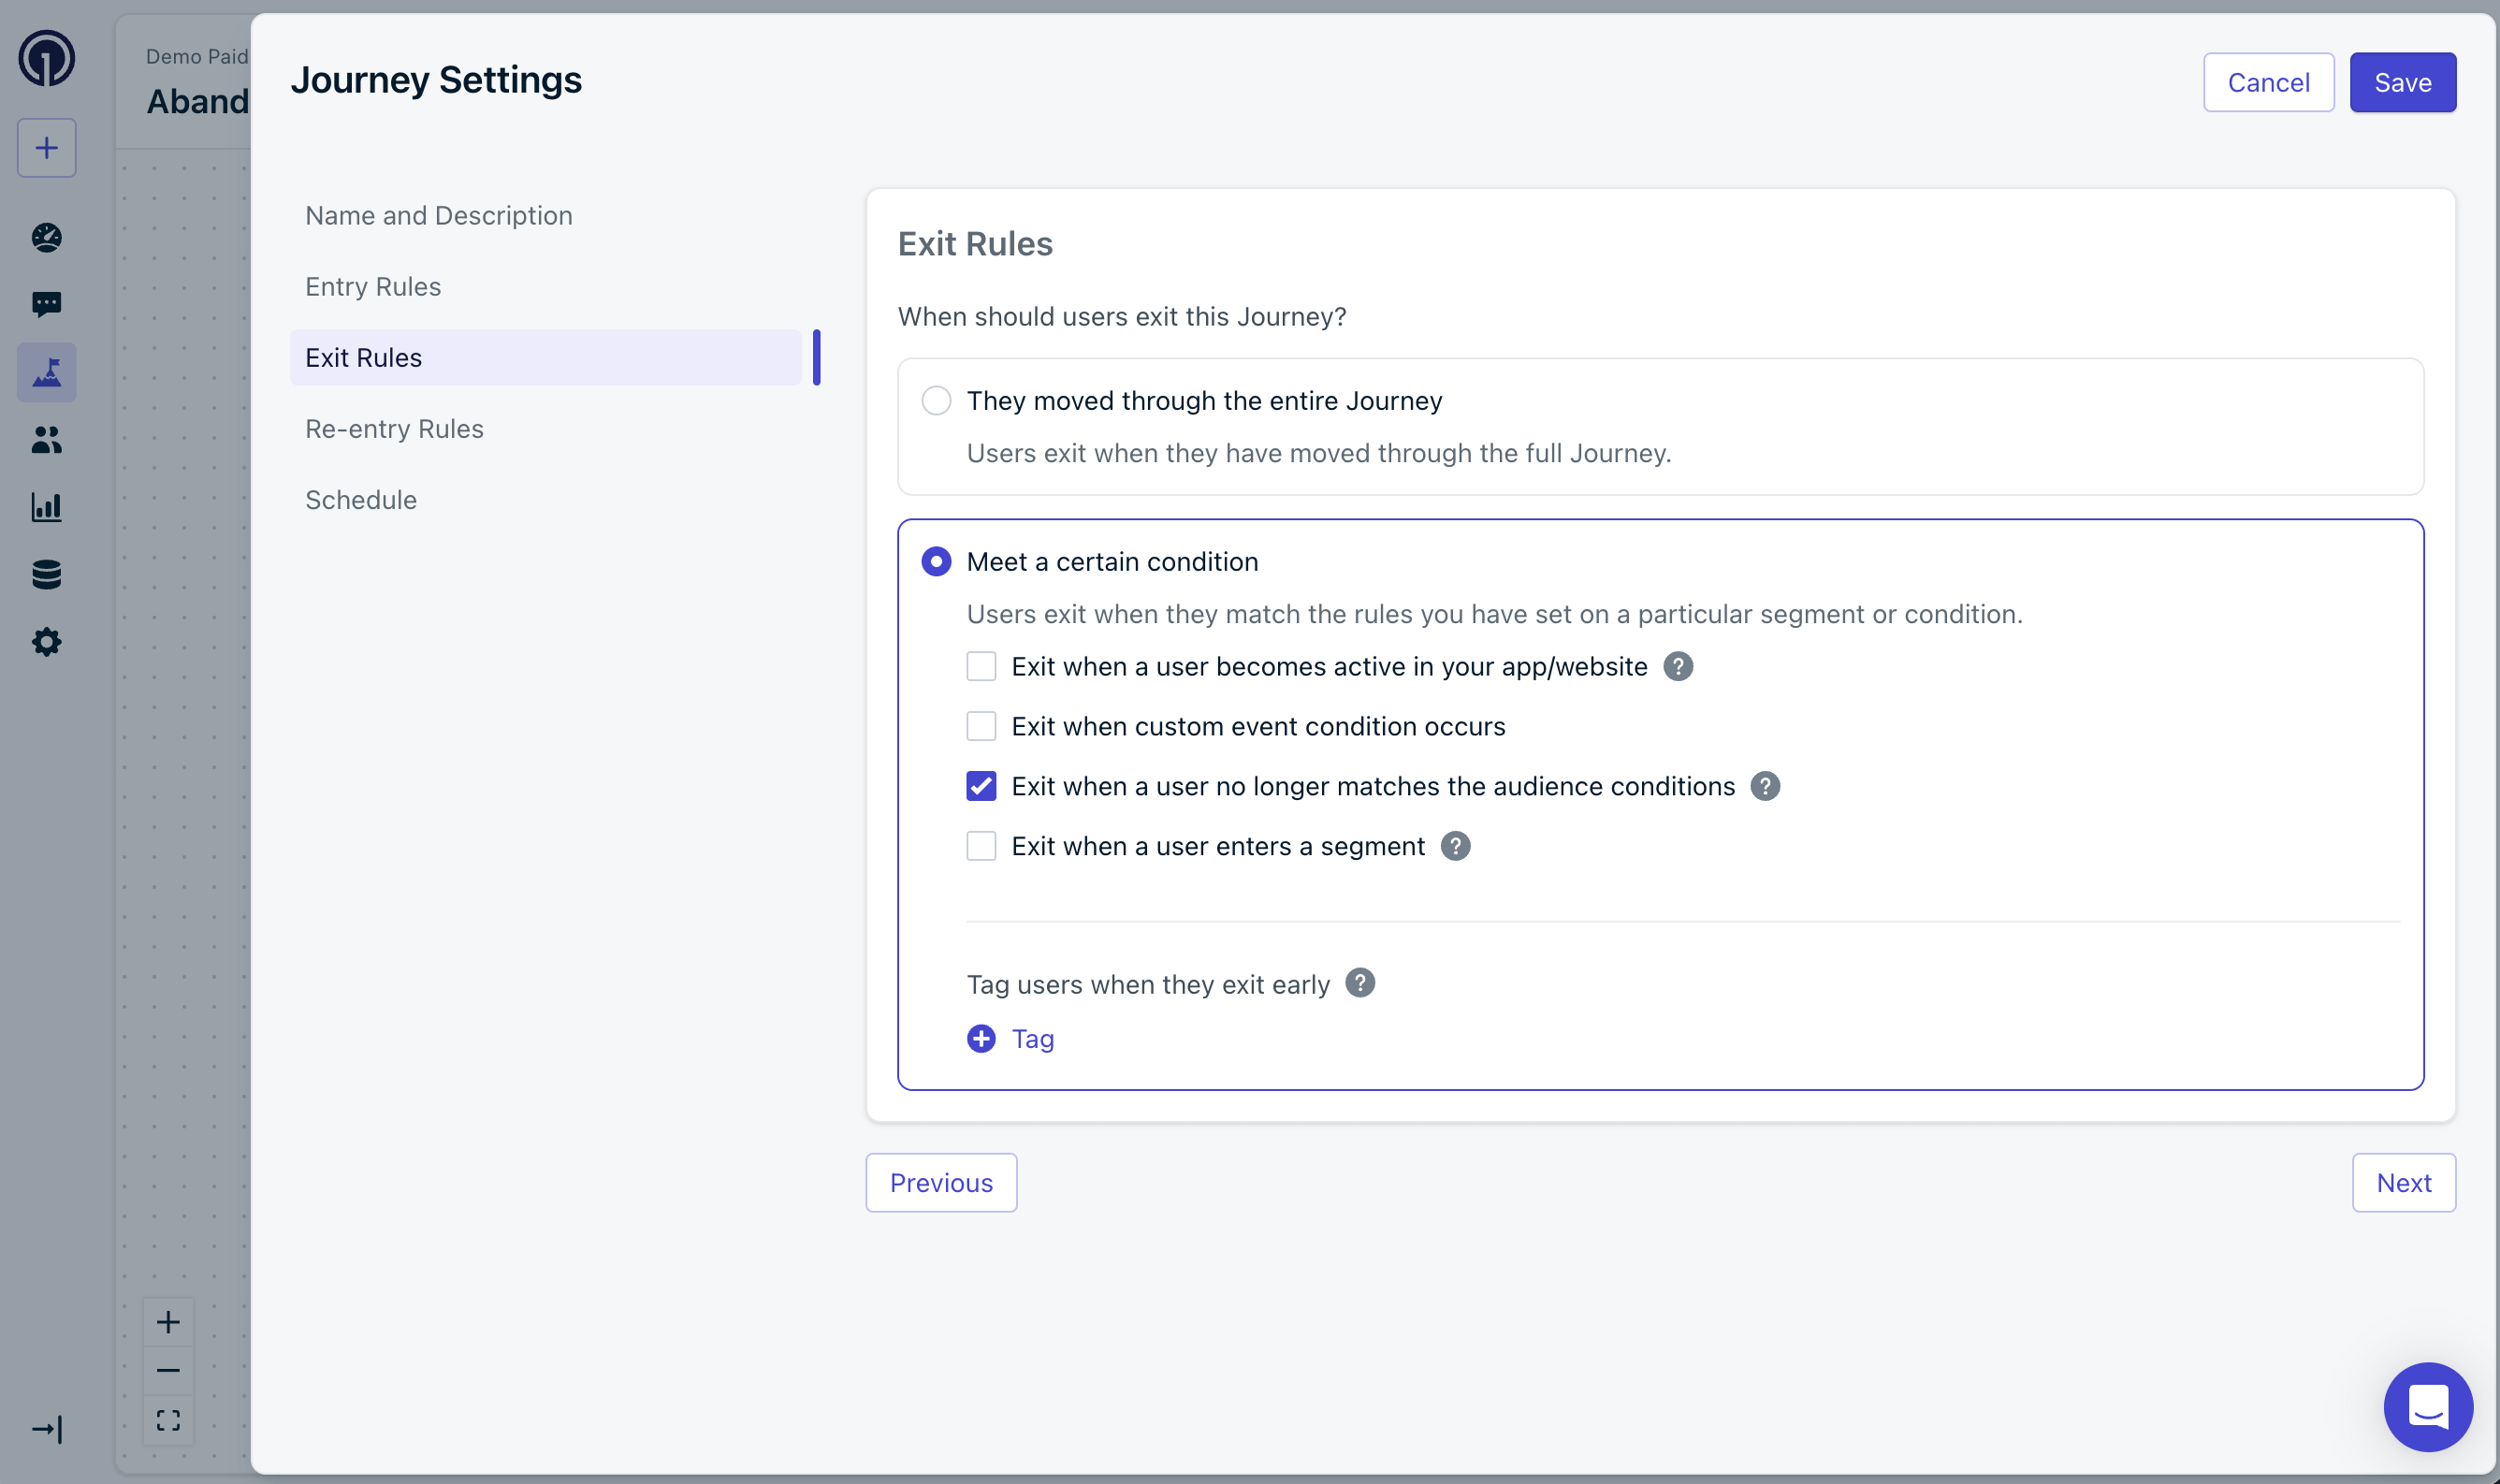
Select Meet a certain condition
Check Exit when a user no longer matches the audience conditions
Abandoned Cart Journey Tag Exit Rules
Users will exit the Journey when either:
They leave the segment.
They complete the Journey.
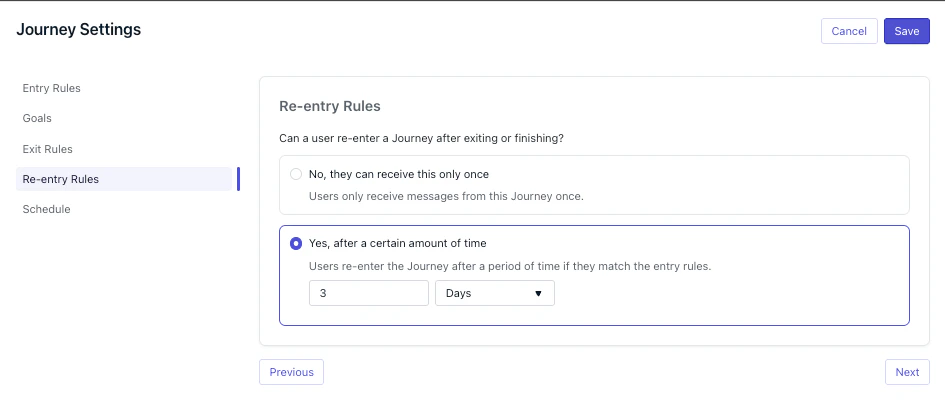
Re-entry Rules (Tags only):
Select Yes, after a certain amount of time
Set the re-entry time to 3Days - Adjust the time period as desired
Abandoned Cart Journey Re-entry Rules
If you have followed this guide completely so far, then users will:
Enter the Journey when they abandon/update their cart
Exit the Journey when they empty their cart or complete the Journey.
Be eligible to re-enter the Journey:
Custom Events: Each time the cart_updated event is performed
Tags: After 3 days have passed since they last exited the Journey and are in the segment.
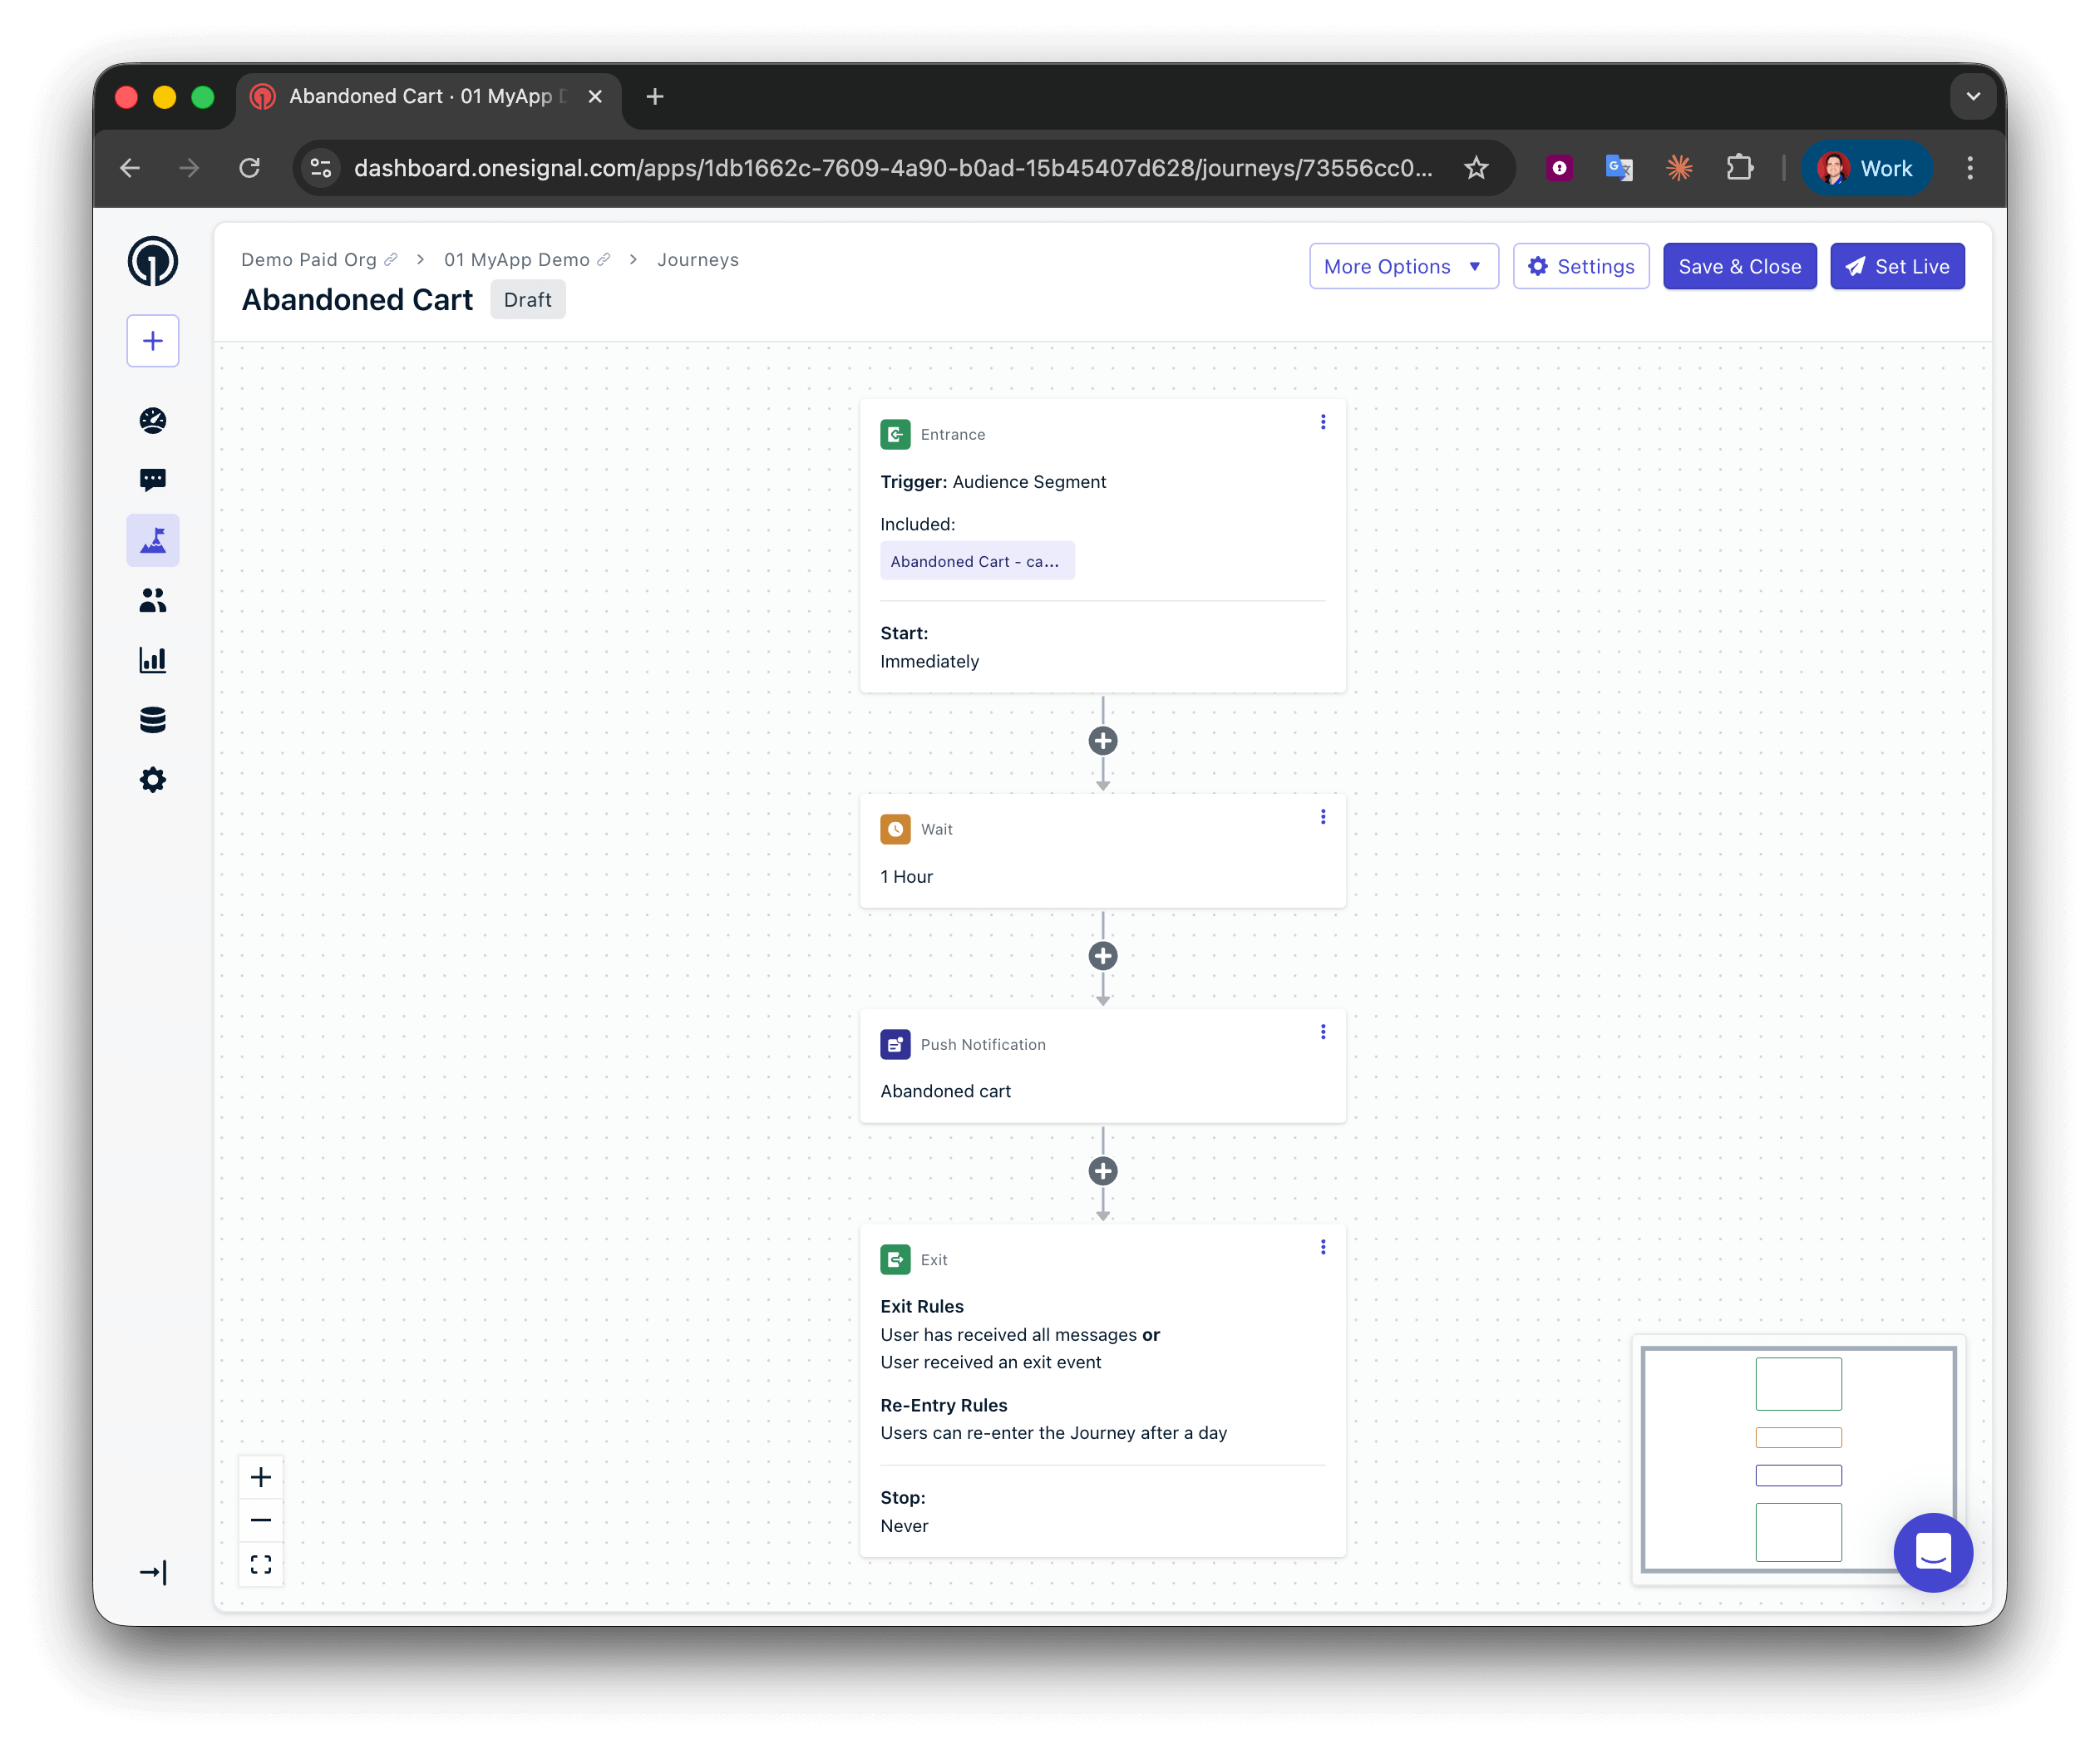
Users will enter the Journey based on your Entry Rules. This typically happens within a few minutes after the event/tag is received.Users will flow through the Journey step-by-step until they reach the end or an Exit Rule is met.A basic abandoned cart Journey does two things:
Gives the user enough time to empty their cart (make a purchase or remove items manually)
If they do not, sends a message reminding them about the items in their cart
Achieve this by first adding a Wait step to the Journey.
Set the wait time to be as long as you want. We recommend setting it to 1 or 2hours so you can message them while they still have the intent to purchase.
Add a Message step.
Select the Abandoned Cart Push Notification template you created in Step 3.
Basic Abandoned Cart Journey Steps
Basic Abandoned Cart Journey is now configured.When a user enters the Journey, they will wait for 1 hour. If they do not exit the Journey, they will receive the abandoned cart push notification.
Depending on which channels you set up with OneSignal, you will achieve better results using an omnichannel approach.
This guide shows how to send a push notification message after the first hour. This is used as a helpful reminder to try capturing the sale while the user may still be online.
Consider using both a push and email for your 2nd message. Use this second message to highlight benefits and social proof with light urgency to encourage them to purchase.
For the final message of the sequence, use an email or maybe an SMS (depending on the use case) as a “last call”. Consider using a discount code or other incentive to encourage them to purchase.
OneSignal’s Journeys provide Wait Until branching logic that you can use to check if a message was confirmed delivered, clicked or opened and if not performed within a certain time period, send a fallback message.This is extremely helpful for users who may have unsubscribed from a specific message channel. More details on how to setup fallback messages can be found in our Fallback Messages guide.
To track revenue from this Journey, you can use Custom Outcomes.When a purchase is made, you can send the event as a “Custom Outcome” to track the revenue associated with the specific message sent.Custom Outcomes can be sent via the Mobile SDK or Web SDK.
Should I use Custom Events or Tags for cart tracking?
Custom Events are recommended for most implementations. They support richer data, allow property-based filtering in Journey entry rules, and automatically handle re-entry when the same event fires again. Tags work for simpler use cases where you only need to track whether a cart exists, but require manual segment creation and re-entry configuration.
How long should I wait before sending the first reminder?
One to two hours is a common starting point. This gives the user enough time to return on their own while the purchase intent is still fresh. Test different wait times and use Journey analytics to find what works best for your audience.
What happens if a user updates their cart while in the Journey?
With Custom Events, the user exits the current Journey instance (because cart_updated fires as an exit condition) and immediately re-enters with the updated event data. With Tags, the user stays in the same Journey instance because the tag still exists — they only re-enter after exiting and waiting for the re-entry period.
Need help?Chat with our Support team or email support@onesignal.comPlease include:
Details of the issue you’re experiencing and steps to reproduce if available
Your OneSignal App ID
The External ID or Subscription ID if applicable
The URL to the message you tested in the OneSignal Dashboard if applicable