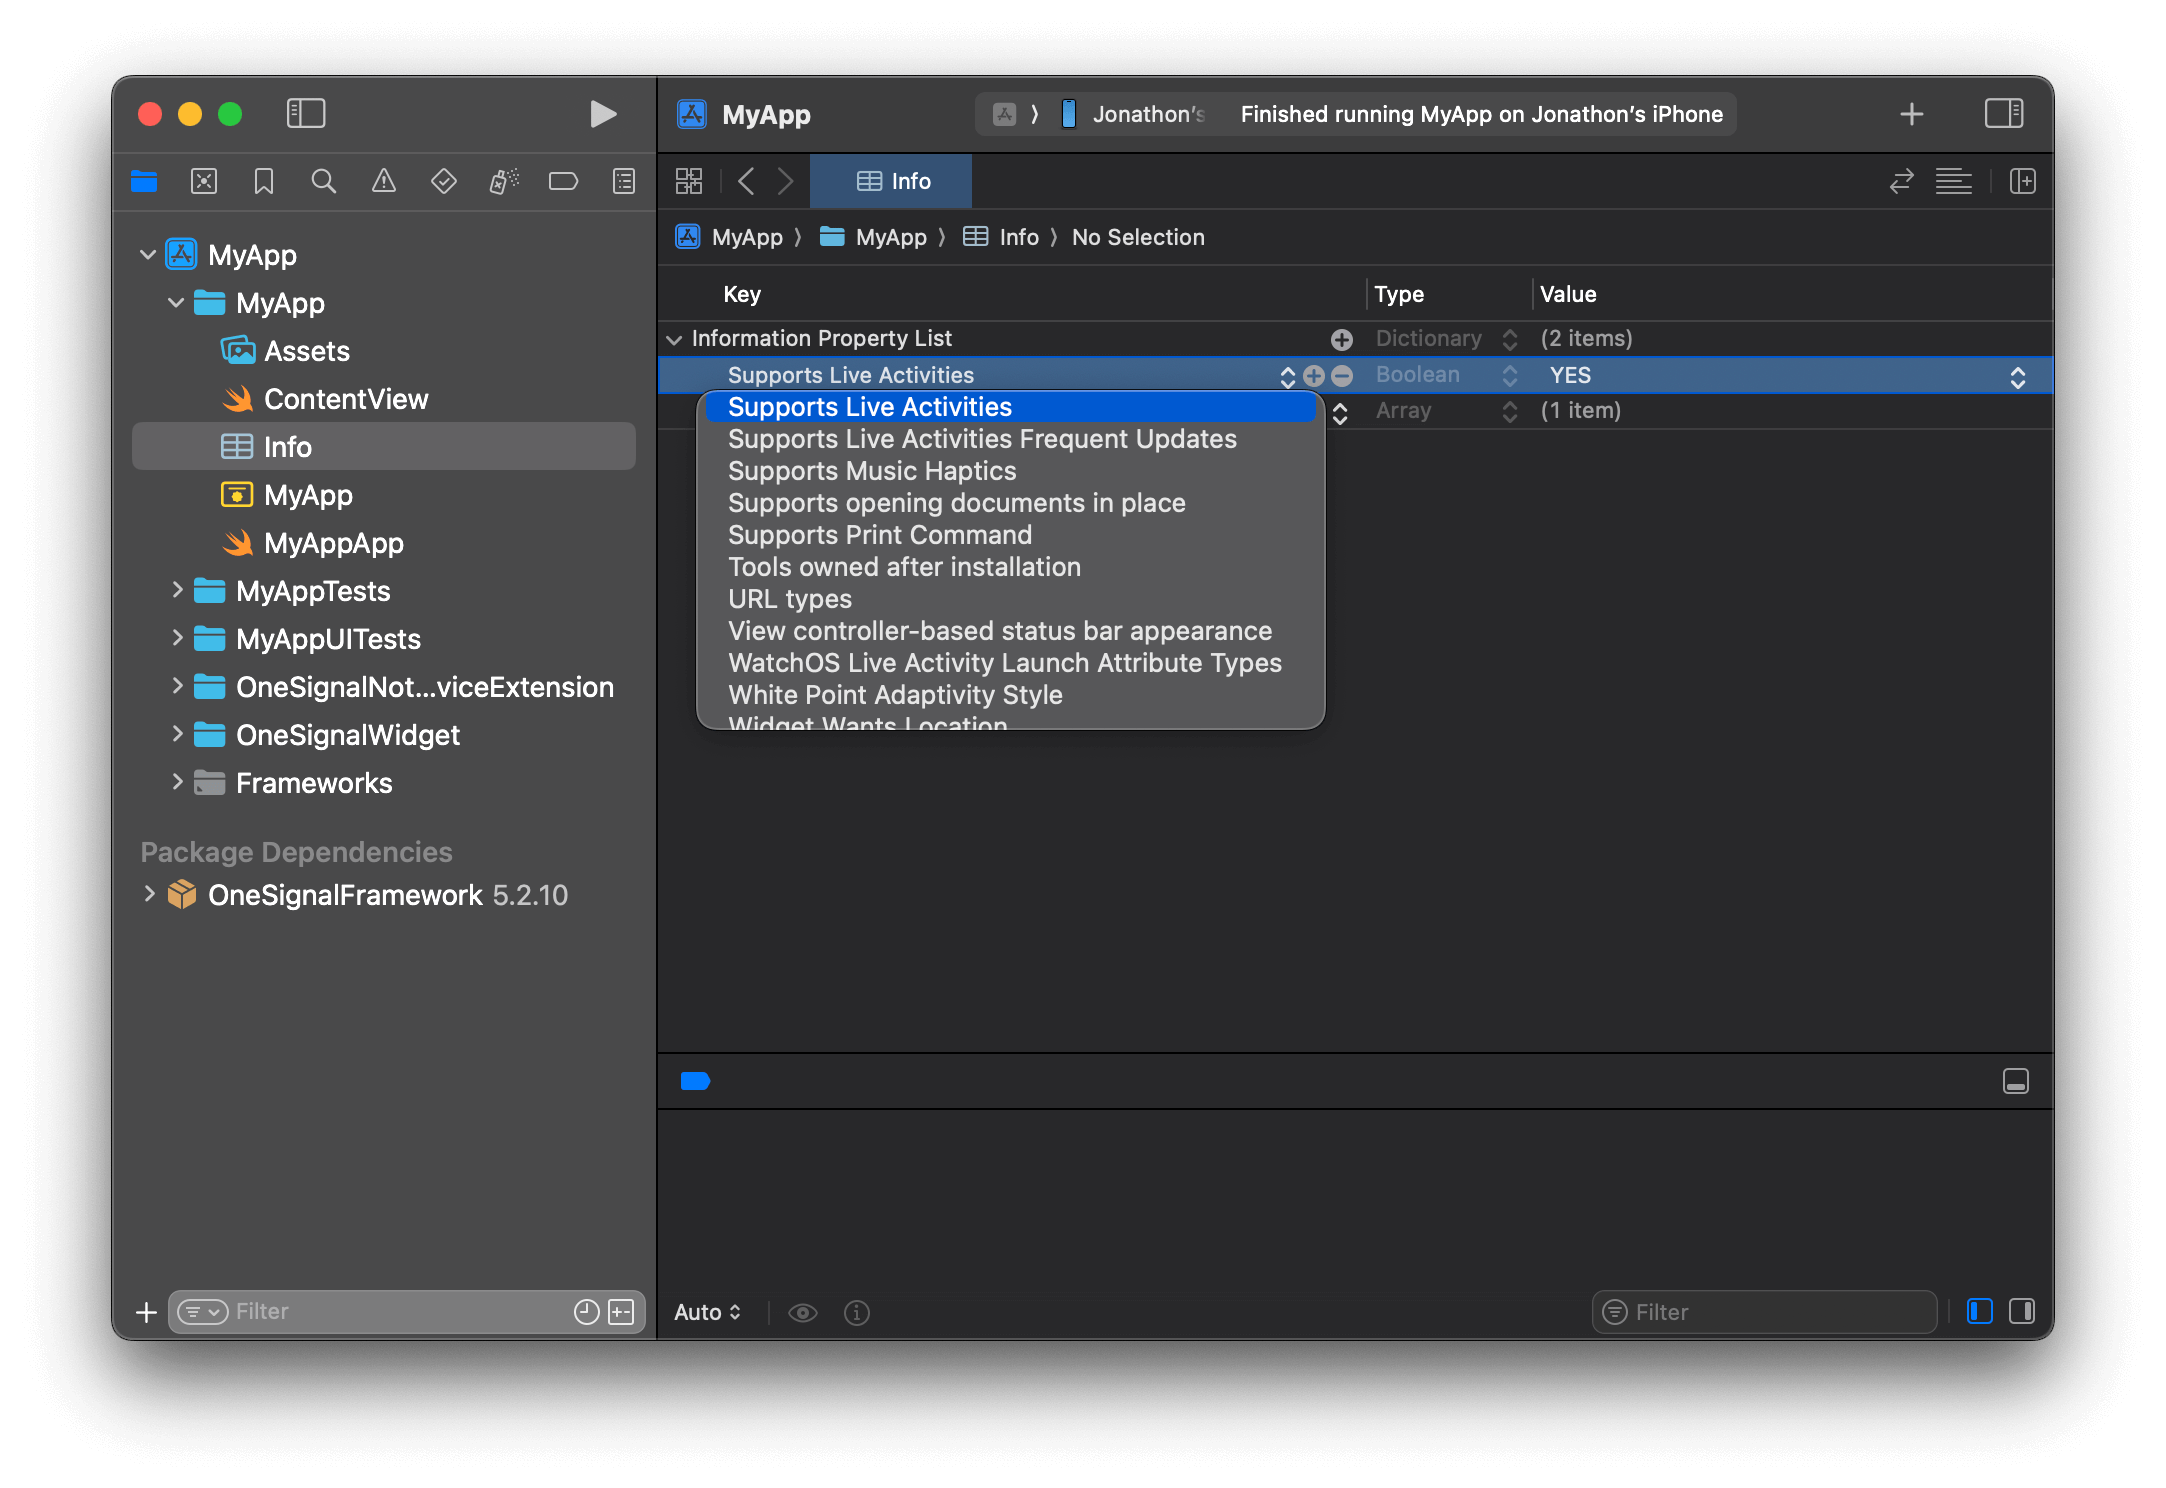
메인 타겟의 Info.plist에서 Supports Live Activities 키를 Boolean으로 추가하고 YES로 설정합니다.
Info에 Supports Live Activities 키를 추가하고 값을 Boolean YES로 설정합니다
프로그래밍 방식으로 설정하는 경우 다음과 같아야 합니다:
info.plist
<key>NSSupportsLiveActivities</key><true/>
Live Activities를 업데이트할 때 Apple이 업데이트의 긴급성을 결정하는 데 사용하는 “priority”를 설정할 수 있는 옵션이 있습니다. Apple에는 높은 우선 순위 플래그를 너무 자주 사용하는 요청을 조절하는 내부 임계값이 있습니다.Live Activities 사용 사례가 더 자주 높은 우선 순위 업데이트에 의존하는 경우 Apple의 개발자 문서에 따라 Info.plist에 NSSupportsLiveActivitiesFrequentUpdates 키를 Boolean 유형으로 YES로 설정하여 추가할 수 있습니다. Live Activity가 푸시 예산을 초과하면 사용자에게 대화 상자가 표시되며, Live Activity를 계속 허용하면 원활한 사용자 경험을 위해 예산이 자동으로 증가합니다.
래퍼 SDK(예: Flutter)에서 SPM이 활성화된 경우 이 단계를 건너뛸 수 있습니다. OneSignal 패키지는 이미 해결되어 모든 타겟에서 사용할 수 있습니다.
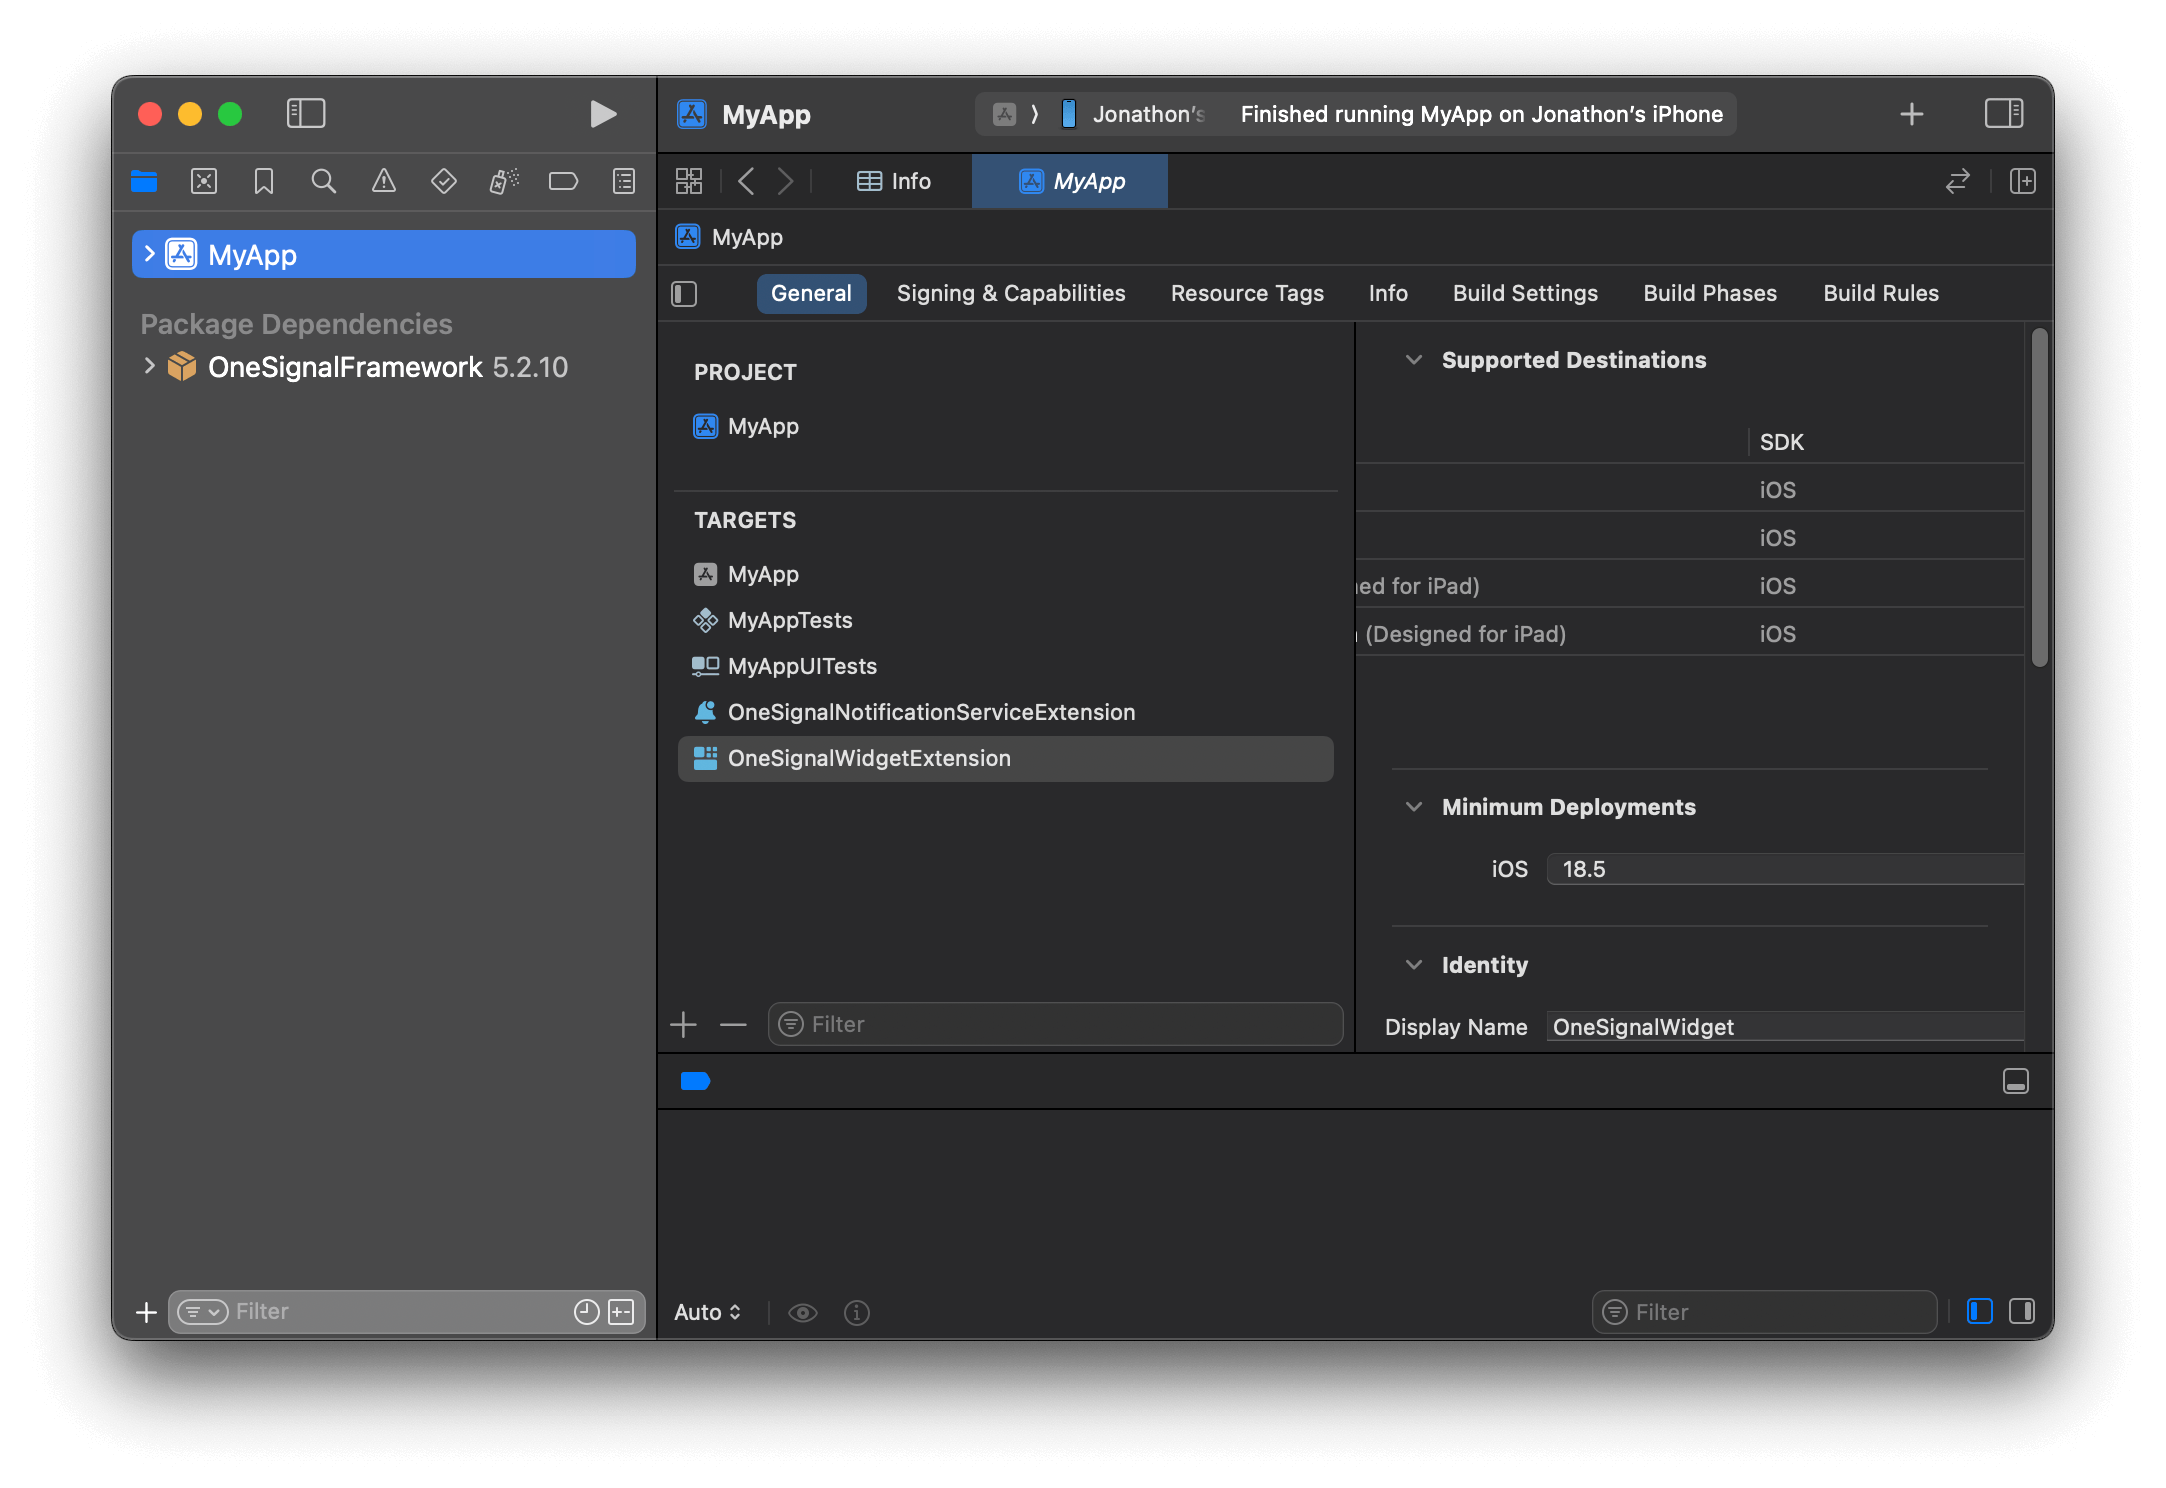
Widget Extension 타겟에서 일반 > 프레임워크, 라이브러리 및 임베디드 콘텐츠 아래에 OneSignalFramework를 추가합니다:
Widget Extension 타겟에 OneSignalFramework를 추가합니다
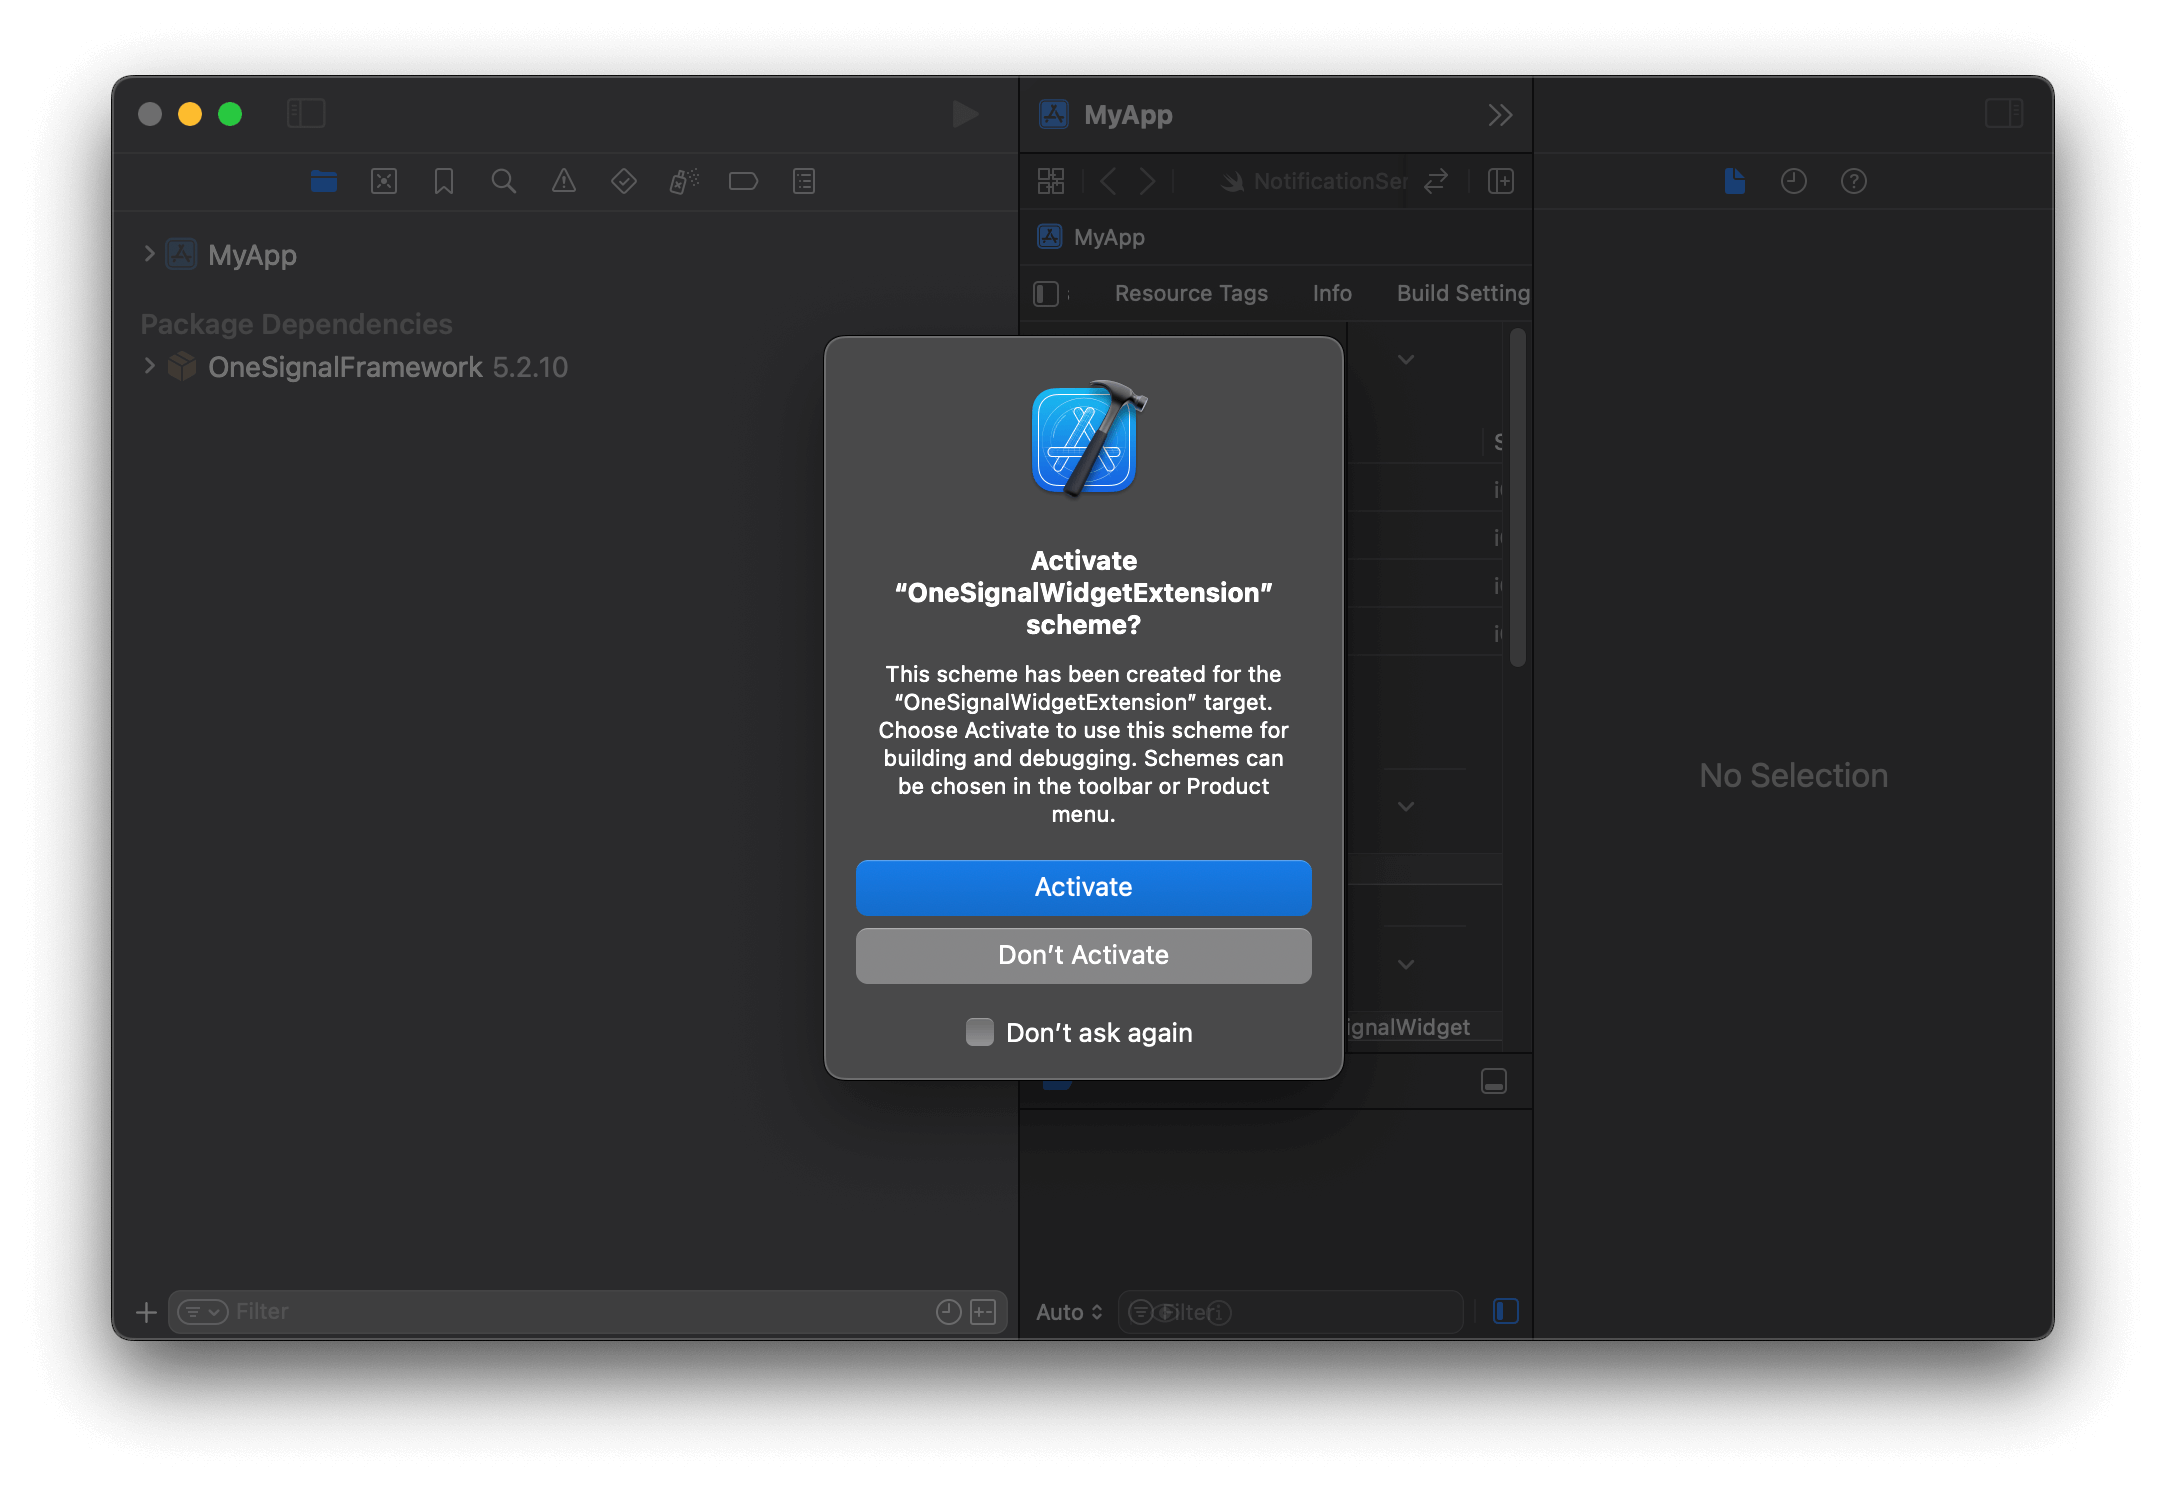
프로젝트의 타겟 목록에서 위젯 확장 타겟의 이름을 찾습니다. 예시 이름은 OneSignalWidgetExtension입니다.
위젯 확장 타겟의 이름을 찾습니다
Podfile을 열고 다음 코드를 추가합니다. OneSignalWidgetExtension을 위젯 확장 타겟의 이름으로 바꿉니다.
target 'OneSignalWidgetExtension' do use_frameworks! pod 'OneSignal/OneSignal', '>= 5.0.0', '< 6.0'end
# Uncomment the next line to define a global platform for your project# platform :ios, '9.0'target 'Demo Momenta' do # Comment the next line if you don't want to use dynamic frameworks use_frameworks! pod 'OneSignal/OneSignal', '>= 5.0.0', '< 6.0' pod 'OneSignal/OneSignalInAppMessages', '>= 5.0.0', '< 6.0'endtarget 'OneSignalNotificationServiceExtension' do use_frameworks! pod 'OneSignal/OneSignal', '>= 5.0.0', '< 6.0'endtarget 'OneSignalWidgetExtension' do use_frameworks! pod 'OneSignal/OneSignal', '>= 5.0.0', '< 6.0'end
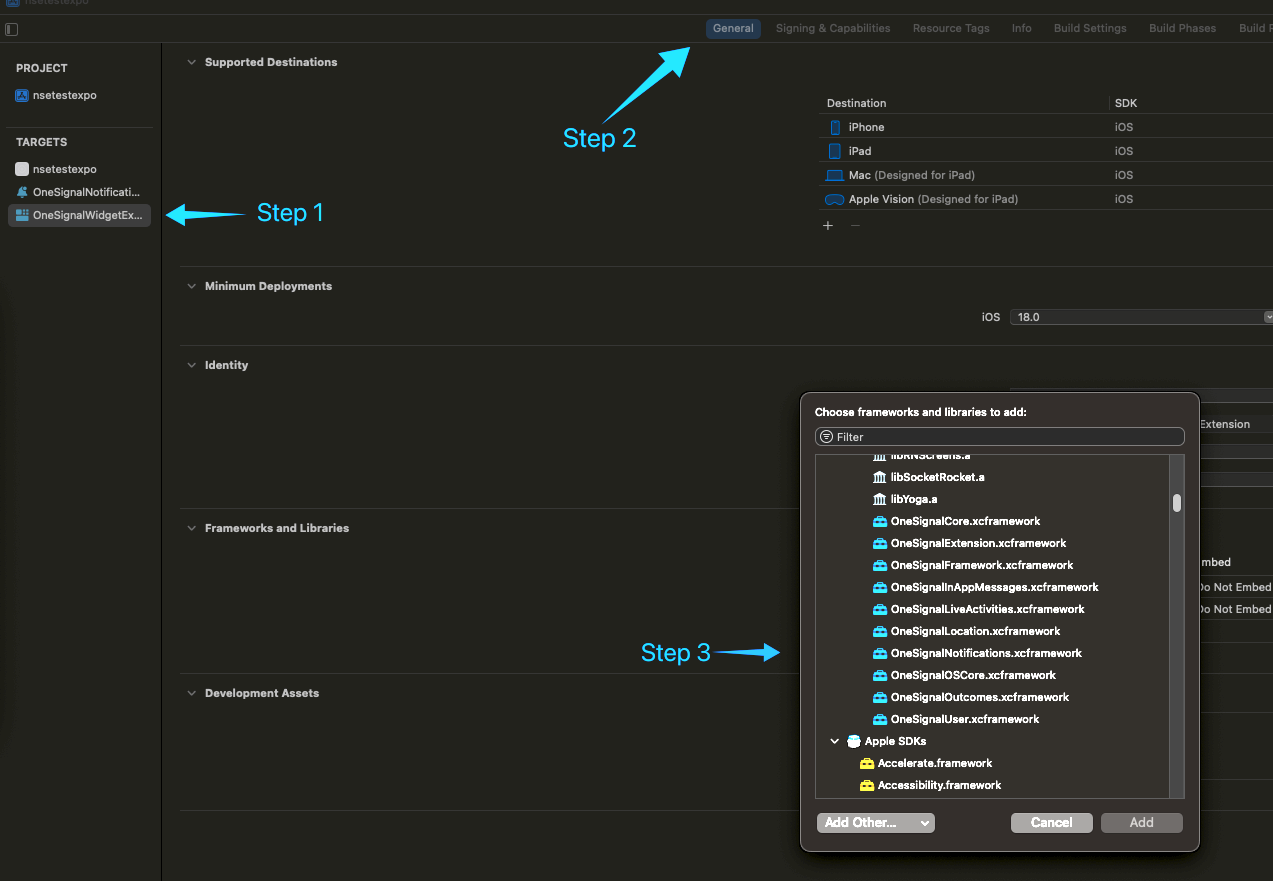
Xcode를 닫고 pod repo update && pod install을 실행하여 OneSignalLiveActivities pod를 설치합니다.이 작업을 수행한 후에도 “No such module ‘OneSignalLiveActivities’” 오류가 계속 표시되면 “Widget Extension 타겟” > 일반 > 프레임워크 및 라이브러리 > + 아이콘으로 이동하여 종속성을 수동으로 추가할 수 있습니다. OneSignalLiveActivities 프레임워크를 선택합니다:
your-nameLiveActivity.swift 파일(예: OneSignalWidgetLiveActivity.swift)을 열어 구조체의 속성을 정의하고 위젯 UI를 변경합니다.
your-nameAttributes는 Live Activity의 정적 콘텐츠를 설명합니다.
ContentState는 Live Activity의 동적 콘텐츠를 설명합니다.
예시를 따르는 경우 아래 코드를 OneSignalWidgetLiveActivity.swift 파일에 복사하여 붙여넣습니다.
your-nameLiveActivity.swift
import ActivityKitimport WidgetKitimport SwiftUI// Import the OneSignalLiveActivities module// If you get an error about the module not being found, return to step 3 and ensure you have added the OneSignalLiveActivities pod correctly.import OneSignalLiveActivities// Update to inherit from OneSignalLiveActivityAttributes// This will be used in your API requests to start a Live Activitystruct OneSignalWidgetAttributes: OneSignalLiveActivityAttributes { // Update to inherit from OneSignalLiveActivityContentState public struct ContentState: OneSignalLiveActivityContentState { // Dynamic stateful properties about your activity go here! var emoji: String // Add a reference to OneSignalLiveActivityContentStateData? var onesignal: OneSignalLiveActivityContentStateData? } // Fixed non-changing properties about your activity go here! var name: String // Add a reference to OneSignalLiveActivityAttributeData var onesignal: OneSignalLiveActivityAttributeData}struct OneSignalWidgetLiveActivity: Widget { var body: some WidgetConfiguration { // Update to use `for: the-name-of-your-attributes-struct` // This will be used in your API requests to start a Live Activity ActivityConfiguration(for: OneSignalWidgetAttributes.self) { context in // Lock screen/banner UI goes here // Update to show the attributes sent via the payload VStack { Text("Hello \(context.attributes.name) \(context.state.emoji)") } .activityBackgroundTint(Color.cyan) .activitySystemActionForegroundColor(Color.black) } dynamicIsland: { context in DynamicIsland { // Expanded UI goes here. Compose the expanded UI through // various regions, like leading/trailing/center/bottom DynamicIslandExpandedRegion(.leading) { Text("Leading") } DynamicIslandExpandedRegion(.trailing) { Text("Trailing") } DynamicIslandExpandedRegion(.bottom) { Text("Bottom \(context.state.emoji)") // more content } } compactLeading: { Text("L") } compactTrailing: { Text("T \(context.state.emoji)") } minimal: { Text(context.state.emoji) } .widgetURL(URL(string: "http://www.apple.com")) .keylineTint(Color.red) } }}
이 단계는 사용자 정의 속성(예: OneSignalWidgetAttributes)을 사용할 때만 필요합니다. DefaultLiveActivityAttributes를 사용하는 경우 이 단계를 건너뛰세요 — 해당 타입은 OneSignal SDK에서 제공되며 메인 앱 타겟에서 이미 접근 가능합니다.
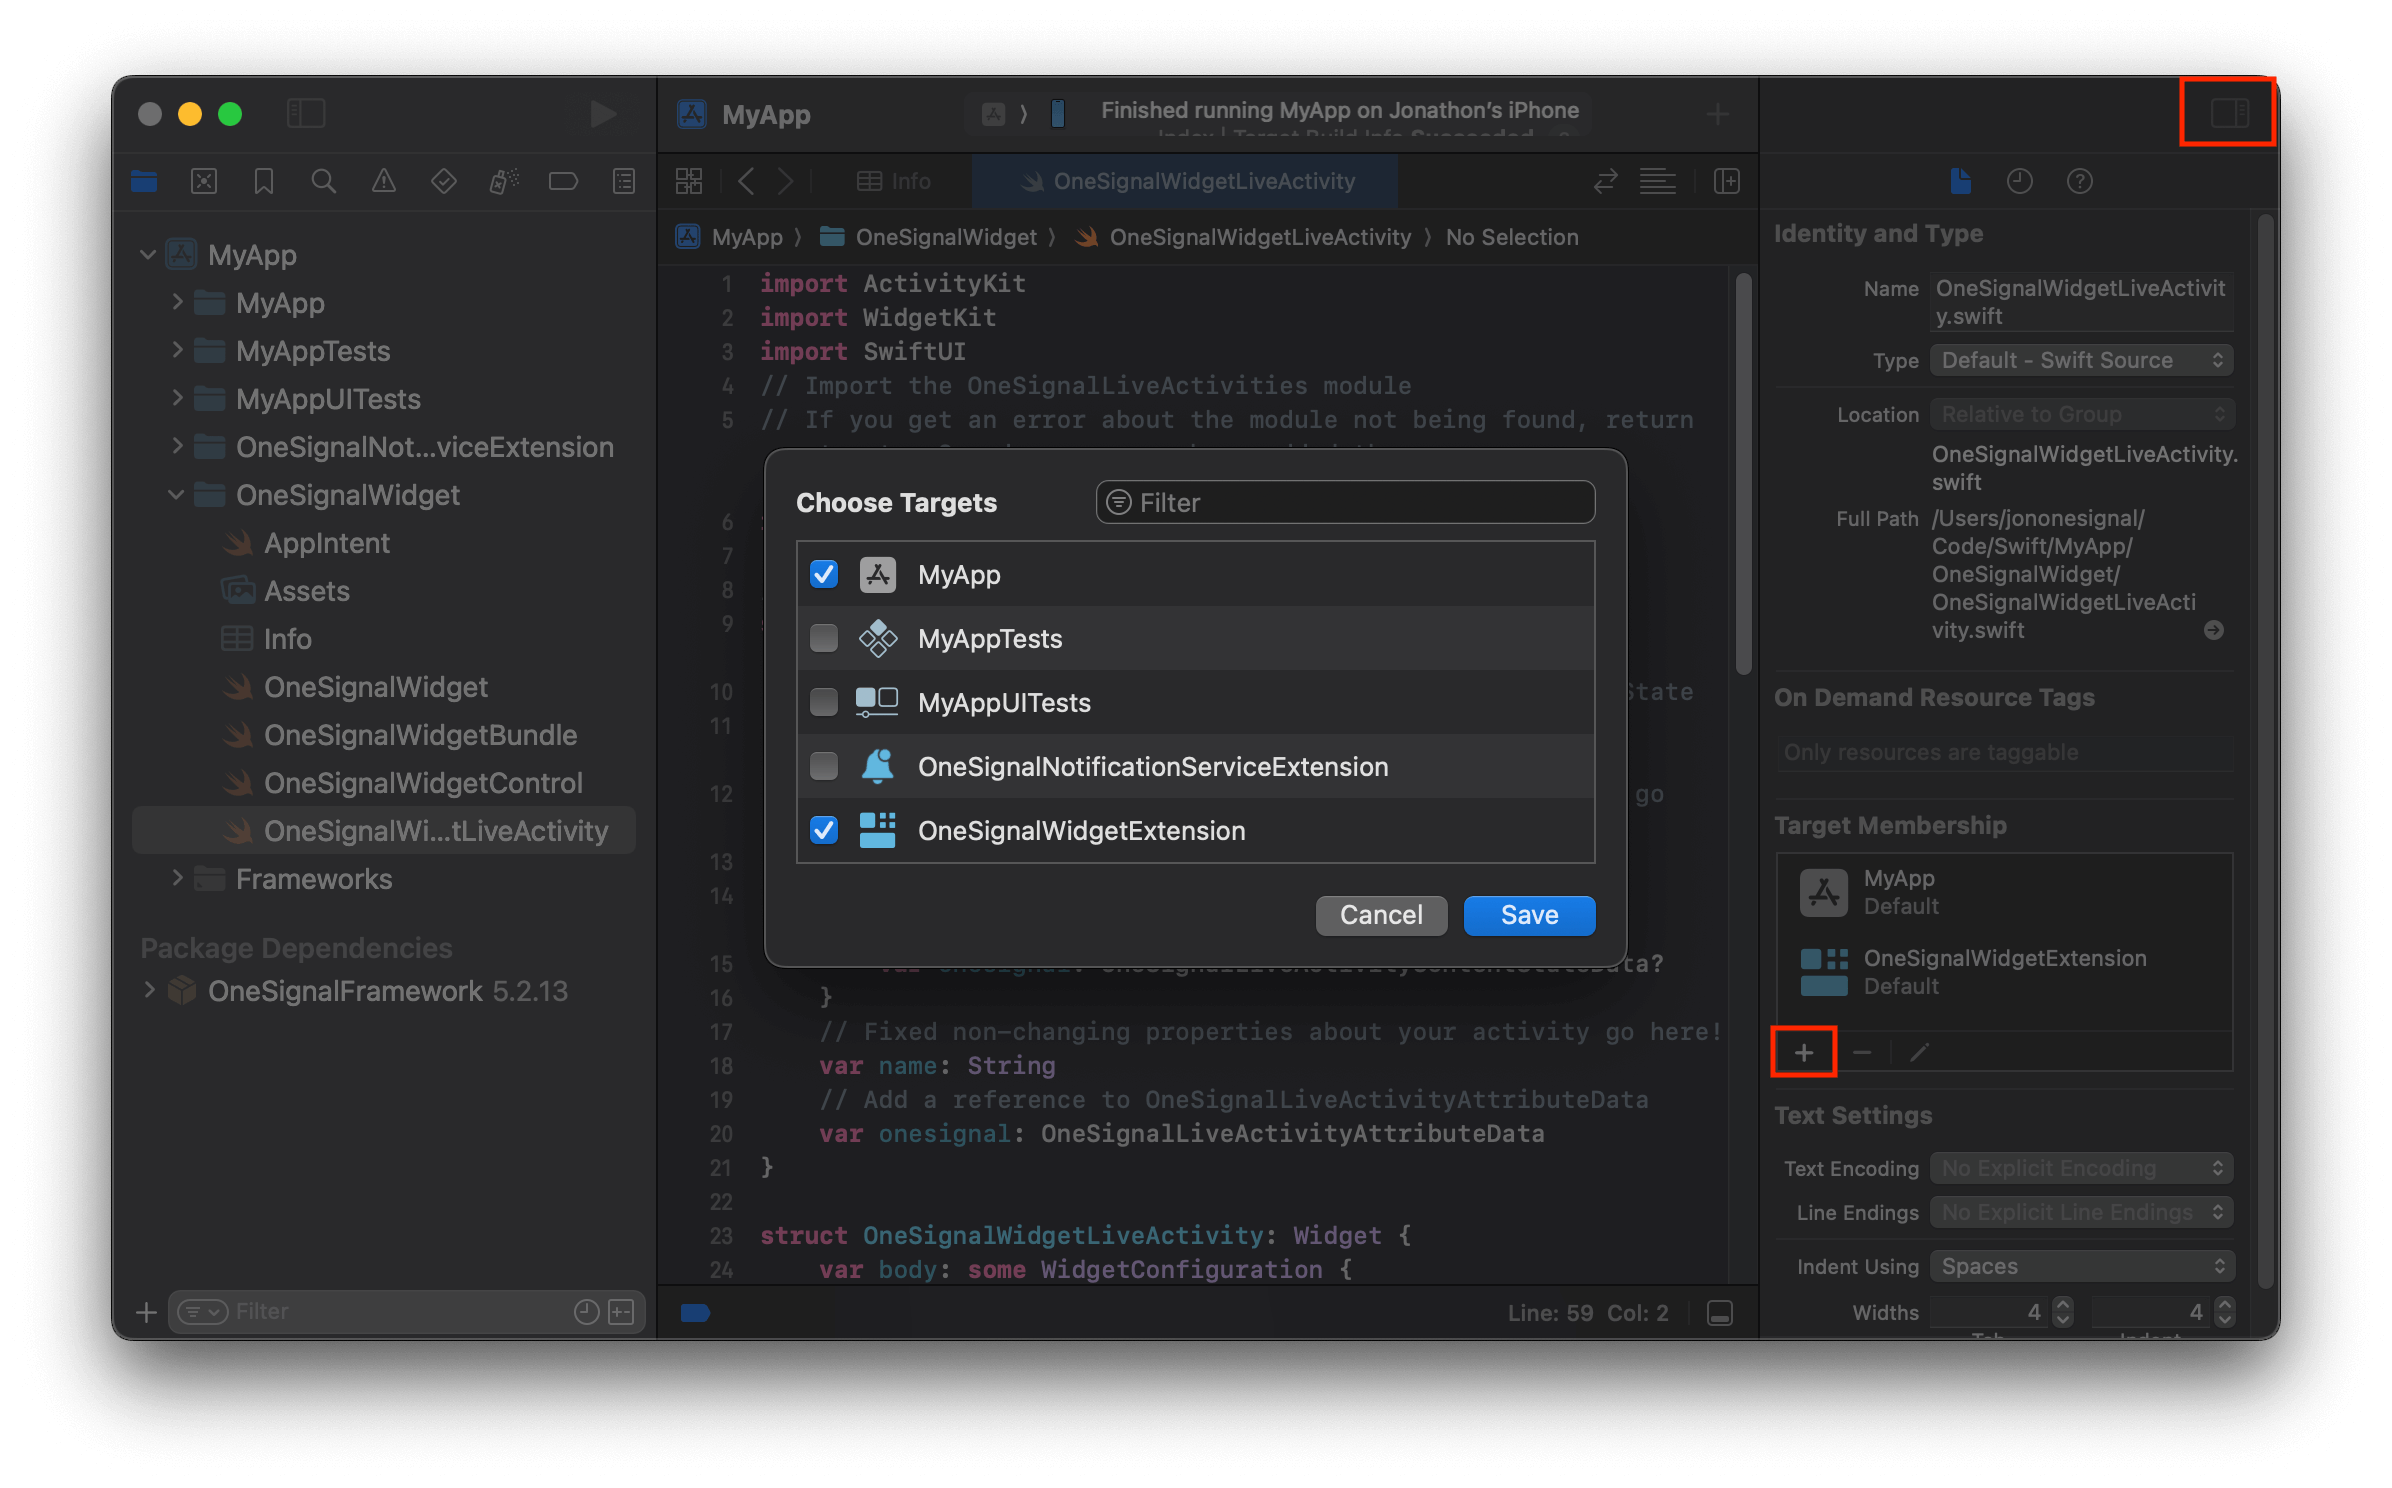
your-nameLiveActivity.swift 파일의 Target Membership 목록에 메인 앱 타겟을 추가합니다. 이는 메인 앱 타겟이 설정 호출(6단계)에서 사용자 정의 속성 구조체를 참조할 수 있도록 하기 위해 필요합니다.Xcode에서 화면 오른쪽의 인스펙터 패널을 엽니다. Target Membership 내에서 + 버튼을 클릭하고 ContentView 및 OneSignal 초기화 코드가 포함된 메인 앱 타겟을 선택합니다.
OneSignal SDK 초기화 후 AppDelegate에서 OneSignal.LiveActivities.setup을 호출합니다.OneSignalWidgetAttributes를 Live Activity 속성 구조체의 이름으로 바꿉니다.
AppDelegate
// Import the OneSignalLiveActivities moduleimport OneSignalLiveActivities// This should be added after initializing the OneSignal SDKif #available(iOS 16.1, *) { OneSignal.LiveActivities.setup(OneSignalWidgetAttributes.self) // If you have multiple Live Activities, you can add them here with the setup method // OneSignal.LiveActivities.setup(LiveActivityWidgetAttributes-2.self)}
이는 ActivityKit 비동기 시퀀스를 사용하여 업데이트를 관리하고 보고합니다.
앱에서 다음 시퀀스 중 하나를 직접 소비하는 경우 OneSignal Live Activity 동작을 방해할 수 있습니다:
Push To Start API 요청을 보냅니다. 모든 이름과 ID가 위젯 구성과 정확히 일치하는지 확인합니다(매개변수는 대소문자를 구분함). 누락되거나 잘못 추가된 것이 있으면 위젯을 실행하려고 할 때 문제가 발생할 수 있습니다.위의 예시에서 작동하는 요청 예시는 다음과 같습니다.바꾸기:
YOUR_APP_ID를 OneSignal 앱 ID로 바꿉니다.
YOUR_APP_API_KEY를 OneSignal API 키로 바꿉니다.
OneSignalWidgetAttributes를 Widget Attributes 구조체의 이름으로 바꿉니다.
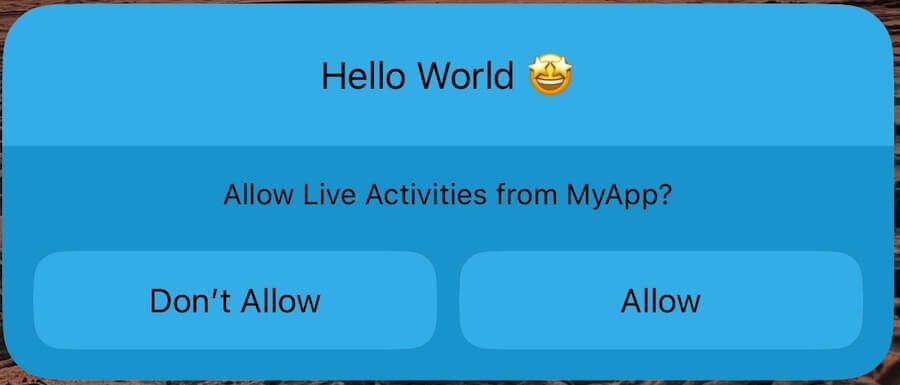
제공된 예시 코드를 따르는 경우 기기의 잠금 화면에 Live Activity가 표시됩니다.
잠금 화면의 Live Activity
push-to-start로 Live Activity를 성공적으로 시작했습니다!사용자는 계속 업데이트를 받으려면 “허용”을 선택해야 합니다.
사용자가 앱과 상호 작용하는 동안 Live Activity를 트리거하도록 할 수 있습니다.예를 들어 사용자에게 활성 이벤트가 진행 중일 때(주문을 했거나, 게임이 진행 중이거나, 이벤트가 곧 시작될 예정 등) 앱을 열면 Live Activity를 자동으로 표시할 수 있습니다.이 예시에서는 버튼을 사용하여 Live Activity를 수동으로 시작합니다.
import SwiftUIimport ActivityKitimport OneSignalFrameworkimport OneSignalLiveActivitiesstruct ContentView: View { @StateObject private var viewModel = LiveActivityViewModel() var body: some View { VStack { Button("Start Live Activity") { viewModel.startLiveActivity() } } }}class LiveActivityViewModel: ObservableObject { func startLiveActivity() { let osAttributes = OneSignalLiveActivityAttributeData.create(activityId: "click-to-start") let attributes = OneSignalWidgetAttributes(name: "OneSignal", onesignal: osAttributes) let contentState = OneSignalWidgetAttributes.ContentState(emoji:"🤩", onesignal: nil) do { let activity = try Activity<OneSignalWidgetAttributes>.request( attributes: attributes, contentState: contentState, pushType: .token) } catch { print(error.localizedDescription) } }}
Live Activity 업데이트 API를 사용하여 활성 위젯을 업데이트합니다.활동을 시작할 때 사용한 activity_id와 일치시킵니다.이 예시 요청은 정의한 push-to-start라는 activity_id가 있으므로 push-to-start 위젯을 업데이트합니다.
click-to-start 위젯을 업데이트하려면 요청 경로를 push-to-start 대신 click-to-start를 사용하도록 업데이트합니다.
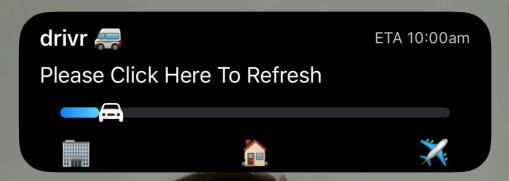
Live Activity가 시작된 후 사용자가 업데이트를 받을 수 없는 경우, 앱을 열면 활동이 새로고침됩니다. 첫 번째 업데이트를 보낸 것으로 예상되는 시점 이후의 미래 날짜와 시간으로 stale date를 설정합니다. 업데이트를 받지 못한 사용자에게는 대신 대체 메시지가 표시됩니다.위젯 UI에서 이 “stale” 상태를 수신 대기하여 대체 메시지를 표시할 수 있습니다:
Live Activity가 stale 상태가 될 때 표시되는 대체 메시지.
struct ptsLiveActivity: Widget { var body: some WidgetConfiguration { ActivityConfiguration(for: ptsAttributes.self) { context in //This will flip to true after the stale date let isStale = context.isStale if !isStale{ VStack { Text("\(context.attributes.name) \(context.state.emoji)") .activityBackgroundTint(Color.cyan) .activitySystemActionForegroundColor(Color.black) } } else { //If the message is stale, we request the user clicks the widget to open the app VStack { Text("Something went wrong, please click to refresh") } } // ... Rest of the widget UI } }}
Apple은 높은 우선 순위(priority: 10) 업데이트에 대한 고정된 제한을 제공하지 않지만 동적 시스템 수준 예산을 시행합니다. 짧은 기간 동안 너무 많은 높은 우선 순위 업데이트를 보내면 업데이트가 지연되거나 삭제되는 조절이 발생할 수 있습니다.조절 위험을 줄이려면:
우선 순위 수준을 혼합하여 사용합니다: Apple은 균형을 위해 priority: 5(표준) 및 priority: 10(높음)을 모두 사용할 것을 권장합니다.
priority: 10은 시간에 민감하거나 중요한 업데이트(예: 주문 상태 변경, 게임 점수)에만 예약합니다.
사용 사례에 빈번한 업데이트가 필요한 경우:
앱의 Info.plist 파일에 NSSupportsLiveActivitiesFrequentUpdates 키를 Boolean YES로 설정하여 추가합니다.
이 예산이 초과되면 iOS가 사용자에게 추가 업데이트를 허용하라는 메시지를 표시할 수 있습니다. 사용자가 동의하면 Apple이 자동으로 허용된 업데이트 제한을 확장하여 원활한 경험을 유지합니다.
Task { for await content in activity.contentUpdates { print("LA activity id: \(activity.id), content update: \(content.state)") }}// Example output:// LA activity id: EFE6D54D-F7E1-45EF-9514-4C2598F8DED2, content update: ContentState(message: "My message from payload")
수명 주기 변경 사항을 추적합니다:
Task { for await state in activity.activityStateUpdates { print("LA state update: \(state)") //If you wanted to do something based on the state, you would use this: if state != ActivityState.active { //Do something here } }}// Example output 1 - LA ended, but still visible// LA state update: active/* State can be equal to 4 possible values on the ActivityState enumactive, dismissed, ended, and stale*/
애플리케이션이 이미 일련의 푸시 알림을 보낼 수 있으며, 설계된 Live Activity가 이러한 푸시 알림의 필요성을 대체합니다. 예를 들어 푸시를 통해 점수 업데이트를 보내는 경우 Live Activity를 통해 이를 대체할 수 있습니다.사용자가 너무 많은 메시지를 받지 않도록 하려면 사용자가 Live Activity를 선택할 때 데이터 태그를 추가하는 것이 좋습니다. 이 데이터 태그를 추가하면 동일하거나 유사한 콘텐츠를 포함할 수 있는 푸시 메시지에서 이 데이터 태그가 있는 사용자를 제외할 수 있습니다. 데이터 태그 및 세그먼트에 대해 자세히 알아보세요.
요청이 올바르게 형식화되었는지 확인합니다. 위젯에서 사용되는 필드가 생략되면 활동이 예상대로 실행되거나 업데이트되지 않을 수 있습니다.
API 요청에서 설정하는 priority 수준을 결정합니다. 이를 10(최고 우선 순위)으로 설정하는 경우 5로 낮추고 다시 테스트하세요. Apple은 자체 내부 속도 제한에 따라 너무 자주 전송되는 요청을 조절합니다.
사용 사례가 더 자주 업데이트에 의존하는 경우 Apple의 개발자 문서에 따라 Info.plist에 NSSupportsLiveActivitiesFrequentUpdates 키를 Boolean 유형으로 YES로 설정하여 추가합니다. Live Activity가 푸시 예산을 초과하면 사용자에게 대화 상자가 표시되며, Live Activity를 계속 허용하면 원활한 사용자 경험을 위해 예산이 자동으로 증가합니다.
도움이 필요하신가요?지원 팀과 채팅하거나 support@onesignal.com으로 이메일을 보내주세요.다음을 포함해 주세요: