

개요
iOS 푸시 알림은 iOS 앱에서 지속적인 사용자 참여와 유지율을 높이는 데 필수적입니다. 실시간 업데이트, 리마인더 및 개인화된 메시지를 사용자에게 직접 전달하여 앱의 전반적인 사용자 경험과 고착도를 향상시킬 수 있습니다. OneSignal의 SDK를 앱과 통합하면 Apple Push Notification Service(APNS)를 활용하여 iOS 기기 전반에 걸쳐 알림이 원활하게 전달되도록 할 수 있습니다. 이 가이드는 iOS 앱에 SDK를 통합하는 과정을 안내합니다.요구 사항
- Xcode 14+가 설치된 macOS(설정 지침은 Xcode 16.2 사용)
- iOS 12+, iPadOS 12+ 또는 iOS 16.2+를 실행하는 Xcode 시뮬레이터가 있는 기기
- 구성된 OneSignal 앱 및 플랫폼
配置您的 OneSignal 应用和平台
使用您支持的平台配置您的 OneSignal 应用——Apple (APNs)、Google (FCM)、华为 (HMS) 和/或 Amazon (ADM)。分步设置说明
分步设置说明
创建或选择您的应用
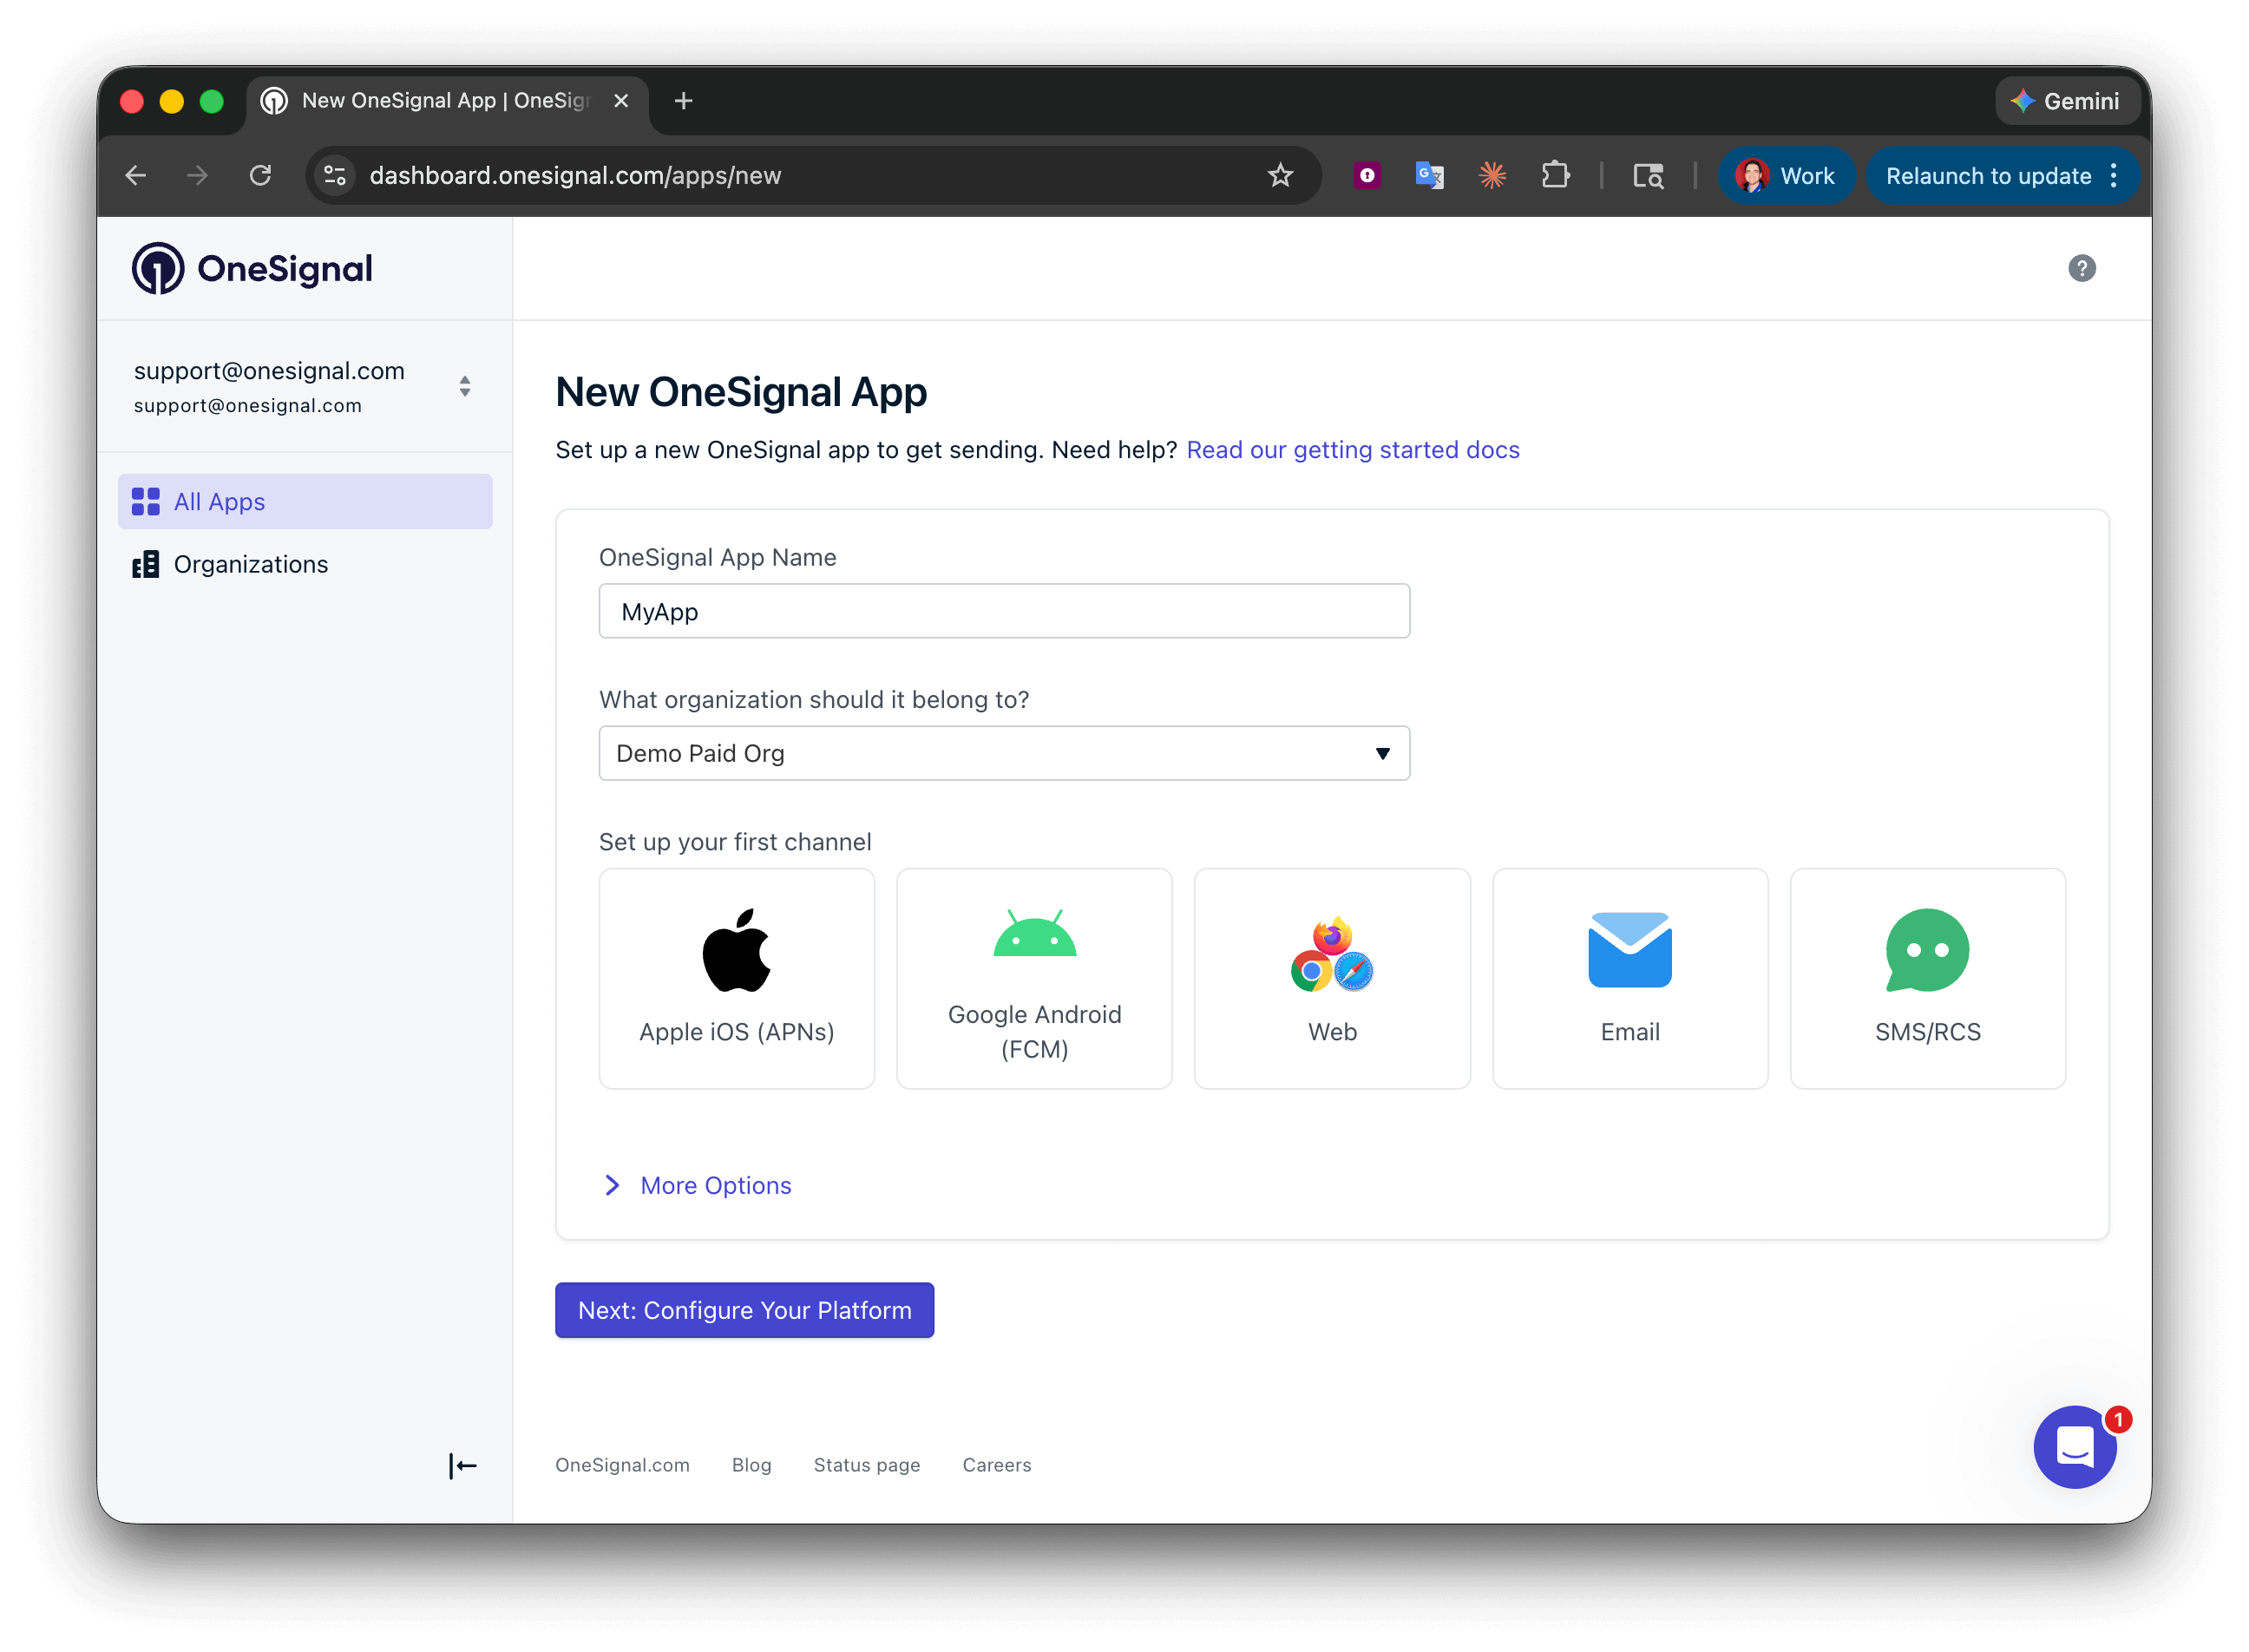
设置您的第一个 OneSignal 应用、组织和频道。
配置平台凭据
- Android:设置 Firebase 凭据
- iOS:p8 令牌(推荐) 或 p12 证书
- Amazon:生成 API 密钥
- 华为:授权 OneSignal
保存您的应用 ID 并安装 SDK
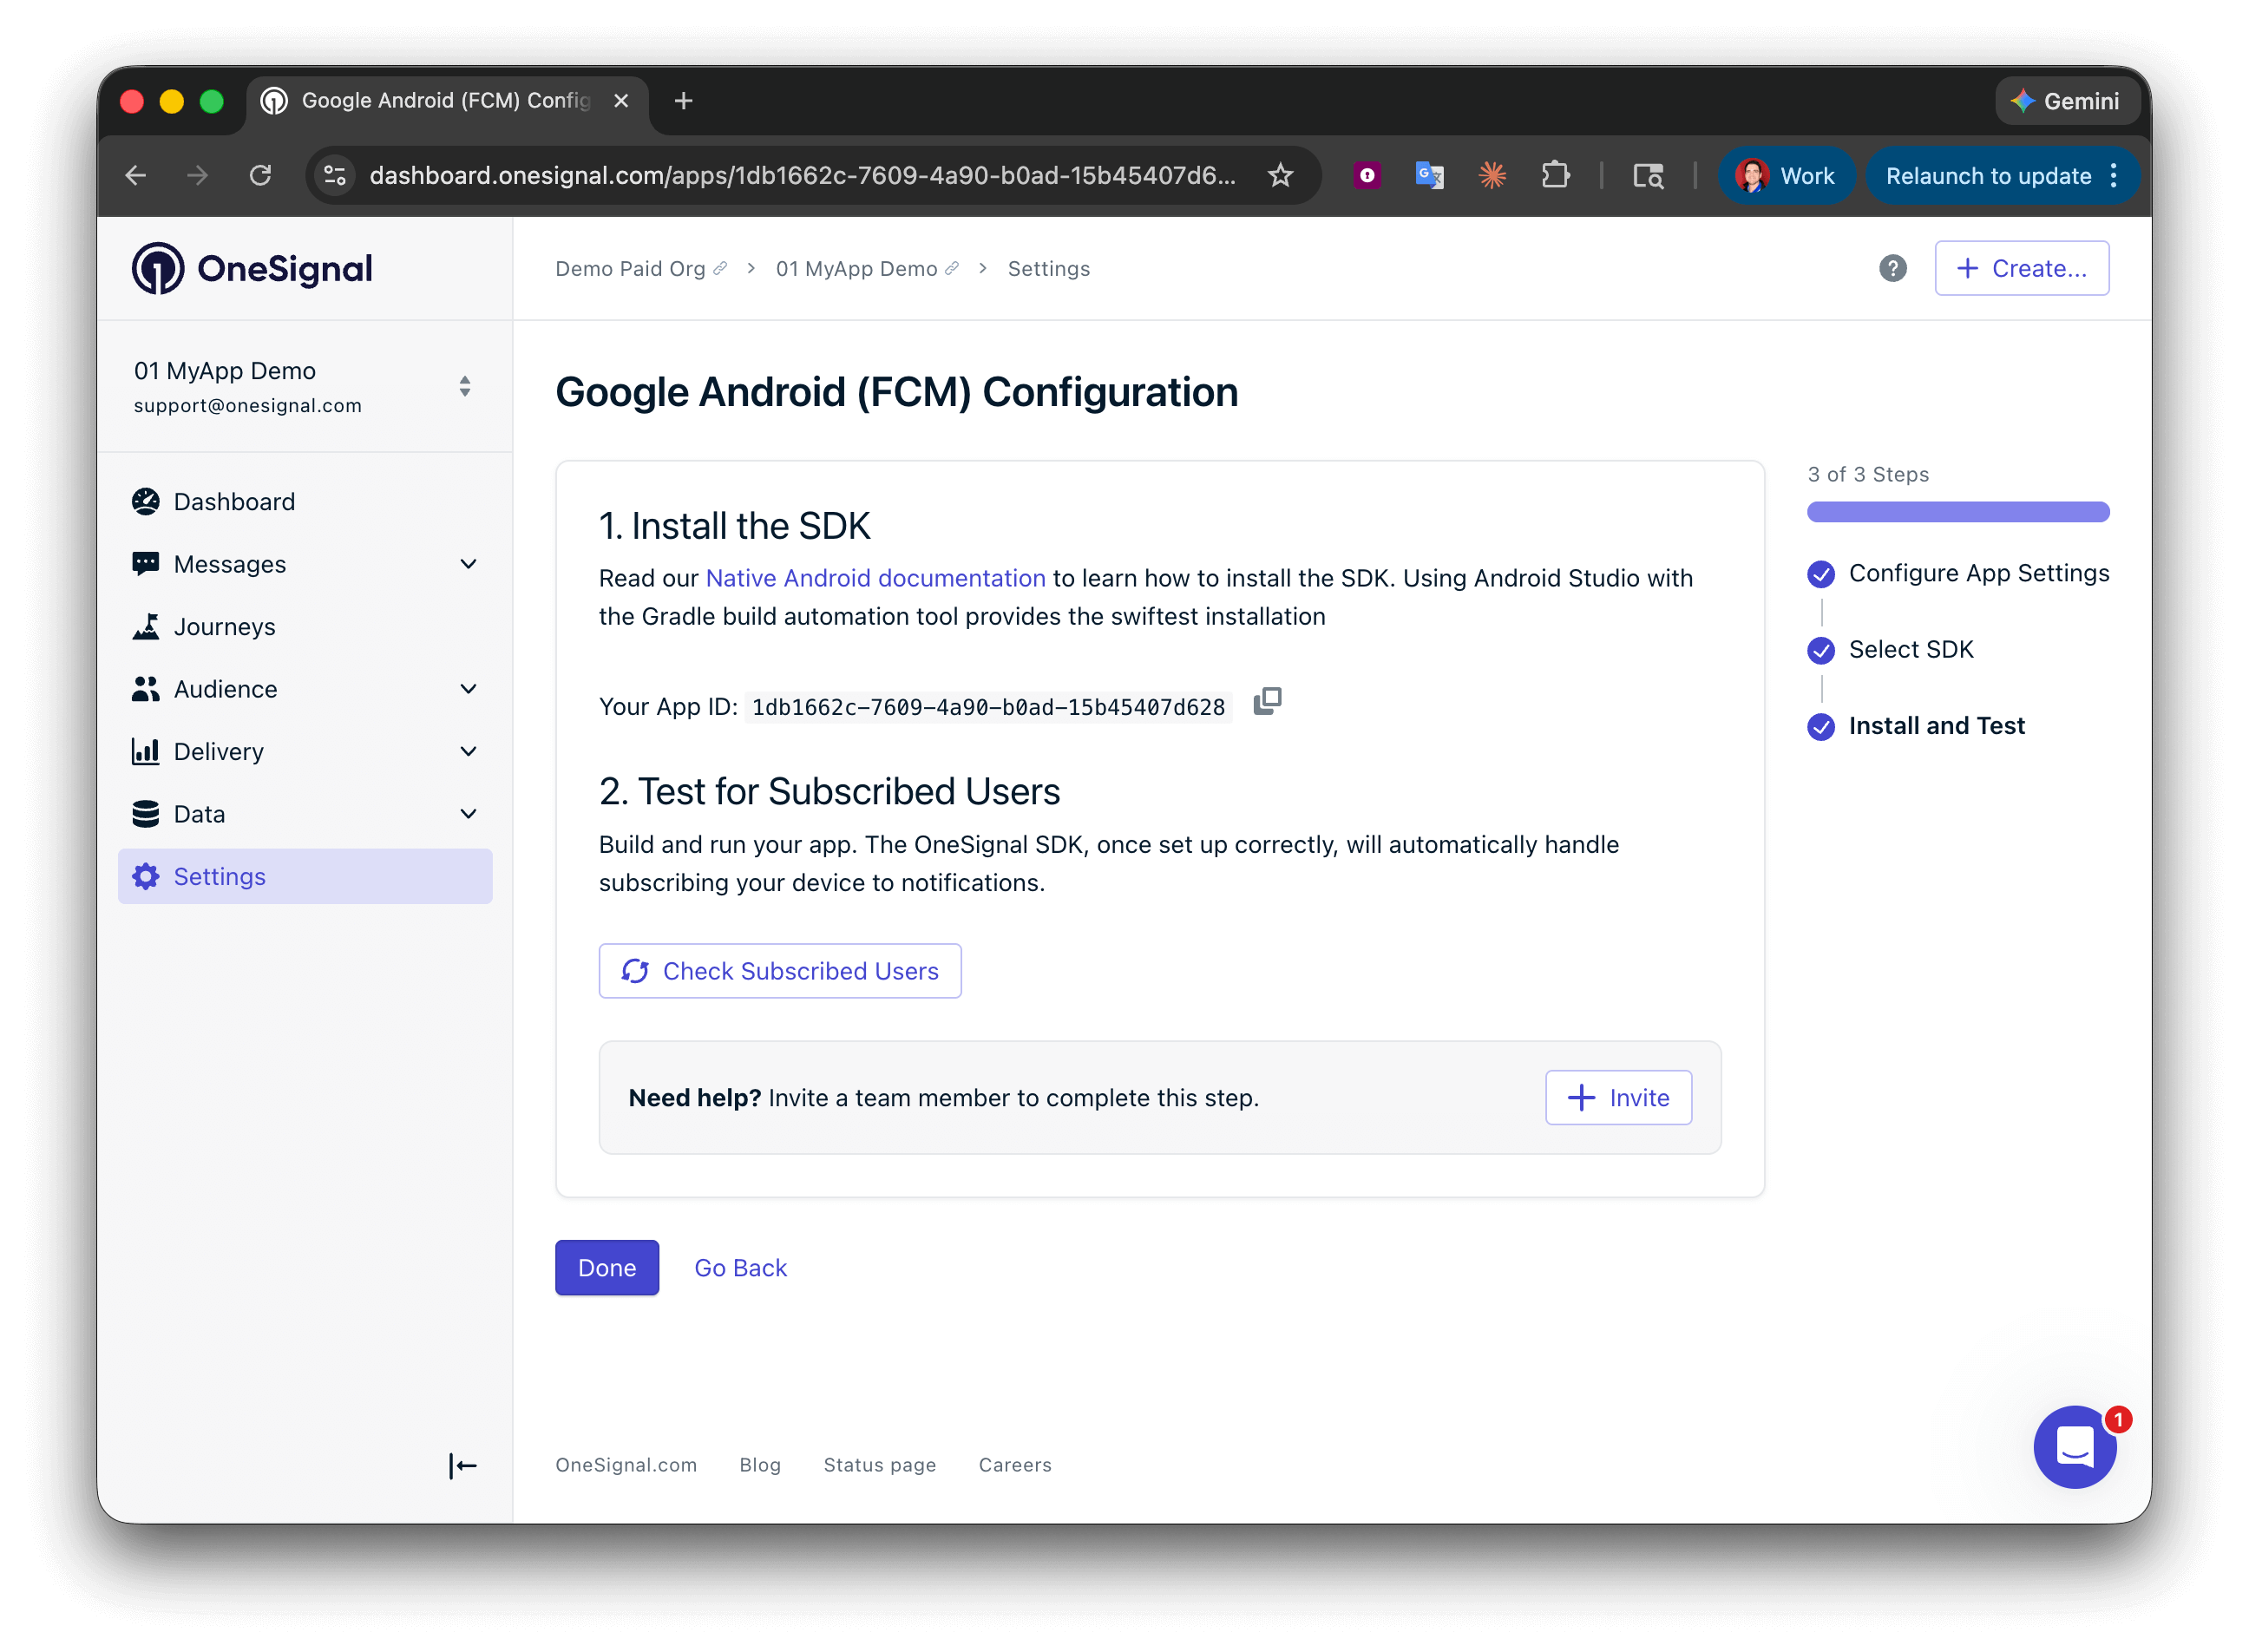
保存您的应用 ID 并邀请其他团队成员。
iOS 설정
배지, 확인된 전달 및 이미지 지원을 포함하여 iOS 앱에 푸시 알림을 추가하려면 다음 단계를 따르세요.1. 앱 타겟에 Push Notifications 기능 추가
Push Notifications 기능을 사용하면 앱이 푸시 토큰을 등록하고 알림을 받을 수 있습니다.- Xcode에서 앱의
.xcworkspace파일을 여세요. - 앱 타겟 > Signing & Capabilities를 선택하세요
- + Capability를 클릭하고 Push Notifications 기능을 추가하세요
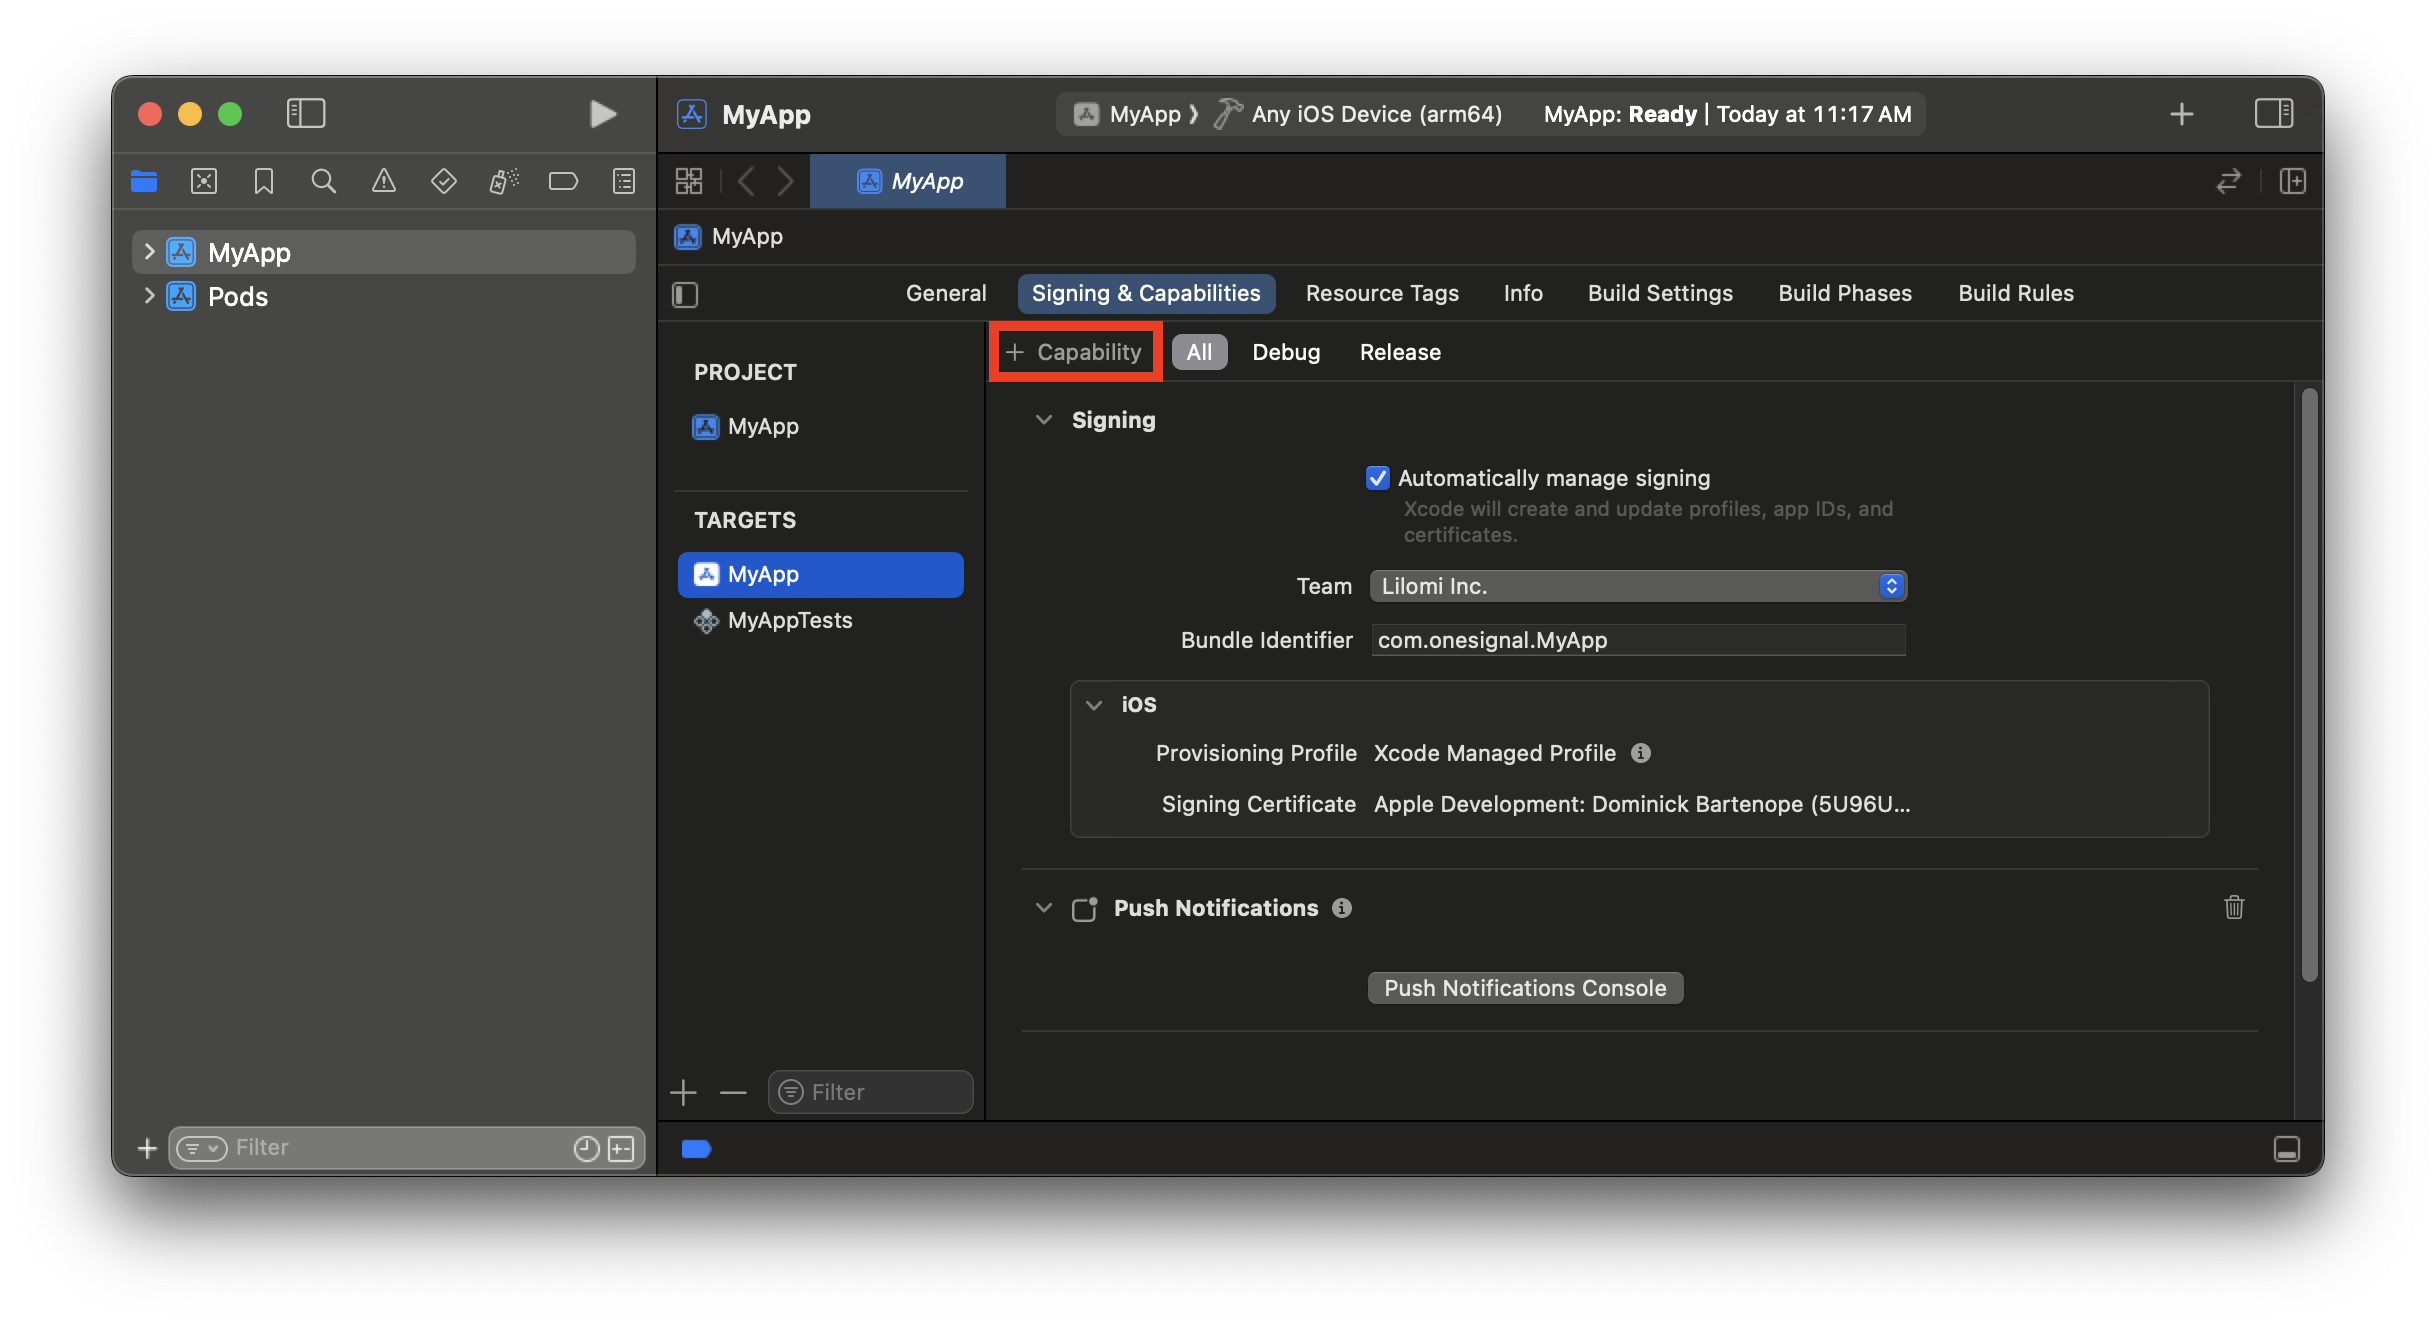
앱 타겟에 Push Notifications 기능이 부여됩니다.
2. 앱 타겟에 Background Modes 기능 추가
이를 통해 푸시 알림이 도착할 때 앱이 백그라운드에서 깨어날 수 있습니다.- Background Modes 기능을 추가하세요
- Remote notifications를 활성화하세요
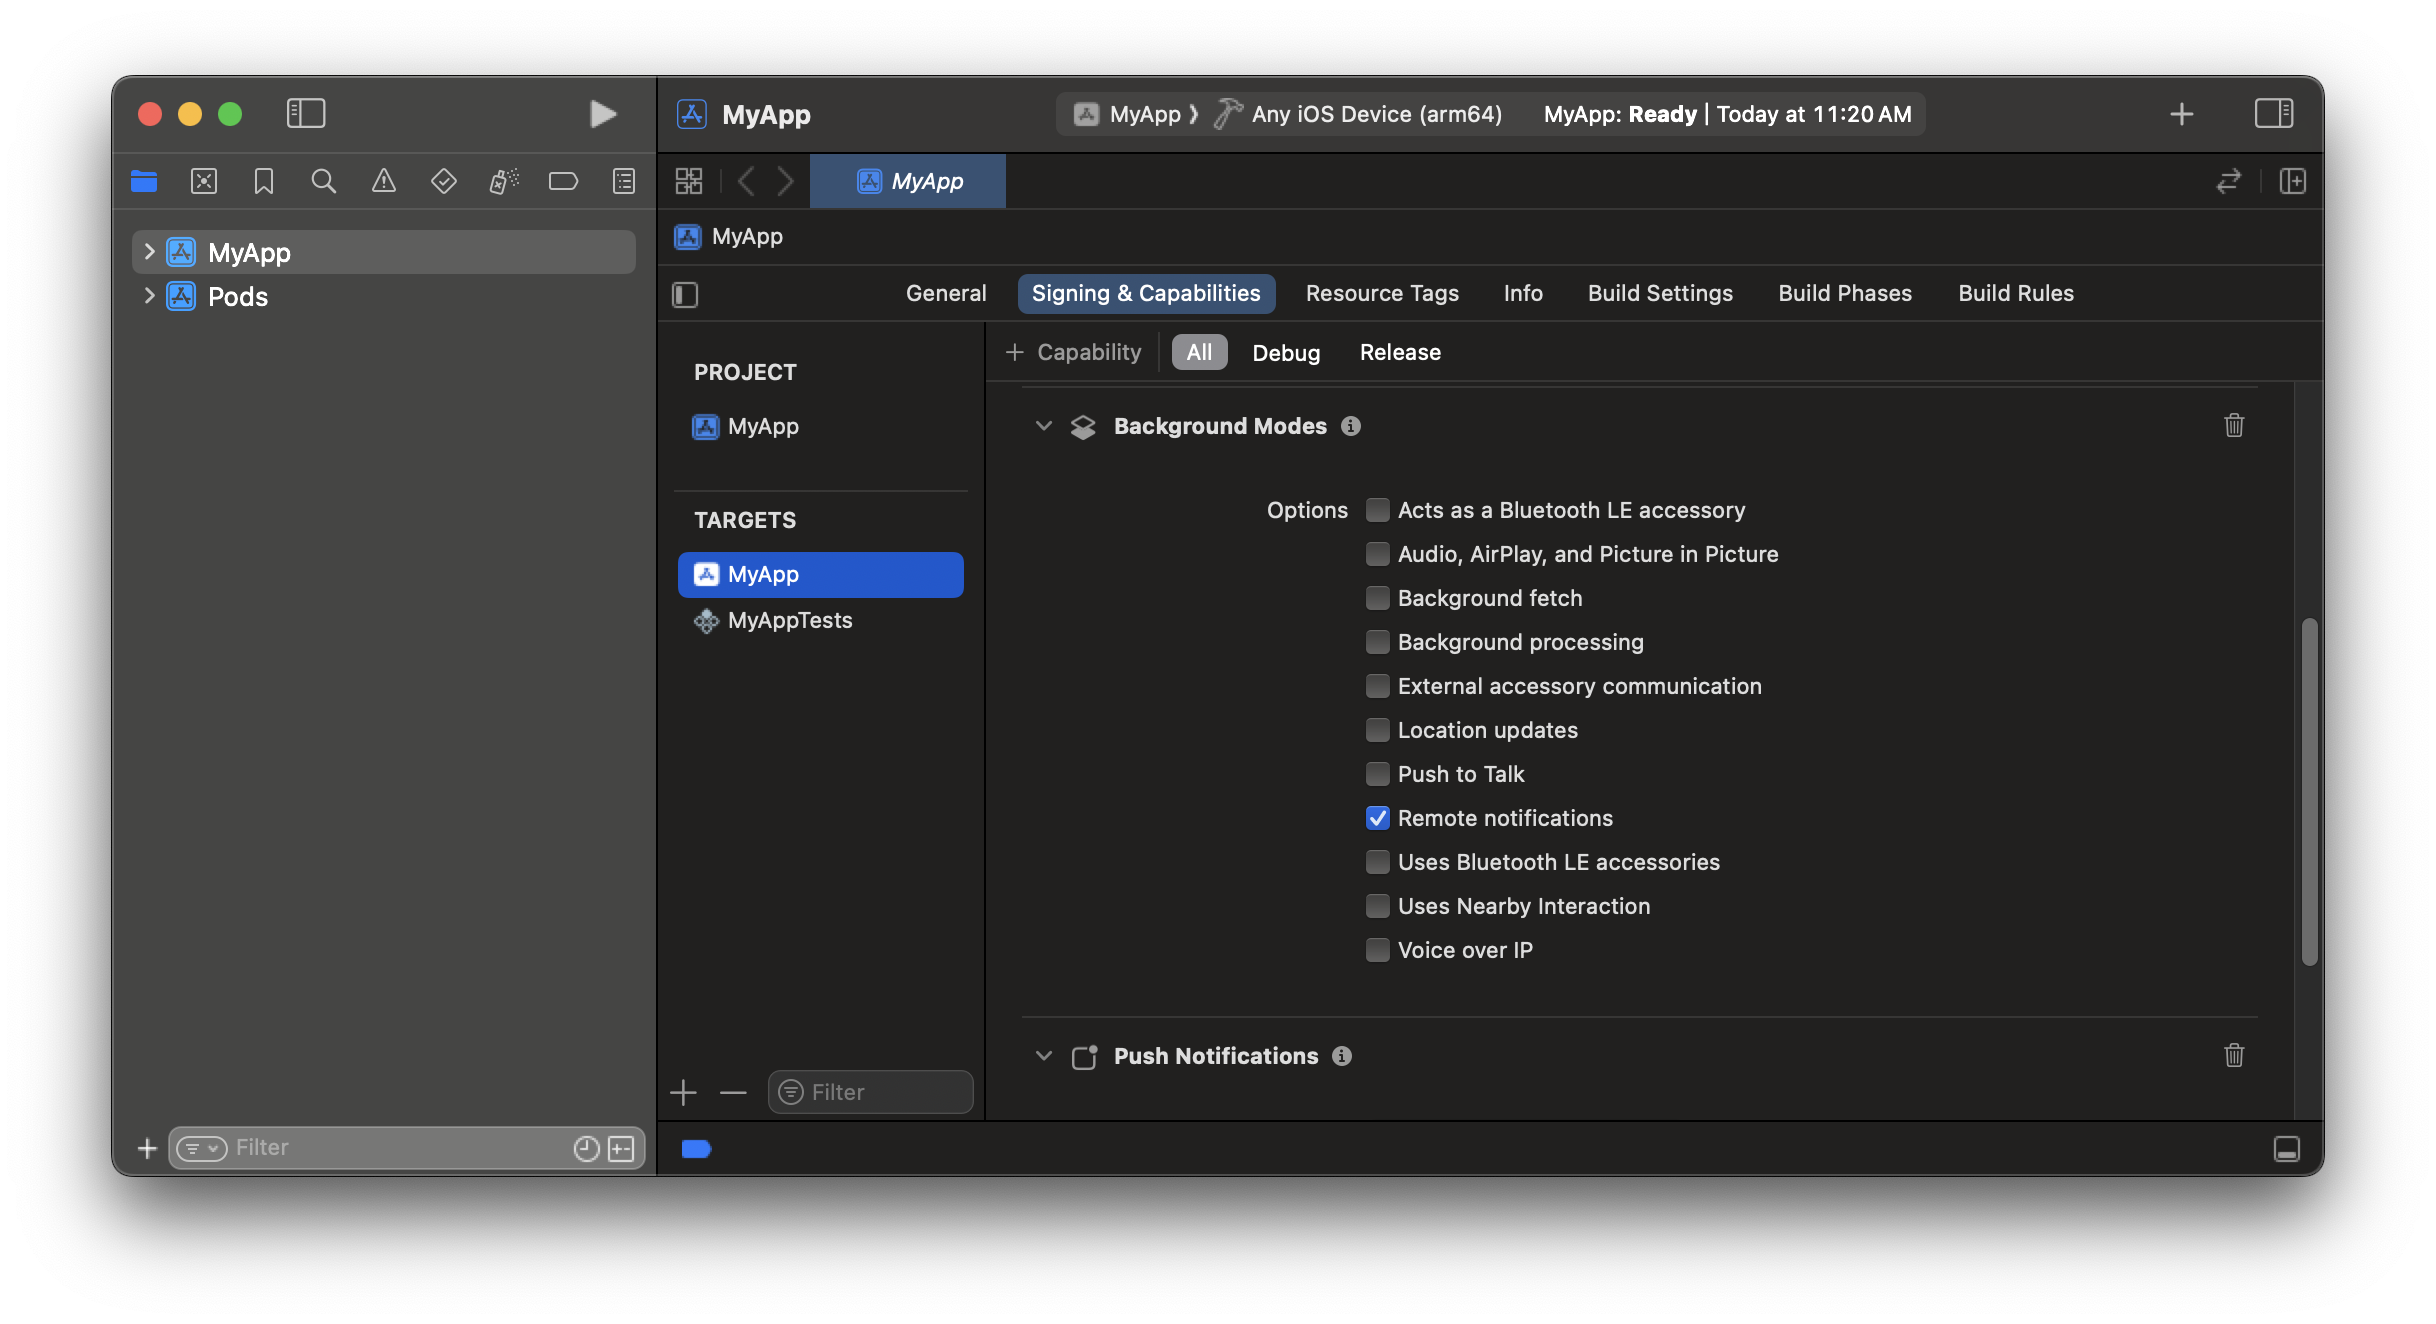
앱 타겟에 Remote Notifications 백그라운드 실행 모드가 부여됩니다.
3. App Group에 앱 타겟 추가
App Groups를 사용하면 앱과 Notification Service Extension 간에 데이터를 공유할 수 있습니다. 확인된 전달 및 배지에 필요합니다.- App Group이 구성되지 않은 경우
- App Group이 있는 경우
- App Groups 기능을 추가하세요
- App Groups 기능에서 **+**를 클릭하세요
- 다음 형식으로 새 컨테이너 ID를 추가하세요:
group.your_bundle_id.onesignal
- group. 및 .onesignal 접두사와 접미사를 유지하세요. **
your_bundle_id**를 앱의 번들 식별자로 바꾸세요. - 예를 들어, 번들 식별자
com.onesignal.MyApp는 컨테이너 이름group.com.onesignal.MyApp.onesignal을 갖습니다.
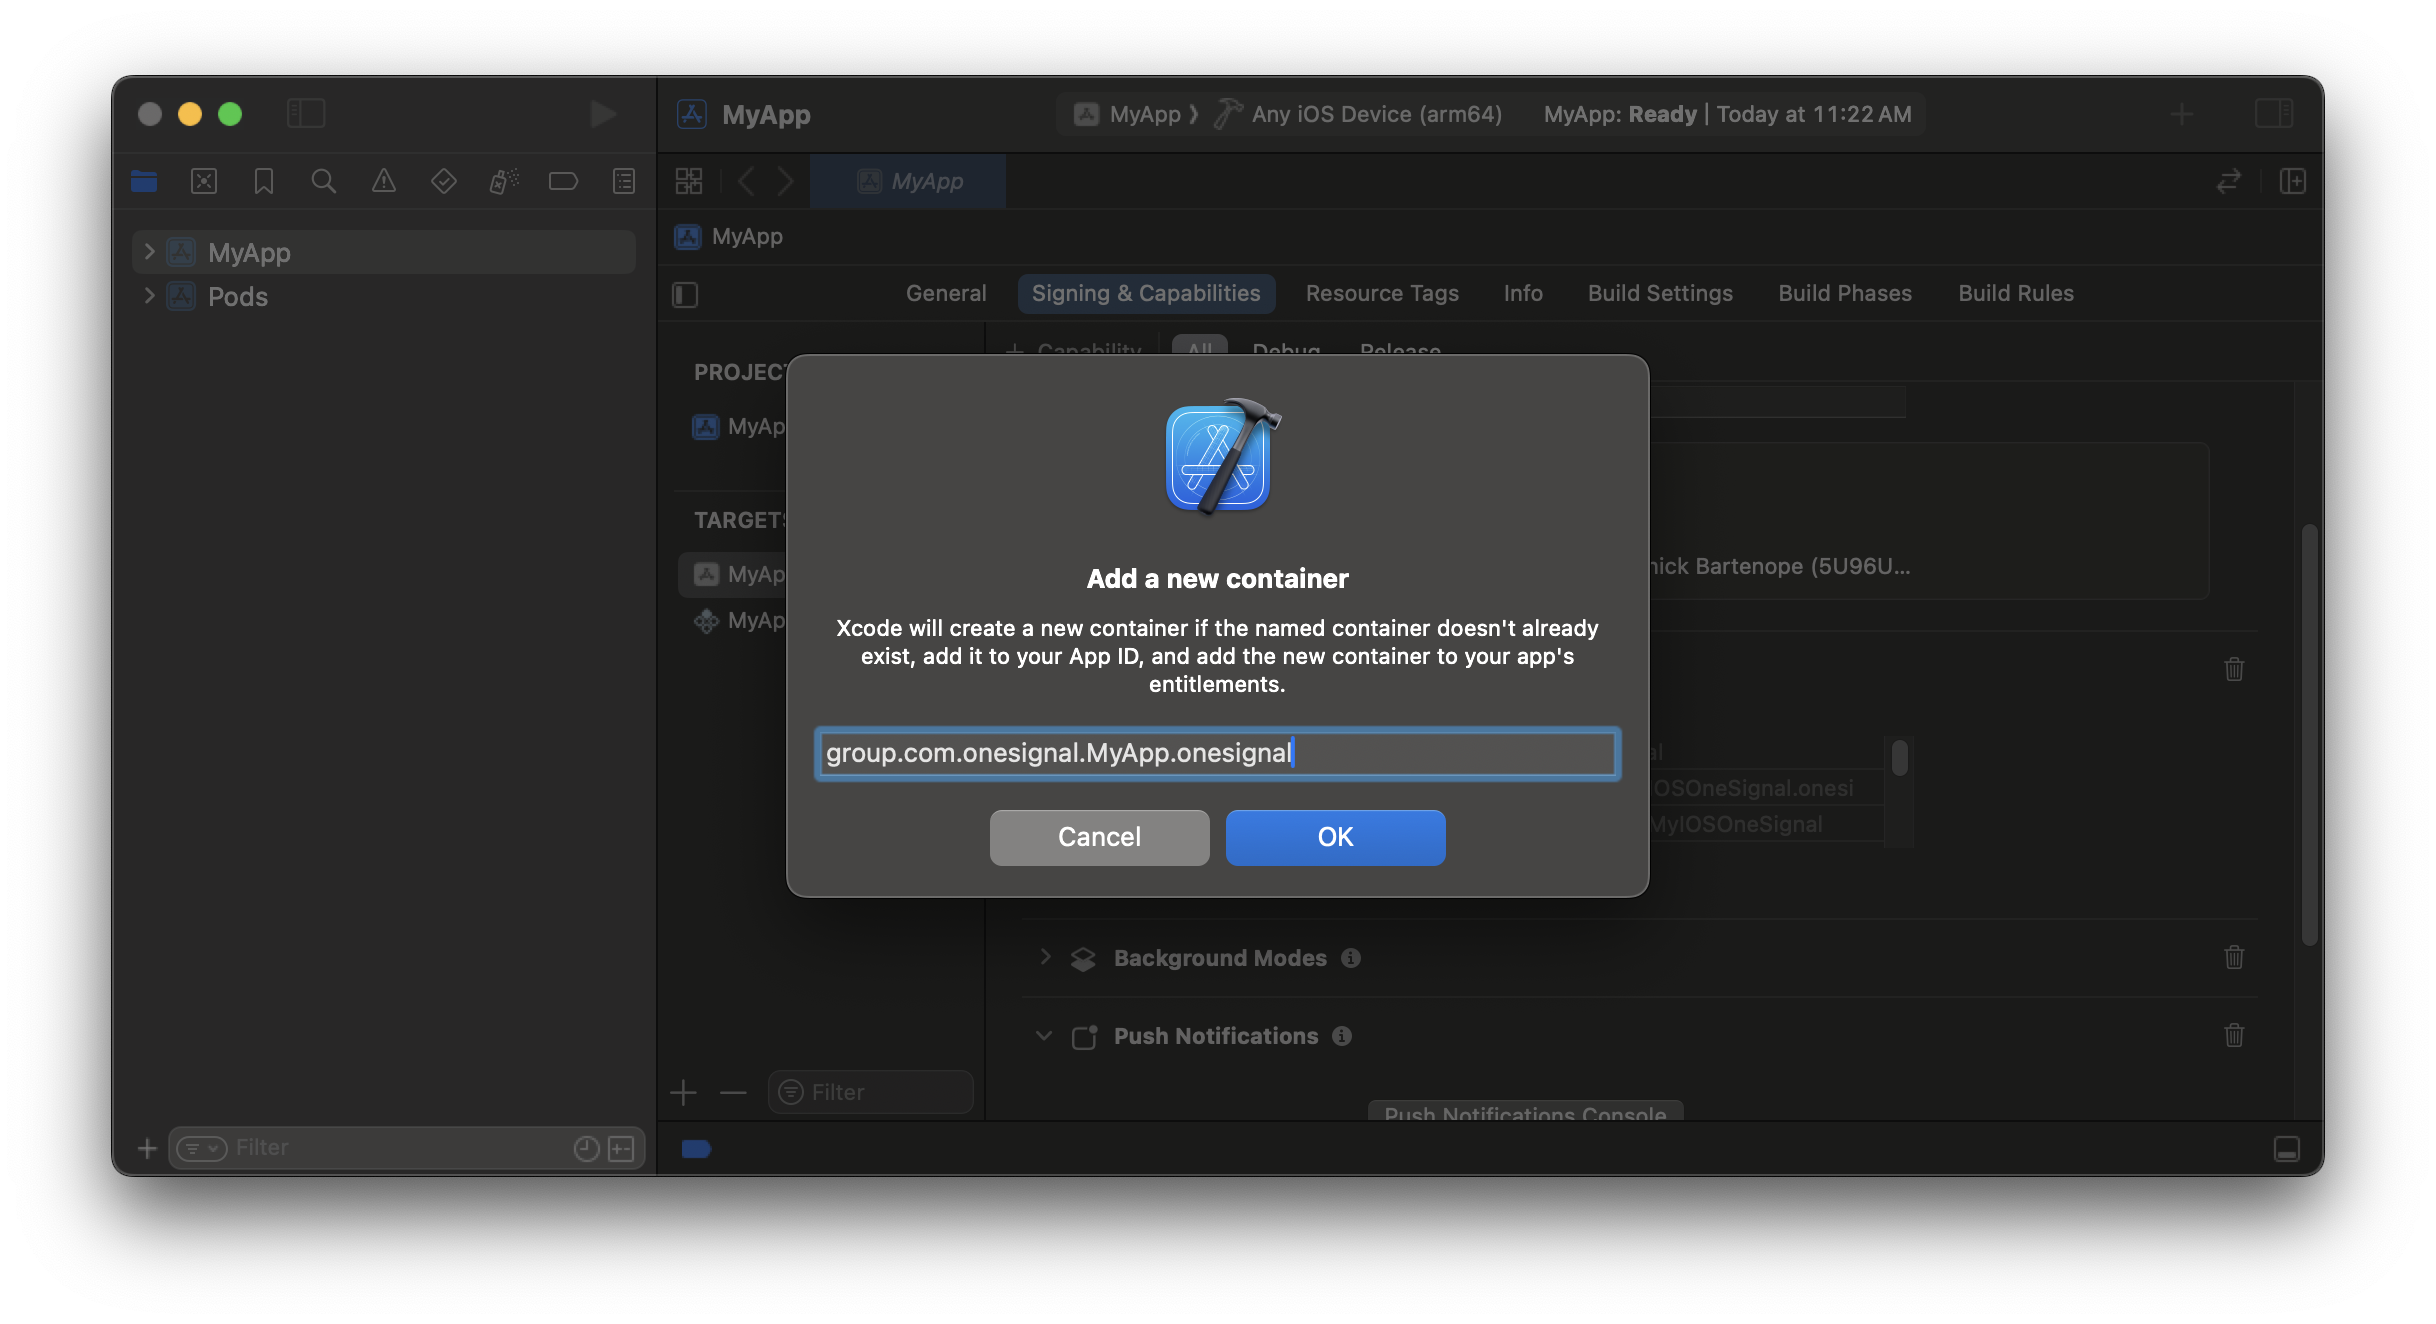
앱 타겟이 App Group의 일부입니다.
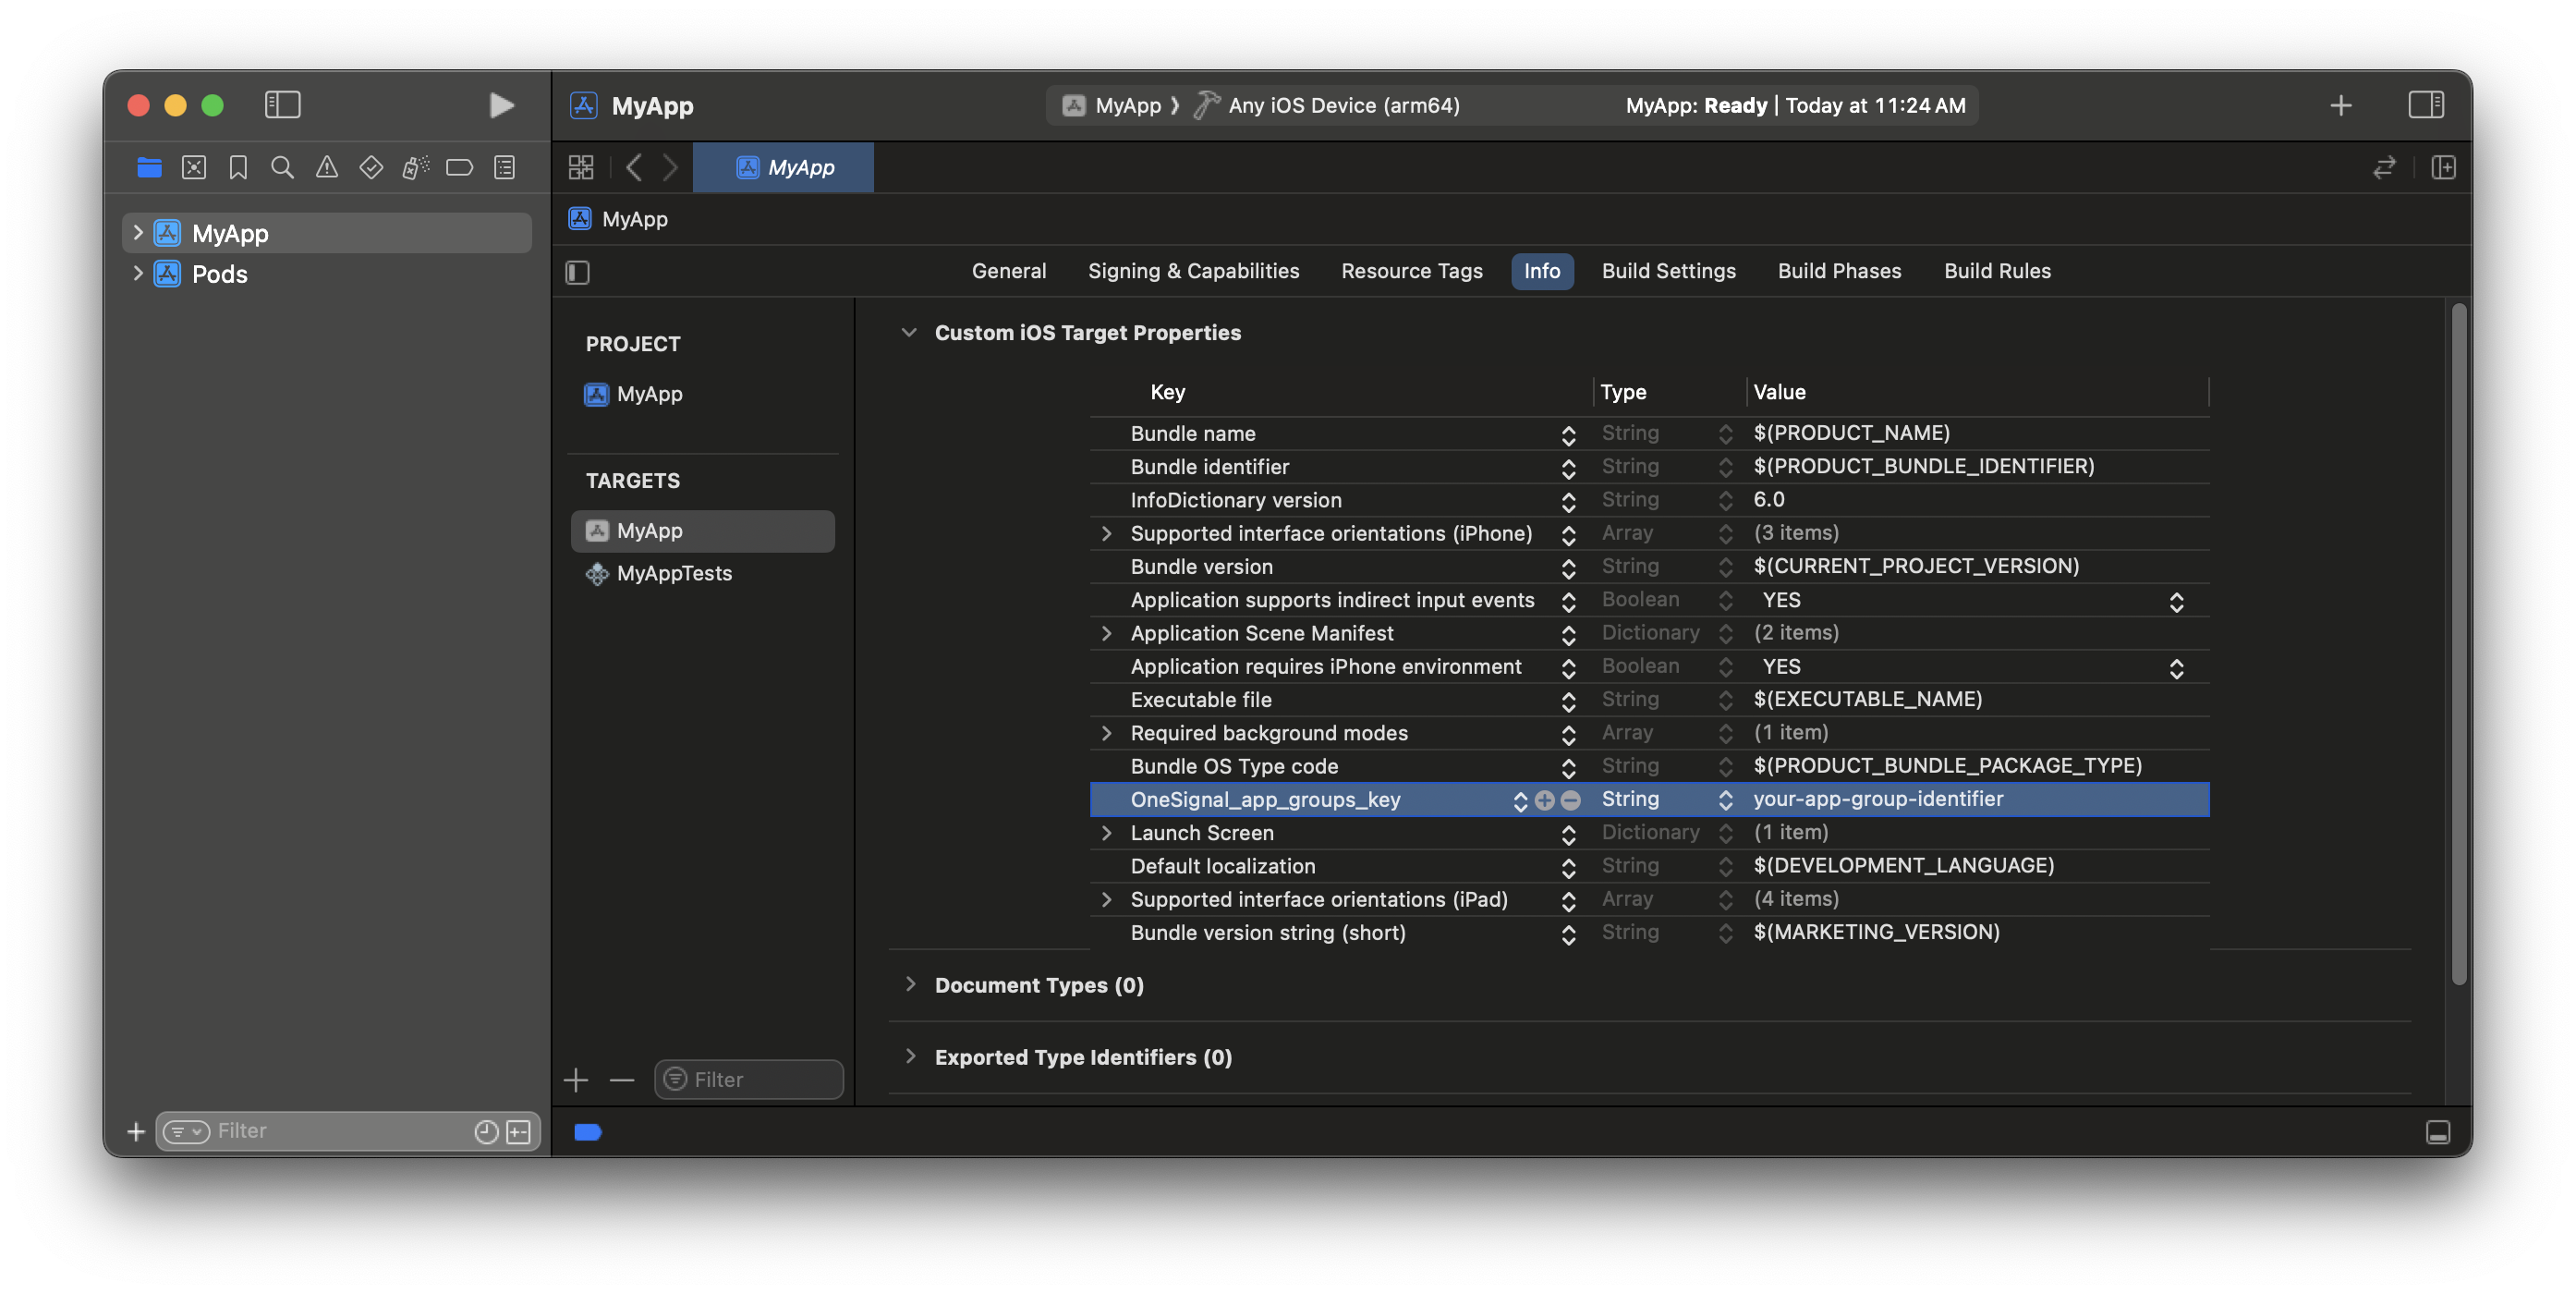
4. Notification Service Extension 추가
Notification Service Extension (NSE)은 리치 알림 및 확인된 전달 분석을 활성화합니다.- Xcode에서: File > New > Target…
- Notification Service Extension을 선택한 다음 Next를 클릭하세요.
- 제품 이름을
OneSignalNotificationServiceExtension으로 설정하고 Finish를 누르세요. - Activate scheme 프롬프트에서 Don’t Activate를 누르세요.
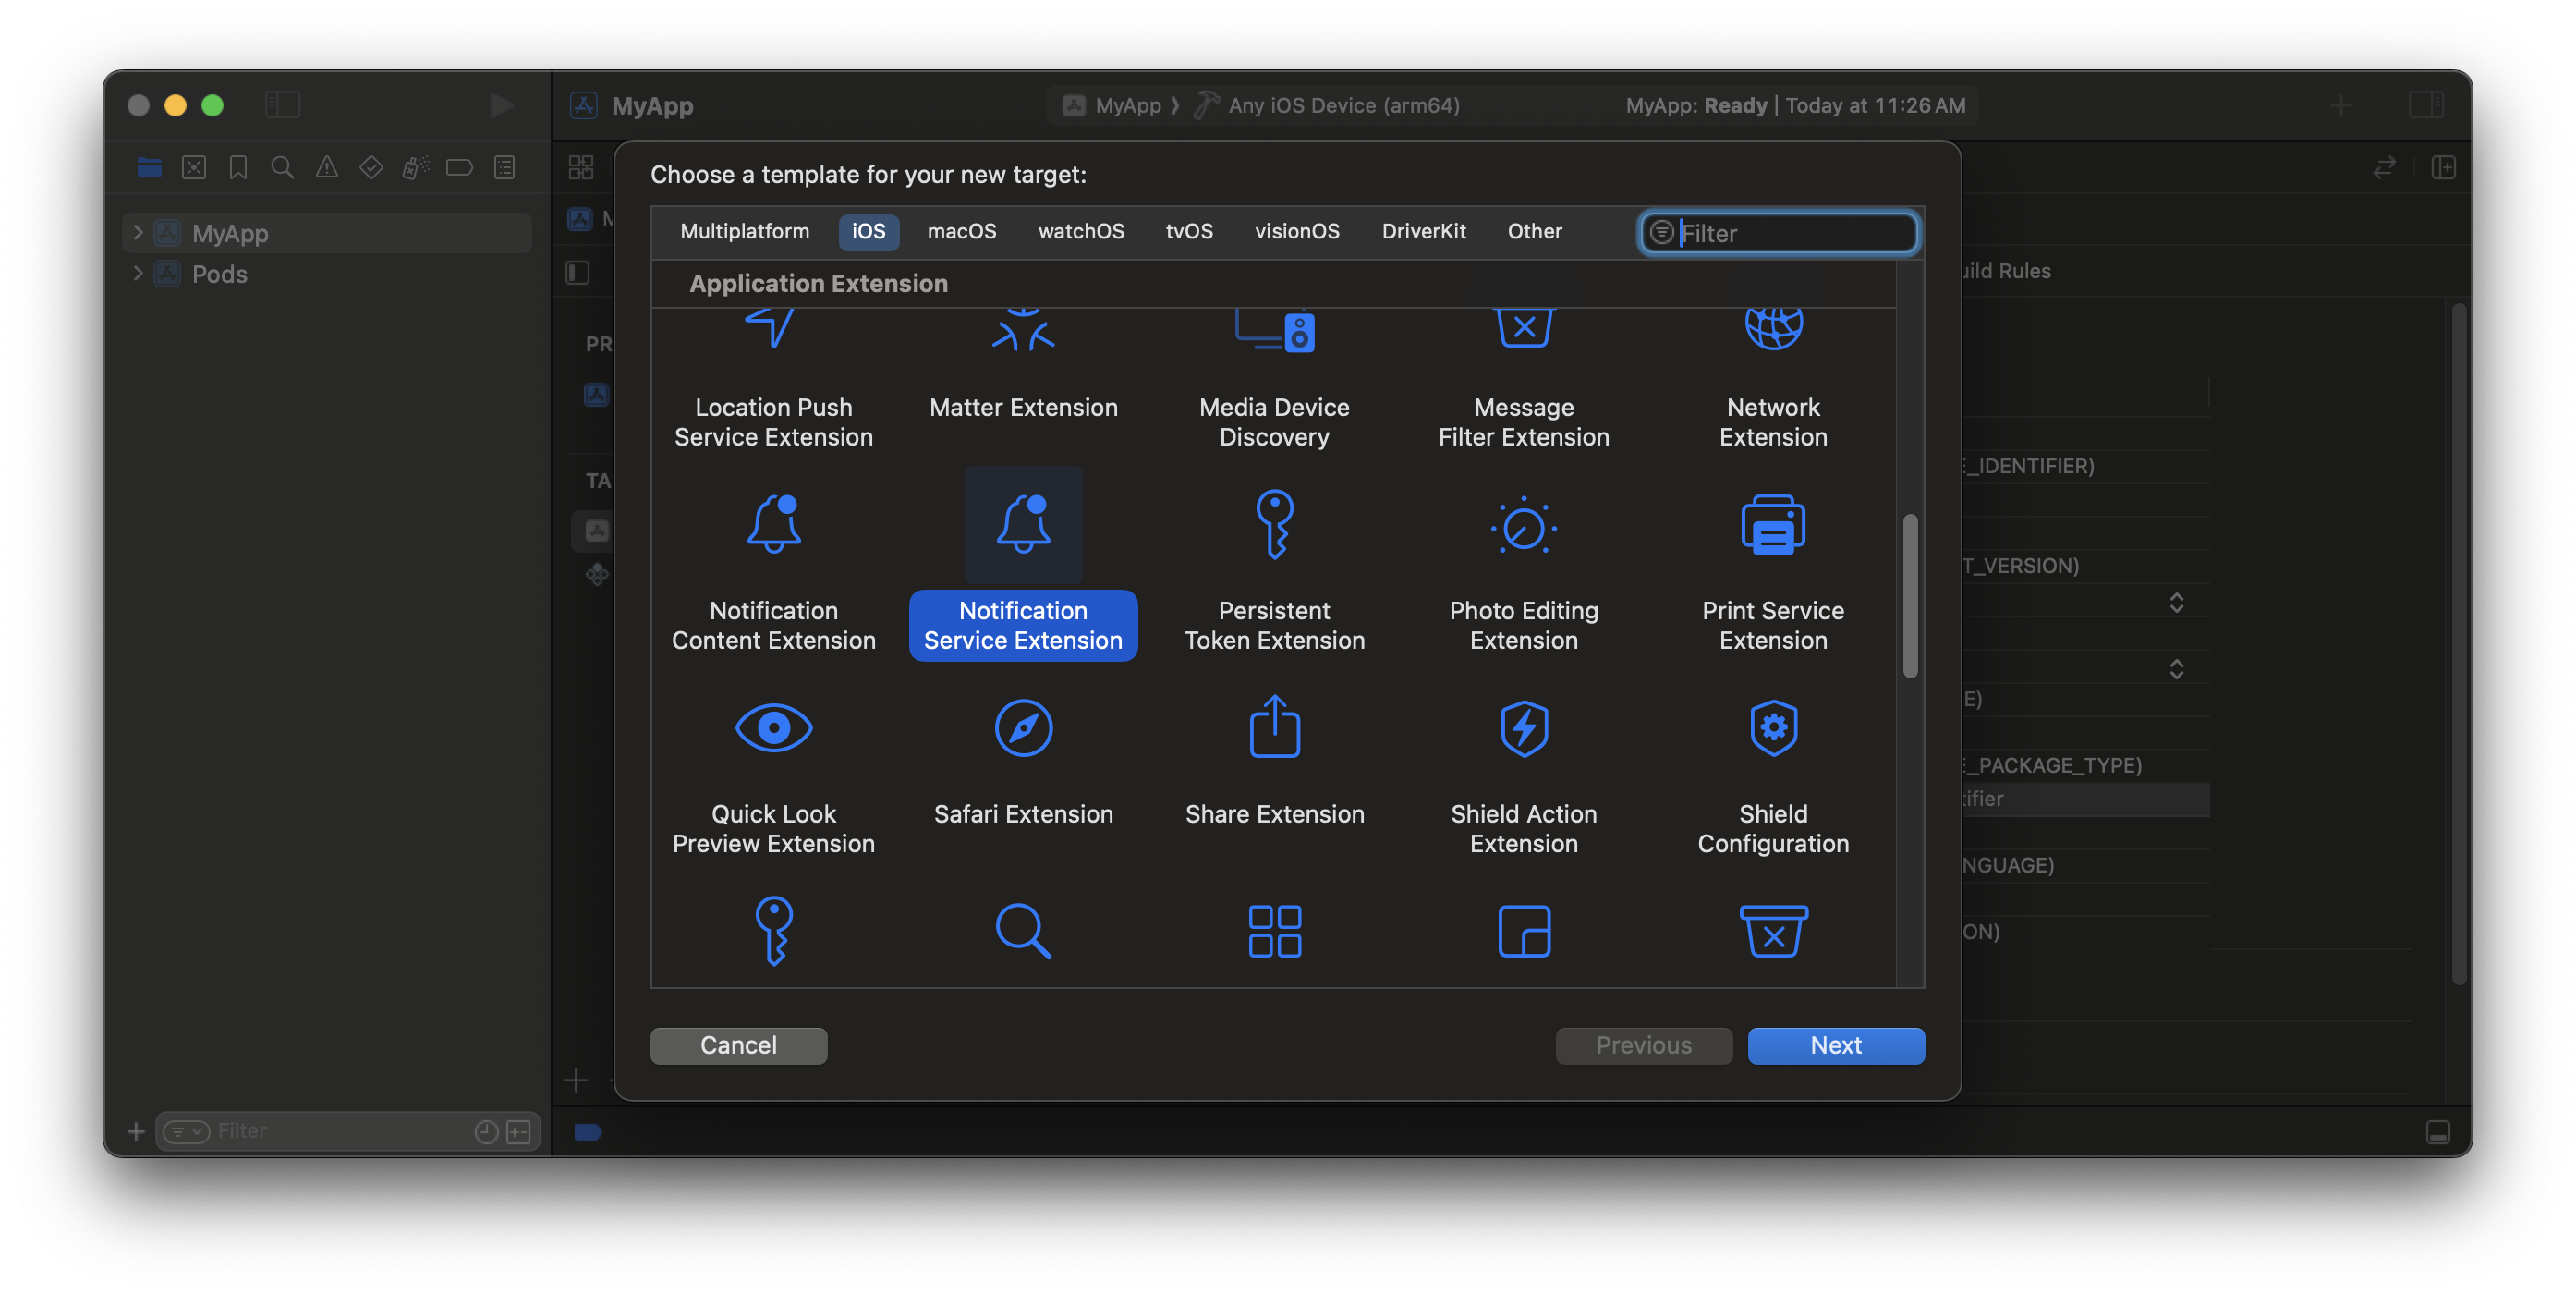
Notification Service Extension 타겟을 선택하세요.
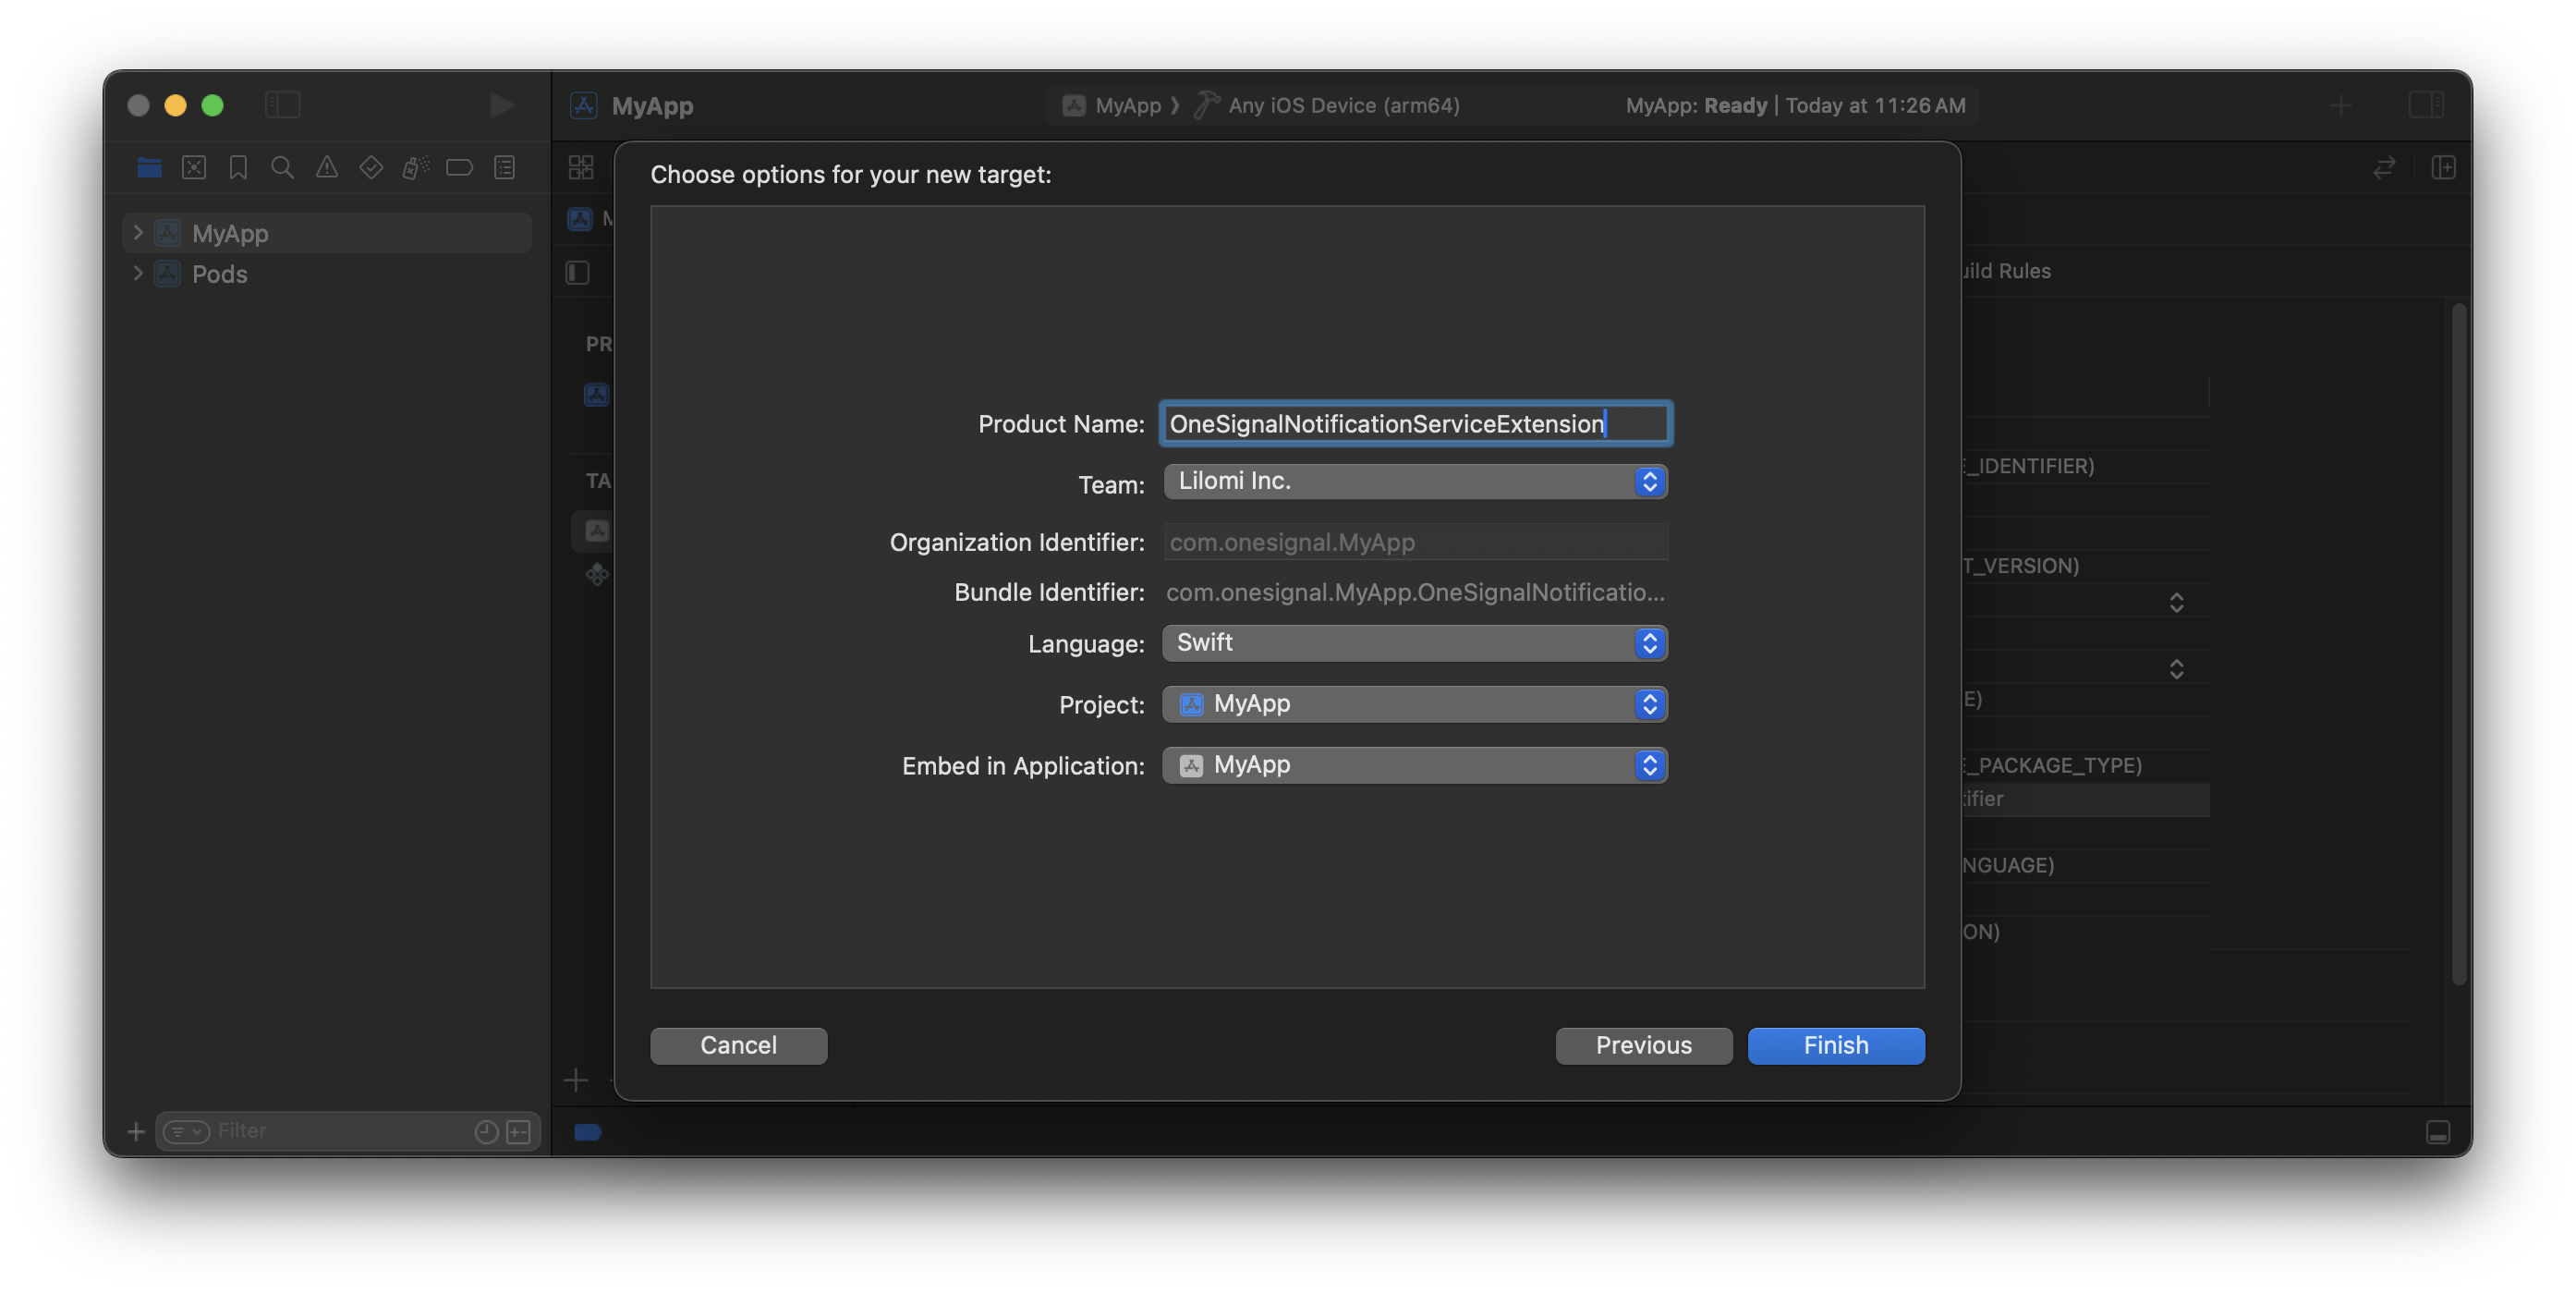
Notification Service Extension의 이름을 지정하세요.
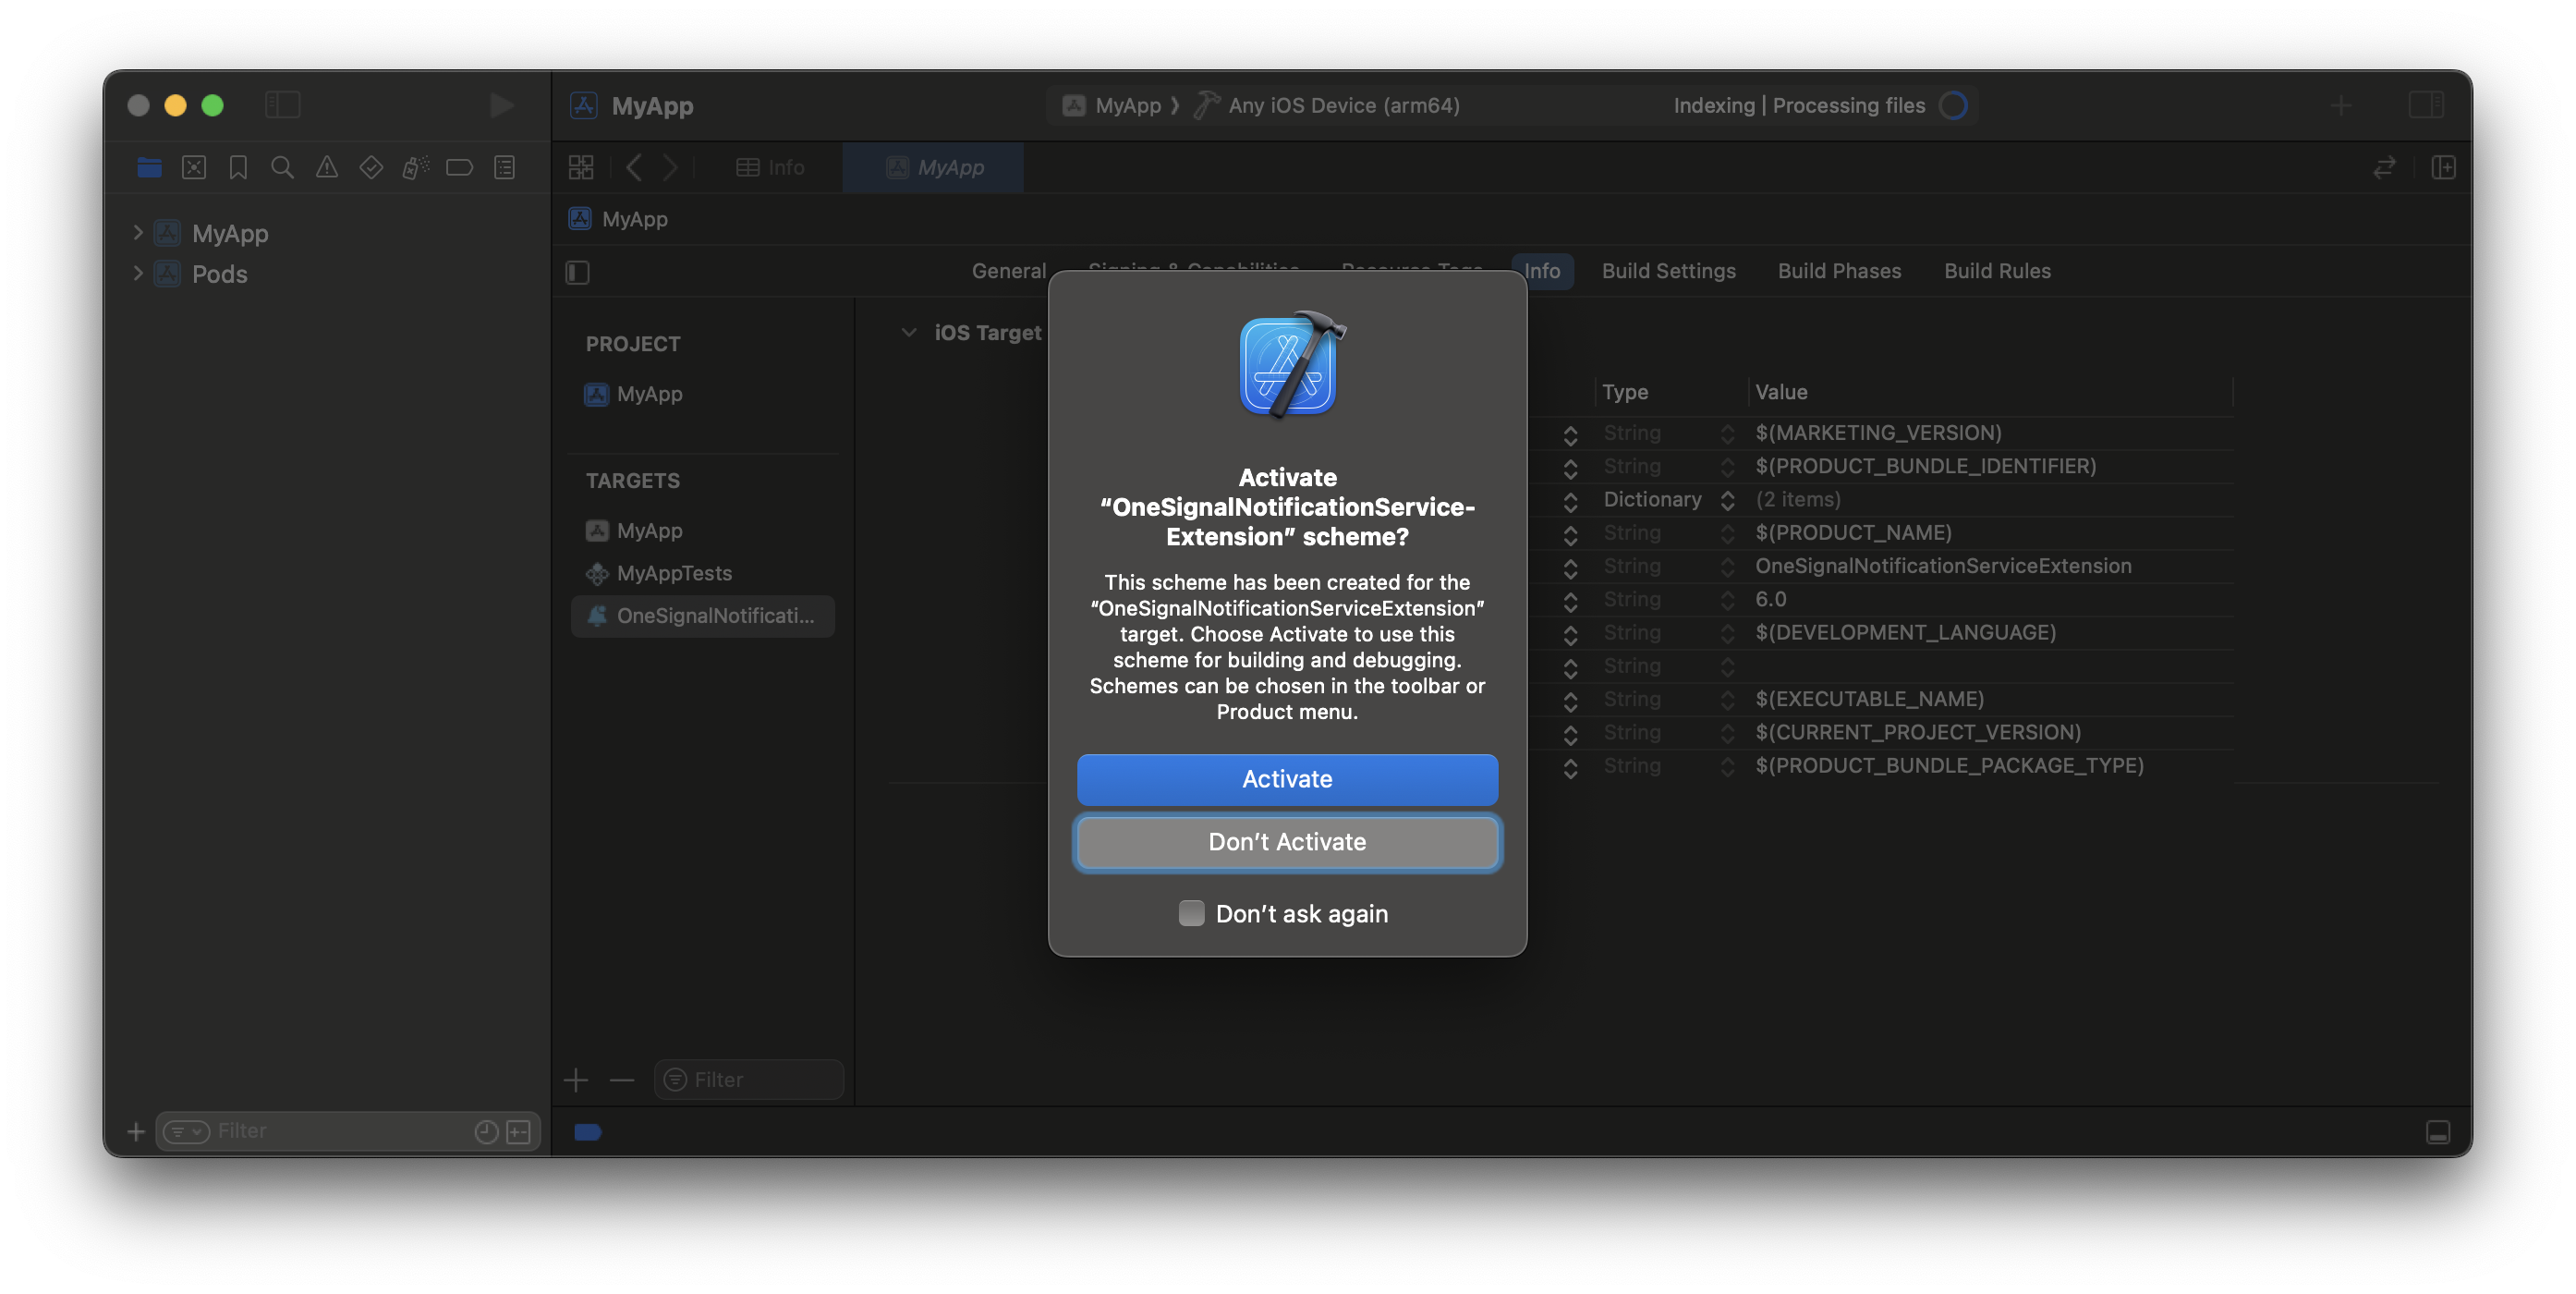
앱 타겟 디버깅을 계속하려면 활성화를 취소하세요.
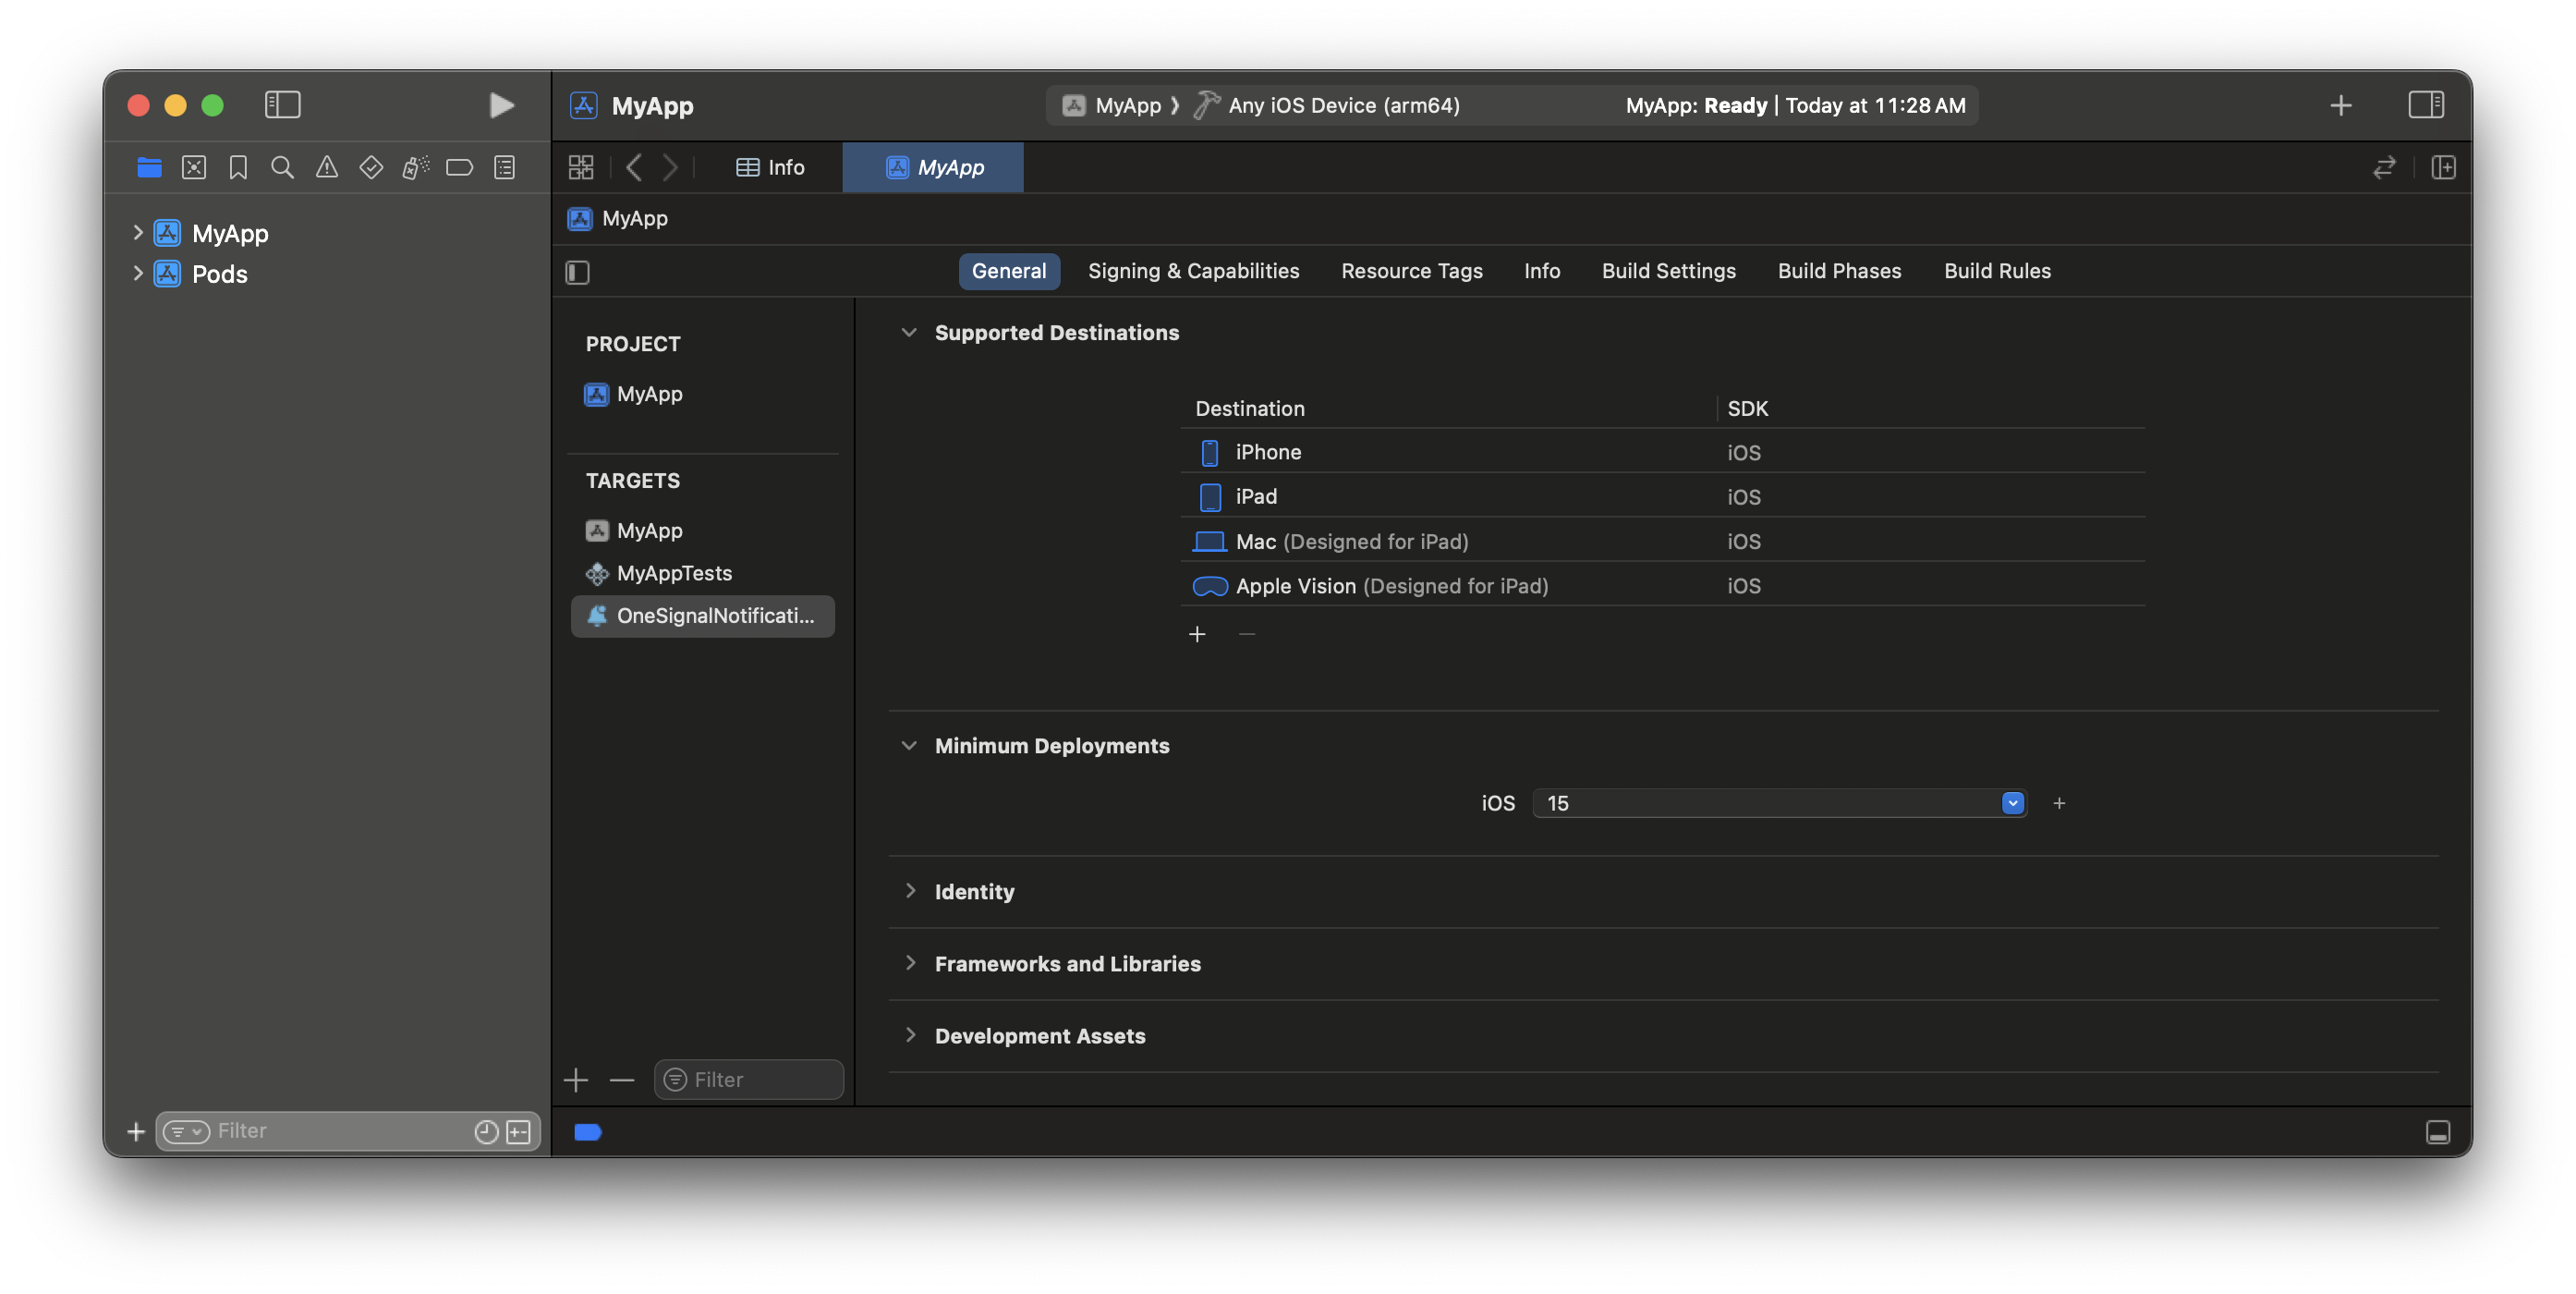
메인 앱과 동일한 배포 타겟을 설정하세요.
5. NSE 타겟을 앱 그룹에 추가
3단계에서 추가한 것과 동일한 App Group ID를 사용하세요.- OneSignalNotificationServiceExtension > Signing & Capabilities로 이동하세요
- App Groups를 추가하세요
- 정확히 동일한 그룹 ID를 추가하세요
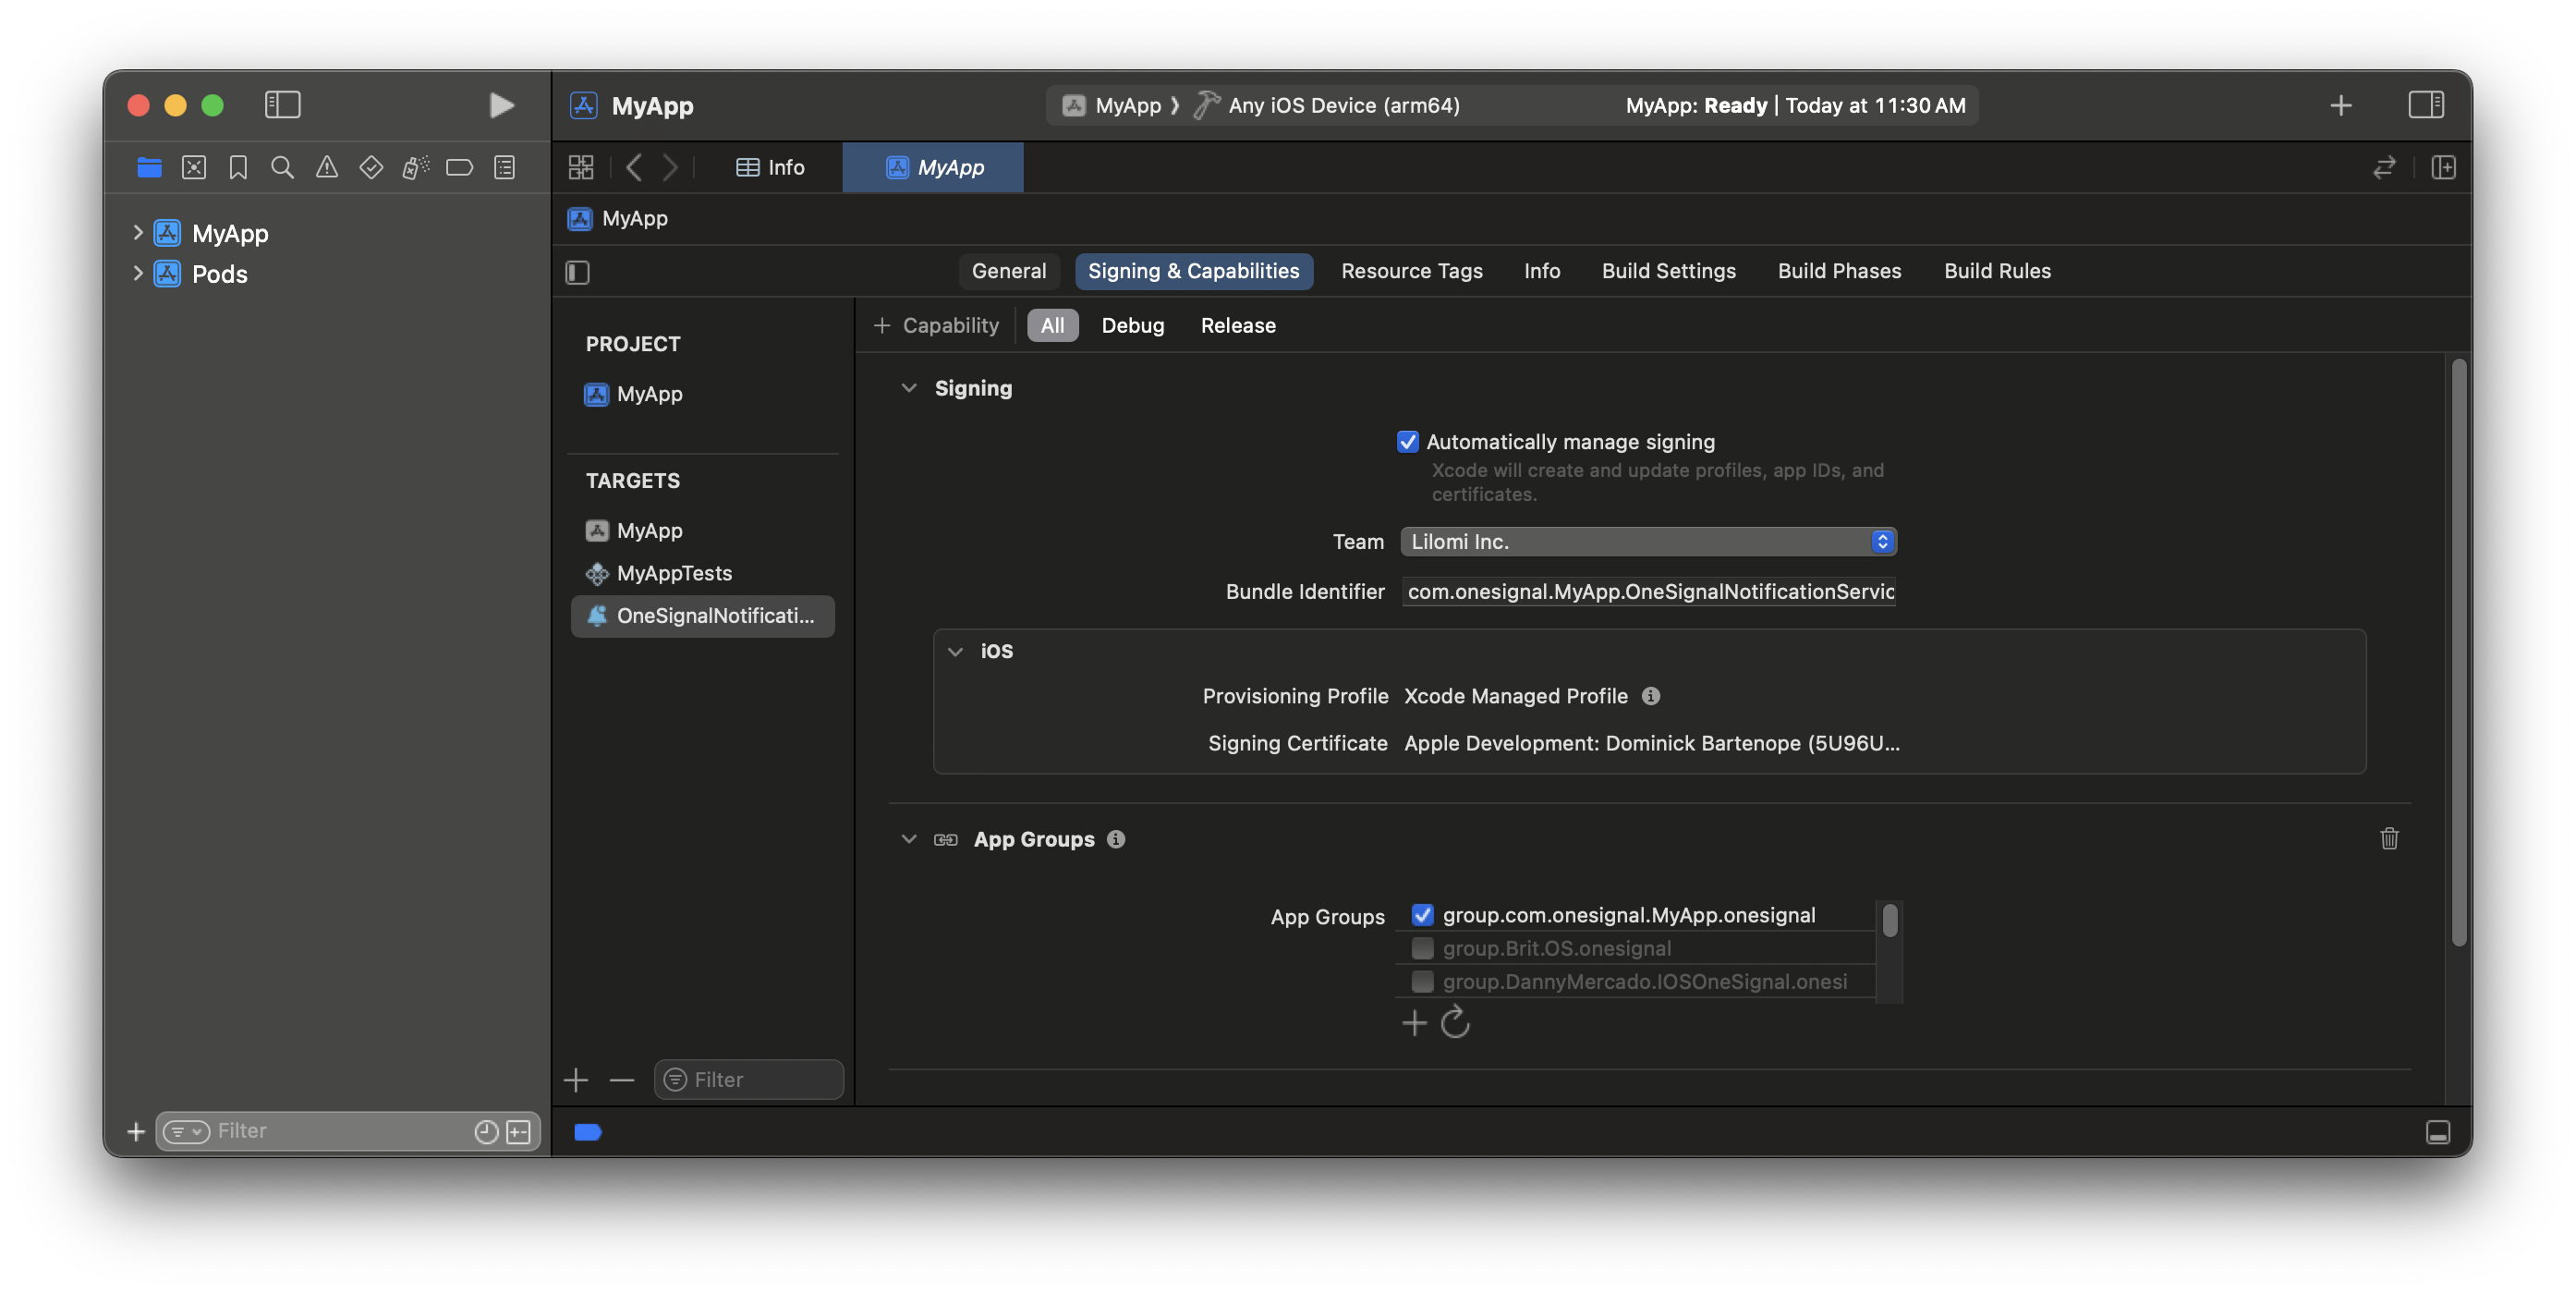
NSE는 이제 앱 타겟과 동일한 앱 그룹에 속합니다.
6. NSE 코드 업데이트
- OneSignalNotificationServiceExtension 폴더로 이동하세요
NotificationService.swift또는NotificationService.m파일의 내용을 다음으로 바꾸세요:
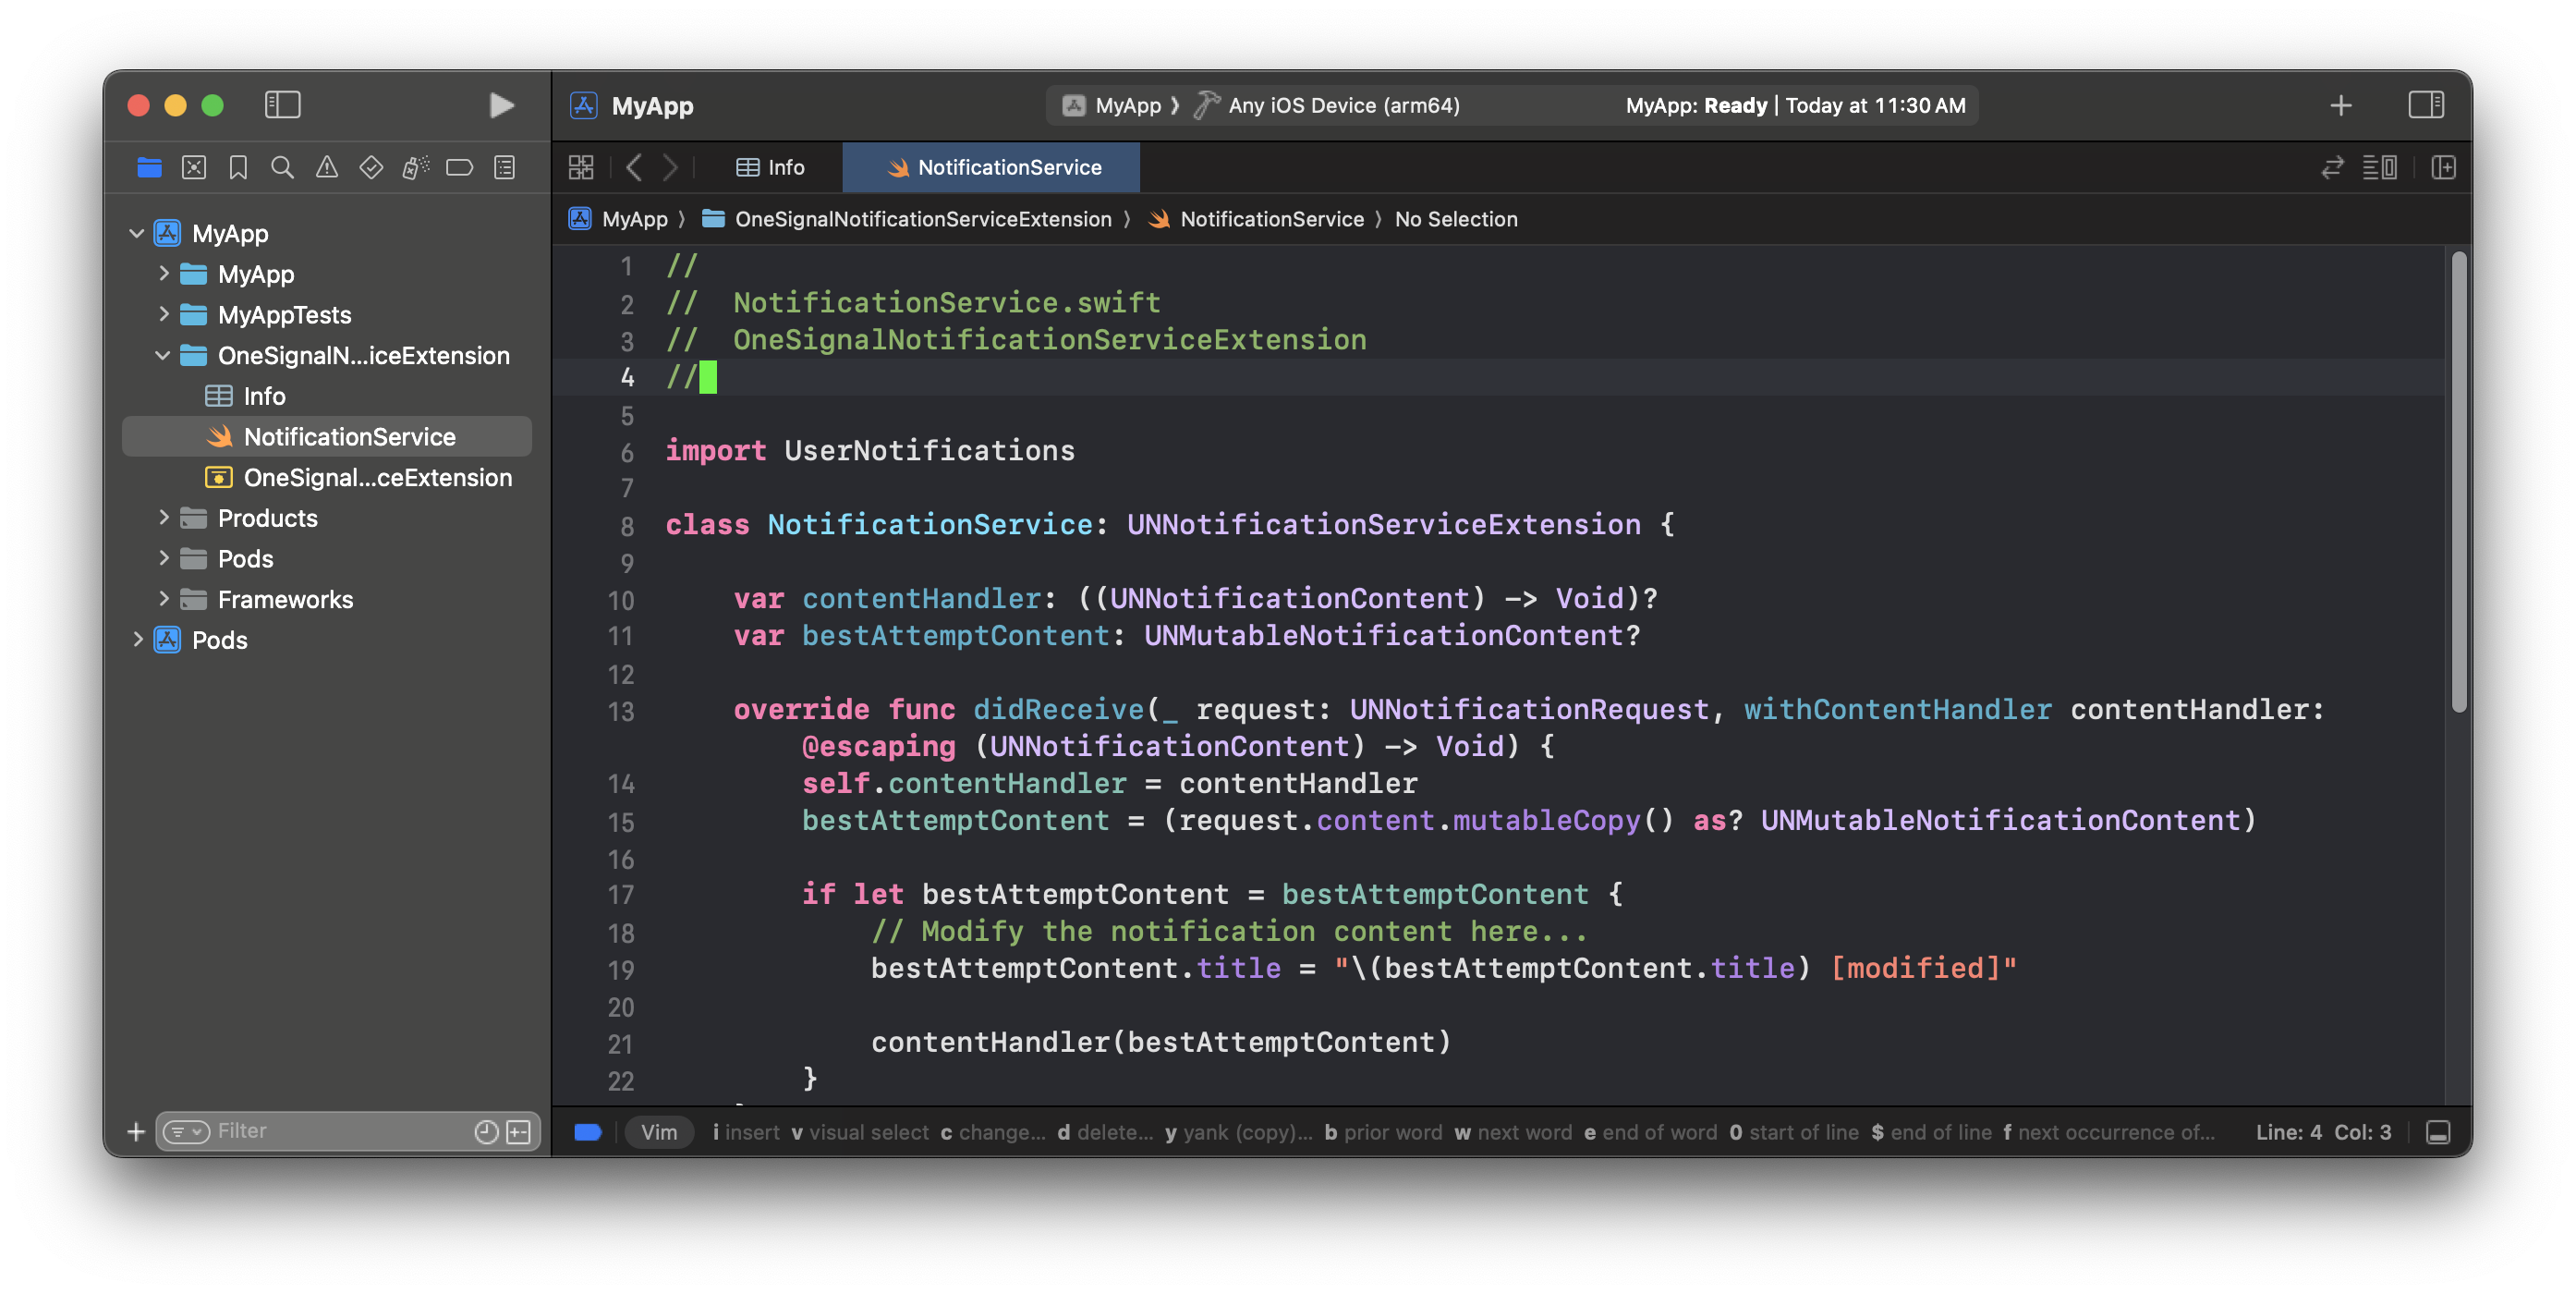
NotificationService 파일로 이동하세요.
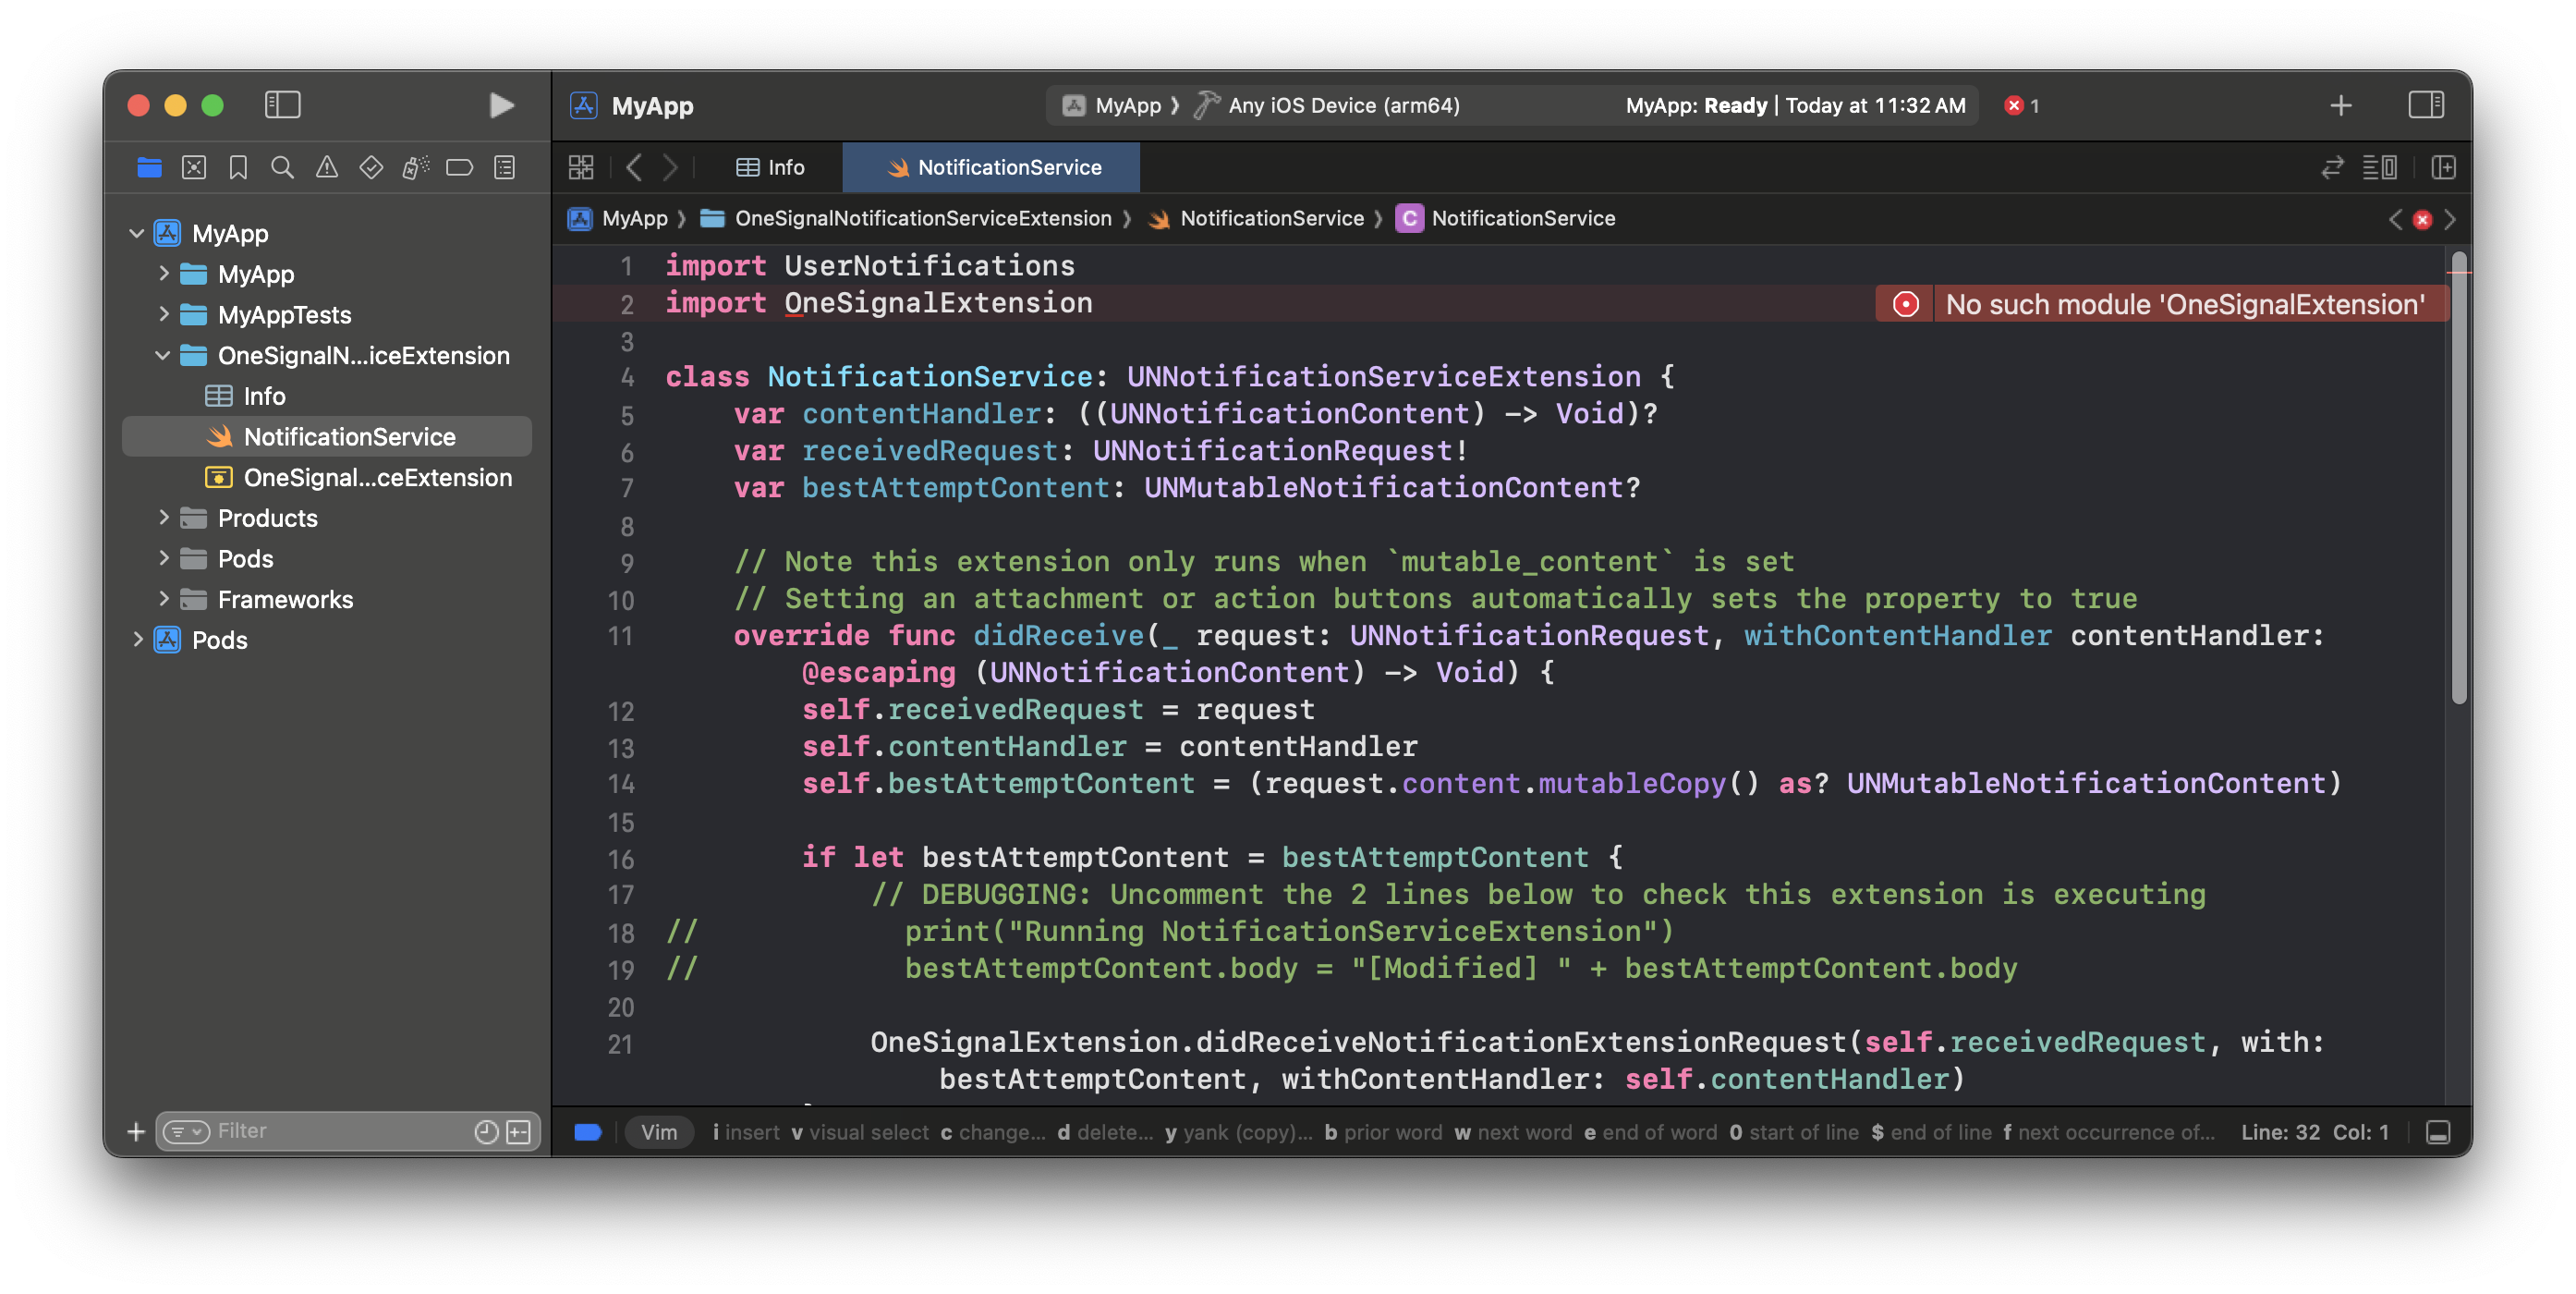
다음 단계에서 패키지를 설치할 때까지 이 파일에 오류가 표시됩니다.
SDK 설정
이 섹션에서는 OneSignal의 핵심 기능을 통합하는 과정을 안내합니다. 이 섹션이 끝나면 인앱 메시지를 트리거하고 푸시 알림을 받을 수 있는 SDK와의 기본 통합이 완료됩니다.1. SDK 추가
Xcode Package Dependencies Manager (Swift Package Manager) 또는 CocoaPods를 사용하여 SDK를 추가하세요. 4개의 사용 가능한 라이브러리가 있습니다. 인앱 메시지 및/또는 위치 추적을 원하지 않는 경우 이러한 패키지를 생략할 수 있습니다.- Xcode Package Dependencies
- CocoaPods
https://github.com/OneSignal/OneSignal-XCFrameworkonesignal-xcframework 패키지를 선택하고 Add Package를 클릭하세요.OneSignal-XCFramework에 대한 패키지 제품을 선택하세요.- 중요: OneSignalNotificationServiceExtension Target에 OneSignalExtension을 추가하세요.
- 앱 타겟에 OneSignalFramework를 추가하세요.
- 인앱 메시지(권장) 및/또는 위치 추적을 사용할 계획이라면 해당 패키지도 앱 타겟에 추가하세요.
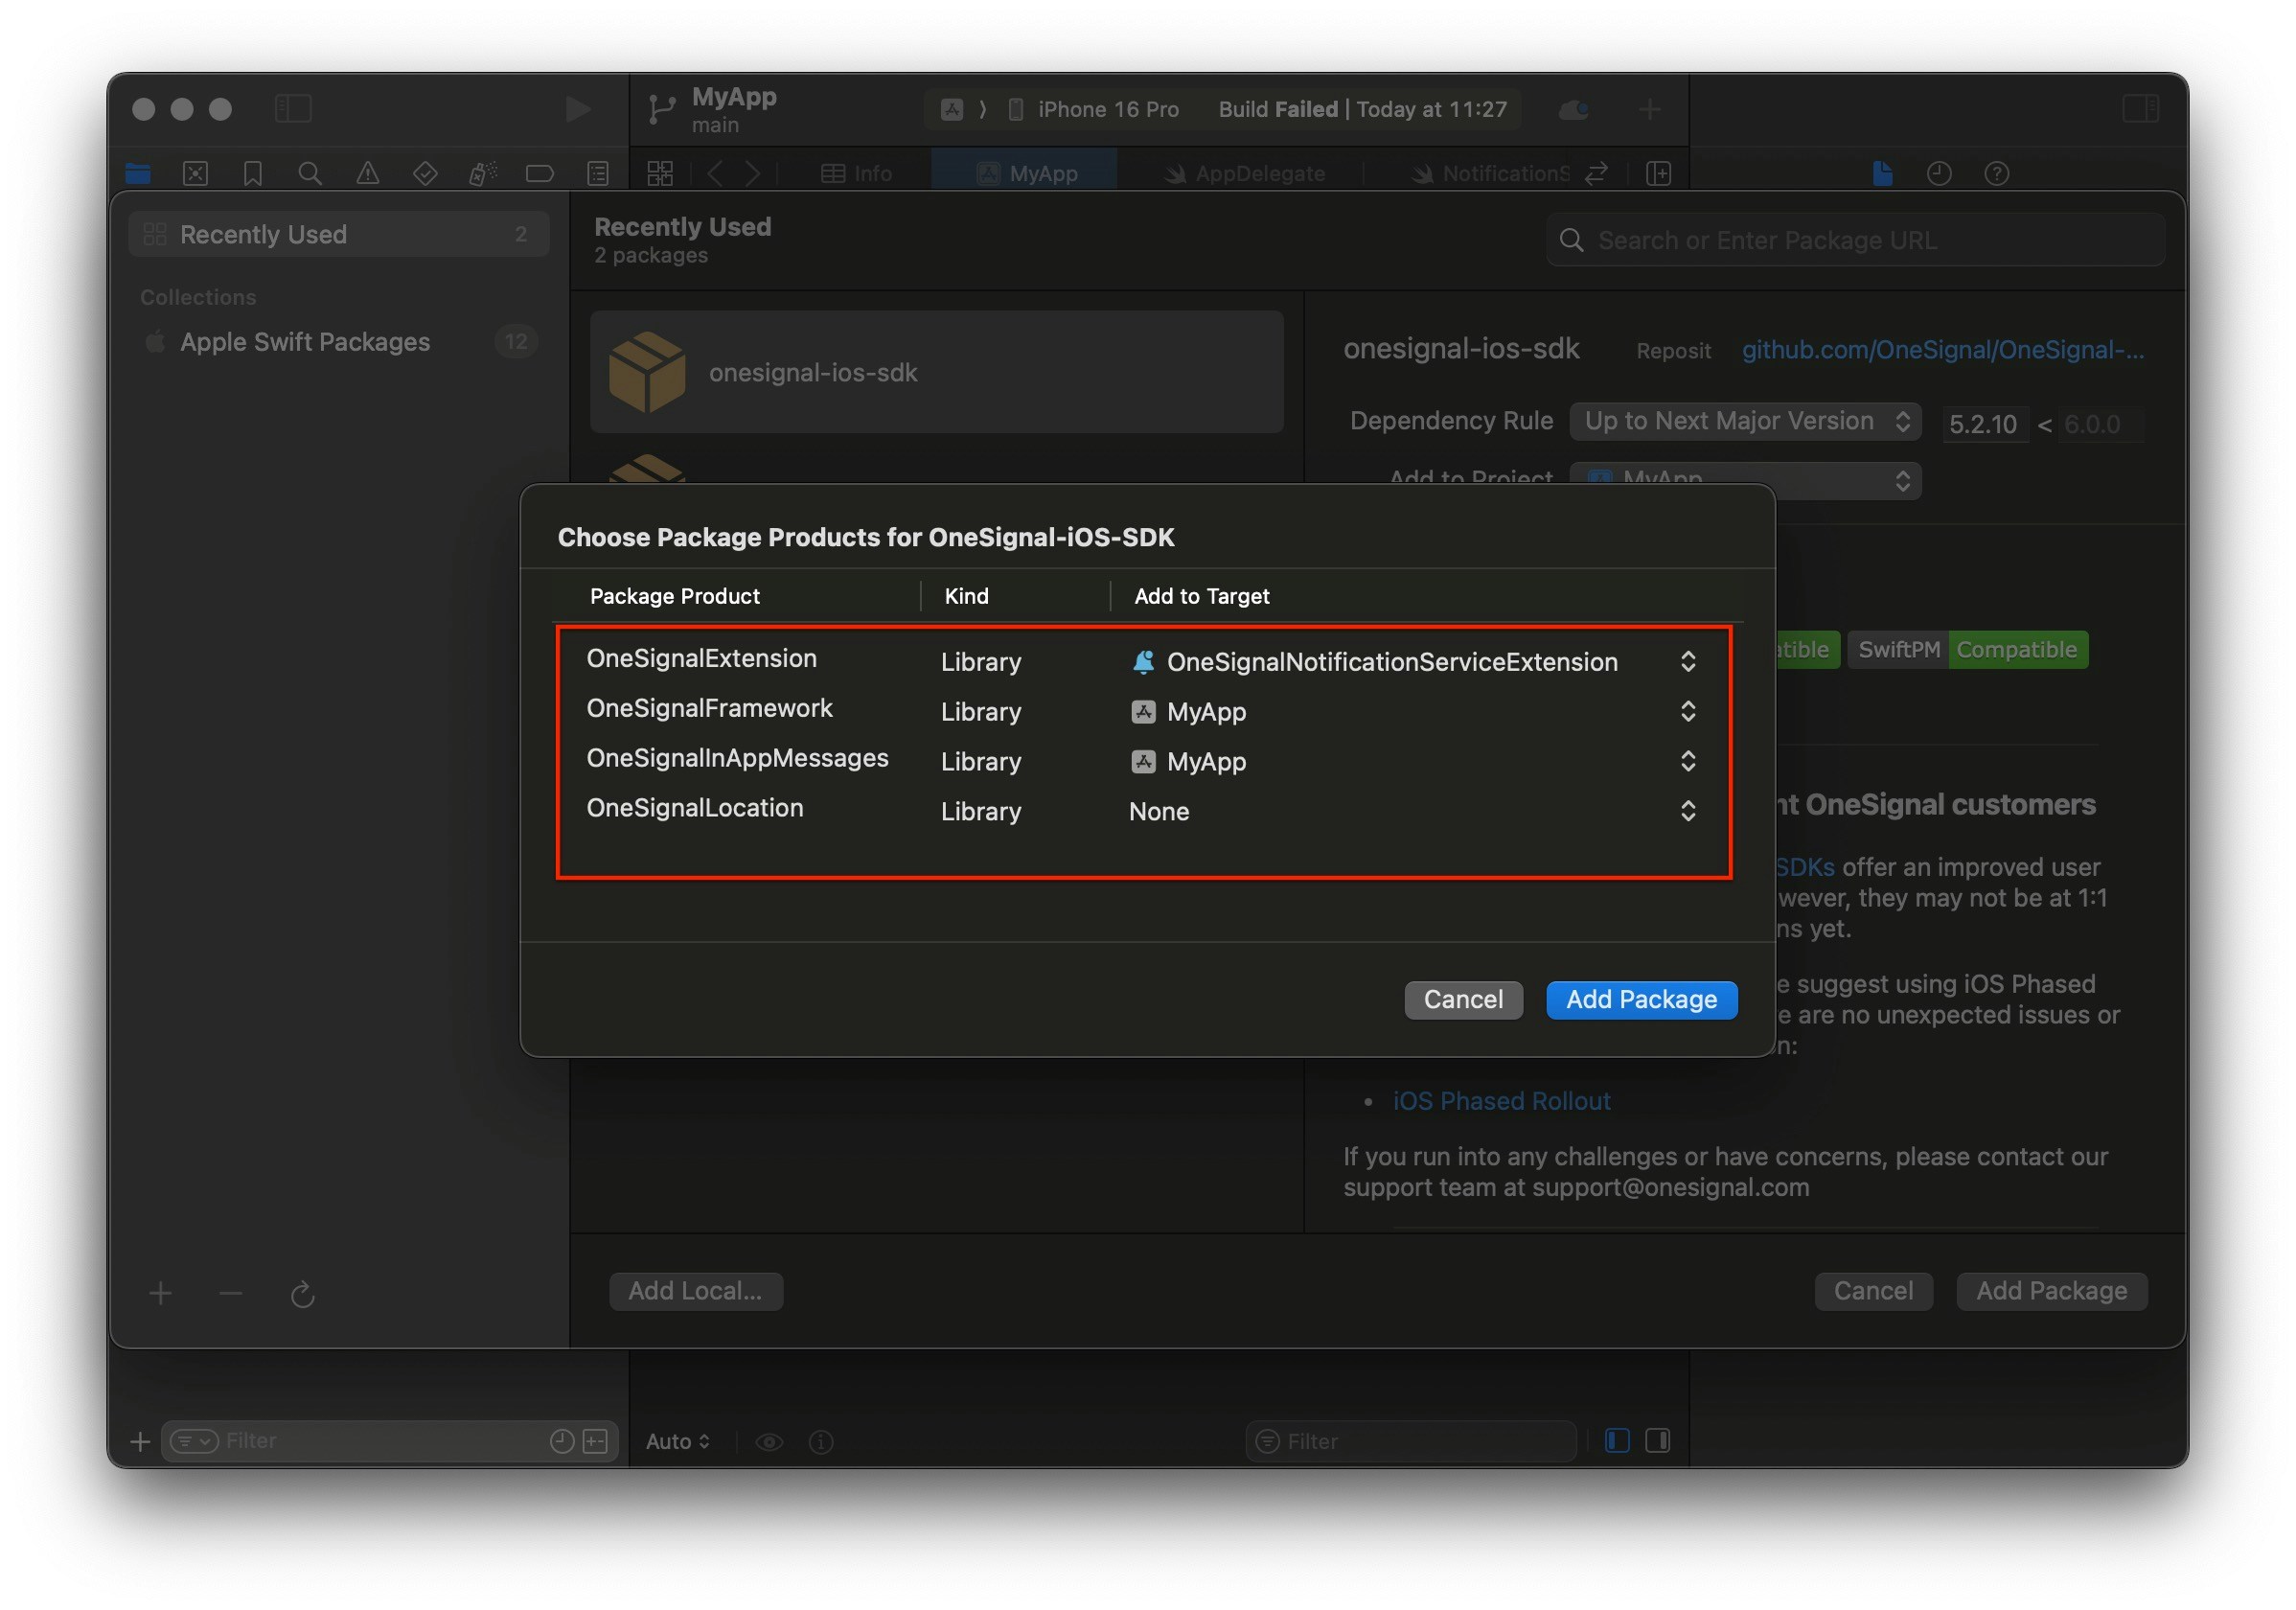
앱에 위치 추적이 필요하지 않은 경우 이 예시와 같이 패키지를 제거할 수 있습니다.
2. SDK 초기화
Xcode 인터페이스 설정에 따라 다음 옵션을 따라 OneSignal을 초기화하세요.- SwiftUI
- Storyboard
<APP_NAME>App.swift 파일로 이동하여 제공된 메서드로 OneSignal을 초기화하세요.OneSignal 대시보드 **Settings > Keys & IDs**에서 찾은 OneSignal 앱 ID로 YOUR_APP_ID를 바꾸세요. OneSignal 앱에 액세스할 수 없는 경우 팀 멤버에게 초대를 요청하세요.OneSignal SDK 통합 테스트
이 가이드는 푸시 알림, 구독 등록 및 인앱 메시징을 테스트하여 OneSignal SDK 통합이 올바르게 작동하는지 확인하는 데 도움이 됩니다.모바일 구독 확인
테스트 기기에서 앱을 실행하세요.
requestPermission 메서드를 추가한 경우 기본 푸시 권한 프롬프트가 자동으로 나타나야 합니다.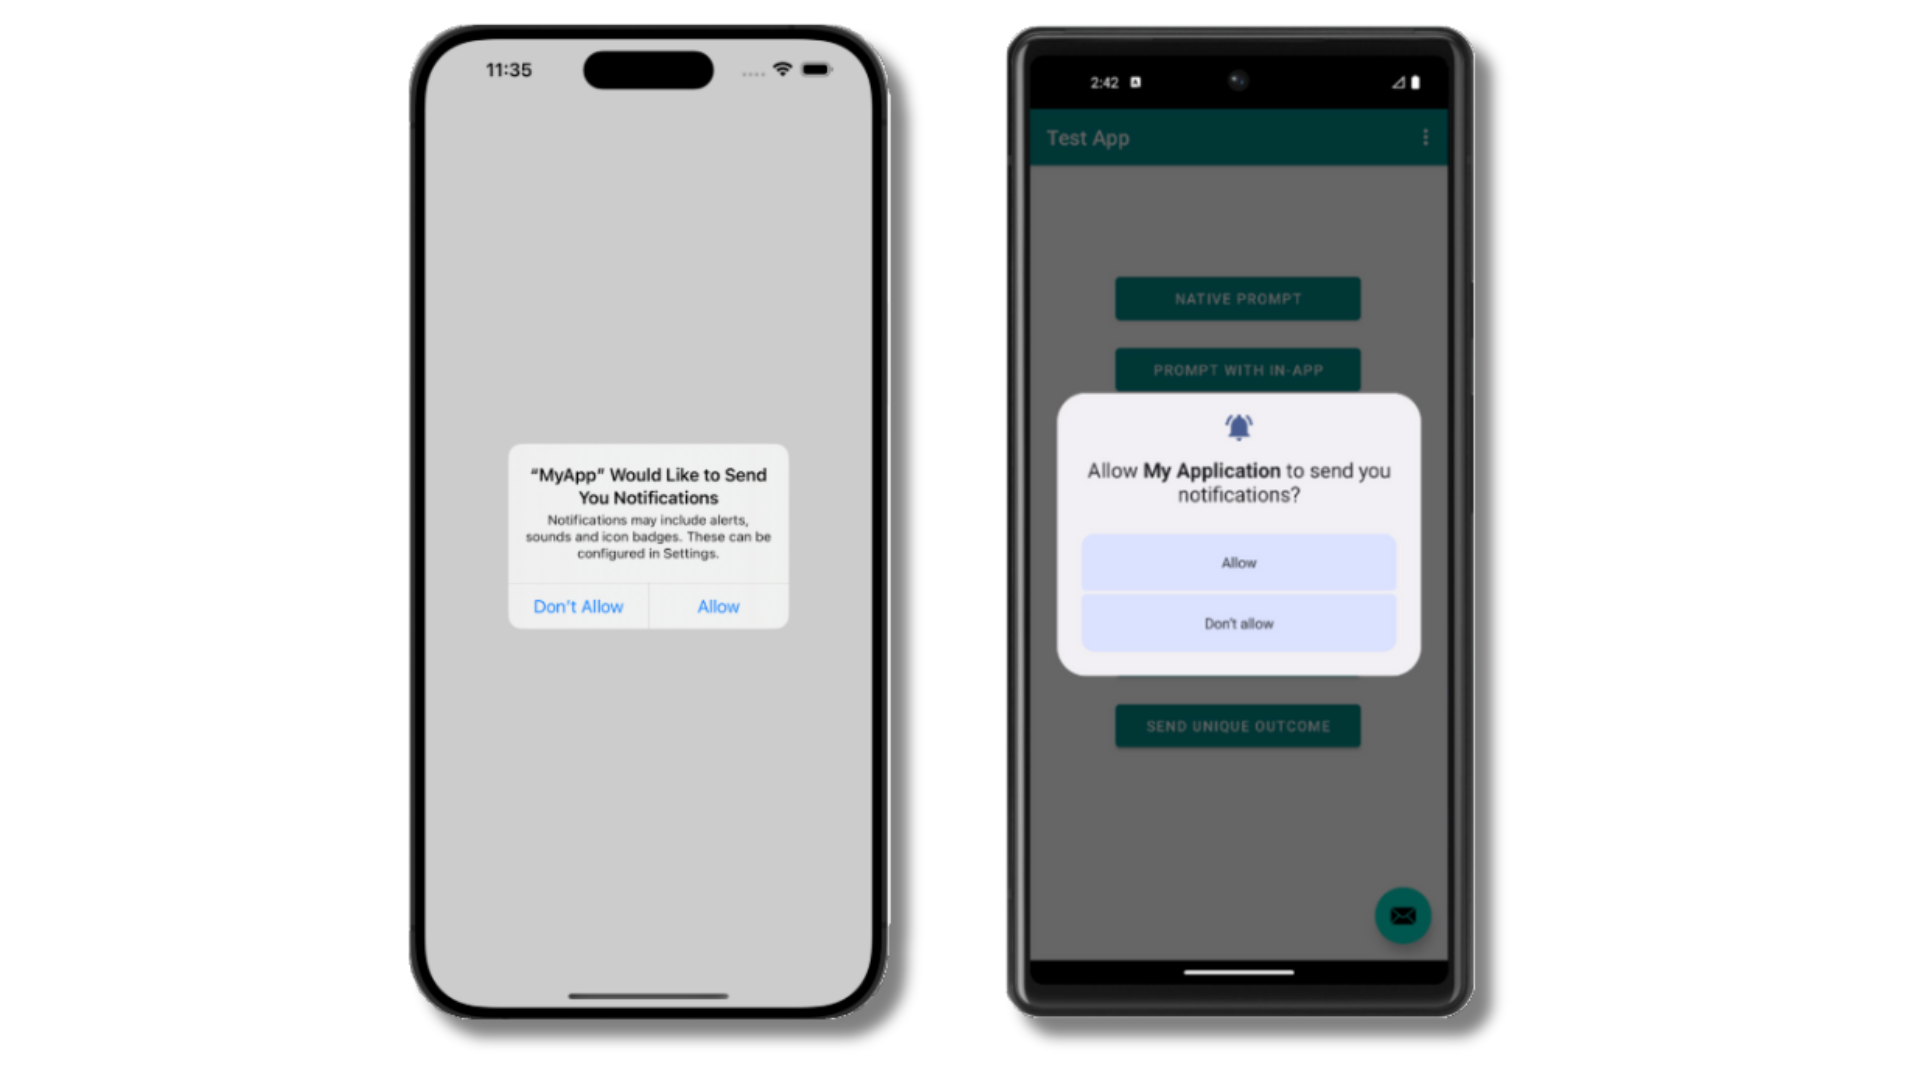
iOS 및 Android 푸시 권한 프롬프트
OneSignal 대시보드 확인
- Audience > Subscriptions로 이동하세요.
- “Never Subscribed” 상태의 새 항목이 표시되어야 합니다.
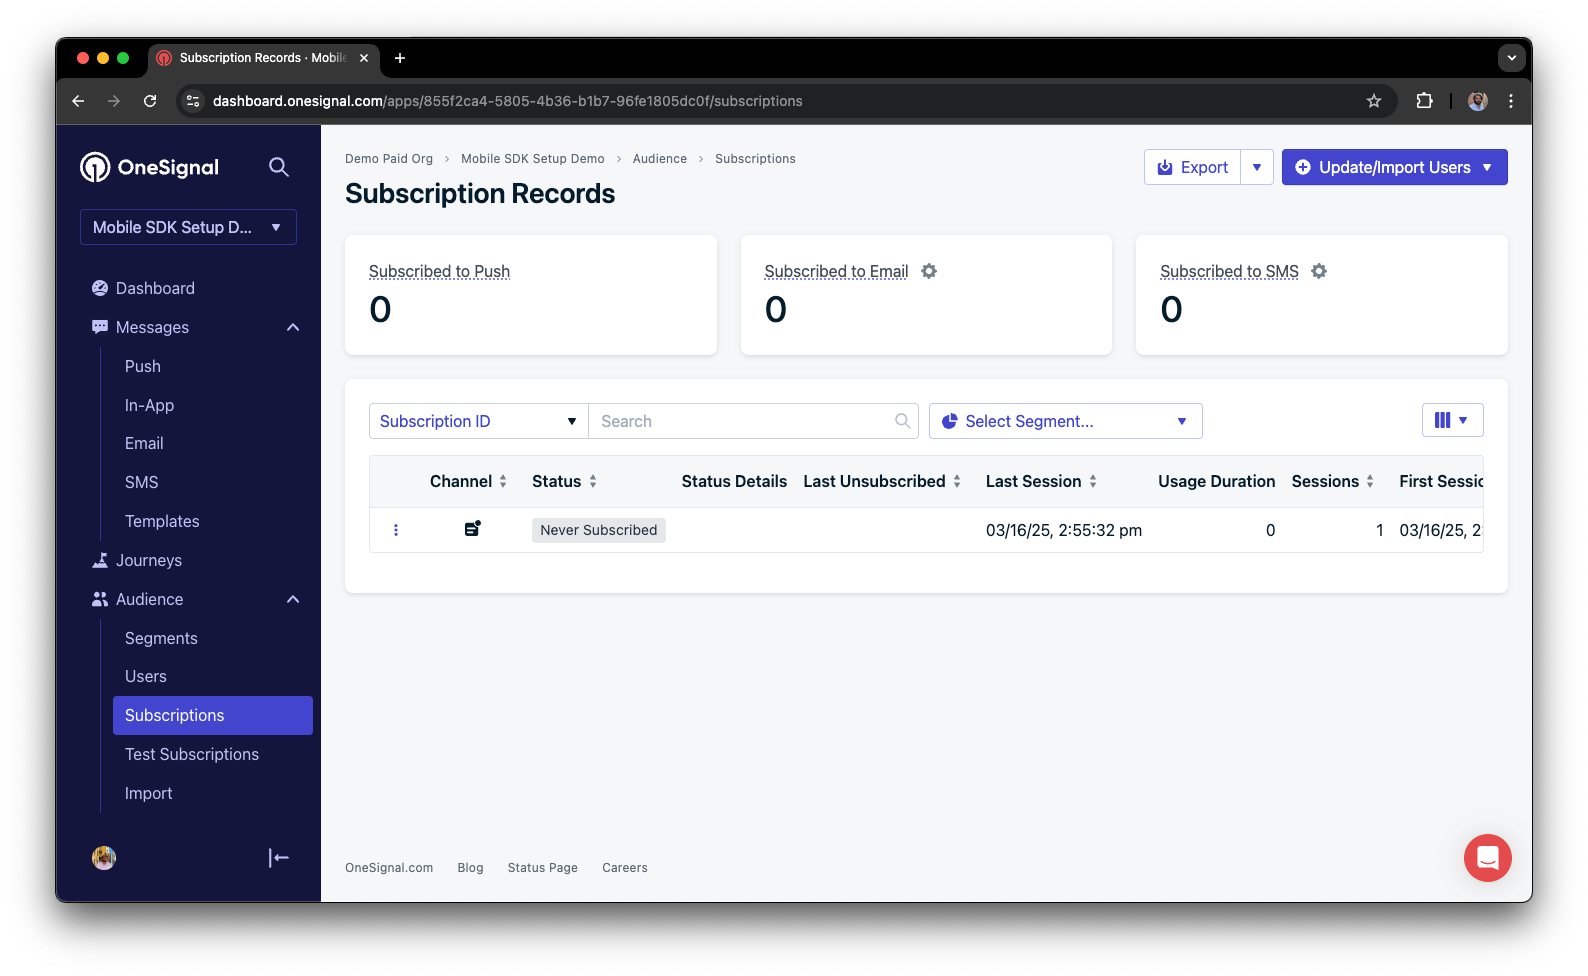
'Never Subscribed' 상태의 구독을 보여주는 대시보드
앱으로 돌아가서 프롬프트에서 허용을 탭하세요.
OneSignal 대시보드 Subscription 페이지를 새로고침하세요.
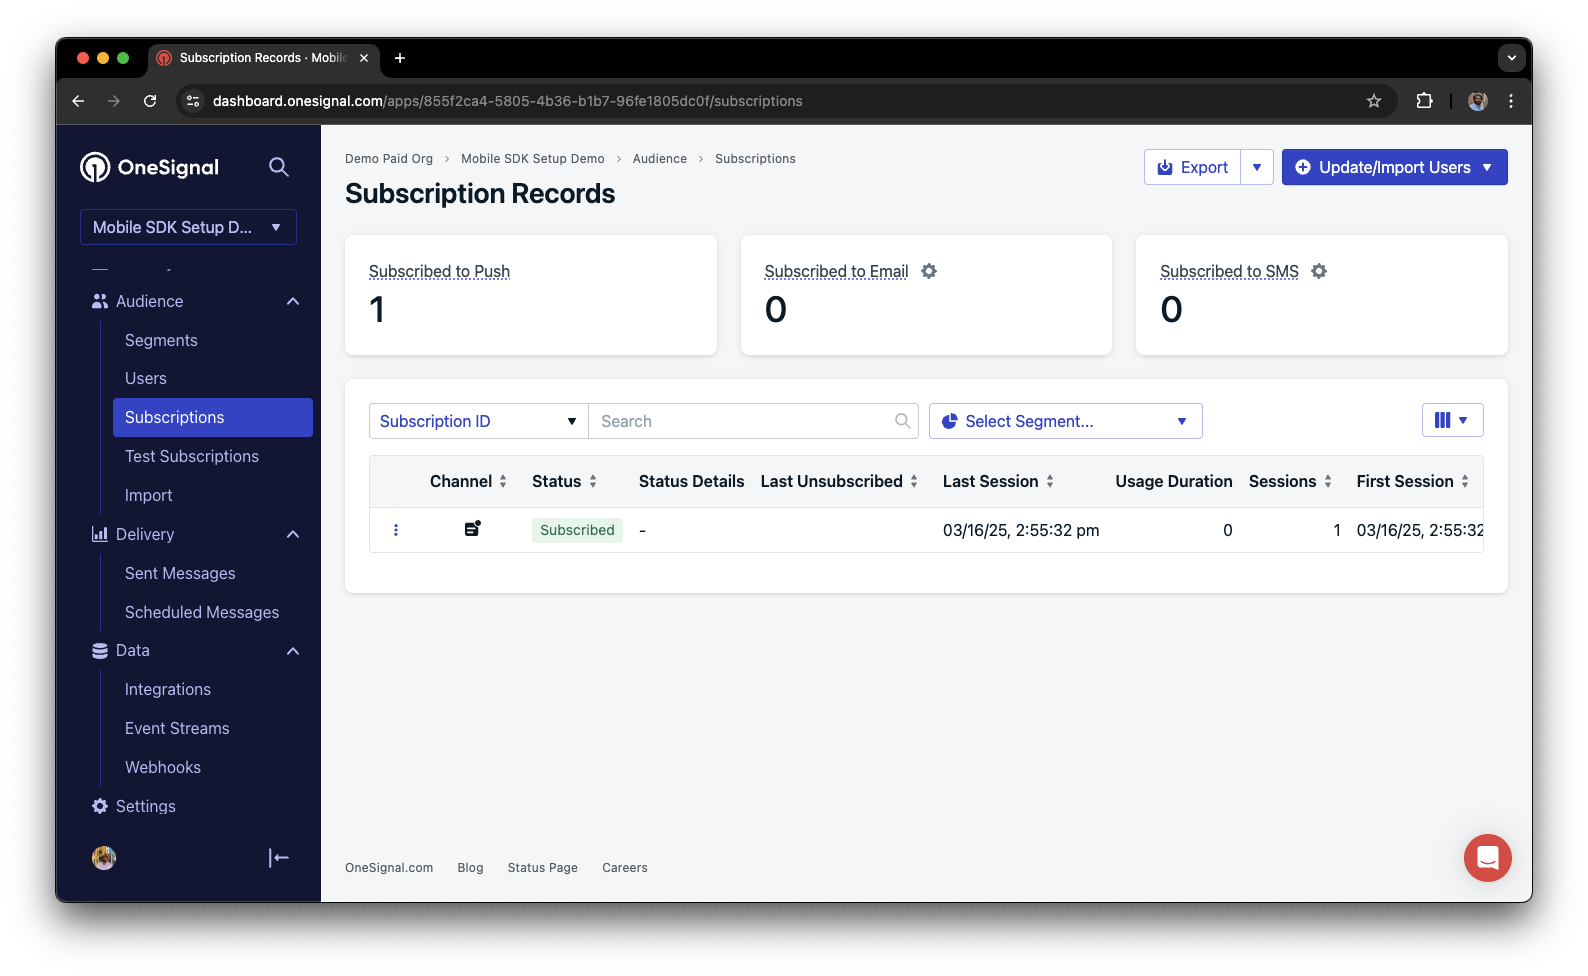
'Subscribed' 상태의 구독을 보여주는 대시보드
테스트 구독 설정
테스트 구독은 메시지를 보내기 전에 푸시 알림을 테스트하는 데 유용합니다.테스트 구독에 추가.

테스트 구독에 기기 추가
구독 이름 지정.
테스트 사용자 세그먼트 생성.
세그먼트 이름 지정.
Test Users로 지정하세요(나중에 사용되므로 이름이 중요함).Test Users 필터를 추가하고 Create Segment를 클릭하세요.
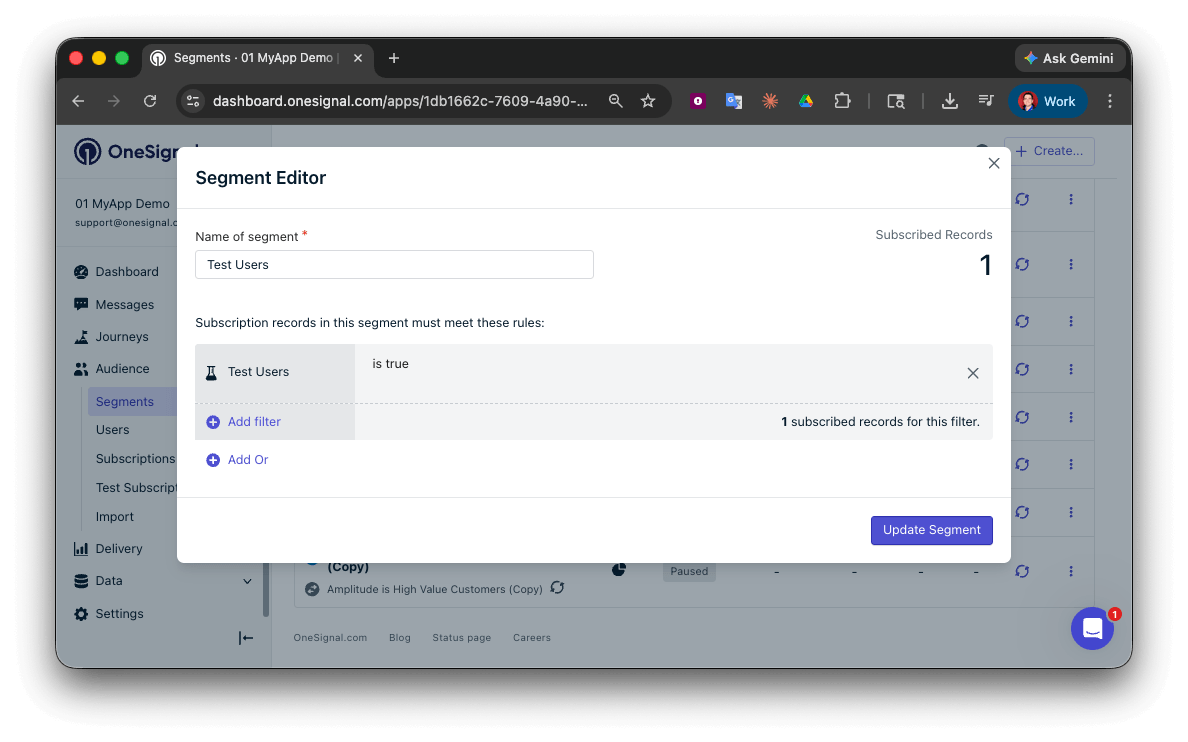
Test Users 필터로 'Test Users' 세그먼트 생성
API를 통해 테스트 푸시 전송
App API Key 및 App ID를 가져오세요.
제공된 코드를 업데이트하세요.
YOUR_APP_API_KEY 및 YOUR_APP_ID를 실제 키로 바꾸세요. 이 코드는 이전에 생성한 Test Users 세그먼트를 사용합니다.Run the code.
이미지 및 확인된 전달 확인.
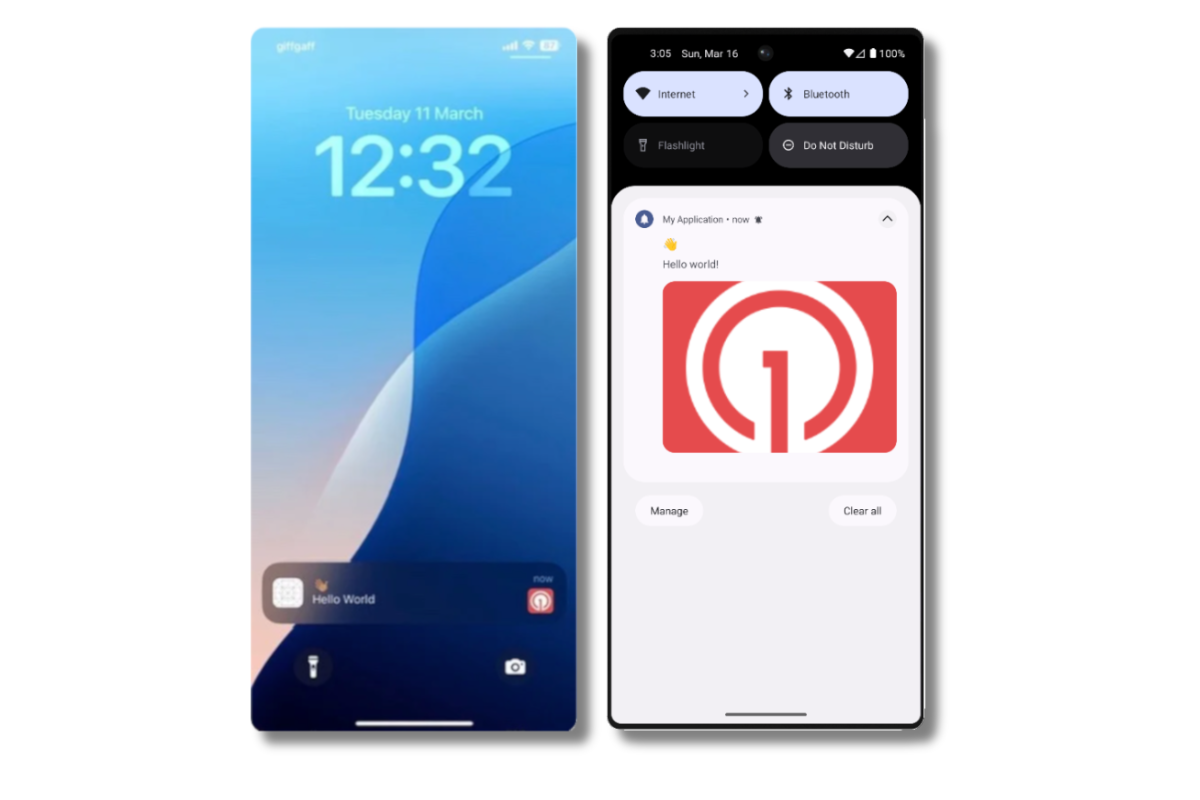
iOS 및 Android에서 이미지가 있는 푸시 알림
확인된 전달 확인.
인앱 메시지 전송
인앱 메시지를 사용하면 사용자가 앱을 사용하는 동안 사용자와 소통할 수 있습니다.기기에서 앱을 닫거나 백그라운드로 전환하세요.
인앱 메시지 생성.
- OneSignal 대시보드에서 Messages > In-App > New In-App으로 이동하세요.
- Welcome 메시지를 찾아 선택하세요.
- 대상을 이전에 사용한 Test Users 세그먼트로 설정하세요.
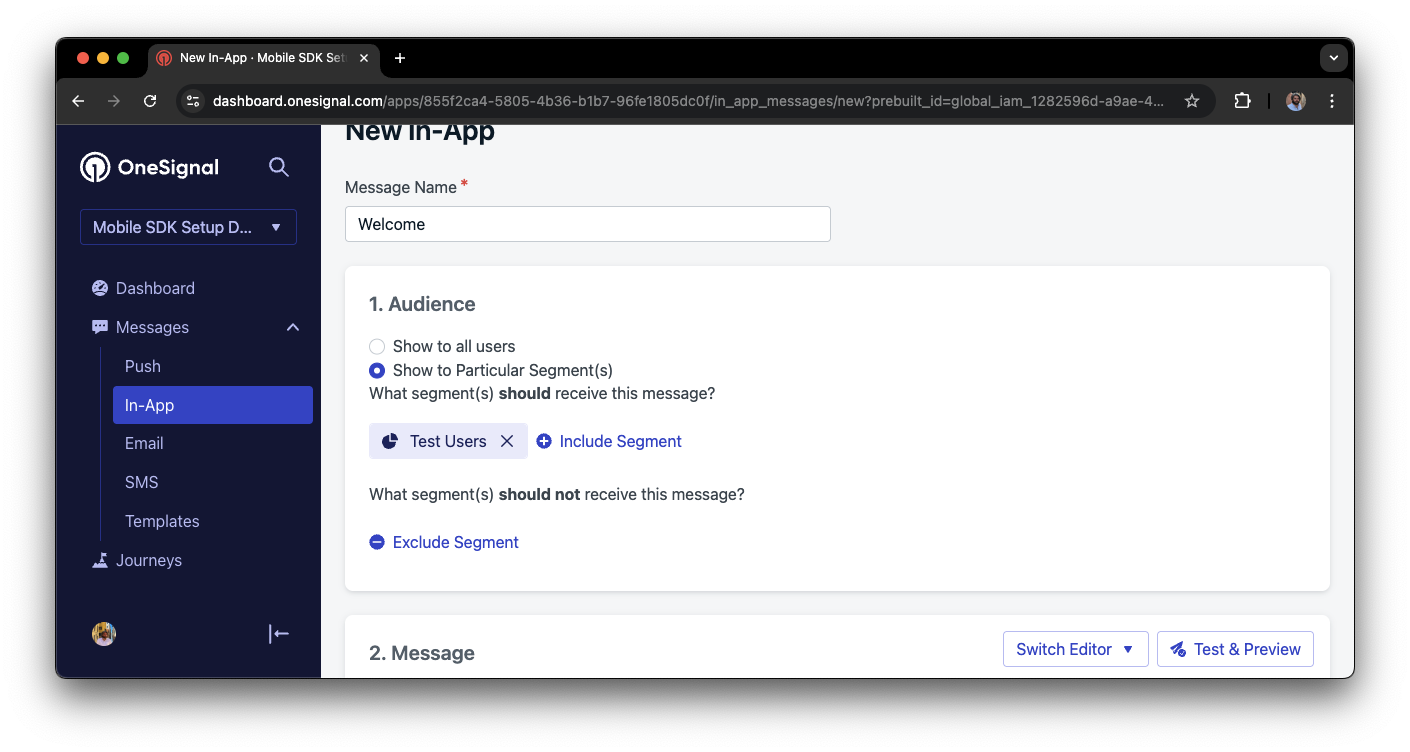
인앱 메시지로 'Test Users' 세그먼트 타겟팅
원하는 경우 메시지 콘텐츠를 사용자 정의하세요.
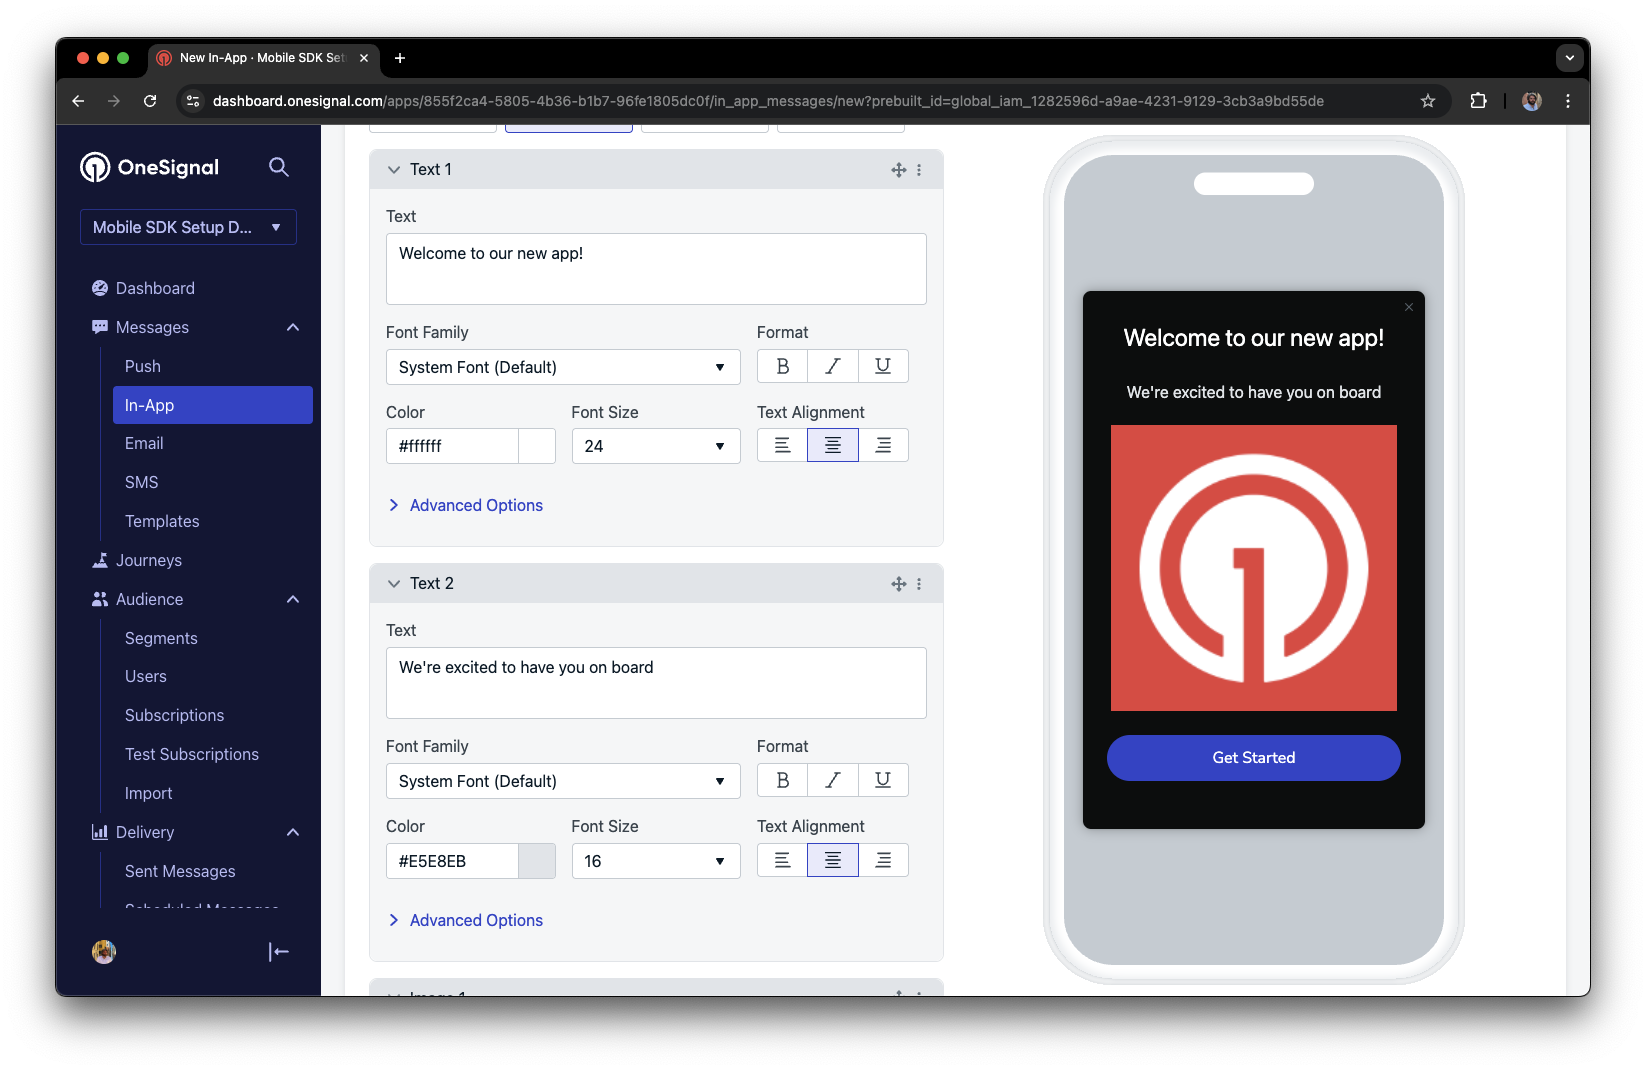
인앱 Welcome 메시지의 사용자 정의 예시
트리거를 'On app open'으로 설정.
빈도 예약.
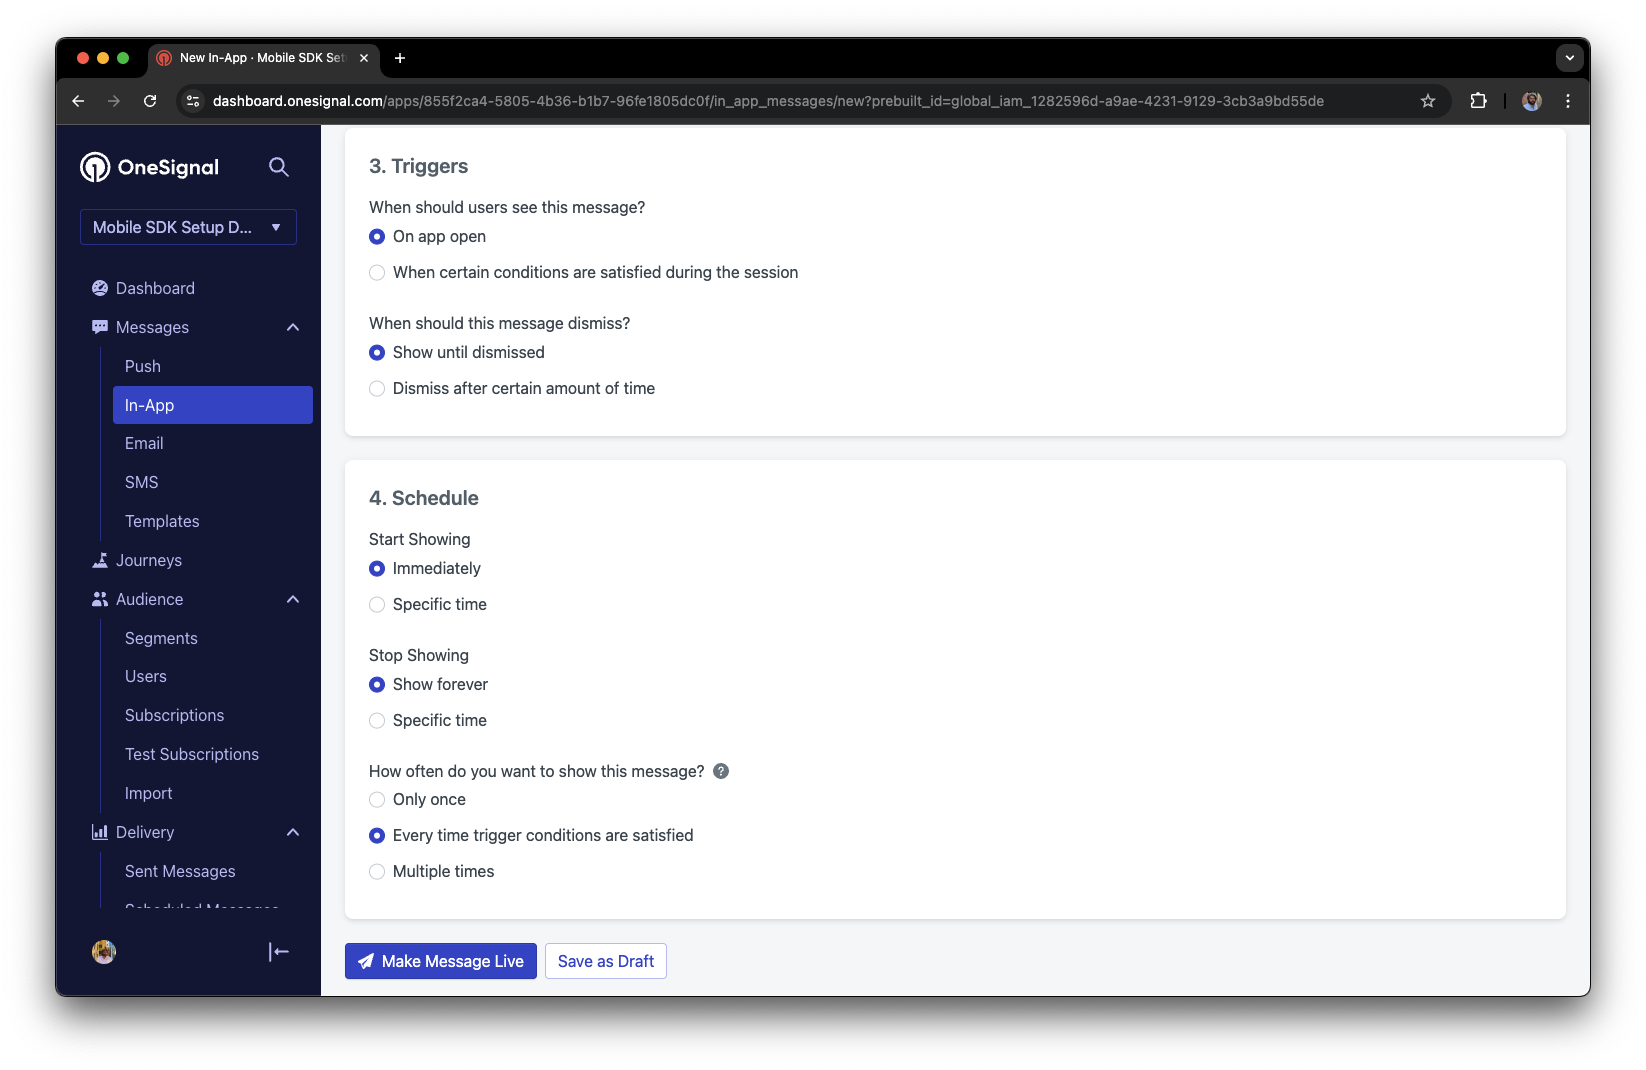
인앱 메시지 예약 옵션
메시지를 라이브로 만들기.
앱을 열고 메시지를 확인하세요.
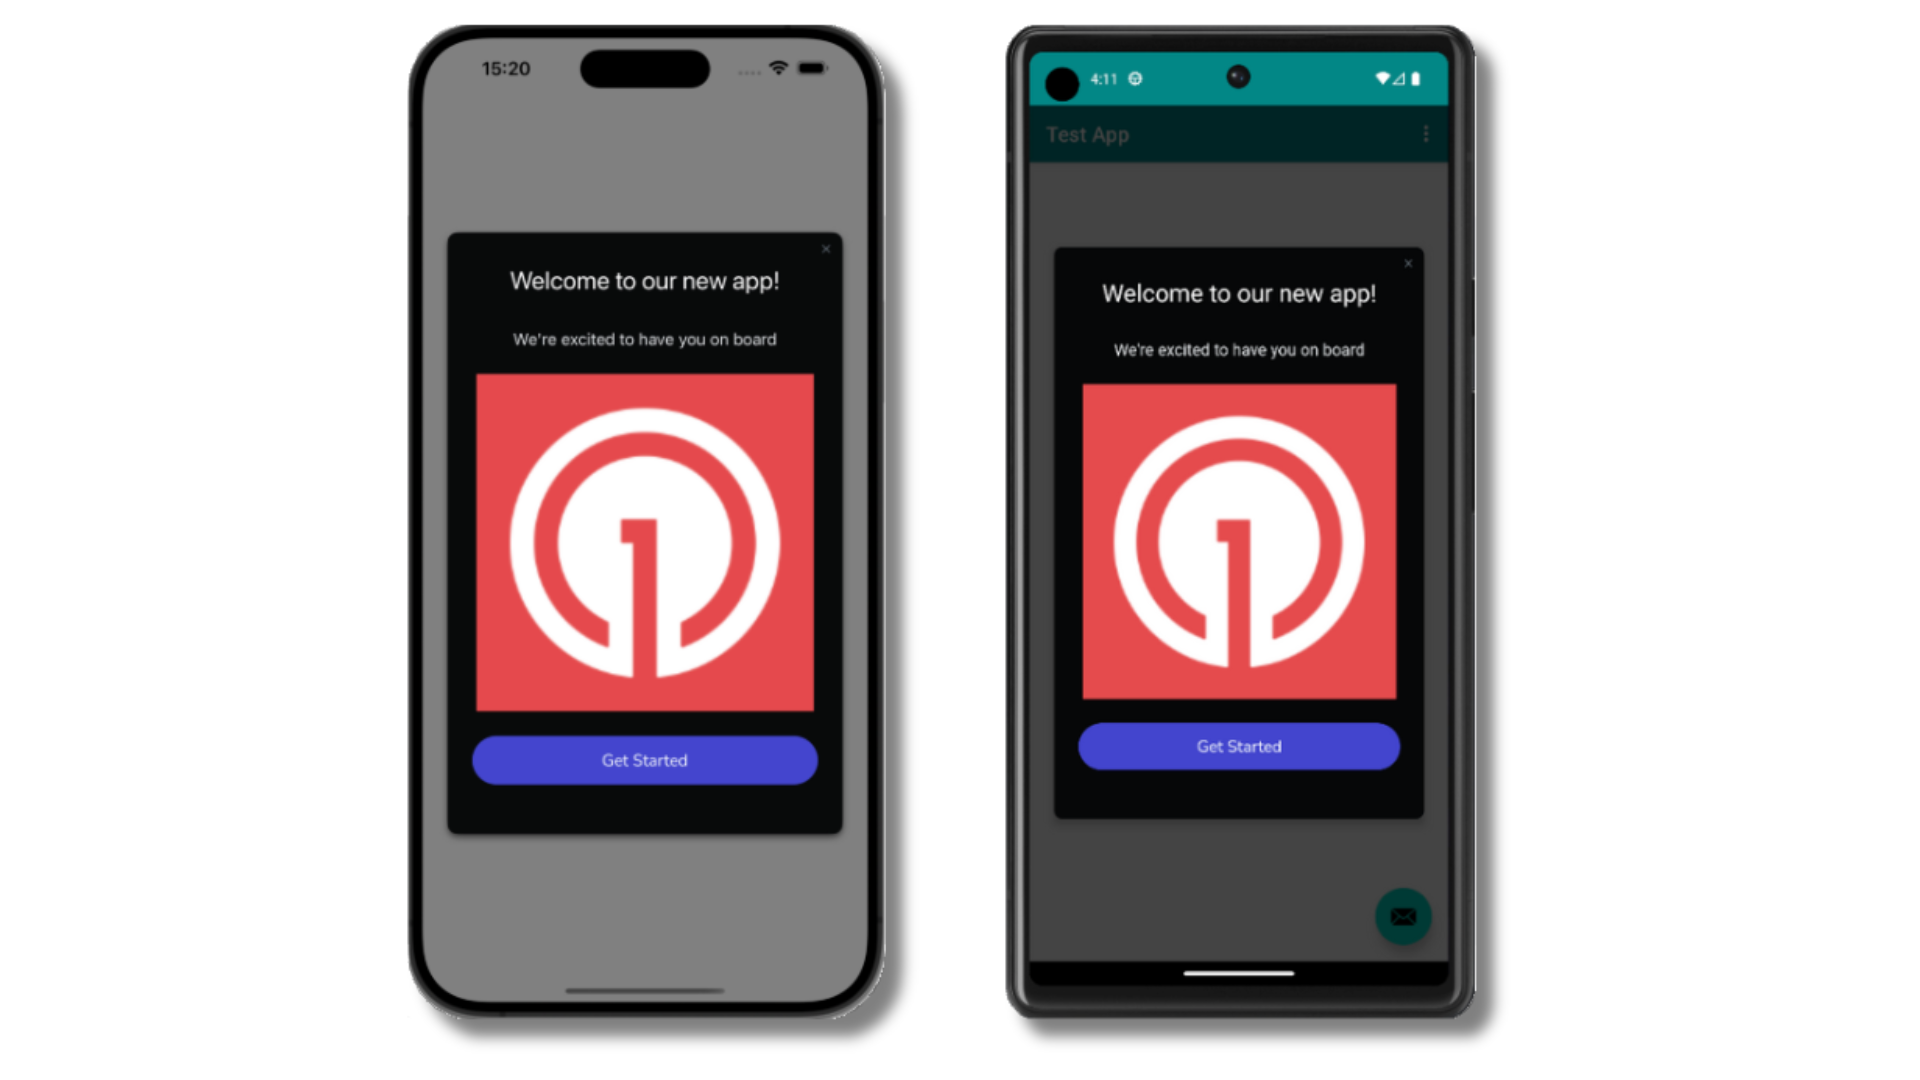
기기에 표시된 Welcome 인앱 메시지
사용자 식별
이전에는 모바일 구독을 생성하는 방법을 시연했습니다. 이제 OneSignal SDK를 사용하여 모든 구독(푸시, 이메일 및 SMS 포함)에서 사용자를 식별하는 것으로 확장하겠습니다. 플랫폼 전반에 걸쳐 사용자를 통합하고 참여시키는 데 도움이 되는 External ID, 태그, 다중 채널 구독, 개인 정보 보호 및 이벤트 추적을 다룹니다.External ID 할당
External ID를 사용하여 백엔드의 사용자 식별자를 사용하여 기기, 이메일 주소 및 전화번호 전반에 걸쳐 사용자를 일관되게 식별하세요. 이렇게 하면 채널 및 타사 시스템 전반에 걸쳐 메시징이 통합된 상태로 유지됩니다(통합에 특히 중요). 앱에서 식별될 때마다 SDK의login 메서드로 External ID를 설정하세요.
데이터 태그 추가
태그는 사용자 속성(username, role 또는 기본 설정 등) 및 이벤트(purchase_date, game_level 또는 사용자 상호 작용 등)를 저장하는 데 사용할 수 있는 문자열 데이터의 키-값 쌍입니다. 태그는 고급 메시지 개인화 및 세그먼테이션을 지원하여 보다 고급 사용 사례를 가능하게 합니다.
앱에서 이벤트가 발생할 때 SDK addTag 및 addTags 메서드로 태그를 설정하세요.
이 예시에서 사용자는 current_level이라는 태그가 6의 값으로 설정되어 식별 가능한 레벨 6에 도달했습니다.
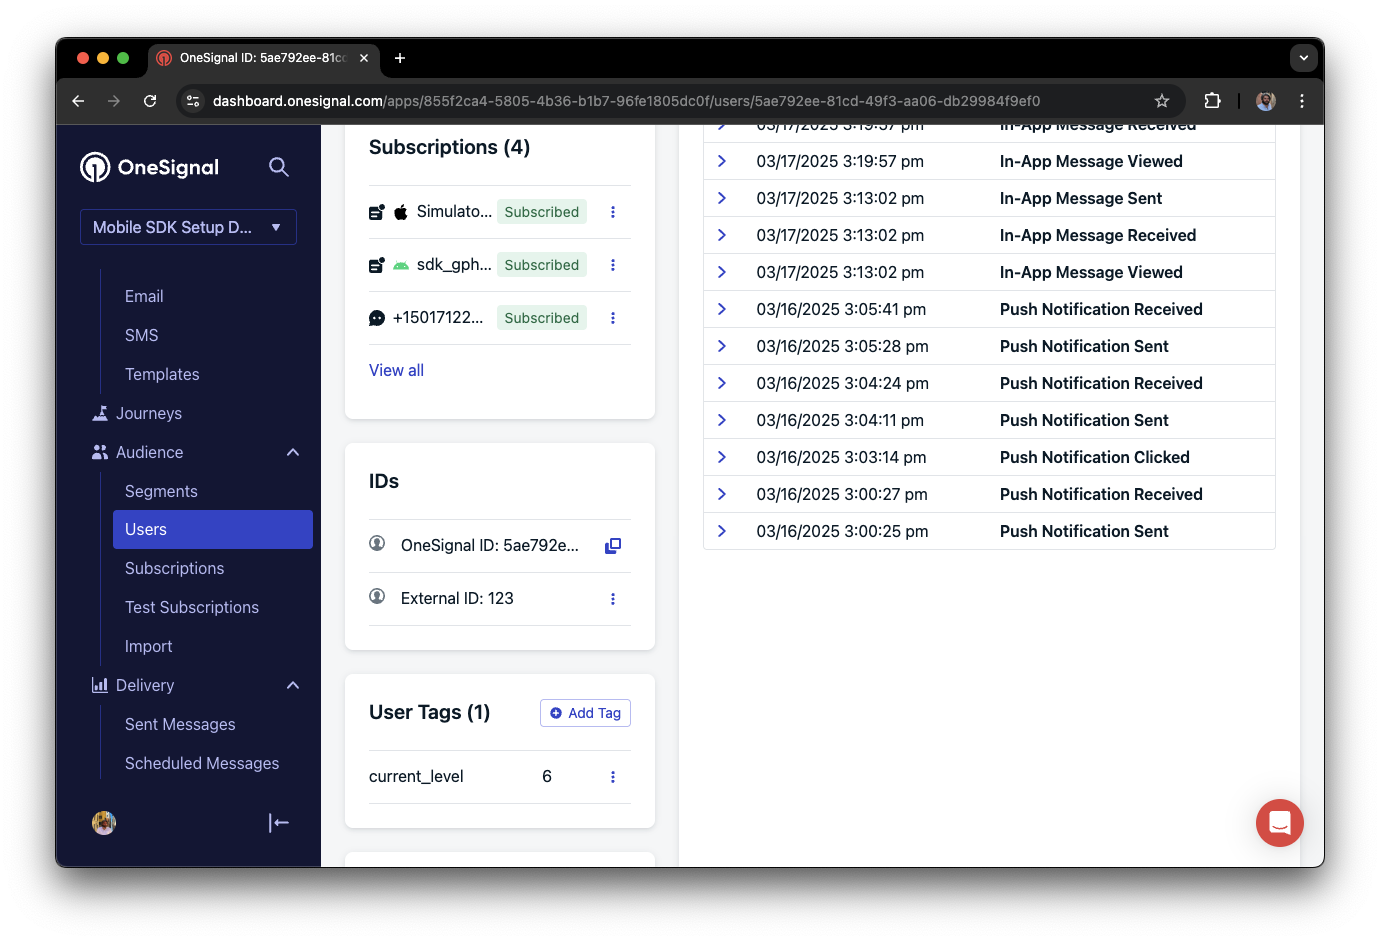
A user profile in OneSignal with a tag called "current_level" set to "6"
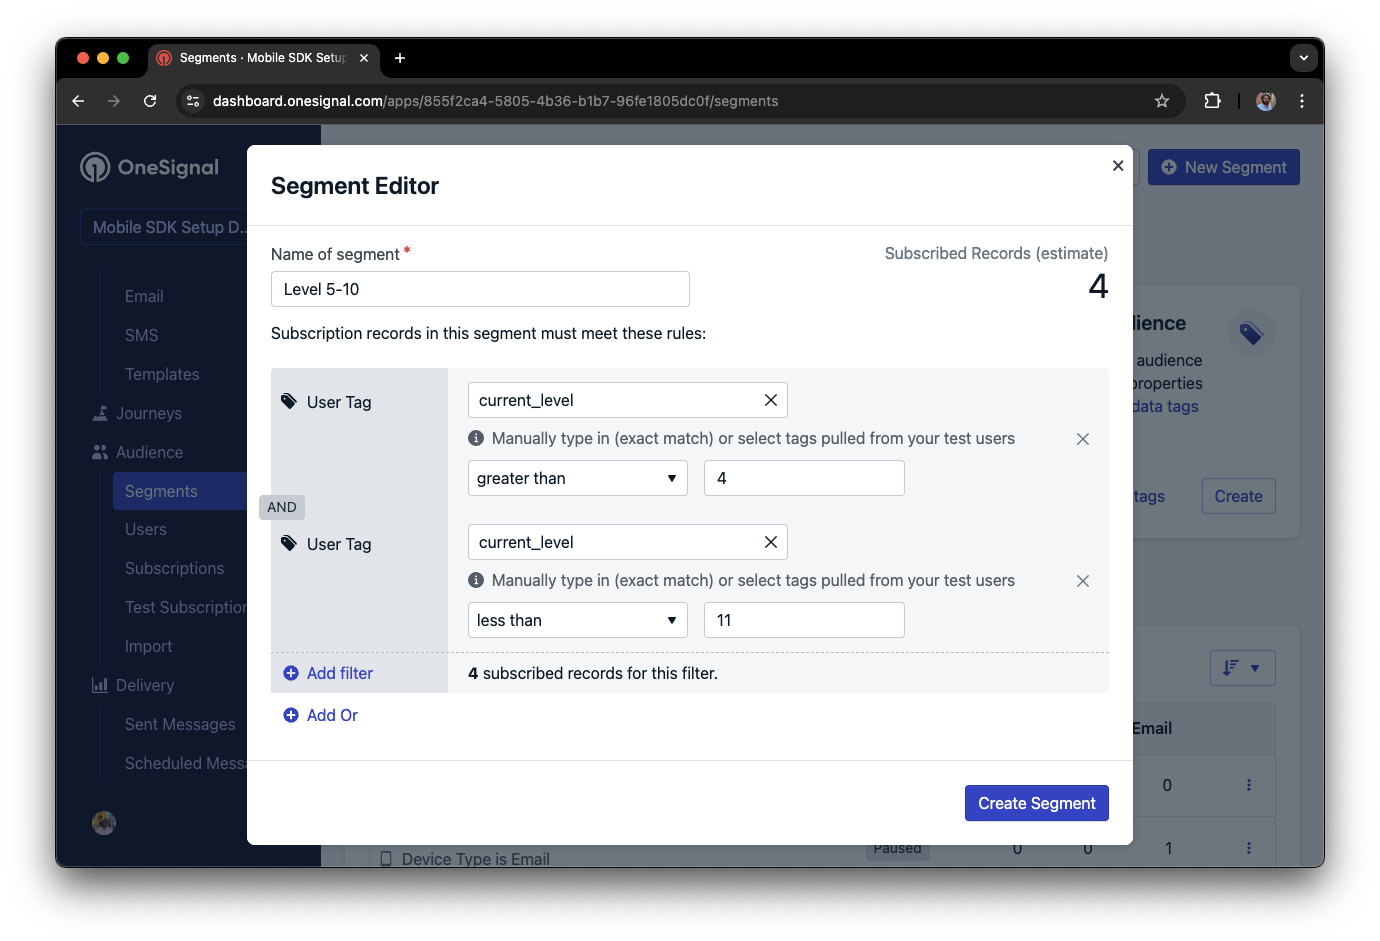
current_level 값이 4보다 크고 10보다 작은 사용자를 타겟팅하는 세그먼트를 보여주는 세그먼트 편집기
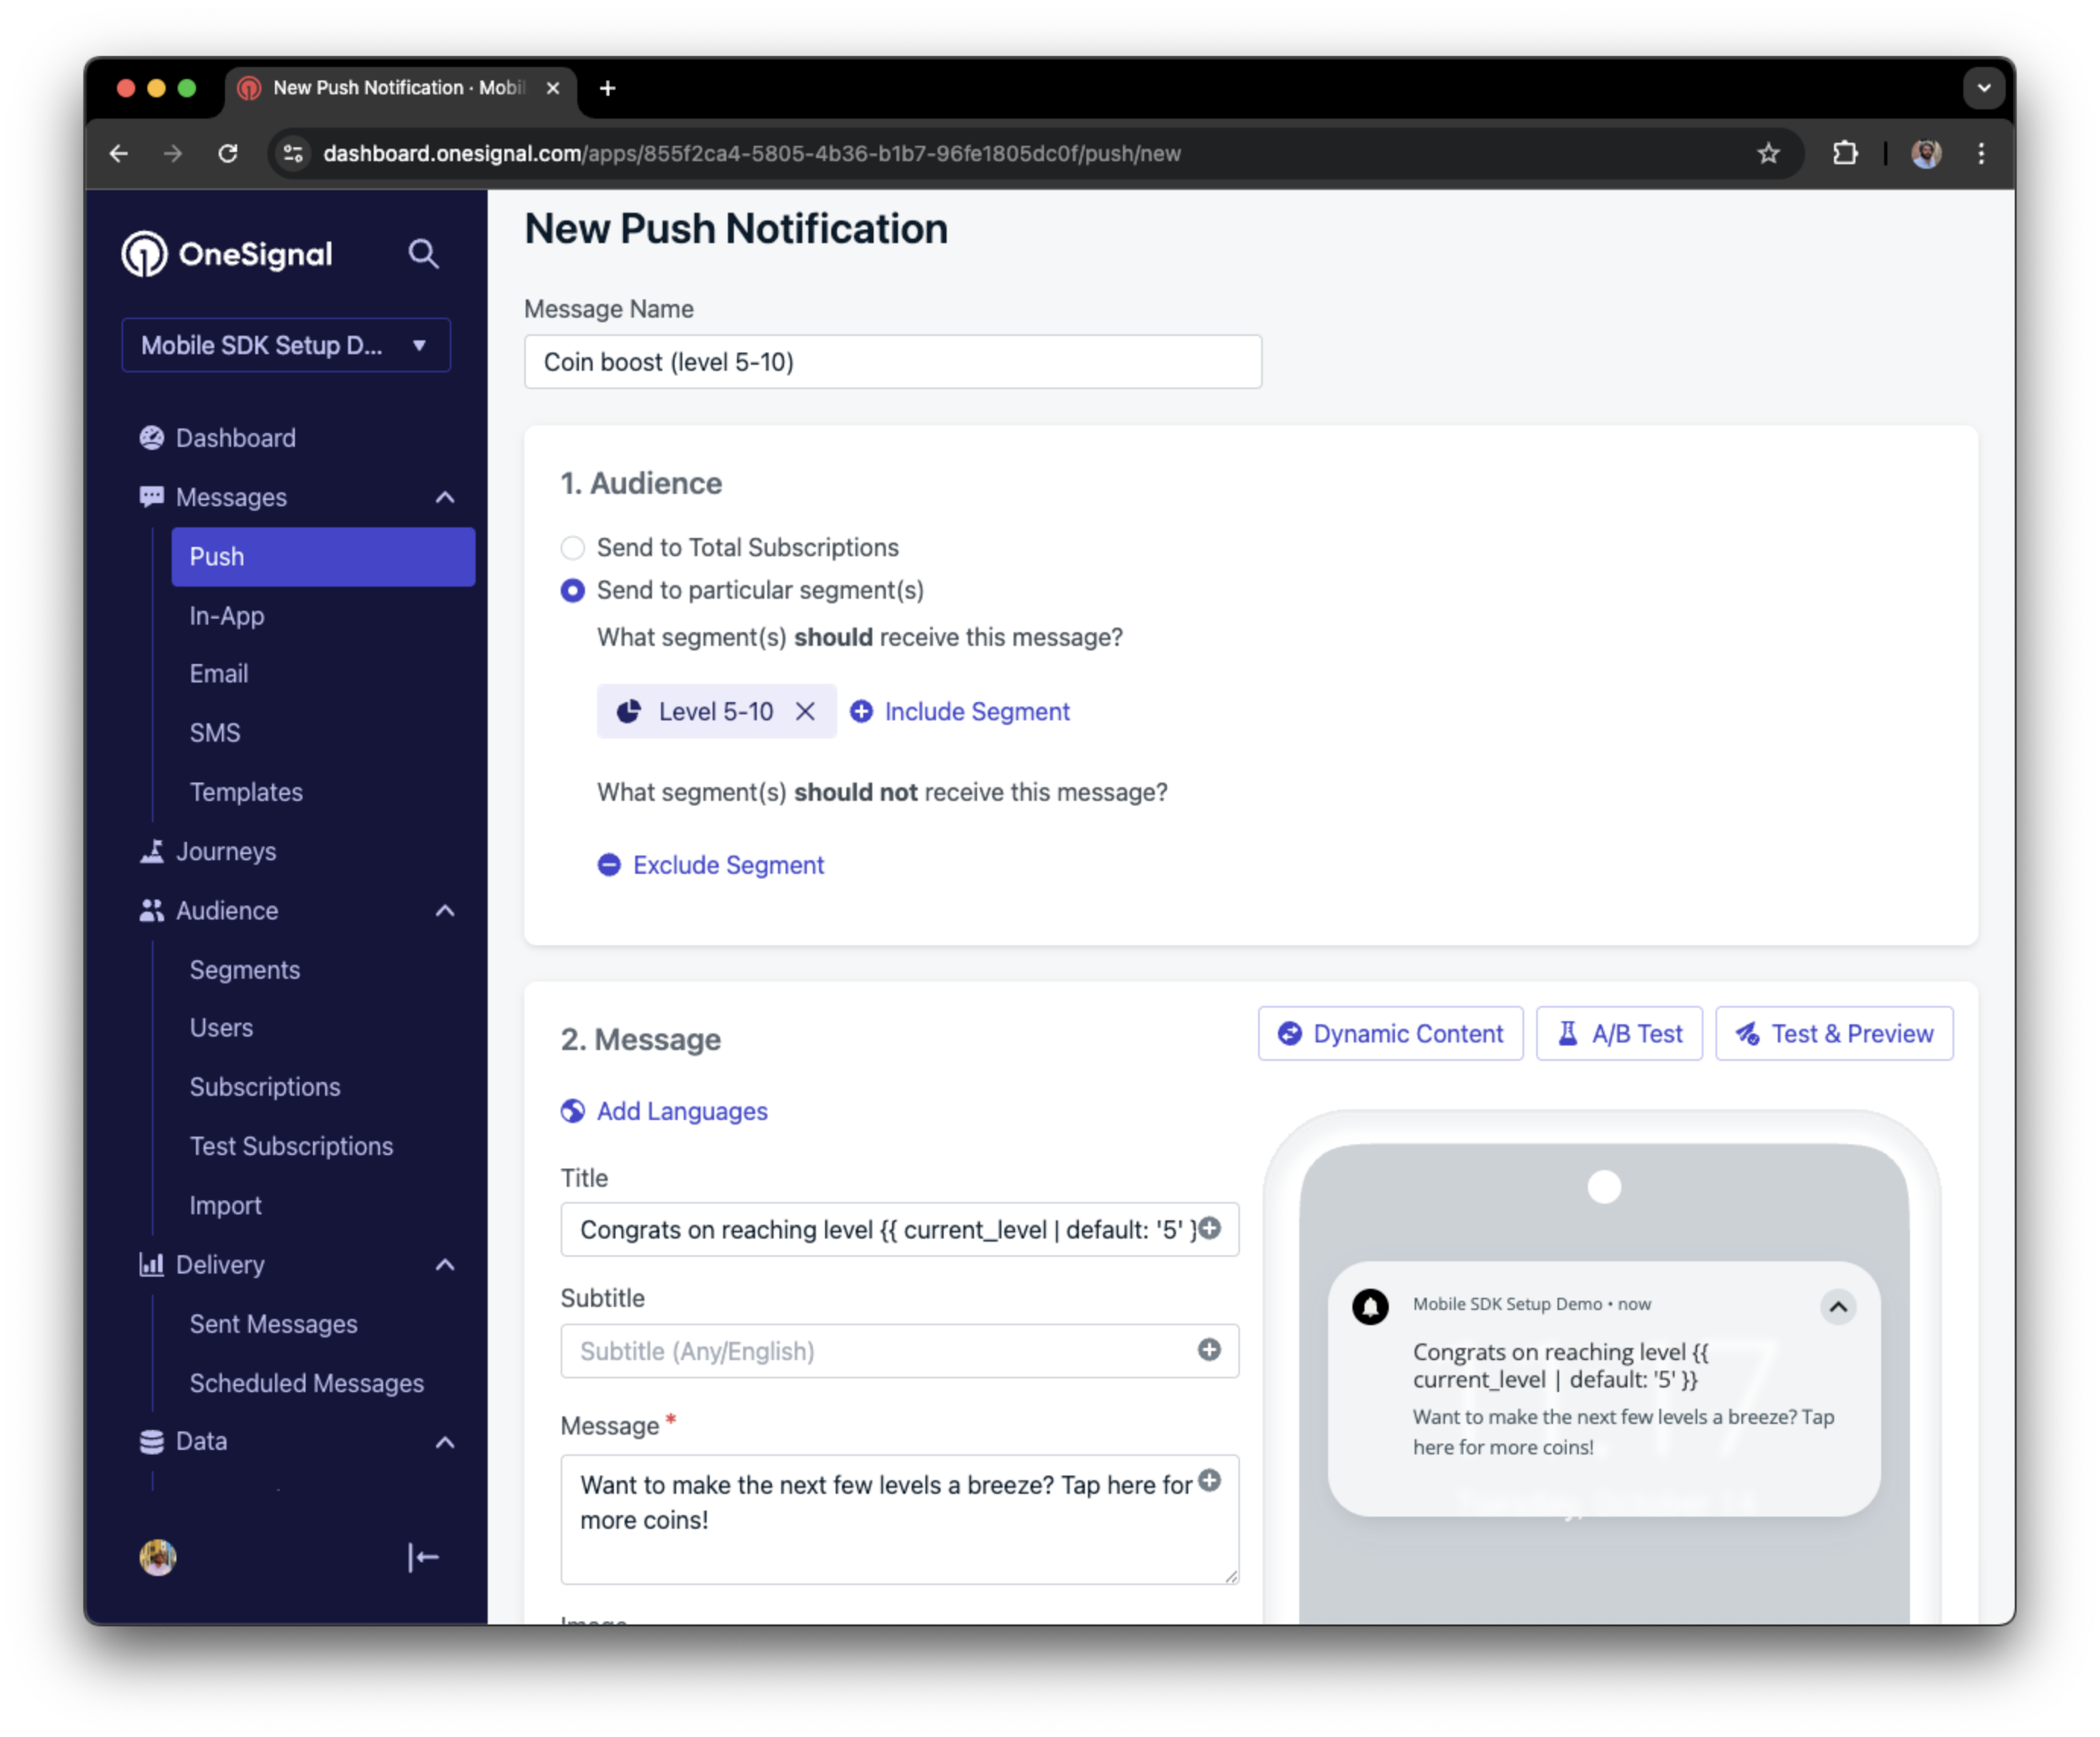
개인화된 메시지로 Level 5-10 세그먼트를 타겟팅하는 푸시 알림을 보여주는 스크린샷
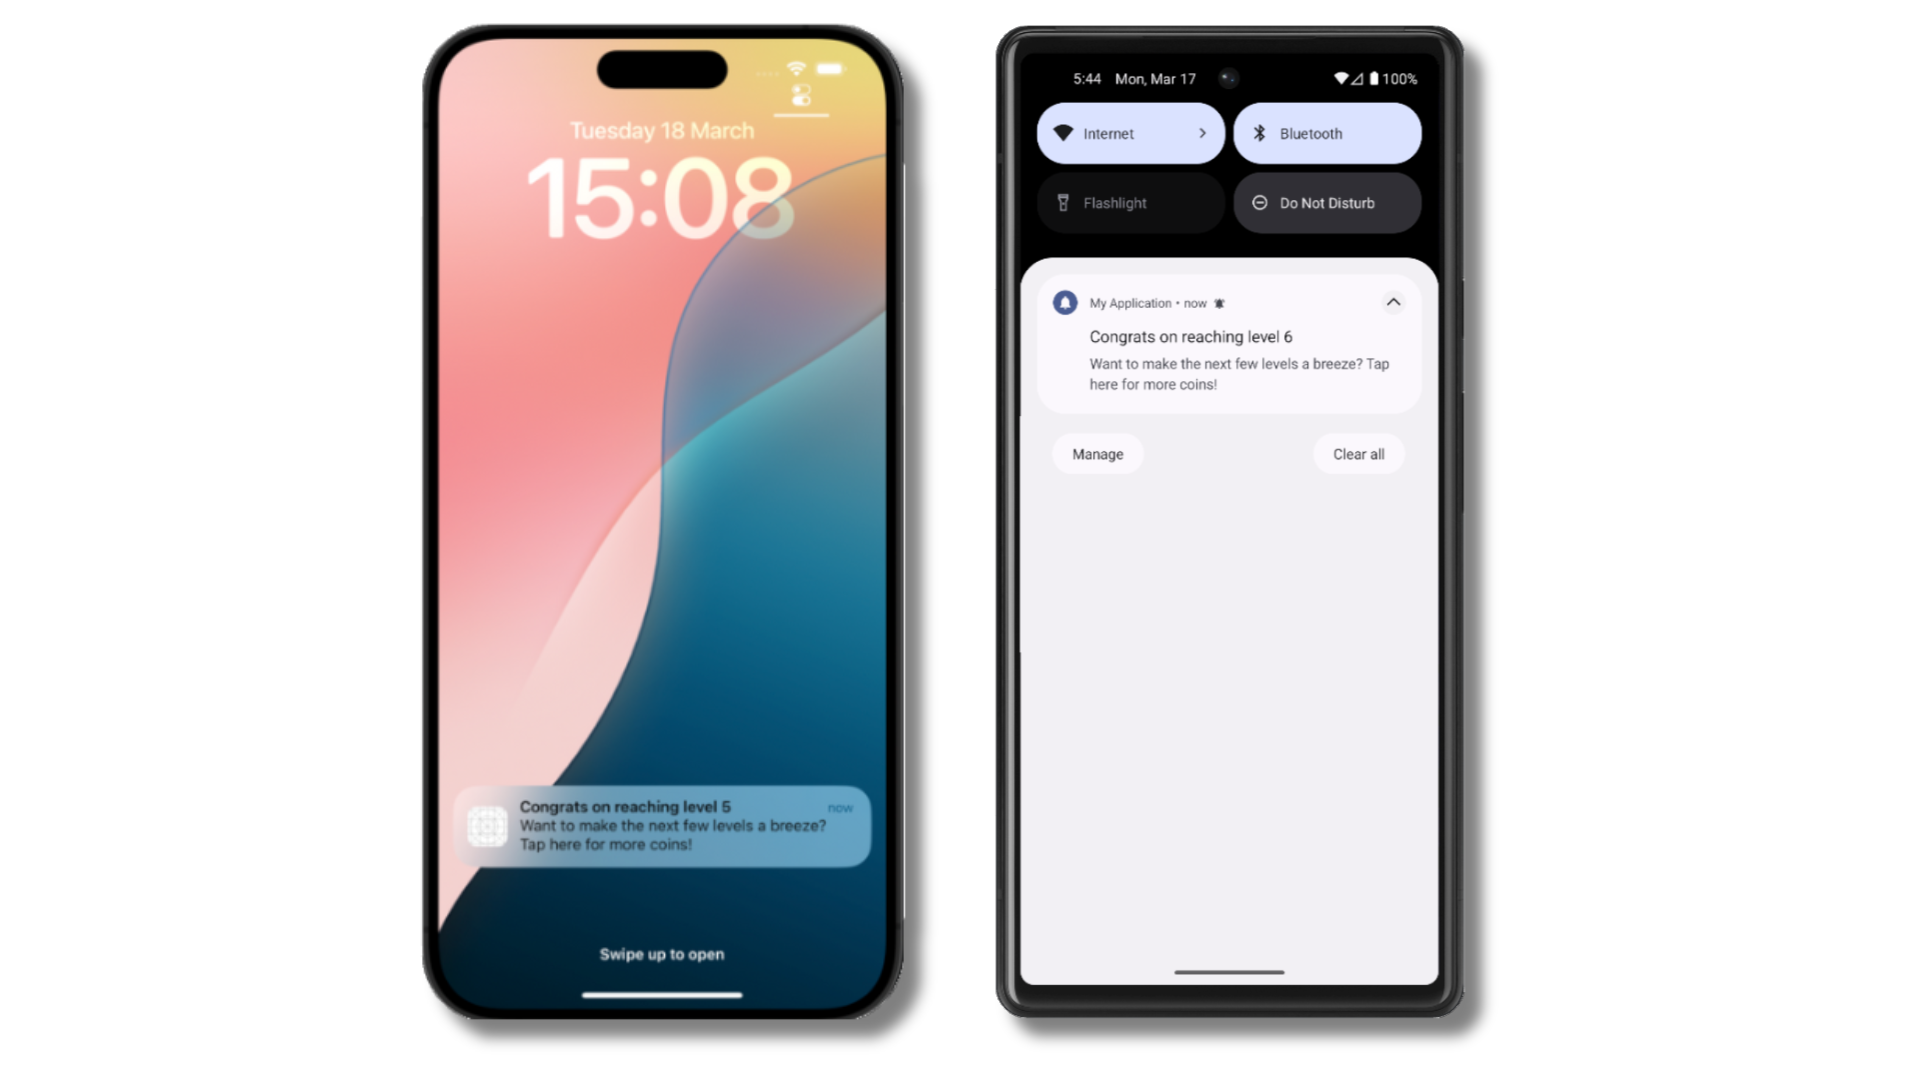
개인화된 콘텐츠와 함께 iOS 및 Android 기기에서 푸시 알림 수신
이메일 및/또는 SMS 구독 추가
이전에 SDK가 푸시 및 인앱 메시지를 보내기 위해 모바일 구독을 생성하는 방법을 살펴보았습니다. 해당 구독을 생성하여 이메일 및 SMS 채널을 통해 사용자에게 도달할 수도 있습니다.addEmail메서드를 사용하여 이메일 구독을 생성하세요.addSms메서드를 사용하여 SMS 구독을 생성하세요.
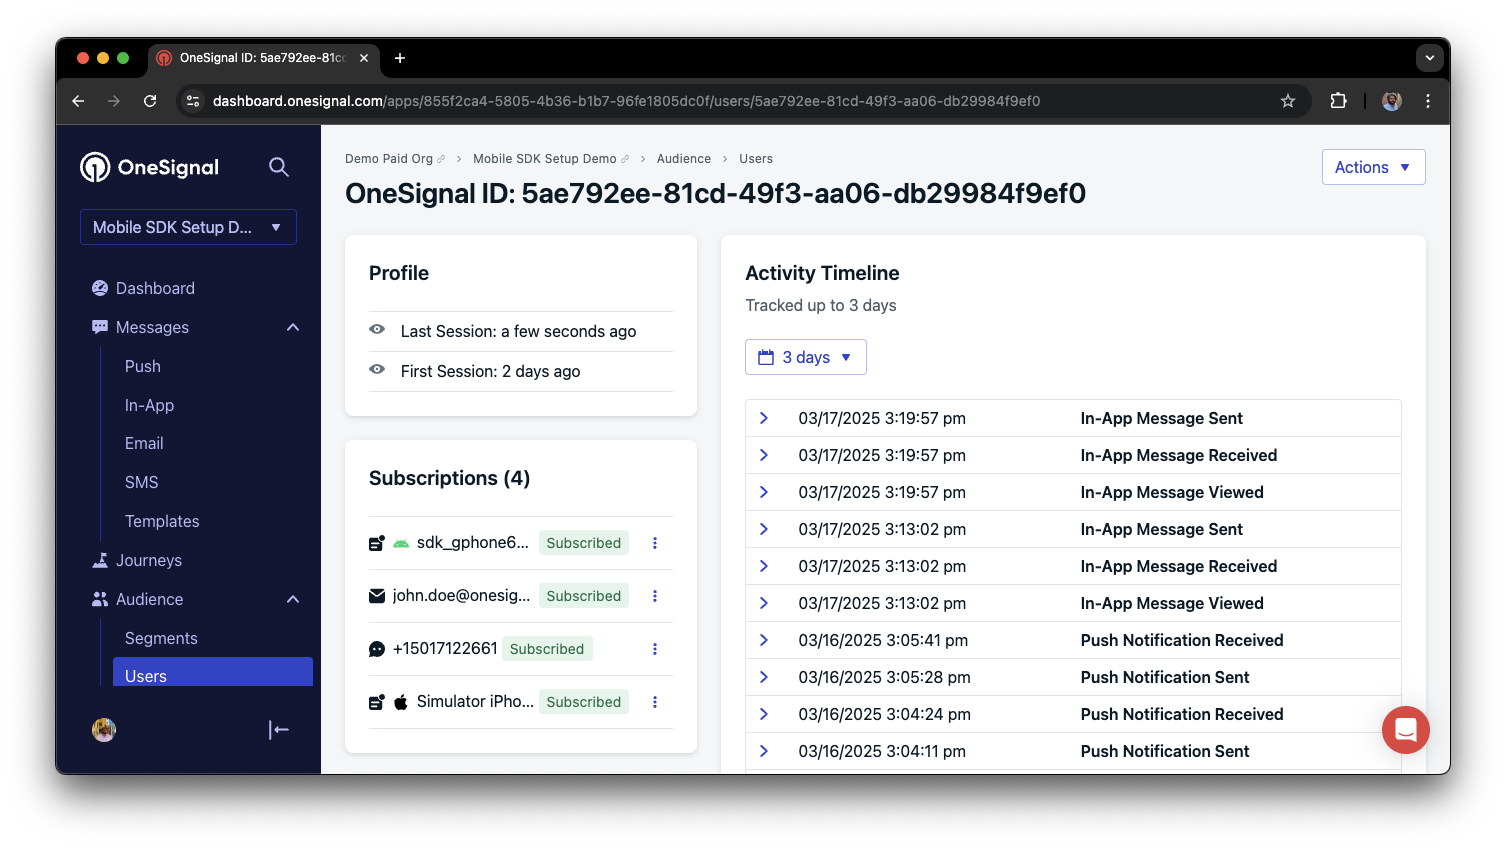
External ID로 통합된 푸시, 이메일 및 SMS 구독이 있는 사용자 프로필
- 이메일 또는 SMS 구독을 추가하기 전에 명시적인 동의를 얻으세요.
- 각 커뮤니케이션 채널의 이점을 사용자에게 설명하세요.
- 사용자가 선호하는 채널을 선택할 수 있도록 채널 기본 설정을 제공하세요.
개인정보 보호 및 사용자 동의
OneSignal이 사용자 데이터를 수집하는 시기를 제어하려면 SDK의 동의 게이팅 메서드를 사용하세요:setConsentRequired(true): 동의가 제공될 때까지 데이터 수집을 방지합니다.setConsentGiven(true): 동의가 부여되면 데이터 수집을 활성화합니다.
푸시 권한 프롬프트
앱을 열 때 즉시requestPermission()을 호출하는 대신 보다 전략적인 접근 방식을 취하세요. 인앱 메시지를 사용하여 권한을 요청하기 전에 푸시 알림의 가치를 설명하세요.
모범 사례 및 구현 세부 정보는 푸시 권한 프롬프트 가이드를 참조하세요.
푸시, 사용자 및 인앱 이벤트 수신
SDK 리스너를 사용하여 사용자 작업 및 상태 변경에 반응하세요. SDK는 연결할 수 있는 여러 이벤트 리스너를 제공합니다. 자세한 내용은 SDK 참조 가이드를 참조하세요.푸시 알림 이벤트
addClickListener(): 알림을 탭했을 때 감지합니다. 딥 링킹에 유용합니다.addForegroundLifecycleListener(): 포그라운드에서 알림이 작동하는 방식을 제어합니다.
사용자 상태 변경
- 사용자 상태에 대한
addObserver(): External ID가 설정되는 시기를 감지합니다. addPermissionObserver(): 기본 푸시 권한 프롬프트와 사용자의 특정 상호 작용을 추적합니다.- 푸시 구독에 대한
addObserver(): 푸시 구독 상태가 변경되는 시기를 추적합니다.
인앱 메시지 이벤트
addClickListener(): 인앱 클릭 작업을 처리합니다. 딥 링킹 또는 이벤트 추적에 이상적입니다.addLifecycleListener(): 인앱 메시지의 전체 수명 주기(표시, 클릭, 닫힘 등)를 추적합니다.
메서드 스위즐링 비활성화 (선택 사항)
기본적으로 OneSignal SDK는 메서드 스위즐링을 사용하여 푸시 알림 델리게이트 메서드를 자동으로 처리합니다. 앱에서 스위즐링을 비활성화해야 하는 경우(예: 다른 SDK와의 충돌을 방지하거나 알림 델리게이트 메서드에 대한 완전한 제어를 유지하기 위해)Info.plist를 통해 이를 해제할 수 있습니다.
스위즐링이 비활성화된 경우 알림 델리게이트 메서드를 OneSignal SDK에 수동으로 전달해야 합니다. 다른 모든 SDK 기능(리스너, 옵저버, 인앱 메시지, 아웃컴 등)은 계속 정상적으로 작동합니다.
1단계. Info.plist 플래그 추가
앱의Info.plist에 다음을 추가합니다:
2단계. UNUserNotificationCenter 델리게이트 설정
OneSignal.initialize를 호출하기 전에 AppDelegate를 UNUserNotificationCenter 델리게이트로 설정합니다. 이 설정 없이는 포그라운드 알림 표시 및 알림 탭 처리가 작동하지 않습니다.
3단계. 알림 델리게이트 메서드 전달
AppDelegate에 다음 메서드를 구현합니다. 모든 메서드는 OneSignal.Notifications를 통해 호출됩니다.
토큰 등록:
OSNotification 객체와 함께 완료 블록을 호출합니다. nil이 아닌 경우 SDK는 알림을 표시하려는 것이므로 원하는 표시 옵션을 전달합니다. nil인 경우(예: IAM 미리보기) 표시 옵션을 전달하지 않습니다.
onWillDisplayNotification 수명 주기 리스너와 preventDefault / display API는 수동 전달에서도 계속 작동합니다. SDK는 handleWillPresentNotificationInForegroundWithPayload 내에서 리스너를 호출합니다.선택 사항: 배지 수 설정
스위즐링이 비활성화된 경우 SDK는 배지 변경을 가로챌 수 없습니다. 이 메서드를 사용하여 배지 수를 설정하고 OneSignal의 내부 배지 캐시와 동기화합니다:SwiftUI 앱
SwiftUI 앱에는 기본적으로AppDelegate가 없습니다. @UIApplicationDelegateAdaptor를 사용하여 추가한 후 위에 표시된 모든 전달 메서드를 구현합니다:
API 참조
고급 설정 및 기능
통합을 향상시키기 위한 더 많은 기능을 살펴보세요:- 🔁 다른 서비스에서 OneSignal로 마이그레이션
- 🌍 위치 추적
- 🔗 딥 링킹
- 🔌 통합
- 🧩 Mobile Service Extensions
- 🛎️ 액션 버튼
- 🌐 다국어 메시징
- 🛡️ Identity Verification
- 📊 Custom Outcomes
- 📲 Live Activities
Mobile SDK 설정 및 참조
Mobile push 설정 가이드를 검토하여 모든 주요 기능을 활성화했는지 확인하세요. 사용 가능한 메서드 및 구성 옵션에 대한 전체 세부 정보는 Mobile SDK 참조를 참조하세요.support@onesignal.com请包含以下信息:- 您遇到的问题详情以及复现步骤(如有)
- 您的 OneSignal 应用 ID
- 外部 ID 或订阅 ID(如适用)
- 您在 OneSignal 控制台中测试的消息 URL(如适用)
- 任何相关的日志或错误信息