Set up iOS Live Activities with OneSignal to display real-time updates on the Lock Screen and Dynamic Island.
Live Activities let your iOS app show real-time updates directly on the Lock Screen and Dynamic Island. Ideal for delivery tracking, sports scores, or time-sensitive transactional updates, they keep users informed without opening the app.
Android has a similar feature called Live Updates.
These steps walk you through setting up Live Activities quickly. For more details and design customizations, see Apple’s Live Activities Developer docs.
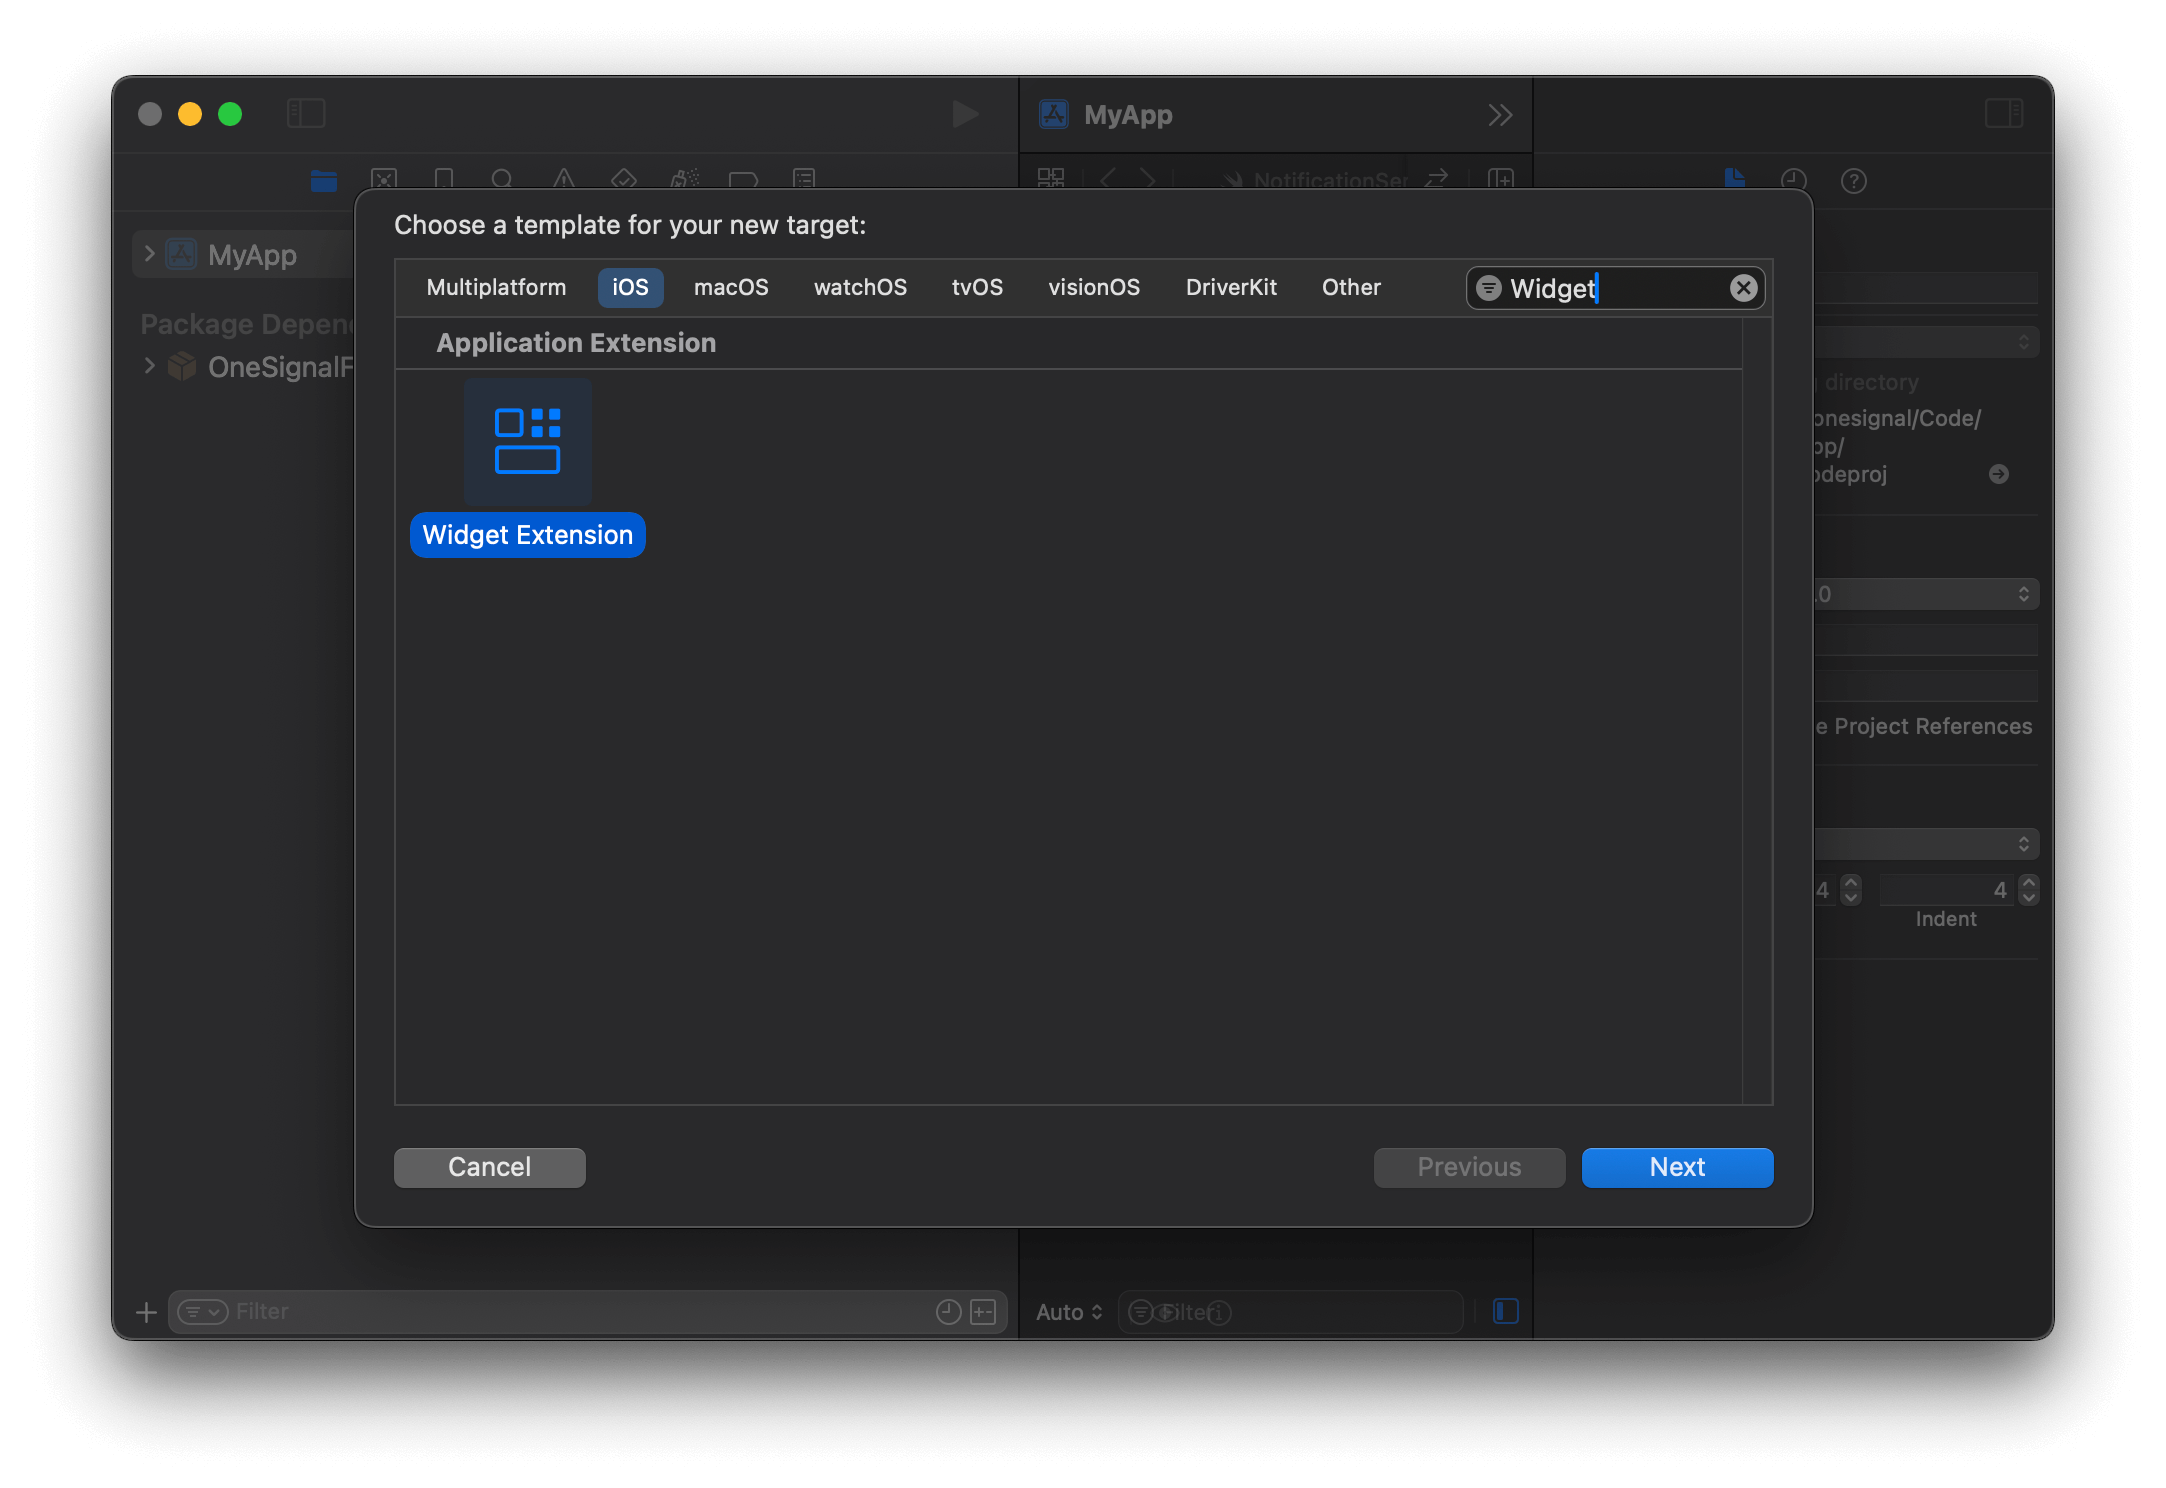
In Xcode, go to File > New > Target… > Widget Extension.
Add a new Widget Extension target for your app in Xcode.
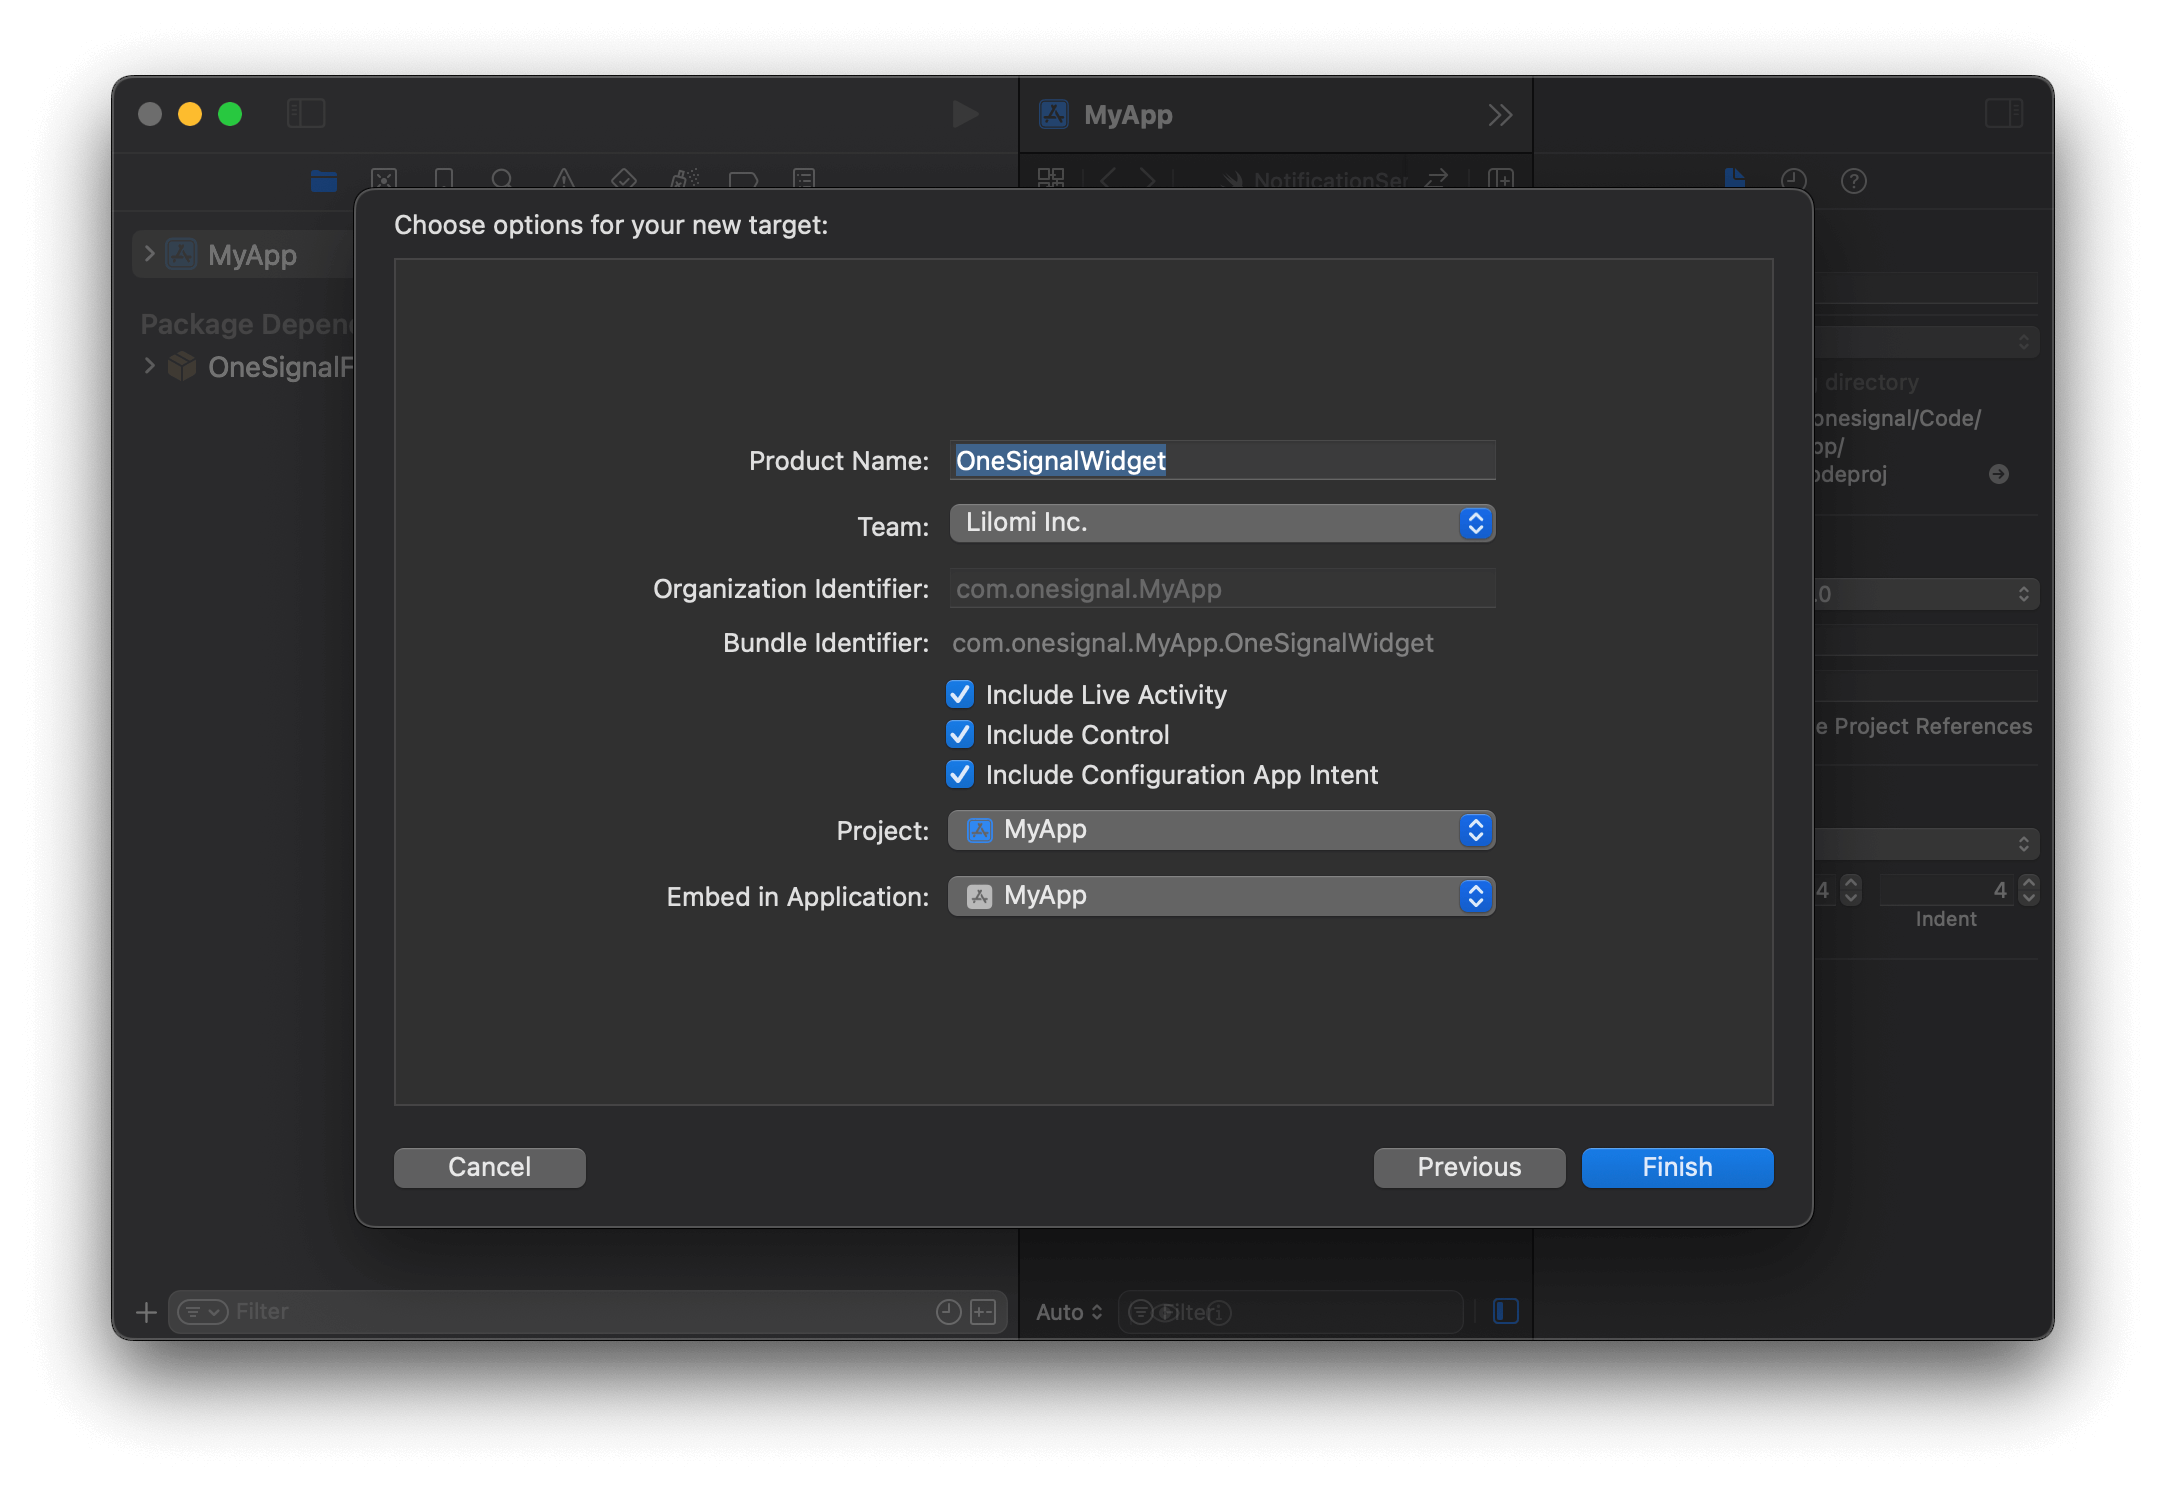
Select and press Next.Configure the Widget Extension by providing a name (example: OneSignalWidget) and ensure Include Live Activity is selected. Then click Finish.
Widget Extension options for a Live Activity.
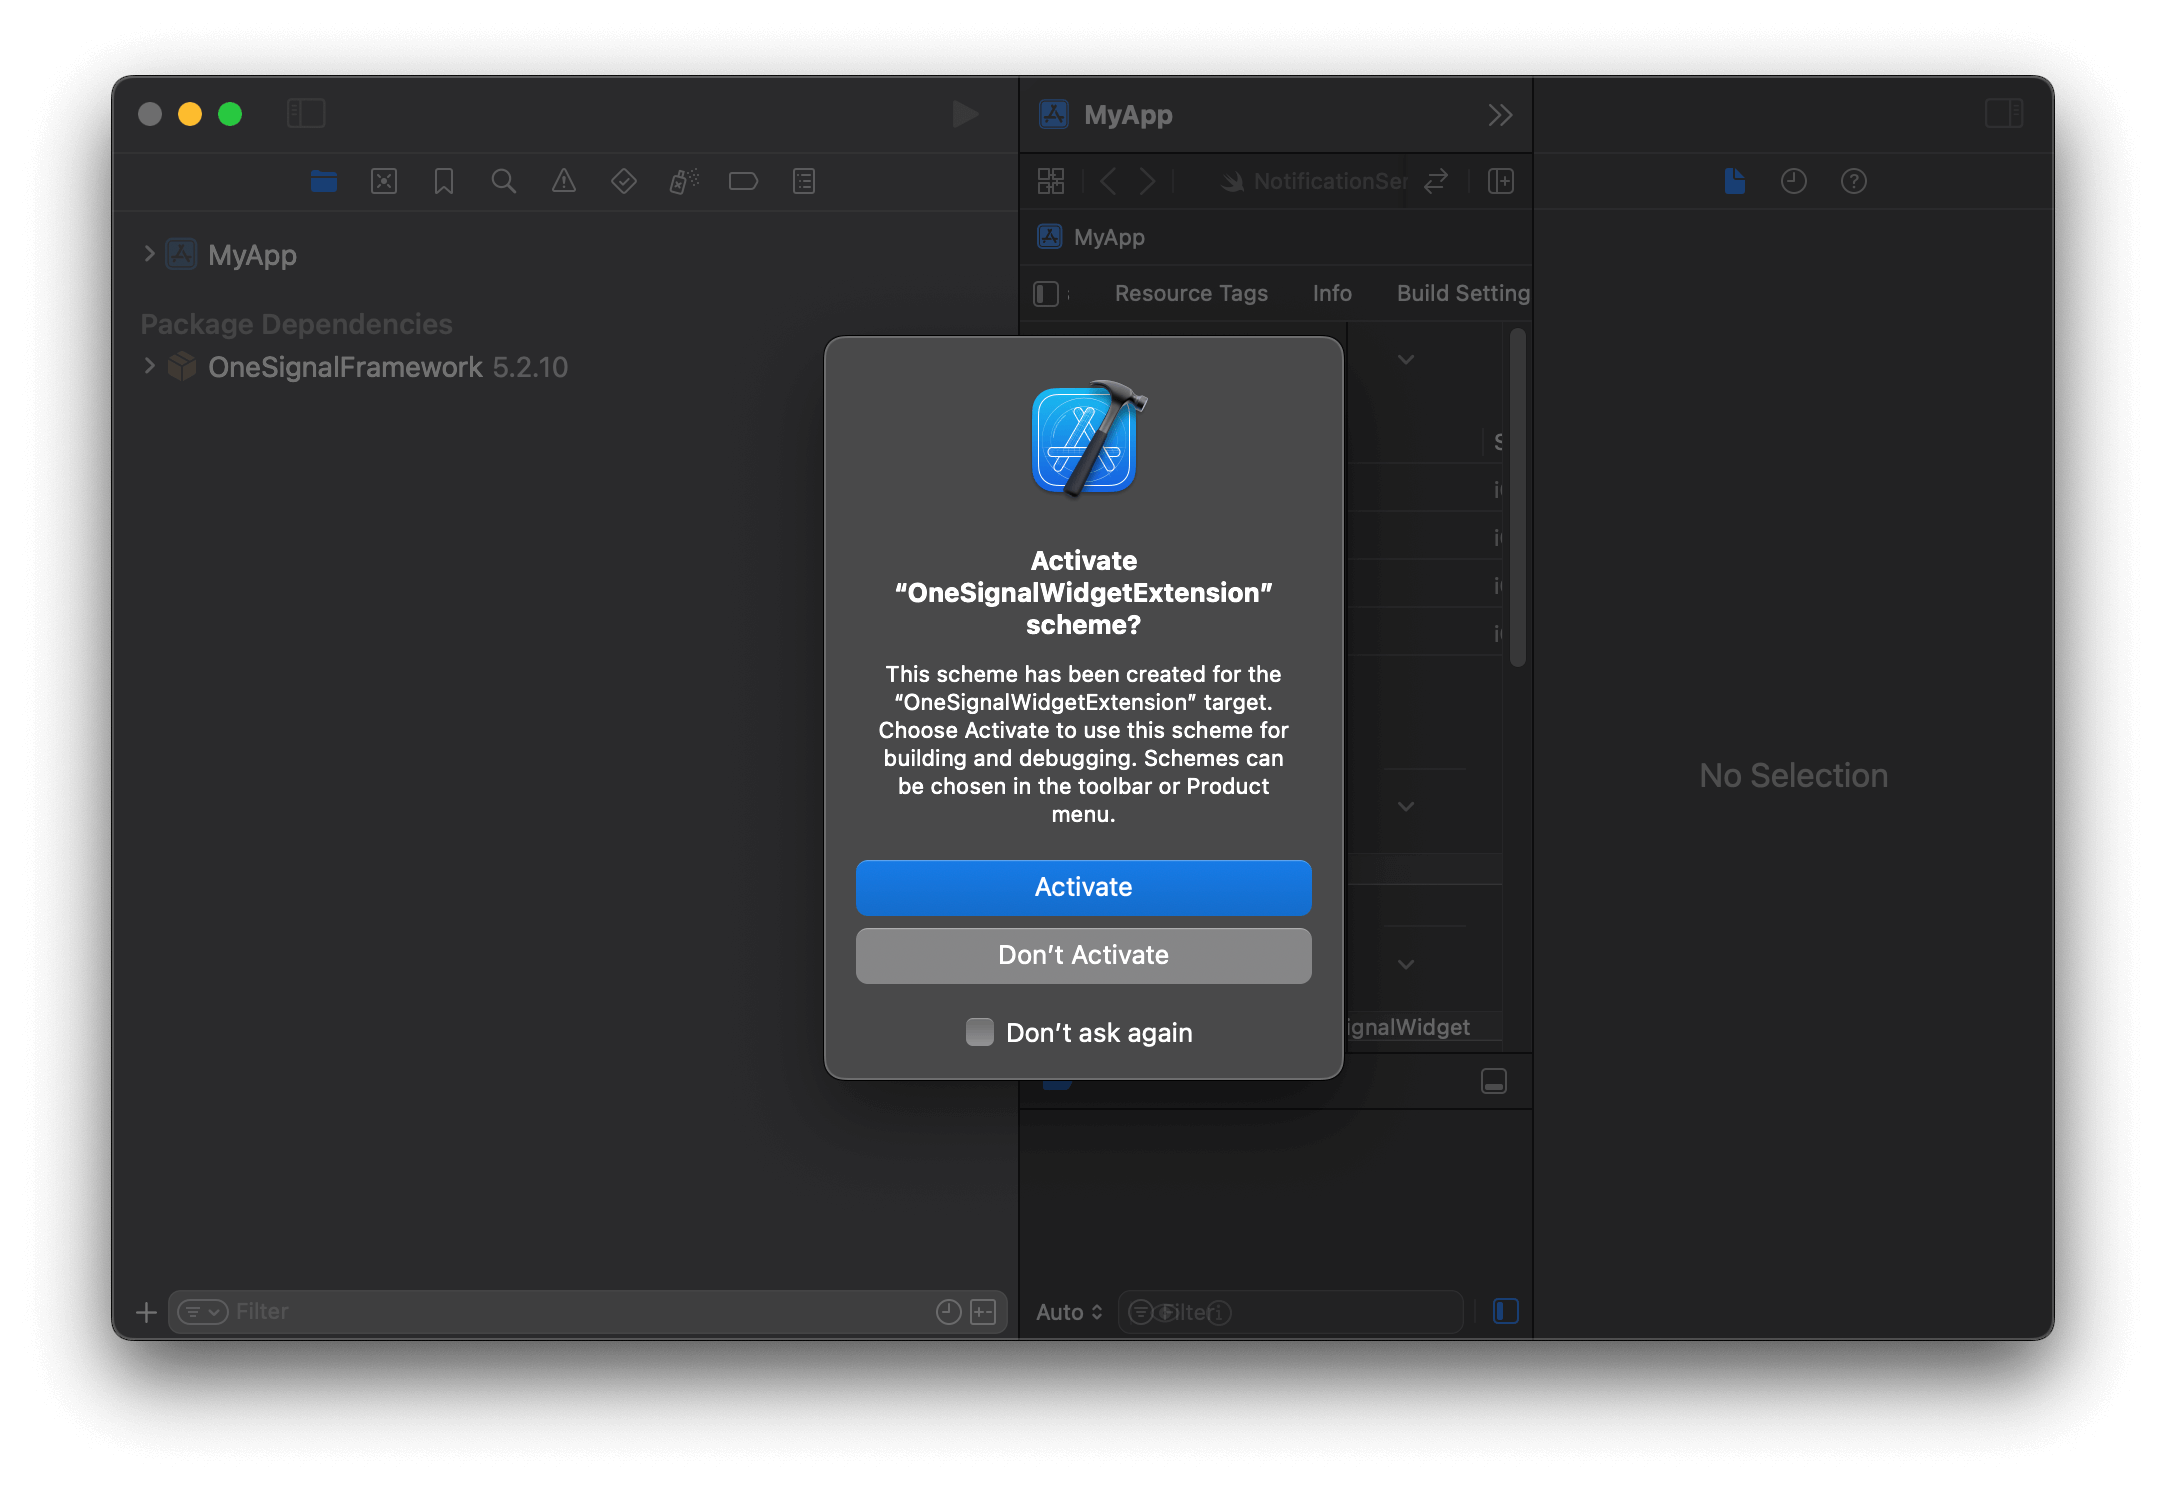
Click Don’t Activate if prompted to activate the scheme.
If you are using a wrapper SDK (e.g. Flutter) with SPM enabled, you can skip this step. The OneSignal package is already resolved and available to all targets.
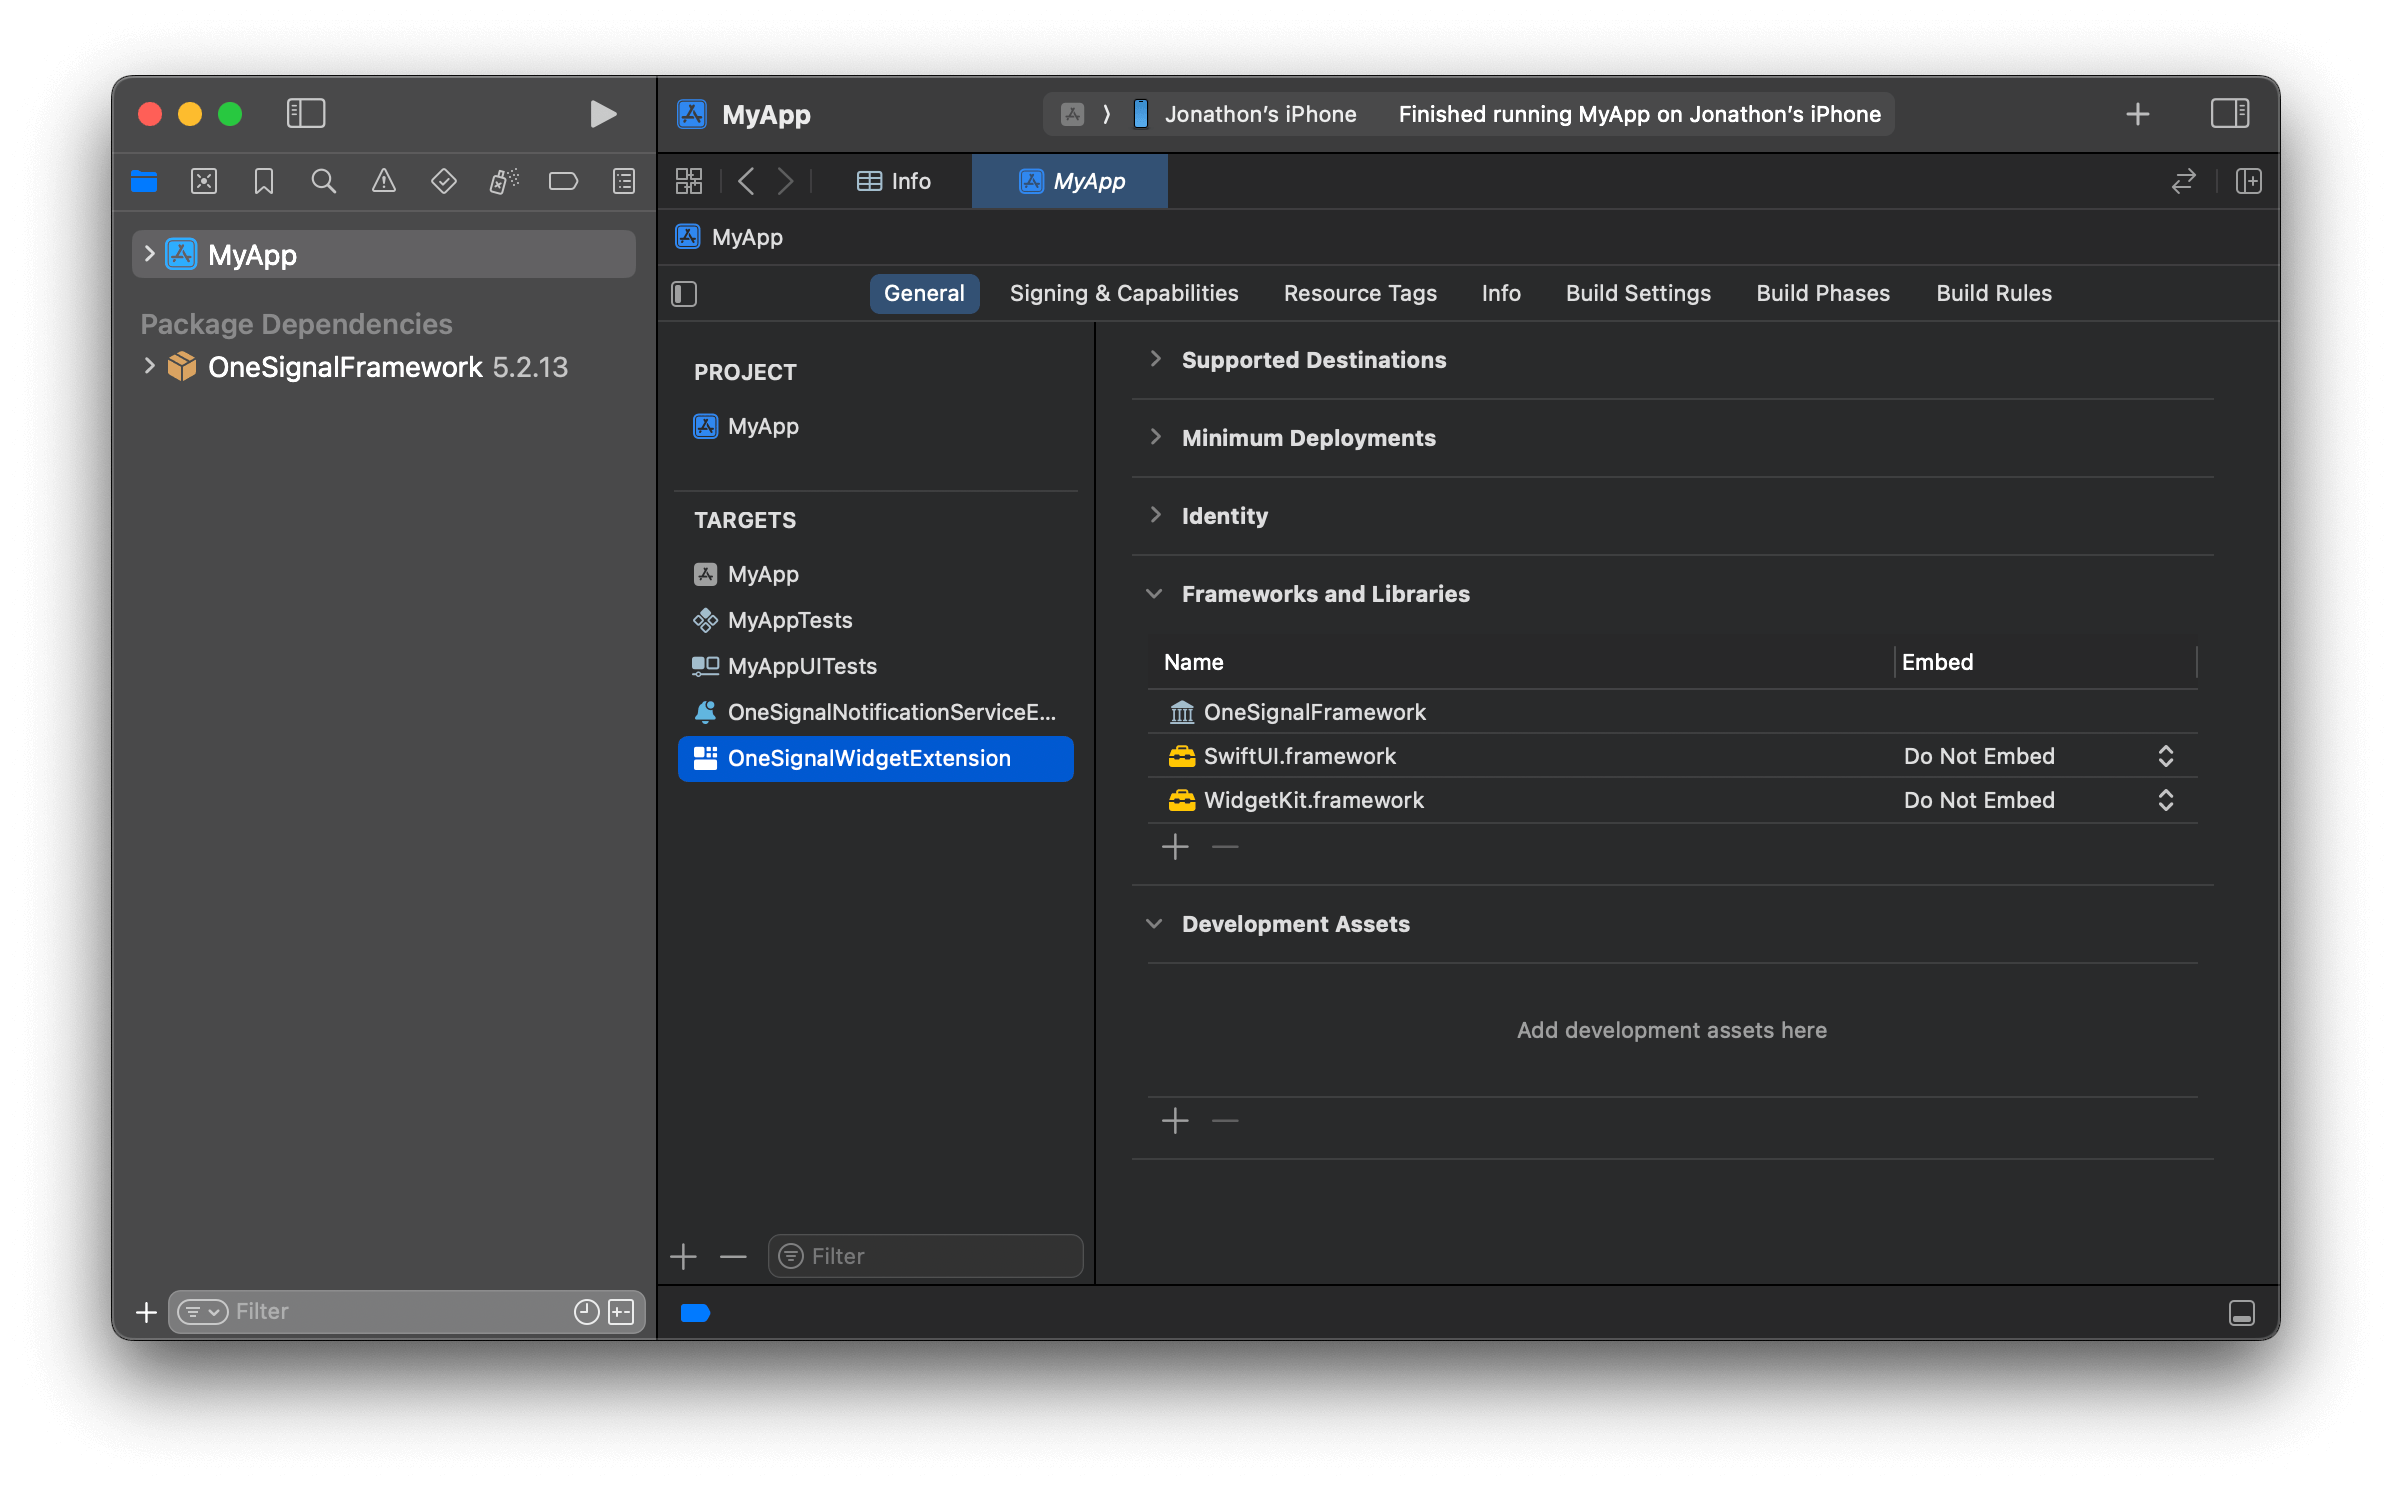
In your Widget Extension target, add the OneSignalFramework under General > Frameworks, Libraries and Embedded Content:
Add the OneSignalFramework to your Widget Extension target.
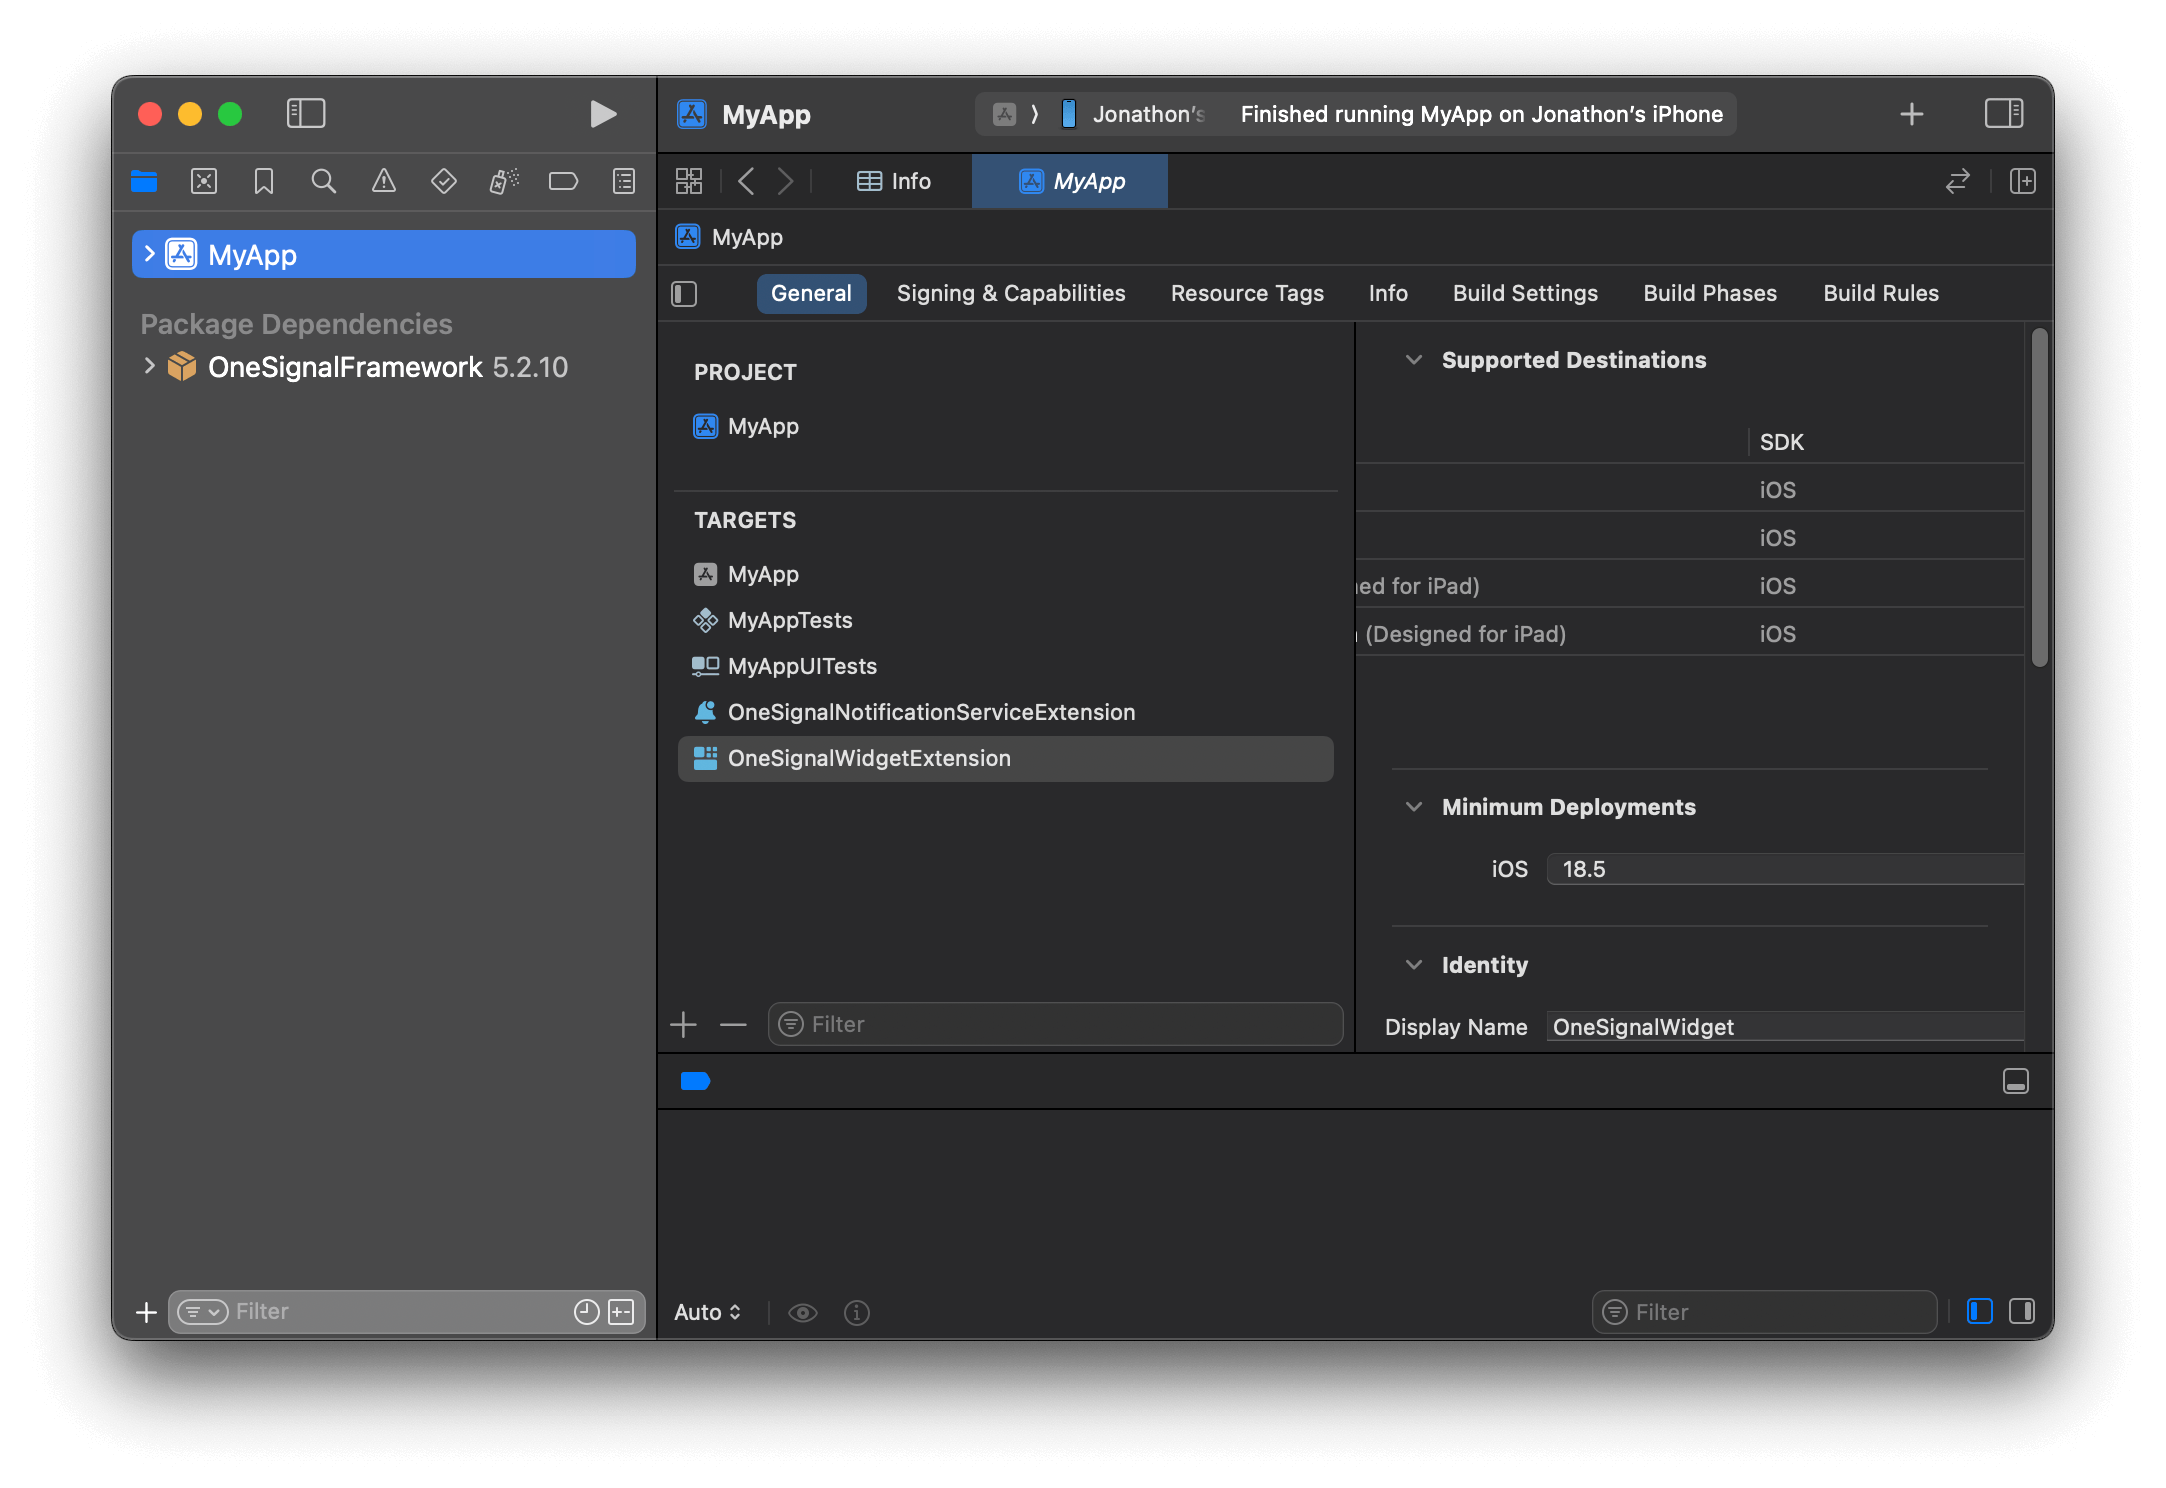
Find the name of your widget extension target in your project’s Targets list. Example’s name is OneSignalWidgetExtension.
Find the name of your widget extension target.
Open your Podfile and add the following code. Replace OneSignalWidgetExtension with the name of your widget extension target.
target 'OneSignalWidgetExtension' do use_frameworks! pod 'OneSignal/OneSignal', '>= 5.0.0', '< 6.0'end
# Uncomment the next line to define a global platform for your project# platform :ios, '15.0'target 'Demo Momenta' do # Comment the next line if you don't want to use dynamic frameworks use_frameworks! pod 'OneSignal/OneSignal', '>= 5.0.0', '< 6.0' pod 'OneSignal/OneSignalInAppMessages', '>= 5.0.0', '< 6.0'endtarget 'OneSignalNotificationServiceExtension' do use_frameworks! pod 'OneSignal/OneSignal', '>= 5.0.0', '< 6.0'endtarget 'OneSignalWidgetExtension' do use_frameworks! pod 'OneSignal/OneSignal', '>= 5.0.0', '< 6.0'end
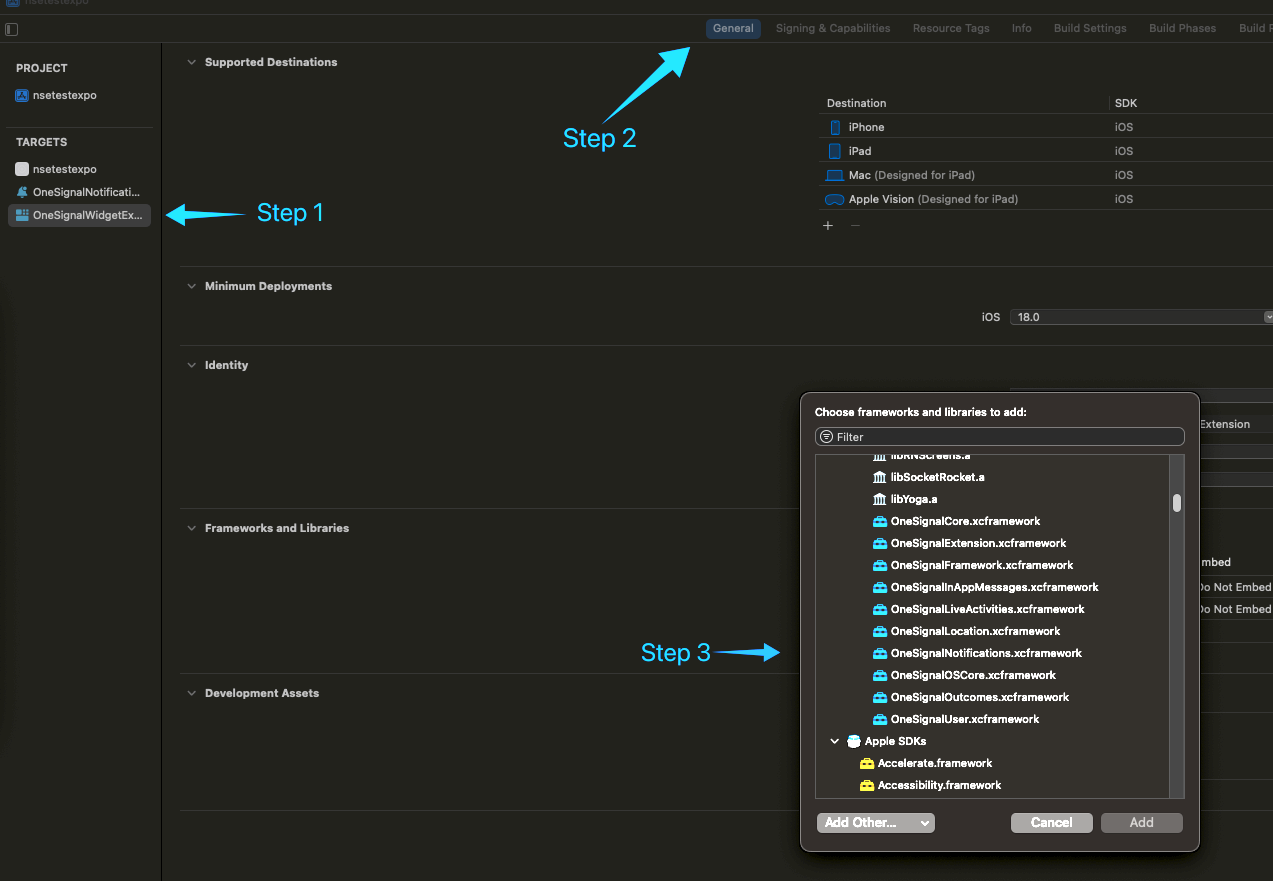
Close Xcode and run pod repo update && pod install to install the OneSignalLiveActivities pod.If you continue to see the error “No such module ‘OneSignalLiveActivities’” after doing this, you can add the dependency manually by going to your “Widget Extension Target” > General > Frameworks and Libraries > + icon. Select the OneSignalLiveActivities framework:
Add the OneSignalLiveActivities framework manually.
Open the your-nameLiveActivity.swift file (example: OneSignalWidgetLiveActivity.swift) to define the properties of the struct and to make changes to the widget UI.
your-nameAttributes describes the static content of your Live Activity.
ContentState describes the dynamic content of your Live Activity.
Send any Date-typed field in your custom Attributes or ContentState struct as a Unix timestamp in seconds, not as an ISO 8601 string and not in milliseconds. ActivityKit decodes date values in the push payload as seconds since 1970, and your app cannot change that strategy. To avoid the ambiguity, declare the field as a Double of Unix seconds and convert it in your widget. OneSignal’s stale_date and dismissal_date parameters are also Unix timestamps in seconds.
If you are following the example, copy-paste the code below into your OneSignalWidgetLiveActivity.swift file.
your-nameLiveActivity.swift
import ActivityKitimport WidgetKitimport SwiftUI// Import the OneSignalLiveActivities module// If you get an error about the module not being found, return to step 3 and ensure you have added the OneSignalLiveActivities pod correctly.import OneSignalLiveActivities// Update to inherit from OneSignalLiveActivityAttributes// This will be used in your API requests to start a Live Activitystruct OneSignalWidgetAttributes: OneSignalLiveActivityAttributes { // Update to inherit from OneSignalLiveActivityContentState public struct ContentState: OneSignalLiveActivityContentState { // Dynamic stateful properties about your activity go here! var emoji: String // Add a reference to OneSignalLiveActivityContentStateData? var onesignal: OneSignalLiveActivityContentStateData? } // Fixed non-changing properties about your activity go here! var name: String // Add a reference to OneSignalLiveActivityAttributeData var onesignal: OneSignalLiveActivityAttributeData}struct OneSignalWidgetLiveActivity: Widget { var body: some WidgetConfiguration { // Update to use `for: the-name-of-your-attributes-struct` // This will be used in your API requests to start a Live Activity ActivityConfiguration(for: OneSignalWidgetAttributes.self) { context in // Lock screen/banner UI goes here // Update to show the attributes sent via the payload VStack { Text("Hello \(context.attributes.name) \(context.state.emoji)") } .activityBackgroundTint(Color.cyan) .activitySystemActionForegroundColor(Color.black) } dynamicIsland: { context in DynamicIsland { // Expanded UI goes here. Compose the expanded UI through // various regions, like leading/trailing/center/bottom DynamicIslandExpandedRegion(.leading) { Text("Leading") } DynamicIslandExpandedRegion(.trailing) { Text("Trailing") } DynamicIslandExpandedRegion(.bottom) { Text("Bottom \(context.state.emoji)") // more content } } compactLeading: { Text("L") } compactTrailing: { Text("T \(context.state.emoji)") } minimal: { Text(context.state.emoji) } .widgetURL(URL(string: "http://www.apple.com")) .keylineTint(Color.red) } }}
This step is only required when using custom attributes (e.g., OneSignalWidgetAttributes). If you are using DefaultLiveActivityAttributes, skip this step. The type is provided by the OneSignal SDK and is already accessible from your main app target.
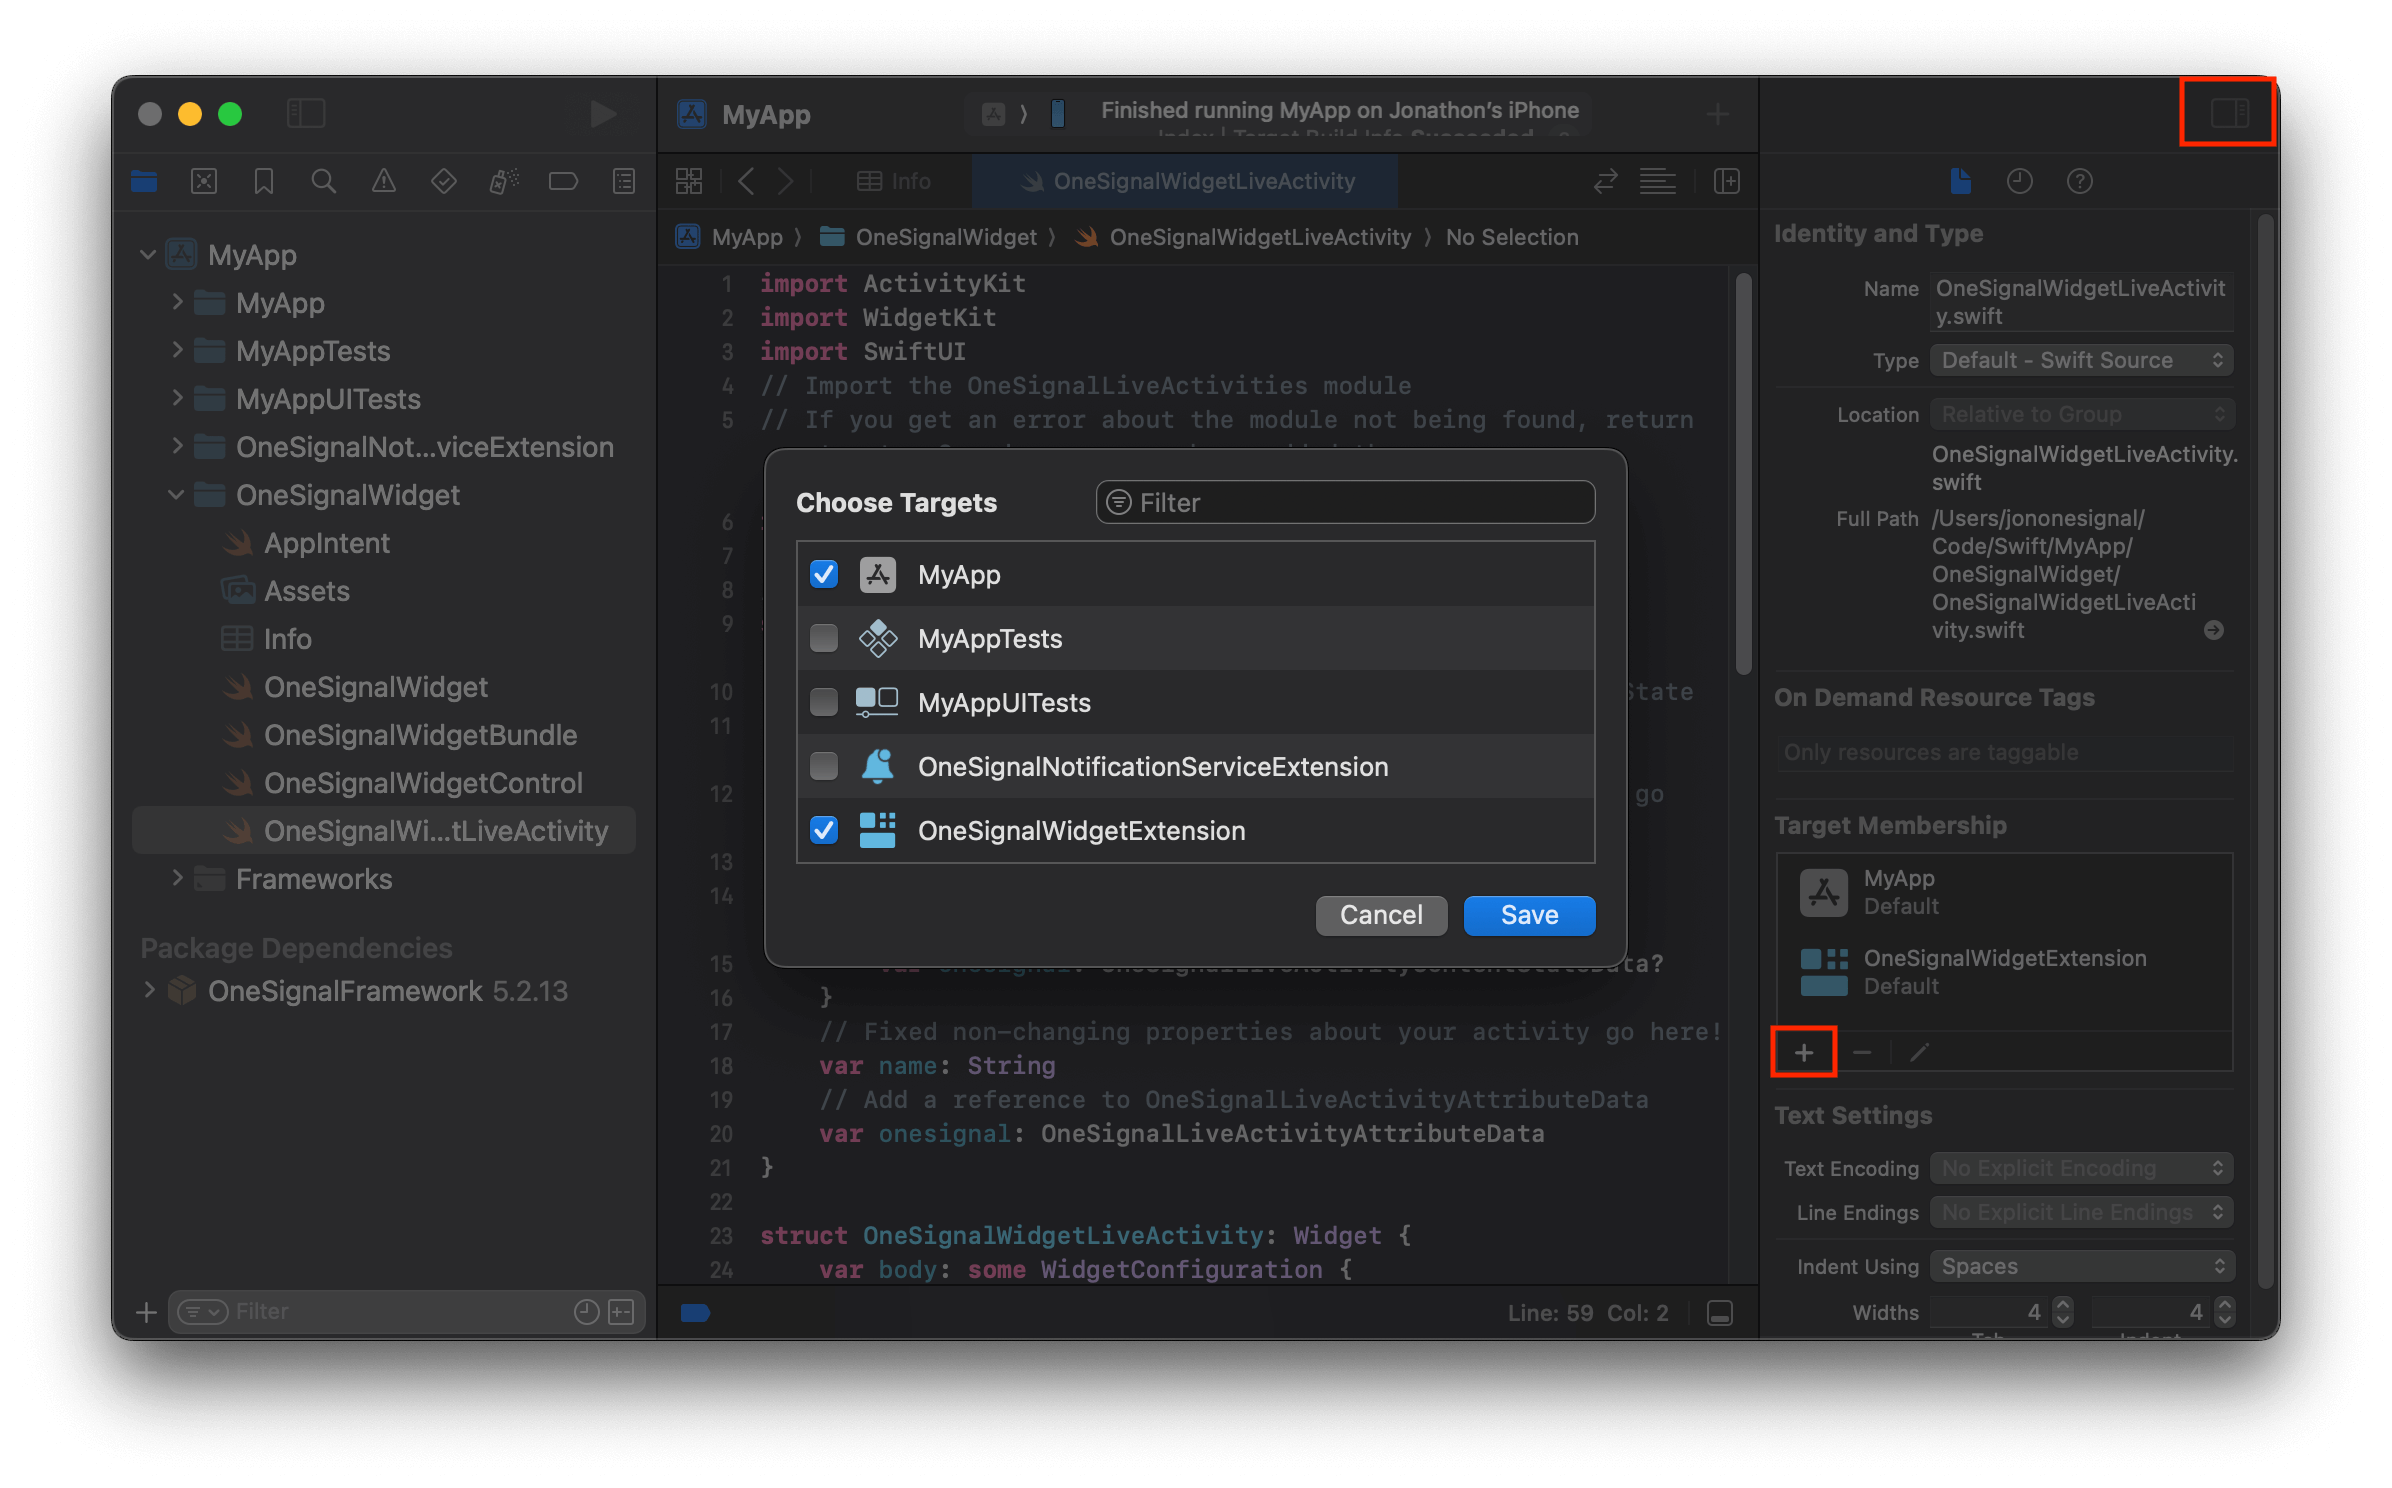
Add your main app target to the Target Membership list in the your-nameLiveActivity.swift file. This is necessary so the main app target can reference your custom attributes struct in the setup call (Step 6).In Xcode, open the Inspector panel on the right side of the screen. Within Target Membership, click the + button and select your main app target containing the ContentView and your OneSignal initialization code.
Call OneSignal.LiveActivities.setup in your AppDelegate, after OneSignal SDK initialization.Replace OneSignalWidgetAttributes with the name of your Live Activity attributes struct.
AppDelegate
// Import the OneSignalLiveActivities moduleimport OneSignalLiveActivities// This should be added after initializing the OneSignal SDKif #available(iOS 16.1, *) { OneSignal.LiveActivities.setup(OneSignalWidgetAttributes.self) // If you have multiple Live Activities, you can add them here with the setup method // OneSignal.LiveActivities.setup(LiveActivityWidgetAttributes-2.self)}
This manages and reports updates using ActivityKit async sequences.
The OneSignal SDK automatically observes the following ActivityKit async sequences. While Apple hasn’t documented whether these sequences support multiple observers, our testing hasn’t revealed any issues. However, if your app also directly observes these sequences, be aware of potential conflicts:
There are 2 options to start a Live Activity on a device:
Push-to-start
Trigger-in-app
Send a Push To Start API request. Be sure all names and IDs match your widget’s configuration exactly (parameters are case-sensitive). If anything is missing or incorrectly added, you may encounter issues when trying to launch the widget.Here is an example request that will work for the example above.Replace:
YOUR_APP_ID with your OneSignal App ID.
YOUR_APP_API_KEY with your OneSignal API key.
OneSignalWidgetAttributes with the name of your Widget Attributes struct.
This example uses the fixed activity_id of push-to-start so you can test quickly. In production, choose the value deliberately: it is the key that determines which devices a later update reaches. See Choose an activity ID.If you are following the example code provided, you should see the Live Activity on your device’s Lock Screen.
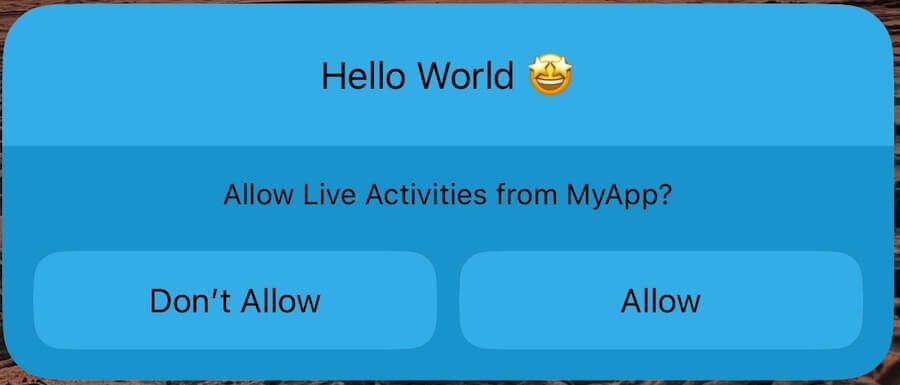
Live Activity on the Lock Screen.
You successfully started a Live Activity with push-to-start!Users will need to select “Allow” to continue getting updates.
You can have a user trigger a Live Activity while interacting with your app.For example, when a user has an active event going on (they placed an order, a game is in progress, an event is about to start, etc.) and opens your app, you can display a Live Activity automatically.This example uses a button to start the Live Activity manually.
import SwiftUIimport ActivityKitimport OneSignalFrameworkimport OneSignalLiveActivitiesstruct ContentView: View { @StateObject private var viewModel = LiveActivityViewModel() var body: some View { VStack { Button("Start Live Activity") { viewModel.startLiveActivity() } } }}class LiveActivityViewModel: ObservableObject { func startLiveActivity() { let osAttributes = OneSignalLiveActivityAttributeData.create(activityId: "click-to-start") let attributes = OneSignalWidgetAttributes(name: "OneSignal", onesignal: osAttributes) let contentState = OneSignalWidgetAttributes.ContentState(emoji:"🤩", onesignal: nil) do { let activity = try Activity<OneSignalWidgetAttributes>.request( attributes: attributes, contentState: contentState, pushType: .token) } catch { print(error.localizedDescription) } }}
Upon clicking the button it will launch the Live Activity.
Track when users tap on your Live Activities and Dynamic Islands by implementing OneSignal’s click tracking. This enables you to measure engagement and optionally deep link users to specific content in your app.
Add URL handling in your app to track clicks and route users appropriately:
import OneSignalLiveActivities// AppDelegate example:func application(_ app: UIApplication, open url: URL, options: [UIApplication.OpenURLOptionsKey : Any] = [:]) -> Bool { let originalURL = OneSignal.LiveActivities.trackClickAndReturnOriginal(url) // Handle the original URL and navigate user if let url = originalURL { // Your custom URL routing logic return handleDeepLink(url) } return false}// SceneDelegate example:func scene(_ scene: UIScene, openURLContexts URLContexts: Set) { guard let url = URLContexts.first?.url else { return } let originalURL = OneSignal.LiveActivities.trackClickAndReturnOriginal(url) if let url = originalURL { // Your custom URL routing logic handleDeepLink(url) }}// SwiftUI example:.onOpenURL { url in let originalURL = OneSignal.LiveActivities.trackClickAndReturnOriginal(url) if let url = originalURL { // Your custom URL routing logic handleDeepLink(url) }}
The trackClickAndReturnOriginal() method automatically tracks the click with OneSignal and returns the original URL you specified in the widget for your app to handle.
Use the Update Live Activity API to update active widgets.Match the activity_id used when starting the activity.This example request updates the push-to-start widget because it has the activity_id of push-to-start defined when starting the activity.
To update the click-to-start widget, update the request path to use click-to-start instead of push-to-start.
This request ends the activity, but iOS keeps it on the Lock Screen for up to 4 hours afterward. To remove it sooner, include a dismissal_date. See End a Live Activity.Other ways a Live Activity can end:
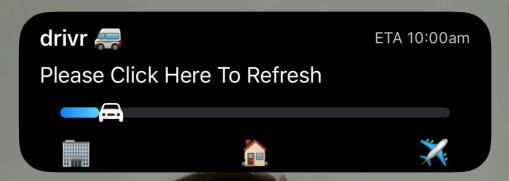
If a user cannot receive an update after a Live Activity has started, opening the app should refresh the activity. Set the stale date to a point in the future after you expect to have sent the first update. Users who have not received the update are shown the fallback message instead.You can listen for the “stale” state in your widget UI to show a fallback message:
Fallback message shown when a Live Activity becomes stale.
struct ptsLiveActivity: Widget { var body: some WidgetConfiguration { ActivityConfiguration(for: ptsAttributes.self) { context in //This will flip to true after the stale date let isStale = context.isStale if !isStale{ VStack { Text("\(context.attributes.name) \(context.state.emoji)") .activityBackgroundTint(Color.cyan) .activitySystemActionForegroundColor(Color.black) } } else { //If the message is stale, we request the user clicks the widget to open the app VStack { Text("Something went wrong, please click to refresh") } } // ... Rest of the widget UI } }}
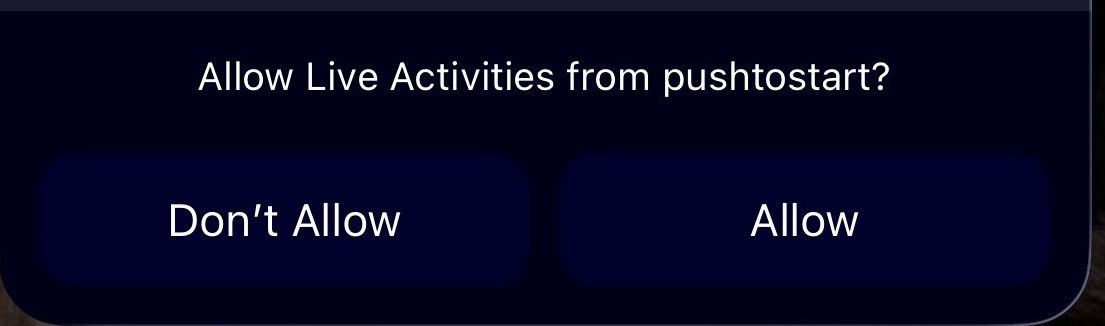
When a user first sees a Live Activity, iOS prompts them to allow or disallow updates. If they select “Don’t Allow”, they do not receive further updates. Use an observer to listen for changes in the user’s Live Activity permission status.
iOS Live Activity permission prompt.
import OneSignalLiveActivities@available(iOS 16.1, *)private func observeLiveActivityPermissionChanges() { let authInfo = ActivityAuthorizationInfo() Task.detached(priority: .background) { for await enabled in authInfo.activityEnablementUpdates { if enabled { print("User Clicked Allow") } else { print("User Clicked Don't Allow") } } }}
As often as you need when you send priority: 5. Those updates deliver opportunistically and are unmetered by Apple, so there is no limit on how many you send.Only priority: 10 is metered. Apple does not publish the size of the budget: iOS calculates it dynamically per device, then delays or drops updates once you exceed it.To reduce the risk of throttling:
Set priority: 5 for routine updates. When you omit priority, OneSignal sends 10 and spends budget, so set it explicitly.
Reserve priority: 10 for updates that need the user’s immediate attention, such as order status changes or game scores.
If your use case requires frequent updates:
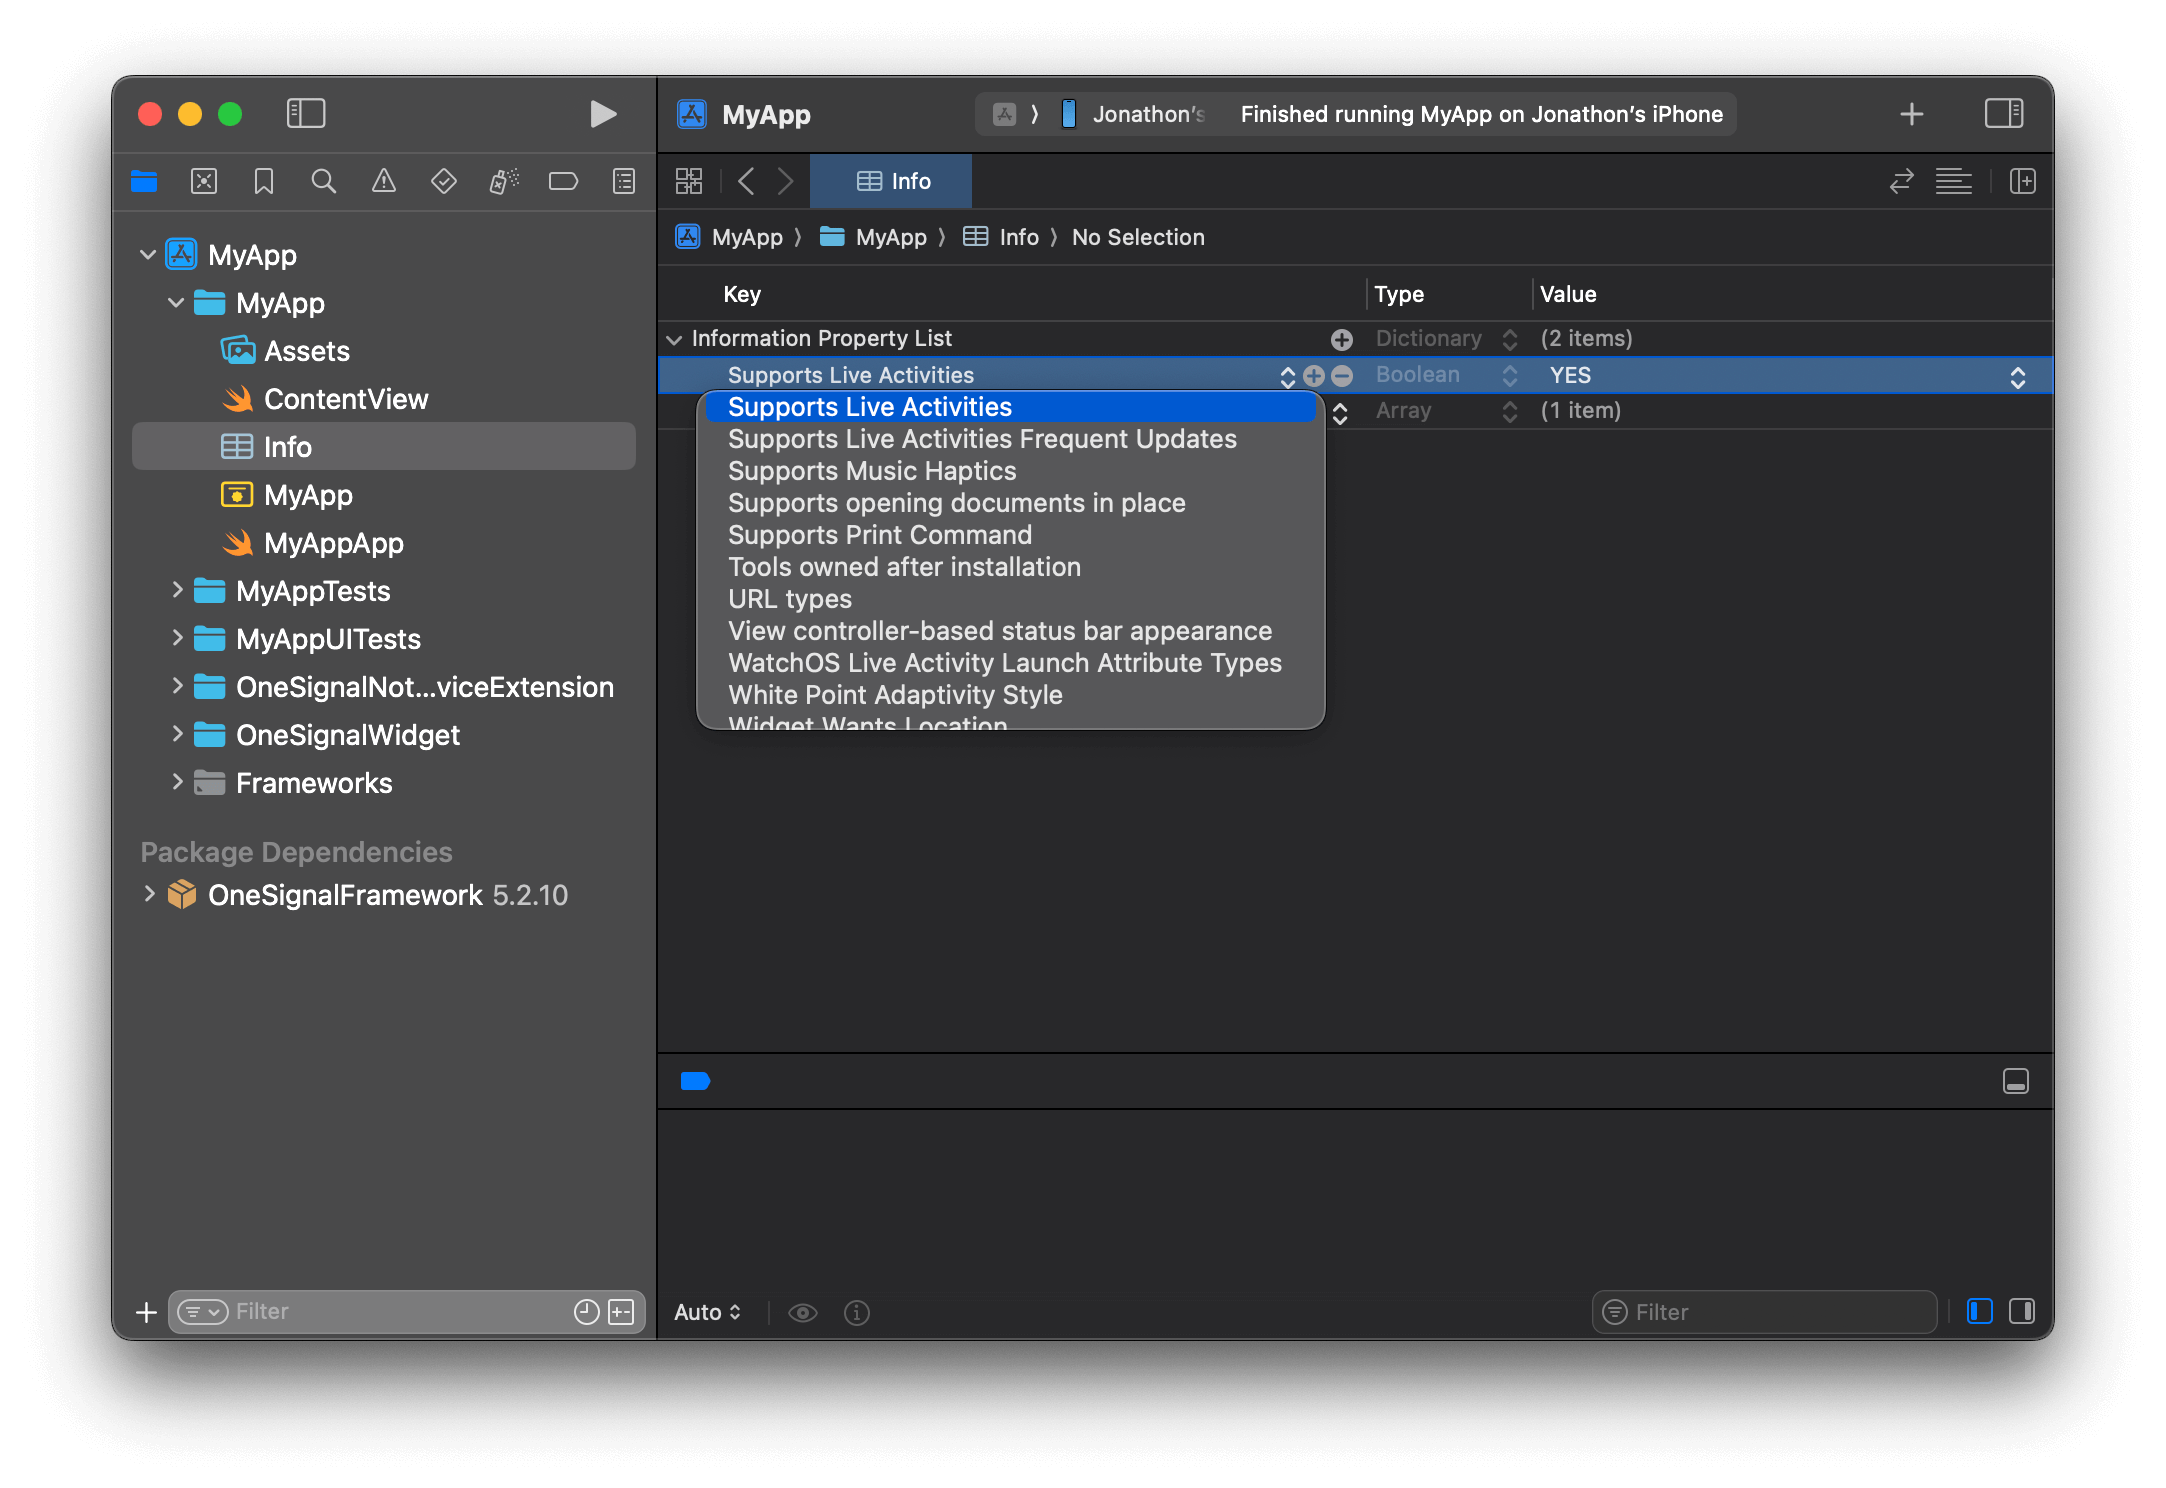
Add the key NSSupportsLiveActivitiesFrequentUpdates to your app’s Info.plist file, set as a Boolean YES.
When this budget is exceeded, iOS may prompt the user to allow additional updates. If the user agrees, Apple will automatically expand the allowed update limit to maintain a seamless experience.
Can I read Live Activity updates from the main app?
Yes. You can observe updates for debugging or UI sync:
Task { for await content in activity.contentUpdates { print("LA activity id: \(activity.id), content update: \(content.state)") }}// Example output:// LA activity id: EFE6D54D-F7E1-45EF-9514-4C2598F8DED2, content update: ContentState(message: "My message from payload")
Track lifecycle changes:
Task { for await state in activity.activityStateUpdates { print("LA state update: \(state)") //If you wanted to do something based on the state, you would use this: if state != ActivityState.active { //Do something here } }}// Example output 1 - LA ended, but still visible// LA state update: active/* State can be equal to 4 possible values on the ActivityState enumactive, dismissed, ended, and stale*/
The API returned a 400 with an error message stating I’m over the subscriber limit. What do I do?
If your push subscriber count exceeds your plan’s limit, upgrade your account to the next plan or contact support@onesignal.com. See the Pricing page for plan details.
How do I avoid sending both push and Live Activities?
Your application may already send a series of Push Notifications, where your designed Live Activity replaces the need for these Push Notifications. For example, if you send score updates via Push, you could replace this through a Live Activity.When a user opts in for a Live Activity, add a data tag to their profile. You can then exclude users with that tag from push messages that contain the same or similar content using Segments.
For users to be found when starting or updating a Live Activity, the activity type, widget, and API request must all have matching values.
Check the path parameters in your request to ensure that you are sending a correctly formatted request to the server. The App ID must match your App ID used in the OneSignal.Initialize method and the activity type must match that of the type you’ve defined in your Live Activity file.
event_updates: The dynamic data you have defined in your struct under activity type and that is used in your widget. Ensure the letter casing and variables all match between the request, the type, and the widget. Any Date fields must be sent as Unix timestamps, not ISO 8601 strings.
event_attributes: Static data follows the same logic as Event Updates and must include all variables in use, and must match across all parts of the live activity and the request
activity_id: This will assign an ID to the widget and is what will be used to update the activity after it has been launched on the user’s device. See Choose an activity ID.
name: The Live Activity Name.
contents: The message content required for sending push.
headings: The message heading required for sending push.
Check the Confirmed Receipt count first. In your message report, if you see a Confirmed Receipt count, this means Apple successfully delivered the update to the device. The issue is likely that the device is preventing the widget from displaying, not a delivery problem. This could be due to:
The Live Activity being dismissed by the user
Widget configuration issues within the app
Ensure that the request is formatted correctly. If any fields that are used in the Widget are omitted, the activity may not launch or update as expected.
Send any Date-typed field in your custom Attributes or ContentState struct as a Unix timestamp in seconds, not as an ISO 8601 string and not in milliseconds. ActivityKit decodes date values in the push payload as seconds since 1970, and your app cannot change that strategy. To avoid the ambiguity, declare the field as a Double of Unix seconds and convert it in your widget. OneSignal’s stale_date and dismissal_date parameters are also Unix timestamps in seconds.
In your API request, check the priority level. If you are sending 10, try 5 and test again. Only priority: 10 counts against Apple’s budget, and exceeding it causes throttling. If your use case needs frequent high-priority updates, add NSSupportsLiveActivitiesFrequentUpdates to your Info.plist as a Boolean set to YES. See Update frequency and throttling.
If you’re experiencing issues with Live Activities not updating properly or unexpected behavior, check if your app is directly observing the same ActivityKit async sequences that OneSignal monitors:
activityStateUpdates
pushTokenUpdates
pushToStartTokenUpdates
activityUpdates
Since Apple hasn’t documented whether these sequences support multiple concurrent observers, having both OneSignal and your app observe the same sequences may cause conflicts. To resolve:
Remove direct observation of these sequences from your app code if possible
Use OneSignal.LiveActivities.setup() which handles all observation automatically. Avoid manually observing sequences when using this method
If you must use the low-level approach with enter()/exit() and manual token observation, ensure your implementation doesn’t prevent OneSignal from receiving updates
Need help?Chat with our Support team or email support@onesignal.comPlease include:
Details of the issue you’re experiencing and steps to reproduce if available
Your OneSignal App ID
The External ID or Subscription ID if applicable
The URL to the message you tested in the OneSignal Dashboard if applicable