Step 0. Configure APNs in OneSignal (required to deliver push)
You can install and initialize the OneSignal iOS SDK without completing this step. However, push notifications will not deliver until APNs credentials are configured in your OneSignal app.Steps to configure your OneSignal app.
Steps to configure your OneSignal app.
- Login to https://onesignal.com and create or select your App.
- Navigate to Settings > Push & In-App.
- Select Apple iOS (APNs) and Continue through the setup wizard.
- Input your p8 Auth Key (Recommended) or p12 Certificate details.
- Continue through the setup wizard to get your App ID. This will be used to initialize the SDK.
Setup contract & requirements
This section summarizes the tools, versions, and assumptions used throughout the guide.- SDK version:
5.4.0+(latest: check releases) - AI setup instructions:
https://raw.githubusercontent.com/OneSignal/sdk-ai-prompts/main/docs/ios/ai-prompt.md - SDK repo:
https://github.com/OneSignal/OneSignal-XCFramework - Xcode: 16.0+
- iOS: 12.0+ minimum, 16.2+ recommended
- Simulator: iOS 16.2+ required for push testing
- App target packages:
OneSignalFramework(required),OneSignalInAppMessages(recommended),OneSignalLocation(optional) - Notification Service Extension (NSE) target name:
OneSignalNotificationServiceExtension - Notification Service Extension (NSE) target package:
OneSignalExtension - App Group format:
group.YOUR_MAIN_APP_BUNDLE_ID.onesignal - App ID format: 36-character UUID (example:
12345678-1234-1234-1234-123456789012) — find at OneSignal Dashboard > Settings > Keys & IDs - Initialize:
OneSignal.initialize("YOUR_APP_ID", withLaunchOptions: launchOptions) - Requires NSE + App Group: images, confirmed receipt, badges
- confirmed receipt: Requires an eligible plan (not available on free plans)
- Recommended: Assign External ID via
OneSignal.login("user_id")to unify users across devices
iOS setup steps
By the end of the steps below, you will have:- The OneSignal SDK installed and initialized in your iOS app
- Push notification permissions prompting correctly on a real device
- A test push and in-app message successfully delivered
Step 1. Enable Push Notifications and Background Modes
- Open your
.xcodeprojin Xcode (or.xcworkspaceif using CocoaPods) - Select app target > Signing & Capabilities
- Click + Capability > add Push Notifications
- Click + Capability > add Background Modes
- Enable Remote notifications checkbox
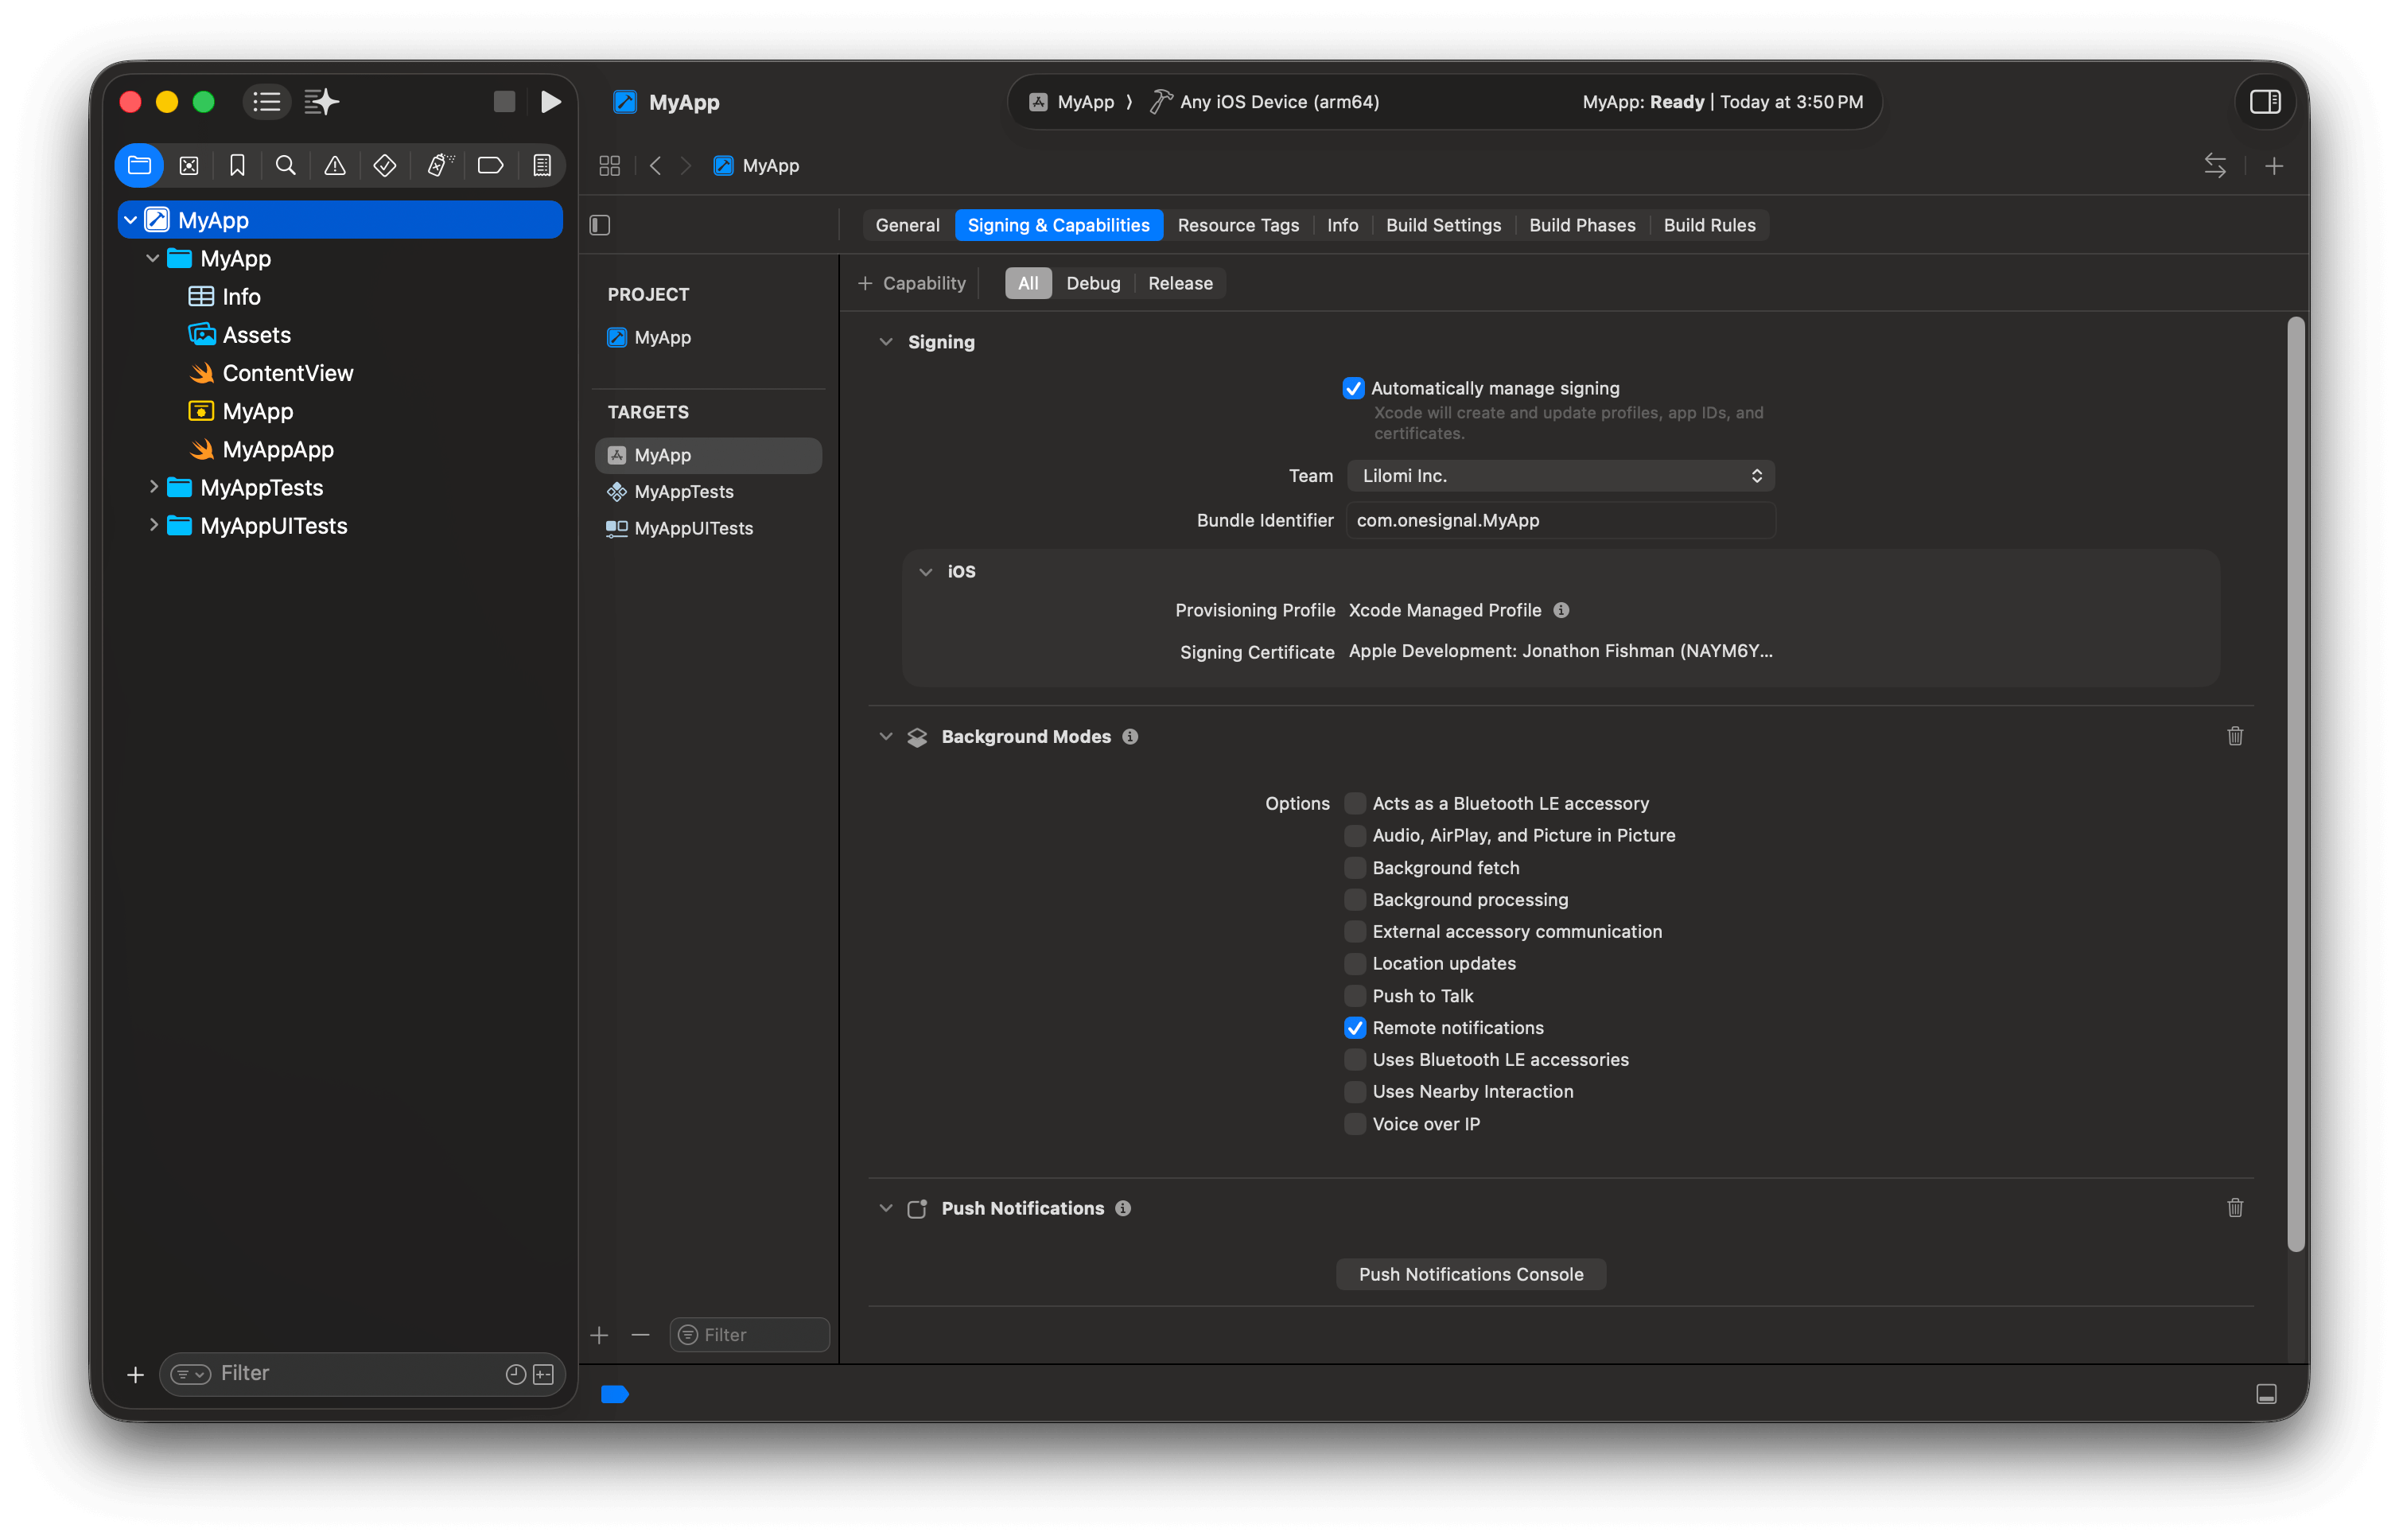
Your app target with Push Notifications and Background Modes capabilities.
Step 2. Add a Notification Service Extension (NSE)
The NSE enables rich notifications (images) and confirmed receipt analytics. Create the target:- File > New > Target…
- Select Notification Service Extension > Next
- Product name:
OneSignalNotificationServiceExtension - Click Finish > click Don’t Activate when prompted
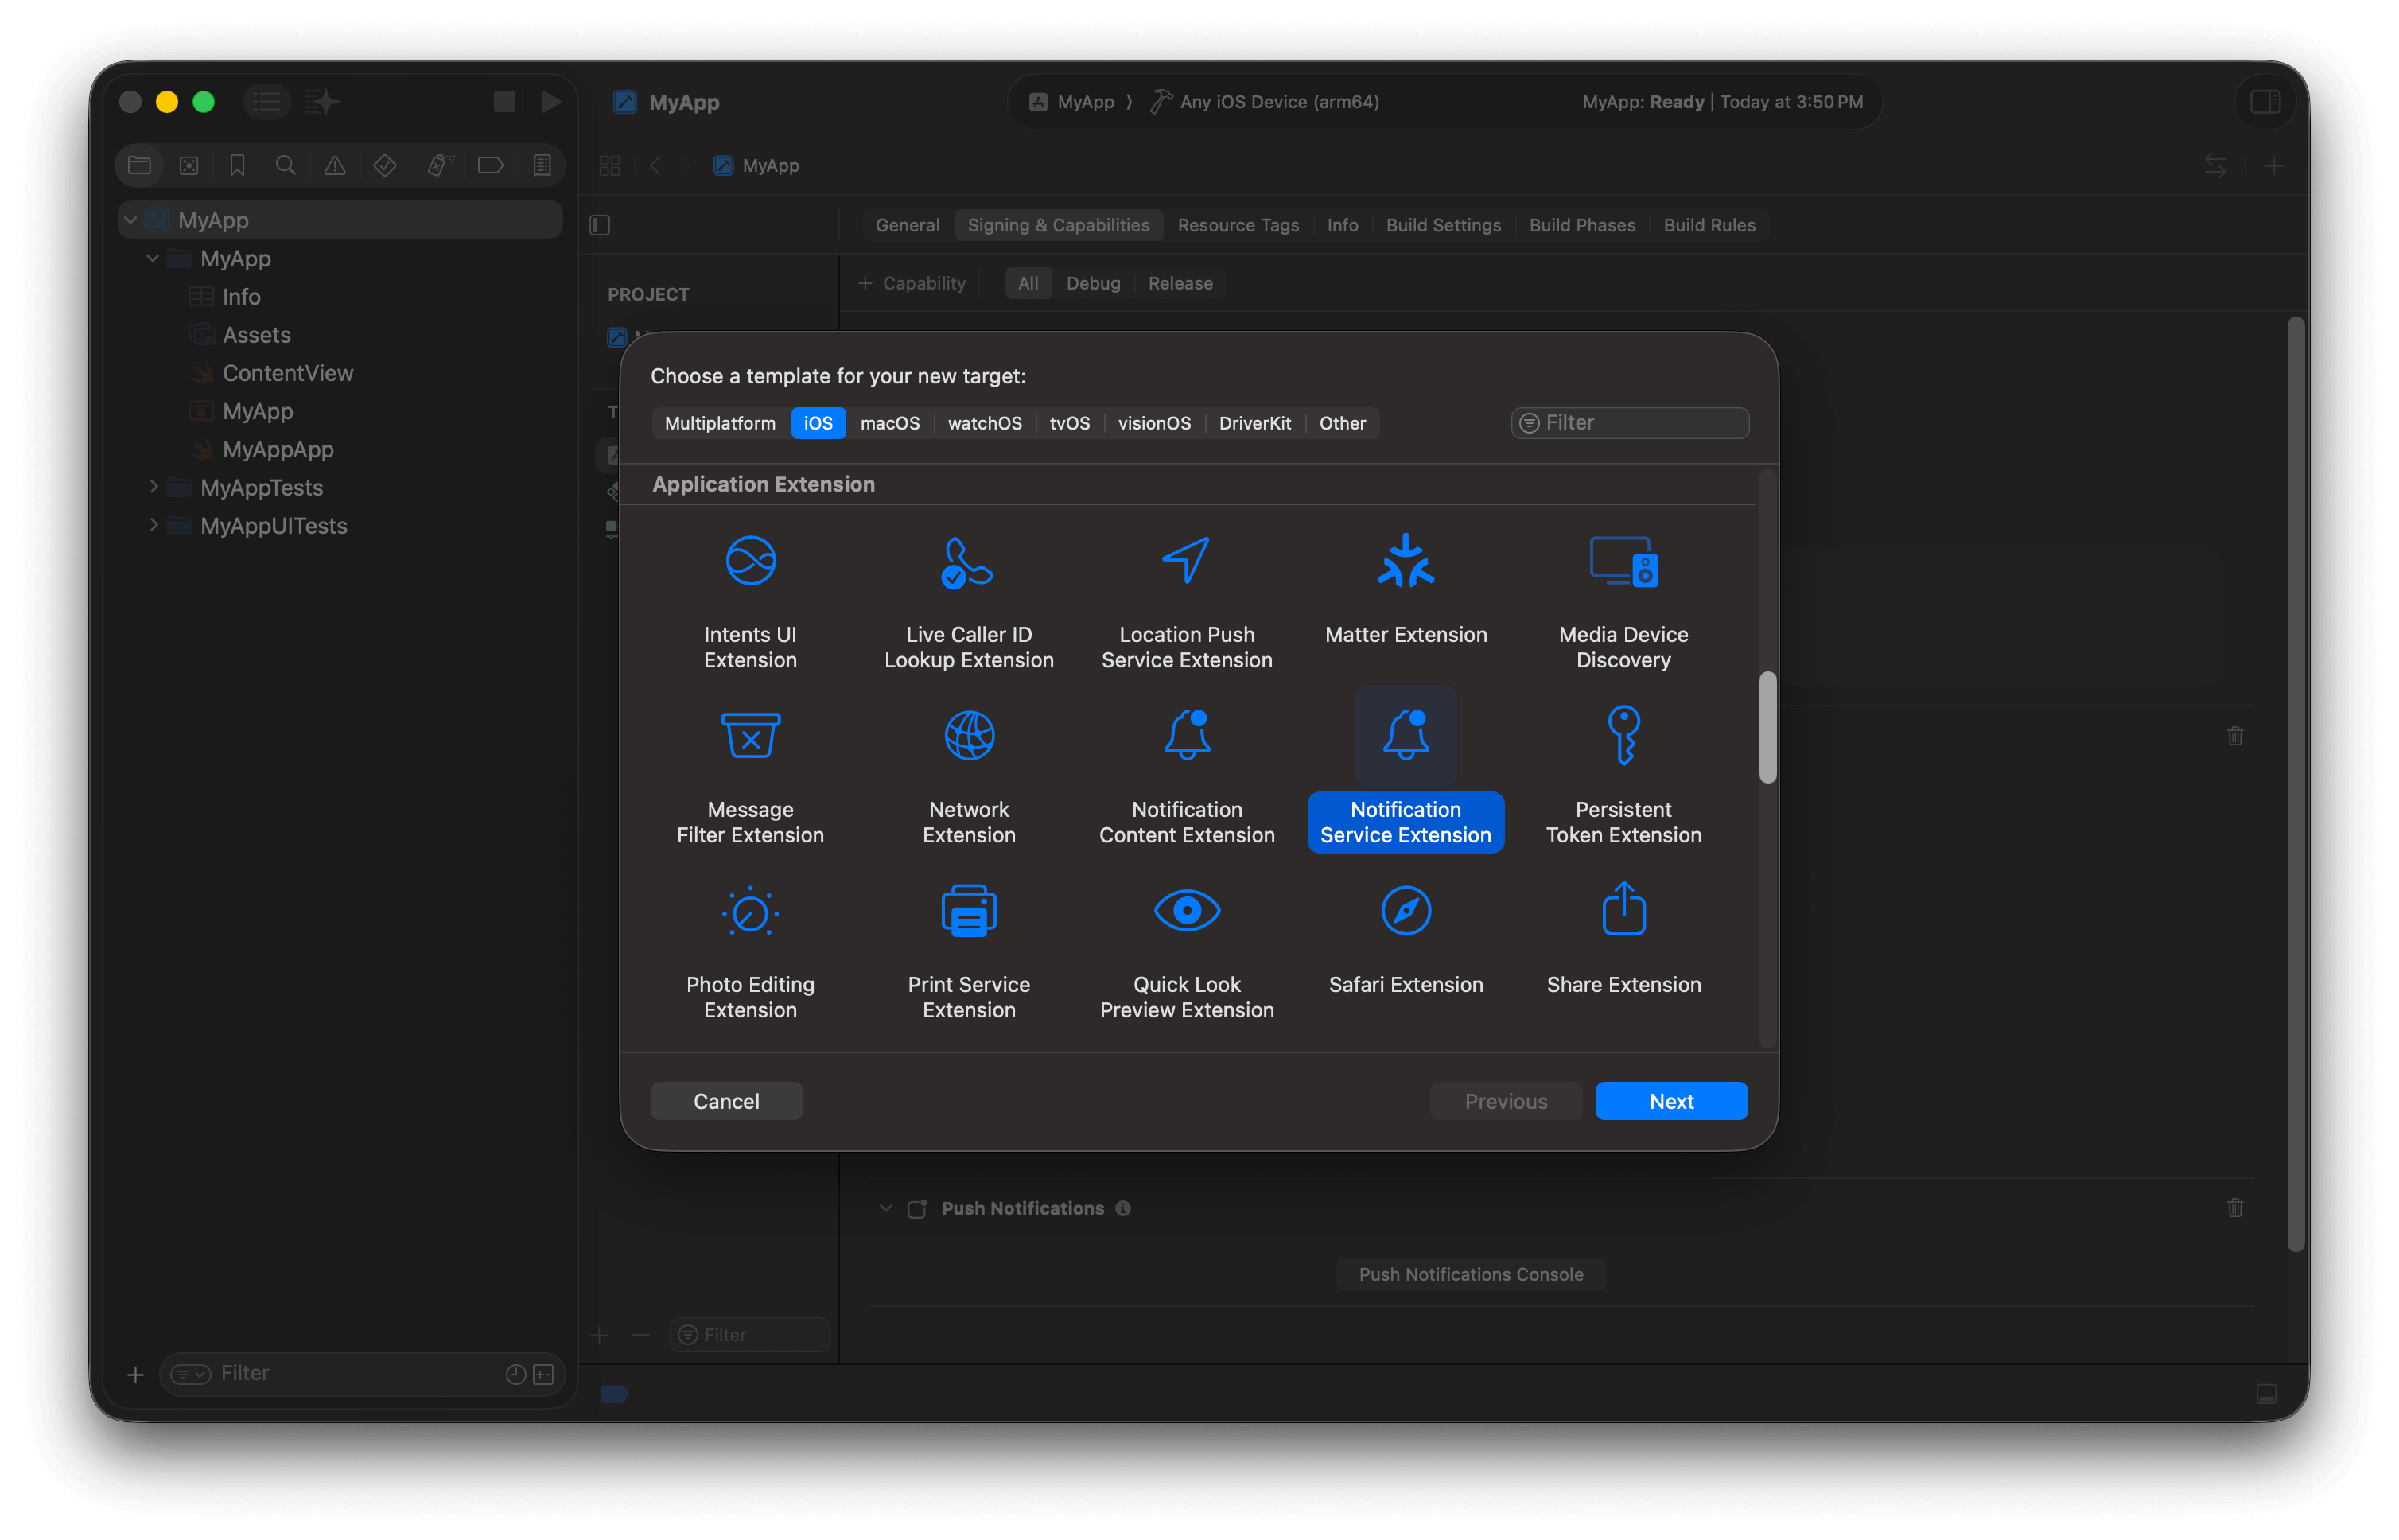
Create a Notification Service Extension target.
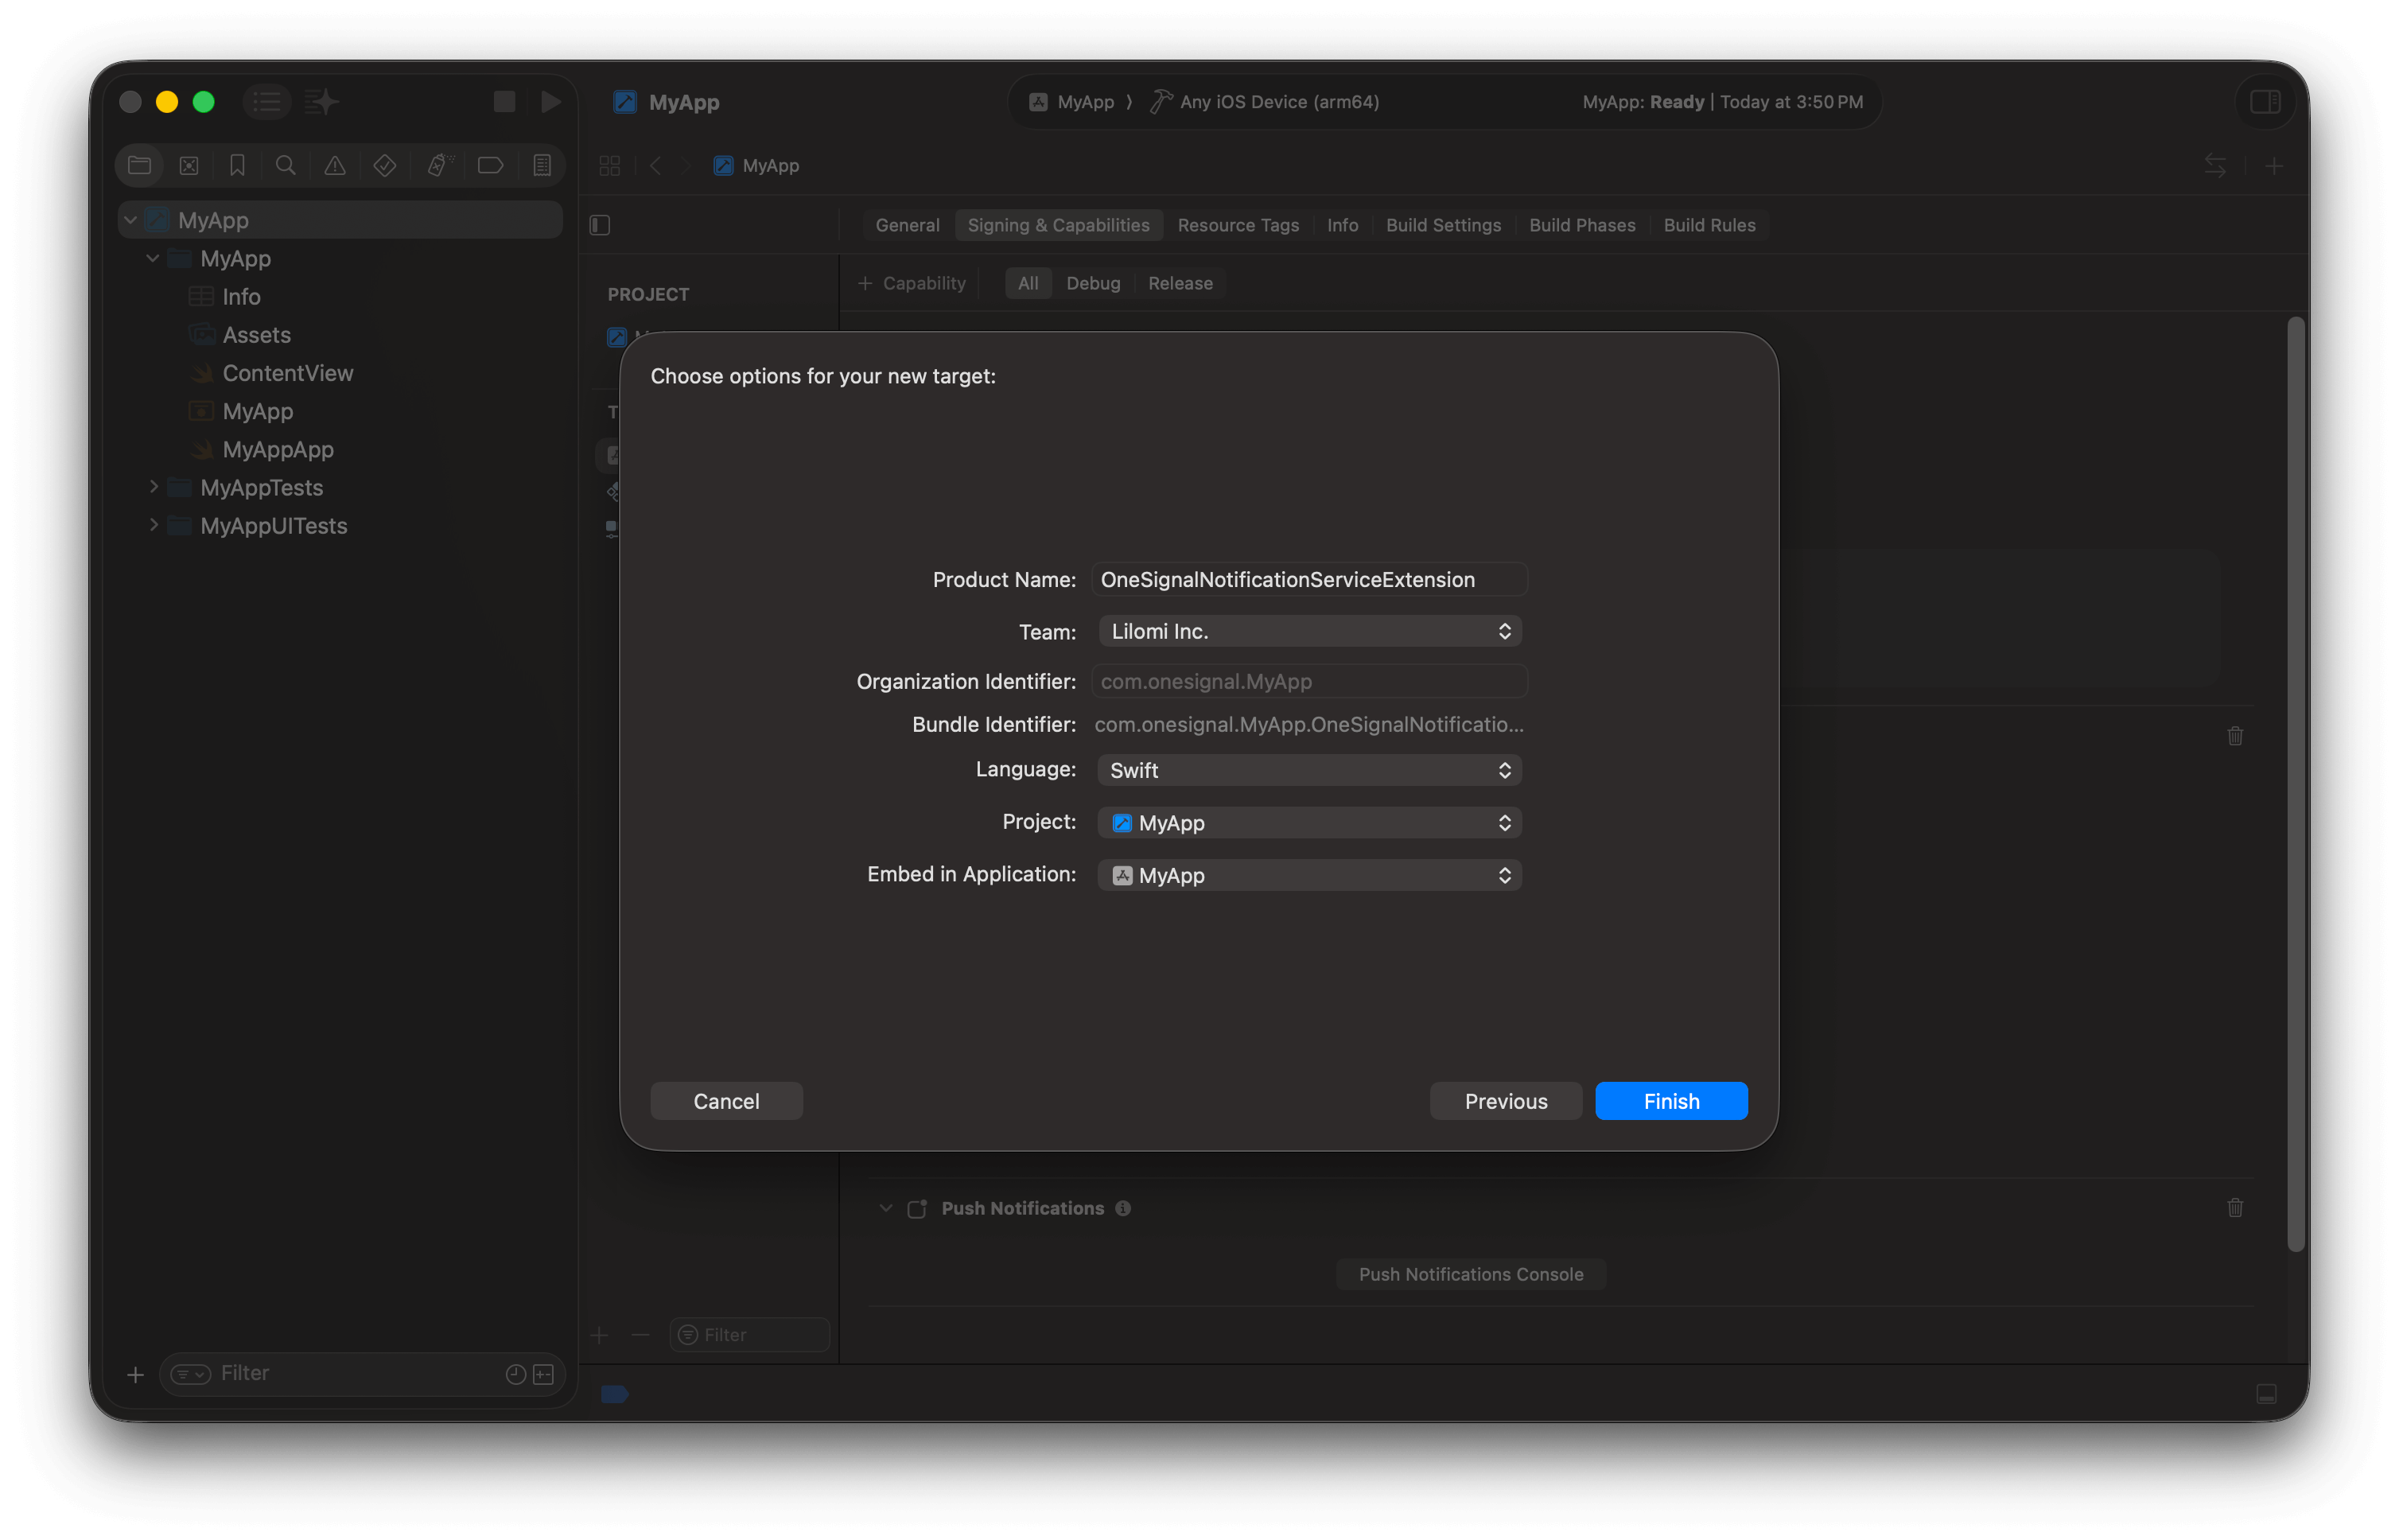
Name the Notification Service Extension and use the following options if your app is written in Swift.
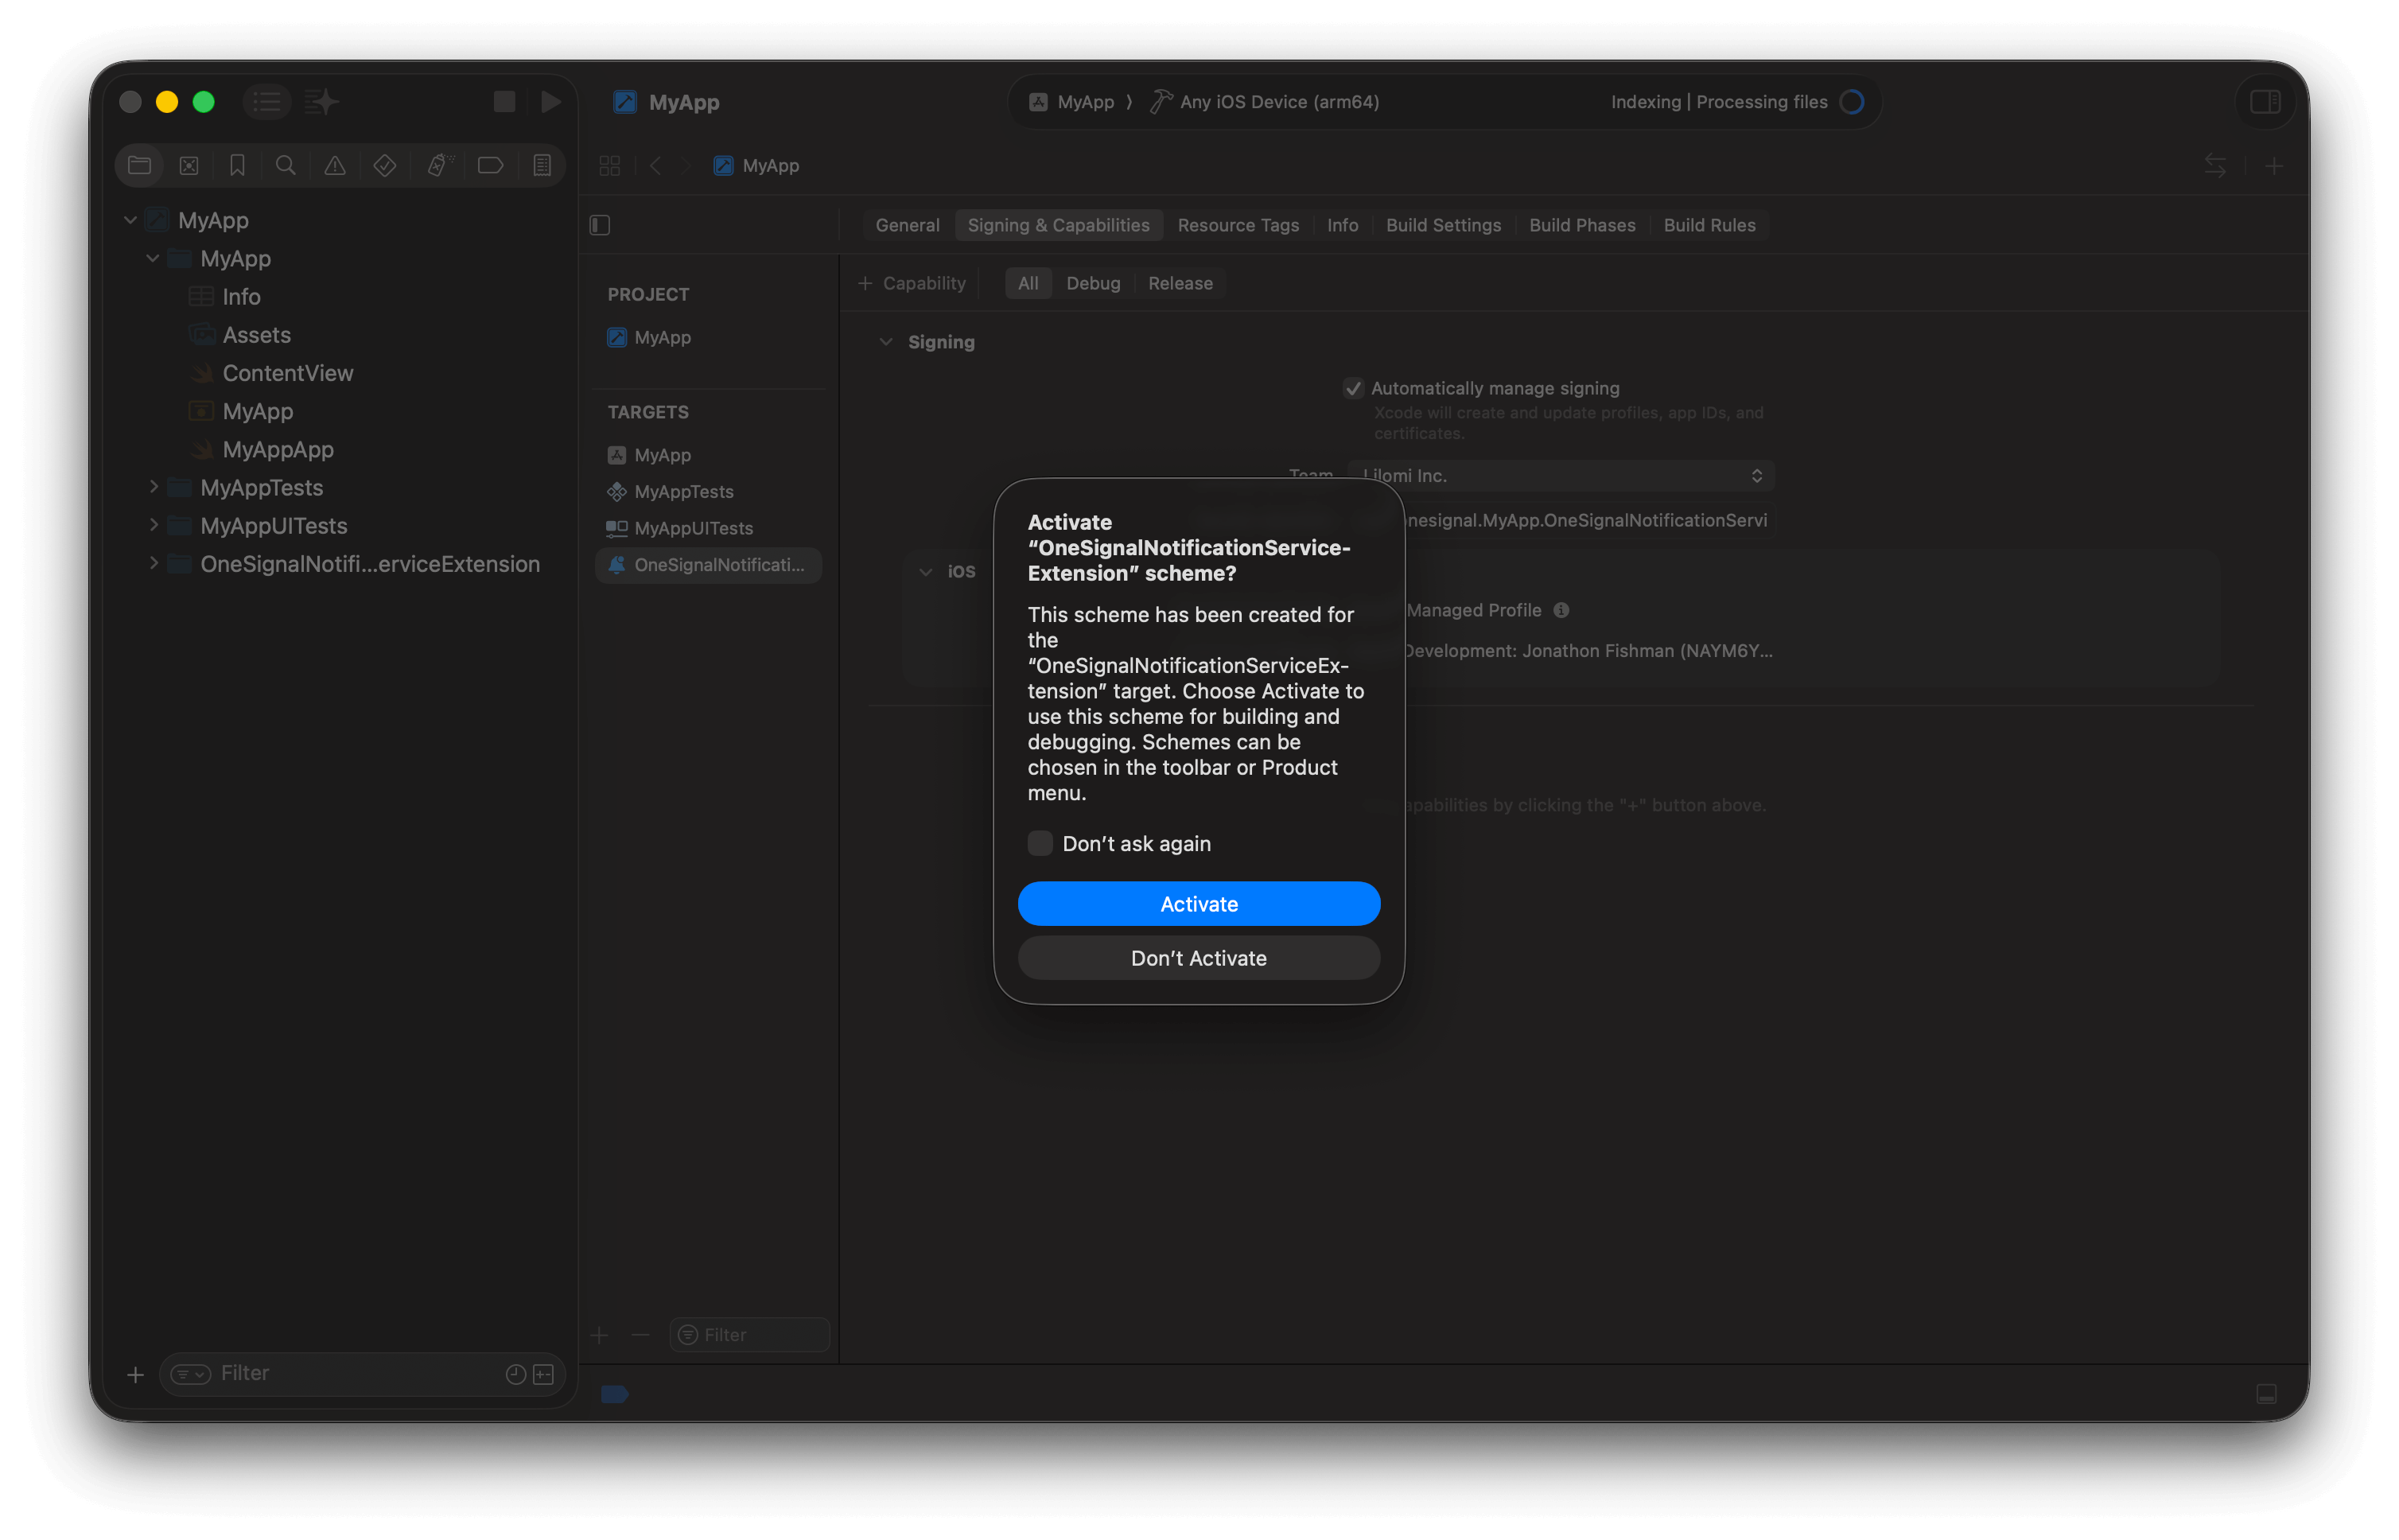
Don't Activate the NSE Scheme.
- Select OneSignalNotificationServiceExtension target > General
- Set Minimum Deployments to match your app target
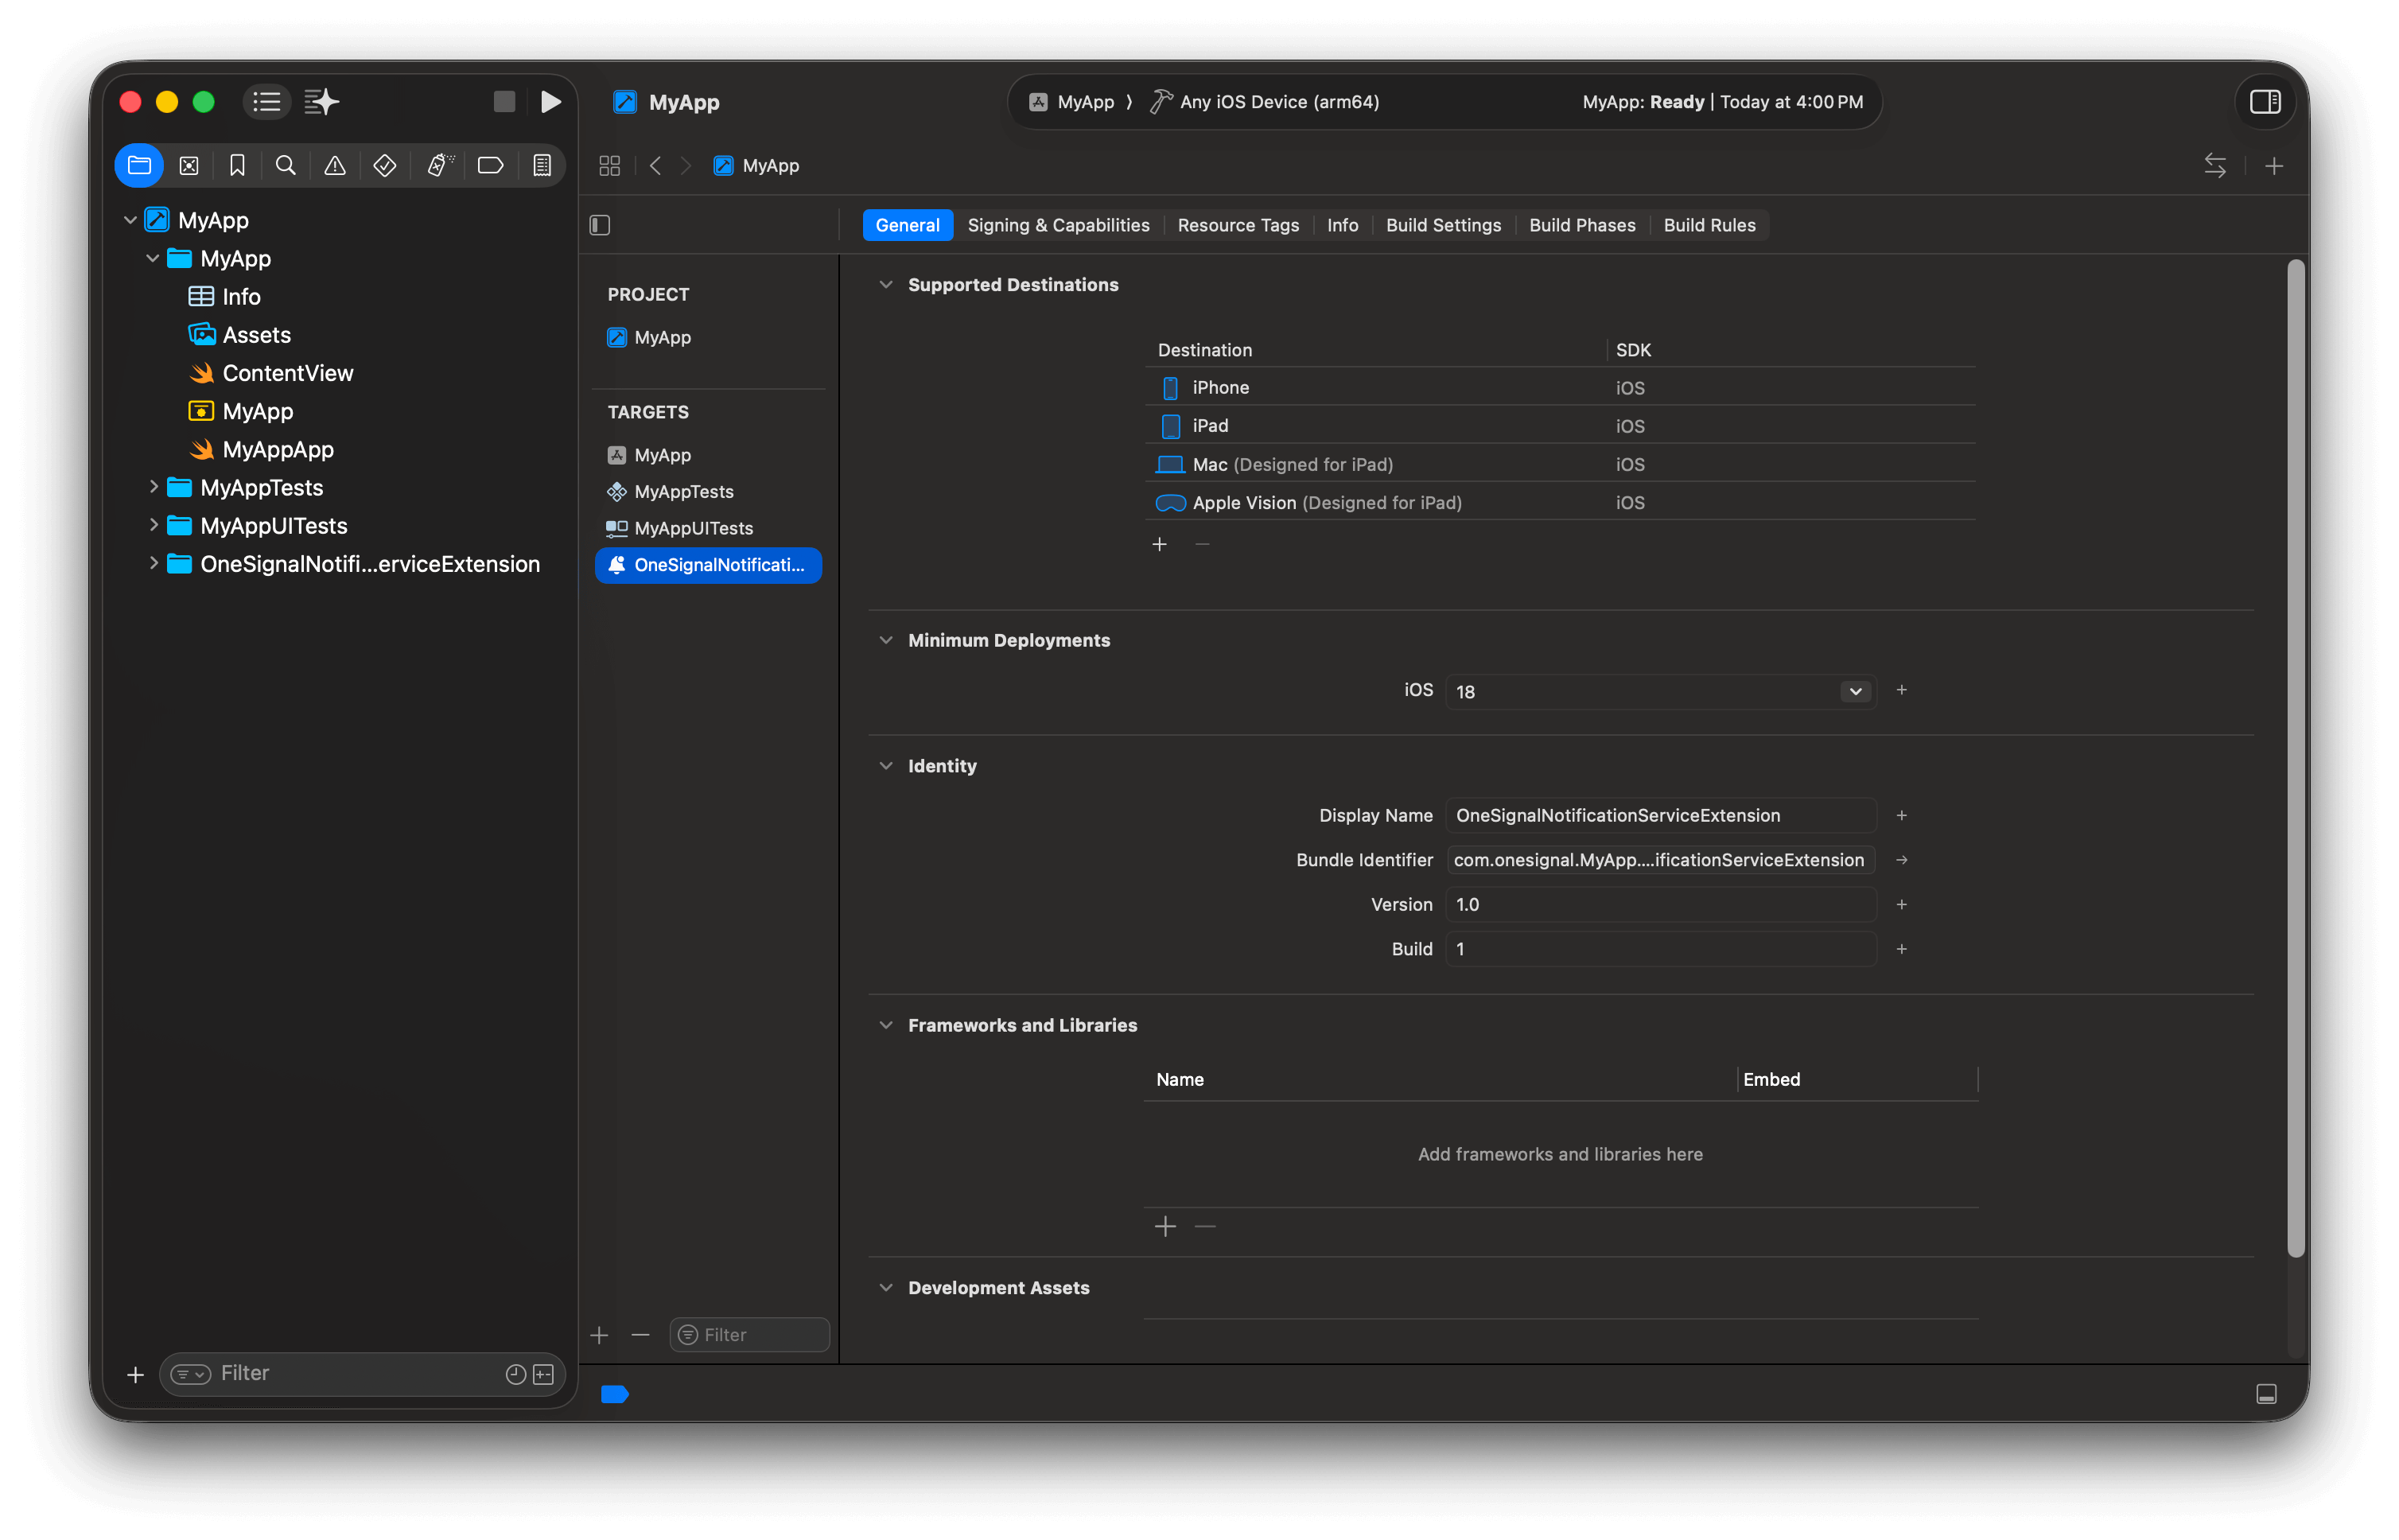
Set the OneSignalNotificationServiceExtension Minimum Deployments target to be the same as your main App target.
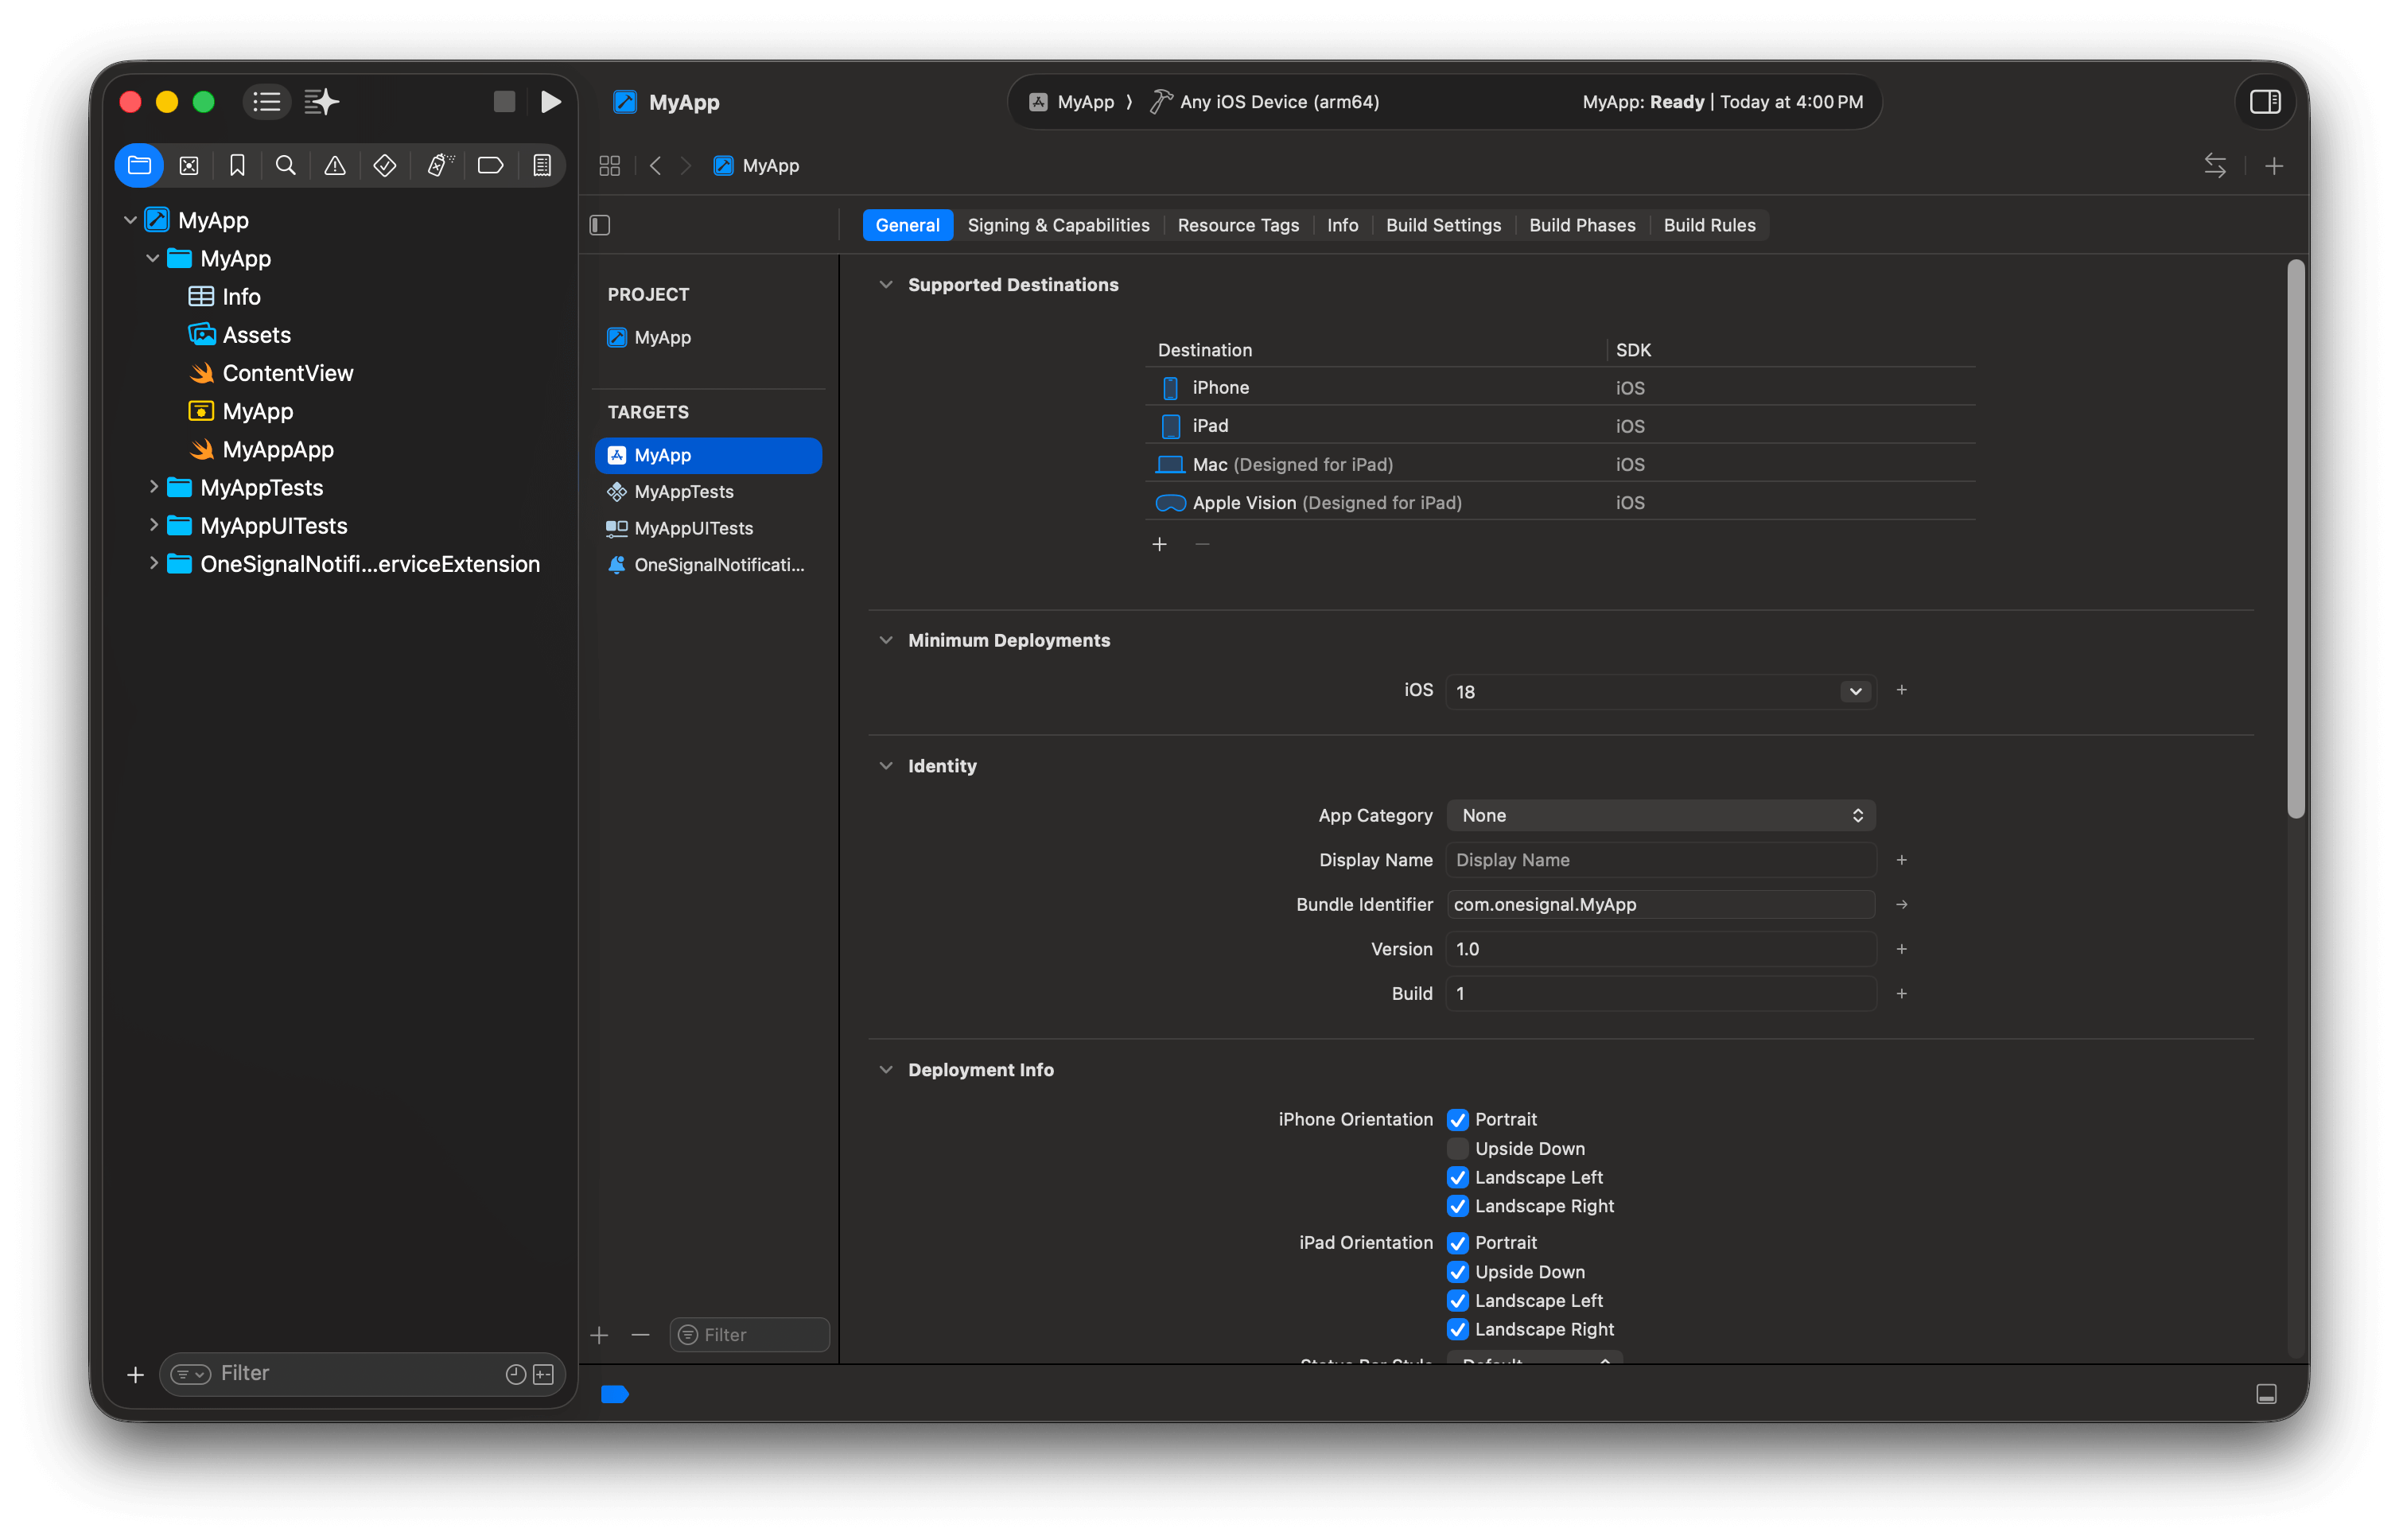
Set the App target Minimum Deployments target to be the same as your OneSignalNotificationServiceExtension target.
- Navigate to OneSignalNotificationServiceExtension/NotificationService.swift
- Replace the contents with the code below:
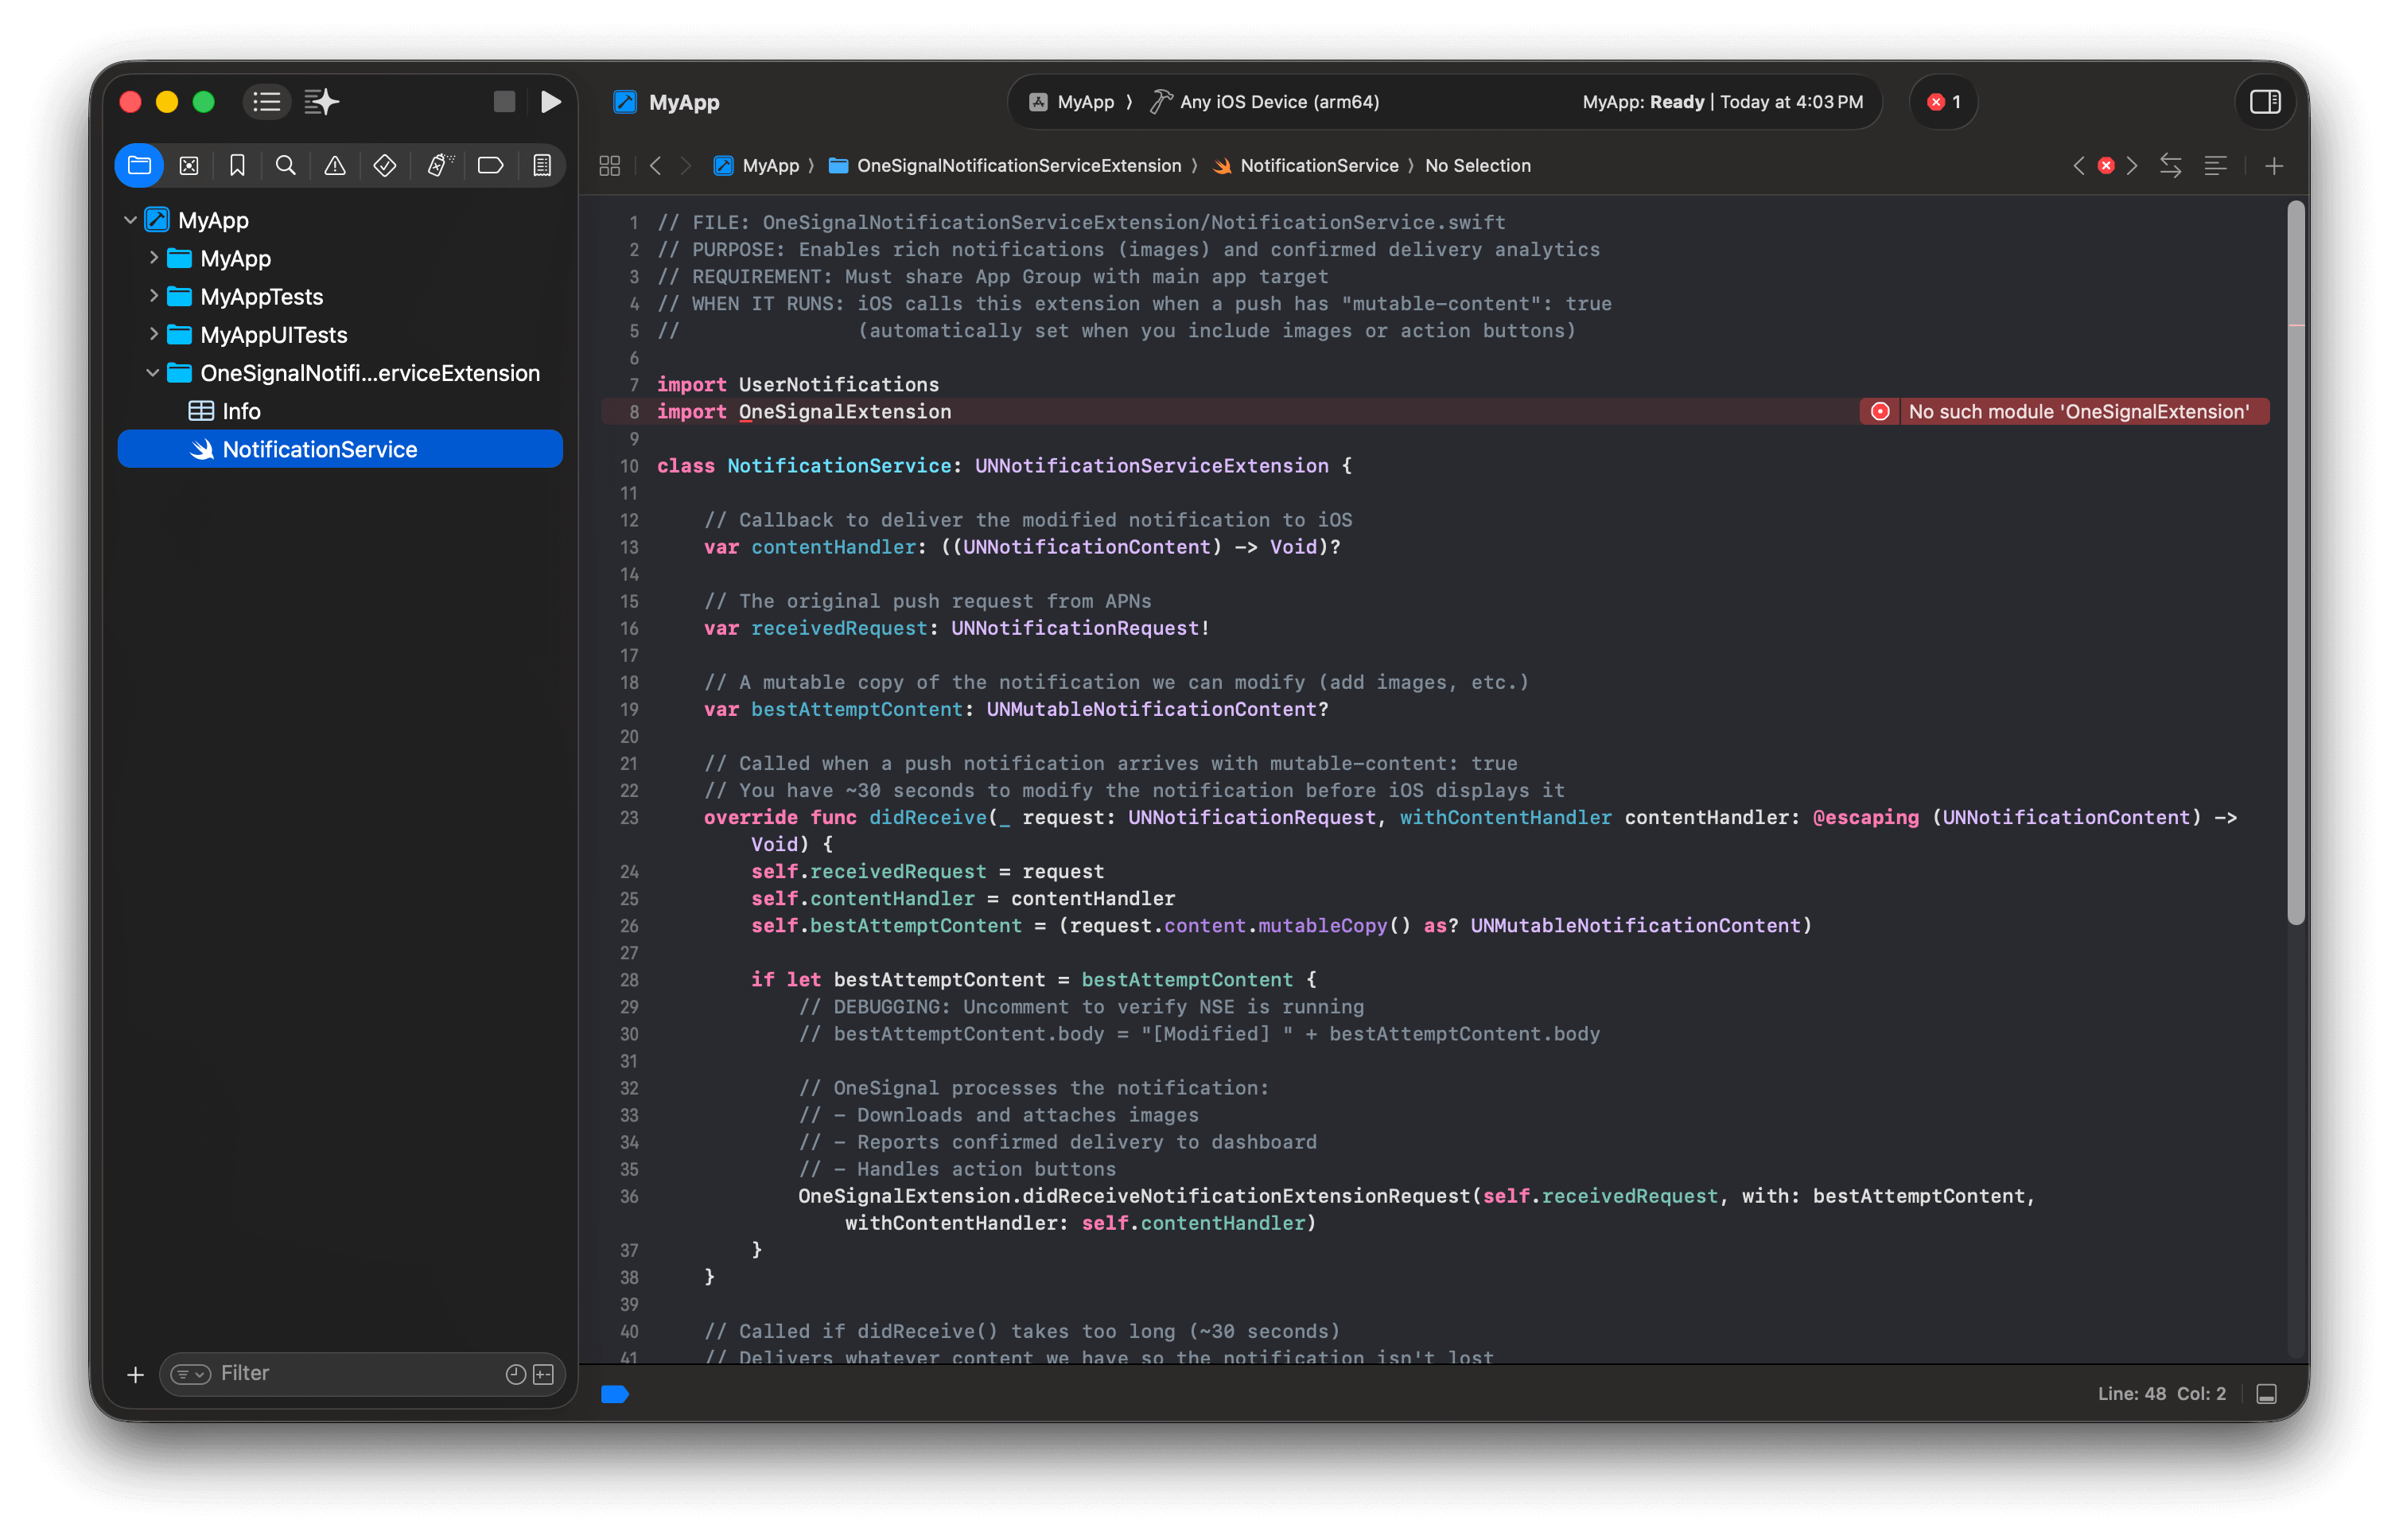
Updated NSE code with error that will resolve after installing the SDK.
Step 3. Create an App Group
App Groups enable data sharing between your app and the NSE. Required for Confirmed receipt, badges, and images. Add the App Group to your main app target:- Select your main app target > Signing & Capabilities
- Click + Capability > add App Groups
- Click + and enter:
group.YOUR_MAIN_APP_BUNDLE_ID.onesignal- ReplaceYOUR_MAIN_APP_BUNDLE_IDwith your main app target’s Bundle Identifier (found at app target > General > Identity).
- Select OneSignalNotificationServiceExtension target > Signing & Capabilities
- Click + Capability > add App Groups
- Select the same App Group ID you created above:
group.YOUR_MAIN_APP_BUNDLE_ID.onesignal
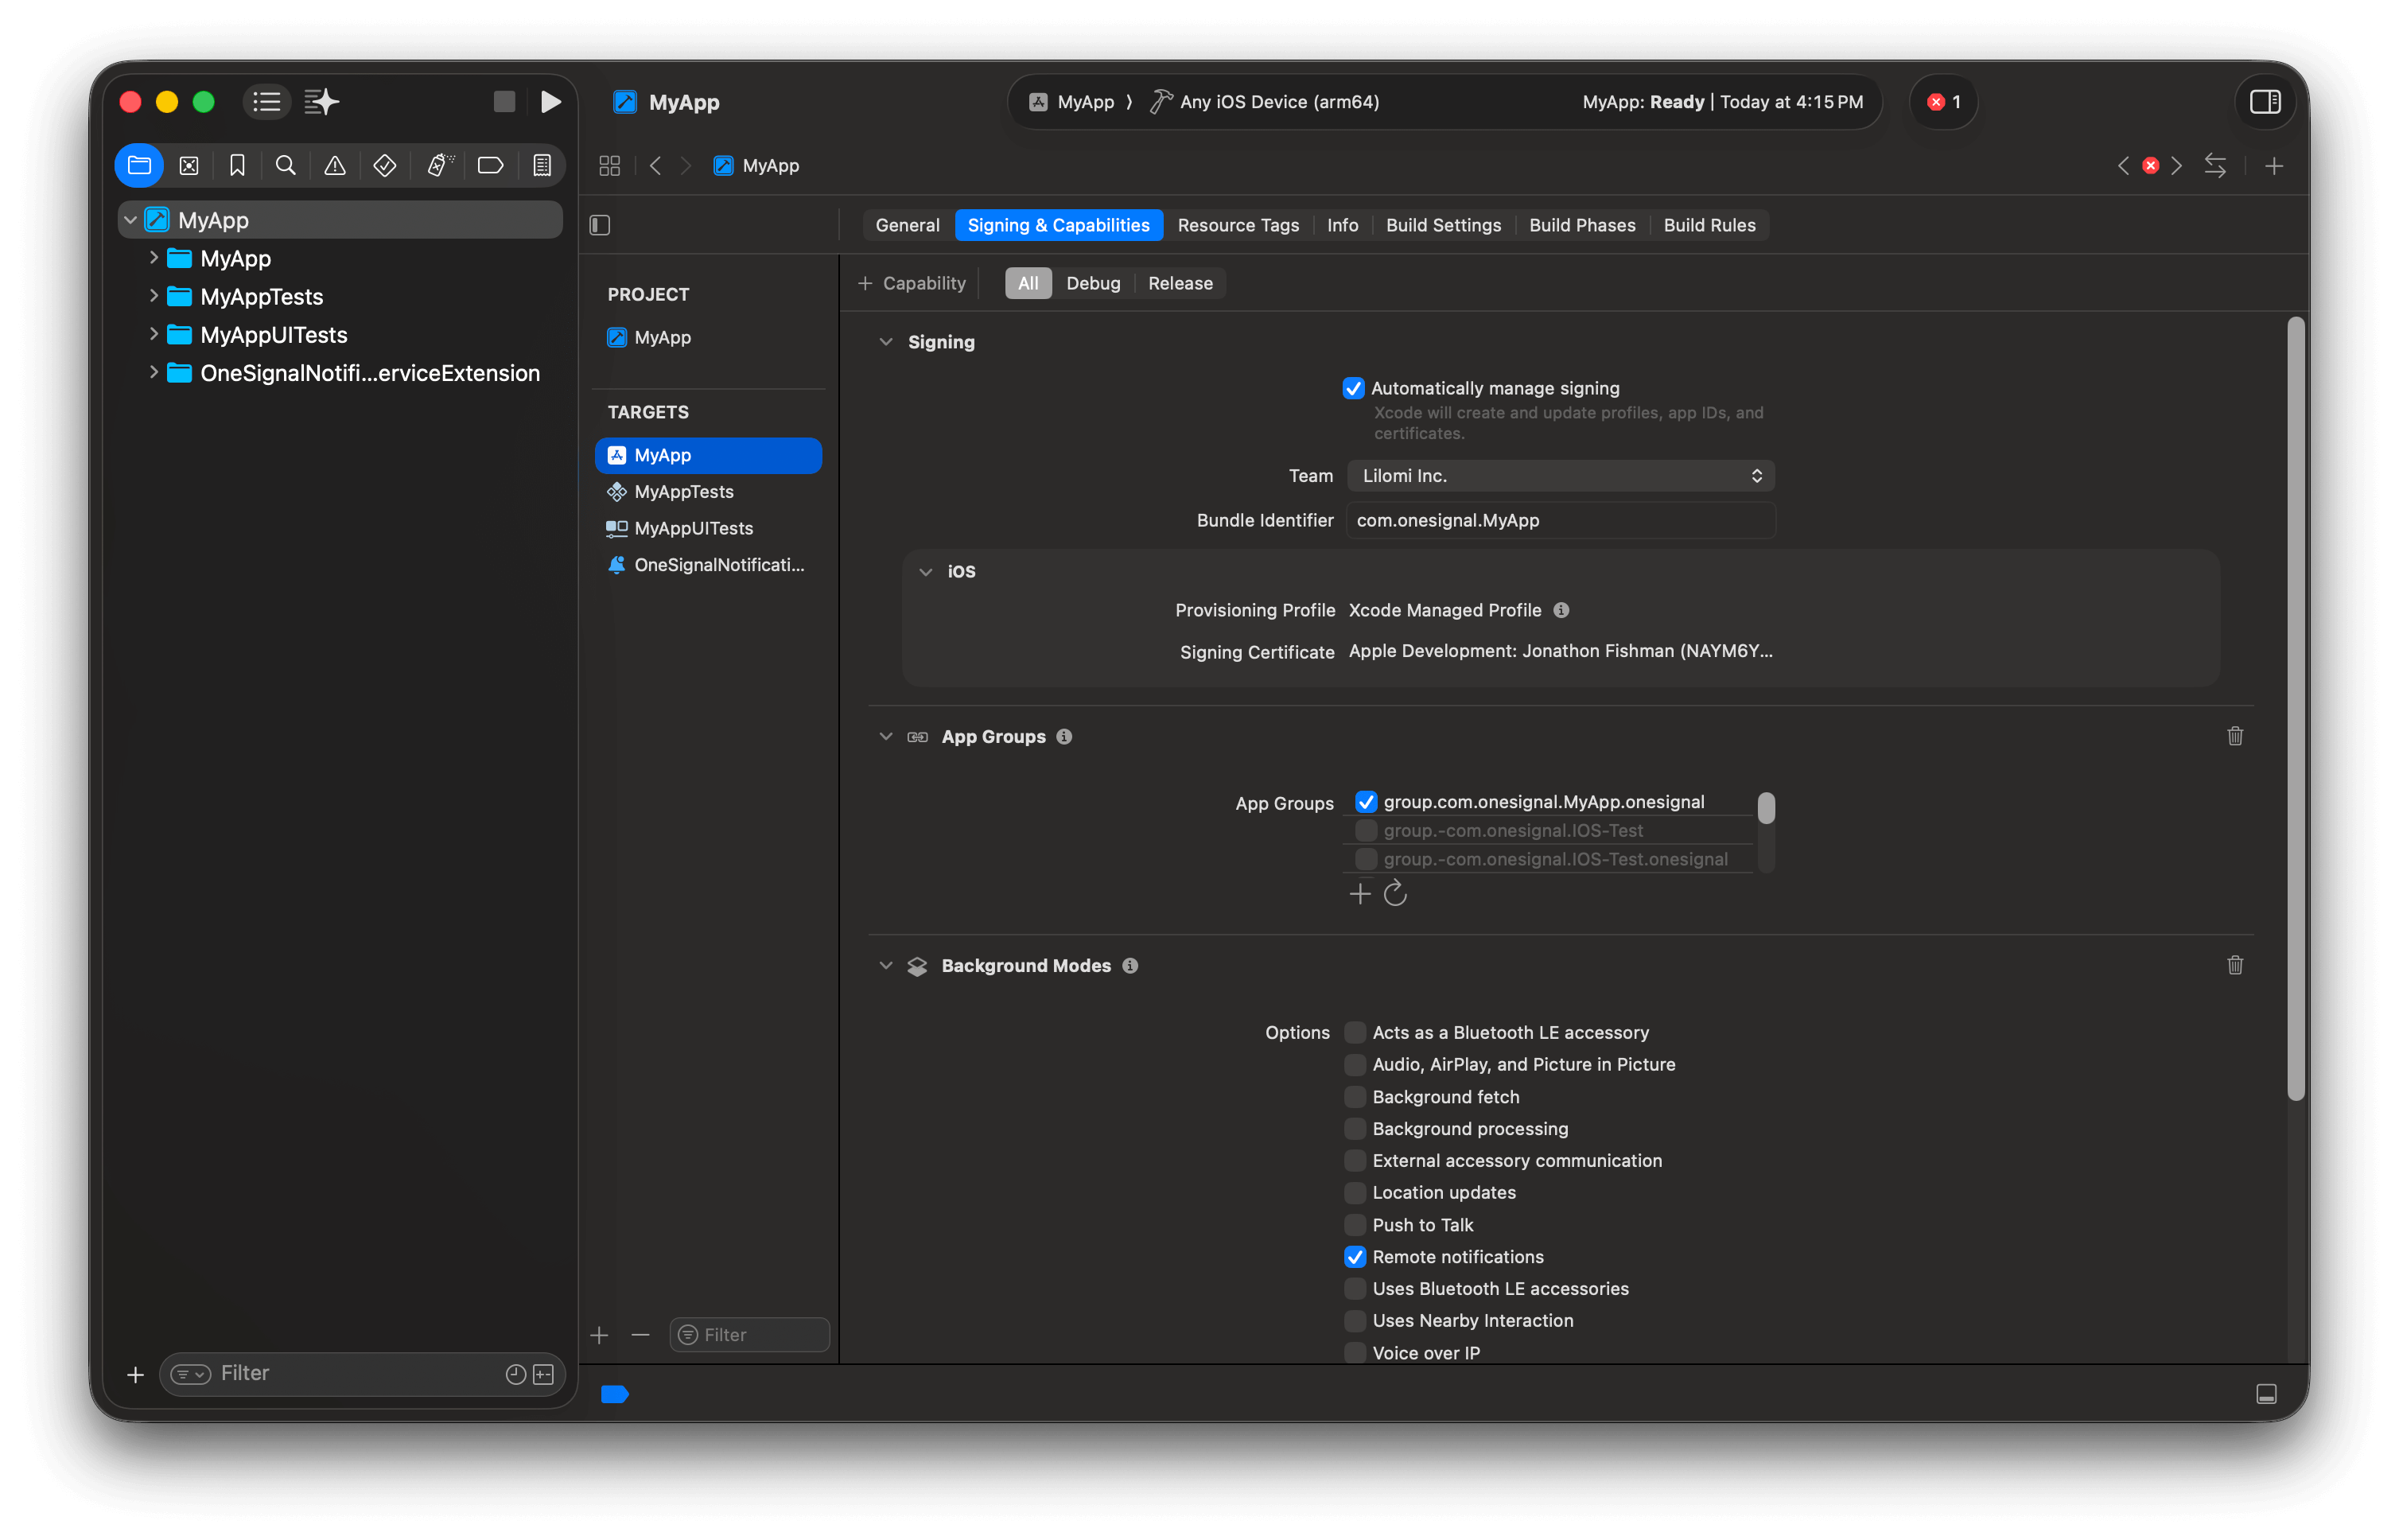
Example shows the main app target is part of the group.YOUR_MAIN_APP_BUNDLE_ID.onesignal App Group.
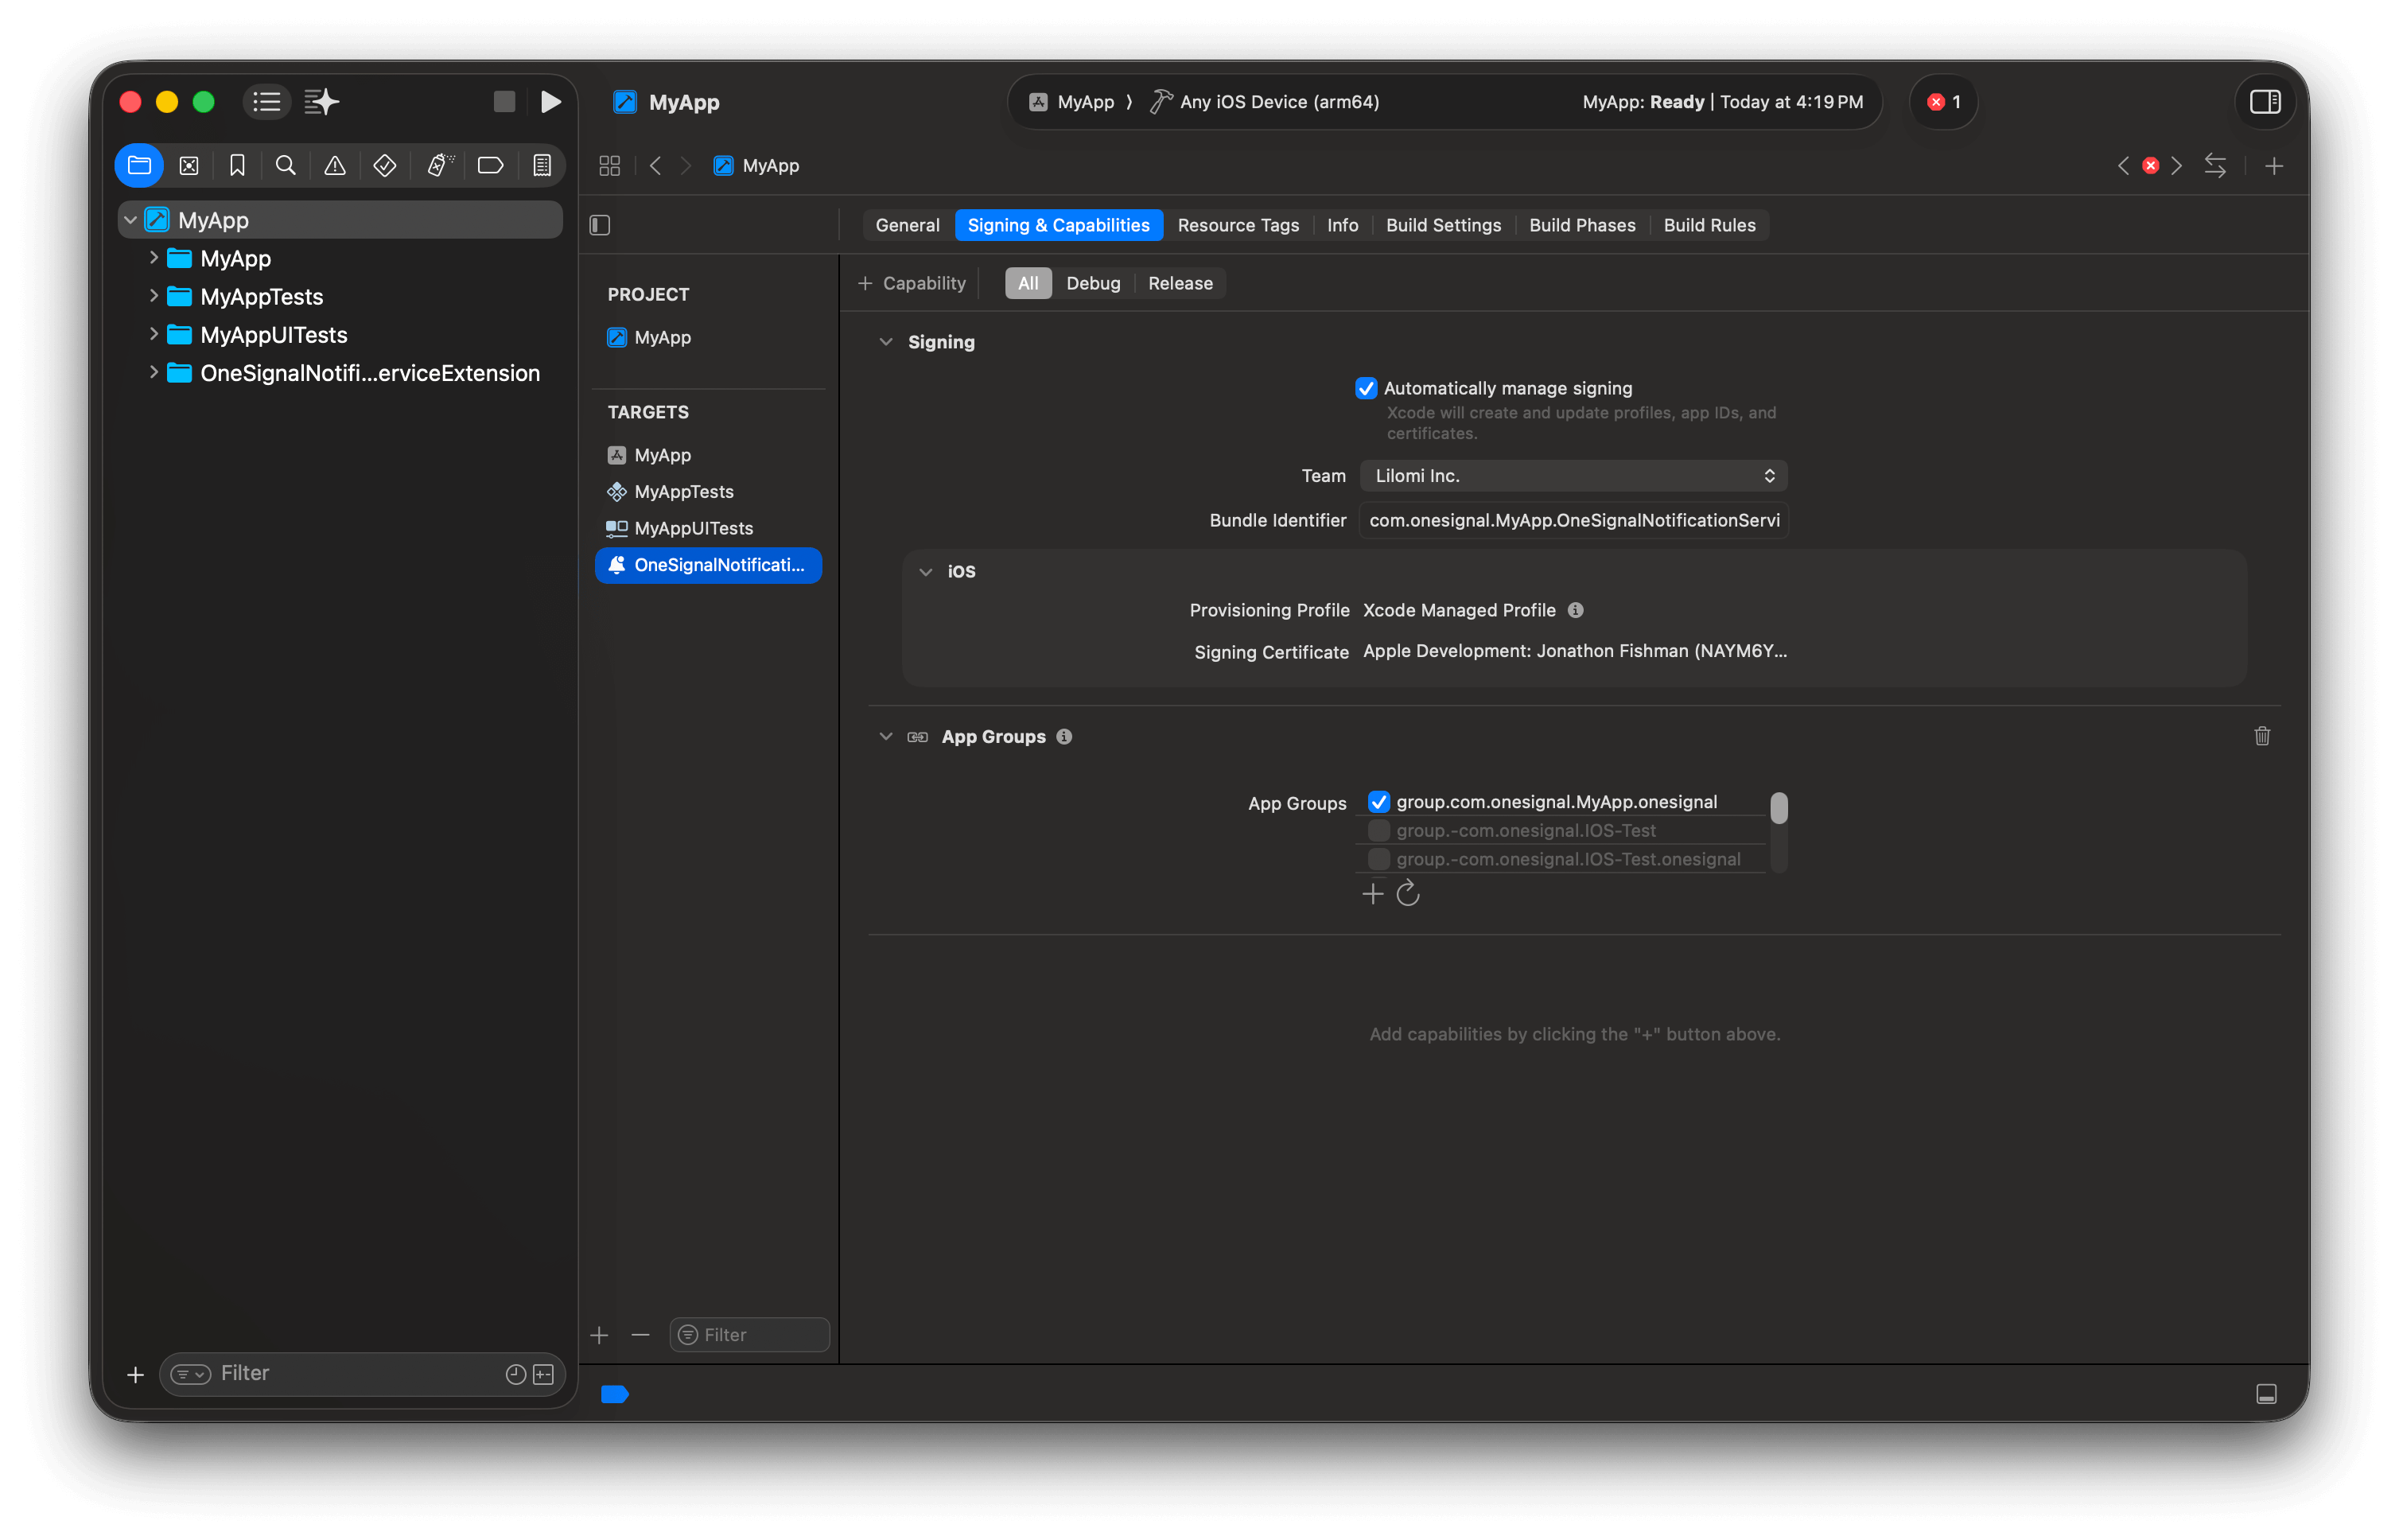
Example shows the OneSignalNotificationServiceExtension target is part of the same group.YOUR_MAIN_APP_BUNDLE_ID.onesignal App Group.
Info.plist of BOTH your main app target and NSE target. Replace group.your-existing-group-id with your existing App Group ID.Info.plist files, the SDK defaults to looking for group.YOUR_MAIN_APP_BUNDLE_ID.onesignal and will not find your custom App Group.
If you use your own App Group, add the OneSignal_app_groups_key to the Info.plist for BOTH the main app target and the OneSignalNotificationServiceExtension target.
Step 4. Install the OneSignal SDK
Swift Package Manager (recommended):- Select Your project file > Package Dependencies > +
- Enter:
https://github.com/OneSignal/OneSignal-XCFramework - Click Add Package
- Assign packages:
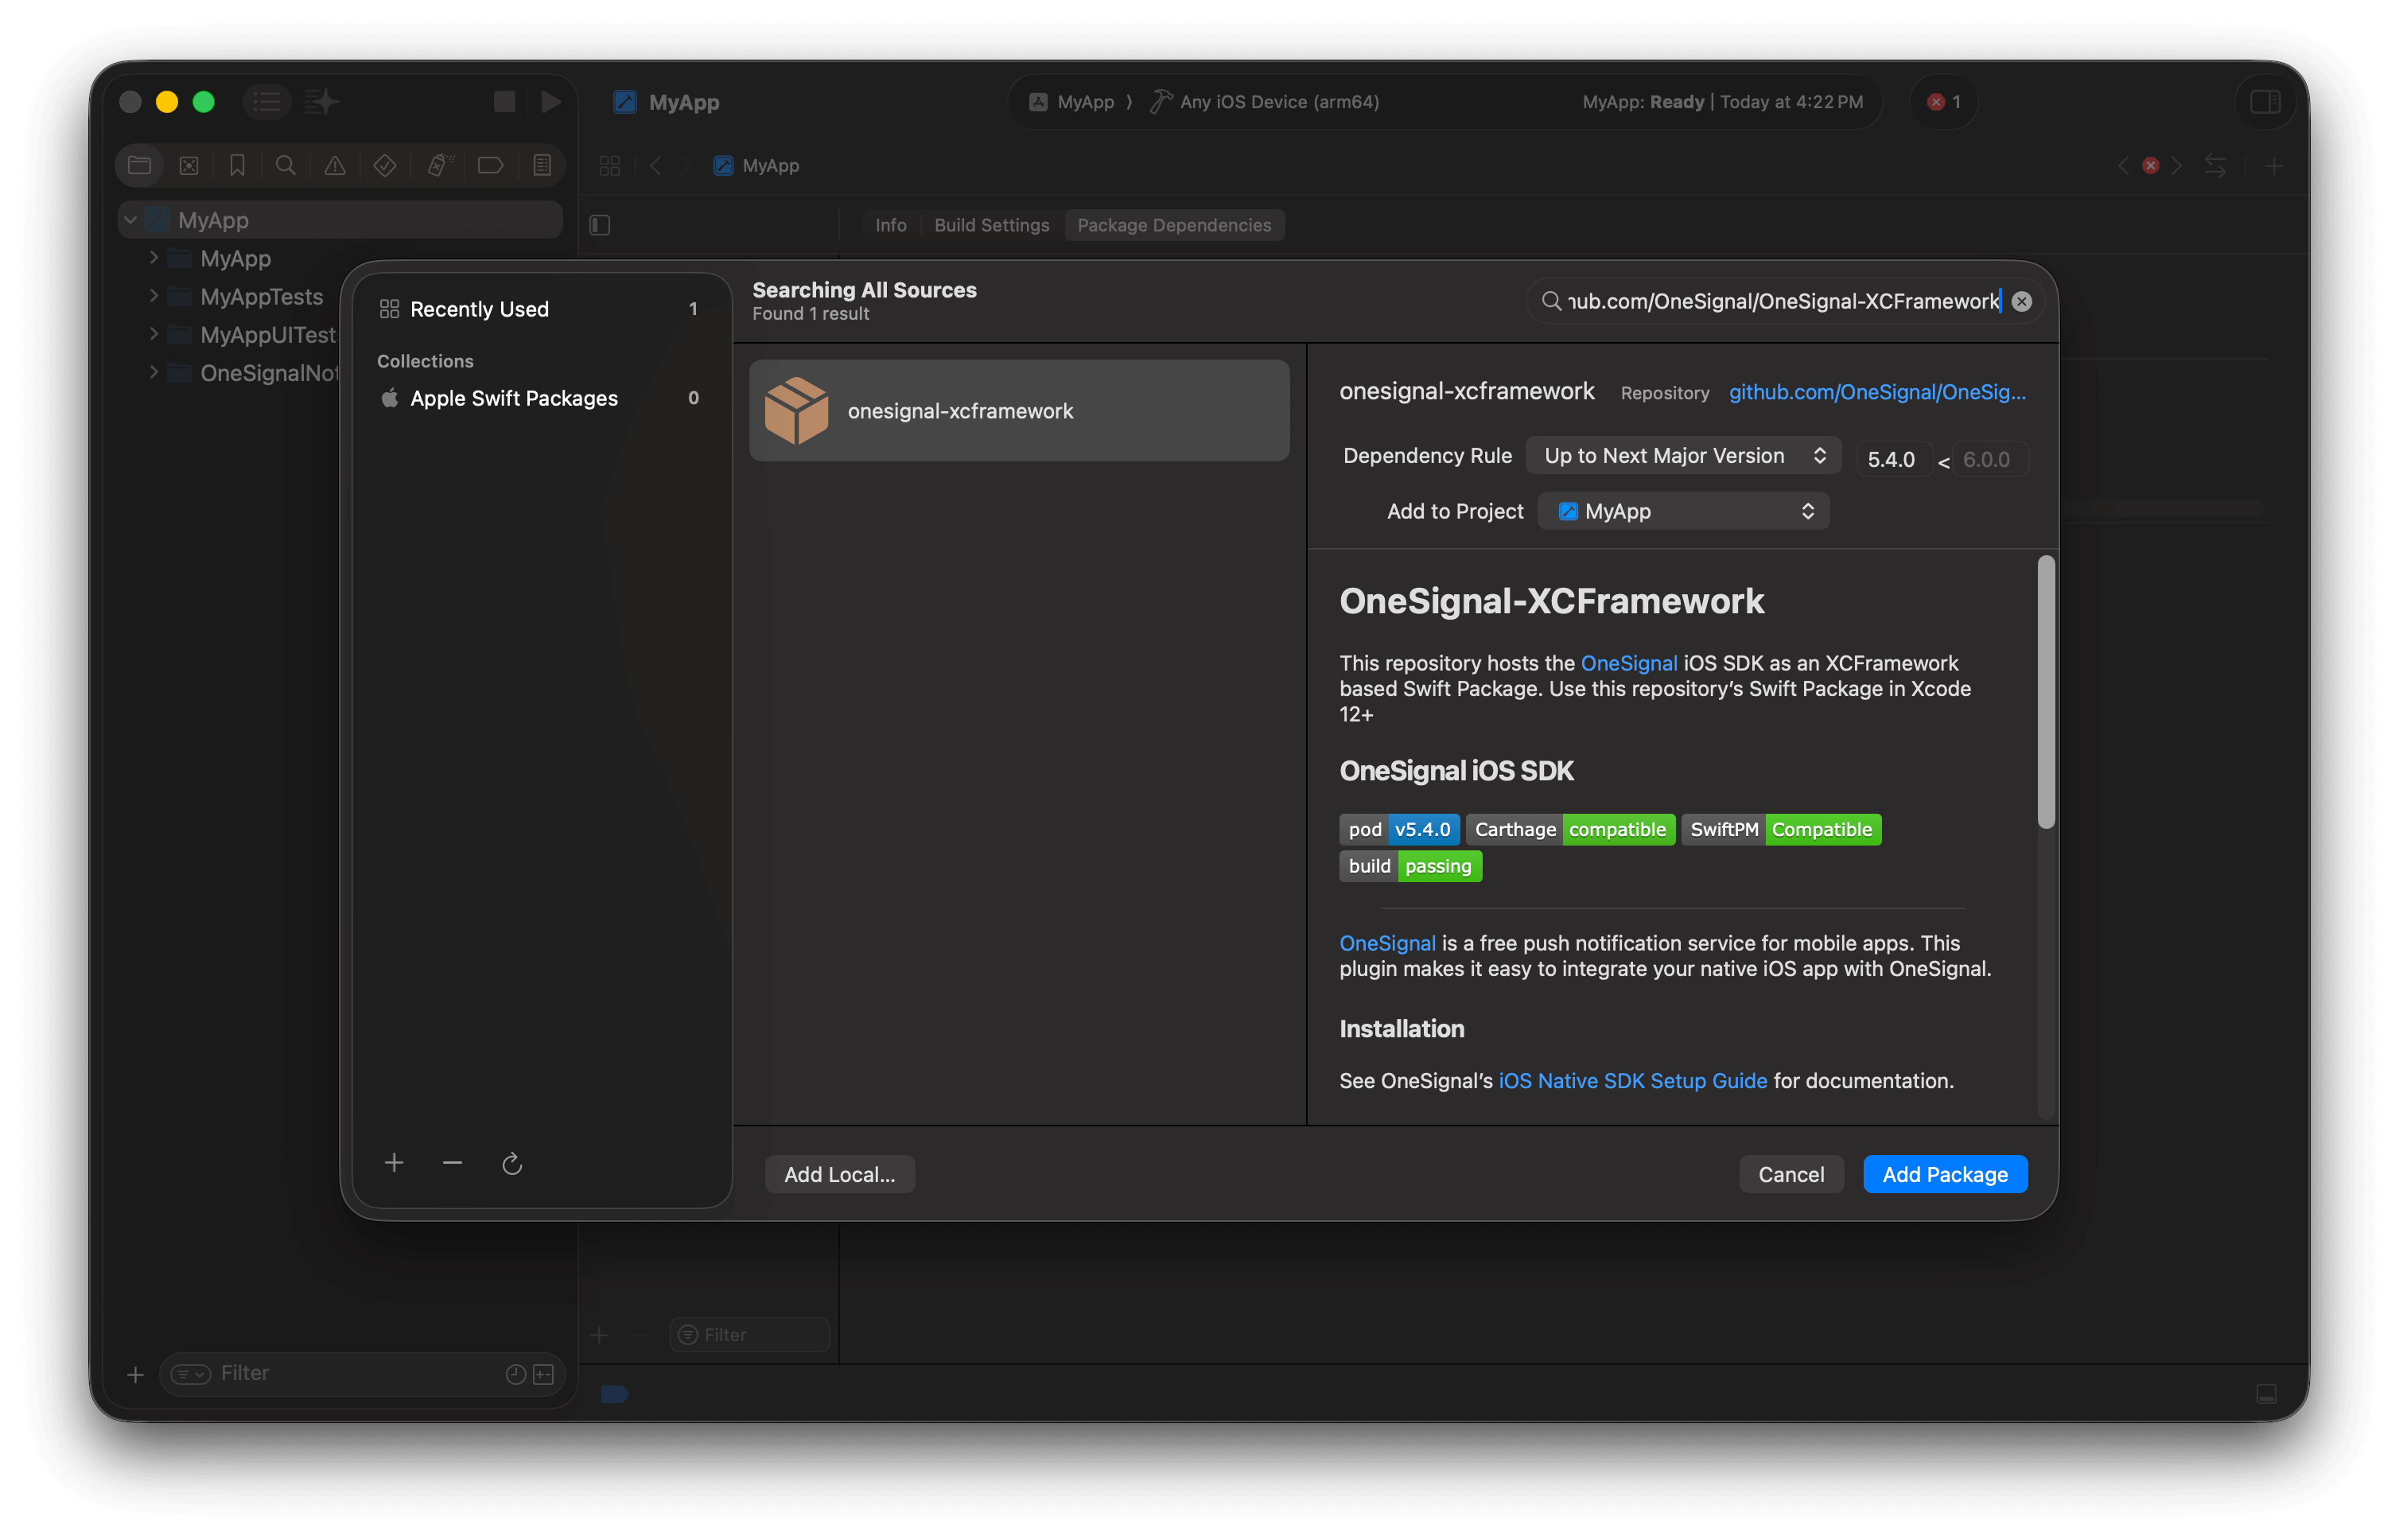
Add the onesignal-xcframework package.
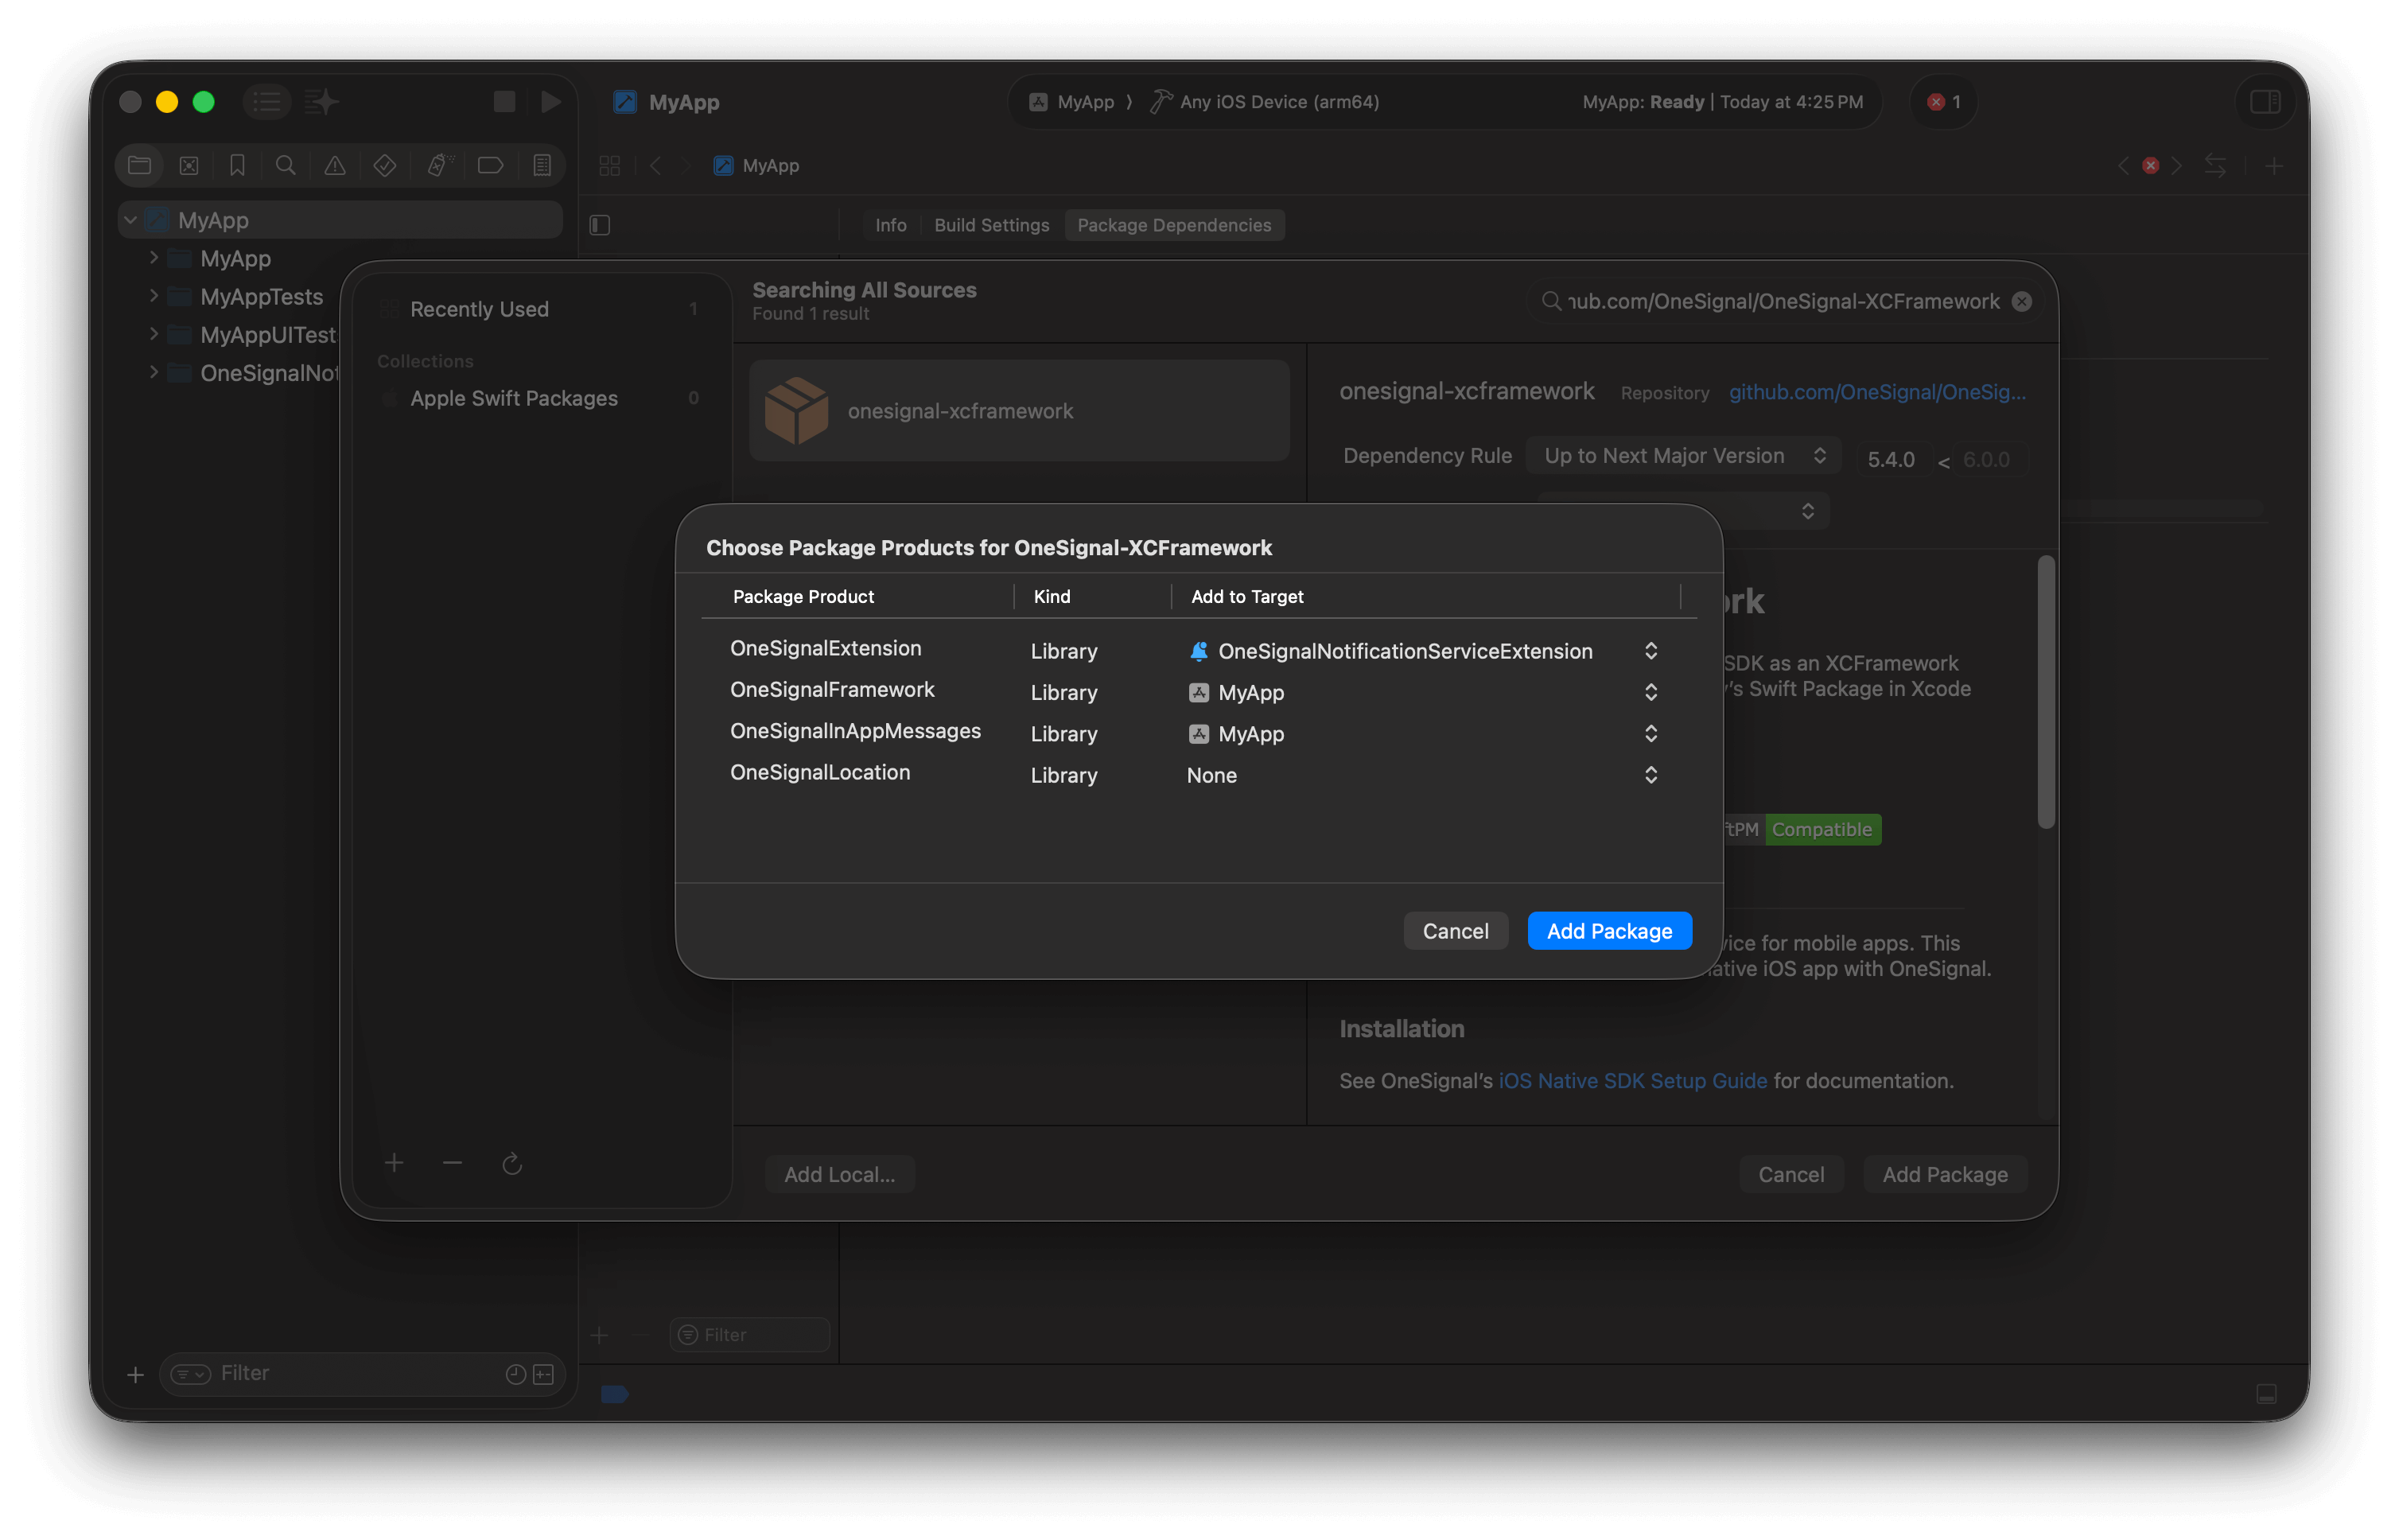
Example shows adding the correct packages to the correct targets omitting Location. If you want location tracking, add it to the main app target.
CocoaPods alternative
CocoaPods alternative
Podfile:pod repo update && pod install, then open .xcworkspace (not .xcodeproj).Common error: ArgumentError - [Xcodeproj] Unable to find compatibility version string for object version 70.CocoaPods relies on the xcodeproj Ruby gem to read your Xcode project files. As of now, the latest xcodeproj release does not recognize object version 70, which was introduced by Xcode 16. So when CocoaPods tries to open your .xcodeproj file, it crashes with this error.- Close Xcode.
- Navigate to your project’s
ios/<your-app>.xcodeproj/project.pbxprojfile. - Change this line:
objectVersion = 70; - Replace it with:
objectVersion = 55; - Save, close, and rerun
cd ios && pod install && cd ..
Step 5. Initialize OneSignal
Add the following initialization code to your app’s main file. ReplaceYOUR_APP_ID with your actual OneSignal App ID from the Dashboard > Settings > Keys & IDs.
SwiftUI:
Open your main app file (typically YourAppNameApp.swift) and add:
UIKit (Storyboard) alternative
UIKit (Storyboard) alternative
Step 6. Test the integration
Verify Subscription creation:- Launch app on device
- Check Dashboard > Audience > Subscriptions — status shows “Never Subscribed”
- Accept the permission prompt
- Refresh dashboard — status changes to “Subscribed”
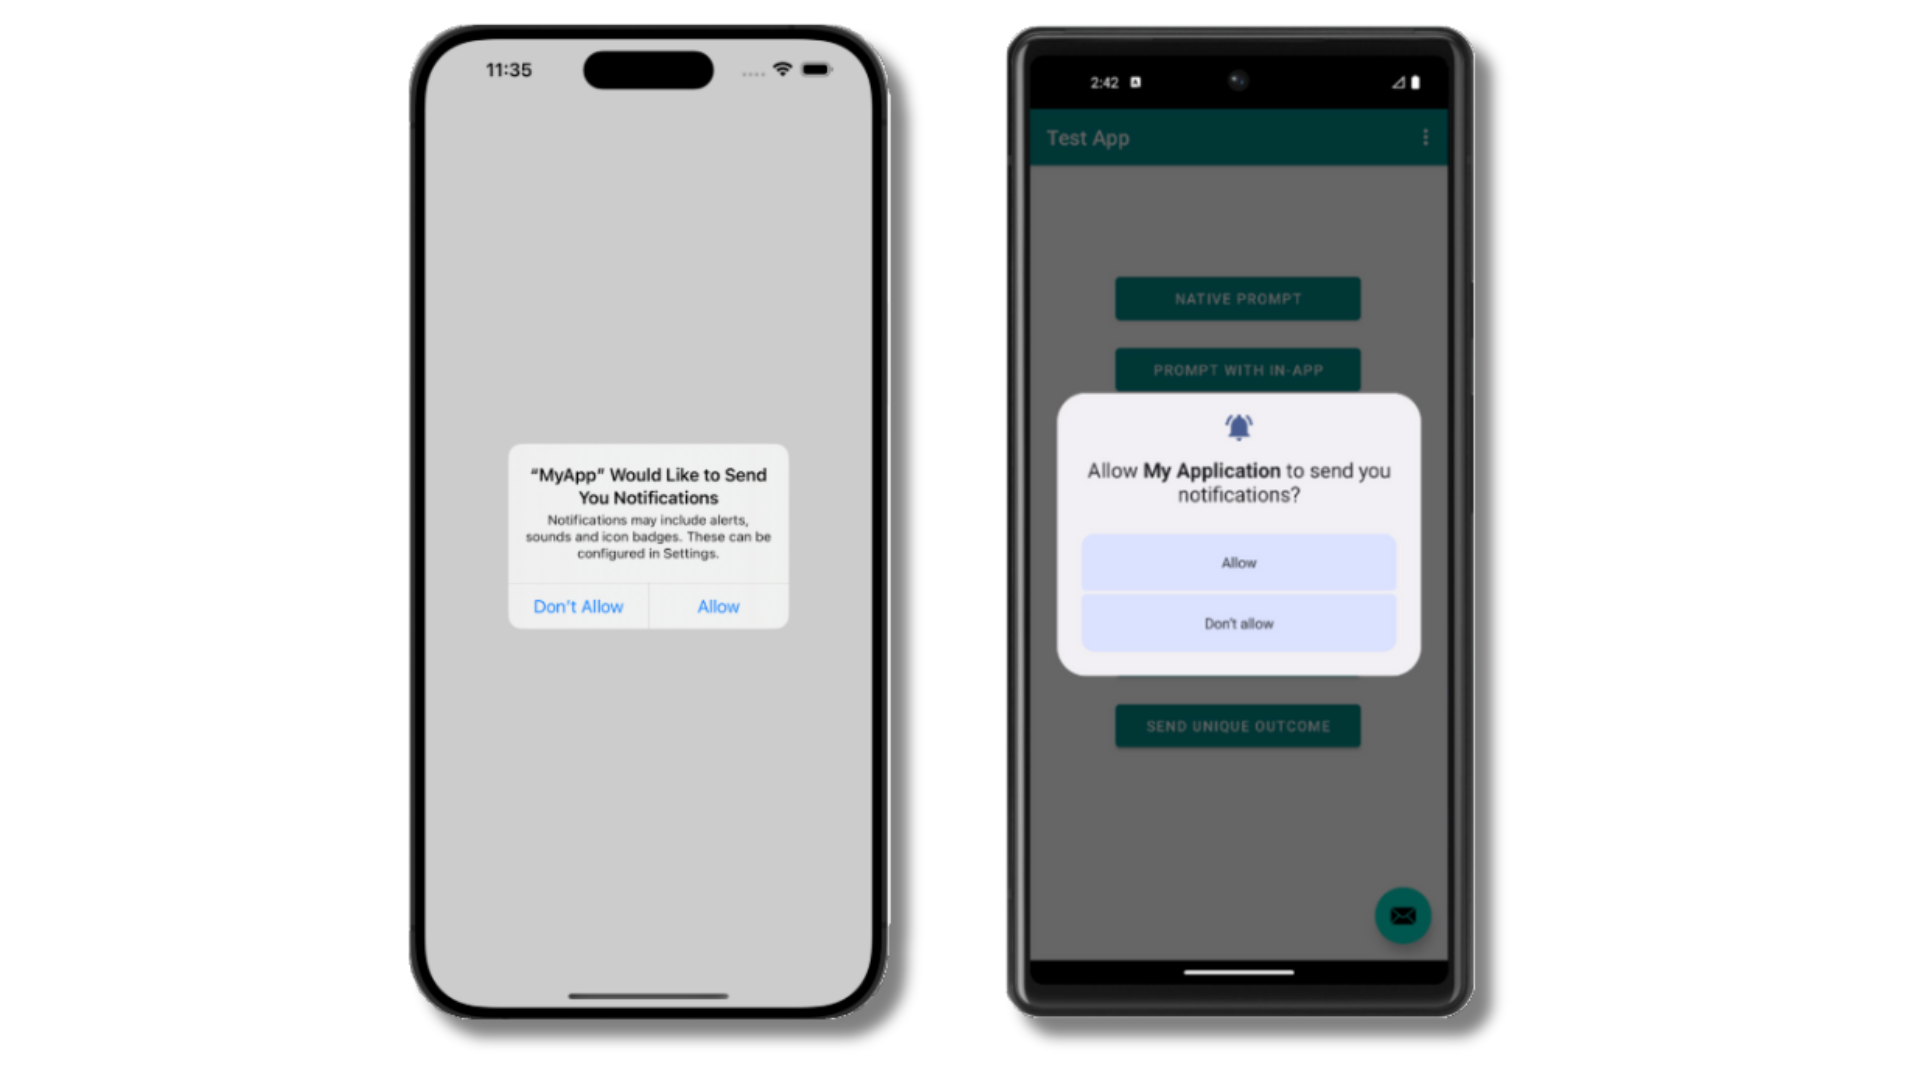
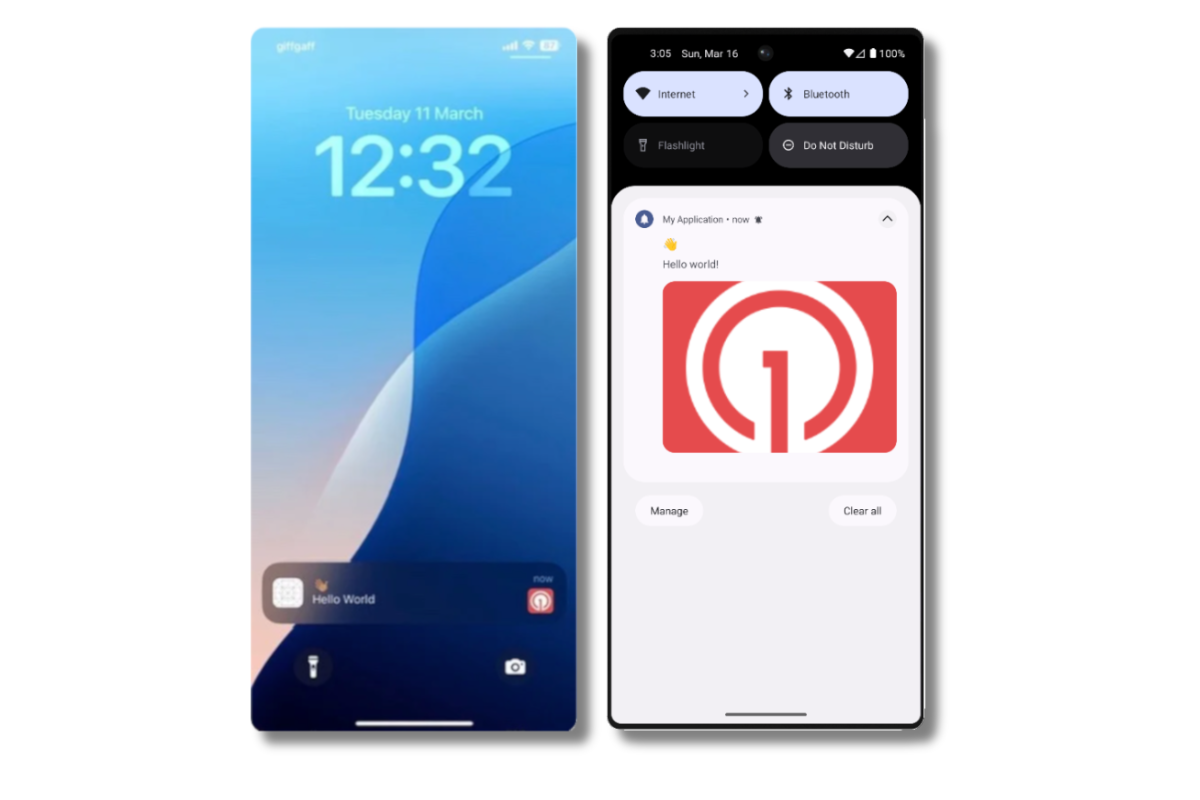
Example of the iOS and Android push permission prompts
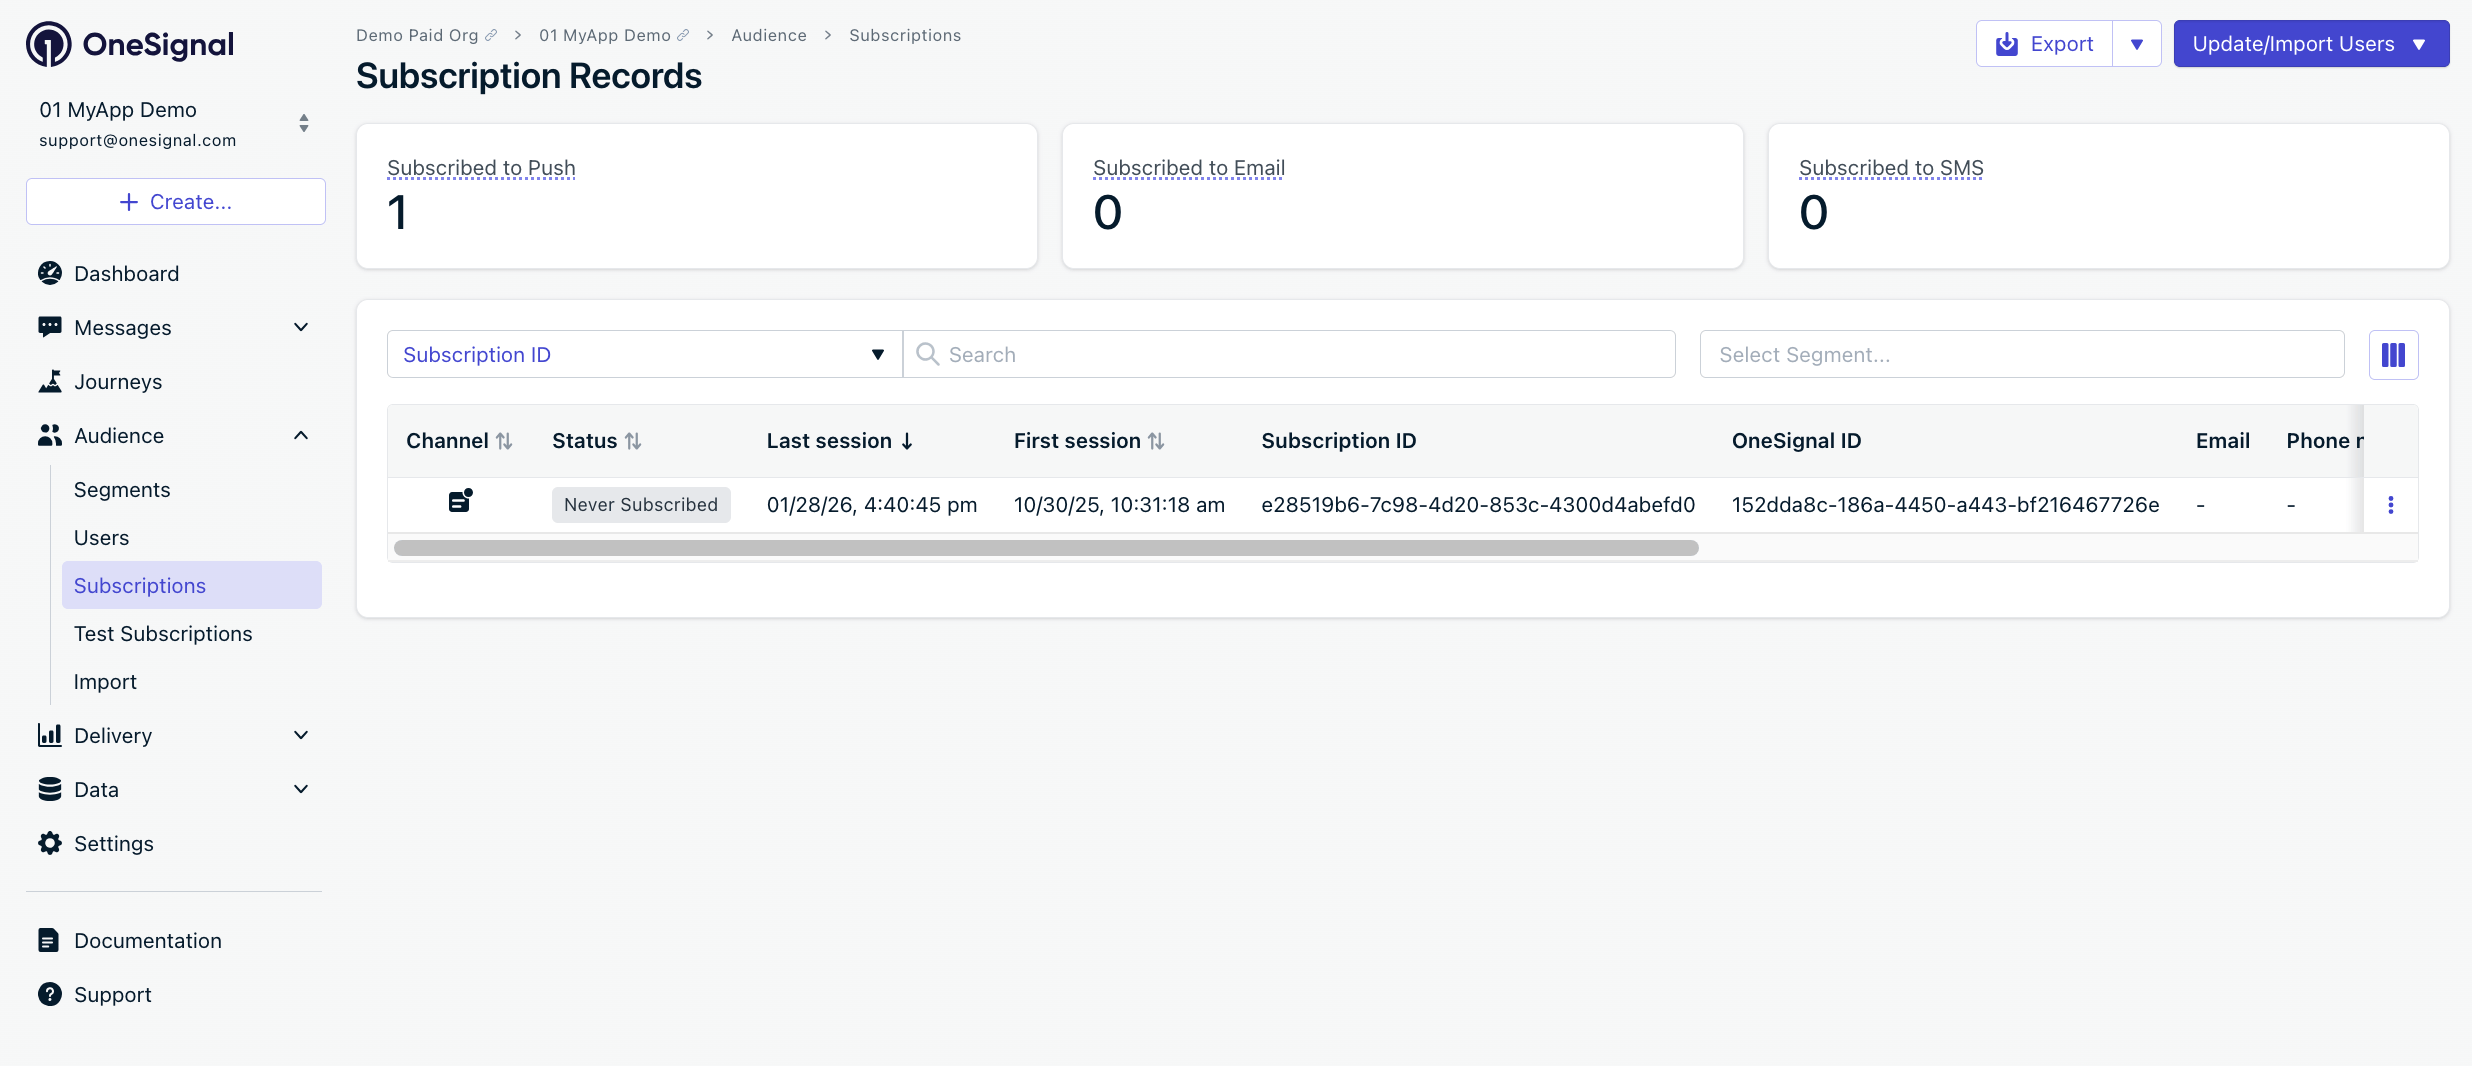
Dashboard showing Subscription with 'Never Subscribed' status
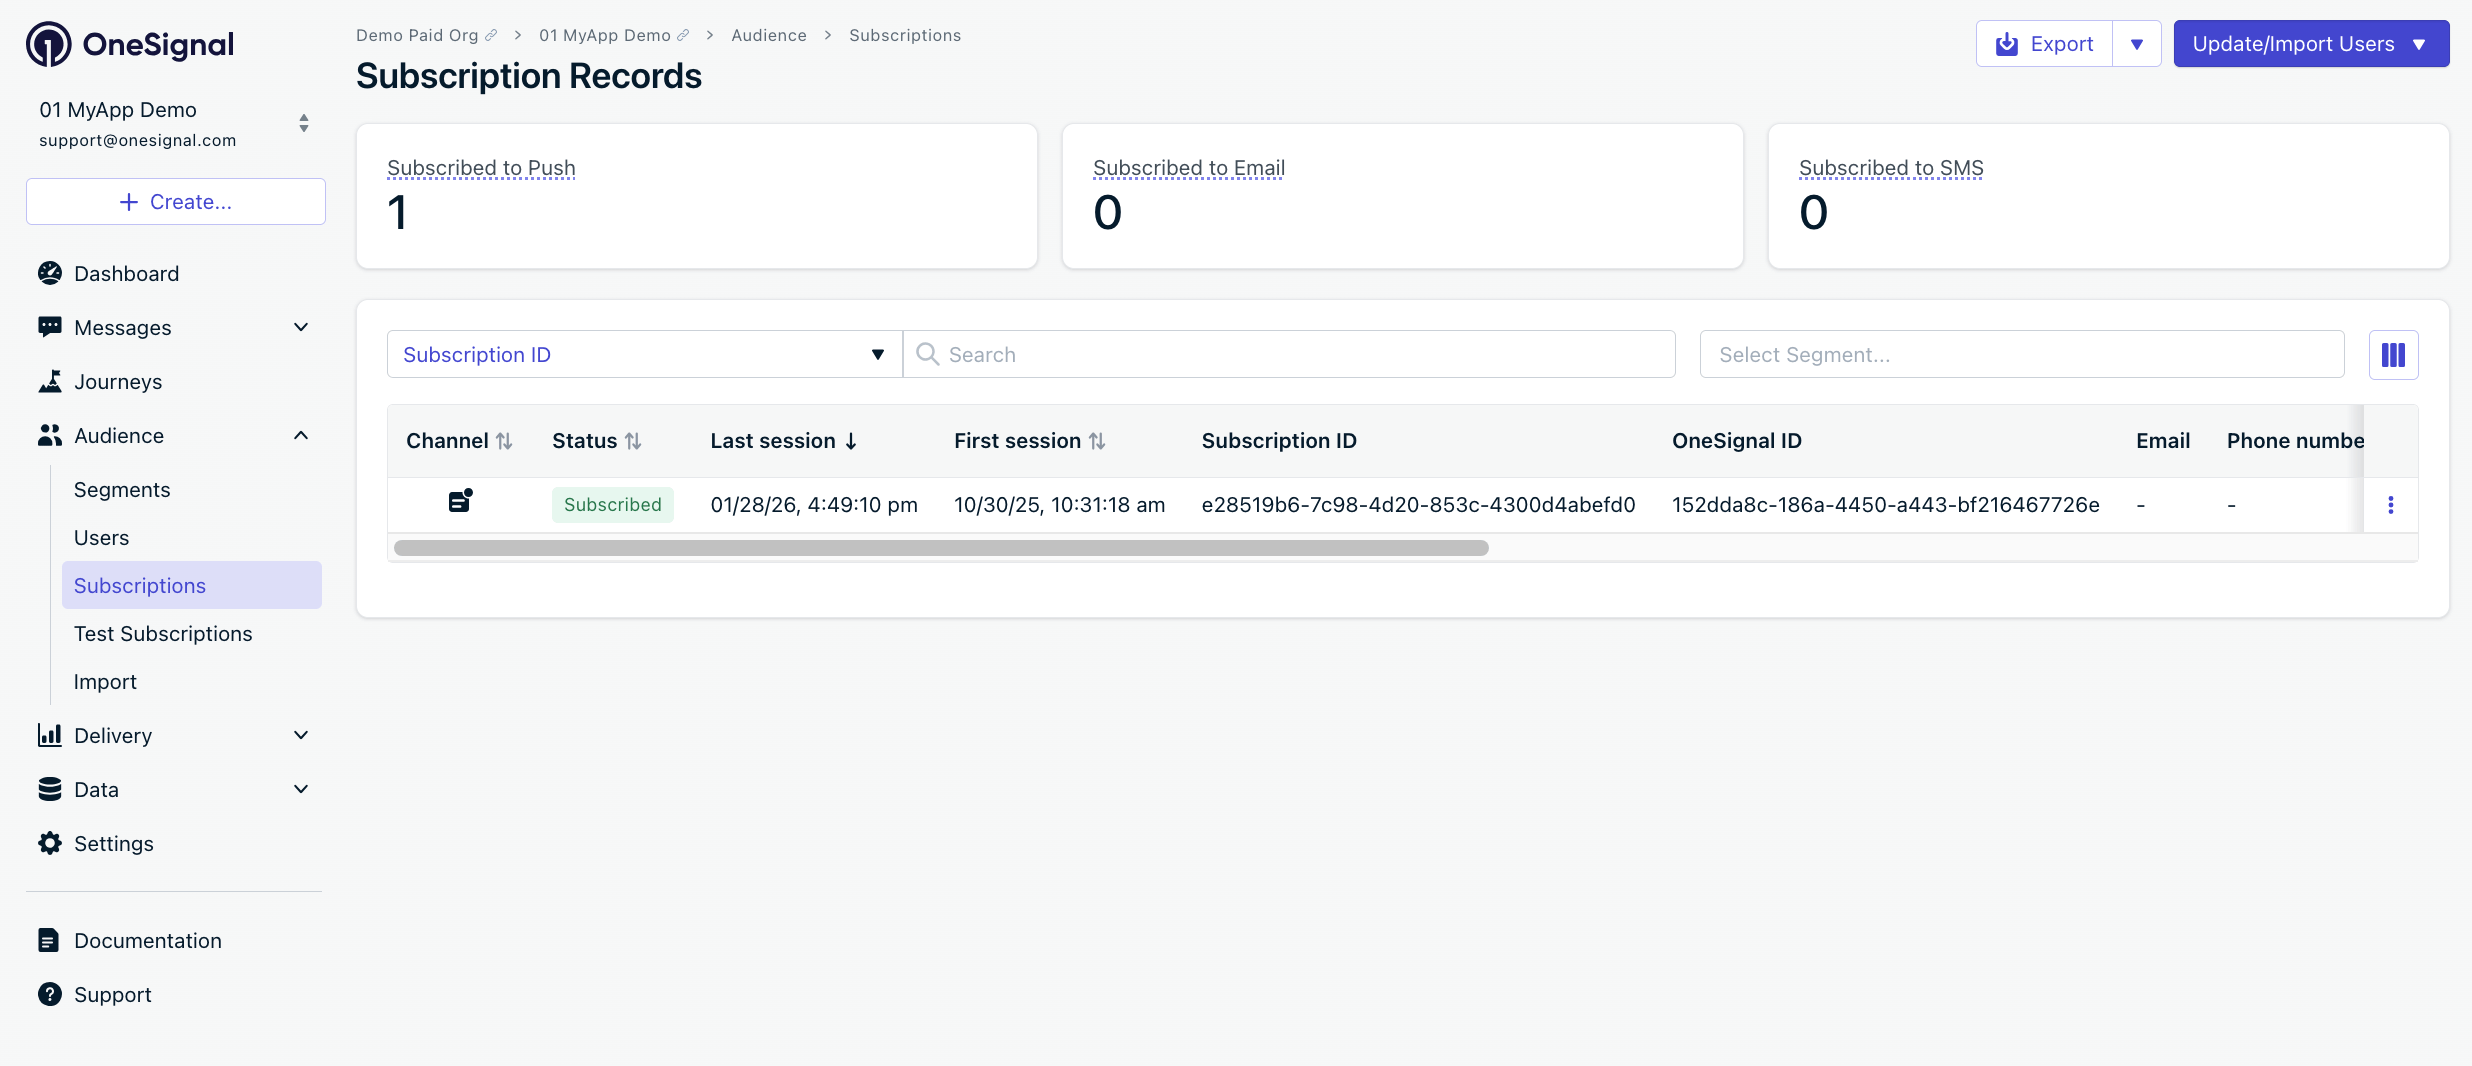
After allowing push permissions, refresh the dashboard to see the Subscription status update to 'Subscribed'
Create test user and segment
- Click ⋮ next to the Subscription > Add to Test Users > name it
- Go to Audience > Segments > New Segment
- Name:
Test Users, add filter Test Users > Create Segment

Add a test user

Create a 'Test Users' segment with the Test Users filter
Send test push via API
- Navigate to Settings > Keys & IDs.
- In the provided code, replace
YOUR_APP_API_KEYandYOUR_APP_IDin the code below with your actual keys. This code uses theTest Userssegment we created earlier.
Images will appear small in the collapsed notification view. Expand the notification to see the full image.
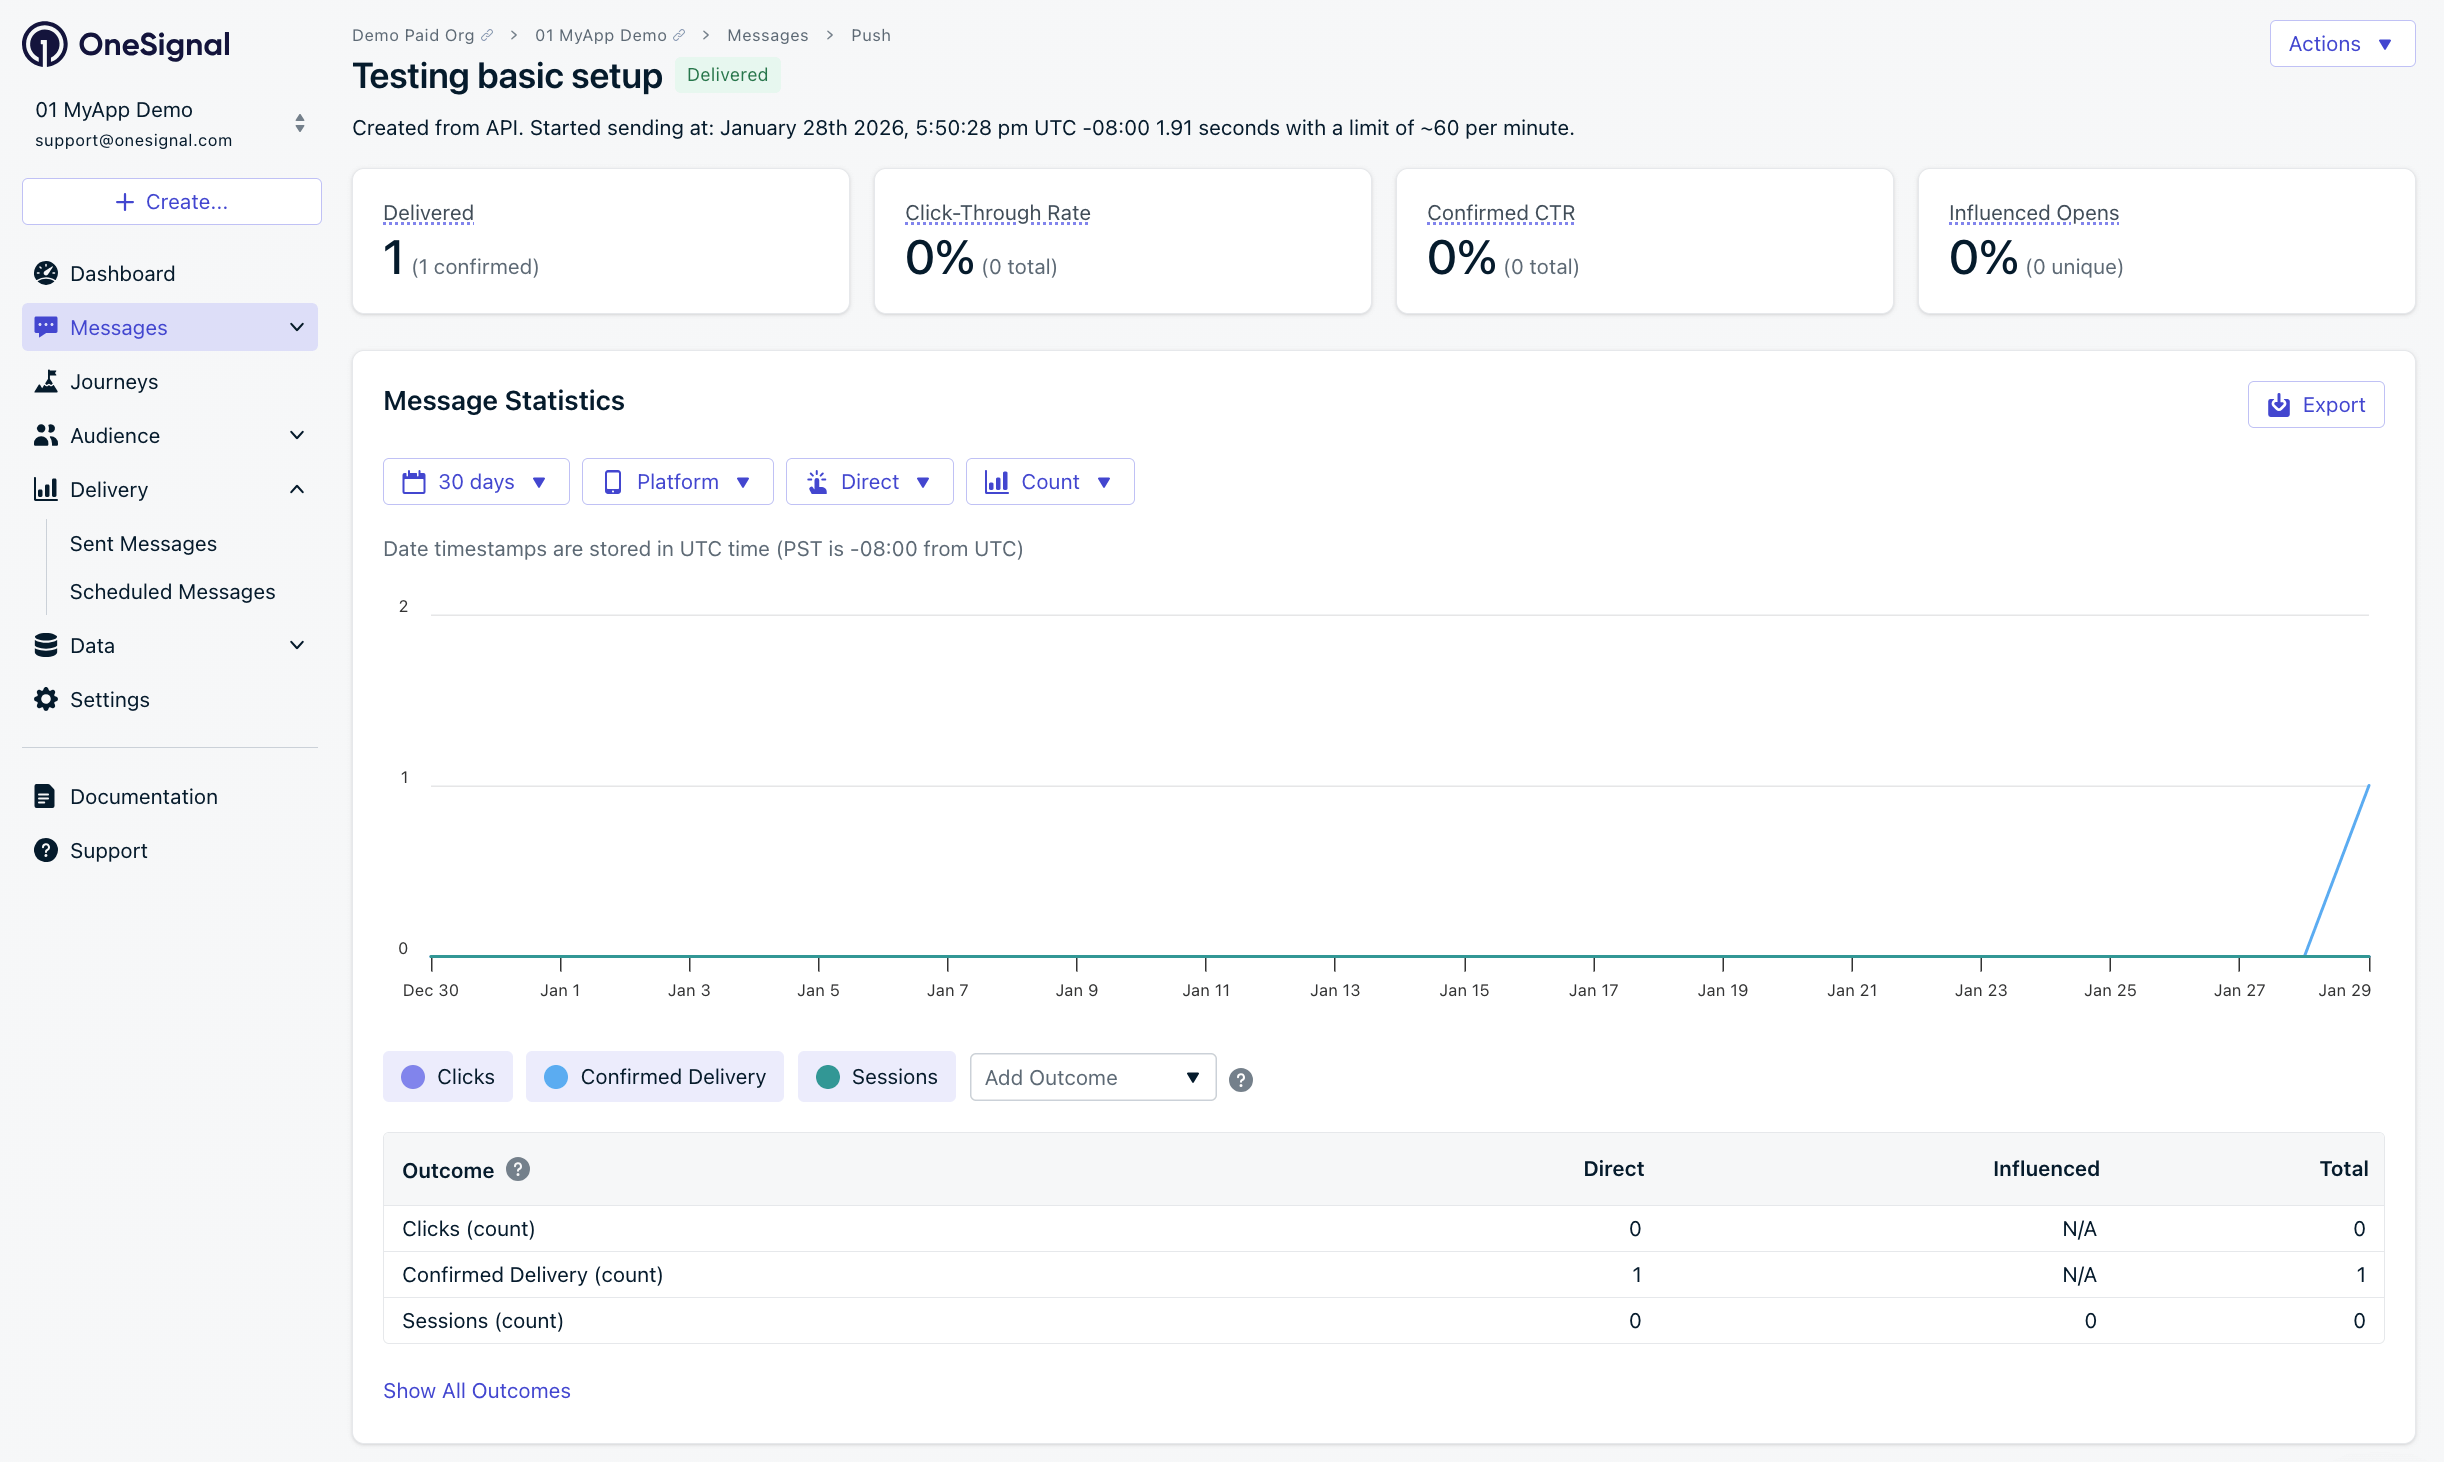
Delivery stats showing confirmed receipt (unavailable on free plans)
- An image.
- Dashboard > Delivery > Sent Messages shows “Confirmed” status (unavailable on free plans).
Test in-app messages
- Close app for 30+ seconds
- Dashboard > Messages > In-App > New In-App > select Welcome template
- Audience: Test Users segment
- Trigger: On app open
- Schedule: Every time trigger conditions are satisfied
- Click Make Message Live
- Open app
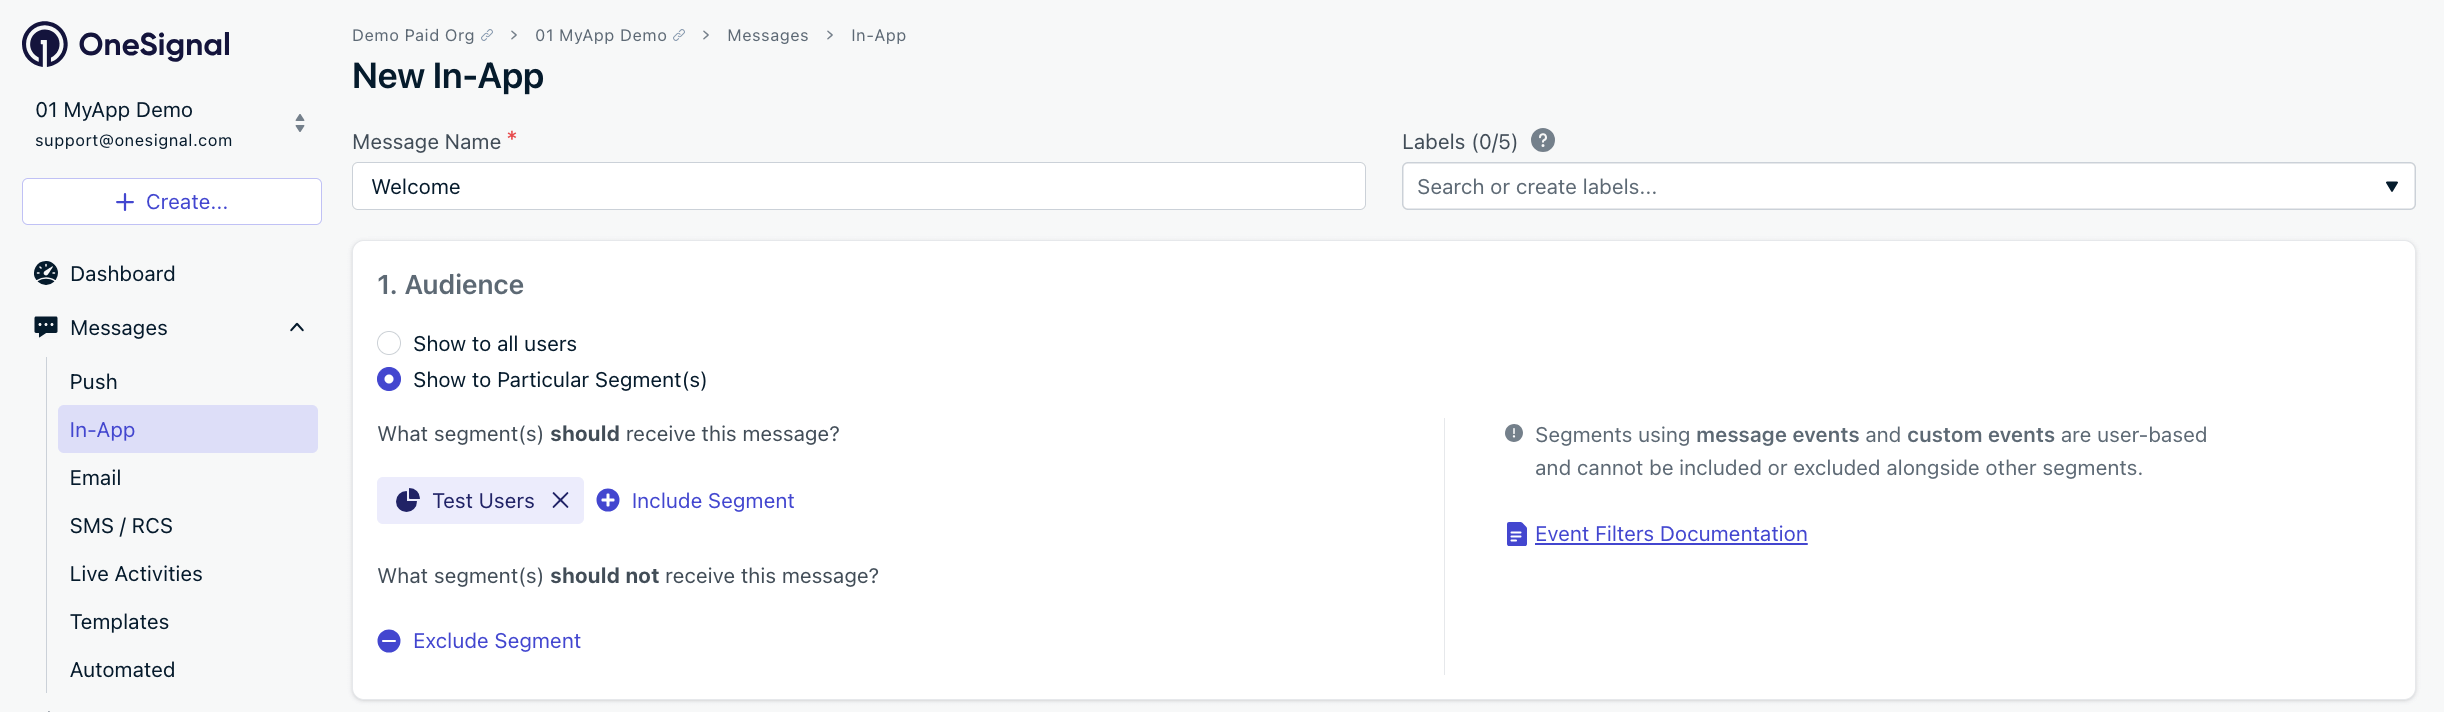
Targeting the 'Test Users' segment with an in-app message
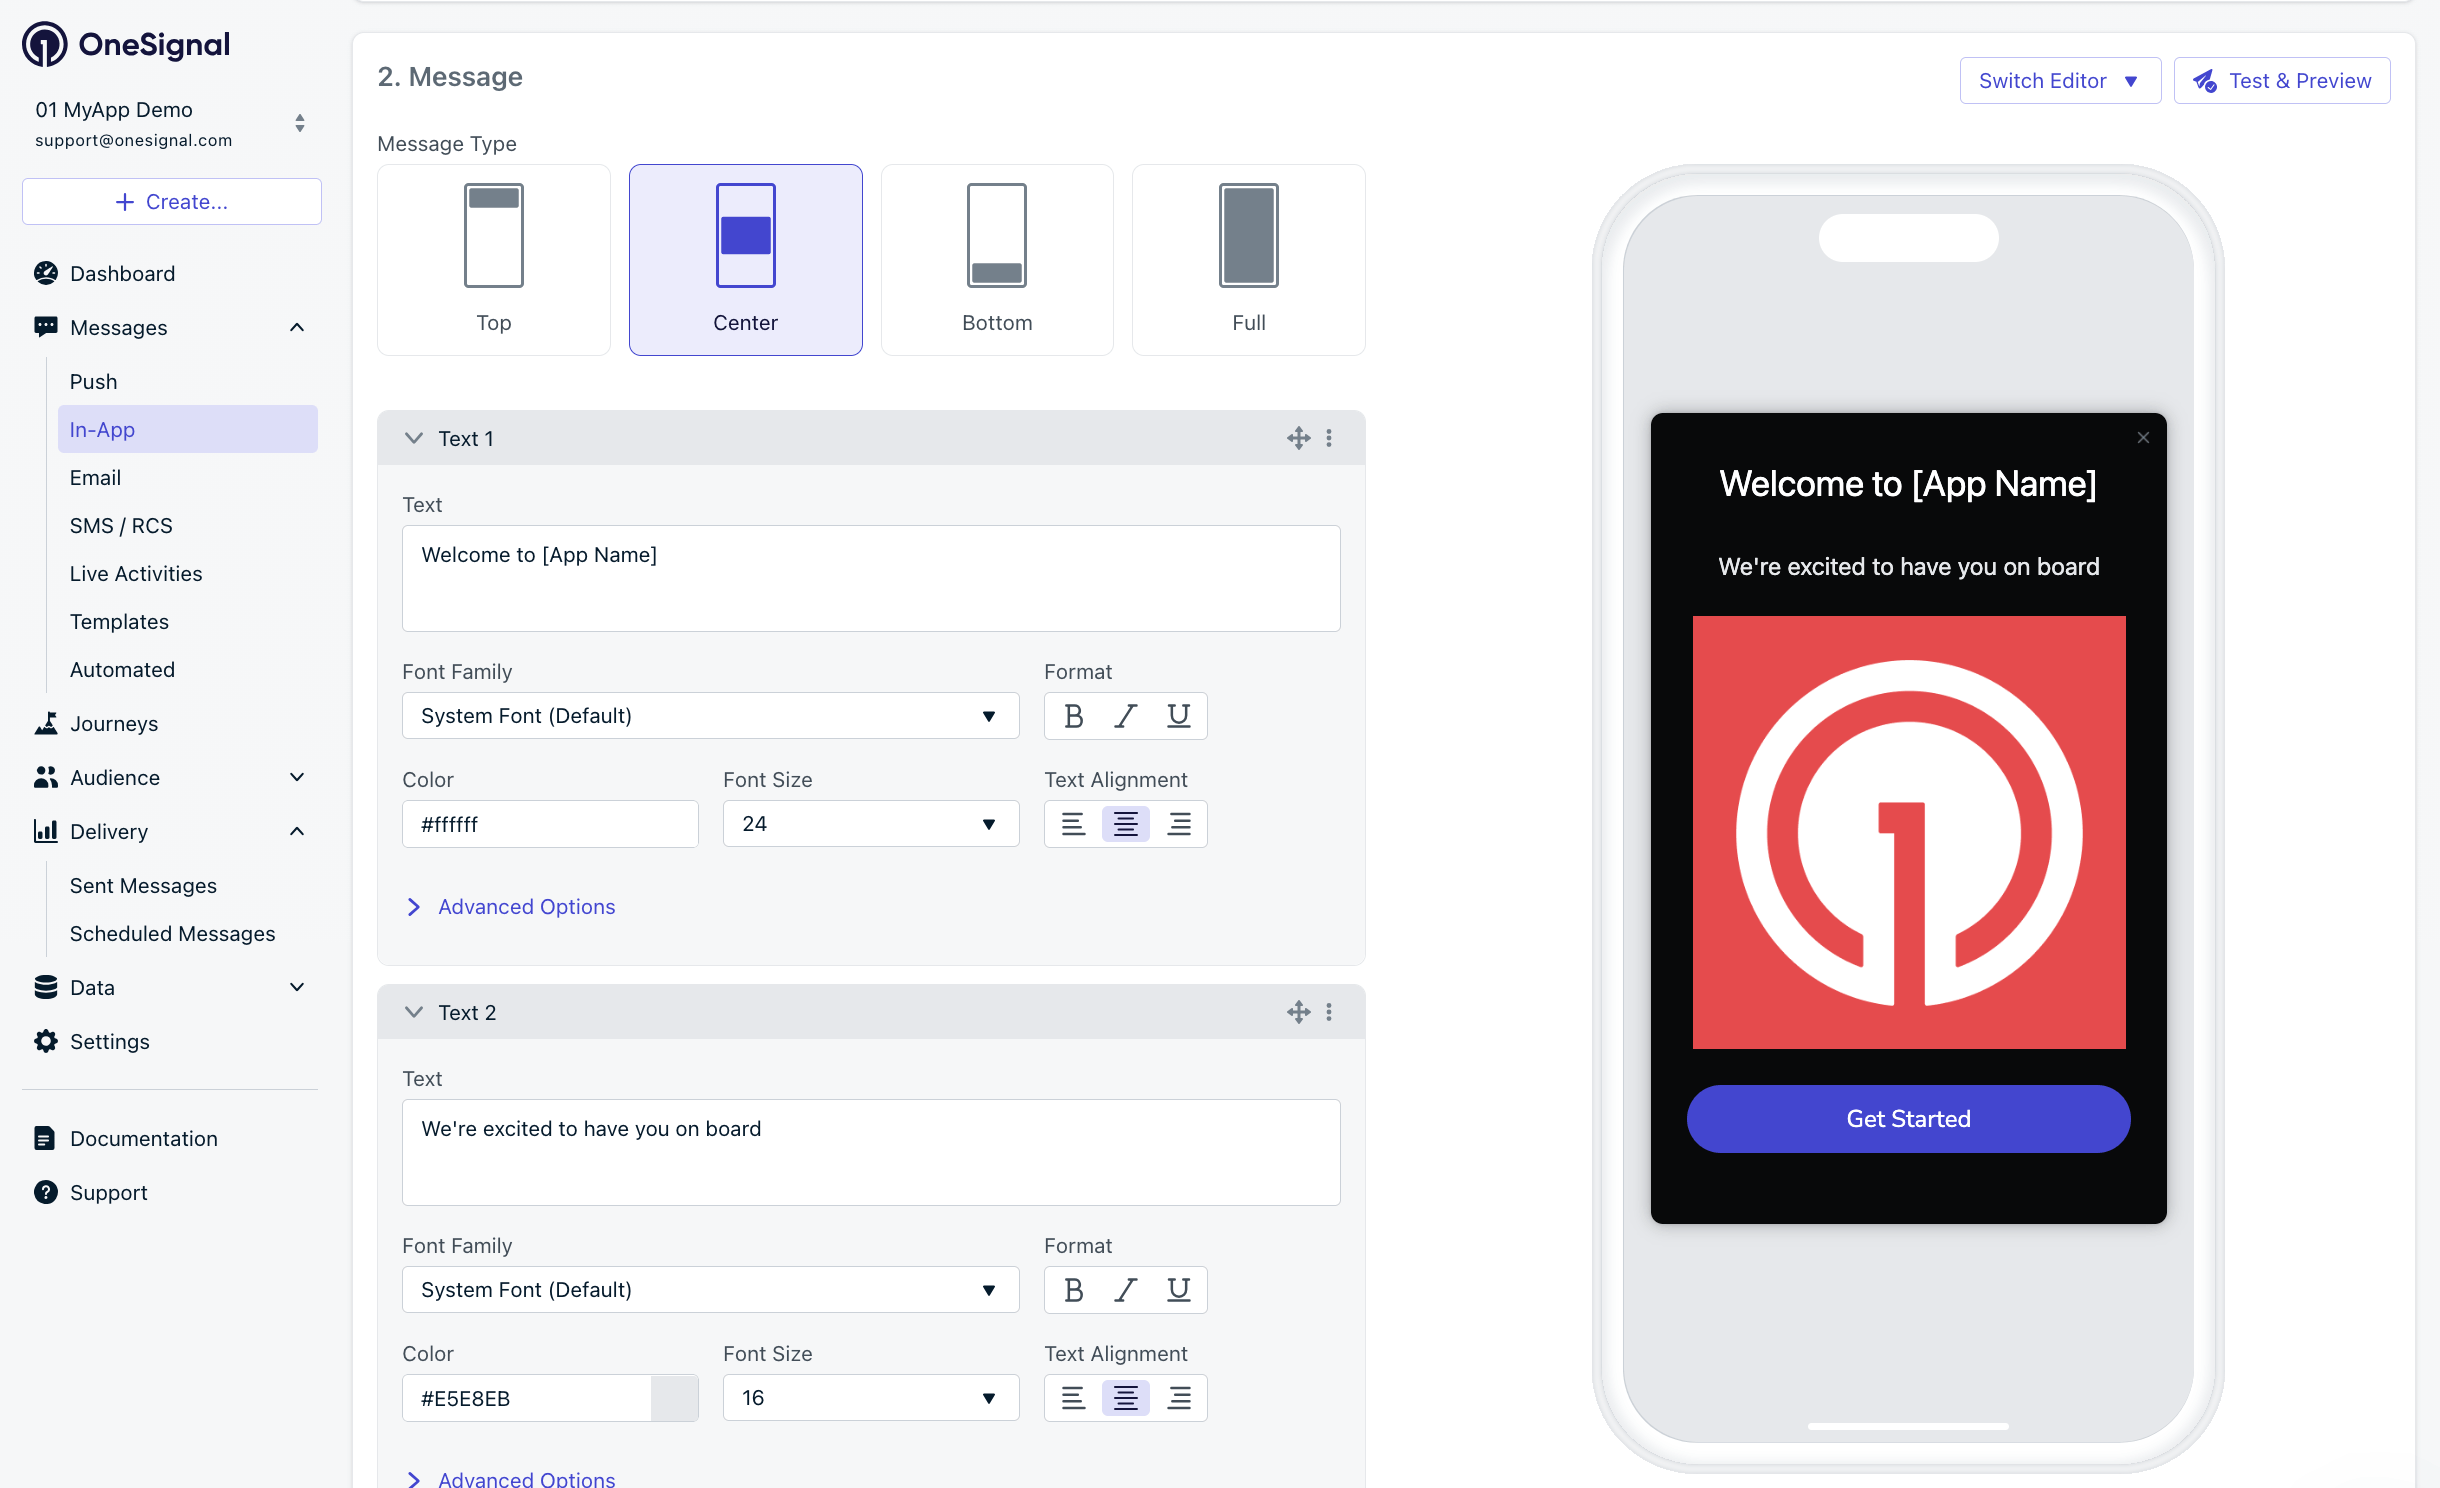
Example customization of in-app Welcome message
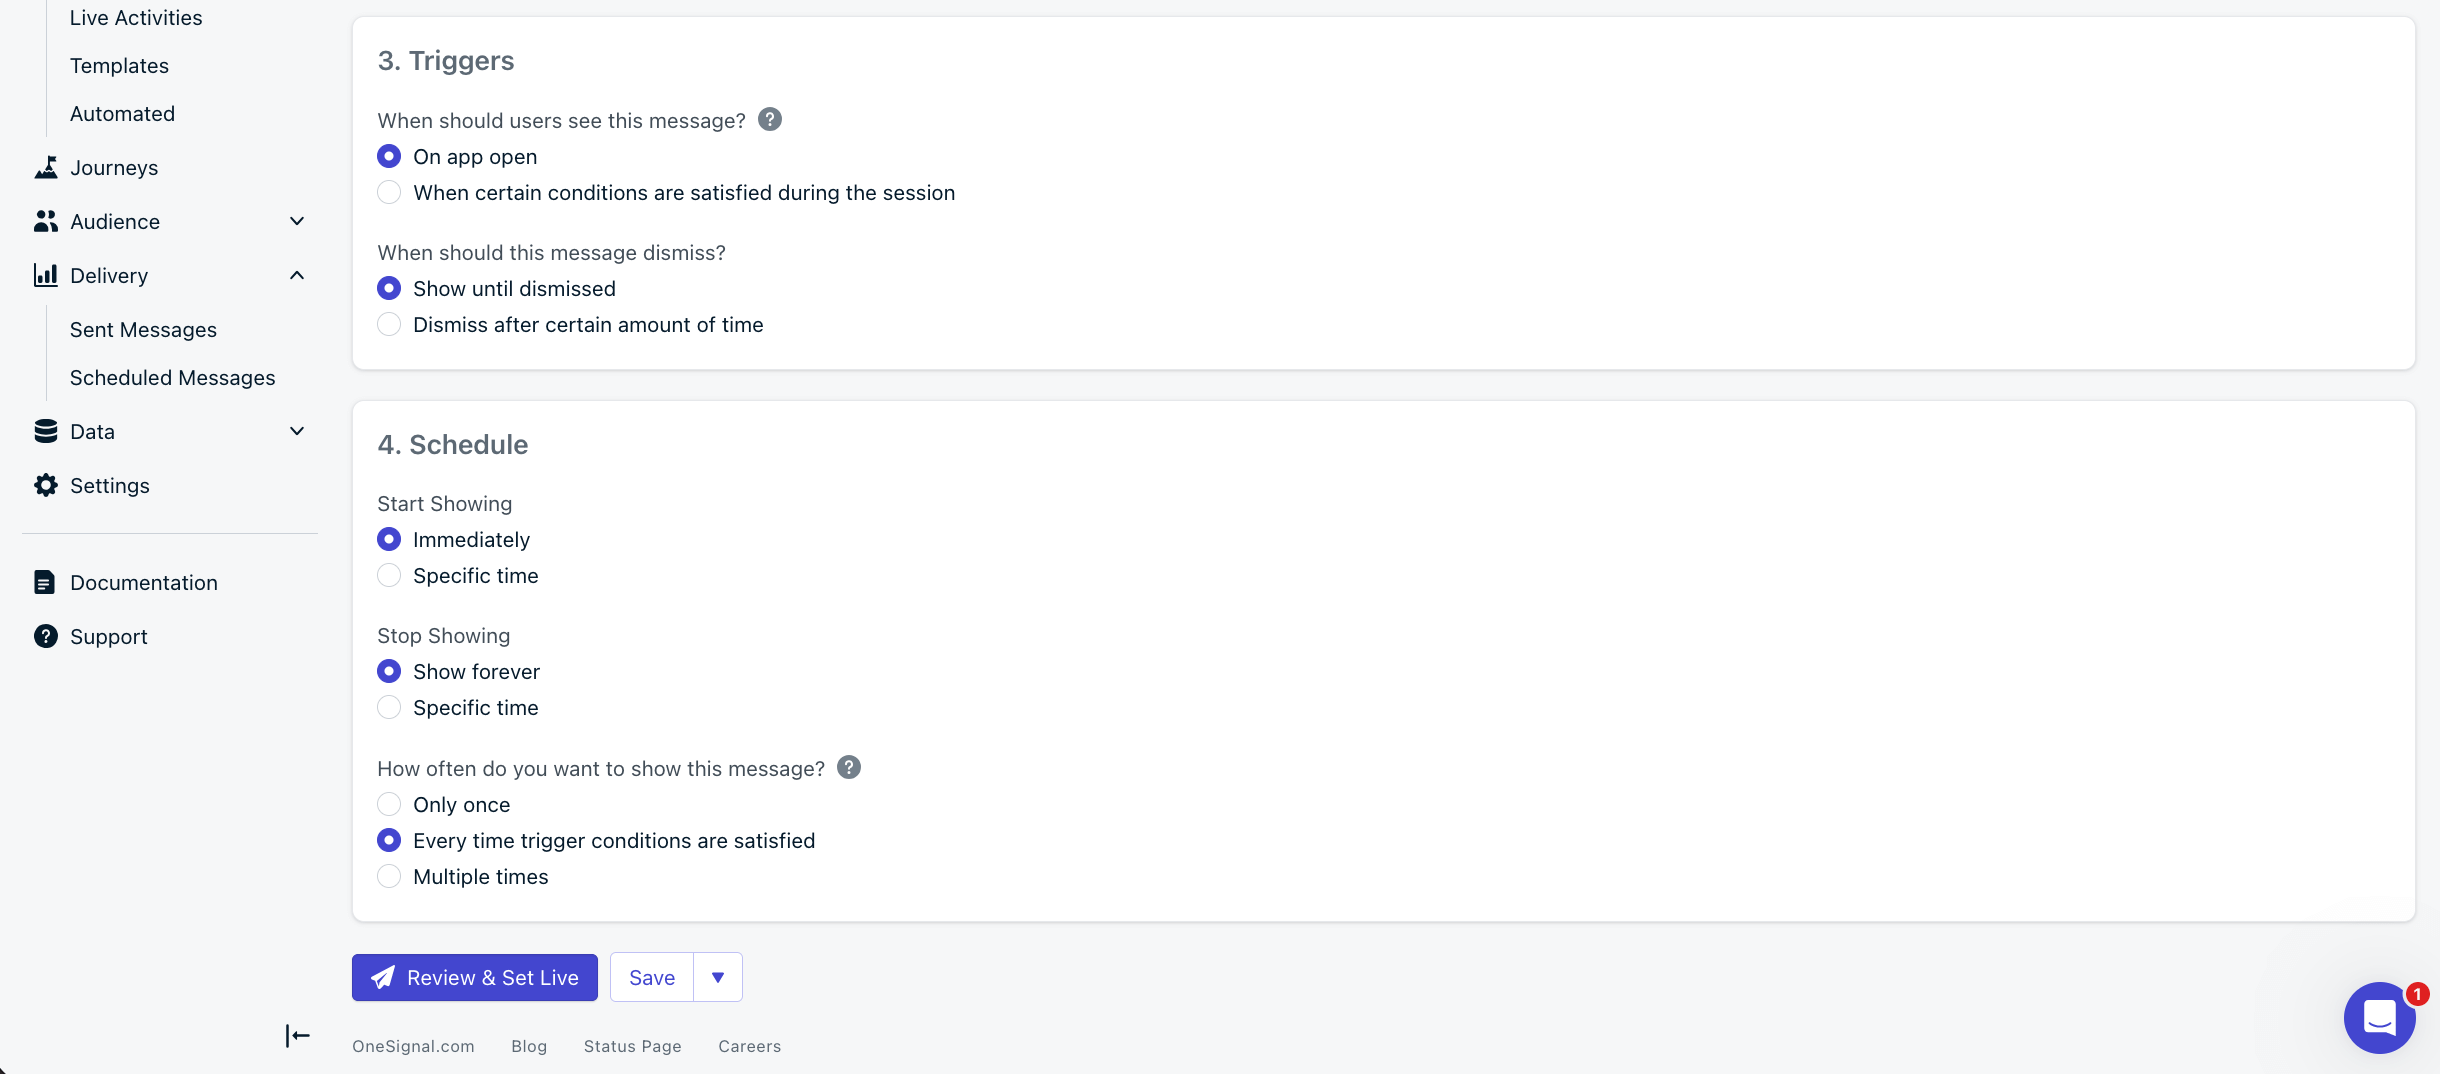
In-app message scheduling options
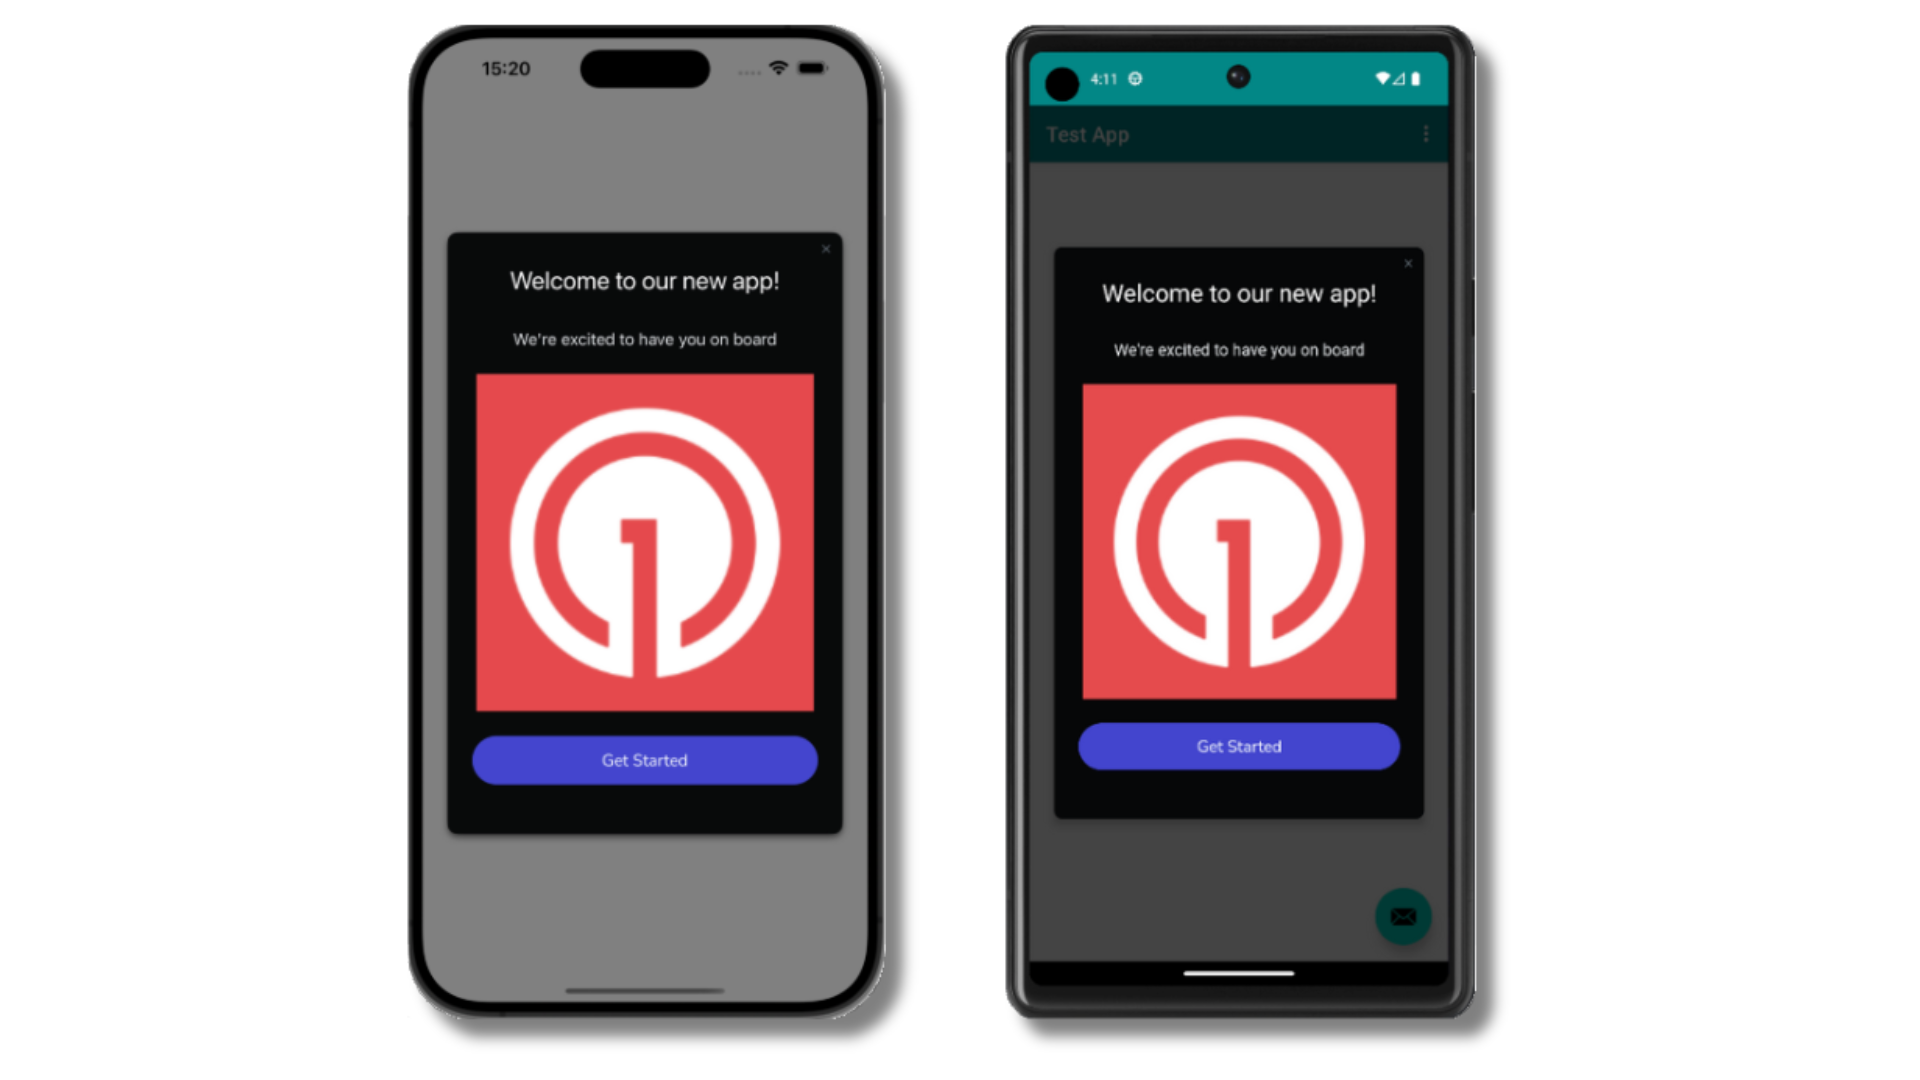
Welcome in-app message shown on devices
- Gathering Subscriptions, setting Test Users, and creating Segments.
- Sending Push with images and Confirmed receipt using Segments and our Create message API.
- Sending In-app messages.
Common Errors & Fixes
User management
Previously, we demonstrated how to create mobile Subscriptions. Now we’ll expand to identifying Users across all their Subscriptions (including push, email, and SMS) using the OneSignal SDK.Assign External ID (recommended)
Use an External ID to identify users consistently across devices, email addresses, and phone numbers using your backend’s user identifier. This ensures your messaging stays unified across channels and 3rd party systems. See our Mobile SDK reference for more details and Objective-C code examples.login method in the SDK reference guide.Add Tags & Custom Events
Tags and Custom Events are both ways to add data to your users. Tags arekey-value strings and are generally associated with user properties (like username, role, or status) while Custom Events have a JSON format and are usually associated with actions (like new_purchase, abandoned_cart, and associated properties). Both can be used to power advanced Message Personalization and Journeys. See our Mobile SDK reference for more details and Objective-C code examples.
Add email and/or SMS subscriptions
You can reach users through email and SMS channels in addition to push notifications. If the email address and/or phone number already exist in the OneSignal app, the SDK will add it to the existing user — it will not create duplicates. See our Mobile SDK reference for more details and Objective-C code examples.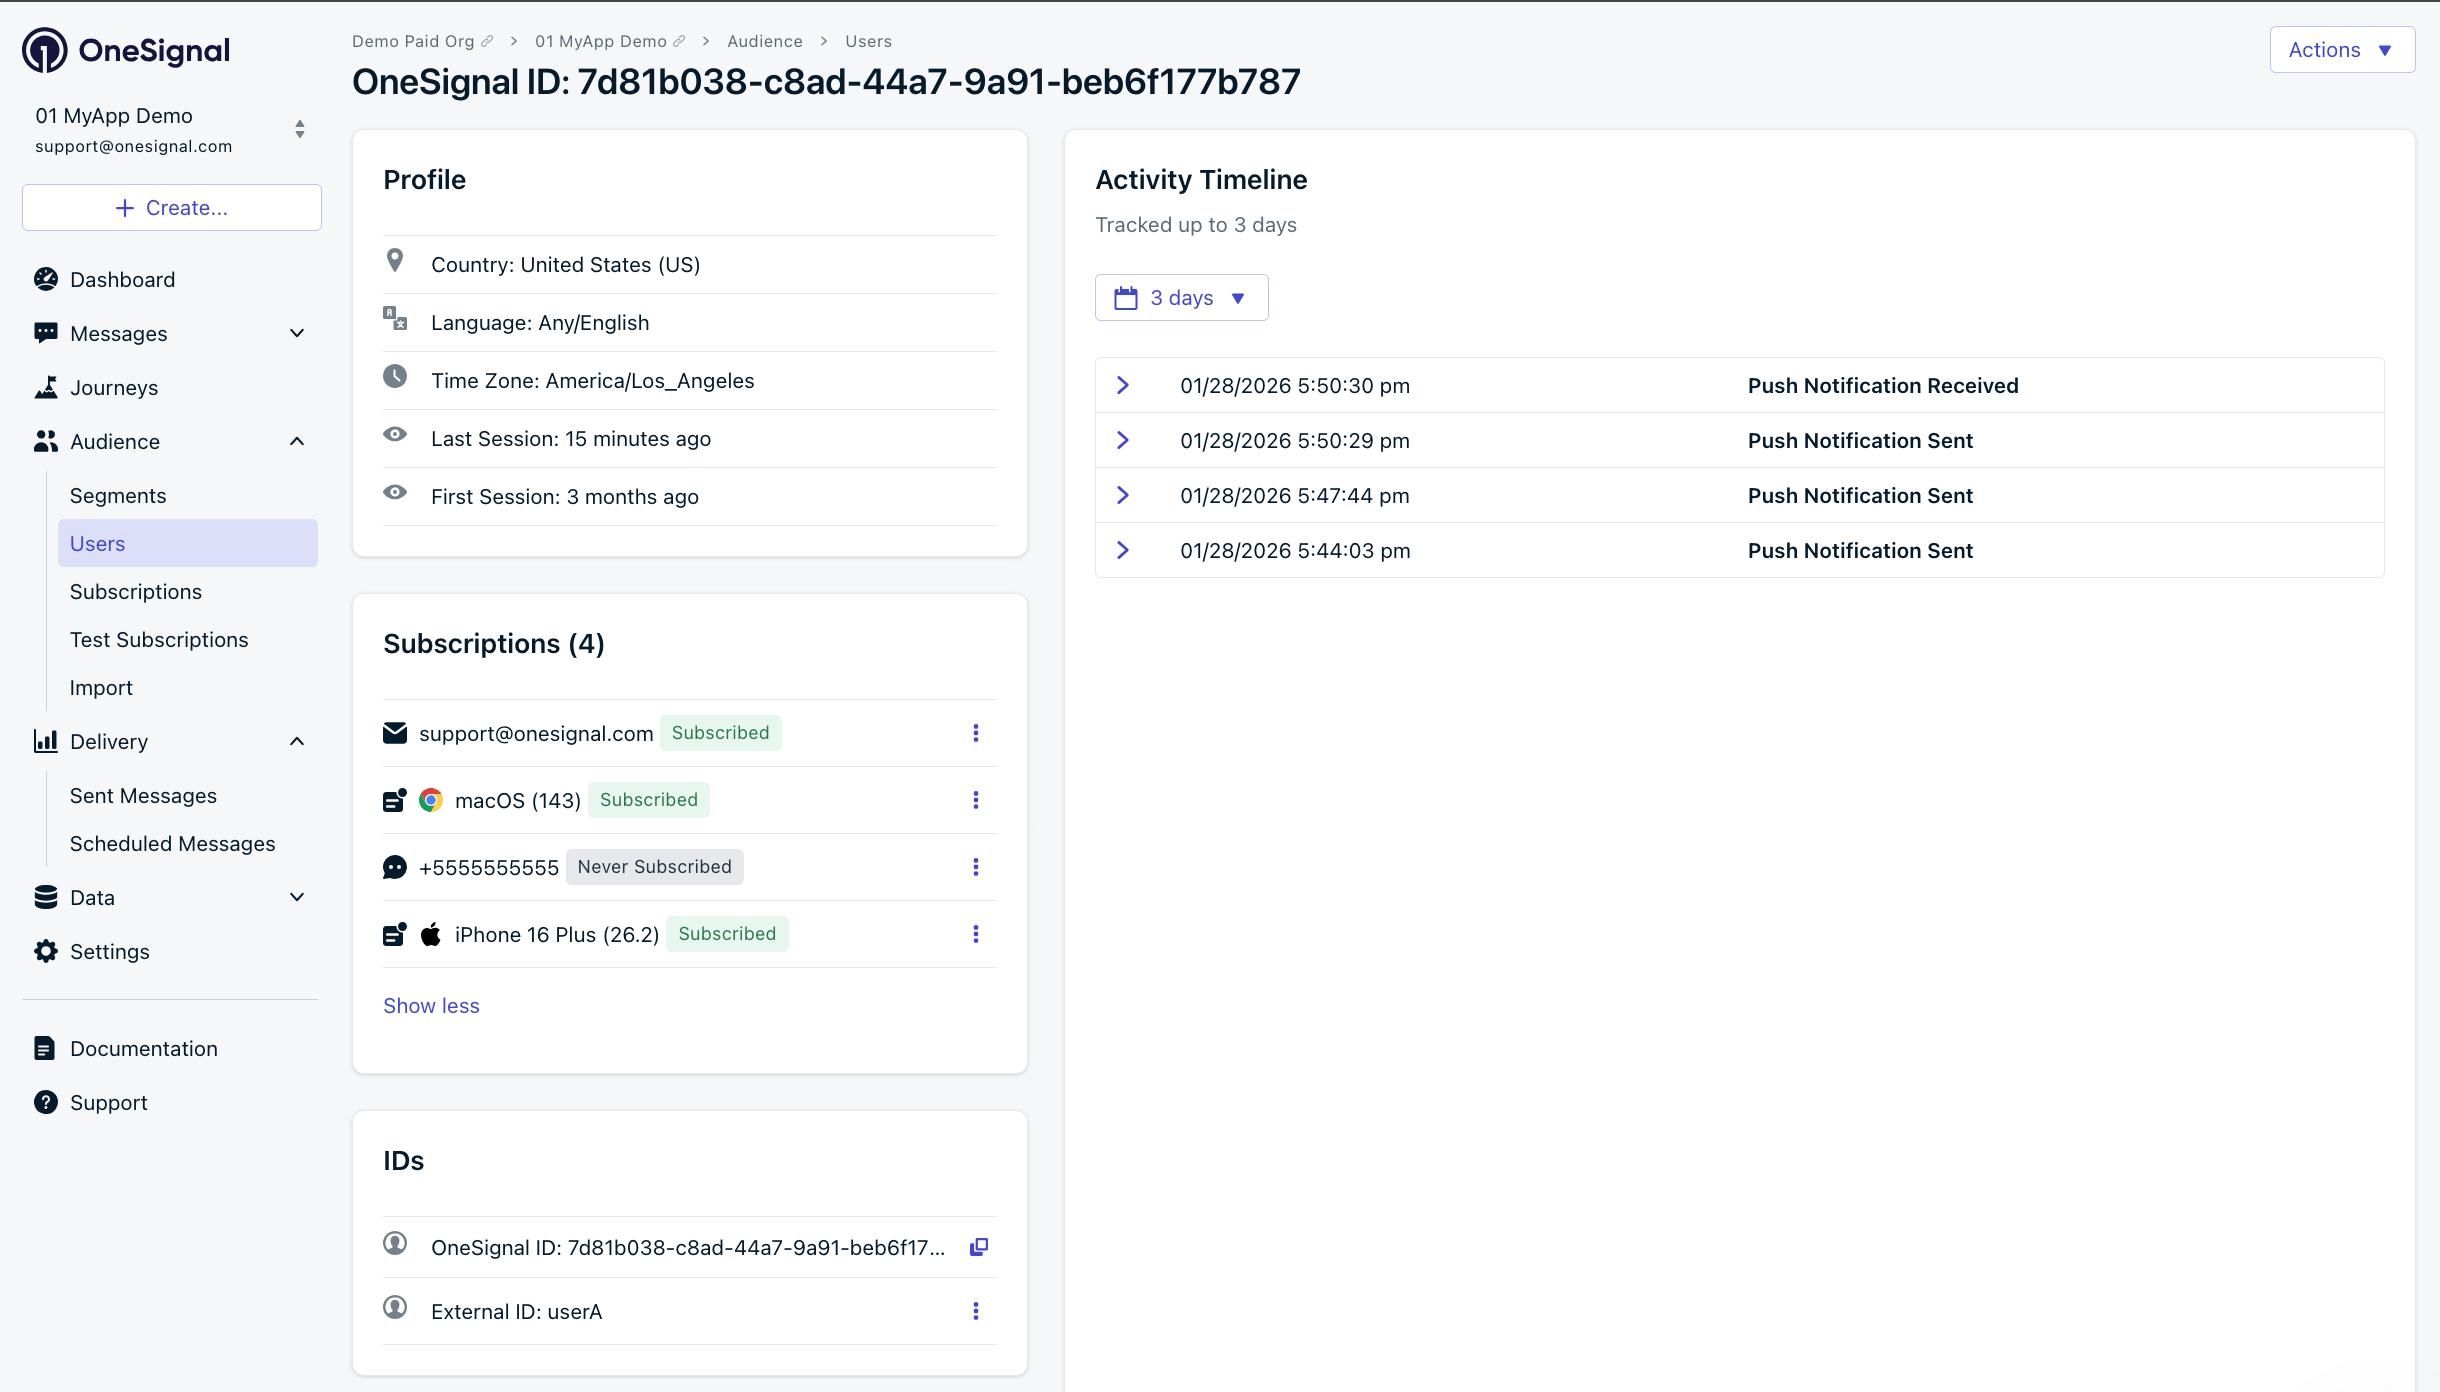
A user profile with push, email, and SMS subscriptions unified by External ID
- Obtain explicit consent before adding email or SMS subscriptions.
- Explain the benefits of each communication channel to users.
- Provide channel preferences so users can select which channels they prefer.
Privacy & user consent
To control when OneSignal collects user data, use the SDK’s consent gating methods. See our Mobile SDK reference for more details and Objective-C code examples.Prompt for push permissions
Instead of callingrequestPermission() immediately on app open, take a more strategic approach. Use an in-app message to explain the value of push notifications before requesting permission.
For best practices and implementation details, see our Prompt for push permissions guide.
Listen to push, user, and in-app events
Use SDK listeners to react to user actions and state changes. Add these in your AppDelegate afterOneSignal.initialize().
Push notification events
Example shows how to use the push click listener. Other push notification events like the foreground lifecycle listener to control how notifications behave in foreground are available in the Mobile SDK Reference.User state changes
Example shows how to use push subscription observer. Other user state events like the user state observer and notification permission observer are available in the Mobile SDK Reference.In-app message events
Additional in-app message methods are available in the Mobile SDK Reference.Disable method swizzling (optional)
By default, the OneSignal SDK uses method swizzling to automatically handle push notification delegate methods. If your app needs to disable swizzling (for example, to avoid conflicts with other SDKs or to maintain full control over notification delegate methods), you can opt out viaInfo.plist.
When swizzling is disabled, you must manually forward notification delegate methods to the OneSignal SDK. All other SDK features (listeners, observers, in-app messages, outcomes, etc.) continue to work normally.
Step 1. Add the Info.plist flag
Add the following to your app’sInfo.plist:
Step 2. Set the UNUserNotificationCenter delegate
Set yourAppDelegate as the UNUserNotificationCenter delegate before calling OneSignal.initialize. Without this, foreground notification display and notification tap handling will not work.
Step 3. Forward notification delegate methods
Implement the following methods in yourAppDelegate. All methods call through OneSignal.Notifications.
Token registration:
OSNotification object. If non-nil, the SDK wants the notification displayed — pass your preferred presentation options. If nil (e.g., an IAM preview), pass no presentation options.
onWillDisplayNotification lifecycle listener and preventDefault / display APIs continue to work with manual forwarding. The SDK invokes your listeners from within willPresentNotification.Optional: Set badge count
When swizzling is disabled, the SDK cannot intercept badge changes. Use this method to set the badge count and keep OneSignal’s internal badge cache in sync:SwiftUI apps
SwiftUI apps don’t have anAppDelegate by default. Use @UIApplicationDelegateAdaptor to add one, then implement all the forwarding methods shown above:
API reference
Advanced setup & capabilities
- Deep Linking — Navigate users to specific screens from notifications
- Action Buttons — Add interactive buttons to notifications
- Live Activities — iOS Live Activities support
- Service Extensions — Advanced notification customization
- Identity Verification — Secure user identification
- Location Tracking — Location-based targeting
- Integrations — Connect with analytics and data platforms
- Multi-language Messaging — Localized notifications
support@onesignal.comPlease include:- Details of the issue you’re experiencing and steps to reproduce if available
- Your OneSignal App ID
- The External ID or Subscription ID if applicable
- The URL to the message you tested in the OneSignal Dashboard if applicable
- Any relevant logs or error messages