개요
“프롬프팅”은 사용자에게 푸시 알림을 보낼 수 있는 권한을 요청하는 프로세스를 말합니다. 프롬프트는 브라우저 또는 모바일 앱이 표시하는 팝업 메시지이며 사용자가 “허용”을 클릭해야 구독되고 푸시 알림을 받을 수 있습니다. Web Push는 Desktop, Android 및 iOS에서 작동하지만 iOS용 Web Push를 구성하려면 몇 가지 추가 단계가 필요합니다. 모바일 앱이 있는 경우 In-App Message로 Push 권한을 요청하는 방법을 참조하세요. 브라우저는 자체적인 기본 시스템 수준 권한 프롬프트를 제공하며, 사용자가 웹사이트를 구독하려면 이 프롬프트가 표시되고 “허용”을 클릭해야 합니다. 브라우저는 이제 기본 권한 프롬프트를 표시할 때 웹사이트가 더 선택적으로 표시할 것을 강력히 권장합니다. 이것이 기본 프롬프트 전에 OneSignal 프롬프트 또는 자체 사용자 지정 “Soft 프롬프트”를 사용하도록 권장되는 이유입니다.OneSignal 프롬프트(Soft 프롬프트)
OneSignal Soft 프롬프트는 브라우저의 기본 권한 대화 상자 전에 나타나는 사용자 친화적이고 사용자 지정 가능한 프롬프트입니다. 이러한 프롬프트는 자체적으로 사용자를 알림에 구독시키지 않습니다. 대신 다음을 돕습니다:- 알림 구독(Push, Email 또는 SMS)의 가치를 설명합니다.
- 브라우저가 권한 요청을 자동으로 차단하는 것을 방지합니다.
- 사용자가 관심을 표명한 후에만 기본 브라우저 프롬프트를 시작합니다.
프롬프트 아이콘
Web Push 알림에 표시되는 아이콘을 사용자 지정하려면 OneSignal 대시보드로 이동하세요: Settings > Push & In-App > Web Settings. Site Setup 섹션에서 Default Icon URL을 구성하세요. 이 아이콘은 달리 지정되지 않는 한 모든 알림에 표시됩니다.- 허용되는 형식:
.png또는.jpg - 권장 크기:
256x256픽셀(Safari의 요구 사항을 충족하기 위해) - 설정하지 않으면 OneSignal은 일반 벨 아이콘을 사용합니다
권한 프롬프트 설정
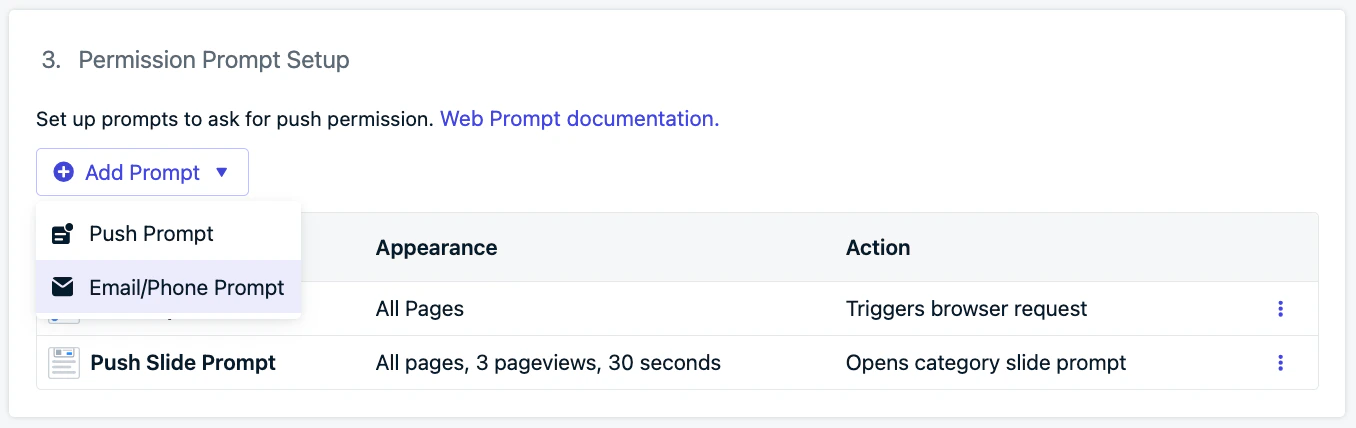
사용자 구독을 장려하기 위해 사이트에 표시할 프롬프트를 구성하세요. OneSignal 대시보드에서 다음으로 이동하세요: Settings > Push & In-App > Web Settings > Permission Prompt Setup 여기에서 Add Prompt를 클릭하여 OneSignal에서 사용 가능한 프롬프트 유형 중에서 선택하세요. 목록에 이미 표시된 기존 프롬프트를 편집할 수도 있습니다.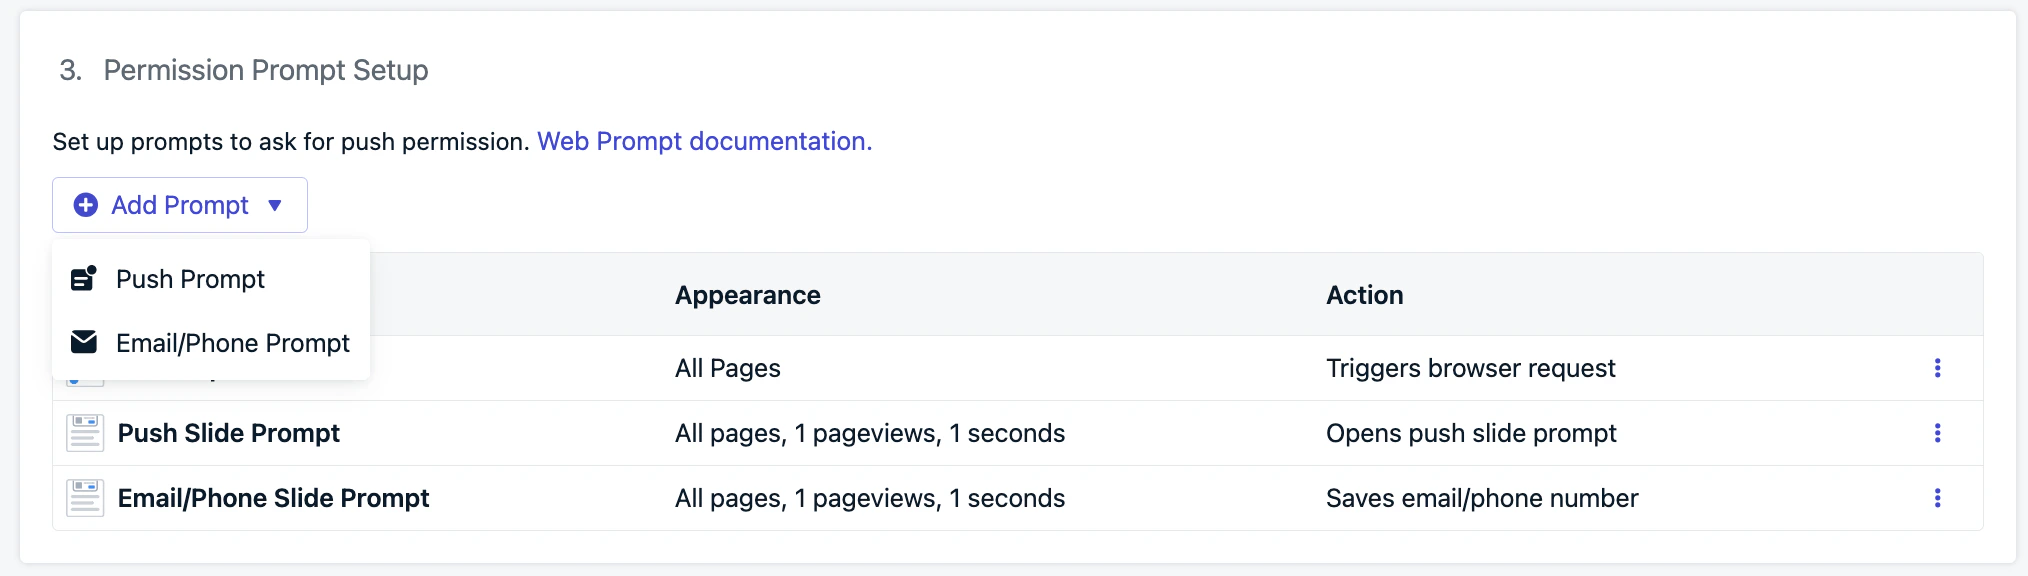
- Slidedown: 푸시 알림 및 선택적 카테고리 선택에 사용되는 시각적으로 눈에 띄는 프롬프트입니다.
- Email/Phone 프롬프트: 사용자 이메일 주소, 전화번호 또는 둘 다를 수집하는 데 사용됩니다.
- Subscription Bell 프롬프트: 일반적으로 사이트의 하단 모서리에 배치되는 푸시 구독을 위한 지속적인 플로팅 위젯입니다.
- 사용자 지정 링크 프롬프트: 기본 브라우저 프롬프트를 트리거하는 사이트에 포함된 사용자 지정 가능한 버튼 또는 링크입니다.
- 기본 권한 프롬프트: 사용자가 푸시 알림을 받으려면 수락해야 하는 필수 브라우저 수준 프롬프트입니다.
Slidedown 및 카테고리
Slide 및 Category 프롬프트는 데스크톱에서는 화면 상단 중앙에, 모바일에서는 하단 중앙에 눈에 띄게 나타납니다. 이는 필수 기본 권한 프롬프트 전에 표시되는 가시성이 높은 Soft 프롬프트입니다. 자체적으로 사용자를 구독시키지 않지만 구독 흐름을 시작하는 데 도움이 됩니다.
- Settings > Push & In-App > Web Settings > Permission Prompt Setup으로 이동하세요
- Add Prompt > Push Prompt > Push Slide Prompt를 선택하세요
init 코드의 promptOptions 객체 내에서 slidedown 속성을 사용하세요. 자세한 내용은 Web SDK Reference를 참조하세요.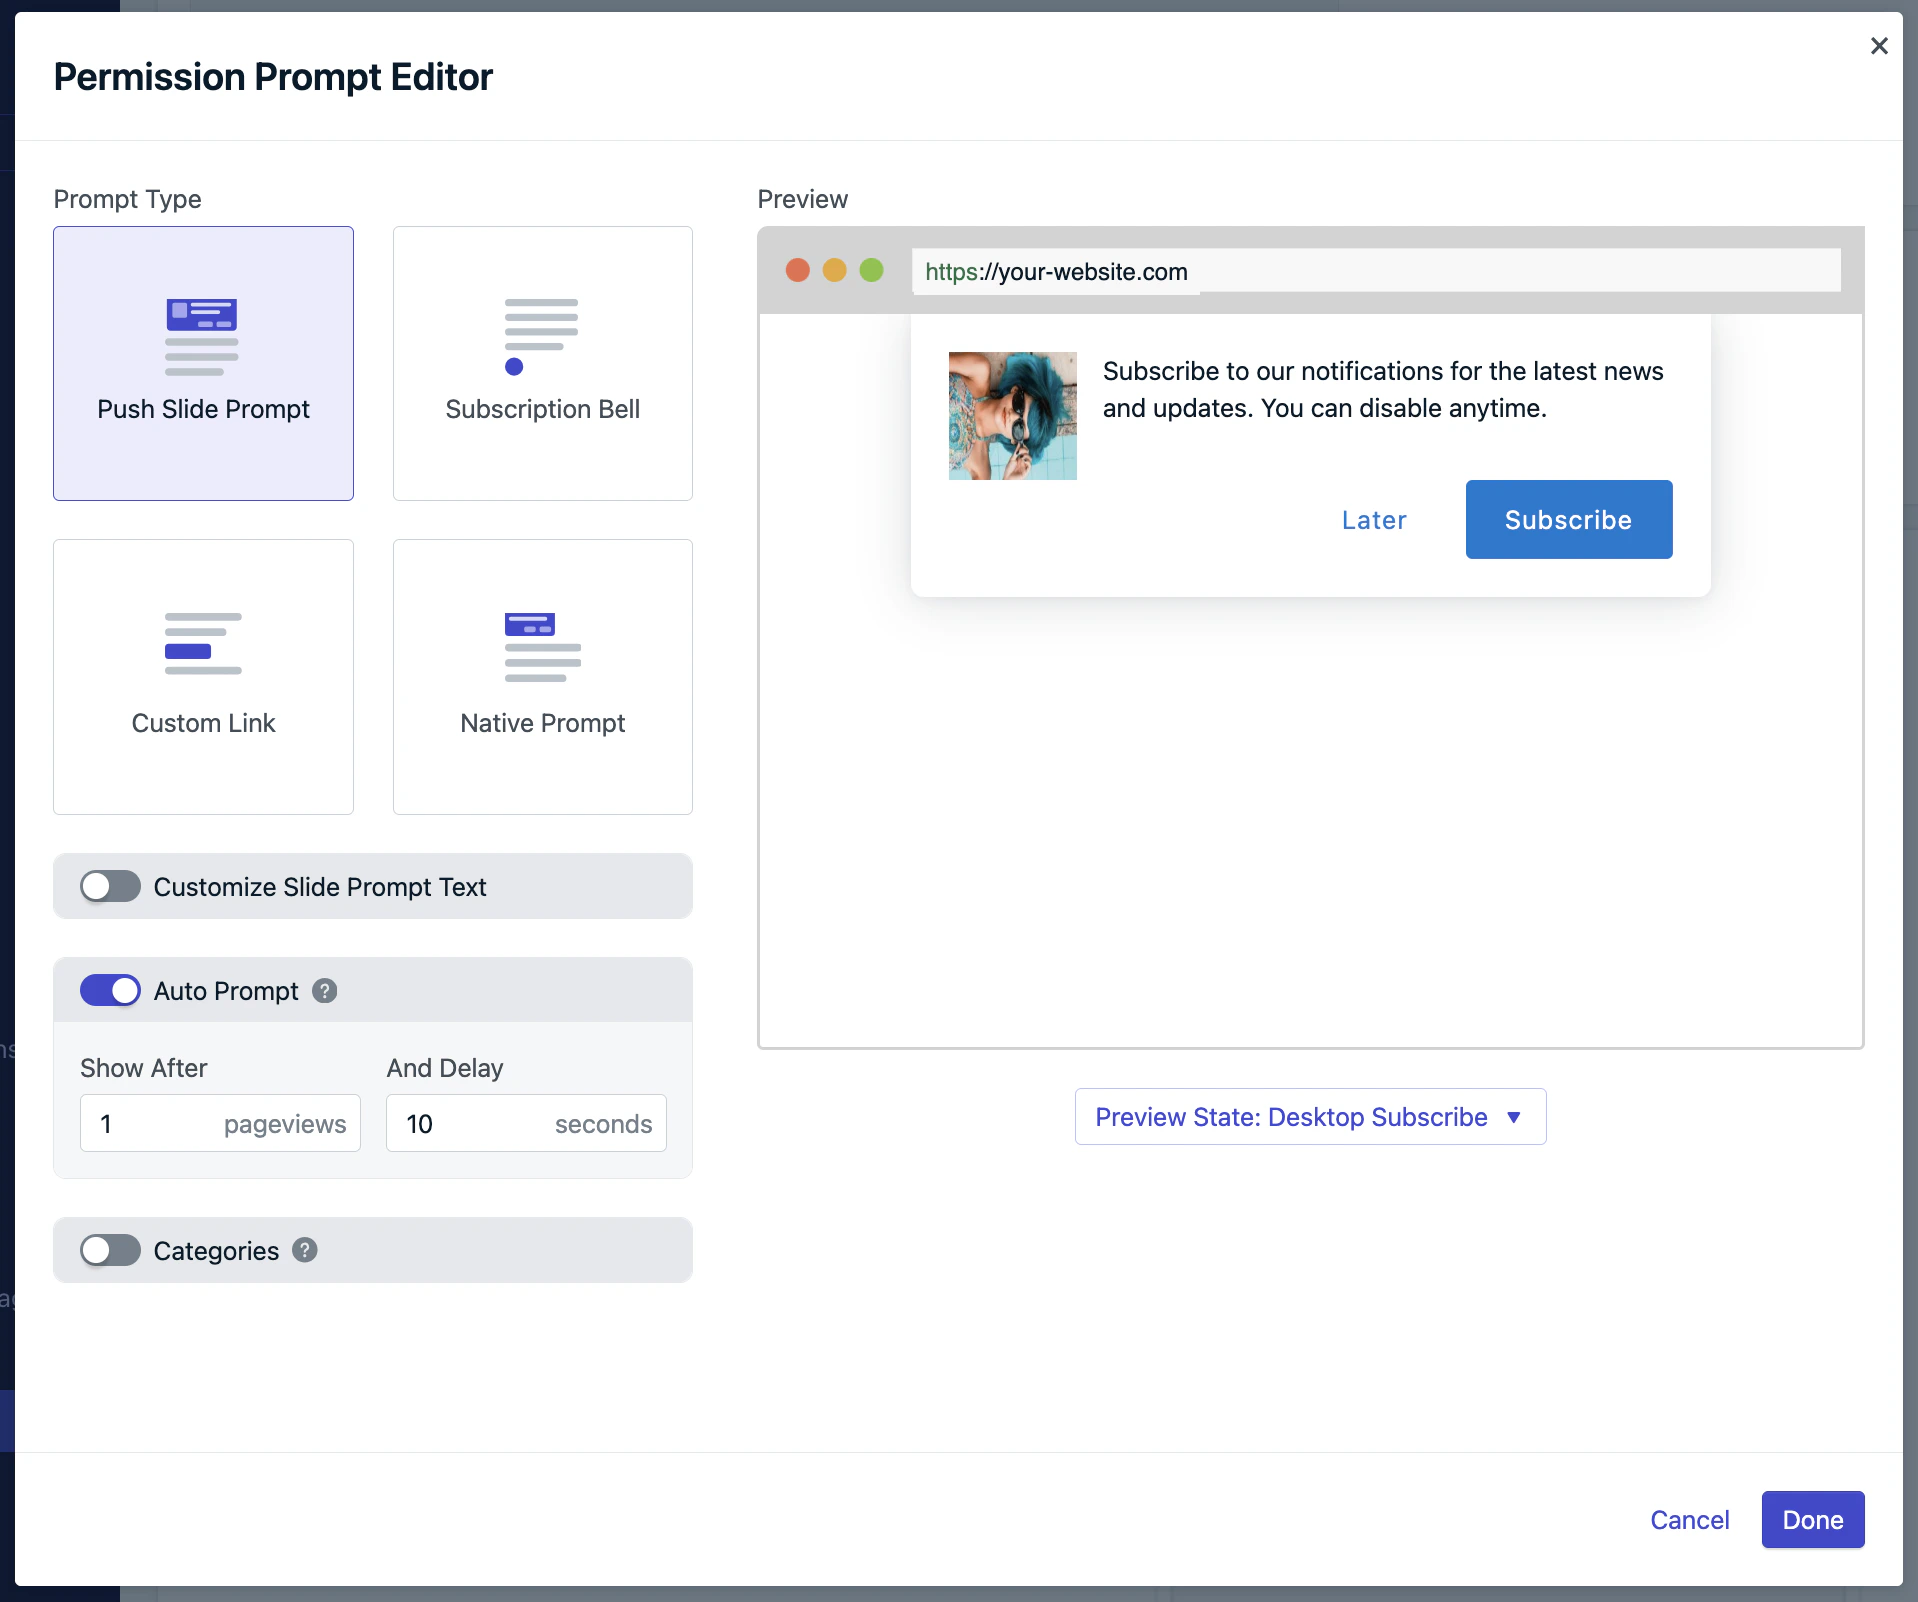
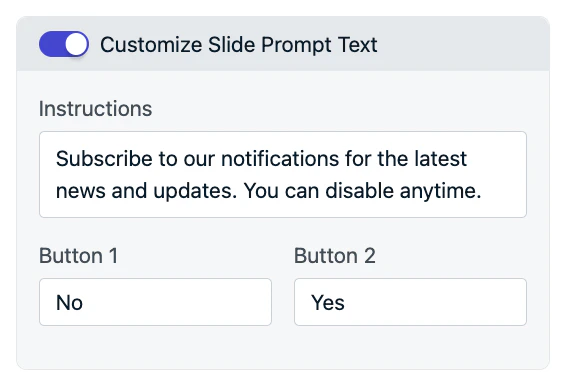
Slide 프롬프트 텍스트
Slide 프롬프트에 표시되는 텍스트를 사용자 지정할 수 있습니다:- 액션 메시지: 최대 90자
- 버튼 레이블: 각각 최대 15자
- 글꼴, 크기 또는 색상의 사용자 지정은 현재 지원되지 않습니다
init 코드의 promptOptions 객체 내에서 text 속성을 사용하세요. 자세한 내용은 Web SDK Reference를 참조하세요.카테고리
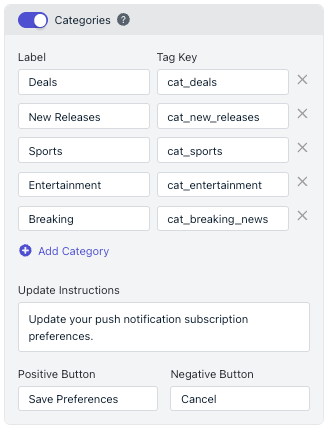
카테고리(사용자가 특정 메시지 주제(예: 뉴스, 판매, 업데이트)에 대한 관심을 나타낼 수 있는 체크박스)를 추가하여 Slidedown 프롬프트를 향상시킬 수 있습니다.- 최대 10개의 카테고리가 허용됩니다
- 각 카테고리는 1(선택됨) 또는 0(선택 안 됨)으로 Data Tag로 저장됩니다
- 사용자 기본 설정에 따라 메시지를 세분화하고 타겟팅하는 데 유용합니다
- Label: 프롬프트에서 사용자에게 표시되는 내용입니다. 첫 글자를 대문자로 사용하는 것이 좋습니다.
- Tag Key: OneSignal의 Tag가 될 내용입니다. 소문자와 공백에 밑줄(
_)을 사용하는 것이 좋습니다. - Update Instructions, Positive 및 Negative 버튼: 사용자가 이미 푸시에 구독한 후 카테고리 프롬프트를 다시 표시하도록 선택하면 액션 메시지 대신 업데이트 지침이 표시됩니다. 이를 통해 사용자에게 카테고리를 업데이트할 수 있음을 알릴 수 있습니다.
init 코드의 promptOptions 객체 내에서 categories 속성을 사용하세요. 자세한 내용은 Web SDK Reference를 참조하세요.Email 및 전화번호 프롬프트
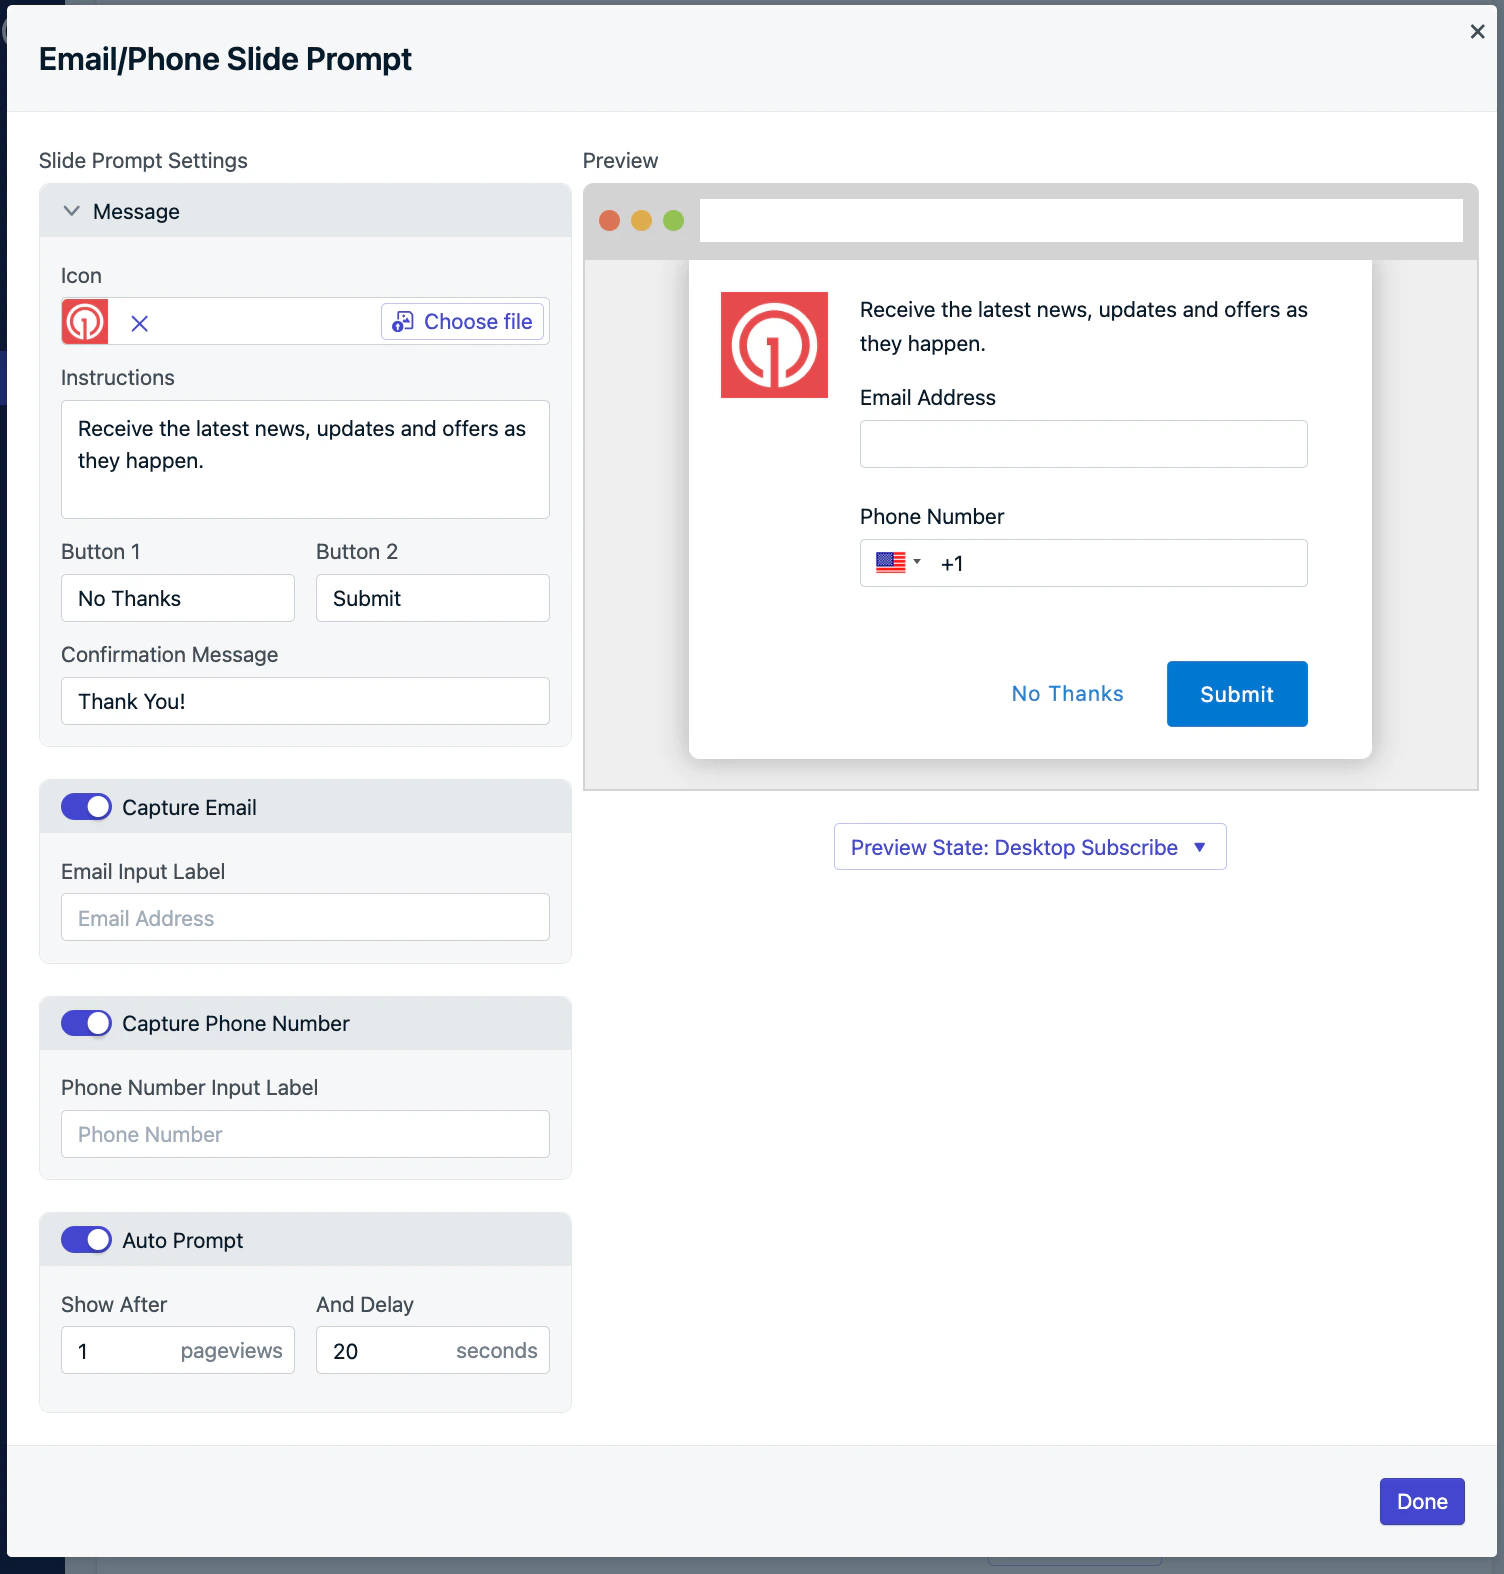
Email 및 Phone 프롬프트는 Slidedown 내에서 직접 선택적 사용자 연락처 정보를 수집합니다. 각 필드에는 올바른 형식을 보장하기 위한 검증 기능이 내장되어 있습니다. 제출되면:- 사용자에 대한 새 Email 및/또는 SMS 구독이 생성됩니다
- 이러한 채널을 통해 메시지를 보낼 수 있습니다
- Settings > Push & In-App > Web Settings > Permission Prompt Setup > Add Prompt > Email/Phone Prompt로 이동하세요.
init 코드의 promptOptions 객체 내에 type을 email, sms 또는 smsAndEmail로 추가하세요. 자세한 내용은 Web SDK Reference를 참조하세요.Subscription Bell 프롬프트
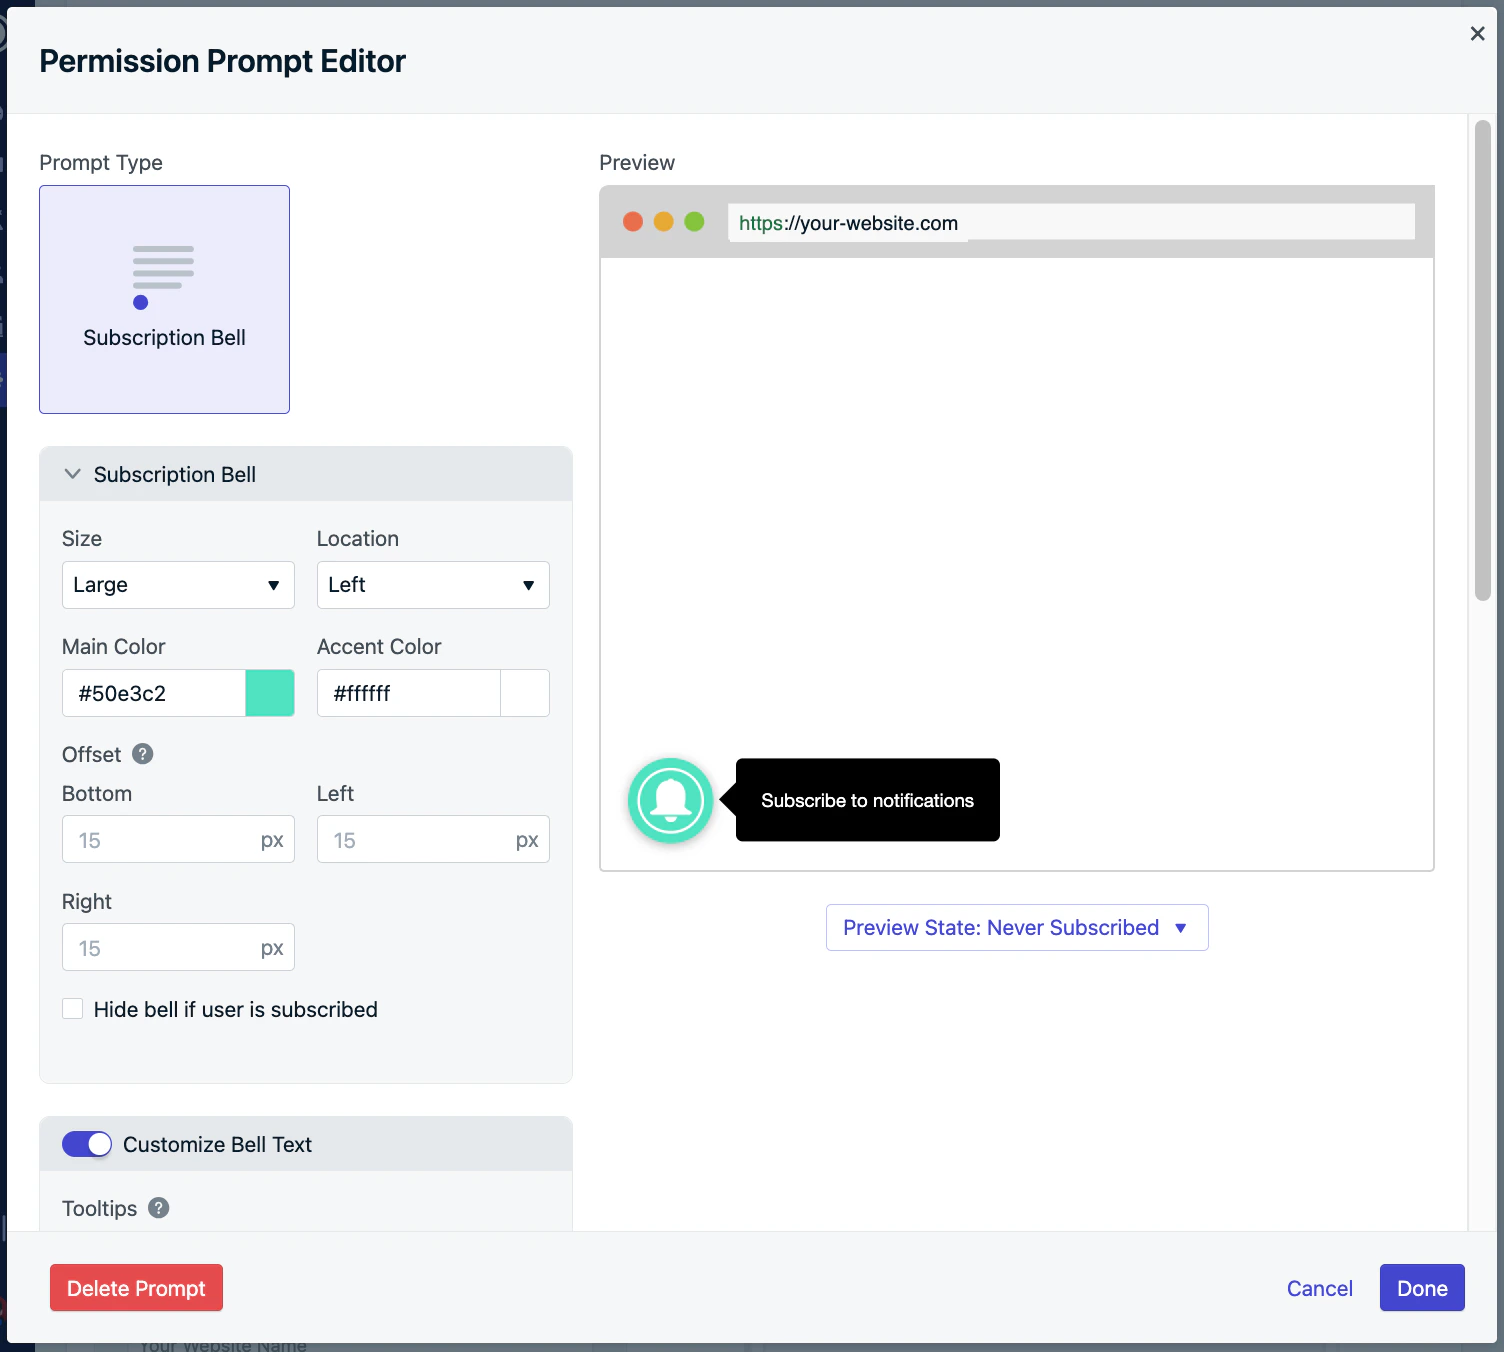
Subscription Bell 프롬프트는 웹사이트의 하단 모서리에 나타나는 작고 지속적인 위젯입니다. 구독하지 않은 사용자가 클릭하면 기본 브라우저 프롬프트가 트리거됩니다. 최소한의 공간을 차지하기 때문에 벨을 항상 표시할 수 있어 지속적인 옵트인 기회를 위한 수동적이면서도 효과적인 옵션이 됩니다. 닫기가 필요하지 않으며 사용자가 구독 시기를 제어할 수 있습니다.
Typical Site 및 WordPress 설정: Subscription Bell 프롬프트
Typical Site 및 WordPress 설정: Subscription Bell 프롬프트
- 색상
- 크기
- 하단 위치(왼쪽 또는 오른쪽)
- 텍스트 및 레이블
Custom Code 설정: Subscription Bell 프롬프트
Custom Code 설정: Subscription Bell 프롬프트
notifyButton 매개변수를 사용하세요. Bell 프롬프트 사용자 지정에 대한 다양한 예제 간에 전환할 수 있습니다.숨기기: 사용자가 구독한 후 Subscription Bell을 숨기거나 특정 페이지에만 표시하려면 초기화 중에 displayPredicate 함수에서 false 값 또는 false 값으로 해결되는 Promise를 반환해야 합니다. 이 함수는 Subscription Bell이 표시되기 전에 평가됩니다. Subscription Bell을 표시하려면 다른 값을 반환할 수 있습니다.사용자 지정 링크 프롬프트
사용자 지정 링크 프롬프트는 웹사이트의 어디에나 포함할 수 있는 사용자 트리거 버튼 또는 링크입니다. 클릭하면 푸시 알림에 대한 기본 브라우저 프롬프트가 표시됩니다.
- 블로그 게시물 아래: “이 글이 마음에 드시나요? 게시하는 즉시 업데이트를 받으세요!”
- 사이트 바닥글에
- 고정 헤더 또는 플로팅 도구 모음에
Typical Site & WordPress Setup: Custom Link Prompt
Typical Site & WordPress Setup: Custom Link Prompt
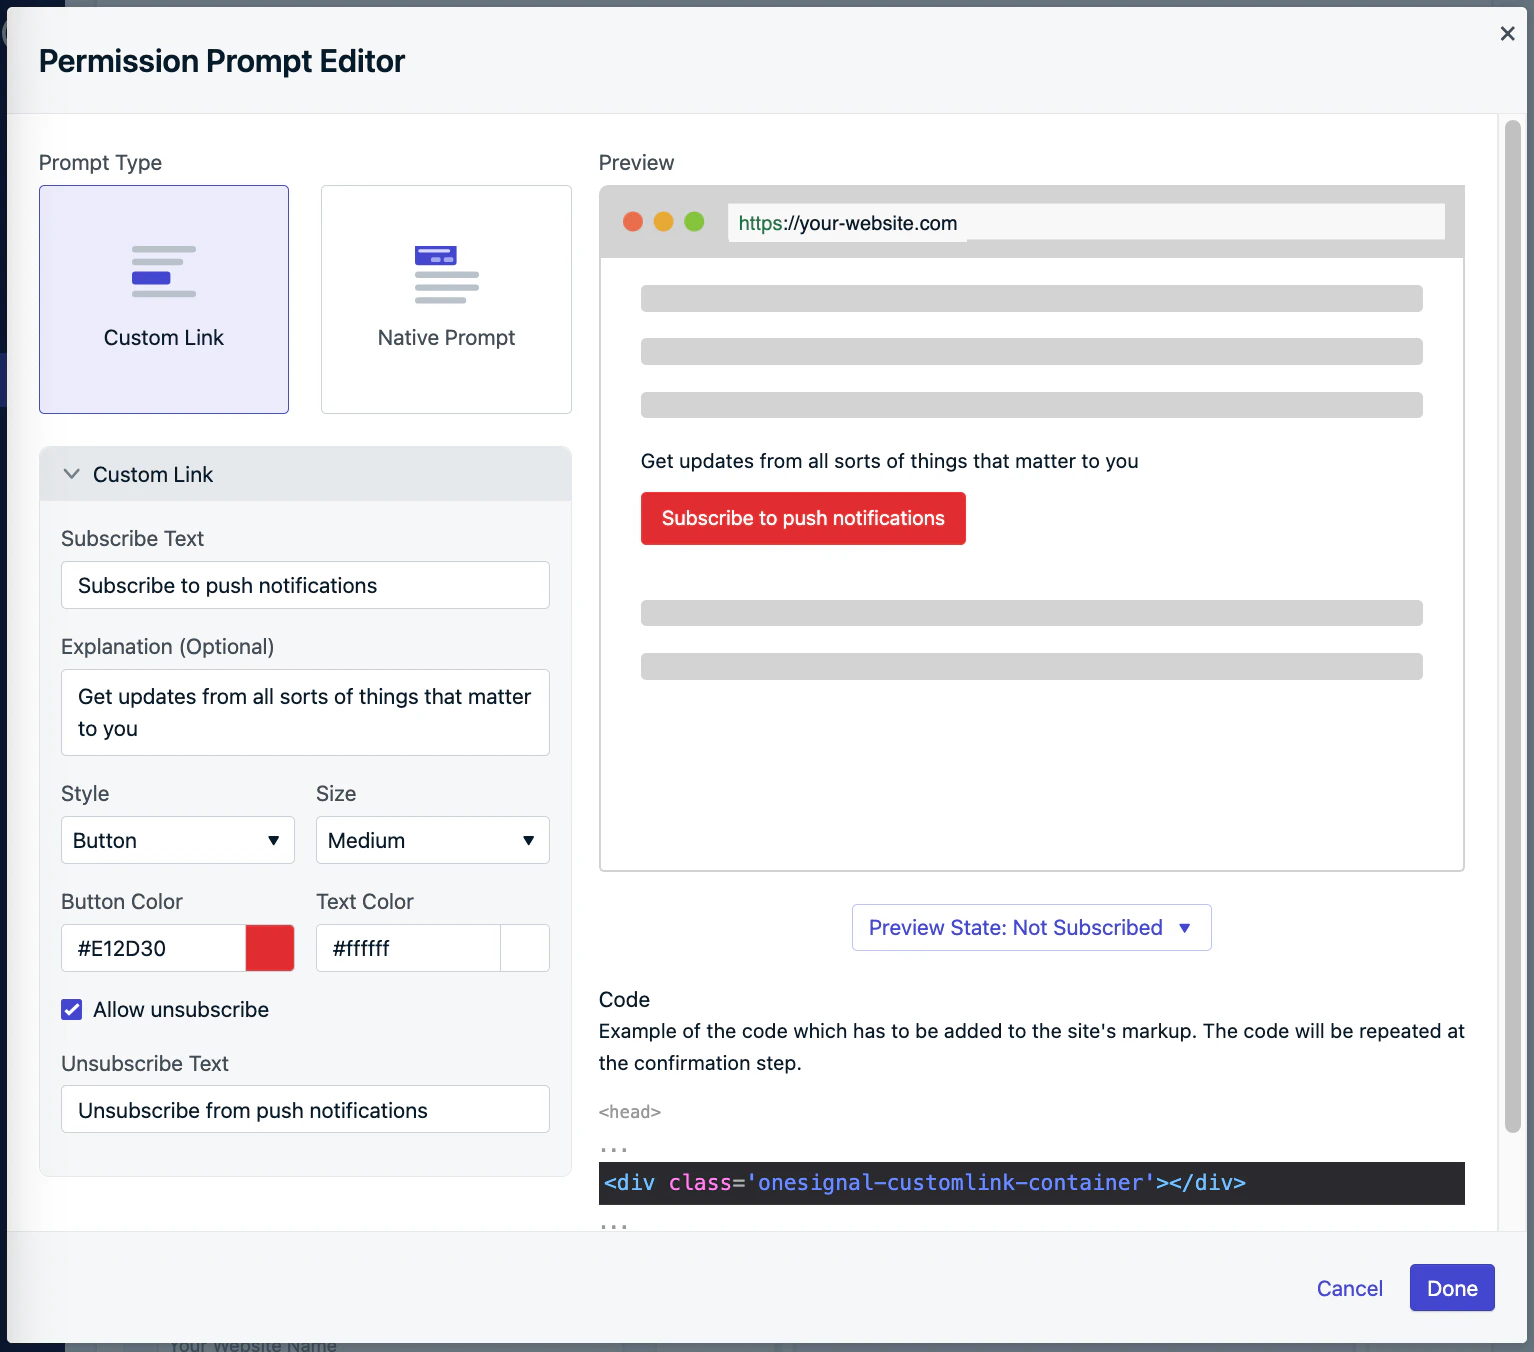
Custom Code Setup: Custom Link
Custom Code Setup: Custom Link
init code’s promptOptions object, add the customlink object and its available properties.Typical & Custom Code Setup: Additional Styling
Typical & Custom Code Setup: Additional Styling
onesignal-reset that removes any prior styling from the element to make sure there are no conflict with our internal styles and that it looks exactly as you’ve defined it in the dashboard.If you ever find yourself in need to redefine any OneSignal styles, here is a short reference of the classes used in the Custom Link widget| Class Name | Applies to |
|---|---|
| onesignal-customlink-container | Main container |
| onesignal-customlink-subscribe | Action button |
| onesignal-customlink-explanation | Paragraph with a custom explanation text |
| state-subscribed | All components internal to the main container |
| state-unsubscribed | All components internal to the main container |
| button | Action button if in button mode |
| link | Action button if in link mode |
| small | All components internal to the main container |
| medium | All components internal to the main container |
| large | All components internal to the main container |
| hide | All components internal to the main container if unsubscribeEnabled is set to false |
기본 권한 프롬프트
기본 권한 프롬프트는 사용자가 웹사이트의 푸시 알림을 구독하려면 수락해야 하는 브라우저 제어 대화 상자입니다. 이 프롬프트는:- 구독에 필요합니다
- OneSignal Soft 프롬프트(Slidedown 또는 사용자 지정 링크 등) 후에 자동으로 트리거됩니다
- 모양, 텍스트 또는 동작을 사용자 지정할 수 없습니다
브라우저 기본 프롬프트 동작
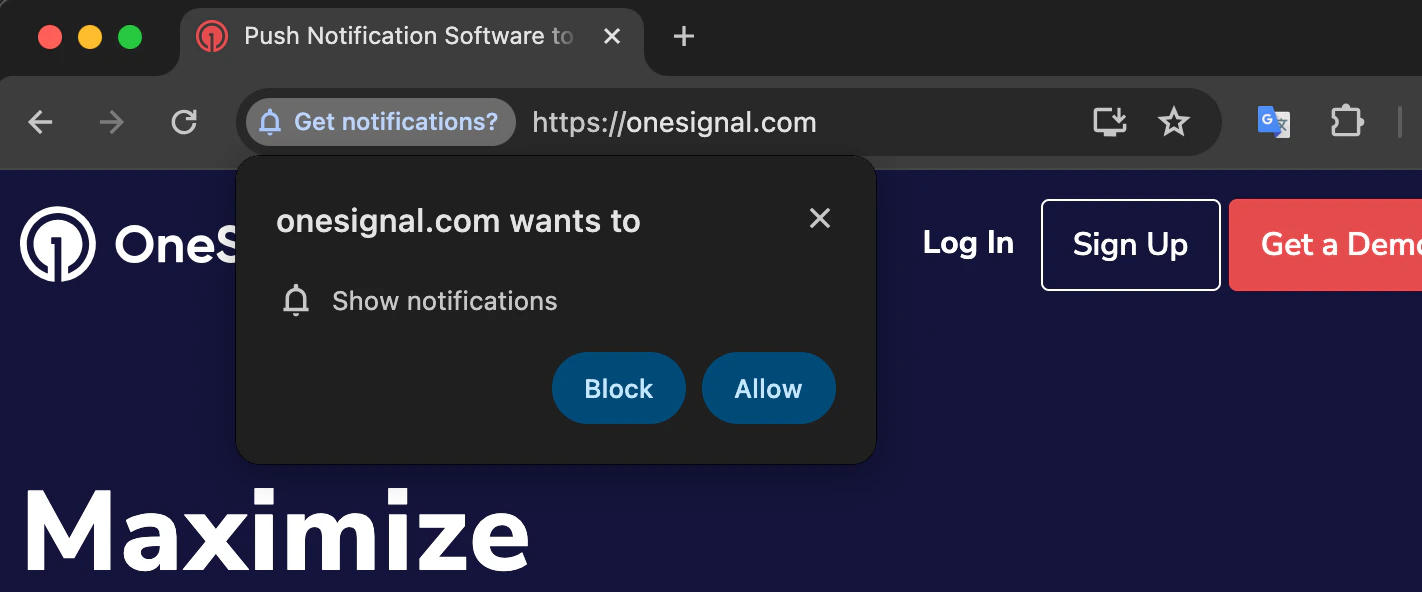
다양한 브라우저는 스팸성 권한 요청을 줄이기 위해 고유한 동작과 제한을 적용합니다:Chrome
Chrome 80+는 전체 프롬프트 대신 더 조용한 UI를 표시할 수 있습니다:- 자주 프롬프트를 거부하는 사용자에게 자동으로 적용됩니다
- 거부율이 높은 사이트에도 적용됩니다
- 프롬프트를 표시할 수 있는 기회가 3번 있습니다
- 3번째 닫기 후 프롬프트가 7일 동안 억제됩니다(출처).
Firefox
- Firefox 72+는 프롬프트를 트리거하려면 사용자 제스처가 필요합니다
- 자동 프롬프트가 차단되며 사용자가 사이트 요소와 적극적으로 상호 작용해야 합니다
Safari
- Safari 12.1+ 프롬프트는 사용자 제스처가 필요합니다
- 직접 상호 작용으로 트리거되지 않는 한 자동 프롬프팅이 자동으로 차단됩니다
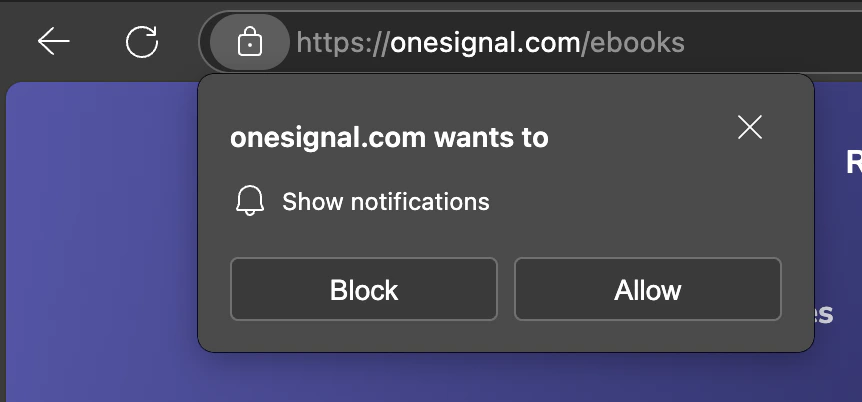
Edge
Edge는 신뢰 기반 모델을 사용합니다:- 사이트를 신뢰할 수 없는 경우 프롬프트가 억제되고 브라우저 표시줄의 벨 아이콘으로 대체됩니다:
- 사이트를 신뢰할 수 있는 경우 기본 프롬프트가 정상적으로 나타납니다:
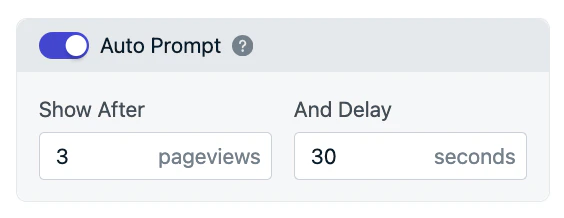
자동 프롬프트 및 표시 설정
참여를 극대화하고 사용자를 방해하지 않으려면 사용자가 사이트에서 시간을 보낸 후에 프롬프트를 표시하는 것이 가장 좋습니다. OneSignal을 사용하면 두 가지 지연 조건을 사용하여 사용자 행동에 따라 프롬프트를 자동으로 표시할 수 있습니다:- Page Views: 사용자가 사이트의 모든 페이지를 로드하는 횟수
- Seconds on Page: 사용자가 페이지에 머물러야 하는 시간
Typical Site & WordPress Setup: Auto Prompt
Typical Site & WordPress Setup: Auto Prompt
- Navigate to: Settings > Push & In-App > Web Settings > Permission Prompt Setup
- Choose a prompt or create a new one
- Enable Auto Prompt
- Set your delay preferences (page views and time delay)
- Click Done, then Save
Custom Code Setup: Auto Prompt
Custom Code Setup: Auto Prompt
init code’s promptOptions object use the autoPrompt and delay options. There are also methods to trigger the desired slidedown or native prompts directly. See Web SDK Reference for more details.Manual Triggering (Instead of Auto Prompt)
Manual Triggering (Instead of Auto Prompt)
- Disable Auto Prompt
- Use the SDK’s Slidedown or Native Prompt methods to show the prompt via code
Slidedown 프롬프트 백오프 로직
Slidedown(Push, 카테고리 또는 Email/Phone) 프롬프트가 표시되고 닫히면(허용, 취소 또는 대화 상자 닫기를 통해) 백오프되고 정의된 일정에 따라 다시 나타납니다:| 상호 작용 결과 | 다음 프롬프트 타이밍 |
|---|---|
| 첫 번째 닫기 | 3일 대기 |
| 두 번째 닫기 | 7일 대기 |
| 세 번째 및 이후 닫기(구독하지 않음) | 30일 대기 |
FAQ
How to translate/localize the prompt?
How to translate/localize the prompt?
Can I AB Test Prompts?
Can I AB Test Prompts?
Can I segment subscriptions based on the page they subscribed?
Can I segment subscriptions based on the page they subscribed?
Can I change the bell icon?
Can I change the bell icon?
Can I change the categories based on page?
Can I change the categories based on page?
How to track Slide Prompt Events?
How to track Slide Prompt Events?
After dismissing a web push prompt, when is the prompt shown again?
After dismissing a web push prompt, when is the prompt shown again?
How can I show the prompt on only certain pages?
How can I show the prompt on only certain pages?
Why do I see the Slide Prompt on Firefox when I want the Native Browser Prompt?
Why do I see the Slide Prompt on Firefox when I want the Native Browser Prompt?
requestPermission() method.Why do I see the Slide Prompt on mobile when I want the native Permission Prompt?
Why do I see the Slide Prompt on mobile when I want the native Permission Prompt?
requestPermission() method.Why does the slide prompt keep showing up?
Why does the slide prompt keep showing up?
Why is my prompt not showing?
Why is my prompt not showing?
- The browser prevented the prompt from showing.
- The user has already allowed notifications or already subscribed
- The user blocked notifications. If a user clicks “Block” (Chrome), “Don’t Allow” (Safari), or “Never Allow” (Firefox) they can never be prompted again and must subscribe through a multi-step process in the browser settings. This is why it is recommended to use the OneSignal Prompts.
- Auto Prompt is turned off and no call to
requestPermission(); - The native Permission Prompt will not show while in Incognito Mode, Private Browser mode or Guest Browser mode. It will also not show right away on Safari 12.1+ or Firefox 72+ (more details).
- Make sure you are using a browser and device that supports web push.