Use the custom_data field in the Create Message API to send dynamic data from your backend and render it inside templates using Liquid syntax. custom_data:
  • Is message-specific
  • Is not stored
  • Exists only during the API request
  • Must be used with a template_id
Reference values in templates with:
Liquid
{{ message.custom_data.key_name }}
custom_data is ephemeral. Data is not saved to user profiles and cannot be reused in future messages. If you need persistent data, see Message personalization.

When to use custom_data

Use custom_data when you need:
  • Data changes per message (order totals, cart items, balances)
  • You need arrays (product lists, line items, recommendations)
  • Data should not persist (one-time codes, temporary URLs)
  • You send backend-triggered messages
  • You want bulk personalization in one API request

How custom_data personalization works

Adding custom_data to messages requires a few steps:
1

Create a template

Create a Push, Email, or SMS Template in the dashboard or via Create Template API.
2

Add Liquid placeholders

Insert references using the required prefix:
Liquid
Hi {{ message.custom_data.first_name }},
Order {{ message.custom_data.order_id }} is confirmed.
3

Send custom_data in your API request

Call the Create Message API with:
  • template_id - The ID of the template
  • custom_data - The data object
  • Audience targeting (include_player_ids, include_aliases, or segments)
OneSignal renders the template at send time using your data.If Liquid syntax is invalid or keys don’t exist, those fields render as empty strings, but the message still sends.

Data patterns

Common examples of data patterns you can use with custom_data.

Flat JSON example

Use simple key-value pairs for basic personalization like names, IDs, URLs, or any single-value data. Use case: Transactional messages (invoices, receipts, confirmations) where each field contains a single value. Template:
Liquid
Invoice {{ message.custom_data.invoice_id }} for {{ message.custom_data.product_name }} is ready.
API request:
JSON
{
  "app_id": "YOUR_APP_ID",
  "template_id": "YOUR_TEMPLATE_ID",
  "include_email_tokens": ["[email protected]"],
  "custom_data": {
    "invoice_id": "463246732",
    "product_name": "Widget"
  }
}
What the customer sees:
Text
Invoice 463246732 for Widget is ready.

Array data example

Pass arrays of objects to work with multiple items like cart products, order line items, or recommendations. Arrays enable both direct access (indexing) and iteration (loops). Use case: Displaying product lists, leaderboards, order summaries, or any multi-item data. Indexing template (accessing first item):
Liquid
Your {{message.custom_data.cart_items[0].item_name}} is waiting for you!
Image: {{message.custom_data.cart_items[0].img_url}}
Array indexing starts at 0, not 1. The first item is [0], second is [1], etc. Accessing an index that doesn’t exist returns empty (no error thrown).
Looping template (accessing all items):
Liquid
{% for item in message.custom_data.cart_items %}
- {{ item.item_name }}{{ item.img_url }}
{% endfor %}
API request:
JSON
{
  "app_id": "YOUR_APP_ID",
  "template_id": "YOUR_TEMPLATE_ID",
  "include_email_tokens": ["[email protected]"],
  "custom_data": {
    "cart_items": [
      {
        "item_name": "sweater",
        "img_url": "https://.../sweater.png"
      },
      {
        "item_name": "socks",
        "img_url": "https://.../socks.png"
      }
    ]
  }
}
What the customer sees:
Text
Your sweater is waiting for you!
Image: https://.../sweater.png

- sweater — https://.../sweater.png
- socks — https://.../socks.png
Useful array properties:
  • {{message.custom_data.cart_items.size}} — Number of items in array (returns 2 in this example)
  • {{message.custom_data.cart_items.first.item_name}} — First item’s name (equivalent to [0])
  • {{message.custom_data.cart_items.last.item_name}} — Last item’s name

Bulk personalization example

Send a single API request to multiple users where each recipient sees personalized content based on their external_id. How it works:
  1. Structure custom_data as an object where keys are external_ids and values are user-specific data
  2. In the template, use subscription.external_id to look up the current recipient’s data
  3. OneSignal renders the template once per recipient with their specific data
Template:
Liquid
{% assign user = message.custom_data.users[subscription.external_id] %}
Hi {{ user.first_name }}, you have {{ user.points }} points. Your level is {{ user.level }}.
What’s happening:
  • subscription.external_id contains the current recipient’s external_id (e.g., “user123”)
  • message.custom_data.users[subscription.external_id] looks up that user’s data from the custom_data object
  • user becomes a shorthand variable for that user’s data
  • Each recipient only sees their own personalized content
API request:
JSON
{
  "app_id": "YOUR_APP_ID",
  "template_id": "YOUR_TEMPLATE_ID",
  "include_aliases": {
    "external_id": ["user123", "user456"]
  },
  "custom_data": {
    "users": {
      "user123": { "first_name": "John", "points": "150", "level": "Gold" },
      "user456": { "first_name": "Sarah", "points": "200", "level": "Platinum" }
    }
  }
}
What each user sees:
  • John (user123): “Hi John, you have 150 points. Your level is Gold.”
  • Sarah (user456): “Hi Sarah, you have 200 points. Your level is Platinum.”
Requirements for bulk personalization:
  • All recipients must have an external_id set in OneSignal
  • Each external_id in include_aliases must have a matching key in custom_data.users
  • If a recipient’s external_id is missing from custom_data, their message will have empty fields

Example: Abandoned cart with custom_data

How to build abandoned cart messages for both email and push using custom_data. When to use this approach:
  • Your server detects cart abandonment (e.g., 1 hour after last activity)
  • Real-time cart data is in your database
  • You want to display multiple products with images, names, prices
  • Each user may have different items and quantities
  • You want to orchestrate the message from your backend.

Example custom_data payload

This is the Create Message API request for this example.
JSON
{
  "custom_data": {
    "cart_url": "https://yourdomain.com/cart",
    "cart": [
      {
        "product_name": "24 Pack of Acorns",
        "product_image": "https://i.imgur.com/ssPCfbC.png",
        "product_price": "$12.99",
        "product_quantity": "1"
      },
      {
        "product_name": "Fancy Sweater",
        "product_image": "https://i.imgur.com/8QWTfV4.png",
        "product_price": "$9.99",
        "product_quantity": "1"
      }
    ]
  },
  "app_id": "YOUR_APP_ID",
  "template_id": "YOUR_TEMPLATE_ID",
  "include_aliases": {
    "external_id": ["YOUR_EXTERNAL_ID"]
  }
}
Field explanations:
FieldTypePurpose
cart_urlstringCustomer’s unique cart link (for buttons/launch URLs)
cartarrayList of products—supports counting, looping, and detail display
product_imagestringProduct image (per item in array)
product_namestringProduct name (per item)
product_quantitystringQuantity (per item)
product_pricestringPrice with formatting (per item)
You can name fields anything you want—just ensure your template’s Liquid syntax matches.
Stay under 2KB: If you have large carts, consider limiting to the first 3-5 items or sending only essential fields to avoid exceeding the size limit.

Email template

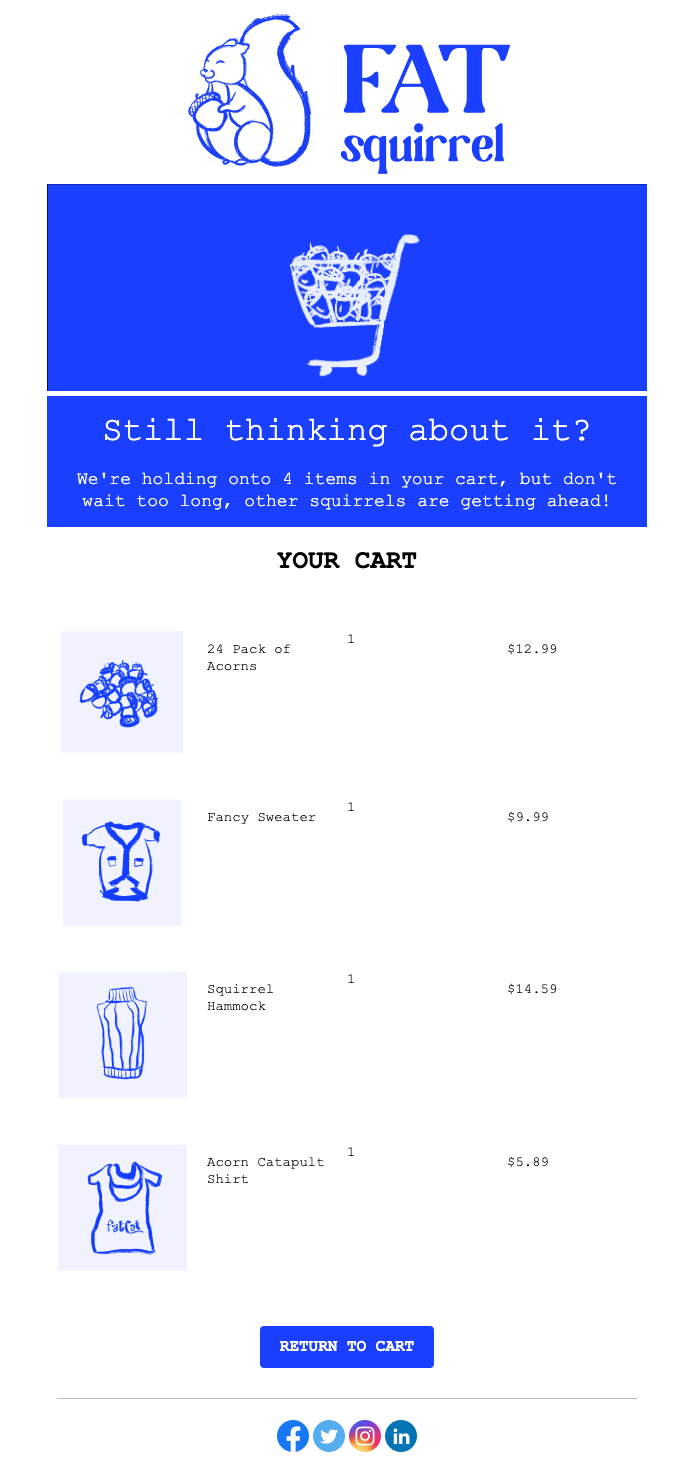
This example shows how to build an email template that displays:
  • The cart item count
  • Each product with image, name, quantity, and price using a for-loop
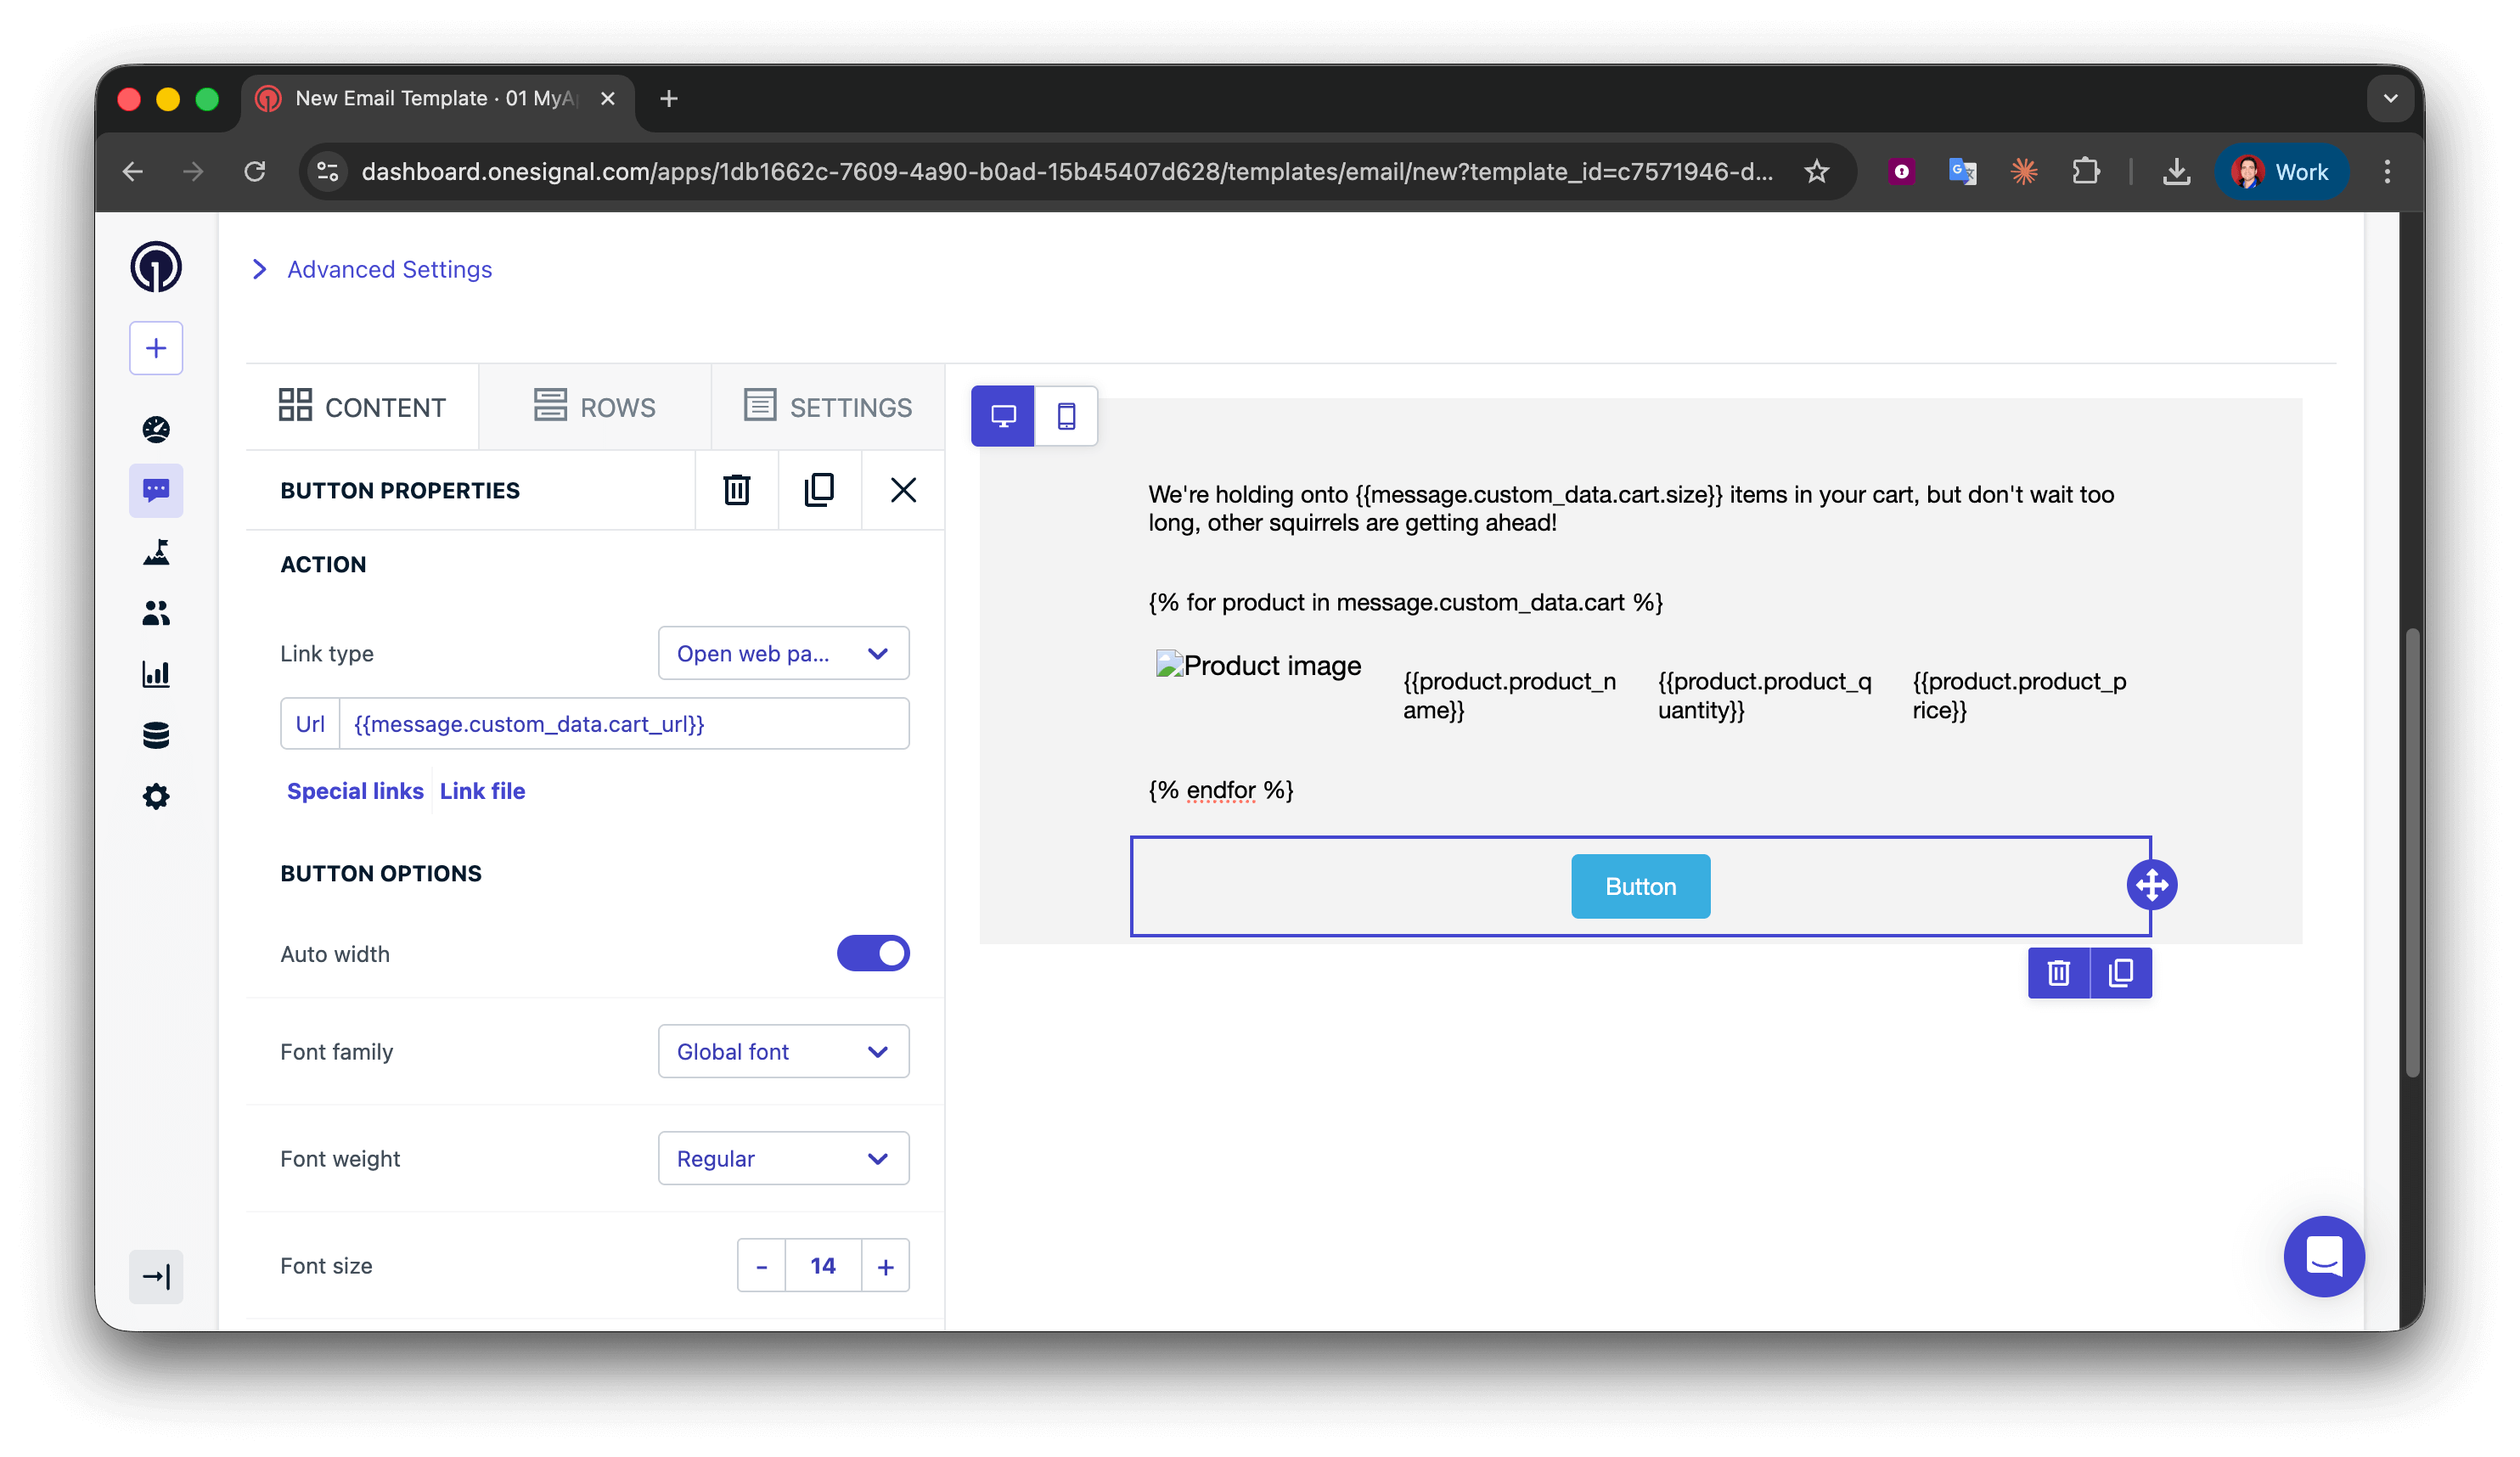
  • A button that links to the customer’s unique cart URL
1

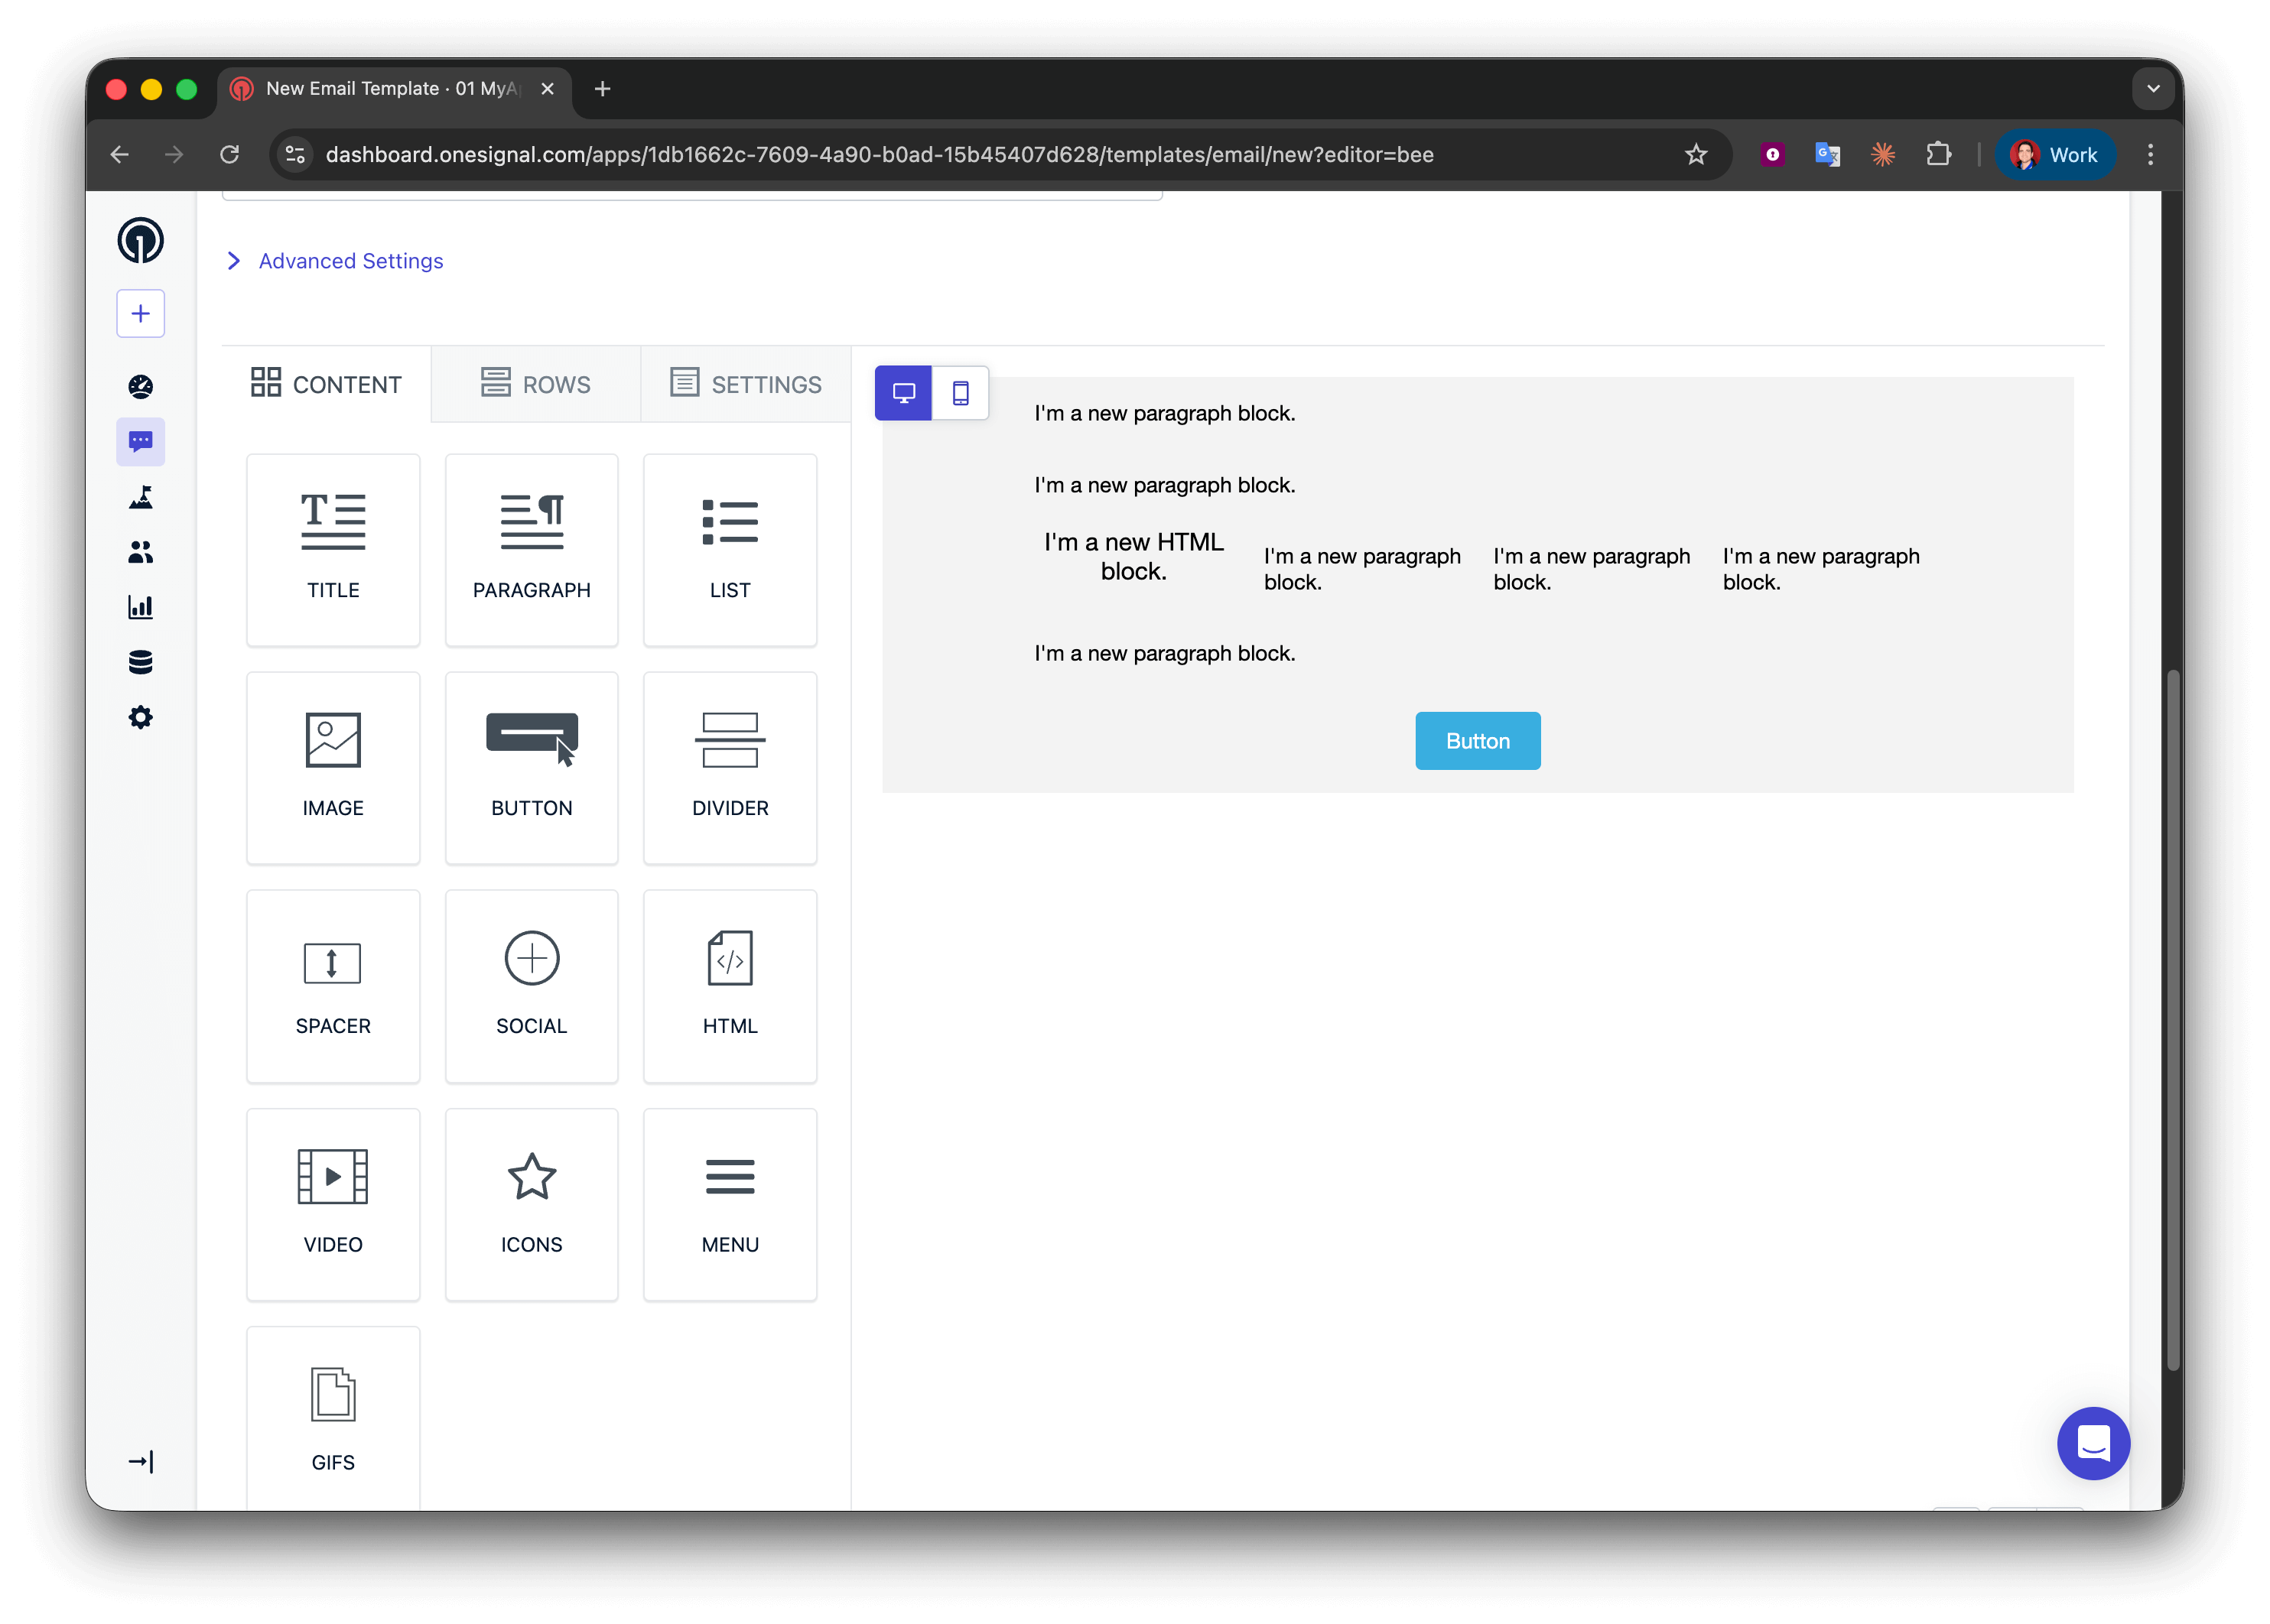
Create the email template

Navigate to Messages > Templates > New Email Template and open the Drag & Drop Editor.
2

Add the layout structure

Create five rows:
  • Rows 1, 2, and 4: one column with a Paragraph block
  • Row 3: four columns with HTML | Paragraph | Paragraph | Paragraph
  • Row 5: one column with a Button block
3

Display the item count

In row 1, add:
Liquid
We're holding onto {{message.custom_data.cart.size}} items in your cart, but don't wait too long, other squirrels are getting ahead!
For better grammar, you could use a conditional to say “1 item” vs “2 items”, but for abandoned cart emails, plural is usually acceptable.
Liquid
{% assign cart = message.custom_data.cart %}
{% assign item_count = cart.size | plus: 0 %}
{% if item_count == 1 %}
We're holding onto {{item_count}} item in your cart, but don't wait too long, other squirrels are getting ahead!
{% endif %}
{% if item_count > 1 %}
We're holding onto {{item_count}} items in your cart, but don't wait too long, other squirrels are getting ahead!
{% endif %}
4

Start the for-loop

Use a for-loop to repeat the product display row for each cart item.In row 2 (loop start), add:
Text
{% for product in message.custom_data.cart %}
What this does:
  • Begins a loop that iterates over each object in the cart array
  • Creates a temporary variable called product that represents the current item
  • Everything between {% for %} and {% endfor %} repeats once per cart item
  • You can name product anything (e.g., item, cartItem)—just stay consistent
For-loop placement: Make sure the {% for %} syntax is in its own Text block row. Don’t put it inside a multi-column row with other content, as this can break email rendering in some clients.
5

Display product details

This 4-column row shows image, name, quantity, and price. Because it’s inside the loop, it repeats for every cart item.In row 3 (product details), configure:Column 1 - HTML block (product image):
HTML
<img src="{{product.product_image}}" alt="Product image" style="max-width:100%;" />
Columns 2–4 - Text blocks (product name, quantity, price):
  • Column 2: {{product.product_name}}
  • Column 3: {{product.product_quantity}}
  • Column 4: {{product.product_price}}
How the loop works:
  • On the first iteration, product = first object in the cart array
  • {{product.product_image}} gets the first item’s image URL
  • On the second iteration, product = second object
  • Row repeats automatically for all cart items
Field name matching: Keys like product_image must exactly match your event payload (case-sensitive). Mismatches render as empty strings.
6

End the for-loop

Close the loop to mark where repetition stops.In row 4 (loop end), add:
Liquid
{% endfor %}
Every {% for %} must have a matching {% endfor %}. Missing this will break email rendering.
7

Add a cart link button

In the row 5 Button block, set the Action URL to:
Text
{{message.custom_data.cart_url}}
8

Test the template

Success! Now you can apply your own styling to the template. See Design emails with drag-and-drop.

Push template

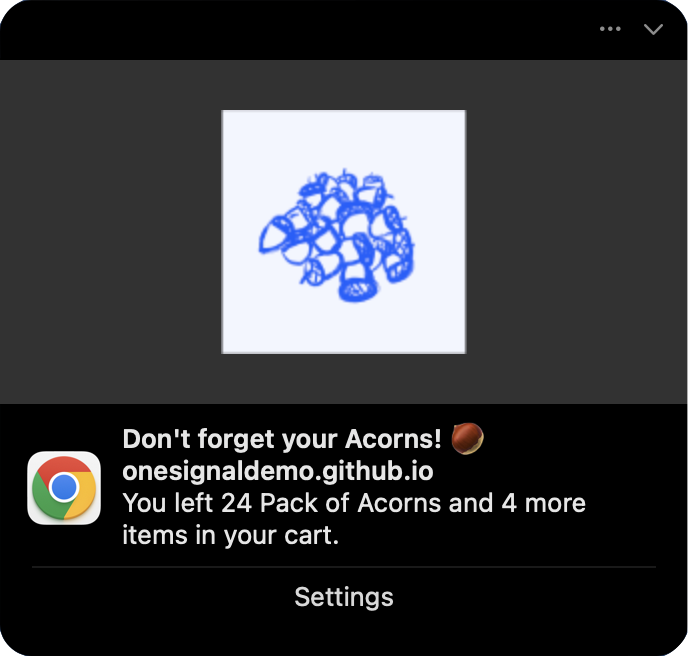
Push notifications have character limits and operating system restrictions, so instead of showing all items, display the first product and indicate the total count with proper grammar. Here is an example push notification we will build:
Message field:
Liquid
{% assign cart = message.custom_data.cart %}
{% assign item_count = cart.size | plus: 0 %}
{% if item_count == 1 %}
You left {{cart.first.product_name}} in your cart.
{% endif %}
{% if item_count == 2 %}
You left {{cart.first.product_name}} and {{item_count | minus: 1}} more item in your cart.
{% endif %}
{% if item_count > 2 %}
You left {{cart.first.product_name}} and {{item_count | minus: 1}} more items in your cart.
{% endif %}
See Using Liquid syntax for more information.
Image field:
Liquid
{{message.custom_data.cart.first.product_image | default: "https://i.imgur.com/ssPCfbC.png"}}
See Notification images & rich media for more information.
Launch URL field:
Liquid
{{cart_url | default: "https://yourdomain.com/cart"}}
Success! Save the template and use its template_id in your Create message API request with the custom_data property to test.

Troubleshooting & best practices

  • Keep it simple: Only include data you’ll actually use in the template
  • Stay under 2KB: Monitor your payload size, especially with arrays
  • Use consistent naming: Stick to snake_case or camelCase throughout
  • Validate before sending: Check for null values, empty arrays, and required fields
Template design:
  • Always use default filters for optional fields:
    Liquid
    {{message.custom_data.user_name | default: "there"}}
    
  • Check array size before looping:
    Liquid
    {% if message.custom_data.items.size > 0 %}
      {% for item in message.custom_data.items %}
        {{item.name}}
      {% endfor %}
    {% endif %}
    
  • Test with edge cases: empty arrays, missing fields, maximum item counts
Error handling:
  • Log API responses server-side to catch validation errors
  • Monitor message delivery rates—sudden drops may indicate Liquid errors
  • Keep fallback templates ready for critical transactional messages
Performance:
  • Pre-format complex data in your backend rather than using complex Liquid logic
  • Cache templates and reuse them across many API calls
  • Consider separating high-volume transactional messages from marketing campaigns
Cause: Liquid syntax errors or mismatched field namesSolutions:
  • Verify field names match exactly between custom_data and template (case-sensitive)
  • Check for typos: {{message.custom_data.name}} not {{message.custm_data.name}}
  • Use default filters to catch missing fields
  • Test templates with the actual custom_data structure before production
Cause: custom_data exceeds 2KB limitSolutions:
  • Remove unnecessary fields from your payload
  • Shorten field names and values where possible
  • Limit arrays to first 3-5 items
  • Move large static content (like full HTML) to your template instead

Need help?Chat with our Support team or email [email protected]Please include:
  • Details of the issue you’re experiencing and steps to reproduce if available
  • Your OneSignal App ID
  • The External ID or Subscription ID if applicable
  • The URL to the message you tested in the OneSignal Dashboard if applicable
  • Any relevant logs or error messages
We’re happy to help!