Gereksinimler
- Flutterflow planı: Standard veya üzeri
- Yapılandırılmış OneSignal uygulaması ve platformu
- Xcode 14+ ile macOS (kurulum talimatları Xcode 16.2 kullanır)
- iOS 12+, iPadOS 12+ ile cihaz veya iOS 16.2+ çalıştıran Xcode simülatörü
- CocoaPods 1.16.2+
- Google Play Store (Services) yüklü Android 7.0+ cihaz veya emülatör
Configure your OneSignal app and platform
Configure your OneSignal app with the platforms you support — Apple (APNs), Google (FCM), Huawei (HMS), and/or Amazon (ADM).Step-by-step setup instructions
Step-by-step setup instructions
Create or select your app
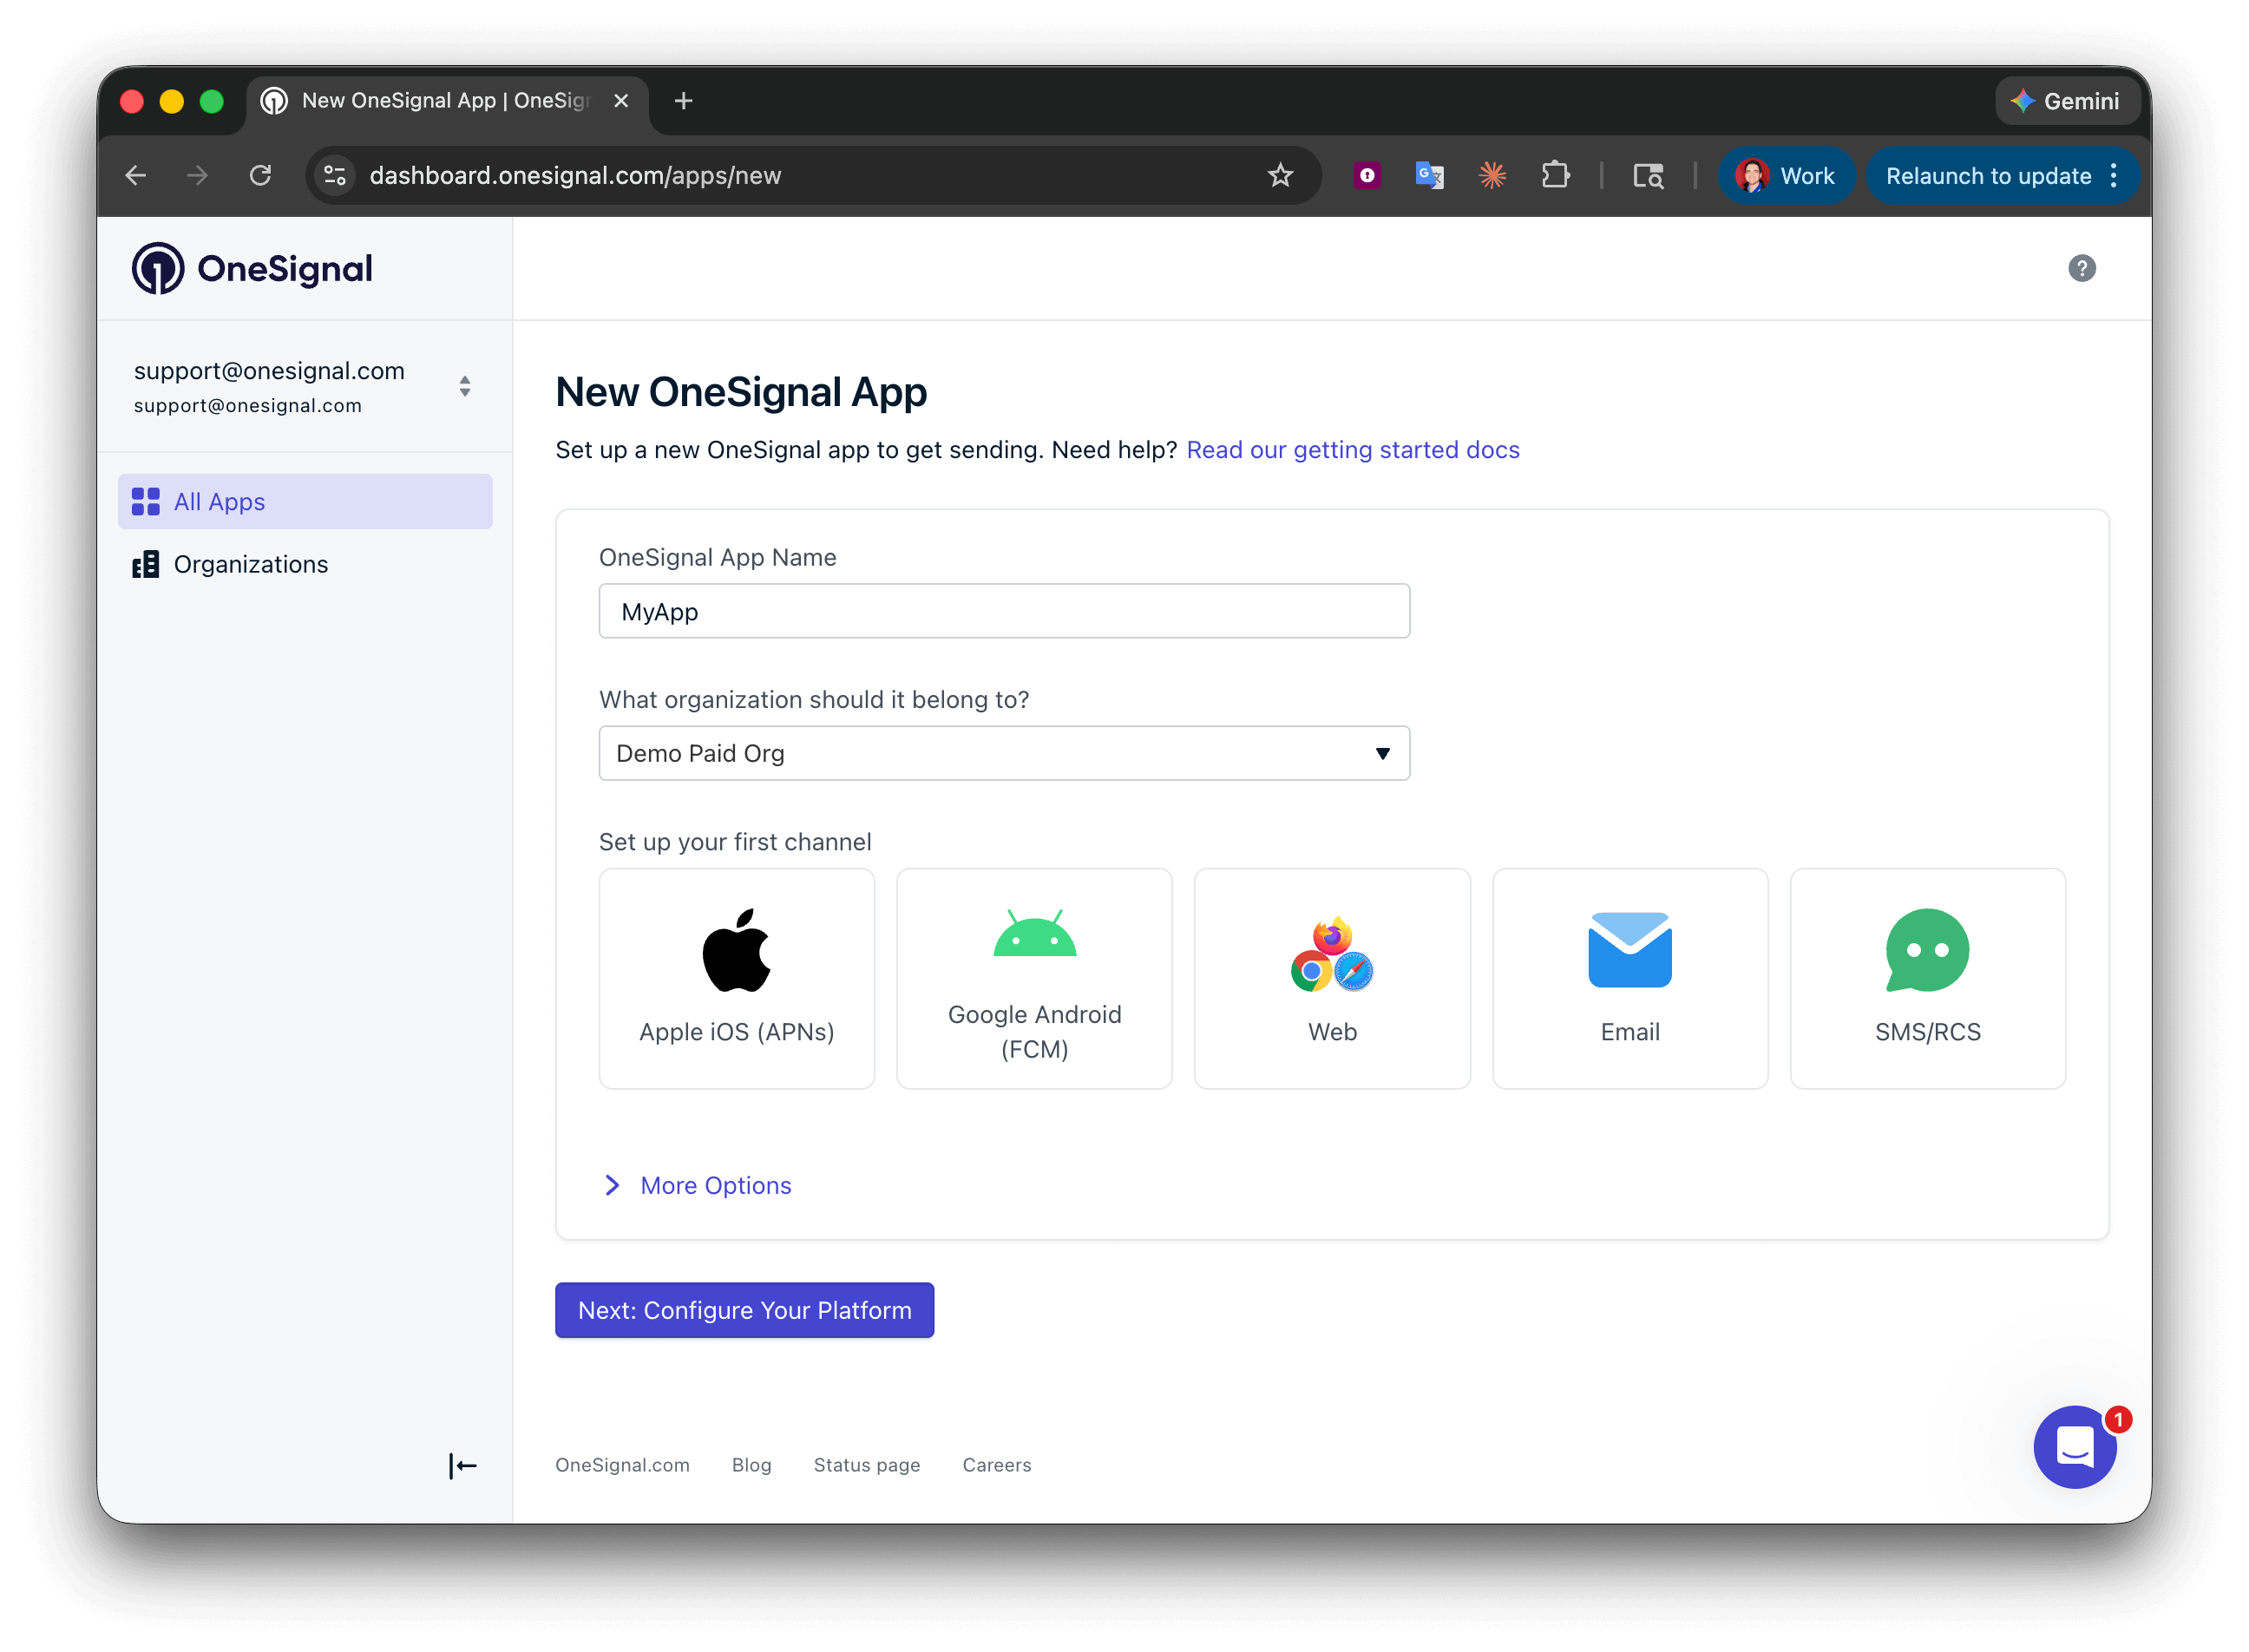
Setting up your first OneSignal app, Organization, and channel.
Configure platform credentials
- Android: Set up Firebase credentials
- iOS: p8 token (recommended) or p12 certificate
- Amazon: Generate API key
- Huawei: Authorize OneSignal
Save your App ID and install the SDK
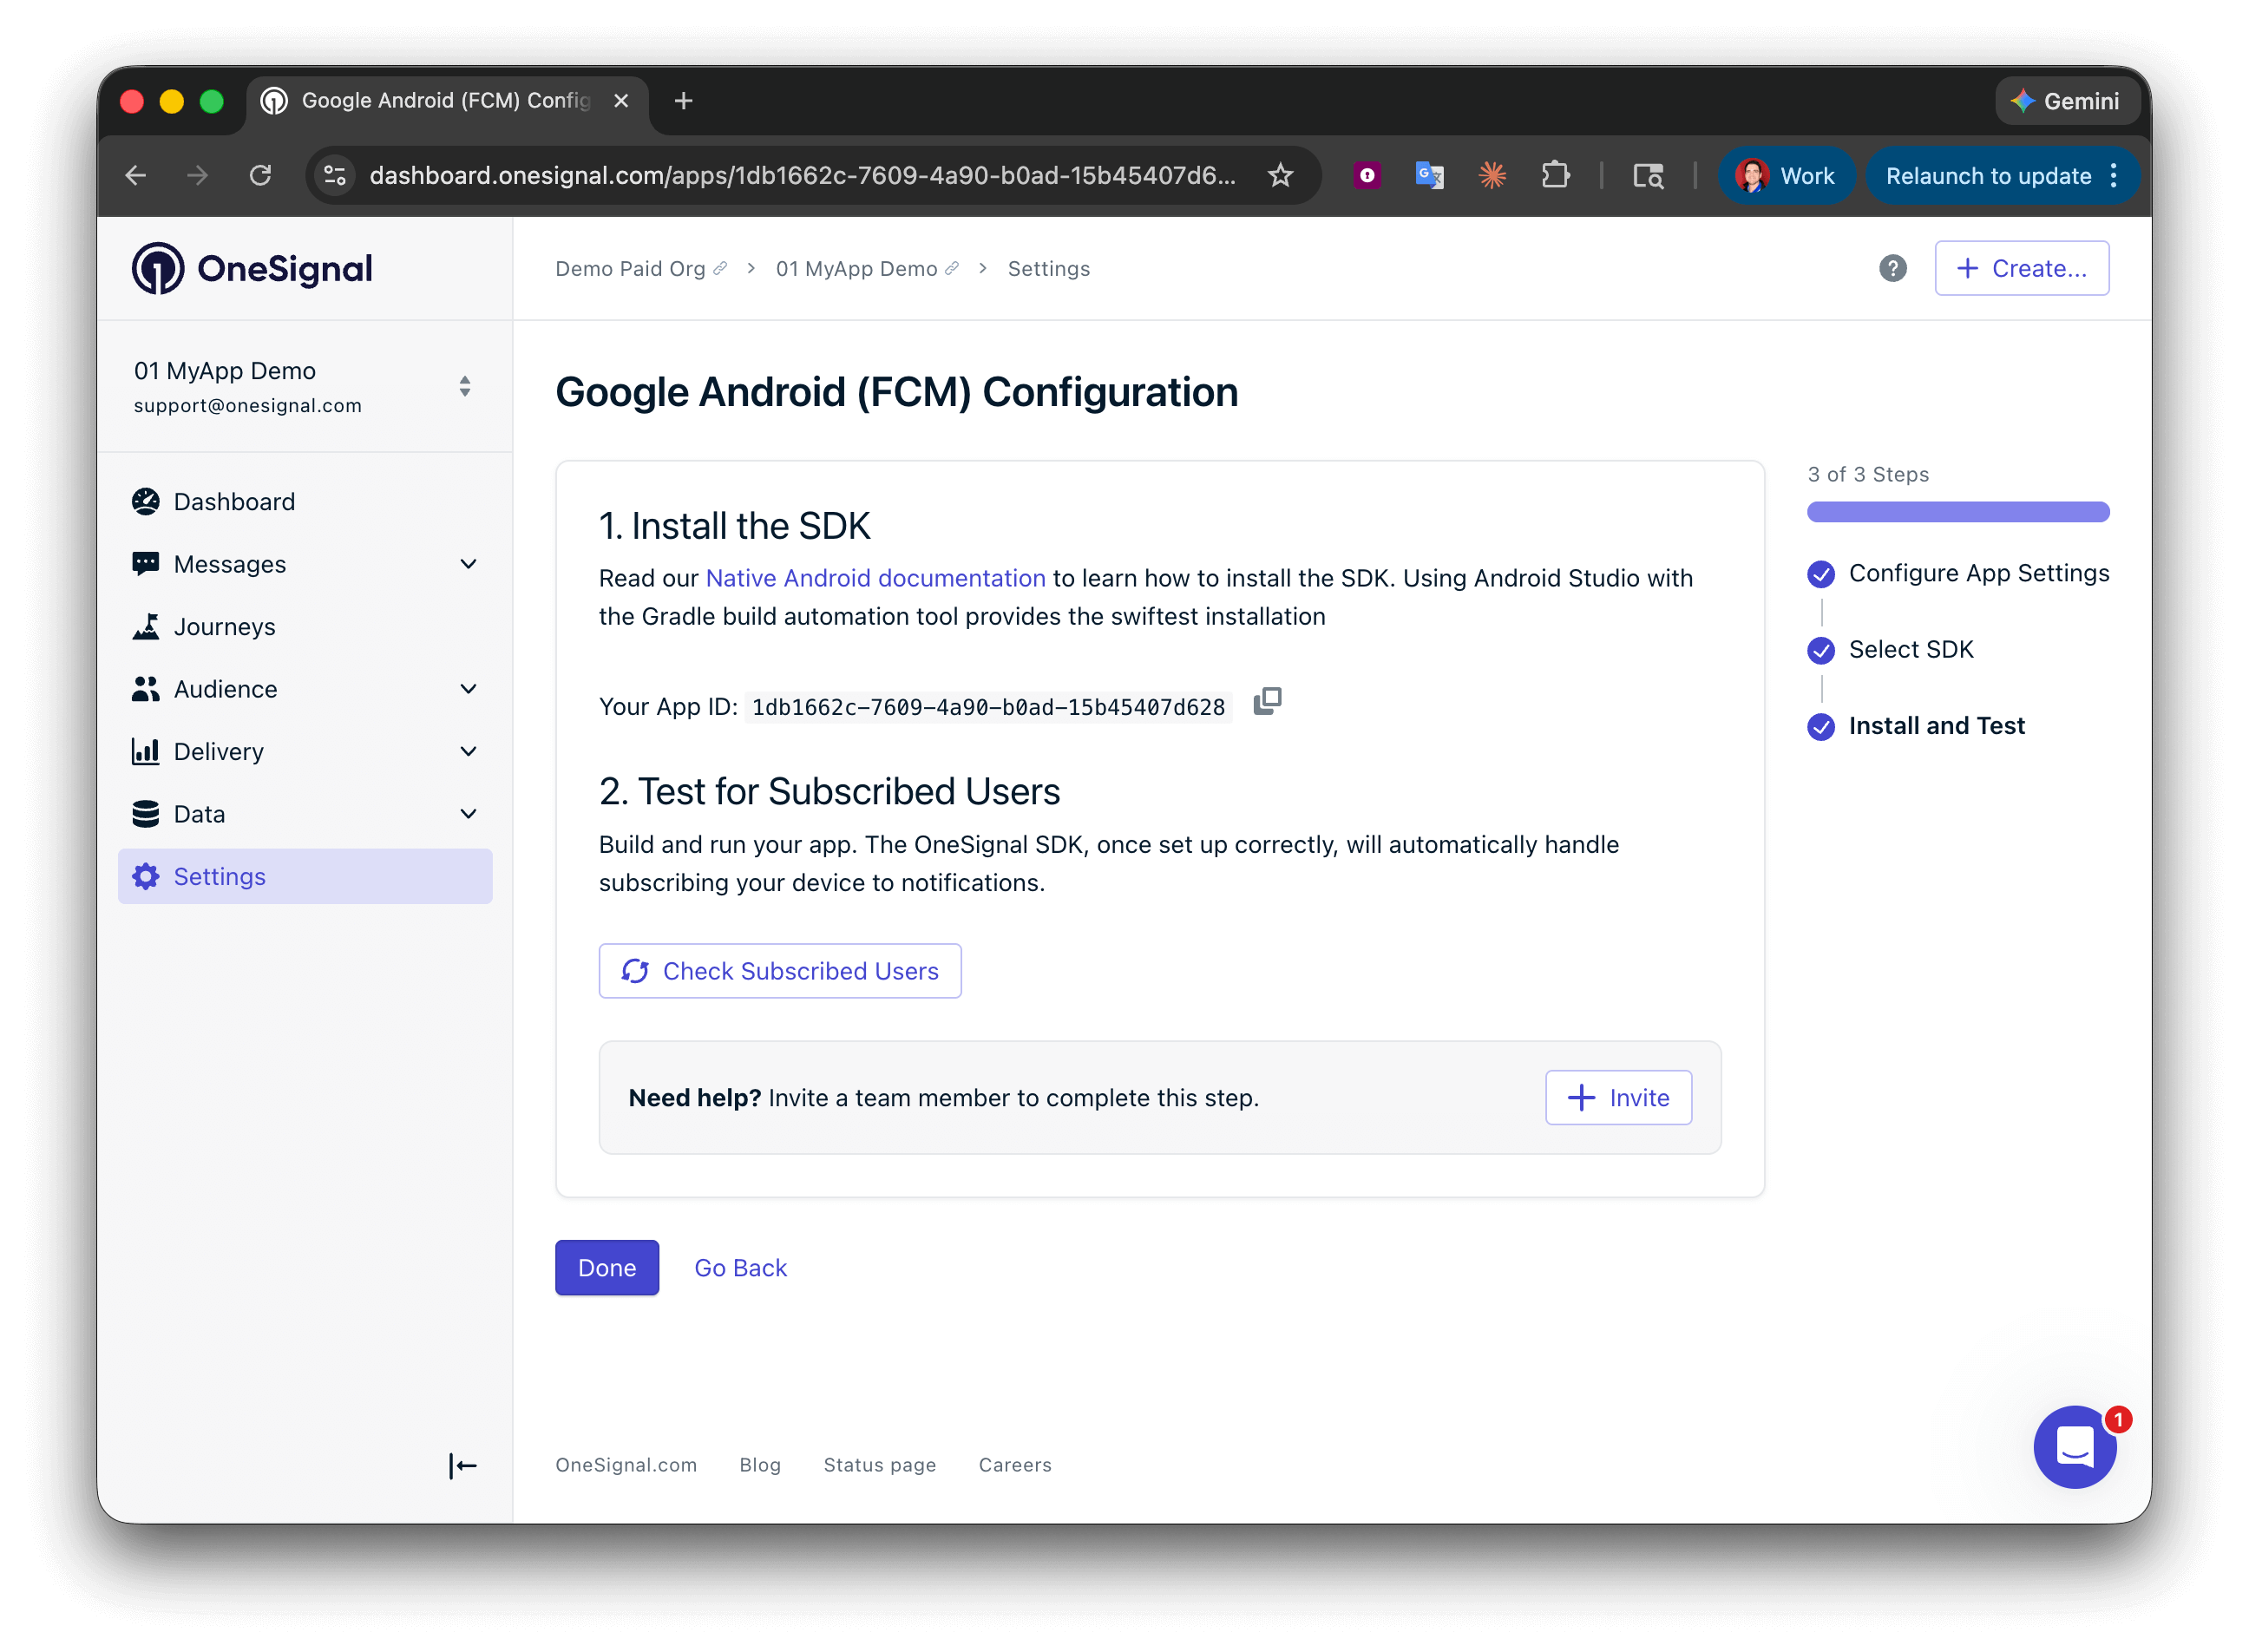
Save your App ID and invite additional team members.
Kurulum
1. Yeni bir özel eylem oluşturun
Flutterflow projenizde, Custom Code’a gidin, ardından +Add düğmesine tıklayın ve Action’ı seçin.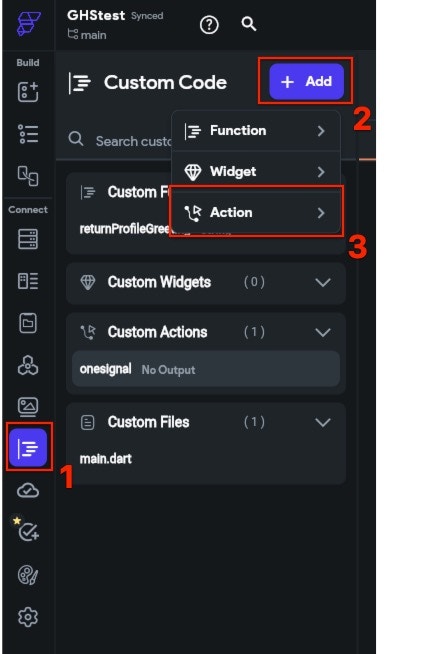
YOUR_APP_ID’yi OneSignal panonuzda Settings > Keys & IDs bölümünde bulunan OneSignal App ID’nizle değiştirin.
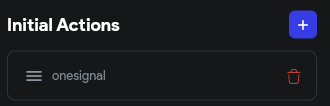
onesignal eylemine tıklayın.

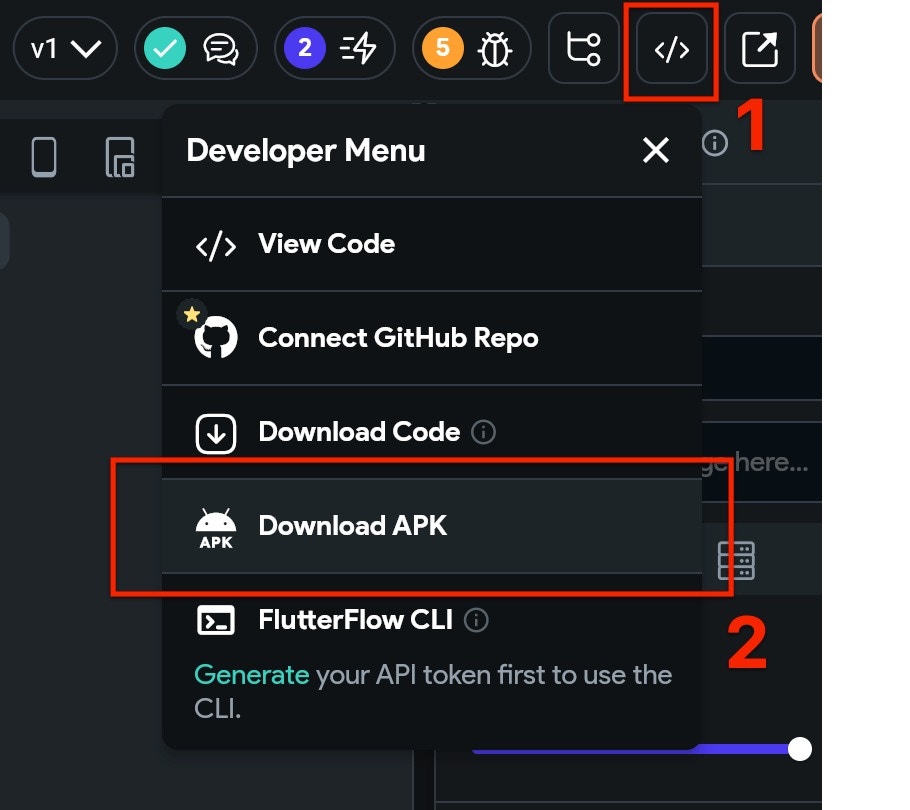
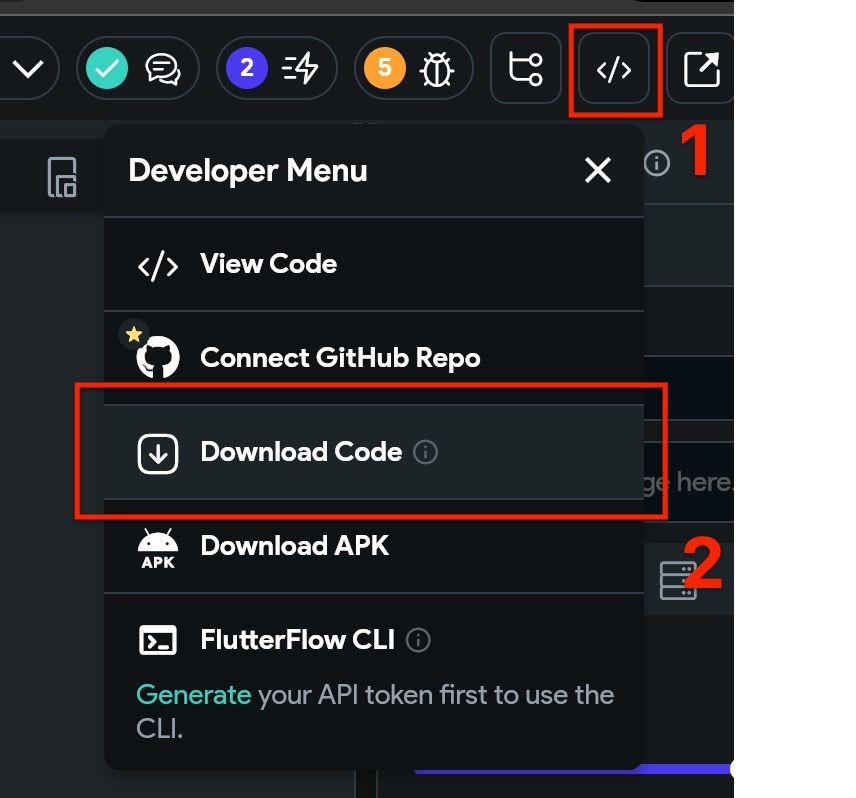
2. Projeyi dışa aktarma
- APK indirme (Yalnızca Android)
- Tam proje indirme (iOS ve Android)
3. iOS Kurulumu
İndirilen proje muhtemelen iOS’ta başlatılmaya hazır olmayacaktır. OneSignal’e özgü eklemeleri yapmadan önce, projenin tam olarak derlendiğinden emin olmanız gerekecektir. Bunu yapmak için:- Bir Terminal penceresi açın, indirdiğiniz projenin
iosklasörüne cd (dizin değiştir) yapın. - Terminal’de
flutter build iosyazın ve enter tuşuna basın. Derlemenin tamamlanmasını bekleyin, bu projenizin boyutuna bağlı olarak biraz zaman alabilir. - Hala Terminal’de
pod installyazın ve enter tuşuna basın. Pod kurulumunun tamamlanmasını bekleyin.
.xcworkspace dosyasını Xcode’da açın.
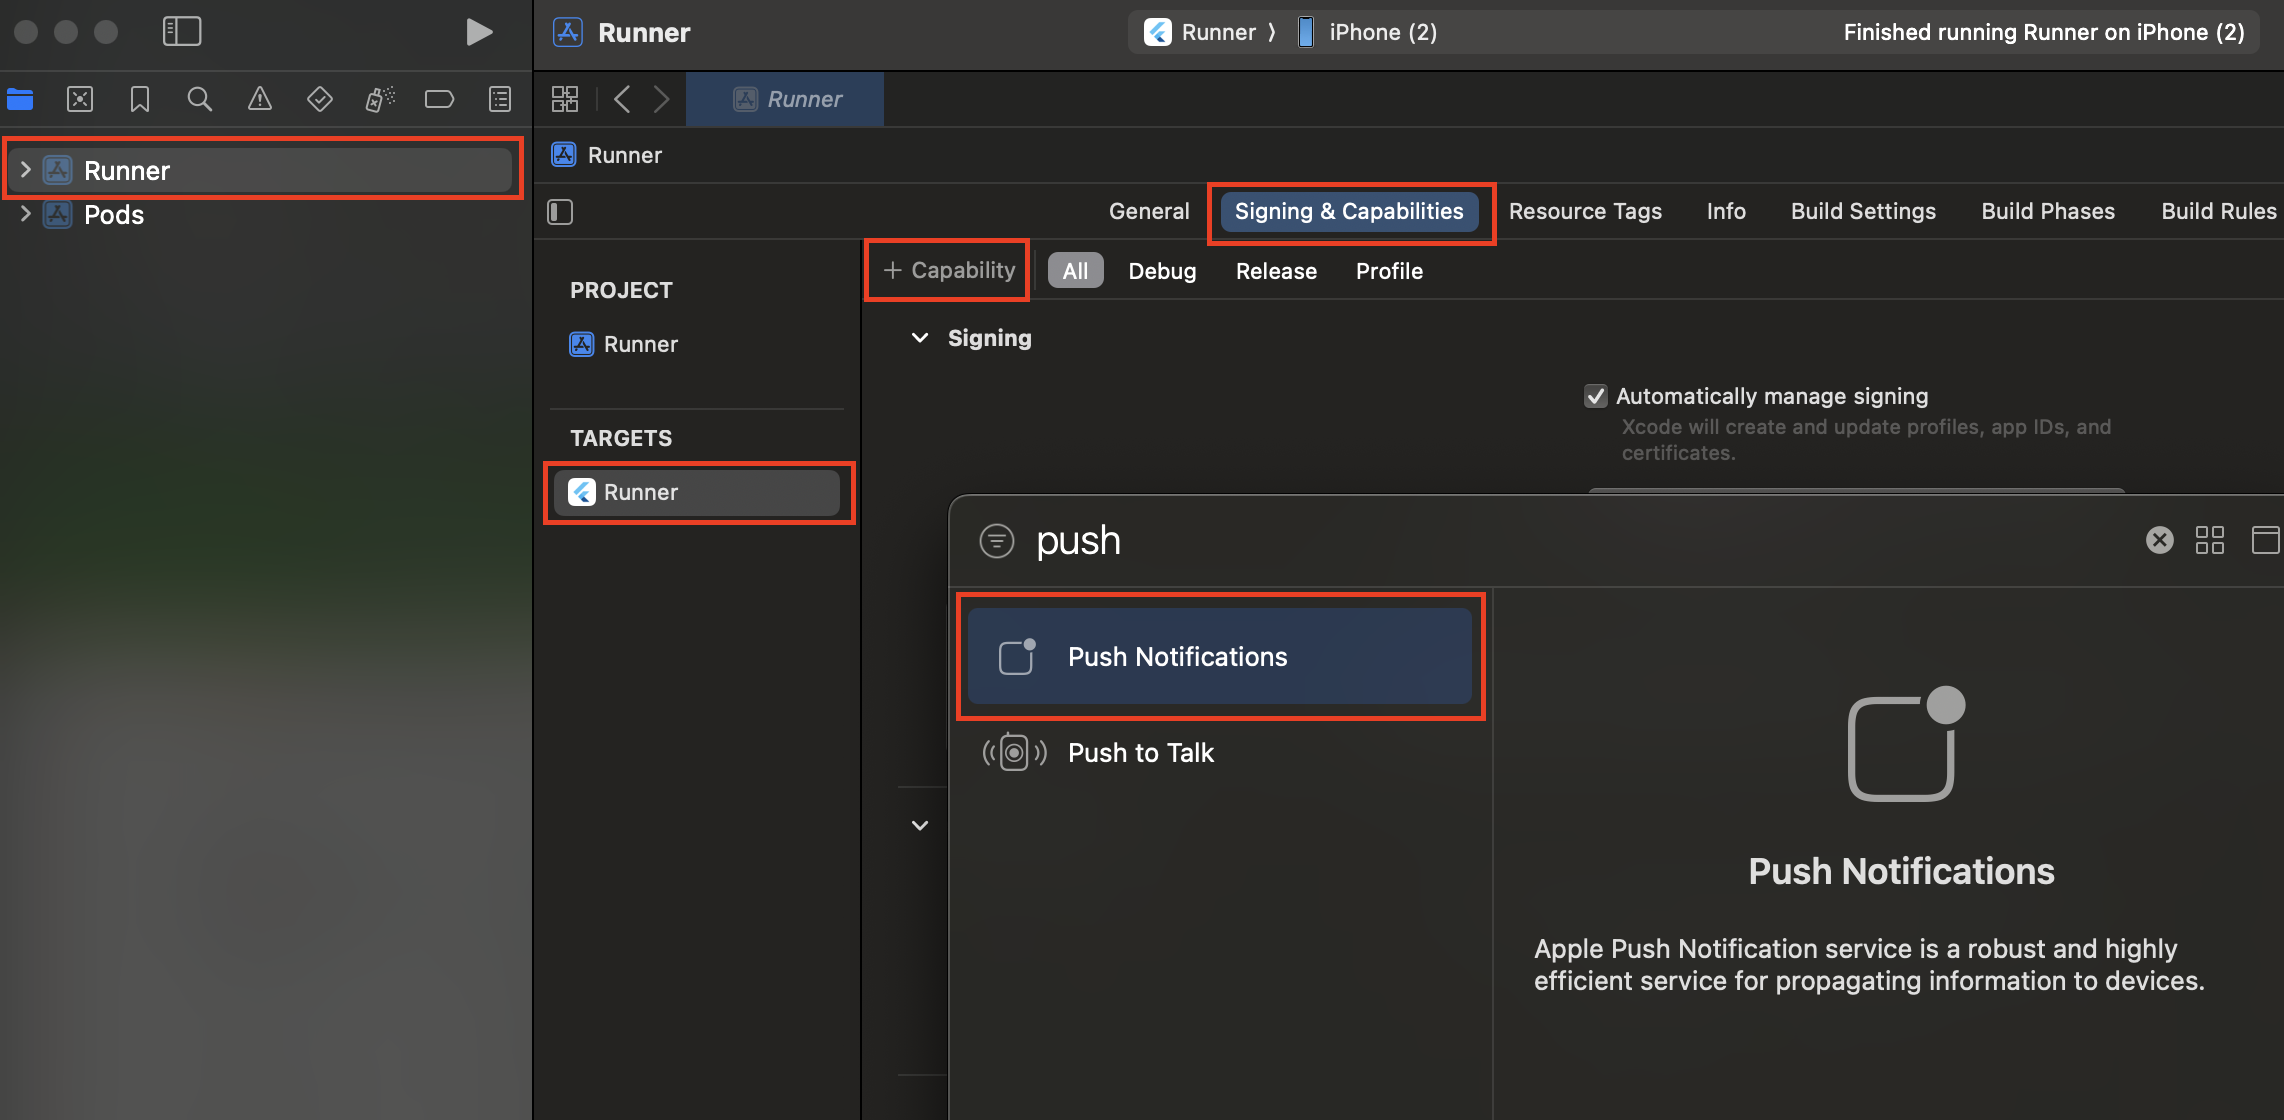
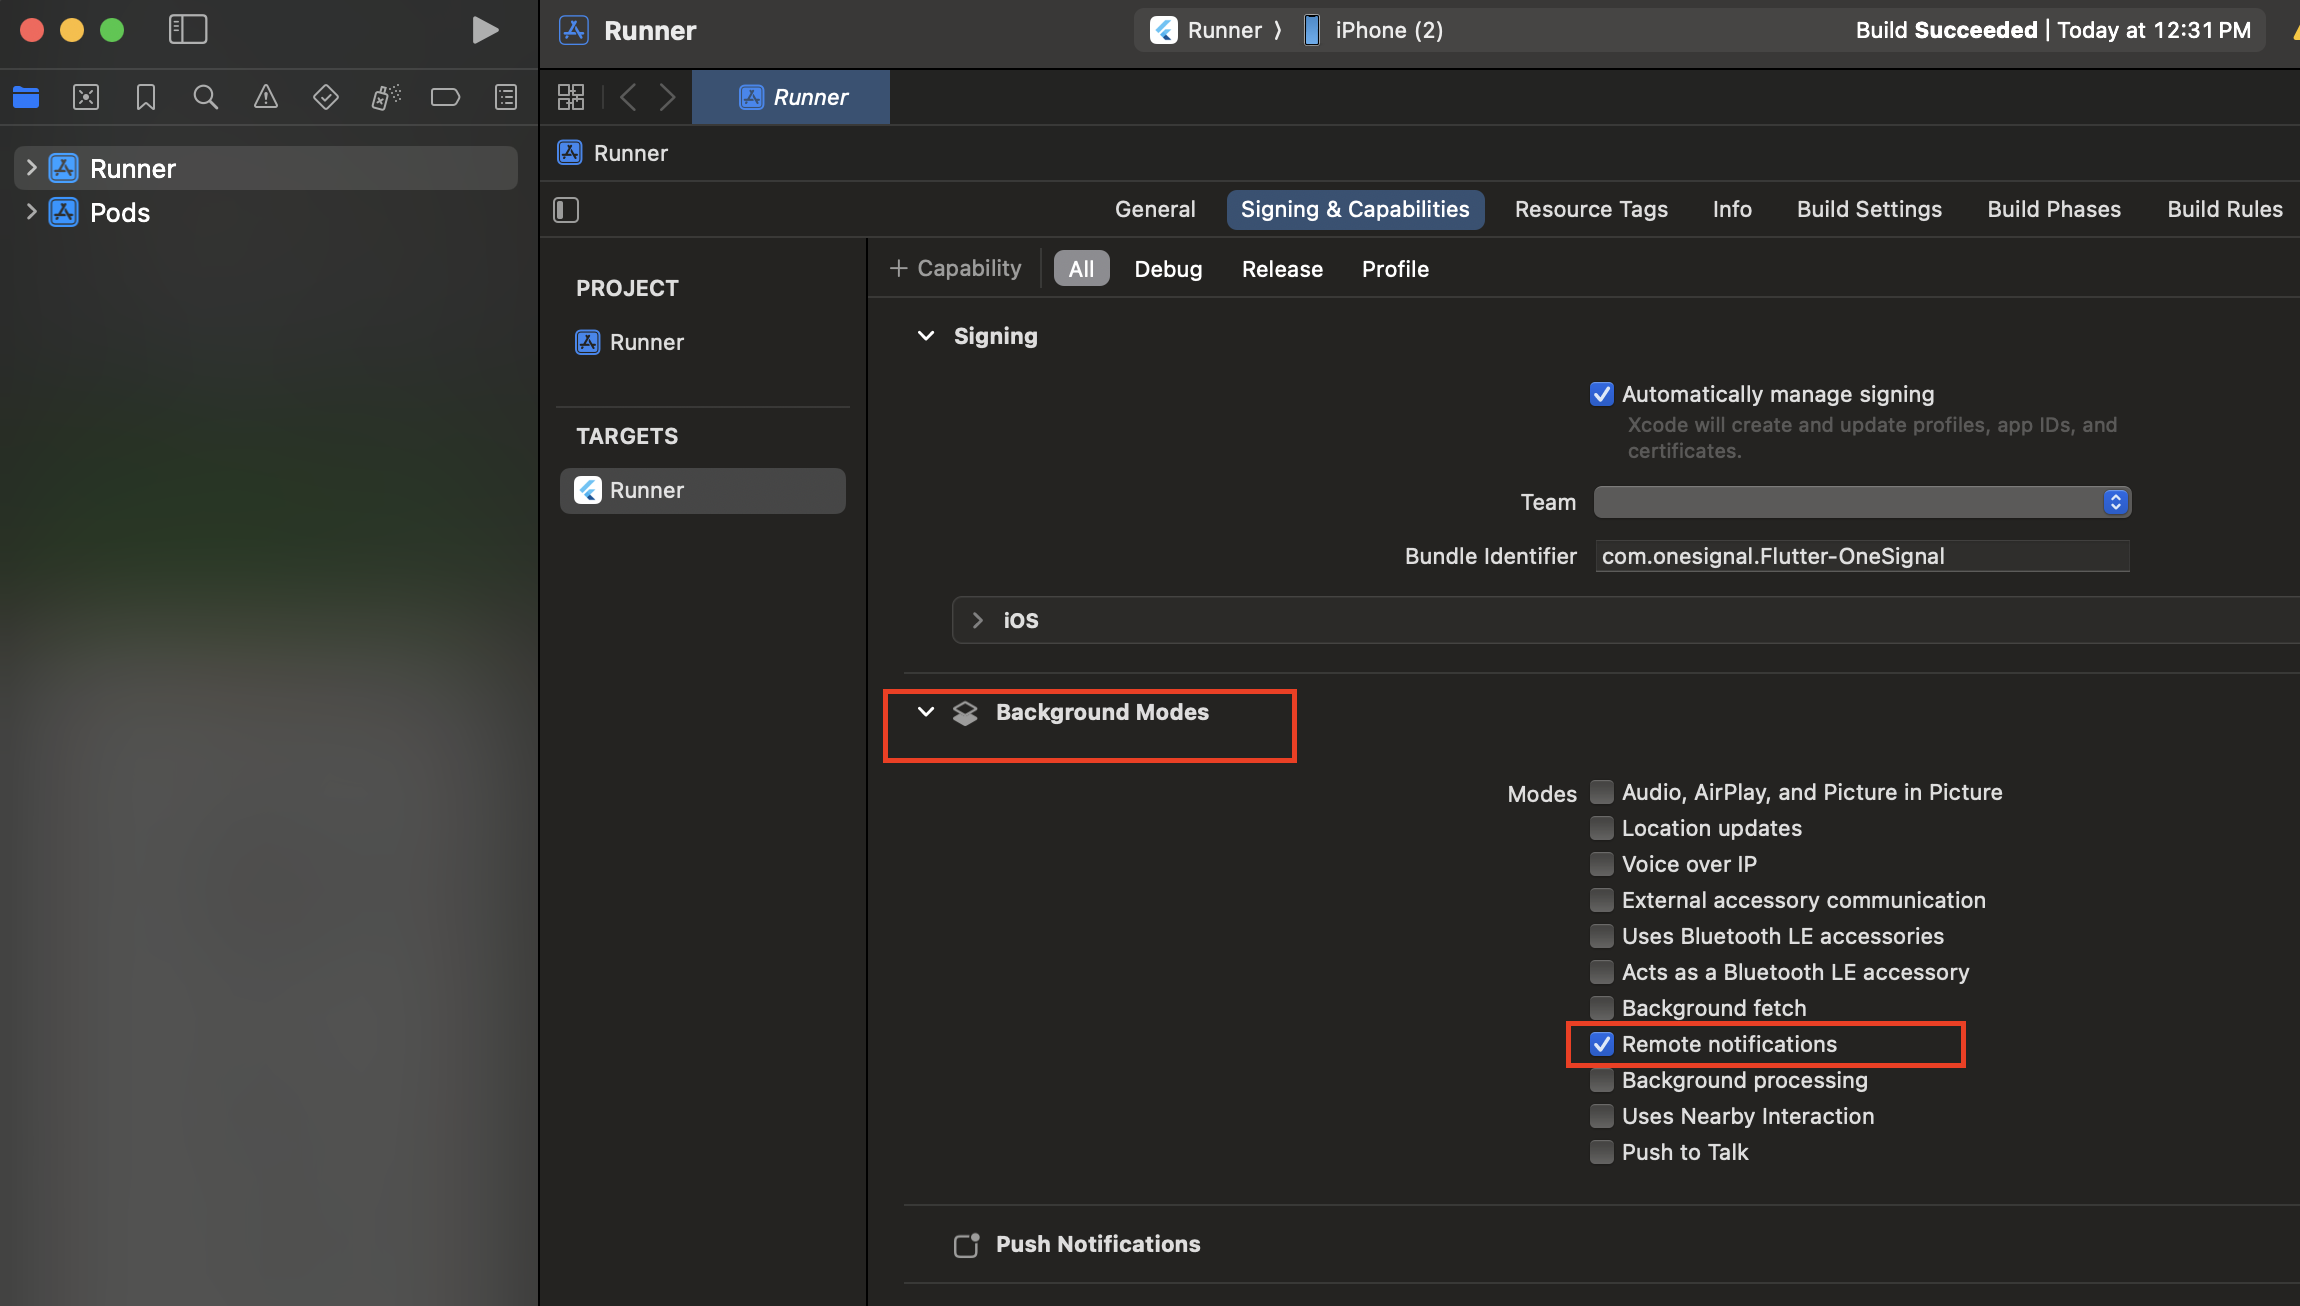
root project > your main app target > Signing & Capabilities seçeneğini seçin.
Push Notifications etkin olduğunu görmüyorsanız, + Capability seçeneğine tıklayın ve Push Notifications ekleyin. Team ve Bundle Identifier için doğru ayrıntıları girdiğinizden emin olun.
Notification Service Extension Ekleme
OneSignalNotificationServiceExtension, iOS uygulamanızın görseller, düğmeler ve rozetler içeren zengin bildirimler almasına olanak tanır. Ayrıca OneSignal’in confirmed receipt analitik özellikleri için gereklidir. Xcode’da File > New > Target… seçeneğini seçin Notification Service Extension’ı seçin, ardından Next.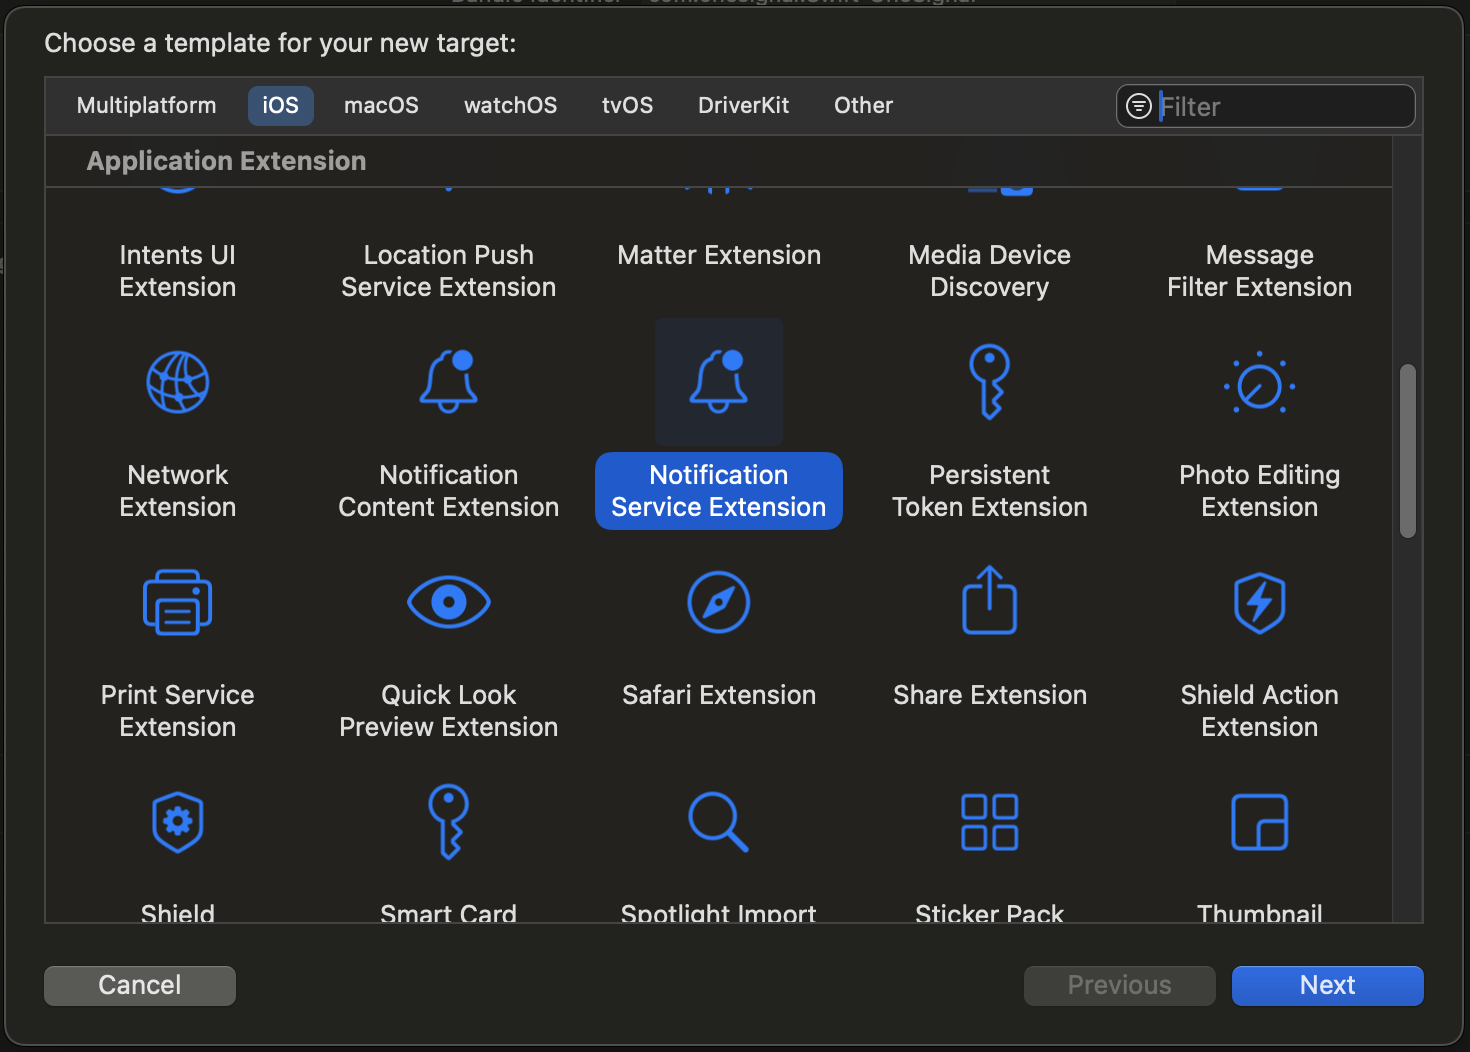
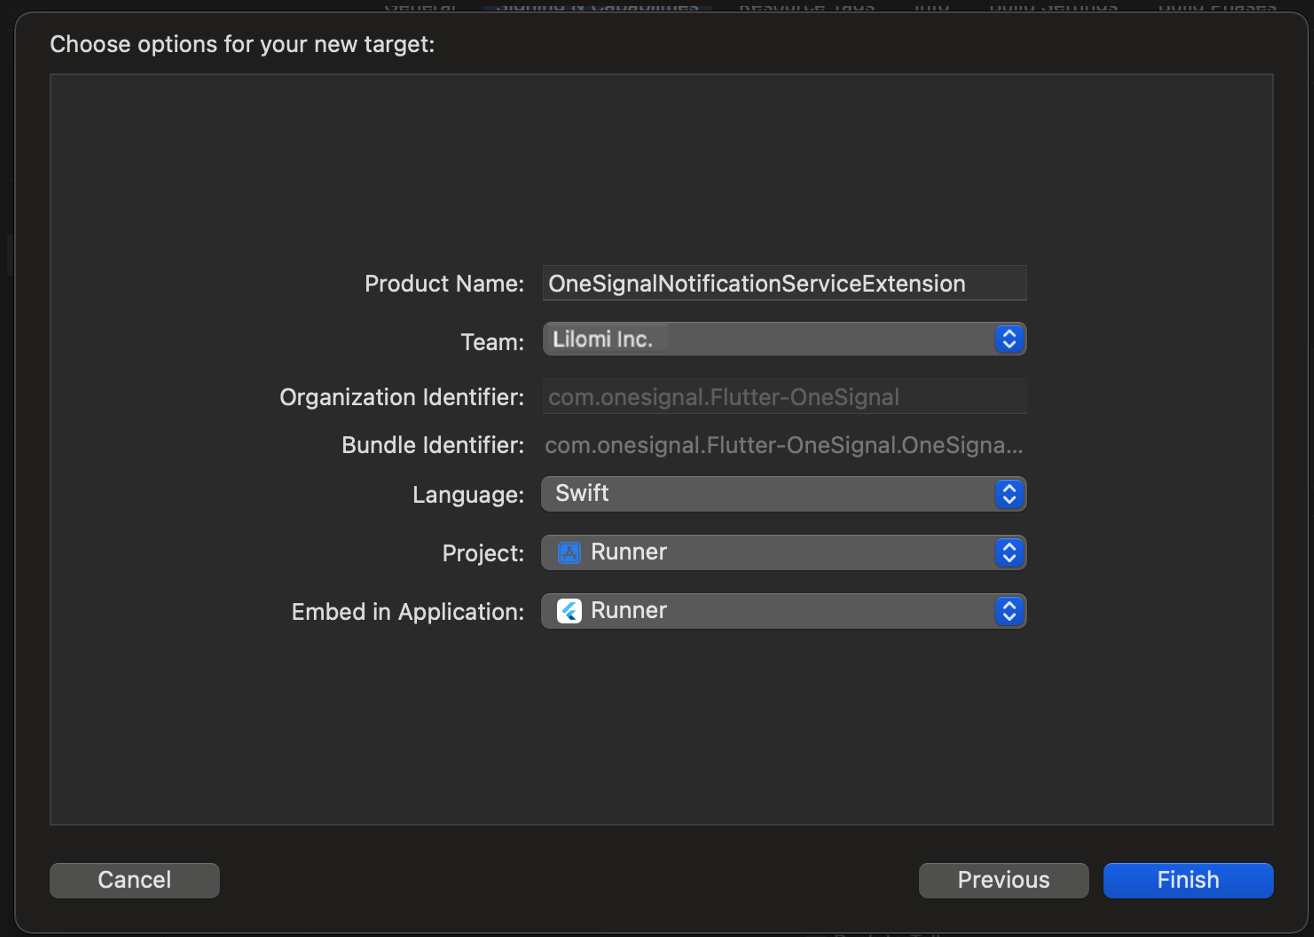
OneSignalNotificationServiceExtension olarak girin ve Finish tuşuna basın.
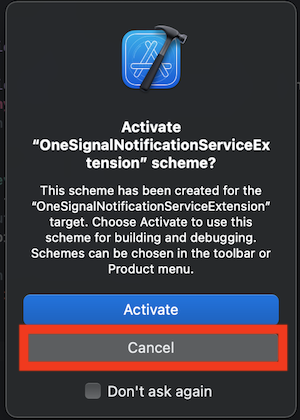
İptal ederek, az önce oluşturduğunuz uzantı yerine uygulamanızda hata ayıklamaya devam edersiniz. Yanlışlıkla etkinleştirdiyseniz, cihaz seçicinin yanındaki orta üstte uygulama hedefinize geri dönebilirsiniz.
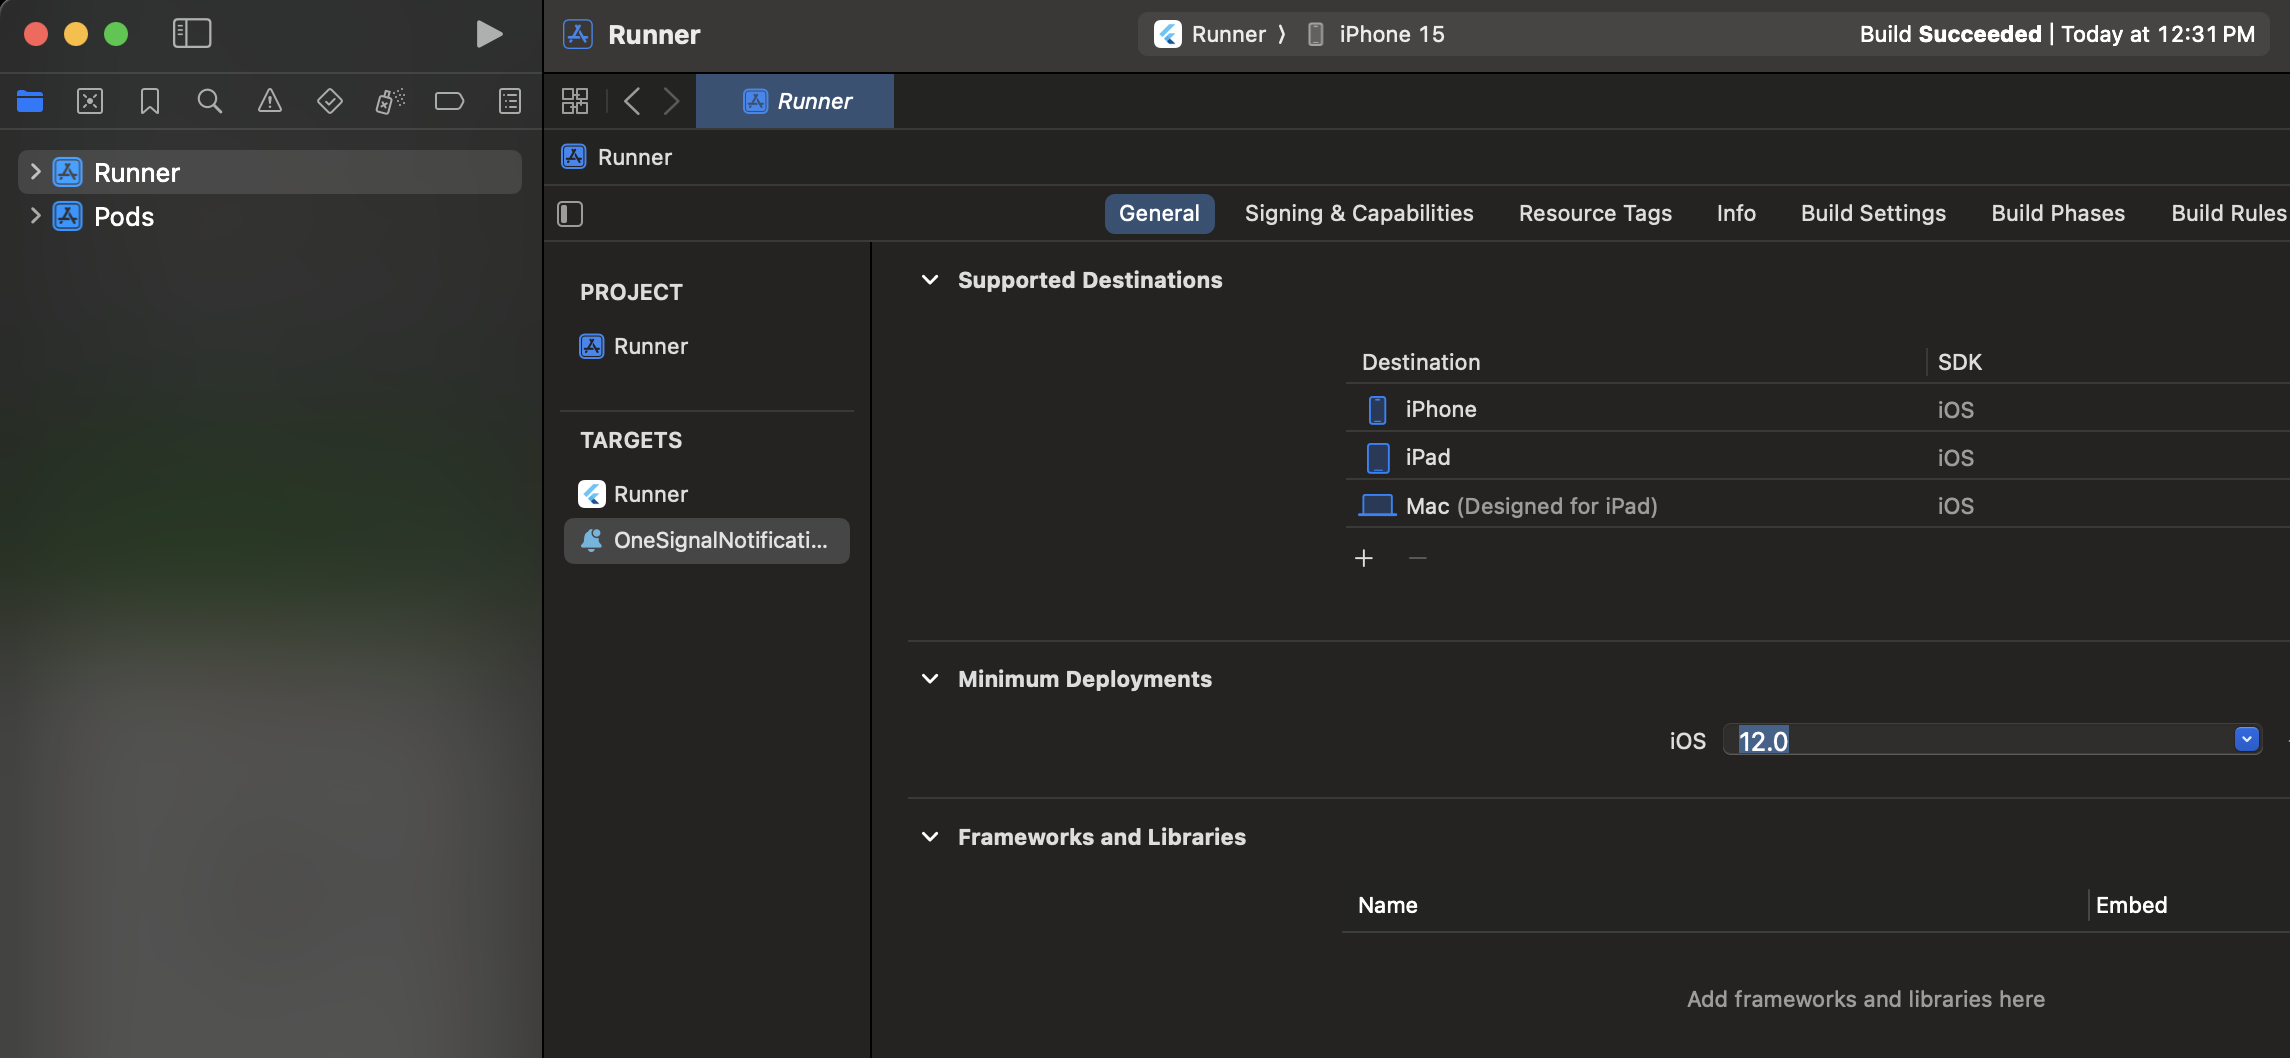
Bu, Ana Uygulama Hedefinizle aynı değer olmalıdır.
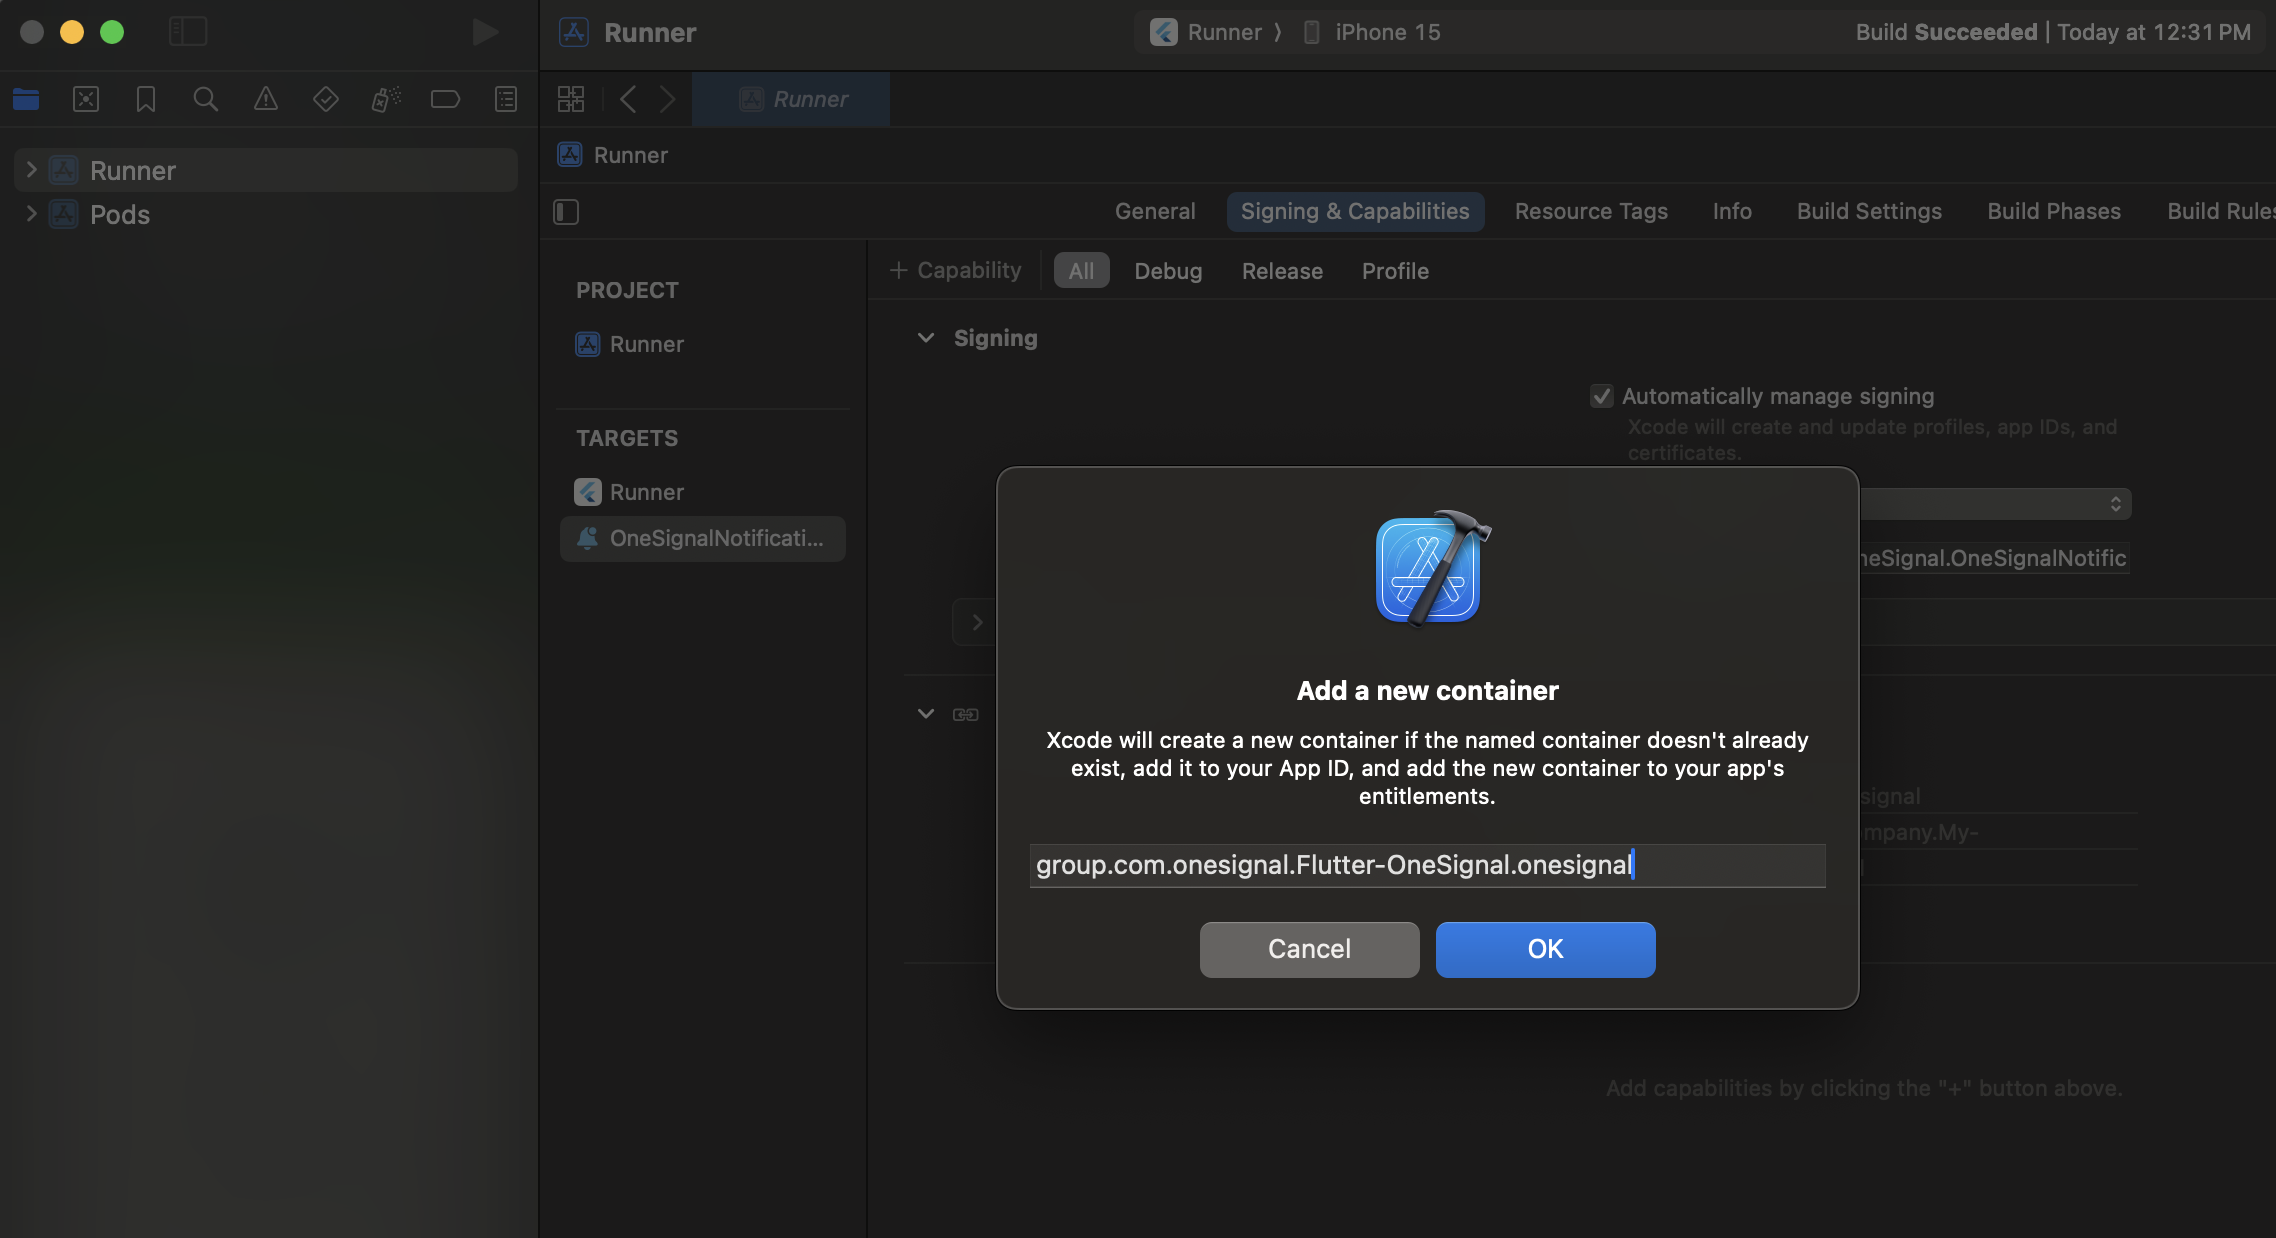
App Groups Ekleme
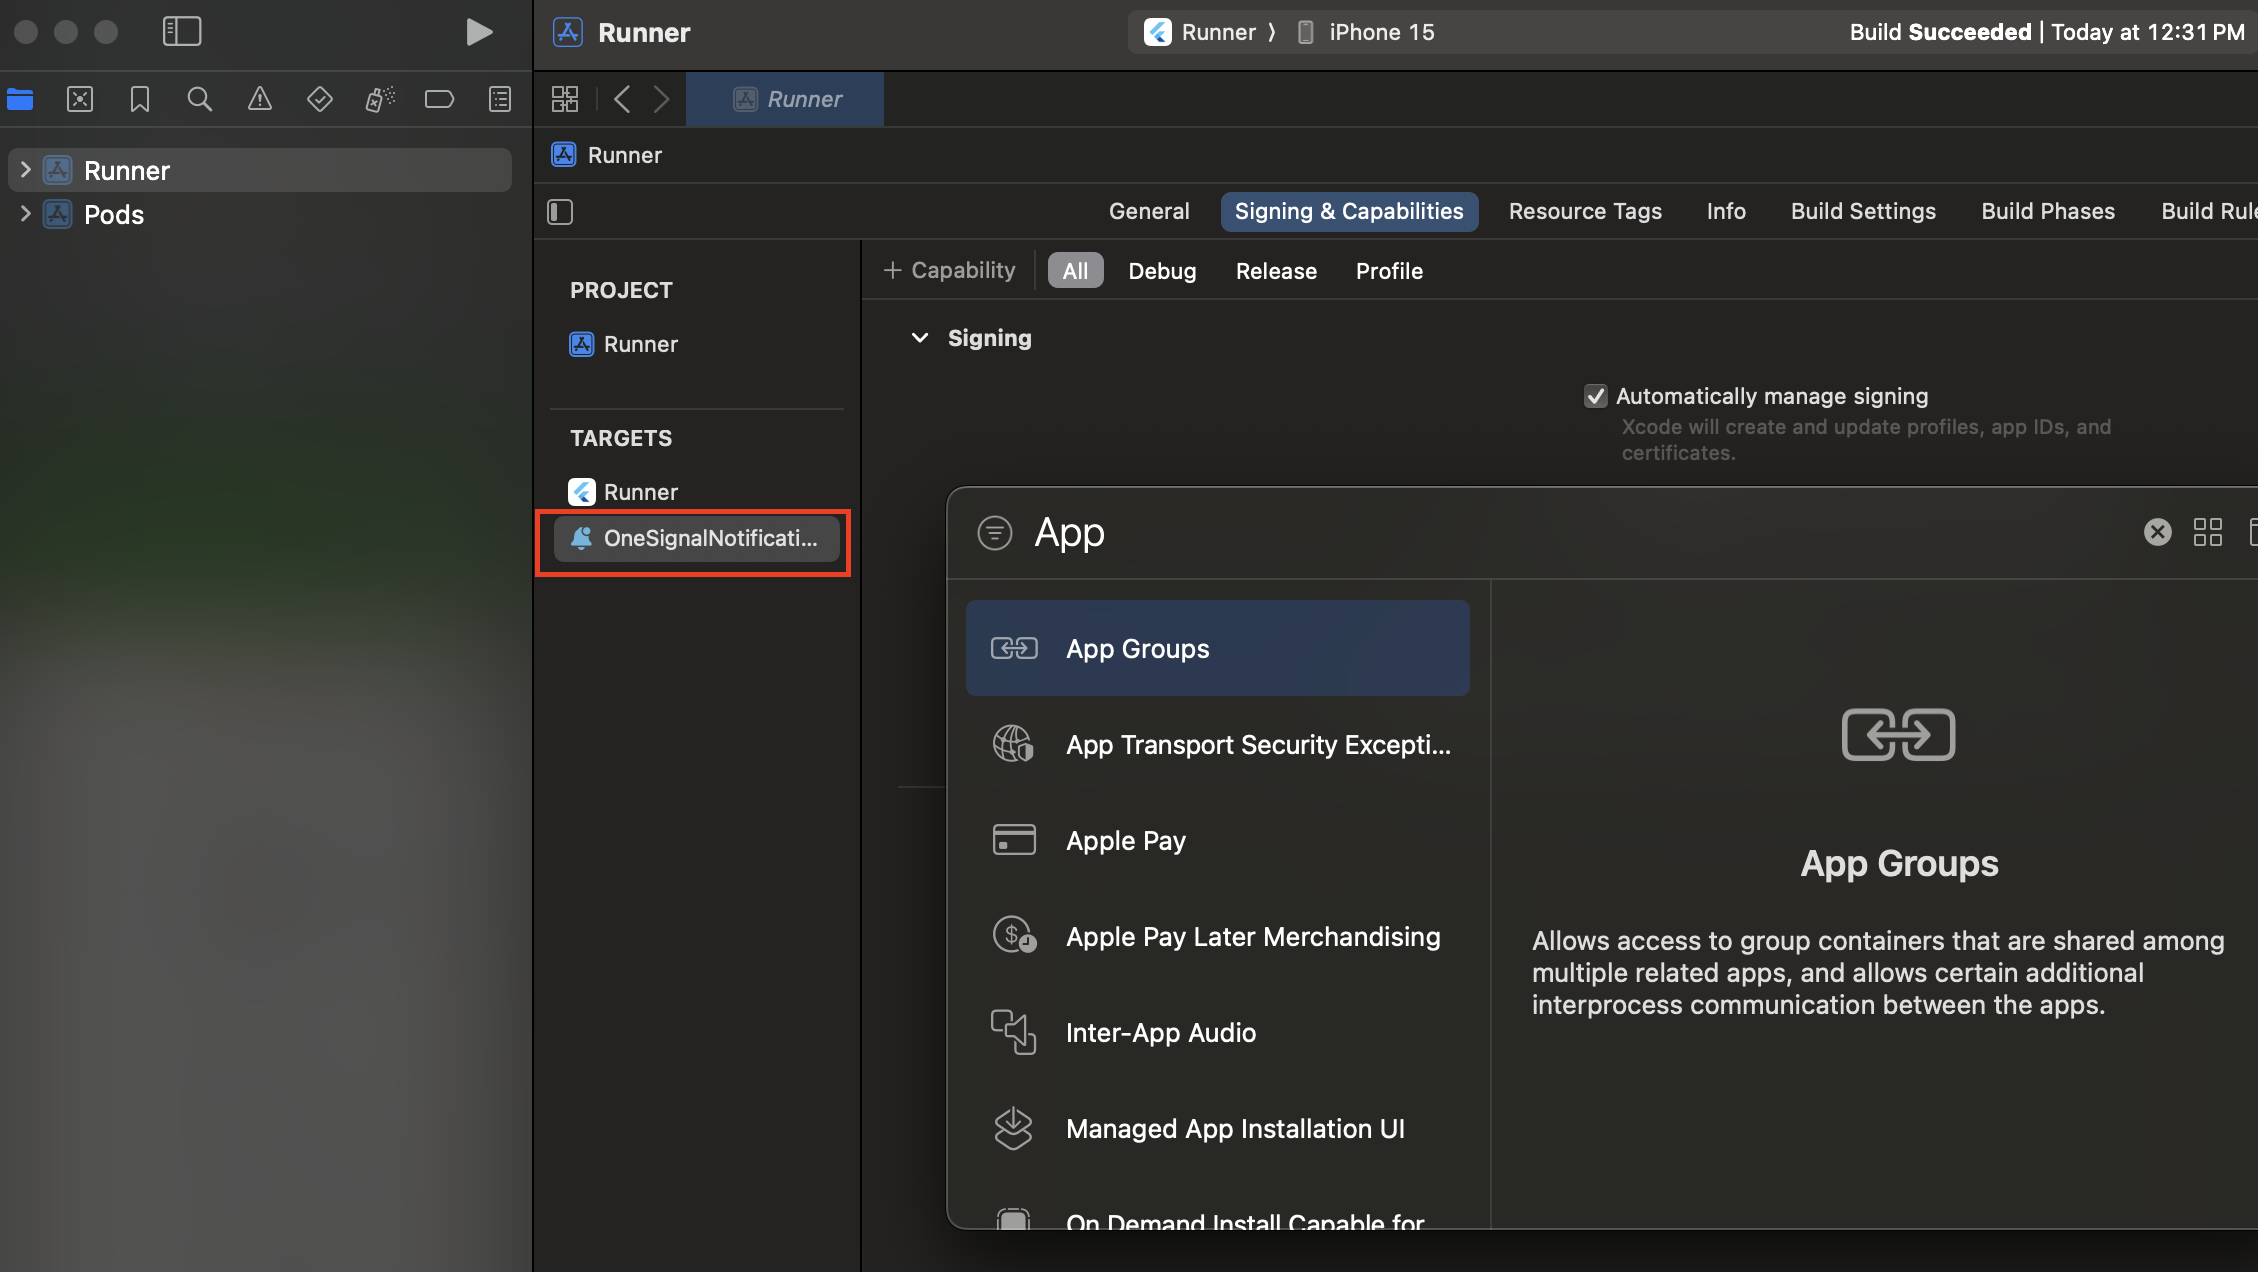
App Groups, uygulamanız aktif olmasa bile bir bildirim alındığında uygulamanızın ve OneSignalNotificationServiceExtension’ın iletişim kurmasına olanak tanır. Bu, rozetler ve Confirmed Deliveries için gereklidir. Main App Target > Signing & Capabilities > + Capability > App Groups seçeneğini seçin.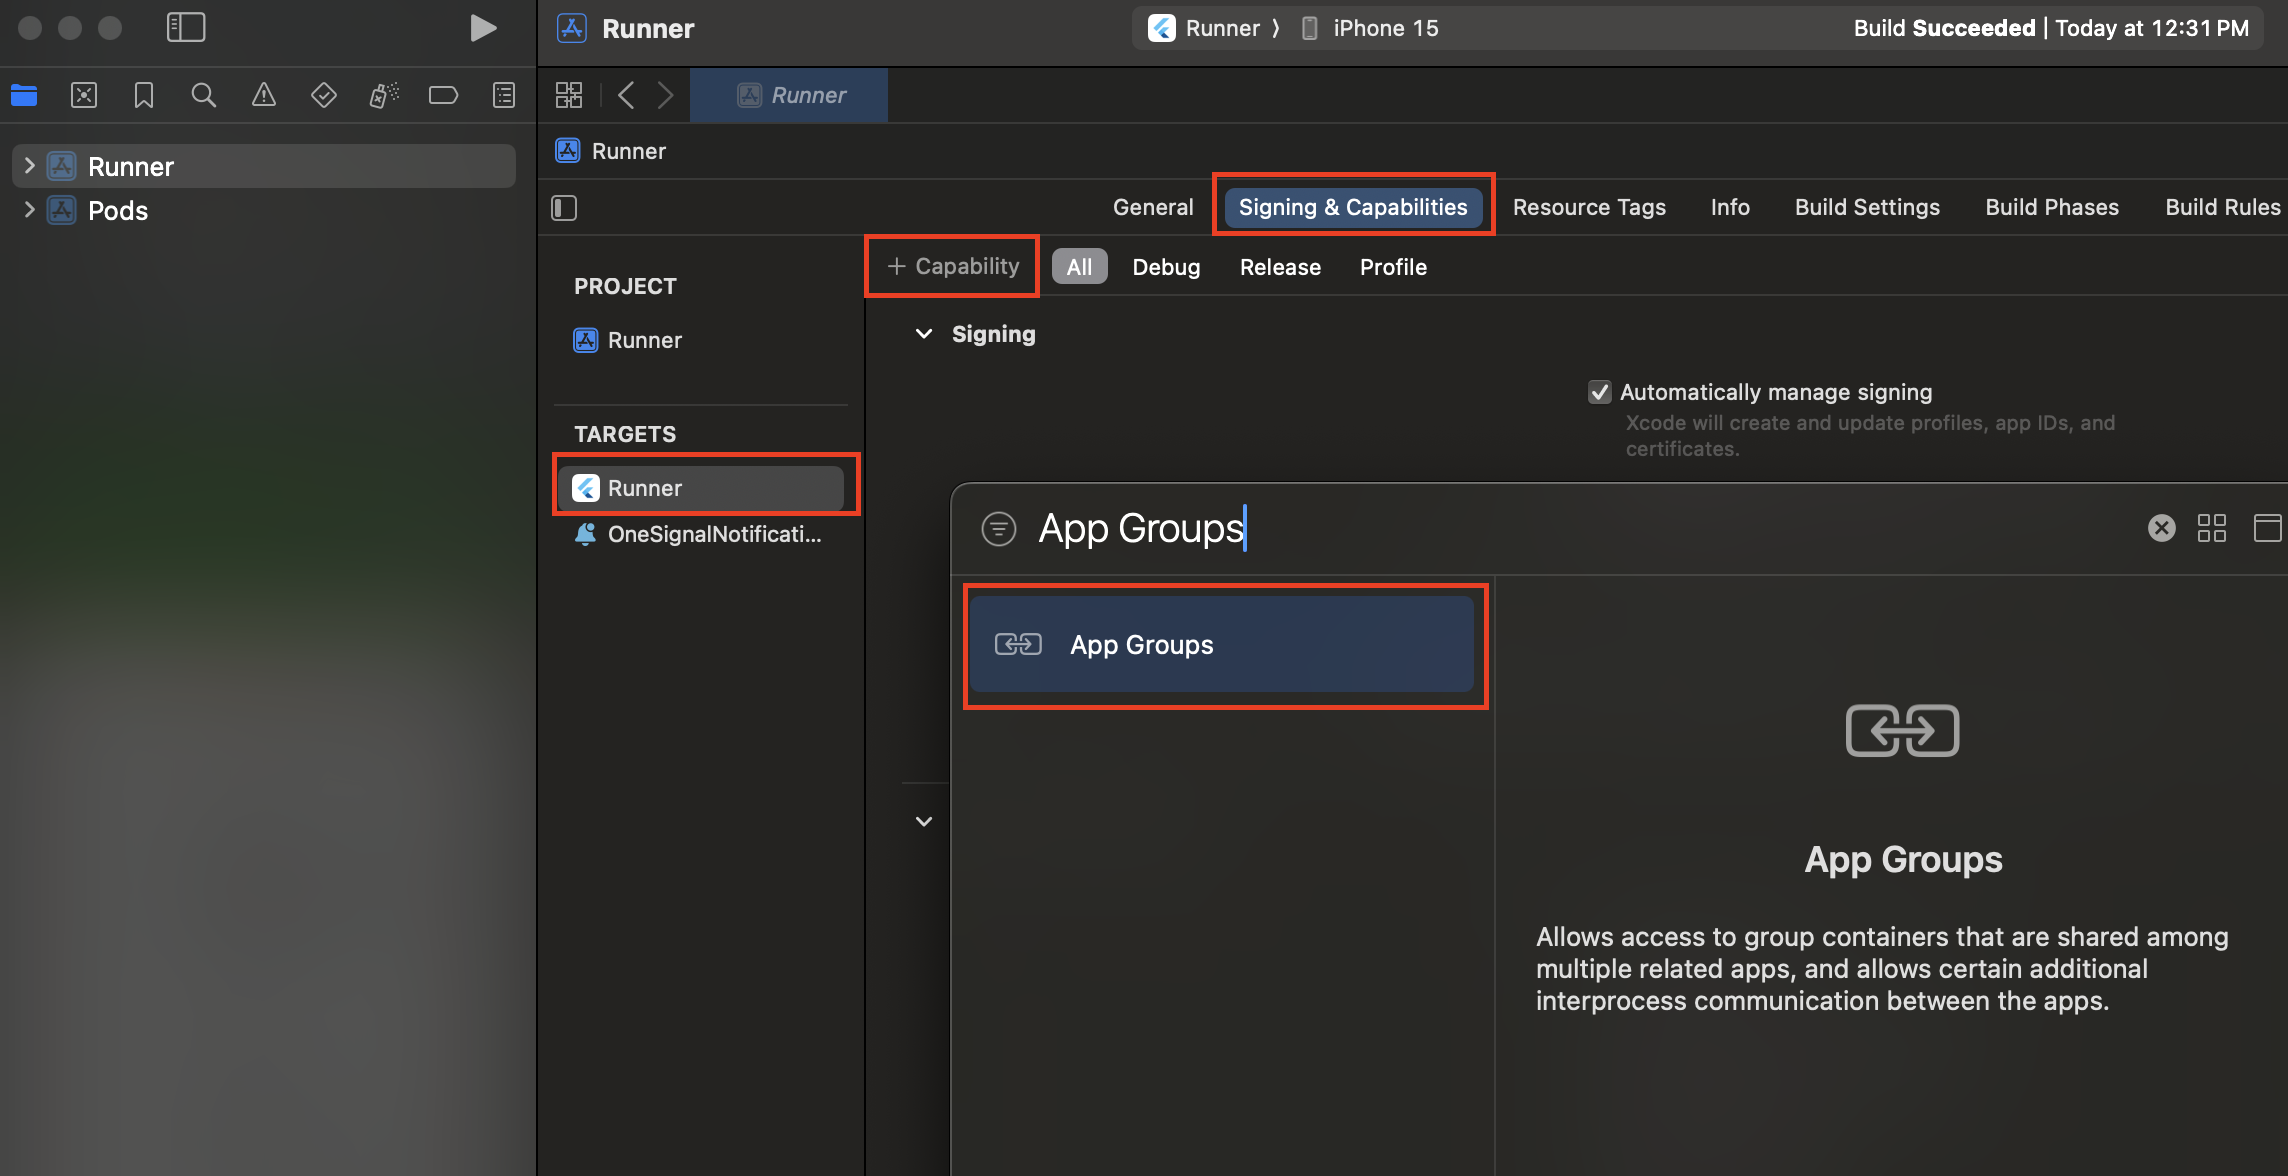
group.YOUR_BUNDLE_IDENTIFIER.onesignal olarak ayarlayın; burada YOUR_BUNDLE_IDENTIFIER, Ana Uygulamanızın “Bundle Identifier” ile aynıdır.
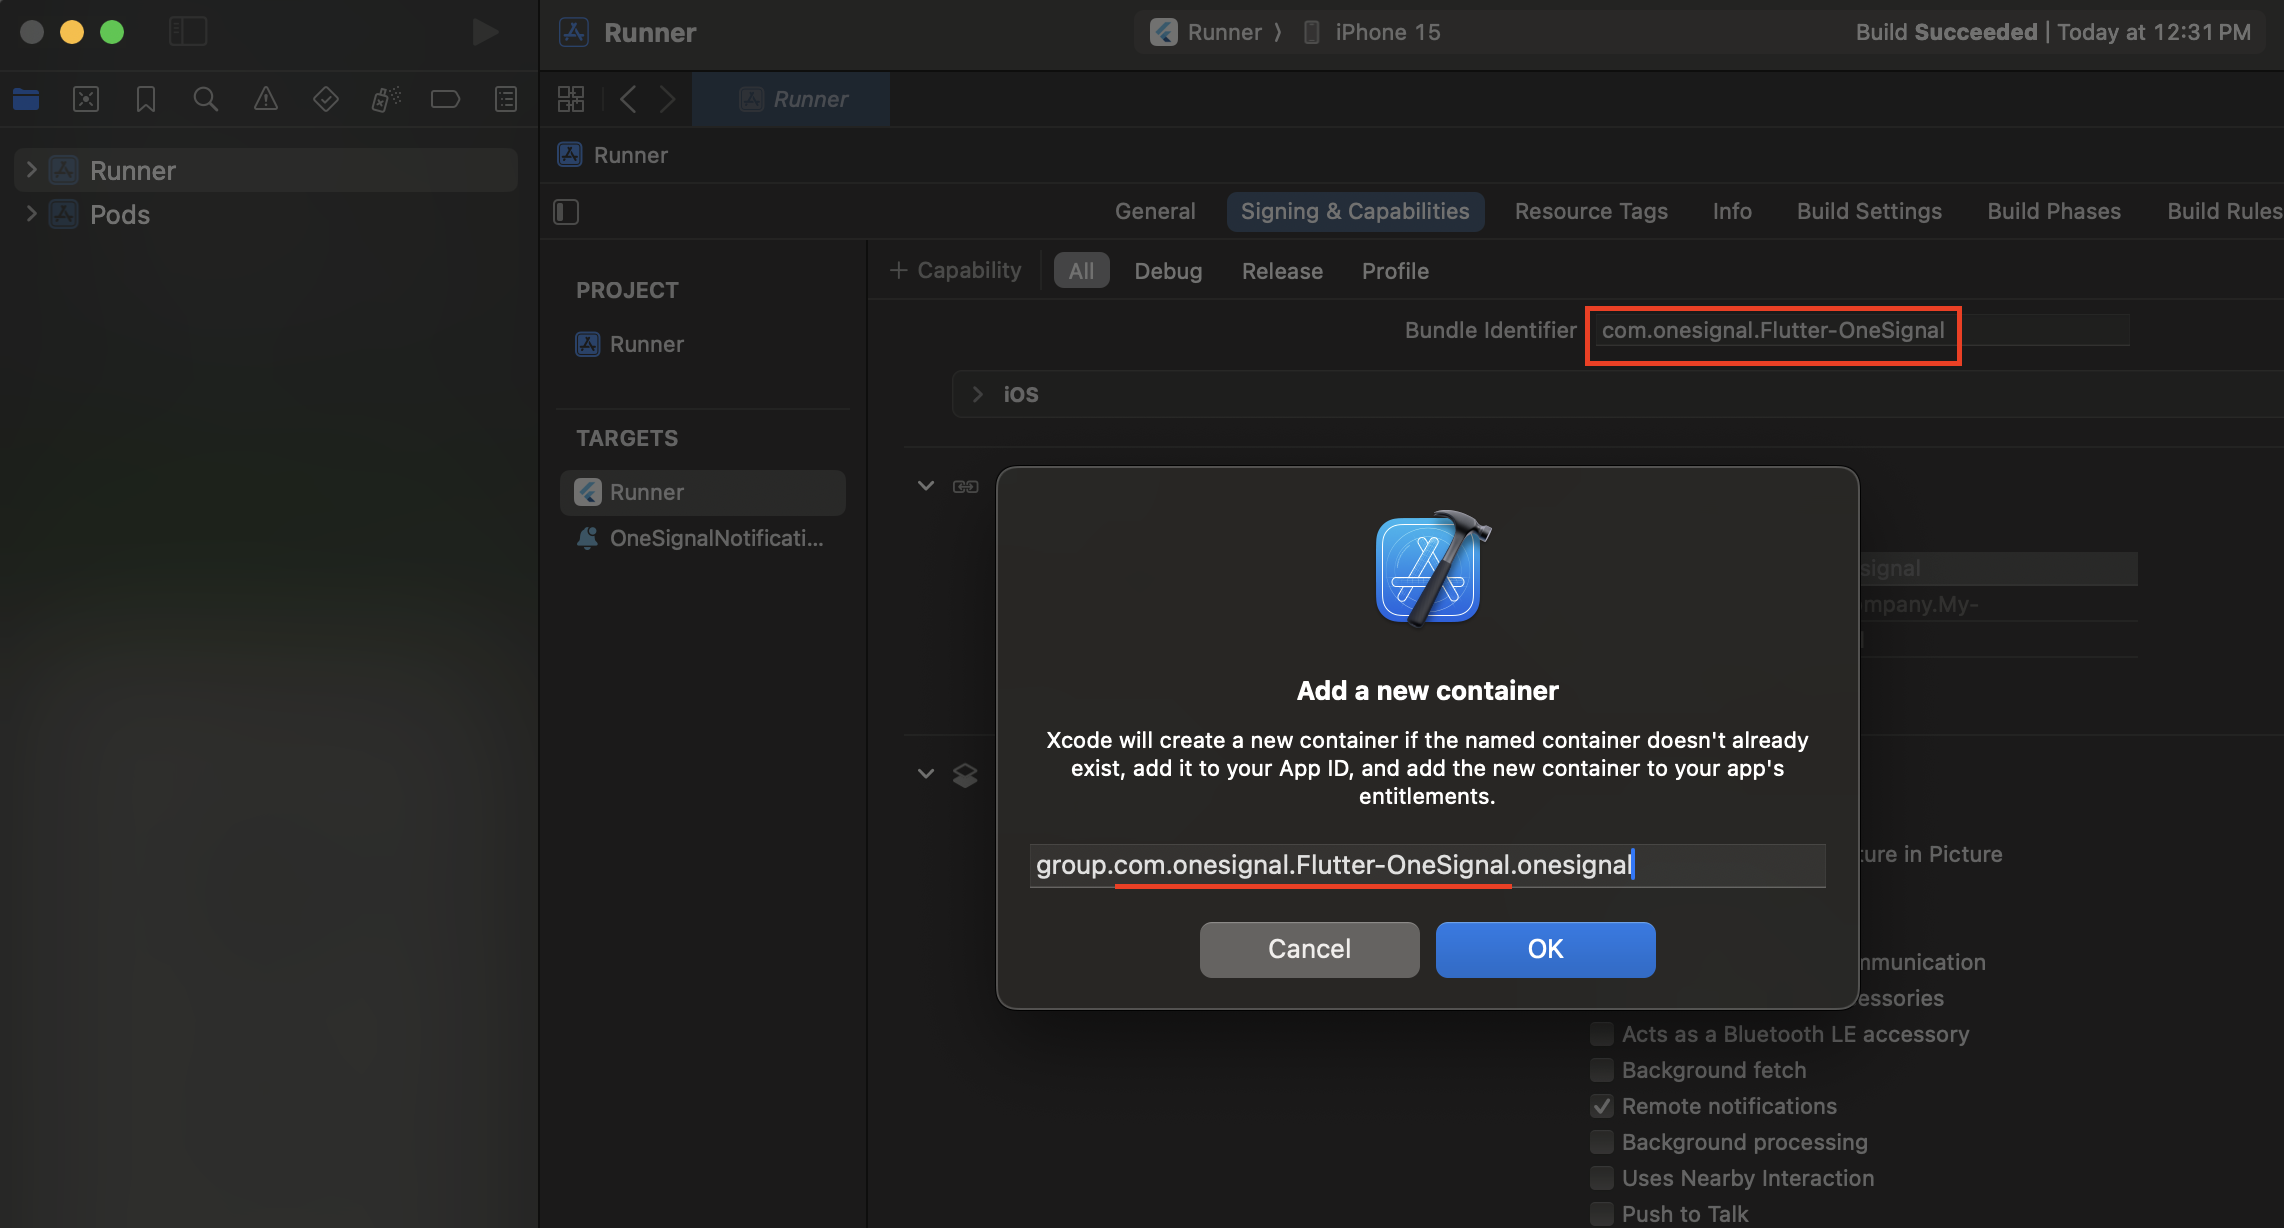
group.YOUR_BUNDLE_IDENTIFIER.onesignal olarak ayarlayın; burada YOUR_BUNDLE_IDENTIFIER, Ana Uygulamanızın “Bundle Identifier” ile aynıdır.
OneSignalNotificationServiceExtension EKLEMEYİN.
OneSignalNotificationServiceExtension eklemeyin
Özel App Group Adı kurmak için isteğe bağlı talimatlar
Özel App Group Adı kurmak için isteğe bağlı talimatlar
group.{your_bundle_id}.onesignal) kullanmak istemiyorsanız gereklidir.Info.plist dosyanızı açın ve String türü olarak yeni bir OneSignal_app_groups_key ekleyin.Son adımda kontrol ettiğiniz grup adını değeri olarak girin.OneSignalNotificationServiceExtension klasörü altındaki Info.plist için de aynısını yaptığınızdan emin olun.OneSignalNotificationServiceExtension’a OneSignal SDK Ekleme
ios/Podfile’ınızı şunları içerecek şekilde güncelleyin:
Podfile’ınızın en üstünde platform :ios, '11.0' olduğundan emin olun. - Veya uygulamanız gerektiriyorsa daha yeni bir iOS sürümü.
ios dizinine cd yapın ve pod install komutunu çalıştırın.
Aşağıdaki hatayı görürseniz, podfile’ınızın en üstüne use_frameworks! ekleyin ve tekrar deneyin.
OneSignalNotificationServiceExtension Kodu
Xcode proje gezgininde, OneSignalNotificationServiceExtension klasörünü seçin veNotificationService.m veya NotificationService.swift dosyasını açın.
Tüm dosya içeriğini aşağıdaki kodla değiştirin.
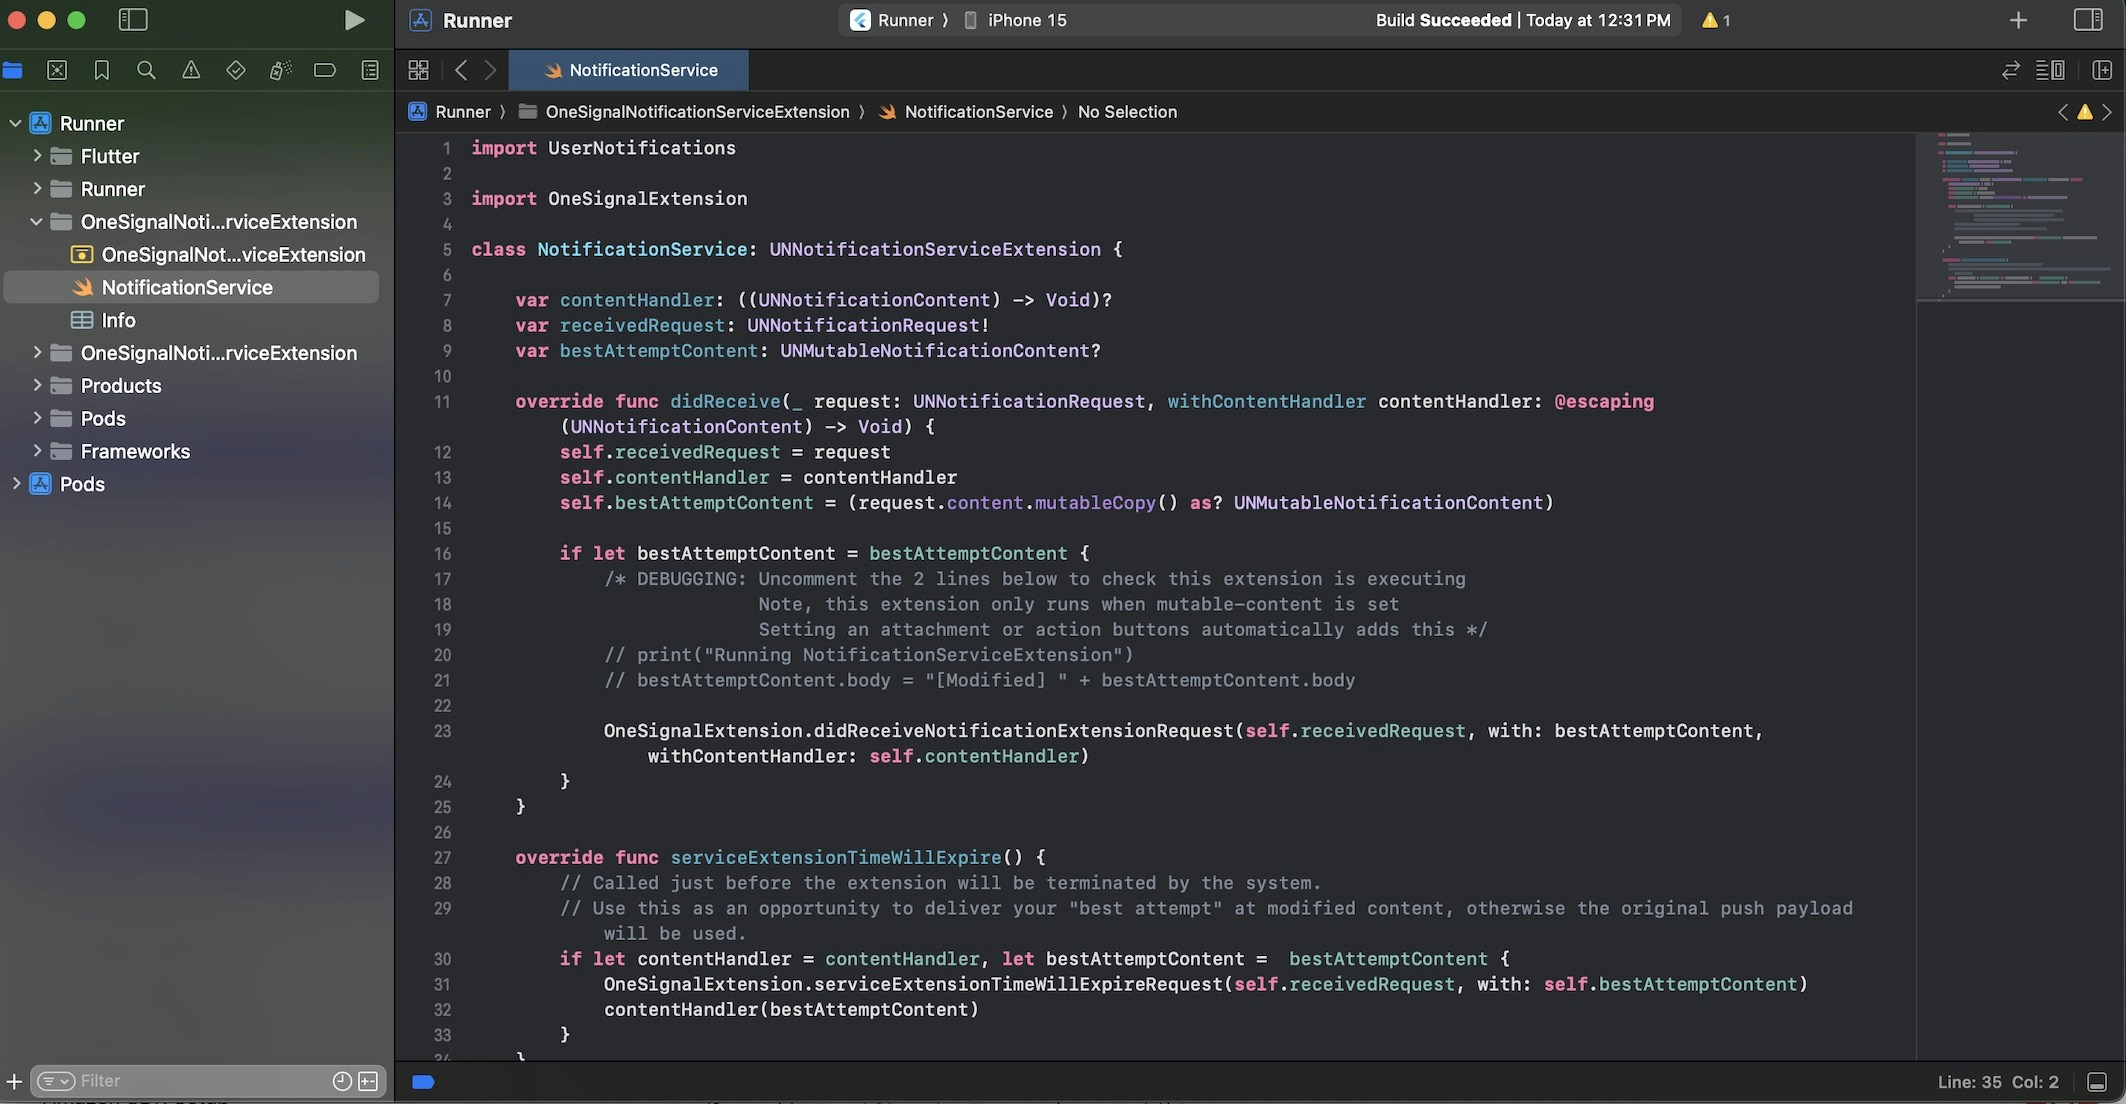
NotificationService.swift dosyasının örneği.
Testing the OneSignal SDK integration
This guide helps you verify that your OneSignal SDK integration is working correctly by testing push notifications, subscription registration, and in-app messaging.Check mobile subscriptions
Launch your app on a test device.
requestPermission method during initialization.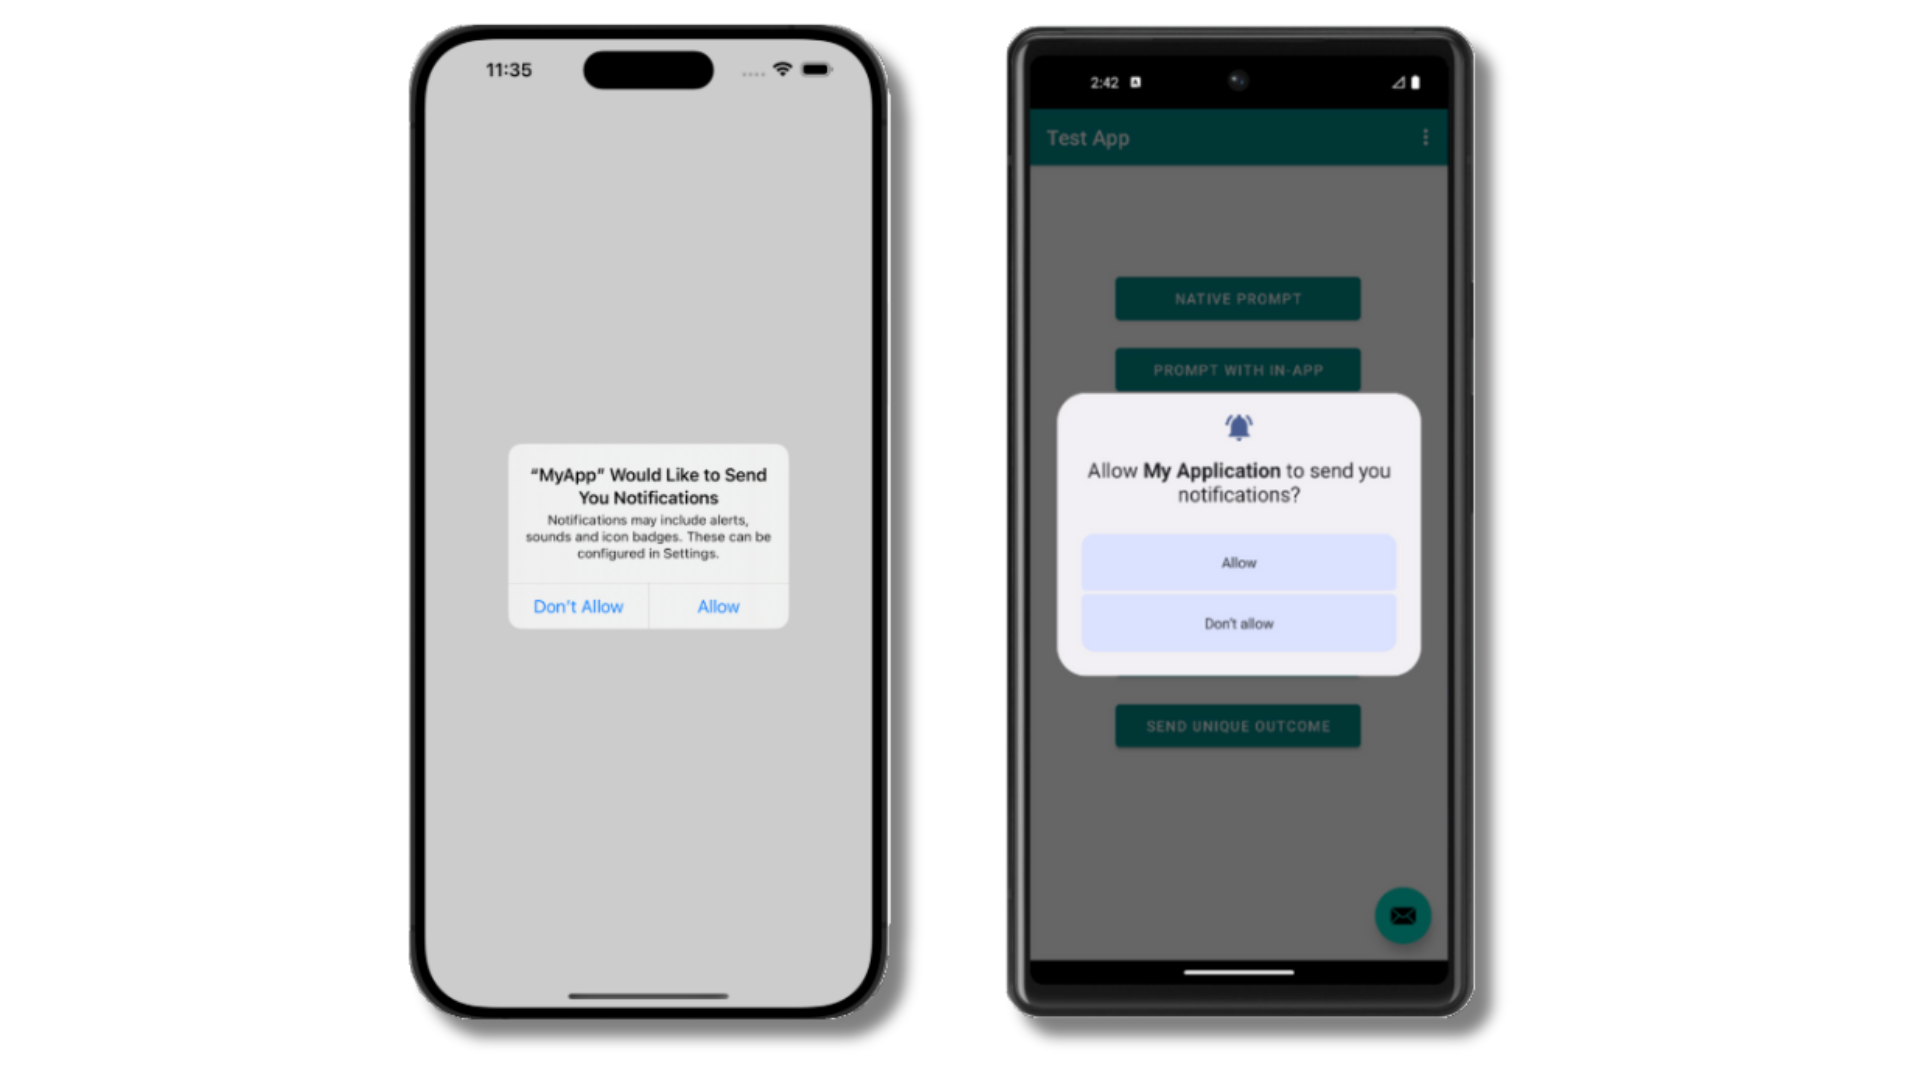
iOS and Android push permission prompts
Check your OneSignal dashboard
- Go to Audience > Subscriptions.
- You should see a new entry with the status “Never Subscribed”.
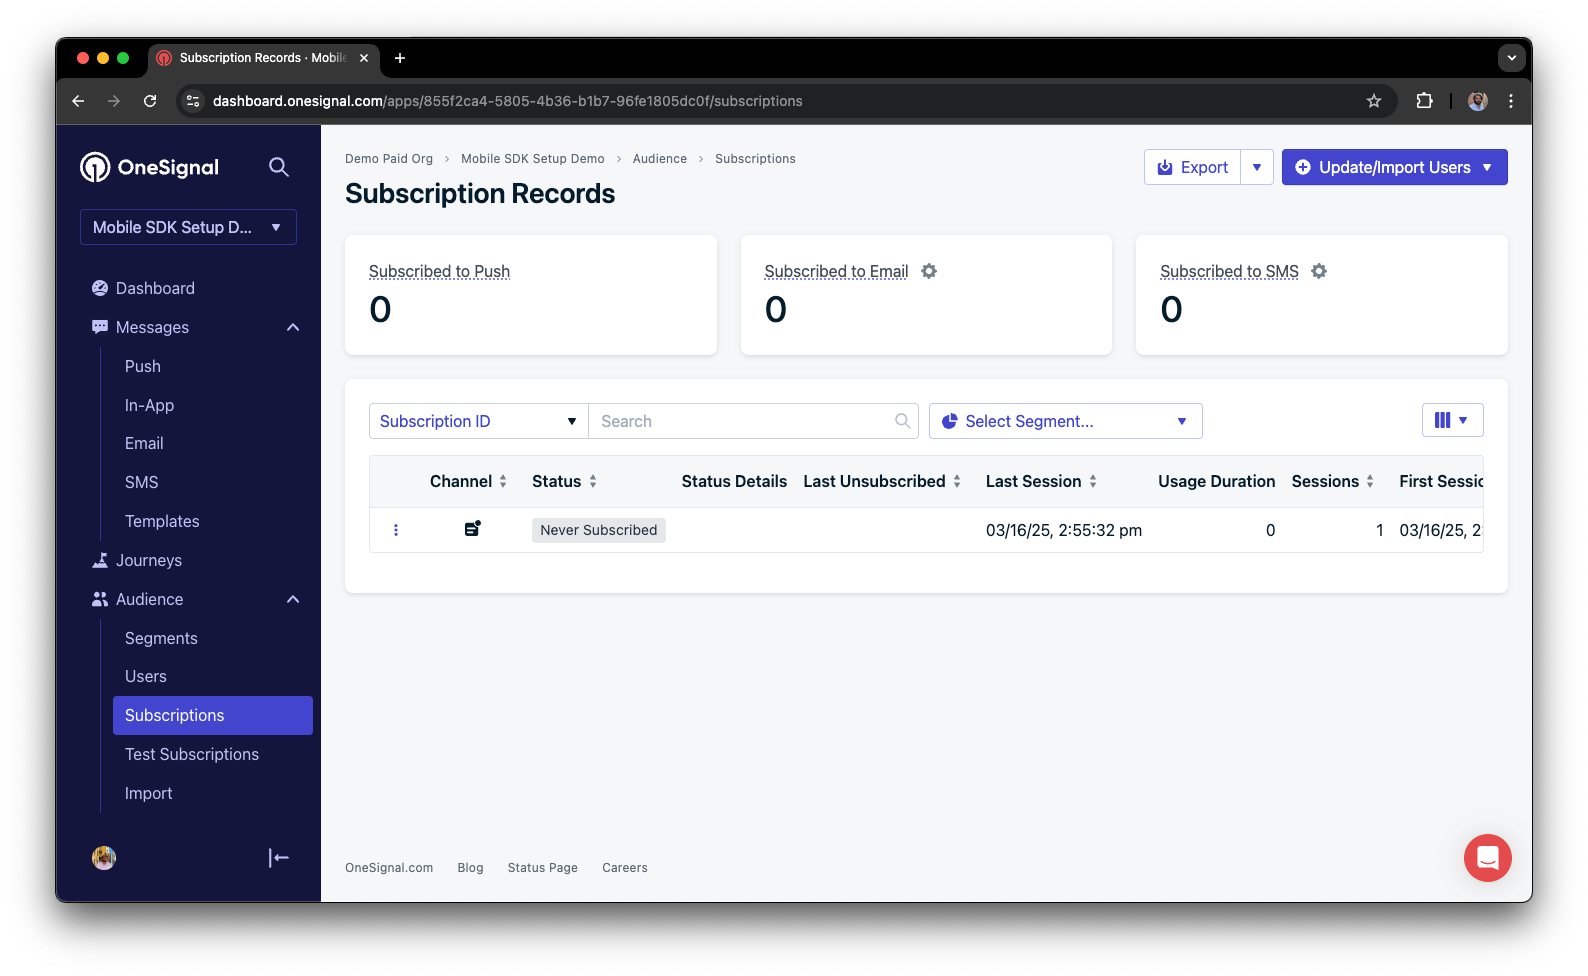
Dashboard showing subscription with 'Never Subscribed' status
Return to the app and tap Allow on the prompt.
Refresh the OneSignal dashboard Subscription's page.
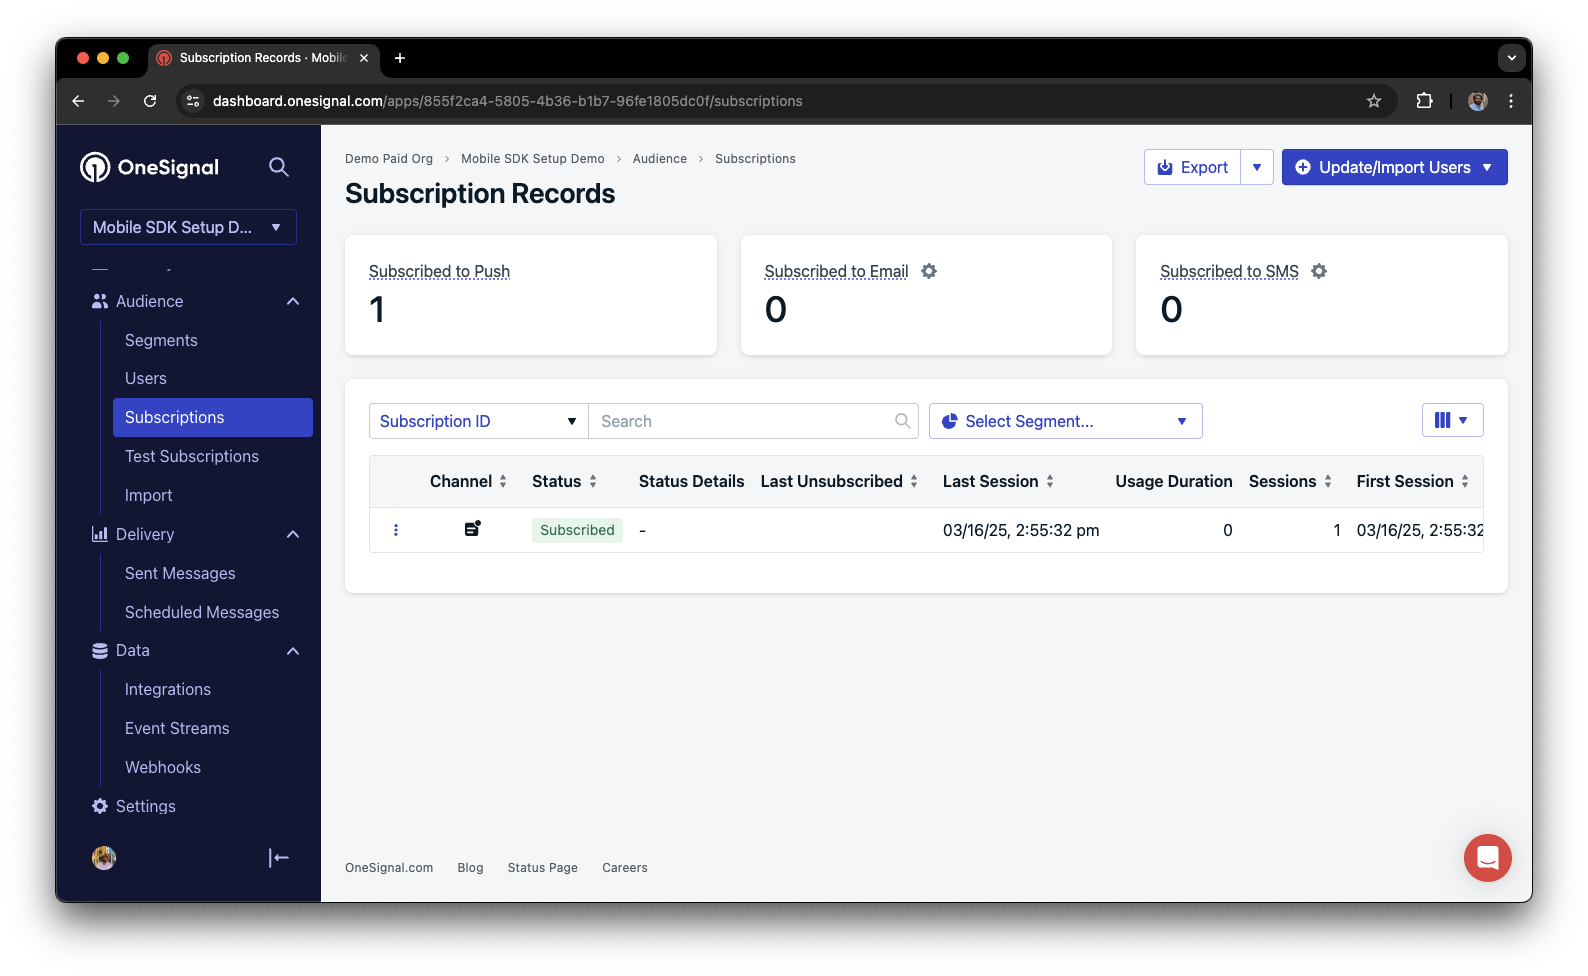
Dashboard showing subscription with 'Subscribed' status
Set up test users
test users are helpful for testing a push notification before sending a message.Add to Test Users.

Adding a device to Test Users
Name your subscription.
Create a test users segment.
Name the segment.
Test Users (the name is important because it will be used later).Add the Test Users filter and click Create Segment.

Creating a 'Test Users' segment with the Test Users filter
Send test push via API
Get your App API Key and App ID.
Update the provided code.
YOUR_APP_API_KEY and YOUR_APP_ID in the code below with your actual keys. This code uses the Test Users segment we created earlier.Run the code.
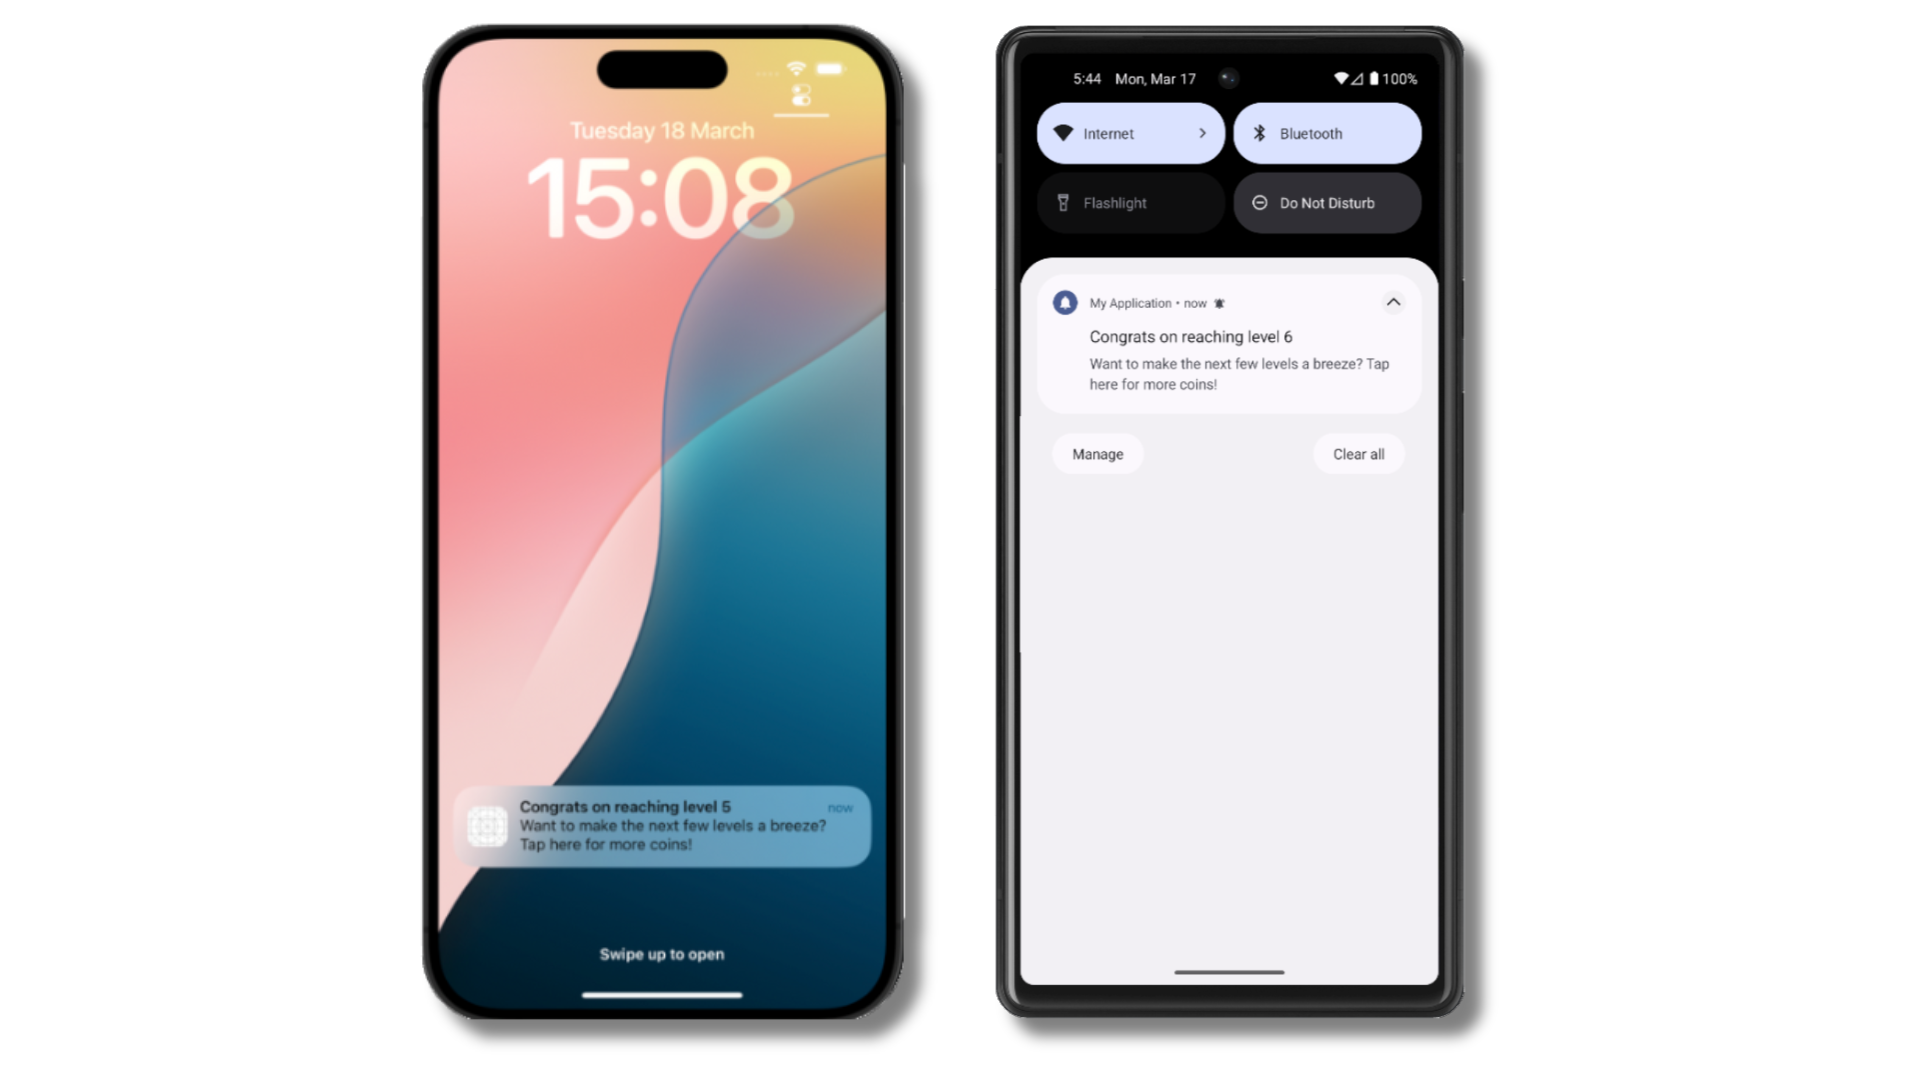
Check images and confirmed receipt.
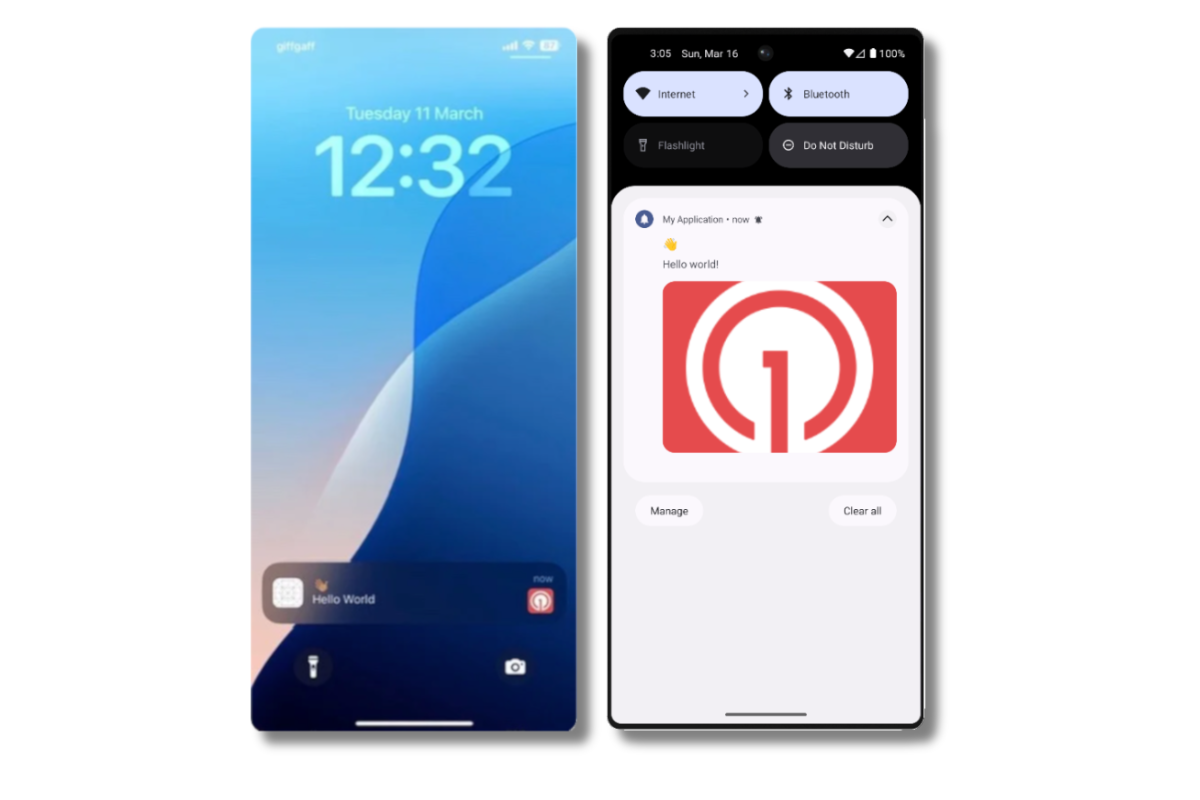
Push notification with image on iOS and Android
Check for confirmed receipt.
Send an in-app message
In-app messages let you communicate with users while they are using your app.Close or background your app on the device.
Create an in-app message.
- In your OneSignal dashboard, navigate to Messages > In-App > New In-App.
- Find and select the Welcome message.
- Set your Audience as the Test Users segment we used previously.
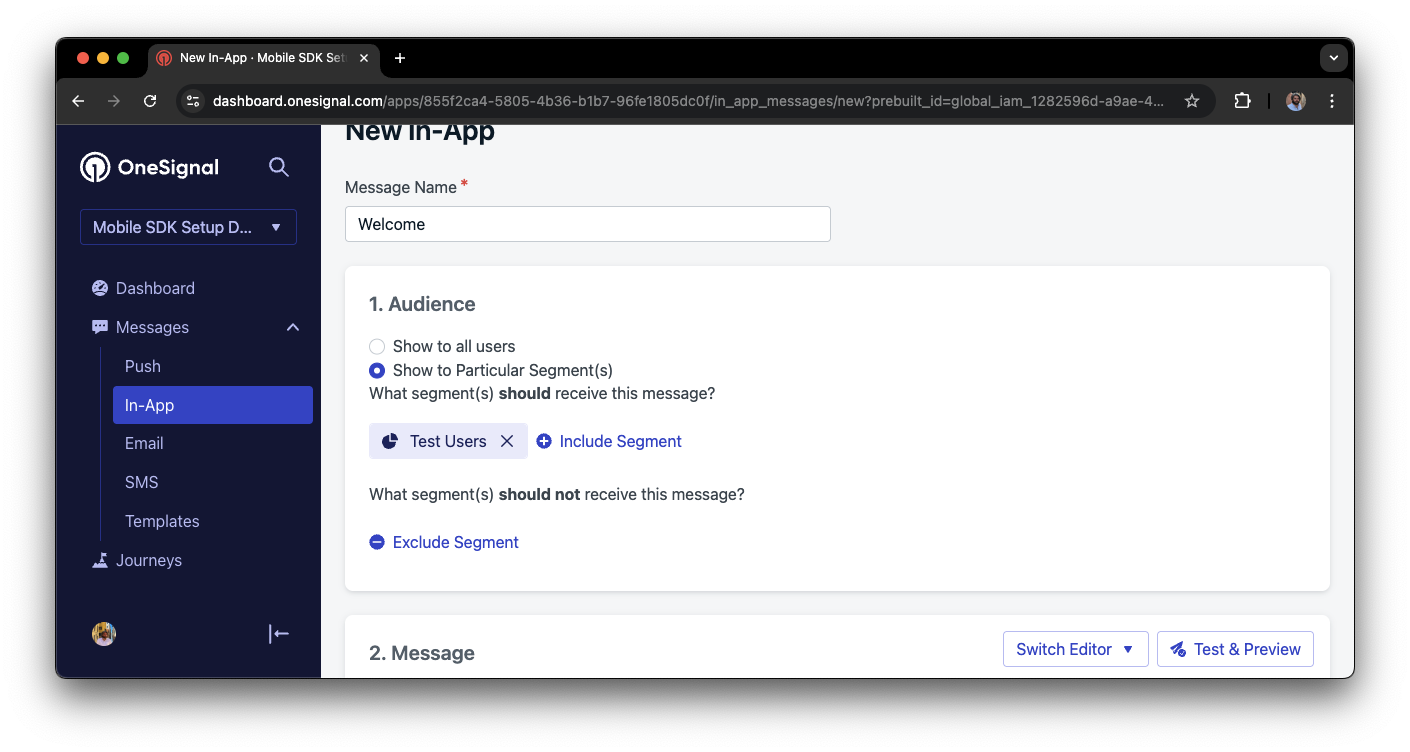
Targeting the 'Test Users' segment with an in-app message
Customize the message content if desired.
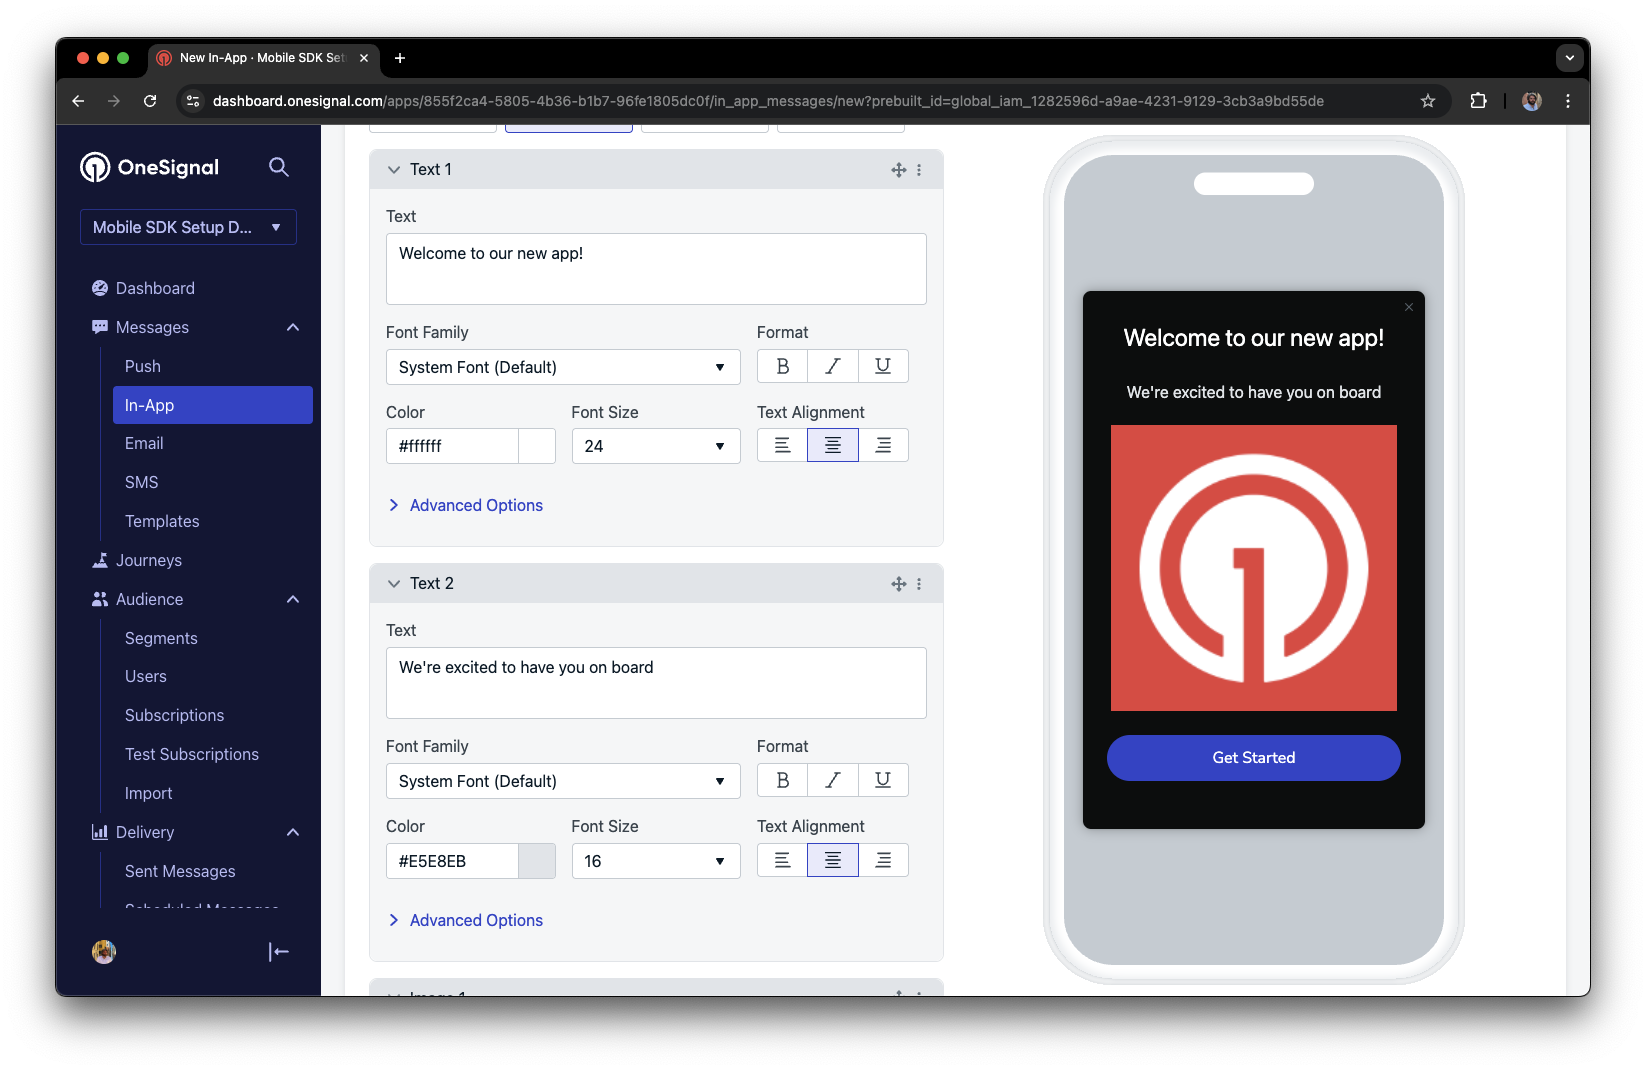
Example customization of in-app Welcome message
Set Trigger to 'On app open'.
Schedule frequency.
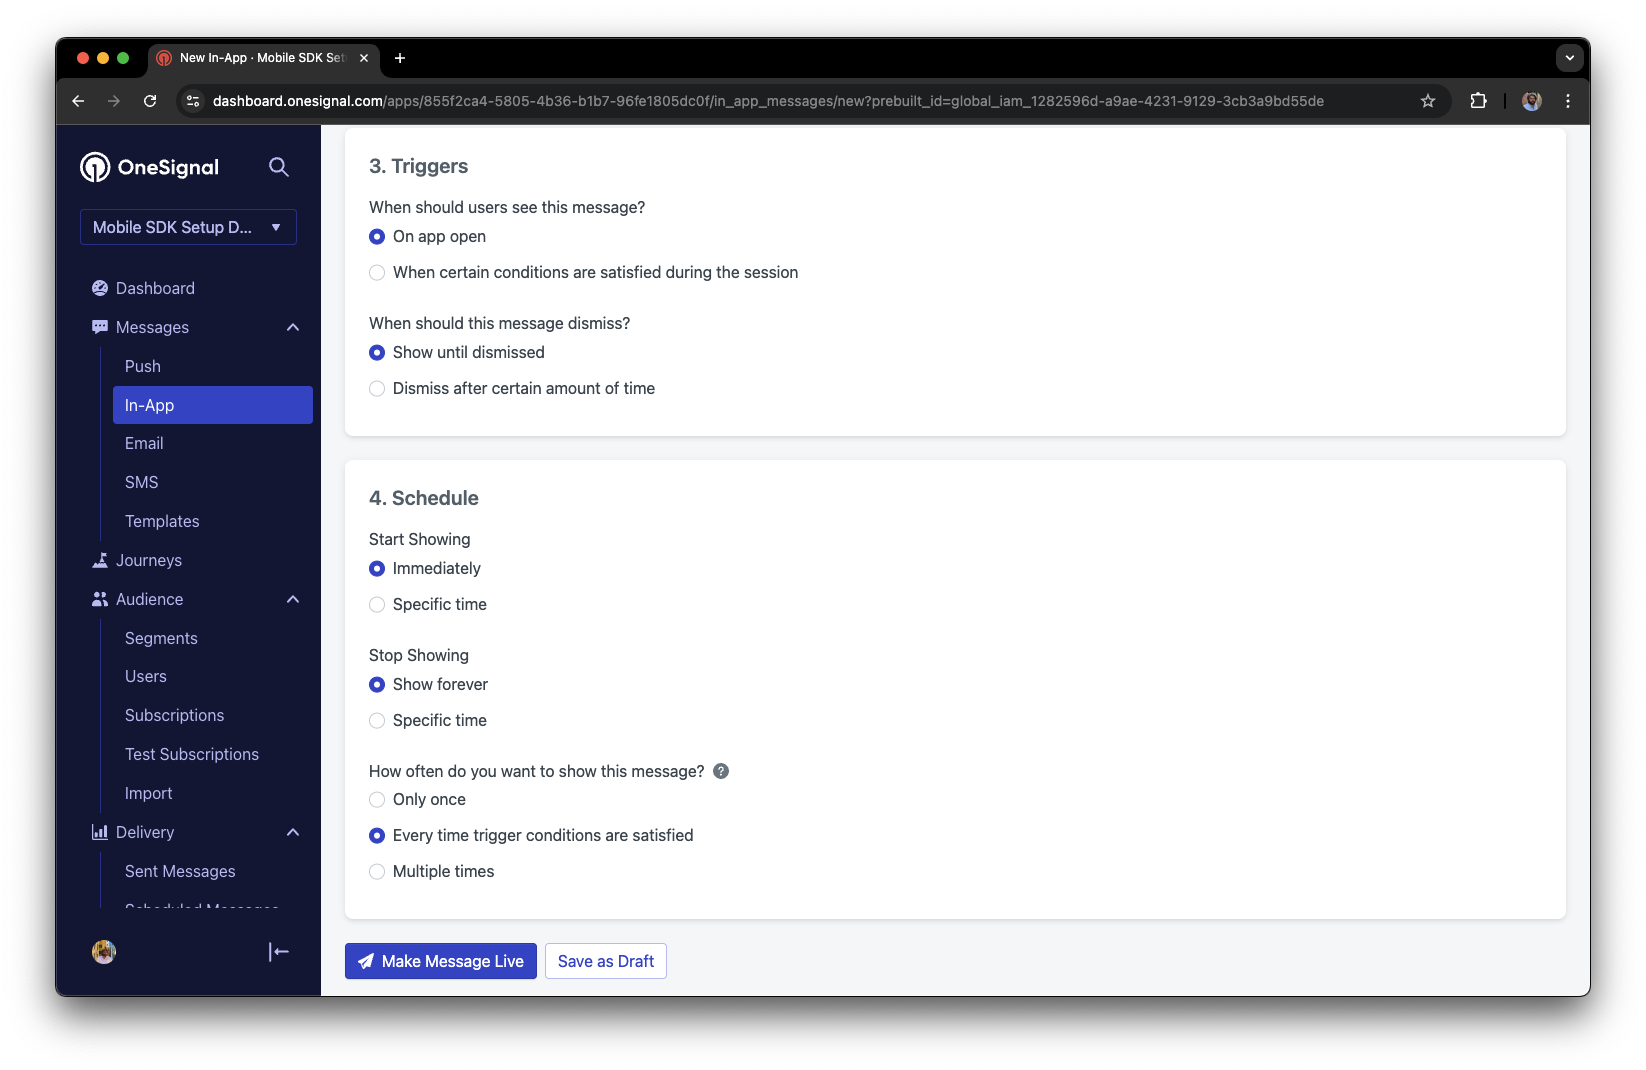
In-app message scheduling options
Make message live.
Open the app and see the message.
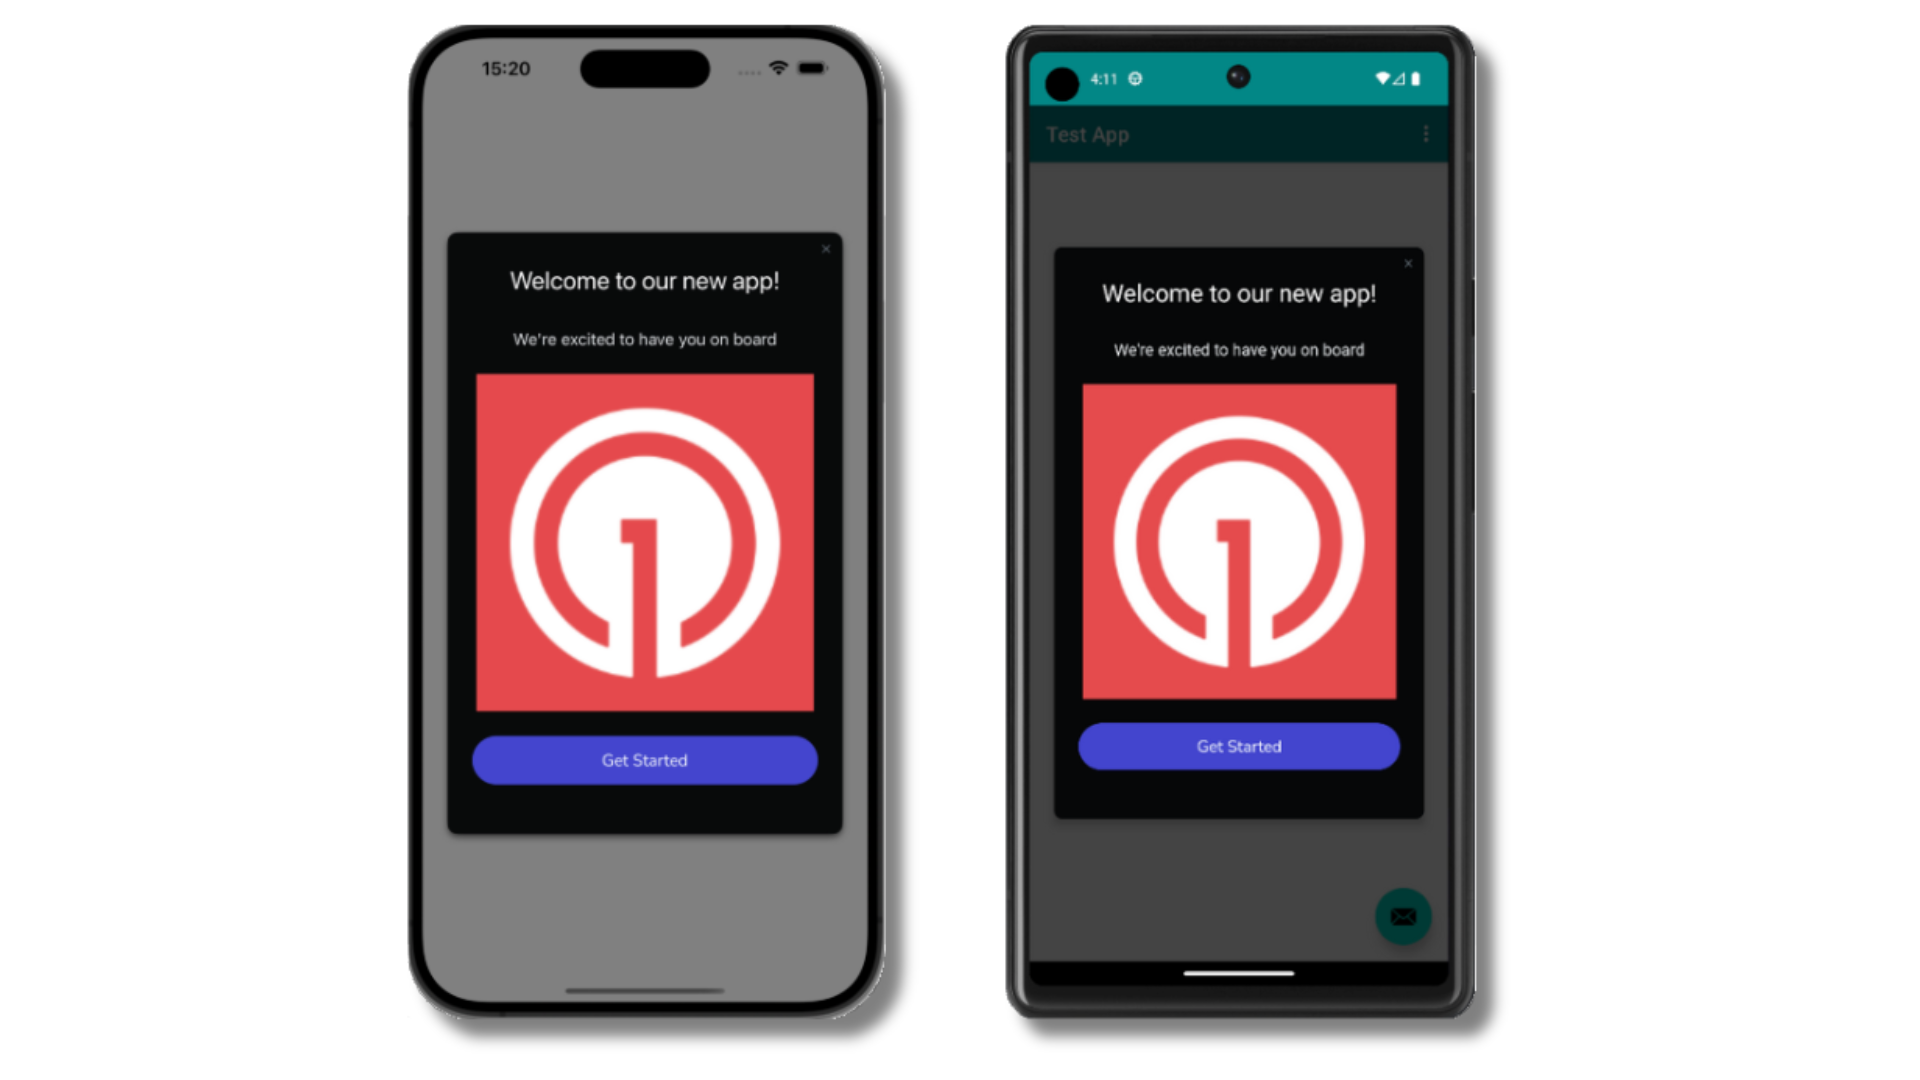
Welcome in-app message shown on devices
- Gathering Subscriptions, setting Test Users, and creating Segments.
- Sending Push with images and Confirmed receipt using Segments and our Create message API.
- Sending In-app messages.
User identification
Previously, we demonstrated how to create mobile Subscriptions. Now we’ll expand to identifying Users across all their subscriptions (including push, email, and SMS) using the OneSignal SDK. We’ll cover External IDs, tags, multi-channel subscriptions, privacy, and event tracking to help you unify and engage users across platforms.Assign External ID
Use an External ID to identify users consistently across devices, email addresses, and phone numbers using your backend’s user identifier. This ensures your messaging stays unified across channels and 3rd party systems (especially important for Integrations). Set the External ID with our SDK’slogin method each time they are identified by your app.
Add Tags
Tags are key-value pairs of string data you can use to store user properties (likeusername, role, or preferences) and events (like purchase_date, game_level, or user interactions). Tags power advanced Message Personalization and Segmentation allowing for more advanced use cases.
Set tags with our SDK addTag and addTags methods as events occur in your app.
In this example, the user reached level 6 identifiable by the tag called current_level set to a value of 6.
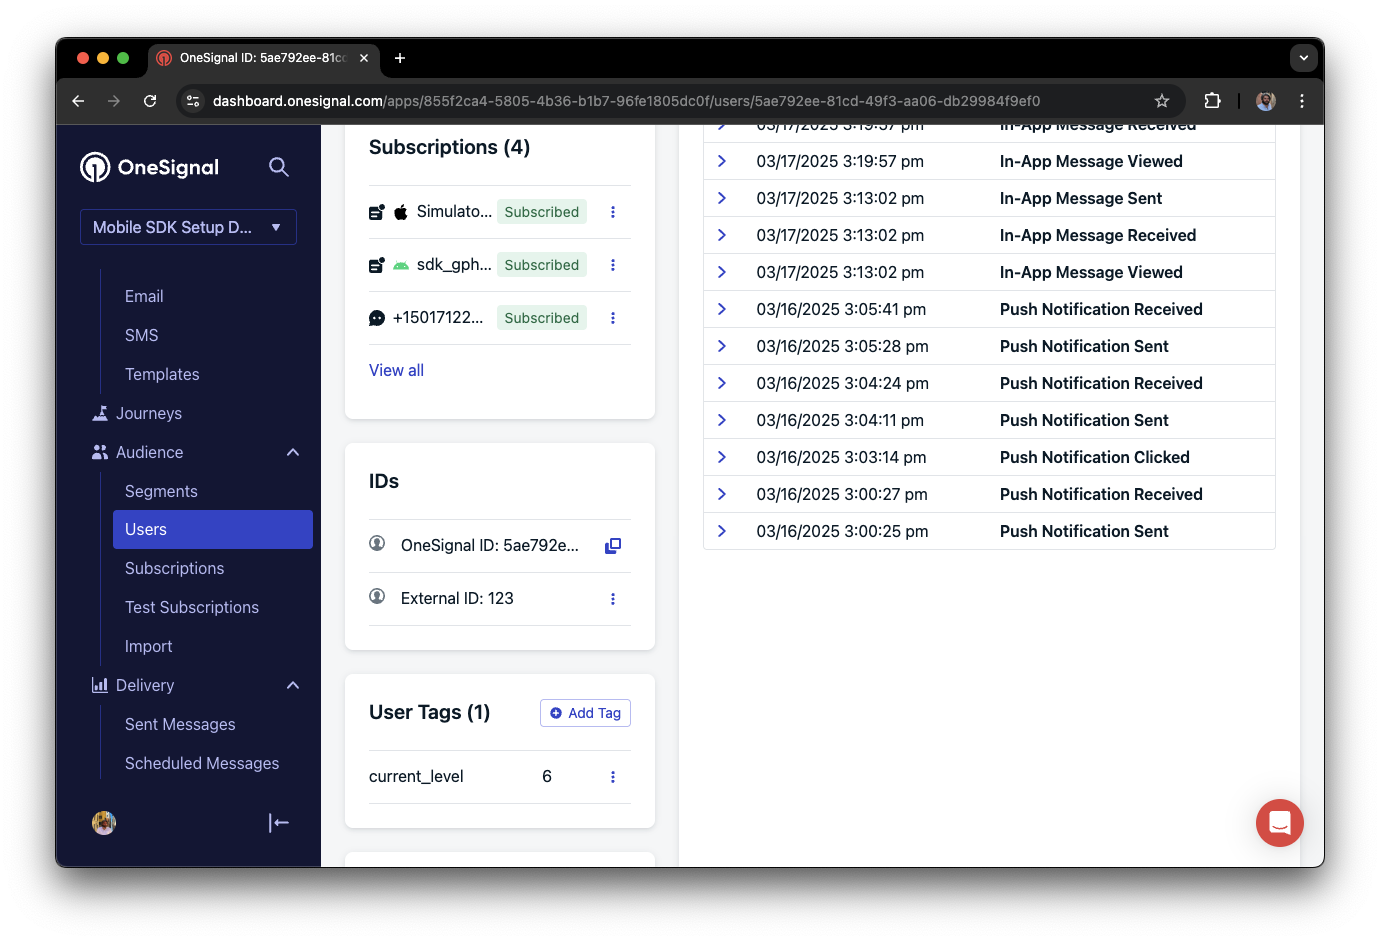
A user profile in OneSignal with a tag called "current_level" set to "6"
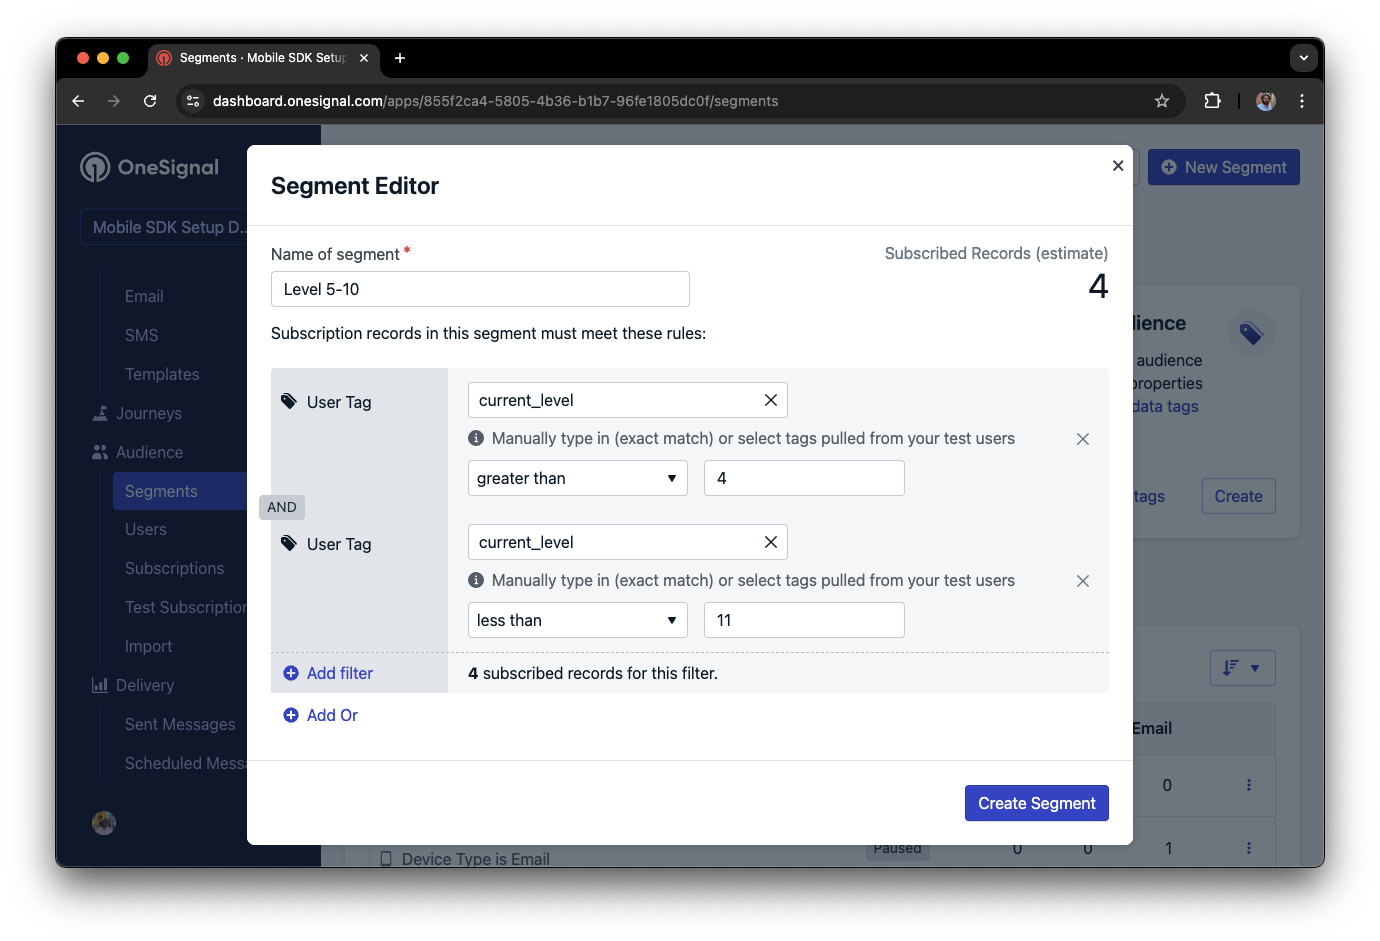
Segment editor showing a segment targeting users with a current_level value of greater than 4 and less than 10
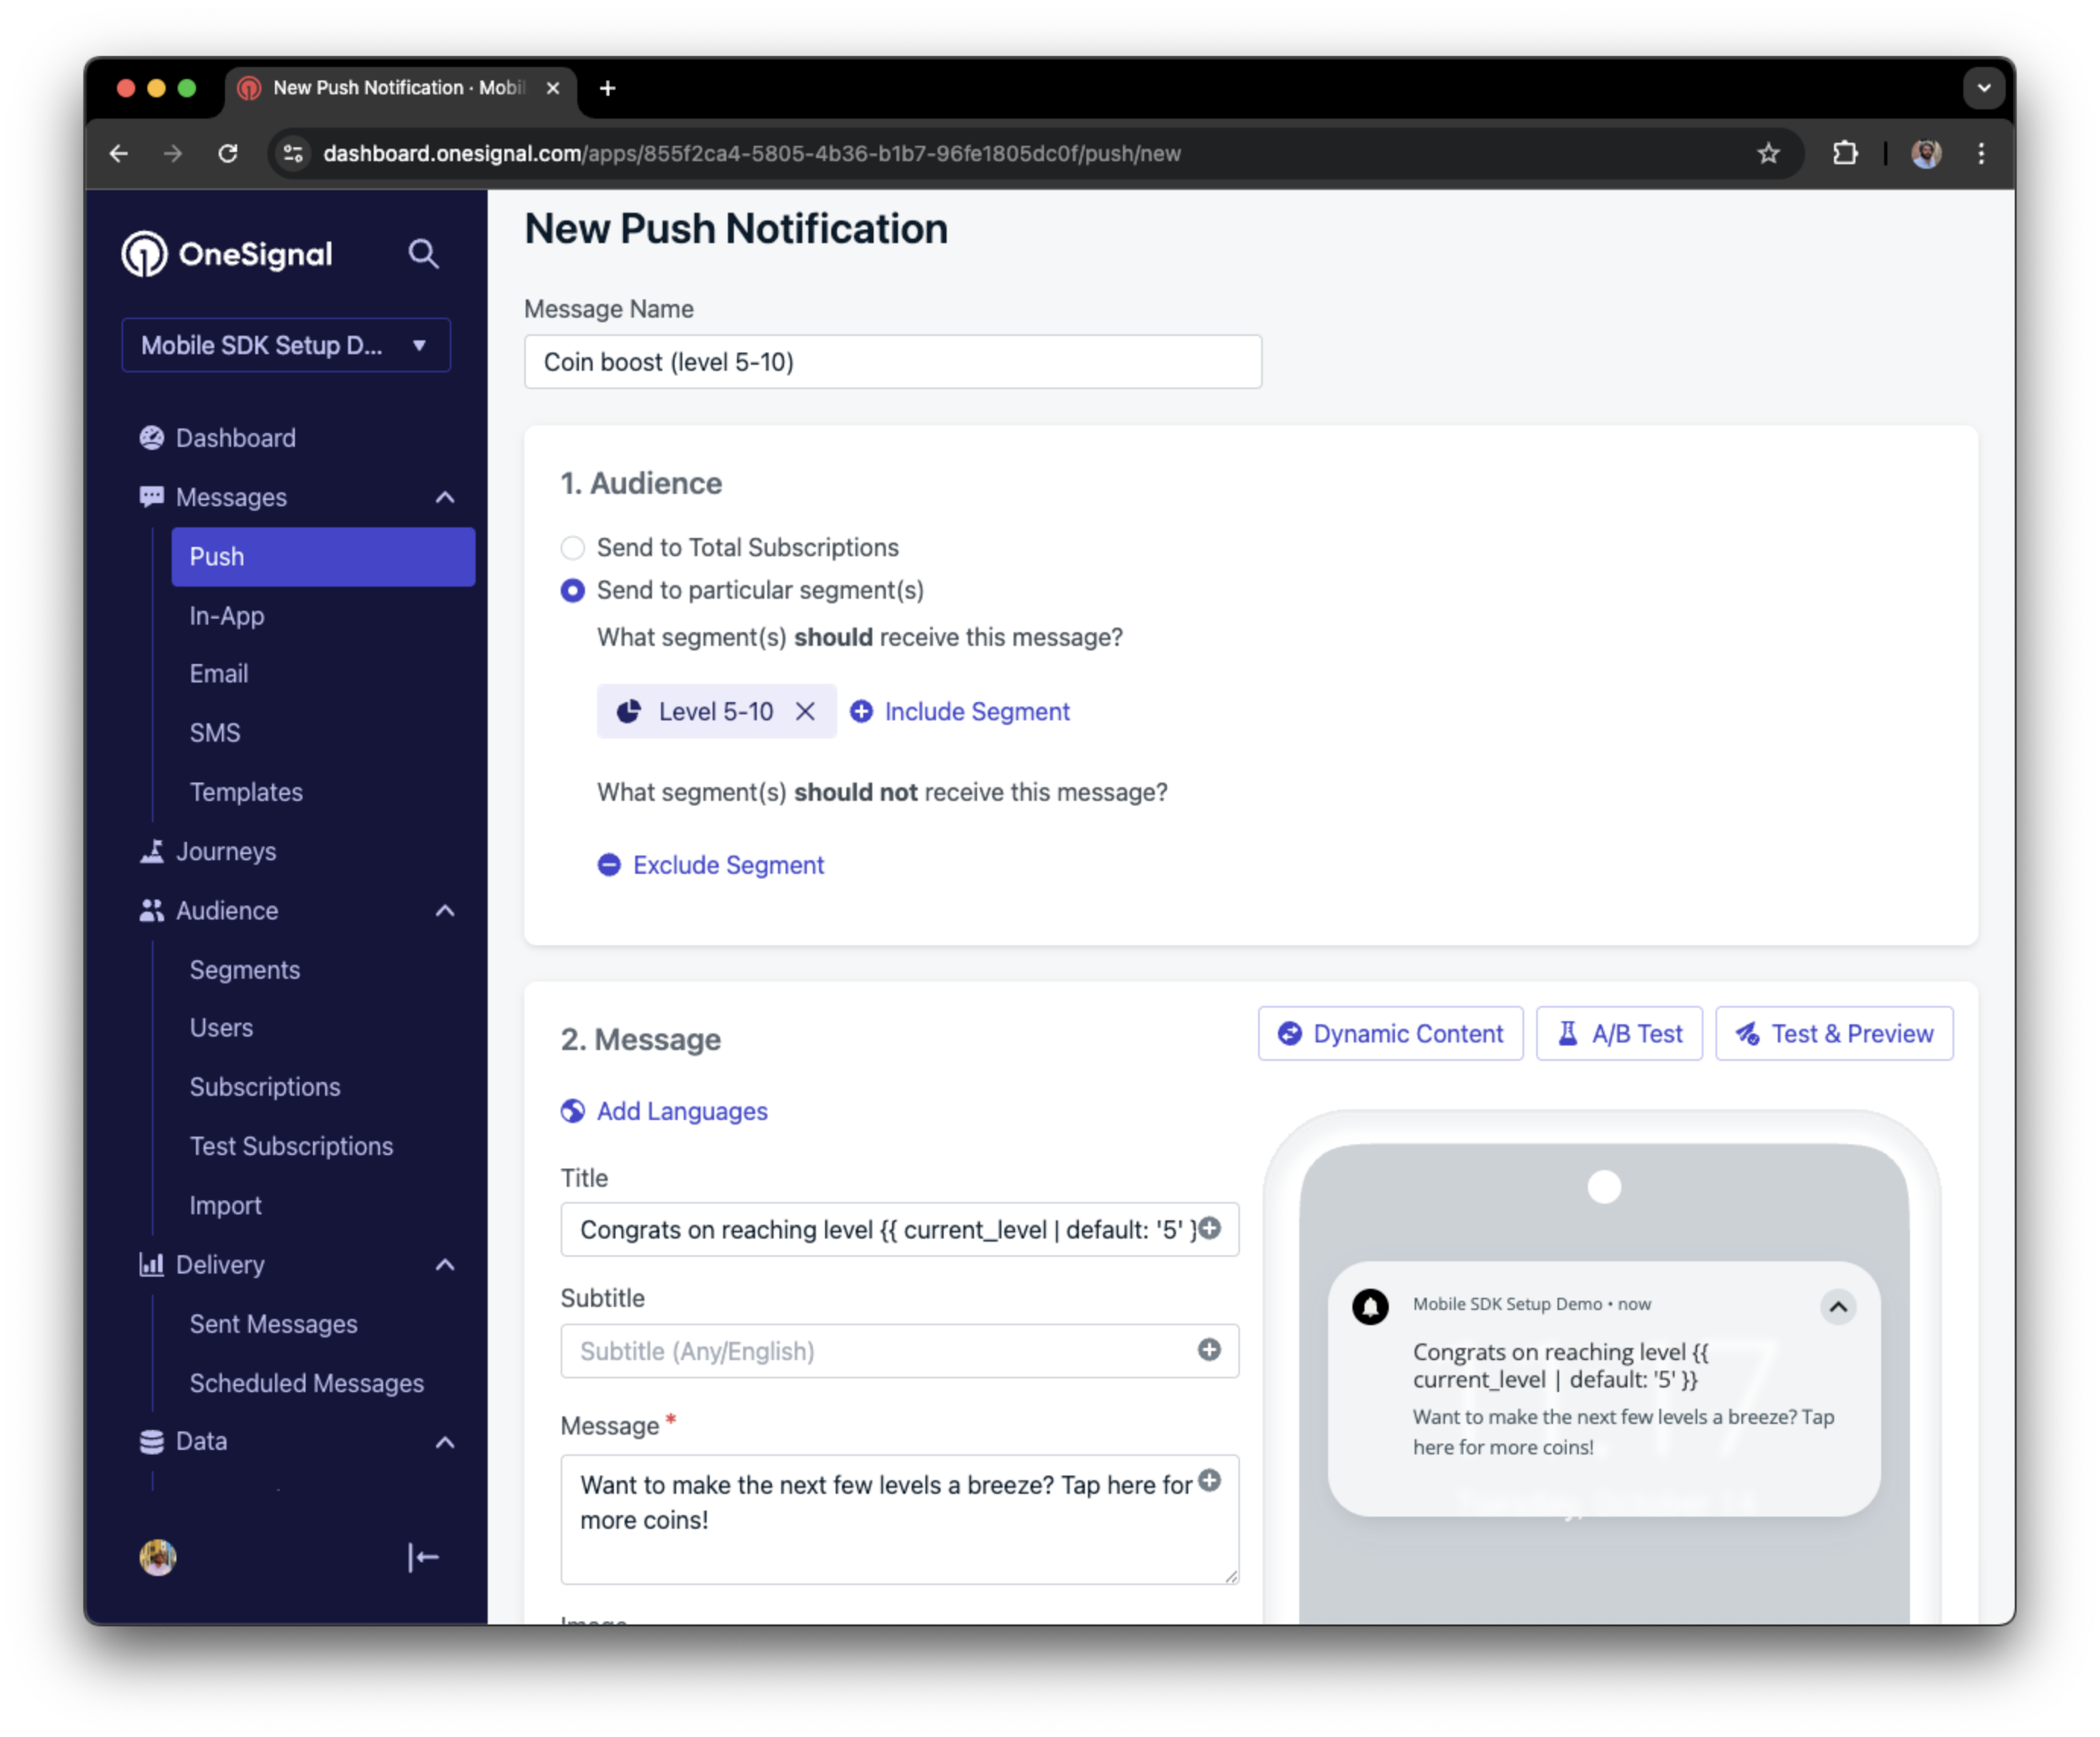
Screenshot showing a push notification targeting the Level 5-10 segment with a personalized message
The push notification is received on an iOS and Android device with the personalized content
Add email and/or SMS subscriptions
Earlier we saw how our SDK creates mobile subscriptions to send push and in-app messages. You can also reach users through emails and SMS channels by creating the corresponding subscriptions.- Use the
addEmailmethod to create email subscriptions. - Use the
addSmsmethod to create SMS subscriptions.
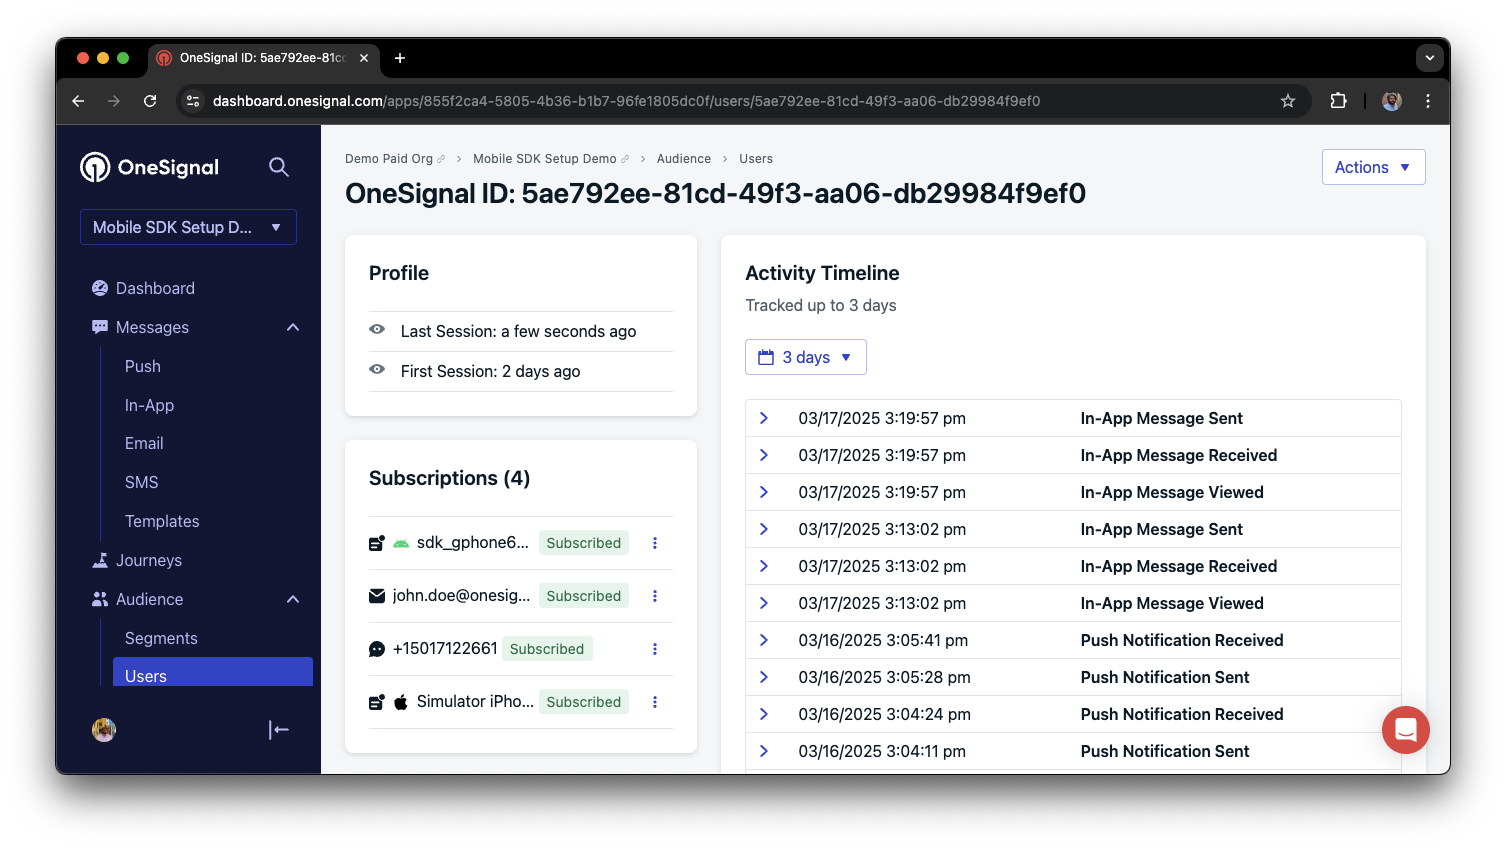
A user profile with push, email, and SMS subscriptions unified by External ID
- Obtain explicit consent before adding email or SMS subscriptions.
- Explain the benefits of each communication channel to users.
- Provide channel preferences so users can select which channels they prefer.
Privacy & user consent
To control when OneSignal collects user data, use the SDK’s consent gating methods:setConsentRequired(true): Prevents data collection until consent is given.setConsentGiven(true): Enables data collection once consent is granted.
Prompt for push permissions
Instead of callingrequestPermission() immediately on app open, take a more strategic approach. Use an in-app message to explain the value of push notifications before requesting permission.
For best practices and implementation details, see our Prompt for push permissions guide.
Listen to push, user, and in-app events
Use SDK listeners to react to user actions and state changes. The SDK provides several event listeners for you to hook into. See our SDK reference guide for more details.Push notification events
addClickListener(): Detect when a notification is tapped. Helpful for Deep Linking.addForegroundLifecycleListener(): Control how notifications behave in foreground.
User state changes
addObserver()for user state: Detect when the External ID is set.addPermissionObserver(): Track the user’s specific interaction with the native push permission prompt.addObserver()for push subscription: Track when the push subscription status changes.
In-app message events
addClickListener(): Handle in-app click actions. Ideal for deep linking or tracking events.addLifecycleListener(): Track full lifecycle of in-app messages (shown, clicked, dismissed, etc.).
Advanced setup & capabilities
Explore more capabilities to enhance your integration:- 🔁 Migrating to OneSignal from another service
- 🌍 Location tracking
- 🔗 Deep Linking
- 🔌 Integrations
- 🧩 Mobile Service Extensions
- 🛎️ Action buttons
- 🌐 Multi-language messaging
- 🛡️ Identity Verification
- 📊 Custom Outcomes
- 📲 Live Activities