Set up Firebase for Android: upload an FCM Service Account private key to OneSignal, and add google-services.json plus the Google Services Gradle plugin to your app.
To send push notifications to Android devices with Google Play services, you need two things from the same Firebase project:
An FCM Service Account private key, uploaded to OneSignal. This authorizes OneSignal’s servers to send to your Firebase project. Required.
A google-services.json file, added to your app. This is Firebase client configuration that ships inside your app. Recommended for all new integrations, and required for Firebase Installation ID registration.
These instructions do not apply to:
Web Push. Android devices can subscribe to your website or PWA without an FCM Service Account. See Web push setup.
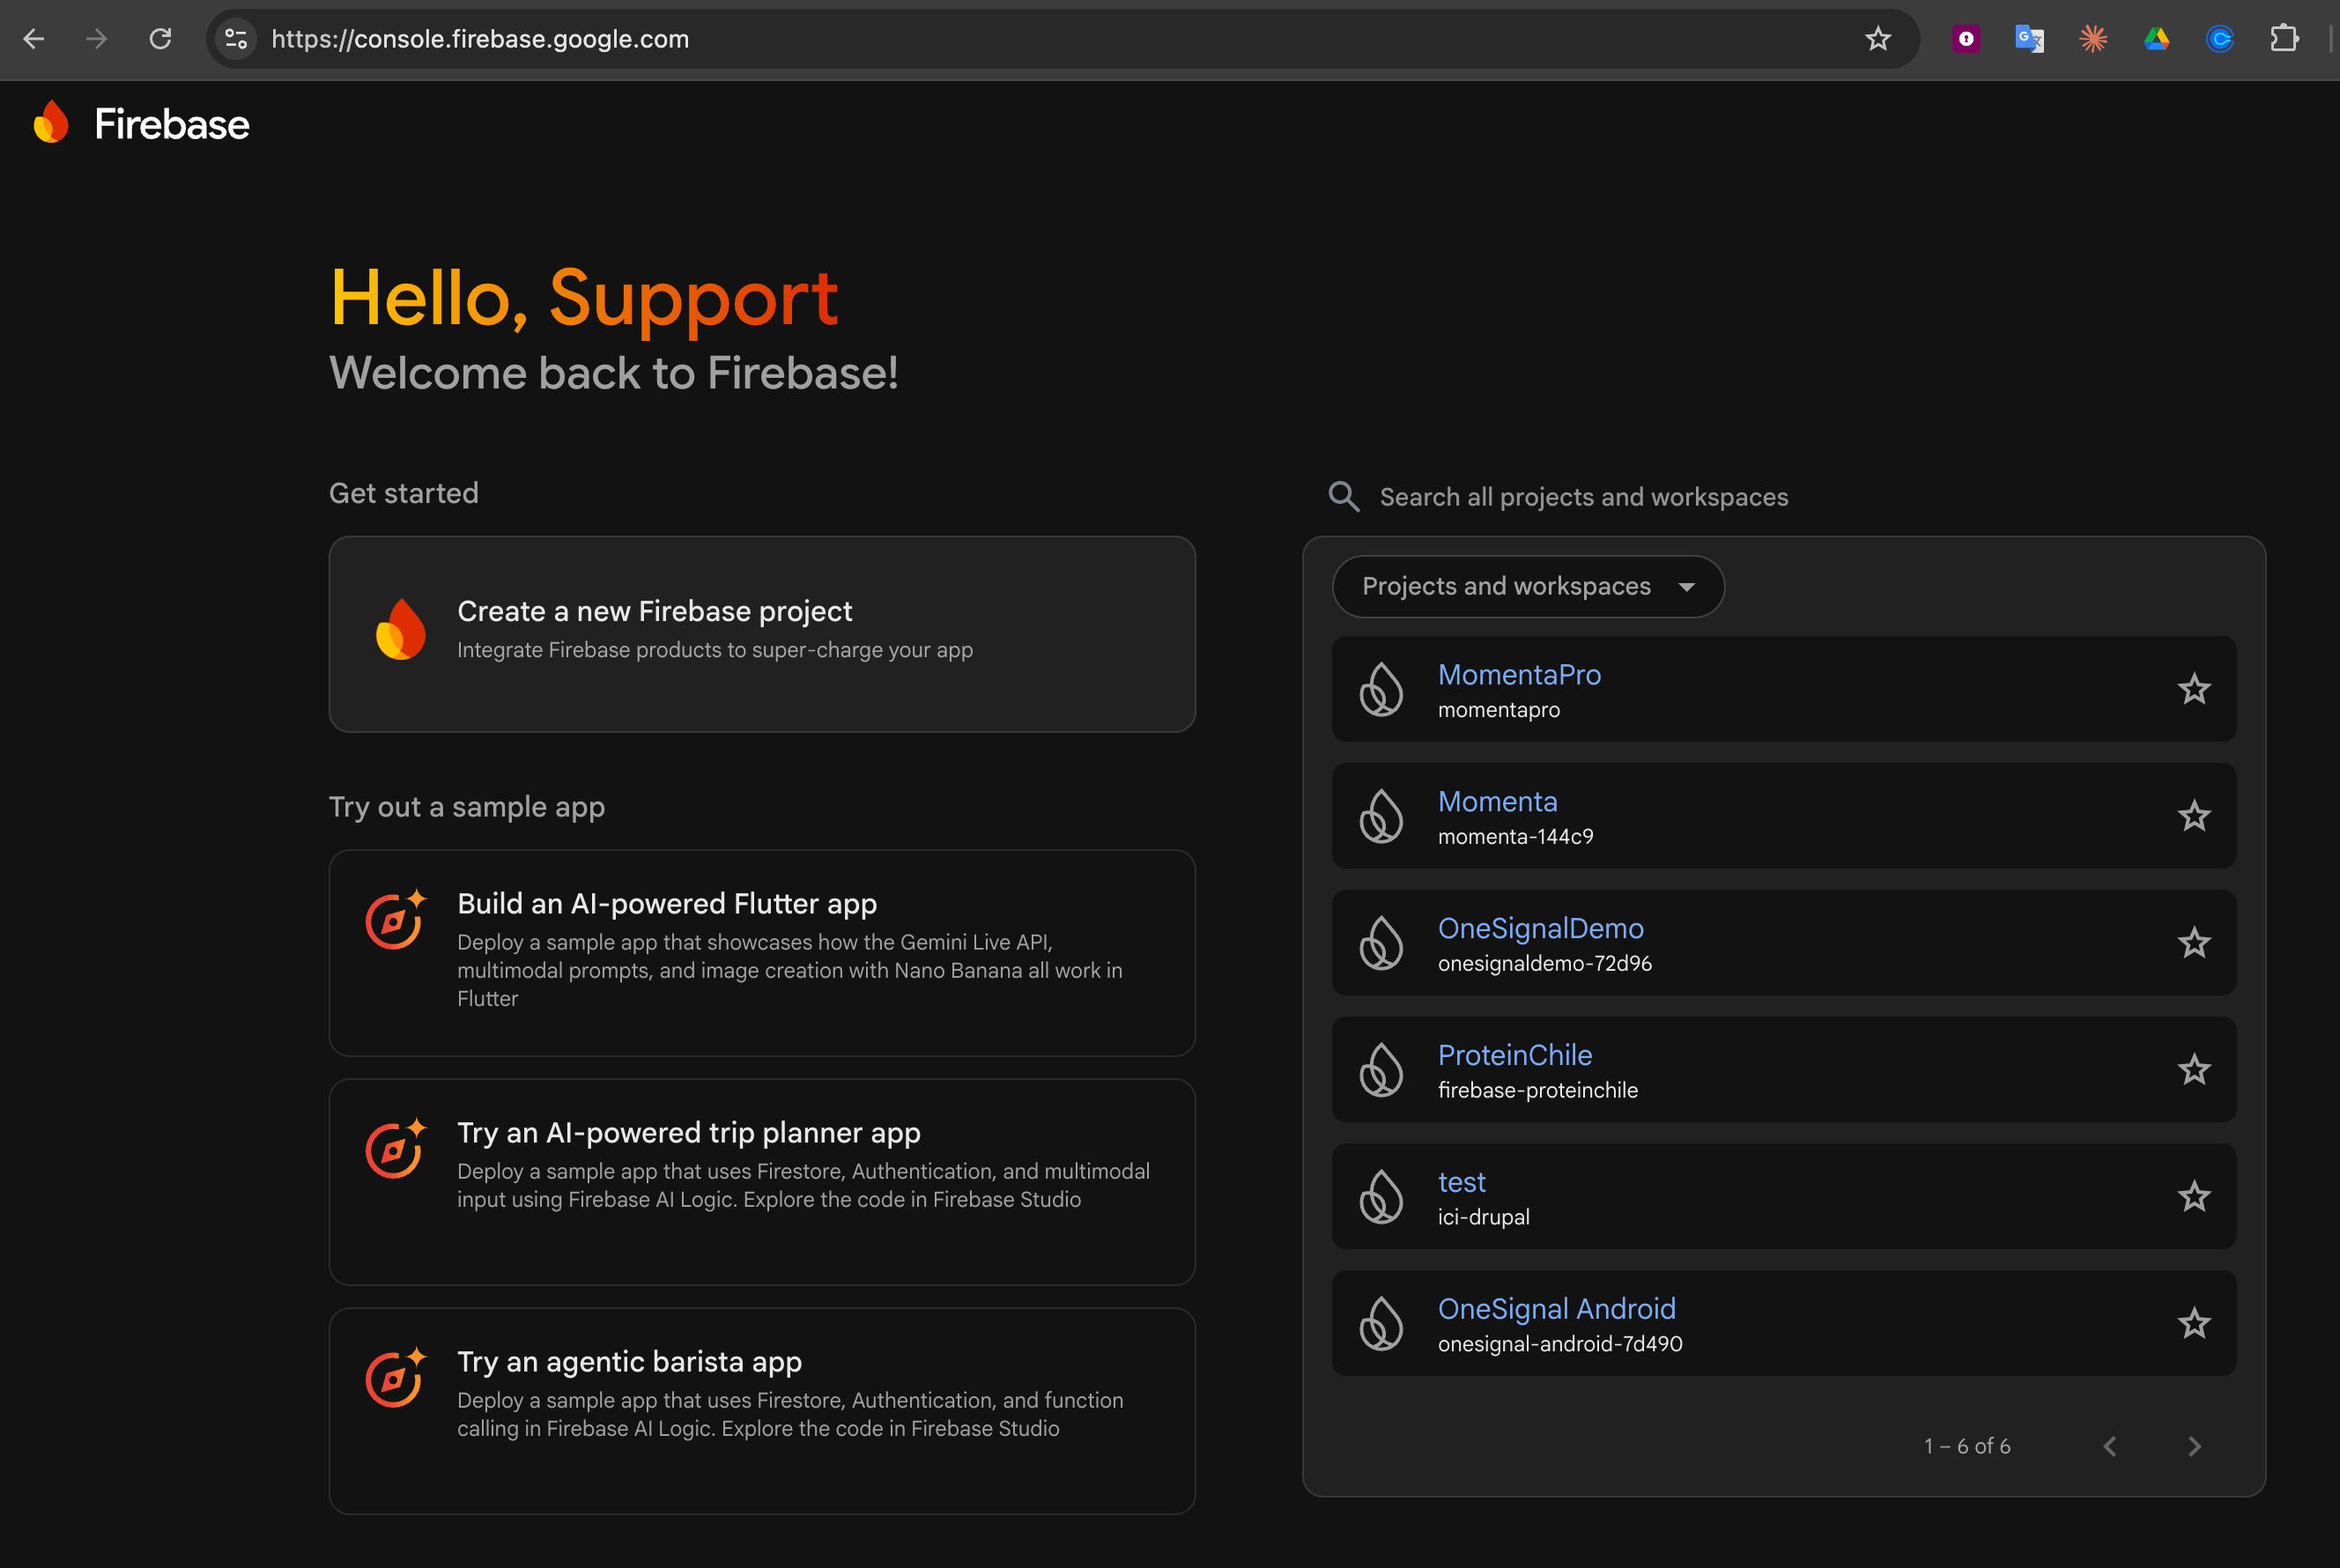
Go to your Firebase console and either create or select a project.
Page of Projects within Firebase
2
Enable Firebase Cloud Messaging API V1
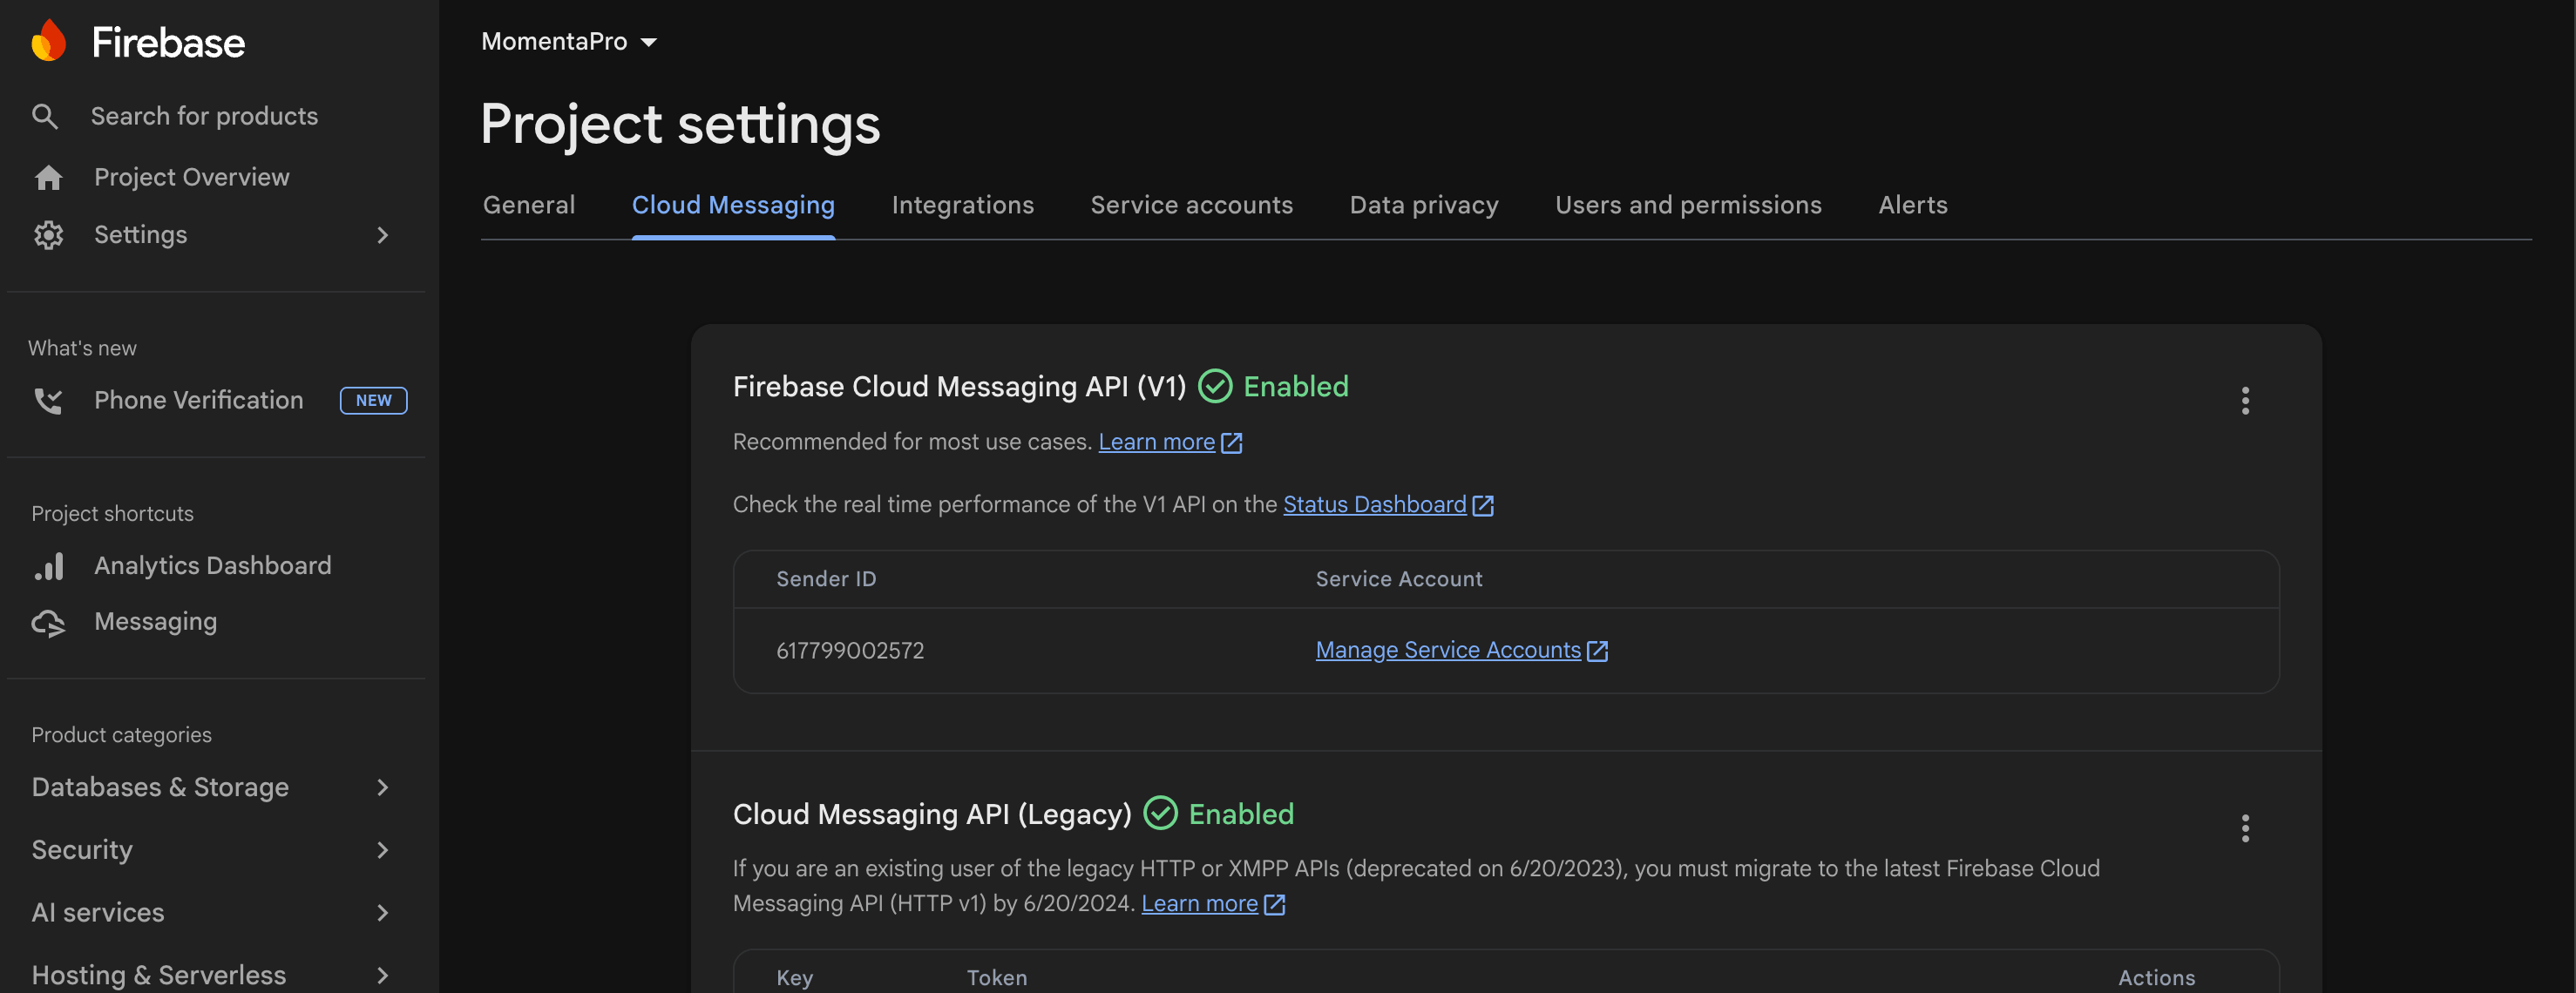
In your Firebase project’s Settings, select the Cloud Messaging tab.
Cloud Messaging tab in Firebase Project settings
Check the Firebase Cloud Messaging API (V1) status:
Enabled (green checkmark) means Google accepts Cloud Messaging send requests for this project.
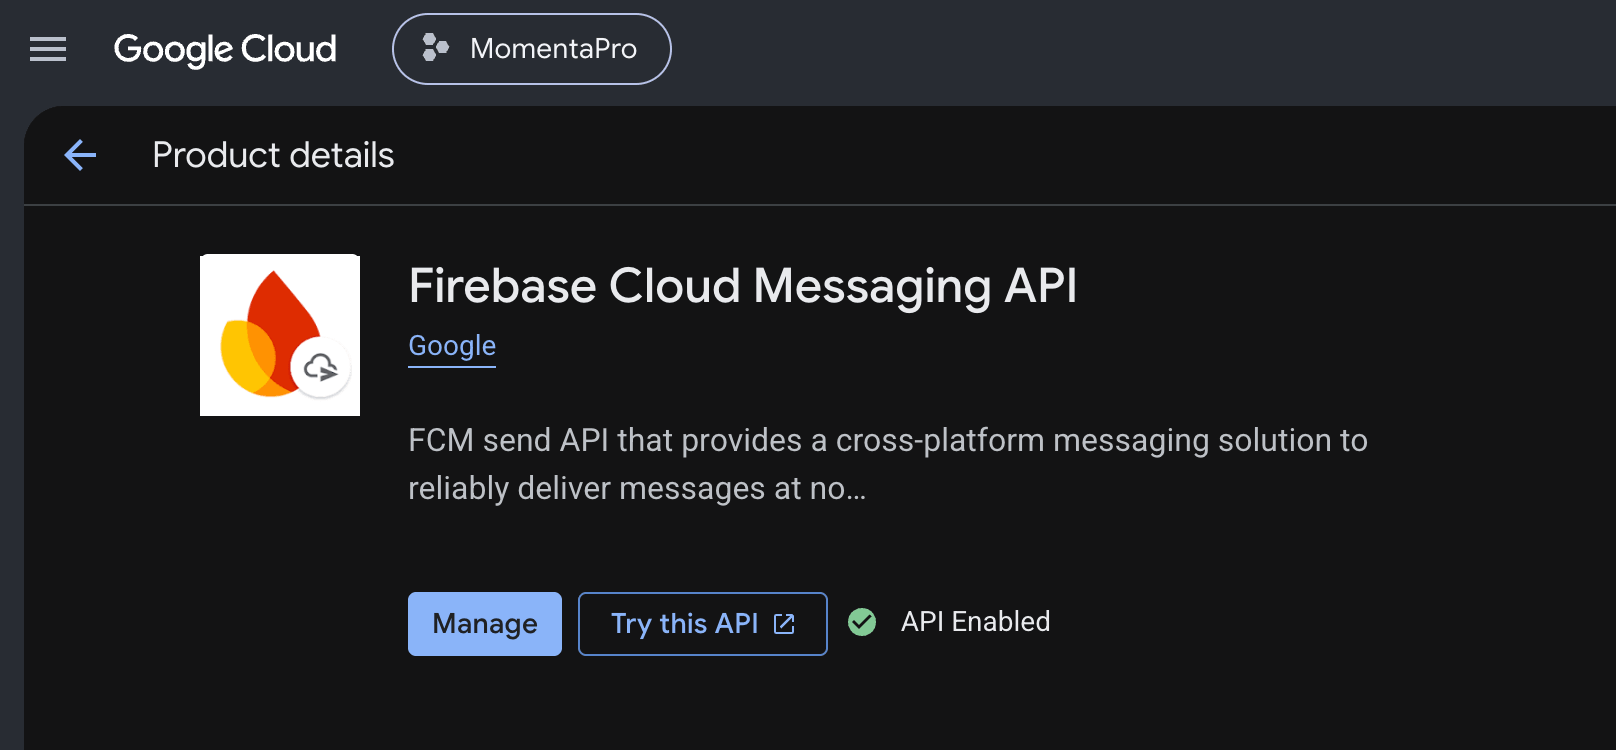
Disabled means Google rejects those requests, so Android push notifications do not deliver. Enable this by clicking the 3-dot menu > Manage API in Google Cloud Console, then click Enable and wait until the status shows API Enabled with a green checkmark.
Firebase Cloud Messaging API enabled in the Google Cloud Console
Enabling the API does not grant the Service Account any roles. If someone else owns the Firebase project or Google account, check your Service Account permissions first.
3
Generate a new private key
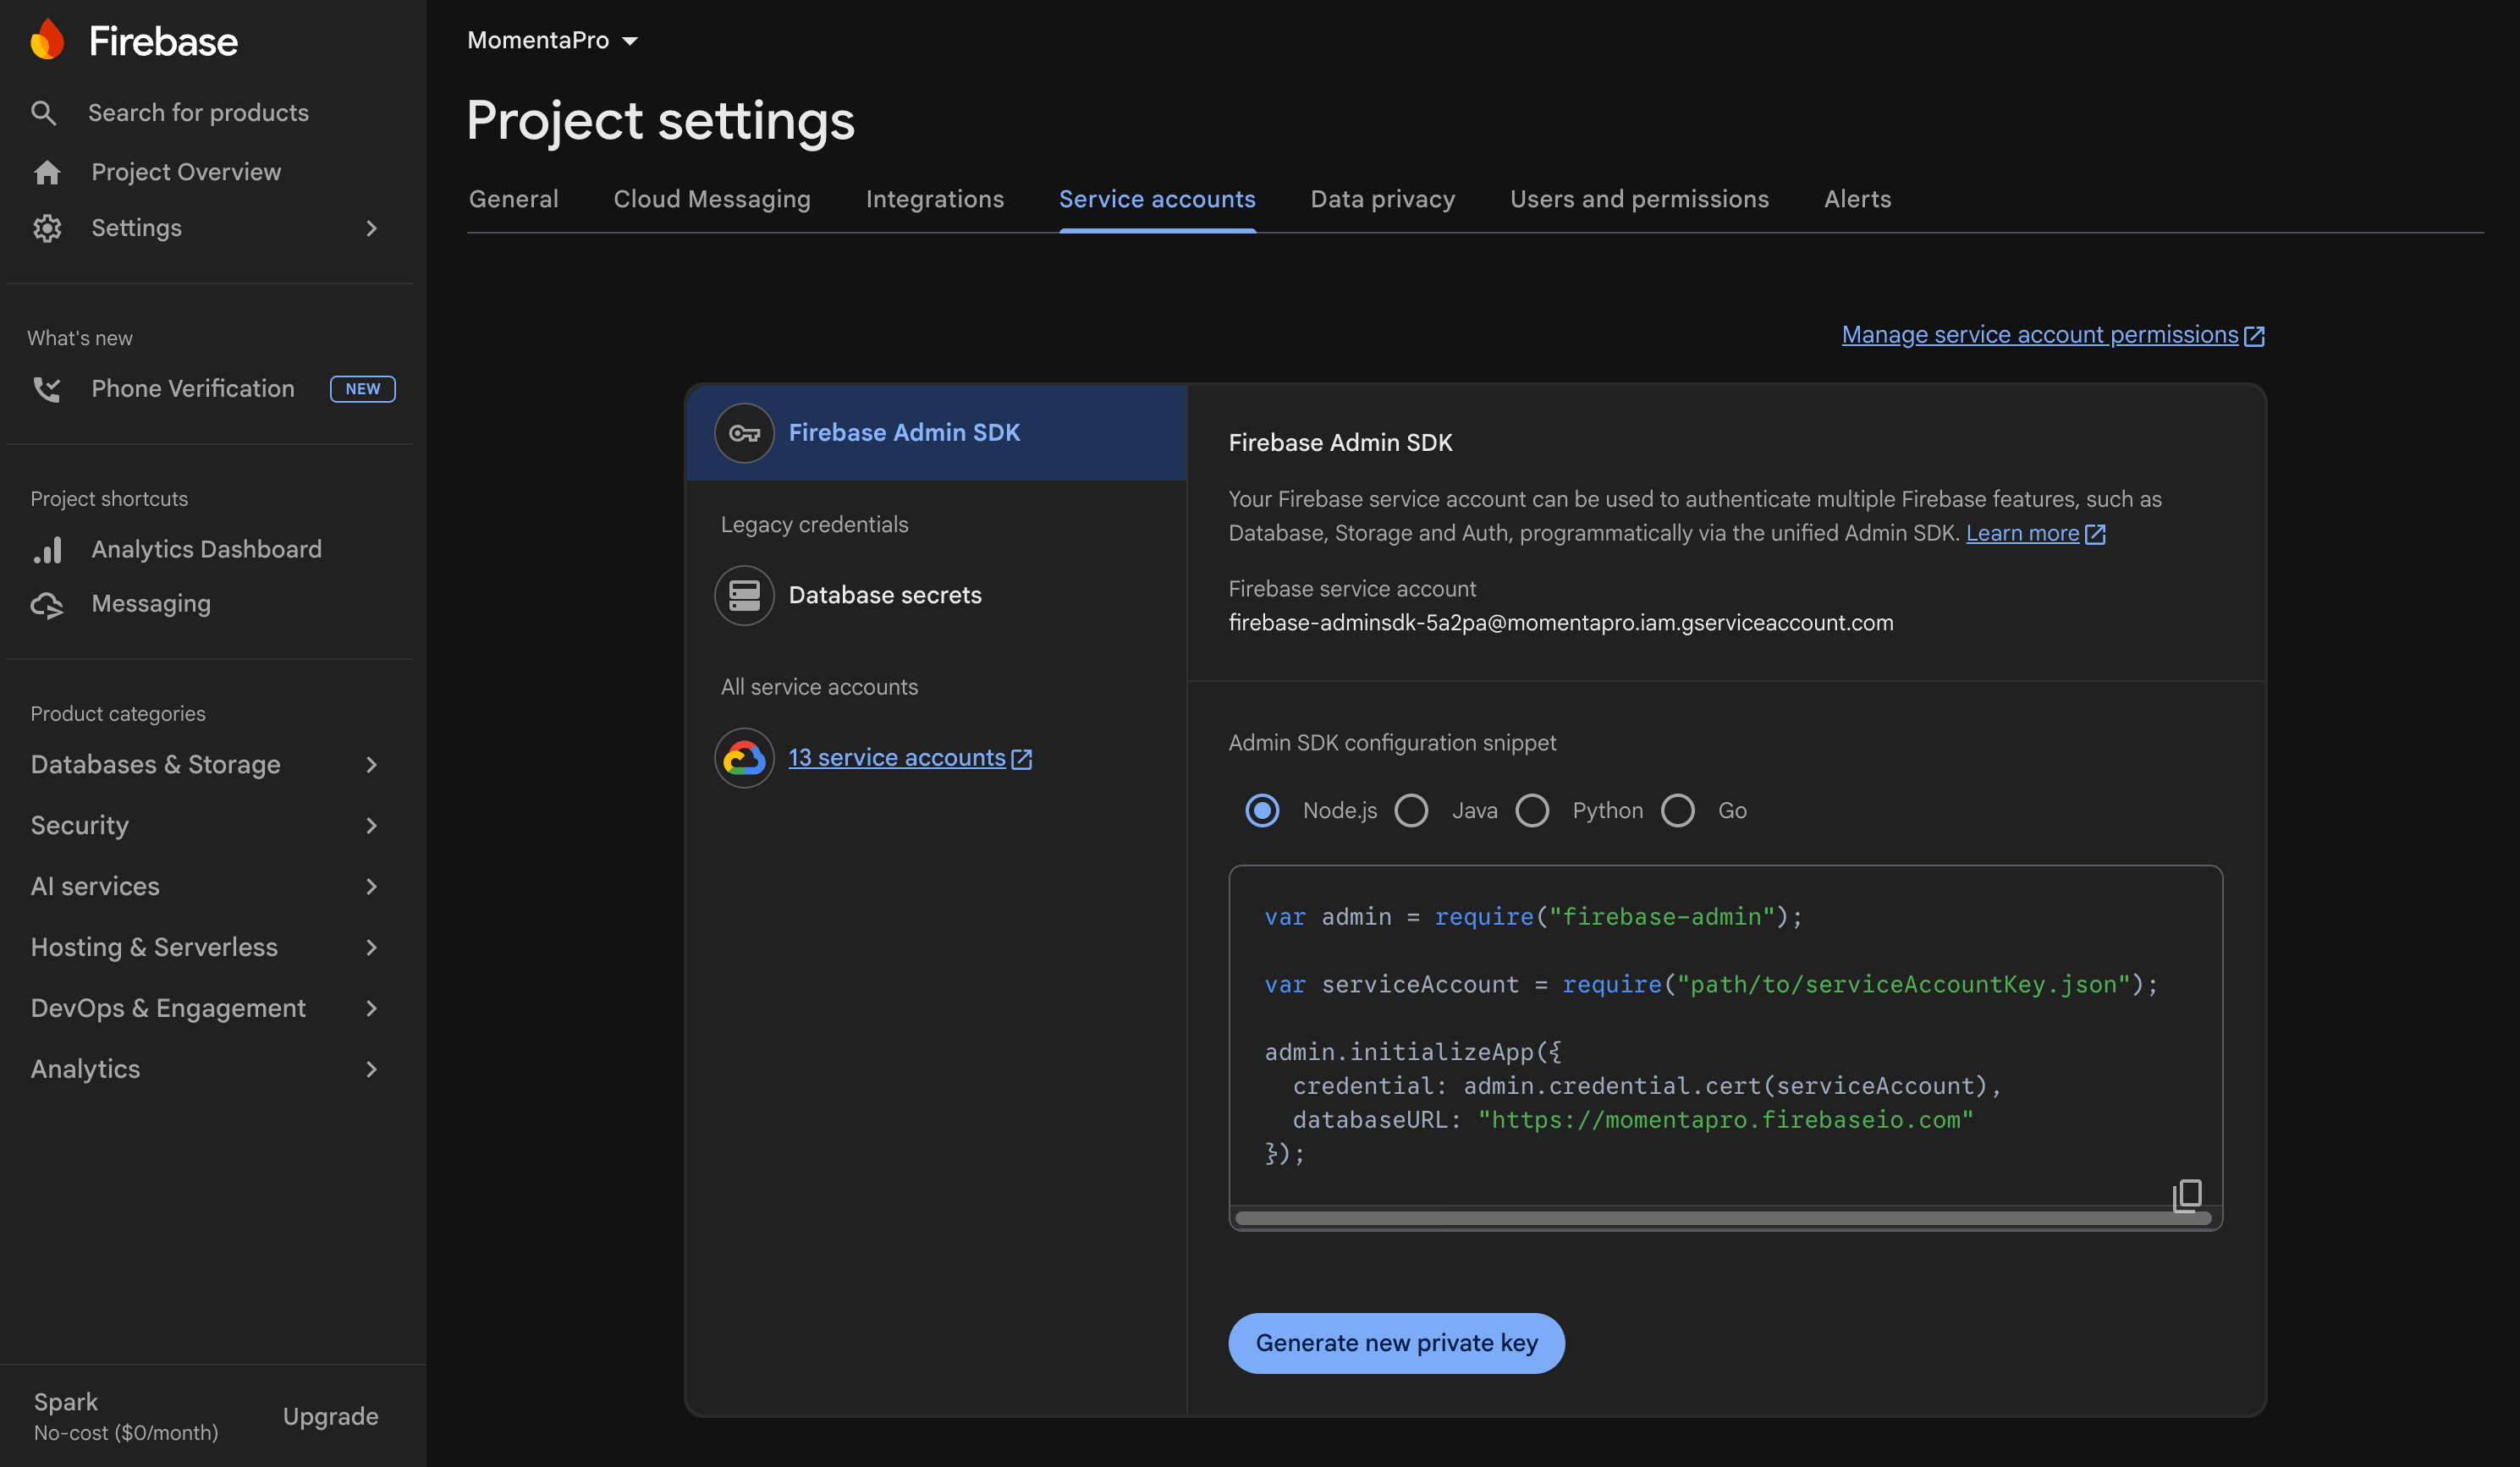
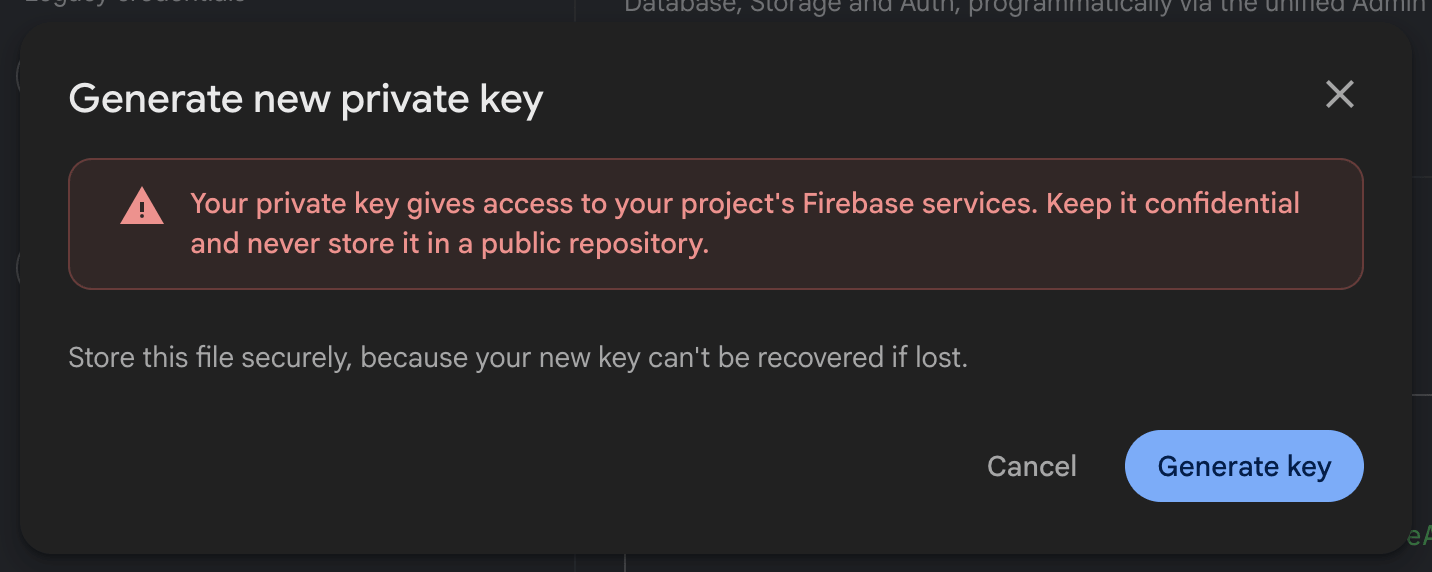
Back in Project settings, select the Service accounts tab and click Generate new private key.
Service Accounts section within Firebase
Confirm by clicking Generate key in the popup.
Generate the private key for the service account.
The downloaded private key contains sensitive credentials. Do not share it or check it into version control.
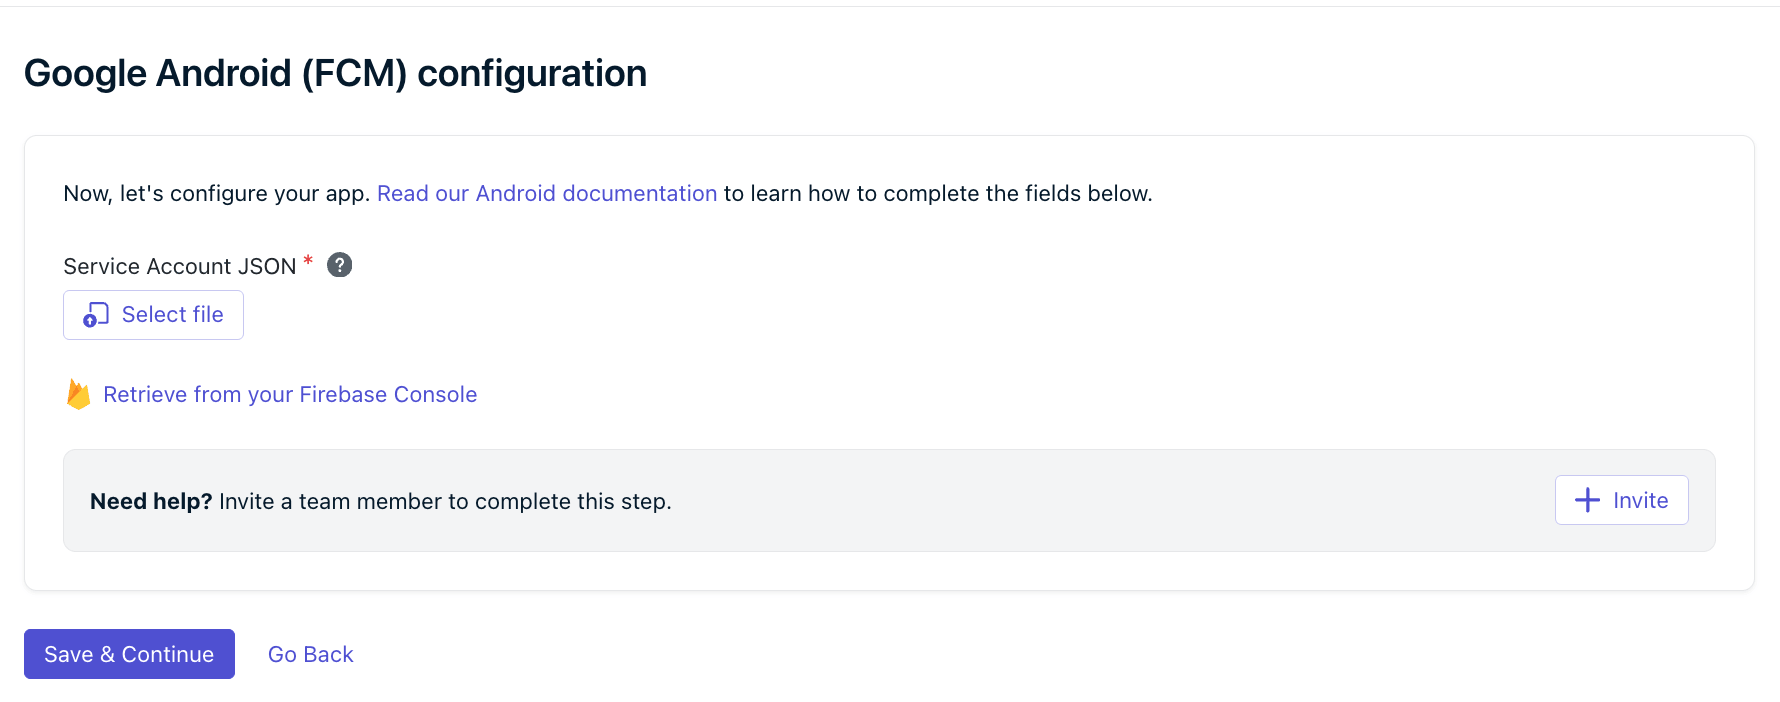
Save the .json file in a secure location. You upload it to OneSignal in the next section.
Your app needs a google-services.json file from the same Firebase project as your Service Account above. Do not upload this file to OneSignal. It belongs in your app’s source code and tells your app which Firebase project to register with.On OneSignal Android SDK 5.11.0 and later, the SDK registers through your Firebase project when your google-services.json matches the Sender ID in OneSignal. Otherwise the SDK uses OneSignal’s shared Firebase project. See What happens if I skip google-services.json?
Upgrading an existing app? Delivery keeps using the same Firebase project and Service Account, but:
Each device gets a new push token value the next time it opens the updated app. Its Subscription is preserved, and the old token works until then.
Your Firebase console FCM metrics start including OneSignal registrations.
Your Firebase token calls now affect OneSignal. Calling FirebaseMessaging.getInstance().deleteToken() (on logout, for example) also deletes the OneSignal registration until the SDK re-registers. With Firebase Installation ID registration, the equivalent call is unregister().
Plan to add the file eventually. Without it, your app stays on legacy FCM registration tokens, which Firebase has deprecated.
1
Download google-services.json
In your Firebase console, open the project you used for the Service Account private key. Go to Project settings > General, then scroll to Your apps. If your Android app is not listed, click Add app.Confirm the Android package name matches your app’s applicationId, then download google-services.json.
2
Add it to your app
Your app never reads the file at runtime. A build step converts it into Android resources, and without that step the file does nothing. Find your platform below and follow its setup guide.
Reference it with <GoogleServicesJson Include="Platforms\Android\google-services.json" />
On SDK versions earlier than the ones listed above, the file is safe to add but does nothing for OneSignal. Push keeps registering through OneSignal’s shared Firebase project until you upgrade.
3
Apply the Google Services Gradle plugin
This step is for Android native, React Native, and Flutter only. Other platforms handle the plugin as described in the table above.The plugin resolves from Google’s Maven repository. Confirm google() is listed under pluginManagement in settings.gradle or settings.gradle.kts, or the build fails with Plugin [id: 'com.google.gms.google-services'] was not found:
If google_app_id and project_id appear, the file took effect. A successful build alone does not prove it.
Neither value appears: the plugin is not applied. Adding the file without the plugin produces no error.
File google-services.json is missing: the plugin is applied, but the file is not where your toolchain expects it. Check the table above.
No matching client found for package name: the package registered in Firebase does not match your applicationId. Fix it in the Firebase console and download the file again.
Initialize the default FirebaseApp in code if you can’t use the Google Services Gradle plugin, or if you load Firebase only after user consent. Use values from the same Firebase project as the Service Account private key you uploaded to OneSignal:
val options = FirebaseOptions.Builder() .setProjectId("YOUR_FIREBASE_PROJECT_ID") .setApplicationId("1:123456789012:android:abcdef123456") .setApiKey("YOUR_FIREBASE_API_KEY") .setGcmSenderId("123456789012") .build()FirebaseApp.initializeApp(context, options)
Initialize Firebase before OneSignal initializes. A storage bucket is not required for push. If initialization has not completed by the time OneSignal registers for push:
On the legacy token path, the SDK registers through OneSignal’s shared Firebase project for that session, and uses your project on a later session.
Push notifications still work today. The OneSignal SDK registers through OneSignal’s shared Firebase project, using FCM registration tokens. Google has deprecated FCM registration tokens in favor of Firebase Installation IDs. The shared project can’t register with Firebase Installation IDs, so adding google-services.json now prepares your app for that change if and when Google starts requiring Firebase Installation IDs.Without the file, you also can’t turn on Firebase Installation ID registration.
Service Account roles are granted on the IAM page in the Google Cloud Console, not in the Firebase Console and not on the Service Accounts page. The Service Account whose private key you upload to OneSignal needs these two roles:
Role to add
What it lets OneSignal do
Permission it grants
Firebase Cloud Messaging API Admin
Send push notifications through your Firebase project
cloudmessaging.messages.create
Firebase Viewer
Read your Firebase project details
firebase.projects.get
Broader roles like Firebase Admin (roles/firebase.admin), Editor, or Owner include both permissions and also satisfy the requirement. For OneSignal-only Service Accounts, prefer the narrow pair above to limit the impact if the private key is ever exposed.If the OneSignal dashboard shows Invalid request after you upload your Service Account private key, missing roles are the most common cause.
1
Open the IAM page
In the Google Cloud Console, set the project picker to the Firebase project, not the organization. In the left nav, open IAM & Admin and click IAM.The page is a table with Principal, Name, and Role columns. Do not use Service Accounts > Permissions. That page lists who can use the account, not which roles the account has on the project.
2
Find your Service Account
Find the row whose principal email matches the client_email field in the private key you uploaded. It looks like firebase-adminsdk-xxxxx@YOUR_PROJECT_ID.iam.gserviceaccount.com. Paste that email into the filter box if the table is long.
3
Add any missing roles
On that row, click the pencil (Edit principal). In the Edit permissions panel, click Add another role and add Firebase Cloud Messaging API Admin and Firebase Viewer if they are not already assigned. Skip this if the account already has Firebase Admin, Editor, or Owner.
4
Save
Click Save. The new roles can take about a minute to apply.
Why am I seeing “This configuration is for a different Firebase Project”?
This error occurs when the uploaded private key belongs to a different Firebase project (a different Sender ID).Solution: Use the original Firebase project’s private key. If unavailable, contact support@onesignal.com with your App ID. Switching projects resets push tokens. Your users must reopen the app to get push again.The reverse also happens: the uploaded key is correct, but the app ships a google-services.json from a different Firebase project. See Match your Firebase projects.
Yes, but changing it invalidates existing device tokens, because tokens are tied to the original Sender ID. Users stop receiving push notifications until they reopen the app and get a new token. For help, contact support@onesignal.com with your App ID.
If your Firebase server key looks like AIz..., you’re likely using an outdated Google Cloud Messaging (GCM) setup. Add Firebase to your existing Google Cloud project to keep your Sender ID, then upload a Service Account private key. Creating a new Firebase project gives you a new Sender ID, which invalidates existing push tokens. See Can I change my Sender ID?
No. Google’s legacy FCM APIs are fully deprecated and no longer deliver notifications. If your app still uses them, upload a Service Account private key as described above to move to FCM V1.
What is Firebase Cloud Messaging, and why does OneSignal need a Service Account private key?
Firebase Cloud Messaging (FCM) is Google’s service for delivering push notifications to Android devices. A Service Account is a Google identity that OneSignal uses to authenticate to your Firebase project, and its private key is a JSON file that proves the identity. Uploading the private key authorizes OneSignal to send pushes through Firebase on your behalf. For more details, see Google’s Service Account documentation.
Install and initialize the OneSignal SDK in your Android app.
Firebase Installation ID registration
Check whether FID registration is enabled in your app, and enable or disable it.
Huawei push setup
Authorize OneSignal to send push to Huawei devices without Google Play services.
Amazon push setup
Generate an Amazon API key to send push to Fire OS devices.
Web push setup
Configure push notifications for websites.
Was this page helpful?
{"docsConfig":{"theme":"mint","$schema":"https://mintlify.com/docs.json","name":"OneSignal Documentation","description":"OneSignal is a platform for sending push notifications, emails, in-app messages, and SMS campaigns via a single API, Journey Builder, and a dashboard.","colors":{"primary":"#3A3DB3","light":"#E54B4D","dark":"#3A3DB3"},"logo":{"light":"https://mintcdn.com/onesignal/yJcueeDCO7UpHnnY/logo/OneSignal-Logo.svg?fit=max\u0026auto=format\u0026n=yJcueeDCO7UpHnnY\u0026q=85\u0026s=1fcfb6fef6d820fd9d99c74850711107","dark":"https://mintcdn.com/onesignal/s4WC_KzLxf8ornqq/logo/OneSignal-Logo-White.svg?fit=max\u0026auto=format\u0026n=s4WC_KzLxf8ornqq\u0026q=85\u0026s=2573a53b5aea961e18c82b3af8f31925"},"favicon":"https://mintcdn.com/onesignal/SGduBFHpiRdg5l6h/favicon.ico?fit=max\u0026auto=format\u0026n=SGduBFHpiRdg5l6h\u0026q=85\u0026s=c0a99fadc0553c658a83741c5611cef4","api":{"examples":{"languages":["curl","typescript","python","php","go","ruby","java","csharp","rust"],"autogenerate":true}},"navbar":{"links":[{"href":"mailto:support@onesignal.com","label":"Support"}],"primary":{"type":"button","label":"Dashboard","href":"https://dashboard.onesignal.com"}},"footer":{"socials":{"github":"https://github.com/OneSignal","linkedin":"https://linkedin.com/company/onesignal","youtube":"https://www.youtube.com/@onesignalofficial/playlists"}},"seo":{"metatags":{"apple-mobile-web-app-title":"OneSignal Docs"}},"fonts":{"family":"Nunito Sans"},"styling":{"eyebrows":"breadcrumbs","latex":true},"integrations":{"ga4":{"measurementId":"G-2DGWL0VYP5"},"posthog":{"apiKey":"phc_vZpvE0f5eyzcOt30FHer34yddVmNdo9kmlMVRBzLMtn","apiHost":"https://eu.i.posthog.com","sessionRecording":true}},"contextual":{"options":["copy","view","chatgpt","claude"],"display":"header"},"navigation":{"languages":[{"language":"en","href":"docs/en/home"},{"language":"cn","href":"docs/cn/home"},{"language":"ko","href":"docs/ko/home"},{"language":"ja","href":"docs/ja/home"},{"language":"tr","href":"docs/tr/home"},{"language":"pt-BR","href":"docs/pt-BR/home"},{"language":"es","href":"docs/es/home"},{"language":"fr","href":"docs/fr/home"}]}},"deployment":{"deploymentMetadataValue":{"subdomain":"onesignal","hasAudioNarration":false,"actualSubdomain":"onesignal","customDomains":["documentation.onesignal.com"],"gitSource":{"type":"github","owner":"onesignal","repo":"mintlify-docs","deployBranch":"main","contentDirectory":"","isPrivate":true,"mountPath":"","label":""},"feedback":{"thumbs":true},"entitlements":{"AI_CHAT":{"status":"ENABLED"},"WEB_MCP":{"status":"ENABLED"},"NARRATION":{"status":"ENABLED"}},"buildId":"6af263cb6575a850b3cad407","clientVersion":"0.0.4094","searchFilterCounts":[{"language":"en","tag":"User Guides","count":203},{"language":"es","tag":"Guías del Usuario","count":178},{"language":"fr","tag":"Guides utilisateur","count":178},{"language":"ja","tag":"ユーザーガイド","count":178},{"language":"ko","tag":"사용자 가이드","count":178},{"language":"pt-BR","tag":"Guia do Usuário","count":178},{"language":"tr","tag":"Kullanıcı Kılavuzları","count":178},{"language":"cn","tag":"用户指南","count":176},{"language":"en","tag":"Message channels","count":90},{"language":"es","tag":"Canales de mensajería","count":84},{"language":"fr","tag":"Canaux de messagerie","count":84},{"language":"ja","tag":"メッセージングチャネル","count":84},{"language":"ko","tag":"메시지 채널","count":84},{"language":"pt-BR","tag":"Canais de mensagem","count":84},{"language":"tr","tag":"Mesaj kanalları","count":84},{"language":"cn","tag":"消息渠道","count":83},{"language":"default","tag":"API Reference","count":68},{"language":"default","tag":"API reference","count":64},{"language":"en","tag":"Analytics \u0026 Integrations","count":53},{"language":"es","tag":"Analítica \u0026 Integraciones","count":52},{"language":"fr","tag":"Analyses et intégrations","count":52},{"language":"ja","tag":"分析 \u0026 統合","count":52},{"language":"ko","tag":"분석 \u0026 통합","count":52},{"language":"pt-BR","tag":"Análises \u0026 Integrações","count":52},{"language":"tr","tag":"Analitik ve Entegrasyonlar","count":52},{"language":"cn","tag":"分析和集成","count":51},{"language":"cn","tag":"开发者指南","count":48},{"language":"es","tag":"Guías del desarrollador","count":48},{"language":"fr","tag":"Guides développeur","count":48},{"language":"ja","tag":"開発者ガイド","count":48},{"language":"ko","tag":"개발자 가이드","count":48},{"language":"tr","tag":"Geliştirici Kılavuzları","count":48},{"language":"en","tag":"Developer Guides","count":47},{"language":"pt-BR","tag":"Guia de desenvolvedor","count":47},{"language":"en","tag":"Integrations","count":37},{"language":"es","tag":"Integraciones","count":37},{"language":"fr","tag":"Intégrations","count":37},{"language":"ja","tag":"統合","count":37},{"language":"ko","tag":"통합","count":37},{"language":"pt-BR","tag":"Integrações","count":37},{"language":"tr","tag":"Entegrasyonlar","count":37},{"language":"cn","tag":"集成","count":36},{"language":"en","tag":"Tutorials","count":35},{"language":"cn","tag":"推送通知","count":31},{"language":"cn","tag":"OneSignal 作为目的地","count":31},{"language":"en","tag":"Push","count":31},{"language":"en","tag":"OneSignal as destination","count":31},{"language":"es","tag":"Push notificaciones","count":31},{"language":"es","tag":"OneSignal como destino","count":31},{"language":"fr","tag":"Push","count":31},{"language":"fr","tag":"OneSignal comme destination","count":31},{"language":"ja","tag":"プッシュ通知","count":31},{"language":"ja","tag":"OneSignal as 宛先","count":31},{"language":"ko","tag":"푸시","count":31},{"language":"ko","tag":"OneSignal을 데이터 목적지로 사용","count":31},{"language":"pt-BR","tag":"Push notificações","count":31},{"language":"pt-BR","tag":"OneSignal como destino","count":31},{"language":"tr","tag":"Anlık bildirimler","count":31},{"language":"tr","tag":"OneSignal hedef","count":31},{"language":"en","tag":"Mobile SDKs","count":26},{"language":"cn","tag":"移动SDK","count":25},{"language":"es","tag":"SDKs móviles","count":25},{"language":"fr","tag":"SDK mobiles","count":25},{"language":"ja","tag":"モバイルSDK","count":25},{"language":"ko","tag":"모바일 SDKs","count":25},{"language":"pt-BR","tag":"SDKs móveis","count":25},{"language":"tr","tag":"Mobil SDK'lar","count":25},{"language":"cn","tag":"教程","count":24},{"language":"es","tag":"Tutoriales","count":24},{"language":"fr","tag":"Tutoriels","count":24},{"language":"ja","tag":"チュートリアル","count":24},{"language":"ko","tag":"튜토리얼","count":24},{"language":"pt-BR","tag":"Tutoriais","count":24},{"language":"tr","tag":"Eğitimler","count":24},{"language":"en","tag":"Mobile SDK setup","count":19},{"language":"cn","tag":"移动SDK设置","count":18},{"language":"es","tag":"Configuración del SDK móvil","count":18},{"language":"fr","tag":"Configuration SDK mobile","count":18},{"language":"ja","tag":"モバイルSDKセットアップ","count":18},{"language":"ko","tag":"모바일 SDK 설정","count":18},{"language":"pt-BR","tag":"Configuração do SDK móvel","count":18},{"language":"tr","tag":"Mobil SDK kurulumu","count":18},{"language":"default","tag":"Messages","count":9},{"language":"default","tag":"Users","count":9},{"language":"default","tag":"Organization","count":9},{"language":"default","tag":"Journeys","count":8},{"language":"default","tag":"Deprecated","count":6},{"language":"default","tag":"Templates","count":6},{"language":"default","tag":"Subscriptions","count":6},{"language":"default","tag":"Segments","count":5}]},"assistantConfig":{"enableStarterQuestions":false,"deflection":{"enabled":true,"email":"support@onesignal.com","showHelpButton":true}},"basePath":"","hasChatPermissions":true,"hasWebMcpPermissions":true,"toggles":[{"name":"kill-isr","enabled":true,"variant":{"name":"disabled","enabled":false,"feature_enabled":true},"impressionData":false},{"name":"custom-rbac-roles","enabled":true,"variant":{"name":"disabled","enabled":false,"feature_enabled":true},"impressionData":false},{"name":"agent-mintlify-slack","enabled":true,"variant":{"name":"disabled","enabled":false,"feature_enabled":true},"impressionData":false},{"name":"agent-integrations-settings","enabled":true,"variant":{"name":"disabled","enabled":false,"feature_enabled":true},"impressionData":false},{"name":"rbac-expansion","enabled":true,"variant":{"name":"disabled","enabled":false,"feature_enabled":true},"impressionData":false},{"name":"automations-pr-grouping","enabled":true,"variant":{"name":"disabled","enabled":false,"feature_enabled":true},"impressionData":false},{"name":"custom-prefix","enabled":true,"variant":{"name":"disabled","enabled":false,"feature_enabled":true},"impressionData":false},{"name":"analytics-v7","enabled":true,"variant":{"name":"disabled","enabled":false,"feature_enabled":true},"impressionData":false},{"name":"user-flows-analytics","enabled":true,"variant":{"name":"disabled","enabled":false,"feature_enabled":true},"impressionData":false},{"name":"no-publish-flow","enabled":true,"variant":{"name":"disabled","enabled":false,"feature_enabled":true},"impressionData":false},{"name":"workos-onboarding","enabled":true,"variant":{"name":"disabled","enabled":false,"feature_enabled":true},"impressionData":false},{"name":"llms-txt-v2","enabled":true,"variant":{"name":"disabled","enabled":false,"feature_enabled":true},"impressionData":false},{"name":"snapshot-serving-live","enabled":true,"variant":{"name":"disabled","enabled":false,"feature_enabled":true},"impressionData":false},{"name":"stripTemperatureMiddleware","enabled":true,"variant":{"name":"disabled","enabled":false,"feature_enabled":true},"impressionData":false},{"name":"support-platform-pylon-zendesk","enabled":true,"variant":{"name":"disabled","enabled":false,"feature_enabled":true},"impressionData":false},{"name":"snapshot-serving","enabled":true,"variant":{"name":"disabled","enabled":false,"feature_enabled":true},"impressionData":false},{"name":"instant-rollback","enabled":true,"variant":{"name":"disabled","enabled":false,"feature_enabled":true},"impressionData":false},{"name":"granular-notifications-server","enabled":true,"variant":{"name":"disabled","enabled":false,"feature_enabled":true},"impressionData":false},{"name":"granular-notifications","enabled":true,"variant":{"name":"disabled","enabled":false,"feature_enabled":true},"impressionData":false},{"name":"automations-fable","enabled":true,"variant":{"name":"disabled","enabled":false,"feature_enabled":true},"impressionData":false},{"name":"fixed-ai-action-pricing","enabled":true,"variant":{"name":"disabled","enabled":false,"feature_enabled":true},"impressionData":false},{"name":"automation-resolve-merge-conflict","enabled":true,"variant":{"name":"disabled","enabled":false,"feature_enabled":true},"impressionData":false},{"name":"scoped-publishing","enabled":true,"variant":{"name":"disabled","enabled":false,"feature_enabled":true},"impressionData":false},{"name":"mintql","enabled":true,"variant":{"name":"disabled","enabled":false,"feature_enabled":true},"impressionData":false},{"name":"page-level-analytics","enabled":true,"variant":{"name":"disabled","enabled":false,"feature_enabled":true},"impressionData":false},{"name":"editor-version-history-v2","enabled":true,"variant":{"name":"disabled","enabled":false,"feature_enabled":true},"impressionData":false},{"name":"billing-page-v2","enabled":true,"variant":{"name":"disabled","enabled":false,"feature_enabled":true},"impressionData":false},{"name":"full-page-search","enabled":true,"variant":{"name":"disabled","enabled":false,"feature_enabled":true},"impressionData":false},{"name":"workspace-projects","enabled":true,"variant":{"name":"disabled","enabled":false,"feature_enabled":true},"impressionData":false},{"name":"assistant-v5","enabled":true,"variant":{"name":"disabled","enabled":false,"feature_enabled":true},"impressionData":false},{"name":"fork-pr-previews","enabled":true,"variant":{"name":"disabled","enabled":false,"feature_enabled":true},"impressionData":false},{"name":"revalidation-jwt","enabled":true,"variant":{"name":"disabled","enabled":false,"feature_enabled":true},"impressionData":false},{"name":"workos-sso-scim","enabled":true,"variant":{"name":"disabled","enabled":false,"feature_enabled":true},"impressionData":false},{"name":"hobby-abuse-scan","enabled":true,"variant":{"name":"disabled","enabled":false,"feature_enabled":true},"impressionData":false},{"name":"dashboard-inbox","enabled":true,"variant":{"name":"disabled","enabled":false,"feature_enabled":true},"impressionData":false},{"name":"workos-signup","enabled":true,"variant":{"name":"disabled","enabled":false,"feature_enabled":true},"impressionData":false},{"name":"turbopuffer-dual-write","enabled":true,"variant":{"name":"disabled","enabled":false,"feature_enabled":true},"impressionData":false},{"name":"workos-enabled","enabled":true,"variant":{"name":"disabled","enabled":false,"feature_enabled":true},"impressionData":false},{"name":"approve-review-flow","enabled":true,"variant":{"name":"disabled","enabled":false,"feature_enabled":true},"impressionData":false},{"name":"editor-metadata","enabled":true,"variant":{"name":"disabled","enabled":false,"feature_enabled":true},"impressionData":false},{"name":"sso-setup-deadline-banner","enabled":true,"variant":{"name":"disabled","enabled":false,"feature_enabled":true},"impressionData":false},{"name":"turbopuffer-serve","enabled":true,"variant":{"name":"disabled","enabled":false,"feature_enabled":true},"impressionData":false},{"name":"live-agents","enabled":true,"variant":{"name":"disabled","enabled":false,"feature_enabled":true},"impressionData":false},{"name":"comment-mode","enabled":true,"variant":{"name":"disabled","enabled":false,"feature_enabled":true},"impressionData":false}],"googleFontsInlined":true},"customCss":[],"page":{"pagePath":"docs/en/android-firebase-credentials","slug":"/docs/en/android-firebase-credentials","pageMetadata":{"title":"Android Firebase credentials","description":"Set up Firebase for Android: upload an FCM Service Account private key to OneSignal, and add google-services.json plus the Google Services Gradle plugin to your app.","keywords":["fcm","firebase","push setup","service account","fcm json key","google-services.json","google-services Gradle plugin","default FirebaseApp","FCM V1","Sender ID","Project Number","Invalid request","service account JSON","FCM server key","FCM legacy API","-6"],"href":"/docs/en/android-firebase-credentials"},"description":{"compiledSource":"\"use strict\";\nconst {jsx: _jsx} = arguments[0];\nconst {useMDXComponents: _provideComponents} = arguments[0];\nfunction _createMdxContent(props) {\n const _components = {\n p: \"p\",\n ..._provideComponents(),\n ...props.components\n };\n return _jsx(_components.p, {\n children: \"Set up Firebase for Android: upload an FCM Service Account private key to OneSignal, and add google-services.json plus the Google Services Gradle plugin to your app.\"\n });\n}\nfunction MDXContent(props = {}) {\n const {wrapper: MDXLayout} = {\n ..._provideComponents(),\n ...props.components\n };\n return MDXLayout ? _jsx(MDXLayout, {\n ...props,\n children: _jsx(_createMdxContent, {\n ...props\n })\n }) : _createMdxContent(props);\n}\nreturn {\n default: MDXContent\n};\n","frontmatter":{},"scope":{}},"pageType":"default","mdx":{"mdxSource":{"compiledSource":"\"use strict\";const{Fragment:_Fragment,jsx:_jsx,jsxs:_jsxs}=arguments[0];const{useMDXComponents:_provideComponents}=arguments[0];function _createMdxContent(props){const _components={a:`a`,code:`code`,hr:`hr`,li:`li`,ol:`ol`,p:`p`,pre:`pre`,span:`span`,strong:`strong`,tbody:`tbody`,td:`td`,th:`th`,thead:`thead`,tr:`tr`,ul:`ul`,..._provideComponents(),...props.components},{Card,Check,CodeBlock,CodeGroup,Columns,Frame,Heading,Info,Note,OptimizedImage,Step,Steps,Table,Warning}=_components;if(!Card)_missingMdxReference(`Card`,true);if(!Check)_missingMdxReference(`Check`,true);if(!CodeBlock)_missingMdxReference(`CodeBlock`,true);if(!CodeGroup)_missingMdxReference(`CodeGroup`,true);if(!Columns)_missingMdxReference(`Columns`,true);if(!Frame)_missingMdxReference(`Frame`,true);if(!Heading)_missingMdxReference(`Heading`,true);if(!Info)_missingMdxReference(`Info`,true);if(!Note)_missingMdxReference(`Note`,true);if(!OptimizedImage)_missingMdxReference(`OptimizedImage`,true);if(!Step)_missingMdxReference(`Step`,true);if(!Steps)_missingMdxReference(`Steps`,true);if(!Table)_missingMdxReference(`Table`,true);if(!Warning)_missingMdxReference(`Warning`,true);return _jsxs(_Fragment,{children:[_jsx(_components.p,{children:`To send push notifications to Android devices with Google Play services, you need two things from the same Firebase project:`}),`\n`,_jsxs(_components.ol,{children:[`\n`,_jsxs(_components.li,{children:[_jsx(_components.strong,{children:`An FCM Service Account private key, uploaded to OneSignal.`}),` This authorizes OneSignal’s servers to send to your Firebase project. Required.`]}),`\n`,_jsxs(_components.li,{children:[_jsxs(_components.strong,{children:[`A `,_jsx(_components.code,{children:`google-services.json`}),` file, added to your app.`]}),` This is Firebase client configuration that ships inside your app. Recommended for all new integrations, and required for `,_jsx(_components.a,{href:`/docs/en/android-firebase-installation-id`,children:`Firebase Installation ID registration`}),`.`]}),`\n`]}),`\n`,_jsxs(Info,{children:[_jsx(_components.p,{children:`These instructions do not apply to:`}),_jsxs(_components.ul,{children:[`\n`,_jsxs(_components.li,{children:[_jsx(_components.strong,{children:`Web Push.`}),` Android devices can subscribe to your website or PWA without an FCM Service Account. See `,_jsx(_components.a,{href:`/docs/en/web-push-setup`,children:`Web push setup`}),`.`]}),`\n`,_jsxs(_components.li,{children:[_jsx(_components.strong,{children:`Huawei devices without Google Play services.`}),` See `,_jsx(_components.a,{href:`/docs/en/authorize-onesignal-to-send-huawei-push`,children:`Huawei Authorization`}),`.`]}),`\n`,_jsxs(_components.li,{children:[_jsx(_components.strong,{children:`Amazon devices (Fire OS).`}),` See `,_jsx(_components.a,{href:`/docs/en/generate-an-amazon-api-key`,children:`Amazon API key generation`}),`.`]}),`\n`]})]}),`\n`,_jsx(_components.hr,{}),`\n`,_jsx(Heading,{level:`2`,id:`requirements`,children:`Requirements`}),`\n`,_jsxs(_components.ul,{children:[`\n`,_jsx(_components.li,{children:`An Android app that runs on devices with Google Play services, including Google Play, sideloaded, and internal builds`}),`\n`,_jsxs(_components.li,{children:[`A `,_jsx(_components.a,{href:`https://onesignal.com`,children:`OneSignal account`})]}),`\n`,_jsxs(_components.li,{children:[`A `,_jsx(_components.a,{href:`https://firebase.google.com`,children:`Firebase account (free)`})]}),`\n`]}),`\n`,_jsx(_components.hr,{}),`\n`,_jsx(Heading,{level:`2`,id:`create-a-firebase-service-account-private-key`,children:`Create a Firebase Service Account private key`}),`\n`,_jsxs(Steps,{children:[_jsxs(Step,{title:`Create or open your Firebase Project`,children:[_jsxs(_components.p,{children:[`Go to your `,_jsx(_components.a,{href:`https://console.firebase.google.com/`,children:`Firebase console`}),` and either create or select a project.`]}),_jsx(Frame,{caption:`Page of Projects within Firebase`,children:_jsx(OptimizedImage,{src:`https://mintcdn.com/onesignal/uWz0BIZj_JUi1RGq/images/mobile/firebase-projects.png?fit=max\u0026auto=format\u0026n=uWz0BIZj_JUi1RGq\u0026q=85\u0026s=aca8614ec0e40fc63fd71f3160098778`,alt:`Firebase console showing the list of available projects`,\"data-og-width\":`2656`,width:`2656`,\"data-og-height\":`1780`,height:`1780`,\"data-path\":`images/mobile/firebase-projects.png`,\"data-optimize\":`true`,\"data-opv\":`3`,srcset:`https://mintcdn.com/onesignal/uWz0BIZj_JUi1RGq/images/mobile/firebase-projects.png?w=280\u0026fit=max\u0026auto=format\u0026n=uWz0BIZj_JUi1RGq\u0026q=85\u0026s=20c64054ed6763a3be6d73713e9adc38 280w, https://mintcdn.com/onesignal/uWz0BIZj_JUi1RGq/images/mobile/firebase-projects.png?w=560\u0026fit=max\u0026auto=format\u0026n=uWz0BIZj_JUi1RGq\u0026q=85\u0026s=90aceea94e5054275b5162ddb6dc05ba 560w, https://mintcdn.com/onesignal/uWz0BIZj_JUi1RGq/images/mobile/firebase-projects.png?w=840\u0026fit=max\u0026auto=format\u0026n=uWz0BIZj_JUi1RGq\u0026q=85\u0026s=c239262c5221d87e461d8cba4243f226 840w, https://mintcdn.com/onesignal/uWz0BIZj_JUi1RGq/images/mobile/firebase-projects.png?w=1100\u0026fit=max\u0026auto=format\u0026n=uWz0BIZj_JUi1RGq\u0026q=85\u0026s=874e8f5fa61dc150085380cec02fe371 1100w, https://mintcdn.com/onesignal/uWz0BIZj_JUi1RGq/images/mobile/firebase-projects.png?w=1650\u0026fit=max\u0026auto=format\u0026n=uWz0BIZj_JUi1RGq\u0026q=85\u0026s=1d537e7767f269a7d97d4970117916a0 1650w, https://mintcdn.com/onesignal/uWz0BIZj_JUi1RGq/images/mobile/firebase-projects.png?w=2500\u0026fit=max\u0026auto=format\u0026n=uWz0BIZj_JUi1RGq\u0026q=85\u0026s=3cb27f13fa4ee704518ac02e9c041ad4 2500w`})})]}),_jsxs(Step,{title:`Enable Firebase Cloud Messaging API V1`,children:[_jsxs(_components.p,{children:[`In your Firebase project’s `,_jsx(_components.strong,{children:`Settings`}),`, select the `,_jsx(_components.strong,{children:`Cloud Messaging`}),` tab.`]}),_jsx(Frame,{caption:`Cloud Messaging tab in Firebase Project settings`,children:_jsx(OptimizedImage,{src:`https://mintcdn.com/onesignal/uWz0BIZj_JUi1RGq/images/mobile/firebase-project-settings-cloud-messaging.png?fit=max\u0026auto=format\u0026n=uWz0BIZj_JUi1RGq\u0026q=85\u0026s=e877c1d0ca51b85b1f2e80418e0195c4`,alt:`Firebase Project settings showing the Cloud Messaging tab with the Firebase Cloud Messaging API (V1) status as Enabled`,\"data-og-width\":`2956`,width:`2956`,\"data-og-height\":`1140`,height:`1140`,\"data-path\":`images/mobile/firebase-project-settings-cloud-messaging.png`,\"data-optimize\":`true`,\"data-opv\":`3`,srcset:`https://mintcdn.com/onesignal/uWz0BIZj_JUi1RGq/images/mobile/firebase-project-settings-cloud-messaging.png?w=280\u0026fit=max\u0026auto=format\u0026n=uWz0BIZj_JUi1RGq\u0026q=85\u0026s=28c476446eec4e5907141149af04a28d 280w, https://mintcdn.com/onesignal/uWz0BIZj_JUi1RGq/images/mobile/firebase-project-settings-cloud-messaging.png?w=560\u0026fit=max\u0026auto=format\u0026n=uWz0BIZj_JUi1RGq\u0026q=85\u0026s=3688112d9c5f88e42200c135ac32b720 560w, https://mintcdn.com/onesignal/uWz0BIZj_JUi1RGq/images/mobile/firebase-project-settings-cloud-messaging.png?w=840\u0026fit=max\u0026auto=format\u0026n=uWz0BIZj_JUi1RGq\u0026q=85\u0026s=89a7c1fe0474fa590a514053facef959 840w, https://mintcdn.com/onesignal/uWz0BIZj_JUi1RGq/images/mobile/firebase-project-settings-cloud-messaging.png?w=1100\u0026fit=max\u0026auto=format\u0026n=uWz0BIZj_JUi1RGq\u0026q=85\u0026s=eee27f23587296234488d657830168c7 1100w, https://mintcdn.com/onesignal/uWz0BIZj_JUi1RGq/images/mobile/firebase-project-settings-cloud-messaging.png?w=1650\u0026fit=max\u0026auto=format\u0026n=uWz0BIZj_JUi1RGq\u0026q=85\u0026s=f94a0b31efc2f96650d93222c35d7669 1650w, https://mintcdn.com/onesignal/uWz0BIZj_JUi1RGq/images/mobile/firebase-project-settings-cloud-messaging.png?w=2500\u0026fit=max\u0026auto=format\u0026n=uWz0BIZj_JUi1RGq\u0026q=85\u0026s=1fd4514a95f0cdb1bb7439d0ecf750f2 2500w`})}),_jsxs(_components.p,{children:[`Check the `,_jsx(_components.strong,{children:`Firebase Cloud Messaging API (V1)`}),` status:`]}),_jsxs(_components.ul,{children:[`\n`,_jsxs(_components.li,{children:[_jsx(_components.strong,{children:`Enabled`}),` (green checkmark) means Google accepts Cloud Messaging send requests for this project.`]}),`\n`,_jsxs(_components.li,{children:[_jsx(_components.strong,{children:`Disabled`}),` means Google rejects those requests, so Android push notifications do not deliver. Enable this by clicking the `,_jsx(_components.strong,{children:`3-dot menu > Manage API in Google Cloud Console`}),`, then click `,_jsx(_components.strong,{children:`Enable`}),` and wait until the status shows `,_jsx(_components.strong,{children:`API Enabled`}),` with a green checkmark.`]}),`\n`]}),_jsx(Frame,{caption:`Firebase Cloud Messaging API enabled in the Google Cloud Console`,children:_jsx(OptimizedImage,{src:`https://mintcdn.com/onesignal/uWz0BIZj_JUi1RGq/images/mobile/firebase-cloud-messaging-api-v1-enabled.png?fit=max\u0026auto=format\u0026n=uWz0BIZj_JUi1RGq\u0026q=85\u0026s=9239c8baa0659152d8aed6fc6af810a7`,alt:`Google Cloud Console Firebase Cloud Messaging API page showing the API Enabled status with a green checkmark`,\"data-og-width\":`1616`,width:`1616`,\"data-og-height\":`750`,height:`750`,\"data-path\":`images/mobile/firebase-cloud-messaging-api-v1-enabled.png`,\"data-optimize\":`true`,\"data-opv\":`3`,srcset:`https://mintcdn.com/onesignal/uWz0BIZj_JUi1RGq/images/mobile/firebase-cloud-messaging-api-v1-enabled.png?w=280\u0026fit=max\u0026auto=format\u0026n=uWz0BIZj_JUi1RGq\u0026q=85\u0026s=125d2be824573b24ae1d0ad2dadace8d 280w, https://mintcdn.com/onesignal/uWz0BIZj_JUi1RGq/images/mobile/firebase-cloud-messaging-api-v1-enabled.png?w=560\u0026fit=max\u0026auto=format\u0026n=uWz0BIZj_JUi1RGq\u0026q=85\u0026s=d65671d23e05cb02f5e5875ae735ab8f 560w, https://mintcdn.com/onesignal/uWz0BIZj_JUi1RGq/images/mobile/firebase-cloud-messaging-api-v1-enabled.png?w=840\u0026fit=max\u0026auto=format\u0026n=uWz0BIZj_JUi1RGq\u0026q=85\u0026s=82a7c18d47a115f2c89b9fe3a5b315fe 840w, https://mintcdn.com/onesignal/uWz0BIZj_JUi1RGq/images/mobile/firebase-cloud-messaging-api-v1-enabled.png?w=1100\u0026fit=max\u0026auto=format\u0026n=uWz0BIZj_JUi1RGq\u0026q=85\u0026s=f016f0b79f28a8433fb11cf20b6161f6 1100w, https://mintcdn.com/onesignal/uWz0BIZj_JUi1RGq/images/mobile/firebase-cloud-messaging-api-v1-enabled.png?w=1650\u0026fit=max\u0026auto=format\u0026n=uWz0BIZj_JUi1RGq\u0026q=85\u0026s=90cf142a7d24dbf51444f9c50a9e496e 1650w, https://mintcdn.com/onesignal/uWz0BIZj_JUi1RGq/images/mobile/firebase-cloud-messaging-api-v1-enabled.png?w=2500\u0026fit=max\u0026auto=format\u0026n=uWz0BIZj_JUi1RGq\u0026q=85\u0026s=49f07ba51430771bd0614949e711f72f 2500w`})}),_jsx(Note,{children:_jsxs(_components.p,{children:[`Enabling the API does not grant the Service Account any roles. If someone else owns the Firebase project or Google account, `,_jsx(_components.a,{href:`#how-do-i-check-my-service-account-permissions`,children:`check your Service Account permissions`}),` first.`]})})]}),_jsxs(Step,{title:`Generate a new private key`,children:[_jsxs(_components.p,{children:[`Back in `,_jsx(_components.strong,{children:`Project settings`}),`, select the `,_jsx(_components.strong,{children:`Service accounts`}),` tab and click `,_jsx(_components.strong,{children:`Generate new private key`}),`.`]}),_jsx(Frame,{caption:`Service Accounts section within Firebase`,children:_jsx(OptimizedImage,{src:`https://mintcdn.com/onesignal/uWz0BIZj_JUi1RGq/images/mobile/firebase-project-settings-service-accounts.png?fit=max\u0026auto=format\u0026n=uWz0BIZj_JUi1RGq\u0026q=85\u0026s=d0b4a6d7c84cd1a639b6de79c3789363`,alt:`Service accounts tab in Firebase Project settings showing the Generate new private key button`,\"data-og-width\":`2978`,width:`2978`,\"data-og-height\":`1734`,height:`1734`,\"data-path\":`images/mobile/firebase-project-settings-service-accounts.png`,\"data-optimize\":`true`,\"data-opv\":`3`,srcset:`https://mintcdn.com/onesignal/uWz0BIZj_JUi1RGq/images/mobile/firebase-project-settings-service-accounts.png?w=280\u0026fit=max\u0026auto=format\u0026n=uWz0BIZj_JUi1RGq\u0026q=85\u0026s=bfa5795777786f4a5ac52630bc2c3dec 280w, https://mintcdn.com/onesignal/uWz0BIZj_JUi1RGq/images/mobile/firebase-project-settings-service-accounts.png?w=560\u0026fit=max\u0026auto=format\u0026n=uWz0BIZj_JUi1RGq\u0026q=85\u0026s=7eec0505dc3633c5fbc85420a96a1ff6 560w, https://mintcdn.com/onesignal/uWz0BIZj_JUi1RGq/images/mobile/firebase-project-settings-service-accounts.png?w=840\u0026fit=max\u0026auto=format\u0026n=uWz0BIZj_JUi1RGq\u0026q=85\u0026s=ca0356bbfcc6b179cf2c27349336bb2e 840w, https://mintcdn.com/onesignal/uWz0BIZj_JUi1RGq/images/mobile/firebase-project-settings-service-accounts.png?w=1100\u0026fit=max\u0026auto=format\u0026n=uWz0BIZj_JUi1RGq\u0026q=85\u0026s=8f60371d8fd7cdf1894b247fcc3a469f 1100w, https://mintcdn.com/onesignal/uWz0BIZj_JUi1RGq/images/mobile/firebase-project-settings-service-accounts.png?w=1650\u0026fit=max\u0026auto=format\u0026n=uWz0BIZj_JUi1RGq\u0026q=85\u0026s=3f16e652211b08dcf36ab09cb15b2649 1650w, https://mintcdn.com/onesignal/uWz0BIZj_JUi1RGq/images/mobile/firebase-project-settings-service-accounts.png?w=2500\u0026fit=max\u0026auto=format\u0026n=uWz0BIZj_JUi1RGq\u0026q=85\u0026s=84a07f9398e54052595bd10db09e3622 2500w`})}),_jsxs(_components.p,{children:[`Confirm by clicking `,_jsx(_components.strong,{children:`Generate key`}),` in the popup.`]}),_jsx(Frame,{caption:`Generate the private key for the service account.`,children:_jsx(OptimizedImage,{src:`https://mintcdn.com/onesignal/uWz0BIZj_JUi1RGq/images/mobile/firebase-generate-new-private-key.png?fit=max\u0026auto=format\u0026n=uWz0BIZj_JUi1RGq\u0026q=85\u0026s=6b3ca4145c180400cf80a434adbbc216`,alt:`Firebase confirmation dialog for generating a new private key for the service account`,\"data-og-width\":`1432`,width:`1432`,\"data-og-height\":`572`,height:`572`,\"data-path\":`images/mobile/firebase-generate-new-private-key.png`,\"data-optimize\":`true`,\"data-opv\":`3`,srcset:`https://mintcdn.com/onesignal/uWz0BIZj_JUi1RGq/images/mobile/firebase-generate-new-private-key.png?w=280\u0026fit=max\u0026auto=format\u0026n=uWz0BIZj_JUi1RGq\u0026q=85\u0026s=d14ba08af3042bd4439f8f2589fa9bd4 280w, https://mintcdn.com/onesignal/uWz0BIZj_JUi1RGq/images/mobile/firebase-generate-new-private-key.png?w=560\u0026fit=max\u0026auto=format\u0026n=uWz0BIZj_JUi1RGq\u0026q=85\u0026s=0c11c4d2442786b302d7dbe2e537f7bb 560w, https://mintcdn.com/onesignal/uWz0BIZj_JUi1RGq/images/mobile/firebase-generate-new-private-key.png?w=840\u0026fit=max\u0026auto=format\u0026n=uWz0BIZj_JUi1RGq\u0026q=85\u0026s=983cd5389aeae5ef1e0defe3b0b6640a 840w, https://mintcdn.com/onesignal/uWz0BIZj_JUi1RGq/images/mobile/firebase-generate-new-private-key.png?w=1100\u0026fit=max\u0026auto=format\u0026n=uWz0BIZj_JUi1RGq\u0026q=85\u0026s=66b1793cb9e2b718e58167bf4ac79231 1100w, https://mintcdn.com/onesignal/uWz0BIZj_JUi1RGq/images/mobile/firebase-generate-new-private-key.png?w=1650\u0026fit=max\u0026auto=format\u0026n=uWz0BIZj_JUi1RGq\u0026q=85\u0026s=c083327eccc04bab32e9504d8a6fc90b 1650w, https://mintcdn.com/onesignal/uWz0BIZj_JUi1RGq/images/mobile/firebase-generate-new-private-key.png?w=2500\u0026fit=max\u0026auto=format\u0026n=uWz0BIZj_JUi1RGq\u0026q=85\u0026s=3b3af5a416d4c5fd0793efab4adc9f33 2500w`})}),_jsx(Warning,{children:_jsx(_components.p,{children:`The downloaded private key contains sensitive credentials. Do not share it or check it into version control.`})}),_jsxs(_components.p,{children:[`Save the `,_jsx(_components.code,{children:`.json`}),` file in a secure location. You upload it to OneSignal in the next section.`]})]})]}),`\n`,_jsx(_components.hr,{}),`\n`,_jsx(Heading,{level:`2`,id:`upload-the-service-account-private-key-to-onesignal`,children:`Upload the Service Account private key to OneSignal`}),`\n`,_jsx(_components.p,{children:`Upload the private key so OneSignal’s servers can send push notifications through your Firebase project.`}),`\n`,_jsxs(Steps,{children:[_jsx(Step,{title:`Open Android settings`,children:_jsxs(_components.p,{children:[`Go to `,_jsx(_components.strong,{children:`Settings > Push \u0026 In-App`}),` and follow the steps to reach Google Android (FCM) configuration.`]})}),_jsxs(Step,{title:`Upload your Service Account private key`,children:[_jsxs(_components.p,{children:[`Click `,_jsx(_components.strong,{children:`Select file`}),` and choose the `,_jsx(_components.code,{children:`.json`}),` private key you saved in the previous section.`]}),_jsx(Frame,{caption:`FCM configuration screen`,children:_jsx(OptimizedImage,{src:`https://mintcdn.com/onesignal/uWz0BIZj_JUi1RGq/images/mobile/onesignal-fcm-configuration.png?fit=max\u0026auto=format\u0026n=uWz0BIZj_JUi1RGq\u0026q=85\u0026s=5fb6b977bf1517c453b1c0b0c9b57274`,alt:`OneSignal Google Android (FCM) configuration screen with the Service Account JSON file upload field and Select file button`,\"data-og-width\":`1780`,width:`1780`,\"data-og-height\":`702`,height:`702`,\"data-path\":`images/mobile/onesignal-fcm-configuration.png`,\"data-optimize\":`true`,\"data-opv\":`3`,srcset:`https://mintcdn.com/onesignal/uWz0BIZj_JUi1RGq/images/mobile/onesignal-fcm-configuration.png?w=280\u0026fit=max\u0026auto=format\u0026n=uWz0BIZj_JUi1RGq\u0026q=85\u0026s=d32e43ad6f896701de49567ea081228e 280w, https://mintcdn.com/onesignal/uWz0BIZj_JUi1RGq/images/mobile/onesignal-fcm-configuration.png?w=560\u0026fit=max\u0026auto=format\u0026n=uWz0BIZj_JUi1RGq\u0026q=85\u0026s=d3213a281d494de779964c3bafeff58d 560w, https://mintcdn.com/onesignal/uWz0BIZj_JUi1RGq/images/mobile/onesignal-fcm-configuration.png?w=840\u0026fit=max\u0026auto=format\u0026n=uWz0BIZj_JUi1RGq\u0026q=85\u0026s=d26d6e3c9ae027cfcaab95e3650b604e 840w, https://mintcdn.com/onesignal/uWz0BIZj_JUi1RGq/images/mobile/onesignal-fcm-configuration.png?w=1100\u0026fit=max\u0026auto=format\u0026n=uWz0BIZj_JUi1RGq\u0026q=85\u0026s=8009ead86abfa57ed7518715b33ab831 1100w, https://mintcdn.com/onesignal/uWz0BIZj_JUi1RGq/images/mobile/onesignal-fcm-configuration.png?w=1650\u0026fit=max\u0026auto=format\u0026n=uWz0BIZj_JUi1RGq\u0026q=85\u0026s=340a763082ecc76e247dad9007a6a5fe 1650w, https://mintcdn.com/onesignal/uWz0BIZj_JUi1RGq/images/mobile/onesignal-fcm-configuration.png?w=2500\u0026fit=max\u0026auto=format\u0026n=uWz0BIZj_JUi1RGq\u0026q=85\u0026s=3c6391d479d0cb6bd8bd9250e53c4429 2500w`})})]}),_jsxs(Step,{title:`Save and continue`,children:[_jsxs(_components.p,{children:[`Click `,_jsx(_components.strong,{children:`Save \u0026 Continue`}),`. OneSignal validates the private key and moves you to SDK selection.`]}),_jsx(Warning,{children:_jsxs(_components.p,{children:[`If the dashboard shows `,_jsx(_components.strong,{children:`Invalid request`}),`, the Service Account is likely missing a required role. See `,_jsx(_components.a,{href:`#how-do-i-check-my-service-account-permissions`,children:`How do I check my Service Account permissions?`})]})})]})]}),`\n`,_jsx(_components.hr,{}),`\n`,_jsx(Heading,{level:`2`,id:`add-your-firebase-configuration-file`,children:`Add your Firebase configuration file`}),`\n`,_jsxs(_components.p,{children:[`Your app needs a `,_jsx(_components.code,{children:`google-services.json`}),` file from the `,_jsx(_components.strong,{children:`same Firebase project`}),` as your Service Account above. `,_jsx(_components.strong,{children:`Do not upload this file to OneSignal.`}),` It belongs in your app’s source code and tells your app which Firebase project to register with.`]}),`\n`,_jsxs(_components.p,{children:[`On OneSignal Android SDK `,_jsx(_components.code,{children:`5.11.0`}),` and later, the SDK registers through your Firebase project when your `,_jsx(_components.code,{children:`google-services.json`}),` matches the Sender ID in OneSignal. Otherwise the SDK uses OneSignal’s shared Firebase project. See `,_jsx(_components.a,{href:`#what-happens-if-i-skip-google-services-json`,children:`What happens if I skip google-services.json?`})]}),`\n`,_jsxs(Warning,{children:[_jsxs(_components.p,{children:[_jsx(_components.strong,{children:`Upgrading an existing app?`}),` Delivery keeps using the same Firebase project and Service Account, but:`]}),_jsxs(_components.ul,{children:[`\n`,_jsxs(_components.li,{children:[`Each device gets a `,_jsx(_components.strong,{children:`new push token value`}),` the next time it opens the updated app. Its Subscription is preserved, and the old token works until then.`]}),`\n`,_jsx(_components.li,{children:`Your Firebase console FCM metrics start including OneSignal registrations.`}),`\n`,_jsxs(_components.li,{children:[`Your Firebase token calls now affect OneSignal. Calling `,_jsx(_components.code,{children:`FirebaseMessaging.getInstance().deleteToken()`}),` (on logout, for example) also deletes the OneSignal registration until the SDK re-registers. With `,_jsx(_components.a,{href:`/docs/en/android-firebase-installation-id`,children:`Firebase Installation ID registration`}),`, the equivalent call is `,_jsx(_components.code,{children:`unregister()`}),`.`]}),`\n`]}),_jsx(_components.p,{children:`Plan to add the file eventually. Without it, your app stays on legacy FCM registration tokens, which Firebase has deprecated.`})]}),`\n`,_jsxs(Steps,{children:[_jsxs(Step,{title:`Download google-services.json`,children:[_jsxs(_components.p,{children:[`In your `,_jsx(_components.a,{href:`https://console.firebase.google.com/`,children:`Firebase console`}),`, open the project you used for the Service Account private key. Go to `,_jsx(_components.strong,{children:`Project settings > General`}),`, then scroll to `,_jsx(_components.strong,{children:`Your apps`}),`. If your Android app is not listed, click `,_jsx(_components.strong,{children:`Add app`}),`.`]}),_jsxs(_components.p,{children:[`Confirm the `,_jsx(_components.strong,{children:`Android package name`}),` matches your app’s `,_jsx(_components.code,{children:`applicationId`}),`, then download `,_jsx(_components.code,{children:`google-services.json`}),`.`]})]}),_jsxs(Step,{title:`Add it to your app`,children:[_jsx(_components.p,{children:`Your app never reads the file at runtime. A build step converts it into Android resources, and without that step the file does nothing. Find your platform below and follow its setup guide.`}),_jsxs(Table,{children:[_jsx(_components.thead,{children:_jsxs(_components.tr,{children:[_jsx(_components.th,{children:`Platform`}),_jsx(_components.th,{children:`Takes effect from`}),_jsx(_components.th,{children:`Where the file goes`}),_jsx(_components.th,{children:`How it is processed`})]})}),_jsxs(_components.tbody,{children:[_jsxs(_components.tr,{children:[_jsx(_components.td,{children:_jsx(_components.a,{href:`/docs/en/android-sdk-setup#step-2-add-your-firebase-configuration`,children:_jsx(_components.strong,{children:`Android (native)`})})}),_jsx(_components.td,{\"data-numeric\":`true`,children:_jsx(_components.code,{children:`5.11.0`})}),_jsx(_components.td,{children:_jsx(_components.code,{children:`app/google-services.json`})}),_jsxs(_components.td,{children:[`Apply `,_jsx(_components.code,{children:`com.google.gms.google-services`}),` in the app module`]})]}),_jsxs(_components.tr,{children:[_jsx(_components.td,{children:_jsx(_components.a,{href:`/docs/en/flutter-sdk-setup#add-your-firebase-configuration`,children:_jsx(_components.strong,{children:`Flutter`})})}),_jsx(_components.td,{\"data-numeric\":`true`,children:_jsx(_components.code,{children:`5.7.2`})}),_jsx(_components.td,{children:_jsx(_components.code,{children:`android/app/google-services.json`})}),_jsxs(_components.td,{children:[`Declare the plugin in `,_jsx(_components.code,{children:`android/settings.gradle`}),` and apply it in `,_jsx(_components.code,{children:`android/app/build.gradle`}),`. The OneSignal Flutter plugin cannot apply it for you`]})]}),_jsxs(_components.tr,{children:[_jsx(_components.td,{children:_jsx(_components.a,{href:`/docs/en/react-native-sdk-setup#add-your-firebase-configuration`,children:_jsx(_components.strong,{children:`React Native`})})}),_jsx(_components.td,{\"data-numeric\":`true`,children:_jsx(_components.code,{children:`5.5.16`})}),_jsx(_components.td,{children:_jsx(_components.code,{children:`android/app/google-services.json`})}),_jsx(_components.td,{children:`Declare and apply the plugin in the Android app module, or reuse an existing React Native Firebase setup`})]}),_jsxs(_components.tr,{children:[_jsx(_components.td,{children:_jsx(_components.a,{href:`/docs/en/react-native-expo-sdk-setup#add-your-firebase-configuration`,children:_jsx(_components.strong,{children:`Expo`})})}),_jsxs(_components.td,{children:[_jsx(_components.code,{children:`react-native-onesignal`}),` `,_jsx(_components.code,{children:`5.5.16`})]}),_jsxs(_components.td,{children:[`Any path, referenced by `,_jsx(_components.code,{children:`android.googleServicesFile`}),` in your app config`]}),_jsxs(_components.td,{children:[_jsx(_components.code,{children:`expo prebuild`}),` copies the file and applies the plugin. `,_jsx(_components.code,{children:`android.package`}),` must match a client entry in the file. Requires a dev build, not Expo Go`]})]}),_jsxs(_components.tr,{children:[_jsx(_components.td,{children:_jsx(_components.a,{href:`/docs/en/capacitor-sdk-setup#add-your-firebase-configuration`,children:_jsx(_components.strong,{children:`Capacitor`})})}),_jsx(_components.td,{\"data-numeric\":`true`,children:_jsx(_components.code,{children:`1.2.2`})}),_jsx(_components.td,{children:_jsx(_components.code,{children:`android/app/google-services.json`})}),_jsx(_components.td,{children:`Automatic. Capacitor’s Android template already carries the plugin and applies it when the file is present`})]}),_jsxs(_components.tr,{children:[_jsx(_components.td,{children:_jsx(_components.a,{href:`/docs/en/cordova-sdk-setup#add-your-firebase-configuration`,children:_jsx(_components.strong,{children:`Cordova`})})}),_jsx(_components.td,{\"data-numeric\":`true`,children:_jsx(_components.code,{children:`5.6.2`})}),_jsxs(_components.td,{children:[`Project root, copied to `,_jsx(_components.code,{children:`platforms/android/app/`}),` by a `,_jsx(_components.code,{children:`\u003cresource-file>`}),` entry in `,_jsx(_components.code,{children:`config.xml`})]}),_jsxs(_components.td,{children:[`Set `,_jsx(_components.code,{children:`\u003cpreference name=\"GradlePluginGoogleServicesEnabled\" value=\"true\" />`}),` in `,_jsx(_components.code,{children:`config.xml`})]})]}),_jsxs(_components.tr,{children:[_jsx(_components.td,{children:_jsx(_components.a,{href:`/docs/en/unity-sdk-setup#android-firebase-configuration`,children:_jsx(_components.strong,{children:`Unity`})})}),_jsx(_components.td,{\"data-numeric\":`true`,children:_jsx(_components.code,{children:`5.4.2`})}),_jsxs(_components.td,{children:[`No JSON at runtime. Ship `,_jsx(_components.code,{children:`res/values/google-services.xml`}),` inside an `,_jsx(_components.code,{children:`.androidlib`}),` under `,_jsx(_components.code,{children:`Assets/Plugins/Android`})]}),_jsxs(_components.td,{children:[`No plugin step. `,_jsx(_components.code,{children:`FirebaseInitProvider`}),` reads the resources directly. The Firebase Unity SDK generates this file from `,_jsx(_components.code,{children:`google-services.json`})]})]}),_jsxs(_components.tr,{children:[_jsx(_components.td,{children:_jsx(_components.a,{href:`/docs/en/net-sdk-setup#add-your-firebase-configuration`,children:_jsx(_components.strong,{children:`.NET / MAUI`})})}),_jsx(_components.td,{\"data-numeric\":`true`,children:_jsx(_components.code,{children:`6.4.2`})}),_jsx(_components.td,{children:_jsx(_components.code,{children:`Platforms/Android/google-services.json`})}),_jsxs(_components.td,{children:[`Reference it with `,_jsx(_components.code,{children:`\u003cGoogleServicesJson Include=\"Platforms\\\\Android\\\\google-services.json\" />`})]})]})]})]}),_jsx(Note,{children:_jsx(_components.p,{children:`On SDK versions earlier than the ones listed above, the file is safe to add but does nothing for OneSignal. Push keeps registering through OneSignal’s shared Firebase project until you upgrade.`})})]}),_jsxs(Step,{title:`Apply the Google Services Gradle plugin`,children:[_jsxs(_components.p,{children:[_jsx(_components.strong,{children:`This step is for Android native, React Native, and Flutter only.`}),` Other platforms handle the plugin as described in the table above.`]}),_jsxs(_components.p,{children:[`The plugin resolves from Google’s Maven repository. Confirm `,_jsx(_components.code,{children:`google()`}),` is listed under `,_jsx(_components.code,{children:`pluginManagement`}),` in `,_jsx(_components.code,{children:`settings.gradle`}),` or `,_jsx(_components.code,{children:`settings.gradle.kts`}),`, or the build fails with `,_jsx(_components.code,{children:`Plugin [id: 'com.google.gms.google-services'] was not found`}),`:`]}),_jsx(CodeBlock,{filename:`settings.gradle.kts`,numberOfLines:`7`,language:`kotlin`,children:_jsx(_components.pre,{className:`shiki shiki-themes github-light-default dark-plus`,style:{backgroundColor:`#ffffff`,\"--shiki-dark-bg\":`#0B0C0E`,color:`#1f2328`,\"--shiki-dark\":`#D4D4D4`},language:`kotlin`,children:_jsxs(_components.code,{language:`kotlin`,numberOfLines:`7`,children:[_jsxs(_components.span,{className:`line`,children:[_jsx(_components.span,{style:{color:`#8250DF`,\"--shiki-dark\":`#DCDCAA`},children:`pluginManagement`}),_jsx(_components.span,{style:{color:`#1F2328`,\"--shiki-dark\":`#D4D4D4`},children:` {`})]}),`\n`,_jsxs(_components.span,{className:`line`,children:[_jsx(_components.span,{style:{color:`#8250DF`,\"--shiki-dark\":`#DCDCAA`},children:` repositories`}),_jsx(_components.span,{style:{color:`#1F2328`,\"--shiki-dark\":`#D4D4D4`},children:` {`})]}),`\n`,_jsxs(_components.span,{className:`line`,children:[_jsx(_components.span,{style:{color:`#8250DF`,\"--shiki-dark\":`#DCDCAA`},children:` google`}),_jsx(_components.span,{style:{color:`#1F2328`,\"--shiki-dark\":`#D4D4D4`},children:`()`})]}),`\n`,_jsxs(_components.span,{className:`line`,children:[_jsx(_components.span,{style:{color:`#8250DF`,\"--shiki-dark\":`#DCDCAA`},children:` mavenCentral`}),_jsx(_components.span,{style:{color:`#1F2328`,\"--shiki-dark\":`#D4D4D4`},children:`()`})]}),`\n`,_jsxs(_components.span,{className:`line`,children:[_jsx(_components.span,{style:{color:`#8250DF`,\"--shiki-dark\":`#DCDCAA`},children:` gradlePluginPortal`}),_jsx(_components.span,{style:{color:`#1F2328`,\"--shiki-dark\":`#D4D4D4`},children:`()`})]}),`\n`,_jsx(_components.span,{className:`line`,children:_jsx(_components.span,{style:{color:`#1F2328`,\"--shiki-dark\":`#D4D4D4`},children:` }`})}),`\n`,_jsx(_components.span,{className:`line`,children:_jsx(_components.span,{style:{color:`#1F2328`,\"--shiki-dark\":`#D4D4D4`},children:`}`})}),`\n`]})})}),_jsxs(_components.p,{children:[`Add the plugin to your `,_jsx(_components.strong,{children:`project-level`}),` Gradle file:`]}),_jsxs(CodeGroup,{children:[_jsx(CodeBlock,{filename:`build.gradle.kts (Project)`,numberOfLines:`3`,language:`kotlin`,children:_jsx(_components.pre,{className:`shiki shiki-themes github-light-default dark-plus`,style:{backgroundColor:`#ffffff`,\"--shiki-dark-bg\":`#0B0C0E`,color:`#1f2328`,\"--shiki-dark\":`#D4D4D4`},language:`kotlin`,children:_jsxs(_components.code,{language:`kotlin`,numberOfLines:`3`,children:[_jsxs(_components.span,{className:`line`,children:[_jsx(_components.span,{style:{color:`#8250DF`,\"--shiki-dark\":`#DCDCAA`},children:`plugins`}),_jsx(_components.span,{style:{color:`#1F2328`,\"--shiki-dark\":`#D4D4D4`},children:` {`})]}),`\n`,_jsxs(_components.span,{className:`line`,children:[_jsx(_components.span,{style:{color:`#8250DF`,\"--shiki-dark\":`#DCDCAA`},children:` id`}),_jsx(_components.span,{style:{color:`#1F2328`,\"--shiki-dark\":`#D4D4D4`},children:`(`}),_jsx(_components.span,{style:{color:`#0A3069`,\"--shiki-dark\":`#CE9178`},children:`\"com.google.gms.google-services\"`}),_jsx(_components.span,{style:{color:`#1F2328`,\"--shiki-dark\":`#D4D4D4`},children:`) version `}),_jsx(_components.span,{style:{color:`#0A3069`,\"--shiki-dark\":`#CE9178`},children:`\"[4.4.2, 4.99.99]\"`}),_jsx(_components.span,{style:{color:`#1F2328`,\"--shiki-dark\":`#D4D4D4`},children:` apply `}),_jsx(_components.span,{style:{color:`#0550AE`,\"--shiki-dark\":`#569CD6`},children:`false`})]}),`\n`,_jsx(_components.span,{className:`line`,children:_jsx(_components.span,{style:{color:`#1F2328`,\"--shiki-dark\":`#D4D4D4`},children:`}`})}),`\n`]})})}),_jsx(CodeBlock,{filename:`build.gradle (Project)`,numberOfLines:`5`,language:`groovy`,children:_jsx(_components.pre,{className:`shiki shiki-themes github-light-default dark-plus`,style:{backgroundColor:`#ffffff`,\"--shiki-dark-bg\":`#0B0C0E`,color:`#1f2328`,\"--shiki-dark\":`#D4D4D4`},language:`groovy`,children:_jsxs(_components.code,{language:`groovy`,numberOfLines:`5`,children:[_jsx(_components.span,{className:`line`,children:_jsx(_components.span,{style:{color:`#1F2328`,\"--shiki-dark\":`#D4D4D4`},children:`buildscript {`})}),`\n`,_jsx(_components.span,{className:`line`,children:_jsx(_components.span,{style:{color:`#1F2328`,\"--shiki-dark\":`#D4D4D4`},children:` dependencies {`})}),`\n`,_jsxs(_components.span,{className:`line`,children:[_jsx(_components.span,{style:{color:`#1F2328`,\"--shiki-dark\":`#D4D4D4`},children:` classpath `}),_jsx(_components.span,{style:{color:`#0A3069`,\"--shiki-dark\":`#CE9178`},children:`'com.google.gms:google-services:[4.4.2, 4.99.99]'`})]}),`\n`,_jsx(_components.span,{className:`line`,children:_jsx(_components.span,{style:{color:`#1F2328`,\"--shiki-dark\":`#D4D4D4`},children:` }`})}),`\n`,_jsx(_components.span,{className:`line`,children:_jsx(_components.span,{style:{color:`#1F2328`,\"--shiki-dark\":`#D4D4D4`},children:`}`})}),`\n`]})})})]}),_jsxs(_components.p,{children:[`Then apply it in your `,_jsx(_components.strong,{children:`app-level`}),` Gradle file:`]}),_jsxs(CodeGroup,{children:[_jsx(CodeBlock,{filename:`app/build.gradle.kts`,numberOfLines:`3`,language:`kotlin`,children:_jsx(_components.pre,{className:`shiki shiki-themes github-light-default dark-plus`,style:{backgroundColor:`#ffffff`,\"--shiki-dark-bg\":`#0B0C0E`,color:`#1f2328`,\"--shiki-dark\":`#D4D4D4`},language:`kotlin`,children:_jsxs(_components.code,{language:`kotlin`,numberOfLines:`3`,children:[_jsxs(_components.span,{className:`line`,children:[_jsx(_components.span,{style:{color:`#8250DF`,\"--shiki-dark\":`#DCDCAA`},children:`plugins`}),_jsx(_components.span,{style:{color:`#1F2328`,\"--shiki-dark\":`#D4D4D4`},children:` {`})]}),`\n`,_jsxs(_components.span,{className:`line`,children:[_jsx(_components.span,{style:{color:`#8250DF`,\"--shiki-dark\":`#DCDCAA`},children:` id`}),_jsx(_components.span,{style:{color:`#1F2328`,\"--shiki-dark\":`#D4D4D4`},children:`(`}),_jsx(_components.span,{style:{color:`#0A3069`,\"--shiki-dark\":`#CE9178`},children:`\"com.google.gms.google-services\"`}),_jsx(_components.span,{style:{color:`#1F2328`,\"--shiki-dark\":`#D4D4D4`},children:`)`})]}),`\n`,_jsx(_components.span,{className:`line`,children:_jsx(_components.span,{style:{color:`#1F2328`,\"--shiki-dark\":`#D4D4D4`},children:`}`})}),`\n`]})})}),_jsx(CodeBlock,{filename:`app/build.gradle`,numberOfLines:`1`,language:`groovy`,children:_jsx(_components.pre,{className:`shiki shiki-themes github-light-default dark-plus`,style:{backgroundColor:`#ffffff`,\"--shiki-dark-bg\":`#0B0C0E`,color:`#1f2328`,\"--shiki-dark\":`#D4D4D4`},language:`groovy`,children:_jsxs(_components.code,{language:`groovy`,numberOfLines:`1`,children:[_jsxs(_components.span,{className:`line`,children:[_jsx(_components.span,{style:{color:`#1F2328`,\"--shiki-dark\":`#D4D4D4`},children:`apply `}),_jsx(_components.span,{style:{color:`#0550AE`,\"--shiki-dark\":`#D4D4D4`},children:`plugin`}),_jsx(_components.span,{style:{color:`#1F2328`,\"--shiki-dark\":`#D4D4D4`},children:`: `}),_jsx(_components.span,{style:{color:`#0A3069`,\"--shiki-dark\":`#CE9178`},children:`'com.google.gms.google-services'`})]}),`\n`]})})})]}),_jsxs(_components.p,{children:[`If your project uses a `,_jsx(_components.a,{href:`https://docs.gradle.org/current/userguide/version_catalogs.html`,children:`Gradle version catalog`}),`, declare the version there instead of in the project-level file. The app-level step above is unchanged.`]}),_jsxs(CodeGroup,{children:[_jsx(CodeBlock,{filename:`gradle/libs.versions.toml`,numberOfLines:`5`,language:`toml`,children:_jsx(_components.pre,{className:`shiki shiki-themes github-light-default dark-plus`,style:{backgroundColor:`#ffffff`,\"--shiki-dark-bg\":`#0B0C0E`,color:`#1f2328`,\"--shiki-dark\":`#D4D4D4`},language:`toml`,children:_jsxs(_components.code,{language:`toml`,numberOfLines:`5`,children:[_jsxs(_components.span,{className:`line`,children:[_jsx(_components.span,{style:{color:`#1F2328`,\"--shiki-dark\":`#D4D4D4`},children:`[`}),_jsx(_components.span,{style:{color:`#953800`,\"--shiki-dark\":`#D4D4D4`},children:`versions`}),_jsx(_components.span,{style:{color:`#1F2328`,\"--shiki-dark\":`#D4D4D4`},children:`]`})]}),`\n`,_jsxs(_components.span,{className:`line`,children:[_jsx(_components.span,{style:{color:`#1F2328`,\"--shiki-dark\":`#9CDCFE`},children:`google-services`}),_jsx(_components.span,{style:{color:`#1F2328`,\"--shiki-dark\":`#D4D4D4`},children:` = `}),_jsx(_components.span,{style:{color:`#0A3069`,\"--shiki-dark\":`#CE9178`},children:`\"[4.4.2, 4.99.99]\"`})]}),`\n`,_jsx(_components.span,{className:`line`}),`\n`,_jsxs(_components.span,{className:`line`,children:[_jsx(_components.span,{style:{color:`#1F2328`,\"--shiki-dark\":`#D4D4D4`},children:`[`}),_jsx(_components.span,{style:{color:`#953800`,\"--shiki-dark\":`#D4D4D4`},children:`plugins`}),_jsx(_components.span,{style:{color:`#1F2328`,\"--shiki-dark\":`#D4D4D4`},children:`]`})]}),`\n`,_jsxs(_components.span,{className:`line`,children:[_jsx(_components.span,{style:{color:`#1F2328`,\"--shiki-dark\":`#9CDCFE`},children:`google-services`}),_jsx(_components.span,{style:{color:`#1F2328`,\"--shiki-dark\":`#D4D4D4`},children:` = { `}),_jsx(_components.span,{style:{color:`#1F2328`,\"--shiki-dark\":`#9CDCFE`},children:`id`}),_jsx(_components.span,{style:{color:`#1F2328`,\"--shiki-dark\":`#D4D4D4`},children:` = `}),_jsx(_components.span,{style:{color:`#0A3069`,\"--shiki-dark\":`#CE9178`},children:`\"com.google.gms.google-services\"`}),_jsx(_components.span,{style:{color:`#1F2328`,\"--shiki-dark\":`#D4D4D4`},children:`, `}),_jsx(_components.span,{style:{color:`#1F2328`,\"--shiki-dark\":`#9CDCFE`},children:`version.ref`}),_jsx(_components.span,{style:{color:`#1F2328`,\"--shiki-dark\":`#D4D4D4`},children:` = `}),_jsx(_components.span,{style:{color:`#0A3069`,\"--shiki-dark\":`#CE9178`},children:`\"google-services\"`}),_jsx(_components.span,{style:{color:`#1F2328`,\"--shiki-dark\":`#D4D4D4`},children:` }`})]}),`\n`]})})}),_jsx(CodeBlock,{filename:`build.gradle.kts (Project)`,numberOfLines:`3`,language:`kotlin`,children:_jsx(_components.pre,{className:`shiki shiki-themes github-light-default dark-plus`,style:{backgroundColor:`#ffffff`,\"--shiki-dark-bg\":`#0B0C0E`,color:`#1f2328`,\"--shiki-dark\":`#D4D4D4`},language:`kotlin`,children:_jsxs(_components.code,{language:`kotlin`,numberOfLines:`3`,children:[_jsxs(_components.span,{className:`line`,children:[_jsx(_components.span,{style:{color:`#8250DF`,\"--shiki-dark\":`#DCDCAA`},children:`plugins`}),_jsx(_components.span,{style:{color:`#1F2328`,\"--shiki-dark\":`#D4D4D4`},children:` {`})]}),`\n`,_jsxs(_components.span,{className:`line`,children:[_jsx(_components.span,{style:{color:`#8250DF`,\"--shiki-dark\":`#DCDCAA`},children:` alias`}),_jsx(_components.span,{style:{color:`#1F2328`,\"--shiki-dark\":`#D4D4D4`},children:`(libs.plugins.google.services) apply `}),_jsx(_components.span,{style:{color:`#0550AE`,\"--shiki-dark\":`#569CD6`},children:`false`})]}),`\n`,_jsx(_components.span,{className:`line`,children:_jsx(_components.span,{style:{color:`#1F2328`,\"--shiki-dark\":`#D4D4D4`},children:`}`})}),`\n`]})})})]}),_jsx(_components.p,{children:`Sync Gradle.`}),_jsxs(_components.p,{children:[`The range keeps you on the latest 4.x plugin. To pin a specific release, see `,_jsx(_components.a,{href:`https://firebase.google.com/docs/android/google-services-plugin-and-file`,children:`Google’s documentation`}),`.`]})]})]}),`\n`,_jsx(Heading,{level:`3`,id:`verify-the-file-took-effect`,children:`Verify the file took effect`}),`\n`,_jsx(_components.p,{children:`Build your app, then confirm the plugin generated Firebase’s string resources:`}),`\n`,_jsx(CodeBlock,{filename:``,numberOfLines:`2`,language:`shellscript`,children:_jsx(_components.pre,{className:`shiki shiki-themes github-light-default dark-plus`,style:{backgroundColor:`#ffffff`,\"--shiki-dark-bg\":`#0B0C0E`,color:`#1f2328`,\"--shiki-dark\":`#D4D4D4`},language:`shellscript`,children:_jsxs(_components.code,{language:`shellscript`,numberOfLines:`2`,children:[_jsxs(_components.span,{className:`line`,children:[_jsx(_components.span,{style:{color:`#953800`,\"--shiki-dark\":`#DCDCAA`},children:`./gradlew`}),_jsx(_components.span,{style:{color:`#0A3069`,\"--shiki-dark\":`#CE9178`},children:` :app:processDebugGoogleServices`})]}),`\n`,_jsxs(_components.span,{className:`line`,children:[_jsx(_components.span,{style:{color:`#953800`,\"--shiki-dark\":`#DCDCAA`},children:`grep`}),_jsx(_components.span,{style:{color:`#0550AE`,\"--shiki-dark\":`#569CD6`},children:` -r`}),_jsx(_components.span,{style:{color:`#0A3069`,\"--shiki-dark\":`#CE9178`},children:` \"google_app_id\\\\|project_id\"`}),_jsx(_components.span,{style:{color:`#0A3069`,\"--shiki-dark\":`#CE9178`},children:` app/build/generated/res/`})]}),`\n`]})})}),`\n`,_jsx(Check,{children:_jsxs(_components.p,{children:[`If `,_jsx(_components.code,{children:`google_app_id`}),` and `,_jsx(_components.code,{children:`project_id`}),` appear, the file took effect. A successful build alone does not prove it.`]})}),`\n`,_jsxs(_components.ul,{children:[`\n`,_jsxs(_components.li,{children:[_jsx(_components.strong,{children:`Neither value appears:`}),` the plugin is not applied. Adding the file without the plugin produces no error.`]}),`\n`,_jsxs(_components.li,{children:[_jsxs(_components.strong,{children:[_jsx(_components.code,{children:`File google-services.json is missing`}),`:`]}),` the plugin is applied, but the file is not where your toolchain expects it. Check the table above.`]}),`\n`,_jsxs(_components.li,{children:[_jsxs(_components.strong,{children:[_jsx(_components.code,{children:`No matching client found for package name`}),`:`]}),` the package registered in Firebase does not match your `,_jsx(_components.code,{children:`applicationId`}),`. Fix it in the Firebase console and download the file again.`]}),`\n`,_jsxs(_components.li,{children:[_jsx(_components.strong,{children:`The file comes from a different Firebase project than your Service Account:`}),` see `,_jsx(_components.a,{href:`#match-your-firebase-projects`,children:`Match your Firebase projects`}),`.`]}),`\n`]}),`\n`,_jsx(Heading,{level:`3`,id:`set-up-firebase-without-google-services-json`,children:`Set up Firebase without google-services.json`}),`\n`,_jsxs(_components.p,{children:[`Initialize the default `,_jsx(_components.code,{children:`FirebaseApp`}),` in code if you can’t use the Google Services Gradle plugin, or if you load Firebase only after user consent. Use values from the same Firebase project as the Service Account private key you uploaded to OneSignal:`]}),`\n`,_jsx(CodeBlock,{filename:``,numberOfLines:`8`,language:`kotlin`,children:_jsx(_components.pre,{className:`shiki shiki-themes github-light-default dark-plus`,style:{backgroundColor:`#ffffff`,\"--shiki-dark-bg\":`#0B0C0E`,color:`#1f2328`,\"--shiki-dark\":`#D4D4D4`},language:`kotlin`,children:_jsxs(_components.code,{language:`kotlin`,numberOfLines:`8`,children:[_jsxs(_components.span,{className:`line`,children:[_jsx(_components.span,{style:{color:`#CF222E`,\"--shiki-dark\":`#569CD6`},children:`val`}),_jsx(_components.span,{style:{color:`#1F2328`,\"--shiki-dark\":`#D4D4D4`},children:` options `}),_jsx(_components.span,{style:{color:`#CF222E`,\"--shiki-dark\":`#D4D4D4`},children:`=`}),_jsx(_components.span,{style:{color:`#1F2328`,\"--shiki-dark\":`#D4D4D4`},children:` FirebaseOptions.`}),_jsx(_components.span,{style:{color:`#8250DF`,\"--shiki-dark\":`#DCDCAA`},children:`Builder`}),_jsx(_components.span,{style:{color:`#1F2328`,\"--shiki-dark\":`#D4D4D4`},children:`()`})]}),`\n`,_jsxs(_components.span,{className:`line`,children:[_jsx(_components.span,{style:{color:`#1F2328`,\"--shiki-dark\":`#D4D4D4`},children:` .`}),_jsx(_components.span,{style:{color:`#8250DF`,\"--shiki-dark\":`#DCDCAA`},children:`setProjectId`}),_jsx(_components.span,{style:{color:`#1F2328`,\"--shiki-dark\":`#D4D4D4`},children:`(`}),_jsx(_components.span,{style:{color:`#0A3069`,\"--shiki-dark\":`#CE9178`},children:`\"YOUR_FIREBASE_PROJECT_ID\"`}),_jsx(_components.span,{style:{color:`#1F2328`,\"--shiki-dark\":`#D4D4D4`},children:`)`})]}),`\n`,_jsxs(_components.span,{className:`line`,children:[_jsx(_components.span,{style:{color:`#1F2328`,\"--shiki-dark\":`#D4D4D4`},children:` .`}),_jsx(_components.span,{style:{color:`#8250DF`,\"--shiki-dark\":`#DCDCAA`},children:`setApplicationId`}),_jsx(_components.span,{style:{color:`#1F2328`,\"--shiki-dark\":`#D4D4D4`},children:`(`}),_jsx(_components.span,{style:{color:`#0A3069`,\"--shiki-dark\":`#CE9178`},children:`\"1:123456789012:android:abcdef123456\"`}),_jsx(_components.span,{style:{color:`#1F2328`,\"--shiki-dark\":`#D4D4D4`},children:`)`})]}),`\n`,_jsxs(_components.span,{className:`line`,children:[_jsx(_components.span,{style:{color:`#1F2328`,\"--shiki-dark\":`#D4D4D4`},children:` .`}),_jsx(_components.span,{style:{color:`#8250DF`,\"--shiki-dark\":`#DCDCAA`},children:`setApiKey`}),_jsx(_components.span,{style:{color:`#1F2328`,\"--shiki-dark\":`#D4D4D4`},children:`(`}),_jsx(_components.span,{style:{color:`#0A3069`,\"--shiki-dark\":`#CE9178`},children:`\"YOUR_FIREBASE_API_KEY\"`}),_jsx(_components.span,{style:{color:`#1F2328`,\"--shiki-dark\":`#D4D4D4`},children:`)`})]}),`\n`,_jsxs(_components.span,{className:`line`,children:[_jsx(_components.span,{style:{color:`#1F2328`,\"--shiki-dark\":`#D4D4D4`},children:` .`}),_jsx(_components.span,{style:{color:`#8250DF`,\"--shiki-dark\":`#DCDCAA`},children:`setGcmSenderId`}),_jsx(_components.span,{style:{color:`#1F2328`,\"--shiki-dark\":`#D4D4D4`},children:`(`}),_jsx(_components.span,{style:{color:`#0A3069`,\"--shiki-dark\":`#CE9178`},children:`\"123456789012\"`}),_jsx(_components.span,{style:{color:`#1F2328`,\"--shiki-dark\":`#D4D4D4`},children:`)`})]}),`\n`,_jsxs(_components.span,{className:`line`,children:[_jsx(_components.span,{style:{color:`#1F2328`,\"--shiki-dark\":`#D4D4D4`},children:` .`}),_jsx(_components.span,{style:{color:`#8250DF`,\"--shiki-dark\":`#DCDCAA`},children:`build`}),_jsx(_components.span,{style:{color:`#1F2328`,\"--shiki-dark\":`#D4D4D4`},children:`()`})]}),`\n`,_jsx(_components.span,{className:`line`}),`\n`,_jsxs(_components.span,{className:`line`,children:[_jsx(_components.span,{style:{color:`#1F2328`,\"--shiki-dark\":`#D4D4D4`},children:`FirebaseApp.`}),_jsx(_components.span,{style:{color:`#8250DF`,\"--shiki-dark\":`#DCDCAA`},children:`initializeApp`}),_jsx(_components.span,{style:{color:`#1F2328`,\"--shiki-dark\":`#D4D4D4`},children:`(context, options)`})]}),`\n`]})})}),`\n`,_jsxs(_components.p,{children:[`Initialize Firebase `,_jsx(_components.strong,{children:`before`}),` OneSignal initializes. A storage bucket is not required for push. If initialization has not completed by the time OneSignal registers for push:`]}),`\n`,_jsxs(_components.ul,{children:[`\n`,_jsxs(_components.li,{children:[_jsx(_components.strong,{children:`On the legacy token path`}),`, the SDK registers through OneSignal’s shared Firebase project for that session, and uses your project on a later session.`]}),`\n`,_jsxs(_components.li,{children:[_jsxs(_components.strong,{children:[`With `,_jsx(_components.a,{href:`/docs/en/android-firebase-installation-id`,children:`Firebase Installation ID registration`}),` turned on`]}),`, registration fails with status `,_jsx(_components.code,{children:`-32`}),` and retries on a later session.`]}),`\n`]}),`\n`,_jsx(_components.hr,{}),`\n`,_jsx(Heading,{level:`2`,id:`match-your-firebase-projects`,children:`Match your Firebase projects`}),`\n`,_jsx(_components.p,{children:`Your app must register with the same Firebase project as the Service Account private key you uploaded to OneSignal. When the projects differ:`}),`\n`,_jsxs(_components.ul,{children:[`\n`,_jsxs(_components.li,{children:[_jsx(_components.strong,{children:`On the legacy token path`}),`, the OneSignal SDK registers through OneSignal’s shared Firebase project and logs a warning.`]}),`\n`,_jsxs(_components.li,{children:[_jsxs(_components.strong,{children:[`With `,_jsx(_components.a,{href:`/docs/en/android-firebase-installation-id`,children:`Firebase Installation ID registration`}),` turned on`]}),`, registration fails with status `,_jsx(_components.a,{href:`/docs/en/subscriptions`,children:_jsx(_components.code,{children:`-6`})}),`, and existing Subscriptions are marked invalid.`]}),`\n`]}),`\n`,_jsx(_components.p,{children:`Compare either value below. A Firebase project’s Project ID and Project Number are permanently paired, so if one matches, both do.`}),`\n`,_jsxs(Table,{children:[_jsx(_components.thead,{children:_jsxs(_components.tr,{children:[_jsx(_components.th,{children:`OneSignal dashboard`}),_jsxs(_components.th,{children:[`Your `,_jsx(_components.code,{children:`google-services.json`})]})]})}),_jsxs(_components.tbody,{children:[_jsxs(_components.tr,{children:[_jsxs(_components.td,{children:[_jsx(_components.strong,{children:`Firebase Project ID`}),_jsx(`br`,{}),_jsx(_components.strong,{children:`Settings > Push \u0026 In-App > Google Android (FCM)`})]}),_jsx(_components.td,{children:_jsx(_components.code,{children:`project_info.project_id`})})]}),_jsxs(_components.tr,{children:[_jsxs(_components.td,{children:[_jsx(_components.strong,{children:`Sender ID`}),` (Project Number)`]}),_jsx(_components.td,{children:_jsx(_components.code,{children:`project_info.project_number`})})]})]})]}),`\n`,_jsxs(_components.p,{children:[`Your `,_jsx(_components.code,{children:`google-services.json`}),` looks like this:`]}),`\n`,_jsx(CodeBlock,{filename:`google-services.json`,numberOfLines:`12`,language:`json`,children:_jsx(_components.pre,{className:`shiki shiki-themes github-light-default dark-plus`,style:{backgroundColor:`#ffffff`,\"--shiki-dark-bg\":`#0B0C0E`,color:`#1f2328`,\"--shiki-dark\":`#D4D4D4`},language:`json`,children:_jsxs(_components.code,{language:`json`,numberOfLines:`12`,children:[_jsx(_components.span,{className:`line`,children:_jsx(_components.span,{style:{color:`#1F2328`,\"--shiki-dark\":`#D4D4D4`},children:`{`})}),`\n`,_jsxs(_components.span,{className:`line`,children:[_jsx(_components.span,{style:{color:`#116329`,\"--shiki-dark\":`#9CDCFE`},children:` \"project_info\"`}),_jsx(_components.span,{style:{color:`#1F2328`,\"--shiki-dark\":`#D4D4D4`},children:`: {`})]}),`\n`,_jsxs(_components.span,{className:`line`,children:[_jsx(_components.span,{style:{color:`#116329`,\"--shiki-dark\":`#9CDCFE`},children:` \"project_number\"`}),_jsx(_components.span,{style:{color:`#1F2328`,\"--shiki-dark\":`#D4D4D4`},children:`: `}),_jsx(_components.span,{style:{color:`#0A3069`,\"--shiki-dark\":`#CE9178`},children:`\"388536902528\"`}),_jsx(_components.span,{style:{color:`#1F2328`,\"--shiki-dark\":`#D4D4D4`},children:`,`})]}),`\n`,_jsxs(_components.span,{className:`line`,children:[_jsx(_components.span,{style:{color:`#116329`,\"--shiki-dark\":`#9CDCFE`},children:` \"project_id\"`}),_jsx(_components.span,{style:{color:`#1F2328`,\"--shiki-dark\":`#D4D4D4`},children:`: `}),_jsx(_components.span,{style:{color:`#0A3069`,\"--shiki-dark\":`#CE9178`},children:`\"my-app-12345\"`})]}),`\n`,_jsx(_components.span,{className:`line`,children:_jsx(_components.span,{style:{color:`#1F2328`,\"--shiki-dark\":`#D4D4D4`},children:` },`})}),`\n`,_jsxs(_components.span,{className:`line`,children:[_jsx(_components.span,{style:{color:`#116329`,\"--shiki-dark\":`#9CDCFE`},children:` \"client\"`}),_jsx(_components.span,{style:{color:`#1F2328`,\"--shiki-dark\":`#D4D4D4`},children:`: [{`})]}),`\n`,_jsxs(_components.span,{className:`line`,children:[_jsx(_components.span,{style:{color:`#116329`,\"--shiki-dark\":`#9CDCFE`},children:` \"client_info\"`}),_jsx(_components.span,{style:{color:`#1F2328`,\"--shiki-dark\":`#D4D4D4`},children:`: {`})]}),`\n`,_jsxs(_components.span,{className:`line`,children:[_jsx(_components.span,{style:{color:`#116329`,\"--shiki-dark\":`#9CDCFE`},children:` \"mobilesdk_app_id\"`}),_jsx(_components.span,{style:{color:`#1F2328`,\"--shiki-dark\":`#D4D4D4`},children:`: `}),_jsx(_components.span,{style:{color:`#0A3069`,\"--shiki-dark\":`#CE9178`},children:`\"1:388536902528:android:a1b2c3d4e5f6\"`}),_jsx(_components.span,{style:{color:`#1F2328`,\"--shiki-dark\":`#D4D4D4`},children:`,`})]}),`\n`,_jsxs(_components.span,{className:`line`,children:[_jsx(_components.span,{style:{color:`#116329`,\"--shiki-dark\":`#9CDCFE`},children:` \"android_client_info\"`}),_jsx(_components.span,{style:{color:`#1F2328`,\"--shiki-dark\":`#D4D4D4`},children:`: { `}),_jsx(_components.span,{style:{color:`#116329`,\"--shiki-dark\":`#9CDCFE`},children:`\"package_name\"`}),_jsx(_components.span,{style:{color:`#1F2328`,\"--shiki-dark\":`#D4D4D4`},children:`: `}),_jsx(_components.span,{style:{color:`#0A3069`,\"--shiki-dark\":`#CE9178`},children:`\"com.example.myapp\"`}),_jsx(_components.span,{style:{color:`#1F2328`,\"--shiki-dark\":`#D4D4D4`},children:` }`})]}),`\n`,_jsx(_components.span,{className:`line`,children:_jsx(_components.span,{style:{color:`#1F2328`,\"--shiki-dark\":`#D4D4D4`},children:` }`})}),`\n`,_jsx(_components.span,{className:`line`,children:_jsx(_components.span,{style:{color:`#1F2328`,\"--shiki-dark\":`#D4D4D4`},children:` }]`})}),`\n`,_jsx(_components.span,{className:`line`,children:_jsx(_components.span,{style:{color:`#1F2328`,\"--shiki-dark\":`#D4D4D4`},children:`}`})}),`\n`]})})}),`\n`,_jsx(_components.hr,{}),`\n`,_jsx(Heading,{level:`2`,id:`faq`,children:`FAQ`}),`\n`,_jsx(Heading,{level:`3`,id:`what-happens-if-i-skip-google-services-json`,children:`What happens if I skip google-services.json?`}),`\n`,_jsxs(_components.p,{children:[`Push notifications still work today. The OneSignal SDK registers through OneSignal’s shared Firebase project, using FCM registration tokens. Google has `,_jsx(_components.a,{href:`https://firebase.google.com/docs/cloud-messaging/android/client#access-fcm-registration-token`,children:`deprecated FCM registration tokens`}),` in favor of Firebase Installation IDs. The shared project can’t register with Firebase Installation IDs, so adding `,_jsx(_components.code,{children:`google-services.json`}),` now prepares your app for that change if and when Google starts requiring Firebase Installation IDs.`]}),`\n`,_jsxs(_components.p,{children:[`Without the file, you also can’t turn on `,_jsx(_components.a,{href:`/docs/en/android-firebase-installation-id`,children:`Firebase Installation ID registration`}),`.`]}),`\n`,_jsx(Heading,{level:`3`,id:`how-do-i-check-my-service-account-permissions`,children:`How do I check my Service Account permissions?`}),`\n`,_jsxs(_components.p,{children:[`Service Account roles are granted on the `,_jsx(_components.a,{href:`https://console.cloud.google.com/iam-admin/iam`,children:`IAM page`}),` in the Google Cloud Console, not in the Firebase Console and not on the Service Accounts page. The Service Account whose private key you upload to OneSignal needs these two roles:`]}),`\n`,_jsxs(Table,{children:[_jsx(_components.thead,{children:_jsxs(_components.tr,{children:[_jsx(_components.th,{children:`Role to add`}),_jsx(_components.th,{children:`What it lets OneSignal do`}),_jsx(_components.th,{children:`Permission it grants`})]})}),_jsxs(_components.tbody,{children:[_jsxs(_components.tr,{children:[_jsx(_components.td,{children:_jsx(_components.strong,{children:`Firebase Cloud Messaging API Admin`})}),_jsx(_components.td,{children:`Send push notifications through your Firebase project`}),_jsx(_components.td,{children:_jsx(_components.code,{children:`cloudmessaging.messages.create`})})]}),_jsxs(_components.tr,{children:[_jsx(_components.td,{children:_jsx(_components.strong,{children:`Firebase Viewer`})}),_jsx(_components.td,{children:`Read your Firebase project details`}),_jsx(_components.td,{children:_jsx(_components.code,{children:`firebase.projects.get`})})]})]})]}),`\n`,_jsxs(_components.p,{children:[`Broader roles like `,_jsx(_components.strong,{children:`Firebase Admin`}),` (`,_jsx(_components.code,{children:`roles/firebase.admin`}),`), `,_jsx(_components.strong,{children:`Editor`}),`, or `,_jsx(_components.strong,{children:`Owner`}),` include both permissions and also satisfy the requirement. For OneSignal-only Service Accounts, prefer the narrow pair above to limit the impact if the private key is ever exposed.`]}),`\n`,_jsxs(_components.p,{children:[`If the OneSignal dashboard shows `,_jsx(_components.strong,{children:`Invalid request`}),` after you upload your Service Account private key, missing roles are the most common cause.`]}),`\n`,_jsxs(Steps,{children:[_jsxs(Step,{title:`Open the IAM page`,children:[_jsxs(_components.p,{children:[`In the `,_jsx(_components.a,{href:`https://console.cloud.google.com/iam-admin/iam`,children:`Google Cloud Console`}),`, set the project picker to the Firebase project, not the organization. In the left nav, open `,_jsx(_components.strong,{children:`IAM \u0026 Admin`}),` and click `,_jsx(_components.strong,{children:`IAM`}),`.`]}),_jsxs(_components.p,{children:[`The page is a table with `,_jsx(_components.strong,{children:`Principal`}),`, `,_jsx(_components.strong,{children:`Name`}),`, and `,_jsx(_components.strong,{children:`Role`}),` columns. Do not use `,_jsx(_components.strong,{children:`Service Accounts > Permissions`}),`. That page lists who can use the account, not which roles the account has on the project.`]})]}),_jsx(Step,{title:`Find your Service Account`,children:_jsxs(_components.p,{children:[`Find the row whose principal email matches the `,_jsx(_components.code,{children:`client_email`}),` field in the private key you uploaded. It looks like `,_jsx(_components.code,{children:`firebase-adminsdk-xxxxx@YOUR_PROJECT_ID.iam.gserviceaccount.com`}),`. Paste that email into the filter box if the table is long.`]})}),_jsx(Step,{title:`Add any missing roles`,children:_jsxs(_components.p,{children:[`On that row, click the pencil (`,_jsx(_components.strong,{children:`Edit principal`}),`). In the `,_jsx(_components.strong,{children:`Edit permissions`}),` panel, click `,_jsx(_components.strong,{children:`Add another role`}),` and add `,_jsx(_components.strong,{children:`Firebase Cloud Messaging API Admin`}),` and `,_jsx(_components.strong,{children:`Firebase Viewer`}),` if they are not already assigned. Skip this if the account already has `,_jsx(_components.strong,{children:`Firebase Admin`}),`, `,_jsx(_components.strong,{children:`Editor`}),`, or `,_jsx(_components.strong,{children:`Owner`}),`.`]})}),_jsx(Step,{title:`Save`,children:_jsxs(_components.p,{children:[`Click `,_jsx(_components.strong,{children:`Save`}),`. The new roles can take about a minute to apply.`]})})]}),`\n`,_jsx(Heading,{level:`3`,id:`why-am-i-seeing-“this-configuration-is-for-a-different-firebase-project”`,children:`Why am I seeing “This configuration is for a different Firebase Project”?`}),`\n`,_jsx(_components.p,{children:`This error occurs when the uploaded private key belongs to a different Firebase project (a different Sender ID).`}),`\n`,_jsxs(_components.p,{children:[_jsx(_components.strong,{children:`Solution`}),`: Use the original Firebase project’s private key. If unavailable, contact `,_jsx(_components.code,{children:`support@onesignal.com`}),` with your App ID. Switching projects resets push tokens. Your users must reopen the app to get push again.`]}),`\n`,_jsxs(_components.p,{children:[`The reverse also happens: the uploaded key is correct, but the app ships a `,_jsx(_components.code,{children:`google-services.json`}),` from a different Firebase project. See `,_jsx(_components.a,{href:`#match-your-firebase-projects`,children:`Match your Firebase projects`}),`.`]}),`\n`,_jsx(Heading,{level:`3`,id:`can-i-change-my-sender-id`,children:`Can I change my Sender ID?`}),`\n`,_jsxs(_components.p,{children:[`Yes, but changing it invalidates existing device tokens, because tokens are tied to the original Sender ID. Users stop receiving push notifications until they reopen the app and get a new token. For help, contact `,_jsx(_components.code,{children:`support@onesignal.com`}),` with your App ID.`]}),`\n`,_jsx(Heading,{level:`3`,id:`why-don’t-i-see-a-sender-id-in-onesignal`,children:`Why don’t I see a Sender ID in OneSignal?`}),`\n`,_jsxs(_components.p,{children:[`If your Firebase server key looks like `,_jsx(_components.code,{children:`AIz...`}),`, you’re likely using an outdated Google Cloud Messaging (GCM) setup. Add Firebase to your existing Google Cloud project to keep your Sender ID, then upload a Service Account private key. Creating a new Firebase project gives you a new Sender ID, which invalidates existing push tokens. See `,_jsx(_components.a,{href:`#can-i-change-my-sender-id`,children:`Can I change my Sender ID?`})]}),`\n`,_jsx(Heading,{level:`3`,id:`do-i-need-to-update-my-code-when-switching-to-fcm-v1`,children:`Do I need to update my code when switching to FCM V1?`}),`\n`,_jsx(_components.p,{children:`No app or SDK changes are required. This is a dashboard-only update.`}),`\n`,_jsx(Heading,{level:`3`,id:`are-the-legacy-fcm-apis-still-supported`,children:`Are the legacy FCM APIs still supported?`}),`\n`,_jsx(_components.p,{children:`No. Google’s legacy FCM APIs are fully deprecated and no longer deliver notifications. If your app still uses them, upload a Service Account private key as described above to move to FCM V1.`}),`\n`,_jsx(Heading,{level:`3`,id:`how-can-i-check-which-apps-are-still-using-the-legacy-api`,children:`How can I check which apps are still using the Legacy API?`}),`\n`,_jsxs(_components.p,{children:[`Call the `,_jsx(_components.a,{href:`/reference/view-an-app`,children:`View an app`}),` API for each app and check the `,_jsx(_components.code,{children:`fcm_v1_service_account_json`}),` field in the response:`]}),`\n`,_jsxs(_components.ul,{children:[`\n`,_jsxs(_components.li,{children:[_jsx(_components.strong,{children:`Present and non-empty`}),`: the app is on FCM V1.`]}),`\n`,_jsxs(_components.li,{children:[_jsx(_components.strong,{children:`Missing or empty`}),`: the app is not configured for FCM V1. If the app sends Android push, it is still on the Legacy API and must be migrated.`]}),`\n`]}),`\n`,_jsxs(_components.p,{children:[`To list your apps and their App IDs first, use the `,_jsx(_components.a,{href:`/reference/view-apps`,children:`View apps`}),` API.`]}),`\n`,_jsx(Heading,{level:`3`,id:`what-is-firebase-cloud-messaging-and-why-does-onesignal-need-a-service-account-private-key`,children:`What is Firebase Cloud Messaging, and why does OneSignal need a Service Account private key?`}),`\n`,_jsxs(_components.p,{children:[_jsx(_components.strong,{children:`Firebase Cloud Messaging (FCM)`}),` is Google’s service for delivering push notifications to Android devices. A `,_jsx(_components.strong,{children:`Service Account`}),` is a Google identity that OneSignal uses to authenticate to your Firebase project, and its `,_jsx(_components.strong,{children:`private key`}),` is a JSON file that proves the identity. Uploading the private key authorizes OneSignal to send pushes through Firebase on your behalf. For more details, see `,_jsx(_components.a,{href:`https://cloud.google.com/iam/docs/service-account-overview`,children:`Google’s Service Account documentation`}),`.`]}),`\n`,_jsx(_components.hr,{}),`\n`,_jsx(Heading,{level:`2`,id:`related-pages`,children:`Related pages`}),`\n`,_jsxs(Columns,{cols:2,children:[_jsx(Card,{title:`Mobile SDK setup`,icon:`mobile-screen`,href:`/docs/en/mobile-sdk-setup`,children:_jsx(_components.p,{children:`Install and initialize the OneSignal SDK in your Android app.`})}),_jsx(Card,{title:`Firebase Installation ID registration`,icon:`fingerprint`,href:`/docs/en/android-firebase-installation-id`,children:_jsx(_components.p,{children:`Check whether FID registration is enabled in your app, and enable or disable it.`})}),_jsx(Card,{title:`Huawei push setup`,icon:`mobile`,href:`/docs/en/authorize-onesignal-to-send-huawei-push`,children:_jsx(_components.p,{children:`Authorize OneSignal to send push to Huawei devices without Google Play services.`})}),_jsx(Card,{title:`Amazon push setup`,icon:`amazon`,href:`/docs/en/generate-an-amazon-api-key`,children:_jsx(_components.p,{children:`Generate an Amazon API key to send push to Fire OS devices.`})}),_jsx(Card,{title:`Web push setup`,icon:`globe`,href:`/docs/en/web-push-setup`,children:_jsx(_components.p,{children:`Configure push notifications for websites.`})})]})]})}function MDXContent(props={}){const{wrapper:MDXLayout}={..._provideComponents(),...props.components};return MDXLayout?_jsx(MDXLayout,{...props,children:_jsx(_createMdxContent,{...props})}):_createMdxContent(props)}return{default:MDXContent};function _missingMdxReference(id,component){throw new Error(`Expected `+(component?`component`:`object`)+\" `\"+id+\"` to be defined: you likely forgot to import, pass, or provide it.\")}","frontmatter":{},"scope":{"config":{},"pageMetadata":{"title":"Android Firebase credentials","description":"Set up Firebase for Android: upload an FCM Service Account private key to OneSignal, and add google-services.json plus the Google Services Gradle plugin to your app.","keywords":["fcm","firebase","push setup","service account","fcm json key","google-services.json","google-services Gradle plugin","default FirebaseApp","FCM V1","Sender ID","Project Number","Invalid request","service account JSON","FCM server key","FCM legacy API","-6"],"href":"/docs/en/android-firebase-credentials"}}},"mdxSourceWithNoJs":null},"mdxExtracts":{"tableOfContents":[{"title":"Requirements","slug":"requirements","depth":2,"children":[]},{"title":"Create a Firebase Service Account private key","slug":"create-a-firebase-service-account-private-key","depth":2,"children":[]},{"title":"Upload the Service Account private key to OneSignal","slug":"upload-the-service-account-private-key-to-onesignal","depth":2,"children":[]},{"title":"Add your Firebase configuration file","slug":"add-your-firebase-configuration-file","depth":2,"children":[{"title":"Verify the file took effect","slug":"verify-the-file-took-effect","depth":3,"children":[]},{"title":"Set up Firebase without google-services.json","slug":"set-up-firebase-without-google-services-json","depth":3,"children":[]}]},{"title":"Match your Firebase projects","slug":"match-your-firebase-projects","depth":2,"children":[]},{"title":"FAQ","slug":"faq","depth":2,"children":[{"title":"What happens if I skip google-services.json?","slug":"what-happens-if-i-skip-google-services-json","depth":3,"children":[]},{"title":"How do I check my Service Account permissions?","slug":"how-do-i-check-my-service-account-permissions","depth":3,"children":[]},{"title":"Why am I seeing “This configuration is for a different Firebase Project”?","slug":"why-am-i-seeing-“this-configuration-is-for-a-different-firebase-project”","depth":3,"children":[]},{"title":"Can I change my Sender ID?","slug":"can-i-change-my-sender-id","depth":3,"children":[]},{"title":"Why don’t I see a Sender ID in OneSignal?","slug":"why-don’t-i-see-a-sender-id-in-onesignal","depth":3,"children":[]},{"title":"Do I need to update my code when switching to FCM V1?","slug":"do-i-need-to-update-my-code-when-switching-to-fcm-v1","depth":3,"children":[]},{"title":"Are the legacy FCM APIs still supported?","slug":"are-the-legacy-fcm-apis-still-supported","depth":3,"children":[]},{"title":"How can I check which apps are still using the Legacy API?","slug":"how-can-i-check-which-apps-are-still-using-the-legacy-api","depth":3,"children":[]},{"title":"What is Firebase Cloud Messaging, and why does OneSignal need a Service Account private key?","slug":"what-is-firebase-cloud-messaging-and-why-does-onesignal-need-a-service-account-private-key","depth":3,"children":[]}]},{"title":"Related pages","slug":"related-pages","depth":2,"children":[]}],"codeExamples":{}},"jsLinks":["/_mintlify/custom/onesignal/e069c1b9f3157e14/hotjar-koala.js","/_mintlify/custom/onesignal/3e5d03885ab32f49/intercom.js","/_mintlify/custom/onesignal/dbb7af4794d1b586/munchkin-marketo.js"],"subdomain":"onesignal","siteName":"OneSignal Documentation","title":"Android Firebase credentials - OneSignal Documentation","navMaps":{"firstHrefInVersion":{},"firstHrefInLanguage":{"en":{"href":"/docs/en/android-firebase-credentials","matchLevel":0},"cn":{"href":"/docs/cn/android-firebase-credentials","matchLevel":1},"ko":{"href":"/docs/ko/android-firebase-credentials","matchLevel":1},"ja":{"href":"/docs/ja/android-firebase-credentials","matchLevel":1},"tr":{"href":"/docs/tr/android-firebase-credentials","matchLevel":1},"pt-BR":{"href":"/docs/pt-BR/android-firebase-credentials","matchLevel":1},"es":{"href":"/docs/es/android-firebase-credentials","matchLevel":1},"fr":{"href":"/docs/fr/android-firebase-credentials","matchLevel":1}}},"lastModified":"2026-11-03T02:03:59.004Z","originalFileLocation":"docs/en/android-firebase-credentials.mdx","locale":"en"},"headHtml":"\u003cscript data-mint-head>(function(){var d=document.documentElement,p=null;if(!p){try{p=localStorage.getItem(\"isDarkMode\")}catch(e){}if(p==='true')p='dark';else if(p==='false')p='light';if(p!=='light'\u0026\u0026p!=='dark'\u0026\u0026p!=='system')p=\"system\"}var r=p==='system'?(matchMedia(\"(prefers-color-scheme: dark)\").matches?'dark':'light'):p;d.classList.remove(r==='dark'?'light':'dark');d.classList.add(r);d.setAttribute(\"data-theme-preference\",p)})();\u003c/script>\u003cmeta data-mint-head name=\"description\" content=\"Set up Firebase for Android: upload an FCM Service Account private key to OneSignal, and add google-services.json plus the Google Services Gradle plugin to your app.\">\u003cmeta data-mint-head name=\"application-name\" content=\"OneSignal Documentation\">\u003cmeta data-mint-head name=\"generator\" content=\"Mintlify\">\u003clink data-mint-head rel=\"icon\" type=\"image/png\" sizes=\"192x192\" href=\"/mintlify-assets/_mintlify/favicons/onesignal/eCiRydtW5fLfLRWp/_generated/favicon/android-chrome-192x192.png\" media=\"(prefers-color-scheme: light)\">\u003clink data-mint-head rel=\"apple-touch-icon\" type=\"image/png\" sizes=\"180x180\" href=\"/mintlify-assets/_mintlify/favicons/onesignal/eCiRydtW5fLfLRWp/_generated/favicon/apple-touch-icon.png\">\u003clink data-mint-head rel=\"icon\" type=\"image/png\" sizes=\"16x16\" href=\"/mintlify-assets/_mintlify/favicons/onesignal/eCiRydtW5fLfLRWp/_generated/favicon/favicon-16x16.png\" media=\"(prefers-color-scheme: light)\">\u003clink data-mint-head rel=\"icon\" type=\"image/png\" sizes=\"32x32\" href=\"/mintlify-assets/_mintlify/favicons/onesignal/eCiRydtW5fLfLRWp/_generated/favicon/favicon-32x32.png\" media=\"(prefers-color-scheme: light)\">\u003clink data-mint-head rel=\"shortcut icon\" type=\"image/x-icon\" href=\"/mintlify-assets/_mintlify/favicons/onesignal/eCiRydtW5fLfLRWp/_generated/favicon/favicon.ico\" media=\"(prefers-color-scheme: light)\">\u003clink data-mint-head rel=\"icon\" type=\"image/png\" sizes=\"192x192\" href=\"/mintlify-assets/_mintlify/favicons/onesignal/eCiRydtW5fLfLRWp/_generated/favicon-dark/android-chrome-192x192.png\" media=\"(prefers-color-scheme: dark)\">\u003clink data-mint-head rel=\"icon\" type=\"image/png\" sizes=\"16x16\" href=\"/mintlify-assets/_mintlify/favicons/onesignal/eCiRydtW5fLfLRWp/_generated/favicon-dark/favicon-16x16.png\" media=\"(prefers-color-scheme: dark)\">\u003clink data-mint-head rel=\"icon\" type=\"image/png\" sizes=\"32x32\" href=\"/mintlify-assets/_mintlify/favicons/onesignal/eCiRydtW5fLfLRWp/_generated/favicon-dark/favicon-32x32.png\" media=\"(prefers-color-scheme: dark)\">\u003clink data-mint-head rel=\"shortcut icon\" type=\"image/x-icon\" href=\"/mintlify-assets/_mintlify/favicons/onesignal/eCiRydtW5fLfLRWp/_generated/favicon-dark/favicon.ico\" media=\"(prefers-color-scheme: dark)\">\u003cmeta data-mint-head property=\"og:title\" content=\"Android Firebase credentials - OneSignal Documentation\">\u003cmeta data-mint-head property=\"og:description\" content=\"Set up Firebase for Android: upload an FCM Service Account private key to OneSignal, and add google-services.json plus the Google Services Gradle plugin to your app.\">\u003cmeta data-mint-head property=\"og:site_name\" content=\"OneSignal Documentation\">\u003cmeta data-mint-head property=\"og:url\" content=\"https://documentation.onesignal.com/docs/en/android-firebase-credentials\">\u003cmeta data-mint-head property=\"og:type\" content=\"website\">\u003cmeta data-mint-head property=\"og:image\" content=\"https://onesignal.mintlify.site/_mintlify/api/og/v2?division=Platform+credential+setup\u0026amp;title=Android+Firebase+credentials\u0026amp;description=Set+up+Firebase+for+Android%3A+upload+an+FCM+Service+Account+private+key+to+OneSignal%2C+and+add+google-services.json+plus+the+Google+Services+Gradle+plugin+to+your\u0026amp;theme=12e705baa88dc8cc6d7a9877\u0026amp;signature=638563178c0b8d2575ac3c60463566443560874d8a7529e63ad2592c8ff39187\">\u003cmeta data-mint-head property=\"og:image:width\" content=\"1200\">\u003cmeta data-mint-head property=\"og:image:height\" content=\"630\">\u003cmeta data-mint-head name=\"twitter:card\" content=\"summary_large_image\">\u003cmeta data-mint-head name=\"twitter:title\" content=\"Android Firebase credentials - OneSignal Documentation\">\u003cmeta data-mint-head name=\"twitter:description\" content=\"Set up Firebase for Android: upload an FCM Service Account private key to OneSignal, and add google-services.json plus the Google Services Gradle plugin to your app.\">\u003cmeta data-mint-head name=\"twitter:image\" content=\"https://onesignal.mintlify.site/_mintlify/api/og/v2?division=Platform+credential+setup\u0026amp;title=Android+Firebase+credentials\u0026amp;description=Set+up+Firebase+for+Android%3A+upload+an+FCM+Service+Account+private+key+to+OneSignal%2C+and+add+google-services.json+plus+the+Google+Services+Gradle+plugin+to+your\u0026amp;theme=12e705baa88dc8cc6d7a9877\u0026amp;signature=638563178c0b8d2575ac3c60463566443560874d8a7529e63ad2592c8ff39187\">\u003cmeta data-mint-head name=\"twitter:image:width\" content=\"1200\">\u003cmeta data-mint-head name=\"twitter:image:height\" content=\"630\">\u003cmeta data-mint-head name=\"msapplication-config\" content=\"/mintlify-assets/_mintlify/favicons/onesignal/eCiRydtW5fLfLRWp/_generated/favicon/browserconfig.xml\">\u003cmeta data-mint-head name=\"apple-mobile-web-app-title\" content=\"OneSignal Docs\">\u003cmeta data-mint-head name=\"msapplication-TileColor\" content=\"#3A3DB3\">\u003clink data-mint-head rel=\"canonical\" href=\"https://documentation.onesignal.com/docs/en/android-firebase-credentials\">\u003clink data-mint-head rel=\"alternate\" type=\"application/xml\" href=\"/sitemap.xml\">\u003clink data-mint-head rel=\"alternate\" type=\"text/markdown\" href=\"/docs/en/android-firebase-credentials.md\">\u003clink data-mint-head rel=\"alternate\" hreflang=\"en\" href=\"https://documentation.onesignal.com/docs/en/android-firebase-credentials\">\u003clink data-mint-head rel=\"alternate\" hreflang=\"zh\" href=\"https://documentation.onesignal.com/docs/cn/android-firebase-credentials\">\u003clink data-mint-head rel=\"alternate\" hreflang=\"ko\" href=\"https://documentation.onesignal.com/docs/ko/android-firebase-credentials\">\u003clink data-mint-head rel=\"alternate\" hreflang=\"ja\" href=\"https://documentation.onesignal.com/docs/ja/android-firebase-credentials\">\u003clink data-mint-head rel=\"alternate\" hreflang=\"tr\" href=\"https://documentation.onesignal.com/docs/tr/android-firebase-credentials\">\u003clink data-mint-head rel=\"alternate\" hreflang=\"pt-BR\" href=\"https://documentation.onesignal.com/docs/pt-BR/android-firebase-credentials\">\u003clink data-mint-head rel=\"alternate\" hreflang=\"es\" href=\"https://documentation.onesignal.com/docs/es/android-firebase-credentials\">\u003clink data-mint-head rel=\"alternate\" hreflang=\"fr\" href=\"https://documentation.onesignal.com/docs/fr/android-firebase-credentials\">\u003clink data-mint-head rel=\"alternate\" hreflang=\"x-default\" href=\"https://documentation.onesignal.com/docs/en/android-firebase-credentials\">\u003cscript data-mint-head type=\"application/ld+json\">{\"@context\":\"https://schema.org\",\"@graph\":[{\"@type\":\"Organization\",\"@id\":\"https://documentation.onesignal.com/#organization\",\"name\":\"OneSignal Documentation\",\"url\":\"https://documentation.onesignal.com\",\"logo\":{\"@type\":\"ImageObject\",\"url\":\"https://mintcdn.com/onesignal/yJcueeDCO7UpHnnY/logo/OneSignal-Logo.svg?fit=max\u0026auto=format\u0026n=yJcueeDCO7UpHnnY\u0026q=85\u0026s=1fcfb6fef6d820fd9d99c74850711107\"}},{\"@type\":\"WebSite\",\"@id\":\"https://documentation.onesignal.com#website\",\"name\":\"OneSignal Documentation\",\"url\":\"https://documentation.onesignal.com\",\"publisher\":{\"@id\":\"https://documentation.onesignal.com/#organization\"}},{\"@type\":\"WebPage\",\"@id\":\"https://documentation.onesignal.com/docs/en/android-firebase-credentials#webpage\",\"url\":\"https://documentation.onesignal.com/docs/en/android-firebase-credentials\",\"name\":\"Android Firebase credentials\",\"description\":\"Set up Firebase for Android: upload an FCM Service Account private key to OneSignal, and add google-services.json plus the Google Services Gradle plugin to your app.\",\"dateModified\":\"2026-11-03T02:03:59.004Z\",\"isPartOf\":{\"@id\":\"https://documentation.onesignal.com#website\"},\"breadcrumb\":{\"@id\":\"https://documentation.onesignal.com/docs/en/android-firebase-credentials#breadcrumb\"}},{\"@type\":\"BreadcrumbList\",\"@id\":\"https://documentation.onesignal.com/docs/en/android-firebase-credentials#breadcrumb\",\"itemListElement\":[{\"@type\":\"ListItem\",\"position\":1,\"name\":\"Mobile SDKs\",\"item\":\"https://documentation.onesignal.com/docs/en/mobile-sdk-setup\"},{\"@type\":\"ListItem\",\"position\":2,\"name\":\"Mobile SDK setup\",\"item\":\"https://documentation.onesignal.com/docs/en/mobile-sdk-setup\"},{\"@type\":\"ListItem\",\"position\":3,\"name\":\"Android Firebase credentials\",\"item\":\"https://documentation.onesignal.com/docs/en/android-firebase-credentials\"}]},{\"@type\":[\"Article\",\"TechArticle\"],\"@id\":\"https://documentation.onesignal.com/docs/en/android-firebase-credentials#article\",\"headline\":\"Android Firebase credentials\",\"name\":\"Android Firebase credentials\",\"description\":\"Set up Firebase for Android: upload an FCM Service Account private key to OneSignal, and add google-services.json plus the Google Services Gradle plugin to your app.\",\"url\":\"https://documentation.onesignal.com/docs/en/android-firebase-credentials\",\"mainEntityOfPage\":{\"@id\":\"https://documentation.onesignal.com/docs/en/android-firebase-credentials#webpage\"},\"dateModified\":\"2026-11-03T02:03:59.004Z\",\"keywords\":\"fcm, firebase, push setup, service account, fcm json key, google-services.json, google-services Gradle plugin, default FirebaseApp, FCM V1, Sender ID, Project Number, Invalid request, service account JSON, FCM server key, FCM legacy API, -6\",\"publisher\":{\"@id\":\"https://documentation.onesignal.com/#organization\"},\"isPartOf\":{\"@id\":\"https://documentation.onesignal.com#website\"}}]}\u003c/script>\u003cscript data-mint-head type=\"application/ld+json\">{\"@context\":\"https://schema.org\",\"@type\":\"WebSite\",\"name\":\"OneSignal Documentation\",\"creator\":{\"@type\":\"Organization\",\"name\":\"Mintlify\",\"url\":\"https://mintlify.com\"}}\u003c/script>","siteName":"OneSignal Documentation","nav":{"global":null,"languages":[{"language":"en","tabs":[{"tab":"Home","pages":[{"title":"Home","href":"/docs/en/home"}]},{"tab":"User Guides","pages":[{"title":"User Guides","href":"/docs/en/quickstart-guide"}]},{"tab":"Developer Guides","groups":[{"group":"Developer Documentation","pages":[{"title":"Developers","href":"/docs/en/developers"},{"title":"Identity verification","href":"/docs/en/identity-verification"},{"group":"User model","pages":[{"title":"User model \u0026 migration guide","href":"/docs/en/user-model-migration-guide"},{"title":"Mobile SDK Mapping","href":"/docs/en/device-user-model-mobile-sdk-mapping"},{"title":"Web SDK Mapping","href":"/docs/en/device-user-model-web-sdk-mapping"}]}]},{"group":"Mobile SDKs","pages":[{"group":"Mobile SDK setup","pages":[{"title":"Mobile SDK setup","description":"Get push credentials for Android, iOS, Huawei, and Amazon, then install the OneSignal SDK to send push notifications and in-app messages from native, React Native, Expo, Flutter, Unity, .NET MAUI, Cordova, or Capacitor apps.","href":"/docs/en/mobile-sdk-setup"},{"group":"Platform credential setup","pages":[{"title":"Android Firebase credentials","href":"/docs/en/android-firebase-credentials"},{"title":"iOS p8 token-based connection to APNs","description":"Set up a .p8 authentication key to connect your iOS or macOS app to Apple Push Notification service (APNs) through OneSignal.","href":"/docs/en/ios-p8-token-based-connection-to-apns"},{"title":"iOS p12 certificate generation","href":"/docs/en/ios-p12-generate-certificates"},{"title":"Amazon API key generation","href":"/docs/en/generate-an-amazon-api-key"},{"title":"Huawei authorization","href":"/docs/en/authorize-onesignal-to-send-huawei-push"}]},{"title":"iOS SDK setup","href":"/docs/en/ios-sdk-setup"},{"group":"Android SDK setup","pages":[{"title":"Android SDK setup","href":"/docs/en/android-sdk-setup"},{"title":"Firebase Installation ID registration","href":"/docs/en/android-firebase-installation-id"}]},{"title":"Unity SDK setup","href":"/docs/en/unity-sdk-setup"},{"title":"React Native SDK setup","href":"/docs/en/react-native-sdk-setup"},{"title":"Expo SDK setup","href":"/docs/en/react-native-expo-sdk-setup"},{"title":"Flutter SDK setup","href":"/docs/en/flutter-sdk-setup"},{"title":"Flutterflow SDK setup","href":"/docs/en/flutterflow-sdk-setup"},{"title":"Cordova SDK setup","href":"/docs/en/cordova-sdk-setup"},{"title":"Capacitor SDK setup","href":"/docs/en/capacitor-sdk-setup"},{"title":".NET MAUI SDK setup","href":"/docs/en/net-sdk-setup"},{"title":"Amazon SDK setup","href":"/docs/en/amazon-sdk-setup"},{"title":"Huawei SDK setup","href":"/docs/en/huawei-sdk-setup"}]},{"group":"Mobile SDK reference","pages":[{"title":"Mobile SDK reference","href":"/docs/en/mobile-sdk-reference"},{"title":"Mobile service extensions","href":"/docs/en/service-extensions"},{"title":"Managing the notification tray","href":"/docs/en/managing-the-notification-tray"},{"title":"OSNotification payload","href":"/docs/en/osnotification-payload"},{"title":"iOS: App Clip Support","href":"/docs/en/app-clip-support"}]},{"group":"Mobile SDK troubleshooting","pages":[{"title":"Mobile SDK troubleshooting","href":"/docs/en/mobile-troubleshooting"},{"title":"Getting a Debug Log","href":"/docs/en/capturing-a-debug-log"}]}]},{"group":"Web SDKs","pages":[{"group":"Web SDK setup","pages":[{"title":"Web SDK setup","href":"/docs/en/web-sdk-setup"},{"title":"iOS web push setup","href":"/docs/en/web-push-for-ios"},{"title":"OneSignal service worker","href":"/docs/en/onesignal-service-worker"},{"title":"Custom code web push setup with the OneSignal Web SDK","href":"/docs/en/web-push-custom-code-setup"},{"title":"Google Tag Manager setup","href":"/docs/en/google-tag-manager"},{"title":"Angular Web SDK setup","href":"/docs/en/angular-setup"},{"title":"ReactJS \u0026 NextJS Setup","href":"/docs/en/react-js-setup"},{"title":"Vue JS Web SDK setup","href":"/docs/en/vue-js-setup"}]},{"title":"Web SDK reference","href":"/docs/en/web-sdk-reference"},{"group":"Web SDK troubleshooting","pages":[{"title":"Web SDK troubleshooting","href":"/docs/en/troubleshooting-web-push"},{"title":"Clearing cache and resetting push permissions","href":"/docs/en/clearing-cache-and-resetting-push-permissions"},{"title":"Web push webhooks","sidebarTitle":"Web push webhooks (legacy)","href":"/docs/en/webhooks"}]}]},{"group":"Live Activities","pages":[{"title":"Live Activities developer setup","href":"/docs/en/live-activities-developer-setup"},{"title":"Cross-platform Live Activity SDK setup","href":"/docs/en/cross-platform-live-activity-setup"},{"title":"Android Live Update notifications","href":"/docs/en/android-live-notifications"}]},{"group":"Desktop \u0026 Watch Setup","pages":[{"title":"macOS app setup","href":"/docs/en/macos-app-setup"},{"title":"Windows app setup","href":"/docs/en/windows-app-setup"},{"title":"watchOS \u0026 Wear OS Support","href":"/docs/en/watchos-and-wear-os-support"}]},{"group":"Legacy SDK reference","pages":[{"group":"v3-4 Client SDK reference","pages":[{"title":"v3-4 Client SDK Reference","href":"/v9.0/docs/sdk-reference"},{"title":"v3-4 SDK SDK Notification Event Handlers","href":"/v9.0/docs/sdk-notification-event-handlers"},{"title":"v4 Android Mobile Service Extensions","href":"/v9.0/docs/service-extensions"},{"title":"v3-4 SDK In-App Message SDK Methods","href":"/v9.0/docs/iam-sdk-methods"},{"title":"v3-4 SDK Web SDK Methods","href":"/v9.0/docs/web-push-sdk"},{"title":"v3-4 SDK SMS SDK Methods","href":"/v9.0/docs/sms-sdk-methods"},{"title":"v3-4 SDK Email SDK Methods","href":"/v9.0/docs/email-sdk-methods"}]},{"title":"v3-4 SDK Capturing a Debug Log","href":"/v9.0/docs/capturing-a-debug-log"},{"title":"v3-4 SDK Identity Verification","href":"/v9.0/docs/identity-verification"},{"title":"v3-4 SDK Handling Personal Data","href":"/v9.0/docs/handling-personal-data"}]}]},{"tab":"Tutorials","pages":[{"title":"Tutorials","href":"/docs/en/tutorials"}]},{"tab":"API Reference","pages":[{"title":"API Reference","href":"/reference/rest-api-overview"}]},{"tab":"Release Notes","pages":[{"title":"Release Notes","href":"/release-notes/changelog"}]},{"tab":"Customer Success Hub","pages":[{"title":"Customer Success Hub","href":"/docs/en/customer-success-hub"}]}],"global":{"anchors":[{"anchor":"Blog","icon":"newspaper","href":"https://onesignal.com/blog"},{"anchor":"GitHub","icon":"github","href":"https://github.com/OneSignal"},{"anchor":"YouTube","icon":"youtube","href":"https://www.youtube.com/@onesignalofficial/playlists"}]}},{"language":"cn","pages":[{"title":"cn","href":"/docs/cn/android-firebase-credentials"}]},{"language":"ko","pages":[{"title":"ko","href":"/docs/ko/android-firebase-credentials"}]},{"language":"ja","pages":[{"title":"ja","href":"/docs/ja/android-firebase-credentials"}]},{"language":"tr","pages":[{"title":"tr","href":"/docs/tr/android-firebase-credentials"}]},{"language":"pt-BR","pages":[{"title":"pt-BR","href":"/docs/pt-BR/android-firebase-credentials"}]},{"language":"es","pages":[{"title":"es","href":"/docs/es/android-firebase-credentials"}]},{"language":"fr","pages":[{"title":"fr","href":"/docs/fr/android-firebase-credentials"}]}]},"basePath":"","title":"Android Firebase credentials - OneSignal Documentation","buildId":"dpl_42LwxxU1kGN114H4XzwGYXa9ZDah","deploymentId":"dpl_42LwxxU1kGN114H4XzwGYXa9ZDah","dynamics":["07c022d89b","a74be98ba7"],"chunks":["Frame-5Xwp92K7.js","DynamicMarkdown-BoyYAA8K.js","zoom-image-lightbox-DkE6VzSN.js","lightbox-handle-r17bVUz3.js"]}