Prerequisites
- WordPress website with admin access
- HTTPS enabled (required for web push notifications)
- OneSignal account (free at onesignal.com)
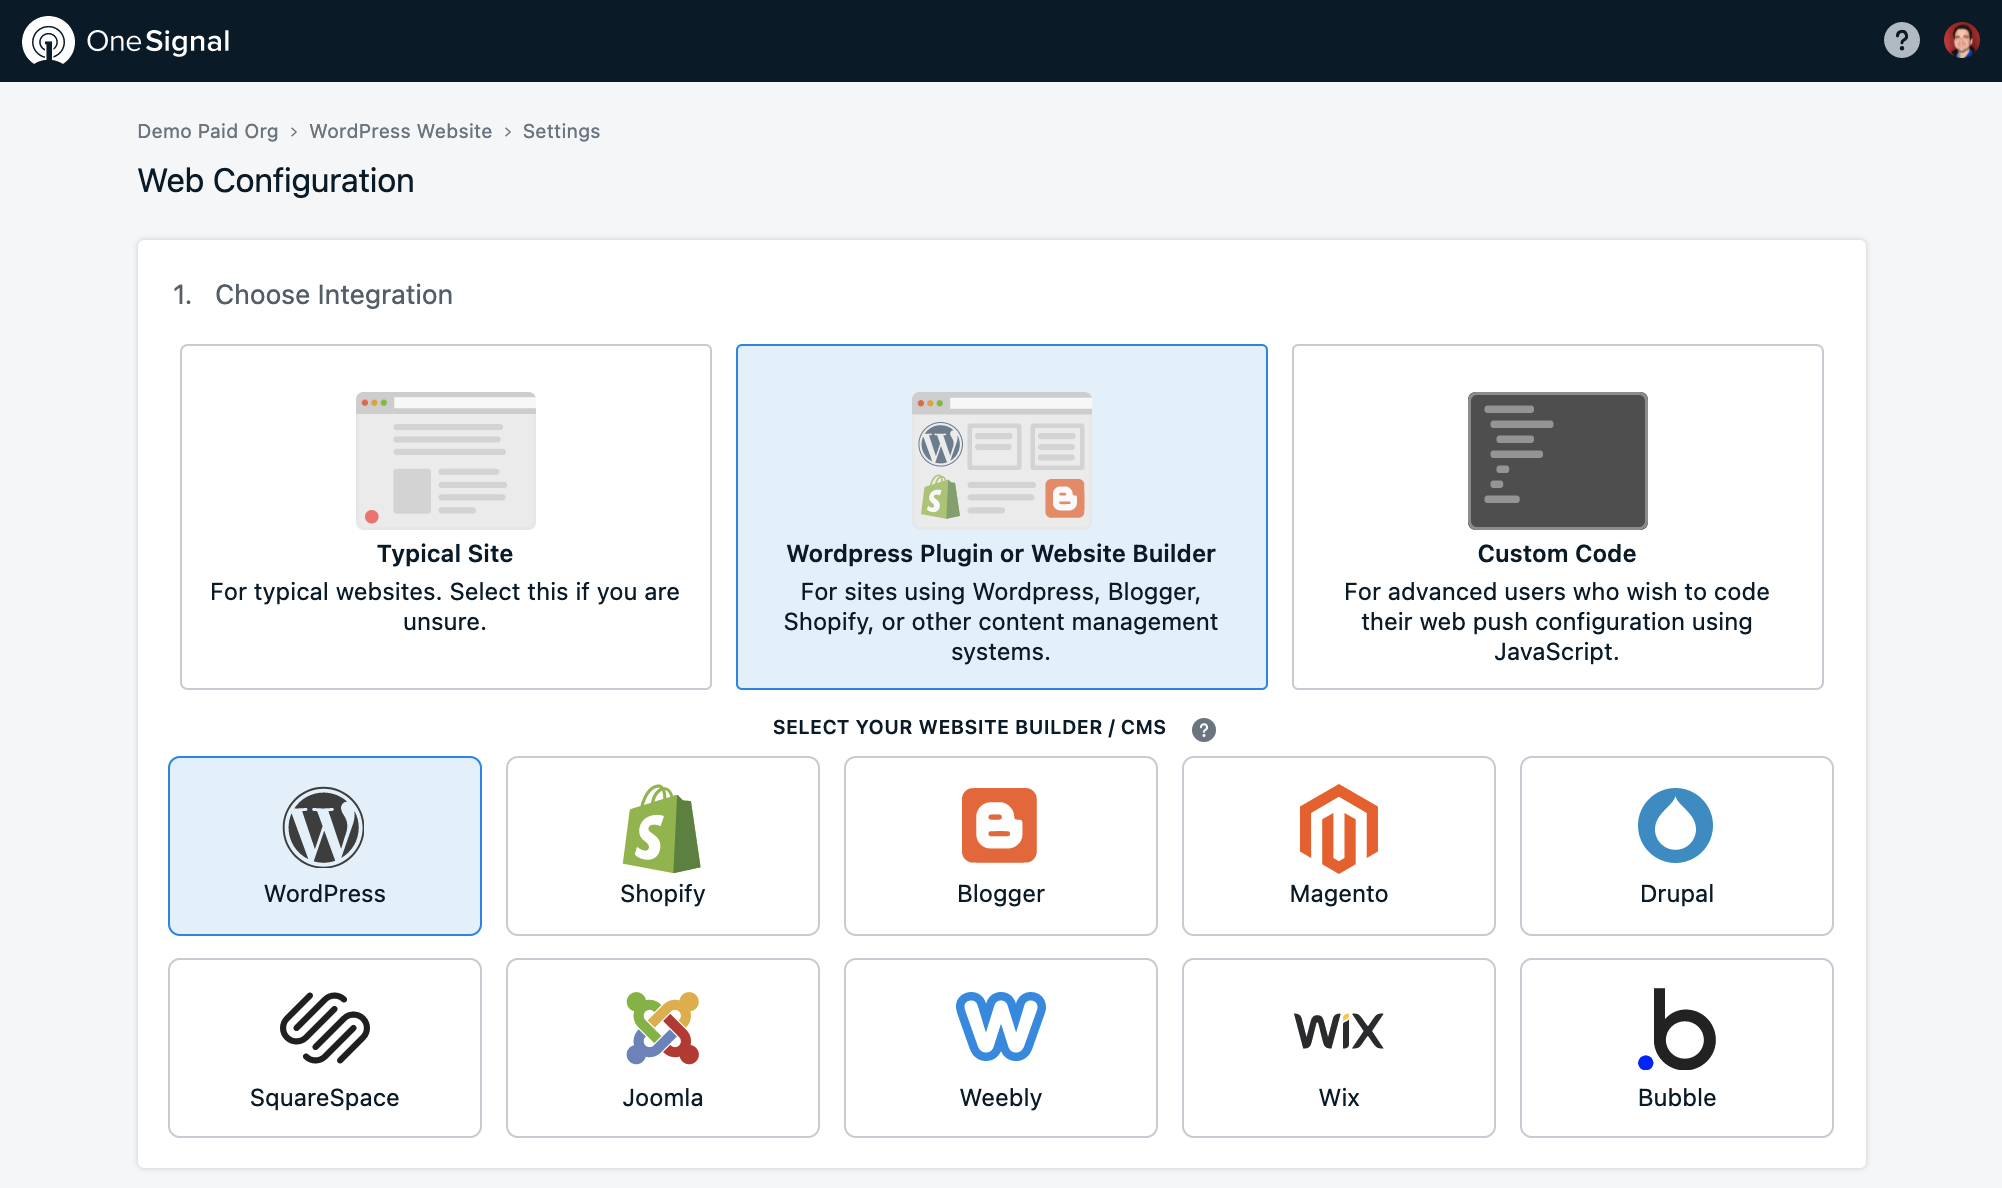
Step 1: Choose Integration
Create your OneSignal account at onesignal.com. If this isn’t your first app, select New App/Website, name your app, select Web, and click “Next”.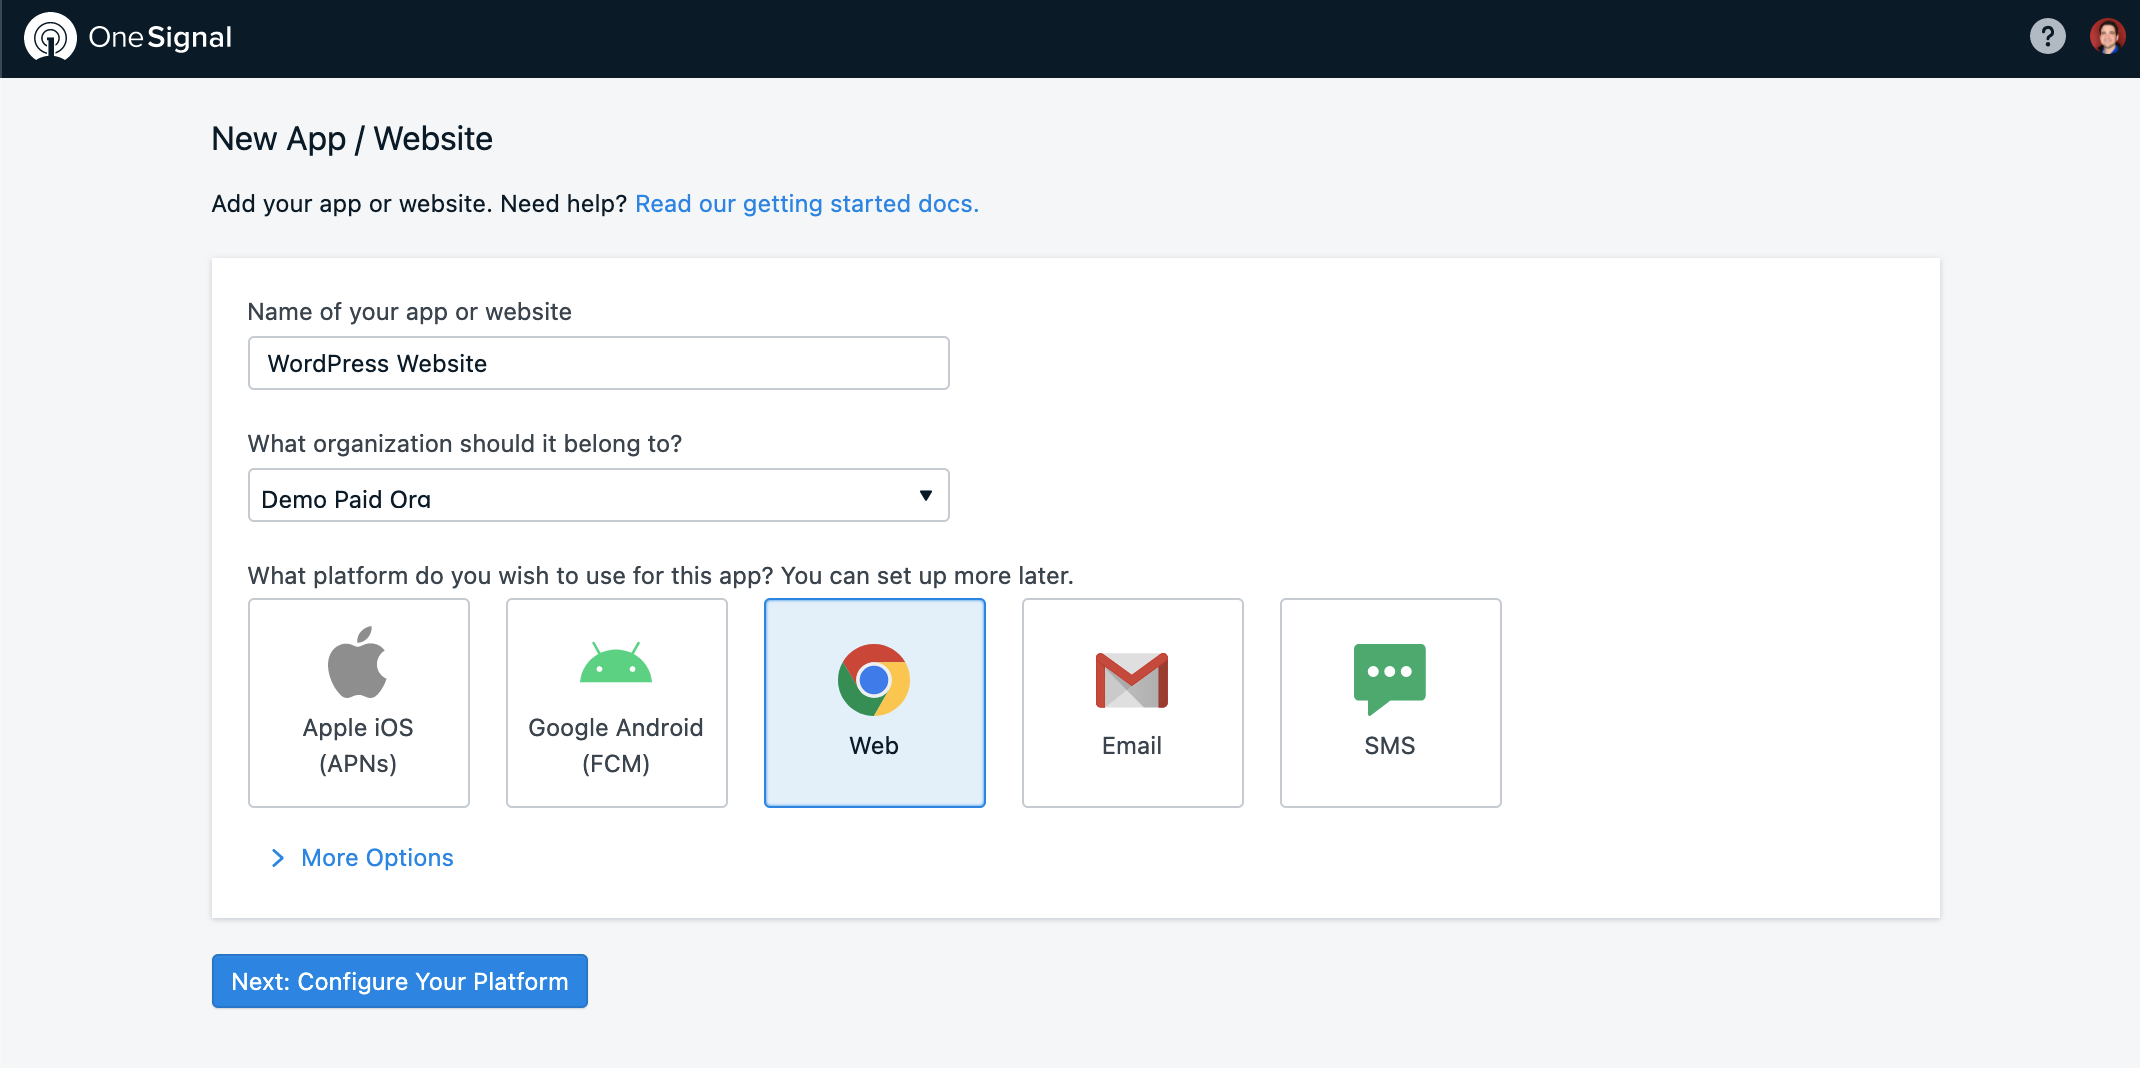
Step 2: Site Setup
Configure your site information carefully as these settings affect all notifications: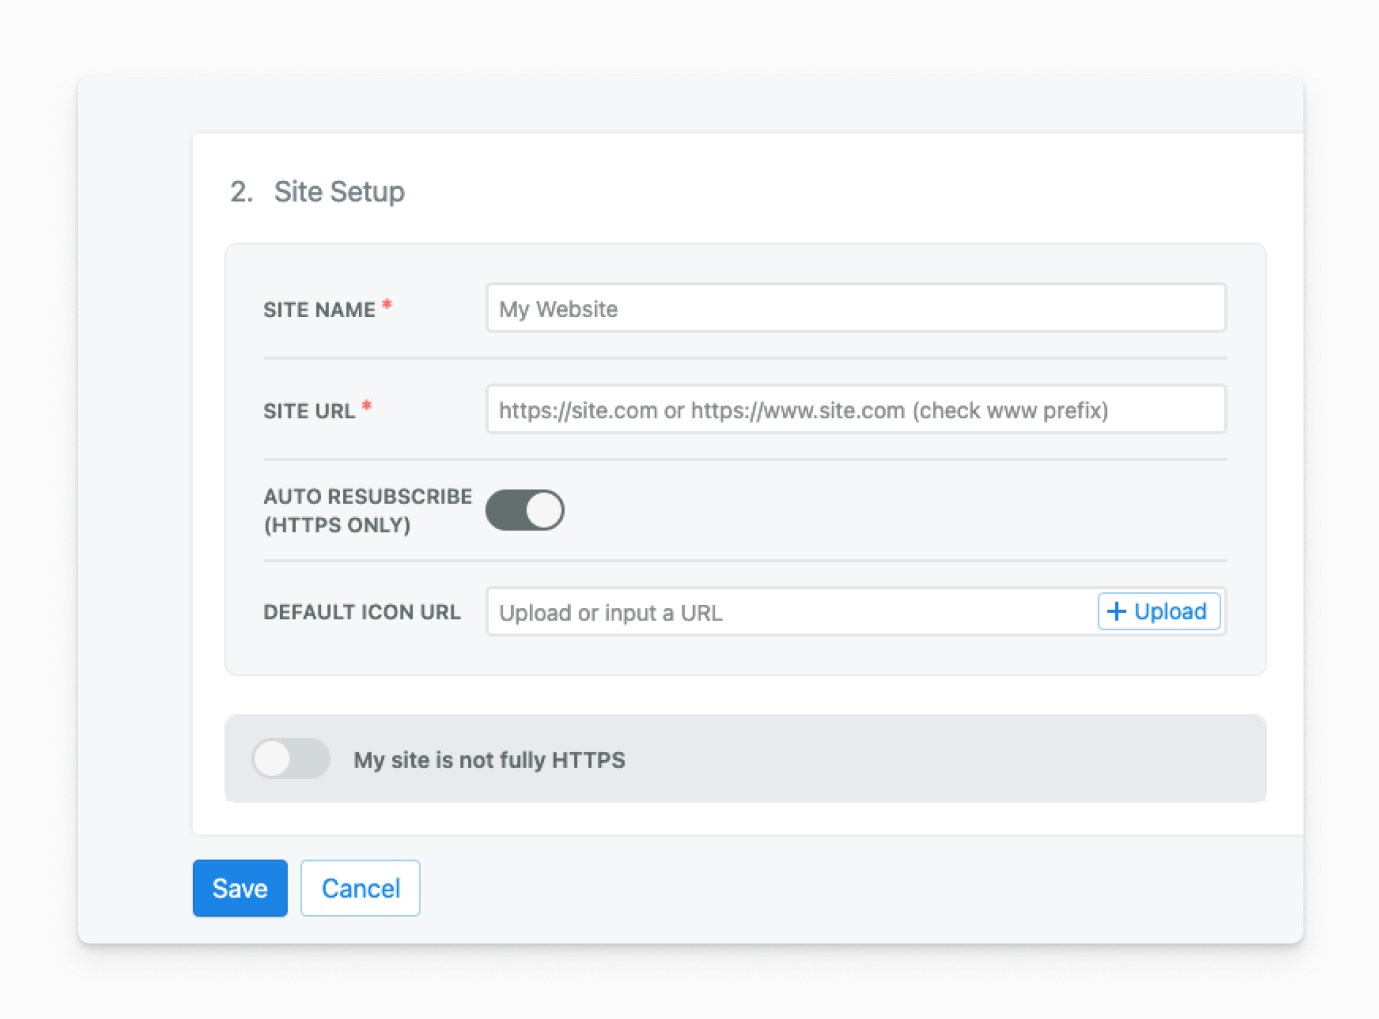
| Field | Description | Requirements |
|---|---|---|
| Site Name | Default name displayed in push notifications | Keep concise for better display |
| Site URL | Your complete website URL | Must include http:// or https:// and match your actual URL format |
| Auto Resubscribe | Automatically resubscribes returning users (HTTPS only) | Recommended - Reduces friction for users who cleared browser data |
| Default Icon URL | Icon for prompts and notifications | Must be HTTPS, square 256x256 pixels, PNG/JPG/GIF format |
URL Format Important: Ensure your Site URL exactly matches how users access your site. Mismatched URLs (www vs non-www, http vs https) can cause subscription issues.
Step 3: Advanced Push Settings (Optional)
OneSignal provides Safari Web Push certificates at no cost. Only upload custom certificates if you have specific requirements.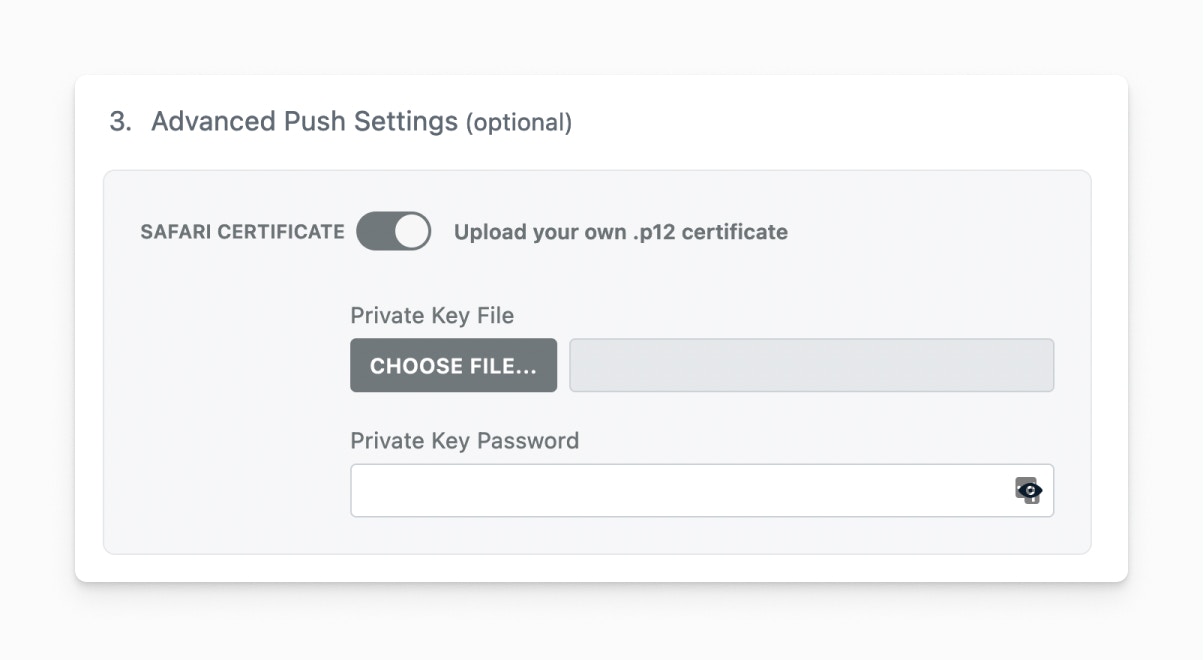
- You have existing Safari certificates
- Your organization requires specific certificate management
- You need custom certificate branding
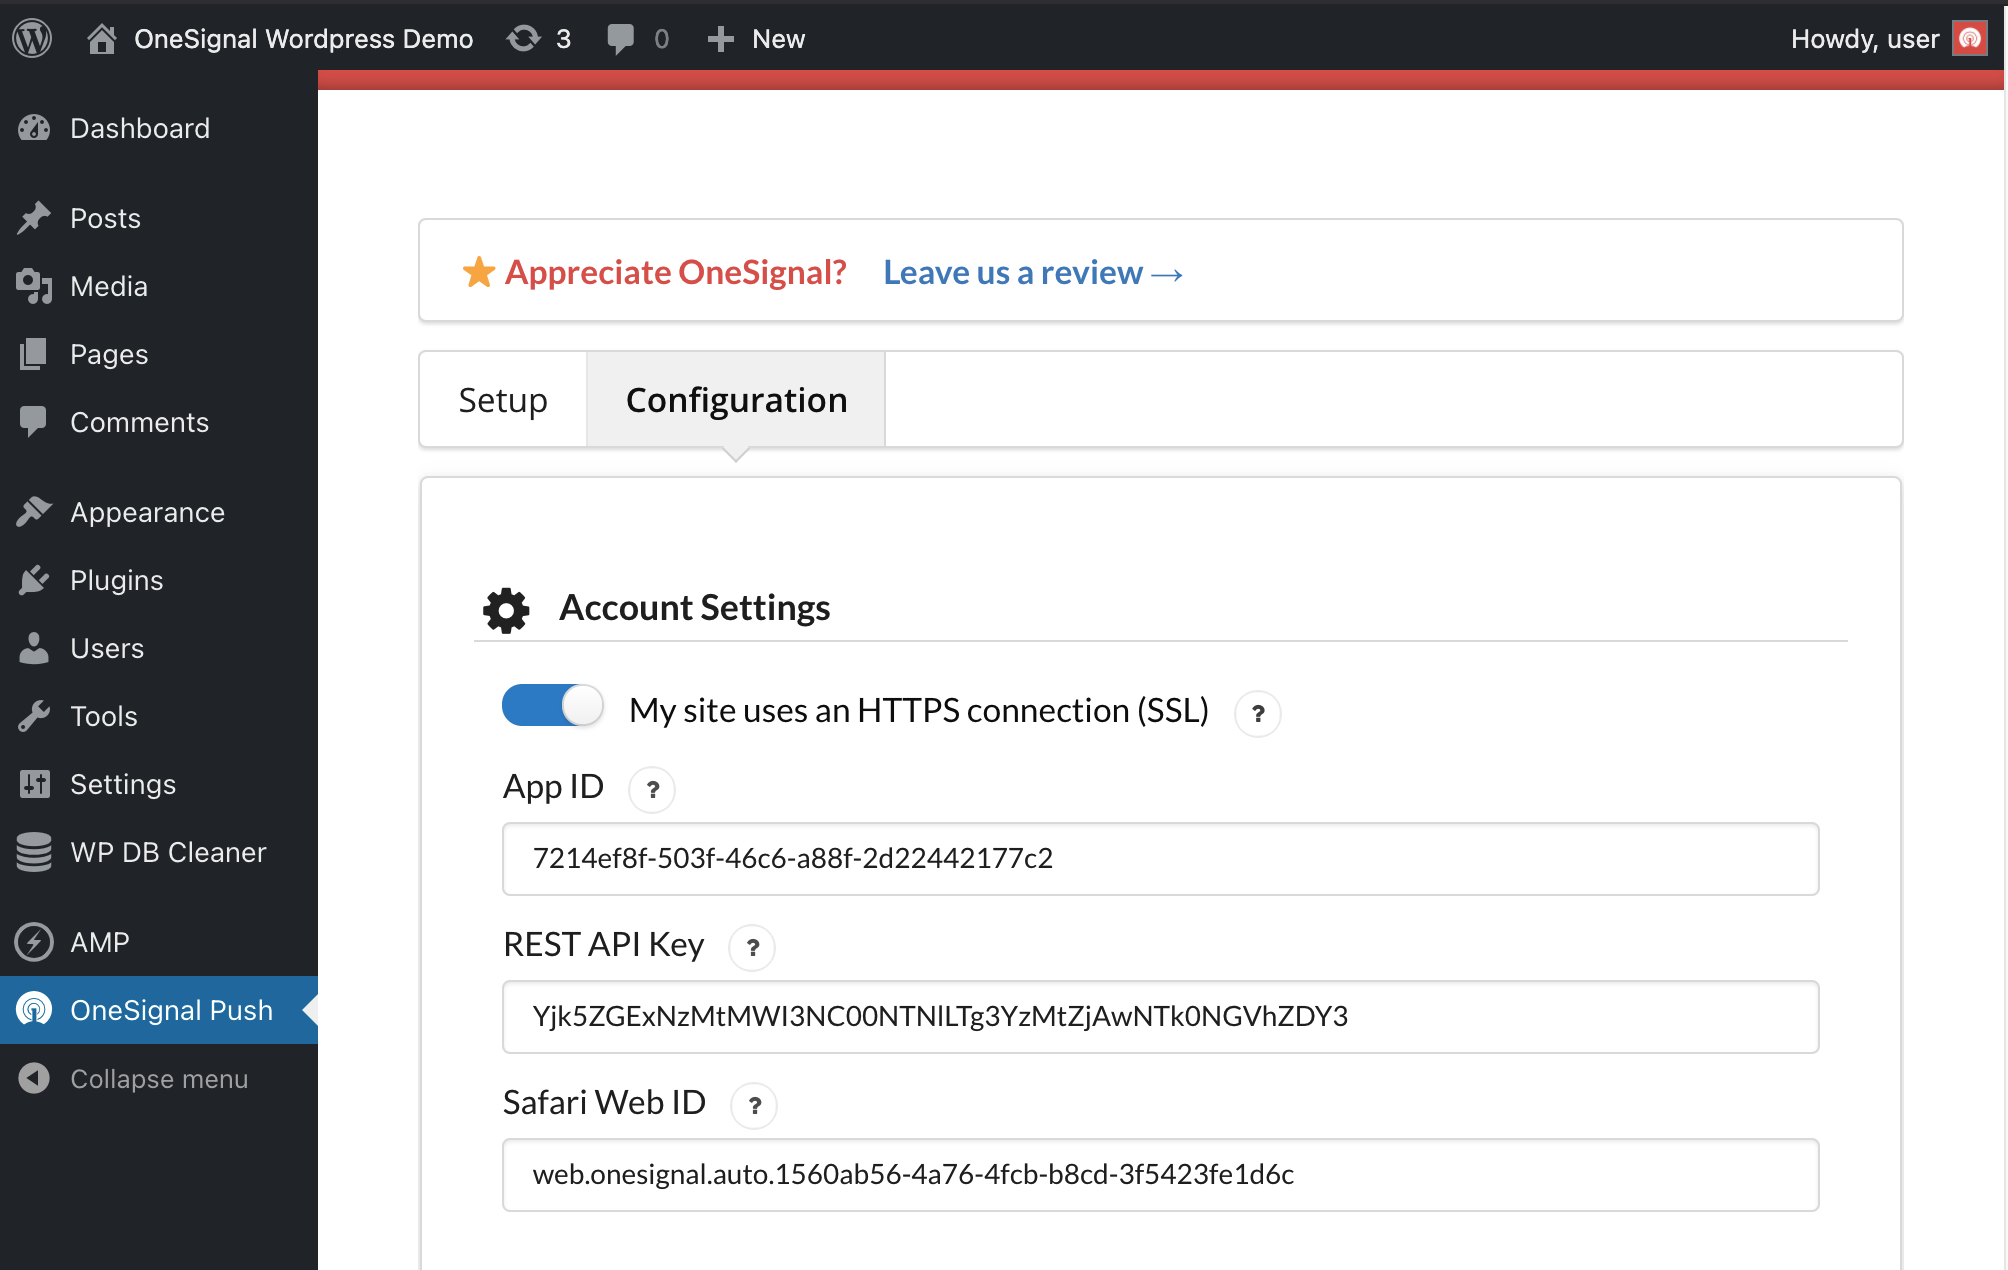
Step 4: Configure WordPress Plugin
Install the Plugin
Add the OneSignal WordPress Plugin from your WordPress admin or by searching “OneSignal” in the plugin directory.Configure API Keys
Copy your App ID and API Key from the OneSignal dashboard: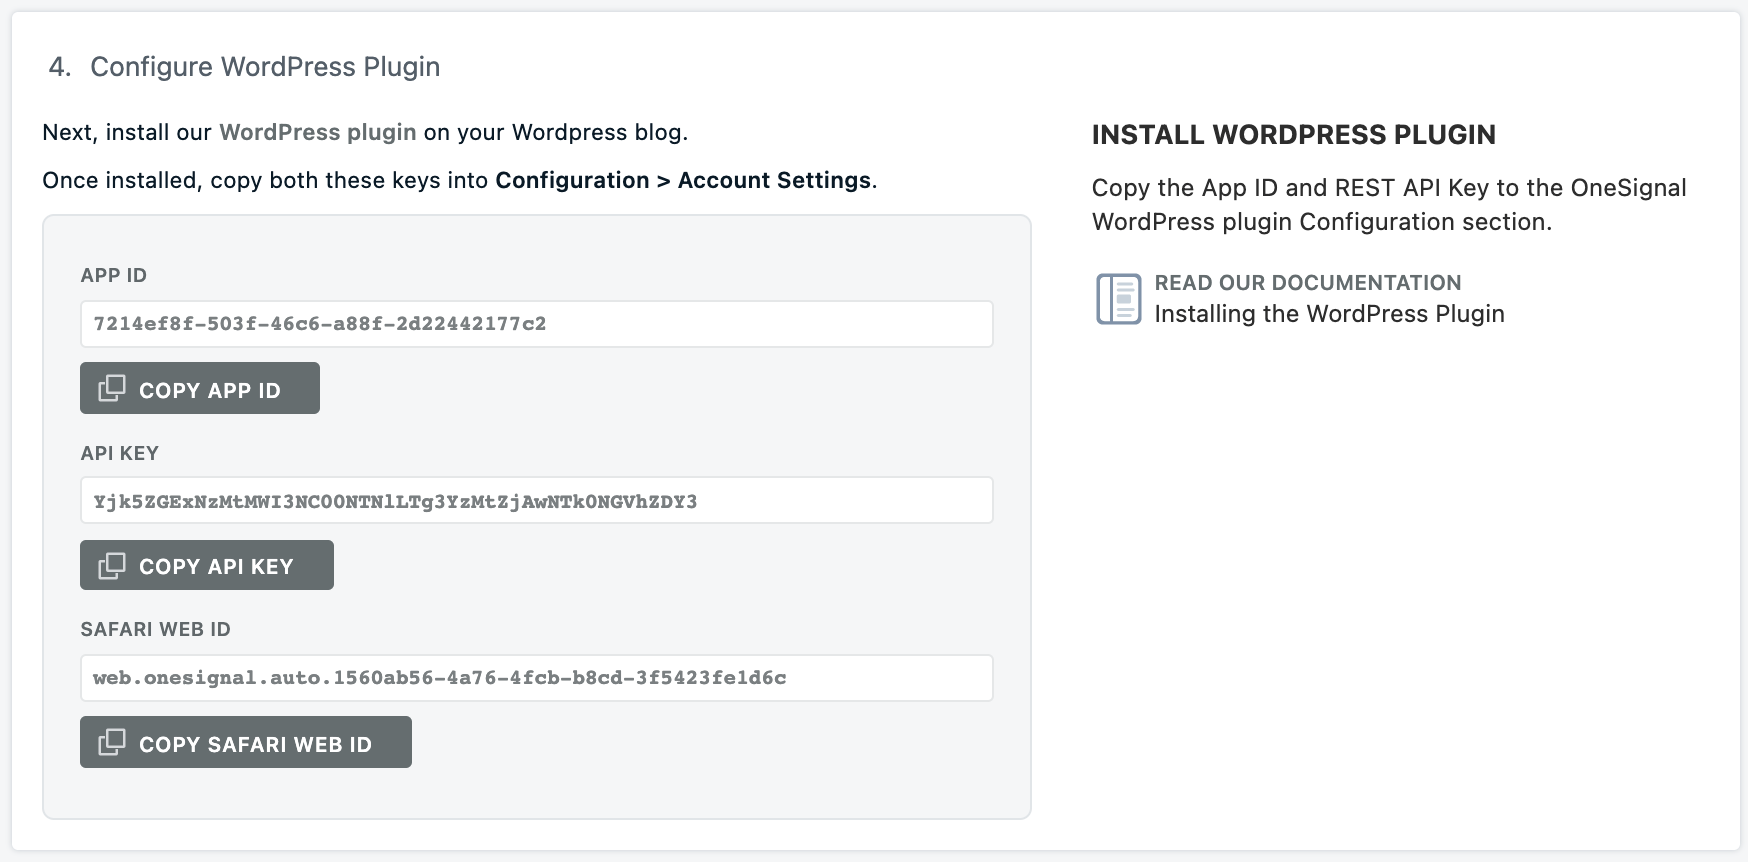
Enable Push Prompts
Activate the Slide Prompt and Subscription Bell to request permission from visitors: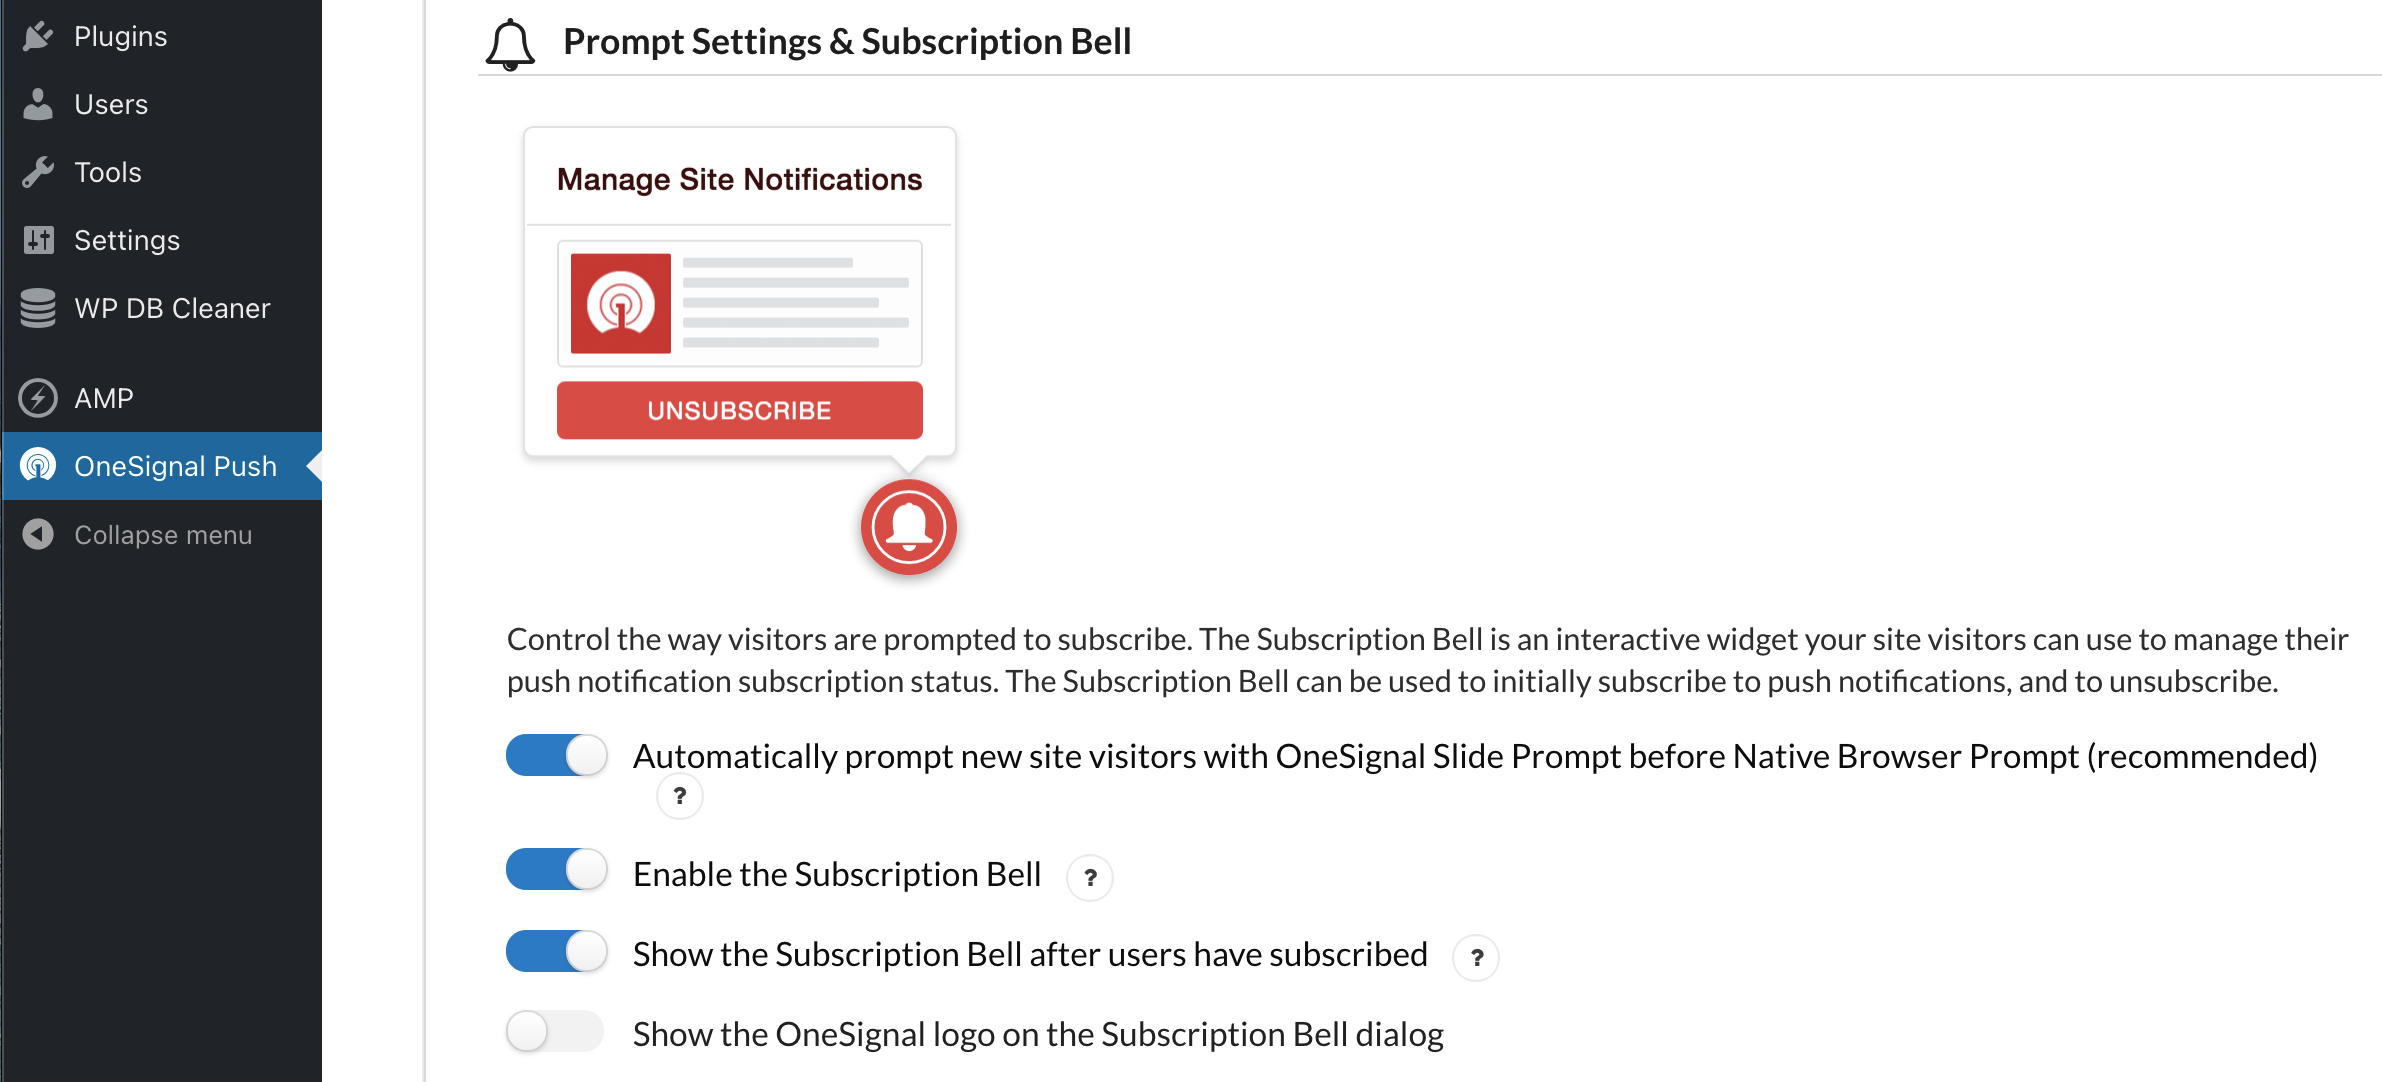
Step 5: Test Your Setup
Verify Installation
- Visit your website (you may need to clear cache plugins)
- Look for the OneSignal Slide Prompt and Subscription Bell
- Subscribe to test the flow
- Check OneSignal Dashboard → Audience → Users to confirm your subscription
Send Test Notification
Navigate to OneSignal Dashboard → Messages → New Push to send your first notification and verify everything works.Troubleshooting: If prompts don’t appear, check that push notifications are enabled in your device settings and try clearing your browser cache.
Step 6: Configure Notification Prompts
Set up how and when users see subscription prompts in the Configure section:Subscription Bell
A persistent icon (usually in the corner) that users can click anytime to manage their subscription status.Slide Prompt
A modal dialog that appears based on your timing settings to request permission. Next Steps: Users typically want to customize prompt timing and appearance. See the Advanced Customizations section below.Step 7: Automatic Post Notifications
Basic Setup
When creating posts, you’ll see a OneSignal section. Check Send notification on post publish to notify subscribers: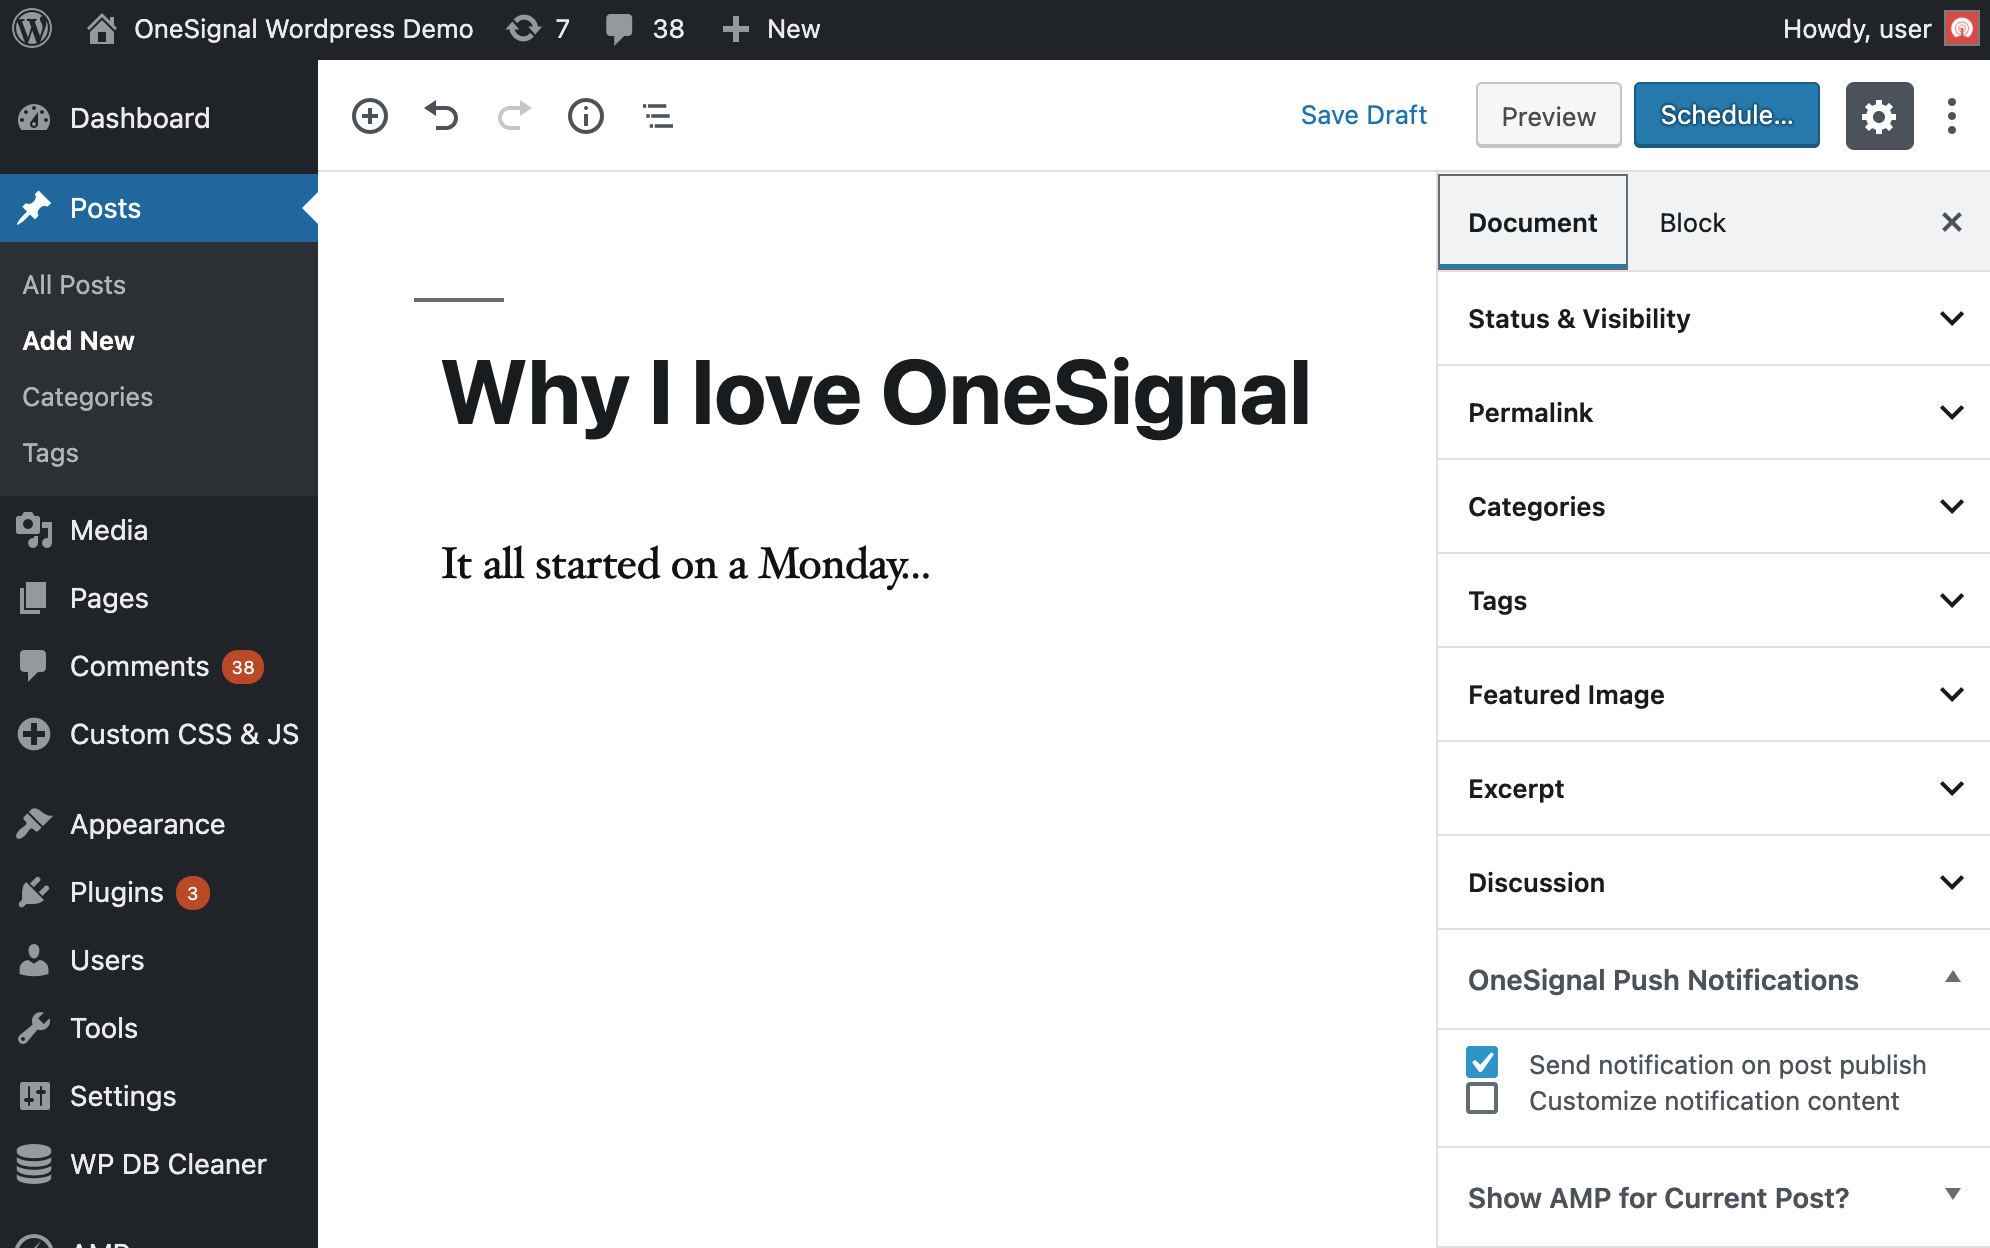
Auto-Enable Notifications
To automatically check this box for all new posts:- Go to OneSignal Push → Automatic Notification Settings
- Enable Automatically send a push notification when I create a post
- Save settings

Welcome Notifications
Configure optional welcome messages sent immediately after users subscribe. Edit or disable these in the Configure section of your plugin.Rate Limiting: Multiple notifications for the same post are limited to one per minute to prevent spam.
Advanced Customizations
The OneSignal WordPress plugin loads our Web Push SDK with your configured options. You can use any Web Push SDK JavaScript APIs to customize the experience further.Developer Note: This section requires JavaScript and PHP knowledge. If you need help adding code to your site, consider using plugins like Insert Headers and Footers or Custom CSS & JS.
Customizing Subscription Prompts
Advanced Prompt Setup
For sophisticated prompt customization including delays, categories, and email collection:Step 1: Disable Default Prompts
In OneSignal WordPress Plugin → Prompt Settings, turn OFF the Slide and Native Prompt (you can keep the Bell enabled).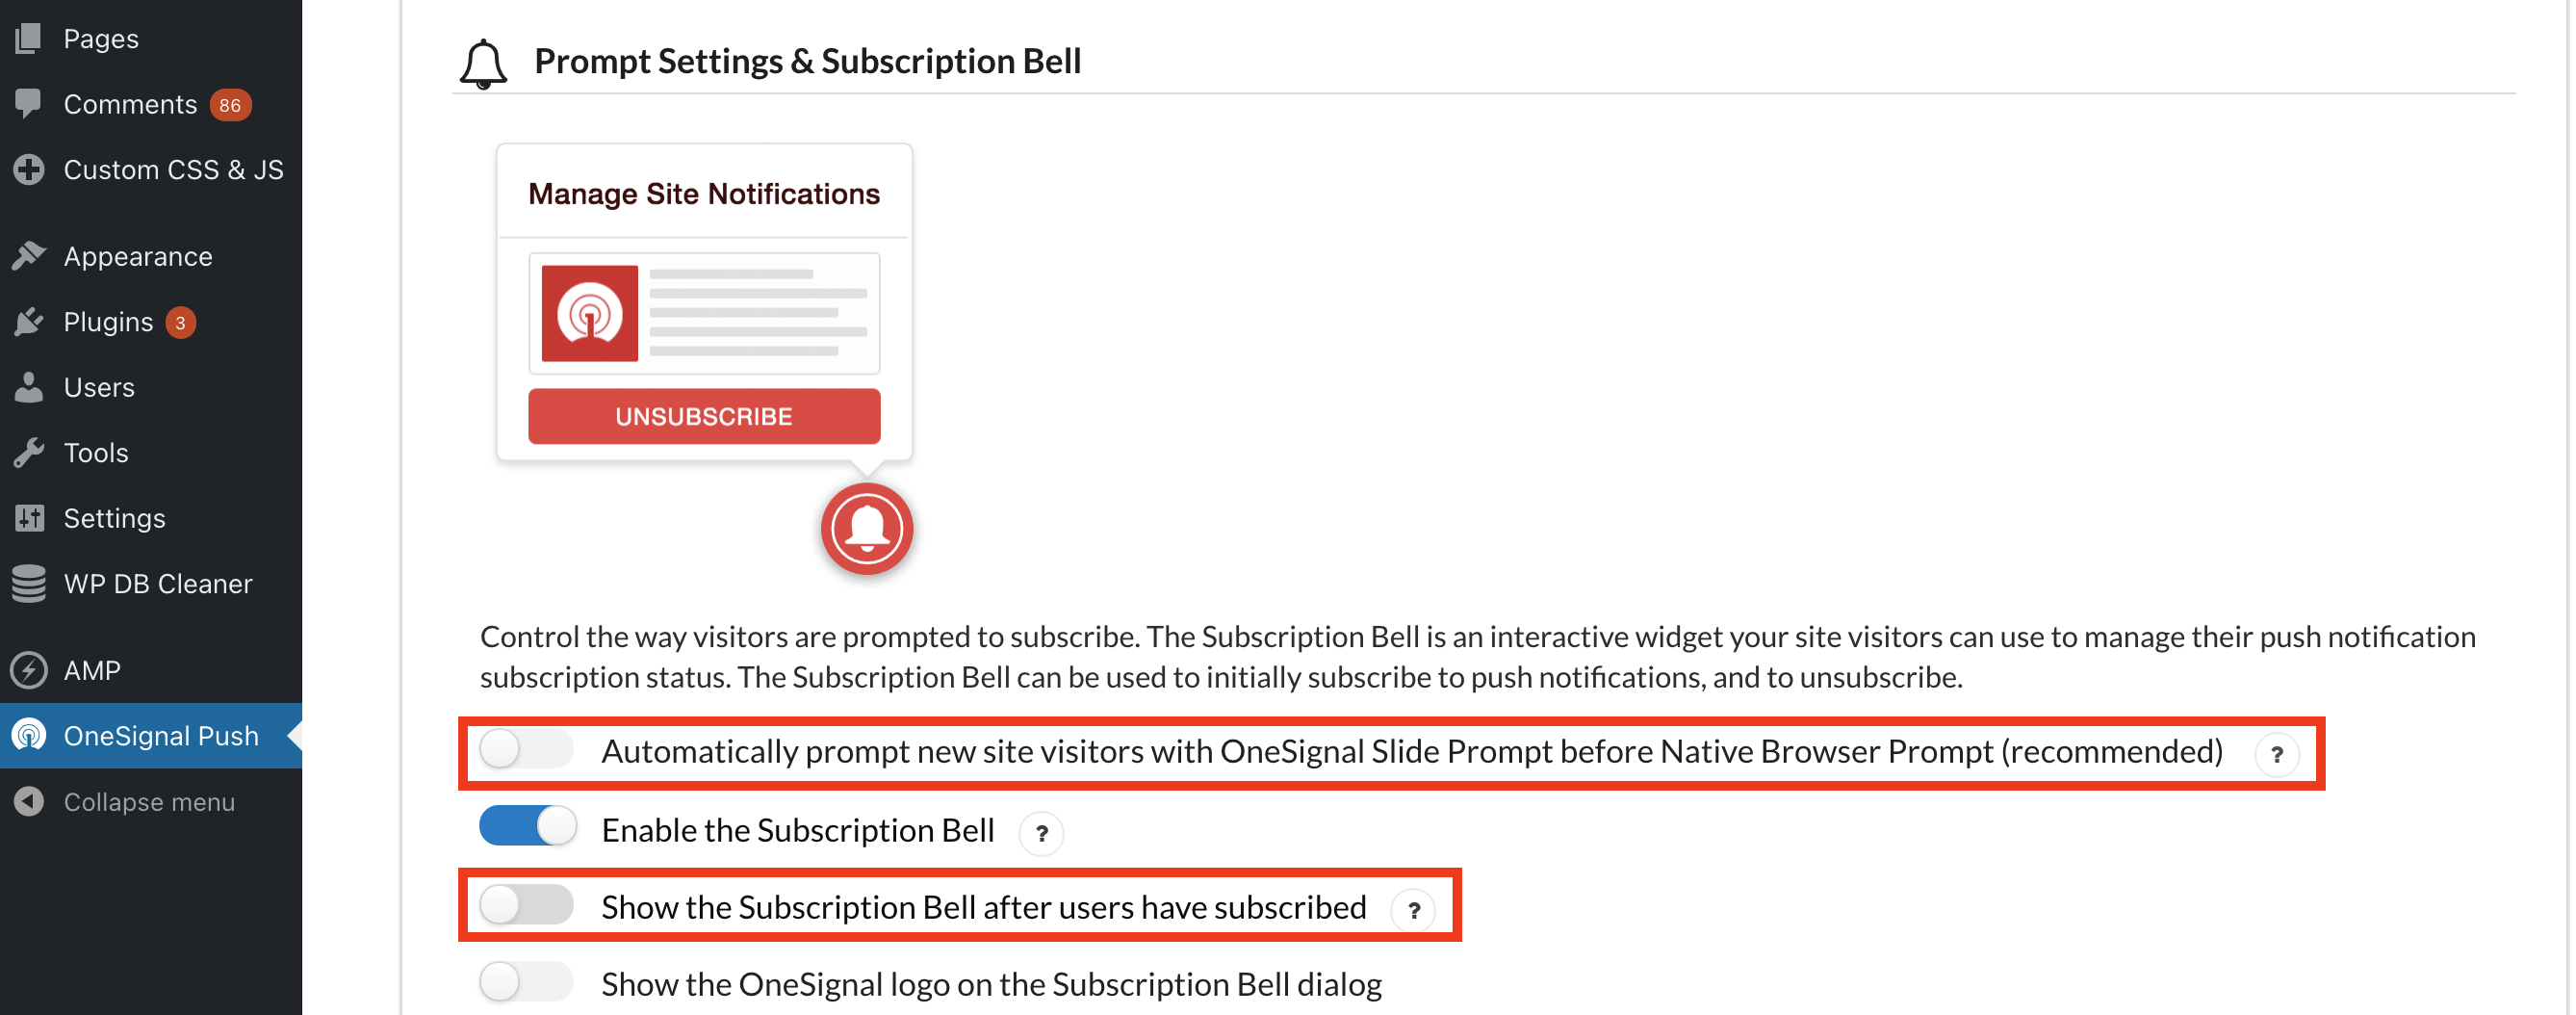
Step 2: Enable Manual Initialization
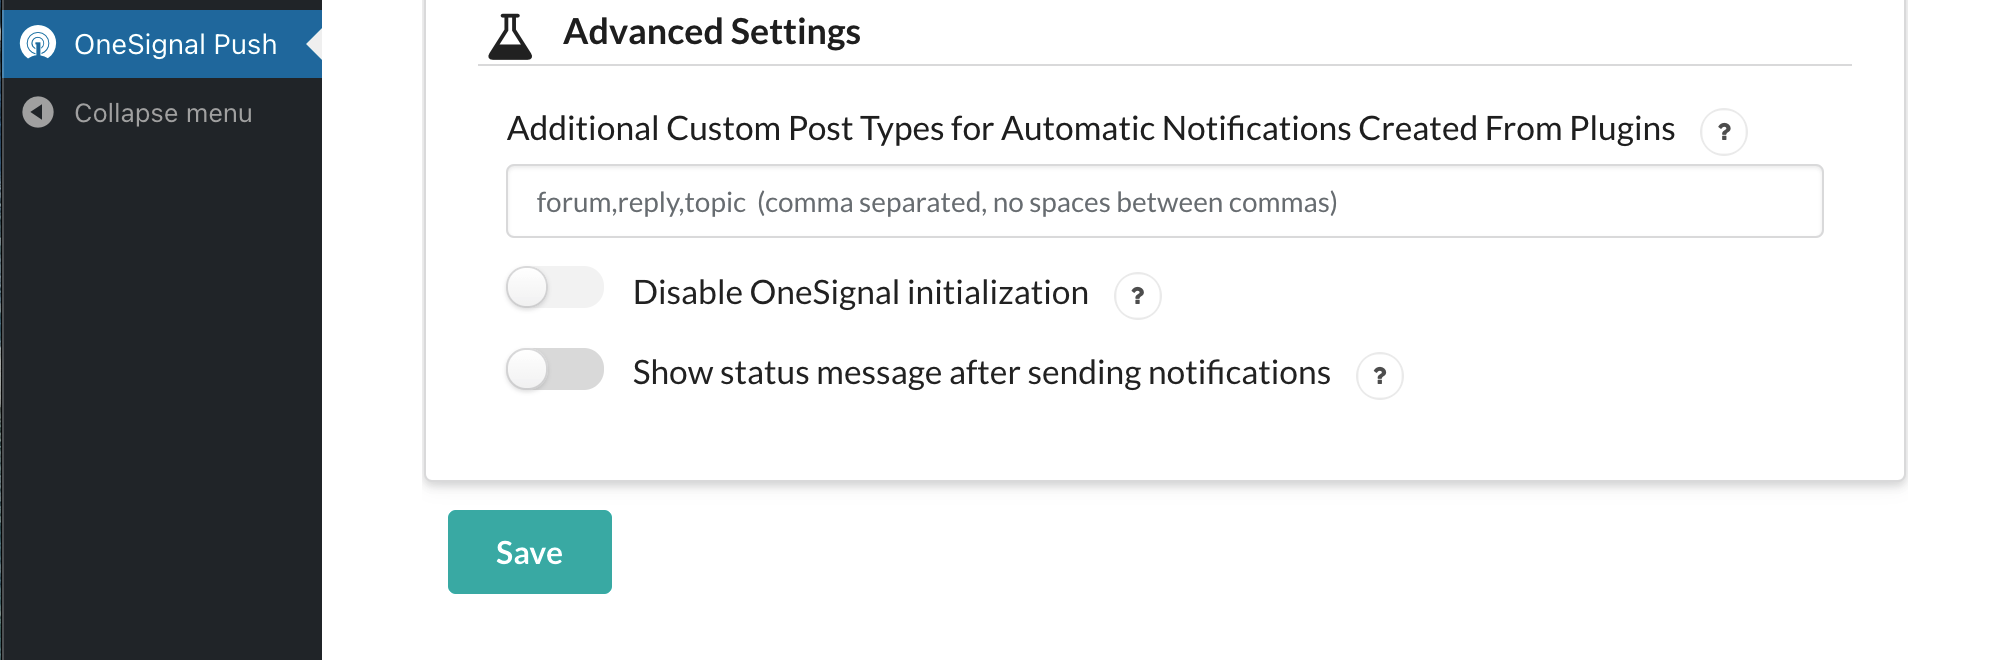
Scroll to Advanced Settings and toggle ON “Disable OneSignal initialization”, then Save.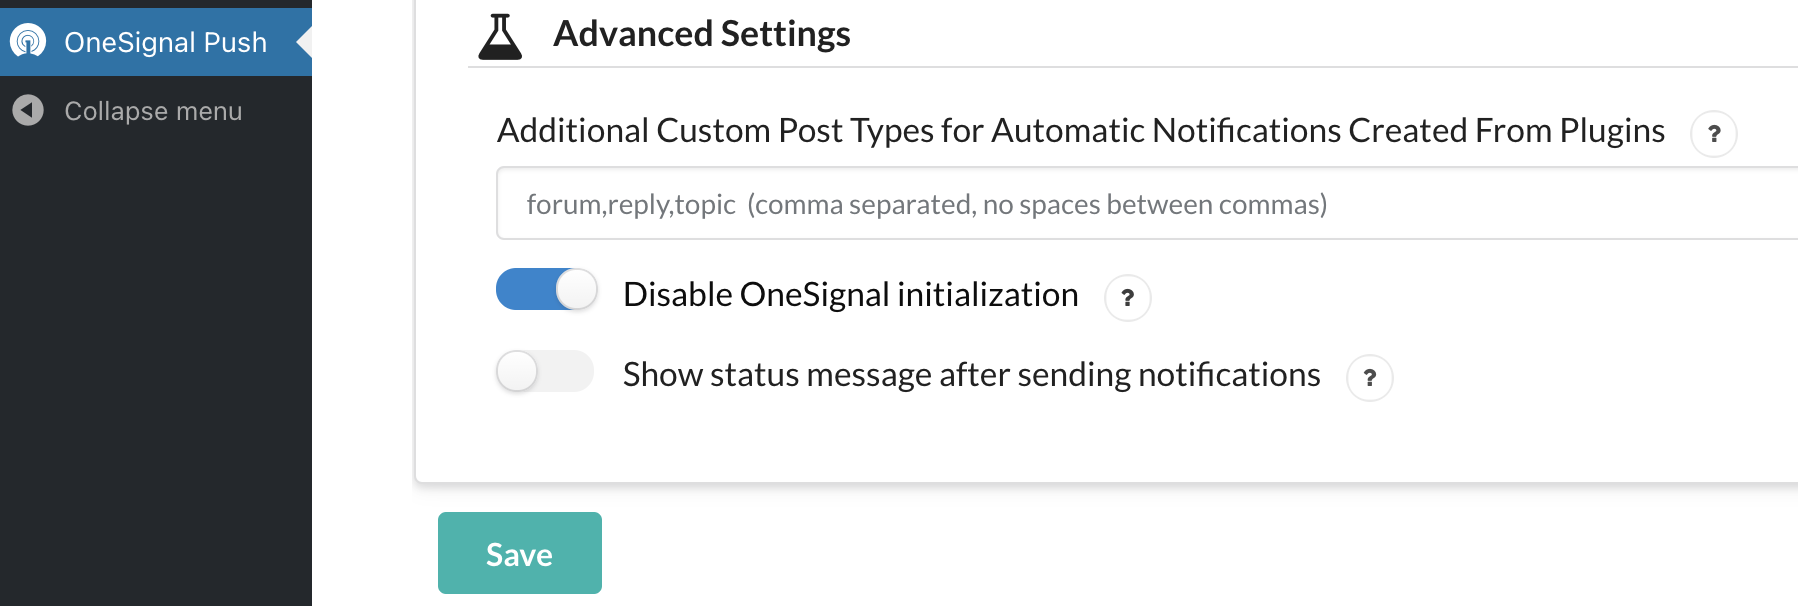
Step 3: Add Custom JavaScript
Add this code to your site (after the 3-second delay shown in examples):Page-Specific Prompts
Server-Side PHP Method
Use theonesignal_initialize_sdk filter to control initialization based on page properties.
Client-Side JavaScript Method
Enable “Disable OneSignal initialization” and add conditional JavaScript to initialize OneSignal only on specific pages.Multi-Language Prompts
For single language sites, simply translate the text in the prompt configuration. For multi-language sites, use the manual initialization method above and detect the page language to display appropriate text.User Segmentation and Targeting
Tagging Users
Categorize users with Tags to send targeted notifications:Targeting Segments
Create Segments in your OneSignal dashboard using User Tag filters, then target them with theonesignal_send_notification filter:
Featured Images in Notifications
Enable Featured Image Support
Ensure your theme supports featured images. Check your theme’sfunctions.php for:
Configure Image Settings
In OneSignal Push → Sent Notification Settings, toggle on the desired featured image options:
Third-Party Plugin Integration
Standard Post Types
Enable Automatically send a push notification when I publish a post from 3rd party plugins for standard post types.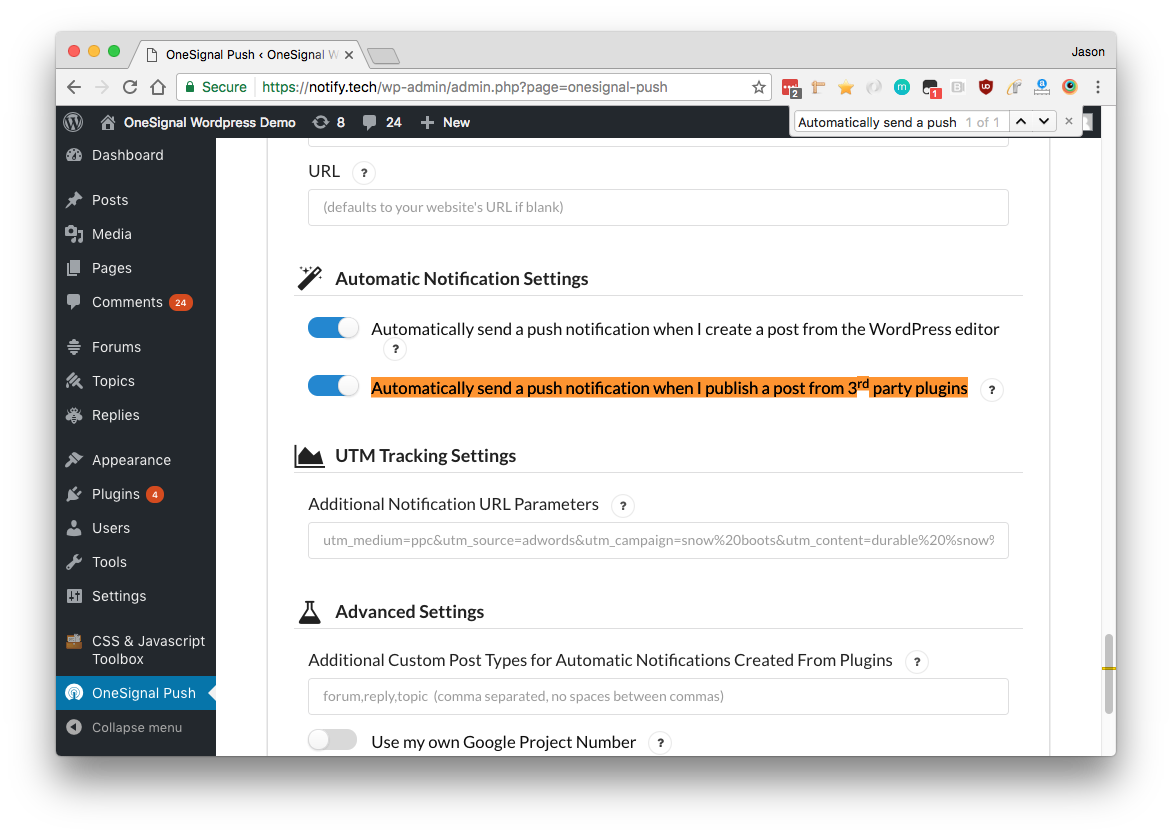
Custom Post Types
Add custom post types (comma-separated) to the Additional Custom Post Types field: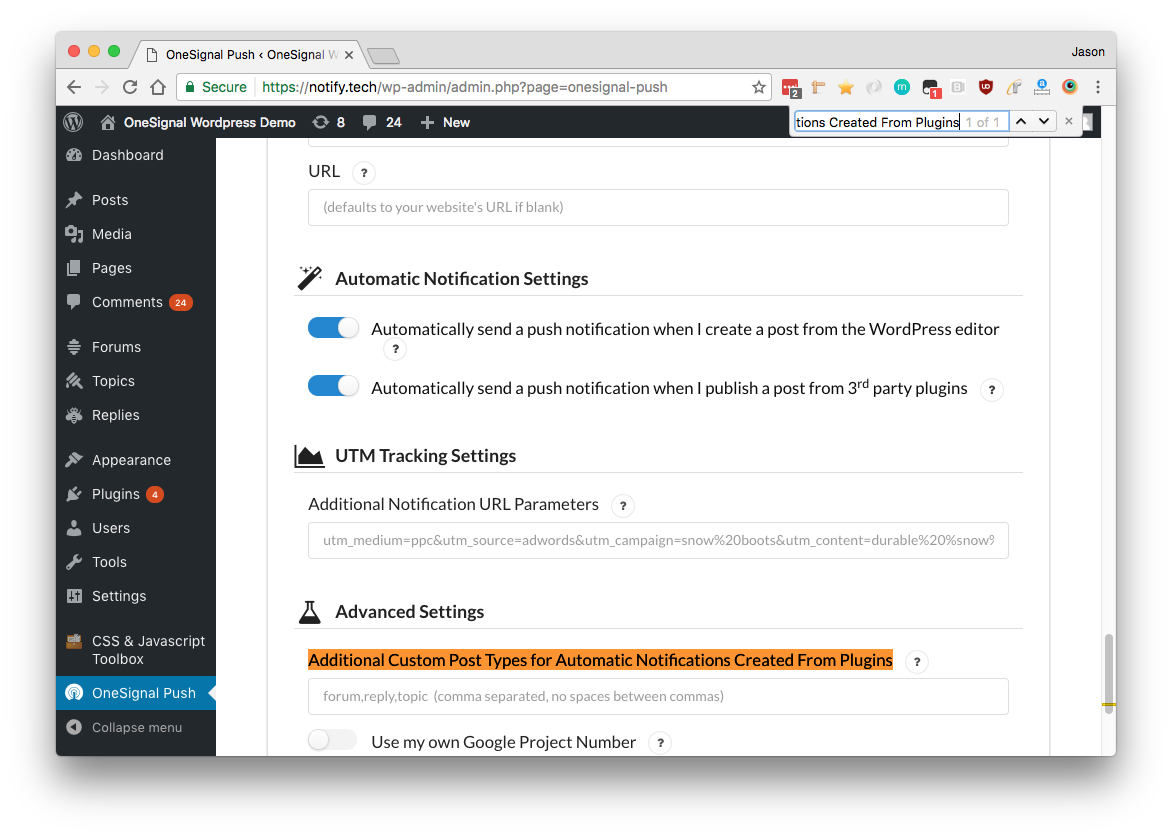
https://yoursite.com/wp-admin/post-new.php?post_type=your_custom_type
The post_type parameter shows the name to add.
Mobile App Integration
Method 1: Simple Web Browser Opening
Enable Send notifications additionally to iOS & Android platforms in your WordPress plugin settings.
Method 2: Deep Linking
For custom mobile app behavior, disable the above setting and use this PHP code:WordPress Plugin Hooks and Filters
Code Placement
Place custom PHP code in
wp-content/mu-plugins/ to prevent it from being overwritten by updates.wp-content/mu-plugins/onesignal-custom.php with your custom code.
onesignal_send_notification
Modify notification parameters before sending:onesignal_initialize_sdk
Control when OneSignal initializes:onesignal_include_post
Force notifications for specific post types:onesignal_meta_box_send_notification_checkbox_state
Control the default state of the notification checkbox:Mixed WordPress/Non-WordPress Sites
For sites with both WordPress and non-WordPress pages:- Use Custom Code Setup in OneSignal dashboard
- Add this code to non-WordPress pages:
Troubleshooting
Common Issues
”No Recipients” Error
- Cause: Trying to send multiple notifications for the same post too quickly
- Solution: Wait at least one minute between notifications for the same post
Prompts Not Appearing
- Cause: Cache plugins, browser settings, or initialization issues
- Solutions:
- Clear all cache plugins
- Check browser notification permissions
- Verify HTTPS is enabled
- Confirm plugin configuration is saved
”Couldn’t load wp.data” Warning
- WordPress 5+ with Gutenberg: May indicate setup issues - contact support
- WordPress 4.x: Safe to ignore - this warning doesn’t affect functionality
Custom Post Types Not Working
- Cause: Missing required meta data
- Solution: Use the
onesignal_include_postfilter to explicitly include your post type
Notifications Not Scheduling
- Cause: WordPress cron or theme conflicts
- Solutions:
- Use OneSignal Dashboard or API for scheduling
- Implement custom scheduling with
onesignal_send_notificationfilter - Use Zapier integration for automation
Database Entries
OneSignal creates these entries in yourwp_postmeta table:
| Entry | Description |
|---|---|
onesignal_meta_box_present | Confirms OneSignal was active when post was published |
onesignal_send_notification | Tracks notification sending |
status | HTTP status of notification (200 = success) |
response_body | API response with notification ID and recipient count |
recipients | Number of users who received the notification |
Getting Help
- Plugin Issues: Check Troubleshooting WordPress Web Push
- General Support: Contact
support@onesignal.com - Plugin Source: Available on GitHub
Next Steps
After completing this setup:- Monitor Performance: Check your OneSignal dashboard regularly for subscriber growth and engagement metrics
- Optimize Prompts: Experiment with different prompt timing and messaging
- Segment Users: Implement tagging to send more targeted notifications
- Test Thoroughly: Send test notifications to different devices and browsers
- Plan Content Strategy: Develop a notification strategy that adds value without overwhelming users