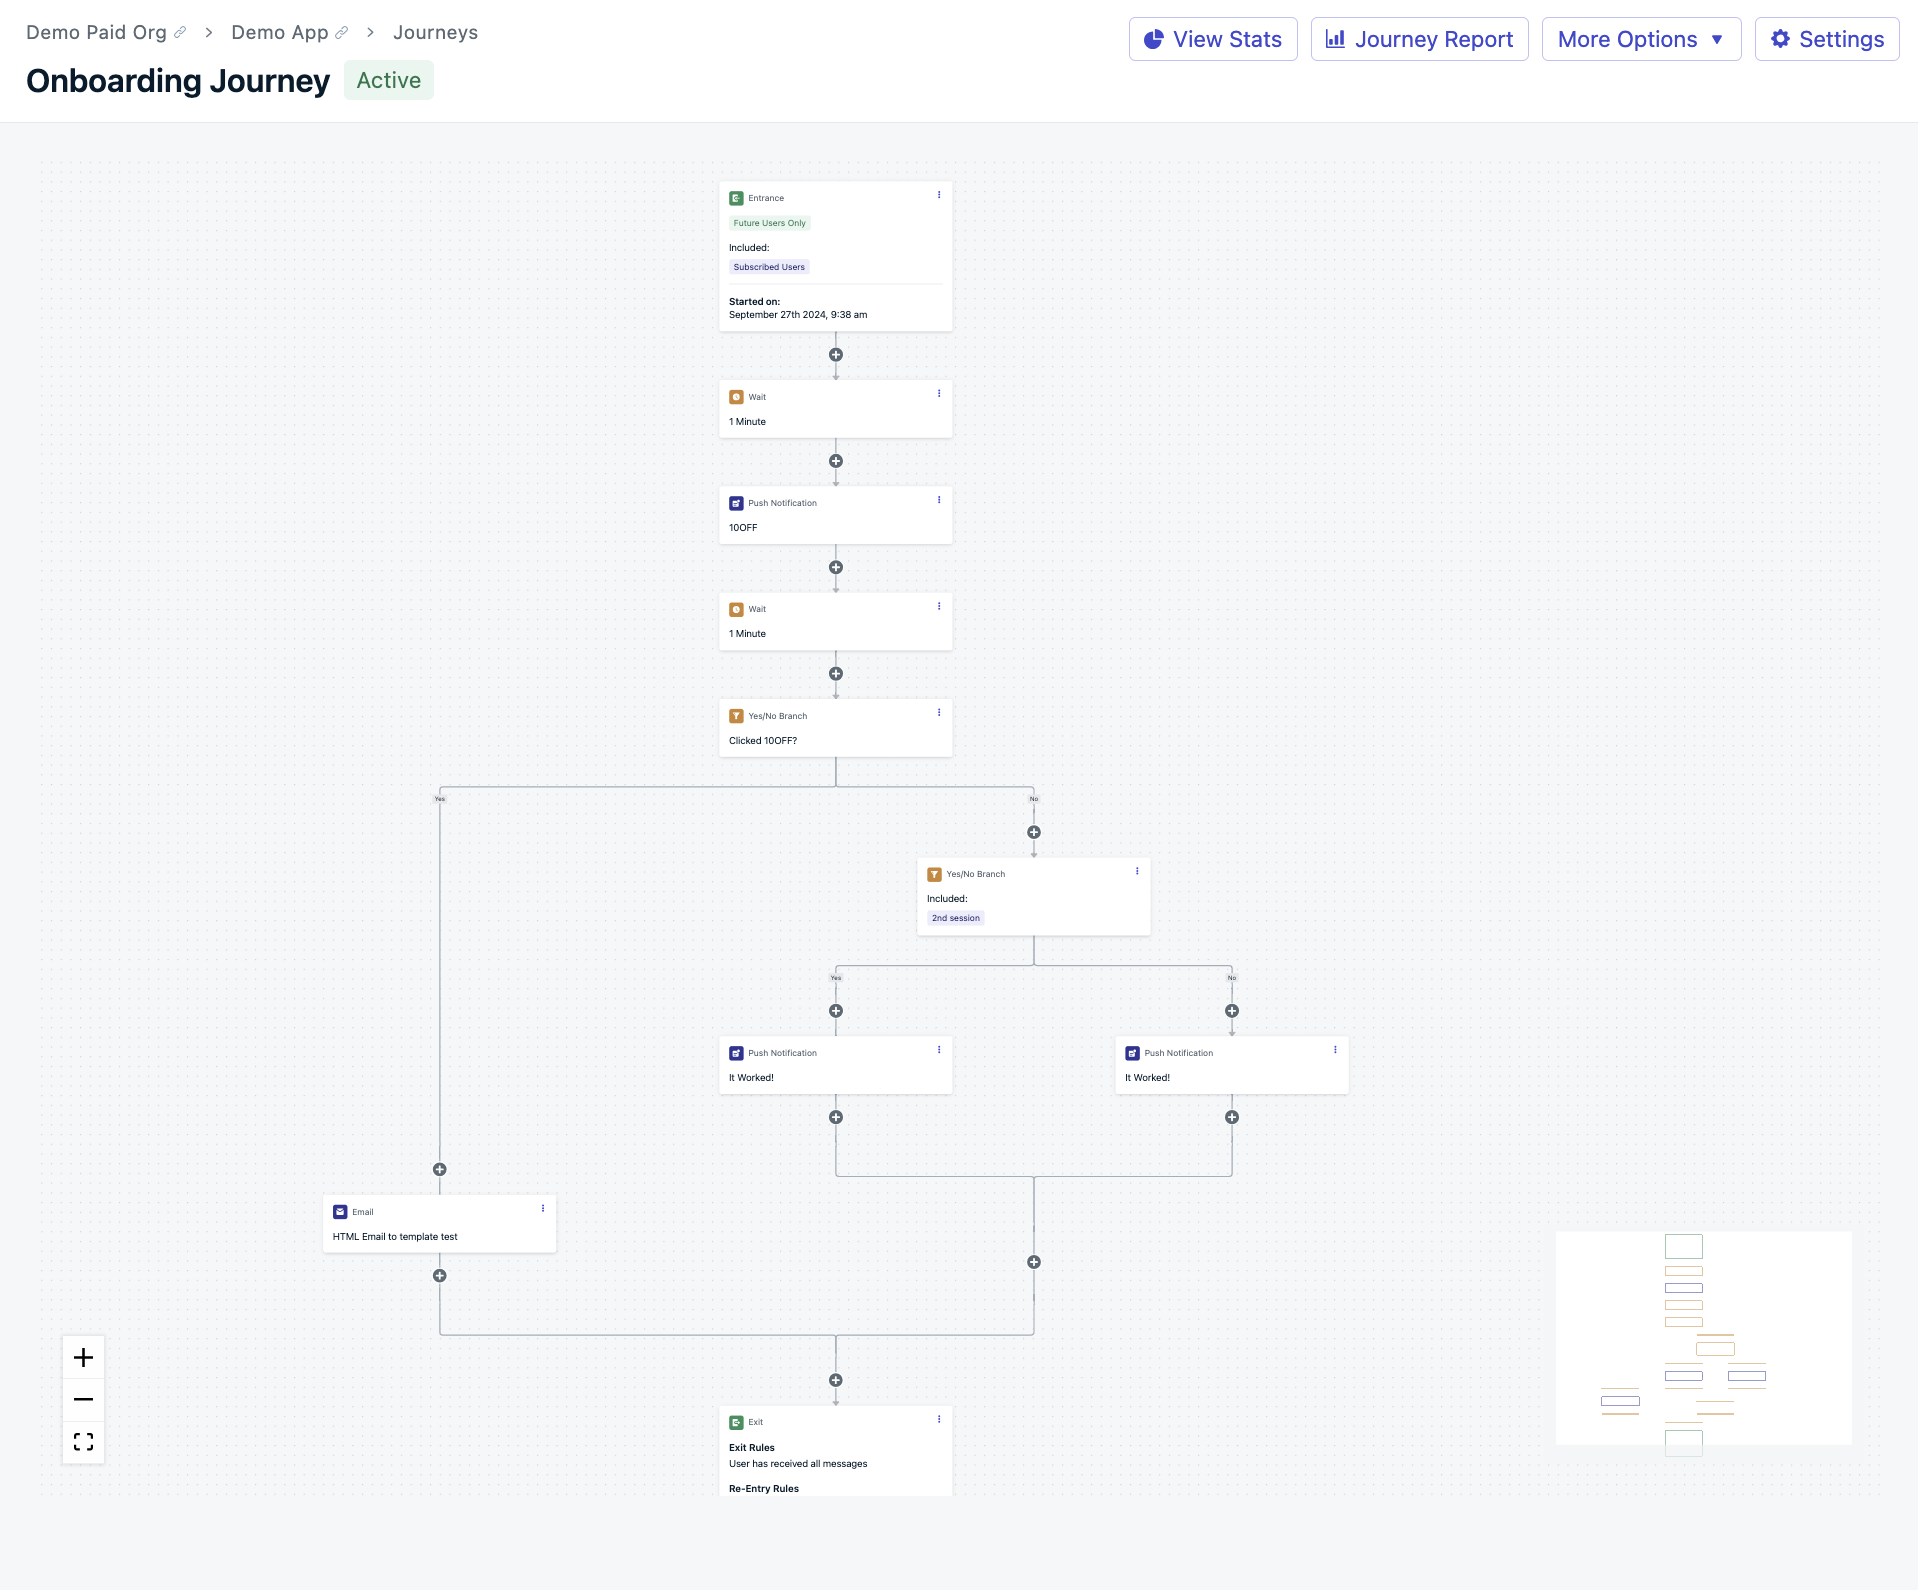
Journeys overview

Explore our extensive SDK and API reference material.

Our visual builder enables easy creation of personalized messaging journeys without any coding. The Journey builder supports a full omnichannel experience including mobile push, web push, in-app messaging, email, and SMS.

Create Journeys for every situation:

  • Onboarding sequences to guide your users to success
  • Re-engagement campaigns to get your users back
  • Abandoned cart workflows to drive sales and revenue
  • Promo, upsells, post-action followups, and more
1427

Example of an Abandoned Cart Journey

Using journeys with multiple channels

It’s best practice to mix channels to target your users—e.g., welcome users with an email, then nudge them to return with push notifications, announce a promotion with an in-app message, and send a final day reminder via SMS.

In order to ensure a smooth user experience across channels, you should set external IDs on your Users to unite Subscriptions under a single person. If an external ID is not set, then each subscription will be treated as its own user which may cause your customers to get duplicate or confusing messages. In short, setting the External ID on your users will enable us to track them through your Journeys and allow you to combine message channels to create the perfect user experience and avoid over-messaging. Please see Users and Subscriptions for more details.

Journey settings

Start by giving your Journey a descriptive name for you and your teams to reference. Some common examples include:

  • Abandoned Cart
  • Welcome Campaign or
  • Inactive User Reach Out

Entry rules

This defines how users will enter your Journey and any filters you want to apply to that audience using a segment.

Entry rules for a Journey

Entry rules for a Journey

Segments

Include or exclude the segment(s) of subscriptions that are eligible to enter the Journey. When a user has a subscription that matches the segment rules, they will enter the Journey. If a user's subscriptions stops matching the segment rules while a Journey is in progress, they will not automatically exit the Journey unless you select "Exit when a user no longer matches the audience conditions" in the Exit Rules.

For users with multiple subscriptions, their ability to enter a Journey is based on the segment rules for all of their subscriptions. For example, if a user has a subscription that is in an Included segment, but also a subscription that is in the excluded segment, the user will not be entered into the Journey based on the subscription that excludes them from it.

🚧

Users with multiple subscriptions and last session

The way Journeys evaluates its audience and determines whether or not a user should enter, is based on the collection of the user's subscriptions, and their subscriptions' segment membership status.

For the "Include Segments" audience field in Journeys, it is an inclusive check. Meaning, if even one of a user's subscriptions belongs to the included segment, the user will qualify and enter the Journey.

For the "Exclude Segments" audience field in Journeys, it is an exclusive check. Meaning, if even one of a user's subscriptions belongs to the excluded segment, the user will never qualify or enter the Journey.

Try to be explicit in your Segments and provide an excluded Segment for cases where users should not enter the Journey, even if the user's other subscriptions may qualify for the Include Segments audience field.

Example: Segments with Last Session

If a Journey is set to target users whom have been inactive for greater than 60 hours, to ensure that users who have been active recently but may have other inactive subscriptions associated with their external_id (last_session > 60hrs), do not enter the Journey, the Exclude Segments audience field should include a segment that explicitly excludes users who have been active within the last 60 hours (last_session <= 60hrs).

Future additions only

Segments are dynamic and have users entering and exiting them constantly. Checking this option means any user currently in the included or excluded segment at the time the Journey is set live will never enter the Journey. Even if the user leaves the segment and enters again, they will never enter the Journey. This setting is especially recommended for onboarding Journeys that you may not want users to ever re-enter.

Subscription reach

The Subscription Reach denotes the number of subscriptions based on the entrance criteria. Use this to help understand what type(s) of messages might reach the most people when creating your Journey. It is displayed in the Journey settings and on the Journey canvas.

A count of subscriptions that can be reached per channel.

A count of subscriptions that can be reached per channel.

Push includes the count of all web and mobile push subscriptions that are subscribed and can receive push.

Email includes the count of all email subscriptions that are subscribed and can receive email.

SMS includes the count of all SMS subscriptions that are subscribed and can receive SMS.

In-App includes the count of all subscriptions that are reachable via iOS and Android. Note that unlike other channels, in-app messages do not require users to subscribe or opt-in, but they do require the user to have the app open to receive the in-app.

Exit rules

These settings define if and when a user should automatically exit your Journey. They can re-enter a Journey based on the re-entry rules you define.

Journey exit rules.

Journey exit rules.

Exit when user becomes active in your app/website

Use this option if you want users who visit your website or app to exit immediately. This is useful if your Journey is a re-engagement or reactivation campaign.

Exit when user no longer matches the audience conditions

Use this option if you want users to exit immediately in cases where they no longer match the original target audience segment.

Exit when a user enters a segment

If at any time the user falls into one of the selected Segments, they will immediately exit and not enter any more steps or be sent any more messages.

Tag users when they exit early

744

Tag User on Early Exit

This will add a tag to a user when they get to this step. If value is left empty the tag will be removed if it exists. If your app has reached the tag limit, no tag will be applied.

For example, if you want users to enter another Journey when they exit early, you could tag them (exited-journey-1:true) then create a segment for that tag and value, and set the trigger for the next Journey to be when users enter that segment with tag (exited-journey-1:true).

Another good use case is using tags to ensure users are not active in too many Journeys. By tagging users when they start a Journey, finish a Journey, or exit early, you can create segments that exclude these users from other Journeys e.g. at the start of a Journey tag users (in-journey:true), then at the end of the Journey and on exit, remove that tag.

Re-entry rules

Journey re-entry rules.

Journey re-entry rules.

Defines how often they can repeatedly enter a Journey. Some message sequences you want to send once, like a Black Friday promotion. Some messages you’ll want to send every time a user is eligible to receive, like an abandoned cart campaign every time a user abandons the card, or a reactivation campaign every time they are inactive. This helps you space out the time in between.

Schedule a Journey

You can schedule when you’d like users to enter a Journey and when you’d like the Journey to be stopped. You can only schedule start and end times for dates and times in the future.

When you set a journey's start date and time, it will be listed as Scheduled in the Journey Index. You can edit the scheduled time before it goes live. At the scheduled date and time, it will become Active.

When you set the end date and time, the Journey will be stopped and archived once that date and time are reached. Any users currently within that Journey will immediately stop receiving messages for that Journey. Those users will not be counted toward the Early Exit or Exit event.

Entitlements: If you have reached the number of active Journeys for your plan, and do not stop and archive one by the time a new Journey is scheduled to start, the new Journey will not be set live, and will have an updated status of “Failed to Send.” We will also notify the most recent person to schedule the Journey letting them know of the failure. To resolve, you must stop and archive an older Journey, and then reschedule the new Journey or set it live immediately.

Journey messages

Send a push notification

Select the Message Template you would like to send. We strongly encourage naming the template something recognizable so you can easily find it in the dropdown.

Message scheduling is not currently supported. When a user reaches this step in your Journey they will be sent the message immediately.

Send an in-app message

First, ensure that you’re set up to support sending In-App Messages.

Once set up, you can add an In-App Message (IAM) node to your Journey by clicking on the (+) and selecting “In-App Message”. This will open up a side panel where you can manage the content and format of your message via drag and drop or HTML editor.

Aside from the content of the message, you also have the option to set trigger conditions for the message as well as a delivery schedule. Triggers define when the message should display and the Delivery Schedule defines the duration of time the user has to open the app to receive the message.

Currently for IAMs to display, the user must have reached the Journey IAM node before a new session. A new session is when the app is out of focus for 30 seconds+ and put back into focus. After the user reaches the IAM node, they are eligible to get the message based on the trigger conditions and delivery schedule. Users that enter the IAM node during the current session are not eligible to get the IAM until a new session begins.

Example: a user gets a Data Tag set using the SDK. This enters them into the journey and they pass the IAM step. The user will not get the IAM until they close the app for 30+ seconds, then open it again because this starts the new session. If the user entered the Journey and passed the IAM step before opening the app, then they should see the IAM once the trigger conditions are met assuming they are within the Delivery Schedule.

📘

How often do you want to show this message?

Currently, In-App Messages within a Journey will only show once and never again to that user. Even if the user re-enters the Journey, the message will not display again to that user.

Send an email

First ensure you’ve set up your app to support sending email.

Select the Message Template you would like to send. We strongly encourage naming the template something recognizable so you can easily find it in the dropdown.

Message scheduling is not currently supported. When a user reaches this step in your Journey they will be sent the message immediately.

Send an SMS

First ensure you’re set up to support sending SMS.

Next, make sure you’ve created an SMS template with the messaging you’d like to send out from your Journey. You can access this by:

  • Clicking on “Messages” at the top of your screen
  • Then click on “Templates”
  • Finally click “(+) New Template” where you’ll select “New SMS Template”

Then, in your Journey, click on the (+) to add an SMS node. This will open up the side panel where you can select the template you’d like to send out at that specific point in the Journey.
Once users reach that step in the Journey, SMS messages will send out to them immediately.

Journey actions

Wait

Users move the Journey in real-time. Use the wait action to space out your messages and steps. Define your wait time in minutes, hours, days or weeks. When a user enters these steps they will wait here the defined amount of time before leaving and going to the next step.

For example, if you send a message in the Journey and want to split users based on the interaction with that message, you should set a wait node for how long you want the user to interact with the message before continuing.

Time window

Select the particular days on which users should be allowed to move forward into the next step of the Journey.

For example, if you want to only send a notification to users in the evening at the weekend, you could set up a time before the notification that specifies that the user can only progress to the message node during this time period:

Screenshot showing an example of a time window node

Screenshot showing an example of a time window node

Time window handling

When specifying a Time Window outside the predefined allowed periods, a timer will be activated to determine the wait duration until the next eligible period within the Time Window. The timer will be set to trigger at any time within the allowed Time Window.

Example:

If the allowed Time Window is every Tuesday from 1:00 PM to 6:00 PM PST, and you set a Time Window outside this period, OneSignal will set a timer to activate at a random time within the allowed window on the next available Tuesday.

For instance, if the user sets the Time Window outside the allowed period, the timer might activate at 5:45 PM on that Tuesday.

Yes/No branch

Use the Yes/No Branch to personalize a user's journey based on segment membership or previous message behavior.

Segment membership

Branches depending on what segment the user is in. For example, if you tag your users with a plan type (lets say “Free” and “Paid”) then you can create a branch for free users and paid users. The free branch may contain more messaging incentivizing users to upgrade, while the paid branch may introduce more paid features.

Previous message behavior

Branch depending on what behavior the user had for other messages in the same Journey. For push those options are “Clicked” and “Delivered”. For email those options are “Delivered”, “Opened” and “Clicked”. For example, if a user did clicked a previous notification, maybe you want to follow up with another notification or add a data tag to those users

Safari does not support Confirmed Delivery so keep this in mind when you create branched messages.

Split branch


Split branches direct random segments of your audience to different messaging paths. Marketers use this feature to test various elements, such as message content, channel performance at specific stages of the customer journey, or even the overall flow structure. You can split your audience across up to 20 different branches.

You can choose to distribute your audience evenly across branches or customize the percentage allocation. If the percentage split results in repeating decimals (for example, with 3-way or 6-way splits), the system will round the percentages to whole numbers, evenly distributing them and rounding up the last branch to make the total 100%.

Percentage splits are applied at the user level, meaning the distribution may not always be perfectly even, especially with smaller sample sizes. For instance, with a 50/50 split and a 6-person audience, you might end up with 4 people on one path and 2 on the other. However, the distribution will be more even with larger sample sizes.

📘

User Re-entry Branch Path

By default, users who re-enter a Journey will continue to be randomly routed through your percent split branches. If you would like to users to continue on the same branch each time they re-enter, you can toggle off the Randomize on re-entry setting

To track which branch a user followed, you can utilize the Tag Step.

ABN tests (Multi-Variant Testing)

You can set up ABN tests by nesting your Split Branches and setting the percentages in accordance with your ideal sample group structure.

For example, if you want to set up a test with 3 variants with equally proportioned, randomized sample groups, then you start by adding a Split Branch set to send 33% of the audience down one path, and 67% down the other. Next, under the 67% branch, you’ll nest another Split Branch, sending 50% of that group down each branch. This will give you approximately a 1/3 breakdown across each of your 3 branches.

Control groups

See how audience members naturally behave without a touch point by keeping one path free of message nodes.

Choosing a winner

Once you’ve assessed and concluded that one branch is the highest performing, the split branch node can be edited to send 100% of the audience down that particular path.

Tag user

Use the tag user action to add tags to users. Examples of why you might add a tag include tagging them with the Journey and step they are on in case you want to creates a segment or target this group later.

You can also use tags to make use of in-app messaging in Journeys. Tag users at a particular step in a Journey and then set up an in-app message that targets an audience with that tag.

Using Tag User action as part of an Onboarding/Welcome Flow.

A use case for Tagging Users in a Journey can be to take users exclusively through an Onboarding/Welcome Flow without new users participating in any other Journeys as the Onboarding/Welcome Flow takes priority.

As such the first action of a Journey would be to add a custom tag such as onboardingJourney : Active and use that tag to create a live audience of all users going through their Onboarding/Welcome flow and ensuring that this segment gets excluded on other, lower priority Journeys that you wish will not interfere with the user experience.

The last step before users exit and leave the Onboarding/Welcome Journey would be to delete the tag so that the user now leaves the aforementioned audience thus making them eligible to participate in any other Journeys you see fit. Simply leave the value as blank in the Tag User action as in the example below:

📘

If you'd like to adjust when a customer sees a message, you can drag and drop messages and actions on the canvas while your Journey is in Draft.

Managing journeys

"Refresh Stats" button

Clicking Refresh Stats will refresh all of the Journey statistics to see an updated view of users passing through the Journey.

"More Options" dropdown

  • Journey Examples— will open a new browser window to a page that shows examples of pre-built Journeys inside of our documentation
  • Delete — will delete a Journey. Once deleted you cannot retrieve it.
  • New Journey — will bring you to a new instance of Journey.
  • Stop + Archive — stops the Journey and gives it an archive status. These can still be accessed and duplicated. Once a Journey has been stopped, all users within the Journey will halt from finishing the Journey.
  • Duplicate — creates a copy of that Journey which you can then edit and make live. When you duplicate a Journey, your start and end date and time schedule will not be duplicated.
  • Export as Image — will automatically download a PNG image of your Journey. The image will only capture what is visible on your screen.

"Edit" button

Clicking Edit will enter "Edit Mode" allowing you to update your Journey.

Saving changes in edit mode will be made live immediately for Journey steps. As soon as steps are added or changed, audience members will be able to enter into or other experience those changes, as applicable.

Saving changes to Journey Settings will go live for future users who match your updated rules. Any users who have already entered, exited, or re-entered will not be affected.

Supported Edits

  • Journey Name
  • Update Entry Segments
  • Update Exit Criteria
  • Update Re-entry Rules
  • Add new steps between existing steps
  • Update details of existing steps
  • Delete Message steps
  • Delete Tag steps
  • Delete Wait periods - note that deleting a wait node will immediately move your users into the next node

Not yet supported edits

The following list of edits is not yet supported. To make any of these changes, you can Stop and Archive the Journey, then duplicate it. When duplicating it, we also recommend that you exclude any previous users who have already received/experienced the Journey.

  • Delete branches
  • Pause a Journey

"View Stats" button

The View Stats button will exit the "Edit mode"and enter "Stat Mode" allowing you to view the statistics of the message.

For more information on the stats that are included for Journeys, please see Journeys Analytics.

Adding a note

Adding notes serves as a dynamic collaborative tool for your team to pinpoint, debate, and refine specific aspects of your Journeys.

Benefits
Adding notes within Journeys offers several advantages:

  1. Centralizes all details and discussions directly within a Journey, maintaining context and focus.
  2. Helps identify intricate details of a Journey, such as targeted segmentation or unique attributes specific to your marketing strategy.
  3. Describes the objective or purpose of a given step, such as detailing what the message template is supposed to relay to the user.

You can add a note or comment to any messages or actions within your Journey. To do so, go to a Journey step in Edit mode, add a note, and then click Save.

When a note is added to a Journey step, you will see a note icon it. Click the icon to view it. In the example below, note taking is used to inform Journey Editors of what an A/B test is looking to solve:

If you have previously been using Automated Messages to orchestrate your messaging, please refer to the documentation on Automated Messages.


What’s Next