Video: Journey examples walkthrough
Onboarding
Use this pattern to send a welcome or onboarding sequence to new subscribers. It is also commonly referred to as a welcome campaign, welcome series, or new user campaign. The goal is to guide users toward completing a key action (finishing their profile, making their first purchase, or discovering a core feature) rather than messaging them the moment they sign up.Immediately: Send a welcome email
Wait 1 day
Day 2: Branch on key action completed?
onboarding_complete = true) or segment membership.- Yes branch: Exit the journey. The user doesn’t need a nudge.
- No branch: Send a push notification with a specific, actionable prompt. For example: “Finish setting up your profile” or “Make your first [action].”
Wait 5 days
Day 7: Branch on key action completed?
- Yes branch: Exit the journey.
- No branch: Send a follow-up email as a last touch. Avoid messaging further. Users who haven’t engaged after a week are better candidates for a re-engagement campaign.
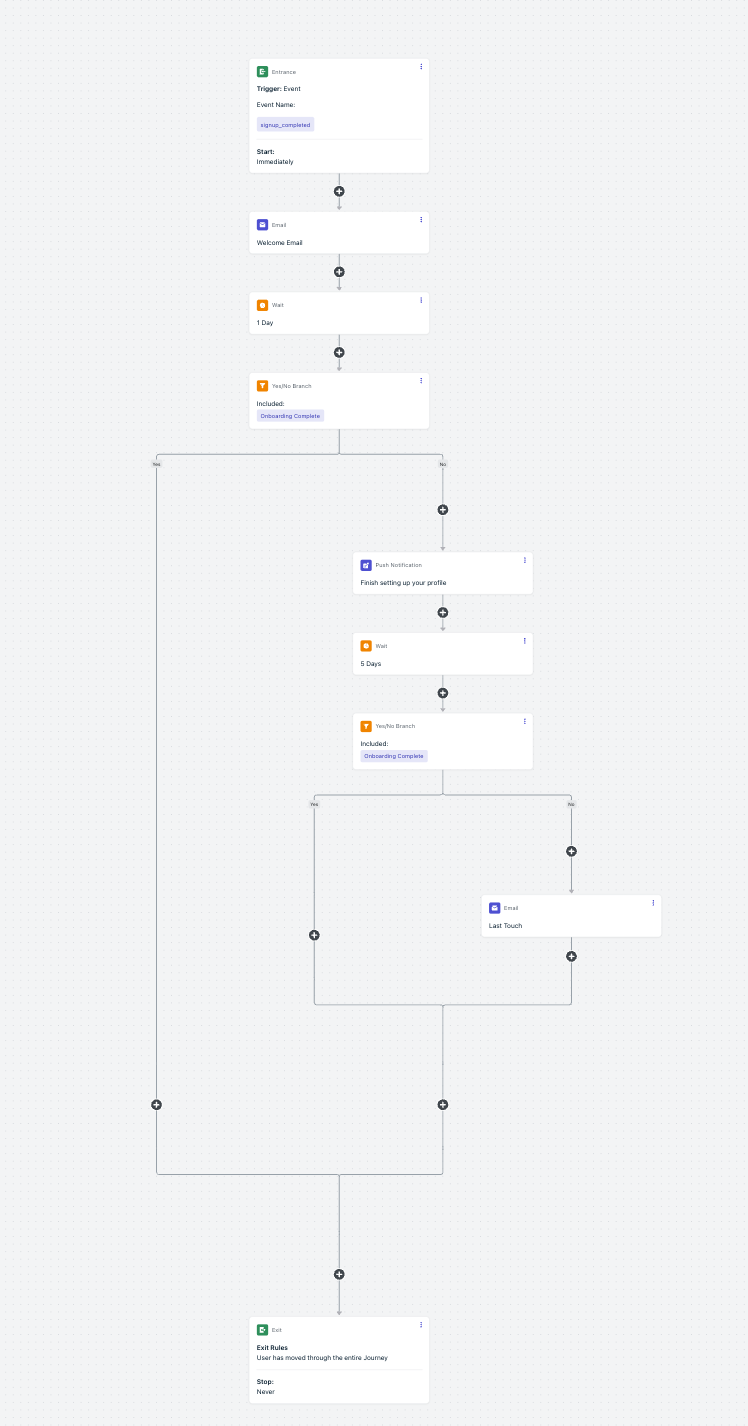
Onboarding welcome journey example
Re-engagement campaign
Use this pattern to win back users who haven’t opened your app or visited your site recently. The journey sends a series of increasingly compelling messages and exits the user as soon as they return.Send a push notification
Wait 2 days
Branch on user activity
- Yes branch: Exit the journey. The user is re-engaged.
- No branch: Send an email with a stronger incentive (for example, a discount, new content, or feature highlight).
Wait 3 days
Final check
- Active: Exit the journey.
- Still inactive: Optionally send a final SMS or exit. Avoid further messaging — users who haven’t responded after multiple touches are unlikely to convert from more messages.
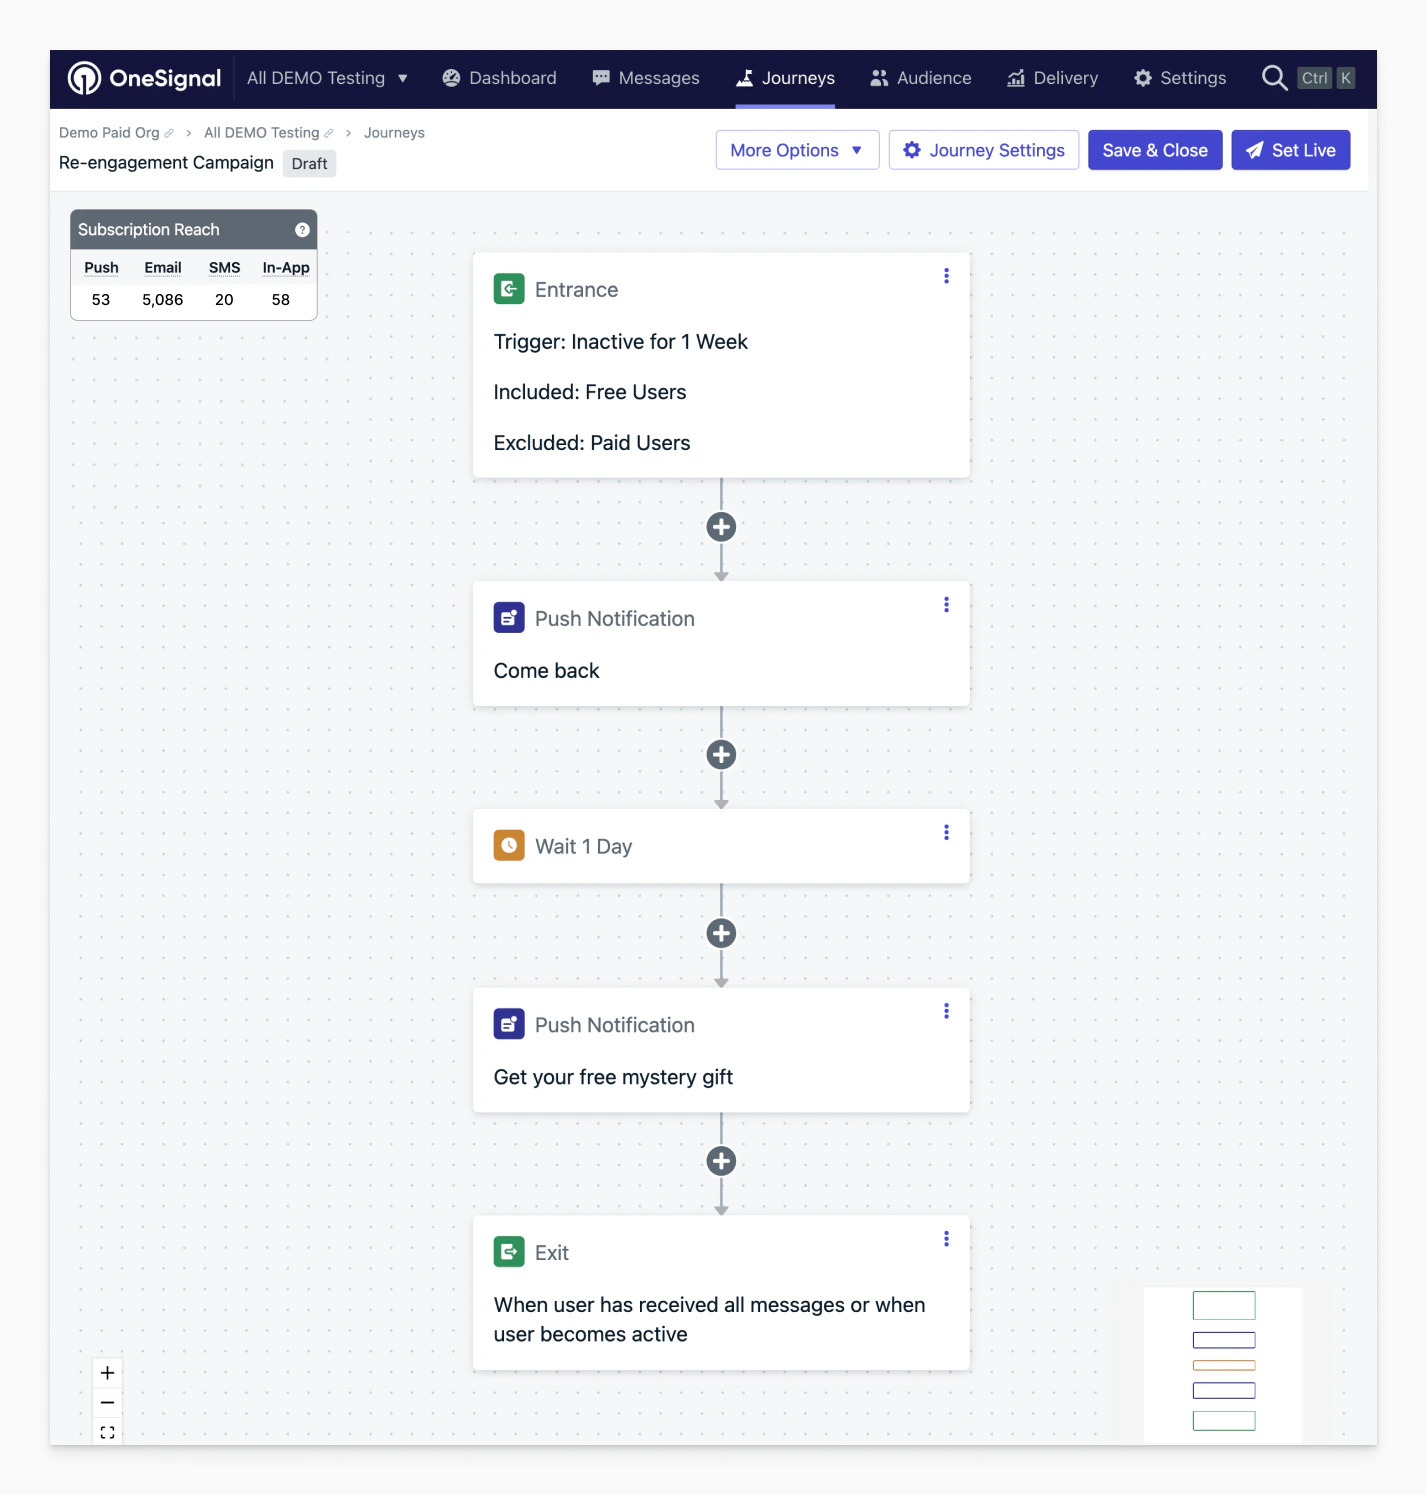
Re-engagement campaign journey example
Abandoned cart
Abandoned cart example
Promotional campaign
Use this pattern for time-limited promotions, sales events, or product launches. The journey builds anticipation, reminds users during the event, and creates urgency as it ends.Announcement: Send a teaser message
Wait until event start
Event start: Send the main offer
Wait 2–3 days (mid-event)
Reminder: Last chance message
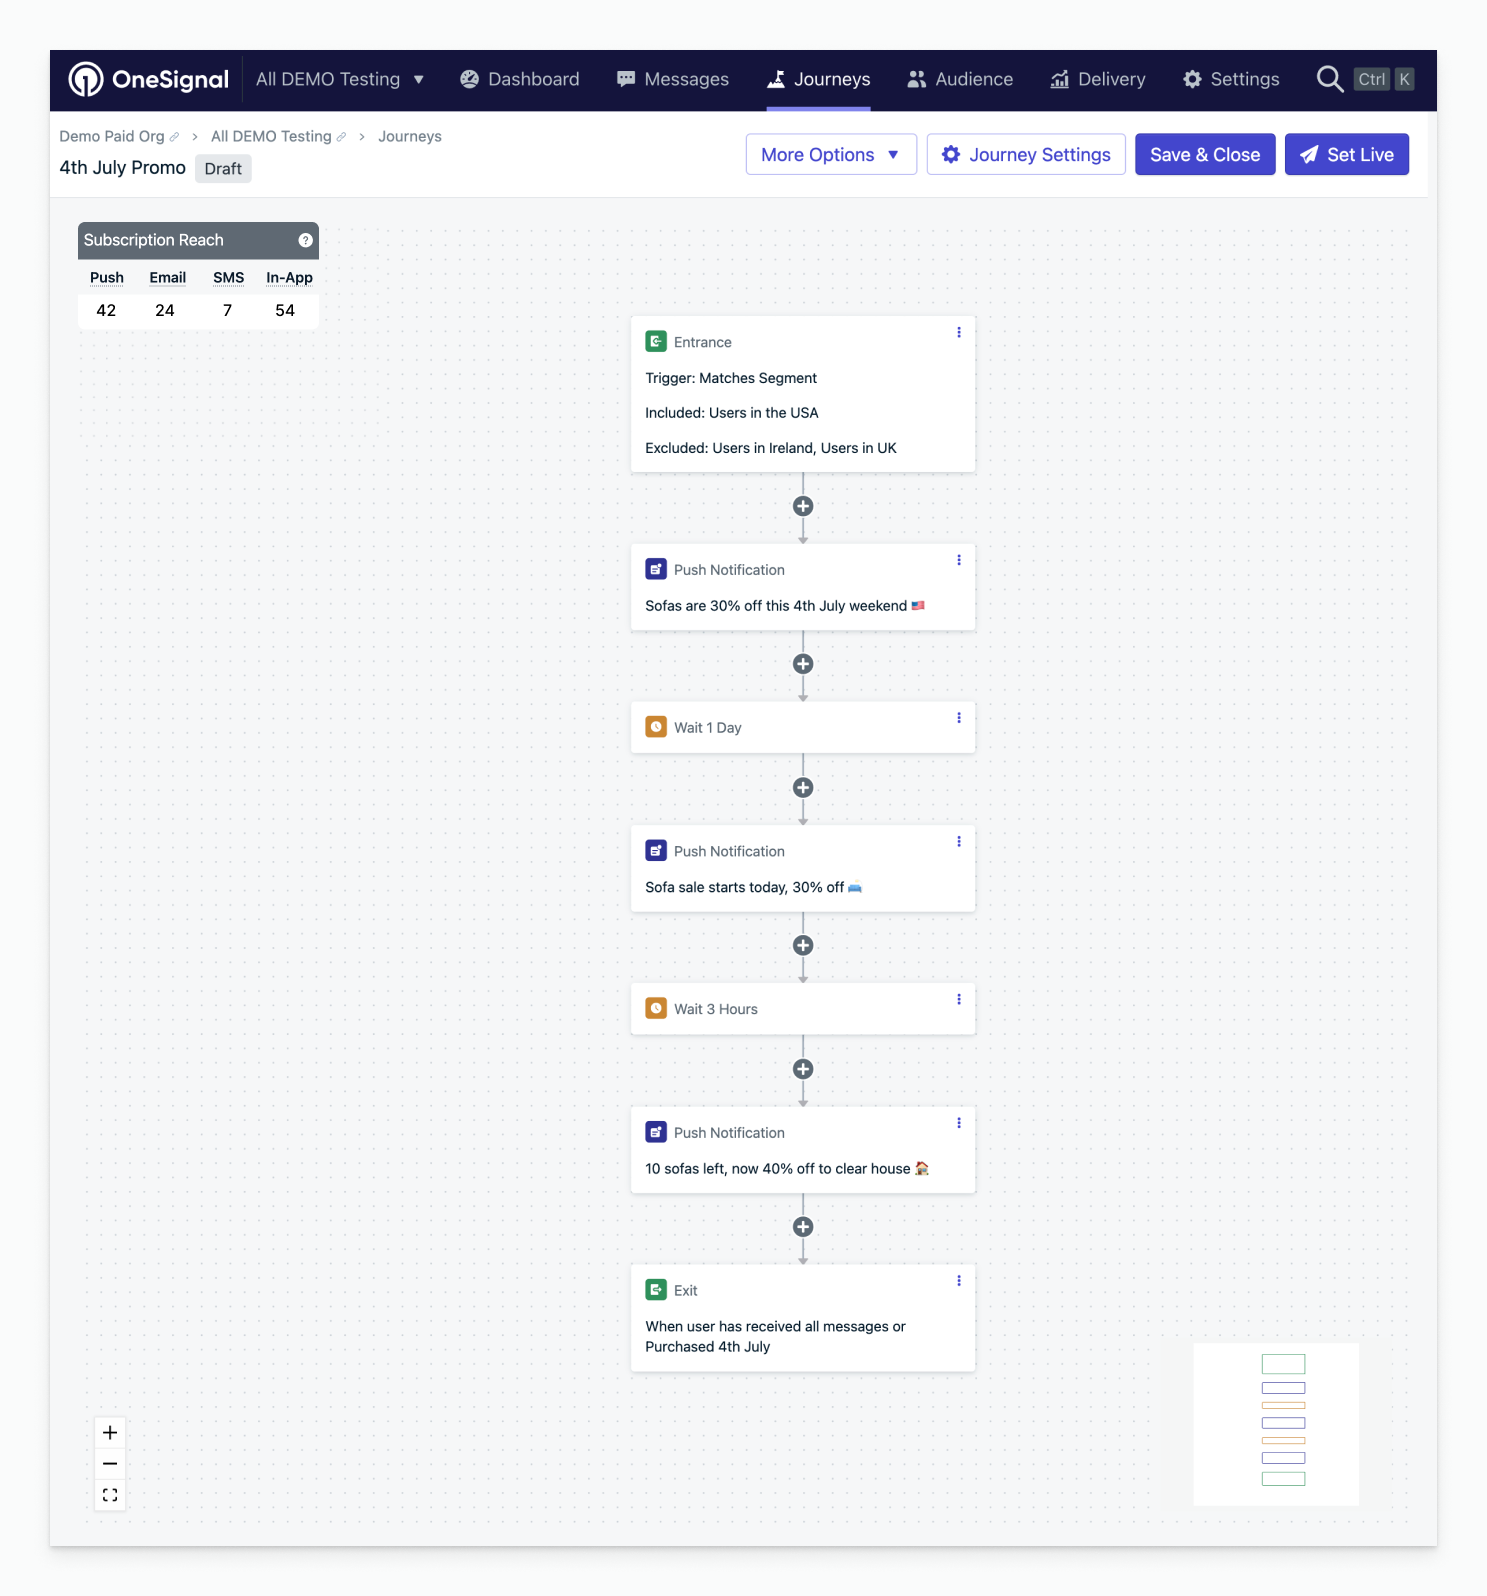
Promotional campaign journey example
Send a message after a user leaves without completing an action
Initial setup- Use Tags to mark that the action needs to be performed by the user. Remove the tag when the action is completed.
- Set up the segment for this tag.
Add the desired message(s)
Set a wait node for the amount of time you want the user to wait
A/B test within a Journey
Using a split branch node, you can set a 50/50 split within your journey. Create two different message templates and as your users flow through, half will get “Template A” and the other “Template B”. Export the message data from each template to compare analytics between variants.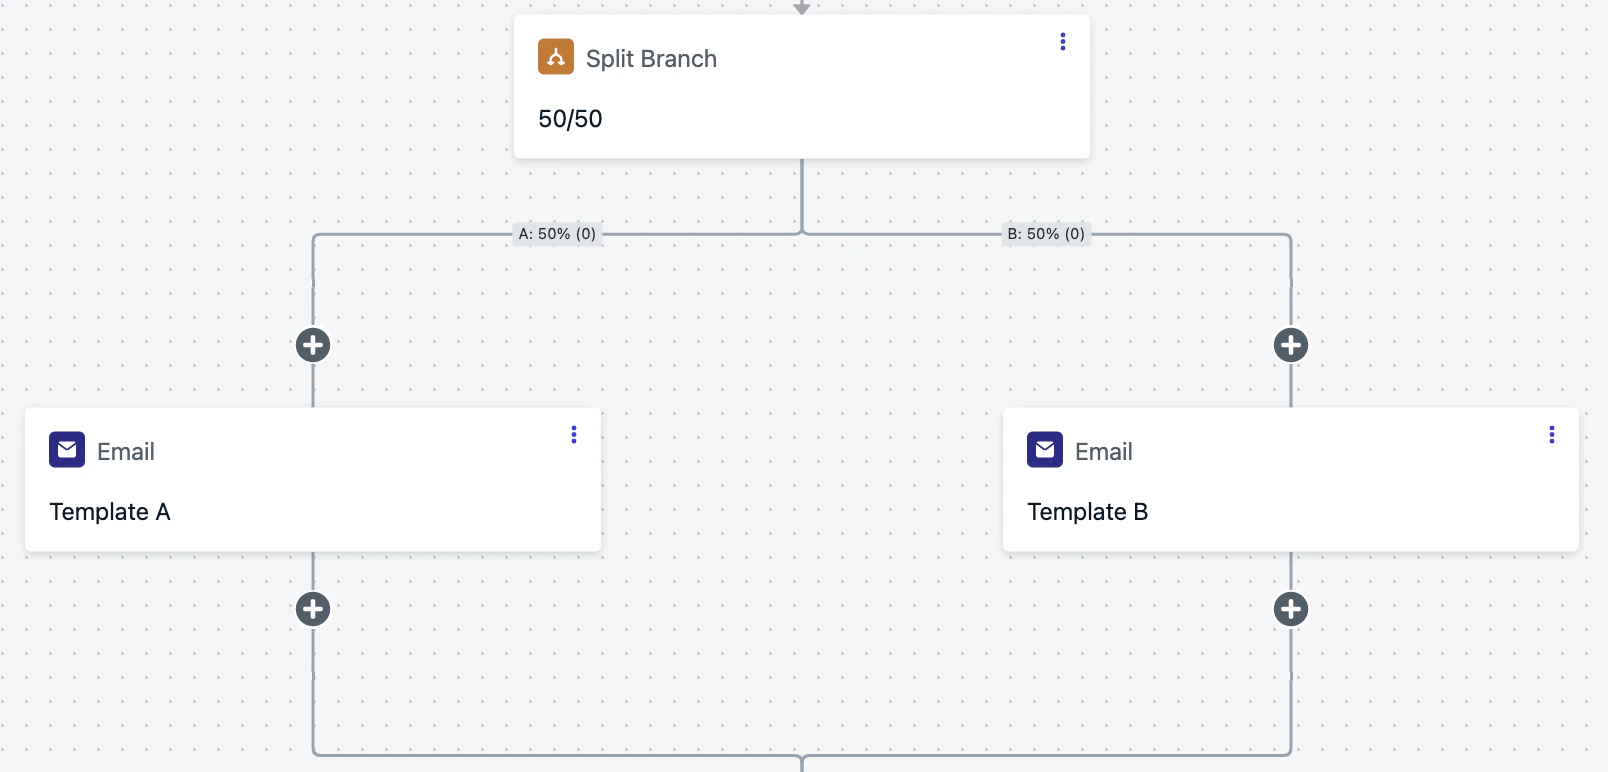
An A/B test
Display in-app messages in order and once per day
This example displays 3 or more in-app messages in sequence, showing one per day. If a user does not open the app, the next message appears the next time they open it. Initial setupCreate a new segment
iam_journey with filter: User Tag iam_journey is 1- You can change
iam_journeyto whatever name you choose. - This tag will be set on each user that finishes the journey and gets all messages.
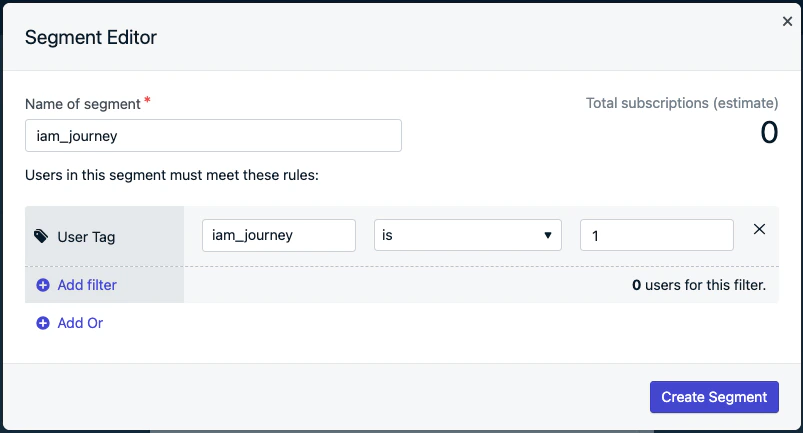
Segment creation screen
Create the in-app messages
Set up the following journey
-
Add an in-app message step.
- Name the message, for example:
IAM 1. - At the bottom of the message, set delivery schedule to 1 day.
- Name the message, for example:
-
Add a yes/no branch action before the in-app message step.
- Set your branching condition: previous message behavior: “
IAM 1viewed”. - Follow the No branch
- Drag the
IAM 1to the No branch. - Add a wait step for 1 day.
- Drag the
- Follow the Yes branch
- Within the Yes branch, repeat steps 1 and 2 for all messages, replacing
IAM 1with the next in-app message (IAM 2,IAM 3). - At the final Yes branch, add tag user action.
- Tag the same key used in Initial setup → Step 1 segment.
- Example
iam_journey : 1.
- Example
- Tag the same key used in Initial setup → Step 1 segment.
- Within the Yes branch, repeat steps 1 and 2 for all messages, replacing
- Set your branching condition: previous message behavior: “
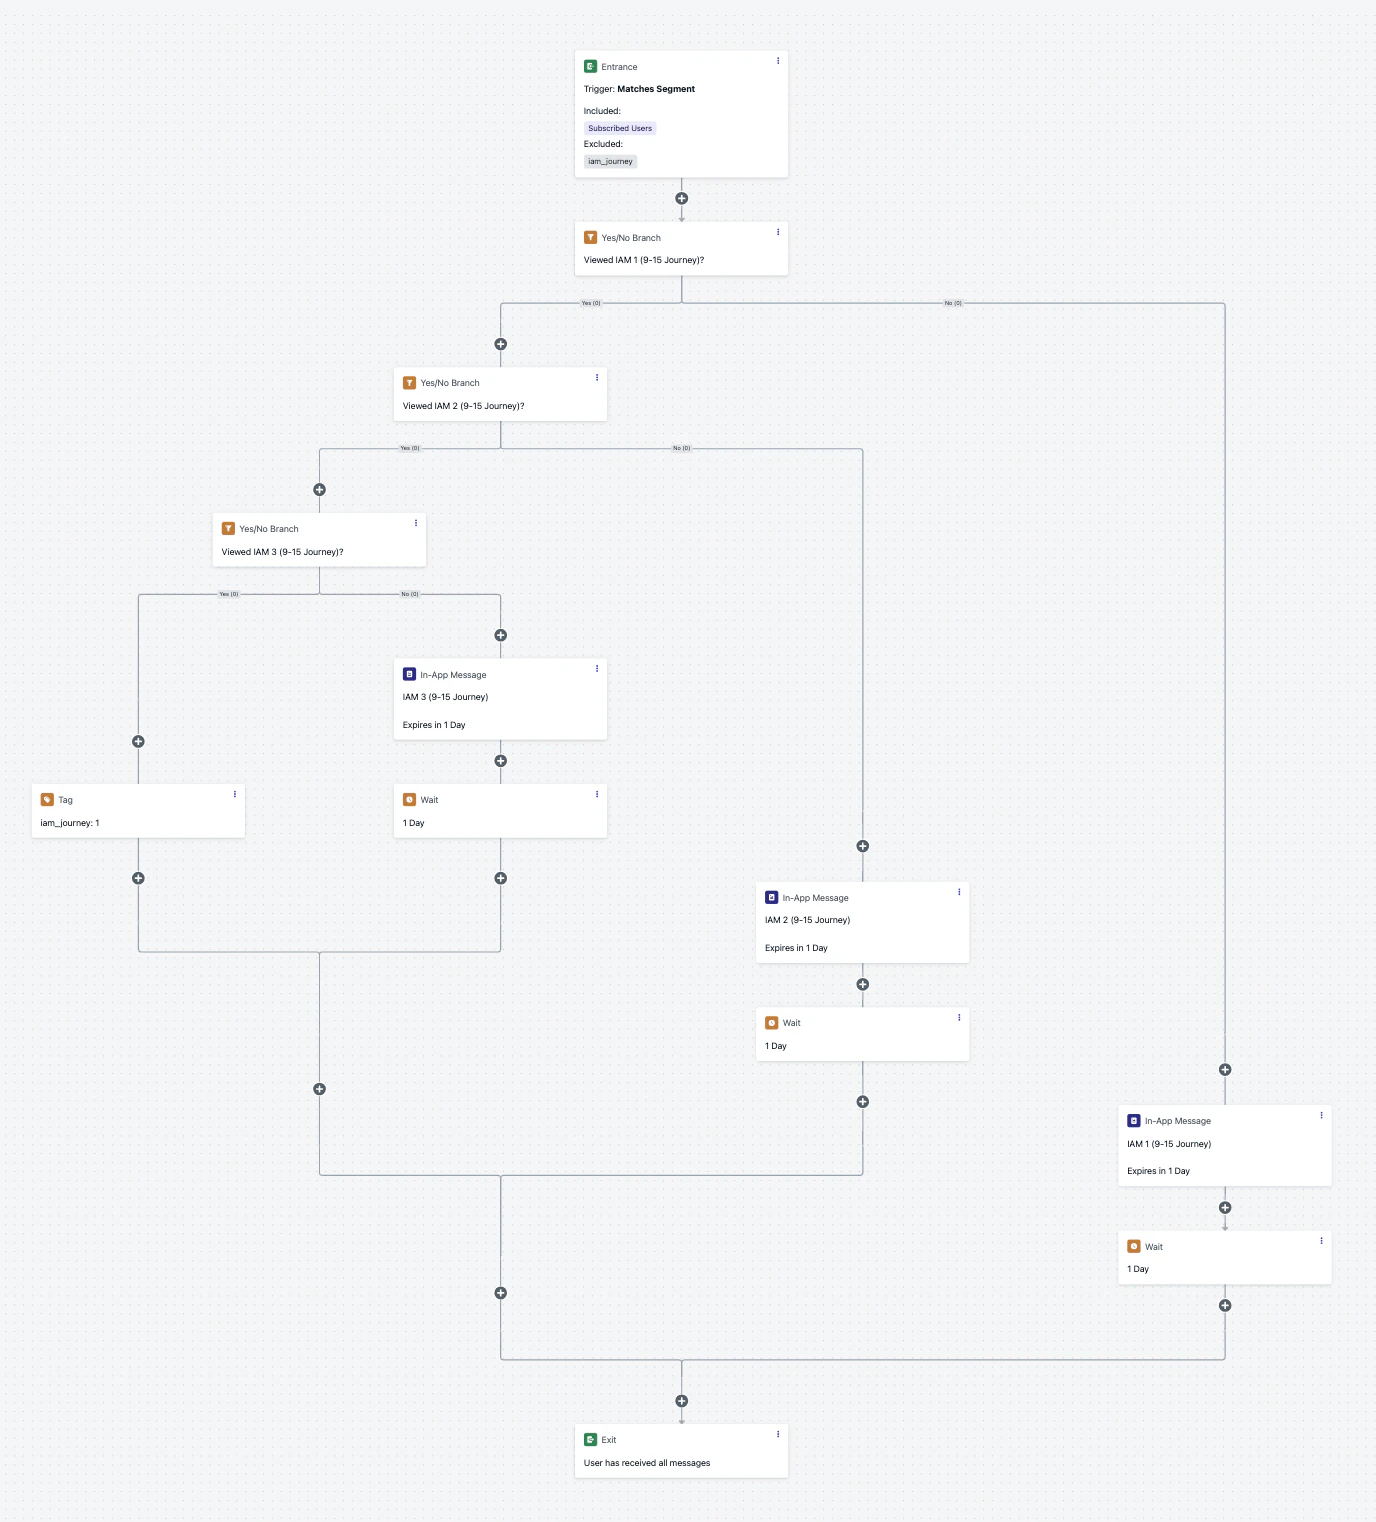
The complete journey
Limited entry journey
Ensure users can only enter a journey a limited number of times while controlling the experience at each stage.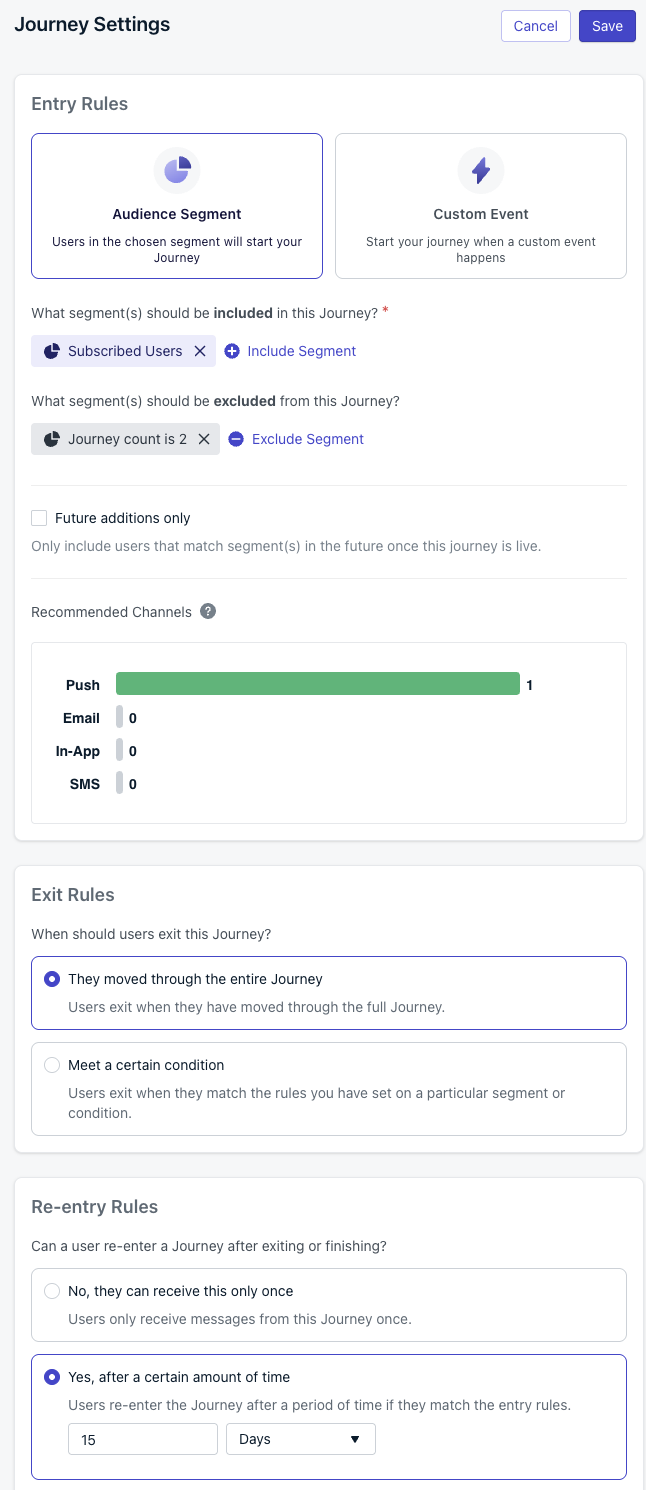
Limited entry settings
Prepare your tag strategy
journey_count to track entries. Tags are created automatically when you set them in the Journey. See tag action for details.Configure audience include/exclude
- Include your target segment (for example, “Subscribed Users”).
- Exclude users where user tag
journey_countis2.
Set re-entry rules
This allows exactly one re-entry between the first and second runs.
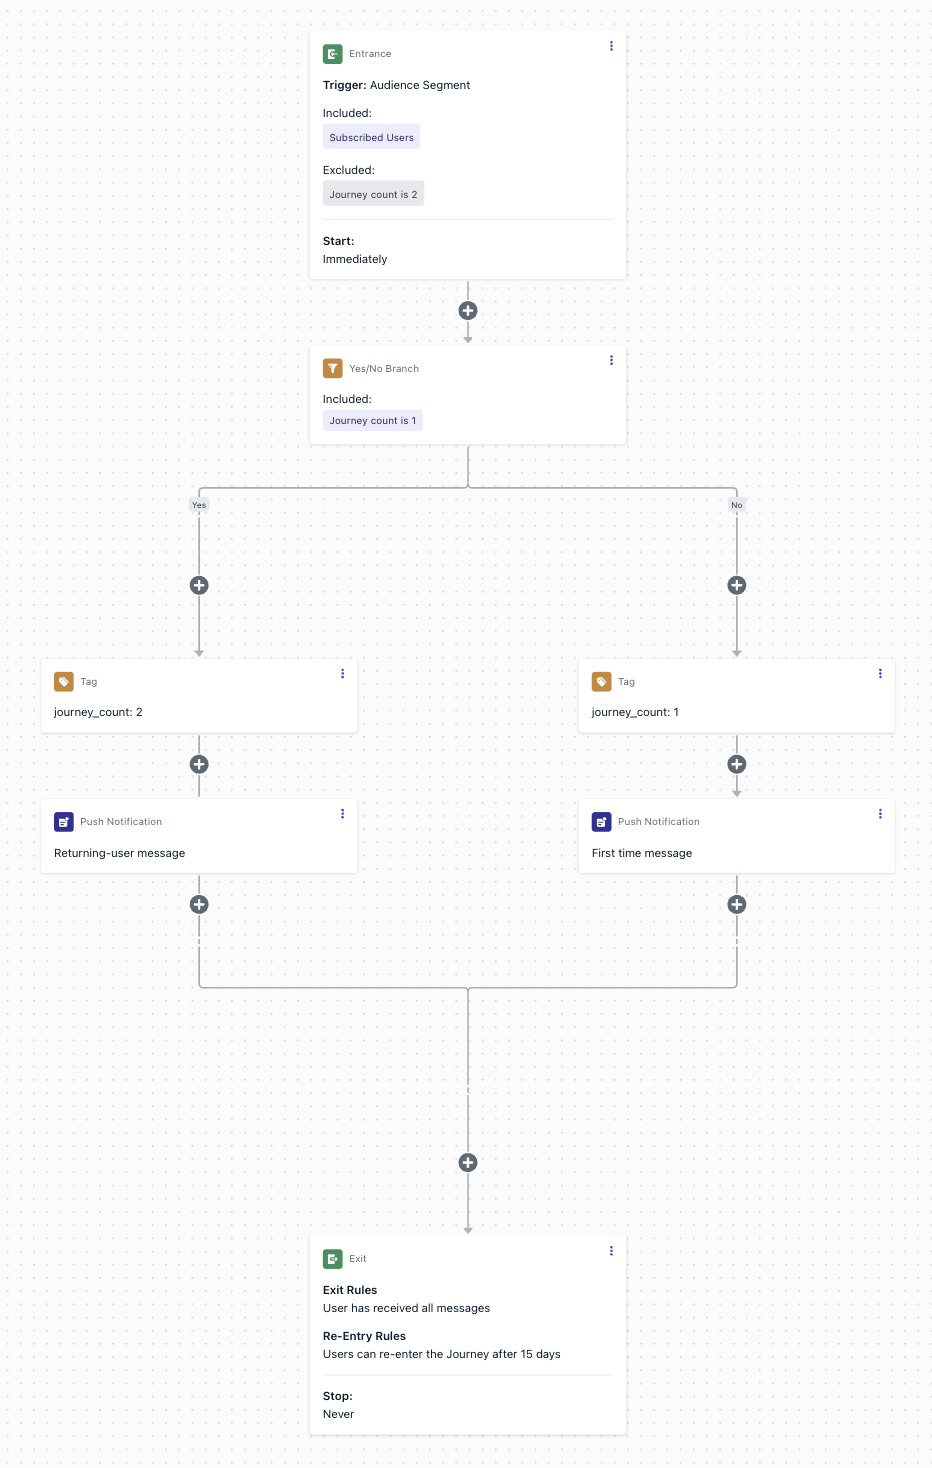
Limited entry flow
Add a yes/no branch at the start
journey_count equals 1.- Yes branch = returning users (second entry).
- No branch = first-time users (no tag present yet).
No branch (first time entry)
- Add tag user action: set
journey_countto1. - Send your first-time messages and actions.
- Continue to end or additional logic as needed.
Yes branch (second time entry)
- Add tag user action: set
journey_countto2. - Send your returning-user messages and actions.
- Continue to end or additional logic as needed.
Enforce the limit
journey_count = 2, any attempted third entry is blocked automatically.Recurring journeys for specific days
Send recurring messages that align with a specific day of the week, like weekly promotions or event reminders.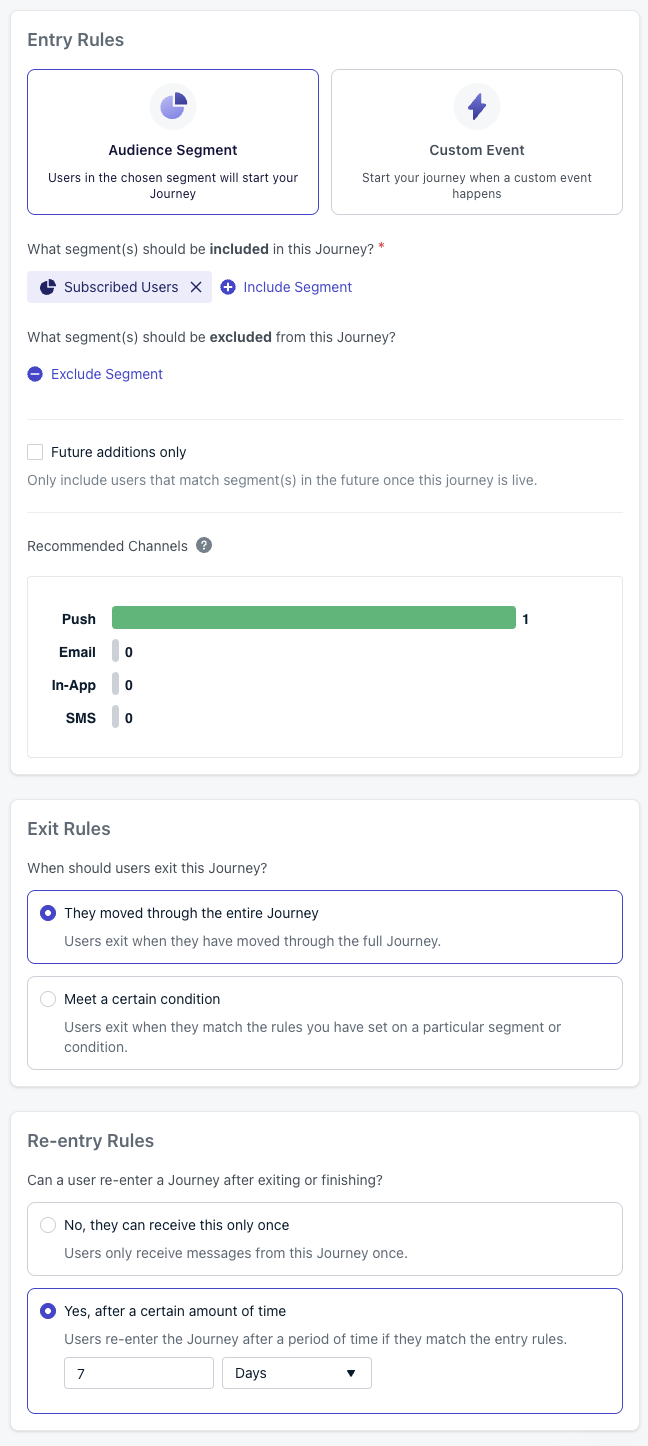
Recurring journey settings
Configure audience
Set re-entry rules
- The re-entry timer starts when the user exits the Journey, not when they entered.
- A 7-day re-entry ensures users re-enter in time for the next week’s time window.
- The re-entry duration must be longer than the time window duration to avoid double-sends.
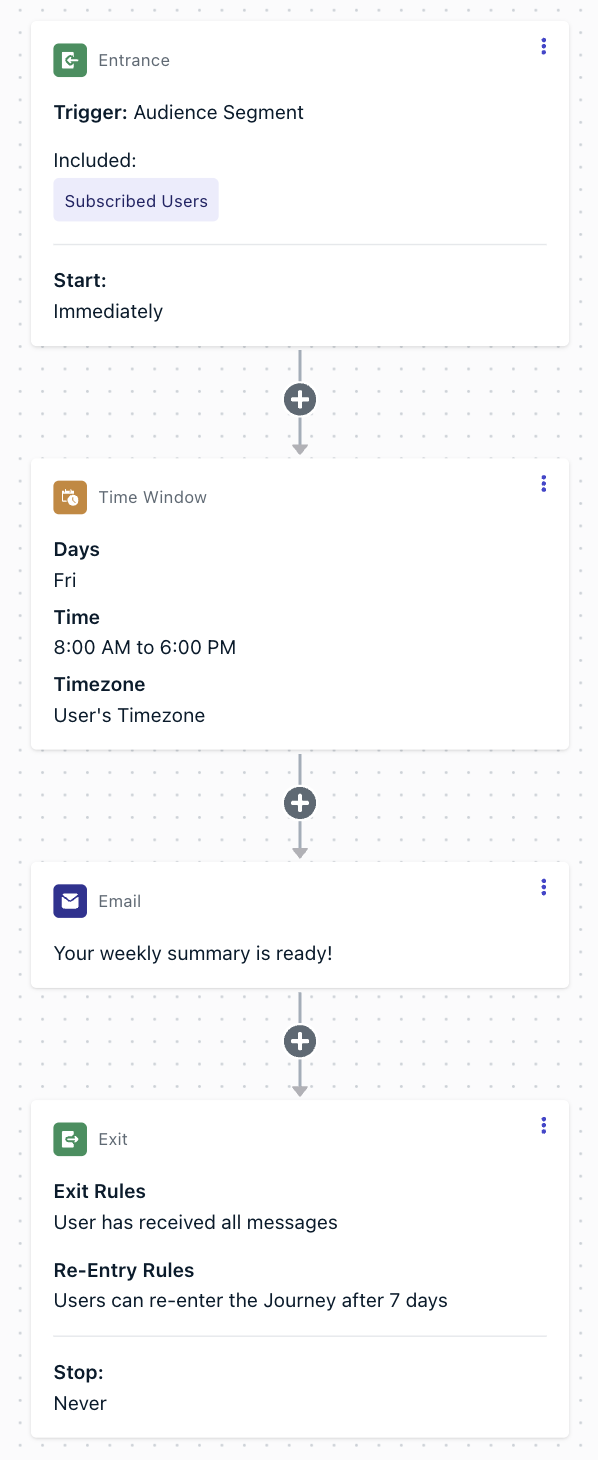
Recurring journey flow
Add a time window node (first step)
Users entering the journey will wait until the next matching day.
Add your message after the time window
End the journey
Progressive journeys (event-driven)
Escalate engagement based on user progression using custom events and wait-until conditions.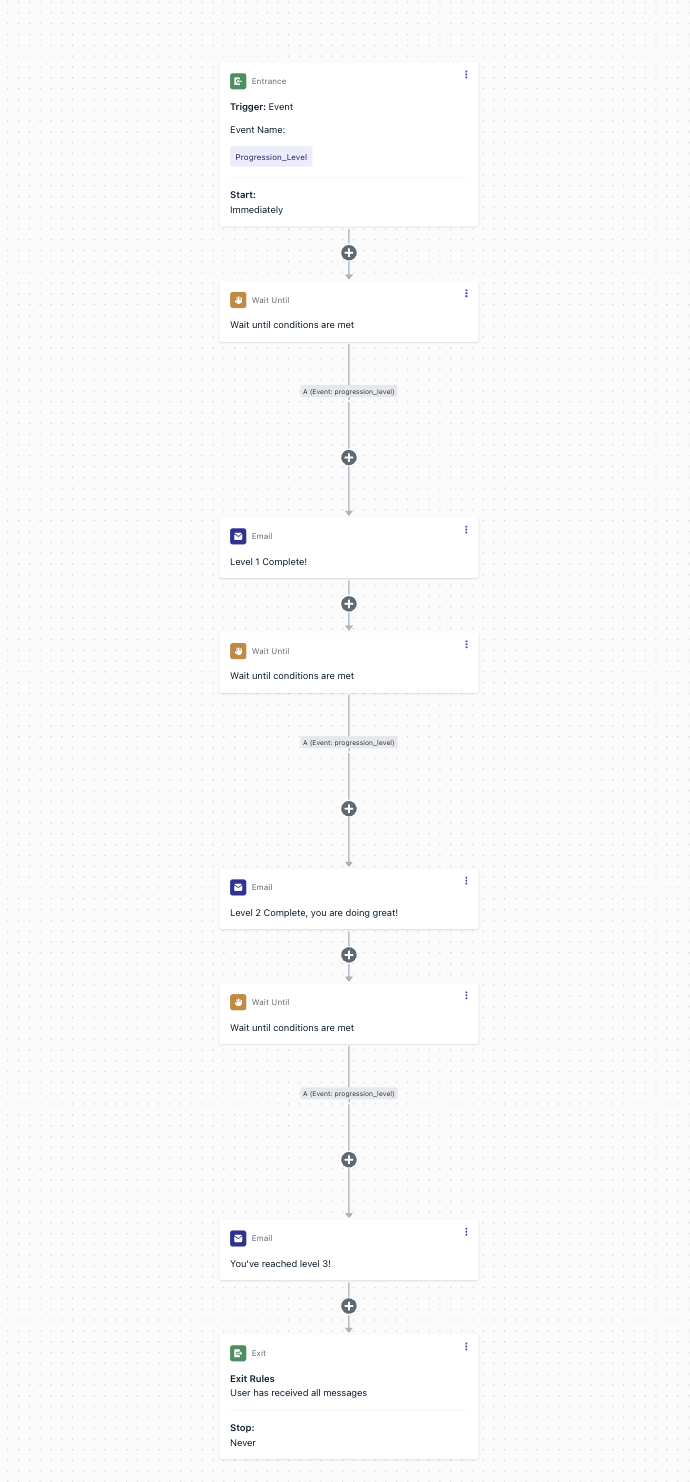
Progression journey flow
User enters the journey
Trigger: Custom Event
Progression_Level with progression_level = 0.Start: Immediately.
Level 1
- Wait until custom event
Progression_Leveloccurs withprogression_level = 1. - Send: Level 1 Complete! message.
- (Optional) Apply expiration on the wait node → exit user if milestone not reached.
- (Optional) Branch: if expiration hits, tag the user and send them into a re-engagement journey.
Level 2
- Wait until custom event
Progression_Leveloccurs withprogression_level = 2. - Send: Level 2 Complete, you are doing great! message.
- (Optional) Apply expiration or branch/tag to re-engagement.
Level 3
- Wait until custom event
Progression_Leveloccurs withprogression_level = 3. - Send: You’ve reached level 3! message.
- (Optional) Apply expiration or branch/tag to re-engagement.
Exit
Optionally, use branch/tag paths to route stalled users into a re-engagement track.
Schedule: Start immediately, Never stops.
Branch a Journey by action button clicked
Route users down different Journey paths based on which push notification action button they tapped. This pattern uses action buttons, a custom event, and a Wait Until step to branch users by their specific button click — not just whether they clicked or not.Add action buttons to your push
- Button 1: “Shop Now” → Action ID:
shop_now - Button 2: “Learn More” → Action ID:
learn_more
Add a click listener and send a Custom Event
160500 or later. Users should be logged in for custom events to be tracked.Add a Wait Until step in the Journey
- Add a Wait Until step.
- Add a condition for each button: Custom Event
cta_clickedwhere propertybuttonequals the Action ID (for example,shop_now). - Add additional conditions for each Action ID you want to branch on (for example,
learn_more). - Set an expiration (for example, 3 days) so users who don’t click any button continue down a fallback path.
Add follow-up messages to each branch
- “Shop Now” branch: Send a product recommendation or discount code.
- “Learn More” branch: Send educational content or a feature overview.
- Expiration branch: Send a re-engagement message or exit the Journey.
FAQ
Can I schedule a message to send every day?
Yes. Add a time window node as the first step and configure it for every day of the week with the hours you want the message to send (for example, 10 AM to 6 PM in the user’s time zone). Then set re-entry rules to re-enter after a time shorter than one day but longer than the time window duration — for example, 12 hours for an 8-hour window. This ensures users re-enter early enough to catch the next day’s time window without risking a double-send within the same window.Can I A/B test different messages in a Journey?
Yes. Add a split branch node to divide users evenly (for example, 50/50). Place a different message template on each branch, then compare analytics between the two templates after the Journey runs.How do I limit how many times a user can enter a Journey?
Use a tag (for example,journey_count) to track entries. Increment the tag each time the user enters, and add an audience exclusion rule that blocks users once the tag reaches your desired limit. See the Limited entry journey example above.