

Overview
“Prompting” refers to the process of asking users for permission to send them messages. Prompts are pop-up messages presented in the browser or mobile app and require the user to click “Allow” to be subscribed and receive messages. This guide covers the different types of web prompts and how to configure them. Web push works on desktop, Android, and iOS, but web push for iOS requires additional steps. If you have a mobile app, see how to prompt for Push Permissions with In-App Messages. Browsers provide their own native, system-level permission prompt, which is required to be both shown and clicked “Allow” for the user to subscribe to push notifications on your website. Browsers now highly recommend websites be more selective when it comes to showing the native permission prompt. This is why using OneSignal Prompts or your own custom “soft prompts” before the native prompt is encouraged.OneSignal prompts (soft prompts)
OneSignal soft prompts are user-friendly, customizable prompts that appear before the browser’s native permission prompt. These prompts do not subscribe users to messages by themselves; instead, they help:- Explain the value of subscribing to messages (push, email, or SMS).
- Prevent browsers from automatically blocking permission requests.
- Launch the native browser prompt only after the user expresses interest.
Prompt icon
Set a Default Icon in Settings > Push & In-App > Web. This icon appears in web push notifications and prompts unless you override it per message.- Accepted formats: PNG, JPG, or non-animated GIF
- Recommended size:
256×256pixels - If left unset, OneSignal uses a generic bell icon
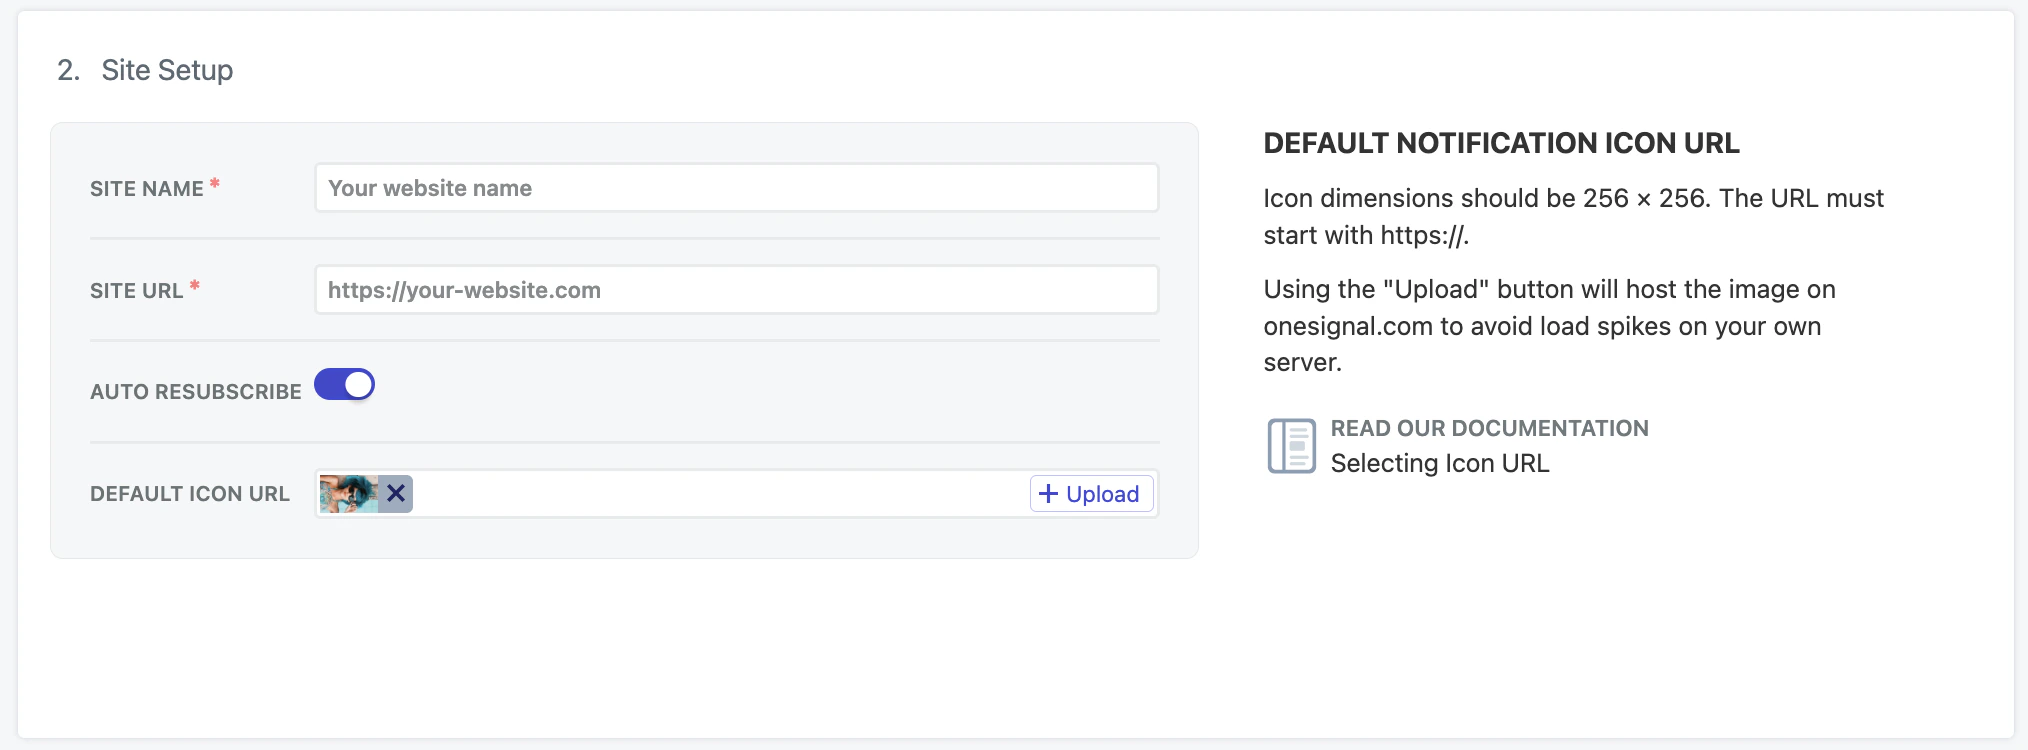
Site setup section of web push settings
Permission prompt setup
Configure the prompts you want to display on your site. In your OneSignal dashboard, navigate to: Settings > Push & In-App > Web Settings > Permission Prompt Setup. From there, click Add Prompt to choose from OneSignal’s available prompt types. You can also edit any existing prompts already shown in the list.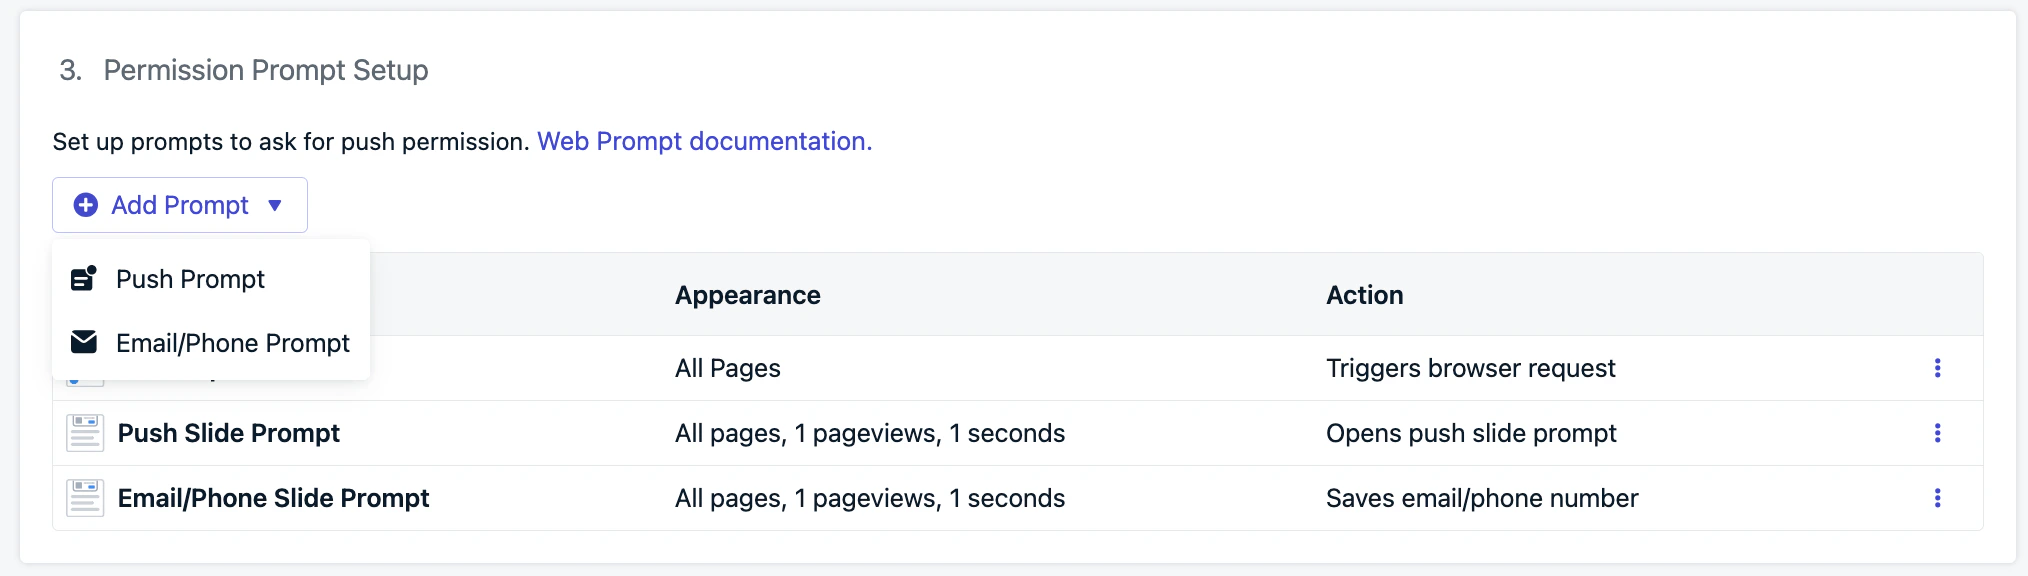
Add new prompts or select the prompt you want to edit
- Slidedown: A visually prominent prompt used for push notifications and optional category selection.
- Email/Phone prompt: Used to collect user email addresses, phone numbers, or both.
- Subscription bell prompt: A persistent floating widget for push subscriptions, typically placed in the bottom corner of your site.
- Custom link prompt: A customizable button or link embedded in your site that triggers the native browser prompt.
- Native permission prompt: The required browser-level prompt that must be accepted for users to receive push notifications.
Slidedown & category
The Slide and Category prompts appear prominently at the top center of the screen on desktop and bottom center on mobile. These are high-visibility, soft prompts shown before the required native permission prompt. They do not subscribe the user on their own but help initiate the subscription flow and capture user interest.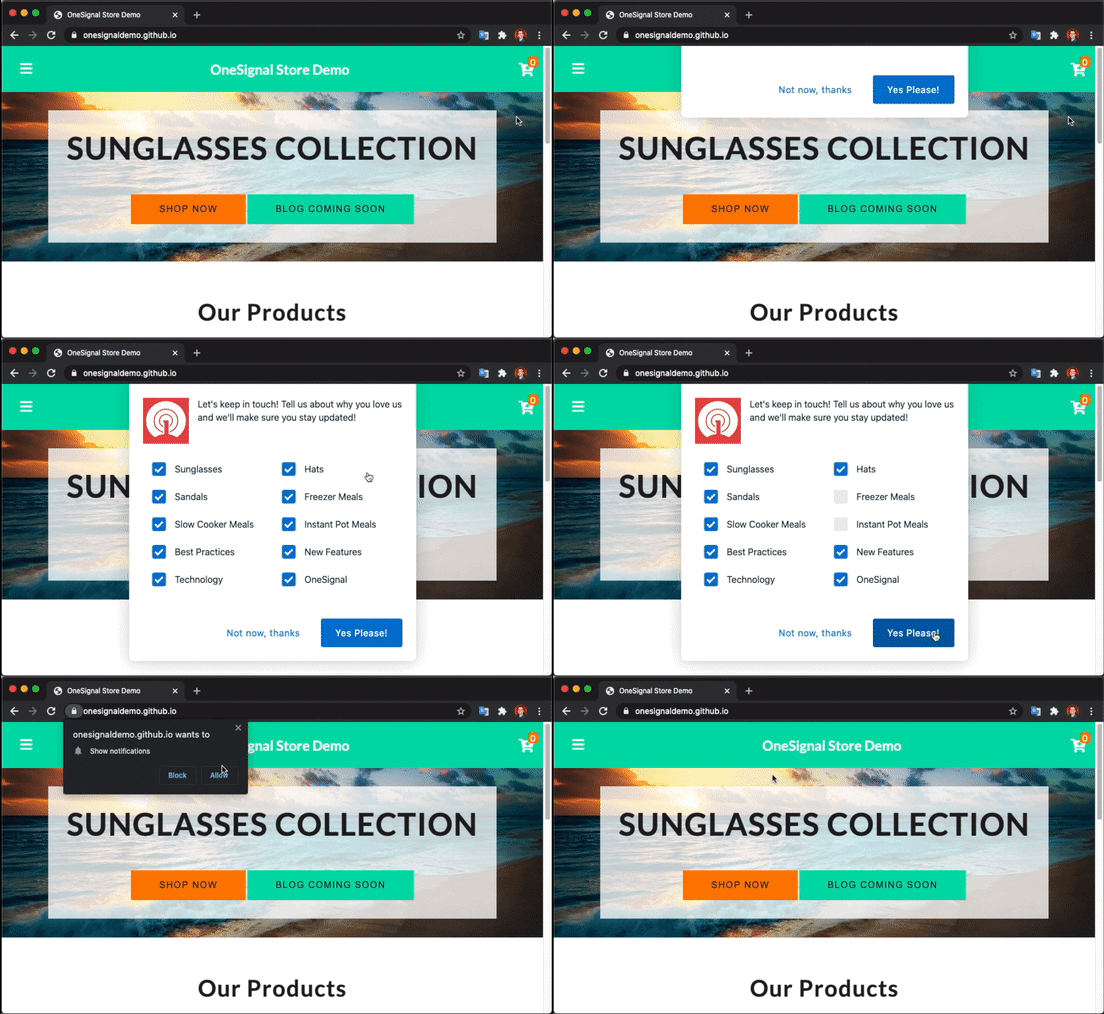
Slide prompt with category tags
- Go to Settings > Push & In-App > Web Settings > Permission Prompt Setup
- Select Add Prompt > Push Prompt > Push Slide Prompt
slidedown property in your OneSignal init code’s promptOptions object. See Web SDK Reference for more details.
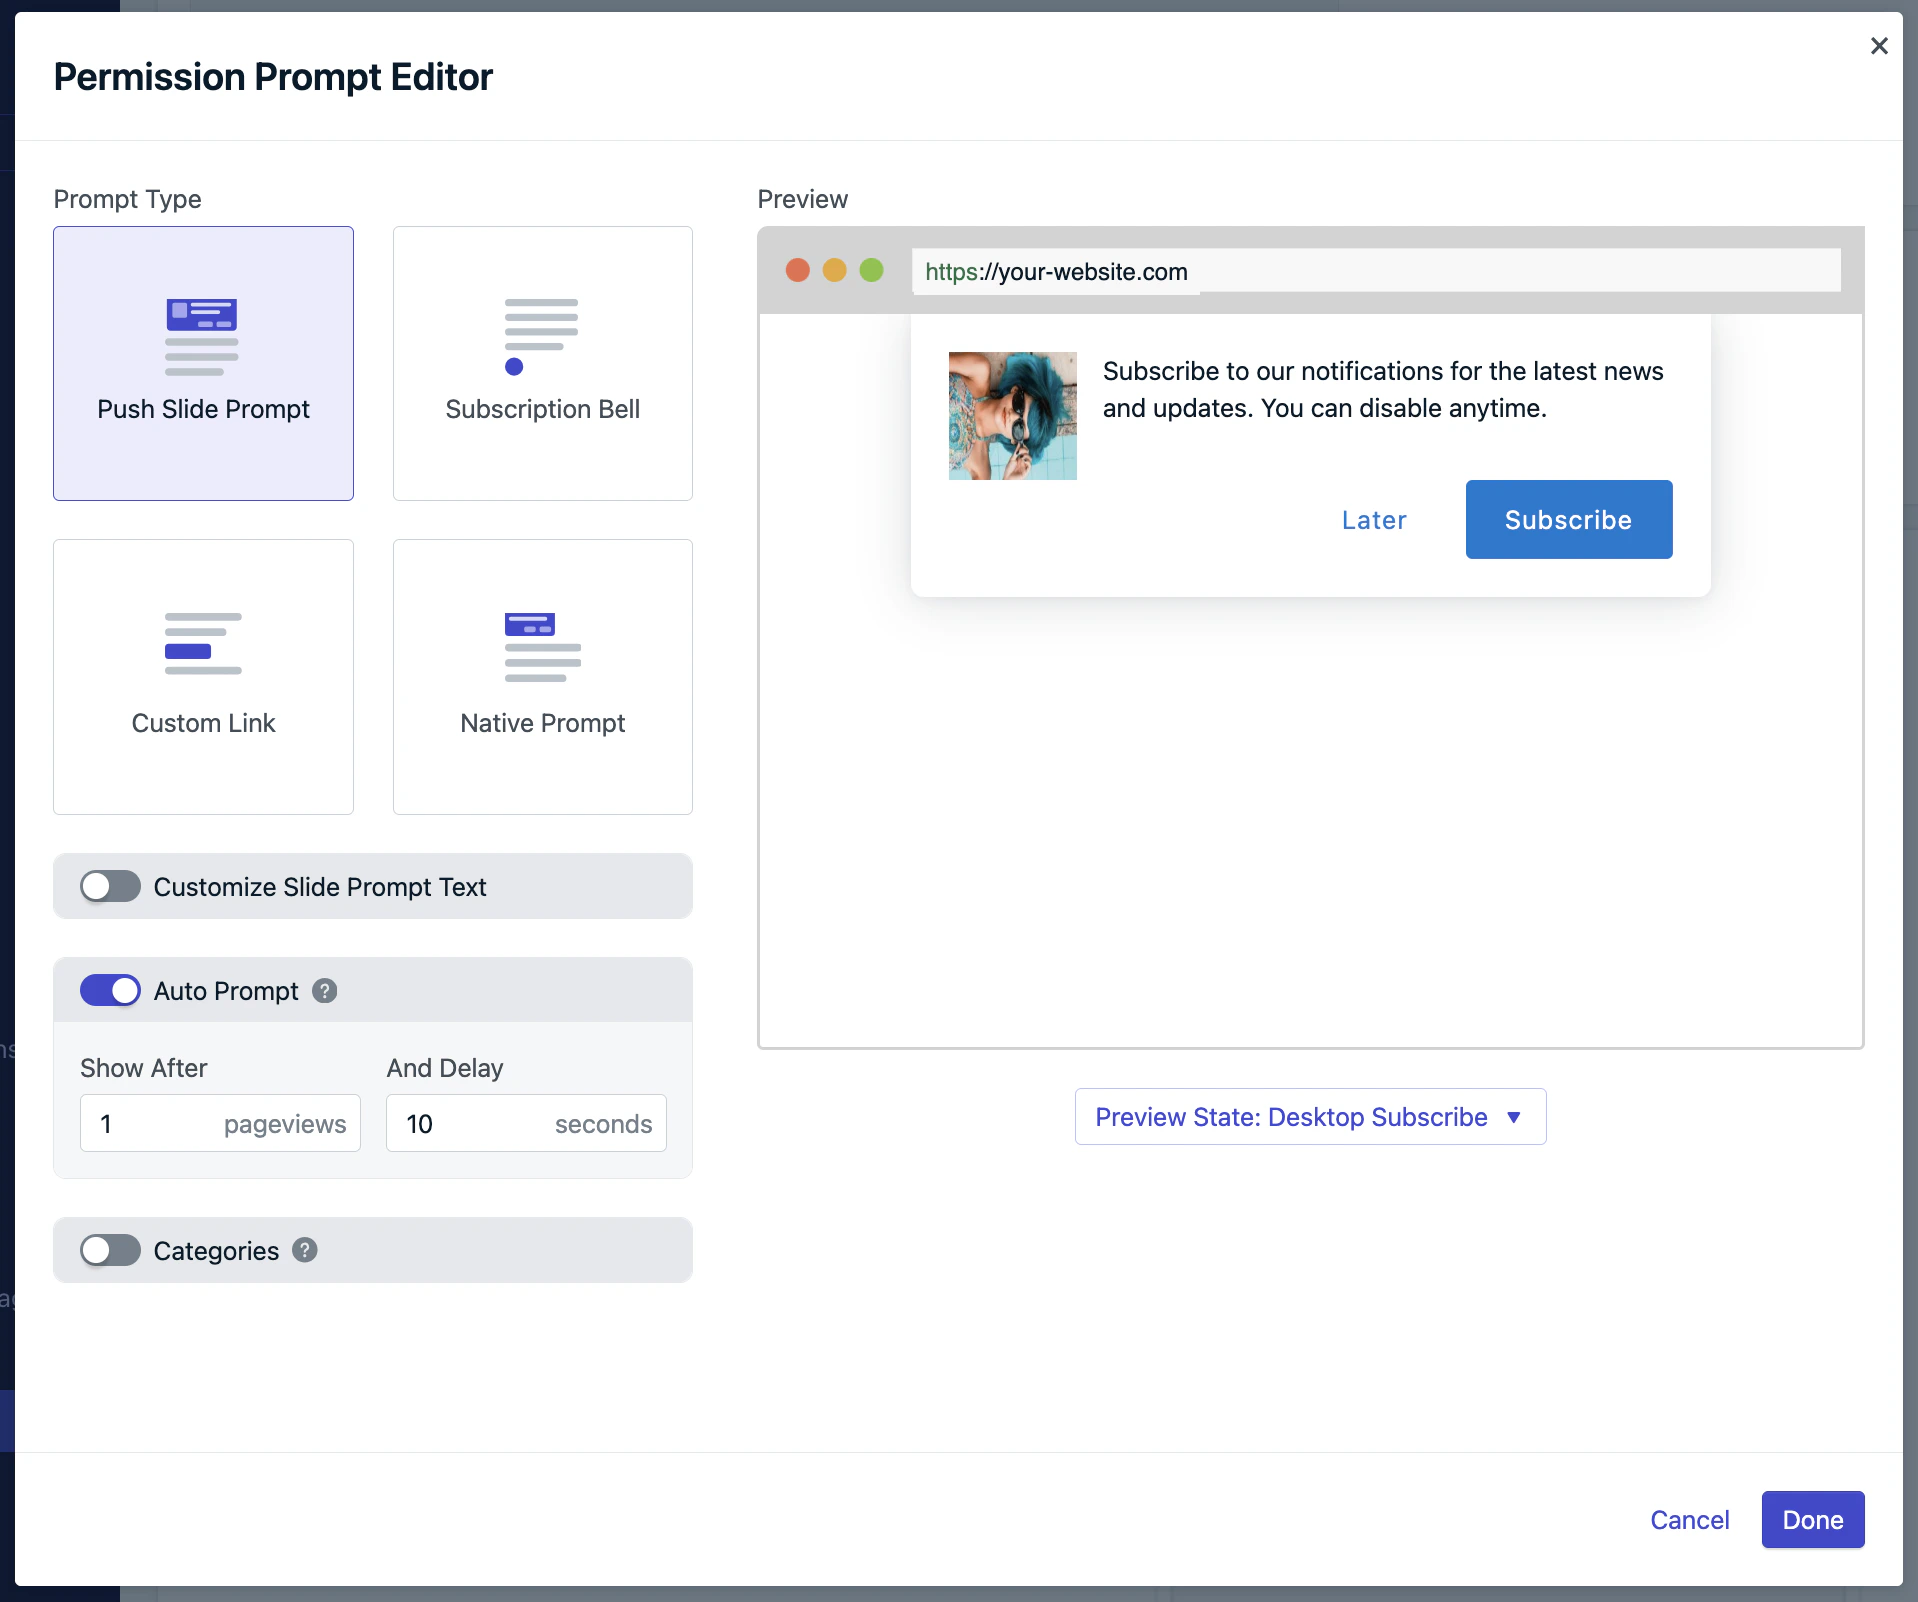
Push slide prompt options
Slide prompt text
You can customize the text displayed in the slide prompt:- Action message: up to 90 characters
- Button labels: up to 15 characters each
- Customization of font, size, or colors is not currently supported
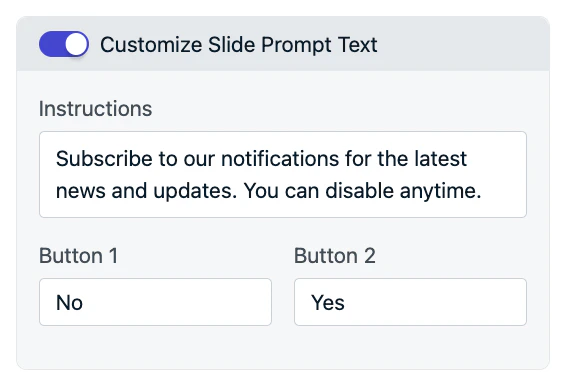
Slide prompt text options
text properties within your OneSignal init code’s promptOptions object. See Web SDK Reference for more details.Categories
You can enhance the Slidedown prompt by adding categories—checkboxes that let users indicate interest in specific message topics (e.g., News, Sales, Updates).- Up to 10 categories allowed
- Each category is stored as a Data Tag with a
1(selected) or0(not selected) - Useful for segmentation and targeting messages by user preferences
- Label: what the user sees in the prompt. Recommended to capitalize the first letter.
- Tag Key: what the tag in OneSignal will be. Use the
cat_<category>naming convention (lower case, underscores for spaces) — for examplecat_breaking_news,cat_sports,cat_apparel. This matches the convention used across OneSignal industry guides and lets the same Tag namespace be populated automatically from page-visit behavior. See Tag users by page topic for the auto-tag pattern. - Update Instructions, Positive and Negative Buttons: if you choose to display the category prompt again after the user is already subscribed to push, the update instructions will be shown instead of the action message. This allows you to inform the user they can update their categories.
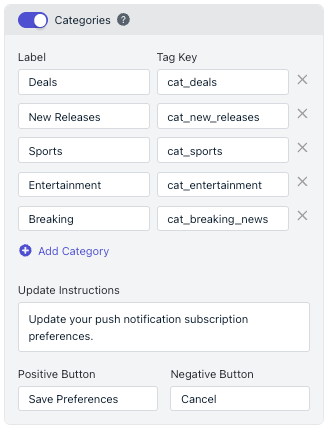
Category configuration with label and tag key
categories properties within your OneSignal init code’s promptOptions object. See Web SDK Reference for more details.Email & phone number prompt
The Email & Phone Prompt collects optional user contact information directly within a Slidedown. Each field has built-in validation to ensure correct formatting. Once submitted:- New Email and/or SMS subscriptions are created for the user
- You can start messaging them across these channels
- Navigate to Settings > Push & In-App > Web Settings > Permission Prompt Setup > Add Prompt > Email/Phone Prompt.
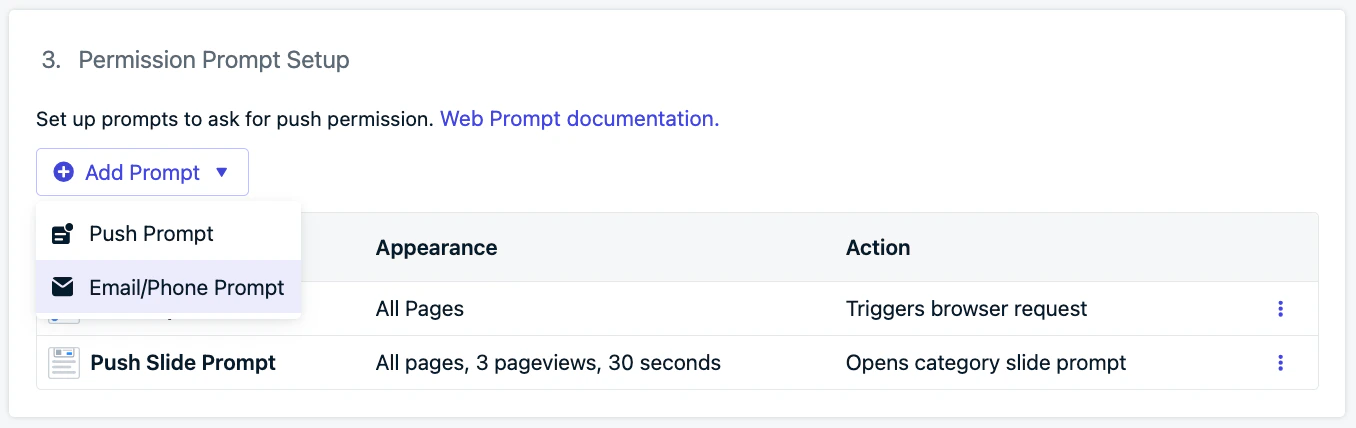
Email and phone number prompt setup
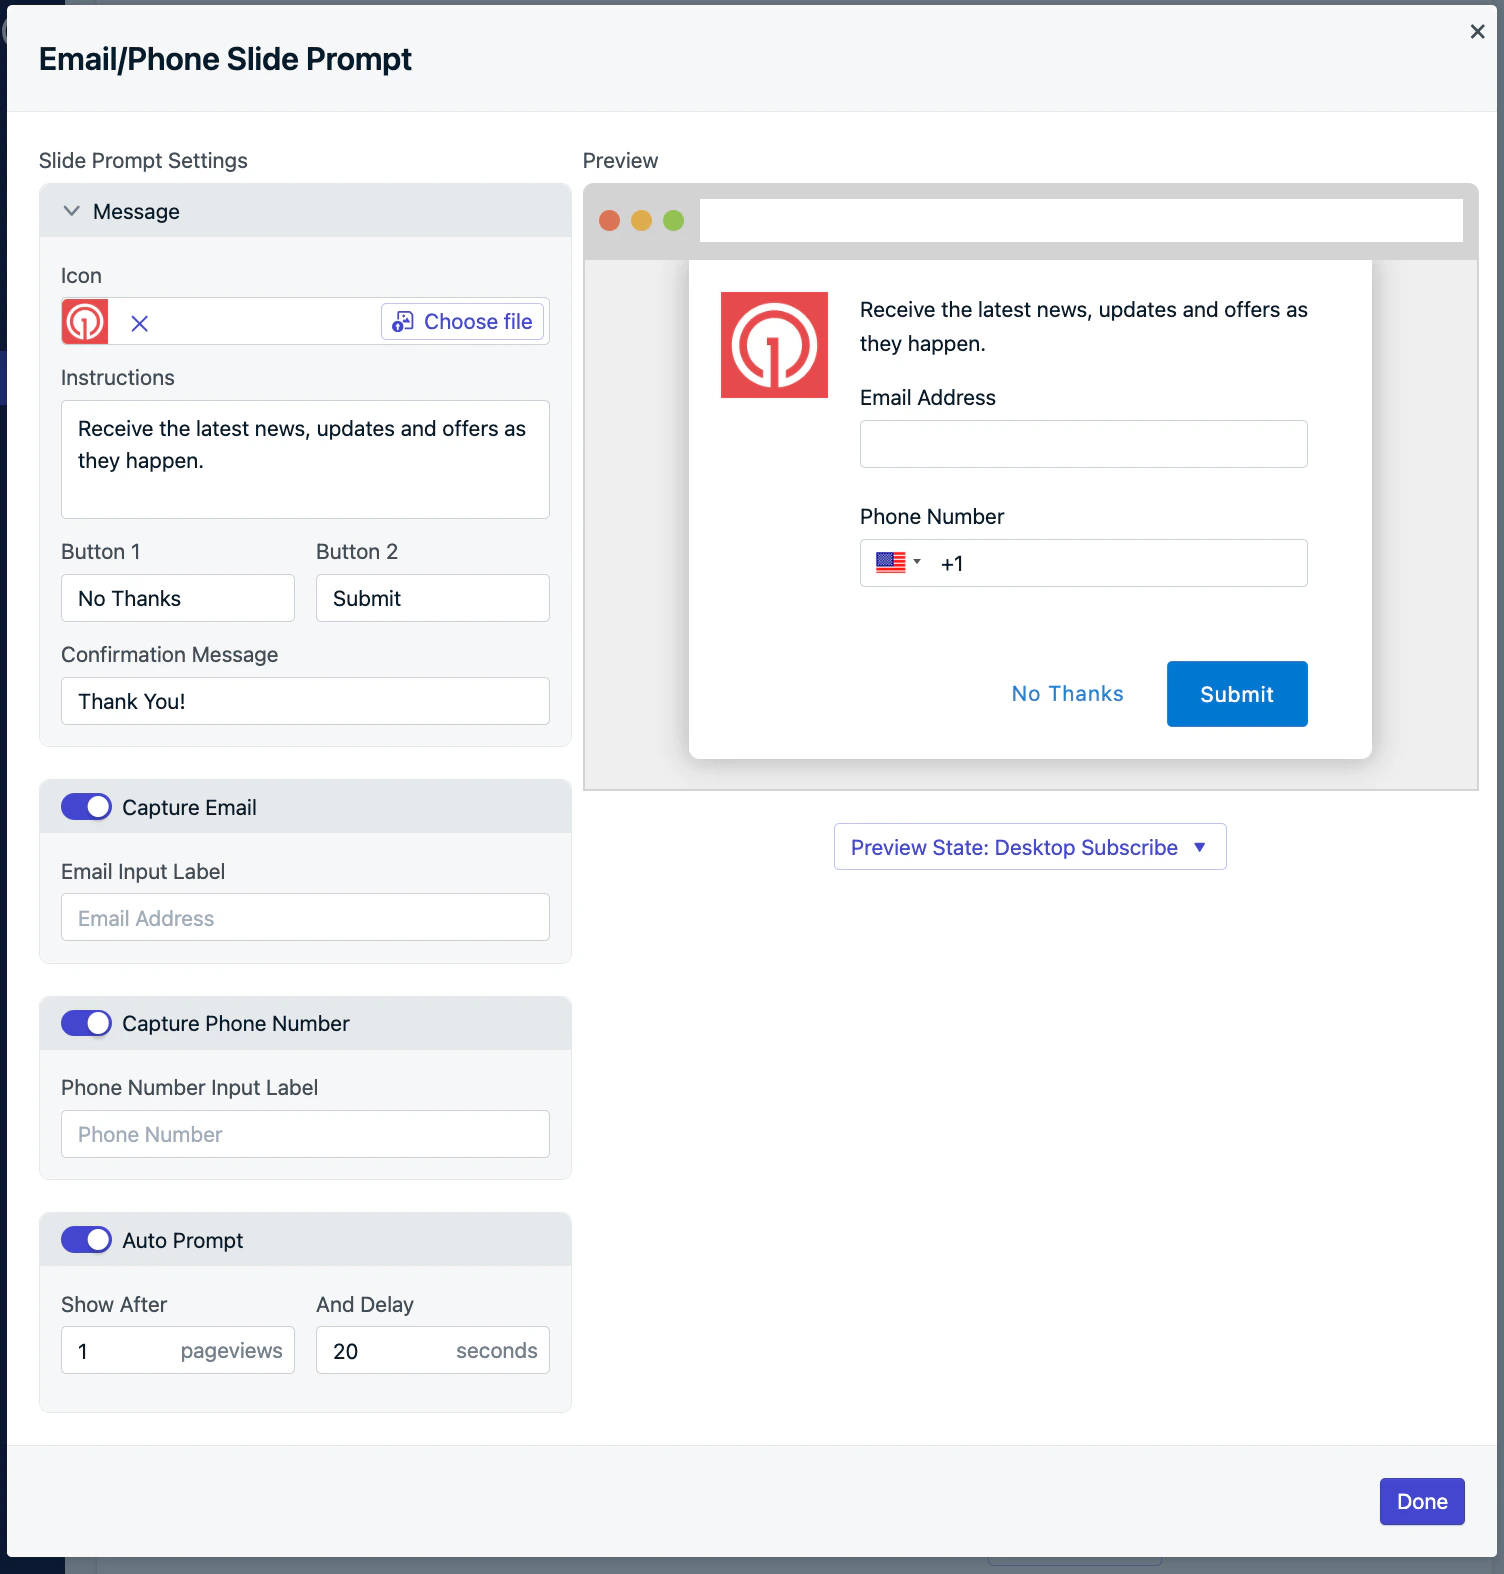
Email and phone number prompt options
init code’s promptOptions object add the type to be either email, sms, or smsAndEmail. See Web SDK Reference for more details.Subscription bell prompt
The Subscription Bell Prompt is a small, persistent widget that appears in the bottom corner of your website. When clicked by an unsubscribed user, it triggers the Native Browser Prompt. Because of its minimal footprint, the bell can be left visible at all times, making it a passive yet effective option for ongoing opt-in opportunities. It does not require dismissal and provides users with control over when to subscribe.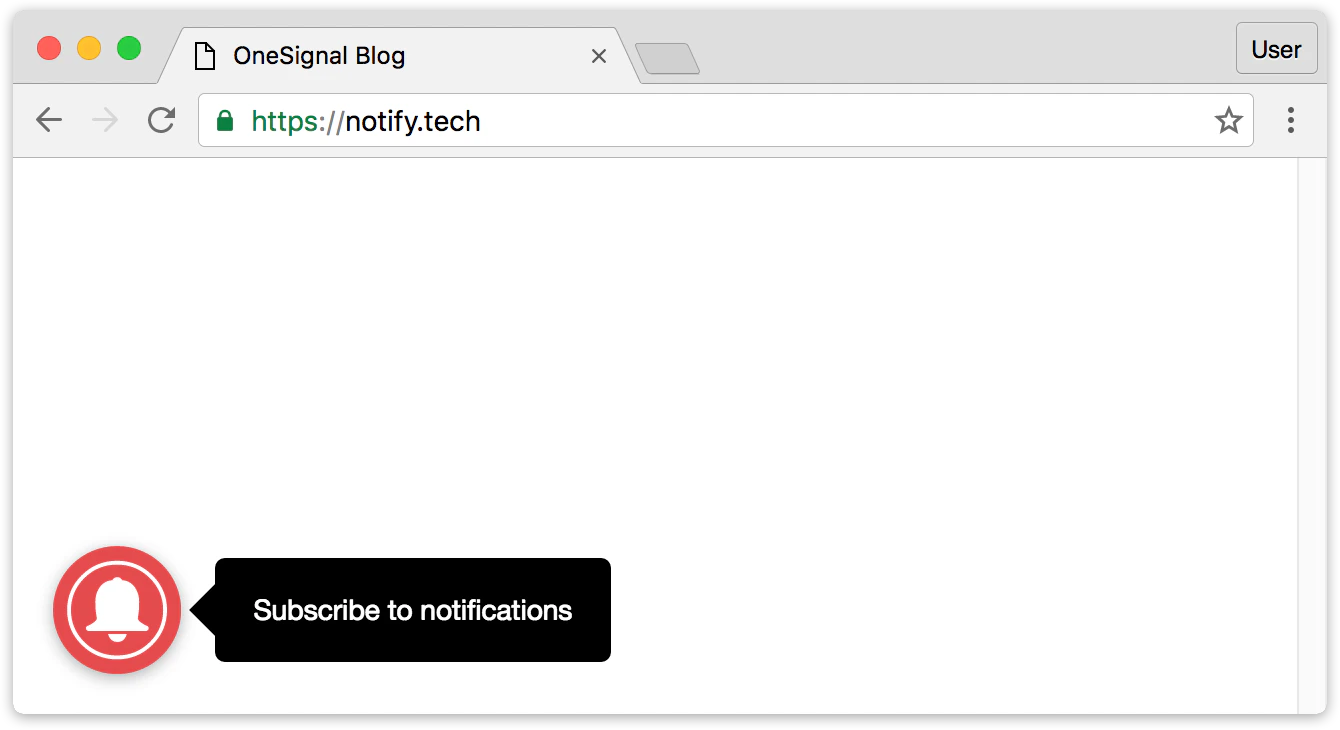
Subscription bell prompt widget
Typical Site & WordPress Setup: Subscription Bell Prompt
Typical Site & WordPress Setup: Subscription Bell Prompt
- Color
- Size
- Bottom position (left or right)
- Text and labels
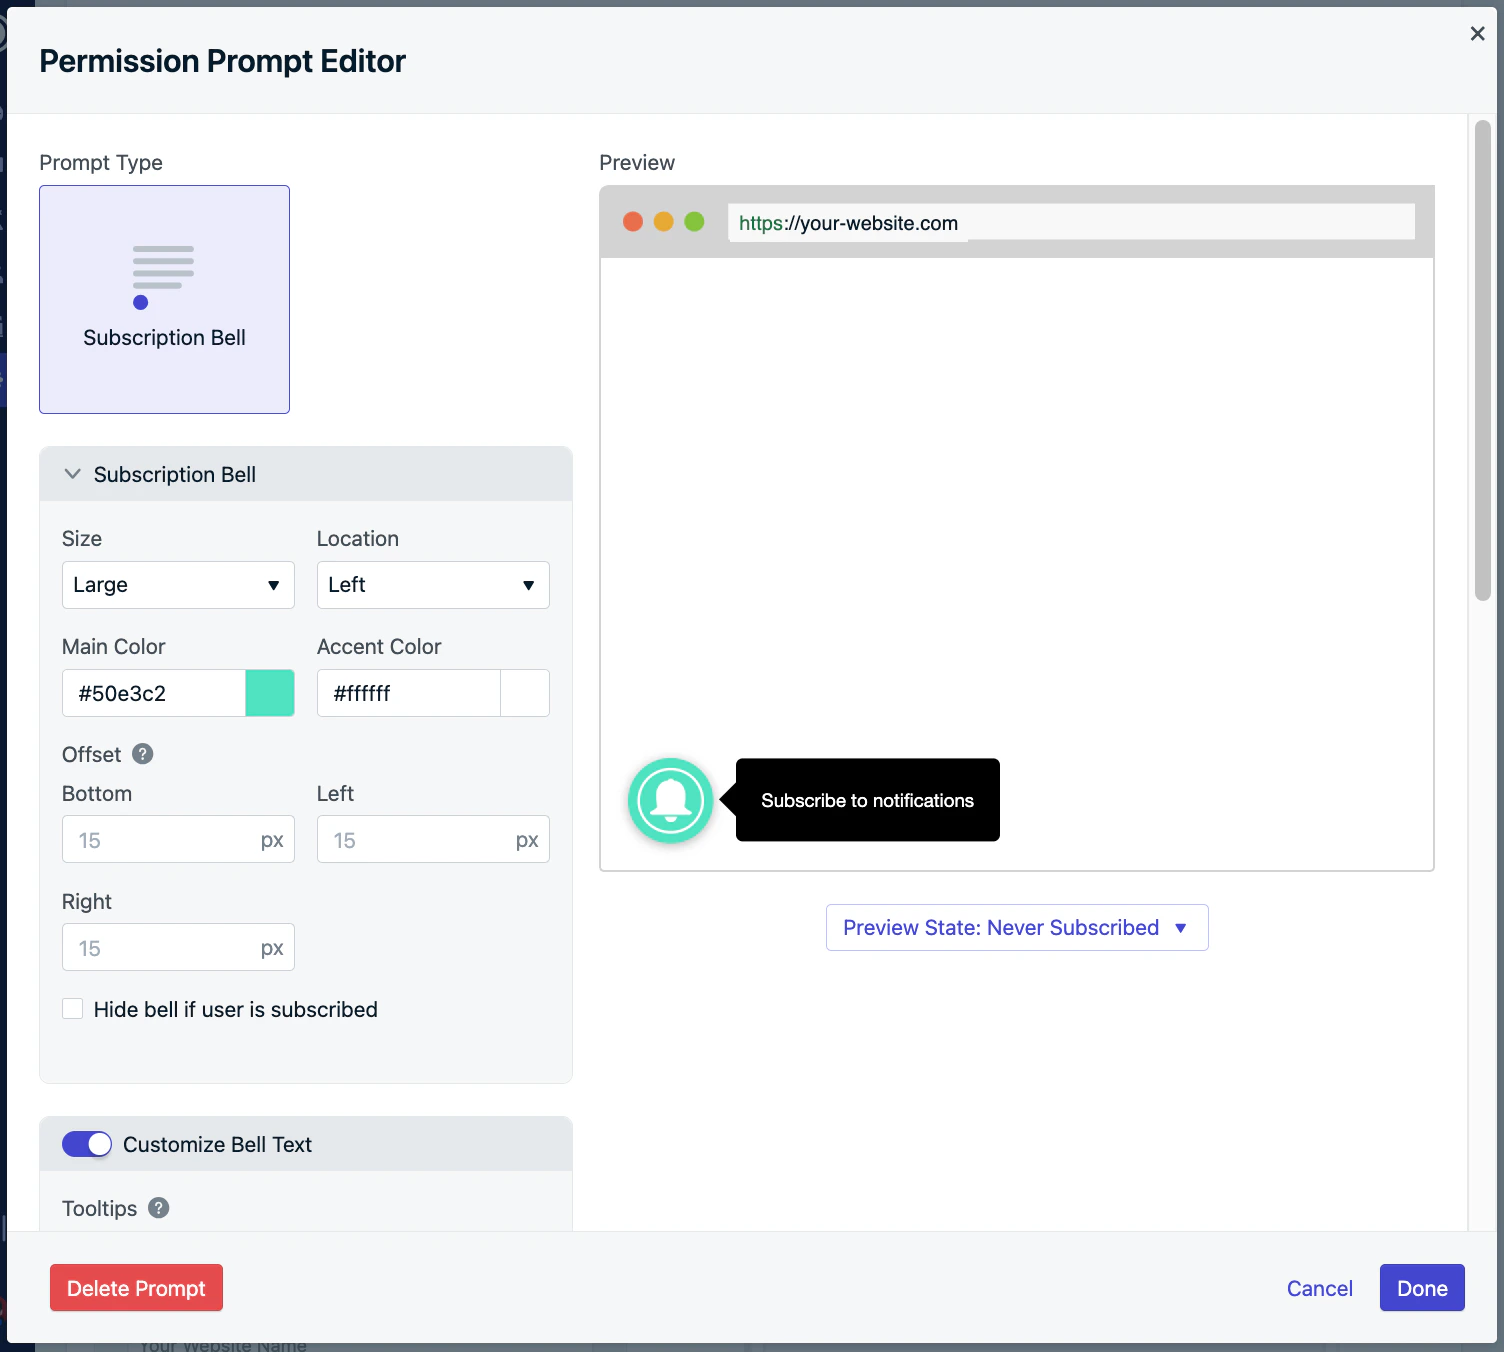
Subscription bell setup in dashboard
Custom Code Setup: Subscription Bell Prompt
Custom Code Setup: Subscription Bell Prompt
notifyButton parameter in your web SDK initialization options. You may toggle between different examples for Bell Prompt customizations.Hiding: To hide the subscription bell after a user subscribes or only show it on certain pages, be sure to return the value false or a Promise that resolves to the value false in the displayPredicate function during initialization. This function is evaluated before the subscription bell is shown. You may return any other value to show the subscription bell.Custom link prompt
The Custom Link Prompt is a user-triggered button or link you can embed anywhere on your website. When clicked, it displays the Native Browser Prompt for push notifications.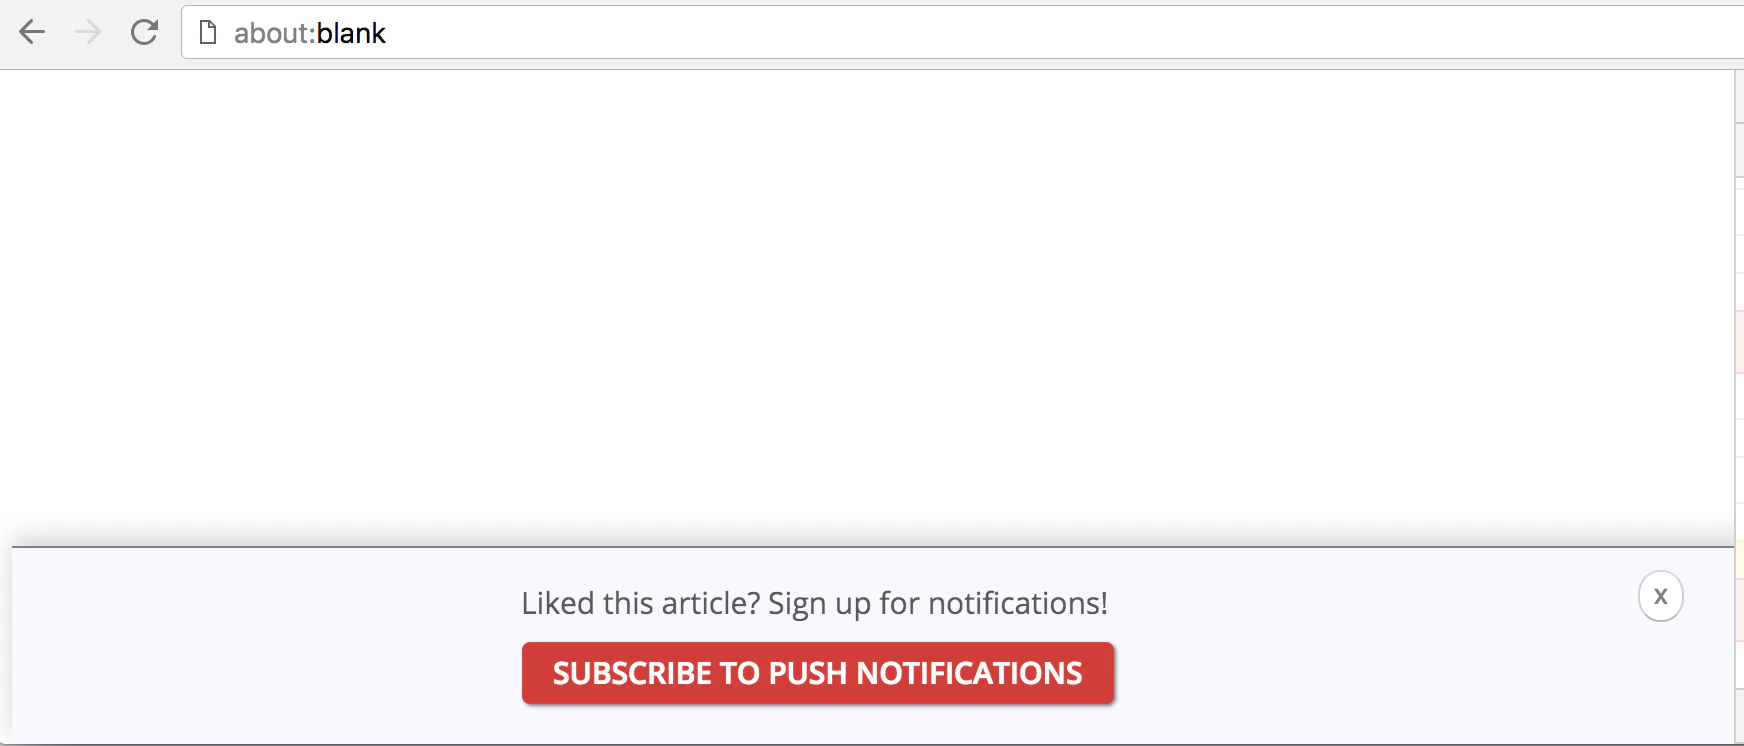
Custom link prompt example
- Below a blog post: “Like this article? Get updates as soon as we post!”
- In your site footer
- In a sticky header or floating toolbar
Typical Site & WordPress Setup: Custom Link Prompt
Typical Site & WordPress Setup: Custom Link Prompt
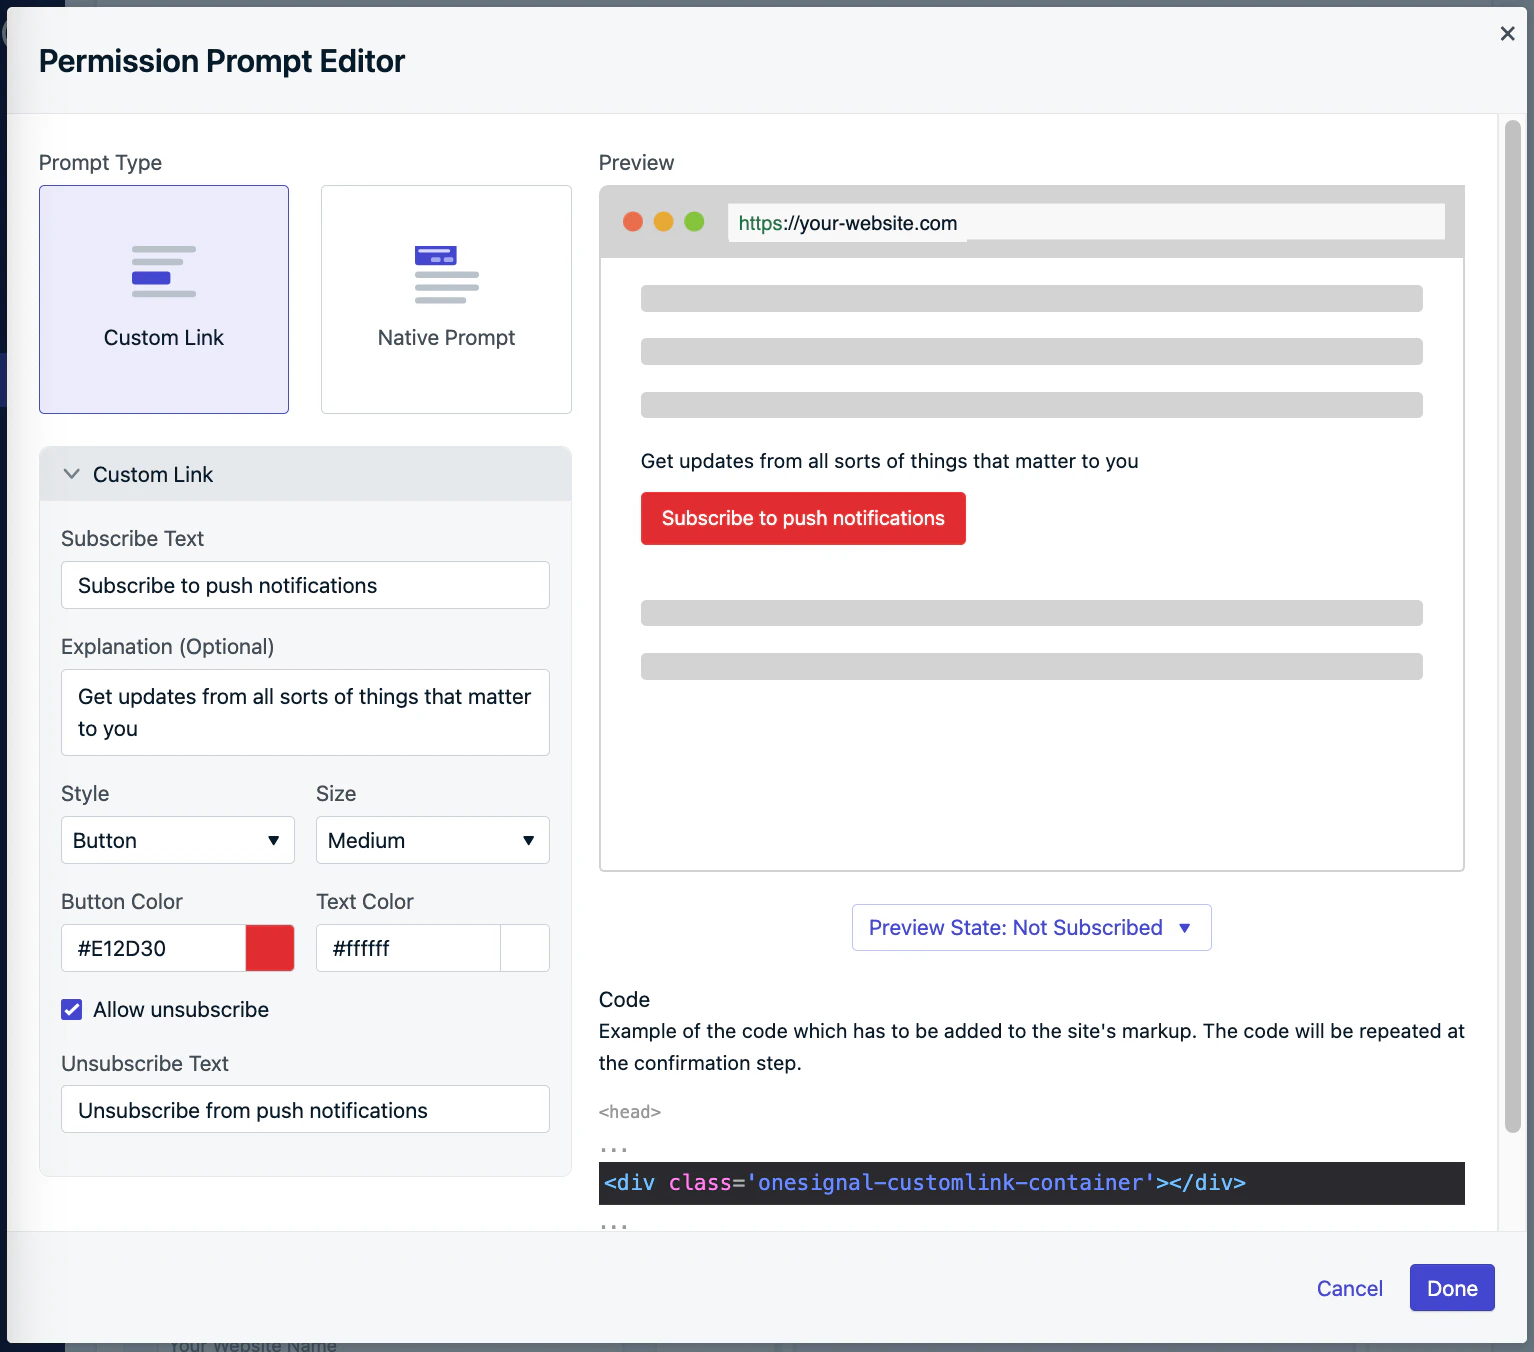
Custom link setup in dashboard
Custom Code Setup: Custom Link
Custom Code Setup: Custom Link
init code’s promptOptions object, add the customlink object and its available properties.Typical & Custom Code Setup: Additional Styling
Typical & Custom Code Setup: Additional Styling
onesignal-reset that removes any prior styling from the element to make sure there are no conflict with our internal styles and that it looks exactly as you’ve defined it in the dashboard.If you ever find yourself in need to redefine any OneSignal styles, here is a short reference of the classes used in the Custom Link widgetNative permission prompt
The native permission prompt is the browser-controlled dialog that users must accept to subscribe to push notifications from your website. This prompt is:- Required for subscription
- Automatically triggered after OneSignal soft prompts
- Not customizable in appearance, text, or behavior
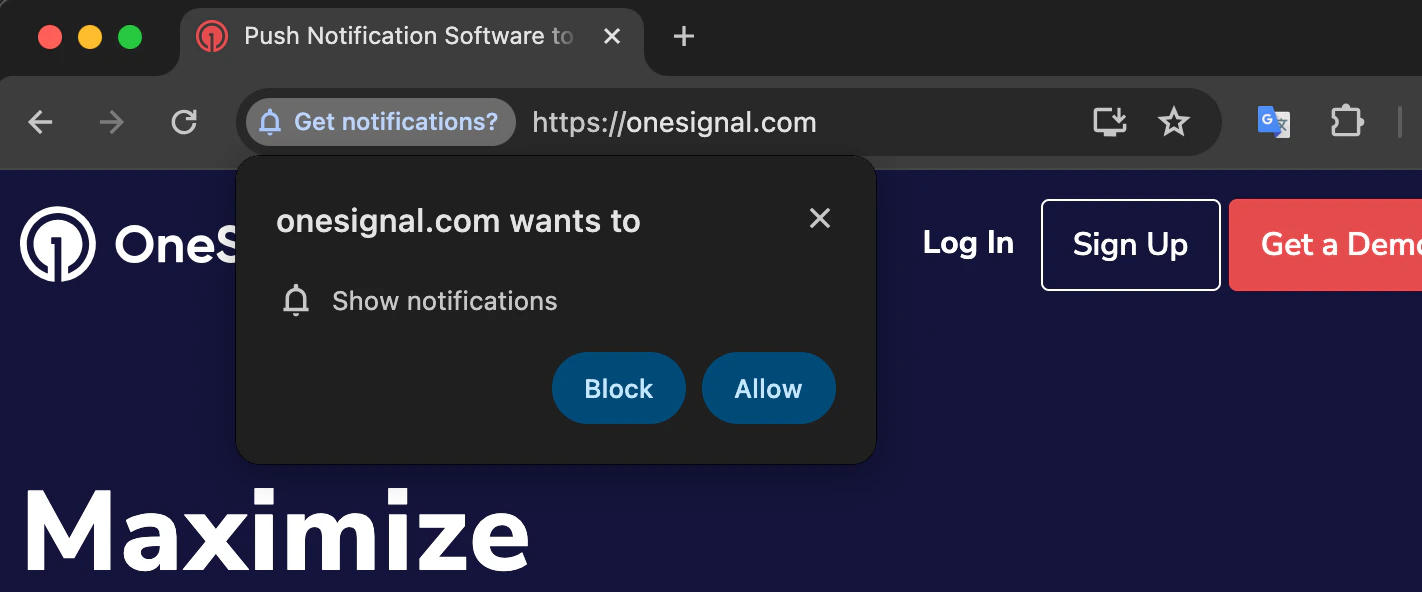
Native permission prompt on Chrome
Browser native prompt behavior
Different browsers impose unique behaviors and restrictions to reduce spammy permission requests. In an effort to combat spam and poor user experience, OneSignal will automatically default to the Slide Prompt in certain cases listed below. If you do not want to show the Slide Prompt and would like to use the native permission prompt directly, you must turn off the Auto Prompt options and use our Web SDKrequestPermission() method. Displaying the native permission prompt directly may not work in all browsers as described below.
Chrome
Chrome 80+ may display a quieter UI instead of the full prompt:- Automatically applies to users who frequently deny prompts
- Also applies to sites with a high rate of denials
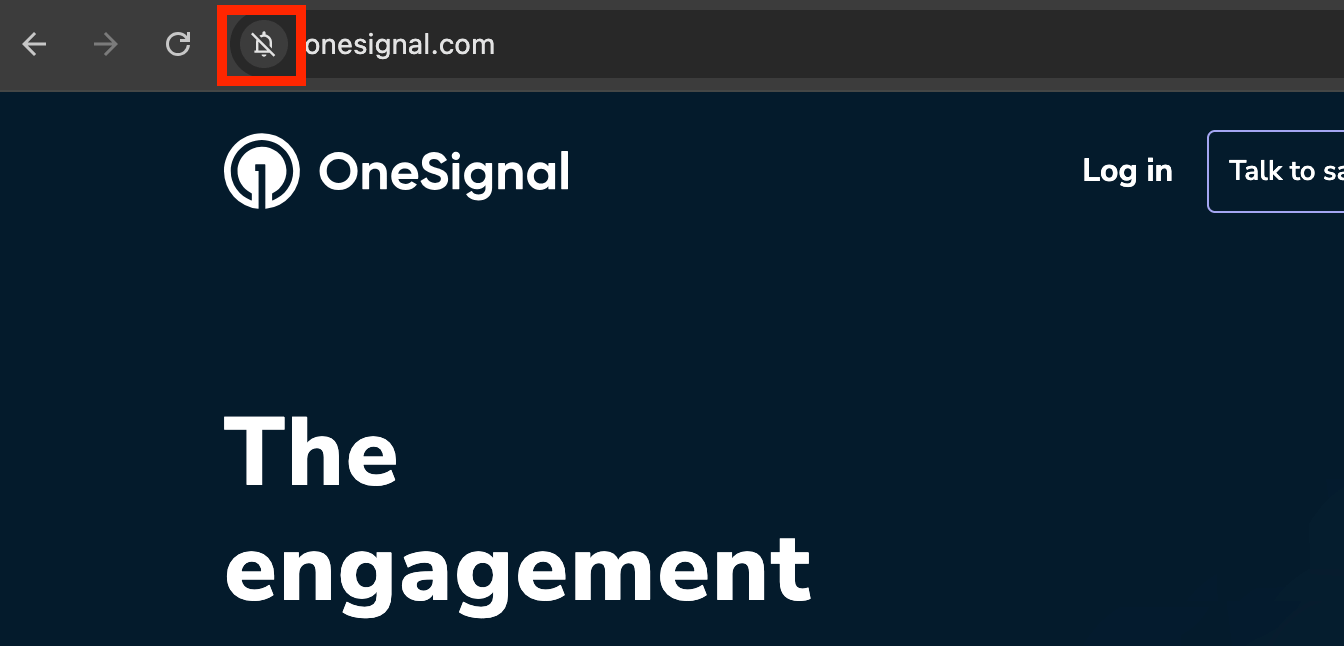
Quieter notification UI on Chrome desktop
- You have 3 attempts to prompt
- After the 3rd dismissal, the prompt is suppressed for 7 days (source).
Firefox
Firefox 72+ started requiring a user gesture to trigger the native permission prompt. If you try to automatically show the native permission prompt on Firefox, you will see an icon within the browser like this, requiring the user to click the icon to show the native permission prompt.
Firefox notification permission icon
Safari
Safari 12.1+ started requiring a user gesture to trigger the native permission prompt.Edge
Edge uses a trust-based model:- If the site is untrusted, the prompt is suppressed and replaced by a bell icon in the browser bar:
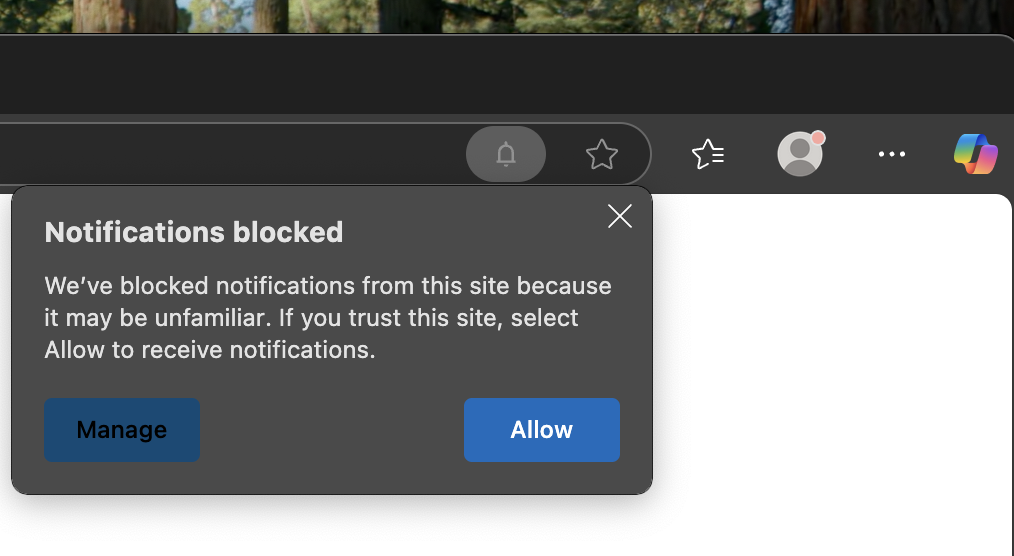
Bell icon for untrusted sites in Edge
- If the site is trusted, the native prompt appears normally:
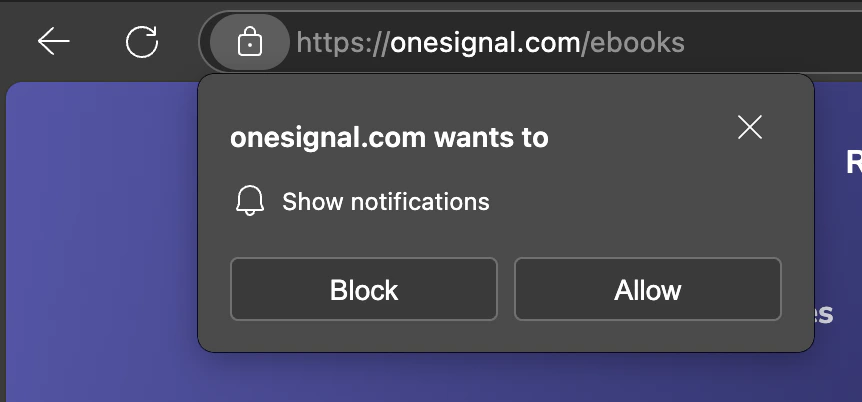
Native prompt for trusted sites in Edge
Auto prompt & display settings
To maximize engagement and avoid disrupting your users, it’s best to delay showing prompts until after they’ve spent some time on your site. OneSignal allows you to automatically display prompts based on user behavior using two delay conditions:- Page Views: Number of times the user loads any page on your site
- Seconds on Page: Amount of time the user must spend on the page
Typical Site & WordPress Setup: Auto Prompt
Typical Site & WordPress Setup: Auto Prompt
- Navigate to: Settings > Push & In-App > Web Settings > Permission Prompt Setup
- Choose a prompt or create a new one
- Enable Auto Prompt
- Set your delay preferences (page views and time delay)
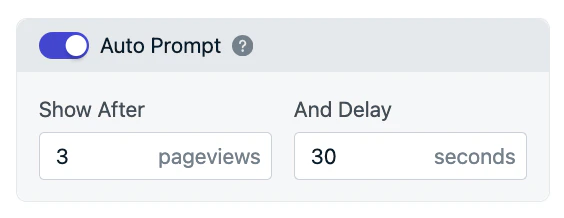
Auto prompt delay settings
- Click Done, then Save
Custom Code Setup: Auto Prompt
Custom Code Setup: Auto Prompt
init code’s promptOptions object use the autoPrompt and delay options. There are also methods to trigger the desired slidedown or native prompts directly. See Web SDK Reference for more details.Manual Triggering (Instead of Auto Prompt)
Manual Triggering (Instead of Auto Prompt)
- Disable Auto Prompt
- Use the SDK’s Slidedown or Native Prompt methods to show the prompt via code
Slidedown prompt back-off logic
Once a Slidedown (Push, Category, or Email/Phone) prompt is shown and dismissed (via Allow, Cancel, or closing the dialog), it will back off and reappear on a defined schedule:Best practices for requesting web push permissions
Getting users to grant web push permissions requires timing, trust, and user-friendly design. Follow these best practices to maximize opt-in rates while maintaining a positive on-site experience.Be strategic with when you ask
Timing matters more than frequency. Display permission prompts when users are already engaged or showing intent. For example:- After they add an item to their cart or engage on a post or comment
- When they update their profile or sign in to their account
- Upon completing an action that shows commitment to your brand
Use the Subscription Bell Prompt
The Bell Prompt is a persistent, non-intrusive way for users to subscribe at any time. This floating bell icon is ideal for long-term engagement because it:- Keeps the subscription option visible without disrupting browsing.
- Allows users to subscribe when they choose.
- Builds trust by not forcing immediate permission requests.
Let users personalize their subscriptions with Categories
The Category Prompt lets users choose which topics or message types they want—like “Sales”, “Product Updates”, or “Blog Posts”. This approach:- Makes the prompt feel less intrusive and more relevant
- Improves engagement and message click-through rates
- Reduces opt-outs later by setting expectations early
Test and optimize over time
Don’t rely on a single strategy. Test different prompt types, messages, and timings to see what resonates with your audience. Try this approach:- Start with the native browser prompt for a few months to measure your baseline opt-in rate.
- After gathering data, experiment with the slidedown prompt or custom prompt flows to improve conversions across browsers and audience segments.
- Track performance using our SDK’s
permissionPromptDisplayandpermissionChangeevents andslidedownevents.
FAQ
Prompt display issues
A browser’s native permission prompt may not show if any of the following conditions are true: 1. The browser blocked the prompt from showing. Navigate to your browser’s settings and check the “Notifications” permission setting. Chrome example:chrome://settings/content/notifications
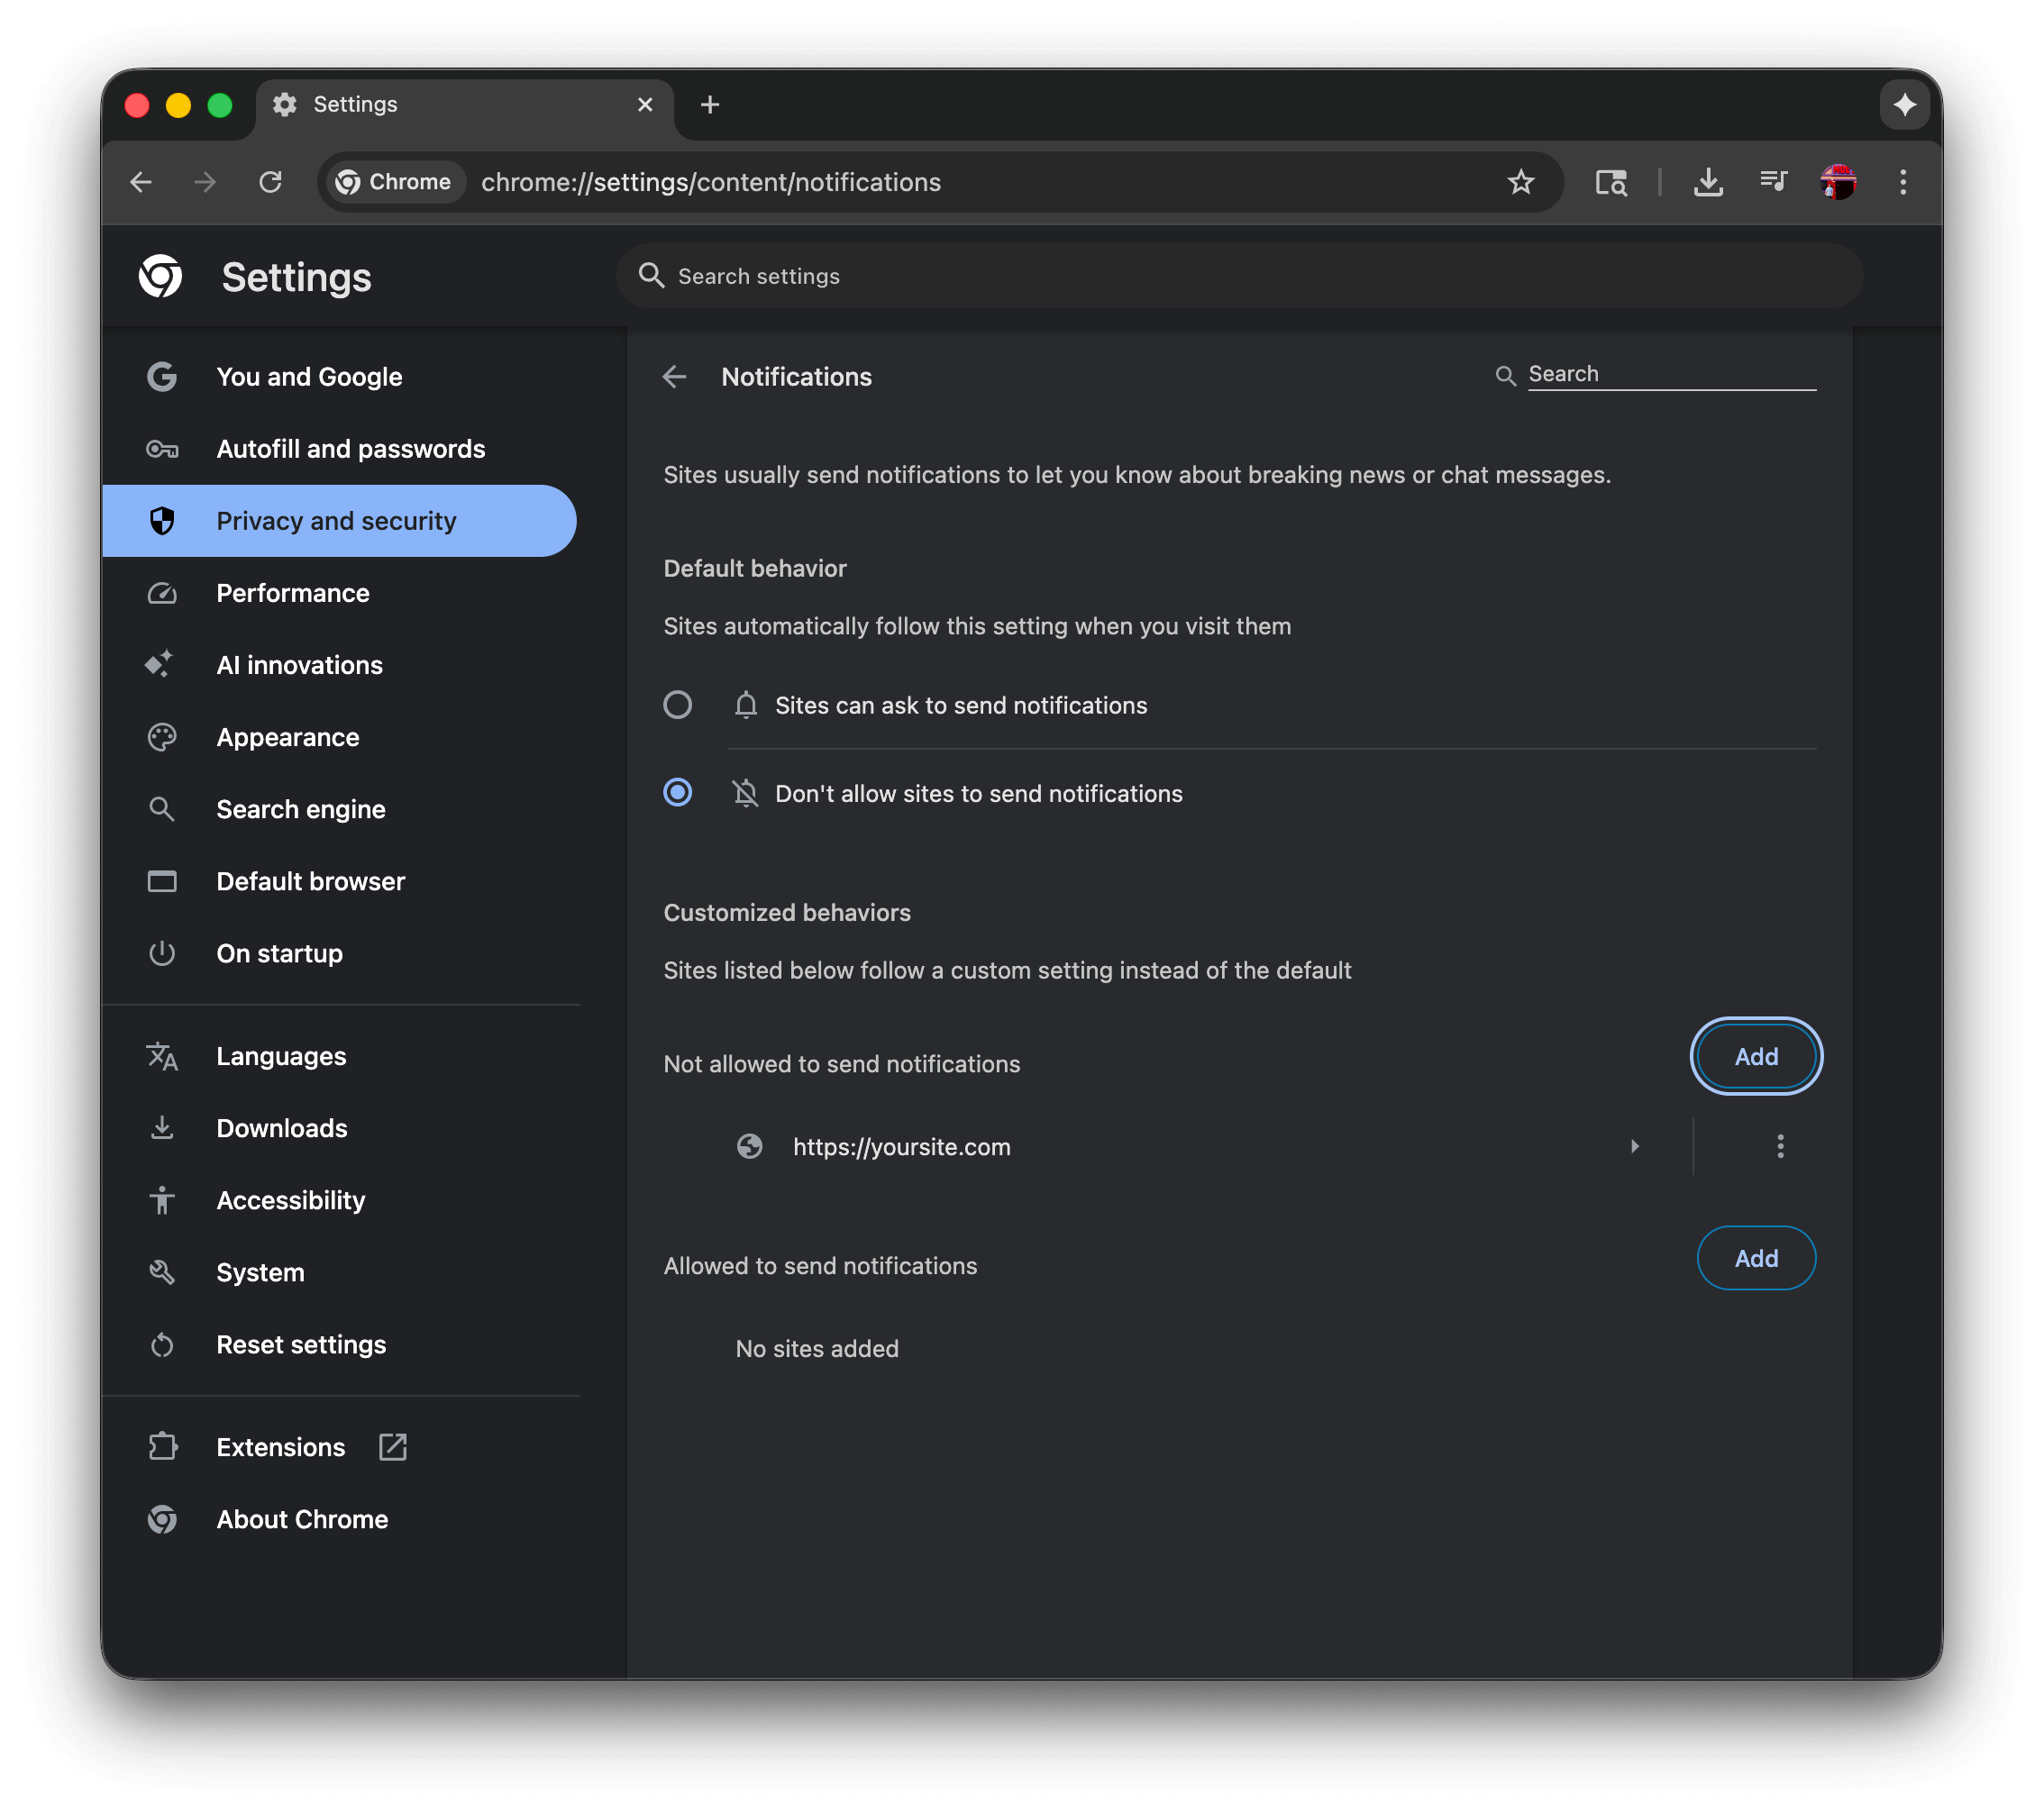
Chrome notification settings
- The user has selected “Don’t allow sites to send notifications” which will prevent the native permission prompt from showing. This must show “Sites can ask to send notifications” to allow the native permission prompt to show.
- The user has added
https://yoursite.comto the “Not allowed to send notifications” list, which will prevent the native permission prompt from showing. This must be removed from the list to allow the native permission prompt to show.
- Chrome - This page explains how to manage notifications in Chrome by going to Settings > Privacy and security > Site Settings > Notifications, where you can control default behavior and manage permissions for individual websites.
- Firefox - This guide covers Firefox’s Web Push notifications, explaining how to manage notification permissions through Settings > Privacy & Security > Notifications, and how to control permissions for specific sites through the address bar’s site information icon.
- Safari - This Apple guide explains how to customize Safari notifications on Mac through Safari > Preferences > Websites > Notifications, where you can manage which sites can send notifications and control notification behavior through System Preferences.
- Edge - This article details how to manage Edge notifications by navigating to Settings > Privacy, search, and services > Site permissions > Notifications, or by clicking the site information icon in the address bar.
How do I show prompts in a social media app webview?
Webviews used by social media apps (Instagram, TikTok, Facebook, etc.) do not support web push notifications. The app must open your website in a full browser that supports web push.Why does the slide prompt keep showing up?
There are two common causes:- You are in incognito mode, private browser mode, or guest browser mode.
- You are triggering the prompt programmatically without using the Auto Prompt option. See the Web SDK Reference and check the prompting methods you are using.
After dismissing a prompt, when does it show again?
For OneSignal prompts, see Slidedown prompt back-off logic. For the native permission prompt, see Browser native prompt behavior.Why do I see the slide prompt instead of the native browser prompt?
Certain browsers require a user gesture before showing the native prompt. OneSignal automatically shows a slide prompt first in these cases. See Browser native prompt behavior for details.How do I translate or localize the prompt?
Use the Custom Code Setup to programmatically detect the user’s browser language and initialize the OneSignal SDK with different text. The native permission prompt automatically translates to the browser’s set language.Can I A/B test prompts?
Yes. Using the Custom Code Setup, you can initialize OneSignal with different prompting options. You need to set up your own method to trigger the A/B tests. Use the Subscription Change event to detect when a user subscribes and add Tags based on which variant won.Can I segment subscriptions based on the page they subscribed?
Yes. See the Auto-Segment By Subscription Page guide.Can I change the bell icon?
No. You cannot change the bell image, but you can customize the colors, text, and position (bottom-left or bottom-right).Why does my accessibility audit flag the subscription bell?
Current versions of the Web SDK give the bell button a default accessible name of “Manage notifications”, so it passes the “buttons must have discernible text” check used by Lighthouse, PageSpeed Insights, and axe. To change or localize the label, set thelauncher.button.aria-label key in notifyButton.text using the Custom Code Setup.
Can I change the categories based on page?
Yes, in two ways. To show different category checkboxes on different pages, use Custom Code Setup and configure thecategories promptOptions per page. To automatically apply cat_<category> Tags as readers browse (without showing a prompt), see Tag users by page topic — the auto-tag pattern uses the same Tag namespace as the Category Prompt, so the two approaches combine cleanly.
How do I track slide prompt events?
The OneSignal Web SDK provides Slide Prompt Event Methods to detect when the prompt shows, closes, or receives an “Allow” or “Cancel” action.How can I show the prompt on only certain pages?
Disable Auto Prompt, then use the Slidedown prompt SDK method on the specific pages where you want prompts to appear. The Bell prompt cannot be disabled on a per-page basis.Why do I see the slide prompt on mobile instead of the native prompt?
Chrome for Android displays a full-screen native prompt that disrupts the browsing experience. OneSignal shows a slide prompt first to provide a better user experience. To bypass this, turn off Auto Prompt in the Prompt Editor and use the Web SDKrequestPermission() method.