Descripción general
Esta guía te muestra cómo agregar notificaciones web push de OneSignal a tu sitio — desde la configuración del dashboard hasta la instalación del SDK. OneSignal soporta Chrome, Firefox, Edge, Safari y otros navegadores principales.Requisitos
- Sitio web HTTPS: Web push no funciona en HTTP o en modos incógnito/privado.
- Acceso al servidor: Necesitarás subir un archivo service worker a tu sitio.
- Origen único: Web push sigue la política de mismo origen. Si tienes múltiples orígenes (dominios/subdominios), necesitarás múltiples apps OneSignal (una por origen). Para cumplir con esta limitación del navegador, puedes:
- Redirigir tráfico a un único origen para suscripciones.
- Crear múltiples apps OneSignal—una por origen.
Configurar tu app OneSignal y plataforma
En el dashboard de OneSignal:- Ve a Settings > Push & In-App > Web.
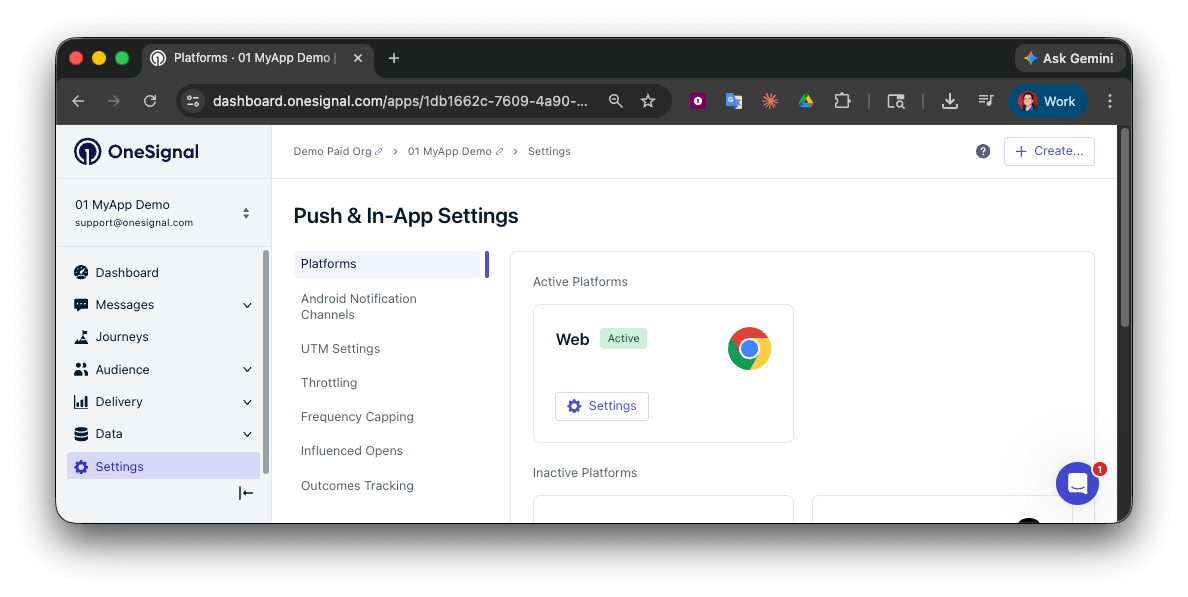
Activa la plataforma web en tu configuración de OneSignal
Sitio típico (recomendado)
WordPress
Código personalizado
Configuración del sitio
Agrega los detalles del sitio:- Nombre del sitio: El nombre de tu sitio y título de notificación predeterminado.
- URL del sitio: La URL de tu sitio. Ver URL del sitio para más detalles.
- Resuscripción automática: Habilita esto para resuscribir automáticamente a usuarios que limpian sus datos del navegador cuando regresan a tu sitio (sin nuevo prompt de permiso requerido)
- URL de icono predeterminado: Sube una imagen PNG o JPG cuadrada de 256x256px que aparece en notificaciones y prompts. Si no se establece, usamos una campana para el icono predeterminado.
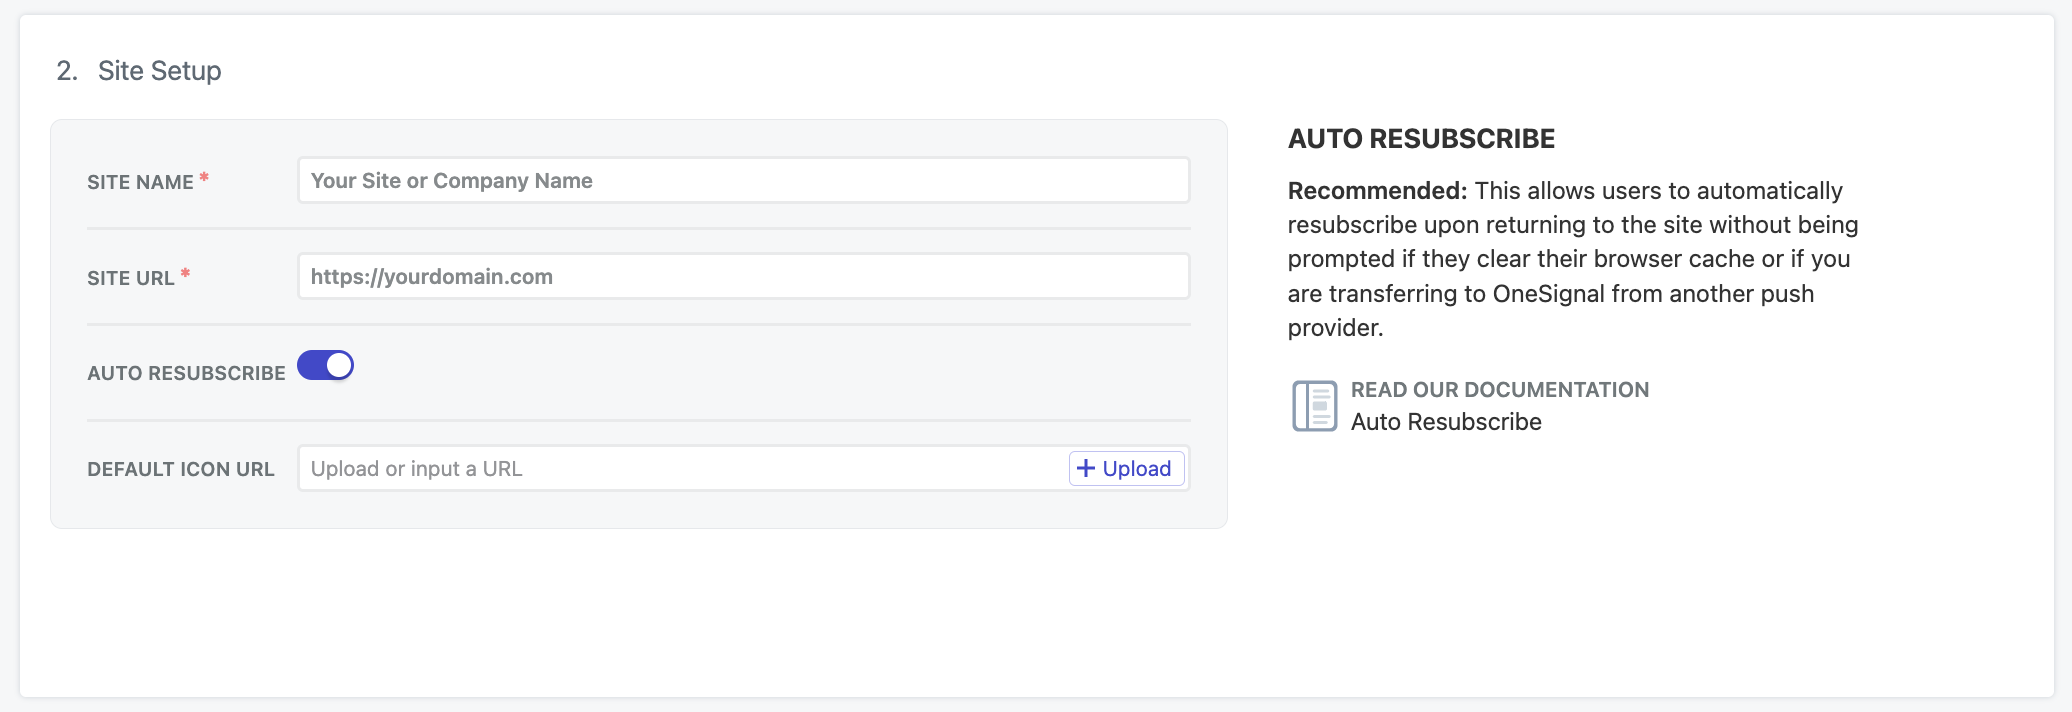
Configuración web en el dashboard de OneSignal
URL del sitio
Ingresa el origen exacto de tu sitio, ej.,https://yourdomain.com. Evita usar www. si tu sitio no está configurado de esa manera.
Si tienes múltiples orígenes:
- Redirige a un único origen.
- O configura una app OneSignal por origen.
Pruebas locales
Nuestro SDK web puede probarse en entornos localhost. Si estás probando en localhost, recomendamos configurar una app OneSignal diferente de tu app de producción.Configuración de Localhost
Configuración de Localhost
http://localhosthttps://localhost:3000http://127.0.0.1https://127.0.0.1:5000
http://localhost y http://127.0.0.1 como orígenes seguros, permitiendo integraciones HTTPS incluso en HTTP. Por esto no puedes probar otros orígenes no estándar en HTTPS localhost.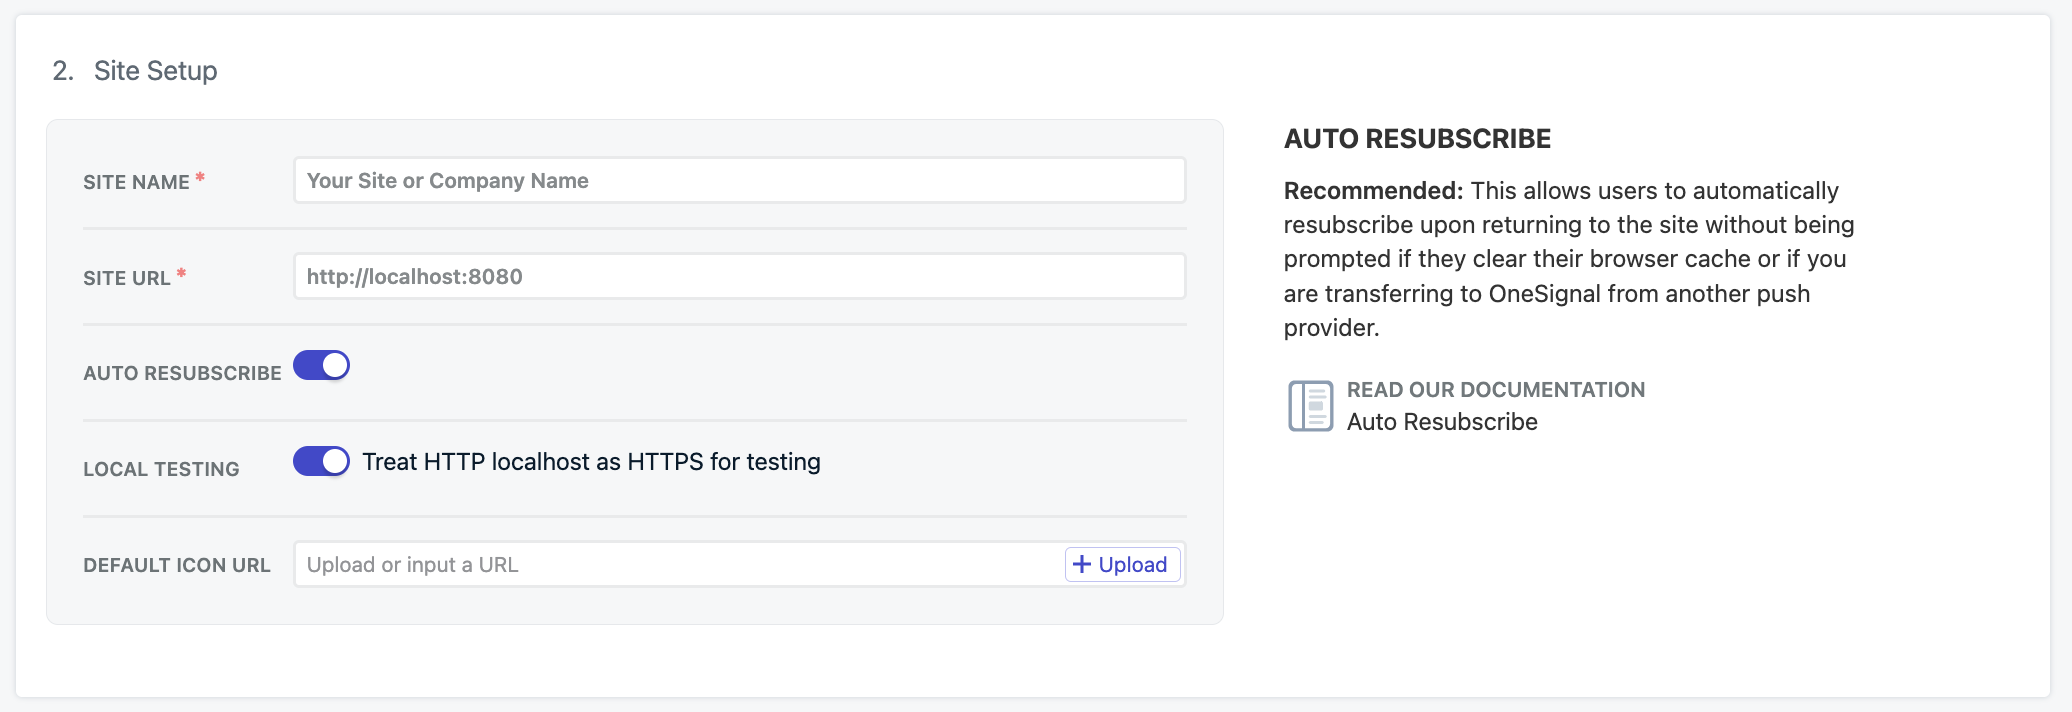
Pruebas locales en el dashboard de OneSignal
Agregar allowLocalhostAsSecureOrigin a tus opciones init de OneSignal
Al inicializar OneSignal en tu sitio localhost, agrega allowLocalhostAsSecureOrigin: true, a tus opciones init de OneSignal.Adicionalmente, si estás probando localhost en HTTPS con un certificado autofirmado, puede que tengas que pedir a Chrome que ignore certificados inválidos para pruebas con: --allow-insecure-localhost. Firefox y Safari proporcionan mecanismos integrados para agregar excepciones para certificados de seguridad.Prompt de permisos
La configuración de sitio típico permite a ti o a los miembros de tu equipo agregar, eliminar y actualizar prompts de permiso a través del dashboard de OneSignal en cualquier momento.Prompts de permiso web
Notificación de bienvenida (opcional)
También puedes establecer una notificación de bienvenida para ser enviada a los usuarios cuando se suscriban a notificaciones push.Configuraciones avanzadas
Características adicionales configurables en el dashboard de OneSignal.Webhooks
Nuestro SDK web proporciona la habilidad de hacerPOST de ciertos eventos web push a una URL de tu elección.
Los Webhooks Web Push son una implementación separada de los Webhooks de eventos y no pueden usarse de manera intercambiable.
Webhooks web push
Service workers
En la siguiente página de configuración web push, se te proporcionará el archivo service workerOneSignalSDKWorker.js.
Nuestro SDK web por defecto busca este archivo en la raíz de tu sitio. Si quieres cambiar la ubicación, nombre y/o alcance del archivo service worker, aquí es donde puedes actualizar esas configuraciones.
- Ruta a archivos service worker es la ruta al directorio donde pondrás estos archivos.
- Nombres de archivo service worker principal y actualizador pueden ser simplemente
OneSignalSDKWorker.jso si quieres renombrar este archivo. Debe usar extensión de archivo.js. - Alcance de registro de service worker son las páginas en las que este archivo puede funcionar. Para notificaciones push, esto no importa y fue diseñado originalmente para casos donde quieres agregar más funcionalidad al archivo service worker. Deberías establecer esto como la misma ruta que tu ubicación.
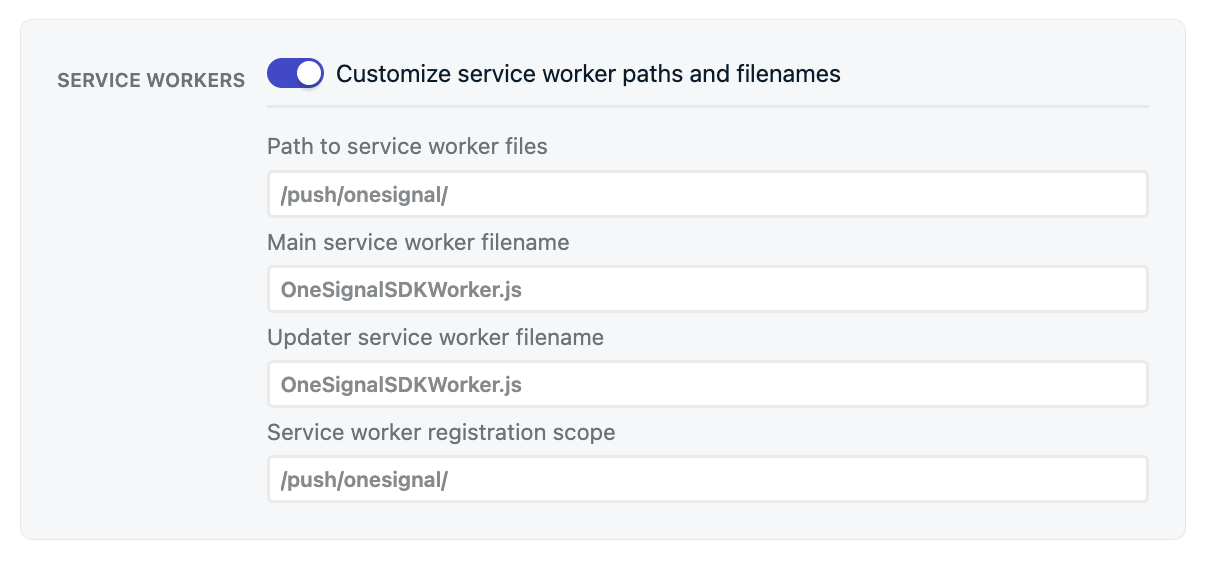
Configuración de service worker
https://yourdomain.com/push/onesignal/OneSignalSDKWorker.js
Service worker de OneSignal
Comportamiento de clic
Controla cómo los usuarios navegan a la URL que estableces cuando hacen clic en la notificación. Si el usuario no tiene tu sitio abierto en ninguna pestaña, el navegador abre una nueva pestaña y navega a la URL de la notificación. Si el usuario ya tiene tu sitio abierto, el comportamiento depende de la configuración que elijas:Persistencia
El comportamiento web push predeterminado es que aparecen en el dispositivo durante aproximadamente 5 segundos antes de moverse al Centro de notificaciones donde se mantienen durante aproximadamente 1 semana antes de ser eliminadas por el sistema operativo. Algunos dispositivos y versiones de Chrome y Edge te permiten persistir notificaciones por más tiempo en la pantalla. Esto significa que la notificación permanecerá en la pantalla hasta que el usuario interactúe con ella. Esto puede molestar a tus usuarios y no se recomienda. Además, si habilitas la persistencia afectará cómo aparecen las notificaciones a los suscriptores reduciendo el conteo de caracteres y puede afectar cómo se muestran las imágenes y botones. Al cambiarlos, entrarán en efecto solo para suscriptores que visiten el sitio con las configuraciones actualizadas. Si no ves estos cambios de opciones, necesitarás esperarCertificado Safari (Opcional)
OneSignal proporciona automáticamente los certificados necesarios para funcionar con navegadores Safari sin costo adicional. Si ya tienes tus propios Certificados Safari Web Push, activa esta opción para subir tuSafari Web .p12 Push Certificate y contraseña.
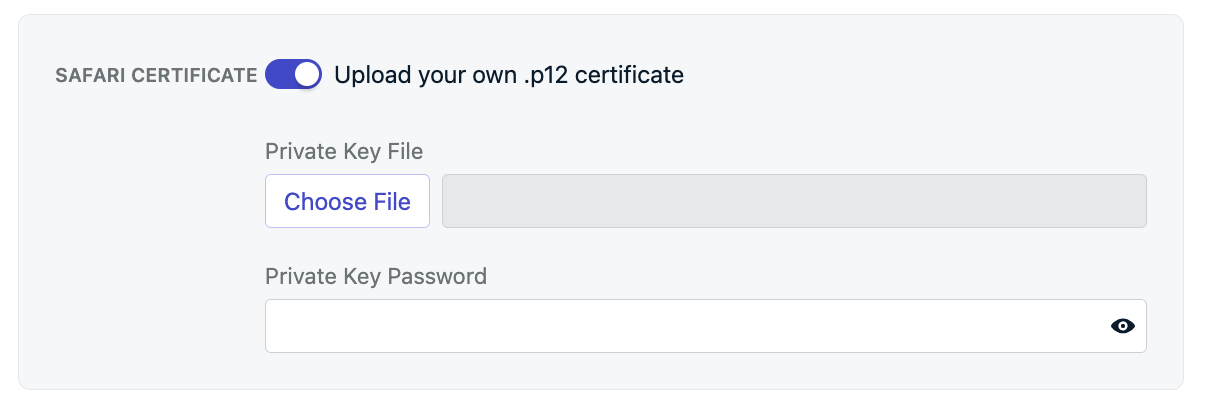
Configuración de certificado Safari
Subir archivo service worker
Agrega el archivo service workerOneSignalSDKWorker.js a tu sitio. Descárgalo desde el dashboard de OneSignal o desde GitHub.
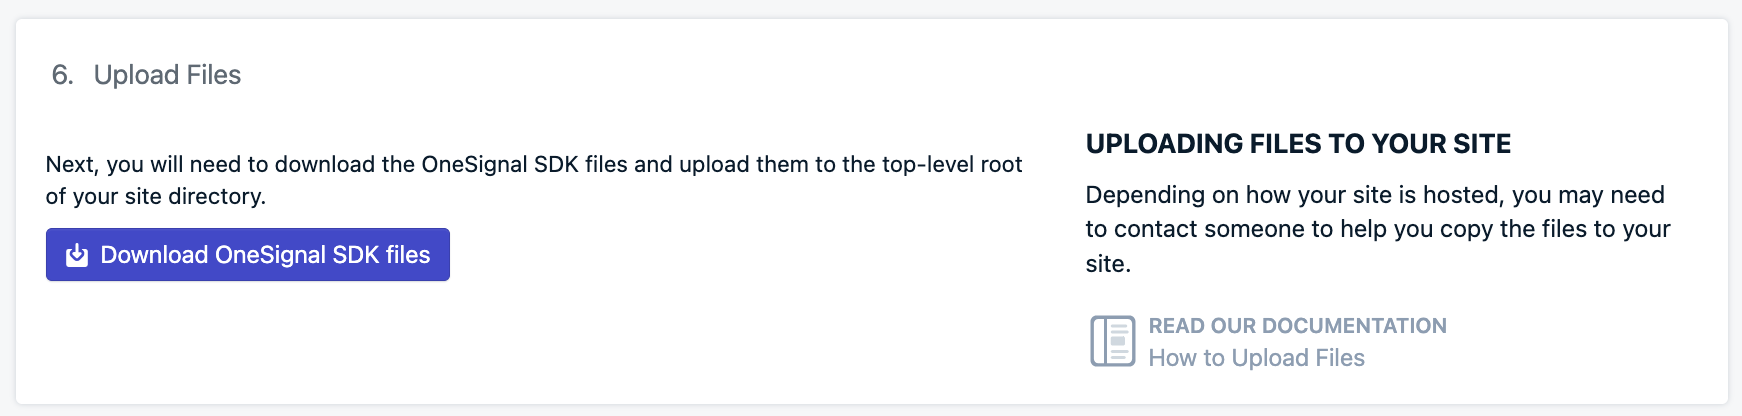
Paso de subir archivo service worker
Verifica la ubicación
https://yourdomain.com/OneSignalSDKWorker.jshttps://yourdomain.com/some-subdirectory/OneSignalSDKWorker.js
Debe ser públicamente accesible en tu origen
OneSignalSDKWorker.js debe ser públicamente accesible y disponible en tu origen. No puede alojarse a través de un CDN o colocarse en un origen diferente con redirección.Cuando visites la URL del archivo, deberías ver el código.Debe servirse con content-type: application/javascript
Service worker de OneSignal
Agregar código a tu sitio
El código JavaScript SDK que proporcionamos funciona en cualquier sitio. Si tu sitio está configurado usando Angular, React JS o Vue JS entonces sigue estos enlaces. Para inicializar OneSignal en tu sitio con nuestro JavaScript SDK, copia/pega el código proporcionado en las etiquetas<head> de tu sitio web. El dashboard de OneSignal proporciona este mismo fragmento de código prellenado con tu app ID.
Soporte iOS web push
Apple comenzó a soportar notificaciones web push en iPhones e iPads ejecutando iOS 16.4+. A diferencia de dispositivos Android donde web push simplemente “funciona” siempre que se visite en un navegador soportado, Apple agregó algunos requisitos más como un archivomanifest.json y una acción del usuario para agregar tu sitio a su pantalla de inicio.
Configuración iOS Web Push
manifest.json requerido y guía a los usuarios para agregar tu sitio a su pantalla de inicio.Testing the OneSignal SDK integration
This guide helps you verify that your OneSignal SDK integration is working correctly by testing push notifications and subscription registration.Check web push subscriptions
Launch your site on a test device.
- Use Chrome, Firefox, Edge, or Safari while testing.
- Do not use Incognito or private browsing mode. Users cannot subscribe to push notifications in these modes.
- The prompts should appear based on your permission prompts configuration.
- Click Allow on the native prompt to subscribe to push notifications.
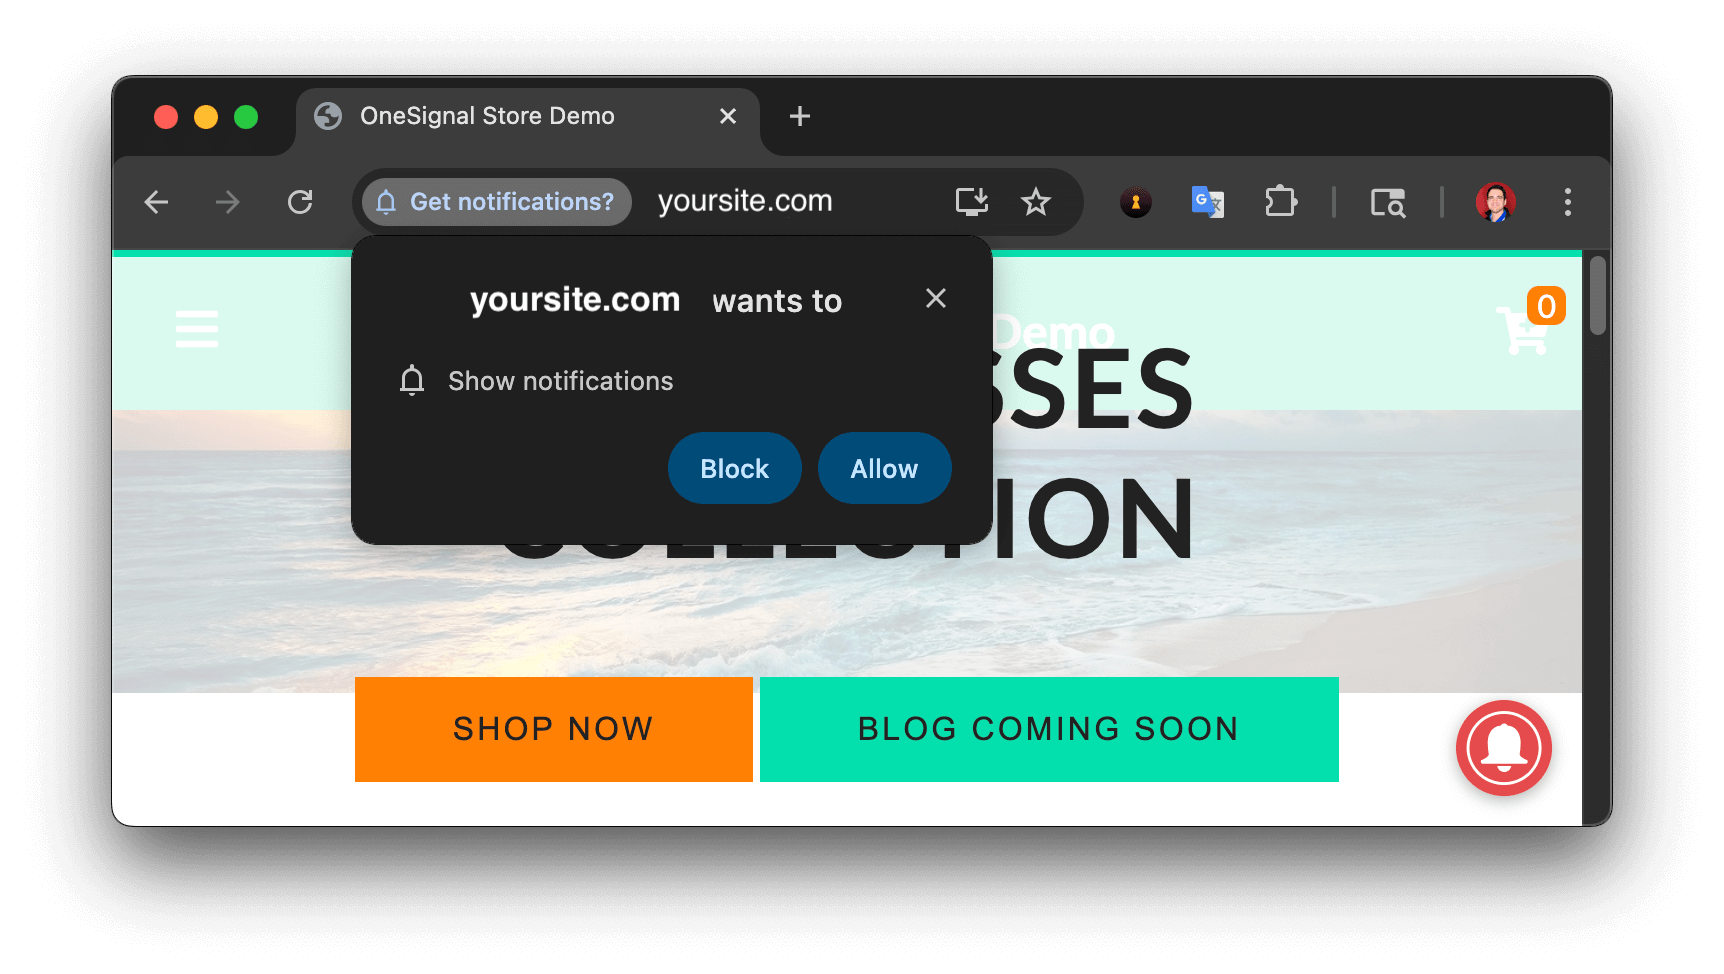
Web push native permission prompt
Check your OneSignal dashboard
- Go to Audience > Subscriptions.
- You should see a new entry with the status Subscribed.
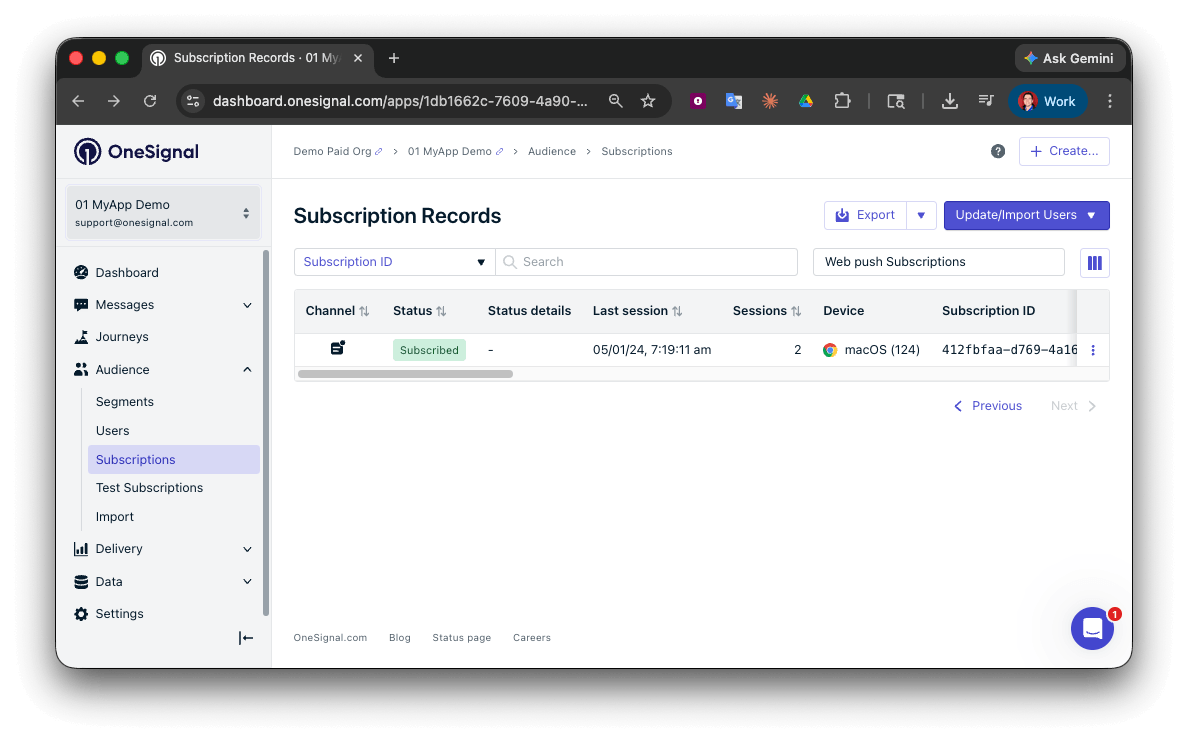
Dashboard showing subscription with 'Subscribed' status
Set up test users
test users are helpful for testing a push notification before sending a message.Add to Test Users.

Adding a device to Test Users
Name your subscription.
Create a test users segment.
Name the segment.
Test Users (the name is important because it will be used later).Add the Test Users filter and click Create Segment.

Creating a 'Test Users' segment with the Test Users filter
Send test push via API
Get your App API Key and App ID.
Update the provided code.
YOUR_APP_API_KEY and YOUR_APP_ID in the code below with your actual keys. This code uses the Test Users segment created earlier.Run the code.
Check images and confirmed receipt.
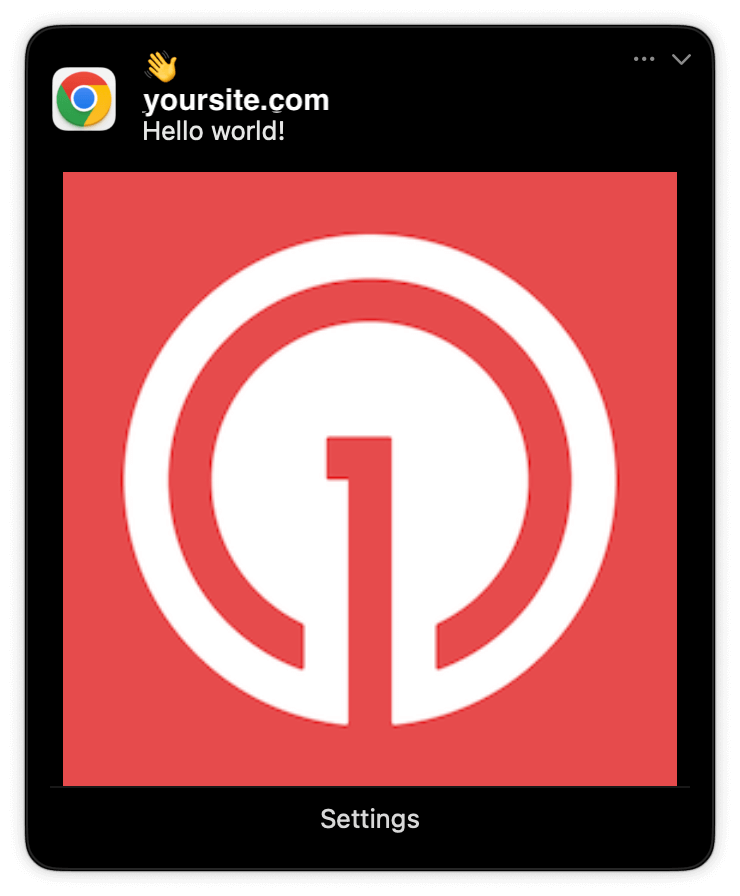
Expanded push notification with image on Chrome macOS
Check for confirmed receipt.
Push notification message reports
support@onesignal.com with the following:
- The API request and response (copy-paste into a
.txtfile) - Your Subscription ID
- Your website URL with the OneSignal code
User identification
The previous section covered creating web push Subscriptions. This section expands to identifying Users across all their subscriptions (including push, email, and SMS) using the OneSignal SDK. It covers External IDs, tags, multi-channel subscriptions, privacy, and event tracking to help you unify and engage users across platforms.Assign External ID
Use an External ID to identify users consistently across devices, email addresses, and phone numbers using your backend’s user identifier. This ensures your messaging stays unified across channels and 3rd party systems (especially important for Integrations). Set the External ID with the SDK’slogin method each time a user is identified by your app.
Add Tags
Tags are key-value pairs of string data you can use to store user properties (likeusername, role, or preferences) and events (like purchase_date, game_level, or user interactions). Tags power advanced Message Personalization and Segmentation allowing for more advanced use cases.
Set tags with the SDK’s addTag and addTags methods as events occur in your app.
In this example, the user reached level 6 identifiable by the tag called current_level set to a value of 6.
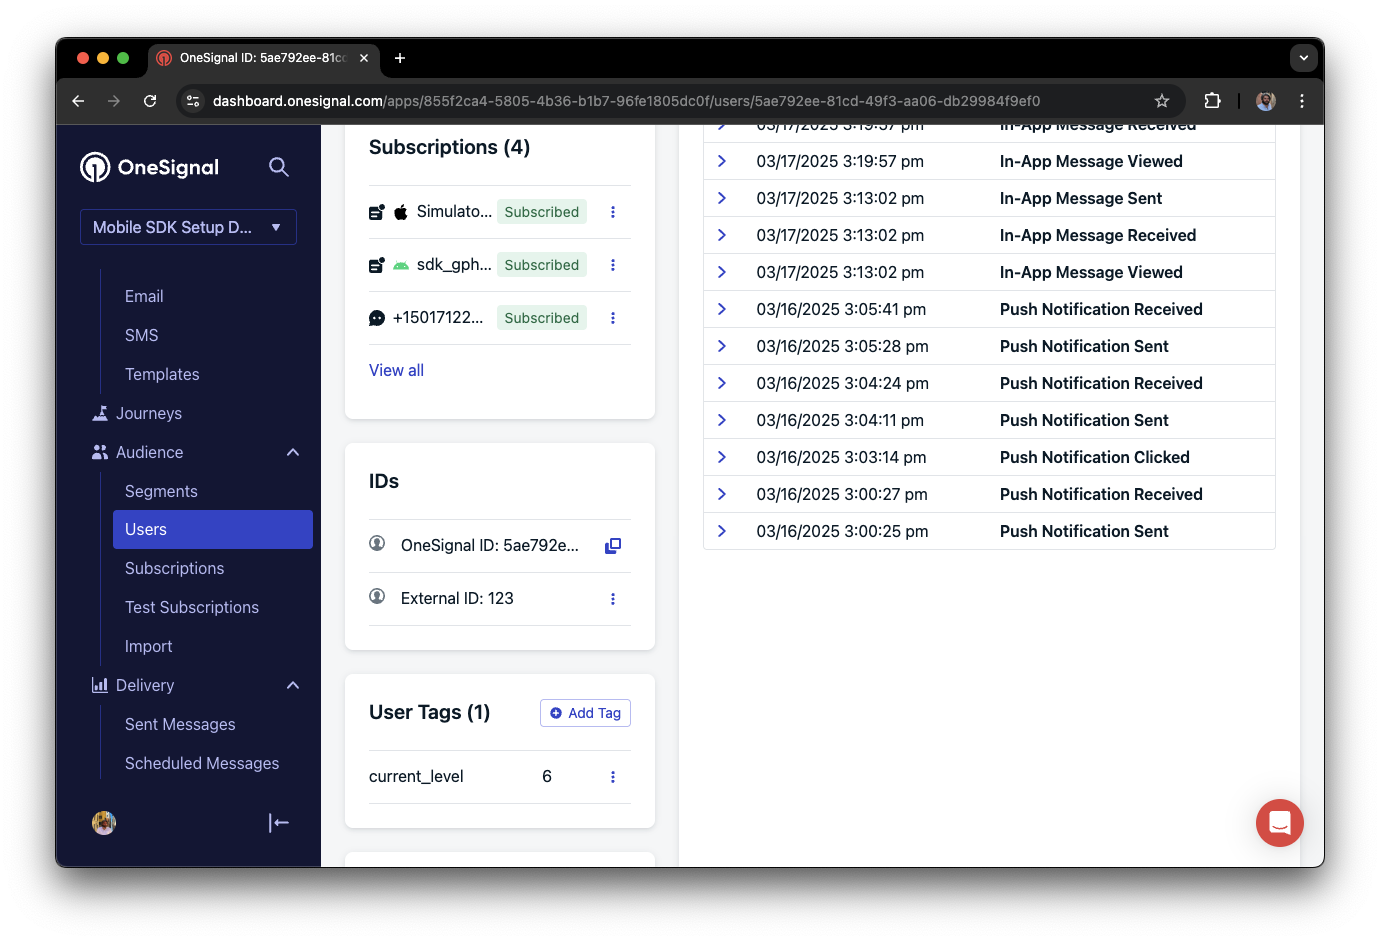
A user profile in OneSignal with a tag called "current_level" set to "6"
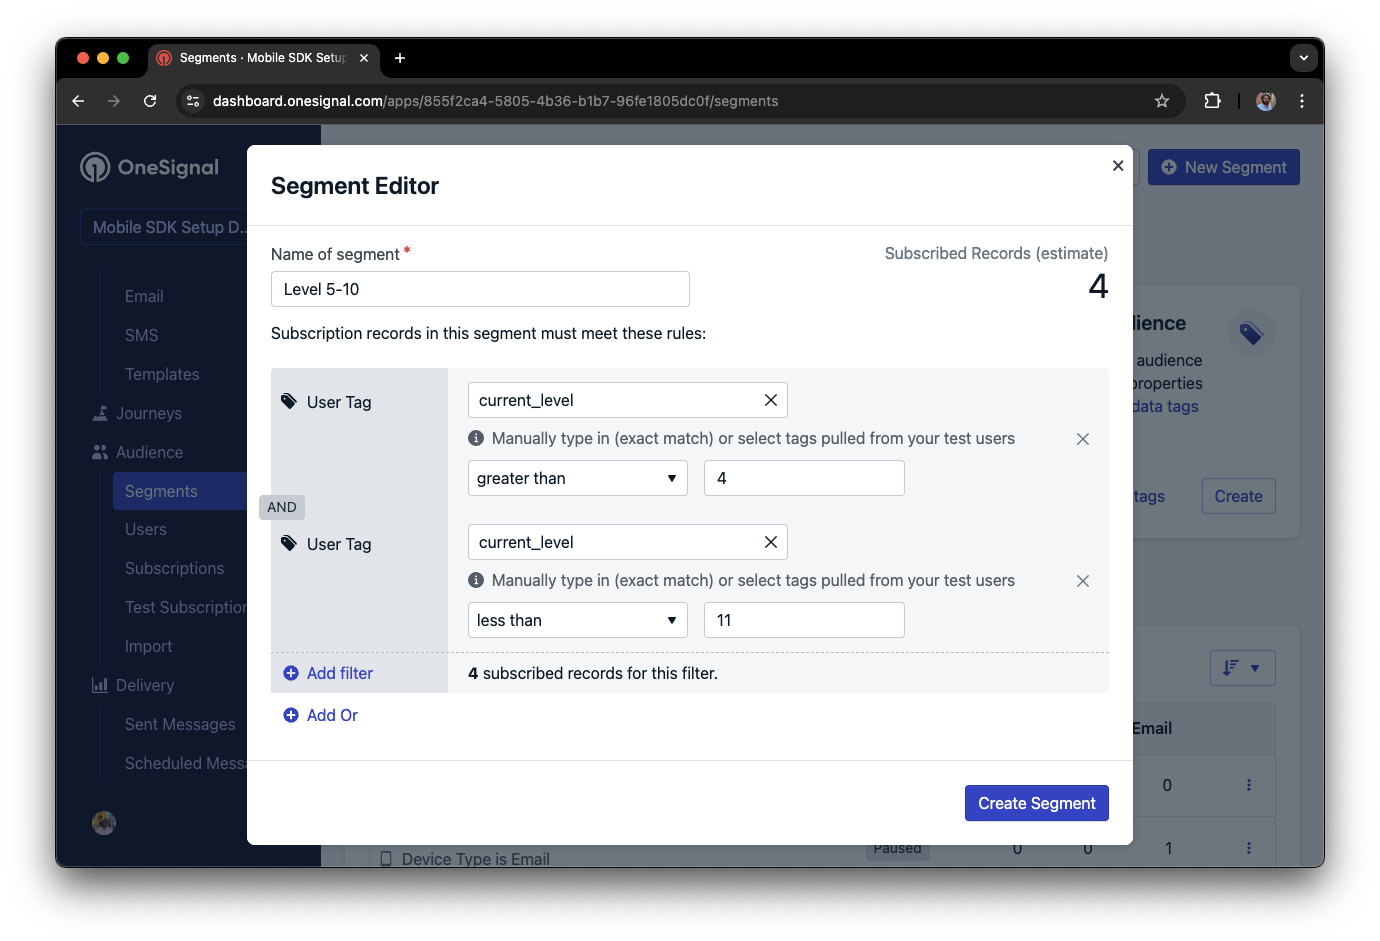
Segment editor showing a segment targeting users with a current_level value of greater than 4 and less than 10
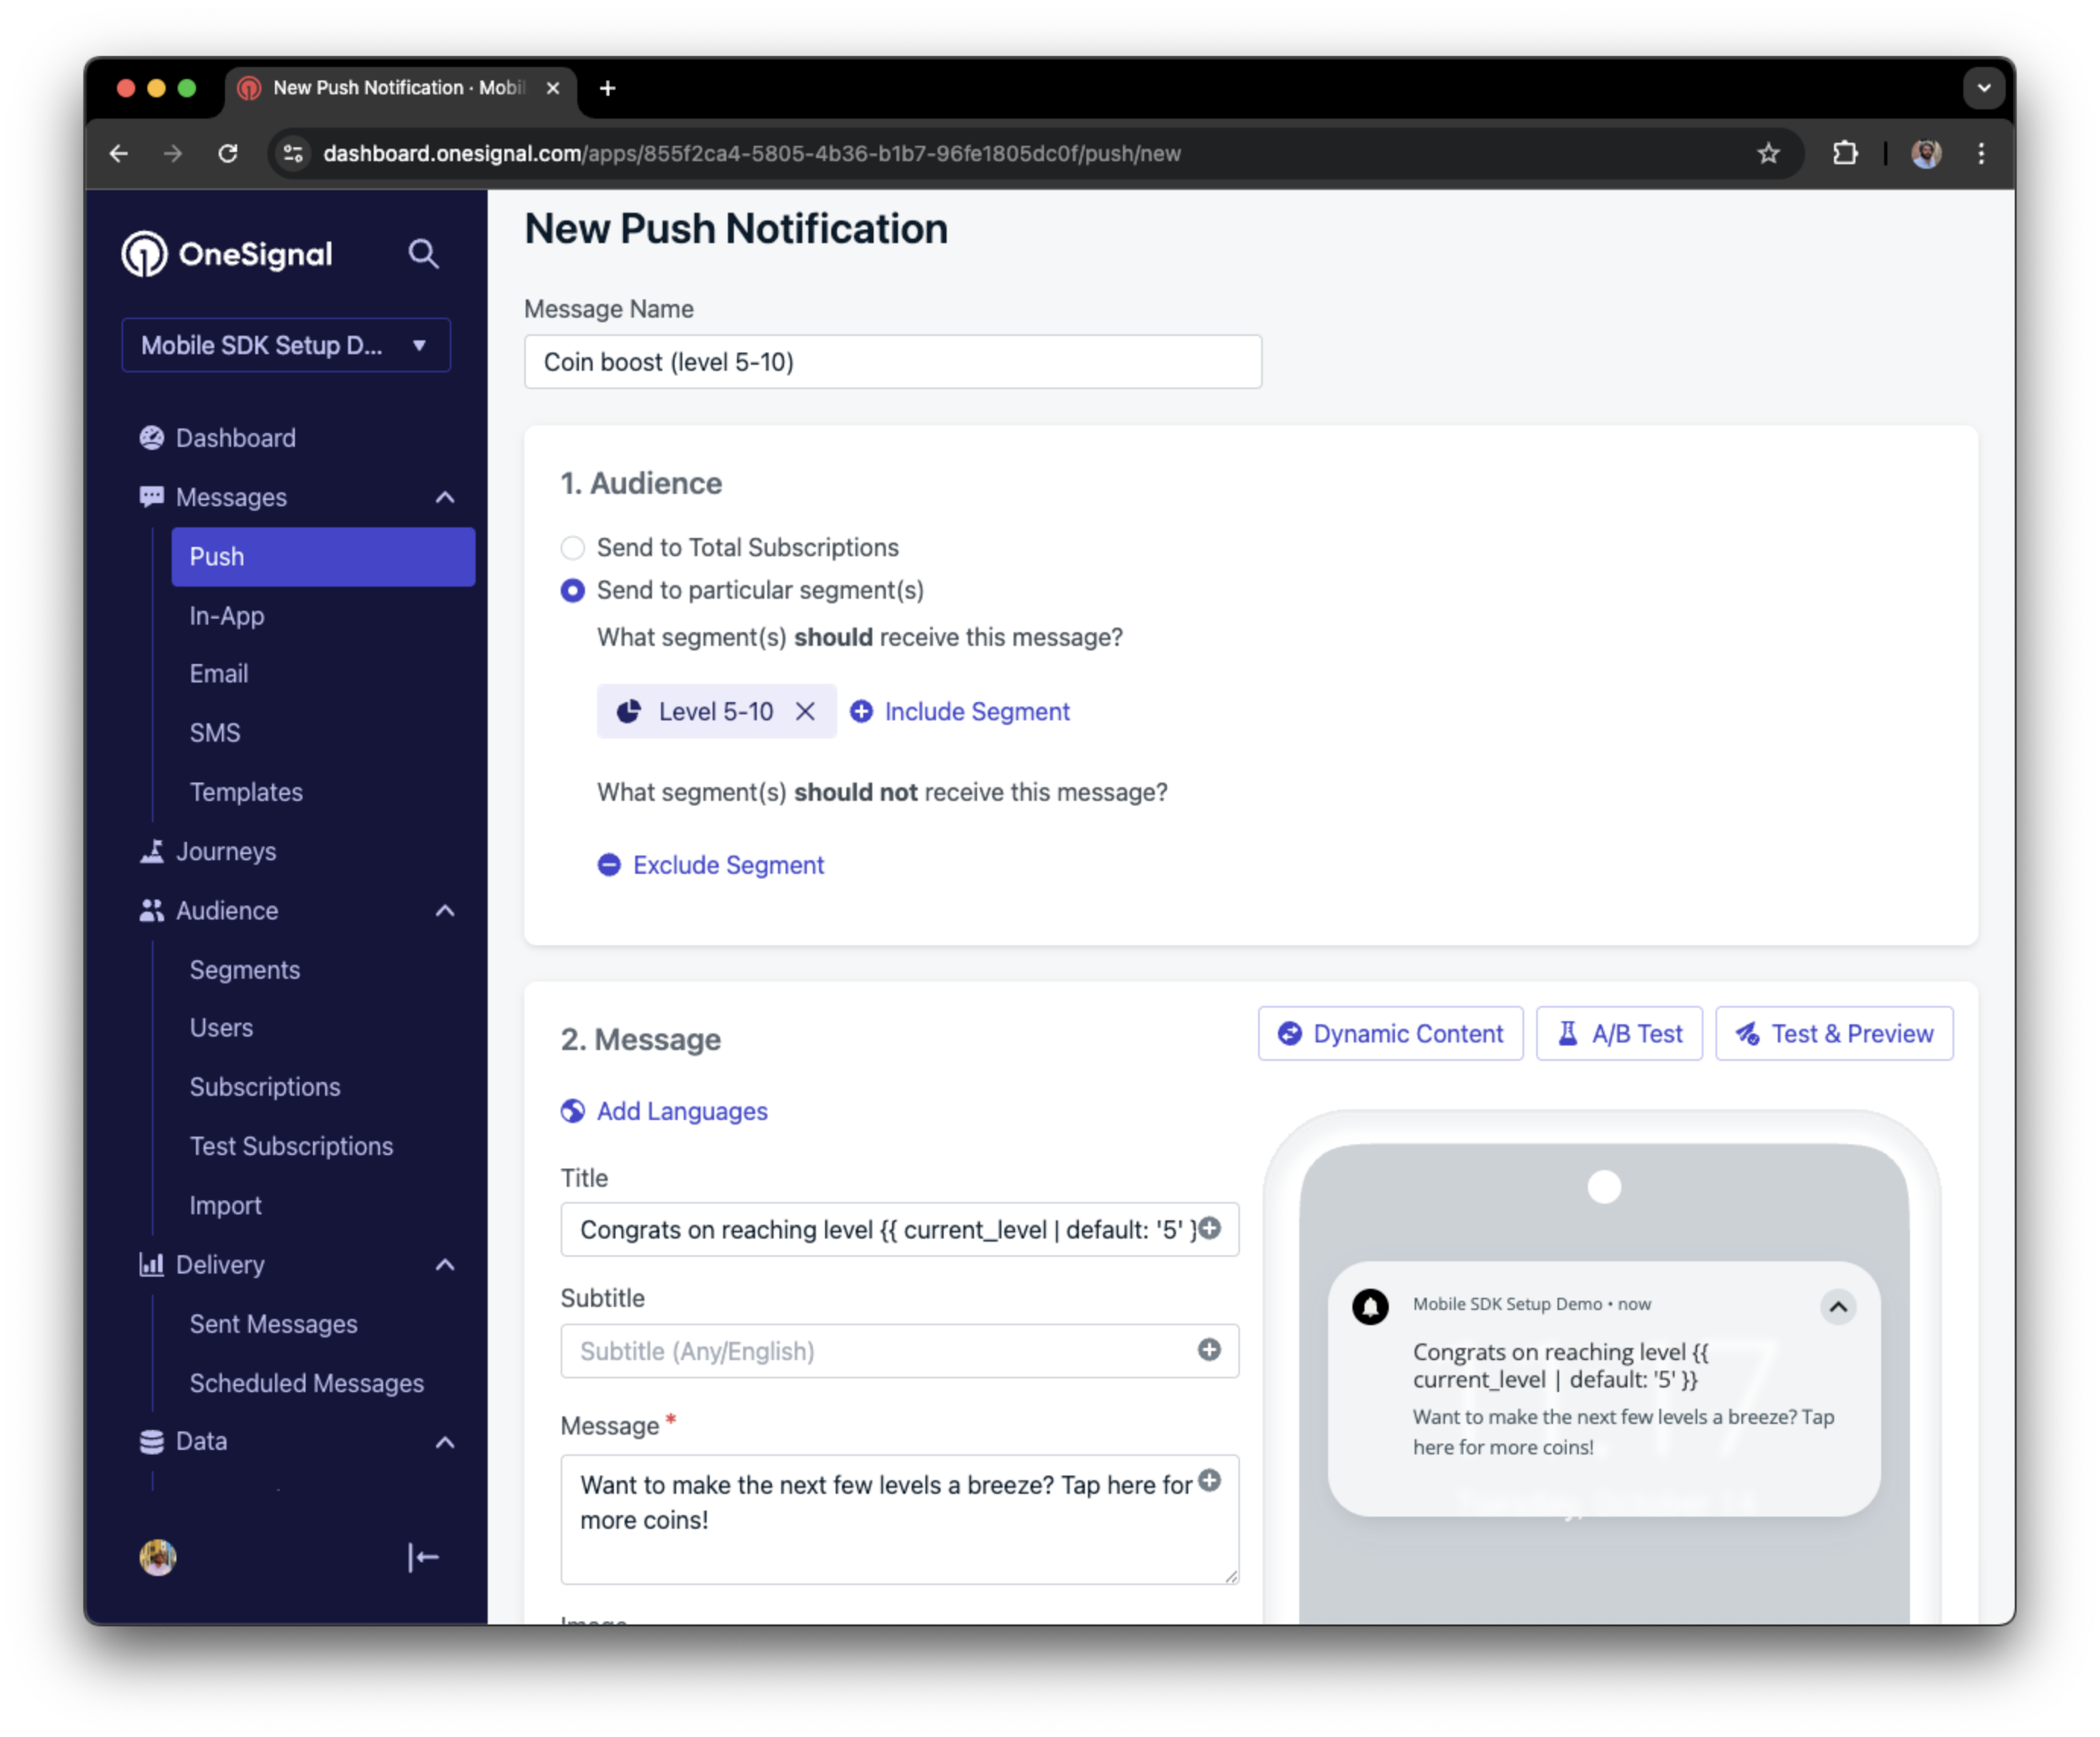
Push notification targeting the Level 5-10 segment with a personalized message
Add email and/or SMS subscriptions
The OneSignal SDK creates web push subscriptions automatically when users opt in. You can also reach users through email and SMS channels by creating the corresponding subscriptions.- Use the
addEmailmethod to create email subscriptions. - Use the
addSmsmethod to create SMS subscriptions.
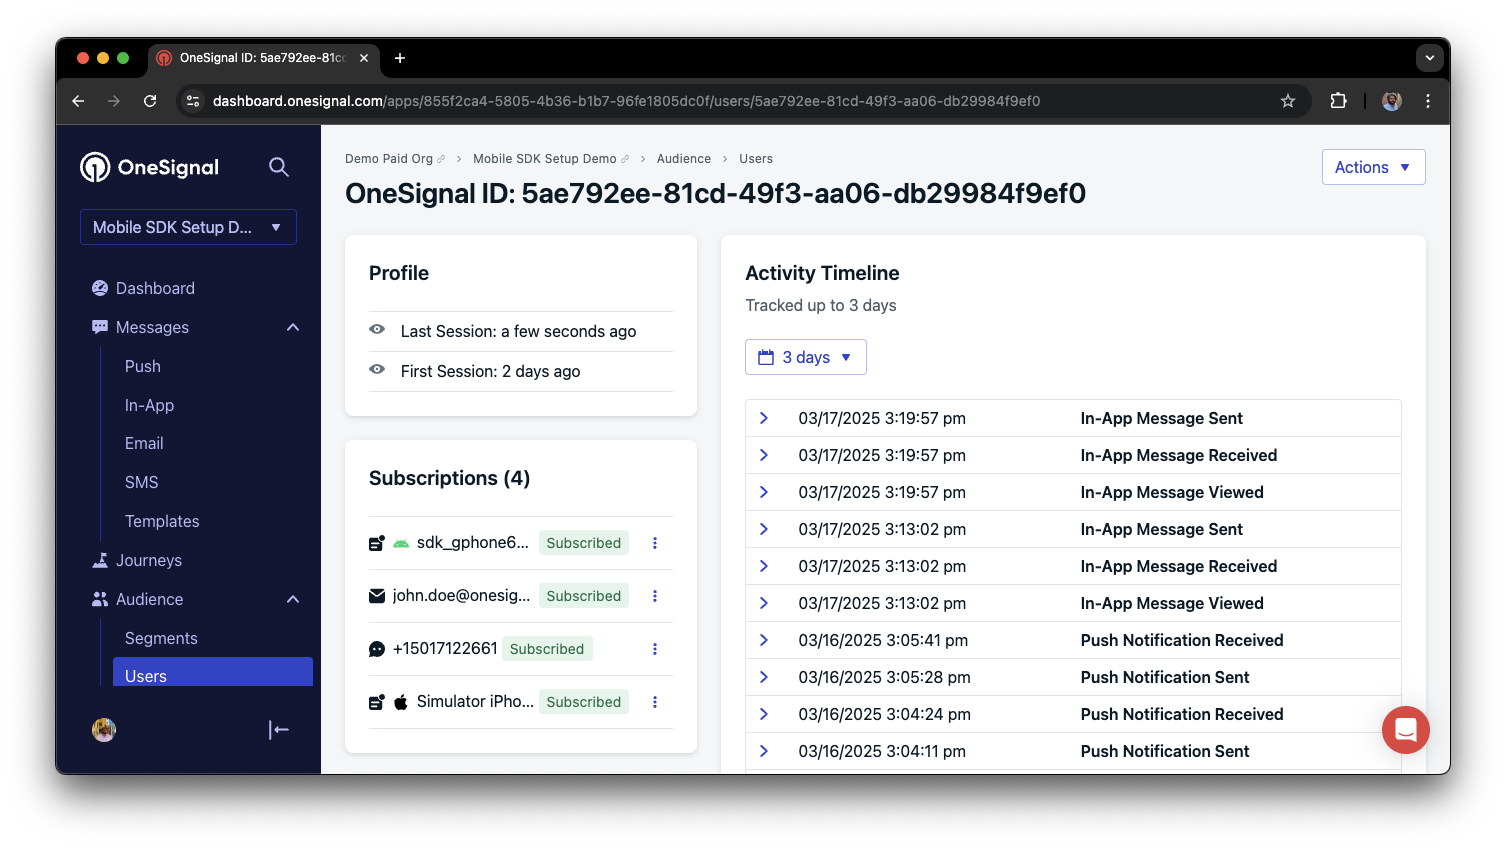
A user profile with push, email, and SMS subscriptions unified by External ID
- Obtain explicit consent before adding email or SMS subscriptions.
- Explain the benefits of each communication channel to users.
- Provide channel preferences so users can select which channels they prefer.
Privacy & user consent
To control when OneSignal collects user data, use the SDK’s consent gating methods:setConsentRequired(true): Prevents data collection until consent is given.setConsentGiven(true): Enables data collection once consent is granted.
Data collected by the SDK
Handling personal data
Listen to push, user, and in-app events
Use SDK listeners to react to user actions and state changes. The SDK provides several event listeners you can hook into. See the SDK reference guide for more details.Push notification events
- Click event listener: Detect when a notification is tapped.
- Foreground lifecycle listener: Control how notifications behave in foreground.
User state changes
- User state change event listener: Detect when the External ID is set.
- Permission observer: Track the user’s specific interaction with the native push permission prompt.
- Push subscription change observer: Track when the push subscription status changes.
Advanced setup & capabilities
Explore more capabilities to enhance your integration:Migrating to OneSignal
Integrations
Action buttons
Multi-language messaging
Identity Verification
Custom Outcomes
Web SDK setup & reference
Web push setup
Web SDK reference
Preguntas frecuentes
¿Funciona web push en sitios HTTP?
No. Web push requiere HTTPS. Los navegadores aplican esto como un requisito de seguridad. La única excepción eslocalhost y 127.0.0.1, que los navegadores tratan como orígenes seguros para fines de desarrollo.
¿Por qué necesito un archivo service worker?
El service worker se ejecuta en segundo plano y gestiona las notificaciones push entrantes incluso cuando el usuario no tiene tu sitio abierto. Sin él, el navegador no puede mostrar notificaciones. El archivoOneSignalSDKWorker.js debe ser públicamente accesible en tu origen.
¿Puedo usar web push en iOS (iPhone/iPad)?
Sí, a partir de iOS 16.4+. Sin embargo, Apple requiere un archivomanifest.json y el usuario debe agregar tu sitio a su pantalla de inicio primero. Consulta Configuración iOS web push para conocer todos los requisitos.
¿Por qué no se muestran mis notificaciones?
Las causas comunes incluyen un archivo service worker colocado incorrectamente, una URL del sitio que no coincide en el dashboard, o el usuario tiene las notificaciones bloqueadas en la configuración de su navegador. Consulta Notificaciones que se muestran correctamente pero no aparecen para obtener una lista completa de solución de problemas.support@onesignal.comPlease include:- Details of the issue you’re experiencing and steps to reproduce if available
- Your OneSignal App ID
- The External ID or Subscription ID if applicable
- The URL to the message you tested in the OneSignal Dashboard if applicable
- Any relevant logs or error messages