Wait
Delay the user’s Journey progression by a specific amount of time—minutes, hours, days, or weeks. Use it to:- Space out messages and steps
- Allow time for users to engage with a message before branching
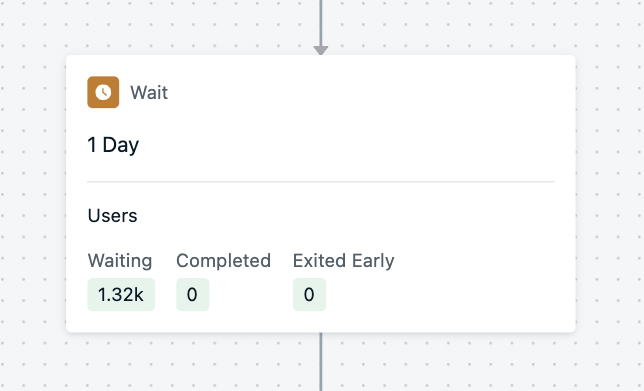
A wait node with users currently waiting to progress in the journey
Wait until
Hold a user at this step until they meet specific conditions:- Entering a segment
- Triggering a message event (e.g., specific message delivered, opened, or clicked)
- Only one message event per wait until step is supported at this time.
- Triggering a custom event (e.g., onboarding complete, purchase made) - BETA
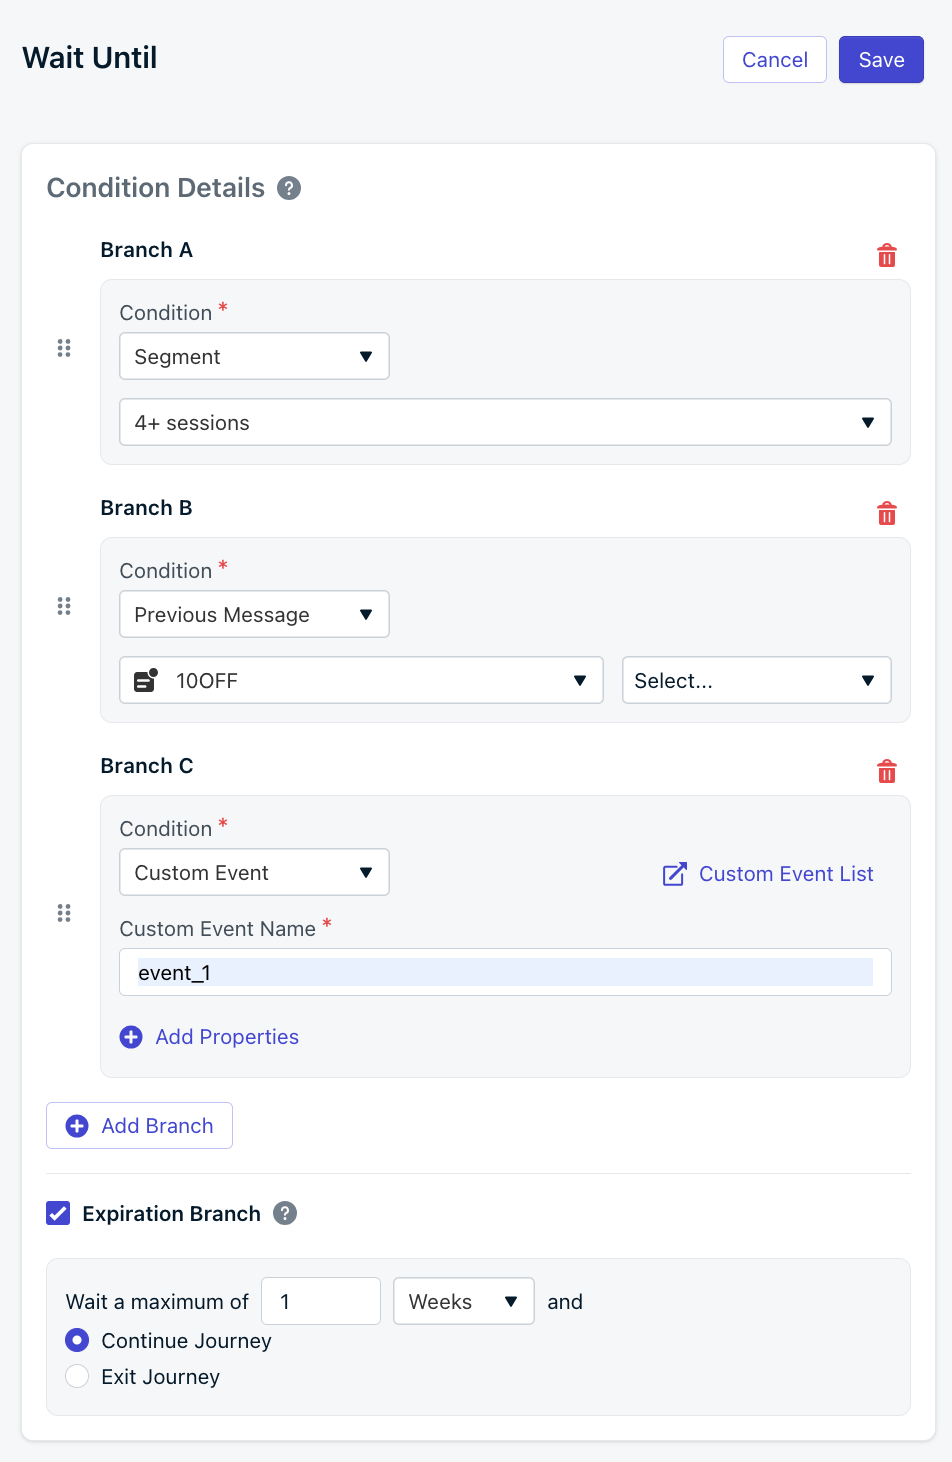
Wait Until user is in a segment or triggers a custom event
Event Matching
Wait Until Action with Custom Events is currently in beta.
To request access, contact
support@onesignal.com with:- Your company name
- Your OneSignal Organization ID
- The OneSignal App ID(s) where you’d like access
- Set the Journey Entry Rules to use a custom event.
- Include an event property when entering users into the Journey.
1
Set the Journey Entry Rules and custom event properties
Set the Journey Entry Rules to use a custom event. Example: 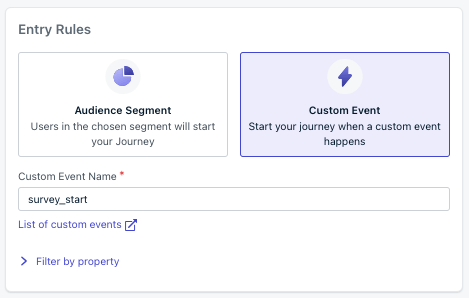
survey_startJourney Entry Rules using a custom event
name set to survey_start and a payload property survey_id with a value of the survey they are taking (e.g., survey_1).Entrance Trigger Event Example
2
Create a Wait Until step and custom event properties
Set the Wait Until condition to use a custom event. Example: When the value of Expiration branch:If the Wait Until event does not occur within the expiration time, the user will progress through the Journey. This example gives the user 1 week to complete the survey.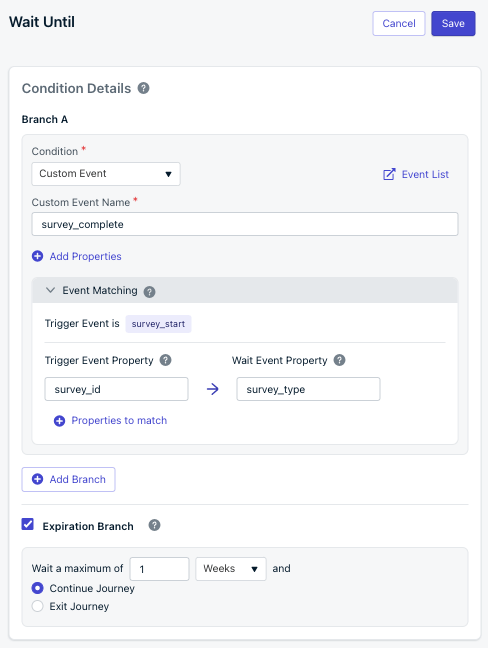
survey_completeSet the Event Matching option to specify which instance of the user to progress through the Wait Until step by matching the:- Trigger Event Property: set in the Journey entrance trigger event (e.g.,
survey_id) - Wait Event Property: set in the Wait Until event (e.g.,
survey_type)
Wait Until Event Example
survey_id matches the value of survey_type, that instance of the user will progress through the Journey.You can use the same properties (e.g.,
survey_id) in both the Trigger Event Property and the Wait Event Property. The example uses different properties (e.g., survey_id and survey_type) to demonstrate the concept.Properties are case-sensitive! survey_1 does not equal Survey_1.Wait Until step using a custom event
3
Add a message step
To complete the example, add a message step within the Expiration branch to send the reminder.
Message step within the Expiration branch
4
Test it out!
After following the steps above, you can test it:
- Replace the
external_idin the Custom Event API with your external ID - Trigger the
survey_startevent with asurvey_idofsurvey_1- You will see your user enter the Journey and flow into the Wait Until step
Events are not immediate but very quick! You may need to wait a few minutes before the event is processed.Check the Custom Events list to see if the event was processed.
- Trigger another
survey_startevent with asurvey_idofsurvey_2- You will see 2 users enter the Journey and Wait Until step
- Trigger the
survey_completeevent with asurvey_typeofsurvey_1- You will see your user progress through the Journey
- Trigger another
survey_completeevent with asurvey_typeofsurvey_2- You will see both instances of your user progress through the Journey and exit
You completed the Journey custom event example with Event Matching!
Time Window
Restrict when users can move to the next step in the Journey based on specific days and times. Example: Only allow users to receive a message on weekends in the evening.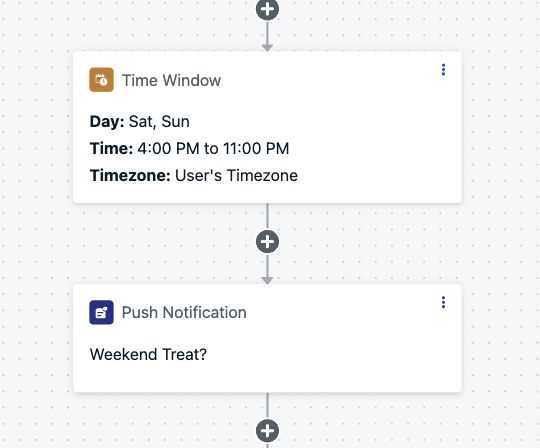
Screenshot showing an example of a time window node
How time window behavior works
If a user enters this node outside the allowed time:- OneSignal sets a timer to delay the user until the next available window
- The entry time into the window is randomized
Yes/No branch
Branch users based on segment membership or message behavior.Segment membership
Create branches based on what segment a user is in. Example: If users are tagged by plan type:- “Free” branch = promote upgrade
- “Paid” branch = highlight premium features
Message behavior
Branch based on interaction with previous messages in the Journey:- Push: Clicked, Delivered
- Email: Clicked, Opened, Delivered
Split Branch
Randomly distribute users across different paths to test messaging, channels, or Journey flows.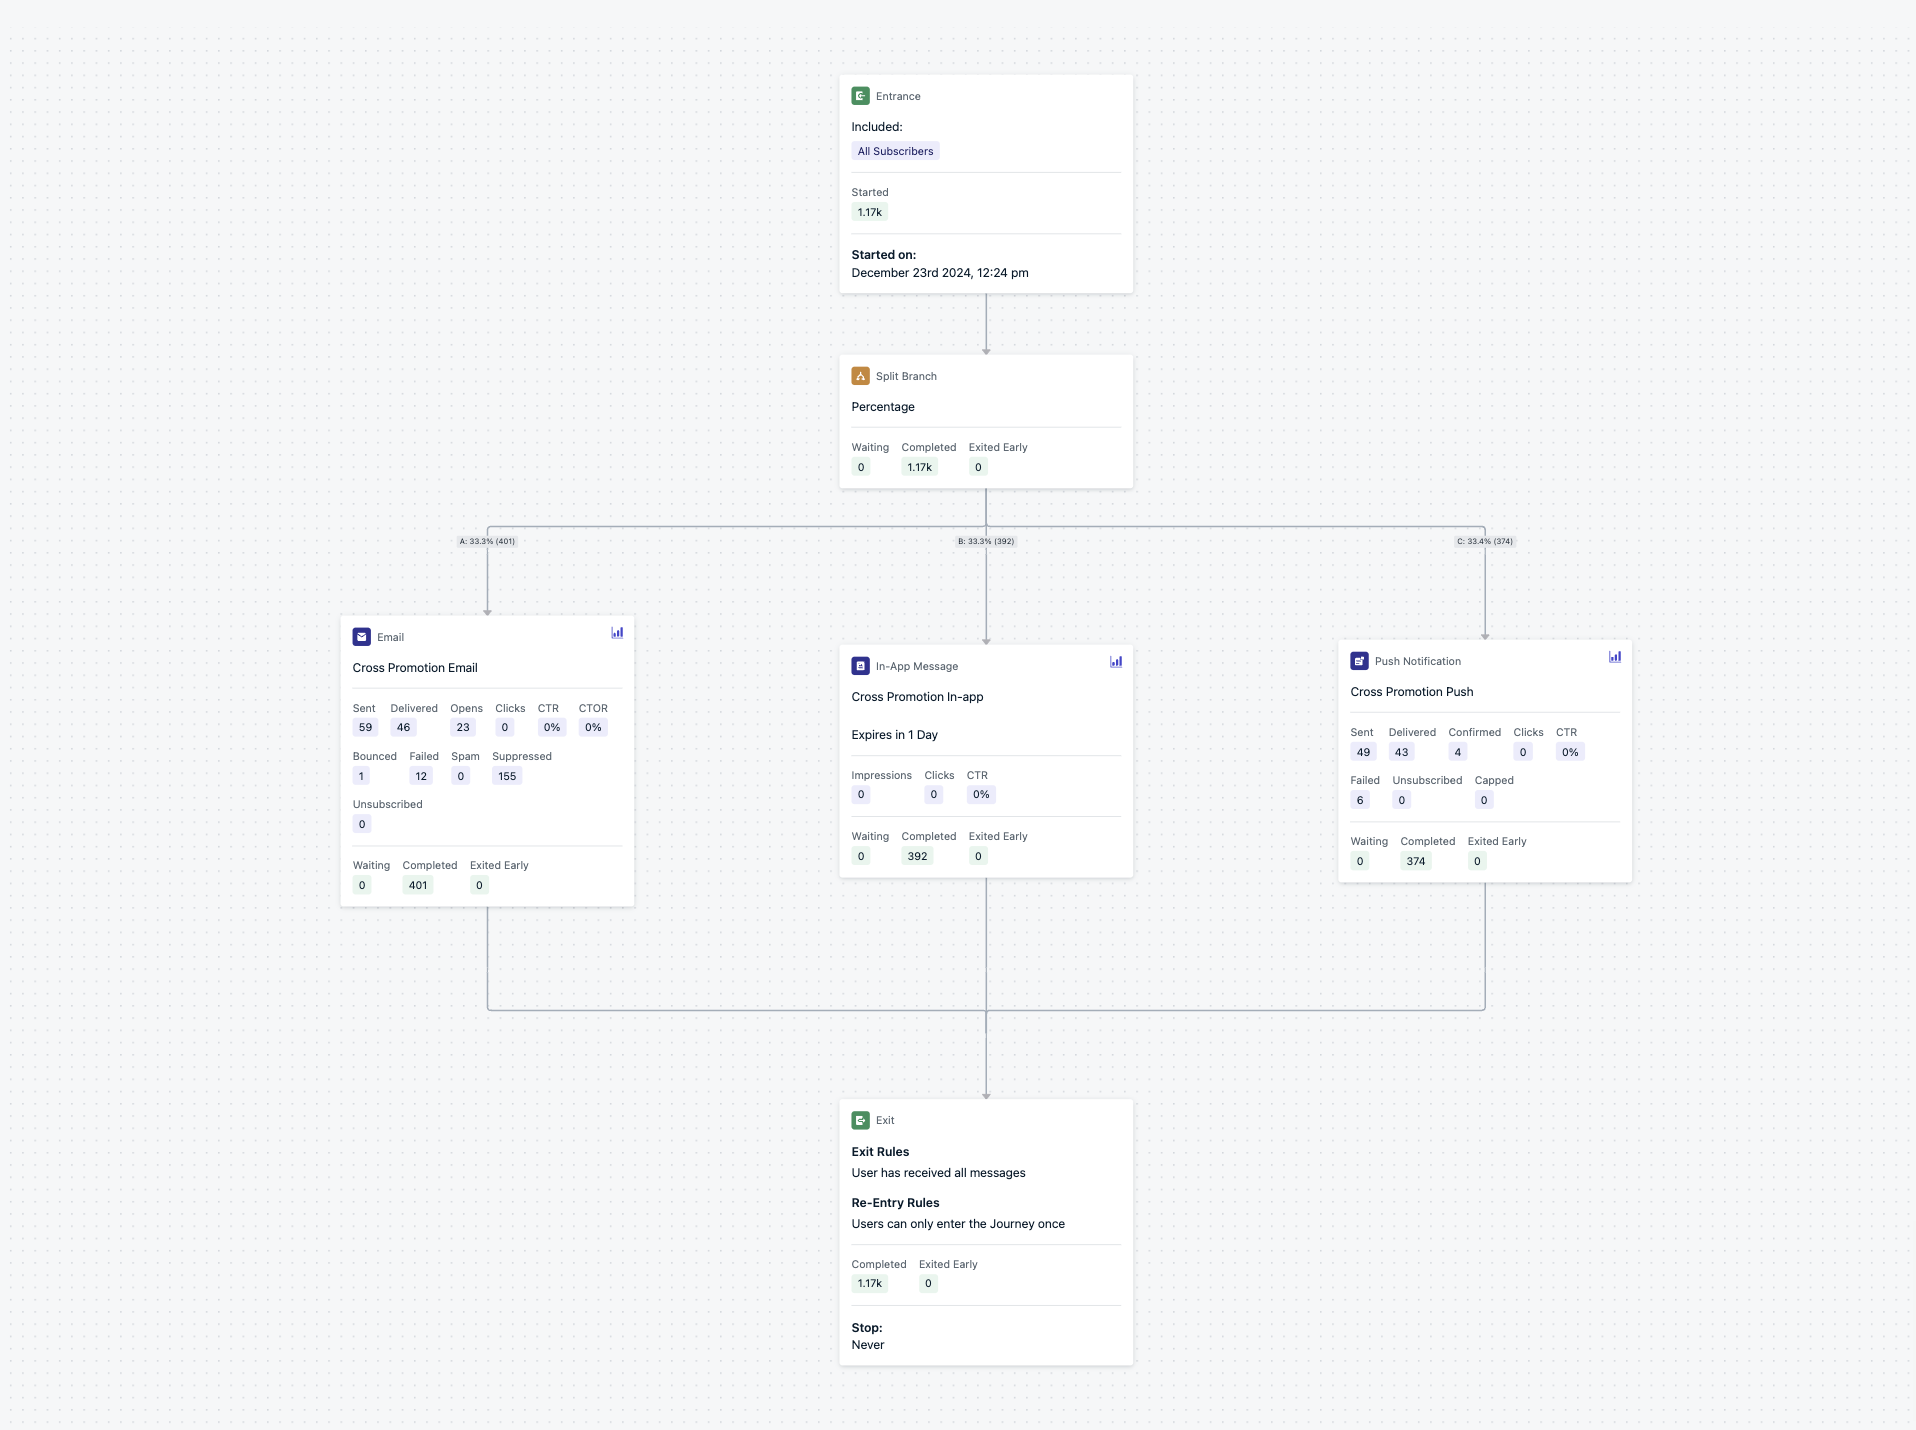
An example of a 3-way split branch
Once a Journey is live, you cannot edit a Split Branch. To change the number of branches, create a new Journey.
How it works
- Up to 20 branches
- Set equal or custom percentage splits
- Percentages round to whole numbers (e.g., 3-way split becomes 34/33/33)
- Distribution may vary slightly with small sample sizes
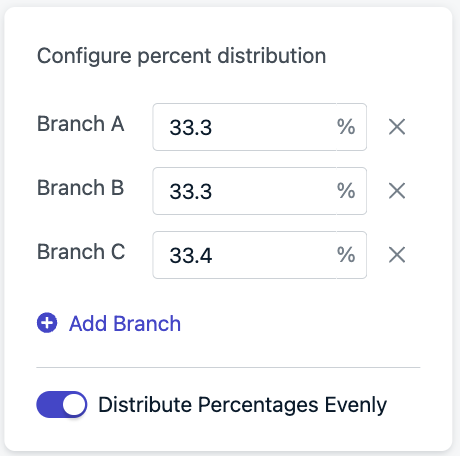
Split branch settings
ABN Tests (Multivariate Testing)
Nest Split Branches to simulate more complex testing structures. Example: To split users equally across 3 variants:- First branch: 33% vs 67%
- Under the 67% branch, add another 50/50 Split Branch
Control Groups
Test the impact of messaging by leaving one branch empty (no message nodes).Choosing a winner
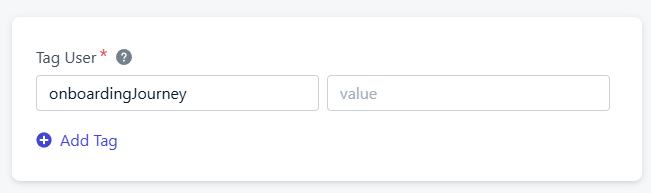
Once a winning variant is identified, update the branch to send 100% of traffic down that path.Tag User
Use this action to apply or remove tags during a Journey. Common use cases:- Track Journey progress (e.g.,
journeyStep: welcome) - Power in-app messages by tagging users at key moments
- Exclude users from other Journeys using active tags

A simple onboarding/welcome flow
Example: onboarding flow control
- First step: Add a tag (e.g.,
onboardingJourney: active) - Use this tag to create a segment for exclusion from other Journeys
- Last step: Remove the tag by setting the value to blank
A tag node settings to remove the tag from the user