Requirements
- Contact the OneSignal sales team for access.
- The URL or IP address must be valid and reachable over HTTP or HTTPS.
- Endpoints must be publicly routable — not behind a firewall or on localhost.
- Domains must have a valid top-level domain (
.com,.org,.net, etc.).
Setup
Once your Journey is created, follow these steps:- Navigate to Data > Webhooks in the OneSignal dashboard.
- Click to create a new webhook.
- Define the following:
- HTTP method (usually
POST) - Target URL
- Custom headers (for example, authentication tokens)
- Body content (plain text or JSON, optionally using Liquid)
- HTTP method (usually
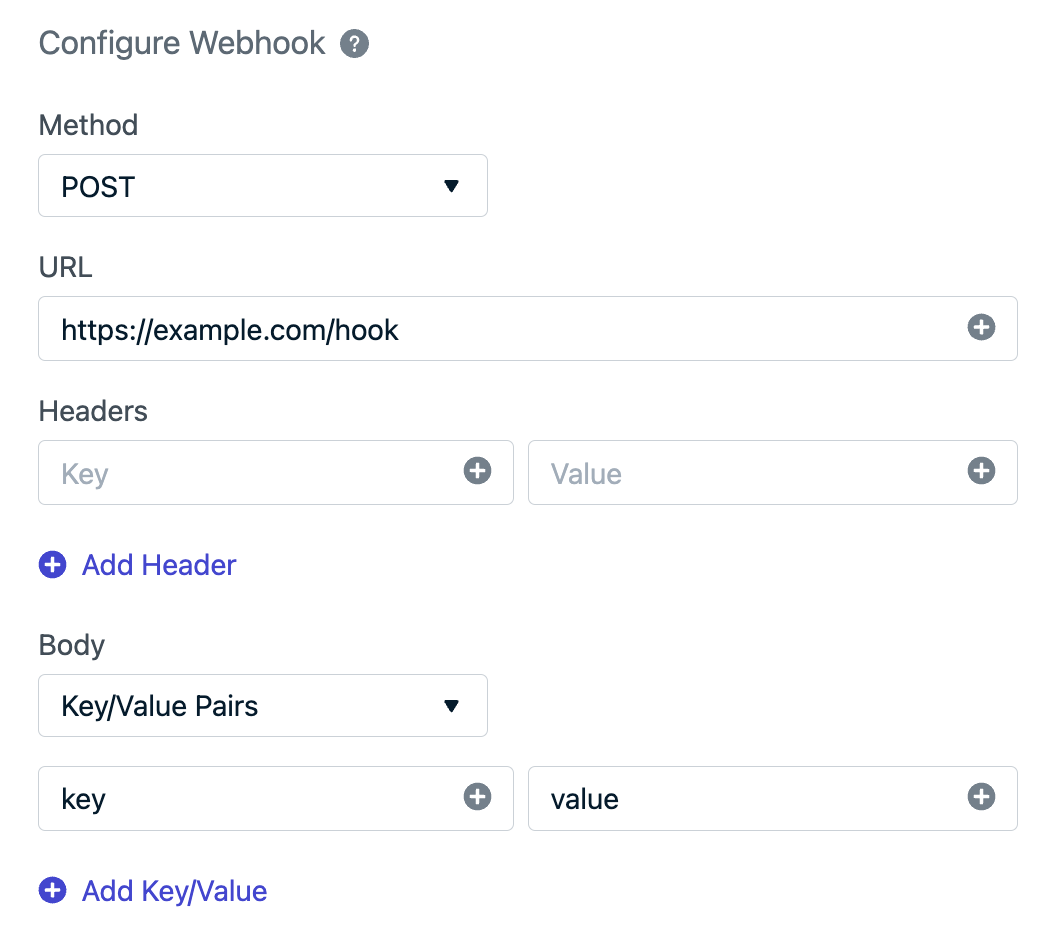
Webhook configuration screen
Disallowed headers
You cannot set the following headers:content-lengthreferermetadata-flavorx-google-metadata-requesthost- Any header starting with
x-onesignal
Testing webhooks
You can also test your endpoint manually using a tool like curl:Personalization
All webhook fields support Liquid syntax, allowing you to dynamically insert user and subscription data into the request. See Message personalization for the full list of available properties.User data reference
The following properties from theuser object are available in webhook fields via Liquid syntax:
Adding a webhook to a Journey
- After creating and testing your webhook, open your Journey.
- Add a Webhook step where needed.
- Select the webhook you configured earlier.
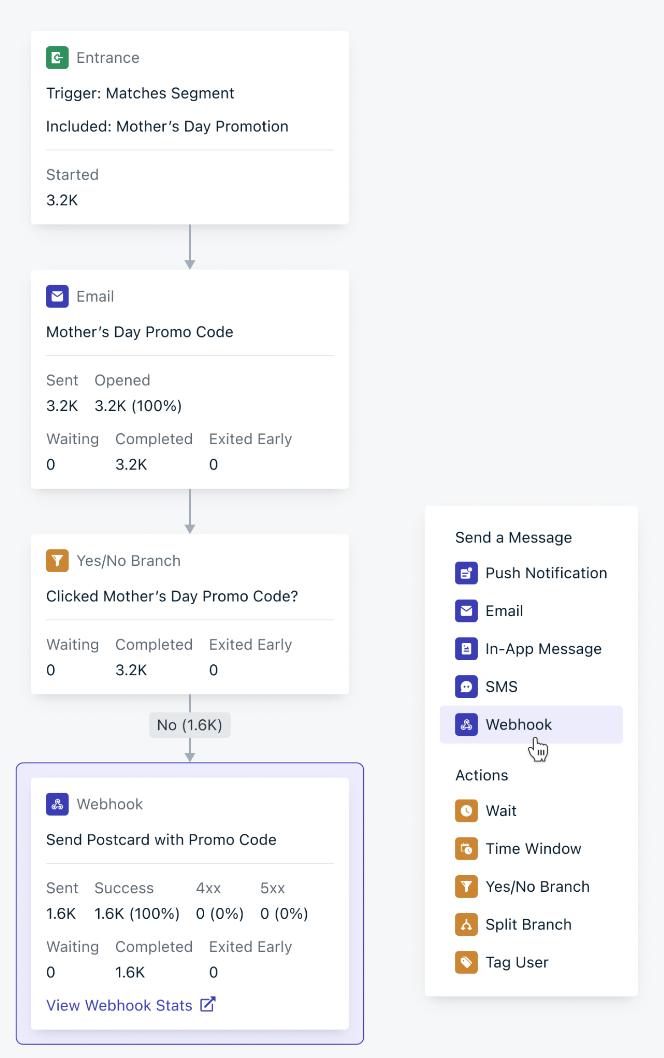
Webhook step within a Journey
Debugging and logs
Webhook stats
Go to the webhook’s Stats tab to view how your webhook is performing. This includes:- Total events sent
- Response time trends
- Status code distribution
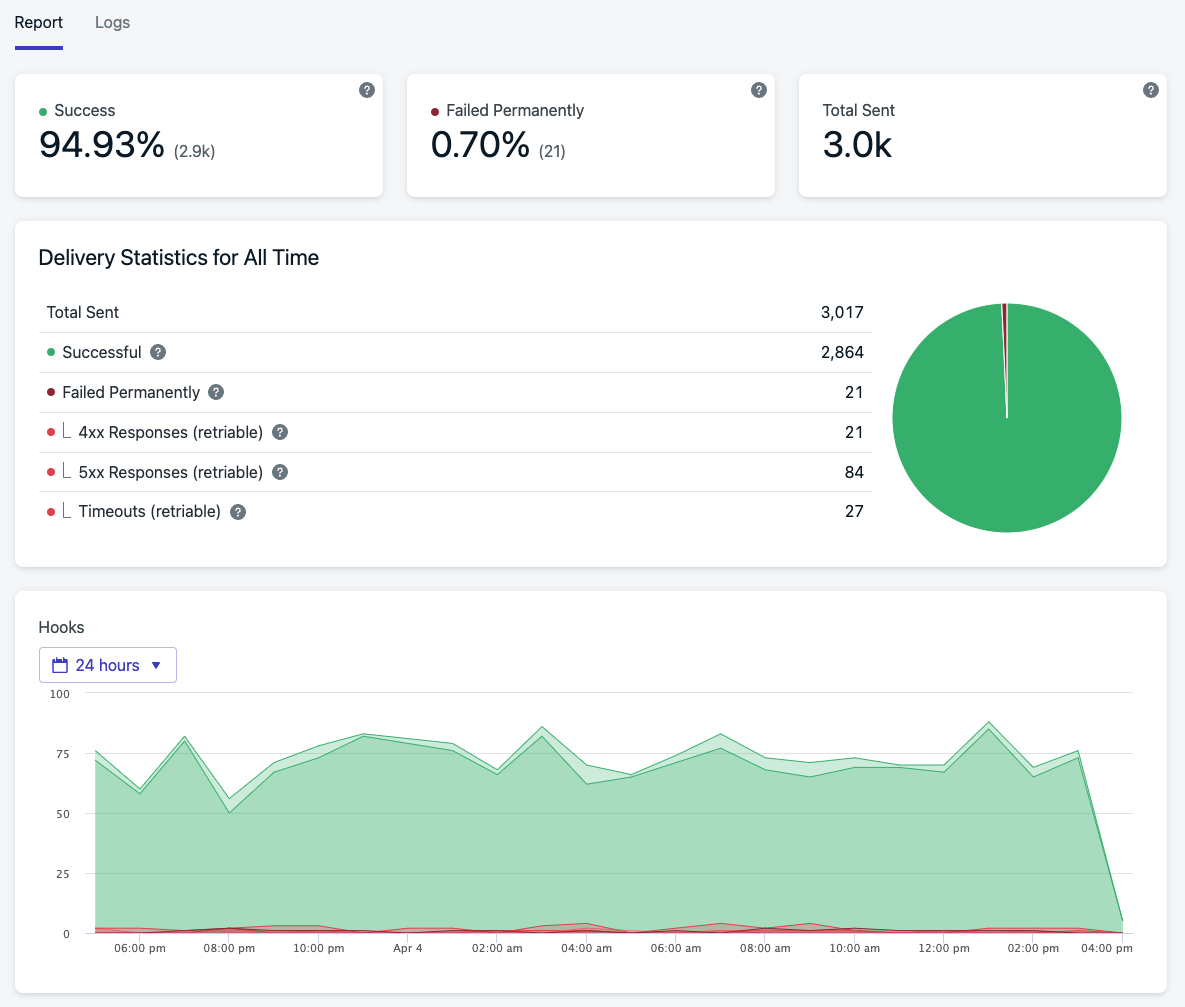
Webhook stats showing event count and response times
Logs tab
For more granular insights, the Logs tab displays:- Recent request/response data
- Status codes and error messages
- Headers and payloads (where applicable)
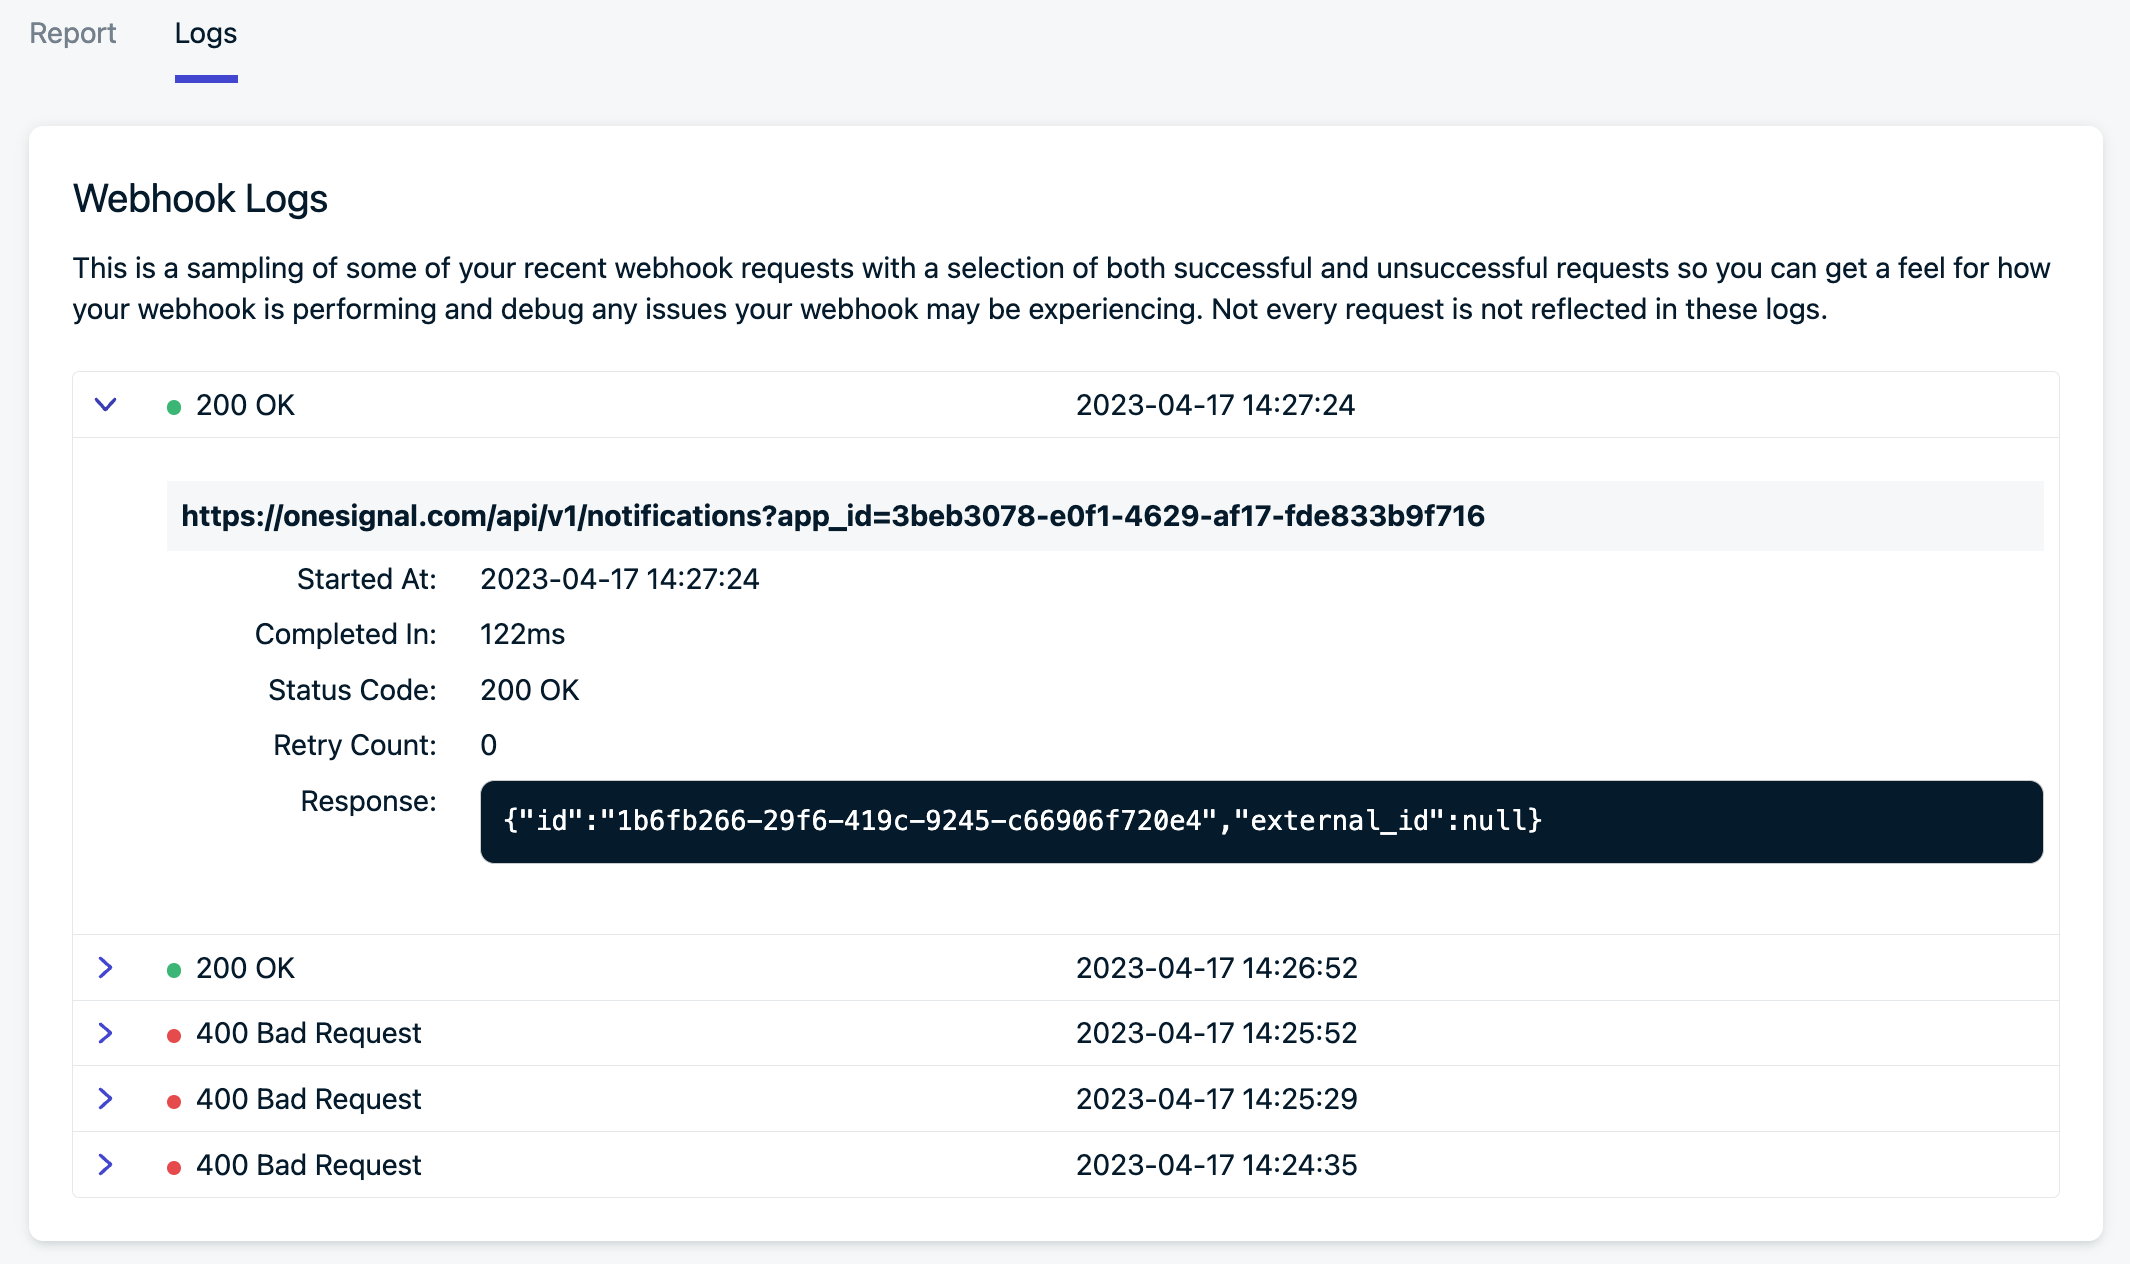
Webhook logs showing request and response details
Retry logic and disabling behavior
OneSignal retries failed webhook requests for recoverable errors (like429 Too Many Requests). Retries use increasing delays between attempts.
If retries repeatedly fail, the webhook is marked as permanently failed and no further attempts are made.
Automatic disabling
If a webhook consistently fails, OneSignal disables it to prevent further issues. Admins receive email alerts and a dashboard banner before and after disabling. Troubleshoot the root cause and test the webhook before re-enabling it. Your endpoint must handle the volume of events your Journey produces. Review your app’s message send volume to estimate the throughput your API needs.Performance guidance
- Slow or overloaded endpoints (especially those returning
429responses) can trigger automatic disabling. - Record events quickly and defer additional processing to avoid timeouts.
- Volume scales with user activity — ensure your endpoint can handle peak throughput.
- Use the
event.idvalue (available as a header or in the body) to deduplicate incoming events.
Reliability best practices
- Route through your own server first, not directly to third-party services. This gives you control over logging, authentication, throttling, and queuing. Third-party services may rate-limit or block requests during volume spikes, and OneSignal does not manage those limits.
- Plan for bursts. Webhook execution happens immediately when users reach the step. If many users hit a webhook step at once, OneSignal sends a burst of HTTP requests without rate limiting. Consider building a lightweight API layer or queuing proxy that can ingest webhooks reliably, apply rate limits or batching, and route requests to third-party services gracefully.
- Review third-party API limits. Popular tools like Slack, Twilio, and Segment offer public HTTP APIs but have their own rate limits, authentication requirements, and error handling. Check their documentation before connecting directly.
Securing your webhook
To verify that requests are coming from OneSignal, add a custom authorization header (for example,Authorization: Bearer YOUR_SECRET_TOKEN) and verify it server-side before accepting the request.
FAQ
Can I use webhooks to call OneSignal APIs?
No. Journey webhooks are designed for sending data to external systems only. They cannot call OneSignal APIs. To update OneSignal data based on Journey events, route the webhook through your own server and have your server call the OneSignal API.Why was my webhook automatically disabled?
OneSignal disables webhooks that consistently fail to prevent further issues. Check the Logs tab for error details (status codes, response bodies), fix the root cause, and test the webhook before re-enabling it. Common causes include endpoint downtime, authentication errors, and rate limiting.How do I deduplicate webhook events?
Use theevent.id value (available as a header or in the request body) to identify unique events. Store processed event IDs on your server and skip any duplicates. This is especially important if retries deliver the same event more than once.
Are webhook requests rate limited by OneSignal?
No. OneSignal sends webhook requests immediately as users reach the step, without rate limiting. If many users hit a webhook step at once, your endpoint receives a burst of requests. Build your endpoint to handle peak volume, or use a queuing proxy to buffer and batch requests.Can I test webhooks without launching a Journey?
Yes. Use the Test button in the webhook configuration to send a sample request. Note that tags are not available in test requests — use Test Users in a live Journey for full validation.What’s the difference between Journey webhooks, Event Streams, and Web push webhooks?
These are separate features that are all commonly called “webhooks”. Here’s how they compare:Related pages
Journeys overview
Introduction to Journeys and how multichannel workflows operate.
Journey actions
Add wait steps, branching logic, time windows, and split paths.
Liquid syntax
Full reference for Liquid templating in OneSignal messages and webhooks.
Message personalization
Overview of all personalization methods including tags, Liquid, and dynamic content.