Descripción general
Esta guía explica cómo integrar notificaciones push de OneSignal en una aplicación Huawei distribuida en Huawei AppGallery. Estas instrucciones son para aplicaciones nativas escritas en Java o Kotlin. Para otros SDKs compatibles, consulta:Ionic/Cordova/Capacitor
Flutter
React Native
Unity
Requisitos
- Android Studio
- Un dispositivo Huawei con “Huawei App Gallery” instalada
- Aplicación y Plataforma de OneSignal configuradas
Configure your OneSignal app and platform
Configure your OneSignal app with the platforms you support — Apple (APNs), Google (FCM), Huawei (HMS), and/or Amazon (ADM).Step-by-step setup instructions
Step-by-step setup instructions
Create or select your app
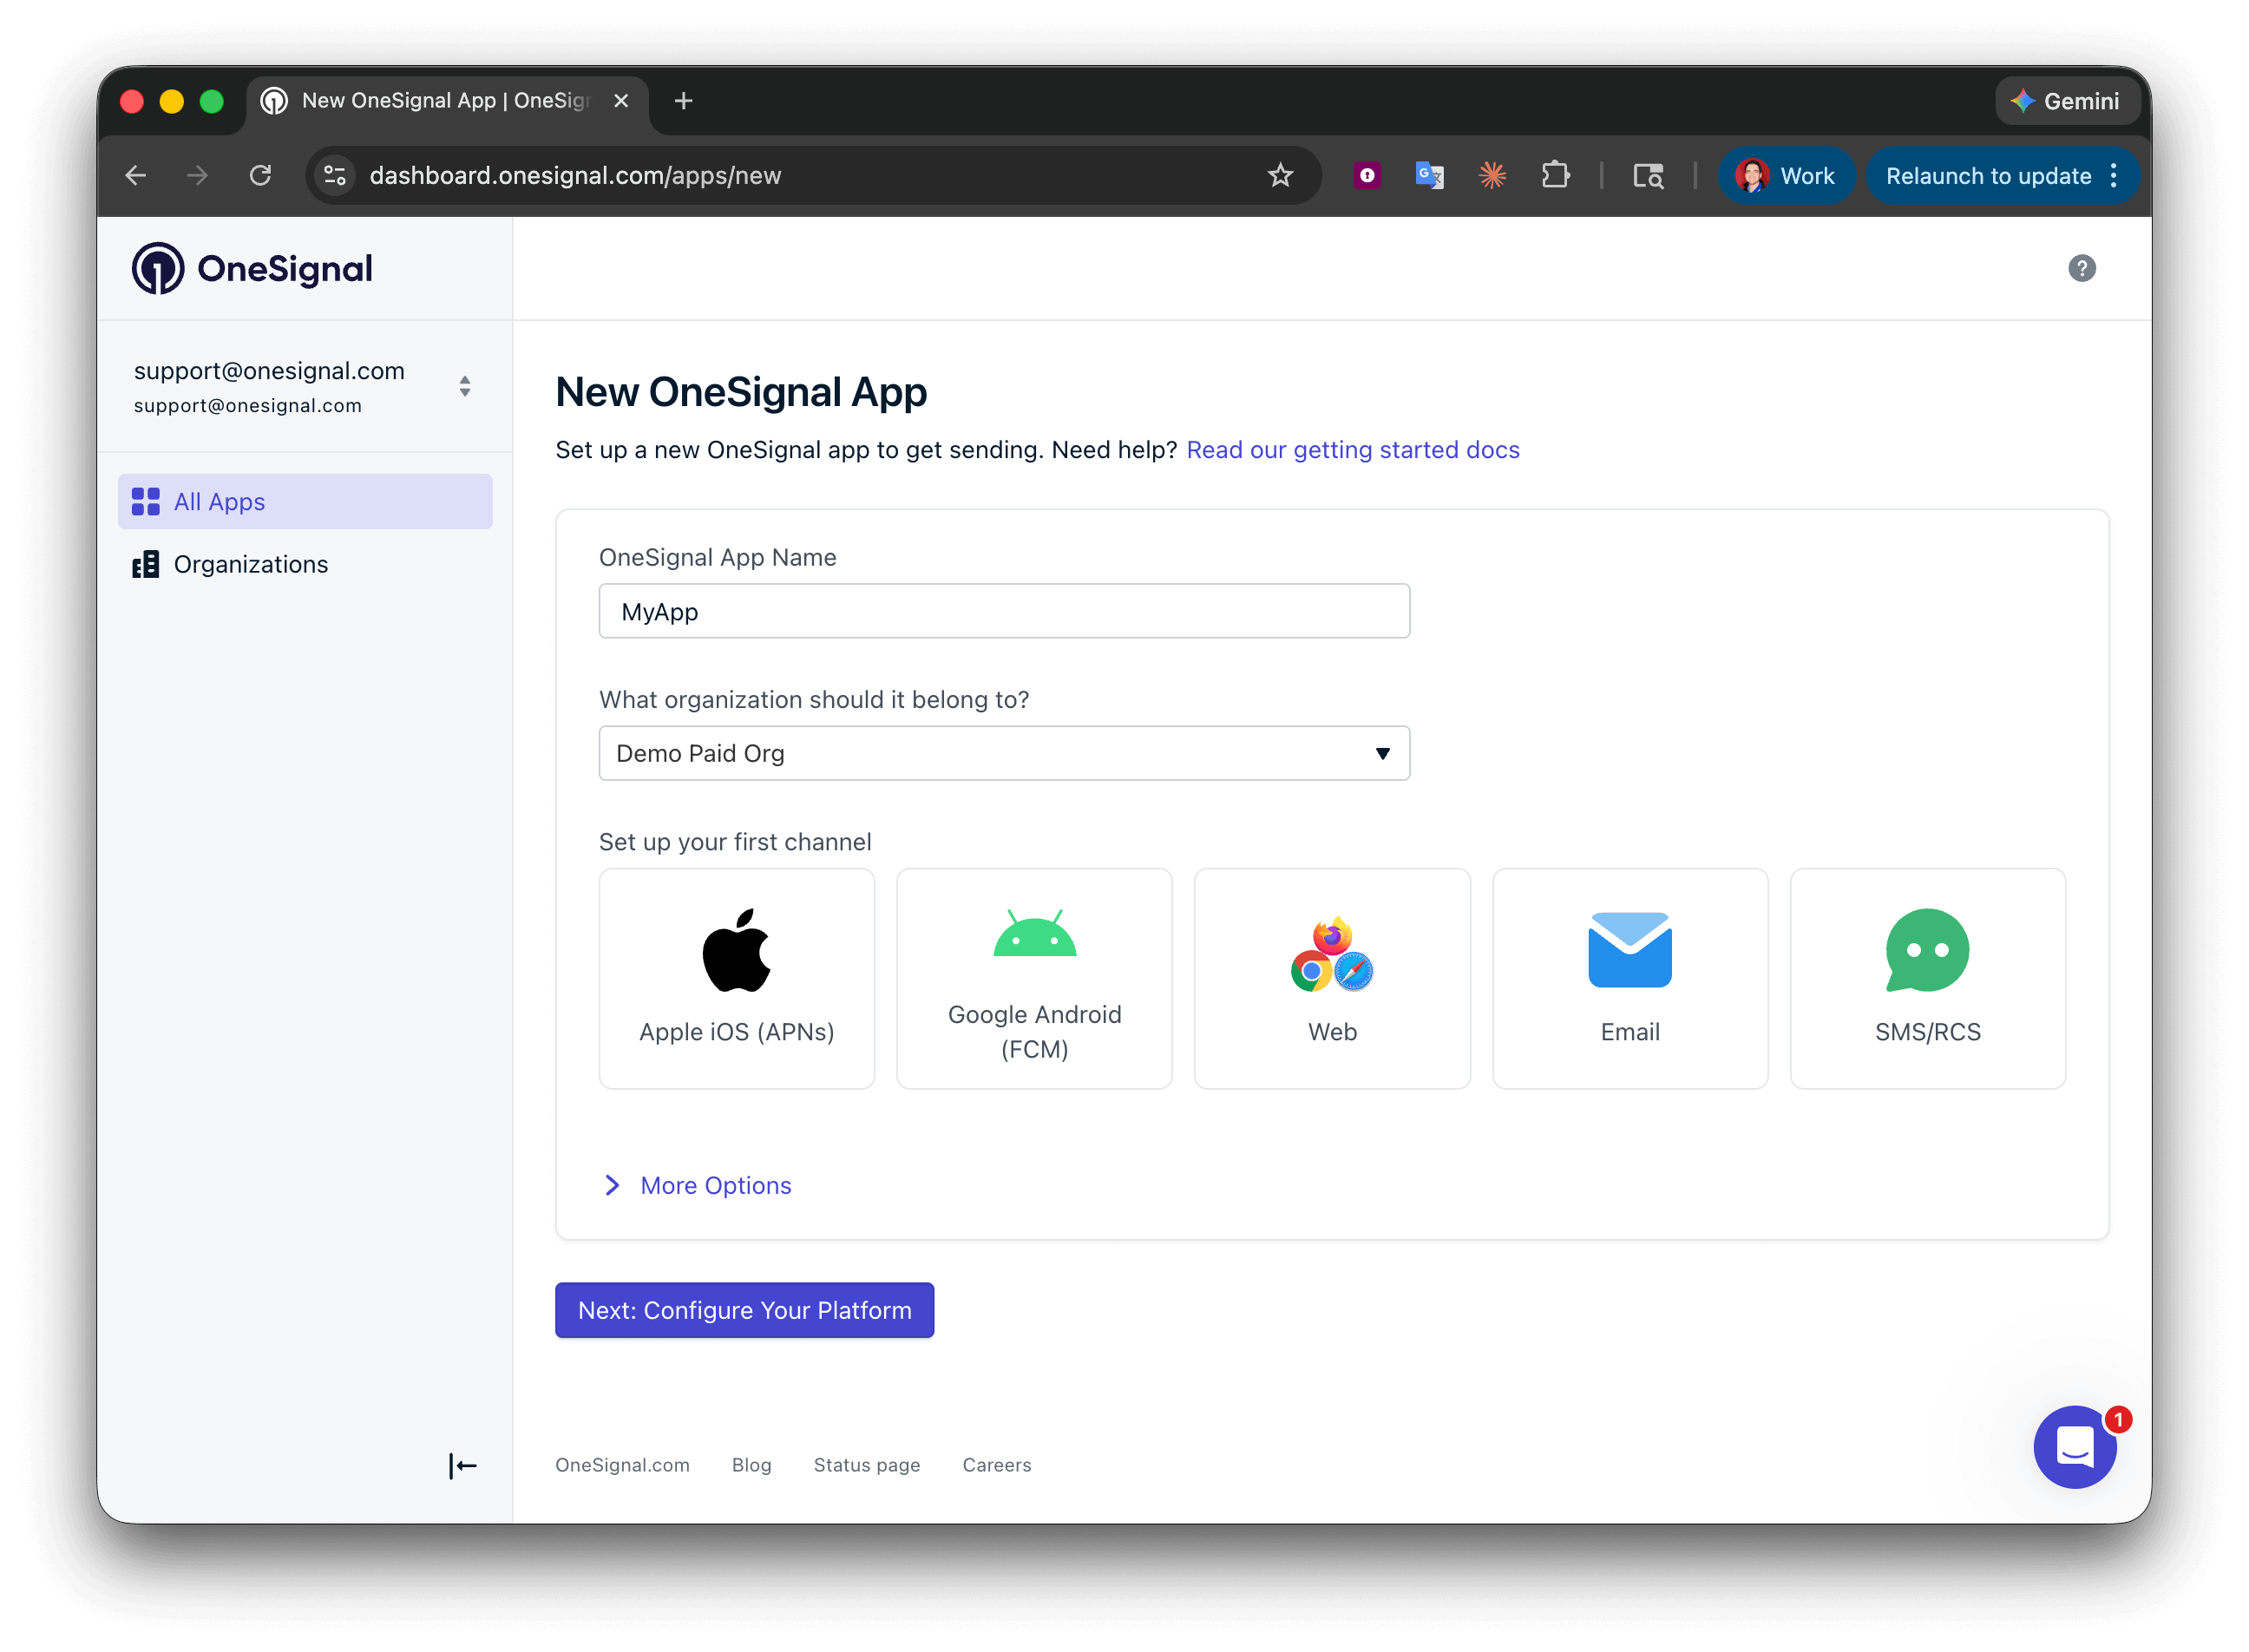
Setting up your first OneSignal app, Organization, and channel.
Configure platform credentials
- Android: Set up Firebase credentials
- iOS: p8 token (recommended) or p12 certificate
- Amazon: Generate API key
- Huawei: Authorize OneSignal
Save your App ID and install the SDK
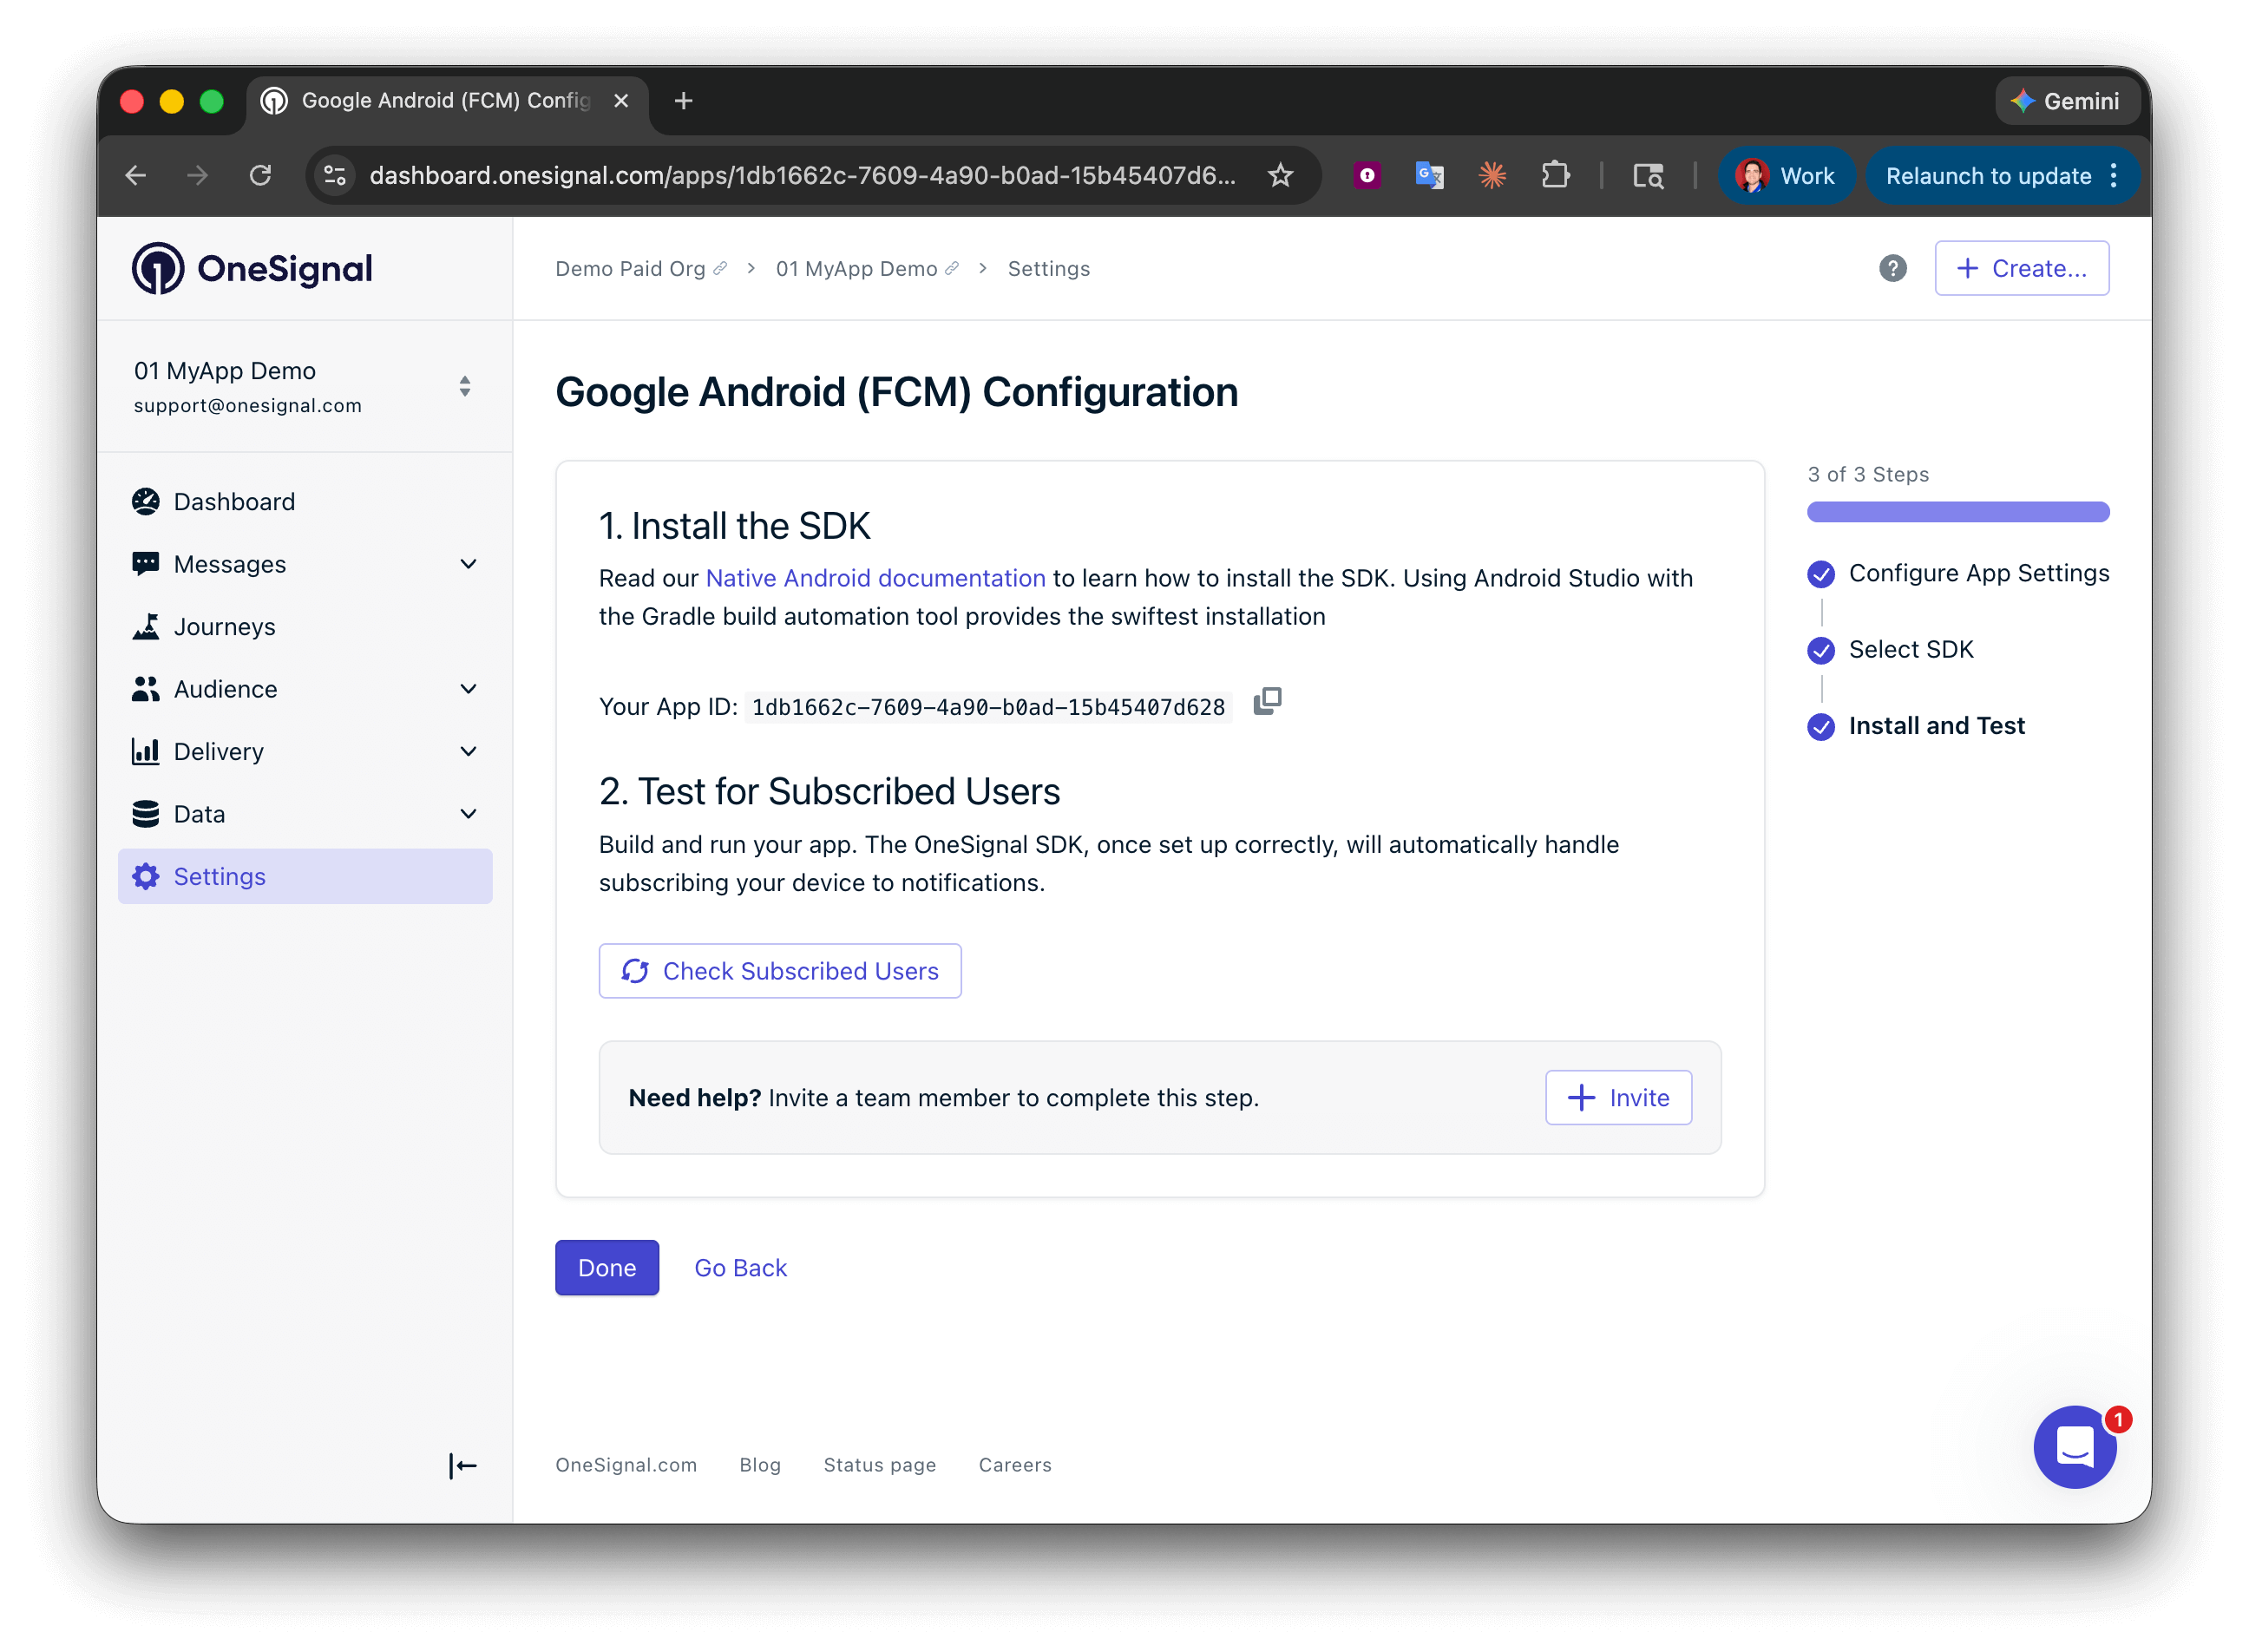
Save your App ID and invite additional team members.
Configuración
1. Configurar el SDK de OneSignal
Configuración del SDK de OneSignal Android
2. Configuración de Huawei (agconnect-services.json)
agconnect-services.json de Huawei en tu Proyecto de Android Studio de configurar un servicio diferente de Huawei.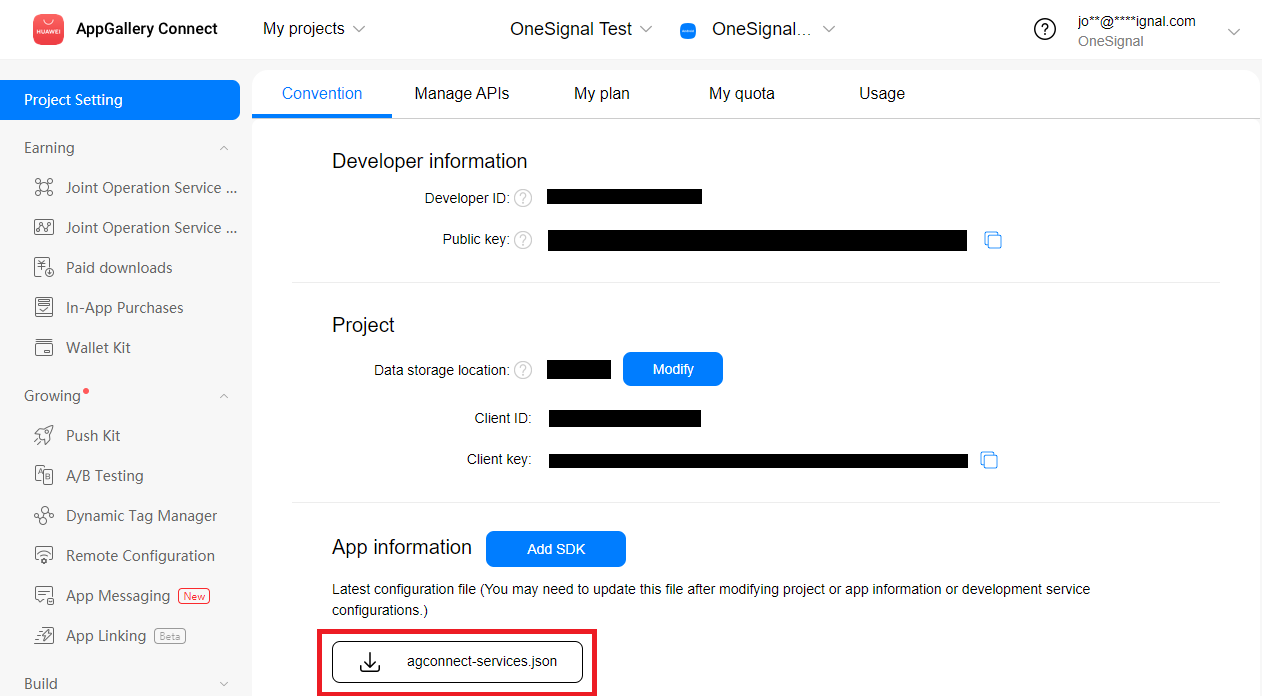

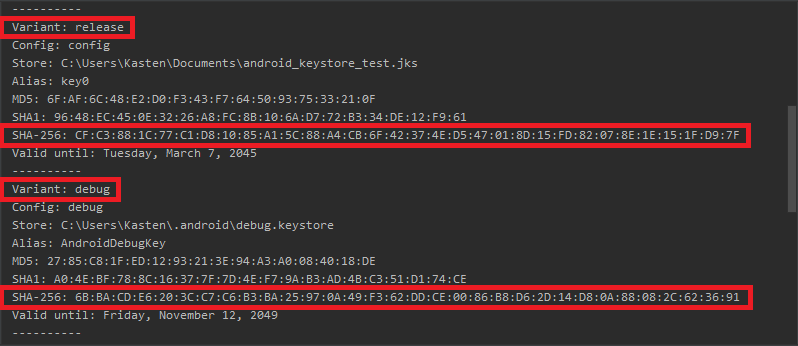
3. Generar una huella digital de certificado de firma
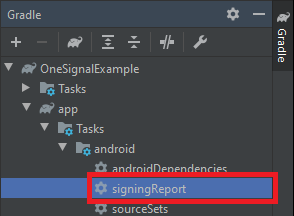
SHA-256 para tu variante release.
- Opcional pero recomendado para pruebas más rápidas es el
SHA-256para tu variantedebugtambién. - Puedes tener otras variantes personalizadas en tu proyecto, si necesitas soporte push para ellas, cópialas también.

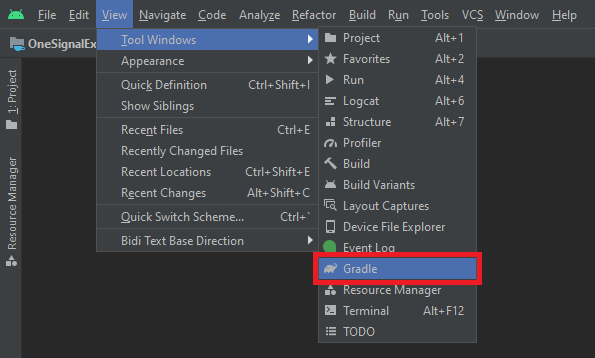
4. Agregar plugin gradle de Huawei y dependencias
- Groovy + AGP 7.x
- Kotlin + AGP 8.x
build.gradle raíz (Project: ) en Android Studio y agrega maven {url 'https://developer.huawei.com/repo/'} bajo buildscript { repositories } y allprojects { repositories }buildscript { dependencies } agrega classpath 'com.huawei.agconnect:agcp:1.9.1.301'
Debes tener en total 3 nuevas líneas en tu build.gradle raíz, resaltadas a continuación.

app/build.gradle y agrega implementation 'com.huawei.hms:push:6.3.0.304' bajo la sección dependencies.
También en el archivo app/build.gradle agrega apply plugin: 'com.huawei.agconnect' al final del archivo.
Debes tener en total 2 nuevas líneas en tu app/build.gradle, resaltadas a continuación.

Pasos de configuración adicionales
Compatibilidad con otras bibliotecas push de HMS o tu propia clase HmsMessageService
Requerido si:
- Tienes otro SDK/Biblioteca push de HMS en tu aplicación además de OneSignal
- Tienes tu propia clase
HmsMessageService
Más detalles...
Más detalles...
HmsMessageService, si aún no tienes una y agrega los siguientes métodos.onNewToken y onMessageReceived a OneSignal vía el OneSignalHmsEventBridge.Si no tenías una clase que extendiera HmsMessageService antes, asegúrate de agregarla a tu AndroidManifest.xml bajo la etiqueta <application>.Omitir bibliotecas de Google para compilaciones de Huawei AppGallery (opcional)
Más detalles...
Más detalles...
- Opción 1
- Opción 2
exclude con implementation en tu app/build.gradle.Preferir HMS sobre FCM (opcional)
Más detalles...
Más detalles...
AndroidManifest.xml:Solución de problemas de Huawei
Durante las pruebas, asegúrate de mantener el método setLogLevel de OneSignal establecido en VERBOSE. Revisa los logs para ver cualquier error que se genere y los Códigos de Error Comunes de Huawei.Error 6003
Error 6003
debug o release) para evitar un error 6003 al registrarse para el pushToken de Huawei con el SDK de OneSignal. Ve la sección “Configure a Signature”notification_types: -25
notification_types: -25
"notification_types":-25 significa que OneSignal agotó el tiempo de espera por una respuesta de HMS de Huawei para obtener un token push. Esto probablemente se debe a que otro SDK push de HMS de terceros o tu propio HmsMessageService está recibiendo este evento en lugar de OneSignal.Revisa el paso sobre cómo verificar esto y reenviar el evento si este es el caso.notification_types: -28
notification_types: -28
com.huawei.hms:push en el build.gradle hará que este error específico ya no ocurra. Sin embargo, si tienes configuraciones agresivas de Proguard o R8, esto podría causar problemas. Recomendamos desactivar minifyEnabled temporalmente si lo tienes para ver si esa es la raíz del problema.Además, no debes mezclar versiones principales de otras bibliotecas HMS. Comienza con 4 o 5. Asegúrate de no tener una mezcla de 3 a 5 que creará otros erroresError obteniendo token push de Huawei
Error obteniendo token push de Huawei
Testing the OneSignal SDK integration
This guide helps you verify that your OneSignal SDK integration is working correctly by testing push notifications, subscription registration, and in-app messaging.Check mobile subscriptions
Launch your app on a test device.
requestPermission method during initialization.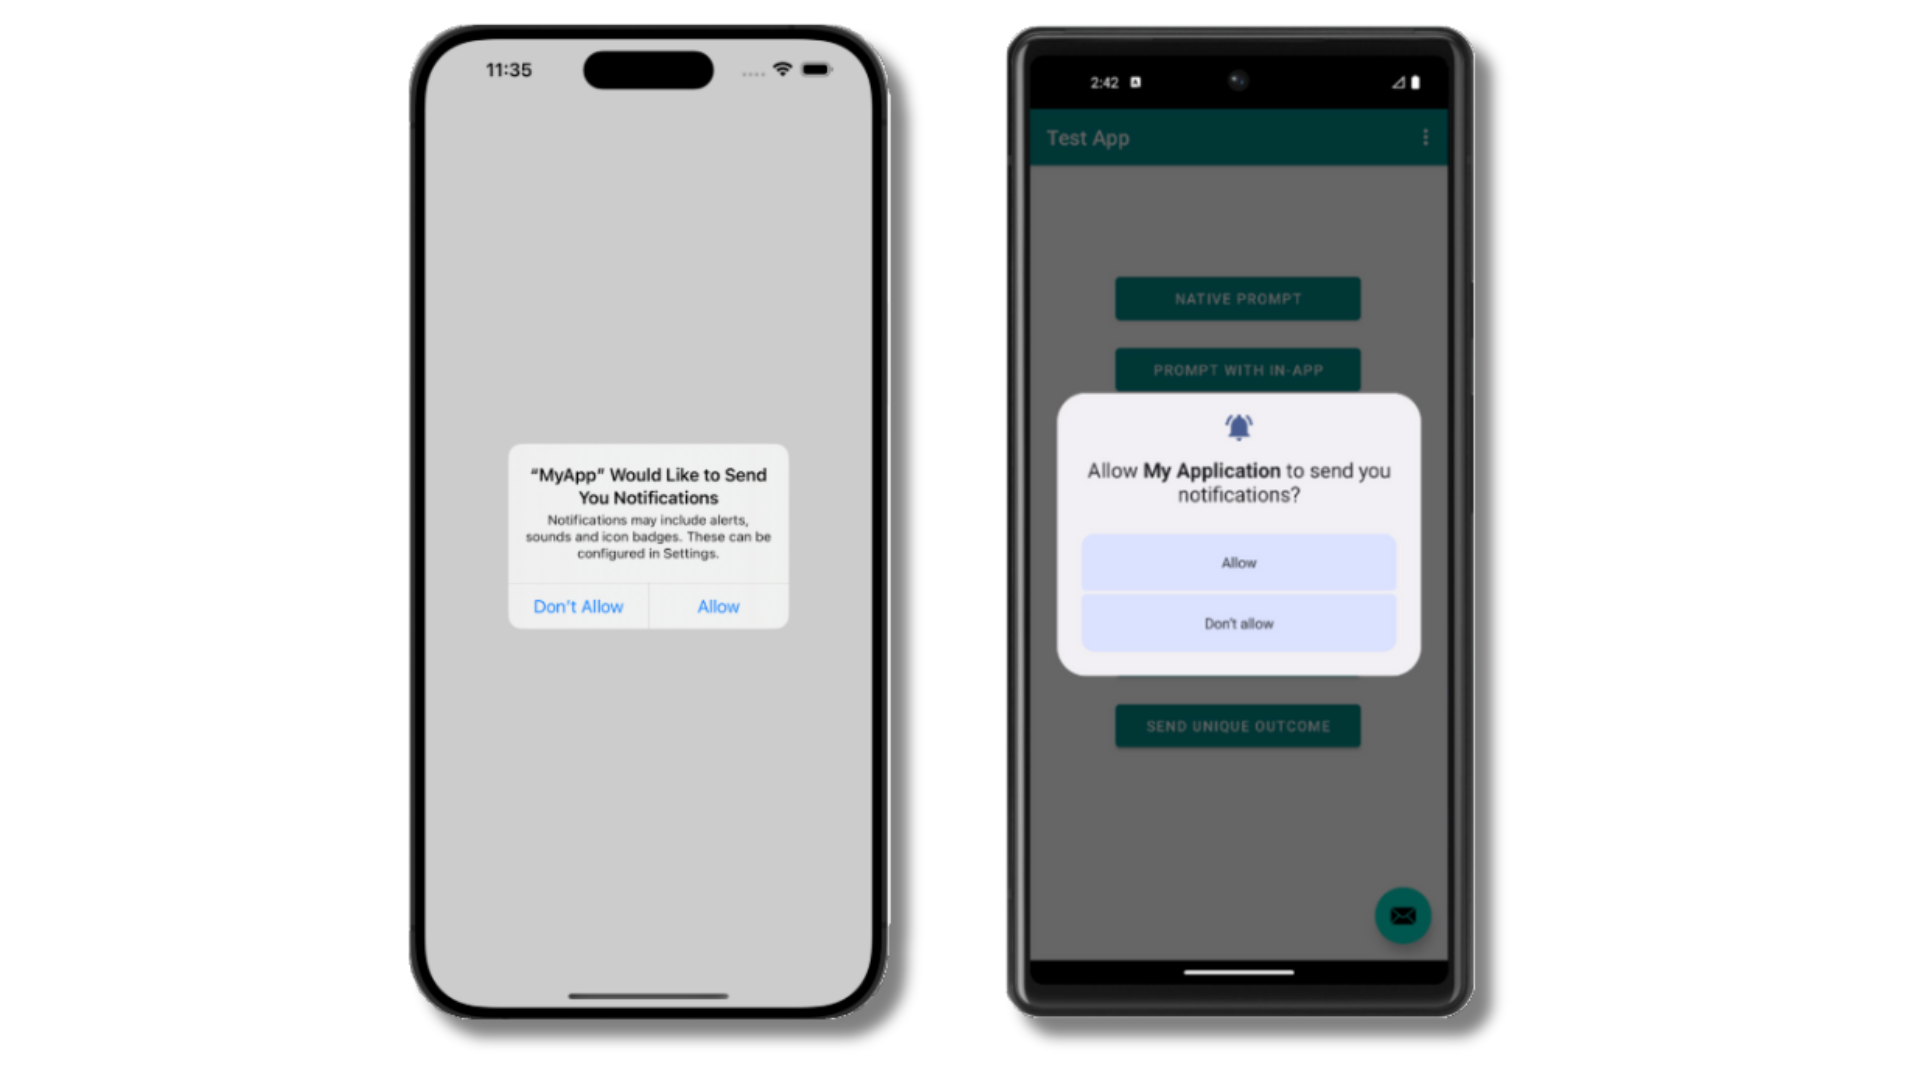
iOS and Android push permission prompts
Check your OneSignal dashboard
- Go to Audience > Subscriptions.
- You should see a new entry with the status “Never Subscribed”.
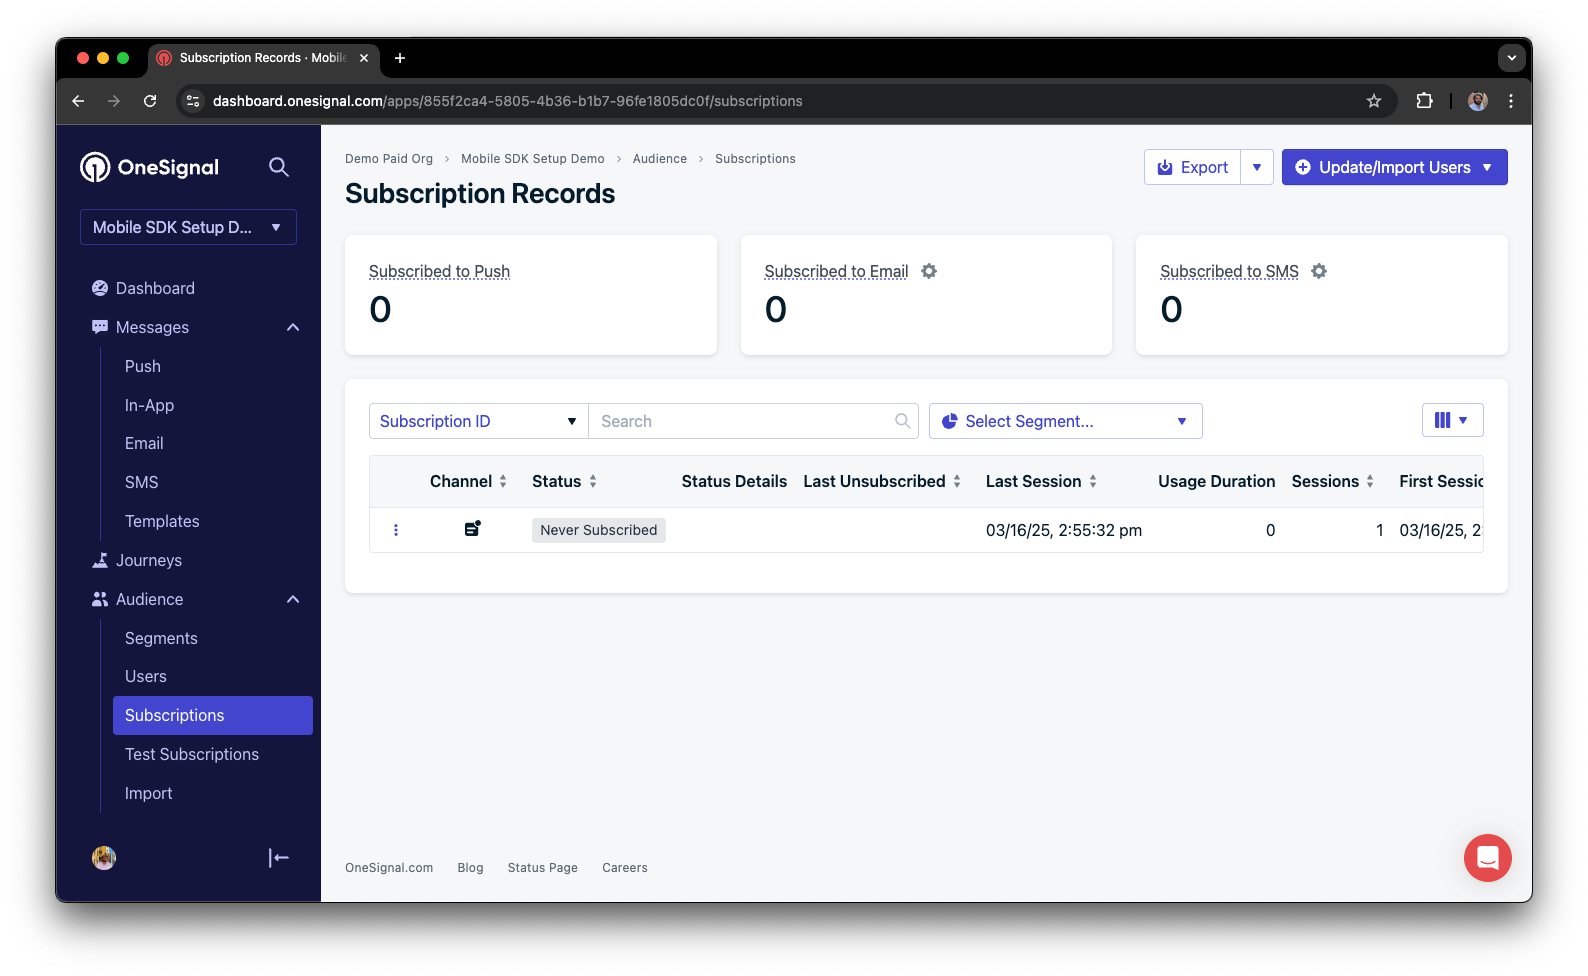
Dashboard showing subscription with 'Never Subscribed' status
Return to the app and tap Allow on the prompt.
Refresh the OneSignal dashboard Subscription's page.
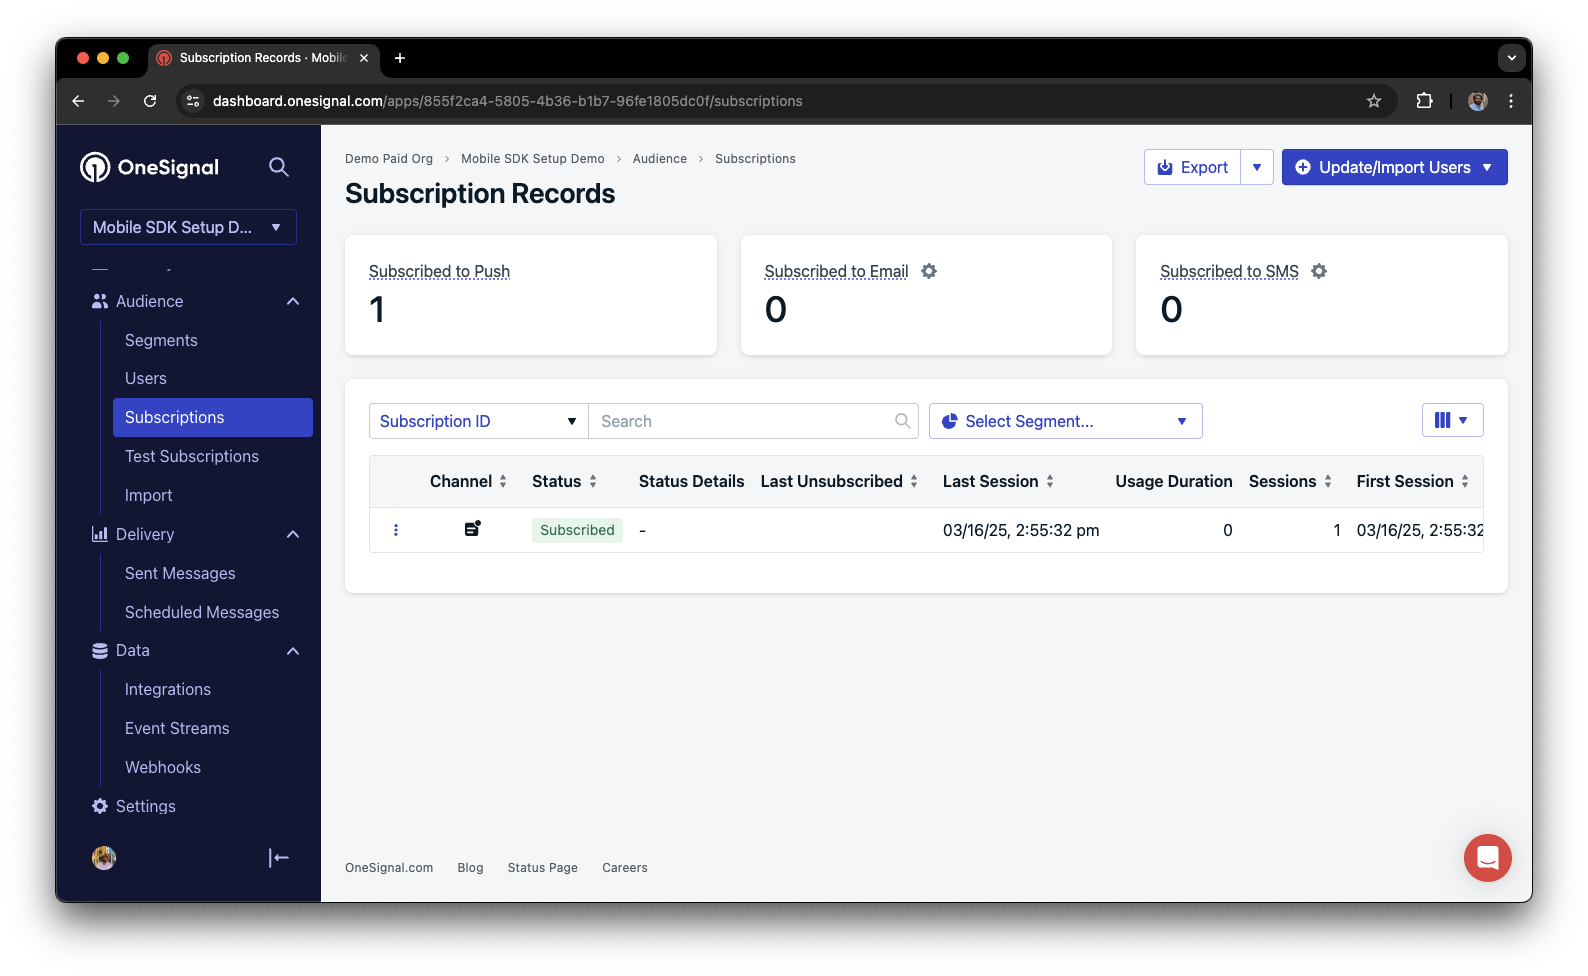
Dashboard showing subscription with 'Subscribed' status
Set up test users
test users are helpful for testing a push notification before sending a message.Add to Test Users.

Adding a device to Test Users
Name your subscription.
Create a test users segment.
Name the segment.
Test Users (the name is important because it will be used later).Add the Test Users filter and click Create Segment.

Creating a 'Test Users' segment with the Test Users filter
Send test push via API
Get your App API Key and App ID.
Update the provided code.
YOUR_APP_API_KEY and YOUR_APP_ID in the code below with your actual keys. This code uses the Test Users segment we created earlier.Run the code.
Check images and confirmed receipt.
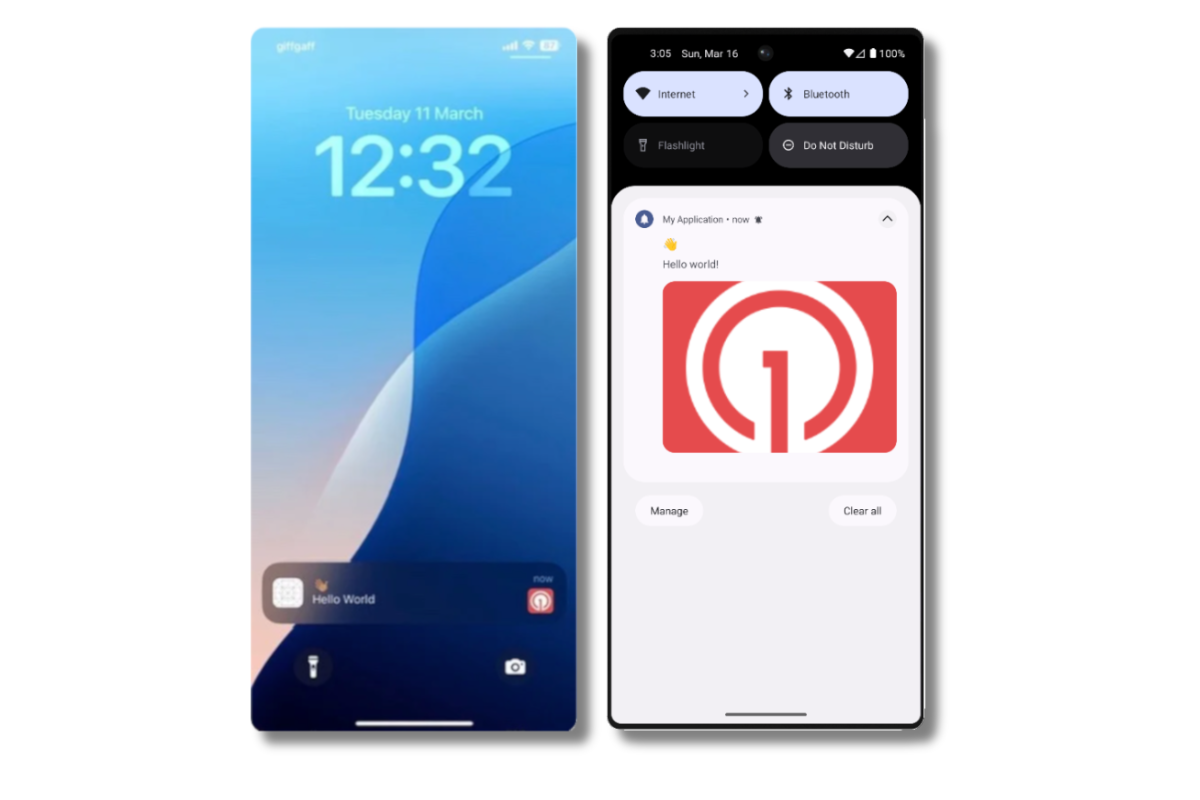
Push notification with image on iOS and Android
Check for confirmed receipt.
Send an in-app message
In-app messages let you communicate with users while they are using your app.Close or background your app on the device.
Create an in-app message.
- In your OneSignal dashboard, navigate to Messages > In-App > New In-App.
- Find and select the Welcome message.
- Set your Audience as the Test Users segment we used previously.
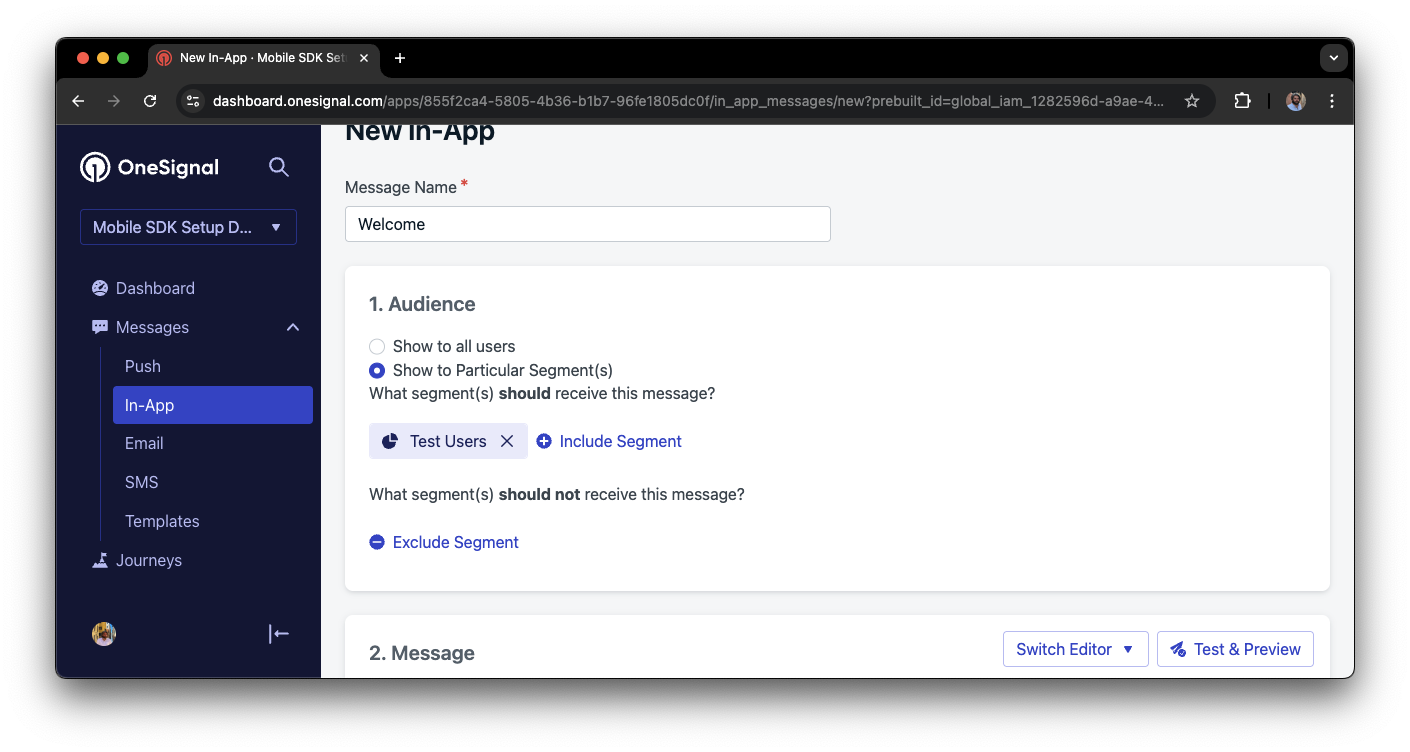
Targeting the 'Test Users' segment with an in-app message
Customize the message content if desired.
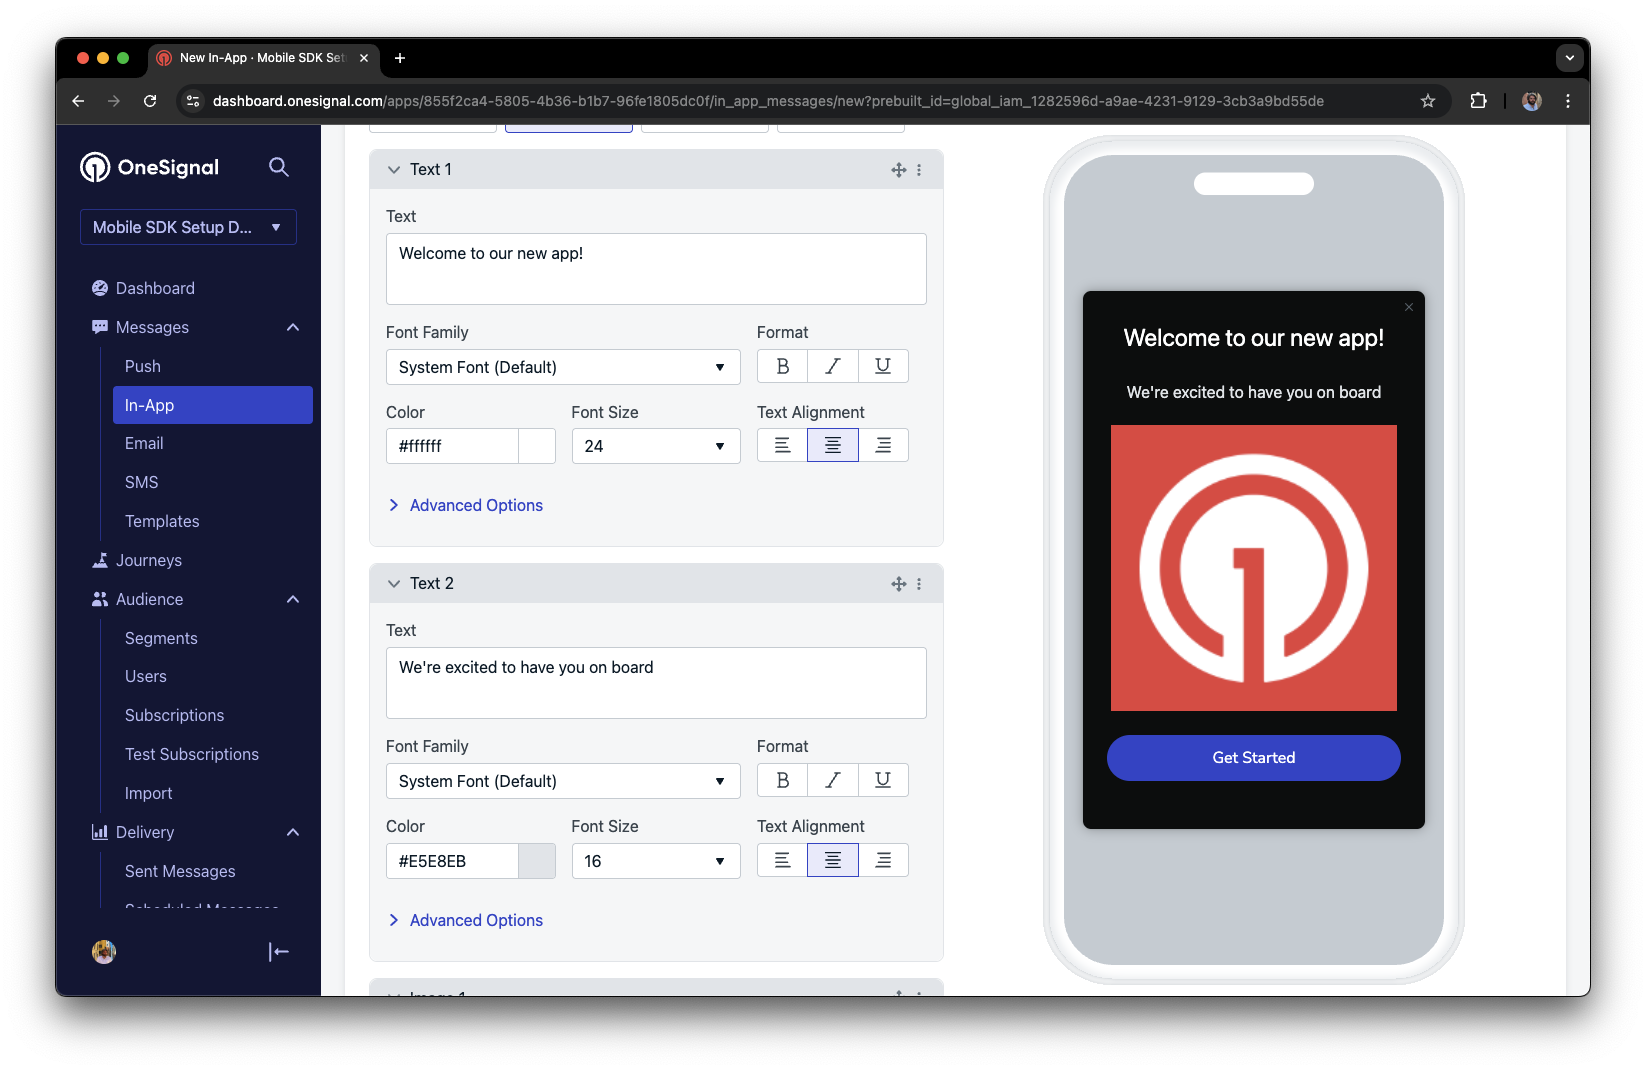
Example customization of in-app Welcome message
Set Trigger to 'On app open'.
Schedule frequency.
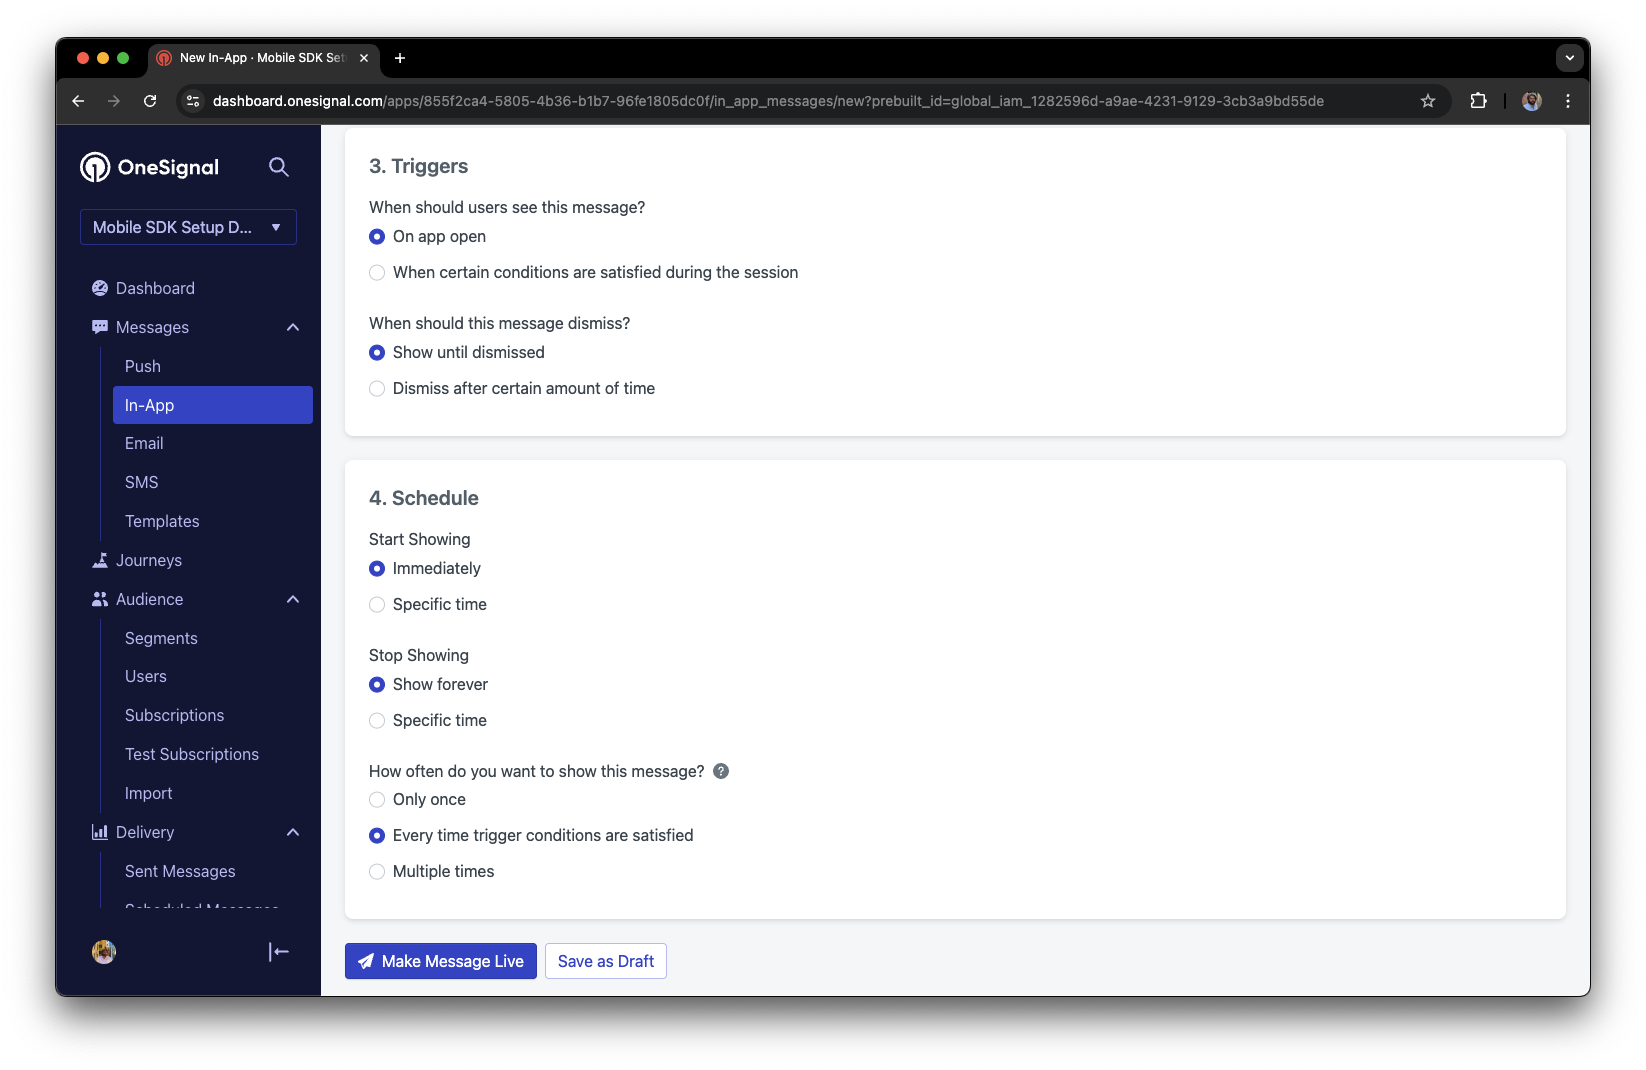
In-app message scheduling options
Make message live.
Open the app and see the message.
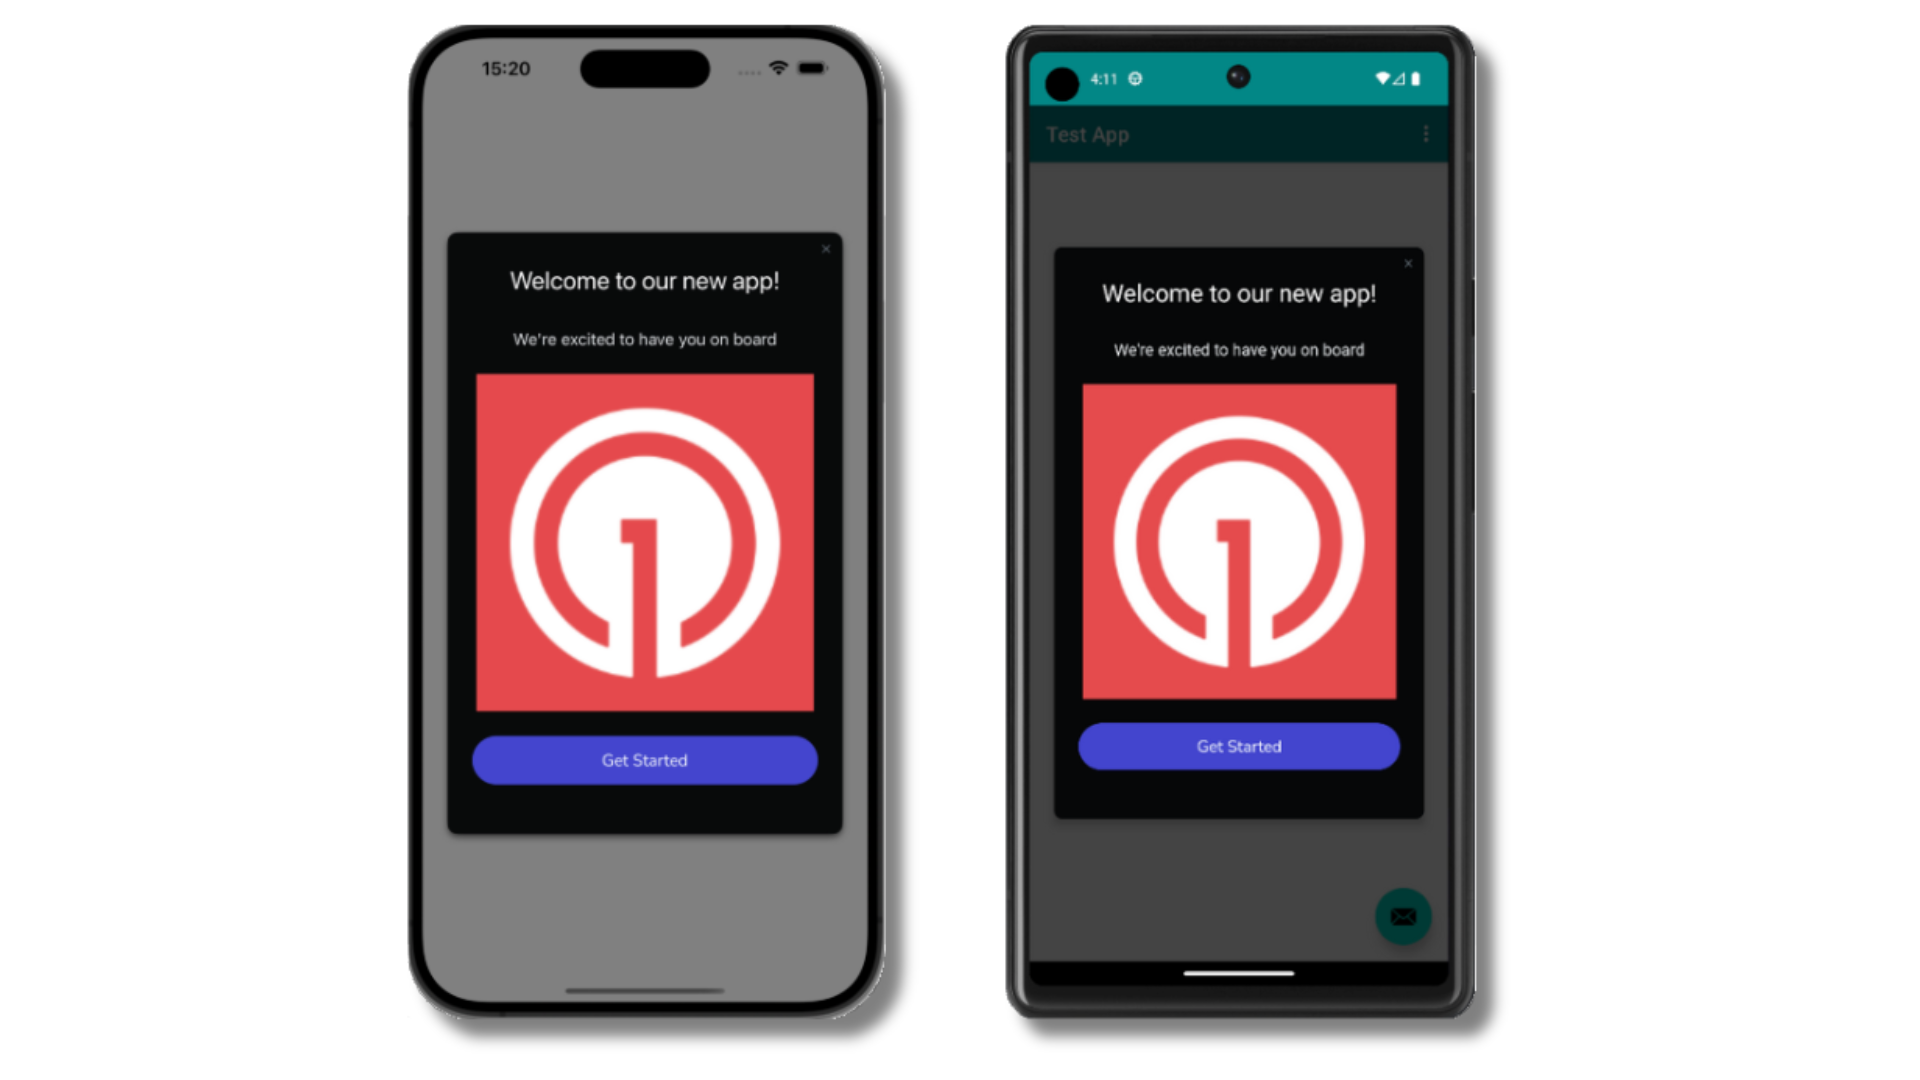
Welcome in-app message shown on devices
- Gathering Subscriptions, setting Test Users, and creating Segments.
- Sending Push with images and Confirmed receipt using Segments and our Create message API.
- Sending In-app messages.
User identification
Previously, we demonstrated how to create mobile Subscriptions. Now we’ll expand to identifying Users across all their subscriptions (including push, email, and SMS) using the OneSignal SDK. We’ll cover External IDs, tags, multi-channel subscriptions, privacy, and event tracking to help you unify and engage users across platforms.Assign External ID
Use an External ID to identify users consistently across devices, email addresses, and phone numbers using your backend’s user identifier. This ensures your messaging stays unified across channels and 3rd party systems (especially important for Integrations). Set the External ID with our SDK’slogin method each time they are identified by your app.
Add Tags
Tags are key-value pairs of string data you can use to store user properties (likeusername, role, or preferences) and events (like purchase_date, game_level, or user interactions). Tags power advanced Message Personalization and Segmentation allowing for more advanced use cases.
Set tags with our SDK addTag and addTags methods as events occur in your app.
In this example, the user reached level 6 identifiable by the tag called current_level set to a value of 6.
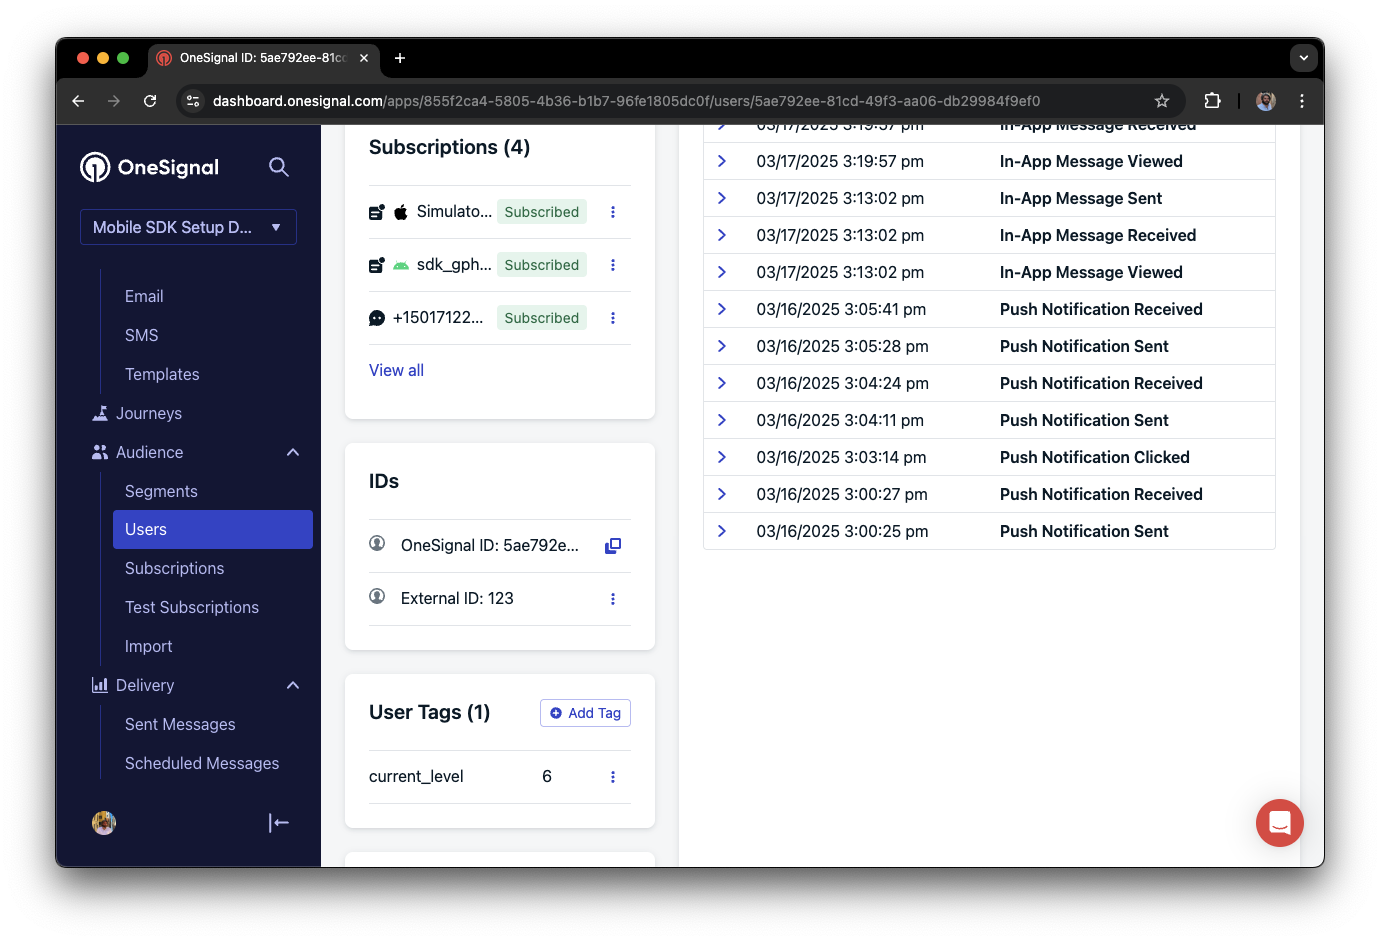
A user profile in OneSignal with a tag called "current_level" set to "6"
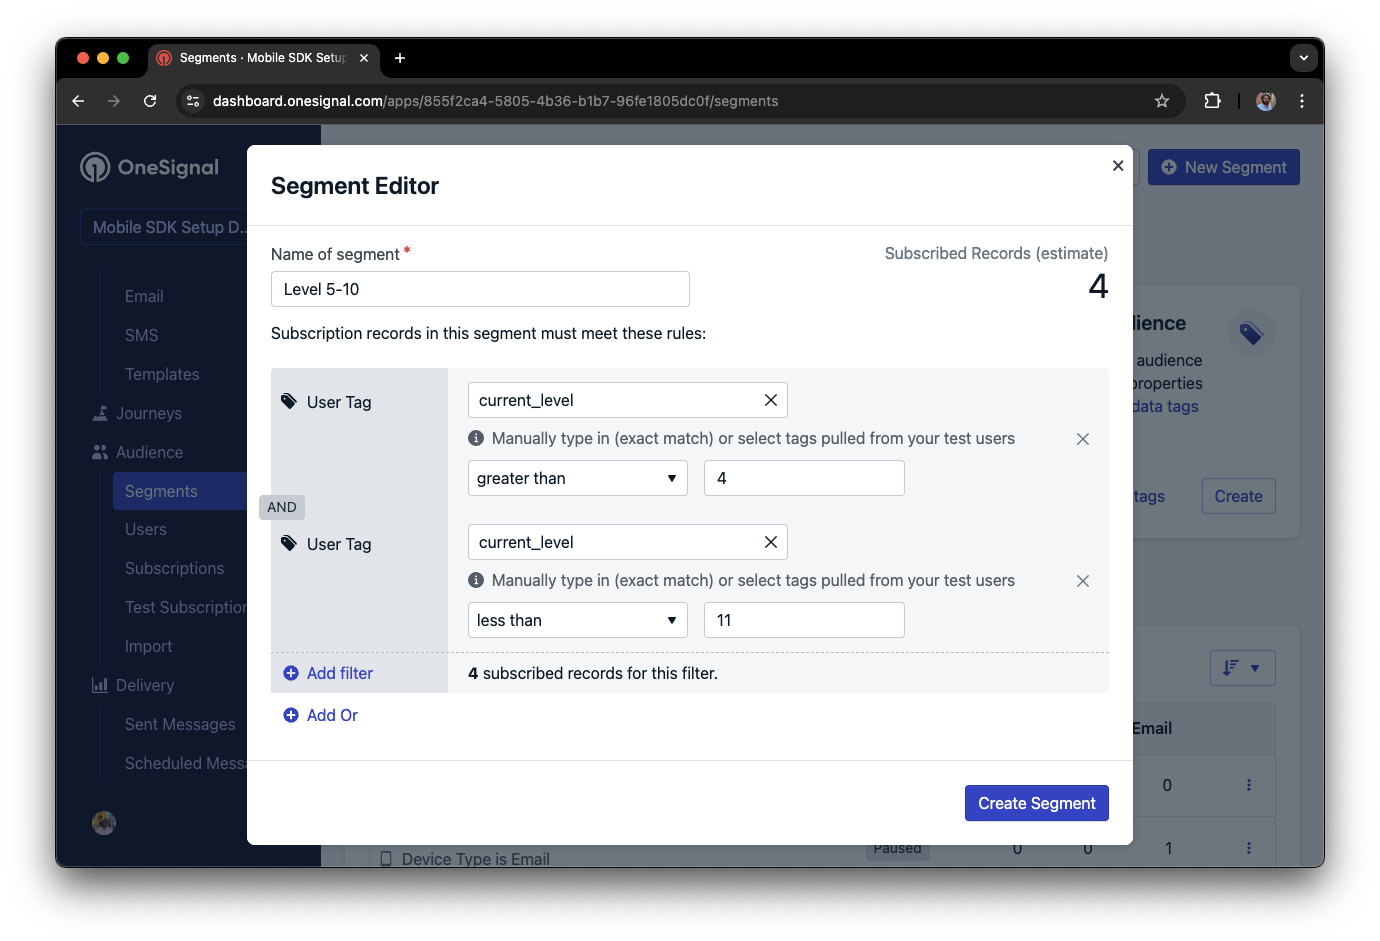
Segment editor showing a segment targeting users with a current_level value of greater than 4 and less than 10
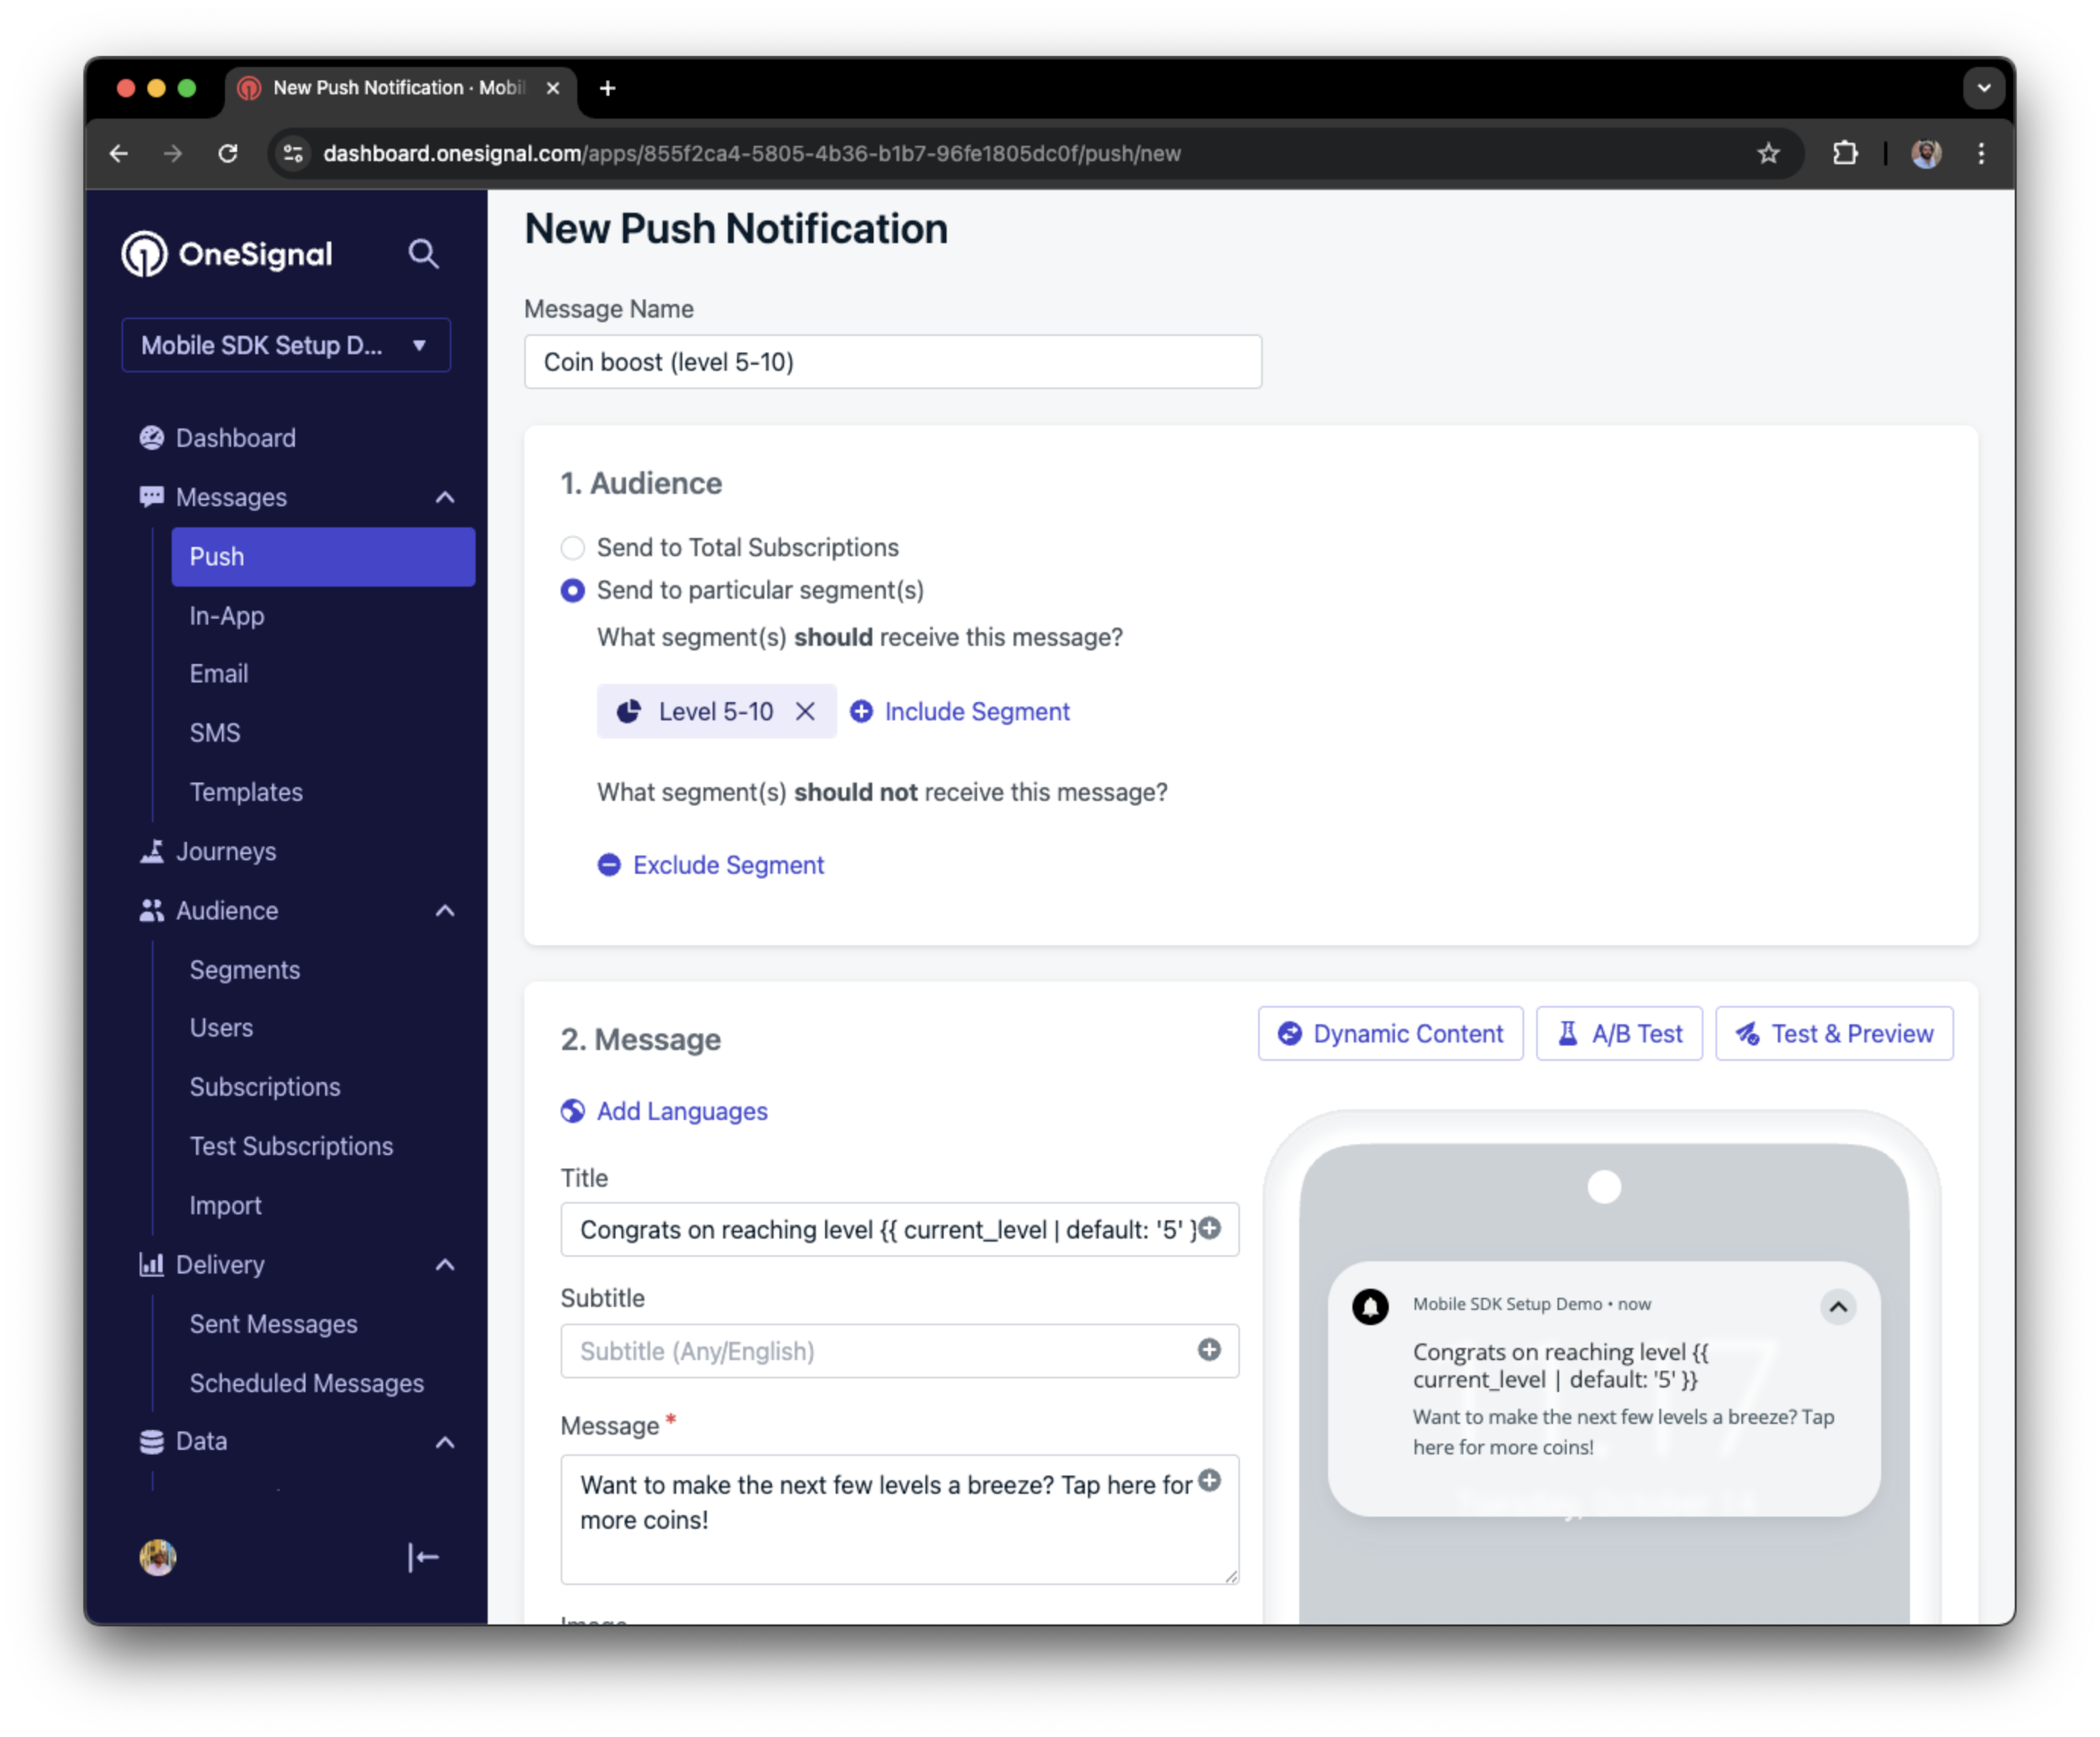
Screenshot showing a push notification targeting the Level 5-10 segment with a personalized message
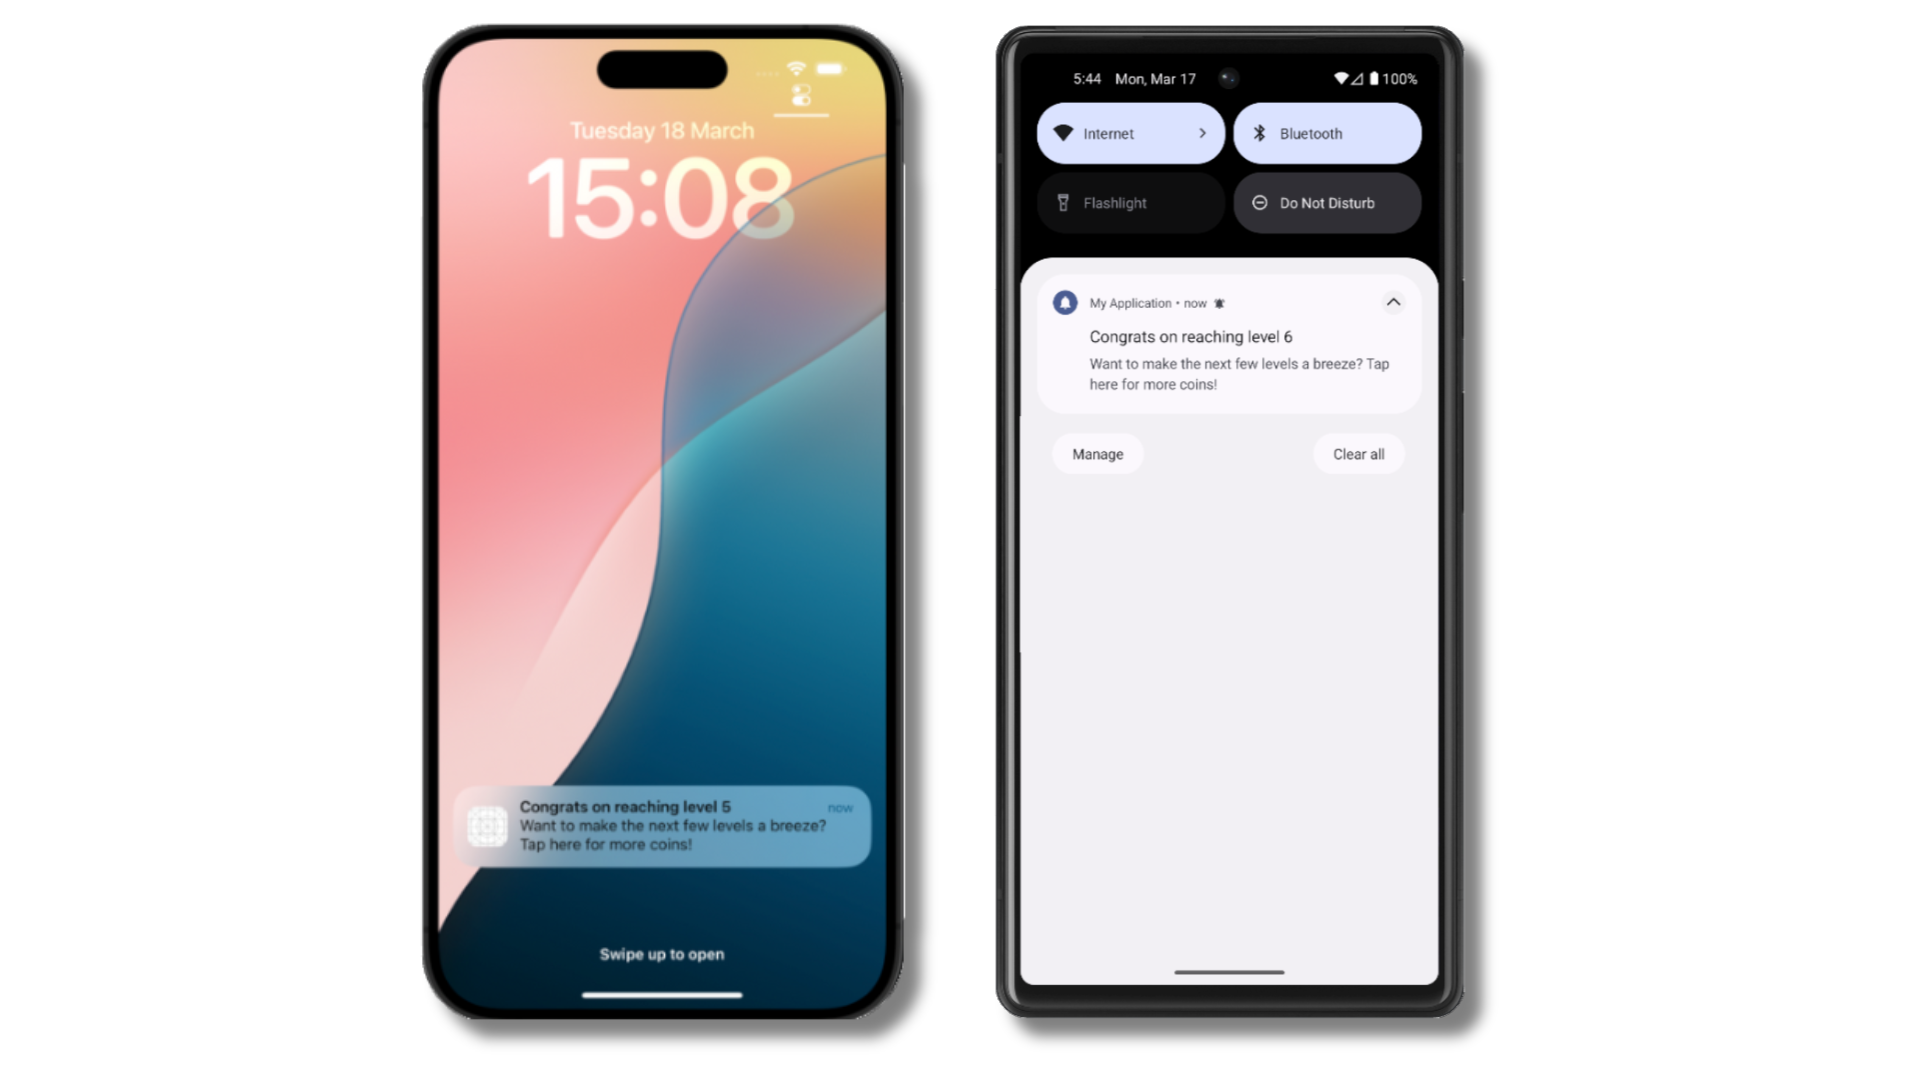
The push notification is received on an iOS and Android device with the personalized content
Add email and/or SMS subscriptions
Earlier we saw how our SDK creates mobile subscriptions to send push and in-app messages. You can also reach users through emails and SMS channels by creating the corresponding subscriptions.- Use the
addEmailmethod to create email subscriptions. - Use the
addSmsmethod to create SMS subscriptions.
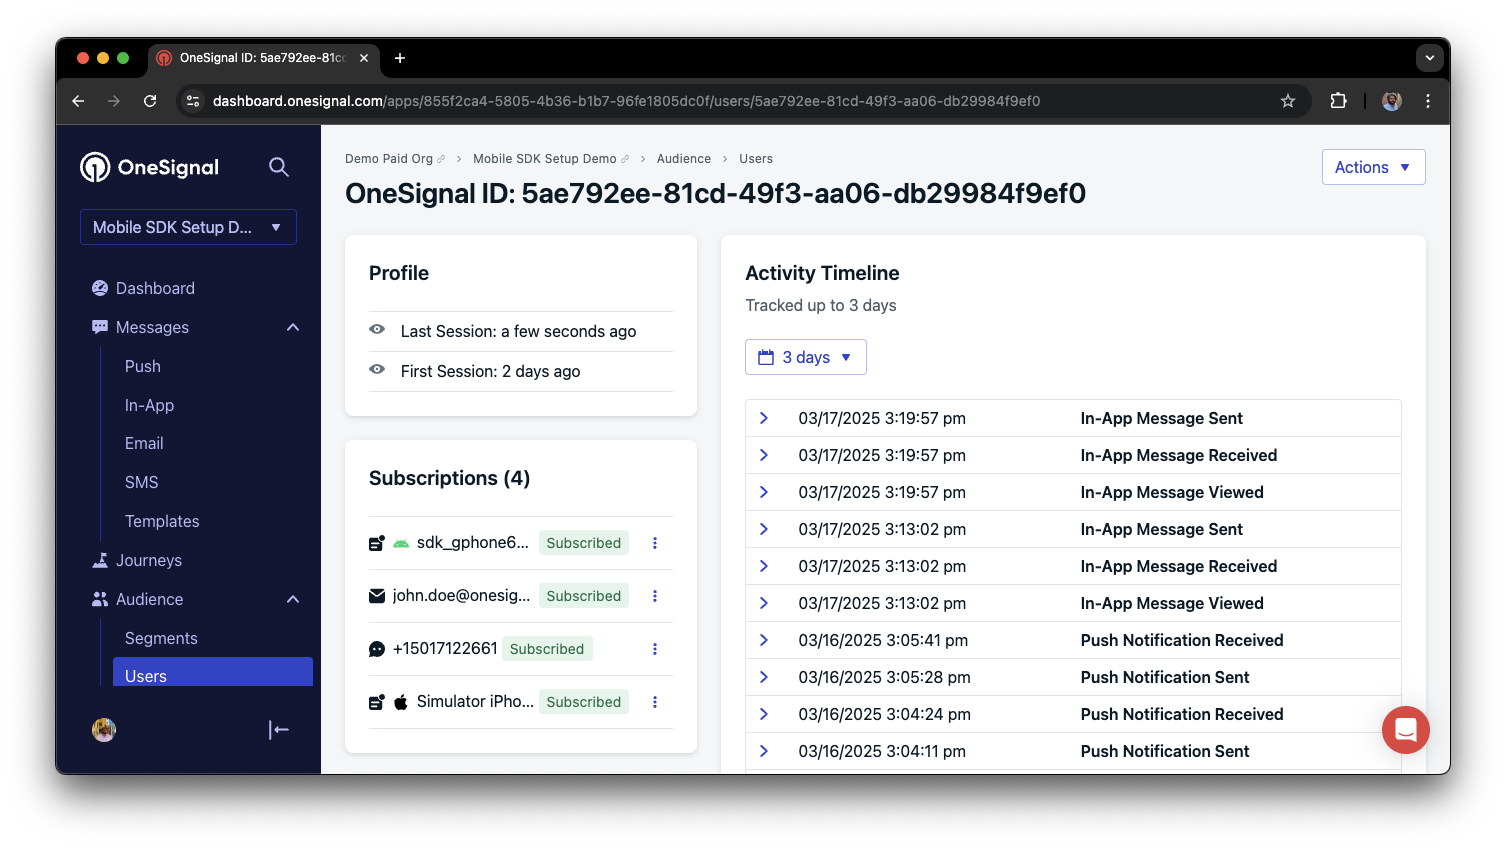
A user profile with push, email, and SMS subscriptions unified by External ID
- Obtain explicit consent before adding email or SMS subscriptions.
- Explain the benefits of each communication channel to users.
- Provide channel preferences so users can select which channels they prefer.
Privacy & user consent
To control when OneSignal collects user data, use the SDK’s consent gating methods:setConsentRequired(true): Prevents data collection until consent is given.setConsentGiven(true): Enables data collection once consent is granted.
Prompt for push permissions
Instead of callingrequestPermission() immediately on app open, take a more strategic approach. Use an in-app message to explain the value of push notifications before requesting permission.
For best practices and implementation details, see our Prompt for push permissions guide.
Listen to push, user, and in-app events
Use SDK listeners to react to user actions and state changes. The SDK provides several event listeners for you to hook into. See our SDK reference guide for more details.Push notification events
addClickListener(): Detect when a notification is tapped. Helpful for Deep Linking.addForegroundLifecycleListener(): Control how notifications behave in foreground.
User state changes
addObserver()for user state: Detect when the External ID is set.addPermissionObserver(): Track the user’s specific interaction with the native push permission prompt.addObserver()for push subscription: Track when the push subscription status changes.
In-app message events
addClickListener(): Handle in-app click actions. Ideal for deep linking or tracking events.addLifecycleListener(): Track full lifecycle of in-app messages (shown, clicked, dismissed, etc.).
Advanced setup & capabilities
Explore more capabilities to enhance your integration:- 🔁 Migrating to OneSignal from another service
- 🌍 Location tracking
- 🔗 Deep Linking
- 🔌 Integrations
- 🧩 Mobile Service Extensions
- 🛎️ Action buttons
- 🌐 Multi-language messaging
- 🛡️ Identity Verification
- 📊 Custom Outcomes
- 📲 Live Activities
Mobile SDK setup & reference
Make sure you’ve enabled all key features by reviewing the Mobile push setup guide. For full details on available methods and configuration options, visit the Mobile SDK reference.support@onesignal.comPlease include:- Details of the issue you’re experiencing and steps to reproduce if available
- Your OneSignal App ID
- The External ID or Subscription ID if applicable
- The URL to the message you tested in the OneSignal Dashboard if applicable
- Any relevant logs or error messages