Requisitos
- Plan Flutterflow: Standard o superior
- Aplicación y plataforma de OneSignal configuradas
- macOS con Xcode 14+ (las instrucciones de configuración usan Xcode 16.2)
- Dispositivo con iOS 12+, iPadOS 12+ o simulador de Xcode ejecutando iOS 16.2+
- CocoaPods 1.16.2+
- Dispositivo Android 7.0+ o emulador con Google Play Store (Services) instalado
Configure your OneSignal app and platform
Configure your OneSignal app with the platforms you support — Apple (APNs), Google (FCM), Huawei (HMS), and/or Amazon (ADM).Step-by-step setup instructions
Step-by-step setup instructions
Create or select your app
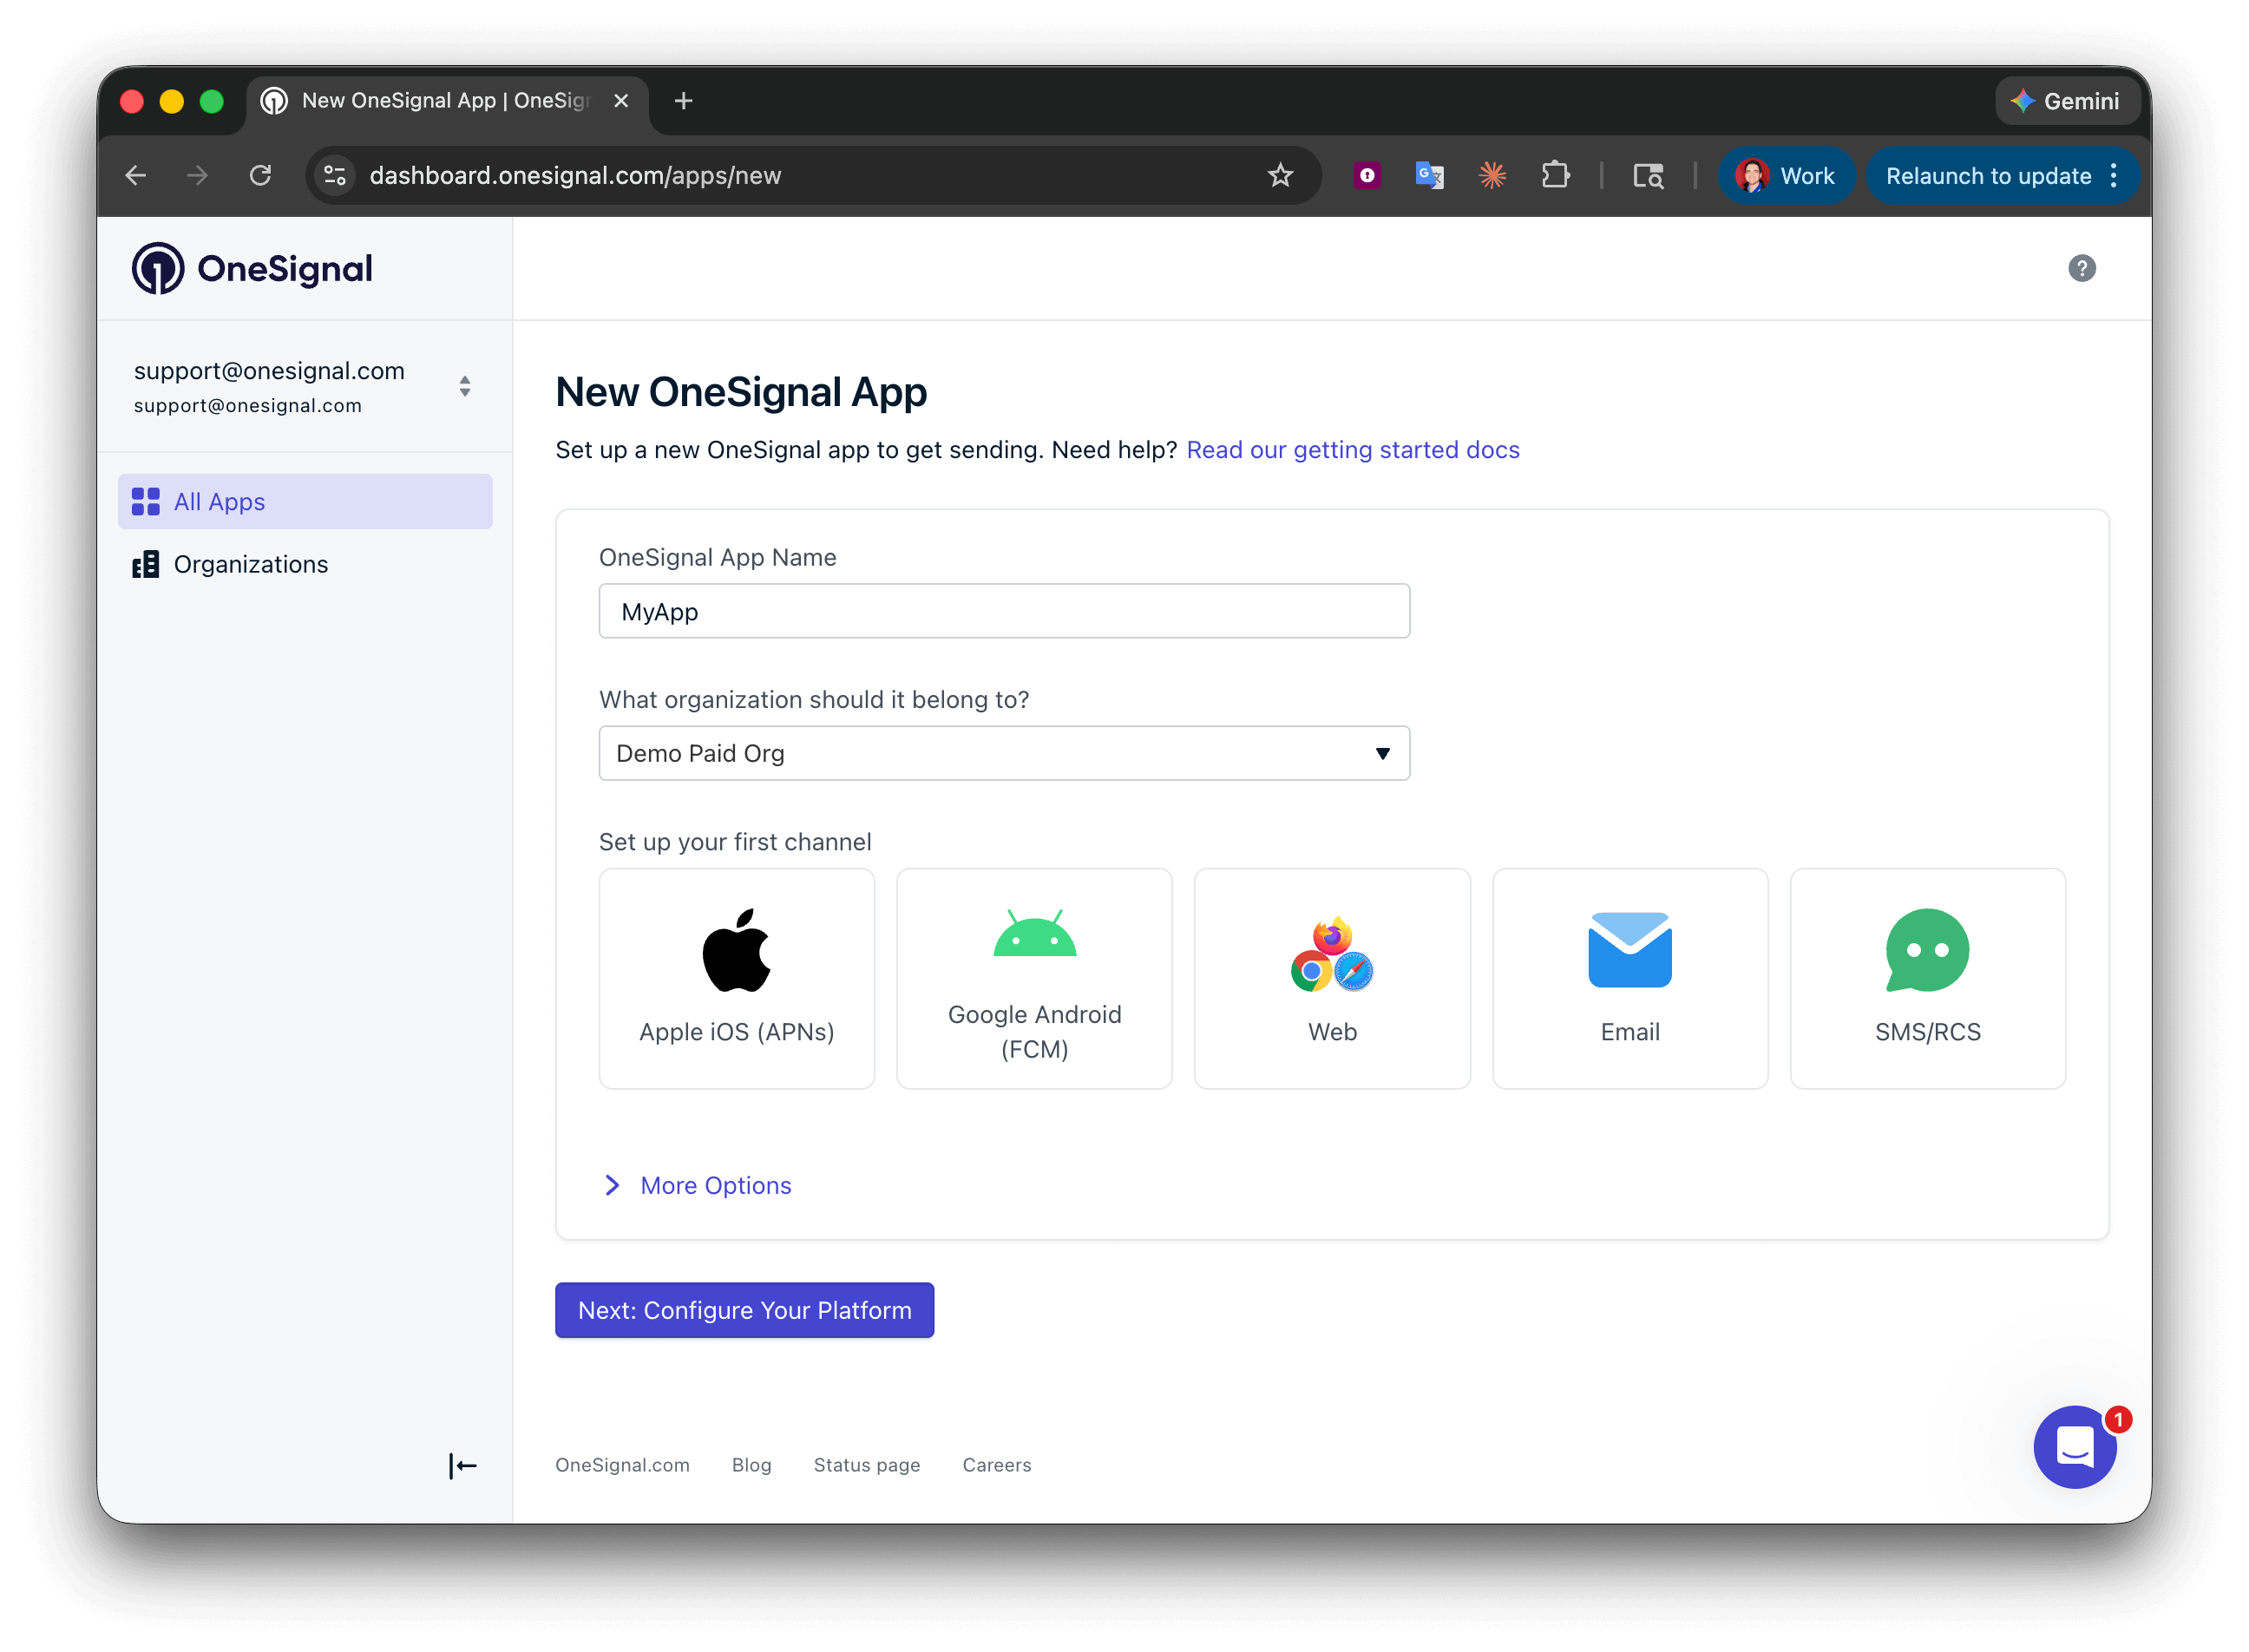
Setting up your first OneSignal app, Organization, and channel.
Configure platform credentials
- Android: Set up Firebase credentials
- iOS: p8 token (recommended) or p12 certificate
- Amazon: Generate API key
- Huawei: Authorize OneSignal
Save your App ID and install the SDK
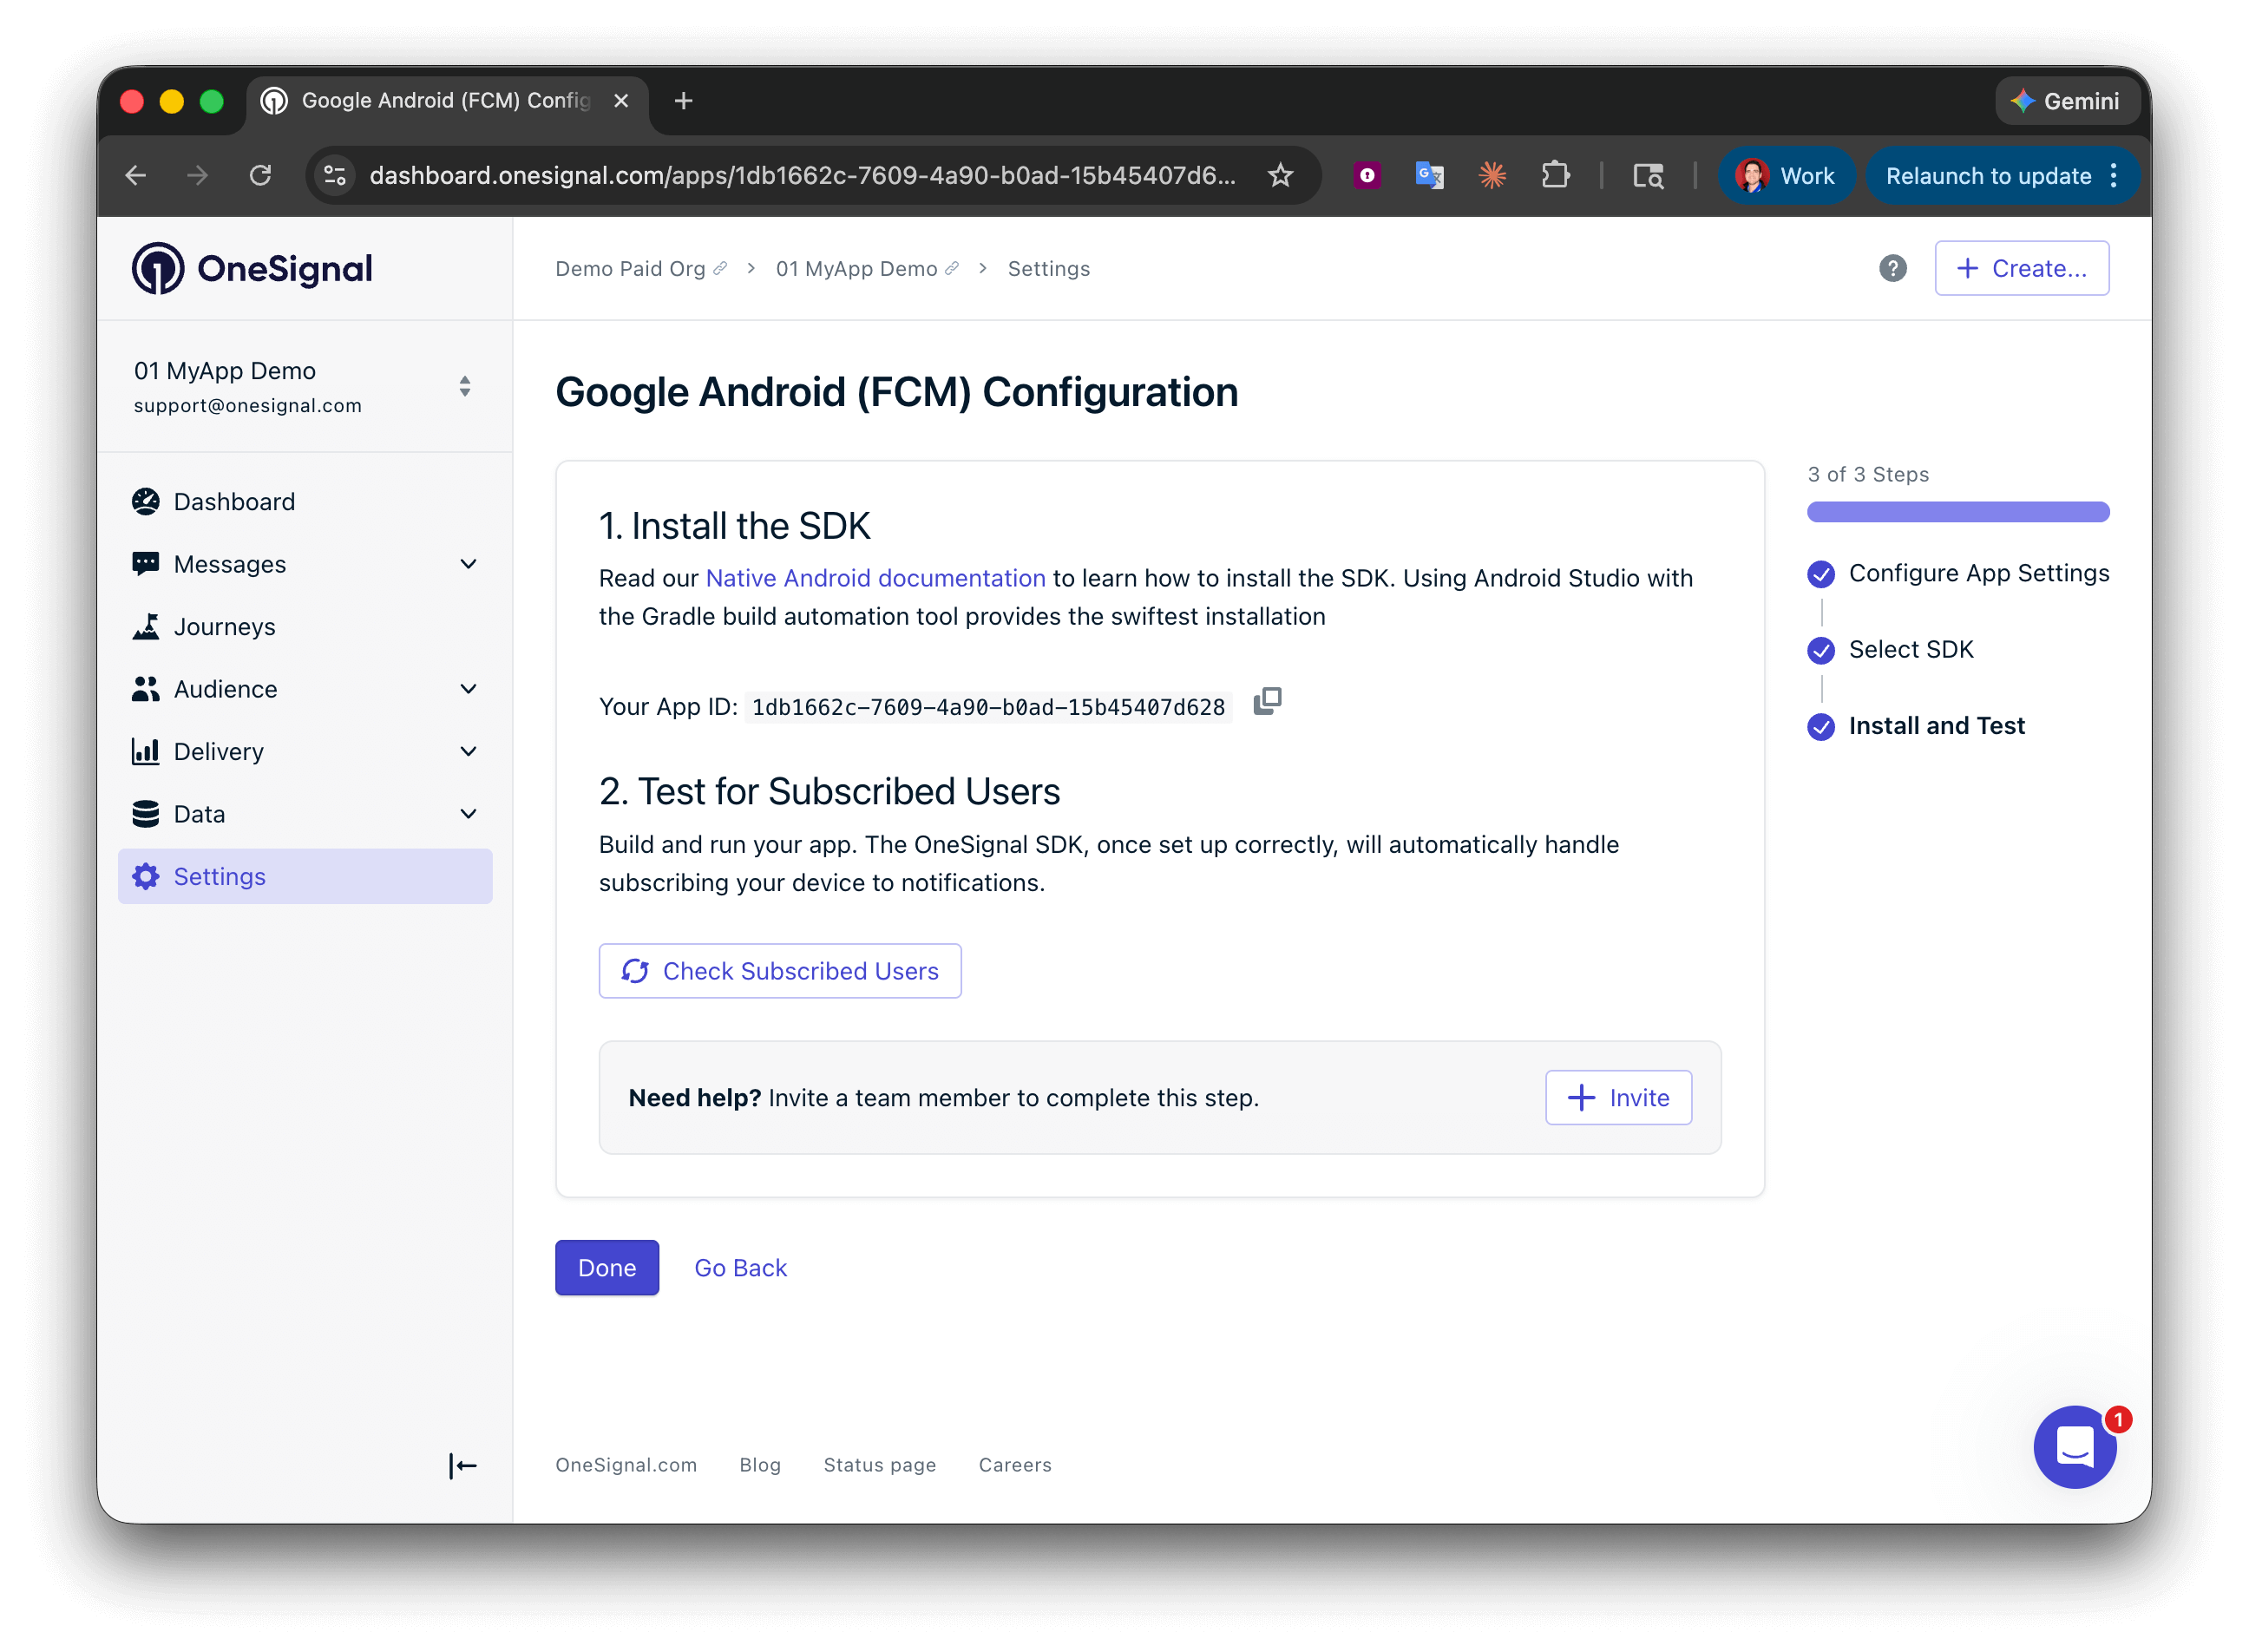
Save your App ID and invite additional team members.
Configuración
1. Crear una nueva acción personalizada
En tu proyecto Flutterflow, navega a Custom Code, luego haz clic en el botón +Add y selecciona Action.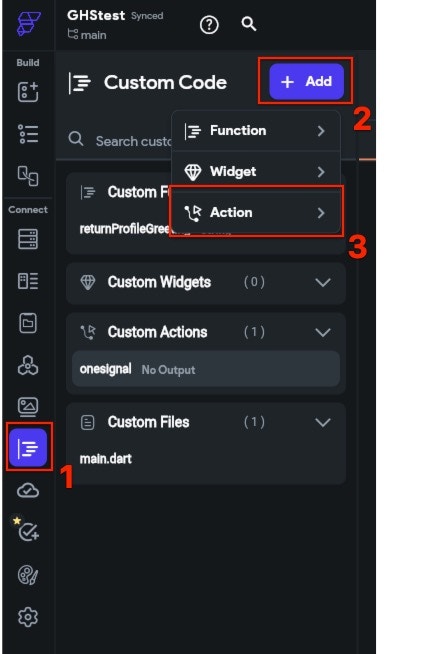
YOUR_APP_ID con tu OneSignal App ID encontrado en tu dashboard de OneSignal Settings > Keys & IDs.
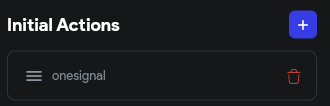
onesignal que acaba de ser creada.

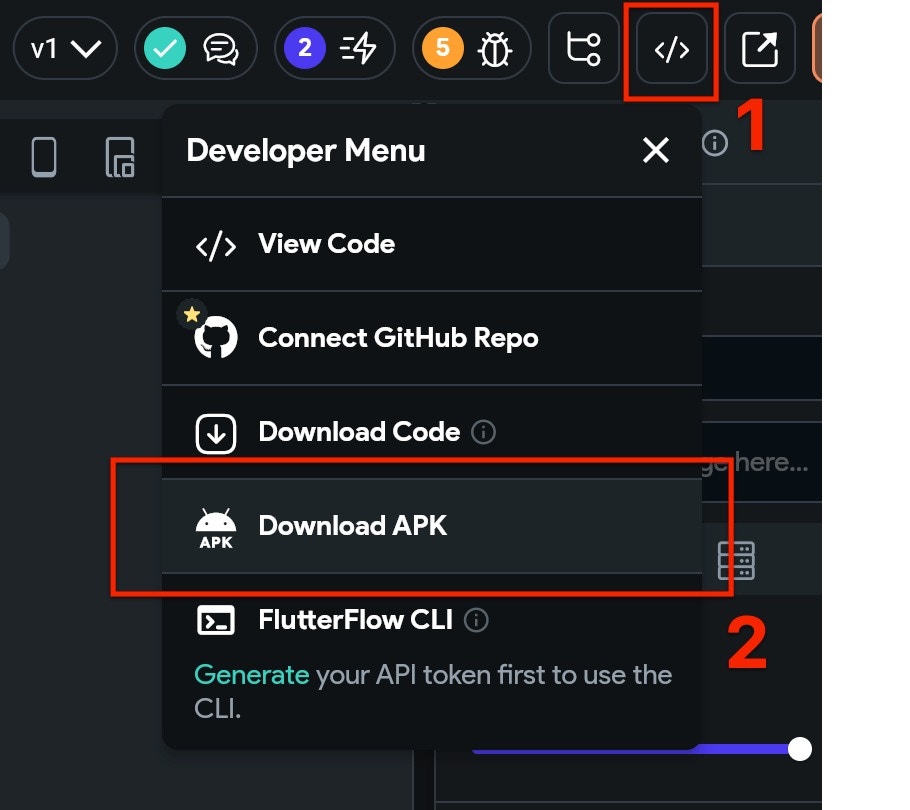
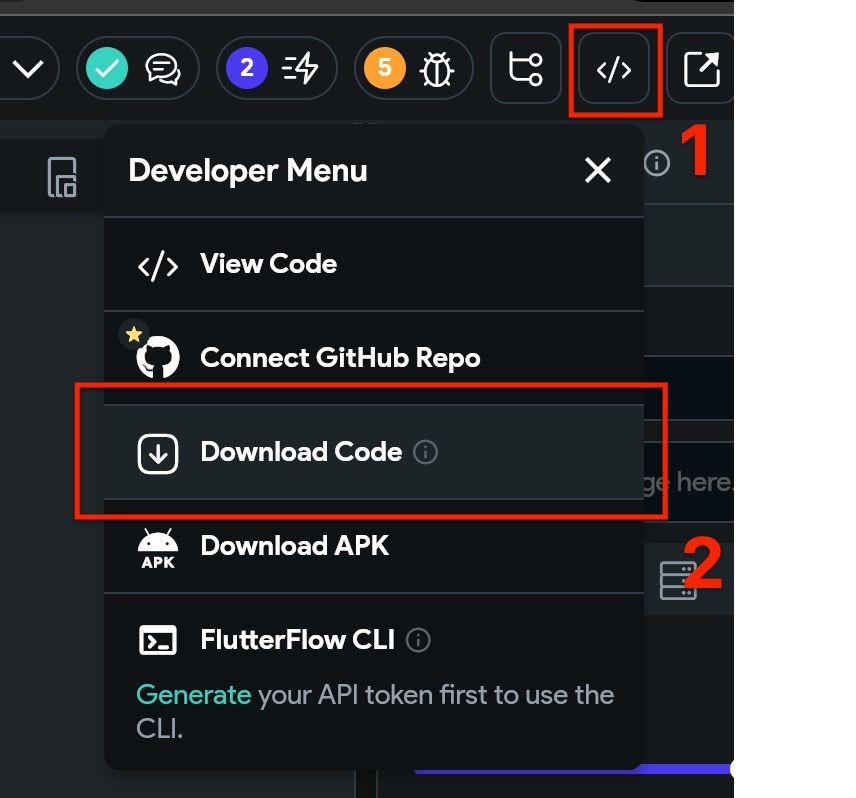
2. Exportar el proyecto
- Descarga de APK (solo Android)
- Descarga de proyecto completo (iOS y Android)
3. Configuración de iOS
Es probable que el proyecto descargado no esté listo para lanzar en iOS. Antes de configurar las adiciones específicas de OneSignal, necesitarás asegurarte de que el proyecto esté completamente construido. Para hacerlo:- Abre una ventana de Terminal, cd (cambiar directorio) a la carpeta
iosde tu proyecto descargado. - En Terminal escribe
flutter build iosy presiona enter. Espera a que la compilación se complete, esto puede tomar algún tiempo dependiendo del tamaño de tu proyecto. - Todavía en Terminal escribe
pod instally presiona enter. Espera a que la instalación del pod se complete.
.xcworkspace en Xcode ubicado en la carpeta ios de tu proyecto.
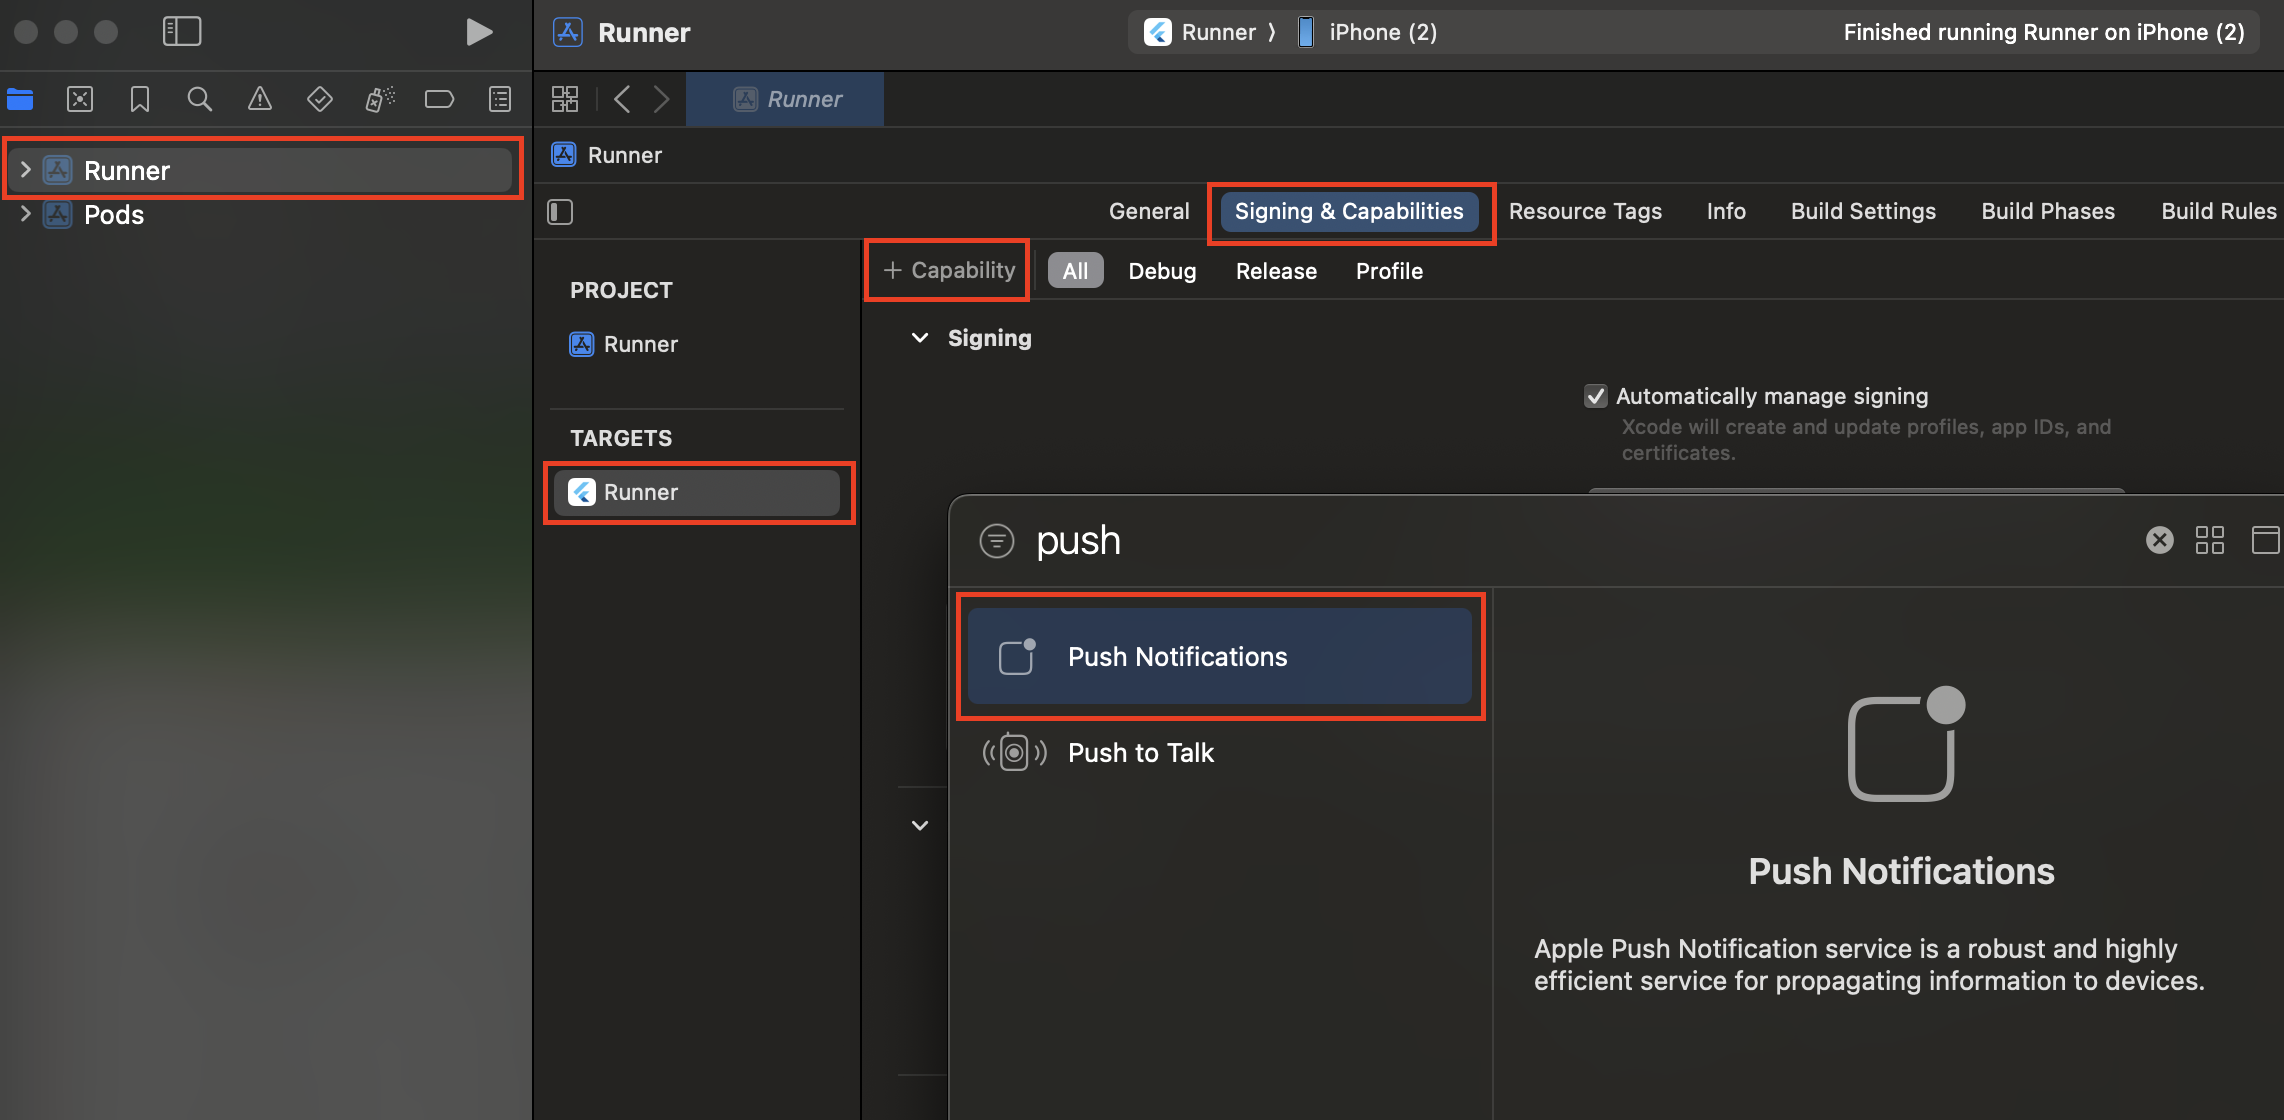
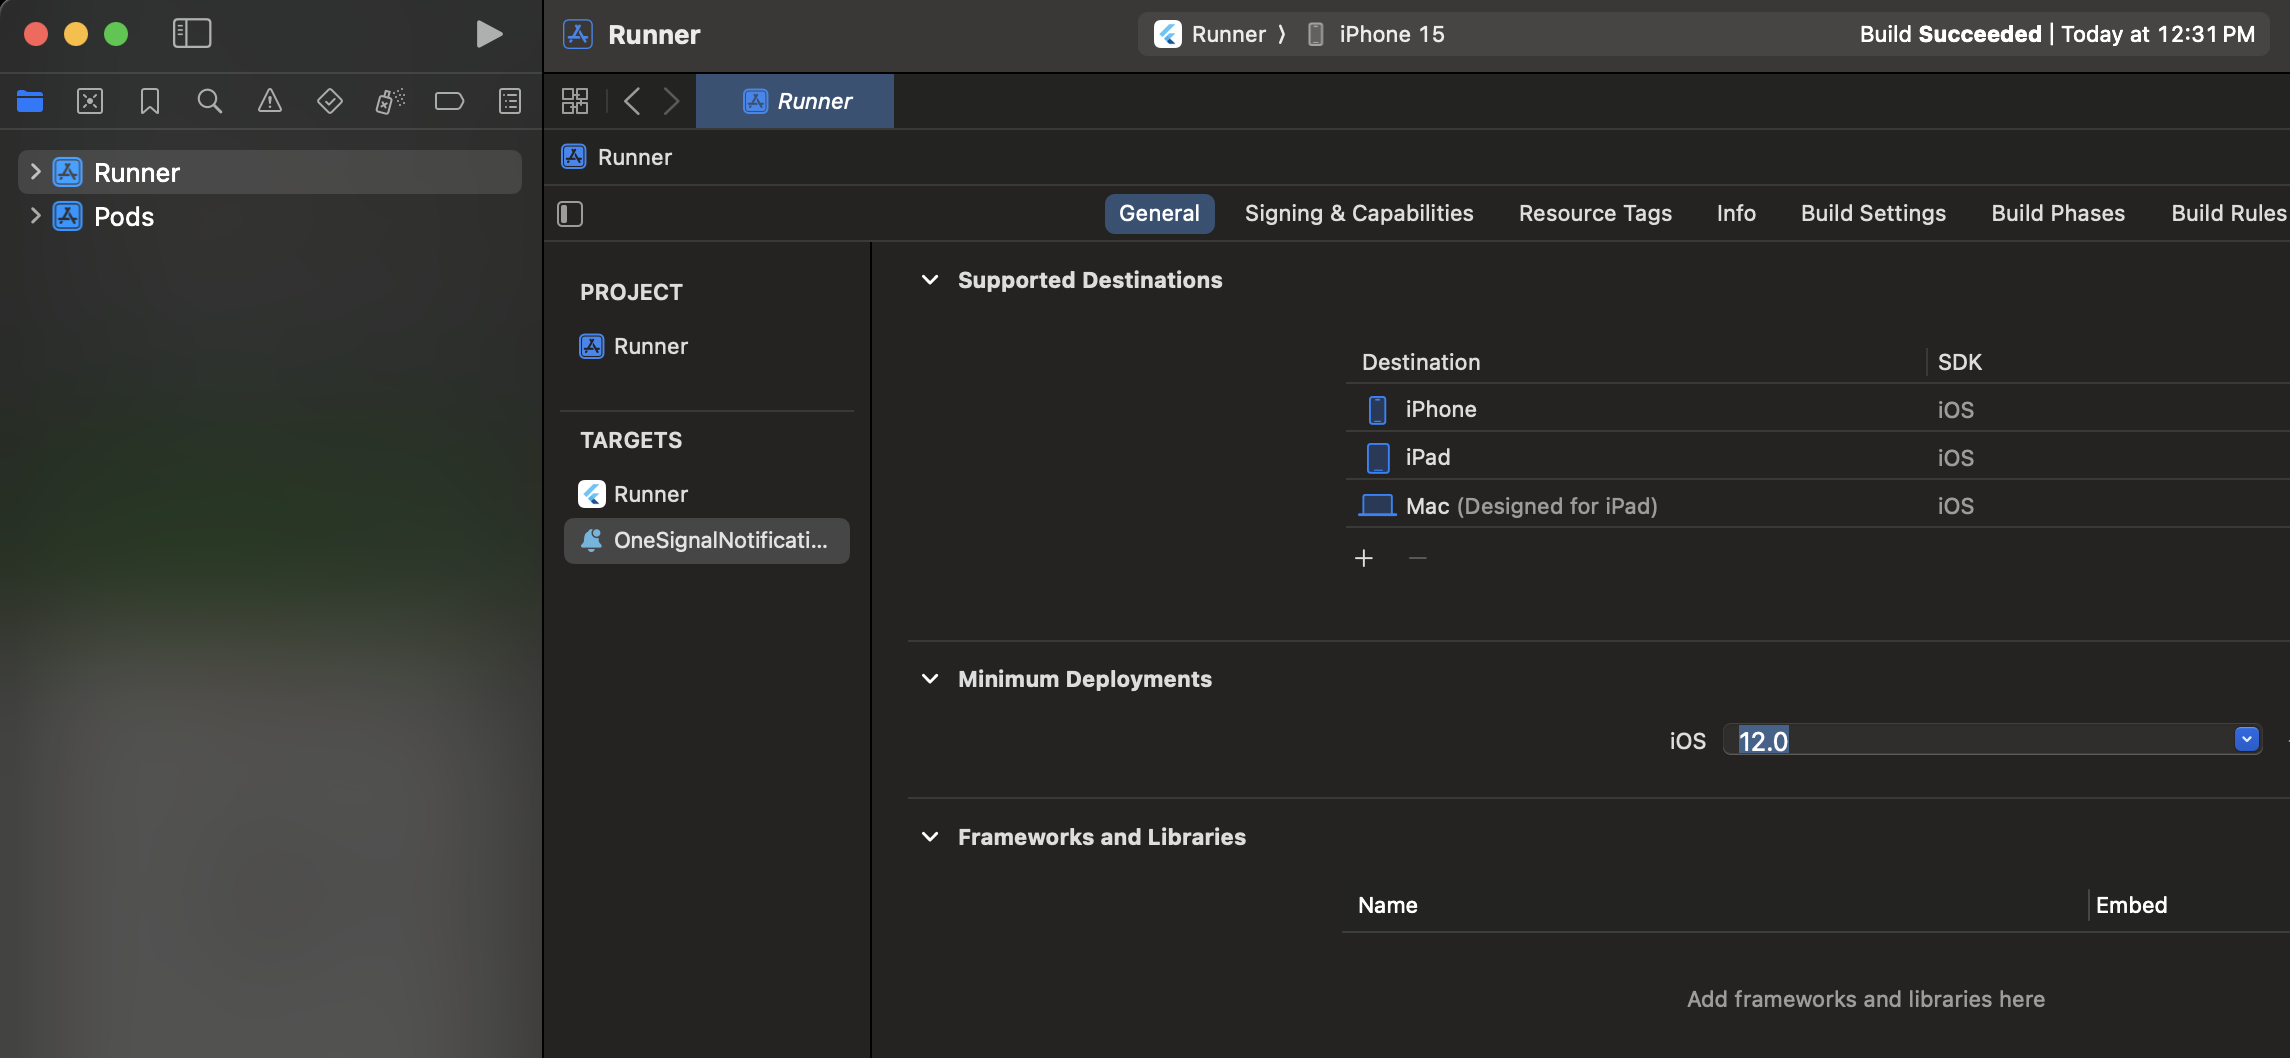
Selecciona el proyecto raíz > tu objetivo de aplicación principal > Signing & Capabilities.
Si no ves Push Notifications habilitado, haz clic en + Capability y agrega Push Notifications. Asegúrate de ingresar los detalles correctos para tu Team y Bundle Identifier.
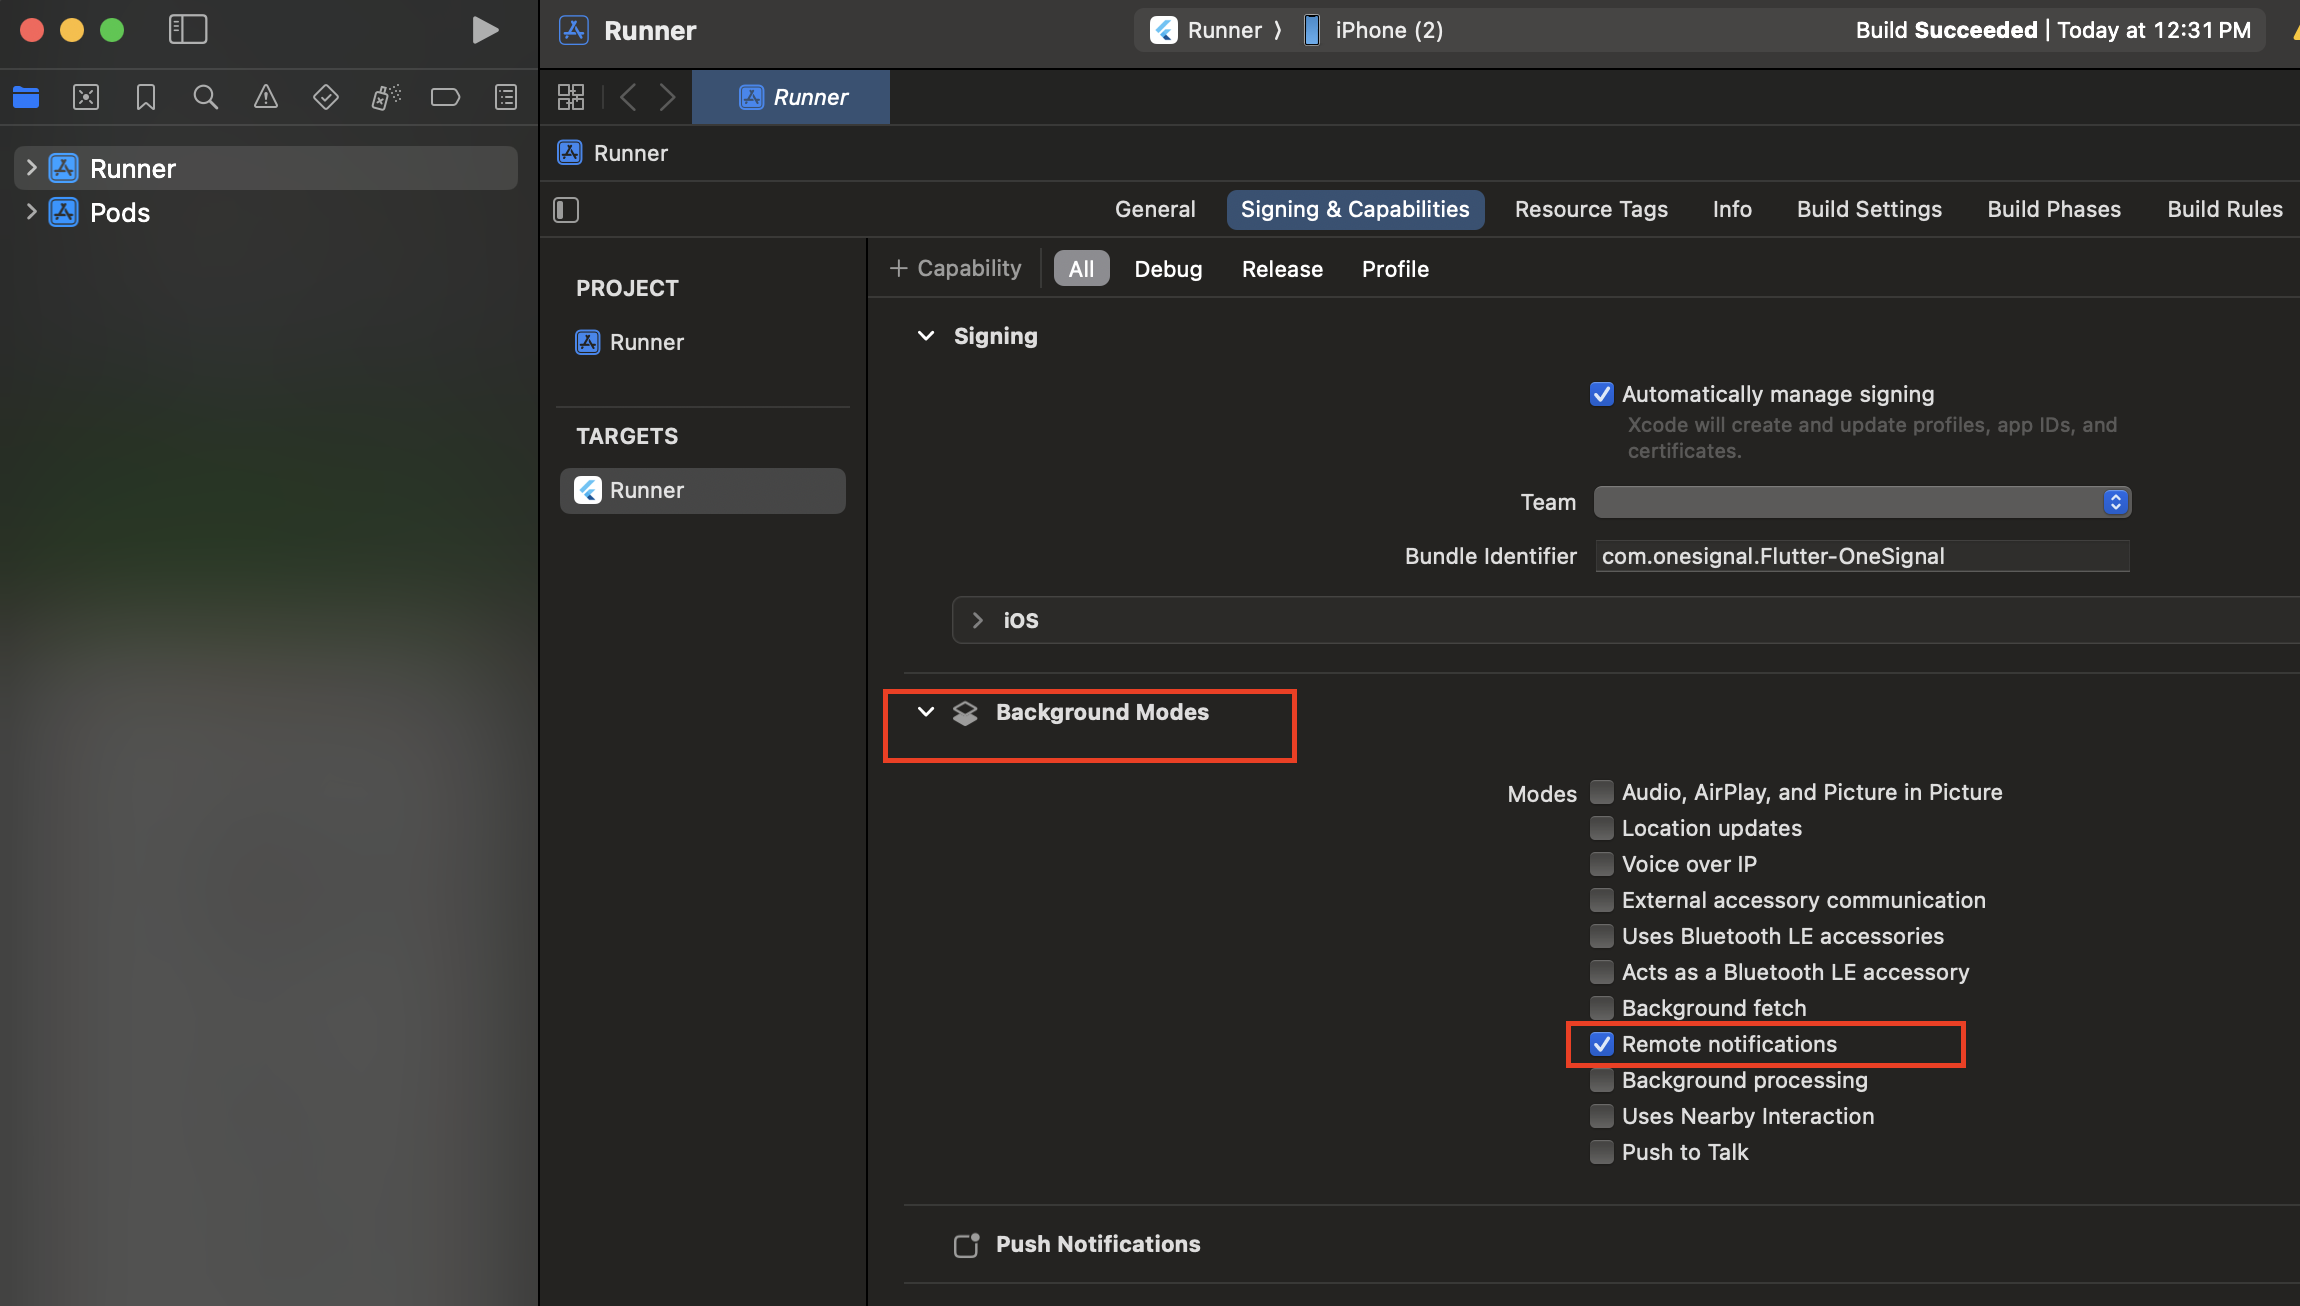
Agregar Notification Service Extension
La OneSignalNotificationServiceExtension permite que tu aplicación iOS reciba notificaciones enriquecidas con imágenes, botones e insignias. También es requerida para las funciones de analíticas de confirmed receipt de OneSignal. En Xcode selecciona File > New > Target… Selecciona Notification Service Extension y luego Next.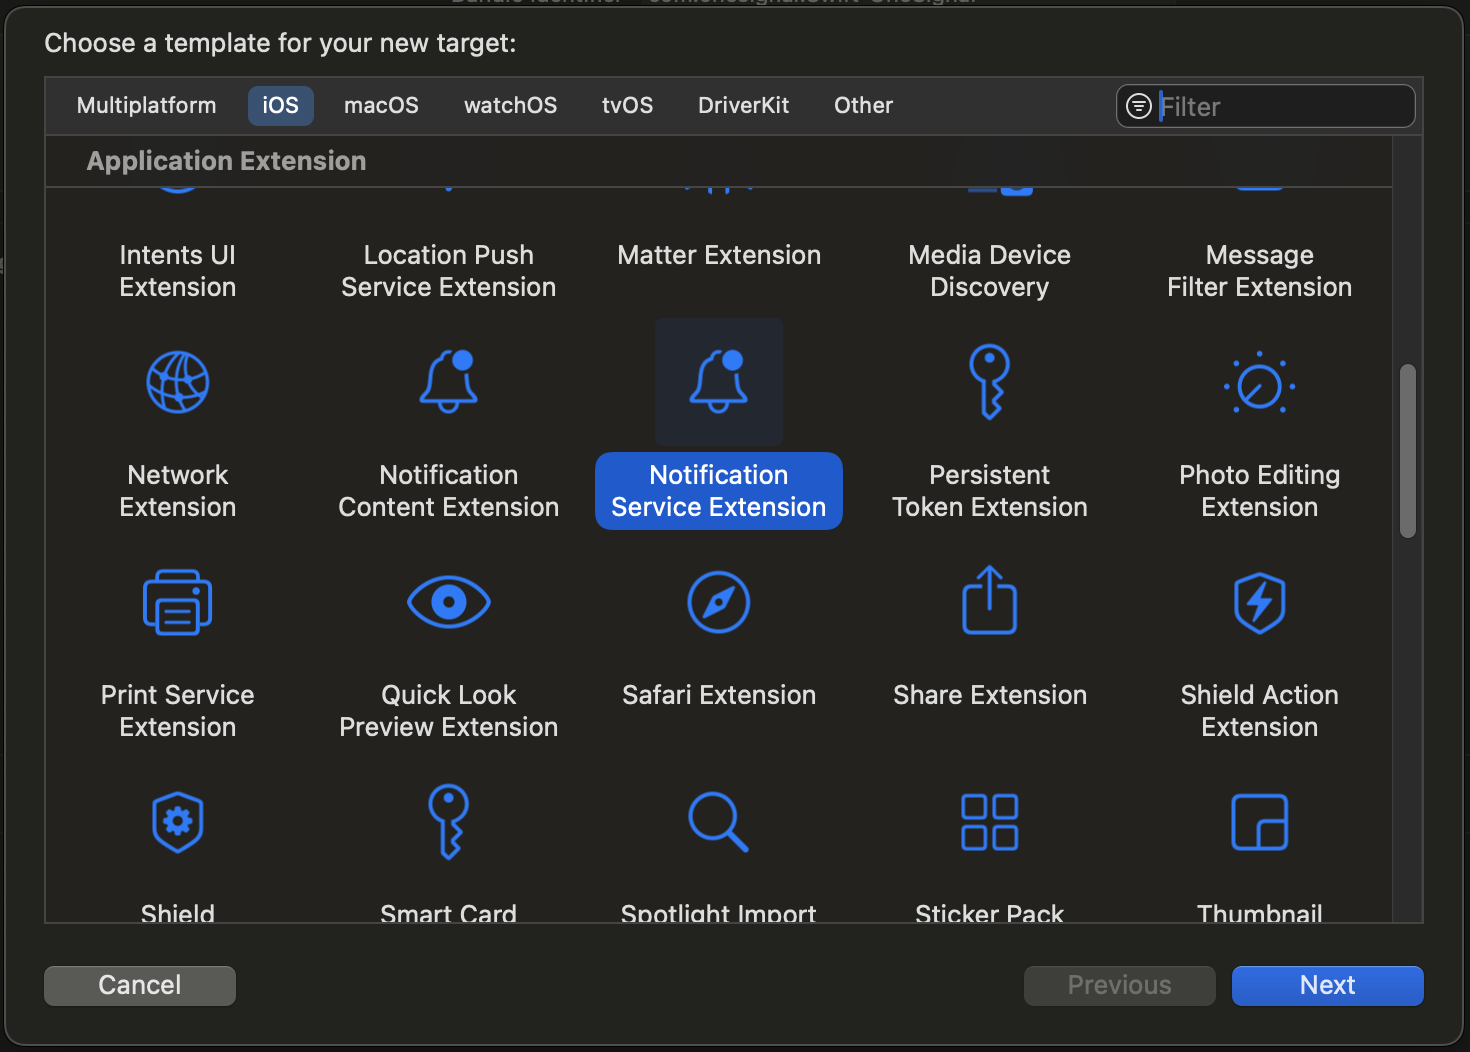
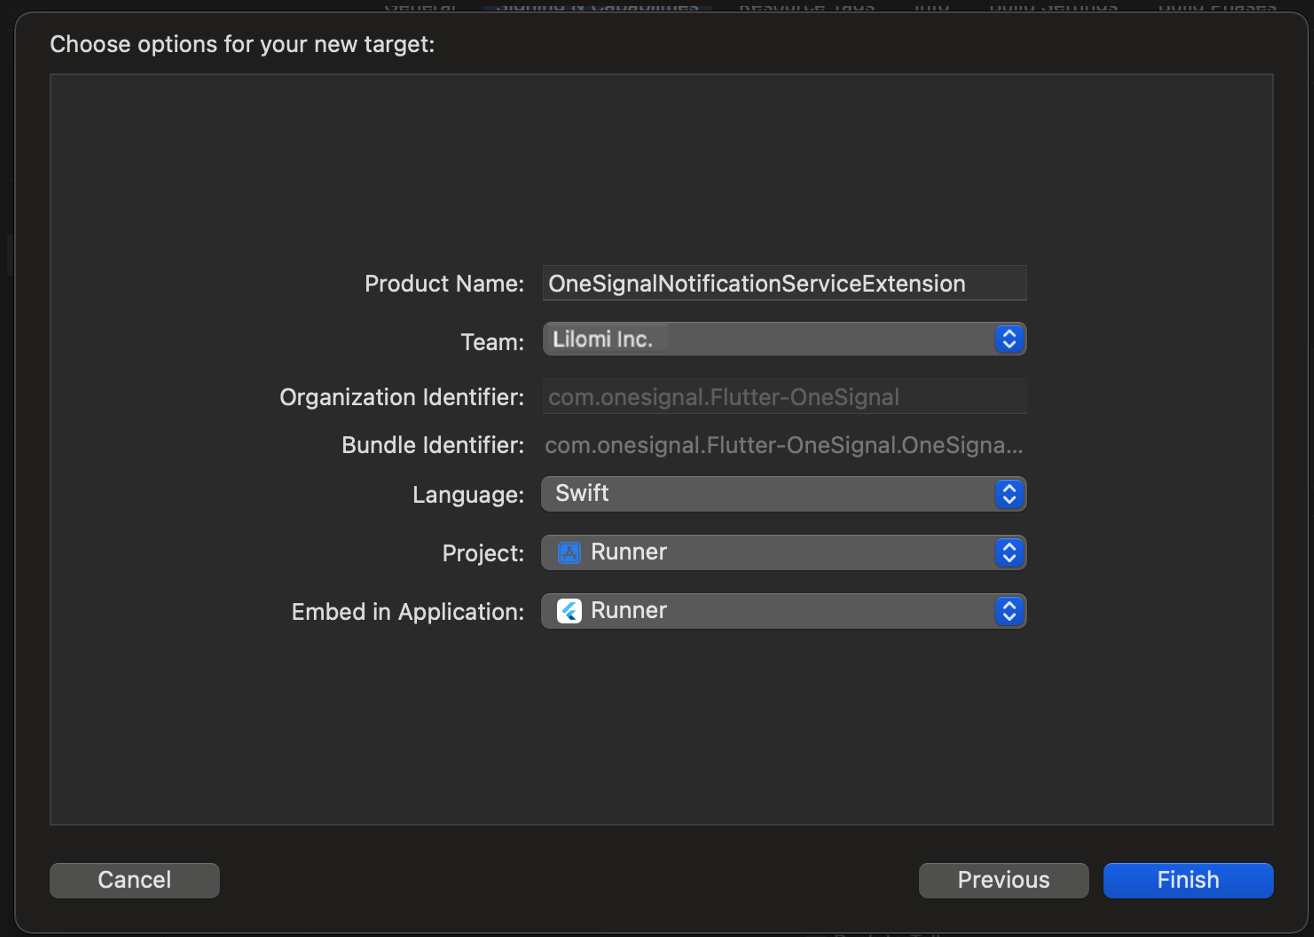
OneSignalNotificationServiceExtension y presiona Finish.
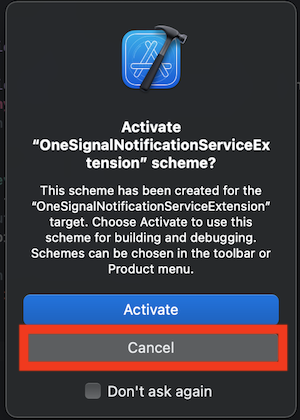
Al cancelar, mantienes la depuración de tu aplicación en lugar de la extensión que acabas de crear. Si la activaste por accidente, puedes volver a depurar tu objetivo de aplicación cerca de la parte superior central junto al selector de dispositivo.
Esto debería ser el mismo valor que tu Main Application Target.
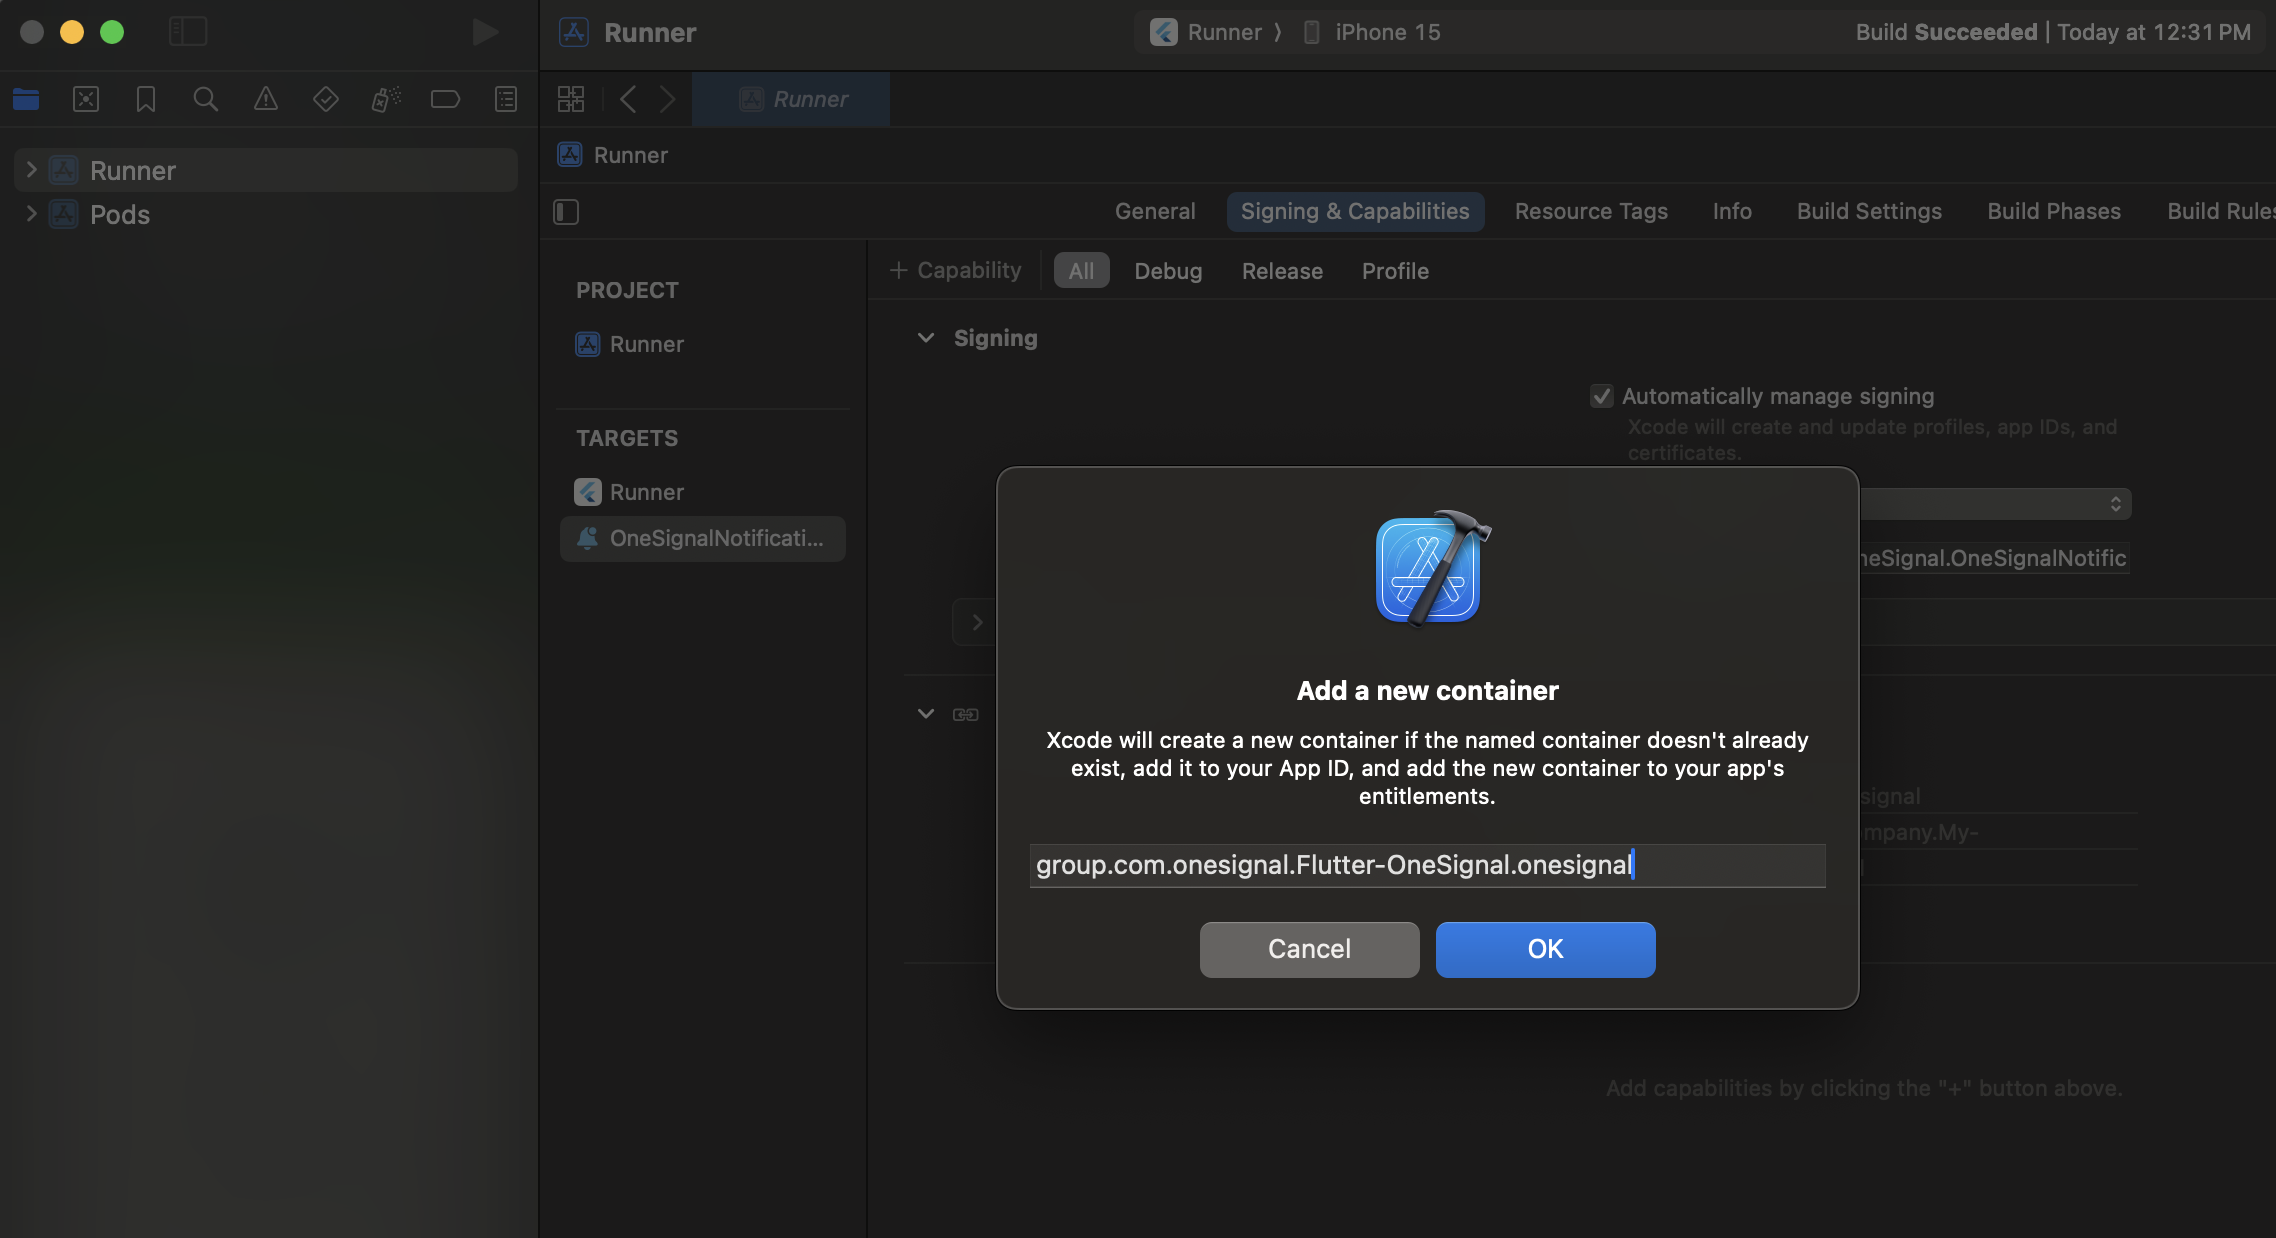
Agregar App Groups
Los App Groups permiten que tu aplicación y la OneSignalNotificationServiceExtension se comuniquen cuando se recibe una notificación, incluso si tu aplicación no está activa. Esto es requerido para insignias y Confirmed Deliveries. Selecciona tu Main App Target > Signing & Capabilities > + Capability > App Groups.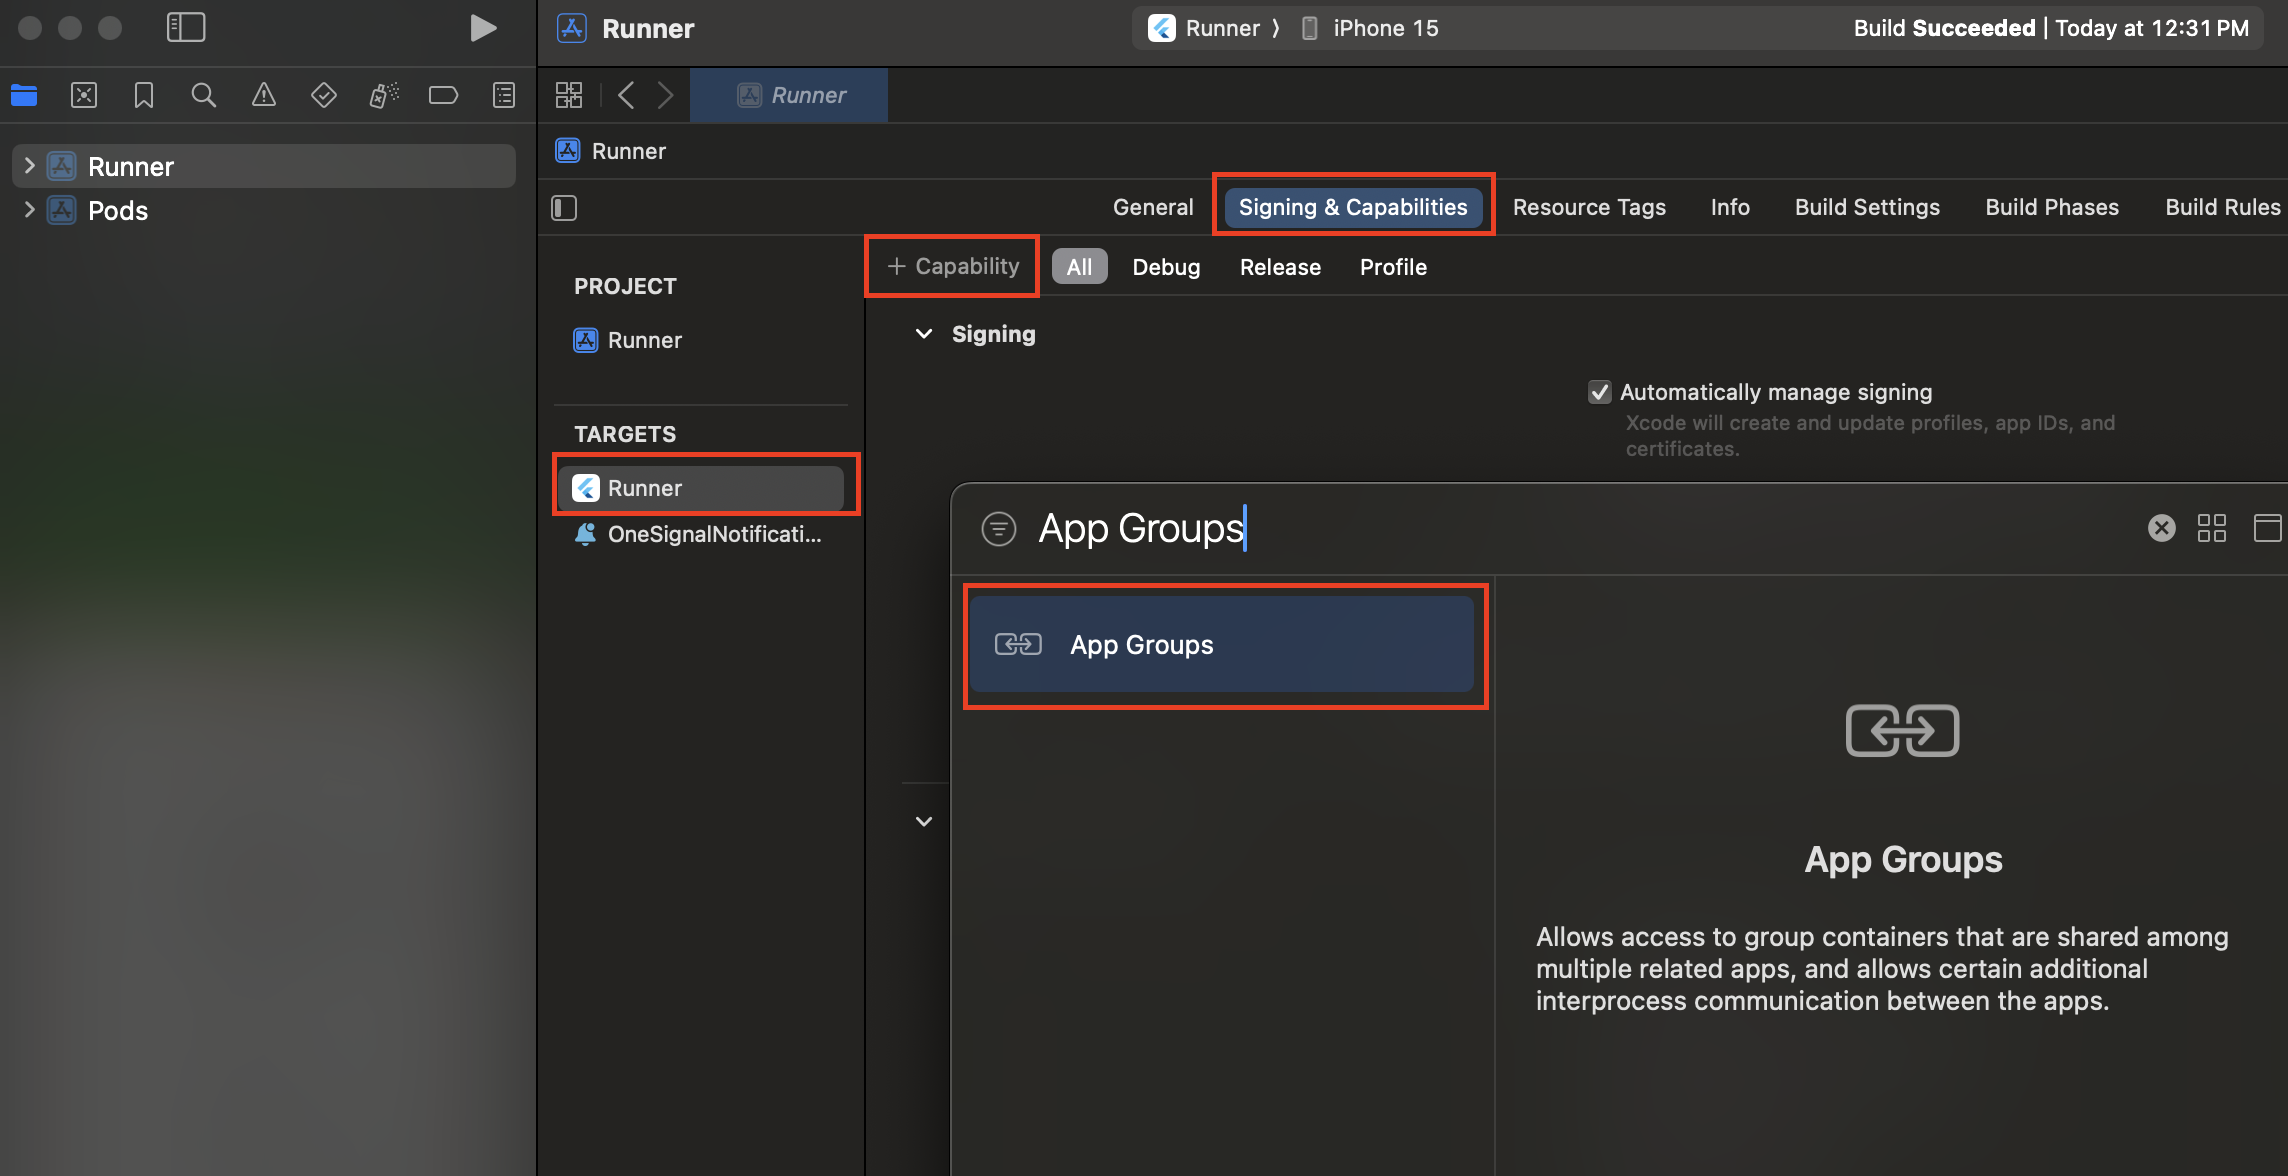
group.YOUR_BUNDLE_IDENTIFIER.onesignal donde YOUR_BUNDLE_IDENTIFIER es el mismo que el “Bundle Identifier” de tu aplicación principal.
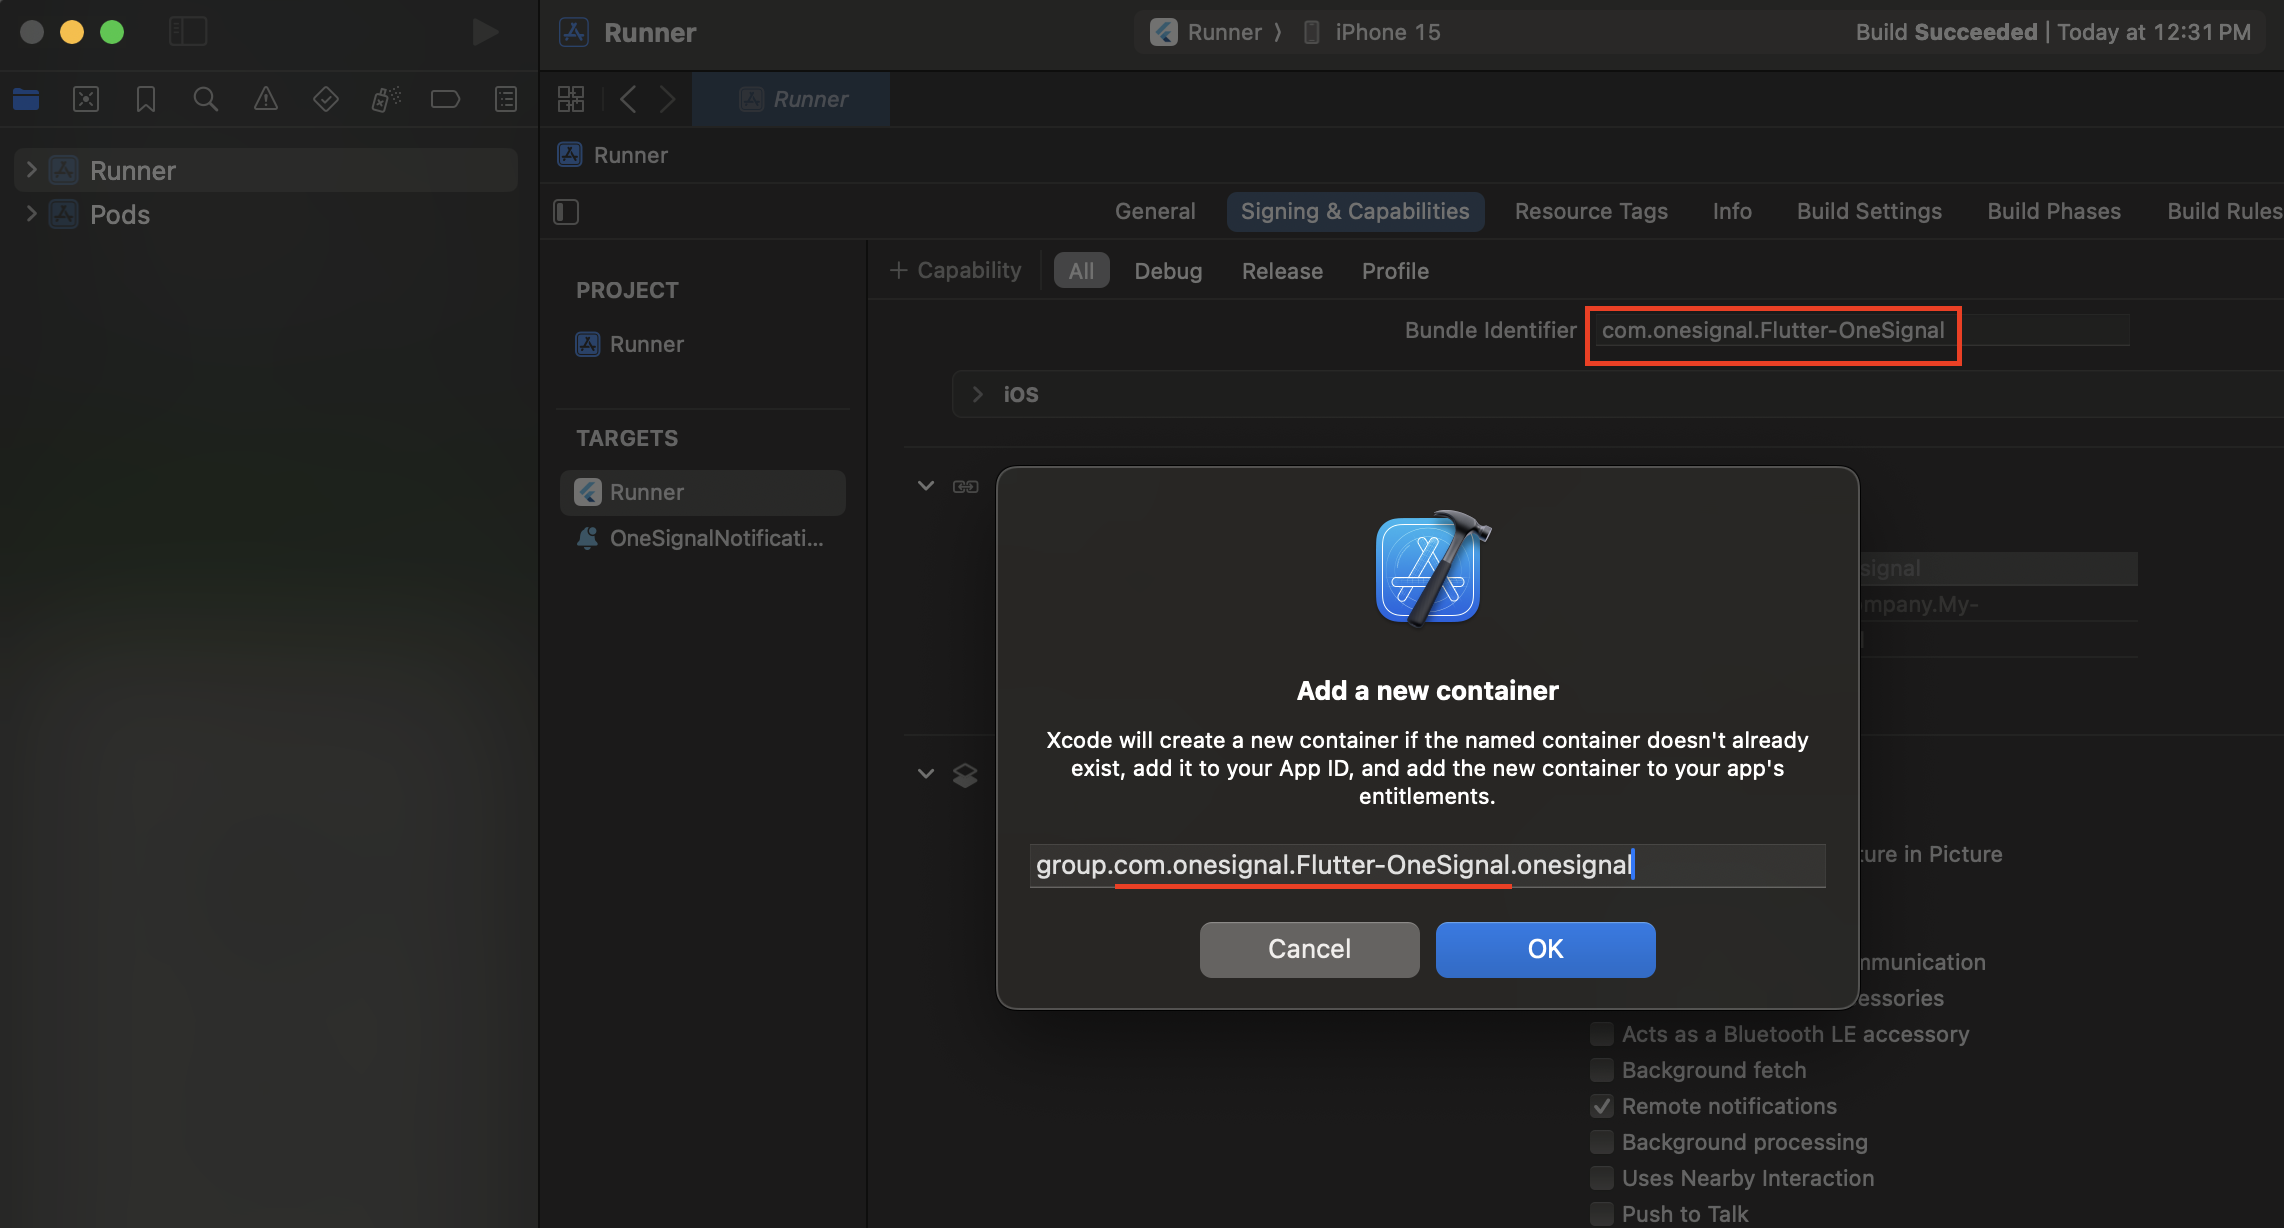
group.YOUR_BUNDLE_IDENTIFIER.onesignal donde YOUR_BUNDLE_IDENTIFIER es el mismo que el “Bundle Identifier” de tu aplicación principal.
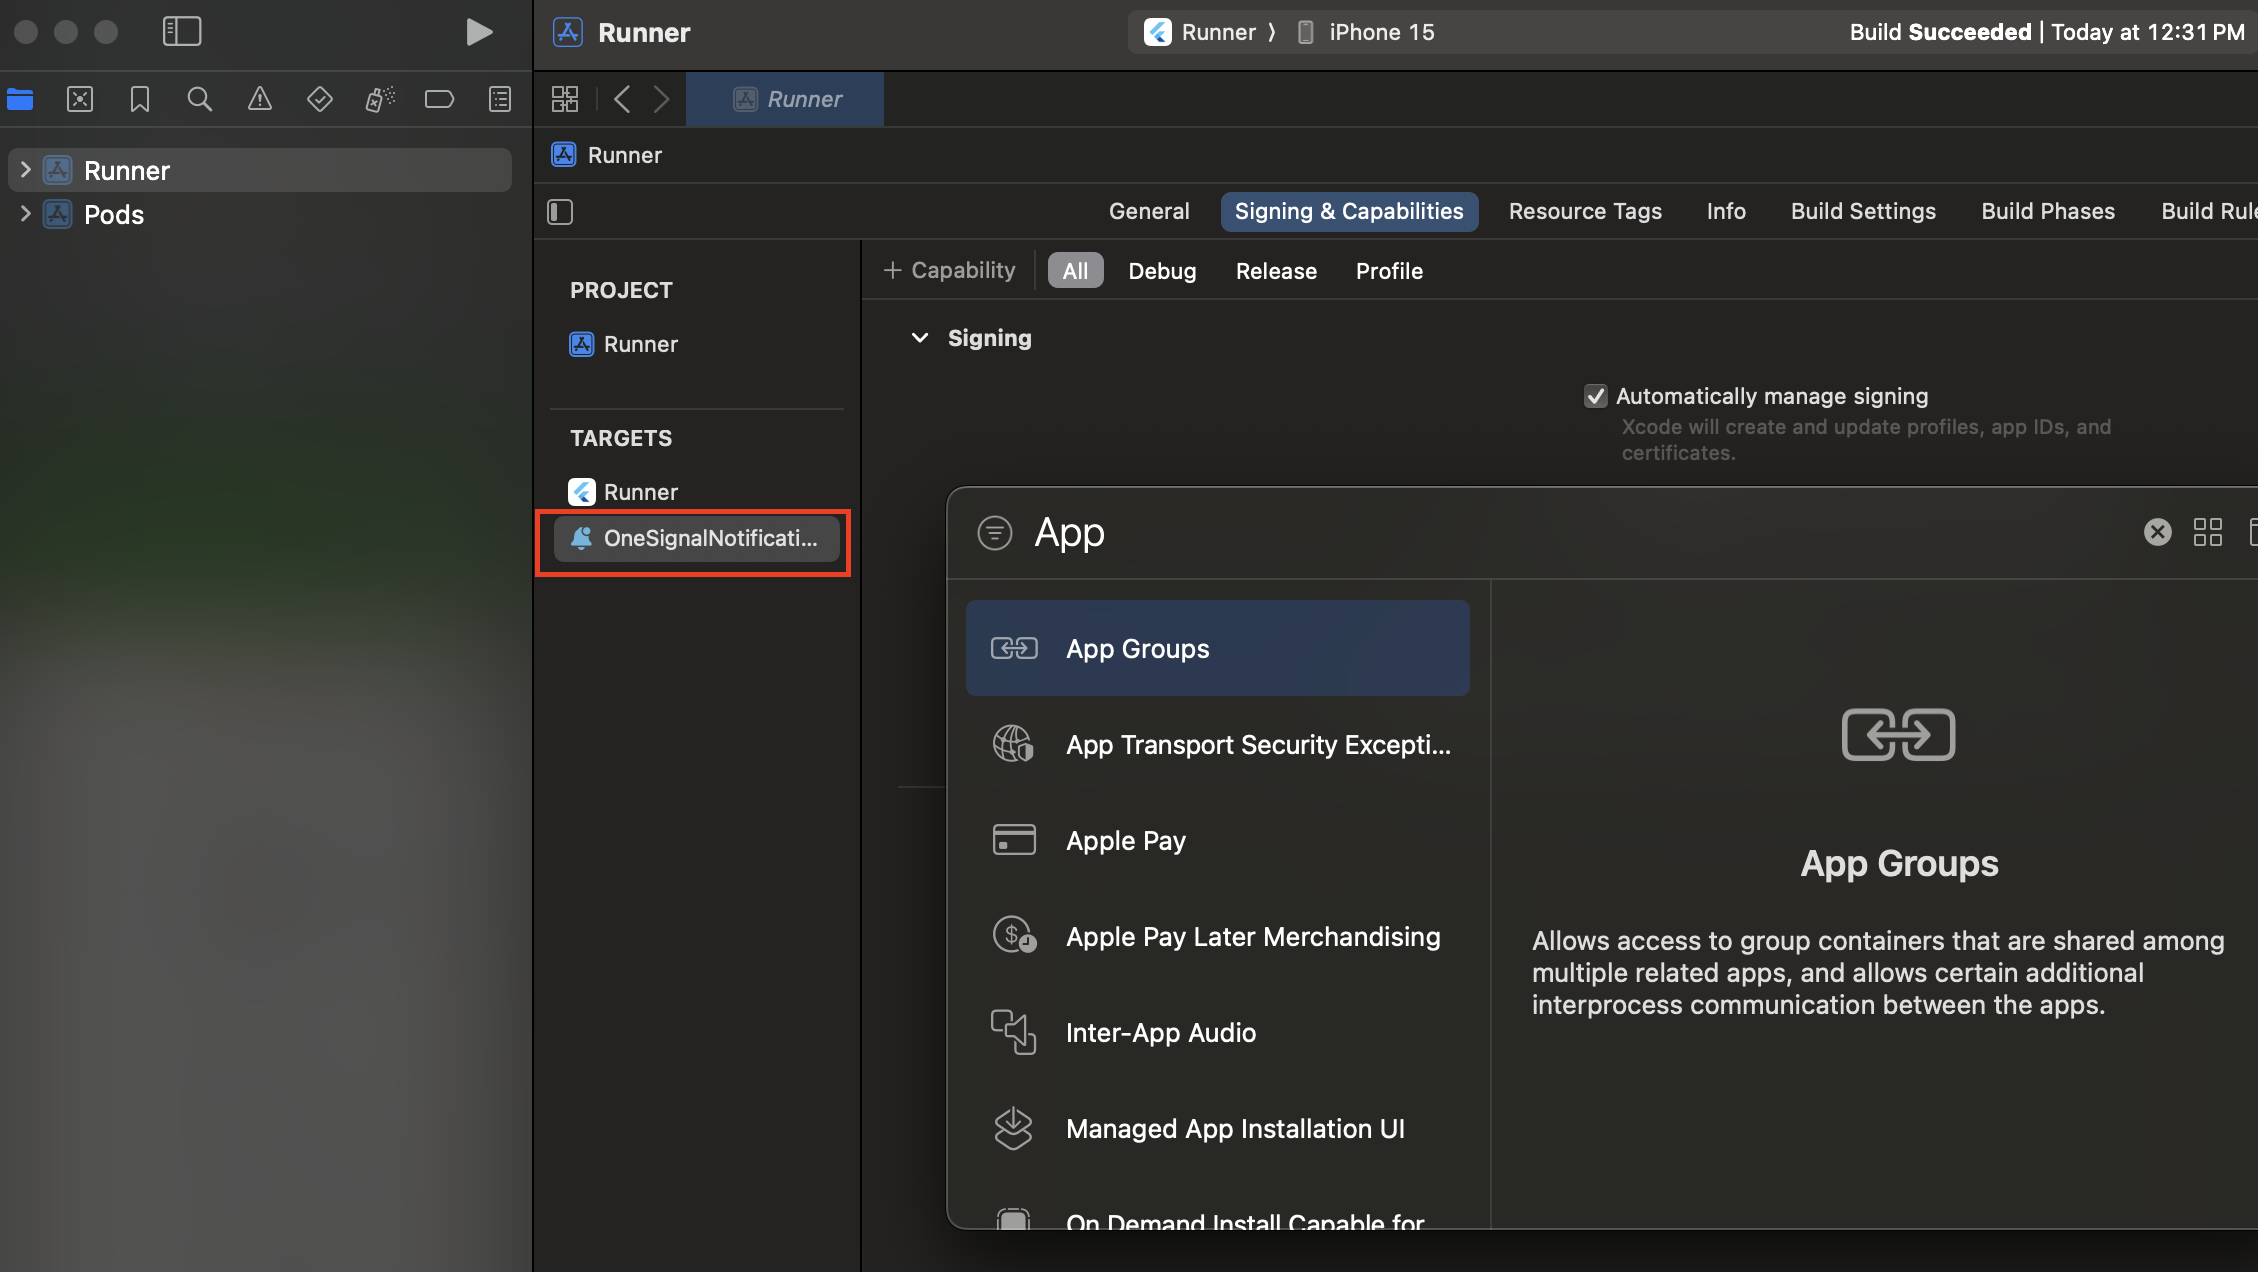
NO INCLUYAS OneSignalNotificationServiceExtension.
No incluyas OneSignalNotificationServiceExtension
Instrucciones opcionales para configurar nombre de App Group personalizado
Instrucciones opcionales para configurar nombre de App Group personalizado
group.{your_bundle_id}.onesignal).Abre tu archivo Info.plist y agrega una nueva OneSignal_app_groups_key como tipo String.Ingresa el nombre del grupo que verificaste en el último paso como su valor.Asegúrate de hacer lo mismo para el Info.plist bajo la carpeta OneSignalNotificationServiceExtension.Agregar SDK de OneSignal a la OneSignalNotificationServiceExtension
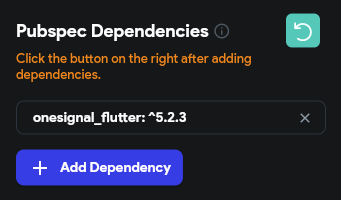
Actualiza tuios/Podfile para incluir:
Podfile asegúrate de tener platform :ios, '11.0'. - O una versión más nueva de iOS si tu aplicación lo requiere.
cd al directorio ios, y ejecuta pod install.
Si ves el error a continuación, agrega use_frameworks! en la parte superior de tu podfile e intenta nuevamente.
Código de OneSignalNotificationServiceExtension
En el navegador de proyectos de Xcode, selecciona la carpeta OneSignalNotificationServiceExtension y abre el archivoNotificationService.m o NotificationService.swift.
Reemplaza todo el contenido del archivo con el siguiente código.
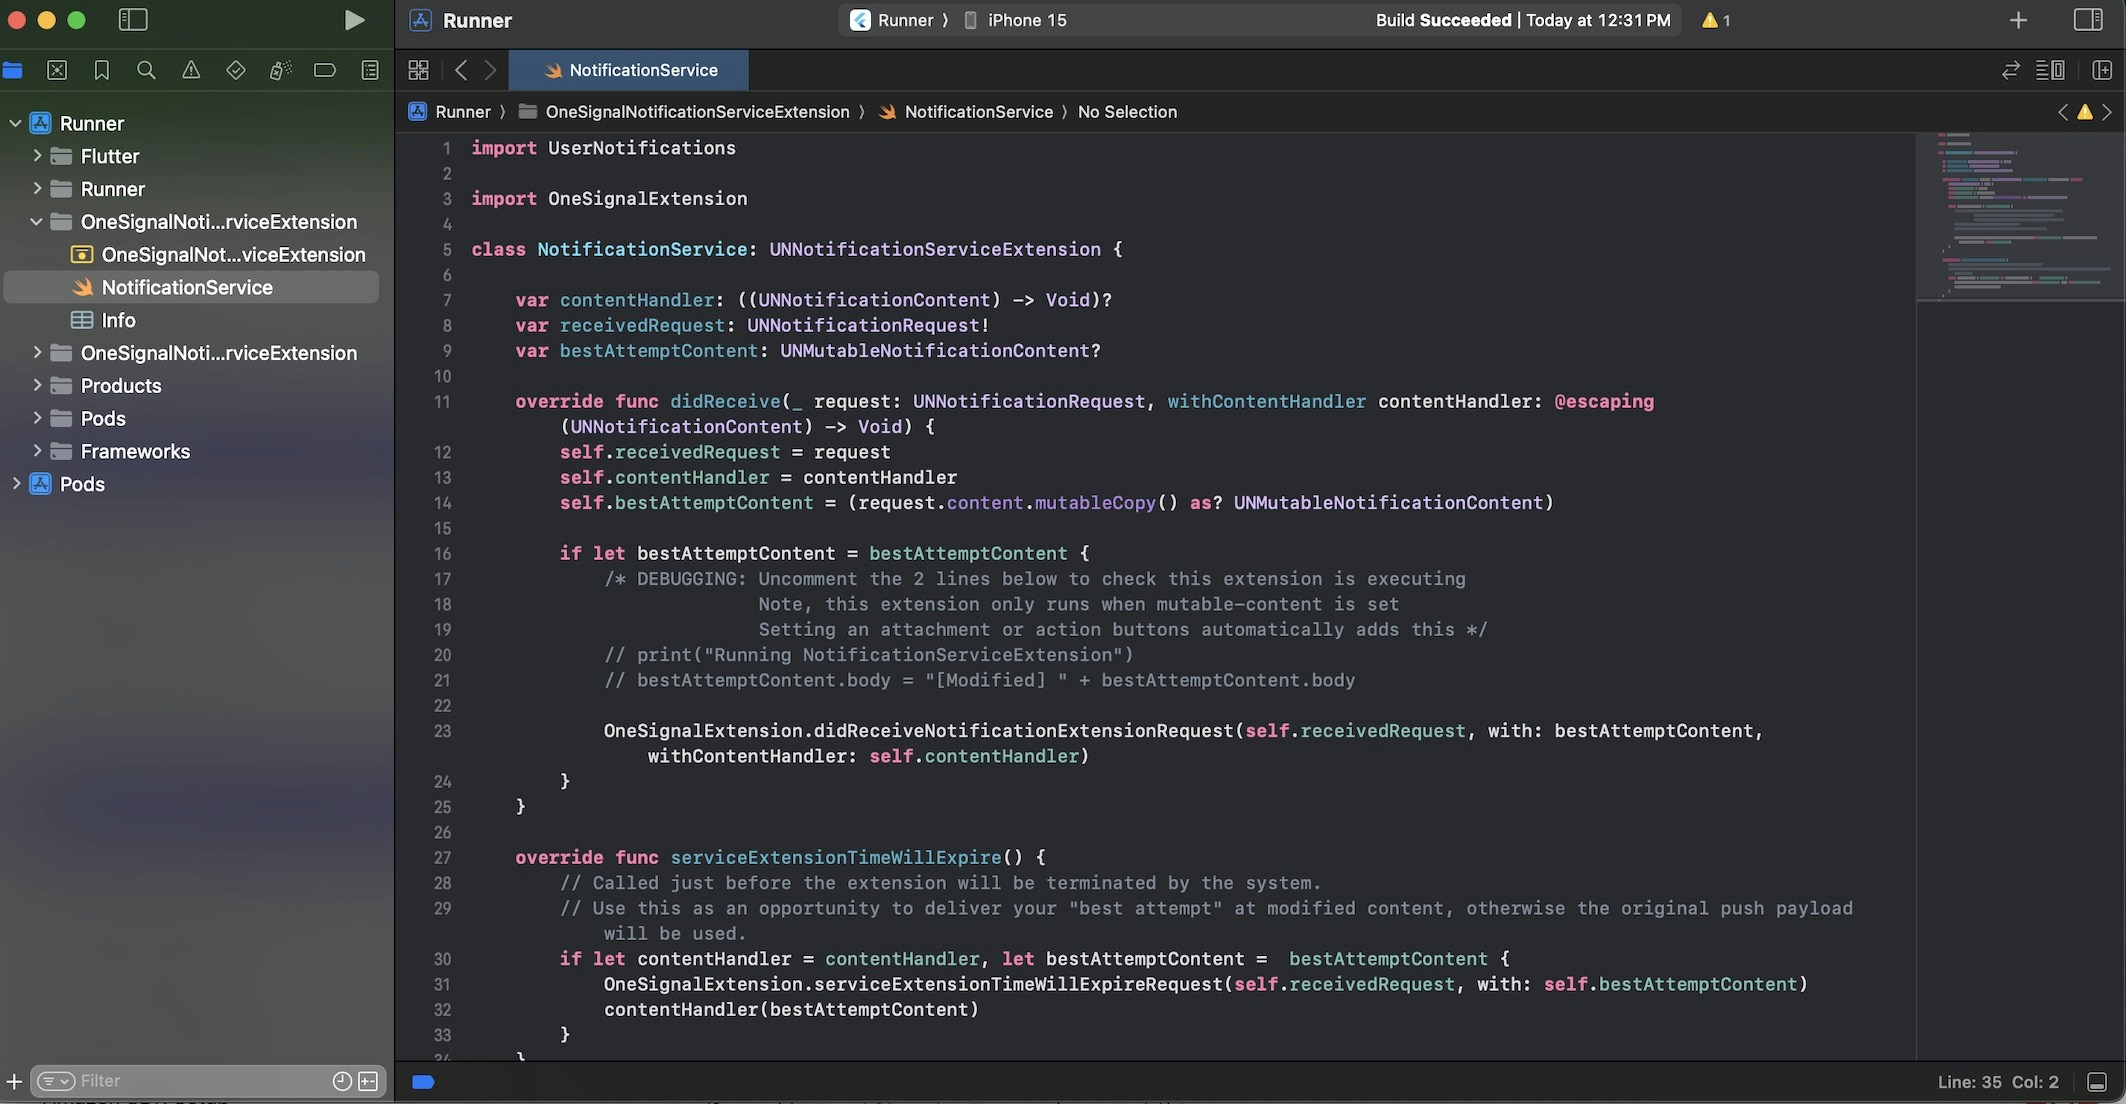
Ejemplo del archivo NotificationService.swift.
Testing the OneSignal SDK integration
This guide helps you verify that your OneSignal SDK integration is working correctly by testing push notifications, subscription registration, and in-app messaging.Check mobile subscriptions
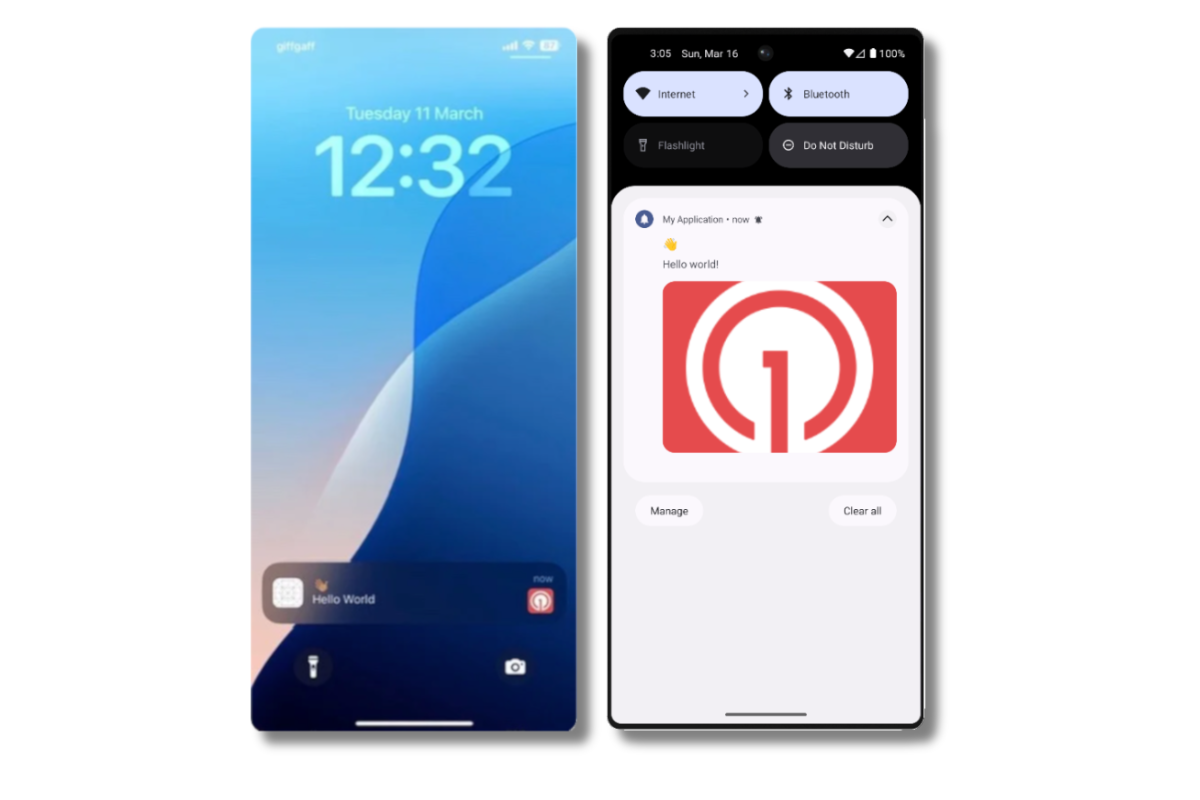
Launch your app on a test device.
requestPermission method during initialization.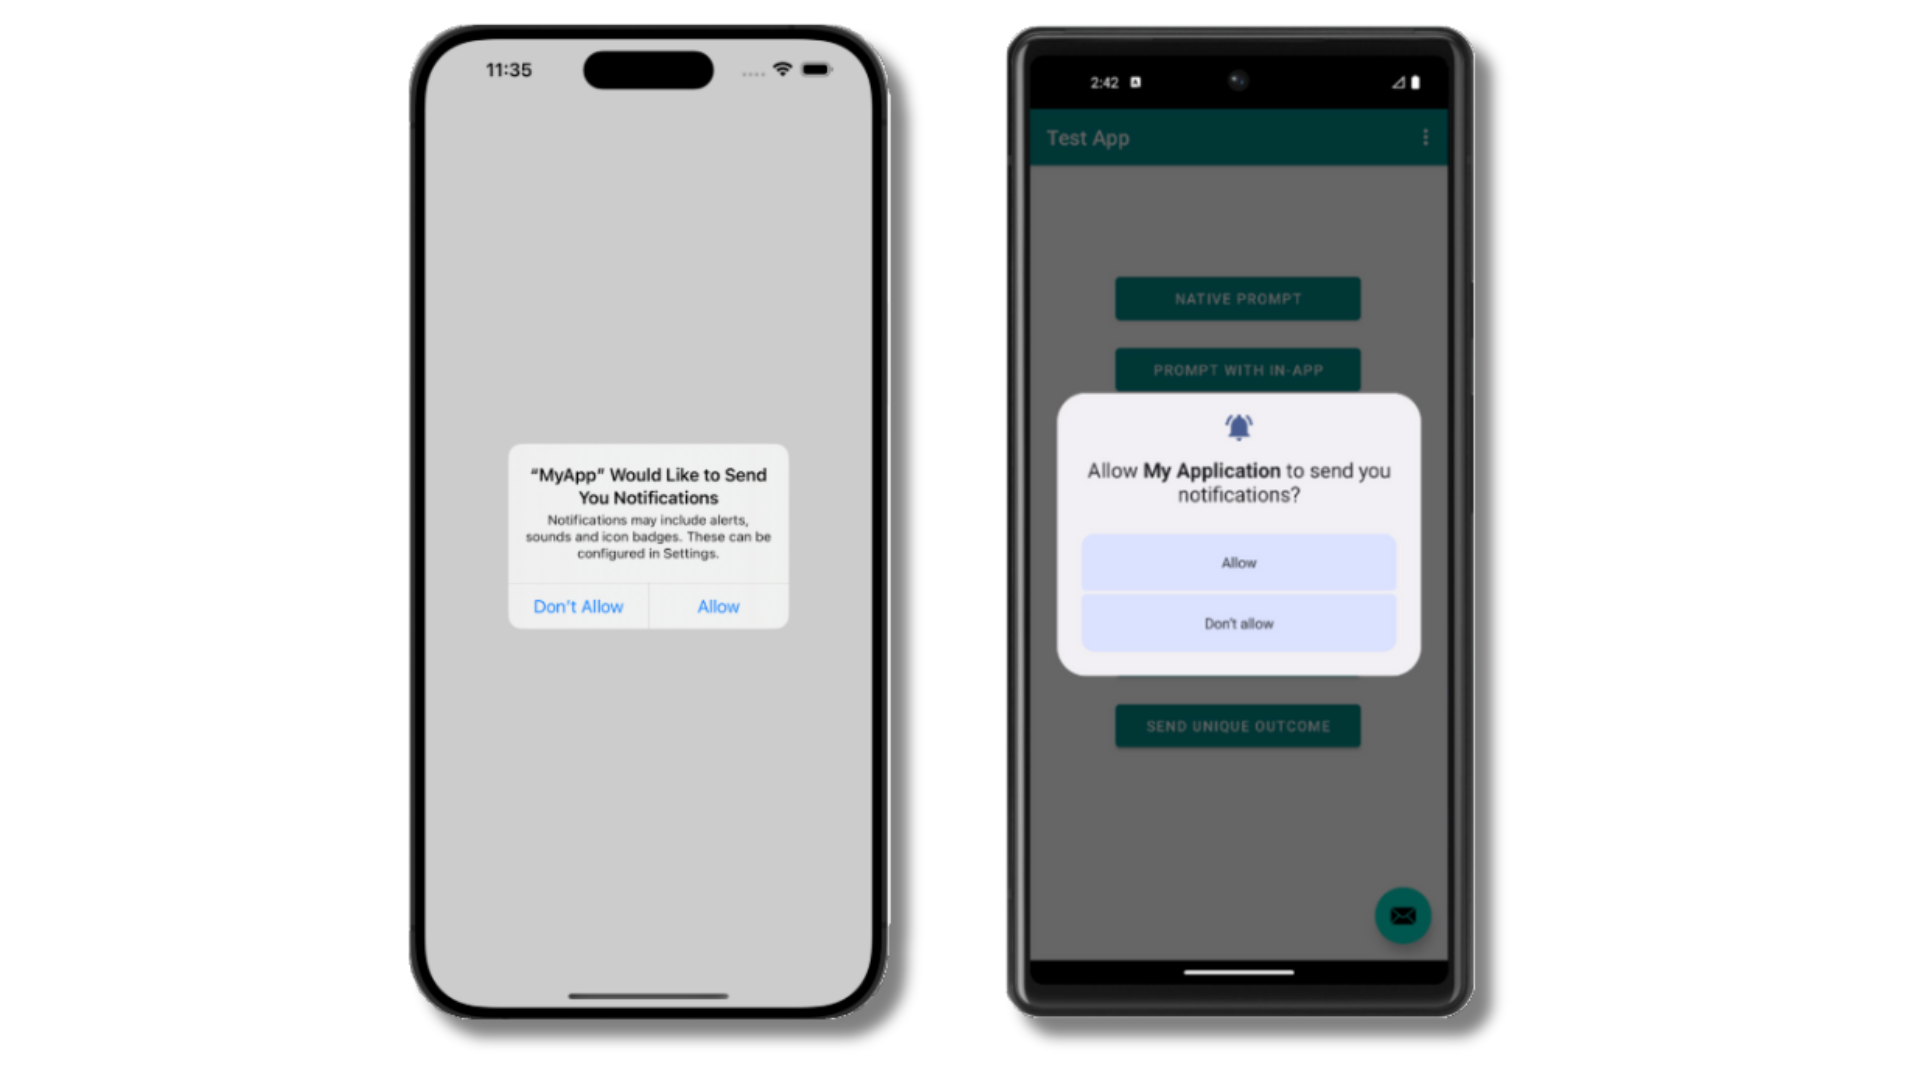
iOS and Android push permission prompts
Check your OneSignal dashboard
- Go to Audience > Subscriptions.
- You should see a new entry with the status “Never Subscribed”.
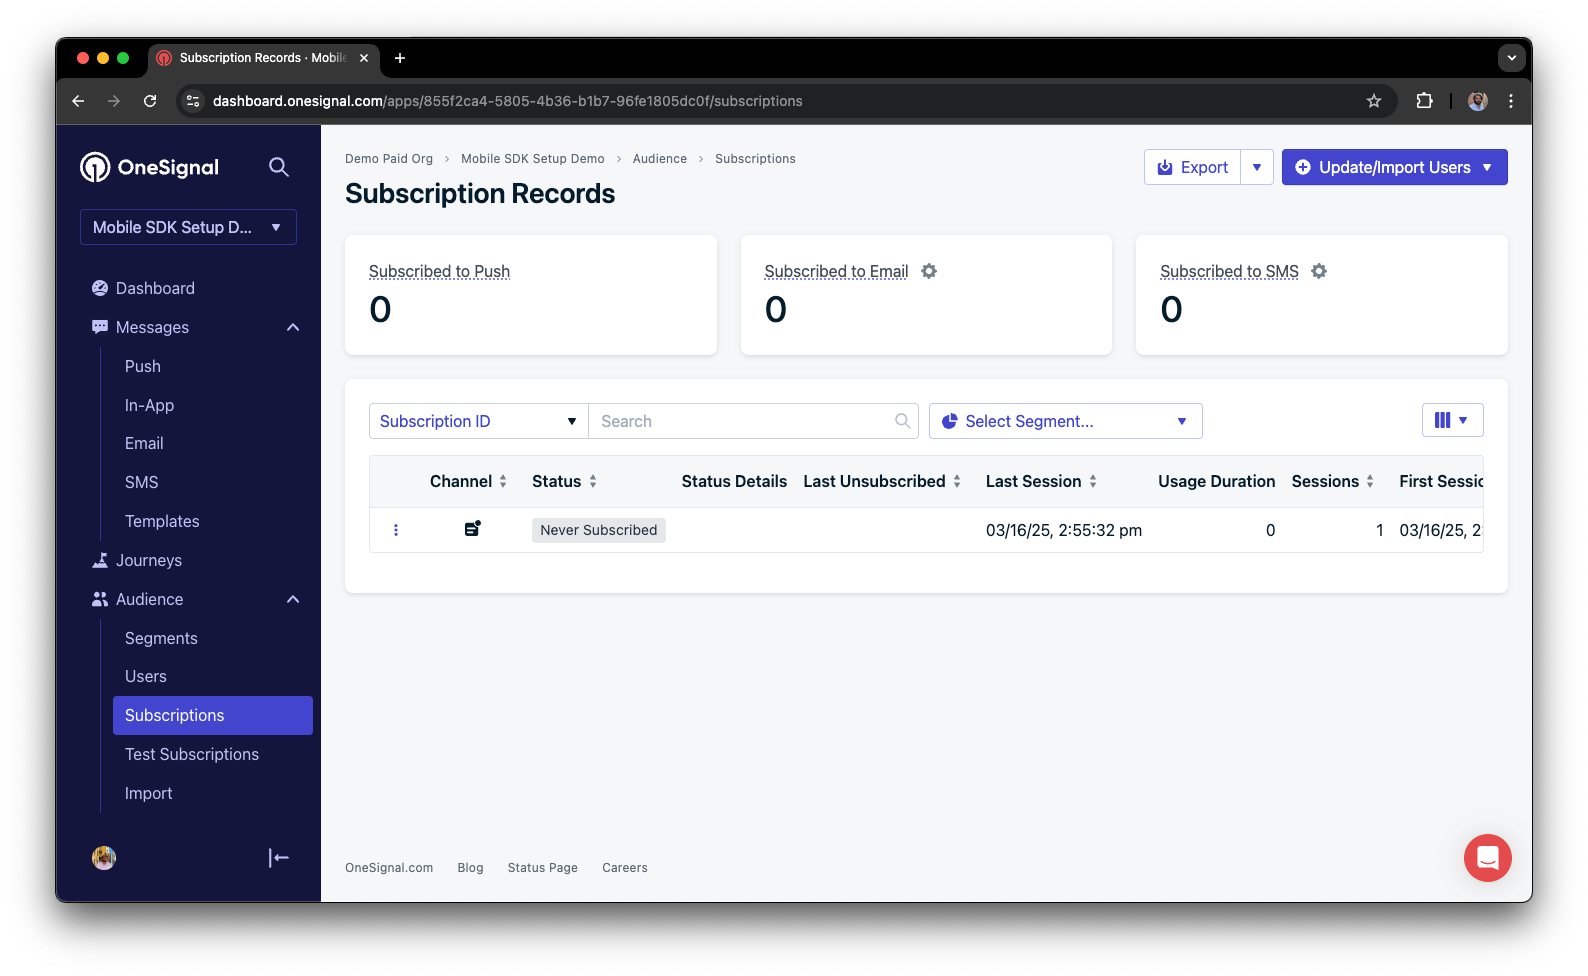
Dashboard showing subscription with 'Never Subscribed' status
Return to the app and tap Allow on the prompt.
Refresh the OneSignal dashboard Subscription's page.
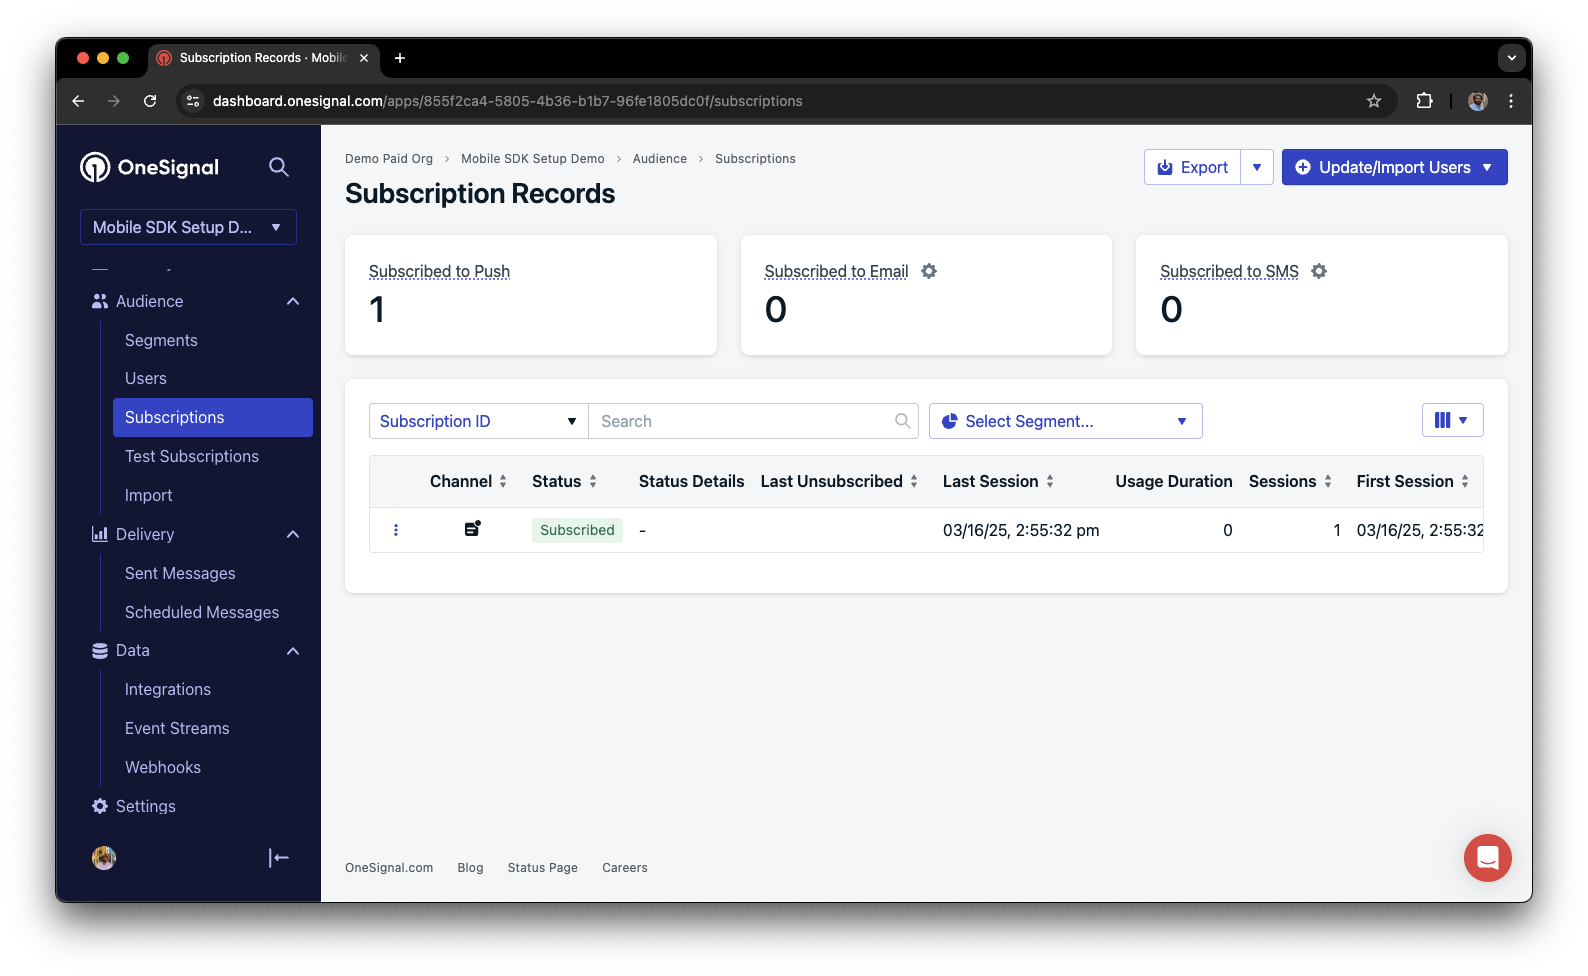
Dashboard showing subscription with 'Subscribed' status
Set up test users
test users are helpful for testing a push notification before sending a message.Add to Test Users.

Adding a device to Test Users
Name your subscription.
Create a test users segment.
Name the segment.
Test Users (the name is important because it will be used later).Add the Test Users filter and click Create Segment.

Creating a 'Test Users' segment with the Test Users filter
Send test push via API
Get your App API Key and App ID.
Update the provided code.
YOUR_APP_API_KEY and YOUR_APP_ID in the code below with your actual keys. This code uses the Test Users segment we created earlier.Run the code.
Check images and confirmed receipt.
Push notification with image on iOS and Android
Check for confirmed receipt.
Send an in-app message
In-app messages let you communicate with users while they are using your app.Close or background your app on the device.
Create an in-app message.
- In your OneSignal dashboard, navigate to Messages > In-App > New In-App.
- Find and select the Welcome message.
- Set your Audience as the Test Users segment we used previously.
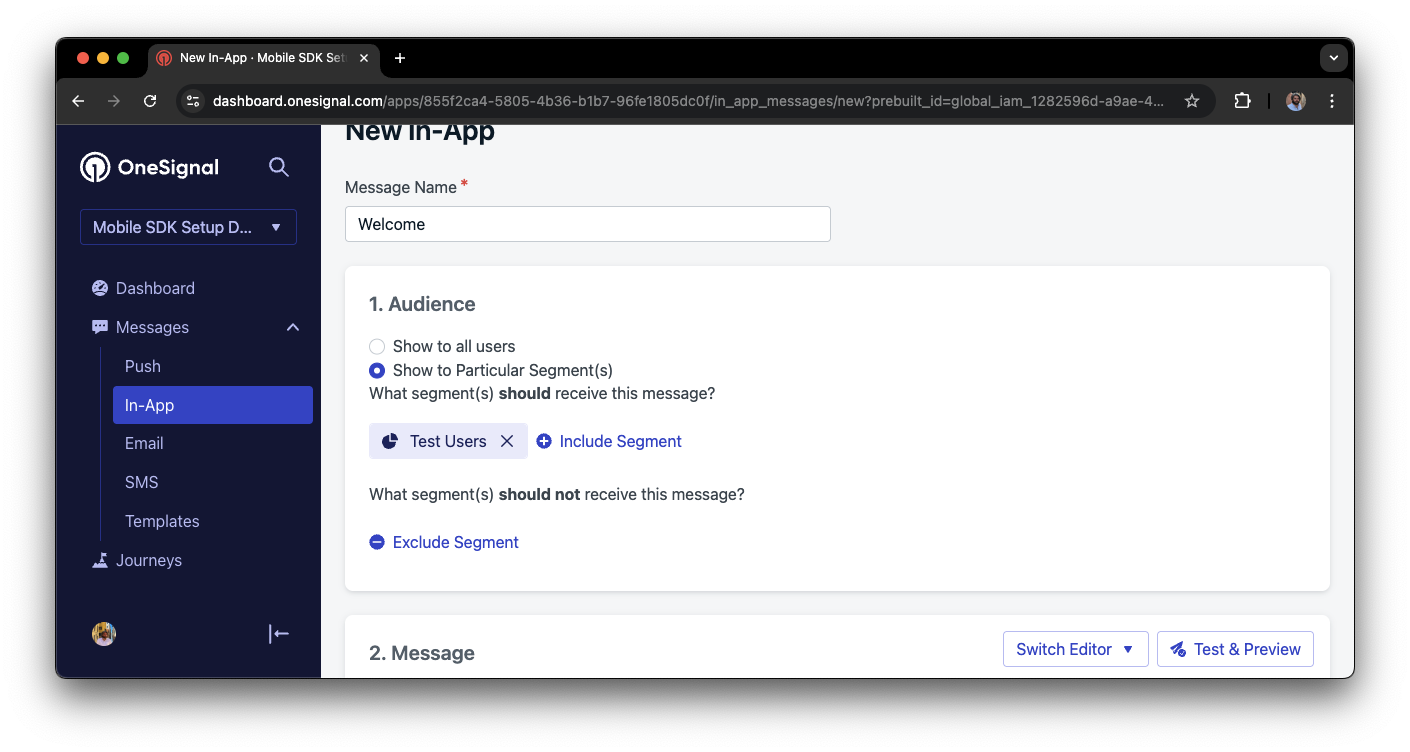
Targeting the 'Test Users' segment with an in-app message
Customize the message content if desired.
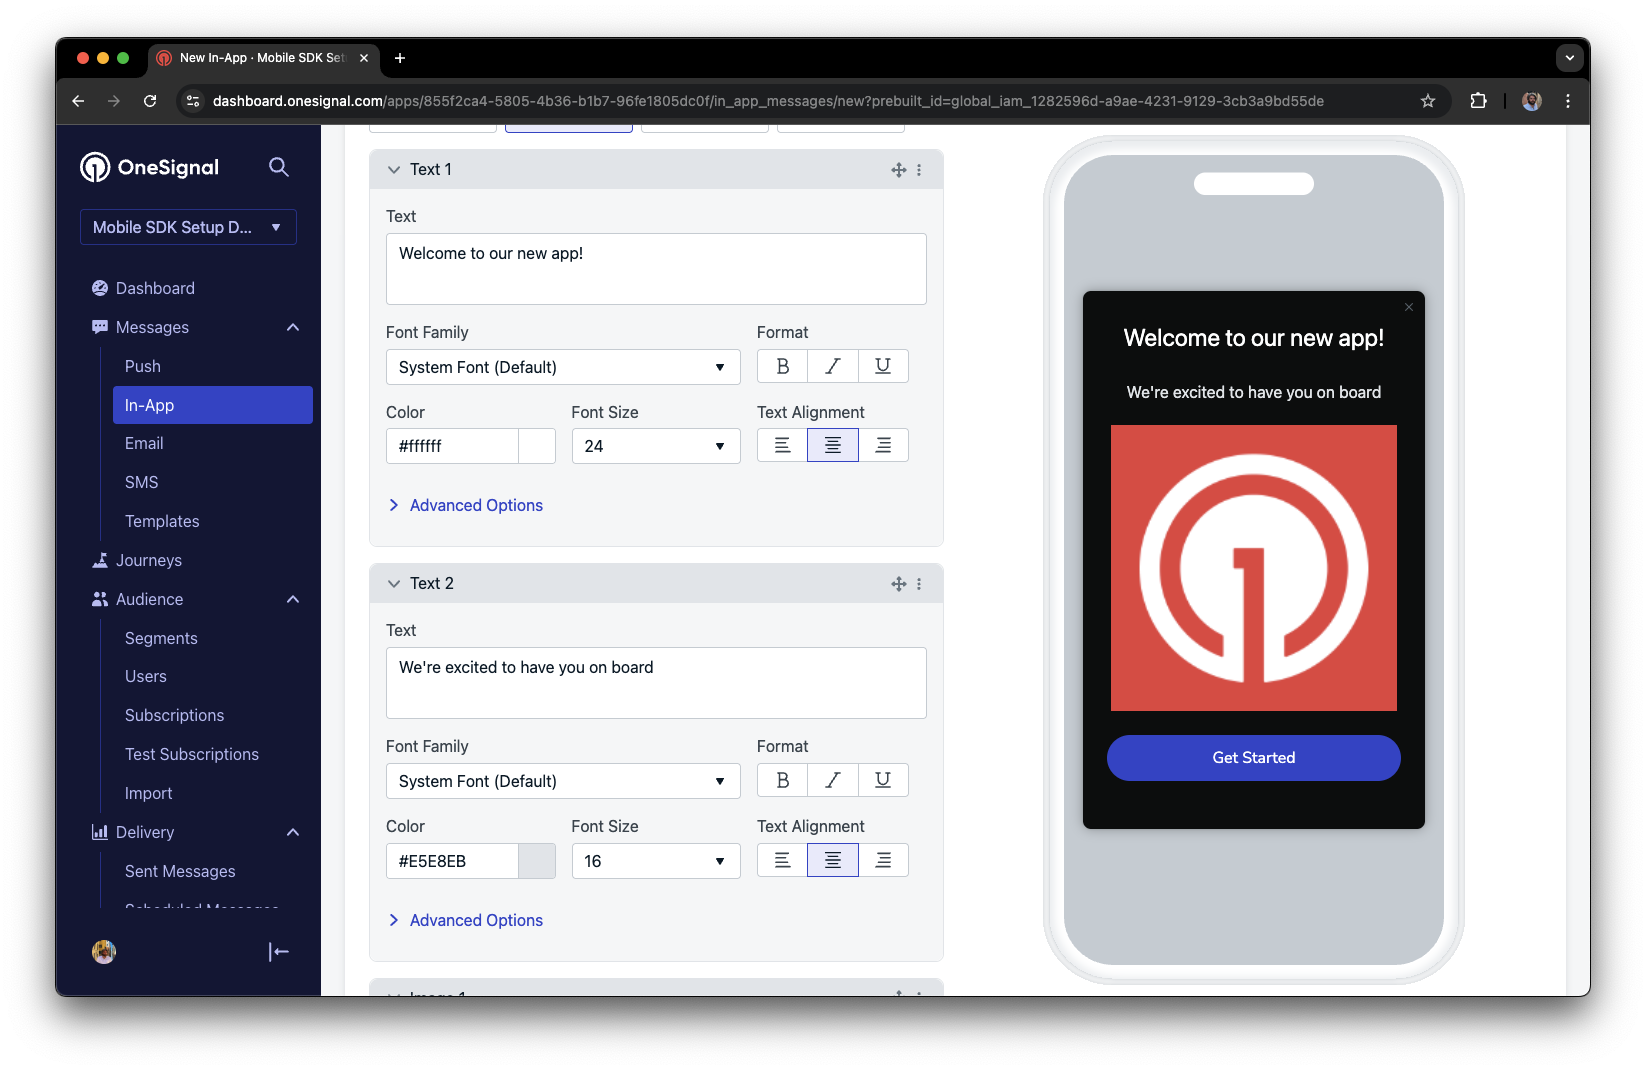
Example customization of in-app Welcome message
Set Trigger to 'On app open'.
Schedule frequency.
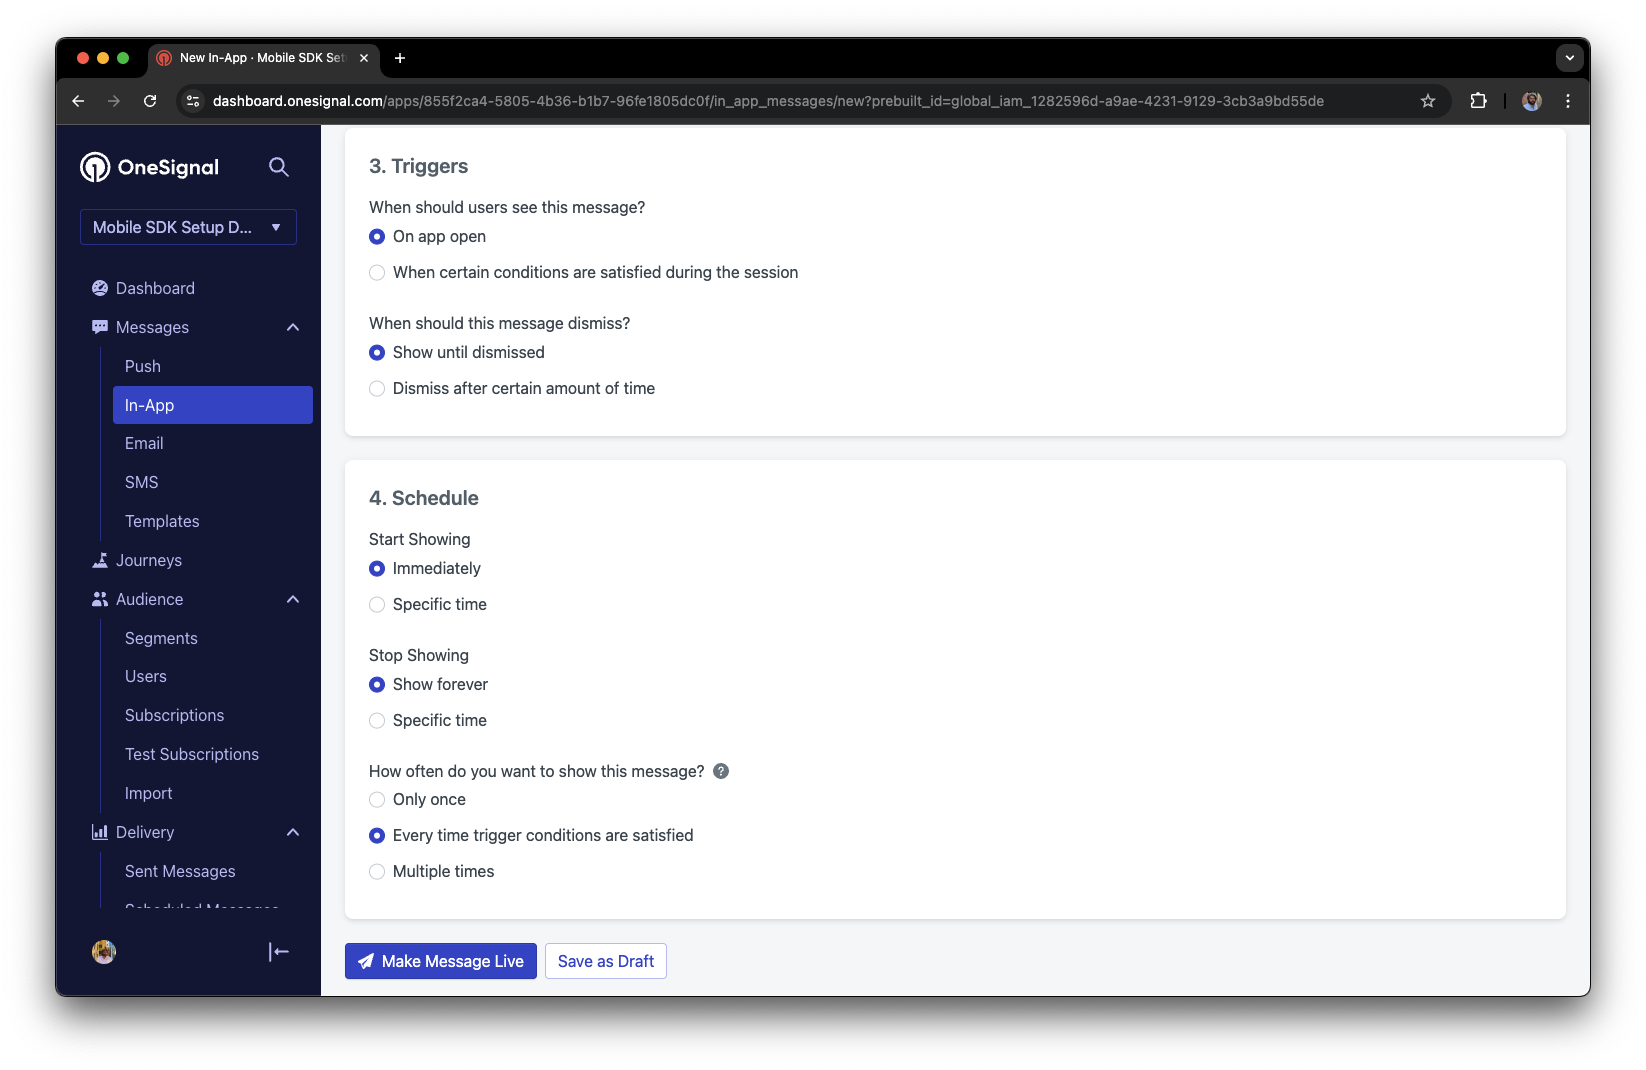
In-app message scheduling options
Make message live.
Open the app and see the message.
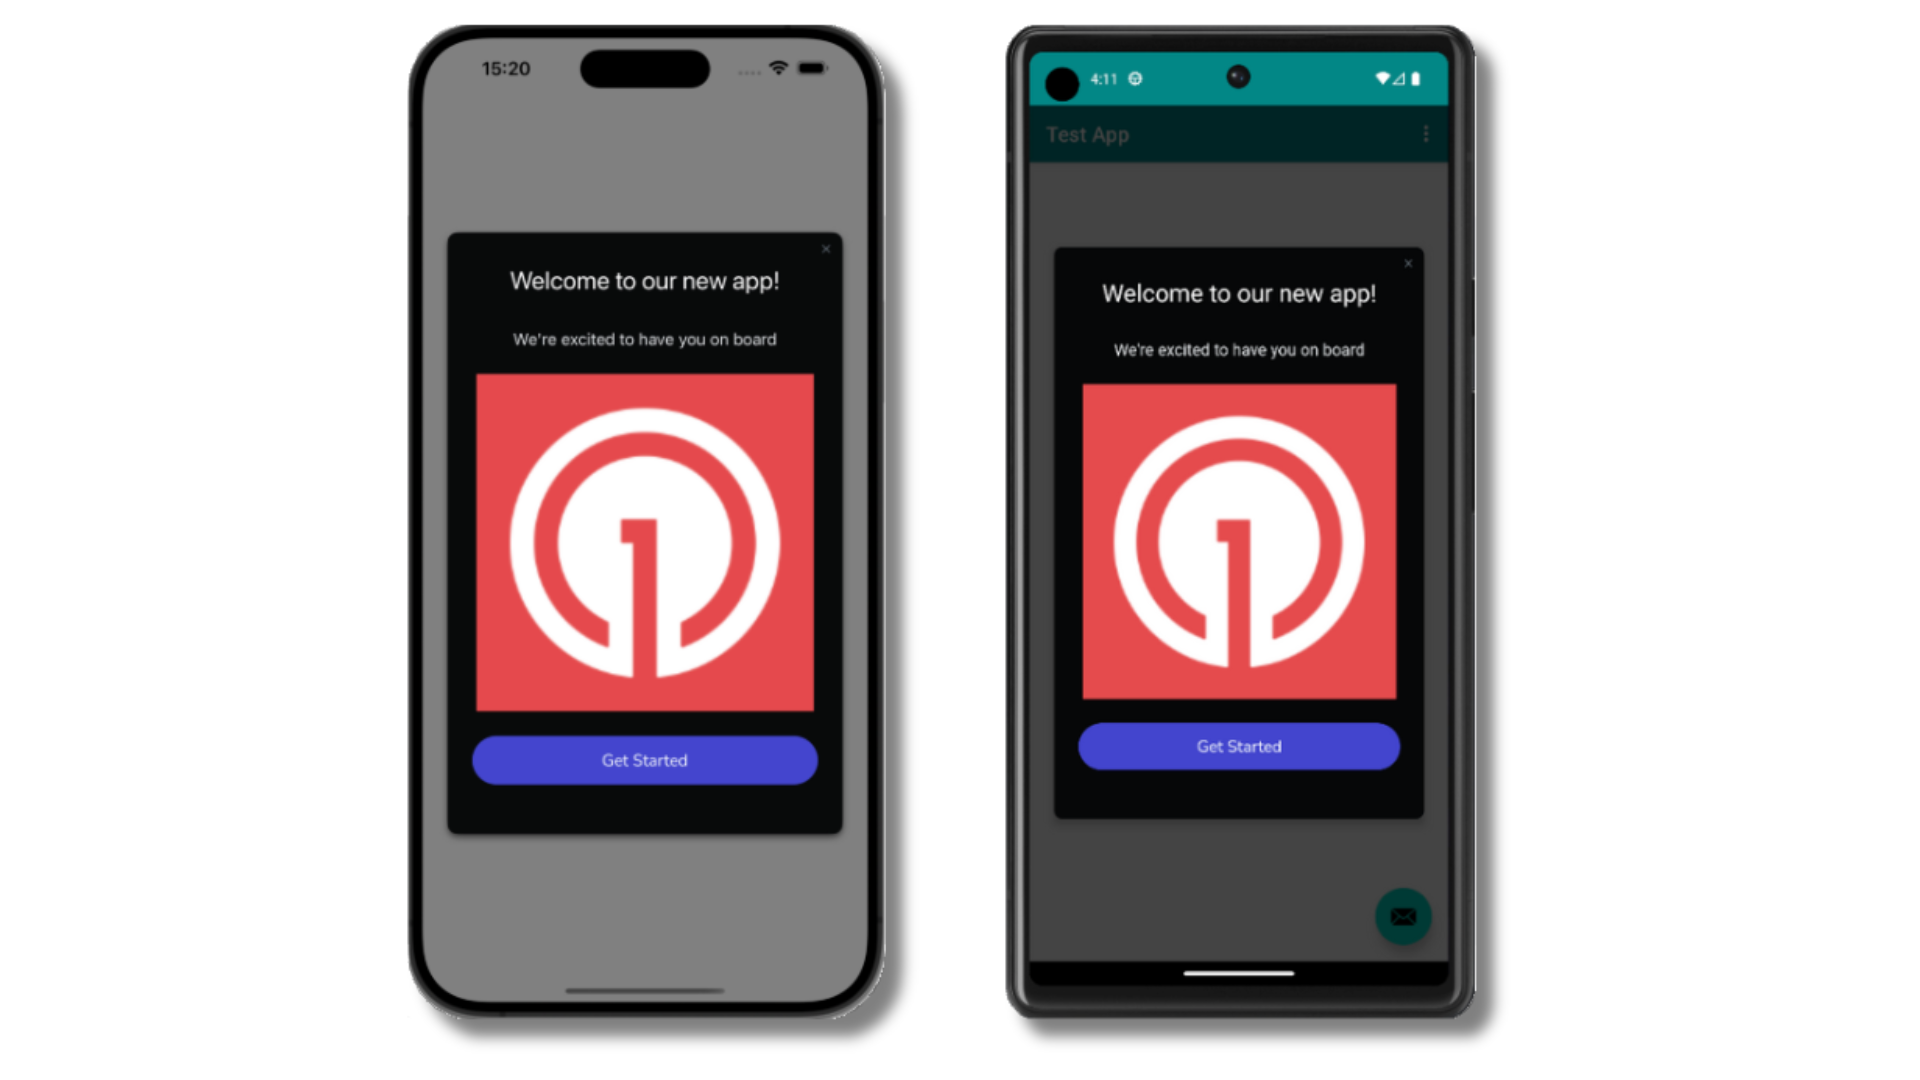
Welcome in-app message shown on devices
- Gathering Subscriptions, setting Test Users, and creating Segments.
- Sending Push with images and Confirmed receipt using Segments and our Create message API.
- Sending In-app messages.
User identification
Previously, we demonstrated how to create mobile Subscriptions. Now we’ll expand to identifying Users across all their subscriptions (including push, email, and SMS) using the OneSignal SDK. We’ll cover External IDs, tags, multi-channel subscriptions, privacy, and event tracking to help you unify and engage users across platforms.Assign External ID
Use an External ID to identify users consistently across devices, email addresses, and phone numbers using your backend’s user identifier. This ensures your messaging stays unified across channels and 3rd party systems (especially important for Integrations). Set the External ID with our SDK’slogin method each time they are identified by your app.
Add Tags
Tags are key-value pairs of string data you can use to store user properties (likeusername, role, or preferences) and events (like purchase_date, game_level, or user interactions). Tags power advanced Message Personalization and Segmentation allowing for more advanced use cases.
Set tags with our SDK addTag and addTags methods as events occur in your app.
In this example, the user reached level 6 identifiable by the tag called current_level set to a value of 6.
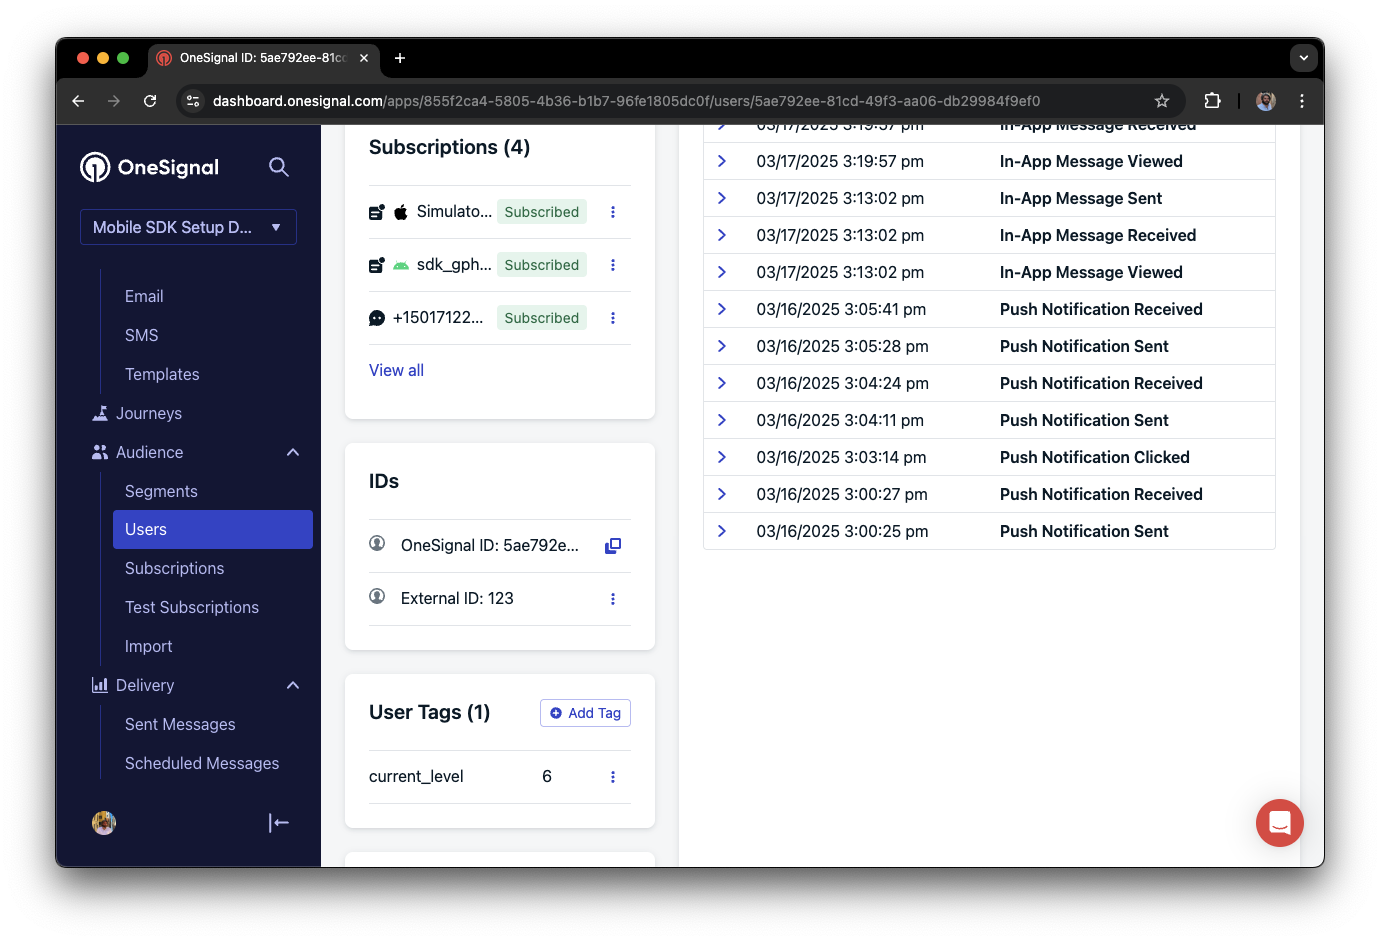
A user profile in OneSignal with a tag called "current_level" set to "6"
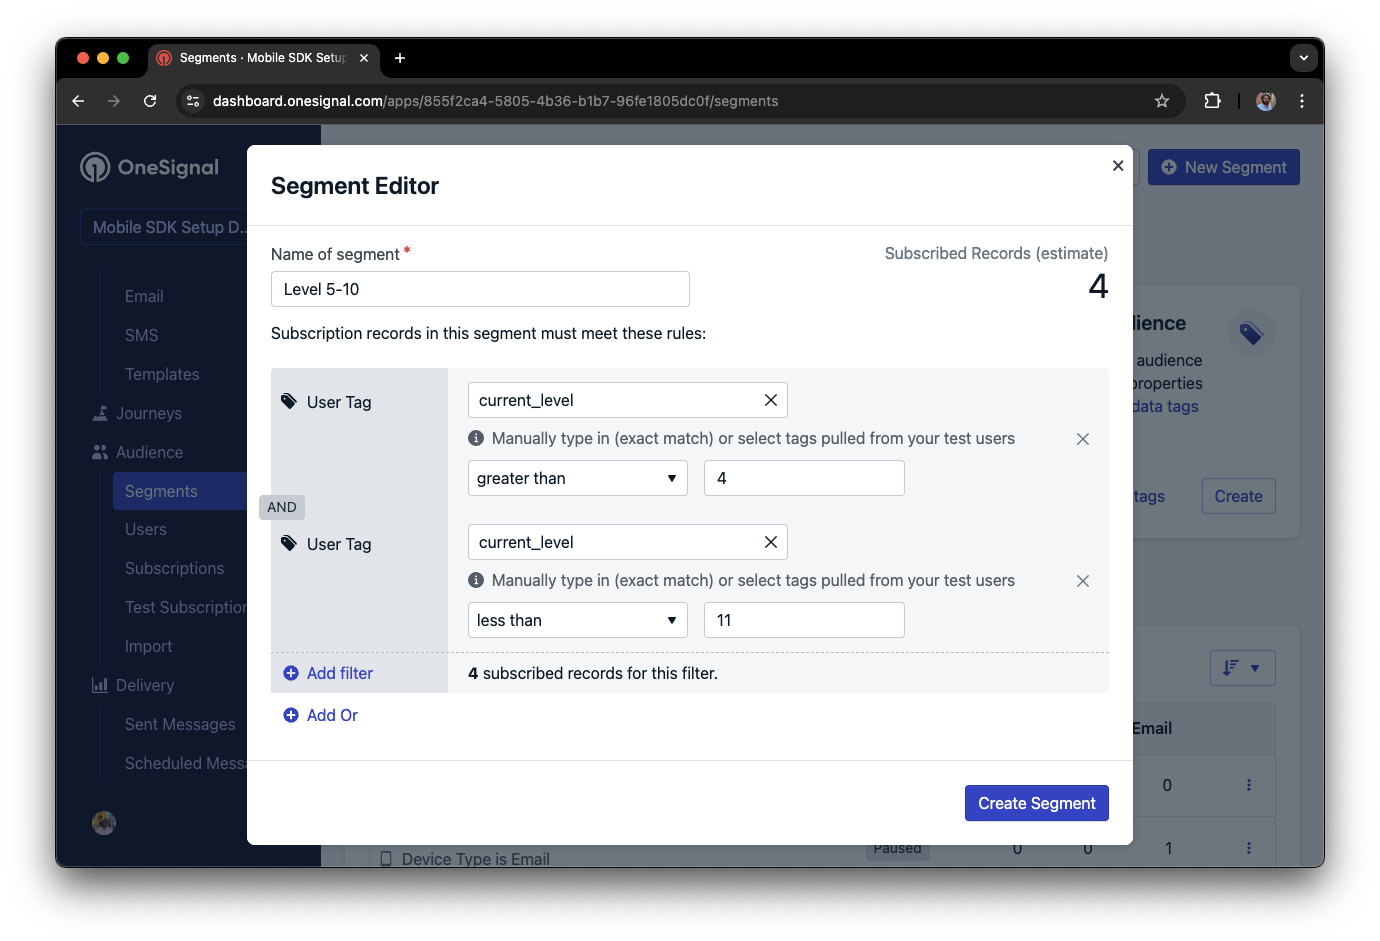
Segment editor showing a segment targeting users with a current_level value of greater than 4 and less than 10
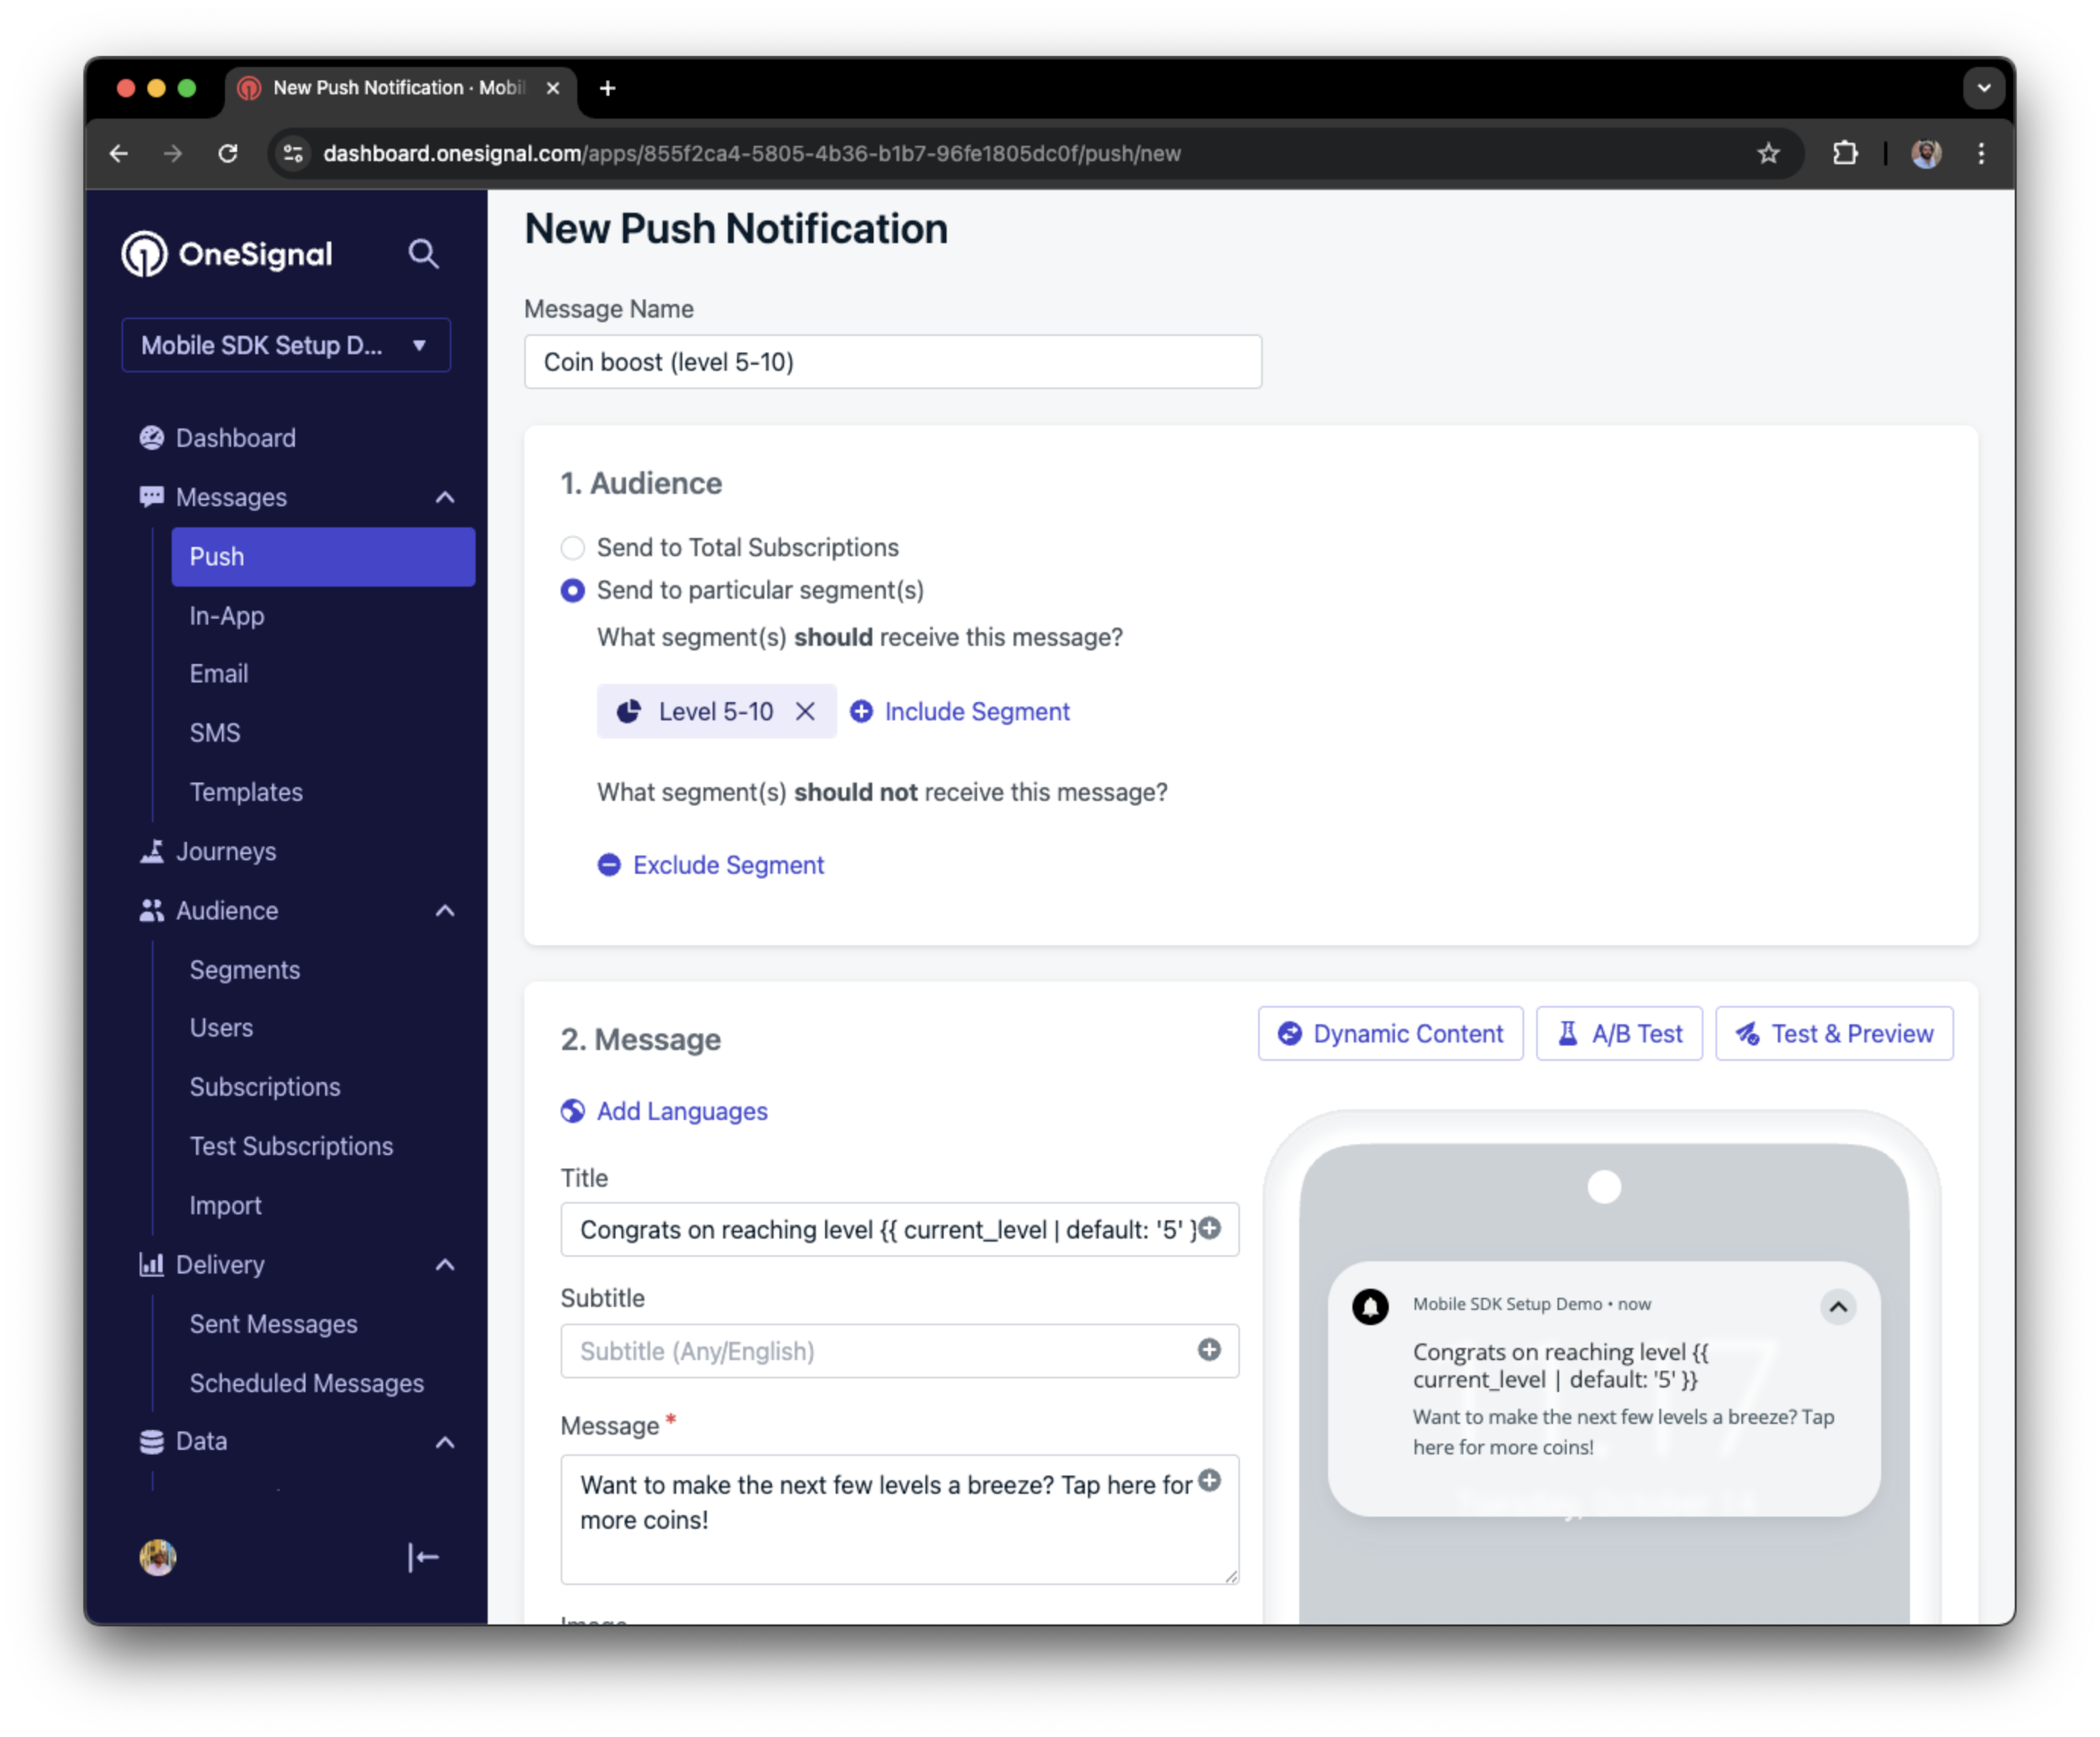
Screenshot showing a push notification targeting the Level 5-10 segment with a personalized message
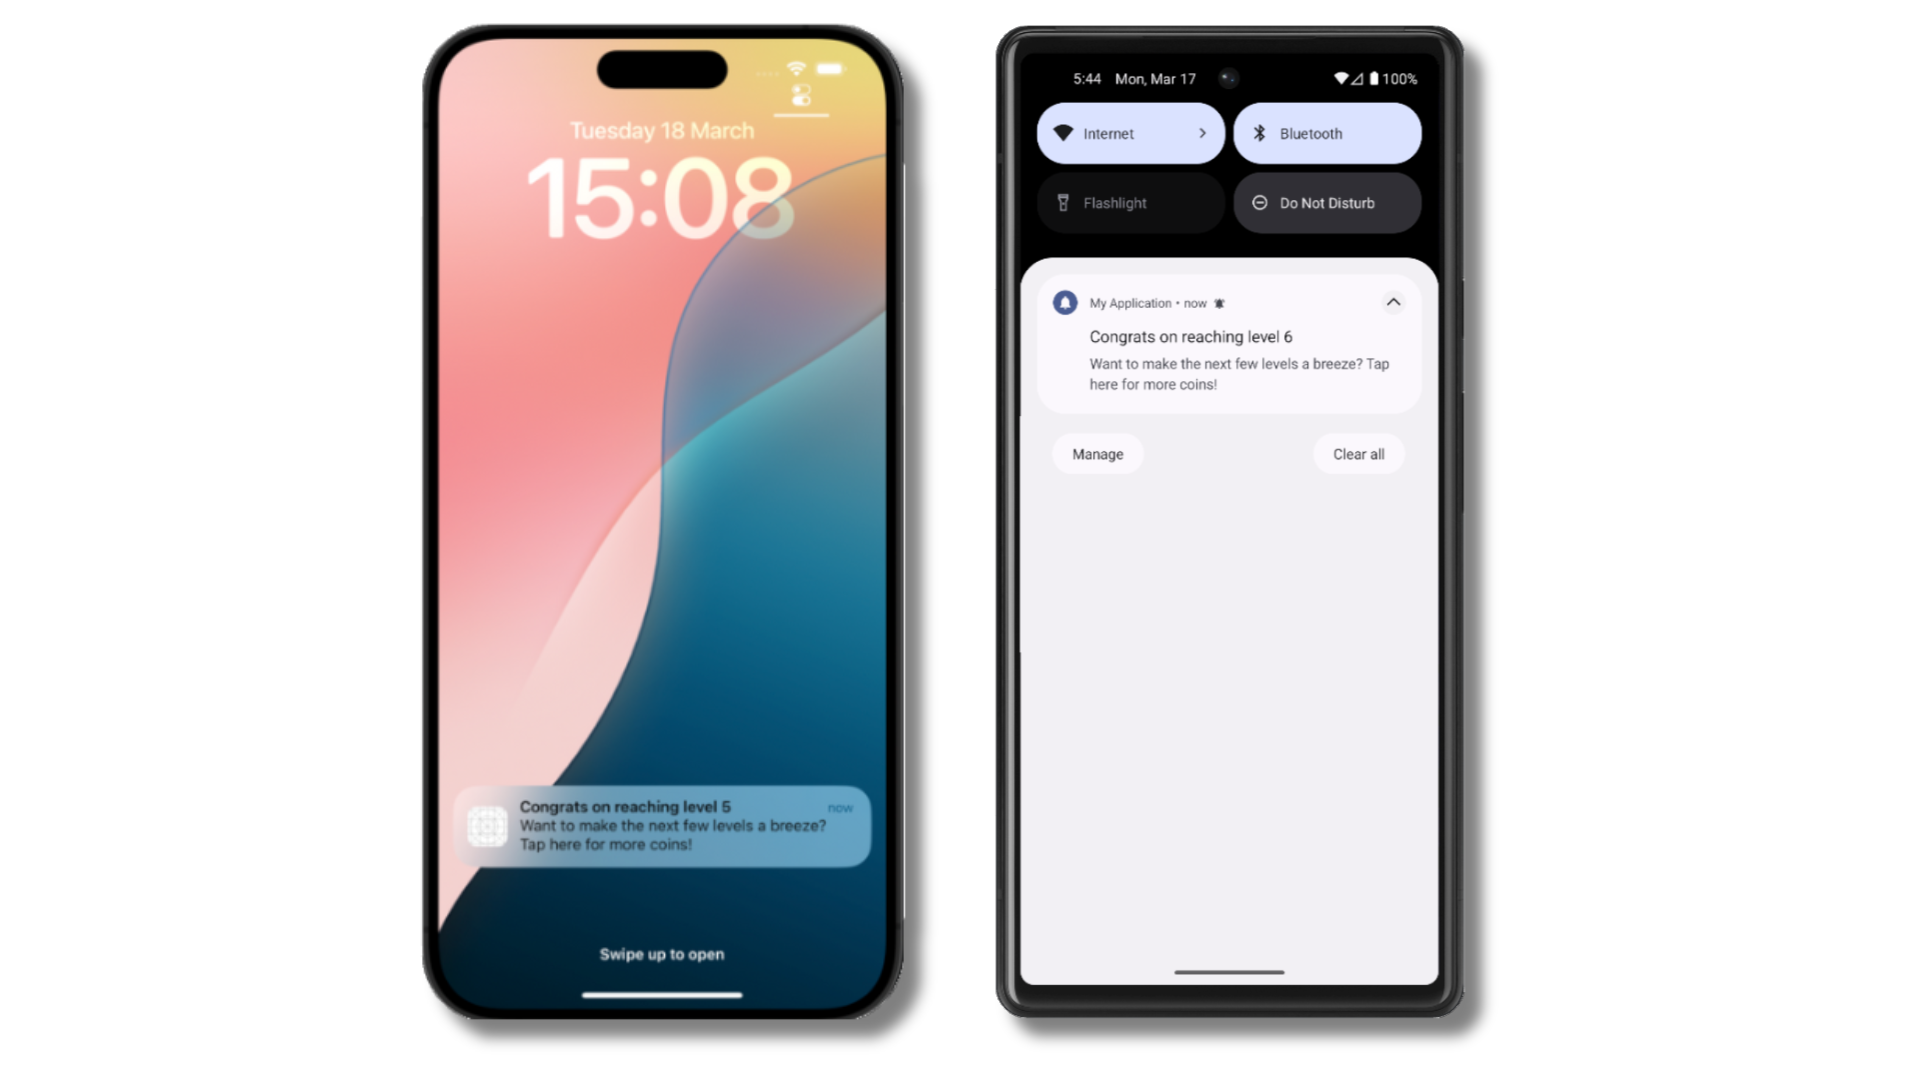
The push notification is received on an iOS and Android device with the personalized content
Add email and/or SMS subscriptions
Earlier we saw how our SDK creates mobile subscriptions to send push and in-app messages. You can also reach users through emails and SMS channels by creating the corresponding subscriptions.- Use the
addEmailmethod to create email subscriptions. - Use the
addSmsmethod to create SMS subscriptions.
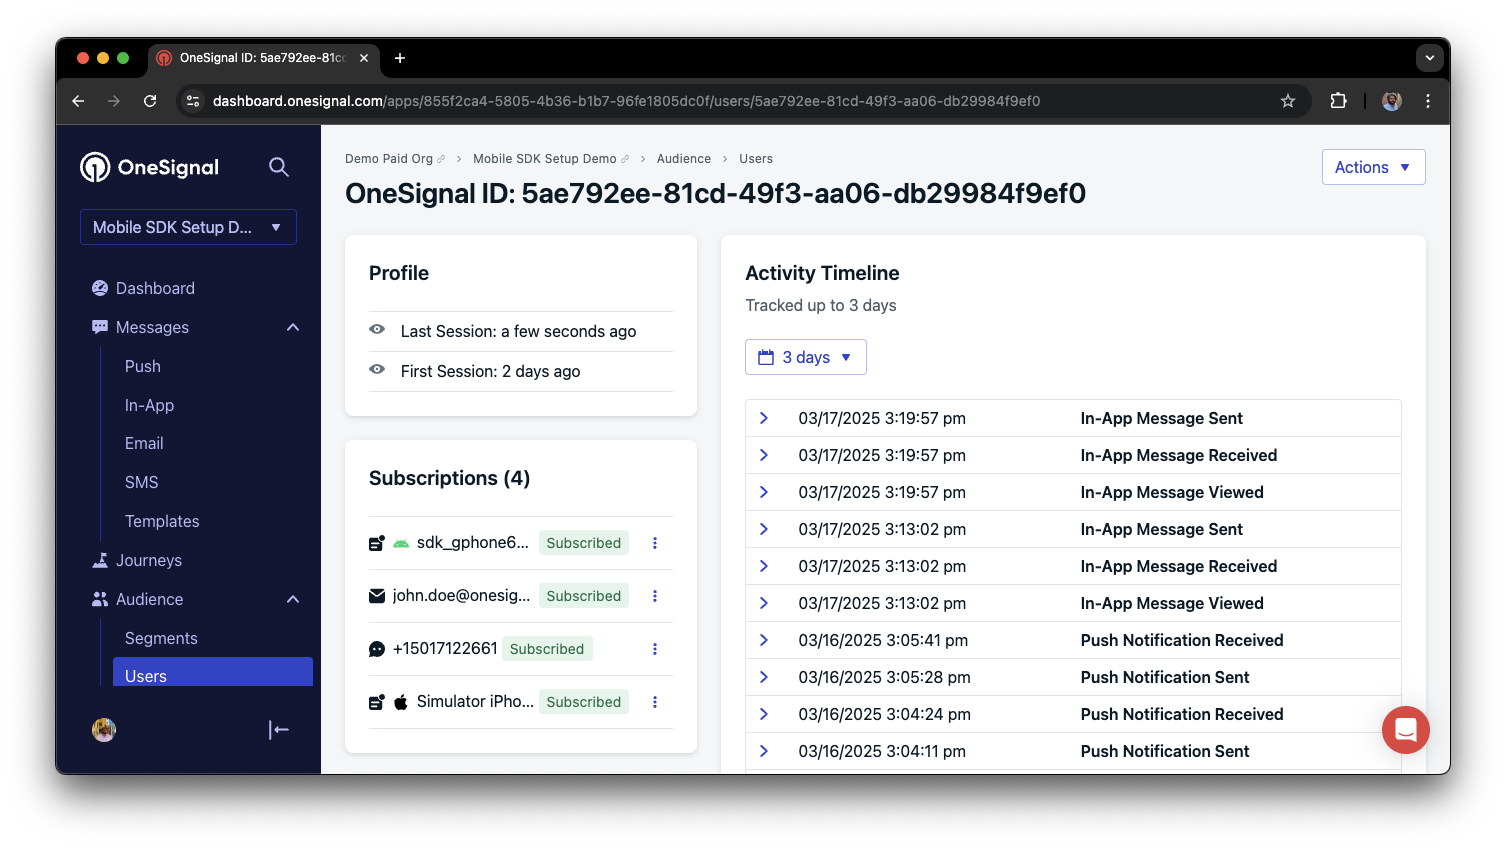
A user profile with push, email, and SMS subscriptions unified by External ID
- Obtain explicit consent before adding email or SMS subscriptions.
- Explain the benefits of each communication channel to users.
- Provide channel preferences so users can select which channels they prefer.
Privacy & user consent
To control when OneSignal collects user data, use the SDK’s consent gating methods:setConsentRequired(true): Prevents data collection until consent is given.setConsentGiven(true): Enables data collection once consent is granted.
Prompt for push permissions
Instead of callingrequestPermission() immediately on app open, take a more strategic approach. Use an in-app message to explain the value of push notifications before requesting permission.
For best practices and implementation details, see our Prompt for push permissions guide.
Listen to push, user, and in-app events
Use SDK listeners to react to user actions and state changes. The SDK provides several event listeners for you to hook into. See our SDK reference guide for more details.Push notification events
addClickListener(): Detect when a notification is tapped. Helpful for Deep Linking.addForegroundLifecycleListener(): Control how notifications behave in foreground.
User state changes
addObserver()for user state: Detect when the External ID is set.addPermissionObserver(): Track the user’s specific interaction with the native push permission prompt.addObserver()for push subscription: Track when the push subscription status changes.
In-app message events
addClickListener(): Handle in-app click actions. Ideal for deep linking or tracking events.addLifecycleListener(): Track full lifecycle of in-app messages (shown, clicked, dismissed, etc.).
Advanced setup & capabilities
Explore more capabilities to enhance your integration:- 🔁 Migrating to OneSignal from another service
- 🌍 Location tracking
- 🔗 Deep Linking
- 🔌 Integrations
- 🧩 Mobile Service Extensions
- 🛎️ Action buttons
- 🌐 Multi-language messaging
- 🛡️ Identity Verification
- 📊 Custom Outcomes
- 📲 Live Activities