Example of an Android Chrome Web Push notification with small badge icon, large icon, and image.
Best practices for push notification icons
- Use PNG images with transparency whenever possible.
- Keep icons simple and recognizable at very small sizes.
- Avoid text or fine details that may become illegible.
- Follow platform-specific rules for size, color, and transparency.
- Test notifications on real devices across platforms and OS versions.
Web notification icons
Web push notifications display an icon provided at send time or defined as a default in your site settings. If no icon is provided, a default bell icon is used.- Supported formats: PNG, JPG, GIF (non-animated)
- Icon must be square. Recommended size is
256x256pixels.
Different browsers (Chrome, Edge, Safari, Firefox) may crop or scale icons differently depending on device and OS. A square
256x256 icon is recommended to ensure consistent display across all browsers.Android web push badge icon
On Android devices, Web Push notifications may display a smaller badge icon defined by the Web App Manifestbadge property. The badge icon is used in limited UI contexts (such as the Android status bar) and may not appear on all Android devices. If no badge icon is provided, the default is the browser icon.
While badge icons are not subject to the same strict alpha-only rules as Android app small notification icons, they are still rendered in system-controlled UI.
Best practices:
- Use a square PNG with a transparent background
- Keep the design simple and high-contrast
- Avoid text or fine detail
- Use monochrome or minimal color for best consistency
72×72 pixels is recommended. Larger images are acceptable and will be downscaled as needed.
Example small badge icon: https://i.imgur.com/9QFB20F.png
Example of how the badge icon is displayed in the Android status bar using the example badge icon.
Unlike Android app small notification icons, Web Push badge icons may preserve color on some devices. However, full-color or complex icons may render inconsistently depending on Android version, browser, and device manufacturer.
iOS notification icons
iOS notifications always use your app icon.- The notification icon is automatically derived from your app’s icon asset
- You cannot change the notification icon per message
- Changing the icon requires updating your app icon and shipping a new app version
There is no APNs payload field that allows you to specify a custom notification icon on iOS.This behavior is enforced by iOS and applies to standard push notifications, Critical Alerts, and Live Activities.
Communication Notifications
On iOS 15 and newer, Apple supports Communication Notifications. When properly implemented, communication-style notifications (such as messaging or calling apps) may display a contact or sender image instead of the app icon in supported system views.Communication Notifications are limited to specific use cases and require explicit adoption of Apple’s communication notification APIs. They are not available for general-purpose notifications.
Android notification icons
Android (including Amazon and Huawei devices) supports Small and Large notification icons. Android also supports Conversation Notifications that allow you to change the icon to the user’s profile image.On Android 8.0+ (API 26+), notification appearance is heavily influenced by system UI, notification channels, and device manufacturer customizations.
Small notification icons
The small notification icon appears in the status bar and the top-left of the notification. If no custom small icon is provided, OneSignal displays a default bell icon. Android renders small notification icons using the icon’s alpha channel, not its color data. The system applies its own tint (or your configured accent color) when displaying the icon. Requirements and best practices:- Use a monochrome silhouette icon on a transparent background
- Design the icon so the shape is defined by transparency, not color
- Avoid gradients, shadows, or multi-color artwork
- Keep the design simple and recognizable at very small sizes
Small icon accent color
You can change the color shown around the small icon of the notification.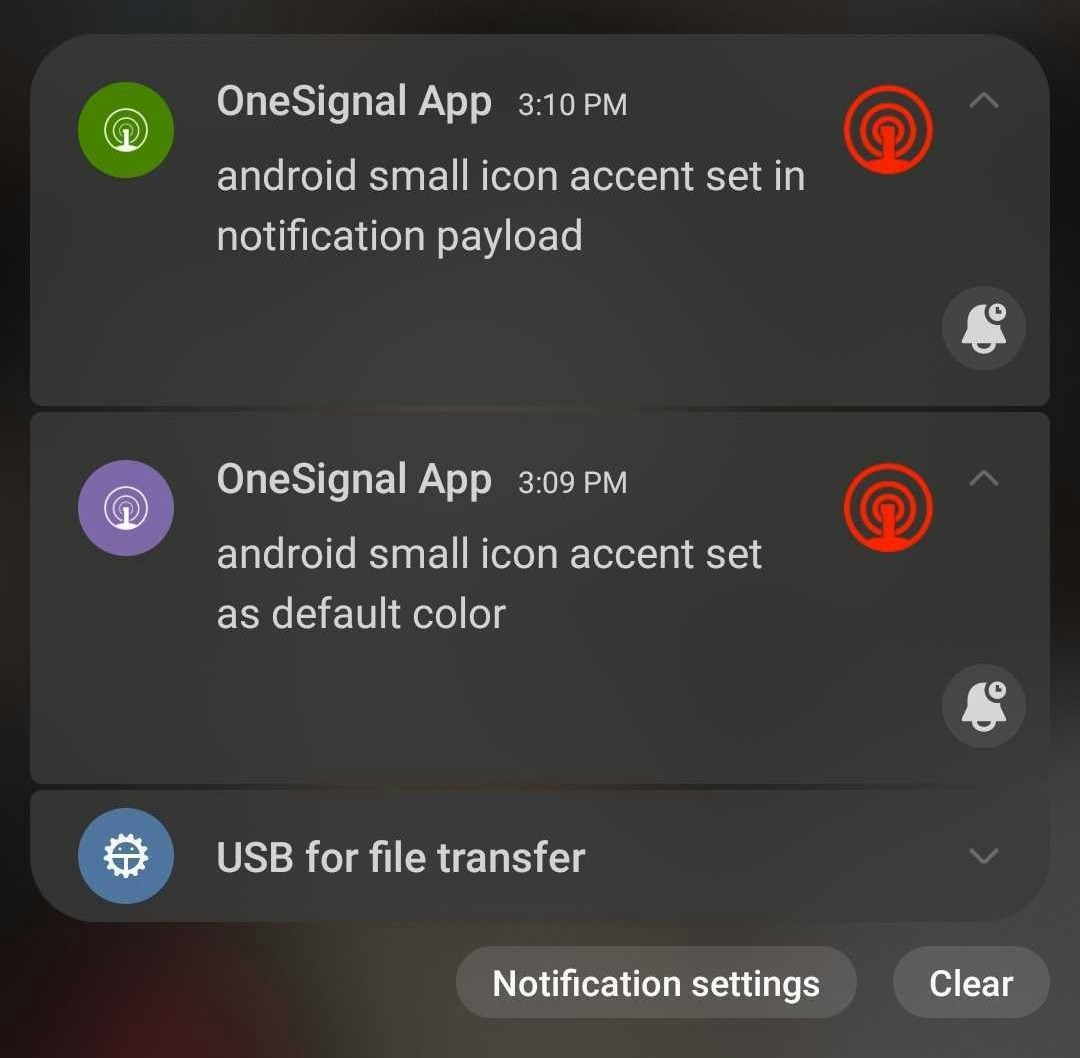
res/values/strings.xml file in your project.
If you want a different color for dark mode, add the key to your res/values-night/strings.xml as well.
Use a HEX value (e.g., FF00FF00). You can use Android Asset Studio to preview color values.
android_accent_color in the Create notification API call or enter a value in the Accent color field under Messages > New Push > Platform Settings > Google Android Options.
Custom non-alpha channel small icon images
Some device manufacturers display the image as-is (ignoring the alpha channel rule). You can set up a custom notification layout based on Android’s documentation if you need non-alpha channel images across all devices. Following the alpha rule is strongly recommended. Icons may not render consistently across all devices, and Google enforces the single-color approach because the icon is too small for meaningful detail — a clear silhouette is easier to recognize at a glance.Large notification icons
The large icon appears on the right side of the Android notification.- Recommended size: 256×256 pixels
- Format: PNG or JPG
- If not set, Android may reuse the small icon
How to add Android default icons
Configuring default notification icons is strongly recommended for every Android-based app (Google Play, Amazon, Huawei). Missing or incorrectly configured icons are the most common cause of broken notification rendering.Default icons are bundled inside your app, not uploaded to the OneSignal dashboard. You add them to your project’s resource directories (or use a plugin config for Expo), and the OneSignal SDK uses them automatically.
- Small notification icon (required)
- Large notification icon (optional but recommended)
1
Generate the small notification icon
The small notification icon appears in the status bar and notification header.Requirements:Name the icon:
- Monochrome silhouette icon
- Transparent background (alpha channel required)
- No colors, gradients, or shadows
The fastest and safest way to generate compliant small icons is using Android Asset Studio – Notification Icons.
ic_stat_onesignal_default2
Create required small icon sizes
Required: You must include all density variants for the small icon. Missing any size can cause Android to fall back to a system default icon.
3
Generate the large notification icon (optional)
Best practices:
- Square image
- PNG or JPG
- Transparent background recommended
- Recommended size: 256×256 px
- Color is allowed
- Alpha-only is not required
- Only one size is needed
ic_onesignal_large_icon_default.png4
Place icons in the correct project paths
Each icon must be placed in the correct resource directory for your framework. Make sure the following paths exist; create any folders you are missing.Required: Each image must be present in the following paths:
- Android Native
- Unity
- Cordova/Ionic
- React Native / Expo
- .NET Maui
- Flutter
res/drawable-mdpi/(24x24)res/drawable-hdpi/(36x36)res/drawable-xhdpi/(48x48)res/drawable-xxhdpi/(72x72)res/drawable-xxxhdpi/(96x96)res/drawable-xxxhdpi/(256x256) (Large Icon)
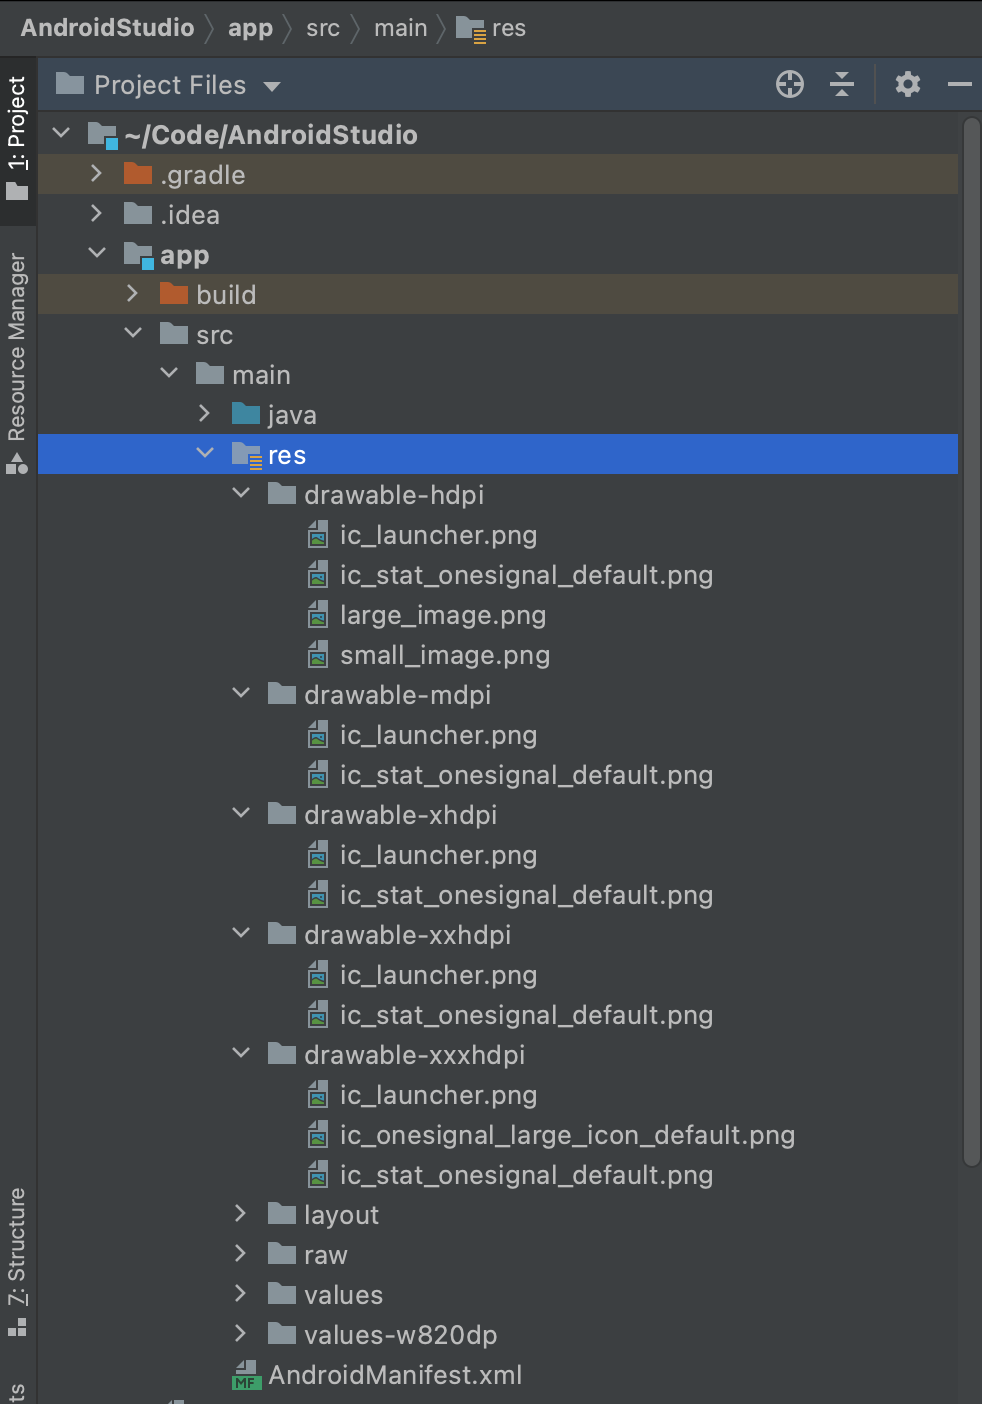
Android Native project with icon files in drawable folders
Your Android app is now correctly configured with default notification icons.
Send notifications with non-default icons
When sending push notifications from the OneSignal dashboard or REST API, you can override the default icons with custom icons for Android, Amazon, Huawei, and Web Push notifications. You cannot override the icon for iOS notifications.REST API parameters
Android, Amazon, and Huawei REST API parameters:string
Amazon:
adm_small_icon Huawei: huawei_small_iconFor the small icon, the image must exist within the same project path as the default small icon. It cannot use a remote URL. See How to add Android default icons for details on where to add your custom icons.Set the icon name without the file extension in the REST API parameters.Example: "small_icon": "my_custom_icon_name_without_extension"string
Amazon:
adm_large_icon Huawei: huawei_large_iconFor the large icon, the image can exist within the same project path as the default large icon or as a remote URL. See How to add Android default icons for details on where to add your custom icons.Set the icon name without the file extension in the REST API parameters.Example: "large_icon": "my_custom_icon_name_without_extension"string
Firefox:
firefox_iconThe URL to the image resource. Must be the direct URL to the image resource.Example: "chrome_web_icon": "https://example.com/my_custom_icon.png"string
The URL to the image resource. Must be the direct URL to the image resource.Example:
"chrome_web_badge": "https://i.imgur.com/9QFB20F.png"Dashboard
In the OneSignal dashboard, using the Messages > Push > New Push form or Templates, navigate to the platform-specific options. For Android, Amazon, and Huawei, if the file exists within the same project path as the default icon, set the icon names without the file extension. With Large Notification Icons, you can also supply a direct URL where the icon will be displayed from.OneSignal dashboard, where to override the default icons.
FAQ
Why does my Android small icon show as a white or grey square?
The image does not have proper transparency. Android renders small notification icons using the alpha channel only — any fully opaque pixels with a solid background appear as a filled square. Regenerate the icon as a monochrome silhouette on a transparent background using Android Asset Studio.Why does the OneSignal bell icon appear instead of my custom icon?
One or more required density variants of the small icon are missing or placed in the wrong drawable directory. You must include all five sizes (MDPI through XXXHDPI) with the exact file nameic_stat_onesignal_default. See How to add Android default icons for the correct paths.
Can I change the iOS notification icon per message?
No. iOS always uses your app icon for push notifications. There is no APNs payload field to override it. Changing the icon requires updating your app icon asset and releasing a new app version.What size should my web push icon be?
Use a square PNG image at256x256 pixels. Different browsers and operating systems may crop or scale the icon, but 256x256 provides the best consistency across Chrome, Firefox, Edge, and Safari.
Can I use a URL for the Android small icon?
No. The Android small icon must be a local resource file bundled with your app. Only the large icon supports remote URLs.How do I add notification icons in Expo?
With theonesignal-expo-plugin, you provide a single source PNG (96x96 for small icons, 256x256 for large icons) and reference it in app.json or app.config.js under the smallIcons and largeIcons arrays. The plugin automatically generates all density variants and places them in the correct android/ directories at build time. You do not need to create drawable folders manually. See the Expo tab under “Place icons in the correct project paths” for an example config.
Do I upload default icons to the OneSignal dashboard?
No. Default notification icons are bundled inside your app binary, not uploaded to OneSignal. You add them to your project’s resource directories (or plugin config for Expo), and the OneSignal SDK uses them automatically. The OneSignal dashboard only lets you override icons on a per-message basis for Android and Web Push.Related pages
Images & rich media
Attach large images, GIFs, and videos to push notifications.
Android notification categories
Create and manage Android notification channels for custom sound, vibration, and importance.
Web push setup
Configure your site for web push notifications including default icon settings.
Create message API
Send push notifications with custom icons using the REST API.