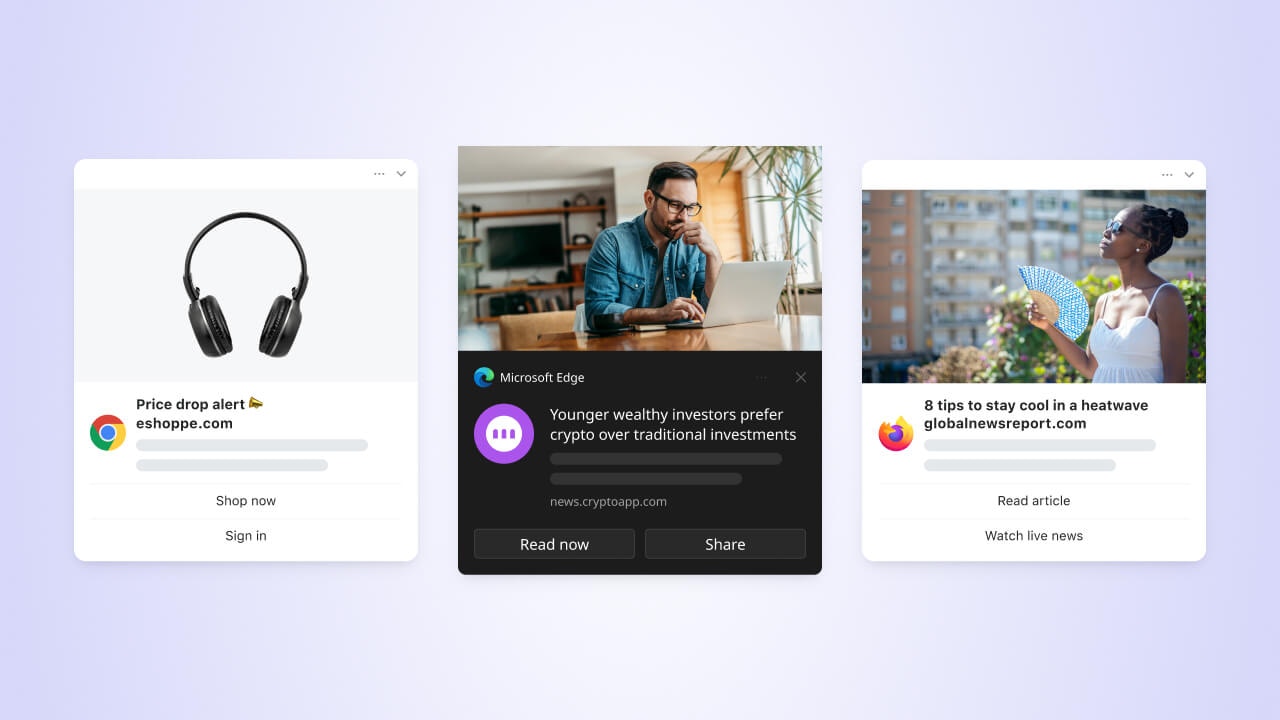
Web push notifications reach Users even when they're not on your site
- HTTPS website: Web push only works on secure sites with a valid SSL certificate
- Service worker: You must be able to add the OneSignal service worker to your website
- Single domain origin: Must follow the same-origin policy
- User permission: Users must explicitly grant permission to receive notifications
- Supported browsers: Works across most modern browsers (Chrome, Firefox, Safari, Edge)
Web push developer guides
Before sending web push notifications, complete the following setup steps.Not a developer? See Manage team members to invite a teammate with developer access to your OneSignal project.
Web SDK setup
Install and configure the OneSignal Web SDK, including localhost testing and permission prompts.
iOS web push setup
Follow Apple-specific steps to enable web push on iPhones and iPads running iOS 16.4+.
Migration from another provider
Transition from another web push provider and retain your Subscriptions.
WordPress plugin
Integrate push notifications on WordPress using the official plugin — no coding required.
Shopify-Vendo integration
Integrate Shopify with OneSignal through the Vendo integration for web push, custom events, and customer identification.
Configuration options
Set up your website for web push in the OneSignal dashboard under Settings > Push & In-App > Web.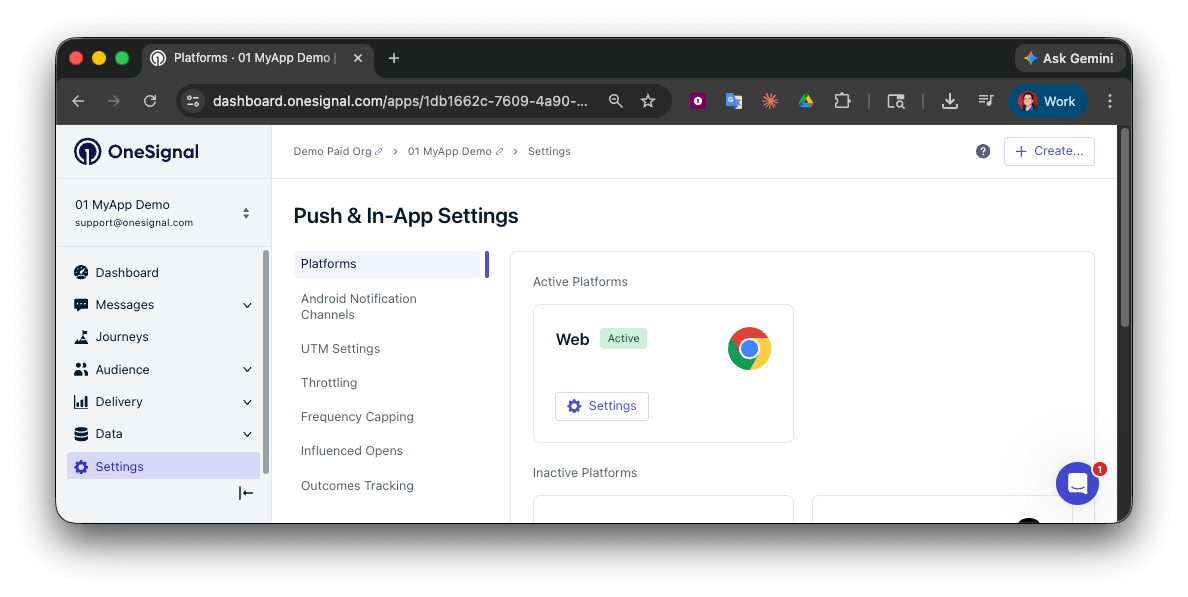
Activate the web platform in your OneSignal settings
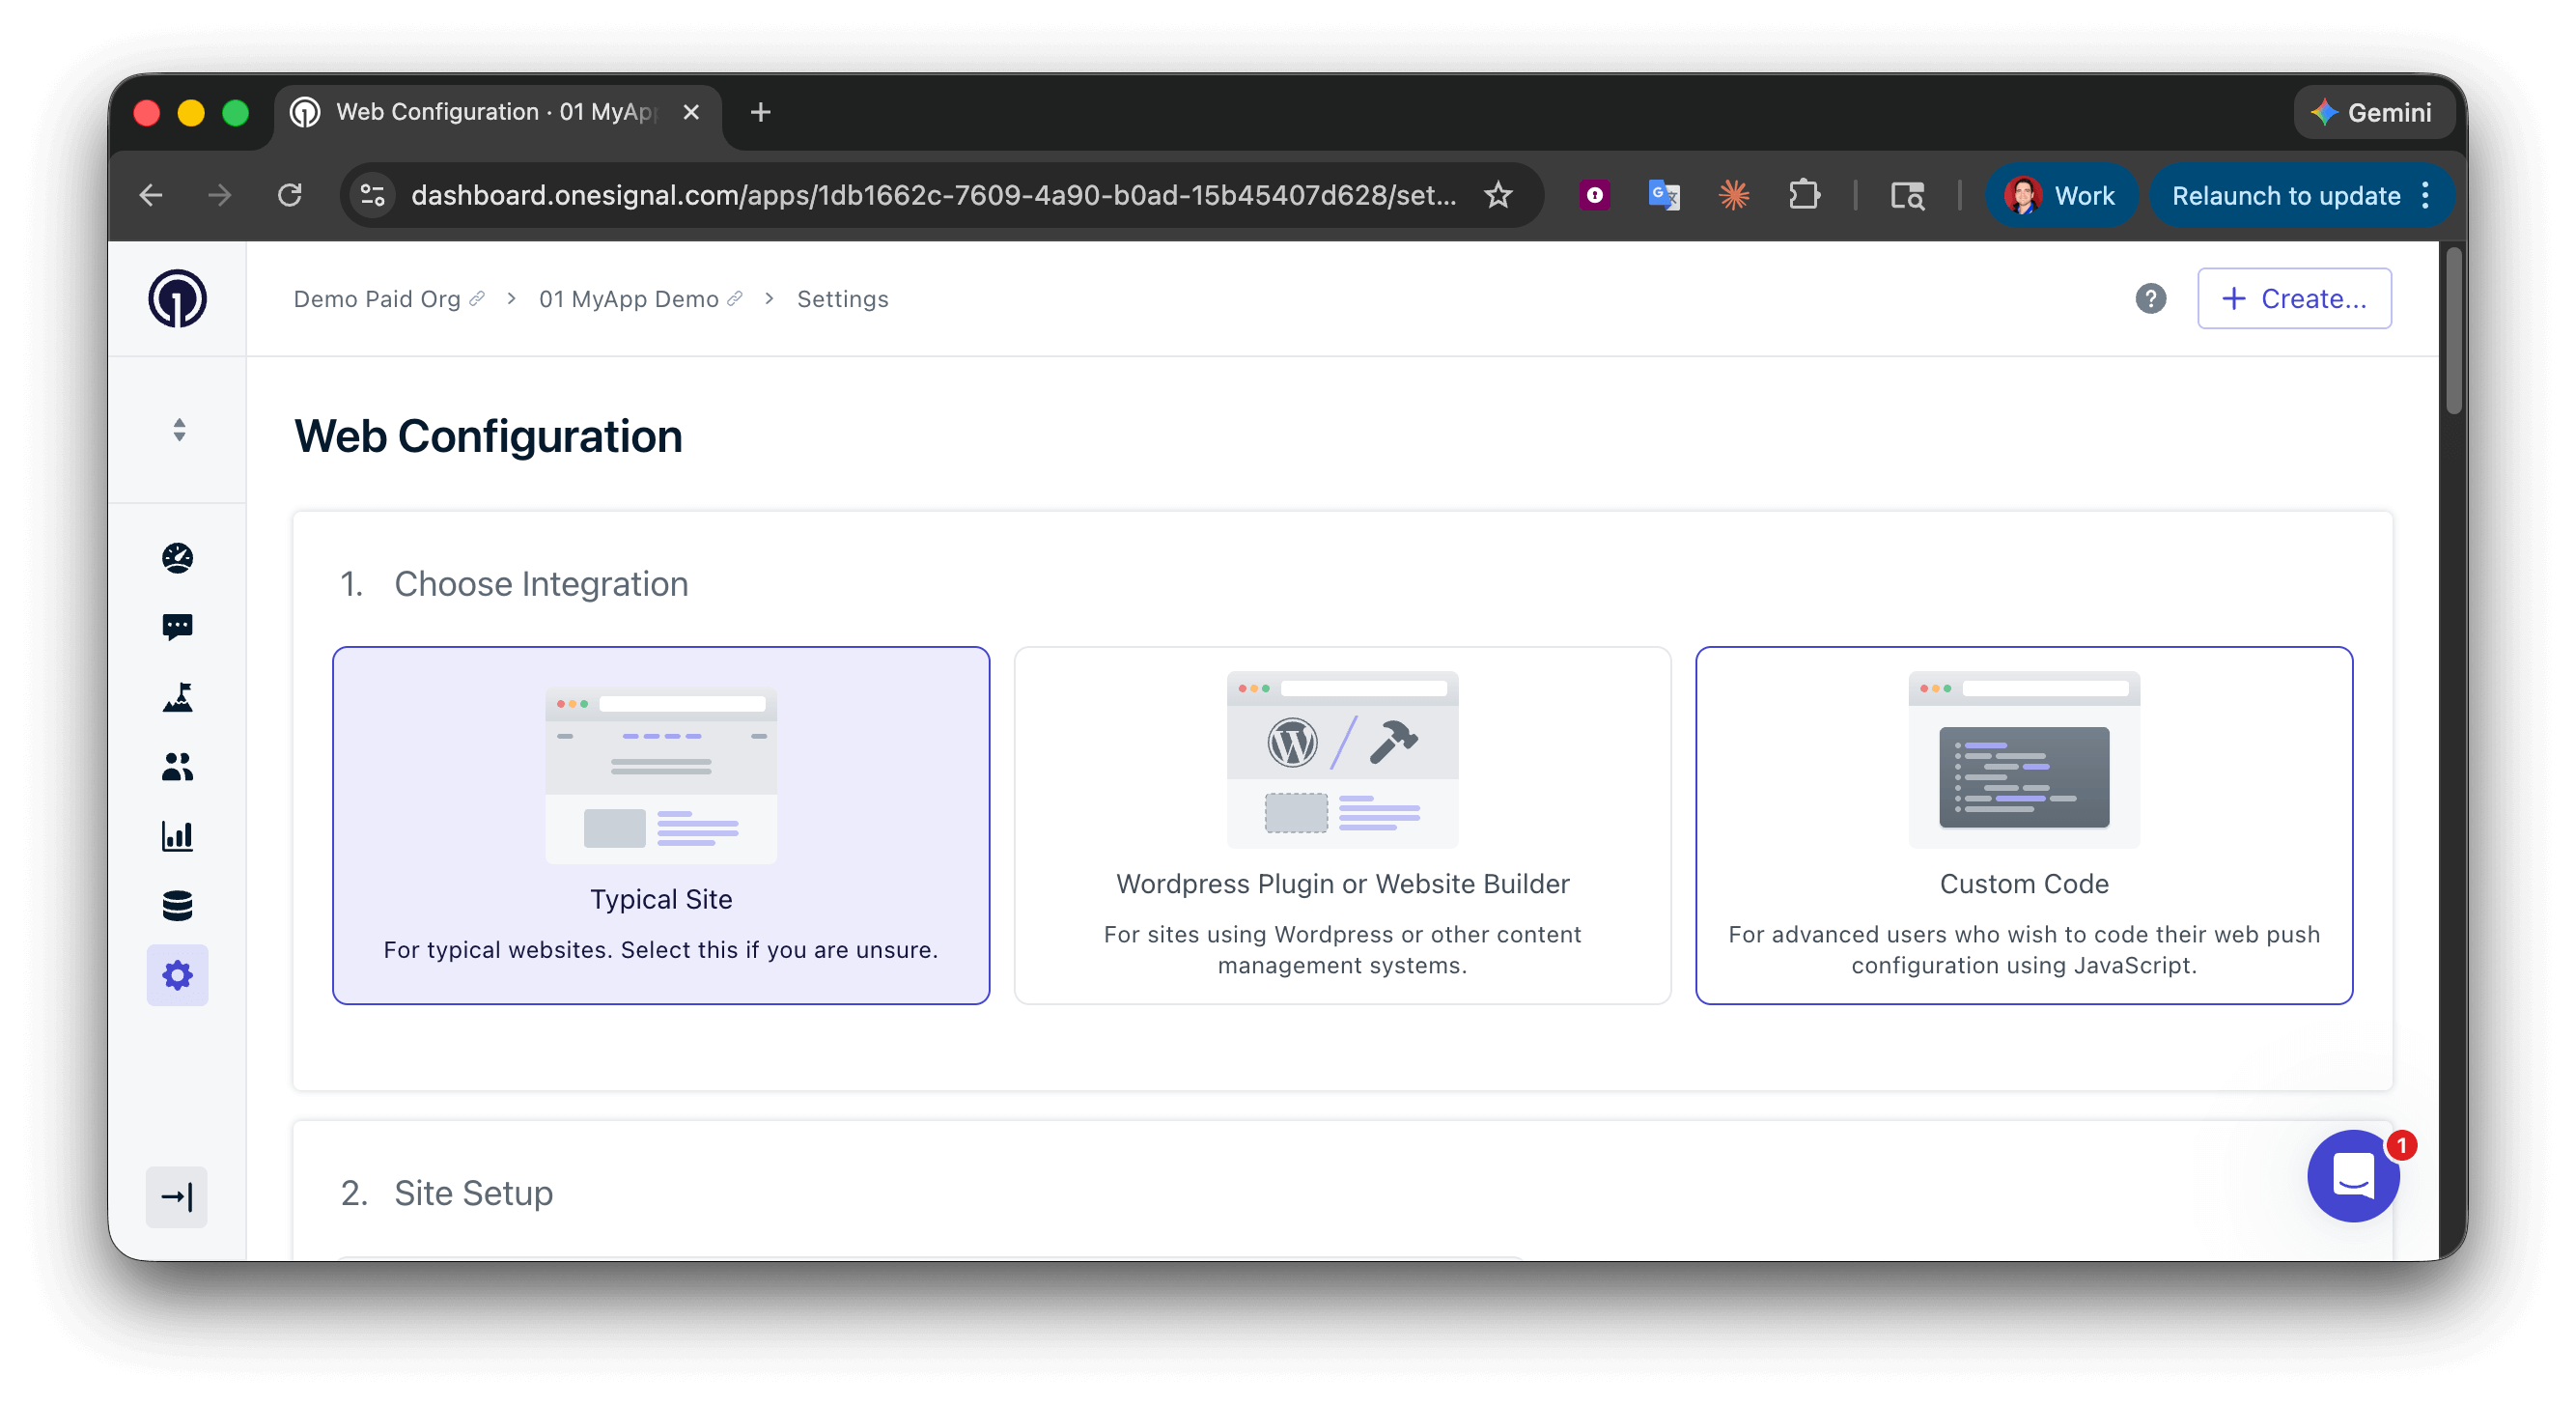
Choose your integration type based on your website setup
Typical site
Recommended — Configure prompts, welcome notification, and service worker setup directly in the dashboard.
WordPress
Use the official OneSignal WordPress plugin and configure prompts and welcome notification directly in the dashboard.
Custom code
Full control for developers who want to customize everything via code.
- Site Name: Used in default notification titles
- Site URL: Must exactly match your domain origin (no paths or
wwwmismatch) - Auto Resubscribe: Recommended — Automatically re-subscribes returning Users who cleared browser data
- Default Icon URL:
256x256pximage shown in notifications (if unset, a default bell icon is used)
Auto resubscribe
If Users clear their browser data, they stop receiving push notifications. Enable this option to automatically re-subscribe Users when they return to your site. See Subscriptions for more details.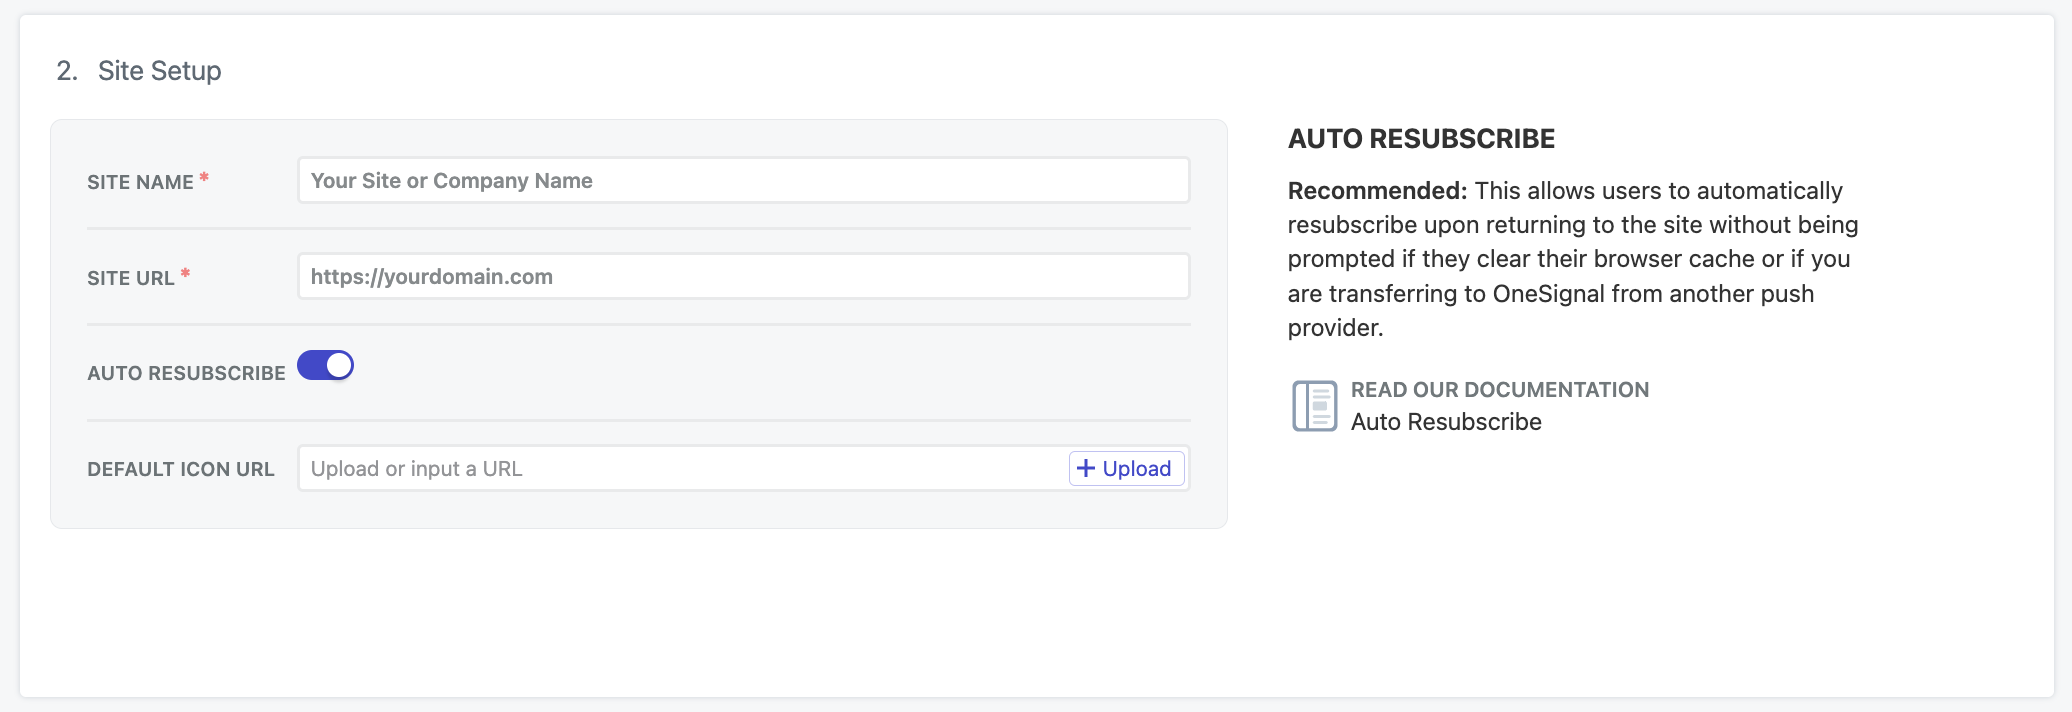
Web settings in the OneSignal dashboard
Web permission prompts
Customize when and how the notification permission prompt appears to maximize opt-in rates.Web permission prompts
Compare different prompt types (slidedown, category-based, native, subscription bell, and more).
Web SDK reference
Programmatically control when and how prompts are shown using the SDK.
Welcome notification
You can enable an optional confirmation push that’s sent immediately after a User subscribes. Typical and WordPress integrations can set this in the dashboard.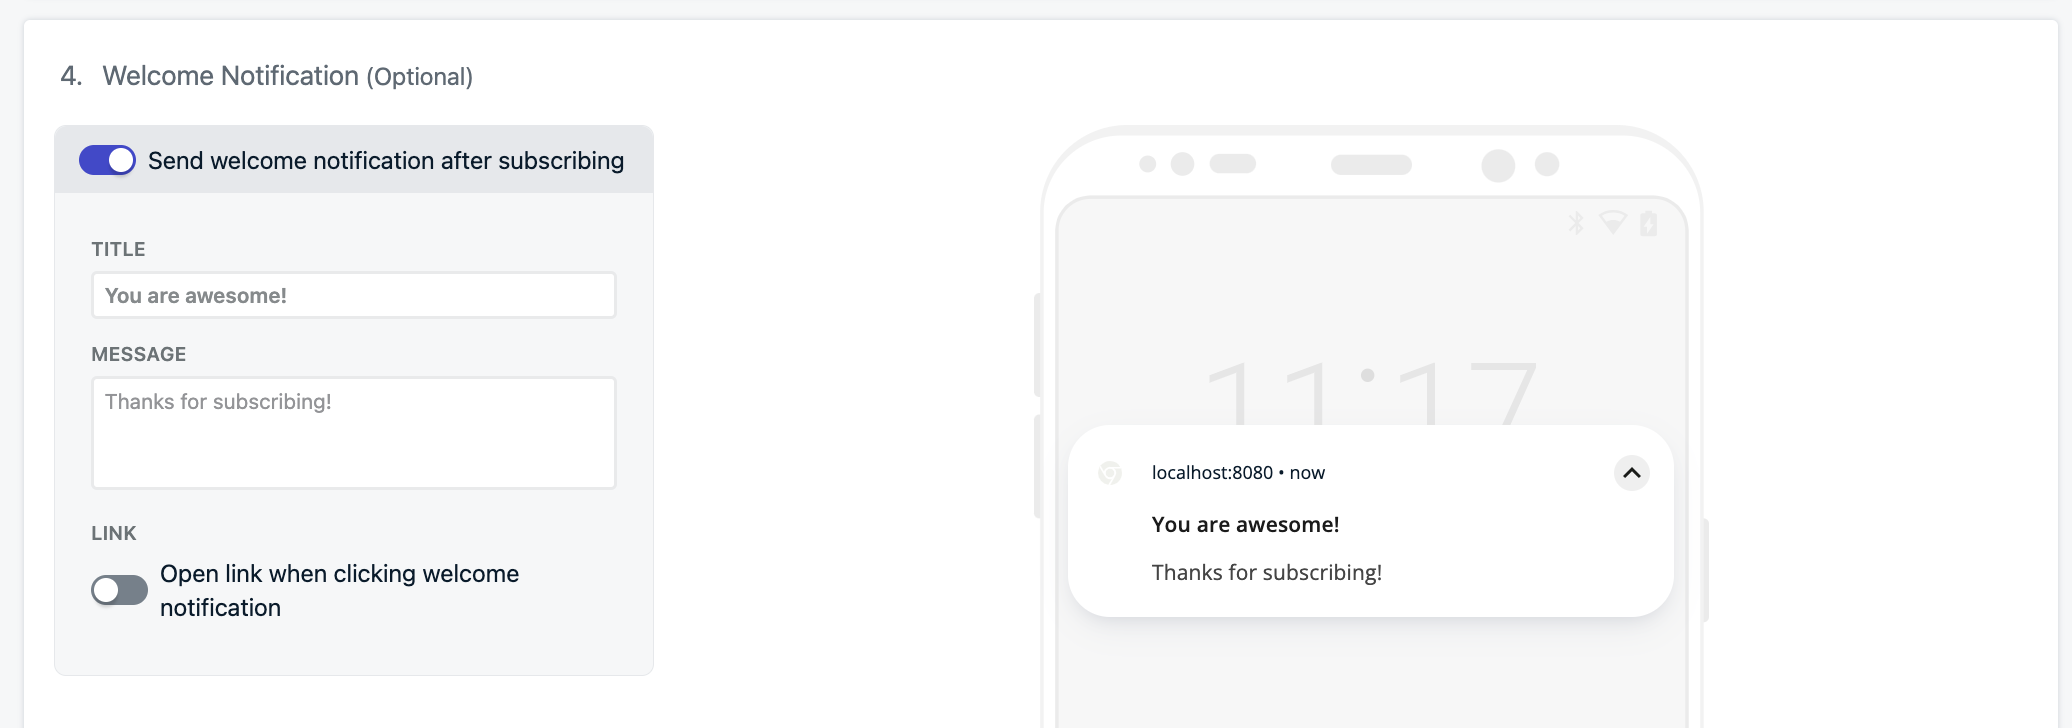
Welcome notifications confirm successful Subscription and demonstrate value
welcomeNotification object in the OneSignal.init function. See Web SDK reference for details.
Why send welcome notifications?
- Let Users know they’ve subscribed successfully
- Show what future notifications will look like
- Provide onboarding content or next steps
Users and Subscriptions
When a User subscribes to push, OneSignal automatically creates a unique Subscription tied to their browser and device. Web push Subscriptions are created when Users:- Grant permission for push notifications on your website using a specific browser and device
- Return to your site after clearing browser data (if Auto Resubscribe is enabled)
- Subscribe from a new browser or device
Each browser/device combination creates a separate Subscription. Incognito/private browsing mode cannot create Subscriptions. Web push Subscriptions remain anonymous until you assign them an External ID.
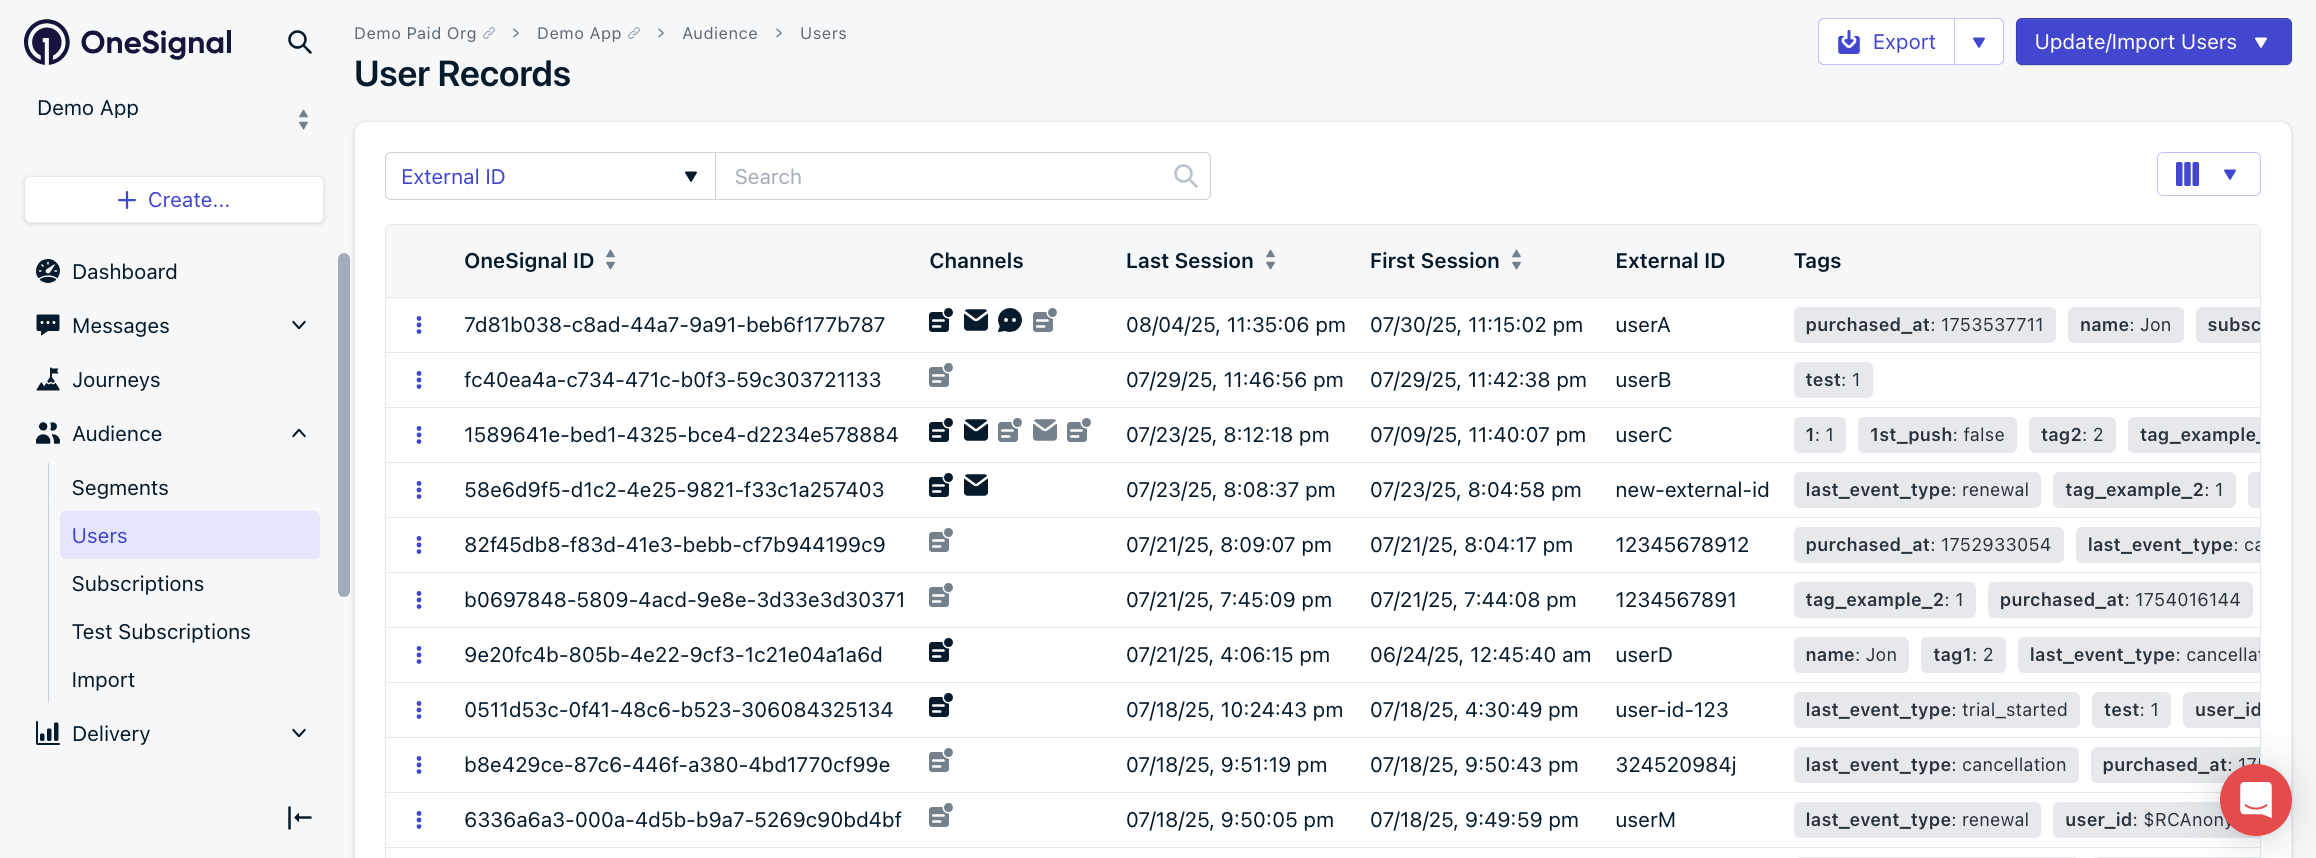
OneSignal dashboard: Audience > Users
Users
Manage Users, assign External IDs, and track their activity.
Subscriptions
How Subscriptions work across browsers and devices.
Segments
Group Users into Segments to target based on behavior, device, and more.
iOS support
Apple added web push support for iPhones and iPads running iOS 16.4+ with stricter requirements:- Users must add your site to their Home Screen
- Permission prompts are shown only after that step
- Notifications behave like native app alerts once enabled
Web push for iOS
Step-by-step instructions to enable iOS support, including service worker and manifest setup.
Design web push notifications
Web push notifications support titles, messages, icons, images, and action buttons. The diagram below shows which elements you can customize.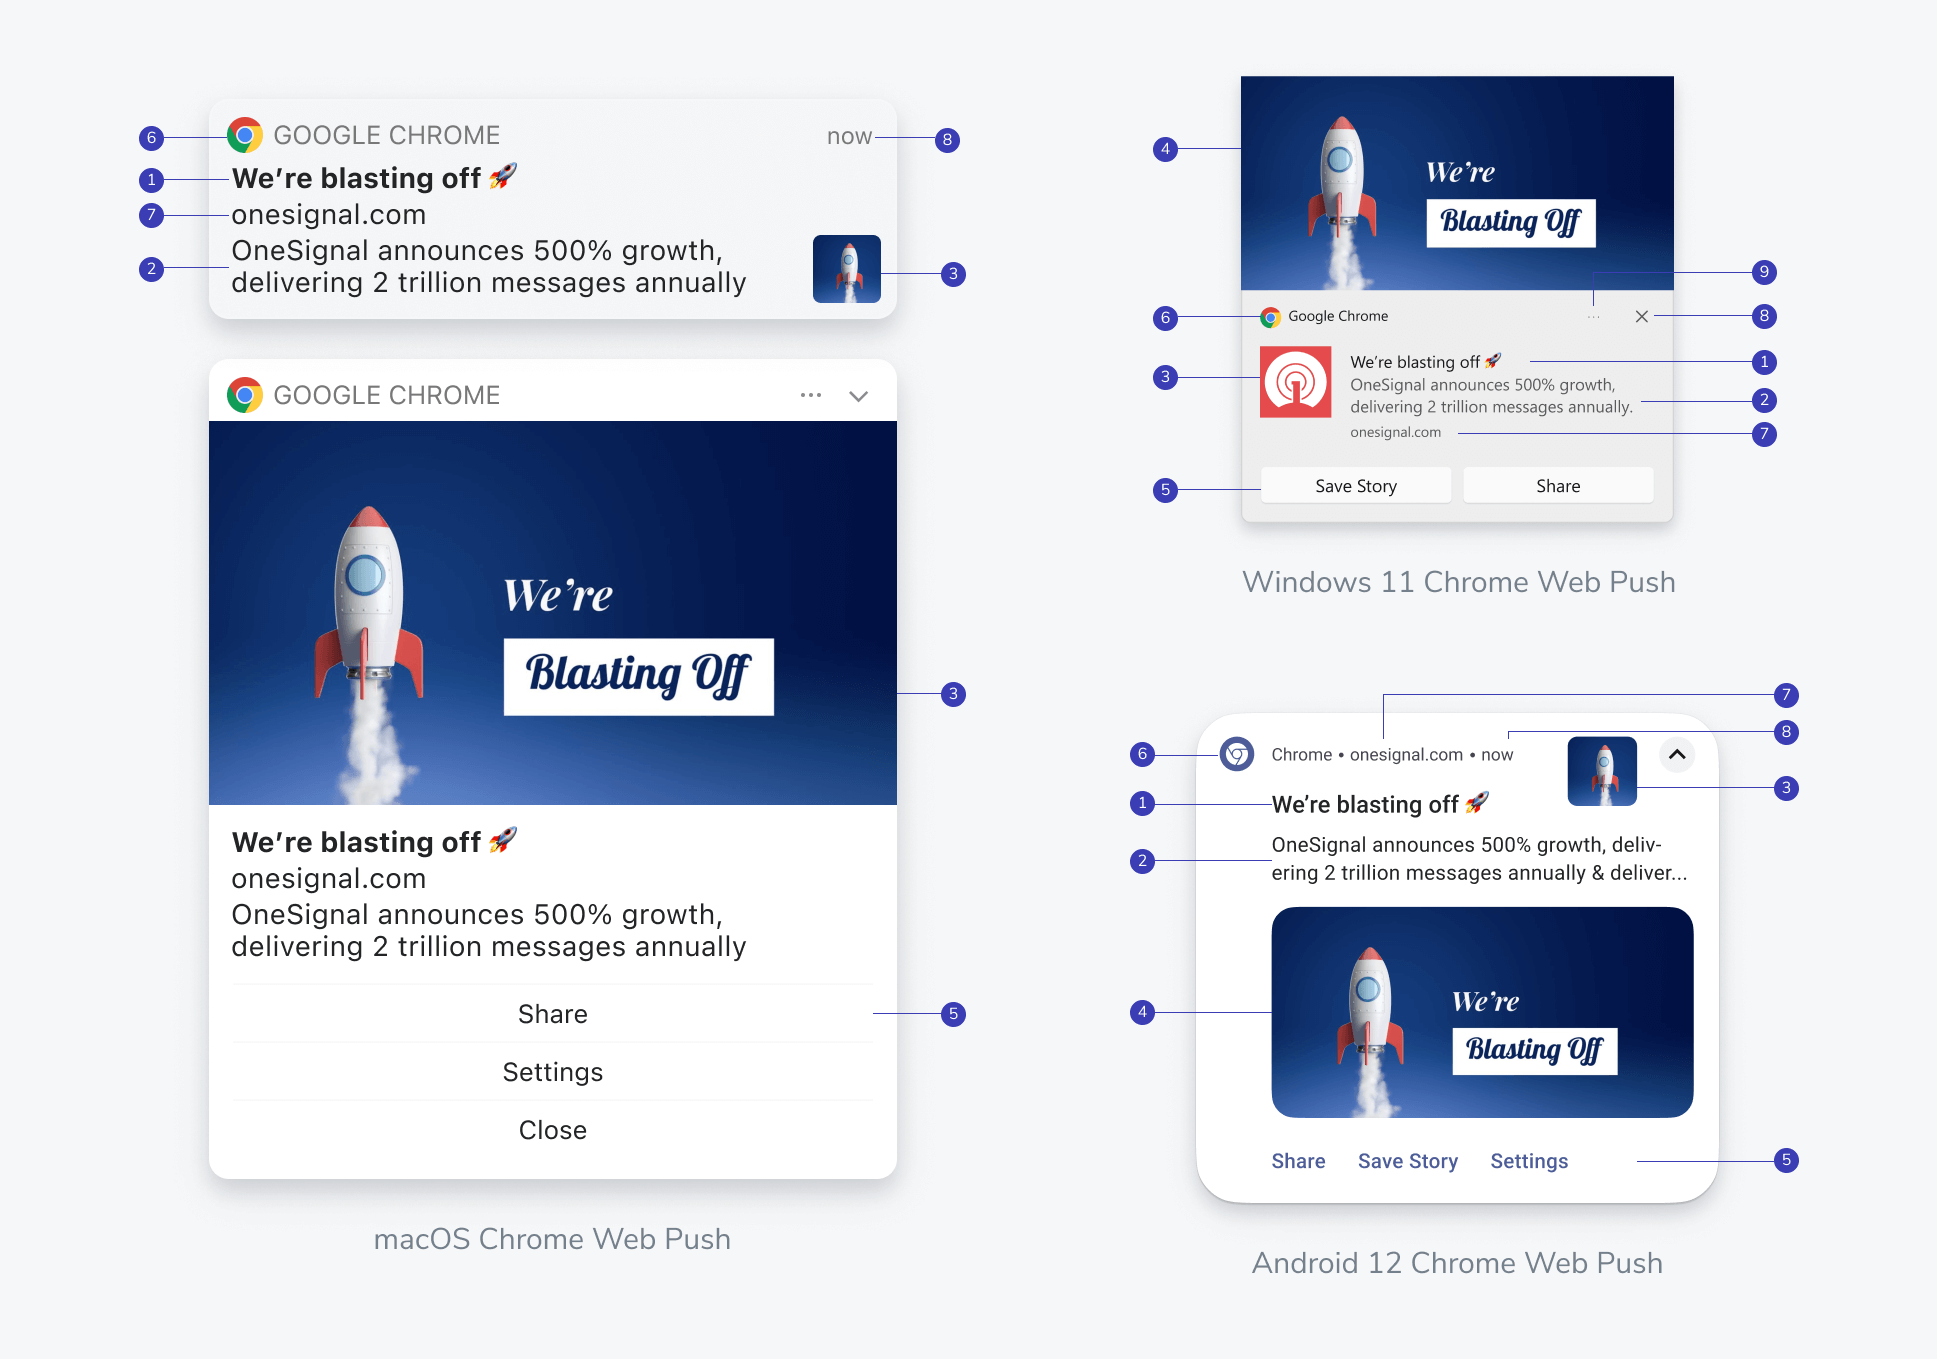
Web push notification anatomy — customize elements 1–6, while 7–9 are controlled by the browser
- Title: Attention-grabbing headline (recommended: under 50 characters)
- Message: Main notification content (recommended: under 120 characters)
- Icon: Your brand icon or notification-specific image (recommended:
256x256pxPNG or JPG) - Large image: Eye-catching visual content
- Action buttons: Call-to-action buttons
Push overview
Full overview of push notification creation, options, and delivery behavior.
Templates
Save time with reusable templates for consistent messaging.
Personalization and localization
Customize push messages to match each User’s preferences and language.Message personalization
Insert dynamic variables like name or preferences to tailor messages.
Multi-language messaging
Deliver messages in each User’s preferred language.
Configure web push behavior
Control how your push messages behave after sending — when they appear, how long they’re stored, and how Users interact.Delivery, display, and dismiss settings
Throttling
Control notification delivery speed.
Frequency capping
Set limits to prevent over-sending notifications to the same User.
Time to live (TTL)
Define how long push services retain messages when the device is offline.
Web push topic
Use topics to group, replace, or suppress duplicate notifications.
Click behavior
Control what happens when a User clicks a notification. By default: Clicking opens your homepage. Customize it:- Direct Users to a specific URL
- Use UTM tracking
- Suppress default behavior with
?_osp=do_not_open
URLs, links, and deep linking
Route Users to relevant content or pages using deep links and tracking.
Action buttons
Let Users take immediate actions from your notification.
Web SDK push event listeners
Listen for click events and trigger in-app behavior with custom code.
Test your setup
Before launching, thoroughly test your web push implementation across devices and browsers.Pre-launch checklist
- SDK is correctly loaded with no console errors
- Permission prompt appears and functions correctly
- Test notification is sent and received
- Icons and images render correctly
- Service worker is registered and up to date
- HTTPS certificate is valid
Analytics and troubleshooting
Measure notification performance and resolve common delivery issues.Push message reports
View delivery, open rate, and click-through metrics for each message.
Analytics overview
Explore engagement and User behavior metrics across channels.
Notifications not shown or delayed
Troubleshooting checklist if messages aren’t appearing.
Notification images not showing
Fix image rendering issues across different browsers.
Next steps
A/B testing
Optimize messages with experiments to find what drives engagement.
Journeys
Build automated, multi-step messaging flows triggered by User behavior.
Tags
Add custom properties to users for personalization and segmentation.
FAQ
Can Users subscribe to web push on iOS?
Yes, starting with iOS 16.4+. Users must first add your website to their Home Screen, then grant notification permission. See Web push for iOS for the full setup steps.Why did a User stop receiving web push notifications?
The most common cause is that the User cleared their browser data, which removes the push Subscription. Enable Auto Resubscribe in your web push settings to automatically re-subscribe returning Users. See Subscriptions for details.Do web push notifications work in incognito or private browsing mode?
No. Users cannot subscribe to web push while in incognito or private browsing mode. Subscriptions created in a normal session are not accessible in private mode.What browsers support web push notifications?
Chrome, Firefox, Safari (macOS and iOS 16.4+), and Edge all support web push. Each browser may have different prompt behavior and notification display. See Web push FAQ for browser-specific details.Can I use subdomains with web push?
Each subdomain (e.g.,app.example.com vs shop.example.com) is a separate origin. Browsers enforce the same-origin policy for web push, so each subdomain requires its own OneSignal App. The service worker must also be hosted on the same origin as the subscribing page — CDNs and other subdomains are not allowed. See Multiple sites & subdomains for setup options.