Single vs double opt-in
- Single opt-in: A user enters their email (e.g., signup form) and is immediately added to your mailing list.
- Double opt-in (confirmed opt-in): After entering their email, the user must click a confirmation link in a verification email before they’re added.
Benefits of double opt-in
- Improves engagement and list quality
- Verifies compliance with GDPR, CAN-SPAM, and other regulations
- Filters out fake, spam-trap, or mistyped addresses
- Reduces bounce and complaint rates
- Protects against abuse and list bombing
Most professional senders use double opt-in to protect their domain reputation and maximize deliverability.
Prerequisites
Before starting:- A configured OneSignal Email sending domain — see Email setup and Email DNS configuration.
- At least one email Subscription marked as a Test User — see Test Users.
- Dashboard access to Audience > Segments, Messages > Templates, and Journeys.
confirmed_opt_in Tag so they bypass the Journey entirely.
How to create a confirmed opt-in Journey
This setup uses a Tag calledconfirmed_opt_in with a value of true or false to identify confirmed subscribers.
1. Create a segment of users that did not confirm opt-in
Within the OneSignal dashboard, go to Audience > Segments and click New Segment. Build a segment called Did not confirm email opt-in that uses the following filters with AND logic:- User Tag with
confirmed_opt_inis nottrue - Device Type is Email
- Test Users is true (remove this filter before going live in production)
confirmed_opt_in is set to false or is not set.

2. Create a confirmed opt-in email template
Navigate to Messages > Templates > New Email Template and select HTML Editor or Drag & Drop Editor. Design a simple confirmation email:- Clear subject line (e.g., “Confirm your subscription”)
- A single, prominent confirmation CTA (“Confirm Subscription”)
- No social media buttons or other CTAs that might distract from the confirmation action
HTML
Replace
YOUR_CONFIRMATION_URL with the page on your site that thanks the user for confirming their subscription. The Wait Until step in the next section detects clicks on this link, so it must be a tracked URL inside the OneSignal template editor.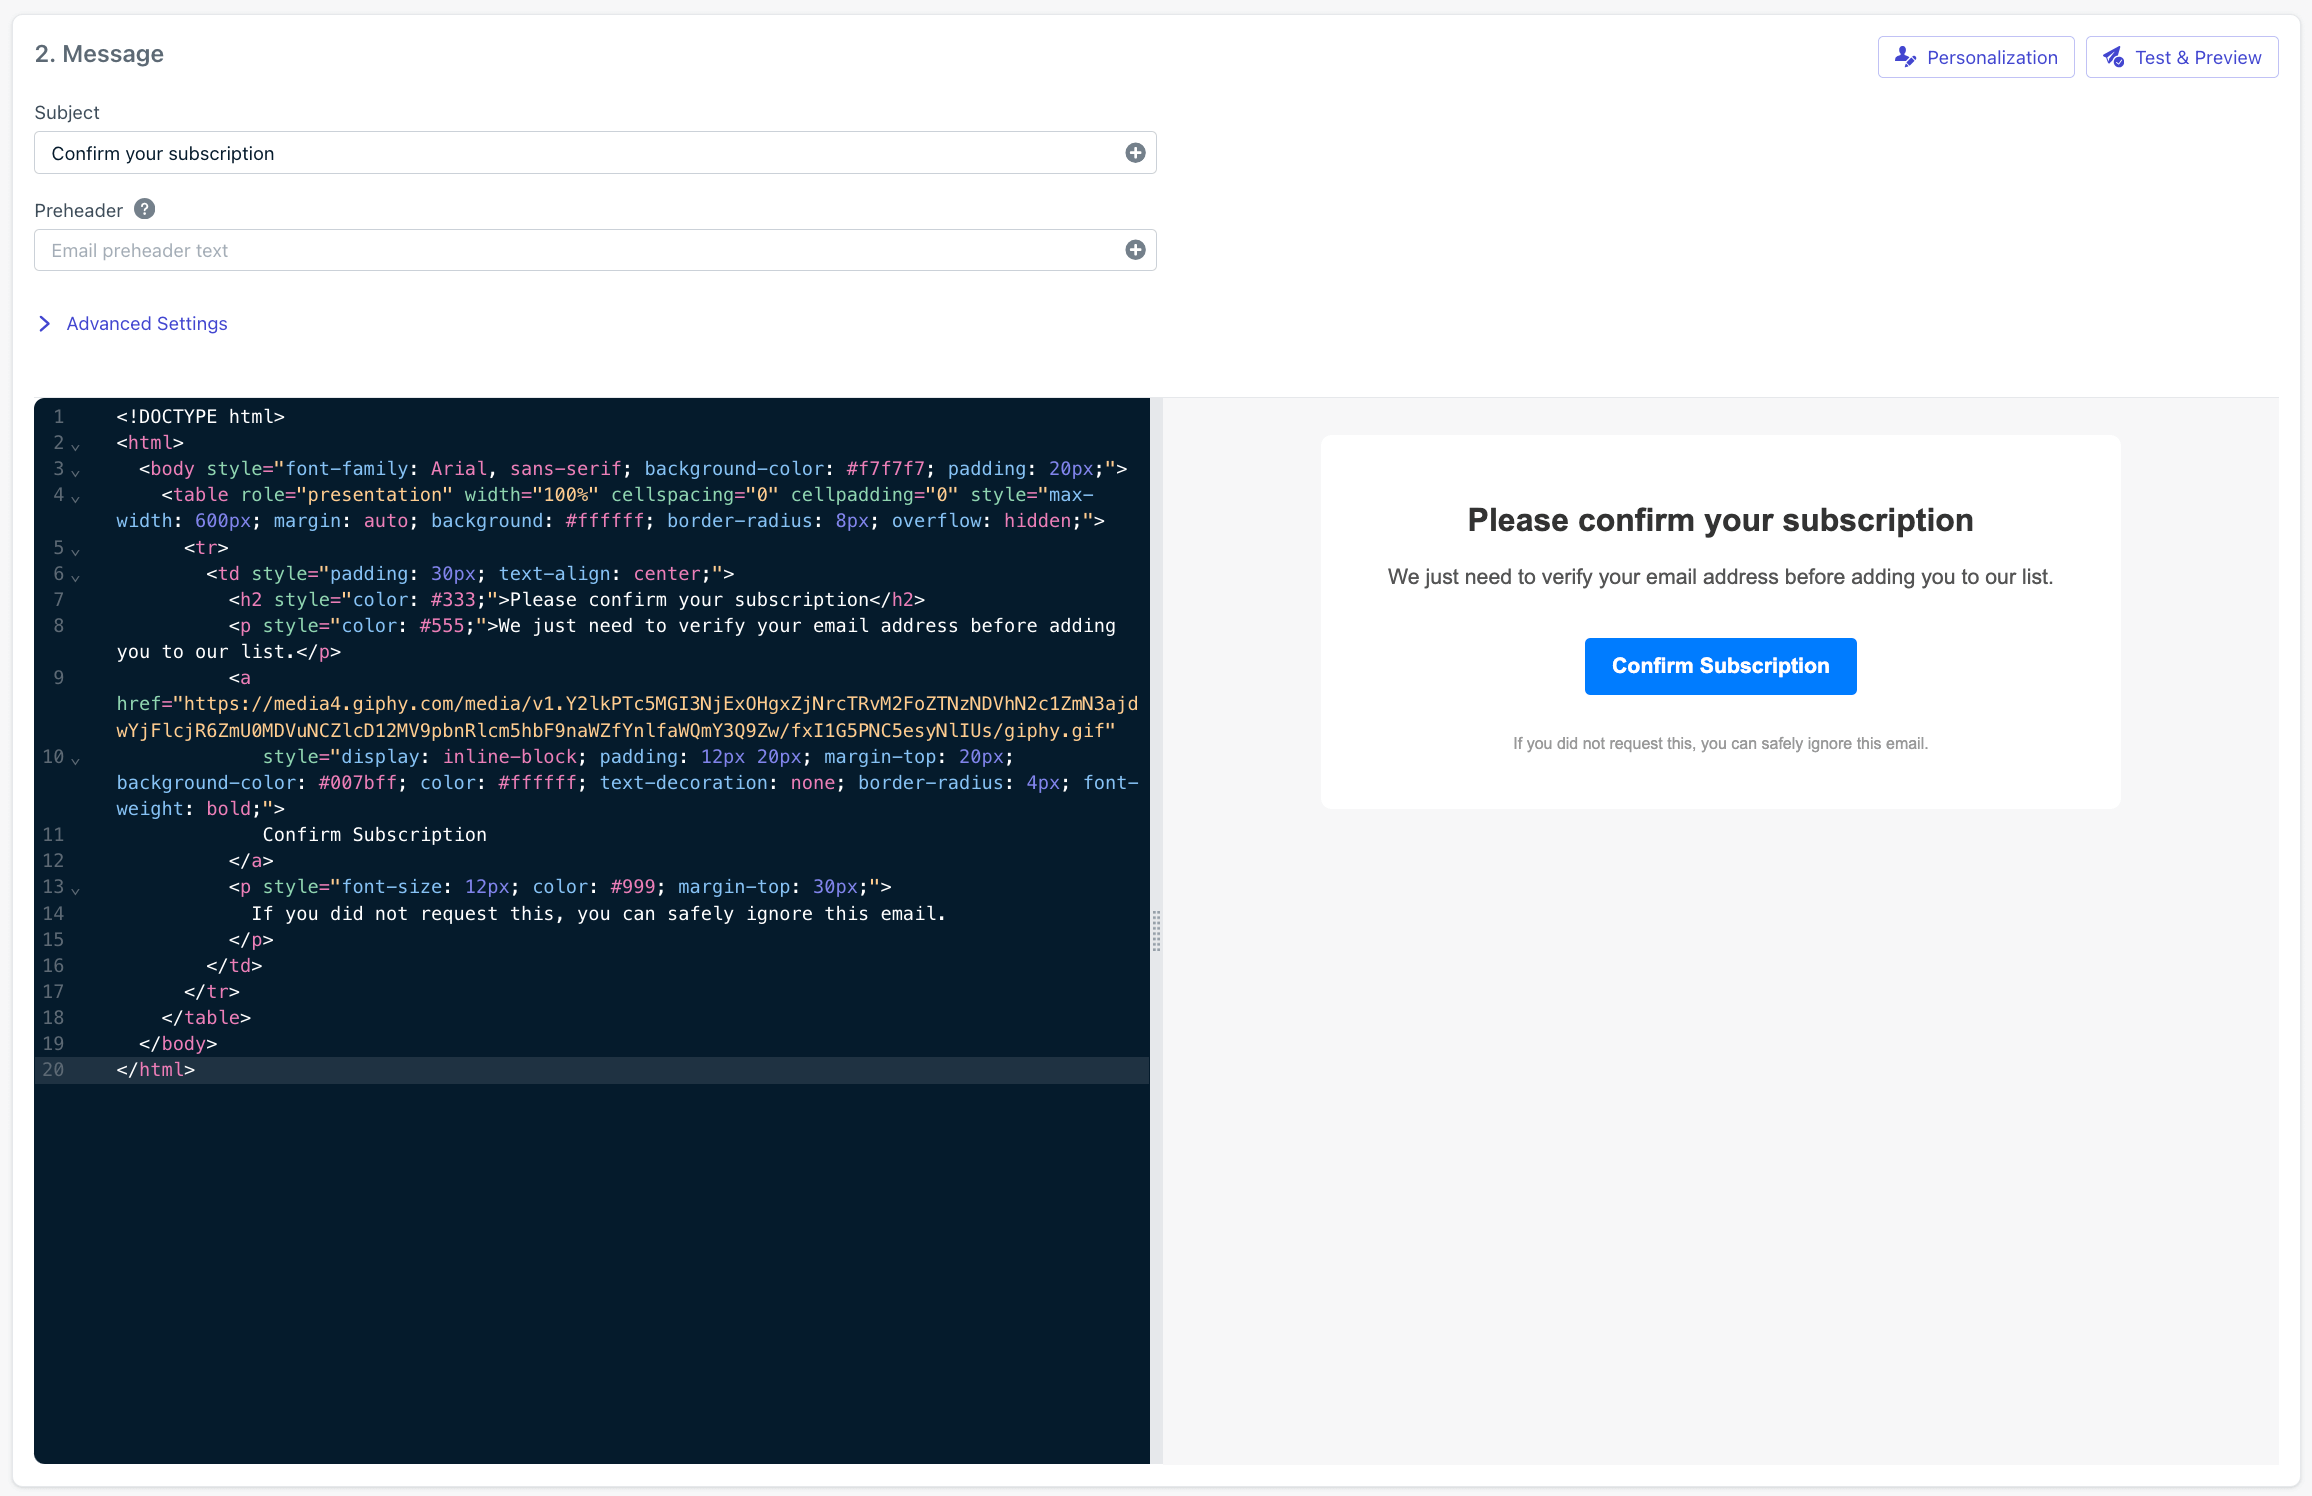
3. Build a confirmed opt-in Journey
Navigate to Journeys > New Journey and select Start from scratch.Journey settings
- Name:
Confirm email opt-in(or any name that helps you recognize this Journey). - Entry rules: Include the Did not confirm email opt-in segment.
- Exit rules: Check They moved through the entire Journey.
- Re-entry rules: Select No, they can receive this only once.
- Schedule: Select Start immediately (or schedule for a later time) and Never stops.
Email message step
Add an Email message step and select the Confirm email opt-in template.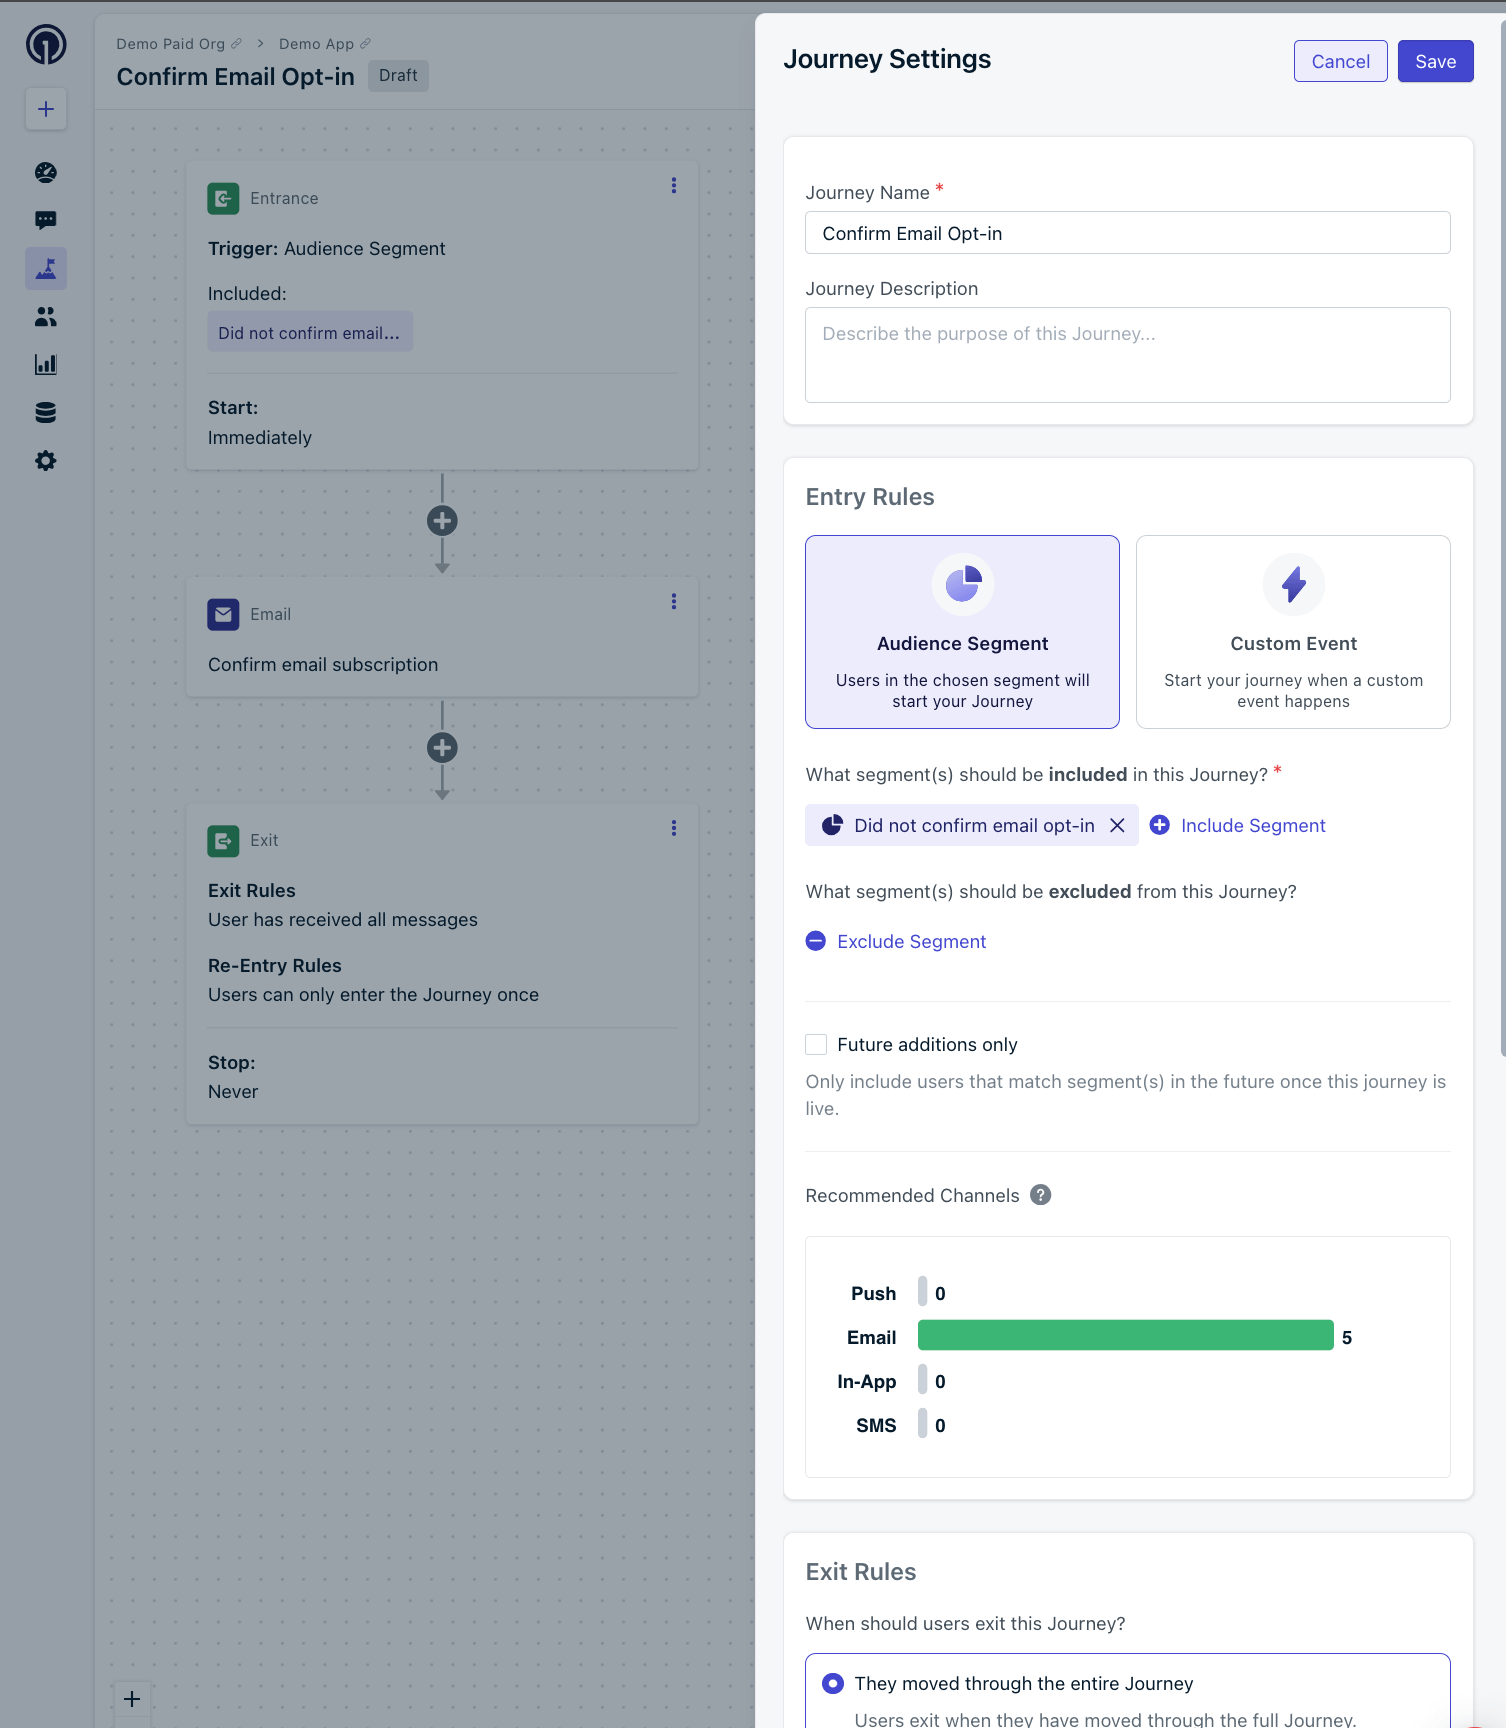
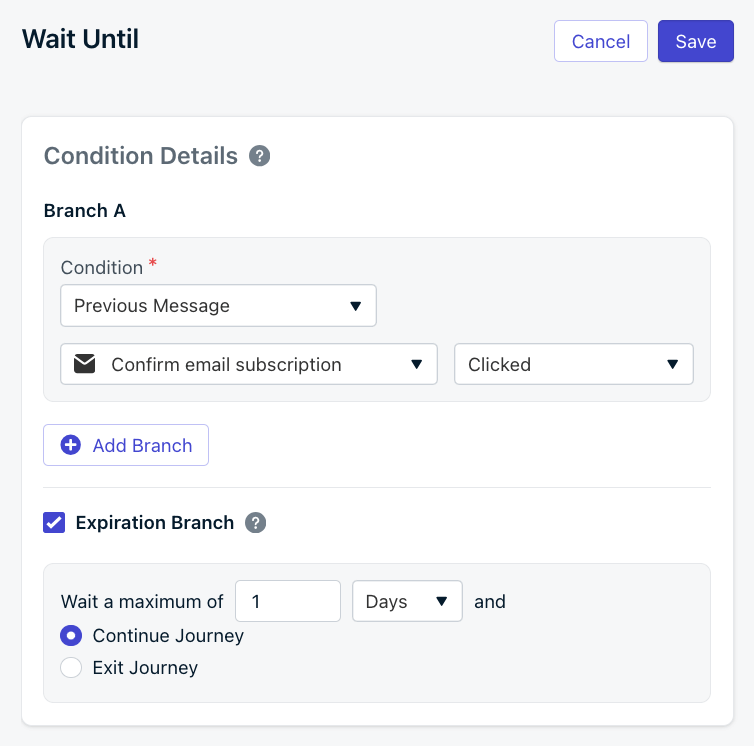
Wait Until step
Add a Wait Until step and set the Branch A condition to:- Previous Message
- Confirm email opt-in template name
- Clicked
1 Day and Continue Journey”.
Tag users who confirm
Under the A (Message Clicked) branch, add a Tag User action and set the Tag toconfirmed_opt_in with a value of true.
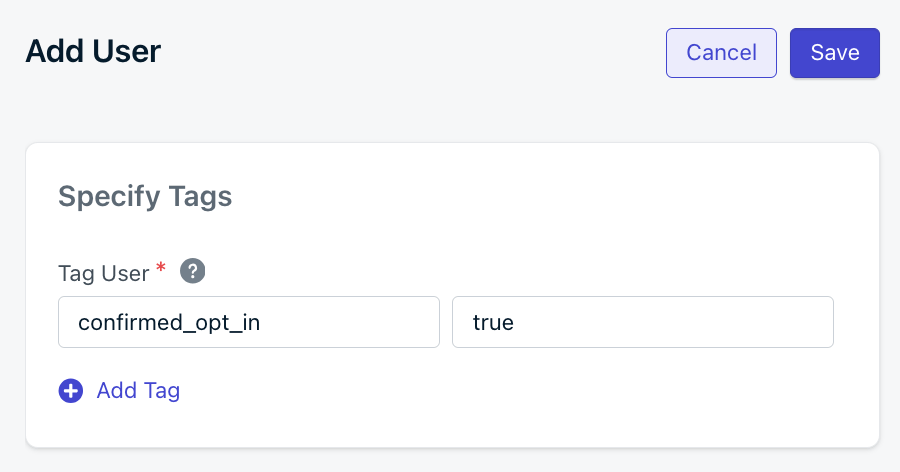
confirmed_opt_in Tag changes from false (or unset) to true. You can use this Tag to track which users have confirmed their email subscription.
Follow up with non-confirmers
After 1 day, users who did not click the confirmation button go down the Expire (1 Day) branch. From there you can repeat the pattern (second confirmation email > Wait Until clicked > Tag if clicked) to give users another chance. Two attempts is a good baseline; three is usually the upper limit before it feels like nagging.
4. Test the Journey
The Journey is now ready to test. Because the Segment uses the Test Users filter, only emails marked as Test Users will receive the confirmation message. To add more test addresses, see Import emails and Test Users.1
Set the Journey live
Click Set Live in the Journey.
2
Receive the confirmation email
Wait a few minutes — you should receive the confirmation email at your test address.
3
Click the confirmation button
Click the button in the email and wait a few more minutes for the click to register.
4
Verify the Tag
Check the user profile in Audience > Users. You should see
confirmed_opt_in=true and the user should have exited the Journey.Troubleshooting
If you did not receive the confirmation email after a few minutes:- Navigate back into the active Journey.
- Click the first Email step.
- Select Audience Activity at the top left. See Journey analytics for more details.
- You should see your email in the Delivered column. If it’s not there, check that your email address is Subscribed and matches the Segment criteria.
- Navigate to Audience > Users.
- Search for your email address.
- Check the Tags column. You should see
confirmed_opt_in=trueif the Journey worked correctly.
Still need help? Email
support@onesignal.com with:- The email address that you are testing.
- A link to the Journey (copy the URL from your browser address bar).
- Any additional information that may be helpful.
5. Set live in production
When you’re ready to send to actual users:1
Stop and archive the test Journey
Navigate to the Journey and click More Options > Stop + Archive.
2
Duplicate the segment
Navigate to the Segment and click Options > Pause, then Options > Duplicate.
3
Remove the Test Users filter
Update the duplicated Segment to remove the Test Users filter, then save.
4
Duplicate the Journey
Navigate back to the Journeys page and click Options > Duplicate on the test Journey.
5
Point the Journey at the production segment
Update the duplicated Journey to use the segment without the Test Users filter, then save.
6
Set live
Click Set Live when you’re ready to roll out to all users.
Subscribers who confirm now carry the
confirmed_opt_in=true Tag, which you can use for segmentation and to ensure you only message verified users.FAQ
Is double opt-in required by GDPR or CAN-SPAM?
GDPR requires explicit consent, which double opt-in provides cleanly. CAN-SPAM does not strictly require it, but using double opt-in reduces complaint rates and helps you store proof of consent (timestamp + source). Always log the confirmation event for compliance audits.Do existing email subscribers need to re-confirm?
No — for users you already trust as confirmed, use the CSV importer to bulk-setconfirmed_opt_in=true so they bypass the confirmation Journey entirely.
What should my confirmation email look like?
Keep it plain and short. Use a clear subject line (“Confirm your subscription”), a single confirmation CTA, and avoid heavy images, marketing content, or extra links. Make sure your sending domain has SPF, DKIM, and DMARC configured — see Email DNS configuration.How can I improve confirmation rates?
Show a thank-you page after signup that explains the upcoming confirmation step. Use a benefit-led subject line (“One last step: confirm your subscription”). Send 2–3 reminders maximum — more becomes nagging. If you’re sending from a new domain, warm it up before launching at scale.Why aren’t my confirmation links tracking?
Make sure the button uses a tracked link generated by the OneSignal template editor — raw external URLs won’t fire click events. If users click through but the Tag isn’t applied, verify the Wait Until step is set to Previous Message Clicked and that the Tag User action sits on the click branch, not the expiration branch.Why aren’t users confirming?
Confirmation emails sometimes land in spam or promotions. Encourage users on your post-signup thank-you page to check those folders. Follow the email reputation best practices to keep your sender reputation high enough to land in the inbox.What happens to users who never click the confirmation link?
After the Wait Until step expires (1 day in this tutorial), users go down the expiration branch. Send one or two follow-up confirmations, then exclude them from your primary segments — they remain unconfirmed and shouldn’t receive marketing email.Related pages
Email deliverability
How sender reputation, list hygiene, and inbox placement work together to land in the inbox.
Email reputation best practices
Opt-in, monitoring, frequency, warm-up, and list-hygiene recommendations.
Email warm-up
Ramp volume on a new sending domain without hurting deliverability.
Email setup and compliance
Configure your sending domain and meet legal sending requirements.
Journeys actions
Wait Until branches, Tag actions, and other Journey building blocks.
Magic Link OTP example
Build the same confirmation flow programmatically via the OneSignal API.