

If you are using Snowflake with OneSignal’s legacy integration, please refer to the Snowflake Legacy Integration guide. See Migrating from legacy for migration steps.
Overview
The OneSignal + Snowflake integration supports two powerful data pipelines:- Outbound: Automatically send messaging event data (push, email, SMS, in-app) from OneSignal to Snowflake for analysis and reporting.
- Inbound: Sync custom user events from your Snowflake datasets to OneSignal to trigger automated Journeys and personalized messaging.
Outbound setup
This is currently in early access.
To request access, contact
support@onesignal.com with:- Your company name
- Your OneSignal organization ID
- The app ID(s) you want to enable
- Build custom dashboards and reports
- Track delivery and engagement trends across channels
- Combine OneSignal data with other business data for analysis
- Access to Event Streams for outbound message events (Plan limitations and overages apply)
- Access to Custom Events for inbound event syncing (Plan limitations and overages apply)
- Updated Account Plan (not available on free apps)
- OneSignal Professional Plan (not available on free apps)
- Snowflake account
- SECURITYADMIN or ACCOUNTADMIN role in Snowflake (for setup)
1. Gather your Snowflake account details
Before configuring the integration, collect the following information from your Snowflake account:- Snowflake Host: Your account URL in the format
<account_identifier>.snowflakecomputing.com - Database name: The database where OneSignal will write event data
- Schema name: The schema within the database for OneSignal tables (this will be auto created by OneSignal)
- Warehouse name: The warehouse to use for data loading operations
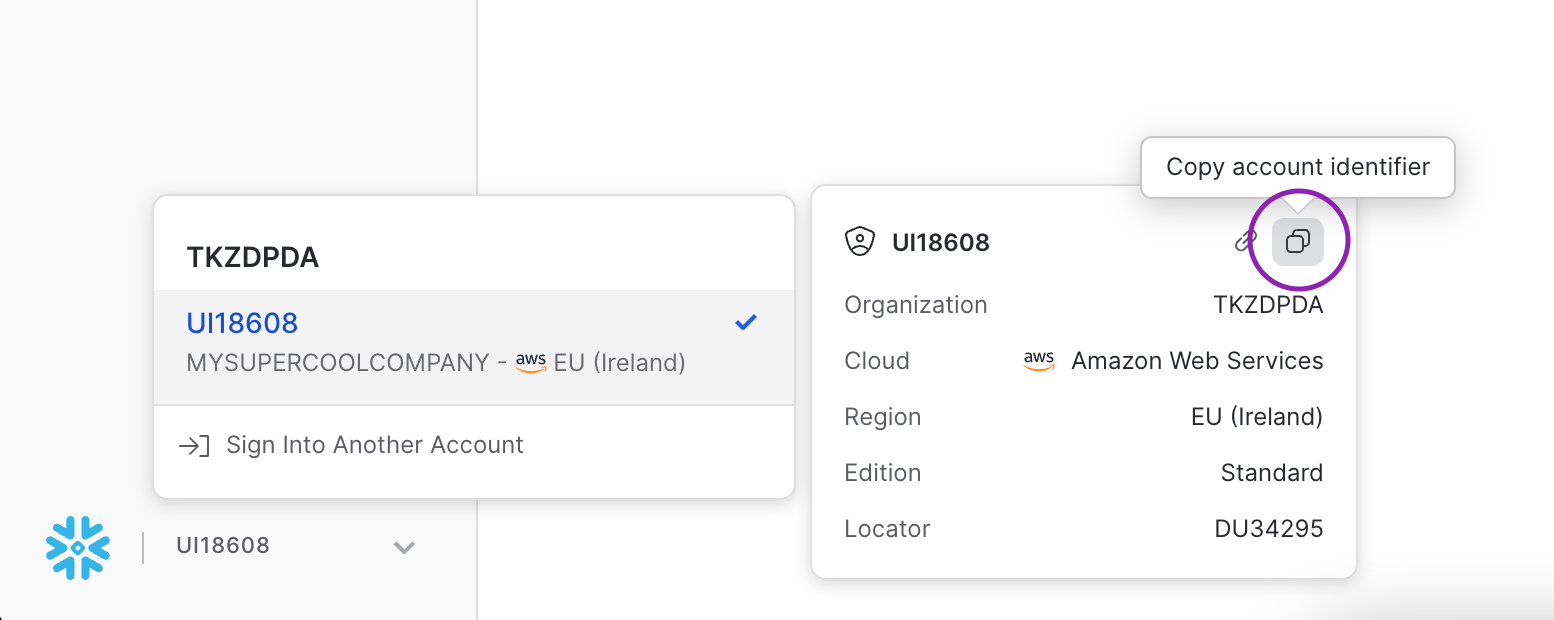
Snowflake account identifier location
2. Run setup script in Snowflake
Execute the following SQL script in your Snowflake warehouse to create the necessary role, user, warehouse, and database for OneSignal:You can customize the variable values at the top of the script to match your naming conventions. If you’re using an existing warehouse or database, modify the script accordingly.
3. Generate key pair for authentication
OneSignal requires key-pair authentication for secure access to your Snowflake account. Follow these steps to generate and configure the keys:1
Generate a private key
Run one of the following commands to generate a private key:Unencrypted private key (simpler, but less secure):Encrypted private key (recommended for production):If using an encrypted key, you’ll be prompted to create a passphrase. Save this passphrase securely—you’ll need it when configuring OneSignal.
2
Generate the public key
Generate the public key from your private key:
3
Assign the public key to your Snowflake user
Copy the contents of the public key file (excluding the header and footer lines), then run this SQL command in Snowflake:Replace
<YOUR_PUBLIC_KEY_CONTENT> with the key content (without -----BEGIN PUBLIC KEY----- and -----END PUBLIC KEY----- lines).4. Connect OneSignal
1
Activate the integration
In OneSignal, navigate to Data > Integrations > Snowflake.
2
Enter the details
- Host:
<your_account>.snowflakecomputing.com - Port: Optional, defaults to
443 - Database: e.g.
ONESIGNAL - Role: Optional, uses the user’s default role if omitted
- User: e.g.
ONESIGNAL_USER - Private Key: Paste the contents of your private key file (
rsa_key.p8) - Private Key Passphrase: Optional, only if your private key is encrypted
- Data processing location: Where data is processed before before sending it to Snowflake
3
Configure the integration
- Sync Frequency: as often as every 15 minutes
- Schema/Table Names: pre-set as
onesignal_events_<app-id>andmessage_events(editable) - Event Types: choose which to sync—select all or just what you need
4
Select events
Select the events you care to receive in your Snowflake warehouse.
5
Complete the setup
Click Save and wait for the success confirmation
Events go through a processing step that can take up to 30 minutes before they are included in a sync. With a 15-minute sync frequency, expect events to appear in Snowflake within 45 minutes.While you wait, send messages via push, email, in-app, or SMS to trigger the events selected.
5. View data in Snowflake
Once the initial sync completes, query your OneSignal event data:If you run into issues like missing schemas, permission errors, or malformed events, contact
support@onesignal.com.Message events and properties
Message event kinds
Property:event_kind
Type: String
The kind of message and event (e.g. message.push.received, message.push.sent).
message.email.sent and message.sms.sent are deprecated. They can’t be added to new exports, but exports that already include them keep receiving them. Use message.email.received and message.sms.delivered instead.
Event data schema
For each message event generated by a user, the following metadata will be attached to the record.Notes
- Events go through a processing step that can take up to 30 minutes before they are included in a sync. With a 15-minute sync frequency, expect events to appear in your warehouse within 45 minutes.
- Deactivating may still result in one final sync after deactivation.
- To ensure efficient data synchronization, our system automatically creates and manages staging datasets. These datasets, named with a pattern like
fivetran_{two random words}_staging, temporarily store data during processing before it’s integrated into your main schema. These staging datasets are essential for maintaining a streamlined workflow and should not be deleted, as they will be automatically recreated.
Migrating from legacy
If you’re currently using the legacy Snowflake integration, this section covers the key differences and how to migrate your queries.Key differences
Schema changes
The new integration creates columns on-demand. If no events contain data for a particular field, that column won’t exist in your table. When data appears for that field, the column is created automatically.Column renames
Type inference
The new integration uses automatic type inference. If all values in a column are numeric (e.g., all yourEXTERNAL_ID values are numbers), the column may be typed as NUMBER. If a non-numeric value appears later, the column type is promoted to VARCHAR.
Use explicit casting if needed:
Migrating queries
To migrate existing queries:- Update references to the legacy database to point to your new Snowflake database
- Account for the column renames listed above
- Add explicit type casting where needed
EVENT_ID:
Replace
<new-database>.<new-schema> with your new integration’s database and schema.Replace <legacy-backup-database>.<legacy-backup-schema> with wherever you backed up your legacy shared data.This view merges historical + new data and deduplicates on EVENT_ID, so events that
appear in both sources are only counted once. This is especially important if you run
both integrations simultaneously during migration.Inbound setup
Import behavioral event data from Snowflake to OneSignal to:- Trigger Journeys based on user activity
- Personalize messaging based on behavioral data
- Access to Event Streams for outbound message events (Plan limitations and overages apply)
- Access to Custom Events for inbound event syncing (Plan limitations and overages apply)
- Updated Account Plan (not available on free apps)
- Snowflake account with warehouse access
- Event data stored in Snowflake tables or views
- Network connectivity from OneSignal to your Snowflake instance
- User credentials with appropriate permissions
1
Create dedicated role for OneSignal
Create a role hierarchy following Snowflake best practices:
2
Create dedicated warehouse
Create a cost-optimized warehouse for OneSignal operations:
3
Create user and grant permissions
Create the OneSignal user and grant access to your event data:
4
Create bookkeeping database (Advanced Sync Engine)
Create a private database for OneSignal’s sync state management:
5
Configure authentication
Set up key-pair authentication (recommended) for enhanced security:
- Generate a public/private key pair following Snowflake’s documentation
- Configure the public key on your Snowflake user
- Use the private key in OneSignal’s connection settings
6
Connect to OneSignal
In OneSignal, go to Data > Integrations and click Add Integration.Select Snowflake and provide the following connection details:
- Account Name: Your Snowflake account identifier (e.g.,
abc123.us-east-1) - Warehouse:
CENSUS_WAREHOUSE - User:
CENSUS - Database: Your event data database name
- Schema: Your event data schema name
- Authentication: Key-pair (provide private key and optional passphrase)
Event data mapping
Map your Snowflake event data to OneSignal’s custom events format:The Sync Key is the column you designate as the unique identifier for each row during sync. OneSignal uses it to detect whether a row has already been processed, so re-syncing your data doesn’t create duplicate events. Choose a column with a unique text value per row. Don’t use a boolean or a value that repeats across rows.
Example Event Table Schema
SQL Query Mode
Write custom SQL queries to transform your event data:Advanced configuration
Managing Warehouse Costs
- Use X-Small warehouse size for cost optimization
- Configure auto-suspend (60 seconds) and auto-resume
- Schedule syncs during off-peak hours
- Consider sharing warehouse with other batch processing systems
Live Syncs Support
For real-time event processing, enable change tracking on your event tables:Network Security
If you use Snowflake’s Allowed IPs network policy, add the relevant IP ranges to your allowlist. The OneSignal Snowflake integration is powered by Fivetran, so traffic to your Snowflake account originates from Fivetran’s Google Cloud Platform (GCP) IP ranges. The ranges you need depend on the Data processing location you select on the integration settings page. See Fivetran’s Google Cloud Platform IP addresses page for the complete, current list of ranges per location.If you select the US data processing location, allowlist the ranges for the default US region.
Limitations
- Complex analytical queries may impact warehouse performance and costs
- User/Password authentication will be deprecated November 2025
- The CENSUS database is reserved for OneSignal operations only
FAQ
Which authentication method should I use?
Use Key-pair authentication (recommended). User/Password authentication will be blocked by Snowflake starting November 2025.Can I use an existing warehouse?
Yes, you can share a warehouse with other batch processing systems like dbt or Fivetran to optimize costs. Ensure the warehouse has sufficient capacity for your event processing needs.How can I optimize costs?
- Use X-Small warehouse size
- Configure aggressive auto-suspend (60 seconds)
- Schedule syncs during off-peak hours
- Use hourly/daily syncs instead of continuous syncing