Requirements
- A managed Expo app. For bare React Native apps, see React Native SDK setup.
- Expo development build
- Expo SDK 53+ (React Native 0.79+) with New Architecture enabled
- EAS CLI (EAS Build documentation)
- Configured OneSignal app and platform
- macOS with Xcode 14+ (setup instructions use Xcode 16.2)
- Device with iOS 12+, iPadOS 12+, or Xcode simulator running iOS 16.2+
- CocoaPods 1.16.2+
- Android 7.0+ device or emulator with Google Play Store (Services) installed
Configure your OneSignal app and platform
Configure your OneSignal app with the platforms you support — Apple (APNs), Google (FCM), Huawei (HMS), and/or Amazon (ADM).Step-by-step setup instructions
Step-by-step setup instructions
Create or select your app
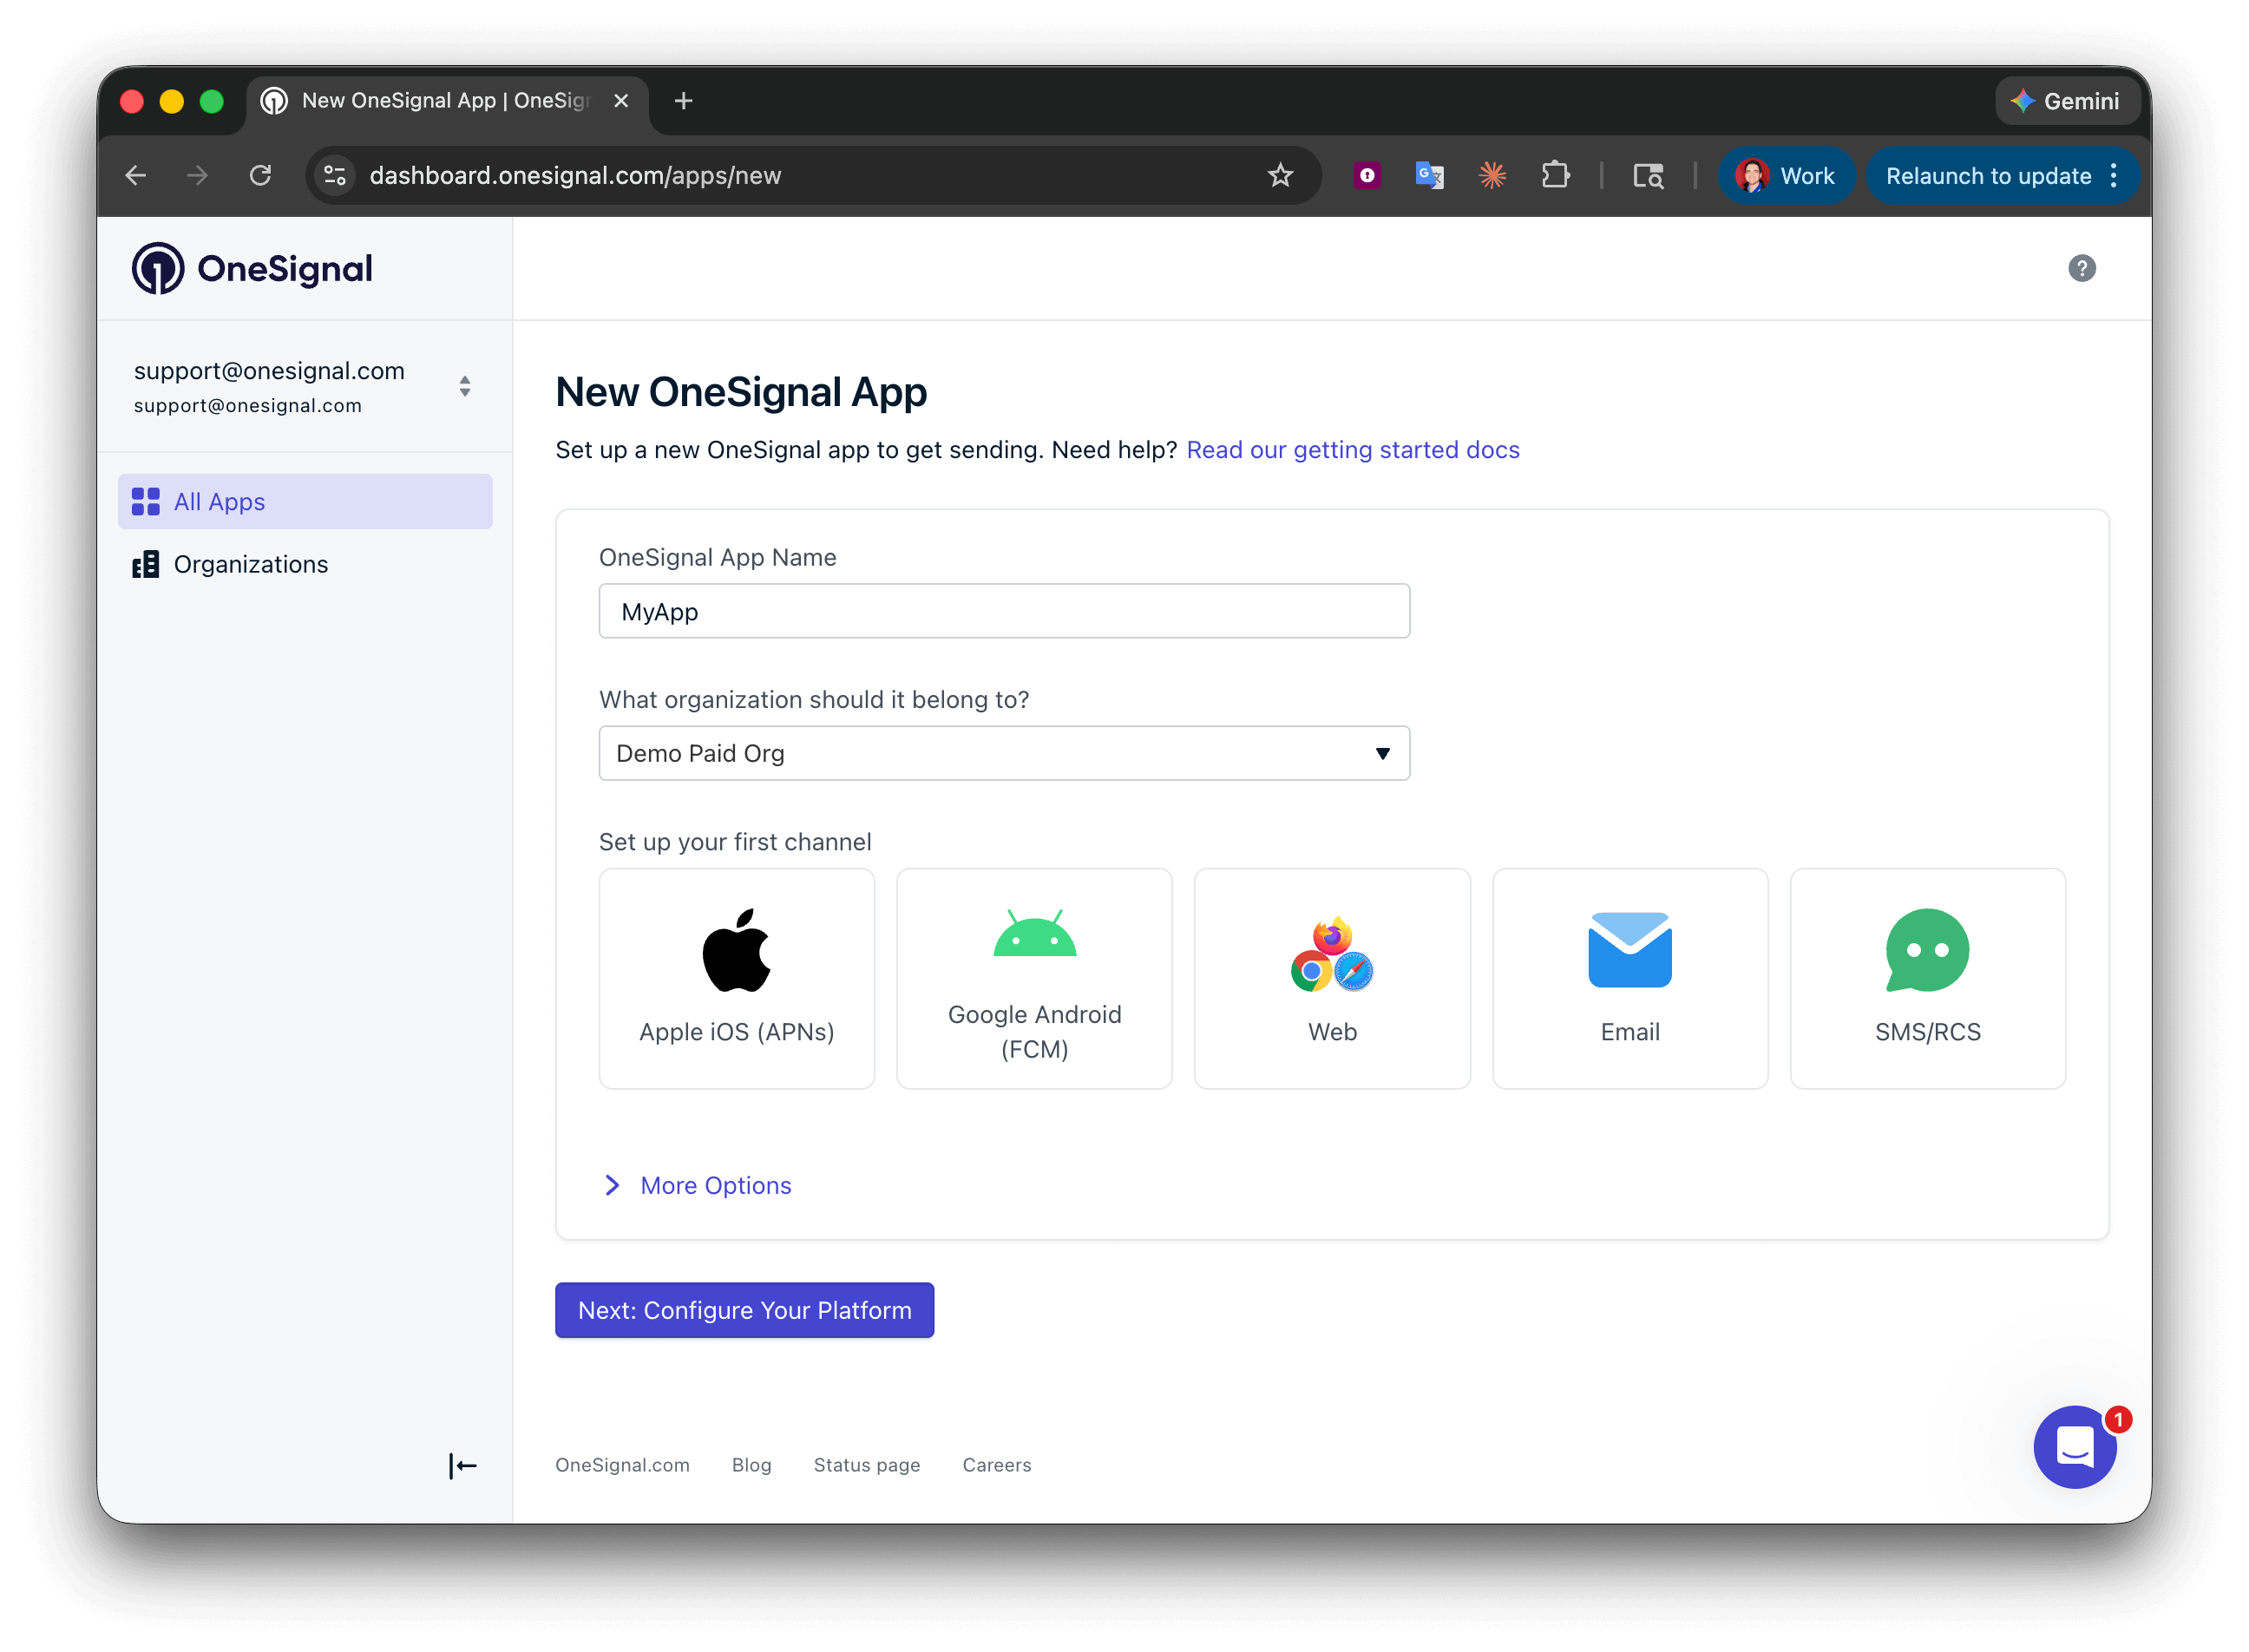
Setting up your first OneSignal app, Organization, and channel.
Configure platform credentials
- Android: Set up Firebase credentials
- iOS: p8 token (recommended) or p12 certificate
- Amazon: Generate API key
- Huawei: Authorize OneSignal
Save your App ID and install the SDK
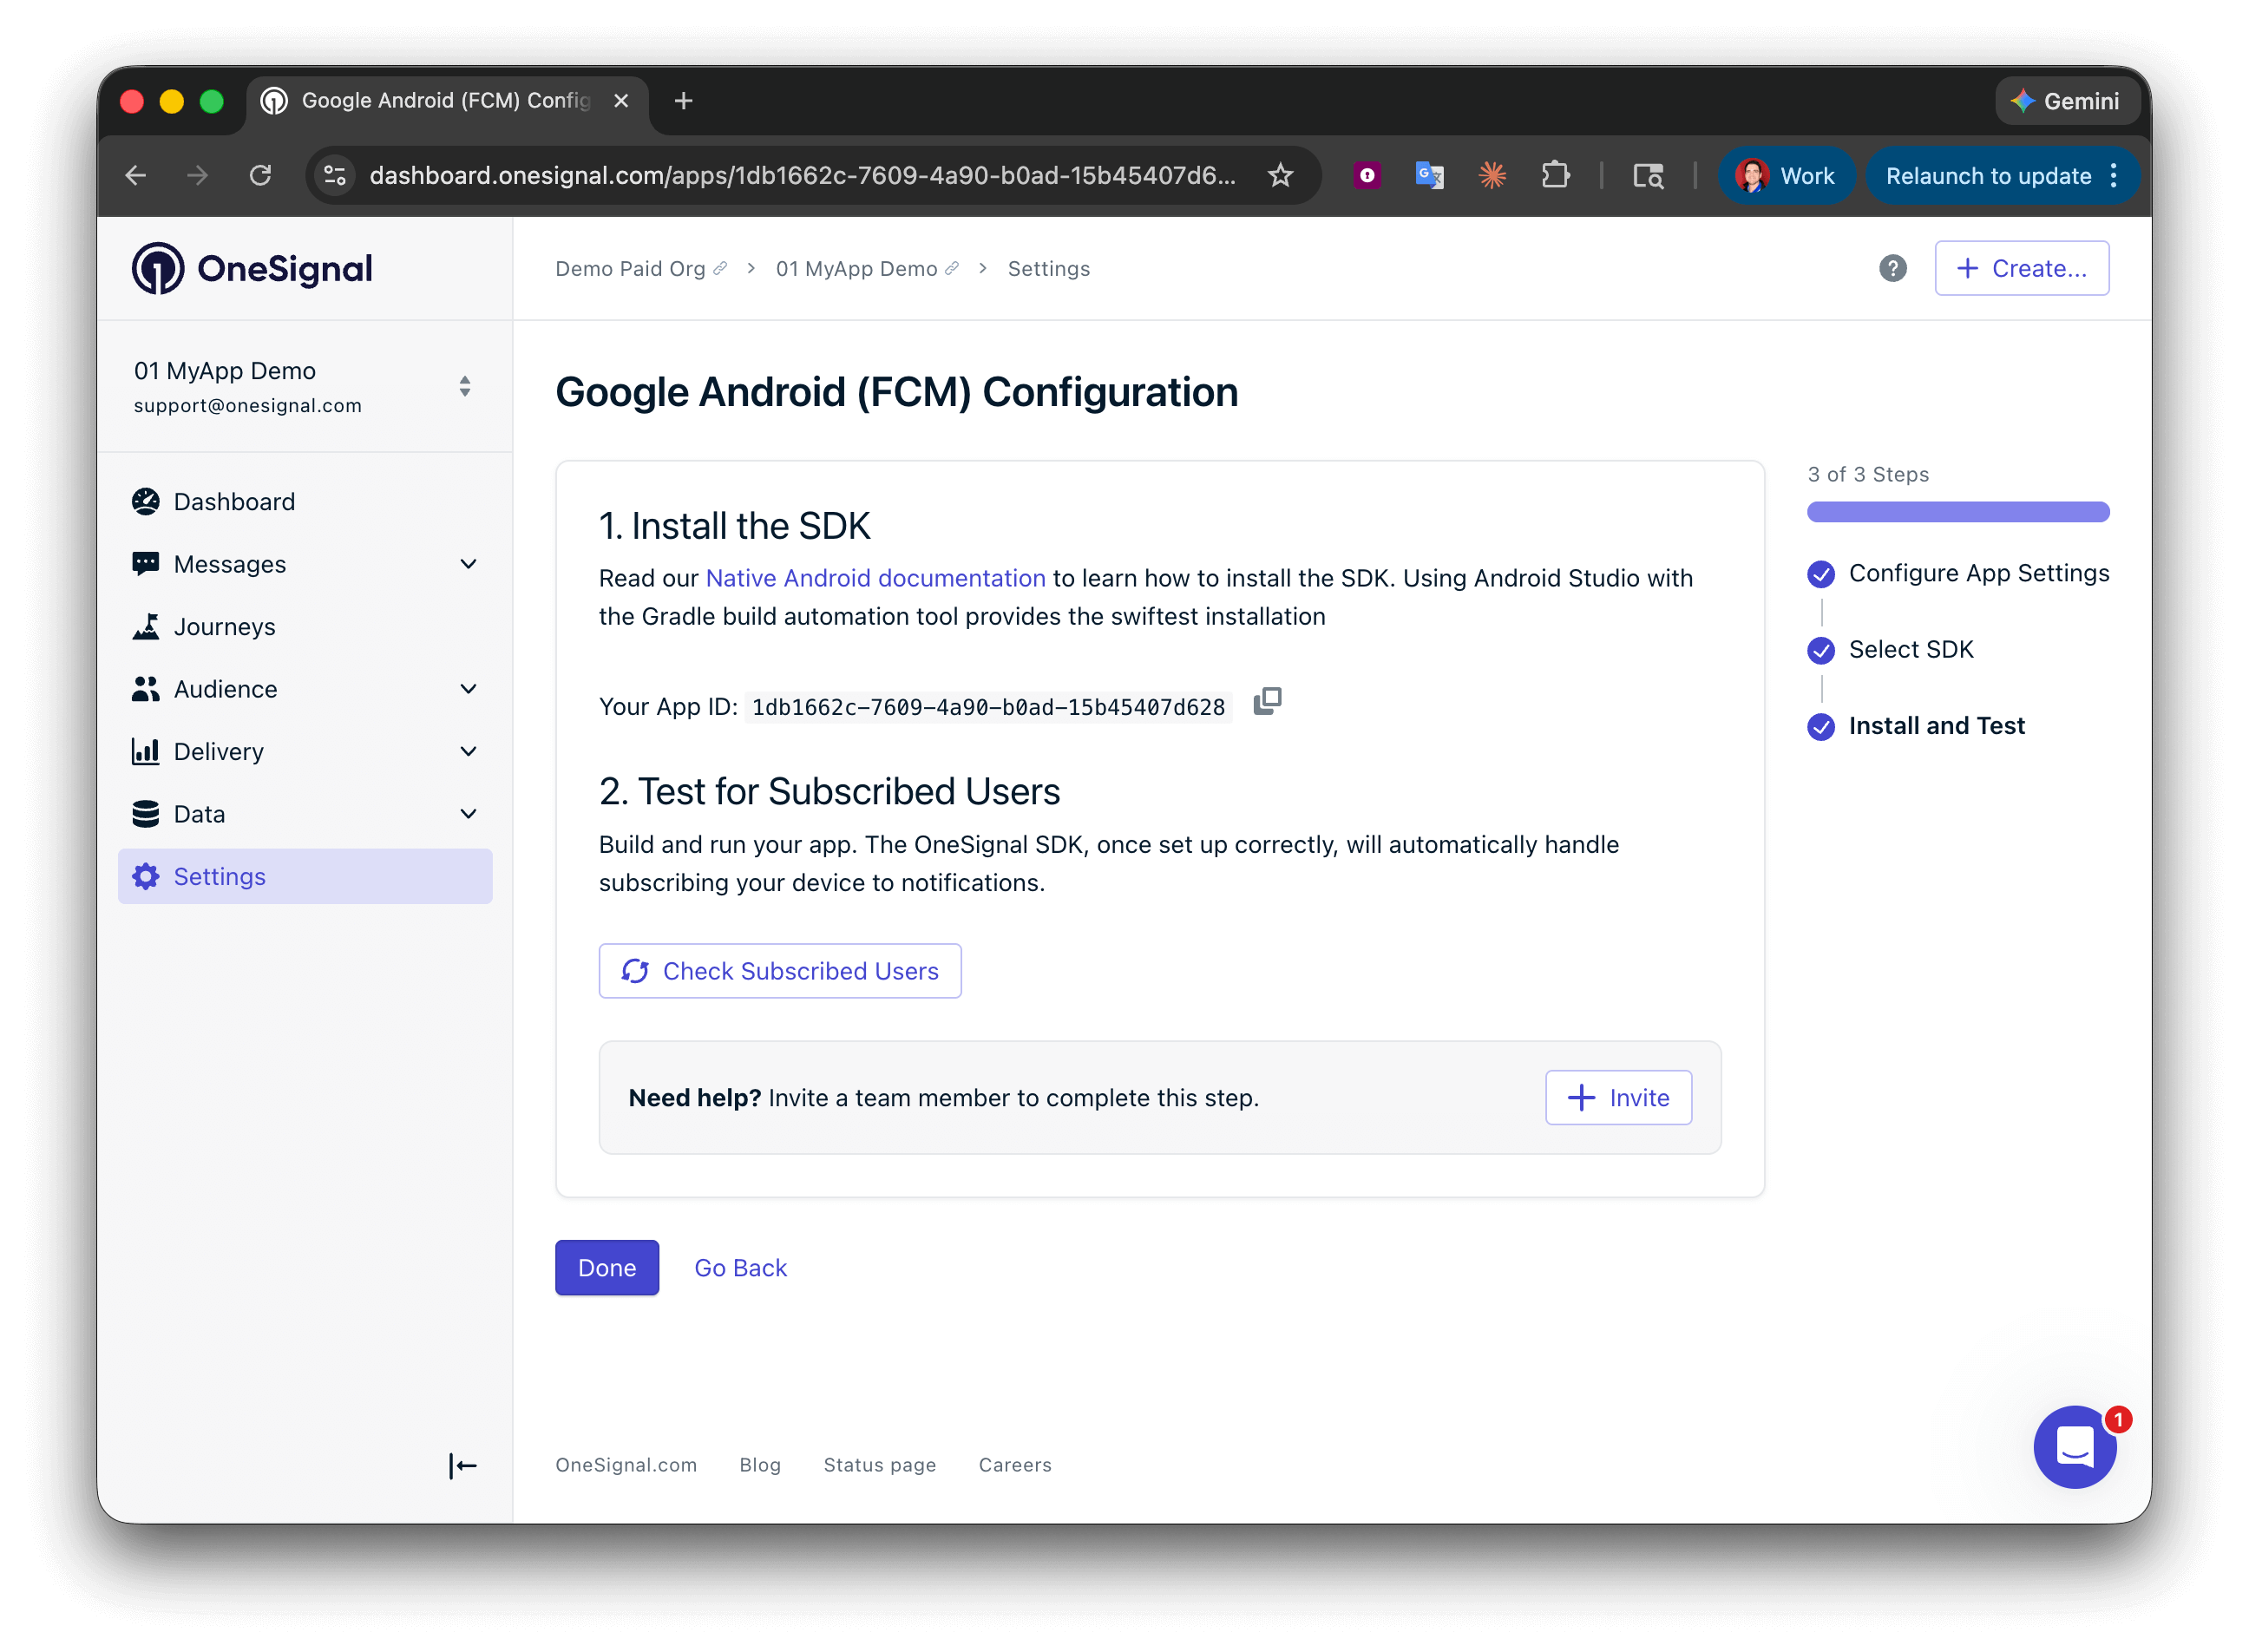
Save your App ID and invite additional team members.
SDK setup
1. Add SDK
Install the OneSignal Expo plugin using the Expo CLI.react-native-onesignal package to your project.
2. Configure the plugin
Open yourapp.json (or app.config.js / app.config.ts). You must include the following settings.
Required settings
UIBackgroundModes key set to ["remote-notification"].- Set
aps-environmentto"development"for testing and"production"for TestFlight and App Store builds.
Additional plugin props.
Additional plugin props.
Optional: Disable the location module
If your app does not useOneSignal.Location, set disableLocation to true in the OneSignal Expo plugin props. This option requires react-native-onesignal 5.5.1 or later. The plugin configures native dependency resolution so react-native-onesignal excludes the location module. On iOS, the plugin writes the Podfile environment setting used during CocoaPods resolution. On Android, the plugin writes onesignal.disableLocation=true to the generated Gradle properties.
Podfile explicitly declares OneSignalXCFramework on a Notification Service Extension or Live Activity widget target, use a modular subspec such as OneSignalXCFramework/OneSignal or OneSignalXCFramework/OneSignalLiveActivities. The aggregate pod 'OneSignalXCFramework' resolves OneSignalComplete and includes location. After a clean prebuild, verify that neither OneSignalComplete nor OneSignalLocation appears in ios/Podfile.lock.
- app.config.ts
- app.json
onesignal-expo-plugin 2.6.0, you can import withOneSignal for full TypeScript support and autocompletion on the plugin props.3. Initialize SDK
Depending on your Expo structure (Traditional App entry or Expo Router), initialize OneSignal following these options.- Traditional App Entry
- Expo Router
App.tsx or App.js file initialize OneSignal with the provided methods.Replace YOUR_APP_ID with your OneSignal App ID found in your OneSignal dashboard Settings > Keys & IDs.useCallback
If your listener needs access to props or state, define it outside useEffect with useCallback so the same reference is used to add and remove the listener. Passing different function references to addEventListener and removeEventListener is a silent no-op — the listener will not be removed and can fire after the component unmounts.
Android setup
Make sure your OneSignal app is configured for the Android platform using your Firebase credentials. Set up your notification icons to match your app’s branding. If this step is skipped, a default bell icon will display for your push notifications. Build for Android At this point, you should be able to build and run your app on a physical Android device or emulator without issues.- Continue with the iOS setup, if applicable.
- Or jump ahead to Testing the OneSignal SDK integration.
iOS setup
Make sure your OneSignal app is configured for the iOS platform using either the p8 Token (Recommended) or p12 Certificate.Build for iOS
You should now be able to build and run your app on a real iOS device or iOS simulator (16.2+).Common iOS build errors
Cycle Inside... building could produce unreliable results.
Cycle Inside... building could produce unreliable results.
- Open your
.xcworkspacefolder in Xcode and navigate to your app target > Build Phases. - You should have a phase called “Embed Foundation Extensions” or “Embed App Extensions”.
- Drag and move this build phase to above “Run Script”.
- Build and run your app. The error should be resolved.
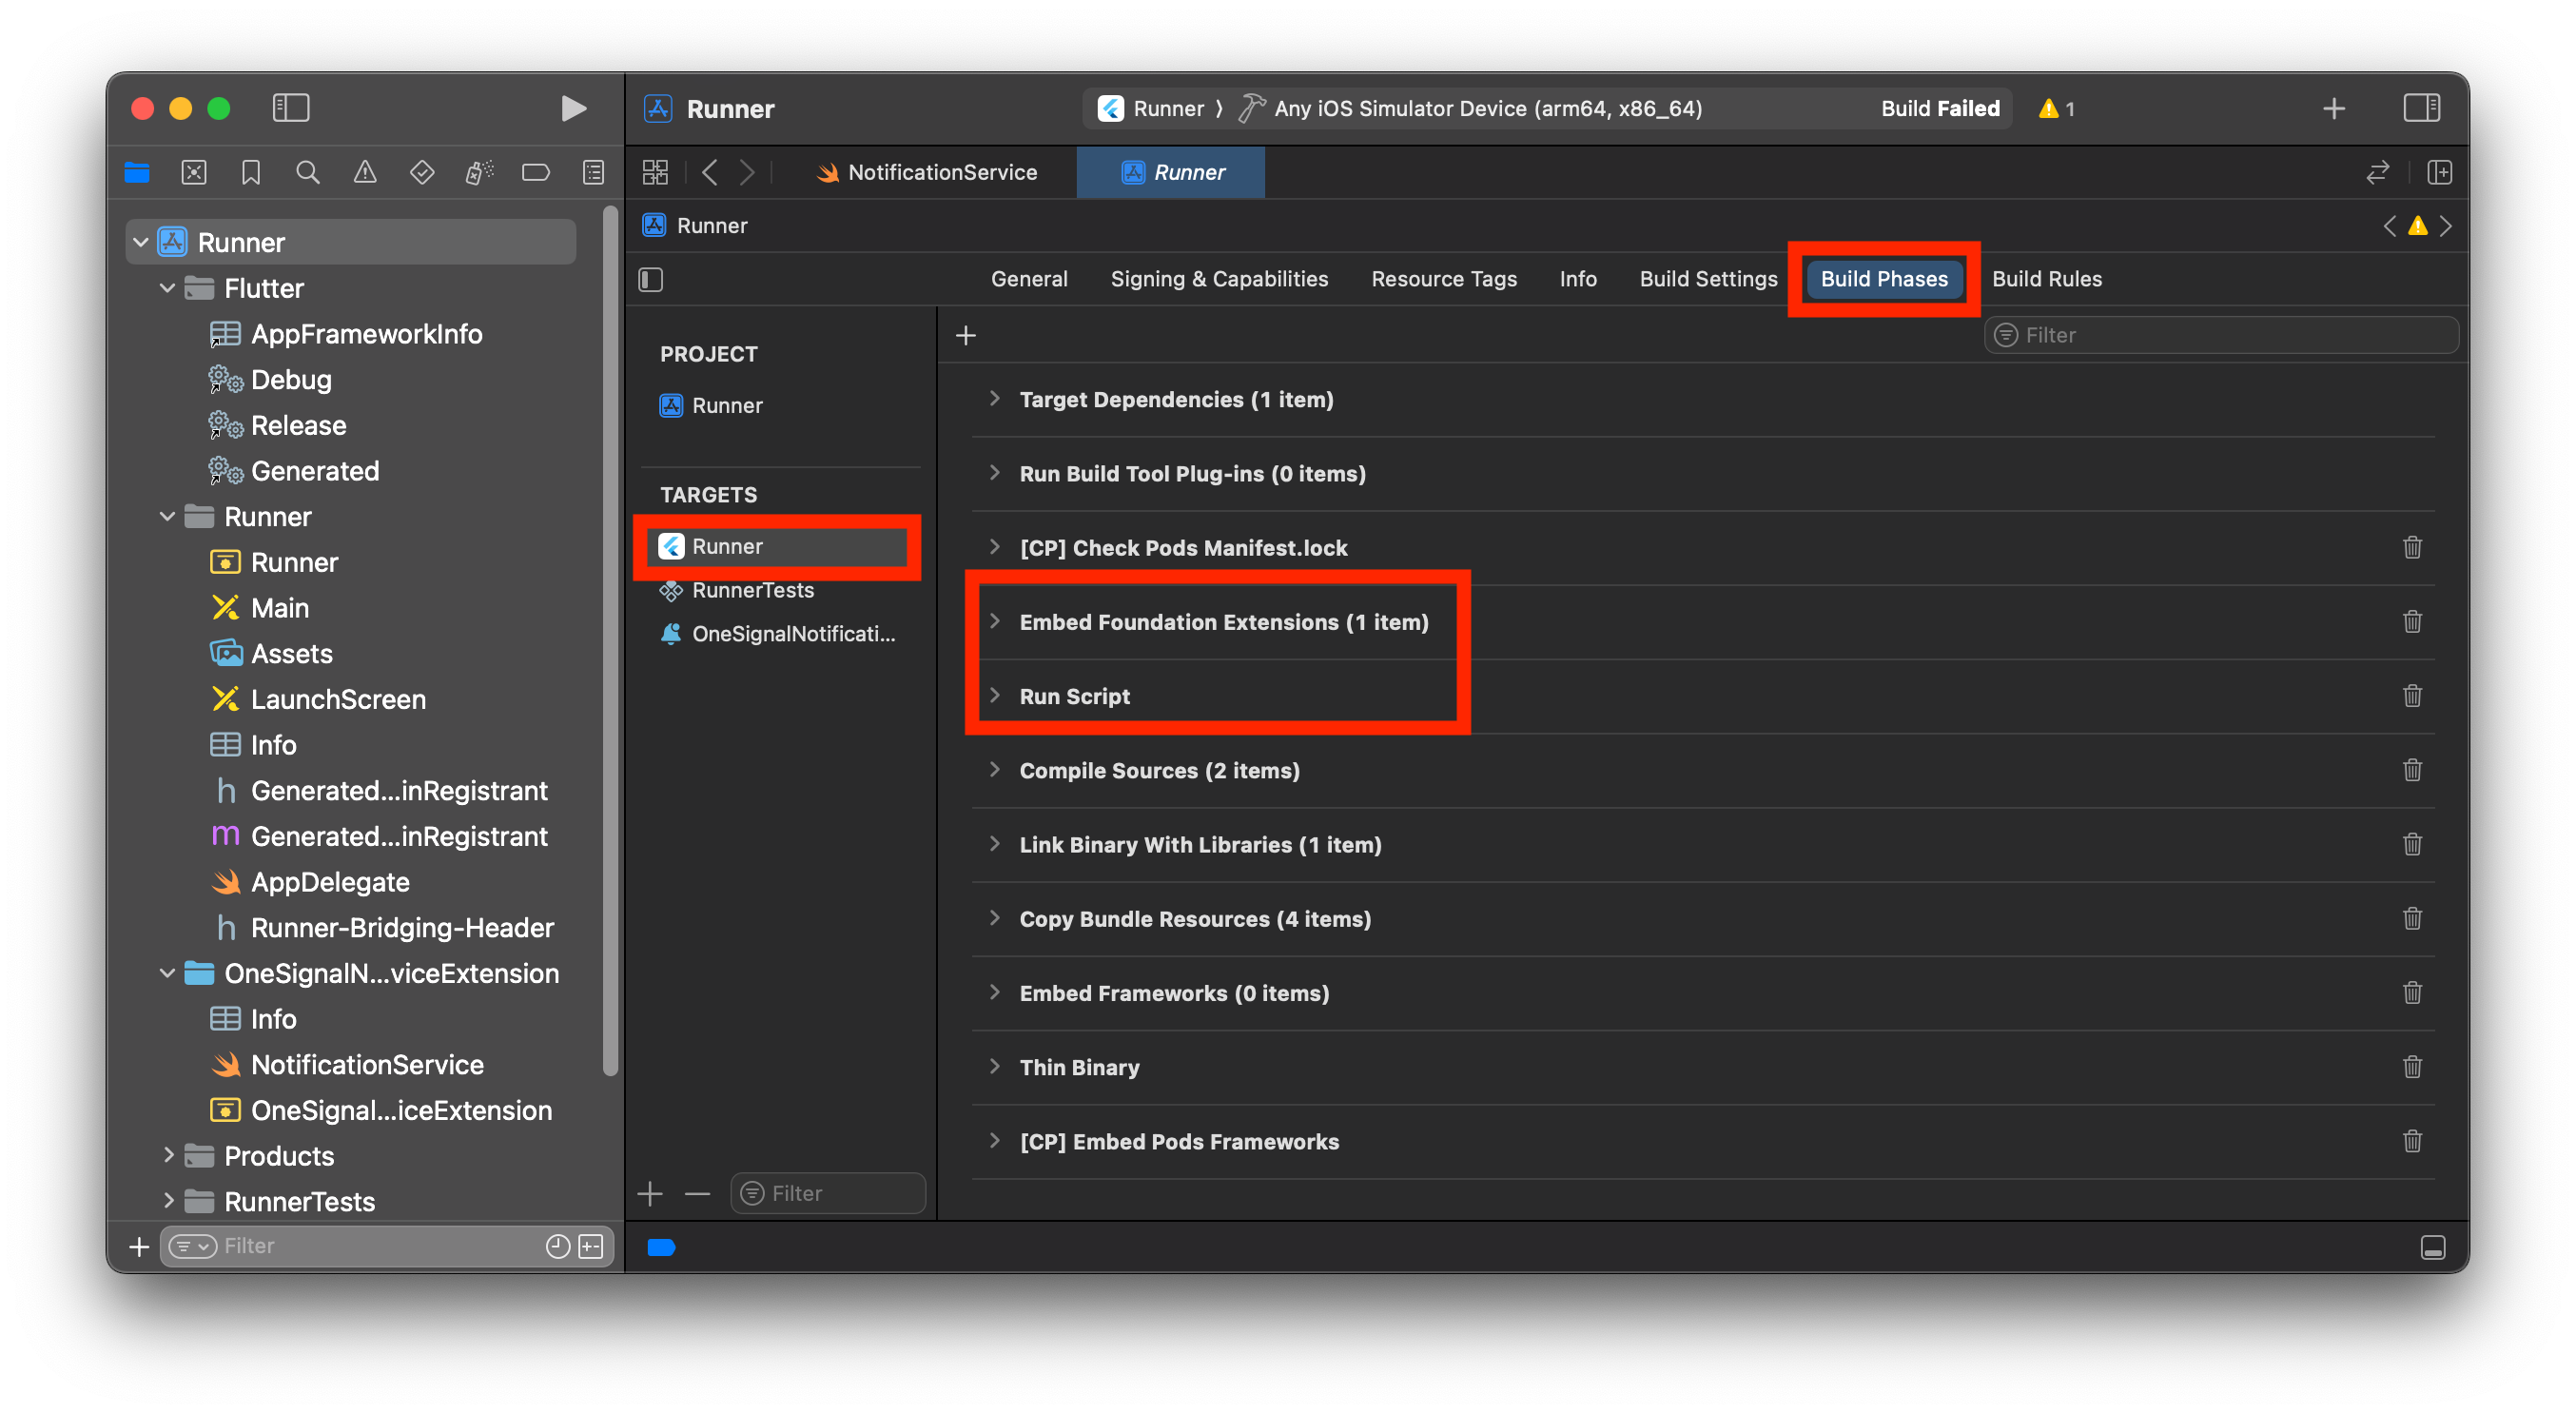
Correct order of Build Phases in Xcode.
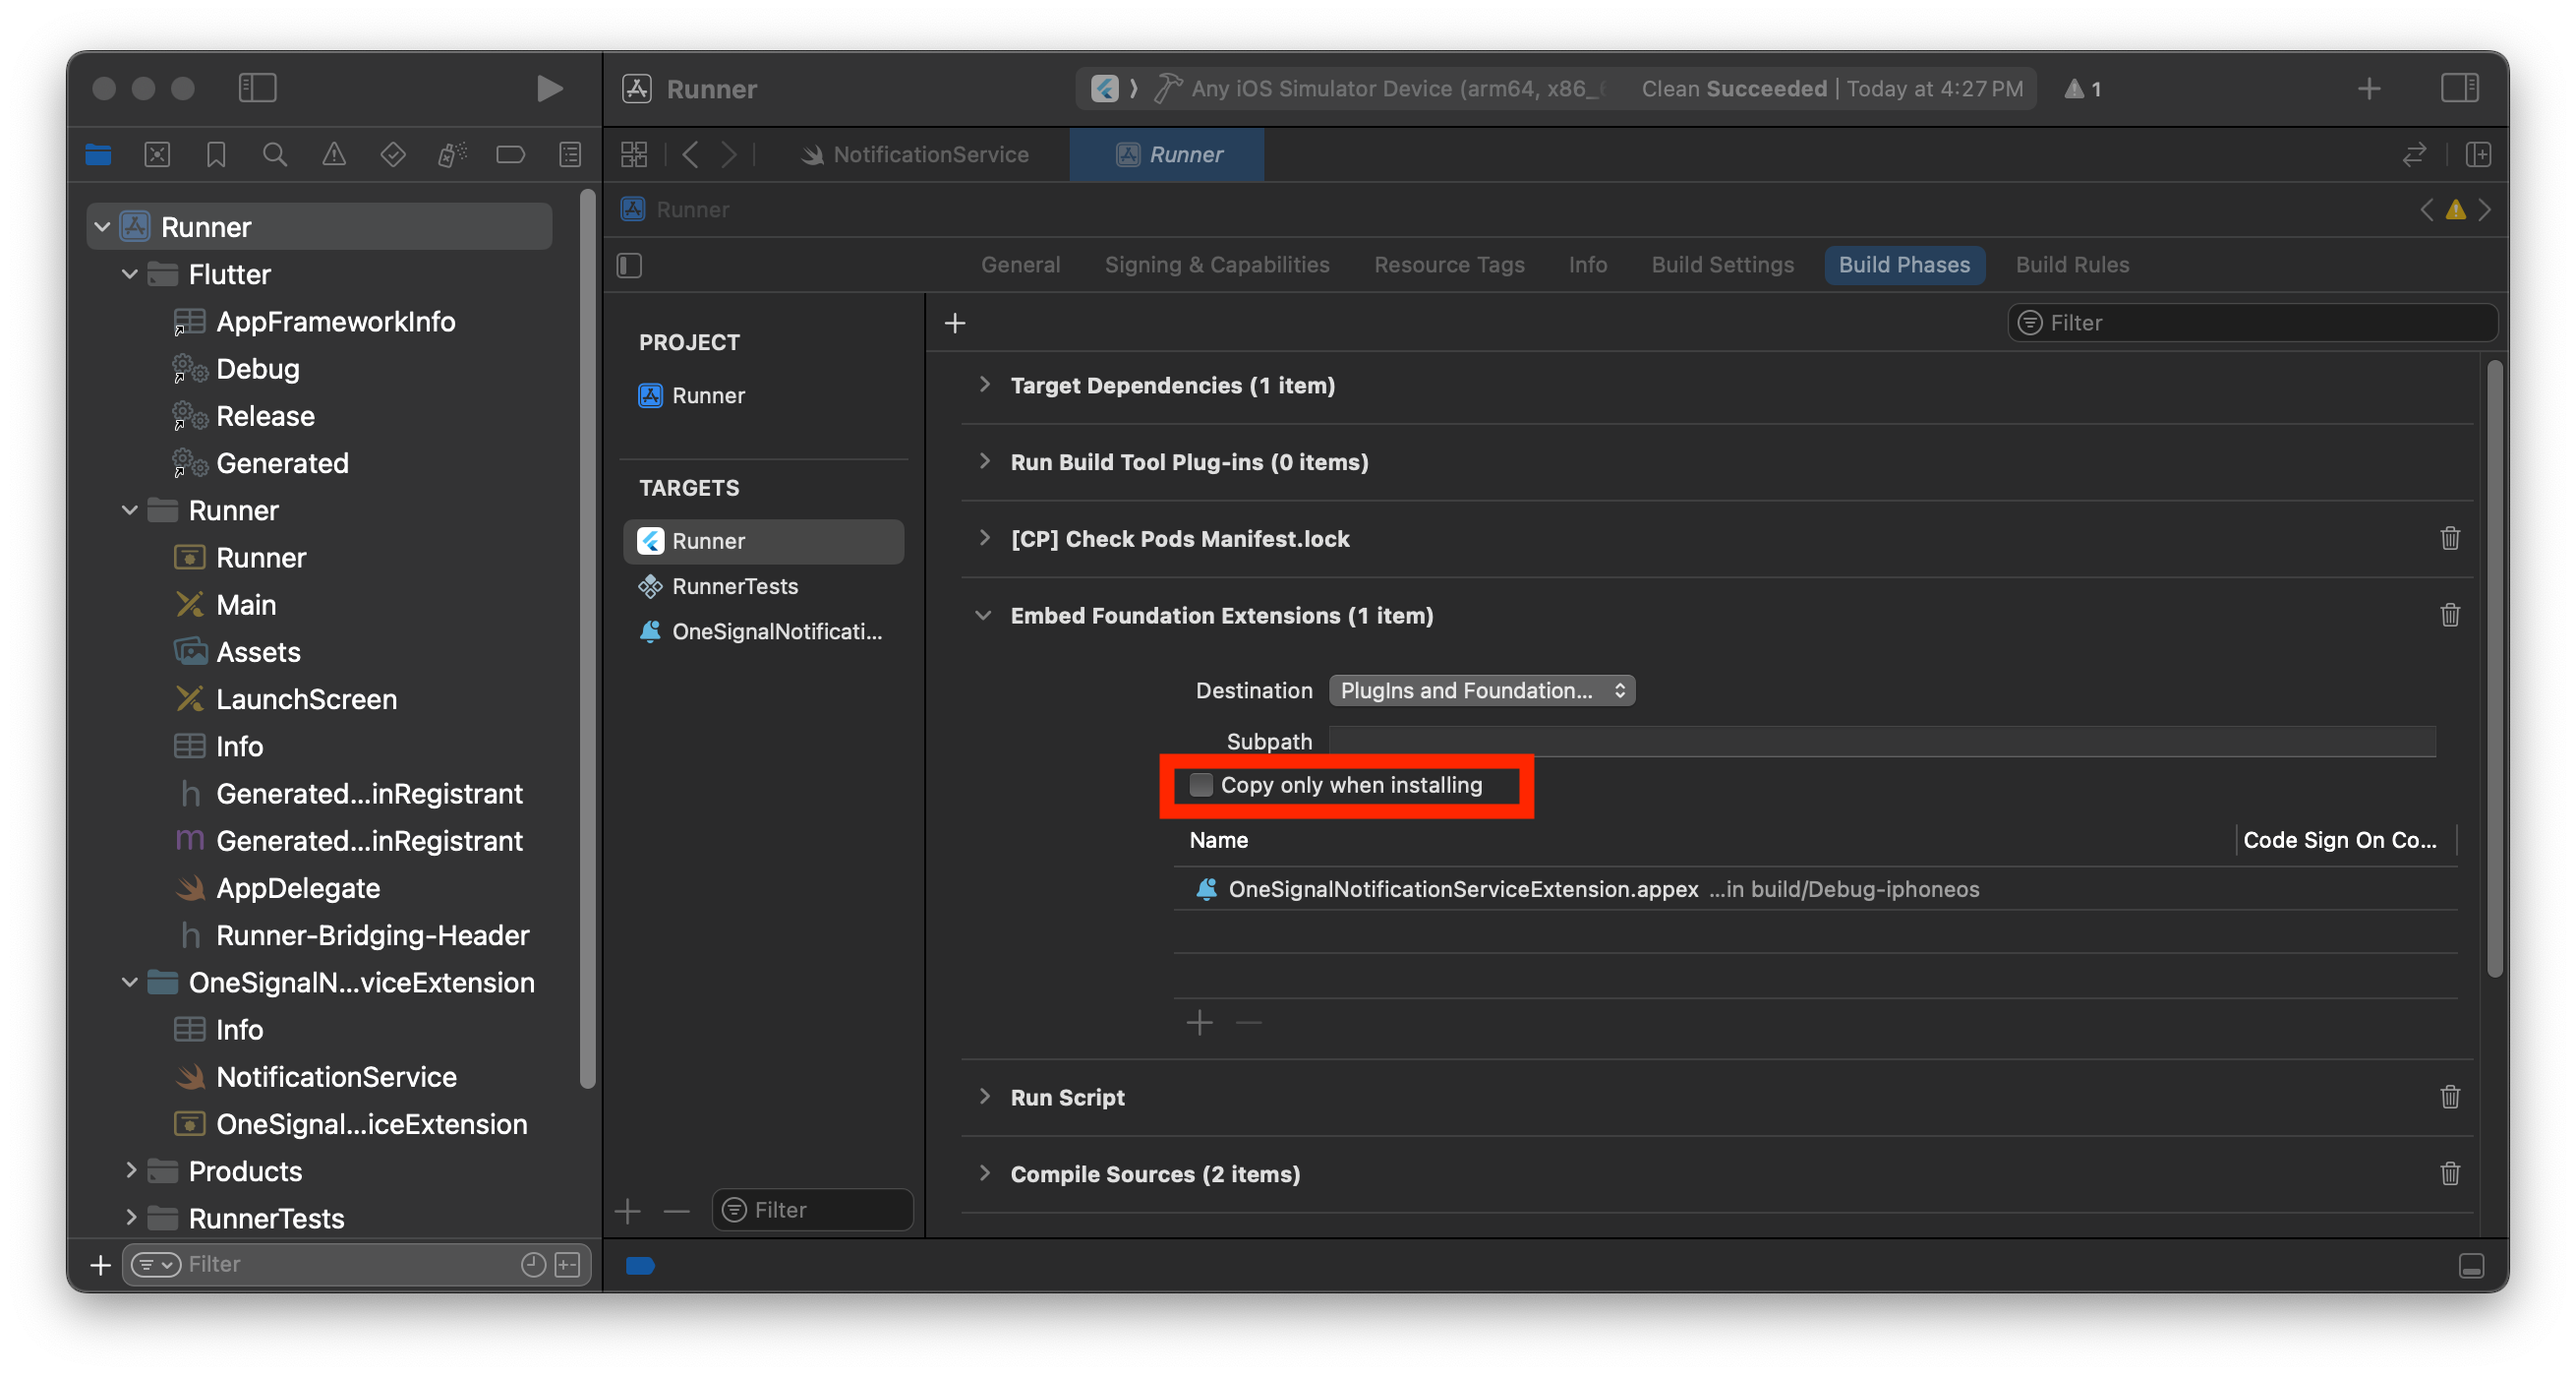
Uncheck Copy only when installing.
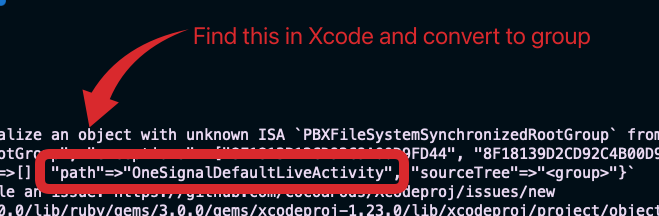
PBXGroup Error
PBXGroup Error
PBXGroup attempted to initialize an object with unknown ISA PBXFileSystemSynchronizedRootGroup from attributes: {"isa"=>"...", "exceptions"=>["//", "..."], "explicitFileTypes"=>{}, "explicitFolders"=>[], "path"=>"OneSignalNotificationServiceExtension", "sourceTree"=>"<group>"}- Find the folder listed under “path” in the error
- In Xcode project sidebar, right-click the folder
- Select Convert to Group
Path error for PBXGroup.
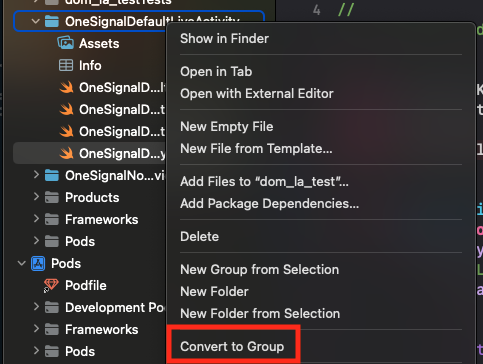
Convert folder to group.
Testing the OneSignal SDK integration
This guide helps you verify that your OneSignal SDK integration is working correctly by testing push notifications, subscription registration, and in-app messaging.Check mobile subscriptions
Launch your app on a test device.
requestPermission method during initialization.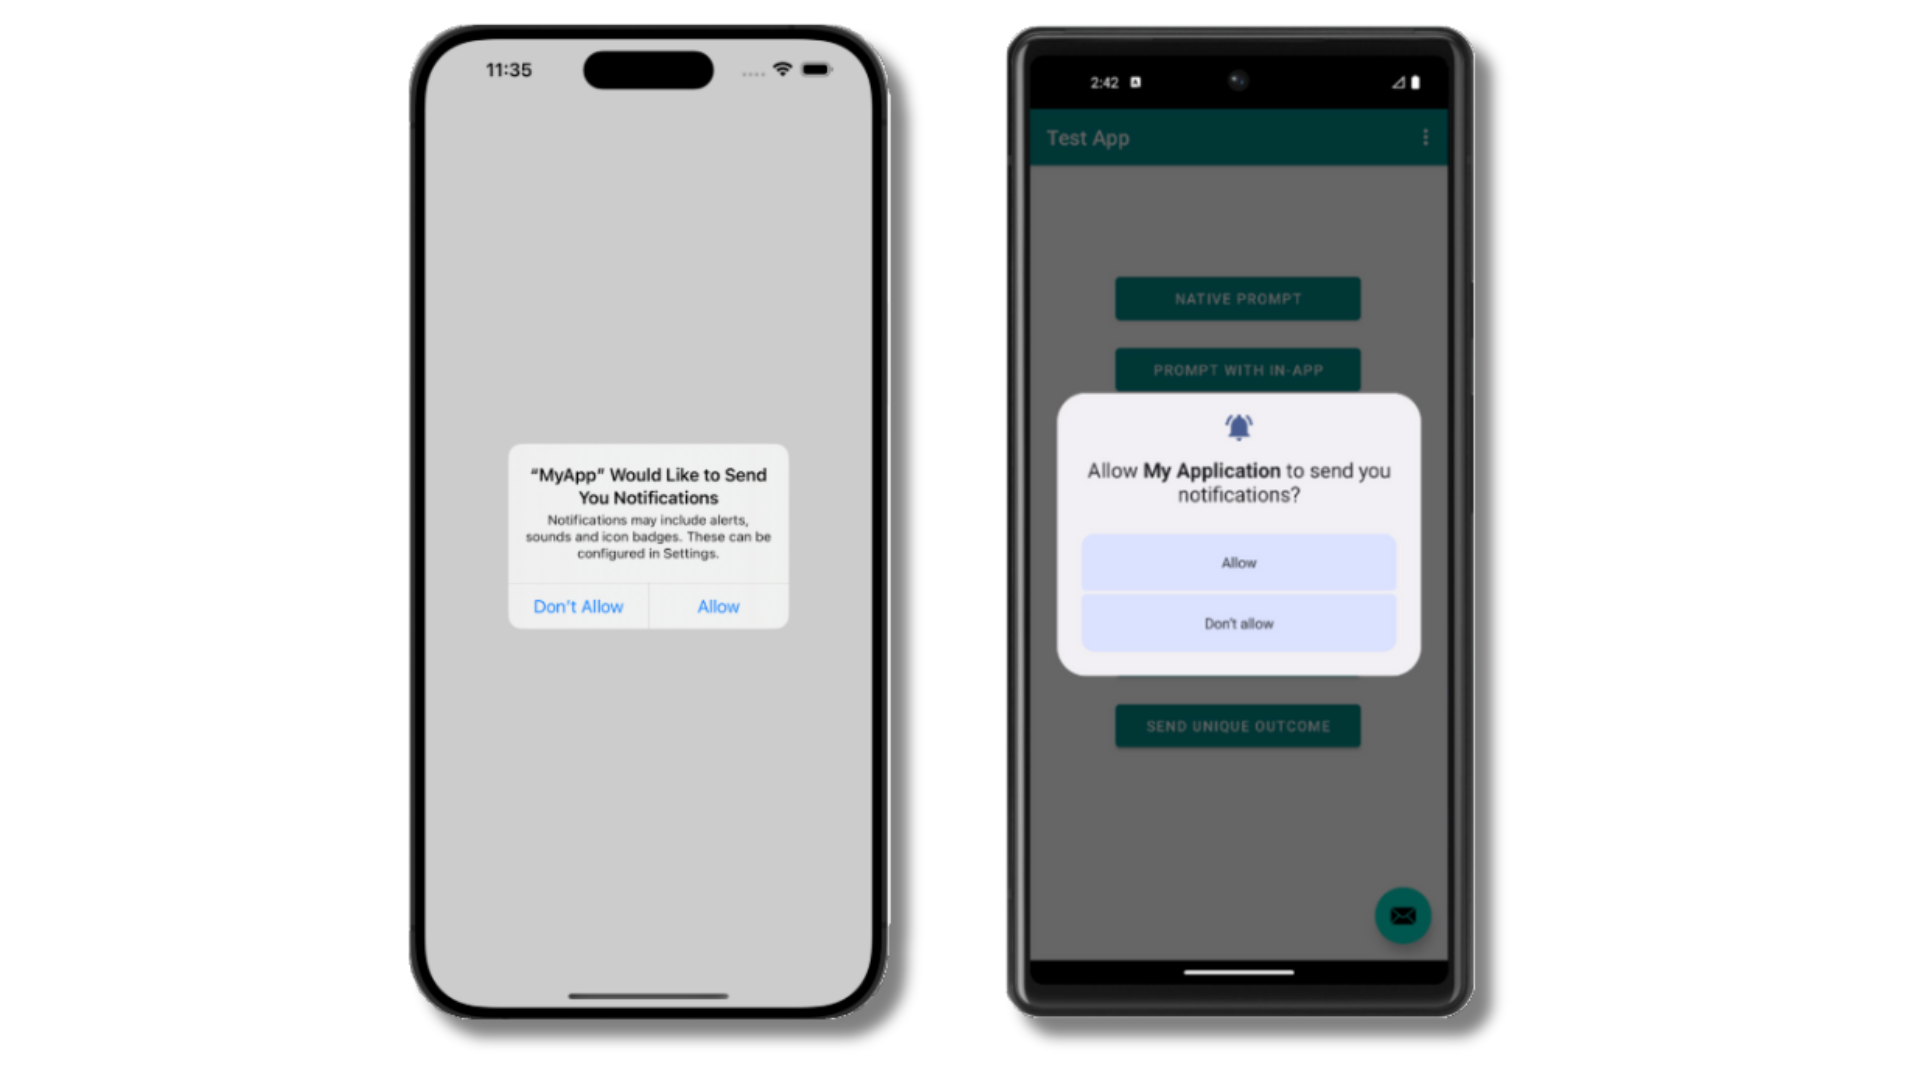
iOS and Android push permission prompts
Check your OneSignal dashboard
- Go to Audience > Subscriptions.
- You should see a new entry with the status “Never Subscribed”.
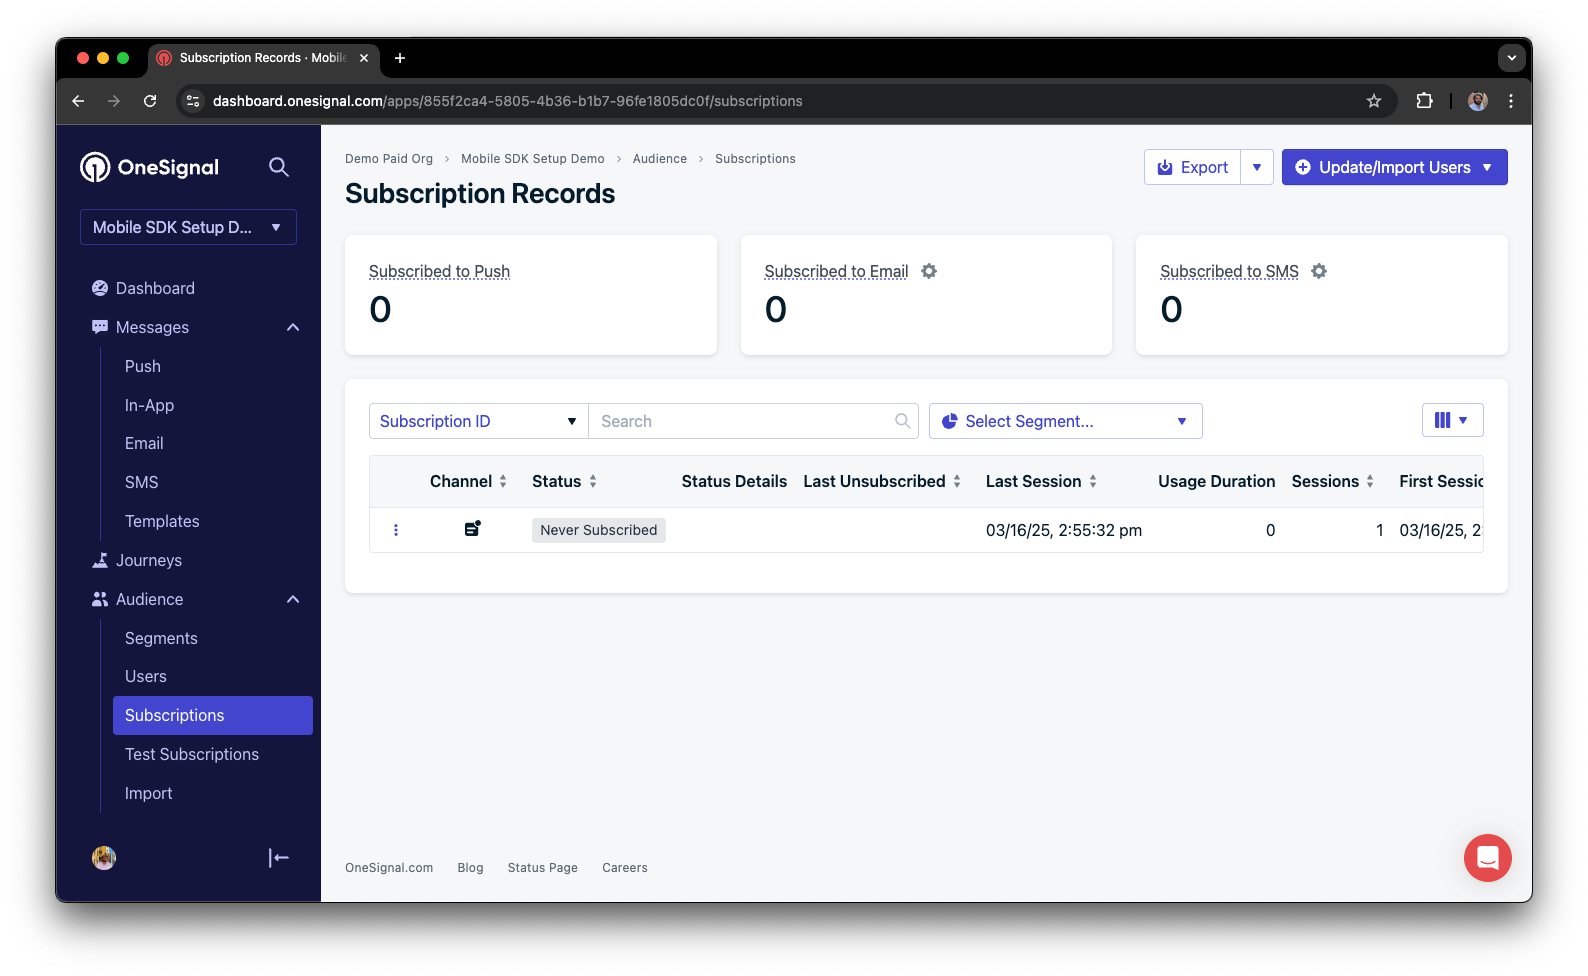
Dashboard showing subscription with 'Never Subscribed' status
Return to the app and tap Allow on the prompt.
Refresh the OneSignal dashboard Subscription's page.
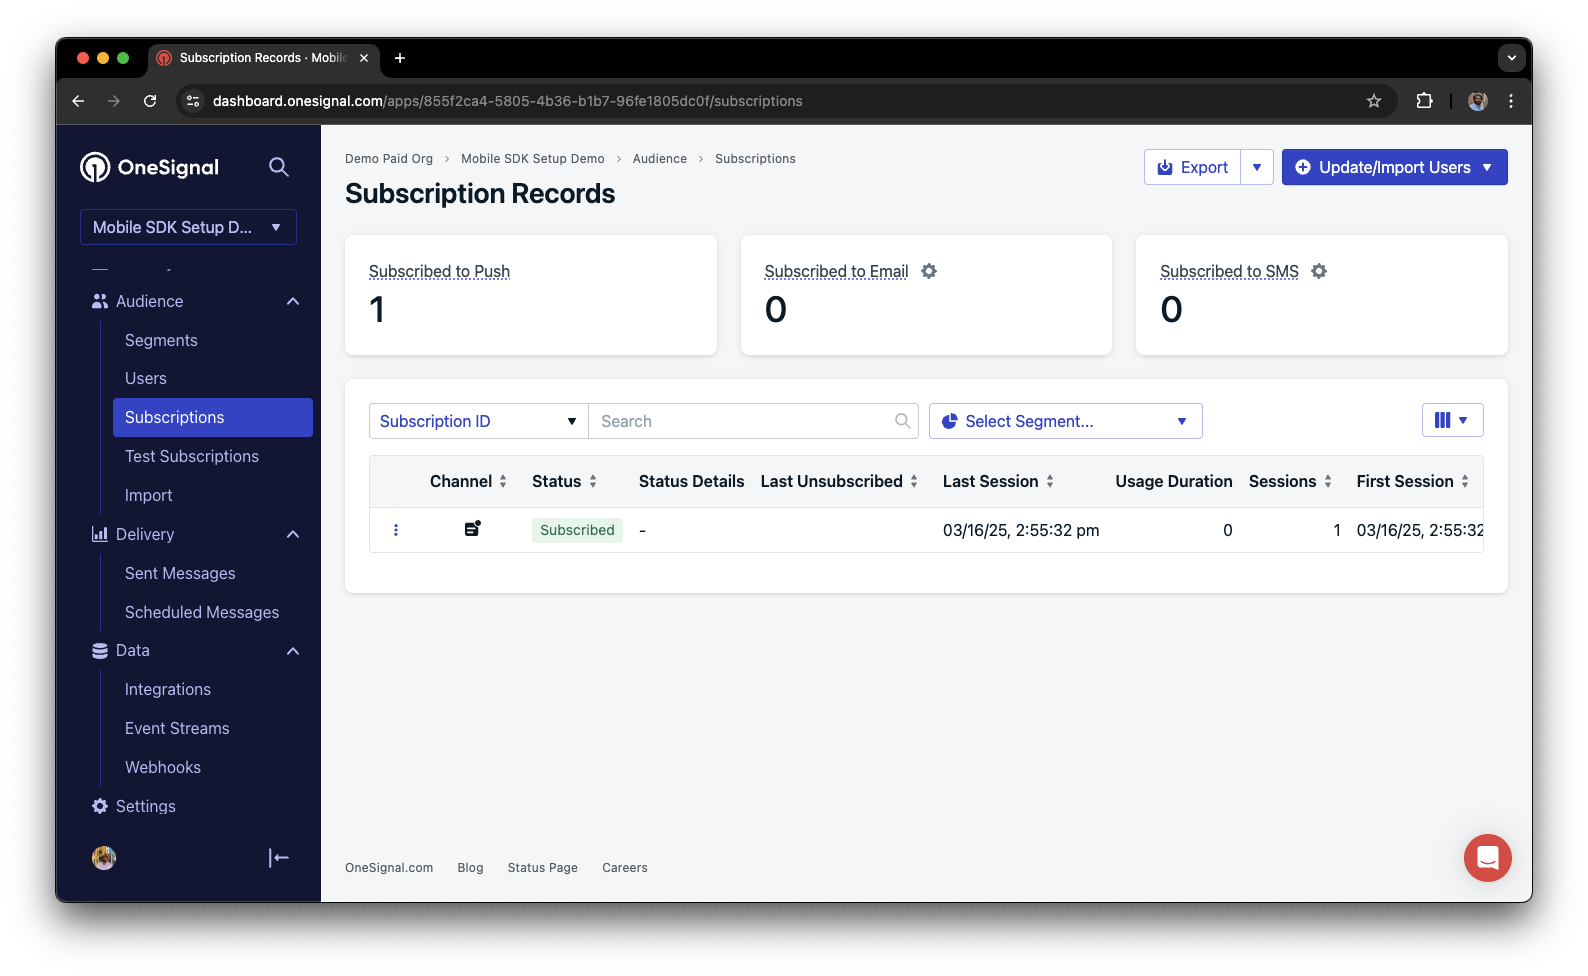
Dashboard showing subscription with 'Subscribed' status
Set up test users
test users are helpful for testing a push notification before sending a message.Add to Test Users.

Adding a device to Test Users
Name your subscription.
Create a test users segment.
Name the segment.
Test Users (the name is important because it will be used later).Add the Test Users filter and click Create Segment.

Creating a 'Test Users' segment with the Test Users filter
Send test push via API
Get your App API Key and App ID.
Update the provided code.
YOUR_APP_API_KEY and YOUR_APP_ID in the code below with your actual keys. This code uses the Test Users segment we created earlier.Run the code.
Check images and confirmed receipt.
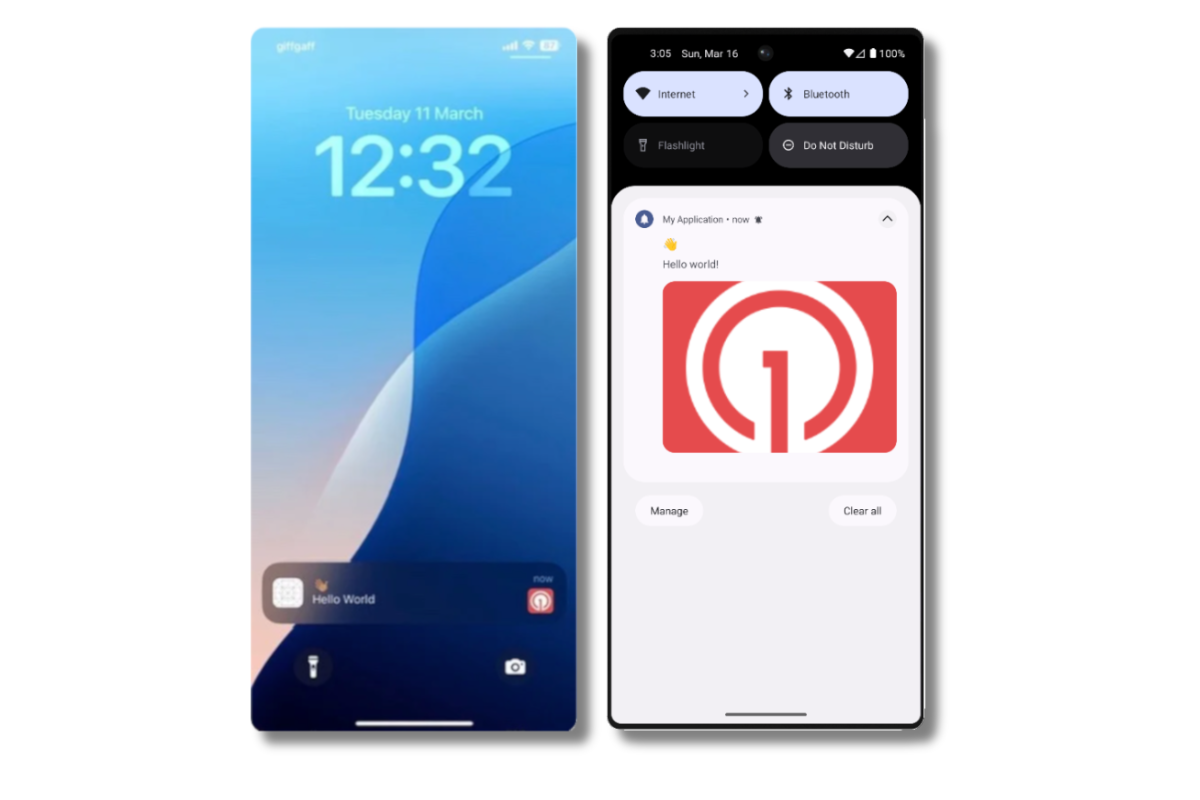
Push notification with image on iOS and Android
Check for confirmed receipt.
Send an in-app message
In-app messages let you communicate with users while they are using your app.Close or background your app on the device.
Create an in-app message.
- In your OneSignal dashboard, navigate to Messages > In-App > New In-App.
- Find and select the Welcome message.
- Set your Audience as the Test Users segment we used previously.
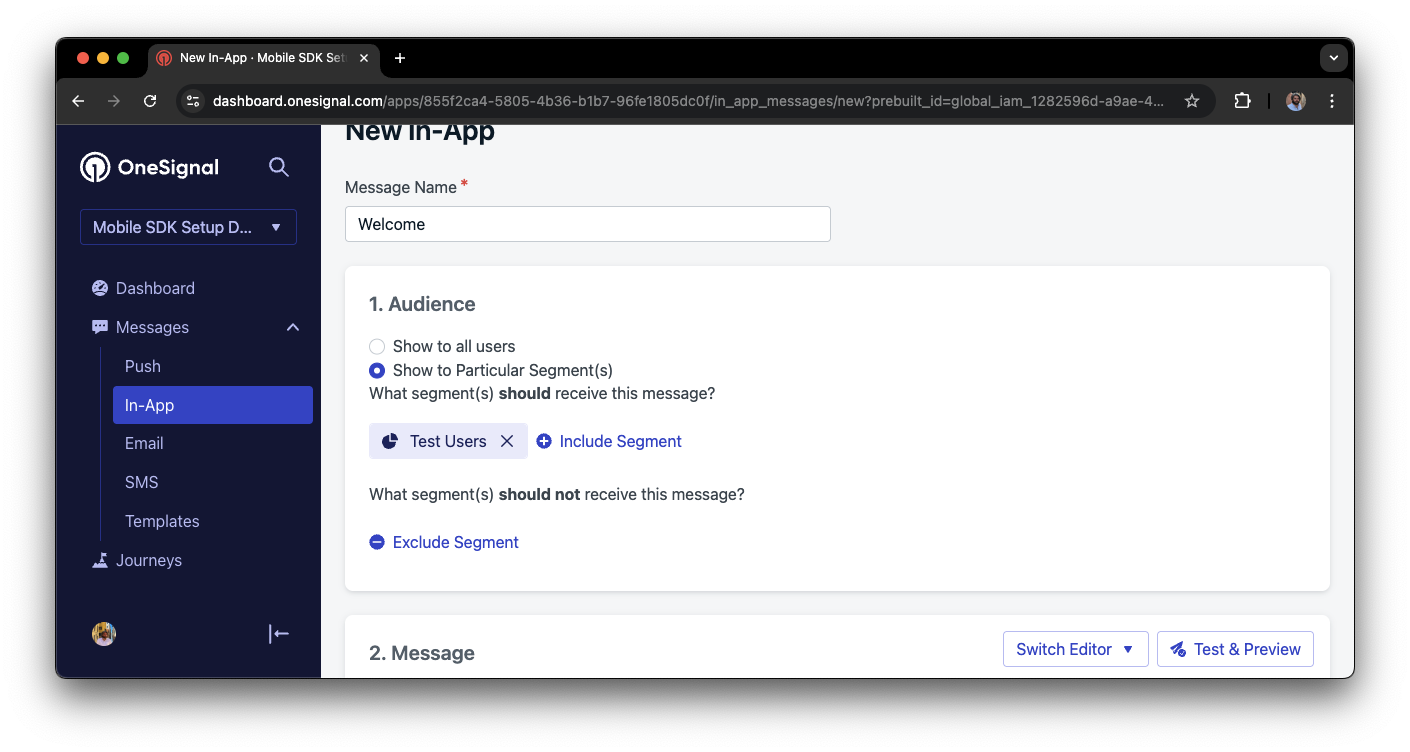
Targeting the 'Test Users' segment with an in-app message
Customize the message content if desired.
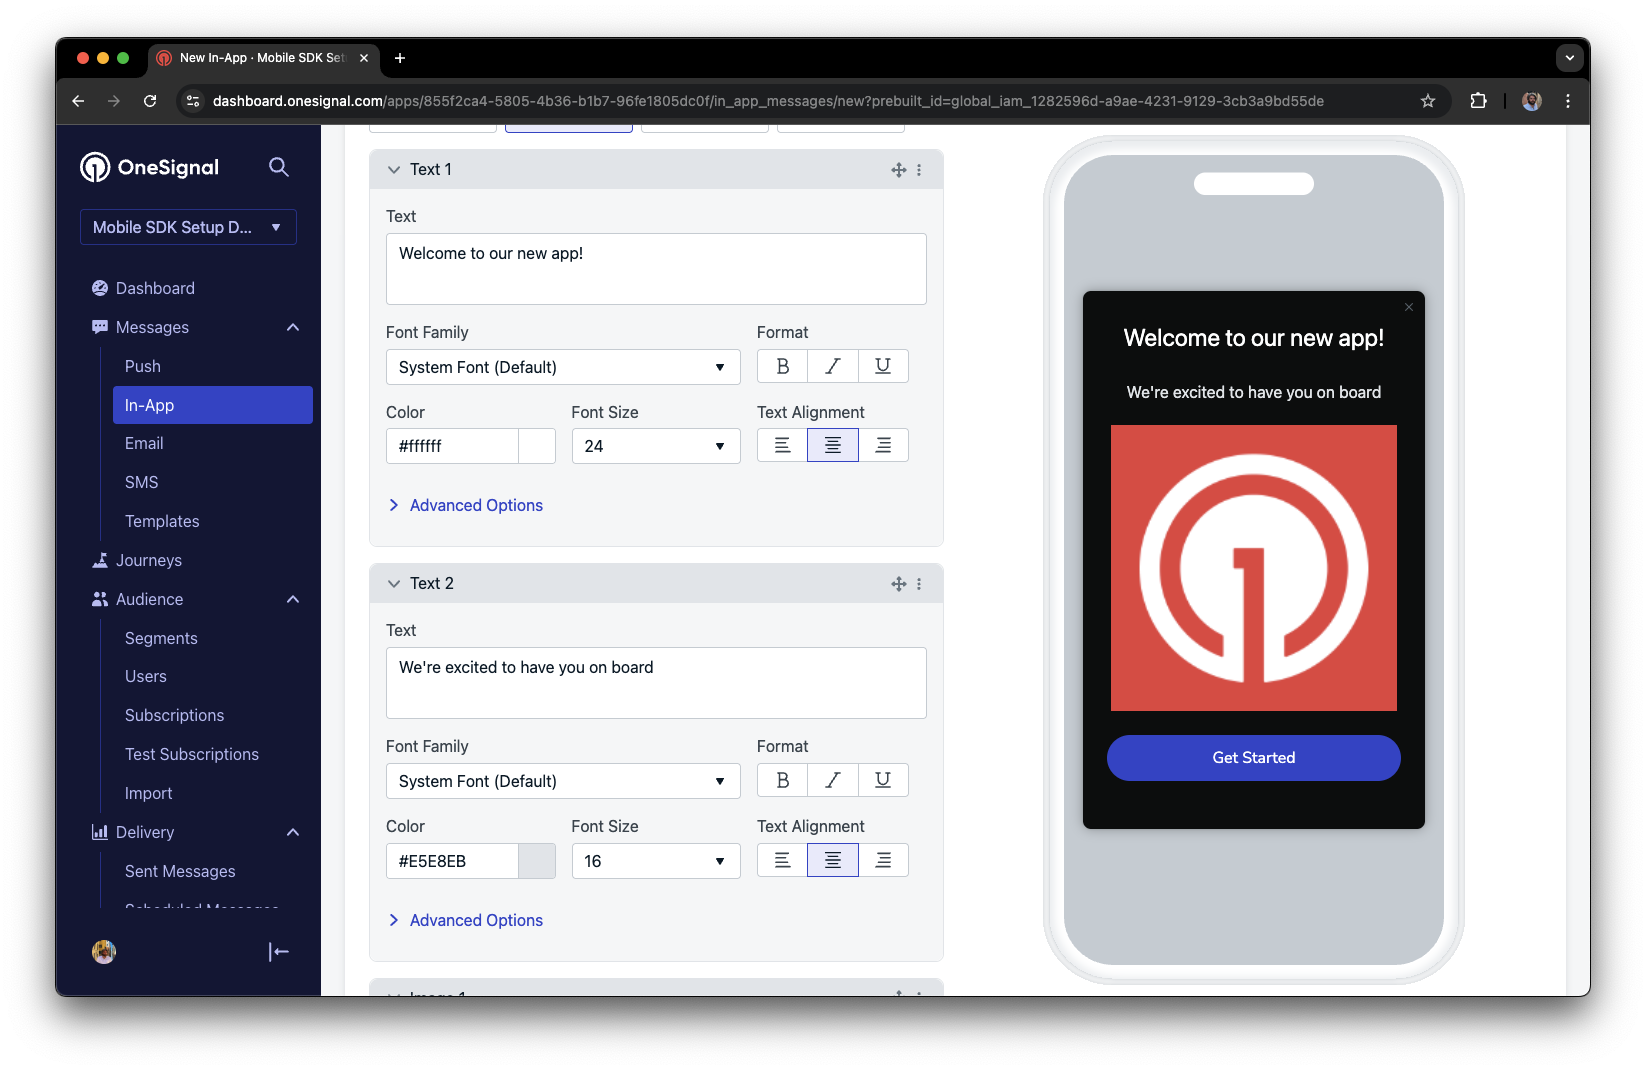
Example customization of in-app Welcome message
Set Trigger to 'On app open'.
Schedule frequency.
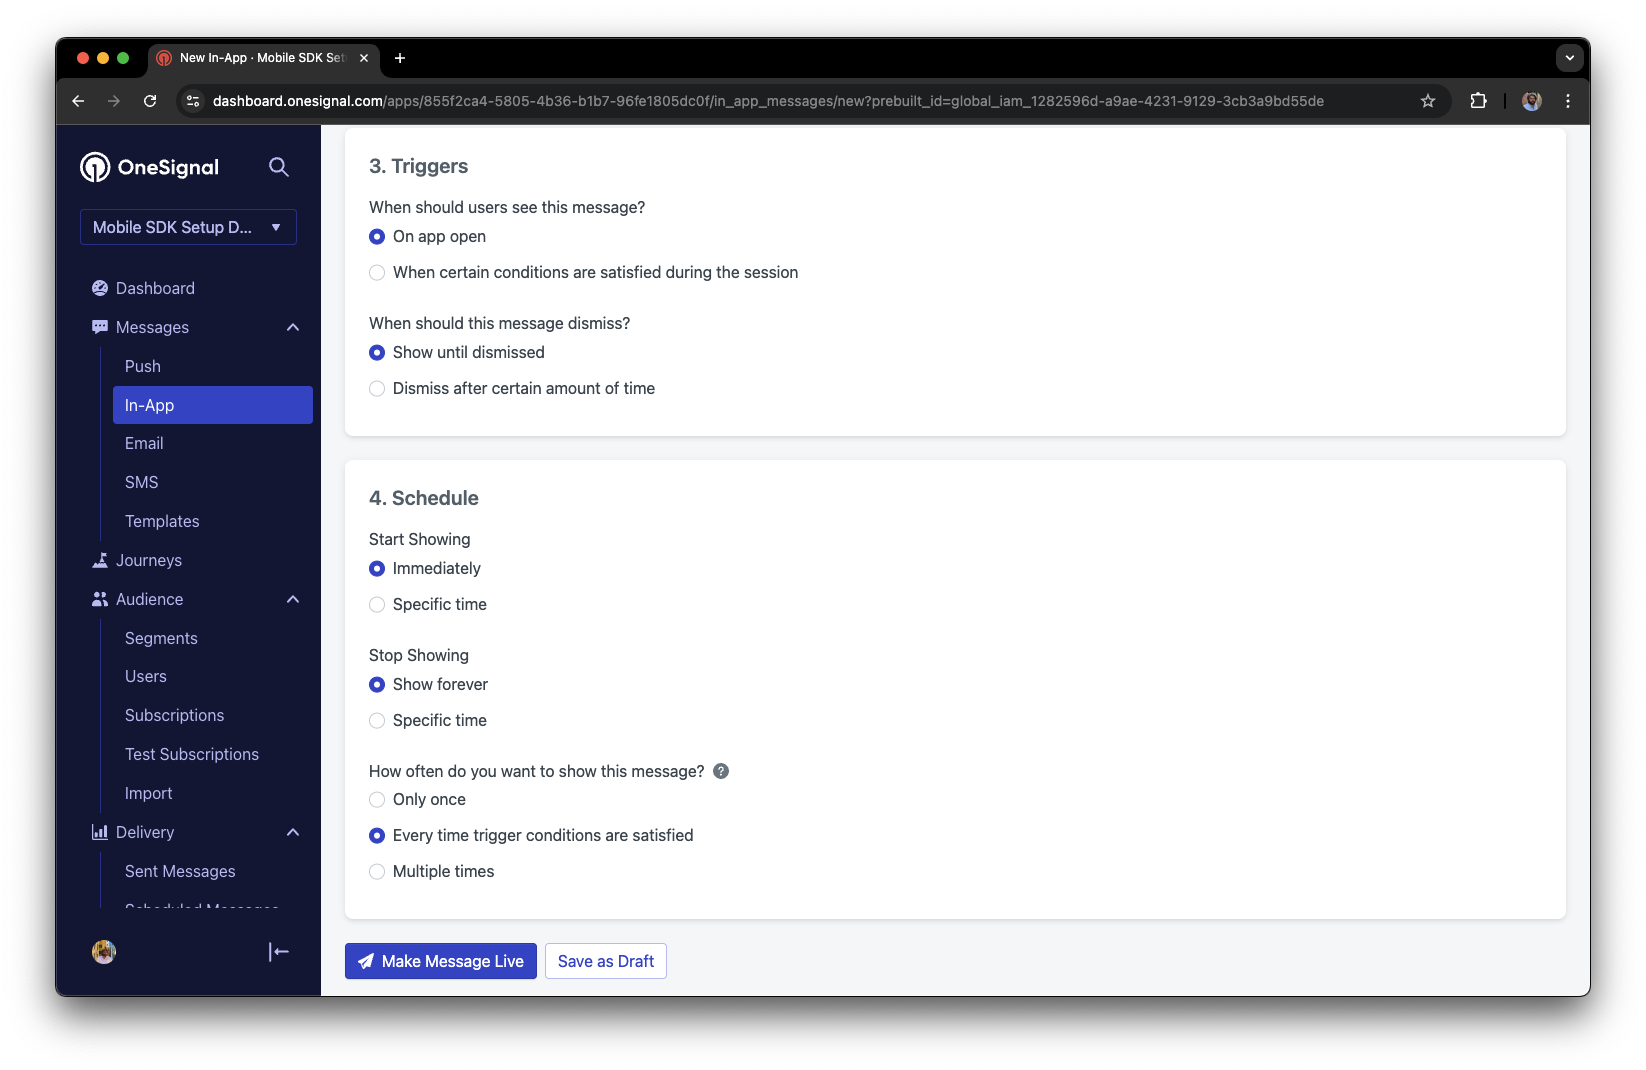
In-app message scheduling options
Make message live.
Open the app and see the message.
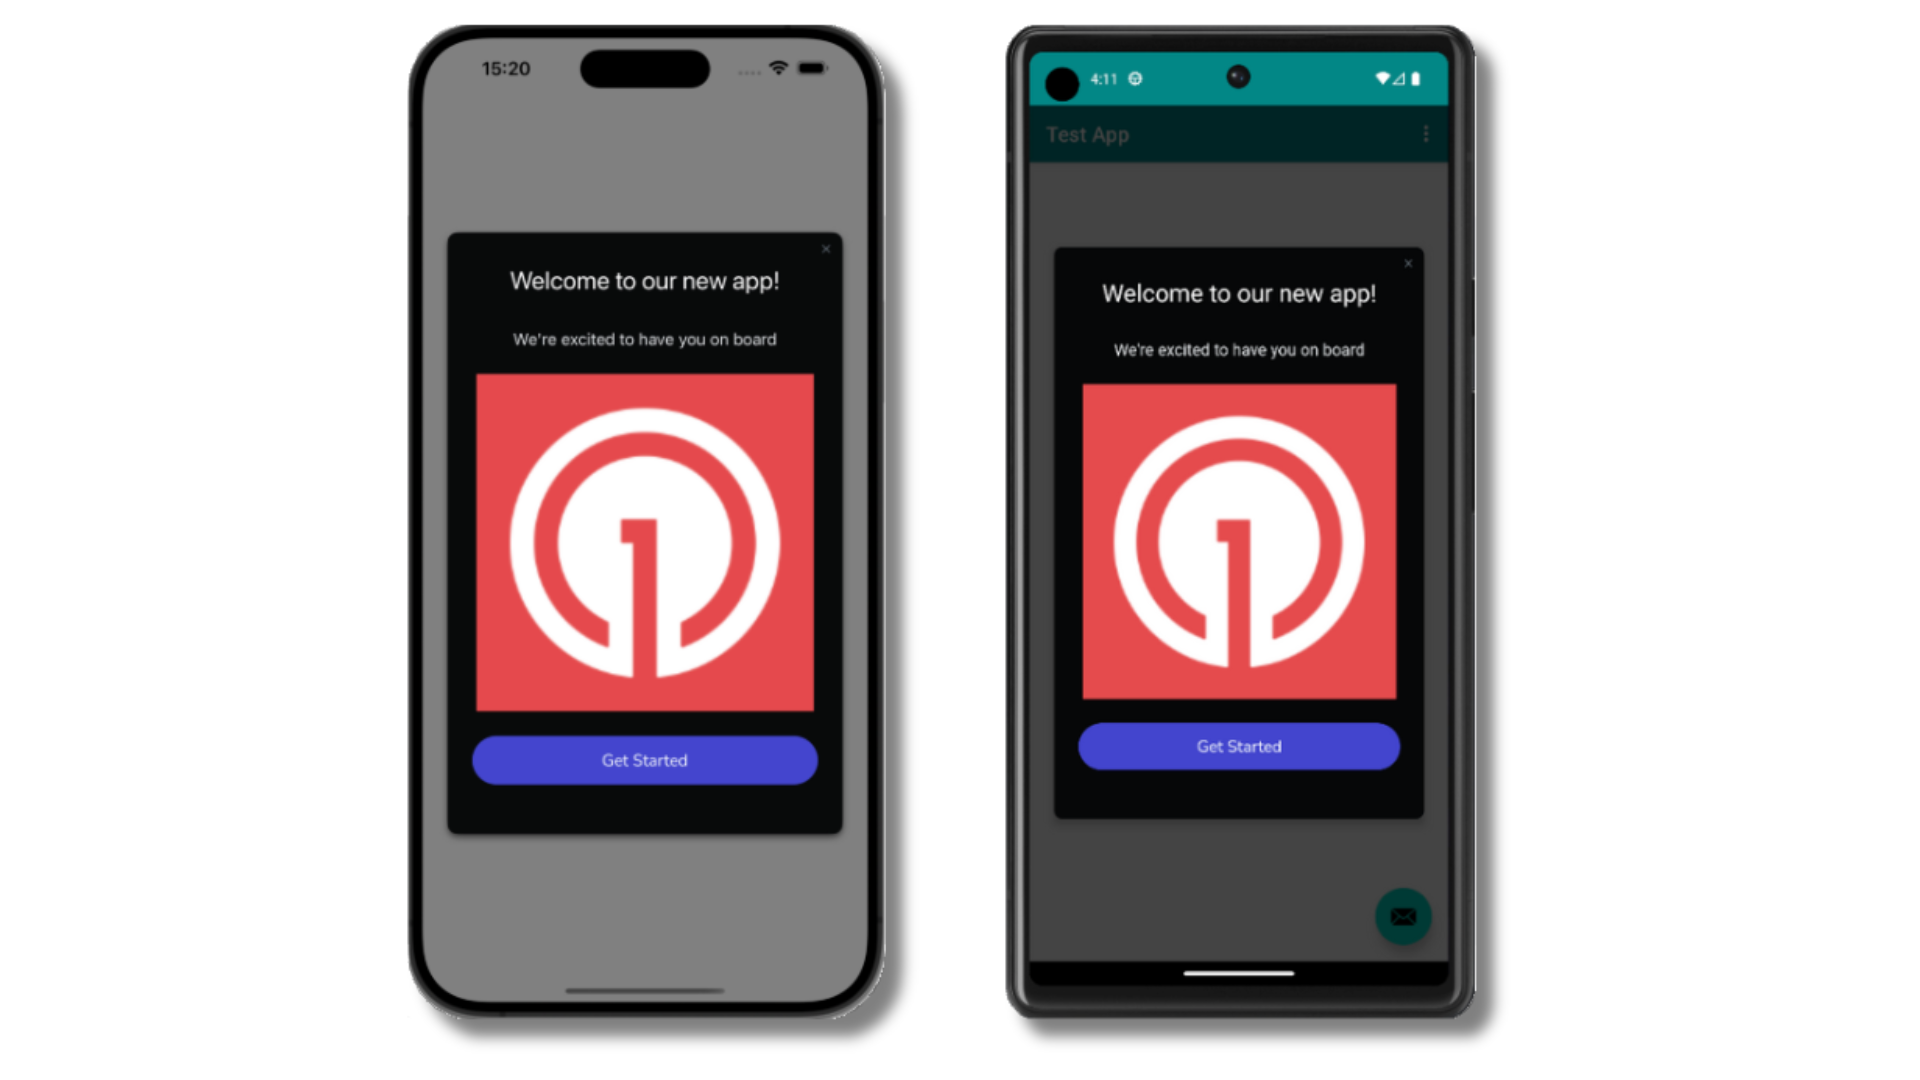
Welcome in-app message shown on devices
- Gathering Subscriptions, setting Test Users, and creating Segments.
- Sending Push with images and Confirmed receipt using Segments and our Create message API.
- Sending In-app messages.
User identification
Previously, we demonstrated how to create mobile Subscriptions. Now we’ll expand to identifying Users across all their subscriptions (including push, email, and SMS) using the OneSignal SDK. We’ll cover External IDs, tags, multi-channel subscriptions, privacy, and event tracking to help you unify and engage users across platforms.Assign External ID
Use an External ID to identify users consistently across devices, email addresses, and phone numbers using your backend’s user identifier. This ensures your messaging stays unified across channels and 3rd party systems (especially important for Integrations). Set the External ID with our SDK’slogin method each time they are identified by your app.
Add Tags
Tags are key-value pairs of string data you can use to store user properties (likeusername, role, or preferences) and events (like purchase_date, game_level, or user interactions). Tags power advanced Message Personalization and Segmentation allowing for more advanced use cases.
Set tags with our SDK addTag and addTags methods as events occur in your app.
In this example, the user reached level 6 identifiable by the tag called current_level set to a value of 6.
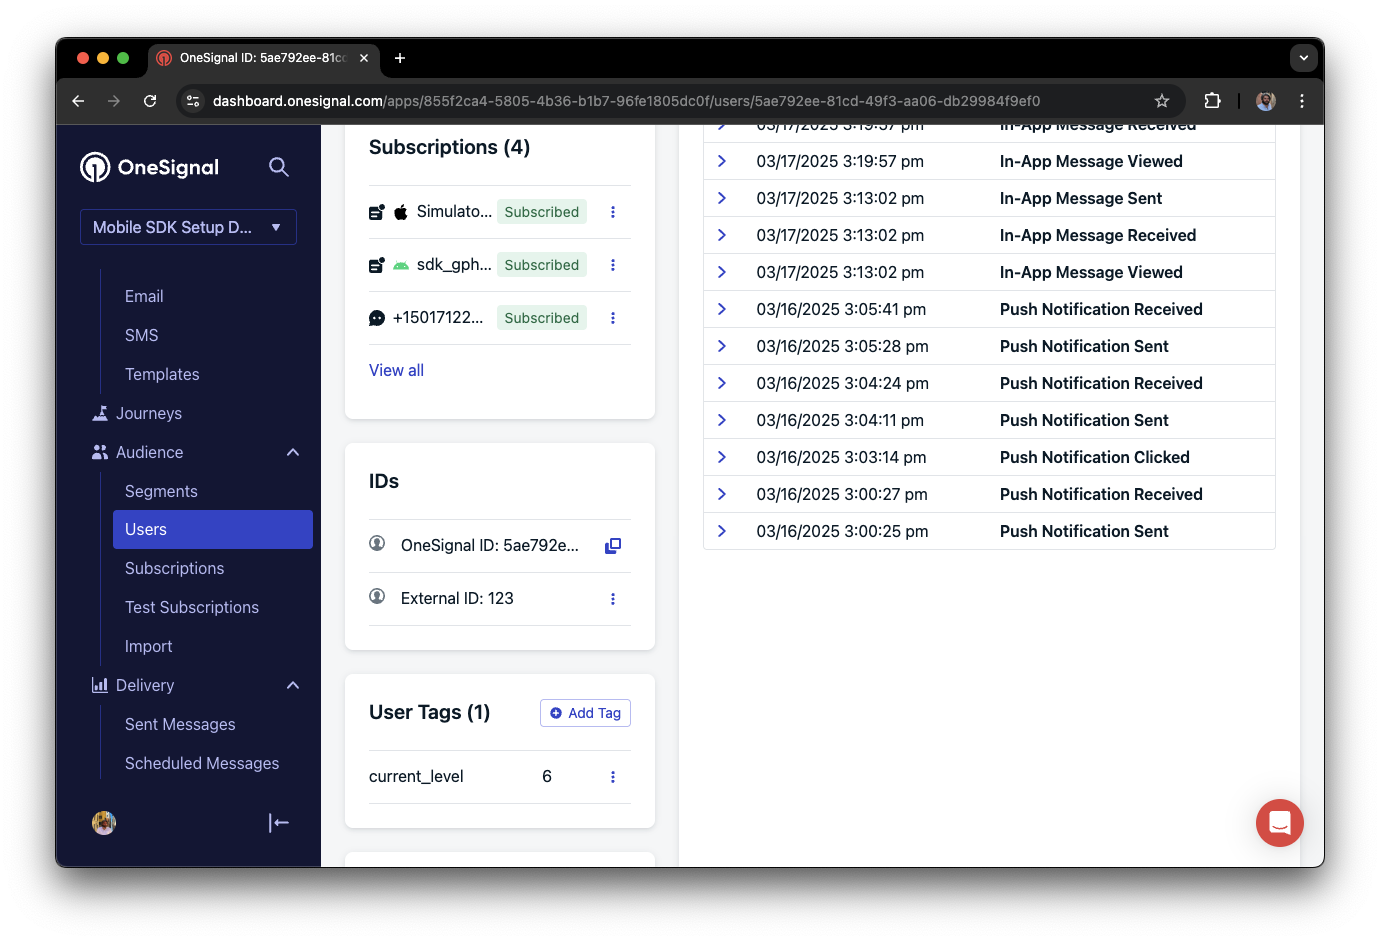
A user profile in OneSignal with a tag called "current_level" set to "6"
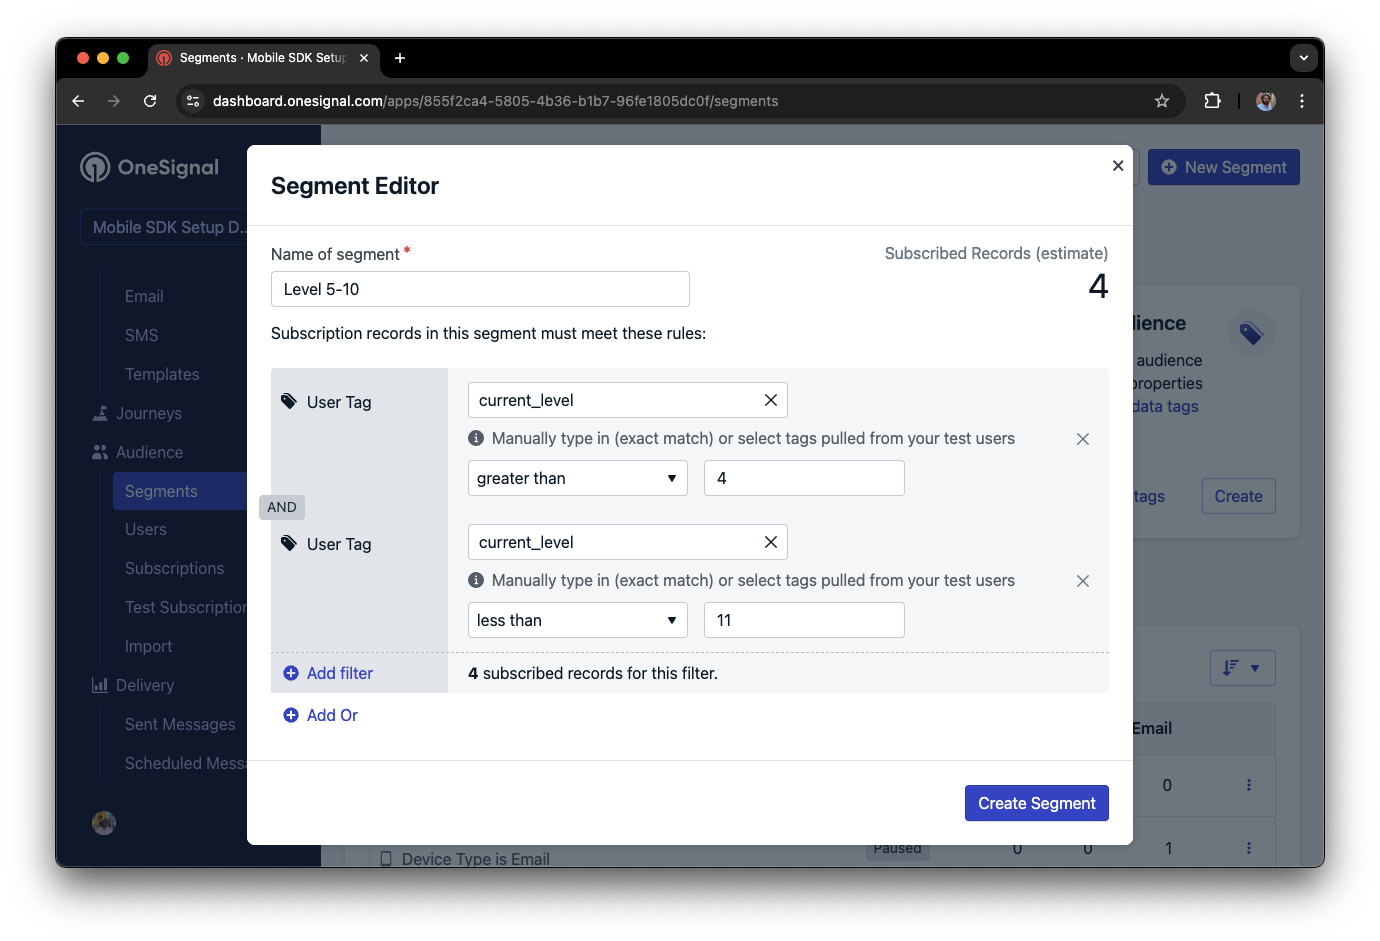
Segment editor showing a segment targeting users with a current_level value of greater than 4 and less than 10
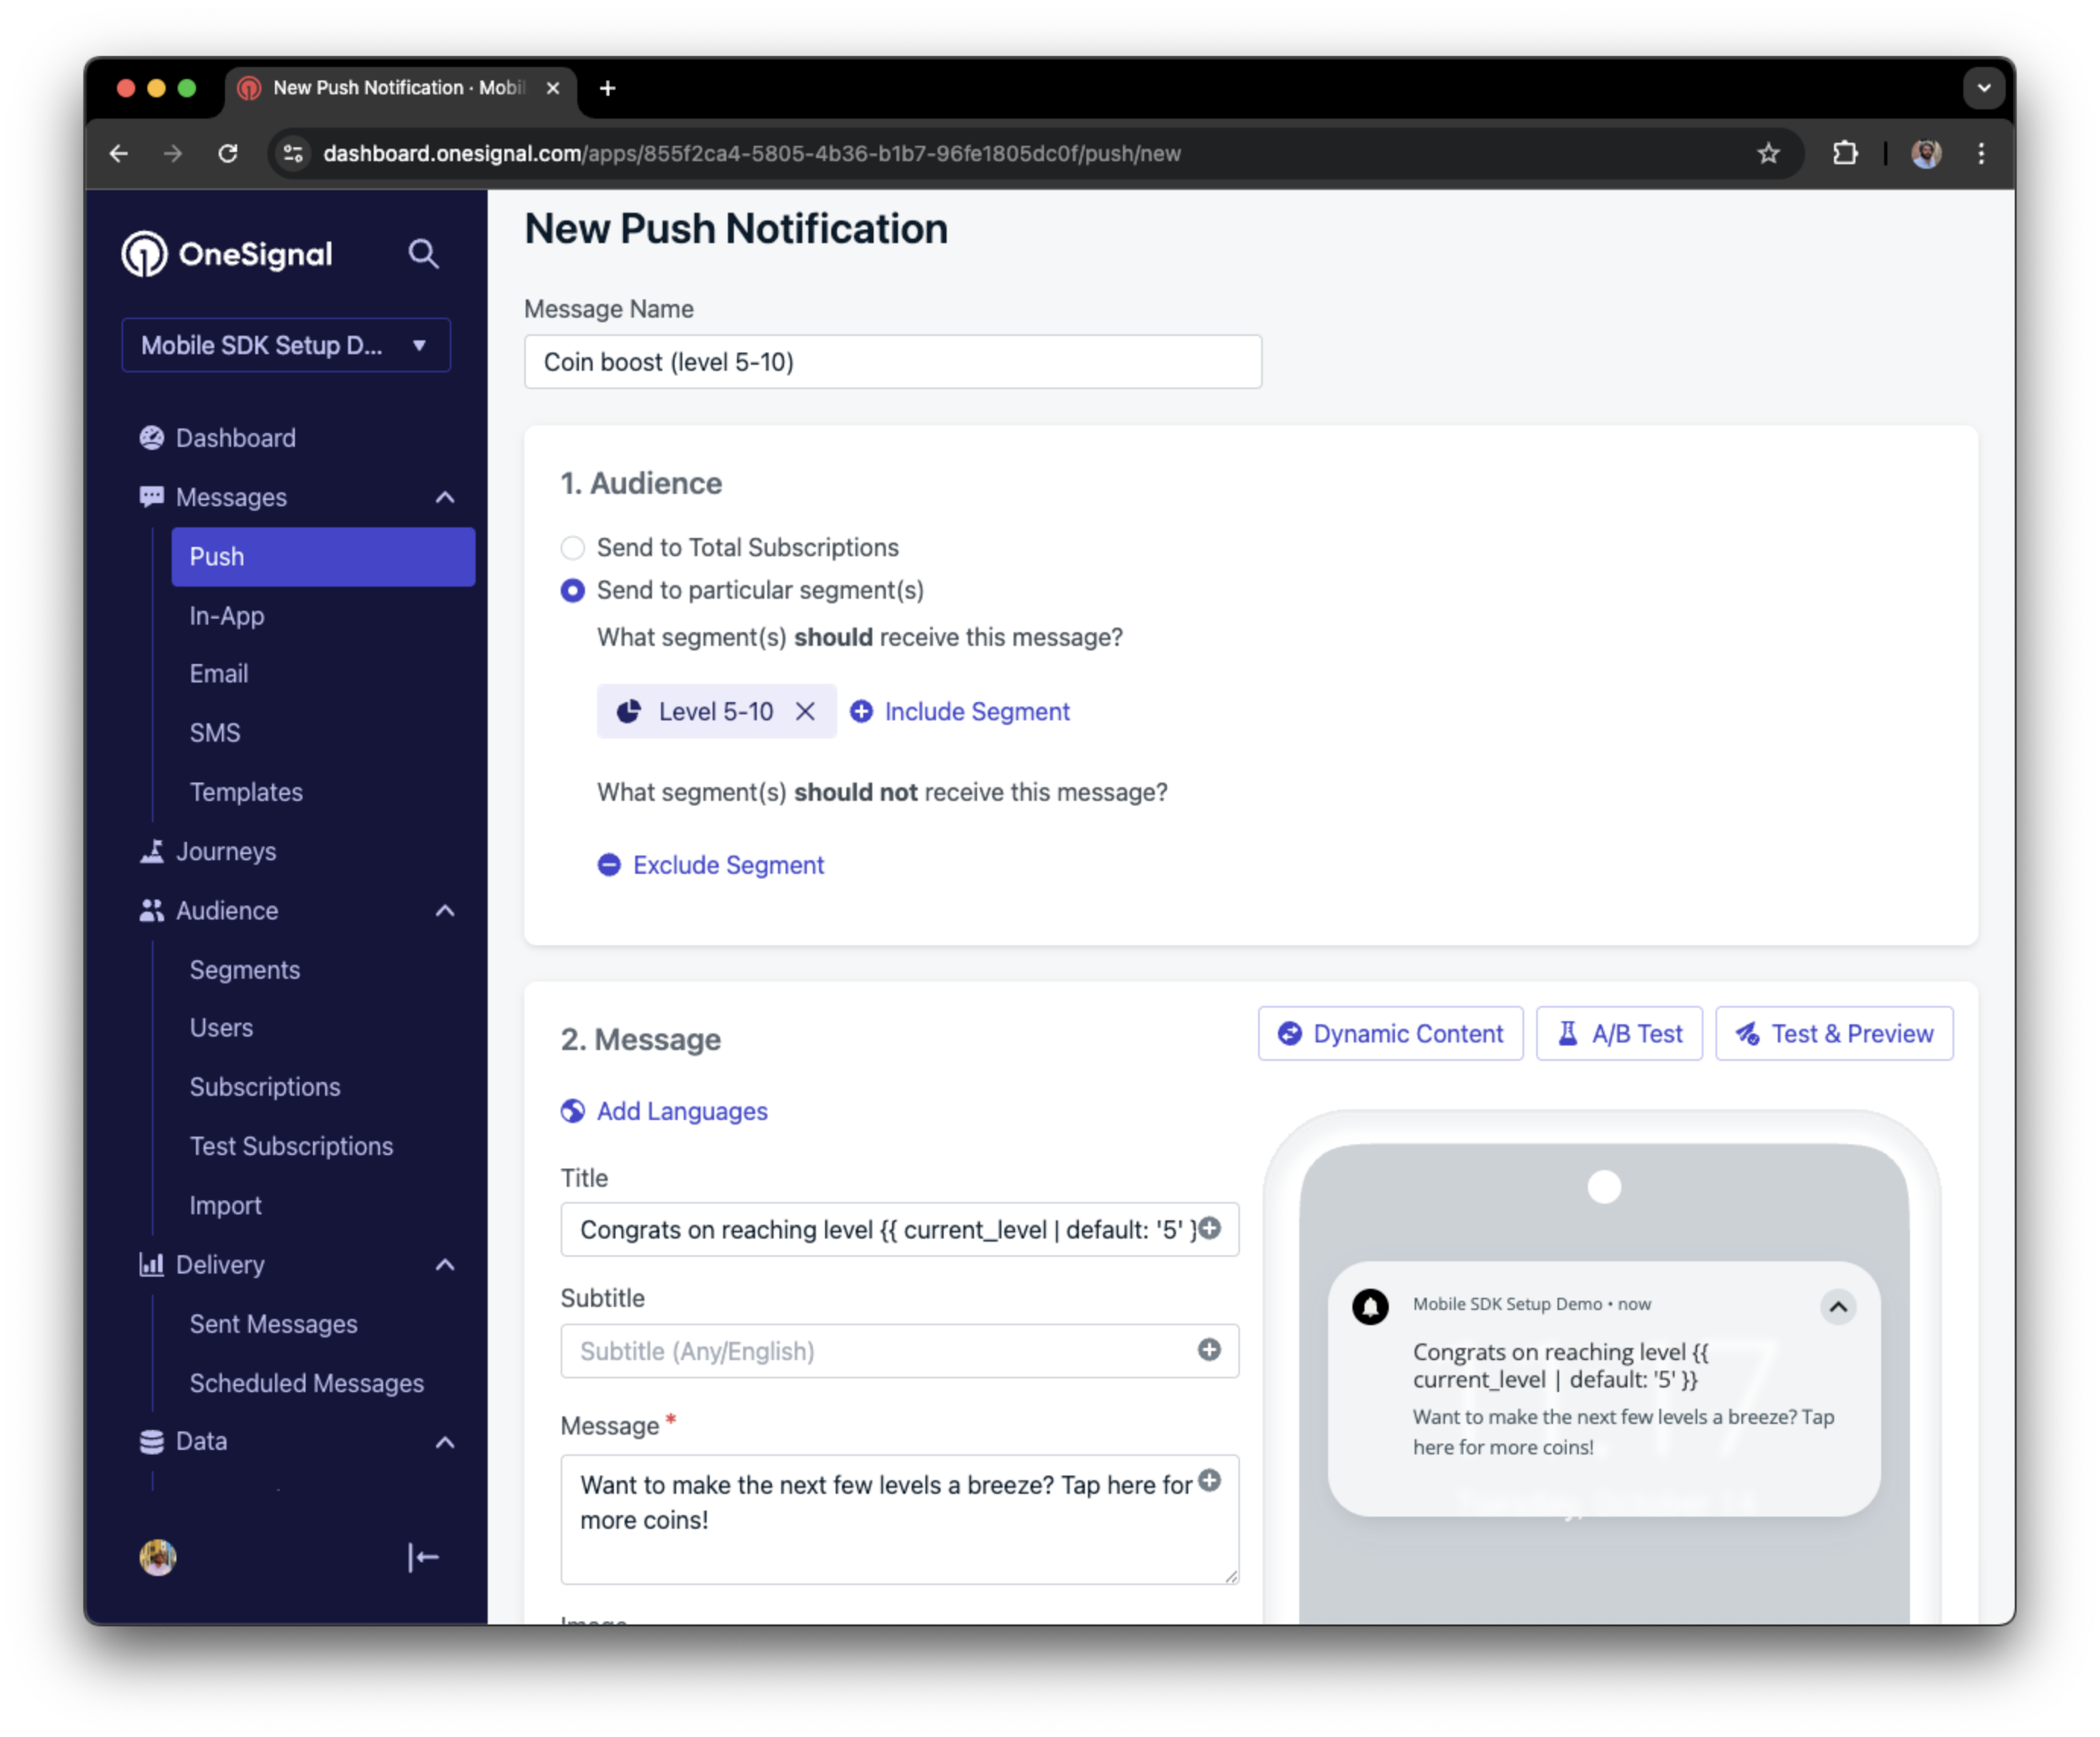
Screenshot showing a push notification targeting the Level 5-10 segment with a personalized message
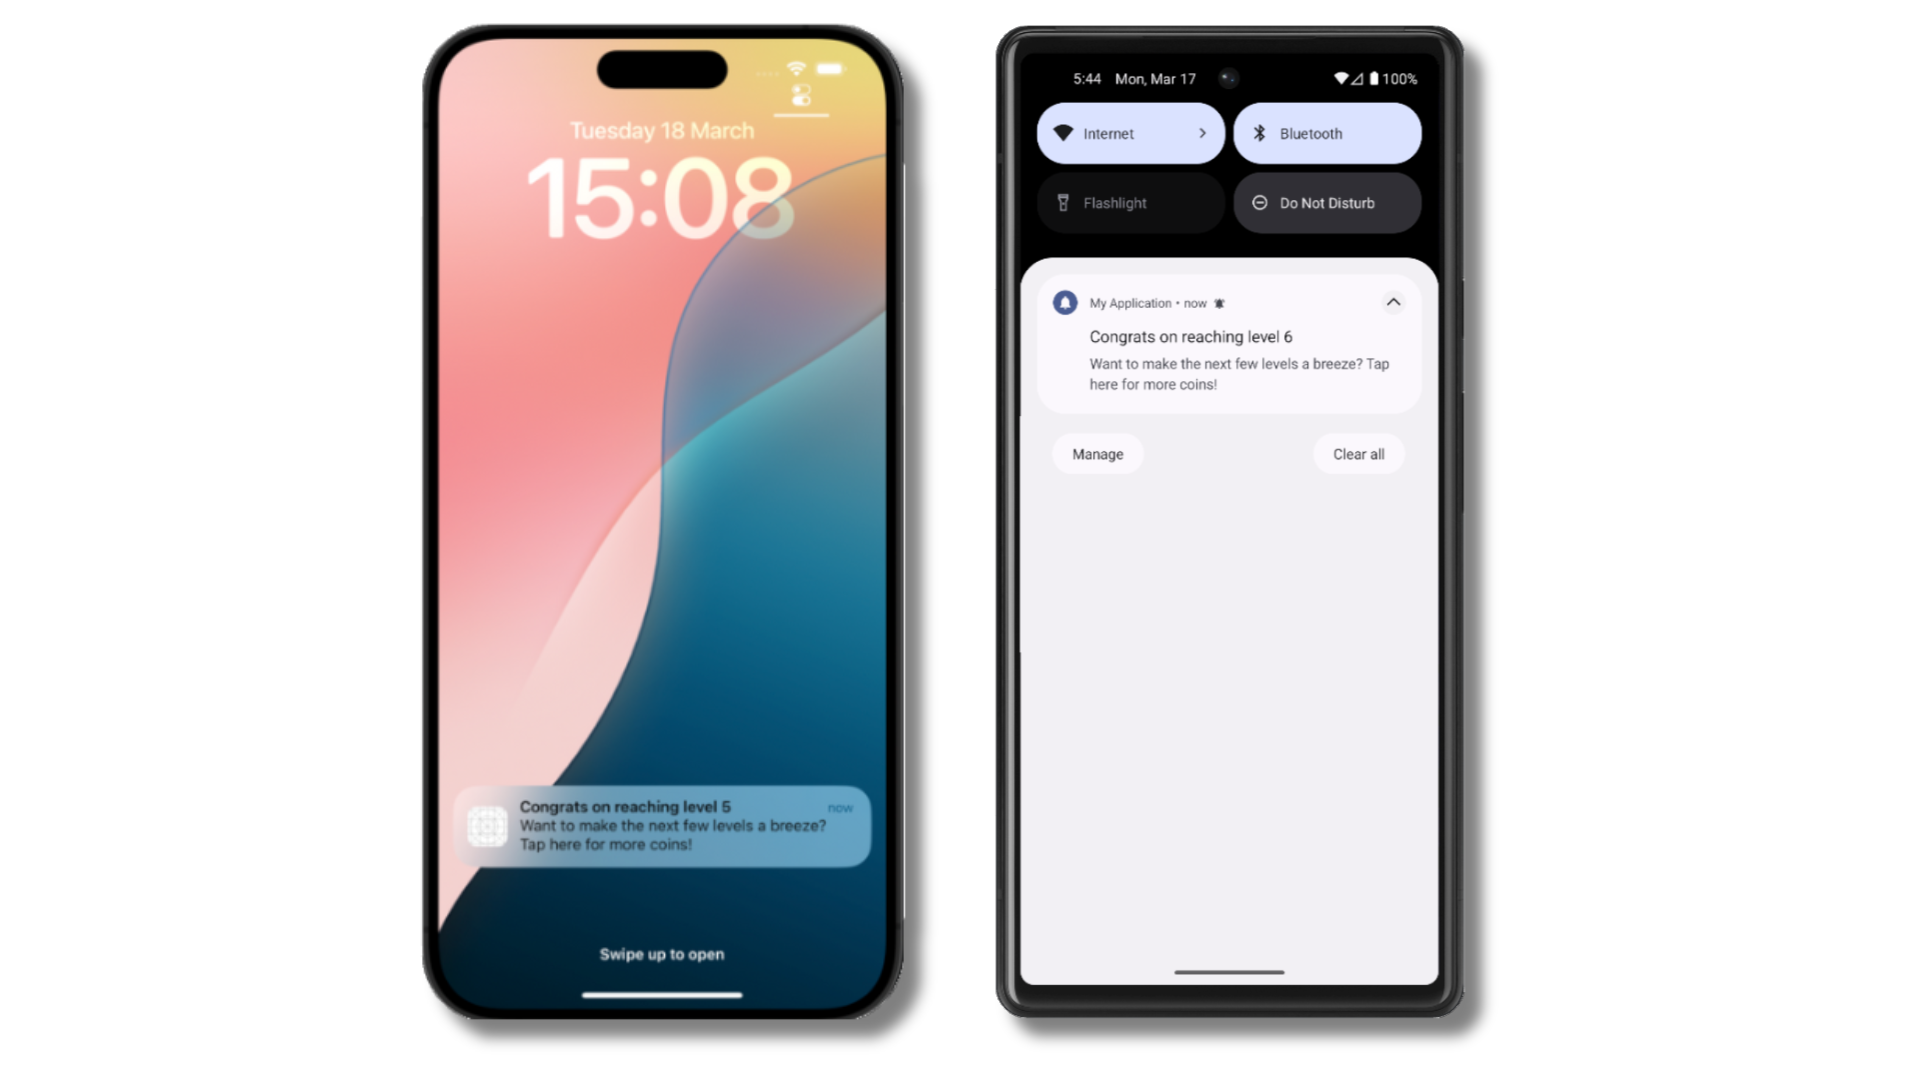
The push notification is received on an iOS and Android device with the personalized content
Add email and/or SMS subscriptions
Earlier we saw how our SDK creates mobile subscriptions to send push and in-app messages. You can also reach users through emails and SMS channels by creating the corresponding subscriptions.- Use the
addEmailmethod to create email subscriptions. - Use the
addSmsmethod to create SMS subscriptions.
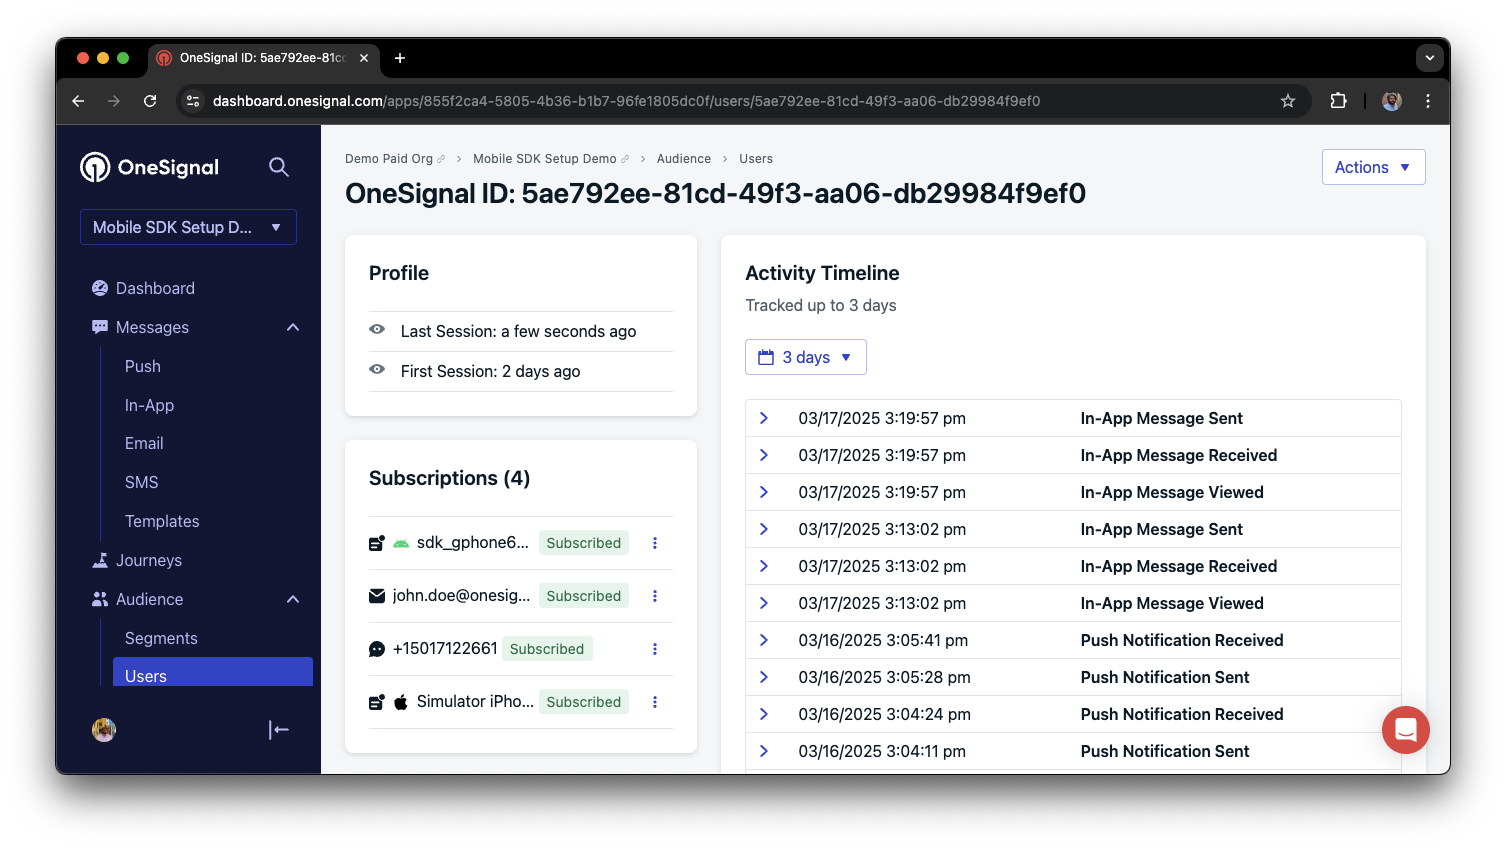
A user profile with push, email, and SMS subscriptions unified by External ID
- Obtain explicit consent before adding email or SMS subscriptions.
- Explain the benefits of each communication channel to users.
- Provide channel preferences so users can select which channels they prefer.
Privacy & user consent
To control when OneSignal collects user data, use the SDK’s consent gating methods:setConsentRequired(true): Prevents data collection until consent is given.setConsentGiven(true): Enables data collection once consent is granted.
Prompt for push permissions
Instead of callingrequestPermission() immediately on app open, take a more strategic approach. Use an in-app message to explain the value of push notifications before requesting permission.
For best practices and implementation details, see our Prompt for push permissions guide.
Listen to push, user, and in-app events
Use SDK listeners to react to user actions and state changes. The SDK provides several event listeners for you to hook into. See our SDK reference guide for more details.Push notification events
addClickListener(): Detect when a notification is tapped. Helpful for Deep Linking.addForegroundLifecycleListener(): Control how notifications behave in foreground.
User state changes
addObserver()for user state: Detect when the External ID is set.addPermissionObserver(): Track the user’s specific interaction with the native push permission prompt.addObserver()for push subscription: Track when the push subscription status changes.
In-app message events
addClickListener(): Handle in-app click actions. Ideal for deep linking or tracking events.addLifecycleListener(): Track full lifecycle of in-app messages (shown, clicked, dismissed, etc.).
Advanced setup & capabilities
Explore more capabilities to enhance your integration:- 🔁 Migrating to OneSignal from another service
- 🌍 Location tracking
- 🔗 Deep Linking
- 🔌 Integrations
- 🧩 Mobile Service Extensions
- 🛎️ Action buttons
- 🌐 Multi-language messaging
- 🛡️ Identity Verification
- 📊 Custom Outcomes
- 📲 Live Activities
Mobile SDK setup & reference
Make sure you’ve enabled all key features by reviewing the Mobile push setup guide. For full details on available methods and configuration options, visit the Mobile SDK reference.Privacy and user consent
If your app requires user consent before collecting data (e.g., for GDPR compliance), you can delay OneSignal’s data collection until consent is granted. CallsetConsentRequired before initialize.
setConsentGiven(true) once the user opts in. See Handling Personal Data for more details.Troubleshooting
support@onesignal.comPlease include:- Details of the issue you’re experiencing and steps to reproduce if available
- Your OneSignal App ID
- The External ID or Subscription ID if applicable
- The URL to the message you tested in the OneSignal Dashboard if applicable
- Any relevant logs or error messages